I haven’t written anything about Gloomhaven yet, and it only seems fair, since these days I play Gloomhaven ten times for each time I play any other game. I play with my boyfriend, and we frequently lament what we’re giving up in order to make time for this monster of a game (Social lives. Meals. Sleep. Sanity?). We’ve been playing Gloomhaven without a tank lately, so this topic has been on my mind.
Playing Gloomhaven can be brutal in more ways than just time: you don’t have many hit points, and the monsters all deal too much damage. How do I play Gloomhaven without a tank? You may be asking. Well, read on.
People often start playing Gloomhaven with a mindset from MMORPGs: Tanks stand in front, taking damage for days, while the squishy characters safely stand behind them. However, this game doesn’t work like that.
In Gloomhaven, even when you have a tank, you want to avoid taking damage at every possible opportunity. But when you don’t have a tank, it’s absolutely essential.
The single biggest key to winning a scenario in Gloomhaven is preventing damage. Taking too much damage is often how you lose: you find yourself in a position where 4 or 5 monsters attack you, or you burnt one too many cards to prevent damage, and can’t quite make it through the final room.
Can I play Gloomhaven without a tank?
Yes, you can! Some party combinations are (significantly) stronger than others, but if you’re okay making the game more difficult, you can play as any combination of classes you want.
Playing as two squishy characters is certainly quite difficult, but possible. The less traditional your party composition is, the more you’ll rely on the following tips and tricks (But all parties should follow them, even if they do have a tank). And if you’re playing with two players, you’ll need to use these tricks even more.
Tactics to Avoid Taking Damage
Without further ado, here are my best tips and tricks for avoiding damage in Gloomhaven!
Always Know what the Monster AI is doing
First, if you don’t understand all the rules of monster AI, figure it out. Here is a handy Monster AI Flowchart that is absolutely essential for mastering how it works.
Even though you must play your cards before you can know what the monster AI is doing, you can still take its actions into account. You must be flexible. Once you play your cards, you get to know exactly what the monsters are doing! Before your turn, you ought to look at exactly where each monster is going, what their ranges are, who they will attack, etc, so you can plan around it. If you want to land in hex A or B, but hex A will be in a ranged monster’s attack range after it moves, then you know you should be in hex B!
If a melee-ranged monster is attacking without moving that turn, you should do your best to avoid ending your turn next to that monster, or if a teammate if next to it, you can use your push on it to keep your teammate safe.
If a monster with no damage is healing this turn, be sure to use your stun on a monster who’s actually going to attack.
Planning out your turn like this is essential to the entire strategy of the game.
Getting the most out of your Initiative
One trick you can use is to play a very slow (high number) initiative card while you’re out of a monster’s attack range, so it goes before you, taking its turn without attacking you. Then when you go at the end of the round, you get into range and attack it. Next, you play a very fast (low number) initiative card, so you can attack, and get back out of the monster’s range before it takes its turn. Being able to pull moves like this off should be a consideration even when you’re building your deck. A few very slow cards are worthwhile to keep, even if you want to go fast 90% of the time.
These hit and run techniques are core to classes like the Scoundrel or Mindthief, who are both very fast, yet very squishy.
It’s harder for slower classes to use these kinds of tricks, but in general, the slower classes can take more hits and rely less on it.
Positioning Yourself: Using Funnels and Kiting
The worst thing you can do is to run head first into a room full of enemies. They will surround you, and you’ll get hit many times, and risk exhausting all in one turn.
Always consider how you position yourself: in doorways, against walls or obstacles, out of range of where enemies could move, etc.
By limiting the number of hexes that are adjacent to you, you’re going to take far less damage. It will sometimes take enemies longer to move to those hexes, and sometimes just limit the number of enemies that can attack you. It’s a reasonable strategy to do all melee brawls in doorways whenever practical, so enemies can only attack one at a time. Finding a position where enemies can only attack (in melee range) one at a time, is called a funnel. There could be melee 10 enemies on the board, but if only one can attack, they become very manageable.
Alternatively, if you have ranged attacks, attacking just outside of the enemies movement range is really powerful. Remember to keep in mind that a Move +1 might happen, and plans or that when you can, but even playing the odds are good: if a monster can usually only move 1 hex, ending three hexes away means you’re safe 75+% of the time, depending on the monster’s deck. Staying just outside of its range is called kiting, and its another super effective way to avoid damage.
Stunning, Disarming and Immobilizing
If your class can stun, disarm or immobilize, you ought to consider exactly who and when to use it on, carefully.
Immobilizing a melee monster who isn’t adjacent to you or an ally by the time their turn happens is essentially the same as a stun, so try to plan to immobilize melee monsters whenever you can. Otherwise, the effect isn’t super powerful, as it’s much harder to keep ranged enemies away from valid targets.
Stunning is probably the strongest effects in the game! In a room with just a few enemies, chaining stuns makes the monster all but impossible to lose to. Stuns are also particularly effective in a room with a funnel, obstacles forcing them through a narrow passage, such as a door. If there is only one enemy in attack range, a single stun can negate all damage for the turn. Always be sure to stun the enemy who deals the most damage or who has the most threatening ability this round.
Stun effects at the end of a round are a great way to get time to flee a room and press forward without fighting in race scenarios too.
Disarm can be just as good as stun, but disarm allows the monsters to move, create elements, and other non-attacks. You typically want to use disarm in much the same way as stun, even if it is a little less versatile.
Invisibility
Invisibility is a great ability with a few caveats. First, you must realize that invisibility often doesn’t always prevent damage, it frequently just moves it to your teammates, which is sometimes useful, but ultimately underwhelming. But with good positioning, you can avoid that damage altogether.
A common trick is to go invisible in a doorway, so the ranged begin to bunch together at the doorway, while the melee monsters just take a turn off. (Be warned this tip doesn’t work if the monsters have flying or can jump, as they’ll go right over you.
Summons
Using a summon to prevent damage is a bummer, but taking a hit you can’t afford to take is also a bummer. The question becomes if losing a card to prevent a hit or two is worthwhile, and the answer is sometimes yes, especially if the enemy can’t take down the summon in one hit or if you can incidentally heal the summon between hits.
Think of it this way: if you can’t afford to take a hit, you’re going to lose a card either way. If you could lose a single card to prevent multiple attacks, it starts looking a little better to make the summon. However, you’re also sacrificing an action, so keep that in mind.
Make sure to put the summon in a position where it will get attacked. Summons are prioritized over players, but that doesn’t mean you can’t position it wrong. The golden rule of damage prevention is to look at what the monster AI is doing before you do anything, and remember that your summon might be moving at the beginning of your next turn to a position that might not be as defendable as your current position.
This isn’t something you’ll want to do all the time, but sometimes something you’ll need to do.
Kill Enemies Before they can Attack
One of the most overlooked ways to prevent damage is to kill enemies before they attack. This can mean focusing on enemies who are going slower than the players, so they can kill that enemy before it gets to deal damage, or attacking enemies with the least health rather than the most convenient ones. Having many enemies with a little lost health means you’re taking extra damage, but with a little teamwork and coordination, you can decide how to focus your damage in a smart way.
Focusing on enemies that will damage one of your teammates is also smart. If the melee monsters aren’t moving, but are attacking twice, attacking and killing the melee monster adjacent to your teammate is the best way to keep your teammate safe.
How to Mitigate Damage with Items
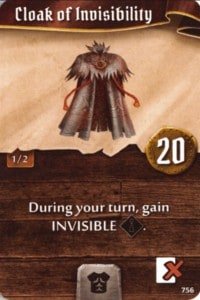
Cloak of Invisibility
The Cloak of Invisibility is such a powerful item, especially in two player games. In a turn where you would take damage, or get strongly focused, you can use the cloak and take no damage instead. When used well, the ceiling for the cloak is quite high: it might prevent 5 attacks and give you time to long-rest! However, the floor is quite low too. When used poorly, it won’t prevent any damage at all (maybe the monsters wouldn’t have attacked either way), or it might just send all the damage to your allies.
Despite that, this item is one of the very best for keeping a party alive. You just need to take into account what the monster AI will be doing.
Two player tip: If both players take the cloak, you can get two entire rounds of invincibility to long rest and position yourselves!
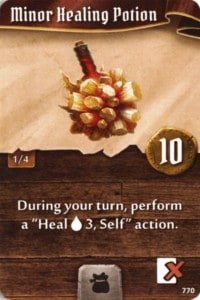
Minor Healing Potion
The minor healing potion is pretty minor when it comes to staying alive. 3 health is not nothing, but there are other items which will save you twice that much life when used well. This one is the easiest to use though, as the other items will take good positioning, etc.
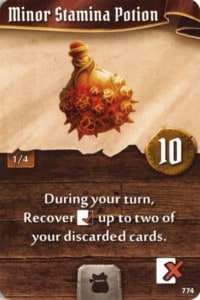
Minor Stamina Potion
This card is the real deal. It gives you an extra turn, which is ultimately more cards to lose to damage. It will almost always be more effective than the Minor Healing Potion, as reusing your stuns, or your best attack to defeat an enemy before it gets a chance to attack you is almost always going to prevent more than 3 damage. This is among the best items in the game, you really don’t want to leave home without it.
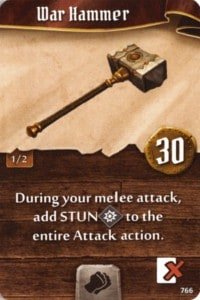
War Hammer
This is an amazing item, especially or classes with multi-target melee attacks. A stun is going to prevent a single round of attacks from an enemy. If you can do multi-target stuns with it, it starts to look absolutely bonkers. I like this more than any of the other purely defensive items in the game.
I plan on expanding this section later. If there is interest, I could write about the items from higher prosperities too.
Damage Mitigation: How to Deal with Damage when it happens anyways
No matter how well positioned you are, or how you use the above tips, eventually you are going to take damage.
So, when should you lose a card or when should you take the hit? Typically, if you have the HP to spare, you should take the hit. Your life is a resource, and it’s less valuable than cards are. However, high damage hits can warrant losing a card too, especially if it means you can take multiple smaller hits down the line.
Be sure the share the damage. Even if you’re playing with a tank, a glass cannon with more health still has more health! They should take a few hits at that point to put less pressure on their teammate.
Once again, you don’t lose until everyone is exhausted. Winning is winning if you’re at 1hp or 20.
Reach Out
If you liked this article, it’s my first in a potential Gloomhaven strategy series. Please let me know what kind of articles about Gloomhaven you’d like me to write by joining my discord: Class reviews, more visual guides, etc. Anything is possible!


This entire post absolutely ROCKS! Thank you for all the hard work you put into it. It really shows.
Thanks for sharing. I read many of your blog posts, cool, your blog is very good. https://www.binance.com/bg/register?ref=V2H9AFPY
Your point of view caught my eye and was very interesting. Thanks. I have a question for you. https://www.binance.com/de-CH/register?ref=W0BCQMF1
Can you be more specific about the content of your article? After reading it, I still have some doubts. Hope you can help me.
Thanks for sharing. I read many of your blog posts, cool, your blog is very good. https://accounts.binance.info/de-CH/register?ref=W0BCQMF1
Your article helped me a lot, is there any more related content? Thanks!
Your point of view caught my eye and was very interesting. Thanks. I have a question for you. https://www.binance.info/register?ref=IXBIAFVY
Your point of view caught my eye and was very interesting. Thanks. I have a question for you.
Thank you for your sharing. I am worried that I lack creative ideas. It is your article that makes me full of hope. Thank you. But, I have a question, can you help me?
I don’t think the title of your article matches the content lol. Just kidding, mainly because I had some doubts after reading the article.
Thanks for sharing. I read many of your blog posts, cool, your blog is very good.
Your point of view caught my eye and was very interesting. Thanks. I have a question for you.
Thank you for your sharing. I am worried that I lack creative ideas. It is your article that makes me full of hope. Thank you. But, I have a question, can you help me?
slots of vegas no deposit bonus codes
References:
https://www.stetoscopio.net/circolazione/coagulo-sangue-rischi-cause
what type of drugs are steroids
References:
notes.io
hollywood casino maryland
References:
https://www.cebumascot.com/product/ejor/
best stacks for muscle gain
References:
https://u.to/
hollywood casino tunica
References:
https://rebomo.co.ls/product/xp-velvet/
References:
Turning stone casino
References:
https://www.stpaulscholars.com/
Loverummyappbet is kinda addictive. Quick games and good payouts. Worth a download for sure! Download it here: loverummyappbet
Been using luckbetapp for a few weeks and it’s decent. Simple interface, got a few wins already! Check it out: luckbetapp
Luckbetcasino is a fun little spot to unwind. Good selection of games and easy to get around. Give it a try at: luckbetcasino
Your point of view caught my eye and was very interesting. Thanks. I have a question for you. https://www.binance.com/register?ref=JW3W4Y3A
I don’t think the title of your article matches the content lol. Just kidding, mainly because I had some doubts after reading the article. https://www.binance.com/register?ref=JW3W4Y3A
I don’t think the title of your article matches the content lol. Just kidding, mainly because I had some doubts after reading the article.
KG777 is a decent enough site with a good variety of games, keeps you entertained. Give it a shot and see what you think from: kg777.
Alright, gotta say I was a bit skeptical at first, but lucky57gamedownload actually delivered the goods. Download was smooth and the game runs great. Definitely worth checking out if you’re looking for something new.
Seriously, if you’re looking for a no-fuss login experience, wolf777login is where it’s at. Quick, easy, and I haven’t had any issues. Plus, the wolf theme is kinda cool.
Thanks for sharing. I read many of your blog posts, cool, your blog is very good.
Your point of view caught my eye and was very interesting. Thanks. I have a question for you. https://www.binance.info/register?ref=QCGZMHR6
Thank you for your sharing. I am worried that I lack creative ideas. It is your article that makes me full of hope. Thank you. But, I have a question, can you help me? https://www.binance.com/ro/register?ref=HX1JLA6Z
Your article helped me a lot, is there any more related content? Thanks! https://www.binance.info/register?ref=IHJUI7TF