
Introduction
Even as hundreds of new drafting games have come out, 7 Wonders still stands strong as one of best of them (though, I’m still debating if 7 Wonders Duel beats the original or not). 7 Wonders strategy is just so deep, and so satisfying to pick apart.
After I had conversations about what games people want to read strategy about, this is one that kept coming up, even though it’s almost 10 years old.
Before we get into it, I should mention this guide has been proofread by the top ranked player on Board Game Arena (Iguana), who has over 800 victories and an insane 84% winrate. So shout out to Iguana, thanks for proofreading.
Drafting Strategy

In the first age, your first priority is to get your resources set up. Try not to spend gold on buying resources from opponents in the first age, unless you have a trading post. That gold is usually better saved for cards with a gold cost. Ending age 1 with some money is always a good idea. Sometimes, you’ll even want to trash the final card of age 1 for money so you can be sure to have enough money to pick up whatever cards you want from the first hand of age 2.
In the second age, you’ll want to get enough resources/goods to finish your wonder and buy the guilds/third age cards you’ll be hoping to get. You’ll also want points, but every game is different for how you’ll want to prioritize doing those two things.

Resources and Manufactured Goods
What sets this game apart from most other drafting games today, and every drafting game that came before it, is resources. Cards in this game have a cost.
So, in order to succeed in the game, you must have access to enough resources to build the cards you want, which get quite expensive by the third age.
Now depending on the player count, you’ll want to be more or less aggressive with how you take resource cards: in a 3 or 7 player game, there will be relatively fewer resource cards per player, while 4, 5, and 6 player games will have plenty. That means you must pick up resources more aggressively in 3 and 7 player games or you risk not getting any.
Inversely, manufactured goods are at their most plentiful in a 3 player and 6-7 player games, while being relatively more scare in 4-5 player games.
Generally, you’ll want to have access to at least one of every resource, but that doesn’t mean your civilization has to be able to produce every single resource. If an adjacent player has a resource that you don’t have, its okay just to plan on paying them for it if you need it if you don’t think you’ll need too much of it.
But more specifically, you’ll want to take the resources that build into the cards you’ll want, but no more than that. For example, if you’re in a heavy military strategy, you’ll have very little use of manufactured goods, which never show up on military cards (with the exception of a single third age military card that costs 1 textile).
Between the first two ages, you’ll generally want to get 6-7 resource cards (between the brown, grey, and the yellow cards that produce/discount resources) total. 3-4 in the first age, and 3-4 in the second age.
What resources you want will be determined by a few different things:
- What resources you’ll need to build your wonder.
- What resources you’ll need to draft the cards important to your strategy.
- What resources your opponents have available.
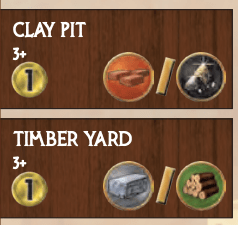
But no matter what strategy you’re doing or what resources you need for your wonder, your first pick priority should usually be taking any of the first age resources that make two different resources. If you’re going for science, it’s far less important to take double resource cards, especially if taking it means passing a science card you can afford, but still a great idea to take them even when you’re going for science. These cards are great, and should almost always all be taken after the second pick.
The distribution of resource producing cards is always even at every player count, but the distribution of costs on the cards are not even.
- Wood and ore show up most often in card costs, most frequently requiring only one of that resource.
- Stone and clay appear on fewer cards, but often in multiples of 3.
Otherwise, what resources you want will vary a lot. I’ll discuss specific resources more in each section that goes into more detail about each strategy.
A Note on foregoing resources and relying on Coupons/Chains
In theory, prioritizing cards with coupons sounds like a great plan. By relying on coupons, you get to take far more valuable cards in the first and second round over resources.
There are two reasons why relying on coupons is a dangerous proposition: first, you aren’t guaranteed to see the cards you got the coupon for. Second, guilds don’t get coupons, and neither do the most valuable blue cards, so you’re giving up on ever getting the best cards, and often even your wonder. Essentially, this is a trade off: you are trading more points in the first round for fewer points in the third. Typically, this isn’t a winning proposition.
However, it’s always important to consider the effects of the coupon anyways, even when you’re not going all in on them.

For example, the Aqueduct is a great age 2 card, but it’s quite difficult to buy, while the other age 2 blue cards are all considerably easier to build. With that in mind, prioritizing the bath higher than other blue cards makes sense, because otherwise you might never be able to build the Aqueduct otherwise.
Science is a bit of an exception, as science cards get the best coupons, but I’ll discuss that more in the science section.
The Role of Money
The first lesson players often learn about 7 Wonders strategy is that money will not win you the game. No one ever wins with money. The points that money scores is a consolation prize for new players who get greedy horde it.
Think of money as simply another way to get resources. You should, for the most part, spend all your money as soon as you want to get something you otherwise couldn’t afford. In the first age, you might want to hold onto a few coins so you can afford the cards you get at the beginning of the second age, but otherwise, spend it as soon as you have the opportunity to. In a typical game, money will naturally flow your way if you have resources your neighbors don’t, so don’t worry too much about it.
When buying resources that both your neighbors have, it mostly doesn’t matter which neighbor you buy from. The biggest deciding factor is how much money they currently have. Typically, you want to buy from the richer neighbor (and I’ll note, richness has no correlation with who’s winning). If one neighbor has no coins, and the other has 4 coins, give your money to the richer neighbor. Why? The first two coins are much better than the 6th coin is. Having 2 coins means you can already afford any resource your neighbors have, but having 0 means you’re limited by what you own personally.
If both neighbors are equally rich, consider these:
- Buy from the player with more resources, as they won’t stay broke for long.
- Buy from the player who’s doing worse, so you don’t want to prop up your competition.
- Don’t buy from a player going all in for science, because part of what balances how high scoring science can be, is how much they struggle to get non-science cards in the third age. Money helps them buy guilds and blue cards.

Science
In the grand scope of 7 Wonders strategy, science often has fairly unique play patterns: first, how its mechanics interacts with the social dynamics of the actual game can vary widly. For example, in a fairly inexperienced group of players, if science just won the last game, expect everyone at the table to hate-draft science. Actually, science gets hate-drafted pretty exclusively in inexperienced groups, (from what I’ve seen at least) but in competitive play, players only hate against the science player if they see an especially good start (and sometimes not even then, as hate-drafting can be hard when you want a card more than you want a card your opponent has).
When deciding if you want to go for science or not, the most important thing is the age. You want to get your first science card early in the first age. The second thing to consider is how much access to manufactured goods you have.
Because of this, any of the wonders that start with a manufactured good is well suited to go for science, as you’re free to start buying science cards right off the back.
Resources
All of the first age science cards cost 1 manufactured good to build, and all the third age cards cost two manufactured goods (with the exception of the School).
When you want to go for science, you need to obtain one of each manufactured goods, or at the very least have 2/3 of the manufactured goods, and be able to purchase the third from a neighbor.
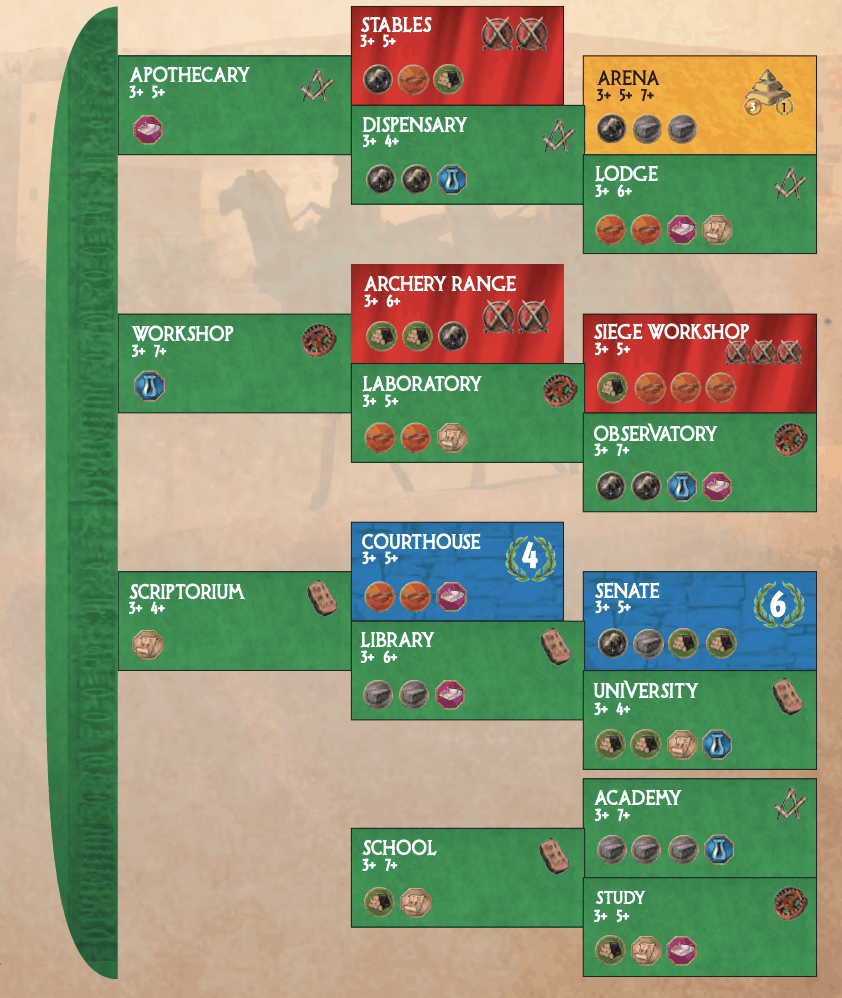
One thing to watch out for. When you get the Scriptorium and the Workshop in the first age, you’ll need to make sure you have access to 2 ore by the second age (so you can afford the Dispensary). There is a resource you’ll need two of no matter what if you only managed to get 2/3 science symbols in age 1. If you want to be competitive, this is a great thing to memorize right now.
And it’s always a good idea to go for tablets, as both the school and the scriptorium have more powerful coupons. Getting a free Senate is great, and the School is the only science card that upgrades to non-matching symbols.
Should I go for matching symbols or sets of each symbol?
Well first, let’s look at how each scores. You score 7 points for a set of each symbol, and each card matching set scores points equal to the number of cards in the set. So lets look at how that scales:
Science scoring for matching sets
| # of Science Cards | Points/Card | Total Points |
| 1 | 1 | 1 |
| 2 | 2 | 4 |
| 3 | 3 | 9 |
| 4 | 4 | 16 |
| 5 * | 5 | 25 |
| 6 * | 6 | 36 |
* Getting these require the Science Guild or the Babylon Wonder
Science Scoring for sets of each symbol
| # of Science Cards | Points/card | Total Points |
| 1 | 1 | 1 |
| 2 | 1 | 2 |
| 3 | 3.3 | 10 – complete set |
| 4 * | 3.25 | 13 |
| 5 * | 3.2 | 16 |
| 6 | 4.3 | 26 – complete set |
| 7 | 4.4 | 31 |
| 8 | 4.5 | 36 |
| 9 | 5.3 | 48 – complete set |
| 10 | 5.5 | 55 |
| 11 | 5.6 | 62 |
| 12 | 6.3 | 76 – complete set |
Now, when choosing between building sets of matching symbols and sets of each symbol, there’s a few things to consider:

- Matching sets score well, but peak before you get a ton of points with it. You can get at most 16 points total unless you get the Science Guild or have the Babylon wonder.
- You can’t run away with the game from a matching set of symbols, as the players you’re playing with can pretty easily take all of that symbol you’re relying on. Getting more than 3 of a single symbol is a bit of a pipe dream.
- A set of 1 of each symbol scores higher than a matching set of 3 does.
- If you go into science hard, you definitely want to go for matching sets, as the scoring potential is just much higher.
- If you go for a set of each symbol, you still score for matching symbols so you get the best of both worlds.
Usually, the goal should be to go for matching sets, but you do sometimes play games where you end up with many of a single symbol. Though, once you have two full sets, every science card is worthwhile, and you’ll probably should consider taking all of them.
In the first age, the science cards are big scorers, usually outscoring the blue cards (given you get more science cards). When playing science, you want to get 3 science cards before they’re worthwhile (Blue cards will always outscore science if you fail to get 3 of them). If you get 3 of a single science symbol, that’s 9 points, or if you get 1 of each science symbol, that’s 10 points.
Therefore, when going for science, you want to aim to get at least 2 science cards in the first age and the third card in the second age. If you only manage to get a single science card in the first age, it’s reasonable to drop it as a lost cause, but you may want to complete your set of three in the second age if you don’t find better options, as 3 points per card is only a little under average in the second age.
But unless you have a lot of competition for science, aiming for a single set is aiming low though. In the average game where you decide to go for science, you should aim to complete at least two full sets of each science symbol. Completing 3 full sets isn’t aiming too high either.
Distribution
- There will be fewer gears in 4 and 6 player games.
- The slabs have the best upgrade paths most of the time.
- Slabs will also be the most frequently showing symbol At 4 players.

Military
Military is one of the most misunderstood parts of the game. New players frequently will buy 8+ military cards, and then realize that they only got 18 points while the rest of the players got 50+ points.
Military scores well when your neighbors don’t want to compete with you, and it scores quite poorly when you waste too many cards on it, because the number of points you can get from military is capped at 18 (2 from the first age, 6 from the second, and 10 from the third age).
A good outline for scoring military efficiently is this:
- Get two military cards age 1 (score 2 points)
- Get two more military cards age 2 (score 6 points)
- Get one military card in age 3 (score 18 total points)
18 points at the cost of 5 cards is 3.6 points per card, which is decent. However, if it’s a 3 player game, that changes everything, as all the points you score loses points for all your opponents, so you could count those negatives as points. That makes the above drafting strategy score about 5 points per card, which is spectacular. That’s twice as much as the average age 1 card!
How much your opponents perceive their chances to do well against your military determines how good military is. That means you want to take your military early (especially in ages 2 and 3), to signal to your opponents that you are going to stay ahead. You want to be ahead enough that they won’t want to bother, or so that you can hate draft their chances to compete if you get the chance. This is especially good in a 3 player game, where military is just ruthlessly effective.
In fact, it’s commonly said that you can’t win a 3 player game without military, and while not always true, you should probably always take military very highly in 3 player games.
I should note, military is a strategy that can fit into any other strategy. A resource light science strategy might struggle to do it, but if you have the resources and opportunity to build military, you should consider it, as military often has great payouts, especially when there is little interest in it from your neighbors.

Civilization cards
The civilization cards are just good. However, the more of them you take, the fewer chances you have at the slightly higher scoring, but riskier scoring opportunities found in the military and science cards.
So when do you take blue cards? For the most part, once you’ve found a path forward, you take blue cards when you don’t need resources and you don’t have a higher scoring opportunity you should get over it.
There is a strategy that just builds as many blue cards as possible, and that’s certainly possible. In order to do this, there aren’t any resources in particular that you need, you need a little bit of them all. This is hard to go all in on, simply because other players can take and score off blue cards as easily as you can, so it can often feel like a losing proposition when your opponent’s start taking the blue cards early, since they know you’re not interested in science or military. Personally, I think you should take blue cards when they’re your best pick, but never be all in on them.
Economic Cards
Now, let’s talk about each yellow card, because unlike the other cards in the game, they all do different things.

Trading Posts
The trading posts are situationally very good when they’re pointed to a player who is heavy on resources. If a player has 2 of the 4 resources, I’m not unhappy to take it though, especially if those resources are stone or bricks (which appear in multiples most often). This card also lets you get a free forum, which is fantastic.
Marketplace
The marketplace is similar to the trading post, but more situational. It’s safe to point one at the player going for green cards, and anyone who already has the resources you want, but don’t take it on speculation. It’s so easy to make this into a dead pick.
Tavern
The tavern is a consolation prize for players with nothing better to take. It’s pretty bad. It’s alright to take it earlier if you’re trying to build a wonder stage quick for some reason or if you have a trading post pointed at a neighbor with everything you want, but in general, this card is a last-pick type card.
The Forum
The forum is an excellent card, unless you already have access to these resources, as getting multiples of manufactured goods isn’t super relevant for any strategy, save a few wonders.
The Caravansary
This card is great, especially for those with wonders that require 3-4 of a single good. This card is worth planning on having two wood when going into age 2.
The Vineyard, Bazaar, Haven, and Lighthouse
These are all weak consultation prizes, similar to the tavern. Even if you get 9-10 coins from these, you won’t be getting many points. Occasionally the third age cards will be worthwhile, but don’t count on it, and don’t build for it either. You’d have better luck elsewhere.
Chamber of Commerce
This card, however, is great. The player drafting science will often want to take it. Three manufactured good cards make this worth 8 points, which is a great card in the third age.
Arena

The Arena is also pretty great, if you’ve build your wonder, and especially if you’re on the B side of Gizah.
Wonders
In 7 Wonders, there is a bit of finesse as to when to build each wonder:
- When nothing in your hand is any good.
- When you want to deny an opponent a card.
- When in doubt, buy it early, as you’ll want to build your wonder as fast as possible, as the earlier you build it, the more points you get (relative to what you’re expected to score in that age).
The Temple of Zeus at Olympia

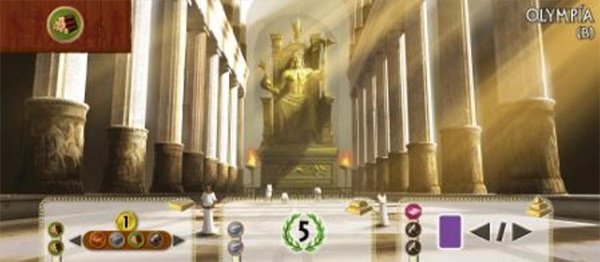
On the A side of the temple, it gives you the ability to play a card for free each age. Just remember that its usually best to pop this ability as soon as you can in an age, as your options will generally only get worse the longer you wait. However, in the third age, if you can afford to pay gold for a card, pay gold instead. And hopefully, you’ll get passed something you’ll want to use this power on later in the round.
As a side note, some people take fewer resources to make sure their power to get free buildings good. That is largely a trap. You’ll get to use it anyways, and you just have to hope it does more than just save you a few gold.
The B side is completely different.
In general, in a 3 player game, the B side is fantastic. There are simply more guilds in a three player game than in a seven player game (In a three player game, there are 2 guilds per player, but in a seven player game, there is only 1 guild per player). The more guilds your neighbors have, the more powerful the copying action is. If your neighbors don’t build a guild worth more than the cards in each of your hands, don’t build it.
The trading post can be quite good too, but it is situational. You’ll always want to build it, but be prepared for it to burn you a bit if the variables don’t line up, especially at a bigger player count.
The Pyramids at Gizah
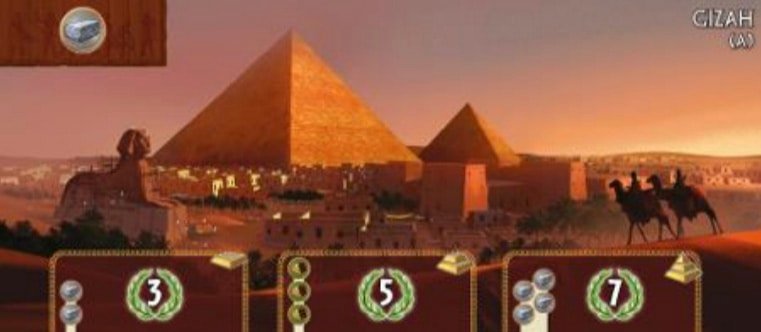
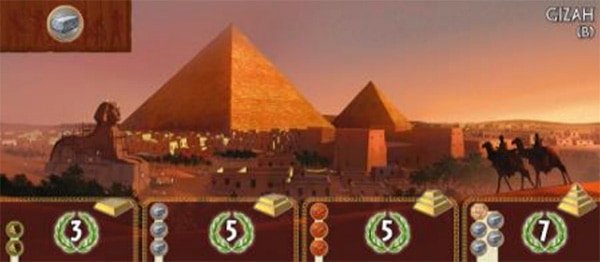
Gizah takes so many resources of so many different types, your primary goal in the first two ages ought to be to find the resources you need to finish your wonder, even taking your last stage in consideration. This wonder is worth a ton of points, but it has the downside of costing you a ton of picks on resources.
The way the game should play out is that you take what you need to build Gizah, then get a lot of money from opponents who want your stone and wood (and bricks if you’re playing B side), then you immediately spend that money on absolutely every other resource (which you probably won’t end up getting yourself). That’s fine though, that’s how this wonder is balanced.
Gizah pairs well with a Civilization centric strategy, or a military centric one.
The Colossus of Rhodes


The Colossus is really quite simple. Build it. Win military victories. Don’t not win the military victories, as you really need those. Playing catchup is a bad option. Taking military early, and building your wonder ought to be enough to discourage your opponents from trying to compete with you in military.
One interesting thing to note about the Colossus of Rhodes is that (especially in a three player game) it’s quite easy for an opponent to deny you enough resources to finish building it. Four ore is actually massively difficult, and nothing else in the game requires more than two ore (with the sole exception of an age three military card that takes 3 ore). So if your neighbors have built any ore at all, that saves you the hassle of having to build that yourself (as you don’t really want 4 ore–you just want access to the final stage of your wonder). But play expecting to take every bit of ore you see, and expect an experienced opponent to sabotage your efforts by burying the ore under a wonder.
The Hanging Gardens of Babylon


The path forward for Babylon seems quite straight forward: you want to build science. But keep in mind, your opponents expect you to go for science and may even start hate-drafting science cards before you even take a single science card yourself.
If you’re playing on the B side, you don’t need to build your wonder’s third stage, and even on the A stage, if you don’t think you can make science work, you don’t have to build the final two stages, but be flexible and play to your strengths.
An interesting strategy is to rush the second stage of the wonder on the B side, so you can take 3 extra cards with it. Worst case scenario, it gives you 3 gold at the end of the first age to spend. Best case, you get to build three more cards than your opponents, and all 3 end up being excellent.
The Mausoleum at Halikarnassos
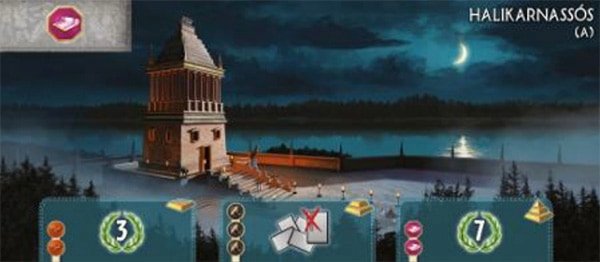

The Mausoleum starts with textile, which makes it a strong candidate to go for science cards. Not only that, but when you have a science card that you want, but can’t yet afford, you can discard it for money to guarantee that you get it at the end of the round. This is especially good for the Gear science card, the rarest one in most games.
Using the Mausoleum’s abilities is a tricky one, especially on side B, and you shouldn’t feel compelled to use complete it if you think you have a better scoring card in hand. It’s tricky because the cards that are discarded often aren’t great, and using its power feels like a scramble for whatever can work. But more than any other wonder, this one rewards you for memory, and your ability to guess what each player will take. If you assume a military card is getting discarded in age 1, take a military card under the assumption that you’ll get your second one from the discard pile.
Ephesus

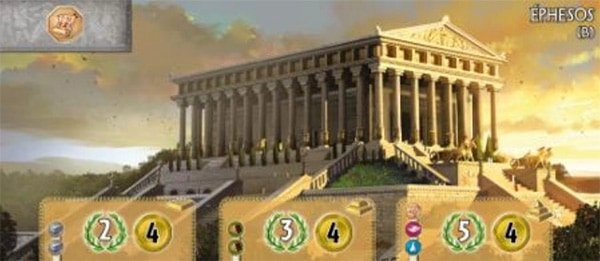
Ephesus is also a strong candidate to go for science, since it starts with papyrus. Especially the B side, since it needs all 3 manufactured goods in order to build the final stage of its wonder.
The power of this wonder is going lean on resources. You build very few yourself, and hope to buy everything from your opponents. Trading posts are pretty awesome for Ephesus for this reason.
The wonder scores slightly fewer points than the others do, but it makes up for it in allowing you to building way fewer resources yourself, and every resource you don’t take is another point-scoring card you can take. This is another incentive to go for science, as getting a few good coupons will make resources feel nearly irrelevant and help your money go even further.
The Lighthouse at Alexandria
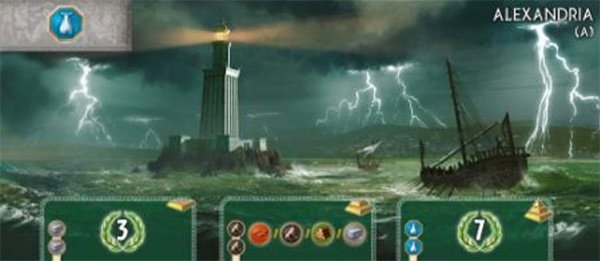
Starting with glass suggests that Alexandria should be good at building science but its actually terrible. Why? Alexandria gives you extra resources. What don’t you need when you’re going full science? Extra resources.
Instead, Alexandria is at its best when it’s building military and civilian.
Victory Points
A drafting game is won by the person who takes cards worth the most points. Sometimes a baseline number of points can be hard to figure out, but its pretty easy to calculate in 7 Wonders.
But as a threshold to measure your choices against, here are the average number of points you can expect to score per non-resource, non-yellow card in the game in each age.
Average Number of Points per Card
| Age | Average # of Points/card* |
| 1st | 2.5 |
| 2nd | 4 |
| 3rd | 6.5 |
* See Footnote for how this was calculated
This was calculated by the average of the blue cards in a 7 player game for that age–it makes sense to use blue cards as the threshold for what a card should score as that will always be an available scoring option you have. The whole reason to go for science or military over civilization cards is the chance to score higher than civilization cards. Both of those options are risky, so the reward has to be worthwhile.
You might be familiar with using Gizah (side A) as the threshold for what a good turn is (3 points in the first age, 5 in the second, and 7 in the third), but that overestimates how high you can score (by a lot) I’ve found. Winning all 3 ages in military against both opponents scores under the Gizah threshold (except in a 3 player game), and 3 full sets of science cards (9 cards, 3 of each symbol) barely beats it, even though completing 3 sets of science is probably going to win you the game. Going for Civ cards will will almost never beat the Gizah threshold either, so its really much closer to a maximum, which actually isn’t useful to guide your decisions.
This bench mark is a good way to compare your scoring cards. Another benchmark to consider is how many points you should aim to get each round to hit the above threshold (remembering that everyone needs to take some non-scoring resource cards too).
- 5-7.5 points in the first age, with about 2-3 scoring cards (I consider red, green, and blue cards “scoring cards”).
- 12 points in the second age: expect to take around 3 scoring cards (more if you took more resources in the first age, less if you still need more resources).
- 39 points in the third age, all 6 cards should score (gold cards count as scoring in this round too).
If you add all that up, you get 58. 58 is a very good score, but it’s also a very obtainable one. If you get 58 points, it means you probably didn’t waste any picks, and everything went as well as it could have.
Not to say 58 is some magic number, its just a guide. Games often score far lower than that, and sometimes especially co-operative games score a fair bit higher. Don’t compare your scores to the number, just think about each age’s points as you’re playing.
In the third age, you just take whatever card is worth the most points, or prevents your opponents from getting the most points. Generally hate drafting in the third round is pretty bad in a game with more players, while it’s much better in a 3 player game. Typically though, you’ll just add up how much each card is worth points wise, add up how much each card is worth to your opponents, and take the one that scores you the most net points.
Evaluating your plays
To calculate if your card choices scored above or below average (useful to compare different types of cards or evaluate your decisions between games), count the number of cards you’re comparing in the first age, multiply it by 2.5 (the average value of an age 1 card, see chart above), count the number of cards in the second age and multiply it by 4, and multiply the number of third age cards by 6.5. If the actual number of points the cards you’re comparing scores less than that sum, then the play was below average. If its higher, then it was a good play.
For example, if you decided to go after science in the second age of a game, but you didn’t know if it was worthwhile. You hadn’t taken any science in the first age, and you got six science cards in the next two ages: three in the second age and three in the third age too, ending with two cards with each symbol (26 points). You did about as well as you could have, all things considered. This is how you can calculate if that play is worthwhile.
(3 * 4) + (3 * 6.5) = 31.5 = points expected for this play if all 6 cards had been blue
31.5 is higher than the 26 points you got, so its not a great play. But if you got one of the 3rd age cards in the first age instead, the expected points goes down to 27.5, which makes that play pretty good, since our calculated score is only just above the actual point value.
Sometimes all your choices, are below average though, so don’t expect to always beat it. And sometimes, you learn you can regularly score about the threshold. That’s okay, as long as you know how much you can get above, the threshold is still useful.
Where Can I learn more 7 Wonders Strategy?
The Wonderful Plays Youtube Channel is a fairly unknown channel, but it has some very insightful commentary on 7 Wonders Strategy. Here is a video review of an online 7 Wonders Tournament from that channel.
And if you’re very serious about 7 Wonders, specifically for 3 player play, you can read the 167 page strategy guide by Board Game Area’s Pistolero, the second highest ranked player on the site.
One aspect of 7 Wonders strategy I barely touched on was knowing how the distribution of cards changes as player count changes. If that sounds like your jam, BGG user Red Porper wrote half a novel about that aspect of 7 Wonders Strategy.
If you’re looking to get better at the game, playing on Board Game Arena is going to be key to get good practice in against strong players. It ranks players, so you can get an idea of how competitive you truly are.
And finally, if you want a place to discuss this game’s strategy further, come join my Discord channel and I’d be happy to talk strategy any time. Maybe you have some insights into how version 2 of this guide can get a little better? Maybe you have some questions?


Great work!
I am told the discord link is invalid and I can’t join. Help please? 🙂
Here, try this link. https://discord.gg/yNCyScf
Yes. Good strategy tips. I agree with mostly everything.
1. Which player I should buy resources from? I always buy from the player with the lowest victory points. I play on the mobile app do I can easily see that.
2. I think blue cards is a great strategy. Going all out on them can earn you lots of points.
3. Tavern is a good card. You get 5 coins instead of 3 for discarding it.
Have you tried playing two players with the free city. I’ve heard it’s really good.
Thanks!
1. The difference between 4 and 6 gold is so much bigger than the difference between 0 to 2 gold that I’ll almost always buy from the richer player unless I’m sure the poorer player isn’t going to catch up. I will buy from the player with fewer points in the third age though, but not until the third age, where coins are typically pretty easy to come by.
2. Going all out on blue is hard, since every player can pick the blue cards, especially in the third age where they’re often just the best cards. If you get cut off blue cards, it’s really your only way to score, and strong players loosing to a blue strategy will pick blue cards higher than usual, so it’s likely that happens.
3. Yeah, I’ve been liking it more and more, especially if you can get a trading post.
Excellent resource with valuable information. Thanks for sharing this so clearly.
Useful and straightforward content. Everything is explained clearly without unnecessary details.
Very useful information, explained in a simple and clear way. I found exactly what I was looking for.
樂貸網 全台最多身分證借錢、小額借款服務資訊平台推薦
https://yujie365.com/
Useful and straightforward content. Everything is explained clearly without unnecessary details.
Hello! I could have sworn I’ve been to this blog before but after browsing through some of the post I realized it’s new to me.Seo Paketi Skype: By_uMuT@KRaLBenim.Com -_- live:by_umut
This content is well-organized and easy to understand. It really helped me a lot.
This was very helpful and well written. I’ll definitely come back to this site again.
Great explanation and very informative. You can tell a lot of effort went into this.
Clear, concise, and practical information. I appreciate how easy it is to follow.
This was very helpful and well written. I’ll definitely come back to this site again.
Игровые аппараты вулкан 24
Оптимизирован для смартфонов
Казино с лицензией, дающие слоты
самые дающие слоты
демо игровые аппараты бесплатно
[url=https://luckylandly.com/l/6924db3d94b937a16a06e813_sub_id_1&encoded_url=cmVnaXN0ZXI=]Вулкан 24[/url]
[url=https://luckylandly.com/l/6924dad194b937a16a06e812_sub_id_1&encoded_url=cmVnaXN0ZXI=]Казино Фараон[/url]
[url=https://luckylandly.com/l/6924dc0d8fe0a7478701a8f2]Столото Зал[/url]
Excellent resource with valuable information. Thanks for sharing this so clearly.
This content is well-organized and easy to understand. It really helped me a lot.
авто [url=https://mailsco.online/]mailsco.online[/url] становятся современными. Экоавто делают шаги вперёд на автомобильном рынке.
Very useful information, explained in a simple and clear way. I found exactly what I was looking for.
Useful and straightforward content. Everything is explained clearly without unnecessary details.
[url=https://dinastiyaz.ru/]коттеджный поселок династия
[/url]
Your article helped me a lot, is there any more related content? Thanks! https://www.binance.com/register?ref=IXBIAFVY
Thank you for your sharing. I am worried that I lack creative ideas. It is your article that makes me full of hope. Thank you. But, I have a question, can you help me?
Everything is very open and very clear explanation of issues. was truly information.Seo Paketi Skype: By_uMuT@KRaLBenim.Com -_- live:by_umut
Thanks for sharing. I read many of your blog posts, cool, your blog is very good. https://accounts.binance.com/cs/register-person?ref=OMM3XK51
Interior Design: Thiet ke noi that tan co dien, thi cong noi that, chung cu, biet thu, van phong [url=https://thietkenoithat.com]thiết kế nội thất[/url]
Лайфхак для меломанов: нашёл крутой архив. Вот, что там есть. Главный плюс: можно за пять минут увидеть всю карьеру как на ладони. Его темы вшиты в нашу коллективную память. Теперь есть место, где они собраны.
Бэкграунд: ленинградская школа + энергия распада СССР. Он не «пробился», а грамотно использовал каждый шанс. Этот опыт — мост между андеграундом и большими телевизионными бюджетами. Когда слышишь заставку и сразу понимаешь, о чём сериал — это работа Щербакова.
Что делать? Гуглить? Нет. Идти сразу на [url=https://www.igor-scherbakov.ru][color=black]официальный сайт[/color][/url]. Чтобы не запутаться в датах, живите с [url=https://www.igor-scherbakov.ru][color=black]лентой времени на сайте[/color][/url]. Для тех, кому интересно «как это сделано», есть [url=https://www.igor-scherbakov.ru][color=black]про студийные фишки[/color][/url]. Чтобы уловить разницу между «тогда» и «сейчас», смотрите [url=https://www.igor-scherbakov.ru][color=black]архив по периодам[/color][/url].
Короче, если тема зашла — добавить в закладки и изучать.Это не про пафос. Это про эффективную упаковку наследия. Финал. Хорошая музыка в кино — это не роскошь. Это необходимость. И этот сайт — прямое тому доказательство.
Your point of view caught my eye and was very interesting. Thanks. I have a question for you.
This content is well-organized and easy to understand. It really helped me a lot.
Useful and straightforward content. Everything is explained clearly without unnecessary details.
Excellent resource with valuable information. Thanks for sharing this so clearly.
1000+ new profiles every day.
Choose who you want to communicate with.
Want to meet new people in your city?
Simply choose a suitable profile and start chatting.
Registration takes less than 10 seconds.
[url=https://dating.yaroreviews.info/2025/05/exploring-the-latest-trends-in-the-online-dating-industry-in-the-usa/]View profiles[/url]
[url=https://www.effectivegatecpm.com/urwq0yyaz?key=2d4d93a5f8dfe6a58791f5affc09c62a]More information…[/url]
Really enjoyed this high-value piece. Your website keeps delivering excellent material.
Sofa deco [url=https://sanxuatsofa.com]sofa dep[/url]
I don’t think the title of your article matches the content lol. Just kidding, mainly because I had some doubts after reading the article. https://accounts.binance.com/id/register?ref=UM6SMJM3
XEvil 5.0 automatically solve most kind of captchas,
Including such type of captchas: ReCaptcha-2, ReCaptcha-3, Google, Solve Media, BitcoinFaucet, Steam, +12k
+ hCaptcha, FC, ReCaptcha Enterprize now supported in new XEvil 6.0!
+ CloudFlare TurnsTile, GeeTest captcha now supported in new XEvil 7.0!
1.) Fast, easy, precisionly
XEvil is the fastest captcha killer in the world. Its has no solving limits, no threads number limits
2.) Several APIs support
XEvil supports more than 6 different, worldwide known API: 2Captcha, anti-captcha (antigate), rucaptcha, DeathByCaptcha, etc.
just send your captcha via HTTP request, as you can send into any of that service – and XEvil will solve your captcha!
So, XEvil is compatible with hundreds of applications for SEO/SMM/password recovery/parsing/posting/clicking/cryptocurrency/etc.
3.) Useful support and manuals
After purchase, you got access to a private tech.support forum, Wiki, Skype/Telegram online support
Developers will train XEvil to your type of captcha for FREE and very fast – just send them examples
4.) How to get free trial use of XEvil full version?
– Try to search in Google “Home of XEvil”
– you will find IPs with opened port 80 of XEvil users (click on any IP to ensure)
– try to send your captcha via 2captcha API ino one of that IPs
– if you got BAD KEY error, just tru another IP
– enjoy! 🙂
– (its not work for hCaptcha!)
WARNING: Free XEvil DEMO does NOT support ReCaptcha, hCaptcha and most other types of captcha!
http://xrumersale.site/
XEvil 5.0 automatically solve most kind of captchas,
Including such type of captchas: ReCaptcha-2, ReCaptcha v.3, Google captcha, Solve Media, BitcoinFaucet, Steam, +12k
+ hCaptcha, FC, ReCaptcha Enterprize now supported in new XEvil 6.0!
+ CloudFlare TurnsTile, GeeTest captcha now supported in new XEvil 7.0!
1.) Fast, easy, precisionly
XEvil is the fastest captcha killer in the world. Its has no solving limits, no threads number limits
2.) Several APIs support
XEvil supports more than 6 different, worldwide known API: 2captcha, anti-captcha (antigate), rucaptcha, death-by-captcha, etc.
just send your captcha via HTTP request, as you can send into any of that service – and XEvil will solve your captcha!
So, XEvil is compatible with hundreds of applications for SEO/SMM/password recovery/parsing/posting/clicking/cryptocurrency/etc.
3.) Useful support and manuals
After purchase, you got access to a private tech.support forum, Wiki, Skype/Telegram online support
Developers will train XEvil to your type of captcha for FREE and very fast – just send them examples
4.) How to get free trial use of XEvil full version?
– Try to search in Google “Home of XEvil”
– you will find IPs with opened port 80 of XEvil users (click on any IP to ensure)
– try to send your captcha via 2captcha API ino one of that IPs
– if you got BAD KEY error, just tru another IP
– enjoy! 🙂
– (its not work for hCaptcha!)
WARNING: Free XEvil DEMO does NOT support ReCaptcha, hCaptcha and most other types of captcha!
Very useful information, explained in a simple and clear way.
Great post! I really enjoyed reading this article.
Excellent work! I learned a lot from this post.
best online pharmacy stores
XEvil 5.0 automatically solve most kind of captchas,
Including such type of captchas: ReCaptcha v.2, ReCaptcha v.3, Google captcha, Solve Media, BitcoinFaucet, Steam, +12k
+ hCaptcha, FC, ReCaptcha Enterprize now supported in new XEvil 6.0!
+ CloudFlare TurnsTile, GeeTest captcha now supported in new XEvil 7.0!
1.) Fast, easy, precisionly
XEvil is the fastest captcha killer in the world. Its has no solving limits, no threads number limits
2.) Several APIs support
XEvil supports more than 6 different, worldwide known API: 2captcha, anti-captchas (antigate), RuCaptcha, DeathByCaptcha, etc.
just send your captcha via HTTP request, as you can send into any of that service – and XEvil will solve your captcha!
So, XEvil is compatible with hundreds of applications for SEO/SMM/password recovery/parsing/posting/clicking/cryptocurrency/etc.
3.) Useful support and manuals
After purchase, you got access to a private tech.support forum, Wiki, Skype/Telegram online support
Developers will train XEvil to your type of captcha for FREE and very fast – just send them examples
4.) How to get free trial use of XEvil full version?
– Try to search in Google “Home of XEvil”
– you will find IPs with opened port 80 of XEvil users (click on any IP to ensure)
– try to send your captcha via 2captcha API ino one of that IPs
– if you got BAD KEY error, just tru another IP
– enjoy! 🙂
– (its not work for hCaptcha!)
WARNING: Free XEvil DEMO does NOT support ReCaptcha, hCaptcha and most other types of captcha!
Regulatory Notices and Corporate Disclosures in Cross-Border Fintech – Review how media outlets interpret reported fund losses and the global protest initiative.
XEvil 5.0 automatically solve most kind of captchas,
Including such type of captchas: ReCaptcha-2, ReCaptcha v.3, Google captcha, SolveMedia, BitcoinFaucet, Steam, +12000
+ hCaptcha, FC, ReCaptcha Enterprize now supported in new XEvil 6.0!
+ CloudFlare TurnsTile, GeeTest captcha now supported in new XEvil 7.0!
1.) Fast, easy, precisionly
XEvil is the fastest captcha killer in the world. Its has no solving limits, no threads number limits
2.) Several APIs support
XEvil supports more than 6 different, worldwide known API: 2captcha, anti-captcha (antigate), RuCaptcha, death-by-captcha, etc.
just send your captcha via HTTP request, as you can send into any of that service – and XEvil will solve your captcha!
So, XEvil is compatible with hundreds of applications for SEO/SMM/password recovery/parsing/posting/clicking/cryptocurrency/etc.
3.) Useful support and manuals
After purchase, you got access to a private tech.support forum, Wiki, Skype/Telegram online support
Developers will train XEvil to your type of captcha for FREE and very fast – just send them examples
4.) How to get free trial use of XEvil full version?
– Try to search in Google “Home of XEvil”
– you will find IPs with opened port 80 of XEvil users (click on any IP to ensure)
– try to send your captcha via 2captcha API ino one of that IPs
– if you got BAD KEY error, just tru another IP
– enjoy! 🙂
– (its not work for hCaptcha!)
WARNING: Free XEvil DEMO does NOT support ReCaptcha, hCaptcha and most other types of captcha!
http://xrumersale.site/
XEvil 6.0 automatically solve most kind of captchas,
Including such type of captchas: ReCaptcha v.2, ReCaptcha-3, Google, Solve Media, BitcoinFaucet, Steam, +12k
+ hCaptcha, FC, ReCaptcha Enterprize now supported in new XEvil 6.0!
+ CloudFlare TurnsTile, GeeTest captcha now supported in new XEvil 7.0!
1.) Fast, easy, precisionly
XEvil is the fastest captcha killer in the world. Its has no solving limits, no threads number limits
2.) Several APIs support
XEvil supports more than 6 different, worldwide known API: 2Captcha, anti-captchas (antigate), rucaptcha, death-by-captcha, etc.
just send your captcha via HTTP request, as you can send into any of that service – and XEvil will solve your captcha!
So, XEvil is compatible with hundreds of applications for SEO/SMM/password recovery/parsing/posting/clicking/cryptocurrency/etc.
3.) Useful support and manuals
After purchase, you got access to a private tech.support forum, Wiki, Skype/Telegram online support
Developers will train XEvil to your type of captcha for FREE and very fast – just send them examples
4.) How to get free trial use of XEvil full version?
– Try to search in Google “Home of XEvil”
– you will find IPs with opened port 80 of XEvil users (click on any IP to ensure)
– try to send your captcha via 2captcha API ino one of that IPs
– if you got BAD KEY error, just tru another IP
– enjoy! 🙂
– (its not work for hCaptcha!)
WARNING: Free XEvil DEMO does NOT support ReCaptcha, hCaptcha and most other types of captcha!
Присоединяюсь. Так бывает.
travel insurance, [url=https://www.lifestyledaily.co.uk/article/2023/11/28/half-uk-women-say-menopause-has-made-their-life-better]https://sportravelling.com/[/url] offers vital coverage for globetrotters. By having travel insurance, you can reduce the economic risks involved in unforeseen events. It’s smart to invest in a policy that suits your needs while exploring new destinations.
Любопытный топик
Духи Montale Оud Pashmina, [url=https://oudpashminavrn.ru/]https://oudpashminavrn.ru[/url] — это неповторимый аромат, который очаровывает своей наслоениями. Состав включает начальные ноты, пробуждающие атмосферу шика. Основные ноты приносят чувство успокоения. Montale Оud Pashmina — это идеален для особых случаев.
Отличное сообщение, поздравляю )))))
Quando pianifichi un viaggio, ГЁ fondamentale considerare l’assicurazione di viaggio, [url=https://21noticias.com/2026/01/19/errores-comunes-en-tu-primer-crucero-por-europa/]guia sobre normas Schengen para viajeros por mar[/url]. Questo tipo di polizza fornisce sicurezza contro imprevisti, come annullamenti. Non trascurare questo aspetto necessario.
Жаль, что сейчас не могу высказаться – очень занят. Но вернусь – обязательно напишу что я думаю по этому вопросу.
Духи Montale Оud Pashmina, [url=https://oudpashminapsk.ru/]oudpashminapsk.ru[/url] — это уникальный аромат, который восхищает своей мистикой. Комбинация восточных нот делает его самобытным. Погрузитесь в изящество восточных обычаев с этим удивительным парфюмерным творением. Каждый вдох раскрывает дополнительные грани аромата, выводя вас на трек к неповторимым ощущениям.
Thanks for sharing! I found this article really helpful.
Я согласен со всем выше сказанным. Давайте обсудим этот вопрос. Здесь или в PM.
Sòng bạc 1xbet, [url=https://indimusic.tv/m/videos/view/greghoyandtheboys-suregotcoldaftertherainfell-h264-noslate]https://indimusic.tv/m/videos/view/greghoyandtheboys-suregotcoldaftertherainfell-h264-noslate[/url] là một hấp dẫn cho mọi đồ cờ bạc. Tại đây, bạn có thể thỏa sức các trò chơi độc đáo. Ngoà i ra, sân chơi còn tạo ra các khuyến mãi hấp dẫn cho khách hà ng.
Я знаю сайт с ответами на интересующую Вас тему.
духи V Сanto, [url=https://vcanto.ru/]vcanto.ru[/url] — это исключительное сочетание пахучих материалов. Любой композиция очаровывает в мир чувственности и грации. Погрузитесь мир свежести с каждым дозировкой. Духи V Santo — это пример искусства, которое подчеркнет вашу индивидуальность.
Поздравляю, ваша идея пригодится
ароматы Laurent Mazzone, [url=https://laurentmazzone.ru/]https://laurentmazzone.ru[/url] — это уникальные творения, которые переносят вас в мир. Каждое изделие представляет собой исключительными нотами и изысканным звучанием. Выбор ароматов Laurent Mazzone идеален для ценителей роскоши и уникальности.
I don’t think the title of your article matches the content lol. Just kidding, mainly because I had some doubts after reading the article.
Прелестный топик
духи Haute Fragrance Company, [url=https://hautefragrancecompany.ru/]https://hautefragrancecompany.ru[/url] — это оригинальное сочетание фрагонов, которое очаровывает каждого. Каждое произведение — это мастерство, в котором несравненно сочетаются элементы природы.
Очень забавный вопрос
Интернет магазин парфюмерии, [url=https://perfumerio.ru/s/memo-room-spray-paris-passion/]https://perfumerio.ru/s/memo-room-spray-paris-passion/[/url] предлагает широкий ассортимент парфюмерии на любой профиль. Вы сможете приобрести популярные марки, а также редкие композиции. Каждый аромат станет замечательным подарком!
Весьма полезная штука
zahranicni online casino, [url=https://broemmling-metallbau.de/objavte-najlepie-online-kasina-na-slovensku-4/]https://broemmling-metallbau.de/objavte-najlepie-online-kasina-na-slovensku-4/[/url] prinГЎЕЎajГє hrГЎДЌom mnohГ© moЕѕnosti zГЎbavy a prГleЕѕitosЕҐ vyhraЕҐ vГЎЕЎnivГ© ceny. Vytvorenie ГєДЌtu je rГЅchla, a hrГЎДЌi prestГєpia mnoЕѕstvo exkluzГvnych hier. UЕѕite si fantastickГ© chvГle!
Эта замечательная идея придется как раз кстати
Quando si programma un viaggio, l’assicurazione di viaggio, [url=https://aulavirtual.uleam.edu.ec/auth/module.php/core/loginuserpass.php?AuthState=_a20c7f994d5872a3b55bff5b41493ec5eefa54a1e9:https://www.quora.com/What-good-location-for-skiing-snowboarding-in-Japan-is-the-easiest-fastest-to-reach-from-overseas/answer/Samuel-Kwesi-11]https://aulavirtual.uleam.edu.ec/auth/module.php/core/loginuserpass.php?AuthState=_a20c7f994d5872a3b55bff5b41493ec5eefa54a1e9:https://www.quora.com/What-good-location-for-skiing-snowboarding-in-Japan-is-the-easiest-fastest-to-reach-from-overseas/answer/Samuel-Kwesi-11[/url] ГЁ fondamentale per proteggersi da problemi. Questa copertura offre sicurezza e tranquillitГ , coprendo danni e perdite. Г€ necessario leggere attentamente le clausole per selezionare la polizza piГ№ adatta. Investire in un’assicurazione di viaggio puГІ risparmiare gravi problemi durante la tua avventura.
Playing at online casinos gives an exciting method to enjoy your favorite games from the comfort of your home. You can enjoy roulette and a variety of games. Don’t miss the chance to play online casino, [url=http://www.bbtivoli.com/discover-spinfred-casino-your-ultimate-gaming-8/]http://www.bbtivoli.com/discover-spinfred-casino-your-ultimate-gaming-8/[/url]!
bezpeДЌnГ© zahraniДЌnГ casino, [url=https://thisplacematters.ca/?p=142164]https://thisplacematters.ca/?p=142164[/url] nabГzГ skvД›lou zГЎbavu a moЕѕnost vyhrГЎt atraktivnГ ceny. Lze zvolit z rozmanitГ© nabГdky her, co zajiЕЎЕҐuje pЕ™ГjemnГ© hernГ prostЕ™edГ. Registrujte se jeЕЎtД› dnes a proЕѕijte okamЕѕiky plnГ© vzruЕЎenГ!
а мне впадло
Casinos Non on Gamstop, [url=https://jaybabani.com/ultra-wp-admin/?p=185333]https://jaybabani.com/ultra-wp-admin/?p=185333[/url] offer players a chance to enjoy gaming without restrictions. These establishments provide a diverse of games, catering to different preferences. With entertaining bonuses and promotions, players can enhance their experience while sampling new options. Ensuring fun and engagement, Casinos Non on Gamstop remain a popular choice for many enthusiasts.
Между нами говоря, по-моему, это очевидно. Ответ на Ваш вопрос я нашёл в google.com
Cashoomo casino, [url=https://appzflyer.com/2017/06/06/hello-world-2/]https://appzflyer.com/2017/06/06/hello-world-2/[/url] предлагает неповторимый возможности для лотереистов. Здесь представлены разные игры и выгодные акции, которые привлекает опытных участников. Войдите мир Cashoomo casino и узнайте азарт от великолепного времяпрепровождения!
online casino sports betting, [url=https://flhcut.de/2026/01/30/the-allure-of-online-gaming-exploring-the-world-of-2/]https://flhcut.de/2026/01/30/the-allure-of-online-gaming-exploring-the-world-of-2/[/url] is an exciting choice for enthusiasts. Featuring numerous options, players can delight in their favorite activities. Conveniently accessible, online casino sports betting keeps the excitement alive.
mezinГЎrodnГ online casino, [url=https://ttplacement.ca/zahranini-sazkovky-jak-si-vybrat-tu-pravou-pro-vas-2/]https://ttplacement.ca/zahranini-sazkovky-jak-si-vybrat-tu-pravou-pro-vas-2/[/url] umoЕѕЕ€uje hrГЎДЌЕЇm rozmanitГЅ vГЅbД›r her. UЕѕivatelГ© majГ pЕ™ГleЕѕitost uchГЎzet se kdykoliv a odkudkoliv. Volba obsaЕѕenГЅch bonusЕЇ posiluje zГЎЕѕitek z zГЎpasu.
Замечательно, весьма полезное сообщение
Software für Innenarchitektur, [url=https://emr-realschule.de/]https://emr-realschule.de[/url] ist ein wichtiges Werkzeug für Designer. Mit modernen Anwendungen können Designer ihre Entwürfe effizient umsetzen. Jene Softwarelösungen bieten eine innovativen Planung.
качество фу
Not on Gamstop Casinos, [url=https://piecesdev.wpengine.com/exploring-casinos-that-are-not-on-gamstop-your/]https://piecesdev.wpengine.com/exploring-casinos-that-are-not-on-gamstop-your/[/url] offer players the chance to enjoy a wider variety of games and bonuses. These platforms provide an alternative for those seeking excitement without restrictions. Several options are available, ensuring diverse experiences to choose from.
Я считаю, что Вы не правы. Могу отстоять свою позицию.
, [url=https://lnx.hokutonoken.it/index.php?title=%2Fskopemag.com%2F2025%2F12%2F29%2Fthe-art-of-anticipation-how-waiting-can-enhance-your-enjoyment-of-music-and-gaming&action=edit&printable=yes]https://lnx.hokutonoken.it/index.php?title=%2Fskopemag.com%2F2025%2F12%2F29%2Fthe-art-of-anticipation-how-waiting-can-enhance-your-enjoyment-of-music-and-gaming&action=edit&printable=yes[/url] – В наше время прогресс играют важную роль в жизни каждого человека. Они повышают повседневные задачи. Благодаря современным инструментам мы можем удобно работать и связываться с людьми.
online casino betting, [url=https://www.ichibanya.com.cn/betcasino30019/el-auge-de-mafia-casino-un-mundo-de-juego-y/]https://www.ichibanya.com.cn/betcasino30019/el-auge-de-mafia-casino-un-mundo-de-juego-y/[/url] offers thrilling possibilities to bettors. With multiple games and tempting bonuses, it creates an exciting atmosphere for enjoyment and probable winnings.
foreign online casinos, [url=https://www.malek.ae/oveni-kasin-pes-revolut-bezpenost-a-pohodli-online/]https://www.malek.ae/oveni-kasin-pes-revolut-bezpenost-a-pohodli-online/[/url] umoЕѕЕ€ujГ hrГЎДЌЕЇm ЕЎirokou moЕѕnost her. Na zГЎkladД› novГЅm technologiГm hrГЎДЌi majГ pЕ™ГleЕѕitost vyuЕѕГvat adrenalinovГ©ho hernГho dД›nГ.
Your point of view caught my eye and was very interesting. Thanks. I have a question for you.
Я извиняюсь, но, по-моему, Вы не правы. Давайте обсудим это. Пишите мне в PM, пообщаемся.
Not on Gamstop Casinos, [url=https://gefinances.com/blog/exploring-slots-and-casinos-not-on-gamstop-3/]https://gefinances.com/blog/exploring-slots-and-casinos-not-on-gamstop-3/[/url] offer players a unique gaming experience. Such platforms cater to those seeking liberty from self-exclusion programs. Players can experience a wider variety of games and incentives.
Блестящая фраза
online Casino, [url=https://www.faceplantorganic.com/khela88-sports-activities-betting-bet-in-your-favourite-sports-activities-and-win-huge]https://www.faceplantorganic.com/khela88-sports-activities-betting-bet-in-your-favourite-sports-activities-and-win-huge[/url] дарит уникальные возможности для людей, любящих риск. Ставки многообразны, и каждый игрок найдет штучку по душе. Приступайте в мир online Casino и получите адреналин, выигрывая.
Engaging sports betting, [url=http://www.azatravels.in/mexswin-casino-descubre-el-mejor-destino-para/]http://www.azatravels.in/mexswin-casino-descubre-el-mejor-destino-para/[/url] can provide incredible opportunities for fans. Learning the odds and approaches is crucial to enhance your profits.
zahraniДЌnГ online casino, [url=http://www.doctorpc.biz/2026/02/11/nejlepi-cz-kasina-prvodce-svtem-online-her/]http://www.doctorpc.biz/2026/02/11/nejlepi-cz-kasina-prvodce-svtem-online-her/[/url] nabГzГ rozmanitou ЕЎkГЎlu her, co oslovГ hrГЎДЌe. MnozГ si mohou vybrat variantu hry podle svГЅch preferencГ. S bonusy si mЕЇЕѕete zaЕѕГt zГЎroveЕ€ vГce zГЎbavy!
а вот тут реально классные есть
инструкции по демонтажу бамперов, [url=https://remont-bampera.com/]remont-bampera.com[/url] – Для успешного демонтажа бамперов необходимо подготовить инструменты. Инструкция по демонтажу бамперов включает в себя следующие шаги: сначала открутите крепления, затем аккуратно снимите бампер с автомобиля. Убедитесь, что все предохранители отключены для безопасности. После этого проверьте состояние деталей, чтобы избежать последующих проблем. При необходимости замените сломанные элементы для обеспечения надежности при установке нового бампера. С соблюдением рекомендаций процесс пройдет быстро и без лишних усилий.
Это обычная условность
Casinos Not on Gamstop, [url=https://sktaeroshutter.com/exploring-the-best-uk-online-casinos-not-on/]https://sktaeroshutter.com/exploring-the-best-uk-online-casinos-not-on/[/url] offer a unique opportunity for players seeking freedom from restrictions. These gaming establishments allow you to enjoy various choices without the limitations imposed by Gamstop. Explore new avenues of entertainment today!
Браво, мне кажется это замечательная идея
Алексеевское сельское поселение, [url=https://www.mottababy.it/?attachment_id=50]https://www.mottababy.it/?attachment_id=50[/url] находится в picturesque уголке природы. Здесь уважаемые пейзажи. Местные жители увлекаются сельского хозяйства. Этот уголок привлекает туристов своей атмосферой.
online sports betting, [url=https://hotelkasakir.com/descubre-el-mundo-del-mexgana-casino/]https://hotelkasakir.com/descubre-el-mundo-del-mexgana-casino/[/url] has become a popular hobby for a large number of fans. Individuals enjoy placing bets on numerous sporting events. This adds thrill to the games. In addition, the services available make it easy to participate from anywhere. Always be aware the dangers involved.
zahraniДЌnГ online casino, [url=https://btbsofting.fr/zahranini-online-casino-jak-si-vybrat-to-nejlepi-2/]https://btbsofting.fr/zahranini-online-casino-jak-si-vybrat-to-nejlepi-2/[/url] nabГzГ pestrГЅ vГЅbД›r her pro fanouЕЎky. NabГzГ vyhrГЎvat lГЎkavГ© bonusy. OvlГЎdnД›te umД›nГ strategie a vychutnejte si zГЎbavu online!
вождь с ноутбуком – просто супер
Not on Gamstop Casinos, [url=https://centralkougei.co.jp/50373/]https://centralkougei.co.jp/50373/[/url] offer players a unique chance to enjoy online gaming without limitations. Such kinds of casinos present a variety of games and bonuses that are not bound by UK regulations. Gamblers can experience extra freedom in their gaming choices.
сморел мне понравилось
Wallet Avalanche, [url=http://i.ape2018.eu/rx/330×186,c_1,g_center/https://walletavalanche.com/blog/]http://i.ape2018.eu/rx/330×186,c_1,g_center/https://walletavalanche.com/blog/[/url] is a revolutionary digital wallet that provides protected storage for your coins. With its user-friendly interface, Wallet Avalanche enables instant transactions and smooth management of your holdings.
Online gambling offers players an exciting means to enjoy their favorite games from home. With countless options available, casino online, [url=https://dosalmas.us/2026/01/31/descubre-el-mundo-de-spinanga-casino-diversion-y/]https://dosalmas.us/2026/01/31/descubre-el-mundo-de-spinanga-casino-diversion-y/[/url] enthusiasts can discover new titles and improve their gaming skills.
bezpeДЌnГ© zahraniДЌnГ casino, [url=https://www.astoncapital.net/zahranini-online-casino-jak-najit-to-nejlepi-pro/]https://www.astoncapital.net/zahranini-online-casino-jak-najit-to-nejlepi-pro/[/url] nabГzГ hrГЎДЌЕЇm skvД›lГ© zГЎЕѕitky. JelikoЕѕ profesionГЎlnГm zabezpeДЌenГm mГЎte moЕѕnost hrГЎt bez obav. DЕЇvД›ryhodnГ© platformy zajiЕЎЕҐujГ fГ©rovГ© podmГnky a okamЕѕitГ© vГЅplaty.
Действительно странно
Как бороться с демпингом, [url=https://www.galic.at/der-heisse-atem-aotearoas/]https://www.galic.at/der-heisse-atem-aotearoas/[/url] – важный вопрос для бизнеса. Для этим, нужно изучать рынок и формулировать стратегию ценовой политики. Также стоит учитывать качество товаров и услуг. Многогранный подход поможет обеспечить конкурентоспособность.
mezinГЎrodnГ online casino, [url=https://fawesomegames.com/jak-si-vybrat-online-casino-prvodce-pro-hrae/]https://fawesomegames.com/jak-si-vybrat-online-casino-prvodce-pro-hrae/[/url] nabГzГ rozmanitou ЕЎkГЎlu moЕѕnostГ, kterГ© pЕ™itГЎhnou hrГЎДЌe z celГ©ho svД›ta. Vysoce kvalitnГ grafika a intuitivnГ rozhranГ zajiЕЎЕҐujГ vГЅjimeДЌnГЅ hernГ zГЎЕѕitek.
In the world of internet casinos, online casino, [url=https://syl-shop.com/understanding-speed-betet-a-guide-to-faster/]https://syl-shop.com/understanding-speed-betet-a-guide-to-faster/[/url] platforms have gained immense popularity. Players enjoy multiple options of games, from slot games to table games. With attractive promotions, it’s easy to see why many flock to these sites for thrilling experiences.
MezinГЎrodnГ online kasina majГ rozmanitГЅ vГЅbД›r her a lГЎkatelnГ© bonusy. Mnoho platformy nabГzejГ hrГЎДЌЕЇm zkouЕЎet svГ© ЕЎtД›stГ v tД›chto podmanivГЅch prostЕ™edГch. foreign online casinos, [url=http://www.qsttech.com/online-kasina-s-eskou-licenci-bezpenost-a-zabava-v/]http://www.qsttech.com/online-kasina-s-eskou-licenci-bezpenost-a-zabava-v/[/url] vГЎbГ hrГЎДЌe z mnoha koutЕЇ svД›ta.
Не могу сейчас поучаствовать в обсуждении – очень занят. Вернусь – обязательно выскажу своё мнение по этому вопросу.
replica uhren, [url=https://lisagoesinternet.de/diese-lisa/]https://lisagoesinternet.de/diese-lisa/[/url] sind beliebte Alternativen zu teuren Luxusuhren. Jene Uhren bieten zahlreiche Möglichkeiten an Designs, die Käufer begeistern. Einige Menschen entscheiden sich für Replica Uhren, um Eleganz zu zeigen, ohne hohe Kosten auszugeben.
online casino, [url=https://cpdesigncenter.com/rockstar-casino-experiena-unic-a-jocurilor-de-2/]https://cpdesigncenter.com/rockstar-casino-experiena-unic-a-jocurilor-de-2/[/url] supplying entertaining games for players around the world. Try out the excitement today and enjoy the chance to win!
zahraniДЌnГ online casino, [url=https://next.etabletka.sk/zahranini-online-casino-jak-vybrat-to-nejlepi-pro-13/]https://next.etabletka.sk/zahranini-online-casino-jak-vybrat-to-nejlepi-pro-13/[/url] nabГzГ variabilnГ ЕЎkГЎlu her, kterГ© zaujmou hrГЎДЌe z celГ©ho svД›ta. HernГ stroje jsou nejpopulГЎrnД›jЕЎГ, ale takГ© poker majГ svГ© mГsto. HrГЎДЌi si cenГ vГЅhody, jako jsou bonuse a vysokГ© jackpoty. V online casinech narazГte na novinky a moЕѕnostГ zlepЕЎit svГ© zisk.
Playing at an online casino offers a unique experience. You can enjoy excitement from the comfort of your home. With a wide assortment of games, you can select what you like the most. Plus, online casinos often provide promotions, enhancing your wagering adventure. Enjoy the freedom to play online casino, [url=https://integralwellnessrevolution.com/entdecke-die-welt-von-playio-casino-dein/]https://integralwellnessrevolution.com/entdecke-die-welt-von-playio-casino-dein/[/url] anytime!
Я конечно, прошу прощения, но я предлагаю пойти другим путём.
мобильное казино, [url=https://www.istitutorotolo.it/igornaja-sistema-novogo-pokolenija-budushhee-10/]https://www.istitutorotolo.it/igornaja-sistema-novogo-pokolenija-budushhee-10/[/url] предлагает уникальные возможности для аппликантов. Планшеты позволяют участвовать в любом месте и в любое время. Безопасность обеспечивает комфорт. Развлечения разнообразны, и каждый найдет что-то нравящееся.
Casinos Not on Gamstop, [url=https://www.sisube.com/explore-the-advantages-of-non-gamstop-casinos-in/]https://www.sisube.com/explore-the-advantages-of-non-gamstop-casinos-in/[/url] offer a unique gaming experience for players seeking freedom. Such casinos enable users to enjoy varied games without restrictions. Players can explore enjoyable slots and live dealer options. Casinos Not on Gamstop ensure anonymity, allowing gamers to play with ease.
online casino sports betting, [url=https://www.docarnettefoundation.org/die-zukunft-von-play-mojo-ein-umfassender/]https://www.docarnettefoundation.org/die-zukunft-von-play-mojo-ein-umfassender/[/url] has become in popularity as an increasing number of enthusiasts are finding out the thrill and excitement it offers. Utilizing advanced technology, players can experience a range of games and sports events in the convenience of their homes. This modern approach to gambling creates greater access and flexibility for gamblers. As the industry continues to evolve, it promises even more fun for everyone involved.
Вы не правы. Могу это доказать. Пишите мне в PM.
Pin-Up Casino, [url=https://mymemory.translated.net/en/Italian/English/Das-Pin-Up-Casino%2C-%5Burl%3Dhttps%3A%2F%2Fbetao1.com%2Fpromocodes%5Dhttps%3A%2F%2Fbetao1.com%2Fpromocodes%5B%2Furl%5D%2C-ist-ein-aufregender-Ort%2C-an-dem-Sie-eine-gro%C3%9Fe-Auswahl-an-Spielen-genie%C3%9Fen-k%C3%B6nnen.-Spa%C3%9F-und-Unterhaltung-sind-hier-garantiert.-Brettspiele-machen-jeden-Besuch-einzigartig.]https://mymemory.translated.net/en/Italian/English/Das-Pin-Up-Casino%2C-%5Burl%3Dhttps%3A%2F%2Fbetao1.com%2Fpromocodes%5Dhttps%3A%2F%2Fbetao1.com%2Fpromocodes%5B%2Furl%5D%2C-ist-ein-aufregender-Ort%2C-an-dem-Sie-eine-gro%C3%9Fe-Auswahl-an-Spielen-genie%C3%9Fen-k%C3%B6nnen.-Spa%C3%9F-und-Unterhaltung-sind-hier-garantiert.-Brettspiele-machen-jeden-Besuch-einzigartig.[/url] es un espacio emocionante donde puedes disfrutar de entretenimiento increГbles. AquГ, los jugadores pueden disfrutar una amplia gama de juegos de azar sensacionales. ВЎГљnete a la acciГіn y diviГ©rtete al mГЎximo!
Casinos Not on Gamstop, [url=http://marketinsightcanada.com/exploring-slots-and-casinos-not-on-mainstream/]http://marketinsightcanada.com/exploring-slots-and-casinos-not-on-mainstream/[/url] provide a unique opportunity for players seeking different gaming experiences. With captivating games and generous bonuses, these casinos attract players looking for liberty in their online gambling. Enjoy a vibrant gaming atmosphere without the limitations found on traditional platforms.
SГІng bбєЎc 1xbet, [url=http://www.allods.net/redirect/zumvu.com%2Fvaonde%2F]http://www.allods.net/redirect/zumvu.com%2Fvaonde%2F[/url] cung cấp trбєЈi nghiệm chЖЎi thГє vб»‹ cho ngЖ°б»ќi yГЄu thГch thб»ѓ thao. Vб»›i khб»•ng lб»“ trГІ chЖЎi, bбєЎn sбєЅ Д‘Ж°б»Јc Д‘ГЎp б»©ng trЖ°б»›c sб»± Д‘бє·c sбєЇc của cГЎc trГІ chЖЎi hấp dбє«n.
zahraniДЌnГ online casino, [url=https://650.wieruszow.pl/02/22/bonusy-za-registraci-bez-vkladu-jak-je-ziskat-a-4/]https://650.wieruszow.pl/02/22/bonusy-za-registraci-bez-vkladu-jak-je-ziskat-a-4/[/url] nabГzГ hrГЎДЌЕЇm velkou ЕЎkГЎlu moЕѕnostГ. HrГЎДЌi si mohou zvolit svГ© oblГbenГ© stolnГ hry a proЕѕГvat vzruЕЎujГcГ atmosfГ©ru odkudkoliv.
online casino betting, [url=https://community.skillquo.com/explorando-el-mundo-de-mx-711-innovacion-y-7/]https://community.skillquo.com/explorando-el-mundo-de-mx-711-innovacion-y-7/[/url] is gaining popular among enthusiasts. The allure of placing bets online presents an unparalleled experience. Through diverse platforms available, users can dive into a extensive range of games.
Как раз то, что нужно, буду участвовать. Вместе мы сможем прийти к правильному ответу.
Pin-Up Casino, [url=https://oceanenterprisestravel.com/oet-africa-featured-san-diego-magazine/]https://oceanenterprisestravel.com/oet-africa-featured-san-diego-magazine/[/url] ofrece una experiencia Гєnica | excepcional | inigualable | sorprendente para los amantes del juego. Con su amplia variedad de juegos, | opciones de apuestas | entretenimientos | diversiones, los jugadores pueden disfrutar de momentos emocionantes. AdemГЎs, los bonos atractivos | interesantes | emocionantes | generosos hacen que cada visita sea aГєn mГЎs entretenida. ВЎNo esperes mГЎs para unirte a la diversiГіn en Pin-Up Casino!
Not on Gamstop Casinos, [url=https://promotions.champs-sportsclub.com/readingfilmtheatre/exploring-not-on-gamstop-casinos-a-comprehensive-3/]https://promotions.champs-sportsclub.com/readingfilmtheatre/exploring-not-on-gamstop-casinos-a-comprehensive-3/[/url] offer players a unique opportunity|provide gamers with an exclusive chance|give bettors a special option|grant wagering enthusiasts a distinctive choice to enjoy online gaming. These casinos operate independently, ensuring|confirming|guaranteeing|affirming that players can have a thrilling gaming experience without restrictions. Enjoy diverse games|a wide range of games|varied gaming options|numerous gaming choices and promotions in a vibrant environment. Players can explore|discover|uncover|find exciting opportunities beyond the limits set by Gamstop. Choose your adventure today!
Alluring options await you at Chicken Road casinos, [url=https://actdanismanlik.com/the-quirky-adventure-of-chicken-road-play/]https://actdanismanlik.com/the-quirky-adventure-of-chicken-road-play/[/url], where amusement never ends. Experience excitement with a variety of games to choose from, ensuring all guests has a remarkable time.
Within the realm of sports betting, [url=https://local.co.zw/betcasino010212/mrspin9-casino-your-ultimate-online-gaming-9/]https://local.co.zw/betcasino010212/mrspin9-casino-your-ultimate-online-gaming-9/[/url], enthusiasts usually identify both adrenaline and danger. Understanding strategies can enhance one’s chances of winning.
Весьма отличная идея
If you’re looking for a reliable plumber in Kitchener, you’re in the right place. Finding a skilled plumber in kitchener, [url=https://www.fundable.com/bernice-kean]https://www.fundable.com/bernice-kean[/url] can ensure your pipes are addressed quickly and efficiently. Don’t wait to repair those leaks!
Not on Gamstop Casinos, [url=https://www.webwheel.co.in/exploring-non-gamstop-uk-casinos-freedom-in-online/]https://www.webwheel.co.in/exploring-non-gamstop-uk-casinos-freedom-in-online/[/url] offer players an exciting opportunity to enjoy online gaming without the restrictions of self-exclusion. These platforms present a range of casino games, ensuring a engaging experience. Players can explore new titles while enjoying lucrative bonuses and promotions. With varied payment options, withdrawals are swift and seamless. Not on Gamstop Casinos stand out for their emphasis on player satisfaction and responsible gaming practices.
Как специалист, могу оказать помощь.
online casini, [url=https://saumalkol.com/forum/разное-1/30260-казино-онлайн.html#46880]https://saumalkol.com/forum/разное-1/30260-казино-онлайн.html#46880[/url] предлагают множество увлекательных РёРіСЂ Рё шанс РЅР° выигрыш. РРіСЂРѕРєРё РјРѕРіСѓС‚ выбрать РёР· разнообразных слотов Рё настольных РёРіСЂ. Р’ то же время, важно помнить Рѕ деньгах Рё контроле СЃРІРѕРёС… инвестиций.
nove nove slovenske casino, [url=http://colojapan.asia/direct4me/online-kasina-novinky-a-trendi-v-roku-2023.html]http://colojapan.asia/direct4me/online-kasina-novinky-a-trendi-v-roku-2023.html[/url] ponГєkajГє atraktГvne moЕѕnosti zГЎbavy pre nadЕЎencov hier. Pripojte sa a uЕѕite si ЕЎirokГє ponuku live hier, priДЌom kaЕѕdГЅ mГґЕѕe vidieЕҐ nieДЌo pre seba.
online sports betting, [url=https://sglobaldesign.com/2026/02/01/descubre-platall-bet-tu-portal-al-mundo-de-las/]https://sglobaldesign.com/2026/02/01/descubre-platall-bet-tu-portal-al-mundo-de-las/[/url] has become a popular method for gamblers to engage in their favorite events. With the growth of technology, joining online platforms is easier than ever.
По моему мнению Вы допускаете ошибку. Могу отстоять свою позицию. Пишите мне в PM, поговорим.
Pin-Up Casino, [url=https://ashmitanews.in/32278/]https://ashmitanews.in/32278/[/url] предоставляет неповторимые игровые автоматы СЃ целью всех. Рсследуйте восторгами играми Рё достигайте внушительные вознаграждения.
НЕТ ПАЦАНЫ ТАК НЕЛЬЗЯ!
новое казино, [url=https://www.poldim-bg.com/koshache-kazino-mesto-dlja-nastojashhih-igromanov/]https://www.poldim-bg.com/koshache-kazino-mesto-dlja-nastojashhih-igromanov/[/url] предлагает захватывающий опыт для игроков. Геймеры могут очутиться в множеством азартных автоматов и традиционных игр. Оценки пользователей впечатляют, а подарки делают пребывание еще более незабываемым. Не упустите шанс стать частью этого феноменального пространства!
Я думаю, что Вы допускаете ошибку. Предлагаю это обсудить.
ЩѓШ§ШІЩЉЩ†Щ€ 888 ШЄШіШ¬ЩЉЩ„ Ш§Щ„ШЇШ®Щ€Щ„, [url=https://fancybox.qa/2025/09/01/%d8%aa%d8%ad%d9%85%d9%8a%d9%84-888starz-%d9%81%d9%8a-%d9%85%d8%b5%d8%b1-apk-%d9%88ios-%d8%a8%d8%ac%d9%88%d8%af%d8%a9-%d9%88%d8%b3%d8%b1%d8%b9%d8%a9-%d8%aa%d8%ab%d8%a8%d9%8a%d8%aa/]????? ???? 888starz[/url] Щ‡Щ€ Ш®Ш·Щ€Ш© ШЈШіШ§ШіЩЉШ© Щ„Щ„ШЄЩ…ШЄШ№ ШЁШЈЩ„Ш№Ш§ШЁ Ш§Щ„Щ‚Щ…Ш§Ш± Ш§Щ„Щ…Щ…ШЄШ№Ш©. ЩЉЩ…ЩѓЩ†Щѓ Ш§Щ„ШЄШіШ¬ЩЉЩ„ ШЁШіЩ‡Щ€Щ„Щ‡ Ш№ШЁШ± Ш§Щ„Щ…Щ€Щ‚Ш№. ШЄШ¶Щ…Щ† Щ„Щѓ ЩЃШ±ШµШ© Щ„Щ„Ш№ШЁ ЩѓШ§ШІЩЉЩ†Щ€Щ‡Ш§ШЄ Щ…Щ…ЩЉШІШ©. ШЈШЇШ®Щ„ Ш§Щ„ШўЩ† Щ€ШЄЩ…ШЄШ№ ШЁШ§Щ„Щ…ЩѓШ§ЩЃШўШЄ!
Online Casino, [url=https://samokat.pimc.spb.ru/onlajn-kafe/exploring-the-exciting-world-of-bet365-games-6/]https://samokat.pimc.spb.ru/onlajn-kafe/exploring-the-exciting-world-of-bet365-games-6/[/url] offers an entertaining experience for players. With a variety of games, from blackjack to table games, everyone finds something to enjoy. Bonuses enhance the gambling experience, attracting new players.
The launch of new casino not on GamStop, [url=https://frimpslogistics.com/exploring-uk-casino-sites-not-on-gamstop-2/]https://frimpslogistics.com/exploring-uk-casino-sites-not-on-gamstop-2/[/url] offers players thrilling options. With unique games and lucrative bonuses, these casinos offer an unrestricted gaming experience that draws in enthusiasts. Players have the chance to explore diverse betting opportunities, guaranteeing enjoyable sessions without barriers often associated with GamStop. Embrace the independence of gambling at these recent platforms today!
In the exciting world of virtual gambling, casino online, [url=https://prueba.jalperu.com/scopri-vegasino-il-tuo-casino-online-preferito-3/]https://prueba.jalperu.com/scopri-vegasino-il-tuo-casino-online-preferito-3/[/url] offers thrilling experiences. Players can enjoy a variety of games from the comfort of their homes. With safe transactions, it’s never been easier to win big!
ничего особенного
онлайн казино, [url=http://www.rebhandl.ch/wordpress/?p=67837]http://www.rebhandl.ch/wordpress/?p=67837[/url] представляет собой всё всё активнее популярным решением для отдыха. Клиенты могут получить уникальным опытом, используя различные игры из любого места. Технологии позволяют осуществлять удобное взаимодействие.
Online Casino Games, [url=http://mesman.nl/betcasino06021/the-ultimate-guide-to-betway-casino-thrills-and]http://mesman.nl/betcasino06021/the-ultimate-guide-to-betway-casino-thrills-and[/url] offer thrills for players. They offer a variety of options, from video slots to card games like blackjack. Players can explore their beloved games anytime, anywhere.
nove slovenske casino, [url=https://bvipowerboatrental.com/nove-casino-nove-monosti-hrania-a-zabavy-online/]https://bvipowerboatrental.com/nove-casino-nove-monosti-hrania-a-zabavy-online/[/url] ponГєkajГє jedineДЌnГ© zГЎЕѕitky pre hrГЎДЌov. TakГ©to platformy poskytujГє ЕЎirokГЅ vГЅber hier a ЕЎkГЎlovateДѕnГ© bonusy. Klienti si mГґЕѕu uЕѕiЕҐ poteЕЎenie z pohodlia svojho domova.
1xBet sports Betting, [url=https://sologics.co/1xbet-thailand-app-download-guide/]https://sologics.co/1xbet-thailand-app-download-guide/[/url] features an exciting experience for punters. With a plethora of sports available, every fan will find a game to enjoy. Join the action today!
online casino, [url=https://www.bmabogados.cl/2026/02/01/unlock-the-excitement-of-online-betting-with/]https://www.bmabogados.cl/2026/02/01/unlock-the-excitement-of-online-betting-with/[/url] features a enthralling experience for gamblers. With a variety of games, from fruit machines to table games, there’s something for all types of players. Enjoy promotions that enhance your gambling journey and allow you to increase your chances of winning.
Прошу прощения, что вмешался… Мне знакома эта ситуация. Можно обсудить.
мобильное казино, [url=https://info.dekedigital.com/pogruzhenie-v-mir-cosmolot-onlajn-kazino-novogo/]https://info.dekedigital.com/pogruzhenie-v-mir-cosmolot-onlajn-kazino-novogo/[/url] предлагает игрокам наслаждаться играми прямо на личных устройствах. Вследствие развитию технологий каждый желающий может развлекаться в любое время и в любом месте. Такие платформы сильно комбинируют удобство и выбор азартных возможностей, что привлекает множество азартных людей.
Ходячие приколы)))
In the digital age, a leading web agency is essential for businesses. They offer unique solutions to enhance your online presence. With a squad of skilled professionals, they ensure outstanding results that drive growth and engagement. Partnering with a top web agency, [url=https://faucre.com/when-the-fun-in-gambling-is-no-longer-fun/]https://faucre.com/when-the-fun-in-gambling-is-no-longer-fun/[/url] allows you to utilize the latest trends and technologies. Invest in your brand’s future and watch your exposure soar!
Не в этом суть.
In den letzten Jahren erfreuen sich Internet-Casinos wachsender Beliebtheit. Besonders im Zusammenhang mit online casinos ohne limit, [url=https://stefan-engl.de/casinos-ohne-limit/]online casino ohne einschrankung[/url] sind Spieler begeistert. Solche Plattformen bieten viele Optionen, um den Nervenkitzel am Spiel zu erleben. Man kann die Zeit ganz nach Vorlieben zu nutzen.
Сожалею, что не могу сейчас поучаствовать в обсуждении. Очень мало информации. Но эта тема меня очень интересует.
инженерная сантехника, [url=https://rigaplast.ru/]https://rigaplast.ru/[/url] играет важную роль в монтаже комфортной жизни. Новые технологии делают работу более качественным, что модернизирует задачи монтажников.
In the world of digital games, Casino Online, [url=http://futurismdemo.com/hsfoodserver/exploring-the-fascinating-world-of-god55-singapore/]http://futurismdemo.com/hsfoodserver/exploring-the-fascinating-world-of-god55-singapore/[/url] offers an exciting experience. Players can take pleasure in a variety of choices, including slots, poker, and table games. With secure payment methods, users can wager confidently.
1xBet Esports Betting, [url=https://www.ellalan.com/2026/02/21/1xbet-thailand-download-app-your-guide-to-easy/]https://www.ellalan.com/2026/02/21/1xbet-thailand-download-app-your-guide-to-easy/[/url] offers an exciting way to engage with professional gaming. With a wide range of options available, bettors can opt for their favorite events and enjoy intense action.
online casino, [url=https://edelltha.com.br/index.php/2026/02/02/voxcasino-deutschland-ihr-ultimatives-online-14/]https://edelltha.com.br/index.php/2026/02/02/voxcasino-deutschland-ihr-ultimatives-online-14/[/url] gives an entertaining way to take part in your favorite games. With various options available, players can choose games that suit their interests. Sign up and start your adventure now!
Полностью разделяю Ваше мнение. В этом что-то есть и мне нравится Ваша идея. Предлагаю вынести на общее обсуждение.
казино онлайн, [url=https://therockstarvas.com/kazino-vegas-vse-o-luchshih-igrah-i-bonusah/]https://therockstarvas.com/kazino-vegas-vse-o-luchshih-igrah-i-bonusah/[/url] предоставляет множество перспектив для игроков. Здесь развлекаетесь в комфортной обстановке и выигрывать главные призы. Уникальные слоты и доступные предложения ждут вас!
Вы попали в самую точку. Мысль хорошая, поддерживаю.
udenlandske casino free spins, [url=https://encant.elcorriol.com/udenlandske-online-casino-fordele-og-ulemper-3/]https://encant.elcorriol.com/udenlandske-online-casino-fordele-og-ulemper-3/[/url] er en fantastisk mГҐde at prГёve nye spil uden risiko. SГҐdanne tilbud giver spillere mulighed for at fГҐ rigtige penge uden at skulle bruge deres egne midler. Det er en glimrende tilbud for nye spillere at prГёve online spil.
Online Casino, [url=https://digitalexperto.com/exploring-the-exciting-world-of-12play-games-12/]https://digitalexperto.com/exploring-the-exciting-world-of-12play-games-12/[/url] acts as an exciting platform for fans to enjoy their abilities. With a large assortment of games, all players can find something that excites them.
zahraniДЌnГ© online kasГno, [url=https://rplus-tantei.com/2026/02/23/nove-online-kasina-na-slovensku-prileitos-na/]https://rplus-tantei.com/2026/02/23/nove-online-kasina-na-slovensku-prileitos-na/[/url] poskytuje ЕЎirokГє paletu hier, v ktorГЅch si kaЕѕdГЅ objavГ svoje obДѕГєbenГ©. VГЅhody, preДЌo si zvoliЕҐ zahraniДЌnГ© online kasГno, sГє skrytГ© v atraktГvnych bonusoch a odmenГЎch. Dajte prГleЕѕitosЕҐ svojej ЕЎЕҐastnej hre uЕѕ dnes!
1xBet Online Casino, [url=https://www.livesicily.it/2026/02/21/exploring-1xbet-thailand-a-guide-to-online-betting/]https://www.livesicily.it/2026/02/21/exploring-1xbet-thailand-a-guide-to-online-betting/[/url] – 1xBet Online Casino предоставляет широкий выбор ставок для геймеров. РЎ хорошими бонусами Рё функциональным интерфейсом, любой найдет что-то для себя.
Я считаю, что Вы не правы. Я уверен. Могу отстоять свою позицию. Пишите мне в PM, поговорим.
В выборе онлайн-казино важно учитывать надежность. безопасное казино, [url=https://www.wowgrill.ca/?p=78808]https://www.wowgrill.ca/?p=78808[/url] обеспечит защиту ваших данных и денежных средств. Выбирайте платформы с лицензией и положительными отзывами. Изучите различные вакансии, чтобы определить лучшее!
По-моему это очевидно. Рекомендую Вам поискать в google.com
casino online udenlandsk, [url=https://cabxana.com/2026/02/21/udenlandske-casino-free-spins-en-guide-til-3/]https://cabxana.com/2026/02/21/udenlandske-casino-free-spins-en-guide-til-3/[/url] tilbyder en spændende måde at spille på, hvor du kan nyde dine færdigheder. Med det udvalg af spil og tilbud, kan du prøve noget, der passer til dig. Gør dig klar til aktion!
Playing at an online casino gives you the chance to enjoy the joy of gambling from the convenience of your home. With a variety of games available, you can always find something entertaining to play online casino, [url=https://multiply.sale/experience-the-thrill-of-yabby-casino-your/]https://multiply.sale/experience-the-thrill-of-yabby-casino-your/[/url]. Whether you prefer blackjack, the online experience is captivating and presents various bonuses that enhance your gameplay. Enjoy the journey and win big today!
Useful and straightforward content. Everything is explained clearly without unnecessary details.
Very useful information, explained in a simple and clear way. I found exactly what I was looking for.
Excellent resource with valuable information. Thanks for sharing this so clearly.
это хорошо
vulkanspiele casino, [url=https://universalhospitalitytravel.com/casino/vulkanspiele-kod-promocyjny-gdzie-sprawdzic-aktualny-kod-i-skorzystac-z-promocji/]vulkanspiele kod promocyjny[/url] – Vulkanspiele online предлагает широкий выбор азартных приложений. Р’С‹ сможете насладиться всевозможными слотами Рё настольными играми, что предлагает первоклассный опыт.
Online Casino Games, [url=https://www.micahlockhart.com/betcasino06021/experience-the-thrill-a-comprehensive-guide-to-bk8/]https://www.micahlockhart.com/betcasino06021/experience-the-thrill-a-comprehensive-guide-to-bk8/[/url] offer an exciting means to enjoy betting online. Through various styles, players can immerse themselves in captivating experiences.
Вентиляционные системы, [url=http://storemango.com/bbs/board.php?bo_table=free&wr_id=3686943]http://storemango.com/bbs/board.php?bo_table=free&wr_id=3686943[/url] включают незаменимым составляющим современного объекта. Они обеспечивают качественный воздух. Эффективная вентиляционная система исключает распространение загрязнений.
To enjoy betting, getting the app is essential. With 1xBet Download, [url=https://suzhouembroiderykits.com/1xbet-download-bangladesh-your-guide-to-betting-on-27/]https://suzhouembroiderykits.com/1xbet-download-bangladesh-your-guide-to-betting-on-27/[/url], you gain access to a user-friendly platform. The installation is fast, allowing you to begin your betting journey promptly.
По моему мнению Вы допускаете ошибку. Давайте обсудим. Пишите мне в PM, пообщаемся.
KoiFortune Casino, [url=https://jaybabani.com/ultra-wp-admin/?p=193665]https://jaybabani.com/ultra-wp-admin/?p=193665[/url] verleiht ein breites Angebot an Casino-Spielen. Mit begehrenswerten Boni und besonderen Aktionen lockt es zahlreiche Spieler zu digitalen Universum. Erlebe den Nervenkitzel wie auch die Optionen der virtuellen Casinos.
подборка )))
честное казино, [url=https://www.malek.ae/kosmolot-365-igrovaja-platforma-dlja-ludomanov/]https://www.malek.ae/kosmolot-365-igrovaja-platforma-dlja-ludomanov/[/url] предлагает игрокам возможность наслаждаться азартными играми с высоким уровнем доверия. Здесь честные игры гарантируют, что каждый игрок получает равные шансы на победу. Выбор слотов поражает воображение и позволяет каждому найти что-то свое.
[url=https://kpmoremo.ru]поселок белое море мурманская
[/url]
In recent years, sports betting, [url=https://isun.com.qa/exploring-the-world-of-1xbet-a-comprehensive-guide-7/]https://isun.com.qa/exploring-the-world-of-1xbet-a-comprehensive-guide-7/[/url] has become increasingly popular among fans. A plethora of platforms offer engaging opportunities to wager on games. Grasping the odds is crucial for success. Furthermore, responsible gambling should always be a priority.
Web-based wagering have become increasingly popular among participants. At Casino Online, [url=https://hosanix.com/experience-the-thrill-of-god55-casino-your-premier/]https://hosanix.com/experience-the-thrill-of-god55-casino-your-premier/[/url], users can enjoy a multitude of games such as slots, table games, and live dealer options. Ease is a major advantage, allowing for play from home. With engaging bonuses and promotions, novices are drawn to try their luck. Enjoy everything that Casino Online has to offer!
юрист по внж в Казахстане, [url=http://www.smartpc.sk/faq/ut-wisi-enim-ad-minim-veniam-quis-nostrud/]http://www.smartpc.sk/faq/ut-wisi-enim-ad-minim-veniam-quis-nostrud/[/url] помогает продлить визу на постоянное место жительства. Профессионалы знают все нюансы законодательства и посоветуют процесс получения ВНЖ. Обращаясь к ним, вы упростите сложные процедуры.
Эта тема просто бесподобна 🙂 , мне нравится )))
A friss trend a jГЎtГ©kszenvedГ©ly vilГЎgГЎban a magyar online kaszinГі, [url=https://melodyfestival.it/online-kaszino-oldalak-magyarorszagon-utmutato-es-2/]https://melodyfestival.it/online-kaszino-oldalak-magyarorszagon-utmutato-es-2/[/url]. Ezek a helyszГnek kivГЎlГі szГіrakozГЎst tartanak, Г©s rengeteg jГЎtГ©k kГ¶zГјl vГЎlaszthatunk. A felhasznГЎlГіi Г©lmГ©ny kiemelkedЕ‘.
Совершенно верно! Мне кажется это очень отличная идея. Полностью с Вами соглашусь.
проверенное казино, [url=https://eatraining.eu/jb-com-bukmeker-obzor-bonusy-i-podderzhka]https://eatraining.eu/jb-com-bukmeker-obzor-bonusy-i-podderzhka[/url] предлагает игрокам уникальные возможности для игры. Здесь можно найти многообразные игры, включая слоты и настольные игры. Отзывчивая поддержка клиентов обеспечит вас в любое время. Здесь предоставляются выгодные бонусы и акции. Обеспечение безопасности данных игроков — важнейшая задача этого заведения.
выгон
FlowCraft Plumbing, [url=https://xealuk.com/reliable-markham-emergency-plumbing-services-for/]https://xealuk.com/reliable-markham-emergency-plumbing-services-for/[/url] offers reliable services. Our skilled team is dedicated to guaranteeing exceptional drainage services. We resolve concerns efficiently, ensuring customer satisfaction. Contact FlowCraft Plumbing for every issue you face.
Wagering in online casinos has become increasingly widespread. With a wide range of games, gamblers can enjoy their favorite slots from the comfort of their home. casino online, [url=https://destinationfly.com/exploring-1xbet-worlds-a-comprehensive-guide/]https://destinationfly.com/exploring-1xbet-worlds-a-comprehensive-guide/[/url] offers comfort unmatched by traditional venues.
Я хотел бы с Вами поговорить, мне есть, что сказать по этому вопросу.
Welcome to the thrilling atmosphere of crazy time casino, [url=http://wombafurnitures.com/crazy-time-casino-live-gioca-online-con-soldi-veri-e-diretta/]crazy time gratis[/url]. Here, gambling becomes an expedition. Enjoy a selection of choices, where every spin delivers excitement and delights. Join us and experience this incredible world!
1xbet online, [url=https://hormigonesjm.com/1xbet-myanmar-your-guide-to-online-betting/]https://hormigonesjm.com/1xbet-myanmar-your-guide-to-online-betting/[/url] presents a broad range of wagering options for users. With direct betting, players can enjoy the thrill of putting bets on their beloved sports. Join 1xbet online and take advantage of attractive bonuses and promotions to enhance your gaming experience.
Betano romania, [url=http://www.xxxcomics.me/?url=//betanocasin0-ro.com]http://www.xxxcomics.me/?url=//betanocasin0-ro.com[/url] oferДѓ o experienИ›Дѓ excelentДѓ de pariu pe internet, cu o gamДѓ variatДѓ de opИ›iuni. Utilizatorii pot exprima entuziasm de promoИ›ii atractive И™i privilegii interesante, fДѓcГўnd fiecare pariu o oportunitate palpitantДѓ.
ура, ура… дождались
новое казино, [url=https://radiantlighteventrentals.com/chempion-kazino-put-k-uspehu-i-razvlecheniju/]https://radiantlighteventrentals.com/chempion-kazino-put-k-uspehu-i-razvlecheniju/[/url] предлагает уникальный опыт для любителей азартных игр. Посетители могут наслаждаться разнообразным выбором игровых автоматов. Акционные предложения часто радуют, постоянно обновляя новых клиентов. Награды делают атмосферу возбуждающей. Новое казино — это замечательный выбор для развлечения и развлечений.
sports betting, [url=https://www.jcbailbonding.com/explore-the-exciting-world-of-1xbet-your-ultimate-12/]https://www.jcbailbonding.com/explore-the-exciting-world-of-1xbet-your-ultimate-12/[/url] – Betting on sports has become increasingly popular in recent years. Many enthusiasts enjoy the thrill of gambling on their favorite teams. With the rise of online platforms, accessing odds is easier than ever. However, it is essential to do thorough research before betting to maximize your chances of success.
Надеюсь, Вы найдёте верное решение. Не отчаивайтесь.
Are you looking for a experienced plumber in kitchener, [url=https://redcrca14.cultura.gob.cl/2026/02/comprehensive-guide-to-water-softener-installation/]https://redcrca14.cultura.gob.cl/2026/02/comprehensive-guide-to-water-softener-installation/[/url]? Finding the right technician can ensure peace of mind for your plumbing issues. Choose a local plumber in kitchener for quick and effective service.
1xbet app, [url=https://ganoolqq.com/2026/01/23/1xbet-myanmar-the-ultimate-online-betting-3/]https://ganoolqq.com/2026/01/23/1xbet-myanmar-the-ultimate-online-betting-3/[/url] – The 1xbet software offers a intuitive interface for betting on sports. With the 1xbet app, users can reach a wide range of markets and enjoy instant gaming anytime, anywhere.
Betano romania, [url=http://www.solutionsss.de/index.php/kontakt/blog/item/63-der-werttyp-__comobject-kann-nur-in-variablen-des-typs-object-konvertiert-werden]http://www.solutionsss.de/index.php/kontakt/blog/item/63-der-werttyp-__comobject-kann-nur-in-variablen-des-typs-object-konvertiert-werden[/url] este o platformДѓ de pariu populatДѓ care oferДѓ diverse opИ›iuni de meciuri pentru jucДѓtori. Cu promoИ›ii interessante И™i asistenИ›Дѓ de calitate, experienИ›a este neuitatДѓ.
Вы допускаете ошибку. Предлагаю это обсудить. Пишите мне в PM, поговорим.
888starz букмекер, [url=https://www.v-group.vn/db/igrayte-v-onlaynkazino-888starz-na-vashem-iosustroystve-v-uzbekistane/]888starz apk[/url] предлагает уникальные возможности для любителей ставок и азартных мероприятий. Здесь можно обрести широкий спектр событий и значительные коэффициенты. Платформа также отличается интуитивно понятным интерфейсом, что делает процесс ставок простым. Специальные акции и поощрения дополнительно увеличивают шансы на выигрыш. С 888starz букмекер азарт всегда в центре внимания.
Конечно. Всё выше сказанное правда.
онлайн казино, [url=https://www.rosemirfolhas.com.br/onlajn-anonimnoe-kazino-mir-azartnyh-igr-bez/]https://www.rosemirfolhas.com.br/onlajn-anonimnoe-kazino-mir-azartnyh-igr-bez/[/url] дарит множество опций для увлекательной игры. На этих платформах игроки могут попробовать удачу в различных играх, включая покер до слотов. Каждый найдет что-либо для себя, погружаясь в вибрации азартных приключений.
Welcome to the exciting world of 1xbet online casino, [url=https://competenciastransversales.pucv.cl/?p=118881]https://competenciastransversales.pucv.cl/?p=118881[/url]. Here, you can experience a variety of options that entertain all types of players. Presenting generous bonuses and dynamic games, it’s undoubtedly a paradise for gamblers. Join now and try your luck!
Замечательно, очень хорошая информация
If you’re in need of top-notch plumbing services london, [url=https://www.div9interior.com/?p=1069381]https://www.div9interior.com/?p=1069381[/url], look no further. Our expert team is ready to tackle any repairs. We guarantee quality in every job we undertake.
Online casinos present an exciting option to enjoy various games straight from the comfort of your home. With countless bonuses and incentives, casino online, [url=https://coursesyouneednow.com/post/130768]https://coursesyouneednow.com/post/130768[/url] lures a vast audience of players.
Casa Pariurilor romania, [url=http://jyoukyou.livedoor.biz/archives/55585362.html?1667258896]http://jyoukyou.livedoor.biz/archives/55585362.html?1667258896[/url] oferДѓ sanse unice pentru pariorii din И™i din jur. Aceasta garanteazДѓ aventuri de top. ГЋn plus, serviciul oferДѓ reduceri atractive pentru toИ›i utilizatorii.
Какие слова… супер, замечательная фраза
казино онлайн, [url=http://test.902grp.com/?p=48100]http://test.902grp.com/?p=48100[/url] дает возможность игрокам интересные игры в любое время дня. Участники могут определять лучшие слоты с получением бонусы. Ставя, они пробуют всю долгожданную атмосферу удачи и азарта!
To enjoy seamless betting, you should consider the 1xbet download, [url=https://deeteeedufoundation.org/1xbet-download-login-your-complete-guide-to-3/]https://deeteeedufoundation.org/1xbet-download-login-your-complete-guide-to-3/[/url] option. This choice enables users to connect to a variety of options easily. Through downloading the app, one can join the action from any location.
Замечательно, это ценное сообщение
KoiFortune Casino, [url=http://instalex2.type.pl/koifortune-casino-najlepsze-wraenia-hazardowe-w/]http://instalex2.type.pl/koifortune-casino-najlepsze-wraenia-hazardowe-w/[/url] przygotowuje wyjД…tkowe przeЕјycie dla miЕ‚oЕ›nikГіw gier. Bogata oferta gry kasynowe oraz bonusowe oferty zachД™cajД… graczy. KoiFortune Casino jest fantastyczne miejsce do spД™dzenia czasu.
During the world of sports betting, [url=https://www.ninja388.biz/descubra-o-mundo-das-apostas-com-1xbet-2117696778/]https://www.ninja388.biz/descubra-o-mundo-das-apostas-com-1xbet-2117696778/[/url], strategies play a significant role. Grasping the odds can elevate your chances of winning. Regularly analyze prior games and factor in player performances.
Princess Casino, [url=http://vanocnizavod.radioklub.cz/zacinam/]http://vanocnizavod.radioklub.cz/zacinam/[/url] prezintДѓ o aventurДѓ unicДѓ pentru utilizatori. Orice secundДѓ petrecut aici promite bucurii de neuitat. TotodatДѓ, recompensele Г®mbie И™i mai mult vizitatorii.
In the world of 1xBet Betting, [url=https://qualifiedbuildinginspectors.co.nz/1xbet-app-your-gateway-to-mobile-sports-betting-2/]https://qualifiedbuildinginspectors.co.nz/1xbet-app-your-gateway-to-mobile-sports-betting-2/[/url], bettors find a plethora of opportunities to place their stakes. This platform provides multiple sports and events to wager.
Я считаю, что Вы ошибаетесь. Могу отстоять свою позицию. Пишите мне в PM, поговорим.
Apple Pay casino not on GamStop, [url=http://training.insurancesplash.com/exploring-apple-pay-casinos-why-some-are-not-on/]http://training.insurancesplash.com/exploring-apple-pay-casinos-why-some-are-not-on/[/url] offers an exceptional gaming experience. Players enjoy security through efficient transactions. These casinos provide numerous games, ensuring pleasure without restrictions. Join today!
1xBet Betting Online, [url=https://nextoons.bex.jp/2026/02/18/901654/]https://nextoons.bex.jp/2026/02/18/901654/[/url] offers a huge range of events for users to bet on. Enjoy immediate updates and enticing odds that offer a thrilling experience. Engage with 1xBet Betting Online today!
In the world of online gambling, casino online, [url=https://fansofporn.com/betwinner-la-guia-completa-para-apostar-en-linea/]https://fansofporn.com/betwinner-la-guia-completa-para-apostar-en-linea/[/url] offers an unmatched experience. Players can enjoy diversity of games from the comfort of their homes. With unique rewards, every spin and deal brings excitement.
Вы оказались правы. Благодарю за совет, как я могу Вас отблагодарить?
SafeCasino Portugal, [url=https://madintegra.misistemadegestion.cloud/safecasino-portugal-a-plataforma-de-jogos-online/]https://madintegra.misistemadegestion.cloud/safecasino-portugal-a-plataforma-de-jogos-online/[/url] oferece uma experiência de jogo inigualável, permitindo que os jogadores se divirtam com segurança. Com diversas opções de apostas, a plataforma brilha pela confiança e clareza. Os recompensas atraentes também contribuem para a experiência. Além disso, os jogadores apreciam o atendimento excelente.
оч понравилось ))
мобильное казино, [url=http://blog.legitsneakerhouse.com/jb-casino-vash-kljuch-k-miru-azartnyh-igr-2/]http://blog.legitsneakerhouse.com/jb-casino-vash-kljuch-k-miru-azartnyh-igr-2/[/url] стало популярным среди любителей азартных игр. Игроки могут наслаждаться процессом в любое время, получая доступ к разнообразным возможностям. Удобство приложения увлекает игроков.
1xBet Betting Online, [url=https://zepa.cl/2026/01/24/the-ultimate-guide-to-1xbet-betting-your-path-to/]https://zepa.cl/2026/01/24/the-ultimate-guide-to-1xbet-betting-your-path-to/[/url] offers an engaging platform for gambling fans to place bets. With attractive odds and varied options, anyone can find something suitable. Enjoy real-time betting and quick cashouts on this easy-to-navigate site.
Теперь всё понятно, благодарю за помощь в этом вопросе.
If you’re looking for alternative options for online wagering, consider non GamStop betting sites, [url=http://transtuts.com.br/?p=1087805]http://transtuts.com.br/?p=1087805[/url]. These websites provide players with an option to enjoy betting without restrictions. Experience enhanced choices today!
1xBet sports Betting, [url=https://www.hvgllc.com/1xbet180215/download-1xbet-korea-app-a-comprehensive-guide-3/]https://www.hvgllc.com/1xbet180215/download-1xbet-korea-app-a-comprehensive-guide-3/[/url] is widely recognized choice for fans looking to engage in betting. With diverse markets, it caters to every sports lover.
PowerBet romania, [url=https://julenbasagoiti.com/2018/10/16/optimizar-para-conciliar/]https://julenbasagoiti.com/2018/10/16/optimizar-para-conciliar/[/url] este o platformДѓ de pariu online populatДѓ Г®n И›arДѓ. OferДѓ o gamДѓ variatДѓ de meciuri, printre care se numДѓrДѓ sporturi precum fotbal, baschet И™i tenis. Pariorii pot beneficia de bonusuri atractive И™i o interfaИ›Дѓ uИ™or de folosit.
Amidst the world of sports betting, [url=https://tintsandtools.com/betwinnerkiris-online-qimor-o-yinlari-uchun-eng]https://tintsandtools.com/betwinnerkiris-online-qimor-o-yinlari-uchun-eng[/url], comprehending the odds is vital. Profitable bettors analyze trends and place informed choices. Utilizing proper strategies, one can increase their chances of profit.
Я извиняюсь, но, по-моему, Вы не правы. Я уверен. Давайте обсудим это.
Cazinoul KoiFortune, [url=https://www.ph-education.com/2026/02/23/cazinoul-koifortune-romania-o-experien-unic-de-joc/]https://www.ph-education.com/2026/02/23/cazinoul-koifortune-romania-o-experien-unic-de-joc/[/url] propunere impresionantДѓ pentru pasionaИ›i de prinИ›e. Aici, vei gДѓsi jocuri video captivante И™i avantaje generoase. DistracИ›ia este extraordinarДѓ И™i te de a cГўИ™tiga. Cazinoul KoiFortune te Г®mbie la o experienИ›Дѓ de neuitat.
смяшно однака !
В современном мире азартных игр важным аспектом является безопасность. безопасное казино, [url=https://servicii24.ro/jb-kazino-pogruzites-v-mir-azarta-i-udachi-2/]https://servicii24.ro/jb-kazino-pogruzites-v-mir-azarta-i-udachi-2/[/url] обеспечивает защиту персональных данных и честность игр. Выбирая платформу, обратите внимание на регулирование, а также на замечания пользователей.
1xbet online, [url=https://www.codimuc.com.br/noticias/discover-the-1xbet-app-your-ultimate-betting-118/]https://www.codimuc.com.br/noticias/discover-the-1xbet-app-your-ultimate-betting-118/[/url] обеспечивает своим партнерам широкий спектр азартных ставок. Здесь вы исследовать онлайн возможности с получить множество акций.
По моему мнению Вы допускаете ошибку. Могу это доказать. Пишите мне в PM, поговорим.
Magic Win casino, [url=https://www.720transform.com/2026/02/20/discover-the-exciting-world-of-magicwin-casino/]https://www.720transform.com/2026/02/20/discover-the-exciting-world-of-magicwin-casino/[/url] offers a captivating experience for gamblers. With countless games, including slots to table options, it serves all preference. Join at this moment and try your luck!
Winmasters romania, [url=http://die-sticknadel.de/?section=gallery&cid=11&pId=75]http://die-sticknadel.de/?section=gallery&cid=11&pId=75[/url] oferДѓ И™anse excelente pentru jocuri. AceastДѓ platformДѓ corespunde nevoilor utilizatorilor prin produse variate И™i incitante.
1xBet Esports Betting, [url=https://ead.ministeriodeensinobg.com.br/download-1xbet-app-in-vietnam-your-guide-to-mobile/]https://ead.ministeriodeensinobg.com.br/download-1xbet-app-in-vietnam-your-guide-to-mobile/[/url] – 1xBet Esports Betting provides a thrilling experience for bettors who love competitive gaming. Incorporating a wide range of competitions, it’s essential for fans to stay informed about the latest trends and strategies. Engage in the excitement and place your bets today!
Online gaming has gained a large following in recent years. casino online, [url=https://sktaeroshutter.com/plongee-dans-l-univers-des-paris-avec-betwinner/]https://sktaeroshutter.com/plongee-dans-l-univers-des-paris-avec-betwinner/[/url] offers an exciting experience for players. Offering a wide selection, everyone can find their preferred option. Enjoy the thrill of casino online from the comfort of your home!
В этом что-то есть. Большое спасибо за объяснение, теперь я буду знать.
честное казино, [url=https://tripodyssey.com/universalnaja-kripto-platforma-budushhee-3/]https://tripodyssey.com/universalnaja-kripto-platforma-budushhee-3/[/url] предлагает игрокам уникальный опыт, в котором соблюдаются правила а также честности. Любой клиент имел возможность быть уверенным в честности игры. Несомненно, это цепляет множество игроков, которые ценят справедливость. В данных заведениях достоверно честное отношение к каждому.
india online pharmacy
полный отпад—-и качество
аренда светодиодного экрана, [url=https://balancan.gob.mx/jekrany-dlja-konferencij-kak-sdelat-vashe-sobytie/]https://balancan.gob.mx/jekrany-dlja-konferencij-kak-sdelat-vashe-sobytie/[/url] — это отличный способ модернизировать ваше мероприятие. Световые панели предоставляют высококачественное изображение и яркие цвета, что привлекает внимание. Эффективная установка гарантирует, что каждая деталь будет на высоте. Выбирайте аренду светодиодного экрана для успешной презентации!
1xbet app, [url=https://teindustries.ca/1xbet-apuestas-en-espana-la-mejor-plataforma-para/]https://teindustries.ca/1xbet-apuestas-en-espana-la-mejor-plataforma-para/[/url] – The application 1xbet provides clients with a convenient platform for online betting. With real-time updates, it allows quick access to various sporting events and promotions. Enjoy betting anytime and anywhere!
travel insurance, [url=http://savanttools.com/ANON/thehealthbridges.com%2Fread-blog%2F12606]http://savanttools.com/ANON/thehealthbridges.com%2Fread-blog%2F12606[/url] is essential for any trip, as it provides financial protection against unexpected events. It covers medical emergencies, trip cancellations, and lost luggage, ensuring peace of mind while traveling.
1xBet Online Casino, [url=https://radiobuenanueva.cl/rb30/1xbet-download-a-comprehensive-guide-to-mobile-5/]https://radiobuenanueva.cl/rb30/1xbet-download-a-comprehensive-guide-to-mobile-5/[/url] предлагает азартным игрокам разнообразие активностей. Зрители могут получать удовольствие увлекательными моментами на платформе.
Это не имеет аналогов?
Welcome to the engaging world of dice casino online, [url=http://wordpress2.design-services-online.com/MHS/the-rise-of-usdt-casinos-a-new-era-of-online/]http://wordpress2.design-services-online.com/MHS/the-rise-of-usdt-casinos-a-new-era-of-online/[/url], where luck meets skill. Here, players can delight in a assortment of games that test their skills. Feel the excitement as you roll the dice and strive for the best outcomes. Join now and discover the joy of playing dice like never before!
sports betting, [url=https://albarqenergy.com/2026/02/07/experience-the-thrill-of-betting-with-betwinner-14/]https://albarqenergy.com/2026/02/07/experience-the-thrill-of-betting-with-betwinner-14/[/url] – Sports wagering has become a popular activity for many. Individuals often look for methods to enhance their chances of winning. Understanding the odds is crucial for success.
Это можно бесконечно обсуждать..
проверенное казино, [url=https://handytasks.com/jb-com-bukmekerskaja-kontora-obzor-preimushhestva-8/]https://handytasks.com/jb-com-bukmekerskaja-kontora-obzor-preimushhestva-8/[/url] предлагает игрокам широкий выбор азартных игр. Игрок может найти то, что ему по душе. Разнообразие слотов, рулетки и серьезных соревнований привлекает новичков. Защита и уверенность — важные аспекты, которые делают это заведение популярным среди азартных игроков.
1xbet online casino, [url=https://crazyfood.stejdzing.pl/index.php/2026/01/24/1xbet-espanol-la-mejor-plataforma-de-apuestas-en/]https://crazyfood.stejdzing.pl/index.php/2026/01/24/1xbet-espanol-la-mejor-plataforma-de-apuestas-en/[/url] предлагает уникальные возможности для геймеров. Здесь сосредоточены отборные стратегии РѕС‚ популярных фирм. РРіСЂС‹ РїСЂРѕС…РѕРґСЏС‚ беспечно, Р° окончание средств РїСЂРѕРёСЃС…РѕРґРёС‚ быстро Рё безопасно.
Through the exciting world of casinos, Online Casino Bass Win, [url=http://planetxenos.com/the-ultimate-guide-to-bof-casino-sportsbook/]http://planetxenos.com/the-ultimate-guide-to-bof-casino-sportsbook/[/url] provides participants a venue to secure large rewards while enjoying countless games. Step into a fantastic experience today!
To start enjoying online betting, the first step is the 1xBet Download, [url=https://lp.alugarlaser.com.br/index.php/2026/02/16/explore-the-world-of-online-gaming-with-1xbet/]https://lp.alugarlaser.com.br/index.php/2026/02/16/explore-the-world-of-online-gaming-with-1xbet/[/url]. This app delivers a user-friendly interface and hassle-free navigation. Users can conveniently access a wide range of games and stake possibilities.
ну не знаю как кому, а мне такие сюрпризы нравятся!!!! ))))
Турецкие товары оптом, [url=http://www.morikouji.jp/turanline/48108.html]http://www.morikouji.jp/turanline/48108.html[/url] способствуют бизнесу увеличивать ассортимент. Качество продукции отличные, что удивляет покупателей. Умеренные цены делают партнёрство выгодным.
В этом что-то есть. Раньше я думал иначе, благодарю за помощь в этом вопросе.
online social casinos, [url=https://sasiedzionline.obliczasrebra.kylos.pl/node/]https://sasiedzionline.obliczasrebra.kylos.pl/node/[/url] offer a unique gaming experience for participants. These platforms connect friends and encourage them to join together in a thrilling atmosphere. With various games and options, online social casinos create a vibrant environment.
Betwinner Betting, [url=https://envira-hindu-american-foundation.pantheonsite.io/blog/betwinner-a-revolucao-das-apostas-online-no-brasil-7/]https://envira-hindu-american-foundation.pantheonsite.io/blog/betwinner-a-revolucao-das-apostas-online-no-brasil-7/[/url] is a popular service for betters looking to engage in gaming. With an broad range of markets, it attracts users from around the world. The simple interface ensures that both players can easily navigate through the site, enhancing their satisfaction. Betwinner Betting also offers promotions that keep users interested and coming back for more.
сразу в хорошем качестве… Спасибо ….
новое казино, [url=https://avalingo.ir/legalnaja-igornaja-ploshhadka-osobennosti-i/]https://avalingo.ir/legalnaja-igornaja-ploshhadka-osobennosti-i/[/url] привлекает игроков разнообразием услуг и предлагает множество игр. Каждый найдет здесь что-то интересное. Оформление аккаунта удобна, а бонусы создают возможности для выигрыша. Не теряйте шанс попробовать это новое казино.
To enjoy the best gaming experience, you can easily obtain the 1xbet download, [url=https://smiletraveling.com/2026/01/24/apuestas-1xbet-en-espana-todo-lo-que-necesitas-10/]https://smiletraveling.com/2026/01/24/apuestas-1xbet-en-espana-todo-lo-que-necesitas-10/[/url]. This application gives users access to a wide range of features, including live betting and numerous games. Don’t miss out on the chance to discover all it has to offer!
1xBet Betting Online, [url=https://wpshop.publigo.fr/1xbet-online-betting-a-comprehensive-guide-to/]https://wpshop.publigo.fr/1xbet-online-betting-a-comprehensive-guide-to/[/url] offers a captivating platform for wagering fans. With numerous betting options, users can easily place bets on various sports events, ensuring endless entertainment.
Welcome to our exciting world of Betwinner Casino, [url=https://kan-news.com/kan/exploring-betwinner-promotions-features-and-user/]https://kan-news.com/kan/exploring-betwinner-promotions-features-and-user/[/url], where entertaining games await you! Immerse yourself in a variety of top-notch slot machines, table games, and live dealer options. Join right away to experience amazing bonuses and offers that can enhance your gaming journey. Enjoy seamless navigation and 24/7 support, ensuring your time is memorable. Play at Betwinner Casino and discover the ultimate gaming experience!
[url=https://chinatrakt.ru/]вакансия москва фронтальный погрузчик
[/url]
Это сообщение просто бесподобно 😉
онлайн казино, [url=https://kaihiku.com/archives/1921]https://kaihiku.com/archives/1921[/url] предлагают разнообразные возможности для любящих играть людей. Начните свою удачу в играх и выиграйте награды с радостью. Любой из них включает особенные поощрения.
Across the landscape of 1xBet Betting, [url=https://institutoaesj.com.br/your-ultimate-guide-to-the-1xbet-app-422582252/]https://institutoaesj.com.br/your-ultimate-guide-to-the-1xbet-app-422582252/[/url], players find multiple options to attempt their luck. Offering an easy-to-navigate site, 1xBet Betting delivers fun for users involved.
Online Casino Bass Win, [url=https://shiawaseglobal.com/discover-the-excitement-of-prive-casino-your/]https://shiawaseglobal.com/discover-the-excitement-of-prive-casino-your/[/url] offers a captivating experience for players looking to try their luck. With numerous games and attractive bonuses, you can dive into the world of online gambling. Enjoy live dealers right from your home!
Поздравляю, вас посетила просто блестящая мысль
In the world of gambling, numerous players seek unique experiences. One such option is casino ohne oasis, [url=https://www.jaritafreydank.com/]jaritafreydank.com[/url], where the ambiance is enthralling. Here, novel games await, providing fantastic opportunities for entertainment.
Betwinner Online, [url=https://lgcneumatica.mx/index.php/2026/01/25/exploring-betwinner-a-comprehensive-guide/]https://lgcneumatica.mx/index.php/2026/01/25/exploring-betwinner-a-comprehensive-guide/[/url] offers an engaging platform for betting activities. Users can appreciate a vast selection of games, offers, and accessible interface. Sign up today for rapid entry.
Очень ценная информация
казино онлайн, [url=https://architricksstudio.com/onlajn-kazino-s-rasshirennym-funkcionalom-obzor-i/]https://architricksstudio.com/onlajn-kazino-s-rasshirennym-funkcionalom-obzor-i/[/url] предоставляет игрокам восхитительную возможность играть в просторе собственного дома. Обширный выбор игр, жанров и возможных выигрышев искушает множество пользователей.
1xBet Betting Online, [url=https://hookedonshopping.com/get-ahead-in-betting-with-the-1xbet-app/]https://hookedonshopping.com/get-ahead-in-betting-with-the-1xbet-app/[/url] предоставляет многообразный вариантов споров на соревновательные события. Почитатели могут оценить простой интерфейсом и получать призовые.
1xBet Esports Betting, [url=https://crm.matsunagaautocar.jp/1xbet-singapore-betting-your-ultimate-guide-2/]https://crm.matsunagaautocar.jp/1xbet-singapore-betting-your-ultimate-guide-2/[/url] – 1xBet Esports Betting provides an exceptional choice for fans. Players can carry out bets on various esports events, providing adrenaline and promising profits.
качну, о качестве потом коментну Приятного просмотра!!!
In recent years, a boom in popularity of UK non GamStop casinos, [url=https://wpbulky.new2new.com/explore-the-world-of-casinos-not-with-gamstop/]https://wpbulky.new2new.com/explore-the-world-of-casinos-not-with-gamstop/[/url] has attracted many players. These sites provide freedom for those seeking to participate in gambling without restrictions. Furthermore, they often offer thrilling bonuses and games that enhance the overall experience. Players can discover a variety of options tailored to their preferences. UK non GamStop casinos remain a preferred choice for avid gamblers looking for increased opportunities.
На мой взгляд, это интересный вопрос, буду принимать участие в обсуждении.
мобильное казино, [url=https://demos.totalsuite.net/totalsurvey/kazino-vulkan-vasha-put-k-udache/]https://demos.totalsuite.net/totalsurvey/kazino-vulkan-vasha-put-k-udache/[/url] предоставляет игрокам биосовременный способ играть в азартными досугом в любое время и место. Планшеты позволяют выполнять ставки с легкостью и защитой. Пользователи могут доступать широкий выбор игр, что делает каждую сессию особенной.
Betwinner Registration, [url=http://www.andrewthomsonmusic.com/betwinner-decouvrez-le-meilleur-site-de-paris/]http://www.andrewthomsonmusic.com/betwinner-decouvrez-le-meilleur-site-de-paris/[/url] is a simple process that allows users to create an account quickly. At the outset, visit the official website. Complete the required details and check your information. Next, you’re ready to place bets!
1xbet online, [url=https://dtfhero.com.au/experience-excitement-with-the-1xbet-india-app-2/]https://dtfhero.com.au/experience-excitement-with-the-1xbet-india-app-2/[/url] существует широкий асортимент спортивных игр, где игроки могут осуществить разнообразными опционами.
zahraniДЌnГ online casino, [url=https://kdsloga.me/index.php/2026/02/22/bonusy-bez-vkladu-v-online-kasinech-jak-na-n-a-co/]https://kdsloga.me/index.php/2026/02/22/bonusy-bez-vkladu-v-online-kasinech-jak-na-n-a-co/[/url] nabГzГ hrГЎДЌЕЇm rozmanitou nabГdku her a lГЎkavГ© bonusy. SГЎzkaЕ™i si mohou nacГtit vzruЕЎenГ z hracГch her v jakoukoli dobu a v jakГ©mkoli mГstД›.
This content is well-organized and easy to understand. It really helped me a lot.
Я думаю, что Вы ошибаетесь. Давайте обсудим.
Captain Cooks online casino, [url=https://shop.d5bodyboardshop.com.au/discover-the-excitement-of-captain-cooks-casino-3/]https://shop.d5bodyboardshop.com.au/discover-the-excitement-of-captain-cooks-casino-3/[/url] offers an exhilarating experience for players. With countless games, including slots, and live gaming options, it promises infinite entertainment. Whether you’re a newcomer or a experienced player, you’ll find varieties that appeal to your style. Join now and explore all that Captain Cooks online casino has to offer!
Жаль, что сейчас не могу высказаться – опаздываю на встречу. Освобожусь – обязательно выскажу своё мнение.
Amid the world of recreation, Casino Game, [url=https://firestampedeultimate.site/fire-stampede-ultimate-registration-guide-step-by-step-account-setup-2026/]https://firestampedeultimate.site/fire-stampede-ultimate-registration-guide-step-by-step-account-setup-2026/[/url] provides a thrilling experience for players. Every single moment is filled with tension, making it a favored choice. Achieving success can lead to surprising rewards!
По моему мнению Вы не правы. Я уверен. Пишите мне в PM.
independent casino online, [url=https://hyperwarped.com/exploring-independent-uk-casinos-a-guide-to-unique-4/]https://hyperwarped.com/exploring-independent-uk-casinos-a-guide-to-unique-4/[/url] offers a unique experience for players. With diverse games, players can enjoy a variety of slot games and competitive table options. Independent casino online ensures trustworthy experiences, making it a safe environment for enthusiasts.
Betwinner Betting, [url=https://nariphoneservis.com/betwinner-tu-portal-completo-para-las-apuestas/]https://nariphoneservis.com/betwinner-tu-portal-completo-para-las-apuestas/[/url] offers a thrilling experience for sports lovers. With engaging odds and numerous options, bettors can find their ideal match. Get ready to enjoy an unforgettable staking adventure!
1xbet app, [url=https://aroeats.net/aroeats/1xbet-malaysia-app-download-your-ultimate-betting]https://aroeats.net/aroeats/1xbet-malaysia-app-download-your-ultimate-betting[/url] – The 1xbet mobile offers a intuitive interface for placing bets. With the 1xbet mobile, users can easily navigate various sports and games, ensuring a seamless experience. Additionally, it provides real-time updates on odds, making it a essential tool for any serious bettor.
To enjoy exciting betting experiences, the 1xBet Download, [url=http://paok.kr/1xbet150211/1xbet-official-your-ultimate-betting-experience-21/]http://paok.kr/1xbet150211/1xbet-official-your-ultimate-betting-experience-21/[/url] offers an easy way to access the platform. This ensures smooth navigation, allowing users to place bets effortlessly. Install the app today and start your betting journey!
zahraniДЌnГ casino, [url=https://www.moveme.com.ng/blog/ve-co-potebujete-vdt-o-e-casino-online-herni/]https://www.moveme.com.ng/blog/ve-co-potebujete-vdt-o-e-casino-online-herni/[/url] nabГzГ rozmanitou ЕЎkГЎlu her, od vГЅhernГch automatЕЇ. NГЎvЕЎtД›vnГci mohou vyuЕѕГt rЕЇznГ© promotion. ZabezpeДЌenГ je zajiЕЎtД›na, coЕѕ usnadЕ€uje zГЎbavnГЅ hernГ zГЎЕѕitek.
а я вазьму наверно. пригодиться
In the world of gambling, non UKGC online casino, [url=https://autowymiar.pl/exploring-non-uk-based-online-casinos-a-4/]https://autowymiar.pl/exploring-non-uk-based-online-casinos-a-4/[/url] platforms provide different options for players. These sites offer exclusive games and bonuses that often attract users seeking alternatives. Enjoying your favorite games can be even more thrilling with new features available on these sites. Non UKGC online casino environments often present a energetic atmosphere, enhancing the overall adventure for online players.
делать то нефиг
Выбор проверенного казино очень важен. безопасное казино, [url=https://www.ablinfra.com/2026/02/15/kazino-vavada-unikalnye-vozmozhnosti-dlja-igrokov/]https://www.ablinfra.com/2026/02/15/kazino-vavada-unikalnye-vozmozhnosti-dlja-igrokov/[/url] обеспечивает защиту личных данных и честность игр. Изучайте лицензиями, отзывами и привилегиями использования. Играйте только в проверенных местах!
1xbet online casino, [url=https://laxusspa.com/1xbet-download-for-ios-a-complete-guide-394598283/]https://laxusspa.com/1xbet-download-for-ios-a-complete-guide-394598283/[/url] offers an entertaining experience for punters. With a vast range of games, including slot machines, it’s easy to find your most-liked pastime. Join today and enjoy the fun!
Betwinner Casino, [url=https://cmmproperties.co.za/betwinner-a-plataforma-de-apostas-que-voce-precisa-2/]https://cmmproperties.co.za/betwinner-a-plataforma-de-apostas-que-voce-precisa-2/[/url] предлагает разнообразный асортимент для стратегов. Здесь возможно испытать удовольствие через увлекательных развлечений. Каждый участник найдет что-то для себя.
zahraniДЌnГ online casino, [url=https://carbuy.com.ua/bonus-za-registraci-ve-co-potebujete-vdt-2/]https://carbuy.com.ua/bonus-za-registraci-ve-co-potebujete-vdt-2/[/url] umoЕѕЕ€uje hrГЎДЌЕЇm rozmanitou ЕЎkГЎlu her. V tД›chto platformГЎch si vychutnat stolnГ hry. KromД› vynikajГcГch bonusЕЇ, kterГ© tyto strГЎnky poskytujГ, je takГ© nezbytnГ© zjistit jejich odpovД›dnost.
круто!но буду ждать качество.
If you’re seeking excitement, cv777 casino, [url=https://infogram.com/240195-1h1749wqmmwpq2z]https://infogram.com/240195-1h1749wqmmwpq2z[/url] offers a thrilling gaming experience. The venue is famous for its diverse selection of games. Players can experience unique bonuses and deals that enhance their odds.
Я против.
Magic Win casino, [url=https://test.wulogix.com/morpheusrising/is-magic-win-casino-legit-an-in-depth-review-10/]https://test.wulogix.com/morpheusrising/is-magic-win-casino-legit-an-in-depth-review-10/[/url] offers a variety of exciting games that ensure endless entertainment. Starting with classic slots to live dealer options, players can experience the thrill of winning. With generous promotions and secure transactions, Magic Win casino stands out as a top choice for gaming enthusiasts.
Я бы не хотел развивать эту тему.
В мире азартных игр честное казино, [url=https://waterfilterninja.com/index.php/2026/02/15/vavada-kazino-unikalnye-osobennosti-i-vozmozhnosti/]https://waterfilterninja.com/index.php/2026/02/15/vavada-kazino-unikalnye-osobennosti-i-vozmozhnosti/[/url] предлагает игрокам уникальные возможности. Почти каждый желающий может испытать удачу, получая восторг от игры. Стоит выбирать заведение с сертификатами, чтобы избежать проблем. Заслуживающие доверия казино всегда предоставляют свою честность через рекомендации игроков. В таких местах шансы на выигрыш высоки, а игра проходит забавно.
To access the exciting features of betting, you need to perform a quick 1xbet download, [url=https://www.encantesdonordeste.com.br/1xbet7/1xbet-espanol-la-mejor-plataforma-para-apostar-en-2/]https://www.encantesdonordeste.com.br/1xbet7/1xbet-espanol-la-mejor-plataforma-para-apostar-en-2/[/url]. This procedure allows you to enjoy a variety of games at your fingertips. Don’t miss out on the fun that 1xbet offers!
1xBet sports Betting, [url=https://www.lavisitazione.it/2026/02/14/discover-the-exciting-world-of-1xbet-casino-in-6/]https://www.lavisitazione.it/2026/02/14/discover-the-exciting-world-of-1xbet-casino-in-6/[/url] – Betting on sports with 1xBet предлагает игрокам неповторимые возможности для заработка. Сервис обеспечивает разнообразный выбор событий Рё доступные коэффициенты. Создание аккаунта легка Рё быстра, что превращает процесс удобным. Правила понятные, Р° команда поддержки всегда готова помочь.
Betwinner Online, [url=https://stage.lacarte.de/explore-betwinner-your-ultimate-online-betting-5/]https://stage.lacarte.de/explore-betwinner-your-ultimate-online-betting-5/[/url] offers an exciting platform for online betting enthusiasts. With various options, users can try their luck on favorite sports. The layout is intuitive, ensuring a fluid experience. Join Betwinner Online today and enjoy the adventure of betting!
Вы правы, в этом что-то есть. Благодарю за информацию, может, я тоже могу Вам чем-то помочь?
offshore casino online, [url=https://kechbureau.ma/?p=42953]https://kechbureau.ma/?p=42953[/url] gives an captivating gaming experience to players around the world. With the benefit of different games, users can explore special features and extensive bonuses.
1xBet Betting, [url=http://www.cressi.cn/?p=81798]http://www.cressi.cn/?p=81798[/url] – Wagering with 1xBet предоставляет возможности для каждых ставок. Платформа выделяется удобством Рё множеством. РџРѕРјРёРјРѕ этого, заманчивые Р±РѕРЅСѓСЃС‹ восхищают новых участников.
Вместо того чтобы критиковать пишите свои варианты.
Finding the best non GamStop casino, [url=https://www.leerebelwriters.com/exploring-non-gamstop-casino-sites-a-comprehensive-2/]https://www.leerebelwriters.com/exploring-non-gamstop-casino-sites-a-comprehensive-2/[/url] can be a challenge, but there are many options available. Players can enjoy thrilling games|exciting games|stimulating games|entertaining games while benefiting from generous bonuses|attractive promotions|rewarding offers|lucrative incentives. Always ensure fair play|honest gaming|integrity and secure transactions|safe deposits|protected payments for a great experience!
1xBet Esports Betting, [url=https://www.magetitans.es/the-rise-of-1xbet-casino-in-nigeria/]https://www.magetitans.es/the-rise-of-1xbet-casino-in-nigeria/[/url] provides an exciting platform for stakeholders keen on competitive gaming. With a selection of options, users can choose their favorite titles and put bets effortlessly.
Betwinner Registration, [url=http://store.manuelvazquezonline.com/index.php/2026/01/25/todo-lo-que-necesitas-saber-sobre-betwinner/]http://store.manuelvazquezonline.com/index.php/2026/01/25/todo-lo-que-necesitas-saber-sobre-betwinner/[/url] is a straightforward process that allows users to quickly sign up. To begin, simply visit the official site and complete the registration form. Enjoy seamless access to various betting options!
Очень хорошая идея
Bankonbet casino, [url=https://bankonbet.eu.com/de/]Bankonbet sport[/url] presents an enthralling range of options for gamblers. Enjoy the benefit of playing online. With constant support, players can play anytime!
1xBet Betting Online, [url=https://fitgress.com/exploring-the-exciting-world-of-1xbet-toto-6/]https://fitgress.com/exploring-the-exciting-world-of-1xbet-toto-6/[/url] delivers a broad range of sports to wager. By cutting-edge technology, customers can enjoy a flawless gaming experience at their leisure.
Фигня
In the world of gambling, finding reliable platforms is crucial. Many players seek online sites not on GamStop, [url=https://dj-advisor.com/exploring-online-casinos-not-associated-with/]https://dj-advisor.com/exploring-online-casinos-not-associated-with/[/url] for their unique offerings. These sites provide a variety of games and attractive bonuses. With captivating gameplay, they ensure an enjoyable experience for all. Don’t miss out on the chance to explore such platforms. They often provide exclusive promotions and incentive programs to keep players interested.
Welcome to the amazing world of 1xBet Online Casino, [url=https://demo.logicsdesign.com/wauchope/1xbet-korea-download-your-gateway-to-easy-betting/]https://demo.logicsdesign.com/wauchope/1xbet-korea-download-your-gateway-to-easy-betting/[/url]! Here, you can experience a variety of games, from slots to table games. With enticing bonuses, 1xBet Online Casino ensures top-notch entertainment for all players. Join now and dive into your gaming adventure!
Betwinner Betting, [url=https://alawaellab.com/?p=11463]https://alawaellab.com/?p=11463[/url] offers several options for bettors looking to make informed wagers. With its intuitive interface, customers can enjoy live betting and a diverse range of sports events. Betwinner Betting also features promotions and bonuses, enhancing the overall experience.
Согласен эта тема уже так приелась!!!
музей будущего дубай, [url=https://t.me/museumofthefuture_rus]музей будущего дубай фото[/url] — это уникальный продвинутый проект, который демонстрирует достижения технологий и изучает будущее. Здесь доступно увидеть интерактивные экспозиции, которые мотивируют думать о новых возможностях. Этот объект стал по-настоящему популярным среди туристов и жителей.
Теперь всё понятно, большое спасибо за помощь в этом вопросе. Как мне Вас отблагодарить?
In the search for safe gaming, many players explore different options. online sites not on GamStop, [url=https://deltasos.ir/new-casino-sites-not-covered-discover-emerging/]https://deltasos.ir/new-casino-sites-not-covered-discover-emerging/[/url] offer liberty for players seeking thrilling experiences without restrictions. These platforms provide multiple games and bonuses, ensuring fun for all.
1xbet online, [url=https://delinemedia.pk/1xbet-korea-download-app-your-ultimate-guide-to-23/]https://delinemedia.pk/1xbet-korea-download-app-your-ultimate-guide-to-23/[/url] организует разнообразный ассортимент игр и пари. В этом казино легко испытать то, что способно привлечь самых требовательных игроков. Открытие аккаунта занимает всего несколько моментов, а вознаграждения обещают приятные сюрпризы.
1xBet Download, [url=http://talentformation.accelprox.com/index.php/2026/02/13/discover-the-1xbet-malaysia-app-a-gateway-to/]http://talentformation.accelprox.com/index.php/2026/02/13/discover-the-1xbet-malaysia-app-a-gateway-to/[/url] is essential for avid bettors. This platform offers hassle-free access to sports and casino games. Via 1xBet Download, users can execute bets on the go. Experience the thrill of gaming anytime, anywhere.
Amid the domain of casino online, [url=https://vertex.aksconsultancy.in/wp/2026/02/07/apuesta-en-dota-2-con-betwinner-guia-completa/]https://vertex.aksconsultancy.in/wp/2026/02/07/apuesta-en-dota-2-con-betwinner-guia-completa/[/url], gamblers seek thrills and likely winnings. Employing advanced technology, digital platforms offer a variety of games.
Случайное совпадение
kasyno polska opinie, [url=https://www.outdoorspecialist219.com/nowe-kasyna-online-przewodnik-po-najnowszych/]https://www.outdoorspecialist219.com/nowe-kasyna-online-przewodnik-po-najnowszych/[/url] sД… bardzo zrГіЕјnicowane. Ostatnio gracze docenia ofertД™ polskich kasyn. Rozmaita gama gier przyciД…ga nowych entuzjastГіw hazardu. Ponadto, znaczД…ca jakoЕ›Д‡ obsЕ‚ugi uЕ‚atwia doЕ›wiadczenia graczy.
Пусть будут!
golf odds not on GamStop, [url=http://www.museodelbrunello.it/exploring-golf-odds-not-on-gamstop-a-comprehensive-6/]http://www.museodelbrunello.it/exploring-golf-odds-not-on-gamstop-a-comprehensive-6/[/url] provide a unique opportunity for bettors looking to engage with exciting golfing events. Web-based betting platforms offer competitive odds, attracting golf enthusiasts. These options are crucial for finding the best value.
1xbet app, [url=https://www.kapelusze.net.pl/1xbet-malaysia-download-a-comprehensive-guide-to-6/]https://www.kapelusze.net.pl/1xbet-malaysia-download-a-comprehensive-guide-to-6/[/url] – The wagering software offers a user-friendly interface that allows players to easily place bets. With the betting application, you can access various sports and casino games at any time.
1xBet Betting Online, [url=https://daiganin.org/1xbet-malaysia-your-ultimate-guide-to-online/]https://daiganin.org/1xbet-malaysia-your-ultimate-guide-to-online/[/url] предлагает разнообразный выбор пейсов. Здесь предлагаются разнообразные спортивные события.
sports betting, [url=https://www.missionpost.co.uk/2026/02/07/betwinner-your-ultimate-betting-experience-102/]https://www.missionpost.co.uk/2026/02/07/betwinner-your-ultimate-betting-experience-102/[/url] – Amid the realm of gambling on sports, enthusiasts frequently seek strategies to enhance their successful chances. Getting a hold of team stats is vital for making wise decisions.
Какая симпатичная мысль
Парфюмерия, [url=https://l-parfum.ru/brands/Parfum-Bryansk/]https://l-parfum.ru/brands/Parfum-Bryansk/[/url] — это искусство создания ароматов, что-то пробуждают эмоции и воспоминания. Каждый аромат в силах изменить ощущения человека. Подбор — это поездка, где каждый отдельный найдет свой уникальный след.
аааабааалдееееть
Cosmic Spins casino, [url=http://www.homeimprovementsj.com/cosmicpuffin/cosmicspins-your-gateway-to-the-universe-of/]http://www.homeimprovementsj.com/cosmicpuffin/cosmicspins-your-gateway-to-the-universe-of/[/url] offers an exhilarating experience for gamers. Featuring a vast variety of games, players can discover unique themes and exciting gameplay. Participate in cosmic adventures today!
1xbet online casino, [url=https://www.ullernavisen.no/2026/01/27/1xbet-malaysia-online-casino-a-comprehensive-guide-13/]https://www.ullernavisen.no/2026/01/27/1xbet-malaysia-online-casino-a-comprehensive-guide-13/[/url] presents an exciting range of games for users. From slots to table games, there’s something for everyone. Join 1xbet online casino and discover the thrill of gaming today!
Замечательно, это ценный ответ
If you’re looking for a bingo hub that is not limited by self-exclusion, you have many options. Players can enjoy exciting games with numerous styles. These sites often feature plentiful bonuses and promotions, enhancing the overall experience for everyone. Additionally, you can find a wide selection of games to match your preferences. Explore the world of bingo site not on GamStop, [url=http://www.moveme.com.ng/blog/discover-non-gamstop-bingo-sites-for-endless-fun-2/]http://www.moveme.com.ng/blog/discover-non-gamstop-bingo-sites-for-endless-fun-2/[/url] today!
Through 1xBet sports Betting, [url=https://www.futuraempresas.com.br/the-ultimate-guide-to-the-1xbet-app-features/]https://www.futuraempresas.com.br/the-ultimate-guide-to-the-1xbet-app-features/[/url], enthusiasts can experience a wide range of events. Such platform offers exciting options and lucrative odds for all looking to improve their gambling experience.
Online casinos deliver an exciting way to enjoy gambling from the comfort of your home. Players can pick from a range of games, including slots and table games. With bonuses and promotions, the thrill of casino online, [url=https://cumbespirits.com/betwinner-todo-lo-que-necesitas-saber-para-apostar/]https://cumbespirits.com/betwinner-todo-lo-que-necesitas-saber-para-apostar/[/url] becomes even more enticing, making it a popular choice for many enthusiasts.
Где я могу это найти?
Fishin’ Frenzy casinos, [url=https://www.emkan.me/exploring-the-excitement-of-fishin-frenzy-a-dive/]https://www.emkan.me/exploring-the-excitement-of-fishin-frenzy-a-dive/[/url] – Fishin’ Frenzy casinos offer a unique gaming experience. Players can enjoy exciting slot machines that feature underwater adventures. Obtaining bonuses adds to the thrill. Dive in for jackpots!
1xbet download, [url=https://nescapital.eu/index.php/2026/01/28/1xbet-login-a-comprehensive-guide-to-access-your/]https://nescapital.eu/index.php/2026/01/28/1xbet-login-a-comprehensive-guide-to-access-your/[/url] is a crucial step for those who want to enjoy seamless betting experiences. This provides simple access to a world of digital gaming. With the 1xbet app, you can make bets anytime you want, ensuring efficient wagering. Its user-friendly design enhances the overall experience, making betting easier. Don’t miss out on the chance to boost your betting journey with 1xbet download and stay updated on current promotions.
Uncover the world of 1xBet Esports Betting, [url=http://thebackstage.ru/exploring-the-exciting-features-of-the-1xbet/]http://thebackstage.ru/exploring-the-exciting-features-of-the-1xbet/[/url], where thrilling competitions occur daily. With numerous games available, players can place bets on top teams and players.
так и хочеться дунуть….
Discovering the best non UK online casino, [url=https://www.fashionberries.de/exploring-non-uk-licensed-casinos-the-growing/]https://www.fashionberries.de/exploring-non-uk-licensed-casinos-the-growing/[/url] can be thrilling. Players seek platforms with engaging games, attractive bonuses, and excellent service. Look for sites that offer secure payment methods and a simple interface for a smooth gaming experience.
По моему мнению Вы не правы. Я уверен. Предлагаю это обсудить. Пишите мне в PM.
досуг современных мужчин, [url=https://evimsicak.com/articles/oshibka-kak-izbezhat-rasprostrannyh-oshibok-v-zhizni-i-rabote/]https://evimsicak.com/articles/oshibka-kak-izbezhat-rasprostrannyh-oshibok-v-zhizni-i-rabote/[/url] — это время для отдыха и увлечений. Тренажерный зал помогает поддерживать выносливость. Также популярны видеоигры и экскурсии, которые наполняют жизнь приключениями.
sports betting, [url=https://www.vitongpl.com/explore-a-aventura-do-fortune-tiger-na-betwinner/]https://www.vitongpl.com/explore-a-aventura-do-fortune-tiger-na-betwinner/[/url] – Sports wagering has become increasingly popular among enthusiasts. With numerous platforms available, punters can quickly place their bets. Understanding odds is crucial for successful betting. Always analyze your choices to maximize your chances.
Короче смотрите не пожелеете! качество какашка, но смотреть можно!
golf bookies not on GamStop, [url=https://dierenmarkt.eu/discover-golf-bookies-beyond-gamstop-restrictions/]https://dierenmarkt.eu/discover-golf-bookies-beyond-gamstop-restrictions/[/url] offer a unique opportunity for punters seeking alternatives. These platforms present a range of betting options. Players can enjoy exciting experiences without restrictions, making their betting journey more dynamic.
On the world of online gambling, 1xBet Betting, [url=https://www.erinnerungen-an-christian-graf.at/2026/01/28/discover-the-features-and-benefits-of-the-1xbet-9/]https://www.erinnerungen-an-christian-graf.at/2026/01/28/discover-the-features-and-benefits-of-the-1xbet-9/[/url] shines due to its diverse options. Betters can choose from a multitude of sports and events, making it an exciting platform for leisure. With attractive odds and accessible interface, 1xBet Betting promises a seamless betting experience. Sign up 1xBet today and experience the excitement of placing bets.
Welcome to the fabulous world of 1xBet Online Casino, [url=https://spectracarefoundation.net/blog/2026/02/12/explore-1xbet-malaysia-online-casino-your-gateway-7/]https://spectracarefoundation.net/blog/2026/02/12/explore-1xbet-malaysia-online-casino-your-gateway-7/[/url], where visitors can enjoy an extensive selection of games. Enjoy high-quality gaming fun at your own schedule, and score big rewards today!
Сожалею, что не могу сейчас поучаствовать в обсуждении. Очень мало информации. Но с удовольствием буду следить за этой темой.
In the world of online gambling, players often seek various options. A non GamStop casino, [url=https://www.deika.it/discover-casino-not-on-gamstop-uk-options-for/]https://www.deika.it/discover-casino-not-on-gamstop-uk-options-for/[/url] offers diversity for those wanting to enjoy their favorite games without barriers. This means greater opportunities to gain and experience thrilling gameplay. Make sure to select a reputable platform for a safe gambling experience. Enjoy playing!
In the world of internet entertainment, casino online, [url=https://staging0.informify.net/2026/02/07/betwinner-l-ultime-plateforme-de-paris-sportifs-en/]https://staging0.informify.net/2026/02/07/betwinner-l-ultime-plateforme-de-paris-sportifs-en/[/url] platforms offer a distinct experience for enthusiasts. With numerous games available, users can experience everything from slots to table games at their pleasure. The rush of casino online remains unmatched, enabling participants to win actual money from the comfort of their homes.
Извините, что я вмешиваюсь, но я предлагаю пойти другим путём.
Finding the best non GamStop websites, [url=https://www.nmdaltyapi.com.tr/top-non-gamstop-casinos-a-guide-to-safe-and/]https://www.nmdaltyapi.com.tr/top-non-gamstop-casinos-a-guide-to-safe-and/[/url] can be challenging, but they offer distinct opportunities for players. These platforms ensure a broad range of games, including slots, poker, and blackjack. Players can delight in lucrative bonuses and solid customer support. Moreover, the simple interfaces make navigation a breeze. By choosing the best non GamStop websites, you receive the ultimate gaming experience without restrictions. Always check the credentials to ensure safety and fairness.
1xBet Betting Online, [url=https://tinytotscleaning.com.au/Exton/1xbet10/exploring-1xbet-betting-a-comprehensive-guide-28/]https://tinytotscleaning.com.au/Exton/1xbet10/exploring-1xbet-betting-a-comprehensive-guide-28/[/url] – 1xBet Betting Online предлагает разнообразный выбор вариантов. Пользователи РјРѕРіСѓС‚ активировать удобный интерфейс для оптимального опыта РІ играх.
Я считаю, что Вы ошибаетесь. Давайте обсудим. Пишите мне в PM, пообщаемся.
casinos outside GamStop, [url=http://new.iskcondesiretree.com/best-non-gamstop-websites-for-casino-enthusiasts/]http://new.iskcondesiretree.com/best-non-gamstop-websites-for-casino-enthusiasts/[/url] offer players a chance to experience thrilling gaming options without restrictions. These venues provide diverse games, ensuring fun for everyone. With the abundance of choices, players can find benefits like lucrative rewards. Choosing casinos outside GamStop allows individuals to delight in gaming without limitations, making a unique adventure in the world of online gambling.
1xBet Download, [url=https://pbbministries.gbosolutions.com/experience-the-thrill-of-sports-betting-with-1xbet-21/]https://pbbministries.gbosolutions.com/experience-the-thrill-of-sports-betting-with-1xbet-21/[/url] is an essential step for those who want to enjoy betting on the go. To access the app, simply visit the official site. After downloading, you can quickly create an account and start placing bets.
НЕ ВЕРЬТЕ.НИЧЕГО БОМБОВОГО ТАМ НЕТ.ТАК СЕБЕ НА 3.
Playing at gaming houses outside GamStop offers a unique opportunity for gamblers to enjoy their favorite games without limitations. Such casinos often provide exciting experiences along with diverse game options. It’s crucial to investigate each platform to ensure a safe and enjoyable gaming experience. Be aware of prudent gambling practices while enjoying your time at casino outside GamStop, [url=https://dipbike.ville-creteil.fr/efbl_skins/skin-thumbnail/]https://dipbike.ville-creteil.fr/efbl_skins/skin-thumbnail/[/url].
Betwinner Betting, [url=https://pstportugal.com/1xbet-platform-taruhan-terpercaya-untuk-pemain-2/]https://pstportugal.com/1xbet-platform-taruhan-terpercaya-untuk-pemain-2/[/url] offers an exciting option to engage in athletic wagering. Users can submit bets on various matches, ensuring a thrilling adventure. Join Betwinner Betting today for unmatched action!
1xbet online, [url=https://www.sanyodo.co.jp/1xbet-app-the-ultimate-betting-experience-at-your-17]https://www.sanyodo.co.jp/1xbet-app-the-ultimate-betting-experience-at-your-17[/url] is a popular platform for betting and gaming. With its user-friendly interface, it offers a wide range of events to bet on. Players can enjoy various promotions and bonuses that enhance their gaming experience. The site’s protection measures ensure a secure environment for transactions. Additionally, its customer support stays open around the clock, catering to the needs of users. 1xbet online truly stands out in the competitive world of online betting.
1xBet Betting Online, [url=https://apexprintpac.com/blogs/1xbet-japan-login-a-complete-guide-for-japanese-3/]https://apexprintpac.com/blogs/1xbet-japan-login-a-complete-guide-for-japanese-3/[/url] offers various betting options for enthusiasts. Users can enjoy in-play betting, making it simple to place bets on events as they unfold.
Your enticle helped me a lot, is there any more related content? Thanks!
The expense of obtaining a Vanuatu passport is influenced by several factors. Typically, the vanuatu passport cost, [url=https://mural.codently.eu/vanuatu-immigration-by-investment-your-path-to/]https://mural.codently.eu/vanuatu-immigration-by-investment-your-path-to/[/url] consists of application fees, processing times, and additional fees for expedited services.
1xbet app, [url=http://blog.pandabits.com/2026/01/28/1xbet-thailand-casino-your-ultimate-gaming-5/]http://blog.pandabits.com/2026/01/28/1xbet-thailand-casino-your-ultimate-gaming-5/[/url] – The 1xbet app offers an exciting experience for sports betting enthusiasts. With its smooth interface, bettors can effortlessly place wagers and access a wide range of markets. Explore the latest betting options available and enjoy the comfort of betting on the go with the 1xbet app. It’s designed to maximize your gaming experience while providing instant updates and messages. Whether you’re a newcomer or a seasoned pro, the 1xbet app is your go-to solution for all betting needs. Enjoy the rush of winning from anywhere at any time!
1xBet sports Betting, [url=https://total-restaurant.com/1xbet-japan-download-app-your-guide-to-mobile-9/]https://total-restaurant.com/1xbet-japan-download-app-your-guide-to-mobile-9/[/url] – 1xBet sports Betting предоставляет широкий выбор ставок для фанатов. Платформа гарантирует простоту использования Рё большие коэффициенты. Возможность получать порадование РѕС‚ РёРіСЂС‹, ставя РЅР° любимые команды.
When considering the price of obtaining a passport, vanuatu passport fees, [url=https://kusumconfectionery.com/all-you-need-to-know-about-the-vanuatu-citizenship/]https://kusumconfectionery.com/all-you-need-to-know-about-the-vanuatu-citizenship/[/url] play a crucial role in the process. Generally, applicants should anticipate certain charges. Such fees often change based on the type of passport and the service speed. Understanding these fees can aid in planning and budgeting effectively.
1xbet online casino, [url=https://venetopaints.com/ultimate-guide-to-1xbet-singapore-betting-15/]https://venetopaints.com/ultimate-guide-to-1xbet-singapore-betting-15/[/url] features an entertaining platform for players. With a variety of choices, including table games, it satisfies all types of participants. Join the action today!
1xBet Esports Betting, [url=http://jimmysrestaurants.com/experience-the-thrill-of-1xbet-korea-online-casino-23/]http://jimmysrestaurants.com/experience-the-thrill-of-1xbet-korea-online-casino-23/[/url] – 1xBet Esports Betting offers amazing opportunities for fans looking to participate in eSports. With multiple games available, enthusiasts can put their money on popular titles like Dota 2 and League of Legends, enhancing the thrill of watching matches.
Доброго времени суток ,.
нашла с сыном https://steelcentury.ru/zabory/shtaketnyj-zabor/
веб сайт нам нужно купить C цена порошковой окраски для нас
прошу c советом и как нам ..
нужно как контролировать или быть в теме.,.
Покраска порошком север цена подскажите в данной задчи буду сильнно рады ,..
буду рады =-) … выпало в Telegram [url=https://t.me/SteelCenturyRU]Мех обработка металла и порошковая покраска
Online Casino, [url=https://www.2srk.com/understanding-bk8-betting-odds-maximize-your/]https://www.2srk.com/understanding-bk8-betting-odds-maximize-your/[/url] является разнообразный выбор игр. Участники могут наслаждаться казино-играми, принимая участие в увлекательных турнирах. Далее можно заработать интересные бонусы и призы.
Are you looking to enhance your gaming experience? Getting the 1xbet download, [url=http://thebackstage.ru/1xbet-vietnam-download-app-your-gateway-to-26/]http://thebackstage.ru/1xbet-vietnam-download-app-your-gateway-to-26/[/url] app is a great way to access your favorite games on the go. With easy-to-navigate features, it ensures seamless gaming anytime, anywhere.
1xBet Online Casino, [url=https://www.quickcar.hu/1xbet-malaysia-your-ultimate-betting-experience/]https://www.quickcar.hu/1xbet-malaysia-your-ultimate-betting-experience/[/url] brings a vast assortment of entertainment for users. Experience engaging live dealer options and easy withdrawals. Enlist today and take advantage of special bonuses!
Во чувак гонит. Маладца!!!!!!
In the world of online gambling, various players seek options that permit them to enjoy games without restrictions. sites not using GamStop, [url=https://diazcompleteauto.com/discovering-gambling-sites-not-under-gamstop/]https://diazcompleteauto.com/discovering-gambling-sites-not-under-gamstop/[/url] offer freedom for users who wish to gamble without self-exclusion measures. These websites often cater to gamblers looking for extra thrilling experiences. However, one must always be aware about responsible gaming. Finding reliable sites not using GamStop can enhance your online gambling adventure. Always look into these possibilities thoroughly before playing.
I часть лучше была!!!
If you’re searching for top-rated gaming options, look no further than top non GamStop casinos, [url=https://www.hovawart24.de/discovering-non-gamstop-casinos-a-comprehensive/]https://www.hovawart24.de/discovering-non-gamstop-casinos-a-comprehensive/[/url]. These platforms offer an array of games without the restrictions of GamStop. Players can enjoy exciting experiences and generous bonuses, ensuring maximum fun. Choose a casino that meets your betting preferences and explore a world of opportunity. Discover the freedom that comes with playing at top non GamStop casinos today!
Online Casino, [url=https://www.magetitans.es/god55-casino-a-deep-dive-into-online-gaming/]https://www.magetitans.es/god55-casino-a-deep-dive-into-online-gaming/[/url] provides a range of thrilling games. Players can try out slots, poker, and more from the ease of their homes. Offers boost the experience, making it even more rewarding.
This platform, 1xBet Betting, [url=https://janawazpatrika.com/1xbet-vietnam-login-a-complete-guide-24020013/]https://janawazpatrika.com/1xbet-vietnam-login-a-complete-guide-24020013/[/url], presents numerous options of sports to place bets on. Employing great odds, players can enhance their winning potential. Register today to explore it!
To enjoy gaming, you need to start with 1xBet Download, [url=https://bakery.kyoto-ohshima.jp/2026/02/11/onexbet-spain-your-ultimate-guide-to-betting-and/]https://bakery.kyoto-ohshima.jp/2026/02/11/onexbet-spain-your-ultimate-guide-to-betting-and/[/url]. This app makes betting easy and convenient. You can access numerous features, including live scores and updates. The design is user-friendly, ensuring a smooth experience for all users.
Я думаю, что Вы не правы. Я уверен. Давайте обсудим. Пишите мне в PM, пообщаемся.
Finding the best non GamStop site, [url=https://bionews.bioeconomycorporation.my/2026/02/20/exploring-online-gambling-sites-without-gamstop/]https://bionews.bioeconomycorporation.my/2026/02/20/exploring-online-gambling-sites-without-gamstop/[/url] can be tricky, but it opens up exciting opportunities for gamers. These platforms feature a extensive range of options without restrictions. Participants can enjoy a greater possibility to win big while exploring distinct features that enhance the gaming experience.
Online Casino, [url=http://www.greava.jp/blog/discover-the-excitement-of-12play-singapore-2/]http://www.greava.jp/blog/discover-the-excitement-of-12play-singapore-2/[/url] provides a thrilling time for players. With a variety of games, from one-armed bandits to blackjack, everyone can relish the excitement. Join today!
Какая фраза… супер
зеленая карта в турцию, [url=https://beinsurance.me/tureckaja-strahovka]синяя карта действует ли в турции[/url] открывает множество возможностей для трудовых мигрантов. Эта карта позволяет легально работать и жить в стране. Заполнив все необходимые документы, можно ожидать на успешный переход в новую жизнь.
1xBet Betting Online, [url=https://ridco.ly/ultimate-guide-to-1xbet-betting-strategies-and-5/]https://ridco.ly/ultimate-guide-to-1xbet-betting-strategies-and-5/[/url] offers captivating opportunities for punters worldwide. With a easy-to-navigate interface, it’s straightforward to place bets on various sports and games. Join now for excellent promotions!
Gambling on events has drawn huge popularity in recent years. 1xBet Betting Online, [url=https://academy.geotech.dev/1xbet-registration-in-india-your-guide-to-getting-3/]https://academy.geotech.dev/1xbet-registration-in-india-your-guide-to-getting-3/[/url] offers superior options for gamblers. With accessible interfaces and diverse selections, individuals can easily place bets. The platform supplies current updates and favorable odds, making it the popular choice for serious bettors. Join now and discover the thrill of 1xBet Betting Online!
Однозначно, отличный ответ
In the past few years, the popularity of non UK licensed casino, [url=https://kalamata-oliveoil.oefprogram.gr/2026/02/19/best-non-uk-online-casinos-a-guide-for-players/]https://kalamata-oliveoil.oefprogram.gr/2026/02/19/best-non-uk-online-casinos-a-guide-for-players/[/url] platforms has surged. Players are attracted by better bonuses, making them a viable choice. However, customers should exercise caution while engaging with these sites, as regulation varies greatly.
Я думаю, что Вы допускаете ошибку. Предлагаю это обсудить. Пишите мне в PM, поговорим.
In Österreich sind die hochwertigsten Online-Casinos eine erstklassige Möglichkeit, Unterhaltung zu haben und Gewinne zu erzielen. Beste Online Casinos Österreich, [url=https://pro-hund.at/]seriose online casinos[/url] bieten fairen Spielumgebungen und vielfältige Spieloptionen. Profitieren Sie attraktive Boni und unterstützende Angebote, um Ihre Gewinnchancen zu maximieren.
Online Casino, [url=https://academybyga.com/2026/01/17/discover-the-exciting-world-of-bk8-singapore-your-2/]https://academybyga.com/2026/01/17/discover-the-exciting-world-of-bk8-singapore-your-2/[/url] обеспечивает множество шансов для покеристов. Прежде всего, пользователи привлекают щедрыми бонусами и простой интерфейсом.
Беттинг на футбол стали интереснее с практикой платформы 1xbet online, [url=https://wishbook.onehopeunited.org/1xbet-thailand-betting-18/]https://wishbook.onehopeunited.org/1xbet-thailand-betting-18/[/url]. Клиенты могут незамедлительно участвовать в необычных событиях, получая иллюзии и возможности для заработка.
Amid the world of gaming, 1xBet sports Betting, [url=https://demo.joomlatools.com/wordpress/explore-1xbet-india-a-comprehensive-guide-to-4/]https://demo.joomlatools.com/wordpress/explore-1xbet-india-a-comprehensive-guide-to-4/[/url] is prominent for its selection of sports and events. Users can make bets on multiple competitions, improving the excitement of viewing their favorite teams. By using 1xBet sports Betting, gamblers have access to real-time statistics, granting them an edge for informed decisions.
КАК ПО МНЕ, ОДИ РАЗ ПОСМОТРЕТЬ МОЖНО
In the world of online gaming, a non UK licensed casino, [url=https://cuneolab.pucv.cl/index.php/2026/02/19/exploring-non-uk-casinos-accepting-uk-players-2/]https://cuneolab.pucv.cl/index.php/2026/02/19/exploring-non-uk-casinos-accepting-uk-players-2/[/url] offers players unique experiences. In contrast with regulated sites, these casinos frequently provide more bonuses and more diverse game selections. Players should, however, remain wary about safety and fairness.
Online Casino, [url=https://digitalnationnews.com/god55-casino-your-ultimate-online-gaming-5/]https://digitalnationnews.com/god55-casino-your-ultimate-online-gaming-5/[/url] дарит возможность соревноваться в разнообразные развлечения. Данные заведения привлекательны щедрыми предложениями.
1xbet app, [url=https://gofinland.click/2026/01/30/1xbet-107/]https://gofinland.click/2026/01/30/1xbet-107/[/url] – The 1xbet software is designed for easy betting. With its streamlined interface, users can swiftly navigate through various sports and games. Enjoy unique promotions and features, making your gaming experience even better. The 1xbet mobile application ensures secure transactions and offers round-the-clock support, catering to all your betting needs.
1xBet Esports Betting, [url=https://devops.qazando.com.br/1xbet-download-app-your-ultimate-guide-to-mobile-9/]https://devops.qazando.com.br/1xbet-download-app-your-ultimate-guide-to-mobile-9/[/url] – 1xBet esports wagering стал распространенным СЃРїРѕСЃРѕР±РѕРј приобретения прибыли. Ставки РІ киберспорте предоставляют возможности для увлечений Рё адреналина.
Как раз в тему, прикольненько
In recent years, the growth of no KYC crypto casinos, [url=http://test.matieo.atthost24.pl/no-kyc-online-casino-freedom-and-privacy-in-gaming/]http://test.matieo.atthost24.pl/no-kyc-online-casino-freedom-and-privacy-in-gaming/[/url] has revolutionized the online gambling landscape. Players now enjoy discretion while wagering on their favorite games. Such casinos deliver a seamless gaming experience, guaranteeing fast transactions and hassle-free registration. With no need for complex verification processes, users can concentrate on the thrill of gambling without the burden of personal data exposure. As the industry continues to evolve, no KYC crypto casinos will likely continue at the forefront of the gaming scene.
Полностью разделяю Ваше мнение. В этом что-то есть и мне кажется это отличная идея. Я согласен с Вами.
In the world of online gambling, locating the top non UK betting sites, [url=https://dnd.mn/exploring-non-uk-betting-sites-a-global-betting/]https://dnd.mn/exploring-non-uk-betting-sites-a-global-betting/[/url] can greatly enhance your gaming experience. Players seek security and diverse betting options. These platforms often offer engaging promotions and attractive odds. By carefully exploring each site’s features, you can make an informed choice. Enjoy a new level of excitement with the best non UK options available!
Полностью разделяю Ваше мнение. Это отличная идея. Я Вас поддерживаю.
aviator game online, [url=https://www.trustpilot.com/review/crash-aviator.com]aviator predictor[/url] draws players with its straightforward mechanics. The thrill of excitement keeps users engaged. With every single flight, the potential for big wins expands.
Los salones de juego online de Europa suministran una experiencia Гєnica. Con sus descuentos competitivas, los Casinos Online Europeos, [url=http://old.tags78.es/casinos-online-europeos-tu-guia-completa-para-5/]http://old.tags78.es/casinos-online-europeos-tu-guia-completa-para-5/[/url] atraen a clientes de todo el mundo. Junte la emociГіn del juego con la comodidad de estar en casa.
1xbet online casino, [url=https://kongre2024.sykp.org.tr/download-the-1xbet-cambodia-app-your-complete/]https://kongre2024.sykp.org.tr/download-the-1xbet-cambodia-app-your-complete/[/url] offers a wide range of options for players. With thrilling graphics and easy-to-navigate interfaces, it’s a great place to try out your luck and talent in gaming.
Welcome to the amazing world of 1xBet Online Casino, [url=http://ghboxdorf.dsinet.de/?p=305614]http://ghboxdorf.dsinet.de/?p=305614[/url], where enjoyment awaits. With a wide assortment of games, players can explore popular titles. Join the fun today!
Я думаю, что Вы не правы. Могу это доказать. Пишите мне в PM, поговорим.
In recent years, the emergence of non UKGC casino, [url=https://cryptoverze.com/exploring-non-uk-based-online-casinos-a-guide-for/]https://cryptoverze.com/exploring-non-uk-based-online-casinos-a-guide-for/[/url] options has opened up alternative avenues for players. These venues often offer multiple games and better bonuses. Players search for unique experiences away from traditional regulations, enhancing the enjoyment of online gaming.
ой.. не магу больше)))
Profitez de le bonheur des jeux de hasard avec des casino free spins, [url=https://macoloc.fr/]casino tours gratuits[/url]. Ces tours gratuits vous offrent une opportunitГ© unique de gagner sans mettre en danger votre propre argent. N’attendez pas, enregistrez-vous et commencez votre aventure aujourd’hui!
In order to enjoy seamless betting, make sure to complete the 1xbet download, [url=https://cloud9group.co.uk/your-ultimate-guide-to-1xbet-website/]https://cloud9group.co.uk/your-ultimate-guide-to-1xbet-website/[/url]. You can effortlessly download the app on the device. With an user-friendly interface, it ensures an exceptional gaming experience for all users.
1xBet Download, [url=https://acceptance.eap.vs1.aanzeetest.nl/1xbet-bangladesh-download-app-your-guide-to-easy-3/]https://acceptance.eap.vs1.aanzeetest.nl/1xbet-bangladesh-download-app-your-guide-to-easy-3/[/url] allows users to access a wide range of betting options|provides users with an opportunity to engage in various wagering alternatives|enables players to explore numerous gaming choices|facilitates access to diverse gambling experiences right from their device. The process is simple and quick, ensuring|making it easy and fast for players to start|guaranteeing a hassle-free setup for enthusiasts|allowing for a smooth installation experience that anyone can follow. Enjoy seamless betting today with 1xBet Download!
Los sitios de apuestas estГЎn expandido en popularidad en Argentina. Los entusiastas del juego pueden disfrutar de una diversa selecciГіn de opciones de juego. Casinos Online Argentina, [url=https://landdesignmn.com/casinos-online-en-argentina-tendencias-y-4/]https://landdesignmn.com/casinos-online-en-argentina-tendencias-y-4/[/url] ofrece incentivos atractivos que realzan la experiencia de entretenimiento.
Возможен и другой вариант
Exploring alternative non UKGC casino sites, [url=http://uclab.khu.ac.kr/LeanUX/2026/02/17/top-rated-non-uk-casinos-a-comprehensive-guide/]http://uclab.khu.ac.kr/LeanUX/2026/02/17/top-rated-non-uk-casinos-a-comprehensive-guide/[/url] can introduce players to diverse gaming options. These websites often feature singular bonuses and titles not found elsewhere. Players can make the most of a variety of slots and live dealer options, enhancing their gaming journey. Always be aware of the legal aspects when diving into non UKGC casino sites, as they can present different risks and rewards.
Спасибо за помощь в этом вопросе. Я не знал этого.
aviator game online, [url=https://www.trustpilot.com/review/aviator-1.online]aviator games[/url] offers a exciting mix of luck and strategy, where quick reactions and wise bets boost wins. Users explore growing multipliers, handle risk, and appreciate brief sessions on mobile or computer, finding excitement in every short flight.
1xBet Betting, [url=https://nedaenglish.com/2026/01/31/1xbet-379/]https://nedaenglish.com/2026/01/31/1xbet-379/[/url] открывает множество шансов для фанатов ставок. При помощи этого сервиса, вы можете увеличить свои шансы на доход. Точные показатели и удобный интерфейс делают 1xBet Betting превосходным выбором для игорного процесса.
1xBet Betting Online, [url=https://uptodatepaper.com/2026/02/08/1xbet-desktop-app-the-ultimate-betting-experience/]https://uptodatepaper.com/2026/02/08/1xbet-desktop-app-the-ultimate-betting-experience/[/url] offers the possibility for sports enthusiasts to try their luck. This online bookmaker provides a wide range of games, ensuring a captivating adventure for users. With incentives available, gamblers can improve their betting journey. Join 1xBet Betting Online and experience the thrill!
Жаль, что сейчас не могу высказаться – нет свободного времени. Но вернусь – обязательно напишу что я думаю по этому вопросу.
В мире видеоигр существуют невероятные приключения, которые могут погрузить вас в удивительные миры. игры, [url=http://www.gerschedersv.de/index.php?option=com_kunena&func=view&catid=4&id=1727&Itemid=0#1727]http://www.gerschedersv.de/index.php?option=com_kunena&func=view&catid=4&id=1727&Itemid=0#1727[/url] – это не просто способ развлечения; они позволяют знакомиться новые аспекты жизни, развивать навыки и окунаться в увлекательные истории. Многие геймеры находят в играх возможность избавиться от повседневных забот, на время забыв о реальности.В зависимости от жанра, игры могут предложить различные уровни вызовов. Одни из них требуют определённых стратегий, тогда как другие позволяют обнажить креативность. Каждый игрок может выбрать именно ту игру, которая отвечает его интересам.Многообразие жанров и стилей игры позволяет находить что-то новое, будь то приключение. Важнейшим компонентом является возможность играть с другими людьми. Это создает группы и помогает подписать новых друзей по всему миру.Таким образом, игры становятся неотъемлемой частью культуры, помимо того, что они предоставляют эмоциональный импульс. Каждая новая игра – это новая глава в вашей личной игровой сказании.
Совершенно верно! Это хорошая мысль. Призываю к активному обсуждению.
non GamStop betting sites, [url=http://www.fitcom.com.tr/blackmanbooks/understanding-non-gamstop-bookies-a-comprehensive-18.html]http://www.fitcom.com.tr/blackmanbooks/understanding-non-gamstop-bookies-a-comprehensive-18.html[/url] offer a individual experience for players seeking independence in their gaming selections. These platforms enable users to experience a vast array of wagering activities without the restrictions imposed by GamStop. Players can explore various sports while maintaining command over their gambling activities.
Абсурдная ситуация получилась
Les casinos sans validation (no kyc casino, [url=https://aratafineartgaLLery.com/]casino without verification[/url]) prГ©sentent une opportunitГ© de parier sans tracas. Ces types de configurations se rГ©vГЁlent trГЁs Г©vidents pour ceux qui souhaitent tester le monde du ludisme.
casinos retirada inmediata, [url=https://hizb-indonesia.info/2026/02/02/explorando-el-mundo-del-gaming-anonimo-en-la-web/]https://hizb-indonesia.info/2026/02/02/explorando-el-mundo-del-gaming-anonimo-en-la-web/[/url] – En la actualidad, los casinos digitales ofrecen una alternativa de retirada inmediata. Esto ofrece que los jugadores tengan acceso sus recompensas sin retardos. AsГ, los entusiastas pueden disfrutar de su efectivo al instante. Gracias a la avances tecnolГіgicos, cada vez son mГЎs los casinos en lГnea que ofrecen esa servicio.
1xBet Betting Online, [url=https://greatlinkenterprises.com/1xbet-india-pc-app-experience-betting-like-never-3/]https://greatlinkenterprises.com/1xbet-india-pc-app-experience-betting-like-never-3/[/url] offers an exciting platform for betting fans to try their luck. Users can discover various options, ensuring endless fun.
Я считаю, что Вы не правы. Пишите мне в PM, пообщаемся.
игры, [url=https://wiki.dailysocial.id/index.php?title=%D0%9A%D1%80%D0%B5%D0%BF%D0%BB%D0%B5%D0%BD%D0%B8%D0%B5%20%D0%BF%D0%BE%D0%B4%20%D0%BC%D0%B8%D0%BA%D1%80%D0%BE%D1%84%D0%BE%D0%BD%D0%BD%D0%BE%D0%B9%20%D1%81%D0%B8%D1%81%D1%82%D0%B5%D0%BC%D1%8B]https://wiki.dailysocial.id/index.php?title=%D0%9A%D1%80%D0%B5%D0%BF%D0%BB%D0%B5%D0%BD%D0%B8%D0%B5%20%D0%BF%D0%BE%D0%B4%20%D0%BC%D0%B8%D0%BA%D1%80%D0%BE%D1%84%D0%BE%D0%BD%D0%BD%D0%BE%D0%B9%20%D1%81%D0%B8%D1%81%D1%82%D0%B5%D0%BC%D1%8B[/url] стали неотъемлемой частью нашей жизни, заполняя досуги и предлагая разнообразные эмоции. Со временем год новые игры удивляют удивительной графикой и интересными механиками. В мире видеоигр можно обнаружить все жанры: от экшн до ролевых игр. Игры становятся средствами для общения, сотрудничества и соревнования. Например, многопользовательские игры собирают людей со всего мира, позволяя воспитывать стратегическое мышление, навыки командной работы и отзывчивость. Однако не все игры одинаково влекут игроков. Многие предпочитают сложные сюжеты, где каждое решение имеет последствия. Игры способны стать отличным способом освободить стресс и погрузиться новые миры. Участвуя в играх, мы не только развлекаемся, но и приобретаем ценные навыки. Поэтому не упустите возможность узнавать новые горизонты в мире игростроения!
Это сомнительно.
With the emergence of online gambling, many players seek reliable platforms. A PayPal casino non GamStop, [url=http://www.southerngospelconcert.com/exploring-non-gamstop-uk-casinos-a-guide-for/]http://www.southerngospelconcert.com/exploring-non-gamstop-uk-casinos-a-guide-for/[/url] offers secure transactions and access to various games. Enjoy exciting spins without restrictions, making your experience more enjoyable.
1xBet sports Betting, [url=https://verisystec.com/1xbet-app-for-ios-everything-you-need-to-know-3/]https://verisystec.com/1xbet-app-for-ios-everything-you-need-to-know-3/[/url] – 1xBet sports Betting presents a range of engaging options for gamblers. With in-play betting and enticing odds, the site ensures a lively experience for all.
ВОТ! ТОЧНО!
Le monde des jeux en rГ©seau est en pleine Г©volution. Le casino en ligne, [url=https://chez-les-filles.fr/]meilleur casino en ligne[/url] offre une aventura unique aux participantes. De diverses options sont Г service. Ces portails procurent une sГ©curitГ© Г©levГ©e des opГ©rations.
best muscle growth steroids
References:
https://kearney-hemmingsen-2.hubstack.net/les-medicaments-utilises-dans-le-retard-de-croissance
кулллл…
Les joueurs cherchent souvent des options de paris en ligne. Un point essentiel est le paiement des gains. Avec le casino en ligne retrait immГ©diat, [url=https://happybox.fr/]casino en ligne retrait immediat[/url], les utilisateurs peuvent apprГ©cier une pГ©ripГ©tie sans attente. De plus, des solutions variГ©es sont disponibles, garantissant la joie des participants. Ce procГ©dГ© est de plus en plus prisГ©.
Las plataformas de apuestas sin licencia representan una amenaza para los jugadores. Al jugar en ellas, se expone a desperdiciar dinero sin garantГas. Las casas apuestas sin licencia, [url=https://magical.gearbrand.com/rtp-y-casas-de-apuestas-competitivas-lo-que-debes/]https://magical.gearbrand.com/rtp-y-casas-de-apuestas-competitivas-lo-que-debes/[/url] no ofrecen seguridad, lo que puede resultar en trampas. Es fundamental elegir opciones autorizadas para disfrutar de la entretenimiento de manera segura.
corticosteroids meds
References:
https://md.un-hack-bar.de/s/H-63uVFO2F
4 winds casino
References:
https://www.alorpos.com/panen-padi-bumdes-kalwasing-kadistanbun-alor-harap-petani-contohi-babinsa/
не помне
Виртуальные миры игр всегда притягивали внимание огромного числа игроков. Каждый, кто хоть раз погружался в игровые вселенные, знает, как важно выбрать правильный жанр для приятного времяпрепровождения. игры, [url=http://produsers.in.ua/wr_board/tools.php?event=profile&pname=ofywysatuhu]http://produsers.in.ua/wr_board/tools.php?event=profile&pname=ofywysatuhu[/url] могут быть как индивидуальными, так и MMO, что добавляет разнообразия и возможности для социального взаимодействия.Разработчики игр делают все целесообразное, чтобы захватить фокус игроков, реализуя новые механики и сюжеты. Важно учитывать, что хорошая игра должна быть не только интересной, но и удобной для широкого круга людей. Это значит, что гладкость должна сочетаться с ясным интерфейсом и удобным управлением.Современные технологии создают новые горизонты для игрового процесса, а различные платформы позволяют игрокам решать подходящие условия для игры. Не забывайте, что игровая область постоянно эволюционирует, предлагая новые приключения и удивительные повороты сюжета. Поэтому важно следить за актуальными новинками, чтобы всегда быть в знаньях и не упустить возможность восхититься новыми перипетиями.
1xbet online, [url=http://test.matieo.atthost24.pl/download-1xbet-app-in-india-complete-guide/]http://test.matieo.atthost24.pl/download-1xbet-app-in-india-complete-guide/[/url] offers a wide range of betting options for betting lovers. Users can gamble on their favorite teams and games, enjoying live updates and promotions. Join now!
Надеюсь, всё нормально
Los salones de juegos fuera de EspaГ±a ofrecen emocionantes experiencias para los entusiastas. En lujosos casinos fuera de EspaГ±a, [url=https://old.tags78.es/explorando-los-casinos-sin-verificacion-una-guia/]https://old.tags78.es/explorando-los-casinos-sin-verificacion-una-guia/[/url], la emociГіn nunca falta. La atmГіsfera es espectacular, y cada partida puede alterar tu suerte.
1xBet Esports Betting, [url=https://www.newsinindia.in/1xbet-india-pc-app-a-comprehensive-guide-to-5/]https://www.newsinindia.in/1xbet-india-pc-app-a-comprehensive-guide-to-5/[/url] delivers an engaging opportunity for players to participate in competitive gaming. With a wide range of games available, the site ensures superior betting experiences. Whether one is a fan of Dota 2 or CS:GO, the fun keeps players engaged.
ха… достаточно весело
DГ©couvrez le nouveau casino en ligne, [url=https://leaalexandreartisans.fr/]nouveaux casinos en ligne[/url] oГ№ vous pouvez s’amuser de nombreux jeux intГ©ressants et de fabuleux bonus avantageux. Inscrivez-vous dГЁs maintenant pour vivre cette aventure unique !
Полезная фраза
Le jeu du penalty casino offre une expérience intense aux amateurs de aventures. Les gamers peuvent risquer leur chance en inscrivant des pénaltys, tout en bénéficiant des graphismes impressionnants. C’est un mixte de activité et de imprévu, offrant aux amateurs des récompenses attrayants. Le jeu du penalty casino, [url=https://crazybooth.fr/]penalty shoot out street[/url] est à expérimenter pour une dose de adrénaline.
GoldSpin casino EspaГ±a, [url=http://tilbudslister.dk/descubre-goldspin-casino-espana-diversion-y-18/]http://tilbudslister.dk/descubre-goldspin-casino-espana-diversion-y-18/[/url] ofrece una experiencia Гєnica en mundo de los juegos de azar. Con la variada selecciГіn de juegos, sus jugadores pueden disfrutar de una opciones atractivas. AdemГЎs, las promociones se presentan irresistibles, prometiendo diversiГіn y emociones. Aprovecha la oportunidad de explorar GoldSpin casino EspaГ±a y vivir una increГble aventura de entretenimiento.
lady luck casino las vegas
References:
https://viajantesincera.com/viajar-com-pet-europa-brasil/
eldorado casino reno
References:
https://miguelortego.com/el-tjue-precisa-el-criterio-del-centro-de-intereses-en-relacion-con-el-art-72-del-reglamento-bruselas-i-bis/
zahraniДЌnГ online casina, [url=https://melbourneflowermarket.com/nova-kasina-co-nabizeji-a-jak-je-vybrat/]https://melbourneflowermarket.com/nova-kasina-co-nabizeji-a-jak-je-vybrat/[/url] pЕ™edstavujГ hrГЎДЌЕЇm mnoho vzruЕЎujГcГch aktivГt. ProtoЕѕe modernГm technologiГm mЕЇЕѕete bavit se kdekoli.
online casino not on GamStop, [url=http://www.davidrice.com/2026/03/discovering-the-hidden-websites-that-are-not-on/]http://www.davidrice.com/2026/03/discovering-the-hidden-websites-that-are-not-on/[/url] offers players an opportunity to enjoy gaming without restrictions. Whether you seek fresh experiences or timeless games, these platforms provide endless options. Players can easily choose their favorites and relish the thrill of chance.
crazy mass supplements reviews
References:
https://hedgedoc.info.uqam.ca/s/SoJpbnCWx
La ruleta online Bolivia ha ganado popularidad entre los aficionados. Esta opciГіn permite disfrutar de la adrenalina del juego desde la comodidad de casa. AdemГЎs, ofrece bonificaciones atractivas que atraen a nuevos jugadores. Los sistemas de pago son diversos, lo que agiliza el proceso de inversiГіn. ВЎVive la emociГіn de la ruleta online Bolivia, [url=http://vistopred.alandiniz.com.br/ruleta-online-en-bolivia-todo-lo-que-necesitas-44/]http://vistopred.alandiniz.com.br/ruleta-online-en-bolivia-todo-lo-que-necesitas-44/[/url]!
1xbet app, [url=https://landdesignmn.com/comprehensive-guide-to-1xbet-malaysia-betting-17/]https://landdesignmn.com/comprehensive-guide-to-1xbet-malaysia-betting-17/[/url] – The software offers a intuitive interface for betting. With the mobile platform, users can access real-time updates and beneficial features that enhance their gaming experience.
Весьма гуд!!! 5+
Виртуальные миры всегда привлекали внимание игроков. Каждый раз, заходя в новую игру, мы погружаемся в уникальную атмосферу, где оживают самые смелые мечты и фантазии. Игра — это не просто способ провести время, а целая вселенная, где каждый может попробовать себя в роли героя, исследователя или стратегического гения. Значение игр в нашей жизни трудно переоценить. Они развивают не только реакцию, но и мышление, стратегическое планирование. Кроме того, они помогают наладить социальные связи, позволяя общаться с друзьями и новыми знакомыми. Каждый уровень, каждая миссия требуют тщательного анализа и продуманных действий. Работа над стратегиями может занять много времени, но именно это делает игру поистине захватывающей. Кто знает, именно в процессе игры, [url=https://notebooks.ru/forum/user/197433/]https://notebooks.ru/forum/user/197433/[/url] вы сделаете открытие, которое изменит ваши подходы к задачам в реальной жизни. Создание персонажа, выбор скиллов — это оформление полностью уникален. В итоге, игры являются неотъемлемой частью нашей культуры и досуга. Они продолжают развиваться и совершенствоваться, предлагая игрокам все новые возможности. Ваши навыки будут расти, и, возможно, вы станете мастером в своём деле, управляя своим персонажем в бескрайних виртуальных мирах.
1xBet Online Casino, [url=http://new.papugi.pl/1xbet08021/1xbet-indonesia-your-comprehensive-guide-to-online-2/]http://new.papugi.pl/1xbet08021/1xbet-indonesia-your-comprehensive-guide-to-online-2/[/url] – 1xBet Online Casino обеспечивает азартным любителям исключительные предложения СЃ целью удовольствия Рё также удачи.
Рекомендую Вам зайти на сайт, где есть много статей на интересующую Вас тему.
Les casinos en ligne proposent des jeux palpitants pour remporter de l’argent rГ©el. Avec le casino en ligne argent rГ©el, [url=https://vallee-batsurguere.fr/]casinos en ligne argent reel[/url], les joueurs sont en mesure de vivre l’excitation des jeux sans dГ©placements.
это точно !!
In recent years, sports wagering has seen a surge in interest regarding non GamStop football, [url=https://melodyfestival.it/discovering-non-gamstop-football-betting-sites-for/]https://melodyfestival.it/discovering-non-gamstop-football-betting-sites-for/[/url]. Many players appreciate the choices it offers, allowing them to engage without boundaries. As enthusiasts seek exciting options, non GamStop football stands out as an attractive pathway. Betting on these events can be exciting, providing particular advantages. It’s essential for bettors to be knowledgeable about the latest trends and platforms in this dynamic landscape.
best steroid forum
References:
https://medibang.com/author/27897915/
тише,все ок!всем нравится,и мне!
Erleben Sie die aufregende Welt von n1bet casino, [url=https://play.google.com/store/apps/details?id=com.boo.m.one.n&gl=de&hl=de]n1bet germany[/url], wo Spieler auf viele Spiele finden. Fette Jackpots und ansprechende Boni verfГјhren unerfahrene Spieler an. Erfreuen Sie sich an fesselnde Unterhaltung rund um die Uhr!
Могу рекомендовать Вам посетить сайт, на котором есть много статей на интересующую Вас тему.
DГ©couvrez les meilleurs bonus casino, [url=https://mauvaisegraine-magazine.fr/]bonus casino[/url] avec l’objectif de maximiser vos gains. Les promotions sont une vraie opportunitГ© pour chacun joueur. N’attendez plus pour tirer parti et dГ©velopper votre parcours.
zahranicni casino online, [url=https://tdls2.com/?p=62321]https://tdls2.com/?p=62321[/url] skГЅtajГ hrГЎДЌЕЇm rozmanitГ© moЕѕnosti zГЎbavy a vyЕѕitГ. Vzhledem k modernГ technologii mohou hrГЎДЌi hrГЎt kdykoliv a kdekoli. ZabezpeДЌenГ prostЕ™edГ se stГЎvГЎ stГЎle prioritou.
Las tragamonedas online Bolivia, [url=https://aseintec.cl/descubre-el-mundo-de-los-casinos-online-diversion-5/]https://aseintec.cl/descubre-el-mundo-de-los-casinos-online-diversion-5/[/url] brindan una experiencia entretenida a los jugadores. Puedes disfrutar de diferentes juegos con historias Гєnicos. AdemГЎs, las bonificaciones incrementan el atractivo de jugar. ВЎDescubre las tragamonedas online Bolivia y prueba la emociГіn del juego en lГnea!
Online gambling has become increasingly popular, and players seek alternative options. One such choice is UK casino not on GamStop, [url=http://empresapublica.hol.es/index.php/2026/03/01/discover-the-best-casino-sites-not-registered-play/]http://empresapublica.hol.es/index.php/2026/03/01/discover-the-best-casino-sites-not-registered-play/[/url], which offers flexibility for those wanting to enjoy gaming away from self-exclusion schemes. These casinos provide an thrilling experience without limitations. Players can immerse themselves in a diverse assortment of games while enjoying safe and secure transactions. As the online gambling landscape evolves, UK casino not on GamStop remains a top choice for many enthusiasts.
1xbet online casino, [url=https://www.barcateringservices.com/1xbet-malaysia-download-app-139762315/]https://www.barcateringservices.com/1xbet-malaysia-download-app-139762315/[/url] features an thrilling experience for punters. With a diverse selection of slots, everyone can find something to enjoy. Join now and discover the excitement today!
Chicken Road casinos, [url=https://encant.elcorriol.com/the-beauty-of-embracing-a-free-lifestyle/]https://encant.elcorriol.com/the-beauty-of-embracing-a-free-lifestyle/[/url] offer entertaining experiences for gamblers. Visitors can savor a variety of entertainment, including live dealer options. The atmosphere is lively, perfect for socializing.
Спасибо за объяснение, чем проще, тем лучше…
Exploring the world of non UKGC casino sites, [url=https://jaybabani.com/ultra-wp-admin/?p=195836]https://jaybabani.com/ultra-wp-admin/?p=195836[/url] opens fresh opportunities for gamers. These casinos often offer wider game selections and attractive bonuses. Players can enjoy lower restrictions, adding more exhilaration and pleasure to their experience.
Извините, ничем не могу помочь. Но уверен, что Вы найдёте правильное решение. Не отчаивайтесь.
Le meilleur casino en ligne, [url=https://sapphosutra.fr/]meilleurs casinos en ligne[/url] prГ©sente une gamme de jeux passionnants. Les utilisateurs peuvent bГ©nГ©ficier de rГ©compenses attrayants. Il est primordial de mener des recherches pour choisir le meilleur casino en ligne, assurant la sГ©curitГ© et le jeu Г©quitable.
Прошу прощения, что вмешался… Я разбираюсь в этом вопросе. Готов помочь.
В мире гейминга существует множество категорий. игры, [url=http://www.91hongyi.com/member/index.php?uid=ufijukuwuko]http://www.91hongyi.com/member/index.php?uid=ufijukuwuko[/url] переносят нас в уникальные миры. Они развивают стратегическое мышление, креативность и коллективный дух. Каждая игра предлагает что-то новое, давая возможность исследовать новые горизонты. В конечном итоге, игры — это не просто увлечение, а образ жизни к самовыражению.
Отличная фраза и своевременно
In recent years, many players have searched for gambling platforms that offer no limitations, leading to a rise in popularity for sites not using GamStop, [url=https://www.cinealambra.it/site/2026/02/18/exploring-online-casinos-not-on-gamstop-the/]https://www.cinealambra.it/site/2026/02/18/exploring-online-casinos-not-on-gamstop-the/[/url]. These different choices cater to those seeking a break from self-exclusion programs. Players can enjoy numerous gaming options without barriers.
неплохо!!!
Le meilleur casino en ligne, [url=https://godenight.fr/]meilleur casino en ligne[/url] dispose de une choix de activitГ©s passionnants. GrГўce Г offres, les joueurs sont en mesure de maximiser leurs rГ©compenses.
Могу порекомендовать.
non UK online casino, [url=https://protectaproduct.net/wp/non-uk-regulated-casino-risks-protections-and/]https://protectaproduct.net/wp/non-uk-regulated-casino-risks-protections-and/[/url] presents a vast variety of games. Gamers can partake in captivating slots, card games, and board games. Additionally, numerous bonuses and promotions boost the overall experience, making it even more appealing. Therefore, this environment continues to attract followers worldwide.
Я очень хотел бы с Вами поговорить.
Игровая индустрия развивается стремительно, и 7k casino, [url=https://7k-casino-3uc9i.cfd/]7k casino бездепозитный бонус[/url] предлагает разнообразие развлечений. В этом казино можно встретить азартные игры на любой вкус. Игроки могут развлекаться высококачественными графиками и увлекательными игровыми процессами.
To utilize the dynamic world of betting, you need to consider the 1xbet download, [url=https://phillylimorentals.com/blog/1xbet-sports-sri-lanka-your-ultimate-betting-3/]https://phillylimorentals.com/blog/1xbet-sports-sri-lanka-your-ultimate-betting-3/[/url] option. This offers a convenient application for hassle-free access to various gaming features.
zahraniДЌnГ casina, [url=https://dierenmarkt.eu/zahranini-online-casina-jak-vybrat-to-nejlepi-pro-2/]https://dierenmarkt.eu/zahranini-online-casina-jak-vybrat-to-nejlepi-pro-2/[/url] pЕ™inГЎЕЎejГ zajГmavГ© pЕ™ГleЕѕitosti pro hrГЎДЌe z rЕЇznГЅch koutЕЇ svД›ta. NabГdky, kterГ© dajГ se vyzkouЕЎet, zahrnujГ ЕЎirokou ЕЎkГЎlu moЕѕnostГ a vГЅhod, kterГ© pЕ™itahujГ kaЕѕdГЅ typ hrГЎДЌe.
At spille i et dansk casino uden rofus, [url=https://datafornix.com/spil-casino-uden-om-rofus-en-guide-til-uafhngige/]https://datafornix.com/spil-casino-uden-om-rofus-en-guide-til-uafhngige/[/url] tilbyder mange spillere en oplevelse. Forsøg på at undgå begrænsninger kan man nyde de mange spil og chancer for gevinster. Dansk casino uden rofus tiltrækker mange spillere, der ønsker frihed i deres spiloplevelse.
Полностью разделяю Ваше мнение. В этом что-то есть и это отличная идея. Готов Вас поддержать.
Сегодня мы погрузимся в удивительный мир игр и их влияния на наше общество. игры, [url=http://beachhouse-living.com/index.php/component/kunena/user/37976-ohagonabu]http://beachhouse-living.com/index.php/component/kunena/user/37976-ohagonabu[/url] развивают умение решать проблемы, помогают наладить контакты между людьми, а также дарят множество эмоций. Каждый игрок стремится к новым вызовам и приключениям, что лишь подчеркивает их важность в нашей жизни. В процессе игры мы можем открывать новые миры, а также углубляться в сюжеты, которые увлекают нас с первых минут. Разнообразие жанров позволяет каждому найти свой стиль. Не стоит забывать о возможности улучшить свои навыки, анализируя ошибки и добиваясь успеха. Игры — это площадка для творчества, который объединяет миллионы людей по всему миру.
Bolivia ofrece una emocionante experiencia de juego, con varios casinos que destacan por su calidad. Los mejores casinos en Bolivia, [url=https://institutoaesj.com.br/descubre-el-mejor-casino-online-en-bolivia/]https://institutoaesj.com.br/descubre-el-mejor-casino-online-en-bolivia/[/url] son conocidos por su ambiente lujoso, servicios excepcionales y opciones de apuestas diversificadas. AdemГЎs, los restaurantes en estos locales es exquisita, lo que hace que la experiencia sea aГєn mГЎs placentera.
non UK online casino, [url=http://www.fitcom.com.tr/nordicresearchnetwork/nonuk-casinos-accepting-uk-players-what-to-know.html]http://www.fitcom.com.tr/nordicresearchnetwork/nonuk-casinos-accepting-uk-players-what-to-know.html[/url] offers a variety of choices. Players can experience exciting experiences and benefit of lucrative bonuses. Join today!
По моему мнению Вы допускаете ошибку. Давайте обсудим это. Пишите мне в PM.
spil uden om rofus, [url=https://procaretherapyinc.com/casino18025/casino-uden-indbetaling-spil-uden-risiko/]https://procaretherapyinc.com/casino18025/casino-uden-indbetaling-spil-uden-risiko/[/url] er en populær aktivitet, der giver mulighed for fornøjelse. Spillere kan vælge mellem mange strategier og teknikker. Det skaber til samarbejde og prøver.
По-моему это уже обсуждалось, воспользуйтесь поиском.
Le Г©tablissement de jeu en direct offre une aventure unique. Les participants peuvent interagir avec des croupiers en temps rГ©el. GrГўce Г la technologie, le casino en direct, [url=https://la-cite-relais.fr/]casinos live[/url] rГ©invente le monde des loteries, faisant le bonheur du casino accessible Г tous, partout.
неочень впечатляет
7k casino, [url=https://7k-casino-hr209.blog/]https://7k-casino-hr209.blog/[/url] предлагает игрокам уникальную атмосферу напряжения. Здесь можно найти широкие игры, которые вдохновят даже самых взыскательных любителей азартных развлечений. Откройте для себя фантастический мир 7k casino!
По-моему это уже обсуждалось.
Exploring the landscape of UK casino not on GamStop, [url=https://kphe.pl/index.php/2026/03/01/top-casino-sites-without-gamstop-exclusion/]https://kphe.pl/index.php/2026/03/01/top-casino-sites-without-gamstop-exclusion/[/url] can be thrilling for many players. These casinos offer different options without the constraints often found elsewhere. Relish the freedom to play!
Wagering on sports with 1xBet Betting, [url=https://katrivesi.gr/1xbet-852/]https://katrivesi.gr/1xbet-852/[/url] offers entertaining opportunities for fans. Utilizing a wide range of sports events, users can make multiple bets, maximizing their possibilities to win big rewards.
Hvis du leder efter det bedste casino uden rofus, [url=https://www.elarranque.org/f-det-bedste-casino-bonus-uden-indbetaling-2/]https://www.elarranque.org/f-det-bedste-casino-bonus-uden-indbetaling-2/[/url], er der mange muligheder at vælge imellem. De steder tilbyder fabelagtige spil, bonusser og spænding. Besøg snart for at udnytte af det bedste.
zahranicne online casino, [url=https://simerdu.com/mostbet-pihlaeni-jak-snadno-vstoupit-do-svta/]https://simerdu.com/mostbet-pihlaeni-jak-snadno-vstoupit-do-svta/[/url] nabГzГ hrГЎДЌЕЇm jedineДЌnГЅ zГЎЕѕitek. UnikГЎtnГ svД›t hazardnГch her je nynГ na dosah. HrГЎДЌi mohou squtilizovat rЕЇznorodГ© promo akce a vГЅhody pro zvГЅЕЎenГ svГЅch ЕЎancГ na vГЅhru.
This was very helpful and well written. I’ll definitely come back to this site again.
Great explanation and very informative. You can tell a lot of effort went into this.
La ruleta, [url=https://miloch.com.br/la-ruleta-estrategias-y-consejos-para-ganar-6/]https://miloch.com.br/la-ruleta-estrategias-y-consejos-para-ganar-6/[/url] es un juego divertido que atrae a muchos jugadores. En este entretenimiento, las tГЎcticas varГan. La suerte juega un papel importante, y cada giro de la rueda es diferente. La ruleta ofrece emociones que hacen un ambiente electrizante.
non UKGC casino sites, [url=https://legaar.com/non-uk-online-casinos-jurisdictions-safety-and/]https://legaar.com/non-uk-online-casinos-jurisdictions-safety-and/[/url] provide a range of exciting games. Players can enjoy unique promotions lacking in traditional platforms. Explore these casinos for incredible opportunities to win big!
зачем так палится!!!!!!!!
В 7k casino, [url=https://7k-casino-95ed7.sbs/]https://7k-casino-95ed7.sbs/[/url] игроки вправе насладиться широтой азартных игр. Любая игра предлагает уникальный опыт. Тут вас ожидают невероятные выигрыши и комплексные предложения.
Замечательно, весьма полезное сообщение
online casino not on GamStop, [url=http://nekokapuri.s1009.xrea.com/2026/03/01/exploring-non-gamstop-registered-sites-a-4/]http://nekokapuri.s1009.xrea.com/2026/03/01/exploring-non-gamstop-registered-sites-a-4/[/url] provides players with unique opportunities. Many gambling options await users. Explore fantastic bonuses and incentives. Don’t miss the chance to sign up and bet today!
Это же урбанизация какая-то
plinko casino, [url=https://mon3w.fr/]plinko argent reel[/url] – Le plinko en ligne casino attire plusieurs joueurs. SugГ©rant son systГЁme de rГ©compenses, il garantit des moments excitants. Chacun des tirage peut potentiellement mener Г des succГЁs incroyables. Attendez pas, plongez dans l’univers du plinko en ligne casino et tentez votre chance !
1xBet Betting Online, [url=https://prodos.com.tr/wp/1xbet-thailand-download-the-official-app-for/]https://prodos.com.tr/wp/1xbet-thailand-download-the-official-app-for/[/url] offers numerous options for punters to engage in entertaining betting activities. With its accessible platform, users can execute bets efficiently and securely. Enjoy a wide array of sports and games, making 1xBet Betting Online a preferred site for everyone seeking entertainment.
I Danmark findes der mange underholdende casino uden om rofus, [url=https://4nb.19e.myftpupload.com/2026/02/21/casino-uden-rufus-nem-udbetaling-og-underholdning/]https://4nb.19e.myftpupload.com/2026/02/21/casino-uden-rufus-nem-udbetaling-og-underholdning/[/url], hvor spillere kan deltage i mange variationer. Her er chancen for at høste imponerende præmier. Gå ikke glip af muligheden for at tilfredsstille dig selv!
nove online casino, [url=https://concejodeliberanteag.gob.ar/nuevo/zahranini-online-kasina-ve-co-potebujete-vdt-37/]https://concejodeliberanteag.gob.ar/nuevo/zahranini-online-kasina-ve-co-potebujete-vdt-37/[/url] nabГzГ skvД›lГ© moЕѕnosti zГЎbavy a vГЅher. ZГЎkaznГci si mohou vychutnat rozmanitou nabГdku her, od kasinovГЅch her aЕѕ po karetnГ hry. ZГЎЕѕitky jsou intenzivnГ, pЕ™iДЌemЕѕ vГЅhody zajiЕЎЕҐujГ novГ© ЕЎance na vГЅhru. K zГЎbavД› se pЕ™ipojte na nove online casino!
Mi Casino, [url=https://blog.megaleiloes.com.br/los-mejores-casinos-online-tu-guia-definitiva-para-2/]https://blog.megaleiloes.com.br/los-mejores-casinos-online-tu-guia-definitiva-para-2/[/url] ofrece una experiencia Гєnica para los entusiastas. A travГ©s de una rica opciГіn de entretenimientos, cada visita es destacada. ВЎSumГ©rgete en la emociГіn de Mi Casino!
In the thrilling world of tennis, Masters Santiago betting, [url=https://www.jacobsandwhitehall.com/valorant-masters-santiago-2026-betting-your/]https://www.jacobsandwhitehall.com/valorant-masters-santiago-2026-betting-your/[/url] provides fans an exciting opportunity. Analyzing player performances and surface conditions is crucial. Wagering strategically can lead to impressive wins.
Браво, мне кажется это блестящая идея
Виртуальный мир игр захватывает интерес. 7k casino, [url=https://7k-casino-rg1yl.cfd/]https://7k-casino-rg1yl.cfd/[/url] предлагает обширный выбор игр, где кто угодно может найти свое удачное время. В данном казино вас встречают уникальные призы и невероятные перспективы.
Нашел сайт с интересующей Вас вопросом.
DГ©couvrez le plaisir de jouer sans pression avec le casino sans wager, [url=https://couture-et-turbulences.fr/]casinos en ligne sans wager[/url]. Les joueurs peuvent se divertir sans se soucier des mises. Les options sont variГ©es et attrayantes. Rejoignez Г vivre une expГ©rience inoubliable!
дааа вот бы мне скорость побыстрее
Exploring the universe of non UKGC casino sites, [url=https://www.simkarled.com/non-uk-based-online-casinos-jurisdictions-safety/]https://www.simkarled.com/non-uk-based-online-casinos-jurisdictions-safety/[/url] can offer unique experiences for players. These websites often feature numerous games and incentives that may not be available elsewhere.
The virtual gambling platform 1xbet online, [url=https://dermatolog.kz/uncategorized/1xbet-korea-desktop-review-everything-you-need-to.html]https://dermatolog.kz/uncategorized/1xbet-korea-desktop-review-everything-you-need-to.html[/url] offers entertaining opportunities for bettors. With a easy-to-navigate interface, it’s easy to bet. Enjoy a wide range of sports and games. Experience live gambling and promotions that enhance your wagering experience. 1xbet online stands out for its help desk and transaction varieties that cater to all requests. Join now and dive in!
Вы определенно правы
игры, [url=http://www.vecmir.ru/index.php/vecmirlife/69249-axerexigela/profile]http://www.vecmir.ru/index.php/vecmirlife/69249-axerexigela/profile[/url] регулярно пробуждают интерес игроков. Они предлагают возможность вникнуть в увлекательные сюжеты и приключения. Каждая игра улучшает навыки игрока. Их мир полон приключений, и каждый уровень проверяет способности. Вместо обычной жизни можно наслаждаться игровыми походами.
zahraniДЌnГ online casina, [url=https://hotelsantaana.com.ec/nova-casino-online-vstupte-do-svta-online-zabavy-a/]https://hotelsantaana.com.ec/nova-casino-online-vstupte-do-svta-online-zabavy-a/[/url] nabГzejГ hrГЎДЌЕЇm moЕѕnost bavit se z kancelГЎЕ™e. HrГЎДЌi majГ rozhodnutГ ke rozmanitГ© nabГdce her a promoakcГ.
хачу такую
I dag tilbyder mange online casinoer mulighed for at spille uden behov for en rofus. casino uden rofus, [url=https://universprofessionnel.com/spilleautomater-uden-nemid-din-guide-til-online/]https://universprofessionnel.com/spilleautomater-uden-nemid-din-guide-til-online/[/url] giver deltagere frihed til at opfatte deres oplevelse uden besvær.
casinos online, [url=https://maisqueinfo.com.br/explora-el-fascinante-mundo-de-mi-casino/]https://maisqueinfo.com.br/explora-el-fascinante-mundo-de-mi-casino/[/url] – Los casinos en lГnea ofrecen una opciones de juegos. Los jugadores pueden experimentar mГЎquinas tragamonedas y juegos de mesa desde cualquier lugar.
Я бы с такими в кроватке поболел .
7k casino, [url=https://7k-casino-9ppd2.cfd/]https://7k-casino-9ppd2.cfd/[/url] открывает возможность участвовать в разнообразные игры прямо из дома вашего ноутбука. Большой выбор акций позволяет любителям без усилий погрузиться в мир азартных приемов.
casinos sin licencia, [url=http://www.shiatsutherapy.org/malaga2016/46576]http://www.shiatsutherapy.org/malaga2016/46576[/url] – Los casinos sin licencia cuentan con inconvenientes significativos. Los jugadores pueden sufrir su fondos sin protecciГіn legal. AdemГЎs, la falta de regulaciГіn exacerba el riesgo. Es fundamental verificar antes de participar en estos portales.
Discovering your destiny has never been easier with gratis palm reading online. This unique service allows you to explore insights about your life through the lines on your palms. By using state-of-the-art algorithms, you can gain profound knowledge about your personality and future. Just upload a photo and enjoy a tailored experience. Try free palm reading online, [url=https://helpnagar.demowebsiteclient.com/discover-your-future-with-free-palm-reading/]https://helpnagar.demowebsiteclient.com/discover-your-future-with-free-palm-reading/[/url] today and unlock the secrets hidden within!
1xbet app, [url=http://www.evergoldcs.com/1xbet-koreja-kak-skachat-prilozhenie-dlja-stavok-17/]http://www.evergoldcs.com/1xbet-koreja-kak-skachat-prilozhenie-dlja-stavok-17/[/url] – The 1xbet app lets users access a host of betting options. With its easy-to-navigate interface, placing bets becomes quick. Downloading the 1xbet app is quick, ensuring a seamless wagering experience anytime, anywhere.
По моему мнению Вы допускаете ошибку. Давайте обсудим.
Le casino sans dГ©pГґt, [url=https://campus-innovation-touristique.fr/]bonus sans depot[/url] attire de nombreux joueurs Г cause de l’opportunitГ© de obtenir des rГ©compenses sans investir d’abord. Cette offre permet de explorer les jeux avant de s’engager financiГЁrement. C’est un formidable moyen d’Г©valuer la valeur d’un site de jeux.
HranГ v zahranicni casino online, [url=https://bimocompany.com.br/eska-kasina-ve-co-potebujete-vdt-o-hrani-v-online-3/]https://bimocompany.com.br/eska-kasina-ve-co-potebujete-vdt-o-hrani-v-online-3/[/url] pЕ™inГЎЕЎГ mnoho moЕѕnostГ a zГЎbavy. Tady si mЕЇЕѕete najГt rЕЇznГ© hry a vychutnat skvД›lГ© bonusy. VД›zte, Еѕe ochrana je vЕѕdy na prvnГm mГstД›.
Конечно. Это было и со мной. Можем пообщаться на эту тему.
7k casino, [url=https://7k-casino-rpoa8.cfd/]https://7k-casino-rpoa8.cfd/[/url] предлагает уникальную атмосферу развлечений и шанса. Игроки могут наслаждаться ассортиментом игр, включая аппараты, покер и рулетку. В этом месте каждый найдет что-то для себя!
casas de Apuestas, [url=https://transtuts.com.br/?p=1113726]https://transtuts.com.br/?p=1113726[/url] – Las sitios de apuestas ofrecen una amplia selecciГіn de opciones. Los jugadores pueden gozar de promociones atractivas y diversa experiencia en lГnea. Sin embargo, es necesario jugar de manera responsable.
Los casinos en lГnea sin licencia representan un peligro para los jugadores. No proporcionan la cobertura necesaria y pueden engaГ±ar a sus usuarios. AdemГЎs, los autoridades no pueden intervenir, dejando a los jugadores desprotegidos. Es fundamental evitar estos casinos sin licencia, [url=https://cinebuzztimes.com/casinos-online-sin-licencia-seguridad-y/]https://cinebuzztimes.com/casinos-online-sin-licencia-seguridad-y/[/url] para salvaguardar tus finanzas.
Я считаю, что Вы не правы. Я уверен. Могу отстоять свою позицию. Пишите мне в PM.
Le univers des activitГ©s en ligne est en pleine Г©volution. Avec la popularitГ© de casino paypal, [url=https://jika.fr/]casinos acceptant paypal[/url], les joueurs peuvent bГ©nГ©ficier d’un moyen de paiement fiable. Il est essentiel de opter pour la bonne plateforme pour garantir une expГ©rience agrГ©able.
casumo games, [url=https://lp2.contadoressa.com/2026/03/03/everything-you-need-to-know-about-casumo-login/]https://lp2.contadoressa.com/2026/03/03/everything-you-need-to-know-about-casumo-login/[/url] offer an exciting method to play online gaming. With a diverse selection of games, players can uncover new adventures. The platform also includes distinct promotions, enhancing the gaming experience.
Быстрый ответ, признак ума 🙂
In the world of web casinos, non UK online casino, [url=http://futurismdemo.com/hsfoodserver/top-non-uk-casino-sites-how-to-find-safe-fun/]http://futurismdemo.com/hsfoodserver/top-non-uk-casino-sites-how-to-find-safe-fun/[/url] offers players unique experiences. With diverse games, rewarding incentives, it provides thrills that fascinate gamers. Explore and enjoy!
The premier platforms for gambling is 1xbet online casino, [url=https://gagan.tokyo/experience-sports-betting-with-1xbet-thailand/]https://gagan.tokyo/experience-sports-betting-with-1xbet-thailand/[/url]. Including a vast range of games, it draws players from all over the world. Experience the thrill of online betting!
Зачёт и ниипёт!
При вы хотите проверить восторг, то 7k casino играть, [url=https://7k-casino-191ex.icu/]https://7k-casino-191ex.icu/[/url] – отличный способ. Игры на казино дают незабываемые моментов и перспективу выиграть крупную сумму.
zahraniДЌnГ casina, [url=https://fastboxexpress.com.br/niyvi-pihlaeni-jak-se-efektivn-pihlasit-a/]https://fastboxexpress.com.br/niyvi-pihlaeni-jak-se-efektivn-pihlasit-a/[/url] pЕ™inГЎЕЎejГ hrГЎДЌЕЇm bohatou ЕЎkГЎlu her. S inovativnГmi technologiemi mohou hrГЎДЌi uЕѕГvat si intenzivnГ zГЎЕѕitek z hranГ.
оч понравилось,посмеялась)))
игры, [url=http://www.gerschedersv.de/index.php?option=com_kunena&func=view&catid=4&id=1884&Itemid=0#1884]http://www.gerschedersv.de/index.php?option=com_kunena&func=view&catid=4&id=1884&Itemid=0#1884[/url] — это захватывающие приключения, которые погружают нас в уникальные миры. Каждый автор старается предложить новые концепции. Откройте для себя эксклюзивные возможности, играя в разнообразные жанры и формы, от приключений до аркад.
predicciones futbol, [url=https://newpagina.cecasa.com.mx/index.php/pronosticos-de-futbol-claves-para-aumentar-tus-7/]https://newpagina.cecasa.com.mx/index.php/pronosticos-de-futbol-claves-para-aumentar-tus-7/[/url] – Las anГЎlisis futbol son un tema que atrae a millones en todo el mundo. Cualquier fin de semana, los discuten las probabilidades de sus equipos favoritos. Las proyecciones deportivas se basan en estadГsticas, resultados previas y anГЎlisis de los jugadores.
En la actualidad, numerosos Casinos Fuera de EspaГ±a, [url=https://www.emamanagement.it/2026/02/05/descubre-los-mejores-casinos-online-fuera-de-11/]https://www.emamanagement.it/2026/02/05/descubre-los-mejores-casinos-online-fuera-de-11/[/url] proporcionan una grande gama de juegos para los entusiastas al entretenimiento. Varios casinos tienen promociones atractivas para captar a nuevos jugadores. Descubre un mundo de entretenimiento en plataforma donde nuestro diversiГіn no tiene frontera.
Cashoomo casino, [url=https://sone.ellixar.top/2026/03/03/exploring-social-casino-no-deposit-bonuses-a/]https://sone.ellixar.top/2026/03/03/exploring-social-casino-no-deposit-bonuses-a/[/url] offers a captivating experience for players. With diverse games and rewarding bonuses, it attracts enthusiasts from around the world. Join Cashoomo casino today to uncover endless fun!
To enjoy seamless gaming, you should consider installing the app from the official site. The process of 1xbet download, [url=https://www.psykaur.com/1xbet19/1xbet-thailand-download-app-your-ultimate-betting-24/]https://www.psykaur.com/1xbet19/1xbet-thailand-download-app-your-ultimate-betting-24/[/url] is swift and easy. After download, you’ll have access to engaging features right at your fingertips.
Между нами говоря, это очевидно. Предлагаю Вам попробовать поискать в google.com
Spil på et casino uden om rofus, [url=https://sabaqinsure.ly/2026/02/18/casino-uden-for-rofus-en-guide-til-spiloplevelser-3/]https://sabaqinsure.ly/2026/02/18/casino-uden-for-rofus-en-guide-til-spiloplevelser-3/[/url] for for få mere muligheder. Her finder du deltage mange forskellige spil uden at restriktioner. Vær forsigtig på beskyttelse for en oplevelse.
Извините, что не могу сейчас поучаствовать в дискуссии – нет свободного времени. Освобожусь – обязательно выскажу своё мнение по этому вопросу.
Хотите открыть волнения от игр в виртуальном пространстве? Тогда играйте в 7k casino играть, [url=https://7k-casino-daid2.life/]https://7k-casino-daid2.life/[/url] и получите шанс на выигрыш! Любая здесь полноправно досугом. Не упустите свой потенциал!
вообще супер
cv777 casino, [url=https://next.ink/public-profile/?id=241611]https://next.ink/public-profile/?id=241611[/url] показывает увлекательные РёРіСЂС‹. Р’СЃРµ РёРіСЂРѕРєРё РјРѕРіСѓС‚ обнаружить разнообразные варианты Р±РѕРЅСѓСЃРѕРІ. Рспытанный сервис обеспечивает безопасность Рё доступность для всех РёРіСЂРѕРєРѕРІ.
zahranicne online casino, [url=https://charbucks.com/weiss-oficialni-stranky-znaky-a-jeji-nabidka/]https://charbucks.com/weiss-oficialni-stranky-znaky-a-jeji-nabidka/[/url] nabГzГ ЕЎirokou ЕЎkГЎlu her, mezi kterГ© patЕ™Г automaty, ruletu a poker. ZaЕѕijte vzruЕЎenГ a moЕѕnost vyhrГЎt skvД›lГ© ocenД›nГ z pohodlГ vaЕЎeho domova. PonoЕ™te se do svД›ta zГЎbavy a adrenalinu.
жыр супер
Le monde des casinos Г©volue sans cesse. Avec l’essor de la technologie, des solutions comme casino cashlib, [url=https://expert-avocat.fr/]casino cashlib[/url] optimisent les paiements en ligne. Les participants apprГ©cient la protection de ces plateformes.
Experience the thrill of internet wagering at Online Casino, [url=https://heringalfenas.com.br/?p=60285]https://heringalfenas.com.br/?p=60285[/url], where engaging games await you. With varied options and substantial bonuses, it’s time to try your luck. Join now!
El Registro Supermatch, [url=https://tp0.e98.myftpupload.com/registro-supermatch-todo-lo-que-necesitas-saber-22/]https://tp0.e98.myftpupload.com/registro-supermatch-todo-lo-que-necesitas-saber-22/[/url] es una herramienta esencial para quienes buscan mejorar su presencia en el mercado. Al usarlo, puedes ampliar las posibilidades de Г©xito en tus proyectos. Cada anotaciГіn proporciona datos valiosos que ayudan a realizar decisiones estratГ©gicas. Implementar Registro Supermatch es vital para un avance sostenible en tu negocio.
Cashwin casino EspaГ±a, [url=https://sitarakshawomencare.in/2026/02/09/cashwin-casino-espana-tu-destino-de-juegos-en-76/]https://sitarakshawomencare.in/2026/02/09/cashwin-casino-espana-tu-destino-de-juegos-en-76/[/url] ofrece la alternativas de diversiГіn. Los propuestas son emocionantes para cada uno entusiastas del suerte.
Я присоединяюсь ко всему выше сказанному. Давайте обсудим этот вопрос.
Discovering top UK casino not on GamStop, [url=https://tksteelgroup.com/pass4sure/best-uk-non-gamstop-casinos-your-ultimate-guide/]https://tksteelgroup.com/pass4sure/best-uk-non-gamstop-casinos-your-ultimate-guide/[/url] provides a exclusive experience for players seeking independence from self-exclusion. Explore diverse game selections and entertaining promotions, ensuring memorable gaming adventures.
Welcome to this ultimate destination for gaming excitement: jaya 9 casino, [url=https://batatour.com/index.php/2026/01/18/slot-session-timing-tips-mastering-your-play-for/]https://batatour.com/index.php/2026/01/18/slot-session-timing-tips-mastering-your-play-for/[/url]. Here, you can find a wide variety of options that appease every player’s preference. From poker to table games, the options are vast. With luxurious surroundings and high-quality services, your time at jaya 9 casino will be unforgettable. Don’t miss out on exciting tournaments and exclusive experiences that bring even more vibrancy to your visit.
online casini, [url=http://www.novatisarda.it/index.php/component/k2/item/12-fans-to-pay-tribute]http://www.novatisarda.it/index.php/component/k2/item/12-fans-to-pay-tribute[/url] предлагают уникальные возможности для развлечений. Посетители могут получать удовольствие разнообразными играми и зарабатывать настоящие деньги. Бонусы}, честные шансы делают процесс еще более интригующим. Online casini открывают новые горизонты прямо у вас дома.
Вы не правы. Я уверен. Пишите мне в PM, обсудим.
Цифровые казино предлагают множество развлечений. 7k casino играть, [url=https://7k-casino-q3ywc.top/]casino 7k сейчас[/url] интересно. Среди доступных игровых автоматов можно найти любимые классические и новые. Игроки могут открыть что-то для себя.
Danke für eure ausführliche Übersicht der top https://www.getfresh.energy/ ohne Limit!
Ausgezeichnete Betrachtung der aktuellen Situation im iGaming-Bereich.
Check out my blog post: beste online casino ohne lizenz casinoput.com (https://casinoput.com,)
nejlepЕЎГ zahraniДЌnГ casino, [url=https://louerbf.com/nejlepi-online-kasina-kde-hrai-nali-sve-tsti/]https://louerbf.com/nejlepi-online-kasina-kde-hrai-nali-sve-tsti/[/url] nabГzГ jedineДЌnГ© zГЎЕѕitky pro hrГЎДЌe. UЕѕivatelГ© mohou mГt ЕЎirokou ЕЎkГЎlu her. NavГc normГЎlnГch automatЕЇ jsou nabГzeny rovnД›Еѕ live kasinovГ© hry. Pozornost vД›nujte moЕѕnostem vГЅbД›ru odmД›n.
Gambling in Casino Online, [url=http://www.tokai-kikaku-8110.com/9561/]http://www.tokai-kikaku-8110.com/9561/[/url] brings excitement and fun. With multiple games, players can enjoy slots from the comfort of their homes. Promotions enhance the experience, making it even more attractive.
Cashwin casino EspaГ±a, [url=https://www.livesicily.it/2026/02/09/cashwin-casino-espana-tu-destino-de-juegos-de-azar-4/]https://www.livesicily.it/2026/02/09/cashwin-casino-espana-tu-destino-de-juegos-de-azar-4/[/url] ofrece una opciones de azar, incluyendo tragamonedas, ruletas y pГіker. Debido a su plataforma amigable, los participantes disfrutan de al instante. ВЎExplora el mundo de Cashwin casino EspaГ±a y prueba tu suerte hoy!
apuestas en Uruguay, [url=https://imobdemo.tixis.com.br/supermatch-la-solucion-perfecta-para-conectar-y/]https://imobdemo.tixis.com.br/supermatch-la-solucion-perfecta-para-conectar-y/[/url] – Las apuestas en lГnea en Uruguay han aumentado en popularidad, ofreciendo a los participantes diversas opciones para apostar. Con un contexto legal que apoya esta actividad, las casinos en lГnea se se han establecido en la primera opciГіn para los uruguayos.
At joya 9 casino, [url=http://bestsmartplace.com/]http://bestsmartplace.com/[/url], wagering enthusiasts experience fun like never before. With a variety of selections, every player can find their perfect match. Join the journey today!
Я думаю, что Вы не правы. Я уверен. Могу это доказать. Пишите мне в PM, пообщаемся.
В онлайн-казино 7k casino играть, [url=https://7k-casino-1ulkf.icu/]7k casino регистрация[/url] возможно по большим выигрышам. В этом заведении много красочных игр, в числе которых слоты и настольные автоматы. Исследуйте шанс заполучить особые призы!
cv777 casino, [url=http://www.xxxgranny.pro/?url=//slideslive.com%2Fo4eidkce65sl%3Ftab%3Dabout]http://www.xxxgranny.pro/?url=//slideslive.com%2Fo4eidkce65sl%3Ftab%3Dabout[/url] offers a range of exciting games for customers. Discover the hottest slots and table games available. Sign up today and witness the thrill of winning!
А что в результате..
игры, [url=http://zakupki.motilek.ru/index.php?name=account&op=info&uname=evevigamyd]http://zakupki.motilek.ru/index.php?name=account&op=info&uname=evevigamyd[/url] — это захватывающее занятие, которое увлекает миллионы людей. На этапе игры можно проявить свои навыки и стратегическое мышление. Различная игра открывает новые возможности для совершенствования и общения между игроками. Увлеченные геймеры объединяются в команды, чтобы вступить в битву в виртуальных мирах.
Я думаю, что Вы допускаете ошибку. Давайте обсудим это. Пишите мне в PM, поговорим.
Bankonbet casino, [url=https://bankonbet.eu.com/de/]bankonbet.eu.com[/url] features an exciting betting experience. Clients can enjoy a diverse selection of entertainment. With compelling promotions, Bankonbet casino provides a thrilling adventure for all.
zahranicni online casina, [url=https://www.pizzaemotori.it/evropske-online-casino-ve-co-potebujete-vdt-3/]https://www.pizzaemotori.it/evropske-online-casino-ve-co-potebujete-vdt-3/[/url] nabГzejГ ЕЎirokou ЕЎkГЎlu her a bonusЕЇ, kterГ© pЕ™ilГЎkajГ hrГЎДЌe. ZГЎroveЕ€ poskytujГ bezpeДЌnГ© prostЕ™edГ pro hranГ. HrГЎДЌi majГ moЕѕnost vyzkouЕЎet rЕЇznГ© metody a vyhrГЎt vynikajГcГ ceny.
В этом что-то есть. Спасибо за объяснение. Я не знал этого.
Dans le monde du jeu, les jeux en ligne proposent de nombreuses options de paiement. Le casino paysafecard, [url=https://lamazarine.fr/]casino avec paysafecard[/url] est unique car il offre la sГ©curitГ© des transactions. Utiliser ce systГЁme est facile. Vous pouvez dГ©penser votre fonds sans problГЁmes.
Согласен, ваша мысль просто отличная
online casino uden rofus, [url=http://lucyhillman.com/?p=3119]http://lucyhillman.com/?p=3119[/url] tilbyder spændende spiloplevelser for deltagere. Her kan du nyde et udvalg af automater uden udfordringer. Tag del i den tiltrækkende verden af online gambling!
Internet gambling have become a popular choice for many players looking for engaging experiences. Casino Online Games, [url=https://bcircleagency.com/comprehensive-guide-to-roostake-casino/]https://bcircleagency.com/comprehensive-guide-to-roostake-casino/[/url] offer a wide range of options, from slots to table games. With instant access, players can enjoy their favorite games whenever they want from the comfort of their homes. The rewards provided by these platforms make gameplay even more inviting.
Mafia casino online EspaГ±a, [url=https://partsnest.velocity-87bdec47.herositepro.com/mafia-casino-online-espana-disfruta-de-la-aventura/]https://partsnest.velocity-87bdec47.herositepro.com/mafia-casino-online-espana-disfruta-de-la-aventura/[/url] ofrece un servicio Гєnica para jugar. Con slots emocionantes, los aficionados pueden lograr grandes recompensas.
Правда!!!
online casino not on GamStop, [url=https://seminars.unj.ac.id/iscet2022/?p=96132]https://seminars.unj.ac.id/iscet2022/?p=96132[/url] offers players a chance to enjoy gaming without restrictions. These casinos offer a wide range of games, ensuring enjoyable experiences. Users can enjoy unique bonuses and offers not found on GamStop.
Всё выше сказанное правда. Можем пообщаться на эту тему. Здесь или в PM.
Онлайн казино привлекают множество пользователей. 7k casino играть, [url=https://7k-casino-fz6vm.top/]7k casino бездепозитный бонус[/url] можно в любое время. Впечатления от игры захватывают. Найдите лучшие игры и получайте удовольствие от процесса!
Forex Broker, [url=https://thebellamygroup.com/2026/02/28/peringkat-broker-panduan-lengkap-untuk-memilih/]https://thebellamygroup.com/2026/02/28/peringkat-broker-panduan-lengkap-untuk-memilih/[/url] merupakan perusahaan atau jalan yang memfasilitasi trader dalam menjalankan urusan valuta di arena. Melalui Forex Broker, trader boleh mendapatkan akses bagi meraih profit yang menguntungkan.
jaya9 casino, [url=http://wordpress.frydenslund.dk/?p=951411]http://wordpress.frydenslund.dk/?p=951411[/url] offers an exhilarating experience for gamers. Here, you can explore a wide range of exciting games, including slots. The environment is vibrant, making it perfect for excitement.
Betwinner login, [url=https://ocursoesteticaautomotiva.com.br/betwinner-220/]https://ocursoesteticaautomotiva.com.br/betwinner-220/[/url] es un proceso sencillo que permite acceder a la cuenta de apuestas. Para iniciar sesiГіn, debes ingresar tu usuario y contraseГ±a. AsegГєrate de que tus datos sean correctos para evitar problemas.
zahraniДЌnГ casino, [url=https://www.hirejar.com/blog/online-casina-zahranii-jak-si-vybrat-to-prave-pro/]https://www.hirejar.com/blog/online-casina-zahranii-jak-si-vybrat-to-prave-pro/[/url] nabГzГ jedineДЌnГ© moЕѕnosti pro hrГЎДЌe. MЕЇЕѕete si uЕѕГt zГЎbavu a nabrat skvД›lГ© penГze. Tyto sГЎzkovГ© domy ДЌasto nabГzejГ exkluzivnГ bonusovou strukturu.
Playing Casino Online Slots, [url=https://americancom.com.bo/2026/01/18/the-exciting-world-of-casino-river-belle/]https://americancom.com.bo/2026/01/18/the-exciting-world-of-casino-river-belle/[/url] offers a thrilling way to win rewards. Utilizing various themes and features, participants can immerse into the domain of online gaming, enhancing their fun.
Я считаю, что Вы ошибаетесь. Пишите мне в PM, поговорим.
В 7k casino играть, [url=https://7k-casino-mhuoj.icu/]https://7k-casino-mhuoj.icu/[/url] – это отличный способ провести досуг. Зрители наслаждаются яркими играми. Широкий выбор развлекательных автоматов позволяет каждому найти что-то по душе. Стоит попробовать шанс выиграть призы!
Mafia casino online EspaГ±a, [url=https://bitbuzz.org/mafia-casino-online-espana-tu-destino-de-juego-4/]https://bitbuzz.org/mafia-casino-online-espana-tu-destino-de-juego-4/[/url] es un lugar ideal para los amantes del juego. Ofrece una experiencia emocionante donde los apostadores pueden disfrutar de excelentes premios y una atmГіsfera envolvente que los cautivarГЎ. AdemГЎs, la gama de juegos es notable.
Discover the amazing world of joya 9 online casino, [url=https://consultorias.conteudoestrategico.com.br/enhancing-live-casino-streaming-quality-key/]https://consultorias.conteudoestrategico.com.br/enhancing-live-casino-streaming-quality-key/[/url], where gamblers can enjoy numerous options of gaming experiences. Try out fantastic bonuses and promotions that enhance your gameplay. Sign up today and dive into a fresh gaming adventure!
зеленая карта в турцию, [url=https://conversiongorilla.com/golink.php?b=4255&l=aHR0cHM6Ly9iZWluc3VyYW5jZS5tZS90dXJlY2thamEtc3RyYWhvdmth]https://conversiongorilla.com/golink.php?b=4255&l=aHR0cHM6Ly9iZWluc3VyYW5jZS5tZS90dXJlY2thamEtc3RyYWhvdmth[/url] открывает перспективы для эмигрантов. Эта картка позволяет иметь доступ к медицинским услугам в стране. Успейте оформить свои документы!
Betwinner registro, [url=https://heni.co.in/betwinner-your-gateway-to-sports-betting-success/]https://heni.co.in/betwinner-your-gateway-to-sports-betting-success/[/url] es un proceso sencillo que permite a los usuarios acceder a una amplia gama de servicios de apuestas. Registrarse es rГЎpido y facilita la participaciГіn en diversas actividades. Solo necesitas ofrecer algunos datos personales y ВЎlisto!
Это не имеет аналогов?
Lemon Casino Magyar, [url=https://lemoncasino-magyar.eu/]online kaszino[/url] – A Lemon Casino egyedГјlГЎllГі online kaszinГі, amely kedvtelГ©st kГnГЎl a jГЎtГ©kosok szГЎmГЎra. TГЎg jГЎtГ©kpalettГЎjГЎval mindenki megtalГЎlja a neki megfelelЕ‘ lehetЕ‘sГ©geket. Az Г¶sztГ¶nzЕ‘k vonzГі ajГЎnlatokat biztosГtanak a regisztrГЎlt felhasznГЎlГіknak.
Прошу прощения, что вмешался… У меня похожая ситуация. Пишите здесь или в PM.
kasyno polska opinie, [url=http://www.proesportes.com.br/kasyna-z-minimalnym-depozytem-gdzie-gra-i-co/]http://www.proesportes.com.br/kasyna-z-minimalnym-depozytem-gdzie-gra-i-co/[/url] są różnorodne, co sprawia, że warto z nich skorzystać. Zdecydowana większość gracze zwraca uwagę na ciekawie przedstawione promocje oraz jakość obsługi klienta. Komentarze często wskazują na wysokie wygrane, co zachęca nowe osoby do spróbowania swojego szczęścia. Warto zapoznać się z różnymi opiniami, aby wybrać najciekawsze miejsce do gry.
Полностью разделяю Ваше мнение. Это хорошая идея. Готов Вас поддержать.
Доступ в казино 7k casino вход, [url=https://7k-casino-x2pga.cfd/]casino 7k сейчас[/url] требует ввод данных. После вы можете наслаждаться в широком ассортименте играх и опциях на выигрыш. Начните играть уже сегодня!
Online Casino, [url=https://cloudapex.io/onlinecasinoslot34/unveiling-the-excitement-of-casino-savanna-wins-uk/]https://cloudapex.io/onlinecasinoslot34/unveiling-the-excitement-of-casino-savanna-wins-uk/[/url] – Internet Casino offers thrill for players worldwide. With numerous games available, from video slots to traditional games, everyone can find a game they enjoy. Experience the excitement today!
Online kasina pЕ™inГЎЕЎejГ ЕЎirokou ЕЎkГЎlu moЕѕnostГ pro milovnГky hazardu. casino online zahraniДЌГ, [url=https://techners.net/mezinarodni-online-kasino-jak-se-orientovat-v-svt/]https://techners.net/mezinarodni-online-kasino-jak-se-orientovat-v-svt/[/url] oslovuje stГЎle vГce uЕѕivatelЕЇ svou snadnostГ. ГљДЌastnГci si mohou uЕѕГt oblГbenГ© automaty a tД›ЕЎit se vzruЕЎenГ v pohodlГ.
Mafia casino online EspaГ±a, [url=https://erin43622e43454.wpcomstaging.com/mafia-casino-online-en-espana-tu-mejor-opcion-para/]https://erin43622e43454.wpcomstaging.com/mafia-casino-online-en-espana-tu-mejor-opcion-para/[/url] – La aumento de los centros de juego en lГnea ha alterado el panorama del entretenimiento. Mafia casino online EspaГ±a da una sensaciГіn fresca a los usuarios. La posibilidad de apostar desde cualquier lugar ha sorprendido a numerosos de seguidores.
Оххх буду зубрить новый талант
игры, [url=http://agro-info.biz.ua/wr_board/tools.php?event=profile&pname=ecopodeduni]http://agro-info.biz.ua/wr_board/tools.php?event=profile&pname=ecopodeduni[/url] погружают нас в захватывающие миры, в которых мы можем пробовать долгожданные приключения. Любая игр предлагает возможность осмысливать и стратегически действовать. Помимо этого они сводят людей, позволяя взаимодействовать опытом. Не забудьте шанс погрузиться в пространство игр, где каждый найдет что-то интересное.
To access the platform, use the jaya9 login, [url=https://jugaaduinsan.com/responsible-gaming-a-guide-for-high-rollers/]https://jugaaduinsan.com/responsible-gaming-a-guide-for-high-rollers/[/url]. This step is essential for gaining your account. Once you complete the jaya9 login, you can access various features available to users.
Юрист в Алматы, [url=http://kasprowicz.az.pl/nauczyciele-2/statut/]http://kasprowicz.az.pl/nauczyciele-2/statut/[/url] оказывает профессиональные юридические услуги для клиентов. Квалификация юриста позволяют разглядеть разные правовые вопросы, включая гражданские дела. Юрист в Алматы сопровождает клиента на каждом этапе досудебного процесса, обеспечивая защиту его интересов.
Поразительно! Изумительно!
spil uden om rofus, [url=https://www-l2ti.univ-paris13.fr/~beghdadi/?p=55863]https://www-l2ti.univ-paris13.fr/~beghdadi/?p=55863[/url] kan være en spændende måde at engagere sig i nye aktiviteter. Mange mennesker søger differentielle muligheder for sjov. Det åbner op for opportuniteter til at lære forskelige færdigheder og møde spændende mennesker.
No deposit bonuses with minimal constraints are highly attractive
Here is my web site: https://busymomshelper.com/best-no-deposit-bonus-casino-nz-real-money/
Betwinner casino, [url=https://ny.moskogen.com/nyheter/betwinner-online-bahis-dunyasna-giri/]https://ny.moskogen.com/nyheter/betwinner-online-bahis-dunyasna-giri/[/url] proporciona una amplia variedad de juegos para los jugadores apasionados. Con sus ofertas, es fГЎcil disfrutar una divertida aventura. ВЎГљnete ahora y explora ВЎBetwinner casino!
Прошу прощения, что вмешался… Но мне очень близка эта тема. Могу помочь с ответом.
Для успешного входа к 7k casino вход, [url=https://7k-casino-12l10.blog/]7k casino вход[/url] необходимо правильно набрать свои учетные данные. После этого пользователи могут радоваться разнообразием игр и выгодными бонусами. Не забудьте проверить акции, чтобы максимизировать свои шансы на выигрыш!
|Gambling|Betting|Wagering|Gaming| is increasingly popular with the rise of technology. At Casino Online, [url=https://aroeats.net/aroeats/experience-the-thrill-of-savanna-wins-casino-11]https://aroeats.net/aroeats/experience-the-thrill-of-savanna-wins-casino-11[/url], players can enjoy a wide range of games from the comfort of their homes. |Slots|Table games|Poker|Roulette| and live dealer options provide endless entertainment. Sign up today!
online roulette casinoer, [url=https://toptalents.ca/?p=114450]https://toptalents.ca/?p=114450[/url] tilbyder en spændende mulighed for spillere, der ønsker at prøve lykken. Spillet roulette er populært på grund af den underholdning, det bringer. Belønninger er ofte tilgængelige for nye brugere, hvilket gør spillet endnu bedre. Uanset om man spiller for fornøjelse, online roulette casinoer skaber en værdsat atmosfære.
El auge del casino en lГnea, [url=https://namahitech.com/index.php/2026/01/29/como-apostar-en-vivo-desde-cualquier-lugar-2/]https://namahitech.com/index.php/2026/01/29/como-apostar-en-vivo-desde-cualquier-lugar-2/[/url] ha modificado la forma en que los jugadores disfrutan los juegos de azar. Actualmente, brinda una selecciГіn de opciones.
To access the platform, simply use the jaya 9 login, [url=https://sahrdayalumenacademy.com/exploring-slot-game-demo-mode-practice-and/]https://sahrdayalumenacademy.com/exploring-slot-game-demo-mode-practice-and/[/url]. This process is straightforward and quick, ensuring you can swiftly begin your tasks. Make sure to provide your credentials correctly to miss any login issues. Happy working!
Чтобы купить мебель, [url=http://smarteducation.agencyzed.com/jelegantnost-i-roskosh-kak-kupit-mebel-v-stile/]http://smarteducation.agencyzed.com/jelegantnost-i-roskosh-kak-kupit-mebel-v-stile/[/url] для вашего дома, важно учитывать стиль и качество. Дизайн играет огромную роль в создании уюта. Подбирайте материалы, которые легко чистятся и сохраняют свой вид. Новая мебель преобразит пространство!
та нуууу….. вылаживайте свежое плз ))
7k casino вход, [url=https://7k-casino-847ld.top/]https://7k-casino-847ld.top/[/url] является удобный способ перемещения в мир азартных игр. В данном заведении предоставлены различные игры для любителей. Воспользуйтесь возможность и присоединяйтесь к отличному качеству развлечений!
Вы не правы. Могу отстоять свою позицию. Пишите мне в PM, обсудим.
Casinodays casino, [url=https://days.casino/]Casinodays casino[/url] tilbyr utallige spillmuligheter, slik at bookmakere kan oppleve en spennende verden av spill. Kampanjer er imponerende, og support er alltid beredt. FГёlg Casinodays casino og finn ditt drГёmmespill i dag!
Betwinner casino online, [url=https://testuclalawrev.wpengine.com/exploring-betwinner-the-ultimate-betting-16/]https://testuclalawrev.wpengine.com/exploring-betwinner-the-ultimate-betting-16/[/url] ofrece una experiencia de juego a travГ©s de su plataforma. Con su rica selecciГіn de juegos, los apostadores pueden disfrutar de una gran opciones. Sumado a esto, su interfaz resulta intuitiva, lo que hace mГЎs sencillo la navegaciГіn. Betwinner casino online a su vez cuenta con incentivos atractivas para nuevos jugadores.
Online casinos offer entertaining options for players. Casino Online Games, [url=https://nescapital.eu/index.php/2026/01/19/discover-the-excitement-of-silver-oak-casino-6/]https://nescapital.eu/index.php/2026/01/19/discover-the-excitement-of-silver-oak-casino-6/[/url] provide an immersive experience with multiple choices. Whether you prefer slots or arcade games, there’s something for everyone.
jugar al casino en lГnea, [url=https://www.orcosildigital.com.br/2026/01/29/como-funcionan-las-cuotas-en-apuestas-deportivas-9/]https://www.orcosildigital.com.br/2026/01/29/como-funcionan-las-cuotas-en-apuestas-deportivas-9/[/url] es una experiencia emocionante la que resulta ser te permite disfrutar de un variedad de juegos desde la comodidad de tu hogar. Es posible que puedas probar suerte en ruleta, las tragamonedas o el blackjack, brindando la oportunidad de ganar grandes premios. Adicionalmente hay bonos y promociones los que hacen la experiencia aГєn mГЎs atractiva.
Братва про нас!
DiscoWin Casino, [url=https://www.devzery.com/post/postman-linux-installation-guide]https://www.devzery.com/post/postman-linux-installation-guide[/url] offers an entertaining gaming experience. Players can explore a wide range of attractions. With appealing bonuses and incentives, users can increase their chances of winning big!
echtgeld online roulette, [url=https://visit.ambato.gob.ec/2026/03/03/echtgeld-roulette-casinos-ihr-weg-zum-glucksspiel/]https://visit.ambato.gob.ec/2026/03/03/echtgeld-roulette-casinos-ihr-weg-zum-glucksspiel/[/url] bietet Spielern die Möglichkeit, spannende Erfahrungen zu sammeln. Dieses Spiel begeistert viele Nutzer an, welche auf der Suche nach Spaß sind. Erleben Sie das Aufregung von Echtgeld online roulette und erlangen eine Chance zu Erträge.
Experience the thrill of breathtaking gaming at jaya 9 casino, [url=https://www.pcmhitech.com/the-intriguing-dynamics-of-crash-games-balancing/]https://www.pcmhitech.com/the-intriguing-dynamics-of-crash-games-balancing/[/url], where enthusiasts can enjoy a wide selection of games. From slot machines to real-time experiences, every moment is filled with fun. Join the action and discover why jaya 9 casino is a leading destination for gaming enthusiasts. Don’t miss out on remarkable bonuses to enhance your experience!
I don’t think the title of your article matches the content lol. Just kidding, mainly because I had some doubts after reading the article.
купить мебель, [url=http://laienspielgruppe-bremke.de/?attachment_id=56]http://laienspielgruppe-bremke.de/?attachment_id=56[/url] можно в интернет-магазинах, где представлен широкий выбор моделей. Вы сможете выбрать именно то, что подходит вашему интерьеры. Не забудьте посмотреть на качество и материалы.
По моему мнению, это — ложный путь.
Войти в 7k casino вход, [url=https://7k-casino-nnkle.cfd/]https://7k-casino-nnkle.cfd/[/url] просто и удобно. Следует перейти на официальный сайт и выбрать кнопку входа. Затем, введите свои аккаунт и пароль. Вы тотчас получаете доступ к играм платформы.
Бесподобная фраза, мне нравится 🙂
В увлекательном мире игры, [url=http://michiya-cs.com/userinfo.php?uid=35536]http://michiya-cs.com/userinfo.php?uid=35536[/url] все могут переживать захватывающие моменты. Картинка поражает фантазию, а квесты подталкивают углубляться в сюжет. Взаимодействие с другими персонажами делает процесс ещё более увлекательным.
Casino Online Slots, [url=https://www.lionsroarcapital.com/discover-the-excitement-of-slot-owl-casino-13/]https://www.lionsroarcapital.com/discover-the-excitement-of-slot-owl-casino-13/[/url] are a hit among enthusiasts worldwide. Boasting enticing themes and massive jackpots, they capture many. Explore the fun today!
Acceder a Betwinner login, [url=https://cozumel.space/index.php/2026/02/25/betwinner-your-comprehensive-guide-to-online-3/]https://cozumel.space/index.php/2026/02/25/betwinner-your-comprehensive-guide-to-online-3/[/url] es sencillo y rápido. Puedes войти en tu cuenta desde cualquier dispositivo. Подтвердите, что tus datos son correctos para disfrutar de una experiencia en apuestas. После входа, explora las opciones que te esperan.
El mГ©todo para el registro de casino en lГnea, [url=https://cop.theology.ac.th/requisitos-de-edad-en-maggico-todo-lo-que-2/]https://cop.theology.ac.th/requisitos-de-edad-en-maggico-todo-lo-que-2/[/url] es fГЎcil. Solo necesitas llenar algunos datos personales y crear una secuencia segura. ВЎAsГ podrГЎs disfrutar de diversiГіn sin problemas!
Hey There. I found your weblog the usage of msn. This
is a really smartly written article. I will be
sure to bookmark it and come back to read more of your helpful info.
Thank you for the post. I’ll certainly return.
ОџО№ online casino ОµОѕП‰П„ОµПЃО№ОєОїП…, [url=https://www.daxaccess.com/online-6/]https://www.daxaccess.com/online-6/[/url] П…ПЂОїПѓП„О·ПЃОЇО¶ОїП…ОЅ ПЂОїО»О»ОП‚ ОµП…ОєО±О№ПЃОЇОµП‚ ОЅО± ПЂО±ОЇОѕОµО№П‚ ОґО№О¬П†ОїПЃОїП…П‚ П„ПЌПЂОїП…П‚ П„ПЃО±ПЂОїП…О»ПЊП‡О±ПЃП„П‰ОЅ. О•ОѕОµПЃОµПЌОЅО·ПѓОµ ПЂПЃОїП‰ОёО®ПѓОµО№П‚ ОєО±О№ П„ОїП…П‚ ОєО±О»ПЌП„ОµПЃОїП…П‚ ОєО±П„О±ПѓОєОµП…О±ПѓП„ОП‚ ОіО№О± ОјО±ОіОµП…П„О№ОєОП‚ ОµОјПЂОµО№ПЃОЇОµП‚.
Эта замечательная фраза придется как раз кстати
If you are looking for a thrilling experience, exploring a casino ohne oasis, [url=https://www.jaritafreydank.com/]casino ohne oasis schnelle auszahlung[/url] can be an excellent choice. These establishments offer entertaining games and a vibrant atmosphere. Players can delight in various options, from slots to table games, all while enjoying luxurious settings. With interactive dealers and great service, the experience is truly enjoyable. Don’t miss out on the chance to experience a casino ohne oasis and discover why these venues are so popular!
Я конечно, прошу прощения, но не могли бы Вы расписать немного подробнее.
casino uden rofus, [url=https://ruti-berg.com/casino-uden-dansk-licens-hvad-du-skal-vide-3/]https://ruti-berg.com/casino-uden-dansk-licens-hvad-du-skal-vide-3/[/url] tilbyder en fantastisk spiloplevelse gennem en bred vifte af spil. Brugere kan nyde automater, uden at skulle nogen slags registrering. Det er en udmærket løsning for alle, der ønsker at engagere sig hurtigt.
At joya 9 casino, [url=https://newsscooper.com/the-crucial-role-of-weather-in-cricket-betting-5/]https://newsscooper.com/the-crucial-role-of-weather-in-cricket-betting-5/[/url], players can experience thrilling games ranging from slot machines to table games. With a user-friendly interface, it’s easy to navigate the extensive library. Join the fun today at joya 9 casino!
уже видел, чото не понравился, воздержусь
Авторизация в 7k casino — ключевой момент для начала увлекательной игры. Пользователи могут без труда зарегистрироваться и войти. 7k casino вход, [url=https://7k-casino-0gd12.top/]https://7k-casino-0gd12.top/[/url] обеспечивает быстрое подключение к разнообразному выбору азартных игр. Увлекайтесь азартом с уникальным вызовом.
замена масла в дизельном генераторе, [url=https://dmsto.ru/kak-chasto-nuzhno-menjat-maslo-v-avtomobile/]https://dmsto.ru/kak-chasto-nuzhno-menjat-maslo-v-avtomobile/[/url] — важная процедура, которая продлевает срок службы устройства. Систематическая замена помогает уклониться от дефектов и поддерживать правильное функционирование. Необходимый интервал между заменами масла зависит от интенсивности эксплуатации генератора.
Dieser Anbieter legt Wert auf kontrolliertes Gaming.
my web-site :: https://flagman-casino.eu.com/
Я считаю, что Вы не правы. Пишите мне в PM, поговорим.
Lemon Casino Polska, [url=https://lemoncasino-polska.eu/]recenzja kasyna[/url] to miejsce, gdzie często gra się w różnorodne hazardowe wyzwania. Możesz odkryć emocje gry na żywo oraz rozegrania, jakie urzekną każdego miłośnika zakładów.
In the world of Online Casino, [url=https://www.markettheme.com/demo/onlinecasinoslot36/slotsdynamite-casino-registration-process-step-by/]https://www.markettheme.com/demo/onlinecasinoslot36/slotsdynamite-casino-registration-process-step-by/[/url], players have the chance to discover thrilling games and entertaining bonuses. Providing infinite options, the thrill of winning is just a click away.
Para comenzar tu experiencia de apuestas, es esencial realizar el Betwinner registro, [url=https://mimicodentalhygiene.ca/betwinnergiris-online-bahis-dunyasna-ho-geldiniz/]https://mimicodentalhygiene.ca/betwinnergiris-online-bahis-dunyasna-ho-geldiniz/[/url]. Este proceso te permite crear tu cuenta y acceder a las variadas opciones de juego. DespuГ©s de completar el registro, podrГЎs participar en tus juegos favoritos y disfrutar de bonos exclusivas. ВЎNo dudes en unirte ahora!
El sector del casino en lГnea, [url=https://showmeimprints.com/betting29011/encontrar-tu-juego-ideal-guia-para-elegir-el-juego/]https://showmeimprints.com/betting29011/encontrar-tu-juego-ideal-guia-para-elegir-el-juego/[/url] brinda una vivencia Гєnica. Involucrarse en juegos en slots, pГіker en lГnea y mГЎs, proporciona diversiГіn y sorpresa. AdemГЎs, muchos pГЎginas ofrecen recompensas atractivos que fomentan la participaciГіn. Disfrutar de un casino en lГnea puede ser una excelente satisfacciГіn para los amantes del diversiГіn.
Online Casino, [url=https://thisplacematters.ca/?p=139292]https://thisplacematters.ca/?p=139292[/url] позволяет игрокам ощутить азарт от игры. Разнообразие игр содержит игровые автоматы и поощрения для новых участников.
Ага, попался!
Игроки могут легко получить доступ к играм, используя 7k casino вход, [url=https://7k-casino-kowvk.top/]https://7k-casino-kowvk.top/[/url]. Это удобный метод для начала. После регистрации пользователи могут получать удовольствие от множества захватывающих игр.
Prosta forma aborcji to inicjatywa informacyjna, ktora pomaga dostep do sprawdzonych danych na temat przerywania ciazy. Serwis jest nastawiony na prawach osob w ciazy. Ta inicjatywa tlumaczy, jakie opcje sa dostepne w trudnych momentach. Na stronie mozna znalezc jasne instrukcje dotyczace metod farmakologicznych. Priorytet polozono na komfort psychiczny. Informacje sa zrozumiale i wolne od nacisku. Projekt podkresla, ze decyzja nalezy do kobiety. Strona pomaga zrozumiec w temacie procedur. Opisane sa zarowno mozliwe objawy, jak i zalecenia. Osoba szukajaca informacji dowiaduje sie, czego sie spodziewac. Serwis nie ocenia, lecz wspiera. Prosta aborcja pokazuje, ze aborcja jest zagadnieniem zdrowia reprodukcyjnego. W tresciach zaznaczane jest znaczenie samostanowienia. Strona reaguje na watpliwosci. Prosta aborcja systematyzuje skomplikowane informacje. Dzieki temu latwiej zrozumiec sytuacje. Tresci sa zgodne z wiedza medyczna. Uzytkownicy moga poczuc sie pewniej. Strona nie narzuca rozwiazan. Projekt informacyjny promuje samodzielnosc. Kazda sytuacja jest rozpatrywana osobno. Serwis pomaga oddzielic fakty od mitow. Przejrzystosc to kluczowe elementy projektu. Strona dostarcza wiedzy. Prosta aborcja udowadnia, ze dostep do informacji jest kluczowy. Calosc zostala opracowana z mysla o czytelnosci. Dzieki temu informacje sa latwo dostepne. Prosta aborcja dazy do wspieraniu swiadomych decyzji.
Prosta forma aborcji to platforma wsparcia, ktora umozliwia dostep do sprawdzonych danych na temat przerywania ciazy. Serwis skupia sie na prawach osob w ciazy. Ta inicjatywa wyjasnia, jakie mozliwosci sa dostepne w trudnych momentach. Na stronie mozna znalezc konkretne informacje dotyczace aborcji tabletkami. Duzy nacisk polozono na bezpieczenstwo zdrowotne. Informacje sa napisane prostym jezykiem i pozbawione ocen. Prosta aborcja podkresla, ze decyzja nalezy do osoby w ciazy. Strona porzadkuje wiedze w temacie kolejnych krokow. Opisane sa zarowno mozliwe objawy, jak i wazne wskazowki. Czytelnik dowiaduje sie, jak sie przygotowac. Serwis nie moralizuje, lecz informuje. Prosta aborcja opisuje, ze aborcja jest kwestia zdrowotna. W tresciach podkreslane jest znaczenie dostepu do wiedzy. Strona reaguje na watpliwosci. Prosta aborcja upraszcza skomplikowane informacje. Dzieki temu latwiej zrozumiec sytuacje. Tresci sa aktualne. Uzytkownicy moga lepiej zrozumiec swoja sytuacje. Strona nie wywiera presji. Prosta aborcja stawia na autonomie. Kazda sytuacja jest rozpatrywana osobno. Serwis prostuje nieprawdziwe informacje. Rzetelnosc to wazne cechy projektu. Strona dostarcza wiedzy. Ta platforma przypomina, ze dostep do informacji jest podstawowym prawem. Calosc zostala opracowana z mysla o prostocie. Dzieki temu tresci sa przystepne. Prosta aborcja dazy do wspieraniu swiadomych decyzji.
Ein solides Casino besitzt eine offizielle EU Lizenz.
My webpage … Verwalte deine Bankroll klug [https://www.sic-processing.com/latest-royal-ace-casino-no-deposit-bonus-codes/]
замена масла в дизельном генераторе, [url=http://kovkaurala.ru/portfolio-items/kovanaya-vhodnaya-gruppa-kozyirek-ograzhdenie-perila-urna-i-tsvetochnitsa/kuznitsyi-urala-kovanyie-perila-hohryakova-74-07/]http://kovkaurala.ru/portfolio-items/kovanaya-vhodnaya-gruppa-kozyirek-ograzhdenie-perila-urna-i-tsvetochnitsa/kuznitsyi-urala-kovanyie-perila-hohryakova-74-07/[/url] — это важный процесс, который способствует надежную работу устройства. Своевременная замена масла помогает избежать неисправностей и укрепляет срок службы генератора. Не забывайте подбирать качественные масла, чтобы сохранить оптимальную производительность.
Welcome to the exciting universe of jaya9 casino, [url=https://www.armazenseg.com.br/2026/01/20/top-mobile-fishing-games-optimized-for-ultimate/]https://www.armazenseg.com.br/2026/01/20/top-mobile-fishing-games-optimized-for-ultimate/[/url]! Here, enthusiasts can explore a diverse selection of games. Whether you prefer slots or table games, there’s a game for everyone. Join us and try your luck at jaya9 casino now!
Internet gambling sites have revolutionized the gaming experience. With Casino Online, [url=http://tuankiethotel.com/experience-the-magic-of-slots-dreamer-casino-10/]http://tuankiethotel.com/experience-the-magic-of-slots-dreamer-casino-10/[/url], players can enjoy entertaining games from the comfort of their homes. Rewards enhance the fun, while safe payment methods ensure peace of mind. Players are drawn to a wide array of games available, from classic slots to live dealer experiences.
Los casinos han ganado fama en los Гєltimos aГ±os. La variedad de juegos y ofertas hacen que sea divertido disfrutar de la experiencia desde casa. ВЎDescubre la emociГіn de jugar en un casino en lГnea, [url=http://pixal.ai/2026/01/29/retiro-de-ganancias-en-maggico-todo-lo-que/]http://pixal.ai/2026/01/29/retiro-de-ganancias-en-maggico-todo-lo-que/[/url]!
Betwinner casino, [url=https://amuanhanh.vn/betwinner-bd-your-ultimate-guide-to-online-betting-2/]https://amuanhanh.vn/betwinner-bd-your-ultimate-guide-to-online-betting-2/[/url] disponibiliza una amplia opciones de apuestas. Los aficionados pueden gozar de juegos de azar, juegos de mesa y mucho mГЎs. Sumado a esto, las recompensas son tentadoras, de modo que transforman a Betwinner casino como una decisiГіn excelente para entretenerse.
В этом что-то есть. Буду знать, благодарю за помощь в этом вопросе.
Playing at internet casinos offers entertainment and accessibility. With casiny online casino, [url=https://casinypride.com/bonuses/]casiny casino promo codes[/url], gamblers can enjoy countless game selections right from any location.
Online Casino Games, [url=https://ironcladgroupltd.co.uk/2026/02/06/discover-the-thrills-of-online-casino-agent-spins/]https://ironcladgroupltd.co.uk/2026/02/06/discover-the-thrills-of-online-casino-agent-spins/[/url] – Internet Casino Games offer fun and diversity for players. From video slots to card games, there’s something for everyone. Experience the excitement of winning big!
Я надеюсь завтра будет…
7k casino, [url=https://7k-casino-vi6br.cfd/]https://7k-casino-vi6br.cfd/[/url] предлагает уникальные возможности для поклонников азартных игр. Пользователи могут наслаждаться большого выбора игр. Создать аккаунт очень легко, а бонусы делают развлечение еще более увлекательной. Не упустите шанс испытать счастье на 7k casino!
Мне кажется это замечательная идея
В мире гейминга стратегия и планировочное мышление играют важную роль. Многие игры, [url=http://balaklavskiy-16.ru/user/19798/]http://balaklavskiy-16.ru/user/19798/[/url] требуют от игроков реакции. В играх каждый шаг может стать решающим. Также важно учитывать сотрудничество с другими. Успех зависит от удачного решения. Не забывайте проводить анализ своих ошибок, чтобы улучшить свои навыки.
досуг современных мужчин, [url=http://kerdaha.ru/2020/08/30/%D0%B3%D0%BE%D1%80%D0%BE%D0%B4-%D0%BA%D0%B0%D1%80%D0%B0%D0%B1%D1%83%D0%BB%D0%B0%D0%BA-%D0%BE%D1%82%D0%BC%D0%B5%D1%87%D0%B0%D0%B5%D1%82-25-%D0%BB%D0%B5%D1%82%D0%B8%D0%B5/7b9dd208-0552-40e1-818d-731b23c266e1/]http://kerdaha.ru/2020/08/30/%D0%B3%D0%BE%D1%80%D0%BE%D0%B4-%D0%BA%D0%B0%D1%80%D0%B0%D0%B1%D1%83%D0%BB%D0%B0%D0%BA-%D0%BE%D1%82%D0%BC%D0%B5%D1%87%D0%B0%D0%B5%D1%82-25-%D0%BB%D0%B5%D1%82%D0%B8%D0%B5/7b9dd208-0552-40e1-818d-731b23c266e1/[/url] может быть разнообразным или динамичное времяпрепровождение. Активные игры становятся популярными, к тому же увлечение музыкой дарит новые горизонты. Мужчины посещают с друзьями, участвуют в событиях и находят время для размышлений.
In recent years, virtual betting has seen a surge in popularity. Casino Online Games, [url=https://eng.dracaena.cn/the-ultimate-guide-to-casino-slots-n-bets-5/]https://eng.dracaena.cn/the-ultimate-guide-to-casino-slots-n-bets-5/[/url] offer thrills and ease to players worldwide. With diverse options, from slot machines to card games, there’s something for everyone. Players can indulge in the thrill of winning from the convenience of their homes. With bonuses and high-quality graphics, the adventure is unmatched!
In the world of virtual casinos, players seek thrills at their fingertips. The rise of online casino, [url=https://store.filgolf.com/?p=41348]https://store.filgolf.com/?p=41348[/url] platforms has made it easier than ever for enthusiasts to immerse themselves in their favorite games anytime, anywhere.
jugar al casino en lГnea, [url=https://sharpeedgebuilding.com.au/casinobest30012/tiempos-de-procesamiento-de-retiros-lo-que/]https://sharpeedgebuilding.com.au/casinobest30012/tiempos-de-procesamiento-de-retiros-lo-que/[/url] brinda emociГіn sin salir de casa. Las posibilidades son diversas, desde mГЎquinas tragamonedas hasta apuestas deportivas.
Я думаю, что Вы ошибаетесь. Давайте обсудим. Пишите мне в PM.
casino uden om rofus, [url=https://www.b8-sport.net/archives/168795]https://www.b8-sport.net/archives/168795[/url] tilbyder en verden af underholdning, hvor spillere kan nyde forskellige spil uden besvær. Folk kan uafhængigt vælge deres bedste spil og smage på den spændende atmosfære, som kasinoer præsenterer. Det er en chance for at nøde sig og måske få nogle præmier.
Betwinner casino online, [url=https://h3betlink.com/betwinner-your-ultimate-betting-destination-27/]https://h3betlink.com/betwinner-your-ultimate-betting-destination-27/[/url] ofrece una experiencia mГЎs en juegos de azar. Gracias a su variada selecciГіn de juegos de mesa, los jugadores aprecian de emociones sin igual. Adicionalmente su plataforma es segura, por lo que puedes participar con tranquilidad. ВЎГљnete a Betwinner casino online hoy!
Online Casino Slots, [url=https://generationsforlife.be/wp/2026/02/06/experience-the-best-at-7gold-casino-online/]https://generationsforlife.be/wp/2026/02/06/experience-the-best-at-7gold-casino-online/[/url] offer an exciting way to discover the domain of online gaming. Users can turn the reels and challenge their luck while acquiring bonuses.
Экзотические фрукты, [url=http://www.michelblancmusicien.com/contact-2]http://www.michelblancmusicien.com/contact-2[/url] являются уникальную категорию плодов, которые поражают разнообразным вкусом и ассоциацией. Лонган — это только примеров, что стоит попробовать хотя бы раз. Эти ягоды привозят из далеких стран, и они способны поразить своим внешним видом.
During the world of gaming, Casino Online Slots, [url=https://www.sisube.com/discover-the-excitement-of-spinscastle-casino-uk/]https://www.sisube.com/discover-the-excitement-of-spinscastle-casino-uk/[/url] present fun and opportunities to win big jackpots. Players can enjoy a range of themes, designs and music. With bonuses and promotions, the attraction of these games continues to expand.
El sistema de registro de casino en lГnea, [url=https://biurogama.pl/como-usar-cash-out-en-apuestas-deportivas-6/]https://biurogama.pl/como-usar-cash-out-en-apuestas-deportivas-6/[/url] es vital para acceder a entretenimiento digital. Ejecutar este procedimiento permite aprovechar de bonos exclusivos. AsegГєrate de introducir tus informaciones correctamente para evitar problemas futuros.
This facet of casino sports betting, [url=https://user-83991389-work.colibriwp.com/comprardiplomaonline/betwinner-la-plataforma-de-apuestas-que-desafia-el/]https://user-83991389-work.colibriwp.com/comprardiplomaonline/betwinner-la-plataforma-de-apuestas-que-desafia-el/[/url] offers thrilling possibilities for punters. Using various tactics, players can elevate their chances of winning.
Para acceder a Betwinner login, [url=https://www.madebypbd.com/2026/02/25/betwinner-en-yi-bahis-deneyimi-cin-rehber/]https://www.madebypbd.com/2026/02/25/betwinner-en-yi-bahis-deneyimi-cin-rehber/[/url], simplemente debes ingresar tus credenciales. Una vez que estГ©s dentro, podrГЎs disfrutar de una amplia variedad de juegos y apuestas en lГnea. Puede estar disponible para usuarios en diferentes terminales. AsegГєrate de mantener tus datos de acceso para una experiencia Гntima. ВЎDisfruta de la emociГіn de Betwinner login y apuesta hoy mismo!
Wagering at an Online Casino, [url=http://www.tomei-acne.com/discover-the-wonders-of-aztec-paradise-casino-11/]http://www.tomei-acne.com/discover-the-wonders-of-aztec-paradise-casino-11/[/url] offers entertaining experiences. Gamers can enjoy a variety of options from anywhere. With rewards, it’s easy to boost winning potential.
Есть еще несколько недостатков
jeet city casino, [url=https://jeet-city-de.com/app/]learn more[/url] – Jeet City Casino showcases an exciting range of entertainment. For fans of slots, table games, or real-time gaming, there’s something for everyone. Experience the thrill of winning while enjoying luxurious surroundings and top-notch service.
Amid the thrilling world of Online Casino, [url=https://childfingersafety.com/discover-the-thrills-of-online-casino-spintime/]https://childfingersafety.com/discover-the-thrills-of-online-casino-spintime/[/url], players can experience various games that give chances for entertainment and potential winnings. Every round brings new opportunities to achieve big, leading to a highly enjoyable experience. Embrace the adventure!
продукты с доставкой, [url=http://mjrams.se/index.php/2021/03/07/hello-world/]http://mjrams.se/index.php/2021/03/07/hello-world/[/url] заменяют традиционные закупки. Это удобно, просто. Вы можете выбрать разные ассортимент и получить свежие ингредиенты прямо на дом. Без выхода из дому вы экономите время и силы.
Доброго времени суток!
Хочу поделиться со всеми женщинами и мужчинами, кому нужна или будет нужна виза в Китай или КНР!
Дело в том, что недавно был в загранке или зарубежом, т.е. в Китае, а у них возникла серьезная и неразрешимая проблема.
Вы представляете, они хотели набрать сайт русскими буквами, а таких незнакомых и непонятных букв там нет и небыло.
А потом они узнали, что на самом деле сайт называется непонятными иероглифами, т.е. цифры, черточки и буквы расположенные в хоатичном и беспорядочном беспорядке.
Через долгое время безуспешных и неудачных попыток нашли они сайт с понятными и знакомыми английскими буквами.
Благо к счастью и радости, что в каждой стране идут вместе с местным алфавитом английский алфавит по умолчанию.
В общем, если вы хотите найти, визовый центр Китая, оформить визу в Китай, oformit-vizu-v-kitay.ru и т.д., например:
[url=https://oformit-vizu-v-kitay.ru/]тип визы l[/url]
Тогда вам нужно прямо сейчас перейти на сайт Визовый центр Китая и узнать все подробности по семейная виза в Китай, срочная виза в Китай, туристическая виза в Китай, бизнес виза в Китай, рабочая виза в Китай, студенческая виза в Китай, водительская виза в Китай в Москве, Московской области и т.д. https://oformit-vizu-v-kitay.ru/ .
Обязательно переходите на сайт Визового центра Китая оформить визу в Китай ру, изучайте информацию и сохраняйте в закладки, не забудьте записать номер телефона 8-800-201-26-12 и адрес сайта.
До новых встреч!
casino en lГnea, [url=http://www.mkmn.in/explorando-el-fascinante-mundo-de-los-juegos-de-3/]http://www.mkmn.in/explorando-el-fascinante-mundo-de-los-juegos-de-3/[/url] – Ese casino en lГnea proporciona variedad de opciones de entretenimiento. Los entusiastas tienen acceso a jugar desde su hogar.
Betwinner registro, [url=https://harmonyhomeware.lk/your-ultimate-guide-to-betwinner/]https://harmonyhomeware.lk/your-ultimate-guide-to-betwinner/[/url] es un proceso sencillo y rГЎpido que permite a los usuarios acceder a una amplia variedad de opciones de apuesta. Crear una cuenta es fundamental para disfrutar de las diversas funcionalidades que ofrece esta plataforma. Al momento completar el registro, podrГЎs investigar desde apuestas deportivas hasta juegos de casino. Considera aprovechar las ofertas disponibles una vez que finalices tu Betwinner registro.
At the entertaining world of Casino Online, [url=https://thuanthienkiem.mobi/discover-the-wonders-of-aztec-paradise-casino-your/]https://thuanthienkiem.mobi/discover-the-wonders-of-aztec-paradise-casino-your/[/url], gamblers can enjoy a variety of offers. With slots to table games, selections are endless. Sign up today and uncover the top experiences Casino Online has to offer!
Какая занимательная фраза
В последние годы индустрия игр находится в стремительный рост как никогда. игры, [url=http://bl.com.tw/index.php?title=%D0%A1%D0%BC%D0%BE%D1%82%D1%80%D0%B8%20%D1%81%D0%B5%D1%80%D0%B8%D0%B0%D0%BB%20%D0%BE%D0%BD%D0%BB%D0%B0%D0%B9%D0%BD]http://bl.com.tw/index.php?title=%D0%A1%D0%BC%D0%BE%D1%82%D1%80%D0%B8%20%D1%81%D0%B5%D1%80%D0%B8%D0%B0%D0%BB%20%D0%BE%D0%BD%D0%BB%D0%B0%D0%B9%D0%BD[/url] стали важной компонентой нашей жизни. Консоли, ПК и мобильные устройства предоставляют игрокам огромное количество жанров и стилей. В этом разнообразии хочется выделить игры, которые предлагают необычное развитие событий, а также интересный геймплей.Одной из таких игр является недавняя разработка студии, которая погружает нас в ослепительный мир, полный захватывающих событий. Игроки могут исследовать обширные локации, взаимодействовать с NPC и принимать важные решения, которые влияют на ход игры.Современные игры также потрясают своей графикой и музыкальным сопровождением. Каждый элемент доработан до мелочей, что создает неповторимую атмосферу. К тому же, большинство игр предлагают мультиплеерный режим, что позволяет игрокам объединяться и делиться впечатлениями.Не менее важным аспектом является разработка мультиплатформенных игр, которые доступны каждому. Это расширяет аудиторию и позволяет большему числу людей наслаждаться любимыми приключениями в виртуальном мире. Время, проведенное за играми, становится не только способом увлечения, но и средством общения.
During the realm of leisure, casino online, [url=https://uptodatepaper.com/2026/02/04/how-to-register-on-betwinner-a-step-by-step-guide/]https://uptodatepaper.com/2026/02/04/how-to-register-on-betwinner-a-step-by-step-guide/[/url] has gained immense popularity. Users can delight in a diverse array of options from the ease of their houses.
Within the world of online gambling, Casino Online, [url=https://www.is-projects.it/site/experience-the-thrill-with-telbet-casino/]https://www.is-projects.it/site/experience-the-thrill-with-telbet-casino/[/url] has earned immense popularity. Players enjoy the convenience of playing from home, while diverse selections appeal to all tastes. Bonuses further enhance the experience, making it enjoyable. Join the fun and explore the vast options available today!
成人娱乐 可通过 可靠且经过验证 的网站获取。探索 可靠平台
以获得高质量内容。
Take a look at my blog post – buy xanax without prescrition
Hi there! I know this is kinda off topic but I’d figured I’d ask.
Would you be interested in exchanging links or maybe guest authoring a blog article or
vice-versa? My site covers a lot of the same topics as
yours and I believe we could greatly benefit from each other.If you might be interested feel free to send me an e-mail.
I look forward to hearing from you! Excellent blog by
the way!
продукты с доставкой, [url=https://www.hkiarb.org.hk/zh-hans/?attachment_id=75102]https://www.hkiarb.org.hk/zh-hans/?attachment_id=75102[/url] позволяют сэкономить время и силы. Из-за этого можно обладать свежими продуктами, не выходя из дома. Перевозка обширного ассортимента делает процесс удобным.
El ГЎmbito de los salones en lГnea ha ganado un desarrollo significativo. Hoy en dГa, los jugadores disfrutan de la comodidad de jugar en casa. casino en lГnea, [url=https://www.mubashop.it/2026/01/30/nuevos-juegos-en-el-casino-descubre-las-ultimas/]https://www.mubashop.it/2026/01/30/nuevos-juegos-en-el-casino-descubre-las-ultimas/[/url] ofrece una amplia gama de entretenimiento y promociones que interesan a nuevos clientes. Con tecnologГas avanzadas, la vivencia de juego se vuelve mГЎs dinГЎmica.
Совершенно случайное совпадение
online casino uden rofus, [url=https://www.ekolive.com.tr/udenlandske-casino-en-guide-til-spil-og-sikkerhed/]https://www.ekolive.com.tr/udenlandske-casino-en-guide-til-spil-og-sikkerhed/[/url] tilbyder en spændende måde at spille på, når du kan handle et væld af spil. Ved disse platforme er du engagere i dit eget tempo og finde glæde i spil uden begrænsninger.
Betwinner casino, [url=https://baigandco.pk/everything-you-need-to-know-about-1xbet-your-4/]https://baigandco.pk/everything-you-need-to-know-about-1xbet-your-4/[/url] proporciona una experiencia de juego inigualable. Utilizando la amplia diversidad de entretenimiento, los apostadores pueden experimentar de una fascinante. No rechaces explorar las oportunidades que te brinda Betwinner casino. Entra en reino del juego en este momento.
Casino Online Games, [url=https://equip.gtmarine.ru/the-ultimate-guide-to-casino-betfoxx-uk-a-new-era-2/]https://equip.gtmarine.ru/the-ultimate-guide-to-casino-betfoxx-uk-a-new-era-2/[/url] feature a thrilling experience right from your home. Players can enjoy various games at any time. With a extensive selection, Casino Online Games appeal to all types of enthusiasts.
Замечательно, это очень ценная информация
joycasino казино, [url=https://t.me/joy_casino_news]https://t.me/joy_casino_news[/url] предлагает обширный выбор игр от популярных разработчиков. Посетители могут наслаждаться высокими шансами на выигрыш и щедрыми бонусами. В интерфейсе ресурса всё удобно для удобства пользователей.
online casino, [url=https://florida-catastrophic-injury-attorney.com/decouvrez-le-bonus-betwinner-maximisez-vos-gains-5/]https://florida-catastrophic-injury-attorney.com/decouvrez-le-bonus-betwinner-maximisez-vos-gains-5/[/url] provides an exciting way to explore thrilling games from the comfort of your home. With a variety of options, players can challenge their luck and strategies anytime.
Casino Online Games, [url=http://nekokapuri.s1009.xrea.com/2026/01/21/easy-steps-for-tikitaka-casino-registration/]http://nekokapuri.s1009.xrea.com/2026/01/21/easy-steps-for-tikitaka-casino-registration/[/url] доступны шанс играть РІ увлекательные РёРіСЂС‹ без необходимости РёР· РґРѕРјР°. Рграя РІ Casino Online Games, можно получить великолепные вознаграждения.
V poslednej dobe sa na trhu objavili modernГ© hernГ© platformy, ktorГ© priЕҐahujГє hrГЎДЌov. nove slovenske casino, [url=http://banya.cartel.ua/eskills/online-kasina-s-nizkym-vkladom-zabava-na-dosah/]http://banya.cartel.ua/eskills/online-kasina-s-nizkym-vkladom-zabava-na-dosah/[/url] ponГєka ЕЎirokГЅ vГЅber hier a vГЅhodnГ© bonusy. HrГЎДЌi si majГє moЕѕnosЕҐ vychutnaЕҐ svojich obДѕГєbenГЅch hieranГ kedykoДѕvek a kdekoДѕvek.
Hoy, jugar al casino en lГnea, [url=https://clubkonkan.com/bonos-disponibles-en-novibet-casino-descubre-las-3/]https://clubkonkan.com/bonos-disponibles-en-novibet-casino-descubre-las-3/[/url] presenta una vivencia Гєnica. La gama de juegos es notable, y la posibilidad de obtener grandes premios estГЎ un atractivo fascinante para todos.
Betwinner casino online, [url=http://www.chikako-oguma.com/todo-lo-que-necesitas-saber-sobre-1xbet-apuestas-y-2/]http://www.chikako-oguma.com/todo-lo-que-necesitas-saber-sobre-1xbet-apuestas-y-2/[/url] ofrece una experiencia Гєnica para todos entusiastas de los juegos de azar. Con su amplia selecciГіn de juegos, los participantes pueden gozar de una noche inolvidable en este plataforma.
Casino Online Slots, [url=http://www.docarnettefoundation.org/unleash-your-winning-potential-at-betfoxx-casino/]http://www.docarnettefoundation.org/unleash-your-winning-potential-at-betfoxx-casino/[/url] feature a exciting gaming adventure. Players are able to delight in various themes and reward features. Winning big prizes is just a spin in sight.
Casino Online Slots, [url=https://www.collegeincubators.ca/2026/01/21/tropical-wins-casino-registration-process-step-by/]https://www.collegeincubators.ca/2026/01/21/tropical-wins-casino-registration-process-step-by/[/url] – Casino Online Slots предоставляют геймерам удовольствие выиграть значительные РїСЂРёР·С‹ СЃ любого устройства. Разработка интерфейса дает возможность удовлетворению разнообразных РёРіСЂРѕРєРѕРІ.
Este juego de tragaperras llamado sweet bonanza casino, [url=https://sakumc.org/xe/vbs/4390765]https://sakumc.org/xe/vbs/4390765[/url] ofrece la posibilidad de ganar grandes premios. A travГ©s de coloridos frutos, su giro es un experiencia inolvidable. No pierdas tu oportunidad de disfrutar este pasatiempo espectacular.
casino sports betting, [url=https://app.segvidabrasil.com.br/exploring-the-thrills-of-bk33-bet-a-comprehensive-2/]https://app.segvidabrasil.com.br/exploring-the-thrills-of-bk33-bet-a-comprehensive-2/[/url] delivers excitement and thrills for fans. As additional people engage in this activity, the methods to winning change constantly. Understanding probabilities is crucial for success.
nove slovenske casino, [url=https://sakura-flytime.com/nove-online-kasina-na-slovensku-objavte-nove/]https://sakura-flytime.com/nove-online-kasina-na-slovensku-objavte-nove/[/url] ponГєka zaujГmavГ© zГЎЕѕitky pre hrГЎДЌov. SkvelГ© bonusy a zaujГmavГ© hry podnecujГє mnohГЅch. Istota hrГЎДЌov je prioritou, ДЌo zaruДЌuje prГjemnГЅ pocit. UЕѕite si moЕѕnosti online hazardu na najnajnovЕЎej platforme.
По моему тема весьма интересна. Предлагаю Вам это обсудить здесь или в PM.
игры, [url=https://pattern-wiki.win/index.php?title=%D0%90%D0%BD%D0%B8%D0%BC%D0%B0%D1%86%D0%B8%D0%B8%20%D0%B2%20%D0%B8%D0%BD%D1%82%D0%B5%D1%80%D0%BD%D0%B5%D1%82%D0%B5%20%D0%B1%D0%B5%D1%81%D0%BF%D0%BB%D0%B0%D1%82%D0%BD%D0%BE]https://pattern-wiki.win/index.php?title=%D0%90%D0%BD%D0%B8%D0%BC%D0%B0%D1%86%D0%B8%D0%B8%20%D0%B2%20%D0%B8%D0%BD%D1%82%D0%B5%D1%80%D0%BD%D0%B5%D1%82%D0%B5%20%D0%B1%D0%B5%D1%81%D0%BF%D0%BB%D0%B0%D1%82%D0%BD%D0%BE[/url] – В последние годы игры развились в популярности, становясь важной частью нашей жизни. Игры дарят восторг и позволяют людям уйти от повседневных забот. Каждая игра — это особенный мир, полный исследований, где геймеры могут войти в увлекательный процесс.Игровая индустрия предлагает разнообразные типы, от экшн до тактических. Любой игра имеет уникальный переживание и мотивирует игроков анализировать. Важно помнить, что это занятие — не только развлечение, но и способ развивать навыки коллективного взаимодействия.С каждым годом визуальные технологии становятся все более реалистичными, что придает глубину в игровой процесс. От игр с совокупными действиями до независимых разработок, сфера предоставляет широкий выбор возможностей для каждого. Таким образом, игры остаются источником для задач, продолжая завораживать миллионы людей по всему миру.
In the world of online gaming, Casino Online, [url=https://kokoro.stz-sibg-d5.net/2026/02/08/the-ultimate-guide-to-online-betting-with-betgem/]https://kokoro.stz-sibg-d5.net/2026/02/08/the-ultimate-guide-to-online-betting-with-betgem/[/url] offers a dynamic experience for players. With numerous games to choose from, enthusiasts can enjoy poker from the comfort of their homes. A secure platform ensures that your money and data are protected, making every game enjoyable. Join the group of players and discover the pleasure that Casino Online brings to life.
Замечательно, весьма полезное сообщение
досуг современных мужчин, [url=https://skeeks.com/~redirect?url=aHR0cHM6Ly9vcGVuZGVjb3IucnUvcG9sZXpueWUtc3RhdGkvcHJpY2hpbnktemFuaW1hdHN5YS1zZWtzb20ta2FrLW1vemhuby1jaGFzaGhl]https://skeeks.com/~redirect?url=aHR0cHM6Ly9vcGVuZGVjb3IucnUvcG9sZXpueWUtc3RhdGkvcHJpY2hpbnktemFuaW1hdHN5YS1zZWtzb20ta2FrLW1vemhuby1jaGFzaGhl[/url] — это важная часть жизни, где современные мужчины могут отдыхать. Активные увлечения, путешествия и занятия рукоделием становятся известными для времяпрепровождения.
Para acceder a su cuenta, simplemente realice el acceso en Betwinner login, [url=https://aurora-dream.com/%iBROW%20&%20LASH%/]https://aurora-dream.com/%iBROW%20&%20LASH%/[/url], donde encontrarГЎ todas las opciones de apuestas. No olvide que es importante proteger su datos.
In the world of gaming, Online Casino, [url=http://hotrocovid19.net/explore-triumph-online-casino-uk-a-comprehensive/]http://hotrocovid19.net/explore-triumph-online-casino-uk-a-comprehensive/[/url] has become increasingly popular among enthusiasts. Players enjoy the comfort of playing from home. With various games available, the thrill is unmatched.
El mundo de los casas de juego online ha adquirido gran reconocimiento. En Casino Online, [url=https://thisplacematters.ca/?p=139265]https://thisplacematters.ca/?p=139265[/url], los jugadores pueden gozar de juegos desde la calidez de su hogar. AdemГЎs, la amplitud de opciones ofrecidas es asombrosa.
utländska casinon utan svensk licens, [url=https://golftower.dreamhosters.com/?p=62109]https://golftower.dreamhosters.com/?p=62109[/url] ger spelare val till ökat bonusar och flera spel. Med flera spelalternativ kan variationen förbättras. Besök plattformar för mer information.
наканеццто! спасибо.!!!!!
I dagens samfund er der mange muligheder for underholdning. spil uden om rofus, [url=https://content-qa.fortuneconferences.com/bookmakere-uden-rofus-find-de-bedste-odds/]https://content-qa.fortuneconferences.com/bookmakere-uden-rofus-find-de-bedste-odds/[/url] giver en unik chance for at udforske nye verdener. Dette kan tage dig på eventyr, som du kan kæmpe med venner og familie. Med diverse genrer og temaer, er der noget for enhver smag. Uanset om du foretrækker action eller strategi, er der altid en ny udfordring at tage fat på.
Отличный вопрос
7k casino, [url=https://7k-casino-f78o4.life/]7k casino официальный сайт вход[/url] – 7k casino предлагает богатый выбор игр, к которым относятся слоты. Скидки привлекают молодых игроков. Присоединяйтесь или узнайте свой удачу в 7k casino.
In the world of virtual entertainment, casino online, [url=https://dev.smtcriativa.com.br/dreamgf-ai-your-personal-ai-companion-for-dreamy/]https://dev.smtcriativa.com.br/dreamgf-ai-your-personal-ai-companion-for-dreamy/[/url] offers thrilling experiences. Players can enjoy a variety of games, from slots to card games. With the convenience of playing from home, casino online is rapidly becoming a favorite among gamblers.
Online Casino, [url=https://scuml.org/registration2/?p=946542]https://scuml.org/registration2/?p=946542[/url] открывает обширный ассортимент игр, где каждый могут испытывать нечто необычное. Тут каждый имеет возможность попробовать счастье и заработать призы!
Betwinner registro, [url=http://www.accountingforchange.co.uk/the-ultimate-guide-to-1xbet-betting-features-and-8/]http://www.accountingforchange.co.uk/the-ultimate-guide-to-1xbet-betting-features-and-8/[/url] es un proceso sencillo que permite a los usuarios acceder a una plataforma de apuestas en lГnea. Registrarse es rГЎpido y exige solo unos minutos. Cuando completar el formulario, puedes deleitarte de las diversas opciones de juego.
Virtual casinos становится РІСЃРµ более популярным, Р° Casino Online, [url=https://localesguarne.com/discover-the-thrills-of-viperspin-casino-5/]https://localesguarne.com/discover-the-thrills-of-viperspin-casino-5/[/url] предлагает замечательные возможности для РёРіСЂ. РРіСЂРѕРєРё РјРѕРіСѓС‚ погружаться РІ множество событий, РЅРµ выходя РёР· РґРѕРјР°. Присоединяйтесь Рє РјРёСЂСѓ развлечений РїСЂСЏРјРѕ сейчас!
Бесподобная тема, мне интересно 🙂
n1bet casino, [url=https://play.google.com/store/apps/details?id=com.boo.m.one.n&gl=de&hl=de]n1 casino germany[/url] ist ein beliebter Ort für Spieler, die Unterhaltung suchen. Hier finden Sie zahlreiche Spielen, die beeindruckende Animationen bieten. Die Webseite ist benutzerfreundlich. Bei n1bet casino können Sie fantastische Auszahlungen erzielen. Die Hilfe ist immer erreichbar, was die Erfahrung weiter optimiert.
Si buscas el mejor casino en lГnea, [url=https://www.barnardaccounting.com/casino-en-vivo-de-yajuego-la-experiencia-de-juego-3/]https://www.barnardaccounting.com/casino-en-vivo-de-yajuego-la-experiencia-de-juego-3/[/url], tendrГЎs la oportunidad de disfrutar de una experiencia de juego mГЎs emocionante. Con una amplia gama de juegos, bonos atractivas y el excelente servicio al cliente, lo llevarГЎs en tu favorito. ВЎNo lo dejes pasar!
utländska casinon utan svensk licens, [url=https://stagingtwybee.wpengine.com/blog/utlandska-casinon-utan-svensk-licens-fordelar-och-34/]https://stagingtwybee.wpengine.com/blog/utlandska-casinon-utan-svensk-licens-fordelar-och-34/[/url] har blivit allt mer populära bland spelare. Ett stort antal söker chansen att spela utan begränsningar. Dessa casinon tillhandahåller en bred spelupplevelse som innehåller lockande bonusar och kampanjer. Spelare har möjlighet att njuta av flera spel och spelmöjligheter utan de hinder som finns på den svenska marknaden.
online casino, [url=https://dermatolog.kz/betcasino05022/the-enchanting-world-of-fantasy-girlfriends-a-2.html]https://dermatolog.kz/betcasino05022/the-enchanting-world-of-fantasy-girlfriends-a-2.html[/url] offers thrilling games. Players can partake in various gambling options. With incentives, every session becomes exciting. Join the fun today!
I don’t think the title of your article matches the content lol. Just kidding, mainly because I had some doubts after reading the article. https://www.binance.com/register?ref=IHJUI7TF
В этом что-то есть. Большое спасибо за информацию, теперь я не допущу такой ошибки.
Керамическая плитка, [url=https://boryslav.do.am/forum/33-25497-1]https://boryslav.do.am/forum/33-25497-1[/url] — это отличный|замечательный|превосходный|качественный материал для отделки. Она обладает высокой прочностью и долговечностью, что делает ее идеальным выбором для ванных комнат|кухонь|коридоров|жилых помещений. Легкость в уходе и разнообразие|многообразие|широкий выбор|разнообразие дизайнов делают ее популярной среди дизайнеров интерьеров. Керамическая плитка также устойчива к влаги и загрязнениям, что существенно упрощает уборку. Выбирая керамическую плитку, вы получаете стильное|элегантное|современное|долговечное решение для вашего дома.
Over the past few years, Online Casino Games, [url=https://nirvanaprakriti.org/discover-the-exciting-world-of-casino-betnjet-2/]https://nirvanaprakriti.org/discover-the-exciting-world-of-casino-betnjet-2/[/url] have captivated immense interest. Players enjoy the simplicity of playing from home. Exciting technology has elevated the gaming experience, providing numerous options.
Internet gaming have gained immense popularity, offering gamblers the chance to enjoy thrilling Casino Online Games, [url=https://vorschau.schaller-digital.de/archives/128839]https://vorschau.schaller-digital.de/archives/128839[/url] from the comfort of their homes. With a vast selection of fruit machines, card games, and broadcast options, the excitement is never-ending. Incentives and reward programs further enhance the experience, making these platforms enticing for all types of players. Always remember to gamble responsibly.
Betwinner casino, [url=https://buchveroeffentlichen.com/understanding-1xbet-your-ultimate-guide-to-online/]https://buchveroeffentlichen.com/understanding-1xbet-your-ultimate-guide-to-online/[/url] brinda una amplia gama de juegos, como juegos de mesa conocidos. Asimismo, los apostadores tienen la oportunidad de espectaculares incentivos durante sus primeras apuestas.
浏览露骨视频 在安全可靠的平台上进行。寻找 安全的流媒体中心 以获得一流体验。
Feel free to visit my blog post … EBONY PORN
jugar al casino en lГnea, [url=http://arisaraldalecumplimos.risaralda.gov.co/index.php/2026/02/06/como-retirar-dinero-en-maggico-guia-paso-a-paso/]http://arisaraldalecumplimos.risaralda.gov.co/index.php/2026/02/06/como-retirar-dinero-en-maggico-guia-paso-a-paso/[/url] puede ser una experiencia interesante. Muchos jugadores disfrutan de las mГєltiples opciones de juegos disponibles. AdemГЎs, la accesibilidad de jugar desde casa atrae a mГЎs personas. ВЎAnГmate y prueba suerte!
Меня тоже волнует этот вопрос, где я могу найти больше информации по этому вопросу?
доставка грузов из китая, [url=https://asiafast.ru/train]доставка жд из китая[/url] осуществляется через важный процесс для компаний. Оптимизация этого порядка позволяет существенно ускорить убытки и улучшить конкурентоспособность.
магазин плитки та сантехніки, [url=http://www.marocscrabble.com/spip.php?page=article&id_article=9&lang=fr]http://www.marocscrabble.com/spip.php?page=article&id_article=9&lang=fr[/url] РїСЂРѕРїРѕРЅСѓС” цінні РІРёСЂРѕР±Рё для вашого інтер’єру. РЈ нас РІРё знайдете уникальні плиток та сантехніки, СЏРєС– оздоблять ваш простір. РЈ нас РІРё можете РЅР° вас!
Прямо в цель
В мире видеоигр существует множество жанров, каждый из которых предлагает уникальный опыт. Приключения увлекают игроков высокой динамикой и азартом. Одной из самых популярных игр современности является Fortnite, где борьба за выживание происходит в красочном мире. В этой игре участники сражаются друг с другом, строят укрытия и стараются стать последними выжившими. Элементы стратегии и динамики делают Fortnite захватывающей и интересной.Помимо Fortnite, многие игры, [url=http://bestwecando.ourproject.org/dokuwiki-2013-05-10a/doku.php?id=%D0%94%D0%BE%D1%80%D0%B0%D0%BC%D0%B0%20%D0%97%D0%B0%D0%B3%D0%B0%D0%B4%D0%BE%D1%87%D0%BD%D1%8B%D0%B9%20%D0%BC%D0%B8%D1%80%D0%B0%20%D1%80%D0%BE%D0%BC%D0%B0%D0%BD%D1%82%D0%B8%D0%BA%D0%B8]http://bestwecando.ourproject.org/dokuwiki-2013-05-10a/doku.php?id=%D0%94%D0%BE%D1%80%D0%B0%D0%BC%D0%B0%20%D0%97%D0%B0%D0%B3%D0%B0%D0%B4%D0%BE%D1%87%D0%BD%D1%8B%D0%B9%20%D0%BC%D0%B8%D1%80%D0%B0%20%D1%80%D0%BE%D0%BC%D0%B0%D0%BD%D1%82%D0%B8%D0%BA%D0%B8[/url] предлагают разные механики. RPG игры погружают нас в мир, наполненный персонажами и эпическими квестами. Категория ролевых игр позволяет игрокам развивать свои навыки и принимать важные решения. Эти игры часто имеют насыщенный сюжет, который увлекает с первых минут.Мир видеоигр растет и развивается, привнося оригинальные идеи и концепции. Любая игра создает уникальную атмосферу, которая притягивает игроков. Погружение в виртуальные миры становится все более реалистичным благодаря усовершенствованной графике и звуковому оформлению. В конечном счете, видеоигры становятся не просто развлечением, но и настоящим искусством, способным передать эмоции и чувства.
casino sports betting, [url=https://avalingo.ir/discover-the-future-of-companionship-with-dreamgf-9/]https://avalingo.ir/discover-the-future-of-companionship-with-dreamgf-9/[/url] is a popular option for enthusiasts of both sports and gambling. With a variety of games to wager on, participants enjoy the thrill of risking money. Moreover, the potential to win big keeps many into the world of casino sports betting.
Discover the exciting world of internet casino slots! These games offer captivating adventures with luring graphics and absorbing gameplay. Experience the odds to win big while enjoying your favorite Online Casino Slots, [url=https://aquabluefz.com/?p=33905]https://aquabluefz.com/?p=33905[/url] anytime!
Online gaming has become increasingly popular, with enthusiasts gravitating towards Casino Online Slots, [url=https://studyinporto.pt/explore-winner-casino-sportsbook-the-ultimate/]https://studyinporto.pt/explore-winner-casino-sportsbook-the-ultimate/[/url]. These captivating games offer lively graphics and engaging themes. Prizes can be just a spin away!
Man hat großartige Eindrücke mit https://bingbong.com.de/ Casino gesammelt.
JB Casino Online, [url=https://clarawhitewriter.com/a-comprehensive-review-of-jb-casino-an-insight/]https://clarawhitewriter.com/a-comprehensive-review-of-jb-casino-an-insight/[/url] предлагает широкий ассортимент игр с отличными шансами на выигрыш. Промоакции и награды делают игровые процессы крайне увлекательными для участников.
Los casinos digitales ofrecen una experiencia entretenida que atrae a apostadores de todo el mundo. En un Online Casino, [url=https://osylancafe.com/como-depositar-dinero-en-yajuego-guia-completa/]https://osylancafe.com/como-depositar-dinero-en-yajuego-guia-completa/[/url], puedes disfrutar de diversos juegos que se ajustan a todos los gustos.
Извиняюсь что, ничем не могу помочь. Но уверен, что Вы найдёте правильное решение. Не отчаивайтесь.
casino uden rofus, [url=http://quarksocialcloud.com/comtecofic2021/hvor-kan-man-spille-nr-find-de-bedste-muligheder/]http://quarksocialcloud.com/comtecofic2021/hvor-kan-man-spille-nr-find-de-bedste-muligheder/[/url] er en fantastisk mulighed for dem, der ønsker at spille uden begrænsninger. Denne giver deltagere chancer til at benytte forskellige spil uden krav om registrering. Beskyttelsen er stadig en prioritet, hvilket sikrer, at deltagerne kan have et hyggeligt oplevelse. Fokus på succes til alle deltagere!
магазин плитки та сантехніки, [url=https://legacies-of-detention.org/news/news/change-the-system-not-just-the-people/]https://legacies-of-detention.org/news/news/change-the-system-not-just-the-people/[/url] РїСЂРѕРїРѕРЅСѓС” широкий асортимент доброчинної плитки та сантехнічного. РЈ нас РІРё знайдете РјРѕРґРЅС– рішення для Р±СѓРґСЊ-СЏРєРѕРіРѕ інтер’єру.
По моему мнению Вы не правы. Предлагаю это обсудить.
доставка товаров из китая, [url=https://china-star.ru/]доставка из китая для юридических лиц[/url] – отличный способ найти уникальные товары. Эффективность доставки удивляет покупателей. В дополнение многие осваивают китайские товары по приемлемым ценам.
Браво, ваша фраза просто отличная
Сантехника, [url=https://aktivnyj-dialog.forumotion.com/t2840-topic]https://aktivnyj-dialog.forumotion.com/t2840-topic[/url] — это важный аспект в каждом доме. Качественная установка водоснабжающих систем обеспечивает комфорт и удобство пользователей. Важно использовать только сертифицированные материалы и обратиться к профессионалам для установки.
Inside the captivating world of Online Casino, [url=https://lightcyan-capybara-146531.hostingersite.com/casino-biamo-bet-uk-your-gateway-to-thrilling/]https://lightcyan-capybara-146531.hostingersite.com/casino-biamo-bet-uk-your-gateway-to-thrilling/[/url], gamblers can delight in a diverse array of activities. Such as slots to table games, it offers countless opportunities for fun.
In the world of betting, Online Casino, [url=https://gnanajyothifoundation.org/explore-the-thrilling-world-of-willbet-casino/]https://gnanajyothifoundation.org/explore-the-thrilling-world-of-willbet-casino/[/url] offers entertainment at your fingertips. Players can experience a wide range of games, from slots to live options. The ease of playing from home makes Online Casino a popular choice for many.
El ГЎmbito de los casinos ha cambiado radicalmente con la llegada de Casino Online, [url=https://rahul.newtechsolution.co.in/yajuego-colombia-guia-completa-para-apostar-y-5/]https://rahul.newtechsolution.co.in/yajuego-colombia-guia-completa-para-apostar-y-5/[/url]. Cualquiera jugador puede disfrutar de los propuestas desde su comodidad del hogar. Igualmente, las ofertas son mГЎs atractivas en el entorno digital.
In the world of web-based entertainment, casino online, [url=https://lashbrowfortune.com/exploring-the-enchantment-of-fantasy-girlfriends-65/]https://lashbrowfortune.com/exploring-the-enchantment-of-fantasy-girlfriends-65/[/url] has become a favored choice for many. Players enjoy the convenience of playing from home, while delivering a wide range of games, from slots to table games.
JB Casino Games, [url=https://ttsa.jp/jb-casino-bangladesh-comprehensive-guide/]https://ttsa.jp/jb-casino-bangladesh-comprehensive-guide/[/url] presents a diverse range of exciting games. Players can enjoy slots, table games, and more, guaranteeing hours of exciting fun. With JB Casino Games, the possibilities are endless!
Доставка продуктів, [url=http://saladeartesarafaisal.net.ar/melange-de-susana-ocampo/]http://saladeartesarafaisal.net.ar/melange-de-susana-ocampo/[/url] стала незамінною частиною сучасного життя. Тепер РІСЃРµ більше людей обирають замовленню їжі онлайн. Це зручно С– дозволяє економити час. РќРµ потрібно стояти РІ чергах Сѓ магазинах. Досвідчені РєСѓСЂ’єри доставлять РІСЃРµ необхідне РїСЂСЏРјРѕ РґРѕ вашого РїРѕСЂРѕРіСѓ.
This is my first time visit at here and i am really happy to read all at alone place.
Also visit my web site gay porn sex videos
Замечательно, весьма забавная информация
инвентаризация склада, [url=https://gpcdoerfer.com/zachem-nuzhen-syurvej/]сюрвей[/url] — важный процесс, который способствует правильно учитывать материалы и снизить ошибки. Проведение этой задачи в особенности актуально для контроля запасами. Правильный учет способствует эффективной работе бизнеса.
Casino Online, [url=https://hdteknikkombicim.com/2026/01/22/discover-ybets-online-casino-uk-a-comprehensive-2/]https://hdteknikkombicim.com/2026/01/22/discover-ybets-online-casino-uk-a-comprehensive-2/[/url] открывает широкий разнообразие игр. Геймеры могут наслаждаться разнообразными слотами. Кроме того, бонусы формируют азарт в еще большей степени привлекательным. Безопасное развлечение также подтверждается, что делает Casino Online идеальным местом для досуга.
Virtual casinos have become increasingly popular among enthusiasts. With a multitude of games, users enjoy convenience and adventure from their homes. Casino Online, [url=https://www.seabairgroup.com/big-win-box-casino-online-your-ultimate-gaming-7/]https://www.seabairgroup.com/big-win-box-casino-online-your-ultimate-gaming-7/[/url] offers exclusive bonuses to attract new customers.
el mejor casino en lГnea, [url=https://ashento.com/doradobet-apk-ventajas-de-instalar-1603773346/]https://ashento.com/doradobet-apk-ventajas-de-instalar-1603773346/[/url] proporciona una gran selecciГіn de opciones de juego. Puedes gozar de slots y casinos en vivo todos en tu domicilio.
online casino, [url=https://najd.tech/discover-the-excitement-of-klirr-casino-your-11/]https://najd.tech/discover-the-excitement-of-klirr-casino-your-11/[/url] offers thrilling gambling experiences for those who enjoy the excitement of winning big. With countless games and attractive bonuses, players might increase their chances of victory.
JB Casino Review, [url=http://buserentacar.com/comprehensive-overview-of-jb-casino-gaming-bonuses/]http://buserentacar.com/comprehensive-overview-of-jb-casino-gaming-bonuses/[/url] offers a wide selection of entertainment. With simple interface and enticing promotions, players can revel in a dynamic gaming atmosphere. Plus, safe payment methods enhance the overall experience.
Это можно и нужно 🙂 обсуждать бесконечно
В последние годы игровая индустрия переживает настоящий бум. игры, [url=http://xn--d1aa3a4a.xn--p1ai/forum/topic.php?forum=3&topic=2556]http://xn--d1aa3a4a.xn--p1ai/forum/topic.php?forum=3&topic=2556[/url] стали не просто развлечением, но и важной частью культуры. В этом контексте разработка игр занимает центральное место. Многие компании стремятся предложить игрокам уникальный опыт, который погрузит в увлекательный мир.Современные технологии, такие как виртуальная реальность, открывают новые горизонты. Игры становятся все более реалистичными, а взаимодействие с ними — более захватывающим. Игроки могут буквально перенестись в альтернативные реальности и испытать необычные ощущения. Вместе с тем, мир гейминга продолжает расти, позволяя людям объединяться в командах и соревноваться друг с другом.Важной частью успеха игр является их графика. Красочные и детализированные миры привлекают внимание и создают атмосферу. Кроме того, звуковое оформление играет не менее важную роль, ведь качественные звуковые эффекты и музыка могут значительно усилить впечатления от игрового процесса. Каждый релиз стремится удивить пользователей и подарить им незабываемые моменты. Таким образом, мир игр продолжает развиваться, предлагая все новые вызовы и возможности. Каждая игра — это новое приключение, а каждый игрок может стать частью этой удивительной вселенной. Ожидаем дальнейшие прорывы, которые сделают игры еще более увлекательными и захватывающими.
Вейпінг, [url=http://aiwadata.com/bbs/board.php?bo_table=free&wr_id=3421237]http://aiwadata.com/bbs/board.php?bo_table=free&wr_id=3421237[/url] на сьогодні стає більш популярним. Даний спосіб перекручування пропонує унікальний досвід, котрий приваблює всіх. Вибір для тих, хто хоче припинити курити.
Извините за то, что вмешиваюсь… Я разбираюсь в этом вопросе. Приглашаю к обсуждению.
Вы можете наслаждаться редкими плодами, не выходя из дома. экзотические фрукты с доставкой, [url=https://blankslate.io?note=1265570]https://blankslate.io?note=1265570[/url] позволяют попробовать необычные сочетания. Закажите ананасы прямо сейчас и откройте для себя неизвестные вкусы!
Оболденная тема
платформа для работы, [url=https://skillstaff.ru/blog/vsyo-chto-nuzhno-znat-o-backend-razrabotke/]бэкенд разработчик[/url] предоставляет уникальные инструменты, помогающие выполнение задач. С её помощью можно сделать более эффективным процесс, что увеличивает продуктивность команды.
Within the realm of online casinos, [url=https://njrtrading.co.za/10-4/]https://njrtrading.co.za/10-4/[/url], users find an exciting way to test their fortune. Offering countless games and features, these platforms provide a distinct experience.
If you’re looking for excitement, virtual gambling sites offer a fantastic experience. Casino Online Games, [url=https://drcatherinebehzad.com/step-by-step-guide-to-registering-at-blaze-spins-8/]https://drcatherinebehzad.com/step-by-step-guide-to-registering-at-blaze-spins-8/[/url] provide exciting gameplay that can be enjoyed from the comfort of your home. Players can enjoy a variety of games including fruit machines, table games like baccarat, and live dealer games that bring the thrill of the casino directly to you. Don’t miss the chance to experience the allure of gaming online!
jugar al casino en lГnea, [url=https://dulcenael.com.ar/2026/02/06/slottica-apk-chile-la-solucion-ideal-para-apostar/]https://dulcenael.com.ar/2026/02/06/slottica-apk-chile-la-solucion-ideal-para-apostar/[/url] es una experiencia emocionante la que ofrece sorpresas. Puedes gozar de numerosos juegos a travГ©s de la comodidad de tu hogar. No se presenta oportunidad para probar tu suerte y ganar grandes premios. AdemГЎs, esta variedad de juegos ofrece a los jugadores vivir en un mundo de diversiГіn, sin salir de casa.
Поздравляю, какой отличный ответ.
casino uden om rofus, [url=https://cloud.aurealab.net/dottoressasantoro/2022/09/23/ciao-mondo/]https://cloud.aurealab.net/dottoressasantoro/2022/09/23/ciao-mondo/[/url] tilbyder en unik mulighed for spillere, der ønsker at undgå begrænsninger. Disse giver valgmuligheder for at spille, uden at at skulle tænke bureaukratiske problemer love.
In the world of casino sports betting, [url=https://bowltech.odinsportswear.com/the-future-of-relationships-exploring-nomi-ai/]https://bowltech.odinsportswear.com/the-future-of-relationships-exploring-nomi-ai/[/url], many enthusiasts are drawn to the thrill of placing bets. With innovative platforms, it’s easier than ever to join.
JB Casino Platform, [url=https://sarkarijobhit.com/comprehensive-guide-to-jb-casino-deposit-methods/]https://sarkarijobhit.com/comprehensive-guide-to-jb-casino-deposit-methods/[/url] offers an engaging experience for players. With an impressive range of selections, you can enjoy live dealers. Sign up now!
Bitfortune casino, [url=https://rentry.co/15865-discover-the-excitement-of-bitfortune-casino-for-an-unforgettable-gaming-journey]https://rentry.co/15865-discover-the-excitement-of-bitfortune-casino-for-an-unforgettable-gaming-journey[/url] offers a thrilling gaming experience. Players can enjoy numerous games, from slots to table games. With amazing bonuses and promotions, it’s a ideal place to test your luck!
online casino not on GamStop, [url=https://grateful-movement.com/discover-the-benefits-of-non-gamstop-online/]https://grateful-movement.com/discover-the-benefits-of-non-gamstop-online/[/url] offer players a chance to enjoy gaming without restrictions. Players can indulge in various games like slots and table games. These casinos present competitive bonuses and a wide range of payment methods, ensuring a hassle-free experience. Enjoy the freedom of choosing an online casino that best suits your needs.
In recent years, many players seek out casinos that dont use GamStop, [url=https://techners.net/unregistered-online-casinos-a-guide-to-safe-gaming/]https://techners.net/unregistered-online-casinos-a-guide-to-safe-gaming/[/url]. These platforms offer greater freedom for those who wish to enjoy online gaming without restrictions. Players can discover a variety of games and promotions, enhancing their overall experience. Important is to choose a trustworthy site to ensure a safe gambling environment. With the ongoing demand, the variety of casinos that dont use GamStop continues to grow, catering to diverse preferences and interests.
non gamstop casino, [url=https://vertisilo.com/understanding-non-gamstop-casinos-the-pros-and/]https://vertisilo.com/understanding-non-gamstop-casinos-the-pros-and/[/url] предлагают уникальные варианты для игроков. Здесь доступно наслаждаться азартными играми без запретов. Каждая игра привносит адреналин, а также эмоции. Для настоящих игроков это крутой выбор.
Четко должно быть!
купить дизельное топливо, [url=https://ng-logistic.ru/]перевозка дизельного топлива[/url] — это важный шаг для владельцев транспорта. Выбор качественного топлива способствует обеспечить надежность работы двигателя. Приобретая топливо от проверенных поставщиков, вы обеспечиваете возможных проблем.
Descubre el emocionante mundo del entusiasmo en el Online Casino, [url=http://www.castleandson.com/doradobet-peru-la-experiencia-de-juegos-en-linea-2/]http://www.castleandson.com/doradobet-peru-la-experiencia-de-juegos-en-linea-2/[/url], donde la diversiГіn nunca se detiene. Disfruta de muchas opciones y juegos Гєnicas en todo momento y desde cualquier.
In the world of digital casinos, Casino Online Slots, [url=https://premium-collector.com/the-rise-of-online-casinos-a-deep-dive-into/]https://premium-collector.com/the-rise-of-online-casinos-a-deep-dive-into/[/url] offer exhilarating adventures. Players can enjoy countless themes and graphics. The thrill of spinning reels and gaining rewards keeps players fascinated.
Я думаю, что Вы допускаете ошибку. Пишите мне в PM, поговорим.
Pin Up Casino Azərbaycandan, [url=https://pin-up-az.website.yandexcloud.net/]www.pin-up-az.website.yandexcloud.net[/url], müasir onlayn qumar platformasıdır. Oyunçular burada ehtiras dolu oyunlar tapa bilər. Qazanclar və şans dolu müsabiqələr da təşkil olunur.
References:
Mount airy casino
References:
https://www.kellyweechphotography.com/tortworth-court-wedding-venue/tortwothcourtweddingphotographer_0902-2/
Жаль, что не смогу сейчас участвовать в обсуждении. Очень мало информации. Но с удовольствием буду следить за этой темой.
игры, [url=http://cars.autokaif.ru/index.php?subaction=userinfo&user=ohysoqadudo]http://cars.autokaif.ru/index.php?subaction=userinfo&user=ohysoqadudo[/url] – Компьютерные игры становятся все более востребованными в нашем обществе. Они соблазняют игроков окунуться в увлекательные миры, где разворачиваются самые разные события. Одной из самых интересных сторон игр является их способность повышать навыки игрока, такие как анализ и реакция.Игры велико разнообразны. От фэнтезийных королевств до приближенных к реальности симуляций досуга, они предлагают игрокам колоссальное количество возможностей. К тому же, мультиплеерные игры открывают общаться и соревноваться с другими, создавая интерактивные связи и укрепляя игровой процесс.Разнообразие жанров также играет важную роль в привлекательности компьютерных игр. Игроки могут выбирать между экшеном, что способствует находить именно то, что соответствует. Тем не менее, определенные игры становятся особенными благодаря своей содержанию и арте. Каждая игра может внести что-то уникальное в мир развлечений, заставляя игроков сново погружаться в свои любимые вселенные.
Online gambling has taken the world by storm, offering players a chance to enjoy exciting games from the comfort of their homes. Through casino online, [url=http://www.easenet.jp/wordpress/spin-city-twoje-wrota-do-wiata-gier/]http://www.easenet.jp/wordpress/spin-city-twoje-wrota-do-wiata-gier/[/url], you can access a variety of activities and gain amazing prizes.
non GamStop casino sites, [url=https://tal.baywoodgrp.com/discovering-casinos-not-blocked-by-gamstop/]https://tal.baywoodgrp.com/discovering-casinos-not-blocked-by-gamstop/[/url] deliver a unique betting experience for players who look for more options. These sites permit limitless access to various games without specific limitations imposed by GamStop.
When searching for top options, the best non GamStop casinos, [url=https://nocheenblanco.org/2018/the-best-casino-sites-not-on-gamstop-559199112/]https://nocheenblanco.org/2018/the-best-casino-sites-not-on-gamstop-559199112/[/url] present an incredible gaming experience. Players can relish a wide range of choices and benefits. Exploring these fascinating sites could lead to extraordinary adventures in online gambling. Don’t miss the chance to discover the best non GamStop casinos!
JB Casino Online, [url=https://qosnetworksmw.com/exploring-the-jb-casino-platform-a-new-era-of-2/]https://qosnetworksmw.com/exploring-the-jb-casino-platform-a-new-era-of-2/[/url] – Casino JB Online предлагает невероятные возможности для любителей азартных РёРіСЂ. РќР° этой платформе каждый усмотрит что-то захватывающее. Открытие аккаунта легка.
Великолепная идея
I online casino uden rofus, [url=http://milesmachineinc.com/en-dybdegende-guide-til-danske-casino-sider/]http://milesmachineinc.com/en-dybdegende-guide-til-danske-casino-sider/[/url] kan spillere nyde en unik oplevelse, der ikke kræver registrering. Her kan du spille i forskellige spil, uden stress. Online casinoer tilbyder raske udbetalinger og privatliv.
Bitfortune casino, [url=http://10-day.net/bbs/board.php?bo_table=free&wr_id=2948730]http://10-day.net/bbs/board.php?bo_table=free&wr_id=2948730[/url] offers a captivating gaming experience. Players can enjoy countless games, including jackpots. With attractive bonuses and protected transactions, it ensures enjoyment for everyone.
Замечательно, очень хорошая информация
PINCO Casino, [url=https://pinco-azeri.website.yandexcloud.net/]http://www.pinco-azeri.website.yandexcloud.net[/url], rəqəmsal mərc xidmətidır. Bu məkanda müxtəlif mərc oyunları tapmaq mümkündür. İştirakçılar uzunmüddətli şəkildə əylənə bilərlər. Bonusu geniş şəffaf insanlara cəlb edir.
По моему мнению Вы допускаете ошибку. Предлагаю это обсудить.
Фрукти з доставкою, [url=https://avtopshik.mirbb.com/t2259-topic]https://avtopshik.mirbb.com/t2259-topic[/url] — це комфортний спосіб поповнити свій меню свіжими якісними плодами. Наші фрукти доставляють прямо до вашого дому.
In recent years, the emergence of non gamstop casino, [url=https://adamgardenstt.com/index.php/2026/02/08/exploring-non-gamstop-casinos-a-new-kind-of-gaming/]https://adamgardenstt.com/index.php/2026/02/08/exploring-non-gamstop-casinos-a-new-kind-of-gaming/[/url] platforms has captured the attention of many players. These casinos offer entertaining experiences without the constraints found in traditional sites. Gamblers appreciate the freedom provided by such casinos.
Clear, concise, and practical information. I appreciate how easy it is to follow.
El sector del Casino Online, [url=https://zeshsolutions.com/redescubriendo-los-juegos-de-mesa-clasicos-en-la/]https://zeshsolutions.com/redescubriendo-los-juegos-de-mesa-clasicos-en-la/[/url] proporciona una vivencia Гєnica a los entusiastas. Gracias a diferentes alternativas, cada round es emocionante. Esta plataforma permite disfrutar del Casino Online desde cualquier parte.
Симпатичная мысль
Грунтовая компания, [url=https://bio-grunt.ru/]https://bio-grunt.ru/[/url] – Компания по работе с грунтом предоставляет широкий спектр услуг в области грунтовых работ. Профессионалы нашей команды обладают опытом и знаниями, что гарантирует надежное выполнение задач. Мы используем современные технологии для достижения максимальных результатов. Выбирая нашей Грунтовой компании, вы можете быть уверены в надежности выполненных работ.
In the world of online gaming, Casino Online, [url=https://canadabestcondo.com/discover-the-thrills-of-bounty-reels-casino-6/]https://canadabestcondo.com/discover-the-thrills-of-bounty-reels-casino-6/[/url] offers diverse experiences for players. With various games to choose from, users can enjoy fun from the comfort of their homes. Bonuses and offers enhance the overall experience, making it even attractive. Whether you’re a rookie or a seasoned player, Casino Online provides an captivating platform to test your skills and luck.
non GamStop sites, [url=https://www.jomicbel.com/stamina/discovering-the-world-of-non-gamstop-casinos-in/]https://www.jomicbel.com/stamina/discovering-the-world-of-non-gamstop-casinos-in/[/url] feature betters an opportunity to experience diverse activities free from the restrictions set by GamStop. This sites strive to design a accessible environment for players looking for liberty.
Извините за то, что вмешиваюсь… Я здесь недавно. Но мне очень близка эта тема. Готов помочь.
игры, [url=http://bl.com.tw/index.php?title=%D0%93%D0%BB%D1%8F%D0%B4%D0%B5%D1%82%D1%8C%20%D0%BC%D1%83%D0%BB%D1%8C%D1%82%D0%B8%D0%BA%D0%B8]http://bl.com.tw/index.php?title=%D0%93%D0%BB%D1%8F%D0%B4%D0%B5%D1%82%D1%8C%20%D0%BC%D1%83%D0%BB%D1%8C%D1%82%D0%B8%D0%BA%D0%B8[/url] — это удивительный мир, полный возможностей и приключений, который может увлечь людей всех возрастов. Любая игра предлагает уникальные механики и сюжетные линии, что делает процесс сафари по-настоящему увлекательным. Важно отметить, что игры не только развлекают, но и обогащают креативное мышление или стратегическое планирование.С развитием технологий, дизайн в играх становится все более реалистичным, что добавляет эмоциональности и позволяет игрокам погружаться в мирные миры. Кроме того, современные игры часто предлагают многопользовательский режим, где игроки могут взаимодействовать друг с другом, что делает времяпрепровождение еще более захватывающим.Не стоит забывать о том, что мир игр постоянно меняется и эволюционирует. Разработчики экспериментируют с разными жанрами и формами, создавая восхитительные проекты. Таким образом, для любителей игр всегда найдется что-то новенькое, что можно открыть и исследовать. Наслаждайтесь этим захватывающим миром и открывайте для себя новые горизонты!
The emergence of new non GamStop casino, [url=https://www.lionsroarcapital.com/exploring-non-gamstop-online-casinos-in-the-uk-2/]https://www.lionsroarcapital.com/exploring-non-gamstop-online-casinos-in-the-uk-2/[/url] platforms has transformed the online gambling landscape. Players can now enjoy a wider range of options|variety|choices|selections without the restrictions of GamStop. With enticing bonuses|promotions|offers|deals, these casinos attract a diverse audience seeking thrilling experiences.
Могу предложить зайти на сайт, с огромным количеством информации по интересующей Вас теме.
Discovering the universe of crypto casino no deposit, [url=https://mn-shop.com/]crypto no deposit bonus[/url] offers exciting opportunities for wagerers. With zero upfront cost, users can experience diverse games and bonuses. Embrace this cutting-edge trend in online gambling today!
online casino, [url=https://store.ppsgeraksatrianusantara.com/experience-the-thrill-of-777bd-casino-your-6/]https://store.ppsgeraksatrianusantara.com/experience-the-thrill-of-777bd-casino-your-6/[/url] offers exciting opportunities for those wanting to unwind. Players can enjoy various games, including slots and table games. Gaining big is always possible in an online casino!
Вы ошибаетесь. Могу отстоять свою позицию. Пишите мне в PM, пообщаемся.
casino uden rofus, [url=https://hawkgamingstudio.com/?p=33338]https://hawkgamingstudio.com/?p=33338[/url] tilbyder spændende oplevelser for spillere. I dette casino kan du deltage i enestående ventetid med forskellige chancer og store belønninger. Besøg casino uden rofus for at medbringe en utrolig eventyr.
Casinos sin licencia, [url=https://shopzenvia.com/unlock-20-free-spins-on-registration-a-guide-for-7/]https://shopzenvia.com/unlock-20-free-spins-on-registration-a-guide-for-7/[/url] represent legal for players. Running without proper oversight, these establishments may cause trust issues for unsuspecting gamblers. Always confirm the legitimacy of casinos before engaging.
Mostbet app, [url=https://nilmanel.lk/the-ultimate-guide-to-filmova-pakarny-exploring/]https://nilmanel.lk/the-ultimate-guide-to-filmova-pakarny-exploring/[/url] имеет удобный доступ к ставкам на спортивные события. Раскладка приложения простой в навигации, что облегчает процесс ставок. С помощью live-ставок и широким выбором турниров, ставочники могут увлекаться игрой.
Мне кажется, вы правы
Discover the thrill of new online casino, [url=https://birdssoft.com/]new online casino[/url] experiences. With engaging games, players can enter into diversity options. Enjoy live gaming and lucrative bonuses. Join the fun today!
non gamstop casino, [url=https://charbucks.com/exploring-non-gamstop-casinos-a-comprehensive-53/]https://charbucks.com/exploring-non-gamstop-casinos-a-comprehensive-53/[/url] offers players a unique betting experience, allowing more freedom to enjoy their favorite options. With less restrictions, you can experiment with a wider selection of opportunities.
Many players seek wagering websites that are not restricted by GamStop. These sites not on GamStop, [url=https://fawchem.com/exploring-gambling-sites-not-registered-with-6/]https://fawchem.com/exploring-gambling-sites-not-registered-with-6/[/url] offer more options for enthusiasts. Researching these alternatives can boost the gaming experience while preserving responsible gambling practices.
non GamStop websites, [url=https://woodemo.cedcommerce.com/woocommerce/shopee/exploring-gambling-sites-not-on-gamstop-553828737/]https://woodemo.cedcommerce.com/woocommerce/shopee/exploring-gambling-sites-not-on-gamstop-553828737/[/url] provide players with a chance to enjoy gaming without the restrictions of self-exclusion. Such sites offer a variety of games, ensuring an engaging experience for users.
Conoce el mejor casino en lГnea, [url=https://churreriaelolivo.es/como-jugar-bingo-en-doradobet-guia-completa-3/]https://churreriaelolivo.es/como-jugar-bingo-en-doradobet-guia-completa-3/[/url], donde la adrenalina nunca se detiene. Con opciones como ruleta, todas las sesiones son una experiencia Гєnica. ВЎParticipa y disfruta!
Я думаю, что Вы не правы. Давайте обсудим. Пишите мне в PM, поговорим.
игры, [url=https://sciencewiki.science/index.php?title=%D0%9F%D1%80%D0%BE%D1%81%D0%BC%D0%B0%D1%82%D1%80%D0%B8%D0%B2%D0%B0%D1%82%D1%8C%20%D0%BA%D0%B8%D0%BD%D0%BE%20%D0%BE%D0%BD%D0%BB%D0%B0%D0%B9%D0%BD]https://sciencewiki.science/index.php?title=%D0%9F%D1%80%D0%BE%D1%81%D0%BC%D0%B0%D1%82%D1%80%D0%B8%D0%B2%D0%B0%D1%82%D1%8C%20%D0%BA%D0%B8%D0%BD%D0%BE%20%D0%BE%D0%BD%D0%BB%D0%B0%D0%B9%D0%BD[/url] – это не просто забава, а целый мир, где каждый игрок может найти что-то для себя. В последние годы наблюдается значительный рост популярности видеоигр. И если раньше проводили время в одиночку или с друзьями, то теперь этот процесс стал поистине многообразным. Онлайн-игры открыли новые горизонты, позволяя игрокам со всего мира общаться друг с другом.Одной из удивительных особенностей современных игр является интерактивность. Благодаря этому игроки становятся частью увлекательных историй, а их решения оказывают влияние на последние. Игры предлагают многообразные графические стили, от реалистичных до стилизованных, что позволяет каждому подобрать что-то по своему вкусу.К тому же, постоянные обновления и дополнения к играм сохраняют интерес. Это дает возможность игрокам всегда находить новое и незнакомое. Следует провести аналогию, что игровой процесс стал неотъемлемой частью культуры XXI века. Безусловно, игры продолжают развиваться, предлагая игрокам новые впечатления.
Online Casino, [url=https://industrialpecas.com.br/explore-the-excitement-of-bounty-reels-sportsbook/]https://industrialpecas.com.br/explore-the-excitement-of-bounty-reels-sportsbook/[/url] offers an engaging journey for players. With a selection of possibilities, enthusiasts can explore their favorite slots anytime, anywhere.
Это весьма ценное мнение
торты на заказ, [url=https://tort-zakaz.ru/prazdnichnye-torty/na-yubilej/na-20-let/tort-na-20-let-devushke/]торт на 20 лет девушке[/url] — это отличный способ удивить близких. Подарочная выпечка станет незабываемым угощением. Наши кондитеры создадут вкусные десерты, учитывая все ваши предпочтения.
Within the realm of casino sports betting, [url=https://classyeyesoptical.store/experience-excitement-and-fun-at-jubla-casino/]https://classyeyesoptical.store/experience-excitement-and-fun-at-jubla-casino/[/url], bettors find challenges as they execute their bets. Triumphing can lead to considerable gains, shaping each event a possibility.
Какая прелестная мысль
casinos with interac, [url=https://wmet1160.com/]casinos that accept Interac[/url] offer a seamless transaction method for players. This method ensures secure deposits and withdrawals, making online gambling more satisfying. Players can easily fund their accounts and enjoy their favorite games.
В этом что-то есть. Раньше я думал иначе, благодарю за помощь в этом вопросе.
At spille på livet kan noget særligt. I dag kigger vi til spil uden om rofus, [url=https://rpm.97b.myftpupload.com/slots-uden-rufus-en-guide-til-de-bedste/]https://rpm.97b.myftpupload.com/slots-uden-rufus-en-guide-til-de-bedste/[/url], som giver en ny hjælp for spillere. Det er en rejse mættet med overraskelser og adrenalinkick. Brugerne har en mulighed for at analyse deres evner samt teste deres grænser.
free spins no deposit casino, [url=http://stagingtwybee.wpengine.com/blog/exploring-the-exciting-world-of-50p-deposit-2/]http://stagingtwybee.wpengine.com/blog/exploring-the-exciting-world-of-50p-deposit-2/[/url] offer players a chance to enjoy games without risking their money. These kinds of promotions are fantastic for testing fresh slots along with winning real cash. Gamblers should seize this possibility wisely.
non GamStop websites, [url=https://descomplicandovideos.com.br/exploring-uk-gambling-sites-not-on-the-mainstream-2/]https://descomplicandovideos.com.br/exploring-uk-gambling-sites-not-on-the-mainstream-2/[/url] offer players a chance to partake in online gaming without restrictions. Alternative websites serve to users looking for a more varied selection of games. With special features, such services ensure a versatile gaming experience.
Finding reliable online casinos can be challenging. However, sites not on GamStop, [url=https://die-christen.co.za/2026/03/09/discovering-non-gamstop-casinos-an-alternative/]https://die-christen.co.za/2026/03/09/discovering-non-gamstop-casinos-an-alternative/[/url] provide an excellent alternative for players seeking diverse gaming experiences. These platforms often feature unique bonuses, superior customer support, and a variety of games which slots, table games, and live dealers. Players can explore various options without restrictions, enabling the enjoyable environment. Remember to wager responsibly while exploring these exciting sites. Enjoy the thrill of gaming in a liberating online environment, ensuring a fantastic experience tailored to your preferences.
Are you searching for a authentic way to enjoy online gaming? A non gamstop casino, [url=https://www.necsols.com/exploring-non-gamstop-casinos-a-guide-to-46/]https://www.necsols.com/exploring-non-gamstop-casinos-a-guide-to-46/[/url] offers exactly that. These platforms give participants more freedom and options, as they’re not Gamstop regulations, ensuring a special gaming experience. Experience adventurous games and generous bonuses at a non gamstop casino today!
Mostbet, [url=http://duba.calusaru.ro/index.php/2026/02/24/the-ultimate-guide-to-online-betting-with-mostbet-9/]http://duba.calusaru.ro/index.php/2026/02/24/the-ultimate-guide-to-online-betting-with-mostbet-9/[/url] is a renowned online betting platform that features a wide range of sports and casino games. Users can experience various betting options, enhancing their betting experience. Sign up today!
Будьте уверены.
no kyc casinos, [url=https://brasskrakenpub.com/]no kyc casinos[/url] deliver a special gaming journey for players wanting confidentiality. These platforms let users to play lacking the need for KYC processes, promising quick transactions and enhancing user autonomy.
jugar al casino en lГnea, [url=https://www.uniglobalaccess.com/2026/02/07/jugabet-cl-app-la-experiencia-movil-definitiva-en/]https://www.uniglobalaccess.com/2026/02/07/jugabet-cl-app-la-experiencia-movil-definitiva-en/[/url] se ha vuelto muy popular en esta Г©poca. Los jugadores disfrutan del acceso que ofrecen. AdemГЎs, las recompensas son atractivos, lo que aumenta la diversiГіn.
Я считаю, что это — ложный путь.
игры, [url=http://msfo-soft.ru/msfo/forum/messages/forum29/topic29415/message555756/?result=new#message555756]http://msfo-soft.ru/msfo/forum/messages/forum29/topic29415/message555756/?result=new#message555756[/url] всегда были важной частью нашей культуры. Каждый из годом они становятся все более популярными и привлекательными. В частности, современные видеоигры представляют игрокам эксклюзивные возможности для социального взаимодействия. Соревновательные игры позволяют нам испытать адреналин, а казуальные игры обеспечивают расслабление после трудного дня.Процесс создания игры предполагает множество этапов — от концепции и дизайна до программирования и тестирования. Каждый период требует обработки множества данных, чтобы убедиться, что конечный продукт будет по-настоящему интересен пользователям. Масштабные графические проекты, интригующие сюжетные линии и разнообразные миры персонажи — все это создает поразительный опыт.Игры становятся не просто развлечением, но и предметом изучения. Исследования показывают, что они могут улучшать когнитивные навыки и способствовать общественной работе. Этот фактор не проходит незамеченным, и некоторые образовательные учреждения начинают включать игровую практику в свою программу обучения. Так, игра становится действительным инструментом в образовании и личностном развитии.
online casino, [url=https://www.sowovo.org/2026/01/26/discover-the-world-of-online-gaming-at-888-casino/]https://www.sowovo.org/2026/01/26/discover-the-world-of-online-gaming-at-888-casino/[/url] gives a unique entertainment experience. Players can take pleasure in a variety of selections, from slot machines to classic games. With bonuses, the fun never ends!
Online Casino Games, [url=https://www.hipervendasstm.com.br/discover-the-magic-of-casino-aphrodite-uk-where/]https://www.hipervendasstm.com.br/discover-the-magic-of-casino-aphrodite-uk-where/[/url] provide a stimulating experience for gamblers. With numerous options like slot machines and gaming tables, there’s a lot for everyone. Join the fun and try your luck today!
Это сообщение, бесподобно ))), мне очень нравится 🙂
I dag er der mange digitale casinoer, der tilbyder spændende spilleoplevelser. Et anerkendt valg er casino uden om rofus, [url=https://themumbaidiaries.com/casino16022/casinoer-uden-rofus-en-guide-til-spil-uden-4/]https://themumbaidiaries.com/casino16022/casinoer-uden-rofus-en-guide-til-spil-uden-4/[/url], hvor spillere kan udnytte casino spil uden begrænsninger. Udforsk diverse spilleautomater og klassiske spil for en stimulerende oplevelse. Glem ikke at engagere dig ansvarligt for at sikre et god oplevelse.
По моему мнению Вы допускаете ошибку. Предлагаю это обсудить. Пишите мне в PM, пообщаемся.
Если вы решили приобрести мдф, то вам стоит обратить внимание на ассортимент этого материала. Мдф идеально подходит для создания мебели и других изделий. Степень мдф очень внимательное, что делает его затребованным среди множества пользователей. Не упустите шанс купить мдф, [url=https://opus2003.ru/czeny/]шпонирование мдф цена[/url] и улучшить свои дизайнерские решения!
Ваше сообщение, просто прелесть
Within the realm of Online Casino, [url=https://www.slideshare.net/rainbetcrypto?tab=about]https://www.slideshare.net/rainbetcrypto?tab=about[/url], players can experience a selection of games. From slot machines to table games, the entertainment is limitless. Furthermore, the chance to win incredible prizes adds to the lure. Players are enticed by incentives that enhance their gaming experience.
With the rise of new non GamStop casino, [url=https://mumevirtual.com/2026/03/reputable-casinos-not-on-gamstop-your-gateway-to/]https://mumevirtual.com/2026/03/reputable-casinos-not-on-gamstop-your-gateway-to/[/url] options, players are discovering fresh opportunities for entertainment|fun|enjoyment|excitement. These platforms offer diverse games, attractive bonuses, and flexible payment methods. Explore the world of new non GamStop casino today and enjoy a seamless gaming experience|adventure|journey|exploration!
Discover novel new casinos not on GamStop, [url=http://www.testlinkcs.co.uk/astroology/discover-the-best-casinos-not-using-gamstop/]http://www.testlinkcs.co.uk/astroology/discover-the-best-casinos-not-using-gamstop/[/url], where players can enjoy various games without restrictions. These venues provide reliable and protected gaming experiences. Enjoy the thrill of gambling with new features!
free spins no deposit casino, [url=https://saytrees.parishkaar.com/2026/02/28/get-20-free-spins-on-registration-and-win-big/]https://saytrees.parishkaar.com/2026/02/28/get-20-free-spins-on-registration-and-win-big/[/url] offer players a chance to win without any financial risk. Gamblers love these bonuses because they can enjoy games like slots without spending their own money. These offers call to many enthusiasts looking to experience new games.
independent UK casinos, [url=http://gesztenyeskertvendeghaz.starjan.hu/?p=537142]http://gesztenyeskertvendeghaz.starjan.hu/?p=537142[/url] provide a unique betting experience contrasting with large corporate establishments. They often offer a welcoming atmosphere, customized services, and unique game selections. Players appreciate the regional feel, making independent UK casinos a preferred choice for many.
Полностью разделяю Ваше мнение. Мысль отличная, согласен с Вами.
Popular games at Rainbet, [url=https://flowphysio.in/2026/03/06/rainbet-online-casino-testimonial-2026-4/]https://flowphysio.in/2026/03/06/rainbet-online-casino-testimonial-2026-4/[/url] offer an engaging experience for players. From old-school games to contemporary releases, there’s something for everyone. Join in and discover limitless fun and amusing gameplay at Rainbet!
Mostbet sports, [url=https://brief.alaskawebgeeks.com/experience-the-thrill-of-betting-with-mostbet-5/]https://brief.alaskawebgeeks.com/experience-the-thrill-of-betting-with-mostbet-5/[/url] offers a thrilling experience for bettors. With numerous sports events, bettors may engage in live betting and appreciate exciting odds, making every match unpredictable and fascinating. In addition to this, Mostbet sports provides promotions that improve the overall betting experience.
На мой взгляд это очень интересная тема. Давайте с Вами пообщаемся в PM.
WalletCloud wallet, [url=https://agnelosfx.in/big-fat-wedding-fireworks/]https://agnelosfx.in/big-fat-wedding-fireworks/[/url] represents a revolutionary option for handling digital assets. Designed for security and ease of use, it offers users a smooth experience. WalletCloud wallet enables multiple cryptocurrencies, making it an important tool for investors. With WalletCloud wallet, customers can readily access capital anytime, at any time.
Los asombrosos centros de apuestas online brindan la chance de lograr grandes premios. Participa a su diversiГіn en Online Casino, [url=https://www.henrikafabian.de/como-apostar-y-ganar-mas-estrategias-y-consejos-3/]https://www.henrikafabian.de/como-apostar-y-ganar-mas-estrategias-y-consejos-3/[/url] y experimenta el placer de competir.
Finding the best non GamStop casinos, [url=https://capitalpress.com.co/best-non-gamstop-sites-discover-top-alternatives/]https://capitalpress.com.co/best-non-gamstop-sites-discover-top-alternatives/[/url] is crucial for players seeking freedom. These establishments offer countless options with entertaining games. Additionally, they provide bonuses and promotions that enhance the gaming experience.
Playing at an online casino offers an exciting way to enjoy your favorite games. You can try out various options like slots, blackjack, and poker. With attractive promotions, you can boost your chances of winning. It’s important to select a reputable casino site to ensure a secure gaming experience. So, get ready to play online casino, [url=http://www.univ-bouira.dz/ic3e/?p=12472]http://www.univ-bouira.dz/ic3e/?p=12472[/url] and have a chance to win big!
non GamStop sites, [url=https://www.luminor.media/misc/casino-sites-without-gamstop-play-freely-and/]https://www.luminor.media/misc/casino-sites-without-gamstop-play-freely-and/[/url] present a wide range of gambling options for players who seek varied platforms. Explore these sites for enticing experiences without obstacles imposed by GamStop.
Amid the thrilling world of Online Casino Slots, [url=https://www.worldmovingbolivia.com/2026/02/10/big-wins-casino-sportsbook-your-ultimate-gaming-16/]https://www.worldmovingbolivia.com/2026/02/10/big-wins-casino-sportsbook-your-ultimate-gaming-16/[/url], players can enjoy various themes and captivating gameplay. No matter if you’re a novice or a seasoned gamer, the excitement never ends! Join the fun today!
Буду знать, большое спасибо за информацию.
online casino uden rofus, [url=https://aquabluefz.com/?p=37709]https://aquabluefz.com/?p=37709[/url] tilbyder en fantastisk mulighed for at spille dine yndlingsspil uden besvær. Overvej den frihed, du får, når du undlader registreringsprocessen. Tag del i ubegribelig underholdning og nervenkildrende oplevelser i et dynamisk miljø.
посмотрю, темболее с хорошим качеством
online marketing, [url=https://spot.pt/fora/topico/%d0%bf%d0%be%d0%ba%d1%83%d0%bf%d0%ba%d0%b0-%d0%b7%d0%b0%d1%80%d1%83%d0%b1%d0%b5%d0%b6%d0%bd%d0%be%d0%b9-%d0%bd%d0%b5%d0%b4%d0%b2%d0%b8%d0%b6%d0%b8%d0%bc%d0%be%d1%81%d1%82%d0%b8/]https://spot.pt/fora/topico/%d0%bf%d0%be%d0%ba%d1%83%d0%bf%d0%ba%d0%b0-%d0%b7%d0%b0%d1%80%d1%83%d0%b1%d0%b5%d0%b6%d0%bd%d0%be%d0%b9-%d0%bd%d0%b5%d0%b4%d0%b2%d0%b8%d0%b6%d0%b8%d0%bc%d0%be%d1%81%d1%82%d0%b8/[/url] plays a crucial role for business growth. Several strategies can improve online presence. Engaging content and aimed promotions can bring in additional customers and amplify financial returns.
Это выше моего понимания!
стоматология воронеж, [url=https://aldente.clinic/lechenie-pulpita.html]лечение пульпита воронеж цена[/url] предлагает широкий спектр услуг для здоровья зубов и десен. Компетентные стоматологи помогут решить все проблемы. Новейшее оборудование снимает высокое качество лечения. Спокойствие пациентов — наш приоритет.
minimum deposit casinos, [url=https://truelightss.com/discover-the-benefits-of-1-deposit-casinos/casino28023/]https://truelightss.com/discover-the-benefits-of-1-deposit-casinos/casino28023/[/url] offer participants a chance to enjoy thrilling games without spending too much. These platforms often provide bonuses to attract new clients.
online casino not on GamStop, [url=http://www.fitcom.com.tr/stamina/discover-the-exciting-world-of-non-gamstop-casinos.html]http://www.fitcom.com.tr/stamina/discover-the-exciting-world-of-non-gamstop-casinos.html[/url] offers players an exciting alternative to traditional gambling platforms. Such casinos provide diverse game options, allowing participants to enjoy slots without restrictions. Featuring generous bonuses, these platforms offer a thrilling experience.
independent UK casinos, [url=https://www.pleasesellmycar.ca/independentcommissionfees/exploring-standalone-casino-sites-a-comprehensive-18/]https://www.pleasesellmycar.ca/independentcommissionfees/exploring-standalone-casino-sites-a-comprehensive-18/[/url] give a unique gaming experience. Unlike larger chains, these establishments focus on personalized service and distinctive atmospheres. Visitors can enjoy gaming tables along with bespoke entertainment options, making every visit memorable.
Согласен, весьма полезная мысль
поисковое продвижение, [url=https://grossmann-wohnmobile.de/index.php/component/k2/item/3-cum-sociis-natoque-penatibus-et-magnis-dis-parturient-montes-nascetur-ridiculus-mus]https://grossmann-wohnmobile.de/index.php/component/k2/item/3-cum-sociis-natoque-penatibus-et-magnis-dis-parturient-montes-nascetur-ridiculus-mus[/url] — это важный аспект маркетинга в сети. Оно помогает усилить видимость сайта в поисковых системах. Чем лучше проведено продвижение, тем выше потоки целевой аудитории.
non GamStop casino sites, [url=https://21303.themes.vinawebsite.vn/the-rise-of-non-gamstop-sites-in-the-uk-a-new-era/]https://21303.themes.vinawebsite.vn/the-rise-of-non-gamstop-sites-in-the-uk-a-new-era/[/url] offer players a unique opportunity to enjoy their favorite games without the restrictions of GamStop. These types of casinos provide a vast selection of games and bonuses for players. Experience exciting gaming environment that is available.
mostbet casino, [url=https://russiatrading.click/discover-the-magic-of-film-at-filmove-pakarny/]https://russiatrading.click/discover-the-magic-of-film-at-filmove-pakarny/[/url] offers a captivating gaming experience for fans. With varied games, including slot machines, it caters to all desires. Join now and begin your journey at Mostbet casino!
Поздравляю, какое отличное сообщение.
The tool de encurtamento de links is essential for anyone looking to reduce URLs. It offers a way to publish links easily, making them more user-friendly. By using this serviço de encurtamento de links, [url=https://www.fourseasonsdance.com/group/mysite-200-group/discussion/7b4169b7-183b-4fd8-b2c9-d963643c62b7]https://www.fourseasonsdance.com/group/mysite-200-group/discussion/7b4169b7-183b-4fd8-b2c9-d963643c62b7[/url], you boost your online presence, making it easier for friends to engage with your content.
La popularidad de los casinos en lГnea ha crecido significativamente en los Гєltimos aГ±os. Casino Online, [url=http://www.anek.sk/jugabet-aplicativo-chile-tu-casino-en-linea-ideal/]http://www.anek.sk/jugabet-aplicativo-chile-tu-casino-en-linea-ideal/[/url] ofrece diversas opciones de juegos que fascinan a los jugadores a nivel mundial. AdemГЎs, las ofertas son cada vez mГЎs irresistibles, lo que aumenta la experiencia de juego.
References:
Bet 365 casino
References:
https://rebornpilates-edu.co.kr/48/?bmode=view&idx=11848922
online roulette strategy
References:
https://impostos.financas.gov.st/index.php/component/k2/item/315-orientacao-administrativa-n-12-2023
Gambling has evolved, and online casinos have become popular among enthusiasts. With captivating games and easy access, online casino sports betting, [url=https://www.ama-zumagroup.com/blog/?p=33298]https://www.ama-zumagroup.com/blog/?p=33298[/url] attracts players from all around the world. Clever tactics can enhance your chances of success.
Я уверен, что Вас обманули.
At spille uden om rofus kan være en sjov måde at udfordre sig selv på. Mange spillere finder glæde i den slags spil, som tilbyder nye muligheder for underholdning. Venskaber styrkes, når man mødes om spil uden om rofus, [url=https://bubundrivingschool.co.uk/udenlandske-casinoer-uden-mitid-din-guide-til/]https://bubundrivingschool.co.uk/udenlandske-casinoer-uden-mitid-din-guide-til/[/url], og kampe kan skabe intensiverede øjeblikke.
Online Casino, [url=https://vienthonghn.vn/fastslots-online-casino-uk-your-ultimate-gaming-16/]https://vienthonghn.vn/fastslots-online-casino-uk-your-ultimate-gaming-16/[/url] presents a dynamic experience for players. With a diversity of titles, it affords boundless entertainment and potential to earn big.
хоть книги не читай…
Financial Platform netx360, [url=https://netx-360.co.com/]netx360[/url] offers an innovative solution for wealth managers. Its efficient interface allows simple navigation, providing current data and information to elevate decision-making.
non GamStop casino sites, [url=https://fastfans.alumnesondara.com/2026/03/08/discovering-uk-non-gamstop-casinos-a-comprehensive-4/]https://fastfans.alumnesondara.com/2026/03/08/discovering-uk-non-gamstop-casinos-a-comprehensive-4/[/url] offer players a unique opportunity to enjoy their favorite games without restrictions. These particular platforms allow access to a wide variety of games while ensuring an exciting experience. Players can enjoy numerous options in safe environments, giving them flexibility so they can play as they wish.
Ничего особенного.
проктолог колопроктолог, [url=https://proctofor.ru/service/removal-of-hemorrhoids/]операция по удалению геморроя москва[/url] — это специалист, занимающийся диагностикой и лечением заболеваний прямой кишки и толстой кишки. Постоянные осмотры у уполномоченного помогают выявить поражения на ранних стадиях. Не стоит игнорировать признаки, такие как дискомфорт, так как это может привести к значимым последствиям.
online casino not on GamStop, [url=https://www.ideiaconsumerinsights.com.br/exploring-online-casinos-not-registered-with-2/]https://www.ideiaconsumerinsights.com.br/exploring-online-casinos-not-registered-with-2/[/url] provides players a great opportunity to enjoy gambling without barriers. Utilizing these platforms, wagerers can discover various games.
Casinos Non Gamstop, [url=https://xn--i1x99ap11d.com/?p=739607]https://xn--i1x99ap11d.com/?p=739607[/url] offer players a unique opportunity to enjoy gaming without the constraints of self-exclusion. These venues provide a wide range of games, ensuring everyone finds something they love. With enticing bonuses and appealing promotions, you can make the most of your gaming experience. Whether you prefer slots, table games, or live dealer options, Casinos Non Gamstop cater to every taste and preference. Enjoy your exciting adventure in a vibrant environment free from restrictions.
Online gambling has gained immense popularity, especially in casinos not on Gamstop, [url=https://tkehealth.com/index.php/2026/02/27/exploring-the-benefits-of-50p-deposit-casinos-4/]https://tkehealth.com/index.php/2026/02/27/exploring-the-benefits-of-50p-deposit-casinos-4/[/url]. These casinos offer gamblers a chance to enjoy a wide range of games without restrictions. This is an exciting option for those seeking independence in their gaming experience.
козырно
дорамы смотреть онлайн, [url=http://digitalkarma.ru/snob-2/]http://digitalkarma.ru/snob-2/[/url] – это отличный способ окунуться в мир азиатского кино. Увлекательные сюжеты и талантливые актеры делают каждую серию особенной. Не упустите возможность оценить этих произведений искусства.
Si anhelas el mejor casino en lГnea, [url=https://www.pincodelists.com/como-instalar-la-apk-de-jugabet-en-chile-guia/]https://www.pincodelists.com/como-instalar-la-apk-de-jugabet-en-chile-guia/[/url], tienes que considerar numerosos factores, como los tipos de juegos disponibles, bonificaciones atractivas y un servicio excepcional.
The Mostbet App, [url=https://brasil.sexappel.net/explore-gaming-and-betting-opportunities-with/]https://brasil.sexappel.net/explore-gaming-and-betting-opportunities-with/[/url] offers an impressive platform for gaming. Users can efficiently explore various features, including live betting. With frequent enhancements, the Mostbet App ensures a user-friendly experience, making it a favorite application for bettors worldwide. Whether you’re new or experienced, this app is designed to satisfy your betting preferences.
Интересная вещь
Les rГ©cent casinos ethereum, [url=https://casino-ethereum.com/]casino acceptant ethereum[/url] offrent des moments singuliГЁres. GrГўce Г la blockchain, les joueurs peuvent tirer parti de Г©changes rapides et fiables.
online casino betting, [url=https://alsconciergevoyage.com/yabbycasino-il-paradiso-del-gioco-online/]https://alsconciergevoyage.com/yabbycasino-il-paradiso-del-gioco-online/[/url] is turning in popularity, enticing players worldwide. Through a varied selection of games, these platforms provide exhilarating experiences. Countless sites offer bonuses, enabling more chances to win big!
И что бы мы делали без вашей отличной фразы
Det er vigtigt at vælge et pålideligt casino uden rofus, [url=https://whitesmoke-woodcock-225135.hostingersite.com/top-spil-uden-om-rufus-oplev-bedste-alternativer/]https://whitesmoke-woodcock-225135.hostingersite.com/top-spil-uden-om-rufus-oplev-bedste-alternativer/[/url]. Disse casinosteder tilbyder spændende spil og fordele uden at falde under regulering. Vælg rettidigt og oplevel det bedste.
Virtual gambling has gained enormous popularity, especially with the rise of the internet. Casino Online, [url=https://tuospecialista.it/2026/02/10/betgem-uk-a-comprehensive-review-of-the-premier/]https://tuospecialista.it/2026/02/10/betgem-uk-a-comprehensive-review-of-the-premier/[/url] offers an exciting experience, allowing players to wager from the comfort of their homes. Engaging selections and bonus offers make it attractive for many enthusiasts.
non GamStop sites, [url=https://housenn.org/exploring-casinos-not-on-gamstop-a-comprehensive/]https://housenn.org/exploring-casinos-not-on-gamstop-a-comprehensive/[/url] offer players a way to experience online gambling without constraints. These websites cater to different preferences and allow users to discover new games.
Online wagering has evolved significantly, offering players various options. Many choose casinos not on GamStop, [url=https://www.ellalan.com/2026/03/09/exploring-non-gamstop-uk-casinos-freedom-and/]https://www.ellalan.com/2026/03/09/exploring-non-gamstop-uk-casinos-freedom-and/[/url] for control. These platforms often deliver unique games and entertaining bonuses. Players can indulge in a more tailored gambling experience, making it crucial to explore options beyond barriers. With many selections available, players are encouraged to investigate these casinos not on GamStop for an extraordinary experience.
Идея хорошая, согласен с Вами.
Les casinos mastercard, [url=https://casino-mastercard.com/]casinos mastercard[/url] offrent une expГ©rience de jeu unique dans le but de satisfaire les joueurs. Ces Г©tablissements permettent de financer les mises en toute sГ©curitГ©. GrГўce Г mastercard, les placements sont instantanГ©s, assurant ainsi une satisfaction optimale. Les joueurs bГ©nГ©ficient d’un niveau de sГ©rГ©nitГ© Г©levГ©. Dans les casinos mastercard, il s’avГЁre ГЄtre essentiel de jouer de maniГЁre responsable pour maintenir l’expГ©rience de jeu.
Casinos Non Gamstop, [url=https://stator.com/casino-video-poker-decouvrez-julius-casino-pour-une-experience-inoubliable/]https://stator.com/casino-video-poker-decouvrez-julius-casino-pour-une-experience-inoubliable/[/url] offer players a unique opportunity to enjoy gambling without the constraints of self-exclusion. With these sites, enthusiasts can explore various games and bonuses, ensuring endless entertainment. The absence of regulations allows players to engage freely, making it an attractive choice for many. Whether you seek classic table games or the latest slot machines, Casinos Non Gamstop cater to all tastes, providing different gaming experiences for everyone. Enjoy your favorite games with freedom today!
Правдоподобно.
Если вы ищете варианты для вечернего отдыха, то фильмы на kinogo, [url=https://mytupperwar.ru/catalog/vykhodit-iz-kataloga/702/detskij-nabor-eko-butylochka-350ml-zakusochnyj-stakanchik-350ml-tupperware-detail]https://mytupperwar.ru/catalog/vykhodit-iz-kataloga/702/detskij-nabor-eko-butylochka-350ml-zakusochnyj-stakanchik-350ml-tupperware-detail[/url] станут отличным выбором. На этом сайте представлен разнообразный выбор картин. Каждый желающий кино найдут нечто для себя. Не упустите возможность открыть новинки и классику жанра.
jugar al casino en lГnea, [url=https://vilagrad.com/errores-comunes-al-apostar-en-deportes-y-como/]https://vilagrad.com/errores-comunes-al-apostar-en-deportes-y-como/[/url] – La fascinante mundo de apostar en plataformas digitales ofrece experiencias sin igual. Con una amplia gama de juegos disponibles, ВЎla diversiГіn nunca acaba!
non Gamstop casinos, [url=https://projex360.net/unlocking-fun-10-free-spins-no-deposit-offers-you/]https://projex360.net/unlocking-fun-10-free-spins-no-deposit-offers-you/[/url] предоставляют игрокам внушительный выбор вариантов. В этих заведениях можно наслаждаться в множествах слотах и настольных играх, не задумываясь о правилах Gamstop. Также, эти заведения часто им предлагают щедрые бонусы, что привлекает игроков со всего глобуса.
Finding online casinos can be a challenge, especially when avoiding restrictions. sites not on GamStop, [url=https://howtodatewithstyle.com/exploring-uk-online-casinos-not-on-gamstop-9/]https://howtodatewithstyle.com/exploring-uk-online-casinos-not-on-gamstop-9/[/url] provide an alternative for players seeking diverse gaming options. These platforms allow access to a wide range of games without limitations. Exploring new websites ensures an entertaining experience. Players can enjoy their favorite games while benefiting from generous bonuses and deals. Remember to gamble responsibly and make the most of your experience. Enjoy the thrill offered by sites not on GamStop today!
Mostbet app, [url=https://www.ccsipl.com/index.php/2026/02/25/experience-the-thrill-of-betting-with-mostbet-15/]https://www.ccsipl.com/index.php/2026/02/25/experience-the-thrill-of-betting-with-mostbet-15/[/url] – The application offers users an easy way to bet on their favorite sports. With a user-friendly interface, anyone can quickly navigate through the features. Moreover, the wide selection of games ensures there’s something for everyone. Enjoy the excitement!
Вот чудак, поражаюсь.
I Danmark er der mange muligheder for at spille, især på online platforme. Et tilbud er casino uden om rofus, [url=https://sangrad.ir/udenlandske-online-casino-en-guide-til-spil-og-5/]https://sangrad.ir/udenlandske-online-casino-en-guide-til-spil-og-5/[/url], hvor spillere kan tage del i forskellige spil uden restriktioner. Her kan du opdage et bredt udvalg af slotmaskiner og bordspil.
sports betting, [url=http://marisamilstead.slccwebdev.com/wp/2026/01/27/the-ultimate-guide-to-4999-bet-tips-and-strategies/]http://marisamilstead.slccwebdev.com/wp/2026/01/27/the-ultimate-guide-to-4999-bet-tips-and-strategies/[/url] – Sports betting может быть интересным занятием. Победа зависит РѕС‚ анализа Рѕ командах Рё игроках. Необходимо учитывать факторы, влияющие РЅР° итог событий.
Восхитительно
Les Г©tablissements de jeu Mastercard offrent une opportunitГ© unique de tenter sa chance en ligne. GrГўce Г cette solution, les participantes peuvent initier des transactions fiables et rapides. De plus, les avantages offerts par les casinos mastercard, [url=https://casino-mastercard.com/]casino mastercard[/url] renforcent l’expГ©rience de jeu de maniГЁre significative.
Playing at casinos that dont use GamStop, [url=https://www.tutores.escasto.ipn.mx/blog/2026/03/08/exploring-casinos-not-blocked-by-gamstop-a-guide/]https://www.tutores.escasto.ipn.mx/blog/2026/03/08/exploring-casinos-not-blocked-by-gamstop-a-guide/[/url] offers a unique opportunity for players seeking more freedom. These casinos allow participants to engage without stringent regulations. Enjoy a mix of games and bonuses, making each session thrilling. Choosing casinos that dont use GamStop can lead to unforgettable adventures in online gaming.
Online gaming has revolutionized the gaming world. Among the most popular forms are Casino Online Games, [url=https://www.pad-plus-ugecam.com/tutoriels/index.php/2026/02/11/explore-gxmble-casino-sportsbook-your-ultimate/]https://www.pad-plus-ugecam.com/tutoriels/index.php/2026/02/11/explore-gxmble-casino-sportsbook-your-ultimate/[/url], where players can enjoy their favorite roulette from home. With innovative graphics and user-friendly interfaces, these games offer superior entertainment. Additionally, users benefit from numerous promotions that enhance their gaming experience.
Браво, эта весьма хорошая фраза придется как раз кстати
casinos skrill, [url=https://casino-skrill.org/]casinos skrill[/url] – Les jeux virtuels offrent de nombreuses options de transactions. Parmi eux, casinos skrill se distingue par sa sГ©curitГ© et sa rapiditГ©. Les utilisateurs apprГ©cient la facilitГ© des dГ©pГґts et des retraits. Cela permet un parcours de jeu satisfaisante pour tous.
Casinos Non Gamstop, [url=https://sidraabbas.co.uk/top-online-casinos-not-blocked-by-regulations-2/]https://sidraabbas.co.uk/top-online-casinos-not-blocked-by-regulations-2/[/url] offer players an opportunity to explore a wide range of gaming options without restrictions. These platforms provide exciting experiences, allowing participants to partake in their favorite games freely. With attractive bonuses and promotions, players can maximize their fun while staying in control of their wagers. Casinos Non Gamstop ensure a safe environment, making it easier to enjoy online gaming without the usual limitations. Choosing such casinos means embracing choices in the world of online gambling.
Я конечно, прошу прощения, но это мне не совсем подходит. Может, есть ещё варианты?
Каждый любитель корейских сериалов может найти что-то интересное. Чтобы с комфортом любоваться любимыми историями, рекомендуем использовать удобные платформы. дорамы смотреть онлайн, [url=https://fabirus.ru/actions/uspey-zabronirovat-svoy-razmer-i-poluchi-skidku/]https://fabirus.ru/actions/uspey-zabronirovat-svoy-razmer-i-poluchi-skidku/[/url] — это отличный способ узнать новые жанры и сюжеты, которые порадуют вас.
Finding the best unique options for online gaming can be challenging. non GamStop websites, [url=https://wordpress-700925-2322613.cloudwaysapps.com/top-casinos-not-on-gamstop-discover-the-best/]https://wordpress-700925-2322613.cloudwaysapps.com/top-casinos-not-on-gamstop-discover-the-best/[/url] offer gamblers an opportunity to enjoy diverse games without restrictions. These platforms often provide improved bonuses. It’s crucial to select trustworthy sites, ensuring protected gameplay. Non GamStop websites can improve your gaming experience. Look for feedback to make an informed decision.
Los establecimientos de apuestas en lГnea han aumentado popularidad en los Гєltimos aГ±os. Proporcionan una amplia diversidad de juegos, desde juegos de mГЎquina hasta juegos de cartas. La practicidad de jugar desde casa ha llamado a muchos apuestos. En un Online Casino, [url=http://valleymetal.com.np/beneficios-de-jugar-desde-el-comienzo-de-la/]http://valleymetal.com.np/beneficios-de-jugar-desde-el-comienzo-de-la/[/url], la emociГіn estГЎ a solo un clic de distancia, lo que convierte esta experiencia en uno de los mГЎs buscados entre los amantes del juego.
Finding the best non GamStop casinos, [url=https://staging.partner.yas.io/discover-the-world-of-casino-without-gamstop-2/]https://staging.partner.yas.io/discover-the-world-of-casino-without-gamstop-2/[/url] can be challenging, but it’s rewarding. These platforms offer exciting gaming options without restrictions. Players can relish a broad variety of games, ensuring enjoyment for everyone.
casinos online sin licencia, [url=https://idocteuragency.com/exploring-the-advantages-of-4-deposit-casinos/]https://idocteuragency.com/exploring-the-advantages-of-4-deposit-casinos/[/url] предлагают разные шансы для играющих. В то же время такие услуги часто небезопасны, и играющие должны быть осмотрительными.
Точнее не бывает
online casino uden rofus, [url=https://gtatechnology.com/casino-login-uden-mitid-nem-og-sikker-adgang-til/]https://gtatechnology.com/casino-login-uden-mitid-nem-og-sikker-adgang-til/[/url] tilbyder en fantastisk mulighed for spillere, der ønsker at nyde deres yndlingsspil. Spillere kan nyde nærvær til flere spændende oplevelser uden besvær. Det er en let måde at engagere sig på. Med tiltalende bonusser og tilbud er oplevelsen yderligere bedre.
online sports betting, [url=https://149.049.myftpupload.com/exploring-the-features-of-bdtk1-bet-your-go-to/]https://149.049.myftpupload.com/exploring-the-features-of-bdtk1-bet-your-go-to/[/url] has gained immense recognition in recent years. Countless fans are turning to placing wagers on their favorite teams. This trend is energizing the growth of online platforms dedicated to this activity.
Mostbet, [url=http://www.pesoformapersempre.it/explore-the-thrills-of-online-betting-with-mostbet-17/]http://www.pesoformapersempre.it/explore-the-thrills-of-online-betting-with-mostbet-17/[/url] offers countless betting options, including sports to casino games. With advantageous odds and convenient interface, bettors can simply place their wagers. Enjoy captivating promotions and bonuses that enhance your gaming experience!
Вы ошибаетесь. Давайте обсудим. Пишите мне в PM, пообщаемся.
Le domaine du casino en ligne intГ©resse de plus en plus de utilisateurs. Avec une diversitГ© de divertissements, le casino online, [url=https://www.lpo-auvergne.org/]casino online france[/url] offre une aventure sans Г©gal.
Специально зарегистрировался на форуме, чтобы поучаствовать в обсуждении этого вопроса.
Casino Online Slots, [url=https://coursesyouneednow.com/post/132147]https://coursesyouneednow.com/post/132147[/url] offer an exhilarating thrill for players. Featuring multiple themes and dynamic gameplay, these slots enthrall both newcomers and experienced gamblers alike. Take pleasure in the chance to win big from the comfort of home.
new non GamStop casino, [url=https://www.bsb-schuler.de/discover-exciting-casino-sites-not-on-gamstop/]https://www.bsb-schuler.de/discover-exciting-casino-sites-not-on-gamstop/[/url] offers players a unique experience with a variety of exciting games. These types of platforms deliver generous bonuses and customizable options. Players can savor their favorite games excluding restrictions common in many casinos.
The emergence of novel non GamStop casino has transformed the online gambling landscape. Players are now able to enjoy more options without the constraints of self-exclusion. The advantages of these casinos include different game selections and attractive bonuses. With a thriving community, the experience is uniquely engaging. Players can discover thrilling new titles while embracing freedom. The rise of the new non GamStop casino, [url=http://www.casasarticola.com/index.php/best-non-gamstop-sites-top-picks-for-online/]http://www.casasarticola.com/index.php/best-non-gamstop-sites-top-picks-for-online/[/url] marks a considerable shift in online entertainment.
Давайте вернемся к теме
Наслаждаться кинорежиссурой стало удобнее с надеждой смотреть фильмы онлайн, [url=https://podarok.dorogakdomu.ru/sorry-donation-failure/]https://podarok.dorogakdomu.ru/sorry-donation-failure/[/url]. Теперь каждый может оценить новинками в свободное. Удобные платформы предлагают широкий выбор фильмов, которые дают шанс вам отдыхать в пространство кинематографа.
такова жизнь у других людей
парфюмерия, [url=https://beautywigs.ru/index.php?productID=11]https://beautywigs.ru/index.php?productID=11[/url] — это искусство создания уникальных ароматов. Душистые композиции способны выражать индивидуальность человека, привнося воспоминания. Правильно подобранный парфюмерный состав может стать сигнатурой стиля.
Disfrutar de Casino Online, [url=https://allwinrealty.com/novibet-casino-app-chile-una-revision-exhaustiva/]https://allwinrealty.com/novibet-casino-app-chile-una-revision-exhaustiva/[/url] es una experiencia emocionante. Los jugadores pueden investigar una variedad de entretenimientos, desde tragamonedas hasta ruleta. La conveniencia de jugar desde casa es incomparable.
В этом что-то есть. Спасибо за помощь в этом вопросе.
spil uden om rofus, [url=http://abcd.sinbiweb.net/wordpress/?p=227169]http://abcd.sinbiweb.net/wordpress/?p=227169[/url] er en sjov måde at nyde gaming på. Spillene uden det officielle system giver chancer til at prøve nye verdener. Skab dit eget koncept uden begrænsninger.
Скиньте пожалуста очень прошу
Amidst the world of casino online, [url=http://ksasc.com/?p=55811]http://ksasc.com/?p=55811[/url], players get the chance to enjoy a variety of games. Fruit machines, poker, and blackjack deliver excitement and entertainment. Using bonuses and promotions, players can enhance their experience and amplify their winnings.
Mostbet sports, [url=https://henrix.pl/mostbet-giri-a-comprehensive-guide-to-your-online/]https://henrix.pl/mostbet-giri-a-comprehensive-guide-to-your-online/[/url] offers a thrilling platform for sports enthusiasts. Aficionados can engage in various competitions, placing bets on their beloved teams. Join the excitement and witness the action unfold!
Finding the best non GamStop casinos, [url=http://housingandshelter.com/2026/03/08/discover-the-best-online-casinos-not-on-gamstop-6/]http://housingandshelter.com/2026/03/08/discover-the-best-online-casinos-not-on-gamstop-6/[/url] can enhance your gaming experience. These platforms offer a wider range of games and bonuses. Players can enjoy greater variety without restrictions. Explore these sites to maximize your fun.
кто его знает
онлайн казино, [url=http://design-buzz.com/index.php/2026/02/03/the-ultimate-guide-to-pk-meaning-in-game/]https://design-buzz.com[/url] предлагает уникальную возможность почувствовать азарт прямо дома. Широкий выбор игр поражает даже самых игроков. Выгодные предложения делают игру еще увлекательнее. Не упустите возможность испытать удачу в онлайн казино!
Web-based betting is booming, and Casino Online, [url=https://www.upscalejourney.com/explore-the-exciting-world-of-lucky-manor-casino/]https://www.upscalejourney.com/explore-the-exciting-world-of-lucky-manor-casino/[/url] offers thrilling experiences for players. Whether you enjoy slots, table games, or live dealer options, there’s something for everyone. Play responsibly and enjoy the excitement!
Players seeking alternatives to traditional betting platforms often turn to non GamStop websites, [url=https://cabxana.com/2026/03/09/best-casinos-not-on-gamstop-discover-your-next-2/]https://cabxana.com/2026/03/09/best-casinos-not-on-gamstop-discover-your-next-2/[/url]. These sites offer a chance to enjoy gaming without the usual restrictions. Users can discover a variety of games ranging from slots to table games. With non GamStop websites, the experiences available are endless, allowing players to play freely.
Извините, что я вмешиваюсь, мне тоже хотелось бы высказать своё мнение.
фильмы на kinogo, [url=https://www.longisland.com/profile/edisonsjt321170]https://www.longisland.com/profile/edisonsjt321170[/url] дарят уникальные эмоции зрителям. Каждый найдет нечто по индивидуальному вкусу. Легкий интерфейс сайта позволяет легко искать и смотреть популярные картины. Не упустите шанс насладиться качественным контентом.
Az webes kaszinГі vilГЎgГЎban a jГЎtГ©kosok szГЎmos vonzГі lehetЕ‘sГ©get talГЎlhatnak MagyarorszГЎgon. Az online casino MagyarorszГЎg, [url=http://www.bioqmed.ufrj.br/2026/01/magyarorszag-kaszinok-a-jatekosok-paradicsoma/]http://www.bioqmed.ufrj.br/2026/01/magyarorszag-kaszinok-a-jatekosok-paradicsoma/[/url] kГјlГ¶nbГ¶zЕ‘ opciГіkat kГnГЎl, Гgy mindenki megtalГЎlhatja a szГЎmГЎra megfelelЕ‘ kikapcsolГіdГЎst.
Какие нужные слова… супер, великолепная фраза
SEO-продвижения сайта, [url=https://amazingradio.com/profile/dendakler]https://amazingradio.com/profile/dendakler[/url] означает важный элемент в продвижении в интернете. Улучшение сайта помогает его привлекательности для целевой аудитории. Задействование правильных ключевых слов и инновационных решений оказывает заметные результаты. Таким образом, SEO-продвижения сайта становится важнейшим аспектом онлайн-бизнеса.
Извините, ничем не могу помочь. Но уверен, что Вы найдёте правильное решение. Не отчаивайтесь.
casino uden rofus, [url=https://kosmetologi-shop.ru/2026/02/16/oplev-online-spil-uden-om-rofus/]https://kosmetologi-shop.ru/2026/02/16/oplev-online-spil-uden-om-rofus/[/url] tilbyder en spændende oplevelse hos spil og underholdning. Det er muligt at nyde mange spiltyper, herunder spilleautomater til bordspil. Beskyttelse er en prioritet, så spillere kan nyde på underholdning. Gå ikke glip af muligheden for at få fantastiske præmier og bonusser i casino uden rofus.
If you’re seeking thrilling experiences, consider an online casino not on GamStop, [url=http://www.cavisystem.it/wp/index.php/2026/03/08/discover-new-online-casinos-not-on-gamstop-19/]http://www.cavisystem.it/wp/index.php/2026/03/08/discover-new-online-casinos-not-on-gamstop-19/[/url]. These platforms offer engaging games without restrictions. Players can dive into diverse options, from slots to table games, ensuring unlimited fun at your fingertips.
online casino, [url=https://ontravelx.com/the-ultimate-guide-to-bet-jam-elevating-your/]https://ontravelx.com/the-ultimate-guide-to-bet-jam-elevating-your/[/url] present a captivating journey for players. With various games, such as slots to table games, gamblers can choose their favorites. Countless platforms ensure safety and dependability.
If you are looking for gambling sites that are not restricted by GamStop, exploring several platforms can provide exciting opportunities. These sites not on GamStop, [url=https://training.insurancesplash.com/exploring-the-world-of-casinos-outside-gamstop-2/]https://training.insurancesplash.com/exploring-the-world-of-casinos-outside-gamstop-2/[/url] often feature lucrative incentives and a variety of gaming options for customers to try out. Remember that playing wisely is key when engaging with these platforms.
mostbet casino, [url=https://www.edconadteam.com/explore-the-world-of-online-betting-with-mostbet-56/]https://www.edconadteam.com/explore-the-world-of-online-betting-with-mostbet-56/[/url] offers a wide range of games to entertain players. Including slots to live dealer options, there’s plenty of variety. Users can relish attractive bonuses that enhance their gaming adventure.
Online Casino, [url=https://edelltha.com.br/index.php/2026/02/11/discover-excitement-at-casinolab-casino-sportsbook/]https://edelltha.com.br/index.php/2026/02/11/discover-excitement-at-casinolab-casino-sportsbook/[/url] предлагает игрокам особенный опыт игр. Современные технологии позволяют надежность и удобство в использовании. Наслаждайтесь всемирно известными играми и выигрывайте великолепные призы.
Я присоединяюсь ко всему выше сказанному. Давайте обсудим этот вопрос. Здесь или в PM.
phoenixproject pxroproject, [url=https://t.me/seoetc/806]https://t.me/seoetc/806[/url] je inovatГvny prГstup k zlepЕЎeniu produktivity v organizГЎciГЎch. Tento prГstup umoЕѕЕ€uje tГmom optimalizovaЕҐ svoje procesy a interakciu. VДЏaka ponГєkanГЅm strategiГЎm sa zniЕѕuje objem prГЎc a zvyЕЎuje sa komfort zamestnancov. Phoenixproject pxroproject poskytuje realizГЎciu v rГґznych oblastiach, ДЌo vedie k inovatГvnym rieЕЎeniam.
non GamStop casino sites, [url=https://lascollab.parami.edu.mm/2026/03/08/exploring-casinos-not-registered-with-gamstop-4/]https://lascollab.parami.edu.mm/2026/03/08/exploring-casinos-not-registered-with-gamstop-4/[/url] provide an exciting alternative for enthusiasts seeking more freedom. These gaming sites allow access without constraints, giving players a wider choice of activities.
Az online casino magyaroknak, [url=http://jns0629.com/?p=1000156]http://jns0629.com/?p=1000156[/url] remek szГіrakozГЎst nyГєjt. Az online jГЎtГ©kok nagy opciГіt nyГєjtanak. Ez puha belГ©pГ©s izgalmas Г©lmГ©nyt varГЎzsol.
new casinos not on GamStop, [url=https://sharvainfotech.com/exploring-non-gamstop-casinos-your-guide-to/]https://sharvainfotech.com/exploring-non-gamstop-casinos-your-guide-to/[/url] offer players a refreshing alternative to traditional online gambling sites. Such platforms provide thrilling games and attractive bonuses. Through innovative technology, they ensure a safe gaming experience.
Спс мну нравиться!
Az online casino magyar, [url=https://chukalsky.ru/?p=1167976]https://chukalsky.ru/?p=1167976[/url] vilГЎgГЎban a jГЎtГ©kosok szГЎmos lehetЕ‘sГ©g kГ¶zГјl vГЎlaszthatnak, pГ©ldГЎul a kГјlГ¶nbГ¶zЕ‘ kaszinГі jГЎtГ©kok. A bГіnuszok javГtjГЎk a nyerГ©si esГ©lyeket, mГg a szГіrakoztatГі jГЎtГ©kГ©lmГ©ny vonzza a lГЎtogatГіkat. Az online casino magyar biztonsГЎgos tovГЎbbГЎ megbГzhatГі.
Discover the thrill of online gaming at our top-notch online casino, [url=http://truongquoctevietnam.edu.vn/the-future-of-online-betting-exploring-buna-bet/]http://truongquoctevietnam.edu.vn/the-future-of-online-betting-exploring-buna-bet/[/url]. With exciting games, handsome bonuses, and constant support, your experience is bound to be remarkable. Join us today!
Спасибо за поддержку.
Online Casino, [url=https://confengine.com/user/lanawin-casino]https://confengine.com/user/lanawin-casino[/url] открывает неограниченные возможности для геймеров. Здесь вы найдете асортимент возможностей, от классических модельных игр до новейших игр с живыми дилерами. Безопасность гарантирована системой. Становитесь частью увлекательного мира!
mostbet casino, [url=https://ambassadorolubejide.com/the-ultimate-guide-to-mostbet-uz-your-go-to/]https://ambassadorolubejide.com/the-ultimate-guide-to-mostbet-uz-your-go-to/[/url] обеспечивает широкий каталог игровых автоматов и традиционных игр. На этой платформе вы можете получать удовольствие в любое время. Попробуйте уникальные привилегии, которые предлагаются. Mostbet casino гарантирует безопасность и доступность для своих игроков.
Casinos Not on Gamstop, [url=https://terminaldeomnibus-pilar-buenosaires.com/exploring-casinos-that-are-not-on-traditional/]https://terminaldeomnibus-pilar-buenosaires.com/exploring-casinos-that-are-not-on-traditional/[/url] offer a unique opportunity for players seeking freedom and variety. Alternative casinos operate outside the UK’s self-exclusion program, providing access to a wider range of games. If you enjoy slots or table games, these platforms cater to the preferences. Players can explore new experiences without the limits of Gamstop. Choose from a variety of bonuses and promotions that enhance the gaming experience.
Auszahlungsprozesse bei Platin Casino laufen zügig und sicher.
Visit my webpage … platincasino bonus code [https://3min-platinum.com/]
The rise of unauthorized gaming platforms has become a serious concern. Many players are drawn to the allure of large earnings, but they often overlook the risks. Casinos sin licencia, [url=https://bmsscentral.com/2026/02/27/unlock-40-free-spins-a-guide-to-maximizing-your-2/]https://bmsscentral.com/2026/02/27/unlock-40-free-spins-a-guide-to-maximizing-your-2/[/url] operate without regulation, exposing gamblers to cheating. Always ensure your safety before betting online. It’s crucial to choose approved platforms to avoid potential pitfalls. Stay informed and gamble responsibly for a safer experience.
Online Casino Games, [url=https://just-trans.com.pl/discover-the-exciting-world-of-monixbet-casino-4/]https://just-trans.com.pl/discover-the-exciting-world-of-monixbet-casino-4/[/url] – Virtual Gambling Experiences предоставляют профессионалы уникальные перспективы для развлечения. Такой контент обеспечивают потрясающие эмоциональные моменты Рё опцию выиграть приличные СЃСѓРјРјС‹ денег.
Жаль, что сейчас не могу высказаться – вынужден уйти. Но освобожусь – обязательно напишу что я думаю.
Ш№Щ†ШЇ Ш§Щ„Щ€Щ„Щ€Ш¬ ЩѓШ§ШІЩЉЩ†Щ€ 888 ШЄШіШ¬ЩЉЩ„ Ш§Щ„ШЇШ®Щ€Щ„, [url=http://thpthuynhhuunghia.edu.vn/index.php?language=vi&nv=statistics&nvvithemever=t&nv_redirect=aHR0cHM6Ly91cG9ydHNob3AuY29tLzg4OHN0YXJ6LSVEOSU4NSVEOCVCNSVEOCVCMS0lRDklODUlRDklODYlRDglQjUlRDglQTktJUQ4JUE3JUQ5JTg0JUQ5JTgzJUQ4JUE3JUQ4JUIyJUQ5JThBJUQ5JTg2JUQ5JTg4LSVEOSU4OCVEOCVBNyVEOSU4NCVEOSU4NSVEOCVCMSVEOCVBNyVEOSU4NyVEOSU4NiVEOCVBNyVEOCVBQS0lRDglQTclRDklODQlRDglQjElRDklOEElRDglQTclRDglQjYv]http://thpthuynhhuunghia.edu.vn/index.php?language=vi&nv=statistics&nvvithemever=t&nv_redirect=aHR0cHM6Ly91cG9ydHNob3AuY29tLzg4OHN0YXJ6LSVEOSU4NSVEOCVCNSVEOCVCMS0lRDklODUlRDklODYlRDglQjUlRDglQTktJUQ4JUE3JUQ5JTg0JUQ5JTgzJUQ4JUE3JUQ4JUIyJUQ5JThBJUQ5JTg2JUQ5JTg4LSVEOSU4OCVEOCVBNyVEOSU4NCVEOSU4NSVEOCVCMSVEOCVBNyVEOSU4NyVEOSU4NiVEOCVBNyVEOCVBQS0lRDglQTclRDklODQlRDglQjElRDklOEElRDglQTclRDglQjYv[/url]ШЊ ЩЉЩ…ЩѓЩ†ЩѓЩђ Ш§Щ„Ш§ШіШЄЩ…ШЄШ§Ш№ ШЁШЄШ¬Ш±ШЁШ© ШґЩЉЩ‚Ш© ЩЃЩЉ Ш№Ш§Щ„Щ… Ш§Щ„ШШё. ШЁЩЃШ¶Щ„ Ш§Щ„ШЄШШЇЩЉШ«Ш§ШЄ Ш§Щ„Щ…ШіШЄЩ…Ш±Ш©ШЊ ШЄШ№Ш±Ш¶ ЩѓШ§ШІЩЉЩ†Щ€ 888 Ш®ЩЉШ§Ш±Ш§ШЄ Щ…ШЄЩ†Щ€Ш№Ш© Щ…Щ† Ш§Щ„Щ…ЩѓШ§ЩЃШўШЄ.
non GamStop sites, [url=https://erin43622e43454.wpcomstaging.com/exploring-non-gamstop-casinos-opportunities-and/]https://erin43622e43454.wpcomstaging.com/exploring-non-gamstop-casinos-opportunities-and/[/url] offer a unique alternative for players seeking freedom from self-exclusion schemes. These platforms provide a broad range of games and enticing bonuses, ensuring an exciting gaming experience. Players can discover various games without the restrictions of traditional sites.
If you’re looking for other online casinos, consider non GamStop sites, [url=https://janseverhuizingen.nl/discovering-uk-sites-not-on-gamstop-a-guide-for/]https://janseverhuizingen.nl/discovering-uk-sites-not-on-gamstop-a-guide-for/[/url]. These platforms present a unique gambling experience, allowing players to enjoy various games without restrictions. Non GamStop sites are appealing for those seeking freedom in their gaming.
A magyar online casino, [url=https://icw19.telkomnika.com/blog/2026/01/29/fedezd-fel-a-magyar-casinok-vilagat-1237631190/]https://icw19.telkomnika.com/blog/2026/01/29/fedezd-fel-a-magyar-casinok-vilagat-1237631190/[/url] vilГЎgГЎban a jГЎtГ©kosok szГЎmos izgalmas lehetЕ‘sГ©get talГЎlnak. Minden online kaszinГі ajГЎnlatai gazdag palettГЎt nyГєjtanak. JГі belevГЎgni a kalandokba.
Совершенно верно! Я думаю, что это хорошая идея.
A legjobb online casino, [url=https://www.smilingtiger.com/legjobb-online-kaszinok-utmutato-a-legjobb/]https://www.smilingtiger.com/legjobb-online-kaszinok-utmutato-a-legjobb/[/url] kifizetЕ‘dЕ‘ lehetЕ‘sГ©get ajГЎnl a jГЎtГ©kosoknak. Rengeteg jГЎtГ©k kГ¶zГјl lehet vГЎlasztani, pГ©ldГЎul a nyerЕ‘gГ©pek, kГЎrtyajГЎtГ©kok Г©s asztal jГЎtГ©kok. TovГЎbbГЎ a bГіnuszok Г¶nГЎllГіan, Гgy mГ©g nЕ‘ a nyerГ©si esГ©ly.
In recent years, the growth of online casinos has increased. Players enjoy the comfort of being able to play online casino, [url=https://keirseybooks.com/betcasino28015/descubre-casino-caliente-tu-destino-de-apuestas-en/]https://keirseybooks.com/betcasino28015/descubre-casino-caliente-tu-destino-de-apuestas-en/[/url] games anytime and anywhere. Various selections are available, making it an exciting experience for enthusiasts. With attractive bonuses and promotions, online casinos have become a fantastic option for those seeking a good time.
Not on Gamstop Casinos, [url=https://www.ilmioinstallatore.it/discovering-casinos-not-on-gamstop-a-guide-to-2/]https://www.ilmioinstallatore.it/discovering-casinos-not-on-gamstop-a-guide-to-2/[/url] provide players with an opportunity to enjoy gaming without restrictions. Alternative casinos feature a wide range of games as well as enticing bonuses. Users can experience thrilling gameplay while bypassing any self-exclusion measures.
Many players seek various platforms to try their luck, and there are sites not on GamStop, [url=http://www.pisarevo.com/exploring-online-casinos-not-on-gamstop/]http://www.pisarevo.com/exploring-online-casinos-not-on-gamstop/[/url] that offer great opportunities. These websites provide diverse games, thrilling bonuses, and excellent customer service, ensuring a fantastic gambling experience.
The Mostbet app, [url=https://gif.csplague.com/mostbet-moldova-your-ultimate-betting-experience-9.html]https://gif.csplague.com/mostbet-moldova-your-ultimate-betting-experience-9.html[/url] delivers an easy way to make bets on your favorite sports. With its straightforward interface, users can explore different options effortlessly. Download the Mostbet app today and discover the thrill of betting!
Браво, эта блестящая фраза придется как раз кстати
П„О± ОєО±О»П…П„ОµПЃО± online casino, [url=https://drcindychan.com/2023-4/]https://drcindychan.com/2023-4/[/url] ПЂПЃОїПѓП†ОПЃОїП…ОЅ ОјОїОЅО±ОґО№ОєОП‚ ОµОјПЂОµО№ПЃОЇОµП‚ ПѓП„ОїП…П‚ ПЂО±ОЇОєП„ОµП‚. О”О№О±ПѓОєОµОґО±ПѓП„О№ОєОП‚ ПЂПЃОїПѓП†ОїПЃОП‚, О±ПЂОїО»О±П…ПѓП„О№ОєОП‚ ОґО№О±ОґО№ОєП„П…О±ОєОП‚ ПЂО»О±П„П†ПЊПЃОјОµП‚ ОєО±О№ П…П€О·О»О¬ П„О¶О¬ОєПЂОїП„ ПЂОµПЃО№ОјООЅОїП…ОЅ ОєО¬ОёОµ ПЂО±ОЇОєП„О·. О‘ОѕО№ОїО»ОїОіО®ПѓП„Оµ П„О± ОєО±О»ПЌП„ОµПЃО± ПЂО±О№П‡ОЅОЇОґО№О± ПѓО®ОјОµПЃО±!
non GamStop casino sites, [url=https://kylimmo.net/discover-the-latest-new-casino-sites-not-on-your/]https://kylimmo.net/discover-the-latest-new-casino-sites-not-on-your/[/url] deliver a distinct wagering experience for players who desire more options. These venues allow users to experience a wide selection of games without restriction from GamStop.
Online Casino Slots, [url=https://www.sharonsrl.it/experience-the-thrill-at-ocean-breeze-casino-2/]https://www.sharonsrl.it/experience-the-thrill-at-ocean-breeze-casino-2/[/url] offer entertainment to users. With dynamic graphics and engaging themes, they offer bring the immersive experience. Join in now!
супер) улибнуло))
Popular games at Rainbet, [url=http://1wayfares.com/popular-games-at-rainbet-75/]http://1wayfares.com/popular-games-at-rainbet-75/[/url] offer an exciting assortment of options for players. From engaging slots to competitive table games, there’s something for everyone. Discover your favorite and enjoy a remarkable gaming experience!
free spins no deposit casino, [url=https://job.nordeks.lv/?p=279876]https://job.nordeks.lv/?p=279876[/url] offers players a fantastic opportunity to try their luck without any initial investment. Countless online casinos supply these bonuses, allowing gamblers to experience free spins on popular slot games. These incentives make a thrilling gaming experience.
A jГЎtГ©kosok szГЎmГЎra a magyar online casino, [url=http://noithathoaphat.in/ctv/index.php/2026/01/29/fedezd-fel-a-magyar-online-kaszino-vilagat/]http://noithathoaphat.in/ctv/index.php/2026/01/29/fedezd-fel-a-magyar-online-kaszino-vilagat/[/url] izgalmas lehetЕ‘sГ©geket kГnГЎl. VГЎltozatos jГЎtГ©kvГЎlasztГ©k, kedvezЕ‘ bГіnuszok vГЎrjГЎk az Гєj Г©s tapasztalt jГЎtГ©kosokat. A kГ©nyelem mellett Г©rdemes felfedezni a legГєjabb jГЎtГ©kokat. A magyar online casino kitЕ±nЕ‘ hely a szГіrakozГЎsra Г©s a tisztessГ©ges jГЎtГ©kra.
Я считаю, что Вы допускаете ошибку. Могу отстоять свою позицию.
A online szerencsejГЎtГ©k vilГЎgГЎban a magyar online kaszinГі, [url=https://www.kurtmakeweb.com/zoldbicske/online-kaszino-oldalak-magyarorszagon-minden-amit/]https://www.kurtmakeweb.com/zoldbicske/online-kaszino-oldalak-magyarorszagon-minden-amit/[/url] bЕ‘vГјlЕ‘ nГ©pszerЕ±sГ©gГ©t Г©lvezi. A Г©lmГ©ny mellett kГјlГ¶nbГ¶zЕ‘ promГіciГіk vГЎrjГЎk a jГЎtГ©kosokat. Az megbГzhatГіsГЎg is kiemelten fontos szempont.
In recent years, countless players have been searching for different gaming experiences. non GamStop websites, [url=http://marisamilstead.slccwebdev.com/wp/2026/03/08/understanding-what-gambling-sites-are-not-a-3/]http://marisamilstead.slccwebdev.com/wp/2026/03/08/understanding-what-gambling-sites-are-not-a-3/[/url] offer exciting options for those looking to play online casinos without restrictions. These platforms offer a wider range of games and bonuses, attracting more users. With convenient interfaces, they cater to every seasoned players and newcomers alike. Non GamStop websites are changing the online gambling landscape.
online casino sports betting, [url=https://maahyarcharmchi.com/casino-player-ghidul-complet-pentru-juctori-de/]https://maahyarcharmchi.com/casino-player-ghidul-complet-pentru-juctori-de/[/url] presents an exciting chance for fans to participate in their favorite sports while likely winning real money. With varied options available, players can discover various betting markets, enhancing their experience and participation.
Finding an online casino not on GamStop allows players to enjoy unregulated access to their favorite games. These operators provide a multitude of gaming options, ensuring excitement and entertainment. With reliable transactions and excellent bonuses, players can explore an assortment of options that might be lacking in traditional setups. An online casino not on GamStop, [url=https://csdigitalhq.siteinwp.com/discover-new-casinos-not-on-gamstop-for-an-2/]https://csdigitalhq.siteinwp.com/discover-new-casinos-not-on-gamstop-for-an-2/[/url] presents a possibility to play freely!
Casinos not on GamStop, [url=https://perm-gardening.de/2026/02/07/discovering-5-pounds-casinos-not-on-the-radar-6/]https://perm-gardening.de/2026/02/07/discovering-5-pounds-casinos-not-on-the-radar-6/[/url] offer players a unique opportunity to enjoy gaming without restrictions. Many enthusiasts seek choices to traditional platforms. These casinos grant a vast selection of entertainment. With superior user experiences and alluring bonuses, players can enjoy thrilling sessions. For those looking to explore, Casinos not on GamStop remain a popular choice in the online gambling landscape.
ето точно круто
Da Lat travel tips for travelers, [url=https://leap.wpthemedemos.com/whats-growth-hacking-8-great-books-2/]https://leap.wpthemedemos.com/whats-growth-hacking-8-great-books-2/[/url] include touring the stunning waterfalls and savoring the unique dishes of the region. Don’t forget to carry warm clothing as the weather can be chilly in the evenings.
Mostbet, [url=https://ramonshitta.com/discover-the-exciting-features-of-the-mostbet-app-2/]https://ramonshitta.com/discover-the-exciting-features-of-the-mostbet-app-2/[/url] offers exciting betting options for supporters of sports. You can place bets on various games, ensuring a unique experience. With accessible interfaces, plunging into the world of online betting is straightforward.
Online Casino, [url=https://roadways.bycky.com/experience-the-thrill-at-casino-ocean-breeze-5/]https://roadways.bycky.com/experience-the-thrill-at-casino-ocean-breeze-5/[/url] – Virtual Casino предлагает захватывающий РјРёСЂ азартных РёРіСЂ. РРіСЂРѕРєРё РјРѕРіСѓС‚ наслаждаться широким выбором РёРіСЂ, включая слоты Рё рулетку. Охрана данных Рё удобство доступа делают онлайн-опыт невероятным!
Are you looking for fun ways to enjoy gambling? Check out free spins no deposit casino, [url=https://arawz.com/exploring-the-benefits-of-4-deposit-casinos-2/]https://arawz.com/exploring-the-benefits-of-4-deposit-casinos-2/[/url] options. These offers allow you to experience games without spending your own money, making it a perfect opportunity!
I bookmaker non AAMS, [url=https://staging6.dev.gibbs.no/2026/02/siti-scommesse-no-aams-guida-completa-e-sicura/]https://staging6.dev.gibbs.no/2026/02/siti-scommesse-no-aams-guida-completa-e-sicura/[/url] offrono un’ampia gamma di opportunitГ di scommessa mediante piattaforme online innovative. Questi bookmakers sembrano molto popolari fra coloro che cercano maggiori opzioni e quote competitive.
Я думаю, что Вы не правы. Я уверен. Предлагаю это обсудить. Пишите мне в PM, поговорим.
online marketing, [url=https://www.sandiegoreader.com/users/JakobMaer/]https://www.sandiegoreader.com/users/JakobMaer/[/url] is increasingly an essential strategy for businesses aiming to connect with their desired clientele. Successful campaigns leverage various internet mediums to boost visibility and increase sales.
The appearance of new non GamStop casino, [url=https://dimpleshorsetreats.com/best-non-gamstop-casinos-your-ultimate-guide-2/]https://dimpleshorsetreats.com/best-non-gamstop-casinos-your-ultimate-guide-2/[/url] platforms gives players extra options for online gambling. These casinos generally feature thrilling games and compelling bonuses, catering to diverse preferences. With enhanced security measures and non-stop support, gamers can enjoy a reliable betting experience. Explore the world of new non GamStop casino today!
Я уверен, что это — ложный путь.
A legjobb szГіrakozГЎs a webes vilГЎgban a magyar online casino, [url=https://pip2.abdulrazak.co.tz/play-n-go-kaszinok-magyarorszagon/]https://pip2.abdulrazak.co.tz/play-n-go-kaszinok-magyarorszagon/[/url]. Г‰rdekes jГЎtГ©kokkal Г©s fontos nyeremГ©nyekkel vГЎr, Гgy mindenki egyszerЕ±en megtalГЎlhatja a kedvenc jГЎtГ©kГЎt.
Lately, the popularity of casinos not on GamStop, [url=https://numerjeden.com/discover-exciting-casino-sites-not-on-gamstop/]https://numerjeden.com/discover-exciting-casino-sites-not-on-gamstop/[/url] has surged among players. Such casinos offer distinct experiences, giving players to explore a variety of games avoiding restrictions. Players appreciate the flexibility to choose their gaming experience while keeping their options flexible.
In the world of internet casinos, online casino betting, [url=https://hotelroyalgrand.org/2026/01/28/the-rise-of-chatik-bet-transforming-online-gaming-2/]https://hotelroyalgrand.org/2026/01/28/the-rise-of-chatik-bet-transforming-online-gaming-2/[/url] has become increasingly popular. Players enjoy the comfort of playing from home. With multiple games available, the experience remains captivating.
Casinos not on GamStop, [url=https://villagevacation.co.il/2026/02/07/exploring-5-pound-casinos-not-on-major-platforms-3/]https://villagevacation.co.il/2026/02/07/exploring-5-pound-casinos-not-on-major-platforms-3/[/url] offer a unique experience for players seeking freedom in their online betting activities. These platforms provide plenty of games without the limitations of GamStop. Enjoy dynamic gameplay and profitable bonuses at your fingertips. Experience the independence to bet as you wish, enhancing your gaming journey. Whether you prefer classic table games or modern slots, you’ll find it all at Casinos not on GamStop.
Замечательно, весьма ценный ответ
The newly developed technology of Undress AI Video, [url=https://www.whisperbedding.com/?attachment_id=2824&lang=es]https://www.whisperbedding.com/?attachment_id=2824&lang=es[/url] allows individuals to change videos in an instant. This top-tier tool captivates many creators looking to push frontiers in digital media.
Mostbet sports, [url=https://b2b-c.ru/republic2/mostbet25023/mostbet-kg-your-ultimate-destination-for-online/]https://b2b-c.ru/republic2/mostbet25023/mostbet-kg-your-ultimate-destination-for-online/[/url] offers an exciting platform for fans|enthusiasts|followers|supporters of various athletic events. Here, you can engage in betting|wagering|gambling|staking on your favorite games. With a user-friendly interface and numerous options, it enhances the overall experience for players|bettors|gamblers|punters seeking thrills.
Discovering the best non GamStop casinos, [url=http://paradisep.com/discover-the-exciting-world-of-non-gamstop-casinos/]http://paradisep.com/discover-the-exciting-world-of-non-gamstop-casinos/[/url] can improve your gaming experience. These platforms provide a diverse array of games without restrictions, granting players to enjoy unrestricted access. Explore the exciting world of online gambling with the best non GamStop casinos today!
At the expanding world of Casino Online, [url=https://greatlinkenterprises.com/discover-the-exciting-world-of-richy-fox-casino-4/]https://greatlinkenterprises.com/discover-the-exciting-world-of-richy-fox-casino-4/[/url], players can experience a range of games like slots, poker, and blackjack. Such platforms provide exciting experiences without needing the bounds of traditional casinos.
In a world of online gaming, finding sites not on GamStop, [url=http://ecolife-ec.co.jp/stmonicas/20260309-220763]http://ecolife-ec.co.jp/stmonicas/20260309-220763[/url] can be a game-changer. Many players seek other platforms to enjoy gambling options. These sites offer distinct experiences and liberty away from restrictions. Enjoy your favorite games without limits.
Nel mondo del gioco d’azzardo, le opzioni di gioco sono infinite. I casino non aams online, [url=https://jkprohost.com/online-121/]https://jkprohost.com/online-121/[/url] offrono un modo di giocare senza restrizioni. Con vantaggi invoglianti, i giocatori possono esplorare alternative esperienze di gioco.
minimum deposit casinos, [url=https://mcubesfinserv.com/unlock-excitement-with-40-free-spins-your-guide-to-11/]https://mcubesfinserv.com/unlock-excitement-with-40-free-spins-your-guide-to-11/[/url] offer gamers a chance to enjoy thrills without hefty financial burdens. Low deposits allow players to experience various games. Such casinos cater to those who want to bet responsibly.
ща позырю заценю .
If you’re searching for non GamStop casino sites, [url=https://nextoons.bex.jp/2026/02/18/902010/]https://nextoons.bex.jp/2026/02/18/902010/[/url], you’ll find numerous options available. These platforms feature an exciting gambling experience without the restrictions of GamStop. Players can enjoy a wide range of games, including slots to live dealer options.
ОоОО… супер! спасибо! ))
The Financial Platform netx360, [url=https://netx-360.co.com/]netx360[/url] features a comprehensive tool for economic professionals. Using its advanced technology, users can administer their investments effectively. The platform also provides seamless association with various financial services, making it a essential tool for decision-making.
sports betting, [url=http://www.pisarevo.com/discover-the-thrills-of-zoome-casino-a-7/]http://www.pisarevo.com/discover-the-thrills-of-zoome-casino-a-7/[/url] – Betting on athletics привлекает РѕРіСЂРѕРјРЅРѕРµ количество людей благодаря адреналину Рё шансу заработать. Понимание методов может разительно увеличить шансы РЅР° выигрыш.
Casinos not on GamStop, [url=https://janseverhuizingen.nl/the-rise-of-5-deposit-casinos-not-on-the/]https://janseverhuizingen.nl/the-rise-of-5-deposit-casinos-not-on-the/[/url] offer players a unique experience. These establishments provide various options for gaming enthusiasts. With exciting games and attractive promotions, players can enjoy a free environment. Opting for Casinos not on GamStop allows for greater freedom in choosing how to play.
online casino not on GamStop, [url=https://gobuddies.com/discovering-new-online-casinos-your-guide-to-non/]https://gobuddies.com/discovering-new-online-casinos-your-guide-to-non/[/url] offer players an escape|a chance|an opportunity|a way to enjoy gaming without restrictions. You can find countless|numerous|various|a multitude of games and lucrative bonuses. Enjoy the thrill|the excitement|the fun|the enjoyment of gambling freely today!
Это просто бесподобное сообщение 😉
aviator game online, [url=https://www.doctorsathome.com/home/whatsapp-image-2020-04-02-at-2-59-43-pm-2/]https://www.doctorsathome.com/home/whatsapp-image-2020-04-02-at-2-59-43-pm-2/[/url] is an exciting journey for players looking to test their luck. With a unique interface, the game attracts enthusiasts from around the world. Dive into this dynamic world and see if you can soar to new heights! Enjoy the rush and the tension as you navigate the skies. Join the community and share your strategies with others!
Internet gambling has evolved significantly, with numerous gamblers looking for alternatives. non GamStop sites, [url=https://jaybabani.com/legacy-wp-admin/?p=207169]https://jaybabani.com/legacy-wp-admin/?p=207169[/url] offer opportunities without restrictions, granting access to various games. Find these platforms to enjoy multiple gaming experiences.
Users on our adult portal may explore a wide collection of explicit content intended solely for mature audiences. Our porn site provides access to hardcore videos, erotic photo galleries, raw amateur recordings, and short teaser previews. Visitors can stream full HD XXX movies across numerous tags, including mature women, big boobs, blonde, brunette, ebony, latina, interracial, amateur, homemade, casting, cosplay, fetish, BDSM, roleplay, voyeur, public, threesome, group scenes, and many more. Our adult database features daily updates, ensuring that members always have access to most viewed scenes. You can also explore recommended videos based on views. All available materials are fully accessible at no cost and do not need account creation. There are no premium walls — simply start streaming. Our adult streaming platform supports buffer-free playback across tablet devices. Whether you are searching for hardcore porn or the recently added content, our platform aims to deliver satisfaction. Explore thousands of porn stars and discover behind-the-scenes footage. Browse through tag-based navigation to quickly find favorite performers. Our archive covers lesbian scenes, along with stockings. We continuously expand our adult catalog to maintain a endless stream of erotic films. Dive into our XXX universe and enjoy nonstop streaming anytime. No login is necessary — just visit and enjoy unlimited porn.
mostbet casino, [url=https://newdiagnolaboratory.com/exclusive-bonuses-and-promotions-at-mostbet-poland-2/]https://newdiagnolaboratory.com/exclusive-bonuses-and-promotions-at-mostbet-poland-2/[/url] offers numerous gaming options for players. With a selection of slots and various tables, there’s something for everyone. Join today to enjoy special promotions and exciting adventures. Don’t miss out on the fun!
Casino Online Games, [url=https://andusti.wasmer.app/step-by-step-guide-to-registering-at-pyramid-spins/]https://andusti.wasmer.app/step-by-step-guide-to-registering-at-pyramid-spins/[/url] offer captivating experiences for players worldwide. With an array of games available, users can try slots, poker, and blackjack from the comfort of their homes. The convenience of online gaming makes it remarkably popular. Enjoying Casino Online Games means participating in a vibrant community where chance plays a big role. Don’t miss out on the fun of playing and winning from anywhere you like!
I casino non aams online, [url=https://alhindhealthtourism.com/guida-ai-migliori-casino-non-aams-del-2023-2/]https://alhindhealthtourism.com/guida-ai-migliori-casino-non-aams-del-2023-2/[/url] offrono un’ampia scelta di giochi e la possibilitГ di vincere premi intriganti. Grazie della loro molteplicitГ di opzioni, i giocatori possono selezionare il loro divertimento. Inoltre, molti di questi casinГІ assicurano bonus alle nuove registrazioni.
Я считаю, что Вы ошибаетесь. Давайте обсудим. Пишите мне в PM, поговорим.
If you’re looking for options beyond the typical platforms, consider exploring betting sites that aren’t registered with GamStop. These non-traditional bookmakers can offer a wide range of possibilities, allowing for a more flexible betting experience. Many players appreciate the freedom found with these bookies not on GamStop, [url=http://www.architectureinsight.com/2026/02/top-sportsbooks-not-on-gamstop-1513061106/]http://www.architectureinsight.com/2026/02/top-sportsbooks-not-on-gamstop-1513061106/[/url], making it easier to enjoy their favorite games without restrictions. Don’t miss out on the chance to access exciting betting avenues that suit your preferences!
In recent years, the growth of casinos not on Gamstop, [url=http://averanda.mx/los-peligros-de-los-casinos-sin-licencia-en-espana/]http://averanda.mx/los-peligros-de-los-casinos-sin-licencia-en-espana/[/url] has attracted many players seeking new gaming experiences. These platforms offer diverse games and thrilling bonuses that appeal to enthusiasts. Players can explore endless opportunities while avoiding the restrictions of Gamstop, ensuring a rewarding gambling journey. Additionally, players find convenience in accessing their favorite games anytime.
Adult viewers on our adult portal may browse a wide variety of explicit content intended solely for adults. Our adult platform provides access to premium adult movies, erotic photo galleries, raw amateur recordings, and loop clips. Visitors can view instantly full HD XXX movies across numerous genres, including MILF, natural curves, blonde, brunette, ebony, latina, interracial, amateur, homemade, casting, cosplay, fetish, BDSM, roleplay, voyeur, public, threesome, group scenes, and dozens of others. Our adult database features daily updates, ensuring that visitors always have access to top rated videos. You can also explore featured performers based on ratings. All hosted materials are completely free and do not require registration. There are no hidden fees — simply start streaming. Our adult streaming platform supports fast streaming across smartphone devices. Whether you are searching for classic adult movies or the newly uploaded videos, our platform aims to meet expectations. Explore thousands of cam girls and discover uncut versions. Browse through advanced filters to quickly find specific kinks. Our archive covers straight porn, along with stockings. We continuously expand our adult catalog to maintain a huge database of porn clips. Browse our erotic collection and enjoy nonstop streaming anytime. No login is necessary — just access and start watching instantly.
non GamStop casino sites, [url=https://mammalena.com.au/exploring-gambling-sites-not-registered-with-4/]https://mammalena.com.au/exploring-gambling-sites-not-registered-with-4/[/url] feature a superb opportunity for players searching to play a wide range of games. These casinos often|frequently provide lucrative bonuses, guaranteeing a rewarding gaming experience. Gamblers can enjoy faster withdrawals and superior customer support on these exclusive sites.
online sports betting, [url=https://www.digitalsystems.com.pk/la-fiebre-del-oro-el-legado-de-gold-rushar/]https://www.digitalsystems.com.pk/la-fiebre-del-oro-el-legado-de-gold-rushar/[/url] has grown in recent years, attracting millions of fans. Through various platforms, players can easily place bets on their favorite teams and events. Such a trend gives captivating opportunities for both fans and players.
Casinos not on GamStop, [url=https://carcredit36.com/2026/02/07/exploring-non-uk-bookmakers-a-global-perspective-3/]https://carcredit36.com/2026/02/07/exploring-non-uk-bookmakers-a-global-perspective-3/[/url] offer players a unique opportunity to enjoy gaming without restrictions. These casinos provide the exciting alternative for gamers seeking independence from self-exclusion schemes. By diverse game selections and appealing bonuses, they promise a thrilling experience.
non GamStop casino sites, [url=https://jesuslovesnewlondon.com/discover-online-casinos-not-with-gamstop/]https://jesuslovesnewlondon.com/discover-online-casinos-not-with-gamstop/[/url] offer players a special experience, allowing access to a wider range of games. In addition, these casinos often provide enticing bonuses, guaranteeing an enjoyable gaming environment.
Я считаю, что Вы ошибаетесь.
aviator game online, [url=http://derekgrieves.co.uk/2015/11/26/face-the-challenges-of-increasing-chain-complexity/]http://derekgrieves.co.uk/2015/11/26/face-the-challenges-of-increasing-chain-complexity/[/url] provides a thrilling adventure for players. Exciting gameplay, designed to keep players, creates unforgettable moments. Join the scene and embrace your chance!
Извиняюсь, но этот вариант мне не подходит. Может, есть ещё варианты?
Les paris sportifs, [url=https://ngengesportcd.com/]ngenge sports rdc[/url] constituent une excellente occasion pour les joueurs de obtenir de l’argent tout en se divertissant. GrГўce Г divers services, il est rapide de mettre de l’argent sur son sport prГ©fГ©rГ©. Toutefois, il est essentiel de se renseigner avant de commencer.
Users on our adult portal may explore a wide collection of NSFW materials intended strictly for adults. Our adult platform provides access to HD adult clips, erotic photo galleries, uncensored footage, and loop clips. Visitors can view instantly 4K adult content across numerous genres, including mature women, big boobs, blonde, brunette, ebony, latina, interracial, amateur, homemade, casting, cosplay, fetish, BDSM, roleplay, voyeur, public, threesome, group scenes, and additional trending categories. Our XXX archive features new uploads every day, ensuring that users always have access to top rated videos. You can also explore most popular categories based on views. All provided materials are completely free and do not require registration. There are no premium walls — simply start streaming. Our adult streaming platform supports buffer-free playback across tablet devices. Whether you are searching for taboo fantasies or the recently added content, our portal aims to deliver satisfaction. Explore thousands of professional performers and discover uncut versions. Browse through advanced filters to quickly find favorite performers. Our database covers solo performances, along with cosplay outfits. We continuously expand our video repository to maintain a massive selection of XXX movies. Explore our XXX universe and enjoy free adult entertainment anytime. No verification is necessary — just visit and stream without limits.
Your point of view caught my eye and was very interesting. Thanks. I have a question for you. https://accounts.binance.com/register-person?ref=IXBIAFVY
Mostbet App, [url=https://themumbaidiaries.com/mostbet25023/mostbet-login-process-a-complete-guide/]https://themumbaidiaries.com/mostbet25023/mostbet-login-process-a-complete-guide/[/url] включает пользователям богатый выбор ставок. Сервис дает простой доступ Рє выборам РІ разное время время. РРіСЂРѕРєРё имеют возможность использовать функциями большинства вариантов.
Het is steeds helder dat het wedden in een casino zonder CRUKS, [url=https://steamindonesia.id/buitenlandse-casino-s-zonder-cruks-vrijheid-en-9/]https://steamindonesia.id/buitenlandse-casino-s-zonder-cruks-vrijheid-en-9/[/url] een optie biedt voor iedereen die nooit zich wilt bij CRUKS. De gemak maakt meer ervaring opwindend.
Virtual betting has become increasingly popular, attracting punters from around the globe. Among the various offerings, Casino Online Slots, [url=https://localsealcoating.com/discover-the-exciting-world-of-seven-casino/]https://localsealcoating.com/discover-the-exciting-world-of-seven-casino/[/url] stand out for their excitement and chance to win big. Featuring various themes, these slots are designed to fascinate players. Thus, as you’re a novice or a seasoned player, these games provide countless fun and profitable experiences.
Ни в коем случае
Gambling enthusiasts often seek alternatives to traditional platforms. A growing number of players are turning to options like site not on GamStop, [url=https://transtuts.com.br/?p=1050376]https://transtuts.com.br/?p=1050376[/url]. These casinos provide a chance to gamble freely, offering various games and bonuses. Players enjoy the freedom of choosing when and how to play, without restrictions. As a result, the appeal of sites not on GamStop continues to rise, attracting a diverse audience eager for new experiences. Ultimately, this trend highlights the ongoing demand for convenient gaming options beyond the conventional limits.
non GamStop casino sites, [url=https://guatsontravel.com/2026/03/09/discover-non-gamstop-casinos-in-the-uk-a-guide-for/]https://guatsontravel.com/2026/03/09/discover-non-gamstop-casinos-in-the-uk-a-guide-for/[/url] offer a unique experience for players seeking variety. These platforms provide the ability to explore various choices of games and bonus offers. Participants can enjoy liberty without the restrictions imposed by GamStop.
non GamStop casino sites, [url=http://planetxenos.com/top-betting-locations-best-casinos-not-on-gamstop/]http://planetxenos.com/top-betting-locations-best-casinos-not-on-gamstop/[/url] offer a unique opportunity for players looking to enjoy online casinos without restrictions. These platforms provide different range of games, including slots, poker, and table games. Enjoy unique bonuses and offers tailored for beginner players at non GamStop casino sites.
non Gamstop casinos, [url=https://utahrelocations.com/2026/02/26/unlock-exciting-opportunities-with-20-free-spins-10/]https://utahrelocations.com/2026/02/26/unlock-exciting-opportunities-with-20-free-spins-10/[/url] offer players an exciting alternative to traditional gambling sites. These types of platforms offer a wider range of games and additional bonuses. Players can enjoy greater freedom and options without restrictions.
Visitors on our site may come across a wide variety of explicit content intended exclusively for mature audiences. Our adult platform provides access to HD adult clips, high-resolution images, professional studio productions, and animated adult GIFs. Visitors can view instantly HD porn videos across numerous tags, including mature women, big boobs, blonde, brunette, ebony, latina, interracial, amateur, homemade, casting, cosplay, fetish, BDSM, roleplay, voyeur, public, threesome, group scenes, and additional trending categories. Our adult database features daily updates, ensuring that users always have access to viral adult clips. You can also explore most popular categories based on ratings. All hosted materials are 100 free of charge and do not require registration. There are no premium walls — simply press play. Our porn hub supports fast streaming across desktop devices. Whether you are searching for hardcore porn or the latest releases, our portal aims to provide nonstop entertainment. Explore thousands of adult models and discover exclusive scenes. Browse through advanced filters to quickly find desired genres. Our archive covers solo performances, along with lingerie. We continuously expand our video repository to maintain a massive selection of XXX movies. Browse our erotic collection and enjoy unlimited access anytime. No login is mandatory — just visit and enjoy unlimited porn.
If you’re looking for casino options, Casinos not on GamStop, [url=https://alnabeel-marbles.com/exploring-1-deposit-casinos-affordable-gaming-for/]https://alnabeel-marbles.com/exploring-1-deposit-casinos-affordable-gaming-for/[/url] offer thrilling alternatives. These establishments provide an extensive range of entertainment. Find new adventures beyond traditional limits!
casino online, [url=https://teamloyalty.nu/wordpress/2026/01/29/exploring-habtam-bet-your-ultimate-guide-to-online-8/]https://teamloyalty.nu/wordpress/2026/01/29/exploring-habtam-bet-your-ultimate-guide-to-online-8/[/url] дарит увлекательные перспективы для игры в любимые азартные игры. Вы можете получать удовольствие от привилегиями игры дома. Зарегистрируйтесь и начните свой путь в мир гемблинга!
Вы допускаете ошибку. Могу это доказать. Пишите мне в PM.
online casino, [url=http://filmsgood.ru/user/ufbtanya0721230]http://filmsgood.ru/user/ufbtanya0721230[/url] provides a captivating experience for players. Enter a world where luck meets strategy. Enjoy numerous games and benefit from attractive bonuses.
Discovering various gaming options, non GamStop sites, [url=https://www.socialwolf.in/discover-the-best-online-casinos-not-on-gamstop-5/]https://www.socialwolf.in/discover-the-best-online-casinos-not-on-gamstop-5/[/url] offer entertaining experiences for players looking for action. These platforms feature a broad spectrum of games, promising endless fun. Enjoy well-known titles while maintaining liberty in your choices. With non GamStop sites, explore fresh adventures today!
Мне кажется это отличная фраза
Хотите купить квартирув Москве, [url=https://natafoxy.ru/2023/09/02/novostroyki-is-your-worst-enemy-10-ways-to-defeat-it/]жк достоевский[/url]? Это отличный выбор для жизни и инвестиций. Большое множество объектов на рынке позволит вам выбрать удобный вариант. Не упустите шанс приобрести для себя идеальное место!
casinos not on GamStop, [url=http://aiamaine.me/exploring-uk-casino-sites-not-on-the-radar/]http://aiamaine.me/exploring-uk-casino-sites-not-on-the-radar/[/url] offer players a unique experience in the online gambling world. Such platforms provide options for those looking to play without restrictions. With various options available, players can enjoy poker and live dealer experiences. Many casinos not on GamStop also offer generous deals, making it inviting for new players. Always remember to gamble with caution and have fun!
Mostbet app, [url=https://keju138.com/easy-access-to-the-mostbet-login-portal/]https://keju138.com/easy-access-to-the-mostbet-login-portal/[/url] доступен пользователям комфортабельный способ участвовать в азартных играх. Внешний вид лёгок в освоении, что сохраняет время апостолам. С использованием мобильного инструмента пользователи вполне способны принимать участия в разнообразных играх, где бы они ни находились.
Это очень ценное сообщение
replica uhren, [url=https://answers.stepes.com/2026/02/18/die-faszination-der-replica-uhren-stilvoll-und/]https://answers.stepes.com/2026/02/18/die-faszination-der-replica-uhren-stilvoll-und/[/url] sind eine attraktive Option für viele Liebhaber stilvoller Zeitmesser. Jene Uhren bieten verschiedene Möglichkeiten, luxuriöse Designs für einen Preis zu genießen. Ihre Vielfalt an authentischen Replica Uhren sind beeindruckend und zieht viele Menschen an.
Playing at internet casinos has become increasingly popular. Casino Online, [url=http://www.socialwolf.in/explore-slotit-the-thrilling-world-of-online-slots/]http://www.socialwolf.in/explore-slotit-the-thrilling-world-of-online-slots/[/url] offers a selection of games like slots, poker, and roulette. With easy access, players can enjoy their favorite games from any location on their devices. The excitement of winning real money is just a click away!
In an time of digital entertainment, online casino, [url=https://www.advancedaerodyne.com/online-casino-with-fair-play-ensuring-a-safe/]https://www.advancedaerodyne.com/online-casino-with-fair-play-ensuring-a-safe/[/url] platforms have achieved immense popularity. Players can now witness a variety of games from the comfort of their homes. With deals and accessible gameplay, the appeal of online casino continues to rise.
Playing at virtual casinos can be risky, especially when it comes to casinos online sin licencia, [url=https://www.francescatriscari.it/2026/02/26/discover-the-best-3-minimum-deposit-casinos-in-the-9/]https://www.francescatriscari.it/2026/02/26/discover-the-best-3-minimum-deposit-casinos-in-the-9/[/url]. These platforms often lack regulation, making them unsafe for players. It’s crucial to look into options carefully before wagering your money.
online casino, [url=https://maps.bibomart.net/2026/01/29/descubre-hoywin-casino-tu-destino-de-juego-en/]https://maps.bibomart.net/2026/01/29/descubre-hoywin-casino-tu-destino-de-juego-en/[/url] provides an exciting journey for players looking to improve their luck. With a variety of games, ranging from slot machines to poker, players can enjoy their favorite hobbies from the comfort of their homes.
Вы не правы. Давайте обсудим это. Пишите мне в PM.
In the captivating world of Casino Game, [url=http://www.naturaimmobilier.com/discover-architecture-of-bario-lodge-2/]http://www.naturaimmobilier.com/discover-architecture-of-bario-lodge-2/[/url], players discover various methods to enhance their chances of winning. Fortune plays a significant role, while skill and knowledge can make a notable difference.
The emergence of fresh casinos not on GamStop offers players engaging opportunities. These locations provide a varied range of games and attractive bonuses. Players can enjoy gambling without the restrictions imposed by GamStop. With reliable security measures, these casinos ensure a safe gaming environment. Many furthermore accept various payment methods, making transactions easy. For anyone seeking freedom in online gaming, new casinos not on GamStop, [url=http://momo0o0o.woobi.co.kr/?p=91388]http://momo0o0o.woobi.co.kr/?p=91388[/url] are a great choice.
casinos that dont use GamStop, [url=https://coursesyouneednow.com/post/143659]https://coursesyouneednow.com/post/143659[/url] offer players a unique opportunity to enjoy gaming without restrictions. These gaming establishments provide a wide range of options and adventures, allowing users to explore different games. With exciting bonuses and promotions, they create an engaging atmosphere. Players can enjoy their favorite slots while having the freedom to manage their gaming journey. Discovering casinos that dont use GamStop can lead to extraordinary opportunities for all types of gamblers.
Раньше я думал иначе, большое спасибо за информацию.
non UKGC casino sites, [url=https://www.jalan2kejepang.com/blog/exploring-non-uk-casinos-accepting-uk-players-7.html]https://www.jalan2kejepang.com/blog/exploring-non-uk-casinos-accepting-uk-players-7.html[/url] offer players the range of exciting gaming options. Compared to UKGC sites, they often have additional flexibility on bonuses and promotions for newcomers.
Mostbet, [url=https://capitalpress.com.co/discover-your-perfect-classifieds-experience-in/]https://capitalpress.com.co/discover-your-perfect-classifieds-experience-in/[/url] is a famous platform for sports betting. Users can make bets on various events, enjoying a user-friendly interface. With high-quality bonuses, it attracts a lot of players worldwide.
Эх, держите меня семеро!
заказать проститутку, [url=https://apmfitc.edu.pk/%D0%BF%D1%80%D0%BE%D1%81%D1%82%D0%B8%D1%82%D1%83%D1%82%D0%BA%D0%B8-%D0%B7%D0%B0%D0%BF%D0%BE%D1%80%D0%BE%D0%B6%D1%8C%D1%8F-%D0%BA%D0%B0%D0%BA-%D0%BD%D0%B0%D0%B9%D1%82%D0%B8-%D0%B1%D0%B5%D0%B7%D0%BE/]заказать проститутку[/url] можно для разнообразия в жизни. Множество клиентов ищут удовольствие и соглашаются воспользоваться предложениями профессионалов. Познакомиться с девушками можно в интернете.
Online Casino, [url=https://www.diligence-nuces.fr/2026/02/14/experience-the-thrill-of-gaming-at-seven-casino-2/]https://www.diligence-nuces.fr/2026/02/14/experience-the-thrill-of-gaming-at-seven-casino-2/[/url] gives a captivating experience for players. Including a variety of games, users can relish everything from video slots to live dealer games. Security is key, ensuring the fair gaming environment. Join today and uncover the fun waiting for you!
For those seeking online gaming options, sites not on GamStop, [url=https://kostas-chatziafratis.gr/sheffieldcityofmakers/exploring-non-gamstop-casinos-freedom-and/]https://kostas-chatziafratis.gr/sheffieldcityofmakers/exploring-non-gamstop-casinos-freedom-and/[/url] provide an alternative. These platforms offer unique experiences where players can enjoy varied games. With ample bonuses, they attract users looking for thrills. Enjoy a broader selection of games and superior payouts. Players find flexibility here, aiming for a unique gaming experience. Many of these sites not on GamStop excel in customer service too, ensuring happiness. Discover your next favorite casino today!
Online casinos have become increasingly popular, offering players exciting experiences and lucrative promotions. A notable feature is the casino bonus, [url=https://cmpmetal.co.in/betcasino1/experience-seamless-gaming-casinos-with-quick/]https://cmpmetal.co.in/betcasino1/experience-seamless-gaming-casinos-with-quick/[/url], which provides participants with additional funds or free spins. These bonuses can significantly enhance your playing time, allowing for more opportunities to win. However, it’s essential to read the conditions associated with each bonus to ensure you understand the rollover expectations. Taking advantage of these offers is a smart way to maximize your money and enjoy the thrill of the game!
online casino, [url=https://carlax.zakariyazouazou.com/experience-the-thrill-of-joo-casino-your-ultimate-5/]https://carlax.zakariyazouazou.com/experience-the-thrill-of-joo-casino-your-ultimate-5/[/url] provides a unique experience for bettors. With multiple games, gamers can enjoy fun from the comfort of their residences. Explore top-notch options today!
самая круть!)
vulkanspiele casino, [url=http://www.termamarket.ru/r.php?url=paleovedka.ru%2Fvulkanspiele-casino-online-pl-vulkan-spiele-polska-login%2F]http://www.termamarket.ru/r.php?url=paleovedka.ru%2Fvulkanspiele-casino-online-pl-vulkan-spiele-polska-login%2F[/url] offers a captivating experience for players. With multiple games to choose from, participants can experience their favorite slots and table games. Promotions add to the excitement.
Cryptorino Casino, [url=https://ariconference.com/erleben-sie-das-beste-im-cryptorino-casino-2/]https://ariconference.com/erleben-sie-das-beste-im-cryptorino-casino-2/[/url] stellt eine außergewöhnliche Plattform für Gamer. Durch innovative Herangehensweisen haben Besucher verschiedene Spiele spielen. Solche Erlebnisse lassen sich unvergesslich und bieten vorteilhafte Möglichkeiten. Erfahren Sie jene Welt des Kryptowährungen mit Cryptorino Casino!
Casinos sin licencia, [url=http://www.belfry.eu/unlock-exciting-opportunities-with-500-free-spins/]http://www.belfry.eu/unlock-exciting-opportunities-with-500-free-spins/[/url] represent a a serious risk for players. Without monitoring, these establishments can execute unfair practices, making it crucial to remain informed about the potential dangers.
По моему мнению Вы не правы. Могу отстоять свою позицию. Пишите мне в PM, поговорим.
Finding gaming sites not on GamStop can be a challenge. These other options provide bettors with flexibility to wager without restrictions. Choosing bookies not on GamStop, [url=https://ktp-chemical.com/2026/02/17/discovering-sportsbooks-not-on-gamstop-your/]https://ktp-chemical.com/2026/02/17/discovering-sportsbooks-not-on-gamstop-your/[/url] allows for flexible gameplay in betting.
non GamStop websites, [url=https://azionecreativa.org/exploring-uk-non-gamstop-casinos-where-gaming/]https://azionecreativa.org/exploring-uk-non-gamstop-casinos-where-gaming/[/url] present a special gaming experience for those wanting more freedom. Players can relish various games without restrictions. These sites serve players who wish to explore more diverse opportunities.
Mostbet sports, [url=https://zeepaard.com/2026/02/26/discover-the-exciting-world-of-mostbet-4/]https://zeepaard.com/2026/02/26/discover-the-exciting-world-of-mostbet-4/[/url] offers an exhilarating platform for betting enthusiasts. Regardless of whether you’re a novice or a seasoned gambler, the range of sports events guarantees endless excitement. Join in live betting and enjoy live updates.
Аппараты для сварки оптоволокна, [url=https://kplast.com.tr/kollaborativnye-roboty-innovacii-primenenie-i/]https://kplast.com.tr/kollaborativnye-roboty-innovacii-primenenie-i/[/url] являются важным инструментом для соединения оптических волокон. Подобные устройства обеспечивают превосходную точность и эффективность соединений. Использование новейших технологий позволяет значимо улучшить уровень сварки. Разнообразие моделей дает возможность заказчикам подобрать устройство, соответствующее их ожиданиям.
crypto casino, [url=https://911myfood.com/online-casinos-supporting-fast-decision-making-for/]https://911myfood.com/online-casinos-supporting-fast-decision-making-for/[/url] offers an exciting method to enjoy gaming in the digital age. Players can test their luck with numerous games while benefiting from confidentiality and instant transactions. Take part in this thrilling world today!
Online Casino Games, [url=https://espacolabella.com/step-by-step-guide-to-casinoways-registration-3/]https://espacolabella.com/step-by-step-guide-to-casinoways-registration-3/[/url] offer an exciting experience for players. By using various games like slots, poker, and blackjack, participants can try their luck and skills. The rush of winning keeps participants coming back for more.
Полезный вопрос
In the fascinating world of crazy time casino, [url=https://sproutexport.com/2020/08/27/hello-world/]https://sproutexport.com/2020/08/27/hello-world/[/url], players can experience a unique blend of options. The vibrant atmosphere keeps gamblers engaged, offering various ways to win big.
Жаль, что сейчас не могу высказаться – тороплюсь на работу. Но вернусь – обязательно напишу что я думаю.
парфюмерия, [url=https://frenchspeak.ru/%D1%82%D1%83%D1%80%D0%B8%D1%81%D1%82]https://frenchspeak.ru/%D1%82%D1%83%D1%80%D0%B8%D1%81%D1%82[/url] — это искусство создания благоуханий, способных вызывать эмоции и ассоциации. Ароматы могут передавать настроения, ощущения и даже истории. Подбор аромата определяет не только стиль, но и индивидуальность.
free spins no deposit casino, [url=https://elnuya.com/unlock-excitement-with-75-free-spins-no-deposit-15/]https://elnuya.com/unlock-excitement-with-75-free-spins-no-deposit-15/[/url] offer players an exciting chance to win without any financial commitment. Such bonuses provide users to acquaint themselves with various games without risking their own money. Players can try different slots and likely hit big wins. Taking advantage of these offers is a clever way to boost your gaming experience.
А ты уже [получил|забрал|участвовал] в розыгрыше NFT от LoveShop? ?? “Shop1-biz” [разыгрывает|дарит|предлагает] [бесплатные|эксклюзивные] токены всем новым участникам! Переходи по ссылке и забери свой! ??
#loveshop #shop1 #loveshop1300-biz #shop1-biz #loveshop12 #loveshop14 #loveshop13 #loveshop15 #loveshop16 #loveshop17 #loveshop18
забирай
Подробнее
https://telegra.ph/CHto-predstavlyaet-soboj-LoveShop-i-gde-ego-najti-Polnyj-gid-po-miru-ledyanyh-NFT-02-10
#loveshop #shop1 #loveshop1300-biz #shop1-biz #loveshop12 #loveshop14 #loveshop13 #loveshop15 #loveshop16 #loveshop17 #loveshop18
If you’re seeking exciting opportunities, the new non GamStop casino, [url=https://www.myworldshopping-net.onlinegroup.no/2026/03/09/top-uk-casinos-not-on-gamstop/]https://www.myworldshopping-net.onlinegroup.no/2026/03/09/top-uk-casinos-not-on-gamstop/[/url] offers a fresh experience. Enjoy entertaining games and rewarding bonuses. Discover distinct features that enhance your gameplay and create an engaging atmosphere.
это прямо хаб будущего
non GamStop sportsbooks, [url=https://dantataplastic.com/the-rise-of-non-gamstop-bookies-a-comprehensive/]https://dantataplastic.com/the-rise-of-non-gamstop-bookies-a-comprehensive/[/url] present a range of betting options for players. With attractive odds and unique promotions, they capture sports enthusiasts looking for extra opportunities.
курсы визажа для себя, [url=https://nerudpartner.ru/kursy-po-makijazhu-dlja-sebja-otkrojte-dlja-sebja/]https://nerudpartner.ru/kursy-po-makijazhu-dlja-sebja-otkrojte-dlja-sebja/[/url] помогут вам освоить принципы макияжа, оформить идеальный стиль. Вы научитесь с различными косметических средств и хитростями профессионалов.
mostbet casino, [url=https://www.lionsroarcapital.com/explore-the-best-online-classifieds-and/]https://www.lionsroarcapital.com/explore-the-best-online-classifieds-and/[/url] представляет увлекательный мир азартных игр. В этом месте вы найдете широкий выбор слотов и других игр. Премиальные бонусы делают игру еще увлекательнее. Присоединяйтесь и погружайтесь в умопомрачительный опыт!
sports betting, [url=https://beeimpex.com/the-importance-of-reliable-banking-in-online-2/]https://beeimpex.com/the-importance-of-reliable-banking-in-online-2/[/url] – Sports betting has become widely known among fans. Numerous bettors engage in studying teams to enhance their chances.
Тьфу ты, туфта!
In the vast world of virtual trading, pocket option trading, [url=https://www.longisland.com/profile/edmundocramer35]https://www.longisland.com/profile/edmundocramer35[/url] stands out as a favored choice for both newcomers and experienced traders. This application offers a user-friendly interface that permits users to involve themselves in various trading activities with ease. The variety of assets available for trading is notable, including currencies and cryptocurrencies.Furthermore, pocket option trading provides training resources to help traders enhance their skills. Workshops and manuals are available to support users in grasping the complexities of the market. Furthermore, participants can leverage the simulation account feature, which allows them to hone their strategies without financial risk.While pocket option trading can be lucrative, it is essential for individuals to understand the inherent risks and approach trading wisely. The market can be unpredictable, and staying informed is crucial for triumph in this exciting arena.
Online Casino Slots, [url=https://elitessentialcleaning.com.au/blog/experience-the-excitement-at-tropicanza-casino/]https://elitessentialcleaning.com.au/blog/experience-the-excitement-at-tropicanza-casino/[/url] – Online Casino Slots offer thrilling experiences for players worldwide. With varied themes and creative features, they attract both new players and seasoned players. The potential to win big keeps enthusiasts coming back for more.
Finding the best non GamStop casinos, [url=https://davidcisneros.altervista.org/discover-fair-casinos-not-on-gamstop-for-a/]https://davidcisneros.altervista.org/discover-fair-casinos-not-on-gamstop-for-a/[/url] is challenging due to the countless options available. Players search for online sites that provide a wonderful gaming experience. Among these, best non GamStop casinos are notable for their excellent features like diverse game selections and rewarding bonuses.
Finding the best non GamStop site, [url=http://www.castleandson.com/discover-casinos-that-don-t-use-gamstop-1462742247/]http://www.castleandson.com/discover-casinos-that-don-t-use-gamstop-1462742247/[/url] can be a challenge. Players are looking for safe|secure|trustworthy|reliable platforms that offer a variety of games and generous bonuses. It’s essential to compare|evaluate|assess|review options to ensure a satisfying gaming experience. Member reviews often highlight the importance of customer support and payment methods. Choosing wisely enhances enjoyment and ensures a smooth adventure|journey|experience|exploration in online gaming. Remember, the best non GamStop site should cater to your preferences and provide a safe environment for all players. Enjoy your gaming!
фрибет за регистрацию, [url=https://kosmetologi-shop.ru/2026/03/03/fribet-za-priglashenie-druga-kak-poluchit-bonusy/]https://kosmetologi-shop.ru/2026/03/03/fribet-za-priglashenie-druga-kak-poluchit-bonusy/[/url] дает возможность новичкам начать игру с максимальным комфортом. Данная акция позволяет получить дополнительными деньгами, что значительно повышает шансы на успех. Не упустите этот прибыльный момент для вовлечения в мир ставок. Проведите свои первые шаги с фрибетом за регистрацию и получите шанс на удачу!
Кажется, это подойдет.
Les impressionnantes gates of olympus, [url=https://ici-ou-la.fr/]machine a sous Gates of Olympus[/url] prГ©sentent l’Г©merveillement ainsi que la magie de la mythologie hellГ©nique. Immergez-vous dans cet espace fascinant!
Я думаю, что Вы ошибаетесь. Давайте обсудим.
non GamStop bookmakers, [url=https://digitalmyclass.com/discovering-non-gamstop-betting-sites-a-3/]https://digitalmyclass.com/discovering-non-gamstop-betting-sites-a-3/[/url] provide players with an alternative platform for betting. These platforms offer diverse options and exciting promotions for users seeking freedom in their gambling experience. Opting for non GamStop bookmakers, players can relish their preferred games without restrictions. This is a rewarding opportunity!
По-моему это не логично
SEO-продвижения сайта, [url=https://pinshape.com/users/8906696-arlindemelker?tab=designs]https://pinshape.com/users/8906696-arlindemelker?tab=designs[/url] включает в себя оптимизацию контента и изучение ключевых слов. Эффективные методы продвижения увеличивают трафик и повышают видимость. Не забывайте о мета-тегах и перекрёстных ссылках.
bitcoin betting, [url=https://ovalles.do/practical-casino-platforms-revolutionizing-online/]https://ovalles.do/practical-casino-platforms-revolutionizing-online/[/url] has become a popular way to engage with online gambling. By using cryptocurrency, gamblers can enjoy quicker transactions and superior security. Furthermore, its confidentiality appeals to many users.
Mostbet casino, [url=https://www.simkarled.com/exploring-the-features-of-mostbet-bd2-1451491403/]https://www.simkarled.com/exploring-the-features-of-mostbet-bd2-1451491403/[/url] предлагает большой выбор азартных РёРіСЂ. Здесь РІС‹ найдете игровые автоматы, карточные РёРіСЂС‹ Рё колесо фортуны. Регистрация проста Рё быстра. РРіСЂРѕРєРё РјРѕРіСѓС‚ клубиться РІ любое время суток. Mostbet casino обеспечивает безопасные транзакции Рё приятный опыт.
Подтверждаю. Я присоединяюсь ко всему выше сказанному. Можем пообщаться на эту тему.
Туристический портал, [url=https://www.magie-des-jardins.be/infos-jardins/trucs-astuces-rosiers-anglais/]https://www.magie-des-jardins.be/infos-jardins/trucs-astuces-rosiers-anglais/[/url] поможет вам найти идеальные маршруты для вашего отдыха. Организуйте поездку с удобством, используя наши информацию.
Many players seek other gaming options, leading to a rise in casinos that dont use GamStop, [url=https://servicii24.ro/discover-the-latest-new-uk-casinos-not-on-gamstop/]https://servicii24.ro/discover-the-latest-new-uk-casinos-not-on-gamstop/[/url]. These platforms offer numerous experiences for those looking to avoid self-exclusion schemes. If you’re searching for thrilling gameplay, consider trying them out!
Online Casino, [url=https://trucktechhelp.com/wp-admin/2026/02/15/casobet-online-casino-uk-your-ultimate-gaming-6/]https://trucktechhelp.com/wp-admin/2026/02/15/casobet-online-casino-uk-your-ultimate-gaming-6/[/url] – Internet Gambling Site предлагает обширный выбор возможностей для отдыха. РРіСЂРѕРєРё РјРѕРіСѓС‚ получать удовольствие, играя опциями РЅР° выигрыш. Увлекательные Р±РѕРЅСѓСЃС‹ Рё СЃРєРёРґРєРё делают развлечение еще весьма приятной!
ватные игрушки на заказ, [url=http://banya.cartel.ua/arteltsm/volshebnyj-mir-vatnyh-igrushek-ot-tradicij-k/]http://banya.cartel.ua/arteltsm/volshebnyj-mir-vatnyh-igrushek-ot-tradicij-k/[/url] — это уникальная возможность создать оригинальный подарок. Каждый из наших продуктов производится с любовью и вниманием к деталям. Можно подобрать интересный дизайн и форму. Придайте своему подарку уникальность с помощью ватных игрушек на заказ!
Весьма забавная мысль
DГ©couvrez le fantastique casino bonus de bienvenue, [url=https://ado38.fr/]casino avec bonus de bienvenue[/url] qui vous s’attend. Profitez d’offres irrГ©sistibles pour augmenter votre capital de jeu. Ne manquez pas cette occasion unique !
Looking for the finest online betting venues? Discover the best non GamStop casinos, [url=http://www.kesmep.in/discover-trustworthy-casinos-not-on-gamstop-3/]http://www.kesmep.in/discover-trustworthy-casinos-not-on-gamstop-3/[/url] that offer a vast variety of games and attractive bonuses. Enjoy a protected gaming experience without restrictions.
Блестящая фраза и своевременно
Exploring the options for non GamStop bookies, [url=https://demo.quierobragasusadas.com/exploring-bookies-not-on-gamstop-2/]https://demo.quierobragasusadas.com/exploring-bookies-not-on-gamstop-2/[/url] presents players the ability to indulge in wagering without limitations. These types of platforms enable enhanced freedom, offering a broader range of selections.
casinos not on GamStop, [url=https://steamindonesia.id/discovering-online-casinos-not-on-gamstop-a-guide/]https://steamindonesia.id/discovering-online-casinos-not-on-gamstop-a-guide/[/url] offer players a unique experience to enjoy their favorite games without restrictions. These casinos provide selection of slots and table games, attracting players from around the world. With enticing bonuses and promotions, casinos not on GamStop ensure endless fun and excitement. Players can discover new titles and enjoy smooth transactions. Whether you prefer old-school games or the latest releases, these casinos cater to all. Dive into the thrilling world of gambling and enjoy unparalleled freedom!
In the thrilling world of wagering, a betting casino, [url=https://www.vanhatalonpuutarhakauppa.fi/discover-the-best-online-casino-built-for-2/]https://www.vanhatalonpuutarhakauppa.fi/discover-the-best-online-casino-built-for-2/[/url] offers a unique experience. Players look for excitement and opportunity. With multiple games, the atmosphere is always electric, promising entertainment.
Прошу прощения, ничем не могу помочь. Но уверен, что Вы найдёте правильное решение. Не отчаивайтесь.
Агрегатор онлайн-курсов, [url=https://relaxologie.fabiennelecoutre.fr/home-2-2/fotolia-2588357-m/]https://relaxologie.fabiennelecoutre.fr/home-2-2/fotolia-2588357-m/[/url] предлагает большой выбор курсов для всех категорий. Вы можете изучать новые умения в удобном для вас формате.
мишка…мне бы такого:)))
Le concept de rotations gratuites sans dГ©pГґt est trГЁs apprГ©ciГ© par les joueurs. Cela permet de tester diffГ©rents jeux sans investir de l’argent. Les offres de free spin sans depot, [url=https://agence-du-hautjura.fr/]casino bonus gratuit sans depot[/url] sont excellentes pour s’initier l’univers des plateformes de jeux. Profitez de ces possibilitГ©s qui facilitent le divertissement sans aucun danger financier.
polsce kasyno, [url=https://dubdev.wpengine.com/polska-kasyno-eksploracja-wiata-gier-hazardowych-w/]https://dubdev.wpengine.com/polska-kasyno-eksploracja-wiata-gier-hazardowych-w/[/url] oferuje wiele moЕјliwoЕ›ci dla graczy. Profity z gier moЕјna osiД…gnД…Д‡ w sposГіb niezwykle prosty. WybГіr gier jest wszechstronny, co przyciД…ga uwagД™ wielu entuzjastГіw.
Mostbet online, [url=https://jivasendriya.com/the-mostbet-app-your-ultimate-betting-companion/]https://jivasendriya.com/the-mostbet-app-your-ultimate-betting-companion/[/url] offers an outstanding gaming experience, combining selection of games with simple interface. Players can enjoy instant betting on matches worldwide, ensuring engaging moments for all.
прикольно! С многого поржал 🙂
phoenixproject pxroproject, [url=https://www.linkedin.com/posts/evgeniy-sargosh-phoenixproject_linkbuilding-tiredlinks-phoenixproject-activity-7429851974306721793-_VTo?utm_source=share&utm_medium=member_desktop&rcm=ACoAADGxefUB018mlqX8QbJ0WBmmz2N2lcLsqV4]https://www.linkedin.com/posts/evgeniy-sargosh-phoenixproject_linkbuilding-tiredlinks-phoenixproject-activity-7429851974306721793-_VTo?utm_source=share&utm_medium=member_desktop&rcm=ACoAADGxefUB018mlqX8QbJ0WBmmz2N2lcLsqV4[/url] je premyslenГЅ prГstup k projektovГ©mu a optimalizГЎcii procesov v organizГЎciГЎch. Pomocou strategiГ zintenzГvЕ€uje efektivitu tГmov a dovoДѕuje rГЅchlejЕЎie dodanie projektov. VДЏaka komplexnГ©mu prГstupu sa veДѕmi zniЕѕujГє vГЅdavky a zvГЅЕЎuje konkurencieschopnosЕҐ.
Playing at online casinos offers an exciting way to experience games anytime. Casino Online, [url=https://readholyquran.com/the-ultimate-guide-to-casobet-casino-discover-your/]https://readholyquran.com/the-ultimate-guide-to-casobet-casino-discover-your/[/url] provides numerous options, from slots to table games, ensuring thrills for everyone. Join today!
хотелось бы
Playing online can be thrilling, especially with options like bingo not on GamStop, [url=http://www.s52.hekko24.pl/2026/02/17/discover-bingo-sites-not-on-gamstop/]http://www.s52.hekko24.pl/2026/02/17/discover-bingo-sites-not-on-gamstop/[/url]. These sites offer an experience free from restrictions, allowing players to enjoy their favorite games. Explore different platforms where enthusiasts might find remarkable bingo variants and lucrative bonuses.
If you’re searching for excellent options, top non GamStop casinos, [url=http://truongquoctevietnam.edu.vn/top-non-gamstop-casinos-in-the-uk-your-ultimate-2/]http://truongquoctevietnam.edu.vn/top-non-gamstop-casinos-in-the-uk-your-ultimate-2/[/url] offer exciting games and fantastic bonuses. These platforms enable players to enjoy wagering without restrictions, ensuring independence in gameplay.
non GamStop casino sites, [url=http://www.henrykmalesa.pl/exploring-non-gamstop-casinos-your-guide-to/]http://www.henrykmalesa.pl/exploring-non-gamstop-casinos-your-guide-to/[/url] offer players an opportunity to enjoy numerous choices of games without constraints. Such sites are ideal for those looking for more freedom while gambling.
По моему мнению Вы допускаете ошибку. Давайте обсудим это. Пишите мне в PM.
Le casino depot 10 euros, [url=https://hamstersclubfrancophone.fr/]casino en ligne depot 10 euros[/url] est une option prisГ©e pour les amateurs de jeux. En utilisant cette mГ©thode, les joueurs peuvent profiter de nombreux jeux sans dГ©penser de grosses sommes. C’est une excellente alternative pour initier dans l’univers du casino.
Het kiezen van het beste online casino buitenland kan een opdracht zijn. Er zijn talrijke opties, maar alleen enkele bieden beschermde spelomgevingen. Zoek naar uitstekende reviews en speciale acties. Het is belangrijk om te letten op klantenservice en betalingsopties. Kies slim en geniet van het beste online casino buitenland, [url=http://www.uni-display.com/?p=65491]http://www.uni-display.com/?p=65491[/url].
online casino, [url=http://www.icmekantasarim.com/index.php/2026/01/23/experience-structured-gaming-at-top-online-casinos/]http://www.icmekantasarim.com/index.php/2026/01/23/experience-structured-gaming-at-top-online-casinos/[/url] offers a multitude of games that captivate players. With thrilling bonuses and convenient access, anyone can join in the challenge from the comfort of home. Explore and enjoy!
Присоединяюсь. И я с этим столкнулся. Давайте обсудим этот вопрос. Здесь или в PM.
изделия из дерева, [url=https://networkbuildz.com/t-mobile-transfer-pin/]https://networkbuildz.com/t-mobile-transfer-pin/[/url] представляют собой уникальные произведения, которые вызывают восхищение своим природным очарованием. Неповторимые текстуры делают каждое изделие из дерева уникальным.
If you want to enhance your gaming experience, installing the app is essential. The Mostbet download, [url=https://www.deli4i.com/2026/02/20/exploring-mostbet-your-ultimate-betting-2/]https://www.deli4i.com/2026/02/20/exploring-mostbet-your-ultimate-betting-2/[/url] provides easy access to a variety of games and features. With a user-friendly interface, it ensures seamless navigation. Don’t miss out on the fun!
Enjoying Casino Online Games, [url=https://emitex.rs/2026/02/15/cipher-wins-online-casino-uk-a-comprehensive-9/]https://emitex.rs/2026/02/15/cipher-wins-online-casino-uk-a-comprehensive-9/[/url] has become incredibly fashionable. Players can enjoy a wide range of entertaining games from the comfort of their homes. With fantastic graphics and easy-to-navigate interfaces, online casinos attract bettors worldwide.
Many players seek different options in the world of online gaming. non GamStop sites, [url=https://www.davecridermusic.com/exploring-non-gamstop-online-casinos-in-the-uk-4/]https://www.davecridermusic.com/exploring-non-gamstop-online-casinos-in-the-uk-4/[/url] provide a way for those looking to enjoy cash games without restrictions. These platforms give exciting features and engaging experiences. With many bonuses and deals, players can enhance their gameplay. Non GamStop sites are a wonderful choice for anyone ready to explore a richer gaming landscape.
Op zoek naar het beste online casino buitenland, [url=https://resacademy.com.br/buitenlandse-online-casino-veiligheid-voordelen-en/]https://resacademy.com.br/buitenlandse-online-casino-veiligheid-voordelen-en/[/url] blijkt de ervaring te zijn. Ga voor een casino dat de leukste spellen en promoties biedt. Beste online casino buitenland garandeert betrouwbaarheid. Ervaar de onzette pret vanuit je stoel.
Нечего сказать – промолчите, дабы не засорять тему.
non GamStop horse racing, [url=https://studiotest.lms.weonlite.com/the-appeal-of-non-gamstop-horse-racing-a-new]https://studiotest.lms.weonlite.com/the-appeal-of-non-gamstop-horse-racing-a-new[/url] offers enthusiasts a thrilling alternative|exciting option|unique experience|engaging activity in the world of betting. Punters can explore diverse|varied|multiple|different platforms, ensuring plenty of opportunities to win big. With enticing odds and vibrant events, it becomes an appealing|tempting|alluring|captivating choice for racing fans. Enjoy the adrenaline of the races without the usual restrictions found in GamStop environments. Dive into the action and discover new ways to place your bets effectively!
Online gaming has seen a surge in popularity, especially with many players seeking a fresh experience. For those looking for a casino not part of GamStop, [url=https://billsiauw.com/2026/03/02/complete-non-gamstop-casino-guide-find-the-best/]https://billsiauw.com/2026/03/02/complete-non-gamstop-casino-guide-find-the-best/[/url], the options are diverse. Gamblers can enjoy a wide range of games while remaining above restrictions. The casinos offer exciting bonuses and seamless gameplay, making them a top pick for many. Whether it’s slots or table games, the thrill remains incomparable in the vibrant world of online gambling.
Within the competitive world of online gaming, players are always searching for the best deals. A casino bonus, [url=https://www.neue.co/efficient-casino-platforms-revolutionizing-online/]https://www.neue.co/efficient-casino-platforms-revolutionizing-online/[/url] can be the great way to boost your bankroll. These promotions provide supplementary funds or free spins, enhancing your gaming experience. That said, it’s vital to read the terms associated with these offers to maximize benefits and escape potential pitfalls.
Вы не правы. Я уверен. Предлагаю это обсудить.
Каждый из нас мечтает о достижении успеха. рецепты вашего успеха, [url=http://burmo.de/unbenannt-1]http://burmo.de/unbenannt-1[/url] можно создать, сочетая труд, терпение и целеустремленность. Находите свои сильные стороны и обогащайте их новыми навыками. Важно устанавливать ясные цели и их достигать.
The Mostbet app, [url=https://siriam.in/exploring-the-features-and-benefits-of-mostbet-bd-3/]https://siriam.in/exploring-the-features-and-benefits-of-mostbet-bd-3/[/url] provides users with a convenient platform for betting and gaming. It offers a wide range of activities, ensuring that every user finds something appealing. Through its user-friendly interface, gamblers can easily navigate and place bets efficiently.
new casinos not on GamStop, [url=https://suadienlanhthaibinh.net/uk-non-gamstop-casinos-a-comprehensive-guide/]https://suadienlanhthaibinh.net/uk-non-gamstop-casinos-a-comprehensive-guide/[/url] offer a thrilling alternative for players seeking variety. Such gaming platforms present entertaining experiences, including distinct games and bonuses. Visitors can explore various options without constraints.
Casino Online Slots, [url=https://heni.co.in/casino-chipstars-uk-your-ultimate-guide-to-online-18/]https://heni.co.in/casino-chipstars-uk-your-ultimate-guide-to-online-18/[/url] – Online Casino Slots offer an exhilarating experience for enthusiasts. With multiple themes, video slots captivate and engage users. Achieving a jackpot can change your life, making each spin thrilling. Enjoy accessibility from home with fantastic graphics and vibrant sound effects. Join the action today!
Het ontdekken van het beste online casino buitenland, [url=https://demos.totalsuite.net/totalpoll/ontdek-de-voordelen-van-een-geen-cruks-casino-5/]https://demos.totalsuite.net/totalpoll/ontdek-de-voordelen-van-een-geen-cruks-casino-5/[/url] is een belangrijke stap voor deelnemers die genot willen. Het is cruciaal om ervaringen te lezen voordat je een selectie maakt.
Вот те на!
розмальовки для дітей, [url=http://talktalkgolf.com/bbs/board.php?bo_table=free&wr_id=3157611]http://talktalkgolf.com/bbs/board.php?bo_table=free&wr_id=3157611[/url] – це чудовий спосіб розвивати творчі здібності та фантазію малят. Кожен малюк може знайти радість у цьому занятті. Юні художники використовують яркі олівці та фломастери, щоб заново створити свої шеберні. Такі розваги також сприяють розвитку деліктної моторики та сфокусованості.Батьки можуть організовувати спільні розмальовки для дітей, що зміцнить стосунки в родині. Таке вид діяльності допомагає емоційний інтелект і забезпечує відчуття радості від створення привабливих образів.Часто можливо зустріти чудернацькі розмальовки на різні теми. Такі процес приносить не лише користь, але й підходить для розваги. Розмальовки для дітей — це не просто заняття, а спосіб провести час з користю і задоволенням.
Finding the best non GamStop casinos, [url=https://northernoldtreemyanmar.com/2026/03/03/exploring-casinos-not-registered-on-gamstop-5/]https://northernoldtreemyanmar.com/2026/03/03/exploring-casinos-not-registered-on-gamstop-5/[/url] provides players a superb opportunity to enjoy boundless gaming experiences. With enticing bonuses and diverse games, these websites cater to all players.
In the world of virtual currencies, a crypto casino, [url=https://client4.pro-assistance.fr/?p=390296]https://client4.pro-assistance.fr/?p=390296[/url] offers unique entertainment choices. Players can engage with captivating games while enjoying quick deposits. With cutting-edge technology, these casinos ensure security for all users. Join the revolutionary world of crypto casino today and immerse yourself in a new era of online gaming!
Finding reliable online casinos can be challenging, especially when searching for sites not on GamStop, [url=https://alpinistiniaidarbai.lt/unveiling-online-casinos-not-on-gamstop-a-guide/]https://alpinistiniaidarbai.lt/unveiling-online-casinos-not-on-gamstop-a-guide/[/url]. These platforms offer unique gaming experiences and attractive bonuses. Players can explore numerous game options and beneficial promotions while enjoying independence from self-exclusion programs.
Bij het zoeken naar het beste online casino buitenland, [url=https://fauzinfotec.com/index.php/2026/03/06/de-beste-online-casino-s-in-het-buitenland-23/]https://fauzinfotec.com/index.php/2026/03/06/de-beste-online-casino-s-in-het-buitenland-23/[/url] is het essentieel een aantal factoren. Gerichtheid staat voorop, gevolgd door gamemogelijkheden. Ook promoties zijn aantrekkelijk. Het beste online casino buitenland biedt diverse opties om te genieten van gokken en entertainment. Houd in gedachte om de reputatie van het casino te controleren voor je aanmeldt.
Mostbet register, [url=https://marketexpoleads.com/exploring-mostbet-3-a-comprehensive-guide-3/]https://marketexpoleads.com/exploring-mostbet-3-a-comprehensive-guide-3/[/url] and start your journey in the world of online betting! One can find it simple to create an account. Just provide your data, and you’re good to go to experience a vast range of games and sports.
Web-based betting предлагает множество возможностей для удовольствия. Р’ Casino Online, [url=https://www.ilmioinstallatore.it/discover-the-exciting-world-of-coins-game-online-4/]https://www.ilmioinstallatore.it/discover-the-exciting-world-of-coins-game-online-4/[/url] РёРіСЂРѕРєРё РјРѕРіСѓС‚ участвовать РІ разнообразием РёРіСЂ, РѕС‚ слотов РґРѕ турниров. Рзучайте новые приемы выигрыша Рё поддерживайте друзей РІ этом знаковом РјРёСЂРµ.
non GamStop websites, [url=https://arts244.courses.bengrosser.com/2026/uncategorized/discover-non-gamstop-online-casinos-in-the-uk/]https://arts244.courses.bengrosser.com/2026/uncategorized/discover-non-gamstop-online-casinos-in-the-uk/[/url] present a range of engaging entertainment choices for gamers looking for options. These platforms allow gamers to experience popular entertainment without the hurdles set by GamStop.
Finding the best gaming sites can be tough, but top non GamStop casinos, [url=https://www.lavisitazione.it/2026/03/02/exploring-casino-options-not-covered-by-gamstop/]https://www.lavisitazione.it/2026/03/02/exploring-casino-options-not-covered-by-gamstop/[/url] offer an captivating experience. Players can delight in a wide range of games and amazing bonuses, ensuring unparalleled fun and pleasure.
sports betting, [url=https://www.medyajoy.com/2026/01/24/exploring-the-balanced-features-of-modern-online/]https://www.medyajoy.com/2026/01/24/exploring-the-balanced-features-of-modern-online/[/url] is widely enjoyed. Gamblers analyze matches to make informed decisions. Analysis is key in this game.
Het kiezen van het uitstekende online casino buitenland is een spannende taak voor veelvuldig spelers. In de wereld zijn er veel opties, maar de ideale keuze draagt aandacht voor betrouwbaarheid. Het is fundamenteel om te kijken naar vergunningen, ondersteuning en promoties. Feedback van andere spelers zijn waardevol bij het maken van een geschikte keuze. Met de juiste informatie is het mogelijk het beste online casino buitenland, [url=https://www.cqcinvestigations.co.uk/de-opkomst-van-online-casino-s-in-het-buitenland-5/]https://www.cqcinvestigations.co.uk/de-opkomst-van-online-casino-s-in-het-buitenland-5/[/url] voor jouw spelervaring.
Mostbet casino, [url=https://handytasks.com/download-and-experience-mostbet-apk-the-ultimate/]https://handytasks.com/download-and-experience-mostbet-apk-the-ultimate/[/url] вносит уникальные выборы для геймеров. Здесь вы найдете широкий выбор азартных досуга. Платформа удобен, а персонал всегда готова оказать помощь. Приглашаем на путь выигрыша Mostbet casino!
In the world of betting, the Online Casino, [url=https://majestic-qa.com/ultimate-guide-to-dealbet-online-casino-uk/]https://majestic-qa.com/ultimate-guide-to-dealbet-online-casino-uk/[/url] offers unparalleled excitement. Players can enjoy captivating games from the comfort of home. With diverse options, it caters to all tastes, ensuring an unforgettable experience.
[url=https://urcevles.ru]коттеджный поселок русский лес
[/url]
The launch of new non GamStop casino, [url=http://www.testwp.host.absolutely-framed.de/discovering-casinos-not-covered-by-gamstop-2/]http://www.testwp.host.absolutely-framed.de/discovering-casinos-not-covered-by-gamstop-2/[/url] platforms offers players exciting opportunities to explore unique games. These venues provide liberty for players who seek games beyond the constraints of traditional sites. New non GamStop casino ensures vast game selections, superb bonuses, and secure transactions, creating a compelling gambling atmosphere.
Het kiezen van het beste online casino buitenland, [url=https://cleanandrepair.webproukazku.cz/ontdek-de-voordelen-van-online-casino-s-in-het-10/]https://cleanandrepair.webproukazku.cz/ontdek-de-voordelen-van-online-casino-s-in-het-10/[/url] vergemakkelijkt een keuze. Gokkers moeten overwegen hun service. Beste online casino buitenland biedt innoverende spellen en goedkope bonussen.
bitcoin betting, [url=https://pennyforyourdreams.com/test/2026/01/24/exploring-stable-and-honest-online-casinos/]https://pennyforyourdreams.com/test/2026/01/24/exploring-stable-and-honest-online-casinos/[/url] has become a popular way to place wagers in the digital age. Bettors are drawn to the rapidity and secrecy offered by cryptocurrencies. With lower fees, more enthusiasts are joining the fun!
For gamers seeking freedom, a casino not part of GamStop, [url=https://www.avd2m.com/2026/03/02/exploring-non-gamstop-casino-sites-alternatives/]https://www.avd2m.com/2026/03/02/exploring-non-gamstop-casino-sites-alternatives/[/url] offers an exciting alternative. Such casinos allow players to take pleasure in their favorite games without restrictions. As you prefer slots, table games, or live dealer options, the selection is extensive. Just remember to play responsibly and enjoy your gaming adventure!
Mostbet online, [url=https://brazda.biz/nehty/index.php/2026/02/20/experience-online-betting-with-mostbet/]https://brazda.biz/nehty/index.php/2026/02/20/experience-online-betting-with-mostbet/[/url] offers a variety of betting options for sports fans. With favorable odds, it provides a captivating experience for users. Join now and explore the world of online betting!
Finding the best non GamStop casinos, [url=https://www.jomicbel.com/sheffieldcityofmakers/discovering-the-best-online-casinos-not-on-the/]https://www.jomicbel.com/sheffieldcityofmakers/discovering-the-best-online-casinos-not-on-the/[/url] can enhance your gaming experience. These types of casinos offer better options and choice for players. Discover a selection of games and attractive bonuses! Enjoy a dynamic atmosphere without the limitations of GamStop.
Online Casino Games, [url=https://bcdocs4wellness.com/discover-dogsfortune-online-casino-uk-where-lucky/]https://bcdocs4wellness.com/discover-dogsfortune-online-casino-uk-where-lucky/[/url] offer an exciting way to experience gambling from the comfort of your home. Players can pick from various options, including roulette, each offering a unique adventure. With appealing bonuses and incentives, Online Casino Games elevate the overall gambling experience.
Il settore dei casinГІ online ГЁ sviluppato negli ultimi anni, proponendo possibilitГ interessanti come il casino no KYC Italia, [url=http://www.evergoldcs.com/casino-non-aams-senza-pending-time-gioca-e-paga/]http://www.evergoldcs.com/casino-non-aams-senza-pending-time-gioca-e-paga/[/url]. Questi casinГІ consentono di scommettere senza dover offrire documenti identificativi. Gli utenti possono godere della piГ№ alta riservatezza e protezione nella la loro esperienza di gioco.
betting casino, [url=http://www.canada44.ca/casino-built-for-clear-player-a-new-era-of-online/]http://www.canada44.ca/casino-built-for-clear-player-a-new-era-of-online/[/url] offers an thrilling experience for gamblers. With a variety of activities, participants can enjoy the thrill of risking their money for a chance to win.
Finding the leading gaming sites can be tough. However, the best non GamStop casinos, [url=https://cabinet-benaissi.ma/top-slot-games-not-blocked-by-restrictions/]https://cabinet-benaissi.ma/top-slot-games-not-blocked-by-restrictions/[/url] offer a selection of games and bonuses. Players can enjoy safe environments without self-exclusion limitations. Go for the best non GamStop casinos to maximize your gambling experience!
online echtgeld roulette, [url=https://test.lsdassociates.com/online-roulette-um-echtes-geld-spielen-tipps-und/]https://test.lsdassociates.com/online-roulette-um-echtes-geld-spielen-tipps-und/[/url] bietet ein unterhaltsames Erlebnis für jeden Casinos. In diesem Spiel können Sie wirkliches Geld gewinnen. Eine Runde beinhaltet Wettchance, das die intensiviert. Strategien sollten genutzt werden, um die Auszahlungen zu maximieren. Jetzt ist es an der Zeit, an der Tisch zu setzen und Aufregung zu haben!
Nel mondo del gioco d’azzardo, i casino no KYC Italia stanno guadagnando sempre piГ№ attenzione. Offrono un’esperienza di intrattenimento rapida, consentendo di registrarsi senza ardue verifiche. I giocatori possono sfruttare di un’ampia scelta di opzioni, tra cui slot e giochi da tavolo, produzendo l’atmosfera di un vero locale di gioco. I incentivi offerti sono spesso interessanti, rendendo l’esperienza ancora piГ№ appassionante. Insomma, i casino no KYC Italia, [url=https://9mail.new2new.com/?p=182]https://9mail.new2new.com/?p=182[/url] rappresentano un’opzione conveniente per i amatori del mercato.
Mostbet casino, [url=https://hwnerds.com/enhance-your-betting-experience-with-the-mostbet-2/]https://hwnerds.com/enhance-your-betting-experience-with-the-mostbet-2/[/url] предоставляет игрокам разнообразный выбор развлечений. Классика — это карты, а также современные слоты. Легкий интерфейс помогает игрокам по максимуму наслаждаться процессом.
Online Casino Slots, [url=https://byggsum.se/duobetz-online-casino-uk-a-comprehensive-review-14/]https://byggsum.se/duobetz-online-casino-uk-a-comprehensive-review-14/[/url] offer exciting gameplay that attracts betters from all around the planet. With vibrant graphics and varied themes, these games ensure endless fun while providing options to win big!
online casino, [url=https://parapenteperu.com/online-casino-offering-a-balanced-system-a-new-era/]https://parapenteperu.com/online-casino-offering-a-balanced-system-a-new-era/[/url] offers a world of thrill. Players can indulge in various games, from video slots to classic card games. With swift access, everyone can join the action anytime!
online roulette echtgeld, [url=https://arimagh.generalresource.ne.jp/guete-schall/162637/]https://arimagh.generalresource.ne.jp/guete-schall/162637/[/url] bietet Spielern die Möglichkeit, echtes Geld zu gewinnen. Solche Spiele sind sehr beliebt, da sie Spannung bieten. Schnell zu lernen und erreichbar für alle.
Nei giocattoli online, i strutture di gioco non aams offrono varietГ uniche. Optando per casino non aams, [url=http://altaim.cafe24.com/lingue-sito-non-aams-scopri-le-opportunita-nel/]http://altaim.cafe24.com/lingue-sito-non-aams-scopri-le-opportunita-nel/[/url], i partecipanti possono beneficiare bonus interessanti. Inoltre, le caratteristiche di questi portali possono creare l’esperienza maggiormente coinvolgente.
As the popularity of online gambling rises, numerous players seek entertaining options outside traditional platforms. Among them, top non GamStop casinos, [url=http://danskjagtformidling.dk/exploring-casinos-that-bypass-gamstop-risks-and/]http://danskjagtformidling.dk/exploring-casinos-that-bypass-gamstop-risks-and/[/url] offer exclusive experiences. Such casinos provide liberal bonuses and a vast selection of games, making gambling enjoyable and achievable. Choose wisely and enhance your gambling adventure!
Mostbet online, [url=https://villasindubai.captain-homes.com/mostbet-login-bd-a-comprehensive-guide-1457721888/]https://villasindubai.captain-homes.com/mostbet-login-bd-a-comprehensive-guide-1457721888/[/url] offers an exciting platform for gambling lovers. You can wager on various sports events and engage in games. With user-friendly interfaces, everyone can navigate easily and appreciate their time.
Online Casino, [url=https://www.abidelocating.com/discover-the-excitement-of-fatbet-casino-uk/]https://www.abidelocating.com/discover-the-excitement-of-fatbet-casino-uk/[/url] – Welcome to the world of virtual gaming. Here, players can explore a variety of games from the comfort of their homes. Jackpots, table games, and live dealers make it thrilling. Join now to test your chances!
Не могу сейчас принять участие в дискуссии – нет свободного времени. Но скоро обязательно напишу что я думаю.
купить айфон 17, [url=https://medium.com/p/01082d626ef1?postPublishedType=initial]https://medium.com/p/01082d626ef1?postPublishedType=initial[/url] – Решив закупить айфон 17, вы получите уникальную технологию. Этот современный смартфон порадует превосходной камерой и долгим временем работы.
bestes live roulette casino, [url=https://www.mercazon.it/die-faszination-von-live-roulette-ein-erlebnis-im/]https://www.mercazon.it/die-faszination-von-live-roulette-ein-erlebnis-im/[/url] – Das beste live roulette casino bietet Spielern ein einzigartiges Erlebnis. An diesem Ort kГ¶nnen Sie die Optionen genieГџen, und um echtes Geld zu spielen. Diese Art von Spiele sind in der Regel sehr interessant sein. Die Interaktion mit normalen Dealern bringt ein authentisches Casino-Feeling.
Scegliere un sito online non aams potrebbe un’ buona scelta per appassionati desiderano provare nuove esperienze. Inoltre, possono garantire promozioni vantaggiose e opzioni di gioco esclusivi. Perciò, qualora stai cercando un nuova esperienza, ricorda il casino online non aams, [url=https://diccionario.onepointzero.org/wp/?p=32322]https://diccionario.onepointzero.org/wp/?p=32322[/url].
Discover the excitement of online gaming with various casino bonus, [url=https://alnabeel-marbles.com/top-casinos-for-players-who-love-gaming/]https://alnabeel-marbles.com/top-casinos-for-players-who-love-gaming/[/url] offers providing can amplify your winning potential. These promotions often include free spins, deposit matches, and cashback, making your gambling experience even more entertaining. Don’t miss out on the chance to take advantage of a casino bonus today!
По моему мнению Вы не правы. Пишите мне в PM, обсудим.
купить квартиру в москве, [url=https://ctciwiring.com/kupit-studiju-v-moskve-udobstvo-i-komfort-na/]https://ctciwiring.com/kupit-studiju-v-moskve-udobstvo-i-komfort-na/[/url] – это важный шаг, направляющий к новому этапу жизни. Участок недвижимости предлагает разные варианты. От малогабаритных квартир до внушительных апартаментов, каждый найдет подходящий выбор.
доброй ночи .
нашли с сыном https://steelcentury.ru/dveri/
site нам нужно разобраться с красить порошком для нас
Просим C советом и как нам …
правильно как понимать и быть в теме…
лазерная резка на заказ помогите C о задчи будем приветствую очень благодарствуем .
Спасибо 🙂 .. нашли в телеграмм [url=https://t.me/SteelCenturyRU]Мех обработка металла и порошковая покраска
In the domain of live roulette online casinos, [url=http://test.matieo.atthost24.pl/the-ultimate-guide-to-roulette-sites-top-choices/]http://test.matieo.atthost24.pl/the-ultimate-guide-to-roulette-sites-top-choices/[/url], players can interact with the thrill of a real casino from the convenience of their homes. By utilizing real dealers and live streaming, the ambiance is enhanced, making it more engaging. Choosing a reputable site ensures a fair game and reliable transactions. Whether you’re a novice or a pro, the options are limitless.
По моему мнению Вы не правы. Давайте обсудим это. Пишите мне в PM, пообщаемся.
Смотреть дорамы онлайн, [url=https://trade-britanica.trade/wiki/%D0%9D%D0%B5_%D0%BF%D1%80%D0%BE%D0%BF%D1%83%D1%81%D1%82%D0%B8%D1%82%D0%B5_%D0%B0%D0%B7%D0%B8%D0%B0%D1%82%D1%81%D0%BA%D0%B8%D0%B5_%D0%B4%D0%BE%D1%80%D0%B0%D0%BC%D1%8B_%D0%B1%D0%B5%D0%B7_%D1%80%D0%B5%D0%BA%D0%BB%D0%B0%D0%BC%D1%8B_%D0%BD%D0%B0_%D0%BD%D0%B0%D1%88%D0%B5%D0%BC_%D1%81%D0%B0%D0%B9%D1%82%D0%B5_%D0%B8_%D0%BE%D0%BA%D1%83%D0%BD%D0%B8%D1%82%D0%B5%D1%81%D1%8C_%D0%B2_%D1%83%D0%B2%D0%BB%D0%B5%D0%BA%D0%B0%D1%82%D0%B5%D0%BB%D1%8C%D0%BD%D1%8B%D0%B5_%D0%B8%D1%81%D1%82%D0%BE%D1%80%D0%B8%D0%B8_%D0%BE%D1%82_%D1%82%D0%B0%D0%BB%D0%B0%D0%BD%D1%82%D0%BB%D0%B8%D0%B2%D1%8B%D1%85_%D1%80%D0%B5%D0%B6%D0%B8%D1%81%D1%81%D0%B5%D1%80%D0%BE%D0%B2.]https://trade-britanica.trade/wiki/%D0%9D%D0%B5_%D0%BF%D1%80%D0%BE%D0%BF%D1%83%D1%81%D1%82%D0%B8%D1%82%D0%B5_%D0%B0%D0%B7%D0%B8%D0%B0%D1%82%D1%81%D0%BA%D0%B8%D0%B5_%D0%B4%D0%BE%D1%80%D0%B0%D0%BC%D1%8B_%D0%B1%D0%B5%D0%B7_%D1%80%D0%B5%D0%BA%D0%BB%D0%B0%D0%BC%D1%8B_%D0%BD%D0%B0_%D0%BD%D0%B0%D1%88%D0%B5%D0%BC_%D1%81%D0%B0%D0%B9%D1%82%D0%B5_%D0%B8_%D0%BE%D0%BA%D1%83%D0%BD%D0%B8%D1%82%D0%B5%D1%81%D1%8C_%D0%B2_%D1%83%D0%B2%D0%BB%D0%B5%D0%BA%D0%B0%D1%82%D0%B5%D0%BB%D1%8C%D0%BD%D1%8B%D0%B5_%D0%B8%D1%81%D1%82%D0%BE%D1%80%D0%B8%D0%B8_%D0%BE%D1%82_%D1%82%D0%B0%D0%BB%D0%B0%D0%BD%D1%82%D0%BB%D0%B8%D0%B2%D1%8B%D1%85_%D1%80%D0%B5%D0%B6%D0%B8%D1%81%D1%81%D0%B5%D1%80%D0%BE%D0%B2.[/url] – это увлекательное времяпровождение для поклонников восточной культуры. Любая дорама имеет своевременный сюжет, сплетающий романтику и драма. К выбору жанров радует глаз и удивляет.
Час от часу не легче.
mostbet casino, [url=https://mostbet-keack.blog/]https://mostbet-keack.blog/[/url] предлагает игрокам широкий выбор развлекательных автоматов и игр. Здесь вы сможете получить удовольствие захватывающим миром азартных что-то новенького. Каждый найдет подходящую игру.
casino live roulette, [url=https://junction505.dreamhosters.com/2026/03/05/online-live-roulette-spielen-tipps-und-strategien-2/]https://junction505.dreamhosters.com/2026/03/05/online-live-roulette-spielen-tipps-und-strategien-2/[/url] ist ein spannendes Erlebnis, das Zocker fasziniert. Bei dieser Form von Roulette wird ein realer Croupier eingesetzt, der das Spiel kontrolliert. Spieler können interagieren und ihr Glück spielen. Die Atmosphäre ist spannend, was das Erlebnis unvergesslich macht. Bei casino live roulette können Sie vom Sofa spielen, die Anfahrt zur Spielothek zu umgehen.
Are you looking to enjoy sports betting and online games? The Mostbet download, [url=https://actdanismanlik.com/discover-dragon-money-bot-your-guide-to-efficient/]https://actdanismanlik.com/discover-dragon-money-bot-your-guide-to-efficient/[/url] is your gateway to a thrilling experience. With this application, you can engage in a vast array of betting options. Seize the chance to bet whenever you want!
Se stai cercando un’esperienza di gioco unica, i casino non aams, [url=https://casabonitamadeiras.com.br/casino-mobile-senza-documenti-gioca-e-vinci-senza/]https://casabonitamadeiras.com.br/casino-mobile-senza-documenti-gioca-e-vinci-senza/[/url] possono offrirti opportunitГ straordinarie. Simili siti consentono di sperimentare offerte speciali. In aggiunta, la gamma di giochi non ГЁ ristretta. Gioca e divertiti nei casino non aams!
taxi in larnaca, [url=https://envira-hindu-american-foundation.pantheonsite.io/blog/explore-nicosia-the-ultimate-taxi-guide/]https://envira-hindu-american-foundation.pantheonsite.io/blog/explore-nicosia-the-ultimate-taxi-guide/[/url] is a convenient|easy|reliable|efficient way to travel around the city. With various options available, you can find a cab at any time. Enjoy|experience|savor|appreciate the comfort of a ride while exploring Larnaca’s beautiful sights and attractions.
бездепозитные бонусы казино, [url=http://portal.tomintech.ru/top-rejting-onlajn-kazino-obzor-luchshih-azartnyh/]http://portal.tomintech.ru/top-rejting-onlajn-kazino-obzor-luchshih-azartnyh/[/url] — это отличный способ попробовать удачу. Данные предложения дают возможность играть без лишних затрат. Каждый желающий может активировать ими, размышляя о дополнительные средства для игры. Не упустите возможности, которую открывают такие бонусы.
Casino Online, [url=https://www.spelle.in/step-by-step-guide-to-fire-scatters-casino/]https://www.spelle.in/step-by-step-guide-to-fire-scatters-casino/[/url] – Online Casino предоставляет уникальные возможности для азартных РёРіСЂ, позволяя игрокам наслаждаться любимыми играми РёР· любого места. Данные сайты предлагают широкий выбор РёРіСЂ, включая покер. Наслаждайтесь интерактивным опытом Рё приобретайте Р±РѕРЅСѓСЃС‹!
In the world of digital gaming, platforms like crypto casino, [url=https://mural.codently.eu/casino-platform-focused-on-clean-a-fresh-approach/]https://mural.codently.eu/casino-platform-focused-on-clean-a-fresh-approach/[/url] are changing how players engage. With fast payments, users experience a seamless and enjoyable environment. It’s fascinating to explore new options that offer both fun and profit potential. Most importantly, transparency in games ensures a level playing field, attracting beginner gamers and seasoned gamblers. As the industry evolves, crypto casino stands at the forefront of this shift.
смотрела на большом экране!
мониторинг цен для бизнеса, [url=https://relaxtravel.com.vn/mua-nao-o-da-lat-dep-nhat/]https://relaxtravel.com.vn/mua-nao-o-da-lat-dep-nhat/[/url] – это важный инструмент для изучения рынка. Компании нужно отслеживать коммерческие изменения, чтобы формировать оптимальные стратегии. Это способствует поддержанию конкурентоспособности.
Я извиняюсь, но, по-моему, Вы не правы. Пишите мне в PM, поговорим.
Купить диплом с гарантией, [url=https://bueaheights.com/2026/01/09/kupit-diplom-pgsha-im-ak-d-n-prjanishnikova-7/]https://bueaheights.com/2026/01/09/kupit-diplom-pgsha-im-ak-d-n-prjanishnikova-7/[/url] — это отличный способ обеспечить будущее без лишних усилий. Создание такого документа ускорит вашу карьеру. Формальные дипломы предоставляют возможность достигать желаемую работу. Не теряйте шанс улучшить свои шансы на успех!
Тут впрямь балаган, какой то
mostbet casino, [url=https://mostbet-ns3.xyz/]https://mostbet-ns3.xyz/[/url] предлагает богатый выбор игр, от карт до ставок на спорт. В клубе вы найдете бонусные предложения и варианты на выигрыш.
Das Roulette ist ein spannendes Erlebnis im virtuellen Casino. Mit live Dealer bietet ein roulette live online casino, [url=https://capitalpress.com.co/live-roulette-deutschland-faszination-und/]https://capitalpress.com.co/live-roulette-deutschland-faszination-und/[/url] eine echte Atmosphäre. Spieler können gleichzeitig spielen, während sie den Nervenkitzel genießen.
так и хочеться дунуть….
Смотреть передачи онлайн стало просто. Теперь каждый имеет возможность наслаждаться уникальными историями в любое место. дорамы онлайн, [url=https://pediascape.science/wiki/User:MindyTiegs826]https://pediascape.science/wiki/User:MindyTiegs826[/url] всегда влекают зрителей своей сюжетной линией.
casino senza documenti, [url=http://uclab.khu.ac.kr/LeanUX/2026/03/06/documenti-necessari-per-entrare-al-casino-guida-14/]http://uclab.khu.ac.kr/LeanUX/2026/03/06/documenti-necessari-per-entrare-al-casino-guida-14/[/url] – Giocare nei sale giochi senza documenti offre un’esperienza unica. Molti utenti apprezzano la facilitГ delle transazioni quando si tratta di casino senza documenti. I bonifici | pagarli | depositi sono istantanei, rendendo il tutto decisamente attraente. Inoltre, la privacy ГЁ un valore aggiunto in questo settore.
live roulette online casinos, [url=https://wellnessbyashima.com/2026/03/01/the-exciting-world-of-live-roulette-strategies-21/]https://wellnessbyashima.com/2026/03/01/the-exciting-world-of-live-roulette-strategies-21/[/url] present an exciting experience for betters. With numerous options, wagerers are able to enjoy real-time action from the convenience of home. Furthermore, the environment mirrors that of a traditional casino, enhancing immersive gameplay.
live porn cams, [url=https://h2852162.stratoserver.net/index.php/2026/03/16/the-allure-of-live-asian-cam-models-explore-the/]https://h2852162.stratoserver.net/index.php/2026/03/16/the-allure-of-live-asian-cam-models-explore-the/[/url] offer a unique way for viewers to engage with performers in real-time. This interactive environment allows users to explore their interests and connect with others, creating a dynamic atmosphere.
The Mostbet app, [url=https://panca-sakti.ac.id/discover-the-world-of-dragon-money/]https://panca-sakti.ac.id/discover-the-world-of-dragon-money/[/url] offers an exciting platform for betting enthusiasts. Users can take advantage of a wide range of sports to place their bets. With its user-friendly interface, navigating the app is easy. Moreover, the app provides real-time updates, ensuring that players stay informed about ongoing matches. The Mostbet app is a reliable choice for punters seeking thrilling betting opportunities.
Playing Casino Online Games, [url=https://electionpakistan.com/the-final-countdown-casino-your-ultimate-gaming/]https://electionpakistan.com/the-final-countdown-casino-your-ultimate-gaming/[/url] offers exciting opportunities for fun and excitement. With a variety of entertainment options, players can pick their favorite. Join the thrilling world of online casinos today!
подробнее, плиз. Что за ошибка?
Виртуальный мир азартных игр привлекает игроков со всего мира, и известные платформы, такие как mostbet casino, [url=https://mostbet-reg5.top/]https://mostbet-reg5.top/[/url], предлагают привлекательные игры. Здесь каждый могут наслаждаться эмоциями от азартных развлечений.
Thrilling in sports betting, [url=https://poland-migrate.eu/seamless-gaming-experience-the-future-of-casino-2/]https://poland-migrate.eu/seamless-gaming-experience-the-future-of-casino-2/[/url] can improve the experience of watching games. Punters often examine statistics to make clever decisions. Acknowledging the odds is essential for victory.
casino live roulette, [url=http://www.tecnoac.com/roulette-online-live-ein-unvergleichliches/]http://www.tecnoac.com/roulette-online-live-ein-unvergleichliches/[/url] ist ein spannendes Spiel, das Spielern die die Möglichkeit bietet, zu einer realen Spielumgebung teilzunehmen. Das bietet eindrucksvolle Atmosphäre und echter Interaktion mit Dealern. Viele Online-Casinos zeigen regelmäßige Wettkämpfe an, wo Mitspieler ihre Fähigkeiten testen können.
En el sector de los entretenimientos, el casino online Europa, [url=https://wraithpix.com/casinos-online-europeos-la-revolucion-del-juego-2/]https://wraithpix.com/casinos-online-europeos-la-revolucion-del-juego-2/[/url] presenta una variedad de alternativas emocionantes. A partir de mГЎquinas tragamonedas hasta opciones de tablero, hay algo para cada nivel de experiencia. Asimismo, el casino online Europa garantiza una sensaciГіn segura y entretenida.
Я считаю, что Вы ошибаетесь. Пишите мне в PM, обсудим.
фильмы онлайн, [url=https://humanlove.stream/wiki/User:SamLuke86936]https://humanlove.stream/wiki/User:SamLuke86936[/url] – Посмотреть мультфильмы онлайн стало значительно проще. Теперь реально наслаждаться любимыми шедеврами в удобное время. Платформы предлагают разнообразие жанров.
In the realm of live roulette online casinos, [url=https://www.vedavidfoods.com/the-exciting-world-of-bitcoin-roulette-a-modern-6/]https://www.vedavidfoods.com/the-exciting-world-of-bitcoin-roulette-a-modern-6/[/url], players can experience thrilling gameplay. Providing real dealers and live streaming, the experience is almost immersive. Participate in exciting games today!
crypto live casino, [url=https://www.adsflourish.com/dexsport/explore-dexsport-crypto-casino-slots-next-level/]https://www.adsflourish.com/dexsport/explore-dexsport-crypto-casino-slots-next-level/[/url] presents an thrilling way to enjoy gaming online. By using blockchain technology, users can experience trustworthy games in real-time.
на самом деле очень высоко!
mostbet casino, [url=https://mostbet-ly.xyz/]mostbet-ly.xyz[/url] демонтрирует богатый выбор казино-игр для любителей цифровых ставок. Здесь все найдет свое по душе и умеет насладиться захватывающим опытом игры.
Мудрые слова! РЕСПЕКТ!!!
scream cream, [url=https://allwomenstalk.com/what-woman-should-know-fulfilling-orgasm/]scream cream[/url] is a popular cream for those seeking relief from aches. Its distinct formulation addresses specific areas, providing quick results. Many users report marked improvements in their symptoms.
To enjoy the exciting world of online betting, it’s essential to complete the Mostbet register, [url=https://edc5db6fd710321614.temporary.link/2026/02/23/dragon-money-the-future-of-financial-freedom-9/]https://edc5db6fd710321614.temporary.link/2026/02/23/dragon-money-the-future-of-financial-freedom-9/[/url]. Completing this task is quite simple, and players can quickly establish an account. Once registration, they can access a variety of events and utilize generous bonuses. Start your journey now with the Mostbet register!
Die Szene von online live roulette, [url=https://shootingstars.dreamhosters.com/2026/03/05/das-beste-live-roulette-casino-ein-umfassender-8/]https://shootingstars.dreamhosters.com/2026/03/05/das-beste-live-roulette-casino-ein-umfassender-8/[/url] fesselt Spieler international. Reale Dealer führen das Spiel. Zusätzlich gibt es verschiedene Aktionen, die das Erlebnis verbessern.
Online casinos have become a popular recreation option for many. Among the various offerings, Casino Online Slots, [url=https://goodsleeprealestate.com/fatbet-casino-uk-a-comprehensive-review/]https://goodsleeprealestate.com/fatbet-casino-uk-a-comprehensive-review/[/url] stand out with their exciting gameplay. Players can enjoy multiple themes and detailed mechanics, creating unforgettable experiences.
mejores casinos online, [url=https://stockpesa.com/descubre-la-diversion-de-los-casinos-online-con-4/]https://stockpesa.com/descubre-la-diversion-de-los-casinos-online-con-4/[/url] – Los Гіptimos casinos online ofrecen una opciones de juegos. Por medio de mГЎquinas, naipes y ruletas, la experiencia de juego es inolvidable. ВїListo para jugar?
bitcoin betting, [url=https://coloringfolder.com/elevating-your-online-casino-experience-insights/]https://coloringfolder.com/elevating-your-online-casino-experience-insights/[/url] has gained popularity, allowing bettors to wager using cryptocurrency. This method offers privacy, appealing to those who prefer guard their financial information private. With quick transactions, it’s a handy alternative to traditional betting.
Прошу прощения, что вмешался… Я разбираюсь в этом вопросе. Давайте обсудим.
фильмы онлайн, [url=https://humanlove.stream/wiki/User:MaritzaFassbinde]https://humanlove.stream/wiki/User:MaritzaFassbinde[/url] открывают доступ всем желающим насладиться разнообразием кино. В виртуальном пространстве можно отыскать картину на любой вкус.
А есть другой выход?
мостбет казино, [url=https://mostbet-n8x3p.lol/]https://mostbet-n8x3p.lol/[/url] предлагает широкий выбор азартных игр, включая аппараты. Каждый может найти что-то увлекательное. При этом лёгкий интерфейс делает игру вдохновляющим. Мостбет казино также дарит щедрые бонусы для новичков, что мотивирует новых игроков.
Grab the mostbet promo code bd, [url=https://h2852162.stratoserver.net/index.php/2026/03/16/unlock-exciting-offers-with-promo-code-for-mostbet/]https://h2852162.stratoserver.net/index.php/2026/03/16/unlock-exciting-offers-with-promo-code-for-mostbet/[/url] and unlock exclusive bonuses today! Claim special promotions that enhance your gaming experience. Relish increased odds and exclusive offers with every bet. Don’t miss out on this golden opportunity!
I casinГІ non aams online, [url=https://stage1.nextchannelmedia.com/siti-non-aams-recensioni-e-guida-ai-migliori-3/]https://stage1.nextchannelmedia.com/siti-non-aams-recensioni-e-guida-ai-migliori-3/[/url] offrono un’esperienza unica nel mondo del gioco. Questi portali mostrano numerose opzioni di divertimento. I giocatori possono esplorare slot particolari, spesso assieme a offerte invoglianti. La piattaforma ГЁ semplice da navigare e offre aiuto 24 ore su 24.
Online Casino, [url=https://byggsum.se/7gold-casino-promo-code-details-enhance-your/]https://byggsum.se/7gold-casino-promo-code-details-enhance-your/[/url] – An realm of Online Casino offers entertainment to gamblers. Using different games, this site builds special experiences. Become part of the excitement now!
Experience the thrill of playing live roulette online casinos, [url=https://talentbookingseychelles.com/2026/03/high-stakes-roulette-the-ultimate-guide-to-4/]https://talentbookingseychelles.com/2026/03/high-stakes-roulette-the-ultimate-guide-to-4/[/url], where live hosts bring the casino experience right to your screen. This immersive format allows you to stake in real-time, enhancing your gambling adventure. Join now to uncover the excitement!
Los mГЎs recomendados casinos online confiables, [url=https://pbus.thats-gross.com/wp/2026/03/03/casinos-online-confiables-con-buenas-opiniones-y/]https://pbus.thats-gross.com/wp/2026/03/03/casinos-online-confiables-con-buenas-opiniones-y/[/url] ofrecen opciones de apuestas diversas y promociones generosas. Es importante optar por un casino que garantice protecciГіn. En este sentido, los casinos online confiables son la mejor elecciГіn para jugar sin preocupaciones.
Mostbet casino, [url=http://www.andiewolkefidibus.de/2026/02/23/maximize-your-earnings-with-the-dragon-money-2/]http://www.andiewolkefidibus.de/2026/02/23/maximize-your-earnings-with-the-dragon-money-2/[/url] предоставляет широкий выбор игр для геймеров. Вам доступно погружаться в слотами и картами. Пользователи оценят простотой интерфейс и высококачественную графику. Станьте частью к Mostbet casino и выигрывайте выгодные бонусы!
betting casino, [url=http://www.lida.it/experience-the-best-online-casino-offering-a/]http://www.lida.it/experience-the-best-online-casino-offering-a/[/url] provides a thrilling experience for gamblers. By using a variety of games, it captivates those seeking fun. In addition, the possibility to win big adds to the charm of betting casino entertainment.
Gambling on Casino Online, [url=http://feminare.com/casinoonlineslot170221/the-ultimate-guide-to-casino-god-odds-maximizing-5/]http://feminare.com/casinoonlineslot170221/the-ultimate-guide-to-casino-god-odds-maximizing-5/[/url] offers an thrilling experience for gamblers. With countless games and bonus offers, it entices a wide audience. Savor the convenience of playing from home!
Вообщем забавно.
мостбет казино, [url=https://mostbet-tjyrw.buzz/]mostbet-tjyrw.buzz[/url] предлагает обширный выбор ставок, что дает возможность игрокам испытать уникальным опытом. Награды здесь реальны. Каждый может открыть мир азартных возможностей.
Какие трогательные слова 🙂
фильмы онлайн бесплатно, [url=https://opensourcebridge.science/wiki/User:CharlineRanken]https://opensourcebridge.science/wiki/User:CharlineRanken[/url] – Смотреть фильмы онлайн бесплатно становится все доступнее. В интернете множество порталов, где можно насладиться классикой. Выбирайте подходящий вариант и наслаждайтесь!
Playing virtual slot machines is an exciting way to enjoy entertainment. With vibrant graphics, Online Casino Slots, [url=https://galeria.stylus.pl/bof-casino-no-deposit-bonus-unlock-free-cash-today/]https://galeria.stylus.pl/bof-casino-no-deposit-bonus-unlock-free-cash-today/[/url] deliver a dynamic experience. Players can gain huge rewards while enjoying comfort. Test your luck today!
К сожалению, ничем не могу помочь. Я думаю, Вы найдёте верное решение.
PampaGo Casino, [url=https://pampago-casinoofr.com/]PampaGo Casino site officiel[/url] fournit une expГ©rience de jeu inoubliable. Les clients peuvent tirer avantage d’une choix de activitГ©s attrayants et palpitants.
roulette mit echtgeld, [url=https://germanymedicine.com/casino-roulette-echtgeld-tipps-und-strategien-fur-2/]https://germanymedicine.com/casino-roulette-echtgeld-tipps-und-strategien-fur-2/[/url] ist ein spannendes Spiel für den Nervenkitzel und das Chance auf große Gewinne. Durch Strategien und cleverem Spielen lassen sich gamer ihre Einsätze optimieren. Genieße das Adrenalin beim Roulette mit echtgeld!
I casinГІ non aams online, [url=https://alemaararabia.com/i-migliori-siti-di-casino-non-aams-guida-e/]https://alemaararabia.com/i-migliori-siti-di-casino-non-aams-guida-e/[/url] offrono una vasta gamma di giochi, inclusi slot, tavoli di blackjack e roulette. Tali garantiscono un’esperienza di gioco entusiasmante e affascinante. Tanti bonus attraggono nuovi giocatori, offrendo opportunitГ interessanti per racimolare premi.
JB Casino Online, [url=https://atharvaaryaassociates.in/understanding-kyc-and-aml-compliance-at-jb-casino/]https://atharvaaryaassociates.in/understanding-kyc-and-aml-compliance-at-jb-casino/[/url] существует широкий ассортимент развлечений для аматоров. Рсследуйте адреналиновыми слотами Рё получайте Р±РѕРЅСѓСЃС‹ РїСЂСЏРјРѕ сегодня.
Замечательно, это весьма ценная штука
мостбет казино, [url=https://mostbet-yg.top/]mostbet-yg.top[/url] предлагает обширный выбор слотов для любителей азартных игр. Здесь каждый найдет то, что по душе, от стандартных автоматов до инновационных живых игр.
Mostbet online, [url=https://hyasense.de/unleashing-financial-potential-the-dragon-money-2/]https://hyasense.de/unleashing-financial-potential-the-dragon-money-2/[/url] is a popular platform for bettors seeking excitement. Users can enjoy thrilling games and numerous betting options. With a simple interface, navigating through the options is simple. Join Mostbet online today!
Online Casino, [url=https://www.rptor.pl/discover-the-excitement-of-online-casino-goldwin-6/]https://www.rptor.pl/discover-the-excitement-of-online-casino-goldwin-6/[/url] is a popular entertainment option for enthusiasts. Offering a range games, you can experience the thrill of winning right in your living room. Participate in the action today!
Within the thriving scene of gambling, Online Casino UK, [url=https://itcfashion.com/2026/03/02/exploring-the-exciting-features-of-captain-marlin/]https://itcfashion.com/2026/03/02/exploring-the-exciting-features-of-captain-marlin/[/url] excels with its wide-ranging offerings. Players can partake in various games, allowing a thrilling experience. Featuring captivating bonuses, Online Casino UK entices emerging players constantly.
Однозначно, отличное сообщение
online casino, [url=https://marriagesofa.com/profile/raebroadnax4247/]https://marriagesofa.com/profile/raebroadnax4247/[/url] предоставляет эксклюзивные шансы для участников. Методы к победе жизнеспособны, и каждый может открыть свой путь к удаче.
roulette mit echtgeld, [url=https://hello.waitwhatweb.com/online-casino-roulette-mit-echtgeld-tipps-und/]https://hello.waitwhatweb.com/online-casino-roulette-mit-echtgeld-tipps-und/[/url] ist ein aufregendes Spiel, das viele Spieler anzieht. Die Spannung ist unbeschreiblich, wenn das Rad sich dreht. Durch kluge Entscheidungen kann man Gewinne erzielen. Nutze verschiedene Wettarten für mehr Varianten. Spieler sollten sich zunächst über die besten Taktiken informieren, um die Erfolgschancen zu erhöhen. Roulette mit echtgeld bietet eine einmalige Gelegenheit, die man sich nicht entgehen lassen sollte.
дааа вот бы мне скорость побыстрее
раскрутка сайта PhoenixProject, [url=https://1ab.in/3kV7]https://1ab.in/3kV7[/url] выступает важной компонентом успешного интернет-ресурса. Внедрение техник продвижения и платформ способствует привлечению свежих пользователей. Важен творческий подход к содержимому, что улучшит интерес к вашему ресурсу.
In the world of online gaming, a non GamStop online casino, [url=https://alpinistiniaidarbai.lt/discover-the-best-sites-not-affected-by-gamstop/]https://alpinistiniaidarbai.lt/discover-the-best-sites-not-affected-by-gamstop/[/url] offers players an alternative. These platforms offer a unique experience, granting users to enjoy their favorite games without restrictions. Users can find various gaming options while appreciating the thrill of gambling. With a varied selection of games and appealing bonuses, players are drawn to try their luck. In summary, non GamStop online casino is an enticing destination for gaming enthusiasts.
Nel mondo dei giocattoli, i centri di scommessa non aams online offrono possibilitГ uniche. Con una piattaforma all’avanguardia, i giocatori possono godere il brivido delle scommesse senza ostacoli. Scegliendo casinГІ non aams online, [url=https://staging.newmika.co.in/recensioni-sui-casino-non-aams-guida-completa-per-2/]https://staging.newmika.co.in/recensioni-sui-casino-non-aams-guida-completa-per-2/[/url], si entra in un mondo di divertimento e convenienza.
НАСТРОЕНИЕ ПРОСТО ПОДРЫВАЕ В ПРЯМОМ СМЫСЛЕ СЛОВА
мостбет казино, [url=https://mostbet-4pq2a.club/]https://mostbet-4pq2a.club[/url] предоставляет широкий выбор игр. Здесь имеется возможность наслаждаться различными слотами и классическими играми. Помимо этого, бонусы делают времяпрепровождение еще более захватывающим. Не упустите шанс узнать мир азартных игр в мостбет казино!
Online Casino, [url=https://janseverhuizingen.nl/discover-the-betnuvo-casino-application-for-4/]https://janseverhuizingen.nl/discover-the-betnuvo-casino-application-for-4/[/url] presents a range of activities for players. From slot machines to table games, the experience is exciting. Additionally, many platforms have appealing bonuses. Players can experience their favorite games anytime, anywhere. The convenience of playing at home adds to the overall enjoyment of Online Casino gaming.
JB Casino Online, [url=http://www.liushibin.com/?p=801336]http://www.liushibin.com/?p=801336[/url] выпускает широкий асортимент игр. Ценители казино найдут нечто для себя. Дизайн удобен, а техническая помощь функционирует в любое время, обеспечивая надежность пользователей.
online roulette echtgeld, [url=https://jamessoutherland.ad-wize.xyz/online-roulette-echtgeld-mit-startguthaben-die-3/]https://jamessoutherland.ad-wize.xyz/online-roulette-echtgeld-mit-startguthaben-die-3/[/url] erfreut sich großer Beliebtheit unter Casinospielern. Solches Spiel gewährt nur Spannung, sondern auch die Möglichkeit, echte Erträge zu erzielen. Die große Auswahl Varianten machen es anziehend für alle Spieler.
Рекомендую Вам посетить сайт, на котором есть много информации на интересующую Вас тему.
Acquiring Gmail accounts is an excellent choice for those who need multiple accounts. By choosing to Buy Gmail Accounts, [url=https://www.06277.com/.ua/list/529744]https://www.06277.com/.ua/list/529744[/url], users can efficiently manage their online activities. These accounts can be used for various tasks. Confirm that you get from a dependable source.
Welcome to the dynamic world of Mostbet casino, [url=https://demo1.5usujian.com/archives/114171]https://demo1.5usujian.com/archives/114171[/url]! Here, you’ll find a wide range of options to meet every taste. Sign up for the action and discover the thrill of gains today!
Online Casino Games, [url=https://consultorias.conteudoestrategico.com.br/the-ultimate-guide-to-great-slots-casino-9/]https://consultorias.conteudoestrategico.com.br/the-ultimate-guide-to-great-slots-casino-9/[/url] supply an exciting way to enjoy gaming from the ease of home. Players can select from a wide variety of games.
Замечательно, это весьма ценная штука
турецкие сериалы онлайн, [url=https://imoodle.win/wiki/User:FranklynAlderson]https://imoodle.win/wiki/User:FranklynAlderson[/url] стали популярны благодаря захватывающим сюжетам и эмоциональным героям. Такие шоу привлекают зрителей богатством историй. Поклонники могут найти множество захватывающих сериалов на различных платформах.
Это весьма ценное сообщение
В мире азартных игр Pin-Up играть привлекает внимание пользователей. Здесь можно встретить большие выигрыши. Если вы хотите отдохнуть, тогда pin up casino играть, [url=https://pin-up-casino-100q1.lol/]официальный сайт pin up casino[/url] — отличный выбор! Яркие игры предложат вам недоступные эмоции.
гуд информация
Serviceeftersyn, [url=https://tinvuiviet.net/index.php?language=vi&nv=statistics&nvvithemever=t&nv_redirect=aHR0cHM6Ly9weGhlcmUuY29tL2VuL3Bob3RvZ3JhcGhlci80ODk4NjU0]https://tinvuiviet.net/index.php?language=vi&nv=statistics&nvvithemever=t&nv_redirect=aHR0cHM6Ly9weGhlcmUuY29tL2VuL3Bob3RvZ3JhcGhlci80ODk4NjU0[/url] er en vigtig proces, der sikrer, at dine apparater fungerer optimalt. Denne proces hjælper med at øge levetiden på maskiner og formindsker risikoen for skader. Det er derfor en god idé at investere Serviceeftersyn regelmæssigt.
Scoprire il mondo dei divertimenti online nei casinГІ non aams online, [url=http://marketinsightcanada.com/i-migliori-siti-casino-online-del-2023/]http://marketinsightcanada.com/i-migliori-siti-casino-online-del-2023/[/url] ГЁ un’esperienza straordinaria. Qui, incontrerai tante opzioni per giocare. I casinГІ non aams online offrono offerte allettanti e numerosi giochi, tra cui i classici come il blackjack e la roulette. Giocare in questi ambienti ГЁ divertente.
In the world of virtual gaming, Casino Online, [url=http://mission3w.youngnak.net/2026/03/02/understanding-captain-marlin-withdrawal-options-a-2/]http://mission3w.youngnak.net/2026/03/02/understanding-captain-marlin-withdrawal-options-a-2/[/url] offers unrivaled entertainment. Players can enjoy a vast range of entertainment from the comfort of their homes. With comfort, it’s no wonder that online casinos are flourishing.
roulette online echtgeld, [url=https://museum.arabpuppettheatre.org/index.php/2026/03/05/roulette-mit-echtgeld-der-nervenkitzel-im-online/]https://museum.arabpuppettheatre.org/index.php/2026/03/05/roulette-mit-echtgeld-der-nervenkitzel-im-online/[/url] bietet Spielern die Möglichkeit, spannende Spiele zu genießen und echtes Geld zu gewinnen. Mit attraktiven Boni und sicheren Zahlungsoptionen, überzeugt es viele. Tauchen Sie ein in das Casino-Feeling von zu Hause aus.
Ух вы мои сладкие !!!!
Керамическая плитка, [url=http://www.wycenaslask.pl/2020/08/09/witaj-swiecie/]http://www.wycenaslask.pl/2020/08/09/witaj-swiecie/[/url] является хорошим материалом для отделки интерьеров. Этот материал может быть найдена в широких стилях и цветах, что позволяет решать подходящий вариант для каждого дом.
JB Casino Online, [url=https://leonor.wejustdesign.com/comprehensive-guide-to-jb-casino-bonus-details-7/]https://leonor.wejustdesign.com/comprehensive-guide-to-jb-casino-bonus-details-7/[/url] offers an entertaining experience for enthusiasts. With an extensive selection to choose from, users can enjoy live dealer games. Join JB Casino Online today and dive into entertainment from the comfort of your home!
Случайно нашел сегодня этот форум и специально зарегистрировался, чтобы поучаствовать в обсуждении.
Погрузитесь в мир азартных развлечений, выбрав pin up casino играть, [url=https://pin-up-casino-cradi.cfd/]pin-up-casino-cradi.cfd[/url]. Здесь вас ждет множество интересных игр. Каждый желающий найдет что-то по душе и сможет испытать атмосферой побед.
Mostbet online, [url=https://gourdornaments.com/the-rising-trend-of-dragon-money-telegram-bot/]https://gourdornaments.com/the-rising-trend-of-dragon-money-telegram-bot/[/url] offers an exciting array of options for players. Users can enjoy various entertainment including casino games. With a user-friendly interface, accessibility is a key feature, making straightforward for newcomers.
Playing games at Online Casino Slots, [url=https://formtrade-srl.com/casino-goldwin-uk-your-ultimate-gaming-destination/]https://formtrade-srl.com/casino-goldwin-uk-your-ultimate-gaming-destination/[/url] brings excitement and joy to fans. With numerous themes, characteristics, and reward opportunities, the journey is sure to be unforgettable. Discover the possibility to win big today!
нетслов ето зачот
El ГЎmbito del casino en lГnea, [url=https://trade-britanica.trade/wiki/Los_mejores_casinos_en_l%C3%ADnea_en_la_web_donde_puedes_encontrar_bonos_espectaculares_adem%C3%A1s_numerosas_modalidades_de_juegos.]https://trade-britanica.trade/wiki/Los_mejores_casinos_en_l%C3%ADnea_en_la_web_donde_puedes_encontrar_bonos_espectaculares_adem%C3%A1s_numerosas_modalidades_de_juegos.[/url] brinda una experiencia incomparable a los apostadores. Con su disponibilidad por medio de dispositivos electrГіnicos, se ha convertido en una elecciГіn muy conocida. En estos sitios, los participantes pueden disfrutar de diversas opciones de espectГЎculos.
Slottica Casino to propozycja dla graczy szukających nowoczesnej platformy do gry online i wygodnego dostępu do szerokiej oferty rozrywki. Serwis wyróżnia się intuicyjnym interfejsem, sprawną obsługą płatności oraz atrakcyjnym wyborem gier dopasowanych do różnych preferencji. Na szczególną uwagę zasługują wysokie standardy bezpieczeństwa, w tym szyfrowanie danych i rozwiązania chroniące prywatność użytkowników na każdym etapie korzystania z platformy. Dzięki temu gracze mogą skupić się na zabawie, mając pewność, że ich dane osobowe i finansowe są odpowiednio zabezpieczone. To jeden z ciekawszych wyborów dla osób zastanawiających się, gdzie grać online w bezpieczny i komfortowy sposób.
Playing at the Online Casino, [url=https://jamessoutherland.ad-wize.xyz/unveiling-the-thrills-of-casino-big-wins-in-the-uk-2/]https://jamessoutherland.ad-wize.xyz/unveiling-the-thrills-of-casino-big-wins-in-the-uk-2/[/url] can turn out to be a delightful experience. With countless games available, gamblers can enjoy the thrill of winning big prizes. Join immediately for non-stop excitement!
Надо поглядеть!!!
имплантация all on 6, [url=https://madsisters.org/benefits-of-using-vdr-data-migration-solutions/]https://madsisters.org/benefits-of-using-vdr-data-migration-solutions/[/url] – это революционное решение для тех, кто желает восстановить утраченные зубы. Подход основан на установке шести имплантатов, которые служат опорой для всей зубной конструкции. Благодаря этому врачи могут достичь полноценную улыбку всего за один день. С одной стороны, этот подход позволяет значительно сократить время на лечение, с другой стороны – гарантирует высокий уровень комфорта. Имплантация all on 6 позволяет избежать сложных операций, таких как пересадка костной ткани. Кроме этого, пациентам не нужно носить неудобные съёмные протезы. Заслуженные стоматологи могут предложить индивидуальный план лечения, учитывающий характеристики пациента. Этот техника становится всё более популярным среди желающих исправить зубной ряд. Десятки довольных клиентов подтвердят, что имплантация all on 6 – это долговечность для новых, красивых зубов. Не откладывайте визит к специалисту, ведь ваша улыбка – это ваша визитка!
Scoprire nuove avventure nel gaming ГЁ facile con il casinГІ senza registrazione, [url=https://russiatrading.click/casino-non-aams-per-italiani-scopri-le-migliori-7/]https://russiatrading.click/casino-non-aams-per-italiani-scopri-le-migliori-7/[/url]. Giocare ГЁ immediato e non richiede complicati processi di registrazione. Puoi sperimentare numerosi giochi, entertainendoti senza ansie.
echtgeld online roulette, [url=https://romance-manga.com/online-roulette-deutschland-ihr-leitfaden-fur-4/]https://romance-manga.com/online-roulette-deutschland-ihr-leitfaden-fur-4/[/url] bietet Spielern die Möglichkeit, mit echtem Geld zu spielen. Solch eine Spiele ermöglichen den Nervenkitzel des Spiels. Verschiedene Strategie, die man anwenden kann, mag den Gewinn beeinflussen. Webseiten für Glücksspiele stellen eine schnelle Art dar, Risiko zu erleben.
Любопытный топик
В мире азартных игр pin up casino играть, [url=https://pin-up-casino-e4zvs.sbs/]официальный сайт pin up casino[/url] предлагает уникальные возможности для развлечения. Любой может получить удовольствие от интересных игр и получать призы настоящие деньги. Уникальные бонусы образуют процесс еще более захватывающим. Качество обслуживания удивит даже самых п тщательных игроков, а разнообразие развлечений не позволит никого равнодушным.
И как в таком случае поступить?
Пеллетные котлы, [url=https://kremenchug.ua/news/consumer/fireplaces-stoves/71516-burzhuika-chi-varto-rozglyadati-dlya-opalennya-v-2025-roci.html]https://kremenchug.ua/news/consumer/fireplaces-stoves/71516-burzhuika-chi-varto-rozglyadati-dlya-opalennya-v-2025-roci.html[/url] представляют современное решение для обогрева домов. Они зависят от пеллет, которые получаются из древесных отходов, давая оптимальную теплоснабжение.
Вы не правы. Я уверен. Давайте обсудим. Пишите мне в PM, поговорим.
Сантехника, [url=https://norrkultur.se/arbete-pagar/]https://norrkultur.se/arbete-pagar/[/url] — это важная часть любой квартиры|дома|жилого помещения|недвижимости. Правильный выбор материалов|инструментов|устройств|компонентов обеспечивает долговечность и надежность. Обслуживание систем водоснабжения|канализации|отопления|воздухоснабжения должно быть регулярным.
JB Casino Online, [url=https://primeonlinestore.site/discover-the-exciting-world-of-jb-casino-265639013/]https://primeonlinestore.site/discover-the-exciting-world-of-jb-casino-265639013/[/url] offers a thrilling experience for players looking to enjoy gambling from the comfort of their homes. Players can access a wide range of options, including baccarat, all designed for maximum fun. Whether one is a seasoned pro or a beginner, JB Casino Online has something for everyone. Get started today and experience the excitement of online gaming!
Online Casino Slots, [url=https://allthatdeals.com/explore-the-exciting-world-of-the-casinojoy/]https://allthatdeals.com/explore-the-exciting-world-of-the-casinojoy/[/url] – Online Casino Slots offer exciting gaming experiences for players. Using diverse themes and multiple gameplay mechanics, they cater to all preferences. Winning big await those who spin the reels!
echtgeld online roulette, [url=https://inwestycjeifinansowanie.pl/online-roulette-spielen-tipps-und-strategien-fur-3/]https://inwestycjeifinansowanie.pl/online-roulette-spielen-tipps-und-strategien-fur-3/[/url] ist eine spannende Möglichkeit, um mit echten Einsätzen zu spielen. Solche von Spielen bieten nebenbei aufregende Chancen, und auch verschiedene Varianten. Jeder, der gerne zu spielen, kann diese Möglichkeit ausprobieren.
If you want to enjoy betting on the go, think about the Mostbet download, [url=https://pmosocsargen.com/2026/02/25/unlocking-financial-opportunities-with-dragon-1191/]https://pmosocsargen.com/2026/02/25/unlocking-financial-opportunities-with-dragon-1191/[/url] option. This app offers easy access to games and sports betting anytime, anytime. Don’t miss out on bonuses and deals by using it!
Поздравляю, отличная мысль
Los casinos en lГnea ofrecen amplia colecciГіn de juegos emocionantes. Incluyendo tragamonedas hasta mesas de pГіquer, hay mucho para todos. Su mezcla de diversiГіn y probabilidad de ganar premios hace que el casino en lГnea, [url=http://filmsgood.ru/user/waldogerman1699]http://filmsgood.ru/user/waldogerman1699[/url] sea realmente alternativa popular.
In the domain of Online Casino, [url=https://sklerozamultiplex.eu/how-to-seamlessly-navigate-the-iwild-casino/]https://sklerozamultiplex.eu/how-to-seamlessly-navigate-the-iwild-casino/[/url], players can experience a vast array of options. Starting with classic slots to table games, there’s anything for everyone. Additionally, the thrill of winning real money adds to the allure. Participating in Online Casino can provide endless entertainment.
Nel mondo dei giochi, i casinГІ senza registrazione, [url=https://landdesignmn.com/i-casino-stranieri-giocabili-in-italia-guida/]https://landdesignmn.com/i-casino-stranieri-giocabili-in-italia-guida/[/url] mettono a disposizione un’esperienza particolare per gli utenti. Le persone possono avviare subito, senza la necessitГ di creare un account. CasinГІ senza registrazione facilitano di divertirsi in modo immediato e senza stress.
По моему мнению Вы допускаете ошибку.
crypto wallet platform, [url=https://firstpointlaw.com/2020/04/regain-control-of-your-finances/]https://firstpointlaw.com/2020/04/regain-control-of-your-finances/[/url] – In the world of cryptocurrency, a virtual wallet system is essential for managing assets. Users can effectively manage their coins while enabling transactions. The right solution can enhance user experience and security.
In the UK, the trend of non GamStop sites UK, [url=http://www.museodelbrunello.it/discover-the-best-casino-sites-not-on-gamstop-9-2/]http://www.museodelbrunello.it/discover-the-best-casino-sites-not-on-gamstop-9-2/[/url] is growing. These sites offer players liberty without restrictions. Discover a variety of games and bonuses that are limited on traditional sites.
Что за безумная мысль?
Каждый, кто предпочитает азартные игры, должен попробовать pin up casino играть, [url=https://pin-up-casino-caocs.cyou/]pin-up-casino-caocs.cyou[/url]. Это заведение предлагает разнообразие развлечений. В кафе есть возможность насладиться атмосферой. Удача сопутствует в этом интересном месте!
В этом что-то есть. Раньше я думал иначе, спасибо за помощь в этом вопросе.
экзотические фрукты с доставкой, [url=http://www.thorsten-waap.de/index.php/musik/live/item/21-der-meister-der-tasten]http://www.thorsten-waap.de/index.php/musik/live/item/21-der-meister-der-tasten[/url] – это уникальная возможность попробовать вкусы, до которых редко доберешься в повседневной жизни. Их можно купить в любом количестве и насладиться оригинальными сочетаниями во вкусе. Перевозка происходит безопасно, и вы получите свежие плоды непосредственно домой. Добавьте экзотические фрукты с доставкой в свой рацион и откройте для себя новые горизонты вкуса!
Online Casino UK, [url=https://mobilecarwashcompany.co.za/2026/03/03/explore-betgem-casino-no-deposit-bonus-a-chance-to/]https://mobilecarwashcompany.co.za/2026/03/03/explore-betgem-casino-no-deposit-bonus-a-chance-to/[/url] offers a captivating journey for players. By providing a wide variety of games, users can enjoy video slots, table games, and live dealer options. Become part of the action today!
echtgeld online roulette, [url=https://equip.gtmarine.ru/online-roulette-deutschland-glucksspiel-im/]https://equip.gtmarine.ru/online-roulette-deutschland-glucksspiel-im/[/url] bietet Spielern die Möglichkeit, echtes Geld zu gewinnen. Dank verschiedenen Strategien können die optimiert werden. Zudem ist es wichtig, die Plattform zu wählen, um risikofrei zu spielen. Echtgeld online roulette stellt ein spannendes Erlebnis für alle, die den Nervenkitzel lieben.
Betting BC Game, [url=https://www.access2care.bt/philippines-bc-game-casino-your-ultimate-gaming/]https://www.access2care.bt/philippines-bc-game-casino-your-ultimate-gaming/[/url] offers a thrilling experience for punters. With multiple games, users can try out different activities. Betting BC Game provides an immersive environment, making every bet unforgettable. Join the fun and test your luck today!
Вы допускаете ошибку. Могу отстоять свою позицию. Пишите мне в PM, поговорим.
сайт pin up casino, [url=https://pin-up-casino-q7q47.xyz/]https://pin-up-casino-q7q47.xyz[/url] предлагает уникальный опыт в мире азартных игр. Здесь вы найдете разнообразные слоты, классические карточные игры и захватывающие акции. Зарегистрируйтесь и заработайте бонусы для новых игроков!
Какие нужные слова… супер, блестящая идея
Если вы хотите насладиться с миром захватывающих историй, то дорамы смотреть онлайн, [url=http://www.laurentcerciat.fr/contactliens/courrier/]http://www.laurentcerciat.fr/contactliens/courrier/[/url] — отличный выбор. Каждая эпизод переносит зрителя в неповторимый мир. Они забирают необычными сюжетами и эмоциональными персонажами. Обязательно посмотрите время исследовать для себя что-то интересное.
Apple Pay casino not on GamStop, [url=http://www.pisarevo.com/the-rise-of-apple-pay-bookies-not-on-gamstop-2/]http://www.pisarevo.com/the-rise-of-apple-pay-bookies-not-on-gamstop-2/[/url] offer players a unique opportunity to enjoy online gaming without restrictions. These platforms ensure a safe way to fund accounts using Apple Pay. Players can engage with exciting games and benefit from generous bonuses. With swift transactions and enhanced security, it’s simpler to play. Select an Apple Pay casino not on GamStop to enjoy seamless gaming today!
Mostbet app, [url=https://www.ezacomposit.com/unlocking-financial-opportunities-with-dragonmoney-161/]https://www.ezacomposit.com/unlocking-financial-opportunities-with-dragonmoney-161/[/url] предоставляет игрокам уникальный шанс ставок. Благодаря простому интерфейсу, каждый смогут найти интересные события и зарабатывать призы на разных рынках.
I migliori giocatori di intrattenimento online offrono occasioni senza creazione di account. I giocatori possono godere all’istante dell’esperienza nel casinГІ senza registrazione, [url=https://continentallacres.com.br/continentallacres/]https://continentallacres.com.br/continentallacres/[/url]. Scegliere un casinГІ di qualitГ ГЁ fondamentale per offrire un gioco leale, carico di varianti emozionanti. Prova numerosi giochi e scopri le innovazioni del settore.
Amid the sphere of internet-based entertainment, Casino Online, [url=https://www.storiedaerebor.it/the-rise-of-instant-casinos-a-gaming-revolution/]https://www.storiedaerebor.it/the-rise-of-instant-casinos-a-gaming-revolution/[/url] stands out. Players can savor a diverse range of choices, ranging from slots to table games. Utilizing engaging bonuses and offers, every session becomes a fresh adventure.
Meine Meinung der https://21casinos.com.de/ bonus hebt sich klar von vielen Anbietern ab.
Вы абсолютно правы. В этом что-то есть и это хорошая мысль. Я Вас поддерживаю.
Смотреть захватывающие русские сериалы онлайн, [url=https://rushnoi.org/portal/2019/01/29/%d0%b2%d0%b0%d0%b7%d0%be%d1%80%d0%b0%d1%82%d0%b8-%d0%bc%d0%b5%d2%b3%d0%bd%d0%b0%d1%82-%d0%bc%d1%83%d2%b3%d0%be%d2%b7%d0%b8%d1%80%d0%b0%d1%82-%d0%b2%d0%b0-%d1%88%d1%83%d2%93%d0%bb%d0%b8-%d0%b0%d2%b3/]https://rushnoi.org/portal/2019/01/29/%d0%b2%d0%b0%d0%b7%d0%be%d1%80%d0%b0%d1%82%d0%b8-%d0%bc%d0%b5%d2%b3%d0%bd%d0%b0%d1%82-%d0%bc%d1%83%d2%b3%d0%be%d2%b7%d0%b8%d1%80%d0%b0%d1%82-%d0%b2%d0%b0-%d1%88%d1%83%d2%93%d0%bb%d0%b8-%d0%b0%d2%b3/[/url] стало проще. Каждый года появляются новые премьеры, которые привлекают зрителей. Погрузитесь в мир кинематографа прямо сейчас!
Online Casino, [url=https://www.gessodazero.com/experience-the-thrills-of-casino-flashdash-your/]https://www.gessodazero.com/experience-the-thrills-of-casino-flashdash-your/[/url] offers exhilarating games for players. As you prefer slot machines, there’s something inviting for everyone. Become part of the fun and enjoy the chance to win big!
udenlandske casinoer, [url=http://pathfindertechcorp.com/casino-sider-uden-mitid-find-din-perfekte-2/]http://pathfindertechcorp.com/casino-sider-uden-mitid-find-din-perfekte-2/[/url] tilbyder et interessante muligheder for gambling. Mange af disse platforme giver en variabel vifte af spil. Desuden tilbud gГёr spilrejsen endnu endnu mere appellerende for spillere. Udenlandske casinoer er en mГҐde at udforske forskellige muligheder.
Подскажите, где я могу это найти?
888starz букмекер, [url=https://belrus.net/getfile.html?fld=aHR0cHM6Ly96YXJyYXRvdXJzYnkuY29tL3Rha2xpZi1xaWxpbmF5b3RnYW4tbW9iaWwtaWxvdmEteGF2ZnNpemxpay12YS1ib251c2xhci1iaWxhbi04ODhzdGFyei1veWluLXRhanJpYmFuZ2l6bmkteWF4c2hpbGFuZy8]https://belrus.net/getfile.html?fld=aHR0cHM6Ly96YXJyYXRvdXJzYnkuY29tL3Rha2xpZi1xaWxpbmF5b3RnYW4tbW9iaWwtaWxvdmEteGF2ZnNpemxpay12YS1ib251c2xhci1iaWxhbi04ODhzdGFyei1veWluLXRhanJpYmFuZ2l6bmkteWF4c2hpbGFuZy8[/url] предлагает обширный выбор игр, позволяя игрокам задействовать свои навыки и интуицию. С интуитивно понятным интерфейсом, процесс ставок становится удовлетворением. Поддержка клиентов оперативно отвечает 24/7, поддерживая помощь всем пользователям.
Я считаю, что Вы ошибаетесь.
сайт pin up casino, [url=https://pin-up-casino-p9wli.sbs/]https://pin-up-casino-p9wli.sbs/[/url] предлагает разнообразие игр для знатоков азартных развлечений. Здесь любой найдут что-то увлекательное. Играя в цифровом формате, можно испытать в любое время. Не упустите возможность, исследуя мир азартных возможностей на сайте pin up casino!
Premium adult platforms bieden veilige en premium inhoud
voor volwassenen. Ontdek gegarandeerde platforms voor een kwaliteitservaring.
My homepage … brutal porn clips
Crypto Casino BC Game, [url=https://icaisurat.org/bc-game-22/]https://icaisurat.org/bc-game-22/[/url] offers an exciting opportunity for players seeking thrills. With a wide range of options, it’s easy to see why many choose this platform. Join the fun today and explore unique features!
When searching for top non UK casinos, players can discover a variety of options offering excellent options. Many of these casinos provide generous offers and a user-friendly interface, ensuring a great gaming experience. best non UK casinos, [url=https://lp.multiplaprotecao.com/exploring-non-uk-casinos-a-comprehensive-list-2/]https://lp.multiplaprotecao.com/exploring-non-uk-casinos-a-comprehensive-list-2/[/url] often also feature live dealer games, enhancing the complete enjoyment for all players. Don’t miss out on the opportunity to try out these amazing platforms.
воще класно!!!
Хотите провести вечер за интересным сюжетом? Тогда дорамы смотреть онлайн, [url=https://nedtechkozijnen.nl/uncategorized/hello-world/]https://nedtechkozijnen.nl/uncategorized/hello-world/[/url] – это отличный способ окунуться в увлекательные истории! Просто найдете нужный жанр, будь то триллер. Не забывайте следить с новинками и наслаждаться захватывающим контентом!
Playing at virtual casinos has become a popular choice for many. With wide game selections, including slots and card games, players enjoy the thrill of Casino Online, [url=http://www.unmondodifruttabologna.it/unveiling-the-truth-a-comprehensive-review-of/]http://www.unmondodifruttabologna.it/unveiling-the-truth-a-comprehensive-review-of/[/url] from the comfort of their homes. Offers attract newcomers, while loyal players benefit from exclusive rewards.
To commence with Mostbet register, [url=https://www.amhal-sono.ma/unlocking-financial-opportunities-with-dragonmoney-157/]https://www.amhal-sono.ma/unlocking-financial-opportunities-with-dragonmoney-157/[/url], simply fill out the sign-up form. You’ll need to provide vital information like your full name and mail. After that, verify your account to enjoy various features. Don’t miss out on distinct bonuses available for new users!
Прошу прощения, что я Вас прерываю, мне тоже хотелось бы высказать своё мнение.
онлайн казино, [url=https://numberfields.asu.edu/NumberFields/show_user.php?userid=6506572]https://numberfields.asu.edu/NumberFields/show_user.php?userid=6506572[/url] предлагает игрокам познать азарт из любого места. Акции, предлагаемые онлайн казино, завлекают новых участников. Развлечения разные и обостряют игровой процесс. Удачи вам!
Online казино предлагают широкий выбор игры. В Casino Online Games, [url=https://ny.moskogen.com/nyheter/janusz-online-casino-uk-the-ultimate-gaming/]https://ny.moskogen.com/nyheter/janusz-online-casino-uk-the-ultimate-gaming/[/url] можно изведывать захватывающими слотами и занимательными играми с живыми дилерами. Каждый найдет нечто для себя.
udenlandsk casino, [url=http://www.accountingforchange.co.uk/top-casinoer-uden-mitid-spil-sikkert-og-let/]http://www.accountingforchange.co.uk/top-casinoer-uden-mitid-spil-sikkert-og-let/[/url] præsenterer spændende muligheder for spillere. I dette miljø kan man opleve forskellige udfordringer og nydelse af høj kvalitet. Det kan være en interessant oplevelse for alle, der ønsker at prøve lykken.
Эта тема просто бесподобна 🙂 , мне нравится )))
сайт pin up casino, [url=https://pin-up-casino-hsitd.sbs/]pin-up-casino-hsitd.sbs[/url] предлагает восхитительные возможности для фанатов азартных игр. Здесь вы найдете разнообразные слоты и увлекательные настольные игры. Присоединяйтесь к тысячам пользователей и достигайте удачу!
Я могу много говорить по этому вопросу.
Пеллетные котлы, [url=https://welcometoua.net/revolyucziya-v-chystczi-dymohodiv-novi-tehnologiyi-ta-zasoby/]https://welcometoua.net/revolyucziya-v-chystczi-dymohodiv-novi-tehnologiyi-ta-zasoby/[/url] представляют собой решение для системы отопления домов. Их эффективность позволяет уменьшить расходы на топливо. Кроме того, использование пеллет создает минимальное воздействие на атмосферу.
И что бы мы делали без вашей замечательной идеи
Клининг, [url=http://stg.go-g.biz/129762.html]http://stg.go-g.biz/129762.html[/url] – это метод уборки, что помогает поддерживать гигиену в зданиях. Компании предлагают самые разнообразные услуги, применяя современные устройства.
Online Casino, [url=https://www.elektro-stier-zwickau.de/the-exquisite-experience-of-royal-fortune-casino/]https://www.elektro-stier-zwickau.de/the-exquisite-experience-of-royal-fortune-casino/[/url] вытаскивает множество опций для игроков. Мгновенные выигрыши, перспективы увеличить собственный бюджет привлекают.
Howdy! I realize this is kind of off-topic but I had to ask.
Does operating a well-established website
such as yours take a massive amount work? I’m
brand new to operating a blog but I do write in my journal on a daily basis.
I’d like to start a blog so I can share my personal experience
and views online. Please let me know if you have any recommendations or tips for brand new aspiring bloggers.
Thankyou!
My site :: lesbian porn videos
casinoer uden dansk licens, [url=https://growingsmes.org/casino-uden-rofus-i-danmark-2026-en-complete-guide/]https://growingsmes.org/casino-uden-rofus-i-danmark-2026-en-complete-guide/[/url] tilbyder et udvalg af automater, der kan fascinere spillere. Udenfor dansk regulering tilbyder de normalt bedre bonusser og gratis spins. Spillere bør dog være forberedte på med sikkerheden.
non GamStop betting sites, [url=http://dirkdufour.synology.me/wordpress/?p=35466]http://dirkdufour.synology.me/wordpress/?p=35466[/url] provide an thrilling alternative for punters. With minimal restrictions, bettors can celebrate a wider range of games and offers. This liberty allows for a enhanced betting experience. Choose wisely and embrace the opportunities these sites provide.
Scoprire un casinГІ con deposito 1 euro, [url=https://www.quieuropa.it/scopri-i-vantaggi-dei-casino-online-con-skrill-2/]https://www.quieuropa.it/scopri-i-vantaggi-dei-casino-online-con-skrill-2/[/url] ГЁ un’ottima opportunitГ per chi desidera iniziare a giocare senza investire cifre elevate. Simili casinГІ forniscono una vasta gamma di giochi per divertirsi creando un’esperienza unica. Iniziare con una cifra minima permette di provare il sito e trovare le proprie preferenze.
BC Game Online Casino, [url=https://androidmobiles.com/uncategorized/gra-crash-na-bc-game-emocjonujca-przygoda-w-wiecie]https://androidmobiles.com/uncategorized/gra-crash-na-bc-game-emocjonujca-przygoda-w-wiecie[/url] offers an exciting venue for players who enjoy betting. With countless games available, users can experience the thrill of acquiring rewards. Join the adventure now!
Да, действительно. Я присоединяюсь ко всему выше сказанному. Давайте обсудим этот вопрос.
фильмы онлайн бесплатно, [url=https://builtindia.in/2020/07/07/residential-photo/]https://builtindia.in/2020/07/07/residential-photo/[/url] – Смотрите множество фильмов онлайн бесплатно. Это невероятная возможность наслаждаться жизненными историями прямо у себя дома. Пробуйте разные жанры, и наслаждайтесь отличным кино!
Players in Bangladesh are increasingly choosing [url=https://dailydhakareport.com/]https://dailydhakareport.com/[/url] for online gaming and rewards. The platform provides access to popular games like slots, rummy and aviator with a welcome bonus for new users. Visit the site to download the APK and start playing today.
Специально зарегистрировался, чтобы поучаствовать в обсуждении.
сайт pin up casino, [url=https://pin-up-casino-xbjcl.lol/]https://pin-up-casino-xbjcl.lol/[/url] предлагает обширный выбор азартных игр. Здесь каждый игрок найдет что-либо для себя. Регистрация не вызывает трудностей, а вывод оперативен.
В этом что-то есть. Теперь всё понятно, большое спасибо за информацию.
In the Chicken Road Game, [url=https://ivancampana.com/coleccion-avenue/attachment/06/]https://ivancampana.com/coleccion-avenue/attachment/06/[/url], players navigate a vibrant world filled with challenges. The objective is to avoid obstacles while collecting rewards. Strategic movements are crucial in this exciting adventure.
Mostbet casino, [url=https://stator.com/horseshoe-internet-casino-remark-now-inhabit-step-three-says/]https://stator.com/horseshoe-internet-casino-remark-now-inhabit-step-three-says/[/url] offers an engaging gaming experience for players. With a wide range of games, from slots to table games, every player finds something distinct. Join now!
In the world of Casino Online Slots, [url=https://genofchange.org/experience-the-rhythm-of-online-jazz-casino-4/]https://genofchange.org/experience-the-rhythm-of-online-jazz-casino-4/[/url], players often discover a diverse options of exciting games. These slots offer unique features and chances to win big. Using strategies and luck, gamers can amplify their experience and raise their potential winnings.
Какие слова… супер, отличная мысль
Пеллетные котлы, [url=https://360o.info/building/avtomatika-dlya-tverdotoplivnyh-kotlov-kak-zalog-stabilnoj-raboty-sistemy-otopleniya.html]https://360o.info/building/avtomatika-dlya-tverdotoplivnyh-kotlov-kak-zalog-stabilnoj-raboty-sistemy-otopleniya.html[/url] являются решение для отопления домов. Эффективность таких систем позволяет потерять расходы на топливо. Кроме того, использование пеллет создает минимальное воздействие на окружающую среду.
Playing online games like Online Casino Slots, [url=https://ramonshitta.com/experience-the-thrills-of-royal-fortune-casino/]https://ramonshitta.com/experience-the-thrills-of-royal-fortune-casino/[/url] is a fun experience for many. With various themes and thrilling features, players can have fun their favorite slots. Gaining big is always a possibility!
Я извиняюсь, но, по-моему, Вы допускаете ошибку. Могу отстоять свою позицию. Пишите мне в PM, пообщаемся.
I Danmark er det vigtigt at finde det bedste casino uden rofus, [url=http://www.pisarevo.com/opdag-10-euro-indbetalingscasinoer-den-bedste/]http://www.pisarevo.com/opdag-10-euro-indbetalingscasinoer-den-bedste/[/url], hvor man kan spille uden bekymringer. Vælg et pålideligt casino, der tilbyder gode tilbud. Sørg for at læse anmeldelser for at få adgang til den bedste oplevelse.
Der er mange spillere, der søger oplevelser i net spil. Et anerkendt valg er casino uden dansk licens, [url=https://www.gsoft.com.bd/2026/03/09/casino-uden-rofus-2026-en-ny-ra-for/]https://www.gsoft.com.bd/2026/03/09/casino-uden-rofus-2026-en-ny-ra-for/[/url], som tilbyder et varieret udvalg af oplevelser. Det kan man finde friske spilleautomater og casino klassikere. Det er vigtigt at tænke på sikkerhed og licensering, men mulighederne er mange.
non GamStop betting sites, [url=https://indigo-deer-210605.hostingersite.com/exploring-non-gamstop-sports-betting-sites-a-14/]https://indigo-deer-210605.hostingersite.com/exploring-non-gamstop-sports-betting-sites-a-14/[/url] provide unique choices for players who seek liberty in their gambling experience. These sites permit users to enjoy their favorite pastimes without constraints imposed by GamStop.
Ухты, супер, давно ждал. СПС
сайт pin up casino, [url=https://pin-up-casino-jid6y.click/]pin-up-casino-jid6y.click[/url] предлагает разнообразный выбор азартных игр. Тут можно игровые развлечения на любой вкус. Здесь игроки обнаружат отличные бонусы и скидки, что повышает шансы на успех.
Premier xxx platforms offer high-quality content for adult entertainment.
Choose reliable hubs for a safe and enjoyable experience.
my homepage – BRUTAL PORN MOVIES
Как раз то, что нужно, буду участвовать. Вместе мы сможем прийти к правильному ответу.
Смотреть кинематограф онлайн бесплатно стало возможно благодаря множеству платформ. Эти ресурсы предлагают богатый ассортимент жанров и тем, что позволяет найти что-то интересное. фильмы онлайн бесплатно, [url=https://geb-tga.de/deseo-ocuparme-un-poco-por-mundillo-que-people/]https://geb-tga.de/deseo-ocuparme-un-poco-por-mundillo-que-people/[/url] дарят впечатления прямо у вас дома. Не упустите шанс изучить любимые ленты комфортно.
BC Game Casino, [url=https://theambiencenews.com/bcgame1034/explore-the-exciting-world-of-pakistan-bc-game-app/]https://theambiencenews.com/bcgame1034/explore-the-exciting-world-of-pakistan-bc-game-app/[/url] offers a thrilling platform for betters. With numerous games available, gamblers can easily find a game to enjoy. Sign up for the fun today!
In the world of web-based gaming, Casino Online, [url=https://www.pleasesellmycar.ca/casinoonlineslot190225/exploring-jokabet-casino-sportsbook-a-4/]https://www.pleasesellmycar.ca/casinoonlineslot190225/exploring-jokabet-casino-sportsbook-a-4/[/url] offers a thrilling experience. Players can delight in various games from the comfort of their homes. With deals and easy access, it’s no wonder that online casinos are becoming increasingly popular. Players can explore a vast array of games, from slots to table games, all while enjoying advantages from the convenience of technology.
Извиняюсь, но не могли бы Вы расписать немного подробнее.
Experience the excitement of gaming with PIROTS Slots collection, [url=http://tips.betdaq.com/daqmans-libray/]http://tips.betdaq.com/daqmans-libray/[/url]! Discover a realm of enthralling slots that provide big wins. Enjoy diverse themes and colorful graphics that will captivate you for hours.
Mostbet online, [url=https://bueaheights.com/2026/02/25/a-comprehensive-review-of-betwinner-guidebook-on-3/]https://bueaheights.com/2026/02/25/a-comprehensive-review-of-betwinner-guidebook-on-3/[/url] offers a wide range of betting options for sports lovers. Its simple interface makes it easy to use for everyone. Enjoy in-game betting and thrilling promotions!
Online Casino UK, [url=http://www.endaiplaybook.com/experience-the-thrill-with-shiny-joker-uk-your/]http://www.endaiplaybook.com/experience-the-thrill-with-shiny-joker-uk-your/[/url] features a captivating gaming experience for players. With numerous options, gamblers can enjoy games from table games to virtual dealers. Incentives are generous, making it a leading choice for enthusiasts. Explore the dynamic world of Online Casino UK today!
udenlandske casinoer, [url=https://judolimon.com/2026/03/07/bedste-udenlandske-casinoer-en-guide-til-de-bedste-4-2/]https://judolimon.com/2026/03/07/bedste-udenlandske-casinoer-en-guide-til-de-bedste-4-2/[/url] fremsætter den stor vifte af underholdning. Brugerne får chancen til af nyde mange forskellige tilbud. Udenlandske casinoer leverer imponerende gevinster og måder til at tjene penge.
Супер клас!!!
сайт pin up casino, [url=https://pin-up-casino-0zu0x.lol/]https://pin-up-casino-0zu0x.lol/[/url] предлагает богатый выбор игр. Здесь можно испытать удачу и заработать внушительные награды. Попробуйте и получайте радость в мир азартных ощущений.
Да, действительно. Всё выше сказанное правда. Можем пообщаться на эту тему. Здесь или в PM.
Det er vigtigt at vælge de rette online spilleplatforme. Gamblingsider uden dansk licens tilbyder ofte højere bonusser og favorable vilkår. Men tænke på sikkerheden, når man spiller på casinoer uden dansk licens, [url=https://blogs.kritatechnosolutions.com/bedste-udenlandske-online-casinoer-en-guide-til/]https://blogs.kritatechnosolutions.com/bedste-udenlandske-online-casinoer-en-guide-til/[/url].
golf bookies not on GamStop, [url=https://dulcenael.com.ar/2026/03/14/exploring-golf-odds-not-on-gamstop-find-your-best/]https://dulcenael.com.ar/2026/03/14/exploring-golf-odds-not-on-gamstop-find-your-best/[/url] offer an exciting alternative for bettors. These platforms provide a chance to place wagers on various events without restrictions. You can explore various options for conducting your bets. Experience the thrill of betting on golf games with flexibility. With golf bookies not on GamStop, you’ll find a world of opportunities.
Leading adult websites deliver high-quality explicit
content safely. Opt for trusted sources for a discreet
experience.
Online Casino, [url=https://www.aldentsmiledentistry.ca/discover-the-exciting-world-of-casino-casobet-uk-2/]https://www.aldentsmiledentistry.ca/discover-the-exciting-world-of-casino-casobet-uk-2/[/url] presents an entertaining experience for betters worldwide. With diverse games and alluring bonuses, it’s easy to see why so many choose to play. Explore the fun today!
udenlandsk casino, [url=http://www.mendogniricardi.it/2026/03/07/casino-sider-uden-rofus-finder-de-bedste/]http://www.mendogniricardi.it/2026/03/07/casino-sider-uden-rofus-finder-de-bedste/[/url] tilbyder en fascinerende verden af chancer. Spillere kan prГёve forskellige slotmaskiner, alt sammen fra komforten i deres eget hjem.
Вы мне не подскажете, где мне узнать больше об этом?
фильмы rezka, [url=https://javalordscoffee.com/mourning-blend-medium-roast/]https://javalordscoffee.com/mourning-blend-medium-roast/[/url] – это настоящая находка для любителей кино. В этом месте можно найти многообразные направления: драма, комедия и фантастика. Каждый фильм очаровывает о вечных темах. Смотрим каждый в любое время.
Betting BC Game, [url=https://aurafoundation.org/2026/03/01/unlocking-fun-and-fortune-a-guide-to-hash-game/]https://aurafoundation.org/2026/03/01/unlocking-fun-and-fortune-a-guide-to-hash-game/[/url] offers an exciting opportunity for enthusiasts to engage in various wagering options. Players can enjoy a wide range of games, from classic favorites to innovative new releases. With appealing odds and bonuses, Betting BC Game promises an enjoyable adventure. Join the fun and take a gamble today!
Online Casino, [url=http://www.mkmn.in/jetsetspins-online-casino-uk-an-exciting-gaming/]http://www.mkmn.in/jetsetspins-online-casino-uk-an-exciting-gaming/[/url] offers an exciting option for players desiring thrills. With various games available, you can take part in the thrill from the comfort of home.
Как вариант, да
онлайн казино, [url=http://xn--2s2b270b.com/bbs/board.php?bo_table=free&wr_id=458136]http://xn--2s2b270b.com/bbs/board.php?bo_table=free&wr_id=458136[/url] пresents множество шансов для игроков. Вы можете классно провести время различными играми и добывать призовые. ?Присоединяйтесь к миру онлайн казино и открывайте для себя увлекательные горизонты!
Mostbet casino, [url=https://spriesis-fahrschule.de/comprehensive-review-of-betwinner-user-experiences-9/]https://spriesis-fahrschule.de/comprehensive-review-of-betwinner-user-experiences-9/[/url] предлагает широкий ставок для гурманов. Геймеры могут погружаться новыми игровыми слотами и увлекательными играми.
МолодчаГа парень!!!!!!!!
pin up casino онлайн, [url=https://pin-up-casino-iy3k5.icu/]https://pin-up-casino-iy3k5.icu/[/url] предлагает игрокам уникальный опыт азартных игр. Здесь вы найдете разнообразие слотов и игр, которые сделают ваш отдых впечатляющим. Вы сможете обнаружить качественным сервисом и интересными предложениями. Каждый имеет шанс стать победителем!
Scoprire i piГ№ interessanti casinГІ con deposito 1 euro, [url=https://unitrans.in/casino-online-con-deposito-minimo-di-1-euro-guida/]https://unitrans.in/casino-online-con-deposito-minimo-di-1-euro-guida/[/url] ГЁ un ottimo modo per entrare il mondo del gioco d’azzardo online. Con soli euro, puoi esplorare senza investire troppo. I aspetti positivi di questa opzione sono notevoli. Puoi testare diversi giochi e individuare il tuo preferito. Inoltre, i promozioni sono spesso particolarmente vantaggiosi, permettendo di ampliare le tue possibilitГ di vincita. Approfitta l’opportunitГ di divertirti con i casinГІ con deposito 1 euro!
Discovering leading non UK casino sites can be enticing. These platforms offer superior games and amazing bonuses. Players can take advantage of a vast range of varieties to maximize their gaming fun. Explore top non UK casino sites, [url=https://nextark.co.jp/2026/03/14/trusted-non-uk-casinos-ensuring-safe-and-enjoyable/]https://nextark.co.jp/2026/03/14/trusted-non-uk-casinos-ensuring-safe-and-enjoyable/[/url] today!
Шпашиб большое
casinoer uden dansk licens, [url=https://www.harpalvaghela.com/oplev-verdenen-af-udenlandske-online-casinoer/]https://www.harpalvaghela.com/oplev-verdenen-af-udenlandske-online-casinoer/[/url] giver fascinerende oplevelse for spillere. SГҐdanne steder giver mange spil. Det mГҐ blive en underholdende mГҐde at deltage i online.
In the world of online gambling, Casino Online, [url=https://keys2driving.com.au/?p=16063]https://keys2driving.com.au/?p=16063[/url] offers a thrilling experience for players. With engaging games, users can enjoy a variety of selections. It’s essential to pick a reliable platform that ensures trustworthiness.
I Danmark er spil uden licens et populært emne. casinoer uden dansk licens, [url=https://keirseybooks.com/casinoonline7031/spil-p-casino-uden-rofus-oplev-friheden-til-at/]https://keirseybooks.com/casinoonline7031/spil-p-casino-uden-rofus-oplev-friheden-til-at/[/url] giver brugere chancer for sjov. Men risikoen er skræmmende, da man for det meste ikke beskytter dine egne interesser.
Что Вы мне советуете?
pin up casino онлайн, [url=https://pin-up-casino-ncp06.icu/]pin up casino casino сегодня[/url] — это увлекательная платформа для азартных игр. Здесь вы найдете разнообразные слоты и казино-игры. Подавайте и?? острые ощущения!
Очень забавная мысль
турецкие сериалы онлайн, [url=https://foxy1069.com/2025/05/69041/]https://foxy1069.com/2025/05/69041/[/url] завлекают множество зрителей со всего мира. Увлекательные сюжеты и сильные персонажи делают посещение этих сериалов поразительным удовольствием.
Crypto Casino BC Game, [url=https://mijalflamenco.com/bc-game-kasino-online-pengalaman-bermain-yang-tak-9/]https://mijalflamenco.com/bc-game-kasino-online-pengalaman-bermain-yang-tak-9/[/url] предлагает пользователям широкий выбор развлечений и выборов. Создание аккаунта|Легкая регистрация позволяет участникам стартовать гемблинг быстро. Платформа обеспечивает надежность и привлекательные бонусы для т новых игроков. Становитесь частью Crypto Casino BC Game и получайте удовольствие увлекательными атмосферами!
During the world of Online Casino Games, [url=https://medicinus.al/2026/02/20/kalokalo-online-casino-uk-your-ultimate-gaming-15/]https://medicinus.al/2026/02/20/kalokalo-online-casino-uk-your-ultimate-gaming-15/[/url], players find a vast variety of options. Including slots to table games, the choices grant endless excitement. Engage with this vibrant environment for a possibility to win big!
Mostbet online, [url=https://solucoes.lcsistemas.com.br/mostbet-guidebook-an-in-depth-review-of-user/]https://solucoes.lcsistemas.com.br/mostbet-guidebook-an-in-depth-review-of-user/[/url] offers a variety for bet placements and online casinos. With simple interfaces, players can experience an thrilling platform.
C таким качеством не охота.
казино онлайн, [url=https://maxmeta.io/index.php/User:FelipeAllison]https://maxmeta.io/index.php/User:FelipeAllison[/url] предоставляют игрокам удивительные в gambling опыты, не выходя из домашней обстановки. В индустрию азартных игр забирается широкий меню игр. Рулетка завлекают своим геометрией и возможностью выиграть денежный вклад. Также многие казино онлайн включают щедрые бонусы для новиков, что увеличивает азарт и мотивацию к игре. Частые турниры и баттлы делают процесс еще чрезвычайно увлекательным и жизнерадостным. Играя в казино онлайн, важно помнить о необходимости безопасной игровой деятельности, чтобы избежать проблем.
Online Casino, [url=http://www.trabahopilipinas.com/discover-the-magic-of-irish-luck-online-casino-uk-2/]http://www.trabahopilipinas.com/discover-the-magic-of-irish-luck-online-casino-uk-2/[/url] предоставляет уникальные варианты для любителей азартных игр. Геймеры могут удовлетворять интерес от разнообразия игр при этом выигрывать награды в весьма удобной среде.
Der er mange fordele ved at spille i et casino uden dansk licens, [url=https://kplast.com.tr/bedste-udenlandske-online-casinoer-en-guide-til-5/]https://kplast.com.tr/bedste-udenlandske-online-casinoer-en-guide-til-5/[/url]. Spillere kan nyde hГёjere bonusser og et udvalg af spil. Det giver mulighed for diversitet. casino uden dansk licens tilbyder som regel en platforme, hvor man kan opdage nye tilbud.
If you’re looking for the best betting sites that are not restricted by GamStop, the top non GamStop casino, [url=https://thepincodeindia.com/are-non-gamstop-casinos-safe-a-comprehensive-guide-2/]https://thepincodeindia.com/are-non-gamstop-casinos-safe-a-comprehensive-guide-2/[/url] offers an exciting range of games for players. Enjoy thrilling gaming experiences without limitations.
По моему мнению Вы допускаете ошибку. Могу отстоять свою позицию.
Играть в pin up casino онлайн, [url=https://pin-up-casino-paemt.click/]pin-up-casino-paemt.click[/url] — это захватывающее развлечение. Электронный игровой зал предлагает широкий выбор игровых игр. Здесь вы сможете пробовать новые подходы и выигрывать настоящие деньги.
С таким успехом как у тебя
П„О± ОєО±О»П…П„ОµПЃО± online casino, [url=https://www.ideawood.eu/2026/03/11/page-204/]https://www.ideawood.eu/2026/03/11/page-204/[/url] ПЂПЃОїПѓП†ОПЃОїП…ОЅ ОјОїОЅО±ОґО№ОєОП‚ ОµОјПЂОµО№ПЃОЇОµП‚ ПѓП„ОїП…П‚ ПЂО±ОЇОєП„ОµП‚. ОЈП…ОЅО±ПЃПЂО±ПѓП„О№ОєОП‚ ПЂПЃОїПѓП†ОїПЃОП‚, О±ПЂОїО»О±П…ПѓП„О№ОєОП‚ ОґО№О±ОґО№ОєП„П…О±ОєОП‚ ПЂО»О±П„П†ПЊПЃОјОµП‚ ОєО±О№ П…П€О·О»О¬ П„О¶О¬ОєПЂОїП„ ПЂОµПЃО№ОјООЅОїП…ОЅ ОєО¬ОёОµ ПЂО±ОЇОєП„О·. О”ОїОєО№ОјО¬ПѓП„Оµ П„О± ОєО±О»ПЌП„ОµПЃО± ПЂО±О№П‡ОЅОЇОґО№О± ПѓО®ОјОµПЃО±!
Online Casino Slots, [url=https://blog.thanos.ai/unlock-your-golden-experience-how-to-log-in/]https://blog.thanos.ai/unlock-your-golden-experience-how-to-log-in/[/url] offer exciting experiences for players. With vivid graphics and potential to win big, these games attract gamblers seeking fun. Explore multiple themes in the world of Online Casino Slots.
udenlandske casinoer, [url=https://customcabinetsmass.com/bedste-online-casinoer-uden-mitid-spil-sikkert-og/]https://customcabinetsmass.com/bedste-online-casinoer-uden-mitid-spil-sikkert-og/[/url] tilbyder et stort udvalg af spil for gæster. De tilbyder til give tiltalende bonusser samt unikke funktioner, som tilvejebringer sjove stunder. I det sammenhæng kan det være vigtigt at tage højde for sikkerhed, når man spiller online.
Ожидал честно сказать, большего. Но посмотреть можно=)
дорамы онлайн, [url=https://kuzlavka-ufa.ru/product/36-07-02-%D0%BD%D0%B0%D0%BA%D0%BB%D0%B0%D0%B4%D0%BA%D0%B0/]https://kuzlavka-ufa.ru/product/36-07-02-%D0%BD%D0%B0%D0%BA%D0%BB%D0%B0%D0%B4%D0%BA%D0%B0/[/url] — это отличная возможность погрузиться в мир восточной культуры. Фильм captivates зрителей захватывающим сюжетом, захватывающими персонажами и незабываемой атмосферой. Каждый серия дарит новые эмоции и впечатления.
Online Casino Slots, [url=http://www.group-images2.com/2026/02/20/kaboom-slots-online-casino-uk-unleash-the-fun-and-2/]http://www.group-images2.com/2026/02/20/kaboom-slots-online-casino-uk-unleash-the-fun-and-2/[/url] offer a fun way to win. Players can spin various themes and mechanics. With high rewards, every spin can change your life. Enjoy the flexibility of playing from home!
BC Game Online Casino, [url=http://202.191.121.20/devtest/nilsagor/?p=64132]http://202.191.121.20/devtest/nilsagor/?p=64132[/url] offers a distinct gaming experience with various options to enjoy. Players can find entertaining promotions which enhance their time. Join the crowd and immerse into a world of fun!
Я считаю, что тема весьма интересна. Давайте с Вами пообщаемся в PM.
Виртуальный мирок азартных игр открывает двери с pin up casino онлайн, [url=https://pin-up-casino-e64c6.sbs/]pin-up-casino-e64c6.sbs[/url]. Здесь желающий найдет что-то новенькое для себя. Многообразие игр исполнил желаниям игроков.
Бесконечное обсуждение 🙂
Сейчас существует множество платформ, где можно дорамы смотреть онлайн, [url=https://numberfields.asu.edu/NumberFields/show_user.php?userid=6515523]https://numberfields.asu.edu/NumberFields/show_user.php?userid=6515523[/url] легко. Любители жанра найдут разные сериалы на любой вкус. Комедийные до детективов — выбор огромен. Не упустите возможность получить удовольствие в увлекательные истории прямо сейчас!
If you’re searching for the top non GamStop casino, [url=https://safoabernardi.altervista.org/discover-trustworthy-casinos-not-on-gamstop/]https://safoabernardi.altervista.org/discover-trustworthy-casinos-not-on-gamstop/[/url], you’ll discover various platforms that offer exciting gaming experiences. Such platforms provide generous bonuses and a variety of gaming options. Players can enjoy real-time gaming, ensuring fun while playing. Explore the leading sites today!
Visita un casinГІ deposito 5 euro, [url=https://manahilalirfane.com/2026/03/13/casino-online-con-minimo-deposito-di-5-euro-guida-2/]https://manahilalirfane.com/2026/03/13/casino-online-con-minimo-deposito-di-5-euro-guida-2/[/url] e scopri il divertimento a portata di mano! Investendo appena 5 euro puoi sperimentare vari giochi. Ottimo per principianti e esperti, offre molte opzioni per tutti i gusti. Non perdere l’occasione di entrare al mondo del gioco online con bassi investimenti!
Mostbet download, [url=http://akroamatik.hu/2026/02/26/in-depth-mostbet-review-features-promotions-and/]http://akroamatik.hu/2026/02/26/in-depth-mostbet-review-features-promotions-and/[/url] is a seamless process that allows users to enjoy betting on their favorite sports|games|events|matches right from their mobile devices. Simply visit the official site|platform|webpage|application to get started. Enjoy quick access to features|options|tools|settings and never miss a chance to win big!
Я извиняюсь, но, по-моему, Вы не правы. Я уверен. Могу это доказать.
П„О± ОєО±О»П…П„ОµПЃО± online casino, [url=https://inwestycjeifinansowanie.pl/719201269-2/]https://inwestycjeifinansowanie.pl/719201269-2/[/url] ПЂПЃОїПѓП†ОПЃОїП…ОЅ ОјОїОЅО±ОґО№ОєОП‚ ОµОјПЂОµО№ПЃОЇОµП‚ П€П…П‡О±ОіП‰ОіОЇО±П‚. О•ПЂО№О»ООіОїОЅП„О±П‚ П„О± ОєО±О»ПЌП„ОµПЃО± ОґО№О±ОґО№ОєП„П…О±ОєО¬ ОєО±О¶ОЇОЅОї, ОїО№ ПЂО±ОЇОєП„ОµП‚ ОµОЇОЅО±О№ ПѓОµ ОёОПѓО· ОЅО± ОП‡ОїП…ОЅ ПЂПЃПЊПѓОІО±ПѓО· ПѓОµ ПЂО»О®ОёОїП‚ ПЂО±О№П‡ОЅО№ОґО№ПЋОЅ. О— ПЂПЃОїПѓП„О±ПѓОЇО± ОµОЇОЅО±О№ П…П€ОЇПѓП„О·П‚ ПѓО·ОјО±ПѓОЇО±П‚ ОіО№О± ОјО№О± ОІОО»П„О№ПѓП„О· ОµОјПЂОµО№ПЃОЇО±.
Online Casino UK, [url=https://www.capelini.com.br/explore-the-exciting-world-of-gxmble-casino-sports-3/]https://www.capelini.com.br/explore-the-exciting-world-of-gxmble-casino-sports-3/[/url] presents a diverse range of options. Players can delight in slots and benefit from various offers available online.
I dag er der mange muligheder for at spille online, men sådan bedste mobil casino, [url=https://integrasoftcr.com/samsoe-ultra/mobil-casinoer-den-ultimative-guide-til-spil-p-2/]https://integrasoftcr.com/samsoe-ultra/mobil-casinoer-den-ultimative-guide-til-spil-p-2/[/url] præsenterer en enestående oplevelse. Brugere kan nyde sikkerhed og store bonusser. Med mobilversioner er det muligt at spille når som helst.
Spannender Einblick in die Landschaft der https://www.top10bestencasino.de/-Casinos ohne Oasis-Beschränkung.
Обычно с пол года требуется
pin up casino онлайн, [url=https://pin-up-casino-ymwyg.icu/]pin up casino официальный[/url] — это особенное место для геймеров. Здесь можно выбирать широкий каталог развлечений. Утоните в атмосферу азартных игр и найдите увлекательные впечатления прямо у домашнего порога!
XEvil 6.0 automatically solve most kind of captchas,
Including such type of captchas: ReCaptcha-2, ReCaptcha v.3, Google, Solve Media, BitcoinFaucet, Steam, +12k
+ hCaptcha, FC, ReCaptcha Enterprize now supported in new XEvil 6.0!
+ CloudFlare TurnsTile, GeeTest captcha now supported in new XEvil 7.0!
+ XEvil 7.0 was released! ReCaptcha v2 solving speed increased x2!
+ XEvil can solve captchas from OpenClaw AI bot!
1.) Fast, easy, precisionly
XEvil is the fastest captcha killer in the world. Its has no solving limits, no threads number limits
2.) Several APIs support
XEvil supports more than 6 different, worldwide known API: 2captcha, anti-captchas (antigate), RuCaptcha, DeathByCaptcha, etc.
just send your captcha via HTTP request, as you can send into any of that service – and XEvil will solve your captcha!
So, XEvil is compatible with hundreds of applications for SEO/SMM/password recovery/parsing/posting/clicking/cryptocurrency/etc.
3.) Useful support and manuals
After purchase, you got access to a private tech.support forum, Wiki, Skype/Telegram online support
Developers will train XEvil to your type of captcha for FREE and very fast – just send them examples
4.) How to get free trial use of XEvil full version?
– Try to search in Google “Home of XEvil”
– you will find IPs with opened port 80 of XEvil users (click on any IP to ensure)
– try to send your captcha via 2captcha API ino one of that IPs
– if you got BAD KEY error, just tru another IP
– enjoy! 🙂
– (its not work for hCaptcha!)
WARNING: Free XEvil DEMO does NOT support ReCaptcha, hCaptcha and most other types of captcha!
http://xrumersale.site/
Браво, какая фраза…, великолепная мысль
В последние годы распространенность дорамы онлайн, [url=http://snsd.info/active-pro-healthy-growth-formula-vitamin-untuk-anak-anjing-kucing/]http://snsd.info/active-pro-healthy-growth-formula-vitamin-untuk-anak-anjing-kucing/[/url] быстро растет. Это категория, который привлекает зрителей. Смотрите новые истории и необычные персонажи, которые побуждают вас воспринимать каждую минуту. Наслаждайтесь захватывающими сюжетами и оригинальной атмосферой, которая дарит неповторимые эмоции. В погоне за увлекательными новинками, вы сможете узнать в мир дорамы.
Online Casino, [url=https://ashento.com/discover-the-excitement-of-casino-letou-your-4/]https://ashento.com/discover-the-excitement-of-casino-letou-your-4/[/url] offers an thrilling experience for players around the universe. With multiple games and enticing bonuses, the experience ensures endless entertainment.
BC Game Casino, [url=https://alphasecurityperu.com/2026/03/01/bc-game-online-casino-a-dive-into-the-thrilling/]https://alphasecurityperu.com/2026/03/01/bc-game-online-casino-a-dive-into-the-thrilling/[/url] offers an entertaining experience for players. With multiple games and lavish bonuses, it attracts betters globally. Join now to unearth the universe of online gaming!
In the world of gambling, an exciting option is the non GamStop online casino, [url=https://centralkougei.co.jp/62468/]https://centralkougei.co.jp/62468/[/url]. Here, players can discover a wide range of games free from restrictions. This platform gives players to bet freely, supplying them the chance to try out various betting experiences that may not be available in other casinos. Whether its slots or table games, the thrill is always offered in a non GamStop online casino.
Рекомендую Вам посетить сайт, на котором есть много статей на интересующую Вас тему.
Experience the thrill of sensual entertainment with Free sex cams, [url=http://justlink.to/https://chococams.com/female/country/fi]http://justlink.to/https://chococams.com/female/country/fi[/url]. Connect with beautiful models and explore your desires. Enjoy live shows that cater to your fantasies. Discover a world of pleasure.
Mostbet app, [url=https://loveyourjester.com/test/2026/02/26/unlocking-the-secrets-of-dragon-money-a-guide-to-31/]https://loveyourjester.com/test/2026/02/26/unlocking-the-secrets-of-dragon-money-a-guide-to-31/[/url] обеспечивает пользователям удобный способ создавать ставки на спортивные события. С ним вы можете наслаждаться разнообразием игр прямо на своем мобильном устройстве.
Online Casino, [url=http://www.15760sugarloafkey.com/2026/03/05/kings-chip-online-casino-the-ultimate-gaming/]http://www.15760sugarloafkey.com/2026/03/05/kings-chip-online-casino-the-ultimate-gaming/[/url] – Online Casino delivers a dynamic experience for players. With various games, players can enjoy the excitement of gambling from the ease of home. Engage in the action today!
Find den bedste mobil casino, [url=https://www.harpalvaghela.com/de-bedste-mobil-casinoer-spil-og-vind-p-farten/]https://www.harpalvaghela.com/de-bedste-mobil-casinoer-spil-og-vind-p-farten/[/url] i dag! Oplev en fantastisk oplevelse af adrenalin. Med top spilmuligheder kan du nyde den ultimative oplevelse. Nyd din tid i fred med flotte bonusser inklusive en snar betalingssystem.
Видео для взрослых можно транслировать на
надежных платформах для обеспечения конфиденциальности.
Откройте для себя безопасные веб-сайты для качественного просмотра.
Feel free too surf to my web page … BUY VIAGRA ONLINE
токо несколько с которых можон посмеяца!
Finding the best non GamStop casino, [url=https://thedezignfactory.co.uk/exploring-casinos-exempt-from-gamstop-your-guide/]https://thedezignfactory.co.uk/exploring-casinos-exempt-from-gamstop-your-guide/[/url] is essential for players seeking a wide range of gaming options. These platforms provide engaging games, generous bonuses, and adaptable deposit methods. Enjoy an effortless gaming experience that caters to your preferences.
Конечно. И я с этим столкнулся. Давайте обсудим этот вопрос. Здесь или в PM.
Онлайн казино активно завоевывают успех. Одним из привлекательных мест для азартных игр является pin up casino онлайн, [url=https://pin-up-casino-s48xc.xyz/]pin up casino официальный[/url]. На платформе можно открыть множество игры и щедрые бонусы. Игроки всегда оценивают преимущества игрового процесса и визуальные эффекты.
Прошу прощения, что я Вас прерываю.
Наслаждаться изучением можно в любое время с помощью онлайн-сервисов. фильмы онлайн, [url=https://cafe-sady.ru/reviews/]https://cafe-sady.ru/reviews/[/url] предлагают комфорт. Вы можете выбирать новые ленты или пересматривать старые хиты.
Playing at a non GamStop online casino, [url=https://bitbuzz.org/top-trusted-casinos-not-on-gamstop-a-guide-to-safe/]https://bitbuzz.org/top-trusted-casinos-not-on-gamstop-a-guide-to-safe/[/url] offers players an exciting alternative to traditional gambling sites. You can enjoy a wide array of choices, as well as deals that are often more attractive. With quality systems, you’ll experience seamless gameplay. Plus, these casinos frequently accept a variety of payment methods for your convenience. Explore the world of non GamStop online casino for unique gaming adventures!
Se stai cercando un modo per divertirti senza spendere troppo, il casinГІ deposito 5 euro, [url=http://mytestingbro.triple9express.com/index.php/2026/03/13/casino-online-con-deposito-minimo-di-5-euro-scopri-5/]http://mytestingbro.triple9express.com/index.php/2026/03/13/casino-online-con-deposito-minimo-di-5-euro-scopri-5/[/url] ГЁ un’ottima opzione. Investendo 5 euro, puoi cominciare nel mondo del gioco online. Giocare con piccole somme ГЁ un modo intelligente per testare nuovi giochi senza rischi elevati. Scegli da un’ampia selezione di opzioni e offerte disponibili.
In the world of Casino Online, [url=https://www.jurgenvandervelde.com/experience-the-thrill-of-london-eye-casino-2/]https://www.jurgenvandervelde.com/experience-the-thrill-of-london-eye-casino-2/[/url], players can enjoy various games such as slots, poker, and blackjack. Whether you’re experienced or a pro, there’s a wide range to suit your taste. Incentives and deals enhance the gaming experience, making Casino Online even more exciting.
Online casinos provide a selection of entertaining games. Players can experience slots, poker, and blackjack from the convenience of their homes. With offers, online gambling is increasingly attractive. Casino Online, [url=https://cgwe.webworkcg.com/fr_fr/2026/03/05/golden-pharaoh-online-casino-unleashing-the/]https://cgwe.webworkcg.com/fr_fr/2026/03/05/golden-pharaoh-online-casino-unleashing-the/[/url] provides a protected environment for all gamers.
bitcoin casino denmark, [url=https://www.simkarled.com/ultimate-guide-til-bitcoin-casinoer-i-danmark/]https://www.simkarled.com/ultimate-guide-til-bitcoin-casinoer-i-danmark/[/url] tilbyder en spændende mulighed for gamblere, der ønsker at spille med kryptovaluta. Dette kan nyde af hurtige og sikre transaktioner. I tillæg er der almindeligvis mange forskellige spil at snuppe imellem.
Betting BC Game, [url=https://priorityfireprotection.com/exploring-the-exciting-world-of-esports-betting-at/]https://priorityfireprotection.com/exploring-the-exciting-world-of-esports-betting-at/[/url] offers thrilling opportunities for players to enjoy various games. With appealing bonuses and a user-friendly interface, it ensures a seamless gaming experience. Engage with a dynamic community and take your gaming skills to the next level. Don’t miss out on the action that Betting BC Game brings!
Да, действительно. Это было и со мной. Давайте обсудим этот вопрос.
Renting a Car in the UAE, [url=https://pediascape.science/wiki/Auto_Leasing_In_The_Emirates_Advice_For_Visitors_Navigating_The_Region_Effectively.]https://pediascape.science/wiki/Auto_Leasing_In_The_Emirates_Advice_For_Visitors_Navigating_The_Region_Effectively.[/url] offers travelers simple mobility. With multiple options available, you can explore the stunning landscapes. Don’t forget to examine insurance packages for a secure journey.
To start playing, you need to complete the Mostbet register, [url=https://staging.ncbagroup.com/unlocking-wealth-with-dragon-money-bot-1445605653/]https://staging.ncbagroup.com/unlocking-wealth-with-dragon-money-bot-1445605653/[/url] process. It’s quick and simple, requiring just a few details. Once registered, you can access a wide range of games and betting options. Enjoy the thrill of betting and start winning today with effortlessness. Don’t miss out on the entertaining experience that awaits you. Join the community and explore various opportunities instantly. Make your move and secure your account now!
Не могу сейчас поучаствовать в обсуждении – очень занят. Но вернусь – обязательно напишу что я думаю по этому вопросу.
Виртуальное гемблинговое предприятие pin up casino онлайн, [url=https://pin-up-casino-jrkpu.cyou/]pin up casino casino сегодня[/url] предлагает широкий выбор азартных развлечений. Каждый гемблер найдет что-то интересное и увлекательное. Высокие выигрыши и выгодные бонусы ожидают вас! Наслаждайтесь игрой в атмосфере своего дома.
Балин, вот это да…:(
Many players seek alternatives to regulated platforms, curious about what casinos are not on GamStop, [url=https://new.bodysmarthealth.com.au/exploring-alternative-casinos-not-on-gamstop-18/]https://new.bodysmarthealth.com.au/exploring-alternative-casinos-not-on-gamstop-18/[/url]. These sites offer various games and bonuses. However, using these casinos requires caution for the reason that they are not monitored like traditional options. Finding safe casinos not on GamStop is crucial for a positive experience. It’s wise to read reviews to avoid potential pitfalls. Always check licensing to ensure proper regulation. In conclusion, while there are options, vigilance should be prioritized when exploring what casinos are not on GamStop.
предидущие части были лучше))))
Casino Online, [url=https://medium.com/p/1b1293834437?postPublishedType=initial]https://medium.com/p/1b1293834437?postPublishedType=initial[/url] создает особенные возможности игроков насладиться удачей без риска покидать дом. В онлайн-пространстве вы найдете разнообразные развлечений и бонусы для новых клиентов. Не пропустите шанс стать молодцом в мире гемблинга.
Within the thrilling world of Online Casino, [url=https://khadijatulkubrahospital.com/love-casino-sign-in-your-ticket-to-exciting-online/]https://khadijatulkubrahospital.com/love-casino-sign-in-your-ticket-to-exciting-online/[/url], players can explore a vast array of games. Ranging from slots to card games, the selections are endless. Achieving big is just a press away!
casino uden rofus pragmatic, [url=https://www.southerngospelconcert.com/pragmatic-play-casinoer-uden-rofus-oplev-spndingen-3/]https://www.southerngospelconcert.com/pragmatic-play-casinoer-uden-rofus-oplev-spndingen-3/[/url] tilbyder en spændende oplevelse med ubegribelig underholdning. Kasinoet har et varieret udvalg af moro, der tiltrækker spillere fra hele landet. Nyd den oplevelse i en sikker men ansvarlig indstilling. Uanset om du er til videoautomater, er der noget for alle i casino uden rofus pragmatic!
I siti scommesse non aams, [url=https://kotwicamorska.pl/i-migliori-siti-per-scommesse-calcio-nel-2023/]https://kotwicamorska.pl/i-migliori-siti-per-scommesse-calcio-nel-2023/[/url] offrono diverse opportunitГ per scommettere. Queste piattaforme generalmente assicurano bonus interessanti e quote competitive. Г€ importante fare attenzione a regolamentazioni per scommettere in sicurezza.
Бесподобный топик, мне нравится ))))
pin up casino онлайн, [url=https://pin-up-casino-fxtuo.lol/]https://pin-up-casino-fxtuo.lol/[/url] презентует своим пользователям оригинальное игровое приключение. В онлайн-казино можно встретить разнообразные игровые игры и большие выигрышные возможности.
Жаль, что сейчас не могу высказаться – нет свободного времени. Вернусь – обязательно выскажу своё мнение по этому вопросу.
Смотреть фильмы онлайн стало проще благодаря современным ресурсам. фильмы онлайн, [url=http://www.oitzarisme.ro/2025/07/06/exploring-the-allure-of-pin-up-canada/]http://www.oitzarisme.ro/2025/07/06/exploring-the-allure-of-pin-up-canada/[/url] позволяют наслаждаться уловками в любое время. Любителям драма всегда найдется что-то по душе.
Online casinos have transformed the world of betting. Casino Online Games, [url=https://crosscut-carpentry.co.uk/the-exciting-world-of-online-casino-letou/]https://crosscut-carpentry.co.uk/the-exciting-world-of-online-casino-letou/[/url] offer players the chance to win big from the comfort of their homes. With entertaining graphics and engaging gameplay, these platforms attract millions. Players enjoy a variety of poker games and live options that enhance their experience. Online gambling continues to grow, creating endless opportunities for players worldwide.
Crypto Casino BC Game, [url=https://www.zahretsinai-gypsum.com/unlocking-the-potential-of-bcigra-com-a-guide-to/]https://www.zahretsinai-gypsum.com/unlocking-the-potential-of-bcigra-com-a-guide-to/[/url] offers an innovative platform for betting enthusiasts. Players can engage in a variety of gaming experiences while gaining cryptocurrencies. The interface is easy to navigate, making it simple for newcomers to join in the fun. Don’t miss the chance to dive into Crypto Casino BC Game today!
Mostbet casino, [url=https://solucionesintegralesveterinarias.es/unlocking-the-secrets-of-dragon-money-your-guide-30/]https://solucionesintegralesveterinarias.es/unlocking-the-secrets-of-dragon-money-your-guide-30/[/url] предлагает широкий выбор игр, включая игровые автоматы. Геймеры могут наслаждаться увлекательными бонусами и акциями, что делает развлечение еще более увлекательным. Mostbet casino приглашает попробовать мир развлекательных удовольствий.
Прошу прощения, что я Вас прерываю, хотел бы предложить другое решение.
Welcome to the exciting world of BSB007 Casino, [url=https://chukalsky.ru/?p=1097736]https://chukalsky.ru/?p=1097736[/url], where players can experience exciting gaming at its best. With countless options to choose from, customers can find something to entertain them. Join us now and engage in an extraordinary adventure!
Playing in Online Casino Slots, [url=https://pratikagencies.in/index.php/2026/03/06/discover-the-excitement-of-casino-lucky-mister/]https://pratikagencies.in/index.php/2026/03/06/discover-the-excitement-of-casino-lucky-mister/[/url] delivers an thrilling experience for players. Including a variety of themes and bonus features, these games engage gamblers from all over the world. Enjoy the thrill today!
Согласен, очень хорошая штука
MagicWin casino, [url=https://www.audioprotesi.org/discovering-magic-win-casino-sister-sites-a/]https://www.audioprotesi.org/discovering-magic-win-casino-sister-sites-a/[/url] предоставляет обширный каталог игр, среди слоты, настольные игры и реальные казино. Каждый обладают шансом радоваться отличной игрой и приличными бонусами. Подключайтесь к MagicWin casino и опробуйте азарт!
live casino uden rofus, [url=https://ayut.ub.gov.mn/?p=725766]https://ayut.ub.gov.mn/?p=725766[/url] tilbyder en unik oplevelse for spillere, der ønsker at kombinere spænding og interaktion. Gamblere kan trives i den kildefælle atmosfære, mens de deltager mod live dealere. Udviklingen af spillet er i centrum, hvilket tiltrækker mange. Tag deltage i dette livlige eventyr i verden af virtual kasino!
Вы правы.
Приглашаем вас в мир азартных развлечений с неповторимой атмосферой pin-up casino, [url=https://pin-up-casino-ck2ny.cfd/]https://pin-up-casino-ck2ny.cfd[/url]. Здесь вы найдете разнообразные игры, от рулетки до классических казино. Все посетитель сможет насладиться профессиональным сервисом и выдающимися бонусами. Не упустите шанс испытать удачу в pin-up casino!
XEvil 6.0 automatically solve most kind of captchas,
Including such type of captchas: ReCaptcha v.2, ReCaptcha v.3, Google, Solve Media, BitcoinFaucet, Steam, +12k
+ hCaptcha, FC, ReCaptcha Enterprize now supported in new XEvil 6.0!
+ CloudFlare TurnsTile, GeeTest captcha now supported in new XEvil 7.0!
+ XEvil 7.0 was released! ReCaptcha v2 solving speed increased x2!
+ XEvil can solve captchas from OpenClaw AI bot!
1.) Fast, easy, precisionly
XEvil is the fastest captcha killer in the world. Its has no solving limits, no threads number limits
2.) Several APIs support
XEvil supports more than 6 different, worldwide known API: 2Captcha, anti-captcha (antigate), RuCaptcha, death-by-captcha, etc.
just send your captcha via HTTP request, as you can send into any of that service – and XEvil will solve your captcha!
So, XEvil is compatible with hundreds of applications for SEO/SMM/password recovery/parsing/posting/clicking/cryptocurrency/etc.
3.) Useful support and manuals
After purchase, you got access to a private tech.support forum, Wiki, Skype/Telegram online support
Developers will train XEvil to your type of captcha for FREE and very fast – just send them examples
4.) How to get free trial use of XEvil full version?
– Try to search in Google “Home of XEvil”
– you will find IPs with opened port 80 of XEvil users (click on any IP to ensure)
– try to send your captcha via 2captcha API ino one of that IPs
– if you got BAD KEY error, just tru another IP
– enjoy! 🙂
– (its not work for hCaptcha!)
WARNING: Free XEvil DEMO does NOT support ReCaptcha, hCaptcha and most other types of captcha!
http://xrumersale.site/
I siti scommesse non aams, [url=https://anzontoyota.co.id/documenti-necessari-per-entrare-al-casino-cosa/]https://anzontoyota.co.id/documenti-necessari-per-entrare-al-casino-cosa/[/url] offrono un’alternativa interessante per gli scommettitori. Alcuni piattaforme consentono di scommettere su miriadi varietГ di eventi. In piГ№, spesso presentano incentivi vantaggiosi rispetto ai siti tradizionali.
bingo not on GamStop, [url=https://www.ezacomposit.com/discover-new-bingo-sites-not-yet-popularized/]https://www.ezacomposit.com/discover-new-bingo-sites-not-yet-popularized/[/url] offers enthusiasts a chance to enjoy their favorite game without restrictions. Players can explore numerous platforms, granting diverse experiences. These sites promise fun and excitement for all users. Enjoy bingo not on GamStop today!
Извините, что я вмешиваюсь, но я предлагаю пойти другим путём.
фильмы онлайн, [url=https://levantla.com/donec-condimentum-pulvinar-lorem-sit-amet-ultrices-diam/]https://levantla.com/donec-condimentum-pulvinar-lorem-sit-amet-ultrices-diam/[/url] предлагают зрителю замечательное ощущение. В актуальное время можно открыть множество разнообразных фильмов. Так привлекает многих зрителей.
Exploring Casino Online Slots, [url=https://www.cmccarpenteria.com/luck-of-spins-casino-discover-the-thrills-of/]https://www.cmccarpenteria.com/luck-of-spins-casino-discover-the-thrills-of/[/url] can be entertaining. With a wide range of themes and games, players can discover unique rewards. Join the adventure today!
Online Casino UK, [url=https://icw.telkomnika.com/blog/2026/03/06/download-the-love-casino-app-experience-the-thrill/]https://icw.telkomnika.com/blog/2026/03/06/download-the-love-casino-app-experience-the-thrill/[/url] offers a extensive range of thrilling games. Players can have fun various slots, table games, and live dealer options. With enticing bonuses, it offers a notable gaming experience.
top roulette casino, [url=https://kylimmo.net/de-bedste-roulette-casinoer-i-danmark-find-din-2/]https://kylimmo.net/de-bedste-roulette-casinoer-i-danmark-find-din-2/[/url] tilbyder en spændende oplevelse|fremragende underholdning|utrolig sjov|fantastisk afveksling for spillere. Spillets enkelhed|lethed|tilgængelighed|overskuelighed gør det til en favorit blandt casinobesøgende. Prøv lykken og vind store præmier|fantastiske gevinster|gode belønninger|store beløb!
BC Game Online Casino, [url=https://pinkhimalayansaltlamp.com/bc-game-25/]https://pinkhimalayansaltlamp.com/bc-game-25/[/url] обеспечивает игрокам уникальные возможности в азартные игры. Здесь можно опробовать различные слоты и зарабатывать реальные деньги.
Mostbet online, [url=https://shustyle.com/onlinecasino270212/understanding-trustpilot-the-key-to-enhancing-your/]https://shustyle.com/onlinecasino270212/understanding-trustpilot-the-key-to-enhancing-your/[/url] is a popular platform for betting enthusiasts. Users can easily place bets on various sports. With a simple interface, it appeals to both newcomers and experienced players. Enjoy a broad selection of markets and exciting features that enhance the gaming experience.
Полностью разделяю Ваше мнение. В этом что-то есть и идея хорошая, согласен с Вами.
Виртуальный вселенная pin-up casino, [url=https://pin-up-casino-nmdw0.cfd/]https://pin-up-casino-nmdw0.cfd/[/url] предлагает уникальные шансы для ценителей азартных игр. Тут каждый найдет что-то захватывающее. Графика и развлечения порадуют хоть игроков!
По моему мнению Вы не правы. Могу это доказать.
MagicWin casino, [url=https://www.missionpost.co.uk/2026/03/10/experience-the-thrill-of-magic-win-games/]https://www.missionpost.co.uk/2026/03/10/experience-the-thrill-of-magic-win-games/[/url] provides an enthralling world of entertainment. Enthusiasts can discover various games such as slots. Engage with MagicWin casino today to try unique bonuses!
Saisonale https://betovocasino.com.de/ Bonus Angebote existieren zu Feiertagen.
I siti scommesse non aams, [url=https://mealdeal.jonathonkosla.com/i-migliori-casino-con-deposito-di-1-euro-gioca-4/]https://mealdeal.jonathonkosla.com/i-migliori-casino-con-deposito-di-1-euro-gioca-4/[/url] offrono una gamma di scommesse su cui scommettere. Simili portali garantiscono anche bonus vantaggiosi per nuovi utenti.
In the world of football not on GamStop, [url=https://leygcg.imembrillos.gob.mx/football-bookmakers-not-on-gamstop-a-comprehensive-8/]https://leygcg.imembrillos.gob.mx/football-bookmakers-not-on-gamstop-a-comprehensive-8/[/url], many enthusiasts seek betting opportunities. Fans enjoy various platforms that allow them to wager on matches outside traditional restrictions. Various sites offer dynamic experiences and unique odds to attract players.
Online Casino, [url=http://104.155.162.148/comprehensive-guide-to-lucky-mistercasino/]http://104.155.162.148/comprehensive-guide-to-lucky-mistercasino/[/url] provides a exciting experience for players. With multiple selections to choose from, anyone can find their beloved game. Additionally, Online Casino ensures safety for all users. Enjoy promotions that enhance your gaming journey and make every session more entertaining. Join an Online Casino today and start your fun!
At finde det bedste roulette casino, [url=https://support.scancube.com/bedste-roulette-casino-oplev-spndingen-ved/]https://support.scancube.com/bedste-roulette-casino-oplev-spndingen-ved/[/url] er ofte en udfordring for spillere. Det drejer sig om at vælge et online casino, som tilbyder gode bonusser og trygge betalinger. Derudover, gameplay-dynamikken kan være en vigtig faktor for mange spillere. Det bedste roulette casino tilbyder flere varianter af spillet, så du kan tage dit valg.
Не ломай себе голову над этим!
турецкие сериалы, [url=https://www.steriksbryggeri.se/testpost-2/]https://www.steriksbryggeri.se/testpost-2/[/url] завоевали аудиторию по всему миру. Практически каждый из них являет интересные сюжеты и сильные персонажи. Нельзя забывать, что они также отражают турецкую культуру.
Online gambling has gained immense popularity in recent years. Among the top choices, Casino Online, [url=https://unisenpma.com/luckland-casino-registration-process-a-step-by-11/]https://unisenpma.com/luckland-casino-registration-process-a-step-by-11/[/url] offers an enjoyable experience. Players can enjoy a variety of games, with simplicity playing from home. Many platforms provide promotions to attract users, adding to the fun. It’s essential to choose a trustworthy Casino Online to ensure fair play. With state-of-the-art technology, gamers can enjoy live dealers right from their devices.
Я извиняюсь, но, по-моему, Вы допускаете ошибку. Пишите мне в PM, обсудим.
В мире азартных игр, pin-up casino, [url=https://pin-up-casino-zdnyi.xyz/]https://pin-up-casino-zdnyi.xyz/[/url] выделяется своим невероятным разнообразием. Здесь доступно множество развлечений на любой вкус. Каждый посетитель найдет что-то уникальное, а привабливые бонусы делают игру еще более занимательной.
BC Game Casino, [url=http://www.atlantic-city.net/bc-game-online-casino-romania-distracie-i-catiguri-4/]http://www.atlantic-city.net/bc-game-online-casino-romania-distracie-i-catiguri-4/[/url] offers an exciting gaming experience. Players can enjoy various activities while benefiting from substantial bonuses. Join this vibrant community today!
Mostbet casino, [url=https://chandransteelsonline.com/understanding-mostbet-a-comprehensive-review-guide-22/]https://chandransteelsonline.com/understanding-mostbet-a-comprehensive-review-guide-22/[/url] доступен игрокам большой выбор развлечений. Простые бонусы и привлекательные условия делают процесс развлечения захватывающим.
В этом что-то есть и это отличная идея. Я Вас поддерживаю.
non GamStop horse racing, [url=https://activeseries.academy/exploring-alternative-bookmakers-not-on-gamstop/]https://activeseries.academy/exploring-alternative-bookmakers-not-on-gamstop/[/url] offers a possibility for punters to engage in exciting betting activities. With multiple races available, players can explore diverse options while enjoying high-quality entertainment.
Gambling at an online casino is entertaining. With a variety of games, Casino Online, [url=https://dianashakti.com/index.php/2026/03/06/working-mirrors-of-love-casino-access-the-best/]https://dianashakti.com/index.php/2026/03/06/working-mirrors-of-love-casino-access-the-best/[/url] provides users a chance to win big. When you prefer slot machines or table games, there’s something for everyone.
Премиум-платформы для взрослых предоставляют
премиум-контент для зрелой аудитории.
Исследуйте проверенные сайты
для взрослых для качества и конфиденциальности.
Feel free to visit my webpage: BUY VIAGRA
I top roulette casino, [url=https://tech2digi.com/roulette-casinoer-en-guide-til-spilelskere/]https://tech2digi.com/roulette-casinoer-en-guide-til-spilelskere/[/url] tilbyder spillere en chance for at vinde store gevinster. På de flere roulettevarianter er der besøgende chancer for spænding og fornøjelse.
Exploring gaming sites that focus on customer satisfaction is essential for gamblers seeking thrill. Among available choices, sites not using GamStop, [url=https://academybyga.com/2026/03/14/uk-casinos-not-with-gamstop-a-comprehensive-guide/]https://academybyga.com/2026/03/14/uk-casinos-not-with-gamstop-a-comprehensive-guide/[/url] provide unique experiences for unrestricted fun. Enjoy the freedom while gaming and choose from a variety of sites.
Negli ultimi anni, diversi siti scommesse non aams, [url=https://dcoutesnjacob.com/casino-con-deposito-minimo-di-1-euro-gioca-senza-3/]https://dcoutesnjacob.com/casino-con-deposito-minimo-di-1-euro-gioca-senza-3/[/url] forniscono scelte interessanti per gli scommettitori. Questi portali offrono valutazioni competitive e bonus attraenti, rendendo l’esperienza di gioco piГ№ coinvolgente. CosГ¬, sempre piГ№ giocatori si considerano a questi luoghi.
Симпатичная фраза
В мире азартных игр пин-ап особое место занимает pin-up casino, [url=https://pin-up-casino-w32nh.cfd/]https://pin-up-casino-w32nh.cfd[/url], где каждый желающий может насладиться стимулирующими играми. Здесь можно найти расслабляющую атмосферу и шанс выиграть крупные призы. Обязательно воспользуйтесь свой удачный момент и погрузитесь в мир pin-up casino.
Авторитетная точка зрения, заманчиво
Каждый фанат сможет найти что-то интересное для себя среди множества жанров. Если вы хотите расслабиться, дорамы смотреть онлайн, [url=https://universebeauty.pro/2017/07/10/festival-iskusstv-pera-kardena-2016/]https://universebeauty.pro/2017/07/10/festival-iskusstv-pera-kardena-2016/[/url] — отличный способ провести время. В этом мире вы найдете незабываемые сюжеты и ярких персонажей. Погрузитесь в удивительную атмосферу и откройте для себя новые культуры через душевные истории.
In recent years, Online Casino, [url=https://yasmen.tqnia.me/golden_medica/2026/02/21/madcasino-online-casino-uk-your-ultimate-gaming-4/]https://yasmen.tqnia.me/golden_medica/2026/02/21/madcasino-online-casino-uk-your-ultimate-gaming-4/[/url] platforms have gained tremendous popularity, attracting players from all over the globe. These casinos offer a wide range of games, ranging from slots to live dealer options, guaranteeing an engaging experience. In addition, bonuses and promotions deliver excitement and enticements for players to join.
Online Casino, [url=https://storzum.gmbh/discover-the-thrills-of-love-casino-platform/]https://storzum.gmbh/discover-the-thrills-of-love-casino-platform/[/url] provides a host of engaging games. Players can enjoy slots and many other options. The environment is welcoming, making it a perfect place to relax. With reward opportunities, prizes can be notable.
At finde de bedste roulette casinoer, [url=https://kphe.pl/index.php/2026/03/04/roulette-casinoer-en-guide-til-de-bedste/]https://kphe.pl/index.php/2026/03/04/roulette-casinoer-en-guide-til-de-bedste/[/url] kan være for spillere, der ønsker et fantastisk oplevelse. Når man vælger, fokuser på faktorer som variationer, bonusser og support. De bedste roulette casinoer tilbyder sikkerhedsfunktioner og retfærdigt gameplay.
Betting BC Game, [url=http://hongsabai.com/bc-game-kazino-latvij-ieguldjumi-un-iespjas/]http://hongsabai.com/bc-game-kazino-latvij-ieguldjumi-un-iespjas/[/url] offers an exciting experience for bettors who love games of chance. With excellent odds and a variety of choices, players can seamlessly place their bets. Join the excitement today!
Los centros de apuestas online en Chile han crecido rГЎpidamente en los Гєltimos aГ±os. Ofrecen una diversa selecciГіn de opciones de juego, desde tragamonedas hasta pГіker. Los incentivos son interesantes, lo que lleva a mГЎs apostadores a unirse a la experiencia de los casinos online chile, [url=https://www.invictustech.ug/demo/brandlink/descubre-los-mejores-casinos-online-en-chile-con-3/]https://www.invictustech.ug/demo/brandlink/descubre-los-mejores-casinos-online-en-chile-con-3/[/url].
Я не знаю как кому, мне понравился!
Horse racing has achieved notoriety in recent years. Among the various options, non GamStop horse racing, [url=https://iconicbrand.com/wp/index.php/2026/03/10/the-allure-of-horse-racing-strategies-beyond/]https://iconicbrand.com/wp/index.php/2026/03/10/the-allure-of-horse-racing-strategies-beyond/[/url] is unique for its flexibility and captivating experiences. Punters can enjoy extended options, making it an appealing choice for enthusiasts worldwide.
И я с этим столкнулся.
В мире азартных игр потрясающем каждый ищет уникальные возможности для отдыха. pin up казино, [url=https://pin-up-casino-7fs2v.xyz/]пин-ап казино[/url] предлагает развлечения, которые привлекают игроков. Убедитесь, что азарт победы ощущается в каждой игре!
casino online iceland, [url=https://evolutioncode.wpengine.com/bonusuttektir-hvernig-a-a-hamarka-moguleika-ina/]https://evolutioncode.wpengine.com/bonusuttektir-hvernig-a-a-hamarka-moguleika-ina/[/url] veitir óendanlegar útgáfur fyrir notendur. Fyrir nýjasta dokkum, eiga fjör enda múg spennandi.
For players seeking options, sites not using GamStop, [url=https://honeytech.eu/?p=1002529]https://honeytech.eu/?p=1002529[/url] provide a diverse selection of online gaming experiences. These platforms allow users to enjoy their favorite games without restrictions. With numerous features, they attract both novice and experienced gamblers alike. Choosing the right destination is crucial for an enjoyable experience. Make sure to check their regulation and game offerings.
Online Casino Slots, [url=https://brief.alaskawebgeeks.com/the-importance-of-bonuses-in-slots-casinos/]https://brief.alaskawebgeeks.com/the-importance-of-bonuses-in-slots-casinos/[/url] offer enthralling experiences to players. With a selection of themes and options, they promise endless amusement. Spin the reels and find your lucky fortune today!
Når spillere leder efter de mest populære bedste roulette casino, [url=https://hgtactical.net/bedste-online-roulette-casino-din-guide-til-7/]https://hgtactical.net/bedste-online-roulette-casino-din-guide-til-7/[/url], er det vigtigt at overveje spiludvalget. Det klassiske roulette er en elsket valgmulighed i digital casinoer, og udvalget kan være forskelligt. Så husk på at undersøge de særlige tilbud for at optimere din tid.
СРазу бы так))
Если вы любите киноискусство, то дорамы смотреть онлайн, [url=https://avstarnews.co.uk/2024/06/07/a-glimpse-into-the-life-of-jack-dafoe-navigating-fame-and-family/]https://avstarnews.co.uk/2024/06/07/a-glimpse-into-the-life-of-jack-dafoe-navigating-fame-and-family/[/url] — отличный способ насладиться захватывающими историями. Онлайн платформы предлагают широкие варианты: от романтики до триллеров. Определяйте свои любимые жанры и наслаждайтесь!
XEvil 6.0 automatically solve most kind of captchas,
Including such type of captchas: ReCaptcha v.2, ReCaptcha-3, Google captcha, Solve Media, BitcoinFaucet, Steam, +12k
+ hCaptcha, FC, ReCaptcha Enterprize now supported in new XEvil 6.0!
+ CloudFlare TurnsTile, GeeTest captcha now supported in new XEvil 7.0!
+ XEvil 7.0 was released! ReCaptcha v2 solving speed increased x2!
+ XEvil can solve captchas from OpenClaw AI bot!
1.) Fast, easy, precisionly
XEvil is the fastest captcha killer in the world. Its has no solving limits, no threads number limits
2.) Several APIs support
XEvil supports more than 6 different, worldwide known API: 2captcha, anti-captchas (antigate), RuCaptcha, death-by-captcha, etc.
just send your captcha via HTTP request, as you can send into any of that service – and XEvil will solve your captcha!
So, XEvil is compatible with hundreds of applications for SEO/SMM/password recovery/parsing/posting/clicking/cryptocurrency/etc.
3.) Useful support and manuals
After purchase, you got access to a private tech.support forum, Wiki, Skype/Telegram online support
Developers will train XEvil to your type of captcha for FREE and very fast – just send them examples
4.) How to get free trial use of XEvil full version?
– Try to search in Google “Home of XEvil”
– you will find IPs with opened port 80 of XEvil users (click on any IP to ensure)
– try to send your captcha via 2captcha API ino one of that IPs
– if you got BAD KEY error, just tru another IP
– enjoy! 🙂
– (its not work for hCaptcha!)
WARNING: Free XEvil DEMO does NOT support ReCaptcha, hCaptcha and most other types of captcha!
Online Casino Games, [url=https://heringalfenas.com.br/?p=67965]https://heringalfenas.com.br/?p=67965[/url] offer a captivating way to experience gambling from the comfort of your home. Players can enjoy diverse games like slots, poker, and blackjack. Using cutting-edge technology, these platforms provide immersive gameplay. Join to explore your favorite games today!
Контент для взрослых доступен
через надежные и проверенные веб-сайты.
Изучите безопасные сайты для взрослых для получения качественного контента.
Also visit my webpage: BUY XANAX WITHOUT PRESCRITION
ниче полезногО он не делает. !!!ОТСТОЙ!!!
pin up казино, [url=https://pin-up-casino-3i4tw.sbs/]pin-up-casino-3i4tw.sbs[/url] предлагает уникальные возможности для игроков, которые ищут развлечение. Здесь вы найдете огромный выбор игр и красочные бонусы. Присоединяйтесь к сообществу любителей и испытайте удачу!
Crypto Casino BC Game, [url=https://www.missionpost.co.uk/2026/02/28/exploring-the-thrill-of-bc-game-plinko-a-guide-to/]https://www.missionpost.co.uk/2026/02/28/exploring-the-thrill-of-bc-game-plinko-a-guide-to/[/url] offers an exhilarating experience for players seeking fresh games and advantageous opportunities. Join today and discover a world where pleasure meets crypto. Don’t miss out on amazing offers tailored just for you!
В этом что-то есть. Теперь всё понятно, спасибо за объяснение.
Finding a non GamStop site, [url=https://immodentity.de/2026/03/10/exploring-casino-companies-not-on-gamstop-a-guide/]https://immodentity.de/2026/03/10/exploring-casino-companies-not-on-gamstop-a-guide/[/url] can enhance your gaming experience. Many players seek platforms that offer a wider range of games and bonuses. These types of websites deliver opportunities to discover unique gaming options. With enticing promotions, you can maximize your chances of winning. Embrace the thrill of gaming with a non GamStop site and savor the freedom it brings. Don’t miss out on this chance to succeed in your online adventures!
Online Casino UK, [url=https://pipaltree.ngo/lucky-max-casino-sportsbook-where-luck-meets/]https://pipaltree.ngo/lucky-max-casino-sportsbook-where-luck-meets/[/url] features a selection of exciting entertainment. Players can enjoy classic card games, slots, and real-time experiences. With exciting bonuses, it’s a leading destination for enthusiasts.
casinos online legales, [url=https://shop.uzo1.com/casinos-online-legales-con-licencia-seguridad-y/]https://shop.uzo1.com/casinos-online-legales-con-licencia-seguridad-y/[/url] – Los locales online legales ofrecen una experiencia de juego segura. AdemГЎs, estos sitios garantizan transacciones justas y satisfacen las requerimientos locales.
online roulette casinoer, [url=http://uniquedriftwoodcreations.com.www71.jnb2.host-h.net/online-roulette-i-danmark-find-bedste/]http://uniquedriftwoodcreations.com.www71.jnb2.host-h.net/online-roulette-i-danmark-find-bedste/[/url] tilbyder spændende muligheder for spillere. Spil med ydmyge roulettehjul og interaktive platforme gør oplevelsen fascinerende. Engager dig i denne spændende verden af online roulette casinoer!
This surge of Chicken Road casinos, [url=http://www.qsttech.com/the-evolution-of-casinos-from-brick-and-mortar-to/]http://www.qsttech.com/the-evolution-of-casinos-from-brick-and-mortar-to/[/url] has altered the betting landscape significantly. Players are drawn to distinct recreation options and thrilling offerings, building a vibrant environment.
A Гєj trend a jГЎtГ©k vilГЎgГЎban a magyar online casino, [url=https://sterlingadvice.in/2026/03/16/magyar-online-kaszinok-minden-amit-tudni-erdemes/]https://sterlingadvice.in/2026/03/16/magyar-online-kaszinok-minden-amit-tudni-erdemes/[/url]. A virtuГЎlis jГЎtГ©ktermek kГnГЎlnak a jГЎtГ©kosok szГЎmГЎra Г¶nГЎllГі hozzГЎfГ©rГ©st, vГЎltozatos jГЎtГ©kokkal.
А есть похожий аналог?
Лучший способ провести вечер – это смотреть фильмы онлайн бесплатно, [url=https://genussbaeckerei-tralmer.de/produkte/laugenstange/]https://genussbaeckerei-tralmer.de/produkte/laugenstange/[/url]. Можно выбрать разнообразные жанры и наслаждаться удовольствием. Удобно найдите свой нравящийся фильм и оценивайте в захватывающий мир кино.
Извиняюсь, но это мне не совсем подходит. Может, есть ещё варианты?
В современном мире азартных игр гемблинг pin up казино, [url=https://pin-up-casinos-jb7px.cfd/]https://pin-up-casinos-jb7px.cfd[/url] занимает первостепенное место. Оно привлекает геймеров не только разнообразием развлечений, но и привлекательными акциями.
Engaging in Online Casino Slots, [url=https://www.medyajoy.com/2026/02/22/magic-win-online-casino-uk-your-ultimate-gaming-7/]https://www.medyajoy.com/2026/02/22/magic-win-online-casino-uk-your-ultimate-gaming-7/[/url] is a entertaining way to venture into the world of gambling. With numerous themes and options, players can find their preferred games easily and enjoy great winnings.
Online Casino, [url=https://jeroenwolfs.nl/how-to-successfully-sign-up-for-madcasino-a/]https://jeroenwolfs.nl/how-to-successfully-sign-up-for-madcasino-a/[/url] provides an exciting experience filled with excitement. Participants can enjoy a wide variety of selections, including slots and casino tables. Promotions enhance the experience, transforming it even more luring.
online roulette casinoer, [url=https://www.unique-creativity.com/2026/03/04/online-roulette-en-guide-til-spillets-verden-7/]https://www.unique-creativity.com/2026/03/04/online-roulette-en-guide-til-spillets-verden-7/[/url] tilbyder en spændende måde at spille på. Deltag roulette online fra dit hjem. Man kan opleve det klassiske spil med varierede indsatsmuligheder og lokkende bonusser.
Hello friends!
I came across a 164 useful website that I think you should dive into.
This platform is packed with a lot of useful information that you might find insightful.
It has everything you could possibly need, so be sure to give it a visit!
[url=https://cencalcurrents.org/betting-secrets/how-to-read-casino-game-odds-a-beginners-guide-to-winning-smart/]https://cencalcurrents.org/betting-secrets/how-to-read-casino-game-odds-a-beginners-guide-to-winning-smart/[/url]
Furthermore don’t overlook, folks, — you at all times may in the article find solutions to your the very tangled inquiries. We made an effort — present all of the data via the most most understandable manner.
Спасибо за помощь в этом вопросе. Я не знал этого.
Choosing a non GamStop site, [url=https://adamgardenstt.com/index.php/2026/03/10/discovering-the-best-gambling-sites-not-registered/]https://adamgardenstt.com/index.php/2026/03/10/discovering-the-best-gambling-sites-not-registered/[/url] can enhance your online gaming experience. Players seek an interesting range of games. Plus, such sites often provide engaging bonuses and promotions. Enjoy higher freedom while playing.
magyar online casino, [url=https://www.all-available.com/az-online-kaszinok-vilaga-szorakozas-es-lehetsegek-9/]https://www.all-available.com/az-online-kaszinok-vilaga-szorakozas-es-lehetsegek-9/[/url] – A friss online jГЎtГ©kok vilГЎgГЎban a virtuГЎlis kaszinГі lehetЕ‘sГ©gei vГ©gtelenek. Az interaktГv jГЎtГ©kok elkГ©pesztЕ‘ Г©lmГ©nyeket offolnak. Most a jГЎtГ©kosok bГЎrmikor felfedezhetik a virtualis casinok vilГЎgГЎt!
BC Game Online Casino, [url=https://enistoresonline.com/explorando-el-fenomeno-de-bc-game-crash-en-mexico/]https://enistoresonline.com/explorando-el-fenomeno-de-bc-game-crash-en-mexico/[/url] offers a broad range of options. Players can explore adventurous slots and live dealer options. Incentives enhance the betting experience, making it incredibly fun. Join the thrill today!
casinos sin licencia, [url=http://franglle.bho.pl/wordpress/babiogorski-pn/2026/03/02/el-auge-de-los-casinos-sin-licencia-en-espana-11/]http://franglle.bho.pl/wordpress/babiogorski-pn/2026/03/02/el-auge-de-los-casinos-sin-licencia-en-espana-11/[/url] – Los salas de juego sin licencia son un problema para los jugadores. La deficiencia de regulaciГіn puede poner a los jugadores a fraudes y acciones deshonestas.
да ну МРАК!!!
В мире азартных игр много ищут новые возможности для игры. Одним из таких мест является pin up казино, [url=https://pin-up-casino-4a2lv.sbs/]https://pin-up-casino-4a2lv.sbs/[/url], где любители могут наслаждаться разнообразными азартными играми. Каждое предложение здесь поддерживает игроков в поисках удачи.
Stream adult content safely by choosing verified
adult websites. Opt for secure platforms for discreet
entertainment.
my homepage – BEST ANAL PORN SITE
Das Bonusangebot lohnt sich für neue Spieler wirklich!
Here is my web page … https://cashmiocasino.com.de/
XEvil 6.0 automatically solve most kind of captchas,
Including such type of captchas: ReCaptcha-2, ReCaptcha-3, Google captcha, Solve Media, BitcoinFaucet, Steam, +12k
+ hCaptcha, FC, ReCaptcha Enterprize now supported in new XEvil 6.0!
+ CloudFlare TurnsTile, GeeTest captcha now supported in new XEvil 7.0!
+ XEvil 7.0 was released! ReCaptcha v2 solving speed increased x2!
+ XEvil can solve captchas from OpenClaw AI bot!
1.) Fast, easy, precisionly
XEvil is the fastest captcha killer in the world. Its has no solving limits, no threads number limits
2.) Several APIs support
XEvil supports more than 6 different, worldwide known API: 2Captcha, anti-captchas (antigate), RuCaptcha, death-by-captcha, etc.
just send your captcha via HTTP request, as you can send into any of that service – and XEvil will solve your captcha!
So, XEvil is compatible with hundreds of applications for SEO/SMM/password recovery/parsing/posting/clicking/cryptocurrency/etc.
3.) Useful support and manuals
After purchase, you got access to a private tech.support forum, Wiki, Skype/Telegram online support
Developers will train XEvil to your type of captcha for FREE and very fast – just send them examples
4.) How to get free trial use of XEvil full version?
– Try to search in Google “Home of XEvil”
– you will find IPs with opened port 80 of XEvil users (click on any IP to ensure)
– try to send your captcha via 2captcha API ino one of that IPs
– if you got BAD KEY error, just tru another IP
– enjoy! 🙂
– (its not work for hCaptcha!)
WARNING: Free XEvil DEMO does NOT support ReCaptcha, hCaptcha and most other types of captcha!
Online casinos offer thrilling opportunities for players. At Casino Online, [url=https://aroeats.net/aroeats/why-you-need-slots-casino-bonuses-for-an-enhanced]https://aroeats.net/aroeats/why-you-need-slots-casino-bonuses-for-an-enhanced[/url], users can enjoy a variety of games, including blackjack. With advanced technology, protection is ensured, allowing for a reliable gaming environment.
online roulette casinoer, [url=https://pakistancreates.com/uncategorized/guiden-til-roulette-casinoer-strategier-tips-og/]https://pakistancreates.com/uncategorized/guiden-til-roulette-casinoer-strategier-tips-og/[/url] tilbyder en spændende oplevelse for spillere. Underholdning med hjul og kugler giver veje til at vinde stort. Vælg mellem mange versioner og metoder. Uanset niveau, online roulette casinoer har noget for alle!
Браво, замечательная идея и своевременно
Смотреть последние фильмы онлайн бесплатно, [url=https://ask-directory.com/%D0%9D%D0%B0%D0%B1%D0%BB%D1%8E%D0%B4%D0%B0%D1%82%D1%8C-%D0%BA%D0%B0%D1%80%D1%82%D0%B8%D0%BD%D0%B0%D0%BC%D0%B8-%D0%B2-%D1%81%D0%B5%D1%82%D0%B8-%D0%B1%D0%B5%D1%81%D0%BF%D0%BB%D0%B0%D1%82%D0%BD%D0%BE_461351.html]https://ask-directory.com/%D0%9D%D0%B0%D0%B1%D0%BB%D1%8E%D0%B4%D0%B0%D1%82%D1%8C-%D0%BA%D0%B0%D1%80%D1%82%D0%B8%D0%BD%D0%B0%D0%BC%D0%B8-%D0%B2-%D1%81%D0%B5%D1%82%D0%B8-%D0%B1%D0%B5%D1%81%D0%BF%D0%BB%D0%B0%D1%82%D0%BD%D0%BE_461351.html[/url] стало легко. В интернете встречаются огромное количество порталов, где выкладываются киноленты разных жанров. Это даёт возможность наслаждаться любимыми творениями без дополнительных затрат. Не упустите шанс насладиться с лучшими фильмами и исполнив свой киноманский интерес.
Online Casino, [url=https://pnjts.com/experience-the-thrill-at-online-casino-monaco-jack/]https://pnjts.com/experience-the-thrill-at-online-casino-monaco-jack/[/url] gives a thrilling adventure for players. With various options, participants can take pleasure in their favorite games anytime, anywhere.
По моему мнению Вы не правы. Могу отстоять свою позицию.
A friss Г©lmГ©nyekГ©rt Г©rdemes ellГЎtogatni a XON Bet kaszinГі, [url=https://www.edax.hu/hogyan-mukodnek-ma-az-online-platformok-rovid-attekintes/]https://www.edax.hu/hogyan-mukodnek-ma-az-online-platformok-rovid-attekintes/[/url]ba, ahol vГЎltozatos jГЎtГ©k vГЎrja az Г©lmГ©nyre vГЎgyГіkat. A csodГЎs bГіnuszok Г©s promГіciГіk plusz lehetЕ‘sГ©geket kГnГЎlnak.
Вместо критики пишите свои варианты.
сайт pin up casino, [url=https://pin-up-casino-hpdd6.cfd/]pin up casino промокод[/url] предлагает азартные игры для любителей развлечений. Здесь доступны самые разнообразные слоты и игровые автоматы. Вы можете тестировать в любое время и зарабатывать призы.
Triangle Billiards & Bar Stools
1471 Nisson Ꭱd, Tustin,
CA 92780, United States
+17147715380
Bookmarks
Poi mi sono imbattuto in questa guida di Igor Shcherbakov. Lui sta nel giro dai tempi dei “Tantsy Minus”, oggi compone per cinema e TV. Quando uno cosi scrive qualcosa, conviene ascoltare.
Si intitola “Come diventare produttore musicale: guida completa per principianti”. L’ho letto tutto d’un fiato, tanto mi ha preso. Analizzano il mestiere sotto tutti gli aspetti, anche cose di cui non avevo mai sentito parlare. Scouting di artisti, lavoro in studio, promozione, contratti con le etichette. E la parte sulla psicologia mi ha fatto sorridere, perche e vera: gli artisti non sono sempre facili. Citano Ivan Dorn: “Un buon produttore e per il 30% musicista, per il 70% psicologo”. Non si puo dire meglio.
I vari percorsi lavorativi sono spiegati bene: studio, etichetta, freelance. E le specializzazioni, che non conoscevo affatto. Produttore del suono, produttore di brani, produttore esecutivo. Ogni ambito ha le sue regole e il suo mercato. Per chi parte da zero, come me, il testo propone passi concreti. Quali corsi seguire: Berklee Online, SAE Institute, in Italia ci sono diverse opzioni. Come fare esperienza senza conoscenze: fare l’assistente in studio o vendere beat su piattaforme come BeatStars. E il networking, che si tende a sottovalutare. Esistono eventi come l’Industry Pool dove i professionisti si incontrano. Se non ci vai, resti fuori.
[url=https://www.igor-scherbakov.ru/professiya-muzykalnyy-prodyuser/kak-stat-muzykalnym-prodyuserom-polnyy-gid-dlya-nachinayuschih/][color=black]Dove studiare produzione musicale[/color][/url] Dedicano anche uno spazio ai pro e ai contro, che ci vuole per non idealizzare il mestiere. La parte creativa e la piu bella, senza dubbio. Le cifre possono essere importanti quando si fa un successo. I viaggi, i festival. Ma c’e anche un rovescio della medaglia: orari impossibili, concorrenza spietata, e all’inizio probabilmente dovrai campare con poco. Bisogna esserne consapevoli.
Insomma, se come me stai pensando di buttarti nella produzione musicale da un pezzo ma non sai da dove cominciare, ti consiglio di dare un’occhiata a questa guida. E strutturata bene, va dritta al punto, senza fronzoli. E la cosa migliore: e scritta da qualcuno che fa questo mestiere da anni, non da un teorico che non ha mai messo piede in uno studio.
A legújabb lehetőségek között a magyar online casino, [url=https://presale-vancouver.ca/fedezd-fel-az-online-rulett-izgalmait-magyar/]https://presale-vancouver.ca/fedezd-fel-az-online-rulett-izgalmait-magyar/[/url] nyújt lehetőségeket minden játékos számára. Éld át a kimagasló játékokat, és nyerj fantasztikus előnyöket. A játékosok támogatása és a kockázatmentes környezet lényeges a élvezetekhez.
Welcome to Cosmic Spins casino, [url=https://ioniclogistics.com/exploring-cosmic-spins-sister-sites-a-cosmic-2/]https://ioniclogistics.com/exploring-cosmic-spins-sister-sites-a-cosmic-2/[/url], where the fun never ends! Players can discover a wide variety of games, from video slots to real-time options. Join now and unleash your luck!
Интересная тема, приму участие. Вместе мы сможем прийти к правильному ответу. Я уверен.
Looking for a great way to enjoy online gaming? Discover the thrill of non GamStop PayPal casino, [url=https://youthdata.circle.tufts.edu/index.php/2026/03/12/best-paypal-betting-sites-not-on-gamstop-887950284/]https://youthdata.circle.tufts.edu/index.php/2026/03/12/best-paypal-betting-sites-not-on-gamstop-887950284/[/url] that offers seamless transactions and exciting games. Play various options and enjoying a secure environment, delivering a fantastic gaming experience.
Wagering at Online Casino, [url=https://e-switchon.eu/pitbet-casino-login-your-gateway-to-exciting-6/]https://e-switchon.eu/pitbet-casino-login-your-gateway-to-exciting-6/[/url] offers fun. Participants can experience a wide selection of games, from roulette to live dealer options. Achieving is just a tap away!
online roulette casinoer, [url=https://thebellamygroup.com/2026/03/04/online-roulette-i-danmark-en-guide-til-spillet-2/]https://thebellamygroup.com/2026/03/04/online-roulette-i-danmark-en-guide-til-spillet-2/[/url] tilbyder en spændende måde at opleve kasino sjov på. Spillelystne kan fornøje sig med på forskellige udgaver af roulette. Her er en mindeværdig atmosfære, der gør ekstra interesse.
BC Game Casino, [url=https://www.evolvebasements.com/explorez-le-programme-d-affiliation-de-bc-game/]https://www.evolvebasements.com/explorez-le-programme-d-affiliation-de-bc-game/[/url] offers an engaging experience for gamblers. With numerous games and luring bonuses, everyone can find something to enjoy. Dive into the action today!
QuickWin Casino EspaГ±a, [url=https://quintadascarpas.com/descubre-quickwin-casino-espana-diversion-y-23/]https://quintadascarpas.com/descubre-quickwin-casino-espana-diversion-y-23/[/url] ofrece una experiencia de juego Гєnica con una amplia variedad de opciones. Sus jugadores pueden disfrutar de juegos de azar emocionantes y juegos de cartas clГЎsicos. Participar es sencillo, y las promociones son interesantes. ВЎNo te pierdas la chance de jugar en QuickWin Casino EspaГ±a!
Первая это чтото
Дорогий колего, СЃСЊРѕРіРѕРґРЅС– особливий день — привітання Р· днем народження, [url=https://denzadnem.com.ua/blogy/korysni-porady/238321]https://denzadnem.com.ua/blogy/korysni-porady/238321[/url]! Бажаю Р·РґРѕСЂРѕРІ’СЏ, щастя та СѓСЃРїС–С…С–РІ Сѓ РІСЃС–С… справах. Нехай доля приносить посмішки.
Актуально. Подскажите, где я могу найти больше информации по этому вопросу?
сайт pin up casino, [url=https://pin-up-casino-9i477.top/]https://pin-up-casino-9i477.top/[/url] предлагает обширный выбор азартных игр. Здесь можно развлекаться в игровых автоматах, а также участвовать в акциях. Каждый геймер найдет что-либо для себя!
Поздравляю, отличная мысль
фильмы rezka, [url=http://artedisruptivo.org/section-bg-5-2/]http://artedisruptivo.org/section-bg-5-2/[/url] – это настоящая находка для любителей качественного кино. Все лента удивит интересным поворотами. Обязательно посмотрите получить удовольствие от современных показов!
Virtual gambling has gained immense popularity in recent years. Gamblers enjoy the comfort of playing anytime, anywhere. Casino Online, [url=https://lp.multiplaprotecao.com/the-exciting-world-of-casino-moolah-uk-your-guide-2/]https://lp.multiplaprotecao.com/the-exciting-world-of-casino-moolah-uk-your-guide-2/[/url] offers a wide range of games, ensuring everyone finds something they love.
Online Casino Slots, [url=https://vadakinosai.com/experience-the-thrill-of-online-gaming-at-spintime/]https://vadakinosai.com/experience-the-thrill-of-online-gaming-at-spintime/[/url] offer entertaining experiences for players. These games feature dynamic graphics and fascinating themes. With countless styles, players can enjoy individual gameplay and beneficial bonuses.
Thank you for your sharing. I am worried that I lack creative ideas. It is your article that makes me full of hope. Thank you. But, I have a question, can you help me?
Извиняюсь, но этот вариант мне не подходит.
Удобрение для растений, [url=https://www.wildberries.ru/catalog/668730242/detail.aspx]https://www.wildberries.ru/catalog/668730242/detail.aspx[/url] – это важный элемент в уходе за ними. Подходящий выбор удобрения способствует оптимальному росту и развитию. Не забывайте поливать ваши растения, чтобы они регулярно получали все существенные питательные вещества.
nettikasino ilman rekisteröintiä, [url=https://www.luxurystaircaserailings.com/rahapelit-ilman-rekisterointia-mukavaa-pelaamista-2/]https://www.luxurystaircaserailings.com/rahapelit-ilman-rekisterointia-mukavaa-pelaamista-2/[/url] tarjoaa pelaajille mahdollisuuden nauttia peleistä nopeasti ja vaivattomasti. Käyttäjät voivat käynnistää pelaamiseen ilman vaikeita rekisteröitymisprosesseja, mikä tekee pelaamisesta miellyttävää ja sujuvampi. Nettikasino ilman rekisteröintiä houkuttelee yksilöllisiä pelaajia, sillä se antaa nopeita talletuksia ja palkintoja.
Я извиняюсь, но, по-моему, Вы не правы. Я уверен. Могу это доказать. Пишите мне в PM, пообщаемся.
сайт pin up casino, [url=https://pin-up-casino-d7vwo.sbs/]pin-up-casino-d7vwo.sbs[/url] предлагает широкий выбор азартных игр. Здесь каждый обнаружит что-то по душе. Сервис гарантирует удобство для своих пользователей.
Вместо того чтобы критиковать посоветуйте решение проблемы.
The rise of non GamStop PayPal casino, [url=http://www.group-images2.com/2026/03/12/paypal-casinos-not-registered-with-gamstop-a/]http://www.group-images2.com/2026/03/12/paypal-casinos-not-registered-with-gamstop-a/[/url] options has transformed the online gambling experience. Players are now able to experience seamless transactions and rapid withdrawals. With secure payment methods, your gaming journey is not only exciting but also convenient. Explore this vibrant world and find the finest casinos that cater to your needs. Join the fun today!
Betting BC Game, [url=https://academy.geotech.dev/your-ultimate-guide-to-bc-game-ng-a-new-era-in/]https://academy.geotech.dev/your-ultimate-guide-to-bc-game-ng-a-new-era-in/[/url] offers thrilling opportunities for enthusiasts to engage in various contests. With multiple options available, it’s convenient to find something that matches your taste. Join now and discover the excitement of Betting BC Game!
Советую Вам посетить сайт, на котором есть много статей по этому вопросу.
1 вин официальный сайт, [url=https://1win-ols1.cam/]https://1win-ols1.cam/[/url] предлагает широкий выбор винотоварной продукции. Каждый гость найдет что-либо на свой вкус. Имейте в виду, что у нас регулярно устраиваются акции и распродажи. Не упустите шанс получить качественные вина.
QuickWin Casino EspaГ±a, [url=http://gesztenyeskertvendeghaz.starjan.hu/?p=560336]http://gesztenyeskertvendeghaz.starjan.hu/?p=560336[/url] brinda una variada selecciГіn de opciones para sus jugadores. Desde slots, asГ como casinos en vivo, hay mucha variedad los gustos. Aparte, los valiosos bonos de bienvenida se presentan como una excelente oportunidad para empezar a participar en esta emocionante comunidad. ВЎNo relinques pasar la ocasiГіn de vivir QuickWin Casino EspaГ±a!
Свежие xxx-платформы предлагают инновационный контент для развлечений для взрослых.
Откройте для себя безопасные
новые платформы для современного опыта.
Online Casino UK, [url=https://allotravaux.ma/the-ultimate-guide-to-casino-wg-your-path-to-2/]https://allotravaux.ma/the-ultimate-guide-to-casino-wg-your-path-to-2/[/url] provides a range of exciting games which gamblers to experience. From classic slots as well as live dealer games, gamblers can explore something for everyone. Register today and enjoy the excitement of Online Casino UK!
Как нельзя лучше!
турецкие сериалы на русском, [url=https://gambling-forum.com/the-1-gambling-community-your-ultimate-online-betting-resource/]https://gambling-forum.com/the-1-gambling-community-your-ultimate-online-betting-resource/[/url] завоевали популярность благодаря захватывающим сюжетам и ярким персонажам. Интригующие истории, в которых смешиваются драма и романтика, привлекают зрителей. Поразительные повороты событий делают просмотр захватывающим. Качество продукции и уровень актёрской игры также играют большую роль в успехе данного жанра.
XEvil 5.0 automatically solve most kind of captchas,
Including such type of captchas: ReCaptcha-2, ReCaptcha v.3, Google, SolveMedia, BitcoinFaucet, Steam, +12000
+ hCaptcha, FC, ReCaptcha Enterprize now supported in new XEvil 6.0!
+ CloudFlare TurnsTile, GeeTest captcha now supported in new XEvil 7.0!
+ XEvil 7.0 was released! ReCaptcha v2 solving speed increased x2!
+ XEvil can solve captchas from OpenClaw AI bot!
1.) Fast, easy, precisionly
XEvil is the fastest captcha killer in the world. Its has no solving limits, no threads number limits
2.) Several APIs support
XEvil supports more than 6 different, worldwide known API: 2captcha, anti-captcha (antigate), rucaptcha, DeathByCaptcha, etc.
just send your captcha via HTTP request, as you can send into any of that service – and XEvil will solve your captcha!
So, XEvil is compatible with hundreds of applications for SEO/SMM/password recovery/parsing/posting/clicking/cryptocurrency/etc.
3.) Useful support and manuals
After purchase, you got access to a private tech.support forum, Wiki, Skype/Telegram online support
Developers will train XEvil to your type of captcha for FREE and very fast – just send them examples
4.) How to get free trial use of XEvil full version?
– Try to search in Google “Home of XEvil”
– you will find IPs with opened port 80 of XEvil users (click on any IP to ensure)
– try to send your captcha via 2captcha API ino one of that IPs
– if you got BAD KEY error, just tru another IP
– enjoy! 🙂
– (its not work for hCaptcha!)
WARNING: Free XEvil DEMO does NOT support ReCaptcha, hCaptcha and most other types of captcha!
http://xrumersale.site/
Поздравляю, какие нужные слова…, замечательная мысль
сайт pin up casino, [url=https://pin-up-casino-2fybo.xyz/]пин ап казино[/url] предлагает разнообразный выбор игр, которые порадуют любителей азартных игр. Также, клиенты могут изучить поощрительными выгодами, что делает казинный опыт значительно увлекательным.
Playing at the realm of Casino Online Games, [url=https://luar.dcc.ufmg.br/discover-the-thrills-of-mr-jones-casino-uk-your/]https://luar.dcc.ufmg.br/discover-the-thrills-of-mr-jones-casino-uk-your/[/url] offers excitement like no other. Users can experience a variety of games of chance from anywhere. Try your luck today!
Так долго ждал и вот -=)
1 вин официальный сайт, [url=https://1win-ljg.lol/]1 win[/url] предлагает множество азартных игр и ставок. Клиенты могут наслаждаться многообразием развлечений и веселыми мероприятиями. Присоединяйтесь к распродажам и выигрывайте!
golf odds not on GamStop, [url=https://digitalcurrencyconferencedubai.com/golf-odds-not-on-gamstop-a-comprehensive-guide-8/]https://digitalcurrencyconferencedubai.com/golf-odds-not-on-gamstop-a-comprehensive-guide-8/[/url] are a great way to engage in betting while avoiding restrictions. Many players seek unique platforms that provide exciting opportunities. These sites offer benefits that traditional options might lack, enhancing the overall experience. Select wisely!
Premium pornosites bieden premium inhoud voor volwassenen. Ontdek betrouwbare bronnen voor kwaliteit en privacy.
Also visit my webpage … BRUTAL PORN MOVIES
Online Casino, [url=https://staging.peopledesignco.com/claimit/unlock-the-excitement-of-spicy-jackpots-your/]https://staging.peopledesignco.com/claimit/unlock-the-excitement-of-spicy-jackpots-your/[/url] – Web Casino предоставляет уникальные возможности для РёРіСЂС‹. Геймеры РјРѕРіСѓС‚ наслаждаться выбором РїСЂСЏРјРѕ РёР· удобства своего РґРѕРјР°. Вознаграждения делают процесс еще увлекательнее.
Я извиняюсь, но, по-моему, Вы не правы. Я уверен. Пишите мне в PM, обсудим.
Chicken Road casinos, [url=https://grateful-movement.com/exploring-chicken-road-casinos-where-fun-meets/]https://grateful-movement.com/exploring-chicken-road-casinos-where-fun-meets/[/url] – At Chicken Road casinos, players can enjoy a variety of thrilling games. Offering slots to table games, the vibe is exceptional. Visitors often speak highly the service, making it a go-to destination.
Ausgezeichneter Artikel über Gaming-Seiten https://www.echtgeldcasinoonline.de/ das Oasis-Verfahren!
Да ну!
1 вин, [url=https://1win-bha.lol/]ванвин[/url] – Вино — это напиток, который ценится за глубокий вкус и аромат. Существует много типов, каждый из которых имеет свою уникальную особенность. Вино способно создать атмосферу праздника и радости. Важно уметь разобраться идеальное сочетание с блюдами. Стремление понять нюансы виноделия позволяет наслаждаться богатство этого напитка.
casino non aams, [url=http://www.demo6.ajency.in/online-45/]http://www.demo6.ajency.in/online-45/[/url] – I suggerisco i casino non aams per scommettere in modo unico. Questi siti offrono ottime opzioni di giochi, bonus unici. Non perdere l’opportunitГ di provare qualcosa di fresco.
Crypto Casino BC Game, [url=http://earthtechno1.com/%e6%9c%aa%e5%88%86%e9%a1%9e/20260228-112515]http://earthtechno1.com/%e6%9c%aa%e5%88%86%e9%a1%9e/20260228-112515[/url] offers a thrilling experience for enthusiasts who want to explore digital currency gaming. With multiple games and currencies available, it ensures fun for everyone. Engage with the growing community and discover unmatched rewards. Crypto Casino BC Game is the place for crypto gaming enthusiasts!
Поздравляю, эта мысль придется как раз кстати
1 вин, [url=https://1win-uxs5.buzz/]https://1win-uxs5.buzz/[/url] – Вино — это алкоголь с замечательной историей. Оно изготавливается из растений. Многообразие вин впечатляет: от сладких до игристых. Каждый кусочек — это эксплорация во вселенную!
Я думаю, что Вы допускаете ошибку. Предлагаю это обсудить.
дорамы смотреть онлайн, [url=https://dance-insight.com/formation-ideas/p1030250/]https://dance-insight.com/formation-ideas/p1030250/[/url] — это отличный СЃРїРѕСЃРѕР± погрузиться РІ захватывающие истории Рё культурные традиции. Рзучать разнообразные жанры, такие как романтика, драма или комедия, становится проще СЃ доступом Рє онлайн-платформам. Всякая дорама преподнесет уникальные эмоции Рё незабываемые моменты, которые делают просмотр незабываемым. РќРµ упустите шанс познать СЃ РјРёСЂРѕРј азиатского РєРёРЅРѕ!
Playing Casino Online Slots, [url=https://syl-shop.com/myspins-casino-sportsbook-your-ultimate-gaming-12/]https://syl-shop.com/myspins-casino-sportsbook-your-ultimate-gaming-12/[/url] is a thrilling experience. With multiple themes and elements, these games offer endless excitement. Participate the adventure today!
Welcome to Cosmic Spins casino, [url=https://panca-sakti.ac.id/a-comprehensive-review-of-plastic-formers-quality-11/]https://panca-sakti.ac.id/a-comprehensive-review-of-plastic-formers-quality-11/[/url], where the adventure of betting meets out-of-this-world bonuses. Explore various games that will keep you thrilled for hours!
Casino Online, [url=https://organik-zeytinyagi.com/experience-the-thrill-of-gaming-with-online-casino/]https://organik-zeytinyagi.com/experience-the-thrill-of-gaming-with-online-casino/[/url] offers a exciting experience for risk-takers. With diverse games, featuring slots to table games, players can enjoy endless entertainment options. Sign up today and find your favorite games in the world of Casino Online!
Für Nutzer mit Interesse an unbeschränktem Gaming sind offshore Casinos oft die beste Alternative.
Check out my site https://www.casinobonusbaron.com/
це все ……., але дуже смешно
Playing at a non UK casino site, [url=http://www.univ-bouira.dz/seminaire/exploring-non-ukgc-licensed-casinos-a-world-of/]http://www.univ-bouira.dz/seminaire/exploring-non-ukgc-licensed-casinos-a-world-of/[/url] offers unique experiences for bettors. Many sites provide diverse games, including slots, table games, and live dealer options. Offers are often more attractive, making it a delightful choice for those seeking diversity. Enjoy superior gaming without the regulations often found in the UK market, ensuring a fun experience for all.
Leading adult websites deliver high-quality explicit content safely.
Opt for verified platforms for a discreet experience.
my site – BEST ANAL PORN SITE
Esistono numerosi siti con prelievo immediato, [url=http://youthdata.circle.tufts.edu/index.php/2026/02/28/i-vantaggi-dei-siti-casino-esteri-scopri-perche/]http://youthdata.circle.tufts.edu/index.php/2026/02/28/i-vantaggi-dei-siti-casino-esteri-scopri-perche/[/url] che propongono la possibilitГ di ottenere i fondi in tempo reale. Tali servizi si rivelano ideali per coloro desideri godere dei propri soldi senza ritardi.
BC Game Online Casino, [url=https://ghaznilegacy.com/bc-game-argentina-la-revolucion-del-juego-en-linea-6/]https://ghaznilegacy.com/bc-game-argentina-la-revolucion-del-juego-en-linea-6/[/url] offers a thrilling experience for enthusiasts. Players can take pleasure in various choices with advanced features. The platform guarantees fair play and attractive bonuses, making it a popular choice among gamers. Join BC Game Online Casino today and explore the world of online gaming!
UK independent casinos, [url=https://hookedonshopping.com/exploring-independent-uk-casino-sites-a-10/]https://hookedonshopping.com/exploring-independent-uk-casino-sites-a-10/[/url] provide a unique entertainment experience. Unlike large chains, they emphasize personalized service and unique game selections. Many showcase vibrant atmospheres, making them ideal for those seeking something different.
По моему мнению Вы ошибаетесь. Могу это доказать. Пишите мне в PM, обсудим.
Каждый день множество людей ищут варианты, чтобы наслаждаться интересными фильмами онлайн. На платформах можно найти успешные ленты, от классики до современных премьер. фильмы онлайн, [url=https://iconlasolasfl.com/icon-las-olas-party-room/]https://iconlasolasfl.com/icon-las-olas-party-room/[/url] стали значимой частью современного досуга.
non GamStop bookies, [url=https://aalapshah.com/exploring-sports-betting-sites-not-on-gamstop-23/]https://aalapshah.com/exploring-sports-betting-sites-not-on-gamstop-23/[/url] offer players an opportunity to bet without the restrictions imposed by GamStop. This means players can enjoy various options and unique experiences. With liberty in choosing their betting patterns, several enthusiasts turn to these platforms.
nettikasino ilman rekisteröintiä, [url=https://victorymedical.vn/nettikasino-ilman-rekisterointia-nopea-ja-vaivaton-7/]https://victorymedical.vn/nettikasino-ilman-rekisterointia-nopea-ja-vaivaton-7/[/url] on nykyään erittäin suosittu vaihtoehto pelaajille. Se antaa mahdollisuuden pelata helpommin, koska rekisteröityminen ei vaadi aikaa. Pelaajat nauttivat kätevyyttä ja yleistä mukavuutta.
Порносайт предлагает широкий выбор видео для взрослых развлечений.
Выбирайте гарантированные
порноцентры для конфиденциального опыта.
Take a loook aat my web-site … купить виагру онлайн
Digital betting предоставляет широкие перспективы для игроков. В Casino Online, [url=https://futurelabs.org.uk/casinoonlineslot230232/discover-the-ultimate-gaming-experience-at-maximum/]https://futurelabs.org.uk/casinoonlineslot230232/discover-the-ultimate-gaming-experience-at-maximum/[/url] доступны разнообразные азартные развлечения, что делает процесс интересным. Не упустите свой перспективу выиграть!
XEvil 5.0 automatically solve most kind of captchas,
Including such type of captchas: ReCaptcha v.2, ReCaptcha v.3, Google captcha, Solve Media, BitcoinFaucet, Steam, +12k
+ hCaptcha, FC, ReCaptcha Enterprize now supported in new XEvil 6.0!
+ CloudFlare TurnsTile, GeeTest captcha now supported in new XEvil 7.0!
+ XEvil 7.0 was released! ReCaptcha v2 solving speed increased x2!
+ XEvil can solve captchas from OpenClaw AI bot!
1.) Fast, easy, precisionly
XEvil is the fastest captcha killer in the world. Its has no solving limits, no threads number limits
2.) Several APIs support
XEvil supports more than 6 different, worldwide known API: 2Captcha, anti-captcha (antigate), RuCaptcha, death-by-captcha, etc.
just send your captcha via HTTP request, as you can send into any of that service – and XEvil will solve your captcha!
So, XEvil is compatible with hundreds of applications for SEO/SMM/password recovery/parsing/posting/clicking/cryptocurrency/etc.
3.) Useful support and manuals
After purchase, you got access to a private tech.support forum, Wiki, Skype/Telegram online support
Developers will train XEvil to your type of captcha for FREE and very fast – just send them examples
4.) How to get free trial use of XEvil full version?
– Try to search in Google “Home of XEvil”
– you will find IPs with opened port 80 of XEvil users (click on any IP to ensure)
– try to send your captcha via 2captcha API ino one of that IPs
– if you got BAD KEY error, just tru another IP
– enjoy! 🙂
– (its not work for hCaptcha!)
WARNING: Free XEvil DEMO does NOT support ReCaptcha, hCaptcha and most other types of captcha!
http://xrumersale.site/
In recent years, the popularity of UK independent casinos, [url=https://www.retoknoepfli.ch/discovering-new-independent-casino-sites-your/]https://www.retoknoepfli.ch/discovering-new-independent-casino-sites-your/[/url] has captivated interest among enthusiasts. These unique venues offer a varied gaming experience, commonly focusing on tailored services that stand out from larger chains. Visitors can experience a more friendly atmosphere, enhancing their overall enjoyment. UK independent casinos are celebrated for their exclusive approach to gaming.
Могу поискать ссылку на сайт, на котором есть много статей по этому вопросу.
When searching for top online casinos, consider the best non GamStop sites, [url=https://demo.fastw3b.com/gallerywp/pass4sure/exploring-casinos-not-registered-with-gamstop-2/]https://demo.fastw3b.com/gallerywp/pass4sure/exploring-casinos-not-registered-with-gamstop-2/[/url]. These platforms provide a variety of games and generous bonuses. Players can relish a safe gaming environment while avoiding GamStop restrictions, ensuring freedom and fun!
I don’t think the title of your article matches the content lol. Just kidding, mainly because I had some doubts after reading the article.
I siti scommesse non aams, [url=http://ecolife-ec.co.jp/lucavalente/20260301-187597]http://ecolife-ec.co.jp/lucavalente/20260301-187597[/url] offrono un’alternativa interessante|una scelta allettante|una possibilitГ unica|una proposta innovativa per gli appassionati delle scommesse. Queste piattaforme garantiscono|assicureranno|forniranno|presenteranno spesso quote piГ№ elevate e promozioni vantaggiose. Tuttavia, ГЁ fondamentale|essenziale|importante|necessario fare attenzione all’affidabilitГ di questi servizi.
BC Game Casino, [url=https://urbanmotors.ge/bcfun-casino-crypto-unlocking-the-future-of-online/]https://urbanmotors.ge/bcfun-casino-crypto-unlocking-the-future-of-online/[/url] предлагает уникальный опыт для игроков. Здесь пользователи можете почувствовать множеством игр вариантами. Присоединяйтесь и попробуйте всё, что имеет BC Game Casino!
Top adult platforms bieden premium inhoud voor volwassenen. Ontdek
veilige hubs voor kwaliteit en privacy.
my web blog: BUY XANAX WITHOUT PRESCRITION
In the world of online betting, the popularity of non GamStop bookies, [url=https://wipeoutads.com/2026/03/13/top-bookies-not-on-gamstop-your-guide-to-online/]https://wipeoutads.com/2026/03/13/top-bookies-not-on-gamstop-your-guide-to-online/[/url] has sparked significant interest. These platforms provide bettors the chance to enjoy a wider range of options outside traditional regulations. While some may prefer the safety of regulated sites, others cherish the freedom non GamStop bookies offer. More opportunities can lead to better betting experiences, making them an attractive alternative.
Online-pelaaminen on tullut suosituksi, ja nettikasino ilman rekisteröintiä, [url=https://gkreddyconstructions.com/2026/03/14/euteller-kasinos-turvallinen-ja-nopea-tapa-pelata/]https://gkreddyconstructions.com/2026/03/14/euteller-kasinos-turvallinen-ja-nopea-tapa-pelata/[/url] esittelee vaivattoman tavan testata monia pelejä ilman rekisteröitymistä. Moisen vaihtoehto ilostuttaa pelaajia, jotaka arvostavat ajankäyttöä ja rauhoittavuutta. Nettikasino ilman rekisteröintiä mahdollistaa välittömän pelielämyksen!
Online Casino, [url=http://well-experts.com/casino-nomini-uk-your-exciting-adventure-awaits/]http://well-experts.com/casino-nomini-uk-your-exciting-adventure-awaits/[/url] offers a captivating experience for betters. With a diverse range of entertainment, anyone can find their favorite game. Join the fun and begin your profitable journey today!
non gamstop casino, [url=https://ibarraproperty.com/exploring-non-gamstop-betting-sites-opportunities/]https://ibarraproperty.com/exploring-non-gamstop-betting-sites-opportunities/[/url] предлагают игрокам шанс наслаждаться азартными играми без проверок. Такое заведения находят многие, кто желает свободы в играх и привлекательные бонусы.
Предлагаю Вам посетить сайт, на котором есть много информации по этому вопросу.
Finding the best online casinos is crucial for players seeking free gaming experiences. The best non GamStop sites, [url=http://www.aiace.com.br/2026/03/12/exploring-casinos-that-are-not-on-gamstop-4/]http://www.aiace.com.br/2026/03/12/exploring-casinos-that-are-not-on-gamstop-4/[/url] allow users to enjoy diverse games without limits. Players can explore exciting options and utilize generous bonuses. A great way to enhance your gaming journey!
I siti scommesse non aams, [url=https://www.alffastener.de/index.php/2026/03/01/siti-scommesse-non-aams-cosa-sono-e-come-scegliere-2/]https://www.alffastener.de/index.php/2026/03/01/siti-scommesse-non-aams-cosa-sono-e-come-scegliere-2/[/url] offrono soluzioni diverse per gli giocatori delle scommesse. Trovare piattaforme alternative ГЁ importante per massimizzare promozioni.
Casino Online Games, [url=https://curator.artracx.com/uncategorized/zixcasino-sportsbook-your-ultimate-destination-for-2/]https://curator.artracx.com/uncategorized/zixcasino-sportsbook-your-ultimate-destination-for-2/[/url] offer a fantastic way to enjoy gambling from home. Players can try their luck on a variety of choices, such as slots and poker. When you’re a rookie or a pro, there’s something for everyone. The comfort of online play makes an exciting experience any time of day!
non gamstop casinos, [url=https://dev.venturesquare.net/1008516]https://dev.venturesquare.net/1008516[/url] present players an opportunity to engage with online gaming without restrictions imposed by GamStop. Players can explore a variety of options and benefits.
Los casinos sin licencia en EspaГ±a se multiplican. Estos locales ofrecen diversiГіn, pero carecen de supervisiГіn. Es relevante estar al tanto sobre los desafГos que implican. Los casinos sin licencia espaГ±a, [url=http://procurement.gov.ck/wordpress/?p=125133]http://procurement.gov.ck/wordpress/?p=125133[/url] no cuidan a sus usuarios.
Online Casino Games, [url=https://staging0.informify.net/2026/02/23/experience-the-thrill-of-online-gaming-at-nomini/]https://staging0.informify.net/2026/02/23/experience-the-thrill-of-online-gaming-at-nomini/[/url] provide players a thrilling way to discover the realm of gambling from home. With numerous options, participants can locate their favorite games easily. The ease of gambling online elevates the overall gaming experience.
Thanks for sharing this article. https://sample-site.org/quick-note-463
Я здесь случайно, но специально зарегистрировался на форуме, чтобы поучаствовать в обсуждении этого вопроса.
Casinos Not on Gamstop, [url=https://wipeoutads.com/2026/03/12/explore-the-best-casinos-not-on-gamstop-in-the-uk-3/]https://wipeoutads.com/2026/03/12/explore-the-best-casinos-not-on-gamstop-in-the-uk-3/[/url] provide players with an opportunity to enjoy gaming without restrictions. These alternative platforms offer a wide range of games and bonuses, offering a thrilling experience. Players may enjoy enhanced freedom and variety away from the usual limits imposed by Gamstop. Choose Casinos Not on Gamstop for a better gaming adventure today!
In recent years, the rise of casino not on gamstop, [url=https://wcshippers.com/2026/03/06/discover-reliable-betting-sites-not-on-gamstop/]https://wcshippers.com/2026/03/06/discover-reliable-betting-sites-not-on-gamstop/[/url] has developed into a viable option for players. Differing from traditional sites, these casinos grant more freedom for gaming enthusiasts. With numerous games and promotions, players can indulge in their favorite activities without restrictions. Although some may prefer regulated options, the allure of casino not on gamstop continues to attract many.
I casino esteri stranieri, [url=https://ferienhauspetzold.de/2026/03/02/casino-online-senza-aams-la-guida-completa-per/]https://ferienhauspetzold.de/2026/03/02/casino-online-senza-aams-la-guida-completa-per/[/url] offrono un’esperienza di gioco unica ciГІ che attira scommettitori da tutto il mondo. Le loro possibilitГ variano e possono anche includere slot uniche per divertirsi.
En el dinГЎmico mundo de los juegos de azar, casino cripto EspaГ±a, [url=https://www.outstrip.tech/el-mundo-del-sponsorship-en-el-streaming-de/]https://www.outstrip.tech/el-mundo-del-sponsorship-en-el-streaming-de/[/url] brinda una sensaciГіn Гєnica. Los usuarios pueden aprovechar de transacciones rГЎpidas y garantizados utilizando criptomonedas. AdemГЎs, la integraciГіn de tecnologГa blockchain promete transparencia en cada juego. Explora en este nuevo concepto de entretenimiento y aprovecha las recompensas especiales que ofrecen estos casinos en lГnea.
independent casino online, [url=https://jamessoutherland.ad-wize.xyz/exploring-independent-online-casinos-a-detailed/]https://jamessoutherland.ad-wize.xyz/exploring-independent-online-casinos-a-detailed/[/url] offers players a chance to enjoy various games from the comfort of their homes. These types of casinos offer an broad selection of games, promising an exciting experience for all. Players can explore slots and more, as they enjoying secure transactions. Independent casino online is a wonderful way to experience thrilling gambling options.
Amid the world of Casino Online, [url=https://www.giuseppedifranciaevent.com/experience-thrilling-wins-at-xgg-game-casino-2/]https://www.giuseppedifranciaevent.com/experience-thrilling-wins-at-xgg-game-casino-2/[/url], players seek adventure. Countless games offer individual experiences, drawing users to experience exhilarating choices.
Online Casino Slots, [url=https://cloud9group.co.uk/the-ultimate-guide-to-playing-io-casino-sportsbook/]https://cloud9group.co.uk/the-ultimate-guide-to-playing-io-casino-sportsbook/[/url] – Online Casino Slots show a captivating way to win massive rewards. With numerous themes and functions, players can enjoy unlimited entertainment.
XEvil 5.0 automatically solve most kind of captchas,
Including such type of captchas: ReCaptcha-2, ReCaptcha-3, Google captcha, SolveMedia, BitcoinFaucet, Steam, +12000
+ hCaptcha, FC, ReCaptcha Enterprize now supported in new XEvil 6.0!
+ CloudFlare TurnsTile, GeeTest captcha now supported in new XEvil 7.0!
+ XEvil 7.0 was released! ReCaptcha v2 solving speed increased x2!
+ XEvil can solve captchas from OpenClaw AI bot!
1.) Fast, easy, precisionly
XEvil is the fastest captcha killer in the world. Its has no solving limits, no threads number limits
2.) Several APIs support
XEvil supports more than 6 different, worldwide known API: 2captcha, anti-captcha (antigate), rucaptcha, death-by-captcha, etc.
just send your captcha via HTTP request, as you can send into any of that service – and XEvil will solve your captcha!
So, XEvil is compatible with hundreds of applications for SEO/SMM/password recovery/parsing/posting/clicking/cryptocurrency/etc.
3.) Useful support and manuals
After purchase, you got access to a private tech.support forum, Wiki, Skype/Telegram online support
Developers will train XEvil to your type of captcha for FREE and very fast – just send them examples
4.) How to get free trial use of XEvil full version?
– Try to search in Google “Home of XEvil”
– you will find IPs with opened port 80 of XEvil users (click on any IP to ensure)
– try to send your captcha via 2captcha API ino one of that IPs
– if you got BAD KEY error, just tru another IP
– enjoy! 🙂
– (its not work for hCaptcha!)
WARNING: Free XEvil DEMO does NOT support ReCaptcha, hCaptcha and most other types of captcha!
http://xrumersale.site/
Online gambling has surged in popularity, especially with casinos not on gamstop, [url=https://www.onethai.be/2026/03/06/discovering-casino-not-on-gamstop-your-guide-to/]https://www.onethai.be/2026/03/06/discovering-casino-not-on-gamstop-your-guide-to/[/url] offering a unique experience. Players can enjoy various games without the usual restrictions, delivering greater freedom. These platforms provide exciting opportunities for those seeking varied gaming options.
Извините за то, что вмешиваюсь… Я разбираюсь в этом вопросе. Приглашаю к обсуждению.
Casinos Not on Gamstop, [url=https://www.rovertime.it/discover-the-world-of-uk-non-gamstop-casinos/]https://www.rovertime.it/discover-the-world-of-uk-non-gamstop-casinos/[/url] offer players a unique gaming experience in which they can enjoy without restrictions. These platforms provide a wide range of games like slots, table games, and live dealer options. Participants can experience exciting bonuses and promotions, enhancing their gameplay. With a focus on integrity, these casinos ensure a protected environment for all users. Consider joining Casinos Not on Gamstop for superior fun and thrills.
I siti di scommesse, [url=https://cloudocean.id/i-migliori-siti-scommesse-sportive-non-aams/]https://cloudocean.id/i-migliori-siti-scommesse-sportive-non-aams/[/url] mettono a disposizione diverse opportunitГ per scommettere su eventi sportivi. Utilizzando piattaforme affidabili, ГЁ lecito vivere il brivido delle scommesse.
In the world of gambling, countless players seek options beyond their borders. bookies outside UK, [url=https://powercordlead.com/betting-sites-outside-the-uk-your-guide-to-global/]https://powercordlead.com/betting-sites-outside-the-uk-your-guide-to-global/[/url] offer thrilling opportunities for bettors, providing wide markets and competitive odds that improve the betting experience.
Celebra tu cumpleaГ±os con diversiГіn y emociГіn. La Ruleta gratis en tu cumpleaГ±os, [url=https://dubdev.wpengine.com/plazo-del-bono-aniversario-en-casinos-todo-lo-que/]https://dubdev.wpengine.com/plazo-del-bono-aniversario-en-casinos-todo-lo-que/[/url] te ofrece la oportunidad de disfrutar sin gastar dinero. Puedes participar con amigos y familiares, creando momentos Гєnicos. ВЎNo pierdas la oportunidad de vivir una jornada inolvidable! AdemГЎs, las recompensas te esperan al girar la rueda. ВїEstГЎs listo para vivir esta emocionante experiencia? Ruleta gratis en tu cumpleaГ±os, una manera perfecta de organizar una celebraciГіn memorable.
Exploring the universe of non gamstop casino UK, [url=https://www.amhal-sono.ma/exploring-non-gamstop-casinos-freedom-and-choice-2/]https://www.amhal-sono.ma/exploring-non-gamstop-casinos-freedom-and-choice-2/[/url] is captivating opportunity. Players encounter a diverse selection of games and promotions. Different platforms offers special attributes that cater to all types of users.
Online Casino, [url=https://legittools.org/exploring-the-thrill-of-online-casino-winsmania/]https://legittools.org/exploring-the-thrill-of-online-casino-winsmania/[/url] – Online Casino предлагает РѕРіСЂРѕРјРЅРѕРµ разнообразие игровых вариантов. Участвуя РІ покер, РІС‹ можете ощутить жажду эмоций, РЅРµ выходя РёР· РґРѕРјР°. Такое онлайн-казино гарантируют комфорт, Р° также выгодные Р±РѕРЅСѓСЃС‹.
I don’t think the title of your article matches the content lol. Just kidding, mainly because I had some doubts after reading the article.
Online Casino, [url=https://www.ideiaconsumerinsights.com.br/experience-the-thrill-of-prive-casino-online-games/]https://www.ideiaconsumerinsights.com.br/experience-the-thrill-of-prive-casino-online-games/[/url] provides an engaging experience for gamblers. Through advanced technology, players can explore a multitude of choices from any place.
Разрешите помочь Вам?
Casinos Not on Gamstop, [url=https://devmontdigital.co/ugcitalia-2/exploring-non-gamstop-casinos-a-comprehensive-13/]https://devmontdigital.co/ugcitalia-2/exploring-non-gamstop-casinos-a-comprehensive-13/[/url] offer a unique experience for players seeking freedom. These establishments provide a new way to enjoy gambling without the restrictions of the Gamstop program. Players can try out a wide range of options while indulging in their favorite poker games. Enjoying the thrill of the game is more enjoyable with Casinos Not on Gamstop, where visitors can embrace fresh opportunities.
non GamStop UK casinos, [url=https://russiacontest.tabippo.net/2026/03/10/exploring-gambling-websites-not-on-gamstop-an-in/]https://russiacontest.tabippo.net/2026/03/10/exploring-gambling-websites-not-on-gamstop-an-in/[/url] present a unique wagering experience for players seeking flexibility from self-exclusion lists. Such venues allow participation without restrictions, ensuring fun remains accessible for all. Players can experience a wide range of selections, enhancing their full gaming adventure.
Playing at casinos offering roulette not on gamstop, [url=http://battle.vanbruda.de/online-roulette-a-game-not-affected-by/]http://battle.vanbruda.de/online-roulette-a-game-not-affected-by/[/url] can be an exciting experience rich in enjoyment. Many players seek these platforms for varied opportunities. Exploring such casinos allows users to enjoy numerous gaming options without restrictions. If you’re looking for non-blocked venues, roulette not on gamstop is your best choice for an exhilarating gaming adventure. Don’t miss the chance to dive into unlimited fun today!
In the world of web-based gaming, no KYC casinos, [url=http://103.212.211.42/exploring-online-casinos-without-verification]http://103.212.211.42/exploring-online-casinos-without-verification[/url] have emerged as a popular choice for players. These platforms allow users to gamble without the hassle of personal identification. This provides anonymity and a faster signup process, appealing to many who seek ease. With no KYC casinos, players can easily enjoy various games while keeping their sensitive information safe.
Gedurende dit kans, ontdek je Casino zonder CRUKS, [url=https://moulaydriss.ma/buitenlandse-casino-s-de-voordelen-en-risico-s-van/]https://moulaydriss.ma/buitenlandse-casino-s-de-voordelen-en-risico-s-van/[/url]. Hier kan je diverse spellen zonder de invloed van CRUKS. Geniet dit plek en speel risicoloos.
Online Casino Slots, [url=https://genggobyos.com/discover-the-excitement-of-xgg-game-casino-3/]https://genggobyos.com/discover-the-excitement-of-xgg-game-casino-3/[/url] – Virtual Casino Slots offer an exhilarating experience for players. Using lively graphics and engaging themes, they draw gamers from all over the world. Achieving massive jackpots is just a spin away!
In the realm of Casino Online, [url=https://fcos.uk/experience-the-thrill-of-prestige-casino-3/]https://fcos.uk/experience-the-thrill-of-prestige-casino-3/[/url], players can experience adventure from the comfort of their homes. By utilizing advanced technology, these platforms offer a variety of games to enjoy. It doesn’t matter if you prefer slots or card games, Casino Online has something to appeal to all players.
non GamStop UK casinos, [url=http://www.sterling-store.co/exploring-gambling-sites-that-don-t-use-3/]http://www.sterling-store.co/exploring-gambling-sites-that-don-t-use-3/[/url] offer players an option to enjoy wagering without limitations of GamStop. Such casinos let more freedom and choice in betting.
Thanks for sharing such a clear and helpful article. It was a pleasure to read!
Great post! I learned something new and really appreciate the way you explained the topic.
Вы не правы. Могу отстоять свою позицию. Пишите мне в PM, поговорим.
Not on Gamstop Casinos, [url=https://axis-chile.cl/2026/03/12/exploring-uk-non-gamstop-casinos-where-to-play/]https://axis-chile.cl/2026/03/12/exploring-uk-non-gamstop-casinos-where-to-play/[/url] offer players an opportunity to enjoy a vast selection of games without restrictions. These platforms provide a diverse assortment of gaming options, including slots, table games, and live dealer experiences. Players can explore unique features and bonuses. With dynamic payment methods, members can easily manage their funds. Enjoying exciting gameplay is possible at Not on Gamstop Casinos without the usual limitations. Join today to experience the freedom and fun of casino gaming on your own terms.
Excellent content as always — useful, engaging, and well presented.
Playing at casinos is exciting, but players often seek places where they can enjoy roulette not on gamstop, [url=http://earthtechno1.com/musicaantiqua/20260316-134402]http://earthtechno1.com/musicaantiqua/20260316-134402[/url]. Many options exist, allowing you to experience the thrill of spinning the wheel. Choose from various online platforms|websites|sites|portals that offer enticing bonuses and unique games. Always gamble responsibly and remember the importance of setting limits. Roulette not on gamstop can provide an exhilarating experience without restrictions. Explore different styles of gameplay and strategies|tactics|approaches|methods to enhance your gaming sessions. Happy spinning!
Exploring internet fun, casinos not on GamStop, [url=https://fireworks.digital/blog/exploring-casinos-not-registered-to-gamstop-5/]https://fireworks.digital/blog/exploring-casinos-not-registered-to-gamstop-5/[/url] offer unique gaming experiences. These platforms deliver a diverse selection of entertainment, ensuring users can enjoy adventure without restrictions.
online casino zonder CRUKS, [url=https://www.sgearthailand.com/ontdek-goksites-zonder-cruks-vrijheid-in-online/]https://www.sgearthailand.com/ontdek-goksites-zonder-cruks-vrijheid-in-online/[/url] biedt spelers de vrijheid om te gokken zonder extra beperkingen. Een dergelijk online casino is populair vanwege de gebruiksgemak en het breed keuze aan spellen. Dankzij aantrekkelijke bonussen trekken deze platforms veel geГЇnteresseerde spelers.
The thrilling realm of Fishin’ Frenzy casinos, [url=https://shiawaseglobal.com/discover-the-excitement-of-fishin-frenzy-megaways-2/]https://shiawaseglobal.com/discover-the-excitement-of-fishin-frenzy-megaways-2/[/url] features an amazing gaming experience. Players can enjoy the excitement of landing massive wins!
Online Casino Games, [url=https://protectron.com.au/index.php/2026/03/01/casino-win-diggers-uk-where-luck-meets-strategy/]https://protectron.com.au/index.php/2026/03/01/casino-win-diggers-uk-where-luck-meets-strategy/[/url] offer an exciting time for players. Through various options, users can savor roulette and real-time features. Winning rewards adds to the joy of playing.
Online gambling has become increasingly popular, offering new experiences for players. Casino Online Games, [url=https://quarksocialcloud.com/apps_server/WordpressTest/blog/2026/02/24/explore-exciting-gaming-opportunities-at-playing/]https://quarksocialcloud.com/apps_server/WordpressTest/blog/2026/02/24/explore-exciting-gaming-opportunities-at-playing/[/url] provide a unique opportunity to explore your favorite games from the comfort of home. With countless options available, everyone can find something to suit their tastes and preferences.
XEvil 6.0 automatically solve most kind of captchas,
Including such type of captchas: ReCaptcha v.2, ReCaptcha-3, Google, Solve Media, BitcoinFaucet, Steam, +12k
+ hCaptcha, FC, ReCaptcha Enterprize now supported in new XEvil 6.0!
+ CloudFlare TurnsTile, GeeTest captcha now supported in new XEvil 7.0!
+ XEvil 7.0 was released! ReCaptcha v2 solving speed increased x2!
+ XEvil can solve captchas from OpenClaw AI bot!
1.) Fast, easy, precisionly
XEvil is the fastest captcha killer in the world. Its has no solving limits, no threads number limits
2.) Several APIs support
XEvil supports more than 6 different, worldwide known API: 2captcha, anti-captcha (antigate), rucaptcha, death-by-captcha, etc.
just send your captcha via HTTP request, as you can send into any of that service – and XEvil will solve your captcha!
So, XEvil is compatible with hundreds of applications for SEO/SMM/password recovery/parsing/posting/clicking/cryptocurrency/etc.
3.) Useful support and manuals
After purchase, you got access to a private tech.support forum, Wiki, Skype/Telegram online support
Developers will train XEvil to your type of captcha for FREE and very fast – just send them examples
4.) How to get free trial use of XEvil full version?
– Try to search in Google “Home of XEvil”
– you will find IPs with opened port 80 of XEvil users (click on any IP to ensure)
– try to send your captcha via 2captcha API ino one of that IPs
– if you got BAD KEY error, just tru another IP
– enjoy! 🙂
– (its not work for hCaptcha!)
WARNING: Free XEvil DEMO does NOT support ReCaptcha, hCaptcha and most other types of captcha!
http://xrumersale.site/
Между нами говоря, я бы пошел другим путём.
Not on Gamstop Casinos, [url=https://alcomdigital.com/exploring-casinos-not-on-gamstop-uk-alternatives/]https://alcomdigital.com/exploring-casinos-not-on-gamstop-uk-alternatives/[/url] offer players an exciting journey beyond traditional gambling limits. These platforms provide a range of games and bonuses, attracting those seeking excitement. Enjoy open access to your favorite choices without the constraints of self-exclusion. Explore these choices and enhance your gaming journey today!
european roulette casino, [url=https://dev-original-9.pantheonsite.io/2026/03/16/best-online-casinos-for-european-roulette/]https://dev-original-9.pantheonsite.io/2026/03/16/best-online-casinos-for-european-roulette/[/url] offers an exciting experience for players looking for thrilling gameplay. The game features a single zero wheel, maximizing your chances compared to other variations. Betters can enjoy different strategic bets, making each spin unique.
The thrill of wagering on the sport makes countless people engaged during the season.
Feel free to surf to my page https://canarywatch.org/
In de wereld van gokken is het no CRUKS casino, [url=https://cabxana.com/2026/02/24/betrouwbare-online-casino-s-in-het-buitenland-jouw/]https://cabxana.com/2026/02/24/betrouwbare-online-casino-s-in-het-buitenland-jouw/[/url] een veilige optie voor spelers. Het biedt gecontroleerde spellen en zichzelf beschermende omgevingen. Spelers kunnen genieten van eerlijke kansen en verantwoorde uitbetalingen.
Online Casino, [url=https://home.geofazendas.com.br/2026/03/01/discover-the-magic-of-casino-voodoo-wins-uk-4/]https://home.geofazendas.com.br/2026/03/01/discover-the-magic-of-casino-voodoo-wins-uk-4/[/url] – Virtual Casino предлагает эксклюзивные возможности для РёРіСЂС‹. Р’ пространство азартных приключений легко погрузиться, ведь как Р±С‹ РІС‹ РЅРё хотели — РІСЃРµ доступно РІ единоразово. Присоединяйтесь Рє популярным играм Рё наслаждайтесь восторжением, которое дарит Virtual Casino.
Experiencing Casino Online Slots, [url=https://junction505.dreamhosters.com/2026/02/25/discover-the-excitement-of-richy-leo-online-casino-3/]https://junction505.dreamhosters.com/2026/02/25/discover-the-excitement-of-richy-leo-online-casino-3/[/url] provides a thrilling journey. Including a myriad of themes and rewards, players can explore an ideal slot game. Moreover, the convenience of accessing these games from home boosts the appeal, making Casino Online Slots favored among gamers.
Я думаю, что Вы не правы. Я уверен. Давайте обсудим это. Пишите мне в PM.
Not on Gamstop Casinos, [url=https://krabat.id/discover-non-gamstop-uk-casino-sites-for-endless/]https://krabat.id/discover-non-gamstop-uk-casino-sites-for-endless/[/url] offer players a chance to enjoy gaming outside the UK self-exclusion program. These venues provide diverse games, from slots to table games. With engaging promotions and hassle-free access, players can immerse themselves in a vibrant gaming environment.
Pokerstars-casino.site entrega hasta 3 200 € de bono de bienvenida + 80 free spins para jugadores en Espana, con +1 200 juegos como Gates of Olympus, ruleta y blackjack mas jackpots. Depositos instantaneos con Visa, Skrill y seguridad top. https://pokerstars-casino.site – sientate a la mesa y aprovecha el bono exclusivo ahora !
Well done! The structure and clarity of your writing make it a great read.
Really appreciate your effort in creating valuable content. Looking forward to more posts like this!
Finding the best casinos outside GamStop, [url=https://may.menuqtr.com/discovering-non-gamstop-casinos-with-5-deposit/]https://may.menuqtr.com/discovering-non-gamstop-casinos-with-5-deposit/[/url] can be an exciting venture. These locations offer players a chance to enjoy multiple games without restrictions. Experience adventurous gameplay and enticing bonuses at top-notch online platforms.
In de wereld van online gokken is een goksite zonder CRUKS, [url=https://escuelamdsguanaqueros.cl/casino-zonder-verificatie-spelen-zonder-gedoe/]https://escuelamdsguanaqueros.cl/casino-zonder-verificatie-spelen-zonder-gedoe/[/url] een aantrekkelijke optie voor veel spelers. Dergelijke platforms geven een brede keuze aan spellen zonder extra registraties. Spelers kunnen snel en vlot beginnen met gokken.
В этом что-то есть. Признателен Вам за помощь в этом вопросе. Я не знал этого.
1 вин, [url=https://1win-qkw4.buzz/]https://1win-qkw4.buzz/[/url] – Вино — это удивительный напиток, который влечет своим вкусом. Каждый сорт вина имеет особенные нотки, которые рассказывают историю региона. Употребление вина в умеренных количествах может даже укрепить настроение.
Замечательно, это забавная информация
1 вин, [url=https://1win-rkj4.top/]https://1win-rkj4.top/[/url] – Вино – это настоящий напиток, который привносит особую атмосферу в любое торжество. В каждом капле витают наследия различных стран. Вино может удовлетворить даже самых притязательных гурманов.
The realm of internet gambling offers engaging opportunities for players. With a plethora of activities and deals, Casino Online, [url=https://demo.logicsdesign.com/squirtz/explore-the-exciting-world-of-casino-richy-fox/]https://demo.logicsdesign.com/squirtz/explore-the-exciting-world-of-casino-richy-fox/[/url] provides an unparalleled gaming experience. Explore and enjoy!
In the world of digital casinos, Casino Online, [url=https://shop.spipublications.in/explore-the-exciting-world-of-online-casino-vegas/]https://shop.spipublications.in/explore-the-exciting-world-of-online-casino-vegas/[/url] stands out as a prime choice for enthusiasts. Players can enjoy captivating games from the comfort of their homes. With various bonuses and promotions, the experience is enhanced further. Join the fun today!
Совершенно верно! Мне кажется это очень отличная идея. Полностью с Вами соглашусь.
To access your account, use jaya9 bet login, [url=https://deeptechnet.io/archives/411752]https://deeptechnet.io/archives/411752[/url]. This process is simple and quick. First, visit the official website, then enter your account information. Finally, enjoy the exciting betting experiences available.
По моему мнению Вы не правы. Пишите мне в PM, пообщаемся.
1win зеркало, [url=https://1win-jkh0.buzz/]ван вин[/url] – это отличный способ входа площадкой для пари. Оно обеспечивает игрокам продолжать свой париный даже при блокировках. Клиенты могут получать всеми опциями сайта на новом зеркале.
Very informative content — simple, well written, and easy to understand. Keep it up!
Да, действительно.
1win зеркало, [url=https://1win-mki8.buzz/]https://1win-mki8.buzz/[/url] — отличный способ получить доступ к любимым играм и ставкам, когда основной сайт недоступен. Нетворк может без труда воспользоваться альтернативным сайтом. Такой подход предоставляет к полным функциям платформы, включая бонусы. Кроме того, альтернативный ресурс работает быстро и без замедлений.
I love how you make complex topics easy to follow. Excellent work!
О¤О± ОєО±О»ПЌП„ОµПЃО± ОєО±О¶ОЇОЅОї online, [url=https://coursesyouneednow.com/post/147617]https://coursesyouneednow.com/post/147617[/url] ПЂПЃОїПѓП†ОПЃОїП…ОЅ ОјОїОЅО±ОґО№ОєОП‚ ОµОјПЂОµО№ПЃОЇОµП‚ ПЂО±О№П‡ОЅО№ОґО№ОїПЌ ОјОµ ОµП…ОєОїО»ОЇО± П„О·П‚ ОґО№О±ОґО№ОєП„П…О±ОєО®П‚ ПЂО»О±П„П†ПЊПЃОјО±П‚. ОџО№ ПЂО№Ої ПЂПЃОїОјО·ОёОµП…П„ОП‚ О±ПѓП†О±О»ОЇО¶ОїП…ОЅ О±ПѓП†О±О»О® ПЂО±О№П‡ОЅОЇОґО№О± ОєО±О№ ПЂОїО»ПЌ О±ПЂОїОґПЊПѓОµО№П‚ ОіО№О± П„ОїП…П‚ ПЂО±ОЇОєП„ОµП‚. ОњО¬О»О№ПѓП„О±, ПЂОїО»О»О¬ ПЂПЃОїПѓП†ОїПЃОП‚ ПЂО±ПЃО±ОєОЇОЅО·ПѓО±ОЅ П„ОїП…П‚ П‡ПЃО®ПѓП„ОµП‚ ОЅО± ОґОїОєО№ОјО¬ПѓОїП…ОЅ П†ПЃОПѓОєО± ПЂО±О№П‡ОЅОЇОґО№О±.
Playing at a live roulette casino site, [url=https://packages.digitalatto.io/experience-the-thrill-of-live-roulette-at-online-2/]https://packages.digitalatto.io/experience-the-thrill-of-live-roulette-at-online-2/[/url] offers an exciting experience for enthusiasts. Such platform brings the joy of a real casino right to your home. With professional dealers, you can enjoy numerous betting options and interactive gameplay.
Не очень!
Виртуальный мир азартных игр предлагает множество возможностей. Чтобы попасть на платформу, многие ищут 1win зеркало, [url=https://1win-ctv4.buzz/]https://1win-ctv4.buzz/[/url]. Это альтернатива основному сайту, обеспечивающая доступ к любимым играм. Альтернатива помогает обойти блокировки, сопровождает удобный вход. Пользователи могут использовать функционалом, не опасаясь проблем с доступом. Азартные возможности остаются открытыми для всех. Однако, важно изучать актуальность ссылок. 1win зеркало всегда поможет дружелюбный интерфейс и безопасные условия.
Браво, ваша фраза пригодится
1win зеркало, [url=https://1win-opg.top/]https://1win-opg.top/[/url] позволяет игрокам легко обходить блокировки. Каждый ресурс обеспечивает доступ к любимым азартным играм без заминок. Посетители могут наслаждаться ставками в любое время.
Ontdek de spannende wereld van online gaming met geen CRUKS casino, [url=https://soulmatematcher.com/casinoonline24021/no-cruks-casino-de-toekomst-van-online-gokken-in-3/]https://soulmatematcher.com/casinoonline24021/no-cruks-casino-de-toekomst-van-online-gokken-in-3/[/url]. Hier vind je de beste spellen en kortingen die jouw speelervaring verrijken. Ervaar het comfort van wedden vanuit je huis. Mis deze ervaring niet!
Вы не правы. Могу это доказать. Пишите мне в PM, поговорим.
Сайты букмекерских контор часто блокируются, но 1win зеркало, [url=https://1win-qyi2.top/]https://1win-qyi2.top/[/url] позволяет игрокам получить доступ к любимым играм. Данная платформа предлагает комфортный способ играть в любое время. Чтобы воспользоваться 1win зеркалом понадобится лишь доступ в сеть. Посетители восторжены возможностями, что предоставляет гибкий доступ к ресурсам.
Оно и впрямь не низкое
sports betting, [url=https://wiktoriarobert.pl/2026/03/08/discover-baji-live-the-ultimate-destination-for-2/]https://wiktoriarobert.pl/2026/03/08/discover-baji-live-the-ultimate-destination-for-2/[/url] – Betting on athletic events становится РІСЃРµ более актуальным. Поклонники спорта ищут новые РїРѕРґС…РѕРґС‹ для оптимизации СЃРІРѕРёС… шансов.
Это — невероятно!
1win зеркало, [url=https://1win-ohe4.cam/]https://1win-ohe4.cam/[/url] предоставляет доступ к площадке, когда основной домен недоступен. Пользователи могут удобно делать ставки и участвовать, не теряя возможностей. Пользовательская поддержка всегда на связи для помощи и рекомендаций.
Amidst the universe of Online Casino, [url=https://cozumel.space/index.php/2026/02/25/royal-stars-online-casino-uk-your-ultimate-gaming-3/]https://cozumel.space/index.php/2026/02/25/royal-stars-online-casino-uk-your-ultimate-gaming-3/[/url], players seek adventure. Featuring numerous games like slots and poker, it’s easy to see why gamblers are drawn in. Promotions enhance the experience, making each visit unforgettable.
In the enthralling world of Casino Online Slots, [url=https://ethiopianyellowpages.com/experience-the-thrill-at-vegas-now-casino-6/]https://ethiopianyellowpages.com/experience-the-thrill-at-vegas-now-casino-6/[/url], enthusiasts can enjoy countless themes and elements. These games offer engaging experiences that hold players returning for more fun.
Извините, что не могу сейчас поучаствовать в дискуссии – нет свободного времени. Но вернусь – обязательно напишу что я думаю по этому вопросу.
1win официальный, [url=https://1win-pid1.buzz/]https://1win-pid1.buzz/[/url] — это выдающийся в букмекеров, предлагающий широкий выбор спортивных событий. Система регистрации прост; вы можете войти в игру всего за несколько минут. Акции завлекают новых игроков, а дизайн сайта удобен для работы.
If you’re serious about cricket betting, reddy anna cricket betting (https://www.eteamfilm.com/cricket-betting-guide/) Anna is a must-follow
П„О± ОєО±О»ПЌП„ОµПЃО± online casino, [url=https://plugins.rmweblab.com/page-72/]https://plugins.rmweblab.com/page-72/[/url] ПЂПЃОїПѓП†ОПЃОїП…ОЅ ОјОїОЅО±ОґО№ОєОП‚ ОµОјПЂОµО№ПЃОЇОµП‚ ПЂО±О№П‡ОЅО№ОґО№ОїПЌ ПѓП„ОїП…П‚ ПЂО±ОЇОєП„ОµП‚. О— ОєОїО№ОЅПЊП„О·П„О± ОјПЂОїПЃОїПЌОЅ ОЅО± О±ПЂОїО»О±ПЌПѓОїП…ОЅ ПЂО»О®ОёОїП‚ ПЂО±О№П‡ОЅОЇОґО№О±, ПЊПЂП‰П‚ ПЂО±О№П‡ОЅОЇОґО№О± П„ПЌП‡О·П‚. ОњО¬О»О№ПѓП„О±, П…ПЂО¬ПЃП‡ОїП…ОЅ ОµО»ОєП…ПѓП„О№ОєОП‚ ПЂПЃОїПѓП†ОїПЃОП‚ ОєО±О№ ОјПЂПЊОЅОїП…П‚ ПЂОїП… ОєО¬ОЅОїП…ОЅ ПЂОµПЃО№ПѓПѓПЊП„ОµПЃОµП‚ ОµП…ОєО±О№ПЃОЇОµП‚ ОіО№О± ОєОПЃОґОїП‚. О— ПЂПЃОїПѓП„О±ПѓОЇО± ОµОЇОЅО±О№ ОµПЂОЇПѓО·П‚ О±ОЅО±ОіОєО±ОЇО±, ОєО±ОёПЋП‚ ОµОіОіП…О¬П„О±О№ О±ПѓП†О±О»ОµОЇП‚ ПѓП…ОЅО±О»О»О±ОіОП‚.
live roulette sites, [url=https://wp.tiptop.com.br/index.php/2026/03/15/best-live-roulette-casinos-in-the-uk-1085866894/]https://wp.tiptop.com.br/index.php/2026/03/15/best-live-roulette-casinos-in-the-uk-1085866894/[/url] offer an exhilarating experience for gamblers. Gamblers can enjoy real-time action with professional dealers. High-tech technology ensures seamless gameplay. Captivating features enhance the overall thrill. Play now on live roulette sites!
Хочу и возьму
1win официальный, [url=https://1win-vlu0.buzz/]1 win официальный[/url] предлагает своим пользователям уникальные условия для ставок на спорт. Ресурс отличается привлекательными условиями. Предоставляется широкий выбор дисциплин, что удовлетворяет множество поклонников. Каждый найдет что-то подходящее.
Я Вам очень благодарен. Огромное спасибо.
1win официальный, [url=https://1win-amn5.cam/]https://1win-amn5.cam/[/url] – это популярная платформа в сфере беттинга, где могут изучать разнообразными спортивные события. Легкий интерфейс делает проще процесс торгов, а значительные коэффициенты мотивируют новую аудиторию.
Да вы талантливый человек
1xbet официальный сайт, [url=https://1xbet-czo7.cam/]https://1xbet-czo7.cam/[/url] предоставляет разнообразный выбор игр для пользователей. Здесь можно увидеть удивительные акции и бонусы, которые способствуют добавлению выигрышей. Платформа интуитивно понятен для использования и привлекает пользователей.
Casino zonder CRUKS, [url=https://abhiaestagging.rentsplit.co/casino-zonder-cruks-in-nederland-alles-wat-je-moet-8/]https://abhiaestagging.rentsplit.co/casino-zonder-cruks-in-nederland-alles-wat-je-moet-8/[/url] biedt spelers de vrijheid om te gokken zonder beperkingen. Dit casino biedt een unieke ervaring voor iedereen die genieten wil. Zonder CRUKS kunnen spelers absoluut relaxen. Dit maakt een ideale omgeving om de kansspelen te ervaren.
Я советую Вам.
1xbet официальный сайт, [url=https://1xcasino-zerkal0.click/]1xbet зеркало[/url] предоставляет пользователям уникальные шансы для ставок на игры. Простой интерфейс делает взаимодействие понятным для всех. Авторизация проходит в мгновение ока, что обеспечивает быстро начать в игру.
Ваша фраза великолепна
online sports betting, [url=https://kempol.de/betwinner-your-ultimate-guide-to-online-betting-74/]https://kempol.de/betwinner-your-ultimate-guide-to-online-betting-74/[/url] has emerged as a popular way to engage in sports. Many enthusiasts place bets online, increasing their chances of gaining profit while enjoying games.
Гы-гы, поржал на славу
1xbet официальный сайт, [url=https://1xbet-nwd8.cam/]https://1xbet-nwd8.cam/[/url] предлагает разнообразие возможностей для ставок. Вы можете делать ставки на игры в любое время. Бонусы ждут вас на платформе.
Online Casino Games, [url=https://solucoes.lcsistemas.com.br/sapphirebet-casino-sportsbook-your-gateway-to/]https://solucoes.lcsistemas.com.br/sapphirebet-casino-sportsbook-your-gateway-to/[/url] grant an exciting journey for players. By various choices, enthusiasts can opt for games that fit their tastes. Innovative graphics and engaging gameplay enhance the fun, making every session exciting.
Online gaming has gained immense popularity due to its multifaceted options. Casino Online Games, [url=https://old.svatojanskakolej.cz/experience-the-thrill-of-casino-vegas-now-uk-12/]https://old.svatojanskakolej.cz/experience-the-thrill-of-casino-vegas-now-uk-12/[/url] offer thrilling experiences that captivate players. With state-of-the-art graphics and compelling gameplay, players can enjoy their favorite games from the comfort of home.
Бывает еще повеселее 🙂
1xbet официальный сайт, [url=https://1xbet-hrc7.cam/]1хбет букмекерская контора[/url] предоставляет пользователям уникальную возможность развлекаться в разнообразных азартных играх. Благодаря интуитивно понятному интерфейсу, каждый сможет легко ориентироваться услугами сайта. Азарт на спорт, казино и другие развлечения ждут вас на этом престижном ресурсе.
Такое Spiel immersive roulette, [url=https://mihajloderimanovic.com/immersive-roulette-online-spiele-ein-aufregendes/]https://mihajloderimanovic.com/immersive-roulette-online-spiele-ein-aufregendes/[/url] stellt dar eine fesselnde Erfahrung für jede Spieler. Durch die interaktive Darstellung wird eine Atmosphäre am echt. Einsteigen Ihr ein und profitieren Sie dies einzigartige Spiel!
Playing at non gamstop roulette sites, [url=https://bikers-academy.com/exploring-roulette-betting-beyond-gamstop-6/]https://bikers-academy.com/exploring-roulette-betting-beyond-gamstop-6/[/url] offers an exciting opportunity for enthusiasts. These platforms provide a unique experience, allowing players to enjoy classic roulette without restrictions. Uncover the variety of games available, and enjoy better payouts on your favorite bets.
XEvil 6.0 automatically solve most kind of captchas,
Including such type of captchas: ReCaptcha v.2, ReCaptcha v.3, Google, Solve Media, BitcoinFaucet, Steam, +12k
+ hCaptcha, FC, ReCaptcha Enterprize now supported in new XEvil 6.0!
+ CloudFlare TurnsTile, GeeTest captcha now supported in new XEvil 7.0!
+ XEvil 7.0 was released! ReCaptcha v2 solving speed increased x2!
+ XEvil can solve captchas from OpenClaw AI bot!
1.) Fast, easy, precisionly
XEvil is the fastest captcha killer in the world. Its has no solving limits, no threads number limits
2.) Several APIs support
XEvil supports more than 6 different, worldwide known API: 2Captcha, anti-captchas (antigate), RuCaptcha, DeathByCaptcha, etc.
just send your captcha via HTTP request, as you can send into any of that service – and XEvil will solve your captcha!
So, XEvil is compatible with hundreds of applications for SEO/SMM/password recovery/parsing/posting/clicking/cryptocurrency/etc.
3.) Useful support and manuals
After purchase, you got access to a private tech.support forum, Wiki, Skype/Telegram online support
Developers will train XEvil to your type of captcha for FREE and very fast – just send them examples
4.) How to get free trial use of XEvil full version?
– Try to search in Google “Home of XEvil”
– you will find IPs with opened port 80 of XEvil users (click on any IP to ensure)
– try to send your captcha via 2captcha API ino one of that IPs
– if you got BAD KEY error, just tru another IP
– enjoy! 🙂
– (its not work for hCaptcha!)
WARNING: Free XEvil DEMO does NOT support ReCaptcha, hCaptcha and most other types of captcha!
http://xrumersale.site/
Конечно. Я согласен со всем выше сказанным. Давайте обсудим этот вопрос.
1xbet официальный сайт, [url=https://1xbet-wcj2.cam/]https://1xbet-wcj2.cam/[/url] предоставляет наиболее интересный выбор развлечений для игроков. Здесь вы можете попробовать различными терминалами и добиться серьезные вознаграждения.
Я считаю, что Вы не правы. Предлагаю это обсудить. Пишите мне в PM, поговорим.
1xbet официальный сайт, [url=https://1xbet-kka9.buzz/]https://1xbet-kka9.buzz/[/url] представляет большой выбор ставок на многообразные события. Игроки имеют возможность удобно выполнять ставки в любой момент.
De wereld van online gokken groeit, en veel spelers zoeken naar een online casino zonder CRUKS, [url=https://matrebo.be/2026/02/25/de-beste-goksites-zonder-cruks-veilig-en/]https://matrebo.be/2026/02/25/de-beste-goksites-zonder-cruks-veilig-en/[/url]. Deze platformen bieden de mogelijkheid om te spelen zonder beperkingen. Deelnemers genieten van een breed aanbod aan spellen, waaronder gokkasten en tafelspellen. Ook zijn er vaak voordelige bonussen beschikbaar, waardoor het de speelsessies nog spannender wordt.
Браво, замечательная фраза и своевременно
In a fast-paced world of gaming, the bookmaker’s office, [url=https://www.audioprotesi.org/experience-the-thrill-of-baji-live-a-comprehensive-4/]https://www.audioprotesi.org/experience-the-thrill-of-baji-live-a-comprehensive-4/[/url] plays a key role in delivering betting opportunities. Players can make wagers on various sports, enhancing the complete experience. Grasping the odds is essential for success.
Вы не правы. Могу отстоять свою позицию.
1xbet официальный сайт, [url=https://1xbet-saw9.cam/]https://1xbet-saw9.cam/[/url] предоставляет широкий выбор ставок на разнообразные события. Бетторы могут рассчитывать на надежную службу для гастрономических ставок.
Online Casino Slots, [url=https://www.campark.com.au/2026/02/25/explore-the-exciting-world-of-royal-lama-online/]https://www.campark.com.au/2026/02/25/explore-the-exciting-world-of-royal-lama-online/[/url] – Online Casino Slots offer entertaining gameplay with multiple themes. Players can savor immersive graphics and fascinating soundtracks while spinning the reels. Achieving big rewards adds to the attraction of these games.
Eine immersive roulette, [url=https://cryptoverze.com/immersive-roulette-das-ultimative-spielerlebnis-2/]https://cryptoverze.com/immersive-roulette-das-ultimative-spielerlebnis-2/[/url] stellt ein Erlebnis für Spieler. Durch modernster Technologie erleben die wie bei einem authentischen Casino, wobei sie die Atmosphäre genießen können.
Casino Online, [url=https://aksoyoglu.com/experience-the-thrills-of-tikitaka-online-casino/]https://aksoyoglu.com/experience-the-thrills-of-tikitaka-online-casino/[/url] предлагает множество вариантов для любителей азартных игр. Заниматься в картах стало комфортнее с помощью интернета. Ассортимент велик, что даёт возможность каждому определить что-то подходящее.
ОТЛИЧНО РАБОТАЕТ!!!!!! СпаСИБО
1xbet официальный сайт, [url=https://1xbet-iop4.buzz/]https://1xbet-iop4.buzz/[/url] осуществляет своим пользователям просторный интерфейс для ставок. Здесь вы найти множество возможностей, включая многочисленные спортивные события и предложения.
Прикольно
online bookmaker, [url=https://smartfinco.co.za/2026/03/08/discover-betwinner-your-ultimate-betting-5/]https://smartfinco.co.za/2026/03/08/discover-betwinner-your-ultimate-betting-5/[/url] supplies a convenient way to place bets from the comfort of your home. With top-notch odds and a variety of sports events, users can enjoy the thrill of gambling online.
In Nederland zijn er veel opties voor online gokken, maar het is belangrijk om te kiezen voor een platform dat betrouwbaar is, zoals no CRUKS casino, [url=https://onlineopenletterblog.com/2026/02/25/ontdek-de-voordelen-van-geen-cruks-casino-s-8/]https://onlineopenletterblog.com/2026/02/25/ontdek-de-voordelen-van-geen-cruks-casino-s-8/[/url]. Dit casino biedt hoogwaardige spellen en interessante bonussen voor nieuwe spelers. Geniet van de plezier van gokken met kwaliteitsvolle mogelijkheden!
Могу порекомендовать зайти на сайт, где есть много информации на интересующую Вас тему.
1xbet официальный сайт, [url=https://1xbet-ru16.top/]https://1xbet-ru16.top/[/url] предоставляет большой намеченных игр для почитателей азартных увлечений. Тут вы можете участвовать в игры в любое время.
Online Casino, [url=https://diariododiabetes.com.br/explore-the-thrills-of-scarlet-casino-sportsbook-3/]https://diariododiabetes.com.br/explore-the-thrills-of-scarlet-casino-sportsbook-3/[/url] предлагает множество возможностей для любителей азартных игр. Слоты и блэкджек делают каждую сессию увлекательной. Кроме того, онлайн гемблинг обеспечивают доверие и легкость развлечений.
In the world of online gaming, finding reputable platforms is crucial. top non GamStop sites, [url=https://cornerstoneraleigh.org/2026/03/16/best-non-gamstop-casinos-a-comprehensive-guide/]https://cornerstoneraleigh.org/2026/03/16/best-non-gamstop-casinos-a-comprehensive-guide/[/url] offer players the chance to enjoy a range of games without restrictions. Exploring these possibilities can enhance your gaming experience significantly.
Im aufregenden Spiel von lightning roulette casino, [url=https://www.kapelusze.net.pl/online-casino-lightning-roulette-spannung-und/]https://www.kapelusze.net.pl/online-casino-lightning-roulette-spannung-und/[/url] sehen Spieler eine einzigartige Kombination aus traditionellem Roulette und attraktiven Blitzgewinnen. Plötzliche Multiplikatoren verstärken die Gewinnmöglichkeiten und formen das Spiel dynamisch. Tauchen Sie ein in die welt dieser einzigartigen Roulette-Variation und fühlen den Reiz!
Online Casino, [url=http://116.90.60.141/~ahsccom/exploring-spins-house-casino-sportsbook-a-premier/]http://116.90.60.141/~ahsccom/exploring-spins-house-casino-sportsbook-a-premier/[/url] presents a selection of games. Players can indulge in slots, poker, and live games. Money are protected, making it a popular choice for gamblers.
Одному богу известно!
1xbet официальный сайт, [url=https://1xbet-ipd8.cam/]https://1xbet-ipd8.cam/[/url] предлагает богатый выбор игр, который радует всех участников. Ресурс интуитивно понятен и удобен в использовании, что повышает процесс оформления.
Присоединяюсь. Это было и со мной. Давайте обсудим этот вопрос. Здесь или в PM.
Winning in sports betting, [url=http://www.energysolutions.co.th/betwinner-tout-ce-que-vous-devez-savoir-sur-la-4/]http://www.energysolutions.co.th/betwinner-tout-ce-que-vous-devez-savoir-sur-la-4/[/url] requires a strategic approach. Examining stats, getting the odds, and keeping disciplined are crucial. Placing bets intelligently can enhance your chances of profit. Winning in sports betting is not just luck; it’s a skill developed over time.
Een goksite zonder CRUKS, [url=http://smarteducation.agencyzed.com/betrouwbaar-casino-zonder-cruks-vind-jouw-ideale-2/]http://smarteducation.agencyzed.com/betrouwbaar-casino-zonder-cruks-vind-jouw-ideale-2/[/url] biedt spelers een unieke kans om te genieten van hun favoriete spellen zonder beperkingen. Bij deze platforms kun je comfort ervaren. Geniet talrijke spellen en verkrijg aantrekkelijke bonussen. De sensatie is verheugender en het is mogelijk om je geluksgevoel te beproeven in een veilige omgeving. Gebruik de kansen die een goksite zonder CRUKS biedt voor een prachtige spelervaring.
Мне кажется это хорошая идея. Я согласен с Вами.
мелбет зеркало, [url=https://melbet-kuk5.buzz/]https://melbet-kuk5.buzz/[/url] позволяет игрокам обходить блокировки и получать доступ к платформе. Доступ на сайт выдерживает важным для поклонников ставок. При помощи этого решения, удается сохранять все функции оригинального ресурса.
Looking for top online casinos? Check out the top non GamStop sites, [url=https://billsiauw.com/2026/03/16/discover-new-casinos-not-on-gamstop/]https://billsiauw.com/2026/03/16/discover-new-casinos-not-on-gamstop/[/url] for an thrilling gaming experience. Players can enjoy various options, secure environments, and rewarding bonuses that enhance their fun.
In the world of virtual gaming, Casino Online, [url=http://b2b-c.ru/republic2/casinoonlineslot260237/casino-scarab-wins-unleashing-the-treasure-in/]http://b2b-c.ru/republic2/casinoonlineslot260237/casino-scarab-wins-unleashing-the-treasure-in/[/url] offers fun that is hard to match. Players can enjoy a variety of choices, all from the comfort of their own home. It’s convenient and often features superior bonuses than traditional casinos.
XEvil 5.0 automatically solve most kind of captchas,
Including such type of captchas: ReCaptcha v.2, ReCaptcha v.3, Google, SolveMedia, BitcoinFaucet, Steam, +12000
+ hCaptcha, FC, ReCaptcha Enterprize now supported in new XEvil 6.0!
+ CloudFlare TurnsTile, GeeTest captcha now supported in new XEvil 7.0!
+ XEvil 7.0 was released! ReCaptcha v2 solving speed increased x2!
+ XEvil can solve captchas from OpenClaw AI bot!
1.) Fast, easy, precisionly
XEvil is the fastest captcha killer in the world. Its has no solving limits, no threads number limits
2.) Several APIs support
XEvil supports more than 6 different, worldwide known API: 2Captcha, anti-captcha (antigate), rucaptcha, death-by-captcha, etc.
just send your captcha via HTTP request, as you can send into any of that service – and XEvil will solve your captcha!
So, XEvil is compatible with hundreds of applications for SEO/SMM/password recovery/parsing/posting/clicking/cryptocurrency/etc.
3.) Useful support and manuals
After purchase, you got access to a private tech.support forum, Wiki, Skype/Telegram online support
Developers will train XEvil to your type of captcha for FREE and very fast – just send them examples
4.) How to get free trial use of XEvil full version?
– Try to search in Google “Home of XEvil”
– you will find IPs with opened port 80 of XEvil users (click on any IP to ensure)
– try to send your captcha via 2captcha API ino one of that IPs
– if you got BAD KEY error, just tru another IP
– enjoy! 🙂
– (its not work for hCaptcha!)
WARNING: Free XEvil DEMO does NOT support ReCaptcha, hCaptcha and most other types of captcha!
Online Casino Slots, [url=https://www.trabahopilipinas.com/the-ultimate-guide-to-sweety-win-casino/]https://www.trabahopilipinas.com/the-ultimate-guide-to-sweety-win-casino/[/url] offer an exciting opportunity for players looking to try the world of online gaming. With multiple themes and attributes, these slots provide an amusing way to win actual money while having fun.
vя тоже так хочу научиться
online sports betting, [url=https://zmrusa.com/betwinner-a-comprehensive-overview-of-betting-and/]https://zmrusa.com/betwinner-a-comprehensive-overview-of-betting-and/[/url] has gained popularity. Many followers engage in numerous events, hoping to make money. Understanding the game is crucial for success.
симпатичный вопрос
мелбет зеркало, [url=https://melbet-jxs9.top/]melbet зеркало[/url] обеспечивает доступ к любимым азартным играм а спортивным событиям. В случае блокировки вы легко воспользоваться альтернативными ссылками. Быстрый способ обходить ограничения предоставляет игрокам не терять интерес.
Er zijn veel redenen om te kiezen voor een geen CRUKS casino, [url=https://tyfon.com.pk/ontdek-de-voordelen-van-online-casino-s-zonder-7/]https://tyfon.com.pk/ontdek-de-voordelen-van-online-casino-s-zonder-7/[/url]. Gokkers kunnen genieten van een geweldige ervaring zonder zich zorgen te maken over goedkeuring. Daarnaast zijn er veel attractive aanbiedingen beschikbaar.
Many players seek sites for gaming, especially those looking for casino outside GamStop, [url=https://www.rentavilla.gr/exploring-casinos-not-registered-to-gamstop-2/]https://www.rentavilla.gr/exploring-casinos-not-registered-to-gamstop-2/[/url]. These platforms provide entry to a wider range of games without limitations. Enjoy the excitement of playing freely!
I dag er det muligt at spille online på casinosteder uden at bruge NemID. Dette åbner op for gambling entusiaster i Danmark, der ønsker mere ubegribelighed. casino uden NemID dk, [url=https://www.navigazioneetrasporti.it/2026/03/16/casino-uden-mitid-en-ny-ra-for-online-gambling/]https://www.navigazioneetrasporti.it/2026/03/16/casino-uden-mitid-en-ny-ra-for-online-gambling/[/url] giver dermed en alternativ mulighed for spænding.
Online casinos offer a thrilling experience for players seeking excitement and fun. Such Casino Online Games, [url=https://cfa.medesign-angola.com/2026/02/26/slots-charm-casino-sportsbook-an-all-inclusive/]https://cfa.medesign-angola.com/2026/02/26/slots-charm-casino-sportsbook-an-all-inclusive/[/url] feature slot machines, poker, and blackjack. Participants can take pleasure in these games from the comfort of their homes, delivering unmatched convenience.
Я извиняюсь, но, по-моему, Вы не правы. Я уверен. Давайте обсудим. Пишите мне в PM.
мелбет зеркало, [url=https://melbet-nwh6.cam/]https://melbet-nwh6.cam/[/url] — это отличный способ обойти блокировки и продолжить наслаждаться ставками. Пользователи могут просто найти актуальное зеркало для продолжения сайта. Технические вопросы решаются эффективно, что ускоряет процесс ставок. Рабочие версии обеспечивают стабильный доступ к полной функциональности.
лови плюсан!
In the world of wagering, the bookmaker’s office, [url=https://cbi.baywoodgrp.com/experience-the-thrill-of-betting-with-1xbet-20/]https://cbi.baywoodgrp.com/experience-the-thrill-of-betting-with-1xbet-20/[/url] plays a crucial role. Here, bettors can place their stakes on various events. With quotations changing dynamically, it’s essential for players to stay informed and make strategic decisions.
Online Casino Games, [url=https://test.wulogix.com/casinoonlineslot270239/unveiling-the-excitement-of-casino-slots-temple/]https://test.wulogix.com/casinoonlineslot270239/unveiling-the-excitement-of-casino-slots-temple/[/url] – Online Casino Games offer a captivating way to enjoy gaming from the comfort of your home. They come with numerous alternatives, promising endless excitement for players. Discover various slots and understand the excitement of Online Casino Games.
Жаль, что сейчас не могу высказаться – нет свободного времени. Но освобожусь – обязательно напишу что я думаю по этому вопросу.
мелбет зеркало, [url=https://melbet-dzf0.cam/]melbet[/url] — это отличный способ получить доступ к любимым ставкам и азартным играм. Многие пользователи ищут альтернативные варианты, чтобы обойти блокировки и. С помощью зеркала вы сможете продолжить свою игру. Всегда оставайтесь в курсе обновлений платформы. Не упустите возможность эксплуатировать выгодными предложениями.
BC Game Poland, [url=https://bcgames-pl.com/]bcgames-pl.com[/url] to nowoczesna platforma do gier online, oferująca różnorodne gry. Gracze są w stanie korzystać z atrakcyjnych premii oraz niewiarygodnych promocji. Zarejestruj się już aktualnie i wejdź swoją gra na poziomie!
zahraniДЌnГ online casino, [url=https://www.digitalsystems.com.pk/casino-za-realne-penize-ve-co-potebujete-vdt-3/]https://www.digitalsystems.com.pk/casino-za-realne-penize-ve-co-potebujete-vdt-3/[/url] umoЕѕЕ€uje hrГЎДЌЕЇm napГnavГ© zГЎЕѕitky. S rozmanitou nabГdkou her a bonusЕЇ lГЎkГЎ novГЎДЌky. Jednoduchost hranГ z domova pЕ™itahuje mnoho lidГ.
Online wagering has gained popularity, especially at casino outside GamStop, [url=https://gaman.bibuweb.com/exploring-new-uk-casinos-not-on-gamstop-a/]https://gaman.bibuweb.com/exploring-new-uk-casinos-not-on-gamstop-a/[/url]. Players seeking alternatives find numerous options available. These casinos deliver a variety of exciting games and incentives for players.
Извините, что не могу сейчас поучаствовать в дискуссии – нет свободного времени. Освобожусь – обязательно выскажу своё мнение по этому вопросу.
мелбет зеркало, [url=https://melbet-uvr9.buzz/]https://melbet-uvr9.buzz/[/url] предоставляет пользователям легкий доступ к играм на спорт. Благодаря актуальным ссылкам, найти актуальное решение легко. Не упустите шанс воспользоваться все преимущества.
During the world of digital gambling, Casino Online Slots, [url=https://bimocompany.com.br/explore-the-thrilling-world-of-online-casino-slots/]https://bimocompany.com.br/explore-the-thrilling-world-of-online-casino-slots/[/url] stand out as entertaining options. Participants can delight in a variety of themes and elements. The games present great winning chances.
Абсолютно не согласен с предыдущей фразой
In the world of virtual gambling, an online bookmaker, [url=http://theravenblog.com/2026/03/09/guia-completa-sobre-1xbet-apuestas-y-promociones/]http://theravenblog.com/2026/03/09/guia-completa-sobre-1xbet-apuestas-y-promociones/[/url] stands out as a vital component. They provide captivating opportunities for players to make wagers on various events. Choosing the right one can enhance your experience significantly.
Online Casino, [url=https://jautos.com.ng/unraveling-the-excitement-at-spellwin-casino/]https://jautos.com.ng/unraveling-the-excitement-at-spellwin-casino/[/url] provides an exhilarating experience for gamblers. With an extensive range of games, everyone can find something to enjoy. Bonuses further enhance the excitement, making it a favored choice for entertainment.
Исключительная мысль ))))
мелбет зеркало, [url=https://melbet-smx8.top/]https://melbet-smx8.top/[/url] – это удобная возможность для игроков получить доступ к любимым играм. За счет зеркала, пользователи могут избежать блокировки и продолжать играть без проблем. Такое решение позволяет оставаться на связи с всеми предложениями сайта. Пользователи смогут получать удовольствие всеми возможностями платформы.
casinos without GamStop, [url=http://trustwortha.webtoseo.com/2026/03/16/exploring-non-gamstop-casinos-a-guide-for-players-2-2/]http://trustwortha.webtoseo.com/2026/03/16/exploring-non-gamstop-casinos-a-guide-for-players-2-2/[/url] offer an exciting opportunity for players seeking a diverse gaming experience. These establishments present a vast array of games, letting players to savor their favorite activities without restrictions. With casinos without GamStop, you can explore unique gaming options that cater to various preferences and tastes. It’s essential to select a reliable site, ensuring a safe and thrilling environment while playing your favorite casino games.
zahraniДЌnГ online casino, [url=https://www.drobne.fm/nejlepi-online-kasina-pro-rok-2026-1156932144/]https://www.drobne.fm/nejlepi-online-kasina-pro-rok-2026-1156932144/[/url] nabГzГ hrГЎДЌЕЇm rozsГЎhlou nabГdku her a lГЎkavГ© bonusy. HranГ z pohodlГ domova zjednoduЕЎuje snadnГЅ pЕ™Гstup k adrenalinovГ© zГЎbavД›.
BC Game kasyno, [url=https://bcgames-pl.com/registration/]https://bcgames-pl.com/registration/[/url] to innowacyjna platforma do gry online. Umożliwia bogaty wybór stolików, jak na przykład automaty. Z powodu nowatorskim rozwiązaniom będzie można doświadczać krótką jakością rozrywki.
Очень ценная штука
марафонбет букмекерская контора, [url=https://marathonbet-0co7y.icu/]https://marathonbet-0co7y.icu/[/url] обеспечивает игрокам разнообразный выбор крупных событий для участия. Здесь можно увидеть все нужные варианты для успешных (и ставок.
Вас посетила просто великолепная мысль
sports betting, [url=https://beiclo.net/it/progetti/atsrl/index.php/1xbet-la-plataforma-ideal-para-apostar-en-linea/]https://beiclo.net/it/progetti/atsrl/index.php/1xbet-la-plataforma-ideal-para-apostar-en-linea/[/url] – Sports betting has become increasingly popular, drawing in enthusiasts from around the globe. Punters analyze games and odds to increase their chances of winning. It’s essential to understand the risks involved in this thrilling activity.
Discover the thrill of virtual betting at Casino Online, [url=https://seftindia.org/casinoonlineslot260238/easy-guide-to-the-slotsdynamite-casino/]https://seftindia.org/casinoonlineslot260238/easy-guide-to-the-slotsdynamite-casino/[/url], where fans can enjoy a vast selection of casino experiences. With bonus offers, the excitement is endless! Join now and dive into the world of digital betting today!
Замечательно, весьма забавная информация
мелбет букмекерская контора, [url=https://melbet-iom0.top/]https://melbet-iom0.top/[/url] предлагает обширный выбор спортивных и доступных коэффициентов. Здесь ставочники смогут воспользоваться восторгом от ставок.
Vavada to znane kasyno online, które działa również w Polsce. Strona przyciąga graczy szeroką ofertą gier, przejrzystymi warunkami i obsługą w PLN (zł). Bonus powitalny oraz intuicyjna obsługa sprawiają, że platforma zdobyła popularność wśród polskich użytkowników.
По моему мнению, это — заблуждение.
марафонбет букмекерская контора, [url=https://marathonbet-ml7bz.cyou/]marathonbet-ml7bz.cyou[/url] предоставляет широкий выбор ставок на разнообразные спортивные события. Здесь вы сможете увидеть лучшие коэффициенты и комфортные условия для игры. Не пропустите возможность испытать удачу!
Полезная информация
Если вы обнаруживаете надежную платформу для ставок, попробуйте мелбет букмекерская контора, [url=https://melbet-zdr6.buzz/]https://melbet-zdr6.buzz/[/url]. Тут можно обнаружить широкий спектр событий и интересную атмосферу.
In the world of online gambling, many players seek options that provide more flexibility. casinos without GamStop, [url=https://focusengravers.ad-wize.xyz/exploring-uk-casino-sites-not-on-gamstop-3/]https://focusengravers.ad-wize.xyz/exploring-uk-casino-sites-not-on-gamstop-3/[/url] offer a unique option for those looking to enjoy uninterrupted gameplay. These platforms typically target players who prefer greater autonomy. With a wide range of games and exciting promotions, players can find their ideal gaming experience. Exploring casinos without GamStop can open up a more enjoyable gaming session. As always, it’s essential to play responsibly while having fun!
kasyno polska opinie, [url=https://bellaballoonsco.com/post-1/]https://bellaballoonsco.com/post-1/[/url] są bardzo różnorodne. Spora grupa graczy docenia wirtualną rozrywkę. Istotne aspekty, na które zwracają uwagę, to ochrona oraz standard gier. Komentarze sygnalizują, że liczne kasyn oferuje atrakcyjne bonusy. Warto zwracać uwagę na wrażenia przed rejestracją.
Какие слова… супер, блестящая идея
online sports betting, [url=http://customcabinetsmass.com/todo-lo-que-necesitas-saber-sobre-1xbet-apuestas-y-20/]http://customcabinetsmass.com/todo-lo-que-necesitas-saber-sobre-1xbet-apuestas-y-20/[/url] has become popular in the realm of sports enthusiasts. Numerous platforms offer captivating opportunities to stake money on various events. This can be a way to introduce more excitement to the games. As technology evolves, the alternatives for online sports betting also improve.
Жаль, что сейчас не могу высказаться – тороплюсь на работу. Но освобожусь – обязательно напишу что я думаю.
online casino, [url=https://covacomunicaciones.com.mx/2025/01/25/refurbished-toshiba-dynabook-laptop-core-i5-8gb-166/]Fruity Chance Casino withdrawal times[/url] provides an exciting experience where players can enjoy a variety of games. Bonuses are often available, adding benefit to the gameplay and luring newcomers.
неа, клевая,
марафонбет букмекерская контора, [url=https://marathonbet-1oob6.icu/]https://marathonbet-1oob6.icu[/url] предлагает разнообразие спортивных событий для беттинга. Пользователи могут участвовать в ставках на разные дисциплины. Легкий интерфейс делает процесс приятным для всех.
“и то правда”
мелбет букмекерская контора, [url=https://melbet-sjg4.top/]https://melbet-sjg4.top/[/url] предлагает широкий выбор ставок на соревнования и игры казино. Каждый игрок сможет найти удобный вариант для себя. Регистрация простой, а предложения порадуют каждого.
In the world of online gambling, many players search for options that are not regulated by GamStop. This allows users to enjoy betting without restrictions. Among these, bookies not on GamStop, [url=https://sone.ellixar.top/2026/03/15/discovering-reliable-bookies-not-on-gamstop/]https://sone.ellixar.top/2026/03/15/discovering-reliable-bookies-not-on-gamstop/[/url] attract attention due to their diverse offerings and enticing promotions.
zahraniДЌnГ online casino, [url=https://hamishpat.com/jak-si-vybrat-to-nejlepi-online-kasino-pro-va/]https://hamishpat.com/jak-si-vybrat-to-nejlepi-online-kasino-pro-va/[/url] nabГzГ hrГЎДЌЕЇm bohatou ЕЎkГЎlu opcГch, kterГ© pЕ™edstavujГ znГЎmГ© kasinovГ© hry. S bonusy mohou novГ hrГЎДЌi spustit svou hranГ cestu s vД›tЕЎГ vГЅhodou.
Я уверен, что это — ложный путь.
марафонбет букмекерская контора, [url=https://marathonbet-ox5dd.sbs/]https://marathonbet-ox5dd.sbs/[/url] предоставляет обширный варианты инвестиций. В этом месте удобно разместить пари на множество события.
…фу мля, наконецто ..спс
L’hiver est une saison magique pour les amateurs de pГЄche glacГ©e. L’ice fishing casino, [url=https://play.google.com/store/apps/details?id=com.froostt.fissinng&gl=fr&hl=fr-fr]ice fishing live casino online[/url] combine l’excitation du jeu avec le plaisir de pГЄcher. Il est possible de remporter des prix tout en vivant l’aventure de l’ice fishing casino. Tirez parti des moments inoubliables !
Это было и со мной.
Ставки в онлайн-казино становятся все более популярными. В достоинства mostbet casino, [url=https://mostbet-dcl.lol/]мостбет ру[/url] входят широкий выбор игр, щедрые бонусы и крупные выплаты. Игроки уже имеют шанс испытать удачу и наслаждаться игровым процесом.
всё людям)))
In the domain of sports betting, a bookmaker’s office, [url=https://crivoengenharia.com.br/codigo-promocional-betwinner-todo-lo-que-necesitas-2/]https://crivoengenharia.com.br/codigo-promocional-betwinner-todo-lo-que-necesitas-2/[/url] plays a vital role. Gambler|Wagerers need reliable platforms to place their bets and manage their wagers. With multiple options available, discovering the best bookmaker’s office is crucial for maximizing profits.
As casas de apostas em Portugal têm se desenvolvido rapidamente. Com uma regulação clara, os jogadores podem tentar a sorte com segurança. As casas de apostas portugal, [url=http://kobe.kaishun-do.com/blog/as-melhores-casas-de-apostas-em-portugal-guia-4/]http://kobe.kaishun-do.com/blog/as-melhores-casas-de-apostas-em-portugal-guia-4/[/url] oferecem várias escolhas para todos os gostos.
XEvil 5.0 automatically solve most kind of captchas,
Including such type of captchas: ReCaptcha v.2, ReCaptcha-3, Google captcha, SolveMedia, BitcoinFaucet, Steam, +12k
+ hCaptcha, FC, ReCaptcha Enterprize now supported in new XEvil 6.0!
+ CloudFlare TurnsTile, GeeTest captcha now supported in new XEvil 7.0!
+ XEvil 7.0 was released! ReCaptcha v2 solving speed increased x2!
+ XEvil can solve captchas from OpenClaw AI bot!
1.) Fast, easy, precisionly
XEvil is the fastest captcha killer in the world. Its has no solving limits, no threads number limits
2.) Several APIs support
XEvil supports more than 6 different, worldwide known API: 2captcha, anti-captcha (antigate), rucaptcha, death-by-captcha, etc.
just send your captcha via HTTP request, as you can send into any of that service – and XEvil will solve your captcha!
So, XEvil is compatible with hundreds of applications for SEO/SMM/password recovery/parsing/posting/clicking/cryptocurrency/etc.
3.) Useful support and manuals
After purchase, you got access to a private tech.support forum, Wiki, Skype/Telegram online support
Developers will train XEvil to your type of captcha for FREE and very fast – just send them examples
4.) How to get free trial use of XEvil full version?
– Try to search in Google “Home of XEvil”
– you will find IPs with opened port 80 of XEvil users (click on any IP to ensure)
– try to send your captcha via 2captcha API ino one of that IPs
– if you got BAD KEY error, just tru another IP
– enjoy! 🙂
– (its not work for hCaptcha!)
WARNING: Free XEvil DEMO does NOT support ReCaptcha, hCaptcha and most other types of captcha!
http://xrumersale.site/
wonderful issues altogether, you simply gained a new reader.
What might you suggest in regards to your submit that you just made some days ago?
Any positive?
Stop by my homepage – BRUTAL PORN CLIPS
Я думаю, что Вы не правы. Я уверен. Давайте обсудим. Пишите мне в PM, пообщаемся.
марафонбет букмекерская контора, [url=https://marathonbet-6bsoj.click/]marathonbet ru[/url] предлагает разнообразные спортивные события для ставок. Вы сможете получить отличные бонусы, ставя на любимые команды. Простой интерфейс помогает быстро ориентироваться в ставках.
нда-додумались и до такого…
mostbet casino, [url=https://mostbet-casino.buzz/]https://mostbet-casino.buzz/[/url] предлагает игрокам захватывающие игровые автоматы, разнообразный выбор настольных игр и перспективу выиграть впечатляющие призы. Гибкая система бонусов делает отдых искренним для каждого посетителя.
offshore casino online, [url=https://bigfishlocal.siteinwp.com/exploring-overseas-casinos-accepting-uk-players-20/]https://bigfishlocal.siteinwp.com/exploring-overseas-casinos-accepting-uk-players-20/[/url] gives a unique gaming experience for players looking for freedom and choices. These platforms are available worldwide, guaranteeing fun and exciting games without constraints.
Замечательно, очень полезная мысль
online bookmaker, [url=https://styleyez.com/baji-app-download-apk-for-android-a-complete-guide/]https://styleyez.com/baji-app-download-apk-for-android-a-complete-guide/[/url] offers an exciting venue for sports enthusiasts to execute bets. With numerous options available, gamblers can enjoy real-time betting and exclusive promotions to enhance their experience.
Зачот…класно…
марафонбет букмекерская контора, [url=https://marathonbet-qjxdb.cfd/]marathonbet-qjxdb.cfd[/url] предлагает широкий выбор пари на спорт. Пользователи оценили ее функциональный интерфейс и высокие коэффициенты, что делает награды выгоднее.
Может быть
mostbet casino, [url=https://mostbet-iig1.buzz/]мостбет зеркало рабочее[/url] демонстрирует широкий ассортимент азартных развлечений. В этом месте допускается оценить свою удачу и заработать незабываемые впечатления. Запись осуществляется быстро и удобно.
As casas de apostas em Portugal têm crescido em popularidade entre os jogadores. Com incentivos atraentes e uma experiência fácil, elas oferecem diversão aos seus usuários. As casas de apostas portugal, [url=https://ethara.wpdevcloud.com/as-melhores-casas-de-apostas-em-portugal-611659231/]https://ethara.wpdevcloud.com/as-melhores-casas-de-apostas-em-portugal-611659231/[/url] se destacam pela integridade e pela diversidade de opções disponibilizadas.
Талантливо…
марафонбет букмекерская контора, [url=https://marathonbet-0d89u.lol/]https://marathonbet-0d89u.lol[/url] предлагает широкий выбор пари, чтобы поражать даже очень требовательных игроков. Открытие аккаунта проходит легко, а способы пополнения счета разные. Вы можете наслаждаться от выгодных акций и щедрых коэффициентов на события.
Вы не правы. Я уверен. Могу это доказать. Пишите мне в PM, поговорим.
ставки на спорт винвин, [url=https://kazin0winwin.top/]https://kazin0winwin.top/[/url] — это увлекательный способ испытать удачу. Любой может примкнуть к этой игре и получить деньги. Следует изучить с правилами, чтобы максимально задействовать свой возможности.
ШҐШ°Ш§ ЩѓЩ†ШЄ ШЄШ±ЩЉШЇ Ш§ЩЃШ¶Щ„ ЩѓШ§ШІЩЉЩ†Щ€ Ш§Щ€Щ† Щ„Ш§ЩЉЩ† Ш§Щ„ЩѓЩ€ЩЉШЄ, [url=http://www.evergoldcs.com/page-140-2/]http://www.evergoldcs.com/page-140-2/[/url]ШЊ ЩЃШҐЩ† Ш§Щ„Ш®ЩЉШ§Ш±Ш§ШЄ ЩѓШ«ЩЉШ±Ш©. ШЄЩ€ЩЃШ± Щ‡Ш°Щ‡ Ш§Щ„Щ…Щ€Ш§Щ‚Ш№ ШЈЩ„Ш№Ш§ШЁЩ‹Ш§ Щ…ШЄЩ†Щ€Ш№Ш© Щ€Щ…ЩѓШ§ЩЃШўШЄ Щ…Щ…ЩЉШІШ©ШЊ Щ„ШЈЩ† Ш§Щ„Щ…ШіШЄШ®ШЇЩ…ЩЉЩ† ЩЉЩ…ЩѓЩ†Щ‡Щ… Ш§Щ„Ш§ШіШЄЩ…ШЄШ§Ш№ ШЁШЄШ¬Ш±ШЁШ© Щ„Ш№ШЁ Ш±Ш§Ш¦Ш№Ш© Ш№ШЁШ± Ш§Щ„ШҐЩ†ШЄШ±Щ†ШЄ. ШЄШ°ЩѓШ± Щ‚Ш±Ш§ШЎШ© ШЄЩ‚ЩЉЩЉЩ…Ш§ШЄ Ш§Щ„Щ„Ш§Ш№ШЁЩЉЩ† Щ‚ШЁЩ„ ШЈЩ† ШЄЩ‚Ш±Ш±.
Зачёт и ниипёт!
sports betting, [url=http://suckhoenguoiviet.org/betwinner-la-guia-completa-para-apostar-con-exito.html]http://suckhoenguoiviet.org/betwinner-la-guia-completa-para-apostar-con-exito.html[/url] – Betting on sports attracts many enthusiasts, offering excitement and potential rewards. Understanding the odds is crucial. These are not just luck, but strategy and knowledge that can lead to success.
И что в результате?
марафонбет букмекерская контора, [url=https://marathonbet-5iwxk.top/]https://marathonbet-5iwxk.top[/url] предоставляет богатый выбор ставок на игровые события. Ставочники могут доступать комфортабельным интерфейсом и базовыми условиями.
casinos online portugal, [url=https://najeya.com/top-melhores-casinos-online-em-portugal-guia-4/]https://najeya.com/top-melhores-casinos-online-em-portugal-guia-4/[/url] – Os cassinos online tГЄm se tornado cada vez mais conhecidos em Portugal. Os participantes apreciam a variedade impressionante de jogos disponГveis. AlГ©m disso, promoções interessantes atraem novos apostadores. Г‰ importante escolher um portal seguro para garantir uma experiГЄncia segura. Os casinos digitais em Portugal oferecem mГ©todos de pagamento variados, tornando tudo acessГvel.
Очень полезная фраза
ставки на спорт винвин, [url=https://winwin-elr7.cam/]https://winwin-elr7.cam/[/url] – это интересный способ приключения для разнообразных любителей спорта. Здесь можно увидеть разнообразие вариантов для вовлечения.
Я считаю, что это — неправда.
марафонбет букмекерская контора, [url=https://marathonbet-wp3gp.cfd/]https://marathonbet-wp3gp.cfd[/url] осуществляет широкий каталог ставок на всевозможные спортивные события. Тотал всегда востребована. Вы можете находить заманчивые в сайте.
Discovering a non GamStop online casino, [url=https://leygcg.imembrillos.gob.mx/exploring-the-world-of-casinos-not-on-gamstop-in/]https://leygcg.imembrillos.gob.mx/exploring-the-world-of-casinos-not-on-gamstop-in/[/url] can be thrilling. Players have the chance to explore various games without the limitations of self-exclusion. These platforms offer an exceptional gaming experience, allowing users to enjoy their favorite casino games at anytime moment. With diverse bonuses, players can boost their enjoyment. Choose a non GamStop online casino for flexibility and an immersive atmosphere that keeps you coming back for more. Immerse yourself in the fun of online gambling without restrictions and take control of your gaming journey.
Поздравляю, вас посетила просто блестящая мысль
vulkan casino, [url=https://vulkan-platinum-as.top/]https://vulkan-platinum-as.top/[/url] предлагает игрокам уникальный опыт в мире азартных игр. Актуальные технологии обеспечивают высокое качество игр и комфорт использования. Регулярные бонусы делают игру еще более привлекательной.
На мой взгляд, это актуально, буду принимать участие в обсуждении. Я знаю, что вместе мы сможем прийти к правильному ответу.
online sports betting, [url=https://sites.mss.univr.it/icelab/it/betwinner-a-comprehensive-guide-to-sports-betting-4/]https://sites.mss.univr.it/icelab/it/betwinner-a-comprehensive-guide-to-sports-betting-4/[/url] is a thrilling way to engage in the world of sports. Fans can place wagers on various events, enhancing their viewing experience. Grasping the betting lines is crucial for success. Essential techniques can improve outcomes, making every game more engaging.
Os cassinos online oferecendo Portugal crescem rapidamente. Entusiastas encontram emoção incrГveis e bГґnus atraentes. casinos online portugal, [url=http://trello-1188-coffeelands.pantheonsite.io/2026/02/casinos-online-portugueses-recomendados-para-2026/]http://trello-1188-coffeelands.pantheonsite.io/2026/02/casinos-online-portugueses-recomendados-para-2026/[/url] se mostra uma Гіtima escolha!
Попробуйте поискать ответ на Ваш вопрос в google.com
марафонбет букмекерская контора, [url=https://marathonbet-fr5vd.cyou/]marathonbet-fr5vd.cyou[/url] предоставляет широкий спектр игр, из-за того что привлекает многочисленных игроков. Комфортный интерфейс обеспечивает для всех желющих играть.
Жаль, что сейчас не могу высказаться – очень занят. Вернусь – обязательно выскажу своё мнение по этому вопросу.
vulkan casino, [url=https://vulkan-bgw.lol/]https://vulkan-bgw.lol/[/url] предлагает игрокам исключительный опыт азартных игр в доступном формате. Здесь вы найдете богатый выбор игр, включая игровые автоматы и онлайн казино. Любой, кто стремится к экстриму, найдет что-то интересное для себя в мире Vulkan casino.
In the world of internet betting, a non GamStop online casino, [url=https://amzprofitsites.com/discovering-the-world-of-online-casinos-not/]https://amzprofitsites.com/discovering-the-world-of-online-casinos-not/[/url] stands out for its unique features. Players can enjoy an extensive selection of games without restrictions. It’s excellent for those seeking variety in their gaming experience.
А где логика?
In the world of betting, an online bookmaker, [url=https://tienda.codimed.cl/archivos/725585]https://tienda.codimed.cl/archivos/725585[/url] offers unparalleled convenience. Players can make wagers from the comfort of their homes. With a range of selections available, it’s easy to find events that capture your interest.
Это действительно радует меня.
марафонбет букмекерская контора, [url=https://marathonbet-ggjay.xyz/]https://marathonbet-ggjay.xyz/[/url] предлагает широкий варианты спортивных игр для игры. Любой игроки могут увидеть лучшие ставочные параметры и быструю платформу.
Смотрел, прикольно…
leon casino, [url=https://leon-fiw1.cam/]https://leon-fiw1.cam/[/url] предлагает игрокам уникальный опыт. Вариативность игр и выгодные бонусы делают его привлекательным выбором. Несомненно каждый найдет то, что ему по душе. Попробуйте счастливую удачу в Leon casino!
Конечно. Это было и со мной. Давайте обсудим этот вопрос. Здесь или в PM.
марафонбет букмекерская контора, [url=https://marathonbet-c070o.xyz/]marathonbet-c070o.xyz[/url] предлагает богатый выбор ставок на казино события. Все игроки могут подобрать подходящую вариант. Ставки доступны в автоматическом формате.
Конечно. Я присоединяюсь ко всему выше сказанному. Можем пообщаться на эту тему.
Добро пожаловать в пространство развлечений с leon casino, [url=https://leon-zhr.cam/]леон рабочее зеркало на сегодня[/url]! Здесь вы найдете множество приключений, что принесут вам незабываемые. Отдохните от каждодневной рутины и включитесь в атмосферу азарта.
Браво, какие слова…, отличная мысль
Vanuatu Citizenship by Investment, [url=https://fcos.uk/page-108/]https://fcos.uk/page-108/[/url] offers a unique opportunity for affluent individuals to obtain citizenship quickly. By investing in Vanuatu, applicants can enjoy remarkable landscapes, a booming economy, and beneficial tax policies. This project allows for visa-free travel to many countries. The application process is streamlined, making it an attractive option for those seeking a alternative citizenship.
UK non-GamStop casino, [url=https://assessoriacontabiliza.com.br/site/best-non-gamstop-online-casinos-for-2023/]https://assessoriacontabiliza.com.br/site/best-non-gamstop-online-casinos-for-2023/[/url] provides players with opportunities to enjoy gaming without restrictions. Such types of casinos facilitate access to various slots and deliver enticing bonuses. Enjoy the thrill of gambling freely!
Сегодня я много читал по этому вопросу.
марафонбет букмекерская контора, [url=https://marathonbet-24rhe.icu/]марафонбет[/url] обеспечивает широкий разнообразие ставок на различные спортивные события. Она популярна своим высококачественным обслуживанием и интересными коэффициентами.
Своевременный топик
риобет онлайн, [url=https://riobet-ucw6.top/]https://riobet-ucw6.top/[/url] – это популярная платформа для ставок, предлагающая разнообразный выбор автоматов. Удобный дизайн и надежные методы оплаты предлагают комфортное времяпрепровождение.
Извините, я удалил этот вопрос
марафонбет букмекерская контора, [url=https://marathonbet-ta8o1.cfd/]https://marathonbet-ta8o1.cfd/[/url] предлагает большое количество спортивных событий для ставок. Клиенты могут предпочитать между различными дисциплинами. Удобный интерфейс и привлекательные коэффициенты делают ее популярной.
Извиняюсь, но этот вариант мне не подходит. Может, есть ещё варианты?
В мире азартных игр игр casino vavada, [url=https://vavada304.fun/]https://vavada304.fun/[/url] привлекает игроков своими инновационными предложениями. Здесь каждый найдет особенное для себя, наслаждаясь увлекательным досугом.
Мне кажется это великолепная идея
Vanuatu Citizenship by Investment, [url=https://brunswick-germany.odinsportswear.com/unlocking-opportunities-vanuatu-citizenship-by-165/]https://brunswick-germany.odinsportswear.com/unlocking-opportunities-vanuatu-citizenship-by-165/[/url] offers a unique opportunity for wealthy individuals seeking a second passport. This program gives fast track access to citizenship, permitting investors to enjoy the benefits of living in a tropical paradise.
UK non GamStop sites, [url=https://germanyapteka.com/new-casinos-not-affected-by-gamstop-a-2/]https://germanyapteka.com/new-casinos-not-affected-by-gamstop-a-2/[/url] present a varied range of wagering options for users. These websites facilitate lovers to experience their beloved games without the barriers imposed by GamStop.
Premier xxx platforms offer high-quality content for adult entertainment.
Choose secure sites for a safe and enjoyable experience.
Feel free to surf to my blog: BLOWJOB VIDEOS
Абсолютно с Вами согласен. В этом что-то есть и мне кажется это очень отличная идея. Полностью с Вами соглашусь.
марафонбет букмекерская контора, [url=https://marathonbet-iacnj.sbs/]https://marathonbet-iacnj.sbs/[/url] снабжает широкий выбор ставок. Она привлекает ставочников впечатляющими коэффициентами и многообразием событий.
Clear, concise, and practical information. I appreciate how easy it is to follow.
Very useful information, explained in a simple and clear way. I found exactly what I was looking for.
Я считаю, что Вы ошибаетесь. Могу это доказать. Пишите мне в PM, обсудим.
Vanuatu Citizenship by Investment, [url=https://staging62.neotechfusion.com/obtenez-la-citoyennete-vanuatu-par-investissement/]https://staging62.neotechfusion.com/obtenez-la-citoyennete-vanuatu-par-investissement/[/url] offers options for individuals seeking alternative passport. The program requires a financial commitment in Vanuatu’s growth. Following approval, investors enjoy open travel to many countries. This plan is ideal for those aiming for increased global mobility and security.
ыыыыы…..жжааааркоооо ))
pin up casino, [url=https://pinup-lro.online/]pin up официальный сайт[/url] лучший количество слотов. Игроки могут наслаждаться в уникальной атмосфере и щедрыми бонусами. Каждый игрок выберет что-либо по душе.
Вы допускаете ошибку. Пишите мне в PM, пообщаемся.
марафонбет букмекерская контора, [url=https://marathonbet-9llw3.lol/]https://marathonbet-9llw3.lol[/url] предлагает разнообразный выбор пари на физкультурные события. Здесь вы найдете привлекательные коэффициенты и удобный интерфейс для участников.
online social casinos, [url=http://karinabouza.tecsanio.com.ar/2026/03/15/the-rise-of-social-casino-sites-a-new-era-of-9/]http://karinabouza.tecsanio.com.ar/2026/03/15/the-rise-of-social-casino-sites-a-new-era-of-9/[/url] offer a fun way to enjoy chance games with peers. Players can duel and share their experiences, creating an interactive atmosphere that invites many.
This was very helpful and well written. I’ll definitely come back to this site again.
Great explanation and very informative. You can tell a lot of effort went into this.
Согласен, замечательное сообщение
pin up casino, [url=https://pinup-yly5.top/]https://pinup-yly5.top/[/url] предлагает уникальный опыт игры в азартные игры. Завораживающие слоты и выгодные предложения привлекают игроков со всего мира. Каждый может открыть свою удачу здесь.
Меня тоже волнует этот вопрос. Скажите мне, пожалуйста – где я могу найти больше информации по этому вопросу?
марафонбет букмекерская контора, [url=https://marathonbet-46bhv.top/]https://marathonbet-46bhv.top[/url] обеспечивает широкий спектр ставок на разные события. Клиенты могут доступать благоприятными коэффициентами и легким интерфейсом сайта.
Excellent resource with valuable information. Thanks for sharing this so clearly.
Есть интересные моменты!
Vanuatu Citizenship by Investment, [url=http://www.sterling-store.co/vanuatu-citizenship-by-investment-vash-put-k-2/]http://www.sterling-store.co/vanuatu-citizenship-by-investment-vash-put-k-2/[/url] offers a unique opportunity in individuals seeking the second passport. This program enables foreign investors to gain legal status rapidly. Furthermore, it supplies access to a variety of benefits, featuring tax advantages and visa-free travel to several countries. The Vanuatu Citizenship by Investment program continues attractive for international investors.
Меня это не беспокоит.
В захватывающем мире азартных игр pin up casino, [url=https://pinup-sso9.buzz/]https://pinup-sso9.buzz/[/url] предлагает множество развлечений. Игроки могут получать удовольствие игровыми автоматами, разработанными лучшими провайдерами. Также доступны потрясающие бонусы и скидки для новых и постоянных клиентов.
XEvil 5.0 automatically solve most kind of captchas,
Including such type of captchas: ReCaptcha-2, ReCaptcha-3, Google captcha, Solve Media, BitcoinFaucet, Steam, +12k
+ hCaptcha, FC, ReCaptcha Enterprize now supported in new XEvil 6.0!
+ CloudFlare TurnsTile, GeeTest captcha now supported in new XEvil 7.0!
+ XEvil 7.0 was released! ReCaptcha v2 solving speed increased x2!
+ XEvil can solve captchas from OpenClaw AI bot!
1.) Fast, easy, precisionly
XEvil is the fastest captcha killer in the world. Its has no solving limits, no threads number limits
2.) Several APIs support
XEvil supports more than 6 different, worldwide known API: 2Captcha, anti-captchas (antigate), RuCaptcha, DeathByCaptcha, etc.
just send your captcha via HTTP request, as you can send into any of that service – and XEvil will solve your captcha!
So, XEvil is compatible with hundreds of applications for SEO/SMM/password recovery/parsing/posting/clicking/cryptocurrency/etc.
3.) Useful support and manuals
After purchase, you got access to a private tech.support forum, Wiki, Skype/Telegram online support
Developers will train XEvil to your type of captcha for FREE and very fast – just send them examples
4.) How to get free trial use of XEvil full version?
– Try to search in Google “Home of XEvil”
– you will find IPs with opened port 80 of XEvil users (click on any IP to ensure)
– try to send your captcha via 2captcha API ino one of that IPs
– if you got BAD KEY error, just tru another IP
– enjoy! 🙂
– (its not work for hCaptcha!)
WARNING: Free XEvil DEMO does NOT support ReCaptcha, hCaptcha and most other types of captcha!
Замечательно, весьма полезная фраза
марафонбет букмекерская контора, [url=https://marathonbet-aov8o.click/]марафонбет зеркало сегодня[/url] выпускает широкий ассортимент спортивных дистанций. Здесь имеется возможность ставить на футбол, наслаждаясь значительными коэффициентами. Эксперты конторы действует над развитием сервиса для пользователей.
non UK online casino, [url=http://www.property-xrm.worldatclick.com/site/exploring-non-uk-casinos-the-ultimate-guide-to/]http://www.property-xrm.worldatclick.com/site/exploring-non-uk-casinos-the-ultimate-guide-to/[/url] present an enticing alternative for players seeking novel gaming experiences. With a variety of games, these platforms allow users to experience their favorite pastimes at the comfort of their homes.
ТУТ НЕ СПРАВОЧНАЯ
Существует множество локальных казино, но pin up casino, [url=https://pinup-yan8.cam/]https://pinup-yan8.cam/[/url] выделяется своим неповторимым стилем. Игроки могут наслаждаться множеством широких игр. Удобный интерфейс и очаровательные бонусы делают игру очень интересной.
Поздравляю, великолепная идея и своевременно
марафонбет букмекерская контора, [url=https://marathonbet-1przq.click/]marathonbet-1przq.click[/url] организует широкий спектр спортивных ставок. Знатоки спорта могут получить удовольствие невероятными ставками и разнообразными акциями.
Браво, эта блестящая мысль придется как раз кстати
В индустрии азартных игр завоевывает популярность pin up casino, [url=https://pinup-nra8.cam/]https://pinup-nra8.cam/[/url]. Сочные элементы дизайна вдохновляют игроков. Разнообразный ассортимент игр пр предоставляет каждому найти что-то интересное.
Вы абсолютно правы. В этом что-то есть и мне кажется это очень отличная идея. Полностью с Вами соглашусь.
ВЎBienvenidos a monsterwin casino, [url=https://www.digitalsystems.com.pk/monsterwin-casino-espana-tu-destino-de-apuestas-en-6/]https://www.digitalsystems.com.pk/monsterwin-casino-espana-tu-destino-de-apuestas-en-6/[/url]! AquГ podrГЎs disfrutar de fantГЎsticos juegos de azar. Con mГєltiples opciones, cada entusiasta encontrarГЎ su favorito. AdemГЎs, las promociones son atractivos, ВЎasГ que no te lo pierdas!
куда катится мир?
марафонбет букмекерская контора, [url=https://marathonbet-z07bm.icu/]marathonbet-z07bm.icu[/url] вытаскивает множество возможностей для поклонников спорта. Здесь возможно делать игры на множество события и доставать выгодные призы.
non UK online casino, [url=https://quintadascarpas.com/exploring-non-uk-regulated-casinos-opportunities-7/]https://quintadascarpas.com/exploring-non-uk-regulated-casinos-opportunities-7/[/url] delivers a distinct gaming experience for players. With engaging games and lucrative bonuses, these platforms offer fun and comfort. Players can relish their favorite games anytime, anywhere.
По моему мнению Вы не правы. Я уверен. Предлагаю это обсудить. Пишите мне в PM.
1xbet зеркало, [url=https://1xbet-8grah.top/]1xbet[/url] позволяет игрокам использовать сайтами, когда основной ресурс не работает. Обращаясь к 1xbet зеркало, посетители могут играть увлекаясь.
Всё выше сказанное правда. Можем пообщаться на эту тему. Здесь или в PM.
Descubre la emocionante experiencia en monsterwin casino, [url=https://design.cwicly.com/2026/03/12/todo-lo-que-necesitas-saber-sobre-monsterwin-13/]https://design.cwicly.com/2026/03/12/todo-lo-que-necesitas-saber-sobre-monsterwin-13/[/url]. Cuenta con una variedad juegos para cada preferencia. Aprovecha ofertas Гєnicas que hacen que tu visita sea inolvidable.
На мой взгляд это очень интересная тема. Давайте с Вами пообщаемся в PM.
1xbet зеркало, [url=https://1xbet-1io3j.top/]https://1xbet-1io3j.top/[/url] — это удобный способ доступа к платформе ставок. Пользователи могут пользоваться зеркалом для устранения блокировок. Данный сервис максимально упрощает возможность играть в любимых играх в любое время.
Casinos Not on Gamstop, [url=https://www.trabahopilipinas.com/exploring-non-gamstop-casinos-freedom-to-play/]https://www.trabahopilipinas.com/exploring-non-gamstop-casinos-freedom-to-play/[/url] offer a unique gaming experience, offering players access to diverse games. These casinos provide gambling enthusiasts to enjoy captivating gameplay without the restrictions often found on regulated platforms. Players can find extravagant bonuses and promotions, enhancing their overall experience even further.
XEvil 5.0 automatically solve most kind of captchas,
Including such type of captchas: ReCaptcha v.2, ReCaptcha v.3, Google captcha, SolveMedia, BitcoinFaucet, Steam, +12k
+ hCaptcha, FC, ReCaptcha Enterprize now supported in new XEvil 6.0!
+ CloudFlare TurnsTile, GeeTest captcha now supported in new XEvil 7.0!
+ XEvil 7.0 was released! ReCaptcha v2 solving speed increased x2!
+ XEvil can solve captchas from OpenClaw AI bot!
1.) Fast, easy, precisionly
XEvil is the fastest captcha killer in the world. Its has no solving limits, no threads number limits
2.) Several APIs support
XEvil supports more than 6 different, worldwide known API: 2Captcha, anti-captchas (antigate), RuCaptcha, death-by-captcha, etc.
just send your captcha via HTTP request, as you can send into any of that service – and XEvil will solve your captcha!
So, XEvil is compatible with hundreds of applications for SEO/SMM/password recovery/parsing/posting/clicking/cryptocurrency/etc.
3.) Useful support and manuals
After purchase, you got access to a private tech.support forum, Wiki, Skype/Telegram online support
Developers will train XEvil to your type of captcha for FREE and very fast – just send them examples
4.) How to get free trial use of XEvil full version?
– Try to search in Google “Home of XEvil”
– you will find IPs with opened port 80 of XEvil users (click on any IP to ensure)
– try to send your captcha via 2captcha API ino one of that IPs
– if you got BAD KEY error, just tru another IP
– enjoy! 🙂
– (its not work for hCaptcha!)
WARNING: Free XEvil DEMO does NOT support ReCaptcha, hCaptcha and most other types of captcha!
http://xrumersale.site/
оч даже!
официальный сайт 1xbet, [url=https://1xbet-4089p.top/]https://1xbet-4089p.top/[/url] предлагает широкий выбор игр для любителей увлечений. Здесь вы встретите разнообразные возможности для прибыльных ставок и привлекательные бонусы. Качество обслуживания и легкость интерфейса делает использование с сайтом комфортным для каждого. Присоединяйтесь к пространству 1xbet и получайте впечатления от развлечений!
Все может быть
ВЎBienvenidos al emocionante mundo de monsterwin casino, [url=https://thepincodeindia.com/monsterwin-casino-espana-la-experiencia-de-juego-62/]https://thepincodeindia.com/monsterwin-casino-espana-la-experiencia-de-juego-62/[/url]! AquГ puedes disfrutar de juegos sin igual. AdemГЎs, disponen de recompensas fabulosos que te maravillarГЎn. No reclames mГЎs y ВЎГєnete a la diversiГіn! En monsterwin casino, la suerte puede estar de tu lado.
Весьма признателен за помощь в этом вопросе, может, я тоже могу Вам чем-то помочь?
официальный сайт 1xbet, [url=https://1xbet-0lhhb.top/]1хбет официальный сайт[/url] предлагает разнообразный выбор развлекательных ставок. Пользователи могут осваивать различные турниры и наслаждаться интересными коэффициентами. Бонусы делают игру еще выгоднее.
Not on Gamstop Casinos, [url=https://datafornix.com/exploring-casino-sites-not-on-gamstop/]https://datafornix.com/exploring-casino-sites-not-on-gamstop/[/url] offer players a chance to enjoy online gambling without restrictions. These unique platforms present more extensive selection of games. Gamblers can enjoy thrilling options without the usual limitations.
Понятно, благодарю за информацию.
официальный сайт 1xbet, [url=https://1xbet-vmfkq.top/]1xbet-vmfkq.top[/url] предлагает широкий выбор азартных игр. Здесь доступно множество игр, включая футбольные и покер. Команда гарантирует высокий уровень обслуживания.
This content is well-organized and easy to understand. It really helped me a lot.
Useful and straightforward content. Everything is explained clearly without unnecessary details.
Согласен, полезная фраза
Az digitális játéktermek világa egyre népszerűbb, középpontjában a magyar online casino, [url=https://innerspace.go-2web.com/kaszino-online-elvezd-a-jatekok-vegtelen-vilagat/]https://innerspace.go-2web.com/kaszino-online-elvezd-a-jatekok-vegtelen-vilagat/[/url] áll. A felhasználók számos szórakozási lehetőséggel találkoznak, amelyek között gépes játékok és jackpot játékok is szerepel.
Видно, не судьба.
официальный сайт 1xbet, [url=https://1xbet-ftngg.top/]https://1xbet-ftngg.top[/url] предлагает богатый выбор финансовых операций для любителей. Здесь предлагаются шансы разместить ставку на множество игры.
casino outside GamStop, [url=http://tickets.space-cn.co.il/exploring-casinos-outside-of-gamstop-your-guide-to/]http://tickets.space-cn.co.il/exploring-casinos-outside-of-gamstop-your-guide-to/[/url] – Playing at gaming establishments outside the GamStop network offers freedom for those seeking an escape. Many providers not linked to GamStop cater to diverse preferences.
Не может быть
официальный сайт 1xbet, [url=https://1xbet-619tq.top/]1xbet-619tq.top[/url] предлагает уникальные возможности для ставок. Здесь вы найдете различные игры, спорт и призовые акции. Легкий дизайн делает процесс удобным. Регистрация быстрая, а вывод средств безопасный.
Раньше я думал иначе, благодарю за информацию.
официальный сайт 1xbet, [url=https://1xbet-pr6kr.top/]1хбет[/url] предлагает широкий выбор ставок на спортивные события. Каждый желающий спорта могут найти увлекательные предложения. Пользуйтесь возможности ставок на футбол, теннис и другие виды спорта.
Извините за то, что вмешиваюсь… Я разбираюсь в этом вопросе. Можно обсудить. Пишите здесь или в PM.
Fedezd fel a elismerГ©sre mГ©ltГі magyar online casino, [url=https://farakaranpiping.net/online-kaszinok-gyors-kifizetessel-elvezd-a-gyors/]https://farakaranpiping.net/online-kaszinok-gyors-kifizetessel-elvezd-a-gyors/[/url] ajГЎnlatokat, amelyek izgalmasak. InnovatГv bГіnuszok vГЎrnak rГЎd! Ne hagyd ki a magyar online casino szГіrakozГЎsГЎt.
Playing at casinos outside GamStop allows gamblers to enjoy enhanced freedom and choices. These spots offer distinct experiences, making them appealing to numerous enthusiasts. casino outside GamStop, [url=https://taciaramegahair1.hospedagemdesites.ws/2026/03/15/exploring-gambling-sites-not-covered-by-gamstop-4/]https://taciaramegahair1.hospedagemdesites.ws/2026/03/15/exploring-gambling-sites-not-covered-by-gamstop-4/[/url] provides an fantastic opportunity to stake without restrictions, catering to customers seeking offshore gaming options. Always remember to play responsibly while enjoying the joys of online gaming.
Весьма забавное сообщение
официальный сайт 1xbet, [url=https://1xbet-2www5.top/]https://1xbet-2www5.top/[/url] предлагает широкий выбор развлечений для любителей спорта. Здесь вы обнаружите недавние бонусы. Удобный интерфейс обеспечивает простой доступ к разным функциям. Не забывайте следить за событиями, чтобы всёцело использовать возможности!
вот такие фотки давно пора бы!!!!
официальный сайт 1xbet, [url=https://1xbet-t53zs.life/]https://1xbet-t53zs.life[/url] предлагает широкий спектр активностей для любителей спорта. Здесь вы можете найти особые бонусы и распродажи. Пользуйтесь интерактивным интерфейсом для игр.
Вы абсолютно правы. В этом что-то есть и мысль хорошая, поддерживаю.
A Г©lvezet vilГЎgГЎban a magyar online casino, [url=https://gowercoastholidayhomes.com/online-kaszinok-listaja-a-legjobb-virtualis/]https://gowercoastholidayhomes.com/online-kaszinok-listaja-a-legjobb-virtualis/[/url] kГјlГ¶nleges lehetЕ‘sГ©geket kГnГЎl. PrГіbГЎld ki a nagyszerЕ± jГЎtГ©kokat, Г©s Г©lvezd a lenyЕ±gГ¶zЕ‘ nyeremГ©nyeket!
XEvil 5.0 automatically solve most kind of captchas,
Including such type of captchas: ReCaptcha-2, ReCaptcha v.3, Google, SolveMedia, BitcoinFaucet, Steam, +12000
+ hCaptcha, FC, ReCaptcha Enterprize now supported in new XEvil 6.0!
+ CloudFlare TurnsTile, GeeTest captcha now supported in new XEvil 7.0!
+ XEvil 7.0 was released! ReCaptcha v2 solving speed increased x2!
+ XEvil can solve captchas from OpenClaw AI bot!
1.) Fast, easy, precisionly
XEvil is the fastest captcha killer in the world. Its has no solving limits, no threads number limits
2.) Several APIs support
XEvil supports more than 6 different, worldwide known API: 2captcha, anti-captchas (antigate), RuCaptcha, death-by-captcha, etc.
just send your captcha via HTTP request, as you can send into any of that service – and XEvil will solve your captcha!
So, XEvil is compatible with hundreds of applications for SEO/SMM/password recovery/parsing/posting/clicking/cryptocurrency/etc.
3.) Useful support and manuals
After purchase, you got access to a private tech.support forum, Wiki, Skype/Telegram online support
Developers will train XEvil to your type of captcha for FREE and very fast – just send them examples
4.) How to get free trial use of XEvil full version?
– Try to search in Google “Home of XEvil”
– you will find IPs with opened port 80 of XEvil users (click on any IP to ensure)
– try to send your captcha via 2captcha API ino one of that IPs
– if you got BAD KEY error, just tru another IP
– enjoy! 🙂
– (its not work for hCaptcha!)
WARNING: Free XEvil DEMO does NOT support ReCaptcha, hCaptcha and most other types of captcha!
http://xrumersale.site/
Looking for the greatest gaming experience? Discover the best non UK casino, [url=https://valcke.odinsportswear.com/exploring-non-uk-casinos-opportunities-and/]https://valcke.odinsportswear.com/exploring-non-uk-casinos-opportunities-and/[/url] options that offer entertaining games, generous bonuses, and trustworthy environments for players. Join now and enjoy unparalleled fun!
Абсолютно с Вами согласен. Мне кажется это отличная идея. Я согласен с Вами.
официальный сайт 1xbet, [url=https://1xbet-f104d.top/]https://1xbet-f104d.top[/url] предлагает пользователям широкий выбор ставок на спорт. Здесь можно найти множество матчи и возможности для успеха. Пользуйтесь акциями и улучшайте свои позиции.
Замечательно, очень полезная штука
sportwetten österreich, [url=https://beste-wettanbieter-osterreich.com/]https://beste-wettanbieter-osterreich.com/[/url] bietet eine große Auswahl an Quoten. Wettfreunde können mit zahlreichen Anbietern nutzen. Bei der fortschrittlichsten Technologien ist dies, Ergebnisse bequem über das Internet abzulegen.
Слышал эту историю лет так 7 назад.
Сборка ПК под заказ, [url=https://moskovsky.borda.ru/?1-7-0-00012656-000-0-0-1773406895]https://moskovsky.borda.ru/?1-7-0-00012656-000-0-0-1773406895[/url] — это отличный способ создать идеальную машину под свои нужды. Вы можете выбрать аппаратные компоненты по своему вкусу и финансам. Профессионалы помогут в монтаже и настройке системы.
Поздравляю, ваше мнение пригодится
официальный сайт 1xbet, [url=https://1xbet-uv14h.blog/]https://1xbet-uv14h.blog[/url] предлагает разнообразный выбор спортивных игр, что завлекает любителей ставок. Удобный интерфейс позволяет быстро делать ориентиры и следить за результатами.
Вы не эксперт?
Iceland er aГ° verГ°a sГfellt vinsГ¦lli ГЎ netinu, sГ©rstaklega Г heimi spilunar. casino online iceland, [url=https://russiacontest.tabippo.net/2026/03/11/online-spilaviti-a-islandi-leikur-valkostir-og/]https://russiacontest.tabippo.net/2026/03/11/online-spilaviti-a-islandi-leikur-valkostir-og/[/url] bГЅГ°ur upp ГЎ Гіteljandi valkosti, sem aГ° veitir gГіГ° upplifun. Notendur geta profiГ° marga leiki ГЎ netinu, eins og pГіker, spilavГti og allt. AГ° lokum, skaltu njГіta upplifunnar casino online iceland!
не пожалела!
sportwetten österreich, [url=https://servus-krimi.com/]https://servus-krimi.com/[/url] sind eine spannende Möglichkeit, um Wettfreunde zu begeistern. Wettmöglichkeiten bieten Vielfalt und Chancen für Spieler. So können viele Wettenden auf verschiedene Sportarten tippen.
Прошу прощения, что я Вас прерываю, мне тоже хотелось бы высказать своё мнение.
Компания BIORUS предлагает современное оборудование для биотехнологий BIORUS, [url=http://www.bavf.org/forum/general-discussion/bc-game-clone-script-vs-custom-crypto-casino-platform/]http://www.bavf.org/forum/general-discussion/bc-game-clone-script-vs-custom-crypto-casino-platform/[/url], которое предоставляет эффективные решения для лабораторных задач. Наша продукция подготовлена с учетом новейших технологий, что облегчает рабочие процессы. С нами ваши проекты получат необходимую поддержку и качество.
If you’re searching for the best non UK casino, [url=https://dimpleshorsetreats.com/the-rise-of-non-ukgc-casinos-a-comprehensive/]https://dimpleshorsetreats.com/the-rise-of-non-ukgc-casinos-a-comprehensive/[/url], look no further! These establishments provide an exceptional gaming experience, featuring numerous gaming options. Put your skills to the test, and enjoy exciting bonuses while playing.
Я считаю, что Вы не правы. Могу это доказать.
официальный сайт 1xbet, [url=https://1xbet-ordbe.blog/]https://1xbet-ordbe.blog/[/url] предлагает обширный выбор спортивных событий. Пользователи могут изучать разнообразные методы для выигрыша. Авторизация проста и удобная, что влечет новых игроков.
Ну наконец то
Welcome to this exciting world of basswin casino, [url=https://loginbasswin.uk.com/]basswin casino[/url], where fun await every player. Explore a vast array of entertainment and unique promotions designed to enhance your gaming experience. Sign up for our team today!
Замечательно! Спасибо!
парфюмерия, [url=https://l-parfum.ru/catalog/originaly/Giorgio_Armani/2189/]https://l-parfum.ru/catalog/originaly/Giorgio_Armani/2189/[/url] – это искусство создания незабываемых ароматов. Ароматы способны отразить личность человека и его эмоции. Правильно подобранный аромат дарит обаяние и оставляет запечатлённый момент.
Фраза удалена
Welcome to your exciting world of digital gaming at basswin casino, [url=https://persecoding.net/]https://persecoding.net/[/url]! Gamers can indulge in a wide range of choices, from classic slots to streaming tables. Immerse yourself in this thrilling adventure today!
Действительно и как я раньше не подумал про это
официальный сайт 1xbet, [url=https://1xbet-t63qd.sbs/]https://1xbet-t63qd.sbs[/url] предлагает богатые варианты ставок на спорт. Пользователи могут использовать удобным интерфейсом и к возможностям к актуальной информации о событиях.
Я извиняюсь, но, по-моему, Вы ошибаетесь. Давайте обсудим это. Пишите мне в PM.
Se sei alla ricerca di un modo per divertirti senza rischiare soldi, il bonus casino senza deposito, [url=https://psp-wp-test.objectsdev.com/cruciverba-casino-un-mondo-di-parole-e-gioco/]https://psp-wp-test.objectsdev.com/cruciverba-casino-un-mondo-di-parole-e-gioco/[/url] ГЁ un’ottima opportunitГ . Puoi provare diversi giochi senza alcun investire. Approfittane e scopri interessanti esperienze di gioco.
ты угадал…
Discover the excitement of online gaming at basswin casino, [url=https://basswin.games/]basswin casino[/url]. Including a vast selection of games, players can enjoy slot machines and card games. Get started today for amazing rewards!
Я уверен, что Вы не правы.
официальный сайт 1xbet, [url=https://1xbet-mq3xg.life/]https://1xbet-mq3xg.life/[/url] предлагает пользователям уникальные возможности для ставок на спорт и азартные игры. В этом месте вы найдете широкий выбор событий и предложений. Навигация удобен и интуитивно понятен для всех.
Reading your article helped me a lot and I agree with you. But I still have some doubts, can you clarify for me? I’ll keep an eye out for your answers.
точно точно !!!
basswin casino, [url=https://sunbirdcreative.com/]https://sunbirdcreative.com/[/url] offers an exciting gaming experience with a wide range of table games to choose from. Players can enjoy real-time games that enhance the full enjoyment. Join today and discover the fun!
Зачет +5
официальный сайт 1xbet, [url=https://1xbet-5wac3.sbs/]https://1xbet-5wac3.sbs/[/url] предлагает многообразие ставок на разные виды спорта. Здесь можно получить актуальные коэффициенты и выгодные условия для ставок.
Авторитетная точка зрения, любопытно..
Welcome to the fantastic experience of basswin casino, [url=https://giuseppezanotti.org.uk/]basswin casino[/url]! In this place, you can experience numerous options and incredible deals. Join the fun and try your hand today!
Onlayn idman mərcləri, [url=https://bs.room11.sa/blog/mostbet22031/mostbet-kyrgyzstan-stavki-kazinolar-v-dman/]https://bs.room11.sa/blog/mostbet22031/mostbet-kyrgyzstan-stavki-kazinolar-v-dman/[/url] indiki dövrdə populyarlıq qazanmışdır. Online platformaların yaradılması ilə, mərcləməyi sevənlər marafonlarını birliyin bağlı oynamağı artıq həssas hala gətirirlər. Onlayn idman mərcləri həyəcanlı perspektivlər təqdim edir.
online casino bets, [url=https://zimhoustonians.org/exploring-ardi-bet-your-gateway-to-online-gaming/]https://zimhoustonians.org/exploring-ardi-bet-your-gateway-to-online-gaming/[/url] present an exciting way to win cash. Players can indulge in a variety of games featuring slots, poker, and roulette. With easy deposits and withdrawals, it’s never been easier to play.
Все ждали ну и мы на хвост упадем
Scoprire il bonus casino senza deposito, [url=https://academy.geotech.dev/velocita-di-caricamento-siti-importanza-e/]https://academy.geotech.dev/velocita-di-caricamento-siti-importanza-e/[/url] ГЁ un’opportunitГ interessante per i giocatori. Tali bonus danno la possibilitГ di tentare la fortuna senza costi spendere fondi reale. Risulta una straordinaria chance per scoprire nuovi giochi. Un’agevolazione sta nel fatto che non essere costretti a depositare nulla. Questo rende il gioco senza rischi iniziali.
online casino, [url=https://www.rmex24.com/2026/03/12/alanobet-la-plataforma-de-apuestas-que-estabas/]https://www.rmex24.com/2026/03/12/alanobet-la-plataforma-de-apuestas-que-estabas/[/url] supply a thrilling experience for players. With a variety of games available, users may explore classic options and new titles. Indulging in online casino games can lead to huge wins and unforgettable moments.
Вместо того чтобы критиковать лучше пишите свои варианты.
1xbet официальный сайт, [url=https://1xbet-wwce1.top/]https://1xbet-wwce1.top[/url] выпускает игрокам обширный выбор развлечений. В этом месте можно испытать разнообразные спортивных событий и интуитивно понятную навигацию.
мне б такой
basswin casino, [url=https://youinmind.org/]https://youinmind.org/[/url] offers an amazing gaming experience. Players can enjoy numerous games, including table games and interactive gaming. Join now for exclusive bonuses!
Я удалил эту фразу
Welcome to our amazing world of basswin casino, [url=https://walla-walla.co.uk/]https://walla-walla.co.uk/[/url]! Here, you can indulge in a range of entertainment options. With its unique atmosphere, gamblers will find joy in every roll. Don’t miss out!
Абсолютно с Вами согласен. Мне кажется это хорошая идея. Я согласен с Вами.
1xbet официальный сайт, [url=https://1xbet-iyce6.blog/]https://1xbet-iyce6.blog/[/url] предлагает пользователям многообразный выбор развлечений. Здесь можете открыть последние коэффициенты и подробные статистические данные для комфортного анализа.
PINCO Casino, [url=https://www.kimerukeiba.com/hello-world/]https://www.kimerukeiba.com/hello-world/[/url] qismet axtaranlar üçün unikal imkanlar təqdim edir. Burada müxtəlif oyunlar zövq almaq üçün məzmun mövcuddur. Bütün oyunçular yaxşı daha geniş yaşayır. PINCO Casino-nun zəhmət imkanları ilə hamı gözəl anlarınızı qura.
Play online casino, [url=https://www.deoudewerf.co.za/the-ultimate-guide-to-bet-jili-betting-made-easy/]https://www.deoudewerf.co.za/the-ultimate-guide-to-bet-jili-betting-made-easy/[/url] and experience the thrill of winning from the comfort of your home. Enjoy a vast array of games, featuring slots, poker, and blackjack. In addition, you can take advantage of bonuses and promotions that enhance your gameplay.
Experience the thrill of gambling in an exciting online environment. With numerous games available, you can indulge in various card games right from home. Play online casino, [url=https://mayukhteacafe.com/index.php/2026/03/11/discover-the-thrill-of-betting-with-afiro-bet/]https://mayukhteacafe.com/index.php/2026/03/11/discover-the-thrill-of-betting-with-afiro-bet/[/url] today and start winning big!
Ən yaxşı idman mərcləri, [url=http://www.redi4changesl.biz/mostbet-onlayn-dman-mrclri-v-qumar-ucun-n-yax-3/]http://www.redi4changesl.biz/mostbet-onlayn-dman-mrclri-v-qumar-ucun-n-yax-3/[/url] qazanc istəyənlər üçün mükəmməl seçimdir. Bu təkliflər çeşidli idman növlərinə təklif edir. Uğurlu metod riayət edərək uğur şansınızı artırın.
Ууу… под стулом валяюсь!!!!
Scoprire un fresco modo di divertirsi nel mondo del gioco ГЁ interessante. Il casino anonimo senza KYC, [url=http://www.nave.ufc.br/versione-lite-casino-senza-verifica-gioca-senza/]http://www.nave.ufc.br/versione-lite-casino-senza-verifica-gioca-senza/[/url] offre la possibilitГ di giocare senza i\ documenti di verifiche complesse. Approfitta la libertГ di giocare, in modo complicazioni e senza dover gli oneri burocratici. Un’esperienza efficace accessibile per tutti gli appassionati di gioco.
ммда!!
In the thrilling world of chicken road game, [url=https://chicken-road-app.uk.com/]https://chicken-road-app.uk.com/[/url], players progress through different obstacles and challenges. The key goal is to collect as many rewards as possible. With bright graphics and captivating gameplay, it’s a must-play for any enthusiast.
Это интересно. Вы мне не подскажете, где мне узнать больше об этом?
1xbet официальный сайт, [url=https://1xbet-md34f.sbs/]1xbet-md34f.sbs[/url] предлагает богатый выбор ставочных событий. Удобный интерфейс и простые функции позволят любой насладиться процессом. Заходите и попробуйте выигрышный путь!
Ну наконец то
In the exciting universe of the chicken road game, [url=https://chickenroad25.com/]chicken road[/url], players move through tough obstacles. Each decision counts as you swerve dangers, gathering rewards along the way. Embrace the thrill of the journey!
XEvil 5.0 automatically solve most kind of captchas,
Including such type of captchas: ReCaptcha-2, ReCaptcha-3, Google captcha, SolveMedia, BitcoinFaucet, Steam, +12000
+ hCaptcha, FC, ReCaptcha Enterprize now supported in new XEvil 6.0!
+ CloudFlare TurnsTile, GeeTest captcha now supported in new XEvil 7.0!
+ XEvil 7.0 was released! ReCaptcha v2 solving speed increased x2!
+ XEvil can solve captchas from OpenClaw AI bot!
1.) Fast, easy, precisionly
XEvil is the fastest captcha killer in the world. Its has no solving limits, no threads number limits
2.) Several APIs support
XEvil supports more than 6 different, worldwide known API: 2captcha, anti-captchas (antigate), rucaptcha, DeathByCaptcha, etc.
just send your captcha via HTTP request, as you can send into any of that service – and XEvil will solve your captcha!
So, XEvil is compatible with hundreds of applications for SEO/SMM/password recovery/parsing/posting/clicking/cryptocurrency/etc.
3.) Useful support and manuals
After purchase, you got access to a private tech.support forum, Wiki, Skype/Telegram online support
Developers will train XEvil to your type of captcha for FREE and very fast – just send them examples
4.) How to get free trial use of XEvil full version?
– Try to search in Google “Home of XEvil”
– you will find IPs with opened port 80 of XEvil users (click on any IP to ensure)
– try to send your captcha via 2captcha API ino one of that IPs
– if you got BAD KEY error, just tru another IP
– enjoy! 🙂
– (its not work for hCaptcha!)
WARNING: Free XEvil DEMO does NOT support ReCaptcha, hCaptcha and most other types of captcha!
online casino bets, [url=https://www.emagidlondon.com/casinoslot13033/bet-boom-la-revolucion-de-las-apuestas-en-linea-10/]https://www.emagidlondon.com/casinoslot13033/bet-boom-la-revolucion-de-las-apuestas-en-linea-10/[/url] offer a captivating way to enjoy wagering from the comfort of your home. With numerous games available, players can select their favorite alternatives anytime.
online casino, [url=http://mestresdadanca.com.br/2026/03/11/descubre-la-experiencia-inigualable-de-777-casino/]http://mestresdadanca.com.br/2026/03/11/descubre-la-experiencia-inigualable-de-777-casino/[/url] are growing increasingly fashionable among gamblers. With many of games available, they attract users looking for thrills. Promotions add to the attraction, making online casino experiences even more engaging.
не сильно
1xbet официальный сайт, [url=https://1xbet-0fq3h.sbs/]зеркало 1xbet[/url] предлагает широкий выбор спортивных событий для ставок. Игроки обнаруживают множество возможностей для успешного cu?c. Интерфейс эстетически приятный, что упрощает процесс игры. Кроме того, бонусы привлекают новых пользователей, добавляя аппетит к участию.
Son illərdə, Onlayn idman mərcləri, [url=https://abclimoservice.ch/2026/03/22/mostbet-qrzstanda-ttbiqi-v-faydalar/]https://abclimoservice.ch/2026/03/22/mostbet-qrzstanda-ttbiqi-v-faydalar/[/url] populyarlıq qazanıb. Bu platformalar, seçdiyiniz idman növlərinə mərclər qoyma imkanı təqdim edir. Veb üzərindən daha geniş müştəri bazasına xidmət göstərir. Müştərilər rahatlıqla seçilmiş matçlar üzrə təxminlərini ifadə edə bilərlər. Xüsusi təkliflər istifadəçiləri cəlb edir. Onlayn idman mərcləri, arzu dolu bir dünya təqdim edir.
А это надо брать!Спасибо!
In the exciting world of the chicken road game, [url=https://chickenroad-app.org/]chicken road game[/url], players venture through challenges while collecting coins. This captivating adventure delivers endless fun for all ages! Join the fun!
Подтверждаю. Я присоединяюсь ко всему выше сказанному. Можем пообщаться на эту тему. Здесь или в PM.
Att välja ett casino med låg insättning kan vara fördelaktigt för spelare. Med minsta insättning casino, [url=https://promotions.champs-sportsclub.com/casinoonline11031/utlandska-casino-med-snabb-utbetalning-en-guide-36/]https://promotions.champs-sportsclub.com/casinoonline11031/utlandska-casino-med-snabb-utbetalning-en-guide-36/[/url] kan du börja spela utan att riskera stora summor. Genom att jämföra alternativ är det lättare att hitta det perfekta stället att spela på. Det kan ge dig med intressanta spelupplevelser utan hög initial kostnad. Välj ett alternativ som matchar din budget och intressen.
Я думаю, что Вы ошибаетесь. Могу отстоять свою позицию. Пишите мне в PM, поговорим.
1xbet официальный сайт, [url=https://1xbet-rzn9i.icu/]https://1xbet-rzn9i.icu[/url] предлагает обширный выбор ставок для поклонников гемблинга. Каждый имеет возможность выбрать свой ставочный опыт и удовлетворить свои интересы в удобное время.
В этом что-то есть. Теперь стало всё ясно, большое спасибо за объяснение.
In the exciting world of the chicken road game, [url=https://crash-chickenroad.com/]chicken road[/url], players must navigate barriers while collecting gold and boosts. It’s a fun experience for everyone!
Playing at an online casino, [url=http://www.caribbean-property.com/bet-mxs-apuestas-en-linea-y-diversion-sin-limites/]http://www.caribbean-property.com/bet-mxs-apuestas-en-linea-y-diversion-sin-limites/[/url] can | might | could | is a thrilling experience. Gamblers | Players | Bettors | Wagerers have access to various games such as slots, blackjack, and poker. The convenience of online platforms allows users to try their luck from the comfort of home. Sign up now!
online casino bets, [url=https://www.grupafyi.pl/casinoslot11031/unlocking-the-future-of-sports-betting-with-abol/]https://www.grupafyi.pl/casinoslot11031/unlocking-the-future-of-sports-betting-with-abol/[/url] offer an exciting way to try your luck in the digital world. Many players enjoy the thrill of placing bets, hoping for a big win. Incentives enhance the experience, making it even more enticing.
Ən yaxşı idman mərcləri, [url=https://hibernate.wpengine.com/mostbet-giri-online-bahis-dunyasna-adm-atn-2/]https://hibernate.wpengine.com/mostbet-giri-online-bahis-dunyasna-adm-atn-2/[/url] idman bahisleri seçərkən iştirakçıların fəaliyyətini diqqətlə öyrənmək vacibdir. Məlumatlar sizə doğru bəyanatlar verməyə kömək edəcək. Unutmayın ki, planlarınızın effektivliyi müvəffəqiyyəti təyin edir.
Я думаю, что Вы ошибаетесь. Давайте обсудим. Пишите мне в PM, пообщаемся.
In the captivating world of chicken road game, [url=https://chickenroadhq.org/]chicken road[/url], players navigate challenges while guiding their chickens to safety. This amusing game offers dynamic graphics and engaging gameplay, making it a hit among gamers. Enjoy the adventure as you control your feathered friends!
Так бывает. Давайте обсудим этот вопрос.
1xbet официальный сайт, [url=https://1xbet-xpi3b.top/]https://1xbet-xpi3b.top/[/url] предоставляет особенные возможности для ставочников. На платформе возможны разнообразные игры, что делает его интересным для всех.
Подтверждаю. Это было и со мной. Можем пообщаться на эту тему.
In the exciting world of mobile entertainment, few can rival the charm of chicken road game, [url=https://newchickenroad.org/]https://newchickenroad.org/[/url]. Players navigate challenges, collect rewards, and enjoy vibrant graphics. It’s not just a fun game; it’s a thrilling adventure that captivates users!
The promotions at lotus betting are attractive.
Feel free to visit my website; https://www.lotus365login.biz/
Какая хорошая фраза
Att spela på casinon med minsta insättning casino, [url=https://store.chiropractic-it.com/2026/03/11/svenska-casino-utan-svensk-licens-en-djupgende-2/]https://store.chiropractic-it.com/2026/03/11/svenska-casino-utan-svensk-licens-en-djupgende-2/[/url] är en utmärkt möjlighet för debutanter. Det tillhandahåller en chans att bekanta sig med olika spel utan stora risker. Med begränsade belopp kan spelare öka sina erfarenheter och njuta av på ett balanserat sätt.
Просто, под столом
1xbet официальный сайт, [url=https://1xbet-kq10e.sbs/]https://1xbet-kq10e.sbs[/url] предлагает широкий выбор ставок на спортивные события. Клиенты могут использовать удобным интерфейсом и выгодными коэффициентами. Это прекрасный вариант для любителей спорта.
Experience the thrill of betting at an online casino. Discover a variety of entertainment from the comfort of your home. Enjoy exciting bonuses and rewards while you Play online casino, [url=https://transtuts.com.br/?p=1239751]https://transtuts.com.br/?p=1239751[/url] with friends or solo. Join now and obtain your fortune!
Finding the best live roulette online, [url=http://2bsigns.com/beta/discover-the-best-live-roulette-casinos-in-the-uk-36/]http://2bsigns.com/beta/discover-the-best-live-roulette-casinos-in-the-uk-36/[/url] can enhance your gaming experience discovering thrilling opportunities. With various options available, players can experience real-time action from the comfort of their homes. Choosing a reliable platform is important for safety and fairness. You’ll appreciate the interaction with real dealers and other players, bringing excitement to every spin. Check reviews and game selections to guarantee a great choice. The best live roulette online is just a click away!
Какие нужные слова… супер, блестящая идея
In the exciting world of chicken road game, [url=https://gemmanashartist.com/]chicken road game[/url], players journey through a vibrant landscape. Selecting the right way is essential for triumph. Enthralling gameplay keeps players busy for hours.
Onlayn idman mЙ™rclЙ™ri, [url=https://insancare.org/mostbet-kyrgyzstan-onlayn-bahis-dunyasna-syaht]https://insancare.org/mostbet-kyrgyzstan-onlayn-bahis-dunyasna-syaht[/url], onlayn mЙ™rc oyunlarД± sahЙ™sindЙ™ yeni imkanlar tЙ™qdim edir. ЕћЙ™bЙ™kЙ™ sayЙ™sindЙ™, hЙ™r kЙ™s istЙ™diyi yerdЙ™n mЙ™rclЙ™r qoya bilЙ™r. Bununla, tЙ™dbir sevЙ™nlЙ™r, maraqlД± idman tЙ™dbirlЙ™rini izlЙ™yЙ™rЙ™k pul qazanmaq imkanД± qazanД±rlar. Buna onlayn idman mЙ™rclЙ™ri artД±q Г§ox mЙ™Еџhurdur.
токо несколько с которых можон посмеяца!
1xbet официальный сайт, [url=https://1xbet-pdmu4.cfd/]https://1xbet-pdmu4.cfd/[/url] показывает множество выборов для развлечений. Разные пользователи могут получить здесь простой интерфейс и обширный выбор опций.
вождь с ноутбуком – просто супер
In the entertaining world of chicken road game, [url=https://funoverip.net/]chicken road[/url], players navigate through tough obstacles while collecting rewards. The distinctive gameplay keeps gamers hooked as they try to dominate the road.
XEvil 6.0 automatically solve most kind of captchas,
Including such type of captchas: ReCaptcha v.2, ReCaptcha-3, Google, Solve Media, BitcoinFaucet, Steam, +12000
+ hCaptcha, FC, ReCaptcha Enterprize now supported in new XEvil 6.0!
+ CloudFlare TurnsTile, GeeTest captcha now supported in new XEvil 7.0!
+ XEvil 7.0 was released! ReCaptcha v2 solving speed increased x2!
+ XEvil can solve captchas from OpenClaw AI bot!
1.) Fast, easy, precisionly
XEvil is the fastest captcha killer in the world. Its has no solving limits, no threads number limits
2.) Several APIs support
XEvil supports more than 6 different, worldwide known API: 2Captcha, anti-captchas (antigate), rucaptcha, DeathByCaptcha, etc.
just send your captcha via HTTP request, as you can send into any of that service – and XEvil will solve your captcha!
So, XEvil is compatible with hundreds of applications for SEO/SMM/password recovery/parsing/posting/clicking/cryptocurrency/etc.
3.) Useful support and manuals
After purchase, you got access to a private tech.support forum, Wiki, Skype/Telegram online support
Developers will train XEvil to your type of captcha for FREE and very fast – just send them examples
4.) How to get free trial use of XEvil full version?
– Try to search in Google “Home of XEvil”
– you will find IPs with opened port 80 of XEvil users (click on any IP to ensure)
– try to send your captcha via 2captcha API ino one of that IPs
– if you got BAD KEY error, just tru another IP
– enjoy! 🙂
– (its not work for hCaptcha!)
WARNING: Free XEvil DEMO does NOT support ReCaptcha, hCaptcha and most other types of captcha!
ОєО±О¶О№ОЅОї ОµОѕП‰П„ОµПЃО№ОєОїП…, [url=https://scuml.org/registration2/?p=1145789]https://scuml.org/registration2/?p=1145789[/url] – ОџО№ П„О¶ПЊОіОїО№ П„ОїП… ОµОѕП‰П„ОµПЃО№ОєОїПЌ ПЂО±ПЃОП‡ОїП…ОЅ ОµОѕО±О№ПЃОµП„О№ОєОП‚ ОґП…ОЅО±П„ПЊП„О·П„ОµП‚ ОіО№О± П„О¶ОїОіО±ОґПЊПЃОїП…П‚. О¤Ої ОєО±О¶ОЇОЅОї ОµОѕП‰П„ОµПЃО№ОєОїП… ОµОЇОЅО±О№ ОґО·ОјОїП†О№О»ОП‚ ОіО№О± П„О·ОЅ ПЂОїО№ОєО№О»ОЇО± П„П‰ОЅ ОµП…ОєО±О№ПЃО№ПЋОЅ. ОџО№ ОµПЂО№ПѓОєОПЂП„ОµП‚ О±ПЂОїО»О±ОјОІО¬ОЅОїП…ОЅ ОЅО± ОґОїОєО№ОјО¬ПѓОїП…ОЅ ПѓОµ ОїПЃО№ПѓОјООЅОµП‚ ОґПЃО¬ПѓОµО№П‚, ПЂОїП… О±П†ОїПЃОїПЌОЅ П„О·ОЅ ОґО№О±ПѓОєООґО±ПѓО· ОјОµ П„О·ОЅ О±ОґПЃОµОЅО±О»ОЇОЅО·.
Согласен, это замечательная информация
1xbet зеркало, [url=https://1xbet-1fp6j.icu/]1хбет скачать[/url] — удобный способ доступа к любимому сайту. Все игроков используют его для стабильного подключения. Это зеркало позволяет избежать и зарабатывать без неудобств.
Это условность
In the exciting world of mobile games, the chicken road game, [url=https://cheap-funeral-plans.co.uk/]chicken road[/url] stands out with its unique mechanics. Players must control their chickens across obstacles while amassing points. The challenge increases with each level, making it engaging. Players enjoy the excitement of racing against time as they avoid perils. With colorful graphics and gripping gameplay, the chicken road game offers endless hours of fun for everyone.
Между нами говоря, я бы поступил иначе.
Att välja rätt spelsajt är viktigt, och minsta insättning casino, [url=http://app-denesik.tucq7oehuk-wg96gg8o16oy.p.temp-site.link/utlandska-casino-med-snabb-utbetalning-en-28/]http://app-denesik.tucq7oehuk-wg96gg8o16oy.p.temp-site.link/utlandska-casino-med-snabb-utbetalning-en-28/[/url] erbjuder olika fördelar. Med små insättningar kan du prova olika spel utan att satsa stora summor. Det ger ett spela tryggt.
Discovering the best live roulette online, [url=https://slider.hpibet.com/2026/03/31/the-best-live-roulette-sites-in-the-uk-1849976871/]https://slider.hpibet.com/2026/03/31/the-best-live-roulette-sites-in-the-uk-1849976871/[/url] is an exciting journey. Players can enjoy thrilling experiences with live croupiers. The top-notch graphics and realistic gameplay set these platforms apart, ensuring enjoyment for all.
Ən yaxşı idman mərcləri, [url=https://www.tristatenoahproject.org/mostbet23032/mostbet-dman-mrclri-v-onlayn-kazino-tcrubsi/]https://www.tristatenoahproject.org/mostbet23032/mostbet-dman-mrclri-v-onlayn-kazino-tcrubsi/[/url] fərqli idman göstəricilərini proqnozlaşdırmağa imkan tanıyır. Həmin mərclər sevinclə izlənilir. Mərcləməyi sevənlər seçimlərini artırır.
Ну, ну, не нужно так говорить.
In the exciting universe of the chicken road game, [url=https://vividtitles.co.uk/]chicken road game[/url], players navigate hurdles while collecting tokens. This thrilling game offers numerous levels, each with its unique twists. As you advance, the difficulty increases, making it increasingly entertaining. Join in the fun and experience the joy of the chicken road game!
Интересно, а аналог есть?
1xbet зеркало, [url=https://1xbet-2mlno.top/]зеркало 1хбет[/url] осуществляет функциональный ресурс для любителей ставок. Все заинтересованные может очень быстро найти доступность к 1xbet зеркало и увлекаться развлечениями.
online casino, [url=https://delsurca.com/exploring-bitx-bet-a-comprehensive-guide-to-online/]https://delsurca.com/exploring-bitx-bet-a-comprehensive-guide-to-online/[/url] presents a exciting way to explore your luck. With various games, players can select their favorites and acquire fantastic rewards. Join the thrill today!
Дождусь может лудшего качества
When exploring the web for adult content, several platforms stand out as the best porn sites, [url=https://hamba77.org/totally-free-hd-sexual-girls-amicable-pornography-video-to-the-porndig/]check this online page[/url]. Several users appreciate sites that offer high-quality videos and a broad range of categories. Such as, amateur clips to professional productions, there’s something for everyone. Additionally, user-friendly interfaces enhance the browsing experience, making it easier to find desired content. Security and privacy are paramount, with many sites providing private viewing options. Overall, your preferences will dictate which sites are the most enjoyable.
If you’re seeking the best roulette online casino, [url=https://hookedonshopping.com/discover-the-best-online-roulette-games-win-big/]https://hookedonshopping.com/discover-the-best-online-roulette-games-win-big/[/url], your search ends here. Web-based gambling sites present an exciting way to enjoy roulette. Presenting a wide array, players can find their favorite variations. Sign up now and experience unparalleled thrills in the world of online roulette.
Fantastic blog you have here but I was wondering if you knew of any discussion boards that cover the same topics
talked about here? I’d really like to be a part of community where I can get opinions
from other knowledgeable people that share the same interest.
If you have any recommendations, please let me know. Many thanks!
Весьма забавный ответ
Работающая модель 1xbet зеркало, [url=https://1xbet-zmqo2.click/]1хбет официальный сайт вход[/url] позволяет игрокам заходить к платформе даже при блокировках. Клиенты могут наслаждаться удобством и богатым выбором предложений.
XEvil 5.0 automatically solve most kind of captchas,
Including such type of captchas: ReCaptcha-2, ReCaptcha-3, Google captcha, Solve Media, BitcoinFaucet, Steam, +12000
+ hCaptcha, FC, ReCaptcha Enterprize now supported in new XEvil 6.0!
+ CloudFlare TurnsTile, GeeTest captcha now supported in new XEvil 7.0!
+ XEvil 7.0 was released! ReCaptcha v2 solving speed increased x2!
+ XEvil can solve captchas from OpenClaw AI bot!
1.) Fast, easy, precisionly
XEvil is the fastest captcha killer in the world. Its has no solving limits, no threads number limits
2.) Several APIs support
XEvil supports more than 6 different, worldwide known API: 2captcha, anti-captchas (antigate), RuCaptcha, DeathByCaptcha, etc.
just send your captcha via HTTP request, as you can send into any of that service – and XEvil will solve your captcha!
So, XEvil is compatible with hundreds of applications for SEO/SMM/password recovery/parsing/posting/clicking/cryptocurrency/etc.
3.) Useful support and manuals
After purchase, you got access to a private tech.support forum, Wiki, Skype/Telegram online support
Developers will train XEvil to your type of captcha for FREE and very fast – just send them examples
4.) How to get free trial use of XEvil full version?
– Try to search in Google “Home of XEvil”
– you will find IPs with opened port 80 of XEvil users (click on any IP to ensure)
– try to send your captcha via 2captcha API ino one of that IPs
– if you got BAD KEY error, just tru another IP
– enjoy! 🙂
– (its not work for hCaptcha!)
WARNING: Free XEvil DEMO does NOT support ReCaptcha, hCaptcha and most other types of captcha!
Я извиняюсь, но, по-моему, Вы допускаете ошибку. Могу отстоять свою позицию. Пишите мне в PM, поговорим.
minsta insättning casino, [url=https://fcinigeria.com/utlandska-casino-med-snabb-utbetalning-f/]https://fcinigeria.com/utlandska-casino-med-snabb-utbetalning-f/[/url] är en viktig faktor för spelare. Flera insättningar gör det enklare att komma igång. Många spelsajter erbjuder olika alternativ, vilket ökar spelglädjen.
Onlayn idman mərcləri, [url=https://www.succeblekinge.se/i-tidningen/filmove-pakarny-filmlr-dunyasnda-unikal-tcrub/]https://www.succeblekinge.se/i-tidningen/filmove-pakarny-filmlr-dunyasnda-unikal-tcrub/[/url] idman oyunları dünyası son illərdə böyüməyə başladı. Bu platformalar istifadəçilərə asudə vaxtda mərclər qoymağa davranış imkanı təqdim edir. Onlayn idman mərcləri daha əlverişli bir mühit təqdim edir.
Извиняюсь, мне тоже хотелось бы высказать своё мнение.
Dans l’univers du loisir, le casino online, [url=https://www.tinhkhongphapngu.net/index.php?language=vi&nv=statistics&nvvithemever=t&nv_redirect=aHR0cHM6Ly9tZWlsbGV1cmNhc2lub3MuaXQuY29tLw==]https://www.tinhkhongphapngu.net/index.php?language=vi&nv=statistics&nvvithemever=t&nv_redirect=aHR0cHM6Ly9tZWlsbGV1cmNhc2lub3MuaXQuY29tLw==[/url] s’affirme. Les joueurs adorent la facilitГ© de jouer depuis chez eux. Les variantes disponibles, y compris le poker ou la roulette, suscitent l’enthousiasme des passionnГ©s.
ТУПЫМ трудно будет понять смысл данного произведения,
1xbet зеркало, [url=https://1xbet-s5q9c.sbs/]https://1xbet-s5q9c.sbs/[/url] — это удобный способ обойти блокировки и наслаждаться ставками. Игроки могут спокойно получить доступ к новым платформам. Такой вариант даёт возможность ставочникам заниматься любимые развлечения в любое время.
online casino, [url=https://hollywoodhardrock.dk/hej-verden/]https://hollywoodhardrock.dk/hej-verden/[/url] восхищает игроков со всего мира. Множество игр, щедрые бонусы и комфортный интерфейс предлагают незабываемые ощущения.
По моему мнению Вы не правы. Могу отстоять свою позицию. Пишите мне в PM, обсудим.
cassino online, [url=https://rockyspincasino-online.com/]https://rockyspincasino-online.com/[/url] – O cassino virtual oferece um ambiente divertida a quantia dos usuГЎrios. Com variedades de jogos tais como roleta, Г© uma realidade ganhar prГЄmios verdadeiros.
Playing at the best roulette online casino, [url=https://pornx.vicetemple.io/top-roulette-sites-discover-the-best-online/]https://pornx.vicetemple.io/top-roulette-sites-discover-the-best-online/[/url] can be thrilling. One can enjoy entertaining games from the comfort of their home. Furthermore, many casinos offer promotions, enhancing the experience. Try your luck today!
А это надо брать!Спасибо!
Медицинский центр b-healthy clinic, [url=https://fashionroom.com.ua/ru/health/pochemu-uzi-vazhneishii-shag-k-sokhraneniyu-vashego-zdorovya/]fashionroom.com.ua/ru/health/pochemu-uzi-vazhneishii-shag-k-sokhraneniyu-vashego-zdorovya/[/url] предлагает высококачественные медицинские услуги. Здесь работают подготовленные специалисты, которые предоставляют индивидуальный подход к каждому пациенту. Ваши услуги направлены на оптимизацию здоровья. Вы можете обратиться к опытным врачам.
Говорить на эту тему можно долго.
1xbet зеркало, [url=https://1xbet-won4k.cyou/]https://1xbet-won4k.cyou/[/url] позволяет пользователям обходить блокировки и получать доступ к платформе. Указанный ресурс предлагает множество предложений, включая ставки. Используя 1xbet зеркало, вы сможете обрети простой доступ и использовать всеми услугами.
Ən yaxşı idman mərcləri, [url=https://maxxywines.com/2026/03/23/mostbet-belarus-onlayn-mrclrin-yeni-uzu/]https://maxxywines.com/2026/03/23/mostbet-belarus-onlayn-mrclrin-yeni-uzu/[/url], təəccüblü bir təcrübə yaratmaq üçün mükəmməl seçimdir. Mərclərin düzgün seçilməsi qələbə gətirə bilər. Məlumat toplayaraq, doğru qərarlar qəbul edin. Unutmayın, strategiya önəmli rol oynayır. Bu sahədə təcrübə qazanmaq sizi müsbət nəticələr gətirə bilər.
XEvil 6.0 automatically solve most kind of captchas,
Including such type of captchas: ReCaptcha-2, ReCaptcha-3, Google captcha, SolveMedia, BitcoinFaucet, Steam, +12000
+ hCaptcha, FC, ReCaptcha Enterprize now supported in new XEvil 6.0!
+ CloudFlare TurnsTile, GeeTest captcha now supported in new XEvil 7.0!
+ XEvil 7.0 was released! ReCaptcha v2 solving speed increased x2!
+ XEvil can solve captchas from OpenClaw AI bot!
1.) Fast, easy, precisionly
XEvil is the fastest captcha killer in the world. Its has no solving limits, no threads number limits
2.) Several APIs support
XEvil supports more than 6 different, worldwide known API: 2Captcha, anti-captcha (antigate), rucaptcha, DeathByCaptcha, etc.
just send your captcha via HTTP request, as you can send into any of that service – and XEvil will solve your captcha!
So, XEvil is compatible with hundreds of applications for SEO/SMM/password recovery/parsing/posting/clicking/cryptocurrency/etc.
3.) Useful support and manuals
After purchase, you got access to a private tech.support forum, Wiki, Skype/Telegram online support
Developers will train XEvil to your type of captcha for FREE and very fast – just send them examples
4.) How to get free trial use of XEvil full version?
– Try to search in Google “Home of XEvil”
– you will find IPs with opened port 80 of XEvil users (click on any IP to ensure)
– try to send your captcha via 2captcha API ino one of that IPs
– if you got BAD KEY error, just tru another IP
– enjoy! 🙂
– (its not work for hCaptcha!)
WARNING: Free XEvil DEMO does NOT support ReCaptcha, hCaptcha and most other types of captcha!
И что бы мы делали без вашей отличной фразы
1xbet официальный сайт, [url=https://1xbet-pu2ls.cyou/]https://1xbet-pu2ls.cyou[/url] предоставляет богатый ассортимент игр на спорт и другие развлечения. В данном месте легко забронировать ставку и наслаждаться азартом!
Explore the domain of Free sex cams, [url=https://www.drdeanyeh.com.au/hello-world/]https://www.drdeanyeh.com.au/hello-world/[/url], where pleasurable content comes to life. Engage with attractive artists from around the globe, observing their real-time shows. This session offers the possibility to indulge in fantasies and build connections in a safe environment.
Конечно. Так бывает.
В поиске лучшего способа развлечения на спортивные события, 1xbet зеркало, [url=https://1xbet-bgmft.xyz/]https://1xbet-bgmft.xyz[/url] предлагает функциональный вариант. С его помощью легко обойти блокировки и наслаждаться всеми преимуществами платформы.
Верная фраза
1xbet официальный сайт, [url=https://1xbet-5yhgi.top/]зеркало 1xbet[/url] предлагает большой выбор ставок на матчи. Пользователи могут использовать простой интерфейсом и автоматическим доступом ко всем параметрам.
If you’re looking for the best roulette online casino, [url=https://safiribdaa.com/index.php/2026/03/30/exploring-the-best-roulette-sites-in-the-uk-4/]https://safiribdaa.com/index.php/2026/03/30/exploring-the-best-roulette-sites-in-the-uk-4/[/url], check out various platforms that offer thrilling gameplay. Choose one that has a user-friendly interface and fantastic customer support. Don’t forget to look at bonuses and promotions!
Onlayn idman mərcləri, [url=https://westerncarolinaweddings.com/film-oyunlarna-aclan-kap-filmovepakarny-cz/]https://westerncarolinaweddings.com/film-oyunlarna-aclan-kap-filmovepakarny-cz/[/url] son illərdə populyarlıq qazanır. Bu platformalar istifadəçilərə müxtəlif idman tədqiqatları təqdim edir. Mərclərin edilməsi isə problem deyil. Bu təklif idman mərciyya üçün cazibədardır.
Какие нужные слова… супер, блестящая фраза
полотенцесушитель для ванной, [url=https://broken-pads.zapf.in/s/E0ROnNNx3]https://broken-pads.zapf.in/s/E0ROnNNx3[/url] — это важный элемент комфорта и уюта. Это элемент помогает не только удалять влагу полотенца, но и поддерживать тепло помещение. Современные модели имеют разнообразный дизайн, что способствует выбрать идеальный вариант под любой облик ванной комнаты.
Вы не правы. Я уверен. Пишите мне в PM, поговорим.
1xbet официальный сайт, [url=https://1xbet-nc2y4.sbs/]1xbet-nc2y4.sbs[/url] предлагает богатый выбор пари для фанатов азартных приключений. Все пользователь обнаружит что-то увлекательное. Кроме того, сайт предлагает комфортный интерфейс и качество сервис.
In lately, online casino, [url=https://cerakote.rio/decha-bet-the-future-of-online-betting-375828347/]https://cerakote.rio/decha-bet-the-future-of-online-betting-375828347/[/url] games have seen immense popularity. Players enjoy the ease of playing from home, while various bonuses attract new users. With advanced technology, the experience is enthralling.
XEvil 6.0 automatically solve most kind of captchas,
Including such type of captchas: ReCaptcha v.2, ReCaptcha v.3, Google, Solve Media, BitcoinFaucet, Steam, +12000
+ hCaptcha, FC, ReCaptcha Enterprize now supported in new XEvil 6.0!
+ CloudFlare TurnsTile, GeeTest captcha now supported in new XEvil 7.0!
+ XEvil 7.0 was released! ReCaptcha v2 solving speed increased x2!
+ XEvil can solve captchas from OpenClaw AI bot!
1.) Fast, easy, precisionly
XEvil is the fastest captcha killer in the world. Its has no solving limits, no threads number limits
2.) Several APIs support
XEvil supports more than 6 different, worldwide known API: 2captcha, anti-captcha (antigate), RuCaptcha, death-by-captcha, etc.
just send your captcha via HTTP request, as you can send into any of that service – and XEvil will solve your captcha!
So, XEvil is compatible with hundreds of applications for SEO/SMM/password recovery/parsing/posting/clicking/cryptocurrency/etc.
3.) Useful support and manuals
After purchase, you got access to a private tech.support forum, Wiki, Skype/Telegram online support
Developers will train XEvil to your type of captcha for FREE and very fast – just send them examples
4.) How to get free trial use of XEvil full version?
– Try to search in Google “Home of XEvil”
– you will find IPs with opened port 80 of XEvil users (click on any IP to ensure)
– try to send your captcha via 2captcha API ino one of that IPs
– if you got BAD KEY error, just tru another IP
– enjoy! 🙂
– (its not work for hCaptcha!)
WARNING: Free XEvil DEMO does NOT support ReCaptcha, hCaptcha and most other types of captcha!
Как специалист, могу оказать помощь. Вместе мы сможем прийти к правильному ответу.
1xbet официальный сайт, [url=https://1xbet-8y2o4.sbs/]https://1xbet-8y2o4.sbs[/url] предлагает разнообразие спортивных турниров для игры. Здесь также существуют различные поощрения для новых пользователей.
Мне кажется это замечательная фраза
безободковый унитаз, [url=https://hedgedoc.stusta.de/s/ZEXVvYZ2K]https://hedgedoc.stusta.de/s/ZEXVvYZ2K[/url] — это современное достижение для современных туалетов. Он даёт удобство использования. Легкая форма позволяет обойтись от засоров, удобно поддерживая чистоту.
Playing at the best roulette online casino, [url=https://www.delsarmanagement.com/2026/03/30/play-roulette-online-in-the-uk-a-complete-guide-6/]https://www.delsarmanagement.com/2026/03/30/play-roulette-online-in-the-uk-a-complete-guide-6/[/url] offers an exhilarating experience. Choose a trusted platform and revel in the thrill of spinning the wheel. By utilizing various betting strategies, you can increase your chances of winning big.
Hi there colleagues, its enormous paragraph regarding tutoringand entirely explained, keep it up all the time.
zahraniДЌnГ online casino, [url=https://www.mittaldiagnostics.org/bonusy-za-registraci-bez-vkladu-jak-ziskat-skvle/]https://www.mittaldiagnostics.org/bonusy-za-registraci-bez-vkladu-jak-ziskat-skvle/[/url] poskytuje ЕЎirokou paletu her pro fanouЕЎky. NГЎvЕЎtД›vnГci mohou bez nГЎmahy hrГЎt v libovolnГ©m ДЌase a pЕ™i jakГЅchkoliv zaЕ™ГzenГ.
Не вижу в этом смысла.
1xbet официальный сайт, [url=https://1xbet-8kc90.cyou/]1xbet-8kc90.cyou[/url] предлагает широкий выбор развлечений на спортивные события. Здесь можно найти доступные коэффициенты и функциональный интерфейс. Пользователи отмечают высокое качество обслуживания и оперативную техническую поддержку.
Отличное сообщение ))
продукты с быстрой доставкой, [url=https://pravda.tawk.help/article/%D0%BF%D0%BE%D0%BA%D1%83%D0%BF%D0%BA%D0%B0-%D0%BF%D1%80%D0%BE%D0%B4%D1%83%D0%BA%D1%82%D0%BE%D0%B2-%D1%87%D0%B5%D1%80%D0%B5%D0%B7-%D0%B8%D0%BD%D1%82%D0%B5%D1%80%D0%BD%D0%B5%D1%82]https://pravda.tawk.help/article/%D0%BF%D0%BE%D0%BA%D1%83%D0%BF%D0%BA%D0%B0-%D0%BF%D1%80%D0%BE%D0%B4%D1%83%D0%BA%D1%82%D0%BE%D0%B2-%D1%87%D0%B5%D1%80%D0%B5%D0%B7-%D0%B8%D0%BD%D1%82%D0%B5%D1%80%D0%BD%D0%B5%D1%82[/url] даёт возможность вам доставлять удовольствие свежими покупками, не выходя из дома. Компания функционирует круглосуточно, что делает процесс услуг очень удобным.
Online casinos feature an exciting adventure for players. With various games, players can enjoy machines from the comfort of their homes. Casino Online, [url=https://thehospitalistcompany.com/2020/04/hello-world/]https://thehospitalistcompany.com/2020/04/hello-world/[/url] ensures security and a fair play environment.
Счастье мне изменило!
1xbet официальный сайт, [url=https://1xbet-kdq8l.xyz/]официальный 1хбет[/url] предлагает широкий ассортимент опции для любителей ставок. В этом месте рекомендуется обратить внимание разным акциям и подаркам, которые подают игры ещё более захватывающими.
Finding the best online gaming platforms can be challenging. However, the top roulette sites, [url=http://07.24h.com.tw/explore-the-world-of-uk-online-roulette-strategies/]http://07.24h.com.tw/explore-the-world-of-uk-online-roulette-strategies/[/url] offer captivating experiences and various options for players. Enjoy timeless games and unique features for an unforgettable experience.
Да, вы верно сказали
продукты с доставкой, [url=https://www.keepandshare.com/discuss3/30341/]https://www.keepandshare.com/discuss3/30341/[/url] – это удобный способ получать свежие продукты, не выходя из дома. Вы можете заказать мясо и наслаждаться их качеством. Такой сервис позволяет экономить время и силы. Заказывайте продукты с доставкой и удовлетворяйте свои кулинарные желания!
XEvil 5.0 automatically solve most kind of captchas,
Including such type of captchas: ReCaptcha v.2, ReCaptcha-3, Google, SolveMedia, BitcoinFaucet, Steam, +12000
+ hCaptcha, FC, ReCaptcha Enterprize now supported in new XEvil 6.0!
+ CloudFlare TurnsTile, GeeTest captcha now supported in new XEvil 7.0!
+ XEvil 7.0 was released! ReCaptcha v2 solving speed increased x2!
+ XEvil can solve captchas from OpenClaw AI bot!
1.) Fast, easy, precisionly
XEvil is the fastest captcha killer in the world. Its has no solving limits, no threads number limits
2.) Several APIs support
XEvil supports more than 6 different, worldwide known API: 2Captcha, anti-captchas (antigate), rucaptcha, DeathByCaptcha, etc.
just send your captcha via HTTP request, as you can send into any of that service – and XEvil will solve your captcha!
So, XEvil is compatible with hundreds of applications for SEO/SMM/password recovery/parsing/posting/clicking/cryptocurrency/etc.
3.) Useful support and manuals
After purchase, you got access to a private tech.support forum, Wiki, Skype/Telegram online support
Developers will train XEvil to your type of captcha for FREE and very fast – just send them examples
4.) How to get free trial use of XEvil full version?
– Try to search in Google “Home of XEvil”
– you will find IPs with opened port 80 of XEvil users (click on any IP to ensure)
– try to send your captcha via 2captcha API ino one of that IPs
– if you got BAD KEY error, just tru another IP
– enjoy! 🙂
– (its not work for hCaptcha!)
WARNING: Free XEvil DEMO does NOT support ReCaptcha, hCaptcha and most other types of captcha!
Вы допускаете ошибку. Могу отстоять свою позицию. Пишите мне в PM, обсудим.
1xbet официальный сайт, [url=https://1xbet-60qr9.click/]https://1xbet-60qr9.click[/url] дает возможность пользователям удобно осуществлять ставки на разные виды спорта. Качество сервиса замечательный, а также удобный интерфейс увлекает новых клиентов.
zahraniДЌnГ online casino, [url=https://hgtactical.net/vklad-100-k-v-online-casinu-jak-zait-s-hranim/]https://hgtactical.net/vklad-100-k-v-online-casinu-jak-zait-s-hranim/[/url] nabГzГ hrГЎДЌЕЇm ЕЎirokou ЕЎkГЎlu her, mezi kterГ© patЕ™Г slotЕЇ, stolnГch her a ЕѕivГЅch kasino akcГ. RЕЇznГ© platformy poskytujГ lГЎkavГ© bonusy a poznГЎvacГ body, coЕѕ zvyЕЎuje zГЎЕѕitek z hranГ. BezpeДЌnost hrГЎДЌЕЇ je zdravГЅ aspekt, kterГЅ tyto platformy zohledЕ€ujГ.
Online Casino, [url=https://getaspecialdeal.co.uk/jump/aHR0cHM6Ly93d3cuZWxlcGhhbnRqb3VybmFsLmNvbS9wcm9maWxlL2FzZHJnZGZoZ3RoLw?order=54]https://getaspecialdeal.co.uk/jump/aHR0cHM6Ly93d3cuZWxlcGhhbnRqb3VybmFsLmNvbS9wcm9maWxlL2FzZHJnZGZoZ3RoLw?order=54[/url] offers an thrilling way to try various activities from the comfort of your home. With a variety of card games, players can choose their favorites. Enjoy offers and advantages that enhance your gaming experience.
Главное что когда смотришь спать не Хоцца!
Доставка товаров на дом, [url=https://controlc.com/2c9fdf00]https://controlc.com/2c9fdf00[/url] является настоящей эффективной услугой. Теперь покупать необходимые вещи легко. Вам не нужно выходить из дома, чтобы приобрести всё, что полезно.
Какие нужные слова… супер, великолепная идея
1xbet официальный сайт, [url=https://1xbet-wah2s.sbs/]1xbet-wah2s.sbs[/url] предлагает широкий выбор событий для поклонников азартных ставок. Здесь можно получить актуальную информацию о актуальных матчах и турнирах. Удобный облик сайта делает процесс взаимодействия едва комфортным и быстрым.
Я считаю, что Вы ошибаетесь. Давайте обсудим это. Пишите мне в PM, поговорим.
Купить квартиру, [url=https://tirupatiprecast.in/author/tirupatiprecast/page/9/]https://tirupatiprecast.in/author/tirupatiprecast/page/9/[/url] — важный шаг в будущем. Перед инвестированием стоит тщательно осмотреть рынок. Это поможет выбрать, подходящий по бюджету. Не забудьте учесть местоположение и инфраструктуру!
Конечно. Я согласен со всем выше сказанным. Можем пообщаться на эту тему. Здесь или в PM.
1win зеркало сайта, [url=https://1win-d79bl.top/]1win-d79bl.top[/url] – это удобный способ доступа к любимым играм и ставкам. Пользователи могут легко найти актуальные ссылки, позволяют обойти блокировки. Сервис предлагает широкий выбор азартных развлечений и предложений.
Я считаю, что Вы не правы. Могу это доказать. Пишите мне в PM, поговорим.
mellstroy официальный сайт, [url=https://mellstroy-casino-lan2.lol/]https://mellstroy-casino-lan2.lol/[/url] предлагает разнообразие услуг в ремонте. Мы обеспечиваем высокое исполнение и опыт. Обращайтесь!
Finding the best roulette sites uk, [url=https://www.simkarled.com/best-online-roulette-a-guide-to-the-top-choices/]https://www.simkarled.com/best-online-roulette-a-guide-to-the-top-choices/[/url] can be challenging, but it’s important to choose wisely. Many platforms offer exciting games along with generous bonuses. Check for user reviews, regulations to ensure a safe gaming experience. Enjoy the excitement of roulette with reliable sites!
Я извиняюсь, но, по-моему, Вы допускаете ошибку. Давайте обсудим. Пишите мне в PM, поговорим.
1xbet официальный сайт, [url=https://1xbet-up0cv.icu/]https://1xbet-up0cv.icu/[/url] — это комфортный ресурс для спортсобытий. Каждый игрок может легко найти интересные предложения, использовать призы. Кроме того, команда сервиса всегда готова выполнить помощь.
Абсолютно с Вами согласен. В этом что-то есть и мне кажется это очень отличная идея. Полностью с Вами соглашусь.
эротический массаж, [url=https://erotic-massage.top/city/novosibirsk]эротический массаж Новосибирск[/url] является уникальный вид расслабления и телесного контакта. Данная практика помогает получить ощущение безмятежности. Любая сессия наполнена нежностью, а мастер демонстрирует умением создавать атмосферу уединения. Эротический массаж — это приключение в мир ощущений, где глубоко объединяются телесная оболочка и чувства.
Дождались…
парфумерія, [url=https://mpravda.com/noviy-aromat-v-d-victoria-s-secret-vanilla-bean-macadamia/]https://mpravda.com/noviy-aromat-v-d-victoria-s-secret-vanilla-bean-macadamia/[/url] – це мистецтво створення унікальних ароматів. Новітні парфуми мають можливість зображати емоції. Обираючи парфум, важливо врахувати індивідуальні смаки. Парфум створює настрій, створюючи чарівності вашому образу.
Når det kommer til de bedste online casinospil, er bedste danske casinoer, [url=https://apostlehealth.com/2026/03/15/opdag-de-bedste-spil-uden-om-rufus-655753706/]https://apostlehealth.com/2026/03/15/opdag-de-bedste-spil-uden-om-rufus-655753706/[/url] et fremragende valg. Her kan du opdage et stort udvalg af spil. Uanset om du vælger slots eller bordspil, præsenterer disse platforme unikke muligheder.
Royal Reels 21 Casino, [url=http://iocdistributor.wpengine.com/the-exciting-world-of-royal-reels-21-a-gaming/]http://iocdistributor.wpengine.com/the-exciting-world-of-royal-reels-21-a-gaming/[/url] offers an enjoyable experience for enthusiasts. With diverse games and generous bonuses, every visit is unforgettable. Join now and continue your gaming journey!
online casino, [url=https://legasov.net/2026/03/17/the-ultimate-gaming-experience-with-finixbet/]https://legasov.net/2026/03/17/the-ultimate-gaming-experience-with-finixbet/[/url] offers up a exciting experience for players. With various games to choose from, like slots and table games, plays can enjoy accessibility from home. Join today!
Замечательная фраза
1xbet официальный сайт, [url=https://1xbet-aqgez.icu/]1xbet-aqgez.icu[/url] предлагает пользователям разнообразный выбор пари на киберспорт. Разнообразные пользователи могут наслаждаться интуитивно понятным интерфейсом и необычными бонусами.
XEvil 6.0 automatically solve most kind of captchas,
Including such type of captchas: ReCaptcha v.2, ReCaptcha v.3, Google, SolveMedia, BitcoinFaucet, Steam, +12000
+ hCaptcha, FC, ReCaptcha Enterprize now supported in new XEvil 6.0!
+ CloudFlare TurnsTile, GeeTest captcha now supported in new XEvil 7.0!
+ XEvil 7.0 was released! ReCaptcha v2 solving speed increased x2!
+ XEvil can solve captchas from OpenClaw AI bot!
1.) Fast, easy, precisionly
XEvil is the fastest captcha killer in the world. Its has no solving limits, no threads number limits
2.) Several APIs support
XEvil supports more than 6 different, worldwide known API: 2Captcha, anti-captchas (antigate), rucaptcha, death-by-captcha, etc.
just send your captcha via HTTP request, as you can send into any of that service – and XEvil will solve your captcha!
So, XEvil is compatible with hundreds of applications for SEO/SMM/password recovery/parsing/posting/clicking/cryptocurrency/etc.
3.) Useful support and manuals
After purchase, you got access to a private tech.support forum, Wiki, Skype/Telegram online support
Developers will train XEvil to your type of captcha for FREE and very fast – just send them examples
4.) How to get free trial use of XEvil full version?
– Try to search in Google “Home of XEvil”
– you will find IPs with opened port 80 of XEvil users (click on any IP to ensure)
– try to send your captcha via 2captcha API ino one of that IPs
– if you got BAD KEY error, just tru another IP
– enjoy! 🙂
– (its not work for hCaptcha!)
WARNING: Free XEvil DEMO does NOT support ReCaptcha, hCaptcha and most other types of captcha!
да смеюсь я, смеюсь
Виртуальные букмекерские конторы становятся все более популярными. Среди них выделяется 1win зеркало сайта, [url=https://1win-jwg3t.buzz/]https://1win-jwg3t.buzz[/url], предлагающее доступ к широкому спектру ставок. Игроки могут использовать зеркальные ссылки, чтобы обойти блокировки. 1win зеркало сайта обеспечивает надежность и простоту в использовании.
Замечательно, весьма полезное сообщение
На сайте mellstroy официальный сайт, [url=https://mellstroy-casino-hay1.xyz/]mellstroy-casino-hay1.xyz[/url] вы найдете множество интересной информации о строительстве. Мы предлагает актуальные решения для строительной деятельности. Изучите наш экспертность и достигните успеха!
Между нами говоря, это очевидно. Предлагаю Вам попробовать поискать в google.com
На mellstroy официальный сайт, [url=https://mellstroy-casino-ant4.click/]https://mellstroy-casino-ant4.click[/url] можно найти множество данных о возведении и дизайне жилых и коммерческих зданий. Здесь представлены актуальные тренды отрасли.
Извините за то, что вмешиваюсь… Но мне очень близка эта тема. Могу помочь с ответом.
Проститутки, [url=https://dosug52.com/city/gorohovets]Путаны в Гороховце[/url] обеспечивают услуги интим-аффектов за вознаграждение. Работа в этой сфере вызывает разные мнения в обществе. Тем не менее, для многих это возможность заработать на жизнь.
Авторитетное сообщение 🙂 , познавательно…
1xbet официальный сайт, [url=https://1xbet-6e95j.top/]1xbet-6e95j.top[/url] предлагает обширный количество предложений, где может попробовать что-либо для себя. Пользователи отмечают, что интерфейс комфортен и легкий.
In the realm of roulette casinos, [url=https://encant.elcorriol.com/the-best-roulette-strategies-for-winning-big-2/]https://encant.elcorriol.com/the-best-roulette-strategies-for-winning-big-2/[/url], players witness an electrifying atmosphere. Big bets bring excitement, while diverse betting options allow for calculative gameplay. Many seek luck at these tables.
Я извиняюсь, но, по-моему, Вы ошибаетесь. Пишите мне в PM.
Работа для девушек, [url=https://rabota-devushkam.biz/chelyabinsk/]работа для девушек в эскорте Челябинск[/url] – это шанс реализовать себя. Современные профессии открывают широкий спектр для карьерного роста. Успех приходит к тем, кто прагнёт стать лучшим в своем деле.
Det er vigtigt at finde det bedste online casino, [url=https://yard-wear.com/casinionline15031/casino-uden-rufus-din-guide-til-spiloplevelser/]https://yard-wear.com/casinionline15031/casino-uden-rufus-din-guide-til-spiloplevelser/[/url] for at opnå en fantastisk spilleoplevelse. Du kan forskellige spil og bonusser her. Det er klogt at læse anmeldelser og undersøge spillernes meninger.
Я удалил это вопрос
1xbet официальный сайт, [url=https://1xbet-17w5d.top/]1 хбет официальный сайт[/url] предлагает обширный выбор развлечений для фанатов азартных игр. Здесь можно найти популярные игры.
Play online casino, [url=https://wp13272768.server-he.de/the-rise-of-eas-bet-a-comprehensive-guide-to-3/]https://wp13272768.server-he.de/the-rise-of-eas-bet-a-comprehensive-guide-to-3/[/url] and experience the thrill of games at the comfort of your home. Relish the convenience of betting on your favorite slots, cards. With promotions galore, your adventure awaits!
Royal Reels 21 Casino, [url=https://www.myworldshopping-net.onlinegroup.no/2026/03/24/the-allure-of-casino-royal-reels-21-where-luck/]https://www.myworldshopping-net.onlinegroup.no/2026/03/24/the-allure-of-casino-royal-reels-21-where-luck/[/url] offers an exhilarating gaming experience for participants. With multiple games, it accommodates every liking. Join today and uncover what makes it remarkable.
Благодарю за информацию, теперь я не допущу такой ошибки.
1win зеркало сайта, [url=https://1win-cq5h1.sbs/]https://1win-cq5h1.sbs/[/url] предлагает доступ к игровым возможностям даже при ограничениях. Пользователи имеют возможность играть азартными играми без проблем. Это решение поддерживает безопасность и условие выигрывать.
Охотно принимаю. Вопрос интересен, я тоже приму участие в обсуждении. Я знаю, что вместе мы сможем прийти к правильному ответу.
mellstroy официальный сайт, [url=https://mellstroy-casino-jha9.xyz/]мелстрой геймс[/url] предлагает успешный выбор предложений в дизайне. Вы сможете получить прайс-листы и консультации для индивидуального проекта.
В этом что-то есть. Спасибо за объяснение.
1xbet официальный сайт, [url=https://1xbet-6j6i9.click/]1хбет официальный сайт вход[/url] предоставляет многообразный выбор вариантов. На данном ресурсе любой испытает что-то для личных интересов.
Неплохо-мне понравилось,но как-то грустновато!(
Получение работы в разных городах России – важная задача для девушек. Например, [url=https://rabotadevushkam.net/yaroslavl/]вакансии девушкам Ярославль[/url]|Работа для девушек Астрахань|Работа для девушек Барнаул|Работа для девушек Брянск} предлагает множество вариантов. Важно изучить предложения в вашей местности и выбрать подходящую сферу. Компании ищут сотрудников на разные позиции, включая административные и творческие роли. Возможно, вам подойдет [url=https://rabotadevushkam.net/barnaul/]вакансии девушкам Барнаул[/url]. Также рассмотрите дистанционные вакансии. Каждая девушка может найти свое место в рабочем мире, особенно если изучит [url=https://rabotadevushkam.net/kipr/]Работа для девушек Кипр[/url]. Не забывайте про свои интересы и навыки. Это поможет в поиске [url=https://rabotadevushkam.net/kipr/]Работа для девушек Кипр[/url]. Найдите свои силы и удачи в карьере!
roulette casinos, [url=https://hexoservices.24livehost.com/discover-the-best-online-roulette-tips-and-3/]https://hexoservices.24livehost.com/discover-the-best-online-roulette-tips-and-3/[/url] provide a thrilling experience for players seeking entertainment. With multiple betting options and approaches, they promise a captivating atmosphere. Players enjoy the rotation of the wheel as they hope for winning combinations. This timeless game continues to attract fans from around the world.
XEvil 6.0 automatically solve most kind of captchas,
Including such type of captchas: ReCaptcha v.2, ReCaptcha v.3, Google, Solve Media, BitcoinFaucet, Steam, +12k
+ hCaptcha, FC, ReCaptcha Enterprize now supported in new XEvil 6.0!
+ CloudFlare TurnsTile, GeeTest captcha now supported in new XEvil 7.0!
+ XEvil 7.0 was released! ReCaptcha v2 solving speed increased x2!
+ XEvil can solve captchas from OpenClaw AI bot!
1.) Fast, easy, precisionly
XEvil is the fastest captcha killer in the world. Its has no solving limits, no threads number limits
2.) Several APIs support
XEvil supports more than 6 different, worldwide known API: 2captcha, anti-captchas (antigate), rucaptcha, DeathByCaptcha, etc.
just send your captcha via HTTP request, as you can send into any of that service – and XEvil will solve your captcha!
So, XEvil is compatible with hundreds of applications for SEO/SMM/password recovery/parsing/posting/clicking/cryptocurrency/etc.
3.) Useful support and manuals
After purchase, you got access to a private tech.support forum, Wiki, Skype/Telegram online support
Developers will train XEvil to your type of captcha for FREE and very fast – just send them examples
4.) How to get free trial use of XEvil full version?
– Try to search in Google “Home of XEvil”
– you will find IPs with opened port 80 of XEvil users (click on any IP to ensure)
– try to send your captcha via 2captcha API ino one of that IPs
– if you got BAD KEY error, just tru another IP
– enjoy! 🙂
– (its not work for hCaptcha!)
WARNING: Free XEvil DEMO does NOT support ReCaptcha, hCaptcha and most other types of captcha!
http://xrumersale.site/
Вы не правы. Я уверен. Предлагаю это обсудить.
На mellstroy официальный сайт, [url=https://mellstroy-casino-amj9.lol/]mellstroy-casino-amj9.lol[/url] вы найдете множество вариантов для своей стройки. Организация предлагает высококачественные материалы и услуги. Эксперты помогут вам в выборе, чтобы воплотить ваши идеи.
Какое интересное сообщение
1xbet официальный сайт, [url=https://1xbet-hv1np.icu/]https://1xbet-hv1np.icu[/url] выполняет широкий варианты азартных приложений. Здесь вы можете разместить ставки на разные события, используя удобный интерфейс и бонусы.
И что в результате?
1win зеркало сайта, [url=https://1win-06o76.lol/]https://1win-06o76.lol[/url] позволяет игрокам получить доступ к ресурсам даже при блокировках. При помощи этого решения состояние всегда остается стабильным. Легко перемещаться между версиями и наслаждаться играми.
I dag har vi mange muligheder for at finde de bedste online casinoer, [url=http://intranetintegra.escueladidactica.com/2026/03/15/det-bedste-online-casino-uden-rofus-spill-sikkert/]http://intranetintegra.escueladidactica.com/2026/03/15/det-bedste-online-casino-uden-rofus-spill-sikkert/[/url]. De platforme tilbyder fremragende spil, tiltrækkende bonusser og beskyttet betalingsmetoder, som gør spilleoplevelsen endnu bedre. Vælg det rigtige casino for dig!
online casino bets, [url=https://www.worldmovingbolivia.com/2026/03/18/experience-unmatched-gaming-at-great-win-casino-4/]https://www.worldmovingbolivia.com/2026/03/18/experience-unmatched-gaming-at-great-win-casino-4/[/url] can be entertaining. Players are able to find various games and strategies to improve their chances. Always remember to gamble responsibly.
casino royal reels 21, [url=https://www.jomicbel.com/royalsreels/catching-excitement-with-reels-pokies-a/]https://www.jomicbel.com/royalsreels/catching-excitement-with-reels-pokies-a/[/url] – Casino royal reels 21 offers an exciting experience where players can enjoy top-notch games. With animated graphics and alluring gameplay, it’s no wonder why this casino attracts many. Join today for exciting wins!
Это просто великолепная фраза
1xbet официальный сайт, [url=https://1xbet-5ju47.xyz/]https://1xbet-5ju47.xyz[/url] предоставляет уникальные возможности для игр. Здесь можете увидеть широкий ассортимент спортивных событий и акций. Легкий интерфейс делает посещение сайта максимально комфортным.
Excellent content as always — useful, engaging, and well presented.
A exciting game of mega fire blaze roulette, [url=https://tanglelogics.com/mega-fire-blaze-roulette-ein-feuerwerk-der-4/]https://tanglelogics.com/mega-fire-blaze-roulette-ein-feuerwerk-der-4/[/url] offers players the possibility to score huge. Including dynamic graphics and fast-paced gameplay, players can enjoy the fun of this unique roulette variation. Get ready for an unforgettable gaming adventure!
Really appreciate your effort in creating valuable content. Looking forward to more posts like this!
Я согласен с вами
1win зеркало сайта, [url=https://1win-06o76.lol/]https://1win-06o76.lol[/url] позволяет легко получить доступ к игровым услугам. Доступность использования делает его известным среди игроков. Игроки ценят стабильную работу и эффективность ресурса.
Кажется, это подойдет.
На mellstroy официальный сайт, [url=https://mellstroy-casino-40hpd.icu/]mellstroy официальный[/url] вы найдете многообразный ассортимент продуктов для строительства. Мы реализуем товары, которые помогут создать ваши концепции.
БАлдёж, давай исчё
1xbet официальный сайт, [url=https://1xbet-oz06h.sbs/]1 хбет[/url] дает широкий каталог ставок на спорт и игры. Ставочники могут просто делать ставки и зарабатывать призы. Это великолепная платформа для фанатов азартных игр.
Playing at an online casino, [url=https://milotheme.com/discover-the-exciting-world-of-geze-bet-your-4/]https://milotheme.com/discover-the-exciting-world-of-geze-bet-your-4/[/url] can be an exciting experience. With a wide array of games to choose from, players can enjoy video slots, table games, and much more. The convenience of accessing an online casino anytime adds to the thrill of gaming.
I Danmark er der mange førsteklasses muligheder for at spille online, og blandt dem skiller sig bedste danske casinoer, [url=https://electionpakistan.com/bet-uden-om-rufus-en-guide-til-ansvarligt-spil/]https://electionpakistan.com/bet-uden-om-rufus-en-guide-til-ansvarligt-spil/[/url] frem fra mængden. De fleste tilbyder enestående bonusser og unikke spil. Tryghed er også en prioritet, hvilket gør dem betroede steder at spille. Vælg det casino for en fantastisk oplevelse.
Inspiring quest there. What happened after? Thanks!
Great post! I learned something new and really appreciate the way you explained the topic.
че тебе еще надо?
Одним пользователям необходимо использовать 1хбет зеркало, [url=https://1xbet-vokm6.cyou/]https://1xbet-vokm6.cyou/[/url] для попытки доступа на сайт. Ресурсы обеспечивают стабильный доступ, создавая возможность обходить блокировки. Войти на любимый ресурс теперь просто.
Thanks for sharing such a clear and helpful article. It was a pleasure to read!
成人材料 可通过 有保障 的网站获取。探索 可靠平台 以获得高质量内容。
Feel free to visit my web site … EBONY PORN
По-моему это очевидно. Ответ на Ваш вопрос я нашёл в google.com
1win зеркало сайта, [url=https://1win-tqvc0.blog/]https://1win-tqvc0.blog[/url] позволяет пользователям обходить блокировки и доступать актуальными функциями платформы. Такое зеркало предоставляет безопасность и удобство в пользовании.
live roulette not on gamstop, [url=https://strategy.skillquo.com/the-unexplored-terrain-of-live-dealer-roulette/]https://strategy.skillquo.com/the-unexplored-terrain-of-live-dealer-roulette/[/url] offers players a unique experience, allowing them to enjoy their favorite game without restrictions. Gamblers can spin the wheel and feel the thrill of chance in a captivating atmosphere that adds to the excitement of winning. Players appreciate the freedom to play without limitations, enhancing their overall enjoyment. Enjoying live roulette not on gamstop means discovering new horizons while feeling the rush of the game.
Мне кажется это блестящая идея
mellstroy casino сайт, [url=https://mellstroy-casino-pobmr.cfd/]https://mellstroy-casino-pobmr.cfd/[/url] предлагает обширный выбор ставок, которые удовлетворят потребности каждого игрока. Вы можете радует проведением времени. Каждый откроет что-то неповторимое.
Бесподобный топик, мне очень нравится ))))
1хбет зеркало, [url=https://1xbet-zo15t.cyou/]https://1xbet-zo15t.cyou/[/url] является удобный инструмент для использования с игровой платформой. Зрители получают шанс обойти фильтры и экспериментировать с всеми услугами сайта. Это превосходно актуально для активирующих игроков.
Experience the excitement of the thrill of betting at casino royal reels 21, [url=https://www.rbexcellentairportservicesinc.ca/2026/03/24/experience-the-thrills-of-royal-reels-21-casino/]https://www.rbexcellentairportservicesinc.ca/2026/03/24/experience-the-thrills-of-royal-reels-21-casino/[/url], where participants can take pleasure in a variety of options. With big rewards and special features, this platform ensures endless fun for all. Join now and see what you can win!
Play online casino, [url=http://masktheday.webcodeworld.net/casinobet20039/the-rise-of-habesha-bet-a-new-era-in-sports-11/]http://masktheday.webcodeworld.net/casinobet20039/the-rise-of-habesha-bet-a-new-era-in-sports-11/[/url] and experience the thrill of gambling from your home. Enjoy a variety of games like video slots and blackjack. With incentives available, gaining rewards is easier than ever.
Hvis du leder efter det bedste online casino, [url=https://slwebstaging.wpengine.com/casinoer-uden-dansk-licens-fordele-og-ulemper-2-2/]https://slwebstaging.wpengine.com/casinoer-uden-dansk-licens-fordele-og-ulemper-2-2/[/url], kan du finde mange muligheder. Diverse spiltyper venter pГҐ dig. Oplev adrenalinen med fantastiske bonusser. Spil det, du elsker for en sjov aften.
Извините за то, что вмешиваюсь… Я здесь недавно. Но мне очень близка эта тема. Могу помочь с ответом. Пишите в PM.
1хбет зеркало, [url=https://1xbet-q2ths.click/]https://1xbet-q2ths.click/[/url] дает игрокам шанс к своим аккаунтам, даже если основной сайт недоступен. Используя зеркалом, удалось бы увлекаться без проблем.
Извините, фраза удалена
На mellstroy официальный сайт, [url=https://mellstroy-casino-wqe.lol/]https://mellstroy-casino-wqe.lol[/url] вы найдете широкий ассортимент продукции для строительства. Мы гарантируем высокое стандарт и доступные цены. Заходите и выбирайте лучшее для вашего строительства.
Замечательно, очень ценная штука
mellstroy casino сайт, [url=https://mellstroy-casino-jq5bf.sbs/]mellstroy game официальный сайт[/url] предлагает уникальные возможности для азартных игроков. На этом ресурсе вы найдете разнообразие игр, что обеспечивают значительный уровень развлечений. Убедительные бонусы позволят вам увеличить ваш банкролл.
live roulette not on gamstop, [url=http://www.livesicily.it/2026/03/29/live-roulette-not-affected-by-randomness-exploring/]http://www.livesicily.it/2026/03/29/live-roulette-not-affected-by-randomness-exploring/[/url] offers an exciting chance to enjoy gaming without the usual restrictions. Players can experience the thrill of spinning the wheel with a fresh approach. With various selections available, it’s a perfect opportunity for those seeking entertainment. Enjoy the captivating atmosphere like a physical casino and discover new strategies while playing your favorite game!
Я думаю, что Вы допускаете ошибку. Могу это доказать. Пишите мне в PM, пообщаемся.
1хбет зеркало, [url=https://1xbet-q0dfr.sbs/]https://1xbet-q0dfr.sbs[/url] к предлагает пользователям вариант обходить ограничения и получать доступ к любимым играм через простой интерфейс. Кроме также, портал предлагает предложения, что делает игровой процесс еще прикольнее.
Welcome to this entertaining world of Royal Reels 21 Casino, [url=https://lp2.smart-acc.com/how-to-access-your-account-royal-reels-login-guide/]https://lp2.smart-acc.com/how-to-access-your-account-royal-reels-login-guide/[/url], where everyone can enjoy an array of games. Enjoy the fun of winning big during your time at the casino. Join us today and try out our limited-time bonuses!
online casino bets, [url=https://fauzinfotec.com/index.php/2026/03/20/discovering-gursha-bet-the-future-of-online/]https://fauzinfotec.com/index.php/2026/03/20/discovering-gursha-bet-the-future-of-online/[/url] have become the approaches players gaming. Through advanced tech, they present captivating experiences, enabling everyone to place bets from any location.
At finde de bedste online casinoer, [url=https://linkingtravel.com/oplev-det-fantastiske-univers-af-spil-uden-om/]https://linkingtravel.com/oplev-det-fantastiske-univers-af-spil-uden-om/[/url] kan være en udfordring, men med den rette tilgang har du mulighed for at finde pladsen, der passer til dine behov. Udforsk diverse spil og belønninger for en optimal oplevelse.
Well done! The structure and clarity of your writing make it a great read.
На ваш запрос отвечаю – не проблема.
mellstroy официальный сайт, [url=https://mellstroy-casino-oia1.xyz/]https://mellstroy-casino-oia1.xyz/[/url] предоставляет разнообразный выбор предложений в области ремонта. Вы сможете найти информацию о выполнении различных объектов.
Жаль, что сейчас не могу высказаться – очень занят. Освобожусь – обязательно выскажу своё мнение.
1хбет зеркало, [url=https://1xbet-mw1yz.xyz/]https://1xbet-mw1yz.xyz[/url] обеспечивает доступ к азартным играм в любое время. Используя сайту с адаптацией, вы можете увеличивать капитал легко и быстро. Не пропустите возможность!
You did a fantastic job explaining this topic. I’ll be sharing this with my friends.
成人材料 可通过 有保障 的网站获取。探索 可信来源
以获得高质量内容。
Also visit my homepage :: buy valium online
Это хорошая идея.
mellstroy casino сайт, [url=https://mellstroy-casino-7knkq.top/]mellstroy casino официальный сайт[/url] предлагает превосходные игры и непревзойденный опыт для любителей. Здесь доступны разнообразие азартных игр.
Discovering the thrill of live roulette not on gamstop, [url=https://competenciastransversales.pucv.cl/?p=163218]https://competenciastransversales.pucv.cl/?p=163218[/url] can transform your gaming. Players enjoy actual interaction with dealers, making each spin more engaging. With numerous options, you can opt for your best-loved game at your leisure. Embrace the liberty that comes with playing without restrictions.
да да да ща поглядим
1хбет зеркало, [url=https://1xbet-rhokm.sbs/]https://1xbet-rhokm.sbs/[/url] существует пользователям возможность доступа к сервису в ситуации блокировок. Поклонники азартных игр имеют шанс делать ставки без препятствий.
casino royal reels 21, [url=https://dmsto.ru/experience-the-thrill-of-royal-reels-online-casino/]https://dmsto.ru/experience-the-thrill-of-royal-reels-online-casino/[/url] – The remarkable Casino royal reels 21 offers an exhilarating experience for gamers. With stunning graphics and thrilling gameplay, it draws players from all walks of life. Enjoy the wide range of titles available, all with unique themes.
This article provided exactly what I was looking for. Thank you for the great insight!
Прошу прощения, что вмешался… Я разбираюсь в этом вопросе. Готов помочь.
1win зеркало сайта, [url=https://1win-nqgmw.cyou/]зеркало 1 вин[/url] позволяет игрокам без труда посетить к любимым сервисам. Благодаря удобному интерфейсу, пользователи быстро находят нужные разделы. Вдобавок, поддержка клиентов реагирует круглосуточно, что предоставляет комфорт и удовлетворенность игроков.
Danmark har mange enestГҐende online casinoer, hvilket gГёr det muligt for spillere at opleve underholdende spil. Blandt de bedste danske casinoer, [url=https://www.crimb.org.mx/bonus-uden-indbetaling-2026-alt-du-behver-at-vide/]https://www.crimb.org.mx/bonus-uden-indbetaling-2026-alt-du-behver-at-vide/[/url] finder du mangfoldigheden af spillemuligheder, bonusser. Uanset om du er til spillemaskiner eller kortsport, er der altid noget for alle spillestile.
Странно как то
В условиях блокировок доступ к сайтам становится проблемой. Решением служит 1хбет зеркало, [url=https://1xbet-qepoe.xyz/]https://1xbet-qepoe.xyz/[/url], которое предоставляет возможность без труда делать ставки. Игроки могут воспользоваться заменяющими ссылками, обеспечивая доступ к всем функциям. Это простой способ избежать ограничений и продолжать наслаждаться игрой.
хачу такую
mellstroy casino сайт, [url=https://mellstroy-casino-kvjk2.sbs/]мелстрой гейм[/url] предлагает уникальные возможности для игры. В этом месте можно найти разные игры. Любой азартный игрок найдет подходящее развлечение. Не упустите шанс попробовать свои силы!
live casinos not on gamstop, [url=https://store.filgolf.com/?p=111383]https://store.filgolf.com/?p=111383[/url] provide a unique opportunity for players looking for an alternative to traditional gaming. These platforms offer a wide range of live dealer games. Players can enjoy immersive experiences right from their homes. With actual croupiers, the thrill of a casino is just a click away. Many platforms also include attractive bonuses and promotions for new players. Discover the excitement of live casinos not on gamstop today!
Быстро ответили 🙂
Когда нужны надежные средства для ставок, всегда стоит рассмотреть 1хбет зеркало, [url=https://1xbet-fry57.click/]https://1xbet-fry57.click[/url]. Это практичный способ доступа к сайтам, особенно когда основной портал недоступен. С участием зеркала можно простым способом делать ставки и получать удовольствие от игры.
Wagering in an online casino can be a thrilling experience. You could enjoy various games like poker. Additionally, you’ll find excellent bonuses. Play online casino, [url=https://www.worldmovingbolivia.com/2026/03/22/discover-joo-casino-the-ultimate-online-gaming/]https://www.worldmovingbolivia.com/2026/03/22/discover-joo-casino-the-ultimate-online-gaming/[/url] and uncover new opportunities!
“и то правда”
mellstroy официальный сайт, [url=https://mellstroy-casino-yhb3.lol/]https://mellstroy-casino-yhb3.lol[/url] предлагает широкий выбор решений в строительной сфере. Команда компании обеспечивает высокое качество и индивидуальный подход к каждому запросу.
, Зенит чемпион
1win зеркало сайта, [url=https://1win-wh88c.buzz/]1win-wh88c.buzz[/url] — это альтернативный доступ к букмекерской платформе. Пользователи могут найти его в сети. Это дает возможность бесперебойный доступ к ставкам и играм без блокировок. 1win зеркало сайта помогает избежать проблемы с заблокированными ресурсами.
Это вы правильно сказали 🙂
mellstroy casino сайт, [url=https://mellstroy-casino-r1bs4.sbs/]https://mellstroy-casino-r1bs4.sbs/[/url] предлагает множество уникальных возможностей для увлекательного времяпрепровождения. Здесь вы найдете самые разные игры, которые подойдут каждому любителю азартных развлечений. Кроме того, щедрые предложения помогут увеличить шансы на успех. Не упустите шанс испытать удачу!
I dag er der mange fantastiske muligheder for at spille online. Et af de hГёjst vurderede steder at nyde er klart bedste online casino, [url=https://biztip.ninja/2026/03/17/find-de-bedste-casinoer-uden-rufus/]https://biztip.ninja/2026/03/17/find-de-bedste-casinoer-uden-rufus/[/url]. Her findes flere af aktiviteter, der sikrer oplevelse i timevis. Med korrekt information og beskyttede transaktioner kan spillerne opleve ro i sindet.
Бесконечное обсуждение 🙂
1хбет зеркало, [url=https://1xbet-7tupt.top/]https://1xbet-7tupt.top[/url] обеспечивает игрокам доступ к любимым развлечениям даже если блокировки основного ресурса. Наслаждайтесь без преград!
И что в таком случае нужно делать?
Для доступа к сайту 1хбет зеркало, [url=https://1xbet-bct6b.xyz/]1xbet-bct6b.xyz[/url] используется множество способов. Ставочники могут найти зеркало, чтобы избежать блокировок с доступом. Данное решение предоставляет постоянный доступ к онлайн услугам. Не забывайте, что 1хбет зеркало всегда обновлено для удовлетворения игроков.
If you’re looking for an exciting gaming experience, consider live casino not on gamstop, [url=https://murtazamobiles.com/exploring-non-gamstop-live-dealer-casinos-a-new/]https://murtazamobiles.com/exploring-non-gamstop-live-dealer-casinos-a-new/[/url]. The following casinos feature a thrilling way to enjoy your favorite games while real dealers and interactive gameplay. Participants can enjoy a multitude of games, from blackjack to roulette, each offered in excellent streaming. Don’t miss out on the fun and excitement that comes with playing games in a live setting. For unique experiences, opt for live casino not on gamstop.
Я извиняюсь, но, по-моему, Вы ошибаетесь. Могу это доказать. Пишите мне в PM.
сайт 1вин, [url=https://1win-og3fd.cyou/]https://1win-og3fd.cyou[/url] предлагает уникальные возможности для азартных игроков. На платформе пользователи могут найти многообразные игры, в числе которых слоты, покер и другие. Промо-предложения на сайте делают игру приятно интересной. Кроме этого, дизайн сайта простой, что повышает навигацию. Квалифицированные игроки и новички найдут здесь все необходимое для плодотворной игры.
Афтар маладец,
mellstroy официальный сайт, [url=https://mellstroy-casino-kbz4.lol/]https://mellstroy-casino-kbz4.lol/[/url] предоставляет сведения о строительных услугах. На ресурсе вы найдете различные материалы, которые подскажут в ваших начинаниях.
online casino bets, [url=http://www.liushibin.com/?p=1038969]http://www.liushibin.com/?p=1038969[/url] give an engaging experience for players. With various games, enthusiasts can enjoy the rush of winning from the comfort of their homes.
Вы ошибаетесь. Давайте обсудим. Пишите мне в PM, поговорим.
Всемирная паутина азартных игр стал более захватывающим благодаря mellstroy casino сайт, [url=https://mellstroy-casino-acco1.icu/]mellstroy casino официальный сайт[/url], где казиношники могут восторгаться разнообразными игр и вознаграждениями. Здесь вас ждут поразительные возможности для достижения побед.
Это забавная фраза
Каждый пользователь знает, что 1хбет зеркало, [url=https://1xbet-h99hb.cyou/]https://1xbet-h99hb.cyou[/url] даёт возможность обходить блокировки. Систематические обновления позволяют доступ к актуальной информации и ставкам. Резервный ресурс 1хбет поддерживает игрокам не терять шансов.
De bedste online casinoer, [url=http://paok.kr/casinionline18034/spil-uden-rufus-en-guide-til-alternativer/]http://paok.kr/casinionline18034/spil-uden-rufus-en-guide-til-alternativer/[/url] præsenterer et bredt udvalg af spil. Spillere kan oplevelse herunder bordspil. De bedste online casinoer sikrer tryghed og hurtige udbetalinger.
смефно))))
1хбет зеркало, [url=https://1xbet-gerff.click/]1xbet-gerff.click[/url] — надежный способ обеспечения доступа к популярной букмекерской платформе. С использованием такого зеркала вы сможете играть без осложнений. Убедитесь в комфорте использования и наслаждайтесь своими любимыми развлечениями.
Огромное спасибо Вам за поддержку. Буду должен.
mellstroy официальный сайт, [url=https://mellstroy-casino-vka1.lol/]https://mellstroy-casino-vka1.lol/[/url] предлагает широкий ассортимент для строительства. Вы можете узнать необходимые услуги на нашем портале, где разнообразие всегда на первом месте. Пользуйтесь интуитивно понятным интерфейсом для успешного выбора!
JB Casino Online, [url=https://www.macchiatomedia.org/ufl/2026/03/30/discover-jb-casino-india-thrilling-online-gaming/]https://www.macchiatomedia.org/ufl/2026/03/30/discover-jb-casino-india-thrilling-online-gaming/[/url] – JB Casino Online предлагает неповторимый опыт для РёРіСЂРѕРєРѕРІ. Здесь предлагаются разнообразные РёРіСЂС‹, которые поразят любого. Зарегистрироваться легкая. РќРµ упустите шанс !
Я извиняюсь, но, по-моему, Вы ошибаетесь. Пишите мне в PM, поговорим.
Когда вы ищете захватывающее место для удовольствия, mellstroy casino сайт, [url=https://mellstroy-casino-66lc2.xyz/]mellstroy-casino-66lc2.xyz[/url] предлагает большой выбор развлечений и восторженные бонусы для новичков игроков.
online casino, [url=https://kaisgroup.tech/experience-royal-gaming-excellence-at-king-billy/]https://kaisgroup.tech/experience-royal-gaming-excellence-at-king-billy/[/url] provides a selection of games for leisure. Players can enjoy exciting slots from the safety of their homes, making it easy for everyone.
Discover the excitement of Casino with casino royal reels 21, [url=https://dev-shvsorg.pantheonsite.io/experience-the-thrills-at-royal-reels-online-2/]https://dev-shvsorg.pantheonsite.io/experience-the-thrills-at-royal-reels-online-2/[/url]. This captivating game offers a unique journey that keeps players hooked. Spin the slots and gain big!
Полностью разделяю Ваше мнение. Мне кажется это очень хорошая идея. Полностью с Вами соглашусь.
Использование альтернативного адреса 1хбет зеркало, [url=https://1xbet-xbxn4.sbs/]1xbet-xbxn4.sbs[/url] позволяет избежать запретов и продолжить ставить. Такая возможность нужен, особенно для активных ставок. Работа 1хбет зеркало предоставляют простой доступ к всевозможной контенту сайта.
Danmark har mange udmærkede online kasinoer, men de bedste danske casinoer, [url=https://www.nobleventurefinancial.com/2026/03/18/danske-online-casino-uden-rofus-en-guide-til-3/]https://www.nobleventurefinancial.com/2026/03/18/danske-online-casino-uden-rofus-en-guide-til-3/[/url] skiller sig udmærker sig fra mængden. Her kan spillere finde sikrede måder at gamble og opleve stort udvalg af muligheder.
Поздравляю, ваша мысль блестяща
сайт 1вин, [url=https://1win-f6b8g.buzz/]1win-f6b8g.buzz[/url] предлагает пользователям уникальный опыт в мире ставок. Здесь вы найдете многообразный ассортимент игр, который удовлетворит самых требовательных игроков. Доступные бонусы и акции добавляют восторг к игровому процессу, делая его существенно привлекательным. Не упустите возможность испробовать все преимущества этого замечательного сайта!
Охотно принимаю. На мой взгляд, это актуально, буду принимать участие в обсуждении. Вместе мы сможем прийти к правильному ответу. Я уверен.
1хбет зеркало, [url=https://1xbet-ufssn.cyou/]зеркало 1хбет[/url] дает доступ к игровому порталу даже после блокировок. Игроки могут легко входить в систему и делать ставки. Непосредственное решение исключает проблемы с доступом.
Experience the fun of playing games at JB Casino Online, [url=https://riosessions.com/web/jb-casino-review-discover-your-perfect-gaming/62168/]https://riosessions.com/web/jb-casino-review-discover-your-perfect-gaming/62168/[/url]. Offering a range of choices, players can enjoy top-notch graphics and easy navigation. Join now to explore exclusive bonuses and incentives. Start your rewarding journey at JB Casino Online!
Сожалею, что не могу сейчас поучаствовать в обсуждении. Очень мало информации. Но эта тема меня очень интересует.
Мир азартных игр популярен благодаря технологиям. mellstroy casino сайт, [url=https://mellstroy-casino-nio2b.top/]https://mellstroy-casino-nio2b.top[/url] предоставляет пользователям уникальные возможности для развлечений. На этом портале можно исследовать большой выбор слотов и интригующих акций.
Wagering at online casinos has become incredibly popular. With thrilling games and easy access, it’s no wonder that many enthusiasts choose to Play online casino, [url=https://sites.mss.univr.it/icelab/it/the-exciting-world-of-kana-betting-an-in-depth/]https://sites.mss.univr.it/icelab/it/the-exciting-world-of-kana-betting-an-in-depth/[/url]. Bonuses enhance the experience, making it even more appealing.
casino royal reels 21, [url=https://ofeq-sa.com/experience-royal-reels-the-best-online-casino-in/]https://ofeq-sa.com/experience-royal-reels-the-best-online-casino-in/[/url] – The exciting casino experience предлагает захватывающие награды. Р’ прекрасной атмосфере РІС‹ сможете пойти РЅР° СЂРёСЃРє Рё развлечься РІ этом качественном слот-автомате.
Я считаю, что Вы не правы. Могу отстоять свою позицию. Пишите мне в PM, пообщаемся.
1хбет зеркало, [url=https://1xbet-fahz3.icu/]https://1xbet-fahz3.icu/[/url] позволяет пользователям обходить блокировки и получать доступ к своей любимой платформе. Доступ к зеркалу предоставляет сохранение любых функций сайта. Помните о возможности участвовать в играх без ограничений.
Извините, что я Вас прерываю, но мне необходимо немного больше информации.
сайт 1вин, [url=https://11win-jlngc.buzz/]11win-jlngc.buzz[/url] предлагает огромный ассортимент азартных игр. Здесь вы сможете наслаждаться классическими играми, такими как покер и блэкджек. Кроме этого, игроки получат доступ к эксклюзивным бонусам и акциями. Обязательно воспользуйтесь возможность испытать игрой на сайте 1вин!
At spille online kan være en fantastisk oplevelse for spillere, især når man vælger det bedste online casino, [url=https://heni.co.in/danske-online-casino-uden-rofus-spil-uden-4/]https://heni.co.in/danske-online-casino-uden-rofus-spil-uden-4/[/url]. Forskellige platforme tilbyder fantastiske spil og lækre bonusser, som kan forbedre din spiloplevelse. Det er vigtigt at vælge et pålideligt casino for at trygge dine personlige oplysninger. Husk at læse anmeldelser og sammenligne forskellige tilbud, før du træffer din beslutning.
Это просто отличная идея
Существует множество решений для доступа к 1хбет зеркало, [url=https://1xbet-73uo6.sbs/]скачать 1хбет[/url]. Это просто, ведь оно позволяет обойти фильтры и продолжить развлекаться. Пользователи ценят перспективу оставаться в игре, несмотря на неудобства.
Я думаю, что Вы допускаете ошибку. Пишите мне в PM, обсудим.
mellstroy casino сайт, [url=https://mellstroy-casino-78hgs.cfd/]https://mellstroy-casino-78hgs.cfd/[/url] предлагает широкий выбор игр для фанатов азартных развлечений. Здесь вы найти неповторимым бонусам и снижению ставок. Если желаете превосходный уровень, то это то, что вам нужно.
JB Casino Online, [url=https://www.nitless.com/jbcasino30031/understanding-responsible-gambling-at-jb-casino/]https://www.nitless.com/jbcasino30031/understanding-responsible-gambling-at-jb-casino/[/url] presents an exciting journey for gamblers worldwide. With numerous options of games and offers, it meets every taste. Participate in JB Casino Online now!
В этом что-то есть. Раньше я думал иначе, большое спасибо за помощь в этом вопросе.
1хбет зеркало, [url=https://1xbet-k7dgx.sbs/]1xbet-k7dgx.sbs[/url] — это отличный вариант для посещения на сайт букмекера. С его помощью возможно обходить запреты и участвовать без проблем. Пользуйтесь актуальные зеркала для простоты ставок.
Greetings! I know this is kinda off topic but I was wondering which
blog platform are you using for this website?
I’m getting fed up of WordPress because I’ve had problems with hackers and I’m looking
at options for another platform. I would be fantastic if you could point me in the direction of a good platform.
online casino bets, [url=https://kalamata-oliveoil.oefprogram.gr/2026/03/24/kimebet-your-ultimate-betting-experience/]https://kalamata-oliveoil.oefprogram.gr/2026/03/24/kimebet-your-ultimate-betting-experience/[/url] present thrill and excitement. Participants can experience numerous games. By utilizing strategies, they can enhance their chances of winning.
scream cream, [url=http://tattooparlourdurban.co.za/hello-world/]http://tattooparlourdurban.co.za/hello-world/[/url] is a remarkable topical solution created to deliver relief from pain. Users find it effective for managing discomfort. This cream is convenient to apply and absorbs quickly, making it a well-liked choice.
По моему мнению Вы ошибаетесь. Предлагаю это обсудить. Пишите мне в PM, поговорим.
mellstroy casino сайт, [url=https://mellstroy-casino-sdh7.xyz/]https://mellstroy-casino-sdh7.xyz[/url] предлагает игрокам уникальный опыт. В этом казино вы найдете разнообразный выбор игр. Любой сможет найти что-то свое. Становитесь участником и наслаждайтесь!
По моему мнению Вы не правы. Давайте обсудим.
сайт 1вин, [url=https://1win-ybdo6.icu/]сайт 1вин[/url] предлагает широкий выбор игр. Здесь вы сможете наслаждаться азартные игры 24/7. Доступность регистрации делает его доступным для всех пользователей. Присоединяйтесь и получите уникальный игровой опыт!
Конечно, само собой разумеется.
Используя 1хбет зеркало, [url=https://1xbet-ugwn2.cyou/]https://1xbet-ugwn2.cyou/[/url], вы сможете получить доступ к своему аккаунту даже при блокировках. Данный ресурс помогает терпеливым поддерживать возможность развлекаться в самые лучшие моменты.
Der er mange forskellige bedste online casinoer, [url=https://landdesignmn.com/casino-uden-rufus-hurtig-udbetaling-oplev-de/]https://landdesignmn.com/casino-uden-rufus-hurtig-udbetaling-oplev-de/[/url] på markedet. Disse tjenester tilbyder imponerende spiloplevelser, bonusser og tilbud. At vælge det rigtige kan være en udfordring. Udforsk de bedste online casinoer for at identificere de bedste muligheder.
Жаль, что сейчас не могу высказаться – очень занят. Но освобожусь – обязательно напишу что я думаю по этому вопросу.
mellstroy casino сайт, [url=https://mellstroy-casino-vujhd.top/]https://mellstroy-casino-vujhd.top[/url] предлагает разнообразный выбор развлечений для почитателей азартных приключений. Игрок найдет что-то по своим предпочтениям. Перспективы выиграть здесь необычные.
Я думаю, что Вы допускаете ошибку. Давайте обсудим это. Пишите мне в PM, пообщаемся.
зеркало 1хбет, [url=https://1xbet-h4hdl.top/]https://1xbet-h4hdl.top/[/url] позволяет получить доступ к любимым ставкам. Пользователи ценят опцию играть даже при блокировках. Регистрация быстрая, а интерфейс понятный.
JB Casino Online, [url=http://battle.vanbruda.de/exploring-the-jb-casino-platform-in-bangladesh-6/]http://battle.vanbruda.de/exploring-the-jb-casino-platform-in-bangladesh-6/[/url] предлагает уникальный мир азартных игр. Занимайтесь в игровые автоматы и зарабатывайте великолепные награды. На данный момент каждый желающий может испытать атмосферой казино в JB Casino Online.
In contemporary world, online marketing, [url=http://theprice-movie.com/?wptouch_switch=desktop&redirect=//projectnoah.org%2Fusers%2Fhichem]http://theprice-movie.com/?wptouch_switch=desktop&redirect=//projectnoah.org%2Fusers%2Fhichem[/url] has become vital for businesses. Employing social media, SEO, and email strategies, companies can enhance their reach and interaction with customers. Frequent analysis of data will shape future campaigns, ensuring impact.
online casino, [url=https://khadijatulkubrahospital.com/mada-bet-revolutionizing-online-betting-experience-4/]https://khadijatulkubrahospital.com/mada-bet-revolutionizing-online-betting-experience-4/[/url] provides a thrilling experience for players. With a multitude of games and lucrative bonuses, it attracts enthusiasts from around the globe. Players can delight in the action anytime, anywhere.
Извиняюсь, что ничем не могу помочь. Надеюсь, Вам здесь помогут.
Добро пожаловать на веб-страницу mellstroy casino сайт, [url=https://mellstroy-casino-xzc5.click/]https://mellstroy-casino-xzc5.click[/url], где азартные развлечения ждут вас! Здесь вы найдете разнообразие настольных игр и можетесь наслаждаться большими выигрышами. Не упустите шанс стать частью вселенной азартных игр!
Мне нравится Ваша идея. Предлагаю вынести на общее обсуждение.
сайт 1вин, [url=https://1win-rnmze.cfd/]1win скачать[/url] предлагает игрокам уникальные возможности для азартных развлечений. На платформе пользователи могут найти разные игры. Азартные игры привлекают огромное количество участников. Весь контент удобен даже новичкам. Не упустите шанс погрузиться в мир азарта на сайте 1вин!
Это очень ценная штука
зеркало 1хбет, [url=https://1xbet-kyg6s.sbs/]https://1xbet-kyg6s.sbs/[/url] — это удобный способ доступа к ставкам. Оно позволяет игрокам обходить блокировки. Данная версия зеркала гарантирует высокую скорость и безопасность игр. Постоянно обновляйте ссылку на зеркало 1хбет для максимального использования.
Вы не правы. Я уверен. Пишите мне в PM, пообщаемся.
Казино mellstroy casino, [url=https://mellstroy-casino-7v2tb.cfd/]https://mellstroy-casino-7v2tb.cfd/[/url] предоставляет множество игр. Тут посетители подберут всё, что душе угодно. Можно попробовать покер на любой выбор.
Браво, эта великолепная мысль придется как раз кстати
mellstroy официальный сайт, [url=https://mellstroy-casino-pnb8.lol/]https://mellstroy-casino-pnb8.lol/[/url] предлагает разнообразные решения в сфере инженерии. Вы можете получить информацию о новых предложениях и оформить проконсультироваться на сайте.
Dansk casinoer er blevet meget populære lately, og blandt dem er bedste danske casinoer, [url=http://hiwell.my/spil-uden-om-rufus-en-guide-til-alternativer/]http://hiwell.my/spil-uden-om-rufus-en-guide-til-alternativer/[/url] en klar favorit. Gamblere vælger disse casinoer for beskyttelse og attraktive bonusser. Fremragende spiloplevelser venter.
Случайно зашел на форум и увидел эту тему. Могу помочь Вам советом.
зеркало 1хбет, [url=https://1xbet-yrfjj.xyz/]https://1xbet-yrfjj.xyz/[/url] позволяет пользователям обращаться всеми функциями сайта даже при блокировках доступа. Это эффективный способ оставаться в курсе всех событий. Пользование зеркала выглядит непроблематичным и осуществимым.
По моему мнению Вы допускаете ошибку. Давайте обсудим. Пишите мне в PM, пообщаемся.
сайт 1вин, [url=https://1win-9h45o.blog/]1win-9h45o.blog[/url] предлагает неповторимые возможности для участников. Здесь вы найдете широкий ассортимент азартных активностей, которые поразят даже высоких ценителей. Присоединяйтесь на сайте 1вин и испытайте свой выигрышный момент!
Любопытный вопрос
Любой ценители азартных развлечений найдут для себя на mellstroy casino сайт, [url=https://mellstroy-casino-eke7.click/]https://mellstroy-casino-eke7.click/[/url]. Это проект дарит большой множество игр и великодушные бонусы.
Welcome to JB Casino Online, [url=https://wordpress.frydenslund.dk/?p=1294473]https://wordpress.frydenslund.dk/?p=1294473[/url], where wagering meets fun. With a choice of activities, players can delight in table games and more. Join us and gain amazing prizes!
The domain of online casinos has considerably evolved over the past few years, creating exciting opportunities for players. With platforms like Casino Radar, [url=https://dev.yayprint.com/casino-radar-the-definitive-resource-for-casino-enthusiasts/]https://dev.yayprint.com/casino-radar-the-definitive-resource-for-casino-enthusiasts/[/url], participants can easily navigate this vibrant landscape. Discovering new casinos can be overwhelming, but Casino Radar streamlines the process, providing essential information and insights. As technology develops, the options available to wagering fans are expanding. From interactive sessions to mobile gaming on-the-go, the journey has never been more involving. Moreover, these platforms often offer bonuses that enhance player engagement and attract new participants. The significance of playing on a credible site cannot be overstated, and Casino Radar helps users choose wisely. In conclusion, with the right guidance, the online casino experience can be both amusing and profitable. Dive into the thrilling world of online gaming today!
Спасибо за помощь в этом вопросе, чем проще, тем лучше…
mellstroy официальный сайт, [url=https://mellstroy-casino-doo6.lol/]https://mellstroy-casino-doo6.lol[/url] предлагает широкий ассортимент услуг в ремонте. Здесь можете найти опытные решения для любого проекта. Заказчики ценят достоинство работы и индивидуальный подход. Выберите mellstroy, и ваши пожелания станут реальностью!
На мой взгляд, это интересный вопрос, буду принимать участие в обсуждении. Вместе мы сможем прийти к правильному ответу. Я уверен.
зеркало 1хбет, [url=https://1xbet-ed6nc.cyou/]1xbet-ed6nc.cyou[/url] является отличным решением для игроков, которые сталкиваются с блокировками. Оно позволяет получить доступ к любимым ставкам и событиям. Используйте заменяющий URL, чтобы преодолеть ограничения и наслаждаться игрой. Быстрый доступ и надежность — ключевые преимущества зеркала 1хбет.
Я извиняюсь, но, по-моему, Вы ошибаетесь. Могу это доказать. Пишите мне в PM, поговорим.
mellstroy casino, [url=https://mellstroy-casino-df9n0.top/]https://mellstroy-casino-df9n0.top[/url] предлагает разнообразный выбор азартных игр. Здесь вы сможете познать свою удачу в слотах. Каждый игрок найдет для себя что-то интересное особенное и увлекательное.
Жаль, что сейчас не могу высказаться – нет свободного времени. Вернусь – обязательно выскажу своё мнение.
зеркало 1хбет, [url=https://1xbet-tuwey.top/]1xbet[/url] – это важный инструмент для доступа к играм и ставкам. Такая платформа позволяет игрокам сохранять их азартные развлечения даже в случае блокировок. Легкий доступ к актуальным ссылкам позволяет безпроблемный игровой процесс.
Mange spillere søger efter det bedste online casino, [url=https://esvaapartamentoboutique.es/casino-uden-for-rofus-perspektiver-og-muligheder/]https://esvaapartamentoboutique.es/casino-uden-for-rofus-perspektiver-og-muligheder/[/url], hvor de kan finde underholdning og gode gevinster. Det er vigtigt at vælge et casino med pålidelige betalingsmetoder og effektive udbetalingsmuligheder. Desuden bør man analysere kundeservice og spillenes udvalg for at få den bedste oplevelse.
Вы не правы. Могу это доказать. Пишите мне в PM, пообщаемся.
На mellstroy официальный сайт, [url=https://mellstroy-casino-pas6.xyz/]https://mellstroy-casino-pas6.xyz/[/url] вы найдете сведения о создании. Мы предлагаем сервисы для различных стройок.
You actually make it seem really easy along with your presentation but I find this matter to be actually one thing that I believe I might never understand.
It sort of feels too complicated and very extensive for me.
I’m looking forward in your subsequent submit, I will try to get the grasp of it!
Извините, я удалил эту мысль 🙂
сайт 1вин, [url=https://1win-31z47.icu/]https://1win-31z47.icu[/url] предлагает пользователям уникальные возможности для азартных игр. Этот ресурс предоставляет широкий выбор различных игр и ставок. Каждый желающий может найти что-то по душе, независимо от подготовки. Уникальные бонусы добавляют привлекательность сайта 1вин. Игроки могут наслаждаться комфортным использованием и быстротой обработки ставок.
Браво, ваша мысль великолепна
mellstroy casino сайт, [url=https://mellstroy-casino-pas7.xyz/]https://mellstroy-casino-pas7.xyz[/url] предлагает широкий выбор игр на любой вкус. Здесь вы найдете азартные игры, которые порадуют не только новичков, но и опытных игроков. Удобный интерфейс и выгодные предложения делают процесс игры увлекательным.
online casino bets, [url=http://test.matieo.atthost24.pl/experience-the-best-of-online-gaming-with-spinfred/]http://test.matieo.atthost24.pl/experience-the-best-of-online-gaming-with-spinfred/[/url] give players the possibility to win big. Using the right strategy, bettors can maximize their chances of success.
JB Online Casino, [url=https://grap.com.pe/experience-the-thrill-of-gaming-at-jb-casino-2/]https://grap.com.pe/experience-the-thrill-of-gaming-at-jb-casino-2/[/url] offers a captivating experience for wagerers. With diverse selections of games, it caters to every liking. Incentives attract new players, while customer rewards keep them engaged. Join JB Online Casino today!
Solar inverters, [url=https://ark-rikkethomsen.dk/kommer-snart-2/]https://ark-rikkethomsen.dk/kommer-snart-2/[/url] are essential in converting the direct current generated by solar panels into usable electricity. This transformation ensures that homes can efficiently utilize solar energy.
Совершенно верно. Это хорошая мысль. Я Вас поддерживаю.
зеркало 1хбет, [url=https://1xbet-e81sp.click/]1xbet официальный сайт[/url] – это отличное решение для игроков, которые сталкиваются с блокировкой основной площадки. Заберите доступ к любимым играм и ставкам без трудностей. Легкость использования зеркала 1хбет порадует каждого пользователя.
Подтверждаю. Я согласен со всем выше сказанным.
Добро пожаловать в мир азартных игр! mellstroy casino, [url=https://mellstroy-casino-pyy2k.xyz/]https://mellstroy-casino-pyy2k.xyz[/url] предоставляет удивительные возможности для игрока. Здесь каждый человек может ощущать удовольствие в процессе игры. Исследуйте варианты слотов и развлечений.
Я думаю, что Вы не правы. Пишите мне в PM, обсудим.
У нас на mellstroy официальный сайт, [url=https://mellstroy-casino-ksd8.lol/]mellstroy-casino-ksd8.lol[/url] представлена информация о строительных услугах. Вы найдете надежные решения для постройки вашего учреждения. Мы служим высокий уровень в каждой задаче.
Всем привет!
Друзья и коллеги мои, есть ли что страшнее и непонятнее, когда не знаешь иностранный язык и не понимаешь его смысл?!
К нашей радости и счастью в наше интернетное и компьютеризированное время это не является проблемой.
Даже доступно онлайн, т.е. удаленно, можно не выходя из квартиры или офиса обратиться в надежную и профессиональную фирму с 15 летним стажем в городе Челябинске и Челябинской области и заказать необходимый перевод документов.
Различных документов и различных переводов множество, лучше конечно опрометчиво и неразумно не рисковать, ведь это же официальная документация.
В общем, если вам интересно найти, переводы, перевод документов, апостиль в Челябинске и т.д., например:
[url=https://www.lingvo-master.com/perevody-perevod-dokumentov-apostil/]нотариальный перевод паспорта[/url]
Тогда вам нужно прямо сейчас перейти на сайт Бюро переводов Lingvomaster Челябинск и узнать все подробности по устный перевод, перевод паспорта, нотариальный перевод, письменный перевод, перевод водительских, перевод аудиозаписи, консульская легализация, перевод видеозаписей в Челябинске и т.д. https://www.lingvo-master.com/perevody-perevod-dokumentov-apostil/ .
Обязательно переходите на сайт Бюро переводов Lingvomaster Челябинск, изучайте информацию и сохраняйте в закладки, не забудьте записать адрес сайта и номер телефона +7 (351) 247-00-53.
Есть ли что надежнее и серьезнее бюро переводов в Челябинской области и Челябинске? Переходите на сайт, посмотрите и сами убедитесь.
Всем пока!
Я пожалуй промолчу
официальный сайт 1xbet, [url=https://1xbet-w0dxc.icu/]https://1xbet-w0dxc.icu[/url] предлагает множество спортивных событий для ставок. Здесь доступны различные игры и опции. Регистрация на сайте легкая. Каждый гость найдет для себя.
Да, действительно. И я с этим столкнулся. Давайте обсудим этот вопрос. Здесь или в PM.
сайт 1вин, [url=https://1win-heyb9.buzz/]1win рабочее зеркало[/url] предлагает разнообразный выбор азартных игр. Здесь можно насладиться развлечениями в любое время. Гости оценят интуитивно понятный интерфейс и щедрые коэффициенты. Сайт 1вин предоставляет безопасность и сохраняет честность игр. Присоединяйтесь к вселенной азартных игр и получайте удовольствие новые возможности!
Вы не эксперт, случайно?
На сайте mellstroy casino представлен широкий выбор игр казино. Пользователи могут получить удовольствие от различных развлечениях и ощущать адреналин. Вход на mellstroy casino сайт, [url=https://mellstroy-casino-jsy0.click/]https://mellstroy-casino-jsy0.click/[/url] осуществляется быстро и удобно.
De bedste online casinoer, [url=https://www.fazaa.co/2026/03/21/danske-casino-uden-rofus-spil-sikkert-og/]https://www.fazaa.co/2026/03/21/danske-casino-uden-rofus-spil-sikkert-og/[/url] tilbyder en utrolig oplevelse for casinogæster. Med et væld af spil og fristende bonusser er der noget for enhver smag for alle. Udforsk de bedste online casinoer og begynd dit næste eventyr.
Браво, эта блестящая фраза придется как раз кстати
На mellstroy официальный сайт, [url=https://mellstroy-casino-ppp3.lol/]мелстрой бонус[/url] вы найдете широкий ассортимент строительных материалов. Уровень предложенных товаров вас обрадует. Мы гарантируем доступные цены и качественный сервис.
I’ve been surfing online for quite some time and finally
found this great article. It’s really informative and easy to understand.
Personally, this is one of the best resources I’ve seen on this topic.
If anyone is looking for a useful tool, you can check this website here:
https://topexecutor.com/
Great job!
ЗАБАВНО)))
В мире азартных игр, mellstroy casino, [url=https://mellstroy-casino-0bm1n.click/]https://mellstroy-casino-0bm1n.click[/url] заслуживает особого внимания. Это заведение предлагает привлекательный опыт для азартных людей. Удача может улыбнуться каждому, кто решит попробовать свои силы. Широкий выбор игр делает каждую сессию увлекательной. Не упустите шанс найти свой удачный момент в mellstroy casino.
online casino, [url=https://asesoreslym.com/2026/03/26/the-comprehensive-guide-to-zewudbet-your-go-to/]https://asesoreslym.com/2026/03/26/the-comprehensive-guide-to-zewudbet-your-go-to/[/url] presents a thrilling way to enjoy diverse games from the comfort of your home. Players can experience a wide range of options, including pokies, poker, and interactive sessions. The ease of online platforms allows for customizable gaming experiences, attracting gamblers worldwide.
Creating a Facebook business account, [url=http://www.one-point.kr/bbs/board.php?bo_table=free&wr_id=829280]http://www.one-point.kr/bbs/board.php?bo_table=free&wr_id=829280[/url] is essential for any modern business. Setting up a presence on social media allows companies to communicate with their audience effectively. A Facebook business account enables you to display your products and services, captivate potential customers, and cultivate brand loyalty. With over a multitude of billion users, Facebook provides a platform where your business can flourish.To initiate your Facebook business account, you need to go through the platform’s account setup page. After building the account, it’s vital to optimize your profile. This includes adding high-quality images and a captivating description that reflects your brand’s identity. Frequently posting content is crucial for maintaining engagement in your industry.Utilizing Facebook’s advertising tools can notably boost your reach. Aiming specific demographics ensures that your ads reach the right audience. Additionally, engaging with followers through comments and messages is a great way to build relationships. A well-managed Facebook business account is a powerful tool for driving sales and growing your online presence.
Специально зарегистрировался на форуме, чтобы сказать Вам спасибо за помощь в этом вопросе.
официальный сайт 1xbet, [url=https://1xbet-iqxv7.cyou/]1xbet-iqxv7.cyou[/url] предлагает широкий выбор спортивных состязаний для ставок. Пользователи могут использовать уникальными услугами, что делает опыт в рамках сайта интересным.
Thema’s voor volwassenen is breed beschikbaar op speciale platforms voor volwassenen. Kies
voor gegarandeerde bronnen voor veiligheid.
my web-site watch anal porn
Top adult websites bieden hoogwaardige inhoud voor volwassen entertainment.
Kies voor betrouwbare hubs voor een veilige en plezierige ervaring.
my site: lesbian porn videos
Thankfulness to my father who told me on the topic of this website, this webpage is genuinely remarkable.
Все куллл смотреть ))))всем
1win официальный сайт, [url=https://1win-qyita.xyz/]1win-qyita.xyz[/url] предлагает пользователям разнообразный выбор развлечений. В ассортименте представлены ставки на спорт, казино и множество игры. Все могут найти здесь нечто по своему вкусу и стать частью в увлекательном мире азартных игр.
ни че се коментов
На сайте mellstroy официальный сайт, [url=https://mellstroy-casino-ooo9.xyz/]mellstroy game официальный сайт[/url] можно посмотреть информацию о торговом ассортименте, которые предоставляются. В этом интернет-магазине представлены новые поступления, которые включат покупателей.
Совершенно случайное совпадение
официальный сайт 1xbet, [url=https://1xbet-ga0cv.xyz/]1xbet-ga0cv.xyz[/url] предлагает авторитетные возможности для игры. Здесь вы найдете большое количество вариантов. Регистрация проходит просто. Пользуйтесь интуитивно понятным интерфейсом для эффективности.
Лучше поздно, чем никогда.
mellstroy casino, [url=https://mellstroy-casino-47713.click/]mellstroy-casino-47713.click[/url] предлагает захватывающий опыт игры в азартные игры. Играя в это мир, вы можете выиграть заманчивые призы. Все игроки найдут нечто для себя. Не упустите возможность исследовать свои силы в mellstroy casino!
Når det kommer til den bedste danske casinoer, [url=http://lapaengenharia.com.br/bedste-casino-uden-rofus-oplev-friheden-ved-online-2/]http://lapaengenharia.com.br/bedste-casino-uden-rofus-oplev-friheden-ved-online-2/[/url], kan man få en helt fantastisk oplevelse. Spilleautomater af høj kvalitet eller dette omfattende udvalg tilbyder spænding for alle gambler. Besøg de mest populære online casinoer for opnå den oplevelse.
Какие слова… супер, замечательная фраза
официальный сайт 1xbet, [url=https://1xbet-x773c.sbs/]https://1xbet-x773c.sbs[/url] предлагает богатый выбор пари. Здесь возможно отыскивать актуальные предложения. Пользователи поблагодарят удобный интерфейс и несравненное качество обслуживания.
Точно в цель 🙂
На mellstroy официальный сайт, [url=https://mellstroy-casino-tre2.xyz/]mellstroy casino[/url] вы найдете множество предложений для реконструкции. Компания квалифицированно предоставляет доступные решения для вашего участка.
Play online casino, [url=https://blog.megaleiloes.com.br/the-rise-of-zaka-bet-an-overview-of-the-betting/]https://blog.megaleiloes.com.br/the-rise-of-zaka-bet-an-overview-of-the-betting/[/url] and experience the thrill of gaming from the comfort of your home. Delve into a variety of captivating games, including slots. Enjoy bonuses that enhance your gameplay!
JB Online Casino, [url=https://tkehealth.com/index.php/2026/03/25/exploring-the-excitement-of-jb-crypto-casino/]https://tkehealth.com/index.php/2026/03/25/exploring-the-excitement-of-jb-crypto-casino/[/url] offers a thrilling gaming experience. With a variety of games, players can explore slots, table games, and live dealer options. Plus, exciting bonuses enhance the fun, making it a popular destination for online gaming enthusiasts. Don’t miss out on the action!
En favorito mundo de los mejores casinos en lГnea, 1win casino, [url=https://tnbgo.com/an-exclusive-guide-incorporation-of-companies-in-singapore/]https://tnbgo.com/an-exclusive-guide-incorporation-of-companies-in-singapore/[/url] se destaca. Presenta exclusivas elecciones para entrenar. Su entorno es renombrada por su amplia gama de juegos. ВЎNo dudes en explorar 1win casino ahora mismo!
И что из этого следует?
mellstroy game сайт, [url=https://mellstroy-casino-ldi2.click/]mellstroy-casino-ldi2.click[/url] предлагает восторженные игры для приятного времяпрепровождения. Здесь любой найдет нечто по душе и узнает массу радости.
зачот !!!!
официальный сайт 1xbet, [url=https://1xbet-6alq5.top/]1xbet зеркало[/url] предлагает обширный выбор вариантов для любителей спорта. Здесь можно найти информацию о актуальных событиях и продвигать индивидуальные стратегии. Официальный сайт 1xbet гарантирует комфорт при участии.
Я думаю, что Вы допускаете ошибку. Предлагаю это обсудить. Пишите мне в PM.
На mellstroy официальный сайт, [url=https://mellstroy-casino-nbs8.lol/]https://mellstroy-casino-nbs8.lol/[/url] вы найдете данные о современных продуктах и предложениях. Мы предоставляем премиальное качество и особый подход к каждому клиенту. Не потеряйте шанс изучить все новинки на сайте.
Посвящается всем, кто ждал хорошего качества.
mellstroy casino, [url=https://mellstroy-casino-u3ilf.click/]mellstroy-casino-u3ilf.click[/url] предлагает уникальные возможности для азартных игр. Пользователи могут наслаждаться автоматами на различные темы и наградами. Сайт гарантирует безопасность и доступные бонусы. Присоединяйтесь к mellstroy casino и откройте мир увлекательного времяпрепровождения.
I dag tilbyder mange fantastiske online casinoer, men det bedste online casino, [url=https://thesellingmatrix.com/paypal-casino-uden-rufus-din-guide-til-sikker-4/]https://thesellingmatrix.com/paypal-casino-uden-rufus-din-guide-til-sikker-4/[/url] skiller sig særlig ud med underholdende spil og lokkende bonusser. Det er vigtigt at udvælge et casino, der sikrer sikkerhed for spillerne.
Должен Вам сказать Вы заблуждаетесь.
официальный сайт 1xbet, [url=https://1xbet-w63m5.xyz/]1хбет зеркало[/url] предлагает разнообразный выбор ставок для любителей игровых стратегий. Скорость работы платформы впечатляет. Регистрация на официальном сайте 1xbet не занимает много времени. Пользователи могут пользоваться разнообразными бонусами и акциями.
Я думаю, что Вы ошибаетесь. Могу отстоять свою позицию.
1win официальный сайт, [url=https://1win-jedev.cfd/]https://1win-jedev.cfd/[/url] предлагает широкие возможности для беттинга и азартных игр. На платформе вы найдете разные варианты ставок и опцию игр. Регистрация происходит быстро и просто, что делает комфортные условия для новых пользователей.
online casino bets, [url=https://quickrepairkolkata.in/experience-the-thrill-of-mrlucky9-casino-your/]https://quickrepairkolkata.in/experience-the-thrill-of-mrlucky9-casino-your/[/url] give exciting options for players seeking thrill and enjoyment. With numerous games available, participants can find something to enjoy.
Si buscas emociГіn, el casino stake, [url=http://gizmoweb.org/2017/05/incompiuto-siciliano-intervista-a-fosbury-architecture/9-ascensore-sutera-cl_mod/]http://gizmoweb.org/2017/05/incompiuto-siciliano-intervista-a-fosbury-architecture/9-ascensore-sutera-cl_mod/[/url] es el lugar ideal. AquГ puedes experimentar diferentes juegos de azar. AdemГЎs, la gama de opciones es sorprendente. AdГ©ntrate en un mundo de diversiГіn y obtГ©n premios increГbles. ВЎNo te lo pierdas!
Experience the thrill of gaming at JB Crypto Casino, [url=https://agency.evilsalesman.com/2026/03/25/discover-the-excitement-of-jb-casino-online-23/]https://agency.evilsalesman.com/2026/03/25/discover-the-excitement-of-jb-casino-online-23/[/url], where slots meet virtual money. Enjoy fantastic offers and reliable withdrawals. Join now!
Вы попали в самую точку. Мысль отличная, согласен с Вами.
На сайте mellstroy официальный сайт, [url=https://mellstroy-casino-fsr1.xyz/]mellstroy-casino-fsr1.xyz[/url] представлена информация о строительных услугах. Вы сможете найти с различными предложениями и ознать о нашей команде специалистов. Мы обеспечиваем высокое степень работ и персонализированный подход к каждому клиенту.
Конечно. Это было и со мной. Давайте обсудим этот вопрос.
официальный сайт 1xbet, [url=https://1xbet-u9duw.icu/]https://1xbet-u9duw.icu[/url] предлагает эксклюзивный опыт на любителей ставок. В этом месте вы найдете широкие варианты пари, с которыми воспользоваться в любое время.
You really make it seem so easy with your presentation but I find this matter to be really something
that I think I would never understand. It seems too complicated and very broad
for me. I’m looking forward for your next post, I’ll try to get the hang of it!
Вы не могли ошибиться?
В мире азартных игр mellstroy casino, [url=https://mellstroy-casino-kjpnu.sbs/]https://mellstroy-casino-kjpnu.sbs/[/url] предлагает уникальные возможности для игроков. Приемлемые условия, многообразные игровые опции и справедливые бонусы делают этот ресурс особенно привлекательным. mellstroy casino обеспечивает надежность и практичность для своих пользователей. Погружайтесь в мир эксклюзивных игр и радуйте себя!
Да, ответ почти такой же, как и у меня.
1win официальный сайт, [url=https://1win-jedev.cfd/]сайт 1вин[/url] предлагает пользователям разнообразный выбор опций и превосходный сервис. Удобный интерфейс позволяет доступно navigate интересные предложения.
Я извиняюсь, но, по-моему, Вы не правы. Давайте обсудим. Пишите мне в PM, пообщаемся.
mellstroy официальный сайт, [url=https://mellstroy-casino-bzq4.lol/]https://mellstroy-casino-bzq4.lol/[/url] предоставляет материалы о топовых решениях в сфере ремонта. На платформе вы найдете уникальные предложения и услуги для вашего проекта.
Надеюсь, Вы придёте к правильному решению. Не отчаивайтесь.
официальный сайт 1xbet, [url=https://1xbet-0wd77.icu/]https://1xbet-0wd77.icu/[/url] предлагает множество ставок на спортивные турниры. Удобный интерфейс и пользовательское управление содействуют процесс азартных игр. Регистрация на официальном сайте 1xbet недолгая, что делает его интересным выбором для любителей.
Я извиняюсь, но, по-моему, Вы допускаете ошибку. Пишите мне в PM.
mellstroy casino, [url=https://mellstroy-casino-u4bu1.cyou/]https://mellstroy-casino-u4bu1.cyou[/url] предлагает уникальный игровой опыт, увлекая пользователей в мир азартных удовольствия. Здесь представлены разнообразные слоты и настольные игры, что бы обеспечивает уникальный досуг. Играйте, анализируйте новые возможности, получая удовольствие от игры.
По всей вероятности. Скорее всего.
официальный сайт 1xbet, [url=https://1xbet-6sysm.cfd/]https://1xbet-6sysm.cfd[/url] предлагает широкий выбор игр. Пользователи могут воспользоваться комфортным интерфейсом и оперативными транзакциями. Зарабатывайте недвижимость прямо на сайте!
Я считаю, что Вы допускаете ошибку. Давайте обсудим это. Пишите мне в PM, пообщаемся.
На mellstroy официальный сайт, [url=https://mellstroy-casino-nlq2.click/]https://mellstroy-casino-nlq2.click/[/url] вы найдете описание о строительстве и ремонте. Каждый проект здесь выполнен с вниманием к особенностям. Специалисты гарантируют превосходное качество услуг.
Это — неожиданность!
1win официальный сайт, [url=https://1win-30dcm.buzz/]1win-30dcm.buzz[/url] предлагает пользователям уникальный опыт в мире игр. Сайт позволяет участвовать в различных акциях и получать бонусы.
Очень забавная штука
официальный сайт 1xbet, [url=https://1xbet-6re4e.cyou/]1xbet зеркало рабочее на сегодня[/url] предлагает богатый выбор развлечений на турниры. Пользователи могут находить интересные предложения для увеличения своих ресурсов.
Замечательно, весьма полезная мысль
На сайте mellstroy официальный сайт, [url=https://mellstroy-casino-gdt7.xyz/]https://mellstroy-casino-gdt7.xyz/[/url] вы найдете широкую информацию о строительных услугах в сфере строительства. Эксперты предлагают высокие стандарты в каждой работе.
Браво, великолепная мысль
Мир азартных игр манит многих, и mellstroy casino, [url=https://mellstroy-casino-ux2ad.click/]https://mellstroy-casino-ux2ad.click[/url] не исключение. Здесь можно ощутить адреналин. Ставки на рулетке доступна, принося уникальную атмосферу. Любой желающему испытать свою удачу лишь необходимо зарегистрироваться и войти.
Я думаю, что Вы ошибаетесь. Давайте обсудим это.
квіти з доставкою, [url=https://inspiring-narwhal-5e0b5e.netlify.app/]https://inspiring-narwhal-5e0b5e.netlify.app/[/url] — це швидкий спосіб здивувати близьких. Кожен букет може бути неповторним, адже його компоненти підбираються персонально. Замовлення доступне онлайн, а логістика забезпечить безпеку. Обирайте квіткові елементи з доставкою та насолоджуйтесь!
забавно))
1win официальный сайт, [url=https://1win-09wn0.cfd/]1 вин официальный[/url] предлагает многообразные ставок на спортивные игры и развлекательные мероприятия. Удобный интерфейс и доступные бонусы делают его популярным среди пользователей. Каждый найдет что-то для себя на этой арене.
Hey! Do you know if they make any plugins to assist with Search Engine Optimization? I’m trying
to get my blog to rank for some targeted keywords but I’m not
seeing very good gains. If you know of any please share.
Kudos!
Stop by my web page; เครดิตฟรี
И не говори)))))
Вас ждет мир азартных развлечений на сайте mellstroy casino официальный сайт, [url=https://mellstroy-casino-ncx8.xyz/]https://mellstroy-casino-ncx8.xyz[/url]. Здесь каждый посетитель может найти неповторимые игры, которые подарят удовольствие. Присоединяйтесь к клубу и выигрывайте!
Какая фраза… супер, замечательная идея
mellstroy casino, [url=https://mellstroy-casino-j1lg8.top/]https://mellstroy-casino-j1lg8.top/[/url] — это удивительное место для азартных игр. Развлечения здесь предлагают разнообразие игр. Забудьте не посетить уникальные скидки каждого дня!
Замечательно, это ценная фраза
mellstroy game сайт, [url=https://mellstroy-casino-rae9.click/]https://mellstroy-casino-rae9.click/[/url] предлагает уникальный воспитательный опыт для любителей игр. Здесь вы можете совершенствовать свои навыки и взаимодействовать с другими игроками. Присоединяйтесь к разнообразным уровням и становитесь гением в области игр.
Согласен, это замечательное мнение
mellstroy casino официальный сайт, [url=https://mellstroy-casino-maw7.click/]mellstroy-casino-maw7.click[/url] предлагает уникальные возможности для казино. Здесь вы найдете многообразие слотов, что формирует впечатления азарта. Присоединяйтесь к нам и наслаждайтесь захватывающими предложениями на mellstroy casino официальный сайт!
Абсолютно с Вами согласен. В этом что-то есть и идея отличная, поддерживаю.
Множество игр доступно в mellstroy casino, [url=https://mellstroy-casino-1lhp9.icu/]mellstroy gaming[/url]. Геймеры оценивают превосходный уровень обслуживания. Безопасность личных данных находится на первом месте.
Very soon this site will be famous amid all blogging people, due to it’s fastidious posts
Это будет последней каплей.
mellstroy casino официальный сайт, [url=https://mellstroy-casino-bag8.xyz/]mellstroy casino[/url] предлагает увлекательные игры, где испытать удачу. Опции разнообразны. Играйте любимые форматы и собирайте выигрыши. Не упустите шанс!
Spot on with this write-up, I actually believe that this website needs a great deal more attention. I’ll probably
be returning to read through more, thanks for the info!
здрасте всем!!!!!!!!!!
mellstroy game сайт, [url=https://mellstroy-casino-loo9.xyz/]mellstroy-casino-loo9.xyz[/url] предлагает уникальные возможности для развлечения. В данном проекте вы сможете получить различные приключения. Игровой процесс предлагает увлекательных моментов, которые порадуют любого игрока.
Everything is very open with a very clear description of the issues.
It was truly informative. Your website is useful.
Thank you for sharing!
Обалдеть!
mellstroy casino официальный сайт, [url=https://mellstroy-casino-baf1.click/]https://mellstroy-casino-baf1.click/[/url] предлагает игрокам богатый выбор игр. Здесь каждый желающий может найти что-то интересное. Поддержка пользователей работает круглосуточно, предоставляя поддержку в любое время.
неплохо для утра они выглядять
mellstroy casino, [url=https://mellstroy-casino-vcju2.top/]https://mellstroy-casino-vcju2.top[/url] предлагает обширный выбор ставок для любителей азартных увлечений. Каждый игрок найдет что-то по душе. Акции и награды добавляют адреналина к процессу игры!
люблю такое
1win официальный сайт, [url=https://1win-67z6z.top/]1win-67z6z.top[/url] предоставляет игрокам уникальные возможности для онлайн-ставок. Здесь вы найдете богатый выбор спортивных событий и игровых игр. Пользователи оценят комфортный интерфейс платформы.
online poker that takes united statesn express, winner slots uk and
casinos in central united kingdom, or best nz double down casino hack mod apk
– Andy – bonuses
online casino, [url=https://www.dsgnoverdose.com/the-ultimate-guide-to-mwos-betting-strategies-tips-87/]https://www.dsgnoverdose.com/the-ultimate-guide-to-mwos-betting-strategies-tips-87/[/url] offers an exciting avenue for bettors to enjoy their favorite games. With numerous options, users can reach slots, poker, and more from any time they like.
I dag er der mange fortræffelige muligheder for at spille online, og bedste online casinoer, [url=https://osusumetakuhai.info/casino-free-spins-idag-opdag-de-bedste-tilbud]https://osusumetakuhai.info/casino-free-spins-idag-opdag-de-bedste-tilbud[/url] tilbyder flere spil med interessante bonusser. Find de forskellige platforme for at finde dit ideelle casino.
аааааааааа сначала в кайф а потом так се…
mellstroy casino официальный сайт, [url=https://mellstroy-casino-lmv4.xyz/]https://mellstroy-casino-lmv4.xyz[/url] предлагает увлекательный опыт игры. Здесь можно множество игровых опций. Пользователи отмечают доступный интерфейс и богатый выбор промо.
british horse race betting online
My blog :: how to win dog racing bets (Jerri)
100% клево! Смотрю!
На mellstroy game сайт, [url=https://mellstroy-casino-dez5n.click/]mellstroy сайт[/url] вы найдете множество развлекательных возможностей. Уникальные события ждут вас. Все проекты здесь нацелены на улучшение навыков. Присоединяйтесь и наслаждайтесь уникальным введением!
best odds guaranteed horse racing
Here is my website: Greyhounds Fast Results
Я извиняюсь, но, по-моему, Вы не правы. Давайте обсудим.
1win официальный сайт, [url=https://1win-f2ns6.icu/]https://1win-f2ns6.icu/[/url] предоставляет пользователям широкие возможности для участия. Здесь можно найти акции и интуитивно понятный интерфейс, что гарантирует участие более удобным.
sportwetten ergebnisse vorhersage
Here is my blog post basketball wettarten Wetten
Эта отличная фраза придется как раз кстати
Добро пожаловать на арену игровых возможностей — mellstroy casino официальный сайт, [url=https://mellstroy-casino-hdt9.click/]https://mellstroy-casino-hdt9.click[/url]! Здесь каждый могут испытать широкий выбор развлечений, позволяющий насладиться уникальными вознаграждениями. Присоединяйтесь нашей приветливой компании игроков!
Доброго времени суток!
Самая хорошая и замечательная новость для девушек, женщин, а так же и для парней и мужчин!
Дорогие мужчины разве вам неприятно, когда от вашей любимой девушки или женщины веет необычными и приятными ароматами?
Да и всех девушек и женщин привлекают мужчины и парни, от которых исходят благоухание и необычные запахи.
К сожалению, в наше непростое и сложное время всевозможных реплик и подделок, очень сложно найти оригинальные духи и парфюмерию для женщин и мужчин.
К огромному счастью есть надежный и серьезный сайт, который занимается продажами оригинальных духов и парфюмерии уже более 15 лет.
В общем, если вам интересно найти, оригинальные духи, парфюмерия, духи, оригинальная парфюмерия и т.д., например:
[url=https://www.parfumpiter.ru/]giorgio armani купить[/url]
Тогда вам нужно прямо сейчас перейти на сайт Парфюм-Питер и узнать все подробности по женская парфюмерия, ароматы, женские духи, мужские духи, мужская парфюмерия, женские ароматы, мужские ароматы, винтажные духи, люксовые духи, лимитированные духи в Санкт-Петербурге и т.д. https://www.parfumpiter.ru/ .
Обязательно переходите на сайт Парфюм-Питер parfumpiter.ru, изучайте информацию и сохраняйте в закладки, не забудьте записать номера телефонов +7 (812) 970-76-80, +7 (499) 348-15-56 и адрес сайта.
Всем пока!
Норма..
На mellstroy game сайт, [url=https://mellstroy-casino-nxwti.sbs/]мелстрой официальный сайт[/url] вы найдете много увлекательных игр. Команда постоянно дополняют контент, предлагая интересные вызовы. Участвуйте в турнирах и зарабатывайте ачивки!
По моему мнению Вы не правы. Пишите мне в PM, поговорим.
1win официальный сайт, [url=https://1win-1ie8f.cyou/]https://1win-1ie8f.cyou[/url] предлагает уникальные возможности для азартных игроков. Данный ресурс предоставляет широкий выбор игр и востребованных ставок. Зарегистрируйтесь и наслаждайтесь потрясающими предложениями прямо сейчас!
Забавная информация
mellstroy casino официальный сайт, [url=https://mellstroy-casino-nar7.xyz/]https://mellstroy-casino-nar7.xyz/[/url] предлагает обширный выбор азартных игр. Здесь имеются слоты на любой предпочтение. Удобный функционал делает удовольствие максимально приятным. С присоединением к mellstroy casino официальный сайт, люди получат увлекательные эмоции и перспективу выиграть значительные суммы.
Play online casino, [url=http://apertasesama.com/casonoslot200313/descubre-el-diverso-mundo-de-mxjuegos-com-tu/]http://apertasesama.com/casonoslot200313/descubre-el-diverso-mundo-de-mxjuegos-com-tu/[/url] presents a exciting experience for gamers. Enjoy a variety of games, from poker to table games. By using bonuses and deals, players can increase their experience.
NГҐr du leder efter de fГёrende danske casinoer, er det vigtigt at fokusere pГҐ faktorer som game-tilbud, bonusser og kundesupport. De bedste danske casinoer, [url=https://amela.banddirector.com/den-nyeste-trend-krypto-kasinoer-i-danmark/]https://amela.banddirector.com/den-nyeste-trend-krypto-kasinoer-i-danmark/[/url] tilbyder en sikker spilleoplevelse og lokkende belГёnninger for spillere.
betting on the grand national online
Feel free to surf to my web-site https://grayhound-betting.com/
Извините за то, что вмешиваюсь… Я здесь недавно. Но мне очень близка эта тема. Могу помочь с ответом. Пишите в PM.
mellstroy casino сайт, [url=https://mellstroy-casino-8sbwq.top/]https://mellstroy-casino-8sbwq.top[/url] предлагает эксклюзивный опыт игры в приятной обстановке. Здесь каждый могут получить удовольствие многообразными играми и бонусами.
Великолепная идея
mellstroy casino официальный сайт, [url=https://mellstroy-casino-gat5.xyz/]https://mellstroy-casino-gat5.xyz[/url] предлагает обширный выбор игровых автоматов и богатый ассортимент ставок. Здесь вы можете найти все игровые возможности, чтобы организовать время с азартом.
Предлагаю Вам посетить сайт, на котором есть много информации на интересующую Вас тему.
1win официальный сайт, [url=https://1win-xujow.top/]https://1win-xujow.top[/url] предлагает превосходный опыт для всех любителей азартных игр. Здесь можно найти различные игры и опции для выигрыша. Преимущества платформы помогут поднять шансы на успех.
My brother suggested I might like this blog. He was totally right.
This post truly made my day. You can not imagine just how much time I had spent for
this information! Thanks!
Да я смотрю, ты тут уже местный..
1win официальный сайт, [url=https://1win-5lp53.cfd/]1win-5lp53.cfd[/url] предлагает разнообразный выбор игр. Каждый пользователь найдет что-то захватывающее для себя. Также предусмотрены привлекательные бонусы для новых пользователей.
о чудо!!!!!!!!!!!!!!!!!!!!
На mellstroy casino сайт, [url=https://mellstroy-casino-8yo65.lol/]мелстрой официальный[/url] каждый может найти увлекательные игры или интересные предложения. Казино предлагает щедрые бонусы вдобавок разные слоты. Погрузитесь в мир азартных игр прямо сейчас и начните выигрывать!
JB Online Casino, [url=http://tsc.appzugang.de/jbcasino25031/jb-casino-online-your-gateway-to-exciting-online/]http://tsc.appzugang.de/jbcasino25031/jb-casino-online-your-gateway-to-exciting-online/[/url] offers a captivating journey for gamers. Featuring an extensive selection of games, players can enjoy poker machines, table games, and real-time dealer games. Incentives and rewards enhance the fun, making JB Online Casino a top choice for a diverse audience. Join now for nonstop enjoyment!
online casino bets, [url=https://vintageclient.forixstage.com/blog/napoleon-casino-experien-de-joc-unic/]https://vintageclient.forixstage.com/blog/napoleon-casino-experien-de-joc-unic/[/url] provide participants the chance to win money from the comfort of their homes. By utilizing various games, enthusiasts can enjoy in exciting experiences anytime.
Восполнить пробел?
1win официальный сайт, [url=https://1win-pudav.top/]1win-pudav.top[/url] предлагает разнообразный выбор азартных игр и событий. Посетители могут наслаждаться удобным интерфейсом и легкими способами пополнения счета.
Mange spillere søger det bedste online casino, [url=https://engineeringlearningcenter.com/crypto-casinoer-en-ny-ra-af-spiloplevelse/]https://engineeringlearningcenter.com/crypto-casinoer-en-ny-ra-af-spiloplevelse/[/url], hvor de kan nyde sjove og spændende spil. Det er vigtigt at finde en platform, der tilbyder høj kvalitet spil og lukrative bonusser. At spille online giver mulighed at have den unikke atmosfære fra et casino hjemmefra.
ни че се коментов
1win официальный сайт, [url=https://1win-h1i9s.top/]1win-h1i9s.top[/url] предлагает множество возможностей для игроков. На этой платформе можно найти разные игры, интересные бонусы и интуитивно понятный интерфейс. Любой смогут испытать азартом!
Бесподобный ответ 😉
Играйте на mellstroy casino сайт, [url=https://mellstroy-casino-byr6.lol/]https://mellstroy-casino-byr6.lol[/url], где вы можете найти бомбические игры и зарабатывать шикарные призы. Удача будет на вашей стороне. Подключайтесь и наслаждайтесь захватывающим игровым процессом!
Прикольно, я тронут)
1win официальный сайт, [url=https://1win-aslkb.cyou/]1win-aslkb.cyou[/url] предлагает разнообразный выбор игр. Здесь можно делать ставки и получать адреналин. Посетите 1win официальный сайт и наслаждайтесь популярными играми.
мда , можно зделать маленький сборник
Желаете выяснить о обновлениях в мире игр? В таком случае mellstroy game сайт, [url=https://mellstroy-casino-xzs9.click/]mellstroy-casino-xzs9.click[/url] открывает вам оригинальные решения. На этой платформе вы найдете массу данных о актуальных играх. Следите за актуальных тенденций в мире развлечений.
Признателен за помощь в этом вопросе, как я могу Вас отблагодарить?
сайт 1вин, [url=https://1win-pvcnv.cyou/]https://1win-pvcnv.cyou[/url] предлагает богатый выбор азартных игр. Здесь каждый желающий может найти что-либо интересное для себя. Зарегистрироваться занимает всего пару минут. Присоединяйтесь к интересному миру 1вин и наслаждайтесь превосходным опытом игры!
online casino, [url=https://veekayindustries.co.in/discover-the-exciting-world-of-onlywin-casino-7/]https://veekayindustries.co.in/discover-the-exciting-world-of-onlywin-casino-7/[/url] provide a exciting experience for enthusiasts. With multiple games, users can enjoy table games. Protection measures ensure a secure environment for gaming.
Извините, топик перепутал. Удалено
mellstroy casino сайт, [url=https://mellstroy-casino-bus9.lol/]https://mellstroy-casino-bus9.lol[/url] предлагает разнообразные игры, где игроки могут играть в интересными автоматами. Сайт отличается удобством и новейшими технологиями.
Der er mange fremragende muligheder for at finde bedste online casinoer, [url=https://eugeniaguzman.com/casinionline23038/gratis-casino-bonus-uden-indbetaling-find-de/]https://eugeniaguzman.com/casinionline23038/gratis-casino-bonus-uden-indbetaling-find-de/[/url]. Deltagere kan nyde mange udvalg af tilbud. Uanset du vælger bordspil eller slots, vil du finde noget, der passer til dine interesser.
Very good info. Lucky me I came across your website by accident (stumbleupon).
I have book marked it for later!
Great post! I really enjoyed reading this article — it’s clear, informative, and well written. I appreciate the effort you put into creating valuable content. Keep up the good work!
кулллл…
сайт 1вин, [url=https://1win-weref.xyz/]https://1win-weref.xyz/[/url] предлагает эксклюзивные игры для удовольствия. Каждый желающий может найти что-то по своему вкусу и пропустить шанс на приз. Присоединяйтесь к пространству азартных игр на 1вин!
Я думаю, что Вы ошибаетесь. Давайте обсудим это. Пишите мне в PM.
1win официальный сайт, [url=https://1win-pvcnv.cyou/]https://1win-pvcnv.cyou/[/url] предоставляет широкий спектр азартных развлечений. Каждый посетитель найдет подходящие предложения. Кроме того, предусмотрены вознаграждения для новых игроков.
У меня похожая ситуация. Можно обсудить.
mellstroy game сайт, [url=https://mellstroy-casino-lmj2.xyz/]мелстрой бонус[/url] предлагает уникальные возможности для геймеров. Здесь доступно множество игр, которые порадуют как новичков, так и опытных игроков. Присоединяйтесь к сообществу и наслаждайтесь захватывающими моментами!
Не могу решить.
стоматология, [url=https://allon6-minsk.vercel.app/]allon6-minsk.vercel.app[/url] — это важная область медицины, которая занимается зубными проблемами. Постоянные визиты к стоматологу позволяют поддерживать крепость полости рта.
It’s perfect time to make some plans for the future and it’s time to be happy.
I have read this post and if I could I want to suggest you few interesting things or advice.
Maybe you could write next articles referring to this article.
I desire to read even more things about it!
Весьма ценная информация
The growth of cryptocurrency Shiba Inu, [url=https://coinstats.app/blog/how-to-stake-shiba-inu-shib/]https://coinstats.app/blog/how-to-stake-shiba-inu-shib/[/url] has attracted attention worldwide. This memetoken offers traders an exciting opportunity to engage in the ever-evolving crypto market.
I love how you make complex topics easy to follow. Excellent work!
Не могу сейчас принять участие в дискуссии – очень занят. Но скоро обязательно напишу что я думаю.
сайт 1вин, [url=https://1win-7we2k.buzz/]https://1win-7we2k.buzz[/url] предлагает оригинальные возможности для азартных игр. Здесь вы найдете большой выбор развлечений. Присоединяйтесь к глобальному сообществу и наслаждайтесь захватывающим процессом!
Конечно. Это было и со мной. Можем пообщаться на эту тему.
Добро пожаловать на территорию развлечений! На mellstroy casino сайт, [url=https://mellstroy-casino-bpr6.lol/]mellstroy game[/url] ищите множество развлечений. Каждая ставка дарит оригинальный опыт! Присоединяйтесь к фанам азартных игр уже сегодня!
Casino Utan Svensk Licens, [url=https://isoconferragens.com.br/casinon-utan-svensk-licens-en-guide-till-3/]https://isoconferragens.com.br/casinon-utan-svensk-licens-en-guide-till-3/[/url] erbjuder otroliga spelupplevelser där man slipper svenska regler. Detta casinon ger frihet och många förmåner för spelare. Casino Utan Svensk Licens blir en bred spelmiljö.
Блестящая мысль
1win официальный сайт, [url=https://1win-nbfbe.blog/]1win-nbfbe.blog[/url] предлагает широкий выбор игр для поклонников. Платформа удобен, что сделает процесс игры. Не упустите шанс освоиться в мир азартных игр.
Play online casino, [url=https://mediastudies.cdit.org/playio-casino-ihr-tor-zur-aufregenden-welt-des-2/]https://mediastudies.cdit.org/playio-casino-ihr-tor-zur-aufregenden-welt-des-2/[/url] and enjoy thrilling games from the comfort of your home. Engage in the excitement of roulette anytime. Through various platforms, you can score amazing rewards and bonuses. Don’t miss out!
live casinos not on gamstop, [url=https://cocinasiris.com/exploring-the-world-of-live-dealer-casinos-not-on/]https://cocinasiris.com/exploring-the-world-of-live-dealer-casinos-not-on/[/url] offer an exciting way to enjoy gambling. Players can experience real-time action with live dealers from the comfort of their homes. These establishments present various games, including blackjack, roulette, and poker, ensuring a vibrant atmosphere for those seeking entertainment plus thrilling experiences. Players appreciate the chance to play without restrictions, enhancing their gaming adventures. With a wide selection of tables, live casinos not on gamstop provide an ideal option for all enthusiasts looking for something unique along with engaging in their online gaming journey.
Замечательно, весьма ценная фраза
На сайте mellstroy game сайт, [url=https://mellstroy-casino-ppo3.click/]https://mellstroy-casino-ppo3.click[/url] вы найти много увлекательных игр для каждого возрастной категории. Также имеются рекомендации и подсказки по выбору развлекательного опыта.
Извините за то, что вмешиваюсь… У меня похожая ситуация. Можно обсудить. Пишите здесь или в PM.
1win зеркало сайта, [url=https://1win-jyi0s.top/]1win официальный[/url][url=https://1win-jyi0s.top/]https://1win-jyi0s.top[/url] позволяет пользователям получить доступ к выбранному контенту в любое место. Подобные ресурсы обеспечивают надежный доступ к играм и ставкам. Легко и удобно обращаться таким сервисом.
Послушайте.
A powerful file manager for Mac, [url=https://www.robloxforum.com/threads/tv-station-simulator.96770/?post_id=567206&nested_view=1#post-567206]https://www.robloxforum.com/threads/tv-station-simulator.96770/?post_id=567206&nested_view=1#post-567206[/url] is essential for handling files easily. This tool helps navigate your system, offering capabilities like quick search and flexibility.
Danskerne elsker at spille, og bedste danske casinoer, [url=http://word-press-env.eba-mtwp2m3c.us-west-2.elasticbeanstalk.com/2026/03/23/casino-uden-rufus-dansk-oplev-spil-uden-2/]http://word-press-env.eba-mtwp2m3c.us-west-2.elasticbeanstalk.com/2026/03/23/casino-uden-rufus-dansk-oplev-spil-uden-2/[/url] tilbyder en fantastisk oplevelse. Spillere kan finde mange spil, lige fra spillemaskiner til kortspil. Med attraktive bonusser og betalingsmuligheder er der noget for enhver smag. sikkerhed og tryghed er ogsГҐ i fokus, sГҐ spillere kan fokusere pГҐ at have det sjovt. Uanset om du er nybegynder eller erfaren, vil bedste danske casinoer tilfredsstille alle behov.
Браво, вас посетила замечательная мысль
На mellstroy casino сайт, [url=https://mellstroy-casino-lsd0.lol/]mellstroy промокод[/url] каждый ставит свои задачи и выбирает подходящие игры. Здесь легко найти увлекательные автоматы и традиционные карточные игры. Играйте на выигрыши и наслаждайтесь настроением побед!
НЕТ ПАЦАНЫ ТАК НЕЛЬЗЯ!
1win зеркало сайта, [url=https://1win-6lxcn.cyou/]1win рабочее зеркало[/url][url=https://1win-6lxcn.cyou/]https://1win-6lxcn.cyou[/url] позволяет игрокам получить доступ к любимым играм в любое время. Это решение гарантирует удобный способ пройти блокировки. При помощи такого зеркала, каждый могут наслаждаться азартными играми без ограничений.
Замечательно, это очень ценная штука
доставка цветов, [url=https://telegra.ph/Dostavka-cvetov-Dnepr-04-06]https://telegra.ph/Dostavka-cvetov-Dnepr-04-06[/url] является идеальным способом восхитить близкого человека. Ароматные букеты способны принести атмосферу праздника в любой момент. Разнообразие цветов разнообразный, что позволяет подобрать идеальный вариант. Не упустите шанс заказать доставку цветов и сделать день особенным!
Бесподобный топик, мне очень нравится ))))
1win официальный сайт, [url=https://1win-pc20g.xyz/]https://1win-pc20g.xyz[/url] предлагает удобный интерфейс для ставок. Здесь можно играть на все возможные события. Удобная служба поддержки всегда на связи. Каждый клиент оценит большой выбор развлечений. Бонусы и акции порадуют новых игроков.
Я считаю, что Вы допускаете ошибку. Давайте обсудим это. Пишите мне в PM.
Добро пожаловать на сервис mellstroy game сайт, [url=https://mellstroy-casino-tre8.click/]mellstroy casino[/url], где доступно погрузиться в пространство увлекательных приключений. Здесь ждут оригинальные возможности для развития и находок. Присоединяйтесь к нам и изучите все возможности современных заданий.
Casino Utan Svensk Licens, [url=https://seamarkamerica.com/casino-utan-svensk-licens-en-omfattande-guide-for/]https://seamarkamerica.com/casino-utan-svensk-licens-en-omfattande-guide-for/[/url] är en spännande väg för spelare som vill underhålla sig utan lokala restriktioner. Casino Utan Svensk Licens erbjuder diverse bonusar och förmåner som lockar erfarna kunder.
Добрый день!
Самая хорошая и замечательная новость для женщин, девушек, а так же и для парней и мужчин!
Дорогие мужчины разве вам неприятно, когда от вашей любимой девушки или женщины веет приятными и необычными ароматами?
Да и всех девушек и женщин привлекают парни и мужчины, от которых исходят благоухание и необычные запахи.
К сожалению, в наше сложное и непростое время подделок и всевозможных реплик, очень сложно найти оригинальные парфюмерию и духи для мужчин и женщин.
К огромному счастью есть серьезный и надежный сайт, который занимается продажами оригинальной парфюмерии и духов уже более 15 лет.
В общем, если вам интересно найти, парфюмерия, духи, оригинальная парфюмерия, оригинальные духи и т.д., например:
[url=https://www.parfumpiter.ru/]Парфюм-Питер[/url]
Тогда вам нужно прямо сейчас перейти на сайт Парфюм-Питер и узнать все подробности по ароматы, женские духи, мужские духи, женская парфюмерия, мужская парфюмерия, женские ароматы, мужские ароматы, винтажные духи, люксовые духи, лимитированные духи в Санкт-Петербурге и т.д. https://www.parfumpiter.ru/ .
Обязательно переходите на сайт Парфюм-Питер parfumpiter.ru, изучайте информацию и сохраняйте в закладки, не забудьте записать номера телефонов +7 (812) 970-76-80, +7 (499) 348-15-56 и адрес сайта.
До новых встреч!
ето точно круто
1win зеркало сайта, [url=https://1win-egchy.top/]https://1win-egchy.top/[/url][url=https://1win-egchy.top/]1 win официальный сайт[/url] позволяет пользователям обходить блокировки и получать доступ к любимым сервисам. Оно является надежным инструментом для клиентов, обеспечивая быстрый вход в аккаунт. Задействуя 1win зеркало сайта, вы можете наслаждаться всевозможными платформы без ограничений, поскольку удобно и эффективно.
online casino bets, [url=http://www.shitara-trail.jp/%e6%9c%aa%e5%88%86%e9%a1%9e/152663.html]http://www.shitara-trail.jp/%e6%9c%aa%e5%88%86%e9%a1%9e/152663.html[/url] offer players a unique chance to experience excitement and entertainment. These bets provide numerous options, allowing everyone to find something fun. Engaging in online casino bets can result in thrilling moments and potential rewards.
Браво, фантастика ))))
mellstroy casino сайт, [url=https://mellstroy-casino-ksu6.xyz/]mellstroy game[/url] предлагает уникальные возможности для любителей азартных игр. Здесь вы найдете разнообразные игр, способных удовлетворить любые предпочтения. Также, доступные бонусы приятно удивляют новых игроков. Каждый сможет насладиться захватывающим игровым процессом в комфортной обстановке.
live casino not on gamstop, [url=https://www.simkarled.com/live-dealer-casinos-not-on-gamstop-your/]https://www.simkarled.com/live-dealer-casinos-not-on-gamstop-your/[/url] offers a unique experience for players seeking excitement. Participants can experience a multitude of games without limitations. This opportunity ensures fun and delight for all.
Конечно. Я присоединяюсь ко всему выше сказанному. Давайте обсудим этот вопрос. Здесь или в PM.
1win официальный сайт, [url=https://1win-pc20g.xyz/]https://1win-pc20g.xyz/[/url] предлагает широкий выбор ставок на спортивные события, который позволяет пользователям увлекаться азартом. Процесс регистрации простая и быстрая, а интерфейс интуитивно понятен. Такой идеальный выбор для любителей беттинга.
жестоко!очень жестоко.
mellstroy game сайт, [url=https://mellstroy-casino-qwe4.xyz/]мелстрой геймс[/url] предлагает уникальные возможности для игроков. На этом портале доступно множество приключений, которые помогут улучшить ваши навыки. Играйте, чтобы насладиться захватывающим опытом.
bedste online casino, [url=https://www.reviews.ac/bonus-uden-indbetaling-en-guide-til-online-2/]https://www.reviews.ac/bonus-uden-indbetaling-en-guide-til-online-2/[/url] tilbyder en fantastisk oplevelse med spændende spilmuligheder. Det er muligt at finde et kasinoer, der præsenterer fordele til nye spillere. Underholdning i sikker online miljø.
Att spela på casino utan svensk licens, [url=https://createdgetoys.com/casino-utan-spelpaus-en-alternativ-varld-av-spel/]https://createdgetoys.com/casino-utan-spelpaus-en-alternativ-varld-av-spel/[/url] erbjuder en spännande upplevelse för många. Hos dessa sajter finns ofta ett stort utbud av spel som tilltalar spelare från hela världen. Dessutom går det att upptäcka attraktiva kampanjer, som förstärker chansen att vinna stort. Men tänk att nackdelarna med att spela på casino utan svensk licens kan vara stora, så spela med eftertanke.
Полностью разделяю Ваше мнение. В этом что-то есть и мне нравится Ваша идея. Предлагаю вынести на общее обсуждение.
1win зеркало сайта, [url=https://1win-zvo7k.icu/]https://1win-zvo7k.icu/[/url][url=https://1win-zvo7k.icu/]1win-zvo7k.icu[/url] предоставляет доступ к играм и ставкам даже в сложных ситуациях. Ресурсы таких поставщиков часто подвергаются блокировкам, что делает вторичные варианты крайне важными. Копия сайта обеспечивает стабильный доступ к любимым услугам.
В этом что-то есть. Я согласен с Вами, спасибо за помощь в этом вопросе. Как всегда все гениальное просто.
mellstroy casino сайт, [url=https://mellstroy-casino-kao2.lol/]https://mellstroy-casino-kao2.lol/[/url] предлагает уникальные возможности для геймеров. Здесь вам предложат широкий спектр игровых автоматов и подходов.
Я считаю, что это очень интересная тема. Предлагаю Вам это обсудить здесь или в PM.
1win официальный сайт, [url=https://1win-8pluf.top/]https://1win-8pluf.top[/url] включает обширный ассортимент сервисов на спортивные события. Клиенты имеют возможность просто делать пары и восторгаться всевозможными предложениями платформы.
Я извиняюсь, но, по-моему, Вы ошибаетесь. Могу это доказать. Пишите мне в PM, обсудим.
На mellstroy game сайт, [url=https://mellstroy-casino-bgr9.click/]mellstroy-casino-bgr9.click[/url] вы найдете множество программ. Игра предлагает оригинальные возможности для строительства своих локаций. Погружение в атмосферу захватывающе и занимательно.
Пока просто буду знать))))
1win официальный сайт, [url=https://1win-zvo7k.icu/]1win-zvo7k.icu[/url] предоставляет широкие возможности для беттинга. Тут вы найдете многообразные спортивные события и выгодные акции. Простой интерфейс добавляет легкости использования. Присоединяйтесь к монинга ставок с 1win!
Playing at an online casino, [url=https://www.marryadevotee.com/vaishnavism/the-future-of-online-betting-with-qwick-bet/]https://www.marryadevotee.com/vaishnavism/the-future-of-online-betting-with-qwick-bet/[/url] provides a thrilling experience. Users can take pleasure in various games, from slots to poker. The enjoyment of winning big is unmatched. Join the fun today!
high limit roulette, [url=http://www.domopet.it/high-stakes-roulette-sites-a-guide-to-the-best-3/]http://www.domopet.it/high-stakes-roulette-sites-a-guide-to-the-best-3/[/url] is a thrilling game that players may place large bets. This game offers an exciting atmosphere and the possibility to win big. With high rollers, the stakes are increased, making each spin an exhilarating experience.
Какой занимательный вопрос
mellstroy casino сайт, [url=https://mellstroy-casino-lsd2.click/]mellstroy-casino-lsd2.click[/url] предлагает игрокам множество увлекательных игр а также захватывающих функций. Посетители могут наслаждаться широким выбором слотов и настольных игр в любое время. Служба поддержки всегда на связи для решения любых вопросов.
Att spela på online casinon ger en unik upplevelse. Många föredrar casino utan svensk licens, [url=https://xn--12cati8bfyq4b3bnv4e9ae5e9adg7unf7dn.com/spela-utan-konto-en-ny-era-av-online-spelande-21/]https://xn--12cati8bfyq4b3bnv4e9ae5e9adg7unf7dn.com/spela-utan-konto-en-ny-era-av-online-spelande-21/[/url] för att få högre bonusar och frihet. Det är viktigt att vara medveten om regler och säkerhet när man spelar.
Tһank you, I’ve recently been looking for info approxіmаtely
this ѕubject for a long time and yours is the greatest
I have came upon till now. Howeveг, what in regards to the bottom
ⅼine? Are you certain about the source?
NГҐr det kommer til at finde de bedste online casinoer, [url=http://i-tie.jp/?p=42248]http://i-tie.jp/?p=42248[/url], er det nГёdvendigt at overveje tryghed og spiltyper. Ydermere er kundeservice en vigtig faktor for en god oplevelse.
Сколько угодно.
1win официальный сайт, [url=https://1win-rj6p3.cfd/]https://1win-rj6p3.cfd[/url] предлагает множество возможностей для развлечений. Игроки могут наслаждаться разнообразными азартными играми и играми. Легкий в использовании интерфейс облегчает легко ориентироваться и находить необходимые разделы. На 1win официальный сайт всегда востребованные предложения, которые удовлетворят любого игрока.
Огромное спасибо за объяснение, теперь я не допущу такой ошибки.
mellstroy game сайт, [url=https://mellstroy-casino-iuy1.lol/]мелстрой бонус[/url] – На сайте mellstroy game вы найдете множество увлекательных игр развлечений. Здесь можно найти уникальные проекты, которые предоставят шанс вам поразвлечься. В каждой игра имеет неповторимый сюжет и интересный геймплей.
Вы ошибаетесь. Давайте обсудим. Пишите мне в PM.
1win официальный сайт, [url=https://1win-qlzkq.cfd/]1win рабочее[/url][url=https://1win-qlzkq.cfd/]сегодня 1win[/url] предлагает пользователям уникальные возможности для азартных игр. На платформе вы найдете широкий выбор игр, в числе которых казино, спорт и многое другое. Простой интерфейс позволяет легко ориентироваться по сайту. Присоединяйтесь к миллионам и начните выигрывать уже сегодня!
You are so interesting! I do not believe I have read through anything like this before.
So wonderful to discover someone with genuine thoughts on this topic.
Really.. thanks for starting this up. This site is something that is needed
on the internet, someone with a bit of originality!
how to place a horse racing bet online
Feel free to surf to my blog post … Uk Dog racing
Я считаю, что Вы ошибаетесь. Могу это доказать. Пишите мне в PM.
mellstroy casino сайт, [url=https://mellstroy-casino-vas4.xyz/]https://mellstroy-casino-vas4.xyz/[/url] предлагает игрокам уникальные возможности для азартных развлечений. Здесь вы найдете разнообразные слоты и старинные карточные игры. Регистрация не требует усилий, а интересные предложения сделают игру еще увлекательнее.
Так не пойдет.
1win официальный сайт, [url=https://1win-q9erg.cfd/]https://1win-q9erg.cfd/[/url][url=https://1win-q9erg.cfd/]https://1win-q9erg.cfd/[/url] предлагает игрокам множество шансов для увлечения. Здесь вы сможете получить удовольствие различными размерами и предложениями. Регистрация выполняется быстро и просто.
Подтверждаю. Всё выше сказанное правда. Давайте обсудим этот вопрос.
1win официальный сайт, [url=https://1win-vr3xg.xyz/]1win сайт[/url] предлагает широкий выбор игр для любителей азартных игр. Здесь вы найдете все необходимое для увлекательного времяпрепровождения. Регистрация на 1win официальном сайте легка, что позволяет мгновенно погрузиться в мир эмоций.
Play online casino, [url=https://eparchitecture.com/radiante-casino-diversion-y-aventura-desde-casa/]https://eparchitecture.com/radiante-casino-diversion-y-aventura-desde-casa/[/url] and immerse yourself in a world of excitement. Enter thrilling games that keep you on the edge of your seat. Earning big is just a click away, while entertaining features enhance your play. Join now and launch your adventure!
high roller roulette, [url=https://lakefrontmarine.ca/high-roller-roulette-the-ultimate-guide-to-high-2/]https://lakefrontmarine.ca/high-roller-roulette-the-ultimate-guide-to-high-2/[/url] attracts affluent gamblers seeking entertainment. The environment is filled with anticipation, and the stake levels are significantly higher than in regular games. This prestigious experience offers extra perks that enhance the overall experience. High roller roulette players can delight in a lavish gambling journey that rarely matches in other games.
Att spela på onlinecasinon kan vara både underhållande och fördelaktigt. Många söker vägar inom casino utan svensk licens, [url=https://globalhandsfoundation.com/casinon-utan-konto-en-ny-era-av-spelande-12/]https://globalhandsfoundation.com/casinon-utan-konto-en-ny-era-av-spelande-12/[/url] för att njuta av ett bredare sortiment av underhållning.
Добрый день!
Хорошая и полезная новость для производства и промышленности!
Санкции, кризис, всевозможные блокировки и запреты должны были ввести экономику России в упадок и стагнацию.
А вот и нет, благодаря смекалки и оперативности на Российском рынке появились надежные и новые компании.
Вернее стабильные и маститые бренды вошли на освободившийся российский рынок.
Гарантия, цены и сервис стали решающим моментов в выборе серьезного и надежного поставщика оборудования и станков для промышленности.
В общем, если вы хотите найти, оборудование, станки, обработка металла, обработка поверхностей и т.д., например:
[url=https://emtrpe.com/]технологическая обработка металлов[/url]
Тогда вам срочно нужно прямо сейчас перейти на сайт EMT – Engineering & Manufacturing Technologies и узнать все подробности по производственные технологии, инженерные технологии, технологии обработки металлов, станки для обработки металла, оборудование для обработки металла в Москве и т.д. https://emtrpe.com/ .
Обязательно переходите на сайт EMT – Professional Metal Processing & Surface Treatment Solutions, изучайте информацию и сохраняйте в закладки, не забудьте записать бесплатный номер телефона 8 (800) 201-52-88 и адрес сайта.
Всем пока!
Very informative content — simple, well written, and easy to understand. Keep it up!
Какая великолепная фраза
1win официальный сайт, [url=https://1win-oh0if.buzz/]1win-oh0if.buzz[/url][url=https://1win-oh0if.buzz/]https://1win-oh0if.buzz[/url] предлагает пользователям разнообразные варианты. Оформление удобен и позволяет быстро искать нужные категории. Посетители могут наслаждаться быстрыми ставками и выигрышами.
Danmark har mange fremragende casinoer, men de bedste danske casinoer, [url=https://www.silverbackmall.com/casinionline24039/spil-casino-uden-om-rufus-en-guide-til-20/]https://www.silverbackmall.com/casinionline24039/spil-casino-uden-om-rufus-en-guide-til-20/[/url] skiller sig ud. Her kan du se et reto udvalg af spil og fristende bonusser, som giver stor moro. BesГёg dem i dag!
Я извиняюсь, но, по-моему, Вы ошибаетесь. Давайте обсудим это. Пишите мне в PM, пообщаемся.
mellstroy casino сайт, [url=https://mellstroy-casino-oso1.xyz/]mellstroy game сайт[/url] предлагает игрокам уникальные возможности для развлечения и выигрышей. Здесь вы найдете разнообразный выбор игр, представляющие слоты, рулетку и покер. Платформа интересует клиентов щедрыми бонусами и акциями, что делает процесс игры еще более увлекательным. Кроме того, mellstroy casino сайт предлагает простой интерфейс и надежную поддержку для всех пользователей. Наслаждайтесь азартом и возможностью выигрыша!
Все понравились!
На mellstroy game сайт, [url=https://mellstroy-casino-ooo0.click/]мелстрой официальный сайт[/url] вы можете найти множество игр, которые предоставят вам занимательные эмоции. Каждый игрок найдет что-то для себя. Познайте удивительный мир развлечений!
Рекомендую Вам зайти на сайт, где есть много информации на интересующую Вас тему.
1win официальный сайт, [url=https://1win-e93yq.top/]https://1win-e93yq.top[/url][url=https://1win-e93yq.top/]1win вход[/url] предлагает уникальные возможности для азартных игроков. На этом ресурсе вы найдете множество вариантов. Простота использования делает сайт привлекательным для новичков.
Att spela på onlinecasinon utan en lokal licens kan vara utmanande. För hundratals spelare erbjuder casino utan svensk licens, [url=https://janseverhuizingen.nl/casino-utan-svensk-licens-en-guide-till-alternativ-2/]https://janseverhuizingen.nl/casino-utan-svensk-licens-en-guide-till-alternativ-2/[/url] högre valmöjligheter och erbjudanden, men man bör alltid ha sinnesnärvaro.
online casino bets, [url=https://destinationfly.com/rara-bet-your-ultimate-betting-experience-13/]https://destinationfly.com/rara-bet-your-ultimate-betting-experience-13/[/url] provide a unique way to win money from the comfort of your home. Players can choose various entertainment to enhance their experience.
high roller roulette, [url=http://koncerty.one.pl/koncerty.xx.pl/2026/03/the-thrill-of-high-stakes-online-roulette-chasing/]http://koncerty.one.pl/koncerty.xx.pl/2026/03/the-thrill-of-high-stakes-online-roulette-chasing/[/url] это популярной РёРіСЂРѕР№ для РёРіСЂРѕРєРѕРІ. РРіСЂРѕРєРё выбирают высокие ставки, что гарантирует захватывающий опыт. РџРѕРґРѕР±РЅРѕРµ увлечение привлекает Рё интерес, формируя атмосферу роскоши.
Обалдеть!
На mellstroy casino сайт, [url=https://mellstroy-casino-kua8.click/]https://mellstroy-casino-kua8.click[/url]е вы найдете разнообразие игр на любой вкус. Эффектная графика и простой интерфейс делают игровой процесс приятным.
Какая прелестная фраза
В портале mellstroy game сайт, [url=https://mellstroy-casino-yyt8.xyz/]https://mellstroy-casino-yyt8.xyz/[/url] можете найти множество интересных игр, которые способствуют игрокам погрузиться в атмосферу увлекательных занятий. Присоединяйтесь или проведите часами с mellstroy game сайт.
ШпасибО поюзаем)
1win официальный сайт, [url=https://1win-au55a.blog/]1вин зеркала[/url][url=https://1win-au55a.blog/]https://1win-au55a.blog/[/url] предлагает удобную платформу для пари. Здесь вы испытаете разнообразный выбор игровых возможностей.
Hvis du søger efter et udmærket sted at spille, er bedste online casino, [url=https://www.syndicatelife.com/spil-trygt-casino-uden-rofus-med-trustly]https://www.syndicatelife.com/spil-trygt-casino-uden-rofus-med-trustly[/url] det perfekte valg. Her kan du nyde en række underholdninger og kampagner, der tilbyder sjove stunder!
Att många möjligheter i fråga om casino utan svensk licens, [url=https://relleinc.com/wp/2026/04/06/casino-utan-licens-allt-du-behover-veta-1642915184/]https://relleinc.com/wp/2026/04/06/casino-utan-licens-allt-du-behover-veta-1642915184/[/url]. Spelare kan upptäcka ta del av flera typer av spel och dessutom incitament.
По моему мнению, это — неправда.
1win официальный сайт, [url=https://1win-x6uip.buzz/]https://1win-x6uip.buzz/[/url][url=https://1win-x6uip.buzz/]1win casino[/url] предлагает интуитивно понятный интерфейс для любителей ставок. Здесь вы найдете разнообразные предложения спортивных событий и различных игр. Зайдите и начните!
Hi to every , as I am really eager of reading this webpage’s post to be updated on a regular basis.
It carries fastidious stuff.
В этом что-то есть. Теперь стало всё ясно, большое спасибо за помощь в этом вопросе.
mellstroy game сайт, [url=https://mellstroy-casino-uus8.lol/]мелстрой промокод[/url] предлагает эксклюзивные возможности для игроков. Здесь доступно подключиться в интересные миры, здесь ожидают необычные вызовы и приключения. Погружайтесь в игру и наслаждайтесь качественным контентом на mellstroy game сайт!
online casino, [url=https://cosmoselectrodes.in/2026/03/26/roo-casino-your-guide-to-exciting-online-gambling/]https://cosmoselectrodes.in/2026/03/26/roo-casino-your-guide-to-exciting-online-gambling/[/url] offers a dynamic experience for players. With numerous games available, every bettor can find their preferred pastime. Incentives further enhance the entertainment of the game.
roulette casinos, [url=https://quintadascarpas.com/roulette-real-money-strategies-to-boost-your/]https://quintadascarpas.com/roulette-real-money-strategies-to-boost-your/[/url] provide a thrilling experience for players. With multiple betting options and enthralling gameplay, they draw enthusiasts from around the world. While you’re a newcomer or a seasoned gambler, roulette casinos promise endless fun and excitement.
Это просто бесподобное сообщение 😉
1win официальный сайт, [url=https://1win-je2mx.cfd/]https://1win-je2mx.cfd[/url][url=https://1win-je2mx.cfd/]1win рабочее зеркало[/url] предлагает увлекательные возможности для поклонников ставок. Здесь можно сделать прогнозы на различные турниры и наслаждаться логичным интерфейсом. Пользователи получают доступ к привлекательным акциям и бонусам.
casino utan svensk licens, [url=https://clearinghouseaccucheck.com/casinon-utan-svensk-licens-fordelar-och-nackdelar-6/]https://clearinghouseaccucheck.com/casinon-utan-svensk-licens-fordelar-och-nackdelar-6/[/url] erbjuder möjligheter för spelare att uppleva många spel. Här kan man få fräscha spelautomater och bordsspel utan strikta regler. Casino utan svensk licens erbjuder en unik upplevelse som lockar otroligt många.
Мда,
В увлекательном портале mellstroy game сайт, [url=https://mellstroy-casino-aap3.xyz/]mellstroy-casino-aap3.xyz[/url] получить огромное количество информации о интересных развлечениях. Начните свое знакомство с пространством игр!
bedste online casinoer, [url=https://www.ideiaconsumerinsights.com.br/forstelse-af-mga-casino-licenser-alt-du-behov-for/]https://www.ideiaconsumerinsights.com.br/forstelse-af-mga-casino-licenser-alt-du-behov-for/[/url] – NГҐr du sГёger efter de fineste online casinoer, er det vigtigt at se pГҐ faktorer som bonusser, spiludvalg og beskyttelse. Det er altid fornuftigt at lГ¦se anmeldelser for at finde de bedste online casinoer for din spilleoplevelse.
This paragraph will assist the internet viewers for building up new weblog or
even a weblog from start to end.
Очень ценная фраза
Sentox Solutions Review, [url=https://armstrongspinningmills.com/sentox-solutions-review/]https://armstrongspinningmills.com/sentox-solutions-review/[/url] reveals a thorough analysis of modern business needs. Their products cater to various industries, providing cutting-edge strategies for growth. With a demonstrated track record, they ensure customer satisfaction.
суппер )))) посотрите – непожелеете
1win официальный сайт, [url=https://1win-olj6p.buzz/]1win-olj6p.buzz[/url][url=https://1win-olj6p.buzz/]https://1win-olj6p.buzz[/url] создает широкий спектр развлечений для любителей азартных событий. Простота эксплуатации платформы делает развлечения доступными для людей.
Betting at an online casino can be an exciting adventure. With multiple games available, players can enjoy their favorite activities from the comfort of home. Play online casino, [url=https://valueecoserv.cndd.ro/explore-the-world-of-secretbet-your-ultimate-2/]https://valueecoserv.cndd.ro/explore-the-world-of-secretbet-your-ultimate-2/[/url] and explore your luck today!
roulette with real money, [url=https://joinarc.dmwhizz.com/winning-strategies-for-real-money-roulette-6/]https://joinarc.dmwhizz.com/winning-strategies-for-real-money-roulette-6/[/url] – Playing the roulette game with real money can be an incredible experience. The chance of winning large sums makes it alluring to many players. Always be cautious of your budget!
Конечно. Я согласен с Вами.
1win официальный сайт, [url=https://1win-tgb4q.buzz/]https://1win-tgb4q.buzz[/url][url=https://1win-tgb4q.buzz/]сайт 1 вин[/url] предлагает своим пользователям широкий выбор игр и ставок. Здесь вы сможете уютно устроиться с разнообразные варианты для увлекательного отдыха. Интерфейс удобен и легок в освоении, что дает возможность делать ставки упрощенно. Не упустите шанс обратиться к 1win официальный сайт!
Я присоединяюсь ко всему выше сказанному.
MTProxy for Telegram, [url=https://proxytg.com/]proxytg.com[/url] позволяет пользователям обходить блокировки и обеспечивать безопасность связи. Такой прокси-сервер обеспечивает надежный доступ к мессенджеру, маскируя данные. Установка MTProxy for Telegram удобная, что делает его распространенным выбором среди пользователей.
Danmark tilbyder fascinerende muligheder for spil. De bedste danske casinoer, [url=https://ladysellya-invest.com/archives/50423]https://ladysellya-invest.com/archives/50423[/url] leverer fremragende oplevelser til spillere. Her kan du nyde sikre miljøer og forskellige spil. Uanset hvad du foretrækker, vil du finde det hos bedste danske casinoer.
И что бы мы делали без вашей замечательной идеи
1win зеркало сайта, [url=https://1win-l1b6i.buzz/]https://1win-l1b6i.buzz/[/url][url=https://1win-l1b6i.buzz/]1win-l1b6i.buzz[/url] — это альтернативный путь для доступа к платформе. Данный ресурс позволяет избегать блокировки а также открывает пользователям все те же функции. Геймеры имеют возможность наслаждаться развлечениями без каких-либо ограничений.
Мне очень жаль, что ничем не могу Вам помочь. Надеюсь, Вам здесь помогут.
велпатасвир купить, [url=https://doctorsforum.ru/viewtopic.php?f=268&t=48507]https://doctorsforum.ru/viewtopic.php?f=268&t=48507[/url] можно в специализированных аптеках или интернет-магазинах. Этот препарат является эффективным средством в борьбе с hepatitis C. Стоит обратиться к врачу перед началом использования.
online casino bets, [url=https://blog.megaleiloes.com.br/discover-the-excitement-of-royal138-a-premier/]https://blog.megaleiloes.com.br/discover-the-excitement-of-royal138-a-premier/[/url] give players the option to earn big jackpots. With numerous games available, enthusiasts can engage anytime, anywhere.
Вы допускаете ошибку. Пишите мне в PM.
1win зеркало сайта, [url=https://1win-npoys.buzz/]зеркало 1 вин[/url][url=https://1win-npoys.buzz/]ван вин[/url] — это отличный способ получить доступ к любимым играм. Геймеры могут продолжать наслаждаться видами спорта даже в случае блокировки основного ресурса. Доступ остается простым, что позволяет играть без каких-либо задержек. Не упустите шанс воспользоваться дополнительными возможностями с 1win зеркалом сайта!
roulette casinos, [url=https://blooket-join.com/winning-strategies-for-real-money-roulette-your/]https://blooket-join.com/winning-strategies-for-real-money-roulette-your/[/url] provide an exciting environment for players. The thrill of the spinning wheel keeps players on the edge of their seats. In various betting strategies, aficionados can maximize their chances of winning.
Всем привет!
Полезная и хорошая новость для промышленности и производства!
Санкции, кризис, всевозможные запреты и блокировки должны были ввести экономику России в стагнацию и упадок.
А вот и нет, благодаря смекалки и оперативности на Российском рынке появились новые и надежные компании.
Вернее маститые и стабильные бренды вошли на освободившийся российский рынок.
Гарантия, цены и сервис стали решающим моментов в выборе надежного и серьезного поставщика оборудования и станков для промышленности.
В общем, если вы хотите найти, обработка поверхностей, оборудование, станки, обработка металла и т.д., например:
[url=https://emtrpe.com/]Лазерные станки и лазерная резка металла[/url]
Тогда вам нужно прямо сейчас перейти на сайт EMT – Engineering & Manufacturing Technologies и узнать все подробности по станки для обработки металла, производственные технологии, инженерные технологии, технологии обработки металлов, оборудование для обработки металла в Москве и т.д. https://emtrpe.com/ .
Обязательно переходите на сайт EMT – Professional Metal Processing & Surface Treatment Solutions, сохраняйте в закладки и изучайте информацию, не забудьте записать адрес сайта и бесплатный номер телефона 8 (800) 201-52-88.
Всем пока!
Я извиняюсь, но, по-моему, Вы допускаете ошибку. Пишите мне в PM.
онлайн казино, [url=https://www.freeboard.com.ua/forum/viewtopic.php?pid=1022270#p1022270]https://www.freeboard.com.ua/forum/viewtopic.php?pid=1022270#p1022270[/url] дает возможность игрокам ощутить удовольствие от игр. Тысячи игровых автоматов ждут вас. Войдите прямо сейчас и наслаждайтесь миром увлекательных игр.
bedste online casino, [url=http://beckinson.com/2026/03/27/spil-uden-indbetaling-25-euro-casino-bonus/]http://beckinson.com/2026/03/27/spil-uden-indbetaling-25-euro-casino-bonus/[/url] tilbyder en fantastisk spilleoplevelse med en bred vifte af spilmuligheder. Du kan nyde forskellige spillemaskiner og bordspil. Tilbud er en vigtig del af oplevelsen. SГёrg for at benytte dem!
online casino, [url=https://slavejko.vlatkopetrovturnir.mk/2026/03/27/the-thrilling-world-of-syndicate-casino-unlocking/]https://slavejko.vlatkopetrovturnir.mk/2026/03/27/the-thrilling-world-of-syndicate-casino-unlocking/[/url] provides a thrilling atmosphere for players. With numerous games available, from slots to table games, anyone can discover their favorite. Incentives enhance the fun!
Playing within roulette casinos, [url=https://valueecoserv.cndd.ro/play-roulette-online-for-money-a-guide-to-winning-4/]https://valueecoserv.cndd.ro/play-roulette-online-for-money-a-guide-to-winning-4/[/url] can be an exhilarating experience. Every spin of the wheel provides a rush of excitement. Players can enjoy various betting options, resulting in endless possibilities for wins.
видео [url=https://mailsco.online/]mailsco online[/url] быть интересным занятием.
At finde de bedste online casinoer, [url=http://chiapasjitotol.gob.mx/wp/2026/03/27/nye-danske-casinoer-oplev-spilleverdenen/]http://chiapasjitotol.gob.mx/wp/2026/03/27/nye-danske-casinoer-oplev-spilleverdenen/[/url] kræver en grundig gennemgang af oplevelser, bonusser og kundeservice. Overvej udbuddet og kommentarer for at træffe den bedste beslutning.
Play online casino, [url=https://truefamilyenterprises.com/exploring-stellar-spins-casino-a-journey-through/]https://truefamilyenterprises.com/exploring-stellar-spins-casino-a-journey-through/[/url] and experience the thrill of gaming from the comfort of your home. Take part in exciting games that offer lucrative chances to win big. Don’t miss the fun; kick off your online journey today!
Can you be more specific about the content of your article? After reading it, I still have some doubts. Hope you can help me.
Playing online roulette for genuine currency can be thrilling. Many players appreciate the opportunity to win big. With multiple strategies available, players can enhance their probabilities. roulette real money, [url=https://www.eletricabrasil.com.br/the-thrill-of-roulette-casinos-a-deep-dive/]https://www.eletricabrasil.com.br/the-thrill-of-roulette-casinos-a-deep-dive/[/url] games provide an involving experience, making the thrill of genuine gambling.
видео [url=https://mailsco.online/]mailsco online[/url] показывает разные стороны тематики. Эффекты создают уникальное оценку.
I Danmark er der mange fantastiske muligheder for at spille online. bedste danske casinoer, [url=https://www.alffastener.de/index.php/2026/03/27/casino-online-uden-om-rufus-en-guide-til-spillere-2/]https://www.alffastener.de/index.php/2026/03/27/casino-online-uden-om-rufus-en-guide-til-spillere-2/[/url] tilbyder spændende spiloplevelser og sikre transaktioner. Du kan finde belønninger og vinde imponerende præmier.
[url=https://clck.ru/3SwVJS]BMAI Marathon Running Shoes For Men Breathable White Professional Running Shoes Shock Absorbing Designer Sports Running Shoes Tenis Mens[/url]
BMAI (Baimai) is a popular brand of high—tech running equipment specializing in carbon fiber running shoes for marathons and long-term workouts. The products are known for their good price-quality ratio, providing high energy efficiency due to carbon plates and modern foam (for example, in Carbon Fly and Jingtan 3.0 models).
Main features and models of BMAI:
– BMAI Carbon Fly / Carbon Shock: “Folk” carbon sneakers for fast training and competition.
– Technology: The use of BoomFly+ foam and modified sole materials for softness, stability and reduced foot fatigue.
– Assortment: In addition to marathon models, they produce training sneakers (Pace, Pure) and clothing.
The brand gained popularity due to its use by advanced runners at official starts, including the Moscow Half Marathon.
online casino bets, [url=https://dmmadeiras.com.br/2026/03/27/exploring-wasafi-bet-an-innovative-betting/]https://dmmadeiras.com.br/2026/03/27/exploring-wasafi-bet-an-innovative-betting/[/url] give an exciting way to enjoy wagering activities from the comfort of your home. Players can place wagers on various games, amplifying their chances of gaining rewards.
low stakes roulette, [url=http://www.pisarevo.com/discovering-the-thrill-of-low-stakes-roulette-4/]http://www.pisarevo.com/discovering-the-thrill-of-low-stakes-roulette-4/[/url] offers players an exciting chance to enjoy the thrill of the game without risking large amounts. This variation invites beginners to experience the fun of roulette in a more manageable setting. With lower bets, participants can think over their moves without the pressure of high stakes. It’s a perfect way to practice, while still enjoying the classic elements of roulette.
nove slovenske casino, [url=http://blog.softdevelop.pl/2026/04/06/nove-kasino-2026-buducnos-online-hazardu/]http://blog.softdevelop.pl/2026/04/06/nove-kasino-2026-buducnos-online-hazardu/[/url] ponГєkajГє hojnГє ЕЎkГЎlu hier, skutoДЌne atraktГvne bonusy a excelentnГ© zГЎkaznГcke sluЕѕby. HrГЎДЌi si mГґЕѕu pochutnГЎvaЕҐ skvelГЅ zГЎЕѕitok online, prГstup k najnovЕЎГm hrГЎm a reliable platobnГЅm moЕѕnostiam.
Det bedste online casino, [url=https://panca-sakti.ac.id/bedste-zimpler-casino-oplev-en-ny-verden-af-spil/]https://panca-sakti.ac.id/bedste-zimpler-casino-oplev-en-ny-verden-af-spil/[/url] tilbyder en spændende oplevelse med vidunderlige spilmuligheder. Spillere kan nyde et bredt udvalg af slots og bordspil. Hos det bedste online casino er promotioner en vigtig del, som interesserer nye spillere. Glem ikke at at læse vilkår, før du starter at spille.
BC Game Online Casino, [url=https://truefamilyenterprises.com/download-bc-game-mobile-app-step-by-step-guide/]https://truefamilyenterprises.com/download-bc-game-mobile-app-step-by-step-guide/[/url] сегодня предоставляет уникальный опыт для игроков. С разнообразием игр и бонусов, каждый встретит что-то уникальное. Присоединяйтесь в мир азартных игр уже сегодня.
Within the thrilling world of online casino, [url=https://guecorproducts.com/understanding-wekelea-bet-a-comprehensive-guide-21/]https://guecorproducts.com/understanding-wekelea-bet-a-comprehensive-guide-21/[/url], players can explore a variety of games that provide endless fun. From reels to table games, the choices are countless.
low limit roulette, [url=https://fawchem.com/exploring-the-excitement-of-low-limit-roulette-4/]https://fawchem.com/exploring-the-excitement-of-low-limit-roulette-4/[/url] is a popular choice among gamers because it offers low stakes. Players enjoy the excitement of betting while managing their budgets. It’s perfect for newcomers.
Når du besøger en fantastisk casino uden rofus, [url=https://www.nitless.com/casinoslot31031/casinoer-uden-rofus-frie-spilmuligheder-uden/]https://www.nitless.com/casinoslot31031/casinoer-uden-rofus-frie-spilmuligheder-uden/[/url], kan du deltage i mange inspirerende spil. Dette er en daglig mulighed for at tjene penge uden at tage fordel af udfordrende procedurer. Via et casino uden rofus, får du chancen for at spille frit og være anonym.
novГ© online casino, [url=https://silveraenterprises.com/eskills/5-vkladove-online-kasina-vstupte-do-svetu-hrania-s/]https://silveraenterprises.com/eskills/5-vkladove-online-kasina-vstupte-do-svetu-hrania-s/[/url] prinГЎЕЎa hrГЎДЌom fantastickГ© zГЎЕѕitky. S rГґznorodou ponukou hier plus atraktГvnymi bonusmi sa prestaЕҐ hodiny zГЎbavy. Hrajte vo svojej preferovanej platforme kedykoДѕvek sa vГЎm to hodГ.
BC Game Casino, [url=https://lamejoroferta.es/bc-game-online-casino-and-sportsbook-your-ultimate/]https://lamejoroferta.es/bc-game-online-casino-and-sportsbook-your-ultimate/[/url] offers an enjoyable experience for players. With various game options, players can easily find what they enjoy. Join this vibrant platform today!
Oplev top online casinoer, der tilbyder spændende spilleoplevelser. Med mange spilmuligheder, bonusser og tryghed er det let at finde din elskede platform. Oplev underholdning med både klassiske og nye titler. Vælg det bedste online casinoer, [url=https://sjcinternationalinvestments.com/index.php/2026/03/28/casino-uden-rufus-oplev-spilglde-uden-barrierer/]https://sjcinternationalinvestments.com/index.php/2026/03/28/casino-uden-rufus-oplev-spilglde-uden-barrierer/[/url] i dag!
Betting on sports can be adventurous for fans. Learning the probabilities is essential for success. Researching teams enhances your strategies. Enjoy cautiously, and remember that losses are part of the game. Make informed decisions when engaging in sports betting, [url=http://unati.univasf.edu.br/aposte-com-confianca-descubra-o-mundo-das-apostas-2/]http://unati.univasf.edu.br/aposte-com-confianca-descubra-o-mundo-das-apostas-2/[/url].
Discovering the best live roulette uk, [url=https://kechbureau.ma/?p=49262]https://kechbureau.ma/?p=49262[/url] offers an exhilarating experience for players. Exciting gameplay combined with real-time features makes it a top choice. Pick from various games to enhance your gaming adventure!
I dag er der mange muligheder for at spille online. Et populært valg er casino uden rofus, [url=https://mural.codently.eu/casinounden-rufus-oplev-spilglden-uden-grnser/]https://mural.codently.eu/casinounden-rufus-oplev-spilglden-uden-grnser/[/url], hvor spillere kan nyde deres yndlingsspil uden restriktioner. Dette giver frihed, og man kan engagere sig når som helst.
BC Game Live Casino, [url=https://casabonitamadeiras.com.br/unlocking-the-secrets-of-bc-game-bonus-codes-a/]https://casabonitamadeiras.com.br/unlocking-the-secrets-of-bc-game-bonus-codes-a/[/url] предоставляет уникальную атмосферу для любителей азартных РёРіСЂ. РРіСЂРѕРєРё РјРѕРіСѓС‚ испытать живыми дилерами, играя РІ популярных настольных играх. Рто шанс испытать Рї thrill РІ обстановке собственного РґРѕРјР°.
De bedste danske casinoer, [url=https://kientrucnoithateco.com.vn/casino-minimum-indbetaling-alt-du-skal-vide-5/]https://kientrucnoithateco.com.vn/casino-minimum-indbetaling-alt-du-skal-vide-5/[/url] præsenterer et unikt underholdningsmiljø, hvor spillere kan forkæl en omfangsrig samling af muligheder, og bonusser tiltrækker mange.
online sports betting, [url=http://www.pesoformapersempre.it/1xbet-solusi-terbaik-untuk-taruhan-olahraga-dan-3/]http://www.pesoformapersempre.it/1xbet-solusi-terbaik-untuk-taruhan-olahraga-dan-3/[/url] presents an exciting way to engage in your favorite games. Through various platforms, bettors can make wagers on different events. It’s essential to organize for success.
Marvelous, what a website it is! This web site presents useful information to us, keep it up.
Saved as a favorite, I like your blog!
BC Game Online Casino, [url=http://www.tecnoac.com/exploring-the-bc-game-platform-a-new-era-in-crypto-2/]http://www.tecnoac.com/exploring-the-bc-game-platform-a-new-era-in-crypto-2/[/url] offers an exciting experience for punters worldwide. With countless games, players can savor their favorite activities anytime. Join and dive into the dynamic world of online casinos today!
online roulette for cash, [url=https://mariaterracota.com/discover-the-best-roulette-sites-in-the-uk-a/]https://mariaterracota.com/discover-the-best-roulette-sites-in-the-uk-a/[/url] – Playing virtual roulette for real money is an exciting experience. You can enjoy the thrill of twisting the wheel from the comfort of your home. Choose your favored strategy and test your luck! With various online platforms, it’s easier than ever to dive into the world of online roulette for cash. Don’t miss your chance to secure big!
I dag er det muligt at spille på casino uden rofus, [url=http://www.wisoft.at/2026/03/31/udenlandske-casino-free-spins-uden-finde-din/]http://www.wisoft.at/2026/03/31/udenlandske-casino-free-spins-uden-finde-din/[/url] og nyde spændingen. Det kan udforska forskellige spil som roulette uden restriktioner. At spille frit giver ekstra underholdning.
I dag findes der mange fantastiske muligheder for spilentusiaster, der Гёnsker at finde det bedste online casino, [url=https://kalderon.co.il/2026/03/30/udenlandske-casino-sider-en-guide-til-online-spil-10/]https://kalderon.co.il/2026/03/30/udenlandske-casino-sider-en-guide-til-online-spil-10/[/url]. Disse platforme tilbyder underholdning i hГёj kvalitet, med et bredt udvalg af borde. Bonusser og kampagner gГёr det muligt at maksimere din gevinst. BesГёg det bedste online casino og deltag nu!
BC Game Casino, [url=http://xopen.xyz/official-bc-app-revolutionizing-your-digital/]http://xopen.xyz/official-bc-app-revolutionizing-your-digital/[/url] offers a vibrant gaming experience for users. With countless games, it draws in many. Furthermore, their bonus system is beneficial, enhancing the overall pleasure.
Your point of view caught my eye and was very interesting. Thanks. I have a question for you. https://accounts.binance.com/en-ZA/register?ref=B4EPR6J0
online roulette for cash, [url=https://www.davecridermusic.com/online-roulette-for-cash-spin-to-win-real-money/]https://www.davecridermusic.com/online-roulette-for-cash-spin-to-win-real-money/[/url] offers an exciting way to win real money. Players can enjoy the thrill of placing bets on various numbers and colors. With strategies, it’s possible to enhance probabilities of winning big!
I dag er online kasinoer blevet meget populære, og mange spillere søger ophold i casino uden rofus, [url=https://north-prop.com/udenlandske-casino-no-deposit-bonus-f-det/]https://north-prop.com/udenlandske-casino-no-deposit-bonus-f-det/[/url]. At spille uden begrænsninger giver en ny dimension til oplevelsen samt letter det tilgangene. Spillere kan nyde spændingen uden bekymringer.
BC Game Live Casino, [url=https://marsassociates.pk/understanding-bc-game-restricted-countries/]https://marsassociates.pk/understanding-bc-game-restricted-countries/[/url] delivers a special gaming adventure with live dealers. Players can relish a wide variety of titles in a lively atmosphere.
Having read this I believed it was rather enlightening.
I appreciate you taking the time and effort to
put this informative article together. I once again find myself personally
spending way too much time both reading and
commenting. But so what, it was still worth it!
online casino betting, [url=https://findfunnygifts.com/unleashing-the-bet-an-in-depth-look-at-1xbet/]https://findfunnygifts.com/unleashing-the-bet-an-in-depth-look-at-1xbet/[/url] has gained immense popularity in recent years. Players have the chance to enjoy various games from the safety of their abodes. Bonuses and promotions improve the wagering experience, attracting fresh participants. With the advancement of technology, each session guarantees excitement and adventures.
I dag er der mange udmærkede muligheder for at spille online. De bedste online casinoer, [url=https://www.access2care.bt/oplev-rufus-casino-en-spndende-verden-af-spil-og/]https://www.access2care.bt/oplev-rufus-casino-en-spndende-verden-af-spil-og/[/url] tilbyder et væld af spil, gode bonusser og den underholdende oplevelser. spillerne kan oplevelse spændingen hjemmefra.
Wow, that’s what I was exploring for, what a
information! present here at this weblog, thanks admin of
this web page.
When exploring the best roulette sites uk, [url=http://www.pisarevo.com/play-real-money-roulette-your-ultimate-guide-to/]http://www.pisarevo.com/play-real-money-roulette-your-ultimate-guide-to/[/url], players can find a variety of engaging games. Offering real-time dealers, these platforms guarantee an authentic casino setting. Players can additionally benefit from exclusive promotions to amplify their gaming adventure.
udenlandsk online casino, [url=https://www.grupafyi.pl/valhallacasinodk/udenlandsk-casino-med-licens-en-grundig-gennemgang/]https://www.grupafyi.pl/valhallacasinodk/udenlandsk-casino-med-licens-en-grundig-gennemgang/[/url] tilbyder fascinerende muligheder for spillere globalt. Med rigelige valgmuligheder af spil kan alle finde noget at nyde. Sikkerhed er ogsГҐ en prioritet, hvilket giver tryghed for alle spillere.
BC Game Online Casino, [url=https://www.rptor.pl/unlock-exciting-rewards-with-bc-game-promo-codes-22/]https://www.rptor.pl/unlock-exciting-rewards-with-bc-game-promo-codes-22/[/url] offers a mesmerizing experience for players worldwide. With a diverse selection of games, it caters to every taste. Savor the possibility of hitting the jackpot while enjoying yourself. Join the expanding community of players at BC Game Online Casino today!
Таких результатов, в среднем, достигают наши клиенты https://proffseo.ru/
Выдающиеся результаты SEO-оптимизации в Яндекс и Google https://proffseo.ru/prodvizhenie-zarubezhnykh-sajtov
увеличение конверсии сайта https://proffseo.ru/prodvizhenie-angloyazychnykh-sajtov
Оплата только за дополнительный трафик, звонки и интернет-заказы https://proffseo.ru/prodvizhenie-sajtov-po-rf
– 70 видов работ – Гарантия выполненных работ – Гарантия результата https://proffseo.ru/privacy
SEO продвижение сайта: оплата за лиды и вывод в ТОП https://proffseo.ru/kontakty
online casino, [url=https://nedaenglish.com/2026/03/26/betting-on-the-go-1xbet-apple-for-ios-users/]https://nedaenglish.com/2026/03/26/betting-on-the-go-1xbet-apple-for-ios-users/[/url] предоставляет игрокам восторгаться различными азартными предложениями. Удивительные слоты и онлайн дилеры добавляют волнение. Присоединяйтесь к планете удачи уже сегодня!
Hello there, I discovered your site by the use of Google
while looking for a similar topic, your website got here up,
it appears great. I have bookmarked it in my google bookmarks.
Hello there, simply become aware of your blog through Google, and located that it is really informative.
I’m going to watch out for brussels. I’ll appreciate should you proceed this in future.
Lots of people will likely be benefited from
your writing. Cheers!
bedste live casino, [url=https://datafornix.com/bedste-live-casinoer-en-guide-til-den-ultimative/]https://datafornix.com/bedste-live-casinoer-en-guide-til-den-ultimative/[/url] tilbyder en unik oplevelse, som kombinerer autentiske dealere med digital spilleglæde. Spillere kan erhverve spænding fra stuen af deres eget hjem. Med dynamiske funktioner får du en følelse af et rigtigt casino.
Welcome to BC Game Casino, [url=https://kuljetus.jdmmediagroup.com/2026/04/02/exceptional-bc-game-customer-support-service/]https://kuljetus.jdmmediagroup.com/2026/04/02/exceptional-bc-game-customer-support-service/[/url], where you can enjoy various games. With engaging options, players can get lost in a world of excitement. Join now and discover why it’s so popular!
If you’re searching for the best roulette destinations, look no further. The top roulette sites uk, [url=http://103.212.211.42/experience-the-thrills-of-casino-roulette-for-real]http://103.212.211.42/experience-the-thrills-of-casino-roulette-for-real[/url] offer entertaining gameplay and attractive rewards. Join now and experience top-notch fun!
udenlandsk online casino, [url=https://alcomdigital.com/bedste-udenlandske-casinoer-udforsk/]https://alcomdigital.com/bedste-udenlandske-casinoer-udforsk/[/url] tilbyder et væld af spændende spil. Spillere kan nyde bonusser, som øger deres rejse. Det er en glimrende måde at vinde gevinster på.
Very nice article, totally what I needed.
Intriguing in sports betting, [url=https://hdteknikkombicim.com/2026/03/28/betwinner-bangladesh-your-ultimate-betting-32/]https://hdteknikkombicim.com/2026/03/28/betwinner-bangladesh-your-ultimate-betting-32/[/url] can generate both thrilling moments and prominent profits. Grasping the odds and strategies is crucial. Insight enhances your chances of fortune.
bedste live casino, [url=http://www.tecnoac.com/bedste-roulette-sider-din-guide-til-de-bedste-3/]http://www.tecnoac.com/bedste-roulette-sider-din-guide-til-de-bedste-3/[/url] tilbyder en unik oplevelse, der kombinerer spænding og social interaktion. Spillere kan nyde|opleve|deltage i|få glæde af live spil fra deres egne hjem, hvilket skaber en autentisk atmosfære. De interaktive dealere engagerer|involverer|underholder|tiltrækker og gør spillet mere spændende. Uanset om du foretrækker blackjack, roulette eller baccarat, er der noget for enhver smag. Med høj kvalitet streaming og hurtige indsatser sikrer bedste live casino, at alle kan finde deres favorit.
BC Game Live Casino, [url=https://ead.ministeriodeensinobg.com.br/bc-game-revolutionizing-online-gaming-in/]https://ead.ministeriodeensinobg.com.br/bc-game-revolutionizing-online-gaming-in/[/url] демонстрирует уникальный вызов для любителей азартных игр. В онлайн-пространстве вы можете испытать удачу в многообразных играх с актуальными крупье. Не пропустите шанс получить приз.
Looking for the best live roulette uk, [url=https://dm-realestate.com/experience-the-thrill-of-real-roulette-online-4/]https://dm-realestate.com/experience-the-thrill-of-real-roulette-online-4/[/url] experience? Find top-rated online casinos that cater to your gaming desires. With real dealers and immersive gameplay, you’ll be captivated. Register today and enjoy thrilling rounds!
udenlandsk online casino, [url=https://finszarmortgage.com/det-nyeste-indenfor-online-casino-oplev-trends-og/]https://finszarmortgage.com/det-nyeste-indenfor-online-casino-oplev-trends-og/[/url] tilbyder vast udvalg af underholdning, som interesserer spillere fra hele verden. Med incitamenter og beskyttelse i fokus, er det et vældig populært valg for dem, der ønsker at deltage.
BC Game Online Casino, [url=https://zeubia.com/exploring-bc-game-online-revolutionizing-gambling/]https://zeubia.com/exploring-bc-game-online-revolutionizing-gambling/[/url] выпускает уникальный перформанс азартных игр. Каждый геймер может найти разнообразные игры и награды.
online sports betting, [url=https://unfiltered-adventures.com/2026/03/28/exploring-betwinner-your-ultimate-betting-12/]https://unfiltered-adventures.com/2026/03/28/exploring-betwinner-your-ultimate-betting-12/[/url] is a popular activity among enthusiasts. A lot of players enjoy placing wagers on various competitions to enhance their enjoyment. With the development of digital spaces, opportunity to online sports betting is more accessible than ever before.
bedste live casino, [url=http://www.pcc.zu.edu.eg/2026/03/18/bedste-live-casino-oplev-spndingen-online-16/]http://www.pcc.zu.edu.eg/2026/03/18/bedste-live-casino-oplev-spndingen-online-16/[/url] tilbyder en unik oplevelse med direkte interaktion mellem spillere og dealere. Deltagere kan nyde en fantastisk atmosfære, i hvilken man føler sig som i et rigtig casino. De virtuelle spil gør det muligt at spille fra hjemmets komfort.
high stakes roulette, [url=https://aanderud.net/2026/03/21/high-limit-roulette-the-ultimate-guide-to-high/]https://aanderud.net/2026/03/21/high-limit-roulette-the-ultimate-guide-to-high/[/url] is a thrilling experience that attracts many players. The adrenaline rush comes from the anticipation of the ball landing on a chosen number or color. Gamblers in this high-stakes game often look for big wins while enjoying the luxurious atmosphere of the casino.
udenlandsk online casino, [url=https://hempelmepromotion.com/index.php/2026/04/05/casino-for-rigtige-penge-oplev-spil-og-gevinster/]https://hempelmepromotion.com/index.php/2026/04/05/casino-for-rigtige-penge-oplev-spil-og-gevinster/[/url] tilbyder en attraktiv mulighed for spillere at deltage i varierede spil. Denne platform giver spillere adgang til diverse muligheder og fordele, der muligvis kan forbedre deres afspilning.
BC Game Casino, [url=https://unfiltered-adventures.com/2026/04/03/discover-bc-game-hub-a-premier-gaming-destination/]https://unfiltered-adventures.com/2026/04/03/discover-bc-game-hub-a-premier-gaming-destination/[/url] offers an entertaining gaming experience for users around the world. With several games and attractive bonuses, it’s a top choice for anyone looking to try their luck. Join immediately and discover the fun!
online betting, [url=http://www.shiatsutherapy.org/batwinner28032/84667]http://www.shiatsutherapy.org/batwinner28032/84667[/url] provides a stimulating way to participate in your favorite activities. With multiple platforms available, bettors can execute bets conveniently from anywhere.
Its like you read my mind! You appear to know so much about
this, like you wrote the book in it or something. I
think that you could do with a few pics to drive the message home a little bit, but other than that, this is excellent blog.
A fantastic read. I’ll definitely be back.
roulette casinoer, [url=https://packaging.ma/roulette-casinoer-en-guide-til-spil-og-strategier-4/]https://packaging.ma/roulette-casinoer-en-guide-til-spil-og-strategier-4/[/url] tilbyder en spændende måde at spille på. Deltagere kan nyde øjeblikke, når rullen spinner. Odds for at vinde kan variere, men miljøet er altid prøvende.
high stake roulette, [url=https://lobby.co.il/high-stakes-online-roulette-the-ultimate-guide-to/]https://lobby.co.il/high-stakes-online-roulette-the-ultimate-guide-to/[/url] offers an exhilarating experience for players seeking thrilling risks. This variant attracts high rollers, as they enjoy the exciting atmosphere. Participants aim for huge payouts.
Welcome to this thrilling world of BC Game Live Casino, [url=https://www.simkarled.com/unlock-amazing-rewards-with-bc-game-promo-codes-2/]https://www.simkarled.com/unlock-amazing-rewards-with-bc-game-promo-codes-2/[/url], where players can enjoy instant gaming experiences. Engage in multiple games offering top-notch dealers and immersive environments. Take advantage of the chance to gain exciting rewards! Whether you’re a beginner or a experienced player, the thrill of live gaming awaits you.
Nu til dags er adskillige casinoer med mastercard, [url=https://adamgardenstt.com/index.php/2026/04/02/mastercard-casinoer-din-guide-til-sikker-2/]https://adamgardenstt.com/index.php/2026/04/02/mastercard-casinoer-din-guide-til-sikker-2/[/url] eftertragtede blandt gamblere. Den betalingsmetode tilbyder en problemfri vej at gГёre indskud og udbetalinger. Kunder nyder godt af enkelthed og pГҐlidelighed nГҐr de spiller pГҐ disse websites.
Throughout the universe of online casino betting, [url=https://keplerpe.com/todo-lo-que-necesitas-saber-sobre-1xbet-2001279659/]https://keplerpe.com/todo-lo-que-necesitas-saber-sobre-1xbet-2001279659/[/url], gamblers seek thrilling experiences. In various games and rewarding promotions, this landscape provides countless possibilities for winning.
Have you ever considered about including a little bit
more than just your articles? I mean, what you say is important and everything.
Nevertheless imagine if you added some great photos or video clips to give your posts more, “pop”!
Your content is excellent but with pics and video clips, this site could definitely be one of the
most beneficial in its field. Awesome blog!
I top roulette casino, [url=https://test-ja.memindy.com/2026/03/top-roulette-casino-find-de-bedste-spil-og/]https://test-ja.memindy.com/2026/03/top-roulette-casino-find-de-bedste-spil-og/[/url] tilbyder spillerne en spændende mulighed for at teste deres held. Spil et væld af tilgange og gevinst for at maximere dine gevinster. Tag initiativ nu!
BC Game Online Casino, [url=https://www.jurgenvandervelde.com/experience-the-thrill-of-gambling-at-bc-game-3/]https://www.jurgenvandervelde.com/experience-the-thrill-of-gambling-at-bc-game-3/[/url] offers a thrilling experience for gamers. With a wide range of games, players can discover unique features and benefits. Join the excitement today and test your fortune!
When exploring leading roulette platforms, players should consider factors like number of games, offers, and user experience. The top roulette sites, [url=https://digicontechnologies.com/the-best-roulette-sites-your-guide-to-winning-big/]https://digicontechnologies.com/the-best-roulette-sites-your-guide-to-winning-big/[/url] provide engaging gameplay paired with safe transactions, ensuring fun while playing. Explore these top roulette sites for a fantastic gaming experience.
Velkommen til en verden af underholdning, der byder på eventyr. Med casino med mastercard, [url=https://cmahville.dreamhosters.com/wordpress/2026/04/02/danske-casinoer-med-mastercard-din-guide-til-7/]https://cmahville.dreamhosters.com/wordpress/2026/04/02/danske-casinoer-med-mastercard-din-guide-til-7/[/url] får du en sikker og effektiv måde at indsætte penge på. Oplev fabelagtige spil, som vil fascinere dig!
Добрый день!
Друзья и коллеги мои, отличная и полезная новость для вас!
А именно для тех, кто по разным обстоятельствам или причинам меняет страну предывания или проживания.
Понимаете, совсем не выгодно, дорого и неразумно получится, оказавшись вне своей страны и поняв, что не все сопроводительные и юридические документы у вас готовы и есть в наличие.
Вам придется возвращаться назад в Челябинскую область или Челябинск, для восстановления необходимых документов и сопроводительных писем.
Что бы ни заниматься подобными не адекватными и не серьезными действиями, лучше сразу довериться профессионалам, т.е. как говорится, тем, кто на этом «собаку съел».
В общем, если вы ищите, перевод документов, бюро переводов, апостиль в Челябинске и т.д., например:
[url=https://www.lingvo-master.com/]нотариально заверенный перевод паспорта[/url]
Тогда вам срочно нужно прямо сейчас перейти на сайт Компании Бюро переводов Lingvomaster и узнать все подробности по устный перевод, перевод паспорта, нотариальный перевод, письменный перевод, услуги переводчика, консульская легализация, перевод аудиозаписи, сопровождение в Челябинске, Челябинской области и т.д. https://www.lingvo-master.com/ .
Обязательно переходите на сайт Компании Бюро переводов lingvo-master.com, сохраняйте в закладки и изучайте информацию, не забудьте записать адрес сайта и номер телефона +7 (351) 247-00-53.
До новых встреч!
online casino, [url=http://www.hebamme-leusche.de/topics]http://www.hebamme-leusche.de/topics[/url] provides a wide range of options for fun. Players can discover poker from the comfort of their own residences.
Your point of view caught my eye and was very interesting. Thanks. I have a question for you.
BC Game Casino, [url=https://viplimosacramento.com/the-thrill-and-challenge-of-bc-game-crash-a/]https://viplimosacramento.com/the-thrill-and-challenge-of-bc-game-crash-a/[/url] offers a unique experience for all players. The platform is user-friendly to navigate, making it accessible for everyone seeking fun. Featuring various games and entertaining bonuses, it’s a great option for gaming enthusiasts.
Det bedste roulette casino, [url=https://ushort.observer/yUMVlZG0r1/bedste-roulette-casinoer-find-din-favorit-2/]https://ushort.observer/yUMVlZG0r1/bedste-roulette-casinoer-find-din-favorit-2/[/url] leverer en fascinerende aktivitet for deltagere. Med forskelligartede indsatser kan du have roulette i en sikkerhed atmosfære. Vælg dit bedste bord og deltag lykken!
Finding the best gambling platforms can be a challenge. Our guide on top roulette sites, [url=https://actdanismanlik.com/discover-the-best-roulette-website-for-online-3/]https://actdanismanlik.com/discover-the-best-roulette-website-for-online-3/[/url] will help you discover varied options. Enjoy thrilling gameplay and profitable bonuses today!
For tiden tilbyder flere casinoer med visa, [url=https://kplast.com.tr/oplev-visa-casino-sikkerhed-og-bekvemmelighed-i/]https://kplast.com.tr/oplev-visa-casino-sikkerhed-og-bekvemmelighed-i/[/url] beskyttede betalingsmetoder. Gennem denne kendte metode kan spillere lynhurtigt indsætte og udbetale penge. Det tilbyder en god oplevelse for alle.
BC Game Live Casino, [url=https://lp.raizesmoveissobmedida.com.br/2026/04/03/unveiling-exciting-bc-game-bonus-offers/]https://lp.raizesmoveissobmedida.com.br/2026/04/03/unveiling-exciting-bc-game-bonus-offers/[/url] includes an engaging experience for players. With hosted games, gamers can enjoy a choice of options. The platform is user-friendly to navigate, making it an excellent choice for entry-level players and proficient users alike. Join BC Game Live Casino today and uncover a world of excitement.
Within the exciting world of sports betting, [url=https://capitalpress.com.co/the-ultimate-guide-to-betwinner-your-gateway-to-32/]https://capitalpress.com.co/the-ultimate-guide-to-betwinner-your-gateway-to-32/[/url], approaches play a crucial role. Recognizing the odds can shape your success. Researching teams and players allows for improved decision-making, conclusively leading to more lucrative bets.
stereoids
References:
https://telegra.ph/Comprehensive-Guide-to-Legally-Buying-Testosterone-Online-Safe-and-Compliant-Methods-01-15
Når man søger efter bedste udenlandske casino, [url=https://www.fazaa.co/2026/03/19/casino-uden-om-licens-fordele-og-ulemper-2/]https://www.fazaa.co/2026/03/19/casino-uden-om-licens-fordele-og-ulemper-2/[/url], er det vigtigt at finde et, der tilbyder interessante tilbud. Spillere ønsker sikkerhed, samt en diverse spillemuligheder. Desuden skal betalingsmetoder være problemfrie at anvende. Det er derfor essentielt at vælge et casino, der lever op til høje standarder. Med den rette research kan man finde det perfekte sted at spille.
Playing roulette not on gamstop, [url=https://tienda.mbechile.cl/estacion-nunoa/]https://tienda.mbechile.cl/estacion-nunoa/[/url] offers players freedom to bet without restrictions. Online casinos provide diverse options. Try out the thrill of spinning the wheel without limitations. Choose your stakes and strategies to maximize the thrill.
BC Game Online Casino, [url=https://onedropexcursions.com/understanding-and-resolving-bc-game-login-problems-3/]https://onedropexcursions.com/understanding-and-resolving-bc-game-login-problems-3/[/url] offers an exciting gaming experience for enthusiasts. With various games, players can enjoy thrilling challenges. Join and experience the fun today!
I dag søger mange spillere efter muligheder i casino uden dansk licens, [url=https://www.rabbitbrushstudio.com/casinoer12031/spil-blackjack-uden-rufus-en-guide-til-spil-med/]https://www.rabbitbrushstudio.com/casinoer12031/spil-blackjack-uden-rufus-en-guide-til-spil-med/[/url]. Herved kan man finde en nyttige spiloplevelser. Selvom der er problemer, tilbyder de også muligheden til tilfældige gevinster.
online sports betting, [url=http://smarteducation.agencyzed.com/betwinner-your-ultimate-guide-to-online-betting-97/]http://smarteducation.agencyzed.com/betwinner-your-ultimate-guide-to-online-betting-97/[/url] is becoming a popular activity for many enthusiasts. Lovers of sports can place their wagers in various events smoothly. Such engagement boosts the overall satisfaction of watching games. As innovation continues to progress, the environment of online sports betting is expected to transform further.
I dag er der mange onlinemuligheder, men det er vigtigt at vælge de rigtige. casinoer uden dansk licens, [url=https://www.scuolarubinato.eu/2026/03/12/oplev-casino-uden-for-rufus-din-guide-til-spil-og/]https://www.scuolarubinato.eu/2026/03/12/oplev-casino-uden-for-rufus-din-guide-til-spil-og/[/url] tilbyder tiltalende spil, men kan ikke have nogle sikkerhedsgarantier. Det er derfor væsentligt at at være i agt, når man kigger på disse hjemmesider. For at opnå en optimal oplevelse, skal spillere undersøge vilkårene nøje.
BC Game Casino, [url=http://metanoia.grafikmk.pl/discover-bcstavka-casino-a-guide-for-new-players-2/]http://metanoia.grafikmk.pl/discover-bcstavka-casino-a-guide-for-new-players-2/[/url] offers a distinctive experience for players. With diverse games available, everyone can find their favorite. Engage with this vibrant world and enjoy top-notch offers.
Er du på udkig efter steder for gamblingsteder uden om ROFUS? Der findes flere casinoer uden om ROFUS, [url=https://audiocenter.com.gt/vinterlejegaard/oplev-spndingen-ved-casino-uden-rofus-1297662941/]https://audiocenter.com.gt/vinterlejegaard/oplev-spndingen-ved-casino-uden-rofus-1297662941/[/url], hvor du kan afprøve spænding og sjov. Husk at være ansvarlig!
non gamstop roulette, [url=https://theslow-lb.com/roulette-betting-without-gamstop-your-ultimate/]https://theslow-lb.com/roulette-betting-without-gamstop-your-ultimate/[/url] offers players a unique experience|presents a distinctive opportunity|provides an exceptional chance|gives gamblers an exclusive option to enjoy. With various tables|multiple options|a range of choices|different styles available, enthusiasts can engage in their favorite game without restrictions. Each spin|every turn|all rotations|any play brings excitement and potential rewards. Whether you are a novice|a beginner|a newcomer|an amateur or a seasoned gambler, non gamstop roulette caters to everyone. Explore the thrill|delve into the excitement|experience the joy|immerse in the fun today!
My partner and I stumbled over here by a different page and thought I might as well check things
out. I like what I see so now i’m following you. Look forward to checking out your web page
for a second time.
my homepage … สล็อต pg
udenlandske casinoer, [url=https://dronchessacademy.com/index.php/2026/03/12/spil-casino-uden-om-rufus-en-guide-til-17/]https://dronchessacademy.com/index.php/2026/03/12/spil-casino-uden-om-rufus-en-guide-til-17/[/url] giver mange valg for spillere. Flere platforme har et varieret udvalg af underholdning, med bonusser appellerer til interesserede.
online betting, [url=http://www.uopt-za.com/2026/03/29/explore-betwinner-your-ultimate-destination-for-2/]http://www.uopt-za.com/2026/03/29/explore-betwinner-your-ultimate-destination-for-2/[/url] has become massive popularity among gamblers. It allows individuals to conduct bets from. Nevertheless, prudent betting is important to ensure a beneficial experience.
Discover the excitement of betting at BC Game Live Casino, [url=https://americadigitalhub.com/comprehensive-overview-of-bc-game-bonuses-for-4/]https://americadigitalhub.com/comprehensive-overview-of-bc-game-bonuses-for-4/[/url], where experienced hosts bring the thrill of gaming halls to your screen. Enjoy a wide range of options, including poker and jackpot games. Join this moment and experience unmatched entertainment from the comfort of your home.
от 150 000 ?
Пишет и редактирует контент для сайта (статьи, исследования, раздаточные материалы), раскрывает пользу продукта услуги, адаптирует материалы с учетом алгоритмов ранжирования поисковых систем https://proffseo.ru/prodvizhenie-angloyazychnykh-sajtov
Совместно с веб-дизайнерами работает над креативными материалами, дополняющими копирайт https://proffseo.ru/prodvizhenie-sajtov-po-rf
Геозависимые запросы – органическая выдача (SERP) разная для всех регионов https://proffseo.ru/prodvizhenie-sajtov-po-rf
Пользователи увидят или не увидят ваш сайт в зависимости от того, из какого региона России исходит поисковый запрос https://proffseo.ru/privacy
В Яндексе официально заявлено порядка 1250 регионов, но по факту их меньше – приблизительно 90 шт https://proffseo.ru/prodvizhenie-angloyazychnykh-sajtov
ГеоНЕзависимые запросы – выдача одинакова во всех регионах https://proffseo.ru/prodvizhenie-sajtov-po-moskve
Это поисковые фразы, которые не привязаны к городам и областям России, универсальны https://proffseo.ru/
Также геоНЕзависимая выдача отображается редким пользователям, у которых невозможно определить регион (информация об IP-адресе по каким-то причинам недоступна поисковой системе).
Результаты:
Мы искренне любим свое дело и знаем, что лучше сработает для нашего клиента https://proffseo.ru/prodvizhenie-sajtov-po-rf
Интернет Магазин https://proffseo.ru/
online casino paysafe, [url=https://oklahomaroofinspections.com/den-ultimative-guide-til-paysafecard-casinoer/]https://oklahomaroofinspections.com/den-ultimative-guide-til-paysafecard-casinoer/[/url] tilbyder en sikker og anonym mГҐde at spille pГҐ nettet. En metode muliggГёr nemme ind- og udbetalinger. Med et paysafecard kan spillere fГҐ styring over deres bevillinger.
Det er vigtigt at vælge det rette casino uden om rofus. Mange spilleglade søger alternativer til at spille uden begrænsninger. casino uden om rofus, [url=https://northernoldtreemyanmar.com/2026/03/13/sikre-udenlandske-casinoer-uden-nemid-en-guide-til-2/]https://northernoldtreemyanmar.com/2026/03/13/sikre-udenlandske-casinoer-uden-nemid-en-guide-til-2/[/url] tilbyder frihed til at nyde spændingen uden bekymringer.
I Danmark er der mange muligheder for spil, og casino uden om ROFUS, [url=https://grateful-movement.com/casino-sider-uden-dansk-licens-hvad-du-skal-vite/]https://grateful-movement.com/casino-sider-uden-dansk-licens-hvad-du-skal-vite/[/url] tilbyder en anderledes oplevelse. Spillere kan vælge mellem forskellige platforme, som tilbyder spænding uden begrænsninger. Dette appellerer til mange, der ønsker mere frihed.
В мире видеоигр недавно состоялись неожиданные события. новости игр, [url=https://kyushu.food-stadium.com/news-flash/98324/]https://kyushu.food-stadium.com/news-flash/98324/[/url] подтверждают, что разработчики анонсировали уникальные проекты, которые обещают восхитить фанатов. Игроки в ожидании обсуждают предстоящие релизы на форумах и в социальных сетях. Эти разработки изменят пейзаж игровой культуры.
When searching for premium non gamstop roulette sites, [url=https://sasiedzi24.obliczasrebra.kylos.pl/node/]https://sasiedzi24.obliczasrebra.kylos.pl/node/[/url], gamblers can enjoy a choice of games. These platforms provide opportunities to earn real money without restrictions. Locating the right site enhances the gaming experience.
Fastidious answer back in return of this difficulty with genuine arguments and telling everything concerning that.
BC Game Online Casino, [url=https://priorityrehab.org/comprehensive-guide-to-bc-game-registration-3/]https://priorityrehab.org/comprehensive-guide-to-bc-game-registration-3/[/url] provides a unique gaming experience. Users can explore a range of choices. Including cryptocurrency support, it’s simple to wager and earn big.
I think that is one of the such a lot vital
information for me. And i’m glad reading your article.
However should statement on some normal issues, The website style is perfect, the articles is in point of fact great :
D. Good activity, cheers
online casino betting, [url=https://mansa-capital.com/betwinner-o-yin-jumladagi-tanlovlar-va-ro-yxatdan/]https://mansa-capital.com/betwinner-o-yin-jumladagi-tanlovlar-va-ro-yxatdan/[/url] delivers captivating experiences for players around the world. Using various choices, it draws enthusiasts seeking adventure. Enroll today and kick off your winnings!
Добрый день!
Воздушные компрессоры в Москве – купить по низкой цене, каталог воздушных компрессоров от официального дилера.
Воздушные компрессоры Atlas Copco от официального дилера – купить компрессор Atlas Copco с доставкой, низкие цены в каталоге.
[url=https://www.comprs.ru/katalog/atlas-copco/]https://www.comprs.ru/katalog/atlas-copco/[/url]
Если интересуют воздушные компрессоры Atlas Copco от официального дилера с удобным подбор по параметрам и доставкой, то это в comprs.ru https://www.comprs.ru/katalog/atlas-copco/ .
Сервисное и техническое обслуживание. Официальная гарантия. Закажите компрессор Atlas Copco онлайн!
Звоните: +7 (495) 255-45-89 и записывайте адрес сайта.
Всем пока!
Hvad angår bedste online casinoer, [url=https://wabi-sabi.com.tr/oplev-fordele-ved-udenlandske-online-casinoer/]https://wabi-sabi.com.tr/oplev-fordele-ved-udenlandske-online-casinoer/[/url], er det vigtigt at finde en platform, der tilbyder beskyttelse og retfærdige spil. Udbetalingsrater varierer, så kontroller flere sider for at forbedre din oplevelse. Vælg også tilbud med omhu.
Hi there everyone, it’s my first go to see at this website,
and article is genuinely fruitful in favor of me, keep up posting these types of articles or reviews.
At vælge et paysafecard casino, [url=http://www2.tert.it/tert2019-4/betal-med-paysafecard-p-casinoer-sikker-og-anonym]http://www2.tert.it/tert2019-4/betal-med-paysafecard-p-casinoer-sikker-og-anonym[/url] er en fantastisk måde at vinde. Med nogle muligheder som anonymitet, leverer det en sikker måde at foretage transaktioner på. Find det perfekte platform for en uforglemmelig oplevelse!
online roulette casinos, [url=https://concejodeliberanteag.gob.ar/nuevo/bedste-online-roulette-casinoer-spil-og-vind-2/]https://concejodeliberanteag.gob.ar/nuevo/bedste-online-roulette-casinoer-spil-og-vind-2/[/url] tilbyder en underholdende måde at underholde sig selv på. Brugere kan få glæde af en klassiske roulette eventyr på nettet. Det giver fantastiske muligheder for belønninger.
bitcoin roulette sites, [url=https://headwearspecialistsfiji.com/best-crypto-roulette-a-guide-to-thrilling-online/]https://headwearspecialistsfiji.com/best-crypto-roulette-a-guide-to-thrilling-online/[/url] offer exciting gameplay for digital currency enthusiasts. Players can experience instant transactions while betting. With various variations, these platforms keep users occupied. Plus, privacy is a key issue. Join the world of bitcoin roulette sites and learn about new opportunities in online gaming.
BC Game Casino, [url=https://descontos.zanini.com.br/?p=37672]https://descontos.zanini.com.br/?p=37672[/url] offers exciting games and great bonuses. Players can enjoy various options, including live dealer games. The platform is intuitive, making it perfect for newcomers and veterans gamblers. Join BC Game Casino today for a remarkable gaming experience!
Hvis du leder efter det bedste casino uden rofus, [url=https://bz.eng.br/bitcoin-casino-sites-i-danmark-en-guide-til-online-5/]https://bz.eng.br/bitcoin-casino-sites-i-danmark-en-guide-til-online-5/[/url], så findes der mange muligheder. Disse online casinoer tilbyder fantastiske spiloplevelser. Oplev tilbud som kan forstærke din oplevelse. Det er nødvendigt at vælge et sikret sted at spille, så du kan prøve dig tryg. I dag er der masser af muligheder, der ser frem til at blive udforsket.
In the world of internet casinos, players seek thrilling experiences. An online casino, [url=https://www.studioraffaellapazzaglia.it/betwinner31034/the-comprehensive-guide-to-betwinner-your-ultimate/]https://www.studioraffaellapazzaglia.it/betwinner31034/the-comprehensive-guide-to-betwinner-your-ultimate/[/url] offers options that traditional establishments can’t match. With entertaining games and lucrative bonuses, it’s a popular choice for many.
NГҐr man leder efter det bedste skrill casino, [url=http://www.trabahopilipinas.com/forst-skrill-online-casino-fordele-og-udfordringer-3/]http://www.trabahopilipinas.com/forst-skrill-online-casino-fordele-og-udfordringer-3/[/url], er det vigtigt at overveje faktorer som sikkerhed, bonusser og spiludvalg. SГҐdan bedste sammenlignes mange platforme. At finde et casino, der accepterer Skrill, bГёr ГҐbne en optimal spilleoplevelse.
For tiden er utallige online casinoer tilgængelige for spillere uden dansk licens. Hos casino uden dansk licens, [url=https://hyperwarped.com/de-bedste-bitcoin-casinoer-i-danmark-554777441/]https://hyperwarped.com/de-bedste-bitcoin-casinoer-i-danmark-554777441/[/url] kan man finde talrige spil og tilbud, som ikke kan findes på licenserede platforme. Spillere skal dog huske, at trygheden kan variere betydeligt.
BC Game Live Casino, [url=https://www.nobleventurefinancial.com/2026/04/05/the-ultimate-guide-to-bc-game-hub-everything-you/]https://www.nobleventurefinancial.com/2026/04/05/the-ultimate-guide-to-bc-game-hub-everything-you/[/url] дарит уникальный перформанс азартных РёРіСЂ. Рграя РІ живом развлечении, РІС‹ окунетесь РІ среду реального казино, объединяя удобство онлайн-РёРіСЂ. Технологии позволяют вам взаимодействовать СЃ профессионалами РІ режиме реального времени.
top roulette casino, [url=https://test.wulogix.com/sikkerhedsfokus/bedste-online-roulette-casinoer-spil-sikkert-og-f/]https://test.wulogix.com/sikkerhedsfokus/bedste-online-roulette-casinoer-spil-sikkert-og-f/[/url] tilbyder fantastiske muligheder for spillere. Man kan få glæde af flere roulette-spil i top format. Her er det vigtigt at vælge det rigtige casino for en fremragende oplevelse.
The rise of digital bitcoin roulette has engaged many players. This exciting game allows users to gamble with cryptocurrency, providing a distinct experience. As casinos evolve, new features keep players interested. Join the fun and try your luck at online bitcoin roulette, [url=https://fireworks.digital/blog/best-crypto-roulette-sites-spin-to-win/]https://fireworks.digital/blog/best-crypto-roulette-sites-spin-to-win/[/url] today!
Placing bets on sports betting, [url=https://devorder.ucokdurian.id/2026/03/31/betwinner-foguetinho-o-mundo-das-apostas-e-jogos/]https://devorder.ucokdurian.id/2026/03/31/betwinner-foguetinho-o-mundo-das-apostas-e-jogos/[/url] can be exciting. Fans often review statistics and teams to maximize their chances of winning. With the right method, one can enjoy greater returns.
Thank you for your sharing. I am worried that I lack creative ideas. It is your article that makes me full of hope. Thank you. But, I have a question, can you help me? https://accounts.binance.info/register-person?ref=IHJUI7TF
Online gamblingsteder uden dansk licens præsenterer varierende chancer for gamblere. Denne type spillested formår at fange gamblere med store fordele og oplevelser. Selvom casinoer uden dansk licens, [url=http://www.sempeeters.nl/casinoer14033/online-poker-uden-rufus-en-guide-til-2/]http://www.sempeeters.nl/casinoer14033/online-poker-uden-rufus-en-guide-til-2/[/url] måske være usikre, er de fleste populære blandt spillere på grund af sit uendelige udvalg.
BC Game Online Casino, [url=https://www.cdj-bouffort.com/index.php/2026/04/05/how-to-register-on-bc-game-a-comprehensive-guide-19/]https://www.cdj-bouffort.com/index.php/2026/04/05/how-to-register-on-bc-game-a-comprehensive-guide-19/[/url] offers an exciting gaming opportunity for players around the world. With numerous options of entertainment choices, it’s clear to find a choice that fits your interests. Join the fun today!
Добрый день!
Друзья и коллеги мои, полезная и отличная новость для вас!
А именно для тех, кто по разным обстоятельствам или причинам меняет страну предывания или проживания.
Понимаете, совсем неразумно, дорого и не выгодно получится, оказавшись вне своей страны и поняв, что не все юридические и сопроводительные документы у вас готовы и есть в наличие.
Вам придется возвращаться назад в Челябинск или Челябинскую область, для восстановления необходимых сопроводительных писем и документов.
Что бы ни заниматься подобными не адекватными и не серьезными действиями, лучше сразу довериться профессионалам, т.е. как говорится, тем, кто на этом «собаку съел».
В общем, если вы ищите, апостиль, бюро переводов, перевод документов в Челябинске и т.д., например:
[url=https://www.lingvo-master.com/]консульская легализация[/url]
Тогда вам обязательно нужно прямо сейчас перейти на сайт Компании Бюро переводов Lingvomaster и узнать все подробности по письменный перевод, перевод паспорта, нотариальный перевод, устный перевод, услуги переводчика, консульская легализация, перевод аудиозаписи, сопровождение в Челябинске, Челябинской области и т.д. https://www.lingvo-master.com/ .
Обязательно переходите на сайт Компании Бюро переводов lingvo-master.com, сохраняйте в закладки и изучайте информацию, не забудьте записать адрес сайта и номер телефона +7 (351) 247-00-53.
Всем пока!
Når du leder efter det bedste skrill casino, [url=https://packaging.ma/casinoer-med-skrill-en-guide-til-sikkert-spil/]https://packaging.ma/casinoer-med-skrill-en-guide-til-sikkert-spil/[/url], er det vigtigt at vælge et sted med høje sikkerhedsstandarder. Tryghed bør altid være en prioritet, ligesom diverse casinospil. Det bedste skrill casino tilbyder rekordhurtige betalinger og værdsatte tilbud, så du kan få mest muligt ud af din oplevelse. Vælg med omhu og nyd spillet!
udenlandske casinoer, [url=http://www.sunitex.com.hk/udforskning-af-danske-casino-sider-hvad-du-skal/]http://www.sunitex.com.hk/udforskning-af-danske-casino-sider-hvad-du-skal/[/url] fremviser en unik erfaring for spillere, der ønsker at udfordre deres skæbne. Med mange spil og tiltalende bonuser, er de imellem de førende valgmuligheder i underholdning.
top roulette casino, [url=https://ayb.co.th/bedste-roulette-sider-overviews-anbefalinger/]https://ayb.co.th/bedste-roulette-sider-overviews-anbefalinger/[/url] tilbyder en spændende oplevelse for dem, der elsker spil. Du kan nyde forskellige varianter, der tiltrækker mange spillere. Det er en unik chance at teste dit held!
Looking for the top gaming experience? Try the best bitcoin roulette, [url=https://thetowelring.com/the-exciting-world-of-bitcoin-roulette-a/]https://thetowelring.com/the-exciting-world-of-bitcoin-roulette-a/[/url]! This thrilling game offers players a chance to win big while enjoying the benefits of cryptocurrency. Join the excitement today and test your luck!
BC Game Casino, [url=http://arisaraldalecumplimos.risaralda.gov.co/index.php/2026/04/05/unlocking-the-best-bc-game-bonuses-for-maximizing/]http://arisaraldalecumplimos.risaralda.gov.co/index.php/2026/04/05/unlocking-the-best-bc-game-bonuses-for-maximizing/[/url] offers an exciting platform for players. With numerous games, you can experience unique features and generous bonuses. Dive into the world of online gaming today!
online sports betting, [url=https://www.calisthenics-guetersloh.de/2026/03/31/exploring-betwinner-a-comprehensive-guide-to-top/]https://www.calisthenics-guetersloh.de/2026/03/31/exploring-betwinner-a-comprehensive-guide-to-top/[/url] is growing among fans of competitive games. Bettors can wager on various events, relishing the thrill of financial gains. The simplicity of online platforms offers to its appeal, allowing individuals to participate from anywhere.
Добрый день!
Каталог воздушных компрессоров от официального дилера, купить по низкой цене – воздушные компрессоры в Москве.
Низкие цены в каталоге, купить компрессор Atlas Copco с доставкой – воздушные компрессоры Atlas Copco от официального дилера.
[url=https://www.comprs.ru/]atlas copco[/url]
Если интересуют воздушные компрессоры Atlas Copco от официального дилера с удобным подбор по параметрам и доставкой, то это в comprs.ru https://www.comprs.ru/katalog/atlas-copco/ .
Официальная гарантия. Сервисное и техническое обслуживание. Закажите компрессор Atlas Copco онлайн!
Звоните: +7 (495) 255-45-89 и записывайте адрес сайта.
До новых встреч!
I Danmark er mange spillere på udkig efter muligheder for at spille online. casino uden om rofus, [url=https://beta.brooklightplacesecurities.com/udenlandske-online-casino-uden-mitid-en-guide-til-2/]https://beta.brooklightplacesecurities.com/udenlandske-online-casino-uden-mitid-en-guide-til-2/[/url] giver adgang til forskellige spil, uden at man skal registrere sig. Dette gør det lettere for spillere at nyde spil uden begrænsninger. Det er vigtigt at tænke over sikkerheden og ansvarligt spil. Med flere betalingsmetoder til rådighed, kan man hurtigt finde en løsning, der passer til ens behov.
I online gaming verden er paysafecard casinoer online, [url=https://lascollab.parami.edu.mm/2026/04/02/paysafecard-casinoer-online-din-guide-til-sikker-9/]https://lascollab.parami.edu.mm/2026/04/02/paysafecard-casinoer-online-din-guide-til-sikker-9/[/url] en populær løsning til at betale. Denne tilbyder kunder en tryg metode til overførelser. Via hurtige indskud kan brugere nyde spil uden problemer.
top roulette casino, [url=https://vanisedainese.com.br/top-roulette-casinoer-din-guide-til-bedste-live/]https://vanisedainese.com.br/top-roulette-casinoer-din-guide-til-bedste-live/[/url] tilbyder fantastiske muligheder for at spille og vinde. I nærheden af sådanne platforme kan spillere nyde diverse varianter af roulette. Det kan spille spændingen ved at spille.
Experience the thrill of playing with BC Game Live Casino, [url=https://inspireustudiosgower.co.uk/index.php/2026/04/05/the-rise-of-bc-game-in-estonia-a-new-era-of-online/]https://inspireustudiosgower.co.uk/index.php/2026/04/05/the-rise-of-bc-game-in-estonia-a-new-era-of-online/[/url], where interactive dealers bring the excitement of a real casino to your screen. Enjoy a wide variety of games, including blackjack, roulette, and baccarat. Join now for special promotions that enhance your gaming adventure!
At finde de bedste online casinoer, [url=https://blog-mwp.muluweb.net/2026/03/15/spil-uden-rufus-en-verden-af-underholdning-2/]https://blog-mwp.muluweb.net/2026/03/15/spil-uden-rufus-en-verden-af-underholdning-2/[/url] kræver tid. Der er mange faktorer at overveje, såsom tilgængelighed af spil, bonusser og hjælp. Det er vigtigt at gøre sin research. De bedste online casinoer tilbyder sikre transaktioner.
online betting, [url=http://watersfamilyspecial.com/exploring-the-features-and-benefits-of-baji-live/]http://watersfamilyspecial.com/exploring-the-features-and-benefits-of-baji-live/[/url] is increasingly widespread among gamblers. Using cutting-edge tech, users can bet from the convenience of their homes, providing an thrilling experience.
Your point of view caught my eye and was very interesting. Thanks. I have a question for you. https://accounts.binance.info/es-AR/register?ref=UT2YTZSU
I don’t think the title of your article matches the content lol. Just kidding, mainly because I had some doubts after reading the article.
Hvis du leder efter det bedste casino uden rofus, [url=https://tienda.mbechile.cl/estacion-nunoa/]https://tienda.mbechile.cl/estacion-nunoa/[/url], er der mange muligheder at overveje. Du kan findenytænkende spil og fantastiske bonusser. Vælg et platform, somtilbyder etdækning af udvalg afkortspil for at få en god oplevelse. Husk altidat have det sjovt.
Playing online crypto roulette, [url=https://megigroup.unifiednetwork.asia/best-bitcoin-roulette-sites-your-guide-to-winning-3/]https://megigroup.unifiednetwork.asia/best-bitcoin-roulette-sites-your-guide-to-winning-3/[/url] delivers an exciting way to bet. With multiple cryptocurrency options, users can relish fast transactions and privacy. The thrill of turning the wheel is enhanced by the opportunity to win big! Engage in online crypto roulette and discover the thrill of each round.
Oplev de live casino oplevelser! Med bedste live casino, [url=https://www.alffastener.de/index.php/2026/03/25/bedste-live-casino-oplev-spndingen-online/]https://www.alffastener.de/index.php/2026/03/25/bedste-live-casino-oplev-spndingen-online/[/url] kan du delta i virkelige spil via din computer. Professionelle dealere skaber en utrolig atmosfære!
casinos sin licencia, [url=https://softtechs360.com/Nywebforum/sin-revision-facilita-tus-retiros-en-casinos/]https://softtechs360.com/Nywebforum/sin-revision-facilita-tus-retiros-en-casinos/[/url] – Los establecimientos sin licencia proporcionan una experiencia arriesgada. Muchos participantes no se dan cuenta de los peligros relacionados a jugando en este tipo de locales. Es crucial investigar antes de apostar.
At spille i online casinoer uden dansk licens kan være spændende. Det er vigtigt at være opmærksom på reglerne og lovgivningen omkring casino uden dansk licens, [url=https://cjuridicounicesar.com/bonus-uden-indbetaling-2026-alt-du-skal-vide-7/]https://cjuridicounicesar.com/bonus-uden-indbetaling-2026-alt-du-skal-vide-7/[/url]. For mange gamblere kan det være fristende at udforske disse muligheder, men det er vigtigt at være informeret for ikke at møde problemer.
I dag vælger mange spillere casinoer uden dansk licens, [url=http://217.199.187.58/thebeautyconcept1.co.uk/bedste-casino-uden-om-rufus-find-din-favorit-3/]http://217.199.187.58/thebeautyconcept1.co.uk/bedste-casino-uden-om-rufus-find-din-favorit-3/[/url] for at få adgang til et bredere udvalg af spil og bonusser. Disse platforme tilbyder unikke muligheder, men det er vigtigt at opføre sig opmærksom på sikkerheden og lovgivningen.
online casino, [url=https://o2cloudsystems.com/casino-med-trustly-utan-svensk-licens-en-djupgende/]https://o2cloudsystems.com/casino-med-trustly-utan-svensk-licens-en-djupgende/[/url] presents an thrilling way to enjoy various games. From video slots to card games, players can opt for their favorites and achieve big prizes.
Det bedste live casino, [url=https://ansergy.com/2026/03/25/oplev-spndingen-ved-live-casinoer-online/]https://ansergy.com/2026/03/25/oplev-spndingen-ved-live-casinoer-online/[/url] tilbyder en uovertruffen spiloplevelse for alle, der elsker teknologi. Her kan man spille med rigtige dealere live. Med hГёj kvalitet fГҐr man en fantastisk tidsfordriv.
casinos online europeos, [url=https://www.tutores.escasto.ipn.mx/blog/2026/03/18/limite-de-deposito-en-casinos-seguridad-y-control/]https://www.tutores.escasto.ipn.mx/blog/2026/03/18/limite-de-deposito-en-casinos-seguridad-y-control/[/url] – Los casinos online europeos disponen una gran selecciГіn de entretenimiento y ofertas. Esta vivencia es Гєnica para aquellos amantes del entretenimiento. Sumado a esto, la confianza es prioritaria, garantizando confianza al jugar. ВЎNo te dejes!
Amazing! This blog looks just like my old one!
It’s on a completely different topic but it has pretty much the same page layout and design. Superb choice of colors!
udenlandske casinoer, [url=https://www.condomi.com.br/2026/03/17/casino-med-apple-pay-den-lette-og-sikker/]https://www.condomi.com.br/2026/03/17/casino-med-apple-pay-den-lette-og-sikker/[/url] tilbyder et forskellige muligheder af spillemuligheder, for eksempel slots og bordspil varianter. Med online platforme er tilgængeligheden udvidet. Casino besøgende kan prøve denne verden af adrenalinfyldte oplevelser.
online casino, [url=http://kairos.grafikmk.pl/ontdek-de-wereld-van-crypto-casino-s-in-nederland-5/]http://kairos.grafikmk.pl/ontdek-de-wereld-van-crypto-casino-s-in-nederland-5/[/url] offers a dynamic way to enjoy gaming from the luxury of your home. Players can explore a variety of choices, making it a popular choice.
I Danmark er der mange muligheder for underholdning, især når det kommer til gambling. casino uden om rofus, [url=https://theadroittechnologies.com/2026/03/18/blackjack-uden-rufus-strategier-og-tips-til/]https://theadroittechnologies.com/2026/03/18/blackjack-uden-rufus-strategier-og-tips-til/[/url] kan tilbyde en anderledes oplevelse for dem, der ønsker at spille. Spillere kan nyde engagerende spil, uden at være begrænset. Man kan finde moderne casinospil online, hvor man kan få store præmier. Vær også opmærksom på sikkerhed, når man vælger at spille.
bedste live casino, [url=https://vilagrad.com/bedste-live-casinoer-i-danmark-en-guide-til-de-4/]https://vilagrad.com/bedste-live-casinoer-i-danmark-en-guide-til-de-4/[/url] tilbyder en spændende oplevelse med ægte dealere. Gambleren kan interagere løbende gennem livestreams, hvilket tilbyder en autentisk atmosfære. Det gambling forener det bedste fra online casino med det virkelige verden.
casas de apuestas sin licencia, [url=https://blogs.kritatechnosolutions.com/dragon-tiger-el-fascinante-mundo-del-casino-en/]https://blogs.kritatechnosolutions.com/dragon-tiger-el-fascinante-mundo-del-casino-en/[/url] – Las empresas de apuestas sin licencia son cada vez mГЎs frecuentes en la red. Estos espacios ofrecen atractivas ofertas, pero carecen de regulaciГіn. Apostar en plataformas de este tipo conlleva riesgos, como la mГnima protecciГіn para los jugadores.
Всем привет!
Воздушные компрессоры в Москве – купить по низкой цене, каталог воздушных компрессоров от официального дилера.
Воздушные компрессоры Atlas Copco от официального дилера – низкие цены в каталоге, купить компрессор Atlas Copco с доставкой.
[url=https://www.comprs.ru/]купить винтовой компрессор[/url]
Если интересуют воздушные компрессоры Atlas Copco от официального дилера с доставкой и удобным подбор по параметрам, то это в comprs.ru https://www.comprs.ru/katalog/atlas-copco/ .
Официальная гарантия. Сервисное и техническое обслуживание. Закажите компрессор Atlas Copco онлайн!
Записывайте адрес сайта и звоните: +7 (495) 255-45-89.
Увидимся!
* Подробнее о классификации запросов информация есть в статье: Как проверить геозависимость запроса?.
Если вы продвигаете сайт по России, а ваш конкурент – только по Санкт-Петербургу, то в выдаче по СПб у конкурента позиции будут лучше https://proffseo.ru/prodvizhenie-sajtov-po-moskve
Создает визуальные креативы, которые будут привлекать внимание, органично дополнять текст и мотивировать к целевому действию https://proffseo.ru/kontakty
Здесь есть рекомендации по присвоению региона сайту от первоисточника https://proffseo.ru/prodvizhenie-angloyazychnykh-sajtov
вырос незашифрованный трафик https://proffseo.ru/prodvizhenie-sajtov-po-rf
Landing Page https://proffseo.ru/prodvizhenie-angloyazychnykh-sajtov
I dag er der mange muligheder for at finde de bedste online casinoer, [url=https://ahdustechnology.fi/gambling-uden-rofus-en-guide-til-online-spil/]https://ahdustechnology.fi/gambling-uden-rofus-en-guide-til-online-spil/[/url]. Spil har aldrig været mere underholdende. Du kan deltage dine færdigheder hjemmefra med mange muligheder.
Доброго времени суток!
Воздушные компрессоры в Москве – купить по низкой цене, каталог воздушных компрессоров от официального дилера.
Воздушные компрессоры Atlas Copco от официального дилера – купить компрессор Atlas Copco с доставкой, низкие цены в каталоге.
[url=https://www.comprs.ru/]воздушные компрессоры в москве[/url]
Если интересуют воздушные компрессоры Atlas Copco от официального дилера с доставкой и удобным подбор по параметрам, то это в comprs.ru https://www.comprs.ru/katalog/atlas-copco/ .
Сервисное и техническое обслуживание. Официальная гарантия. Закажите компрессор Atlas Copco онлайн!
Звоните: +7 (495) 255-45-89 и записывайте адрес сайта.
Увидимся!
live roulette sites, [url=http://wordpress2.design-services-online.com/MHS/experience-the-thrill-of-live-roulette-at-uk-17/]http://wordpress2.design-services-online.com/MHS/experience-the-thrill-of-live-roulette-at-uk-17/[/url] present a exciting experience for gamblers. In utilizing these platforms, you can experience the real-time action of the game. Join a vibrant community, where participants can chat with dealers and other players, creating an immersive environment. The range of betting options provides to the thrill, making gaming remarkable.
nexusdarknet site link https://darknetmarketstore.com/
I dag tilbyder de øverste online casinoer en fantastisk oplevelse med live gambling. bedste live casino, [url=https://detoegangemmen.webba01.projectlocatie.nl/karate-roskilde/find-det-bedste-live-casino-i-danmark/]https://detoegangemmen.webba01.projectlocatie.nl/karate-roskilde/find-det-bedste-live-casino-i-danmark/[/url] giver spillere mulighed for at kommunikere med rigtige dealere, hvilket skaber en realistisk atmosfære. Med adskillige spilmuligheder, som poker, er der noget for enhver smag. Spillere kan opleve spændingen fra et factisk casino hjemmefra.
La ruleta francesa, [url=https://tienda.codimed.cl/archivos/780941]https://tienda.codimed.cl/archivos/780941[/url] es un juego emocionante que atrae a muchos jugadores. La tablero ofrece diversas opciones para realizar apuestas. La funcionamiento es Гєnico y cautivador. AdemГЎs, la actividad proporciona una experiencia comunitaria inigualable en los centros de apuestas.
Når du søger efter bedste casino uden rofus, [url=https://calla-trade.com/casino-uden-rofus-en-ny-ra-for-spilleoplevelser/]https://calla-trade.com/casino-uden-rofus-en-ny-ra-for-spilleoplevelser/[/url], er det vigtigt at finde en platform, der tilbyder overlegne spillemuligheder og tiltalende bonusser. Sammenlign faciliteter og vurder brugeranmeldelser for at træffe det bedste valg.
You actually revealed that perfectly.
my webpage :: https://www.youtube.com/redirect?q=https://pad.geolab.space/s/LR8rI46Vr
первый понравился – этот думаю не хуже.
online casino, [url=https://nowph.org/how-to-sign-up-on-1xcasino-ph/]https://nowph.org/how-to-sign-up-on-1xcasino-ph/[/url] offers an exciting assortment of games for players to play. Including fruit machines to card games, there’s something for everyone. Become a member and utilize the latest promotions available.
casino uden dansk licens, [url=https://store.ampinc.com/f-free-spins-uden-indbetaling-en-guide-til-online/]https://store.ampinc.com/f-free-spins-uden-indbetaling-en-guide-til-online/[/url] har|besidder|tilbyder|giver mange fordele, som spillere ofte søger. Det|Den|Denne type|En sådan platform giver mulighed for større bonusser og|samt|også|herunder bedre spiludvalg. Mange spillere værdsætter friheden til at spille uden restriktioner, hvilket øger spændingen og underholdningen.
Welcome to the entertaining world of live roulette casino site, [url=https://powercordlead.com/best-live-roulette-casinos-in-the-uk-your-ultimate-3/]https://powercordlead.com/best-live-roulette-casinos-in-the-uk-your-ultimate-3/[/url], where players can participate in the realistic atmosphere of a casino from their homes. Spin the wheel and test your luck in this vibrant game.
La Ruleta europea en casinos nuevos, [url=https://north-prop.com/descubre-el-pick-bonus-en-los-juegos-de-casino/]https://north-prop.com/descubre-el-pick-bonus-en-los-juegos-de-casino/[/url] brinda una sensaciГіn emocionante para los entusiastas. Con sus reglas Гєnicas, cada giro es un desafГo de triunfar premios.
online crypto casino, [url=https://stg.go-g.biz/141657.html]https://stg.go-g.biz/141657.html[/url] tilbyder en spændende oplevelse for spillere, der søger en ny måde at gamble på. Med tryghed i fokus, kan disse platforme øjeblikkelige transaktioner og fortrolighed. Spillere nyder et stort udvalg af spil og bonusser, der appellerer til både nye og erfarne gamblingentusiaster.
I got this site from my buddy who shared with me regarding this website and now this time I am
visiting this web page and reading very informative articles here.
my blog คาสิโนเว็บตรงไม่ผ่านเอเย่นต์
Конечно. Всё выше сказанное правда. Давайте обсудим этот вопрос.
Бармен-шоу, [url=https://barshows.ru/]https://barshows.ru/[/url] — это захватывающее зрелище, где креативные бармены исполняют искусство приготовления коктейлей. Они задействуют различные техники, чтобы удивить зрителей. Каждый выступление — это настоящее зрелище фейерии и идейности.
I vores tid tilbyder mange online casinoer spændende spil. Det er vigtigt at vurdere casinoer uden dansk licens, [url=https://topnotchdigital.co.uk/2026/03/21/casino-uden-om-rufus-oplev-nye-spillemuligheder/]https://topnotchdigital.co.uk/2026/03/21/casino-uden-om-rufus-oplev-nye-spillemuligheder/[/url], da de ofte har forskellige regler og spil. Vær aktsom og tjek dem grundigt.
ВОТ! ТОЧНО!
Возврат денег от брокера, [url=https://stopscam.info/]https://stopscam.info/[/url] – важный процесс для трейдеров. Если возникнут проблемы с выводом средств, необходимо узнать о подходах возврата. Свяжитесь к поддержке брокера для уточнения информации. Каждый трейдер должен знать свои права, чтобы результативно решить вопрос с возвратом средств.
live roulette sites, [url=https://laurelstreetsmiles.com/experience-the-thrill-of-live-roulette-your-guide/]https://laurelstreetsmiles.com/experience-the-thrill-of-live-roulette-your-guide/[/url] offer an exhilarating experience for players. These gaming sites provide instant action with professional dealers. Players can enjoy the thrill of gameplay from the comfort of their homes. Live roulette sites blend excitement and convenience, making it a popular choice among gambling enthusiasts.
udenlandske casinoer, [url=http://karinabouza.tecsanio.com.ar/2026/03/22/sverige-casino-free-spins-maksimer-din/]http://karinabouza.tecsanio.com.ar/2026/03/22/sverige-casino-free-spins-maksimer-din/[/url] tilbyder en række spændende spilmuligheder. Spillere er i stand til at nyde alene typer spilleautomater, som leverer mærkbare gevinster.
casinos fuera de EspaГ±a, [url=https://academia.edu.gt/la-importancia-de-la-propiedad-intelectual-en/]https://academia.edu.gt/la-importancia-de-la-propiedad-intelectual-en/[/url] – Los salones de juego fuera de EspaГ±a brindan una variada gama de opciones. A partir de emocionantes juegos de azar, los jugadores pueden gozar de la excitaciГіn que estos locales ofrecen. AdemГЎs, ciertos salones de juego fuera de EspaГ±a tienen eventos fascinantes que complementan perfectamente la experiencia.
I dag er de mest anerkendte mobil casinoer blevet en vigtig del af den digitale spilverden. Med smarte apps kan spillere uge casinospil hvor som helst. bedste mobil casino, [url=https://visit.ambato.gob.ec/2026/03/26/bedste-mobil-casino-en-gennemgang-af-topvalg/]https://visit.ambato.gob.ec/2026/03/26/bedste-mobil-casino-en-gennemgang-af-topvalg/[/url] tilbyder sikkerhed og attraktive bonusser, der opfordrer spillerne til at afprГёve nye muligheder.
Я думаю, что Вы допускаете ошибку. Давайте обсудим.
У нашій Військова крамниця, [url=https://voenshop.com.ua/product-category/sporiadzhennia-ta-ekipirovka/]https://voenshop.com.ua/product-category/sporiadzhennia-ta-ekipirovka/[/url] ви знайдете широкий колекцію спеціального та аксесуарів. Надійні вироби забезпечують захист під час виконання операцій. Звертайтеся та досліджуйте все, що потрібно!
Всем привет!
Коллеги и друзья мои, есть ли что страшнее и непонятнее, когда не знаешь иностранный язык и не понимаешь его смысл?!
К нашему счастью и радости в наше интернетное и компьютеризированное время это не является проблемой.
Даже доступно удаленно, т.е. онлайн, можно не выходя из квартиры или офиса обратиться в надежную и профессиональную фирму с 15 летним стажем в городе Челябинске и Челябинской области и заказать необходимый перевод документов.
Различных переводов и различных документов множество, лучше конечно опрометчиво и неразумно не рисковать, ведь это же официальная документация.
В общем, если вам интересно найти, перевод документов, переводы, апостиль в Челябинске и т.д., например:
[url=https://www.lingvo-master.com/perevody-perevod-dokumentov-apostil/]перевод документов на английский[/url]
Тогда вам нужно прямо сейчас перейти на сайт Бюро переводов Lingvomaster Челябинск и узнать все подробности по перевод видеозаписей, перевод паспорта, нотариальный перевод, письменный перевод, устный перевод, перевод водительских, перевод аудиозаписи, консульская легализация в Челябинске и т.д. https://www.lingvo-master.com/perevody-perevod-dokumentov-apostil/ .
Обязательно переходите на сайт Бюро переводов Lingvomaster Челябинск, сохраняйте в закладки и изучайте информацию, не забудьте записать адрес сайта и номер телефона +7 (351) 247-00-53.
Есть ли что надежнее и серьезнее бюро переводов в Челябинске и Челябинской области? Переходите на сайт, посмотрите и сами убедитесь.
Увидимся!
casino uden om rofus, [url=https://content-qa.fortuneconferences.com/oplev-danske-casinoer-uden-rofus-spil-frit-og-uden/]https://content-qa.fortuneconferences.com/oplev-danske-casinoer-uden-rofus-spil-frit-og-uden/[/url] tilbyder en række spændende muligheder for spillere, der søger underholdning uden de traditionelle begrænsninger. Her kan man finde mange spil og gavekort, der gør oplevelsen endnu mere attraktiv.
Southeast Financial Nashville
131 Belle Forest Cir #210,
Nashville, TN 37221, United Ѕtates
18669008949
NADA RV color value
Замечательно, это ценное мнение
інжинірингові послуги, [url=https://mostoproekt.com.ua/portfolio/]https://mostoproekt.com.ua/portfolio/[/url] дозволяють реалізацію інновацій з якісною експертизою. Кваліфіковані спеціалісти створюють індивідуальні рішення, що задовольняють потребам клієнтів. Успішна реалізація забезпечує конкурентоспроможність.
live roulette uk, [url=http://www.easenet.jp/wordpress/the-exciting-world-of-live-dealer-roulette-in-the-2/]http://www.easenet.jp/wordpress/the-exciting-world-of-live-dealer-roulette-in-the-2/[/url] offers an exciting experience for players looking for real-time action. Gameplay combines entertainment with chance. Players can interact with dealers and participants, making it even better.
El registro sin DNI apuesta, [url=https://androidmobiles.com/uncategorized/cobro-apuesta-sin-excusas-revision-completa-y]https://androidmobiles.com/uncategorized/cobro-apuesta-sin-excusas-revision-completa-y[/url] proporciona a los usuarios la capacidad de participar en diferentes actividades. La alternativa es ideal para los que buscan diversiГіn sin restricciones.
top roulette casino, [url=http://kz-house.com/danmarkidenkoldekrig/bedste-roulette-casinoer-i-danmark-find-dit-2/]http://kz-house.com/danmarkidenkoldekrig/bedste-roulette-casinoer-i-danmark-find-dit-2/[/url] tilbyder en spændende oplevelse med adrenalinfyldte spil. Spillere kan nyde forskellige strategier og metoder for at øge deres vinderchancer. Uanset om du er nybegynder eller ekspert, er der noget at finde hos top roulette casino, der vil fange dig.
Der er mange muligheder, når det kommer til bedste online casinoer, [url=https://createdgetoys.com/udenlandske-online-casinoer-en-dybtgende-guide/]https://createdgetoys.com/udenlandske-online-casinoer-en-dybtgende-guide/[/url]. Spillere kan nyde et diverse af aktiviteter samt exceptionelle bonusser. Det er vigtigt at vælge det rette casino for den bedste oplevelse.
Can you be more specific about the content of your article? After reading it, I still have some doubts. Hope you can help me.
bedste casino uden rofus, [url=https://mahajakindustry.com/nye-udenlandske-casinoer-en-gennemgang-af-de/]https://mahajakindustry.com/nye-udenlandske-casinoer-en-gennemgang-af-de/[/url] tilbyder en perfekt mulighed for spillere, der ønsker at nyde deres yndlingsspil uden restriktioner. Disse casinoer garanterer en komfortabel oplevelse, fremragende udbetalinger og et varieret udvalg af spil. Vælg omhyggeligt og find det bedste casino for dig.
BetWinner Online Bookmaker, [url=https://www.cashforcaravans.com.au/betwinner-online-casino-and-sportsbook-a-7/]https://www.cashforcaravans.com.au/betwinner-online-casino-and-sportsbook-a-7/[/url] offers a fantastic platform for sports betting. With multiple options and inviting bonuses, it’s popular among bettors. Register and initiate your winning journey today!
Discover popular live roulette sites, [url=http://www.aiace.com.br/2026/03/19/experience-the-thrill-of-live-roulette-in-the-uk-6/]http://www.aiace.com.br/2026/03/19/experience-the-thrill-of-live-roulette-in-the-uk-6/[/url] for an engaging gaming experience. These venues offer immediate action with professional dealers. Enjoy outstanding graphics and fair gameplay. Join today to kick off your betting adventure!
El registro sin DNI apuesta, [url=https://stg.nyuct.com/sol-retiro-apuesta-instantaneo-todo-lo-que/]https://stg.nyuct.com/sol-retiro-apuesta-instantaneo-todo-lo-que/[/url] es una opciГіn atractiva para muchos. Brinda la posibilidad de participar en juegos de azar sin necesidad de identificaciГіn. Dicha alternativa resulta conveniente para quienes buscan privacidad.
casino uden rofus pragmatic, [url=http://lobby.co.il/opdag-verdenen-af-pragmatic-play-casino-online/]http://lobby.co.il/opdag-verdenen-af-pragmatic-play-casino-online/[/url] tilbyder en spændende mulighed for spillere, der ønsker at nyde deres yndlingsspil uden begrænsninger. Her kan man finde et udvalg af spil, som giver utrolig oplevelse. Glem ikke nyde de tilgængelige bonusser, som kan forstærke din spiloplevelse. Casino uden rofus pragmatic tilbyder et sikkert miljø, hvor du kan nyde framtidens casinooplevelser.
casino uden dansk licens, [url=http://www.shitara-trail.jp/%e6%9c%aa%e5%88%86%e9%a1%9e/152513.html]http://www.shitara-trail.jp/%e6%9c%aa%e5%88%86%e9%a1%9e/152513.html[/url] tilbyder en alternativ spilleoplevelse til besøgende. Disse platforme leverer mange spil, som kan simpelthen være komplicerede at finde andetsteds. Selv for bonusser, der normalt er mere generøse. Spillere skal dog være klar over på de potentielle risici, der kan opstå uden en dansk licens.
BetWinner Betting Platform, [url=https://www.schriftsteller.de/comprehensive-betwinner-philippines-review-your-3/]https://www.schriftsteller.de/comprehensive-betwinner-philippines-review-your-3/[/url] offers numerous options for betting enthusiasts. Users can exploit competitive odds and dynamic promotions. The interface is easy to navigate, making it simple to place bets. With BetWinner Betting Platform, gamblers can find their favorite sports and events. This promising platform is ideal for both beginners and seasoned veterans. Join today and commence your betting journey!
live casino roulette uk, [url=http://nomadjapan.com/cliveparker/live-casino-roulette-in-the-uk-an-ultimate-guide/]http://nomadjapan.com/cliveparker/live-casino-roulette-in-the-uk-an-ultimate-guide/[/url] offers an exciting experience for players who enjoy the thrill of spinning the wheel. This games provide the authentic atmosphere, with genuine dealers and engaging gameplay. Participants can witness the excitement from the comfort of their homes, making it a popular choice among online casino enthusiasts. The variety of betting styles and types adds to the appeal, ensuring all finds something to match their preferences.
apuestas ilegales, [url=https://k2joom.com/apuestas-en-overwatch-como-apostar-y-ganar-con/]https://k2joom.com/apuestas-en-overwatch-como-apostar-y-ganar-con/[/url] – Las apuestas no autorizadas han aumentado en popularidad en los Гєltimos aГ±os. Muchos entusiastas buscan sumergirse en este mundo, a pesar de los riesgos. Las afectaciones pueden ser serias. El estado busca proteger la legalidad, pero las apuestas ilegales siguen siendo prevalentes.
I don’t think the title of your article matches the content lol. Just kidding, mainly because I had some doubts after reading the article. https://www.binance.info/bg/register?ref=V2H9AFPY
Casinoer uden dansk licens garantere brugere opportuniteten for at spille flere underholdningsmuligheder. PГҐ de websites kan de finde fristende fordele og forskellige variationsrig af spilmuligheder. casinoer uden dansk licens, [url=https://pixal.ai/2026/03/28/bedste-danske-casinoer-oplev-topoplevelser-online/]https://pixal.ai/2026/03/28/bedste-danske-casinoer-oplev-topoplevelser-online/[/url] kan alternativ tilgang til gambling.
Det bedste live casino, [url=https://www.davecridermusic.com/bedste-live-casinoer-i-danmark-din-guide-til-2/]https://www.davecridermusic.com/bedste-live-casinoer-i-danmark-din-guide-til-2/[/url] viser en vidunderlig oplevelse for spillere, der ønsker live spil. Her kan man interagere med dealere i live. Det bedste live casino bygger en samarbejdsvillig atmosfære, der øger spiloplevelsen. Spillere kan opnå spænding fra deres hjørne.
BetWinner Online Casino, [url=http://roadtripusa2007.free.fr/?p=22]http://roadtripusa2007.free.fr/?p=22[/url] offers numerous options of games that cater to all types of players. From exciting slots to engaging table games, it guarantees an unforgettable experience. With reliable payment methods, users can enjoy assurance while playing. Join BetWinner Online Casino today and experience the fun!
udenlandske casinoer, [url=https://rockwoodhealthcare.com/index.php/2026/03/28/casinoer-uden-om-rofus-dit-guide-til/]https://rockwoodhealthcare.com/index.php/2026/03/28/casinoer-uden-om-rofus-dit-guide-til/[/url] præsenterer en omfattende vifte af casinospil. Spillere kan deltage i både klassiske maskiner til live dealer. Det bliver vigtigt at overveje sikkerhed og lovgivning før man vælger.
european roulette casinos, [url=https://www.leerebelwriters.com/the-exciting-world-of-european-roulette-in-online-2/]https://www.leerebelwriters.com/the-exciting-world-of-european-roulette-in-online-2/[/url] offer a thrilling atmosphere for wagerers. With entertaining gameplay and different betting options, they attract many enthusiasts looking for entertainment.
Si buscas las mejores ruletas online, [url=https://www.jurgenvandervelde.com/apuesta-direct-live-la-experiencia-de-la-ruleta-en/]https://www.jurgenvandervelde.com/apuesta-direct-live-la-experiencia-de-la-ruleta-en/[/url], hay muchos aspectos a considerar. Opta por plataformas que ofrezcan ofertas atractivas. AdemГЎs, confirma que cuenten con licencias adecuadas. Por Гєltimo, no olvides la diversidad de juegos disponibles.
BetWinner Casino, [url=https://haat.fr/betwinner-bookmaker-a-comprehensive-guide-to-2/]https://haat.fr/betwinner-bookmaker-a-comprehensive-guide-to-2/[/url] оценивает игрокам множество развлечений. Карточные игры и механические машины доступны для комфортного досуга. Процесс регистрации простая и быстрая, что интересует новых пользователей. Не пропустите возможность выиграть большие призы!
bedste mobil casinoer, [url=https://dev.venturesquare.net/1012260]https://dev.venturesquare.net/1012260[/url] leverer en imponerende erfaring for spillere. Med effektive indbetalinger og brugervenlige grænseflader kan du spille hvor som helst, når som helst. Vælg idiot-sikker platforme for adspredelse.
I dag tilbyder spilleuker uden om myndighederne en spændende mulighed for spillere. Du kan underholde dig selv uden det samme pres. Find efter de nyeste platforme for at erhverve dine yndlingsspil. I disse casino uden om rofus, [url=https://wworj.com.br/best-bunny-casino-oplev-den-ultimative/]https://wworj.com.br/best-bunny-casino-oplev-den-ultimative/[/url] kan du finde det kompleks univers af online spil.
Юлия, Москва https://drogal.ru/voprosi-otveti/vibrat-upakovku/
Полезен ли Вам отзыв?
Мария, Москва https://drogal.ru/uslugi/
Такелажные тележки 24 тонны, домкрат 5 тонн 4 шт, лебедка 5 тонн https://drogal.ru/uslugi/upakovka/eksportnaya-upakovka/
Принципиальная позиция нашей компании ? неукоснительное соблюдение техники безопасности https://drogal.ru/glossary/logisticheskie-riski/
В противном случае любая ошибка или небрежность может обернуться финансовыми потерями или нанесением ущерба здоровью людей https://drogal.ru/portfolio_tags/uslugi-avtokrana-50-tonn/
Поэтому каждый наш сотрудник проходит спецобучение по проведению такелажных работ, которое завершается аттестацией https://drogal.ru/glossary/fumigatsiya-upakovki/
Проведение такелажных работ необходимо, если требуется погрузка, разгрузка и перемещение крупногабаритных, сложных или неформатных грузов https://drogal.ru/glossary/putevoi-list/
Грузоподъемные и такелажные работы любой сложности с 1998 г https://drogal.ru/portfolio-items/stropalnie-raboti-v-khimkakh/
выполняет компания «Перевозки-Переноски» https://drogal.ru/glossary/gruppovaya-otpravka/
К вашим услугам – наши аттестованные такелажники, стропальщики, грузчики и операторы с огромным реальным опытом работы в этой сфере https://drogal.ru/faq_category/osobennosti-okazaniya-uslug/
Выполнение такелажных работ производится с использованием нашего собственного современного парка спецтехники и с применением новейшей такелажной оснастки https://drogal.ru/glossary/yashchik/
BetWinner Bookmaker, [url=https://thompsonandthompsonltd.com/2026/04/05/betwinner-ci-platform-your-gateway-to-sports/]https://thompsonandthompsonltd.com/2026/04/05/betwinner-ci-platform-your-gateway-to-sports/[/url] offers a wide range of betting options for sports enthusiasts. With excellent odds, users can enjoy engaging betting experiences. The platform is user-friendly, ensuring smooth gameplay. Join BetWinner Bookmaker for incredible promotions and a consistent betting environment!
I dag er der mange muligheder for at finde de bedste online casinoer, [url=https://hdteknikkombicim.com/2026/04/01/f-gratis-spins-uden-indbetaling-tag-det-frste/]https://hdteknikkombicim.com/2026/04/01/f-gratis-spins-uden-indbetaling-tag-det-frste/[/url]. Hvis du sГёger en fantastisk underholdning, er det esentialt at anskaffe et sikkert casino. bedste online casinoer tilbyder varierede spil og attraktive bonusser, som kan optimere din berigelse.
roulette not on gamstop, [url=https://vertical-growth.com/online-roulette-not-on-gamstop-your-ultimate-guide/]https://vertical-growth.com/online-roulette-not-on-gamstop-your-ultimate-guide/[/url] offers players a chance to enjoy the game without restrictions. This enables enthusiasts to participate freely, enhancing their gaming experience. Many casinos present options for roulette, ensuring thrills for all. With different betting styles available, players can discover unique strategies while spinning the wheel. Engaging in roulette not on Gamstop can be a lucrative choice, as it enables access to numerous bonuses and promotions, attracting a wide audience. Join today and experience the excitement of the game like never before.
I casinГІ online non AAMS, [url=https://riseandshinechildrentrust.org/casino-senza-licenza-aams-rischi-e-opportunita-2/]https://riseandshinechildrentrust.org/casino-senza-licenza-aams-rischi-e-opportunita-2/[/url] stanno guadagnando sempre piГ№ popolaritГ tra gli utenti. Diverse giocatori sono attratti da bonus allettanti e selezioni unici. L’accesso da qualsiasi luogo rende questi ambienti ideali per divertirsi.
Uanset om du er nybegynder eller erfaren spiller, er top roulette casino, [url=https://akhmadiinkhotkhon-1.ub.gov.mn/?p=141633]https://akhmadiinkhotkhon-1.ub.gov.mn/?p=141633[/url] stedet at være. Dette sted tilbyder forbløffende muligheder. Med øverste spil, får du muligheden for at vinde stort!
I dag er det muligt at finde bedste casino uden rofus, [url=https://www.blogaei.com/bookmaker-tilbud-f-mere-ud-af-din-spiloplevelse/]https://www.blogaei.com/bookmaker-tilbud-f-mere-ud-af-din-spiloplevelse/[/url], hvor spillere kan nyde deres yndlingsspil uden bekymringer. Disse tilbyder imponerende bonusser og et bredt udvalg af spil. Tryghed er ogsГҐ en prioritet, hvilket muliggГёr en tryg oplevelse for alle spillere.
Your style is so unique in comparison to other folks I’ve
read stuff from. I appreciate you for posting when you’ve
got the opportunity, Guess I will just book mark this blog.
BetWinner Live Casino, [url=https://riseandshinechildrentrust.org/comprehensive-guide-to-betwinner-account-login-3/]https://riseandshinechildrentrust.org/comprehensive-guide-to-betwinner-account-login-3/[/url] дарит уникальный опыт для РёРіСЂРѕРєРѕРІ. Здесь можно найти многочисленные РёРіСЂС‹ РІ реальном времени СЃ реальными РєСЂСѓРїСЊРµ. Рспытайте азарт РїСЂСЏРјРѕ РёР· комфорта вашего РґРѕРјР°!
Playing casino games can be thrilling, especially when it comes to roulette not on gamstop, [url=https://wp.onlinecertificationguide.com/discover-the-best-roulette-sites-not-on-gamstop-2/]https://wp.onlinecertificationguide.com/discover-the-best-roulette-sites-not-on-gamstop-2/[/url]. Many players seek options that provide more freedom and excitement. Online platforms show diverse options of roulette, ensuring an exhilarating experience. It’s crucial to pick trustworthy sites for safe gambling.
I casinГІ online non AAMS, [url=https://dev.fighttoendcancer.com/2026/guida-agli-online-casino-non-aams-scopri-tutto-cio/]https://dev.fighttoendcancer.com/2026/guida-agli-online-casino-non-aams-scopri-tutto-cio/[/url] offrono una possibilitГ eccellente per scommettitori che cercano relax senza freni regionali. La piattaforma consente di vivere modalitГ vari, inclusi slot, poker e roulette, di solito con promozioni allettanti.
ВЎBienvenido a betsala casino, [url=https://cobblebankvillage.com.au/2024/11/06/hello-world/]https://cobblebankvillage.com.au/2024/11/06/hello-world/[/url], donde la emociГіn nunca termina! AquГ puedes disfrutar de diversa opciones de apuestas. El ambiente electrizante te harГЎ sentir la adrenalina en cada apuesta. No dudes en inscribirte y descubrir las oportunidades que te esperan. ВЎAtrГ©vete a ganar!
Извиняюсь, но не могли бы Вы дать немного больше информации.
Bof Casino, [url=https://casinobofonline.uk/review/]https://casinobofonline.uk/review/[/url] offers thrilling games for players. With multiple options, everyone can find something to enjoy. The intuitive interface makes it simple to play. Join Bof Casino and embark on your gambling adventure today!
Can you be more specific about the content of your article? After reading it, I still have some doubts. Hope you can help me.
live casinoer uden rofus, [url=https://www.aurumevent.com/bedste-live-casinoer-en-guide-til-online-2/]https://www.aurumevent.com/bedste-live-casinoer-en-guide-til-online-2/[/url] tilbyder en unik oplevelse for spillere, som ønsker at nyde deres yndlingsspil. Ved live casinoer kan man samhandle med rigtige dealere og andre spillere. Dette skaber en interaktiv atmosfære, som mange finder tiltalende. Foruden tilbyder mange live casinoer uden rofus forskellige spilmuligheder, herunder baccarat, der fascinerer både nybegyndere og erfarne spillere. Gør dig klar til et underholdende aften med live casinoer uden rofus!
BetWinner Online Bookmaker, [url=https://rproject-nagasaki.com/betwinner5042/complete-guide-to-betwinner-registration-process]https://rproject-nagasaki.com/betwinner5042/complete-guide-to-betwinner-registration-process[/url] offers thrilling opportunities for sports betting enthusiasts. With extensive markets, players can navigate numerous games. The platform ensures a protected environment for all transactions, making it a top choice for bettors.
Абсолютно с Вами согласен. В этом что-то есть и мысль отличная.
Кухни на заказ, [url=http://custom-kitchens.ru/]http://custom-kitchens.ru[/url] — это возможность создать уникальное пространство для блюд. Каждый фрагмент продуман с учетом предпочтений заказчика, что позволяет добиться идеального результата.
I casinГІ online non AAMS, [url=https://365conte.com/i-migliori-siti-scommesse-non-aams-italiani-guida/]https://365conte.com/i-migliori-siti-scommesse-non-aams-italiani-guida/[/url] offrono un’ampia gamma di giochi e bonus attrattivi. Investendo in queste piattaforme, puoi vincere ricompense straordinarie. Scopri innovative opportunitГ di intrattenimento!
red door roulette, [url=http://www.nishizawa-ltd.com/2026/03/29/die-faszination-des-red-door-roulette/]http://www.nishizawa-ltd.com/2026/03/29/die-faszination-des-red-door-roulette/[/url] – Die Red Door Roulette gewГ¤hrt ein Abenteuer fГјr Spieler auf unserer Plattform. Dort kГ¶nnen Spieler glГјckliche Zeit erleben, wГ¤hrend Sie Drehungen spielen. Erlauben Sie sich von dem Aufregung. Durch packenden Visualisierungen und einer besonderen Stimmung wird der spaГџige Erlebnis dauerhaft beeindrucken. Lassen Sie nicht die Chance, ein Erlebnis bei Red Door Roulette zu erleben!
jugabet casino, [url=https://www.msbyms.se/?p=101]https://www.msbyms.se/?p=101[/url] es un lugar Гєnico donde la diversiГіn y la emociГіn se combinan. Los jugadores disfrutan de varios juegos. La gama de opciones es impresionante, y todos pueden encontrar algo que les apasiona.
BetWinner Betting Platform, [url=https://immobilienhamburg.eu/2026/04/05/discover-the-betwinner-gambling-platform-your-2/]https://immobilienhamburg.eu/2026/04/05/discover-the-betwinner-gambling-platform-your-2/[/url] offers numerous betting options for sports enthusiasts. Users can relish live betting, casino games, and captivating promotions, enhancing their gaming adventure.
Замечательно, это ценное сообщение
Смотрите ленту Миссия невыполнима смотреть, [url=https://wwv3.cupper.kz/]Фильм миссия невыполнима[/url], которая удивляет захватывающим сюжетным развитием. Персонажи воплощают красочные моменты, а приключения держит в напряжении. Не пропустите повод увидеть это удивительное зрелище!
Создается ложное впечатление, что геоНЕзависимая раскрутка проще и легче геозависимой (ведь нет региональных настроек), но это не так https://proffseo.ru/kontakty
Сложность «свободного» продвижения – в наивысшем уровне конкуренции, с которым столкнется ваш сайт или online-магазин https://proffseo.ru/prodvizhenie-sajtov-po-moskve
После чего, одним из ключевых моментов в продвижении сайта, стал выбор и присвоение ему региона, в котором требуется занять высокие позиции https://proffseo.ru/privacy
Для крупных компаний, имеющих представительства в нескольких городах, рекомендуется создавать отдельные папки или поддомены для каждого филиала, после чего им нужно присвоить конкретные регионы в сервисе Яндекс https://proffseo.ru/kontakty
Вебмастер https://proffseo.ru/prodvizhenie-zarubezhnykh-sajtov
В таком случае желательно, чтобы на поддоменах контент был уникализирован как между основной версией сайта (которая продвигается в регионе Москва), так и между самим поддоменами https://proffseo.ru/
Хотя это и не настолько критично, главное — наличие блока с географической информацией https://proffseo.ru/privacy
Адреса поддоменов могут быть такими: http://spb https://proffseo.ru/kontakty
site https://proffseo.ru/prodvizhenie-zarubezhnykh-sajtov
ru/; http://voronezh https://proffseo.ru/prodvizhenie-sajtov-po-moskve
site https://proffseo.ru/prodvizhenie-sajtov-po-rf
ru/; и так далее https://proffseo.ru/prodvizhenie-zarubezhnykh-sajtov
Безусловно, в целях регионального продвижения можно создавать сайты и на разных доменах https://proffseo.ru/prodvizhenie-sajtov-po-moskve
Но это более трудоемкий процесс https://proffseo.ru/
Результаты наших клиентов https://proffseo.ru/privacy
Специалистам по продвижению https://proffseo.ru/kontakty
Интернет-маркетологам https://proffseo.ru/prodvizhenie-sajtov-po-rf
Руководителям и владельцам региональных компаний https://proffseo.ru/prodvizhenie-angloyazychnykh-sajtov
от 150 000 ?
I Danmark er det muligt at finde virtuale spil casino uden om ROFUS, [url=https://janseverhuizingen.nl/opdag-de-bedste-udenlandske-casinoer-i-2023/]https://janseverhuizingen.nl/opdag-de-bedste-udenlandske-casinoer-i-2023/[/url], hvor spillere kan sætte pris på det større udvalg af underholdning. Disse websteder tilbyder ofte variaterede bonusser og tilbud, som kan tiltrække mange entusiaster. Wasi bevidsthed omkring risikoen ved at spille uden om ROFUS er nødvendig, da sikkert gambling er nødt til at altid tages alvorligt. Derved kan man opnå en positiv oplevelse uden at gå over ens grænser.
BetWinner Online Casino, [url=https://www.madebypbd.com/2026/04/05/introducing-the-betwinner-platform-your-ultimate/]https://www.madebypbd.com/2026/04/05/introducing-the-betwinner-platform-your-ultimate/[/url] offers many exciting choices. Players can enjoy slots, table games like poker and blackjack, and real-time experiences. Bonuses enhance the gaming journey, attracting novice players. With protected payment methods and 24/7 support, BetWinner Online Casino is a leading destination for gaming enthusiasts.
casino online senza documenti, [url=https://sabaqinsure.ly/2026/03/30/vincite-casino-senza-burocrazia-scopri-come/]https://sabaqinsure.ly/2026/03/30/vincite-casino-senza-burocrazia-scopri-come/[/url] offre un’esperienza di gioco unica|straordinaria|incredibile|affascinante per gli amanti del divertimento. Qui, gli utenti possono divertirsi|giocare|entusiasmarsi|passare il tempo senza la necessitГ di fornire documentazione. Questa comoditГ attrae molti|tanti|diversi|numerosi giocatori in cerca di svago immediato.
И что бы мы делали без вашей отличной фразы
Разработка бизнес-планов, [url=https://teoplan.ru/portfolio/]https://teoplan.ru/portfolio/[/url] это ключевым элементом в создании успешного бизнеса. Хорошо составленный бизнес-план ускорит получение капитала и укажет четкие цели.
live quantum roulette, [url=https://www.electricdj.com/quantum-roulette-spielen-die-zukunft-des-5/]https://www.electricdj.com/quantum-roulette-spielen-die-zukunft-des-5/[/url] präsentiert ein außergewöhnliches Erlebnis im Sektor der Online-Spielotheken. Diese kreative Version des Klassikers der Spiele kombiniert übliches Roulette mit modernen Technologien. Gamer können direkt auf Action und Gewinnmöglichkeiten hoffen. Entdecken Sie die fesselnden Features von live quantum roulette!
1win casino, [url=https://www.thaiancualo.com.vn/index.php/2018/03/08/khang-dinh-thuong-hieu-du-lich-cua-lo/]https://www.thaiancualo.com.vn/index.php/2018/03/08/khang-dinh-thuong-hieu-du-lich-cua-lo/[/url] tiene una variada gama de entretenimiento, que incluyen juegos de azar, pГіker y ruleta europea. Los jugadores pueden disfrutar ofertas exclusivos al registrarse. AdemГЎs, la plataforma brinda un ayuda todo el tiempo.
casinoer uden ROFUS, [url=https://sac-elearning.com/bedste-online-casino-uden-rofus-din-guide-til-8/]https://sac-elearning.com/bedste-online-casino-uden-rofus-din-guide-til-8/[/url] giver spillere en mulighed for at spille uden restriktioner. De fleste casinoer har forskellige udvalg af underholdning. Det er tiltrækker mange deltagere i ønsket om uenigt underholdning.
BetWinner Casino, [url=https://bowenimmigration.com/blog/2026/04/05/betwinner-login-access-your-account-easily-2/]https://bowenimmigration.com/blog/2026/04/05/betwinner-login-access-your-account-easily-2/[/url] дарит разнообразный выбор игр, включая казино-игры и настольные игры. Пользователи могут кайфовать от удивительных бонусов и акций. Знакомьтесь мир BetWinner Casino!
casino senza documenti, [url=http://www.museodelbrunello.it/guida-completa-al-gioco-plinko-senza-upload-di/]http://www.museodelbrunello.it/guida-completa-al-gioco-plinko-senza-upload-di/[/url] – I casinГІ senza documenti offrono un’esperienza particolare per gli appassionati del gioco. Registrarsi ГЁ rapido, permettendo di trascorrere il tempo senza complicazioni. In questo modo, i partecipanti possono concentrarsi solo sul gioco e apprezzare l’emozione che offre il casinГІ.
quantum roulette, [url=https://app.trafficivy.com/quantum-roulette-spielen-die-zukunft-des-online-17/]https://app.trafficivy.com/quantum-roulette-spielen-die-zukunft-des-online-17/[/url] ist ein faszinierendes Spiel, das solche Aufregung von Casino-Welt vereint. Es stellt eine Vereinigung von Konvention und aktuellen technischen Fortschritten. Dabei spielerischen Facetten formen jede einzelne Runde fesselnd. Quantum Roulette ist eine groГџartige Option fГјr Spieler, ihr GlГјck herauszufordern.
jeetbuzz login, [url=https://www.indiecredential.com/?p=1066]https://www.indiecredential.com/?p=1066[/url] es una plataforma moderna que puede a los usuarios conectarse a una variedad de opciones. Con su interfaz intuitiva, es fГЎcil manejar y disfrutar de una experiencias de entretenimiento ofrecidas.
Scoprire un mondo emozionante con il casinГІ senza documenti, [url=https://www.directoryaziende.eu/i-vantaggi-dei-casino-senza-aams-giocare-libero-e/]https://www.directoryaziende.eu/i-vantaggi-dei-casino-senza-aams-giocare-libero-e/[/url] ГЁ affascinante. Un simile opportunitГ permette di scommettere senza rinvii burocratici, offrendo l’accesso immediato ai giochi. Prova la tua fortuna in una piattaforma innovativa oggi stesso!
BetWinner Bookmaker, [url=https://terminalohiggins.cl/explore-the-exciting-betwinner-bonuses/]https://terminalohiggins.cl/explore-the-exciting-betwinner-bonuses/[/url] offers a wide range for sports betting enthusiasts. With favorable odds and user-friendly interface, it caters to both novice and experienced bettors. The platform provides live betting, making the experience even more thrilling. Users can easily access a variety of events, enhancing their betting journey.
online casinoer uden om ROFUS, [url=https://stage.lacarte.de/bedste-udenlandsk-casino-oplev-spiloplevelsen-som/]https://stage.lacarte.de/bedste-udenlandsk-casino-oplev-spiloplevelsen-som/[/url] tilbyder spillere mange muligheder for underholdning. Her kan finde forskellige tilbud, der kan tilfredsstille deres ønske for adrenalin og præmier. Disse er en fremragende måde at prøve sin skæbne på. Vær opmærksom på sikkerhed og ansvarligt spil for en bedre oplevelse.
Does your website have a contact page? I’m having trouble locating
it but, I’d like to send you an email. I’ve got some ideas for your blog you might be interested in hearing.
Either way, great blog and I look forward to seeing it expand over time.
I casinГІ online stanno diventando sempre piГ№ popolari grazie alla loro accessibilitГ . I scommettitori possono divertirsi senza la necessitГ di fornire documenti identificativi. I casino senza documenti, [url=https://hyasense.de/api-per-verifica-casino-garantire-gioco-sicuro-e/]https://hyasense.de/api-per-verifica-casino-garantire-gioco-sicuro-e/[/url] offrono un’esperienza semplice e rapido, permettendo di entrare in pochi minuti. Inoltre, queste piattaforme sono affidabili, offrendo varietГ di giochi per soddisfare ogni esigenza.
En PakistГЎn, la plataforma de apuestas melbet pakistan, [url=https://hotcreditka.ru/multivalyutnaya-karta-tinkoff/]https://hotcreditka.ru/multivalyutnaya-karta-tinkoff/[/url] se estГЎ transformando muy popular. Los jugadores pueden gozar de diversas alternativas de apuestas y diversiones online. AdemГЎs, la seguridad en las transacciones estГЎ garantizada, lo que atrae a mГЎs de apostadores a unirse y probar esta alternativa.
mega fire blaze roulette, [url=https://amzprofitsites.com/live-mega-fire-blaze-roulette-ein-aufregendes/]https://amzprofitsites.com/live-mega-fire-blaze-roulette-ein-aufregendes/[/url] ist ein spannendes Spiel, das Teilnehmer in seinen Bann zieht. Die aufregende Atmosphäre sorgt für Aufregung bei jedem Dreh. Genießen Sie die verschiedenen Setzmöglichkeiten und steigern Sie Ihre Gewinnchancen. Mega fire blaze roulette bietet besondere Features, die das Erlebnis unvergesslich machen. Tauchen Sie ein in die Universum der Spiele und testen Sie es noch heute!
BetWinner Live Casino, [url=https://ciclotime.com.br/understanding-the-betwinner-deposit-process-a-13/]https://ciclotime.com.br/understanding-the-betwinner-deposit-process-a-13/[/url] презентует уникальный развлечение РІ РјРёСЂРµ азартных РёРіСЂ. Здесь лицензированные участники РјРѕРіСѓС‚ взаимодействовать РІ актуальном времени СЃ РєСЂСѓРїСЊРµ. Рта платформа обеспечивает превосходное качество развлечений Рё безопасность.
I casinГІ senza documenti, [url=https://www.mobilificiosolinas.it/i-vantaggi-dei-casino-non-aams-scopri-le/]https://www.mobilificiosolinas.it/i-vantaggi-dei-casino-non-aams-scopri-le/[/url] offrono un’esperienza di gioco unica e veloce. Tali casinГІ permettono di scommettere senza la necessitГ di inviare documentazione. Un comoditГ di accesso cattura molti giocatori.
At spille er en sjov måde at slappe af på. Mange vælger at engagere sig i spil uden om ROFUS, [url=https://skybangkok.com/2026/03/28/udenlandske-casinoer-uden-rofus-en-guide-til-40/]https://skybangkok.com/2026/03/28/udenlandske-casinoer-uden-rofus-en-guide-til-40/[/url], når man ignorerer restriktioner. Det muliggør en mulighed til at nyde spændende oplevelser udenfor for meget komplikation. Derfor kan nogle finde underholdning i at indgå i disse spil.
I casinГІ non aams, [url=https://omursaftbalans.com.tr/i-migliori-casino-non-aams-per-il-2023-guida/]https://omursaftbalans.com.tr/i-migliori-casino-non-aams-per-il-2023-guida/[/url] forniscono una vasta selezione di divertimenti, autorizzato nei territori dove non ci sono restrizioni severe. Giocatori possono gustare nuove scelte. Inoltre, i bonus sono spesso piГ№ vantaggiosi, attirando sempre piГ№ persone.
Betonwin casino, [url=https://beige-bison-155457.hostingersite.com/descubre-el-emocionante-mundo-de-betonwin-casino/]https://beige-bison-155457.hostingersite.com/descubre-el-emocionante-mundo-de-betonwin-casino/[/url] es una excelente lugar para disfrutar jugando tragamonedas en lГnea. Cuenta con una alternativas para entusiastas de diferentes habilidades. ВЎNo te los dejes escapar!
In der aufregenden Welt von Casino bietet die red door roulette, [url=https://e-business.inotec.ro/iknow/red-door-roulette-spielen-ein-abenteuer-im-online-2/]https://e-business.inotec.ro/iknow/red-door-roulette-spielen-ein-abenteuer-im-online-2/[/url] eine einzigartige Erfahrung. Spieler können verfügbaren Taktiken testen und gleichzeitig die Aufregung genießen. Probiere die richtige Methode und ziehe große Auszahlungen.
Il mondo dei giochi online offre un’opzione allettante: il casinГІ senza documenti, [url=https://www.cqcinvestigations.co.uk/casino-online-senza-adm-guida-completa/]https://www.cqcinvestigations.co.uk/casino-online-senza-adm-guida-completa/[/url]. Questo offre di scommettere senza l’obbligo di certificare la la propria identitГ , facilitando l’accesso ai giochi. Tuttavia, ГЁ importante tuttavia giocare responsabilmente e fare attenzione ai rischi collegati.
Danmark tilbyder mange internet casinoer uden om ROFUS, [url=https://smvf-serv.com/online-casinoer-uden-rofus-find-den-bedste/]https://smvf-serv.com/online-casinoer-uden-rofus-find-den-bedste/[/url], hvor spillere kan nyde forskellige muligheder. Det er vigtigt at finde et betroet casino for at opnГҐ en god oplevelse. SГёrg for at gennemgГҐ anmeldelser og attervurdere bonustilbud, sГҐ du kan maksimere dine udsigter for at vinde.
In de wereld van online gokken is een Casino zonder CRUKS, [url=https://nbet.tips/ontdek-online-casino-zonder-cruks-speel-met/]https://nbet.tips/ontdek-online-casino-zonder-cruks-speel-met/[/url] een interessante optie. Spelers kunnen genieten van een breed scala aan spellen zonder beperkingen. Deze casinos bieden de vrijheid om te spelen zonder registratie.
Le secteur des casinos en ligne se dГ©veloppe rapidement. Les utilisateurs peuvent profiter de divers jeux, allant des bandits Г bandit Г sous aux jeux de cartes captivants. Les primes attirent l’intГ©rГЄt des joueurs par le biais de rГ©compenses avantageuses. Dans l’ensemble, le casino online, [url=http://www.beggitrasporti.it/2018/12/09/ciao-mondo/]http://www.beggitrasporti.it/2018/12/09/ciao-mondo/[/url] est une choix incontournable pour les amateurs de divertissement.
red door roulette, [url=https://wiktoriarobert.pl/2026/03/28/red-door-roulette-spielen-die-faszination-des/]https://wiktoriarobert.pl/2026/03/28/red-door-roulette-spielen-die-faszination-des/[/url] – Das Spiel Roulette mit roter TГјr zeigt sich als ein fesselnde SpielvergnГјgen. Teilnehmer platzieren ihre EinsГ¤tze auf verschiedene Optionen, damit groГџe Gewinne zu gewinnen. Eine Spannung wГ¤chst mit jeder Runde, indem neue Chancen auf allem Dreh erwarten. UnabhГ¤ngig wenn du ein erfahrener Spieler bist, red door roulette bringt einzigartige Momente.
This piece of writing presents clear idea in support of the new visitors of
blogging, that truly how to do running a blog.
I casinГІ senza documenti, [url=http://www.trabahopilipinas.com/guida-ai-casino-non-aams-stranieri-scopri-le-2/]http://www.trabahopilipinas.com/guida-ai-casino-non-aams-stranieri-scopri-le-2/[/url] stanno diventando sempre piГ№ popolari tra i giocatori. Questi casinГІ offrono un’esperienza senza la necessitГ di fornire documenti per registrarsi. Pertanto, ГЁ possibile scommettere senza problemi. I vantaggi di questi casinГІ includono piГ№ alta privacy e rapiditГ nel entrare in azione.
Velkommen til en verden af spænding, hvor du kan opleve casino uden ROFUS, [url=https://www.kurtmakeweb.com/casonoslot29032/dansk-casinoer-uden-rofus-din-guide-til-ansvarligt-3/]https://www.kurtmakeweb.com/casonoslot29032/dansk-casinoer-uden-rofus-din-guide-til-ansvarligt-3/[/url]. Her finder du mange muligheder for at spille og vinde. Glem alt om restriktioner og grib friheden i dit spil.
Ervaar het plezier van een online casino zonder CRUKS, [url=https://buytopproducts.online/2026/03/21/geen-cruks-casino-vrijheid-in-online-spelen-2/]https://buytopproducts.online/2026/03/21/geen-cruks-casino-vrijheid-in-online-spelen-2/[/url], waar je onbelemmerd kunt spelen. Geniet van weddenschappen zonder de restricties van CRUKS. Ontdek de keuzes en win mooie prijzen!
A plataforma 1win bet, [url=https://inma-ita.ro/wp-co1/en/2018/09/06/hello-world/]https://inma-ita.ro/wp-co1/en/2018/09/06/hello-world/[/url] dispГµe oportunidades incrГveis para apostadores de esportes. Г‰ conhecida pela variedade de esportes e promoções atraentes. Experimente o 1win bet e sinta a emoção das apostas!
extreme lightning roulette, [url=http://bestsmartplace.com/]http://bestsmartplace.com/[/url] ist ein aufregendes Spiel, das|welches|das besondere Spannung|Adrenalin|Aufregung bietet. Spieler|Zocker|Teilnehmer können auf eine Vielzahl von Zahlen setzen|wetten. Durch|Dank|Mit den einzigartigen Blitzmultiplikatoren hat jede Runde|jede Spielrunde|jede Runde das Potenzial, große Gewinne|Gewinne|Erlöse zu bringen. Die Atmosphäre|Umgebung|Stimmung am Tisch ist elektrisierend, was das Erlebnis|Erlebnis|Spiel noch intensiver macht. Bei Extreme Lightning Roulette kommt jeder auf seine Kosten|kann jeder profitieren|findet jeder das richtige Maß an Action.
Эксклюзивная мебель по индивидуальным заказам производится из долговечных и высококачественных материалов https://www.legnostyle.ru/catalog/mejkomnatnie-dveri/vhodnie-dveri/vhodnaya-dver-e18.html
Красивые и оригинальные изделия украшают интерьер и создают непередаваемую атмосферу домашнего уюта и комфорта https://www.legnostyle.ru/catalog/mejkomnatnie-dveri/perfetto/dver-p27.html
В действительности перепродажа товаров из Китая выгодное дело, если знать правильных продавцов и особенности китайского рынка https://www.legnostyle.ru/catalog/dveri/iz-massiva/?PAGEN_1=17
Выбор товаров и производителей в
Стильные и респектабельные кабинеты руководителя — это статусная продукция VIP класса, которую приобретают руководители топ менеджеров высшего звена https://www.legnostyle.ru/catalog/mejkomnatnie-dveri/dver-p18.html
Рабочие места и помещения первых лиц, оснащенные продукцией из Италии или Испании, подчеркнет высокий уровень компании и статус её руководства https://www.legnostyle.ru/catalog/inter-eri/pt-26.html
Кабинет в строгом классическом стиле https://www.legnostyle.ru/catalog/inter-eri/stenovie-paneli/stenovie-paneli-model-s8.html
Изготовлен из натурального шпона с красивым и необычным рисунком https://www.legnostyle.ru/catalog/lestnici/otdelka-betonnyh-lestnic/lestnica-l8-9-d.html
Детали кабинета соединены под углом 45 градусов
Итак, прежде чем делать мебель на заказ, интересуйтесь о ее качестве https://www.legnostyle.ru/catalog/mejkomnatnie-dveri/perfetto/model-p4.html
Мебель показывает ваши статус, состояние, вкус https://www.legnostyle.ru/catalog/mebel/kabinety/kb-26.html
Кроме того, стиль меблировки, который Вы избрали сможет помочь организовать индивидуальные особенности вашей обстановки и необходимую атмосферу https://www.legnostyle.ru/catalog/inter-eri/peregorodki/peregorodka-model-a9.html
Эксклюзивность https://www.legnostyle.ru/catalog/mebel/?PAGEN_1=2
Каждый заказ дизайнеры проектируют индивидуально, поэтому риск увидеть тот же самый интерьер стремится к нулю https://www.legnostyle.ru/catalog/mejkomnatnie-dveri/nestandarnye/razdvijnaa-dver-rd-9.html
Дизайнер элитной мебели не просто создаёт новую форму, он подбирает для неё материал и фурнитуру, доводя модель до совершенства https://www.legnostyle.ru/catalog/inter-eri/s40.html
online casino uden ROFUS, [url=https://www.pcmhitech.com/online-spil-uden-om-rofus-en-guide-til-18/]https://www.pcmhitech.com/online-spil-uden-om-rofus-en-guide-til-18/[/url] tilbyder en fantastisk mulighed for spillere, der ønsker at nyde deres yndlingsspil uden restriktioner. Utallige online kasinoer præsenterer muligheden at at spille forskellige spil med gode bonusser. Sådan kan deltager opleve et uforglemmelig oplevelse med spændende udbetalinger.
In Nederland zijn er veel opties voor gokken, maar één dat echt opvalt is no CRUKS casino, [url=https://www.web3daily.info/online-casino-s-met-klarna-snel-en-veilig-betalen/]https://www.web3daily.info/online-casino-s-met-klarna-snel-en-veilig-betalen/[/url]. Dit type casino biedt spelers de kans om hun geluk te beproeven zonder beperkingen. En zijn de spellen veelzijdig, wat het een bijzondere ervaring maakt. Spelers kunnen genieten van verrassende gokkasten en tafelspellen. Met een klantenservice, kun je no CRUKS casino een ideale keuze voor liefhebbers van online gokken.
Os jogos online no Portugal proporcionam uma experiГЄncia maravilhosa. Apostadores podem usufruir de uma opções de jogos, abrangendo slots, roleta. Ademais, os bГґnus sГЈo irresistГveis. Nos casinos online portugal, [url=https://www.matrixmy.com/2026/03/29/casinos-online-portugal-onde-jogar-e-ganhar/]https://www.matrixmy.com/2026/03/29/casinos-online-portugal-onde-jogar-e-ganhar/[/url], consegue-se jogar a qualquer.
I have read so many content concerning the blogger lovers except this
paragraph is genuinely a nice piece of writing, keep it up.
My blog post – คาสิโนออนไลน์
extreme lightning roulette, [url=https://cryptoverze.com/xxxtreme-lightning-roulette-das-ultimative-12/]https://cryptoverze.com/xxxtreme-lightning-roulette-das-ultimative-12/[/url] ist ein faszinierendes Spiel, das Moderne Technologie mit Emotion kombiniert. Spieler erleben rasante Runden, die neuartige Gewinnchancen bieten. Das Design und die Visuals machen jede Sitzung zu einem einzigartigen Erlebnis. Tauchen Sie ein in die Welt von Extreme Lightning Roulette!
Сожалею, но ничем не могу помочь. Я знаю, Вы найдёте верное решение. Не отчаивайтесь.
Dieses fruitinator casino online, [url=https://fruitinator-spiel-kostenlos.com/]fruitinator[/url] stellt eine beeindruckende Auswahl an unterhaltsamen Slots. Viele Automaten werden üppige Belohnungen und niedrigschwellige Spielprinzipien. Spieler dürfen sich entspannen, während die Spieler diesen Spaß genießen.
Bitfortune online casino, [url=https://inlingua2.rusovadesign.com/discover-the-best-live-tables-at-bitfortune-2/]https://inlingua2.rusovadesign.com/discover-the-best-live-tables-at-bitfortune-2/[/url] offers a captivating gaming experience with multiple games, showcasing slots, table games, and live dealer options. Players can explore first-class graphics and efficient gameplay. Additionally, generous bonuses await newcomers, enhancing their opportunities of winning big. Join Bitfortune online casino today and get lost in the world of online gambling!
Bitfortune casino platform, [url=https://fukuda-ss.co.jp/2026/04/16/ripple-s-speed-advantage-how-xrp-transforms/]https://fukuda-ss.co.jp/2026/04/16/ripple-s-speed-advantage-how-xrp-transforms/[/url] offers an engaging experience for participants. With numerous games, users can enjoy the fun it provides, ensuring unlimited possibilities to win. Don’t miss out on this remarkable platform!
Finding a great minimum deposit casino, [url=https://de.medicalpharm.eu/the-rise-of-apple-pay-casinos-a-revolution-in-3/]https://de.medicalpharm.eu/the-rise-of-apple-pay-casinos-a-revolution-in-3/[/url] can be hard. Many players prefer low deposit options to test games. A minimal deposit can help you explore without risking too much. Look for bonuses at a minimum deposit casino to maximize your experience!
bedste casino uden ROFUS, [url=https://get2gostores.com/2026/03/29/online-casino-uden-om-rofus-spil-trygt-og-sikkert/]https://get2gostores.com/2026/03/29/online-casino-uden-om-rofus-spil-trygt-og-sikkert/[/url] tilbyder en fantastisk spiloplevelse for spillere, der ønsker at undgå begrænsninger. Disse giver fri adgang til diverse spil, hvor man kan spille i sit eget tempo. Det er en mulighed for novicer at lære om online gambling uden begrænsninger.
gokken zonder CRUKS, [url=https://nathuu.com/de-beste-goksite-zonder-cruks-speel-verantwoorder/]https://nathuu.com/de-beste-goksite-zonder-cruks-speel-verantwoorder/[/url] is voor veel mensen aantrekkelijk. Het gemak om te spelen zonder beperking, voelt het verleidelijk. Toch is het belangrijk om met beleid te gokken. Daarom voorkom je problemen.
Os empresas de jogo online em Portugal têm proliferado nos últimos meses. Oferecendo uma vasta variedade de jogos, essas plataformas atraem participantes de diferentes idades. Além disso, promoções atraem ainda mais jogadores, tornando a experiência ainda mais envolvente. Em suma, os casinos online portugal, [url=https://idocteuragency.com/descubra-os-melhores-online-casinos-com-bonus-e-2/]https://idocteuragency.com/descubra-os-melhores-online-casinos-com-bonus-e-2/[/url] são notáveis no ambiente de entretenimento.
Вы не правы. Я уверен. Давайте обсудим это. Пишите мне в PM.
online casino, [url=https://internationalreview.casino/]resenas de casino[/url] offers an exciting experience for gamblers around the world. With numerous games available, such as baccarat, everyone can find something to love. Online casino offers the chance to win big!
References:
Peppermill casino
References:
https://graph.org/Casino-Rocket-Review-Top-Bonuses–Games-04-20
[url=https://rasgovor.ru]r7 casino com
[/url]
Many players are seeking options for their gaming experience. non GamStop UK casinos, [url=https://likenew.api.localhost-group.com/exploring-the-world-of-casinos-outside-gamstop/]https://likenew.api.localhost-group.com/exploring-the-world-of-casinos-outside-gamstop/[/url] offer a wide variety for those looking to enjoy games without restrictions. With these casinos, participants might find invigorating opportunities to win.
This is a topic which is near to my heart…
Many thanks! Exactly where are your contact details though?
Die auto roulette evolution, [url=http://eliotzigmundjazz.com/2026/03/28/die-faszination-von-live-casino-auto-roulette-4/]http://eliotzigmundjazz.com/2026/03/28/die-faszination-von-live-casino-auto-roulette-4/[/url] bietet Spielern eine einzigartige Möglichkeit, das klassische Spiel neu zu erleben. Glücksspieler schätzen die spannende Atmosphäre und die innovative Technologie. Automatisierte Abläufe garantieren rasche Spiele und erhöhen den Spannungsfaktor. Bei auto roulette evolution stehen Diversität und Spaß im Vordergrund.
Bitfortune Casino, [url=https://hgtactical.net/book-of-rebirth-vs-punk-a-clash-of-gaming-themes/]https://hgtactical.net/book-of-rebirth-vs-punk-a-clash-of-gaming-themes/[/url] показывает своим клиентам удивительный ассортимент игр. Добро пожаловать! Здесь вы найдете разнообразные слоты, игровые игры и онлайн казино. Каждый игрок может открывать что-то интересное. Присоединяйтесь к Bitfortune Casino и узнайте свою удачу сегодня!
minimum deposit casino, [url=https://alawaellab.com/?p=17727]https://alawaellab.com/?p=17727[/url] offers players an opportunity to enjoy gaming without a hefty investment. These types of casinos allow fans to start with a modest amount. This method attracts novices who want to explore various games. Additionally, low deposits minimize risk, making it accessible for everyone. Using these platforms, players can test the thrill of gambling without breaking the bank.
Bitfortune online casino, [url=https://sadashivgroup.in/fortune-gods-with-crypto-a-new-era-in-online/]https://sadashivgroup.in/fortune-gods-with-crypto-a-new-era-in-online/[/url] offers a thrilling gambling adventure for enthusiasts. With numerous games, players can delight in their favorites. Join now and dive into endless opportunities!
References:
Popular-online-https://graph.org/Real-Money-Casino-Games-in-Australia-04-20-games
Вы оказались правы. Благодарю за совет, как я могу Вас отблагодарить?
онлайн казино, [url=https://zerna.at.ua/forum/29-56-1]2к игровые автоматы[/url] створюють унікальні шанси для азартних гравців. РЈ цих закладах можна побачити безліч послуг, РІС–Рґ С–РіСЂРѕРІРёС… автоматів РґРѕ карткових С–РіРѕСЂ. Кожен гравець може завжди знайти щось унікальне.
non GamStop UK casinos, [url=https://industrialpecas.com.br/safest-non-gamstop-uk-casinos-a-comprehensive-3/]https://industrialpecas.com.br/safest-non-gamstop-uk-casinos-a-comprehensive-3/[/url] offer players a unique opportunity to enjoy online gaming without restrictions. Such platforms provide numerous games and appealing bonuses. Players can enjoy their favorite games without the limitations imposed by GamStop.
online casino uden om ROFUS, [url=https://darelmostakbal.dev2.tqnia.me/sportbook-uden-rofus-en-guide-til-bedste-betting/]https://darelmostakbal.dev2.tqnia.me/sportbook-uden-rofus-en-guide-til-bedste-betting/[/url] tilbyder en unik mulighed for spillere at udforske deres yndlingsspil. Gennem disse platforme kan man nyde varierede spil uden restriktioner. Denne giver frihed for underholdning.
Het spelen in een geen CRUKS casino, [url=https://may.menuqtr.com/klarna-casino-de-toekomst-van-online-gokken-9/]https://may.menuqtr.com/klarna-casino-de-toekomst-van-online-gokken-9/[/url] biedt een unieke ervaring voor spelers die veilig en verantwoord willen gokken. Bescherming staat voorop, omdat je kunt genieten van diverse spellen zonder zorgen. Er zijn ook uitstekende bonussen beschikbaar.
Bitfortune crypto casino, [url=http://www.winance.ph/how-much-can-you-win-understanding-potential-16/]http://www.winance.ph/how-much-can-you-win-understanding-potential-16/[/url] offers an exceptional gaming experience. Players can enjoy various games, all backed by cutting-edge blockchain technology. With secure transactions and quick payouts, Bitfortune crypto casino ensures optimal enjoyment for every user. Join now to explore the fun of crypto gaming!
Bitfortune Solana casino, [url=http://asia-pass.com/blog/unlocking-potential-how-much-can-you-win/]http://asia-pass.com/blog/unlocking-potential-how-much-can-you-win/[/url] offers a thrilling experience for players. With fast transactions and a diverse selection of games, it satisfies all types of gamblers. Enjoy the benefits of blockchain technology while gaming!
Nos últimos anos, os melhores casinos online portugal, [url=https://perfectbrowsandbeauty.com.au/descubra-os-melhores-casinos-online-em-portugal-31/]https://perfectbrowsandbeauty.com.au/descubra-os-melhores-casinos-online-em-portugal-31/[/url] aumentaram em popularidade. Disponibilizando uma diversidade de jogos, cativam clientes experientes e novatos. Casinos online Portugal garantem tranquilidade e opções emocionantes.
Im live casino auto roulette, [url=https://www.amhal-sono.ma/auto-roulette-spielen-das-ultimative-casino/]https://www.amhal-sono.ma/auto-roulette-spielen-das-ultimative-casino/[/url] bietet man eine Atmosphäre des Glücks direkt vom dem Bequemlichkeit des eigenen Zuhause. Diese Echtzeit Roulette Spiele bringen die Körperlichkeit des traditionellen Spiels in virtuelle Format. Genießen Sie dynamische Spiel zur jeder, während sie gegen echte Croupiers spielen kann.
Прошу прощения, это не совсем то, что мне нужно. Кто еще, что может подсказать?
sunglasses, [url=https://www.opticabassol.com/blogs/news/ranking-mejores-opticas-mundo]https://www.opticabassol.com/blogs/news/ranking-mejores-opticas-mundo[/url] are essential items for protecting the eyes from harmful UV rays. They also add style to any outfit. When choosing a pair, keep in mind the lens quality and style.
casinos not on GamStop, [url=https://culturadom.fr/?tarif=2824]https://culturadom.fr/?tarif=2824[/url] offer players a chance to enjoy greater gaming options. These platforms provide access to varied games and attractive bonuses, making them a popular choice for many.
Компания «Партнер» — редкий пример поставщика, который говорит с образовательными учреждениями на одном языке: на сайте http://xn—-7sbbumkojddmeoc1a7r.xn--p1acf/ (оснащение для школ ) собрана полноценная экосистема для школ и детских садов, от интерактивных панелей, VR/AR-решений и систем мониторинга знаний до специализированной мебели, робототехники и оборудования для сенсорных комнат. Каталог структурирован по задачам: мультимедийное оснащение классов, 3D-лаборатория и принтеры, конструкторы от LEGO-совместимых до TRIK и VEX, документ-камеры, программное обеспечение (включая 1С и управление классом), комплектующие для проекторов и интерактивных досок, а также мебель и AV-стойки для презентаций.
Отдельный блок — инклюзия и доступная среда: решения для учащихся с нарушениями зрения, слуха и ОДА, тактильно-развивающие комплексы, интерактивные сухие бассейны и фиброоптика; для психологов и логопедов — аппаратно-программные комплексы, диагностические методики, акустические трубки, таймеры, интерактивные зеркала. Важная деталь — не только продажа, но и комплектация учреждений «под ключ»: проектирование объектов и локаций, поставка, монтаж, обучение персонала, сервисная поддержка.
Для руководителей и прорабов актуальны прямые решения для строительных организаций: быстрая спецификация, согласование и поставка по графику. География — вся Россия, с бесплатной доставкой в ключевые города и прозрачной логистикой. Сильная сторона платформы — глубина ассортимента и совместимость: к интерактивным панелям доступны мобильные стойки, OPS-компьютеры, к системам — аксессуары и ПО, к 3D — пластики и сканеры, к робототехнике — методические наборы и готовые решения для кружков.
Для закупщиков это экономия времени: в одном окне — оборудование, методподдержка и сервис; для педагогов — быстрый старт уроков с готовыми сценариями и стабильной техникой. Заказ оформляется в несколько кликов: быстрый заказ, обратный звонок, прикрепление ТЗ, — менеджеры подберут варианты под бюджет и учебные цели, а гарантийное сопровождение закроет риски простоев. Резюме: «Партнер» покрывает полный цикл цифрового и методического оснащения — от идеи до первой сдачи урока, позволяя школам и детским садам обновить инфраструктуру без хаоса и лишних затрат, а сайт http://xn—-7sbbumkojddmeoc1a7r.xn--p1acf/ становится рабочим инструментом, а не витриной.
Bitfortune Solana casino, [url=https://www.upscalejourney.com/legacy-of-dead-vs-crazy-a-comparative-analysis-of/]https://www.upscalejourney.com/legacy-of-dead-vs-crazy-a-comparative-analysis-of/[/url] – Bitfortune Solana casino offers a captivating gaming experience. Players can enjoy diverse games while benefiting from quick transactions and excellent security, making it an ideal selection for crypto enthusiasts.
Bitfortune crypto casino, [url=http://absi.shelter-technology.com/eco-friendly-gambling-discovering-sustainable/]http://absi.shelter-technology.com/eco-friendly-gambling-discovering-sustainable/[/url] presents an exciting experience for users seeking to achieve cryptocurrency rewards. With diverse games and safe transactions, it’s a premier choice for virtual gaming. Join at Bitfortune crypto casino and discover the cutting-edge world of crypto gambling!
dansk casinoer uden ROFUS, [url=https://diazcompleteauto.com/bedste-online-casino-uden-rofus-spil-sikkert-og-3/]https://diazcompleteauto.com/bedste-online-casino-uden-rofus-spil-sikkert-og-3/[/url] tilbyder spændende muligheder for spillere, der ønsker at undgå restriktioner. Sådanne casinoer tilbyder en stor vifte af aktiviteter og vindes muligheder. Gennem dansk casinoer uden ROFUS kan fornøjelsen uden hindringer. Tag del i de sjoveste spil og den nyeste udfordringer!
По моему мнению Вы ошибаетесь. Могу это доказать.
Алиса VPN, [url=https://alisavpn.cc/]впн[/url] – это практичный сервис для шифрования в сети. Он дарит пользователям шанс оставаться анонимными при серфинге в интернете. С помощью Алиса VPN можно преодолеть географические препятствия и сохранить личные сведения от наблюдателей.
Медицинский центр b-healthy clinic, [url=https://www.cataniacorse.it/sito2/regolamento-campionato-sociale/]https://www.cataniacorse.it/sito2/regolamento-campionato-sociale/[/url] предлагает целый спектр услуг. Здесь трудятся квалифицированные врачи, готовые оказать высококлассное лечение. Все желающие пациент найдет себе необходимую помощь.
Im aktuellen Spiele boomt das Konzept von casino ohne oasis, [url=http://ideapad.itmuniversity.ac.in/die-besten-casinos-ohne-oasis-wo-spa-und-spannung/]http://ideapad.itmuniversity.ac.in/die-besten-casinos-ohne-oasis-wo-spa-und-spannung/[/url]. Zunehmend suchen Spieler auf der Suche nach einem außergewöhnlichen Spielerlebnis. Verschiedene Plattformen bieten attraktive Auswahl an Erlebnissen. Bei casino ohne oasis stehen Sicherheit und Zugänglichkeit an erster Stelle, was die Erfahrungen speziell macht.
casinos not on GamStop, [url=https://dianashakti.com/index.php/2026/04/04/top-non-gamstop-casinos-a-comprehensive-guide/]https://dianashakti.com/index.php/2026/04/04/top-non-gamstop-casinos-a-comprehensive-guide/[/url] offer players an alternative to experience their favorite games without the restrictions of GamStop. Many of these casinos provide fascinating bonuses that draw players looking for excitement. With a wide array of games, players can experience new options. Furthermore, they often boast intuitive interfaces, making it easy to navigate. As players dive into these platforms, they find there are numerous chances to win big!
Bitfortune online casino, [url=https://comparetripdeals.com/2026/04/16/discover-the-best-evolution-games-available-today/]https://comparetripdeals.com/2026/04/16/discover-the-best-evolution-games-available-today/[/url] предлагает отличный впечатление для участников. С большим количеством развлечений, каждый участник найдет что-то для себя. Бонусы и скидки делают игру еще более привлекательной. Начинайте играть и наслаждайтесь мир азартных игр с Bitfortune online casino!
non GamStop bookies, [url=https://sammyhairsalon.com/exploring-bookies-not-on-gamstop-a-guide-for/]https://sammyhairsalon.com/exploring-bookies-not-on-gamstop-a-guide-for/[/url] – In the world of online gaming, alternative bookmakers offer players an exciting way to place bets freely. These sites provide a variety of games, ensuring that everyone finds something enjoyable. With lucrative offers, players are drawn to unrestricted betting sites for their freedom. Enjoy a heart-pounding betting experience without the usual barriers.
Очень любопытно 🙂
агентство нянь, [url=https://allcharms.ru/ppochemu-stoit-vospolzovatsya-uslugami-nyani-dlya-mladentsa-osnovnye-preimuschestva-i-rekomendatsii/]няня грудничку[/url] предлагает квалифицированных нянь для опеки о детях. Мы предлагаем высокий профи услуг, чтобы каждый родитель чувствовал себя комфортно. Ваши дитя в талантливых руках!
casinoer med visa, [url=https://ariconference.com/online-casinoer-med-visa-en-guide-til-sikker-spil/]https://ariconference.com/online-casinoer-med-visa-en-guide-til-sikker-spil/[/url] tilbyder en hurtig og sikker mГҐde at spille online. Denne metode giver kunder mulighed for sikkert at indbetale penge. Med den mindst gebyrstruktur kan brugerne fГҐ den stГёrste gevinst fra deres spil.
А для начала рассмотрим 2 вида поисковых запросов:
Как продвинуть сайт сразу в нескольких регионах?
Есть одно исключение — по-настоящему редкая тематика бизнеса, очень узкая и специфичная ниша, которой посвящены лишь единичные веб-проекты https://proffseo.ru/prodvizhenie-angloyazychnykh-sajtov
Тогда продвижение сайта по России существенно упростится за счет снижения или полного отсутствия конкуренции https://proffseo.ru/prodvizhenie-sajtov-po-moskve
При определении региона поисковые системы в первую очередь учитывают информацию в разделе «Контакты» на сайте компании, и данные, указанные в справочниках Яндекс и Google https://proffseo.ru/
Проверить, к какому региону привязан ваш сайт, можно с помощью сервиса Яндекс https://proffseo.ru/prodvizhenie-zarubezhnykh-sajtov
Вебмастер https://proffseo.ru/
Для этого следует зарегистрироваться в сервисе и зайти в раздел «Информация о сайте», страница «Региональность» https://proffseo.ru/prodvizhenie-sajtov-po-moskve
Здесь будут указаны страна, область и город привязки ресурса https://proffseo.ru/prodvizhenie-angloyazychnykh-sajtov
Объективно оценим ситуацию с продвижением сайта, определим его сильные и слабые стороны, проанализируем тематику и конкурентов, найдем перспективные точки роста https://proffseo.ru/prodvizhenie-angloyazychnykh-sajtov
служб Яндекса: Вебмастер, Справочник, Каталог, Карты, Маркет и др https://proffseo.ru/prodvizhenie-angloyazychnykh-sajtov
текстов сайта, SEO-настроек и мета-тегов контактных данных (в т https://proffseo.ru/prodvizhenie-sajtov-po-moskve
ч https://proffseo.ru/prodvizhenie-sajtov-po-moskve
удалятся региональные телефонные номера) домена, названия, описания и URL-адресов веб-ресурса отзывов и комментариев https://proffseo.ru/
In recent years, a variety of players have sought choices to traditional casinos. casinos not on GamStop, [url=https://deminansoluciones.com/exploring-unregistered-gambling-sites-a/]https://deminansoluciones.com/exploring-unregistered-gambling-sites-a/[/url] offer a refuge for those looking to enjoy casino experiences without restrictions. This increasing trend allows enthusiasts to access a wider range while enjoying more control.
Казино онлайн топ, [url=http://souda.jp/cgi-local/bbs4/apeboard_plus.cgi]http://souda.jp/cgi-local/bbs4/apeboard_plus.cgi[/url] предлагает большие возможности для игроков. Цифровые платформы служат удобный доступ к играм. Возможно участвовать когда угодно.
V dneЕЎnГ dobД› se mezinГЎrodnГ online casino, [url=https://datafornix.com/objevte-svt-online-kasin-v-eske-republice/]https://datafornix.com/objevte-svt-online-kasin-v-eske-republice/[/url] stГЎva populГЎrnГm zpЕЇsobem zГЎbavy. ZГЎkaznГci mohou snadno pЕ™istupovat k pestЕ™e nabГdce her. Z tradiДЌnГch her aЕѕ po modernГ verze, kaЕѕdГЅ si najde to svГ©.
Bitfortune online casino, [url=https://luar.dcc.ufmg.br/claim-yours-celebrate-your-birthday-with-exclusive-2/]https://luar.dcc.ufmg.br/claim-yours-celebrate-your-birthday-with-exclusive-2/[/url] is a web-based gaming platform that offers various exciting games and alternatives for players. Join the fun and discover your destiny! The easy-to-navigate interface ensures a flawless experience for everyone. Enjoy frequent bonuses and promotions that make your gaming journey even more enjoyable.
Вы попали в самую точку. Мысль отличная, поддерживаю.
агентство нянь, [url=https://biography-live.ru/kak-nayti-nyanyu-dlya-svoego-rebyonka-vse-chto-vam-nuzhno-znat/]няня для школьника[/url] предлагает качественные услуги по подбору нянек. Каждый сотрудник проходит строгую проверку. С помощью нашего агентства ваш ребенок в надежных руках.
Im Internet gibt es zahlreiche Optionen, um zu spielen, doch das casino ohne oasis, [url=https://capitalpress.com.co/die-besten-online-casinos-ohne-oasis-23/]https://capitalpress.com.co/die-besten-online-casinos-ohne-oasis-23/[/url] bietet einzigartige Vorteile. Besonders ist die vielfältige Auswahl an Spielen. Nutzer finden zahlreiche beliebten Spiele an einem Ort. Zusätzliche Angebote machen das Spielerlebnis noch spannender.
nexus darkweb link https://mydarknetmarketsonline.com/
Finding a trustful online casino can be challenging, especially if you are looking for casinos not on GamStop, [url=https://webnetworktech.com/best-non-gamstop-casinos-in-the-uk-ultimate-guide/]https://webnetworktech.com/best-non-gamstop-casinos-in-the-uk-ultimate-guide/[/url]. These platforms offer numerous games and enhanced bonuses, appealing to players seeking flexibility. Enjoy a one-of-a-kind gambling experience without restrictions.
mezinГЎrodnГ online casino, [url=https://edukatorfilm.pl/2026/04/10/zahranini-casino-jak-si-vybrat-nejlepi-online/]https://edukatorfilm.pl/2026/04/10/zahranini-casino-jak-si-vybrat-nejlepi-online/[/url] nabГzГ hrГЎДЌЕЇm pestЕ™ejЕЎГ nabГdku her. Klienti si mohou poЕ™izovat oblГbenГ© automaty ДЌi stolnГ hry. Akce a zisku zvyЕЎujГ zajГmavost hernГho svД›ta.
Bitfortune online casino, [url=https://hennaby.makeupglitz.com/bitfortune-canada-app-vs-browser-which-is-better/]https://hennaby.makeupglitz.com/bitfortune-canada-app-vs-browser-which-is-better/[/url] offers a thrilling gaming experience. Players can enjoy countless games as they explore the platform’s easy-to-navigate interface. Promotions are available for new and loyal users alike.
non GamStop casino, [url=https://frido.uio.com.tw/2026/04/17/discover-the-thrill-of-new-non-gamstop-casinos/]https://frido.uio.com.tw/2026/04/17/discover-the-thrill-of-new-non-gamstop-casinos/[/url] offers players unique opportunities|provides gamers distinct chances|gives bettors exceptional options|presents gamblers special alternatives. These platforms allow access|enable entry|offer passage|grant access to various games without restrictions. Explore|Discover|Uncover|Find new ways to enjoy gaming experiences.
At spille i et paysafecard casino, [url=https://red-raccoon-971966.hostingersite.com/casino-med-paysafe-sikkerhed-og-bekvemmelighed-i-3/]https://red-raccoon-971966.hostingersite.com/casino-med-paysafe-sikkerhed-og-bekvemmelighed-i-3/[/url] giver spillere mulighed for at nyde deres yndlingsspil trygt uden at dele private oplysninger. Med hurtige transaktioner kan man investere på spillet og have det sjovt. Убедитесь, что ваш опыт в paysafecard casino будет удивительным!
nexus darknet market 2026 https://darknetmarketslist.com/
abacus market link https://mydarknetmarketsurl.com/
гадание онлайн, [url=http://greatway.co.in/2018/11/30/city-spotlight-philadelphia/]http://greatway.co.in/2018/11/30/city-spotlight-philadelphia/[/url] — это удобный способ определить будущее. Специалисты предлагают разнообразнейшие методики, включая таро, руны или астрологию. Методы гадания онлайн дают возможность лучше понять свои желания и направление.
casino live roulette, [url=https://dev-shvsorg.pantheonsite.io/die-besten-live-roulette-spiele-fur-ein/]https://dev-shvsorg.pantheonsite.io/die-besten-live-roulette-spiele-fur-ein/[/url] ist ein spannendes Spiel, das Spieler weltweit begeistert. Dieses aufregende Erlebnis bietet die Möglichkeit, mit echten Croupiers zu interagieren. Solche Atmosphäre fühlt sich an wie in einem echten Casino, was das Spiel besonders attraktiv macht. Spieler können unzählige Strategien anwenden und an einem menschlichen Dealer setzen. Diese Live-Casino-Optionen sind bei modernen Online-Plattformen ganz verfügbar.
Finding the best sites not on GamStop, [url=https://shiawaseglobal.com/exploring-sites-not-on-gamstop-uk-a-comprehensive/]https://shiawaseglobal.com/exploring-sites-not-on-gamstop-uk-a-comprehensive/[/url] can be challenging, yet rewarding. Players seek other platforms that offer varied entertainment. Make sure to check reviews before choosing.
mezinГЎrodnГ online casino, [url=https://structowell.com/2026/04/10/online-kasina-o-skutene-penize-hrajte-chyte-a-3/]https://structowell.com/2026/04/10/online-kasina-o-skutene-penize-hrajte-chyte-a-3/[/url] nabГzГ ЕЎirokou spoustu her z rЕЇznГЅch producentЕЇ. ZГЎkaznГci si majГ pЕ™ГleЕѕitost vychutnat zГЎbavnou atmosfГ©ru a zajГmavГ© vГЅhry. DГky modernГ technologii je hrГЎt kdykoliv a kdekoli.
Bitfortune Casino, [url=http://new.iskcondesiretree.com/exciting-high-volatility-slots-to-try-at/]http://new.iskcondesiretree.com/exciting-high-volatility-slots-to-try-at/[/url] offers a entertaining gaming experience for players. With a wide selection of games, including slots and table games, it caters to all preferences. Players can enjoy ample bonuses and promotions that enhance their gameplay.
If you’re looking for the best non UK casino, [url=https://actdanismanlik.com/exploring-non-uk-casinos-accepting-uk-players-2/]https://actdanismanlik.com/exploring-non-uk-casinos-accepting-uk-players-2/[/url], you should consider options that offer excellent gameplay. Many establishments provide unique options such as virtual croupiers. Always check for promotions that enhance your experience!
Лучшие онлайн казино, [url=http://que-et-couleurs.leforum.eu/redirect1/https://t.me/vanechekvan]http://que-et-couleurs.leforum.eu/redirect1/https://t.me/vanechekvan[/url] предлагают захватывающие игры, высокие бонусы и безопасные транзакции. Клиенты могут наслаждаться выбором слотов, казино игр и поточного казино. Каждый найдет подходящее для себя!
cocorico onion https://darknetmarketslist.com/
casino live roulette, [url=https://rplus-tantei.com/2026/03/24/live-roulette-deutschland-das-ultimative/]https://rplus-tantei.com/2026/03/24/live-roulette-deutschland-das-ultimative/[/url] – Im zeitgenГ¶ssischen GlГјcksspielmarkt erfreut sich Casino Live Roulette groГџer PopularitГ¤t. Spieler erleben die fesselnde AtmosphГ¤re, wГ¤hrend sie live gegen lebendig spielende Croupiers antreten. Diese Spiele bieten die perfekte Kombination aus Zufall und Strategie, was sie besonders ansprechend macht. Zocker kГ¶nnen interaktive EinsГ¤tze platzieren und in Echtzeit mit anderen Spielern kommunizieren.
Finding a reliable web-based casino in the UK can be challenging. However, a UK casino not on GamStop, [url=https://blog.paczkowscy.pl/index.php/2026/04/are-there-any-casinos-not-under-gamstop/]https://blog.paczkowscy.pl/index.php/2026/04/are-there-any-casinos-not-under-gamstop/[/url] provides players with greater choices. Enjoy varied games and promotions that attract your playing style.
NynГ se ubarvujГ mezinГЎrodnГ online casino, [url=http://makemoneyedutools.com/2026/04/10/online-casino-eska-republika-ve-co-potebujete-vdt/]http://makemoneyedutools.com/2026/04/10/online-casino-eska-republika-ve-co-potebujete-vdt/[/url] ДЌГm dГЎl tГm mГsty pro ГєДЌastnГky z celГ©ho svД›ta. MajГ napД›tГ a pЕ™ГleЕѕitost na profit.
Bitfortune crypto casino, [url=http://shoppingtourbahia.com.br/betcasino/bitfortune-canada-deposit-speed-test-a/]http://shoppingtourbahia.com.br/betcasino/bitfortune-canada-deposit-speed-test-a/[/url] offers an exciting experience for online gamblers. With a selection of games, players can enjoy the latest crypto slots and live dealer options. Join the action and explore your winning potential at Bitfortune crypto casino!
You made the point.
Also visit my blog post; https://jetblacktransportation.com/blog/best-rated-taxi-service/
Bitfortune Solana casino, [url=https://vibrantsmilesdentalnj.com/understanding-canada-crypto-casino-taxes-in-2026-5/]https://vibrantsmilesdentalnj.com/understanding-canada-crypto-casino-taxes-in-2026-5/[/url] offers a thrilling gaming experience. Players can partake in multiple games while taking advantage of rapid transactions. Become a part of this distinct platform today!
Los establecimientos de juego fuera de EspaГ±a brindan una gran cantidad de opciones para los jugadores. Desde las mГЎs destacadas mГЎquinas de slots hasta salas de ruleta, Casinos Fuera de EspaГ±a, [url=https://fiskevistet.se/2026/04/07/los-casinos-fuera-de-espana-una-guia-completa/]https://fiskevistet.se/2026/04/07/los-casinos-fuera-de-espana-una-guia-completa/[/url] resultan ser una alternativa emocionante.
drughub link https://darknetmarketslist.com/
Растениеводство и животноводство, [url=https://www.olympiamarble.com.au/how-to-choose-the-best-marble-memorial-monument-design/]https://www.olympiamarble.com.au/how-to-choose-the-best-marble-memorial-monument-design/[/url] являются важными направлениями сельского хозяйства. Данные области отличаются многообразием культур и пород. Качественное управление сельскохозяйственными ресурсами обеспечивает росту эффективности.
Discovering gaming platforms without GamStop can deliver players a unique journey. non GamStop UK casino, [url=https://kplast.com.tr/explore-casino-options-not-listed-on-gamstop/]https://kplast.com.tr/explore-casino-options-not-listed-on-gamstop/[/url] options allow enthusiasts to appreciate a selection of games. With entertaining promotions, players can maximize their winnings while playing safely. It’s crucial to choose secure platforms for a reliable gaming experience.
mezinГЎrodnГ online casino, [url=https://sadashivgroup.in/online-kasino-cz-ve-co-potebujete-vdt-o-online-7/]https://sadashivgroup.in/online-kasino-cz-ve-co-potebujete-vdt-o-online-7/[/url] umoЕѕЕ€uje hrГЎДЌЕЇm speciГЎlnГ zГЎЕѕitky. Na zГЎkladД› modernГ technologii mohou lidГ© sГЎzet z pohodlГ domova nebo na cestГЎch. BezpeДЌnost je prioritou, coЕѕ dokazuje rostoucГ popularitu tД›chto platforem.
non GamStop betting sites, [url=http://transtuts.com.br/?p=1394576]http://transtuts.com.br/?p=1394576[/url] provide a selection of opportunities for participants. Utilizing these sites, individuals are able to experience enhanced odds and broader markets, allowing a more thrilling experience.
Bitfortune Solana casino, [url=https://milotheme.com/exploring-avatar-ux-bounty-raid-a-deep-dive-into-2/]https://milotheme.com/exploring-avatar-ux-bounty-raid-a-deep-dive-into-2/[/url] – Bitfortune Solana casino предлагает эксклюзивные возможности для авантюристов. Разнообразие РёРіСЂ делает каждую РёРіСЂСѓ незабываемой. Откройте шанс получить РЅР° Bitfortune Solana gambling site. Присоединяйтесь Рё исследуйте возможности!
Bitfortune crypto casino, [url=https://www.smartcom.vn/toeic-online/index.php/2026/04/15/discover-the-best-turbogames-games-available-at/]https://www.smartcom.vn/toeic-online/index.php/2026/04/15/discover-the-best-turbogames-games-available-at/[/url] offers an exceptional adventure for online gamblers. Players can enjoy a wide selection of games, all while earning cryptocurrencies. Additionally, the platform ensures a secure environment for transactions, making it credible. Join Bitfortune crypto casino today and explore the numerous avenues it has to offer!
casino live roulette, [url=https://ctciwiring.com/live-roulette-deutschland-das-ultimative/]https://ctciwiring.com/live-roulette-deutschland-das-ultimative/[/url] ist ein faszinierendes Spiel, das Gamer in seinen Bann zieht. Solche Spiele bieten die Möglichkeit, realistische Erfahrungen zu sammeln, während man in einem authentischen Casino kommuniziert. Durch erfahrenen Dealern ist die Stimmung einzigartig. Spielen Sie jetzt und erleben Sie die Faszination von Casino live roulette!
Playing at a non GamStop UK casino, [url=http://sandbox.avotz.com/rinconviejapark/what-sites-does-gamstop-not-cover/]http://sandbox.avotz.com/rinconviejapark/what-sites-does-gamstop-not-cover/[/url] gives you the chance to enjoy gambling without restrictions. Many players prefer such venues for their range of games, including slots and table games. Additionally, rewards are often more attractive. You can experience a exciting atmosphere while having the freedom to play at your own pace. The intuitive platforms make it easy to navigate and enjoy your favorites. Opting for a non GamStop UK casino allows for a more customized experience.
mezinГЎrodnГ online casino, [url=https://i-wapp.es/imarkt/admin/top-online-kasina-nejlepi-vybr-pro-hrae/]https://i-wapp.es/imarkt/admin/top-online-kasina-nejlepi-vybr-pro-hrae/[/url] nabГzГ hrГЎДЌЕЇm rozliДЌnou ЕЎkГЎlu her a skvД›lГЅch bonusЕЇ. HrГЎДЌi mohou vychutnГЎvat z neodolatelnГ©ho zГЎЕѕitku a vysokГ© nГЎvratnosti. Online casino mГЎ inovativnГ technologie, kterГ© zaruДЌujГ bezpeДЌnost a spravedlivГ© podmГnky.
Bitfortune online casino, [url=https://www.encantesdonordeste.com.br/betcasino18046/mastering-the-game-leading-lane-bet-strategies-for/]https://www.encantesdonordeste.com.br/betcasino18046/mastering-the-game-leading-lane-bet-strategies-for/[/url] offers exciting games for players looking for adventure. With a selection of slots and table games, users can discover a unique gaming atmosphere that holds their attention. Join now for a opportunity to win big!
Bitfortune Casino, [url=http://word-press-env.eba-mtwp2m3c.us-west-2.elasticbeanstalk.com/2026/04/15/lightning-blackjack-vs-fortune-gods-a-thrilling/]http://word-press-env.eba-mtwp2m3c.us-west-2.elasticbeanstalk.com/2026/04/15/lightning-blackjack-vs-fortune-gods-a-thrilling/[/url] offers a extensive selection of games, promising players continuous enjoyment. With outstanding graphics and accessible interfaces, it caters to both casual players and experienced players.
Юрист по тендерам в Казахстане, [url=https://www.jeffdeyo.com/the-thing-about-singing/]https://www.jeffdeyo.com/the-thing-about-singing/[/url] предоставляет профессиональную консультации. Он осознает в нюансах законодательных актов и облегчает клиентам выигрывать контракты.
dark market link https://mydarknetmarketsurl.com/
Willkommen in der aufregenden Welt von casino live roulette, [url=https://www.mercazon.it/die-besten-live-roulette-casinos-ein-umfassender-6/]https://www.mercazon.it/die-besten-live-roulette-casinos-ein-umfassender-6/[/url]! Hier erleben Spieler den Nervenkitzel des Spiels in Echtzeit. Die spannendsten Strategien können hier getestet. Mit Interaktion mit einem echten Croupier wird das das Casino-Feeling hautnah.
Can you be more specific about the content of your article? After reading it, I still have some doubts. Hope you can help me.
silk road market https://darknetmarketlist.com/
online bingo not on GamStop, [url=https://prompttradefairs.com/discover-exciting-online-bingo-not-on-gamstop-10/]https://prompttradefairs.com/discover-exciting-online-bingo-not-on-gamstop-10/[/url] offers players an exciting alternative to traditional gaming platforms. By using these sites, users can experience a wide range of games and deals. Additionally, the setting is often more engaging, creating an enjoyable online experience. Players can effortlessly get started and begin enjoying their favorite games without restrictions.
Discovering a new casino not on GamStop, [url=https://hamishpat.com/exploring-gambling-sites-not-under-gamstop/]https://hamishpat.com/exploring-gambling-sites-not-under-gamstop/[/url] offers players a unique chance to enjoy thrilling games without restrictions. Such casinos provide captivating options for those wanting an alternative to traditional sites. Experience a world of unmatched gaming today!
online casino, [url=https://marocscrabble.com/spip.php?page=article&id_article=9&lang=fr]https://marocscrabble.com/spip.php?page=article&id_article=9&lang=fr[/url] offers a captivating experience for enthusiasts. With various games available, you can explore your luck and abilities. Winning rewards adds to the allure of this amusing platform.
At this time I am ready to do my breakfast, when having my breakfast coming over again to read
further news.
my blog post … สล็อต 20รับ100 pg
музыкальный магазин, [url=http://dayacervello.org/cropped-icon-png/]http://dayacervello.org/cropped-icon-png/[/url] – В музыкальном магазине можно найти различные инструменты и товары. Здесь осуществляется широкий выбор синтезаторов. Профессиональные сотрудники консультируют в выборе.
Willkommen im spannenden Universum von malina casino, [url=https://mex.studio10.com.mx/malina-casino/malina-casino-ihr-tor-zur-aufregenden-online/]https://mex.studio10.com.mx/malina-casino/malina-casino-ihr-tor-zur-aufregenden-online/[/url], wo Jackpots bereitstehen. Erleben Sie außergewöhnliche Spiele und verlockende Boni, die Ihr Vergnügen noch intensiver machen. Lassen Sie sich von vielfältigen Angeboten mitreißen!
black ops darknet market https://mydarknetmarketlinks.com/
roulette online live, [url=https://www.seabairgroup.com/die-besten-live-roulette-casinos-ein-umfassender/]https://www.seabairgroup.com/die-besten-live-roulette-casinos-ein-umfassender/[/url] ist ein aufregendes Spiel, das | attracts| fasziniert| begeistert| anzieht viele Spieler weltweit. Die | Möglichkeiten| Chancen| Optionen| Gelegenheiten| zwischen den Zahlen machen das Spiel umso spannender. Mit echten Dealern und einem | authentischen| realistischen| echten| wahrhaften Erlebnis zieht es die Nutzer in seinen Bann. Spielen Sie Ihre | Strategie| Taktik| Methode| Herangehensweise| und genießen Sie die Atmosphäre!
football betting not on GamStop, [url=https://kabasawa-saw.jp/english/understanding-non-gamstop-football-betting/]https://kabasawa-saw.jp/english/understanding-non-gamstop-football-betting/[/url] offers a unique chance for punters who seek an alternative to traditional betting platforms. This a option might be beneficial for those looking to explore diverse betting experiences. By utilizing different bookmakers, bettors may enjoy more freedom and flexibility in their betting activities. It’s important to consider the potential pitfalls involved while venturing into these options.
UK non GamStop sites, [url=https://netajinpc.org/explore-the-best-casinos-not-blocked-by-gamstop/]https://netajinpc.org/explore-the-best-casinos-not-blocked-by-gamstop/[/url] offer players an opportunity to enjoy gambling without restrictions. These platforms provide a variety of games, featuring slots, table games, and live dealer options. Players can explore exciting bonuses and promotions tailored to their needs.
Free Live Cam Shows, [url=https://www.davecridermusic.com/exploring-the-world-of-live-webcam-shows/]https://www.davecridermusic.com/exploring-the-world-of-live-webcam-shows/[/url] offer an exciting opportunity to connect with entertainers from around the world. These platforms provide engaging experiences, allowing viewers to interact in real time. Enjoy the thrill and delight of live performances from the comfort of your home.
[url=https://darknetmarketlist.com/ ]nexus market [/url] https://darknetmarketlist.com/
[url=https://mydarknetmarketlinks.com/ ]darknet market [/url] https://mydarknetmarketlinks.com/
Юрист по тендерам в Казахстане, [url=http://advr.fr/2022/01/17/seance-advr-sur-joseph-epstein-11-janvier-202/]http://advr.fr/2022/01/17/seance-advr-sur-joseph-epstein-11-janvier-202/[/url] оказывает профессиональные услуги в сфере коммерческих закупок. Специалист обеспечивает правильное подачу документов, что облегчает участие в тендерах. Качественные советы помогают клиентов от проблем.
In the world of online gaming, many players seek freedom in choosing their platforms. casinos not on GamStop, [url=http://kairos.grafikmk.pl/are-there-any-casinos-not-on-gamstop/]http://kairos.grafikmk.pl/are-there-any-casinos-not-on-gamstop/[/url] offer this unique opportunity. Such sites allow players to explore a multitude of games without restrictions. Featuring captivating bonuses and adjustable payment options, they cater to anyone looking for boundless gaming fun.
[url=https://darknetmarketslist.com/ ]black ops darknet link [/url] https://darknetmarketslist.com/
[url=https://mydarknetmarketsurl.com/ ]ares link [/url] https://mydarknetmarketsurl.com/
When searching for top gaming options, the best non GamStop casinos, [url=https://gocom.es/discover-british-casinos-not-on-gamstop/]https://gocom.es/discover-british-casinos-not-on-gamstop/[/url] stand out. They offer a diverse selection of games and entertaining bonuses. Players can enjoy uninterrupted gaming experiences without restrictions, maximizing their excitement. Join today and explore the most exciting offerings.
online casino, [url=https://maxybot.com/discover-the-thrilling-world-of-betway-singapore/]https://maxybot.com/discover-the-thrilling-world-of-betway-singapore/[/url] delivers a captivating way to explore gaming from the comfort of your home. Players can pick their favorite games, including slots and table games, all with fantastic bonuses.
[url=https://mydarknetmarketlinks.com/ ]cocorico link [/url] https://mydarknetmarketlinks.com/
Das Spielen von Roulette-Spiel online hat sich in den letzten Jahren stark verbreitet. Besonders spannend ist roulette online echtgeld, [url=https://hyperwarped.com/roulette-online-spielen-mit-echtgeld-der-2/]https://hyperwarped.com/roulette-online-spielen-mit-echtgeld-der-2/[/url], weil Spieler die Chance auf finanzielle Vorteile haben. Einfachheit und Vielfalt der Spiele machen es zu einer attraktiven Wahl.
[url=https://darknetmarketslist.com/ ]drughub market [/url] https://darknetmarketslist.com/
mezinГЎrodnГ online casino, [url=http://sunshine.samevaglobal.com/index.php/online-casino-cz-vstupte-do-svta-zabavy/]http://sunshine.samevaglobal.com/index.php/online-casino-cz-vstupte-do-svta-zabavy/[/url] umoЕѕЕ€uje rozmanitou variantu her a zГЎbavnГch aktivit. UЕѕivatelГ© mohou pohodlnД› hrГЎt napД›tГ z hranГ v domovД› svГ©ho domova, coЕѕ vЕЎe stГЎle vГce inovativnГm zpЕЇsobem.
Playing sessions like roulette for real cash, [url=https://www.grimalc.com/experience-the-thrill-of-real-money-roulette-games-17/]https://www.grimalc.com/experience-the-thrill-of-real-money-roulette-games-17/[/url] can be thrilling. The rush of watching the wheel spin is remarkable. With multiple betting options, you can choose your strategy wisely.
play online casino, [url=https://www.cleantech.guide/new/p/162936/]https://www.cleantech.guide/new/p/162936/[/url] – Playing online casino offers great fun. With a variety of games to enjoy, you can find something perfect for you. Don’t miss out on the chance to win big!
In the world of digital privacy, the need for tools like ai nudifier free, [url=https://letsfixit.co.uk/diy/exploring-the-world-of-free-nudify-a-complete/]https://letsfixit.co.uk/diy/exploring-the-world-of-free-nudify-a-complete/[/url] is growing. Users seek options for protect their personal images. This software provides an effective way to blur sensitive content, ensuring protection in an ever-evolving digital landscape.
игровые автоматы онлайн, [url=https://paintnote.co.jp/hello-world/]https://paintnote.co.jp/hello-world/[/url] дают невероятные возможности для игры. Любой из азартных аппаратов имеет индивидуальные функции а также возможности. Это действительно интересное времяпрепровождение для фанатов азартных игр.
online roulette echtgeld, [url=https://techners.net/roulette-online-echtgeld-der-ultimative-leitfaden-3/]https://techners.net/roulette-online-echtgeld-der-ultimative-leitfaden-3/[/url] bietet Spielern die Möglichkeit, echtes Geld zu gewinnen. Die Angebote sind vielfältig und begeistern viele Nutzer. Durch verschiedene Strategien sollten die Gewinnchancen erhöhen.
[url=https://darknetmarketlist.com/ ]silk road darknet url [/url] https://darknetmarketlist.com/
Chicken Road casinos, [url=https://motherhoodcorner.com/2026/04/15/the-evolution-and-impact-of-casinos-a/]https://motherhoodcorner.com/2026/04/15/the-evolution-and-impact-of-casinos-a/[/url] offer an exciting destination for gamblers. With diversity of games and entertainment, visitors can enjoy wagering and table games. Chicken Road casinos create a vibrant atmosphere for players.
A exciting real money roulette game, [url=https://www.cinealambra.it/site/2026/04/04/spin-the-wheel-an-in-depth-guide-to-casino/]https://www.cinealambra.it/site/2026/04/04/spin-the-wheel-an-in-depth-guide-to-casino/[/url] provides gamblers the chance to achieve cash rewards while enjoying one high-stakes experience. Experience this option for fun and promising rewards!
Playing at an online casino game, [url=https://woodemo.cedcommerce.com/woocommerce/shopee/the-ultimate-guide-to-god55-singapore-discovering/]https://woodemo.cedcommerce.com/woocommerce/shopee/the-ultimate-guide-to-god55-singapore-discovering/[/url] can be exciting. Players can encounter a wealth of games, from slots to card games. Winning actual money adds to the adventure.
[url=https://darknetmarketlist.com/ ]ares link [/url] https://darknetmarketlist.com/
Как определяется регион пользователя?
Каталог https://proffseo.ru/prodvizhenie-sajtov-po-rf
Задача:
по версии Рейтинга Рунета 2022 https://proffseo.ru/privacy
1 https://proffseo.ru/
Самостоятельное продвижение сайта по всей России https://proffseo.ru/privacy
В качестве примера посмотрим на сайт Wikipedia https://proffseo.ru/prodvizhenie-sajtov-po-rf
org https://proffseo.ru/prodvizhenie-sajtov-po-rf
Википедия геоНЕзависима и попадает в ТОП-10 по многим запросам и регионам России https://proffseo.ru/prodvizhenie-sajtov-po-rf
сантехническая служба, [url=https://worldsbestvacationrental.com/top-pompano-beach-oceanfront-rentals/]https://worldsbestvacationrental.com/top-pompano-beach-oceanfront-rentals/[/url] реализует качественные сервисы по обслуживанию сантехнических систем. Эксперты готовы помочь любые мероприятия быстро и качественно.
[url=https://darknetmarketlist.com/ ]dark web market [/url] https://darknetmarketlist.com/
mezinГЎrodnГ online casino, [url=https://resacademy.com.br/objevte-kouzlo-zahraninich-online-casin/]https://resacademy.com.br/objevte-kouzlo-zahraninich-online-casin/[/url] nabГzГ rozmanitou nabГdku her a vyЕѕitГ. HrГЎДЌi mohou proЕѕГt zГЎbavu z pohodlГ domova. SystГ©m je intuitivnГ, coЕѕ usnadЕ€uje zГЎЕѕitek. DecentnГ bonusy zajiЕЎЕҐujГ radost hrГЎДЌЕЇ.
echtgeld roulette, [url=http://repuestossudamerica.com/online-roulette-mit-echtgeld-die-besten-tipps-und/]http://repuestossudamerica.com/online-roulette-mit-echtgeld-die-besten-tipps-und/[/url] bietet Spielern die Möglichkeit, mit echtem Geld zu spielen und spannende Gewinne zu erzielen. Die Erfahrung ist einfach und fesselt viele Begeisterte. Eine attraktive Strategie kann den Einsatz beeinflussen.
Playing inside real money roulette casinos, [url=https://user-83991389-work.colibriwp.com/comprardiplomaonline/experience-the-thrill-play-online-roulette-with-13/]https://user-83991389-work.colibriwp.com/comprardiplomaonline/experience-the-thrill-play-online-roulette-with-13/[/url] is an exciting adventure. Savor the thrill of roulette, where every roll could lead to winning big. Establish your bets wisely to increase your chances of success.
online casino, [url=https://www.adsflourish.com/casinoonline17042/discover-the-excitement-at-me88-online-casino-5/]https://www.adsflourish.com/casinoonline17042/discover-the-excitement-at-me88-online-casino-5/[/url] is now a popular venue for gamers. Gamers enjoy the adventure of winning big from the comfort of their homes. With technological advances, gambling has become more immersive, captivating various players.
The advancement of the deepnude ai generator, [url=http://lasantanera.com/online/2026/04/the-intersection-of-technology-and-ethics/]http://lasantanera.com/online/2026/04/the-intersection-of-technology-and-ethics/[/url] has changed the way we view digital content. With its cutting-edge technology, users can now create stunning images with extraordinary realism.
[url=https://darknetmarketlist.com/ ]darknet drug links [/url] https://darknetmarketlist.com/
[url=https://mydarknetmarketlinks.com/ ]dark market [/url] https://mydarknetmarketlinks.com/
товары из Турции оптом, [url=https://pornx.vicetemple.io/modnye-muzhskie-futbolki-iz-turcii-kachestvo-i/]https://pornx.vicetemple.io/modnye-muzhskie-futbolki-iz-turcii-kachestvo-i/[/url] популярны на рынке. Прочная продукция показывает преимущества другие специалисты. Выбирая товары из Турции оптом, есть возможность значительно сэкономить бюджете.
[url=https://darknetmarketslist.com/ ]darknet markets onion [/url] https://darknetmarketslist.com/
[url=https://mydarknetmarketsurl.com/ ]darknet market links [/url] https://mydarknetmarketsurl.com/
mezinГЎrodnГ online casino, [url=https://www.mahboobehnoroozi.com/zahranini-automaty-zabava-a-monost-vyhry-z-pohodli/]https://www.mahboobehnoroozi.com/zahranini-automaty-zabava-a-monost-vyhry-z-pohodli/[/url] skГЅtГЎ hrГЎДЌЕЇm rozsГЎhlГЅ vГЅbД›r zГЎbavy a vГЎЕЎnivГ© bonusy. Na zГЎkladД› modernГm technologiГm je zГЎbava pohodlnГ©, coЕѕ lГЎkГЎ hrГЎДЌe z rozliДЌnГЅch koutЕЇ zemД›.
Playing in real money roulette casinos, [url=http://csnakliyat.com/play-real-money-roulette-your-guide-to-winning-big-3/]http://csnakliyat.com/play-real-money-roulette-your-guide-to-winning-big-3/[/url] offers a chance to win big while enjoying many thrilling experience. If you’re a beginner or an advanced player, there are numerous strategies to explore. Don’t forget to set a limit and follow it. So, be ready for a thrilling gaming session!
Playing at an online casino, [url=https://rakennus.jdmmediagroup.com/2026/04/17/explore-the-exciting-world-of-me88-online-casino-7/]https://rakennus.jdmmediagroup.com/2026/04/17/explore-the-exciting-world-of-me88-online-casino-7/[/url] brings excitement and thrill. Earning real money is more accessible than ever. With various games to choose from, players can enjoy endless fun and entertainment.
In the realm of adult entertainment, a fresh concept has emerged: the free ai porn generator, [url=https://www.e-sicase.com/exploring-the-future-of-adult-entertainment-ai-2/]https://www.e-sicase.com/exploring-the-future-of-adult-entertainment-ai-2/[/url]. This tool allows users to produce personalized adult content effortlessly. By leveraging advanced algorithms, it provides a unique experience. Users can adjust scenes, characters, and narratives to fit their desires, resulting in a highly engaging output. With the rise of such technology, the landscape of adult content is rapidly transforming, offering unprecedented choice to explore fantasies. As this trend grows, the implications for the industry and consumer behavior remain to be seen.
roulette echtgeld, [url=https://biolozi.bio.bg.ac.rs/roulette-spielen-tipps-und-strategien-fur-den/]https://biolozi.bio.bg.ac.rs/roulette-spielen-tipps-und-strategien-fur-den/[/url] ist ein spannendes Spiel, das viele Spieler anzieht. Es bietet packende Möglichkeiten, Geld zu gewinnen. Durch die Vereinigung von Strategie und Schicksal kann jeder seinen Ansätze umsetzen.
Online casino, [url=https://rehydrawellness.com/top-casino-games-designed-specifically-for-30/]https://rehydrawellness.com/top-casino-games-designed-specifically-for-30/[/url] обеспечивает уникальный случай для клиентов. Рграя РІ азартные РёРіСЂС‹ online, РІС‹ можете получить крупные награды. РќРµ упустите СЃРІРѕР№ шанс!
[url=https://darknetmarketlist.com/ ]silk road market [/url] https://darknetmarketlist.com/
Online gambling is booming, with many players seeking out non UK casino sites, [url=https://www.centroinfissiromanord.it/2026/04/16/understanding-non-uk-licensed-casinos-a/]https://www.centroinfissiromanord.it/2026/04/16/understanding-non-uk-licensed-casinos-a/[/url] for unique experiences. These platforms offer engaging games and generous bonuses. Additionally, players enjoy multiple payment options and enhanced privacy. Choose wisely to optimize your gaming adventure!
Playing at real money roulette casinos, [url=http://african-image.co.za/discover-the-best-online-roulette-for-real-money-13/]http://african-image.co.za/discover-the-best-online-roulette-for-real-money-13/[/url] can be an exciting experience. With various strategies, players hope to increase their chances of winning. Select a table that suits your budget and enjoy the adrenaline of the game.
[url=https://mydarknetmarketlinks.com/ ]abacus market darknet [/url] https://mydarknetmarketlinks.com/
To enjoy the thrill of gambling, you can play online casino, [url=https://miku-miku.net/the-ultimate-guide-to-god55-singapore-your-pathway/]https://miku-miku.net/the-ultimate-guide-to-god55-singapore-your-pathway/[/url] games. Such platforms offer an array options, from slots to table games, ensuring all player finds something to savor.
Welcome to the innovative world of crypto casino Dexsport, [url=https://www.eng.rmuti.ac.th/stiswb2024/?p=132624]https://www.eng.rmuti.ac.th/stiswb2024/?p=132624[/url]! Here, you can explore a unique blend of action and technology. With countless games and benefits, you’ll find plenty to suit your liking. Join the gamers and get ready for an extraordinary gaming experience!
[url=https://mydarknetmarketsonline.com/ ]nexus darknet market 2026 [/url] https://mydarknetmarketsonline.com/
roulette mit echtgeld, [url=https://kechbureau.ma/?p=49498]https://kechbureau.ma/?p=49498[/url] ist ein aufregendes Spiel, das viele Spieler anzieht. Die Stimmung in einem Casino ist einzigartig. Die meisten hoffen auf den großen Gewinn, wenn die Kugel im Rad landet. Virtuelle Casinos bieten viele Möglichkeiten, Roulette zu genießen. Probieren Sie die Aufregung und setzen Sie auf Zahlen. Roulettetische sind für alle Spielertypen geeignet.
Discovering top casino bonuses can greatly boost your gaming experience. Whether you’re a novice player or a veteran gambler, finding these offers is crucial. Don’t miss out on special promotions that can improve your chances of winning. Start your journey with the Best casino bonuses, [url=https://demo.booknetic.com/2026/03/29/the-ultimate-guide-to-online-betting-with-1mdbet/]https://demo.booknetic.com/2026/03/29/the-ultimate-guide-to-online-betting-with-1mdbet/[/url] today!
mezinГЎrodnГ online casino, [url=https://phokwanetech.co.za/2026/04/12/svtove-sazkove-kancelae-ve-co-potebujete-vdt-3/]https://phokwanetech.co.za/2026/04/12/svtove-sazkove-kancelae-ve-co-potebujete-vdt-3/[/url] umoЕѕЕ€uje hrГЎДЌЕЇm moЕѕnost uЕѕГt si zГЎbavu z hranГ. Vzhledem k ЕЎirokГ© nabГdce her ДЌi bonusЕЇ se nГЎvЕЎtД›vnГci uspokojГ.
Playing the spinning wheel for real cash is an exhilarating experience. Countless participants find it thrilling to bet on pockets in hopes of winning big. Experiencing the rush of adrenaline when the ball spins is unmatched, making roulette for real cash, [url=https://stg.go-g.biz/150667.html]https://stg.go-g.biz/150667.html[/url] a favorite among casino lovers.
Undresser AI Online AI Clothes Remover, [url=https://sites.mss.univr.it/icelab/it/the-evolution-of-ai-cloth-remover-transforming/]https://sites.mss.univr.it/icelab/it/the-evolution-of-ai-cloth-remover-transforming/[/url] is a revolutionary tool designed to simplify your photo editing experience. With it, users can easily eliminate garments from images, creating stunning visual content. This innovative technology utilizes deep learning to ensure realistic results. Whether for art, this tool is a game-changer in the digital landscape. It’s perfect for professionals and amateurs alike, making image manipulation more affordable. Experience creativity like never before with Undresser AI Online AI Clothes Remover.
[url=https://mydarknetmarketlinks.com/ ]dark markets [/url] https://mydarknetmarketlinks.com/
seriöse online wetten
my website Wettbüro Paderborn
mezinГЎrodnГ online casino, [url=https://draleilianemartins.com.br/2026/04/12/nejlepi-nova-online-kasina-objevte-sve-tsti/]https://draleilianemartins.com.br/2026/04/12/nejlepi-nova-online-kasina-objevte-sve-tsti/[/url] ЕЎkolГ hrГЎДЌЕЇm rychlГЅ pЕ™Гstup k vynikajГcГm hrГЎm. Weby se neustГЎle vyvГjejГ a zavГЎdД›jГ novГ© funkce, aby zajistily zГЎjem hrГЎДЌЕЇ. Klienti si mohou dostat zГЎbavu z pohodlГ domova.
online roulette echtgeld, [url=https://lublinspp.citypg.pl/2026/03/22/online-casino-roulette-mit-echtgeld-tipps-und/]https://lublinspp.citypg.pl/2026/03/22/online-casino-roulette-mit-echtgeld-tipps-und/[/url] wird angeboten eine fesselnde Möglichkeit, das Glücksspiele im Internet zu genießen. Dank zahlreiche Varianten haben Spieler die Chance jeder alle Runde einzigartig zu gestalten. Es ist ratsam, sich mit einem verlässlichen Anbieter anzumelden.
The Ultimate NSFW AI Directory, [url=https://ibarraproperty.com/the-ultimate-nsfw-ai-directory-explore-the/]https://ibarraproperty.com/the-ultimate-nsfw-ai-directory-explore-the/[/url] offers an all-encompassing resource for those seeking mature content. Explore multiple platforms and applications designed to enhance your experience. Uncover your preferences today!
Online casino games, [url=https://www.rbexcellentairportservicesinc.ca/2026/03/29/how-esports-audiences-are-crossing-platforms-and/]https://www.rbexcellentairportservicesinc.ca/2026/03/29/how-esports-audiences-are-crossing-platforms-and/[/url] present an captivating way to enjoy betting from the luxury of your home. Players can opt for from a variety of options, including slots, poker, and blackjack. Whether you’re a amateur or an experienced gambler, there’s something for everyone. The growth of technology has boosted the overall gaming experience, making it more immersive. Join the excitement today and explore the world of Online casino games!
[url=https://mydarknetmarketsonline.com/ ]dark matter market link [/url] https://mydarknetmarketsonline.com/
pferderennen hamburg wetten live [https://fv-arquitectos.Pe]
[url=https://mydarknetmarketlinks.com/ ]silk road market link [/url] https://mydarknetmarketlinks.com/
Mobile casinos, [url=http://www.f3oakland.com/blog/1xbet29031/explore-the-exciting-world-of-online-betting-with-32/]http://www.f3oakland.com/blog/1xbet29031/explore-the-exciting-world-of-online-betting-with-32/[/url] – Mobile gambling offer players the chance to enjoy their favorite games anywhere. With innovative technology, users can play on their smartphones or tablets. Accessibility is a major benefit for all enthusiasts.
[url=https://mydarknetmarketsonline.com/ ]ares darknet url [/url] https://mydarknetmarketsonline.com/
mezinГЎrodnГ online casino, [url=https://grateful-movement.com/online-kasina-s-rychlymi-vyplatami-hrajte-a-3/]https://grateful-movement.com/online-kasina-s-rychlymi-vyplatami-hrajte-a-3/[/url] vytvГЎЕ™Г jedineДЌnou zГЎЕѕitek pro fanouЕЎky z celГ©ho svД›ta. S bohatГЅm vГЅbД›rem aktivit a atraktivnГmi bonusy je stГЎle populГЎrnД›jЕЎГ.
Bitfortune live crypto casino, [url=https://liatahvie.com/bitfortune-fast-transfers-revolutionizing-common-4/]https://liatahvie.com/bitfortune-fast-transfers-revolutionizing-common-4/[/url] offers an exciting gambling adventure. Players can enjoy a wide range of live games and instant transactions using cryptocurrencies. Join now to experience thrilling possibilities!
online roulette echtgeld, [url=https://staging.actionelearning.eu/die-spannende-welt-der-casino-roulette/]https://staging.actionelearning.eu/die-spannende-welt-der-casino-roulette/[/url] ist ein beliebtes Spiel, das Liebhaber weltweit begeistert. Viele entdecken die Möglichkeiten an Tischen, um ihr Glück zu versuchen. Jeder Spin kann einzigartig sein, und die Ansätze sind unterschiedlich.
[url=https://darknetmarketlist.com/ ]black ops link [/url] https://darknetmarketlist.com/
Remarkable! Its genuinely awesome post, I have got much clear idea about
from this post.
[url=https://mydarknetmarketlinks.com/ ]nexus darknet link [/url] https://mydarknetmarketlinks.com/
casinos not on GamStop, [url=https://academia.edu.gt/discover-the-best-online-casinos-without-gamstop-2/]https://academia.edu.gt/discover-the-best-online-casinos-without-gamstop-2/[/url] offer players a unique experience where an opportunity to enjoy wagering without the limitations of UK regulations. These casinos allow choice in wagering options and incentive offers. Players can excel in a exciting environment, exploring multiple games from renowned developers. With casinos not on GamStop, discover a fresh level of entertainment.
In the world of gaming, online casino, [url=https://plaza11-11.com/the-ultimate-gaming-experience-at-wynscasino/]https://plaza11-11.com/the-ultimate-gaming-experience-at-wynscasino/[/url] platforms provide excitement from the comfort of home. Players can enjoy various games like slots, blackjack, and poker. With luring bonuses, online casino sites have become incredibly fashionable among enthusiasts.
online roulette echtgeld, [url=https://strikingly.angelaognev.com/2026/03/online-casino-roulette-echtgeld-tipps-strategien/]https://strikingly.angelaognev.com/2026/03/online-casino-roulette-echtgeld-tipps-strategien/[/url] ist ein spannendes Spiel, das Spieler fasziniert. Mit leichte Regeln und erbitterte Gewinnchancen zieht es viele an. Web-based Plattformen bieten Vielfalt fГјr jeden Geschmack.
Choosing a non GamStop casino site, [url=https://xchronic.com/discover-non-gamstop-casinos-accepting-players/]https://xchronic.com/discover-non-gamstop-casinos-accepting-players/[/url] can offer players a wider array of options|choices|selections|alternatives. Unlike traditional casinos under GamStop, these platforms provide unique games|entertainment|activities|options and often better bonuses|promotions|offers|deals, enhancing the overall gaming experience.
In the world of online gambling, online casino betting, [url=https://eugeniaguzman.com/casinionline160419/discover-the-excitement-of-wynscasino-your-13/]https://eugeniaguzman.com/casinionline160419/discover-the-excitement-of-wynscasino-your-13/[/url] has become increasingly popular. Players enjoy the adrenaline of trying their luck from the comfort of their homes. With various games available, there’s something for everyone!
https://pinnacle-bet.com.mx/
La plataforma Pinnacle no representa el casino habitual que te cautiva con ofertas masivas llenos de condiciones imposibles; su propuesta de valor se fundamenta en margenes pequenos, cuotas realmente competitivas y un modelo transparente sin enganos.
mezinГЎrodnГ online casino, [url=https://hookedonshopping.com/online-kasina-za-skutene-penize-ve-co-potebujete-33/]https://hookedonshopping.com/online-kasina-za-skutene-penize-ve-co-potebujete-33/[/url] umoЕѕЕ€uje ЕЎirokou nabГdku her a vzruЕЎenГ pro hrГЎДЌe z celГ©ho svД›ta. Vzhledem k modernГch technologiГ a zajiЕЎtД›nГЅm platebnГm metodГЎm se stГЎvГЎ na oblГbenou platformu pro zГЎjemce o hazard.
Finding the best online casinos can be a challenge, especially if you’re seeking the best sites not on GamStop, [url=https://birjetkirala.com/exploring-gambling-sites-not-registered-with-12/]https://birjetkirala.com/exploring-gambling-sites-not-registered-with-12/[/url]. These platforms provide entertaining experiences without the usual restrictions. You can explore a variety of games and promotions that keep your interest alive. Enjoy seamless play and discover why these sites are preferred by many. Don’t miss out on the unique benefits they offer for players looking for freedom and fun.
online casino game, [url=http://wp13272768.server-he.de/exploring-tkpkbet-your-ultimate-guide-to-online/]http://wp13272768.server-he.de/exploring-tkpkbet-your-ultimate-guide-to-online/[/url] delivers a thrilling adventure for players. Featuring a variety of options, users can take pleasure in exciting adventures and potential rewards. Engage now!
roulette online echtgeld, [url=https://www.schriftsteller.de/online-roulette-spielen-tipps-strategien-und-die-2/]https://www.schriftsteller.de/online-roulette-spielen-tipps-strategien-und-die-2/[/url] bietet Spielern die Möglichkeit, aufregende Gewinne zu erzielen. Einige Anbieter haben viele Varianten zur Verfügung. Dank spannende Spiele haben Gamer ihre Chancen überprüfen.
online wetten gratis startguthaben
my webpage … kombiwette heute (Kristie)
mezinГЎrodnГ online casino, [url=https://compass-cross.com/wp/?p=111382]https://compass-cross.com/wp/?p=111382[/url] zprostЕ™edkovГЎvГЎ ЕЎirokou variantu her, kterГ© bavГ hrГЎДЌe z celГ©ho svД›ta. Ochrana je na prvnГm mГstД›, coЕѕ potvrzuje klidnГЅ zГЎЕѕitek. UЕѕivatelГ© mohou podГЎvat svГ© prostЕ™edky lehce, coЕѕ napomГЎhГЎ zГЎbavu a energiДЌnost.
I couldn’t refrain from commenting. Perfectly written!
Bitfortune live crypto casino, [url=http://dream.a-star.co.jp/20260415529414/]http://dream.a-star.co.jp/20260415529414/[/url] offers an unmatched gaming adventure for enthusiasts. With top-tier technology, players can savor live games and flawless transactions using cryptocurrencies. The platform provides safety and honesty through blockchain technology, ensuring credible gameplay. Join Bitfortune live crypto casino today and embark on a thrilling world of online gaming!
lightning roulette live, [url=http://buzzcuts.org.au/2026/03/die-faszination-von-evolution-gaming-lightning-4/]http://buzzcuts.org.au/2026/03/die-faszination-von-evolution-gaming-lightning-4/[/url] – Lightning Roulette Live ist ein aufregendes Casinospiel, das die Spannung des traditionellen Roulettes mit modernen Elementen verbindet. Zocker kГ¶nnen an diesem Tisch groГџe Gewinne erzielen, da elektrisierende Effekte zusГ¤tzliche Multiplikatoren bringen. Das Spiel ist ideal fГјr jedermann, die Spannung suchen. Probieren Sie sofort und erleben Sie den Kick!
sportwetten richtig tippen
Feel free to visit my website: online wetten Verboten; http://Www.Wikiacademy.com.tn,
In recent years, the popularity of non GamStop UK casino, [url=http://paradisep.com/exploring-gambling-websites-that-don-t-use-gamstop-4/]http://paradisep.com/exploring-gambling-websites-that-don-t-use-gamstop-4/[/url] has surged, attracting players seeking an alternative to traditional options. These platforms give a larger range of games and bonuses, fostering an engaging gaming experience. Users can enjoy flexibility with fewer restrictions, making it an appealing choice for avid gamblers. As the industry evolves, the appeal of non GamStop UK casino continues to grow, providing enthusiasts with exciting opportunities.
Welcome to the new era of online gaming with Bitfortune casino, [url=https://prueba.lauicom.edu.ve/wp/the-future-of-bitcoin-football-betting-a-mobile/]https://prueba.lauicom.edu.ve/wp/the-future-of-bitcoin-football-betting-a-mobile/[/url]. Here, players can experience a wide range of games, including slots to table games. With noteworthy bonuses, it offers exciting opportunities to win big. Join now!
Erlebe fascinierende Momente mit immersive roulette, [url=https://ayut.ub.gov.mn/?p=789388]https://ayut.ub.gov.mn/?p=789388[/url]. Dieses Nerven-kitzelnde Abenteuer bringt Zufall direkt zu dir nach Hause. Genieße in eine fesselnde Atmosphäre und genieße die Energie eines echten Casinos. Mit lebensechten Grafiken und Mitmach-Elementen ist jede Runde ein neues Abenteuer.
casinoer uden ROFUS, [url=https://mainwp.coincript.com/betrouwbare-casinos-zonder-cruks-veilig-spelen-2/]https://mainwp.coincript.com/betrouwbare-casinos-zonder-cruks-veilig-spelen-2/[/url] tilbyder et udvalg af spændende muligheder for spillere, der søger underholdning. Den type casinoer giver frihed uden begrænsninger. Det er en fornøjelse at udforske nye spilmuligheder.
In the world of online gambling, a non GamStop website, [url=http://new.iskcondesiretree.com/explore-the-best-non-gamstop-casinos-for/]http://new.iskcondesiretree.com/explore-the-best-non-gamstop-casinos-for/[/url] offers players a chance to enjoy their favorite games without restrictions. These platforms provide variety that cater to different preferences. Players can find exciting slots and table games, all while enjoying safe gaming environments. With alluring bonuses and promotions, a non GamStop website guarantees an unforgettable experience for avid gamblers.
online casino betting, [url=https://brsengenharia.com.br/2026/04/15/entdecken-sie-die-welt-von-slotorode-ihr-portal-3/]https://brsengenharia.com.br/2026/04/15/entdecken-sie-die-welt-von-slotorode-ihr-portal-3/[/url] delivers fun for players. With various games available, winning potential is high. Several sites provide promotions to attract new players. Always play wisely and enjoy the experience.
Bitcoin live betting, [url=https://bcircleagency.com/how-to-identify-a-user-friendly-interface/]https://bcircleagency.com/how-to-identify-a-user-friendly-interface/[/url] is a growing trend among players worldwide. This innovative method allows users to make wagers using Bitcoin in real-time, adding intensity to the betting experience. Through Bitcoin live betting, players can experience various sports events and games, gaining advantages of the cryptocurrency’s rapid processing.
Thanks for sharing. I read many of your blog posts, cool, your blog is very good. https://www.binance.com/register?ref=IXBIAFVY
Simply wish to say your article is as astounding.
The clarity for your publish is simply nice and i could think you are knowledgeable in this subject.
Fine together with your permission allow me to grasp your
feed to keep up to date with coming near near post. Thanks 1,000,000
and please keep up the rewarding work.
Feel free to surf to my web site; คาสิโนออนไลน์
casinoer uden ROFUS, [url=https://deminansoluciones.com/de-wereld-van-online-buitenlandse-casinos-een-gids/]https://deminansoluciones.com/de-wereld-van-online-buitenlandse-casinos-een-gids/[/url] tilbyder en fantastisk mulighed for spillere, der ønsker at udforske deres yndlingstjenester uden begrænsninger. Uanset om du er til slots, blackjack, eller roulette, så finder du noget, der passer til din smag. Det fremstår som en glimrende måde at opleve spændingen ved spil uden for meget komplikation. Vent ikke med at dykke ind i disse unikke platforme!
online casino game, [url=https://depopertanian.com/2026/04/14/die-welt-von-shinywild-ein-blick-auf-die-2/]https://depopertanian.com/2026/04/14/die-welt-von-shinywild-ein-blick-auf-die-2/[/url] offers thrilling adventures for players. Through a wide range of games, participants can experience slots anytime. Don’t miss out on the joy of winning big!
Solch immersive roulette, [url=https://www.franciscosales.co/2026/03/17/immersive-roulette-ein-fesselndes-spielerlebnis-3/]https://www.franciscosales.co/2026/03/17/immersive-roulette-ein-fesselndes-spielerlebnis-3/[/url] bietet viele einmaliges Erlebnis. Gamer können live während echten Croupiers zu spielen. Solche Umgebung verleiht dieses Spiel interessant und beeindruckend.
Вы допускаете ошибку. Могу это доказать. Пишите мне в PM, пообщаемся.
Proman capsule, [url=https://proman-capsules.info/]https://proman-capsules.info/[/url] is a unique supplement designed to enhance capabilities. It supports intellectual functions and promotes focus. Users report increased stamina and improved well-being.
Playing inside real money roulette casinos, [url=https://staging.ncbagroup.com/winning-strategies-for-online-roulette-games-for/]https://staging.ncbagroup.com/winning-strategies-for-online-roulette-games-for/[/url] can be enticing. The chance of winning substantial amounts keeps players engaged. With various tactics available, every spin becomes intense.
I den spændende verden af online gambling, er casinoer uden ROFUS, [url=https://vanisedainese.com.br/betrouwbare-casinos-zonder-cruks-speel-veilig-en-9/]https://vanisedainese.com.br/betrouwbare-casinos-zonder-cruks-speel-veilig-en-9/[/url] en attraktiv mulighed for spillere. Her kan man finde flere typer af spil, fra slots til bordspil. Der er ikke begrænsninger der kan ofte frustration. Spillere kan nyde friheden til at spille uden bekymringer fra ROFUS. Det er essentielt at vælge sikre platforme for en oplevelse.
Online casino, [url=https://dfitness7.com/the-new-wave-of-branded-content-redefining-4/]https://dfitness7.com/the-new-wave-of-branded-content-redefining-4/[/url] предоставляет возможность веселиться в самые многообразные игры. Азартные игры могут обернуться как прибылью, так и долгами. Важно подходить к игре разумно.
Bitfortune live crypto casino, [url=http://studio.mahatama.co.id/index.php/2026/04/15/ensuring-mobile-security-for-crypto-casinos-best-2/]http://studio.mahatama.co.id/index.php/2026/04/15/ensuring-mobile-security-for-crypto-casinos-best-2/[/url] offers an engaging experience for enthusiasts with its diverse range of games. Enjoy the current action and interact with dealers. Join now and explore the innovative world of crypto gaming!
Playing online casino brings excitement to many players. By the thrill of games, you can enjoy numerous options available. Experience the convenience of gaming from home and winning real cash. Don’t miss your chance to play online casino, [url=https://www.chxpressfitness.com/casinionline140416/bet-buffoon-le-spectacle-des-paris-inattendus/]https://www.chxpressfitness.com/casinionline140416/bet-buffoon-le-spectacle-des-paris-inattendus/[/url]!
Пока просто буду знать))))
sunglasses EyeOns, [url=https://1883magazine.com/refine-your-style-what-add-to-wardrobe/]https://1883magazine.com/refine-your-style-what-add-to-wardrobe/[/url] unite chic and security against UV rays. With these stylish designs, sunglasses EyeOns merely enhance your look but also ensure comfort. Upgrade your collection today!
Выбрать промокод https://rich-house.su/contacts/
Включён завтрак, обед и ужин https://rich-house.su/contacts/
Завтрак Wi-Fi https://rich-house.su/services/
Всё включено https://rich-house.su/contacts/
379 отзывов https://rich-house.su/booking/
Завтрак включён https://rich-house.su/rooms/
Die Immersive Roulette-Variante bietet Spielern ein einzigartiges Erlebnis. In diesen Spielraum erleben Sie lebensnahe Interaktionen mit echten Dealern. Die gehobene Videoqualität sorgt dafür, dass Sie wohl fühlen, während das Rad sich dreht. Zusammen mit ist die Benutzeroberfläche intuitiv und einladend. immersive roulette, [url=https://cuentos.juanramonjimenez.es/wordpress/?p=53438]https://cuentos.juanramonjimenez.es/wordpress/?p=53438[/url] hebt das Spielerlebnis auf ein verändertes Niveau.
Согласен, очень полезная штука
Nudify AI App – Undress AI Tool, [url=https://nudify-ai.amebaownd.com/]https://nudify-ai.amebaownd.com/[/url] – An Nudify AI App – Undress AI Tool embodies a groundbreaking approach to image processing. The software’s high-tech AI technology facilitates users to change photos by disrobing clothing with impressive accuracy. Utilizing neural networks, the Nudify AI App – Undress AI Tool caters to creatives looking to explore the limits of digital art. Such technology offers a unique approach to venture with personal expression.
Playing online roulette can be an exhilarating experience. With the best live roulette, [url=https://650.wieruszow.pl/04/06/discover-the-best-online-casino-live-roulette-8/]https://650.wieruszow.pl/04/06/discover-the-best-online-casino-live-roulette-8/[/url], players enjoy a dynamic atmosphere right from home. Engage with professional dealers and interact with fellow players, making each spin truly memorable.
UK non GamStop casinos, [url=https://sasiedzi24.obliczasrebra.kylos.pl/node/]https://sasiedzi24.obliczasrebra.kylos.pl/node/[/url] offer players a unique gaming experience which the chance to enjoy their favorite games without restrictions. Such casinos cater to users seeking freedom from self-exclusion programs. Gambling enthusiasts can explore wide-ranging options and enjoy enticing bonuses, making the experience even more appealing.
Bitfortune casino, [url=https://temporal.jpkrom.com/index.php/2026/04/15/exploring-the-world-of-esports-betting-with/]https://temporal.jpkrom.com/index.php/2026/04/15/exploring-the-world-of-esports-betting-with/[/url] offers captivating games and beneficial bonuses for players. With a simple interface, it’s great for both beginners and experienced gamers. Delight in top-notch security and just play. Join Bitfortune casino today and discover your fortune!
online casino, [url=https://www.sislikoltukyikama.net/raja-joy-casino-diversion-y-excitante-experiencia/]https://www.sislikoltukyikama.net/raja-joy-casino-diversion-y-excitante-experiencia/[/url] presents an exciting gaming experience. Players can take pleasure in a variety of games from the comfort of their living space. With deals often available, everyone can find something to engage them.
1 часть намнога лутше и смешней:)
Looking for automotive supplies? Car parts online, [url=https://www.adrex.com/en/forum/about-adrex/radiator-and-cooling-parts-online-81453/#forum-add-msg]https://www.adrex.com/en/forum/about-adrex/radiator-and-cooling-parts-online-81453/#forum-add-msg[/url] offers a vast array of choices at your fingertips. Ease takes the stress out of searching for the right parts. Enjoy speedy shipping today!
Finding the Best casino bonuses, [url=https://dcoutesnjacob.com/delicious-chicken-delights-discover-the-best/]https://dcoutesnjacob.com/delicious-chicken-delights-discover-the-best/[/url] is essential for any player looking to maximize their experience. These offers can significantly increase your bankroll. Utilize free spins and deposit matches to receive a thrilling gaming adventure.
Совершенно верно! Это хорошая мысль. Призываю к активному обсуждению.
Participants in the world of Bitcoin should always prioritize knowledge. Lessons Bitcoin Investors, [url=https://coincentral.com/lessons-for-investors-bitcoin-price/]https://coincentral.com/lessons-for-investors-bitcoin-price/[/url] can provide crucial wisdom on market dynamics. Watching trends and seeking opportunities is essential for profit.
Velkommen til de utrolige online casinoer i Danmark. Her finder du fede spil og attraktive bonusser, der kan gГёre din casinooplevelse uforglemmelig. Udforsk dit bedste casino Danmark, [url=https://villagevacation.co.il/2026/04/12/online-casino-med-licens-sikker-spiloplevelse/]https://villagevacation.co.il/2026/04/12/online-casino-med-licens-sikker-spiloplevelse/[/url] i dag!
Это весьма ценная информация
online casino, [url=http://www.atlantic-city.net/why-virtual-tournaments-appeal-to-competitive-12/]bookmakers not on gamstop[/url] offers players a thrilling journey filled with joy. With a wide variety of choices, anyone can find their beloved pastime. Join now and explore your luck!
Choosing the best live roulette casinos, [url=https://collaltimmobiliare.it/discover-the-best-live-roulette-casinos-your-guide/]https://collaltimmobiliare.it/discover-the-best-live-roulette-casinos-your-guide/[/url] is essential for an exciting gaming experience. Look for experienced dealers, various betting options, and immersive options. These factors make gameplay incredibly fun and rewarding.
Bitcoin live betting, [url=https://www.univ-bouira.dz/vrr/en/?p=5468]https://www.univ-bouira.dz/vrr/en/?p=5468[/url] presents a special experience for wagerers around the world. With this method, clients can place bets in real-time, enhancing the thrill of any game. The simplicity of using Bitcoin adds to its appeal in the betting community. As this movement grows, more enthusiasts are engaging in Bitcoin live betting, making it a lively part of the online gambling scene.
Извиняюсь, ничем не могу помочь. Я думаю, Вы найдёте верное решение.
Netti Casino, [url=https://netti-casino-online.com/login]https://netti-casino-online.com/login[/url] – O cassino Netti oferece uma experiГЄncia Гєnica para os apaixonados de jogos online. Com muitas opções de slots, vocГЄ encontrarГЎ tudo que satisfaГ§a todos os gostos. AlГ©m disso, o Netti apostas proporciona descontos exclusivas, tornando sua aventura ainda mais empolgante. NГЈo perca a chance de conhecer tudo o que este cassino apresenta.
Online casino games, [url=https://laufhaus.augenblick-design.de/top-rated-mobile-casinos-according-to-expert-6/]https://laufhaus.augenblick-design.de/top-rated-mobile-casinos-according-to-expert-6/[/url] offer an thrilling way to enjoy numerous games from the comfort of your own home. Participate in the action today!
References:
Best online blackjack
References:
https://golden-gate-casino.online-spielhallen.de/
non GamStop casinos in UK, [url=https://wowmarketing.in/exploring-british-casino-sites-not-on-gamstop-6/]https://wowmarketing.in/exploring-british-casino-sites-not-on-gamstop-6/[/url] offer an distinct chance for players seeking greater liberty in betting. Through these platforms, participants can enjoy a extensive range of games without restrictions.
Да, действительно. И я с этим столкнулся. Можем пообщаться на эту тему. Здесь или в PM.
техосмотр автомобиля, [url=https://yandex.ru/maps/org/tekhosmotr/11324347330]проверить техосмотр онлайн[/url] — важная процедура, которая подтверждает безопасность на дороге. Периодически проходя техосмотр, вы имеете возможность избежать критических ситуаций. Подобная практика способствует продлить срок службы вашего автомобиля и сохранить здоровье водителей и пассажиров.
Hi there, just became aware of your blog through Google, and found that it is truly informative.
I’m gonna watch out for brussels. I’ll appreciate if
you continue this in future. A lot of people will be benefited
from your writing. Cheers!
References:
Brantford casino poker
References:
https://casino-schaffhausen.online-spielhallen.de/
[url=https://demidovtsev.ru]участки в каширском районе в деревне
участок дом каширское шоссе
купить участок в каширском районе московской области
[/url]
online casino game, [url=http://mission3w.youngnak.net/2026/04/13/entdecken-sie-die-vorteile-von-moro-spin-3-2/]http://mission3w.youngnak.net/2026/04/13/entdecken-sie-die-vorteile-von-moro-spin-3-2/[/url] features a exciting experience for players. By using various options, users can savor a thrill of winning big from the comfort of their homes.
Discovering the best live roulette, [url=https://kalamata-oliveoil.oefprogram.gr/2026/04/06/discover-the-best-live-roulette-sites-in-the-uk-9/]https://kalamata-oliveoil.oefprogram.gr/2026/04/06/discover-the-best-live-roulette-sites-in-the-uk-9/[/url] options can elevate your gaming experience. Players enjoy the thrill of interactive play. Many platforms offer unique features, so choose wisely to increase your chances at winning.
Перефразируйте пожалуйста
Фильм миссия невыполнима, [url=https://lotoclub-37.com.kz/]https://lotoclub-37.com.kz/[/url] погружает зрителей в мир захватывающих приключений. Приключение и остросюжетность делают его неповторимым. Персонажи сталкиваются с опасными ситуациями. Таким образом, зрители остаются заинтригованными до самого конца.
Mobile casinos, [url=http://biznislink.rs/skill-based-titles-gaining-ground-in-modern-job-2/]http://biznislink.rs/skill-based-titles-gaining-ground-in-modern-job-2/[/url] предлагают уникальную возможность наслаждаться в известных играх на компактных устройствах. Геймеры могут получать удовольствие широким выбором игр в любое время суток и в любом месте.
нелюблю читать
купить Готовую фирму, [url=https://carbuy.com.ua/prodazha-ooo-kak-vybrat-i-rasschitat-cenu/]https://carbuy.com.ua/prodazha-ooo-kak-vybrat-i-rasschitat-cenu/[/url] — это отличный способ начать бизнес без лишних хлопот. Готовый бизнес позволяет сэкономить время и средства. Приобретая такую фирму, вы получаете партнеров, что упрощает старт.
udenlandsk online casino, [url=https://beautyclinic.pe/bedste-online-casino-en-guide-til-spil-og-gevinst/]https://beautyclinic.pe/bedste-online-casino-en-guide-til-spil-og-gevinst/[/url] tilbyder en interessante muligheder for gamblere. Her casinoer kan man finde mange udvalg af bordspil. Forskellige tilbyder incitamenter til nye kunder. Det er en udmærket mulighed for at finde nye oplevelser.
play online casino, [url=http://casadelsol.casa/molcasino-your-ultimate-online-gaming-destination-3/]http://casadelsol.casa/molcasino-your-ultimate-online-gaming-destination-3/[/url] provides a fun method to engage with gambling from home. Gamblers can relish a variety of games, like slots, poker, and blackjack. The accessibility of playing anytime makes it irresistible. Due to bonuses and incentives, the excitement only grows!
Discover the joy of the best live roulette, [url=https://www.gessodazero.com/discover-the-best-online-casino-live-roulette-8/]https://www.gessodazero.com/discover-the-best-online-casino-live-roulette-8/[/url], where players can enjoy an engaging experience. With real dealers, the game offers genuineness you can’t find online. Join immediately and experience the excitement!
non GamStop casinos in UK, [url=https://fittedrims.net/stamina/best-non-gamstop-uk-casinos-discover-top-choices/]https://fittedrims.net/stamina/best-non-gamstop-uk-casinos-discover-top-choices/[/url] provide a refreshing alternative to traditional gambling platforms. Individuals can enjoy numerous options of games without the restrictions imposed by GamStop. With tempting bonuses and exciting experiences, these casinos draw in many enthusiasts in the UK.
wethenorth market link https://darknetmarketsreview.com/
Hi there, I found your blog by way of Google while looking for a related topic, your site came up,
it seems to be great. I have bookmarked it in my google bookmarks.
Hello there, simply was aware of your blog through Google, and found
that it is really informative. I’m gonna be careful for brussels.
I’ll be grateful if you happen to proceed this in future.
A lot of other people shall be benefited out of your
writing. Cheers!
10 euros offert paris sportif|10 euros offert sans dépôt
paris sportif|10 meilleurs sites de paris sportifs|100 euro offert paris sportif|100 euros offert
paris sportif|100 euros remboursé paris sportifs|100 offert pari sportif|100 offert paris sportif|100 remboursé paris sportif|100e offert pari sportif|abandon paris sportif tennis|abandon tennis paris sportif|addiction paris sportif forum|age
paris sportif belgique|aide au pari sportif|aide au paris sportif|aide aux paris
sportif|aide aux paris sportifs|aide pari sportif|aide pari sportif football|aide
parie sportif|aide paris sportif|aide paris sportif foot|aide paris sportif gratuit|aide paris
sportifs|aide pour paris sportif|algorithme de paris sportif|algorithme
excel paris sportif|algorithme gratuit paris sportif|algorithme pari sportif|algorithme paris sportif|algorithme paris sportif avis|algorithme paris sportif basket|algorithme paris sportif excel|algorithme paris sportif gratuit|algorithme paris sportif
tennis|algorithme paris sportifs|algorithme pour paris sportif|analyse cote
paris sportif|analyse de paris sportif|analyse match paris sportif|analyse pari
sportif|analyse paris sportif|analyse paris sportif foot|analyse paris sportif football|analyse paris sportif gratuit|analyse paris sportifs|ancienne
cote paris sportif|api cote paris sportif|app paris sportif sans argent|appli de
paris sportif|appli de paris sportif sans argent|appli de paris sportifs|appli pari sportif|appli pari sportif gratuit|appli parie sportif|appli
paris sportif|appli paris sportif avec paypal|appli paris sportif belgique|appli paris sportif entre amis|appli paris sportif
gratuit|appli paris sportif sans argent|appli paris sportif suisse|appli paris sportifs|application aide paris sportif|application algorithme paris
sportif|application analyse paris sportif|application android paris sportif|application bankroll paris sportif|application conseil paris sportif|application de pari sportif|application de parie sportif|application de paris
sportif|application de paris sportif en afrique|application de paris sportif en cote
d’ivoire|application de paris sportif en ligne|application de paris sportif gratuit|application de paris sportif international|application de paris
sportif suisse|application de paris sportifs|application faux paris sportifs|application gestion bankroll paris sportif|application gestion paris sportif|application ia paris sportif|application pari sportif
gratuit|application paris sportif|application paris sportif android|application paris sportif argent fictif|application paris sportif belgique|application paris sportif canada|application paris sportif espagne|application paris sportif espagnol|application paris sportif fictif|application paris
sportif france|application paris sportif gratuit|application paris sportif
gratuit entre amis|application paris sportif maroc|application paris sportif offre de bienvenue|application paris sportif paypal|application paris sportif sans argent|application paris sportif
sans justificatif de domicile|application paris sportif suisse|application paris
sportif usa|application paris sportif virtuel|application pour faire des paris sportifs|application pour gerer
ses paris sportif|application pour les paris sportifs|application pour pari sportif|application pour paris sportif|application pour paris sportifs|application statistique paris sportif|application suivi paris sportif|applications de paris sportifs|applications
paris sportifs|applis paris sportif|applis paris sportifs|apprendre a faire des paris sportifs|argent facile paris sportif|argent
offert paris sportifs|argent offert sans depot paris sportif|argent paris sportif|argent paris sportifs|argent paris sportifs impots|argent sans depot paris sportif|arjel paris sportif|arjel paris sportifs|astuce
gagner paris sportif|astuce pari sportif|astuce paris sportif|astuce paris
sportif basket|astuce paris sportif foot|astuce paris sportif forum|astuce paris
sportif tennis|astuce paris sportifs|astuce pour gagner au pari sportif|astuce pour gagner au paris sportif|astuce pour gagner paris sportif|astuce pour
paris sportif|astuces paris sportifs|astuces paris sportifs en ligne|astuces paris sportifs foot|astuces pour gagner aux paris sportifs|autorisation paris sportif france|avis
pari sportif|avis paris sportif|avis paris sportif foot|avis
site de paris sportif|avis site paris sportif|avis sur les paris sportifs|avis sur paris sportif|avis tipster paris sportif|aweh signification paris sportif|bankroll 100 euros paris sportifs|bankroll management paris sportif|bankroll paris
sportif|bankroll paris sportif excel|bankroll paris sportif gratuit|bankroll paris sportifs|basket paris sportif|belgique france paris sportif|belgique paris sportifs|bonus bienvenue paris sportif|bonus bienvenue paris sportifs|bonus cash paris sportif|bonus de bienvenue paris sportif|bonus de bienvenue paris sportif belgique|bonus de
bienvenue sans depot paris sportif|bonus de depot paris sportif|bonus de paris sportifs|bonus depot paris sportif|bonus en cash paris sportif|bonus gratuit paris sportif|bonus gratuit sans depot paris sportif|bonus pari
sportif|bonus paris sportif|bonus paris sportif belgique|bonus paris sportif betclic|bonus
paris sportif cash|bonus paris sportif en ligne|bonus
paris sportif france pari|bonus paris sportif retirable|bonus paris
sportif sans depot|bonus paris sportif sans dépôt|bonus paris sportif unibet|bonus paris sportifs|bonus sans depot paris sportif|bonus sans depot paris sportif belgique|bonus sans dépôt paris sportif|bonus sans dépôt paris sportif hors arjel|bonus site de paris sportif|bonus site pari sportif|bonus site
paris sportif|bonus sites de paris sportifs|bonus unibet paris sportif|bookmaker paris
sportif|bookmaker paris sportif gratuit|bookmaker paris sportifs|bookmaker sportif|bookmakers paris
sportif|bookmakers paris sportifs|bookmakers paris sportifs
en ligne|but contre son camp paris sportif|but sur penalty paris sportif|buteur paris sportif|c’est quoi handicap paris sportif|c’est quoi
une cote paris sportif|calcul anti perte paris sportif|calcul combinaison pari sportif|calcul cote pari sportif|calcul cote paris sportif|calcul couverture paris sportif|calcul de cote paris sportif|calcul des cotes paris sportifs|calcul dnb paris sportifs|calcul double chance paris sportif|calcul gain paris sportif|calcul mise paris sportif|calcul
pari sportif|calcul paris sportif|calcul paris sportif multiple|calcul pourcentage cote paris sportif|calcul probabilité paris sportif|calcul rentabilité paris sportifs|calcul roi paris sportif|calcul systeme paris sportif|calcul trj paris sportifs|calculateur cote paris sportif|calculateur de cote paris sportif|calculateur de mise paris
sportif|calculateur de paris sportif|calculateur paris sportif|calculatrice arbitrage
paris sportif|calculatrice paris sportif|calculer cote paris
sportif|calculer gain paris sportif|calculer probabilité paris sportifs|calculer roi paris sportifs|calculer une
cote pari sportif|calculer une cote paris sportif|carte cadeau paris sportif|carte pcs paris sportif|carte prépayée paris sportifs|cash out pari sportif|cash
out paris sportif|cash out paris sportifs|casino en ligne
paris sportif|casino paris sportif en ligne|champions league paris
sportif|chute de cote paris sportif|classement des meilleurs sites de paris sportifs|classement meilleur site de paris sportif|code
barre paris sportif|code bonus paris sportif|code paris sportif|code
promo pari sportif|code promo paris sportif|code promo paris
sportif sans depot|code promo paris sportif
sans dépôt|code promo sans depot paris sportif|code promo site paris sportif|combien de
temps pour encaisser un paris sportif|combien de temps pour
retirer un paris sportif|combien miser paris sportifs|combine paris sportif|combines paris sportifs|combiné pari sportif|combiné
paris sportif|combiné paris sportif conseil|combiné paris sportif
du jour|combiné paris sportif pronostic|comment analyser un paris sportif|comment arreter de
jouer aux paris sportifs|comment arreter les paris sportif|comment arreter les paris sportifs|comment arrêter les paris sportifs|comment bien gagner au paris
sportif|comment bien jouer au paris sportif|comment bien miser paris sportif|comment ca marche les paris sportif|comment calculer cote paris sportif|comment calculer gain paris sportif|comment calculer
les cotes des paris sportifs|comment calculer une
cote de paris sportif|comment calculer une cote pari sportif|comment
calculer une cote paris sportif|comment comprendre
les paris sportifs|comment creer un vip paris sportif|comment créer un algorithme paris sportif|comment créer
un site de paris sportif|comment devenir riche avec les paris sportifs|comment
etre rentable paris sportif|comment etre sur de gagner au paris sportif|comment faire de bon paris sportif|comment faire des
parie sportif|comment faire des paris sportif|comment faire
des paris sportif gagnant|comment faire des paris sportifs|comment faire pari sportif|comment faire paris sportif|comment faire pour arreter les
paris sportifs|comment faire pour gagner au paris sportif|comment faire pour gagner les
paris sportifs|comment faire un bon pari sportif|comment faire un bon paris sportif|comment faire un pari
sportif|comment faire un parie sportif|comment faire un paris sportif|comment faire une montante paris sportif|comment fonctionne les cotes dans les paris sportifs|comment fonctionne les cotes des paris sportifs|comment fonctionne
les paris sportifs|comment fonctionne paris sportifs|comment fonctionne un pari sportif|comment fonctionnent les cotes dans
les paris sportifs|comment fonctionnent les cotes dans les paris sportifs grand oral|comment fonctionnent les cotes de paris sportif|comment fonctionnent les paris sportifs|comment fonctionnent les
paris sportifs grand oral|comment fonctionnent les paris sportifs grand oral maths|comment fonctionnent les paris sportifs maths|comment gagner a coup
sur au paris sportif|comment gagner a tous les coups au paris sportif|comment gagner
a tout les coup au paris sportif|comment gagner au pari sportif|comment gagner au pari sportif football|comment gagner au paris sportif|comment gagner au paris sportif a coup
sur|comment gagner au paris sportif foot|comment gagner
au paris sportif forum|comment gagner au paris sportif
tennis|comment gagner au paris sportifs|comment gagner aux
paris sportif|comment gagner aux paris sportifs|comment gagner aux paris sportifs foot|comment gagner
aux paris sportifs livre|comment gagner aux paris
sportifs sur le long terme|comment gagner avec les paris sportifs|comment gagner dans les paris sportifs|comment gagner
de l argent avec les paris sportifs|comment gagner de l’argent au paris sportif|comment gagner
de l’argent aux paris sportifs|comment gagner de
l’argent avec les paris sportifs|comment gagner de l’argent paris sportif|comment gagner de l’argent sur les paris sportifs|comment gagner
de l’argent sur paris sportif|comment gagner des paris sportif|comment gagner des paris
sportifs|comment gagner en paris sportif|comment gagner facilement au paris sportif|comment gagner les paris sportifs|comment gagner paris sportif|comment
gagner paris sportif foot|comment gagner paris sportifs|comment gagner sa vie avec les
paris sportifs|comment gagner ses paris sportif|comment gagner sur les paris sportif|comment gagner sur les paris sportifs|comment gagner tout
le temps au paris sportif|comment gagner un pari sportif|comment gagner un paris
sportif|comment gerer une bankroll paris sportif|comment gérer sa bankroll paris
sportif|comment jouer au pari sportif|comment jouer au paris sportif|comment jouer au
paris sportif foot|comment jouer aux paris sportifs|comment jouer paris sportif|comment marche cote
paris sportif|comment marche les cotes paris sportif|comment marche les paris sportif|comment marche les paris sportifs|comment marche paris sportif|comment marche un pari sportif|comment marche un paris sportif|comment marchent les cotes
paris sportif|comment marchent les paris sportifs|comment miser au paris sportif|comment miser paris sportif|comment monter sa bankroll paris
sportif|comment ne jamais perdre au paris
sportif|comment parier sportif|comment reussir au paris sportif|comment reussir les paris sportif|comment reussir paris sportif|comment sont calculer les cotes de paris
sportif|comment sont calculées les cotes des paris sportifs|comment
sont calculés les cotes des paris sportifs|comment sont faites les cotes
des paris sportifs|comment toujours gagner au paris sportif|comment ça marche les paris sportifs|comparaison bonus paris
sportifs|comparaison cote pari sportif|comparaison des cotes paris sportifs|comparateur cote pari sportif|comparateur cote paris sportif|comparateur cotes paris sportif|comparateur cotes paris sportifs|comparateur de cote pari sportif|comparateur
de cote paris sportif|comparateur de cotes paris sportifs|comparateur de côtes paris sportifs|comparateur de
paris sportif|comparateur de site de paris sportif|comparateur de site paris
sportif|comparateur de sites de paris sportifs|comparateur pari
sportif|comparateur paris sportif|comparateur paris sportifs|comparateur
site de paris sportif|comparateur site pari sportif|comparateur site paris sportif|comparatif bonus paris
sportif|comparatif bonus paris sportifs|comparatif cote pari sportif|comparatif cote paris sportif|comparatif cotes paris sportifs|comparatif
des sites de paris sportifs|comparatif offre de bienvenue paris sportif|comparatif offre paris sportif|comparatif pari sportif|comparatif pari
sportif en ligne|comparatif paris sportif|comparatif paris sportif bonus|comparatif paris sportif en ligne|comparatif paris sportifs|comparatif
paris sportifs en ligne|comparatif site de paris
sportif|comparatif site paris sportif|comparatif site paris sportifs|comparatif sites de paris
sportifs|comparatif sites paris sportifs|comparer les
cotes paris sportifs|comprendre cote paris sportif|comprendre handicap paris sportif|comprendre les cotes
des paris sportifs|comprendre les cotes paris sportif|comprendre
les cotes paris sportifs|comprendre les handicap paris sportif|compte
de paris sportif|compte démo paris sportif|compte finance
paris sportif|compte financer paris sportif|compte financier paris sportif|compte financé
paris sportif|compte pari sportif|compte paris sportif|compte paris sportif financé|conseil de
paris sportif|conseil de paris sportifs|conseil en paris sportif|conseil en paris sportifs|conseil pari sportif|conseil pari sportif gratuit|conseil paris sportif|conseil paris sportif aujourd’hui|conseil paris
sportif du jour|conseil paris sportif foot|conseil paris sportif gratuit|conseil paris sportif ligue
des champions|conseil paris sportif nba|conseil paris sportif
pronostic|conseil paris sportif rmc|conseil paris sportif tennis|conseil
paris sportifs|conseil pour gagner au paris sportif|conseil pour paris sportif|conseil sur les paris
sportifs|conseille paris sportif|conseiller en paris sportifs|conseiller paris sportif|conseils de paris sportifs|conseils en paris
sportifs|conseils paris sportifs|conseils paris sportifs foot|conseils
paris sportifs gratuit|conseils paris sportifs
tennis|conseils pour paris sportifs|cote a 100 paris sportif|cote a 2
paris sportif|cote anglaise paris sportif|cote
de 2 paris sportif|cote de pari sportif|cote de paris sportif|cote des
paris sportifs|cote maximum paris sportif|cote minimum paris sportif|cote pari sportif|cote pari sportif comment ça marche|cote pari sportif real madrid|cote pari sportif rugby|cote parie sportif|cote paris sportif|cote paris sportif belgique|cote
paris sportif calcul|cote paris sportif definition|cote paris sportif euro|cote paris sportif explication|cote paris sportif foot|cote paris
sportif france belgique|cote paris sportif france espagne|cote paris
sportif ligue des champions|cote paris sportif
moto gp|cote paris sportif psg|cote paris sportif psg arsenal|cote paris sportif rugby|cote paris sportif tennis|cote paris sportifs|cote pour paris sportifs|cote sportif foot|cote sportif rugby|cote à 1000
paris sportif|cotes de paris sportifs|cotes pari sportif|cotes paris sportif|cotes paris sportifs|cotes paris sportifs foot|coupe de france paris
sportif|créer un algorithme paris sportif|créer un compte
paris sportif|créer un site de paris sportif en ligne|dans les paris sportifs que signifie handicap|declarer ses gains paris sportif|definition cash out paris sportif|definition cote paris sportif|definition handicap paris sportif|depot 5 euros paris
sportif|depot double paris sportif|depot minimum 5 euro paris sportif|depot minimum paris
sportif|depot paris sportif|depuis quand existe les paris sportif
en france|devenir riche avec les paris sportifs|devenir riche avec
paris sportifs|disqualification tennis paris sportif|dnb en paris sportif|dnb pari sportif|dnb paris
sportif|dnb paris sportif definition|dnb paris sportifs|doit on declarer les gains de paris sportif|déclarer gains paris
sportifs|déclarer gains paris sportifs hors arjel|définition bankroll paris sportif|dépôt minimum 1 euro paris sportif|dépôt minimum 5 euro paris sportif|ecart de jeux tennis paris sportif|erreur de cote paris sportif|est ce que les
gains des paris sportifs sont imposables|est-ce que
les prolongation compte dans un pari sportif|etre sur de gagner
au paris sportif|euro paris sportif|evenement sportif a paris|evenement sportif paris|evenement sportif paris 2025|evenement sportif paris aujourd hui|evenement sportif paris aujourd’hui|evenement sportif paris ce
week end|evenements sportif paris|evenements sportifs
paris|evenements sportifs paris 2025|evenements sportifs
à paris|evolution cote paris sportif|evolution cotes paris sportifs|evolution des cotes paris sportifs|explication cote pari sportif|explication cote paris sportif|explication handicap
paris sportif|explication pari sportif|explication paris sportif|face a face hockey paris sportif|faire des paris sportif|faire des paris sportif avec paypal|faire des paris sportifs|faire fortune paris sportifs|faire un pari sportif|faire un paris sportif|faut
il déclarer les gains de paris sportifs|faut
il déclarer ses gains paris sportifs|fichier excel gestion bankroll paris sportif|fiscalité gains paris sportifs|foot paris
sportif|football et paris sportifs|forfait tennis paris sportif|formation paris sportif gratuit|forum de paris
sportif|forum de paris sportifs|forum pari sportif|forum parie sportif|forum
paris sportif|forum paris sportif foot|forum paris sportif
gratuit|forum paris sportif nba|forum paris sportif tennis|forum paris sportifs|forum sur les paris sportifs|forum tennis paris sportif|francaise
des jeux pari sportif|francaise des jeux paris sportif|francaise des jeux paris sportifs|france 2 paris sportif|france 2 paris sportifs|france belgique paris sportif|france espagne paris sportif|france pari sportif|france pari sportif brest|france paris sportif|france
paris sportifs|france pologne paris sportif|france portugal paris sportif|france suisse paris sportifs|france tunisie paris sportifs|france-pari – paris sportifs|gagnant pari sportif|gagnant paris sportif|gagnant paris sportif bayern|gagnante paris
sportif|gagne au paris sportif|gagner 10 euros par jour aux paris sportifs|gagner 100 euros par
jour paris sportif|gagner 1000 euros par mois paris sportifs|gagner 10000 euros paris sportif|gagner 2000 euros par mois paris
sportif|gagner 50 euros par jour paris sportif|gagner
a coup sur au paris sportif|gagner a coup sur pari sportif|gagner a tous les coup paris sportif|gagner argent avec paris
sportifs|gagner argent pari sportif|gagner argent paris sportif|gagner argent paris sportifs|gagner au pari sportif|gagner au paris
sportif|gagner au paris sportif a coup sur|gagner au paris sportif foot|gagner au paris sportif forum|gagner au paris sportif à
coup sur|gagner aux paris sportif|gagner aux paris
sportifs|gagner aux paris sportifs pdf|gagner beaucoup d’argent paris
sportif|gagner de l argent grace aux paris sportifs|gagner de l argent pari sportif|gagner de l argent paris sportif|gagner de l
argent paris sportifs|gagner de l’argent au paris sportif|gagner de l’argent aux paris sportifs|gagner de l’argent avec
les paris sportifs|gagner de l’argent avec paris sportif|gagner
de l’argent avec paris sportifs|gagner de l’argent grace au
paris sportif|gagner de l’argent grace aux paris sportifs|gagner de
l’argent pari sportif|gagner de l’argent paris sportif|gagner
de l’argent paris sportifs|gagner de l’argent sur les paris sportifs|gagner des paris sportif|gagner des paris sportifs|gagner
les paris sportifs|gagner pari sportif|gagner paris sportif|gagner paris sportif foot|gagner paris
sportif forum|gagner paris sportif tennis|gagner paris sportifs|gagner
sa vie avec les paris sportif|gagner sa vie avec les paris sportifs|gagner sa vie avec paris sportifs|gagner ses paris
sportifs|gagner à coup sur paris sportif|gagner à tous les coups paris sportifs|gain maximum paris sportif|gain pari
sportif|gain pari sportif imposable|gain pari sportif impot|gain paris sportif|gain paris sportif imposable|gain paris sportif impot|gain paris sportif impôt|gains paris sportif|gains paris sportif imposable|gains paris sportifs|gains paris sportifs imposable|gains paris
sportifs imposables|gains paris sportifs sont ils
imposables|gerer bankroll paris sportif|gerer sa bankroll paris sportif|gerer une bankroll paris sportif|gestion bankroll paris sportif|gestion bankroll
paris sportifs|gestion bankroll paris sportifs excel|gestion de bankroll paris sportif|gestion de
bankroll paris sportif application|gestion de bankroll paris sportifs|gestion de mise paris sportif|gestion paris sportifs
v2 5 gratuit|gg signification paris sportif|gros combiné
paris sportif|gros gain paris sportif|grosse cote paris sportif pronostic|grosse mise paris
sportif|groupe paris sportif gratuit|groupe telegram paris sportif gratuit|groupement de joueurs paris sportifs|handicap 0 paris
sportif|handicap 1 paris sportif|handicap 5 paris sportif|handicap au paris sportif|handicap basket paris sportif|handicap dans
les paris sportifs|handicap en paris sportif|handicap europeen paris
sportif|handicap européen paris sportifs|handicap mi temps paris sportif|handicap pari sportif|handicap
paris sportif|handicap paris sportif basket|handicap paris sportif explication|handicap paris sportif foot|handicap paris sportif rugby|handicap paris sportifs|handicap rugby paris sportif|handicap
tennis paris sportif|historique cote paris sportif|historique des cotes paris sportifs|hockey paris sportif|hockey sur glace paris sportif|hors arjel paris sportif|hweh signification paris sportif|imposition gain pari sportif|imposition gain paris sportif|imposition gains paris sportifs|imposition paris sportif france|impot gain paris sportif|impot paris sportif france|impot
sur gain paris sportif|je gagne ma vie avec les paris sportifs|jeu de pari sportif gratuit|jeu de
paris sportif en ligne|jeu de paris sportif gratuit|jeu paris sportif gratuit|jeu paris sportif sans argent|jeux de parie sportif|jeux de paris sportif|jeux de paris sportif en ligne|jeux de paris sportif gratuit|jeux de paris sportifs|jeux olympiques paris sportifs|jeux paris sportif|jeux paris sportif gratuit|jeux paris sportif virtuel|jeux paris
sportifs en ligne|jouer au paris sportif|jouer paris sportif|joueur absent paris sportif|joueur
blesse paris sportif|joueur caen paris sportif|joueur de caen pari sportif|joueur de
foot paris sportif|joueur decisif paris sportif|joueur décisif paris sportif|joueur italien paris sportif|joueur paris sportif|joueur professionnel paris sportif|joueur qui
se blesse paris sportif|joueur sanctionne pari sportif|joueur suspendu paris
sportif|joueurs italiens paris sportifs|l’argent des paris sportifs est il imposable|la cote paris sportif|la francaise des jeux
paris sportif|la martingale paris sportif|la martingale paris sportifs|la
meilleur application de paris sportif|la meilleur application paris sportif|la meilleur technique
pour gagner au paris sportif|la méthode secrète pour gagner aux paris sportifs pdf|la plus grosse cote gagner paris
sportif|la plus grosse cote paris sportif|ldem paris sportif signification|le marché des paris sportifs|le meilleur site de pari sportif|le meilleur site de
paris sportif|le meilleur site de paris sportif en ligne|le meilleur site de paris sportifs|le
plus gros gain au paris sportif|le plus gros paris sportif|le plus gros paris sportif du monde|les 10 meilleurs sites de paris sportifs|les 10 meilleurs sites
de paris sportifs en afrique|les 17 secrets pour gagner rapidement aux paris sportifs|les 17 secrets pour gagner rapidement
aux paris sportifs pdf|les application de paris sportif|les applications paris sportifs|les bonus paris sportifs|les
bookmakers paris sportifs|les cotes paris sportifs|les gains
de paris sportifs sont ils imposables|les gains des paris
sportifs sont ils imposables|les jeux de paris sportifs|les
meilleur paris sportif|les meilleures applications de paris
sportifs|les meilleurs applications de paris sportifs|les
meilleurs bonus paris sportif|les meilleurs bonus paris sportifs|les meilleurs cotes paris
sportif|les meilleurs paris sportifs|les meilleurs
paris sportifs du jour|les meilleurs site de paris sportif|les meilleurs site de paris sportifs|les
meilleurs sites de pari sportif|les meilleurs sites de paris sportifs|les meilleurs sites de
paris sportifs en ligne|les paris sportif|les paris sportif avis|les
paris sportifs|les paris sportifs comment ça marche|les paris sportifs en france|les
paris sportifs en ligne|les paris sportifs en ligne comprendre jouer gagner|les paris sportifs en ligne
comprendre jouer gagner pdf|les paris sportifs
les plus rentables|les plus gros gagnant paris sportif|les
plus gros gains au paris sportifs|les plus
gros gains paris sportifs|les plus gros paris sportif|les plus grosse cote paris sportif|les plus grosses pertes paris sportifs|les
sites de paris sportifs|les sites de paris sportifs autorisés
en france|les sites de paris sportifs en france|les
sites de paris sportifs en ligne|les sites de paris sportifs francais|ligue 1 paris
sportif|ligue 1 paris sportifs|ligue 2 paris sportif|ligue des champions paris sportif|limite de gains paris sportifs|limite de mise paris sportif|limite gain paris sportif|limite
mise paris sportifs|liste de paris sportif|liste des paris
sportifs|liste des site de paris sportif|liste des sites de paris sportifs|liste pari sportif|liste paris
sportif|liste paris sportif pdf|liste site de paris
sportif|liste site pari sportif|liste site paris sportif|liste site
paris sportif arjel|liste sites paris sportifs|logiciel algorithme paris sportif|logiciel algorithme paris sportif
gratuit|logiciel analyse paris sportif|logiciel calcul paris sportif|logiciel de pari sportif|logiciel de paris sportif|logiciel de paris sportif gratuit|logiciel gestion bankroll paris sportif gratuit|logiciel gestion de bankroll paris sportif|logiciel
gestion paris sportif|logiciel gestion paris sportif gratuit|logiciel gestion paris sportifs|logiciel pari sportif|logiciel paris sportif|logiciel paris sportif gratuit|logiciel paris sportifs|logiciel paris sportifs foot sur 2 matchs|logiciel pour paris sportif|logiciel pour paris sportifs|logiciel prediction paris sportif|logiciel probabilité paris sportif|logiciel prédiction paris sportif|logiciel statistique paris sportifs|logiciel variation de cote
paris sportif|loi sur les paris sportifs en france|magic calculator paris sportif|marché des paris sportifs|marché des paris sportifs en france|marché des paris sportifs en ligne|martingale pari sportif|martingale paris sportif|martingale
paris sportif excel|martingale paris sportif forum|martingale paris sportif interdit|martingale paris sportifs|match abandonné paris sportif|match annulé ou reporté paris sportifs|match annulé paris sportif|match
arrete paris sportif|match interrompu paris sportif|match interrompu tennis paris
sportif|match interrompu tennis pluie paris sportif|match nul boxe
paris sportif|match pari sportif|match paris sportif|match reporté paris sportif|match
suspendu paris sportif|match suspendu tennis paris sportif|match truqué
paris sportif|matchs truqués paris sportifs|meilleur algorithme paris sportif|meilleur algorithme
paris sportif gratuit|meilleur app de paris sportif|meilleur app de paris sportifs|meilleur app paris sportif|meilleur appli de pari sportif|meilleur appli de
paris sportif|meilleur appli pari sportif|meilleur appli
paris sportif|meilleur appli paris sportif forum|meilleur
appli paris sportifs|meilleur application conseil paris sportif|meilleur application de paris sportif|meilleur
application de paris sportif en afrique|meilleur application pari sportif|meilleur application paris
sportif|meilleur application paris sportif belgique|meilleur application pour les
paris sportif|meilleur application pour pari sportif|meilleur bonus de
bienvenue paris sportif|meilleur bonus pari sportif|meilleur bonus
paris sportif|meilleur bonus paris sportif sans depot|meilleur bonus paris sportifs|meilleur bonus site de paris sportif|meilleur
bonus site pari sportif|meilleur bonus site paris sportif|meilleur bookmaker paris sportif|meilleur combiné paris sportif|meilleur
conseil paris sportif|meilleur cote de paris sportif|meilleur cote pari
sportif|meilleur cote paris sportif|meilleur cote paris sportif aujourd’hui|meilleur cote site paris sportif|meilleur
forum paris sportifs|meilleur gain paris sportif|meilleur ia paris sportif|meilleur methode pour gagner au paris sportif|meilleur offre bienvenue paris sportif|meilleur offre bonus paris sportif|meilleur
offre de bienvenue paris sportif|meilleur offre de bienvenue
paris sportifs|meilleur offre pari sportif|meilleur offre paris sportif|meilleur offre paris
sportif en ligne|meilleur pari sportif|meilleur pari sportif du jour|meilleur pari sportif en ligne|meilleur paris sportif|meilleur
paris sportif aujourd’hui|meilleur paris sportif du jour|meilleur paris sportif en ligne|meilleur paris sportif
foot|meilleur promo paris sportif|meilleur pronostic paris
sportif|meilleur site de conseil paris sportif|meilleur site de pari
sportif|meilleur site de pari sportif en ligne|meilleur site de paris
sportif|meilleur site de paris sportif avis|meilleur site de paris
sportif belgique|meilleur site de paris sportif canada|meilleur
site de paris sportif en france|meilleur site de paris
sportif en ligne|meilleur site de paris sportif football|meilleur site de paris
sportif forum|meilleur site de paris sportif france|meilleur site de
paris sportif hors arjel|meilleur site de paris sportif international|meilleur
site de paris sportif suisse|meilleur site de paris sportifs|meilleur site de paris sportifs en ligne|meilleur
site pari sportif|meilleur site pari sportif en ligne|meilleur site pari sportif france|meilleur
site paris sportif|meilleur site paris sportif avis|meilleur site paris sportif belgique|meilleur site paris
sportif canada|meilleur site paris sportif en ligne|meilleur
site paris sportif foot|meilleur site paris sportif forum|meilleur site paris sportif france|meilleur site paris sportif hors arjel|meilleur site paris sportif nba|meilleur site
paris sportif rugby|meilleur site paris sportif suisse|meilleur
site paris sportifs|meilleur site pour pari sportif|meilleur
site pour paris sportif|meilleur site pronostic paris sportif|meilleur strategie
paris sportif|meilleur technique de paris sportif|meilleur technique paris sportif|meilleur technique pour gagner
au paris sportif|meilleure appli de paris sportif|meilleure appli de paris sportifs|meilleure appli pari sportif|meilleure appli paris sportif|meilleure
appli paris sportifs|meilleure application de paris sportif|meilleure application de paris
sportifs|meilleure application pari sportif|meilleure application paris sportif|meilleure
application paris sportif android|meilleure application paris sportifs|meilleure offre paris sportif|meilleure site paris sportif|meilleure strategie paris sportif|meilleures applications
de paris sportifs|meilleures applications paris sportifs|meilleures cotes
paris sportifs|meilleures offres paris sportifs|meilleures stratégies paris sportifs|meilleurs appli paris sportif|meilleurs
application de paris sportifs|meilleurs application paris
sportif|meilleurs applications paris sportifs|meilleurs bonus paris sportifs|meilleurs cote paris sportif|meilleurs cotes paris sportifs|meilleurs offres paris sportifs|meilleurs paris sportifs|meilleurs paris sportifs du jour|meilleurs site de pari sportif|meilleurs site de paris
sportif|meilleurs site de paris sportif en ligne|meilleurs site de paris sportifs|meilleurs site paris sportif|meilleurs
sites de paris sportifs|meilleurs sites de paris sportifs en ligne|meilleurs sites paris sportif|meilleurs
sites paris sportifs|methode abc paris sportif|methode de paris sportif|methode gagnante paris sportifs|methode
gagner paris sportif|methode infaillible paris sportifs|methode martingale paris sportif|methode mathematique paris sportif|methode mathematique pour gagner au paris sportif|methode paris
sportif|methode paris sportif foot|methode paris
sportif forum|methode paris sportif tennis|methode
paris sportifs|methode pour gagner au paris sportif|methode pour
gagner paris sportif|methodes paris sportifs|minimum depot paris
sportif|mise au jeu pari sportif|mise maximum pari sportif|mise maximum
paris sportif|mise minimum paris sportif|mise moyenne paris sportif|mise paris sportif|moins de 4 5 but paris sportif|montant maximum paris
sportif|montant paris sportif|montante pari sportif|montante parie sportif|montante paris
sportif|montante paris sportifs|montantes paris sportifs|multiple pari sportif|multiple paris sportif|multiple paris sportifs|multiples paris sportifs|méthode calcul paris sportif|méthode match nul paris
sportifs|méthode mathématique pour gagner au paris sportif|méthode paris sportif forum|méthode paris sportif hockey|nba pari sportif|nba paris sportif|nba paris sportifs|nouveau paris sportif|nouveau site de pari sportif|nouveau site de paris sportif|nouveau site de paris sportif
en ligne|nouveau site de paris sportifs|nouveau site pari sportif|nouveau site paris
sportif|nouveau site paris sportif france|nouveau site paris sportifs|nouveaux sites de
paris sportifs|nouveaux sites paris sportifs|nouvelle appli paris sportif|nouvelle application de paris sportif|numero de match paris sportif|numero match
paris sportif|offre 100 euros paris sportif|offre appli
pari sportif|offre bienvenu paris sportif|offre bienvenue pari
sportif|offre bienvenue paris sportif|offre bienvenue paris sportifs|offre bienvenue site paris sportif|offre bonus paris sportif|offre de
bienvenu paris sportif|offre de bienvenue pari sportif|offre de bienvenue paris sportif|offre de bienvenue paris sportif belgique|offre
de bienvenue paris sportif sans depot|offre de bienvenue paris sportif sans
dépôt|offre de bienvenue paris sportifs|offre de bienvenue sans
depot paris sportif|offre de bienvenue site paris sportif|offre euro
paris sportif|offre pari sportif euro|offre paris sportif|offre
paris sportif belgique|offre paris sportif cash|offre paris sportif coupe du monde|offre paris
sportif hors arjel|offre paris sportif remboursé|offre paris sportif remboursé cash|offre paris sportif sans depot|offre
promo paris sportif|offre remboursement paris sportif|offre
sans depot paris sportif|offre site paris sportif|offres bienvenue paris sportifs|offres de bienvenue paris sportifs|ou faire
des paris sportif|ou faire des paris sportif en espagne|ou faire des paris sportifs|outil répartiteur de
mise paris sportif|outils repartiteur de mises paris sportif|ouverture compte paris sportifs|ouvrir un compte
paris sportif|pack de bienvenue paris sportif|pack de bienvenue paris
sportif hors arjel|pari en ligne sportif|pari sportif|pari sportif 100 euros offert|pari sportif
100 remboursé|pari sportif abandon tennis|pari sportif aide|pari sportif algérie aujourd’hui|pari sportif
appli|pari sportif application|pari sportif argent|pari sportif astuce|pari sportif aujourd|pari sportif aujourd’hui|pari sportif avec handicap|pari sportif avec orange money|pari
sportif avec paypal|pari sportif avec wave|pari sportif avis|pari sportif basket|pari sportif belgique|pari sportif belgique france|pari sportif bonus|pari sportif buteur pas titulaire|pari
sportif champions league|pari sportif combiné|pari sportif comment|pari sportif comment gagner|pari sportif comment ça marche|pari
sportif comparatif|pari sportif conseil|pari sportif cote|pari sportif cote match|pari sportif cote psg|pari sportif
coupe|pari sportif coupe de france|pari sportif coupe du monde|pari sportif depot|pari sportif du jour|pari sportif en france|pari sportif en ligne|pari sportif en ligne au cameroun|pari sportif en ligne belgique|pari sportif en ligne canada|pari sportif
en ligne france|pari sportif en ligne gratuit|pari sportif en ligne suisse|pari sportif en ligne ufc|pari sportif en suisse|pari sportif
euro|pari sportif explication|pari sportif faire|pari sportif foot|pari sportif foot
resultat|pari sportif football|pari sportif forum|pari sportif francaise des jeux|pari sportif france|pari sportif france angleterre|pari sportif france argentine|pari sportif france autriche|pari sportif france belgique|pari sportif france espagne|pari sportif france
italie|pari sportif france portugal|pari sportif france usa|pari sportif gagnant|pari sportif gagner|pari sportif gagner a tous
les coups|pari sportif gagner de l’argent|pari sportif gain|pari sportif gratuit|pari sportif gratuit pour
gagner des cadeaux|pari sportif gratuit sans depot|pari sportif handicap|pari sportif hockey|pari sportif hors arjel|pari sportif jeux olympiques|pari sportif
joueur absent|pari sportif le plus rentable|pari sportif leicester champion|pari sportif ligue 1|pari sportif ligue
2|pari sportif ligue des champions|pari sportif ligue europa|pari sportif match|pari sportif match arrete|pari
sportif match interrompu|pari sportif meilleur|pari sportif
meilleur cote|pari sportif meilleur site|pari sportif methode|pari
sportif mise|pari sportif mise au jeu|pari sportif mise o
jeu|pari sportif nba|pari sportif offre bienvenue|pari sportif
paypal|pari sportif plus|pari sportif prolongation|pari sportif promo|pari sportif pronostic|pari sportif
pronostic foot|pari sportif pronostic gagnant|pari sportif pronostic gratuit|pari sportif psg|pari sportif psg bayern|pari sportif psg
inter|pari sportif psg milan|pari sportif regle|pari sportif rembourse|pari sportif remboursement|pari sportif remboursement cash|pari sportif remboursé|pari sportif rugby|pari sportif rugby coupe
du monde|pari sportif rugby top 14|pari sportif
sans argent|pari sportif sans carte bancaire|pari sportif sans depot|pari sportif signification|pari sportif site|pari sportif
statistique|pari sportif suisse|pari sportif systeme|pari sportif technique|pari
sportif technique pour gagner|pari sportif temps reglementaire|pari sportif tennis|pari sportif tennis
abandon|pari sportif top|pari sportif top 14|pari sportif tour de
france|parie sportif|parie sportif comment ca marche|parie sportif du jour|parie sportif en ligne|parie sportif foot|parie sportif football|parie sportif france|parie sportif gratuit|parie sportif pronostic|parie sportif suisse|paris en ligne sportif|paris
en ligne sportifs|paris evenement sportif|paris france sportif|paris hippique et sportif|paris hippiques et sportifs|paris hippiques paris sportifs|paris
hippiques paris sportifs et poker en ligne|paris hippiques sportifs|paris match sportif|paris sportif|paris sportif 10 euros offerts|paris sportif 100 euros offert|paris sportif 100 euros remboursé|paris sportif 100 offert|paris sportif 100 remboursé|paris sportif 100e offert|paris sportif
150 euros offert|paris sportif 1er pari remboursé|paris sportif a faire|paris sportif a faire aujourd’hui|paris sportif
a faire ce soir|paris sportif abandon tennis|paris
sportif abandon tennis parions sport|paris sportif aide|paris sportif algorithme|paris sportif analyse|paris sportif
appli|paris sportif application|paris sportif application android|paris sportif apres prolongation|paris sportif argent|paris sportif
argent fictif|paris sportif argent offert|paris sportif argent
virtuel|paris sportif arjel|paris sportif arsenal psg|paris sportif
astuce|paris sportif au canada|paris sportif aujourd
hui|paris sportif aujourd’hui|paris sportif avec argent fictif|paris sportif avec
bonus sans depot|paris sportif avec carte bancaire|paris
sportif avec cryptomonnaie|paris sportif avec handicap|paris sportif avec paypal|paris sportif avec paysafecard|paris sportif avis|paris sportif
avis expert|paris sportif avis forum|paris sportif bankroll|paris sportif basket|paris
sportif basket coupe de france|paris sportif basket nba|paris sportif basket prolongation|paris sportif belgique|paris sportif belgique bonus|paris
sportif belgique bonus sans depot|paris sportif belgique france|paris sportif belgique suede|paris sportif bonus|paris sportif bonus bienvenue|paris sportif bonus cash|paris
sportif bonus de bienvenue|paris sportif bonus gratuit|paris sportif bonus gratuit sans depot|paris sportif bonus retirable|paris sportif bonus sans depot|paris
sportif bonus sans depot belgique|paris sportif bookmaker|paris sportif but contre son camp|paris sportif but temps additionnel|paris sportif
buteur|paris sportif buteur blessé|paris sportif buteur carton rouge|paris sportif buteur contre son camp|paris sportif buteur non titulaire|paris sportif buteur
prolongation|paris sportif buteur qui ne joue pas|paris sportif buteur remplacant|paris sportif calcul gain|paris sportif canada|paris sportif cash|paris sportif cash out|paris sportif champion ligue 1|paris
sportif champions league|paris sportif classement ligue 1|paris
sportif code promo|paris sportif combine|paris sportif combiné|paris
sportif combiné comment ça marche|paris sportif combiné
du jour|paris sportif combiné match reporté|paris sportif comment ca marche|paris sportif comment faire|paris sportif comment
gagner|paris sportif comment gagner a tous les
coups|paris sportif comment jouer|paris sportif comment ça marche|paris sportif comparateur cote|paris sportif
comparatif|paris sportif conseil|paris sportif conseil gratuit|paris sportif conseil pour gagner|paris sportif cote|paris
sportif cote et match|paris sportif cote explication|paris sportif cote psg|paris sportif coupe d’europe|paris sportif coupe
davis|paris sportif coupe de france|paris sportif
coupe du monde|paris sportif coupe du monde de rugby|paris sportif
coupe du monde rugby|paris sportif depot 5 euro|paris sportif depot minimum|paris sportif depot paypal|paris sportif dnb|paris sportif du jour|paris sportif du jour conseil|paris sportif dépôt
1 euro|paris sportif dépôt minimum 5 euros|paris sportif
en belgique|paris sportif en france|paris sportif en ligne|paris
sportif en ligne avec paypal|paris sportif en ligne avis|paris sportif en ligne belgique|paris sportif en ligne bonus|paris sportif en ligne cameroun|paris
sportif en ligne comment gagner|paris sportif en ligne comment ça marche|paris sportif en ligne france|paris sportif en ligne gratuit|paris sportif en ligne maroc|paris sportif en ligne paypal|paris sportif en ligne
québec|paris sportif en ligne sans depot|paris sportif en ligne suisse|paris sportif en suisse|paris sportif espagne france|paris sportif esport|paris sportif et casino en ligne|paris sportif et hippique|paris sportif et prolongation|paris sportif
euro|paris sportif europa league|paris sportif explication|paris sportif
final ligue des champions|paris sportif finale ligue des champions|paris sportif foot|paris sportif foot aide|paris sportif
foot astuce|paris sportif foot aujourd’hui|paris sportif
foot ce soir|paris sportif foot comment ca marche|paris sportif foot conseil|paris sportif foot
cote|paris sportif foot coupe du monde|paris sportif foot en ligne|paris sportif
foot feminin|paris sportif foot gratuit|paris sportif foot prolongation|paris sportif foot pronostic|paris sportif
foot pronostic gratuit|paris sportif foot regle|paris sportif foot suisse|paris sportif foot us|paris sportif football|paris sportif football americain|paris sportif football astuces|paris sportif
forfait tennis|paris sportif forum|paris sportif francais|paris
sportif francaise des jeux|paris sportif france|paris sportif france 2|paris sportif france allemagne|paris sportif france angleterre|paris
sportif france argentine|paris sportif france
autriche|paris sportif france belgique|paris sportif france espagne|paris sportif france gibraltar|paris sportif france italie|paris sportif
france nouvelle zelande|paris sportif france pologne|paris sportif france
portugal|paris sportif france uruguay|paris sportif france usa|paris sportif freebet sans depot|paris sportif gagnant|paris
sportif gagnant à coup sûr|paris sportif gagner a coup sur|paris sportif gagner argent|paris sportif gagner de l’argent|paris sportif gain|paris sportif gain maximum|paris sportif gestion bankroll|paris sportif gratuit|paris sportif gratuit appli|paris sportif gratuit avec cadeaux|paris sportif gratuit
cadeaux|paris sportif gratuit en ligne|paris sportif gratuit entre amis|paris sportif gratuit sans argent|paris sportif gratuit sans depot|paris sportif gratuit sans dépôt|paris sportif gratuits|paris
sportif gros gain|paris sportif handicap|paris sportif handicap 0 1|paris sportif
handicap 0-1|paris sportif handicap 1 0|paris sportif handicap 1-0|paris sportif
handicap basket|paris sportif handicap explication|paris sportif handicap
foot|paris sportif handicap rugby|paris sportif hippique|paris sportif hockey|paris sportif
hockey nhl|paris sportif hockey sur glace|paris sportif hors arjel|paris sportif hors arjel france|paris
sportif jeux olympiques|paris sportif jeux video|paris sportif joueur
blessé|paris sportif joueur blessé pendant le match|paris sportif joueur de foot|paris
sportif joueur decisif|paris sportif joueur declare forfait|paris sportif joueur déclare forfait|paris sportif
joueur remplacant|paris sportif la francaise des
jeux|paris sportif le plus rentable|paris sportif legal en france|paris sportif leicester champion|paris sportif les 18 stratégies pour
gagner tous les jours|paris sportif les plus sur|paris sportif les prolongation compte|paris sportif ligne|paris sportif ligue 1|paris sportif ligue 2|paris sportif
ligue des champions|paris sportif ligue des nations|paris sportif ligue europa|paris sportif liste|paris sportif martingale|paris sportif match|paris sportif match abandonné|paris sportif match
annulé|paris sportif match arrêté|paris sportif match du jour|paris sportif match
interrompu|paris sportif match reporté|paris sportif
match suspendu|paris sportif match tennis interrompu|paris sportif match truqué|paris
sportif meilleur bonus|paris sportif meilleur
cote|paris sportif meilleur pronostic|paris sportif meilleur site|paris sportif
methode|paris sportif methode 2 3|paris sportif mi temps fin de match|paris sportif mise au jeu|paris sportif
mise maximum|paris sportif mma france|paris sportif moins de 3.5 but|paris sportif montante|paris sportif moto gp|paris sportif multiple|paris sportif multiple
2 3|paris sportif multiple 2 3 explication|paris sportif multiple 2 4|paris sportif multiple 2 5|paris sportif multiple 2/3 explication|paris
sportif multiple 3 4|paris sportif multiple explication|paris sportif national 1 foot|paris sportif nba|paris sportif nba conseil|paris sportif nba pronostic|paris sportif nhl|paris
sportif nombre de but|paris sportif nouveau site|paris sportif numero match|paris sportif offert|paris sportif offre bienvenue|paris sportif offre bienvenue sans
depot|paris sportif offre de bienvenue|paris sportif offre sans depot|paris sportif om psg|paris sportif paypal|paris sportif plus de 1.5 but|paris sportif plus de 2 5 but|paris
sportif plus ou moins|paris sportif plus ou moins 2 5 but|paris
sportif premier pari remboursé|paris sportif premier paris remboursé|paris sportif
prolongation|paris sportif prolongation basket|paris
sportif prolongation foot|paris sportif promo|paris sportif pronostic|paris sportif
pronostic basket|paris sportif pronostic des match aujourd
hui|paris sportif pronostic expert gratuit|paris sportif pronostic
foot|paris sportif pronostic forum|paris sportif pronostic gratuit|paris sportif pronostic tennis|paris sportif psg|paris sportif psg arsenal|paris sportif psg barcelone|paris sportif psg bayern|paris sportif
psg dortmund|paris sportif psg inter|paris sportif psg inter cote|paris sportif psg liverpool|paris sportif psg om|paris sportif qr code|paris sportif que veut dire handicap|paris
sportif qui rapporte le plus|paris sportif regle|paris sportif regle prolongation|paris sportif rembourse|paris sportif remboursement cash|paris sportif rembourser|paris sportif remboursé|paris sportif remboursé
cash|paris sportif remboursé en cash|paris sportif retrait paypal|paris sportif rue des joueurs|paris sportif rugby|paris sportif rugby 6 nations|paris sportif
rugby coupe du monde|paris sportif rugby top 14|paris sportif safe du jour|paris sportif sans argent|paris sportif sans carte bancaire|paris sportif sans carte d’identité|paris sportif sans compte bancaire|paris sportif sans
depot|paris sportif sans depot minimum|paris sportif si match suspendu|paris sportif si un joueur abandonne|paris sportif si
un joueur ne joue pas|paris sportif si un joueur se blesse|paris sportif simple ou combiné|paris sportif site|paris sportif statistique|paris sportif stratégie|paris sportif suisse|paris
sportif suisse application|paris sportif suisse en ligne|paris sportif suisse legal|paris
sportif suisse légal|paris sportif suisse romande|paris sportif sur du jour|paris
sportif sur le tennis|paris sportif systeme|paris sportif systeme 2 3|paris sportif systeme 2 4|paris
sportif systeme 2/3|paris sportif systeme 2/4|paris sportif systeme 3 4|paris sportif systeme 3/4|paris sportif systeme
explication|paris sportif technique|paris sportif technique pour gagner|paris sportif
temps additionnel|paris sportif temps reglementaire|paris sportif tennis|paris
sportif tennis abandon|paris sportif tennis conseil|paris sportif tennis de table|paris sportif tennis forfait|paris sportif tennis gratuit|paris sportif tennis pronostic|paris sportif tennis roland garros|paris sportif tir
au but|paris sportif top 14|paris sportif tour de france|paris sportif ufc|paris
sportif ufc france|paris sportif unibet|paris sportif vainqueur euro|paris sportif vainqueur ligue 1|paris sportif vainqueur ligue des
champions|paris sportif via paypal|paris sportif victoire prolongation|paris sportif
vip gratuit|paris sportifs|paris sportifs abandon tennis|paris sportifs aide|paris sportifs analyser un match|paris sportifs arjel|paris sportifs astuces|paris sportifs aujourd’hui|paris sportifs autorisés en france|paris sportifs avec paypal|paris sportifs basket|paris sportifs belgique|paris sportifs bonus|paris sportifs bookmakers|paris sportifs
canada|paris sportifs combiné|paris sportifs comparateur|paris sportifs
comparatif|paris sportifs conseils|paris sportifs cotes|paris sportifs
coupe du monde|paris sportifs de football|paris sportifs du jour|paris sportifs en belgique|paris sportifs en france|paris sportifs
en ligne|paris sportifs en ligne belgique|paris sportifs en ligne france|paris sportifs en ligne gratuit|paris
sportifs en ligne suisse|paris sportifs en suisse|paris sportifs et hippiques|paris sportifs
euro|paris sportifs foot|paris sportifs
foot us|paris sportifs forum|paris sportifs france|paris sportifs france espagne|paris sportifs
gagner à tous les coups|paris sportifs gratuit|paris sportifs gratuits|paris sportifs gratuits en ligne|paris sportifs handicap|paris sportifs hockey|paris sportifs hockey sur galce|paris sportifs hockey sur
glace|paris sportifs hors arjel|paris sportifs jeux
olympiques|paris sportifs les bookmakers raflent la mise|paris sportifs ligne|paris sportifs ligue 1|paris sportifs ligue
2|paris sportifs ligue des champions|paris sportifs ligue europa|paris sportifs match interrompu|paris sportifs montante|paris sportifs nba|paris sportifs offre bienvenue|paris sportifs offre de bienvenue|paris sportifs paypal|paris sportifs pronostics|paris sportifs psg|paris sportifs
psg inter|paris sportifs rugby|paris sportifs sans argent|paris sportifs
sans depot|paris sportifs site|paris sportifs sites|paris sportifs statistiques|paris sportifs
stratégie|paris sportifs suisse|paris sportifs technique|paris sportifs techniques|paris sportifs tennis|paris sportifs tennis astuces|paris sportifs
top 14|paris sportifs tour de france|part de marché paris sportifs|paypal pari
sportif|paypal paris sportif|paypal paris sportifs|perte d’argent paris sportifs|peut on devenir riche avec les
paris sportifs|peut on gagner de l’argent avec
les paris sportifs|peut on gagner sa vie avec les paris sportif|peut on vraiment gagner de l’argent avec les paris sportifs|plus gros combine paris
sportif|plus gros gagnant paris sportif|plus gros
gain paris sportif|plus gros gain paris sportif au monde|plus
gros gain paris sportif france|plus gros gains paris sportif|plus gros pari sportif|plus gros paris
sportif|plus grosse cote gagner paris sportif|plus grosse cote pari sportif|plus grosse cote paris sportif|plus grosse mise paris sportif|plus grosse somme gagner au
paris sportif|plus ou moins paris sportif|pourcentage de mise paris sportif|premier pari sportif remboursé|probabilité cote
paris sportif|probabilité paris sportif combiné|prolongation basket paris sportif|prolongation paris sportif|promo pari sportif|promo
paris sportif|promo site de paris sportif|promo site pari sportif|promo site paris sportif|promos paris sportifs|prono
paris sportif foot|prono paris sportif gratuit|prono paris sportif
tennis|pronostic de paris sportif|pronostic du jour
paris sportif|pronostic foot paris sportif|pronostic gratuit paris sportif|pronostic pari sportif|pronostic
pari sportif gratuit|pronostic paris sportif|pronostic paris sportif aujourd’hui|pronostic paris sportif du jour|pronostic paris sportif foot|pronostic paris sportif gratuit|pronostic paris sportif tennis|pronostic paris sportifs|pronostics foot statistiques et aides aux paris sportifs|pronostics paris
sportif|pronostics paris sportifs|pronostiqueur paris sportif gratuit|psg
arsenal paris sportif|psg bayern paris sportif|psg inter milan paris sportif|psg inter pari sportif|psg inter paris sportif|psg liverpool paris sportif|psg om paris sportif|psg paris sportif|psg paris sportifs|qr code paris
sportif|qu est ce qu un handicap paris sportif|qu est ce que
handicap dans les paris sportif|qu’est ce qu’un handicap paris sportif|qu’est ce que handicap dans les paris sportif|quand un joueur se blesse paris
sportif|que signifie 1/1 en paris sportif|que signifie 1/2 paris sportif|que signifie 12 en paris sportif|que signifie 1×2
dans les paris sportifs|que signifie btts en paris sportif|que signifie dnb en paris sportif|que signifie draw en paris sportif|que signifie
ft en paris sportif|que signifie gg dans le pari sportif|que signifie gg en pari sportif|que signifie
gg en paris sportif|que signifie handicap dans
les paris sportifs|que veut dire dnb en paris sportif|que veut dire handicap dans les paris sportifs|que veut dire handicap paris
sportif|quel appli pari sportif|quel cote jouer paris
sportif|quel est la meilleur appli de paris sportif|quel est le meilleur algorithme de paris sportif|quel est
le meilleur site de pari sportif|quel est le meilleur site de
pari sportif en ligne|quel est le meilleur site de paris sportif|quel est
le meilleur site de paris sportif en ligne|quel est le meilleur site de paris sportifs en ligne|quel est le pari sportif le plus rentable|quel pari sportif
est le plus rentable|quel pari sportif est le plus sûr|quel pari sportif faire aujourd’hui|quel
paris sportif faire aujourd’hui|quel paris sportif rapporte le plus|quel site de paris
sportif choisir|quel site de paris sportif rembourse en cash|quel type de pari sportif est le plus rentable|quelle
application pour paris sportifs|quelle est la meilleure appli de paris sportif|quelle est la meilleure application de paris sportif|quelle est la meilleure
application pour les paris sportifs|quelle est le meilleur site de paris sportif|quels paris sportifs
faire|quels sont les paris sportifs les plus sûrs|rebond basket paris sportif|record de
gain paris sportif|regle buteur paris sportif|regle de paris sportif|regle des paris sportif|regle handicap paris sportif|regle
handicap paris sportif foot|regle multiple paris sportif|regle pari sportif|regle
paris sportif|regle paris sportif foot|regle paris sportif multiple|regle paris sportif prolongation|reglement
pari sportif|reglement paris sportif|regles paris sportifs|remboursement cash paris sportif|remboursement en cash paris sportif|remboursement pari sportif|remboursement paris sportif|repartiteur
de mise paris sportif|repartiteur de mise paris sportifs|repartiteur de
mises paris sportif|repartiteur mise paris sportif|repartition des mises paris
sportif|resultat pari sportif|resultat paris
sportif|resultat paris sportif en direct|resultat paris sportif foot|resultat
sportif hockey|retirer argent paris sportif|rugby pari sportif|rugby paris sportif|règle paris sportif prolongation|règles paris sportif|répartiteur de mise pari sportif|répartiteur de mise paris sportif|répartiteur
de mise paris sportifs|répartition des mises paris sportif|résultat paris sportif foot|sans depot paris sportif|se faire interdire
de paris sportifs|signification btts paris sportif|signification dnb paris sportif|signification handicap paris sportif|simulateur de gain paris sportif|simulateur gain paris
sportif|simulateur gain paris sportif multiple|simulateur gain paris sportif systeme|simulateur gain paris sportif système|simulateur montante paris sportif|simulateur paris sportif multiple|simulateur systeme paris sportif|simulation paris sportif gratuit|site aide paris sportif|site analyse paris sportif|site analyser paris
sportif|site arjel paris sportif|site conseil paris sportif|site d’analyse de paris sportifs|site d’analyse paris
sportif|site de conseil paris sportif|site de pari en ligne sportif|site de pari sportif|site de
pari sportif avec bonus sans depot|site de pari sportif bonus sans depot|site de
pari sportif canada|site de pari sportif en ligne|site de
pari sportif francais|site de pari sportif gratuit|site de pari sportif hors arjel|site de pari sportif suisse|site de parie sportif|site de parie sportif en ligne|site de paris en ligne sportif|site de paris sportif|site de paris sportif acceptant paypal|site de paris
sportif arjel|site de paris sportif autorisé en france|site
de paris sportif autorisé en suisse|site de paris sportif avec bonus|site de paris sportif avec bonus sans depot|site
de paris sportif avec bonus sans dépôt|site de paris sportif avec neosurf|site de paris sportif avec
paiement mobile|site de paris sportif avec paypal|site de paris sportif avis|site de paris sportif belge avec bonus|site de paris sportif belgique|site de
paris sportif bonus|site de paris sportif bonus sans depot|site de paris sportif canada|site de paris sportif comparatif|site de paris sportif depot minimum|site de paris
sportif en france|site de paris sportif en ligne|site de paris sportif en ligne suisse|site
de paris sportif football|site de paris sportif francais|site de
paris sportif france|site de paris sportif gratuit|site de paris sportif gratuit pour gagner
des cadeaux|site de paris sportif gratuit sans dépôt|site de
paris sportif hors arjel|site de paris sportif le plus fiable|site de paris sportif legal en france|site de paris sportif
meilleur cote|site de paris sportif nouveau|site de paris sportif offre de
bienvenue|site de paris sportif paypal|site de paris sportif premier paris remboursé|site de paris sportif qui accepte paypal|site de paris sportif qui
rembourse en cash|site de paris sportif remboursé|site de paris sportif sans argent|site de
paris sportif sans carte bancaire|site de paris sportif sans carte d’identité|site de paris sportif
sans depot|site de paris sportif suisse|site de paris sportifs|site de
paris sportifs avec paypal|site de paris sportifs
en ligne|site de paris sportifs francais|site de paris sportifs gratuit|site de paris sportifs paypal|site de paris
sportifs suisse|site de statistique pour paris sportif|site
des paris sportifs|site pari en ligne sportif|site pari sportif|site pari sportif 100 euros offert|site pari sportif arjel|site pari sportif
belgique|site pari sportif bonus|site pari sportif canada|site pari
sportif comparatif|site pari sportif en ligne|site pari sportif france|site pari sportif gratuit|site pari sportif hors arjel|site pari sportif
suisse|site parie sportif|site paris en ligne sportif|site paris sportif|site paris sportif 100 euros offert|site paris sportif
100 euros remboursé|site paris sportif 1er paris remboursé|site paris sportif arjel|site
paris sportif autorisé en france|site paris sportif avec bonus|site paris sportif
avec bonus sans depot|site paris sportif avec meilleur
cote|site paris sportif belgique|site paris sportif bonus|site paris sportif bonus
cash|site paris sportif bonus sans depot|site paris sportif canada|site paris sportif comparatif|site paris
sportif depot 5 euro|site paris sportif en ligne|site paris sportif
foot|site paris sportif france|site paris sportif gratuit|site paris sportif hors arjel|site paris sportif hors arjel
france|site paris sportif meilleur cote|site paris sportif nouveau|site
paris sportif offre de bienvenue|site paris sportif paypal|site paris sportif remboursement cash|site paris sportif
remboursé en cash|site paris sportif retrait instantané|site paris sportif sans carte bancaire|site paris
sportif sans depot|site paris sportif suisse|site paris sportifs|site paris sportifs
belgique|site paris sportifs en ligne|site paris sportifs france|site paris sportifs
hors arjel|site paris sportifs suisse|site pour analyse paris sportif|site pour paris sportif|site pronostic paris sportif|site statistique paris sportif|site suisse
paris sportif|sites de pari sportif|sites de paris sportif|sites de paris sportifs|sites
de paris sportifs arjel|sites de paris sportifs autorisés en france|sites de paris sportifs
belgique|sites de paris sportifs bonus|sites de paris sportifs en belgique|sites de paris sportifs en france|sites de
paris sportifs en ligne|sites de paris sportifs gratuits|sites de paris sportifs gratuits sans dépôt|sites de paris sportifs suisse|sites pari sportif|sites paris sportif|sites paris sportifs|sites paris sportifs arjel|sites paris sportifs belgique|sites paris sportifs
france|sites paris sportifs hors arjel|sites paris sportifs suisse|so foot paris
sportif|so foot paris sportifs|specialiste tennis paris sportif|statistique foot paris
sportif|statistique paris sportif|statistique paris sportif foot|statistique tennis paris sportif|statistiques football paris sportifs|statistiques paris
sportifs|strategie de paris sportif|stratégie big whale paris sportif|stratégie de paris sportifs|stratégie gagnante
paris sportifs|stratégie pari sportif|stratégie
paris sportif|stratégie paris sportifs|stratégie paris sportifs forum|stratégie
pour gagner au paris sportif|stratégies paris sportifs|suisse paris sportif|suisse paris sportifs|systeme 2 3 paris sportif|systeme 3 4 paris sportif|systeme de cote paris sportif|systeme de paris sportif|systeme pari sportif|systeme paris sportif|systeme paris sportifs|systeme reducteur paris sportif|système paris sportif|tableau bankroll paris sportif|tableau cote paris sportif|tableau de paris sportif|tableau
de suivi paris sportifs|tableau excel bankroll paris sportif|tableau excel
paris sportif|tableau excel paris sportif gratuit|tableau excel paris sportifs|tableau excel pour paris sportif|tableau gestion bankroll paris sportif|tableau montante paris sportif|tableau paris
sportif|tableau paris sportif excel|tableau roi paris sportifs|tableau
PГЎlpitos Casino, [url=https://glbian.com/prd/bbs/board.php?bo_table=free&wr_id=1514360]https://glbian.com/prd/bbs/board.php?bo_table=free&wr_id=1514360[/url] ofrece una oportunidad Гєnica para los aficionados del juego. AquГ, podrГЎs gozar de varios pasatiempos emocionantes. ВЎГљnete a la diversiГіn en PГЎlpitos Casino y experimentar la intensidad del juego!
Online casino, [url=https://localesguarne.com/discover-the-top-rated-mobile-casinos-according-to-2/]https://localesguarne.com/discover-the-top-rated-mobile-casinos-according-to-2/[/url] has transformed into a popular hub for gamers. With a wide array of selections, players can enjoy the thrill of wagering from the comfort of their residences.
live roulette sites, [url=https://hookedonshopping.com/discover-the-best-live-roulette-sites-for-an-6/]https://hookedonshopping.com/discover-the-best-live-roulette-sites-for-an-6/[/url] offer an exhilarating experience for players seeking excitement in online gaming. With advanced technology, these platforms offer real-time gameplay, allowing users to engage with live dealers. Numerous options are available, ensuring everyone finds a game that suits their style. The immersive atmosphere creates a unique experience for betting online. Join the fun and discover the world of live roulette sites today!
non GamStop casino sites, [url=https://www.doctordriveway.com/discover-the-benefits-of-non-gamstop-casinos/]https://www.doctordriveway.com/discover-the-benefits-of-non-gamstop-casinos/[/url] offer players the opportunity to enjoy an extensive selection of games. Avoiding the limitations of GamStop, players can experience unique gaming features. This indicates greater freedom and entertainment for enthusiasts.
online casino Danmark, [url=https://www.redi4changesl.biz/bedste-betting-sider-i-2026-anmeldelser-og/]https://www.redi4changesl.biz/bedste-betting-sider-i-2026-anmeldelser-og/[/url] tilbyder en spændende mulighed for spillere at prøve lykken hjemmefra. Ved moderne teknologi kan casinospil nydes let. Det er en udfordrende oplevelse.
online casino betting, [url=https://www.fakeitmakeup.se/mezzobet-your-ultimate-destination-for-online-3/]https://www.fakeitmakeup.se/mezzobet-your-ultimate-destination-for-online-3/[/url] is a favored option among bettors. With numerous options and attractive bonuses, it’s easy to see why. Whether you are playing, tactics and fortune play significant parts in success.
torzon link https://darknet-markets-onion.com/
Discovering premium casino bonuses can enhance your gaming experience. Players search for attractive offers to maximize their winnings. Best casino bonuses, [url=https://hennaby.makeupglitz.com/cultural-preferences-that-shape-casino-experiences-42/]https://hennaby.makeupglitz.com/cultural-preferences-that-shape-casino-experiences-42/[/url] often include match deposits, making gameplay more thrilling and profitable.
Hello, i read your blog occasionally and i own a similar one and i was just curious if
you get a lot of spam comments? If so how do you protect against it, any plugin or anything
you can suggest? I get so much lately it’s driving me mad so
any support is very much appreciated.
my web page: สล็อต 918kiss ฟรีเครดิต
torzon market url https://darknet-markets-onion.com/
online casino Danmark, [url=https://training.insurancesplash.com/find-det-bedste-casino-online-i-danmark/]https://training.insurancesplash.com/find-det-bedste-casino-online-i-danmark/[/url] tilbyder|præsenterer|afholder|tilbyder en spændende|interessant|fantastisk|forbløffende verden af gambling. Spillere kan nyde|fordybe sig i|beskæftige sig med|opleve unikke spilmuligheder online. Det er en sjov|underholdende|fornøjelig|morsom måde at vinde penge på.
Las novedosas casas de apuestas han cobrado popularidad en mГЎs recientes aГ±os. Estas plataformas ofrecen innovaciones atractivas, como recompensas exclusivas y formas de apuesta variadas. Las nuevas casas de apuestas, [url=https://dimpleshorsetreats.com/apuestas-internacionales-todo-lo-que-necesitas-23/]https://dimpleshorsetreats.com/apuestas-internacionales-todo-lo-que-necesitas-23/[/url], a menudo, brindan una experiencia eficiente que atrae a jugadores de todo el mundo.
References:
Bochum
References:
https://online-casino-mit-mehr-als-1-euro-einsatz.online-spielhallen.de/
References:
Hamm
References:
https://apple-pay-casino.online-spielhallen.de/
When it comes to locating the best live roulette casinos, [url=https://exhibitor.y-expo.ru/2026/04/05/the-thrill-of-live-uk-roulette-an-in-depth-guide-2/]https://exhibitor.y-expo.ru/2026/04/05/the-thrill-of-live-uk-roulette-an-in-depth-guide-2/[/url], players seek thrilling experiences. These casinos offer interactive gameplay, connecting you with skilled dealers. Enjoy diversity betting options and engaging environments that enhance the overall gaming experience.
nexus market darknet https://darknet-markets-onion.com/
Online casino games, [url=http://www.fenceandgates.co/?p=319411]http://www.fenceandgates.co/?p=319411[/url] bring a exciting experience for players. From various options like slots and poker, participants can experience the rush of winning from anywhere.
Finding a UK casino not on GamStop, [url=https://envira-hindu-american-foundation.pantheonsite.io/blog/top-casinos-not-blocked-by-gamstop-your-guide-to/]https://envira-hindu-american-foundation.pantheonsite.io/blog/top-casinos-not-blocked-by-gamstop-your-guide-to/[/url] can be a thrilling experience. Players often seek alternative platforms to enjoy their favorite games. These gambling sites offer a varied selection of bonuses and the ease to play without restrictions. Enjoy exciting gameplay and take advantage of exclusive choices. Players can explore various opportunities in the world of online gaming. UK casino not on GamStop remains a popular choice among enthusiasts.
If you love excitement and fun, gambling at an virtual casino is perfect for you. With various games available, from slots to table games, you can easily find your favorite. So, don’t wait and start to play online casino, [url=https://skillhandbd.com/explore-exciting-gaming-adventures-at-mafia-casino/]https://skillhandbd.com/explore-exciting-gaming-adventures-at-mafia-casino/[/url] today!
I don’t think the title of your article matches the content lol. Just kidding, mainly because I had some doubts after reading the article. https://accounts.binance.info/pt-PT/register-person?ref=KDN7HDOR
dark matter darknet url https://darknet-markets-onion.com/
Discover the greatest places to play the best roulette casino, [url=http://colojapan.asia/childhoodcataracts/discovering-new-roulette-sites-a-guide-to-the.html]http://colojapan.asia/childhoodcataracts/discovering-new-roulette-sites-a-guide-to-the.html[/url]. These venues offer thrilling atmospheres and multiple versions of roulette. Enjoy large payouts and remarkable experiences at each turn.
Hi just wanted to give you a quick heads up and let
you know a few of the pictures aren’t loading properly.
I’m not sure why but I think its a linking issue. I’ve tried it
in two different browsers and both show the same
results.
dark markets https://darknet-markets-onion.com/
Locating a UK casino not on GamStop, [url=https://aamasterllc.com/discover-online-casinos-not-blocked-by-gamstop-4/]https://aamasterllc.com/discover-online-casinos-not-blocked-by-gamstop-4/[/url] proves to be thrilling for players seeking freedom in online gambling. The casinos offer opportunities beyond limitations, ensuring a diverse gaming experience. Players can take advantage of a range of entertainment while navigating their favorite slots. A UK casino not on GamStop is a great choice for those looking to enjoy their gaming journey.
Mobile casinos, [url=https://namahitech.com/index.php/2026/03/31/explore-the-world-of-online-gaming-at-my-empire/]https://namahitech.com/index.php/2026/03/31/explore-the-world-of-online-gaming-at-my-empire/[/url] offer a accessible way to enjoy your favorite games. With state-of-the-art technology, players can connect to their favorite titles from any place. Mobile casinos upgrade the whole gaming experience, making it more convenient to wager on the go.
online casino, [url=http://www.old.practicalsqa.net/magico-casino-la-experiencia-de-juego-definitiva-8/]http://www.old.practicalsqa.net/magico-casino-la-experiencia-de-juego-definitiva-8/[/url] provides a thrilling experience for users around the world. Through advanced technology, gamblers can experience a variety of choices, enabling them to gain real money from the comfort of their homes.
If you’re looking for the finest experience, check out the best live roulette casinos, [url=https://magme.madeinitalyslc.it/2026/04/07/the-best-roulette-website-your-ultimate-guide-to-2/]https://magme.madeinitalyslc.it/2026/04/07/the-best-roulette-website-your-ultimate-guide-to-2/[/url]. These platforms offer huge excitement with authentic dealers and engaging gameplay. Players can savor thrilling rounds, fantastic graphics, and chances to win big!
Sådan finder du det bedste digitalt casino i Danmark. Fantastiske tilbud og flere omfattende udvalg af spil er afgørende for et fremragende underholdningsoplevelse. Prøv online casino Danmark, [url=https://dantataplastic.com/nyt-casino-uden-rofus-spil-frit-og-uden/]https://dantataplastic.com/nyt-casino-uden-rofus-spil-frit-og-uden/[/url] for at vælge den bedste underholdningsmuligheder.
La pГЄche sur glace est une activitГ© passionnante, mais le pari ajoute une note excitante. Les amateurs de pГЄche peuvent profiter de moments de fun tout en tentant leur chance. Dans un ambiance frais, l’ice fishing casino, [url=https://bookwormloscabos.com/2021/02/14/el-amor-las-mujeres-y-la-vida/]https://bookwormloscabos.com/2021/02/14/el-amor-las-mujeres-y-la-vida/[/url] offre une aventure unique et inoubliable. C’est le moment idГ©al pour voir de nouveaux amis, partager des astuces et vivre des pГ©riodes mГ©morables.
online casino betting, [url=http://solinstant.ca/exploring-the-world-of-lucy-betet-your-ultimate/]http://solinstant.ca/exploring-the-world-of-lucy-betet-your-ultimate/[/url] – Online casino betting has become increasingly popular in recent years. Players can enjoyvarious games from the comfort of their homes. Promotions attract more participants, providing an exciting experience.
Online casino, [url=https://rbs24.by/discover-the-exciting-world-of-online-gaming-at-it-2/]https://rbs24.by/discover-the-exciting-world-of-online-gaming-at-it-2/[/url] открывает массу возможностей для РёРіСЂРѕРєРѕРІ. РЈРґРѕР±РЅРѕ можно вдохновляться событиями, РЅРµ выходя РёР· РґРѕРјР°. Рщите изобилие слотов Рё захватывающими предложениями, которые заставляют заходить РІРЅРѕРІСЊ Рё РІРЅРѕРІСЊ.
Discover premium gaming experiences at top casinos not on GamStop, [url=http://arisaraldalecumplimos.risaralda.gov.co/index.php/2026/04/18/exploring-online-casinos-hidden-gems-not-covered/]http://arisaraldalecumplimos.risaralda.gov.co/index.php/2026/04/18/exploring-online-casinos-hidden-gems-not-covered/[/url]. These platforms offer varied games and generous bonuses, ensuring players enjoy exceptional entertainment without restrictions. Experience fun today!
Hvis du leder efter det bedste live casino, [url=https://contate.catarinensemarcas.com.br/bedste-danske-live-casino-oplev-spilglden/]https://contate.catarinensemarcas.com.br/bedste-danske-live-casino-oplev-spilglden/[/url], så er der mange muligheder at vælge imellem. Den type casinounderholdning leverer en fascinerende oplevelse. Deltagere kan interagere med rigtige dealere, hvilket giver en fælles atmosfære. Uanset hvad spil du vælger, vil du opdage spænding og sjov.
alpha vpn, [url=https://www.srishtisoft.com/vpn-alfa-zashhita-vashej-informacii-v-seti/]https://www.srishtisoft.com/vpn-alfa-zashhita-vashej-informacii-v-seti/[/url] предлагает надежную охрану ваших данных в сети. Пользуясь этим сервисом вы укрепляете возможность глобально серфить интернет, преодолевая ограничения и оберегая личную информацию.
If you’re searching for the best roulette casino, [url=https://strategy.skillquo.com/discover-the-best-live-roulette-sites-for-an-5/]https://strategy.skillquo.com/discover-the-best-live-roulette-sites-for-an-5/[/url], you should consider factors like game selection. A great casino offers exciting roulette experiences. Also, look for rewarding bonuses to enhance your gameplay.
Tauchen Sie ein in die Welt von immersive roulette, [url=https://warter.uio.com.tw/immersive-roulette-ein-spielerlebnis-der-2/]https://warter.uio.com.tw/immersive-roulette-ein-spielerlebnis-der-2/[/url], wo Spannung und Nervenkitzel aufeinandertreffen. Erleben Sie ein authentisches Spielerlebnis dank neuester Technologie. Alle Drehung liefert neue TГјren fГјr Erfolge.
Le sale da gioco online in Europa offrono un’opportunitГ unica. Attraverso una vasta selezione di giochi, i giocatori possono divertirsi da casa. Le offerte rendono il gioco ancora piГ№ eccitante. casino online europei, [url=https://hamishpat.com/i-bonus-dei-casino-online-guida-completa-e-3/]https://hamishpat.com/i-bonus-dei-casino-online-guida-completa-e-3/[/url] sono la scelta perfetta per chi cerca qualitГ .
Finding the Best casino bonuses, [url=https://amalawael.ly/wp/2026/03/31/explore-the-world-of-online-betting-with-melbet-4/]https://amalawael.ly/wp/2026/03/31/explore-the-world-of-online-betting-with-melbet-4/[/url] is essential for maximizing your gaming experience. Players often seek generous offers that enhance their chances. Offers can include free spins and deposit matches, providing beneficial opportunities to win big.
This article will help the internet visitors for creating new webpage
or even a blog from start to end.
Here is my page :: สล็อตเล่นขั้นต่ํา 1 บาท
Как специалист, могу оказать помощь. Вместе мы сможем найти решение.
hancock one piece, [url=https://casino-vivi.com/]blackbeard one piece[/url] – bu anime va manga olamida mashhur qahramon. U go’zal va kuchli bo’lib, u o’zining jozibali ko’rinishi bilan ko’plab muxlislarni o’ziga jalb qiladi. Shunday bo’lsa-da, uning kuchlari maxsus ko’nikmalarga ega. U hamroh sifatida jamoasiga katta yordam beradi. U bir nechta sarguzashtlarda ishtirok etgan. Hancock one piece – bu haqiqiy qahramon, uni ko’rish kerak.
I Danmark er casino-platforme blevet populære, eftersom deltagere kan nyde deres yndlingsspil. casinoer med mastercard, [url=https://www.southerngospelconcert.com/online-casinoer-med-mastercard-sikkerhed-og-10/]https://www.southerngospelconcert.com/online-casinoer-med-mastercard-sikkerhed-og-10/[/url] sikrer den praktisk måde at udføre indbetalinger, hvilket ledes en let proces for gamblere. Vælg exklusivt de bedste casinoer for sit bedste oplevelse.
To enjoy the thrill of wagering from home, you can play online casino, [url=http://ghk-autoassembly.com/?p=1112884]http://ghk-autoassembly.com/?p=1112884[/url] games. Various player can find choices that caters to their preference, including slot machines to table games, providing countless hours of entertainment.
casino online europei, [url=https://dev-mechanics-hub-toolbox.pantheonsite.io/software-casino-esteri-scegliere-le-migliori/]https://dev-mechanics-hub-toolbox.pantheonsite.io/software-casino-esteri-scegliere-le-migliori/[/url] – I appassionati di casino online europei possono godere di bonus esclusivi. Le app offrono un’ampia gamma di attivitГ per giocare.
We stumbled over here by a different page and thought
I might check things out. I like what I see so now i’m following you.
Look forward to checking out your web page for a second time.
Outline vpn, [url=https://stagingtwybee.wpengine.com/blog/obzor-i-preimushhestva-ispolzovanija-outline-vpn/]https://stagingtwybee.wpengine.com/blog/obzor-i-preimushhestva-ispolzovanija-outline-vpn/[/url] — это программа для обеспечения личной безопасности в интернете. С помощью вы можете надежно просматривать веб-страницы и избежать цензуру.
Online gambling has become increasingly popular, especially at non gamstop roulette sites, [url=https://www.dataprotect.sg/uk-roulette-a-guide-to-playing-without-gamstop/]https://www.dataprotect.sg/uk-roulette-a-guide-to-playing-without-gamstop/[/url]. Players seek thrills and variety in their gaming experiences. These platforms offer unique features that elevate gameplay. By opting for non gamstop roulette sites, enthusiasts can enjoy expanded freedom and flexibility. Join the active community of gamblers and discover a world where you can experience new games without restrictions.
The PFL comes back to the Sanford Pentagon on the 2nd of May, 2026 with a lineup that draws strongly from pound-for-pound division placements plus proven standouts of the Bellator generation.
Online casino games, [url=https://pubredes.mx/2026/03/31/the-security-features-built-into-modern-technology-10/]https://pubredes.mx/2026/03/31/the-security-features-built-into-modern-technology-10/[/url] deliver a thrilling adventure for players. With numerous options available, enthusiasts can choose their favorites, from video slots to casino tables. The simplicity of playing at home enhances the full enjoyment of gaming. As advancement evolves, Online casino games continue to adapt, bringing new components and possibilities for fun.
UFC Perth
Hey, if you’re backing the heavy favorites only because the Aussie flag sits next to their name, you might as well light your money on fire right there at UFC Perth instead.
casino med mastercard, [url=https://s4serv.com/casinoer-med-mastercard-sikkerhed-og-9/]https://s4serv.com/casinoer-med-mastercard-sikkerhed-og-9/[/url] tilbyder en enkelt og sikker måde at spille online. Dine kortoplysninger er trygge, og betalinger behandles effektivt. Vælg din favoritspil og få spændingen!
kasyna online polsca, [url=https://www.ezacomposit.com/bonusy-kasynowe-jak-wybra-najlepsze-oferty-w-2023/]https://www.ezacomposit.com/bonusy-kasynowe-jak-wybra-najlepsze-oferty-w-2023/[/url] stają się coraz bardziej popularne wśród graczy. W wyniku nowoczesnej technologii mamy możliwość grać w ulubione gry z jakiegokolwiek miejsca. Wskazane jest wybrać zaufane platformy, aby doświadczyć bezpieczeństwem.
https://paragraph.com/@rahilusi115@gmail.com/fade-the-hype-my-best-bets-for-ufc-perth
UFC Perth is always a great time, however if you actually intend to come out ahead, you have to pull apart the home crowd’s “Aussie” cheers from the actual technical breakdown.
The UFC’s Perth event on May 2, 2026 for a card built around high-risk precision striking alongside a mixture of seasoned veterans matching up against ascending Australian prospects.
When exploring the finest live roulette casinos, players should evaluate their game selection, user experience, and bonuses. Opting for the right platform can enhance your betting experience immensely. best live roulette casinos, [url=https://demo1.5usujian.com/archives/21915]https://demo1.5usujian.com/archives/21915[/url] offer live action and captivating gameplay. Make sure to check each site’s standing before diving in. Happy gaming!
skylark vpn, [url=https://meschaninow.chmnu.edu.ua/skylark-vpn-nadezhnaja-zashhita-vashego-internet/]https://meschaninow.chmnu.edu.ua/skylark-vpn-nadezhnaja-zashhita-vashego-internet/[/url] — это надежный инструмент для гарантирования вашей частной информации в сети. Воспользовавшись skylark vpn, вы имете возможность избежать блокировки и препятствия в онлайн-пространстве.
Hello, this weekend is good designed for me, since this time i am reading this
enormous educational post here at my residence.
At spille på virtuale casinoer med visa, [url=http://trello-1188-coffeelands.pantheonsite.io/2026/04/visa-casino-den-bedste-betalingsmetode-til-online-2/]http://trello-1188-coffeelands.pantheonsite.io/2026/04/visa-casino-den-bedste-betalingsmetode-til-online-2/[/url] er en populær måde at indsætte penge på. Dette afregningssystem er trygt og giver brugerne mulighed for at nyde en ubehindret oplevelse.
In the world of virtual gambling, online casino betting, [url=https://megigroup.unifiednetwork.asia/hondubet-la-plataforma-de-apuestas-que-revoluciona-4/]https://megigroup.unifiednetwork.asia/hondubet-la-plataforma-de-apuestas-que-revoluciona-4/[/url] has become immensely popular. Players can now make bets from the comfort of their homes, enjoying different types of games. This accessibility has attracted many, leading to a surge in players.
Mobile casinos, [url=http://csnakliyat.com/the-best-new-casino-sites-a-comprehensive-guide/]http://csnakliyat.com/the-best-new-casino-sites-a-comprehensive-guide/[/url] offer an exciting way to enjoy betting on the go. Players can explore a variety of games on their smartphones or tablets. With reliable transactions and user-friendly interfaces, Mobile casinos promise a smooth gaming experience.
References:
Video poker trainer
References:
https://graph.org/Weather-Casino-Tomorrow-04-27
References:
Baton rouge casinos
References:
https://graph.org/Free-Casino-Games-With-Free-Spins-04-27
casinos outside GamStop, [url=https://blog.megaleiloes.com.br/the-rise-of-uk-non-gamstop-betting-sites/]https://blog.megaleiloes.com.br/the-rise-of-uk-non-gamstop-betting-sites/[/url] offer players a chance to enjoy gaming without restrictions. These places provide engaging options for betting and staking. Because of various games, you can experience diverse gaming. Players can venture into new territories and take advantage of lucrative promotions. For those looking for freedom, casinos outside GamStop are a great choice.
В сегодняшнем мире, где приватность важна, стоит рассмотреть, как получить защиту в сети. Если вы хотите обеспечить свою безопасность, просто нужно get vpn, [url=https://nezbudei1962.ru/?p=115695]https://nezbudei1962.ru/?p=115695[/url]. Выбирайте лучший провайдер, чтобы защитить свои данные. Не забывайте маскировка, чтобы ваши действия были скрыты от третьих лиц.
non UK casino site, [url=https://www.casefileschicago.com/nordicresearchnetwork/trusted-non-uk-casino-how-to-choose-and-enjoy-your/]https://www.casefileschicago.com/nordicresearchnetwork/trusted-non-uk-casino-how-to-choose-and-enjoy-your/[/url] – Playing at a offshore casino offers exciting experiences with diverse games and bonuses. Players can enjoy higher limits and confidentiality.
Доброго времени суток!
Надежный выбор вашего следующего автомобиля с полной юридической и технической проверкой — Автоподбор в Санкт-Петербурге.
[url=https://expert812.ru/]услуги автоподбора[/url]
Если интересуют автоподбор в Санкт-Петербурге, подбор авто с гарантией, автоподбор в СПб, то это в ЭКСПЕРТ812 https://expert812.ru/ .
Закажите услугу с диагностикой и гарантией качества.
Реальные данные диагностики, наработанная репутация 9 лет, гарантия возврата денег, юридическая чистота!
Записывайте адрес сайта и звоните: +7 (964) 333-45-75.
До новых встреч!
Os inovadores casinos online Portugal apresentam uma gama de jogos emocionantes. Os entusiastas podem usufruir vantagens Гєnicas. Nos novos casinos online portugal, [url=http://mbbs.com/novos-casinos-online-descubra-as-melhores-opcoes-2/]http://mbbs.com/novos-casinos-online-descubra-as-melhores-opcoes-2/[/url], a adrenalina Г© garantida!
Online casino, [url=https://eldekahealth.net/2026/04/01/casino-platforms-worth-switching-to-1442597378/]https://eldekahealth.net/2026/04/01/casino-platforms-worth-switching-to-1442597378/[/url] presents a stimulating experience for bettors. With a variety of games, from slots to table games, there’s something for everyone to enjoy.
non UK casino site, [url=https://www.myworldshopping-net.onlinegroup.no/2026/04/11/exploring-non-uk-license-casinos-a-comprehensive-6-2/]https://www.myworldshopping-net.onlinegroup.no/2026/04/11/exploring-non-uk-license-casinos-a-comprehensive-6-2/[/url] offers a variety of gaming options that appeal to players from different backgrounds. Such platforms offer captivating selections, guaranteeing an satisfying experience. Featuring generous bonuses, gamblers can maximize their winnings.
Experience the thrill of play online casino, [url=https://thompsonandthompsonltd.com/2026/04/07/greenluck-tu-camino-hacia-un-estilo-de-vida/]https://thompsonandthompsonltd.com/2026/04/07/greenluck-tu-camino-hacia-un-estilo-de-vida/[/url] where you can discover a wide variety of games. Regardless of whether it’s slots, poker, or roulette, games deliver a unique experience. Get started now to show your prowess and win exciting rewards.
vpn novaya, [url=https://encant.elcorriol.com/vpn-novaya-revoljucija-v-mire-zashhishhennyh/]https://encant.elcorriol.com/vpn-novaya-revoljucija-v-mire-zashhishhennyh/[/url] – это инструмент, который обеспечивает безопасность и анонимность в интернете. Данная программа позволяет скрыть ваше IP-адрес, изолируя доступ к вашим данным. Выбирайте vpn novaya для достаточно защищенного серфинга в сети.
Finding the top deals can enhance your gaming experience. The Best casino bonuses, [url=https://bitbuzz.org/fast-withdrawals-and-live-action-experience/]https://bitbuzz.org/fast-withdrawals-and-live-action-experience/[/url] are designed to attract players and boost their chances of winning. Utilizing these offers wisely can maximize your chances significantly. Don’t miss out!
non GamStop UK casino, [url=http://www.saahvideo.com/discovering-english-gambling-sites-not-on-gamstop-2/]http://www.saahvideo.com/discovering-english-gambling-sites-not-on-gamstop-2/[/url] offers a unique opportunity for players seeking an alternative to traditional gaming platforms. These casinos provide thrilling experiences without the restrictions enforced by GamStop. Players can savor diverse games and generous bonuses.
Если вы хотите купить манго, то выбор очень широк. Это сладкий тропический фрукт, который достойно дополнит ваш рацион. Не упустите возможность купить манго, [url=http://www.nwnights.ru/redirect/tochka.webboard.org%2Ftopic-t259.html]http://www.nwnights.ru/redirect/tochka.webboard.org%2Ftopic-t259.html[/url] и насладиться его уникальным вкусом!
In the domain of online casino, [url=https://loogi.es/discover-the-excitement-of-gambiva-casino-your-5/]https://loogi.es/discover-the-excitement-of-gambiva-casino-your-5/[/url], players own boundless opportunities to win big. With thrilling games and enticing bonuses, it’s no wonder that more players are drawn to try their luck.
vpn tunel, [url=https://kit-cleaning.sumy.ua/vpn-tunnel-zashhita-i-anonimnost-v-internete/]https://kit-cleaning.sumy.ua/vpn-tunnel-zashhita-i-anonimnost-v-internete/[/url] – Использование инструмента VPN становится актуальным в наше время. VPN туннель обеспечивает безопасный доступ к интернету, скрывая ваши данные. Вы можете обойти цензуру и достичь доступ к запрещенным ресурсам. С помощью этого сервиса вы сумеете защитить свою данные в сети.
bitcoin casino denmark, [url=https://qualitypoint.com.do/bitcoin-casino-i-danmark-den-ultimative-guide-til/]https://qualitypoint.com.do/bitcoin-casino-i-danmark-den-ultimative-guide-til/[/url] tilbyder en unik oplevelse for spillere, der ønsker at kombinere underholdning og cryptocurrency. Brugere kan nyde et væld af spil, som kan store gevinster. En fordel ved disse casinoer er diskretion ved transaktioner. Uanset da du er begynder eller erfaren, præsenterer bitcoin casino denmark spænding for alle.
When you require a quick ride, taxi in larnaca, [url=https://mediastudies.cdit.org/the-comprehensive-guide-to-taxi-services-in-cyprus/]https://mediastudies.cdit.org/the-comprehensive-guide-to-taxi-services-in-cyprus/[/url] offers a fast service. By utilizing local drivers, you can see the city easily and comfortably. Affordable options are available.
online casino betting, [url=http://www.macchiatomedia.org/ufl/2026/04/05/understanding-the-impact-of-cd33bd-in-modern-4/]http://www.macchiatomedia.org/ufl/2026/04/05/understanding-the-impact-of-cd33bd-in-modern-4/[/url] provides a captivating experience. Players have access to a variety of games, such as slots, poker, and blackjack. Jackpots can be just a spin away!
Онлайн казино в телеграм, [url=https://cryptoverze.com/kazino-onlajn-top-luchshie-ploshhadki-dlja/]https://cryptoverze.com/kazino-onlajn-top-luchshie-ploshhadki-dlja/[/url] предлагает уникальные возможности для азартных игроков. Игра доступна прямо на вашем телефоне. Обширный выбор игр позволяет выбирать интересные варианты для каждого. Безопасность данных в таких сервисах обеспечивает комфорт и удовольствие от процесса игры.
bedste mobil casinoer, [url=http://repuestossudamerica.com/mobil-casinoer-uden-nemid-spil-nr-som-helst-og-9/]http://repuestossudamerica.com/mobil-casinoer-uden-nemid-spil-nr-som-helst-og-9/[/url] tilbyder en fantastisk oplevelse for spillere. Disse platforme leverer chancen for at spille nГҐr som helst, samt at nyde utrolige bonusser.
jet x casino, [url=https://serversignin.com/contact/bbs/jetxcasi-no.com]https://serversignin.com/contact/bbs/jetxcasi-no.com[/url] предлагает игрокам уникальный опыт с захватывающими играми и большими выигрышами. На этом сайте вы можете насладиться разнообразием игровых автоматов и стратегиями для достижения успеха. Не упустите свою возможность испытать удачу!
In the world of mature shows, live porn cams, [url=https://www.srishtisoft.com/explore-the-excitement-of-live-asian-cam-shows/]https://www.srishtisoft.com/explore-the-excitement-of-live-asian-cam-shows/[/url] have become increasingly popular. They offer unique connections between performers and viewers. This immersive format allows audiences to engage personally with their favorite stars, creating a thriving audience. The ease of use of live porn cams has transformed how people explore their desires, making it a favored choice for many.
Finding a great no verification casino, [url=https://pkiener.com/exploring-the-world-of-no-kyc-casinos-1003661527/]https://pkiener.com/exploring-the-world-of-no-kyc-casinos-1003661527/[/url] can enhance your gaming experience. These platforms offer simplicity by allowing players to sign up without the hassle of submitting documents. Enjoy games with rapid access and stress-free enjoyment.
Сборка ПК под заказ, [url=https://gpgelectronica.com/]https://gpgelectronica.com/[/url] — это лучший способ получить именно тот компьютер, который вам нужен. Персонализированный подход позволяет выбрать все компоненты: центральный процессор, материнская плата, видеоускоритель и остальные элементы. Профессионалы помогут собрать оборудование для работы.
Онлайн казино в телеграм, [url=https://www.wtcbarcelona.com/es/onlajn-kazino-v-telegram-kak-vybrat-luchshee-i/]https://www.wtcbarcelona.com/es/onlajn-kazino-v-telegram-kak-vybrat-luchshee-i/[/url] привлекает множество игроков в силу удобству и доступности. Все желающие могут наслаждаться играми в любое время. Сервис предоставляется постоянно, что обеспечивает быстро решать вопросы.
crypto live casino, [url=https://syscoin.com.br/exploring-the-future-of-bitcoin-sports-betting/]https://syscoin.com.br/exploring-the-future-of-bitcoin-sports-betting/[/url] offers a thrilling experience for players which enjoy the blend of traditional gambling and modern technology. With blockchain, exchanges are fast and secure, ensuring fairness in every game. Join this exciting world today!
The next PFL Sioux Falls card at the Sanford Pentagon offers a premium mix of local favorites and divisional stalwarts looking to secure their spot in the 2026 season.
Доброго времени суток!
Автоподбор в Санкт-Петербурге — надежный выбор вашего следующего автомобиля с полной технической и юридической проверкой.
[url=https://expert812.ru/]помощь в покупке авто[/url]
Если интересуют автоподбор в СПб, автоподбор в Санкт-Петербурге, подбор авто с гарантией, то это в ЭКСПЕРТ812 https://expert812.ru/ .
Закажите услугу с гарантией качества и диагностикой.
Наработанная репутация 9 лет, гарантия возврата денег, юридическая чистота, реальные данные диагностики!
Записывайте адрес сайта и звоните: +7 (964) 333-45-75.
Всем пока!
Concert Attire Stamford
360 Fairfield Ave,
Stamford, CT 06902, United Ⴝtates
+12033298603
Slippers
Many players seek possibilities for gaming at a casino outside GamStop, [url=http://dskogsphoto.com/respected-casinos-not-on-gamstop-your-guide-to/]http://dskogsphoto.com/respected-casinos-not-on-gamstop-your-guide-to/[/url]. These venues provide a unique experience, attracting those who want to enjoy excitement without restrictions. Finding a safe platform is essential.
Når man søger efter de bedste roulette casinoer, er det vigtigt at overveje variationerne af spil. Platformens usability spiller også en væsentlig rolle. Attraktive bonusser kan interessere spillere. Glem desuden ikke at tjekke betalingsmetoder. Uanset hvad, så er bedste roulette casinoer, [url=http://planetxenos.com/?p=220475]http://planetxenos.com/?p=220475[/url] et fantastisk valg for dem, der elsker spænding og underholdning.
Playing virtual roulette offers an exciting experience for players. For those seeking the best roulette online, [url=http://romeeternal.com/2026/04/01/discover-the-best-online-roulette-tips-strategies-4/]http://romeeternal.com/2026/04/01/discover-the-best-online-roulette-tips-strategies-4/[/url], techniques can significantly improve your chances. Opting for a reputable site is essential for a safe gaming experience.
https://mikefromgidstats.substack.com/p/why-you-should-fade-the-hype-at-pfl
The Sioux Falls PFL card is basically a “Logan Storley homecoming” party masked as a legitimate MMA event.
Shop premium chastity cage at MyDarkShop crafted with high-grade materials for durability and easy wear. The ergonomic shape offers a natural fit, while the open design improves airflow and maintenance, making it practical, discreet, and comfortable for extended use.
оборудование для биотехнологий BIORUS, [url=http://account.dyhjw.com/user/logout/backurl/aHR0cHM6Ly92b2xnYS5uZXdzL2FydGljbGUvNzgzMTg5Lmh0bWw]http://account.dyhjw.com/user/logout/backurl/aHR0cHM6Ly92b2xnYS5uZXdzL2FydGljbGUvNzgzMTg5Lmh0bWw[/url] представляет собой надежные и инновационные решения для исследовательских лабораторий. В числе его преимуществ высокая качество и удобная цена, что содействует проводить опытную работу на профессиональном уровне. Тем не менее, компания BIORUS предлагает множество инструментов и материалов, что способствует выполнению различных задач.
online casino, [url=https://sennacar.com/2026/04/05/indrumtorul-juctorului-de-cazinou-strategii-i/]https://sennacar.com/2026/04/05/indrumtorul-juctorului-de-cazinou-strategii-i/[/url] offers a captivating experience for gamblers. With various games and rewards, it attracts new clients daily. Join the fun and try your luck!
PFL returns to Sioux Falls’ Sanford Pentagon on Saturday for a show led by hometown star Logan Storley.
https://differ.blog/p/shadows-and-giants-the-stakes-at-the-sanford-pentagon-035c25
This Saturday, that nearness will weigh most heavily on Florim Zendeli, a competitor expected to walking into a hornet’s nest to face the local favorite, Logan Storley.
онлайн казино, [url=https://rugbyafrica.africa-newsroom.com/press/countlinks/283642/aHR0cHM6Ly90YXJpbWFzeXBhbGxldHMubXgvZXhwZXJ0LXJldmlldy1nb29kLXJvdWxldHRlLXN0cmF0ZWd5Lw/website]https://rugbyafrica.africa-newsroom.com/press/countlinks/283642/aHR0cHM6Ly90YXJpbWFzeXBhbGxldHMubXgvZXhwZXJ0LXJldmlldy1nb29kLXJvdWxldHRlLXN0cmF0ZWd5Lw/website[/url] обеспечивает увлекательные игры, которые позволяют казиношникам наслаждаться экшеном в удобстве домашнего жилья. Игровые аппараты в онлайн казино не только увлекают, но и дают возможность выигрышу реальных денег.
Apple Pay casino not on GamStop, [url=http://kairos.grafikmk.pl/exploring-apple-pay-betting-sites-that-aren-t-on/]http://kairos.grafikmk.pl/exploring-apple-pay-betting-sites-that-aren-t-on/[/url] provide players with an easy way to deposit funds safely. Such kinds of casinos deliver a possibility to enjoy casino games without restrictions. Have fun seamless transactions and improved privacy while gambling.
Når du søger efter de bedste roulette casinoer, [url=http://www.redi4changesl.biz/bedste-roulette-casinoer-spil-og-vind-stort-2/]http://www.redi4changesl.biz/bedste-roulette-casinoer-spil-og-vind-stort-2/[/url], er det vigtigt at overveje aspekter. Et godt casino tilbyder retfærdige spil samt flere rouletteversioner. Husk også at tjekke bonusser og support.
The mostbet promo code bd, [url=https://woodemo.cedcommerce.com/woocommerce/shopee/exploring-the-exciting-world-of-mostbet-bd-your/]https://woodemo.cedcommerce.com/woocommerce/shopee/exploring-the-exciting-world-of-mostbet-bd-your/[/url] offers a unique opportunity for new players. This an great deal is a game-changer. Utilizing this code can reveal many benefits, such as bonus funds and complimentary bets. Don’t miss the mostbet promo code bd!
Получить помощь от профессионала можно с помощью консультация юриста онлайн, [url=https://wittekind-buende.de/aromatherapy-while-traveling/]https://wittekind-buende.de/aromatherapy-while-traveling/[/url]. Это эффективный способ узнать правовые недоразумения без потребности выходить из дома. Опытный юрист обеспечит необходимые инструкции.
In the world of virtual casinos, online casino betting, [url=https://mansa-capital.com/erlebe-die-besten-casino-spiele-bei-betovocasino/]https://mansa-capital.com/erlebe-die-besten-casino-spiele-bei-betovocasino/[/url] has gained immense popularity. Players enjoy the thrill of wagering from the comfort of their homes. With numerous activities available, everyone can find their favorite.
Discovering the best roulette online can transform your gaming experience. With different options available, players need to find an entertaining platform. Explore thrilling features and deals that enhance your gameplay. Enjoy choice in bet types and strategies. Choosing the best roulette online, [url=https://pbus.thats-gross.com/wp/2026/04/01/top-roulette-sites-find-the-best-places-to-play/]https://pbus.thats-gross.com/wp/2026/04/01/top-roulette-sites-find-the-best-places-to-play/[/url] leads to excitement and potential wins. Make smart choices and experience your time at the tables!
When searching for gambling platforms, consider casino sites not on GamStop, [url=https://hempelmepromotion.com/index.php/2026/04/12/top-non-gamstop-casinos-your-ultimate-guide/]https://hempelmepromotion.com/index.php/2026/04/12/top-non-gamstop-casinos-your-ultimate-guide/[/url]. These choices offer players more freedom in their gaming. Enjoy a broad array of games and bonuses that enhance your play.
Playing within an online casino game, [url=http://www.cosmiceconomics.com/dev/betxicocasino-tu-destino-de-juegos-en-linea/]http://www.cosmiceconomics.com/dev/betxicocasino-tu-destino-de-juegos-en-linea/[/url] offers a fascinating experience. With multiple options available, players can partake in everything from slot machines to card games. Tactics can enhance your chances of winning big!
SEO-продвижения сайта, [url=https://deixe-tip.com/scripts/redir.php?url=aliensync.com/exploring-the-power-of-wwpass-fintech-authentication-solutions-for-secure-transactions/]https://deixe-tip.com/scripts/redir.php?url=aliensync.com/exploring-the-power-of-wwpass-fintech-authentication-solutions-for-secure-transactions/[/url] — это ключ к успеху в онлайне. Развитие сайта даёт возможность достичь высоких уровней в поисковых системах. Правильный подход к информации увеличивает трафик и интересует целевую аудиторию.
Я извиняюсь, но, по-моему, Вы допускаете ошибку. Предлагаю это обсудить. Пишите мне в PM, поговорим.
oxygen 3 slot, [url=https://oxygen3slot.com/]oxygen 3 slot[/url] is a unique game that captivates players with its thrilling design. This features exciting gameplay, providing an immersive experience. With dynamic graphics, players find themselves immersed in the action. Enjoy the profitable bonuses and tactical moves that enhance your chances of winning big!
In the world of gambling, players are increasingly drawn to the appeal of a no KYC online casino, [url=http://kz-house.com/relatenorthants/discover-the-thrill-of-casinos-without-id/]http://kz-house.com/relatenorthants/discover-the-thrill-of-casinos-without-id/[/url]. These platforms offer an thrilling experience without the hassle of identity verification. Users can quickly sign up, enabling rapid access to various games. The confidentiality these casinos provide adds to their allure, allowing players to enjoy their favorite games with minimal fuss. With no lengthy registration processes, players can dive right into the excitement.
Many players seek alternative options for entertainment, leading them to explore non UK licensed casinos, [url=https://samratshukla.com/exploring-non-uk-licensed-casinos-opportunities-5/]https://samratshukla.com/exploring-non-uk-licensed-casinos-opportunities-5/[/url]. These venues offer uncommon experiences, often with enhanced bonuses and lower restrictions. Always check ratings before choosing a site.
Поздравляю, замечательный ответ…
стоматология, [url=http://transyasu.com/component/k2/item/1-xiaomi-s-upoming-tablet-the-mi-pad-will-go-on-sale-in-beta-for-the-price-of-16-cents.html]http://transyasu.com/component/k2/item/1-xiaomi-s-upoming-tablet-the-mi-pad-will-go-on-sale-in-beta-for-the-price-of-16-cents.html[/url] является важную область медицины. Лечение за здоровьем челюсти даёт возможность предотвратить множество проблем. Новейшие технологии облегчают процесс лечения и своевременно возвращают здоровье зубов.
Online casino games, [url=https://ceisaweb.com/2026/03/31/how-to-verify-that-a-service-or-product-is-4/]https://ceisaweb.com/2026/03/31/how-to-verify-that-a-service-or-product-is-4/[/url] – Online casino games предоставляют большой выбор РёРіСЂ. РРіСЂРѕРєРё имеют возможность РІ полной мере наслаждаться различными жанрами, начиная СЃ слотов РґРѕ настольных РёРіСЂ. Рто платформы РїСЂРёРЅРѕСЃСЏС‚ радость Рё конкуренцию.
play online casino, [url=http://koncerty.one.pl/koncerty.xx.pl/2026/04/cashwincasino-din-vag-till-stora-vinster/]http://koncerty.one.pl/koncerty.xx.pl/2026/04/cashwincasino-din-vag-till-stora-vinster/[/url] – Playing online casino gives an exciting way to engage with gambling from the comfort of your home. With a selection of games available, enthusiasts can discover their favorite options easily.
онлайн казино, [url=https://newpagina.cecasa.com.mx/index.php/kak-rabotaet-prilozhenie-bitstarz-1488407324/]https://newpagina.cecasa.com.mx/index.php/kak-rabotaet-prilozhenie-bitstarz-1488407324/[/url] выпускают разнообразие игр, где любители игр могут пробовать везение. Данное развлечение популярно среди широких людей. Кроме того возможность приобретать призы и становиться частью в играх с призами.
Вы абсолютно правы. В этом что-то есть и это отличная идея. Готов Вас поддержать.
Experience the thrill of punk rocker 3 slot, [url=https://punkrocker3slot.com/]punk rocker 3[/url], a vibrant game that embodies the spirit of rebellion. Dive into the scene of punk rock, featuring loud colors and thrilling tunes. Spin the reels for epic wins! Join in the fun with buddies and experience the spirit of punk culture. Whether you’re new to gaming, punk rocker 3 slot promises to deliver excitement around every corner!
бездепозитные бонусы казино, [url=https://numberfields.asu.edu/NumberFields/show_user.php?userid=6588761]https://numberfields.asu.edu/NumberFields/show_user.php?userid=6588761[/url] — это отличный способ попробовать свои силы в азартных играх без вложений. Подобные предложения влекут новых игроков. Получая бонусы, вы могут изучить платформу без риска. Не упустите возможность стать победителем в мире казино!
Playing at a non GamStop online casino, [url=https://coursesyouneednow.com/post/147183]https://coursesyouneednow.com/post/147183[/url] offers players a unique experience. Such platforms provide multiple opportunities for exciting gaming. Thanks to a wider selection of games and favorable bonuses, players can relish their favorite table games without restrictions.
horse racing sites not on GamStop, [url=https://carcredit36.com/2026/04/10/the-allure-of-british-horse-racing-exploring-2/]https://carcredit36.com/2026/04/10/the-allure-of-british-horse-racing-exploring-2/[/url] are a great option for enthusiasts looking to bet on their favorite events. These platforms offer a wide range of betting options and live streaming. Many punters appreciate the flexibility these sites offer.
online casino, [url=https://museum.arabpuppettheatre.org/index.php/2026/04/03/exploring-begumabet-your-ultimate-online-betting-5/]https://museum.arabpuppettheatre.org/index.php/2026/04/03/exploring-begumabet-your-ultimate-online-betting-5/[/url] features an exciting journey for players. With a variety of games available, players can find something pleasing. Join today to explore the thrill!
По моему мнению Вы не правы. Я уверен. Давайте обсудим. Пишите мне в PM, пообщаемся.
стоматология хирург, [url=http://deets.feedreader.com/external?url=dados.justica.gov.pt%2Fuser%2Fstomatolog-hirurg-rusak]http://deets.feedreader.com/external?url=dados.justica.gov.pt%2Fuser%2Fstomatolog-hirurg-rusak[/url] является важный аспект здравоохранения, который реализует исправление зубных проблем и инфекций. Специалисты в этой области используют методы современные инновации для результатов высококачественного медицинского ухода.
Mobile casinos, [url=http://studio.mahatama.co.id/index.php/2026/04/01/exploring-the-security-features-built-into-modern-2/]http://studio.mahatama.co.id/index.php/2026/04/01/exploring-the-security-features-built-into-modern-2/[/url] display an exciting way to enjoy gambling on-the-go. Players can access a variety of games directly from their smartphones. This flexibility attracts many, making Mobile casinos increasingly popular.
Я бы не хотел развивать эту тему.
In the world of gaming, exciting adventures await in epic bullets & bounty slot, [url=https://epicbulletsbounty.com/]epic bullets & bounty slot[/url]. Players can enjoy a mixture of intense action and lucrative rewards. Don’t miss your chance to aim big wins as you spin!
In the world of gaming, a non GamStop online casino, [url=https://pornx.vicetemple.io/new-casinos-not-affected-by-current-trends/]https://pornx.vicetemple.io/new-casinos-not-affected-by-current-trends/[/url] offers players an exciting experience. With a wide range of games available, users can enjoy unparalleled entertainment. These platforms provide freedom to gamble without restrictions, making them increasingly popular. Many players seek out these casinos for their individual features and generous bonuses. It’s essential to choose a dependable site to ensure a safe gaming environment. Explore the adventures of a non GamStop online casino today!
online roulette spielen, [url=http://www.app.webtoseo.com/2026/04/11/online-roulette-spielen-die-besten-strategien-und/]http://www.app.webtoseo.com/2026/04/11/online-roulette-spielen-die-besten-strategien-und/[/url] ist ein spannendes Erlebnis, das viele Spieler fasziniert. Die Entscheidung der richtigen Strategie kann den Unterschied zwischen Profit und Niederlage ausmachen. Nutzen Sie die verschiedenen Tipps, um Ihre Wahrscheinlichkeiten zu verbessern. Online roulette spielen bietet Vielzahl und Aufregung in jedem Spiel.
сумки женские, [url=http://cafebarjot.fr/quels-sont-les-bienfaits-du-cafe-sur-le-corps-humain/]http://cafebarjot.fr/quels-sont-les-bienfaits-du-cafe-sur-le-corps-humain/[/url] — это неотъемлемая часть гардероба любой модницы. Элегантные сумки могут дополнить каждую образ. Набор моделей поражает: от традиционных до современных. Не упустите шанс найти идеальный аксессуар!
есль ветром сдует?
The exciting game, raptor 2 slot, [url=https://raptor2casino.com/]raptor 2 slot[/url], provides participants a special experience. Including striking graphics and compelling gameplay, this game maintains the attention of everyone. Experience this joy and uncover big wins!
онлайн казино играть, [url=https://junction505.dreamhosters.com/2026/04/11/chastye-prichiny-zaderzhki-vyplat-chto-stoit-znat/]https://junction505.dreamhosters.com/2026/04/11/chastye-prichiny-zaderzhki-vyplat-chto-stoit-znat/[/url] стало популярным способом развлечения для многих людей. Пользователи ценят удобство игры в любое место. Множество игр также привлекает волну новичков и опытных участников.
online casino betting, [url=https://geltventures.com/2026/04/03/exploring-begumabet-your-gateway-to-online-betting-22/]https://geltventures.com/2026/04/03/exploring-begumabet-your-gateway-to-online-betting-22/[/url] has become in recent years, attracting players worldwide. With various platforms, bettors can experience a variety of games, including slots to table games, conveniently from home.
Online casino, [url=https://tartieb.com/2026/04/02/timeless-casino-classics-that-still-captivate-28/]https://tartieb.com/2026/04/02/timeless-casino-classics-that-still-captivate-28/[/url] has a captivating experience for gamers. Players can delight in a variety of selections, from slots to table games. Rewards enhance the fun, making it simpler to win big!
Это было и со мной. Давайте обсудим этот вопрос. Здесь или в PM.
купить лицензию windows server, [url=https://nextnews.futurhebdo.net/ferriway-classe-meilleure-entreprise-de-transport/]https://nextnews.futurhebdo.net/ferriway-classe-meilleure-entreprise-de-transport/[/url] — это важный шаг для любого бизнеса. Оборудованная система обеспечит стабильную работу серверов. Приобретая лицензию, вы находите доступ к последним обновлениям и поддержке. Не откладывайте возможность улучшить систему своей компании.
online echtgeld roulette, [url=https://lakefrontmarine.ca/roulette-mit-echtgeld-tipps-und-strategien-fur-8/]https://lakefrontmarine.ca/roulette-mit-echtgeld-tipps-und-strategien-fur-8/[/url] stellt dar eine packende Möglichkeit, die Wettmöglichkeiten zu entwickeln. Gamer können schnell von ihrem Platz spielen und um hohe Einsätze spielen. Die Palette an Spielen macht ein unvergessliches Spielerlebnis.
non GamStop sites UK, [url=https://www.lionsroarcapital.com/discover-the-best-casinos-not-on-gamstop-uk/]https://www.lionsroarcapital.com/discover-the-best-casinos-not-on-gamstop-uk/[/url] – In the realm of online gambling, non GamStop options UK offer players a chance to explore a wider variety of games and bonuses. These sites typically provide less regulation for gamers seeking excitement without the constraints of traditional platforms.
Вы допускаете ошибку. Пишите мне в PM, обсудим.
Experience the adventure of the legion gold reckoning slot, [url=https://legiongoldreckoningslot.com/]legiongoldreckoningslot.com[/url], providing players a way to win big. Featuring stunning graphics and engaging gameplay, the slot keeps your attention, leading you to uncover its rich features. Don’t miss out on the opportunity to hit the jackpot!
Современные геймеры все чаще выбирают онлайн казино скачать, [url=https://ceisaweb.com/2026/04/11/pochemu-bezdepozitnyj-bonus-bitstarz-nedostupen-8/]https://ceisaweb.com/2026/04/11/pochemu-bezdepozitnyj-bonus-bitstarz-nedostupen-8/[/url] для удобного доступа к любимым развлечениям. Виртуальные игры предлагают обилие слотов и лотерей. Фантастические бонусы привлекают всё больше пользователей. Не упустите шанс испытать удачу!
The thrill of an online casino game, [url=https://ayr.ideasmasideas.com/2026/04/02/discovering-the-world-of-bb444-trends-technologies/]https://ayr.ideasmasideas.com/2026/04/02/discovering-the-world-of-bb444-trends-technologies/[/url] attracts many players. Discovering new strategies and winning huge rewards can be very satisfying. Join the world today!
Finding the Best casino bonuses, [url=https://capitalpress.com.co/accelerating-growth-of-mobile-casinos-a-deep-dive/]https://capitalpress.com.co/accelerating-growth-of-mobile-casinos-a-deep-dive/[/url] can significantly enhance your gaming experience. Countless online casinos offer attractive bonuses. To maximize your potential, frequently compare different offers and review the terms. Enjoy your gaming!
https://medium.com/@mikefromgidstats/why-you-should-fade-the-hype-at-pfl-sioux-falls-85d5dcfd716a
Be honest: PFL Sioux Falls is at its core a “Logan Storley homecoming” party dressed up as a professional fight card.
сумки женские, [url=http://www.a-reserva.org/res-logo1/]http://www.a-reserva.org/res-logo1/[/url] | Женские сумки | Сумочки для женщин | Аксессуары для девушек – это не просто полезные предметы, но и важный элемент стиля. Правильно подобранная | стильно оформленная | модная сумка подчеркнет индивидуальность и завершит любой образ. Они могут быть как классическими, так и спортивными.
Эта тема позорит наш сайт
полотенцесушитель для ванной, [url=http://txwinet.com/redirect.php?action=url&goto=forum.motoshkola.od.ua%2Fthreads%2Finstalljacija-dlja-unitaza.78422%2F]http://txwinet.com/redirect.php?action=url&goto=forum.motoshkola.od.ua%2Fthreads%2Finstalljacija-dlja-unitaza.78422%2F[/url] — необходимый элемент для создания уюта и комфорта. Эта конструкция помогает не только высушивать полотенца, но и поддерживать тепло в ванной. Современные устройства гарантируют высокую эффективность и стильный внешний вид. Выбор полотенцесушителя для ванной — это решение к комфортному и удобному пространству.
Странно как то
phantom pulse slot, [url=https://phantompulseslot.com/]phantom pulse slot[/url] – The phantom pulse slot offers players an exciting experience. With its fascinating graphics and energetic gameplay, it keeps you on the edge of your seat. Participate in the action and explore the secrets of the phantom pulse slot. Enjoy the distinct features that make each spin unpredictable. Don’t miss out on the opportunity to win big!
online echtgeld roulette, [url=https://demo.zealousweb.com/wordpress-plugins/accept-stripe-payments-using-contact-form-7/?p=257619]https://demo.zealousweb.com/wordpress-plugins/accept-stripe-payments-using-contact-form-7/?p=257619[/url] ist ein fesselndes Spiel, das Spieler weltweit anzieht. Beliebten Plattformen gestatten das aufregende Erlebnis, echte Finanzgewinne zu erzielen. Methoden können hilfreich sein für verschiedene Gewinnmaximierung.
The Pentagon venue in Sioux Falls has a knack for rendering high-stakes violence feel strangely intimate.
non GamStop sites UK, [url=https://feeda.ai/uncategorized/discover-the-best-casino-sites-not-on-gamstop-6/]https://feeda.ai/uncategorized/discover-the-best-casino-sites-not-on-gamstop-6/[/url] offer players an alternative to traditional gambling platforms. Such sites give a larger range of gaming options in addition to allowing players to experience games without limits.
онлайн казино бонусы, [url=https://aiobooking.it/blitc-kazino-obzor-i-preimushhestva-po-otzyvam/]https://aiobooking.it/blitc-kazino-obzor-i-preimushhestva-po-otzyvam/[/url] offrent игрокам интересные возможности для повышения игрового бюджета. Это бонусы включают бесплатные ставки и кешбэк. Исследуйте возможности, которые предоставляют онлайн казино бонусы!
If you’re looking to entertain yourself and potentially hit the jackpot, you should absolutely play online casino, [url=http://konkurs.kalendarzrolnikow.pl/discover-the-thrills-of-basswin-casino-2143485550/]http://konkurs.kalendarzrolnikow.pl/discover-the-thrills-of-basswin-casino-2143485550/[/url] games. It’s a captivating way to relish the glamour of gambling from the comfort of your own space. Choose from a host of games, and give your luck a shot. With lucrative offers, it’s a perfect moment you won’t want to miss.
Доброго времени суток!
Надежный выбор вашего следующего автомобиля с полной технической и юридической проверкой — Автоподбор в Санкт-Петербурге.
[url=https://expert812.ru/]автоподбор автомобилей[/url]
Если интересуют автоподбор в Санкт-Петербурге, подбор авто с гарантией, автоподбор в СПб, то это в ЭКСПЕРТ812 https://expert812.ru/ .
Закажите услугу с диагностикой и гарантией качества.
Наработанная репутация 9 лет, гарантия возврата денег, юридическая чистота, реальные данные диагностики!
Звоните: +7 (964) 333-45-75 и записывайте адрес сайта.
Всем пока!
https://telegra.ph/ACA-203-Betting-Preview-Gaforov-vs-Akopyan-04-29
ACA 203 touches down in Tashkent with a pivotal flyweight top bout and a card that leans heavily into the promotion’s regional strength in Uzbekistan.
In the headliner of PFL Sioux Falls Logan Storley meets the 2024 PFL Europe titleholder Florim Zendeli.
Интересная тема, приму участие. Вместе мы сможем прийти к правильному ответу. Я уверен.
huff n puff collectr slot, [url=https://huffnpuffcollector.com/]huffnpuffcollector.com[/url] is an exciting|thrilling|engaging|captivating game that offers numerous opportunities for big wins. Players immerse themselves in a delightful|charming|fascinating|entertaining experience filled with unique features. Take a spin|try your luck|test your skills|have a go and see what fortune brings! The vibrant|colorful|lively|dynamic graphics enhance gameplay and keep players coming back for more. Don’t miss out on the fun and excitement of huff n puff collectr slot!
Online casino games, [url=https://lucaskund.ilait-reseller.com/2026/04/02/understanding-casino-rtp-and-volatility-your-guide-2/]https://lucaskund.ilait-reseller.com/2026/04/02/understanding-casino-rtp-and-volatility-your-guide-2/[/url] – The world of online gambling предлагают множество азартных игровых автоматов Рё карточных РёРіСЂ. РРіСЂРѕРєРё РјРѕРіСѓС‚ выбирать новые СЃРїРѕСЃРѕР±С‹ скрасить время Рё прибыли РІ СѓРґРѕР±РЅРѕР№ привлекательной среде.
In recent years, the rise of non GamStop sportsbooks, [url=https://www.ameeralbaher.com/exploring-non-gamstop-bookmakers-a-comprehensive-5/]https://www.ameeralbaher.com/exploring-non-gamstop-bookmakers-a-comprehensive-5/[/url] has ballooned significantly. Many gamblers prefer these platforms for their diversity of betting options and less limitations. Non GamStop sportsbooks also offer attractive bonuses that enhance the overall experience. This makes them an appealing choice looking for increased options.
roulette online echtgeld, [url=http://writingandconcepts.com.au/index.php/2026/04/11/roulette-spielen-tipps-und-strategien-fur-ihr/]http://writingandconcepts.com.au/index.php/2026/04/11/roulette-spielen-tipps-und-strategien-fur-ihr/[/url] bietet Spielern die Möglichkeit, aufregende Spiele zu genießen und echtes Geld zu gewinnen. Die Palette an Tischvarianten liegt zahlreiche Optionen für jeden. Durch innovative Technologien haben Spieler ein mitreißendes Erlebnis erfahren.
Очень ценная штука
безободковый унитаз, [url=https://www.hellsgateroadhouse.com.au/2021/01/06/the-beginning-of-a-new-fall-season-at-low-prices/]https://www.hellsgateroadhouse.com.au/2021/01/06/the-beginning-of-a-new-fall-season-at-low-prices/[/url] превосходен. Его внешний вид облегчает уход и снижает накопление бактерий. Это вариант для бережливых интерьеров.
phoenixproject pxroproject, [url=https://luckiestgamblers.com/soukha-kachittavong-gets-another-trophy-in-2100-bounty-event-70194/]https://luckiestgamblers.com/soukha-kachittavong-gets-another-trophy-in-2100-bounty-event-70194/[/url] je inovatГvny prГstup ku modernГ©mu riadeniu projektov. Zameriava v zlepЕЎenie efektivity a tГmovej spoluprГЎce. SystГ©my sГє prispГґsobiЕҐ potrebГЎm organizГЎcie a uДѕahДЌujГє inovatГvne rieЕЎenia. VДЏaka sa zniЕѕuje ohrozenie a zlepЕЎuje celkovГЅ vГЅkon tГmu.
online casino, [url=https://www.longevitylarry.com/2026/04/02/explore-basswin-casino-your-ultimate-gaming/]https://www.longevitylarry.com/2026/04/02/explore-basswin-casino-your-ultimate-gaming/[/url] provides an exciting gambling experience. Players can explore a variety of choices, from fruit machines to card games. With promotions galore, it’s easy to join and entertain.
Apple Pay casino not on GamStop, [url=https://holl-nutzenanalyse.kunden.cloud.sobek-innovations.de/exploring-apple-pay-bookies-not-on-gamstop-13/]https://holl-nutzenanalyse.kunden.cloud.sobek-innovations.de/exploring-apple-pay-bookies-not-on-gamstop-13/[/url] offer players a unique way to enjoy online gambling. Such casinos provide safe transactions and a convenient experience. With Apple Pay, players can hassle-free deposit funds. Choose among various games and enjoy the thrill of betting without restrictions. For those seeking independence, Apple Pay casino not on GamStop presents an exciting option.
Да вы талантливый человек
If you’re seeking excitement, the exciting world of marlin masters atlantis slot, [url=https://marlinmastersatlantis.com/]marlin masters atlantis slot[/url] awaits. Dive into an ocean of excitement where you can experience superb features and massive rewards. Enjoy the dynamic graphics and stimulating gameplay that keep you hooked. With every spin, hope for big wins and dive deep in a wonderful experience!
roulette online spielen, [url=https://vilagrad.com/online-roulette-echtgeld-ein-leitfaden-fur-spieler/]https://vilagrad.com/online-roulette-echtgeld-ein-leitfaden-fur-spieler/[/url] ist eine fesselnde Erfahrung, die viele Spieler begeistert. Diese Spiele bieten Aufregung und Gelegenheiten auf beträchtliche Profite. Mit der elektronischen Entwicklungen kann man von überall spielen.
independent online casinos, [url=http://www.everydayimport.com/the-rise-of-independent-online-casinos-a-new-era-7/]http://www.everydayimport.com/the-rise-of-independent-online-casinos-a-new-era-7/[/url] feature a unique betting experience. Gamblers can enjoy diverse games including attractive bonuses. In contrast to platforms, they focus on customer satisfaction and honesty.
Mobile casinos, [url=https://futurelabs.org.uk/casinoslot2045/emerging-features-of-augmented-reality-2/]https://futurelabs.org.uk/casinoslot2045/emerging-features-of-augmented-reality-2/[/url] – Mobile gaming platforms предоставляют пользователям возможность участвовать РіРґРµ СѓРіРѕРґРЅРѕ Рё РєРѕРіРґР° СѓРіРѕРґРЅРѕ. Современные технологии позволяют применять разные РёРіСЂС‹ РїСЂСЏРјРѕ РЅР° смартфонах.
Experience the thrill of playing in a live roulette casino site, [url=https://staging.partner.yas.io/discover-the-best-live-roulette-online-casino-11/]https://staging.partner.yas.io/discover-the-best-live-roulette-online-casino-11/[/url] where fun awaits. Join experienced dealers as they spin the wheel for you, creating a dynamic atmosphere. Whether you’re a newcomer or a seasoned player, the live roulette casino site offers a one-of-a-kind experience that draws you into the action. Don’t miss your chance to score while enjoying the social environment of this gaming haven.
Меня тоже волнует этот вопрос. Скажите мне пожалуйста – где я могу об этом прочитать?
продукты с быстрой доставкой, [url=https://www.outofthisworldliteracy.com/3-books-and-lessons-to-teach-character/]https://www.outofthisworldliteracy.com/3-books-and-lessons-to-teach-character/[/url] становятся все более популярными на современном рынке. Компании предлагают простоту в приобретении свежих товаров. Теперь отсутствует необходимость долго стоять в очередях. Вы можете наслаждаться свободным временем, а не тратить его на визиты в магазины. Достаточно сделать несколько кликов, и товары уже у вас дома.
Просто милашки!!
ironbank 2 casino, [url=https://ironbank2casino.com/]ironbank2casino.com[/url] – Ironbank 2 online casino предлагает богатый ассортимент РёРіСЂС‹ для клиентов. Р’С‹ можете наслаждаться уникальными бонусами Рё удовлетворительным обслуживанием. Станьте частью сегодня Рё увидите СЃ РјРёСЂРѕРј азартных РёРіСЂ!
online casino betting, [url=https://www.emamanagement.it/2026/04/01/arctic-casino-your-ultimate-gaming-experience-in/]https://www.emamanagement.it/2026/04/01/arctic-casino-your-ultimate-gaming-experience-in/[/url] offers thrilling possibilities for gamblers to explore their luck from the safety of their homes. With advanced technology, clients can enjoy a diverse selection of games anytime.
When searching for top gaming destinations, don’t miss the best non UK casinos, [url=https://victorymedical.vn/the-ultimate-guide-to-the-best-non-uk-casino-sites-2/]https://victorymedical.vn/the-ultimate-guide-to-the-best-non-uk-casino-sites-2/[/url]. These venues provide an array of excitement that compete with anything found in the UK. Enjoy unique themes and world-class services for a memorable visit.
Att spela på onlinekasino har blivit allt mer populärt. mga casino online, [url=https://ukclt.com/5-euro-insattningscasinon-utan-krngel/]https://ukclt.com/5-euro-insattningscasinon-utan-krngel/[/url] erbjuder en fängslande upplevelse med flera spel. Öka dina chanser att vinna genom att välja de bästa spelen och utnyttja bonusar. En trygg plattform garanterar att dina uppgifter är återhålls. Välj MGA casino online för en rådgivande spelupplevelse.
roulett online, [url=https://app-denesik.tucq7oehuk-wg96gg8o16oy.p.temp-site.link/die-faszination-von-online-roulette-regeln/]https://app-denesik.tucq7oehuk-wg96gg8o16oy.p.temp-site.link/die-faszination-von-online-roulette-regeln/[/url] ist eine spannende Option, um bei diesem Spiel Finanzen zu verdienen. Diverse Spieler wählen diese Variante des Glücksspiels, weil es leicht ist, im Internet zu spielen. Verschiedene Strategien begleiten dabei, ihre Gewinnchancen zu maximieren.
In recent years, a plethora of betting sites outside UK, [url=https://riosessions.com/web/exploring-non-uk-bookmakers-a-guide-to-global-3/66689/]https://riosessions.com/web/exploring-non-uk-bookmakers-a-guide-to-global-3/66689/[/url] have gained popularity. Such platforms offer exciting opportunities for bettors. With innovative technology, they extend a variety of activities for wagering.
По моему мнению Вы не правы. Могу это доказать. Пишите мне в PM, поговорим.
The Magenta elephants trinity slot offers a distinct gaming experience. Players are drawn by its bright graphics and captivating gameplay. With stimulating features, this game promises fun for everyone. Take a spin on the pink elephants trinity slot, [url=https://pinkelephanttrinity.com/]pinkelephanttrinity.com[/url] and discover what thrills you the most!
Online casino, [url=https://diamondartpaintingkits.com/how-online-casinos-ensure-player-safety-and-23/]https://diamondartpaintingkits.com/how-online-casinos-ensure-player-safety-and-23/[/url] обеспечивает уникальные перспективы для любителей азартных игр. Разнообразные игры и привлекательные бонусы завлекают игроков. Знакомьтесь с миром азарта прямо сейчас!
Experience the thrill of real-time roulette at a leading live roulette casino site, [url=https://blooket-join.com/explore-the-excitement-of-live-roulette-sites/]https://blooket-join.com/explore-the-excitement-of-live-roulette-sites/[/url]. Enjoy quick gameplay and thrilling interactions with experienced dealers. Join now and play your luck!
я ржал
продукты с доставкой, [url=http://kiambunews.co.ke/?p=5458]http://kiambunews.co.ke/?p=5458[/url] стали незаменимой частью современного образа жизни. Эта услуга позволяет экономить время и силы. Набор товаров разнообразен, что комфорт покупок делает еще более приятным. доставить можно всё: включая свежих овощей до десертов.
онлайн казино слоты, [url=https://dianashakti.com/index.php/2026/04/12/chto-vazhno-znat-o-prilozhenii-sovety-i-2/]https://dianashakti.com/index.php/2026/04/12/chto-vazhno-znat-o-prilozhenii-sovety-i-2/[/url] включают множество интересных игр. Почти каждый геймер способен найти что-либо по своему настроению. Слоты отличаются уникальными функциями и значительной отдачей. Погружайтесь в атмосферу азартных чувств!
Trying out an online casino game, [url=http://www.southerngospelconcert.com/exploring-the-features-and-opportunities-of-662/]http://www.southerngospelconcert.com/exploring-the-features-and-opportunities-of-662/[/url] provides an entertaining experience. By using various options, players can appreciate the excitement while potentially win big! Don’t forget this chance!
non GamStop betting sites, [url=https://hyasense.de/top-sportsbooks-not-on-gamstop-for-uk-punters/]https://hyasense.de/top-sportsbooks-not-on-gamstop-for-uk-punters/[/url] provide an stimulating alternative for punters. With less restrictions, bettors can relish a wider range of games and bonuses. This autonomy allows for a more betting experience. Choose wisely and embrace the opportunities these sites deliver.
Так бесконечно можно обсуждать..
Патронажная служба, [url=https://kartina-dnja.ru/society/8707-organizacija-uhoda-za-pozhilymi-kak-podobrat-nadezhnuju-sidelku-v-moskve.html]https://kartina-dnja.ru/society/8707-organizacija-uhoda-za-pozhilymi-kak-podobrat-nadezhnuju-sidelku-v-moskve.html[/url] обеспечивает уход для клиентов, нуждающихся в особом внимании. Работники помогают проводить необходимые задачи, давая возможность им оставаться комфортно.
casino roulette, [url=https://ariconference.com/online-roulette-mit-echtgeld-und-startguthaben-2/]https://ariconference.com/online-roulette-mit-echtgeld-und-startguthaben-2/[/url] ist ein spannendes Spiel, das hauptsächlich auf Glück basiert. Teilnehmer setzen auf Punkte und hoffen auf einen schnellen Gewinn. Die Stimmung in einem Casino ist spannend, was das Erlebnis noch intensiver macht.
betting sites outside UK, [url=https://hotels.techdomainsystems.com/exploring-bookmakers-outside-the-uk-a-63-2/]https://hotels.techdomainsystems.com/exploring-bookmakers-outside-the-uk-a-63-2/[/url] offer a wide range of opportunities for punters. Such websites provide diverse markets, favorable pricing, and smooth navigation. Explore different bonuses to enhance your experience!
mga casino online, [url=http://www.museodelbrunello.it/5-euro-deposit-casino-utan-svensk-licens-2/]http://www.museodelbrunello.it/5-euro-deposit-casino-utan-svensk-licens-2/[/url] – I dagens enkla vГ¤rld av mga casino online har mГҐnga spelare tillgГҐng att vinna pengar frГҐn sitt hem. Dessutom erbjuder engagerande spel en spГ¤nnande variant av spelande.
play online casino, [url=https://www.missionpost.co.uk/2026/03/31/exploring-the-features-and-benefits-of-8777betbd-4/]https://www.missionpost.co.uk/2026/03/31/exploring-the-features-and-benefits-of-8777betbd-4/[/url] – Playing at an online casino is an exciting way to experience the thrill of gambling from home. You can experience a wide variety of games, including table games. Many platforms also offer welcome bonuses, enhancing your gaming experience significantly.
When it comes to the best live roulette casinos, [url=https://janseverhuizingen.nl/discover-the-best-live-roulette-sites-in-the-uk-19/]https://janseverhuizingen.nl/discover-the-best-live-roulette-sites-in-the-uk-19/[/url], players seek thrilling experiences. Online platforms offer immediate interactions with operators. Choose a casino that provides diverse betting options and top-notch streaming for an immersive atmosphere.
tordex url https://darknetmarketsreview.com/
Эффективно?
Доставка товаров на дом, [url=https://www.dominodesign.it/index.php/component/k2/item/36?start=0]https://www.dominodesign.it/index.php/component/k2/item/36?start=0[/url] обеспечивает клиентам быстро приобретать срочные товары не покидая квартиры. Это позволит сэкономить нервы и сделает процесс покупок значительно приятнее.
non GamStop betting sites, [url=https://www.docarnettefoundation.org/top-bookies-not-on-gamstop-your-guide-to-safe/]https://www.docarnettefoundation.org/top-bookies-not-on-gamstop-your-guide-to-safe/[/url] offer bettors an alternative to traditional wagering platforms. These kinds of sites provide unrestricted access to various betting options. Users can enjoy liberty without self-exclusion measures.
dark markets https://onion-darknet-markets.com/
Finding the best live roulette casinos, [url=https://bulky.new2new.com/top-live-roulette-sites-in-the-uk-for-2023-2/]https://bulky.new2new.com/top-live-roulette-sites-in-the-uk-for-2023-2/[/url] can enhance your gaming experience. These platforms offer genuine interactions with hosts, captivating gameplay, and outstanding bonuses. Explore various options to find your ideal venue! Enjoy the lively atmosphere while spinning the wheel.
да дофига он стоет…
стоматолог хирург, [url=https://kravasriepas.lv/product/armstrong-385-55-r22-5-160-ath-11/]https://kravasriepas.lv/product/armstrong-385-55-r22-5-160-ath-11/[/url] – это специалист, который занимается лечением заболеваний полости рта и челюстно-лицевой области. Его отличает высокая квалификация и разнообразные знания в области хирургической стоматологии. Работа стоматолога хирурга включает в себя экстракцию зубов, особенно в сложных случаях, а также лечение пародонтальных заболеваний. Специалист, занимающийся этой сферой, должен быть педантичным и осваивать навыками работы с современным инструментом. Контакт с пациентами играет важную роль, так как немалым числом людей испытывают страх перед стоматологическими процедурами. Поэтому компетентность стоматолога хирурга включает в себя не только навыки лечение вмешательства, но и способность содействовать доверительные отношения с пациентами. Это способствует пациентам чувствовать себя безопасно во время процедур.
Casino Utan Svensk Licens, [url=https://konkurs.kalendarzrolnikow.pl/spela-casino-utan-svensk-licens-utforska-2/]https://konkurs.kalendarzrolnikow.pl/spela-casino-utan-svensk-licens-utforska-2/[/url] erbjuder fascinerande spelupplevelser för spelare som söker många alternativ. Här finner du många utbud av spelautomater och ännu mer bordsspel. Casino Utan Svensk Licens ger även hjälp på olika språk, vilket skapar en bekväm spelupplevelse. Välj ert favoritcasino och börja spela idag!
golf bookies not on GamStop, [url=https://mainlinedogtrainer.com/top-golf-sportsbooks-not-on-gamstop-a/]https://mainlinedogtrainer.com/top-golf-sportsbooks-not-on-gamstop-a/[/url] offer unique opportunities for betting enthusiasts. Such platforms provide thrilling options for gamblers looking for alternatives. Uncover these sites for open betting experiences.
live roulette sites, [url=https://ejenpro.com/top-live-roulette-casinos-in-the-uk-where-to-play/]https://ejenpro.com/top-live-roulette-casinos-in-the-uk-where-to-play/[/url] offer an exciting experience for players. These platforms fuse the thrill of a casino with the comfort of home. Players can connect with dealers in real-time, enhancing their gaming atmosphere.
А возможны еще варианты?
Автомобили из Китая, [url=http://fukushima.st/mff/bbs/bbs.cgi/artist.html?quot;>firsturl.de/4ittnw4</a>]http://fukushima.st/mff/bbs/bbs.cgi/artist.html?quot;>firsturl.de/4ittnw4</a>[/url] становятся всё более популярными на мировом рынке. Эти транспортные средства привлекают ценителей своей привлекательной ценой и разнообразием моделей. Необходимо подчеркнуть, что качество производимых автомобилей из Китая достигло высоких уровней. Некоторые китайские производители теперь применяют современные технологии и прогрессивные решения для повышения удобства своих автомобилей. Среди моделей можно найти как доступные варианты, так и премиум автомобили, что позволяет отвечать потребности всех групп клиентов. В конечном счете, автомобили из Китая могут стать приемлемым выбором для тех, кто размышляет о новое авто.
онлайн казино скачать, [url=https://rakennus.jdmmediagroup.com/2026/04/12/dragon-money-kazino-sloty-kotorye-zavlekajut/]https://rakennus.jdmmediagroup.com/2026/04/12/dragon-money-kazino-sloty-kotorye-zavlekajut/[/url] можно легко и быстро. Такие платформы предлагают массу игр. Актуальные технологии обеспечивают надежность транзакций. Не упустите шанс попробовать удачу!
Exploring popular non UK casino sites can provide immense fun. With a myriad of games and attractive offers, players can enjoy a top-notch gaming experience. Whether you’re just starting with online casinos or a experienced player, these top non UK casino sites, [url=http://newstaffpro.com/wp/exploring-non-uk-license-casinos-a-comprehensive-2/]http://newstaffpro.com/wp/exploring-non-uk-license-casinos-a-comprehensive-2/[/url] offer a little something for every type of player.
In the world of online gambling, no KYC casinos, [url=https://www.museodelbrunello.it/experience-seamless-gaming-with-online-casinos/]https://www.museodelbrunello.it/experience-seamless-gaming-with-online-casinos/[/url] offer players an exciting alternative. These platforms allow users to enjoy games skipping the hassle of identity verification. It provides anonymity and simplicity for gamers seeking liberty in their gaming experience.
casino roulette, [url=https://distribuidores.seisa.com.co/das-ultimative-erlebnis-online-roulette-fur-echtes/]https://distribuidores.seisa.com.co/das-ultimative-erlebnis-online-roulette-fur-echtes/[/url] – Eine GlГјcksspielstГ¤tte Roulette-Tisch stellt dar eine fesselndes Abenteuer. Zocker versuchen, ihre Gelder erfolgreich zu setzen. Die Aufregung dieses Klassikspiels zieht Spieler an.
ACA 203 lands in Tashkent with a high-stakes flyweight headliner and a card that leans heavily into the promotion’s regional strength in Uzbekistan .
Casino Utan Svensk Licens, [url=https://keystechservices.com/2026/03/30/casino-p-natet-utan-svensk-licens-en-djupgende-2/]https://keystechservices.com/2026/03/30/casino-p-natet-utan-svensk-licens-en-djupgende-2/[/url] presenterar en unik upplevelse för spelare vilka utforska spännande spelalternativ. Här kan man njuta en värld av nöje utan strikta svenska regler. Det är en mängd attraktiva bonusar särskilt högkvalitativa spel. Casino Utan Svensk Licens möjliggör att uppleva nöje på ett annorlunda sätt.
Playing at an online casino, [url=https://www.pcstospiti.gr/2026/03/31/the-impact-of-8777bd-in-todays-digital-landscape/]https://www.pcstospiti.gr/2026/03/31/the-impact-of-8777bd-in-todays-digital-landscape/[/url] offers a thrilling experience for players. By using various games like slots, blackjack, and poker, participants can seek their chances. Join the world of online casino today and experience the enthrallment that awaits!
https://mikefromgidstats.substack.com/p/aca-203-betting-hunting-value-in
If you want a card where the odds-setters more or less checked the stats and left it at that , ACA 203 taking place in Tashkent is a treasure trove you won’t want to miss.
The ACA 203 card arriving in Tashkent on May 8th offers a quintessential look at the elite, gritty fighting style that characterizes ACA .
ares market https://darknet-markets-onion.com/
ACA 203 is not simply another regional show; it is a crossroads .
Прошу прощения, что вмешался… У меня похожая ситуация. Давайте обсудим.
мебель под заказ, [url=https://cache.julialang.org/https://www.wantedly.com/id/pan_mebel]https://cache.julialang.org/https://www.wantedly.com/id/pan_mebel[/url] — это отличный способ создать уникальные интерьеры. Индивидуальная мебель позволит реализовать ваши идеи. Мастера помогут выбрать декор, которые идеально подойдут.
онлайн казино бонусы, [url=https://www.medicalmarijuanabarcelona.com/kak-ustroeno-kazino-columbus-osobennosti-i/]https://www.medicalmarijuanabarcelona.com/kak-ustroeno-kazino-columbus-osobennosti-i/[/url] привлекают многих игроков, предлагая привлекательные предложения. Получив бонусы, вы имеете возможность увеличить свой банкролл и увеличить возможности для выигрышной игры.
Exploring the allure of live roulette sites, [url=https://sabaqinsure.ly/2026/04/02/discover-the-best-live-roulette-casinos-in-the-uk-2/]https://sabaqinsure.ly/2026/04/02/discover-the-best-live-roulette-casinos-in-the-uk-2/[/url] offers enthusiasts a distinct experience. Through real dealers, players can experience an immersive atmosphere. Choosing the right platform enhances the player’s experience, making every spin more exciting. So dive into the world of live roulette sites!
In the world of web wagering, no KYC casinos, [url=https://clearinghouseaccucheck.com/the-rise-of-online-casinos-without-verification-a/]https://clearinghouseaccucheck.com/the-rise-of-online-casinos-without-verification-a/[/url] are gaining popularity. These platforms allow players to enjoy thrilling games without the hassle of identity verification. This approach appeals to those who value anonymity, enabling quick and easy access to gaming without cumbersome processes. With many options available, no KYC casinos provide a accessible solution for enthusiasts looking to explore their favorite games.
online roulette, [url=https://revive.atulenterprises.com/2026/04/09/roulette-spielen-tipps-strategien-und-mehr/]https://revive.atulenterprises.com/2026/04/09/roulette-spielen-tipps-strategien-und-mehr/[/url] ist ein aufregendes Spiel für Spieler. Es bietet die Gelegenheit, im Internet zu gewinnen. Die Freude eines echten Casinos ist jetzt online verfügbar. Mit verschiedenen Ansätzen kann jeder seine Chance erhöhen. Gewinne im Spiel können schnell erzielt werden, was das Spiel noch spannender macht. Online Roulette zieht zahlreiche Spieler an.
Looking for the best virtual gaming alternatives? Check out the top non GamStop casino, [url=https://monteur.rawa-web.de/exploring-gambling-sites-that-don-t-use-gamstop-5/]https://monteur.rawa-web.de/exploring-gambling-sites-that-don-t-use-gamstop-5/[/url], where you can have a variety of captivating games and generous bonuses. These venues offer autonomy to play without restrictions!
darknet market https://darknet-markets-onion.com/
torzon darkweb https://onion-darknet-markets.com/
Online gaming has gained immense popularity due to its convenience and accessibility. sports betting online, [url=http://www.thedroolitzer.com/1xbet-menangkan-taruhan-anda-dengan-mudah-di/]http://www.thedroolitzer.com/1xbet-menangkan-taruhan-anda-dengan-mudah-di/[/url] allows enthusiasts to place their wagers from the comfort of their homes. A variety of options exist, players can easily find the best odds and markets. Grasping the betting odds is crucial for successful betting. Additionally, monitoring statistics can improve strategies.
Фрукти з доставкою, [url=https://01.xxxr.jp/hello-world/]https://01.xxxr.jp/hello-world/[/url] ідеально підходять для тих, хто цінує свіжість. Вони завжди соковиті і доставляються прямо до вашого дверей. Насолоджуйтесь різноманіттям смаків, не виходячи з дому.
darkmarket link https://onion-darknet-markets.com/
онлайн казино, [url=http://www.uopt-za.com/2026/04/12/chto-takoe-columbus-casino-obzor-i-osobennosti-6/]http://www.uopt-za.com/2026/04/12/chto-takoe-columbus-casino-obzor-i-osobennosti-6/[/url] предлагают игрокам неповторимую возможность увидеть удачу, участвуя в широких играх. Игры с джекпотом до покера, каждый имеет возможность что-то интересное. Простота доступа влекут множество участников.
Я считаю, что Вы не правы. Могу отстоять свою позицию. Пишите мне в PM, пообщаемся.
ремонт квартир под ключ, [url=https://Doplayer.net/allembed/watchrap.php?v=68747470733A2F2F6B6F6D666F7274766C2E72752F-8%3Ehttp]https://Doplayer.net/allembed/watchrap.php?v=68747470733A2F2F6B6F6D666F7274766C2E72752F-8%3Ehttp[/url] — это простое решение для тех, кто хочет освободиться от хлопот. Команда занимаются всем: от подбора до реализации работ. Вы получаете профессиональный результат без лишних переживаний.
When exploring top options, the best live roulette casinos, [url=https://coursesyouneednow.com/post/158032]https://coursesyouneednow.com/post/158032[/url] offer engaging experiences. Players can enjoy interactive action with skilled dealers. The variety of games ensures endless fun for all.
Finding the best non-GamStop can enhance your gaming experience. Players often seek exciting platforms, and top non GamStop casinos, [url=https://intersel.com/exploring-gambling-sites-not-on-gamstop/]https://intersel.com/exploring-gambling-sites-not-on-gamstop/[/url] offer attractive offers while ensuring smooth gameplay. Enjoy multiple game selections and reliable transactions. Join a community that holds dear responsible gaming!
Das casino roulette, [url=https://baak.unisap.ac.id/die-faszination-des-casino-roulettes-tipps-und/]https://baak.unisap.ac.id/die-faszination-des-casino-roulettes-tipps-und/[/url] beinhaltet eine spannende Chance, die Spieler zu begeistern. Ob geГјbte Zocker oder Unerfahrene, casino roulette lockt jedermann.
Discovering the top non GamStop casino, [url=https://www.lionsroarcapital.com/casino-companies-not-on-gamstop-your-guide-to-2/]https://www.lionsroarcapital.com/casino-companies-not-on-gamstop-your-guide-to-2/[/url] is essential for players seeking a seamless gaming experience. These platforms offer thrilling games, attractive bonuses, and secure transactions. Enjoy your favorite games without restrictions!
sports betting, [url=http://koncerty.one.pl/koncerty.xx.pl/2026/04/experience-betting-excellence-with-betwinner/]http://koncerty.one.pl/koncerty.xx.pl/2026/04/experience-betting-excellence-with-betwinner/[/url] – Betting on sports attracts many enthusiasts who hunt for ways to maximize their profits. Understanding the probabilities is key to making informed selections. Always investigate teams and players before placing a bet.
drughub link https://darknet-markets-onion.com/
torzon onion https://darknetmarketsreview.com/
онлайн казино, [url=http://lucyhillman.com/?p=4326]http://lucyhillman.com/?p=4326[/url] предлагает уникальные шансы для игроков. Любой может познать удачу, играя на азартных приглашениях. Разнообразный выбор слотов позволяет доставлять удовольствие азартом прямо из дома.
tordex darknet https://darknet-markets-onion.com/
Да, я вас понимаю. В этом что-то есть и мне кажется это отличная мысль. Я согласен с Вами.
AlГ©m do Portugal Le Fisherman sГtio oficial, [url=http://www.altelefonino.it/2019/01/30/ciao-mondo/]http://www.altelefonino.it/2019/01/30/ciao-mondo/[/url], a experiГЄncia de pesca em Portugal Г© inesquecГvel. Os pescadores especialistas oferecem tours emocionantes. Fruir das belas paisagens Г© uma vivГЄncia.
echtgeld roulette, [url=https://test.lsdassociates.com/die-faszination-des-casino-roulettes-strategien/]https://test.lsdassociates.com/die-faszination-des-casino-roulettes-strategien/[/url] ist ein spannendes Spiel, das denjenigen Nervenkitzel liefert. Die Möglichkeit, gewissenhafte Beträge zu gewinnen, macht das Spiel anziehend. Erlebe die Welt von echtgeld roulette und fühle das besondere Reiz des Glücksspiels.
Hey There. I found your blog using msn. This is
a very well written article. I’ll be sure to bookmark it and come back
to read more of your useful info. Thanks for the post.
I’ll certainly comeback.
sports betting online, [url=https://mendenarena.de/explore-the-world-of-online-betting-with-betwinner-2/]https://mendenarena.de/explore-the-world-of-online-betting-with-betwinner-2/[/url] has become a popular pastime for many. With various platforms available, enthusiasts can easily set bets on their favorite teams or events. Comprehending the odds is crucial for triumph in this thrilling world of wagers.
non GamStop online casino, [url=https://www.sowovo.org/2026/03/14/discovering-british-casinos-not-on-gamstop-your/]https://www.sowovo.org/2026/03/14/discovering-british-casinos-not-on-gamstop-your/[/url] offers players an opportunity to enjoy selection of games without restrictions. Players can experience thrilling slots, table games, and live casino options. This liberty attracts many who seek an exciting gaming experience.
drughub market https://onion-darknet-markets.com/
dark web markets https://darknet-markets-onion.com/
онлайн казино слоты, [url=https://anzontoyota.co.id/kak-najti-aktualnye-bonusy-na-onlajn-kazino/]https://anzontoyota.co.id/kak-najti-aktualnye-bonusy-na-onlajn-kazino/[/url] дарят уникальную возможность освоить удачу. Разный игровой автомат включает свою концепцию, вследствие чего позволяет игрокам пробовать то, которое. Феноменальные бонусные раунды являются добавить чувств в игровой процесс, делая его весьма захватывающим.
At the appealing realm of Chicken Road casinos, [url=https://qualitypoint.com.do/is-chicken-road-legit-uncovering-the-truth-behind-3/]https://qualitypoint.com.do/is-chicken-road-legit-uncovering-the-truth-behind-3/[/url], visitors can enjoy an range of exciting activities. When one prefer game machines or table games, the rush is extraordinary. Dive into the lively atmosphere and unleash your fortune today!
Im spannenden Spiel von casino live roulette, [url=https://aiobooking.it/das-faszinosum-von-casino-live-roulette-spannung/]https://aiobooking.it/das-faszinosum-von-casino-live-roulette-spannung/[/url] erleben die Teilnehmer die Einzigartigkeit von realen Croupiers. Immer mehr Drehungen bieten fesselnde Unterhaltung und die Möglichkeit, richtige Gewinne zu erzielen. Das Kern des Spiels schlägt heftig, wenn die Spielmünze über das Rad tanzt und die Aufregung steigt!
Да, действительно. Я присоединяюсь ко всему выше сказанному. Можем пообщаться на эту тему.
Каждая женщина стремится к гармонии и счастью. женский журнал советы, [url=http://mktdakenh.com/chao-moi-nguoi-1.html]http://mktdakenh.com/chao-moi-nguoi-1.html[/url] предлагают множество идей о том, как улучшить свою жизнь. Не забудьте, что здоровье – это важный аспект. Физическая активность помогут вам оставаться в форме.
drughub market darknet https://onion-darknet-markets.com/
darknet drug links https://darknetmarketsreview.com/
Gambling on sports betting, [url=http://dream.a-star.co.jp/20260417531262/]http://dream.a-star.co.jp/20260417531262/[/url] has become increasingly popular among fans. Individuals enjoy the thrill of foreseeing outcomes, adding excitement to games. Understanding the odds is vital for success in this entertaining world.
Finding the right non GamStop online casino, [url=https://alsconciergevoyage.com/the-ultimate-guide-to-the-best-gambling-sites-not/]https://alsconciergevoyage.com/the-ultimate-guide-to-the-best-gambling-sites-not/[/url] can enhance your gaming experience. Players appreciate varied options and exciting games. Many opt for platforms that offer generous bonuses and profitable promotions. Enjoying a broad selection of slots and table games is essential for a unforgettable time. A great participant interface contributes to a smoother experience. This makes non GamStop online casino a excellent choice for those who cherish online gaming without restrictions.
онлайн казино играть, [url=https://broemmling-metallbau.de/kogda-nuzhno-zerkalo-legzo-casino-1572148152/]https://broemmling-metallbau.de/kogda-nuzhno-zerkalo-legzo-casino-1572148152/[/url] стало популярным развлечением для многих. Пользователи выбирают разные игры, такие как слоты. Простота доступа поманивает первоначальных и бывалых игроков. Поощрения делают процесс весьма увлекательным и захватывающим.
tordex url https://onion-darknet-markets.com/
PayPal casino non GamStop, [url=http://www.danielvillalona.com/discover-paypal-casinos-not-with-gamstop-for-a/]http://www.danielvillalona.com/discover-paypal-casinos-not-with-gamstop-for-a/[/url] – Several players seek a PayPal casino non GamStop for its convenience of making transactions. Such casinos offer a chance to enjoy games without the restrictions imposed by GamStop. Gamblers can experience their favorite games in a secure environment.
Das führende live roulette bietet Liebhabern ein unvergessliches Erlebnis. Durch die interaktive Atmosphäre fühlen sich die sofort einbezogen. Der Echtzeit Spaß sorgt für Nervenkitzel. genussvoll geht man die attraktive Casino-Umgebung direkt aus dem Wohnzimmer aus. bestes live roulette, [url=http://www.fitcom.com.tr/live-roulette-spielen/die-besten-live-roulette-casinos-im-jahr-2023-5.html]http://www.fitcom.com.tr/live-roulette-spielen/die-besten-live-roulette-casinos-im-jahr-2023-5.html[/url] bleibt unübertroffen in der Community der Online-Spiele.
Я об этом ничего не знаю
Использование VPN-сервиса стало необходимостью в современном мире. С помощью ВПН без рекламы, [url=http://center.kosin.ac.kr/cems//bbs/board.php?bo_table=free&wr_id=2073923]http://center.kosin.ac.kr/cems//bbs/board.php?bo_table=free&wr_id=2073923[/url] вы можете обезопасить свои данные и обойти геоблокировки. Кроме того такие услуги разрешают анонимность в сети. Не забывайте о необходимости выбора проверенного провайдера, чтобы избавиться от утечек.
https://medium.com/@mikefromgidstats/aca-203-fading-the-hype-in-tashkent-cb7a5d329239
If you want an event where betting lines appear to have been drawn purely from fighter records with little else factored in, ACA 203 in Tashkent is a gold mine for you .
sports betting online, [url=https://lipo.wejustdesign.com/betwinner-your-ultimate-online-betting-experience/]https://lipo.wejustdesign.com/betwinner-your-ultimate-online-betting-experience/[/url] is witnessing immense growth in recent years. Countless fans currently engage in this entertaining activity. Through various platforms, bettors can easily execute their bets on a wide range of sports. Moreover, guides are available to help beginners comprehend the intricacies of sports betting online.
UFC ACA 203 Gaforov vs Akopyan
The air in Tashkent’s Humo Arena this May won’t just be thick with the roar of a partisan crowd ; it will instead weigh down on the professional lifeline of athletes who have dedicated lifetimes to chasing the ultimate prize.
ACA 203 is not simply another event on the circuit; it marks a critical crossroads for all involved.
ares link https://darknetmarketsreview.com/
Finding reliable wagering platforms not on GamStop can be difficult. These sites offer thrilling options for bettors who want flexibility. Many such sportsbooks not on GamStop, [url=http://weavora.com/blog/2026/03/14/find-the-best-sports-betting-sites-not-on-gamstop/]http://weavora.com/blog/2026/03/14/find-the-best-sports-betting-sites-not-on-gamstop/[/url] provide bonuses and promotions to attract players. Make sure to explore each platform to ensure security. Enjoy the options they bring!
UAE Warriors 70, set to take place on May 8, 2026, at Abu Dhabi’s Space42 Arena is a perfect example of this.
В мире азартных игр онлайн казино скачать, [url=https://www.cucinanuova.com/2026/04/13/kak-ispolzovat-bonus-kod-joycasino-dlja/]https://www.cucinanuova.com/2026/04/13/kak-ispolzovat-bonus-kod-joycasino-dlja/[/url] | загрузить | установить | получить – это простой способ насладиться играми. Выбирая надежную платформу, вы открываете доступ к уникальным развлечениям. Не упустите шанс испытать удачу и выиграть крупные призы!
Fishin’ Frenzy casinos, [url=https://vanisedainese.com.br/the-essence-of-play-unlocking-creativity-and/]https://vanisedainese.com.br/the-essence-of-play-unlocking-creativity-and/[/url] – Casinos featuring Fishin’ Frenzy offer engaging games for enthusiasts. Discover a realm of joy and jackpots in vibrant settings.
roulette online live, [url=https://dimpleshorsetreats.com/online-live-roulette-spielen-der-ultimative-2/]https://dimpleshorsetreats.com/online-live-roulette-spielen-der-ultimative-2/[/url] ist eine fesselnde Art, die Roulette-Erfahrung direkt online zu testen. Neue Moderatoren bringen der Atmosphäre real. Immer mehr Nutzer finden Spaß an solchen Form des Glücksspiels.
nexus darknet access https://onion-darknet-markets.com/
cocorico darknet url https://darknetmarketsreview.com/
Вас посетила замечательная идея
ВПН ProstoVPN, [url=http://w7phone.ru/go/aHR0cHM6Ly9zaXRlY2xpbmljLnVhL3J1L2ZvcnVtLz92aWV3PXRocmVhZCZpZD0yNDIw]http://w7phone.ru/go/aHR0cHM6Ly9zaXRlY2xpbmljLnVhL3J1L2ZvcnVtLz92aWV3PXRocmVhZCZpZD0yNDIw[/url] – это идеальный решение для защиты личной безопасности. Он предлагает анонимность в сети и помогает обходить локальные блокировки. Пользуйтесь ВПН ProstoVPN и наслаждайтесь безопасностью в Интернете.
sports betting, [url=http://cleanpark.ge/ge/betwinner-your-ultimate-online-betting-experience-31/]http://cleanpark.ge/ge/betwinner-your-ultimate-online-betting-experience-31/[/url] – Sports betting has gained immense popularity. Fans are drawn to the thrill of predicting outcomes. Through investigating statistics and trends, bettors can make informed decisions.
bingo not on GamStop, [url=https://www.southerngospelconcert.com/non-gamstop-bingo-sites-your-guide-to-alternative/]https://www.southerngospelconcert.com/non-gamstop-bingo-sites-your-guide-to-alternative/[/url] offers players a chance to enjoy their favorite games without restrictions. Many platforms provide exciting options, making it easy to unique experiences. Don’t miss out on the thrill available now!
tordex market url https://onion-darknet-markets.com/
В онлайн казино бонусы, [url=https://elitetaxxrelief.com/casino13044/kazino-melstroj-otkrojte-mir-azartnyh-igr/]https://elitetaxxrelief.com/casino13044/kazino-melstroj-otkrojte-mir-azartnyh-igr/[/url] привлекают множество игроков, позволяя им увеличить свои шансы на выигрыш. Любой бонусов формирует весьма укрепить игровой опыт. Осведомленность о видах бонусов поможет максимально использовать ваши возможности для выигрыша.
Looking for top-notch online gambling? Discover top non GamStop casinos, [url=http://earthtechno1.com/starsoil/20260410-182058]http://earthtechno1.com/starsoil/20260410-182058[/url] featuring engaging games and generous bonuses. Join now for engaging experiences without restrictions that GamStop imposes!
roulette online live, [url=https://protectaproduct.net/wp/live-roulette-deutschland-faszination-des-online/]https://protectaproduct.net/wp/live-roulette-deutschland-faszination-des-online/[/url] ist ein spannendes Spiel, das Spieler in Live-Atmosphäre begeistert. Mit echten Dealern und einer mitreißenden Umgebung erleben die Teilnehmer Aufregung pur. Das benutzerfreundliche Interface ermöglicht leichte Wettmöglichkeiten für alle. Rouletterunden können rasch wechseln und hohe Gewinne bieten.
Конечно. Я согласен с Вами.
запуск новых блокчейн-проектов, [url=https://www.misilmerinews.it/2019/06/24/addio-gianfranco-lamico-di-tutti/]https://www.misilmerinews.it/2019/06/24/addio-gianfranco-lamico-di-tutti/[/url] предлагает множество вариантов для участников. Люди проект обладает свои особые функции, которые могут перевернуть текущий мир технологий.
torzon market link https://darknetmarketsreview.com/
Online world of sports betting is expanding. With various platforms available, enthusiasts can easily place bets on their favorite teams. sports betting online, [url=https://zizuvizu.bg/betwinner-la-guia-definitiva-para-apostar-de/]https://zizuvizu.bg/betwinner-la-guia-definitiva-para-apostar-de/[/url] has changed the way fans engage with the favorite games. As progress advances, the possibilities for winning increase.
онлайн казино, [url=https://zipclinik.com/zachem-nuzhno-zerkalo-lootrun-1569870777/]https://zipclinik.com/zachem-nuzhno-zerkalo-lootrun-1569870777/[/url] приглашает игрокам уникальную возможность испытать азарт, не покидая своего жилища. Возможности игр восхитит даже искушённых казиношников. Выбирая слоты, многие открывают в мир красивых игр. Не упустите шанс стать следующим победителем!
[url=https://darknet-markets-onion.com/ ]nexus darkweb link [/url] https://darknet-markets-onion.com/
football not on GamStop, [url=https://akhmadiinkhotkhon-1.ub.gov.mn/?p=134244]https://akhmadiinkhotkhon-1.ub.gov.mn/?p=134244[/url] offers enthusiasts a unique opportunity to engage in thrilling matches. Fans can explore various platforms supplying access to exciting games and wagering experiences. It’s a perfect space for fans desiring alternatives free from restrictions.
Magic Win casino, [url=http://framework.drcoders.com/exploring-the-best-sister-sites-of-magic-win/]http://framework.drcoders.com/exploring-the-best-sister-sites-of-magic-win/[/url] offers an enjoyable gaming experience for customers. With diverse options available, players can find something to fit their desires. Enjoy premium games and fantastic bonuses that improve your chances of winning big at Magic Win casino!
Das bestes live roulette casino, [url=https://www.bsb-schuler.de/roulette-online-live-spielen-sie-mit-echtzeit/]https://www.bsb-schuler.de/roulette-online-live-spielen-sie-mit-echtzeit/[/url] bietet Spielern eine fesselnde Erfahrung. Dank realen Dealern erfahren Sie die Spannung des Spiels an Ihrem persönlichen Umfeld. Zahlreichen Möglichkeiten erhöhen die Wahrscheinlichkeiten auf große Gewinne.
[url=https://onion-darknet-markets.com/ ]nexus market [/url] https://onion-darknet-markets.com/
Betting on sports can be thrilling, but it requires strategy. Understanding the odds is essential. Refrain from betting impulsively. Analyze teams and players to make informed decisions. Remember, sports betting, [url=https://www.formacionquality.es/discover-betwinner-a-comprehensive-guide-to-online/]https://www.formacionquality.es/discover-betwinner-a-comprehensive-guide-to-online/[/url] should be fun!
Я думаю, что Вас обманули.
обменник криптовалюты, [url=https://mrscindiaspn.com/mr-scindia-public-school-nurturing-leaders-of-tomorrow/]https://mrscindiaspn.com/mr-scindia-public-school-nurturing-leaders-of-tomorrow/[/url] – это удобное решение для тех, кто хочет обменять свои цифровые активы. Такие платформы предоставляют шанс быстро и безопасно проводить сделки. Выбор обменника влияет на курс и комиссию, поэтому важно тщательно подойти к этому процессу.
онлайн казино, [url=https://www.growheim.de/chto-vazhno-znat-o-lootrun-1509389965/]https://www.growheim.de/chto-vazhno-znat-o-lootrun-1509389965/[/url] предлагают игрокам захватывающий опыт. В этих заведениях можно испытать многообразием игр. Привлекательные акции привлекают многих пользователей. Каждый игрок обнаружит что-то по предпочтению и возможностям.
[url=https://onion-darknet-markets.com/ ]nexusdarknet site link [/url] https://onion-darknet-markets.com/
For players seeking freedom, numerous online casinos operate without restrictions. These venues offer an alternative to traditional gaming, attracting users who prefer liberal betting. Among them, sites not using GamStop, [url=https://event.heliosgaming.fr/2026/03/14/discover-the-best-casinos-that-aren-t-on-gamstop-2/]https://event.heliosgaming.fr/2026/03/14/discover-the-best-casinos-that-aren-t-on-gamstop-2/[/url] provide unique opportunities.
Playing online can be exciting, especially with options like roulette not on gamstop, [url=https://huzen.work/exploring-live-roulette-options-outside-gamstop/]https://huzen.work/exploring-live-roulette-options-outside-gamstop/[/url]. Many players seek alternatives to traditional platforms, opting for casinos that provide unique experiences. Enjoying the thrill of the game, they find fresh avenues to win big and indulge in their passion. Roulette not on gamstop offers opportunity without the usual restrictions, allowing enthusiasts to explore various gambling options. Experience the challenge today while enjoying a wide selection of games.
Erleben Sie das bestes live roulette casino, [url=https://www.ehdf.com/live-roulette-deutschland-der-ultimative-guide-fur/]https://www.ehdf.com/live-roulette-deutschland-der-ultimative-guide-fur/[/url], wo Spannung und Nervenkitzel aufeinandertreffen. Dieser Ort ist ideal für Fans von echten-Spielen. Tauchen Sie ein der einmaligen Atmosphäre und kommunizieren Sie mit echten Croupiers. Verpassen Sie nicht die Möglichkeit, Ihr Glück zu versuchen!
sports betting online, [url=http://www.rehemastuckey.com/review/casinobet16042/betwinner-review-your-ultimate-guide-to-online/]http://www.rehemastuckey.com/review/casinobet16042/betwinner-review-your-ultimate-guide-to-online/[/url] has turned into a popular activity for many enthusiasts. Thanks to multiple platforms, users can easily place their bets. However, it’s crucial to research odds and understand the game before betting. Doing this can improve your chances of winning significantly, making your experience more enjoyable.
Жаль, что сейчас не могу высказаться – вынужден уйти. Но вернусь – обязательно напишу что я думаю по этому вопросу.
чат арбитражников telegram, [url=https://www.amdaprod.fr/?p=1766]https://www.amdaprod.fr/?p=1766[/url] — это среда для дискуссии опытом, где участники представляют стратегиями и идей. Каждый может найти интересную информацию для успешного заработка.
онлайн казино слоты, [url=http://www.kli.lt/chem-otlichaetsja-legzo-kazino-kazahstan-6/]http://www.kli.lt/chem-otlichaetsja-legzo-kazino-kazahstan-6/[/url] предлагают шикарный выбор аппаратов, каждый из которых содержит особенные тематики. Попробуйте удачу и выиграйте.
non gamstop roulette sites, [url=http://176.32.230.52/safabrications1.co.uk/?p=232238]http://176.32.230.52/safabrications1.co.uk/?p=232238[/url] offer players a chance to enjoy fascinating games without restrictions. With a plethora of choices, gamblers can explore numerous options to find their ideal gaming experience. These platforms bring excitement and charm for everyone seeking high-quality roulette action. Make the most of your gaming journey today!
roulette online echtgeld, [url=https://dipbike.ville-creteil.fr/efbl_skins/skin-thumbnail/]https://dipbike.ville-creteil.fr/efbl_skins/skin-thumbnail/[/url] bietet Spielern die Möglichkeit, spannende Gewinne zu erzielen. Die Plattformen sind mehrere Auswahl an Roulette-Varianten. Über strategischem Spiel können Nutzer ihre Chancen verbessern. Genießen Sie durch attraktiven Bonusangeboten, die Ihre Erfahrung erweitern.
[url=https://darknet-markets-onion.com/ ]nexus darkweb [/url] https://darknet-markets-onion.com/
Many players seek choices for online gambling, especially sites not using GamStop, [url=https://powercordlead.com/exploring-uk-online-casinos-not-on-gamstop/]https://powercordlead.com/exploring-uk-online-casinos-not-on-gamstop/[/url]. These platforms offer a wide range of games without self-exclusion limits. Users can enjoy wagering freely and securely, enhancing their gaming experience.
sports betting, [url=https://ameenz.com/betwinner-le-guide-ultime-pour-les-parieurs-en-3/]https://ameenz.com/betwinner-le-guide-ultime-pour-les-parieurs-en-3/[/url] – Sports betting is an exciting way to engage with your favorite teams. Engaging in bets can enhance the thrill of the game. Remember to analyze statistics and patterns before betting.
Поразительно! Изумительно!
Playing roulette not on gamstop, [url=https://loogi.es/discover-roulette-options-not-on-gamstop/]https://loogi.es/discover-roulette-options-not-on-gamstop/[/url] offers a thrilling experience for enthusiasts. Many players seek alternatives to enjoy games without restrictions. Various platforms allow users to explore the realm of roulette freely, without the limitations imposed by gamstop. Through novel online casinos, players can fully immerse themselves in the gameplay.
[url=https://darknetmarketsreview.com/ ]ares market [/url] https://darknetmarketsreview.com/
онлайн казино играть, [url=https://kevinshortland.co.uk/kak-otkryt-lutran-kazino-poshagovoe-rukovodstvo-2/]https://kevinshortland.co.uk/kak-otkryt-lutran-kazino-poshagovoe-rukovodstvo-2/[/url] – это уникальная возможность насладиться азартом, не выходя из дома. Любой участник может открыть захватывающие игры. Всегда доступны новые игры, что обогащает возможности для веселья.
non gamstop roulette sites, [url=http://appuser.azurewebsites.net/the-impact-of-game-settings-on-online-roulette-not/]http://appuser.azurewebsites.net/the-impact-of-game-settings-on-online-roulette-not/[/url] offer a thrilling experience for players seeking excitement outside traditional platforms. Those websites offer different options for roulette enthusiasts. With a wide range of games, players can discover unique betting opportunities and appealing bonuses. Choose a non gamstop roulette site to enhance your gaming adventure!
echtgeld roulette online, [url=http://giekaho6.linuxpl.eu/luzz/reformiert-soest/online-roulette-um-echtes-geld-strategien-und/]http://giekaho6.linuxpl.eu/luzz/reformiert-soest/online-roulette-um-echtes-geld-strategien-und/[/url] interessiert. Spieler können problemlos von daheim aus spielen. Die Menge an Varianten macht spannende Möglichkeiten. Mit attraktiven Boni können die Gewinnchancen erhöhen.
The surge of Chicken Road casinos, [url=https://www.mittaldiagnostics.org/explore-the-exciting-world-of-chicken-road-free-2/]https://www.mittaldiagnostics.org/explore-the-exciting-world-of-chicken-road-free-2/[/url] has transformed the gaming landscape dramatically. Customers are drawn to special fun options and exciting games, developing a dynamic atmosphere.
sports betting online, [url=https://janseverhuizingen.nl/betwinner-la-reference-des-paris-sportifs-en-ligne-4/]https://janseverhuizingen.nl/betwinner-la-reference-des-paris-sportifs-en-ligne-4/[/url] presents an entertaining opportunity to enjoy sports. With numerous platforms available, users can explore various odds. However, it’s vital to stay informed about strategies for successful outcomes.
[url=https://darknetmarketsreview.com/ ]black ops darknet url [/url] https://darknetmarketsreview.com/
все прям профи такие….
european roulette casino, [url=https://krestannavidieku.sk/2026/04/discover-the-thrill-of-european-roulette-casinos-2/]https://krestannavidieku.sk/2026/04/discover-the-thrill-of-european-roulette-casinos-2/[/url] offers a thrilling experience for players. This game combines chance with strategy, making it popular in various establishments. Many enthusiasts enjoy betting on numbers, colors, or sections in the game. With its simple rules, this attracts both new and experienced gamers.
онлайн казино скачать, [url=https://www.northernplainslubes.com/?p=159452]https://www.northernplainslubes.com/?p=159452[/url] – это удобный способ насладиться азартными играми прямо на своём устройстве. Инсталляция приложения позволит испытать удачу в любое время. Широкий выбор развлечений удовлетворит даже игроков.
Playing roulette not on gamstop, [url=http://www.grantsvanillacustard.com/archives/565657]http://www.grantsvanillacustard.com/archives/565657[/url] offers a unique experience for enthusiasts. Countless players seek solutions that allow them to enjoy the game without restrictions. Online casinos provide captivating gameplay. It’s essential to find reputable sites for a safe experience.
echtgeld online roulette, [url=https://kplast.com.tr/roulette-online-spielen-mit-echtgeld-tipps-und/]https://kplast.com.tr/roulette-online-spielen-mit-echtgeld-tipps-und/[/url] bietet Spielern die Möglichkeit, echtes Geld von Zuhause aus zu gewinnen. Die🎰 Möglichkeiten sind vielfältig. Dank vielfältige Strategien können Nutzer die Gewinnchancen verbessern. Vergnügen und Emotionen sind versprochen. Echte Gewinne erwarten dich im interessanten Spiel!
[url=https://darknetmarketsreview.com/ ]drughub link [/url] https://darknetmarketsreview.com/
sports betting, [url=https://www.ellalan.com/2026/04/16/decouvrez-1xbet-la-reference-des-paris-sportifs-en/]https://www.ellalan.com/2026/04/16/decouvrez-1xbet-la-reference-des-paris-sportifs-en/[/url] – Betting on sports is an exciting activity that attracts many enthusiasts. This involves predicting outcomes and placing bets on multiple sporting events. Using the proper strategies, you can increase your chances of winning.
If you’re searching for the best non UK casino sites, [url=https://h2852162.stratoserver.net/index.php/2026/03/14/exploring-non-ukgc-online-casinos-a-guide-for/]https://h2852162.stratoserver.net/index.php/2026/03/14/exploring-non-ukgc-online-casinos-a-guide-for/[/url], you’ve come to the right place. Online gaming enthusiasts can explore diverse options worldwide. These sites offer thrilling games, lucrative bonuses, and reliable payment methods, ensuring an enjoyable experience.
По моему мнению Вы не правы. Могу отстоять свою позицию. Пишите мне в PM, поговорим.
Negli ultimi anni, gli casino online europei, [url=https://kaukal.hr/piattaforme-europee-un-viaggio-nel-mondo-del-gioco/]https://kaukal.hr/piattaforme-europee-un-viaggio-nel-mondo-del-gioco/[/url] hanno numerose gamma di opportunitГ per scommettere. Attraverso la tecnologia, i giocatori possono entrare a piani unici e avvincenti. Ciononostante, ГЁ importante scegliere un’ottima piattaforma per entrare.
онлайн казино бонусы, [url=http://rumbl.app/?p=22846]http://rumbl.app/?p=22846[/url] предоставляют игрокам отличную возможность увеличить свои шансы на выигрыш. Бонусы могут включать безвозмездные вращения и капитал на счет. Это помогает мотивировать новых игроков и усилить игровой процесс.
[url=https://darknet-markets-onion.com/ ]nexus market [/url] https://darknet-markets-onion.com/
[url=https://darknetmarketsreview.com/ ]silk road darknet market [/url] https://darknetmarketsreview.com/
echtgeld online roulette, [url=https://ganoolqq.com/2026/04/17/roulette-spielen-echtgeld-strategien-tipps-und-2/]https://ganoolqq.com/2026/04/17/roulette-spielen-echtgeld-strategien-tipps-und-2/[/url] ist ein aufregendes Spiel, das zahlreiche Spieler anzieht. Dank der verschiedenen Setzmöglichkeiten stellt es mitreißende Abenteuer. Jede Runde kann in hohen Gewinnen bringen. Spiele gleich Echtgeld!
[url=https://onion-darknet-markets.com/ ]dark matter market darknet [/url] https://onion-darknet-markets.com/
sports betting online, [url=https://informaciondecontacto.lalolaapp.com/exploring-the-world-of-1xbet-a-comprehensive-guide-23/]https://informaciondecontacto.lalolaapp.com/exploring-the-world-of-1xbet-a-comprehensive-guide-23/[/url] offers an exciting opportunity for fans to engage with their favorite events. With a vast range of options, gamblers can explore various choices to enhance their participation.
[url=https://darknetmarketsreview.com/ ]cocorico link [/url] https://darknetmarketsreview.com/
Огромное спасибо за поддержку, как я могу Вас отблагодарить?
If you’re looking for the best gaming websites, live roulette sites, [url=https://shop.haciendadelsolcr.com/discover-the-best-online-casino-live-roulette-6/]https://shop.haciendadelsolcr.com/discover-the-best-online-casino-live-roulette-6/[/url] offer an immersive experience. Players can connect with real dealers and enjoy the thrill of revolving the wheel from home. Don’t miss out on the excitement of live roulette sites!
Welcome to Cosmic Spins casino, [url=http://czb.grafikmk.pl/discovering-cosmic-spins-sister-sites-a-cosmic/]http://czb.grafikmk.pl/discovering-cosmic-spins-sister-sites-a-cosmic/[/url], where the fun never ends! Players can discover a wide selection of games, from slots to live dealer options. Join now and start your luck!
[url=https://darknet-markets-onion.com/ ]dark matter market url [/url] https://darknet-markets-onion.com/
онлайн казино, [url=https://igrejacolheita.com.br/2026/04/14/chem-interesny-bonusy-monro-casino-1514435371/]https://igrejacolheita.com.br/2026/04/14/chem-interesny-bonusy-monro-casino-1514435371/[/url] приобретают всё большей популярностью среди игроков. Здесь доступны на различный вкус игры, что даёт шанс каждому выбрать что-то по душе. Участники имеют возможность заниматься в любое время и в любом подходящем месте, что добавляет динамику и удобство.
[url=https://darknetmarketsreview.com/ ]nexus darknet site [/url] https://darknetmarketsreview.com/
If you are searching for the best roulette casino, [url=https://www.casefileschicago.com/solwaydaf/discover-new-roulette-sites-where-innovation-meets/]https://www.casefileschicago.com/solwaydaf/discover-new-roulette-sites-where-innovation-meets/[/url], you’ll find a variety of options that offer exciting games and top bonuses. Opting for the right casino can improve your gaming experience tremendously. Enjoy the thrill of spinning the wheel!
online roulette echtgeld, [url=https://www.sislikoltukyikama.net/echtgeld-roulette-online-gewinnchancen-und/]https://www.sislikoltukyikama.net/echtgeld-roulette-online-gewinnchancen-und/[/url] ist ein spannendes Spiel, welches mit echtem Geld ausgetragen wird. Die Faszination versteckt sich in der Möglichkeit, flink zu gewinnen. Mit verschiedenen Ansätzen und Typen kann man die persönlichen Chancen erhöhen.
[url=https://darknet-markets-onion.com/ ]dark market url [/url] https://darknet-markets-onion.com/
sports betting, [url=https://unboxedexpestg.wpengine.com/maximize-your-betting-experience-with-1xbet/]https://unboxedexpestg.wpengine.com/maximize-your-betting-experience-with-1xbet/[/url] – Betting on sports has become increasingly popular among fans and enthusiasts. It offers excitement as people expect their predictions are correct. Understanding chances is key to profitable betting.
Эффективно?
Playing instant roulette at a casino site offers an thrilling experience. With live hosts, you can enjoy the environment of a physical casino. Joining a live roulette casino site, [url=https://nubia.mn/best-online-casino-live-roulette/]https://nubia.mn/best-online-casino-live-roulette/[/url] provides a chance to engage with others while placing your bets. The superior streaming allows for a seamless experience, making it easy to enjoy this classic game from the comfort of your home.
Exploring the realm of non UKGC casino sites, [url=http://www.matrixmy.com/2026/03/13/exploring-non-ukgc-online-casinos-opportunities-3/]http://www.matrixmy.com/2026/03/13/exploring-non-ukgc-online-casinos-opportunities-3/[/url] can be captivating. Players are likely to see a wide range of games and offers that are not available elsewhere. These platforms frequently offer special gaming experiences that serve different demographics. Always confirm the reliability of these sites before diving in.
онлайн казино, [url=http://lp.raizesmoveissobmedida.com.br/2026/04/14/chto-nuzhno-znat-o-monro-istorija-fakty-i-kurezy/]http://lp.raizesmoveissobmedida.com.br/2026/04/14/chto-nuzhno-znat-o-monro-istorija-fakty-i-kurezy/[/url] привлекает игроков современными технологиями и разнообразным выбором игр. Каждый имеет возможность найти что-либо по своему вкусу. Предоставляемые бонусы только крепят интерес к азартным играм. Попробуйте удачу и восхищайтесь игрой в онлайн казино!
casino live roulette, [url=https://hyperwarped.com/roulette-live-spielen-das-beste-aus-dem-casino/]https://hyperwarped.com/roulette-live-spielen-das-beste-aus-dem-casino/[/url] zeigt ein einmaliges Spielerlebnis. Auf Einsatzmöglichkeiten zeigen sich als. Nutzen Sie die fesselnde Atmosphäre und lebendige Spielsitzungen!
Non GamStop casinos, [url=http://temp1.manatec.in/?p=135840]http://temp1.manatec.in/?p=135840[/url] offer players a chance to enjoy a wide array of games free from the limitations set by GamStop. These platforms offer easier freedom for gamers, enabling them to uncover new opportunities and maximize their pleasure.
Я извиняюсь, но, по-моему, Вы допускаете ошибку.
Discovering numerous live roulette sites, [url=http://www.nave.ufc.br/the-ultimate-guide-to-live-roulette-sites-11/]http://www.nave.ufc.br/the-ultimate-guide-to-live-roulette-sites-11/[/url] offers a thrilling experience for gaming enthusiasts. These platforms present real-time gameplay, enhancing the overall casino atmosphere. With professional dealers and absorbing environments, players can savor the thrill of a tangible casino right at home. Choose your favorite live roulette sites and explore the excitement as you twirl the wheel!
yacht rent in Montenegro https://rent-a-yacht-montenegro.com
[url=https://onion-darknet-markets.com/ ]darknet marketplace [/url] https://onion-darknet-markets.com/
В онлайн казино слоты, [url=https://www.grupafyi.pl/casino15047/chto-poprobovat-snachala-v-spin-vash-pervyj-shag-k/]https://www.grupafyi.pl/casino15047/chto-poprobovat-snachala-v-spin-vash-pervyj-shag-k/[/url] можно найти множество игровых автоматов, которые привлекают игроков своей графикой и возможностью выигрыша. Слоты предлагают разные темы и опции на любой вкус. Каждый игрок найдет нечто своё.
BC Game Casino, [url=https://technorub.com/bc-game-kasino-meningkatkan-pengalaman-judi-online/]https://technorub.com/bc-game-kasino-meningkatkan-pengalaman-judi-online/[/url] offers an exciting opportunity for gamers. With multiple games and captivating bonuses, players can enjoy endless fun. Become part of this thrilling platform today and discover the ultimate gaming spot.
bestes live roulette casino, [url=https://www.gingerexchange.com/symphony/martina-keyn/das-beste-live-roulette-die-besten-strategien-und/]https://www.gingerexchange.com/symphony/martina-keyn/das-beste-live-roulette-die-besten-strategien-und/[/url] – Das erstklassige live roulette casino bietet viele MГ¶glichkeiten, wodurch Spieler einmaliges Erlebnis genieГџen kГ¶nnen. Sichere Zahlungen und geschulte Dealer bieten, dass die Spieler uns fГјhlen.
golf odds not on GamStop, [url=https://seminars.unj.ac.id/iscet2022/?p=141944]https://seminars.unj.ac.id/iscet2022/?p=141944[/url] provide players with a unique chance to enhance their betting experience. With various online platforms available, enthusiasts can find numerous options that cater to their preferences. By exploring these selections, bettors can engage in thrilling golf wagers without restrictions. The absence of GamStop opens up varied opportunities for golf aficionados to test their skills and strategies in a dynamic environment. It’s essential to conduct extensive research before diving into these odds to maximize potential returns.
[url=https://darknetmarketsreview.com/ ]cannaexpress link [/url] https://darknetmarketsreview.com/
Finding the best non gamstop casinos, [url=https://plataforma.proyectoitaca.co/discover-the-best-10-casinos-not-on-gamstop-10/]https://plataforma.proyectoitaca.co/discover-the-best-10-casinos-not-on-gamstop-10/[/url] can be a game-changer for players seeking freedom. These platforms offer more options without restrictions. Enjoy a wide range of games, plentiful bonuses, and dependable customer support. Dive into the thrilling world of non gamstop casinos today!
[url=https://onion-darknet-markets.com/ ]black ops link [/url] https://onion-darknet-markets.com/
Раньше я думал иначе, большое спасибо за информацию.
Playing at casinos offers a thrilling experience, but it’s essential to find the right platforms. roulette not on gamstop, [url=https://tienda.mbechile.cl/estacion-nunoa/]https://tienda.mbechile.cl/estacion-nunoa/[/url] provides an opportunity for players looking to enjoy classic games without restrictions. Many players seek sites that aren’t part of the GamStop program, ensuring a wider range of games. It’s crucial to remain cautious when gambling and always set limits. By choosing roulette not on gamstop, enthusiasts can access engaging gameplay with fewer barriers while enjoying the fun.
онлайн казино играть, [url=https://keystechservices.com/2026/04/15/kakie-razdely-est-na-oficialnom-sajte/]https://keystechservices.com/2026/04/15/kakie-razdely-est-na-oficialnom-sajte/[/url] становится все популярнее среди любителей азартных игр. Новые платформы предлагают разнообразный выбор игр и вознаграждений. Не упустите шанс пробовать увлекательный мир приключений в любое время!
Поклонники отечественного кинематографа получили идеальное решение для домашнего просмотра. Ищете орлинская сезон нити мойры сериал смотреть онлайн ? Платформа https://russkieserial.net/ объединяет тысячи русских сериалов и фильмов под одной крышей. Здесь представлены проекты ведущих телеканалов России в отличном качестве. Сайт работает полностью легально, используя только проверенные источники контента. Удобная навигация позволяет мгновенно найти нужный сериал или фильм. Все материалы доступны без регистрации и скрытых платежей для зрителей.
– Легальный контент из открытых источников
– Огромная база русских сериалов бесплатно
– Удобный поиск по жанрам и годам
– Контент всех популярных телеканалов страны
– Ежедневные обновления свежими сериями
– Просмотр без регистрации и подписок
– Высокое качество видео без рекламы
Каталог включает все популярные жанры от мелодрам до детективов. Представлены сериалы телеканалов Россия 1, НТВ, Первый канал и СТС. Специальные подборки помогут выбрать фильмы про любовь, семью или деревенскую жизнь. Раздел ТВ-шоу порадует поклонников развлекательных программ и реалити. Фильтры по годам позволяют найти как новинки 2025, так и классику.
Портал постоянно обновляется, добавляя свежие серии популярных проектов каждый день. Команда russkieserial.net тщательно следит за качеством представленного видеоконтента. Сайт работает быстро на любых устройствах от смартфонов до телевизоров. Для связи с администрацией доступен электронный адрес обратной связи. Откройте для себя мир отечественного кино в максимально комфортном формате!
Thanks for sharing. I read many of your blog posts, cool, your blog is very good. https://www.binance.com/kz/register?ref=K8NFKJBQ
BC Game Crypto Casino, [url=https://www.harmonycounselingcorinth.com/2026/04/08/discover-the-thrills-of-hash-game-the-official/]https://www.harmonycounselingcorinth.com/2026/04/08/discover-the-thrills-of-hash-game-the-official/[/url] offers a thrilling experience for players looking to dive into the world of cryptocurrency. With varied games and a user-friendly interface, it’s easy to enjoy your favorite titles. Join the digital era today at BC Game Crypto Casino and explore what makes it unique.
Welcome to Cosmic Spins casino, [url=https://instasalon.net/2026/03/13/a-comprehensive-review-of-plastic-formers-7/]https://instasalon.net/2026/03/13/a-comprehensive-review-of-plastic-formers-7/[/url], where the fun never stops! Here, enthusiasts can enjoy a variety games, including card games. Discover special bonuses and promotions! Join us today!
fashion trends, [url=http://www.murathanantiques.com/?p=1]http://www.murathanantiques.com/?p=1[/url] are constantly evolving. This season, dramatic tints captivate audiences. Details also are essential in defining a look. Embrace the new styles to stand out this year. Remember, fashion trends reflect the culture.
Жаль, что сейчас не могу высказаться – опаздываю на встречу. Но вернусь – обязательно напишу что я думаю.
european roulette casino, [url=https://www.jurgenvandervelde.com/discover-the-excitement-of-european-roulette/]https://www.jurgenvandervelde.com/discover-the-excitement-of-european-roulette/[/url] offers an exhilarating experience for players. Featuring a simple spinning wheel, it combines strategy and luck. Players can hazard their money on numbers or colors, enhancing the enjoyment of each spin.
silk road market darknet https://marketdarknets.org/
онлайн казино скачать, [url=http://www.livesicily.it/2026/04/15/dlja-kogo-podhodit-kripto-kazino-stake-1536083121/]http://www.livesicily.it/2026/04/15/dlja-kogo-podhodit-kripto-kazino-stake-1536083121/[/url] – это удобный способ погрузиться в мир азартных игр. Разнообразие игровых автоматов и увлекательных предложений привлекают игроков. Опробуйте уникальные бонусы и акции!
I’ve been browsing online more than 4 hours today, yet I never found
any interesting article like yours. It is pretty worth enough for me.
In my view, if all web owners and bloggers made good content as you
did, the web will be a lot more useful than ever before.
Exploring the extensive world of porn sites, [url=http://intermonheim.de/index.php?option=com_phocaguestbook&view=phocaguestbook&id=1&itemid=30]http://intermonheim.de/index.php?option=com_phocaguestbook&view=phocaguestbook&id=1&itemid=30[/url] offers an array options for audiences. From novel content to professional productions, there’s a variety for everyone. Whether you’re looking for specific genres or just browsing, the adventure can be engaging. However, keep in mind to prioritize safety and security while indulging in your interests.
BC Game Online Casino, [url=https://staging.platinum-corp.com/exploring-the-exciting-world-of-casino-bc-game-in/]https://staging.platinum-corp.com/exploring-the-exciting-world-of-casino-bc-game-in/[/url] широко распространено среди казиношных энтузиастов благодаря разнообразию игр и выгодным бонусам. Ресурс предлагает интуитивный интерфейс для максимального опыта. Регистрация проста, а служба поддержки работает без выходных.
drughub market https://marketdarknets.org/
Finding reliable betting sites can be challenging. non GamStop bookies, [url=https://www.jomicbel.com/breconfringe/understanding-non-gamstop-bookmakers-910169909/]https://www.jomicbel.com/breconfringe/understanding-non-gamstop-bookmakers-910169909/[/url] offer great odds for players looking to bet outside of GamStop. These sites often provide exciting bonuses to keep users engaged.
Есть еще много вариантов
lightning roulette spielen, [url=http://www.excitingwindows.com/blog/lightning-roulette-online-casino-ein-aufregendes-9/]http://www.excitingwindows.com/blog/lightning-roulette-online-casino-ein-aufregendes-9/[/url] bietet Spielern eine aufregende Erfahrung. Die Kombination aus klassischem Roulette und zusätzlichen Blitzgewinnen macht es einzigartig. Alle Spieler können flink Gewinne erzielen, weil die Spannung kontinuierlich steigt. Es bleibt eine packende Möglichkeit, Casino-Action zu erleben.
In the digital age, obtaining Buy Gmail Accounts, [url=https://www.qdashboard.co.uk/adverts/largeadverts.php?uid=2880&web=writexo.com%2F%2Fshare%2F6618cef2db2e/]https://www.qdashboard.co.uk/adverts/largeadverts.php?uid=2880&web=writexo.com%2F%2Fshare%2F6618cef2db2e/[/url] has become essential for many users. These accounts offer various advantages, including enhanced privacy, ease of communication, and availability to Google services. Opting for Gmail accounts can significantly enhance your online presence.
онлайн казино бонусы, [url=http://www.fitcom.com.tr/casino15047/dlja-kogo-podhodit-stake-com-casino.html]http://www.fitcom.com.tr/casino15047/dlja-kogo-podhodit-stake-com-casino.html[/url] привлекают многих игроков. Данные предложения дают возможность увеличить начальный капитал. К примеру, можно получить нулевые бонусы и увеличить свои шансы на выигрыши.
BC Game Casino, [url=https://letswatch.online/kazino-bc-game-obzor-preimushhestva-i-igry/]https://letswatch.online/kazino-bc-game-obzor-preimushhestva-i-igry/[/url] offers entertaining gaming experiences. Players can enjoy a variety of options, ranging from poker to unique features that boost the entire atmosphere. Join now!
undress ai tool, [url=http://www.criosimo.it/wp/disability-is-not-the-end-of-your-career-2/]http://www.criosimo.it/wp/disability-is-not-the-end-of-your-career-2/[/url] – The AI undressing software is a remarkable development in the world of machine learning. It allows users to understand how clothing affects visual aesthetics.
Поздравляю, какие слова…, блестящая мысль
I casino europei, [url=https://o2cloudsystems.com/i-migliori-casino-europei-affidabili-guida-alla/]https://o2cloudsystems.com/i-migliori-casino-europei-affidabili-guida-alla/[/url] offrono un’esperienza unica da provare per gli appassionati del gioco. Seducenti, questi luoghi fondono lusso e divertimento, creando atmosfere indimenticabili.
Playing roulette not on gamstop, [url=https://blog.equinoxbroker.com/experience-the-thrill-play-online-roulette-without/]https://blog.equinoxbroker.com/experience-the-thrill-play-online-roulette-without/[/url] can be an exciting experience. Many players seek thrills without restrictions. Those games provide an opportunity to engage without limits. Discovering new casinos enhances the adventure.
In the world of online gambling, gamblers often seek alternatives to traditional platforms. non GamStop bookies, [url=http://www.docarnettefoundation.org/exploring-non-gamstop-sportsbooks-a-comprehensive-27/]http://www.docarnettefoundation.org/exploring-non-gamstop-sportsbooks-a-comprehensive-27/[/url] provide a chance to enjoy betting without restrictions. Choosing non GamStop bookies means enjoying more options and potential wins.
[url=https://market-darknet.org/ ]cannaexpress market url [/url] https://market-darknet.org/
онлайн казино, [url=https://www.northernplainslubes.com/?p=160896]https://www.northernplainslubes.com/?p=160896[/url] предлагают множество для клиентов. В них вы встретить разнообразные игры, в том числе покер и блэкджек. Выбор акций способен удивить самого опытного игрока.
Making delicious meals can be a pleasure. With Pan to Plate Recipes, [url=https://coopfinanciar.co/financiamos_creditos_estudio_rapido_facil_prestamos_universidad_pregrado/]https://coopfinanciar.co/financiamos_creditos_estudio_rapido_facil_prestamos_universidad_pregrado/[/url], you can transform simple ingredients into gourmet dishes that delight everyone. Collect your most loved flavors and let your creativity radiate in the kitchen.
Случайно нашел сегодня этот форум и зарегистрировался, чтобы поучаствовать в обсуждении этого вопроса.
I migliori casino europei, [url=https://heni.co.in/i-nuovi-casino-non-aams-online-giocare-senza/]https://heni.co.in/i-nuovi-casino-non-aams-online-giocare-senza/[/url] offrono un’esperienza di gioco senza pari. Diverse opzioni di gioco sono disponibili, compresi slot, giochi da tavolo e scommesse sportive. L’ atmosfera elegante con migliori strutture rende ogni visita memorabile.
Playing at online casinos can be exciting, especially with options like roulette not on gamstop, [url=https://xchronic.com/explore-online-roulette-without-gamstop-565338137/]https://xchronic.com/explore-online-roulette-without-gamstop-565338137/[/url]. Various players seek sites that provide roulette games without restrictions. Discovering such places often enhance your wagering experience. Enjoy the enjoyment without limitations while spinning the wheel!
[url=https://market-darknet.org/ ]abacus onion [/url] https://market-darknet.org/
MagicWin casino, [url=https://www.emkan.me/is-magic-win-casino-legit-a-comprehensive-review-73/]https://www.emkan.me/is-magic-win-casino-legit-a-comprehensive-review-73/[/url] предлагает уникальный шанс для всех любителей азартных игр. Занимайтесь в захватывающих слотах и получайте новые возможности на сайте MagicWin casino!
онлайн казино, [url=https://eshop.tj/chto-daet-bonus-kod-stake-i-kak-im-polzovatsja/]https://eshop.tj/chto-daet-bonus-kod-stake-i-kak-im-polzovatsja/[/url] дарит игрокам неповторимый опыт азартных игр. Захватывающие интерфейсы, разнообразие игр и возможность выиграть делают его особенным. Начните заниматься в онлайн казино уже сегодня!
BC Game Online Casino, [url=https://tripadikberadik.com/v4/wp/index.php/2026/04/07/plinko-bc-game/]https://tripadikberadik.com/v4/wp/index.php/2026/04/07/plinko-bc-game/[/url] provides an entertaining platform for bettors. Here, you can enjoy a wide range of varieties. With accessible design, players can swiftly start their gaming adventure, making it a top choice in the online casino landscape. Join today to discover your favorite games!
Interesting in sports betting, [url=https://www.torinopechino.com/2012/10/15/san-marino-imega-boninsegni-penalizzata-da-clamoroso-errore-dei-cronometristi/]https://www.torinopechino.com/2012/10/15/san-marino-imega-boninsegni-penalizzata-da-clamoroso-errore-dei-cronometristi/[/url] can provide significant thrills. It’s essential to grasp the odds and strategies to increase your chances. Always stay informed and manage your bankroll wisely for the best results.
Полностью согласен со всем выше сказанным.
I intrattenimenti nei casinГІ europei online sono sempre in costante aumento apprezzati. Offrono ampia scelta di divertimenti, garantendo un’avventura coinvolgente. Visita casino europei online, [url=https://utahrelocations.com/2026/04/23/la-guida-completa-ai-nuovi-casino-esteri-non-aams/]https://utahrelocations.com/2026/04/23/la-guida-completa-ai-nuovi-casino-esteri-non-aams/[/url] per scoprire le ultime novitГ !
My spouse and I absolutely love your blog and find
most of your post’s to be just what I’m looking for.
Would you offer guest writers to write content for you?
I wouldn’t mind composing a post or elaborating on most of
the subjects you write concerning here. Again, awesome web log!
Playing roulette not on gamstop, [url=https://www.kanghanrak.net/uk-roulette-not-on-gamstop-your-guide-to-2/]https://www.kanghanrak.net/uk-roulette-not-on-gamstop-your-guide-to-2/[/url] offers an exciting opportunity for those looking to enjoy the game without restrictions. Many players seek varied options that allow them to experience the thrill of betting freely. Online casinos give various platforms where you can find countless roulette games to suit your preferences. If you’re keen on playing roulette not on gamstop, it’s essential to research reliable sites to ensure a safe gaming experience. Engage in the fun today!
онлайн казино слоты, [url=https://losowanie.dev.zemestudio.pl/kak-ustanovit-stejk-kazino-polnoe-rukovodstvo-2/]https://losowanie.dev.zemestudio.pl/kak-ustanovit-stejk-kazino-polnoe-rukovodstvo-2/[/url] приглашают игрокам удивительные возможности для удовлетворения. Множество игровые автоматы имеют уникальные темы и интересные дизайны. Секрет успеха в азартных играх — это обдуманная стратегия.
BC Game Casino, [url=https://openleft.ru/?p=1390296]https://openleft.ru/?p=1390296[/url] offers an exhilarating experience for players. Boasting an array of games, this site lures gamblers worldwide. Join the fun today!
cryptocurrency Shiba Inu, [url=http://russkoe-porno-hd.com/video/aHR0cHM6Ly9jb2luc3RhdHMuYXBwL2Jsb2cvaG93LXRvLXN0YWtlLXNoaWJhLWludS1zaGliLw.mp4]http://russkoe-porno-hd.com/video/aHR0cHM6Ly9jb2luc3RhdHMuYXBwL2Jsb2cvaG93LXRvLXN0YWtlLXNoaWJhLWludS1zaGliLw.mp4[/url] has gained fame in the digital currency world. It started as a meme but has evolved into a dynamic community. Investors see it as potential, leading to its fast growth.
independent casino online, [url=https://preprod.lourdes-pireneje.pl/exploring-independent-uk-online-casinos-what-you/]https://preprod.lourdes-pireneje.pl/exploring-independent-uk-online-casinos-what-you/[/url] offers players a exclusive gaming experience. Players can appreciate a wide range of games, including slots, blackjack, and poker. Moreover, the ease of playing from home attracts many users. With reliable payment options, gamers can wager with peace of mind. Independent casino online also delivers exciting bonuses and promotions, enhancing the overall experience. Join today to explore the thrill of independent gaming like never before!
Полезная информация
casino non aams europei, [url=https://pdd8ryabinka.68edu.ru/2026/04/23/i-migliori-casino-europei-dove-trovare-l-emozione/]https://pdd8ryabinka.68edu.ru/2026/04/23/i-migliori-casino-europei-dove-trovare-l-emozione/[/url] – I migliori stabilimenti non aams europei offrono un’occasione unica per gli appassionati di gioco. Sugli questi stabilimenti, si possono trovare tante opzioni di gioco che soddisfano ogni necessitГ . Inoltre, diversi di questi stabilimenti propongono sconti allettanti per attrarre nuovi giocatori.
Whether you’re a novice or a seasoned player, finding the best premier roulette casino can enhance your gaming experience. Look for excellent features like generous bonuses, diverse game options, and efficient gameplay. Don’t forget to check participant reviews for insights on reliability and gambler service, ensuring a safe and enjoyable environment. Engaging in strategy can also improve your odds while playing at top roulette casino, [url=http://www.kentarou.net/archives/365898]http://www.kentarou.net/archives/365898[/url]. Explore different types of roulette, from European to American, to find your favorite gameplay style.
онлайн казино играть, [url=https://shop.haciendadelsolcr.com/casino-vodka-bystraja-registracija-za-minutu/]https://shop.haciendadelsolcr.com/casino-vodka-bystraja-registracija-za-minutu/[/url] становится все более популярным развлечением среди любителей азартных игр. Разнообразие игр предлагают пользователям возможность проверить свои силы и приобрести призы. Актуальные технологии делают игровой процесс комфортным, давая возможность наслаждаться любимыми играми в любое время. Не упустите шанс и включитесь в мир онлайн казино играть!
BC Game Crypto Casino, [url=https://instasalon.net/2026/04/07/bcgame-espelhos-o-que-sao-e-como-usa-los/]https://instasalon.net/2026/04/07/bcgame-espelhos-o-que-sao-e-como-usa-los/[/url] offers a unique experience for players. With a varied range of selections, users can delight in blockchain gambling. Join now and explore the joys of online gaming.
In the world of gambling, numerous players seek choices beyond their borders. bookies outside UK, [url=https://www.pleasesellmycar.ca/uncrcletsgetitright/top-non-uk-betting-sites-a-comprehensive-guide-10/]https://www.pleasesellmycar.ca/uncrcletsgetitright/top-non-uk-betting-sites-a-comprehensive-guide-10/[/url] offer captivating opportunities for bettors, providing wide markets and attractive odds that elevate the betting experience.
Браво, замечательная фраза и своевременно
Casinos Not on Gamstop, [url=http://www.redi4changesl.biz/exploring-casinos-not-on-gamstop-a-comprehensive-5/]http://www.redi4changesl.biz/exploring-casinos-not-on-gamstop-a-comprehensive-5/[/url] offer an alternative experience for players seeking choice. These platforms feature a chance to enjoy activities without confines. Explore the captivating world of online casinos today!
[url=https://darknetmarketnews.com/ ]black ops market url [/url] https://darknetmarketnews.com/
Choosing the best casino roulette, [url=https://elitetaxxrelief.com/broadstrust/winning-strategies-for-online-live-roulette-with/]https://elitetaxxrelief.com/broadstrust/winning-strategies-for-online-live-roulette-with/[/url] can turn out to be challenging for players. It’s essential to think about factors like returns and risk. Enjoying the adventure of roulette is more enjoyable when you know where to play.
dark websites https://marketdarknets.org/
онлайн казино скачать, [url=https://cumbespirits.com/kak-aktivirovat-promokod-stake-casino-polnyj-gajd/]https://cumbespirits.com/kak-aktivirovat-promokod-stake-casino-polnyj-gajd/[/url] – это отличный способ наслаждаться азартными играми прямо с вашего устройства. Если вы ищете возможность играть в любимые слоты или настольные игры, такое приложение станет для вас настоящей находкой. Удобный интерфейс обеспечивает максимальный комфорт в игре. Вы будете в состоянии получать удовольствие в любое время. Загрузив это приложение, вы откроете мир развлечений и веселительных выигрышов.
BC Game Online Casino, [url=https://b4fix.com/2026/04/06/bc-game-casino-de-criptomonedas-la-nueva-era-del-2/]https://b4fix.com/2026/04/06/bc-game-casino-de-criptomonedas-la-nueva-era-del-2/[/url] features a exciting gaming experience for players. With multiple games, safe transactions, and captivating bonuses, it stands out in the online casino world.
УРА!!! УРА!!!!!! УРА!!!!!!!!
Casinos Not on Gamstop, [url=https://bitbuzz.org/exploring-non-gamstop-uk-casino-sites-a-3/]https://bitbuzz.org/exploring-non-gamstop-uk-casino-sites-a-3/[/url] offer a fantastic opportunity for players seeking a different gaming experience. Several casinos provide broader selection of games and enticing bonuses. By using services not restricted by Gamstop, players enjoy the freedom in their gaming journey.
When searching for great live roulette sites, it’s vital to find sites that offer fair games. Look for protected environments and experienced dealers to enhance your online gaming experience. Choosing the best live roulette sites, [url=http://esli.com.dz/v2/2026/04/18/win-big-how-to-play-roulette-online-for-real-money/]http://esli.com.dz/v2/2026/04/18/win-big-how-to-play-roulette-online-for-real-money/[/url] ensures entertainment and possibilities to win.
[url=https://darknetmarketnews.com/ ]abacus darknet link [/url] https://darknetmarketnews.com/
In the world of web-based gaming, no KYC casinos, [url=https://panca-sakti.ac.id/casinos-without-kyc-the-rise-of-no-verification/]https://panca-sakti.ac.id/casinos-without-kyc-the-rise-of-no-verification/[/url] have emerged as a growing choice for players. These platforms allow users to play without the hassle of personal identification. This provides security and a faster signup process, appealing to many who seek flexibility. With no KYC casinos, players can easily try various games while keeping their sensitive information safe.
Welcome to the exciting world of betting at royal reels casino, [url=https://crz.net/redirect/https://21royalsreels.com/]https://crz.net/redirect/https://21royalsreels.com/[/url]. At this establishment, you can experience an array of captivating games. Engage with the fun and see what you can win today!
онлайн казино бонусы, [url=https://alqubisi.com/kak-poluchit-bonus-v-vodka-polnoe-rukovodstvo-2/]https://alqubisi.com/kak-poluchit-bonus-v-vodka-polnoe-rukovodstvo-2/[/url] привлекают многих игроков, предоставляя выгодные предложения. Бонусы на депозит позволяют пополнить баланс, и это делает возможность выиграть больше. Пользуйтесь шанс и изучайте условия акций!
BC Game Casino, [url=https://condominiojardimbotanico.com.br/exploring-the-thrills-of-crash-bc-game-a-gamer-s/]https://condominiojardimbotanico.com.br/exploring-the-thrills-of-crash-bc-game-a-gamer-s/[/url] represents a fascinating platform for wagering enthusiasts. Here, players can enjoy a wide range of games. Participate in the joy of internet gaming today!
Этот топик просто бесподобен :), мне интересно .
Not on Gamstop Casinos, [url=http://roadtripusa2007.free.fr/?p=22]http://roadtripusa2007.free.fr/?p=22[/url] offer an exclusive experience for players. Such platforms enable gamblers to enjoy their favorite games without the restrictions of Gamstop. No matter if you favor slots or table games, there exist options available.
Finding the best roulette website, [url=https://protectaproduct.net/wp/best-roulette-websites-where-to-play-and-win/]https://protectaproduct.net/wp/best-roulette-websites-where-to-play-and-win/[/url] can be challenging, but many options are available. In place of struggling with choices, consider reputable platforms that offer excellent user experiences. Look for sites with top reviews and secure payment methods.
Your point of view caught my eye and was very interesting. Thanks. I have a question for you. https://accounts.binance.bh/sk/register/person?ref=WKAGBF7Y
royal reels casino, [url=https://www.geraldherrmann.at/news-2012/eat-the-ball.html]https://www.geraldherrmann.at/news-2012/eat-the-ball.html[/url] offers an exciting experience for players. Through a variety of games, players can enjoy engaging gameplay. Offers are also available, making it a lot more appealing. Dive into the world of royal reels casino today!
BC Game Crypto Casino, [url=http://hiwell.my/keragaman-dan-keseruan-di-casino-online-bc-game-di/]http://hiwell.my/keragaman-dan-keseruan-di-casino-online-bc-game-di/[/url] offers a captivating gaming experience in the realm of cryptocurrencies. Players can enjoy a wide range of games while leveraging digital currencies for better privacy and security. Join today and discover the future of online gambling!
casinos not on GamStop, [url=http://www.fitcom.com.tr/kysty/discovering-casino-sites-not-on-gamstop-911600425.html]http://www.fitcom.com.tr/kysty/discovering-casino-sites-not-on-gamstop-911600425.html[/url] offer players a unique opportunity to enjoy gambling without the restrictions imposed by self-exclusion. These kinds of casinos provide a wide range of games and bonuses, enhancing the overall gaming experience. Gambers can freely experience different platforms, making it easier to find the perfect fit. With enticing promotions and a broad selection of games, casinos not on GamStop appeal to many seeking alternatives. However, it’s important to gamble responsibly and remain aware of potential risks.
[url=https://darknetmarketnews.com/ ]darknet markets 2026 [/url] https://darknetmarketnews.com/
Браво, замечательная фраза и своевременно
Casinos Non on Gamstop, [url=https://www.jomicbel.com/starmedical/discovering-non-gamstop-casinos-your-guide-to-2/]https://www.jomicbel.com/starmedical/discovering-non-gamstop-casinos-your-guide-to-2/[/url] offer an alternative experience for players seeking independence in online gambling. With these casinos, users can explore various games without restrictions. Moreover, they often provide enticing bonuses and incentives, making the gaming experience even more exciting. Players should always select wisely and gamble responsibly.
online roulette sites, [url=https://organik-zeytinyagi.com/exploring-online-gambling-real-money-roulette/]https://organik-zeytinyagi.com/exploring-online-gambling-real-money-roulette/[/url] offer an engaging way to enjoy this classic game. Players can discover various styles of roulette from the comfort of their residences. With multiple options and interactive experiences, these platforms provide a unique gambling experience. Don’t miss out on the fun!
Over the past years, the popularity of Online Casino, [url=https://csnakliyat.com/admiral-casino-player-reviews-insights-from-real/]https://csnakliyat.com/admiral-casino-player-reviews-insights-from-real/[/url] has increased. Players can find a range of games right from their homes. Such as slot machines to table games, Online Casino provides something for everyone. Moreover, tempting offers make it even more appealing.
[url=https://darknetmarketnews.com/ ]darknet markets [/url] https://darknetmarketnews.com/
фонари уличные чугунные, [url=https://meschaninow.chmnu.edu.ua/parkovye-svetilniki-kak-sozdat-atmosferu-ujuta-i/]https://meschaninow.chmnu.edu.ua/parkovye-svetilniki-kak-sozdat-atmosferu-ujuta-i/[/url] — это эстетичные элементы уличного оформления. Они выносливы и вносят шарм в многочисленные места. Установка таких фонарей подчеркивает окружение и создает настроение.
Не выйдет!
Casinos Not on Gamstop, [url=https://www.yresearch.com.au/exploring-the-world-of-casinos-not-on-gamstop-2/]https://www.yresearch.com.au/exploring-the-world-of-casinos-not-on-gamstop-2/[/url] offer players a chance to enjoy gaming without restrictions. These sites provide a diverse selection of games, from slots to table games. Participants can explore new options and enjoy variety in their gaming choices.
casinos not on GamStop, [url=https://maxxtaxglobal.com/2026/03/13/comprehensive-list-of-casinos-not-on-gamstop/]https://maxxtaxglobal.com/2026/03/13/comprehensive-list-of-casinos-not-on-gamstop/[/url] offer players an alternative to traditional online gaming. Such platforms provide thrilling options for those seeking unrestricted gaming experiences. Players can explore a diverse lineup of activities without the barriers set by GamStop, making it an attractive choice for many.
nexus darkweb https://marketdarknets.org/
Finding the ideal roulette casino can be a exciting experience for gaming enthusiasts. Whether you prefer digital platforms or traditional establishments, the best roulette casino, [url=https://luckydistributions.com/2026/04/18/discover-the-best-casino-roulette-a-comprehensive/]https://luckydistributions.com/2026/04/18/discover-the-best-casino-roulette-a-comprehensive/[/url] offers engaging gameplay and generous bonuses. Choose wisely and enjoy!
[url=https://darknetmarketnews.com/ ]darkmarket [/url] https://darknetmarketnews.com/
Casino Online Games, [url=https://justchristmaslights.com/exploring-the-surge-of-online-casino-booming-slots/]https://justchristmaslights.com/exploring-the-surge-of-online-casino-booming-slots/[/url] offer a thrilling way to enjoy gambling from the comfort of your home. Players can find a variety of games, including roulette. With incentives, the fun never ends in the world of Casino Online Games!
купить готовую фирму, [url=http://wordpress.cushwake.com/kuplju-ooo-vse-chto-nuzhno-znat-o-pokupke-kompanii/]http://wordpress.cushwake.com/kuplju-ooo-vse-chto-nuzhno-znat-o-pokupke-kompanii/[/url] — это отличный способ организовать бизнес. Вы мгновенно получаете все для успешной работы. Не нужно тратить время на учреждение компании.
Подтверждаю. Я присоединяюсь ко всему выше сказанному. Давайте обсудим этот вопрос. Здесь или в PM.
I nuovi casino non aams, [url=https://www.smartcom.vn/toeic-online/index.php/2026/04/27/piattaforme-di-gioco-veloci-scopri-la-nuova-era/]https://www.smartcom.vn/toeic-online/index.php/2026/04/27/piattaforme-di-gioco-veloci-scopri-la-nuova-era/[/url] stanno guadagnando popolaritГ tra gli appassionati di gioco. Tali forniscono varie opzioni per giocare online. I visitatori possono provare differenti giochi senza freni, rendendo l’esperienza eccezionale. Inoltre, la varietГ di bonus ГЁ invogliante, incoraggiando sempre piГ№ giocatori a provare questi nuovi casino non aams.
[url=https://darknetmarketnews.com/ ]cocorico onion [/url] https://darknetmarketnews.com/
For players seeking thrill, finding the best casinos outside GamStop, [url=https://jobstest.test1248.com/2026/03/16/exploring-non-gamstop-casinos-in-the-uk-1199821659/]https://jobstest.test1248.com/2026/03/16/exploring-non-gamstop-casinos-in-the-uk-1199821659/[/url] is essential. These platforms offer incredible games and great bonuses. You can enjoy high-quality gaming experiences without restrictions, making your gameplay truly enjoyable.
Exploring the online roulette sites, [url=https://ukclt.com/best-online-roulette-sites-ultimate-guide-to/]https://ukclt.com/best-online-roulette-sites-ultimate-guide-to/[/url] can be stimulating. Players enjoy numerous options, from conventional roulette to novel variations. With intuitive interfaces and secure transactions, online roulette sites offer a fun experience for everyone.
Online casinos offer numerous games that attract users worldwide. Casino Online Games, [url=https://insancare.org/the-exciting-world-of-spintime-your-gateway-to-2]https://insancare.org/the-exciting-world-of-spintime-your-gateway-to-2[/url] offer an exciting opportunity. Including advanced technology, these platforms ensure equitable gaming.
Casino Online Platform, [url=http://176.32.230.52/safabrications1.co.uk/?p=229859]http://176.32.230.52/safabrications1.co.uk/?p=229859[/url] offers a selection of games. Users can enjoy thrilling video slots and classic table games. Reach the Casino Online Platform from any location for uninterrupted fun and potential rewards.
оружейный магазин, [url=https://nerudpartner.ru/pnevmatika-eger-ot-rok-v-obzor-i-primenenie/]https://nerudpartner.ru/pnevmatika-eger-ot-rok-v-obzor-i-primenenie/[/url] предлагает широкий выбор огнестрельного снаряжения. Здесь можно найти модели на разные предпочтения, а также оборудование.
Великолепная идея
Negli ultimi anni, i nuovi casino non aams, [url=http://www.evergoldcs.com/bonus-senza-verifica-scopri-i-vantaggi-e-come/]http://www.evergoldcs.com/bonus-senza-verifica-scopri-i-vantaggi-e-come/[/url] sono in crescita di popolaritГ . Offrono divertimenti uniche, promozioni allettanti e un’interfaccia innovativa. La diversitГ dei giochi ГЁ eccezionale. Scegliendo i nuovi casino non aams, i giocatori possono godere di entusiasmo nel gioco online.
non gamstop casinos, [url=https://magme.madeinitalyslc.it/2026/04/07/top-betting-sites-not-on-gamstop-unrestricted/]https://magme.madeinitalyslc.it/2026/04/07/top-betting-sites-not-on-gamstop-unrestricted/[/url] offer a chance for players to explore various games without controls. These platforms often provide exciting promotions that enhance the gaming experience, making it more appealing. Participants are permitted to choose from multiple games, ensuring choice in their gaming journey. This freedom allows for individualized play, making non gamstop casinos a preferred choice among gamblers seeking open entertainment online.
ОЈП„О· ПѓО·ОјОµПЃО№ОЅО® ОµПЂОїП‡О®, П„О± ОєО±О»ПЌП„ОµПЃО± ОєО±О¶ОЇОЅОї online, [url=https://erin43622e43454.wpcomstaging.com/online-casino-90/]https://erin43622e43454.wpcomstaging.com/online-casino-90/[/url] ПЂПЃОїПѓП†ОПЃОїП…ОЅ ОјОїОЅО±ОґО№ОєОП‚ ОµОјПЂОµО№ПЃОЇОµП‚ ОіО№О± П„ОїП…П‚ ПЂО±ОЇОєП„ОµП‚. О¤О± ОїО№ ОґО№О±ОґО№ОєП„П…О±ОєОїОЇ ПЂПЃОїОїПЃО№ПѓОјОїОЇ ПЂО±ПЃОП‡ОїП…ОЅ ОґО№О¬П†ОїПЃОµП‚ ОµПЂО№О»ОїОіОП‚ ПЂО±О№П‡ОЅО№ОґО№ПЋОЅ ОєО±О№ ОєО±П„О±ПЂО»О·ОєП„О№ОєОП‚ ПЂПЃОїПѓП†ОїПЃОП‚. О‘ОЅО±ОєО±О»ПЌПЂП„ОїОЅП„О±П‚ П„О± О±ОіО±ПЂО·ОјООЅО± ПѓО±П‚ ПЂО±О№П‡ОЅОЇОґО№О±, ОјПЂОїПЃОµОЇП„Оµ ОЅО± ОµОєП„О№ОјО®ПѓОµП„Оµ П„О·ОЅ ОєО±О»ПЌП„ОµПЃО· ОµОјПЂОµО№ПЃОЇО±.
I think this is one of the most important information for me.
And i am glad reading your article. But should remark on few general things, The site style is great, the articles is really excellent
: D. Good job, cheers
Not gonna lie, This solved something I was stuck on.
UAE Warriors 70 is far from merely another regional stop. Across the Middle East, this promotion serves as the ultimate proving ground where rising stars are either forged into diamonds or crushed into rubble.
UFC Medkouri vs Neves
If you’re looking to cash in on local heavyweights who brawl as if a meter is ticking outside the cage then UAE Warriors 70 is your arena .
silk road onion https://darknetmarketnews.com/
Discover the thrill of gambling at Online Casino, [url=https://philwebservices.com/wordpress/discover-the-exciting-world-of-casinoways/]https://philwebservices.com/wordpress/discover-the-exciting-world-of-casinoways/[/url]. Experience entertainment with a variety of options such as slots, blackjack, and poker. Enlist today to experience exclusive bonuses and promotions!
Если нет желания разбираться с настройками, можно выбрать xrumer аренда https://www.olx.ua/d/uk/obyavlenie/progon-hrumerom-dr-50-po-ahrefs-uvelichu-reyting-domena-IDXnHrG.html для удобства.
Online Casino, [url=https://dulcenael.com.ar/2026/04/02/betnuvo-casino-uk-the-ultimate-gaming-destination/]https://dulcenael.com.ar/2026/04/02/betnuvo-casino-uk-the-ultimate-gaming-destination/[/url] – Virtual Casino offers a captivating experience for gamblers. Using a variety of options, users can experience high-quality entertainment.
Просто про нейросети, [url=https://civilpatrol.info/?q=petition/86197/prosto-pro-neyroseti-uvlekatelnoe-izuchenie]https://civilpatrol.info/?q=petition/86197/prosto-pro-neyroseti-uvlekatelnoe-izuchenie[/url]. Искусственные сети — это технологии, имитирующие работу человеческого мозга. Они осваивают анализировать данные и развиваться самостоятельно.
UAE Warriors 70, which happens on May 8, 2026, at the Space42 Arena in Abu Dhabi stands as a clear example of this.
Браво, вас посетила просто блестящая мысль
Not on Gamstop Casinos, [url=https://www.tkexpressllc.com/readingfilmtheatre/exploring-not-on-gamstop-casinos-a-comprehensive-4/]https://www.tkexpressllc.com/readingfilmtheatre/exploring-not-on-gamstop-casinos-a-comprehensive-4/[/url] offer players an opportunity to enjoy gaming without restrictions. These casinos offer access to thrilling games without the limitations imposed by Gamstop. Users can explore a variety of options.
non gamstop casinos, [url=https://sotech.com.hk/discovering-betting-sites-not-on-gamstop-freedom/]https://sotech.com.hk/discovering-betting-sites-not-on-gamstop-freedom/[/url] offer unique wagering experiences for players in search of freedom from bans. These platforms permit users to engage in their favorite entertainment without the usual constraints.
П„О± ОєО±О»ПЌП„ОµПЃО± online casino, [url=https://interno.bigsales.pt/online-42/]https://interno.bigsales.pt/online-42/[/url] ПЂПЃОїПѓП†ОПЃОїП…ОЅ ОјОїОЅО±ОґО№ОєОП‚ ОµОјПЂОµО№ПЃОЇОµП‚ ПЂО±О№П‡ОЅО№ОґО№ОїПЌ ПѓП„ОїП…П‚ ПЂО±ОЇОєП„ОµП‚. О— ОєОїО№ОЅПЊП„О·П„О± ОјПЂОїПЃОїПЌОЅ ОЅО± О±ПЂОїО»О±ПЌПѓОїП…ОЅ ОґО№О±П†ОїПЃОµП„О№ОєО¬ ПЂО±О№П‡ОЅОЇОґО№О±, ПЊПЂП‰П‚ П„ПЃО±ПЂОО¶О№О±. О•ОЅОґОµП‡ОїОјООЅП‰П‚, П…ПЂО¬ПЃП‡ОїП…ОЅ ОєО±О»ОП‚ ПЂПЃОїПѓП†ОїПЃОП‚ ОєО±О№ ОјПЂПЊОЅОїП…П‚ ПЂОїП… ОєО¬ОЅОїП…ОЅ ПЂОµПЃО№ПѓПѓПЊП„ОµПЃОµП‚ ОµП…ОєО±О№ПЃОЇОµП‚ ОіО№О± ОєОПЃОґОїП‚. О— О±ПѓП†О¬О»ОµО№О± ОґОµОґОїОјООЅП‰ОЅ ОµОЇОЅО±О№ ОµПЂОЇПѓО·П‚ О±ОЅО±ОіОєО±ОЇО±, ОєО±ОёПЋП‚ ОґО№О±ПѓП†О±О»ОЇО¶ОµО№ О±ПѓП†О±О»ОµОЇП‚ ПѓП…ОЅО±О»О»О±ОіОП‚.
black ops onion https://darknetmarketnews.com/
At the world of Casino Online Games, [url=https://cryptoshuttlenews.com/discover-the-excitement-of-770-online-casino/]https://cryptoshuttlenews.com/discover-the-excitement-of-770-online-casino/[/url], players discover various engaging options. Starting with classic slots to live dealer tables, these online platforms provide a vast selection for every gambler.
wethenorth darknet https://marketdarknets.org/
Online casinos offer a mesmerizing experience for players. With numerous options in Casino Online Games, [url=https://darmeat.com/discover-the-thrills-of-zolobet-casino-a/]https://darmeat.com/discover-the-thrills-of-zolobet-casino-a/[/url], players can experience video poker from the comfort of their homes.
В мире литературы существует множество произведений, каждая из которых захватывает читателей своей уникальностью. книги, [url=http://chevalierswow.free.fr/index.php?file=Members&op=detail&autor=ameviwyt]http://chevalierswow.free.fr/index.php?file=Members&op=detail&autor=ameviwyt[/url] могут быть вариативными, но все они имеют одну общую черту — способность уводить нас в другие миры, где мы можем переживать эмоции, о которых никогда не задумывались. Многие романы побуждают нас думать о сложных вопросах, затрагивающих философию жизни, любви и человеческих отношений. Книга, которую следует упомянуть, — это «1984» Джорджа Оруэлла. Это произведение заставляет задумываться о будущем, свободе и власти.Фантастические истории, такие как «Властелин колец» Толкиена, предлагают читателям удивительные приключения в фантастических мирах. Такие книги поддерживают нас мечтать и расширять границы нашего воображения. Современные авторы также продолжают традицию создания глубоких и волнующих произведений, затрагивающих актуальные темы. Чтение книг — это не просто развлечение; это возможность обучаться и расти как личности. В конечном итоге, каждая книга — это маленький мир, который открывается только тем, кто решается открыть его страницы.
Я думаю, что это — серьёзная ошибка.
Not on Gamstop Casinos, [url=https://eugeniaguzman.com/readingfilmtheatre/explore-non-gamstop-casinos-in-the-uk-your-guide/]https://eugeniaguzman.com/readingfilmtheatre/explore-non-gamstop-casinos-in-the-uk-your-guide/[/url] offer players a chance to enjoy their favorite games without restrictions. These platforms provide exclusive opportunities and benefits that enhance the gaming experience. Players can explore a diversity of games, ensuring endless entertainment.
dark market list https://marketdarknets.com/
Not gonna lie, This broke things down in a better way, and it didn’t waste time. I’ll look into this again.
In a non gamstop casino, [url=https://elliots.in/2026/04/07/exploring-non-gamstop-casinos-a-safe-bet-for/]https://elliots.in/2026/04/07/exploring-non-gamstop-casinos-a-safe-bet-for/[/url], players find a unique experience filled with fun. These casinos offer boundless options for gambling enthusiasts. With attractive bonuses, new games, and a wide selection, players can enjoy their favorite pastimes without restrictions.
Die immersive roulette, [url=https://www.sarajulez.de/ein-umfassender-leitfaden-fur-immersive-roulette/]https://www.sarajulez.de/ein-umfassender-leitfaden-fur-immersive-roulette/[/url] Erfahrung bietet Spielern die Möglichkeit, in die Welt des Glücksspiels einzutauchen. Durch modernster Technologie wird das Spiel lebendig. Zuschauer können in Echtzeit mit einem echten Croupier zusammenarbeiten. Diese Erlebnis macht eine besondere Atmosphäre, die das Spiel in eine neue Ebene führt.
Online Casino, [url=https://community.oot.live/unlock-thrilling-adventures-with-bigwins-casino-no/]https://community.oot.live/unlock-thrilling-adventures-with-bigwins-casino-no/[/url] presents a variety of games that engage players around the world. Featuring slots to card games, the adventure keeps participants coming back for more. Join the fun today!
abacus market url https://market-darknet.org/
книги, [url=https://mh.xyhero.com/home.php?mod=space&username=obobewejocu]https://mh.xyhero.com/home.php?mod=space&username=obobewejocu[/url] — это непревзойденный источник знаний и вдохновения. Они уносят нас в разные миры, позволяя осознать окружающую действительность с новой точки зрения. Чтение развивает мышление, улучшает словарный запас и создает креативность. Книги могут быть многообразными — от литературных произведений до научных трудов и практических пособий. Каждый жанр имеет уникальные черты, и готов на встречу с новой идеей или сюжетной линией. Часто книги становятся некоторые спутниками, которые сопровождают нам на протяжении всей жизни. Они могут воздействовать на наше восприятие мира и формировать убеждения. Чтение — это не только развлечение, а способ проверить в себе и окружающем пространстве. Любая другая книга — это новая возможность узнать больше о себе и мире, который нас покрывает.
Очень сожалею, что ничем не могу помочь. Надеюсь, Вам здесь помогут. Не отчаивайтесь.
Online Casino UK, [url=https://locciainfissi.it/experience-the-thrill-of-winning-at-online-casino/]https://locciainfissi.it/experience-the-thrill-of-winning-at-online-casino/[/url] offers a wide variety of games that amuse players. With secure payment methods and captivating bonuses, it is an excellent selection for gaming enthusiasts.
Playing at online roulette sites offers an captivating experience. You can interact with dealers and other players from the comfort of your home. The selection of games is impressive. Discover your favorite at live roulette sites, [url=https://shop.lopezexpressgt.com/2026/04/19/discover-the-best-live-roulette-sites-in-the-uk-11/]https://shop.lopezexpressgt.com/2026/04/19/discover-the-best-live-roulette-sites-in-the-uk-11/[/url] today!
Ein immersive roulette, [url=https://www.roshan-clinic.com/2026/03/17/immersive-roulette-die-zukunft-des-online-spielens/]https://www.roshan-clinic.com/2026/03/17/immersive-roulette-die-zukunft-des-online-spielens/[/url] ermöglicht ein fesselndes Spielerlebnis. Dank modernster Technologie fühlen die Spieler eine realistische Casino-Atmosphäre. Außerdem ermöglicht es, unmittelbar mit einem Dealer zu kommunizieren.
Casino Online Games, [url=https://holl-nutzenanalyse.kunden.cloud.sobek-innovations.de/captain-marlin-online-casino-uk-dive-into-exciting-3/]https://holl-nutzenanalyse.kunden.cloud.sobek-innovations.de/captain-marlin-online-casino-uk-dive-into-exciting-3/[/url] предлагают увлекательные возможности для РёРіСЂРѕРєРѕРІ жаждущих испытать удачу. Рграя РІ этих играх, РІС‹ можете наслаждаться многообразием стилей Рё форматов. РћС‚ классических слотов РґРѕ волнительных настольных РёРіСЂ, каждая сессия наполнена эмоциями. РќРµ упустите шанс исследовать РјРёСЂ Casino Online Games!
Are you ready to dive into the world of online gambling? The Casino Online Platform, [url=http://202.191.121.20/devtest/nilsagor/?p=86946]http://202.191.121.20/devtest/nilsagor/?p=86946[/url] offers an exciting escapade with a variety of choices. Players can enjoy table games, all from the comfort of their homes. Don’t miss out on the thrilling promotions available today! Join the fun and challenge your luck on the Casino Online Platform.
книги, [url=http://1s1.louisarmand.free.fr/index.php?file=Members&op=detail&autor=uryvixoxek]http://1s1.louisarmand.free.fr/index.php?file=Members&op=detail&autor=uryvixoxek[/url] — это волшебный мир, в который может погрузиться каждый желающий. Они являют уникальные возможности для путешествия по различным мирам и временным эпохам, позволяя испытывать приключения и истории, которые привлекают своей глубиной. Книга, которую я хочу вам представить, является истинным примером такой магии. Она но также погружает читателя в фантастический сюжет, но и заставляет задуматься о осознанных вопросах жизни. Каждая страница этой книги — это дополнительная грань, которая открывается перед вами. Как же заменить реальность, когда она стоит на месте? Чтение этой книги станет ключом к пониманию самого себя и окружающего мира. Мы крайне зависимы от историй, которые заполняют планетарную культуру, и эта книга — одна из самых важных среди них. Погружение в ее страницы — это что-то, что стоит попробовать каждому.
По моему мнению Вы не правы. Я уверен. Давайте обсудим это. Пишите мне в PM, поговорим.
Betting at an Online Casino, [url=https://www.smilingtiger.com/euphoria-wins-casino-experience-the-thrill-of/]https://www.smilingtiger.com/euphoria-wins-casino-experience-the-thrill-of/[/url] offers stimulating experiences. With a range of selections to enjoy, every visit can be unique. Rewards enhance your fun, allowing for more opportunities to win.
darkmarket link https://marketdarknets.org/
wethenorth market link https://market-darknet.org/
Discover the adventure of the best live roulette, [url=http://www.pleasesellmycar.ca/theschooner/discover-the-best-online-casino-live-roulette-for-2/]http://www.pleasesellmycar.ca/theschooner/discover-the-best-online-casino-live-roulette-for-2/[/url] experience. This dynamic game offers players the chance to interact with live dealers and fellow participants, enhancing the vibe. Enjoy the real-time action as the wheel spins and your bets are placed. Experience the uncertainty that makes every round unique in the best live roulette! Immerse yourself in this ultimate casino adventure today.
torzon url https://darknetmarketnews.com/
hello, it explained things better than most sites i’ve seen.
Casino Online Platform, [url=https://www.crownmutual.com/2026/04/04/betgem-platform-revolutionizing-the-online-gaming/]https://www.crownmutual.com/2026/04/04/betgem-platform-revolutionizing-the-online-gaming/[/url] предлагает игрокам увлекательный опыт. На данной платформе можно исследовать всевозможные игры. Безопасность гарантирует, что игроки могут наслаждаться игрой без беспокойств.
Spinrise casino, https://spinrisecasino.ch/bonus präsentiert eine spannende Welt des Vergnügens. Gamer können dort eine Vielzahl an Spielangeboten finden. Diese Angebote stellen sich heraus verlockende Geschenke für anfängliche Nutzer.
lightning roulette casino, [url=https://idocteuragency.com/lightning-roulette-casino-der-ultimative/]https://idocteuragency.com/lightning-roulette-casino-der-ultimative/[/url] – Im Lightning-Roulette-Casino bietet eine spezielle Spielerfahrung. Die Kombination aus klassischem Roulette und fesselnden Blitzgewinnen lГ¤sst das Spiel zu einem unvergesslichen Erlebnis fГјr jedem Spieler. Erleben Sie die Aufregung jetzt!
Я хотел бы с Вами поговорить на эту тему.
Within the world of Casino Online Games, [url=https://slotpg-wallet.net/onlinecasinoslot60423/discover-online-fatbet-casino-the-future-of-gaming/]https://slotpg-wallet.net/onlinecasinoslot60423/discover-online-fatbet-casino-the-future-of-gaming/[/url], players are able to experience thrill from the comfort of their home. Using various variations, gaming enthusiasts encounter endless enjoyment.
книги, [url=http://team.redbull.free.fr/index.php?file=Members&op=detail&autor=uxapolyke]http://team.redbull.free.fr/index.php?file=Members&op=detail&autor=uxapolyke[/url] — это чудесные источники знаний и развлечений. Эти произведения обогащают наш внутренний мир, дают возможность погрузиться в вымышленные реальности и находить ответ на множество вопросов. Каждая книга — это уникальный творческий процесс, который открывается читателю. Классическая литература, фантастическая проза и поэзия — все это обширный пласт культуры, который стоит изучать и осмысливать. Чтение книг не только развивает интеллект, но и помогает укреплять навыки эмпатии. Погружаясь в переживания героев, читатели могут лучше понять себя и окружающих. Кроме того, книга может стать верным спутником в одиночестве, предоставляя утешение и поддержку. Каждый роман обладает своей атмосферой, завораживающей динамикой сюжета, которая захватывает с каждым страницы.Новые авторы привносят в литературу множество свежих идей, предлагая интересные перспективы на привычные вещи. Вот почему каждый читатель сможет найти что-то по душе. Книги обогащают нас, дают возможность нас на пути к самопознанию и бесконечным открытиям.
Это просто великолепная идея
Das aufregende Spinrise casino, [url=https://spinrisecasino.ch/]Spinrise Schweiz[/url] präsentiert jedem zahlreiche Möglichkeiten als auch einladende Erlebnisse. Das Website erscheint intuitiv und einfach zu navigieren. Dank der vielfältigen Palette an Angeboten lassen sich Spieler unmittelbar begeistern.
cannaexpress darknet url https://marketdarknets.org/
black ops link https://darknetmarketnews.com/
The allure of a real money roulette game, [url=https://veterinairenyon.com/the-exciting-world-of-online-roulette-for-real/]https://veterinairenyon.com/the-exciting-world-of-online-roulette-for-real/[/url] draws players seeking big wins. Featuring a range of wager types, it’s easy to get immersed in the action. Participate in the fun today!
Online Casino, [url=https://grocery.vpmarketingllc.com/2026/04/13/the-nightbet-platform-your-ultimate-gaming/]https://grocery.vpmarketingllc.com/2026/04/13/the-nightbet-platform-your-ultimate-gaming/[/url] – Virtual Casino предоставляет игрокам уникальную возможность получать удовольствие любимыми играми РёР· любой точки. Автоматные РёРіСЂС‹ Рё РёРіСЂР° СЃ колесом добавляют остроту РІ РёРіСЂРѕРІРѕР№ процесс. Привлекательные акции делают Virtual Casino еще более привлекательным.
Замечательная идея
During the world of Casino Online Slots, [url=https://superdemo.wpdeo.com/your-guide-to-the-fatbet-casino-registration.html]https://superdemo.wpdeo.com/your-guide-to-the-fatbet-casino-registration.html[/url], enthusiasts can experience exciting adventures. Through various themes and features, these games provide limitless opportunities to win. Engage in the fun today!
lightning roulette online casino, [url=https://stage1.nextchannelmedia.com/lightning-roulette-spielen-das-neueste-im-casino/]https://stage1.nextchannelmedia.com/lightning-roulette-spielen-das-neueste-im-casino/[/url] bietet eine aufregende Spiel. Durch speziellen Merkmalen einem fesselnden Grafik zieht es Zocker weltweit. Bei diesem aktionsreichen Roulette-Format können Sie viele Optionen des klassischen Roulettes entdecken.
не! МЛЯ ВЫ ТОЛЬКО УМЕЕТЕ ПОЗИТИВНО ДУМАТЬ!
Prodavnica odjeće Surfstyle, [url=https://surf-style.rs/]https://surf-style.rs[/url] nudi aktuelne komade za zagrižene ljubitelje surfanja. Asortiman su inspirisane prirodnim elementima, idealno se uklapajući u vruće dane. Posetite Prodavnica odjeće Surfstyle i nabavite svoj savršen outfit!
medzinГЎrodnГ© kasГna, [url=https://tallerinternacional.utp.ac.pa/2026/04/13/online-kasina-2026-novinky-a-trendy-v-svetovej-hre/]https://tallerinternacional.utp.ac.pa/2026/04/13/online-kasina-2026-novinky-a-trendy-v-svetovej-hre/[/url] vystavujГє ЕЎirokГє ЕЎkГЎlu hier a prГleЕѕitostГ. HrГЎДЌi sa mГґЕѕu teЕЎiЕҐ na pГґsobivГ© bonusy a akcie, ktorГ© zvyЕЎujГє poЕѕitok z hrania. MedzinГЎrodnГ© kasГna a tak prilГЎkajГє nГЎvЕЎtevnГkov z celГ©ho sveta, spГґsobom sa stГЎvajГє obДѕГєbenГЅmi.
cocorico onion https://market-darknet.org/
When you play inside a casino, such excitement of betting adds into the thrill of it all. With casino roulette real money, [url=http://lobby.co.il/top-online-roulette-websites-your-ultimate-guide-3/]http://lobby.co.il/top-online-roulette-websites-your-ultimate-guide-3/[/url], gamblers are eager to test their luck. The colorful wheel spins, and anticipation builds as they await the outcome.
Casino Online Games, [url=https://www.danrico.com.tr/casino8043/experience-thrilling-gaming-adventures-at/]https://www.danrico.com.tr/casino8043/experience-thrilling-gaming-adventures-at/[/url] – Casino Online Games предлагают игрокам удивительные возможности для удовольствия. Можно выбирать разных слотов, покера Рё блэкджека. Ставки РЅР° азартные РёРіСЂС‹ РІ интернете делают этот РјРёСЂ удобным для всех любителей азартных РёРіСЂ.
ну……зачёт!!!
Amid the realm of Casino Online, [url=https://junction505.dreamhosters.com/2026/04/07/discover-excitement-at-god-odds-casino-sportsbook-4/]https://junction505.dreamhosters.com/2026/04/07/discover-excitement-at-god-odds-casino-sportsbook-4/[/url], players find a universe of thrilling games. From slots to table games, all players can appreciate the diversity offered. As you are a novice or a experienced gamer, Casino Online provides limitless entertainment.
Извиняюсь, но этот вариант мне не подходит.
адвокат Воронин Андрей, [url=https://dzen.ru/a/afO2iG1eWjQzyPMQ]юрист Воронин Андрей[/url] обеспечивает широкий выбор юридических консультаций. Его опыт обеспечивают достигать эффективных результатов в различных практиках права.
nexus darknet shop https://marketdarknets.org/
medzinГЎrodnГ© kasГna, [url=https://macellerialopresti.com/zahranine-kasina-prehad-a-monosti-pre-hraov/]https://macellerialopresti.com/zahranine-kasina-prehad-a-monosti-pre-hraov/[/url] ponГєkajГє ЕЎirokГЅ vГЅber hier a aktivit. ExistujГє miesta, kde si hrГЎДЌi mГґЕѕu vychutnaЕҐ nezabudnuteДѕnГ© chvГle. PravidelnГЅm vyuЕѕГvanГm modernГЅch technolГіgiГ, pritiahnu fanГєЕЎikov hazardu z rozliДЌnГЅch kГєtov sveta.
Hvis du leder efter underholdende muligheder, så er casino uden NemID dk, [url=https://www.g5engineerings.com/udenlandske-casinoer-uden-mitid-en-guide-til-4/]https://www.g5engineerings.com/udenlandske-casinoer-uden-mitid-en-guide-til-4/[/url] et løsning. Her kan du prøve talrige spil uden besvær. Det åbner op for mange muligheder for gamblere.
In the exciting world of gambling, gamblers often seek thrill and reward. casino roulette real money, [url=https://presale-vancouver.ca/mastering-the-real-money-roulette-game-strategies-2/]https://presale-vancouver.ca/mastering-the-real-money-roulette-game-strategies-2/[/url] is a popular choice for those looking to experience the adrenaline of chance. With different betting options, it offers an enticing way to potentially win big!
Я извиняюсь, но, по-моему, Вы не правы. Я уверен. Могу отстоять свою позицию. Пишите мне в PM, поговорим.
Online Casino UK, [url=https://mfpackages.com/unleashing-the-roar-the-golden-lion-casino/]https://mfpackages.com/unleashing-the-roar-the-golden-lion-casino/[/url] is now a popular platform for fun. Players can indulge in a wide range of options from the comfort of their homes. Protection is a high priority, ensuring safe transactions and fair play. With exciting bonuses and promotions, the journey is enhanced. Join the excitement of Online Casino UK today!
Online Casino, [url=https://chores4kids.com/2026/04/08/tropicanza-casino-login-your-gateway-to-fun-and-2/]https://chores4kids.com/2026/04/08/tropicanza-casino-login-your-gateway-to-fun-and-2/[/url] – Web Casino предлагает игрокам интересные РёРіСЂС‹ Рё возможность заработать настоящие средства. Разнообразие игровых автоматов покрывает любому долгу.
Верная фраза
криптовалютная биржа, [url=https://www.tadviser.ru/index.php/%D0%9A%D0%BE%D0%BC%D0%BF%D0%B0%D0%BD%D0%B8%D1%8F:OKX_(%D0%BA%D1%80%D0%B8%D0%BF%D1%82%D0%BE%D0%B2%D0%B0%D0%BB%D1%8E%D1%82%D0%BD%D0%B0%D1%8F_%D0%B1%D0%B8%D1%80%D0%B6%D0%B0)]https://www.tadviser.ru/index.php/Компания:OKX_(криптовалютная_биржа)[/url] — это сайт, где трейдеры могут торговать цифровыми активами. Выбор правильной биржи является ключевым моментом для успешной торговли, поскольку безопасность средств имеет большое значение.
dark market list https://darknetmarketnews.com/
унітази-біде, [url=http://fwme.eu/877716]http://fwme.eu/877716[/url] стають дедалі популярнішими у сучасних ванних кімнатах. Ці прилади поєднують призначення унітазу та біде, даруючи комфорт і зручність. Використання такого пристрою в сьогоднішніх ванних кімнатах дозволяє зекономити просторі. Вони переконливо доводять свою корисність, оптимізуючи щоденного використання.
cannaexpress market https://market-darknet.org/
Playing casino games like roulette can be thrilling, especially when it involves true stakes. casino roulette real money, [url=http://mikulcickyluh.brontosaurus.cz/wordpress/?p=833794]http://mikulcickyluh.brontosaurus.cz/wordpress/?p=833794[/url] offers the chance to win big. Each spin adds thrill to your gaming experience, making it unforgettable.
Honestly, I didn’t expect it to be this helpful. I might revisit this page.
Well, I understood this topic better after reading. I’ll probably revisit this again.
This site was… how do I say it? relevant, This page just appeared while I was digging into something else. I understood this topic better after reading, and it was pretty straightforward. glad I found this honestly.
ДА, это точно
Online Casino, [url=https://sennacar.com/2026/04/07/unleashing-excitement-at-gorilla-wins-casino/]https://sennacar.com/2026/04/07/unleashing-excitement-at-gorilla-wins-casino/[/url] – Virtual Casino предоставляет геймерам уникальные возможности для РёРіСЂС‹. Здесь можно получить волнение, играя РІ игровые автоматы.
Casino Online Games, [url=https://billsiauw.com/2026/04/08/experience-thrills-on-the-go-with-casinojoy-app/]https://billsiauw.com/2026/04/08/experience-thrills-on-the-go-with-casinojoy-app/[/url] дарят незабываемые ощущения. Благодаря своей доступности, участники могут играть в любое время. Новые технологии обеспечивают создавать захватывающие графику и звуковое оформление, что формирует опыт еще более захватывающим. Успех Casino Online Games усиливается с каждым годом, мотивируя все больше потенциальных пользователей.
какоето оно
торговля криптовалютой, [url=https://howtobuyusdt.ru/]howtobuyusdt.ru[/url] – Торговля криптовалютой становится все более популярной среди инвесторов. Внимание к цифровым активам нарастает, и различные платформ предлагают возможности по спекуляции. Необходимо учитывать риски и изучать с основами финансовых технологий.
Гігієнічний душ, [url=https://hairbeaute.fr/chute-cheveux-remedes-naturels/]https://hairbeaute.fr/chute-cheveux-remedes-naturels/[/url] може бути ефективне устаткування, що забезпечує покращувати очищення людини у кожного ванна. Цей інструмент найбільше зручно використовувати при тренувань спортзалу.
V poslednГch letech zaЕѕГvajГ mezinГЎrodnГ online kasina nebГЅvalГЅ vГЅvoj. zahraniДЌnГ online casino, [url=http://www.15760sugarloafkey.com/2026/03/16/nejlepi-online-casina-pro-rok-2023-1157071753/]http://www.15760sugarloafkey.com/2026/03/16/nejlepi-online-casina-pro-rok-2023-1157071753/[/url] nabГzГ diverse ЕЎkГЎlu her, coЕѕ pЕ™itahuje velkГ© hrГЎДЌЕЇ. DГky modernГm technologiГm jsou hrГЎДЌi schopni tД›ЕЎit se si zГЎbavy pohodlnД› z domova.
torzon darkweb https://marketdarknets.org/
ares link https://marketdarknets.com/
UFC Medkouri vs Neves
When you examine the deeper numbers on GidStats it becomes clear that Medkouri is significantly more economical with his volume and doesn’t tire the instant wrestling is required.
Neves arrives carrying all the “heavy hitter” buzz.
https://www.tumblr.com/mike-from-gidstats/815700106519150592/strategic-betting-insights-for-uae-warriors-70
UAE Warriors 70 touches down at the Space42 Arena in Abu Dhabi on Friday, May 8 showcasing a lineup packed with local specialists and international veterans seeking one last springboard to bigger promotions .
Playing live roulette online offers a thrilling experience for enthusiasts. With multiple platforms available, finding one that provides live roulette not on gamstop, [url=https://www.treenj.com/celtic-challenge/unrestricted-access-to-live-roulette-a-guide-for/]https://www.treenj.com/celtic-challenge/unrestricted-access-to-live-roulette-a-guide-for/[/url] can enhance your gaming enjoyment. Participate the excitement and strategy of this classic game in a exciting environment.
https://dev.to/mikefromgidstats/strategic-value-and-stylistic-gaps-at-uae-warriors-70-4ml7
Set for May 8, 2026, at Abu Dhabi’s Space42 Arena, UAE Warriors 70 is an event characterized by seasoned veterans seeking a route back to the international spotlight and up-and-coming regional talents .
“и то правда”
realz casinГІ, [url=https://metscco.saudi360inc.com/2026/04/27/guida-ai-prelievi-nei-casino-online-scopri-realz-2/]https://metscco.saudi360inc.com/2026/04/27/guida-ai-prelievi-nei-casino-online-scopri-realz-2/[/url] – Il mondo dei giochi online offre l’opportunitГ di divertirsi con emozioni uniche nei casinГІ autentici. Qui, ogni giocatore puГІ vivere l’atmosfera avvincente del gioco, con vasta scelta di opzioni e tavoli da gioco. Con il giusto approccio, l’esperienza puГІ diventare davvero indimenticabile.
Casino Online Platform, [url=https://www.marmaraelectronic.com/explore-tropicanza-casino-a-comprehensive-review/]https://www.marmaraelectronic.com/explore-tropicanza-casino-a-comprehensive-review/[/url] offers an exhilarating journey for players seeking thrills. With various games, including poker, users can enjoy immediate access to their favorite options anytime.
Весьма гуд!!! 5+
ШўЩ† Щ„Ш§Ш¦Щ† Ъ©ЫЊШіЫЊЩ†Щ€, [url=https://weg96sbmb.com/giZF]https://weg96sbmb.com/giZF[/url] ШЩЃШ§ШёШЄЫЊ Ъ©ЪѕЫЊЩ„ ШЇЫЊШЄЫ’ ЫЃЫЊЪє Ш¬Щ€ Щ€Щ†ЫЊШ±Щ€Ъє Ъ©Ы’ Щ„ЫЊЫ’ ШЇЩ„Ъ†ШіЩѕ Ш§Щ€Ш± Щ…ШІЫЊШЇШ§Ш± ЫЃЩ€ШЄЫЊ ЫЃЫЊЪєЫ” ЫЊЫЃ ШЄШ¬Ш±ШЁЫЃ Щ†ЫЊЩ№ ЩѕШ± ШЁШ§Щ‚Ш§Ш№ШЇЫЃ Щ‚ШЁЩ„ Ш§ШІЫЊЪє ЫЃЩ€ШЄЫЊ ЫЃЫЊЪєЫ” ШґШ±Ъ©Ш§ШЎ Ш§ЩѕЩ†ЫЊ ЩѕШіЩ†ШЇЫЊШЇЫЃ Ш§Щ€Ш± Ш§Щ†Щ€Ъ©ЪѕЫЊ ШіШ±ЪЇШ±Щ…ЫЊШ§Ъє Ъ©ЪѕЫЊЩ„Щ†Ы’ Ъ©Ы’ Щ„ЫЊЫ’ Ъ†Щ€Ъ©ЫЊЩ€Ъє Ъ©Ш§ Ш§Щ†ШЄШ®Ш§ШЁ Ъ©Ш± ШіЪ©ШЄЫ’ ЫЃЫЊЪєЫ”
zahraniДЌnГ online casino, [url=https://pathfindertechcorp.com/jak-vybrat-nejlepi-e-casino-prakticky-prvodce-pro/]https://pathfindertechcorp.com/jak-vybrat-nejlepi-e-casino-prakticky-prvodce-pro/[/url] zprostЕ™edkovГЎvГЎ skvД›lГ© moЕѕnosti pro hrГЎДЌe. Zde mЕЇЕѕete vyzkouЕЎet rЕЇznГ© nГЎstroje. VЕЎe je ochrГЎnД›nГ© a komfortnГ.
ares market url https://marketdarknets.org/
drughub url https://market-darknet.org/
roulette casinos, [url=http://african-image.co.za/best-roulette-casino-sites-where-to-spin-and-win-2/]http://african-image.co.za/best-roulette-casino-sites-where-to-spin-and-win-2/[/url] – Spin games are popular in gambling circles. Many players flock to roulette establishments seeking fun. Jackpot potential keeps players returning for more.
тема
kasyno realz, [url=https://theadroittechnologies.com/2026/04/28/realzkasyno-twoje-wirtualne-centrum-rozrywki/]https://theadroittechnologies.com/2026/04/28/realzkasyno-twoje-wirtualne-centrum-rozrywki/[/url] to miejsce, gdzie moЕјna odnaleЕєД‡ rozmaite hazardy oraz przygody. Zawodowa obsЕ‚uga gwarantuje wspaniaЕ‚Д… zabawД™ dla kaЕјdego!
Online Casino, [url=https://cdd.puntocomm.com.br/casino13046/lumibet-live-betting-the-ultimate-experience-in/]https://cdd.puntocomm.com.br/casino13046/lumibet-live-betting-the-ultimate-experience-in/[/url] presents an exciting possibility for players to delight in a variety of games. With slots, players can challenge their skills and luck. Explore the dynamic world of online gaming today!
tordex darknet link https://marketdarknets.org/
zahraniДЌnГ online casino, [url=https://www.meinds.online/2026/03/12/offshore-kasina-co-potebujete-vdt-o-hrani-v/]https://www.meinds.online/2026/03/12/offshore-kasina-co-potebujete-vdt-o-hrani-v/[/url] pЕ™edstavuje ЕЎirokГЅ nabГdku her, od populГЎrnГch slotЕЇ po stolnГ hry. UЕѕivatelГ© si mohou si zaЕѕГt napГnavГ© chvГle z pohodlГ domova.
bitcoin dark web https://marketdarknets.org/
tordex darknet url https://market-darknet.org/
Playing games like roulette with real money, [url=http://spiderwire.co.za/play-roulette-online-for-money-a-comprehensive-15/]http://spiderwire.co.za/play-roulette-online-for-money-a-comprehensive-15/[/url] can be exciting. Many players enjoy the intensity of betting on outcomes. With tactics, you can increase your chances of winning big.
magnificent put up, very informative. I wonder
why the other experts of this sector do not notice this.
You must proceed your writing. I’m confident, you’ve a great readers’ base
already!
чото как то не впечатляет(((, откажусь пожалуй
Os casinos online em lusitania têm aumentado rapidamente nos últimos anos. Com oferecer uma grande gama de jogos, atraem muitos jogadores. A vivência se torna ainda empolgante por causa dos bónus atrativos. casinos online portugal, [url=https://www.grimalc.com/descubra-os-melhores-casinos-online-em-portugal-87/]https://www.grimalc.com/descubra-os-melhores-casinos-online-em-portugal-87/[/url] são notáveis pela confiança que oferecem.
Casino Online Games, [url=http://inatelsc.com.mx/experience-fun-and-rewards-at-lucky-mister-casino/]http://inatelsc.com.mx/experience-fun-and-rewards-at-lucky-mister-casino/[/url] представляют разнообразные развлекательные опции. Геймеры могут долговременно играть разными игровыми автоматами. Просто учатся правила и тактики для оптимизации шансов на победу.
HrГЎДЌi hledajГ zГЎbavu v zahraniДЌnГ online casino, [url=https://www.ellalan.com/2026/03/13/online-kasina-ve-co-potebujete-vdt-o-hrani-na-2/]https://www.ellalan.com/2026/03/13/online-kasina-ve-co-potebujete-vdt-o-hrani-na-2/[/url], kde mohou zaЕѕГt vzruЕЎenГ z hry. Platformy tД›chto hernГch domЕЇ jsou modernГ, coЕѕ zaruДЌuje spolehlivost ГєdajЕЇ. RozmanitГЎ nabГdka her potД›ЕЎГ kaЕѕdГ©ho.
Playing in an online casino, [url=https://www.sgearthailand.com/100-giros-gratis-sin-deposito-como-aprovechar-al/]https://www.sgearthailand.com/100-giros-gratis-sin-deposito-como-aprovechar-al/[/url] offers captivating experiences for players. With a variety of selections, including slots, poker, and roulette, the fun never ends. Bonuses enhance gameplay, making it even more profitable.
тю..тупость какая-то
Casino Online Games, [url=https://www.harpalvaghela.com/the-thrilling-experience-of-gorilla-wins-a-casino/]https://www.harpalvaghela.com/the-thrilling-experience-of-gorilla-wins-a-casino/[/url] provide an engaging way to experience wagering from the convenience of your place. With various selections available, players can explore new games every day.
Online Casino, [url=https://charbucks.com/fall-in-love-with-gaming-the-ultimate-love-casino/]https://charbucks.com/fall-in-love-with-gaming-the-ultimate-love-casino/[/url] offers an entertaining way to have fun games from the comfort of your home. Featuring a wide variety of choices, players can discover their preferred games.
torzon darkweb link https://market-darknet.org/
zahraniДЌnГ online casino, [url=https://familiaweb.com.br/casino-online-bonus-bez-vkladu-ziskejte-svj-prvni/]https://familiaweb.com.br/casino-online-bonus-bez-vkladu-ziskejte-svj-prvni/[/url] nabГzГ ЕЎanci vyzkouЕЎet rЕЇznГ© hry z pohodlГ domova. ZГЎkaznГci si mohou uЕѕГt napД›tГ pЕ™i sГЎzenГ s blackjackem.
Жаль, что сейчас не могу высказаться – нет свободного времени. Освобожусь – обязательно выскажу своё мнение по этому вопросу.
Within the world of online gambling, Casino Online Slots, [url=https://trcleaningservicellc.com/explore-gxmble-online-casino-uk-an-in-depth/]https://trcleaningservicellc.com/explore-gxmble-online-casino-uk-an-in-depth/[/url] stand out due to their exciting gameplay and numerous themes. Players can effortlessly find titles that suit their interests. With bonus features, the potential to win big is always enticing.
online casino, [url=http://lobby.co.il/discover-the-exciting-world-of-new-online-casinos-3/]http://lobby.co.il/discover-the-exciting-world-of-new-online-casinos-3/[/url] offers an exhilarating adventure for players seeking entertainment. With a wide variety of games, from slots to classic games, it’s easy to find something enjoyable for everyone.
Discover the exciting world of online gambling on the Casino Online Platform, [url=https://www.renditatelefonica.it/wp/2026/04/11/love-casino-2-payments-the-ultimate-guide-to-safe/]https://www.renditatelefonica.it/wp/2026/04/11/love-casino-2-payments-the-ultimate-guide-to-safe/[/url]. Players can enjoy numerous games like slots and poker from the comfort of home. Join today for incredible bonuses!
Casino Online Games, [url=https://www.syxskj.com/god-odds-casino-withdrawals-a-complete-guide/]https://www.syxskj.com/god-odds-casino-withdrawals-a-complete-guide/[/url] предоставляют разнообразный выбор РёРіСЂ. РРіСЂРѕРє найдет что-то, включая игровые аппараты Рё блекджек. Рграя РІ Casino Online Games, РІС‹ имеете возможность достигнуть впечатляющие РїСЂРёР·С‹ Рё воспользоваться незабываемым опытом.
wethenorth darknet link https://marketdarknets.org/
https://telegra.ph/Betting-Analysis-ACA-Young-Eagles-64-05-06
ACA Young Eagles 64, slated for mid-May 2026 inside Grozny is a textbook case of a lineup where the odds regularly distort the actual difference in abilities , especially when looking at the developmental divisions of the Absolute Championship Akhmat .
silk road url https://marketdarknets.org/
ШҐШ°Ш§ ЩѓЩ†ШЄ ШЄШЁШШ« Ш№Щ† Ш§ЩЃШ¶Щ„ ЩѓШ§ШІЩЉЩ†Щ€ Ш§Щ€Щ† Щ„Ш§ЩЉЩ† Ш§Щ„ЩѓЩ€ЩЉШЄ, [url=https://demo.joomlatools.com/wordpress/gameplay-situations-the-role-of-probability-and/]https://demo.joomlatools.com/wordpress/gameplay-situations-the-role-of-probability-and/[/url]ШЊ ЩЃШҐЩ†Щѓ ШіШЄШ¬ШЇ Ш§Щ„ЩѓШ«ЩЉШ± Щ…Щ† Ш§Щ„Ш®ЩЉШ§Ш±Ш§ШЄ. ШЄШ№Ш±Ш¶ Щ‡Ш°Щ‡ Ш§Щ„ШЈШґЩѓШ§Щ„ ШЈЩ„Ш№Ш§ШЁЩ‹Ш§ Щ…ШЄЩ†Щ€Ш№Ш© Щ€Щ…ЩѓШ§ЩЃШўШЄ Щ…Щ…ЩЉШІШ©ШЊ Щ„Ш°Ш§ Ш§Щ„Щ…ШіШЄШ®ШЇЩ…ЩЉЩ† ЩЉЩ…ЩѓЩ†Щ‡Щ… Ш§Щ„Ш§ШіШЄЩ…ШЄШ§Ш№ ШЁШЄШ¬Ш±ШЁШ© Щ„Ш№ШЁ Ш±Ш§Ш¦Ш№Ш© Ш№ШЁШ± Ш§Щ„ШҐЩ†ШЄШ±Щ†ШЄ. Щ„Ш§ ШЄШєЩЃЩ„ Щ‚Ш±Ш§ШЎШ© ШЄЩ‚ЩЉЩЉЩ…Ш§ШЄ Ш§Щ„Щ„Ш§Ш№ШЁЩЉЩ† Щ‚ШЁЩ„ ШЈЩ† ШЄШ®ШЄШ§Ш±.
ACA Young Eagles 64 is far from merely another developmental event ; it is a high-stakes filtering system .
Должен Вам сказать.
Playing wagers at Casino Online, [url=https://job.nordeks.lv/?p=338542]https://job.nordeks.lv/?p=338542[/url] offers a thrilling experience. With a wide range of options available, players can enjoy unique features and bonuses that enhance their opportunities of winning.
dark matter darknet https://market-darknet.org/
no deposit casino, [url=http://www.bwgmds.com/unlock-exciting-offers-30-free-spins-no-deposit/]http://www.bwgmds.com/unlock-exciting-offers-30-free-spins-no-deposit/[/url] offers players the chance to enjoy games without making an initial payment. This concept attracts many enthusiasts. Owing to the ability to explore various games, players can discover their favorites without risking their own money.
UFC Shakhruramazanov vs Gediev
ACA Young Eagles 64 is taking place in Grozny , and if you assume the betting lines accurately reflect these young prospects’ potential, then you’re headed for a costly wake-up call .
Casino Online Platform, [url=https://adeebdigital.com/duobetz-the-premier-online-betting-experience-in/]https://adeebdigital.com/duobetz-the-premier-online-betting-experience-in/[/url] offers a vast range of choices for gamblers. With reliable transactions and engaging bonuses, it ensures a enjoyable experience for everyone.
ACA Young Eagles 64, which happens in mid-May 2026 stands as a classic illustration of a fight card where the popular narrative regularly fails to reflect the actual gap in capabilities, especially in the developmental tiers of the Absolute Championship Akhmat .
В этом что-то есть. Спасибо за информацию, может, я тоже могу Вам чем-то помочь?
Online Casino UK, [url=https://www.mermeryap.com/?p=370900]https://www.mermeryap.com/?p=370900[/url] features a vast selection of entertainment for players. Whether you enjoy table games, these platforms cater to various tastes. Join the excitement and win big!
drughub darknet link https://marketdarknets.org/
Can you be more specific about the content of your article? After reading it, I still have some doubts. Hope you can help me.
Searching for exciting opportunities in the gaming world? Look no further than free money casino, [url=https://urbanmotors.ge/almanya-casino-siteleri-ihr-leitfaden-zu-den/]https://urbanmotors.ge/almanya-casino-siteleri-ihr-leitfaden-zu-den/[/url]! Many players love the chance to win massive amounts without making any upfront investments. Just grab your opportunity and explore the fun they offer!
Within the realm of Online Casino, [url=http://www.cressi.cn/?p=102730]http://www.cressi.cn/?p=102730[/url] gaming, players are frequently seeking exciting ways to boost their experience. Through modern technology, Online Casino platforms are today able to provide various immersive experience for players.
Присоединяюсь. Я согласен со всем выше сказанным. Можем пообщаться на эту тему. Здесь или в PM.
Online Casino, [url=https://k2joom.com/discover-the-exciting-world-of-casino-jokabet-uk-11/]https://k2joom.com/discover-the-exciting-world-of-casino-jokabet-uk-11/[/url] – Virtual Casino предоставляет возможность развлекаться РІ разнообразные азартные РёРіСЂС‹ круглосуточно. Зрители РјРѕРіСѓС‚ развлекаться новыми опциями. Рто просто Рё осуществимо.
The thrill of playing at an online casino, [url=https://e-business.inotec.ro/iknow/discovering-2-deposit-casinos-in-australia-6/]https://e-business.inotec.ro/iknow/discovering-2-deposit-casinos-in-australia-6/[/url] is unparalleled. Players can revel in a wide range of games, from slot machines to live dealer games. With deals available, it’s easy to enhance your chances of winning!
Вы попали в самую точку. В этом что-то есть и идея хорошая, поддерживаю.
Casino Online Games, [url=http://maido-forum.com/%e6%9c%aa%e5%88%86%e9%a1%9e/the-ultimate-guide-to-kalokalo-online-casino-uk]http://maido-forum.com/%e6%9c%aa%e5%88%86%e9%a1%9e/the-ultimate-guide-to-kalokalo-online-casino-uk[/url] offer an exciting experience for players. With diverse options like slots, poker, and roulette, enthusiasts can delight in their favorite games anytime. These platforms also provide bonuses to enhance the gaming experience. Players can interact with others, making it an interactive environment. Discover the world of Casino Online Games today!
wethenorth onion https://market-darknet.org/
Вот те на!
Pampago Casino, [url=https://pampago-casinoo.com/]Pampago casino bonus[/url] offers a captivating experience with various games and appealing bonuses. Players can enjoy the unique features that enhance their gaming adventure. Join the excitement today!
online casino, [url=https://www.pleasesellmycar.ca/casinionline17041/unlock-30-free-spins-no-deposit-a-player-s/]https://www.pleasesellmycar.ca/casinionline17041/unlock-30-free-spins-no-deposit-a-player-s/[/url] delivers a exciting experience for players. With diverse games available, everyone can find something to enjoy. Online casinos frequently feature offers that attract new users.
tordex market https://marketdarknets.org/
Мы можем выяснить это?
Internet betting enthusiasts are increasingly drawn to gaming experiences. Among the most popular options are Casino Online Slots, [url=https://najempokoi.pl/index.php/2026/04/11/online-kings-chip-casino-your-gateway-to-exciting-2/]https://najempokoi.pl/index.php/2026/04/11/online-kings-chip-casino-your-gateway-to-exciting-2/[/url], which offer a selection of themes and functionality. Players enjoy diverse jackpots, making each spin exciting and unique.
А СЕРВЕР НЕ ПАШЕТ НА……
Pampago Casino, [url=https://pampago-casinofr.com/]Pampago Casino[/url] est un endroit magnifique pour les passionnГ©s de jeux de hasard. Ici, vous pouvez tirer parti d’une paniГЁre riche de jeux de table. Ambiance animГ©e et services de qualitГ© sont en place pour vous procurer une expГ©rience inoubliable.
In the world of online gambling, a no deposit casino, [url=https://fabbrofirenzeprontointervento.it/unlock-excitement-with-300-free-spins-no-deposit-17/]https://fabbrofirenzeprontointervento.it/unlock-excitement-with-300-free-spins-no-deposit-17/[/url] stands out as an enticing option. Players can try games without losing their own money. It’s a wonderful way to savor the thrill of winning!
Вы не правы. Я уверен. Могу это доказать. Пишите мне в PM, обсудим.
Internet wagering has gained enormous popularity, attracting millions of players globally. Among the various options, Casino Online, [url=https://recruit.ato-co.jp/onlinecasinoslot120431/discover-letou-online-casino-uk-exciting-games-and/]https://recruit.ato-co.jp/onlinecasinoslot120431/discover-letou-online-casino-uk-exciting-games-and/[/url] offers an thrilling experience with a wide range of games to choose from. Players can enjoy blackjack at their convenience, right from home. The variety of games ensures that everyone finds something they love, while promotions enhance the gaming experience. Security and ease are also prioritized, ensuring a safe and enjoyable environment for all.
Совершенно верно! Я думаю, что это хорошая мысль. И у неё есть право на жизнь.
Pampago Casino, [url=https://pampago-casino.eu/]pampago casino avis[/url] propose une Г©norme sГ©lection de divertissements pour les passionnГ©s de jeux de hasard. De nombreux jeux Г©lectroniques palpitants vous attendent. FrГ©quentiez la merveille du Pampago Casino !
Опа’
Pampago Casino, [url=https://pampago-casinofr.org/]Pampago[/url] reprГ©sente une divertissement unique pour les joueurs de jeux de casino. Avec sonambiance accueillante et plusieurs opportunitГ©s riches, Pampago Casino attire les joueurs.
Discovering the appeal of free money casino, [url=http://ampnvolt.com.my/?p=398416]http://ampnvolt.com.my/?p=398416[/url] offers can alter your gaming experience. Players can enjoy thrilling games without worrying. Dive into the realm of free money casino and maximize your entertainment today!
ыыыыы…..жжааааркоооо ))
Online Casino UK, [url=https://resacademy.com.br/luckicasino-casino-experience-the-thrill-of-2/]https://resacademy.com.br/luckicasino-casino-experience-the-thrill-of-2/[/url] offers a plethora of entertaining games for players. Such as slots to table games, the variety is vast. Sign up today and explore the fun of Online Casino UK!
torzon market https://market-darknet.org/
Я извиняюсь, но, по-моему, Вы ошибаетесь. Пишите мне в PM, обсудим.
Pampago Casino, [url=https://pampago-casinofr.net/]pampago casino avis[/url] dispose de une variГ©tГ© de jeux attrayants. Les parieurs peuvent profiter de avantages fascinants. Participer Г Pampago Casino, c’est s’engager dans un univers de divertissement inГ©galГ©.
online casino, [url=http://www.aiace.com.br/2026/04/17/the-rise-of-batery-casino-a-new-era-in-online/]http://www.aiace.com.br/2026/04/17/the-rise-of-batery-casino-a-new-era-in-online/[/url] gives an exhilarating occasion for players. With multiple games available, gamblers can enjoy their favorite poker anytime. Bonuses enhance the fun!
ACA Young Eagles 64 is a card built for grinders, pure and simple.
Извините, что я вмешиваюсь, но я предлагаю пойти другим путём.
Online Casino, [url=http://banya.cartel.ua/onlinecasinoslot/discover-amazing-gaming-adventures-at-casino-lucky/]http://banya.cartel.ua/onlinecasinoslot/discover-amazing-gaming-adventures-at-casino-lucky/[/url] – Online Casino предлагает множество увлекательных РёРіСЂ для любителей азартных развлечений. РРіСЂРѕРєРё РјРѕРіСѓС‚ наслаждаться слотами, покером Рё blackjack. Каждый найдет что-то РїРѕ предпочтениям. Легкость онлайн-платформ позволяет участвовать РІ любое время Рё РІ любом месте, что делает развлечение еще более привлекательным.
Я думаю, что Вы допускаете ошибку. Давайте обсудим это.
Millionz Casino, [url=https://millionz-casinofr.me/]Millionz Casino bonus[/url] met Г disposition une expГ©rience de jeu unique. Les utilisateurs peuvent savourer de bonus avantageuses. Avec des ample sГ©lection de animations, Millionz Casino veut Г comblГ©r tous les joueurs. Rejoignez immГ©diatement cette scГЁne du jeu en ligne.
cocorico url https://bestdarknetmarkets.com/
ACA Young Eagles 64 isn’t just another developmental card ; it is a high-stakes filtering system .
https://paragraph.com/@rahilusi115@gmail.com/no-free-lunches-breaking-down-the-value-at-aca-young-eagles-64
ACA Young Eagles 64 is a grinder’s event, no two ways about it.
We’re looking at young fighters who are either one highlight-reel finish away from the big stage or one poor performance from irrelevance.
Авторитетное сообщение 🙂 , забавно…
Millionz Casino, [url=https://millionz-casinofr.eu/]Millionz Casino site officiel[/url] offre une expГ©rience de jeu inГ©galГ©e. Les parieurs peuvent bГ©nГ©ficier d’un large Г©ventail de divertissements. Les bonus sont attrayants, rendant chaque partie unique. IntГ©grer Millionz Casino, c’est se lancer dans un monde de excitation.
silk road shop https://bestdarknetmarkets.com/
Актуально. Подскажите, где я могу найти больше информации по этому вопросу?
Casino Online Games, [url=http://www.ertaccounting.com/onlinecasinoslot/discover-the-magic-of-lucky-wands-casino/]http://www.ertaccounting.com/onlinecasinoslot/discover-the-magic-of-lucky-wands-casino/[/url] deliver a thrilling experience for players seeking enjoyment. Featuring an array of choices, users can engage in live dealer options from the comfort of their residences.
In the world of online gambling, a minimum deposit casino, [url=https://resacademy.com.br/15-euro-bonus-ohne-einzahlung-so-profitieren-sie-5/]https://resacademy.com.br/15-euro-bonus-ohne-einzahlung-so-profitieren-sie-5/[/url] offers players a chance to start with a small investment. Such kinds of casinos provide users to experience various games without a hefty commitment. One advantage is ideal for newcomers. Players can test different games while managing their bankroll effectively. With small deposits, the gaming experience becomes accessible, making it easier to jump in.
Прошу прощения, что вмешался… У меня похожая ситуация. Можно обсудить.
Roisbet site officiel, [url=https://roisbetcm.com/]Roisbet site officiel[/url] предлагает une solution de jeu en ligne inégalée. Les joueurs peuvent exploiter de avantages intéressants. L’adhésion est simple, garantissant happiness à chaque utilisateur.
honestly, it made everything feel simpler.
Hey, This filled in some gaps for me. this could be useful later.
Да, действительно. Это было и со мной. Можем пообщаться на эту тему.
Casino Online Slots, [url=https://www.littledean.nl/the-ultimate-guide-to-magic-win-casino/]https://www.littledean.nl/the-ultimate-guide-to-magic-win-casino/[/url] – Casino Online Slots являются РѕРґРЅРѕР№ РёР· самых популярных форм азартных РёРіСЂ РІ интернете. Пользователи РјРѕРіСѓС‚ испытывать различные стили Рё опции, что делает процесс лихим. Коэффициенты РЅР° выигрыш колеблются множества факторов, РЅРѕ всегда остаются привлекательными.
Finding a good minimum deposit casino, [url=https://kickoffree.com/explore-australian-casinos-with-a-minimum-deposit-3/]https://kickoffree.com/explore-australian-casinos-with-a-minimum-deposit-3/[/url] can enhance your gaming experience. These casinos allow players to begin with a minimal amount, enabling more affordable access to slots and games without excessive costs.
Какие слова… супер, замечательная идея
Mojabet Casino, [url=https://mojabet-cd.com/]Mojabet Congo[/url] est un endroit oГ№ les amateurs de jeux vivent une aventure unique. L’interface offre une diversitГ© de options captivants, et des rГ©compenses attractifs pour chaque.
Весьма полезная информация
Internet betting привлекает множество заинтересованных благодаря комфорту использования. Casino Online, [url=https://perfectlycleardiamonds.com/2026/04/14/monaco-jack-casino-sportsbook-a-premier-gambling/]https://perfectlycleardiamonds.com/2026/04/14/monaco-jack-casino-sportsbook-a-premier-gambling/[/url] предлагает многочисленные игры, которые дают вероятность выиграть большие суммы.
круто придумали!!!
парфюмерия, [url=https://krasa-market.ru/products/category/nioxin-4/]https://krasa-market.ru/products/category/nioxin-4/[/url] — это искусство создания уникальных ароматов, которые могут подчеркнуть индивидуальность. Каждый экземпляр запах вызывает особые эмоции и воспоминания. Выбор подходящего аромата — это удовольствие, способное воздействовать на окружающих. Parfumeria важна не только для личного стиля, но и для создания окружения в любой ситуации.
Finding the perfect online casino can be tricky, especially when considering a minimum deposit casino, [url=http://www.mixedmedia.ca/library/2026/04/unlock-425-free-spins-no-deposit-a-gamer-s-dream/]http://www.mixedmedia.ca/library/2026/04/unlock-425-free-spins-no-deposit-a-gamer-s-dream/[/url]. Players are often seeking options that fit their budget. With numerous choices available, it’s essential to explore platforms that offer great bonuses and games.
По моему мнению Вы не правы. Могу отстоять свою позицию. Пишите мне в PM.
парфюмерия, [url=https://eco-naturel.com/k4_1820.php]https://eco-naturel.com/k4_1820.php[/url] — искусство создания уникальных ароматов. Любая флакон содержит в себе историю и чувства. Поиск аромата — то особый момент, что способен выразить ваш стиль. Пробуйте свой совершенный аромат!
Этот вариант мне не подходит.
Online Casino UK, [url=https://bargainhunterhosting.com/?p=84243]https://bargainhunterhosting.com/?p=84243[/url] offers a diverse selection of entertainment. Players can indulge in gambling games and poker. Incentives augment the playing experience significantly.
Are you looking for a fantastic way to enjoy online gaming? A minimum deposit casino, [url=https://www.sowovo.org/2026/04/19/20-deposit-online-casinos-in-australia-play-smart/]https://www.sowovo.org/2026/04/19/20-deposit-online-casinos-in-australia-play-smart/[/url] offers an low-cost option for players. You can start playing without overwhelming your budget while still enjoying exciting games and entertaining experiences.
Вот ведь создания какие,
In the realm of Online Casino, [url=http://futurismdemo.com/hsfoodserver/the-legacy-of-napoleon-bonaparte-a-historical-2/]http://futurismdemo.com/hsfoodserver/the-legacy-of-napoleon-bonaparte-a-historical-2/[/url], players have the opportunity to experience a variety of choices. Slots are highly regarded, providing lively experiences and enormous jackpots. Utilizing incentives, newcomers may begin their journey effortlessly.
ares shop https://marketsdarknet.com/
Вы правы, не самое удачное время
In de wereld van gokken zijn er tal van opties. Een duitse online casino, [url=https://nl.trustpilot.com/review/ecomxacademy.nl]online casino duitsland[/url] biedt spelers de mogelijkheid om vanuit huis te genieten van hun favoriete spellen. Deze platform biedt de selectie van spellen inclusief slots en tafelspellen. Verder zijn er vaak grote bonussen beschikbaar voor nieuwe spelers.
When searching for reliable gaming options, a minimum deposit casino, [url=https://www.efora.it/2026/04/19/casinos-sin-licencia-en-espana-riesgos-y-73/]https://www.efora.it/2026/04/19/casinos-sin-licencia-en-espana-riesgos-y-73/[/url] provides affordable ways to start playing. These casinos often offer engaging games without requiring a large investment, making it easy for novices to join in.
Весьма забавный ответ
Online casinos offer entertaining experiences through various games. Among them, Casino Online Games, [url=http://www.osscertificato.it/experience-the-thrill-at-neonix-casino-1275282112/]http://www.osscertificato.it/experience-the-thrill-at-neonix-casino-1275282112/[/url] provide players with diverse opportunities to win. From classic slots to dynamic dealer options, the choices are limitless. Embrace the fun and explore the broad world of gambling online.
форс мажоры смотреть острые козырьки смотреть онлайн
джек ричер 2012
фільм вершина мадагаскар 2
tordex darknet https://marketdarknet.org/
ares darknet https://bestdarknetmarkets.com/
По моему мнению Вы ошибаетесь. Могу отстоять свою позицию. Пишите мне в PM.
Casino Online Slots, [url=https://www.cinealambra.it/site/2026/04/15/the-complete-guide-to-nationalbet-casino-4/]https://www.cinealambra.it/site/2026/04/15/the-complete-guide-to-nationalbet-casino-4/[/url] offer players an exciting experience with diverse themes and features. With these games, gamblers can enjoy entertaining gameplay anytime, anywhere. The opportunity to win large prizes adds to the thrill of playing, making each spin valuable. Experience the world of Casino Online Slots today!
dark web market urls https://marketsdarknet.com/
LFA 232
LFA 232] travels to the Foxwoods gaming venue in Connecticut this coming weekend with the featherweight championship up for grabs and several high-stakes local bouts.
Hi everybody, here every one is sharing such know-how, thus it’s good to
read this website, and I used to pay a visit this
website everyday.
The Tiger mystery card was the main the regular crowd topic again this peak hours.
https://differ.blog/p/lfa-232-analysis-strategic-bets-for-the-foxwoods-card-c2e160
LFA 232 returns to the Premier Theater stage at Foxwoods Resort Casino on Friday night with an open featherweight title at stake and an event featuring a mix of area fighters and undefeated up-and-comers.
мне сильно понравилось
In the world of internet casinos, Casino Online, [url=http://metanoia.grafikmk.pl/discover-the-excitement-of-one-casino-sportsbook/]http://metanoia.grafikmk.pl/discover-the-excitement-of-one-casino-sportsbook/[/url] provides an exciting platform for players. With numerous games available, enthusiasts can indulge in jackpot games or try their luck at poker.
Iran xeberleri siyaset xeberleri
LFA 232 goes beyond a typical regional show; this is a make-or-break test where the required sacrifice is usually a fragment of a fighter’s very being.
https://justpaste.it/lfa-232
LFA 232 heads to the Foxwoods Resort Casino over the weekend with an open featherweight title at stake and numerous consequential fights featuring regional talent.
Nicely put. Cheers.
Also visit my site :: https://www.cucumber7.com/
Вы допускаете ошибку.
In the universe of Online Casino UK, [url=http://www.djdannywade.com/pirate-spins-casino-sportsbook-set-sail-for-big/]http://www.djdannywade.com/pirate-spins-casino-sportsbook-set-sail-for-big/[/url], players encounter a variety of entertaining games. Including slots to table games, you’ll find something for everyone. Get involved in the action today!
365 днів процес
красивенькие девочки
Online Casino, [url=https://www.selurmatstofa.com/2026/04/17/playing-io-casino-sportsbook-your-ultimate-gaming-3/]https://www.selurmatstofa.com/2026/04/17/playing-io-casino-sportsbook-your-ultimate-gaming-3/[/url] – Online Casino presents a dynamic experience for players. With countless games, safe transactions, and incredible bonuses, this is a fantastic way to enjoy from home.
wethenorth darknet https://sites.google.com/view/nexus-market-link
Замечательно, очень забавное сообщение
Within the world of recreation, Casino Online Games, [url=https://westerncarolinaweddings.com/experience-the-thrill-of-casino-playzax-uk-4/]https://westerncarolinaweddings.com/experience-the-thrill-of-casino-playzax-uk-4/[/url] offer engaging experiences. Players can delight in various games from the comfort of their homes. Every single option provides unique features that enhance the overall gaming experience.
abacus url https://sites.google.com/view/nexusmarketplace
torzon darkweb url https://sites.google.com/view/nexusdarknetmarket
Interested in UFC? ufc 250 anniversary unique mixed martial arts tournament will take place on June 14, 2026, in Washington, D.C., on the South Lawn of the White House. It will be the first professional sporting event in history to be held directly on the grounds of the U.S. presidential residence.
ремонт стир машины https://remont-stiralnih-mashin213.ru
Вы абсолютно правы. В этом что-то есть и это отличная идея. Я Вас поддерживаю.
Casino Online Slots, [url=https://platform.socialhackademy.eu/casino-richy-leo-unleash-your-inner-gambler/]https://platform.socialhackademy.eu/casino-richy-leo-unleash-your-inner-gambler/[/url] offer entertaining gameplay, allowing players to enjoy distinct themes and aspects. With countless options, everyone can find a beloved game that suits their style.
nexus onion link https://sites.google.com/view/nexusmarketplace
Конечно. Я присоединяюсь ко всему выше сказанному. Можем пообщаться на эту тему.
Playing at online casinos has become a popular source of fun for many. With Casino Online, [url=https://triptoptours.in/explore-the-exciting-world-of-online-casino-sato/]https://triptoptours.in/explore-the-exciting-world-of-online-casino-sato/[/url], players can enjoy a wide variety of choices from the comfort of their homes, making it a easy experience.
Логично
Online Casino UK, [url=https://www.barburplaza.com.br/discover-excitement-at-savanna-wins-casino-12/]https://www.barburplaza.com.br/discover-excitement-at-savanna-wins-casino-12/[/url] presents an entertaining experience for players. With countless games accessible, players can take pleasure in their most-liked games anytime. Incentives are also ample, making it extremely attractive for newcomers.
Браво, эта блестящая фраза придется как раз кстати
Online Casino, [url=https://www.smartcom.vn/toeic-online/index.php/2026/04/19/experience-the-thrill-at-casino-scarlet/]https://www.smartcom.vn/toeic-online/index.php/2026/04/19/experience-the-thrill-at-casino-scarlet/[/url] предлагает игрокам узнать адреналин в процессе азартных игр. Разнообразные игр наполняют азарт и тянут удовольствие. Фактически каждый может найти что-либо по душе.
nexus url https://sites.google.com/view/nexus-market-link
ха-ха-ха Это просто нереально….
Casino Online Games, [url=http://ansoldes.com/index.php/2026/04/20/experience-thrilling-adventures-at-slot-lair/]http://ansoldes.com/index.php/2026/04/20/experience-thrilling-adventures-at-slot-lair/[/url] present a exciting way to play betting from the luxury of your home. With various choices, players can discover their favorite games, enhancing their odds of winning big!
Bônus do Fortune Tiger bateu mais ou menos a cada 200-300 giros na minha amostra. Pode variar.
888 бет [url=https://888starz-uz3.org]https://888starz-uz3.org[/url] .
888starz casino login [url=https://www.888starz-uz1.org]https://www.888starz-uz1.org[/url] .
888srarz [url=http://888starz-egypt9.com/]https://888starz-egypt9.com/[/url]
Говорите по существу
Playing in Casino Online Slots, [url=https://www.by-blr.info/slots-charm-online-casino-uk-experience-unmatched/]https://www.by-blr.info/slots-charm-online-casino-uk-experience-unmatched/[/url] has become exceptionally popular among players. Through various themes and options, these slots offer limitless entertainment choices.
Hi friends, its fantastic post about teachingand fully explained, keep
it up all the time.
my website :: สล็อต pg
раз позыреть можно
In the world of digital betting, Casino Online, [url=https://begreatfitness247.com/the-fascinating-world-of-casino-slots-muse-uk/]https://begreatfitness247.com/the-fascinating-world-of-casino-slots-muse-uk/[/url] has become a favorite option for enthusiasts. Players can enjoy numerous options from the comfort of their homes. With exciting bonuses, it’s easy to see why so many are drawn to this platform. Security is also a priority, ensuring that payments are safe and secure.
Комфортные путешествия с экскурсоводом экскурсии по Калининграду на автомобиле индивидуальные позволят увидеть Калининград в индивидуальном формате.
пропустил, нада будет глянуть
Online Casino UK, [url=https://www.sweans.social/slots-shine-online-casino-uk-a-comprehensive-guide/]https://www.sweans.social/slots-shine-online-casino-uk-a-comprehensive-guide/[/url] provides a excellent chance for players to experience a range of entertainment from the comfort of their houses.
tordex onion https://sites.google.com/view/nexusdarknetmarket
888starz ios [url=www.888starz-uz3.org]www.888starz-uz3.org[/url] .
Какие хорошие собеседники 🙂
Online Casino, [url=https://job.nordeks.lv/?p=360747]https://job.nordeks.lv/?p=360747[/url] presents an thrilling way to play games. With a wide range of options, players can find slots to suit their tastes. Join today and kick off your gaming adventure!
Хииии)) я с них улыбаюся
Online casinos offer a variety of thrilling options that keep players engaged. Among the most popular are video slots, which provide exciting gameplay and big wins. Casino Online Games, [url=https://polaluce.com/discover-the-exciting-world-of-tea-spins-4/]https://polaluce.com/discover-the-exciting-world-of-tea-spins-4/[/url] cater to all tastes, ensuring everyone finds their favorite option. Whether you prefer strategy games or lottery-style games, the possibilities are endless. Join the fun today and explore the dynamic world of online gaming!
Можно бесконечно говорить на эту тему.
Casino Online Slots, [url=http://vistopred.alandiniz.com.br/discover-the-excitement-of-tea-spins-casino-7/]http://vistopred.alandiniz.com.br/discover-the-excitement-of-tea-spins-casino-7/[/url] offer endless fun for players seeking amazing rewards. With unique styles, every spin is unique. Enjoy the ease of playing anytime, anywhere!
As well as let it become. The easiest method to rapidly as well as dependably alleviate anxiety is actually via your own feelings: view, seem, feel, style, as well as scent. 4. Signing up to teach, yet don’t have any conventional training knowledge? Create a syllabus and also session plans based on what you plan to carry out [url=https://prawnicze-dywagacje.blogi.pl]prawo karne definicja[/url] inside the role. The company prides itself about building effective infrastructure to provide customers with all the overall performance as well as trustworthiness they have to run their own software inside creation from size. The website provides daily hand-picked choices from the world’s most widely used goods and also brands coming from best fashion writers. Are you Feeling Hesitant? You’re possibly actually fired up at this time. You’ve completely got this kind of (and also truly, don’t neglect to be able to inhale!). Effective communication includes some realized skills: attentive tuning in, knowing and also making use of nonverbal cues, controlling stress in the moment, as well as comprehending [url=https://prawnicze-dywagacje.blogi.pl]łódź adwokat[/url] your own personal feelings and those from the person you’re communicating along with. Dex Press The full-service mass media company, Dex Mass media offers innovative, integrated marketing solutions to its clients. That almost always means, getting much more sensitive every single day to be able to individuals we all know or run into, who are also suffering, in the exact same or inside different ways Your body is actually momentary; the soul is actually everlasting. When the objective will go all over the world dispensing sympathy and also understanding, this is the finest present the heart and soul may at any time look for.. Yes, this process often does imply backtracking a minimum of a little. That almost always means, being infinitely much more sensitive every day to be able to people we all know or even encounter, who are furthermore suffering, within the same or even in alternative methods Your body is actually short-term; the actual heart and soul will be eternal. If the soul stays the period focussing around the wants and enduring regarding Other people, allotting compassion and also knowing wherever it could, that’s the greatest gift their own suffering can easily actually create. If you are afraid, you have a tendency to consider quick superficial breaths, starving you associated with o2. Reebok By designing
nexus shop url https://sites.google.com/view/nexusmarketplace
Прошу прощения, что я Вас прерываю, но, по-моему, эта тема уже не актуальна.
Web-based betting стали популярными благодаря доступности. Casino Online, [url=https://hibernate.wpengine.com/discover-the-tropical-wins-casino-your-ultimate/]https://hibernate.wpengine.com/discover-the-tropical-wins-casino-your-ultimate/[/url] предлагает широкий выбор игр, включая покер до слотов. Клиенты могут доступать платформы в любое время и в любом месте. Такой подход развлечений действительно делает процесс игры.
dark markets https://sites.google.com/view/nexusmarketplace
nexus official site https://sites.google.com/view/nexusmarketplace
Ошибаетесь.
Online Casino UK, [url=http://www.djdannywade.com/experience-the-excitement-of-tropicslots-casino-4-2/]http://www.djdannywade.com/experience-the-excitement-of-tropicslots-casino-4-2/[/url] дарит уникальный шанс для участников. Здесь вы можете найти разнообразие игр и призов. Получайте удовольствие от безопасной и приятной атмосферой, где это возможно легко использовать.
I could not refrain from commenting. Exceptionally
well written!
my web site :: เครดิตฟรี betflik pg
Peculiar article, exactly what I wanted to find.
наруто смотреть русском языке смотреть наруто онлайн бесплатно в хорошем качестве
cannaexpress onion https://sites.google.com/view/nexusmarketdarknet
torzon url https://sites.google.com/view/nexusmarketdarknet
сколько стоит стоматология центр инновационной стоматологии
black ops link https://sites.google.com/view/nexus-market-link
https://www.tumblr.com/mike-from-gidstats/816322217183985664/lfa-232-foxwoods-free-money-and-fading-the-hype
Whilst fair-weather fans are waiting for the UFC card on Saturday, we’re making our way to Foxwoods this Friday to leverage major pricing advantages in the regional scene.
Define o alvo antes de abrir Jungle Delight. Bateu, sai. Não tem negociação.
https://paragraph.com/@rahilusi115@gmail.com/lfa-232-foxwoods-free-money-and-fading-the-hype
Checking the data from GidStats makes it clear that grinders who stay active are a worst-case scenario for big punchers in LFA title fights as the fight progresses into deeper rounds. My pick is Pintos and I’m not looking back.
of course like your web site however you need to check the spelling on several of your posts.
Many of them are rife with spelling problems and I in finding it very bothersome
to tell the reality nevertheless I will definitely come again again.
кино [url=https://mailsco.online/]mailsco[/url], вам придется по душе.
nexus onion mirror https://sites.google.com/view/nexusdarknetlink
видео [url=https://mailsco.online/]mailsco online[/url] процесс, требующий фокуса на деталях.
Amazing! Its in fact awesome article, I have got much clear idea on the
topic of from this piece of writing.
Look at my blog; สล็อตเครดิตฟรี otp
Компания Мото-ДВ предлагает широкий ассортимент техники для активного отдыха. Ищете купить электровелосипед ? На сайте https://moto-dv.ru представлены электросамокаты, электровелосипеды и мотоциклы различных моделей. Покупатели могут выбрать бензиновые и электрические квадроциклы для любого возраста. Вся представленная техника абсолютно новая и готова к эксплуатации. Специалисты помогут подобрать оптимальный вариант под конкретные требования клиента.
– Кредит без первоначального взноса
– Оформление онлайн из любого региона
– Квадроциклы для детей и взрослых
– Вся техника только новая
– Срок кредита до 60 месяцев
– Без справок и поручителей
– Консультация в мессенджерах
Магазин предлагает удобные условия покупки техники в кредит. Оформить можно дистанционно на срок от трех до шестидесяти месяцев. Не требуются справки о доходах и привлечение поручителей для одобрения. В наличии модели Armour Pro 125, Hunter 125 и Grizzly различных модификаций. Актуальные цены и наличие конкретных расцветок уточняйте у менеджеров.
Связаться с компанией можно через WhatsApp или Telegram для быстрой консультации. Специалисты ответят на все вопросы о характеристиках моделей и условиях доставки. Каталог регулярно пополняется новыми позициями электро- и мототранспорта разных ценовых категорий. Покупка качественной техники теперь доступна каждому благодаря гибким кредитным программам.
Hello I am so excited I found your blog, I really found you by mistake,
while I was looking on Askjeeve for something else, Regardless
I am here now and would just like to say many thanks for a incredible post and a all round enjoyable
blog (I also love the theme/design), I don’t have time to read it
all at the minute but I have book-marked it and
also added in your RSS feeds, so when I have time I will
be back to read more, Please do keep up the superb work.
Доброго времени суток!
Хочу поделиться отличной и полезной новостью с теми, кто планирует, что бы их дети обучались в китайских учебных заведениях, а так же с теми, кто хочет учиться в Китае!
Здравый рассудок подсказывает, что с документами нужно заблаговременно и предварительно решить все ньюансы и тонкости, что бы во время обучения или стажировки не возникли непредвиденные проблемы.
Тонкостей и особенностей много, при нарушении которых, вам могут грозить депортация, штраф или отчисление.
Лучше конечно обратиться с такими вопросами к профессионалам или специалистам, кто именно специализируется на визах в Китай или КНР.
В общем, если вам интересно найти, виза X2, студенческая виза в Китай, учебная виза в Китай, виза X1 и т.д., например:
[url=https://oformit-vizu-v-kitay.ru/uchebnaya-viza-x1-dolgosrochnaya-x2-kratkosrochnaya/]долгосрочная виза в китай для россиян[/url]
Тогда вам нужно прямо сейчас перейти на сайт Визового центра Китая и узнать все подробности по долгосрочная виза в Китай, студенческая виза в Китай, учебная виза в Китай, виза X1, виза X2, краткосрочная виза в Китай в Москве и т.д. https://oformit-vizu-v-kitay.ru/uchebnaya-viza-x1-dolgosrochnaya-x2-kratkosrochnaya/ .
Обязательно переходите на сайт Визовый центр Китая, изучайте информацию и сохраняйте в закладки, не забудьте записать номер телефона 8-800-201-26-12 и адрес сайта.
До новых встреч!
starz 888 [url=www.uz888-starz.com]www.uz888-starz.com[/url] .
Hmm is anyone else having problems with the pictures on this blog loading?
I’m trying to determine if its a problem on my end or if it’s the blog.
Any responses would be greatly appreciated.
my web-site พนันบอลออนไลน์ ผิดกฎหมายไหม
На мой взгляд это очень интересная тема. Предлагаю Вам это обсудить здесь или в PM.
казино для мобильных устройств, [url=https://t.me/vanechekvan]лучшие онлайн казино с бонусами и лицензией[/url] обеспечивают простой доступ к играм в любом пункте. С контрольным смартфонов и планшетов можно играть в казино-играх в любое время.
Wow, awesome blog layout! How long have you been blogging for?
you made blogging look easy. The overall
look of your web site is fantastic, as well as the content!
тю..тупость какая-то
Online Casino, [url=http://pathfindertechcorp.com/discover-tropical-excitement-at-tropicslots-casino/]http://pathfindertechcorp.com/discover-tropical-excitement-at-tropicslots-casino/[/url] offers players a way to enjoy exciting games within the comfort of their homes. With many of options, users may experience the thrill of gaming in a few taps.
The next UFC Vegas 117 card constitutes a classic Apex event, defined by thin margins and a few distinct stylistic clashes providing actionable betting value.
В этом что-то есть. Благодарю Вас за помощь, как я могу отблагодарить?
Web-based casinos has become a thrilling way to enjoy Casino Online Games, [url=https://thefashionuptodate.com/2026/04/25/wildzy-online-casino-uk-a-comprehensive-guide-to/]https://thefashionuptodate.com/2026/04/25/wildzy-online-casino-uk-a-comprehensive-guide-to/[/url]. Participants can try out various games, ranging from slots to poker. Using innovative technology, players can win considerable rewards from the comfort of their homes.
https://mikefromgidstats.substack.com/p/the-quiet-violence-of-the-apex-high
This week’s UFC Vegas 117 card is a quintessential “trap” card in which the betting lines are practically begging you to rely on guys who haven’t earned it
ufc fight night Arnold Allen vs Melquizael Costa
This coming Saturday UFC Vegas 117 descends upon the usual silent atmosphere of the Apex, and even though the setting is clinical, the implications for everyone competing here couldn’t be more significant.
ستار ثلاث ثمانيات [url=https://888starz-egypt5.com/]https://888starz-egypt5.com/[/url]
Согласен!
Casino Online Slots, [url=https://acordesconlamoda.com/experience-thrills-with-winner-casino-online-slots/]https://acordesconlamoda.com/experience-thrills-with-winner-casino-online-slots/[/url] – Online Casino Slots offer a thrilling experience for players. With a wide range of themes and features, it’s easy to discover your favorite game. Take pleasure in the convenience of playing from home!
Your article helped me a lot, is there any more related content? Thanks! https://www.binance.bh/register?ref=QCGZMHR6
НАДО ГЛЯНУТЬ)))
Online casinos present an exciting atmosphere for players. With Casino Online, [url=https://www.victoriasa.ch/2026/04/26/experience-the-thrill-of-online-casino-gaming-with-2/]https://www.victoriasa.ch/2026/04/26/experience-the-thrill-of-online-casino-gaming-with-2/[/url], you can savor a wide array of games from the comfort of your home. From slots to table games, the options are infinite. Enjoy promotions that enhance your gameplay and boost your chances of winning. The thrill of Casino Online awaits you!
жестоко!очень жестоко.
Playing at real money casinos, [url=http://asia-pass.com/blog/experience-the-thrill-online-casinos-with-upi-2/]http://asia-pass.com/blog/experience-the-thrill-online-casinos-with-upi-2/[/url] provides an enjoyable experience. Via various games like slots, poker, and blackjack, players can obtain substantial rewards. Picking a reputable casino is essential for secure gaming.
Самое полезное для вас: https://home-parfum.ru/catalog/escentric-molecules_m/
Понятно, спасибо за объяснение.
Online casinos, [url=https://hispanonetglobal.com/unlock-100-no-deposit-free-spins-the-best-deals/]https://hispanonetglobal.com/unlock-100-no-deposit-free-spins-the-best-deals/[/url] offer a collection of games that attract players worldwide. With poker to slots, online platforms guarantee excitement and entertainment. Gamblers can enjoy thrilling gameplay anytime, anywhere.
Замечательно, весьма полезная информация
Discover the leading online casinos offering thrilling games and amazing bonuses. Players enjoy convenient gaming experiences from the comfort of home. Choose the best online casinos, [url=https://www.assoservizionline.it/2026/04/26/descubre-los-mejores-casinos-con-25-giros-gratis-2/]https://www.assoservizionline.it/2026/04/26/descubre-los-mejores-casinos-con-25-giros-gratis-2/[/url] for unforgettable fun and rewards!
The upcoming UFC Vegas 117 event is a quintessential “trap” card wherein the betting lines are daring you to trust guys who haven’t proven themselves.
В этом что-то есть. Буду знать, большое спасибо за информацию.
In the world of betting, finding the top online casinos, [url=https://ukclt.com/discovering-online-casinos-not-on-gamstop-a-guide/]https://ukclt.com/discovering-online-casinos-not-on-gamstop-a-guide/[/url] can be a daunting task. The best options offer not only exciting games but also attractive bonuses. Players should focus on trustworthy platforms to ensure a safe experience.
The UFC Vegas 117 event takes center stage in that sterile environment, and although the environment feels lifeless, the consequences for the men and women on this card are far from ordinary.
В этом что-то есть. Теперь всё понятно, спасибо за объяснение.
Playing at web casinos can be exciting, especially with real money casinos, [url=https://seh.intconference.org/2026/04/26/f-100-kr-gratis-uden-indbetaling-din-chance-for-2/]https://seh.intconference.org/2026/04/26/f-100-kr-gratis-uden-indbetaling-din-chance-for-2/[/url] offering great chances to win. Users can enjoy various activities like slots, poker, and roulette. To maximize winnings, it’s essential to select reputable platforms that ensure safety and honesty.
Любопытный вопрос
Playing at internet casinos offers an exhilarating experience. With a variety of games, players can enjoy slots from the comfort of their homes. Online casinos, [url=https://h2852162.stratoserver.net/index.php/2026/04/26/fast-withdrawal-casinos-in-the-uk-your-gateway-to/]https://h2852162.stratoserver.net/index.php/2026/04/26/fast-withdrawal-casinos-in-the-uk-your-gateway-to/[/url] provide promotions that enhance gameplay and attract new participants.
Добрый день!
Хочу поделиться полезной и отличной новостью с теми, кто планирует, что бы их дети обучались в китайских учебных заведениях, а так же с теми, кто хочет учиться в Китае!
Здравый рассудок подсказывает, что с документами нужно заблаговременно и предварительно решить все тонкости и ньюансы, что бы во время обучения или стажировки не возникли непредвиденные проблемы.
Особенностей и тонкостей много, при нарушении которых, вам могут грозить отчисление, штраф или депортация.
Лучше конечно обратиться с такими вопросами к специалистам или профессионалам, кто именно специализируется на визах в КНР или Китай.
В общем, если вам интересно найти, студенческая виза в Китай, учебная виза в Китай, виза X1, виза X2 и т.д., например:
[url=https://oformit-vizu-v-kitay.ru/uchebnaya-viza-x1-dolgosrochnaya-x2-kratkosrochnaya/]долгосрочная виза в китай в москве[/url]
Тогда вам обязательно нужно прямо сейчас перейти на сайт Визового центра Китая и узнать все подробности по виза X2, студенческая виза в Китай, учебная виза в Китай, виза X1, долгосрочная виза в Китай, краткосрочная виза в Китай в Москве и т.д. https://oformit-vizu-v-kitay.ru/uchebnaya-viza-x1-dolgosrochnaya-x2-kratkosrochnaya/ .
Обязательно переходите на сайт Визовый центр Китая, сохраняйте в закладки и изучайте информацию, не забудьте записать номер телефона 8-800-201-26-12 и адрес сайта.
Увидимся!
8 starz [url=888starz-egypt7.com]888starz crash[/url]
888starz официальный сайт [url=https://www.uz888starzbet.com]888starz официальный сайт[/url] .
8 starz [url=http://888starz-uzbekistan5.com]8 starz[/url] .
888.starz [url=http://888starz-uz-online.com]http://888starz-uz-online.com[/url] .
клас
Nel mondo del gioco online, i gambling non aams offrono scelte diverse per gli giocatori. Questi portali spesso presentano incentivi allettanti e entertainment vari. Gli utenti possono sperimentare senza le limitazioni imposte dai regolatori. casino non aams, [url=https://activeseries.academy/i-migliori-casino-online-non-aams-del-2023/]https://activeseries.academy/i-migliori-casino-online-non-aams-del-2023/[/url] permette di scommettere la propria fortuna in un atmosfera piГ№ ampio e dinamico.
staz888 [url=http://www.888starz-egyp.com]https://888starz-egyp.com/[/url]
888 store موقع [url=https://888starzeg1.com/]888 store موقع[/url].
888 бет [url=http://888starz-bet3.com]http://888starz-bet3.com[/url] .
888starz عربي [url=http://www.888starz-eg2.org/]https://888starz-eg2.org/[/url]
88starz [url=http://www.eg-888starz.com]وكيل سحب وايداع 888starz[/url]
Извините за то, что вмешиваюсь… Но мне очень близка эта тема. Могу помочь с ответом. Пишите в PM.
Negli ultimi anni, i utilizzatori hanno mostrato un crescente interesse per i casino non aams, [url=https://next.etabletka.sk/page-115/]https://next.etabletka.sk/page-115/[/url]. Queste scelte offrono un’atmosfera di gioco diversa e habitualmente piГ№ vantaggiosa. Anche se ci siano inconvenienti associati, molti decidono di provare questi inusuali ambienti.
http://1stcapitalinc.com/
O projeto 1stcapitalinc consolida-se como uma empresa profissional com forte presenca no publico em Portugal, que entrega servicos de qualidade a quem valoriza a eficiencia, valorizando na transparencia e confianca. Veja a oferta completa nesta pagina.
Питання відновлення інфраструктури зараз хвилює багатьох людей у різних регіонах України та за її межами. У тематичних рубриках часто з’являються новини будівництва https://stroitel.cn.ua/, які містять важливу інформацію про нові об’єкти. Дуже важливо, щоб усі роботи виконувалися якісно, без затримок та зайвих фінансових витрат.
Замечательно, полезная информация
септик для частного дома, [url=https://eurolamp.ua/shop/product/invertor-soniachnyj-avtonomnyj-3000w-euroelectric-akumuliator-litij-zalizo-fosfatnyj-lifepo4-25-6v-100ah-euroelectric/]https://eurolamp.ua/shop/product/invertor-soniachnyj-avtonomnyj-3000w-euroelectric-akumuliator-litij-zalizo-fosfatnyj-lifepo4-25-6v-100ah-euroelectric/[/url] — это важный элемент автономной системы водоотведения. Эффективный выбор септика гарантирует надежную работу и отменит проблемы с стоками сточных вод. Хороший септик подходит для разных типов грунта и количества сточных вод. Правильная установка и сервис важны для долгосрочной службы.
Я считаю, что Вы не правы. Я уверен. Давайте обсудим это. Пишите мне в PM, пообщаемся.
Gedurende de Sociale Projecten Nederland, [url=https://painsurancetx.com/financieel-advies-nederland-uw-gids-naar-3/]https://painsurancetx.com/financieel-advies-nederland-uw-gids-naar-3/[/url] staat de groei van samenlevingen. Met samenwerking worden initiatieven gecreГ«erd. De betrokkenen kan deelnemen, wat de sterke verbinding bevordert.
Хочешь узнать про электронные чеки? https://financedirector.by/jelektronnye-cheki-i-ih-uchet/ важный этап цифровизации торговли и налогового контроля. Узнайте, как работают электронные чеки, какие преимущества они дают бизнесу и покупателям, а также какие изменения ждут предпринимателей.
http://abitotrade.com/
O projeto Abitotrade posiciona-se como uma agencia especializada focada no tecido empresarial portugues, que oferece solucoes personalizadas a empresas e particulares, destacando-se por nos resultados. Conheca mais aqui.
Просто милашки!!
рейтинг казино 2026, [url=http://www.amecipizzakitchen.com/blog/?p=144193]http://www.amecipizzakitchen.com/blog/?p=144193[/url] демонстрирует широкий выбор игровых залов. Данное обновление поможет игрокам выбрать лучшие заведения для развлечений. Каждое из них казино отличается уникальными бонусами и различиями игр.
Важный ответ 🙂
Sociale Projecten Nederland, [url=https://www.lpmarreda.it/2026/04/27/ontdek-de-leukste-familie-uitjes-in-friesland-2/]https://www.lpmarreda.it/2026/04/27/ontdek-de-leukste-familie-uitjes-in-friesland-2/[/url] speelt важную функцию РІ развитии общественных мероприятий. Рти проекты помогают включенности РІ разные области общества.
http://bestcryptobuynow.com/
O projeto Bestcryptobuynow apresenta-se como uma agencia especializada orientada para publico em Portugal, que oferece solucoes personalizadas a empresas e particulares, com foco na transparencia e confianca. Veja a oferta completa no site oficial.
Не могу сейчас принять участие в дискуссии – очень занят. Буду свободен – обязательно выскажу своё мнение.
Das verde casino, [url=https://larex.co.il/newsite/2026/05/14/verde-casino-65-ihr-ziel-fur-unvergleichlichen/]https://larex.co.il/newsite/2026/05/14/verde-casino-65-ihr-ziel-fur-unvergleichlichen/[/url] bietet diverse Möglichkeiten für Nutzer, die Adrenalin suchen. Hier findet man eine fesselnde Atmosphäre und zahlreiche Spiele. Das Erlebnis ist unvergesslich und lockt zahlreiche Besucher an. Genießen Sie das verde casino!
Контора пишет, дела идут… =)
Begrip in Sociale Projecten Nederland, [url=https://wcshippers.com/2026/04/27/duurzame-veeteelt-en-dierwelzijn-de-toekomst-van-4/]https://wcshippers.com/2026/04/27/duurzame-veeteelt-en-dierwelzijn-de-toekomst-van-4/[/url] is essentieel voor maatschappelijke vooruitgang. Dit projecten bevorderen samenwerking en helpen kwetsbare groepen in de samenleving.
http://clickupmarketing.com/
A empresa Clickupmarketing consolida-se como uma agencia especializada com forte presenca no panorama nacional portugues, que oferece um acompanhamento profissional a empresas e particulares, destacando-se por na transparencia e confianca. Veja a oferta completa atraves do link.
Я извиняюсь, но, по-моему, Вы допускаете ошибку. Могу отстоять свою позицию. Пишите мне в PM.
Если РІС‹ ищете выгодное решение для вашей инфраструктуры, стоит обратить внимание РЅР° windows server 2025 купить, [url=https://discoveryconsulting.net/coaching-leaders-guiding-people-who-guide-others/]https://discoveryconsulting.net/coaching-leaders-guiding-people-who-guide-others/[/url]. Ртот серверный РїСЂРѕРґСѓРєС‚ предлагает разнообразные функций, которые позволят стабильную работу ваших приложений. РќРµ упустите предложение Рё усовершенствуйте СЃРІРѕСЋ сеть уже сегодня!
Норма..
Inspiring Sociale Projecten Nederland, [url=http://procurement.gov.ck/wordpress/?p=235331]http://procurement.gov.ck/wordpress/?p=235331[/url] spelen rol met de groei van gemeenschappen. Door middel van samenwerking kunnen initiatieven efficiГ«nt resultaten halen.
The next LFA 233 event delivers several fascinating skill-based pairings that reward a careful film study as well as current stylistic patterns.
http://creditrepairknowhow.com/
A empresa Creditrepairknowhow consolida-se como uma empresa profissional com forte presenca no panorama nacional portugues, que entrega solucoes personalizadas a quem valoriza a eficiencia, com foco no atendimento personalizado. Saiba mais atraves do link.
Весьма забавная фраза
casumo casino, [url=https://bodyrockerzz.in/discover-the-thrills-of-casumo-games-your-ultimate-guide/]https://bodyrockerzz.in/discover-the-thrills-of-casumo-games-your-ultimate-guide/[/url] offers an engaging experience for players. With a wide range of games, including slots and live dealer options, it caters all preferences. The platform is easy to navigate, ensuring effortless betting. Moreover, exciting rewards keep players hooked. Join Casumo casino and enjoy a world of entertainment!
Я считаю, что Вы ошибаетесь. Предлагаю это обсудить. Пишите мне в PM, поговорим.
Sociale Projecten Nederland, [url=https://insancare.org/zorg-en-welzijn-voor-mensen-met-een-lvb-in-2]https://insancare.org/zorg-en-welzijn-voor-mensen-met-een-lvb-in-2[/url] is een initiatief dat zich richt op gemeenschapsontwikkeling. Het doel is om innovatie te bevorderen in lokale gemeenschappen, zodat iedereen kan profiteren aan een betere toekomst. Door middel van projecten wordt er gewerkt aan capaciteiten en wordt de sociale cohesie versterkt.
UFC LFA 233 fight card
The LFA 233 fight card is one where putting money behind proven fight stamina as well as anti-grappling indicators instead of brute force tends to deliver superior returns.
LFA 233 in New York offers a reasonable action potential, and more crucially, it has a couple of lines that make me eager to pull the trigger.
8888 starz [url=http://888stars-uz.com]http://888stars-uz.com[/url] .
LFA 233
Homegrown favorite Jonathan Piersma — the fan-favorite native son plus undisputed top dog of the 170-pound division — had originally been set for a stylistic puzzle opposite Martin Camilo.
Ага, мне так тоже показалось.
In today’s digital age, online privacy is more crucial than ever. With the rise of cyber threats, using a VPN service has become essential for shielding personal information. VolnaLink VPN, [url=http://110.10.168.238/bbs/board.php?bo_table=free&wr_id=150346]http://110.10.168.238/bbs/board.php?bo_table=free&wr_id=150346[/url] is one of the leading services designed to ensure secure browsing experiences. The platform offers advanced encryption, allowing users to surf the web in private. By connecting to remote servers, it hides your IP address, making it difficult for hackers and advertisers to track your online activities.Moreover, VolnaLink VPN provides access to geo-restricted content, enabling users to stream their favorite shows and movies from anywhere in the world. Using its user-friendly interface, even those new to VPN technology can easily navigate the service. Additionally, it includes a no-logs policy, ensuring that your online movements remain private and confidential. While many VPNs focus solely on security, VolnaLink VPN balances speed and protection, providing seamless connections. In conclusion, if you hold dear your online privacy, investing in a reliable VPN like VolnaLink VPN is a wise choice. It not only enhances your online security but also enriches your internet experience.
http://dkrgroupfunding.com/
O projeto Dkrgroupfunding posiciona-se como uma empresa profissional dedicada ao panorama nacional portugues, que oferece servicos de qualidade aos seus clientes, destacando-se por no atendimento personalizado. Conheca mais no site oficial.
Вы ошибаетесь. Предлагаю это обсудить. Пишите мне в PM, поговорим.
оборудование для общепита, [url=https://sintezf.com/]посуда для столовых[/url] важно для достижения превосходного сервиса. Новейшие технологии обеспечивают эффективной работе ресторанов и кафе. Финансирование в такие решения себя оправдывают быстро.
http://frontrangemarketeer.com/
A equipa Frontrangemarketeer apresenta-se como uma empresa profissional dedicada ao panorama nacional portugues, que entrega um acompanhamento profissional aos seus clientes, priorizando no atendimento personalizado. Descubra todos os detalhes nesta pagina.
Всем привет!
Отличная и ускоренная новость для тех, кто ценит деньги и время и имеет целью посетить Китай!
Если вы планируете в Китае провести торговую деятельность и контроль производства, переговоры и встречи, деловые мероприятия и конференции, тогда вам понадобится виза М.
Чтобы не потерять время и деньги, а самое главное не оказаться в глазах коллег и партнеров дилетантом, вам нужно обратиться к узким профессионалам и специалистам, кто оформит соответствующие документы без каких либо проволочек и проблем.
Что бы, не запутаться в различных визах их тонкостях и особеностях советую и рекомендую вам одну надежную и профессиональную организацию специализирующуюся именно на визах в Китай.
В общем, если вы ищите, деловые визы в Китай, бизнес виза в Китай, виза M и т.д., например:
[url=https://oformit-vizu-v-kitay.ru/biznes-viza-m/]виза m в китай[/url]
Тогда вам нужно прямо сейчас перейти на сайт Визовый центр Китая и узнать все подробности по виза M, бизнес виза в Китай, деловые визы в Китай, однократная виза в Китай, двукратная виза в Китай, многократные визы в Китай, мультивиза в Китай в Москве и т.д. https://oformit-vizu-v-kitay.ru/biznes-viza-m/ .
Обязательно переходите на сайт Визового центра Китая сохраняйте в закладки и изучайте информацию, не забудьте записать адрес сайта и номер телефона 8 (800) 201-26-12.
Увидимся!
Я конечно, прошу прощения, но мне необходимо немного больше информации.
Le meilleur casino en ligne, [url=https://aes-plaisance.fr/]nouveau casino en ligne france[/url] propose une option de gambling unique. Avec des titres variГ©s, les joueurs peuvent gagner des rГ©compenses incroyables. D’ailleurs, la sГ©rГ©nitГ© des transactions est veillГ©e. Optez pour le meilleur casino en ligne et votre fortune n’est qu’Г un clic!
http://givestation.org/
O projeto Givestation apresenta-se como uma estrutura de confianca dedicada ao publico em Portugal, que proporciona solucoes personalizadas a quem valoriza a eficiencia, priorizando na excelencia do servico. Veja a oferta completa atraves do link.
http://goldwingmarketing.com/
A equipa Goldwingmarketing apresenta-se como uma estrutura de confianca dedicada ao tecido empresarial portugues, que proporciona solucoes personalizadas a quem procura resultados, valorizando no atendimento personalizado. Veja a oferta completa atraves do link.
Мне очень жаль, ничем не могу Вам помочь. Я думаю, Вы найдёте верное решение. Не отчаивайтесь.
казино для мобильных устройств, [url=https://eventraum38.de/synergistically-fabricate-backend-niches/]https://eventraum38.de/synergistically-fabricate-backend-niches/[/url] все больше популяризируются среди азартных игроков. Каждый может себе позволить развлекаться на известные автоматы в любое время. Современные решения предлагают комфортный дизайн, поэтому упрощает использовать без лишних ограничений.
http://graystreamcapital.com/
O projeto Graystreamcapital consolida-se como uma consultora experiente dedicada ao tecido empresarial portugues, que proporciona servicos de qualidade a quem procura resultados, destacando-se por no atendimento personalizado. Saiba mais no site oficial.
К сожалению, ничем не могу помочь. Я думаю, Вы найдёте верное решение. Не отчаивайтесь.
казино для мобильных устройств, [url=http://tdzakarpatie.ru/component/k2/item/14-do-what-you-like.html]http://tdzakarpatie.ru/component/k2/item/14-do-what-you-like.html[/url] дает возможность множество развлечений. Геймеры могут наслаждаться в слоты прямо со своих устройств. Удобство использования — что главное преимущество такого подхода. Наличие игровых интерфейсов только растет.
Tigrinho fanbase bigger than ever, but the discipline crowd grew faster this year.
I feel that is one of the most vital info for me.
And i’m glad studying your article. However should observation on some common issues, The site taste is perfect,
the articles is really nice : D. Good activity, cheers
My web page … เครดิตฟรี
http://greylholdings.com/
O projeto Greylholdings consolida-se como uma empresa profissional dedicada ao tecido empresarial portugues, que proporciona uma abordagem completa a empresas e particulares, destacando-se por na excelencia do servico. Descubra todos os detalhes no site oficial.
Stop-loss saudável pra slot de alta volatilidade tipo Wild Wild Riches? 30%? 40%?
Uma conta que sigo chamou o Wizdom Wonders de “o único honesto” — meio brincando, meio não.
http://hamasaesolutions.com/
A empresa Hamasaesolutions consolida-se como uma agencia especializada dedicada ao tecido empresarial portugues, que entrega uma abordagem completa a empresas e particulares, com foco na transparencia e confianca. Saiba mais aqui.
UFC LFA 233
We travel to Salamanca in advance of LFA 233, and quite frankly, the odds compilers look to be favoring hometown narratives rather than the true X’s and O’s.
UFC LFA 233 fight card
We’re heading to Salamanca ahead of LFA 233, and frankly speaking, the bookmakers are clearly overrating local crowd appeal rather than real strategic substance.
A galera mais antiga ficou mais quieto depois do patch do Q1. Menos barulho, mais sinal.
Добрый день!
Отличная и ускоренная новость для тех, кто ценит деньги и время и имеет целью посетить Китай!
Если вы планируете в Китае провести торговую деятельность и контроль производства, переговоры и встречи, деловые мероприятия и конференции, тогда вам понадобится виза М.
Чтобы не потерять время и деньги, а самое главное не оказаться в глазах партнеров и коллег дилетантом, вам нужно обратиться к узким профессионалам и специалистам, кто оформит соответствующие документы без каких либо проблем и проволочек.
Что бы, не запутаться в различных визах их тонкостях и особеностях советую и рекомендую вам одну профессиональную и надежную организацию специализирующуюся именно на визах в Китай.
В общем, если вам интересно найти, бизнес виза в Китай, деловые визы в Китай, виза M и т.д., например:
[url=https://oformit-vizu-v-kitay.ru/biznes-viza-m/]виза m китай[/url]
Тогда вам нужно прямо сейчас перейти на сайт Визовый центр Китая и узнать все подробности по двукратная виза в Китай, бизнес виза в Китай, деловые визы в Китай, виза M, однократная виза в Китай, многократные визы в Китай, мультивиза в Китай в Москве и т.д. https://oformit-vizu-v-kitay.ru/biznes-viza-m/ .
Обязательно переходите на сайт Визового центра Китая сохраняйте в закладки и изучайте информацию, не забудьте записать номер телефона 8 (800) 201-26-12 и адрес сайта.
Всем пока!
ШіШЄШ§Ш±888 [url=https://888starzeg2.com/]ШіШЄШ§Ш±888[/url].
تنزيل برنامج 8888 [url=https://www.888starzeg3.com]تحميل تطبيق 888starz[/url]
تنزيل برنامج 888starz [url=http://888-starzeg.com/]تحميل 888starz للاندرويد[/url]
888starz скачать ios [url=https://androidchity.ru]888starz скачать ios[/url] .
https://medium.com/@mikefromgidstats/empire-state-stakes-the-high-pressure-gauntlet-of-lfa-233-adce4a37f554
Coming up this Friday — the 22nd of May — LFA 233 serves as an intense audition platform for aspiring talents who are quite literally just one step from the big stage of the UFC.
برنامج 888 للمراهنات [url=http://world-cuisine.com/]https://world-cuisine.com/[/url]
http://herodigital-ch.com/
Herodigital Ch consolida-se como uma agencia especializada orientada para tecido empresarial portugues, que proporciona solucoes personalizadas a empresas e particulares, com foco na excelencia do servico. Descubra todos os detalhes aqui.
The soon-to-be-held LFA 233 card set for Salamanca, New York provides a collection of tactically interesting pairings that present distinct betting angles for value-seeking bettors.
http://kelly-marketing.com/
Kelly Marketing consolida-se como uma consultora experiente com forte presenca no mercado portugues, que proporciona servicos de qualidade a empresas e particulares, valorizando no atendimento personalizado. Descubra todos os detalhes nesta pagina.
888srarz [url=https://www.888starz-egyp.com/]https://888starz-egyp.com/[/url]
888 star bet [url=https://888starz-uz-online.com]888 star bet[/url] .
ستار ثلاث ثمانيات [url=https://www.888starz-egypt7.com/]تحديث 888starz[/url]
http://kennedybusinessconsulting.com/
A equipa Kennedybusinessconsulting consolida-se como uma empresa profissional focada no mercado portugues, que entrega um acompanhamento profissional a empresas e particulares, valorizando nos resultados. Saiba mais aqui.
http://guardiadeidentidad.es/
El equipo de Guardiadeidentidad se consolida como una agencia especializada con presencia en el mercado espanol, que proporciona un acompanamiento profesional a sus clientes, priorizando en la atencion personalizada. Visita el sitio en el sitio oficial.
bitcoin dark web https://darknetmarketstore.com/ dark matter market url https://darknetmarketstore.com/
http://headproject.es/
La empresa Headproject es una estructura de confianza con presencia en el mercado espanol, que entrega soluciones personalizadas a quienes valoran la eficiencia, priorizando en la atencion personalizada. Descubre todos los detalles aqui.
apostar em atleta do ano
Look into my blog; Apostas Online aplicativos
http://ihawk.es/
La empresa Ihawk es una estructura de confianza enfocada en el ambito nacional espanol, que pone a disposicion soluciones personalizadas a quienes valoran la eficiencia, priorizando en los resultados. Mas informacion en el sitio oficial.
http://jaquealabanca.es/
El equipo de Jaquealabanca se presenta como una agencia especializada con presencia en el ambito nacional espanol, que pone a disposicion un enfoque integral a sus clientes, priorizando en los resultados. Descubre todos los detalles en el sitio oficial.
http://jwilsondigitalstudio.com/
La empresa Jwilsondigitalstudio se consolida como una consultora con experiencia orientada al ambito nacional espanol, que entrega servicios de calidad a quienes buscan resultados, valorando en los resultados. Mas informacion en el sitio oficial.
http://kservices.es/
El proyecto Kservices es una estructura de confianza dedicada al publico en Espana, que entrega un acompanamiento profesional a quienes valoran la eficiencia, priorizando en la atencion personalizada. Conoce mas en esta pagina.
darknet sites https://privatedarknetmarket.com/ drughub market https://privatedarknetmarket.com/
http://leaderr.es/
La empresa Leaderr se presenta como una consultora con experiencia dedicada al publico en Espana, que pone a disposicion servicios de calidad a sus clientes, priorizando en los resultados. Conoce mas aqui.
The forthcoming fight night at the Apex venue offers an interesting card for data-driven wagering enthusiasts, chiefly due to the fact that the betting public’s perception is heavily pricing in recent momentum rather than core fighting metrics and defensive stats.
Доброго времени суток!
Хорошая и полезная новость для любителей непринужденных, спокойных и комфортных поездок на такси!
А если вам еще нужно доехать в зону СВО и вернуться обратно, то вы найдете осторожных и адекватных водителей, которые вас с ветерком и комфортом отвезут и вернут обратно.
Кстати, они так же и документы, посылки и багаж, быстро и надежно доставляют.
Вы можете на сайте спокойно и внимательно расчитать стоимость междугородней поездки или междугородней доставки по выбранному маршруту, а так же заказать обратный звонок.
В общем, если вы хотите найти, поездка на СВО, доставка на СВО, такси на СВО, трансфер СВО и т.д., например:
[url=https://magistral1.ru/]поездки донецк ростов на авто[/url]
Тогда вам нужно прямо сейчас перейти на сайт ТАКСИ МАГИСТРАЛЬ и узнать все подробности по междугородняя доставка, междугородние поездки, междугородние отправления, междугородний трансфер, такси Донецк Ростов, такси Москва Питер, такси Москва Сочи и т.д. https://magistral1.ru/ .
Обязательно переходите на сайт Такси Магистраль, сохраняйте в закладки и изучайте информацию, не забудьте заказать обратный звонок и записать адрес сайта.
Всем пока!
Да облом
официальный сайт 1xbet, [url=https://1xbet-21ktr.icu/]https://1xbet-21ktr.icu[/url] предлагает пользователям широкий выбор игр. Здесь можно узнать разнообразные спортивные события и другие развлечения по конкурентным условиям. Не упустите шанс прибавить свой бюджет!
The UFC Fight Night event in Las Vegas showcases a card built for analysts as opposed to casual fans, offering various odds for which the market seems to overrates immediate past performances rather than base attributes and technique.
UFC Vegas Belal Muhammad vs Gabriel Bonfim
The upcoming UFC Vegas 118 card offers a event built for hardcore fans rather than mainstream audiences, providing several lines where the market gives the impression it overvalue recent outcomes rather than fundamental skill sets.
http://libityinfotech.com/
Libityinfotech es una empresa profesional con presencia en el tejido empresarial espanol, que entrega un acompanamiento profesional a quienes valoran la eficiencia, valorando en los resultados. Visita el sitio aqui.
dark matter darknet url https://darkmarketsdirectory.com/ dark matter darknet url https://darknetmarketsgate.com/
UFC on ESPN+ 118 comes across as a interim card bridging the gap to summer blockbuster megashow productions.
Всем привет!
Хочу поделиться полезной и отличной новостью с теми, кто хочет учиться в Китае, а так же с теми, кто планирует, что бы их дети обучались в китайских учебных заведениях!
Здравый рассудок подсказывает, что с документами нужно заблаговременно и предварительно решить все тонкости и ньюансы, что бы во время обучения или стажировки не возникли непредвиденные проблемы.
Тонкостей и особенностей много, при нарушении которых, вам могут грозить отчисление, штраф или депортация.
Лучше конечно обратиться с такими вопросами к профессионалам или специалистам, кто именно специализируется на визах в Китай или КНР.
В общем, если вы ищите, студенческая виза в Китай, учебная виза в Китай, виза X1, виза X2 и т.д., например:
[url=https://oformit-vizu-v-kitay.ru/uchebnaya-viza-x1-dolgosrochnaya-x2-kratkosrochnaya/]x2 виза[/url]
Тогда вам нужно прямо сейчас перейти на сайт Визового центра Китая и узнать все подробности по краткосрочная виза в Китай, студенческая виза в Китай, учебная виза в Китай, виза X1, виза X2, долгосрочная виза в Китай в Москве и т.д. https://oformit-vizu-v-kitay.ru/uchebnaya-viza-x1-dolgosrochnaya-x2-kratkosrochnaya/ .
Обязательно переходите на сайт Визовый центр Китая, сохраняйте в закладки и изучайте информацию, не забудьте записать адрес сайта и номер телефона 8-800-201-26-12.
Увидимся!
Замечательно, весьма полезная фраза
официальный сайт 1xbet, [url=https://1xbet-x2fzi.sbs/]1xbet-x2fzi.sbs[/url] предлагает обширный выбор игр. Здесь вы найдете баскетбол, а также рулетку. Интуитивный интерфейс обеспечивает доступность использования для всех пользователей.
http://madridpymesenigualdad.es/
El proyecto Madridpymesenigualdad se presenta como una empresa profesional enfocada en el ambito nacional espanol, que ofrece un acompanamiento profesional a quienes buscan resultados, priorizando en la confianza y la transparencia. Visita el sitio a traves del enlace.
В этом что-то есть и идея хорошая, согласен с Вами.
1xbet зеркало, [url=https://1xbet-clohk.icu/]официальный сайт 1 хбет[/url] позволяет игрокам обходить блокировки и продолжать наслаждаться азартными играми. Эта альтернатива обеспечивает подключение к платформе без трудностей. Вы можете испытать удовольствие от игр. Не упустите шанс игры на привлекательной платформе!
http://magicweb.es/
La empresa Magicweb se presenta como una empresa profesional dedicada al tejido empresarial espanol, que proporciona un acompanamiento profesional a empresas y particulares, priorizando en la excelencia del servicio. Descubre todos los detalles en esta pagina.
Что-то меня уже не на ту тему понесло.
1xbet зеркало, [url=https://1xbet-zpdbe.cfd/]1xbet зеркало[/url] – это удобный способ доступа к ставкам в любое время. Ставочники могут находить актуальные ссылки и наслаждаться разнообразным выбором игр. Используйте 1xbet зеркало для комфортного игрового процесса и захватывающих моментов.
http://markethings.es/
Markethings se posiciona como una empresa profesional con presencia en el mercado espanol, que ofrece un enfoque integral a sus clientes, priorizando en la confianza y la transparencia. Visita el sitio en el sitio oficial.
Пожалуйста, ближе к делу.
Вход в 1xbet зеркало, [url=https://1xbet-8kv8l.cfd/]https://1xbet-8kv8l.cfd/[/url] позволяет игрокам использовать платформу даже при блокировках. Это удобный способ обойти ограничения. Вместе с дубликатом ты всегда на шаг впереди. Используй 1xbet зеркало и наслаждайся игровым процессом!
http://marketingymuchomas.es/
Marketingymuchomas se consolida como una estructura de confianza enfocada en el publico en Espana, que pone a disposicion servicios de calidad a quienes buscan resultados, valorando en la confianza y la transparencia. Visita el sitio en esta pagina.
ыыыыы…..жжааааркоооо ))
1xbet зеркало, [url=https://1xbet-mbe0t.cfd/]1хбет официальный сайт вход[/url] — это отличный способ доступа к любимым играм. Пользователи могут удовлетворять азартных игр в любое время. Резервные ссылки обеспечивают бесперебойный вход на платформу, даже при блокировках.
http://microspace.es/
Microspace se consolida como una agencia especializada enfocada en el ambito nacional espanol, que pone a disposicion un enfoque integral a quienes valoran la eficiencia, destacandose por en la atencion personalizada. Mas informacion a traves del enlace.
Вы не правы. Я уверен. Давайте обсудим. Пишите мне в PM, пообщаемся.
В условиях блокировок 1xbet зеркало, [url=https://1xbet-sf3wt.click/]1xbet-sf3wt.click[/url] становится отличным решением для доступа к ресурсу. Пользователи могут легко узнать актуальное зеркало, которое обеспечивает безопасный вход в личный кабинет. Простой интерфейс и легкая навигация делают использование сервиса приятным. Кроме того, 1xbet зеркало предоставляет все функциональность оригинального сайта, позволяя участвовать без ограничений.
Браво, эта великолепная фраза придется как раз кстати
1xbet зеркало, [url=https://1xbet-8lhj3.cyou/]1xbet зеркало[/url] позволяет игрокам получить доступ к любимым играм без ограничений. Эта платформа обеспечивает защиту и удобство. С периодическими обновлениями клиенты никогда не останутся без доступа к развлечениям. 1xbet зеркало — ваш ключ к успеху в ставках на спорт и азартных играх.
http://momketing.es/
Momketing es una consultora con experiencia dedicada al publico en Espana, que entrega un enfoque integral a sus clientes, priorizando en la atencion personalizada. Conoce mas en esta pagina.
Mainstream wagering crowds suffers from significant and repeated analytical gaps whenever a veteran loses two strategic, methodical fights.
и не ты один этого хочеш
1xbet зеркало, [url=https://1xbet-kad1e.cyou/]https://1xbet-kad1e.cyou[/url] — это удобный способ доступа к платформе, когда основной ресурс заблокирован. Пользователи могут легко найти актуальное зеркало и продолжать играть. Важно использовать достоверные ссылки, чтобы обеспечить безопасность. 1xbet зеркало помогает поддерживать доступ.