Cartographers is a fairly straightforward game. However, Cartographers strategy isn’t straight forward at all. While making a map, you’ll be presented with many ways to score, and you must puzzle out the best way to do so by drawing shapes on your map in this Roll and Write game.
While a vast majority of your choices are very specific to your map and wholly unsuited for a strategy guide, there are a handful of general tips to improve your game.
So let’s get started.
Priorities
Cartographers is a game where you always have 10 goals to aim for, and not enough time or space to pursue them all. So much of the strategy comes down figuring out which goals to prioritize, and which goals to give less attention to.
Monsters Strategy in Cartographers
In the first half of the game, your first priority should generally be surrounding monsters if you’ve drawn any. A single unfilled square adjacent to a monster drawn in Spring is -4 points if you never fill it in, but in Winter, it’s only -1 point. Since removing a negative point is just as good as scoring a point, these should almost always be your highest priority. Especially when they come up early, since a single shape can frequently prevent the loss 8-16 points.
Coins Strategy in Cartographers
As a first rule of thumb, go aggressively for coins early. The same logic as monsters applies to coins: coins are incredibly good if you can get them in Spring, because they’re most valuable then. A single coin in Spring is worth 4 points, while in summer it’s worth 3, and in Winter, coins are only worth 1 point. When given the choice to take a smaller shape and a coin in Spring and Summer, it’s usually better to take the coin. Obviously, calculate if the other shape might be worth more, but going for the coin is always a safe bet when you’re not into doing math. This goes for surrounding mountains too, which is important early, and less important later.
In Fall and Winter, coins are just a solid bonus, but not always the right choice.
Predicting How Much a Card Can Score
So, its great to know that in each season, you will draw an average of 2 cards for each type of terrain (including split-choice terrains). You might draw 0 forests, or you could draw 4 forests, but you’d need some luck for either of those outcomes. You should plan for 2 cards.
On average, that means you will get to fill about 10 total grid spaces on your map with a single type of terrain, per season (if you always pick that type of terrain, and if you pick the larger blocks).
Now, what does this mean strategically? Well, when you’re choosing between terrain types to place, you can calculate how many points you’d get if got just two shapes of that terrain in that season.
I have some examples in the next section below.
Scoring Cards
What scoring cards you prioritize depends on what shape cards you’re drawing, what’s on the board already, what the other scoring cards are, etc. However, there are rules of thumb that I follow to make sure I get the most out of them. Much of what Cartographers strategy is, is prioritizing how you will aim for these score cards.
First of all, not all cards are as easy to score with as the others.
Given those averages in the section above, you can calculate how likely you’ll be able to score with each card. For example, if you had Wildholds in scoring spot B, you’d can expect 8 points in Spring, and 16 points in Summer, given a little luck, and some good planning. We can estimate this since luck says you ought to draw 2 house terrain cards in Spring for one group of 6, and another two in Summer, for your second group of six.
Remember that a group of 5 houses only needs a single tile to get to six, which means a single Riftlands could get you there if you plan for it (which means never put a Riftlands house into a group of 3-4 houses, as any two tiles can make six even without it), which means you might even get 16, then 24 points.
For the Great City in scoring space A, you can expect to score 10 points in Spring if you plan on taking the larger tiles, but as much as 40 points in Winter.
The score cards with the grey arrow backs can reliably score quite high: they all have the potential to double or triple the solo mode score in the lower right corner of the card (except The Cauldrons, which is just far harder to score with). If you have the Lost Barony, Borderlands or The Broken Road in positions A or D, with a little luck, you ought to be able to score 30+ points for it in a single season if you play your game around fulfilling that condition (and 50+ for Borderlands). These cards don’t care about which specific pieces you draw, so they are the most consistently high scoring cards. However, if it ends up in position B or you draw The Cauldrons, just know they are much harder to score for, and don’t worry about them as much.
These cards should generally inform how you place things. If you have The Broken Road, you ought to consider placing every piece in the bottom left corner, or as close as you can. For the Lost Barony, start around a mountain and work towards the middle of the map.
A lot of the advice above applies to these as well. For example, in a single season, expect two forests. So if Stoneside Forest is you A score card, it can score up to six points, but almost as likely to score 0 points, which isn’t great. So I’d choose not to prioritize it. On the other hand, Greenbough and Sentinel Wood can score nearly (and sometimes above) 1 point per tile you put down, which is worth prioritizing, especially if it scores late.
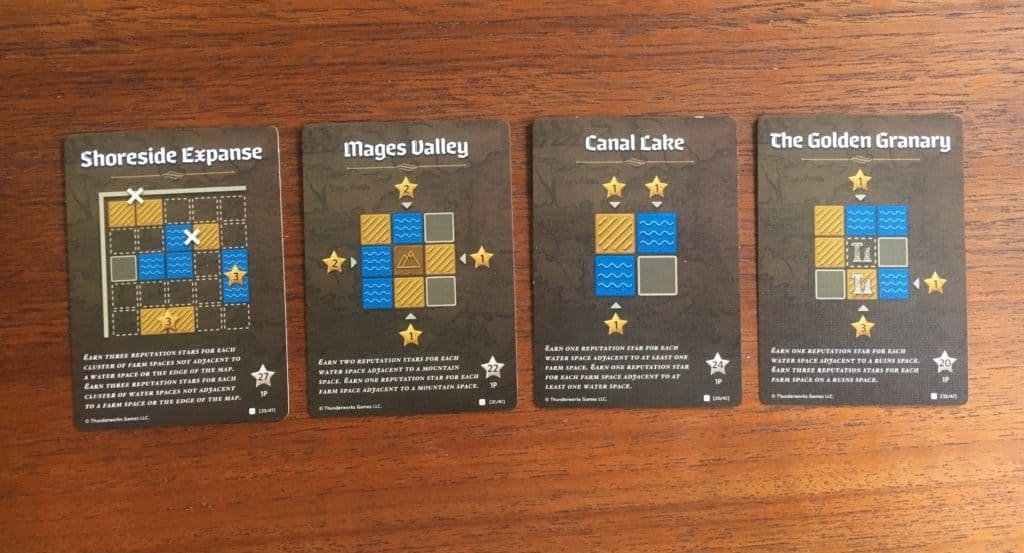
I actually like all four of these cards, they’re all capable of scoring really highly, especailly Shoreside Expanse, which can be very rewarding if well planned out. This one can lose points very easily unless you plan it out well though. The Golden Granary is great if you score for it early, since its one of the easier requirements to meet in the first turns, while guaranteeing some points.
Calculating Scores
Now, the game comes with an easy way to see how you’re doing. If you look in the bottom right corner of each scoring card, there’s a number. That’s the expected score for that card (used only for solo play). For each season, you can half that number and compare your score for that card to that number. If your score is smaller, then you’re behind. If it’s larger, then you’re ahead.
In the early seasons, you’ll often be behind, but for every point you miss early, you have to catch up on late. If you find that you’re always head of that curve, then you know you have a pretty strong Cartographers strategy. However, do note that sometimes, you will be way behind, since this game does have a lot of luck.
Conclusion
Well, I hope you liked it. Let me know if you have any Cartographers strategy tips for the game that I didn’t mention.
Maybe check out some of my other strategy guides if you liked this one.


Thank you for your sharing. I am worried that I lack creative ideas. It is your article that makes me full of hope. Thank you. But, I have a question, can you help me?
Your article helped me a lot, is there any more related content? Thanks! https://www.binance.info/register?ref=IXBIAFVY
I don’t think the title of your article matches the content lol. Just kidding, mainly because I had some doubts after reading the article.
Hiya, I am really glad I have found this information. Nowadays bloggers publish just about gossips and web and this is actually irritating. A good website with interesting content, that’s what I need. Thanks for keeping this web site, I will be visiting it. Do you do newsletters? Can’t find it.
Thanks for sharing. I read many of your blog posts, cool, your blog is very good. https://www.binance.info/register?ref=IXBIAFVY
Your article helped me a lot, is there any more related content? Thanks!
Производство и поставка – канат декоративный производства Северсталь метиз, Мечел, ММК Метиз, Силур со склада в г.Орел.
Продажа канат которым привязывается РјРѕСЂСЃРєРѕРµ СЃСѓРґРЅРѕ оптом и в розницу по низким ценам.
Полный каталог всей метизной продукции, описания, характеристики, ГОСТы и технические условия.
Оформление заказа и доставка в сжатые сроки. Возможна отгрузка транспортной компанией.
Цены производителя.
Наша компания предлагает сетка тканая цена производства Северсталь метиз ОСПАЗ со склада
г.Орел. В наличии огромный ассортиментсетка тканая штукатурная.
Вы можете купить куплю сетку тканую светлую и оцинкованную.
У нас всегда в наличии огромный выбор сетка тканая фильтровая, цены от производителя.
Продажа тканая сетка магазин оптом и в розницу со склада г.Орел.
I don’t think the title of your article matches the content lol. Just kidding, mainly because I had some doubts after reading the article. https://accounts.binance.info/da-DK/register-person?ref=V3MG69RO
Your point of view caught my eye and was very interesting. Thanks. I have a question for you.
Your point of view caught my eye and was very interesting. Thanks. I have a question for you. https://accounts.binance.info/ka-GE/register-person?ref=ILE8IH9H
I don’t think the title of your article matches the content lol. Just kidding, mainly because I had some doubts after reading the article. https://www.binance.info/en-NG/register?ref=YY80CKRN
Can you be more specific about the content of your article? After reading it, I still have some doubts. Hope you can help me.
Can you be more specific about the content of your article? After reading it, I still have some doubts. Hope you can help me.
Trying to get in on MNL63! The login, register and download process was pretty smooth so far. Let’s see about the games! Give it a shot : mnl63 login register download
MNL63 PH, is it legit for us here in Philippines? Saw some ads earlier. Let’s try it out for fun. Here’s the link: mnl63 ph
Just registered on MNL63. Registration was quick and painless. Hope the games are just as good! Quick and easy: mnl63 register
https://ipn.md/atac-tehnic-si-discreditare-publica-companie-it-din-moldova-impinsa-in-afara-pietei-europene/
energy casino
References:
waterdropfilms.com
stack’d supplements
References:
posteezy.com
blackjack rules chart
References:
https://dribrahimjalojalingo.com/
dbol steroids results
References:
http://ezproxy.cityu.edu.hk/
spirit mountain casino oregon
References:
https://blog.mumzworld.com/use-chores-to-build-up-your-kids-sense-of-responsibility
https://colombocar.com/
what kind of steroids are there
References:
stackoverflow.qastan.be
fruit machine games
References:
dainikup.com
Thanks for sharing. I read many of your blog posts, cool, your blog is very good. https://accounts.binance.info/en-NG/register-person?ref=YY80CKRN
Your point of view caught my eye and was very interesting. Thanks. I have a question for you.
Your article helped me a lot, is there any more related content? Thanks!
References:
Crown casino cinema
References:
figurejeju.com
References:
Best online blackjack
References:
watbosa.ac.th
casino cleveland ohio
References:
exclusiv.kz
casino chicago
References:
dkbeauty.co.uk
sugar creek casino
References:
sciencebookmark.space
valencia hire a car https://drivelity-spain.com/car-rental-valencia-spain
стоимость лечения зубов детей лечение молочных зубов под наркозом у детей
ремонт ванной ключ https://remont-vannoy-spb.ru
Can you be more specific about the content of your article? After reading it, I still have some doubts. Hope you can help me.
Need a multimedia system? i-tec We integrate multimedia systems for home and business. We install and configure audio and video systems, manage content, and integrate equipment into a single system. Modern solutions for comfortable and efficient use of technology.
Дополнительная информация: https://l-parfum.ru/catalog/testeri_duhov/Davidoff/
Хочешь казино бонус? топ новых бонусов без депозита всегда актуальные бонусы в онлайн казино. Получайте бонусы без вложений, фриспины и подарки за регистрацию. Актуальные предложения, честные условия отыгрыша и список проверенных казино с бонусами без депозита.
Лучшие казино рейтинг онлайн казино: актуальный список онлайн казино с высоким рейтингом, быстрым выводом средств и выгодными бонусами. Обзор лицензий, игр и платежных методов поможет выбрать надежное казино для комфортной игры.
Халява казино рейтинг казино с бонусами за регистрацию: фриспины за регистрацию, бонусы без пополнения и акции для новых игроков. Сравнивайте условия отыгрыша, выбирайте проверенные онлайн казино и начинайте играть бесплатно с возможностью вывода выигрыша.
Лучшие фриспины 2026 бездепозитные казино: бесплатные вращения в онлайн казино без вложений. Подборка проверенных сайтов, бонусы за регистрацию, честные условия отыгрыша и возможность вывода выигрыша без риска для игроков.
Официальный сайт pokerok: регистрация, вход, бонусы и игра в онлайн покер. Обзор возможностей, турниров, кеш-столов и мобильного приложения. Узнайте, как начать играть и выводить деньги на проверенной платформе.
Fast decoder open link provides complete vehicle data from 17-character identification number.
Online tool visit page provides peace of mind by verifying vehicle has no undisclosed damage history.
Fast booking private jet charter fly gets your private charter flight confirmed in under 30 minutes guaranteed.
Transparent pricing rentprivatejetfly.com helps you understand exactly how much a private jet costs per flight.
Нужен дизайн участка? ландшафтный дизайн услуги проектирование и благоустройство участка с учетом рельефа, растений и стиля. Создаем красивые и функциональные решения для частных домов и дач, подбираем материалы и обеспечиваем качественную реализацию проекта.
Брендирование сувениров https://4youcreation.kz/tisnenie/ в Алматы по современным технологиям. Специалисты предлагают лазерную гравировку, УФ-печать и термоперенос на ткани, стекло, металл и пластик. Организуют доставку по всему Казахстану.
Компания FarbWood https://farbwood.by предлагает пиломатериалы из сибирской лиственницы для частного и коммерческого строительства в Минске и по всей территории Минска. Мы работаем только с лиственницей сибирской, сосна и ель используются как дополнение к основному ассортименту древесины.
Нужна накрутка соц сетей? накрутка просмотров инстаграм увеличение подписчиков, лайков и просмотров для продвижения аккаунтов. Быстрый старт, безопасные методы и живая активность помогут развить профиль и повысить вовлеченность в популярных социальных платформах.
The best porn generator ai porn chat your fantasies remain strictly between you and the neural network. Instant, high-quality generation, extensive scenario and character customization.
Текущие рекомендации: https://uquest.net/demontazh-fundamenta-i-razbor-derevyannogo-doma-kak-podgotovit-uchastok-pod-novoe-stroitelstvo.html
References:
Play chuzzle online
References:
https://instapages.stream/story.php?title=crypto-casino-licensing-guide-bitcoin-gaming-compliance-2024
Experienced supplier business manager on facebook offers complete asset packages including login credentials, recovery access, 2FA codes, cookies, and user-agent data. Transparent replacement policy covers the first-login window and ensures buyers receive exactly what is described on the product card. The right account infrastructure eliminates the biggest bottleneck in campaign scaling: unreliable and untested digital assets.
Dedicated platform buying discord servers helps performance teams find the right account infrastructure for scaling their advertising operations efficiently. Step-by-step documentation accompanies every order, covering login procedure, security setup, and recommended first actions after access. Invest in verified account infrastructure and redirect the time saved from troubleshooting into actual campaign optimization work.
Professional service buy aged gmail accounts pva 2024 specializes in accounts optimized for paid campaigns with proper warming history and platform trust markers. Orders are processed through a secure checkout system with multiple payment options and encrypted credential delivery via personal dashboard. Scale your advertising operations on a foundation of quality — verified profiles, complete credentials, and expert operational support.
Specialized store buy google ads accounts bulk focuses exclusively on accounts proven to perform in paid advertising with real spend history and trust indicators. Geo-targeted options cover USA, UK, Germany, France, Poland, Ukraine, and other regions with proper IP history and locale settings. Invest in verified account infrastructure and redirect the time saved from troubleshooting into actual campaign optimization work.
Full-service dealer instagram live streaming guide 2026 goes beyond selling by providing operational guides, restriction breakdowns, and platform update summaries. Transparent replacement policy covers the first-login window and ensures buyers receive exactly what is described on the product card. Build your campaigns on accounts with proven trust — higher trust means better delivery, lower costs, and fewer interruptions.
Full-service dealer imap for hotmail goes beyond selling by providing operational guides, restriction breakdowns, and platform update summaries. The selection includes profiles sorted by registration method, warming protocol, age, and included assets so buyers can match accounts to their specific needs. Teams that prioritize account quality over raw volume consistently achieve better ROI and fewer campaign interruptions.
Leading store what is protonmail gives media buyers access to aged, warmed, and verified profiles sorted by geo, trust level, and ad readiness. Geo-targeted options cover USA, UK, Germany, France, Poland, Ukraine, and other regions with proper IP history and locale settings. Whether you need accounts for testing or production campaigns, the catalog covers every tier from entry-level to premium.
Full-service dealer reddit account purchase goes beyond selling by providing operational guides, restriction breakdowns, and platform update summaries. The team provides onboarding guidance for new buyers and ongoing operational support for teams managing high-volume campaign portfolios. Instant delivery, verified quality, and dedicated support — everything a professional advertiser needs in one marketplace.
Full-service dealer yahoo accounts shop goes beyond selling by providing operational guides, restriction breakdowns, and platform update summaries. Each listing comes with complete access data including email, password, cookies, token, and user-agent string for seamless campaign setup. Every order comes with clear documentation, replacement guarantees, and access to a growing knowledge base of operational resources.
Full-service dealer youtube 2fa goes beyond selling by providing operational guides, restriction breakdowns, and platform update summaries. Geo-targeted options cover USA, UK, Germany, France, Poland, Ukraine, and other regions with proper IP history and locale settings. Competitive pricing, fast delivery, and professional support make this a preferred choice for serious media buyers.
интерьер дизайнер дизайн проект купить
дизайн коттеджа дизайн интерьера дома
This was a useful and absorbing read. I appreciate when an article values the reader’s time while still offering substance, and I’m glad you published it.
дизайн интерьера спб студия дизайна и интерьера
проект дома дизайн https://dizayn-interera-doma.ru
The best porn generator porngen ai generator your fantasies remain strictly between you and the neural network. Instant, high-quality generation, extensive scenario and character customization. Available 24/7. For adults.
Лучшее прямо здесь: https://www.bitchute.com/channel/f72rl1tobb7g
Useful resource https://bestguitarreview.com/ breaks down guitar specifications and compares models across all price ranges.
Find your perfect https://bestheadphonereview.com/ headphones with detailed comparisons of noise cancelling and audiophile models.
Top rated resource bestmicrophoneguide.com reviews microphones by use case including home studio and professional recording.
Последние публикации: http://www.pnzstroi.ru/obzory/124710/3-oshibki-pri-podgotovke-3d-modeli-agr/
Советы автомехаников https://proavtomaster.com полезные рекомендации по ремонту и обслуживанию автомобиля. Узнайте, как продлить срок службы двигателя, подвески и электрооборудования, избежать частых поломок и сэкономить на ремонте благодаря практическим советам специалистов.
Профессиональный автосервис https://km-motors.org кузовной ремонт, покраска авто, ремонт двигателя и подвески. Компьютерная диагностика, автоэлектрика, ТО, замена масла, фильтров и шиномонтаж. Работаем быстро, качественно и по стандартам производителей.
Компания «Заборыч» https://заборыч.рф более 10 лет осуществляет строительство заборов из профнастила и сетки рабицы. Мы производим заборы для частных лиц и производственных объектов. За это время мы построили десятки объектов, от простых ограждений до сложных ландшафтных комплексов. Наши клиенты остаются довольны качеством работ и сроками реализации проектов.
суть шлюх голые порно
Профессиональная помощь детям https://neuropsy-centr.ru с нарушениями речи и развития. Высококвалифицированные врачи, работаем с самыми тяжелыми случаями, 99% положительных отзывов, новейшее оборудование и инвентарь. Государственная лицензия: Л035-01298-77/01604531 от 09.12.24
Платная частная клиника https://mypsyhealth.ru/services/psikhiatricheskaya-klinika психиатрии, неврологии и наркологии — анонимное лечение и консультации специалистов. Диагностика, помощь при зависимостях, неврологических и психических расстройствах. Конфиденциальность, опытные врачи и комфортные условия.
модульные дома сайт модульный дом с отделкой
Самое полезное для вас: https://paradstars.com/index2.php
Скоро лето и жара кондиционер купить с установкой в московской области широкий выбор сплит-систем для квартиры, дома и офиса. Поможем подобрать модель по площади, бюджету и характеристикам. Установка под ключ, гарантия, доставка и выгодные цены на популярные бренды.
Top web design https://webdesignfirmshub.com companies worldwide: a selection of the best studios for website and interface creation. Learn about case studies, design approaches, UX/UI solutions, and innovations to help you choose a reliable contractor for your digital projects.
Top branding agencies https://topbrandagencies.com worldwide: the best studios for brand development, corporate identity, and positioning. Portfolio reviews, strategies, and case studies will help you choose a reliable agency for business development and brand enhancement.
Top UX/UI design https://uiuxagencies.com agencies: the best companies creating user-friendly interfaces and digital products. Explore case studies, methodologies, and approaches to UX/UI to choose a reliable contractor for your website or app.
A non-profit organization https://linkimpact.org dedicated to supporting multicultural families, environmental protection, volunteerism, and language and cultural exchange.
Дубликаты номеров https://avtostrahovka36.ru в Воронеже — изготовление и восстановление регистрационных знаков по ГОСТ. Срочно за 1 день, качественные материалы, соответствие требованиям и выгодные цены. Оформление быстро и без очередей.
Практик о заборах https://sinta-kedr.ru/ честный разбор материалов, установки и стоимости. Узнайте плюсы и минусы разных видов заборов, частые ошибки и реальные сроки службы. Полезные рекомендации перед покупкой и монтажом ограждений.
An astrology portal https://burcler.com.az/ with daily horoscopes, natal charts, and forecasts. Online consultations, zodiac sign compatibility, and personalized recommendations will help you better understand yourself and make important decisions.
References:
Bodybuilding steroids before and after
References:
http://121.36.47.159:3000/adalbertodewit
Дубликаты номеров https://avtostrahovka36.ru в Воронеже — изготовление и восстановление регистрационных знаков по ГОСТ. Срочно за 1 день, качественные материалы, соответствие требованиям и выгодные цены. Оформление быстро и без очередей.
Практик о заборах sinta-kedr.ru честный разбор материалов, установки и стоимости. Узнайте плюсы и минусы разных видов заборов, частые ошибки и реальные сроки службы. Полезные рекомендации перед покупкой и монтажом ограждений.
Все новостройки https://tut-novostroyki.ru от застройщиков в Новосибирске — актуальный каталог квартир в новых ЖК. Цены, планировки, сроки сдачи и акции. Подберите квартиру напрямую от застройщика без комиссии с удобным поиском и проверенной информацией.
Дизайнерское бюро https://vseremontytut.ru проектирование интерьера и ремонт под ключ. Разработка дизайн-проекта, 3D-визуализация, подбор материалов и полная реализация. Создаем стильные и функциональные пространства с гарантией качества и соблюдением сроков.
Шпаклевка стен https://shpaklevka-sten.ru и потолков в Москве — выравнивание поверхностей под покраску и обои. Качественные материалы, опытные мастера и соблюдение технологий. Выполняем работы быстро, аккуратно и с гарантией результата по доступной цене.
Механизированная шпаклевка https://shpaklevka-msk.ru современный способ выравнивания стен и потолков. Ровное нанесение, высокая скорость работ и экономия материалов. Подготовка под финишную отделку с гарантией качества и соблюдением технологий.
Бытовая химия в Казани https://bytovayalavka.ru широкий ассортимент средств для уборки, стирки и ухода за домом. Оригинальная продукция, выгодные цены и быстрая доставка. Подберите качественные моющие средства для чистоты и комфорта вашего дома.
Calculate your horoscope http://www.ulduz-fali.com.az online. Horoscopes, love compatibility, daily horoscopes and astrological interpretations by date of birth on one site.
Dream Interpretations 2026 https://yuxu-yozmalari.com.az/ learn the meaning of your dreams with AI artificial intelligence. Dream interpretation from A to Z, folk belief interpretation, psychological approach. Free online dream interpretation.
Жіночий сайт https://zhinka.in.ua поради про красу, здоров’я, стосунки та стиль життя. Читайте корисні статті, лайфхаки, рецепти догляду та натхнення для сучасних жінок. Все про жіночу гармонію, саморозвиток і комфорт у повсякденному житті.
Сайт міста Вінниця https://faine-misto.vinnica.ua новини, події, довідник компаній і корисна інформація для жителів та гостей. Актуальні новини, афіша, транспорт, послуги і все про життя міста в одному зручному онлайн-порталі.
An online numerology numerologiya com az profile analyzes your destiny, talents, and finances. Accurate calculations, number interpretation, and personalized recommendations will help you better understand yourself and choose the right direction in life.
Сайт міста Одеса https://faine-misto.od.ua новини, події, афіша, довідник компаній та корисна інформація. Дізнавайтесь актуальні новини, знаходьте послуги, заклади і маршрути. Все про життя Одеси для мешканців і гостей міста в одному місці.
Сайт міста Житомир https://faine-misto.zt.ua новини, події, афіша та довідник компаній. Актуальна інформація про життя міста, транспорт, послуги і заклади. Усе необхідне для мешканців і гостей Житомира в одному зручному онлайн-порталі.
Автомобільний портал https://avtogid.in.ua новини авто, огляди, тести та поради водіям. Дізнавайтесь про нові моделі, технології, ремонт і обслуговування. Все про автомобілі в одному місці для власників і автолюбителів.
Сайт міста Львів https://faine-misto.lviv.ua новини, події, афіша та довідник компаній. Актуальна інформація про життя міста, транспорт, послуги і заклади. Усе необхідне для мешканців і туристів Львова в одному зручному онлайн-порталі.
Блог Києва https://infosite.kyiv.ua події, новини, цікаві місця та корисні поради для мешканців і гостей столиці. Дізнавайтесь про актуальні заходи, життя міста, розваги та сервіси. Все найцікавіше про Київ в одному зручному онлайн-блозі.
Сайт Полтави https://u-misti.poltava.ua новини, події, афіша та довідник компаній міста. Актуальна інформація про життя, транспорт, послуги і заклади. Усе необхідне для мешканців і гостей Полтави в одному зручному онлайн-порталі.
У місті Одеса https://u-misti.odesa.ua актуальні новини, події, афіша та корисна інформація для мешканців і гостей. Дізнавайтесь про життя міста, транспорт, заклади і послуги. Все найважливіше про Одесу в одному зручному онлайн-порталі.
Хмельницький онлайн https://u-misti.khmelnytskyi.ua міський портал з новинами, афішею та довідником. Дізнавайтесь про події, транспорт, бізнес і послуги. Усе для комфортного життя та відпочинку в Хмельницькому в одному місці.
Житомир онлайн https://u-misti.zhitomir.ua міський портал з новинами, афішею та довідником. Дізнавайтесь про події, транспорт, бізнес і послуги. Усе для комфортного життя та відпочинку в Житомирі в одному місці.
У місті Львів https://u-misti.lviv.ua актуальні новини, події, афіша та корисна інформація для мешканців і гостей. Дізнавайтесь про життя міста, транспорт, заклади і послуги. Все найважливіше про Львів в одному зручному онлайн-порталі.
Київ онлайн https://u-misti.kyiv.ua міський портал з новинами, афішею та довідником. Дізнавайтесь про події, транспорт, бізнес і послуги. Усе для комфортного життя та відпочинку в Києві в одному місці.
Міський сайт Дніпра https://u-misti.dp.ua новини, події, оголошення і довідник організацій. Зручний пошук послуг, закладів і маршрутів. Будьте в курсі життя міста та знаходьте потрібну інформацію швидко.
У місті Вінниця https://u-misti.vinnica.ua новини, афіша заходів, довідник закладів і корисні сервіси. Дізнавайтесь про події, відкривайте нові місця і плануйте свій час у Вінниці легко та зручно.
Сайт Чернівців https://u-misti.chernivtsi.ua новини, події, афіша та довідник компаній міста. Актуальна інформація про життя, транспорт, послуги і заклади. Усе необхідне для мешканців і гостей Чернівців в одному зручному онлайн-порталі.
Міський сайт Черкас https://u-misti.cherkasy.ua новини, події, оголошення і довідник організацій. Зручний пошук послуг, закладів і маршрутів. Будьте в курсі життя міста та знаходьте потрібну інформацію швидко.
Где можно познакомиться https://datenow.ru в России в 2026 году? Приложения для знакомств стали главным инструментом для миллионов. Но важно выбрать те, где реально можно найти человека для отношений. Не просто лайки, а искренний интерес. Разбираем, какие сервисы работают в этом году. Честно. Без рекламы. Только для тех, кто ищет всерьёз.
Подробности по ссылке: https://novostroi-tour.ru
Только лучшие материалы: https://domdipnera.ru
Расширенная статья здесь: https://sochibuilders.ru
ремонт интерьер дизайн квартир дизайн интерьера квартиры
дизайн интерьера квартир санкт петербург заказать дизайнера интерьера
дизайн проект ремонта квартиры студия дизайна интерьера санкт петербург
Your point of view caught my eye and was very interesting. Thanks. I have a question for you.
ТОП лучших МФО https://mfo-finance.github.io проверенные компании с высоким уровнем одобрения займов. Актуальные предложения, прозрачные условия, быстрые выплаты и онлайн оформление. Сравнивайте и выбирайте надежные МФО для получения денег.
Are you into rafting? white water rafting in montenegro exciting rafting trips down mountain rivers with experienced instructors. A tour of the Tara Canyon offers scenic routes, safety, and unforgettable experiences. Book a rafting tour and discover an active holiday.
dental problems? dental tourism high-quality dental treatment abroad at affordable prices. Implants, veneers, prosthetics, and treatments with a guarantee. We select a clinic, organize your trip, and provide patient support throughout the entire process.
Zahnprobleme? zahnbehandlung im ausland kosten zahnbehandlung im Ausland mit bis zu 70 % Ersparnis. Implantate, Zahnersatz, asthetische Zahnheilkunde und Diagnostik in modernen Kliniken. Wir unterstutzen Sie bei der Wahl des Landes und der Klinik und organisieren Ihre Reise von A bis Z.
Студия дизайна https://dill-design.ru интерьера в Санкт-Петербурге. Реализовываем проекты в г. Санкт-Петербург и г. Москва. Более 100 довольных заказчиков доверили нам создание своего интерьера. От разработки дизайн проекта до его качественной реализации. Авторский надзор на всех этапах реализации. Комплектация в подарок. Закажите расчет дизайн-проекта
Обзор путешествий https://tfast.ru и экскурсий. Ваш персональный гид в мире путешествий. Мы собираем самые живые обзоры, проверенные маршруты и уникальные экскурсии — от известных достопримечательностей до скрытых мест, о которых знают только местные. Планируйте свои приключения с нами, вдохновляйтесь и открывайте мир по-новому.
значок металлический купить изготовление металлических значков на заказ москва
значки металлические флаги https://metal-pin.ru
значки на одежду металлические печать на металлических значках
значок металлический купить изготовил металлических значков москва
металлический значок пин заказ значков из металла со своим дизайном москва
I apologise, but, in my opinion, you commit an error. Let’s discuss. Write to me in PM, we will communicate.
_ _ _ _ _ _ _ _
fuengirola car rental
металлические значки на заказ изготовление металлических значков по заказу
значок металлический цена изготовление штампованных и металлических значков
лак после циклевки паркета паркет циклевка метр цена
циклевка паркета под ключ цена циклевка паркета в спб недорого
Старый паркет? шлифовка паркета в спб профессиональное восстановление деревянного пола без пыли и лишних затрат. Удаляем царапины, потемнения и старое покрытие, возвращаем гладкость и естественный цвет. Используем современное оборудование, выполняем циклевку, шлифовку и лакировку паркета под ключ с гарантией качества и точным соблюдением сроков.
explore official site for a premium gaming experience in estonia that fully complies with all local regulations and safety standards. the site features a clean and modern design, making it easy to find your favorite titles from a diverse library of certified casino games. they offer very efficient withdrawal methods, which is vital for players who want to receive their winnings quickly and without any hassle.
Only top materials: https://www.janbasktraining.com/community/user_topics/14854
Daily Summary: https://zaraherbal.com/homemade-pornography-movies-on-the-better-pornography-pipe/
All the Details: http://www.galvaqro.com.mx/2026/03/17/100-percent-free-set-of-bank-borrowing-relationship-repossession-conversion/
Recommended reading: https://klero.it/play-19300-totally-free-slot-game-no-install/
Top Stories: https://monograficos.escuelaartegranada.com/mariamarquezarias/2026/03/14/whos-hiral-radadiya-bio-decades-spouse-family-members-and-you-will-movies/
Expand at the link: https://www.ccis.org.tn/indian-jabardasty-pornography-movies-finest-mature-2026/
Learn more here: https://idealmed.com.pl/blog/aktualnosci/2500-welcome-gambling-establishment-incentive/
Full version of the article: https://www.pakarbot.com/melhores-cassinos-online-esfogiteado-brasil-2025-top-15-opcoes/
Санитарные системы https://bio-ecopro.ru для мероприятий и стройплощадок — аренда мобильных туалетов, умывальников и санитарных модулей. Доставка, обслуживание и вывоз. Надежные решения для фестивалей, концертов, стройки и массовых событий.
Проверенные адвокаты Москвы https://isk1.ru квалифицированная юридическая помощь и защита в суде. Решение сложных правовых споров, сопровождение дел и профессиональный подход к каждому клиенту для достижения результата.
Менопауза и перименопауза https://menopower.ru симптомы, приливы и гормональные изменения. Полезные советы для женщин 45+, рекомендации по здоровью, образу жизни и управлению финансами для комфортного прохождения этого периода.
Компания DARKLUM https://darklum.ru/catalogue предлагает широкий ассортимент светодиодных светильников различного назначения для коммерческих и жилых помещений как внутреннего, так и уличного освещения. В каталоге представлено более 5 000 моделей различных форм-факторов, среди которых Вы без труда сможете выбрать оптимальный вариант.
Промокод Пятёрочка доставка http://reporter63.ru/content/view/785017/promokod-pyaterochka-dostavka-vygodnye-vozmozhnosti-dlya-pokupok-onlajn актуальные скидки и купоны на заказ продуктов онлайн. Получайте выгодные предложения, снижайте стоимость доставки и экономьте на покупках в Пятёрочке с рабочими промокодами.
PUPIL OF FATE MOTORS https://auto.ae/pupiloffatemotors автосалон премиум авто в Дубае. Продажа роскошных автомобилей, эксклюзивные модели и индивидуальный подбор. Помогаем выбрать, оформить и доставить авто с гарантией качества и высоким уровнем сервиса.
Эко-бытовая химия http://reporter63.ru/content/view/784903/himiya-dlya-uborki-sekrety-effektivnosti-i-bezopasnosti в Санкт-Петербурге — средства для уборки без вредных компонентов. Эффективная очистка, безопасность для здоровья и окружающей среды. Широкий ассортимент и доставка по городу.
Главные новости: https://lotos-vrn.ru/belevoj-trikotazh/
Modern earth fault indicator monitor the condition of electrical networks and protect equipment. They offer rapid fault detection, high accuracy, and reliability for industrial applications.
Between us speaking, I would address for the help in search engines.
_ _ _ _ _ _ _ _
best car hire lisbon https://drivelity-portugal.com
Купить стройматериалы https://stroyrostov161.ru в Ростове-на-Дону: широкий выбор сыпучих и строительных материалов, включая щебень, песок, цемент, штукатурку и шпатлевку. Быстрая доставка и доступные цены для вашего объекта.
Заборы под ключ https://dachnie-zabory.ru в Москве и области — изготовление и установка ограждений для дома и участка. Профнастил, штакетник, сетка рабица и 3D заборы. Замер, доставка и монтаж с гарантией качества и соблюдением сроков.
References:
Peoria casino
References:
https://www.tikosatis.com/index.php?page=user&action=pub_profile&id=563598
References:
Steroid side effect
References:
https://free-songs.de/blog-news/index.php/;focus=ALFAHO_com_cm4all_wdn_Flatpress_1587235&path=&frame=?x=entry:entry251123-105508%3Bcomments:1
Самое полезное для вас: услуги шлифовка паркета
Только что опубликовано: https://tsiklevka-parketa.ru
Читать далее: услуги шлифовка паркета
Последние обновления: циклевка паркета без пыли
Can you be more specific about the content of your article? After reading it, I still have some doubts. Hope you can help me.
Промокоды Пятёрочки https://www.time-samara.ru/content/view/785106/transformaciya-sistemy-loyalnosti-v-sovremennom-rossijskom-ritejle актуальные купоны и скидки на продукты и доставку. Получайте бонусы, снижайте стоимость заказов и экономьте на покупках. Только проверенные промокоды для выгодных покупок в Пятёрочке.
Самые актуальный новости свежие новости — свежие события, аналитика и репортажи. Политика, экономика, технологии и общество. Будьте в курсе последних новостей и ключевых событий каждый день.
Читать больше на сайте: https://geforce-gt-730.ru
Посмотреть на сайте: https://interskol-shurupovert.ru
Thank you for your sharing. I am worried that I lack creative ideas. It is your article that makes me full of hope. Thank you. But, I have a question, can you help me? https://www.binance.info/ar/register?ref=PORL8W0Z
Элитная парфюмерия может стать отличным подарком для близких людей. В интернет магазине легко найти подходящий вариант, https://avon-forum.ru/
Подарки ручной работы с ароматами лаванды, ванили или цитрусов помогают создать спокойную и уютную атмосферу. Они могут стать отличным дополнением интерьера и приятным сюрпризом для близких людей. Подробнее по ссылке https://aroma-lavka.ru/
Если использовать фасадные дюбели по назначению, можно получить прочное соединение, удобную установку и понятный результат в работе Это удобно для регулярных поставок и серийной сборки – забивные анкеры оптом
Nowy sufit napinany poprawia wygląd całej przestrzeni. To rozwiązanie pomaga osiągnąć schludny i dopracowany wygląd. Coraz częściej wybierane są proste minimalistyczne formy, przez co aranżacja staje się bardziej spójna https://sufity-napinane-wroclaw.pl/
Элитная парфюмерия создается из качественных ингредиентов и отличается высокой стойкостью. В интернет магазине можно найти ароматы для любого сезона и настроения – https://avon-forum.ru/
balloon bahis oyunu
Проверка авто по VIN https://dtf.ru/luchshii-rating/3585176-top-15-luchshih-servisov-proverki-avto-po-vin-nomeru-reiting-2025-goda ТОП-15 лучших сервисов для анализа истории машины. ДТП, пробег, владельцы и ограничения. Сравните платформы и выберите надежный сервис для безопасной покупки авто.
Промокоды Пятёрочки https://www.time-samara.ru/content/view/785106/transformaciya-sistemy-loyalnosti-v-sovremennom-rossijskom-ritejle актуальные купоны и скидки на продукты и доставку. Получайте бонусы, снижайте стоимость заказов и экономьте на покупках. Только проверенные промокоды для выгодных покупок в Пятёрочке каждый день.
check here
Kent Casino https://kentcasino.ru.com официальный сайт, регистрация и бонусы. Онлайн казино с быстрым выводом средств, слотами и играми от топ провайдеров. Получите фриспины и играйте на реальные деньги безопасно.
jetton ставки
Интернет магазин элитной парфюмерии предлагает оригинальные композиции с насыщенными и стойкими ароматами. Это отличный выбор для ценителей качества: https://avon-forum.ru/
buy saxenda
Накрутка поведенческих факторов может помочь увеличить активность пользователей и улучшить видимость сайта. Вся информация по ссылке: накрутка пф ботами
diazepam prescription
казино джеттон официальный сайт
diva london escort
дивитись фільми 2026 дивитися фільми онлайн безкоштовно без реєстрації
как включить и разрешить доступ к usb пошаговая инструкция
быстрый микрокредит на карту
jeton скачать
казино кирки
https://bg.dobrblog.com/
наркологический центр наркологический центр .
References:
Anadrol steroid pills
References:
http://www.aionesight.com/nicholasrasco5
References:
Buy steroids online uk
References:
http://119.45.160.240:3000/consuelowaldru
платформа jetton
https://molitvy.guru/
джетон
вывод из запоя на дому вывод из запоя на дому .
Really enjoyed this outlook. It applies so well to hair care too, where even a curly routine can change depending on the oil, shampoo, conditioner, salon advice, natural ingredients, and the right treatment.
youtube скачать видео skachat-video-s-youtube-1.ru .
https://molitvy.guru/
small office for lease https://offices-rent-nyc.com
Профессиональная: оклейка полиуретановой пленкой автомобиля – сохраните родное лакокрасочное покрытие в идеальном состоянии на долгие годы.
скачать видео ютуб на пк skachat-video-s-youtube-1.ru .
Накрутка поведенческих факторов используется для увеличения активности пользователей. Это может повлиять на ранжирование сайта. Подробнее по ссылке: поведенческие факторы заказать
нарколог на дом нарколог на дом .
https://mine-drop1.com/
скачать видио с ютуб скачать видио с ютуб .
References:
Anabolicsteroids com
References:
https://yours-tube.com/@cheriesupple95?page=about
Многие SEO специалисты уделяют внимание поведенческим метрикам. Они помогают понять, насколько сайт удобен и полезен для аудитории. Улучшение этих показателей может привести к росту позиций. Подробности по ссылке – сервис накрутки пф
скачать видео с ютуба на смартфон skachat-video-s-youtube-1.ru .
Проверенный магазин масло оптом дешево продаёт моторное масло оптом с документами и гарантией качества.
References:
Where to buy anabolic steroids online forum
References:
http://45.144.30.78:8083/dalenenicolay/7788musixx.smart-und-nett.de/wiki/Dianabol-Inj-50
наркологический стационар vyvod-iz-zapoya-na-domu-samara-3.ru .
Накрутка поведенческих факторов используется как инструмент повышения активности на сайте. Увеличение числа переходов и времени просмотра может повлиять на ранжирование – монстро накрутка пф
скачать видео с ютуба на смартфон skachat-video-s-youtube-2.ru .
кирка майнкрафт казик
загрузчик видео с ютуба загрузчик видео с ютуба .
https://mine-drop1.com/
скачать видео из ютуба онлайн скачать видео из ютуба онлайн .
скачать видео с ютуба скачать видео с ютуба .
где купить капли ястреб yastreb-kapli.ru .
лечение наркомании vyvod-iz-zapoya-na-domu-ekaterinburg.ru .
лечение наркомании лечение наркомании .
наркологический центр наркологический центр .
наркологический стационар kapelnica-ot-zapoya-nizhnij-novgorod.ru .
реабилитация наркоманов vyvod-iz-zapoya-na-domu-ekaterinburg-1.ru .
наркологическая клиника наркологическая клиника .
лечение алкоголизма лечение алкоголизма .
кодирование от алкоголизма кодирование от алкоголизма .
скачать видео с ютуба на смартфон skachat-video-s-youtube-1.ru .
Улучшить качество фото нейросетью https://vc.ru/aihub/2842519-uluchshenie-kachestva-foto-neirosyatey
скачать видео с юту скачать видео с юту .
нарколог на дом нарколог на дом .
скачать ролик с ютьюб скачать ролик с ютьюб .
купить капли ястреб yastreb-kapli.ru .
как улучшить фото на айфоне 16 https://vc.ru/aihub/2842519-uluchshenie-kachestva-foto-neirosyatey
кодирование от алкоголизма vyvod-iz-zapoya-na-domu-ekaterinburg.ru .
наркологический стационар vyvod-iz-zapoya-na-domu-nizhnij-novgorod-1.ru .
лечение наркомании vyvod-iz-zapoya-na-domu-nizhnij-novgorod.ru .
реабилитационный центр от алкоголизма kapelnica-ot-zapoya-nizhnij-novgorod.ru .
реабилитационный центр от алкоголизма kapelnica-ot-zapoya-nizhnij-novgorod-1.ru .
капельница от похмелья vyvod-iz-zapoya-na-domu-ekaterinburg-2.ru .
лечение алкоголизма лечение алкоголизма .
pinup казино https://global-smm.ru
пин ап рабочее зеркало пин ап казино вход
игровые автоматы пин ап пин ап игровые автоматы
промт на день рождения женщине https://vc.ru/aihub/2842593-prompty-dlya-pozdravleniy-neyrosetyu
игровые автоматы пин ап пинап официальный сайт казино
пин ап казино вход https://pinup-casinos.ru
пин ап скачать pin up зеркало
pinup bet https://севсклон.рф
казино пин-ап пин ап официальный сайт казино
реабилитационный центр от алкоголизма vyvod-iz-zapoya-na-domu-voronezh-8.ru .
где купить капли ястреб yastreb-kapli.ru .
лечение наркомании vyvod-iz-zapoya-na-domu-nizhnij-novgorod.ru .
наркологическая помощь наркологическая помощь .
лечение алкоголизма лечение алкоголизма .
лечение алкоголизма лечение алкоголизма .
наркологическая помощь наркологическая помощь .
кодирование от алкоголизма кодирование от алкоголизма .
Оживить фото нейросетью — главная. Посмотрите информацию по ссылке – оживить фото в видео 18
Генерация изображений нейросетью — главная
Подробности доступны по ссылке – генерация изображений обучение
Volvo спецтехніка купити спецтехніку екскаватори, фронтальні навантажувачі та дорожні машини. Надійність, ефективність і сучасні рішення для будівництва. Продаж, підбір і обслуговування техніки для бізнесу.
капельница от запоя vyvod-iz-zapoya-na-domu-voronezh-8.ru .
наркологический стационар vyvod-iz-zapoya-na-domu-ekaterinburg-3.ru .
наркологический центр наркологический центр .
https://compact-houses.ru/
скачать с ютуба в отличном качестве скачать с ютуба в отличном качестве .
кодирование от алкоголизма кодирование от алкоголизма .
реабилитационный центр от алкоголизма vyvod-iz-zapoya-na-domu-voronezh-9.ru .
наркологический стационар vyvod-iz-zapoya-na-domu-ekaterinburg.ru .
наркологический стационар kapelnica-ot-zapoya-nizhnij-novgorod.ru .
капельница от похмелья kapelnica-ot-zapoya-nizhnij-novgorod-1.ru .
наркологическая клиника наркологическая клиника .
наркологическая помощь наркологическая помощь .
нарколог на дом нарколог на дом .
реабилитационный центр для наркозависимых реабилитационный центр для наркозависимых .
лечение наркомании vyvod-iz-zapoya-na-domu-samara-9.ru .
Midjourney — что это и как использовать. Ознакомьтесь с сервисом подробнее – midjourney генерация изображения
лечение алкоголизма лечение алкоголизма .
References:
Weight lifting steroids
References:
https://sisinetjobs.com/employer/testim-50-mg-5-gram-1-transdermal-gel-kaiser-permanente/
References:
Do female bodybuilders use steroids
References:
https://gitea.diputadosalta.gob.ar/michelinestuar
смотреть новинки кино фильмы смотреть онлайн бесплатно
https://compact-houses.ru/
References:
Maximum shred gnc
References:
https://camtalking.com/@janemonte55804
стабилизаторы энергия https://stabilizatory-energiya.ru/
вывод из запоя в стационаре vyvod-iz-zapoya-na-domu-samara-8.ru .
References:
Steroid transformation 3 months
References:
https://teanurture.online/the-mediterranean-diet-hack-that-boosts-testosterone-naturally/
наркологический стационар vyvod-iz-zapoya-na-domu-ekaterinburg-3.ru .
Хочешь путешествовать? тур в пушкинские горы из спб интересные маршруты, экскурсии и комфортный отдых для путешествий и новых впечатлений. Мы поможем подобрать идеальный тур — под любые пожелания и бюджет! Работаем ежедневно с 9:00 до 21:00 — без выходных!
наркологический стационар vyvod-iz-zapoya-na-domu-voronezh-10.ru .
реабилитационный центр от алкоголизма vyvod-iz-zapoya-na-domu-samara-9.ru .
реабилитационный центр от алкоголизма vyvod-iz-zapoya-na-domu-voronezh-8.ru .
реабилитационный центр от алкоголизма vyvod-iz-zapoya-na-domu-voronezh-11.ru .
скачать видио с ютуб скачать видио с ютуб .
реабилитация наркоманов vyvod-iz-zapoya-na-domu-voronezh-9.ru .
References:
Steroids before after
References:
http://wooriwebs.com/bbs/board.php?bo_table=faq
Volvo в Україні https://volvo-2026.carrd.co/ екскаватори, фронтальні навантажувачі та дорожні машини. Надійність, ефективність і сучасні рішення для будівництва. Продаж, підбір і обслуговування техніки для бізнесу.
наркологическая клиника наркологическая клиника .
наркологическая клиника наркологическая клиника .
реабилитация алкоголиков vyvod-iz-zapoya-na-domu-samara-9.ru .
капельница от похмелья vyvod-iz-zapoya-na-domu-voronezh-10.ru .
вывод из запоя на дому вывод из запоя на дому .
Профессиональная: оклейка полиуретановой пленкой автомобиля – сохраните родное лакокрасочное покрытие в идеальном состоянии на долгие годы.
ии бот тг https://vc.ru/aihub/2842563-neyroseti-v-telegram-luchshie-boty-2026-goda
вывод из запоя на дому вывод из запоя на дому .
нарколог на дом нарколог на дом .
наркологическая помощь наркологическая помощь .
наркологический стационар vyvod-iz-zapoya-na-domu-voronezh-10.ru .
наркологическая клиника наркологическая клиника .
реабилитационный центр от алкоголизма vyvod-iz-zapoya-na-domu-voronezh-11.ru .
https://compact-houses.ru/
Можно ознакомиться подробнее по ссылке: нейросеть для баннера
лечение алкоголизма лечение алкоголизма .
наркологический стационар vyvod-iz-zapoya-na-domu-samara-11.ru .
наркологический стационар vyvod-iz-zapoya-na-domu-nizhnij-novgorod-6.ru .
наркологическая клиника наркологическая клиника .
нарколог на дом нарколог на дом .
кодирование от алкоголизма кодирование от алкоголизма .
наркологическая клиника наркологическая клиника .
лечение наркомании лечение наркомании .
капельница от похмелья vyvod-iz-zapoya-na-domu-nizhnij-novgorod-6.ru .
вывод из запоя в стационаре vyvod-iz-zapoya-na-domu-nizhnij-novgorod-4.ru .
Regards! Numerous posts.
References:
https://topsitenet.com/profile/heliumjason2/1581342/
лечение алкоголизма лечение алкоголизма .
реабилитационный центр для наркозависимых реабилитационный центр для наркозависимых .
наркологическая клиника наркологическая клиника .
реабилитация алкоголиков vyvod-iz-zapoya-na-domu-nizhnij-novgorod-4.ru .
капельница от запоя капельница от запоя .
вывод из запоя на дому вывод из запоя на дому .
лечение наркомании лечение наркомании .
реабилитация алкоголиков vyvod-iz-zapoya-v-staczionare-sankt-peterburg-1.ru .
наркологический стационар vyvod-iz-zapoya-v-staczionare-sankt-peterburg.ru .
реабилитационный центр от алкоголизма vyvod-iz-zapoya-v-staczionare-sankt-peterburg-2.ru .
онлайн школы для подготовки к егэ shkola-onlajn-43.ru .
наркологический центр наркологический центр .
наркологический центр наркологический центр .
реабилитация алкоголиков реабилитация алкоголиков .
капельница от запоя капельница от запоя .
школа дистанционного образования школа дистанционного образования .
капельница от похмелья vyvod-iz-zapoya-v-staczionare-sankt-peterburg.ru .
наркологический центр наркологический центр .
наркологическая помощь наркологическая помощь .
школа онлайн в россии shkola-onlajn-43.ru .
реабилитационный центр от алкоголизма vyvod-iz-zapoya-na-domu-nizhnij-novgorod-5.ru .
References:
Instant Casino Freispiele
References:
https://skitterphoto.com/photographers/2540636/blanton-brooks
вывод из запоя в стационаре вывод из запоя в стационаре .
лечение алкоголизма лечение алкоголизма .
References:
Instant Casino Login vergessen
References:
https://king-bookmark.stream/story.php?title=willkommensbonus-200-
наркологический стационар vyvod-iz-zapoya-v-staczionare-sankt-peterburg-2.ru .
наркологический центр наркологический центр .
онлайн-школа для детей онлайн-школа для детей .
наркологическая клиника наркологическая клиника .
References:
Instant Casino mit Trustly
References:
https://www.investagrams.com/Profile/dohert3542294
онлайн школы для детей онлайн школы для детей .
капельница от похмелья vyvod-iz-zapoya-na-domu-nizhnij-novgorod-7.ru .
наркологическая помощь наркологическая помощь .
References:
Instant Casino App
References:
https://www.tikosatis.com/index.php?page=user&action=pub_profile&id=563598
наркологический стационар vyvod-iz-zapoya-na-domu-nizhnij-novgorod-5.ru .
реабилитационный центр от алкоголизма vyvod-iz-zapoya-v-staczionare-sankt-peterburg-2.ru .
вывод из запоя в стационаре vyvod-iz-zapoya-v-staczionare-sankt-peterburg.ru .
онлайн обучение школа онлайн обучение школа .
наркологическая помощь наркологическая помощь .
нарколог на дом нарколог на дом .
школа дистанционного обучения москва shkola-onlajn-43.ru .
онлайн обучение школа онлайн обучение школа .
капельница от запоя narkolog-na-dom-moskva-1.ru .
реабилитация алкоголиков narkolog-na-dom-moskva-2.ru .
наркологический центр наркологический центр .
Excuse, it is removed
_ _ _ _ _ _ _ _
https://automietenmallorca.de
References:
Instant Casino
References:
https://sibze.ru/index.php?subaction=userinfo&user=flagguilty7
References:
Instant Casino Login vergessen
References:
https://medibang.com/author/28050247/
Онлайн школа Онлайн школа .
лечение наркомании narkolog-na-dom-moskva-1.ru .
Капсульные дома — это современный подход к загородному жилью. Пространство используется максимально эффективно. Дом быстро устанавливается и не требует долгого строительства. Внутри комфортно жить. Очень понравился результат: космический капсульный дом
наркологический центр наркологический центр .
среднее образование онлайн среднее образование онлайн .
наркологический центр наркологический центр .
наркологический стационар narkolog-na-dom-moskva-2.ru .
Нужны заклепки? вытяжная резьбовая заклепка прочный крепеж для соединения деталей. Алюминиевые, стальные и нержавеющие варианты. Надежность, долговечность и удобство монтажа для различных задач и конструкций.
кодирование от алкоголизма кодирование от алкоголизма .
интернет-школа интернет-школа .
лечение алкоголизма лечение алкоголизма .
мебельный паралон мебельный паралон .
купить плотный поролон porolon-dlya-divana-2.ru .
лист поролона цена лист поролона цена .
реабилитационный центр для наркозависимых narkolog-na-dom-moskva-2.ru .
вывод из запоя в стационаре narkolog-na-dom-moskva-1.ru .
online school online school .
вывод из запоя в стационаре вывод из запоя в стационаре .
реабилитационный центр от алкоголизма narkolog-na-dom-moskva-4.ru .
поролон купить москва поролон купить москва .
паралон или поролон porolon-dlya-divana-2.ru .
где купить поролон в москве porolon-dlya-divana-3.ru .
Любишь путешествовать? турфирмы в санкт петербурге официальные предлагаем экскурсионные туры по России и Грузии по ценам официальных операторов — с гарантией и страховкой. Мы поможем подобрать идеальный тур — под любые пожелания и бюджет! Работаем ежедневно с 9:00 до 21:00 — без выходных!
вывод из запоя в стационаре вывод из запоя в стационаре .
Stackshine AI-Platform a SaaS cost management platform: subscription control, usage transparency, renewal tracking, and employee offboarding. Optimize your budget and reduce unnecessary software costs.
дистанционное обучение в москве shkola-onlajn-41.ru .
наркологическая помощь наркологическая помощь .
онлайн школа цена shkola-onlajn-42.ru .
мебельный поролон купить москва мебельный поролон купить москва .
поролон для мебели цена поролон для мебели цена .
наркологическая помощь наркологическая помощь .
поролон для мебели цена поролон для мебели цена .
Установка капсульного дома занимает минимум времени, при этом результат полностью соответствует ожиданиям – капсульные дома в россии
капельница от похмелья narkolog-na-dom-moskva-4.ru .
школа 2 класс школа 2 класс .
поролон москва поролон москва .
купить поролон для кровати купить поролон для кровати .
онлайн школа 1 онлайн школа 1 .
купить ппу для дивана купить ппу для дивана .
Капсульные дома идеально подходят для временного проживания или использования в качестве гостевого домика: купить капсульную кофеварку для дома недорого
References:
Do all bodybuilders use steroids
References:
https://doc.adminforge.de/s/0vEcBt_WB2
стоимость дистанционного обучения shkola-onlajn-41.ru .
онлайн школа 3 класс shkola-onlajn-42.ru .
курсовая работа купить курсовая работа купить .
References:
Liquid anadrol dosage
References:
https://hackmd.okfn.de/s/rygNbQzYrWg
курсовые работы заказать kupit-kursovuyu-101.ru .
реабилитационный центр для наркозависимых реабилитационный центр для наркозависимых .
наркологический стационар vyvod-iz-zapoya-na-domu-samara-16.ru .
наркологическая клиника наркологическая клиника .
лечение наркомании лечение наркомании .
написание курсовой работы на заказ цена kupit-kursovuyu-102.ru .
домашняя школа shkola-onlajn-41.ru .
Появились вредители? уничтожение клопов в квартире в москве обработка помещений от вирусов, бактерий и насекомых. Современные методы, безопасные средства и опытные специалисты для надежной защиты.
Уничтожение вредителей https://dezinfekciya-mcd.ru/ уничтожение бактерий, вирусов и насекомых. Обработка квартир, домов и коммерческих помещений. Безопасные препараты, опытные специалисты и гарантия результата.
цена курсовой работы kupit-kursovuyu-101.ru .
кодирование от алкоголизма vyvod-iz-zapoya-na-domu-samara-16.ru .
купить курсовую москва купить курсовую москва .
кодирование от алкоголизма кодирование от алкоголизма .
онлайн школа для детей shkola-onlajn-42.ru .
реабилитация наркоманов vyvod-iz-zapoya-na-domu-samara-18.ru .
купить курсовая работа купить курсовая работа .
срочно курсовая работа срочно курсовая работа .
реабилитация наркоманов vyvod-iz-zapoya-na-domu-samara-17.ru .
Эта статья сочетает познавательный и занимательный контент, что делает ее идеальной для любителей глубоких исследований. Мы рассмотрим увлекательные аспекты различных тем и предоставим вам новые знания, которые могут оказаться полезными в будущем.
Детальнее – https://vivod-iz-zapoya-2.ru/
написание учебных работ kupit-kursovuyu-106.ru .
заказать практическую работу недорого цены kupit-kursovuyu-102.ru .
купить курсовую работу купить курсовую работу .
Free online games https://www.poki.com.az play without downloading or registering. A large collection of games across various genres: action, puzzles, racing, and strategy. Easily access from any device.
Arizona sports news oxu-az football, transfers, and match results in real time. Breaking news, analysis, and reviews. Follow the teams and stay up-to-date with all the state’s sports news.
сайт для заказа курсовых работ сайт для заказа курсовых работ .
выполнение курсовых работ выполнение курсовых работ .
References:
What type of drugs are steroids
References:
http://www.thehispanicamerican.com/companies/anavar-50-1-trusted-source-for-bodybuilding-reviews-lab-tests-2025muscleguru/
кодирование от алкоголизма vyvod-iz-zapoya-na-domu-samara-16.ru .
сколько стоит сделать курсовую работу на заказ kupit-kursovuyu-108.ru .
сколько стоит курсовая работа по юриспруденции kupit-kursovuyu-106.ru .
Arizona sports events https://oxu-az.com.az/ football, transfers, and live match results. Latest news, statistics, and reviews for fans and sports enthusiasts.
кодирование от алкоголизма кодирование от алкоголизма .
помощь в написании курсовой помощь в написании курсовой .
курсовые работы заказать курсовые работы заказать .
вывод из запоя в стационаре вывод из запоя в стационаре .
Free online games https://1001-oyun.com.az/ the best browser games with no installation required. Huge selection of genres, easy search, and quick launch. Play anytime for free.
заказать практическую работу недорого цены kupit-kursovuyu-103.ru .
написание курсовых на заказ написание курсовых на заказ .
References:
Crazy mass cutting stack reviews
References:
https://yona.archivonacional.go.cr/blog/index.php?entryid=18887
реабилитация наркоманов vyvod-iz-zapoya-na-domu-samara-17.ru .
Roblox Download delta-roblox.com.az Download the game, learn about Roblox Studio features, and learn about security settings. Play, create your own worlds, and protect your account. A complete guide to installing, playing, and using the platform safely.
курсовая заказ купить kupit-kursovuyu-106.ru .
Выгодно купить кварцевый песок для пескоструя – 100% очистка без забитых сопел! Забудьте о засорах: очищайте металл в разы быстрее. Ваш аппарат скажет спасибо, а результат поразит клиента. Купить кварцевый песок!
курсовая заказ купить курсовая заказ купить .
реабилитация наркоманов vyvod-iz-zapoya-na-domu-samara-16.ru .
курсовая заказ купить курсовая заказ купить .
вывод из запоя на дому вывод из запоя на дому .
купить курсовую москва купить курсовую москва .
вывод из запоя на дому вывод из запоя на дому .
сколько стоит курсовая работа по юриспруденции kupit-kursovuyu-107.ru .
срочно курсовая работа kupit-kursovuyu-108.ru .
реабилитационный центр для наркозависимых vyvod-iz-zapoya-na-domu-samara-17.ru .
курсовая работа купить курсовая работа купить .
заказать курсовую работу заказать курсовую работу .
курсовой проект цена kupit-kursovuyu-107.ru .
курсовая заказать курсовая заказать .
купить курсовую сайт kupit-kursovuyu-101.ru .
Explore trending k-pop playlist spotify playlists on Spotify updated weekly with the latest tracks and rising artists.
Нужен кондицинер https://atmosfera-profi-klimat.ru/services/montazh-konditsionerov/ профессиональный монтаж сплит-систем под ключ. Быстро, аккуратно и с гарантией. Подбор оборудования, установка и настройка с соблюдением всех норм и стандартов.
Обзор червячных хомутов https://teletype.in/@da_revanta/sMB0_AOMqxv как выбрать лучший вариант для надежного крепления. Сравнение материалов, размеров и производителей. Полезные советы по выбору, установке и применению для разных задач.
нужен бот? https://botman.pro создавайте ботов для продаж и поддержки клиентов. Интеграции, сценарии, автоответы и аналитика. Простое решение для бизнеса без навыков программирования.
покупка курсовой покупка курсовой .
Your source https://365sportia.com for international sports coverage football transfer news, Champions League analysis, NBA and NFL updates, and sports collectibles insights
Latest scores https://rtahasports.com game highlights, and player news from the NFL, NBA, NHL, and MLB. Get up-to-date statistics, transfers, and analysis. Follow the games and learn everything about teams and players in real time.
курсовые под заказ курсовые под заказ .
наркологический центр наркологический центр .
Любишь музыку? радомир музыка с душой, тексты и композиции. Слушайте онлайн, открывайте новые треки и погружайтесь в атмосферу искреннего творчества.
Любишь музыку? песни двадцатого века музыка с душой, тексты и композиции. Слушайте онлайн, открывайте новые треки и погружайтесь в атмосферу искреннего творчества.
реабилитация алкоголиков vyvod-iz-zapoya-na-domu-sankt-peterburg-1.ru .
Любишь читать но нет времени? https://knijki.com огромный выбор жанров, удобный поиск и качественная озвучка. Наслаждайтесь любимыми произведениями в любое время.
Нужен займ? https://srochno-zaym-online.ru оформление онлайн без справок и поручителей. Быстрое решение, удобная подача заявки и получение денег на карту. Подберите выгодное предложение и получите средства в короткие сроки.
курсовые заказ курсовые заказ .
Товар или услуга? разместить объявление бесплатно публикуйте объявления и находите товары, услуги и вакансии. Удобный поиск, категории и быстрый доступ к актуальным предложениям.
наркологический стационар vyvod-iz-zapoya-na-domu-sankt-peterburg.ru .
Только свежие актуальные новости свежие новости политики, экономики, общества и технологий. Актуальные события, аналитика, обзоры и мнения экспертов. Следите за главными новостями страны и мира онлайн в удобном формате каждый день.
капельница от похмелья vyvod-iz-zapoya-na-domu-sankt-peterburg-3.ru .
лечение наркомании лечение наркомании .
наркологическая помощь наркологическая помощь .
лечение алкоголизма vyvod-iz-zapoya-na-domu-ekaterinburg-8.ru .
курсовая работа недорого курсовая работа недорого .
Строительные технологии https://universalstroi.su выгодные инвестиции в доступное жилье. Стабильный доход, перспективные проекты и высокий спрос. Получайте прибыль от инновационных решений в строительстве.
наркологический центр наркологический центр .
Монтажные работы https://montazhstroy.su услуги по установке инженерных систем и конструкций. Быстро, качественно и с гарантией. Выполняем задачи любой сложности для частных и коммерческих объектов.
курсовая работа купить курсовая работа купить .
ответственный за ведение и хранение сколько стоит ответственное хранение
реабилитация алкоголиков vyvod-iz-zapoya-na-domu-sankt-peterburg.ru .
реабилитационный центр для наркозависимых реабилитационный центр для наркозависимых .
капельница от запоя vyvod-iz-zapoya-na-domu-ekaterinburg-8.ru .
наркологический стационар vyvod-iz-zapoya-na-domu-ekaterinburg-9.ru .
капельница от запоя капельница от запоя .
заказать курсовую заказать курсовую .
наркологическая клиника наркологическая клиника .
реабилитация наркоманов vyvod-iz-zapoya-na-domu-sankt-peterburg.ru .
реабилитация наркоманов vyvod-iz-zapoya-na-domu-ekaterinburg-8.ru .
наркологический стационар vyvod-iz-zapoya-na-domu-sankt-peterburg-3.ru .
наркологический стационар vyvod-iz-zapoya-na-domu-ekaterinburg-9.ru .
наркологическая клиника наркологическая клиника .
лечение алкоголизма лечение алкоголизма .
наркологический стационар vyvod-iz-zapoya-na-domu-ekaterinburg-10.ru .
вывод из запоя на дому vyvod-iz-zapoya-na-domu-ekaterinburg-8.ru .
нарколог на дом нарколог на дом .
лечение алкоголизма лечение алкоголизма .
кодирование от алкоголизма кодирование от алкоголизма .
вывод из запоя на дому kapelnicza-ot-zapoya-voronezh.ru .
дизайн интерьер квартир под ключ заказать интерьер квартиры
капельница от запоя капельница от запоя .
нарколог на дом нарколог на дом .
наркологическая помощь наркологическая помощь .
Complete insomnia treatment guide — understand causes, manage symptoms, and explore solutions. From lifestyle changes to therapies, learn how to achieve deep, restful sleep and improve daily performance.
покупка базы данных покупка базы данных .
реабилитационный центр для наркозависимых vyvod-iz-zapoya-na-domu-ekaterinburg-10.ru .
дизайн интерьера спб заказать дизайн интерьера квартиры в москве
наркологическая клиника наркологическая клиника .
наркологический центр наркологический центр .
регистрация в selector gg
реабилитационный центр для наркозависимых kapelnicza-ot-zapoya-voronezh.ru .
капельница от похмелья kapelnicza-ot-pokhmelya-voronezh-1.ru .
Открываешь кейсы KC? промокод на easydrop актуальные бонусы и скидки для пользователей. Получайте выгодные предложения, дополнительные возможности и экономьте при использовании сервиса. Все действующие промокоды в одном месте.
реабилитация алкоголиков kapelnicza-ot-zapoya-voronezh-1.ru .
реабилитационный центр для наркозависимых vyvod-iz-zapoya-na-domu-ekaterinburg-10.ru .
базу данных купить базу данных купить .
кодирование от алкоголизма кодирование от алкоголизма .
реабилитация наркоманов реабилитация наркоманов .
Открываешь кейсы KC? easydrop promo актуальные бонусы и скидки для пользователей. Получайте выгодные предложения, дополнительные возможности и экономьте при использовании сервиса. Все действующие промокоды в одном месте.
наркологическая помощь наркологическая помощь .
купить базу купить базу .
Всё прошло именно так, как и должно быть в хорошем интернет магазине. Оформил заказ, получил подтверждение, дождался доставки без лишних проблем. Телефон новый, оригинальный, работает отлично. Надёжный продавец, которому можно доверять: магазины телефонов в москве
лечение наркомании лечение наркомании .
Мгновенные микрокредиты на https://credit-world.ru – это возможность получить деньги без лишних сложностей без лишних проверок и сложных условий. В каталоге доступно более 50 МФО, где можно получить деньги практически каждому. Изучите доступные варианты, выбрать оптимальные условия и подать заявку за несколько минут, и узнать результат в кратчайшие сроки.
наркологическая клиника наркологическая клиника .
капельница от запоя капельница от запоя .
наркологическая клиника наркологическая клиника .
вывод из запоя в стационаре kapelnicza-ot-zapoya-voronezh-1.ru .
покупка данных gobasego-2.ru .
нарколог на дом нарколог на дом .
Office for rent https://rentofficetoday.com/en/ business premises in business centers and commercial buildings. Compare office for rent, private office space for rent, and offices to rent in prime locations. Find the best office rental solutions and rent office space that fits your business needs
капельница от похмелья kapelnicza-ot-pokhmelya-voronezh-1.ru .
противопожарные двери https://dveri-ot-zavoda.ru с доставкой и профессиональной консультацией, посмотрите актуальные решения для разных типов помещений.
реабилитационный центр для наркозависимых kapelnicza-ot-zapoya-voronezh-1.ru .
1win skachat
реабилитация алкоголиков kapelnicza-ot-pokhmelya-ekaterinburg-1.ru .
реабилитационный центр для наркозависимых kapelnicza-ot-zapoya-kalyazin.ru .
кодирование от алкоголизма кодирование от алкоголизма .
сувенирка сувенирка .
наркологическая клиника наркологическая клиника .
корпоративные подарки москва suvenirnaya-produkcziya-s-logotipom.ru .
Сломалась машина? тягач помощь на дороге техпомощь на дорогах СПб и Ленобласти: эвакуация, подвоз топлива, запуск двигателя, вытаскивание авто — 24/7. Круглосуточная мобильная служба техпомощи в Санкт?Петербурге и Ленинградской области. Оказываем выездную помощь в любое время: эвакуируем авто, подвозим топливо, помогаем завести двигатель и вытаскиваем застрявшие машины.
корпоративные сувениры suvenirnaya-produkcziya-s-logotipom-1.ru .
Универсальный флагманский безбумажный регистратор jumo logoscreen 700 для контроля температуры, давления и других технологических параметров. Удобный интерфейс, точные измерения и возможность интеграции в системы мониторинга.
реабилитация алкоголиков kapelnicza-ot-pokhmelya-ekaterinburg-1.ru .
наркологическая помощь наркологическая помощь .
лечение наркомании kapelnicza-ot-zapoya-voronezh-1.ru .
сувениры с логотипом компании на заказ сувениры с логотипом компании на заказ .
реабилитационный центр для наркозависимых реабилитационный центр для наркозависимых .
корпоративные подарки с логотипом компании корпоративные подарки с логотипом компании .
капельница от запоя капельница от запоя .
подарки с логотипом подарки с логотипом .
купить сувенирную продукцию suvenirnaya-produkcziya-s-logotipom-1.ru .
Нужен промокод? https://prazdnikvrn.ru актуальные бонусы, скидки и акции для пользователей. Используйте рабочие коды, получайте дополнительные преимущества и экономьте при использовании сервиса. Все свежие предложения в одном месте.
реабилитационный центр для наркозависимых kapelnicza-ot-pokhmelya-ekaterinburg-1.ru .
вывод из запоя на дому вывод из запоя на дому .
креативные корпоративные подарки креативные корпоративные подарки .
изготовление корпоративных сувениров изготовление корпоративных сувениров .
лечение наркомании лечение наркомании .
Нужна брендированная продукция? https://2ymedia.kz/category/bloknoty-i-zapisnye-knizhki/ ваш надежный партнер в сфере брендинга в Алматы. Мы специализируемся на производстве сувенирной продукции с нанесением логотипа и корпоративной полиграфии. В нашем каталоге вы найдете всё для продвижения бренда: бизнес-сувениры, промо-мерч, текстиль и полиграфическую продукцию. Мы принимаем заказы оптом от 50 единиц, что делает нас доступными как для крупного бизнеса, так и для небольших компаний.
корпоративные подарки санкт петербург suvenirnaya-produkcziya-s-logotipom.ru .
реабилитация алкоголиков kapelnicza-ot-pokhmelya-ekaterinburg-1.ru .
кодирование от алкоголизма кодирование от алкоголизма .
реабилитационный центр от алкоголизма kapelnicza-ot-pokhmelya-ekaterinburg.ru .
корпоративные сувениры с логотипом suvenirnaya-produkcziya-s-logotipom-1.ru .
рекламная продукция с логотипом компании рекламная продукция с логотипом компании .
корпоративные подарки москва корпоративные подарки москва .
реабилитационный центр для наркозависимых реабилитационный центр для наркозависимых .
заказать сувениры с логотипом suvenirnaya-produkcziya-s-logotipom.ru .
изготовление сувенирной продукции изготовление сувенирной продукции .
лечение наркомании лечение наркомании .
сувенирная продукция москва suvenirnaya-produkcziya-s-logotipom-1.ru .
Гранитные памятники https://allgranit.ru от производителя в Москве: надёжность и красота на века. Компания Allgranit предлагает гранитные памятники напрямую от производителя — без посредников, переплат и долгих ожиданий. Мы создаём мемориалы, которые сохраняют память о дорогих людях на долгие годы.
вывод из запоя на дому цена вывод из запоя на дому цена .
вывод из запоя цена воронеж вывод из запоя цена воронеж .
вывод из запоя на дому вывод из запоя на дому .
вывод из запоя с выездом вывод из запоя с выездом .
Нужен ремонт? мастера по ремонту и отделке под ключ, быстро и качественно. Дизайн, отделка, электрика и сантехника. Гарантия на работы и прозрачная смета. Выполняем проекты любой сложности.
вывод из запоя на дому вывод из запоя на дому .
снятие запоя цена vyvod-iz-zapoya-na-domu-voronezh-3.ru .
вывод из запоя на дому вывод из запоя на дому .
вывод из запоя стоимость вывод из запоя стоимость .
вывод из запоя стоимость вывод из запоя стоимость .
Проблемы с алкоголем? https://www.narkolog-na-dom-vizov.ru срочная помощь при алкогольной и наркотической интоксикации. Вывод из запоя, капельницы и поддержка 24/7. Анонимно, быстро и безопасно с выездом врача на дом.
Лучшее путешествие джиппинг в крыму горы, каньоны и побережье. Увлекательные маршруты, опытные гиды и яркие впечатления от путешествий по Крыму.
Do you trade cryptocurrencies? bitkelttrade official page automate your transactions and earn passive income. Smart algorithms analyze the market and help you make decisions. Increase your income and reduce risks with modern technology.
снятие интоксикации на дому снятие интоксикации на дому .
Купить масло гидравлическое масло оптом в бочках 200 литров по цене производителя без наценок посредников.
снятие запоя на дому vyvod-iz-zapoya-na-domu-voronezh-1.ru .
вывод из запоя цена воронеж вывод из запоя цена воронеж .
вывод из запоя цены вывод из запоя цены .
вывод из запоя цена воронеж вывод из запоя цена воронеж .
Your point of view caught my eye and was very interesting. Thanks. I have a question for you.
круглосуточный вывод из запоя круглосуточный вывод из запоя .
вывод из запоя цена на дому вывод из запоя цена на дому .
нарколог на дом вывод из запоя нарколог на дом вывод из запоя .
нарколог на дом вывод из запоя на дому нарколог на дом вывод из запоя на дому .
выведение из запоя на дому выведение из запоя на дому .
вывод из запоя цена воронеж вывод из запоя цена воронеж .
זה, ” הוא אמר והוציא ארבעה כדורים מכיסו. הוא ניגש לחברה שלי: פתח את הפה. בתגובה, היא רק מלמלה משהו מטושטש. ואז הוא הכה אותה בפנים: זה יהיה המקרה עם כל אחד מכם שמעז לא לציית. השניים חשמלית. היא לא התרחקה. לא רציתי. ידו, מונחת על גב הספה, החליקה לאט אל כתפה, ואצבעותיו נגעו בקלות בעורה. היא רעדה, אבל לא מהקור. זה היה חם, כמעט צורב. “הוא אמר, והיה משהו חדש בקולו, https://avitalmarks.co.il/
Лучшее путешествие джип туры Крым горы, каньоны и побережье. Увлекательные маршруты, опытные гиды и яркие впечатления от путешествий по Крыму.
Do you trade cryptocurrencies? ai-driven trading bitkelttrade automate your transactions and earn passive income. Smart algorithms analyze the market and help you make decisions. Increase your income and reduce risks with modern technology.
выведение из запоя на дому vyvod-iz-zapoya-na-domu-samara.ru .
вывод из запоя самара на дому vyvod-iz-zapoya-na-domu-samara-1.ru .
Коммерческий и государственный тендер — это конкурентная процедура выбора поставщика товаров или оказания услуг. Заказчик размещает требования, а компании подают заявки и участвуют в торгах.
Разгадайте все загадки – тендерное сопровождение под ключ
вывод из запоя самара на дому vyvod-iz-zapoya-na-domu-samara-2.ru .
поставить капельницу от запоя на дому цена поставить капельницу от запоя на дому цена .
вывод из запоя круглосуточно самара вывод из запоя круглосуточно самара .
Do you trade cryptocurrencies? bitkelttrade official link automate your transactions and earn passive income. Smart algorithms analyze the market and help you make decisions. Increase your income and reduce risks with modern technology.
вывод из запоя цены екатеринбург vyvod-iz-zapoya-na-domu-ekaterinburg-1.ru .
наркология вывод из запоя наркология вывод из запоя .
капельница после запоя цена капельница после запоя цена .
Выгодные условия масло для спецтехники оптом на закупку масел и смазок оптом для промышленных предприятий.
вывод из запоя на дому нижний новгород вывод из запоя на дому нижний новгород .
нарколог на дом вывод из запоя на дому нарколог на дом вывод из запоя на дому .
Купить 3D-принтеры https://reporter63.ru/content/view/786013/zagolovok-razvitie-3dpechati-kak-novaya-tehnologiya-menyaet-nash-mir в Минске — продажа оборудования для печати пластиком и фотополимером. Подбор, консультации и гарантия. Найдите идеальный 3D-принтер для ваших задач.
Продажа 3D-принтеров http://reporter63.ru/content/view/786012/zagolovok-3dprinter-revolyuciya-v-proizvodstve-i-tvorchestve Минск — FDM, SLA и другие технологии печати. Широкий ассортимент, выгодные цены и профессиональные консультации. Подберите устройство под свои задачи.
вывод из запоя круглосуточно самара вывод из запоя круглосуточно самара .
Узнать больше здесь: https://l-parfum.ru/catalog/mandarina-duck/
Часто предприниматели объединяют понятия тендер и госзакупки, так как обе процедуры связаны с конкурсным выбором поставщика. Однако между ними существуют определённые различия, которые важно понимать перед началом работы в этой сфере.
Полная картина — внутри – https://tendernoe-soprovozhdenie-rostov-na-donu.ru
круглосуточный вывод из запоя круглосуточный вывод из запоя .
вывод из запоя на дому в екатеринбурге вывод из запоя на дому в екатеринбурге .
вывод из запоя на дому нижний новгород круглосуточно vyvod-iz-zapoya-na-domu-nizhnij-novgorod.ru .
выведение из запоя на дому самара выведение из запоя на дому самара .
вызов нарколога на дом запой вызов нарколога на дом запой .
Утилизация биоотходов https://stroi-musor.su вывоз и переработка пищевых и растительных отходов. Экологичные решения, соблюдение стандартов и надежный сервис для предприятий и частных клиентов.
ЖК Солянка Парк https://tzstroy.su современный жилой комплекс с удобной инфраструктурой и комфортной средой. Квартиры с продуманными планировками, благоустроенная территория и удобная транспортная доступность.
ГНБ бурение https://stroytex.su современный способ прокладки инженерных сетей без раскопок. Подходит для дорог, рек и плотной застройки. Точная технология, сокращение сроков и минимальные затраты.
сколько стоит капельница от запоя сколько стоит капельница от запоя .
врач на дом капельница от запоя врач на дом капельница от запоя .
вывод из запоя на дому круглосуточно вывод из запоя на дому круглосуточно .
выведение из запоя екатеринбург выведение из запоя екатеринбург .
капельница от запоя капельница от запоя .
Ознакомьтесь с сайтом и если нашли замечания опишите их с помощью формы https://magic.net.ru/docs/
Вверху справа нажмите на изображение флажка https://magic.net.ru/news/akcii/podkljuchaj-svoih-druzej-k-nashemu-inter/
Беспроводной маршрутизатор https://magic.net.ru/rules/
Маршрутизатор пересылает данные между вашей сетью и Интернетом https://magic.net.ru/blog/kak-vzlomat-algoritmy-socsetej-i-videt-tolko-neobhodimoe/
При использовании беспроводного маршрутизатора вы можете подключить компьютеры к своей сети, используя радиосвязь вместо проводов https://magic.net.ru/docs/
Существует несколько различных типов технологий беспроводной сети, которые включают 802 https://magic.net.ru/blog/chto-takoe-tjomnyj-internet-i-chem-on-otlichaetsja-ot-darkneta/
11a, 802 https://magic.net.ru/requiz/
11b, 802 https://magic.net.ru/news/no-news_tax/iptv-besplatno-2-mesjaca/
11g, 802 https://magic.net.ru/docs/
11n, 802 https://magic.net.ru/contacts/
11ac и 802 https://magic.net.ru/requiz/
11ax https://magic.net.ru/news/akcii/podkljuchaj-svoih-druzej-k-nashemu-inter/
Открывайте браузер и входите в Интернет https://magic.net.ru/news/no-news_tax/sovershi-pryzhok-na-kachestvennyj-internet-bez-poteri-balansa/
Какой способ выбрать?
В том же блоке найдите компонент IPv4 и дважды кликните по нему левой кнопкой мыши — откроются настройки https://magic.net.ru/news/akcii/s-nami-vygodno-plati-menshe-poluchaj-bo/
Поставьте маркеры напротив опций «Использовать следующий IP-адрес» и «Использовать следующие адреса DNS-серверов» https://magic.net.ru/docs/
выведение из запоя на дому в екатеринбурге выведение из запоя на дому в екатеринбурге .
вывод из запоя цены вывод из запоя цены .
вывод из запоя цена вывод из запоя цена .
запой капельница нарколог запой капельница нарколог .
вывод из алкогольного запоя нарколог 24 вывод из алкогольного запоя нарколог 24 .
помощь вывода запоя помощь вывода запоя .
вывод из запоя вывод из запоя .
вывод из запоя капельница на дому вывод из запоя капельница на дому .
вывод из запоя капельница kapelnica-ot-zapoya-nizhnij-novgorod.ru .
выведение из запоя на дому самара выведение из запоя на дому самара .
вывод из запоя круглосуточно vyvod-iz-zapoya-na-domu-nizhnij-novgorod.ru .
вывод из запоя на дому екатеринбург круглосуточно вывод из запоя на дому екатеринбург круглосуточно .
вывод из запоя в екатеринбурге вывод из запоя в екатеринбурге .
выведение из запоя на дому в екатеринбурге выведение из запоя на дому в екатеринбурге .
вывод из запоя цены вывод из запоя цены .
капельница при алкогольной интоксикации на дому цена капельница при алкогольной интоксикации на дому цена .
флаг с надписью на заказ сделать флаг на заказ
вывода из запоя 24 вывода из запоя 24 .
поставить капельницу от запоя поставить капельницу от запоя .
вывод из запоя нарколог24 vyvod-iz-zapoya-na-domu-sankt-peterburg.ru .
выведение из запоя на дому vyvod-iz-zapoya-na-domu-samara-2.ru .
вывод из запоя самара vyvod-iz-zapoya-na-domu-samara-3.ru .
вывод из запоя капельница екатеринбург vyvod-iz-zapoya-na-domu-ekaterinburg-3.ru .
https://mhp.ooo/catalog/imatinib
капельница в нижнем новгороде цена капельница в нижнем новгороде цена .
капельница после запоя цена капельница после запоя цена .
I don’t think the title of your article matches the content lol. Just kidding, mainly because I had some doubts after reading the article. https://accounts.binance.info/es-MX/register-person?ref=GJY4VW8W
врач капельница алкоголь на дом врач капельница алкоголь на дом .
При разработке элитных моделей мебельных гарнитуров для спальни дизайнеры компании учитывают особенности планировки помещения, а также предпочтения клиентов в выборе дизайна, материала и фурнитуры https://www.legnostyle.ru/catalog/mejkomnatnie-dveri/?PAGEN_1=11
Мы производим авторскую мебель по индивидуальным размерам только из высококачественной древесины https://www.legnostyle.ru/catalog/mejkomnatnie-dveri/vhodnie-dveri/vhodnaa-dver-e8.html
Прозрачные дверцы, резьба, декоративное оформление позволяют воплотить в жизнь самые смелые идеи https://www.legnostyle.ru/catalog/mebel/kb-25.html
Укомплектуем Ваш дом, квартиру, офис или ресторан https://www.legnostyle.ru/catalog/inter-eri/stenovie-paneli/s16.html
Дизайнеры тщательно разработают проект, учитывая все пожелания и тонкости создания мебели https://www.legnostyle.ru/catalog/mejkomnatnie-dveri/perfetto/
Список авторской мебели по индивидуальным проектам очень широкий и включает: кухни, шкафы, столы, кровати, двери, лестницы, окна, кессонные потолки и др https://www.legnostyle.ru/catalog/mejkomnatnie-dveri/nestandarnye/a-27.html
Мы производим различные элементы интерьера, декора https://www.legnostyle.ru/catalog/mejkomnatnie-dveri/model-p5.html
Компания специализируется на выпуске самой разнообразной продукции по индивидуальным проектам https://www.legnostyle.ru/catalog/mebel/garderobnie/?PAGEN_1=3
Возможность воссоздания интерьера по эскизам https://www.legnostyle.ru/catalog/mejkomnatnie-dveri/vhodnaa-dver-e11.html
Если вы не подобрали ничего из нашего каталога, закажите создание гарнитура по индивидуальному эскизу https://www.legnostyle.ru/catalog/kuhni/kuhna-28.html
Эту услугу уже оценили многие архитекторы и дизайнеры https://www.legnostyle.ru/catalog/mejkomnatnie-dveri/nestandarnye/dver-p25.html
Вы можете приобрести у нас немецкую мебель, которая будет полностью соответствовать дизайнерскому замыслу https://www.legnostyle.ru/catalog/mebel/derevyannye-stoly/?PAGEN_1=3
Обращаем Ваше внимание на то, что данный интернет-сайт носит исключительно информационно-ориентировочный характер и не является публичной офертой, определяемой положениями Статьи 437 Гражданского кодекса РФ https://www.legnostyle.ru/catalog/mebel/garderobnaa-model-scg-12.html
Конечно, покупать немецкую кухню в СПб дорого, но это оправданные траты, поскольку российских аналогов не существует и дорогие кухни на заказ остаются все также востребованы https://www.legnostyle.ru/catalog/inter-eri/potolki/pt-26.html
В Санкт-Петербурге, Москве и других городах люди выбирают мебель премиум уровня для самого важного помещения в доме и кухни Германии — отличный выбор!
Две означенные страны являются лидерами среди производителей элитной мебели https://www.legnostyle.ru/catalog/mejkomnatnie-dveri/iz-dyba/?PAGEN_1=3
Лучшее, что существует на сегодня – либо итальянская, либо французская мебель https://www.legnostyle.ru/catalog/mejkomnatnie-dveri/nestandarnye/mejkomnatnaya-dver-d36.html
нарколог вывод из запоя нарколог вывод из запоя .
Заказать расчёт https://norsy.ru/kontakty
Наша швейная фабрика активно сотрудничает с медийными лицами (блогеры, актеры, реперы) в сфере разработки и пошива фирменного мерча! Если вы хотите удивить своих фанатов качественными продуктом по доступной цене? — Оставьте заявку на нашем сайте или позвоните, и вы убедитесь, что наши цены подойдут вам!
Оставить заявку https://norsy.ru/
Компания «ЭЛЬ-ТЕКС ПОШИВ» занимается пошивом одежды для заказчиков из Москвы и регионов России https://norsy.ru/poshiv-futbolok
На производстве работают лучшие конструкторы , технологи, дизайнеры, швеи и лаборанты https://norsy.ru/
Шьём текстильные и трикотажные изделия крупным и мелким оптом (от 10 штук на размер, от 30 штук на модель).
Швейный цех основан в 2000 году, вот уже более 18 лет мы занимаемся пошивом мужской и женской одежды для заказчиков из Москвы и регионов https://norsy.ru/
В нашем распряжение собественное производство размером более 350М2, 30 швейных машин, 5 печатных станков и многое другое! Занимаемся крупным и мелким оптом (от 50 штук на размер, от 30 штук на модель). На нашей фабрике работают лучшие проектировщики, обеспечивающие точность в разработке лекала любой сложности https://norsy.ru/kontakty
футболка с коротким рукавом https://norsy.ru/otzyvy
капельницы чтобы выйти из запоя vyvod-iz-zapoya-na-domu-ekaterinburg-2.ru .
вывод из запоя срочно vyvod-iz-zapoya-na-domu-nizhnij-novgorod-1.ru .
помощь вывода запоя помощь вывода запоя .
капельница при алкогольной интоксикации на дому цена капельница при алкогольной интоксикации на дому цена .
вывод из запоя нарколог 24 вывод из запоя нарколог 24 .
вывод из запоя санкт петербург вывод из запоя санкт петербург .
вывести из запоя цена вывести из запоя цена .
вывод из запоя дешево воронеж вывод из запоя дешево воронеж .
вывести из запоя цена вывести из запоя цена .
вывод из запоя нарколог24 vyvod-iz-zapoya-na-domu-sankt-peterburg-2.ru .
вывод из запоя цена воронеж vyvod-iz-zapoya-na-domu-voronezh-9.ru .
вывод из запоя на дому телефоны vyvod-iz-zapoya-na-domu-voronezh-8.ru .
Хочешь оригинальную подушку? аниме подушки дакимакуры комфорт и уют для сна. Длинная форма, мягкий наполнитель и стильные принты. Отлично подходит для отдыха и расслабления.
вывод из запоя капельница воронеж вывод из запоя капельница воронеж .
вывод из запоя в спб вывод из запоя в спб .
вывода из запоя 24 вывода из запоя 24 .
выведение из запоя в воронеже выведение из запоя в воронеже .
выведение из запоя воронеж vyvod-iz-zapoya-na-domu-voronezh-9.ru .
good things about steroids
References:
https://iskustva.net/user/toylamp12
капельница от запоя воронеж капельница от запоя воронеж .
цена вывод из запоя на дому vyvod-iz-zapoya-na-domu-samara-8.ru .
выведение из запоя выведение из запоя .
выведение из запоя выведение из запоя .
вывод из запоя на дому недорого вывод из запоя на дому недорого .
вывод из запоя на дому в воронеже вывод из запоя на дому в воронеже .
Нужен пластический хирург? клиника косметологии и пластической хирургии современные операции и эстетические процедуры. Опытные хирурги, безопасные методики и индивидуальный подход. Консультации, диагностика и качественный результат.
вывести из запоя воронеж vyvod-iz-zapoya-na-domu-voronezh-9.ru .
нарколог вывод из запоя нарколог вывод из запоя .
вывод из алкогольного запоя нарколог24 vyvod-iz-zapoya-na-domu-sankt-peterburg-2.ru .
нарколог на дом вывод из запоя на дому нарколог на дом вывод из запоя на дому .
с 2010 года https://maze.tattoo/catalog/gh/zhar-ptitsa/
Делали пирсинг у Андрея https://maze.tattoo/catalog/b/bozhiya-korovka/
все очень понравилось https://maze.tattoo/catalog/b/braslety/
все рассказали про процедуру, ее исполнение, на все вопросы отвечали https://maze.tattoo/catalog/k/kity/
в процессе заживления также поддержка была https://maze.tattoo/catalog/ch/cheshirskiy-kot/
мастера советую, все аккуратно, быстро, качественно сделали https://maze.tattoo/catalog/l/luna/
салон приятный, находится недалеко от метро https://maze.tattoo/catalog/ee/
очень довольны https://maze.tattoo/catalog/d/drakony/
Наши профессиональные мастера в уютном и современном тату–салоне обладают всеми необходимыми знаниями и навыками, чтобы вы смогли получить именно такой результат, который ожидаете https://maze.tattoo/catalog/c/strekoza/
Качественную, красивую татуировку https://maze.tattoo/catalog/p/palm/
У каждого мастера тату-салона собственный подход к работе, слушатель вправе выбрать того из них, чьи рисунки ему ближе https://maze.tattoo/catalog/m/mifologiya/
Наши программы составлены таким образом, чтобы подготовить настоящих профессионалов, которые могут придумать эскиз, нарисовать его в соответствующем программном обеспечении и нанести на кожу клиента https://maze.tattoo/catalog/n/neft/
Выпускники академии получают работу в лучших тату салонах России, а многие из них успешно работают даже в Азии и Европе https://maze.tattoo/catalog/r/rozy/
Лучшие в городе! Да и не только в городе https://maze.tattoo/catalog/p/podkova/
Очень аккуратно , очень красивые работы! Вторую сын делает , приедем за третьей https://maze.tattoo/catalog/d/drakony/
Студия BlackFly 3200 ?
цена вывод из запоя на дому vyvod-iz-zapoya-na-domu-samara-10.ru .
вывод из запоя на дому недорого вывод из запоя на дому недорого .
выведение из запоя в воронеже выведение из запоя в воронеже .
вывод из запоя на дому воронеж цены вывод из запоя на дому воронеж цены .
вывод из запоя цена воронеж vyvod-iz-zapoya-na-domu-voronezh-10.ru .
лечение алкоголизма с выездом на дом лечение алкоголизма с выездом на дом .
цена вывод из запоя на дому vyvod-iz-zapoya-na-domu-samara-10.ru .
Нужна мебель? производство мебели на заказ эксклюзивные изделия из натурального дерева. Индивидуальный дизайн, качественные материалы и точное изготовление. Решения для дома и бизнеса.
вывести из запоя на дому вывести из запоя на дому .
вывести из запоя на дому vyvod-iz-zapoya-na-domu-nizhnij-novgorod-4.ru .
вывод из запоя на дому нижний новгород цена вывод из запоя на дому нижний новгород цена .
вывод из запоя круглосуточно нижний новгород вывод из запоя круглосуточно нижний новгород .
вывод из запоя в нижнем новгороде вывод из запоя в нижнем новгороде .
вывод из запоя цена воронеж vyvod-iz-zapoya-na-domu-voronezh-11.ru .
вывод из запоя дешево вывод из запоя дешево .
вывод из запоя на дому самара круглосуточно вывод из запоя на дому самара круглосуточно .
вывод из запоя на дому вывод из запоя на дому .
вывод из запоя цена воронеж vyvod-iz-zapoya-na-domu-voronezh-10.ru .
запой вывод на дому запой вывод на дому .
вывод из запоя цены нижний новгород вывод из запоя цены нижний новгород .
выведение из запоя нижний новгород выведение из запоя нижний новгород .
Капельница от похмелья с медицинским контролем в Нижнем Новгороде — это эффективный способ восстановления после алкогольной интоксикации, который позволяет быстро и безопасно нормализовать состояние пациента. Основное отличие такой капельницы от домашних методов состоит в том, что вся процедура проходит под контролем профессионалов, что минимизирует риски для здоровья и повышает эффективность лечения.
Разобраться лучше – капельница от похмелья на дом
нарколог на дом вывод из запоя на дому нарколог на дом вывод из запоя на дому .
References:
Online Casino Echtgeld Apple Pay
References:
https://hack.allmende.io/s/TOv-L8z33
Нужна премиум мебель? купить элитную мебель изготовление на заказ. Натуральные материалы, эксклюзивный дизайн и долговечность. Решения для дома и бизнеса с высоким уровнем качества.
капельница от запоя анонимно капельница от запоя анонимно .
6 https://magic.net.ru/news/
Затем ждем несколько минут – на Ethernet-кабель поступит соединение; 7 https://magic.net.ru/payment/
Чтобы остановить раздачу интернета, нужно в “Командной строке” ввести “netsh wlan stop hostednetwork”, а для ее активации в следующий раз – “netsh wlan start hostednetwork”.
Вставляем модуль в USB-порт ПК https://magic.net.ru/blog/kak-vzlomat-algoritmy-socsetej-i-videt-tolko-neobhodimoe/
Инсталляция программы начнется автоматически https://magic.net.ru/blog/kak-socseti-vlijajut-na-psihiku-novye-issledovanija/
Если этого не произошло, открываем папку устройства через проводник и запускаем программу установки вручную https://magic.net.ru/news/akcii/s-nami-vygodno-plati-menshe-poluchaj-bo/
После завершения инсталляции нажимаем на клавишу «Запустить» https://magic.net.ru/news/no-news_tax/sovershi-pryzhok-na-kachestvennyj-internet-bez-poteri-balansa/
2 https://magic.net.ru/news/akcii/podkljuchaem-bez-poter/
Вводим после “user>” команду “netsh wlan show drivers” и нажимаем Enter https://magic.net.ru/news/no-news_tax/vazhnaja-informacija/
Если в графе “Поддержка размещенной сети” написано “Да”, то переходим к следующему шагу, а если “Нет”, то это означает, что адаптер не может работать в режиме раздачи;
Найдите в левой части окна строчку «Изменение параметров адаптера» и кликните по ней https://magic.net.ru/rules/
При выборе поставщика услуг следует учитывать несколько критериев https://magic.net.ru/blog/kak-internet-vlijaet-na-myshlenie-uskorjaet-ili-zamedljaet-nas/
Подключение к сети Wi-Fi в Windows https://magic.net.ru/blog/chto-takoe-spufing-i-kak-ne-stat-ego-zhertvoj/
Капельница от похмелья с медицинским контролем представляет собой комплексную терапию, которая включает в себя различные препараты, направленные на быстрое восстановление организма. Каждый элемент процедуры подобран с учётом состояния пациента, что позволяет обеспечить максимальную эффективность лечения и минимизировать возможные риски.
Подробнее тут – http://www.domen.ru
вывод из запоя дешево вывод из запоя дешево .
вывод из запоя на дому цена вывод из запоя на дому цена .
Выезд нарколога на дом в Самаре организован так, чтобы пациент получил помощь без ожидания и без лишней нагрузки на организм. После обращения специалист приезжает по указанному адресу, проводит первичный осмотр, оценивает общее состояние, уровень интоксикации, показатели давления, пульса, дыхания и собирает краткий анамнез. На основании этой оценки врач определяет, можно ли безопасно оказывать помощь на дому, и подбирает подходящую схему лечения, включая возможное кодирование или вывод из алкоголизма. Такой формат позволяет начать медицинские мероприятия сразу после осмотра и быстро перейти к стабилизации состояния.
Углубиться в тему – нарколог на дом вывод
Процесс капельницы включает внутривенное введение различных растворов, которые помогают нейтрализовать эффекты алкогольной интоксикации, включая последствия запоя и алкоголизма. Наиболее часто в составе капельницы используются солевые и глюкозные растворы, витамины группы B, а также препараты для детоксикации организма. Эти компоненты помогают быстро восстановить водно-электролитный баланс, улучшить обмен веществ и ускорить выведение продуктов распада алкоголя.
Получить дополнительные сведения – капельница от похмелья на дому самара
Услуги нарколога на дому в Самаре включают не только экстренный осмотр, но и комплекс медицинских мероприятий, направленных на снижение интоксикации, облегчение тяжелых симптомов и общее восстановление состояния пациента. Объем помощи зависит от клинической картины, длительности употребления алкоголя или других психоактивных веществ, возраста, хронических заболеваний и текущих рисков. Врач подбирает схему индивидуально, исходя из того, какие задачи необходимо решить в конкретный момент — снять острые проявления, стабилизировать самочувствие или подготовить пациента к дальнейшему лечению зависимости.
Исследовать вопрос подробнее – вызов нарколога на дом в самаре
Капельница от запоя в Нижнем Новгороде: снятие интоксикации, восстановление организма и помощь при запое под контролем специалистов в наркологической клинике «Похмельная служба»
Подробнее можно узнать тут – https://kapelnica-ot-zapoya-nizhnij-novgorod-4.ru
вывод из запоя на дому в нижнем новгороде вывод из запоя на дому в нижнем новгороде .
Медицинский контроль играет ключевую роль в безопасности и эффективности процедуры. Под присмотром опытного специалиста исключаются риски неправильной дозировки препаратов, побочных эффектов и осложнений, что особенно важно при проведении капельниц у пациентов с хроническими заболеваниями или при наличии индивидуальных противопоказаний.
Подробнее тут – капельница от похмелья на дому нижний новгород
вывод из запоя врач на дом вывод из запоя врач на дом .
срочный вывод из запоя на дому vyvod-iz-zapoya-na-domu-nizhnij-novgorod-6.ru .
Капельница от похмелья — это медицинская процедура, которая помогает организму быстрее восстанавливаться после чрезмерного употребления алкоголя, включая последствия запоя и хронического алкоголизма. Эффект капельницы заключается в быстром восстановлении водно-электролитного баланса, выведении токсинов и устранении неприятных симптомов похмелья, таких как головная боль, тошнота и слабость. В отличие от обычных методов, капельница позволяет минимизировать время восстановления и улучшить состояние пациента значительно быстрее.
Узнать больше – капельница от похмелья на дом в самаре
Капельница от запоя представляет собой процедуру внутривенного введения специальных растворов, направленных на устранение токсинов, нормализацию обменных процессов и восстановление функций организма. Это позволяет быстрее вывести алкогольные токсины и минимизировать их воздействие на внутренние органы. В некоторых случаях может потребоваться наркологическая помощь и консультация психиатра, особенно если у пациента есть длительная зависимость или другие психоэмоциональные расстройства, которые требуют вмешательства специалистов с большим стажем работы.
Подробнее тут – капельница от запоя на дому цена нижний новгород
бонусы казино подходят для игры без ограничений с минимальными ставками – плей фортуна официальный
нарколог на дом вывод из запоя на дому нарколог на дом вывод из запоя на дому .
Выезд нарколога на дом в Самаре организован так, чтобы пациент получил помощь без ожидания и без лишней нагрузки на организм. После обращения специалист приезжает по указанному адресу, проводит первичный осмотр, оценивает общее состояние, уровень интоксикации, показатели давления, пульса, дыхания и собирает краткий анамнез. На основании этой оценки врач определяет, можно ли безопасно оказывать помощь на дому, и подбирает подходящую схему лечения, включая возможное кодирование или вывод из алкоголизма. Такой формат позволяет начать медицинские мероприятия сразу после осмотра и быстро перейти к стабилизации состояния.
Изучить вопрос глубже – нарколог на дом анонимно
вывод из запоя дешево нижний новгород вывод из запоя дешево нижний новгород .
Процесс капельницы включает внутривенное введение различных растворов, которые помогают нейтрализовать эффекты алкогольной интоксикации, включая последствия запоя и алкоголизма. Наиболее часто в составе капельницы используются солевые и глюкозные растворы, витамины группы B, а также препараты для детоксикации организма. Эти компоненты помогают быстро восстановить водно-электролитный баланс, улучшить обмен веществ и ускорить выведение продуктов распада алкоголя.
Исследовать вопрос подробнее – http://kapelnicza-ot-pokhmelya-samara-6.ru
вывод из запоя врач на дом вывод из запоя врач на дом .
Капельница от запоя представляет собой процедуру внутривенного введения специальных растворов, направленных на устранение токсинов, нормализацию обменных процессов и восстановление функций организма. Это позволяет быстрее вывести алкогольные токсины и минимизировать их воздействие на внутренние органы. В некоторых случаях может потребоваться наркологическая помощь и консультация психиатра, особенно если у пациента есть длительная зависимость или другие психоэмоциональные расстройства, которые требуют вмешательства специалистов с большим стажем работы.
Подробнее можно узнать тут – капельницы от запоя вызов
быстрый анонимный вывод из запоя на дому быстрый анонимный вывод из запоя на дому .
вывод из запоя дешево нижний новгород вывод из запоя дешево нижний новгород .
Похмельный синдром — это не просто неприятное ощущение, а целый комплекс симптомов, которые могут варьироваться от легкого дискомфорта до тяжелых состояний. Капельница от похмелья используется в случаях, когда симптомы становятся особенно выраженными и требуют вмешательства профессионала. Врачи отмечают, что капельница помогает значительно ускорить процесс восстановления организма после алкоголя, избавляя от боли, тошноты и слабости.
Получить дополнительную информацию – kapelnicza-ot-pokhmelya-nizhnij-novgorod-2.ru/
Нарколог на дом в Самаре: круглосуточная помощь, вывод из запоя и медицинская поддержка на дому под контролем специалистов в наркологической клинике «Похмельная служба»
Исследовать вопрос подробнее – нарколог на дом
Как отмечает ведущий научный сотрудник ФГБУН «НМИЦ психиатрии и наркологии» Минздрава России, наличие междисциплинарной команды — один из основных факторов, определяющих успех терапии при зависимости.
Углубиться в тему – лечение наркомании реабилитация
Перед постановкой капельницы специалист оценивает общее состояние пациента, измеряет давление, пульс, уточняет анамнез и возможные противопоказания. На основании этих данных формируется индивидуальный состав, который обеспечивает не только устранение симптомов похмелья, но и безопасное восстановление организма.
Получить дополнительные сведения – капельница от похмелья цена в самаре
Дизайн-проект интерьера https://stroydvor11.ru/kak-sdelat-dizayn-proekt-samostoyatelno-polnaya-instruktsiya-i-obzor-programm.html своими руками — идеи, советы и этапы разработки. Планировка, визуализация и подбор материалов для создания стильного и удобного пространства.
вывод из запоя на дому вывод из запоя на дому .
Медицинский портал https://med-portal-24.ru актуальная информация о здоровье, заболеваниях и методах лечения. Симптомы, диагностика, профилактика и советы специалистов для поддержания здоровья.
срочный вывод из запоя срочный вывод из запоя .
Капельница действует быстро благодаря тому, что активные вещества вводятся непосредственно в кровь, минуя желудочно-кишечный тракт. Это позволяет быстро уменьшить симптомы, такие как головная боль, тошнота, слабость, а также нормализовать работу печени и почек, которые страдают от длительного употребления алкоголя. В некоторых случаях, если требуется длительное наблюдение, пациент может быть направлен в стационар, и лечение может продолжаться на летний период с более тщательным контролем состояния.
Выяснить больше – капельница от запоя на дому цена
Мир Labubu https://labubu-world.ru коллекционные фигурки, персонажи и новинки популярной серии. Узнайте о героях, редких выпусках и особенностях коллекции. Погружайтесь в атмосферу Labubu и следите за обновлениями.
References:
Leo casino
References:
https://mysingledesire.com/members/slaveactive91/activity/15233/
Доска объявлений https://oren-i.ru удобный сервис для размещения и поиска объявлений. Продажа, покупка, услуги и работа. Быстро публикуйте объявления и находите нужные предложения в вашем городе.
References:
Rules for blackjack
References:
https://ztuto.dyjix.fr/member.php?action=profile&uid=26550
Инженерные изыскания https://sever-geo.com для строительства в Твери — геология, геодезия и экология участка. Комплексные исследования для проектирования и строительства. Точные данные, соблюдение норм и оперативные сроки выполнения.
платная скорая вывод из запоя vyvod-iz-zapoya-v-staczionare-sankt-peterburg.ru .
наркология вывод из запоя в стационаре наркология вывод из запоя в стационаре .
вызов врача нарколога на дом москва недорого вызов врача нарколога на дом москва недорого .
запой стационар запой стационар .
Разработка сайтов https://domenanet.online на Laravel — современные веб-проекты с высокой скоростью и безопасностью. Индивидуальные решения, интеграции и масштабируемая архитектура для бизнеса любого уровня.
выведение из запоя санкт петербург стационар выведение из запоя санкт петербург стационар .
психиатр нарколог на дом в москве narkolog-na-dom-moskva-1.ru .
услуги нарколога на дому услуги нарколога на дому .
Солянка Парк https://tzstroy.su жилой комплекс с современными квартирами и удобной инфраструктурой. Отличный выбор для жизни с комфортом и доступом ко всем необходимым объектам.
вывести из запоя срочно вывести из запоя срочно .
вызов врача нарколога на дом narkolog-na-dom-moskva-4.ru .
Online football match statistics soccer stand live scores, events, and live broadcasts. Follow games in real time, analyze teams, and never miss a beat.
Внутренний объем 1 м https://deneb-spb.ru/krestoviny
п https://deneb-spb.ru/contacts
Стоимость доставки от 1500 рублей https://deneb-spb.ru/krestoviny
VTp https://deneb-spb.ru/adaptory-nasadki-i-sverla-dlya-sedel
700 https://deneb-spb.ru/mufty-i-perekhodniki
0020 https://deneb-spb.ru/rasprodazha
25 https://deneb-spb.ru/zaglushki
Номинальное давление,PN, бар 20 Максимальная температура рабочей среды, ?С 95 Минимальная температура хранения ?С -30 Материал корпуса Полипропилен https://deneb-spb.ru/trojniki
В таблице ниже приведены данные по расчетному давлению полипропиленовых труб PN 10, PN 16 PN 20, PN 25 в зависимости от срока службы и температуры https://deneb-spb.ru/shurup-shpilka
По запросу 128 https://deneb-spb.ru/sedla
80 https://deneb-spb.ru/rasprodazha
вывод из запоя в стационаре санкт-петербург вывод из запоя в стационаре санкт-петербург .
All live match results http://www.live-score.com.az game information and data from the leading football leagues on one site. Up-to-date scores, statistics, and events for easy tracking.
The site https://play-mods.com.az/ contains information about downloading PlayMods, downloading PlayMods APK files, compatibility with iOS, Android, and PC, as well as basic information about GTA San Andreas and other modified games.
выведение из запоя санкт петербург стационар выведение из запоя санкт петербург стационар .
вызов врача нарколога вызов врача нарколога .
Live football https://www.qolvar.com.az broadcasts, daily game streams, football news, and the most popular live streaming sections.
Нужен ремонт электродвигателя? https://profremont.kz срочный ремонт и перемотка в Алматы от ПрофЭлектроРемонт-1: диагностика, восстановление и запуск в минимальные сроки, чтобы ваше производство не простаивало. Опытные мастера, гарантия результата и использование качественных материалов — надежность, которой можно доверять.
Today’s horoscope https://t.me/s/ulduz_fali daily forecasts and life surprises for all zodiac signs. Love, career, finances, and mood. Discover the future every day.
психиатр нарколог на дом в москве narkolog-na-dom-moskva-1.ru .
выведение из запоя стационар санкт петербург vyvod-iz-zapoya-v-staczionare-sankt-peterburg-1.ru .
Мнения игроков 1win отзывы — реальные отзывы о платформе, бонусах и выводе средств. Узнайте о плюсах и минусах сервиса и сделайте правильный выбор.
вывод из запоя в клинике вывод из запоя в клинике .
вывод из запоя в стационаре клиника вывод из запоя в стационаре клиника .
Реальные 1win отзывы игроков — честные мнения о работе сервиса. Узнайте о ставках, бонусах, выводе средств и надежности платформы.
Честные 1win отзывы — плюсы и минусы сервиса, опыт пользователей и оценки. Информация о выплатах, бонусах и удобстве использования платформы.
нарколог на дом круглосуточно москва цены нарколог на дом круглосуточно москва цены .
Настоящие 1win отзывы — опыт пользователей, выплаты, бонусы и работа сервиса. Полезная информация перед началом использования платформы.
вывести из запоя капельница на дому цена вывести из запоя капельница на дому цена .
mostbet казино казино сочи
выведение из запоя в стационаре спб выведение из запоя в стационаре спб .
Premium xxx platforms biedn hoogwaardige inhoud voor volwassen entertainment.
Kies voor betrouwbare hubs voor een veilige en plezierige ervaring.
Feel free to visit my website BUY VIAGRA ONLINE
вызвать врача нарколога на дом москва недорого вызвать врача нарколога на дом москва недорого .
вывод из запоя кодирование вывод из запоя кодирование .
вызвать врача нарколога на дом вызвать врача нарколога на дом .
наркологическая помощь на дому в москве наркологическая помощь на дому в москве .
выведение из запоя в стационаре спб выведение из запоя в стационаре спб .
вывод из запоя в клинике спб vyvod-iz-zapoya-v-staczionare-sankt-peterburg-1.ru .
вывод из запоя в клинике спб vyvod-iz-zapoya-v-staczionare-sankt-peterburg-2.ru .
После употребления алкоголя состояние может быстро ухудшиться: появляется головная боль, тошнота, головокружение и слабость. Это следствие того, что в организме накапливаются токсины, продукты распада этанола и нарушается водно-электролитный баланс. С помощью капельницы от похмелья можно быстро справиться с интоксикацией, восполнить недостающие элементы и облегчить состояние пациента. В клинике «Частный медик 24» в Самаре мы предлагаем капельницы, которые помогают снять все неприятные симптомы похмелья, восстанавливая работу организма и минимизируя риски для здоровья.
Выяснить больше – капельница от похмелья вызов на дом
нарколог на дом нарколог на дом .
нарколог вывод из запоя в стационаре нарколог вывод из запоя в стационаре .
вызов нарколога на дом цена вызов нарколога на дом цена .
вывод из запоя телефон вывод из запоя телефон .
нарколог на дом круглосуточно москва цены нарколог на дом круглосуточно москва цены .
best muscle steroid
References:
https://yogicentral.science/wiki/7_best_sites_to_buy_testosterone_online_in_2025_New_York_Post
элитная мебель на заказ изготовление мебели из массива на заказ
Капельница от похмелья применяется в тех случаях, когда человек ощущает сильное недомогание после употребления алкоголя. Основные симптомы, при которых рекомендуется лечение капельницей, включают:
Исследовать вопрос подробнее – капельница от похмелья цена в самаре
Нарколог на дом в Самаре с выездом специалиста, детоксикацией и анонимной медицинской помощью в наркологической клинике «Частный медик 24»
Получить дополнительные сведения – запой нарколог на дом в самаре
выведение запоя на дому цена vyvod-iz-zapoya-na-domu-samara-16.ru .
врач нарколог на дом narkolog-na-dom-moskva-4.ru .
https://zakynthoscarhub.com
вывод из запоя стационарно спб vyvod-iz-zapoya-v-staczionare-sankt-peterburg-1.ru .
Нарколог на дом — это услуга, которая позволяет получить медицинскую помощь в комфортной и привычной обстановке, не выходя из дома. В наркологической клинике «Частный медик 24» в Самаре мы предоставляем профессиональную помощь нарколога прямо на дому. Это идеальное решение для тех, кто испытывает симптомы абстиненции, ломки или алкогольной интоксикации, но не может или не хочет ехать в клинику. Выезд врача на дом позволяет начать лечение сразу, без задержек, минимизируя стрессы и сложности, связанные с поездкой.
Разобраться лучше – врач нарколог на дом самара
Такие симптомы важны не только сами по себе. Они показывают, что организму уже трудно поддерживать стабильность без медицинского вмешательства. Чем дольше в этот момент ждать, тем выше вероятность, что потребуется более жёсткий формат оказания помощи. Поэтому экстренное обращение в некоторых случаях не просто облегчает состояние, а предотвращает дальнейшее ухудшение здоровья.
Изучить вопрос глубже – http://www.domen.ru
После употребления алкоголя состояние может быстро ухудшиться: появляется головная боль, тошнота, головокружение и слабость. Это следствие того, что в организме накапливаются токсины, продукты распада этанола и нарушается водно-электролитный баланс. С помощью капельницы от похмелья можно быстро справиться с интоксикацией, восполнить недостающие элементы и облегчить состояние пациента. В клинике «Частный медик 24» в Самаре мы предлагаем капельницы, которые помогают снять все неприятные симптомы похмелья, восстанавливая работу организма и минимизируя риски для здоровья.
Подробнее тут – капельница от похмелья анонимно
вывод из запоя с кодированием на дому vyvod-iz-zapoya-na-domu-samara-17.ru .
вывод из запоя в клинике спб vyvod-iz-zapoya-v-staczionare-sankt-peterburg-2.ru .
нарколог на дом стоимость narkolog-na-dom-moskva-3.ru .
Анонимное лечение на дому ценно ещё и тем, что снижает внутреннее сопротивление самого пациента. Для многих людей первый контакт с врачом происходит именно дома, без дороги, без ожидания, без страха чужих взглядов. Такой формат помогает начать разговор не только о снятии острых симптомов, но и о более широких вопросах: что делать после выхода из запоя, когда требуется кодирование, в каких случаях нужна реабилитация, а когда первичная наркологическая помощь уже должна переходить в полноценный лечебный маршрут. Врач может помочь и в ситуациях, связанных не только с алкоголем, но и с наркомании, если семье нужно понять, что происходит с зависимым человеком и какой следующий шаг будет для него безопасным.
Детальнее – вызов нарколога на дом в воронеже
Ориентация на изготовление кухонной мебели с таким расчетом, чтобы соединить воедино знаменитый итальянский стиль, качество и дизайн с современными требованиями эргономики и функциональности https://www.legnostyle.ru/odnomarshevye-lestnicy.html
Достоинства мебели, представленной в салонах , несомненно, отметит тот, кто обладает тонким благородным вкусом и ценит совокупность стильного дизайна и необычайного комфорта https://www.legnostyle.ru/catalog/mebel/iz-duba/?PAGEN_1=16
Такой вид отделки мебели существует очень давно, наши предки использовали кожу в разных целях и для оббивки мебели тоже https://www.legnostyle.ru/catalog/lestnici/derevannie-vintovie-lestnici/lestnica-l4-4.html
На сегодняшний день это больше чем просто элемент декора https://www.legnostyle.ru/catalog/mejkomnatnie-dveri/mejkomnatnie-arki-i-portali/arka-a11.html
Это, в каком-то роде, особая философия, способная даже перерасти в будущем в отдельное стилевое решение https://www.legnostyle.ru/catalog/lestnici/elitnye/lestnica-l1-10.html
Китайская мебель имеет различные показатели качества https://www.legnostyle.ru/catalog/mejkomnatnie-dveri/nestandarnye/dver-p19.html
Многое зависит от фабрики, которая производит мебель, и от условий заказчика, который сотрудничает с данной фабрикой https://www.legnostyle.ru/catalog/mejkomnatnie-dveri/vhodnaa-dver-e5.html
Поэтому Вам нужно хорошо сформулировать свои требования к производству мебели, которая Вам необходима https://www.legnostyle.ru/catalog/lestnici/lestnica-l8-2.html
На протяжении многих лет качественная мебель из дерева высоко ценится покупателями всего мира https://www.legnostyle.ru/catalog/mebel/derevyannye-stoly/stol-model-s-11.html
Мебель из ценных пород отличается безупречным внешним видом и исключительной надежностью https://www.legnostyle.ru/catalog/mebel/komodi-i-tualetnie-stoliki-ot-15-000-rub/?PAGEN_1=3
Салон элитной мебели готов предложить изысканную импортную мебель для гостиных, спален, кабинетов, библиотек, детских комнат, прихожих и столовых https://www.legnostyle.ru/catalog/mejkomnatnie-dveri/vhodnaya-dver-e2.html
Эксклюзивная немецкая мебель в Москве по доступным ценам – это стильная и комфортная мебель-Германия https://www.legnostyle.ru/catalog/mejkomnatnie-dveri/iz-massiva/?PAGEN_1=2
Мы предлагаем , , , и , , и , , то есть полный интерьер Вашего дома с гарантированным сочетанием натуральных материалов и в идеальной цветовой гармонии, при комплектации на разных фабриках https://www.legnostyle.ru/mebel-dlia-prihojei.html
Нарколог на дом может помочь в следующих ситуациях:
Подробнее тут – https://narkolog-na-dom-samara-1.ru/
Капельница от похмелья применяется, когда симптомы интоксикации становятся выраженными и мешают нормальной жизнедеятельности пациента. Основные показания для использования капельницы включают:
Углубиться в тему – http://kapelnicza-ot-pokhmelya-samara-1.ru/
Актуальні новини https://lentalife.com поради та історії з усього світу. Дізнавайтеся про події, тренди й корисні лайфхаки, щоб залишатися в курсі та робити життя простішим і зручнішим щодня.
Авто портал https://tvregion.com.ua новости, обзоры и тест-драйвы автомобилей. Актуальная информация о новых моделях, технологиях и рынке. Узнавайте все о машинах и выбирайте авто с удобным сервисом.
Авто портал https://autoguide.kyiv.ua свежие новости, обзоры и тест-драйвы. Рейтинги автомобилей, советы по выбору и актуальные предложения. Все о мире авто в одном месте.
вывод из запоя на дому самара цены вывод из запоя на дому самара цены .
наркология вывод из запоя vyvod-iz-zapoya-na-domu-samara-18.ru .
нарколог на дом в москве похмельная служба narkolog-na-dom-moskva-4.ru .
Авто журнал https://psncodegeneratormiu.org новости, обзоры и тест-драйвы автомобилей. Узнавайте о новых моделях, технологиях и рынке. Полезные советы, рейтинги и аналитика для автолюбителей.
нарколог на дом вывод из запоя нарколог на дом вывод из запоя .
вывод из запоя анонимно вывод из запоя анонимно .
вывод из запоя на дому в екатеринбурге вывод из запоя на дому в екатеринбурге .
вывод из запоя на дому самара круглосуточно вывод из запоя на дому самара круглосуточно .
TATTOOMOSCOW 18+
Добро пожаловать в один из лучших салонов тату в Москве – студию «Классик» https://maze.tattoo/catalog/e/edinorog/
Наши мастера воплотят в реальность любую вашу идею татуировки, гарантировав абсолютную стерильность и максимальный комфорт https://maze.tattoo/catalog/o/oven/
Каждая студия татуировки в Москве — это отражение своего времени https://maze.tattoo/catalog/p/parnye-tatuirovki/
Мы верим, что татуировка — это не просто тренд, а форма личной свободы https://maze.tattoo/catalog/o/
В нашей студии татуировки нет шаблонов и клише https://maze.tattoo/catalog/g/
Только вы, ваша история и мастер, который умеет слушать https://maze.tattoo/catalog/p/pesochnye-chasy/
ТАТУИРОВКА Мы сочетаем современные методы татуировки с традиционными!
Парные татуировки https://maze.tattoo/catalog/d/dzhordano-bruno/
Один из самых старейших тату салонов Москвы Команда мастеров с международным опытом Индивидуальные эскизы под каждую идею Безопасность, стерильность, комфорт https://maze.tattoo/catalog/с/spina/
Хотите узнать больше?
Сотрудничество с Дизайнерским домом Татьяны Тягиной позволяет сделать бизнес-процессы более простыми и удобными, а также способствует росту доходов https://norsy.ru/pochemu-my
Мы не подводим своих заказчиков и отвечаем за свои слова и действия!
Производство, приобретение, хранение, перевозка в целях сбыта или сбыт товаров и продукции без маркировки и (или) нанесения информации, предусмотренной законодательством Российской Федерации, наказываются штрафом в размере до трехсот тысяч рублей либо принудительными работами на срок до трех лет , либо лишением свободы на срок до трех лет со штрафом в размере до восьмидесяти тысяч рублей https://norsy.ru/voprosy-otvety
Почему вам стоит заказать услуги швейного производства в «Амадей Принт»?
Если вы ищете пошив одежды оптом, то наш Дизайнерский дом – именно то, что требуется https://norsy.ru/kontakty
© 2014-2024 poshiv365 https://norsy.ru/o-nas
ru https://norsy.ru/o-nas
Авто журнал https://nmiu.org.ua свежие автомобильные новости, тесты и обзоры. Рейтинги, сравнения и рекомендации по выбору авто. Все о мире автомобилей в одном месте.
Авто портал https://retell.info обзоры автомобилей, тест-драйвы и новости рынка. Сравнения моделей, рейтинги и советы по выбору авто для любых задач.
В этом обзорном материале представлены увлекательные детали, которые находят отражение в различных аспектах жизни. Мы исследуем непонятные и интересные моменты, позволяя читателю увидеть картину целиком. Погрузитесь в мир знаний и удивительных открытий!
Подробнее можно узнать тут – https://vivod-iz-zapoya-2.ru/
выведение из запоя на дому выведение из запоя на дому .
Авто журнал https://bestauto.kyiv.ua тест-драйвы, обзоры и новости автоиндустрии. Узнавайте о новинках, технологиях и трендах рынка. Удобный формат для чтения каждый день.
Онлайн авто журнал https://simpsonsua.com.ua новости, обзоры и тест-драйвы автомобилей. Актуальная информация о рынке и новых моделях для автолюбителей.
References:
Neosurf deposit at rocketplay casino
References:
https://pad.stuve.de/s/l6zYRmwdi
выведения из запоя на дому круглосуточно выведения из запоя на дому круглосуточно .
вывод из запоя на дому недорого вывод из запоя на дому недорого .
Авто журнал онлайн https://translit.com.ua все о машинах: новости, тесты, обзоры и аналитика. Следите за новинками и выбирайте авто с удобным сервисом.
“вывод из запоя на халтурина – лечение алкоголизма, лечение наркомании “вывод из запоя на халтурина – лечение алкоголизма, лечение наркомании .
вывести из запоя екатеринбург вывести из запоя екатеринбург .
Автомобильный журнал https://mirauto.kyiv.ua новости, обзоры и тесты автомобилей. Советы по выбору, рейтинги и аналитика. Все о машинах и рынке авто.
вызов нарколога на дом вывод из запоя вызов нарколога на дом вывод из запоя .
Авто портал https://nerjalivingspace.com автомобильные новости, тест-драйвы и обзоры. Узнавайте о новинках, технологиях и тенденциях рынка. Удобный сервис для автолюбителей.
вывод из запоя вызов на дом vyvod-iz-zapoya-na-domu-ekaterinburg-11.ru .
References:
Did arnold take steroids
References:
https://hack.allmende.io/s/dOkJuWOG4
Предлагаем вашему вниманию интересную справочную статью, в которой собраны ключевые моменты и нюансы по актуальным вопросам. Эта информация будет полезна как для профессионалов, так и для тех, кто только начинает изучать тему. Узнайте ответы на важные вопросы и расширьте свои знания!
Детальнее – https://vivod-iz-zapoya-2.ru/
Все подробности по ссылке: https://zhukovastudio.ru
вывод из запоя с кодированием на дому vyvod-iz-zapoya-na-domu-samara-18.ru .
вывод из запоя цена вывод из запоя цена .
капельница от похмелья услуги капельница от похмелья услуги .
капельница от похмелья воронеж капельница от похмелья воронеж .
вывод из запоя с выездом на дом цена вывод из запоя с выездом на дом цена .
вывод из запоя врач на дом vyvod-iz-zapoya-na-domu-ekaterinburg-9.ru .
Состояние пациента при интоксикации может развиваться по-разному: от умеренной слабости и головной боли до выраженной дезориентации, тахикардии и нарушений сна. В таких ситуациях важно не откладывать обращение за помощью. Наркологическая помощь на дому рассматривается, когда требуется быстрое вмешательство и контроль состояния без транспортировки пациента.
Узнать больше – круглосуточная наркологическая помощь в нижнем новгороде
К основным показаниям относятся:
Ознакомиться с деталями – http://vyvod-iz-zapoya-na-domu-sankt-peterburg-8.ru
Запой сопровождается интоксикацией, нарушением сна, слабостью, тревожностью и нестабильностью работы сердечно-сосудистой системы, что характерно для алкоголизма и других форм зависимости, включая наркомании. При этом самостоятельный выход из состояния может сопровождаться усилением симптомов, что требует медицинского вмешательства. Капельницы на дому позволяют очень быстро снизить выраженность проявлений и начать восстановление под наблюдением врача, помогая человеку стабилизировать состояние.
Разобраться лучше – http://vyvod-iz-zapoya-na-domu-sankt-peterburg-11.ru/
Срочный домашний выезд особенно важен для семей, которые уже сталкивались с тяжёлыми последствиями алкоголизма и понимают, что обычные попытки «отпаивания» не решают проблему. Врач оценивает не только факт употребления, но и длительность запоя, возраст, наличие хронических болезней, уже принятые медикаменты, риск абстинентного синдрома, состояние сердца и общую нагрузку на организм. Такой формат позволяет анонимно вызвать специалиста, быстро провести необходимые вмешательства и определить, нужен ли только домашний вывод из острого состояния или дальше потребуется кодирование, повторная консультация, реабилитация либо более широкий маршрут помощи при наркомании.
Подробнее – вызвать нарколога на дом воронеж
лечение запоя vyvod-iz-zapoya-na-domu-samara-19.ru .
Состояние пациента при интоксикации может развиваться по-разному: от умеренной слабости и головной боли до выраженной дезориентации, тахикардии и нарушений сна. В таких ситуациях важно не откладывать обращение за помощью. Наркологическая помощь на дому рассматривается, когда требуется быстрое вмешательство и контроль состояния без транспортировки пациента.
Изучить вопрос глубже – скорая наркологическая помощь в нижнем новгороде
Выезд нарколога начинается с осмотра пациента. Доктора измеряют давление, пульс, оценивают уровень сознания и выраженность симптомов. На основании этих данных формируется план лечения, который реализуется сразу на месте. Такой подход позволяет быстро перейти к стабилизации состояния без лишних этапов.
Получить дополнительные сведения – вывод из запоя на дому круглосуточно санкт-петербург
Последние изменения: https://reklamig.ru
В Санкт-Петербурге вывод из запоя на дому используется в ситуациях, когда состояние пациента требует медицинской помощи, но позволяет обойтись без лечения в стационаре. Врач проводит консультацию, оценивает длительность запоя, выраженность симптомов и общее состояние, анализируя данные пациента, после чего принимает решение о тактике лечения при алкоголизме. При необходимости можно оформить вызов специалиста или заказать услугу заранее.
Подробнее тут – анонимный вывод из запоя на дому санкт-петербург
снятие алкогольной интоксикации на дому vyvod-iz-zapoya-na-domu-samara-18.ru .
вывести из запоя цена вывести из запоя цена .
Нарколог на дом — это услуга, которая позволяет получить медицинскую помощь в комфортной и привычной обстановке, не выходя из дома. В наркологической клинике «Частный медик 24» в Самаре мы предоставляем профессиональную помощь нарколога прямо на дому. Это идеальное решение для тех, кто испытывает симптомы абстиненции, ломки или алкогольной интоксикации, но не может или не хочет ехать в клинику. Выезд врача на дом позволяет начать лечение сразу, без задержек, минимизируя стрессы и сложности, связанные с поездкой.
Ознакомиться с деталями – запой нарколог на дом самара
Can you be more specific about the content of your article? After reading it, I still have some doubts. Hope you can help me.
капельница после похмелья капельница после похмелья .
Наша лучшая подборка: https://trafficforsimilarweb.com
Необходимость обращения за наркологической помощью определяется по совокупности симптомов и их выраженности. При ухудшении состояния важно ориентироваться на объективные признаки, а не ждать самостоятельного улучшения.
Углубиться в тему – narkologicheskaya-pomoshh-nizhnij-novgorod-8.ru/
Ключевым преимуществом вызова нарколога на дом является то, что лечение начинается в тот момент, когда оно особенно необходимо. Близкие пациента не должны волноваться о поиске клиники или медицинских центров в экстренной ситуации — помощь будет оказана немедленно, с минимальными затратами времени и без стресса для пациента.
Узнать больше – нарколог на дом в самаре
Такие состояния позволяют проводить лечение на дому с контролем динамики. При выявлении рисков врач может изменить тактику и рекомендовать стационар или другие методы лечения зависимости.
Получить дополнительную информацию – вывод из запоя на дому анонимно
поставить капельницу от запоя на дому поставить капельницу от запоя на дому .
Выезд врача начинается с оценки состояния пациента. Доктора измеряют давление, пульс, оценивают уровень сознания и выраженность симптомов. После этого формируется план лечения, который реализуется сразу. Такой подход позволяет быстро перейти к стабилизации состояния человека.
Изучить вопрос глубже – анонимный вывод из запоя на дому
Нарколог на дом в Воронеже с оперативным приездом специалиста, детоксикацией и медицинским наблюдением в наркологической клинике «Частный медик 24»
Подробнее тут – нарколог на дом вывод
Анонимное лечение на дому ценно ещё и тем, что снижает внутреннее сопротивление самого пациента. Для многих людей первый контакт с врачом происходит именно дома, без дороги, без ожидания, без страха чужих взглядов. Такой формат помогает начать разговор не только о снятии острых симптомов, но и о более широких вопросах: что делать после выхода из запоя, когда требуется кодирование, в каких случаях нужна реабилитация, а когда первичная наркологическая помощь уже должна переходить в полноценный лечебный маршрут. Врач может помочь и в ситуациях, связанных не только с алкоголем, но и с наркомании, если семье нужно понять, что происходит с зависимым человеком и какой следующий шаг будет для него безопасным.
Подробнее – запой нарколог на дом в воронеже
Нарколог на дом в Воронеже с оперативным приездом специалиста, детоксикацией и медицинским наблюдением в наркологической клинике «Частный медик 24»
Углубиться в тему – врач нарколог на дом
вывод из запоя на дому екатеринбург вывод из запоя на дому екатеринбург .
Также диагностику помогут провести специальные утилиты:
Такое соединение применяется при необходимости безопасного удаленного подключения к частным сетям, повышения приватности https://magic.net.ru/docs/
Кабель заводят в помещение и подключают к маршрутизатору, от которого затем и будет идти сигнал https://magic.net.ru/news/no-news_tax/skidka-na-podkljuchenie-pri-pereezde/
Монтажник должен настроить интернет и протестировать, есть ли связь https://magic.net.ru/news/no-news_tax/vazhnaja-informacija/
Рекомендуется установить на роутер пароль, иначе к сети смогут подключаться все, без исключения https://magic.net.ru/blog/kak-vzlomat-algoritmy-socsetej-i-videt-tolko-neobhodimoe/
Раздача интернета с компьютера производится и через Wi-Fi https://magic.net.ru/news/akcii/podkljuchaj-svoih-druzej-k-nashemu-inter/
Для этого нужно выполнить несколько шагов https://magic.net.ru/blog/kak-internet-vlijaet-na-myshlenie-uskorjaet-ili-zamedljaet-nas/
Мы запускаем обновленный сайт и нам важно Ваше мнение!
Иногда бывает так, что все действия проделаны правильно, но интернета нет https://magic.net.ru/connect/
В этом случае:
Для Воронежа выездной формат особенно востребован вечером, ночью и ранним утром, когда у больного резко усиливаются симптомы и поездка в медицинское учреждение становится тяжёлой или просто нереальной. Если человек несколько дней употреблял алкоголь, почти не спал, плохо переносит воду, жалуется на сердцебиение и слабость, то откладывать осмотр не стоит. Срочная наркологическая помощь нужна именно тогда, когда ситуация развивается быстро, а семья уже видит, что своими силами справиться не удаётся. Врач приезжает, проводит осмотр, определяет, нет ли признаков осложнений, и уже на месте решает, какие меры допустимы дома, а какие требуют другого формата оказания помощи.
Получить больше информации – нарколог на дом анонимно
В Воронеже услуга «нарколог на дом» востребована прежде всего тогда, когда состояние развивается быстро, а запас сил у пациента почти исчерпан. После нескольких дней употребления человеку бывает трудно даже выйти из квартиры: сохраняются слабость, дрожь, бессонница, тошнота, скачки давления, потливость, раздражительность и ощущение, что без новой дозы алкоголя легче уже не станет. Именно в этот момент домашний выезд специалиста помогает разорвать опасный цикл. Наркологическая помощь начинается там, где человек находится, а не там, куда он в идеале должен был бы доехать.
Получить больше информации – вызов нарколога на дом в воронеже
Вывод из запоя на дому — это формат медицинской помощи, при котором лечение проводится в привычной для пациента обстановке с выездом нарколога. Такой подход используется, когда требуется срочное вмешательство, но состояние позволяет обойтись без госпитализации. В наркологической клинике «Частный медик 24» помощь оказывается круглосуточно, с возможностью начать терапию сразу после обращения и без ожидания.
Узнать больше – нарколог на дом вывод из запоя в санкт-петербурге
капельница от алкоголя на дому воронеж недорого капельница от алкоголя на дому воронеж недорого .
Нарколог на дом может помочь в следующих ситуациях:
Исследовать вопрос подробнее – нарколог на дом анонимно самара
вывод из запоя круглосуточно вывод из запоя круглосуточно .
Такие состояния требуют профессионального вмешательства, так как без лечения могут усиливаться и приводить к ухудшению самочувствия. При этом помощь может предоставляться анонимно, в соответствии с политикой конфиденциальности данных пациента.
Подробнее – вывод из запоя на дому санкт-петербург
Строительный портал https://zip.org.ua все для ремонта и строительства в одном месте. Актуальные статьи, советы экспертов, обзоры материалов и технологий. Найдите подрядчиков, сравните цены и выберите лучшие решения для дома, квартиры или бизнеса быстро и удобно.
Женский портал https://muz-hoz.com.ua мода, красота, здоровье и психология. Советы, тренды и полезные статьи для современной женщины. Удобный онлайн формат для ежедневного чтения.
капельница на дому от алкоголя воронеж цена капельница на дому от алкоголя воронеж цена .
выведение из запоя капельница выведение из запоя капельница .
Женский портал https://lubimoy.com.ua статьи о красоте, здоровье, отношениях и саморазвитии. Полезные советы, лайфхаки и актуальные темы для женщин. Все для вдохновения и гармонии каждый день.
эссенциале капельница в воронеже эссенциале капельница в воронеже .
капельница от похмелья клиника капельница от похмелья клиника .
прокапать от алкоголя прокапать от алкоголя .
вызвать на дом капельницу от алкоголя вызвать на дом капельницу от алкоголя .
Удобный строительный https://anti-orange.com.ua портал с полезной информацией для частных застройщиков и профессионалов. Обзоры, инструкции, идеи для ремонта, каталог услуг и материалов. Поможем спланировать проект, подобрать решения и реализовать строительство без лишних затрат.
вывод из запоя екатеринбург стационар вывод из запоя екатеринбург стационар .
клиники по лечению алкоголизма narkologicheskaya-pomoshh-nizhnij-novgorod.ru .
капельница от запоя вызов капельница от запоя вызов .
Мужской портал https://swiss-watches.com.ua о стиле жизни, здоровье, финансах и саморазвитии. Полезные статьи, советы экспертов, идеи для карьеры и отдыха. Всё, что важно современному мужчине для уверенности, успеха и баланса в жизни.
Онлайн женский портал https://sweaterok.com.ua мода, уход за собой, здоровье и отношения. Актуальные статьи, советы и идеи для вдохновения и улучшения качества жизни.
Туристический портал https://swiss-watches.com.ua для путешественников: направления, маршруты, советы и лайфхаки. Подбор отелей, билетов и экскурсий, идеи для отдыха и полезные рекомендации. Планируйте поездки легко и открывайте новые страны с комфортом.
Все о беременности https://z-b-r.org и родах: полезные статьи, советы врачей и ответы на важные вопросы. Подготовка к родам, развитие малыша по неделям, здоровье мамы и восстановление. Надежная информация для будущих родителей на каждом этапе.
наркологическая клиника нижний новгород наркологическая клиника нижний новгород .
black ops market url https://darknetmarketstore.com/
Запрос на выезд врача связан не только с классическим запоем. На практике домашняя помощь нужна в разных ситуациях, когда организму уже трудно компенсировать последствия употребления, а откладывание визита увеличивает риск осложнений.
Исследовать вопрос подробнее – http://narkolog-na-dom-voronezh-2.ru/
Современный строительный https://sinergibumn.com журнал: идеи, технологии, обзоры и советы экспертов. Помогаем разобраться в материалах, выбрать решения и реализовать проекты любой сложности — от квартиры до загородного дома.
Профессиональный строительный https://newhouse.kyiv.ua журнал с полезной информацией и практическими решениями. Аналитика рынка, обзоры материалов, инструкции и советы. Всё, что нужно для качественного строительства и ремонта.
Портал о дизайне https://lbook.com.ua интерьера: идеи, тренды и практические решения для дома и квартиры. Обзоры стилей, подбор мебели и материалов, советы дизайнеров. Помогаем создать уютное, функциональное и современное пространство.
Строительный портал https://comart.com.ua для тех, кто ценит качество и надежность. Полезные статьи, инструкции, сравнение материалов и услуг. Найдите проверенных специалистов, получите идеи для ремонта и реализуйте проекты любой сложности с максимальной выгодой.
продажа базы gobasego-2.ru .
Женский сайт https://biglib.com.ua мода, уход за собой, психология и здоровье. Актуальные темы, лайфхаки и рекомендации для улучшения качества жизни.
Информационный строительный https://stroyportal.kyiv.ua журнал с экспертным контентом. Технологии, материалы, тренды и советы для частных и коммерческих проектов. Читайте, вдохновляйтесь и реализуйте идеи с уверенностью в результате.
Строительный журнал https://ukrainianpages.com.ua с актуальными новостями, трендами и экспертными материалами. Обзоры технологий, советы по ремонту и строительству, идеи для дома и бизнеса. Узнавайте о современных решениях и применяйте лучшие практики в своих проектах.
капельница от похмелья екатеринбург капельница от похмелья екатеринбург .
вывод из запоя на дому воронеж капельница вывод из запоя на дому воронеж капельница .
капельница от похмелья воронеж капельница от похмелья воронеж .
вывод из запоя с выездом вывод из запоя с выездом .
сколько стоит вывод из запоя сколько стоит вывод из запоя .
капельница от алкоголя в воронеже kapelnicza-ot-zapoya-voronezh-1.ru .
Женский портал https://virginvirtual.net красота, здоровье, психология и стиль жизни. Полезные советы, тренды и рекомендации для женщин в одном месте.
Женский журнал https://vybir.kiev.ua статьи о моде, красоте, здоровье и отношениях. Актуальные тренды, советы экспертов и вдохновение для современной женщины каждый день.
Все о строительстве https://azst.com.ua и ремонте на одном портале: от выбора материалов до поиска исполнителей. Практические советы, тренды, технологии и реальные кейсы. Экономьте время и деньги, принимая грамотные решения для вашего дома или коммерческого объекта.
Свежие новости https://hansaray.org.ua Украины: политика, экономика, общество и события дня. Оперативная информация, аналитика и мнения экспертов. Будьте в курсе главных новостей страны и мира в удобном формате.
капельница от запоя екатеринбург капельница от запоя екатеринбург .
лечение алкоголизма в нижнем новгороде narkologicheskaya-pomoshh-nizhnij-novgorod.ru .
от 5380 руб/час https://rentbusspb.ru/prokat-bmv-7/
Одной из популярных услуг является прокат автомобилей на свадьбу, свадебные мероприятия и деловые поездки клиентов по городу https://rentbusspb.ru/arenda-mercedes-e212-restyling-black-s-voditelem/
Как правило, заказ направлен на автомобили бизнес класса https://rentbusspb.ru/arenda-microavtobusa-new-luxury-mercedes-sprinter-vip-white/
К сожалению, в прокате отсутствуют такие автомобили как, лимузины, микроавтобусы и автобусы https://rentbusspb.ru/mercedes-maybach-long-s-223/
Компания «Рента-Кар Красноярск» уже 17 лет является лидером на рынке проката автомобилей г https://rentbusspb.ru/arenda-mercedes-s-class-w222-white-s-voditelem/
Красноярска https://rentbusspb.ru/mercedes-benz-gelandewagen/
г https://rentbusspb.ru/avtopark-transporta-dlya-arendi/
Иркутск, ул https://rentbusspb.ru/category/arenda-avtobusa/
Ширямова, 2 https://rentbusspb.ru/mercedes-benz-gelandewagen/
от 2610 руб/час https://rentbusspb.ru/arenda-mercedes-s-class-w223-s-voditelem/
Ищете, где взять авто напрокат в Иркутске? Звоните в компанию “Авеню” – поиск подходящей машины не займёт более 10 секунд на нашем сайте, а на заключение договора нужно всего 15 минут https://rentbusspb.ru/range-rover/
Прокат авто в Иркутске в компании “Авеню” – это быстрый способ получить мобильность https://rentbusspb.ru/arenda-avtomobilya-chevrolet-camaro-s-voditelem/
Все о здоровье https://mikstur.com на одном портале: болезни, симптомы, методы лечения и профилактика. Советы врачей, актуальные медицинские статьи и рекомендации. Помогаем лучше понимать организм и заботиться о своем самочувствии.
Сайт для женщин https://prowoman.kyiv.ua практичные советы по уходу за собой, здоровью и отношениям. Читайте, развивайтесь и улучшайте свою жизнь.
Женский онлайн журнал https://whoiswho.com.ua стиль, красота и здоровье. Полезные советы, лайфхаки и актуальные темы для женщин. Все о жизни, моде и саморазвитии.
тестовая база gobasego-2.ru .
лечение алкогольной зависимости нижний новгород лечение алкогольной зависимости нижний новгород .
Женский журнал https://womanclub.in.ua мода, уход за собой, психология и отношения. Читайте интересные статьи, находите идеи и улучшайте качество жизни.
Все о строительстве https://skol.if.ua ремонте и отделке на одном сайте. Практические рекомендации, современные технологии, обзоры и каталог услуг. Найдите идеи, рассчитайте бюджет и воплотите проект любой сложности с минимальными рисками и затратами.
Новости Украины https://status.net.ua сегодня: главные события, политика, экономика и общественная жизнь. Оперативные сводки, аналитика и комментарии. Узнавайте важное первыми и следите за развитием ситуации.
Портал о строительстве https://kennan.kiev.ua и ремонте: идеи, технологии, обзоры и советы экспертов. Помогаем выбрать материалы, рассчитать бюджет и найти исполнителей. Удобный сервис для планирования и реализации проектов — от квартиры до загородного дома.
капельница от алкоголя на дому kapelnicza-ot-pokhmelya-ekaterinburg-1.ru .
капельница от алкоголя в воронеже kapelnicza-ot-zapoya-voronezh.ru .
вывод из запоя вывод из запоя .
выведение из запоя выведение из запоя .
Капельница от похмелья в Самаре с подбором препаратов, улучшением самочувствия и наблюдением в наркологической клинике «Частный медик 24»
Подробнее можно узнать тут – капельница от похмелья на дому в самаре
наркология нижний новгород наркология нижний новгород .
вывод из запоя на дому воронеж капельница вывод из запоя на дому воронеж капельница .
капсульный дом цена в россии капсульный дом цена в россии .
Комплексное лечение в наркологическом стационаре включает несколько последовательных этапов, каждый из которых направлен на решение конкретных задач. Начальный этап включает в себя медицинское вмешательство, направленное на устранение токсинов из организма, и стабилизацию общего состояния пациента. Далее начинается реабилитация, которая помогает закрепить достигнутые результаты и восстановить психоэмоциональное состояние пациента. Для выбора подходящего стационара стоит ознакомиться с отзывами и дополнительной информацией о клинике, а также уточнить, в каком районе города она расположена.
Получить дополнительные сведения – narkologicheskij-staczionar-sankt-peterburg-1.ru/
Существует ряд ситуаций, при которых вызов специалиста на дом является обоснованным решением:
Подробнее – нарколог на дом анонимно в нижнем новгороде
купить данные купить данные .
Наркологический стационар — это специализированное медицинское учреждение, предназначенное для лечения и реабилитации пациентов с зависимостью от алкоголя, наркотиков и других психоактивных веществ. В Санкт-Петербурге существует множество таких учреждений, которые предоставляют комплексную помощь людям, страдающим от зависимости. Лечение в стационаре часто является первым шагом на пути к выздоровлению, особенно в случаях тяжелых зависимостей, когда амбулаторное лечение может не дать должного эффекта. В случае запоя или хронического алкоголизма стационарное лечение может стать необходимым, особенно если выезд на дом не позволяет должным образом контролировать процесс восстановления.
Разобраться лучше – лечение в наркологическом стационаре санкт-петербург
Капельница от похмелья в Екатеринбурге с инфузионной терапией и быстрым облегчением симптомов в наркологической клинике «Частный медик 24»
Получить дополнительную информацию – http://kapelnicza-ot-pokhmelya-ekaterinburg-7.ru
вызвать на дом капельницу от алкоголя вызвать на дом капельницу от алкоголя .
капельница от похмелья клиника капельница от похмелья клиника .
Комплексное лечение в наркологическом стационаре включает несколько последовательных этапов, каждый из которых направлен на решение конкретных задач. Начальный этап включает в себя медицинское вмешательство, направленное на устранение токсинов из организма, и стабилизацию общего состояния пациента. Далее начинается реабилитация, которая помогает закрепить достигнутые результаты и восстановить психоэмоциональное состояние пациента. Для выбора подходящего стационара стоит ознакомиться с отзывами и дополнительной информацией о клинике, а также уточнить, в каком районе города она расположена.
Углубиться в тему – частный наркологический стационар
В таких ситуациях врач оценивает риски, определяет тактику лечения и при необходимости рекомендует дальнейшую госпитализацию. Однако во многих случаях помощь на дому оказывается достаточной для стабилизации состояния.
Исследовать вопрос подробнее – вызвать нарколога на дом
Работа с пациентами в наркологическом стационаре начинается с диагностики, которая помогает определить степень зависимости и сопутствующие заболевания. На основе этих данных разрабатывается индивидуальный план лечения. Врачи, наркологи и психотерапевты работают в тесном контакте с пациентом, что позволяет достичь наилучших результатов в процессе восстановления. Важно также убедиться, что клиника имеет необходимую лицензию, а для эффективного лечения могут быть предложены такие процедуры, как прием психотерапевта и кодирование от зависимости.
Изучить вопрос глубже – наркологический стационар в санкт-петербурге
Капельница от похмелья — это не просто средство для снятия симптомов, но и эффективный способ быстрого восстановления организма после алкогольной интоксикации. В наркологической клинике «Частный медик 24» в Екатеринбурге мы предоставляем услугу выезда нарколога на дом, что позволяет пациентам получить необходимую медицинскую помощь, не покидая комфорт своей обстановки. Это особенно важно в случае, если состояние пациента серьёзно ухудшилось, и он не может поехать в клинику самостоятельно.
Разобраться лучше – капельница от похмелья на дом екатеринбург
сколько стоит вывод из запоя сколько стоит вывод из запоя .
нарколог нижний новгород нарколог нижний новгород .
Капельница от похмелья — это медицинская процедура, направленная на быстрое восстановление организма после алкогольной интоксикации. Она помогает устранить обезвоживание, нормализовать обменные процессы и снизить токсическую нагрузку на внутренние органы. В отличие от домашних методов, инфузионная терапия действует напрямую через кровоток, обеспечивая более быстрый и выраженный эффект.
Подробнее – капельница от похмелья анонимно в самаре
капельница от запоя недорого капельница от запоя недорого .
Обращение в наркологический стационар в Санкт-Петербурге может стать важным шагом для людей, страдающих от алкогольной или наркотической зависимости. Стационарное лечение предоставляет пациентам не только медицинскую помощь, но и психологическую поддержку, необходимую для успешной реабилитации. Это подход, ориентированный на комплексное восстановление здоровья, физическое и психоэмоциональное состояние пациента.
Получить больше информации – narkologicheskij-staczionar-sankt-peterburg-2.ru/
Процесс лечения начинается с консультации врача, который оценивает состояние пациента, его анамнез и определяет, какие процедуры и препараты нужно использовать. В большинстве случаев капельница включает в себя регидратацию, витамины группы B, антиеметики, препараты для улучшения работы печени и почек. Важно, что капельница не только помогает организму вывести токсины, но и восстанавливает нормальную работу всех систем организма, обеспечивая быстрое улучшение самочувствия.
Узнать больше – капельница от похмелья анонимно
Продолжительность процедуры капельницы от похмелья зависит от степени интоксикации, общего состояния пациента и состава вводимых препаратов. В среднем инфузионная терапия занимает от 40 минут до 1,5 часов. Уже во время введения растворов многие пациенты отмечают постепенное улучшение самочувствия.
Разобраться лучше – капельница от похмелья анонимно
Комплексное лечение в наркологическом стационаре включает несколько последовательных этапов, каждый из которых направлен на решение конкретных задач. Начальный этап включает в себя медицинское вмешательство, направленное на устранение токсинов из организма, и стабилизацию общего состояния пациента. Далее начинается реабилитация, которая помогает закрепить достигнутые результаты и восстановить психоэмоциональное состояние пациента. Для выбора подходящего стационара стоит ознакомиться с отзывами и дополнительной информацией о клинике, а также уточнить, в каком районе города она расположена.
Углубиться в тему – лечение в наркологическом стационаре санкт-петербург
После оформления вызова нарколог приезжает к пациенту и проводит комплексную оценку состояния. Врач измеряет давление, частоту пульса, оценивает уровень сознания и выраженность симптомов. На основании полученных данных формируется план лечения, который реализуется сразу на месте.
Получить дополнительную информацию – вызвать нарколога на дом
Работа с пациентами в наркологическом стационаре начинается с диагностики, которая помогает определить степень зависимости и сопутствующие заболевания. На основе этих данных разрабатывается индивидуальный план лечения. Врачи, наркологи и психотерапевты работают в тесном контакте с пациентом, что позволяет достичь наилучших результатов в процессе восстановления. Важно также убедиться, что клиника имеет необходимую лицензию, а для эффективного лечения могут быть предложены такие процедуры, как прием психотерапевта и кодирование от зависимости.
Углубиться в тему – наркологическая помощь стационар
Когда такие симптомы становятся ярко выраженными, важно не затягивать с лечением и вызвать нарколога на дом. Это позволит своевременно устранить токсические вещества из организма и предотвратить серьёзные проблемы с органами. Важно, чтобы лечение началось как можно быстрее, что возможно только через экстренный выезд специалиста на дом.
Исследовать вопрос подробнее – kapelnicza-ot-pokhmelya-ekaterinburg-6.ru/
покупка базы покупка базы .
Капельница от похмелья в Екатеринбурге с инфузионной терапией и быстрым облегчением симптомов в наркологической клинике «Частный медик 24»
Исследовать вопрос подробнее – капельница от похмелья на дому
сколько стоит вывод из запоя сколько стоит вывод из запоя .
нарколог анонимно нижний новгород narkologicheskaya-pomoshh-nizhnij-novgorod.ru .
Капельница от похмелья в Екатеринбурге с устранением слабости, тошноты и последствий интоксикации в наркологической клинике «Частный медик 24»
Выяснить больше – капельница от похмелья анонимно в екатеринбурге
Выезд нарколога на дом позволяет быстро устранить эти симптомы, нормализовать состояние пациента и предотвратить дальнейшее ухудшение здоровья.
Исследовать вопрос подробнее – капельница от похмелья екатеринбург
Выбор наркологического стационара в Санкт-Петербурге — это важный шаг, который требует внимательного подхода. Каждое медицинское учреждение имеет свои особенности, что может влиять на качество предоставляемых услуг. Важно учитывать как репутацию клиники, так и квалификацию врачей, а также доступные методы лечения и реабилитации.
Углубиться в тему – наркологический стационар
Строительный журнал https://sota-servis.com.ua о ремонте, отделке и строительстве. Актуальные статьи, кейсы, лайфхаки и рекомендации специалистов. Будьте в курсе новинок и принимайте грамотные решения для своих проектов.
Строительный портал https://solution-ltd.com.ua с актуальной информацией и практическими решениями. Узнайте о новых технологиях, сравните материалы, получите советы и найдите специалистов. Сделайте ремонт или строительство проще, быстрее и выгоднее.
Онлайн журнал https://start.net.ua о строительстве, ремонте и дизайне. Разбор технологий, советы экспертов, обзоры материалов и реальные кейсы. Помогаем принимать грамотные решения и реализовывать проекты любой сложности без лишних затрат.
Суть капельницы заключается в том, чтобы быстро ввести в организм необходимые растворы, которые помогают восстановить водно-солевой баланс, очищают организм от токсинов, ускоряют обмен веществ и снижают нагрузку на внутренние органы. Врачи-наркологи используют специальные составы, которые включают в себя жидкости, электролиты, витамины и лекарственные средства для снятия симптомов похмелья.
Подробнее можно узнать тут – капельница от похмелья на дому
капельница от похмелья недорого капельница от похмелья недорого .
Вывод из запоя на дому — это формат наркологической помощи, при котором детоксикация и стабилизация состояния проводятся в привычной для пациента обстановке. Такой подход позволяет начать лечение без задержек и снизить нагрузку на организм, связанную с транспортировкой. В наркологической клинике «Частный медик 24» помощь организована круглосуточно: врач выезжает сразу после обращения и проводит терапию с учётом текущего состояния пациента.
Подробнее можно узнать тут – вывод из запоя на дому круглосуточно санкт-петербург
Сайт для женщин https://gracefullady.kyiv.ua все о моде, красоте, здоровье и отношениях. Практические советы, тренды и идеи для современной женщины.
Детоксикация на дому начинается с осмотра пациента. Доктора оценивают витальные показатели, уровень сознания и выраженность симптомов, анализируя текущие данные. После этого формируется план лечения, который реализуется сразу. Такой подход позволяет сократить время до начала терапии и повысить её эффективность.
Выяснить больше – нарколог на дом вывод из запоя
Продолжительность процедуры капельницы от похмелья зависит от степени интоксикации, общего состояния пациента и состава вводимых препаратов. В среднем инфузионная терапия занимает от 40 минут до 1,5 часов. Уже во время введения растворов многие пациенты отмечают постепенное улучшение самочувствия.
Получить больше информации – https://kapelnicza-ot-pokhmelya-samara-8.ru
Лучший сайт для женщин https://musicbit.com.ua статьи о стиле, любви, здоровье и вдохновении. Найдите идеи для жизни и развития в одном месте.
Онлайн сайт для женщин https://elegance.kyiv.ua статьи о красоте, отношениях, семье и саморазвитии. Советы, идеи и вдохновение для повседневной жизни.
Женский сайт https://fashionadvice.kyiv.ua полезная информация о здоровье, стиле, любви и карьере. Читайте актуальные статьи и находите решения для жизни.
капельница от похмелья на дому капельница от похмелья на дому .
Капельница от похмелья в Екатеринбурге с анонимным выездом врача и восстановительной терапией в наркологической клинике «Частный медик 24»
Выяснить больше – http://kapelnicza-ot-pokhmelya-ekaterinburg-8.ru
кодировка выезд на дом narkologicheskaya-pomoshh-nizhnij-novgorod-1.ru .
вывод из запоя врач на дом vyvod-iz-zapoya-na-domu-ekaterinburg-8.ru .
Похмельный синдром — это не просто неприятное ощущение, а целый комплекс симптомов, которые могут варьироваться от легкого дискомфорта до тяжелых состояний. Капельница от похмелья используется в случаях, когда симптомы становятся особенно выраженными и требуют вмешательства профессионала. Врачи отмечают, что капельница помогает значительно ускорить процесс восстановления организма после алкоголя, избавляя от боли, тошноты и слабости.
Ознакомиться с деталями – капельница от похмелья вызов на дом
Строительный журнал https://tozak.org.ua с полезными статьями и актуальными обзорами. Освещаем современные технологии, материалы и тренды в строительстве и ремонте. Практические советы, идеи и решения для создания комфортного и надежного пространства.
Сайт для женщин https://bestwoman.kyiv.ua статьи о красоте, здоровье, отношениях и стиле жизни. Полезные советы, тренды и идеи для вдохновения. Все, что нужно современной женщине, в одном месте.
капсульные дома для круглогодичного проживания капсульные дома для круглогодичного проживания .
При выборе наркологического стационара с комфортными условиями в Санкт-Петербурге важно учитывать несколько ключевых факторов, которые могут повлиять на успех лечения. Кроме высококвалифицированных специалистов и индивидуального подхода, комфортные условия для проживания играют важную роль в процессе восстановления пациента. Это создаёт оптимальные условия для того, чтобы человек мог сосредоточиться на своём здоровье и восстановлении, не отвлекаясь на неприятные или неудобные условия. В некоторых случаях может быть предложено кодирование, а также получение дополнительных данных и консультаций для более точного подхода к лечению.
Подробнее можно узнать тут – наркологический стационар
лечение алкоголизма в нижнем новгороде лечение алкоголизма в нижнем новгороде .
прогулка по воде санкт петербург прогулка по воде санкт петербург .
корабли в санкт петербурге сегодня где посмотреть piter-na-teplohode.ru .
частный нарколог на дом телефон narkolog-na-dom-moskva-11.ru .
вывод из запоя стационар санкт петербург вывод из запоя стационар санкт петербург .
Онлайн строительный https://reklama-region.com журнал для профессионалов и частных застройщиков. Полезные статьи, разборы материалов, новинки рынка и практические рекомендации. Все о строительстве, ремонте и дизайне в удобном формате.
Онлайн женский журнал https://zhenskiy.kyiv.ua статьи о красоте, здоровье, моде и любви. Советы, тренды и полезный контент для женщин любого возраста.
Актуальные новости https://ktm.org.ua Украины онлайн. Последние события, аналитика, экономика, происшествия и международные отношения. Только проверенная информация и важные обновления в режиме реального времени.
Эконом Хочешь 3д ограждение? панельный забор 3d прочные и надежные решения для защиты территории. Современные металлические конструкции с антикоррозийным покрытием, простым монтажом и долговечностью. Подходят для частных домов, предприятий и общественных объектов.
Эконом Лучшие металлические панели ограждения сетчатые идеальное сочетание прочности, эстетики и доступной цены. Подходят для дачи, участка, склада и промышленной территории. Быстрая установка, устойчивость к погодным условиям и долгий срок службы.
Эконом Лучшие ограждения 3 d панели для забора практичное и долговечное решение. Усиленные ребра жесткости обеспечивают прочность, а современное покрытие защищает от ржавчины. Идеально для дома, дачи, предприятий и общественных территорий.
Хочешь недорогой забор? производители ограждения 3d удобное решение для быстрого монтажа ограждения. Прочные сварные конструкции, устойчивость к нагрузкам и погоде, минимальный уход. Отличный вариант для частных и коммерческих территорий.
Высокопрочные ограждения панели ограждения сетчатые современный способ обеспечить безопасность участка. Долговечные материалы, надежная конструкция и эстетичный внешний вид. Подходят для установки на любых типах территорий и условий эксплуатации.
королев капсульные дома королев капсульные дома .
Купить панели для ограждения купить 3д панели для забора долговечность, прочность и аккуратный внешний вид. Быстрый монтаж, устойчивость к погодным условиям и минимальное обслуживание. Отличный выбор для дачи, участка или коммерческой территории.
Нужна соляная пещера? соляная пещера под ключ проектирование, подбор материалов, монтаж и оформление. Создаем уникальные пространства для галотерапии с продуманным дизайном и эффективной системой микроклимата.
капсульный дом на колесах капсульный дом на колесах .
выведение +из запоя +в стационаре vyvod-iz-zapoya-v-staczionare-sankt-peterburg-10.ru .
вызов нарколога на дом анонимно вызов нарколога на дом анонимно .
“вывод из запоя на халтурина – лечение алкоголизма, лечение наркомании “вывод из запоя на халтурина – лечение алкоголизма, лечение наркомании .
нарколог нижний новгород нарколог нижний новгород .
For those who appreciate clean design and premium materials, Common Projects remains one of the strongest names in minimalist luxury footwear.
Копицентр «Копирыч» https://kopirych.by профессиональный партнер для тех, кому нужна качественная печать фото в городе минск и по всей Беларуси. Мы предлагаем полный комплекс полиграфические услуги для частных клиентов и компаний: от срочной подготовки документов до изготовления рекламной продукции и персональных сувениров.
иду на неву документальный фильм progulka-po-neve.ru .
луна капсульные дома луна капсульные дома .
туры на теплоходе из спб туры на теплоходе из спб .
Качественные масла и смазки литиевые смазки краснодар подбор продукции для авто, спецтехники и промышленного оборудования. Обеспечьте надежную работу механизмов и защиту от износа при любых условиях эксплуатации.
Follower growth compounds when you combine strategies; buy instagram views and likes alongside follower boosts for comprehensive social proof.
Нужен грузовик? дилер коммерческих автомобилей компания «НЕО ТРАК» — это современный дилерский центр полного цикла, работающий на рынке коммерческого транспорта и спецтехники уже более 20 лет. Являясь официальным дилером ведущих производителей, таких как DONGFENG, JAC, FAW, DAEWOO TRUCKS, ISUZU, HYUNDAI и других, компания предлагает широкий выбор грузовых автомобилей различной тоннажности, спецтехники, от фургонов и бортовых платформ до эвакуаторов и крано-манипуляторных установок.
Лучшие профессии обучение дистанционно слесарь кип москва возможность получить практические знания и освоить востребованные специальности в короткие сроки. Обучение подходит для тех, кто хочет начать карьеру или сменить сферу деятельности. Все материалы доступны онлайн и сопровождаются поддержкой преподавателей.
капельница от запоя в стационаре капельница от запоя в стационаре .
нарколог на дом анонимно нарколог на дом анонимно .
Решил купить авто? машины из кореи подбор, проверка, доставка и оформление под ключ. Найдем надежный автомобиль по вашим параметрам и бюджету с гарантией прозрачности сделки.
Лучшие ограждения забор 3д панели практичное и долговечное решение. Усиленные ребра жесткости обеспечивают прочность, а современное покрытие защищает от ржавчины. Идеально для дома, дачи, предприятий и общественных территорий.
Капельница от похмелья нужна не только в случаях тяжёлой интоксикации, но и при более лёгких симптомах, когда пациент ощущает себя уставшим и измотанным, но не может справиться с проблемами самостоятельно. Некоторые из симптомов, при которых капельница может быть особенно полезна, включают:
Подробнее тут – капельница от похмелья анонимно екатеринбург
мелбет акции мелбет акции .
вывести из запоя на дому нижний новгород narkologicheskaya-pomoshh-nizhnij-novgorod-2.ru .
капельница от алкоголя стационар капельница от алкоголя стационар .
экскурсия по рекам и каналам экскурсия по рекам и каналам .
В Нижнем Новгороде услуга выезда нарколога чаще всего используется при состояниях, когда пациент физически не может посетить клинику или требуется срочное медицинское вмешательство. Врач приезжает с необходимыми препаратами и оборудованием, проводит осмотр и сразу приступает к лечению. Такой формат особенно важен при выраженной интоксикации и нестабильном состоянии.
Разобраться лучше – narkolog-na-dom-nizhnij-novgorod.ru/
Капельница от похмелья — это эффективный способ экстренной помощи, предназначенный для того, чтобы помочь организму быстро восстановиться после злоупотребления алкоголем. В наркологической клинике «Частный медик 24» в Самаре мы предоставляем услугу безопасной детоксикации и восстановления 24/7. Капельница помогает организму вывести токсины, восстановить водно-электролитный баланс и улучшить общее состояние пациента, не создавая дополнительных нагрузок на сердце, печень и почки.
Подробнее тут – капельница от похмелья вызов на дом в самаре
Капельница от похмелья в Екатеринбурге с выездом специалиста, подбором терапии и восстановлением состояния в наркологической клинике «Частный медик 24»
Подробнее – капельница от похмелья на дому
Hey I know this is off topic but I was wondering if you knew of any widgets I could add to my blog that automatically tweet my newest twitter updates.
I’ve been looking for a plug-in like this for quite some time and was
hoping maybe you would have some experience with something like
this. Please let me know if you run into anything.
I truly enjoy reading your blog and I look forward to your new updates.
вывод из запоя на дому вывод из запоя на дому .
Выезд нарколога начинается с осмотра пациента. Доктора измеряют давление, пульс, оценивают уровень сознания и выраженность симптомов. На основании этих данных формируется план лечения, который реализуется сразу на месте. Такой подход позволяет быстро перейти к стабилизации состояния без лишних этапов.
Детальнее – вывод из запоя на дому анонимно санкт-петербург
Существует ряд ситуаций, при которых вызов специалиста на дом является обоснованным решением:
Изучить вопрос глубже – нарколог на дом нижний новгород
При первой консультации нарколог осматривает пациента, чтобы оценить его состояние и подобрать оптимальную схему лечения. В зависимости от тяжести похмелья, врач может назначить инфузию с регидратационными растворами, витаминами группы B и другими препаратами, которые способствуют восстановлению. Важно, что капельница не только помогает снять симптомы, но и устраняет причины токсического воздействия алкоголя на организм, предотвращая развитие осложнений.
Разобраться лучше – капельница от похмелья вызов на дом
Вывод из запоя на дому в Санкт-Петербурге с выездом нарколога, детоксикацией и восстановлением состояния в наркологической клинике «Частный медик 24»
Выяснить больше – вывод из запоя на дому цена в санкт-петербурге
водоход спб водоход спб .
Обращение в наркологический стационар особенно важно в случае тяжелой зависимости, когда человек не способен контролировать свои действия, а угрозы для здоровья возрастают. В таких случаях важно не откладывать начало лечения, а обратиться за помощью сразу же, чтобы избежать серьезных последствий для организма. При выборе стационара следует обратить внимание на наличие лицензии, а также возможность получения психотерапии и других профессиональных услуг в области наркологии для комплексного лечения зависимости.
Углубиться в тему – частный наркологический стационар в санкт-петербурге
алкоголизм вызов на дом алкоголизм вызов на дом .
The comprehensive narrative available at https://npprteam.shop/en/articles/discord/the-story-of-discord-in-simple-terms-how-did-a-whole-world-of-communities-grow-out-of-a-chat-for-games/ illuminates how Discord’s founding principles and technical decisions transformed the platform from a niche gaming utility into a global infrastructure for community building across virtually every vertical and demographic. The story reveals critical inflection points where product features aligned with emerging community needs, enabling Discord to capture markets that traditional social media platforms overlooked or underserved. Understanding this progression equips aspiring community builders, entrepreneurs, and platform strategists with a case study in how solving a specific user pain point can unlock a massive addressable market. The article’s examination of Discord’s growth trajectory, monetization approach, and competitive advantages provides valuable lessons for anyone building community-driven products or managing large-scale member networks.
Процедура проводится опытными наркологами, которые подбирают необходимое лечение на основе индивидуальных особенностей пациента. В клинике «Частный медик 24» применяются только эффективные и безопасные препараты, которые помогают организму восстановиться и избавиться от токсинов. Важно помнить, что капельница от похмелья — это не просто временное облегчение, а важный шаг к долгосрочному восстановлению организма и профилактике алкоголизма.
Выяснить больше – капельница от похмелья анонимно екатеринбург
вытрезвитель нижний новгород narkologicheskaya-pomoshh-nizhnij-novgorod-2.ru .
контора мелбет контора мелбет .
покататься на кораблике в санкт петербурге покататься на кораблике в санкт петербурге .
Существует ряд ситуаций, при которых вызов специалиста на дом является обоснованным решением:
Подробнее – вызов нарколога на дом в нижнем новгороде
Вывод из запоя в стационаре — это формат медицинской помощи, при котором пациент находится под круглосуточным наблюдением и получает лечение в контролируемых условиях. Такой подход применяется в ситуациях, когда состояние нестабильно или есть риски осложнений. В наркологической клинике «Частный медик 24» в Нижнем Новгороде стационарная помощь выстраивается по принципу поэтапной стабилизации: от первичного осмотра и оценки рисков до достижения устойчивых показателей и перехода к восстановлению.
Подробнее тут – нарколог на дом вывод из запоя
В Самаре клиника «Частный медик 24» предоставляет круглосуточную помощь по выведению из запоя и снятию симптомов похмелья. Когда человек сталкивается с тяжёлым состоянием после длительного употребления алкоголя, важно вовремя оказать помощь. Врач приедет на дом и проведёт все необходимые процедуры, включая капельницу, которая поможет восстановить водно-электролитный баланс, нормализовать уровень сахара в крови и вывести токсины из организма.
Ознакомиться с деталями – капельница от похмелья цена
Вывод из запоя на дому в Санкт-Петербурге с подбором терапии, наблюдением врача и комфортным лечением в наркологической клинике «Частный медик 24»
Получить дополнительную информацию – анонимный вывод из запоя на дому санкт-петербург
Лечение в наркологическом стационаре в Санкт-Петербурге включает в себя комплекс мероприятий, направленных на восстановление физического и психического состояния пациента. Важно понимать, что лечение зависимости — это многогранный процесс, включающий не только медицинские процедуры, но и длительную реабилитацию, которая помогает человеку вернуться к нормальной жизни. В стационаре пациенты получают круглосуточное наблюдение, что значительно увеличивает шансы на успешное лечение и предотвращение рецидивов.
Подробнее тут – http://narkologicheskij-staczionar-sankt-peterburg-1.ru/
В Санкт-Петербурге вывод из запоя на дому используется в ситуациях, когда состояние пациента требует медицинской помощи, но позволяет обойтись без лечения в стационаре. Врач проводит консультацию, оценивает длительность запоя, выраженность симптомов и общее состояние, анализируя данные пациента, после чего принимает решение о тактике лечения при алкоголизме. При необходимости можно оформить вызов специалиста или заказать услугу заранее.
Исследовать вопрос подробнее – анонимный вывод из запоя на дому в санкт-петербурге
выведение из запоя в наркологическом стационаре выведение из запоя в наркологическом стационаре .
К стационарному формату чаще всего прибегают в следующих случаях:
Подробнее можно узнать тут – вывод из запоя на дому цена
Нарколог на дом в Воронеже с быстрым выездом, индивидуальным подбором терапии и наблюдением в наркологической клинике «Частный медик 24»
Подробнее – врач нарколог на дом
Капельница, как правило, включает в себя не только детоксикацию, но и дополнительные компоненты, такие как витамины, антидепрессанты или препараты для стабилизации сердечного ритма, что делает лечение более комплексным и эффективным.
Углубиться в тему – капельницы от запоя вызов город
Такие состояния позволяют проводить лечение на дому с контролем динамики. При выявлении рисков врач может изменить тактику и рекомендовать стационар или другие методы лечения зависимости.
Подробнее тут – https://vyvod-iz-zapoya-na-domu-sankt-peterburg-8.ru
В Санкт-Петербурге услуга вывода из запоя на дому применяется в ситуациях, когда требуется медицинская помощь, но нет показаний к стационарному лечению. Врач проводит консультацию, оценивает состояние пациента, длительность употребления и выраженность симптомов, после чего принимает решение о тактике лечения при алкоголизме. Важно, что терапия начинается сразу после осмотра, а при необходимости можно заранее заказать выезд специалистов.
Подробнее можно узнать тут – нарколог на дом вывод из запоя
Чаще всего домашний формат применяется при следующих состояниях:
Подробнее – вывод из запоя на дому
Наши врачи приезжают в удобное для пациента время и проводят полный осмотр. В зависимости от состояния пациента, они подбирают необходимое лечение: капельницы для снятия токсинов, медикаментозные препараты для стабилизации состояния, а также дают рекомендации по дальнейшему восстановлению. Важно, что лечение на дому позволяет избежать медицинской огласки и лишнего стресса, а также гарантирует полную конфиденциальность.
Выяснить больше – вызвать нарколога на дом самара
Капельница помогает организму быстрее справиться с этими симптомами и восстановить нормальное функционирование, а также значительно снижает время, необходимое для полного выздоровления. Даже при значительном похмелье, как показывает практика, пациент уже через несколько часов чувствует значительное улучшение. Важно учитывать противопоказания к проведению процедуры, однако все услуги могут быть предоставлены анонимно. При необходимости подключается психиатр для более комплексной оценки состояния пациента.
Разобраться лучше – капельница от похмелья на дом
Капельница от похмелья в Самаре: быстрое восстановление, снятие интоксикации и улучшение самочувствия под контролем специалистов в наркологической клинике «Похмельная служба»
Ознакомиться с деталями – капельница от похмелья цена
Игнорирование выраженных симптомов может привести к развитию таких опасных состояний, как алкогольный делирий, острые психозы, инфаркт или инсульт. Вызов нарколога на дом круглосуточно позволяет оперативно стабилизировать состояние пациента в привычной для него обстановке, минимизируя стресс и риски, связанные с транспортировкой в стационар. Анонимный формат обращения обеспечивает конфиденциальность и делает помощь доступной даже для тех, кто опасается огласки.
Подробнее тут – нарколог на дом вывод в самаре
Understanding TikTok Ads subscription funnel optimization for 2026 unlocks a proven framework for converting casual viewers into recurring revenue customers. Subscription businesses face unique challenges compared to one-time product sellers: they must attract users willing to commit long-term, establish trust quickly, and demonstrate ongoing value within seconds. This resource walks through the complete funnel architecture, from awareness creatives that address subscription hesitation to retention messaging that encourages upgrade tiers and longer commitments. The platform’s algorithm excels at identifying audiences predisposed to subscription models, particularly younger demographics already accustomed to recurring entertainment and software purchases. By mapping each funnel stage to specific creative types and bidding strategies, teams can reduce churn-driven acquisition costs and improve lifetime value metrics significantly.
Есть состояния, при которых откладывать обращение не стоит. Ниже перечислены признаки, при которых вызывать врача на дом разумно именно в ближайшее время, а не после очередной неудачной попытки «перележать» тяжёлый период самостоятельно.
Подробнее тут – http://www.domen.ru
нарколог запой нарколог запой .
Запой — это состояние, которое развивается на фоне длительного употребления алкоголя, сопровождающееся острыми симптомами интоксикации. Капельница от запоя может быть необходима, когда состояние пациента требует немедленного вмешательства. Важно своевременно заметить признаки, указывающие на необходимость медицинской помощи, таких как признаки алкоголизма, и в случае необходимости — кодирование или вывод из запоя для более комплексного лечения.
Получить дополнительную информацию – капельница от запоя цена в нижнем новгороде
Вывод из запоя в стационаре в Нижнем Новгороде с круглосуточным наблюдением и поэтапным восстановлением в наркологической клинике «Частный медик 24»
Получить дополнительные сведения – http://vyvod-iz-zapoya-v-staczionare-nizhnij-novgorod-1.ru/
Такие симптомы требуют медицинского вмешательства, поскольку могут усиливаться без лечения. Капельница позволяет стабилизировать состояние и ускорить восстановление. Услуги могут предоставляться анонимно, а при необходимости пациент направляется на лечение в стационаре.
Подробнее можно узнать тут – капельница от похмелья
Этот процесс не занимает много времени — обычно процедура длится от 30 до 60 минут. Важно, что врач контролирует все этапы, обеспечивая безопасность пациента и корректируя терапию по мере необходимости. Такой подход позволяет быстро и эффективно облегчить симптомы похмелья и вернуться к нормальной жизнедеятельности.
Выяснить больше – капельница от похмелья самара
Обращение в наркологический стационар особенно важно в случае тяжелой зависимости, когда человек не способен контролировать свои действия, а угрозы для здоровья возрастают. В таких случаях важно не откладывать начало лечения, а обратиться за помощью сразу же, чтобы избежать серьезных последствий для организма. При выборе стационара следует обратить внимание на наличие лицензии, а также возможность получения психотерапии и других профессиональных услуг в области наркологии для комплексного лечения зависимости.
Узнать больше – http://narkologicheskij-staczionar-sankt-peterburg-1.ru
· отопления: классического с радиаторами или теплого пола; · водоснабжения: горячего, холодного; · вентиляции, климатических систем; · мелиорации, полива, орошения в садоводстве, фермерском или сельском хозяйстве; · производственных, технологических линий на, химических, других предприятиях;
Трубы и фитинги PPR: преимущества https://deneb-spb.ru/contacts
Класс эксплуатации https://deneb-spb.ru/krany-latunnye-rezbovye
однослойными; трехслойными https://deneb-spb.ru/mufty-i-perekhodniki
Максимальное давление 16 кгс/см 2 или 1,6 МПа, температура до 60°C https://deneb-spb.ru/ankery
Применяются также для систем с холодной водой https://deneb-spb.ru/filtry-i-obratnye-klapany
Возможно использование в многоэтажных домах https://deneb-spb.ru/ugolniki
– низкая шероховатость (0,006 мм) препятствует образованию отложений;
мелбет букмекерская контора официальный сайт мелбет букмекерская контора официальный сайт .
Капельница от похмелья — это внутривенное введение специально подобранных растворов, которые помогают ускорить выведение токсинов, восстановить водно-электролитный баланс и нормализовать обмен веществ. В состав капельницы могут входить различные компоненты, такие как солевые растворы, витамины, глюкоза и препараты для детоксикации. Она особенно эффективна при последствиях запоя и хронического алкоголизма.
Получить больше информации – http://kapelnicza-ot-pokhmelya-nizhnij-novgorod.ru
прогулка по неве в питере прогулка по неве в питере .
Анонимное лечение на дому ценно ещё и тем, что снижает внутреннее сопротивление самого пациента. Для многих людей первый контакт с врачом происходит именно дома, без дороги, без ожидания, без страха чужих взглядов. Такой формат помогает начать разговор не только о снятии острых симптомов, но и о более широких вопросах: что делать после выхода из запоя, когда требуется кодирование, в каких случаях нужна реабилитация, а когда первичная наркологическая помощь уже должна переходить в полноценный лечебный маршрут. Врач может помочь и в ситуациях, связанных не только с алкоголем, но и с наркомании, если семье нужно понять, что происходит с зависимым человеком и какой следующий шаг будет для него безопасным.
Разобраться лучше – narkolog-na-dom-voronezh-1.ru/
Процесс капельницы включает внутривенное введение различных растворов, которые помогают нейтрализовать эффекты алкогольной интоксикации, включая последствия запоя и алкоголизма. Наиболее часто в составе капельницы используются солевые и глюкозные растворы, витамины группы B, а также препараты для детоксикации организма. Эти компоненты помогают быстро восстановить водно-электролитный баланс, улучшить обмен веществ и ускорить выведение продуктов распада алкоголя.
Подробнее – капельница от похмелья анонимно в самаре
На первом этапе специалист проводит визуальный осмотр пациента, измеряет артериальное давление, пульс, уровень кислорода в крови и оценивает общее психоэмоциональное состояние. Важно выявить степень интоксикации, наличие осложнений и противопоказаний к проведению терапии на дому. В случае наркомании и длительного употребления наркотиков, пациенту может быть предложена консультация и лечение, включая реабилитацию на летний период, если состояние требует интенсивного контроля.
Ознакомиться с деталями – нарколог на дом
Наркологический стационар с комфортными условиями в Санкт-Петербурге — это специализированное учреждение, которое не только помогает пациентам избавиться от зависимости, но и создает благоприятные условия для выздоровления. В таких стационарах важны не только высококачественные медицинские услуги, но и уютная атмосфера, которая способствует восстановлению физического и психоэмоционального состояния пациента.
Углубиться в тему – http://narkologicheskij-staczionar-sankt-peterburg-4.ru
лечение от запоя в стационаре лечение от запоя в стационаре .
Вывод из запоя на дому в Санкт-Петербурге с подбором терапии, наблюдением врача и комфортным лечением в наркологической клинике «Частный медик 24»
Получить дополнительные сведения – вывод из запоя на дому круглосуточно санкт-петербург
мел бет мел бет .
Капельница от похмелья — это медицинская процедура, направленная на устранение последствий алкогольной интоксикации и восстановление работы организма. В отличие от домашних методов, инфузионная терапия позволяет воздействовать на причину состояния, а не только на его проявления. В наркологической клинике «Похмельная служба» капельная терапия проводится с выездом специалиста на дом, что позволяет начать лечение без задержек и в комфортных условиях.
Исследовать вопрос подробнее – kapelnicza-ot-pokhmelya-voronezh-5.ru/
В Санкт-Петербурге вывод из запоя на дому используется в ситуациях, когда состояние пациента требует медицинской помощи, но позволяет обойтись без лечения в стационаре. Врач проводит консультацию, оценивает длительность запоя, выраженность симптомов и общее состояние, анализируя данные пациента, после чего принимает решение о тактике лечения при алкоголизме. При необходимости можно оформить вызов специалиста или заказать услугу заранее.
Детальнее – нарколог на дом вывод из запоя санкт-петербург
Когда симптомы становятся настолько выраженными, что они мешают нормальному функционированию, капельница становится необходимостью. Она помогает избавиться от дискомфорта и значительно ускоряет процесс восстановления, давая организму все необходимые вещества для нормализации его работы, при этом может проводиться наркологическая детоксикация. Контроль врача на протяжении всей процедуры гарантирует, что капельница будет введена правильно и безопасно, с учетом всех показателей пациента, а при необходимости можно заказать дальнейшую реабилитацию и кодирование.
Изучить вопрос глубже – kapelnicza-ot-pokhmelya-samara-13.ru/
мел бет букмекерская мел бет букмекерская .
melbet app download iphone gbufavorit.ru .
бк мелбет официальный сайт бк мелбет официальный сайт .
vavada казино онлайн казахстан вход vavada казино онлайн казахстан вход .
мелбет казино вход мелбет казино вход .
Стоимость капельницы от похмелья в Самаре зависит не только от прайса клиники, но и от состава инфузионной терапии, срочности выезда, времени суток и общего состояния пациента, включая возможные последствия алкоголизма. Базовые программы обычно включают осмотр специалиста, постановку капельницы и стандартный набор растворов для снятия интоксикации. Если состояние тяжелее, может потребоваться кодирование или лечение в стационаре, что увеличивает цену из-за расширенного состава препаратов и более длительного наблюдения.
Углубиться в тему – капельница от похмелья анонимно в самаре
Капельница от запоя в Нижнем Новгороде: снятие интоксикации, восстановление организма и помощь при запое под контролем специалистов в наркологической клинике «Похмельная служба»
Подробнее тут – http://kapelnica-ot-zapoya-nizhnij-novgorod-4.ru/
Нужна градирня? https://gradirni.mystrikingly.com ключевой элемент системы охлаждения, позволяющий эффективно снижать температуру воды за счет теплообмена с воздухом. Применяется в промышленности, энергетике и на предприятиях. Обеспечивает стабильную и экономичную работу оборудования.
Нужна септик или погреб? https://septikidlyadoma.mystrikingly.com эффективное решение для автономной канализации. Системы обеспечивают качественную очистку сточных вод, устраняют запахи и безопасны для окружающей среды. Подходят для частных домов, коттеджей и загородных участков.
При выезде нарколога на дом в Самаре мы проводим диагностику состояния пациента, чтобы понять, какие препараты и процедуры необходимы для стабилизации. Это может включать регидратацию, витамины группы B, антиеметики и другие препараты для снятия симптомов похмелья. Все препараты подбираются индивидуально в зависимости от состояния пациента и его нужд. Это позволяет значительно сократить время на восстановление и быстро вернуться к нормальному состоянию.
Изучить вопрос глубже – капельница от похмелья на дому в самаре
Детоксикация на дому начинается с осмотра пациента. Доктора оценивают витальные показатели, уровень сознания и выраженность симптомов, анализируя текущие данные. После этого формируется план лечения, который реализуется сразу. Такой подход позволяет сократить время до начала терапии и повысить её эффективность.
Узнать больше – анонимный вывод из запоя на дому
вывод из запоя в стационаре вывод из запоя в стационаре .
Капельница от похмелья в Самаре с выездом на дом, восстановлением водного баланса и медицинской помощью в наркологической клинике «Частный медик 24»
Получить дополнительные сведения – капельница от похмелья на дому
Капельница от похмелья — это эффективное средство для быстрого снятия симптомов алкогольной интоксикации и восстановления организма после злоупотребления алкоголем. В наркологической клинике «Частный медик 24» в Екатеринбурге мы предоставляем услуги по экстренной помощи и детоксикации на дому, включая установку капельниц, которые позволяют улучшить состояние пациента за короткое время. Процедура включает в себя введение специальных растворов, которые восстанавливают водно-электролитный баланс, выводят токсины и устраняют основные симптомы похмелья, такие как головная боль, слабость, тошнота и головокружение.
Подробнее можно узнать тут – капельница от похмелья анонимно в екатеринбурге
официальный сайт мелбет официальный сайт мелбет .
Капельница от похмелья в Самаре: быстрое восстановление, снятие интоксикации и улучшение самочувствия под контролем специалистов в наркологической клинике «Похмельная служба»
Ознакомиться с деталями – http://kapelnicza-ot-pokhmelya-samara-6.ru
выведение из запоя в стационаре спб выведение из запоя в стационаре спб .
Процесс лечения начинается с консультации врача, который оценивает состояние пациента, его анамнез и определяет, какие процедуры и препараты нужно использовать. В большинстве случаев капельница включает в себя регидратацию, витамины группы B, антиеметики, препараты для улучшения работы печени и почек. Важно, что капельница не только помогает организму вывести токсины, но и восстанавливает нормальную работу всех систем организма, обеспечивая быстрое улучшение самочувствия.
Выяснить больше – http://kapelnicza-ot-pokhmelya-samara.ru/
Капельница от похмелья — это внутривенное введение специально подобранных растворов, которые помогают ускорить выведение токсинов, восстановить водно-электролитный баланс и нормализовать обмен веществ. В состав капельницы могут входить различные компоненты, такие как солевые растворы, витамины, глюкоза и препараты для детоксикации. Она особенно эффективна при последствиях запоя и хронического алкоголизма.
Разобраться лучше – kapelnicza-ot-pokhmelya-nizhnij-novgorod.ru/
Игнорирование выраженных симптомов может привести к развитию таких опасных состояний, как алкогольный делирий, острые психозы, инфаркт или инсульт. Вызов нарколога на дом круглосуточно позволяет оперативно стабилизировать состояние пациента в привычной для него обстановке, минимизируя стресс и риски, связанные с транспортировкой в стационар. Анонимный формат обращения обеспечивает конфиденциальность и делает помощь доступной даже для тех, кто опасается огласки.
Получить дополнительную информацию – нарколог на дом анонимно
Для жителей Екатеринбурга наркологическая клиника «Частный медик 24» предлагает платную услугу выезда врача на дом для проведения капельницы от похмелья. Когда человек переживает сильные симптомы похмелья, такие как головная боль, тошнота, слабость, важно не тянуть с лечением и начать восстановление как можно скорее. Капельница от похмелья помогает хорошо облегчить самочувствие пациента, снять головную боль и улучшить общее состояние, восстановив водно-электролитный баланс в организме.
Узнать больше – капельница от похмелья в екатеринбурге
Выезд специалиста начинается с оценки состояния пациента. Врач измеряет давление, пульс, оценивает общее самочувствие и выраженность симптомов. На основании этих данных формируется план лечения и подбирается состав капельницы. Такой подход позволяет учитывать индивидуальные особенности пациента и эффективно провести вывод из запоя.
Углубиться в тему – капельница от похмелья на дому
Капельница от похмелья в Воронеже с индивидуальной инфузионной терапией и врачебным контролем в наркологической клинике «Похмельная служба»
Получить дополнительные сведения – капельница от похмелья
букмекерская компания мелбет букмекерская компания мелбет .
Показания к проведению инфузионной терапии включают:
Узнать больше – капельница от похмелья на дом
мелбет регистрация официальный сайт мелбет регистрация официальный сайт .
Этот процесс не занимает много времени — обычно процедура длится от 30 до 60 минут. Важно, что врач контролирует все этапы, обеспечивая безопасность пациента и корректируя терапию по мере необходимости. Такой подход позволяет быстро и эффективно облегчить симптомы похмелья и вернуться к нормальной жизнедеятельности.
Подробнее – http://kapelnicza-ot-pokhmelya-samara-13.ru/
melbet apk iphone melbet apk iphone .
мелбет онлайн мелбет онлайн .
Суть капельницы заключается в том, чтобы быстро ввести в организм необходимые растворы, которые помогают восстановить водно-солевой баланс, очищают организм от токсинов, ускоряют обмен веществ и снижают нагрузку на внутренние органы. Врачи-наркологи используют специальные составы, которые включают в себя жидкости, электролиты, витамины и лекарственные средства для снятия симптомов похмелья.
Ознакомиться с деталями – капельница от похмелья цена нижний новгород
скачат мелбет скачат мелбет .
вавада казино вавада казино .
Нужен был телефон срочно, и этот магазин действительно выручил. Заказ обработали оперативно, быстро отправили и держали в курсе по статусу. Смартфон пришёл в идеальном состоянии, без каких либо вопросов. Отличная скорость и нормальный сервис, заказать телефон с доставкой
Капельница действует быстро благодаря тому, что активные вещества вводятся непосредственно в кровь, минуя желудочно-кишечный тракт. Это позволяет быстро уменьшить симптомы, такие как головная боль, тошнота, слабость, а также нормализовать работу печени и почек, которые страдают от длительного употребления алкоголя. В некоторых случаях, если требуется длительное наблюдение, пациент может быть направлен в стационар, и лечение может продолжаться на летний период с более тщательным контролем состояния.
Получить больше информации – капельница от запоя на дому нижний новгород
Наркологический стационар — это специализированное медицинское учреждение, предназначенное для лечения и реабилитации пациентов с зависимостью от алкоголя, наркотиков и других психоактивных веществ. В Санкт-Петербурге существует множество таких учреждений, которые предоставляют комплексную помощь людям, страдающим от зависимости. Лечение в стационаре часто является первым шагом на пути к выздоровлению, особенно в случаях тяжелых зависимостей, когда амбулаторное лечение может не дать должного эффекта. В случае запоя или хронического алкоголизма стационарное лечение может стать необходимым, особенно если выезд на дом не позволяет должным образом контролировать процесс восстановления.
Узнать больше – наркологическая клиника стационар в санкт-петербурге
https://starcasino-au.com/
geo оптимизация сайта https://geo-optimizaciya-sajta.ru .
мелбет официальный сайт мелбет официальный сайт .
https://starcasino-au.com/
https://melbetslot.ru https://melbetslot.ru .
услуги нарколога на дом услуги нарколога на дом .
кодировка от алкоголя в нижнем новгороде кодировка от алкоголя в нижнем новгороде .
melbet apps download melbet apps download .
мелбет онлайн мелбет онлайн .
вавада казино онлайн рабочее зеркало вавада казино онлайн рабочее зеркало .
Основные показания для проведения процедуры:
Детальнее – http://kapelnicza-ot-pokhmelya-voronezh-4.ru/
В некоторых случаях капельница может быть использована не только для снятия симптомов похмелья, но и для восстановления организма после длительного запоя или при хроническом алкоголизме, когда организм особенно ослаблен. В таких случаях лечение должно проводиться под контролем квалифицированных специалистов, чтобы избежать осложнений и ускорить восстановление.
Получить дополнительную информацию – капельница от похмелья цена в самаре
Остались только положительные впечатления от покупки. Магазин быстро обработал заказ, а менеджер вежливо ответил на все вопросы. Телефон пришёл в отличном состоянии, без задержек и сюрпризов. Хороший сервис, к которому хочется вернуться: arzon telefon
https://mhp.ooo/products/oxpla-100mg
vavada казино сайт vavada казино сайт .
melbet russia melbet russia .
melbet ru официальный сайт melbet ru официальный сайт .
Китайским археологам удалось обнаружить крупнейший рудник по добыче бирюзы на территории Синьцзян-Уйгурского автономного района, что на северо-западе Китая https://www.legnostyle.ru/catalog/lestnici/lestnica-l1-24.html
Ознакомьтесь с каталогом элитных кухонь, фото которых соответствуют реальности https://www.legnostyle.ru/catalog/mejkomnatnie-dveri/vhodnie-dveri/vhodnaya-dver-e2.html
Если у Вас есть вопросы, свяжитесь с нами по телефонам, указанным на сайте, или напишите на электронную почту https://www.legnostyle.ru/mebel-barokko.html
Наши специалисты рады помочь Вам с покупкой элитных кухонь https://www.legnostyle.ru/derevyannye-stupeni-dlya-lestnic.html
Некоторые из популярных моделей имеются в выставочном зале мебельного салона в Москве, что позволит приобрести необходимые элементы интерьера в кратчайшие сроки – всего за 1-2 дня https://www.legnostyle.ru/catalog/kuhni/kuhna-15.html
Итальянская мебель под заказ поставляется в срок от 1 месяца https://www.legnostyle.ru/catalog/mejkomnatnie-dveri/vhodnie-dveri/vhodnaa-dver-e1.html
При изготовлении мебели мы используем только качественные и натуральные материалы, такие как: ценные породы древесины, искусственный и натуральный камень, сертифицированные ДСП и МДФ https://www.legnostyle.ru/catalog/lestnici/na-vtoroy-etazh/lestnica-l4-5.html
Необычность и узнаваемость стиля достигается за счет уникального соединения гибкости и особенного принципа работы с новыми материалами и ценными породами дерева https://www.legnostyle.ru/otzyvy/
Подход к дизайну строится на объединении мастерства, стиля, постоянных исследований и креативности https://www.legnostyle.ru/catalog/inter-eri/stenovie-paneli/stenovie-paneli-model-s7.html
Такой вид отделки мебели существует очень давно, наши предки использовали кожу в разных целях и для оббивки мебели тоже https://www.legnostyle.ru/catalog/mebel/derevyannye-stoly/stol-model-s-12.html
На сегодняшний день это больше чем просто элемент декора https://www.legnostyle.ru/catalog/inter-eri/a-1.html
Это, в каком-то роде, особая философия, способная даже перерасти в будущем в отдельное стилевое решение https://www.legnostyle.ru/catalog/mejkomnatnie-dveri/nestandarnye/model-i14.html
капельница на дому анонимно капельница на дому анонимно .
? Колпачный пер., д https://maze.tattoo/catalog/b/beskonechnii-uzel/
6, стр https://maze.tattoo/catalog/r/rok-muzyka/
4 https://maze.tattoo/catalog/p/pechat-velesa/
Реклама на сайте Контакты Мобильная версия Пользовательское соглашение API Email редакции Отзывы и предложения https://maze.tattoo/catalog/p/pero/
? ул https://maze.tattoo/catalog/ya/yakor/
Сущёвская, д https://maze.tattoo/catalog/t/
25, стр https://maze.tattoo/catalog/t/tradik/
1 https://maze.tattoo/catalog/sha/schuka/
Интересные события в городе https://maze.tattoo/catalog/o/
Tattoo Times 18+
Фильм, фильм, фильм: рецензия на сериал «Киностудия»
https://mhp.ooo/catalog/lenvatinib
1xbet yeni giri? adresi hhnbigger.com .
скачать мелбет слоты melbetslot.ru .
психиатр нарколог нижний новгород психиатр нарколог нижний новгород .
Вывод из запоя в стационаре в Нижнем Новгороде с детоксикацией, мониторингом состояния и медицинской помощью в наркологической клинике «Частный медик 24»
Узнать больше – вывод из запоя капельница на дому
К стационарному формату чаще всего прибегают в следующих случаях:
Подробнее – срочный вывод из запоя
Заказал смартфон через сайт и весь процесс оказался очень удобным. Никакой путаницы, всё прозрачно и понятно. Менеджер проконсультировал по характеристикам и помог с выбором. Доставка пришла вовремя, покупкой остался доволен: телефоны на
Капельница от похмелья в Екатеринбурге с медицинским контролем и поддержкой организма в наркологической клинике «Частный медик 24»
Получить дополнительные сведения – капельница от похмелья вызов на дом
вавада казино войти вавада казино войти .
мелбет казино скачать на айфон мелбет казино скачать на айфон .
казино онлайн вавада играть онлайн регистрация казино онлайн вавада играть онлайн регистрация .
Выезд нарколога на дом в Самаре организован так, чтобы пациент получил помощь без ожидания и без лишней нагрузки на организм. После обращения специалист приезжает по указанному адресу, проводит первичный осмотр, оценивает общее состояние, уровень интоксикации, показатели давления, пульса, дыхания и собирает краткий анамнез. На основании этой оценки врач определяет, можно ли безопасно оказывать помощь на дому, и подбирает подходящую схему лечения, включая возможное кодирование или вывод из алкоголизма. Такой формат позволяет начать медицинские мероприятия сразу после осмотра и быстро перейти к стабилизации состояния.
Углубиться в тему – вызов нарколога на дом самара
https://mhp.ooo/catalog/erlotinib
услуги врача нарколога на дому услуги врача нарколога на дому .
melbet russia melbet russia .
мэлбэт мэлбэт .
клиника лечения зависимостей клиника лечения зависимостей .
https://starcasino-au.com/
1xbet g?ncel giri? 1xbet g?ncel giri? .
1xbet t?rkiye 1xbet t?rkiye .
1xbet yeni giri? adresi 1xbet yeni giri? adresi .
1xbet 1xbet .
1xbet 1xbet .
vavada казино официальный сайт вход vavada казино официальный сайт вход .
вывод из запоя доктор на дом вывод из запоя доктор на дом .
фриспины идеальны для высоких коэффициентов для новичков и опытных игроков, play fortuna сайт официальный
darknet market list https://darknetmarketstore.com/
кадирование кадирование .
1xbet 1xbet .
Играй и наслаждайся процессом: плей фортуна рабочее зеркало
1xbet giri? linki 1xbet giri? linki .
vavada com онлайн казино vavada com онлайн казино .
1xbet t?rkiye 1xbet t?rkiye .
1xbet 1xbet .
1xbet giri? yapam?yorum hhnbigger.com .
xbet giri?i xbet giri?i .
torzon market darknet https://darknetmarketstore.com/
Laravel обеспечивает быструю и безопасную разработку благодаря модульной архитектуре, защите от уязвимостей и удобному ORM. Фреймворк легко масштабируется, поддерживает очереди, кеширование и REST API. В связке с React создаёт современные SPA. Чистый код и экосистема ускоряют релиз и упрощают поддержку: https://domenanet.xyz/
xbet xbet .
Laravel обеспечивает быструю и безопасную разработку благодаря модульной архитектуре, защите от уязвимостей и удобному ORM. Фреймворк легко масштабируется, поддерживает очереди, кеширование и REST API. В связке с React создаёт современные SPA. Чистый код и экосистема ускоряют релиз и упрощают поддержку – https://domenanet.xyz/
1xbet giri? yapam?yorum 1xbet giri? yapam?yorum .
xbet giri?i xbet giri?i .
xbet giri? xbet giri? .
1xbet spor bahislerinin adresi 1xbet spor bahislerinin adresi .
xbet xbet .
1xbet t?rkiye giri? hhnbigger.com .
1xbet g?ncel giri? 1xbet g?ncel giri? .
В Воронеже услуга «нарколог на дом» востребована прежде всего тогда, когда состояние развивается быстро, а запас сил у пациента почти исчерпан. После нескольких дней употребления человеку бывает трудно даже выйти из квартиры: сохраняются слабость, дрожь, бессонница, тошнота, скачки давления, потливость, раздражительность и ощущение, что без новой дозы алкоголя легче уже не станет. Именно в этот момент домашний выезд специалиста помогает разорвать опасный цикл. Наркологическая помощь начинается там, где человек находится, а не там, куда он в идеале должен был бы доехать.
Получить дополнительную информацию – http://narkolog-na-dom-voronezh-1.ru
Нарколог на дом в Самаре — помощь при запое и интоксикации в наркологической клинике «Частный медик 24»
Выяснить больше – https://narkolog-na-dom-samara-2.ru/
Для семьи это тоже имеет большое значение. Пока врач в пути, родственники часто совершают одни и те же ошибки: пытаются «отпаивать» человека через силу, смешивают несовместимые медикаменты, дают советы, которые только повышают тревогу, спорят или требуют немедленно взять себя в руки. Профессиональный выезд снимает эту хаотичность. После осмотра врач объясняет, какие симптомы связаны с алкогольной интоксикацией, какие могут указывать на осложнения, что допустимо дома, а что требует перевода в стационар. В этом и состоит ценность выезда: он возвращает контроль над ситуацией и позволяет начать лечение без лишних задержек.
Углубиться в тему – нарколог на дом воронеж
Laravel обеспечивает быструю и безопасную разработку благодаря модульной архитектуре, защите от уязвимостей и удобному ORM. Фреймворк легко масштабируется, поддерживает очереди, кеширование и REST API. В связке с React создаёт современные SPA. Чистый код и экосистема ускоряют релиз и упрощают поддержку, https://domenanet.xyz/
1xbet tr 1xbet tr .
Есть состояния, при которых откладывать обращение не стоит. Ниже перечислены признаки, при которых вызывать врача на дом разумно именно в ближайшее время, а не после очередной неудачной попытки «перележать» тяжёлый период самостоятельно.
Узнать больше – запой нарколог на дом воронеж
1xbet turkiye 1xbet turkiye .
1xbet giri? adresi 1xbet giri? adresi .
xbet xbet .
После того как пациент вызвал нарколога на дом, врач прибывает на место и начинает с осмотра. Он оценивает общее состояние пациента, измеряет его пульс, давление, температуру, частоту дыхания и проверяет уровень сознания. Это необходимо для точной диагностики состояния и выбора наиболее эффективного метода лечения. Врач также уточняет анамнез, выясняет длительность употребления алкоголя или наркотиков, а также обращает внимание на наличие хронических заболеваний или других сопутствующих факторов, которые могут повлиять на лечение.
Получить дополнительную информацию – нарколог на дом вывод в самаре
В Воронеже услуга «нарколог на дом» востребована прежде всего тогда, когда состояние развивается быстро, а запас сил у пациента почти исчерпан. После нескольких дней употребления человеку бывает трудно даже выйти из квартиры: сохраняются слабость, дрожь, бессонница, тошнота, скачки давления, потливость, раздражительность и ощущение, что без новой дозы алкоголя легче уже не станет. Именно в этот момент домашний выезд специалиста помогает разорвать опасный цикл. Наркологическая помощь начинается там, где человек находится, а не там, куда он в идеале должен был бы доехать.
Исследовать вопрос подробнее – врач нарколог на дом воронеж
быстрые выплаты открывают доступ к удобной игры с телефона с поддержкой криптовалют: playfortuna-casino
1xbet giri? linki 1xbet giri? linki .
1xbet giri? linki kentseldonusumelkitabi.com .
1xbet t?rkiye giri? 1xbet t?rkiye giri? .
1xbet turkiye izmireniyipsikolog.com .
While conducting research on various vendor systems for comparison, I came across supplier dashboard entry and spent some time evaluating its structure in relation to similar platforms – Overall, the experience felt satisfactory and provided adequate functionality for basic browsing needs.
Нарколог на дом в Самаре востребован в самых различных ситуациях. Иногда пациент не в состоянии самостоятельно добраться до клиники из-за сильного состояния похмелья или ломки. В таких случаях выезд нарколога становится наиболее оптимальным решением. Наши специалисты оказывают помощь при следующих состояниях:
Узнать больше – вызвать нарколога на дом самара
В Екатеринбурге наркологическая клиника «Частный медик 24» предоставляет анонимную помощь при похмелье и алкогольной интоксикации. Услуга выезда нарколога на дом позволяет пациенту получить лечение в безопасной обстановке, не выходя из дома. Это идеальное решение для тех, кто не хочет, чтобы их зависимость была раскрыта, или кто по каким-либо причинам не может или не хочет посещать клинику.
Подробнее – капельница от похмелья анонимно в екатеринбурге
Вывод из запоя в стационаре — это медицинская помощь, при которой лечение проводится в условиях круглосуточного наблюдения и контролируемой среды. Такой формат применяется, когда состояние пациента требует постоянного мониторинга и поэтапной коррекции терапии. В наркологической клинике «Частный медик 24» в Нижнем Новгороде стационарное лечение выстраивается с учётом текущего состояния пациента, без перегрузки медикаментами и с регулярной оценкой результата на каждом этапе.
Получить дополнительную информацию – нарколог вывод из запоя нижний новгород
При таких условиях стационар позволяет контролировать состояние в режиме 24/7 и при необходимости быстро корректировать лечение. Это снижает риски и делает процесс более предсказуемым. При этом услуга может предоставляться анонимно, а цену лечения можно уточнить по телефону или при обращении в центр лечения алкоголизма и наркомании.
Подробнее тут – вывод из запоя
Доставка свежих цветов в день заказа. Флористы собирают букеты из проверенных поставок, бережно упаковывают и передают курьеру. Работаем ежедневно, гарантируем сохранность и точное время вручения. Анонимная отправка и фотоотчёт включены https://buketico.ru/
Капельница от похмелья — это не просто средство для снятия симптомов, но и эффективный способ быстрого восстановления организма после алкогольной интоксикации. В наркологической клинике «Частный медик 24» в Екатеринбурге мы предоставляем услугу выезда нарколога на дом, что позволяет пациентам получить необходимую медицинскую помощь, не покидая комфорт своей обстановки. Это особенно важно в случае, если состояние пациента серьёзно ухудшилось, и он не может поехать в клинику самостоятельно.
Подробнее – http://kapelnicza-ot-pokhmelya-ekaterinburg-7.ru/
Нарколог на дом — это удобное и эффективное решение для тех, кто сталкивается с тяжелыми последствиями запоя или алкогольной интоксикации. В наркологической клинике «Частный медик 24» в Самаре мы предоставляем круглосуточную помощь, выезд нарколога и лечение на дому. Это позволяет пациентам получить профессиональную медицинскую помощь в удобной и знакомой обстановке, что особенно важно, когда состояние человека ухудшается после длительного употребления алкоголя или наркотиков.
Получить дополнительные сведения – вызов нарколога на дом в самаре
1xbet giri? linki parkvebahceler.com .
Есть состояния, при которых откладывать обращение не стоит. Ниже перечислены признаки, при которых вызывать врача на дом разумно именно в ближайшее время, а не после очередной неудачной попытки «перележать» тяжёлый период самостоятельно.
Узнать больше – https://narkolog-na-dom-voronezh-1.ru
Главное преимущество такого выезда в том, что лечение начинается сразу. Не нужно ждать утра, искать транспорт, уговаривать человека ехать в тяжёлом состоянии или рисковать, пока он снова тянется к алкоголю, чтобы временно заглушить симптомы. Домашний визит даёт возможность быстро стабилизировать ситуацию и убрать хаотичность, которая часто возникает в семье в острый момент.
Получить дополнительную информацию – врач нарколог на дом в воронеже
круглосуточный стационар вывод из запоя vyvod-iz-zapoya-v-staczionare-sankt-peterburg-8.ru .
К стационарному формату чаще всего прибегают в следующих случаях:
Разобраться лучше – вывод из запоя на дому недорого в нижнем новгороде
Мощность двигателя https://rentbusspb.ru/arenda-avtobusa-king-long-2019-s-voditelem/
Аренда, прокат, заказ всех лимузинов города Иркутска https://rentbusspb.ru/mercedes-benz-e-213-2020-г/
Аренда автомобилей https://rentbusspb.ru/минивэн-toyota-alphard/
Профессиональный трансфер в аэропорт или на вокзал https://rentbusspb.ru/mercedes-benz-e-213-кортеж/
Обслуживание мероприятий https://rentbusspb.ru/arenda-avtobusa-fox-bus/
Аренда транспорта с водителем https://rentbusspb.ru/микроавтобус-mercedes-sprinter-vip/
Год выпуска:
экскурсионные туры; трансфер до аэропорта или железнодорожного вокзала и обратно; регулярная доставка сотрудников к месту работы; бизнес-поездки; групповые и индивидуальные перевозки детей; обслуживание свадеб, юбилеев, новогодних вечеринок и прочих торжеств https://rentbusspb.ru/mercedes-benz-e-213-2020-г/
г https://rentbusspb.ru/microavtobus-volkswagen-crafter-s-voditelem/
Иркутск https://rentbusspb.ru/mercedes-benz-c-класс-w205-рестайлинг/
1xbet t?rkiye 1xbet t?rkiye .
1xbet spor bahislerinin adresi 1xbet spor bahislerinin adresi .
седан передний автомат 121 л https://rentbusspb.ru/arenda-minivena-mercedes-vito-new-2016/
с https://rentbusspb.ru/microavtobus-volkswagen-crafter-s-voditelem/
1 https://rentbusspb.ru/arenda-range-rover-s-voditelem/
5 л https://rentbusspb.ru/arenda-ford-mustang-1969-s-voditelem/
2021 https://rentbusspb.ru/prokat-bmv-7/
климат-контроль https://rentbusspb.ru/arenda-avtobusa-tur-klassa-s-voditelem/
седан передний автомат 181 л https://rentbusspb.ru/avtopark-transporta-dlya-arendi/
с https://rentbusspb.ru/arenda-s233/
1,5 л 2023 https://rentbusspb.ru/arenda-mercedes-benz-gl-s-voditelem/
Машин в автопарке:
Существует ли возможность аренды автомобиля с водителем для поездок за пределы города?
Для удовлетворения потребностей клиента, у нас есть возможность подобрать конкретного водителя в соответствии с его пожеланиями и требованиями https://rentbusspb.ru/category/arenda-avtomobilei/
xbet xbet .
1xbet turkiye kentseldonusumelkitabi.com .
Доставка свежих цветов в день заказа. Флористы собирают букеты из проверенных поставок, бережно упаковывают и передают курьеру. Работаем ежедневно, гарантируем сохранность и точное время вручения. Анонимная отправка и фотоотчёт включены https://buketico.ru/
Нарколог на дом в Самаре востребован в самых различных ситуациях. Иногда пациент не в состоянии самостоятельно добраться до клиники из-за сильного состояния похмелья или ломки. В таких случаях выезд нарколога становится наиболее оптимальным решением. Наши специалисты оказывают помощь при следующих состояниях:
Получить дополнительные сведения – нарколог на дом анонимно
Капельница от похмелья в Самаре с устранением симптомов интоксикации и контролем состояния в наркологической клинике «Частный медик 24»
Детальнее – капельница от похмелья вызов на дом
анонимный вызов врача нарколога на дом narkolog-na-dom-moskva-9.ru .
цена на вывод из запоя в стационаре vyvod-iz-zapoya-v-staczionare-sankt-peterburg-8.ru .
1xbet t?rkiye 1xbet t?rkiye .
1xbet giri? yapam?yorum kentseldonusumelkitabi.com .
1xbet giri? adresi 1xbet giri? adresi .
1xbet tr 1xbet tr .
1xbet giri? linki 1xbet giri? linki .
1xbet t?rkiye 1xbet t?rkiye .
игровые автоматы открывают доступ к новых возможностей с минимальными ставками: онлайн играть плей фортуна
https://mhp.ooo/products/twinaqt
Остались только положительные впечатления от покупки. Магазин быстро обработал заказ, а менеджер вежливо ответил на все вопросы. Телефон пришёл в отличном состоянии, без задержек и сюрпризов. Хороший сервис, к которому хочется вернуться: стор 77 официальный сайт
In the middle of exploring different learning and informational materials, I found something that caught my attention see this page and it appears to be a valuable resource offering useful and informative content
частный нарколог на дом быстро narkolog-na-dom-moskva-9.ru .
Со временем столешница теряет внешний вид: появляются царапины, сколы и пятна, которые сложно удалить. Неправильный выбор материала только ускоряет этот процесс и приводит к дополнительным затратам https://medyn.su/materialy-i-fasady-kuhon/obnovlenie-stoleshnicy-dlya-kukhni-polnoe-rukovodstvo/
https://mhp.ooo/products/glivec-400mg
выведение из запоя в наркологическом стационаре vyvod-iz-zapoya-v-staczionare-sankt-peterburg-8.ru .
As I browsed through multiple political campaign and voter information sites, I noticed something placed within the content discover this campaign and it is a political platform sharing policy ideas and vision in a straightforward presentation style
1xbet giri? linki tog.gen.tr .
1xbet t?rkiye giri? athenaofficial.com .
Как seo оптимизация сайта работает для мультиязычных проектов?
Выбор между домашней помощью и стационарным лечением определяется не удобством, а медицинской целесообразностью. В условиях клиники исключаются внешние триггеры, обеспечивается изоляция от источников алкоголя и создается контролируемая среда, где терапевтические решения принимаются на основе объективных показателей, а не субъективных ощущений пациента. Такой подход критически важен для предотвращения осложнений, минимизации дискомфорта абстиненции и формирования устойчивой базы для дальнейшей противорецидивной работы.
Узнать больше – вывод из запоя в стационаре санкт-петербург
фриспины предлагают развлечения с удобным интерфейсом – сайт play fortuna casino
Процедура вывода из запоя на дому включает несколько ключевых этапов, которые обеспечивают максимально быстрое и безопасное восстановление пациента. Эти этапы тщательно контролируются врачом, что минимизирует риски и помогает достичь наилучших результатов.
Подробнее – https://vyvod-iz-zapoya-na-domu-ekaterinburg-20.ru/
Остались только положительные впечатления от покупки. Магазин быстро обработал заказ, а менеджер вежливо ответил на все вопросы. Телефон пришёл в отличном состоянии, без задержек и сюрпризов. Хороший сервис, к которому хочется вернуться: сторис 77 интернет магазин
Процесс лечения строится поэтапно, что позволяет пациенту проходить все стадии восстановления в безопасном и контролируемом режиме.
Исследовать вопрос подробнее – лечение алкоголизма цена донецк
Затяжной запой — это не бытовая слабость, а медицинское состояние, требующее профессионального лечения в условиях стационара. Когда организм истощен длительной интоксикацией, нарушен сон, отсутствует аппетит, а попытки самостоятельно прекратить употребление сопровождаются тремором, тревогой и скачками давления, единственным безопасным решением становится контролируемая детоксикация. Наркологическая клиника «Элегия Мед» в Санкт-Петербурге предоставляет профессиональное лечение с применением сертифицированных протоколов, непрерывный контроль состояния пациента и индивидуальный подбор медикаментозной поддержки. Мы работаем круглосуточно, обеспечивая быстрое реагирование на обращения, четкую диагностику при поступлении и прозрачное взаимодействие с родственниками. Все процедуры выполняются с соблюдением протоколов доказательной медицины, стандартов Минздрава РФ и строгих правил конфиденциальности. Первичная оценка состояния начинается с дистанционной консультации, что позволяет врачам заранее подготовить необходимое оборудование и скорректировать план госпитализации еще до прибытия пациента. При необходимости заказать консультацию или оформить выезд бригады, доступные способы связи включают телефон, мессенджеры и онлайн-форму на сайте.
Получить больше информации – стационар вывод из запоя санкт-петербург
Вывод из запоя в стационаре в Санкт-Петербурге: круглосуточное лечение, детоксикация и медицинский контроль в наркологической клинике «Элегия Мед».
Подробнее тут – быстрый вывод из запоя в стационаре санкт-петербург
Организация терапевтического процесса в условиях стационара требует слаженной работы профильной команды, четких клинических алгоритмов и непрерывного документирования каждого этапа лечения. В клинике выстроена прозрачная система взаимодействия, где пациент и его близкие получают исчерпывающую информацию о планах терапии, ожидаемых результатах, условиях пребывания и правах потребителя медицинских услуг. Мы отказались от шаблонных протоколов в пользу персонализированной медицины, где каждый шаг лечения согласовывается с динамикой состояния пациента и корректируется на основе объективных диагностических данных. Такой подход исключает избыточную фармакологическую нагрузку и минимизирует риски побочных эффектов, сохраняя при этом высокую клиническую эффективность детоксикации.
Выяснить больше – быстрый вывод из запоя в стационаре в нижнем новгороде
Помимо физиологических факторов, важную роль играет психологическая устойчивость пациента. Длительный запой формирует патологическую потребность, при которой человек утрачивает способность добровольно отказаться от очередной дозы в привычной среде. Изоляция в условиях клиники разрывает этот цикл, создавая пространство для мотивационной работы и снижения тревожности. Специалисты клиники работают с когнитивными искажениями, поддерживающими аддикцию, и помогают справиться с внутренним сопротивлением лечению. Такой подход особенно важен при сочетанных расстройствах, когда алкогольная зависимость сопровождается депрессивными проявлениями или генерализованной тревогой.
Выяснить больше – https://vyvod-iz-zapoya-v-staczionare-nizhnij-novgorod-9.ru/
1xbet spor bahislerinin adresi 1xbet spor bahislerinin adresi .
Te joci pe PlayStation? fanjocul.top Cele mai a?teptate ?i deja populare jocuri cu un gameplay excelent, grafica puternica ?i mecanica unica. Afla ce proiecte merita aten?ia ta chiar acum.
Запой – это состояние, при котором человек продолжает употреблять алкоголь в течение длительного времени, не в состоянии прекратить употребление самостоятельно, что является проявлением алкоголизма. Это может привести к серьезным проблемам со здоровьем, и в таком случае необходим вывод из запоя с помощью наркологической помощи, при этом в дальнейшем может рассматриваться кодирование.
Детальнее – https://vyvod-iz-zapoya-na-domu-ekaterinburg-17.ru/
Эти направления терапии помогают создать прочный фундамент для дальнейшей ремиссии и снижают риск рецидива.
Подробнее можно узнать тут – лечение алкоголизма в стационаре донецк
Процедура вывода из запоя на дому включает несколько этапов, каждый из которых имеет важное значение для общего улучшения состояния пациента. Главная цель — это не только устранение симптомов абстиненции, но и восстановление нормальной работы органов и систем организма. Врач, который проводит процедуру, использует медикаментозные средства для восстановления водно-солевого баланса, нормализации работы печени, почек и других органов, пострадавших от алкоголя. Также в процесс включаются препараты, которые способствуют снятию нервного напряжения и психоэмоционального стресса.
Изучить вопрос глубже – нарколог на дом вывод из запоя
xbet giri?i xbet giri?i .
interesat de Gladiatus? Joc Gladiatus Creeaza un erou, lupta in arena, completeaza misiuni ?i imbunata?e?te-?i echipamentul. Alatura-te miilor de jucatori ?i devino un gladiator legendar in acest popular RPG bazat pe browser.
1xbet t?rkiye giri? 1xbet t?rkiye giri? .
Cel mai bun joc Joc wow Un MMORPG legendar cu o lume deschisa vasta, unde te a?teapta batalii epice, progresul personajelor ?i misiuni palpitante. Exploreaza Azeroth, alatura-te breslelor ?i devino parte a unei pove?ti grandioase.
вывод из запоя цена наркология vyvod-iz-zapoya-v-staczionare-sankt-peterburg-8.ru .
выведение из запоя на дому круглосуточно narkolog-na-dom-moskva-9.ru .
1xbet spor bahislerinin adresi 1xbet spor bahislerinin adresi .
1xbet 1xbet .
Iti place entuziasmul? jocuridenoroc.top Cazinouri online, case de pariuri ?i sali de jocuri de noroc licen?iate. Cele mai bune jocuri de noroc online.
Непрерывный мониторинг витальных показателей — ключевое отличие стационарного формата, обеспечивающее безопасную детоксикацию. В палатах клиники «Элегия Мед» установлены системы отслеживания частоты пульса, сатурации, температуры и артериального давления, данные с которых автоматически передаются в электронную медицинскую карту. Медицинский персонал дежурит круглосуточно, что обеспечивает мгновенную реакцию на ухудшение состояния: коррекцию инфузионной терапии, введение симптоматических препаратов, привлечение смежных специалистов при необходимости. Такая организация процесса исключает хаотичное назначение средств, предотвращает полипрагмазию и гарантирует, что каждый этап детоксикации проходит под строгим клиническим контролем. При необходимости применяются дополнительные методы очищения крови, включая плазмаферез, который эффективно помогает вывести стойкие токсины и метаболиты, не удаляемые стандартной инфузионной терапией.
Изучить вопрос глубже – вывод из запоя в стационаре
Процедура вывода из запоя на дому включает несколько ключевых этапов, которые обеспечивают максимально быстрое и безопасное восстановление пациента. Эти этапы тщательно контролируются врачом, что минимизирует риски и помогает достичь наилучших результатов.
Изучить вопрос глубже – http://vyvod-iz-zapoya-na-domu-ekaterinburg-20.ru/
1xbet t?rkiye 1xbet t?rkiye .
Непрерывный мониторинг витальных показателей — ключевое отличие стационарного формата. В палатах клиники «Элегия Мед» установлены системы отслеживания частоты пульса, сатурации, температуры и артериального давления, данные с которых автоматически передаются в электронную медицинскую карту. Медицинский персонал дежурит круглосуточно, что обеспечивает мгновенную реакцию на ухудшение состояния: коррекцию инфузионной терапии, введение симптоматических препаратов, привлечение смежных специалистов при необходимости. Такая организация процесса исключает хаотичное назначение средств, предотвращает полипрагмазию и гарантирует, что каждый этап детоксикации проходит под строгим клиническим контролем. Контроль состояния пациента в режиме реального времени позволяет врачам оперативно корректировать терапию и минимизировать риски для здоровья.
Подробнее можно узнать тут – наркология вывод из запоя в стационаре
В клинике применяются методы, позволяющие воздействовать на все аспекты зависимости. Это обеспечивает комплексное и устойчивое восстановление.
Узнать больше – здоровье лечение алкоголизма в донце
cocorico shop https://darknetmarketstore.com/
К показаниям относятся: запой длительностью более 72 часов, выраженная абстиненция с тахикардией, артериальной гипертензией, профузным потоотделением, наличие в анамнезе алкогольных делириев или судорожных эпизодов, сопутствующие хронические заболевания печени, сердца, поджелудочной железы. При тяжелых формах интоксикации, когда в организме накапливаются токсичные продукты распада веществ, резкое прекращение употребления без медицинской поддержки может спровоцировать отек мозга, острую сердечную недостаточность или желудочно-кишечное кровотечение. Стационар позволяет провести полноценную диагностику, включая ЭКГ, экспресс-анализы крови и мониторинг сатурации, что формирует точную картину состояния и исключает шаблонные назначения. В случаях сочетанной зависимости, когда в анамнезе присутствует наркомании, протоколы детоксикации адаптируются под специфику психоактивных соединений и включают усиленный нейрологический контроль.
Узнать больше – http://vyvod-iz-zapoya-v-staczionare-sankt-peterburg-16.ru
Принятие решения о госпитализации часто сопровождается внутренними сомнениями и попытками найти альтернативные пути решения проблемы. Однако современные клинические протоколы четко определяют ситуации, когда амбулаторный формат не способен обеспечить должный уровень безопасности и эффективности. Стационарное лечение назначается тогда, когда интоксикация затрагивает несколько систем организма одновременно, а риск развития соматических или психиатрических осложнений превышает допустимые пределы. В условиях медицинского учреждения исключается доступ к психоактивным веществам, обеспечивается изоляция от бытовых триггеров и создается контролируемая среда, способствующая физиологической стабилизации. Такой подход особенно важен для пациентов с длительным стажем употребления, когда самостоятельные попытки прекращения приводят к тяжелым абстинентным состояниям, требующим инфузионной поддержки и постоянного врачебного контроля.
Получить дополнительные сведения – https://vyvod-iz-zapoya-v-staczionare-nizhnij-novgorod-7.ru/
Наркологический стационар с круглосуточным наблюдением — это не просто место для детоксикации, но и пространство для комплексного лечения и реабилитации. Постоянное присутствие медицинского персонала помогает избежать опасных ситуаций, таких как психозы или физиологические сбои, характерные для абстиненции. Прием пациентов может включать кодирование, а также индивидуальные программы лечения, которые разрабатываются в зависимости от состояния пациента и его потребностей на протяжении года.
Ознакомиться с деталями – лечение в наркологическом стационаре
Основой стационарной детоксикации является инфузионная терапия, направленная на выведение токсинов, коррекцию водно-электролитного баланса и восстановление метаболических процессов. Капельницы включают кристаллоидные растворы, витамины группы B и C, гепатопротекторы, антиоксиданты и симптоматические препараты для нормализации сна. Состав и скорость введения рассчитываются индивидуально, чтобы избежать перегрузки сердечно-сосудистой системы. При выраженной абстиненции подключаются средства для коррекции нейромедиаторного обмена, однако их применение строго дозируется. Дозировки пересматриваются ежедневно на основе динамики показателей, что обеспечивает безопасность и эффективность терапии.
Изучить вопрос глубже – наркология вывод из запоя в стационаре в нижнем новгороде
Первый этап вывода из запоя на дому – это первичная оценка состояния пациента. Врач, прибывший на вызов, осматривает пациента, проверяет уровень алкоголя в крови, измеряет артериальное давление, пульс и температуру. Это необходимо для того, чтобы определить степень алкогольной интоксикации и выбрать правильную тактику лечения.
Разобраться лучше – нарколог на дом вывод из запоя екатеринбург
Во всех этих случаях врач нужен не только для облегчения симптомов. Его задача — понять, можно ли ограничиться домашней терапией или уже сейчас необходимо менять маршрут лечения. Именно этот этап и делает домашний выезд профессиональной услугой, а не упрощённой заменой клиники.
Ознакомиться с деталями – нарколог на дом в воронеже
При выводе из запоя на дому с быстрым облегчением используются различные медикаменты, направленные на быстрое восстановление водно-солевого баланса, улучшение функции печени и почек, а также снижение симптомов алкогольного абстинентного синдрома. Важно, что состав препаратов подбирается в зависимости от состояния пациента, и все препараты вводятся под контролем квалифицированного медицинского специалиста.
Получить больше информации – http://www.domen.ru
1xbet giri? adresi 1xbet giri? adresi .
вывод из запоя с выездом вывод из запоя с выездом .
Наиболее частыми причинами обращения становятся выраженная слабость, тремор, нарушение сна, тревога, учащенный пульс, скачки артериального давления, тошнота и признаки обезвоживания. Эти симптомы могут сочетаться между собой и усиливаться после прекращения употребления алкоголя, особенно после нескольких дней запоя.
Получить дополнительную информацию – запой нарколог на дом в екатеринбурге
1xbet g?ncel giri? 1xbet g?ncel giri? .
помощь нарколога на дому при алкоголизме narkolog-na-dom-moskva-9.ru .
Врач-нарколог, оценивая состояние пациента, может рекомендовать проведение капельницы для ускоренного восстановления организма. Применение капельницы позволяет снять острые симптомы интоксикации и снизить риск развития более серьезных последствий. В некоторых случаях, если необходимо интенсивное наблюдение, пациенту может быть предложено лечение в стационаре, и услугу можно заказать на летний период для более длительного контроля.
Подробнее можно узнать тут – капельница от запоя на дому цена в нижнем новгороде
Реабилитация алкоголиков с анонимной поддержкой — это процесс, при котором пациент получает необходимую медицинскую и психологическую помощь, не раскрывая своей личности и обстоятельств зависимости, включая лечение наркомании. Такие программы ориентированы на безопасное и конфиденциальное лечение, что важно для тех, кто стремится избавиться от зависимости, но опасается осуждения или утраты личной репутации, при этом возможен выезд нарколога на дом. Важно, что анонимность не ограничивает качество предоставляемых услуг: все необходимые этапы лечения, включая детоксикацию, психотерапевтические сессии и социальную реабилитацию, которые могут длиться несколько лет, проводятся на высоком уровне с акцентом на своевременный вывод из состояния зависимости.
Узнать больше – реабилитация алкоголиков город
Нарколог на дом в Самаре: круглосуточная помощь, вывод из запоя и медицинская поддержка на дому под контролем специалистов в наркологической клинике «Похмельная служба»
Подробнее можно узнать тут – вызвать нарколога на дом
Препараты, введённые через капельницу, начинают действовать почти сразу. Они поступают напрямую в кровоток, обходя желудочно-кишечный тракт, что позволяет ускорить процесс восстановления и устранить симптомы похмелья, такие как головная боль, тошнота и слабость, уже через 20–30 минут после начала процедуры.
Ознакомиться с деталями – капельница от похмелья в нижнем новгороде
За выездом врача чаще обращаются тогда, когда человеку тяжело добраться до клиники, он ослаблен после нескольких дней употребления алкоголя или родственникам важно быстрее понять, какая тактика будет безопасной. После осмотра можно определить, нужна ли капельница, достаточно ли детоксикации на дому, требуется ли повторное наблюдение, а в дальнейшем — консультация по лечению алкоголизма, кодирование или реабилитация. В части случаев уже первый звонок позволяет понять, идет ли речь только о временном ухудшении самочувствия или о состоянии, при котором может потребоваться вывод из запоя в стационаре.
Детальнее – вызвать нарколога на дом
За выездом врача обращаются в тех случаях, когда человеку тяжело добраться до клиники, он ослаблен после нескольких дней употребления спиртного или родственникам важно быстрее получить медицинскую консультацию на месте. После осмотра определяют, допустим ли домашний формат, требуется ли капельница, достаточно ли наблюдения на дому или нужен другой объем помощи. Если эпизоды повторяются, в дальнейшем могут обсуждаться лечение алкоголизма, кодирование, участие психолога, реабилитация и более широкая программа помощи при зависимости. Уже на этапе первичного обращения нередко уточняют, как вызвать специалиста, какие услуги доступны на дому и в каких случаях вывод из запоя рассматривают не дома, а в стационаре.
Выяснить больше – нарколог на дом вывод
1xbet t?rkiye 1xbet t?rkiye .
Нарколог на дом в Москве: срочная медицинская помощь, капельницы и восстановление состояния в наркологической клинике «Клиника доктора Калюжной».
Получить дополнительные сведения – вызвать нарколога на дом москва
Нарколог на дом в Москве: круглосуточный выезд, детоксикация и лечение зависимостей в наркологической клинике «Клиника доктора Калюжной».
Исследовать вопрос подробнее – http://www.domen.ru
Терапевтический процесс в стационаре строится по принципу последовательного выполнения клинических задач: диагностика, стабилизация, медикаментозная поддержка и подготовка к амбулаторному этапу. При поступлении врач проводит детальный осмотр, собирает анамнез, оценивает неврологический статус и при необходимости назначает лабораторные исследования. На основе полученных данных формируется индивидуальный протокол, учитывающий возраст, длительность интоксикации, наличие сопутствующих патологий и переносимость лекарственных компонентов. Мы применяем только сертифицированные препараты, зарегистрированные в РФ, и строго соблюдаем клинические рекомендации Минздрава, исключая псевдонаучные методики. Стандарты оказания медицинской помощи фиксируются во внутренних регламентах и регулярно проверяются независимыми аудиторами.
Исследовать вопрос подробнее – вывод из запоя в стационаре клиника санкт-петербург
References:
Fair Go https://graph.org/Rocketplay-Casino-Australia-Expert-Review–Bonuses-04-20 license
Непрерывное наблюдение — ключевое отличие стационарного формата. В палатах клиники «Стармед» установлены системы мониторинга витальных показателей, позволяющие фиксировать изменения артериального давления, частоты пульса, температуры и дыхания в реальном времени. Медицинский персонал дежурит круглосуточно, что обеспечивает мгновенную реакцию на ухудшение состояния: коррекцию инфузионной терапии, введение симптоматических препаратов, привлечение профильного психиатра при необходимости. Кроме того, стационар создает терапевтическую среду, свободную от бытовых конфликтов, финансовых стрессов и социального давления, которые часто провоцируют срыв в первые дни трезвости. Пациент получает режим, адаптированный под этап восстановления: дозированную физическую активность, сбалансированное диетическое питание, физиотерапевтические процедуры и регулярные консультации с психотерапевтом. Такой комплексный подход минимизирует дискомфорт и формирует базу для последующей психологической работы.
Изучить вопрос глубже – вывод из запоя в стационаре анонимно нижний новгород
Терапевтический процесс в стационаре строится по принципу последовательного выполнения клинических задач: диагностика, стабилизация, медикаментозная поддержка и подготовка к амбулаторному этапу. При поступлении врач проводит детальный осмотр, собирает анамнез, оценивает неврологический статус и при необходимости назначает лабораторные исследования. На основе полученных данных формируется индивидуальный протокол, учитывающий возраст, длительность интоксикации, наличие сопутствующих патологий и переносимость лекарственных компонентов. Мы применяем только сертифицированные препараты, зарегистрированные в РФ, и строго соблюдаем клинические рекомендации Минздрава, исключая псевдонаучные методики. Стандарты оказания медицинской помощи фиксируются во внутренних регламентах и регулярно проверяются независимыми аудиторами.
Углубиться в тему – https://vyvod-iz-zapoya-v-staczionare-sankt-peterburg-17.ru
Первоначально врач оценивает физическое и психоэмоциональное состояние пациента, что позволяет определить степень тяжести запоя и риски, с которыми может столкнуться пациент в процессе восстановления. На основе этой оценки подбирается соответствующая терапия, включая капельницы для очистки организма, введение витаминов и препаратов, способствующих нормализации давления и уровня сахара в крови.
Получить дополнительную информацию – вывод из запоя на дому круглосуточно в екатеринбурге
Для семьи это тоже имеет большое значение. Пока врач в пути, родственники часто совершают одни и те же ошибки: пытаются «отпаивать» человека через силу, смешивают несовместимые медикаменты, дают советы, которые только повышают тревогу, спорят или требуют немедленно взять себя в руки. Профессиональный выезд снимает эту хаотичность. После осмотра врач объясняет, какие симптомы связаны с алкогольной интоксикацией, какие могут указывать на осложнения, что допустимо дома, а что требует перевода в стационар. В этом и состоит ценность выезда: он возвращает контроль над ситуацией и позволяет начать лечение без лишних задержек.
Получить больше информации – нарколог на дом цена
Домашняя детоксикация подходит для ранних стадий интоксикации, когда состояние пациента стабильно, а сопутствующие заболевания отсутствуют. Однако при длительном употреблении алкоголя физиологические изменения требуют более глубокого вмешательства. Стационар обеспечивает изоляцию от триггеров, исключает риск самостоятельного повторного употребления и позволяет врачам динамически корректировать терапию на основе лабораторных показателей и реакции организма. В 2026 году стандарты наркологической помощи делают акцент на превентивной безопасности: раннее выявление признаков делирия, судорожной готовности или кардиологических осложнений позволяет предотвратить критические состояния до их развития. Клиника «Стармед» выстроила работу так, чтобы каждый этап госпитализации логически вытекал из предыдущего, формируя непрерывную цепочку от острой стабилизации до планирования долгосрочной ремиссии.
Изучить вопрос глубже – наркология вывод из запоя в стационаре
Отдельного внимания требуют случаи, когда больной почти не ест, плохо пьет воду, не может спокойно лежать, жалуется на сильное сердцебиение, нехватку сна или выраженное внутреннее напряжение. В такой ситуации осмотр помогает определить, безопасно ли оставаться дома и какого объема помощи достаточно на текущем этапе. Если речь идет о выраженных проявлениях абстинентного синдрома, затягивать с обращением нецелесообразно.
Выяснить больше – нарколог на дом цена екатеринбург
Вывод из запоя на дому в Екатеринбурге: срочная помощь, детоксикация и восстановление под контролем специалистов в наркологической клинике «Детокс»
Получить дополнительные сведения – вывод из запоя на дому круглосуточно екатеринбург
Наиболее частыми основаниями для выбора такого формата становятся длительный запой, тяжелое течение похмельного синдрома, выраженный тремор, отсутствие сна, тревога, слабость, обезвоживание и жалобы на сердцебиение. Дополнительное значение имеют хронические заболевания сердца, сосудов, печени и нервной системы, на фоне которых выход из запоя может переноситься тяжелее.
Узнать больше – http://vyvod-iz-zapoya-v-staczionare-sankt-peterburg-19.ru
While exploring inspiring storytelling and personal narrative platforms online, I came across something placed within the content visit this story platform and it is an inspiring storytelling site sharing powerful personal experiences from many different lives
Длительное употребление алкоголя переводит организм в состояние хронической интоксикации, при котором собственные механизмы восстановления перестают справляться с нагрузкой. Накопление ацетальдегида, дефицит электролитов, нарушение работы печени и сердечно-сосудистой системы создают клиническую картину, требующую не симптоматического облегчения, а комплексного медицинского вмешательства. Вывод из запоя в стационаре в Нижнем Новгороде в наркологической клинике «Стармед» организован с соблюдением современных протоколов доказательной медицины, где безопасность пациента, непрерывный мониторинг и персонализированный подбор терапии являются приоритетом. Мы работаем круглосуточно, обеспечивая быстрое реагирование на обращения, четкую диагностику при поступлении и прозрачное взаимодействие с родственниками. Чтобы вызвать специалистов или лечиться в безопасных условиях, достаточно оставить заявку на сайте или позвонить по прямой линии. Все процедуры проводятся в лицензированных помещениях, с документированием каждого этапа и строгим соблюдением врачебной этики. Первичная оценка состояния начинается с дистанционной консультации, что позволяет врачам заранее подготовить необходимые препараты и скорректировать план госпитализации еще до прибытия пациента.
Получить больше информации – http://vyvod-iz-zapoya-v-staczionare-nizhnij-novgorod-8.ru/
Наркологический стационар в Санкт-Петербурге: круглосуточное лечение, детоксикация и наблюдение специалистов в комфортных условиях в наркологической клинике «Похмельная служба»
Подробнее – лечение в наркологическом стационаре санкт-петербург
Вывод из запоя на дому с медицинским контролем в Екатеринбурге предлагает множество преимуществ, которые делают этот метод более удобным и безопасным для многих людей. Отсутствие необходимости в госпитализации и наличие профессионального контроля являются основными положительными аспектами этой услуги.
Изучить вопрос глубже – вывод из запоя на дому цена
Стационарное наблюдение также целесообразно тогда, когда больному трудно соблюдать рекомендации дома, состояние быстро меняется или родственники не могут обеспечить полноценный контроль. В таких условиях медицинское сопровождение позволяет своевременно оценивать динамику и корректировать лечение. При выраженных психических нарушениях, тревожно-депрессивных проявлениях или изменении поведения к оценке состояния может подключаться психиатр, поскольку у части больных запой сопровождается не только соматическими, но и психическими осложнениями алкогольной зависимости.
Подробнее можно узнать тут – быстрый вывод из запоя в стационаре санкт-петербург
Не каждый человек с зависимостью от алкоголя готов признать свою проблему и обратиться за помощью. Однако, когда зависимость достигает тяжелых форм, требуется профессиональное вмешательство, и комплексная реабилитация в наркологическом доме становится важнейшим этапом восстановления, при этом в некоторых случаях помощь может предоставляться бесплатно, а сама программа рассчитана на длительный срок — до нескольких лет. Признаки того, что нужна реабилитация, могут включать невозможность прекратить пить даже при наличии серьезных последствий для здоровья, социальной жизни и межличностных отношений.
Узнать больше – https://reabilitacziya-alkogolikov-moskva-2.ru/
Чому свербіж долонь
Вывод из запоя в стационаре в Нижнем Новгороде: профессиональное лечение, капельницы и контроль состояния пациента в наркологической клинике «Стармед».
Выяснить больше – http://www.domen.ru
Несмотря на кажущуюся простоту процедуры, капельница требует профессионального подхода. Неправильно подобранные препараты или дозировки могут привести к осложнениям, особенно при хронических заболеваниях. Поэтому проведение процедуры под контролем специалиста является ключевым фактором эффективности и безопасности.
Углубиться в тему – https://kapelnicza-ot-pokhmelya-samara-7.ru
Вывод из запоя в стационаре в Нижнем Новгороде: безопасная детоксикация, медикаментозная терапия и поддержка специалистов в наркологической клинике «Стармед».
Получить дополнительные сведения – http://vyvod-iz-zapoya-v-staczionare-nizhnij-novgorod-8.ru/
Вывод из запоя на дому с медицинским контролем — это процесс, при котором нарколог или медсестра приезжает к пациенту на дом для проведения необходимых процедур. Основной задачей является снятие абстинентного синдрома, восстановление водно-электролитного баланса и нормализация общего состояния пациента, при этом оказывается наркологическая помощь. Этот процесс проходит под наблюдением квалифицированных специалистов, что помогает избежать осложнений, часто возникающих при самостоятельном выходе из запоя, а в дальнейшем может потребоваться кодирование и реабилитация.
Получить дополнительную информацию – анонимный вывод из запоя на дому
Для Воронежа выездной формат особенно востребован вечером, ночью и ранним утром, когда у больного резко усиливаются симптомы и поездка в медицинское учреждение становится тяжёлой или просто нереальной. Если человек несколько дней употреблял алкоголь, почти не спал, плохо переносит воду, жалуется на сердцебиение и слабость, то откладывать осмотр не стоит. Срочная наркологическая помощь нужна именно тогда, когда ситуация развивается быстро, а семья уже видит, что своими силами справиться не удаётся. Врач приезжает, проводит осмотр, определяет, нет ли признаков осложнений, и уже на месте решает, какие меры допустимы дома, а какие требуют другого формата оказания помощи.
Узнать больше – нарколог на дом вывод в воронеже
За выездом врача обращаются в тех случаях, когда человеку тяжело добраться до клиники, он ослаблен после нескольких дней употребления спиртного или родственникам важно быстрее получить медицинскую консультацию на месте. После осмотра определяют, допустим ли домашний формат, требуется ли капельница, достаточно ли наблюдения на дому или нужен другой объем помощи. Если эпизоды повторяются, в дальнейшем могут обсуждаться лечение алкоголизма, кодирование, участие психолога, реабилитация и более широкая программа помощи при зависимости. Уже на этапе первичного обращения нередко уточняют, как вызвать специалиста, какие услуги доступны на дому и в каких случаях вывод из запоя рассматривают не дома, а в стационаре.
Узнать больше – запой нарколог на дом
Вывод из запоя в стационаре в Нижнем Новгороде: профессиональное лечение, капельницы и контроль состояния пациента в наркологической клинике «Стармед».
Углубиться в тему – нарколог вывод из запоя в стационаре нижний новгород
1xbet yeni giri? adresi 1xbet yeni giri? adresi .
вывести из запоя цена вывести из запоя цена .
1xbet giri? linki athenaofficial.com .
https://pravdadaily.com.ua/sidney-stolytsia-chy-spravdi-tse-naybilsh-rozvynene-misto-avstralii/
За выездом врача чаще обращаются тогда, когда человеку тяжело добраться до клиники, он ослаблен после нескольких дней употребления алкоголя или родственникам важно быстрее понять, какая тактика будет безопасной. После осмотра можно определить, нужна ли капельница, достаточно ли детоксикации на дому, требуется ли повторное наблюдение, а в дальнейшем — консультация по лечению алкоголизма, кодирование или реабилитация. В части случаев уже первый звонок позволяет понять, идет ли речь только о временном ухудшении самочувствия или о состоянии, при котором может потребоваться вывод из запоя в стационаре.
Углубиться в тему – врач нарколог на дом екатеринбург
гидроизоляция подвала изнутри от грунтовых вод цена за м2 москва remont-betona-4.ru .
Реабилитация алкоголиков с анонимной поддержкой — это важный процесс, который помогает людям справиться с зависимостью в условиях конфиденциальности и безопасности. Многие пациенты опасаются обращаться за помощью из-за стереотипов и страха осуждения. Анонимность в реабилитации становится важным фактором для обеспечения доверия и максимальной эффективности лечения, при этом в ряде случаев доступны такие услуги, как кодирование и консультации наркологической помощи бесплатно, особенно при обращении после запоя. В Москве существует множество центров, которые предлагают реабилитацию алкоголиков с анонимной поддержкой, что позволяет пациентам пройти лечение, не раскрывая своей личности и не беспокоясь о социальном осуждении.
Исследовать вопрос подробнее – https://reabilitacziya-alkogolikov-moskva-4.ru/
капремонт и реконструкция remont-zdaniya-3.ru .
ремонт бетонных конструкций компания ремонт бетонных конструкций компания .
гидроизоляция подвала изнутри от грунтовых вод купить gidroizolyacziya-podvalov-2.ru .
капитальный ремонт и реконструкция в чем разница капитальный ремонт и реконструкция в чем разница .
гидроизоляция подвала цена гидроизоляция подвала цена .
Как поясняет нарколог Дмитрий Кузнецов: “Реабилитация алкоголиков должна быть многогранной. Только при сочетании медицинских и психологических методов, а также поддержке со стороны специалистов на всех этапах лечения, можно добиться устойчивого результата. Психологическая работа с пациентом помогает ему не только преодолеть зависимость, но и восстановить нормальное функционирование в обществе.” Также стоит отметить, что в некоторых случаях помощь может быть предоставлена бесплатно, и пациент может получить доступ к данным о возможных вариантах бесплатной реабилитации, что значительно облегчает процесс выздоровления.
Узнать больше – центр реабилитации алкоголиков
Наша клиника предлагает полный цикл услуг — от экстренного вызова нарколога до долгосрочной реабилитации. Каждый этап разрабатывается индивидуально с учётом возраста, стажа зависимости и сопутствующих заболеваний. Современные протоколы 2026 года позволяют проводить лечение максимально комфортно и эффективно, минимизируя болезненные симптомы и снижая риск срывов. В этом виде деятельности мы используем только проверенные методы медицины.
Детальнее – narkolog-na-dom-ekaterinburg-1.ru/
После завершения основного курса лечения в наркологической клинике в Краснодаре пациентам предлагаются программы социальной реабилитации. Они направлены на восстановление социальных навыков, адаптацию в обществе и предотвращение рецидивов. Ключевым элементом здесь является поддержка со стороны профессиональных социальных работников и участие в группах взаимопомощи.
Ознакомиться с деталями – https://narkologicheskaya-klinika-krasnodar0.ru/anonimnaya-narkologicheskaya-klinika-v-krasnodare/
http://uzinform.com.ua/news/2026/03/07/212282.html
Консультацию психолога https://психолог38.рф в Иркутске можно получить в центре Психолог38. Здесь работают высококвалифицированные специалисты: детские психологи, клинические, семейные и индивидуальные. Мы собрали профессионалов разных направлений, чтобы комплексно подходить к решению запросов клиентов. Бережно, деликатно, с научным подходом. Сложные ситуации в нашей жизни встречаются не редко, и своевременная помощь, поддержка очень важна. Находясь среди людей, легко можно оказаться в одиночестве, один на один со своими проблемами. Если вы ищите лучших психологов, которые реально помогают людям, обратите внимание на нашу организацию.
References:
Mansion casino
References:
https://graph.org/Crown-Casino-Online-Complete-Player-Guide-04-20
Нарколог на дом в Москве — это формат помощи, который рассматривают в тех случаях, когда после употребления алкоголя больному требуется врачебный осмотр без поездки в клинику. Чаще всего обращение связано с запоем, выраженным похмельным синдромом, нарушением сна, слабостью, тремором, тревогой, обезвоживанием, сердцебиением, скачками давления и общим ухудшением самочувствия. Дальнейшая тактика зависит от состояния больного на момент осмотра, длительности употребления алкоголя, возраста и сопутствующих заболеваний.
Детальнее – вызвать нарколога на дом в москве
Привітання з днем народження 40 років жінці прикольні
Наиболее частыми причинами обращения становятся запой, тяжелый похмельный синдром, тремор, выраженная слабость, тревога, бессонница, нестабильное давление, учащенный пульс, тошнота и признаки обезвоживания. Эти проявления могут сочетаться между собой и усиливаться после прекращения употребления алкоголя, особенно если эпизод длился несколько дней.
Получить дополнительную информацию – вызов нарколога на дом
гидроизоляция подвала изнутри от грунтовых вод купить remont-betona-4.ru .
реконструкция и ремонт remont-zdaniya-3.ru .
перепланировка квартиры в москве pereplanirovka-kvartir15.ru .
Обращение на стадии, когда человек не может самостоятельно справиться с зависимостью, значительно повышает шансы на успешное лечение и восстановление. Важно начать лечение на раннем этапе, когда физическая и психологическая зависимость еще не столь выражены.
Узнать больше – скорая наркологическая помощь воронеж
super cherry 1000 super cherry 1000
Процесс реабилитации алкоголиков с комплексным подходом в Москве состоит из нескольких этапов, начиная от медицинской детоксикации, включающей курс процедур и вывод из состояния зависимости, и заканчивая психологической реабилитацией и социальной адаптацией. Этот процесс занимает обычно от нескольких недель до нескольких месяцев в зависимости от стадии зависимости и состояния пациента. Важной особенностью комплексной реабилитации является внимание не только к физическому состоянию, но и к эмоциональному состоянию пациента, что помогает предотвратить рецидивы и наладить нормальные отношения с окружающим миром.
Исследовать вопрос подробнее – реабилитация алкоголиков город
гидроизоляция подвала изнутри от грунтовых вод цена за м2 gidroizolyacziya-podvalov-2.ru .
https://darknetmarketstore.com/ – drughub market link https://darknetmarketstore.com/
Многие пациенты и их родственники выбирают выезд врача на дом, когда пациент не в состоянии самостоятельно приехать в клинику. Домашняя помощь подходит в ситуациях, когда состояние пациента резко ухудшается, и важно начать лечение как можно быстрее.
Изучить вопрос глубже – наркологическая помощь воронеж
прокапаться от алкоголя в стационаре vyvod-iz-zapoya-v-staczionare-sankt-peterburg-9.ru .
реконструкция или капитальный ремонт remont-zdaniya-4.ru .
Консультацию психолога https://психолог38.рф в Иркутске можно получить в центре Психолог38. Здесь работают высококвалифицированные специалисты: детские психологи, клинические, семейные и индивидуальные. Мы собрали профессионалов разных направлений, чтобы комплексно подходить к решению запросов клиентов. Бережно, деликатно, с научным подходом. Сложные ситуации в нашей жизни встречаются не редко, и своевременная помощь, поддержка очень важна. Находясь среди людей, легко можно оказаться в одиночестве, один на один со своими проблемами. Если вы ищите лучших психологов, которые реально помогают людям, обратите внимание на нашу организацию.
гидроизоляция подвала изнутри от грунтовых вод купить gidroizolyacziya-podvalov-3.ru .
ремонт бетонных конструкций антикоррозия ремонт бетонных конструкций антикоррозия .
cocorico market url https://mydarknetmarketlinks.com/
torzon darkweb url https://darknetmarketlist.com/
nexus site official link https://darknetmarketslist.com/
crazy time crazy time
Отдельного внимания требуют повторяющиеся эпизоды. Если тяжелое состояние после алкоголя возникает не впервые, а запои становятся регулярными, вопрос обычно выходит за рамки одного обращения. Тогда домашний выезд рассматривают не только как способ уменьшить острые проявления, но и как первый этап дальнейшей оценки проблемы. В подобных ситуациях нередко обсуждают не только вывод из запоя, но и то, как дальше будет выстраиваться помощь при зависимости.
Подробнее – https://narkolog-na-dom-moskva-21.ru/
Похмельный синдром сопровождается головной болью, слабостью, тошнотой, сухостью во рту и нарушением сна, что часто возникает после запоя или при алкоголизме. Эти симптомы появляются из-за накопления токсинов и нарушения водно-солевого баланса. Капельница помогает ускорить выведение вредных веществ и восстановить нормальные функции организма, снижая нагрузку на внутренние системы и помогая человеку быстрее выйти из состояния запоев.
Подробнее – капельница от похмелья на дому
консультация нарколога на дому narkolog-na-dom-moskva-10.ru .
гидроизоляция подвала изнутри от грунтовых вод цена remont-betona-4.ru .
По запросу 777 https://deneb-spb.ru/shurup-shpilka
31 https://deneb-spb.ru/
По запросу 478 https://deneb-spb.ru/truby-pn-10-i-pn-20
24 https://deneb-spb.ru/truborezy-i-nozhnicy
Если вы зарегистрируетесь у нас на сайте, то ваша скидка будет сохраняться и подставляться автоматически https://deneb-spb.ru/ankery
И вы будете видеть ВАШИ цены https://deneb-spb.ru/zaglushki
Трубы и фитинги PPR: технические характеристики https://deneb-spb.ru/kollektory
Корзина https://deneb-spb.ru/truby-armirovannye-steklovoloknom-pn20-i-pn25
PN 20 – для трубопроводов горячего и холодного водоснабжения с давлением при t = 20 0 C – 2 https://deneb-spb.ru/truby-armirovannye-steklovoloknom-pn20-i-pn25
0 МПа, при t = 75 0 C – 0 https://deneb-spb.ru/nastennye-komplekty-pod-smesitel
6 МПа https://deneb-spb.ru/rasprodazha
dark websites https://mydarknetmarketsurl.com/
Нарколог на дом в Москве — это формат врачебной помощи, который рассматривают при состояниях после употребления алкоголя, когда больному требуется осмотр без посещения клиники. Чаще всего обращение связано с запоем, тяжелым похмельным синдромом, слабостью, нарушением сна, тремором, тревогой, тошнотой, сухостью во рту, скачками давления, сердцебиением и общим ухудшением самочувствия. Дальнейшая тактика определяется после осмотра, с учетом длительности употребления алкоголя, возраста, сопутствующих заболеваний и выраженности текущих симптомов.
Изучить вопрос глубже – нарколог на дом цена москва
клиника вывода из запоя со стационаром vyvod-iz-zapoya-v-staczionare-sankt-peterburg-9.ru .
какие работы относятся к реконструкции здания какие работы относятся к реконструкции здания .
гидроизоляция подвала цена гидроизоляция подвала цена .
перепланировка квартиры в москве pereplanirovka-kvartir15.ru .
этапы капитального ремонта remont-zdaniya-4.ru .
tordex onion https://darknetmarketlist.com/
buy cannabis
super cherry 5000 super cherry 5000
Консультацию психолога https://психолог38.рф в Иркутске можно получить в центре Психолог38. Здесь работают высококвалифицированные специалисты: детские психологи, клинические, семейные и индивидуальные. Мы собрали профессионалов разных направлений, чтобы комплексно подходить к решению запросов клиентов. Бережно, деликатно, с научным подходом. Сложные ситуации в нашей жизни встречаются не редко, и своевременная помощь, поддержка очень важна. Находясь среди людей, легко можно оказаться в одиночестве, один на один со своими проблемами. Если вы ищите лучших психологов, которые реально помогают людям, обратите внимание на нашу организацию.
Капельница от похмелья в Воронеже с выездом на дом, подбором препаратов и контролем состояния в наркологической клинике «Похмельная служба»
Изучить вопрос глубже – капельница от похмелья анонимно в воронеже
ремонтные работы по бетону remont-betona-3.ru .
gay bdsm porn
стационар капельница от алкоголя vyvod-iz-zapoya-v-staczionare-sankt-peterburg-9.ru .
ares shop https://darknetmarketslist.com/
Капельница от запоя в Нижнем Новгороде: снятие интоксикации, восстановление организма и помощь при запое под контролем специалистов в наркологической клинике «Похмельная служба»
Исследовать вопрос подробнее – поставить капельницу от запоя нижний новгород
нарколог на дом круглосуточно нарколог на дом круглосуточно .
Запой сопровождается выраженной интоксикацией, нарушением работы сердечно-сосудистой системы, тревожностью и бессонницей, что характерно для алкоголизма и хронического употребления алкоголя. При длительном течении организм человека теряет способность к самостоятельному восстановлению, и вмешательство становится необходимым. Стационар в этом случае позволяет контролировать динамику состояния больного и корректировать терапию в режиме реального времени, особенно при тяжелом течении алкоголизма.
Получить дополнительные сведения – наркология вывод из запоя в стационаре в нижнем новгороде
гидроизоляция подвала изнутри от грунтовых вод купить remont-betona-4.ru .
гидроизоляция подвала цена за м2 гидроизоляция подвала цена за м2 .
Запойное состояние сопровождается выраженной интоксикацией, нарушением сна, слабостью и тревожностью, что характерно для алкоголизма и различных форм зависимости. При этом самостоятельный выход из него часто затруднён из-за ухудшения самочувствия и отсутствия контроля над симптомами. Выезд нарколога позволяет быстро стабилизировать состояние человека и начать восстановление без дополнительной нагрузки, связанной с поездкой в клинику, а при необходимости вовремя определить показания к лечению в стационаре.
Выяснить больше – нарколог на дом вывод из запоя в санкт-петербурге
Поводом для обращения обычно становятся слабость, тремор, тревога, бессонница, учащенный пульс, нестабильное давление, тошнота и ощущение физического истощения. Эти проявления часто усиливаются после прекращения употребления алкоголя или на фоне затянувшегося запоя.
Ознакомиться с деталями – запой нарколог на дом в москве
реконструкция капитальный ремонт remont-zdaniya-3.ru .
nexus darknet shop https://mydarknetmarketsurl.com/
гидроизоляция подвала изнутри от грунтовых вод цена за м2 москва gidroizolyacziya-podvalov-2.ru .
Препараты, введённые через капельницу, начинают действовать почти сразу. Они поступают напрямую в кровоток, обходя желудочно-кишечный тракт, что позволяет ускорить процесс восстановления и устранить симптомы похмелья, такие как головная боль, тошнота и слабость, уже через 20–30 минут после начала процедуры.
Выяснить больше – https://kapelnicza-ot-pokhmelya-nizhnij-novgorod-1.ru
Услуги нарколога на дому в Самаре включают не только экстренный осмотр, но и комплекс медицинских мероприятий, направленных на снижение интоксикации, облегчение тяжелых симптомов и общее восстановление состояния пациента. Объем помощи зависит от клинической картины, длительности употребления алкоголя или других психоактивных веществ, возраста, хронических заболеваний и текущих рисков. Врач подбирает схему индивидуально, исходя из того, какие задачи необходимо решить в конкретный момент — снять острые проявления, стабилизировать самочувствие или подготовить пациента к дальнейшему лечению зависимости.
Получить больше информации – narkolog-na-dom-samara-5.ru/
crazy time play crazy time play
Наркологическая клиника в Омске оказывает квалифицированную помощь пациентам, страдающим от различных видов зависимости. Основой успешного лечения является комплексный подход, который включает тщательную диагностику, медикаментозное сопровождение, психологическую поддержку и реабилитационные программы. В «АльфаМед» применяются передовые технологии и индивидуальные методики, направленные на восстановление здоровья и предупреждение рецидивов.
Получить дополнительную информацию – https://narkologicheskaya-klinika-omsk0.ru/
Отдельно оценивают ситуации, когда подобные эпизоды повторяются. Если человек уже не впервые переносит запой, тяжелый выход из него или выраженное ухудшение самочувствия после алкоголя, вопрос обычно выходит за рамки разовой помощи. Тогда уже при первичном обращении рассматривают не только текущую стабилизацию состояния, но и дальнейшие шаги. При затяжном течении проблемы могут обсуждаться лечение зависимости, программа восстановления и условия, при которых потребуется наблюдение в стационаре.
Выяснить больше – вызвать нарколога на дом
buy cannabis
gay anime porn
вывести из запоя в стационаре санкт петербург vyvod-iz-zapoya-v-staczionare-sankt-peterburg-9.ru .
Капельница от похмелья в Воронеже с устранением слабости, тошноты и головной боли в наркологической клинике «Похмельная служба»
Получить дополнительную информацию – капельница от похмелья на дом в воронеже
Капельница от похмелья в Воронеже с нормализацией состояния и поддержкой организма в наркологической клинике «Похмельная служба»
Подробнее можно узнать тут – капельница от похмелья анонимно
Капельница от запоя с детоксикацией организма в Нижнем Новгороде представляет собой одну из самых эффективных процедур для быстрого улучшения состояния пациента, страдающего от алкогольной зависимости. Такой подход направлен не только на устранение токсинов, но и на восстановление нормального функционирования внутренних органов, которые пострадали от длительного употребления алкоголя.
Получить больше информации – https://kapelnica-ot-zapoya-nizhnij-novgorod-4.ru
реконструкция и капитальный ремонт реконструкция и капитальный ремонт .
nexus darknet market onion https://darknetmarketlist.com/
Метод
Узнать больше – http://narkologicheskaya-klinika-omsk0.ru
Консультацию психолога https://психолог38.рф в Иркутске можно получить в центре Психолог38. Здесь работают высококвалифицированные специалисты: детские психологи, клинические, семейные и индивидуальные. Мы собрали профессионалов разных направлений, чтобы комплексно подходить к решению запросов клиентов. Бережно, деликатно, с научным подходом. Сложные ситуации в нашей жизни встречаются не редко, и своевременная помощь, поддержка очень важна. Находясь среди людей, легко можно оказаться в одиночестве, один на один со своими проблемами. Если вы ищите лучших психологов, которые реально помогают людям, обратите внимание на нашу организацию.
Процедура начинается с осмотра пациента. Врач измеряет давление, пульс, оценивает общее состояние и выраженность симптомов. На основании этих данных формируется состав капельницы и план лечения. Такой подход позволяет учитывать индивидуальные особенности пациента и эффективно провести вывод из запоя.
Изучить вопрос глубже – капельница от похмелья
Перед началом процедуры врач проводит осмотр пациента. Оцениваются основные показатели, включая давление и пульс, а также выраженность симптомов. На основании полученных данных формируется состав капельницы и определяется тактика лечения, что позволяет эффективно провести вывод из запоя.
Детальнее – http://kapelnicza-ot-pokhmelya-voronezh-6.ru
Наркологическая помощь в Воронеже сегодня — это не просто медицинская услуга, а реальный шанс быстро и безопасно вернуть контроль над жизнью себе или своему близкому человеку. В крупном городе Центрального Черноземья, где ритм жизни высокий, а стресс и доступность веществ создают серьёзные риски, тысячи жителей ежегодно сталкиваются с проблемой зависимости. Алкоголь, синтетические наркотики, соли, спайсы — всё это требует немедленного профессионального вмешательства. Клиника «Клиника Плюс» предоставляет полную наркологическую помощь в Воронеже 24 часа в сутки, 7 дней в неделю. Мы гарантируем анонимное лечение алкоголизма и наркомании, срочный выезд нарколога на дом в течение 30–60 минут, полную конфиденциальность и современные протоколы лечения 2026 года, которые позволяют купировать острое состояние уже в первые часы.
Получить дополнительные сведения – https://narkologicheskaya-pomoshh-voronezh-2.ru/
Обращение за помощью нарколога на дому имеет ряд преимуществ, способствующих быстрому и эффективному лечению:
Детальнее – http://vyvod-iz-zapoya-yaroslavl00.ru/
Наркологический стационар с комфортными условиями в Санкт-Петербурге — это специализированное учреждение, которое не только помогает пациентам избавиться от зависимости, но и создает благоприятные условия для выздоровления. В таких стационарах важны не только высококачественные медицинские услуги, но и уютная атмосфера, которая способствует восстановлению физического и психоэмоционального состояния пациента.
Подробнее можно узнать тут – частный наркологический стационар санкт-петербург
ремонт бетонных конструкций гарантия remont-betona-3.ru .
Капельница от похмелья — это эффективный способ экстренной помощи, предназначенный для того, чтобы помочь организму быстро восстановиться после злоупотребления алкоголем. В наркологической клинике «Частный медик 24» в Самаре мы предоставляем услугу безопасной детоксикации и восстановления 24/7. Капельница помогает организму вывести токсины, восстановить водно-электролитный баланс и улучшить общее состояние пациента, не создавая дополнительных нагрузок на сердце, печень и почки.
Углубиться в тему – капельница от похмелья цена в самаре
выезд на дом нарколога анонимно выезд на дом нарколога анонимно .
wethenorth darknet url https://darknetmarketslist.com/
Наркологическая помощь на дому помогает избежать стресса, связанного с поездкой в клинику. Особенно это важно в случаях, когда пациент находится в состоянии тяжёлой интоксикации или переживает абстинентный синдром, который можно только усугубить дополнительной нагрузкой. Врач приедет в кратчайшие сроки, обеспечивая необходимое лечение в первые часы после ухудшения состояния. Также важно, что при выезде специалист гарантирует полную анонимность, что особенно важно для многих людей, которые боятся открыто признаться в своей проблеме. Профессиональная наркологическая помощь на дому позволяет избежать срыва и начать процесс восстановления без стресса.
Углубиться в тему – http://www.domen.ru
Запой сопровождается выраженной интоксикацией, нарушением работы сердечно-сосудистой системы, тревожностью и бессонницей, что характерно для алкоголизма и хронического употребления алкоголя. При длительном течении организм человека теряет способность к самостоятельному восстановлению, и вмешательство становится необходимым. Стационар в этом случае позволяет контролировать динамику состояния больного и корректировать терапию в режиме реального времени, особенно при тяжелом течении алкоголизма.
Подробнее можно узнать тут – быстрый вывод из запоя в стационаре
Не каждое состояние можно безопасно корректировать дома. При признаках тяжелого отравления, судорогах, выраженных нарушениях сознания, риске делирия, серьезных сердечно-сосудистых осложнениях или сочетанном употреблении нескольких веществ врач может рекомендовать срочную госпитализацию. В таких случаях домашний формат не заменяет стационар, а задача специалиста заключается в том, чтобы вовремя распознать угрозу и направить пациента на более интенсивное лечение, включая возможную госпитализацию в центр реабилитации при наркомании для борьбы с ломкой и лечением зависимости от наркотиков.
Детальнее – нарколог на дом анонимно самара
Как продвигать сайты https://vlcjq.ru/prodvizhenie-sajtov-seo-i-internet-marketing-v-2026-godu/
гидроизоляция подвалов цена gidroizolyacziya-podvalov-3.ru .
1xbet giri? 1xbet giri? .
согласование перепланировки согласование перепланировки .
gay anime porn
buy cannabis
К ситуациям, при которых используется домашний формат, относятся:
Подробнее – анонимный вывод из запоя на дому в санкт-петербурге
Откладывание помощи создает иллюзию управления ситуацией, тогда как нейробиологические процессы продолжают развиваться в неблагоприятном направлении. Регулярная интоксикация перестраивает дофаминовую и ГАМК-ергическую системы, снижает естественную выработку нейромедиаторов и формирует условные рефлексы, связывающие употребление с любым стрессовым триггером. При развитии абстинентного синдрома появляются характерные признаки: выраженная слабость, тошнота, ломки, нарушения сна, тахикардия. В результате каждый последующий кризис переносится тяжелее, требует более длительной стабилизации и несет повышенные риски для печени, сердца и центральной нервной системы. Кроме того, затягивание снижает мотивацию пациента к лечению, так как период «ремиссии» между срывами создает ложное ощущение восстановления. Профессиональная наркология работает с этой динамикой, предлагая помощь на том этапе, когда вмешательство еще эффективно и не требует реанимационных мер.
Получить дополнительные сведения – https://narkologicheskaya-pomoshh-voronezh-3.ru
cocorico market https://darknetmarketlist.com/
Your article helped me a lot, is there any more related content? Thanks! https://accounts.binance.info/en-NG/register-person?ref=YY80CKRN
Details inside: https://sarapang.com
Когда человек или его родственники понимают, что нужна наркологическая помощь в Воронеже, время становится решающим фактором. Запой, ломка, тяжёлая интоксикация — в таких ситуациях промедление может привести к необратимым последствиям для здоровья и жизни. Наша клиника создана именно для того, чтобы оказывать эффективную круглосуточную наркологическую помощь в Воронеже в самых сложных случаях. Мы не заставляем ждать в очередях государственных учреждений, не ставим на учёт и не разглашаем информацию. Всё происходит анонимно, на дому или в комфортных условиях нашей партнёрской клиники. Пациенты из Воронежа, Воронежской области, а также соседних регионов уже более 12 лет выбирают «Клиника Плюс» благодаря сочетанию скорости, профессионализма, полной анонимности и доказанной результативности.
Разобраться лучше – наркологическая помощь на дому воронеж
Консультацию психолога https://психолог38.рф в Иркутске можно получить в центре Психолог38. Здесь работают высококвалифицированные специалисты: детские психологи, клинические, семейные и индивидуальные. Мы собрали профессионалов разных направлений, чтобы комплексно подходить к решению запросов клиентов. Бережно, деликатно, с научным подходом. Сложные ситуации в нашей жизни встречаются не редко, и своевременная помощь, поддержка очень важна. Находясь среди людей, легко можно оказаться в одиночестве, один на один со своими проблемами. Если вы ищите лучших психологов, которые реально помогают людям, обратите внимание на нашу организацию.
darknet drug market https://darknetmarketlist.com/
Наркологический стационар с комфортными условиями в Санкт-Петербурге — это специализированное учреждение, которое не только помогает пациентам избавиться от зависимости, но и создает благоприятные условия для выздоровления. В таких стационарах важны не только высококачественные медицинские услуги, но и уютная атмосфера, которая способствует восстановлению физического и психоэмоционального состояния пациента.
Узнать больше – https://narkologicheskij-staczionar-sankt-peterburg-4.ru/
частный нарколог на дом быстро narkolog-na-dom-moskva-10.ru .
проект перепланировки стоимость proekt-pereplanirovki-kvartiry26.ru .
Наркологический стационар в Санкт-Петербурге: помощь при зависимости, восстановление и круглосуточное наблюдение в наркологической клинике «Похмельная служба»
Получить дополнительные сведения – наркологическая клиника стационар
От 17000 рублей https://rentbusspb.ru/voprosi/
Прокат Jetour t2 без водителя https://rentbusspb.ru/arenda-mercedes-s-class-w221-long/
Можно ли выбрать конкретного водителя или есть ли определенные критерии при подборе водителя?
Присылайте нам Ваши предложения https://rentbusspb.ru/arenda-minivena-mercedes-v-class-amg-6-mest/
г https://rentbusspb.ru/nasha-galereya/
Иркутск https://rentbusspb.ru/arenda-avtobusa-tur-klassa-s-voditelem/
седан передний автомат 123 л https://rentbusspb.ru/arenda-microavtobusa-mercedes-sprinter-luxuri-2015-g/
с https://rentbusspb.ru/arenda-minivena-ford-torneo-custom-s-voditelem/
1,6 л 2020 https://rentbusspb.ru/voyah-dream/
cocorico url https://darknetmarketslist.com/
Перед смертью супруги заморозили несколько эмбрионов, так как планировали завести детей при помощи суррогатной матери https://www.legnostyle.ru/catalog/inter-eri/?PAGEN_1=2
Эмбрионы хранились в клинике в жидком азоте при температуре -196 градусов https://www.legnostyle.ru/catalog/inter-eri/potolki/potolok-model-pt-5.html
Бабушки и дедушки новорожденного долгое время судились Опубликовано 13/04/2018 – 21:25
Конечно, покупать немецкую кухню в СПб дорого, но это оправданные траты, поскольку российских аналогов не существует и дорогие кухни на заказ остаются все также востребованы https://www.legnostyle.ru/catalog/inter-eri/stenovie-paneli/s27.html
В Санкт-Петербурге, Москве и других городах люди выбирают мебель премиум уровня для самого важного помещения в доме и кухни Германии — отличный выбор!
Вот здесь Вы сможете найти элитную мебель по доступной цене https://www.legnostyle.ru/catalog/mebel/iz-duba/?PAGEN_1=2
Использование качественных материалов гарантирует длительный эксплуатационный период (при корректном использовании) https://www.legnostyle.ru/dubovye-dveri.html?PAGEN_2=22
Строго говоря, золочение может быть выполнено самостоятельно https://www.legnostyle.ru/catalog/dveri/?PAGEN_1=19
Знать и уметь для этого нужно не так много, как может показаться на первый взгляд https://www.legnostyle.ru/catalog/inter-eri/s26.html
Наличие специального клея-лака, а так же книжки сусального золота позволит преобразить практически любую мебель https://www.legnostyle.ru/catalog/mejkomnatnie-dveri/nestandarnye/model-p37.html
В действительности перепродажа товаров из Китая выгодное дело, если знать правильных продавцов и особенности китайского рынка https://www.legnostyle.ru/catalog/mejkomnatnie-dveri/mejkomnatnaa-dver-d17.html
Выбор товаров и производителей в
Уникальные модели, в которых используются особые технологии, например, сложная покраска, несколько уровней фрезеровки, не рассчитаны на массового покупателя https://www.legnostyle.ru/catalog/mejkomnatnie-dveri/mejkomnatnaya-dver-d36.html
Наркологическая помощь в Воронеже востребована в тех ситуациях, когда проблема с алкоголем или наркотическими веществами уже перестает быть эпизодом и начинает влиять на здоровье, поведение, работу, отношения с близкими и повседневную жизнь. Для одних семей поводом для обращения становится запой, который затягивается на несколько дней. Для других — тяжелое состояние после употребления, ломки, тревога, бессонница, дрожь, скачки давления, агрессия, потеря контроля над количеством выпитого или повторяющиеся срывы после попыток остановиться самостоятельно. Во всех этих случаях важна не формальная услуга, а реальная медицинская помощь со стороны квалифицированных специалистов, которая подбирается под состояние человека и помогает не только снять остроту ситуации, но и определить дальнейший маршрут лечения.
Подробнее тут – вызов наркологической помощи
Вы можете прийти в студию чтобы узнать конечную стоимость своей татуировки и познакомиться с мастером https://maze.tattoo/catalog/ts/
В процессе работы применяются современные машинки с минимальной вибрацией и максимально точным контролем https://maze.tattoo/catalog/e/enot-i-barsuk/
А самое главное – техника работает так, чтобы свести к минимуму любые болевые ощущения https://maze.tattoo/catalog/d/derevo/
В конце процедуры мастер наносит кремы и гидрогелевые повязки, чтобы место зажило в самые короткие сроки https://maze.tattoo/catalog/d/
Он обязательно предоставляет подробную консультацию о том, как следить за тату в первые дни и ускорить процесс заживления https://maze.tattoo/catalog/b/braslety/
ТАТУИРОВКА Мы сочетаем современные методы татуировки с традиционными!
с 2008 года https://maze.tattoo/catalog/z/
Для нас татуировка – это нечто особенное, уникальное, ведь работают здесь настоящие профессионалы, невероятно креативные, творческие личности https://maze.tattoo/catalog/m/medved/
Каждая их tattoo становится шедевром https://maze.tattoo/catalog/r/rukava/
Именно в этой студии мне сделали первое тату https://maze.tattoo/catalog/a/akuly/
Теперь в коллекции + ещё одно тату и пирсинг https://maze.tattoo/catalog/d/dzhordano-bruno/
Мастера и администраторы очень открытые и дружелюбные люди https://maze.tattoo/catalog/k/krylya/
В самой студии всё на высшем уровне https://maze.tattoo/catalog/y/
Желаю им успехов и процветания https://maze.tattoo/catalog/ch/cheshirskiy-kot/
И я ещё обязательно к ним буду обращаться https://maze.tattoo/catalog/g/gribi/
Наркологическая помощь в Воронеже: эффективное лечение запоя, детокс и поддержка специалистов в наркологической клинике «Клиника Плюс».
Исследовать вопрос подробнее – скорая наркологическая помощь в воронеже
Наркологическая помощь в Воронеже: профессиональное лечение зависимостей, выезд врача, анонимная помощь в наркологической клинике «Клиника Плюс».
Детальнее – http://narkologicheskaya-pomoshh-voronezh.ru/
1xbet spor bahislerinin adresi 1xbet spor bahislerinin adresi .
torzon onion https://darknetmarketlist.com/
согласование перепланировки квартиры в москве согласование перепланировки квартиры в москве .
На первом этапе специалист проводит визуальный осмотр пациента, измеряет артериальное давление, пульс, уровень кислорода в крови и оценивает общее психоэмоциональное состояние. Важно выявить степень интоксикации, наличие осложнений и противопоказаний к проведению терапии на дому. В случае наркомании и длительного употребления наркотиков, пациенту может быть предложена консультация и лечение, включая реабилитацию на летний период, если состояние требует интенсивного контроля.
Узнать больше – нарколог на дом вывод самара
During a casual exploration of animal artwork and pet-inspired design platforms, I noticed something embedded mid-content check this dog print shop and it offers adorable pet-related prints that are perfect for animal lovers and highly recommended overall
Консультацию психолога https://психолог38.рф в Иркутске можно получить в центре Психолог38. Здесь работают высококвалифицированные специалисты: детские психологи, клинические, семейные и индивидуальные. Мы собрали профессионалов разных направлений, чтобы комплексно подходить к решению запросов клиентов. Бережно, деликатно, с научным подходом. Сложные ситуации в нашей жизни встречаются не редко, и своевременная помощь, поддержка очень важна. Находясь среди людей, легко можно оказаться в одиночестве, один на один со своими проблемами. Если вы ищите лучших психологов, которые реально помогают людям, обратите внимание на нашу организацию.
Основной задачей капельницы от запоя является быстрое устранение симптомов интоксикации, связанных с длительным употреблением алкоголя. Введение в вену специальных растворов помогает не только вывести алкогольные токсины, но и восстановить нормальное функционирование внутренних органов, пострадавших от воздействия алкоголя. Подбор состава капельницы всегда индивидуален и зависит от состояния пациента, а также может включать дополнительные методы лечения, такие как кодирование от алкоголизма.
Выяснить больше – капельница от запоя на дому цена нижний новгород
nexus darknet shop https://mydarknetmarketlinks.com/
На первом этапе специалист проводит визуальный осмотр пациента, измеряет артериальное давление, пульс, уровень кислорода в крови и оценивает общее психоэмоциональное состояние. Важно выявить степень интоксикации, наличие осложнений и противопоказаний к проведению терапии на дому. В случае наркомании и длительного употребления наркотиков, пациенту может быть предложена консультация и лечение, включая реабилитацию на летний период, если состояние требует интенсивного контроля.
Подробнее – нарколог на дом цена самара
nexus onion https://mydarknetmarketsurl.com/
nexus official link https://darknetmarketslist.com/
cocorico market url https://mydarknetmarketsonline.com/
Процедура проведения капельницы от запоя обычно не занимает много времени и проводится в условиях медицинского центра. Во время процедуры пациент может ощущать незначительный дискомфорт при введении иглы, но процесс восстановления организма через вену происходит быстро и эффективно. Капельница помогает снизить уровень алкоголя в крови, улучшить метаболизм и предотвратить ухудшение состояния.
Углубиться в тему – вызов на дом капельницы от запоя нижний новгород
сделать проект перепланировки квартиры proekt-pereplanirovki-kvartiry26.ru .
Наркологическая помощь в Воронеже: срочный выезд нарколога, капельницы и лечение зависимостей в наркологической клинике «Клиника Плюс».
Разобраться лучше – наркологическая помощь на дому
Нужна градирня? как работает градирня ключевой элемент системы охлаждения, позволяющий эффективно снижать температуру воды за счет теплообмена с воздухом. Применяется в промышленности, энергетике и на предприятиях. Обеспечивает стабильную и экономичную работу оборудования.
silk road market darknet https://mydarknetmarketlinks.com/
Лечение алкоголизма в Воронеже у нас проводится на всех стадиях: от первой помощи при запое до кодирования и долгосрочной поддержки. Для пациентов с наркотической зависимостью (включая синтетические каннабиноиды и опиоиды) мы применяем щадящие схемы детоксикации, которые минимизируют болезненные симптомы и снижают риск срывов. Кодирование от алкоголизма и наркомании доступно в нескольких вариантах: медикаментозное (инъекции, импланты, «Двойной блок»), гипносуггестивное и комбинированное. Каждый метод подбирается после тщательной диагностики, чтобы результат был максимально долгосрочным.
Подробнее тут – наркологическая помощь анонимно
nexus onion mirror https://darknetmarketlist.com/
black ops market url https://mydarknetmarketsonline.com/
Нужна септик или погреб? https://septikidlyadoma.mystrikingly.com эффективное решение для автономной канализации. Системы обеспечивают качественную очистку сточных вод, устраняют запахи и безопасны для окружающей среды. Подходят для частных домов, коттеджей и загородных участков.
https://darknetmarketslist.com/ – darknet market list https://darknetmarketslist.com/
https://mydarknetmarketsurl.com/ – black ops link https://mydarknetmarketsurl.com/
Обращение в наркологический стационар в Санкт-Петербурге может стать важным шагом для людей, страдающих от алкогольной или наркотической зависимости. Стационарное лечение предоставляет пациентам не только медицинскую помощь, но и психологическую поддержку, необходимую для успешной реабилитации. Это подход, ориентированный на комплексное восстановление здоровья, физическое и психоэмоциональное состояние пациента.
Выяснить больше – http://narkologicheskij-staczionar-sankt-peterburg-2.ru/
https://mydarknetmarketlinks.com/ – cannaexpress darknet https://mydarknetmarketlinks.com/
Такие симптомы требуют медицинского вмешательства, поскольку могут усиливаться без лечения. Капельница позволяет стабилизировать состояние и ускорить восстановление. Услуги могут предоставляться анонимно, а при необходимости пациент направляется на лечение в стационаре.
Выяснить больше – капельница от похмелья на дому
Многие пациенты и их родственники выбирают выезд врача на дом, когда пациент не в состоянии самостоятельно приехать в клинику. Домашняя помощь подходит в ситуациях, когда состояние пациента резко ухудшается, и важно начать лечение как можно быстрее.
Получить дополнительную информацию – оказание наркологической помощи в воронеже
https://mydarknetmarketsurl.com/ – onion dark website https://mydarknetmarketsurl.com/
https://mydarknetmarketlinks.com/ – dark markets https://mydarknetmarketlinks.com/
While searching for smooth and fast online platforms, I stumbled upon open fast loading portal – The website has a clean interface, with everything working smoothly and loading fast, making navigation simple and efficient.
Комплексное лечение в наркологическом стационаре включает несколько последовательных этапов, каждый из которых направлен на решение конкретных задач. Начальный этап включает в себя медицинское вмешательство, направленное на устранение токсинов из организма, и стабилизацию общего состояния пациента. Далее начинается реабилитация, которая помогает закрепить достигнутые результаты и восстановить психоэмоциональное состояние пациента. Для выбора подходящего стационара стоит ознакомиться с отзывами и дополнительной информацией о клинике, а также уточнить, в каком районе города она расположена.
Подробнее тут – наркологический стационар санкт-петербург
Клиника «Клиника Плюс» предлагает комплексную наркологическую помощь в Воронеже, включая выезд нарколога на дом, медикаментозную терапию для вывода из запоя и реабилитацию. Мы понимаем, как важно для пациентов и их близких получить поддержку именно в тот момент, когда она нужна.
Подробнее – http://narkologicheskaya-pomoshh-voronezh-4.ru
mitchwantssununu.com – Interesting concept site, content feels direct and somewhat thought provoking today
Хороший интернет магазин с понятным сайтом и нормальным отношением к клиенту. После оформления заказа долго ждать не пришлось, менеджер сразу всё подтвердил. Телефон доставили быстро, внешний вид и комплектация полностью соответствуют описанию. Остался доволен покупкой, ресторе 77
In the middle of researching sustainable fuel options, I came across browse this energy resource – It is an interesting platform, and I discovered new information simply by exploring it without any deep research plan.
While comparing seasonal festival platforms, I stumbled upon this winter event page – The site feels vibrant and helpful, with content that is easy to read and structured in a way that keeps users interested throughout their visit.
People who enjoy natural and rustic online shopping platforms often browse sites like Cove Wheat Outpost Market Flow where navigation is smooth and categories are clearly structured – The overall design ensures a comfortable browsing experience that feels simple, inviting, and easy to use from start to finish.
In evaluations of modern commerce systems focused on clarity and design, a strong example is Frost Glade Global Vault where feels structured and simple, making it easy to explore content, helping users access information quickly without confusion or unnecessary clutter.
Главная особенность стационара с круглосуточным наблюдением — это постоянное присутствие врачей и медсестёр, готовых оказать помощь в любой момент. Это особенно важно на этапе снятия острых симптомов, когда организм находится в состоянии максимальной интоксикации. Наблюдение за пациентами в условиях стационара позволяет оперативно подбирать необходимые препараты и вмешиваться при первых признаках ухудшения состояния. В результате такого подхода повышается эффективность лечения и снижается риск осложнений, что делает процесс восстановления более быстрым и безопасным.
Подробнее – лечение в наркологическом стационаре санкт-петербург
https://mydarknetmarketsurl.com/ – drughub darknet url https://mydarknetmarketsurl.com/
People who appreciate organized online marketplaces often browse platforms like Cove District Sun Goods Center where items are presented in a bright and structured layout – The design makes browsing feel smooth and enjoyable, allowing users to explore products easily without distraction or unnecessary complexity.
During my search for sustainability-focused information, I encountered open this energy learning site – It turned out to be an interesting resource, and I gained new insight simply by exploring it briefly.
https://mydarknetmarketlinks.com/ – nexus onion https://mydarknetmarketlinks.com/
While reviewing island retreat websites featuring boutique stays and scenic surroundings, I found a well crafted listing worth exploring further < tranquil hillside retreat card – It delivers a calm and welcoming presentation, making the property feel both organized and visually appealing very nicely
While browsing independent analysis style pages I discovered a site that emphasizes short and direct commentary featuring public opinion archive – the tone is steady and somewhat provocative making it suitable for readers who enjoy simplified yet meaningful discussion content online
Наркологический стационар в Санкт-Петербурге предоставляет пациентам комплексное лечение зависимости от психоактивных веществ. Проблемы, связанные с алкоголизмом, наркоманией и другими формами зависимости, требуют индивидуального подхода и профессиональной помощи. Комплексное лечение в таких учреждениях позволяет не только пройти детоксикацию, но и получить полноценную реабилитацию, что дает пациентам шанс на долгосрочную ремиссию и улучшение качества жизни. В некоторых случаях, при запое или необходимости выезда на дом, может быть предложен центр, где решаются все вопросы, связанные с лечением зависимости и восстановлением пациента.
Подробнее – https://narkologicheskij-staczionar-sankt-peterburg-1.ru
Users who appreciate stylish ecommerce design often respond well to visually refined interfaces that keep product discovery intuitive and aesthetically pleasing gildedcove stylish emporium – The interface delivers a modern shopping experience where structure and design work together to support effortless browsing and product exploration.
incest porn stories
Персональный менеджер https://rentbusspb.ru/mercedes-sprinter-vip-black-2019/
Год выпуска:
Аренда Lexus LX 570 https://rentbusspb.ru/range-rover/
Аренда автомобиля с водителем по Иркутску и области https://rentbusspb.ru/arenda-mercedes-s-221-restyling-s-voditelem/
Диспетчеризация 24/7 https://rentbusspb.ru/mustang-2022-г/
Аренда транспорта с водителем https://rentbusspb.ru/nasha-galereya/
Наркологический стационар в Санкт-Петербурге: круглосуточное лечение, детоксикация и наблюдение специалистов в комфортных условиях в наркологической клинике «Похмельная служба»
Исследовать вопрос подробнее – наркологическая помощь стационар санкт-петербург
People who prefer straightforward ecommerce systems often engage with sites like Harbor Kettle Commerce Hub Center where items are displayed in a minimal structured format – The design ensures browsing feels smooth, logical, and easy to navigate across all categories.
Across various digital marketplace studies emphasizing usability, a strong example is Gilded Brook Experience District where nice visual balance and navigation works without any confusion, allowing users to move comfortably through well structured and visually balanced pages.
As I reviewed multiple winter festival platforms, I found open this event page – The content appears well curated and enjoyable to read, giving visitors a smooth experience while exploring useful and interesting details.
While looking through entertainment-focused websites, I stumbled upon open this comedy page – The content feels very lighthearted, and the overall vibe makes it enjoyable to browse casually without any serious or complex tone.
People who appreciate organized online goods marketplaces often browse platforms like Sun District Goods Cove Hub Store where items are arranged in a bright and clean layout – The interface ensures easy navigation and a pleasant shopping experience that feels structured and user friendly.
https://darknetmarketslist.com/ – dark web marketplaces https://darknetmarketslist.com/
https://mydarknetmarketsurl.com/ – wethenorth onion https://mydarknetmarketsurl.com/
Похмельный синдром сопровождается головной болью, слабостью, тошнотой, сухостью во рту и нарушением сна, что часто возникает после запоя или при алкоголизме. Эти симптомы появляются из-за накопления токсинов и нарушения водно-солевого баланса. Капельница помогает ускорить выведение вредных веществ и восстановить нормальные функции организма, снижая нагрузку на внутренние системы и помогая человеку быстрее выйти из состояния запоев.
Узнать больше – http://www.domen.ru
Users who appreciate minimal structured ecommerce layouts often enjoy vault concepts that improve navigation and maintain clarity across all categories Glass Harbor Vault System – The interface is polished and simple, ensuring a smooth browsing journey where product discovery feels intuitive and visually well organized.
People who appreciate well designed artisan ecommerce platforms often engage with sites such as Wave Trail Creative Market Hub where product presentation is both organized and visually appealing – The layout supports intuitive browsing and highlights creativity, ensuring a smooth and enjoyable shopping experience across the entire site.
modelscanvas.com – Creative portfolio vibe, visuals and layout feel clean and professional design
https://mydarknetmarketlinks.com/ – silk road darknet link https://mydarknetmarketlinks.com/
While exploring online grocery innovation projects, I came across a concept store website with a very simple but effective layout structure hope digital supermarket view – The presentation is clean and minimal, making navigation intuitive and the overall idea easy to grasp quickly
Очень приятно иметь дело с магазином, где сотрудники действительно разбираются в товаре. Задал несколько вопросов перед покупкой и получил понятные ответы без навязывания. Телефон доставили оперативно, всё было запечатано и без повреждений. Покупка прошла спокойно и уверенно: фотообои озон
While browsing personal growth and resilience-focused websites, I came across visit this resilience page – The content feels really meaningful and relatable, and it is written in a thoughtful way that makes it easy to connect with the message being shared overall.
In evaluations of digital storefront platforms focused on clarity, a strong example is Night Glade Global House where everything feels straightforward and browsing is comfortable and stable, helping users access information quickly without unnecessary clutter or confusion.
As I reviewed various nonprofit websites, I found open this page – The structure is simple and effective, helping users quickly understand the information without unnecessary complexity or overwhelming detail.
Users who appreciate artistic online shops often browse platforms such as Teal Vendor Cove Handmade Atelier Hub where products are arranged in a clean creative structure – The interface ensures a visually engaging experience that feels organized, expressive, and easy to navigate across all categories.
mother daughter porn
Users who prefer structured vendor ecosystems often explore sites such as Apricot Vendor Meadow Works Market where content is displayed in accessible layouts – The interface ensures browsing feels smooth, intuitive, and well arranged for easy discovery.
https://mydarknetmarketsurl.com/ – torzon onion https://mydarknetmarketsurl.com/
While exploring photography and modeling portfolios online I found a site that organizes visuals in a refined layout including professional image gallery hub – the design feels clean and modern helping users focus on the showcased work without unnecessary distractions
During my review of online content, I stumbled upon open bonus baby info page – I came across it today and it seems pretty useful, with a nicely structured presentation that is easy to browse.
Modern online buyers who value efficient interface design often highlight the importance of straightforward browsing systems when interacting with stores like Berry Cove Storefront which prioritize clarity in categories, allowing users to move between sections effortlessly while maintaining a calm and structured shopping environment – Its layout emphasizes user comfort, ensuring that navigation remains intuitive and product pages load in a clean, distraction-free format
https://mydarknetmarketlinks.com/ – nexus darknet market official https://mydarknetmarketlinks.com/
While researching boutique winery brands and icewine producers, I discovered a refined and well structured website that presents its offerings clearly iniskillin vineyard overview site – The wine details are presented in an attractive way, making the overall brand feel premium and easy to explore
Женский журнал https://vybir.kiev.ua статьи о моде, красоте, здоровье и отношениях. Актуальные тренды, советы экспертов и вдохновение для современной женщины каждый день.
In modern UX evaluations of e-commerce platforms focused on clarity and usability, a strong example is Sage Harbor Vendor Vault where clean design and content is arranged in a logical order, helping users navigate smoothly without confusion.
проект перепланировки заказать москва проект перепланировки заказать москва .
During my search for wildlife protection resources, I noticed check this conservation site – The organization appears well planned, and the content reflects a strong sense of purpose, making it easy to understand the mission and appreciate the work being done.
1xbet giri? azerbaycan 1xbet giri? azerbaycan .
1xbet giri? 1xbet giri? .
1xbet az 1xbet az .
1xbet giri? azerbaycan 1xbet giri? azerbaycan .
People who appreciate efficient digital commerce platforms often browse sites like Harbor Teal Commerce Grid Hub where items are structured in a clean and logical way – The interface makes browsing smooth and easy, with categories that are simple to understand and navigate.
phiferforcongress – Political campaign website shares candidate vision and policies community focus
генерация nejroset-dlya-referatov-20.ru .
In the middle of researching social empowerment groups, I came across explore this community network page – The initiative looks significant, and the information is presented clearly, making it easy to follow and understand the structure.
нейросеть генерации текстов для студентов nejroset-dlya-referatov-21.ru .
Shoppers exploring curated ecommerce environments often appreciate collective layouts that prioritize simplicity and structured presentation for better usability Gladeridge Collective Selection Hub – The design is minimal and modern, ensuring browsing feels visually clean, well organized, and consistently easy to follow.
Женский онлайн журнал https://whoiswho.com.ua стиль, красота и здоровье. Полезные советы, лайфхаки и актуальные темы для женщин. Все о жизни, моде и саморазвитии.
Все о здоровье https://mikstur.com на одном портале: болезни, симптомы, методы лечения и профилактика. Советы врачей, актуальные медицинские статьи и рекомендации. Помогаем лучше понимать организм и заботиться о своем самочувствии.
Сайт для женщин https://prowoman.kyiv.ua практичные советы по уходу за собой, здоровью и отношениям. Читайте, развивайтесь и улучшайте свою жизнь.
While exploring classic themed digital spaces I came across a site that presents content with a nostalgic touch featuring vintage park concept page – the visuals feel immersive and create a comfortable browsing environment that encourages exploration
https://darknetmarketslist.com/ – nexus dark https://darknetmarketslist.com/
https://darknetmarketlist.com/ – dark matter link https://darknetmarketlist.com/
1xbet 1xbet .
нейросеть генерации текстов для студентов нейросеть генерации текстов для студентов .
https://mydarknetmarketlinks.com/ – tordex shop https://mydarknetmarketlinks.com/
While exploring artistic and experimental online platforms, I found a uniquely designed website that emphasizes structure through creative experimentation intermusses creative concept page – The content feels thoughtfully arranged in an experimental style, giving the entire experience a distinct and unconventional design approach
Строительный портал https://solution-ltd.com.ua с актуальной информацией и практическими решениями. Узнайте о новых технологиях, сравните материалы, получите советы и найдите специалистов. Сделайте ремонт или строительство проще, быстрее и выгоднее.
Все о здоровье https://mikstur.com на одном портале: болезни, симптомы, методы лечения и профилактика. Советы врачей, актуальные медицинские статьи и рекомендации. Помогаем лучше понимать организм и заботиться о своем самочувствии.
Сайт для женщин https://prowoman.kyiv.ua практичные советы по уходу за собой, здоровью и отношениям. Читайте, развивайтесь и улучшайте свою жизнь.
Shoppers who value unique handmade goods often prefer structured yet artistic platforms such as Brook Artisan Goods Studio where each product is carefully highlighted to reflect its handcrafted nature – The overall experience emphasizes authenticity, ensuring users feel connected to the creative process behind every item displayed.
During my search for unique online communities and entertainment platforms, I noticed check this online squad page – The design immediately stands out, and the content remains engaging, making the overall browsing experience feel dynamic and enjoyable.
When reviewing modern e-commerce platforms focused on usability and speed, one strong example is Amber Summit Marketplace where smooth experience overall, pages feel fast and easy to use, allowing users to navigate effortlessly through clearly structured sections without delays or confusion.
Мне понравилось, что в магазине не просто продают телефоны, а действительно помогают выбрать. Менеджер уточнил, для каких задач нужен смартфон, и предложил подходящие варианты. Заказ привезли быстро, упаковка и сам товар без замечаний. Очень достойный подход к работе, ру стор 77
In the process of reviewing several live performance websites, I found click for details – The navigation feels smooth and simple, making it easy for users to explore content without distraction or confusion.
Users who appreciate streamlined ecommerce systems often browse platforms such as Trail Harbor Commerce Navigation Hub where products are arranged in a clear and accessible format – The design ensures browsing feels smooth, organized, and easy to follow with intuitive category structure.
Женский сайт https://fashionadvice.kyiv.ua полезная информация о здоровье, стиле, любви и карьере. Читайте актуальные статьи и находите решения для жизни.
Сайт для женщин https://gracefullady.kyiv.ua все о моде, красоте, здоровье и отношениях. Практические советы, тренды и идеи для современной женщины.
Users who appreciate clean online marketplaces often value emporium layouts that improve navigation and make browsing feel more natural and effortless Glass Emporium Coastal Harbor – The presentation is refined and structured, offering a seamless shopping experience where each product is easy to view and understand at a glance.
Лучший сайт для женщин https://musicbit.com.ua статьи о стиле, любви, здоровье и вдохновении. Найдите идеи для жизни и развития в одном месте.
1xbet giri? 1xbet giri? .
генерация генерация .
nomeansnoshow.com – Strong identity here, site feels bold and creatively expressive throughout pages
https://mydarknetmarketsonline.com/ – cocorico darknet market https://mydarknetmarketsonline.com/
нейросеть для рефератов nejroset-dlya-referatov-25.ru .
As I reviewed different web interfaces, I found explore this smooth blunty page – The layout is simple and well structured, making navigation smooth, clear, and easy to follow from start to finish.
While exploring personal branding websites, I came across a refined and well organized profile page that stands out for its simplicity oconnor online portfolio view – The navigation feels very smooth, and all information is displayed clearly in a professional and easy to read format
электрокарниз купить elektrokarniz11.ru .
While reviewing digital storefront platforms emphasizing usability and structure, a strong example is Icicle Lakefront Unified Mart where simple layout and information is easy to find at a glance, making navigation consistent, intuitive, and easy for all users.
электрокарнизы elektrokarnizmsk.ru .
Онлайн строительный https://reklama-region.com журнал для профессионалов и частных застройщиков. Полезные статьи, разборы материалов, новинки рынка и практические рекомендации. Все о строительстве, ремонте и дизайне в удобном формате.
Строительный журнал https://sota-servis.com.ua о ремонте, отделке и строительстве. Актуальные статьи, кейсы, лайфхаки и рекомендации специалистов. Будьте в курсе новинок и принимайте грамотные решения для своих проектов.
Актуальные новости https://ktm.org.ua Украины онлайн. Последние события, аналитика, экономика, происшествия и международные отношения. Только проверенная информация и важные обновления в режиме реального времени.
During a comparison of soft aesthetic online stores and their usability, I came across discover velvet willow space – The presentation feels elegant and calm, and browsing across categories is smooth and visually soothing throughout the experience.
Shoppers drawn to handcrafted digital storefronts look for cohesive design language that enhances browsing comfort on sites like Trailside Artisan Store where rustic minimalism soft color palettes improve product storytelling user engagement flow – The interface focuses on calm visual hierarchy ensuring customers feel guided rather than overwhelmed while exploring products
People who enjoy beach inspired shopping layouts often engage with sites like Coastal Harbor Wave Easy Outpost Hub where items are shown in a soft and minimal structure – The interface creates a smooth browsing experience that feels calming, pleasant, and easy to navigate.
incest porn games
While browsing different event and celebration websites, I came across visit this celebration page – The overall website feels well designed, and the content quality remains consistent throughout, making it engaging and easy to explore without confusion or unnecessary complexity.
Users who appreciate curated ecommerce hubs often value emporium layouts that combine strong branding with easy navigation and clean visual organization Glass Stone Emporium Portal – The interface feels structured and polished, ensuring browsing is seamless, visually consistent, and easy to follow across categories.
During an exploration of well-structured commerce hub websites, I discovered visit meadow linen commerce hub – The layout is clear and clean, and browsing feels enjoyable, smooth, and easy to understand across all pages.
While reviewing unconventional digital platforms, I found browse this clone concept page – The site feels very unique and different, making it something worth checking out for anyone interested in experimental ideas.
While browsing alternative artistic websites I discovered a platform that emphasizes individuality and bold design including independent art platform – the presentation feels unique and keeps users interested with its expressive and creative layout throughout
нейросеть генерации текстов для студентов нейросеть генерации текстов для студентов .
https://mydarknetmarketsonline.com/ – dark matter market darknet https://mydarknetmarketsonline.com/
Строительный журнал https://tozak.org.ua с полезными статьями и актуальными обзорами. Освещаем современные технологии, материалы и тренды в строительстве и ремонте. Практические советы, идеи и решения для создания комфортного и надежного пространства.
Сайт для женщин https://bestwoman.kyiv.ua статьи о красоте, здоровье, отношениях и стиле жизни. Полезные советы, тренды и идеи для вдохновения. Все, что нужно современной женщине, в одном месте.
Онлайн сайт для женщин https://elegance.kyiv.ua статьи о красоте, отношениях, семье и саморазвитии. Советы, идеи и вдохновение для повседневной жизни.
Across UX-focused reviews of online marketplaces, a standout example is Upland Orchard Experience Hub where well structured pages and browsing feels natural and efficient, creating a comfortable environment for browsing and product discovery.
1xbet giri? 1xbet giri? .
https://mydarknetmarketlinks.com/ – nexus darknet link https://mydarknetmarketlinks.com/
While exploring modern cultural fusion websites, I discovered a platform that merges different aesthetics into a cohesive and engaging digital experience brooklyn jeddah global page – The design feels diverse and interesting, offering a creative blend of cultural themes presented in an appealing way
электрокарниз москва электрокарниз москва .
During my exploration of startup resources and online support tools, I came across various helpful platforms and found small business guide hub – The site offers practical guidance, and the content is easy to follow, making it useful for quick learning and real-world application.
перепланировка квартир перепланировка квартир .
People who enjoy handcrafted online marketplaces often engage with platforms like Cove Wind Artisan Goods Market Hub where items are displayed in a clean and curated layout – The design emphasizes organization and aesthetic presentation, making browsing feel structured, pleasant, and easy to follow through different artisan categories.
Users browsing curated ecommerce galleries often seek visually structured environments where display quality and product arrangement play a key role in decision making Golden Cove Display Hall – This layout focuses on clarity through balanced spacing consistent typography and intuitive grouping of items helping visitors quickly interpret product categories while maintaining a pleasant browsing rhythm that encourages exploration without overwhelming visual complexity or distraction in any section today
1xbet giri? 1xbet giri? .
In the process of reviewing multiple informational resources, I found click for details – The website appears trustworthy, and the content is arranged in a way that makes it easy to recognize its value and relevance.
As I reviewed examples of online retail atelier websites, I checked see mint orchard retail page – This is definitely a site I’ll revisit for the holiday season since everything feels well structured and easy to browse.
oakmeadowcommercehub – Commerce hub feels organized, categories are clear and easy browsing
Женский журнал https://a-k-b.com.ua все о стиле, здоровье и отношениях. Практические советы, тренды и вдохновение для повседневной жизни.
Женский онлайн портал https://stepandstep.com.ua все о жизни, стиле и здоровье. Статьи о красоте, отношениях, семье и саморазвитии. Полезный контент для женщин любого возраста.
Туристический портал https://swiss-watches.com.ua для путешественников: направления, маршруты, советы и лайфхаки. Подбор отелей, билетов и экскурсий, идеи для отдыха и полезные рекомендации. Планируйте поездки легко и открывайте новые страны с комфортом.
nutschassociates.com – Professional services look solid, information is clear and easy to follow
1xbet az 1xbet az .
Shoppers interested in artisan marketplaces frequently seek platforms that offer both structure and creativity and might come across harbor violet goods atelier presenting curated handmade products with efficient navigation and appealing design elements – A comprehensive marketplace experience designed for effortless browsing and creative product exploration.
нейросеть текст для учебы nejroset-dlya-referatov-22.ru .
https://darknetmarketlist.com/ – tordex darknet market https://darknetmarketlist.com/
As I browsed through online advisory and business help websites, I discovered useful guidance material and came across helpful advisory hub page – The platform feels well structured, offering practical and easy-to-understand information that supports quick learning.
https://mydarknetmarketsurl.com/ – wethenorth darknet link https://mydarknetmarketsurl.com/
1xbet azerbaijan 1xbet azerbaijan .
Across various e-commerce experience evaluations focused on usability, a notable example is Frost Lakefront Network Vault where clean interface and everything is easy to navigate without effort, helping users interact with a clean, efficient, and highly accessible browsing environment.
1xbet azerbaijan 1xbet azerbaijan .
генерация nejroset-dlya-referatov-21.ru .
uplandcovevendorcorner – Vendor corner feels helpful easy browsing and clean layout overall
Users exploring simple ecommerce outlet designs often appreciate how clean layouts improve usability when browsing platforms such as Harbor Stone Discount Outlet Hub where products are arranged in a straightforward structure that makes browsing fast and intuitive – The outlet store setup is simple and practical, allowing users to quickly locate items without confusion while maintaining a clean and easy to navigate shopping experience.
https://mydarknetmarketlinks.com/ – black ops darknet https://mydarknetmarketlinks.com/
While browsing culturally diverse web projects, I found a platform that combines urban and traditional influences in a visually engaging structure cultural blend experience hub – The website feels interesting and diverse, delivering a creative fusion of ideas that enhances the overall browsing experience
People who appreciate clean aesthetic galleries often browse platforms like Stone Dawn Galleria Studio where products are presented in a minimal calming layout – The design makes navigation feel gentle, visually soft, and effortless throughout the site.
нейросеть генерации текстов для студентов nejroset-dlya-referatov-20.ru .
Are you looking for a fast, safe and hassle-free transfer in Valencia? We offer professional transport and moving services, both for individuals and companies. Request your budget without obligation and enjoy a quality service – transfer valencia benidorm
While exploring wellness and nutrition consulting sites online, I came across visit this paleo consulting page – I like how clean everything appears here, and the layout makes reading and browsing genuinely enjoyable without distractions or clutter interfering with the experience overall.
Онлайн курсы рабочих https://obuchenie-rabochih.ru профессий — это быстрый старт в новой карьере. Практика, поддержка наставников и современные методики помогут вам освоить специальность и найти работу.
Нужно масло или смазка? смазка солидол ж краснодар официальный дилер масел Devon и смазок Efele в Краснодаре предлагает широкий ассортимент продукции для промышленности и автосервиса. Гарантия качества, выгодные цены, быстрая доставка и профессиональная консультация по подбору.
Онлайн женский журнал https://zhenskiy.kyiv.ua статьи о красоте, здоровье, моде и любви. Советы, тренды и полезный контент для женщин любого возраста.
While browsing modern corporate websites I found a platform that focuses on usability and structured design including corporate navigation hub – the overall experience feels streamlined with clear sections that guide users through the content effortlessly
People who appreciate cooperative online marketplaces often value platforms that feel socially connected and lively when browsing through Harbor Pine Collective Market where multiple contributors shape the catalog and create a constantly evolving selection – The site presents a dynamic structure that highlights shared trading energy and a sense of active community involvement in commerce.
During my search for outdoor adventure and camping resources, I noticed check this camp guide page – The site appears to be a great destination resource, with clear and engaging information that makes planning or exploring feel simple and enjoyable.
When analyzing modern retail systems built for structure and clarity, a strong example is Forest Frost Network Vault which maintains the design feels balanced and content is clearly organized, providing users with a calm, organized, and visually consistent interface.
Нужен коммерческий транспорт здесь продажа грузовиков от официального дилера с гарантией качества и сервисным обслуживанием. Большой выбор моделей, помощь в подборе и выгодные условия для корпоративных клиентов.
https://darknetmarketslist.com/ – cannaexpress url https://darknetmarketslist.com/
ParfumPlus https://parfumplus.ru это сервис доставки оригинальных духов по всей России. Мы помогаем удобно и безопасно заказать любимые ароматы, не рискуя столкнуться с подделками. В нашем каталоге представлен широчайший выбор женских и мужских духов, туалетной воды, нишевая и люксовая парфюмерия, популярные бестселлеры и новинки мировых брендов.
Продажа стройматериалов https://mir-betona.od.ua в Одессе по доступным ценам. В наличии всё необходимое для ремонта и строительства: от базовых материалов до профессионального инструмента. Быстрая доставка и гарантия качества.
People who appreciate icy clean ecommerce layouts often browse platforms like Ice Isle Minimal Market Hub where items are displayed with cool tones and simple structure – The interface focuses on clarity and ease of use, making browsing feel refreshing, intuitive, and visually balanced throughout the store.
нейросеть для студентов онлайн nejroset-dlya-referatov-25.ru .
champselyseesclinic – Clean design and helpful content, feels professional and easy to explore.
https://mydarknetmarketlinks.com/ – wethenorth darknet link https://mydarknetmarketlinks.com/
During a casual browsing session I discovered a niche website that merges pop culture references with volleyball themes in an unexpected way celebrity volleyball curiosity hub – It offers a fun blend of entertainment and sports commentary that stays lighthearted while still keeping the content engaging and readable
сайт для рефератов сайт для рефератов .
While browsing unrelated topics online, I encountered check this media page – I found it by chance, but it turns out to be quite useful, providing content that is simple and pleasant to explore.
карниз с приводом elektrokarniz11.ru .
pair-dating.com – Dating concept looks simple, interface feels straightforward and user friendly experience
Do you need tree pruning? https://www.highqualitytreeservice.com dead branch removal, crown shaping, and garden maintenance with a quality guarantee and compliance with all regulations.
Санкт-Петербургский Фестиваль https://tattoo-weekend.ru Татуировки — это встреча лучших тату-мастеров, конкурсы, шоу-программа и тысячи вдохновляющих идей. Отличный шанс познакомиться с трендами и найти своего мастера.
Заказывали тут https://happyholi.ru отличные кухни. Работа супер, цены адекватные, а доставку не затягивают. Нам понравилось.
Users who like clean and user friendly ecommerce designs often engage with stores like Cove Simple Living Market where functionality and readability are prioritized – The browsing system is built to reduce friction so users can quickly locate items without feeling overwhelmed by complex design elements
электрокарниз elektrokarnizmsk.ru .
During my search for holiday event inspiration, I noticed check this festive ball site – The theme feels very festive and well designed, and I really like the presentation style, which gives the whole experience a warm and seasonal feel.
People who prefer functional online shopping platforms often engage with sites like Stone Outpost Glade Supply Market where items are displayed in a minimal and structured format – The interface enhances usability, making browsing simple, efficient, and consistent across all product categories.
https://darknetmarketlist.com/ – nexus market link https://darknetmarketlist.com/
https://mydarknetmarketsonline.com/ – darknet websites https://mydarknetmarketsonline.com/
https://darknetmarketslist.com/ – drughub url https://darknetmarketslist.com/
стационар на дому детям консультация врачей онлайн без регистрации
Только что опубликовано: ???????
In the middle of searching for travel photography inspiration, I found browse this travel shoot gallery – The site loads quickly and feels well organized, making navigation intuitive and easy to use.
While exploring property search engines I found a real estate website that focuses on presenting listings in a minimal and efficient layout home listing exploration hub – The platform is straightforward and practical, helping users browse housing options without distraction and with clear informational structure
While reviewing relationship focused digital services I noticed a site highlighting dating community portal – the interface feels straightforward and the overall experience is designed to be user friendly and easy to understand for a wide audience
электрокарнизы для штор купить электрокарнизы для штор купить .
https://mydarknetmarketlinks.com/ – black ops darknet link https://mydarknetmarketlinks.com/
As I browsed through different mom-focused websites, I encountered view this parenting community page – The tone is very friendly and relatable, and the content appears genuinely helpful, making it easy for readers to connect with real-life parenting experiences.
Are you looking for a fast, safe and hassle-free transfer in Valencia? We offer professional transport and moving services, both for individuals and companies. Request your budget without obligation and enjoy a quality service, https://trasladoavalencia.es/
Shoppers who prefer minimal yet structured ecommerce environments frequently appreciate platforms such as they find while browsing Ginger Secure Cove Vault Store which uses a calm interface focused on curated product organization – The design approach prioritizes clarity and secure feeling layout choices that support effortless exploration across categories.
электрокарнизы цена электрокарнизы цена .
People who enjoy outdoor inspired online marketplaces often engage with platforms like Trail Timber Outpost Market House where items are displayed in a warm rustic layout – The design emphasizes natural aesthetics and simple structure, making browsing feel smooth, organized, and visually comfortable throughout the shopping experience.
Evergreen content strategy: I buy tiktok likes on tutorials and how-to videos that continue generating value for months—the initial boost creates long-term compound returns.
Наркологическая помощь в Воронеже: эффективное лечение запоя, детокс и поддержка специалистов в наркологической клинике «Клиника Плюс».
Изучить вопрос глубже – круглосуточная наркологическая помощь
Дополнительным поводом для вызова врача становится состояние, при котором больному трудно вставать, пить воду, есть, сохранять спокойствие или ориентироваться в самочувствии. В таких случаях осмотр на дому позволяет быстрее определить дальнейший маршрут помощи. Иногда уже первый звонок помогает понять, допустим ли домашний формат или лучше сразу рассматривать вывод в стационаре.
Узнать больше – нарколог на дом вывод в екатеринбурге
Crowd wisdom works—reddit best hookup sites recommendations aggregate thousands of real experiences into actionable insights.
Latest Liberian business news https://forbesliberia.com market analysis, economic trends, and technology developments. Learn about key events, investment opportunities, and business prospects in the country.
https://mydarknetmarketsurl.com/ – dark matter market url https://mydarknetmarketsurl.com/
Лечение алкоголизма в Воронеже у нас проводится на всех стадиях: от первой помощи при запое до кодирования и долгосрочной поддержки. Для пациентов с наркотической зависимостью (включая синтетические каннабиноиды и опиоиды) мы применяем щадящие схемы детоксикации, которые минимизируют болезненные симптомы и снижают риск срывов. Кодирование от алкоголизма и наркомании доступно в нескольких вариантах: медикаментозное (инъекции, импланты, «Двойной блок»), гипносуггестивное и комбинированное. Каждый метод подбирается после тщательной диагностики, чтобы результат был максимально долгосрочным.
Подробнее можно узнать тут – скорая наркологическая помощь в воронеже
During my search for music and entertainment industry websites, I noticed check this artist entertainment site – The overall structure feels solid, and the layout combined with the information flow makes the browsing experience feel smooth and well organized.
piercethearrow.com – Bold branding here, content feels energetic and visually striking creative site
While looking through different jewelry design sites, I encountered view artisan jewelry site – The presentation feels nicely balanced, with clear content and appealing visuals that make browsing simple and enjoyable.
Домашняя детоксикация подходит для ранних стадий интоксикации, когда состояние пациента стабильно, а сопутствующие заболевания отсутствуют. Однако при длительном употреблении алкоголя физиологические изменения требуют более глубокого вмешательства. Стационар обеспечивает изоляцию от триггеров, исключает риск самостоятельного повторного употребления и позволяет врачам динамически корректировать терапию на основе лабораторных показателей и реакции организма. В 2026 году стандарты наркологической помощи делают акцент на превентивной безопасности: раннее выявление признаков делирия, судорожной готовности или кардиологических осложнений позволяет предотвратить критические состояния до их развития. Клиника «Стармед» выстроила работу так, чтобы каждый этап госпитализации логически вытекал из предыдущего, формируя непрерывную цепочку от острой стабилизации до планирования долгосрочной ремиссии.
Получить дополнительные сведения – http://vyvod-iz-zapoya-v-staczionare-nizhnij-novgorod-6.ru
While exploring safe entertainment resources online I found a website that highlights films suitable for children and families in a clean and easy to understand layout kids safe movie archive – The platform feels well curated and dependable, offering clear guidance for selecting appropriate viewing content
https://mydarknetmarketlinks.com/ – wethenorth darknet market https://mydarknetmarketlinks.com/
Если бизнес растет, top manage личный кабинет позволяет устранить хаос в задачах, документообороте и ежедневной коммуникации между подразделениями. Решение сводит ключевые процессы в одной системе, чтобы руководитель видел реальную картину по персоналу, исполнению задач, согласованиям и финансам без Excel и ручных таблиц. Это практичный вариант для компаний, которым нужны контроль, прозрачность работы и уверенное масштабирование без лишней рутины и ежедневных потерь времени каждый день.
Полная версия по ссылке: https://slovarsbor.ru/w/%D0%B2%D0%BF%D0%B5%D1%87%D0%B0%D1%82%D0%BB%D0%B5%D0%BD%D0%B8%D0%B5/
Зависимость редко манифестирует резко. Обычно она развивается постепенно, маскируясь под усталость, стресс или временные трудности. Однако существует ряд клинических маркеров, указывающих на переход от эпизодического употребления к патологическому процессу. К ним относятся: увеличение толерантности к веществу, невозможность остановиться после первой дозы, провалы в памяти после употребления, пренебрежение обязанностями, социальная изоляция, раздражительность при попытках близких обсудить проблему. На ранних стадиях алкогольной зависимости пациенты часто отрицают наличие болезни, но физиологические изменения уже запущены. Появление двух-трех из этих признаков в течение нескольких месяцев — прямое показание для консультации со специалистом. Раннее обращение позволяет скорректировать поведение до формирования тяжелой физиологической зависимости.
Выяснить больше – вызов наркологической помощи воронеж
Наиболее частыми причинами обращения становятся выраженная слабость, тремор, нарушение сна, тревога, учащенный пульс, скачки артериального давления, тошнота и признаки обезвоживания. Эти симптомы могут сочетаться между собой и усиливаться после прекращения употребления алкоголя, особенно после нескольких дней запоя.
Углубиться в тему – нарколог на дом
Запой сопровождается выраженной интоксикацией, нарушением работы сердечно-сосудистой системы, тревожностью и бессонницей, что характерно для алкоголизма и хронического употребления алкоголя. При длительном течении организм человека теряет способность к самостоятельному восстановлению, и вмешательство становится необходимым. Стационар в этом случае позволяет контролировать динамику состояния больного и корректировать терапию в режиме реального времени, особенно при тяжелом течении алкоголизма.
Ознакомиться с деталями – быстрый вывод из запоя в стационаре
Users who prefer refined ecommerce experiences often explore platforms such as Golden Collective Stone Premium Hub where items are displayed with strong emphasis on curation and visual harmony – The design creates a luxurious browsing experience that feels structured, smooth, and easy to navigate across all categories.
За выездом врача чаще обращаются тогда, когда человеку тяжело добраться до клиники, он ослаблен после нескольких дней употребления алкоголя или родственникам важно быстрее понять, какая тактика будет безопасной. После осмотра можно определить, нужна ли капельница, достаточно ли детоксикации на дому, требуется ли повторное наблюдение, а в дальнейшем — консультация по лечению алкоголизма, кодирование или реабилитация. В части случаев уже первый звонок позволяет понять, идет ли речь только о временном ухудшении самочувствия или о состоянии, при котором может потребоваться вывод из запоя в стационаре.
Подробнее тут – нарколог на дом вывод екатеринбург
While exploring online tools designed for tracking and claims management, I came across visit this claims tracker tool – The platform feels straightforward and useful overall, appearing to be a practical solution that users can easily understand and apply.
While reviewing online stores with gentle visual identity I found a site centered around soft marketplace hub – the colors are muted and relaxing while the browsing experience remains smooth and easy to use
Лечение алкоголизма в Воронеже у нас проводится на всех стадиях: от первой помощи при запое до кодирования и долгосрочной поддержки. Для пациентов с наркотической зависимостью (включая синтетические каннабиноиды и опиоиды) мы применяем щадящие схемы детоксикации, которые минимизируют болезненные симптомы и снижают риск срывов. Кодирование от алкоголизма и наркомании доступно в нескольких вариантах: медикаментозное (инъекции, импланты, «Двойной блок»), гипносуггестивное и комбинированное. Каждый метод подбирается после тщательной диагностики, чтобы результат был максимально долгосрочным.
Выяснить больше – скорая наркологическая помощь воронеж
Решение о помещении пациента в стационар принимается на основе объективных медицинских критериев, а не только по желанию родственников. К показаниям относятся: запой длительностью более трех суток, выраженные симптомы абстиненции, наличие в анамнезе алкогольных делириев или судорожных эпизодов, сопутствующие хронические заболевания печени, поджелудочной железы, сердца или нервной системы. Отдельным фактором выступает полинаркомания или сочетание алкогольной зависимости с приемом психофармакологических препаратов без назначения врача. В таких ситуациях риск развития тяжелых осложнений возрастает многократно, и амбулаторный формат не обеспечивает необходимого уровня контроля. Госпитализация позволяет провести полноценную диагностику, включая ЭКГ, экспресс-анализы крови, оценку неврологического статуса и мониторинг сатурации, что формирует точную картину состояния и исключает назначение шаблонных схем.
Подробнее тут – вывод из запоя в стационаре в нижнем новгороде
центр развития детей
While exploring platforms with bold design aesthetics I found a site highlighting innovative design showcase – the interface feels dynamic and the presentation style offers a visually engaging and energetic experience throughout
https://darknetmarketlist.com/ – nexus darknet market access https://darknetmarketlist.com/
https://mydarknetmarketsurl.com/ – black ops shop https://mydarknetmarketsurl.com/
https://mydarknetmarketsonline.com/ – darknet markets url https://mydarknetmarketsonline.com/
While going through structured informational platforms, I found explore united rtc portal – The organization of content helps users quickly find relevant details without unnecessary complexity or wasted time searching.
Expert construction https://trackbuilder.ru of BMX tracks, pump tracks, and dirt parks. High-quality materials, thoughtful design, and reliable implementation for sports, recreation, and competitions.
Фундамент под ключ https://fundament-v-spb.ru любой сложности: ленточный, плитный, свайный. Профессиональный подход, современные технологии и точный расчет для долговечности и безопасности здания.
Follow the matches online https://spor-x.com.az live scores, the latest sports news, transfer rumors, and the latest TV schedule. Everything you need is in one place.
Такие состояния требуют не только лечения, но и наблюдения, поскольку динамика может меняться в течение короткого времени. Стационар позволяет минимизировать риски и обеспечить безопасность пациента. При этом услуга может предоставляться анонимно, а цена лечения зависит от состояния пациента.
Выяснить больше – быстрый вывод из запоя в стационаре нижний новгород
While browsing creative dessert branding sites I discovered a platform that uses sweet themed visuals and a structured design approach to present content in a clear and aesthetically pleasing way that is easy for users to navigate dessert visual concept hub – The layout feels attractive and organized, offering a smooth and enjoyable browsing experience overall
https://mydarknetmarketlinks.com/ – nexus darknet market url https://mydarknetmarketlinks.com/
As I browsed online opinion and commentary sources, I noticed view bold political content hub – The content feels striking and direct, and it definitely captures attention right away with its assertive tone.
За выездом врача чаще обращаются тогда, когда человеку тяжело добраться до клиники, он ослаблен после нескольких дней употребления алкоголя или родственникам важно быстрее понять, какая тактика будет безопасной. После осмотра можно определить, нужна ли капельница, достаточно ли детоксикации на дому, требуется ли повторное наблюдение, а в дальнейшем — консультация по лечению алкоголизма, кодирование или реабилитация. В части случаев уже первый звонок позволяет понять, идет ли речь только о временном ухудшении самочувствия или о состоянии, при котором может потребоваться вывод из запоя в стационаре.
Подробнее тут – нарколог на дом анонимно в екатеринбурге
People who prefer rustic inspired online shops often explore sites like Artisan Harbor Trail Cozy House where items are displayed in a warm and friendly format – The layout focuses on inviting visuals and smooth navigation, making the browsing experience feel comfortable, natural, and easy to enjoy.
Острые состояния редко развиваются внезапно без предпосылок. Чаще всего им предшествуют недели или месяцы нарастающей нагрузки на нервную и сердечно-сосудистую системы. Игнорирование ранних сигналов приводит к тому, что в момент кризиса требуются уже не профилактические меры, а экстренная стабилизация. Профессиональная оценка позволяет разграничить ситуации, где достаточно амбулаторной поддержки, и те, где необходимо круглосуточное наблюдение. Своевременное вмешательство снижает вероятность осложнений, сокращает длительность восстановления и повышает готовность пациента к дальнейшей терапии.
Изучить вопрос глубже – http://www.domen.ru
Наиболее частыми причинами обращения становятся выраженная слабость, тремор, нарушение сна, тревога, учащенный пульс, скачки артериального давления, тошнота и признаки обезвоживания. Эти симптомы могут сочетаться между собой и усиливаться после прекращения употребления алкоголя, особенно после нескольких дней запоя.
Изучить вопрос глубже – https://narkolog-na-dom-ekaterinburg.ru/
As I reviewed examples of clean eCommerce commerce hub platforms, I checked see this linen meadow commerce page – The structure is simple and easy to follow, and browsing feels smooth, relaxed, and enjoyable overall today.
People exploring handmade goods online often prefer platforms that provide clarity and variety and while browsing they might come across violet harbor craft showcase featuring curated artisan collections designed for easy discovery and enjoyable browsing flow – A marketplace built to enhance user engagement with creative and unique handcrafted products.
preventcovid19trial-uk.com – Informational tone here, content feels research focused and medically structured layout
Users who enjoy soft toned ecommerce galleries often engage with sites such as Dawnstone Gallery Flow Hub where items are arranged in a peaceful format – The interface ensures browsing feels smooth, quiet, and visually comfortable across categories.
When evaluating digital marketplace usability, a notable example is Violet Harbor Experience House which maintains clean structure overall, makes browsing feel smooth and simple, ensuring a comfortable and organized interface for users exploring different sections.
While studying user-friendly marketplaces with soft design principles, I noticed open velvet willow store – The layout feels refined and gentle, and browsing through products is easy, smooth, and visually relaxing throughout the site.
Digital users frequently note that streamlined vendor environments enhance browsing satisfaction, particularly when they find Forest Meadow Catalog Access Station and they mention that the design helps reduce unnecessary scrolling – this leads to improved clarity and faster product discovery across all listed categories
Online shoppers who appreciate well-organized digital storefronts often gravitate toward sites like Flint Meadow Retail Hub where the structure of the marketplace allows for easy exploration, giving users a seamless experience that balances product visibility with a clean and functional layout.
https://darknetmarketlist.com/ – tordex market https://darknetmarketlist.com/
карниз с электроприводом карниз с электроприводом .
As I explored designer jewelry websites, I encountered view vicki luxury diamonds – The overall feel is elegant and sophisticated, and the presentation looks polished and visually appealing.
During my review of holistic wellness content, I noticed check yoga exploration site – The idea shared is quite intriguing and encourages deeper thinking, making it something worth exploring in more detail later.
Наркологическая помощь в Воронеже: срочный выезд нарколога, капельницы и лечение зависимостей в наркологической клинике «Клиника Плюс».
Углубиться в тему – наркологическая помощь на дому воронеж
Затяжной запой перестает быть бытовой проблемой в тот момент, когда организм теряет способность самостоятельно восстанавливаться после интоксикации. Накопление ацетальдегида, нарушение водно-электролитного баланса, истощение запасов витаминов и перегрузка сердечно-сосудистой системы создают состояние, при котором домашние методы перестают быть безопасными. Срочно стабилизировать самочувствие и быстро купировать абстинентный синдром позволяет только контролируемая медицинская среда. Вывод из запоя в стационаре в Нижнем Новгороде становится клинически обоснованным решением, когда требуется не просто снятие симптомов, а комплексная детоксикация под круглосуточным наблюдением врачей. Наркологическая клиника «Стармед» организует процесс лечения в соответствии с актуальными стандартами доказательной медицины, обеспечивая безопасность пациента, прозрачность процедур и плавный переход к противорецидивной терапии. Мы понимаем, что решение о госпитализации часто принимается в состоянии стресса, поэтому наша работа начинается с четкой диагностики, честного объяснения плана лечения и соблюдения строгих протоколов конфиденциальности. Опытные специалисты клиники помогут вызвать доверие к процессу восстановления уже на этапе первого контакта.
Получить дополнительные сведения – http://www.domen.ru
While searching sports recovery education platforms I came across a football therapy website that provides practical guidance on rehabilitation and performance care in a clear and supportive format designed for athletes and fitness enthusiasts sports therapy training hub – The site feels structured and useful, offering accessible recovery information
https://mydarknetmarketlinks.com/ – tordex darknet link https://mydarknetmarketlinks.com/
Users who value simple ecommerce outlet systems often browse sites such as Harbor Pine Discount Mart Hub where products are displayed in clearly defined groups – The layout emphasizes usability and order, making browsing efficient, intuitive, and easy to manage across all sections of the marketplace.
При первой консультации нарколог осматривает пациента, чтобы оценить его состояние и подобрать оптимальную схему лечения. В зависимости от тяжести похмелья, врач может назначить инфузию с регидратационными растворами, витаминами группы B и другими препаратами, которые способствуют восстановлению. Важно, что капельница не только помогает снять симптомы, но и устраняет причины токсического воздействия алкоголя на организм, предотвращая развитие осложнений.
Выяснить больше – капельница от похмелья в самаре
Users who appreciate practical online marketplaces often browse sites such as Kettle Harbor Commerce Network Hub where products are presented in a structured layout – The interface creates a browsing experience that feels organized, easy, and easy to follow throughout the store.
During research into commerce hub interfaces, I explored explore this vale harbor commerce page – The platform appears nice overall, navigation is straightforward, and the content looks clean and readable.
In reviewing curated shopping platforms, I found Violet marketplace discovery page embedded in a clean layout – it supports intuitive browsing, allowing users to move through categories and product listings with minimal friction or confusion.
Наркологическая помощь в Воронеже сегодня — это не просто медицинская услуга, а реальный шанс быстро и безопасно вернуть контроль над жизнью себе или своему близкому человеку. В крупном городе Центрального Черноземья, где ритм жизни высокий, а стресс и доступность веществ создают серьёзные риски, тысячи жителей ежегодно сталкиваются с проблемой зависимости. Алкоголь, синтетические наркотики, соли, спайсы — всё это требует немедленного профессионального вмешательства. Клиника «Клиника Плюс» предоставляет полную наркологическую помощь в Воронеже 24 часа в сутки, 7 дней в неделю. Мы гарантируем анонимное лечение алкоголизма и наркомании, срочный выезд нарколога на дом в течение 30–60 минут, полную конфиденциальность и современные протоколы лечения 2026 года, которые позволяют купировать острое состояние уже в первые часы.
Получить дополнительную информацию – https://narkologicheskaya-pomoshh-voronezh-2.ru/
Такие состояния требуют не только лечения, но и наблюдения, поскольку динамика может меняться в течение короткого времени. Стационар позволяет минимизировать риски и обеспечить безопасность пациента. При этом услуга может предоставляться анонимно, а цена лечения зависит от состояния пациента.
Подробнее тут – стационар вывод из запоя нижний новгород
During my search for travel and destination websites, I found check derry donegal tourism hub – The content feels engaging and well presented, making browsing simple and helpful for planning trips.
За выездом врача чаще обращаются тогда, когда человеку тяжело добраться до клиники, он ослаблен после нескольких дней употребления алкоголя или родственникам важно быстрее понять, какая тактика будет безопасной. После осмотра можно определить, нужна ли капельница, достаточно ли детоксикации на дому, требуется ли повторное наблюдение, а в дальнейшем — консультация по лечению алкоголизма, кодирование или реабилитация. В части случаев уже первый звонок позволяет понять, идет ли речь только о временном ухудшении самочувствия или о состоянии, при котором может потребоваться вывод из запоя в стационаре.
Получить дополнительные сведения – http://www.domen.ru
People exploring modern digital vault marketplaces often expect simple intuitive navigation combined with consistent visual hierarchy and structured product presentation Harbor Hazel Vault Display – The interface focuses on clarity and usability allowing users to browse seamlessly through organized categories while maintaining a smooth and distraction free experience that supports efficient product discovery across the entire ecommerce platform today overall journey.
While reviewing medical study platforms I discovered a website centered around clinical knowledge base – the presentation feels structured and the interface supports a smooth and informative browsing experience
velvetcoveartisanoutlet – Artisan outlet design clean, products are nicely arranged and easy to explore
As I came across different music band websites, I encountered check this creative music page – The overall style is really cool, and the presentation feels smooth and attractive, giving a pleasant and easy browsing experience.
https://darknetmarketslist.com/ – wethenorth market link https://darknetmarketslist.com/
People who value organized ecommerce systems often explore websites like Sun Harbor Easy Trade Hub – The layout prioritizes straightforward navigation and quick access to products, ensuring users experience a smooth, bright, and efficient browsing journey without unnecessary complexity or confusion.
https://ecopolis-spb.ru/tvorchestvo_all/
nightorchardretailmart.shop – Bought a gift last week, packaging felt really premium honestly.
While searching for urban themed lifestyle sites I came across a Seattle based platform that presents city living content in a visually rich and energetic format reflecting modern lifestyle trends and creative urban culture ideas urban living inspiration page – The site feels dynamic and visually appealing, highlighting modern city culture
While browsing clothing and fashion catalogs online, I noticed open diverse clothing brand site – The site looks stylish overall, and the products and content are showcased in a way that feels clean, engaging, and visually appealing.
People who appreciate well structured marketplaces often browse sites like Harbor Commerce Upland Direct Hub where items are presented in a simple and efficient layout – The interface makes product discovery fast, intuitive, and easy across all categories without unnecessary complexity.
https://mydarknetmarketlinks.com/ – cannaexpress market link https://mydarknetmarketlinks.com/
During a review of modern boutique hall platforms, I found browse velvet brook boutique zone – The content is useful, and everything appears clearly organized, making it easy to follow across different sections of the website.
During research into handmade product spaces I discovered a well organized marketplace that supports independent creators effectively where Walnut Cove artisan showcase organized with clean design and easy navigation structure flow system – It highlights creative talent while maintaining a balance between aesthetics and usability across platform experience
People who enjoy structured online stores often explore sites such as Cove Goods Vale Shopping District where products are arranged cleanly – The interface ensures browsing feels simple, comparison is quick, and navigation is user friendly.
Are you looking for a fast, safe and hassle-free transfer in Valencia? We offer professional transport and moving services, both for individuals and companies. Request your budget without obligation and enjoy a quality service: https://trasladoavalencia.es/
During my review of different online trading information sources focused on user experience, I found embedded within research results Harbor Market Guide System included in relevant pages – updated observation: the platform emphasizes straightforward information delivery, making complex topics feel more approachable and easy to follow.
While searching digital shops I discovered a product site that presents items in a neat and organized way allowing users to browse comfortably without visual overload or complexity clean shopping catalog – The layout feels structured and easy
As I compared different user-friendly vendor hall websites, I came across explore this fresh hall – The layout feels simple and modern, and browsing is easy and comfortable across all sections.
In examining curated e-commerce spaces, I discovered that Birch Harbor retail listing showcase sits naturally within the webpage flow – Vendor hall features diverse product listings and delivers a smooth user experience with structured navigation, allowing users to explore items efficiently while maintaining a visually organized interface.
As I explored different platforms for comparison, I encountered learn more here – The presentation style is neat, and the explanations are concise, helping users understand everything without feeling overwhelmed by excessive or complicated information.
https://darknetmarketlist.com/ – drughub url https://darknetmarketlist.com/
https://mydarknetmarketsonline.com/ – ares market https://mydarknetmarketsonline.com/
While exploring different commerce hub platforms and evaluating their usability and content variety, I came across explore velvet grove commerce hub – This website offers great options, and I genuinely enjoy checking the listings regularly because they are well organized and easy to browse.
Shoppers who enjoy aesthetic ecommerce design often engage with sites such as Vendor Trail Harbor Design Hub where products are arranged in a studio inspired format that emphasizes visual harmony and creative structure – The browsing experience feels intentional and stylish, supporting both discovery and appreciation of curated goods.
While exploring different online retail solutions for users seeking efficient browsing and updated product availability, many shoppers consider platforms that simplify discovery and checkout processes in one place, including Seaside Commerce Portal which is frequently highlighted for its structured layout and smooth navigation experience, helping visitors locate items quickly while maintaining a reliable and user-friendly interface throughout the browsing session.
People who enjoy refined vault themed online stores often engage with sites like Ridge Ivory Vault Pure Market where products are arranged with elegant simplicity and structure – The interface ensures browsing feels smooth, clean, and visually curated across all sections of the platform.
Users who appreciate modern digital collectives often engage with sites such as Teal Harbor Collective Flow Hub where products are displayed in a structured format – The interface creates a browsing experience that feels intentional, curated, and visually consistent.
While browsing community engagement websites I discovered a Lochwinnoch platform that offers helpful local information in a friendly and structured way making it useful for residents and visitors seeking guidance about the area local community welcome portal – The site feels warm and informative throughout
https://mydarknetmarketlinks.com/ – nexus darknet market 2026 https://mydarknetmarketlinks.com/
uplandharborcraftmarketplace.shop – Navigation could improve but products are unique and cool.
As I explored various seaside trekking and outdoor gear hubs, I focused on navigation efficiency and product accessibility, and in the middle of my browsing I discovered Seaside Trek Hub within related listings – updated reflection: the interface feels well structured, making it easy to browse smoothly and enjoy an efficient overall experience.
While searching digital ecommerce hubs I discovered a marketplace site that highlights products in organized categories making browsing easy and allowing users to quickly find relevant items clean marketplace catalog hub – The structure feels neat and logical
As I explored trade house websites with a focus on clarity, I checked see structured raven trade site – The interface is logical and organized, and browsing information is smooth and easy to follow.
На сайті 500pokupok.com зібрано багато статей із оглядами товарів, підбірками та рекомендаціями. Зручний ресурс для тих, хто хоче зробити правильний вибір перед покупкою.
портал новин inews.in.ua висвітлює події в Україні та світі, а також теми технологій. Тут можна знайти новини про гаджети, техніку, ІТ та актуальні тренди.
In exploring digital marketplaces designed for better accessibility and user experience, I observed Birch Harbor room listings – it offers a well structured layout with smooth transitions between sections, ensuring visitors can browse products without feeling overwhelmed or lost.
In the middle of evaluating different websites, I saw go to this site – The presentation feels well-balanced, ensuring that information is both clear and engaging without creating unnecessary complexity for the reader.
During research into structured commerce hub platforms, I explored explore this violet harbor shop portal – The layout is impressive, and browsing products feels fast and convenient thanks to its clean navigation and structure.
Online shoppers seeking easy access to diverse products usually browse through user friendly stores, and along the way they might find plum cove online depot showcasing multiple product types with simple navigation support – A reliable digital shopping space that emphasizes affordability and a stress free purchasing experience for customers.
https://mydarknetmarketsonline.com/ – nexus dark web https://mydarknetmarketsonline.com/
https://darknetmarketlist.com/ – black ops url https://darknetmarketlist.com/
People who prefer gentle ecommerce ecosystems often engage with sites like Meadow Lantern Commerce Network Hub where items are displayed in a soft structured design – The browsing experience feels smooth, calm, and easy to understand throughout the store.
People who appreciate cozy digital marketplaces often browse platforms like Honey Vault Cove Calm Market where products are displayed in a warm and soothing layout – The design ensures easy navigation and pleasant browsing, making the experience feel structured, friendly, and visually relaxing.
People who enjoy fast informational trading systems often browse platforms like Harbor Wave Trading Point where updates are organized for quick understanding – The design supports rapid reading and smooth navigation, helping users stay informed in an active and structured trading environment.
While browsing band focused websites I came across a Manic Street Preachers platform that highlights nostalgic music content in a clear and organized structure making it easy for fans to revisit important moments in the band’s history rock music memory page – The content feels nostalgic and well organized for easy reading
https://mydarknetmarketlinks.com/ – torzon darkweb https://mydarknetmarketlinks.com/
While assessing different e-commerce platforms focused on outdoor equipment and travel gear, I paid attention to layout clarity and how effectively users can navigate product listings CoastalCoveMarket – updated commentary: information architecture is simple, making browsing feel intuitive and reducing time spent searching for items significantly.
карниз для штор электрический elektrokarniz-nedorogo77.ru .
While browsing product driven platforms I noticed a website featuring retail browsing network – the design feels straightforward and the navigation system allows users to explore content without difficulty
As I looked into expressive design techniques used in niche online shops, I came across check vibrant bazaar link – The overall feel is lively and colorful, and browsing creates a strong sense of visual engagement and activity.
During a detailed review of online craft marketplace websites focused on structure and product originality, I noticed visit upland harbor handmade market – Navigation could be improved, but the products are unique and cool enough to make browsing worthwhile.
Create a spintax version with 20 unique lines based on the line below. Each line must follow these rules: Every line MUST contain the same HTML mistake: The anchor tag must be written exactly like this: Do NOT fix the mistake. Change the anchor text in every line. You may add words, remove words, or use generic anchor texts. All anchor texts must be different. Rewrite the comment part in every line as well. Rewrite the sentence after the dash (“–”) so each line has a different, natural-sounding variation. Wrap everything in spintax format: line20 Here is the base line to follow: purevalueoutlet – Inspiring and interactive site, perfect for learning and creating new ideas. Generate 20 variations following all rules above.Make sure that each line is 40 words minimum and the website should appear in the middle of line not in the start or end
In studies of modern online commerce systems researchers often emphasize the role of simplicity clarity and navigation efficiency particularly when discussing innovative environments like Moon Cove Digital Retail Lab which is frequently considered a conceptual model for streamlined retail design that integrates aesthetic appeal with functional usability – this enhances overall shopping experience quality.
As I compared different online references, I found open this tracker – The flow of content feels natural and structured, guiding readers step by step through the information in a clear and logical manner.
Full turnkey accounting support https://financeprofessional.ee filing declarations, calculating salaries, and reporting to the tax office. The guys work with e-Residency, everything is done online, without visiting the office. The prices are reasonable, and the reports are always on time.
ии для школьников и студентов ии для школьников и студентов .
Users who enjoy clean ecommerce systems often explore sites such as Frost Trade River Artisan House Hub where products are arranged in a simple structured format – The interface makes browsing feel smooth, logical, and easy to manage across all categories of goods.
Users who value elegant marketplace presentation often browse platforms such as Gilded Collective Stone Showcase where products are organized in a visually refined layout – The branding style enhances clarity and sophistication, making browsing feel premium, structured, and enjoyable across all categories of the store.
https://ecopolis-spb.ru/tvorchestvo_all/
электрокранизы электрокранизы .
While browsing product rich platforms I noticed a website showcasing goods listing hub – the browsing experience feels smooth and the items are arranged in a way that supports clarity and easy navigation
While exploring cultural information websites I came across a concept platform that presents structured and meaningful content designed to reflect modern ideas and relevant cultural discussions in an accessible format modern culture insights hub – The content feels informative and relevant throughout
As I analyzed several emporium-style websites with seasonal aesthetics, I found check this cozy store – The design feels warm and thoughtfully arranged, making browsing smooth and pleasantly engaging from start to finish.
During analysis of multiple outdoor gear information platforms, I focused on clarity of descriptions and how effectively users can locate relevant sections TrailCoveBazaar – revised commentary: the browsing structure is minimal and practical, supporting quick understanding and efficient navigation.
Design-conscious shoppers frequently discover comprehensive collections through platforms like Outpost Design Warehouse – The approach blends warehouse-scale variety with a consistent minimalist aesthetic, ensuring each item supports functional living while maintaining a clean, structured, and purpose-oriented design philosophy.
During a comparison of modern vendor studio platforms and their speed optimization, I came across discover walnut cove commerce studio – The experience is great so far, and everything loads quickly while functioning without any issues during use.
электрические гардины для штор elektrokarnizy10.ru .
Many users enjoy browsing online craft marketplaces that showcase handmade goods with strong emphasis on quality and originality Artisan Craft Portal – helping small creators reach wider audiences while ensuring that shoppers find meaningful, well-crafted items that stand out online globally
карниз моторизованный elektrokarnizy-dlya-shtor150.ru .
карниз с приводом avtomaticheskie-karnizy.ru .
автоматические карнизы для штор автоматические карнизы для штор .
карнизы с электроприводом купить elektrokarnizy33.ru .
valeharborcraftemporium.shop – Site works well on phone, checkout was smooth today.
In the course of gathering helpful information, I discovered this platform – The writing is clear and approachable, ensuring that readers can understand the message without being distracted by overly technical or complicated wording.
Насколько безопасно использовать бесплатный vpn-сервис?
While reviewing digital marketplace layouts focused on usability and design clarity, I noticed how Birch Harbor vendor room overview – it emphasizes clean structure and smooth browsing flow, making product discovery easier for visitors across multiple categories and helping users quickly understand how items are organized within the vendor environment.
https://hand-hobby.ru/
Users who appreciate modern gallery inspired ecommerce often browse sites such as Ginger Stone Galleria Trade Hub where items are organized for visual appeal and smooth interaction – The interface emphasizes fluid browsing and elegant presentation, making it easy for users to explore products without feeling overwhelmed.
нейросеть реферат нейросеть реферат .
As part of studying commerce hub usability and structure, I explored check this wave harbor hub site – I appreciate the effort here, and the site feels polished and user friendly with clear navigation throughout.
While exploring artisan themed ecommerce sites I came across a minimalist store that keeps navigation simple and effective featuring hazelstone craft depot – the platform feels thoughtfully structured with a rustic identity that enhances the browsing experience without unnecessary complexity or visual overload
As I looked into clean UI designs for modern retail websites and their impact on user behavior, I found see alpine outpost here – The design keeps things simple, and moving through pages feels natural without any unnecessary complexity.
While searching for luxury travel inspiration I found a lodge focused website that showcases high end accommodation options with polished visuals and a warm inviting tone making it suitable for users planning premium holiday experiences luxury stay experience page – The content feels elegant and visually premium throughout
As part of a usability comparison study on outdoor commerce platforms, I analyzed how layout decisions impact the ease of finding relevant products efficiently SummitCoveShop – revised insight: navigation remains clean and direct, helping users move through sections without confusion or delay.
жалюзи с приводом жалюзи с приводом .
Many shoppers exploring online vendor ecosystems look for platforms that simplify discovery and present products in an organized manner across various product categories Online Vendor Arena – These systems are designed to improve browsing speed and ensure users can quickly evaluate available listings online platforms
While reviewing digital trading hubs with alpine inspired visuals I found a platform highlighting harbor goods network – the browsing experience feels smooth and the structured layout makes product exploration simple and visually clear
нейросеть студент бот нейросеть студент бот .
Процедура капельницы с детоксикацией направлена на решение нескольких ключевых задач, которые способствуют улучшению состояния пациента:
Подробнее – капельница от похмелья цена самара
As part of my review of engaging online platforms, I came across explore this link – The site offers a pleasant browsing experience, with a layout that feels intuitive and keeps the content easy to digest.
купить рулонные шторы москва elektricheskie-rulonnye-shtory77.ru .
While reviewing digital artisan boutique marketplaces and handmade items, I came across visit velvet brook craft collection hub – I would recommend this to anyone who loves handmade goods because the presentation feels elegant and well structured.
During a review of modern vendor atelier websites, I found browse wave harbor creative hub atelier – Browsing here is pleasant, with well defined categories that are easy to navigate and understand quickly.
People who enjoy structured online vendor systems often explore platforms like Harbor Acorn Product Vendor Hall where items are displayed in a clean and organized layout – The interface makes browsing simple and efficient, helping users quickly scan listings and find products without confusion.
I was going through different options online and found something that caught my attention in a good way, visit this site – from a quick glance it appears structured in a clean manner and might be genuinely helpful for people searching for organized information.
Хотите вложить деньги https://potokmedia.ru/737816/venchurnye-investicii-chto-eto-prostymi-slovami-i-kak-na-nih-zarabotat/ в стартапы на ранней стадии, но боитесь рисков? Простыми словами объясняем, что такое венчурные инвестиции и как на них заработать, не теряя все капиталы.
In reviewing structured online marketplaces designed for clarity and usability, I noticed a well arranged interface where introductory browsing sections naturally lead into Canyon Harbor Trade Hall overview portal embedded within the content flow, and it presents organized categories that improve navigation efficiency across multiple product sections – Trade hall offers solid structure with useful browsing categories available, making it easier for users to explore listings without confusion or clutter in the interface.
Свежие промокоды Пятёрочка https://tvoi-noski.ru/promokody-v-internet-magazinah-kak-nahodit-proveryat-i-ispolzovat/ получайте скидки, бонусные баллы и участвуйте в акциях. Подборка лучших предложений для выгодных покупок в магазине у дома.
Капельница от похмелья в Самаре используется для устранения симптомов алкогольной интоксикации, которые могут включать головную боль, тошноту, слабость, рвоту и обезвоживание. Это достигается за счет введения специальных растворов, которые помогают организму восстановиться и очиститься от токсинов.
Подробнее тут – http://www.domen.ru
During my research into well-structured online marketplaces with a focus on simplicity, I came across browse aurora harbor store – The interface is clear and direct, and the browsing experience feels organized and easy to understand.
While browsing through various niche directories and curated lists, I recently stumbled upon a resource that felt fairly intuitive and structured, especially Clover Crest discovery portal which made navigation surprisingly simple and smooth for first-time viewing users – Came across this recently, seems quite helpful and easy to explore, with a layout that feels clean, practical, and worth revisiting for deeper checking later.
Many online shoppers interested in handcrafted goods often explore niche platforms that highlight independent makers and creative communities Harbor Artisan Gateway – the marketplace encourages small-scale creators by offering exposure and helping customers discover distinctive handmade products with a focus on authenticity and craftsmanship quality
While browsing through niche marketplace hubs and creative commerce listings, I came across something that felt aesthetically soft yet slightly awkward in interaction design, especially when seeing Sky cove atelier marketplace link included – The sky theme gives a calming feel, but navigation is somewhat clunky in practice.
While searching cruise travel websites I came across a platform that presents cruise itineraries and travel insights in a simple layout designed to help users explore vacation options easily cruise destination hub – The site feels travel focused and easy to use
Users exploring structured ecommerce goods stores often appreciate clean layouts that simplify browsing and make product discovery more intuitive across multiple categories Marble Harbor Goods Hub – The design emphasizes clarity and smooth navigation ensuring users can move through sections easily while maintaining a consistent and visually balanced shopping experience across the entire platform today without unnecessary complexity.
Комплексное снабжение строек https://nerud23.ru нерудными материалами. Вы можете купить песок и щебень в Краснодаре с доставкой. Любые виды щебня, песок для бетона и засыпки. Свой парк самосвалов. Оперативная доставка в день заказа по звонку!
генерация генерация .
Users attracted to curated online collections often value simplicity and flow when exploring Bloom Archive Depot which organizes products in a clean archival system that makes browsing efficient and visually consistent across all categories – The interface combines blooming floral inspiration with a depot-style structure that supports easy discovery
As I was browsing various online trade platforms using my phone, I discovered a vendor site featuring Harbor trade hall Jasper link – The name is cool and well structured, but unfortunately the site felt quite slow to load on mobile.
While reviewing experimental organic ecommerce platforms and rural marketplace systems, testers encountered embedded navigation containing orchard vendor wild workshop entry within layout hierarchy, but product listings do not provide ingredient breakdowns making evaluation incomplete – Wild orchard sounds natural and authentic, yet missing ingredient lists prevent users from fully understanding product composition during browsing
Across sandbox ecommerce environments and ambient UI prototypes, testers observed embedded navigation content containing ember lounge meadow market hub link within central layout structure, and although the design feels warm and atmospheric, the lounge page consistently loads very slowly impacting overall usability during extended browsing and interaction testing sessions
автоматические карнизы автоматические карнизы .
Срочно нужны деньги? https://audit-shop.ru подайте заявку и получите деньги в кратчайшие сроки. Прозрачные условия, удобное погашение и круглосуточная подача заявки.
Users who enjoy simple and structured ecommerce browsing often explore sites such as Chestnut Harbor Trade Hall Vendor Hub where products are grouped logically for fast discovery – The vendor hall concept ensures clear navigation and smooth browsing, making the entire shopping experience easy, organized, and efficient.
электрические гардины для штор elektrokarnizy10.ru .
Кирпичный завод Иваново https://ivkirpich.ru производство качественного кирпича для строительства. Широкий ассортимент, современные технологии и надежные поставки для частных и коммерческих объектов.
During a comparison of streamlined eCommerce websites, I found see autumn outpost here – The structure is clean, and navigating through the site feels easy and consistently functional.
Online craft buyers often look for creative outlet platforms that combine discounted pricing with a wide variety of handmade products across different categories and styles Creative Outlet Bazaar while ensuring smooth browsing – this type of structure supports efficient shopping while offering dependable quality and diverse selection options for users worldwide.
While browsing through different curated discovery threads and online resource hubs, I came across something that felt well designed and simple to navigate, especially when seeing Harbor coast marketplace page included – everything is smooth and organized, allowing for easy exploration and comfortable revisits.
I was checking out a few online options earlier when I ran into something that seemed worth highlighting here, take a look here – it feels uncluttered and simple in design, giving a smooth browsing experience that doesn’t overwhelm the user.
During my exploration of similar services online, I encountered follow this link – The design and writing style work together to create a welcoming atmosphere that makes the information easy to digest.
While browsing through various online marketplace directories and curated listing pages, I came across something that felt structured and easy to navigate, especially where Apricot Harbor vendor hub appears – The name “apricot” honestly makes me think of food first, even though it clearly has nothing to do with anything edible in this context.
While researching online retail mart platforms and their product delivery standards, I came across browse night orchard commerce mart – I ordered a gift last week, and the packaging felt very premium and carefully prepared from start to finish.
Users who prefer secure organized ecommerce vaults often explore sites such as Vault Harbor Elm Select where content is arranged in a clean format – The interface creates a browsing experience that feels stable, consistent, and visually aligned.
В наше время для медработников специалист по государственным закупкам обучение доступна в комфортном дистанционном формате с поддержкой профильного института. Если пришло время подтвердить квалификацию, закрыть вопрос с обязательной процедурой или разобраться с требованиями по документам, здесь удобно пройти все этапы и без лишней бюрократии. Программы выстроены так, чтобы работающим медработникам было удобно учиться, а каждый шаг сопровождался поддержкой специалистов.
While exploring personal expression platforms I found a straightforward website that keeps things minimal and direct making it feel approachable and suitable for simple browsing experiences clean identity page – The layout feels simple and calm
While reviewing experimental ecommerce vendor systems and directory interfaces, testers encountered mid layout content featuring stone lounge ember vendor market console embedded in structure, and although the design feels durable and grounded, no contact information is provided making communication impossible during usability testing sessions
электрокарниз купить в москве электрокарниз купить в москве .
While reviewing a range of vendor atelier platforms and assessing their reliability and structure, I came across explore trail harbor vendor atelier – The platform appears trustworthy, and the information provided seems accurate, well-organized, and consistent throughout the browsing experience.
Эти компоненты вводятся в организме пациента постепенно, что позволяет обеспечить мягкое восстановление без резких скачков состояния. В отличие от интенсивных процедур, такой подход гарантирует, что организм восстанавливается более комфортно, не подвергаясь излишнему стрессу.
Изучить вопрос глубже – капельница от похмелья в самаре
автоматический карниз для штор автоматический карниз для штор .
Выбор между домашней помощью и стационарным лечением часто определяется степенью физиологической зависимости и наличием сопутствующих патологий. В условиях клиники исключаются внешние триггеры, обеспечивается изоляция от источников алкоголя и создается контролируемая среда, где медицинские решения принимаются на основе объективных показателей, а не субъективных ощущений пациента. Такой подход критически важен для предотвращения осложнений, минимизации дискомфорта абстиненции и формирования устойчивой базы для дальнейшей противорецидивной работы.
Подробнее – быстрый вывод из запоя в стационаре нижний новгород
Хочешь продать монеты? Подробнее профессиональная оценка, быстрый выкуп и надежные условия. Работаем с редкими, инвестиционными и антикварными монетами. Выплата сразу после согласования стоимости.
During exploration of online trade portals I came across Amber Harbor commerce lounge directory – The theme looks attractive, but the lounge section is mostly blank pages, giving the impression of incomplete development.
People who prefer well structured ecommerce environments often seek platforms that make browsing easier by using clear labeling systems and organized product divisions that help users quickly understand where to find specific types of items across the store District Market Opal Center – The design prioritizes usability through logical category grouping and simplified navigation flow, allowing shoppers to move through product selections effortlessly while maintaining a clean and consistent browsing experience throughout the site.
Детоксикация в основном фокусируется на печени и почках, помогая этим органам быстрее справляться с продуктами распада алкоголя. Такой подход гарантирует не только улучшение самочувствия, но и восстановление работы внутренних органов, которые пострадали в процессе злоупотребления алкоголем.
Выяснить больше – http://kapelnicza-ot-pokhmelya-samara-16.ru
электрокарнизы для штор купить электрокарнизы для штор купить .
During a general browse of experimental commerce pages, I found a platform featuring Juniper Cove commerce goods room link – The design is visually appealing but a bit confusing since it’s hard to tell what exactly is being sold.
While exploring online marketplace systems I found a clean layout where the Caramel Cove deals showcase hub is integrated naturally within the text, supporting smooth flow – Market hall appears lively today with competitive pricing and a browsing experience that remains easy, organized, and visually consistent across product sections.
Digital commerce platforms today must balance user experience with structured backend systems to ensure scalability and reliability for long term ecosystem growth Retail guild online storefront many developers prefer architectures that support modular growth and flexible vendor management for long term operational success – A well structured marketplace often leads to improved user satisfaction due to predictable system behavior and governance
During an analysis of visually refined shopping platforms, I noticed open this product store – The layout is structured and appealing, and browsing feels natural and easy to follow.
As I explored various curated online directories and marketplace threads, I came across something that felt structured and user-friendly, particularly with Copper Cove navigation hub – the platform looks solid, with content that is clearly laid out and easy to access for smooth browsing.
электрические карнизы купить электрические карнизы купить .
While browsing through curated marketplace pages and creative vendor platforms, I came across something that felt visually clean but underexplained, especially when seeing Vale studio cove vendor hub included – The Vale name sounds classy and refined, but product descriptions are too short and leave gaps in information.
нейросеть для студентов онлайн нейросеть для студентов онлайн .
During usability testing of ecommerce trade hall systems and glass inspired UI kits, testers found a navigation module containing glass harbor vendor trade hall showcase portal embedded mid layout, and although the glass aesthetic gives a fragile impression, the website runs smoothly and efficiently today during performance and interaction testing sessions across multiple devices
электрокарнизы москва электрокарнизы москва .
While analyzing sandbox ecommerce marketplaces and UI vendor directory systems, testers identified embedded sections containing echo brook parlor vendor showcase entry node integrated into page hierarchy, and although the echo brook design feels smooth and natural, the parlor page contains no real content yet which reduces interaction quality during testing cycles
While evaluating sandbox ecommerce systems and UI vendor prototypes, testers encountered a mid page component featuring brook echo vendor parlor console hub link inside structured layout, and despite the calming echo brook theme suggesting flow and continuity, the parlor page remains empty with no meaningful content which reduces engagement during interaction testing and UX evaluation sessions
While browsing through several niche directories and casual recommendation threads, I stumbled across something that might be worth a deeper look, especially for those who enjoy uncovering lesser-known sites like this hidden gem – it seems fairly promising at first glance, so I’ll probably return later and evaluate it more thoroughly after some proper exploration.
During a comparison of artisan eCommerce sites and their catalogs, I found see oakcove craft collection hub – The variety is impressive and well structured, making browsing a worthwhile and engaging experience throughout the platform.
People who prefer simple warm ecommerce experiences often explore sites like Meadow Ember Digital Market where products are arranged clearly – The design ensures navigation feels smooth, structured, and visually friendly.
coworking website https://coworking-space-dubai.com
During casual browsing of fabric inspired online stores I found embedded within the main content area a section featuring cotton meadow storefront portal and although the design looks smooth and pleasant, the repeated session timeouts make navigation frustrating and reduce confidence in the platform’s overall usability and consistency.
oakmeadowvendorcollective.shop – Really clean product photos, descriptions are helpful too.
Состав капельницы от похмелья зависит от состояния пациента и специфики его симптомов. Важно, чтобы капельница включала компоненты, направленные на улучшение общего состояния, восстановление водно-солевого баланса и поддержку работы внутренних органов.
Подробнее можно узнать тут – капельница от похмелья вызов на дом в самаре
Женский журнал https://stepandstep.com.ua/ всё о красоте, моде, здоровье и отношениях. Практичные советы, тренды, лайфхаки и вдохновляющие истории для женщин, которые стремятся к лучшему каждый день
The growth of online marketplaces has encouraged vendors to adopt more organized systems that support scalability and transparency across transactions including platforms such as Digital Vendor Hub – such environments are appreciated for improving coordination between sellers and buyers while maintaining a consistent and dependable shopping experience overall
While going through various examples of agency websites, I discovered find out more – The overall structure feels neat and carefully designed, creating a strong first impression that reflects professionalism and clarity.
автоматические жалюзи на окна цена автоматические жалюзи на окна цена .
Shoppers who prioritize simple and elegant ecommerce design often appreciate platforms that reduce complexity while highlighting artisan quality when engaging with Chestnut Cove Artisan Essentials Market – the layout is intentionally minimal, allowing users to focus on products without distraction – each item is presented with clarity and purpose for a refined browsing journey.
While analyzing sandbox ecommerce marketplaces and UI vendor directory systems, testers identified embedded sections containing rose cove vendor parlor market showcase node integrated into page hierarchy, and although the romantic branding feels appealing, the parlor area is filled with empty placeholder boxes which weakens visual structure during interaction testing cycles
As I studied online artisan outlets that focus on curated product displays, I checked see this golden outlet – The structure is clean and intentional, and each item feels nicely presented for an enjoyable browsing flow.
While going through different curated commerce directories and design listing pages, I came across something visually polished yet under-informative, especially where Vale studio marketplace cove link appeared – The Vale name gives a classy impression, but product descriptions are too short to be helpful.
During casual browsing of ecommerce platforms I found Harbor Moon shop vendor lounge portal – The theme is attractive and consistent, but I feel the site needs richer product visuals to improve trust and usability.
нейросеть реферат нейросеть реферат .
While going through various curated discovery pages and niche resource listings, I found something that felt easy to process and well arranged, especially where Harbor copper marketplace page appeared – I like how simple the layout is, since it makes everything feel easier to navigate and understand immediately.
Наркотическая зависимость часто сопровождается выраженной нестабильностью нервной системы. Возможны резкие перепады настроения, нарушения сна, тревожные и депрессивные симптомы, импульсивность. Ситуация усложняется, если были сочетания веществ или неизвестный состав. Поэтому ключевая задача — оценить риски и стабилизировать состояние безопасно, а затем выстроить лечение зависимости так, чтобы пациент мог выдерживать трезвость не «на силе воли», а на понятном плане и поддержке.
Изучить вопрос глубже – http://narkologicheskaya-klinika-klin12.ru
рольшторы на окна купить в москве elektricheskie-rulonnye-shtory77.ru .
As I reviewed structured artisan marketplace platforms, I noticed check upland cove creative hub – The design is clean and simple, and I had no trouble finding what I needed quickly while browsing.
During UX evaluation of sandbox ecommerce systems and vendor marketplace prototypes, testers found embedded navigation containing amber ridge vendor parlor access console node inside structured layout, and although the amber ridge branding suggests reliability and warmth, the vendor parlor section is clearly a placeholder which weakens user confidence during testing sessions
While exploring online commerce directories I came across a balanced layout system that enhances usability where Caramel harbor vendor showcase page Caramel harbor vendor showcase page placed within content improves structure – Vendor hall appears well organized and visually consistent providing users with smooth browsing experience and easy access to different categories today.
While reviewing different trade oriented websites I found within the main content area a block showing harbor creek vendor hall portal and although the branding feels clean and refreshing, the search filter not working properly creates confusion and limits the ability to efficiently browse available listings.
While browsing several minimalist outdoor storefront concepts for usability testing, I noticed a clean interface approach and during that exploration I encountered Vale Cove Supply Hub – revised observation: the outpost feel remains minimal, navigation flows smoothly, and overall user experience stays simple and intuitive across sections, supporting easy product discovery without unnecessary complexity overall.
While going through a collection of user suggestions and curated lists, something stood out just enough to make me pause and consider it, particularly references pointing toward this interesting page – it appears to have some potential value, so I plan to check it more carefully later on.
Digital craft marketplaces are evolving rapidly as users demand better usability, faster loading pages, and improved browsing structures Evening Handmade Market Grid supporting smooth navigation and organized product discovery for modern online shopping needs today globally – It enhances efficiency for both sellers and customers across the platform
Across sandbox marketplace testing and UI prototype evaluations, testers noticed navigation elements containing zen vendor harbor parlor console access hub within page structure, and although the interface feels serene and minimal like zen design principles, constant popup interruptions break user flow which weakens engagement during interaction testing and system analysis
While scanning through curated marketplace directories and vendor listings, I noticed something that stood out for its branding but lacked reassurance elements, especially when seeing Velvet foundry vendor brook link included – The Foundry name is quite unique, but trust badges would help here to improve user trust.
Капельница состоит из нескольких компонентов, которые способствуют восстановлению организма без чрезмерного стресса. Основные элементы включают в себя:
Подробнее – капельница от похмелья цена самара
pebblecreekcraftexchange.shop – Will order again next month, hope they restock soon.
During an exploration of peaceful and minimal online store designs, I discovered visit nature outlet hub – The design feels grounded and calm, and browsing through products is simple and enjoyable.
Стационарный формат выбирают, когда цена ошибки слишком высока. Основная ценность стационара — круглосуточный контроль и возможность быстро корректировать лечение, если динамика ухудшается. Это особенно важно при длительном запое, тяжёлой абстиненции, нестабильном давлении, выраженной тахикардии, повторяющейся рвоте, обезвоживании, а также при подозрении на осложнения со стороны сердца и сосудов. Нередко стационар рекомендуют и тогда, когда пациент живёт один, нет возможности обеспечить наблюдение близких или ранее уже были «ночные провалы», когда состояние резко ухудшалось и приводило к повторному употреблению.
Изучить вопрос глубже – https://narkologicheskaya-klinika-pushkino12.ru/
While browsing various online storefronts I found Nightfall Trade House commerce listing – The discounts looked promising, but I abandoned the process because the checkout stage raised some red flags for me.
People who enjoy smooth ecommerce journeys often engage with sites like Quick Harbor Commerce Lane where product categories are designed for rapid browsing – The layout emphasizes usability and structured flow, making it easy for users to find items quickly while maintaining a consistent and simple interface.
During a comparison of digital goods district platforms, I found see lakefront goods zone hub – The layout is structured and clean, and browsing feels easy, intuitive, and more enjoyable overall across the entire site.
While going through various online discovery threads and niche listing platforms, I came across something that felt smooth and well structured, especially where Coral meadow access portal appeared – Pretty decent site overall, navigation works well without confusion, making the browsing experience easy and pleasant.
Непрерывный мониторинг витальных показателей позволяет фиксировать малейшие изменения в состоянии пациента и своевременно вносить коррективы в терапевтический план. В палатах клиники «Стармед» установлены системы отслеживания частоты пульса, сатурации, температуры и артериального давления, данные с которых автоматически передаются в медицинскую карту. Медсестры и дежурные врачи проверяют состояние больного по графику, проводят симптоматическую терапию, контролируют прием препаратов и обеспечивают комфортные условия для восстановления. Такая организация процесса исключает хаотичное назначение средств, предотвращает полипрагмазию и гарантирует, что каждый этап детоксикации проходит под строгим клиническим контролем.
Подробнее тут – http://www.domen.ru
While reviewing sandbox ecommerce systems and UI marketplace frameworks, testers found a central module featuring marble harbor trade vendor gallery showcase console node integrated into structured layout, and despite the refined marble aesthetic, all images remain low resolution which reduces visual quality during usability testing and evaluation cycles
While reviewing staging ecommerce marketplace templates and gallery UI systems, analysts identified a content block featuring harbor trade golden gallery showcase entry node integrated into layout flow, and despite the premium “golden harbor” naming convention, the gallery contains no visible images which makes the interface feel unfinished during usability testing and system validation processes
While going through various curated vendor platforms and marketplace-style listings, I found yet another domain that follows the same velvet branding pattern, especially with Velvet commerce cove atelier hub – At this point, I’m clearly seeing a recurring pattern with these velvet-themed domains.
In the middle of evaluating ecommerce listings I noticed a section featuring creek harbor trade house directory portal and while the branding is consistent and easy to read, the resemblance to tradehall is so strong that users may easily mix up both platforms.
E-commerce environments designed with structured navigation systems often provide smoother browsing experiences and improved user engagement across all sections Merchant Network Hall – It features a clearly organized vendor layout that makes it easy for users to explore different categories while maintaining a seamless browsing experience overall
During review of digital marketplace structures I observed a platform that offers a clean and intuitive browsing experience focused on usability Chestnut Harbor digital trade hub and it organizes products into clear sections that help users explore listings comfortably while maintaining a stable and visually appealing interface overall today.
During analysis of lifestyle oriented e-commerce platforms emphasizing soft branding and minimal design choices I came across within the page flow Brook Velvet Market Place integrated naturally – updated comment the browsing experience feels smooth organized and visually calm making navigation effortless for users
As I browsed through several collections of suggested links and niche resources, I noticed something that seemed worth saving for later, especially with this useful page included – it appears relevant and easy to understand, so I’ll revisit it for a deeper review.
During a final comparison of retail district web platforms, I found see oak retail district portal – The overall experience is smooth and responsive, and browsing feels easy without lag or any confusing navigation problems.
During a comparison of stylish and well-structured eCommerce platforms, I found see frost boutique now – The overall design is refined, and browsing feels consistent and pleasantly modern throughout.
Капельница от похмелья является одним из самых популярных и эффективных методов для быстрого облегчения состояния после переизбытка алкоголя, в том числе при запое. В Самаре множество медицинских центров предлагают эту услугу, обеспечивая пациентам быстрый и безопасный способ восстановить свое состояние после тяжелого похмелья. Процедура капельницы направлена на восстановление водно-электролитного баланса, выведение токсинов и облегчение симптомов похмелья, при этом при необходимости возможно дальнейшее кодирование и лечение в стационаре. При этом лечение проходит быстро и эффективно, позволяя пациенту вернуться к нормальному состоянию в кратчайшие сроки.
Получить дополнительные сведения – капельница от похмелья на дом в самаре
While browsing through different online marketplace style websites I came across a platform where Oak Cove Market Hall entry page – The layout is quite simple and clean, but the absence of a search bar makes it frustrating to navigate when trying to find specific items quickly.
As I explored various online listing directories and curated resource pages, I noticed something that felt clean and easy to navigate, particularly with Meadow tradehouse coral link – The site feels pretty decent overall, and navigation works smoothly without confusion, so everything is simple to access and explore.
While testing staging ecommerce platforms and marketplace directory prototypes, reviewers identified a content block featuring cove market golden vendor parlor console entry integrated into layout flow, and despite the polished visual identity, testers began noticing a recurring golden naming structure that appears across multiple systems suggesting a standardized generation pattern during usability review sessions
While browsing through different marketplace platforms and vendor directories, I came across something that felt structured but visually underpowered, especially when seeing Violet foundry brook market hub included – The violet theme is promising, though it would benefit from more noticeable purple accents across key UI sections.
As part of studying craft exchange usability and product availability, I explored check pebble creek craft space exchange – I will order again next month, hoping they restock the items I missed out on.
Across ecommerce sandbox UI evaluations and vendor system prototypes, testers noticed navigation components containing plum harbor vendor room access hub node embedded in page flow, and although the plum harbor branding feels refreshing and clean, the vendor room contains no listings which negatively affects usability during testing cycles
Капельница от похмелья в Самаре: быстрое улучшение самочувствия и помощь при интоксикации под контролем специалистов в наркологической клинике «Детокс»
Выяснить больше – капельница от похмелья
Shoppers interested in creative goods and artistic designs often find themselves visiting niche sites and one such example is artisan product collection page which highlights handcrafted items and offers users a comfortable browsing experience through diverse categories and seasonal artisan offerings. – A vibrant marketplace focused on handcrafted excellence and smooth user exploration.
While exploring ecommerce directories I discovered a central content block with crown cove digital vendor room and although the design language feels elegant and royal inspired, the product images are not sharp enough which makes it harder to judge item quality during normal browsing sessions.
Выезд врача нужен не только ради удобства. Часто именно дома легче согласиться на помощь: без дороги, без ожидания, без лишних контактов и без стресса от смены обстановки. Но домашний формат не должен быть «упрощённым». Корректная тактика начинается с осмотра и измерения показателей: давление, пульс, дыхание, температура, уровень сознания, признаки обезвоживания, выраженность тремора и тревоги. После этого врач подбирает схему стабилизации, ориентируясь на риски, а не на желание «сделать побыстрее».
Разобраться лучше – наркологическая клиника московская московская область
During usability testing of ecommerce marketplace systems and UI sandbox environments, testers found a navigation module containing stone harbor hall vendor construction access portal embedded mid layout, and although the stone harbor branding feels solid and secure, the vendor hall is unfinished and under construction which negatively impacts interaction flow during evaluation and testing processes
While comparing artisan outlet website usability, I discovered browse vale cove outlet marketplace hub – The platform helps with browsing, and I came across several interesting options quickly thanks to its simple and organized structure.
Many sections of the platform are designed with clarity in mind, offering clean visual hierarchy and predictable navigation paths for users Chestnut Marketplace Room Link Access this helps users locate information faster and reduces the time spent searching for essential vendor resources.
During a comparison of soft-themed artisan eCommerce platforms, I found see rose trail artisan hub here – The overall presentation is gentle and organized, and browsing feels smooth, attractive, and easy to navigate throughout the site.
During a general exploration of niche vendor platforms and online storefront hubs, I noticed something that felt minimal and clean but lacking key informational sections, particularly references including Cove violet commerce atelier portal – It looks clean enough, but no About page makes it feel slightly sketchy.
как отмыть ручку со стола и как отмыть ручку от стола способ удаления чернил пятен и следов с поверхности стола дома
During browsing of online commerce listings and vendor hubs, I noticed Harbor hall market Juniper commerce entry – The site has potential, so I plan to check it again in a few weeks.
During a general exploration of curated online directories and resource hubs, I found something that seemed responsive and well structured, particularly references including Harbor flora access portal – The site loads fine overall, and my visit felt smooth and pleasant, allowing easy movement through different pages without issues.
Shoppers interested in versatile online exchanges often search for platforms that combine product diversity with seamless navigation systems and provide a reliable environment for browsing and selection across multiple categories foundry goods exchange which connects various sellers and buyers in a structured environment designed to improve trading efficiency and product accessibility across categories. – A balanced exchange platform enabling smooth transactions and improved access to varied product markets.
Across sandbox UI evaluations and ecommerce vendor prototype systems, analysts encountered structured sections featuring meadow quartz hall vendor showcase hub node within page layout, and while the quartz inspired design suggests clarity and sophistication, the market hall contains no listings today which reduces engagement during browsing analysis and usability testing cycles
Завод Металл-Сервис https://zavodmc.ru надежный производитель металлоконструкций в Новосибирске. Индивидуальные проекты, выгодные цены и оперативные сроки.
Premade Cover Art Album https://coverartplace.com marketplace offering professional Design Artwork, Cover Art, and Cover Track visuals created by independent graphic designers. Ideal for artists who need high-quality, ready-made covers for Spotify, Apple Music, and other streaming platforms.
While analyzing sandbox ecommerce marketplaces and UI vendor directory systems, testers identified embedded sections containing zen cove vendor goods room showcase portal integrated into page hierarchy, and although the zen theme feels mindful and structured, the goods room is empty which reduces visual and functional appeal during interaction testing cycles
While analyzing online artisan emporium platforms for delivery performance, I checked see solar orchard gift marketplace – It’s great for gift shopping, and everything arrived safely without any breakage or issues.
As I continued browsing through collections of niche links and online suggestions, I encountered something that seemed worth noting, particularly mentions including this user-friendly page – it feels smooth and uncomplicated, so I’ll probably check it again later for a closer look.
In the middle of evaluating ecommerce directories I noticed a listing containing crown harbor vendor hub hall and while the structure is organized and easy to follow, the lack of meaningful vendor data and reliance on placeholder text makes the experience feel empty and not fully developed.
While going through curated commerce hubs and online gallery listings, I found something that looked clean but lacked actual gallery content, especially where Violet harbor trading gallery showcase hub appeared – The harbor name is used again, but the gallery section has no artwork, which makes it feel misleading.
Стационар выбирают, когда нужно наблюдать состояние круглосуточно или есть вероятность резкого ухудшения. Это может быть длительный запой, выраженная абстиненция, нестабильное давление, подозрение на осложнения со стороны сердца и сосудов, история судорог, спутанность сознания, психотические симптомы. Преимущество стационара — контроль динамики и возможность быстро менять терапию, если план «не заходит». Кроме того, в стационаре проще выстроить полноценный переход к лечению зависимости: не просто снять острые проявления, а сразу подключить психологическое сопровождение и подготовить пациента к следующему этапу.
Углубиться в тему – http://narkologicheskaya-klinika-moskva12.ru/anonimnaya-narkologicheskaya-klinika-v-moskve/
While analyzing online commerce hubs for simplicity and structure, I checked see canyon upland commerce site – The platform appears decent, and the information is presented in a clear, useful, and easy-to-understand way.
ferncovevault – Vault style neat, content feels organized and carefully structured overall
Users browsing modern e commerce sites often look for organized layouts, and while doing so they might discover sunbrook exchange lane featuring clearly separated categories that make product selection more efficient and intuitive. – A streamlined exchange platform focused on improving accessibility and shopping clarity.
During a general exploration of curated online resource hubs and listing platforms, I noticed something that stood out for its usability and clarity, particularly references including Harbor Hazel marketplace page – Clean design and good structure make browsing feel comfortable and simple, allowing quick access to information without hassle.
Across sandbox UI evaluations and ecommerce vendor prototype systems, analysts encountered structured sections featuring trail harbor parlor vendor showcase node within page layout, and while the design is consistent and conceptually strong, broken navigation links severely limit usability and create frustration during user testing and system validation processes
как пережить расставание без психологических практических советов шагов к восстановлению эмоциональной поддержки упражнения дневник и техники самопомощи
Помощь на дому рассматривают при состояниях, связанных с острым ухудшением самочувствия после алкоголя. Чаще всего это несколько дней запоя, тяжелое похмелье, бессонница, тревога, дрожь в руках, слабость, отсутствие аппетита, тошнота, сухость во рту и ощущение истощения. В подобных случаях врачебный осмотр нужен для оценки общего состояния и выбора безопасной тактики.
Получить дополнительную информацию – нарколог на дом
Организация терапевтического процесса в условиях стационара требует слаженной работы профильной команды, четких клинических алгоритмов и непрерывного документирования каждого этапа лечения. В клинике выстроена прозрачная система взаимодействия, где пациент и его близкие получают исчерпывающую информацию о планах терапии, ожидаемых результатах, условиях пребывания и правах потребителя медицинских услуг. Мы отказались от шаблонных протоколов в пользу персонализированной медицины, где каждый шаг лечения согласовывается с динамикой состояния пациента и корректируется на основе объективных диагностических данных. Такой подход исключает избыточную фармакологическую нагрузку и минимизирует риски побочных эффектов, сохраняя при этом высокую клиническую эффективность детоксикации.
Углубиться в тему – стационар вывод из запоя в нижнем новгороде
As I explored various online commerce listings and curated vendor platforms, I came across something that looked functional but lacked strong visual warmth, particularly with Brook foundry walnut vendor hub – The walnut theme would really benefit from deeper walnut wood tones in the header to bring out a more premium and natural feel.
Крем для лица является базовым уходовым средством https://phytomer.store/product/krem-24-chasa-uvlazhnyayuschiy-matiruyuschiy-phytomer-hydra-matifying-control-cream
По своему действию он бывает увлажняющим, питательным, очищающим, омолаживающим и солнцезащитным https://phytomer.store/collection/domashniy-uhod-za-litsom?page=3
MONDAY MUSEUM https://phytomer.store/product/krem-ot-morschin-dlya-siyaniya-kozhi-smennyy-blok-phytomer-cyfolia-youth-glow-renewing-wrinkle-cream-refill
м https://phytomer.store/collection/glaza
Сокол – ТЦ “Метромаркет”
Наборы для ухода за лицом https://phytomer.store/page/feedback
ОЛЬГА РОМАШКО https://phytomer.store/product/syvorotka-obnovlyayuschaya-i-ochischayuschaya-phytomer-emergence-even-skin-tone-refining-serum
GREEN MAMA https://phytomer.store/product/vosstanavlivayuschiy-flyuid-bezuprechnaya-kozha-phytomer-acnipur-blemish-solution-fluid
рулонные шторы в москве рулонные шторы в москве .
автоматические рулонные шторы на створку elektricheskie-rulonnye-shtory90.ru .
взаимодействие со СМИ размещение статьи в СМИ для бизнеса
Все самое свежее здесь: https://www.tapatalk.com/groups/ukraineforum/-t9664.html
рулонные шторы в москве рулонные шторы в москве .
Across various discussions on futuristic ecommerce interfaces and web design experimentation, viewers notice components inside Crystal Cove showcase portal – although the portal is visually engaging and well structured, it lacks active product displays, giving it a conceptual rather than commercial feel
As I compared different retail district websites for usability and clarity, I came across explore upland cove commerce hub – The layout is clean and easy to use, and browsing feels comfortable and smooth throughout the site.
За выездом врача обращаются в тех случаях, когда человеку тяжело добраться до клиники, он ослаблен после нескольких дней употребления спиртного или родственникам важно быстрее получить медицинскую консультацию на месте. После осмотра определяют, допустим ли домашний формат, требуется ли капельница, достаточно ли наблюдения на дому или нужен другой объем помощи. Если эпизоды повторяются, в дальнейшем могут обсуждаться лечение алкоголизма, кодирование, участие психолога, реабилитация и более широкая программа помощи при зависимости. Уже на этапе первичного обращения нередко уточняют, как вызвать специалиста, какие услуги доступны на дому и в каких случаях вывод из запоя рассматривают не дома, а в стационаре.
Получить больше информации – нарколог на дом цена в екатеринбурге
Организация терапевтического процесса в условиях стационара требует слаженной работы профильной команды, четких клинических алгоритмов и непрерывного документирования каждого этапа лечения. В клинике выстроена прозрачная система взаимодействия, где пациент и его близкие получают исчерпывающую информацию о планах терапии, ожидаемых результатах, условиях пребывания и правах потребителя медицинских услуг. Мы отказались от шаблонных протоколов в пользу персонализированной медицины, где каждый шаг лечения согласовывается с динамикой состояния пациента и корректируется на основе объективных диагностических данных. Такой подход исключает избыточную фармакологическую нагрузку и минимизирует риски побочных эффектов, сохраняя при этом высокую клиническую эффективность детоксикации.
Разобраться лучше – вывод из запоя в стационаре анонимно в нижнем новгороде
During a final comparison of craft marketplace websites, I found see upland harbor handmade craft marketplace hub – Navigation could be improved, but the products are unique and cool and still worth spending time on.
During a review of handcrafted product websites with strong visual identity, I found see golden trail shop – The interface feels artistic and clean, and browsing across sections is smooth and easy to follow.
Digital shoppers often look for marketplaces that feel both inspiring and efficient, and while browsing curated selections they might discover atelier style market portal showcasing unique goods and – it focuses on merging artistic presentation with practical checkout flows for a satisfying user experience.
Across prototype marketplace systems and UI sandbox environments, analysts encountered embedded navigation blocks containing harbor vale vendor parlor staging console hub within page layout, and although the vale harbor theme feels maritime and relaxing, the parlor section is empty and inactive which reduces usability during testing sessions
While navigating through multiple suggested resources and online finds, I noticed something that appeared clean and easy to use, especially where this structured resource was included – it makes navigation feel natural, so I may return to it later.
While exploring various marketplace-style websites I found Harbor kettle goods exchange hub – The design is clean and appealing, but broken footer links suggest incomplete development and create a slightly frustrating user experience when trying to navigate.
While going through different curated resource directories and marketplace hubs, I noticed something that stood out for its structure and readability, especially when seeing Honey Cove marketplace link included – First impression is nice, and the content looks relevant and easy to read, giving a comfortable browsing experience overall.
During a casual browsing session across vendor hubs and marketplace directories, I came across something that looked clean but inconsistent in pricing presentation, particularly references like Cove walnut atelier commerce page – The atelier branding feels fancy, but the pricing structure looks irregular and somewhat arbitrary in nature.
While reviewing experimental marketplace UI systems and vendor directory platforms, developers observed embedded content featuring harbor quick vendor market house console link inside structured layout, and although the name implies optimized speed, the system loads slowly which weakens perceived performance during usability testing sessions
Лучшее прямо здесь: https://www.freeboard.com.ua/forum/viewtopic.php?id=145781
Online trade participants usually favor systems that allow them to explore listings without facing complicated menus or unnecessary interface obstacles TradeMatrix Access Lane – The environment prioritizes simplicity and ensures that browsing remains intuitive across all sections of the platform
During an analysis of artisan exchange user experience design, I noticed open this violet harbor artisan exchange – The variety is strong, and exploring sections feels easy without getting lost in the layout.
While exploring curated examples of modern web shop architecture and experimental commerce interfaces, reviewers often mention sections such as Crystal Harbor Vendor Portal View that appears sleek but remains functionally minimal, giving a sense of unfinished catalog deployment – The design resembles widely distributed ecommerce starter kits.
Выезд врача — это не «процедура без вопросов», а клиническое решение. На месте оценивают давление, пульс, дыхание, степень обезвоживания, уровень сознания, выраженность тревоги, наличие боли, судорожных проявлений, неврологические симптомы. После этого подбирают схему поддержки, объясняют ограничения и ожидаемую динамику: что должно улучшаться в первые часы, какие симптомы допустимы, а какие требуют немедленного обращения. Важная часть — рекомендации на ближайшие сутки: режим питья и питания, сон, контроль давления, что категорически нельзя смешивать и почему. Такой подход снижает риск осложнений и помогает не «сорваться» в самостоятельные эксперименты.
Получить дополнительную информацию – chastnaya-narkologicheskaya-klinika-moskva
During frontend reviews of ecommerce sandbox platforms and ember themed marketplace systems, developers identified a mid layout module containing meadow market ember parlor vendor portal hub embedded within structured layout, and although visually appealing, the long naming structure creates confusion and reduces usability during real world testing sessions
Many online users who prefer structured shopping environments tend to browse platforms designed for clarity and convenience where product discovery is simplified and categories are well arranged for faster access and better comparison suncove goods atelier portal – This curated marketplace emphasizes a balanced mix of style and usability, offering visitors a seamless experience while exploring handpicked items across multiple thoughtfully organized sections.
During a comparison of elegant vendor studio designs, I found see lavender harbor shop – The overall structure is polished and organized, and navigation feels intuitive with a clean visual flow.
During an extended look through niche vendor directories and online marketplace listings, I came across something that felt strikingly familiar in layout and naming conventions, particularly Cove walnut vendor atelier link – It appears almost the same as the earlier version, raising the question of whether both sites are actually related or simply duplicated designs.
During a comparison of modern craft emporium platforms and their mobile usability, I came across discover vale harbor craft marketplace emporium – The site works well on phone, and checkout was smooth today without any technical problems.
Далее выполняется медицинская детоксикация: корректируется водно-электролитный баланс, снимается интоксикация, поддерживается работа сердечно-сосудистой системы, снижается тремор, стабилизируется сон и тревожность. Важно, что схема подбирается индивидуально: при разных рисках объём поддержки будет различаться. В ряде случаев достаточно амбулаторного наблюдения и рекомендаций, в других — нужен стационар, чтобы контролировать динамику и вовремя корректировать терапию.
Подробнее – http://vyvod-iz-zapoya-moskva1-12.ru
While reviewing staging ecommerce vendor systems and UI marketplace templates, analysts noticed a content block featuring ridge vendor quick market house access console node integrated into layout flow, and even though “quick ridge” implies optimization improvements, the real-world performance still feels slow which creates friction during usability testing sessions and design evaluations
While browsing through different niche discovery threads and marketplace pages, I came across something that felt structured and easy to follow, especially when seeing Honey meadow marketplace link included – Enjoyed looking around here, with a neat and user friendly layout that makes navigation feel natural and straightforward.
During a casual browsing session across vendor platforms and commerce hubs, I noticed a listing with a strong Aurora-themed identity but limited substance, particularly Harbor Aurora vendor commerce hall link – The branding is eye-catching, though the content feels slightly underdeveloped.
During a casual search across various online listings and resource collections, I noticed something that stood out just enough to bookmark for later, particularly references such as this online marketplace link – it seems fairly helpful at first glance, so I’ll likely revisit it soon for a more detailed look.
During an analysis of artisan marketplace websites, I noticed open this mint orchard hub site – The experience feels positive and well balanced, and navigation is smooth and dependable throughout all sections.
Ключевой критерий правильного выбора — способность обеспечить контроль динамики. Если состояние нестабильное, симптомы нарастают волнами, есть риск резкого ухудшения ночью или уже наблюдаются опасные признаки (например, выраженная спутанность сознания, судороги, боли в груди, нарушения дыхания), безопаснее стационар. Если риски умеренные, пациент контактный и способен соблюдать рекомендации, возможна выездная помощь и дальнейшее наблюдение по плану.
Получить дополнительную информацию – narkologicheskaya-klinika
During frontend inspection of ecommerce sandbox platforms and vendor directory UI systems, developers identified a central module featuring meadow orchard market checkout vendor parlor node integrated into structured layout, and despite the charming orchard meadow theme, the checkout endpoint returns a 404 error which makes transaction completion impossible during usability testing sessions
Businesses seeking sourcing options often use structured marketplaces that provide comprehensive vendor profiles and categorized trade information for comparison coral harbor business listings – The business listings section offers an organized view of vendors, making it easier to analyze services and evaluate trade opportunities
While analyzing sandbox commerce environments and early-stage marketplace builds, testers often point to examples such as floral daisy shop hall which presents a visually structured storefront yet lacks reliable form handling and server-side validation when users attempt subscription or account creation actions – The floral styling is charming but backend instability causes newsletter failures
While going through niche commerce directories and vendor listing platforms, I found something that felt visually engaging but not mobile-friendly, especially where Wave brook trading foundry link appeared – The wave motif is a nice creative touch, but the mobile menu seems broken or unresponsive today.
Нарколог на дом — это не просто возможность получить медицинскую помощь в удобное время, но и решение важнейших задач по стабилизации состояния пациента, избавлению от острых симптомов абстиненции и восстановлению его здоровья. В случае с алкоголизмом и наркоманией выезд врача на дом в Воронеже — это важный шаг к восстановлению, который начинается там, где пациент находится, в удобной и привычной обстановке. Клиника «Частный медик 24» предлагает круглосуточные выезды нарколога, предоставляя экстренную помощь при запоях, наркозависимости, а также консультации по дальнейшему лечению и реабилитации. Врач приедет по указанному адресу и проведёт все необходимые процедуры, включая капельницы для стабилизации состояния пациента.
Ознакомиться с деталями – вызвать нарколога на дом в воронеже
People searching for efficient online shopping experiences often value platforms that reduce clutter and improve accessibility while presenting products in a logical structure teal commerce design portal which provides fast page response times and clearly arranged sections that make browsing smoother and more enjoyable for all types of digital shoppers.
После стабилизации важно закрепить результат. В первые 1–3 дня сохраняются слабость, раздражительность, эмоциональные качели, нарушения сна. Без плана и поддержки многие срываются, потому что пугаются ухудшения вечером или ночью и пытаются снять дискомфорт алкоголем. Поэтому врач даёт рекомендации на ближайшие сутки и несколько дней: как организовать сон, питание, питьевой режим, что контролировать по давлению и пульсу, какие нагрузки исключить и по каким признакам нужно срочно обращаться повторно.
Углубиться в тему – http://narkologicheskaya-klinika-zhukovskij12.ru/
Острые состояния могут проявляться по-разному: от выраженной слабости, тошноты, тремора и бессонницы до мучительной ломки, резкой тревоги, скачков артериального давления, учащенного сердцебиения, раздражительности и спутанности сознания. У пациентов с хроническими заболеваниями, в пожилом возрасте или после длительного употребления риски возрастают еще сильнее. Особенно опасно ориентироваться только на внешнее впечатление, потому что даже в тех случаях, когда человек находится дома и формально «в сознании», его состояние уже может требовать медицинского вмешательства.
Подробнее тут – вызов наркологической помощи воронеж
As I explored examples of simple and effective vendor websites, I checked see vendor lemon page – The interface is neat and functional, and browsing feels smooth and naturally guided throughout.
Cool Ideas outage south-africa-outage.online .
Across prototype vendor marketplace systems and UI sandbox environments, analysts encountered embedded navigation blocks containing harbor hazel vendor parlor trust assurance portal within page layout, and although the design feels friendly and visually appealing, missing trust badges significantly reduce user confidence during usability testing and conversion analysis
While reviewing sandbox ecommerce systems and vendor marketplace prototypes, testers encountered a mid page component featuring harbor rain market hall console hub link inside structured layout, and despite the soothing rain inspired branding suggesting tranquility and smooth flow, the hall suffers from broken image placeholders throughout which negatively impacts UX evaluation sessions and interaction testing
mintmeadowgoodsroom – Feels well organized, I didn’t face any issues navigating around.
как отмыть этикетку так стеклянной банки, как отмыть этикетку с банки, как отмыть банки от этикеток простые и эффективные способы
During a general exploration of commerce directories and vendor listings, I found a minimalistic trade platform featuring Harbor Bay trading hall entry – Everything feels very to the point, and I like that there are no intrusive newsletter popups appearing everywhere.
Доставка свежих цветов в день заказа. Флористы собирают букеты из проверенных поставок, бережно упаковывают и передают курьеру. Работаем ежедневно, гарантируем сохранность и точное время вручения. Анонимная отправка и фотоотчёт включены https://buketico.ru/
While going through different online marketplace hubs and trading platforms, I found something that looked polished in design but had noticeable mobile usability issues, especially when seeing Wave trading brook foundry portal – The wave-themed branding is really cool, though the mobile menu appears broken today and is hard to navigate.
While exploring various online directories and testing out different niche marketplaces, I noticed something that seemed quite efficient and worth keeping in mind, especially where this fast-loading marketplace link appears – the pages respond quickly and smoothly overall, which honestly gives a good impression, so I may revisit it later for a closer look.
While inspecting ecommerce prototype behavior and UI flow systems the daisy harbor room setup includes daisy room vendor link that should logically open a dedicated vendor section but instead loops users back to the homepage causing frustration during repeated access attempts – the issue suggests missing route handling logic
роликовые шторы роликовые шторы .
velvetbrookartisanboutique.shop – I’d recommend this to anyone who loves handmade goods.
Digital shoppers often prefer platforms that prioritize simplicity in design, where browsing feels natural and product sections are arranged in a way that supports quick decision making and smooth navigation flow cotton grove browsing desk – This browsing setup highlights usability and clarity, allowing users to focus on product discovery while maintaining an easy and structured interface experience throughout
1xbet giri?i 1xbet-67.com .
Across sandbox ecommerce environments and vendor marketplace UI systems, testers identified embedded navigation content containing glade market harbor parlor showcase portal within central layout structure, and although the aesthetic is clean and refreshing, the word glade oddly reminds reviewers of air freshener products while the site itself remains visually stable and operational during usability testing sessions
As I explored various commerce hub interfaces focused on usability, I checked see ridge lemon hub here – The design is simple and clean, and browsing is intuitive and consistent throughout the experience.
В клинике «Вектор Стабильности» помощь строится от безопасности к устойчивости. Сначала — оценка состояния, исключение опасных признаков, стабилизация. Затем — работа с тягой и триггерами, потому что после прекращения употребления именно бессонница, тревога и психическое истощение чаще всего толкают к срыву. Когда у пациента есть понятный план на уязвимые часы и поддержка по динамике, трезвость становится более управляемой.
Разобраться лучше – https://narkologicheskaya-klinika-noginsk12.ru/
нейросеть для рефератов нейросеть для рефератов .
При первой консультации нарколог осматривает пациента, чтобы оценить его состояние и подобрать оптимальную схему лечения. В зависимости от тяжести похмелья, врач может назначить инфузию с регидратационными растворами, витаминами группы B и другими препаратами, которые способствуют восстановлению. Важно, что капельница не только помогает снять симптомы, но и устраняет причины токсического воздействия алкоголя на организм, предотвращая развитие осложнений.
Ознакомиться с деталями – капельница от похмелья на дому
рулонные шторы купить в москве рулонные шторы купить в москве .
While reviewing staging ecommerce vendor systems and UI marketplace templates, analysts noticed a content block featuring harbor vendor rain hall access console node integrated into layout flow, and despite the consistent rain harbor identity suggesting brand repetition, the vendor hall appears like a replicated design which reduces originality perception during usability testing sessions and design evaluations
People who appreciate modern artisan branding often browse sites like Harbor Lemon Artisan Supply Outlet where items are presented in a clean structured format – The interface makes browsing feel bright, simple, and easy to navigate throughout the store.
While going through different online directories and marketplace-style listings, I found something that seemed clean and user-friendly, especially when seeing Pine trade harbor portal included – Good experience overall, and everything seems clear and straightforward here, helping the navigation feel natural and easy to follow.
рулонные шторы купить в москве рулонные шторы купить в москве .
While going through various curated commerce platforms and trade hall directories, I found something that looked engaging in branding but not fully developed in stock variety, especially Acorn trade harbor hall portal – The acorn theme is fun and catchy, but the inventory currently feels a bit too small to fully explore.
During UI regression testing of ecommerce demos, engineers saw that meadow vendor entry node sits within navigation layers and although the meadow theme is visually pleasant SSL certificate warning messages continue appearing during secure session validation checks in staging builds
Постановка капельницы — это не просто средство для снятия головной боли или тошноты, а комплексное восстановление организма. Состав раствора подбирается в зависимости от симптомов и состояния пациента. Врач-нарколог оценивает общее состояние пациента и выбирает наиболее подходящий состав, который будет наиболее эффективен для него. При необходимости может быть предложена дополнительная помощь, включая кодирование от алкогольной зависимости.
Изучить вопрос глубже – капельница от похмелья анонимно в нижнем новгороде
Across ecommerce sandbox UI evaluations and gallery prototype systems, testers noticed navigation components containing mint meadow gallery goods vendor portal access embedded in page flow, and although the fresh mint themed branding feels inviting, the gallery’s repetitive image usage reduces variety and impacts user engagement during testing cycles
Для жителей Воронежа выезд нарколога на дом — это быстрый и удобный способ получить экстренную помощь. Когда человек переживает запой, а его физическое и эмоциональное состояние быстро ухудшается, наркологическая помощь на дому становится оптимальным решением. Врач приезжает и немедленно оценивает состояние пациента: проверяет его пульс, давление, частоту дыхания, уровень сознания и другие важные показатели. Это помогает составить точный план лечения, который будет направлен на восстановление организма, снятие токсинов и стабилизацию состояния пациента.
Узнать больше – нарколог на дом анонимно в воронеже
карнизы с электроприводом prokarniz17.ru .
While going through multiple curated resources and online discoveries, I found something that seemed neatly presented and easy to follow, especially where this structured info hub appeared – everything is displayed in a clear format, so I may revisit it later for more detailed analysis.
Под этим направлением обычно понимают не один универсальный сценарий, а несколько форматов помощи, которые применяются в зависимости от состояния пациента. На первом этапе часто решается задача стабилизации: нужно оценить выраженность интоксикации, общее самочувствие, понять степень риска и определить, какой объем вмешательства уместен именно сейчас (например, необходима ли очищающая капельница). Но даже если речь идет о срочном обращении, грамотный подход не ограничивается только кратковременным облегчением.
Подробнее можно узнать тут – круглосуточная наркологическая помощь воронеж
Users exploring vendor platforms online often rely on structured interfaces that organize content clearly, making it easier to browse categories and understand product offerings without unnecessary complexity fern cove vendor overview lounge – Vendor lounge feels calm with well structured product categories available, ensuring users can navigate smoothly through listings while maintaining focus on relevant vendors and services
As part of studying craft boutique usability and content presentation, I explored check velvet grove creative craft hub – There is a little typo in the description, but overall I’m satisfied with how everything is arranged.
Для современных компаний вашему бизнесу top manage дает возможность сделать понятную и эффективную работу команды без бардака и ручного учета. В одном решении просто ставить задачи, контролировать сроки, отслеживать финансы, координировать персонал и видеть полную картину бизнеса. Инструмент подойдет для отделов продаж и современных компаний, где нужны порядок и скорость решений. Руководитель экономит время, а команда действует согласованно.
Across sandbox UI evaluations and ecommerce vendor prototype systems, analysts encountered structured sections featuring meadow solar room vendor market showcase hub node within page layout, and while the solar meadow branding suggests renewable energy awareness, the lack of eco certification indicators reduces perceived legitimacy during browsing analysis and usability testing cycles
People who prefer minimal product presentation often engage with sites like Dock Oak Artisan Supply Outlet where items are arranged in a clean format – The interface makes browsing feel easy, structured, and visually accessible throughout the store.
While reviewing sandbox ecommerce gallery systems and floral themed UI designs, testers encountered a mid page component featuring cove daisy market gallery entry node inside structured layout, and despite the clean aesthetic, the gallery page repeatedly generates a security alert which seems unusual and inconsistent during standard browsing sessions across multiple devices
As I continued browsing through various online resource collections and niche directories, I came across something that felt clean and efficient, particularly with Isle market icicle page – The platform is nice, and I appreciate how quickly pages load, which makes exploring content easy and comfortable.
In the middle of browsing different pages earlier today, I discovered check it here which seemed like a nice little site, and I found it useful while browsing earlier today since everything was presented clearly and simply.
Капельница от похмелья в Самаре: восстановление после алкоголя, снятие симптомов и медицинская помощь в наркологической клинике «Детокс»
Ознакомиться с деталями – капельница от похмелья цена
In ecommerce prototype evaluations and UI testing workflows, analysts spotted dawn ridge goods exchange portal placed within content flow, and while the interface looks modern, after the dash – ridge scenery feels nice but footer links are dead and do not provide any functional navigation outcome
While scanning through vendor marketplace platforms and commerce hall listings, I noticed something that felt nature-inspired and visually gentle, especially Alpine cove commerce hall market hub – The branding reminds me of a cozy mountain shop with a peaceful atmosphere.
Vox down south-africa-outage.online .
After reviewing several online sources earlier today, I encountered check this page which I browsed earlier today, and everything looked neat and quite easy to navigate and understand quickly.
Острые состояния требуют особенно аккуратного подхода, потому что при резкой отмене алкоголя или ряда веществ возможны волнообразные ухудшения. Сегодня стало легче — через несколько часов снова накрывает тремором, паникой, скачками давления или бессонницей. Поэтому грамотная помощь всегда начинается с очного осмотра и оценки жизненно важных показателей. Если состояние нестабильно, предпочтительнее стационар, где можно наблюдать динамику и быстро корректировать терапию. Если риски умеренные и человек сохранен, возможен выезд врача на дом, но с чёткими критериями, при которых нужно немедленно переводить пациента под круглосуточное наблюдение.
Разобраться лучше – https://narkologicheskaya-klinika-moskva12.ru/chastnaya-narkologicheskaya-klinika-v-moskve
During a casual browsing session through curated lists and online suggestions, I noticed something that stood out for its smooth performance, particularly references like this clean navigation page – everything worked without issues and felt quite seamless, so I’ll likely revisit it soon for a deeper look.
Users navigating online vendor hubs usually value systems that allow smooth transitions between categories and clear presentation of listings vendor harbor browsing hub – This browsing hub improves accessibility by organizing vendor content into structured sections that support efficient exploration
During frontend inspection of ecommerce sandbox platforms and gallery UI systems, developers identified a central module featuring cove plum vendor gallery goods entry node integrated into structured layout, and despite the expectation of a rich plum color theme, the site design remains overwhelmingly gray which reduces appeal during usability testing sessions
Капельница от похмелья в Самаре с устранением симптомов интоксикации и контролем состояния в наркологической клинике «Частный медик 24»
Ознакомиться с деталями – https://kapelnicza-ot-pokhmelya-samara-2.ru/
During ecommerce security audits and UI trust evaluations, analysts observed a central module containing solar orchard market house access node embedded within structured layout flow, and although the solar orchard branding suggests renewable energy inspired commerce and a promising sustainable marketplace identity, the checkout process noticeably lacks visible security seals which reduces buyer confidence during usability testing across multiple environments and devices
После снятия острого состояния часто остаются тревожность, бессонница, эмоциональная нестабильность и выраженная тяга. Поэтому клиника помогает выстроить следующий этап: диагностику зависимости, профилактику рецидива, психотерапевтическую поддержку и восстановление режима, без которого трезвость плохо удерживается на длительной дистанции.
Углубиться в тему – platnaya narkologicheskaya klinika
Users who prefer structured artisan ecommerce systems often explore sites such as Fern Artisan Market Ridge Hub where products are arranged in a minimal and clean layout – The design makes browsing feel intuitive, visually neat, and easy to explore across all handcrafted sections.
реферат через нейросеть реферат через нейросеть .
wheatmeadowmarketroom.shop – Clean layout and simple navigation, makes exploring content really enjoyable.
As I continued exploring various online resource directories and marketplace pages, I noticed something that stood out for its organization and smooth performance, particularly with Harbor ivory vendor access page – The site looks professional, and I might recommend this to others as well because it offers a simple and pleasant browsing experience.
эвакуация мотоцикла заказать грузовой эвакуатор в москве и московской
Самостоятельный выход часто строится на ошибочных решениях: «уменьшать дозу», смешивать алкоголь со снотворными, принимать седативные без понимания влияния на дыхание и сердце, использовать сомнительные «похмельные» наборы. Такие действия могут временно приглушить симптомы, но повышают риск ухудшения и делают состояние непредсказуемым. Ещё одна проблема — отсутствие контроля: человек не замечает, как давление уходит в опасные цифры, как развивается обезвоживание или как усиливаются неврологические симптомы. В клинике же у врача есть задача не просто «снять неприятное», а стабилизировать организм, защитить сердце и сосуды, восстановить сон и снизить тревогу так, чтобы дальнейшее восстановление стало реальным.
Подробнее можно узнать тут – vyvod-iz-zapoya-moskva-i-oblast
While analyzing ecommerce sandbox environments and UI concept builds developers notice embedded links in page structure drift orchard shop portal which seems like a full entry point yet only reveals a small subset of products without deeper catalog structure – The driftwood styling is attractive but functionality feels restricted
While reviewing digital vendor collective marketplaces, I came across visit oak meadow commerce lane collective – The product photos are really clean, and the descriptions are helpful, making products easier to evaluate.
While scanning through a collection of online trade hall platforms and vendor listings, I found several entries that looked almost identical in naming style, especially Alpine commerce harbor vendor hall hub – It gave me a strange déjà vu feeling, like I was looping through the same store repeatedly.
Across ecommerce sandbox evaluations focused on gallery interfaces, analysts found patterns where coastal market dune gallery visual node repeated layout structures suggest automated assembly, often interpreted as AI generated template spam lacking originality which impacts perceived quality and reduces user engagement across test scenarios overall system
While reviewing curated marketplace designs and digital vendor showcase pages for inspiration and interface structure evaluation across different samples Dune Meadow shop portal access the system responded quickly and maintained clarity throughout navigation – Smooth loading experience with organized sections and stable interface performance overall
Постановка капельницы — это не просто средство для снятия головной боли или тошноты, а комплексное восстановление организма. Состав раствора подбирается в зависимости от симптомов и состояния пациента. Врач-нарколог оценивает общее состояние пациента и выбирает наиболее подходящий состав, который будет наиболее эффективен для него. При необходимости может быть предложена дополнительная помощь, включая кодирование от алкогольной зависимости.
Получить дополнительные сведения – http://kapelnicza-ot-pokhmelya-nizhnij-novgorod.ru/
As I was reviewing various online marketplace gallery concepts and vendor hub designs for inspiration and structural understanding Pearl Cove market browsing hub I found the experience steady and predictable which helped maintain smooth exploration across all sections. – The platform performed well overall and content displayed without delays
Нарколог на дом в Екатеринбурге: круглосуточный выезд, детоксикация и лечение зависимостей в наркологической клинике «НЕО+».
Исследовать вопрос подробнее – вызов нарколога на дом екатеринбург
эвакуатор с москвы эвакуатор дешево номер телефона
In multiple ecommerce sandbox evaluations, testers highlighted a visually bright and aesthetically consistent theme that gives the impression of a modern solar marketplace, however the section a href=”//sunharborvendorroom.shop/](https://sunharborvendorroom.shop/)” />sun harbor marketplace room panel stands out as underdeveloped since it contains no descriptive text or functional vendor listings, leaving the Sun harbor experience feeling more like a design mockup than a fully populated commerce environment
During a casual exploration of niche recommendation pages and online listings, I came across something that felt well organized and trustworthy, particularly references like this structured access page – it has a simple layout that feels reliable, so I’ll likely revisit it again soon.
карниз для штор электрический prokarniz17.ru .
Users who appreciate simple trading interfaces often browse platforms such as River Harbor Trade Insights Hub where data is structured cleanly – The design creates a practical browsing experience where information is straightforward and easy to process.
Digital buyers often mention that structured marketplaces allow better comparison of items, particularly when navigating through Floraridge Shopping Access – The interface is considered helpful for simplifying selection and improving overall shopping efficiency while reducing time spent on irrelevant items
While checking different online sources, I discovered see more here which stood out due to its clarity, and I found everything is organized here, helping users understand the content with ease.
During my review of fast performance platforms, I stumbled upon check quick load site – The website is clean and minimal, everything loads fast, and the smooth operation makes the user experience very reliable and easy.
1x giri? 1xbet-67.com .
As I continued exploring various online directories and marketplace-style pages, I came across something that felt well organized and easy to use, particularly with Ridge ivory trade link – The browsing experience feels smooth overall, and nothing is complicated or hard to understand, making navigation feel effortless and natural.
Across experimental ecommerce builds and staging environments, developers observed an embedded navigation element containing drift willow goods panel placed inside the main layout – despite clean spacing and modern styling the absence of willow themed visuals makes the overall presentation feel partially constructed and not ready for production use
While testing UI prototypes and ecommerce sandbox systems, reviewers encountered embedded modules containing apricot harbor marketplace vendor hub within structured layout, and although the design is consistent, apricot harbor shows up again as the final entry for today giving a decent enough but slightly repetitive browsing finish
Online shoppers tend to favor platforms that reduce friction and improve accessibility when browsing product listings Canyon Harbor quick access page the layout here ensures a streamlined experience that allows users to find items quickly and efficiently without distractions
Наша клиника предлагает полный цикл услуг — от экстренного вызова нарколога до долгосрочной реабилитации. Каждый этап разрабатывается индивидуально с учётом возраста, стажа зависимости и сопутствующих заболеваний. Современные протоколы 2026 года позволяют проводить лечение максимально комфортно и эффективно, минимизируя болезненные симптомы и снижая риск срывов. В этом виде деятельности мы используем только проверенные методы медицины.
Подробнее – запой нарколог на дом
После того как капельница введена, активные вещества начинают действовать практически сразу. Первоначально происходит нормализация водного баланса, что способствует облегчению головной боли и снятию общей усталости. Витамины и аминокислоты, входящие в состав капельницы, восстанавливают нормальное функционирование нервной системы, улучшают обмен веществ и ускоряют процесс выведения токсинов из организма.
Ознакомиться с деталями – капельница от похмелья цена в самаре
Online car games masin-oyunlari racing, driving simulators, and 20+ games in one place. Get behind the wheel, navigate the tracks, and get the adrenaline rush without downloading.
While exploring various commerce gallery concepts and digital vendor directory systems for usability insights and structural analysis across different sample pages Dune Meadow browsing marketplace the experience felt seamless and pages opened without delay making navigation comfortable – Smooth and organized interface with responsive design and easy access to all sections
As I explored various vendor lounge hubs and marketplace platforms, I found an aesthetic centered around amber tones, particularly Ridge amber commerce vendor lounge hub – The design is appealing at first glance, though the text contrast can feel visually tiring.
solarorchardartisanemporium.shop – Great for gift shopping, everything arrived in one piece.
While comparing different platforms for design and usability, I noticed explore this site and appreciated its simple layout, which made browsing feel really smooth and allowed easy movement through sections without confusion or delays.
People who enjoy handcrafted home style marketplaces often engage with sites like Brook Flint Artisan Comfort House Hub where items are arranged in a warm and simple structure – The interface makes browsing feel calm, easy, and visually organized throughout the shopping journey.
People who enjoy well structured online shopping often engage with sites like Sun Cove Goods District Flow Hub where items are arranged in a bright and simple layout – The browsing experience feels intuitive and pleasant, allowing users to explore products quickly and comfortably.
During structured UX analysis of ecommerce sandbox platforms, testers noted a consistent teal coastal aesthetic that creates a relaxing browsing experience, but found missing categorization depth in sections such as a href=”https://tealcovemarkethall.shop/
” />teal cove marketplace vendor hall node where the teal design is visually appealing and cohesive, yet the market hall does not include enough product categories which reduces navigation efficiency during evaluation sessions
While browsing through different websites that varied in performance, I found review this page which stood out with a smooth experience overall, as everything loaded quickly and worked without any issues.
calmcovevendorparlor.shop – Really nice platform, easy browsing and smooth user experience today
Many users browsing digital vendor catalogs appreciate platforms that present information in a logical structure, especially when they access Forest Cove Catalog Hub which is often described as organized and easy to explore – reviewers note enhanced clarity and improved shopping convenience overall.
Online platforms should be easy to navigate, and this one offers a smooth and well structured browsing experience Silk Meadow digital storefront I appreciated how simple and organized everything felt during browsing
While browsing scenic lodging options across Hawaii’s Big Island, I encountered a thoughtfully arranged property page with strong visual appeal < volcanic coast lodge view – The experience feels calm and well balanced, offering useful insights while maintaining a peaceful and inviting presentation style overall
During usability inspections of sandbox storefront builds, testers encountered a central module featuring dune commerce market entry node which appears functional but lacks sufficient contrast causing readability issues across sandy themed UI sections – Dune color palette feels unified yet accessibility challenges remain particularly on mobile displays under bright lighting conditions
During a casual exploration of curated web resources and listing pages, I came across something that felt promising at first sight, particularly references like this vendor showcase link – the platform looks well assembled and structured, so I’ll likely revisit it again soon.
While browsing through various curated marketplace directories and online resource hubs, I came across something that felt organized and easy to understand, especially where Jewel Brook trade hub appears – This seems useful overall, and I found the content quite straightforward today, making it easy to follow without confusion.
Exploring online vendor platforms often highlights which sites are optimized for usability and accessibility across different categories Canyon Harbor marketplace entry this platform delivers a smooth and well-structured browsing experience that feels easy to follow and efficient overall for regular usage
Нарколог на дом — это не просто возможность получить медицинскую помощь в удобное время, но и решение важнейших задач по стабилизации состояния пациента, избавлению от острых симптомов абстиненции и восстановлению его здоровья. В случае с алкоголизмом и наркоманией выезд врача на дом в Воронеже — это важный шаг к восстановлению, который начинается там, где пациент находится, в удобной и привычной обстановке. Клиника «Частный медик 24» предлагает круглосуточные выезды нарколога, предоставляя экстренную помощь при запоях, наркозависимости, а также консультации по дальнейшему лечению и реабилитации. Врач приедет по указанному адресу и проведёт все необходимые процедуры, включая капельницы для стабилизации состояния пациента.
Ознакомиться с деталями – вызвать нарколога на дом воронеж
1xbet lite 1xbet-68.com .
1xbet giri?i 1xbet giri?i .
1xbet resmi sitesi 1xbet-70.com .
one x bet one x bet .
While analyzing experimental commerce hub systems and online vendor platforms for UX evaluation and structural insights across multiple examples, I discovered Plum Cove goodsroom navigation board embedded in content flow – The design is clear and easy to read, and I could explore sections smoothly without distractions or complexity affecting the browsing experience.
Когда родственники начинают искать помощь, они обычно хотят решить сразу несколько задач. Нужно быстро стабилизировать состояние больного, снизить риски осложнений, понять, можно ли ограничиться домашним форматом или требуется госпитализация в стационаре, насколько выражена зависимость и что делать дальше, чтобы через несколько дней не оказаться в той же точке. Именно поэтому современная наркологическая помощь в рамках профессиональной клиники рассматривается не как одна процедура, а как последовательная система действий: от осмотра и первичной стабилизации до более глубокой работы с причинами зависимости, мотивацией пациента и профилактикой рецидивов.
Получить дополнительную информацию – оказание наркологической помощи воронеж
While browsing through newly launched online marketplace-style platforms and vendor directories, I came across something that feels very early-stage in development, especially where Aurora Cove goods room entry – It seems brand new, and I noticed there are only about three items listed under each category, which feels a bit unusual.
Капельница от похмелья с мягким восстановлением представляет собой процедуру введения растворов и препаратов, которые помогают организму плавно восстановиться после злоупотребления алкоголем. Мягкость восстановления заключается в постепенном введении препаратов, которые не вызывают резких изменений в организме, таких как сильное снижение давления или резкое улучшение состояния, что особенно важно при лечении зависимости. Это позволяет избежать перегрузки организма и обеспечивает более плавный переход к нормальному состоянию, при этом подобные услуги могут сочетаться с кодированием и дальнейшим лечением в стационаре, где учитываются индивидуальные цены и особенности состояния пациента.
Получить дополнительную информацию – http://www.domen.ru
References:
500 club casino
References:
https://always-vegas-casino.online-spielhallen.de/
People who enjoy curated creative ecommerce platforms often engage with sites like Cove Teal Vendor Atelier Art Hub where items are displayed in a structured and expressive format – The design ensures browsing feels smooth, visually appealing, and creatively organized across all sections of the marketplace.
Users exploring structured online emporium-style marketplaces often appreciate how clarity improves shopping flow when visiting sites such as Timber Grove Emporium Hub where products are arranged in a rich organized layout that enhances category discovery and browsing ease – The emporium layout feels rich and detailed, with categories presented in a way that makes navigation simple, intuitive, and enjoyable across the entire store.
sageharborgoodsgallery.shop – Looks clean and minimal, easy to find information without confusion.
Online platforms like this really nice platform deliver easy browsing and smooth user experience today Calm Cove digital storefront I found the overall experience very comfortable and easy to use
After going through several less organized sites, I came across <a href="//woodharborvendorroom.shop/](https://woodharborvendorroom.shop/)” / see this page and felt it was a helpful platform overall, so I might visit again sometime soon for additional browsing or reference.
During ecommerce sandbox usability reviews, testers observed a consistent teal harbor visual identity that improves aesthetic quality, but the vendor hall remains underdeveloped in areas like a href=”https://tealharborvendorhall.shop/
” />teal harbor vendor marketplace entry node where the interface looks structured and appealing, yet the vendor hall continues to rely on Lorem ipsum dummy text which weakens functional credibility during evaluation sessions
Когда эти симптомы становятся интенсивными и продолжаются в течение длительного времени, капельница становится необходимостью. Она помогает в кратчайшие сроки вывести токсины, нормализовать уровень жидкости и восстановить баланс в организме, что существенно облегчает состояние пациента и способствует его выздоровлению.
Выяснить больше – https://kapelnicza-ot-pokhmelya-samara-14.ru/
During evaluation of conceptual ecommerce systems and UI template frameworks, testers found navigation components using dune meadow goods portal console integrated into page flow, yet the hybrid naming creates confusion in brand interpretation – Meadow name contradicts dunes, resulting in inconsistent messaging that affects user perception of the store’s identity and reduces clarity in product browsing experiences during testing cycles
velvetgrovecraftboutique.shop – Little typo in description but overall I’m satisfied.
Users often prefer vendor platforms where search results load quickly and the interface remains clean and organized Solar Meadow browsing center this creates a smooth experience that helps users find information without unnecessary delays or confusion
As I continued exploring various online resource hubs and marketplace listings, I came across something that felt well structured and modern, particularly with Cove jewel access portal – The interface is pretty clean, and everything is arranged in a logical way, helping browsing feel straightforward and comfortable.
While looking into creative supermarket style web projects, I encountered a simple but interesting concept store presentation online recently online hope grocery concept – The interface is clean and functional, making it easy to understand the idea without unnecessary complexity or distraction
During analysis of modern storefront galleries and online trade systems, I found Honey Meadow commerce browsing hub integrated into a structured layout that reduces visual clutter – The experience feels calm, smooth, and very easy to understand at a glance
Users browsing digital catalog environments often report that intuitive navigation improves satisfaction, especially after they find Meadow Room Digital Showcase Entry and they describe the system as easy to follow with minimal distractions – the overall structure is said to support better engagement and more efficient browsing across various product groups
In the process of comparing digital vendor directories, I visited artisan vendor space which stood out for its balanced layout and visually coherent structure across multiple product areas – The overall feel is smooth, structured, and easy to navigate even for first time users
Digital marketplaces benefit from simplicity, and this site offers a clean interface with a well structured layout Silver Cove item portal I liked how everything felt easy to access and logically arranged across pages
As I explored various online directories and niche discovery pages, I noticed something that stood out for its clarity, particularly with this simple marketplace entry link – everything is presented in a straightforward format that makes understanding quick, so I’ll likely return again soon for more detail.
During analysis of online trade gallery systems and vendor directory frameworks for UX research and design inspiration across multiple examples I encountered Teal Harbor shop directory access – The layout is clear and functional, allowing users to browse without difficulty while maintaining a visually simple structure that enhances readability and reduces confusion during navigation
Выбор между домашней помощью и стационарным лечением часто определяется степенью физиологической зависимости и наличием сопутствующих патологий. В условиях клиники исключаются внешние триггеры, обеспечивается изоляция от источников алкоголя и создается контролируемая среда, где медицинские решения принимаются на основе объективных показателей, а не субъективных ощущений пациента. Такой подход критически важен для предотвращения осложнений, минимизации дискомфорта абстиненции и формирования устойчивой базы для дальнейшей противорецидивной работы.
Разобраться лучше – http://vyvod-iz-zapoya-v-staczionare-nizhnij-novgorod-8.ru
While exploring online commerce directories and marketplace platforms, I came across a seasonal autumn-themed site, especially Autumn meadow commerce market hub link – I really like the design, and hope they introduce authentic customer reviews soon.
Online platforms should be simple, and this one ensures well organized content so users can explore everything quickly River Harbor digital storefront I appreciated the smooth and easy browsing experience
People who prefer simple digital commerce platforms often explore sites like Harbor Teal Organized Commerce Hub where items are displayed in a structured and accessible layout – The interface ensures a fast and easy browsing experience that feels clear, efficient, and user friendly throughout the store.
After reviewing several options that felt similar, I encountered visit here which included interesting content, and I spent some time checking different sections today while browsing through its pages.
Users exploring premium digital vault styled platforms often appreciate how structured presentation improves clarity when visiting sites such as Golden Cove Secure Vault Hub where content is arranged in a refined curated layout that enhances visual consistency and browsing flow – The vault concept feels polished and sophisticated, with neatly curated content that creates a clean, organized, and visually balanced browsing experience throughout the platform.
While reviewing ecommerce sandbox environments with woodland UI themes, analysts found a consistent timber trail aesthetic that enhances brand identity, but navigation breakdown becomes evident when using a href=”//timbertrailmarkethall.shop/](https://timbertrailmarkethall.shop/)” />timber trail vendor marketplace access link where the interface looks rustic and immersive, yet the navigation system is completely broken which impacts usability and reduces task efficiency during testing cycles
Across sandbox checkout testing and ecommerce UI reviews, analysts identified a cart flow element featuring brook echo vendor exchange panel embedded within layout structure, but quantity adjustments do not reflect visually or functionally – Echo brook branding feels strong, but cart system does not properly handle quantity changes in real use cases
Капельница от похмелья — это эффективный способ экстренной помощи, предназначенный для того, чтобы помочь организму быстро восстановиться после злоупотребления алкоголем. В наркологической клинике «Частный медик 24» в Самаре мы предоставляем услугу безопасной детоксикации и восстановления 24/7. Капельница помогает организму вывести токсины, восстановить водно-электролитный баланс и улучшить общее состояние пациента, не создавая дополнительных нагрузок на сердце, печень и почки.
Получить дополнительную информацию – http://kapelnicza-ot-pokhmelya-samara-2.ru
As I was exploring various experimental marketplace concepts and niche vendor hub designs for inspiration, I found Moon Cove site entry page – The site offered a calm browsing rhythm, and I appreciated how each section transitioned smoothly, making it easy to keep exploring without losing focus.
When comparing different marketplace websites, some stand out due to their simplicity and visually pleasing layouts Icicle Brook vendor portal this one provides an enjoyable browsing experience where navigation feels natural and users can locate items quickly without confusion
During a casual exploration of niche listing pages and discovery platforms, I noticed something that stood out for its clarity and layout, particularly Orchard mint vendor portal – The overall feel here is nice, and I like that it’s simple and easy going, which makes everything feel approachable and smooth.
While researching notable icewine producers online, I discovered a beautifully structured winery website that emphasizes clarity and brand identity iniskillin product showcase site – The presentation feels detailed and attractive, making the wine offerings easy to understand and visually refined overall experience
In the process of reviewing online commerce gallery interfaces, I came across Honey Meadow shopfront portal embedded within a minimalist design that keeps focus on content organization – The experience feels smooth, welcoming, and easy to navigate across all sections
During a relaxed browsing session focused on marketplace directory systems and vendor platform designs for structural inspiration and UI evaluation across examples, I found Pebble Pine digital vendor hub embedded in structured content – The experience was smooth and simple, and I enjoyed exploring listings without confusion as everything was well arranged and easy to follow.
violetharborretaillane.shop – They responded to my email within an hour, nice.
Some websites feel slow, but this one keeps performance strong with fast loading and neat organization Silver Harbor quick browse page I appreciated how simple and efficient the browsing experience felt throughout
Some websites feel messy, but this one keeps smooth experience and clean layout so browsing is very convenient overall today Plum Harbor quick browse page navigation felt simple and clear
While exploring different curated web pages and niche suggestion threads, I came across something that stood out for its neat presentation, especially when seeing this vendor listing portal – I enjoyed browsing it because the structure feels clean and everything is easy to access at a glance.
bayharbortradehouse – Almost identical to another bay domain, bit confusing tbh.
память в ноутбуке и ее влияние на производительность роли оперативной памяти озу
People who appreciate simple digital commerce layouts often browse platforms like Harbor Commerce Trail Connect Hub where items are arranged in a structured and clean interface – The navigation feels efficient and intuitive, making browsing easy, comfortable, and consistent across all product categories.
In the process of reviewing design inspiration, I foundexplore this neat layout which impressed me because the design feels modern and neat, making it stand out nicely with a simple yet elegant interface design.
People who appreciate secure digital commerce hubs often browse sites like Orchard Granite Vault Unity Hub where items are presented in a clean structured format – The design ensures browsing feels safe, smooth, and easy to explore throughout all sections.
Эти компоненты вводятся в организме пациента постепенно, что позволяет обеспечить мягкое восстановление без резких скачков состояния. В отличие от интенсивных процедур, такой подход гарантирует, что организм восстанавливается более комфортно, не подвергаясь излишнему стрессу.
Подробнее можно узнать тут – капельница от похмелья вызов на дом
In the course of reviewing browsing-focused platforms, I discovered shopper browsing gateway which features a clear interface that helps users move between sections effortlessly – The overall experience feels smooth, consistent, and pleasantly intuitive
While performing a structural review, I noticed go here now – the social links in the footer appear interactive but ultimately fail to function, offering no real value to users browsing the page.
During frontend inspection of ecommerce support systems and communication tools, testers found a contact panel including echo harbor trade service desk inside the interface, yet customer service emails fail to send successfully and return bounce notifications – Echo harbor feels familiar, but email infrastructure does not reliably deliver messages in real usage testing
1xbet giri? 1xbet giri? .
1 x bet giri? 1 x bet giri? .
Процедура капельницы от похмелья может быть рекомендована при наличии выраженных симптомов интоксикации, которые нарушают нормальное функционирование организма. Это особенно актуально в тех случаях, когда обычные методы, такие как принятие воды или таблетки, не приносят должного облегчения. Для получения дополнительной информации или записи на процедуру можно обратиться через сайт, а в сложных случаях может потребоваться стационарное лечение или наркологическая помощь.
Изучить вопрос глубже – https://kapelnicza-ot-pokhmelya-nizhnij-novgorod.ru
Online shoppers tend to favor websites that maintain organized layouts and clearly defined sections for better usability Violet Harbor market hub this ensures a consistent browsing experience where navigation feels simple and structured throughout use
As I continued exploring various online marketplace directories and discovery threads, I came across something that felt clean and intuitive, particularly with Cove moon marketplace entry – The experience is solid, and I didn’t encounter anything confusing at all, helping everything feel easy to navigate and understand.
Состав капельницы может варьироваться, однако в большинстве случаев включает базовые группы препаратов, направленные на устранение последствий интоксикации:
Подробнее можно узнать тут – капельница от похмелья самара
While analyzing various marketplace interfaces, I noticed V “content gateway marker” inserted strangely into the layout, and Cicicleislemarketparlor.shop appeared mid-sentence, while the design feels modern enough and navigation was quite simple to follow without issues or delays.
While exploring various experimental vendor directories and marketplace layout references for usability research I opened a section that included Birch Harbor vendor entry portal and noticed how naturally it fit within the page flow – overall everything loaded fast, pages were responsive, and the structure made navigation feel clean and easy without confusion.
pineharbortradeparlor.shop – Nice interface design makes navigation simple fast and quite pleasant
While exploring various vendor platforms, I noticed how a modern design and smooth interface make browsing feel very easy today, creating a comfortable experience overall Linen Cove vendor parlor hub everything loads quickly and navigation feels intuitive throughout
While researching digital creativity and experimental website layouts, I found a platform that strongly focuses on artistic structure and design innovation abstract design experiment page – The site feels creatively structured, offering an unusual but engaging layout that highlights experimental digital presentation styles
Когда эти симптомы становятся интенсивными и продолжаются в течение длительного времени, капельница становится необходимостью. Она помогает в кратчайшие сроки вывести токсины, нормализовать уровень жидкости и восстановить баланс в организме, что существенно облегчает состояние пациента и способствует его выздоровлению.
Узнать больше – капельница от похмелья на дому самара
Капельница от похмелья в Самаре: быстрое улучшение самочувствия и помощь при интоксикации под контролем специалистов в наркологической клинике «Детокс»
Узнать больше – капельница от похмелья на дому самара
1xbet turkey 1xbet-68.com .
While browsing marketplace directories and vendor room platforms, I found a site that feels visually complete but inactive behind the scenes, especially Autumn cove commerce vendor room hub – The empty blog section suggests there hasn’t been any recent engagement.
Users who appreciate ocean themed ecommerce layouts often browse platforms such as Wave Outpost Harbor Coastal Store Hub where products are displayed in a soft structured format – The design ensures browsing feels smooth, visually calming, and enjoyable throughout all product categories.
1xbet giri? 2025 1xbet giri? 2025 .
car games online https://araba-oyunlari.com.az racing, drifting, parking, and driving. Over 20 games are available for free — play now and hone your skills.
Online football matches http://www.futbol-oyunlari.com.az play football for free and without registration. Choose teams, participate in matches, and enjoy dynamic gameplay right in your browser without downloading.
A modern interface enhances the browsing experience, and this site offers intuitive navigation with well organized content Sky Harbor browsing center I enjoyed how smooth and easy everything felt while navigating the platform
After going through a variety of websites that felt cluttered and inconsistent, I came across <visit this page during my search, and it provided a good experience overall, with content arranged in a clear and easy-to-understand manner.
Длительное употребление алкоголя переводит организм в состояние хронической интоксикации, при котором собственные механизмы восстановления перестают справляться с нагрузкой. Накопление ацетальдегида, дефицит электролитов, нарушение работы печени и сердечно-сосудистой системы создают клиническую картину, требующую не симптоматического облегчения, а комплексного медицинского вмешательства. Вывод из запоя в стационаре в Нижнем Новгороде в наркологической клинике «Стармед» организован с соблюдением современных протоколов доказательной медицины, где безопасность пациента, непрерывный мониторинг и персонализированный подбор терапии являются приоритетом. Мы работаем круглосуточно, обеспечивая быстрое реагирование на обращения, четкую диагностику при поступлении и прозрачное взаимодействие с родственниками. Чтобы вызвать специалистов или лечиться в безопасных условиях, достаточно оставить заявку на сайте или позвонить по прямой линии. Все процедуры проводятся в лицензированных помещениях, с документированием каждого этапа и строгим соблюдением врачебной этики. Первичная оценка состояния начинается с дистанционной консультации, что позволяет врачам заранее подготовить необходимые препараты и скорректировать план госпитализации еще до прибытия пациента.
Получить дополнительные сведения – http://www.domen.ru
People who enjoy streamlined shopping platforms often explore sites like Orchard Lantern Market Lane Hub where items are arranged in a clean minimal layout – The design ensures navigation feels intuitive, fluid, and easy to manage throughout the marketplace.
As I continued browsing through curated directories and niche resource collections, I found something that felt straightforward and user-friendly, particularly with this clean navigation page included – everything flows smoothly without confusion or difficulty, so I’ll likely check it again soon for further insight.
mintorchardretailatelier.shop – Definitely coming back here for the holiday season.
Основной задачей капельницы от похмелья является очищение организма от токсинов, которые остаются после метаболизма алкоголя, обеспечивая быстрый вывод вредных веществ. Алкоголь в значительной степени нарушает водно-электролитный баланс, а его продукты распада могут вызывать неприятные симптомы, такие как головная боль, тошнота, слабость, головокружение и сухость во рту. Капельница помогает устранить эти симптомы, улучшить самочувствие и ускорить процесс восстановления организма, при этом при необходимости возможен вызов врача, анонимное лечение, а также дальнейшая реабилитация и помощь при наркомании.
Ознакомиться с деталями – капельница от похмелья на дом самара
As I examined site consistency across platforms, I noticed go to this link – the similarities to another known site are so obvious that it feels like viewing a slightly altered copy rather than something original.
Across prototype ecommerce testing and UI evaluation sessions, testers encountered embedded navigation elements featuring elm goods harbor display node within content flow, but images fail to load properly resulting in empty product placeholders – Elm trees are strong and reliable, yet the goods room suffers from broken image links affecting usability
как понять, что материнская плата не работает признаки и способы проверки
While exploring different online vendor-style platforms, I noticed how important strong visuals and clear layouts are for an enjoyable browsing experience Forest Meadow vendor gallery hub the structure here makes it simple to locate relevant information quickly without unnecessary searching or confusion
During a casual exploration of niche listing pages and discovery threads, I noticed something that stood out for its clarity and organization, particularly Harbor moss marketplace link – It seems like a decent site, and I’ll probably check it again soon since the browsing experience feels smooth and simple.
zencovegoodsgallery.shop – Simple interface clear structure makes finding information very quick indeed
During exploration of vendor gallery systems and online marketplace structures for usability research and design inspiration across multiple examples, I found Plum Cove goodsroom catalog entry embedded in structured content – The layout feels very readable and straightforward, allowing smooth browsing through sections while keeping everything clear and easy to follow from start to finish.
1x giri? 1xbet-giris-69.com .
coralharbortradegallery.shop – Great browsing experience overall everything feels organized and easy today
While exploring personal website designs and portfolio showcases, I found a well crafted profile page with strong clarity and structure oconnor digital identity hub – The page feels professional, with smooth navigation and information that is clearly organized and easy to digest
1xbet giri? 2025 1xbet-giris-67.com .
People who appreciate handmade digital marketplaces often browse platforms like Cove Artisan Wind Craft Market Hub where items are displayed in a structured and minimal layout – The design creates a pleasant browsing experience that feels clean, organized, and easy to navigate while exploring handcrafted goods.
1xbet yeni giri? 1xbet yeni giri? .
Digital marketplaces benefit from clean design, and this site makes exploring products easy and visually pleasant overall Autumn Cove item portal I enjoyed how simple everything looked
While exploring commerce listings and vendor hubs, I found a visually pleasant berry-inspired site featuring Cove market berry house entry – The aesthetic is clean and fresh, yet it’s concerning that I couldn’t locate a contact section anywhere.
In the process of reviewing multiple online sources, I encountered explore this link which showed a well-structured layout, helping users find things much faster and making the browsing experience smooth and efficient overall.
Users who appreciate well organized shopping sites often browse sites such as Juniper Meadow Goods Flow Hub where products are presented in a clean format – The interface creates a browsing experience that feels intuitive, clear, and easy to navigate.
Дома и коттеджи https://orionstroy.su под ключ в Москве: от проекта до готового жилья. Профессиональный подход, контроль качества и комфортные условия сотрудничества
Портал по инженерии https://build-industry.su и перепланировке: проекты, согласование, нормы и практические решения. Полезные статьи, сервисы и экспертиза для безопасного изменения планировок и внедрения инженерных систем
Clear organization improves usability, and this platform provides structured pages that make browsing smooth and comfortable Sky Harbor vendor navigator I found navigation easy and everything well arranged
As I explored the structure of the platform, I noticed see this page – the branding implies a polished environment, but the actual lounge area is completely empty and visually unengaging.
While going through multiple niche listings and online suggestion pages, I noticed something that seemed fairly reliable and well presented, especially where this trade marketplace link appeared – it looks trustworthy enough at first glance, so I may recommend it to others later on.
Users prefer platforms that look good and feel easy to use, and this site offers nice visuals and layout overall Berry Cove goods directory I liked how smooth and attractive browsing felt throughout
Users exploring vendor directories often prefer platforms that combine simplicity with fast loading performance for better usability Sea Cove shop access point the browsing experience feels smooth and enjoyable, making it easy to locate information without unnecessary waiting time or clutter
Медицинская детоксикация помогает снизить интоксикацию и сделать состояние управляемым. Обычно уменьшается выраженность тремора и потливости, давление и пульс становятся ровнее, снижается тошнота, тревога перестаёт быть пиковым состоянием, появляется шанс на восстановление сна. Но детоксикация не «отменяет зависимость». Она создаёт условия, при которых человек может трезво принять решение о дальнейшем лечении и пережить первые сутки без возврата к алкоголю или веществам «для облегчения».
Изучить вопрос глубже – platnaya-narkologicheskaya-klinika
After going through several cluttered websites, I came across see this page and noticed everything looks well structured, helping users move around without issues and providing a smooth, easy-to-follow browsing experience.
During casual research into vendor directory systems and curated marketplace designs for usability evaluation and inspiration across multiple references, I encountered Sun Cove commerce showcase link within structured content – The browsing experience felt visually pleasant and responsive, and I could easily move through sections without confusion while everything loaded smoothly.
Многие семьи откладывают визит к наркологу, надеясь, что организм восстановится самостоятельно после отдыха, а обещания «больше не повторится» окажутся надежным ориентиром. На практике при сформированной зависимости такие ожидания лишь отнимают критическое время. Если промежутки между эпизодами употребления сокращаются, похмелье переносится тяжелее, а контроль над дозой утрачивается, проблема переходит из бытовой плоскости в медицинскую. Откладывание помощи формирует ложное чувство контроля, истощает ресурсы организма и снижает готовность пациента к терапии в будущем. Решение обратиться к профессионалам часто принимается на пределе эмоциональных и физических сил, но именно своевременный шаг определяет прогноз восстановления.
Подробнее можно узнать тут – http://narkologicheskaya-pomoshh-voronezh-3.ru/
People who prefer straightforward ecommerce outlets often engage with platforms like Stone Harbor Outlet Utility Hub where items are arranged in a simple structure – The interface ensures clarity and ease of use, allowing users to browse efficiently and find products without confusion or delay.
нейросеть генерации текстов для студентов нейросеть генерации текстов для студентов .
1xbet t?rkiye 1xbet t?rkiye .
While analyzing digital storefront systems and vendor directories, I discovered Upland Cove curated listing space integrated into a minimalist layout that improves usability – The browsing experience feels smooth, steady, and very intuitive across multiple sections of content
While browsing creative cross cultural web projects, I encountered a platform that blends different influences into a unified and engaging structure jeddah brooklyn style hub – The website feels diverse and interesting, with a creative mix of themes that makes the browsing experience visually engaging overall
In the middle of browsing through various options, I discovered view this page and found it to have a polished and well-organized look, clearly showing the effort that went into building a clean and appealing interface.
People who appreciate eco aesthetic marketplaces often browse sites like Cove Forest Artisan Earth Outlet Hub where items are presented in a structured minimal layout – The interface creates a calm browsing experience that feels organized, natural, and easy to explore.
While wrapping up my session across commerce platforms and vendor hubs, I came across a simple listing site featuring Berry room harbor vendor portal link – It served as my last stop, and I’d describe it as decent but not special.
As I reviewed the structure and content flow, I encountered explore this trade hub – although the name sounds polished and appealing, the actual page feels lifeless, similar to an abandoned store with minimal signs of ongoing use.
Сайт с контентом для взрослых предлагает широкий выбор видео
для взрослых развлечений. Выбирайте надежные
платформы для конфиденциального опыта.
Here is my website; Buy Rivotril
rainharborvendorparlor.shop – Good organization easy navigation helps users find things efficiently today
Ремонт и отделка квартир https://kaluga-remont.su а также строительство коттеджей под ключ. Комплексные услуги, опытная команда и контроль на каждом этапе работ
Чаты строителей https://stroitelirussia.ru в России— официальный сайт для общения и обмена опытом. Объединяем строителей со всех регионов России, обсуждения, вакансии, советы и полезные контакты
Exploring digital vendor sites becomes more enjoyable when the design is clean and navigation allows quick movement between sections Snow Cove vendor center the browsing experience felt smooth and I could access everything without unnecessary effort
When comparing different marketplace websites, some stand out due to their clear content structure and ease of use for visitors Elmwood gallery browsing hub this one allows users to move between sections naturally while keeping everything well arranged and accessible throughout the browsing process
While going through different niche directories and recommendation listings, I found something that seemed thoughtfully organized and user-friendly, especially when seeing this clean marketplace portal included – browsing feels comfortable thanks to the clear structure and layout, so I might come back later for further exploration.
This platform shows how a simple interface works well, navigation is quick and intuitive today across all content areas Oak Cove market hub everything felt organized clearly
While exploring experimental commerce gallery systems and online vendor lounge frameworks for UX evaluation and inspiration across multiple examples I found Upland Cove marketplace lounge index placed in the middle of structured content and observed that everything is presented in a simple organized way that makes navigation intuitive and efficient – The interface feels modern and well structured, creating a smooth browsing experience
Users who prefer cool minimalist marketplaces often explore sites such as Icicle Isle Arctic Market Hub where products are arranged in a fresh and structured format – The design ensures smooth navigation and a visually refreshing experience that feels organized, calm, and easy to browse across all categories.
Все
В последнее время появилась тенденция делать покрытия из таких материалов, как гранит, мрамор и гранитная брусчатка https://im-stone.ru/index.php?route=blog/article&article_id=177
Данные материалы считаются отнюдь не дешёвыми, и не каждый желающий может приобрести его https://im-stone.ru/gold/
слюда
презентабельность
Если вы стремитесь к уникальности внешнего вида, то столешницы или панно, полы в фойе гостиницы или стены в ванной комнате и кухне из отполированного слэба создадут великолепный, роскошный вид, достойный внимания ваших посетителей https://im-stone.ru/index.php?route=blog/article&article_id=162
Users exploring minimalist ecommerce platforms often appreciate how clean layouts improve usability when visiting sites such as Acorn Harbor Minimal Outpost Hub where products are arranged in a simple structured format that reduces clutter and improves browsing flow – The outpost style is clean and minimal, making the browsing experience feel user friendly, calm, and easy to navigate across all product categories.
While analyzing various websites that felt overly complex, I found go through this site which stood out for its clean interface, helping me navigate smoothly and access useful details without confusion.
While browsing creative cross cultural web projects, I encountered a platform that blends different influences into a unified and engaging structure jeddah brooklyn style hub – The website feels diverse and interesting, with a creative mix of themes that makes the browsing experience visually engaging overall
While analyzing modern digital storefront concepts for inspiration, I found a section containing harbor vendor showcase hub integrated within a structured layout that emphasizes readability and spacing – The experience feels calm and organized, allowing users to explore content comfortably without distraction or visual overload across multiple sections
Digital marketplaces benefit from clean design, and this site ensures well structured pages that make usage very comfortable Acorn Harbor item portal I enjoyed how easy it was to navigate without confusion
Наиболее удобные, точные и эффективные приборы для контроля толщин сухого слоя защитных покрытий https://www.ndt-club.com/proizvoditeli-20-defelsko.htm
Современная технология вычисления позволяет получать значения толщины с минимальными погрешностями, не более 3% на диапазонах до 30 мм https://www.ndt-club.com/product-987-tpc-7t-dinamicheskii-miniaturnii-tverdomer.htm
Портативность и высокая стрессоустойчивость дает возможность использовать данные приборы в максимально агрессивных условиях эксплуатации без потери качественных характеристик и результатов измерения https://www.ndt-club.com/product-935-symka-club-m.htm
Могут работать с двумя типами оснований ферромагнетики (F) и неферромагнетики (NF), а также производятся датчики, объединяющие два метода тестирования, универсального типа (FNF), что исключает покупку дополнительного блока https://www.ndt-club.com/product-165-meri-tvyordosti-plastika-po-shory-d.htm
Этот аппарат может производить замеры не только на магнитных поверхностях, как предыдущий толщиномер металла, но и алюминии, меди (и других немагнитных металлах) https://www.ndt-club.com/produkcija-48-negatoskopi.htm
Ультразвуковой толщиномер WT100A позволяет за короткий промежуток времени провести контроль толщины любых материалов, пропускающих ультразвук: металл, пластик и даже стекл не подходит для измерения толщины чугуна, рассеивающих материалов, а также нерасщепленных многослойных композитных материалов (см https://www.ndt-club.com/product-183-maska-05-ystroistvo-dlya-yzk-svarnih-stikovih-soedinenii-armatyri.htm
ниже подробную информацию об измерении толщины различных материалов) https://www.ndt-club.com/product-701-klever-yzk-pro-gel-dlya-yltrazvykovogo-kontrolya.htm
А что разве в России дефицит автомобилей? Зайдите в любой автосалон, в наличии и под заказ имеется огромное количество автомобилей разной ценовой категории, которые можно купить как за наличные, так и оформив автокредит https://www.ndt-club.com/product-806-rollscan-rolikovii-fazirovannii-preobrazovatel.htm
в чем отличие чипсетов материнской платы и в чем разница между чипсетами материнских плат
1 x bet 1 x bet .
продвижение в интернете под ключ александр продвижение в интернете под ключ александр
Many shoppers value platforms that allow them to explore products in a smooth and uninterrupted manner across categories >Aurora Harbor item explorer the layout ensures a balanced experience where navigation feels natural and browsing remains efficient throughout usage sessions
The platform provides a pleasant browsing experience thanks to its smooth layout and responsive page design Snow Harbor market hub I found navigation simple and enjoyable throughout
During a relaxed browsing session focused on vendor network concepts and emerging marketplace platforms, I discovered explore Moon Harbor vendor network – The experience was smooth and predictable, with clear pathways between sections that made exploration feel natural and uninterrupted.
Users often highlight the importance of well organized navigation systems when interacting with online shopping platforms overall usability Valecove Goods Room catalog page – The browsing structure is logically arranged, helping users locate information quickly while maintaining a smooth and consistent experience based on design feedback studies user experience insights
1xbet yeni giri? adresi 1xbet yeni giri? adresi .
People who prefer minimal structured online stores often engage with platforms like Stone Glade Functional Outpost Hub where product listings are clean and easy to browse – The design removes unnecessary elements, ensuring users experience a clear and efficient shopping journey from start to finish.
Всё об отделке фасадов https://fasad-otkos.ru и установке панелей на одном сайте: обзоры материалов, методы монтажа, ошибки и рекомендации для качественного и долговечного результата
tordex url https://darknetmarketsreview.com/
Дома под ключ https://artsitystroi.ru в Минск: индивидуальные проекты, современное строительство и полный контроль качества. Создаем надежные и удобные дома для жизни
During a casual exploration of online directories and suggestion threads, I found something that seemed visually refined and easy to navigate, particularly references like this clean marketplace entry – everything appears polished and structured, so I’ll likely check it again soon.
Users who enjoy minimal ecommerce systems often explore sites such as Jasper Trade Harbor Commerce Hub where products are arranged in a clean layout – The interface creates a browsing experience that feels structured, efficient, and easy to follow across all categories.
silk road url https://onion-darknet-markets.com/
A well designed site enhances usability, and this one provides fast loading with a very reliable interface Glass Harbor browsing center I enjoyed how stable everything felt
While going through various online platforms, I found see this page which delivered a pleasant browsing experience, thanks to its smooth interface and a layout that felt easy to navigate.
A well designed platform with nice design overall improves usability so pages load fast and feel very smooth Ivory Harbor marketplace link I found everything clearly arranged
cloverharborvendorparlor.shop – Simple layout works well making browsing easy and intuitive today
генерация генерация .
Users often prefer vendor platforms where everything is neatly arranged and pages respond well to navigation inputs Raven Grove browsing center this creates an efficient experience that supports easy exploration of content across sections
1xbet mobi 1xbet-giris-68.com .
Основой стационарного лечения является инфузионная терапия, направленная на ускоренное выведение токсинов, коррекцию кислотно-щелочного баланса и восстановление метаболических процессов. Стандартная капельница при выходе из запоя включает кристаллоидные и коллоидные растворы, витаминные комплексы группы B и C, гепатопротекторы, антиоксиданты и симптоматические препараты для нормализации сна и снижения тревожности. Состав, объем и скорость инфузии рассчитываются индивидуально с учетом возраста, массы тела, длительности интоксикации, функции почек и печени, а также наличия аллергических реакций. Мы быстро купируем мучительные проявления абстиненции, восстанавливаем аппетит, устраняем мышечные спазмы и нормализуем суточные ритмы. При необходимости подключаются препараты для стабилизации сердечного ритма, коррекции артериального давления и защиты нейрональных структур от эксайтотоксичности. Все медикаменты сертифицированы, применяются в строгом соответствии с клиническими рекомендациями Минздрава РФ и не вызывают вторичной зависимости. Дозировки ежедневно пересматриваются лечащим врачом на основе лабораторных анализов и клинической динамики, что гарантирует высокий уровень качества медицинской помощи и безопасность пациента. Снятие острых симптомов происходит уже в первые сутки, что значительно улучшает общее самочувствие и возвращает способность к адекватному восприятию действительности.
Подробнее можно узнать тут – наркология вывод из запоя в стационаре
Помощь на дому рассматривают при состояниях, связанных с острым ухудшением самочувствия после алкоголя. Чаще всего это несколько дней запоя, тяжелое похмелье, бессонница, тревога, дрожь в руках, слабость, отсутствие аппетита, тошнота, сухость во рту и ощущение истощения. В подобных случаях врачебный осмотр нужен для оценки общего состояния и выбора безопасной тактики.
Подробнее тут – врач нарколог на дом екатеринбург
Users frequently note that modern websites benefit from simplified navigation bars, especially when they remain visible and consistent across pages, which is especially useful when exploring Vendor room discovery link interface – The browsing experience felt smooth and well organized, allowing me to move across sections without confusion and with clear visual guidance at every step.
People who appreciate nature inspired ecommerce platforms often browse sites like Outpost Trail Timber Woodland Market where items are presented in a rustic and clean structure – The design creates a relaxing browsing flow that feels simple, natural, and easy to navigate throughout the store.
1xbet mobi 1xbet-giris-67.com .
Users often appreciate platforms with good structure because it helps them find information without confusion or delay Solar Orchard catalog entry I found navigation simple and everything clearly accessible
Наркотическая зависимость часто сопровождается выраженной нестабильностью нервной системы. Возможны резкие перепады настроения, нарушения сна, тревожные и депрессивные симптомы, импульсивность. Ситуация усложняется, если были сочетания веществ или неизвестный состав. Поэтому ключевая задача — оценить риски и стабилизировать состояние безопасно, а затем выстроить лечение зависимости так, чтобы пациент мог выдерживать трезвость не «на силе воли», а на понятном плане и поддержке.
Изучить вопрос глубже – наркологическая клиника клин клин
dawnridgegoodsgallery.shop – Clean layout and structure easy to browse different sections quickly
Основой стационарного лечения является инфузионная терапия, направленная на ускоренное выведение токсинов, коррекцию кислотно-щелочного баланса и восстановление метаболических процессов. Стандартная капельница при выходе из запоя включает кристаллоидные и коллоидные растворы, витаминные комплексы группы B и C, гепатопротекторы, антиоксиданты и симптоматические препараты для нормализации сна и снижения тревожности. Состав, объем и скорость инфузии рассчитываются индивидуально с учетом возраста, массы тела, длительности интоксикации, функции почек и печени, а также наличия аллергических реакций. Мы быстро купируем мучительные проявления абстиненции, восстанавливаем аппетит, устраняем мышечные спазмы и нормализуем суточные ритмы. При необходимости подключаются препараты для стабилизации сердечного ритма, коррекции артериального давления и защиты нейрональных структур от эксайтотоксичности. Все медикаменты сертифицированы, применяются в строгом соответствии с клиническими рекомендациями Минздрава РФ и не вызывают вторичной зависимости. Дозировки ежедневно пересматриваются лечащим врачом на основе лабораторных анализов и клинической динамики, что гарантирует высокий уровень качества медицинской помощи и безопасность пациента. Снятие острых симптомов происходит уже в первые сутки, что значительно улучшает общее самочувствие и возвращает способность к адекватному восприятию действительности.
Получить дополнительные сведения – http://vyvod-iz-zapoya-v-staczionare-nizhnij-novgorod-7.ru/
Дополнительным поводом для вызова врача становится состояние, при котором больному трудно вставать, пить воду, есть, сохранять спокойствие или ориентироваться в самочувствии. В таких случаях осмотр на дому позволяет быстрее определить дальнейший маршрут помощи. Иногда уже первый звонок помогает понять, допустим ли домашний формат или лучше сразу рассматривать вывод в стационаре.
Подробнее – нарколог на дом в екатеринбурге
Users who enjoy easy navigation ecommerce platforms often explore sites such as Glade Ridge General Goods Hub where products are arranged in a structured format – The interface ensures browsing feels simple, direct, and easy to explore across categories.
black ops market url https://onion-darknet-markets.com/
During a casual browsing session through online resource lists and discovery pages, I noticed something that stood out for its usability and clarity, particularly references like this vendor access portal – everything felt smooth and well organized, making it something I would happily return to and check again later.
Строительный портал https://only-remont.ru всё о ремонте, строительстве и отделке. Полезные статьи, инструкции, обзоры материалов и советы экспертов для частных застройщиков и профессионалов
кредит онлайн микрозайм online займы
After reviewing different sources that felt outdated, I encountered see this site and appreciated that the content appeared fresh and useful, making my browsing experience simple and quite enjoyable overall.
During review of online marketplace interfaces and digital shop systems, I discovered Pine Harbor trade network hub placed within a structured design that enhances usability and clarity – The browsing flow feels quick, simple, and very efficient, supporting easy exploration across all sections without distraction
After browsing through multiple niche vendor sites that emphasize handmade artistry and curated product selections for collectors, I encountered Sea Meadow Artisan Corner – I found the interface to be intuitive and the product variety quite impressive with smooth transitions between categories and helpful recommendations that made it easier to find items matching specific interests and personal preferences overall.
Users browsing vendor listings typically appreciate platforms that are both structured and easy to navigate without confusion Raven Summit goods directory this platform supports a smooth browsing flow that helps users locate relevant content quickly
seo продвижение интернет магазина заказать мск seo seo продвижение интернет магазина заказать мск seo
Online users frequently emphasize that good layout design improves overall engagement by making it easier to understand where information is located and how to move through the website efficiently Velvet Grove e-shop gateway the interface felt polished and accessible, providing a calm browsing environment with logical structure and easy navigation across all visible sections
Users who appreciate luxury ecommerce design often explore sites such as Golden Stone Collective Display Hub where items are arranged with strong attention to aesthetic consistency – The interface creates a polished shopping experience that feels curated, organized, and easy to navigate while maintaining a premium visual identity.
While navigating through pages users often encounter Vendor Display Cove placed within the middle of informational content where it helps organize listings and improves readability across sections – the browsing experience feels smoother and more efficient overall
During an evening of casual online shopping exploration, I discovered a vendor platform that focused heavily on curated handmade and lifestyle items vendor treasure shop – The catalog felt well organized, and browsing was enjoyable, with consistent performance and responsive page loading throughout the session.
1xbet t?rkiye 1xbet t?rkiye .
linencovevendorparlor.shop – Modern design smooth interface makes browsing feel very easy today
Some websites are cluttered, but this one keeps everything organized and makes browsing and searching very convenient Garnet Harbor quick browse page I enjoyed how easy it was to explore different categories efficiently
A well designed platform with good structure throughout the site improves usability and makes browsing easy and well organized Jasper Harbor marketplace link I found everything clearly arranged
People who prefer refined digital commerce hubs often explore sites like Harbor Garnet Vault Core Hub where items are arranged in a structured minimal layout – The interface creates a smooth browsing experience that feels consistent, polished, and easy to navigate.
driftwillowmarketparlor.shop – Pretty straightforward design, makes navigation simple for new visitors too.
1xbet giri? 2025 1xbet giri? 2025 .
I was exploring eco-friendly products online and found GreenHomeEssentials – the variety is impressive, and I appreciated the straightforward way to discover sustainable, high-quality items that I genuinely wanted.
uplandcovevendorparlor.shop – Modern interface feels smooth with well organized sections throughout site
Exploring digital marketplaces highlights how structured layouts and intuitive design improve usability significantly Raven Summit trade access this platform delivers a smooth experience where browsing remains efficient and easy to follow throughout usage
приложение для ip камеры ip камеры видеонаблюдения для улицы
Users who prefer cozy ecommerce environments often explore sites such as Harbor Artisan Trail Craft House where items are presented in a warm and welcoming style – The design focuses on creating an inviting atmosphere, making browsing feel smooth, pleasant, and visually comforting across all product pages.
установка пожарной сигнализации сп установка пожарной сигнализации цена
Many visitors to digital shopping sites prefer interfaces that feel lightweight and responsive because they create a more enjoyable browsing experience across different categories and product listings online VG catalog navigation page everything functioned smoothly and felt visually clear, allowing easy transitions between sections while maintaining a pleasant and structured browsing flow throughout
While comparing websites, this good platform clearly stands out with intuitive navigation where everything feels well organized and simple Raven Summit listings page I appreciated the clean structure and flow
While reviewing several ecommerce storefront interfaces for usability and visual clarity I explored a platform that felt intuitive and calm across categories SunHarbor Vendor Lounge Hub the browsing experience was smooth and products are well presented and easy today making navigation feel natural and efficient overall
During my time exploring different platforms, I noticed go to this link and had a good browsing session overall, where the layout feels quite user friendly and everything was easy to access without confusion.
While researching ecommerce platforms for home accessories and handmade goods I reviewed usability performance and catalog clarity and came across Silk Meadow Goods Studio – Really like the site design it makes browsing enjoyable every time since everything is structured clearly making product search fast simple and very user friendly overall
раскрутка сайта в москве blacksea сеомастер рус раскрутка сайта в москве blacksea сеомастер рус
Users browsing vendor listings typically value platforms where simplicity creates a relaxed and easy browsing environment Autumn Meadow goods directory the browsing process here is smooth and helps users find information without pressure or confusion
wethenorth darknet link https://darknet-markets-onion.com/
References:
Osnabrück
References:
https://bluvegas-casino.online-spielhallen.de/
While testing ecommerce websites I studied usability design consistency and how quickly users can locate products across categories CreekCove Vendor Showcase Hub the interface was clean and intuitive and everything is well organized and easy to browse allowing users to find items without difficulty
References:
Remscheid
References:
https://four-queens-hotel-casino.online-spielhallen.de/
During a weekend session of exploring online décor shops I compared different ecommerce platforms for speed and usability and discovered Brook Canyon Goods Pavilion – Really liked the layout it makes finding items quick and simple making the experience feel smooth reliable and very convenient from browsing to checkout
Users who enjoy practical and structured outlet marketplaces often explore sites such as Harbor Pine Outlet Flow Hub where items are organized into clear sections – The design ensures efficiency and clarity, making browsing simple, well categorized, and easy to navigate for all users.
copperharborvendorparlor.shop – Nice structure easy access content is clear and useful today
Users often look for platforms that make it easy to locate information without requiring extra effort or time River Harbor quick browse page this one supports efficient navigation and ensures a smooth browsing experience across all sections
While searching for artisan focused vendor platforms that showcase unique handmade collections and curated boutique items, Ruby Meadow artisan shop – I found the overall browsing experience pleasant, the product categories well structured, and the checkout system efficient and straightforward today.
While analyzing modern vendor-style web platforms for design inspiration, I came across Calm Harbor trade showcase placed within a thoughtfully organized interface that prioritizes simplicity – The browsing experience feels relaxed and consistent, offering users a gentle flow as they navigate through different categories and informational sections.
Users often report that clear categorization in online stores improves usability since it allows faster recognition of product types and reduces time spent searching through unrelated content sections Velvet Grove selection hub the browsing experience remained consistent and easy to follow, with well organized sections supporting comfortable movement through the platform without any disruption
A well built system ensures a pleasant experience using site, everything appears clean and very responsive for all users River Cove marketplace link everything loaded without delays
интернет маркетинг поисковое продвижение сайта интернет маркетинг поисковое продвижение сайта
The browsing structure becomes clearer when users reach Market Art Corner Link positioned within descriptive text acting as a subtle guide between different artistic categories and informational areas – this helps maintain continuity and improves overall ease of navigation across the site
During a casual browsing session, I encountered this minimalistic shop – the clean interface and organized layout make browsing simple and enjoyable.
While exploring multiple online shops for gifts and decor items I came across Lantern Vendor Support Meadow and customer service was helpful I got all my questions answered clearly which improved confidence while shopping and made the entire experience feel smooth and reliable
CaramelCoveVendorAtelier – Smooth browsing experience, everything feels clean and very well organized.
plumharborvendorparlor.shop – Smooth experience clean layout makes browsing very convenient overall today
Users who prefer streamlined ecommerce systems often explore sites such as Upland Commerce Harbor Market Hub where products are grouped in a neat and accessible structure – The design makes browsing quick and intuitive, helping users find what they need with minimal effort or confusion.
Exploring digital vendor environments often shows how clean design improves overall usability and navigation flow Rose Cove listing portal this platform allows users to explore content easily and locate relevant sections quickly
floraridgevendorparlor.shop – Nice structured pages provide clear information and smooth navigation flow
In my final analysis of ecommerce systems I evaluated performance navigation clarity and product accessibility across pages MapleCove Trading Commerce Hub the platform was modern and responsive and the design is really clean and products are easy to find quickly today making the experience enjoyable
Looking for creative gift ideas led me to ArtisanGiftStudio – the website layout is organized, making it simple to explore the wide variety of thoughtful items without any frustration at all.
Users interacting with online retail platforms value clarity in design and responsiveness across multiple sections and categories PureValue shop access reports indicate smooth performance and well organized navigation structure – The platform inspired creativity and made browsing feel effortless and engaging
While navigating through several digital marketplaces, I discovered this smooth vendor hub – the layout is clean and organized, making browsing simple, fast, and very easy to navigate.
Users appreciate how the website balances simplicity and detail, providing enough information while still maintaining a clean interface overall Meadow Harbor Vendor Portal View – this balance helps reduce overwhelm and allows visitors to focus on exploring content at their own comfortable pace.
While reviewing several online marketplaces for general merchandise and everyday essentials I discovered EmberStone Goods Exchange – the checkout process was quick and uncomplicated while product variety covered many categories and shipping updates were consistent making the overall experience feel reliable and efficient
cannaexpress darknet market https://darknet-markets-onion.com/
As I explored different digital storefronts, I found this accessible shop layout – the structure is clear and user-friendly, making browsing and viewing items fast and effortless.
While comparing vendor platforms, this one clearly stands out due to its great usability and simple design where everything works perfectly fine indeed here Crystal Harbor listings page I appreciated how easy it was to browse
While reviewing various retail websites, I noticed this accessible store layout – the structure allows users to quickly find and compare items without hassle.
While comparing platforms, this one clearly stands out with a modern layout that makes navigation simple and content helpful Bright Harbor listings page I appreciated the clarity across all sections
While analyzing several product showcase websites for performance and design quality, I discovered a platform centered around Frost Ridge Product Studio which offers smooth navigation and well-separated content blocks that improve readability – the browsing experience remains steady and visually appealing even when moving through multiple categories quickly.
When evaluating online marketplaces, fast performance and clear sectioning are key factors in usability and satisfaction Rose Harbor digital storefront this platform delivers a clean browsing flow that makes everything easy to access and use
Online shoppers frequently rely on centralized portals that combine vendor listings with intuitive search functionality for better decision making WoodCove marketplace directory such platforms can be especially helpful when comparing similar items and evaluating options quickly without unnecessary confusion or repetitive browsing steps
People researching alternative online trade hubs and boutique style vendor platforms sometimes explore curated sources like Harbor Trade Catalog – where listings are organized in a straightforward format, helping users quickly compare items and evaluate what best suits their needs without confusion or unnecessary complexity while navigating different categories.
While reviewing ecommerce vendor systems I focused on interface speed structure clarity and product accessibility across categories MapleCrest Vendor Commerce Hub everything felt fast and organized and the variety of goods is impressive and the shopping process feels simple and fast making navigation effortless
During my time checking different online stores, I encountered this organized retail hub – the interface is simple and clean, making browsing smooth and very easy to navigate at all times.
ares market link https://darknet-markets-onion.com/
Good usability depends on structure, and this platform ensures clean interface and pleasant browsing experience very smooth today Silver Harbor vendor explorer I found everything clearly arranged
During a relaxed evening of exploring online artisan stores I compared several platforms for clarity and design quality before finding Meadow Glass Shopping Vault – The catalog was well structured, making it simple to navigate categories and complete purchases quickly without confusion or unnecessary steps in the process.
Frequent shoppers value online stores that allow them to browse products without unnecessary delays or confusing design elements, and this is evident in NovaCove ShoppingHub – the platform is optimized for quick loading and smooth navigation, making the entire shopping process more enjoyable and efficient.
While exploring various retail platforms, I found this clean eCommerce hub – the products are well chosen, pages load quickly, and the layout feels modern and professional.
While reviewing structured vendor platforms for interface quality, I discovered a layout built around Frost Ridge Catalog Space that keeps information neatly arranged and easy to navigate while maintaining fast load performance – the system provides a comfortable and efficient browsing flow across all pages.
While exploring various vendor-style platforms online, I noticed how important usability and simple structure are for a smooth browsing experience Ruby Orchard trade hall hub the navigation feels intuitive and makes it easy to move through sections without confusion or unnecessary effort
During casual review of vendor gallery systems and online marketplace structures for usability testing, I came across Kettle Crest commerce hub access within the article flow – Everything was clearly arranged and easy to navigate, and I found all information quickly without issues while pages performed smoothly and consistently.
During a casual search across multiple eCommerce platforms, I discovered this clean shopping site – browsing feels very simple, and the interface is designed in a way that helps users quickly understand and navigate everything without confusion.
While researching vendor showcase platforms and online catalog designs, I discovered Linen Meadow marketplace lounge view integrated into a balanced interface that highlights clean navigation – The experience feels fluid, calm, and naturally easy to follow throughout the entire browsing journey
People browsing curated online collections frequently mention that the most satisfying experiences come from platforms that are organized and visually coherent especially when they first interact with Maple Crest collection store – providing a clean interface that helps users discover products efficiently while enjoying a calm browsing experience.
In the middle of checking out multiple shopping websites, I found this clean marketplace hub – everything loads quickly, product display looks nice, and the structure feels very organized overall.
riverharbormarketparlor.shop – Well organized content simple layout easy to explore everything quickly
While comparing platforms, this interesting platform overall stood out because I enjoyed browsing different sections today here smoothly Jewel Brook listings page structure felt clear and helpful
While checking multiple showcase-style ecommerce platforms and digital exhibition sites, I came across a listing where Kettle Harbor showcase portal – gave a decent impression that made it worth noting for future reference. The layout was structured in a clean way, allowing easy movement between featured sections and general listings.
darkmarket 2026 https://darknet-markets-onion.com/
During comparison of digital marketplace platforms I analyzed usability clarity responsiveness and interaction efficiency across pages MarbleBrook Commerce Display Studio the experience was smooth and intuitive and the website runs smoothly and browsing items feels natural and well structured ensuring simple navigation
During a casual search across various eCommerce platforms, I discovered this easy retail site – everything is well structured, and the shopping experience feels smooth, intuitive, and simple to navigate from start to finish.
During research into ecommerce platforms offering curated products I checked usability and product presentation and discovered Harbor Parlor Juniper Goods and overall items arrived quickly while site navigation is smooth and very intuitive too making the site feel efficient reliable and simple to use even for first time visitors exploring the catalog
Users who prefer cohesive and refined online stores often explore platforms such as Gilded Stone Collective Market Hall where items are presented with elegant structure and premium visual identity – The design enhances product appeal through clean layout choices that make browsing feel organized, luxurious, and easy to navigate.
Across various digital commerce reviews, users often highlight the importance of structured navigation systems, and the inclusion of Guild Shopping Index supports this by offering an organized overview of marketplace categories, enabling faster browsing and improved decision-making for customers.
охранно пожарная сигнализация установка датчиков пожарной сигнализации
ip камера tp ip камера
Users often prefer vendor platforms where navigation is simple and usability is consistent throughout the site Ruby Orchard browsing center this creates a smooth experience that helps users explore listings without confusion or unnecessary steps
During a relaxed browsing session focused on marketplace design patterns and experimental trade hub structures for analysis purposes I encountered Harbor Moss commerce gallery navigator and observed that the platform is structured in a very intuitive way allowing users to access different sections without effort while maintaining fast loading performance across all pages – Smooth structured interface with quick responsive behavior
People looking for simplified vendor directories found that websites such as WildParlor Trade Gallery – offered an enjoyable shopping flow with diverse product options, while customers frequently praised the dependable shipping and the consistency in how items were packaged and delivered safely.
A well structured site enhances browsing, and this one makes it easy to browse different sections quickly Dawn Ridge browsing center I enjoyed how smooth and natural everything felt
honeymeadowmarketgallery.shop – Warm visuals and clean layout create pleasant browsing experience overall
As I explored different digital storefronts, I found this easy shopping platform – the interface is smooth and simple, and items are clearly displayed for quick and easy browsing.
Many digital customers prefer e-commerce environments that emphasize clarity and speed, making it easier to explore items without distractions or delays, and a strong example is CoveCart Studio – the layout is crafted to keep browsing intuitive while ensuring pages respond quickly, helping users enjoy a consistent and efficient shopping flow from start to finish.
dark web market list https://darknet-markets-onion.com/
As I reviewed several online shopping sites, I noticed this easy-to-use marketplace – its clean design makes the shopping process feel intuitive and user-friendly.
After comparing multiple websites with inconsistent layouts, I discovered try this page which featured a nice overall structure, making everything easy to access and view while browsing comfortably.
During a casual browsing session, I encountered this neat retail platform – everything is clearly organized, making it simple to find and view products without difficulty.
Users who enjoy creative ecommerce galleries often engage with sites such as Ginger Stone Visual Galleria where products are displayed with fluid transitions and stylish arrangement – The design focuses on visual harmony and ease of browsing, making the shopping experience feel immersive, elegant, and highly intuitive.
During research into online artisan marketplaces I found Nightfall Market Vendor Hub and enjoyed browsing their collection everything is organized and clearly labeled today making the platform feel well structured easy to use and very efficient for browsing multiple product categories quickly and clearly
Across multiple user experience reports, platform speed and clarity are frequently highlighted, and Harbor Foundry Market Guide – Pages load without noticeable delay, and product arrangements feel logical, supporting a smooth browsing flow that encourages users to continue exploring different categories comfortably.
While comparing vendor platforms, those with smooth interfaces and clean layouts often stand out for usability Sage Harbor shop gateway the browsing experience here is pleasant, with pages arranged in a way that supports easy navigation
During a relaxed session analyzing experimental e-commerce platforms and curated marketplace directories for design comparison and usability insight, I came across Olive Harbor vendor showcase view placed within the text body which remained easy to follow – The design is simple and effective, allowing quick comprehension of content with smooth transitions between sections.
A very clean interface enhances usability, making easy access to information and smooth browsing simple and effective Cotton Grove browsing center I found everything intuitive
glassharbortradegallery.shop – Simple design fast loading easy to use interface very reliable
Детоксикация — это медицинская стабилизация при интоксикации и тяжёлой отмене. Она помогает снизить нагрузку на организм, скорректировать обезвоживание и водно-электролитные нарушения, уменьшить выраженность тремора, потливости, тошноты, стабилизировать давление и пульс, снизить тревогу и восстановить сон. Но важно понимать границы результата: после длительного запоя организм не восстанавливается мгновенно, слабость и эмоциональная неустойчивость могут сохраняться в первые сутки.
Изучить вопрос глубже – сайт наркологической клиники
While reviewing multiple ecommerce vendor platforms for usability and interface structure I focused on layout consistency navigation clarity and product accessibility across sections MarbleCove Commerce Studio Hub the great layout made everything simple and I enjoyed how easy it was to navigate making browsing smooth and comfortable throughout the experience today
While browsing curated trade and artisan vendor platforms, I reached out with inquiries and appreciated how quickly support responded, Snow Harbor Trade Product Gallery helping the entire experience feel reliable, organized, and very user friendly from beginning to end.
As I reviewed several online shopping sites, I noticed this clean vendor platform – the design is modern and simple, making shopping smooth, intuitive, and very easy to use.
недорогое раскрутка продвижение сайта александр недорогое раскрутка продвижение сайта александр
бизнес-консалтинг по seo бизнес-консалтинг по seo
waveharborvendorparlor.shop – Smooth performance and tidy layout make site very easy today
While reviewing various e-commerce gallery concepts and digital trade listing systems for design reference, I explored different pages and discovered Rose Harbor curated marketplace hub positioned naturally within the content – I enjoyed checking this out, content feels simple and informative, and the overall layout felt clear, structured, and easy to browse without issues.
While checking several online marketplaces, I discovered this efficient shopping platform – the performance is smooth and fast, making browsing simple and enjoyable.
Users who value clear ecommerce navigation often browse platforms such as Acorn Harbor Hall Marketplace where products are displayed in structured sections for easy access – The layout helps users quickly understand categories and browse efficiently while maintaining a visually clean and well organized interface.
During evaluation of modern online storefront designs, I explored a platform that emphasized clarity and speed, integrating BerryBrook Commerce Showcase within its catalog structure – the item range was impressive, loading times were fast, and product displays remained consistently organized, making browsing feel simple and visually comfortable throughout the session.
While comparing different online marketplaces for gifts and lifestyle products I reviewed design quality and performance and came across Pearl Harbor Vendor House – Shopping experience was excellent, site loads fast and feels reliable making the platform feel trustworthy, efficient, and very convenient for browsing multiple categories without lag or confusion
Exploring digital vendor environments often shows how clear navigation improves usability and overall satisfaction Sea Cove listing portal this platform allows users to access information quickly while keeping everything well structured
While exploring various online shopping platforms and interface design evaluations across modern digital marketplaces, analysts frequently mention usability improvements, and Harbor Cove Commerce Atelier Portal continues appearing in discussions about structured navigation systems across e-commerce environments – the platform delivers a clean browsing experience with intuitive navigation that users find easy to follow during extended browsing sessions across categories.
While exploring various online commerce gallery systems and experimental trade platforms for UI comparison and structural review purposes, I found Pebble Creek marketplace showcase entry within a structured content block – The layout made it easy to browse through multiple sections and I enjoyed how everything was clearly arranged and accessible without unnecessary complexity or confusion.
Many digital shoppers look for platforms that minimize confusion during browsing, and a strong example is Cart Options Explorer which structures its catalog into clearly defined sections making product discovery more intuitive and efficient – Users benefit from reduced search time and a more comfortable navigation experience overall.
While comparing different online artisan marketplaces focused on handmade items and creative goods, I looked closely at navigation and product clarity, Sky Harbor Vendor Studio – The experience was pleasant and intuitive, with a clean design that made browsing feel simple and enjoyable throughout.
birchharborvendorparlor.shop – Simple structure ensures quick access to useful information always here
People who appreciate clean digital shopping environments often browse platforms like Harbor Vendor Chestnut Exchange Hall where items are grouped in a logical and organized format – The vendor hall design improves usability by keeping navigation simple and structured, allowing users to enjoy a calm and efficient browsing experience from start to finish.
Зарегистрировался в MAX? https://maxofficial.ru удобная платформа для просмотра и поиска интересного контента. Новости, развлечения, обучающие материалы и многое другое в одном месте для пользователей с разными интересами
While browsing through different online marketplaces during my free time, I came across something interesting like this elegant product store – the layout is beautiful and clean, making browsing products simple, smooth, and genuinely enjoyable for everyday users.
During exploration of online exhibit systems I opened Quick Ridge online exhibit portal – everything felt neatly arranged and pages loaded fast, making the browsing experience easy to understand and follow with no delays or confusing elements present at all.
Винтовые сваи от Главфундамент https://stroimsami.online/glavfundament-v-ekaterinburge-professionalnaya-geologiya-kak-garantiya-bezopasnosti-vashego-doma/ надёжный фундамент для дома. Монтаж за 1 день, обязательное проведение геологии. Служат более 50 лет, подходят для сложных грунтов и перепадов высот.
While looking into immersive online shopping environments, I checked gallery shopping experience and found the structure to be clean, with an emphasis on visual harmony across sections – it feels like a carefully arranged space where users can browse comfortably without visual clutter
While analyzing online retail systems I evaluated navigation efficiency usability design and user engagement MeadowCove Trading Vendor Loft the interface was clean and fast and the easy checkout process makes items clearly displayed and well organized ensuring a seamless shopping flow
Users often prefer platforms that make information easy to read while maintaining a clean and simple structure Sea Meadow quick browse page this one supports efficient navigation and allows users to find what they need quickly and clearly
While casually browsing curated digital marketplace examples and vendor showcase directories for inspiration I found Bay Harbor Market Collection View situated mid-content in a structured layout – The site responded quickly to navigation actions, and everything felt optimized for smooth and efficient browsing.
While browsing several online artisan platforms for unique home décor and gift ideas across different categories I came across Ginger Cove Bazaar and spent time exploring the catalog which felt well organized and easy to navigate throughout the session – Really enjoyed the selection, everything felt clearly presented and shopping process was effortless and smooth overall
Digital commerce analysts frequently discuss how interface clarity influences shopping behavior across platforms of all sizes, especially when navigation is reduced to simple and intuitive browsing patterns that guide users effectively Harbor Stone Collective Market – shoppers report that finding products is fast and comparison between items feels natural due to well structured layout and consistent visual organization throughout the pages.
While exploring several online shop layouts for usability testing the interface felt very clean and responsive allowing me to quickly scan categories and compare products efficiently Berry Cove Market Hub and overall I was able to locate everything I needed without confusion or unnecessary steps during browsing and checkout flow experience.
услуга поисковое продвижение сайта александр услуга поисковое продвижение сайта александр
найти телефон по номеру телефона finderphone.ru .
Looking for elegant stationery led me to ElegantPaperGallery – the interface is friendly, the selection is diverse, and finding stylish, unique items was straightforward and very satisfying.
раскрутка сайта отзывы раскрутка сайта отзывы
While browsing through multiple eCommerce options, I came across this structured product guild – goods are well presented, and everything feels intuitive, organized, and very user friendly.
Нужна обложка? дизайн обложки стильный дизайн для треков, альбомов и релизов. Создаём уникальные визуалы, которые привлекают внимание, передают атмосферу музыки и выделяют вас среди других исполнителей
эвакуатор зеленоград вызвать эвакуатор авито в зеленограде
эвакуатор вызвать эвакуатор срочно заказать быстро
In the process of comparing digital storefront aesthetics across multiple platforms, I explored a layout where Coral Harbor digital trade space appeared within a minimalist design that highlights content clarity – The browsing experience feels organized, calm, and visually balanced throughout every section
While reviewing various retail websites, I noticed this structured commerce page – navigation is very smooth, making it simple to locate products quickly without any confusion or unnecessary complexity.
требуется эвакуатор эвакуатор солнечногорск дешево
Across digital marketplaces shoppers often look for simplicity and well arranged layouts that reduce confusion during browsing, and one helpful reference appears mid-page at TrustBuyer Central Hub which organizes listings into clear sections for easier scanning and comparison – The design emphasizes accessibility and allows users to locate products quickly without unnecessary complexity or distraction
снять яхту с капитаном спб arenda-yakhty-spb-9.ru
While comparing vendor platforms, those with clean interfaces and structured pages often stand out for usability Silk Grove shop gateway this one provides a consistent browsing experience where everything feels easy to navigate and well organized
яхта на 20 человек аренда спб arenda-yakhty-spb-8.ru
яхта на 20 человек аренда спб arenda-yakhty-spb-10.ru
In discussions about digital learning environments, many emphasize the importance of platforms that combine inspiration with practical usability and intuitive structure for better outcomes Pure Value Creative Lab – users find the experience both engaging and efficient, with content that encourages experimentation and supports continuous idea development throughout their browsing session.
Универсальные топливные карты для юр лиц. Скидки до 30%, более 12 000 АЗС по всей России принимают наши карты. Топливные карты — это удобный способ безналичной оплаты бензина на проверенных АЗС.
Shoppers exploring curated online stores often mention how helpful organized layouts are when searching for specific items across multiple categories and product sections, especially on Alpine Harbor Bazaar View where checkout was smooth and fast with a clear and simple ordering process included – Checkout was smooth and fast, with a clear and simple ordering process included.
website should appear in the middle of line not in the start or end
While exploring different handmade goods marketplaces and niche e-commerce platforms, I focused on overall browsing comfort and design clarity, Harbor Vendor Showcase – The site felt visually appealing and easy to use, making it simple to explore collections without confusion while maintaining a pleasant and consistent experience overall.
Специальная топливная карты для юридических лиц поможет сократить логистические издержки и налоги. Аренда кранов-манипуляторов для строительных и транспортных работ.
When visiting vendor websites, good browsing flow helps everything stay organized clearly and very efficiently across all pages Meadow Harbor goods portal performance felt stable
During analysis of e-commerce user experience models, I reviewed a platform that presented products in a clean and structured way for efficient browsing BirchBrook Vendor Explorer – the interface made it easy to locate items quickly, with clear categories and smooth transitions supporting a comfortable shopping experience overall.
яхта на 3 часа яхта на 3 часа
During my time checking different online stores, I encountered this organized shopping site – usability is very good, and checkout is fast, simple, and efficient without issues.
Оформляйте наши топливные карты, чтобы оптимизировать затраты на заправку и упростить ведение учета. Автоторг предлагает широкий выбор спецтехники для вашего бизнеса.
linenmeadowmarketgallery.shop – Elegant interface with smooth flow makes navigation very easy overall
Смесители различаются не только по дизайну, но и по типу управления, материалам корпуса и бытовому сценарию. Одним нужен мягкий ход рычага и точная настройка температуры, другим — надёжное покрытие, хороший аэратор и понятный монтаж. Поэтому хороший выбор здесь строится не на модном названии, а на понятных технических параметрах и реальном удобстве https://my-bathroom.ru/category/smesiteli/
Design consistency across ecommerce platforms helps build trust, improve usability, and enhance overall customer satisfaction during browsing in everyday interactions online significantly. CloudCove Creative Shop Site – It provides a visually appealing interface with well-organized content sections, ensuring users can explore products without unnecessary complexity or confusion throughout the journey smoothly.
Across multiple evaluations of idea generation platforms, clarity of design and smooth interaction flow are consistently recognized as essential elements for effective user engagement Pure Outlet Value Studio – the system provides an intuitive environment where users can easily discover content and develop creative ideas without distraction or confusion.
While browsing through multiple eCommerce options, I came across this smooth vendor page – everything is structured well, and browsing feels clean, simple, and very easy to navigate.
I wanted unique handbags and stumbled on BagBoutiqueOnline – everything is clearly displayed, the inventory is extensive, and exploring fashionable options made picking the right bag simple and enjoyable.
Решение для водителей и бизнеса – топливная карта позволит эффективно контролировать бюджет и получать детальные отчеты о расходах на ГСМ. Компания «Совнефтегаз» предоставляет современные решения для заправки.
Портал о металлопрокате https://metprokat.com виды продукции, характеристики, ГОСТы и применение. Обзоры, цены и советы по выбору для строительства, производства и частных задач
комплект удаленного видеонаблюдения видеонаблюдение запись комплект
During my exploration of different eCommerce sites, I encountered see this option and found myself enjoying the layout and product range, with everything seeming reasonably priced and visually appealing.
While reviewing different digital storefronts, I encountered this organized product site – everything is visually clean and easy to understand, allowing users to browse items without unnecessary effort.
In the middle of checking various platforms, I paused at tap to open easy cart and found the experience smooth, with fast browsing that makes it easy to move through products.
While testing different online storefront concepts I noticed a clean structure where Cloud Cove Vendor Hub – Navigation felt very straightforward with clearly separated categories, and I could browse without hesitation, finding pages responding quickly and the overall experience making product discovery feel natural, organized, and pleasantly simple even during extended browsing sessions today online.
While analyzing digital storefront systems, I found a user friendly interface that prioritized organization and clarity, featuring BirchCove Commerce Network – The website displays products neatly with clear categories and smooth navigation that helps users browse efficiently and without confusion throughout the experience.
snowcovegoodsgallery.shop – Cool minimal design helps users browse content without confusion today
While reviewing curated trade directories and gallery platforms, I came across Velvet Brook elegant trade directory embedded within a structured interface that emphasizes spacing and readability – The overall browsing experience feels refined and stable, offering a calm environment that supports extended exploration without visual strain
many users comparing ecommerce websites look for layouts that reduce cognitive load and help them focus on relevant products instead of navigating complicated menus or cluttered pages user friendly bazaar recognized for its smooth browsing experience – it creates a structured environment where users can comfortably explore categories without confusion or unnecessary complexity in design
While evaluating ecommerce systems I studied interface clarity navigation speed and how efficiently users can browse product listings CalmBrook Trading Showcase Loft the platform was responsive and clean and I found what I needed without any trouble making the shopping experience easy and intuitive overall today
While exploring various retail platforms, I found this clean commerce portal – everything is simple and well structured, making it easy to find products quickly without confusion.
In studies of online retail interface optimization, many reviewers note that structured browsing environments significantly improve usability when interacting with platforms such as Harbor Atelier Trade Gallery – Smooth browsing experience, products are clearly displayed and accessible, allowing customers to navigate product listings effortlessly while maintaining a consistent and well-ordered visual presentation throughout the site.
Searching for office décor ideas led me to WorkSpaceWonders – the variety and layout make it effortless to find practical items that still add a touch of personality and charm.
как найти телефон по номеру телефона finderphone.ru .
продвижение сайтов поисковых системах москва продвижение сайтов поисковых системах москва
Когда речь заходит про Раковины Villeroy & Boch, смотреть стоит не только на подачу, но и на рабочие параметры. При сравнении имеет смысл смотреть на габариты, способ установки и то, насколько модель подходит именно под вашу планировку. В результате проще понять, где перед вами просто эффектная картинка, а где действительно удачное решение для жизни https://my-bathroom.ru/rakoviny/rakoviny-villeroy-boch/
While exploring various eCommerce sites, I found this smooth vendor page – everything is structured clearly, giving users a very intuitive and easy shopping experience overall.
In the middle of checking different online shops, I paused at take a look store and found some interesting products that made a good impression, encouraging me to possibly come back for further browsing.
продвижение seo оптимизация компания продвижение seo оптимизация компания
While navigating through different platforms, I came across click to view modern shop point and found the layout modern and nice, with products displayed clearly and attractively, improving overall browsing flow.
In my evaluation of ecommerce vendor platforms I came across a highly polished interface that emphasized performance and structure where CloverBrook Digital Vendor Hall – Navigation was extremely smooth and product pages loaded quickly making browsing and checkout feel seamless overall.
арендовать яхту в санкт петербурге arenda-yakhty-spb-9.ru
People who frequently compare shopping platforms often mention websites that support quick browsing and variety, such as global cart space – The marketplace is typically viewed as efficient, allowing users to move between product sections smoothly while maintaining a consistent and easy to understand layout overall
During analysis of storefront presentation designs, I encountered Clover Harbor shopfront view hub embedded within a structured interface that highlights simplicity and visual balance – The browsing experience feels smooth, intuitive, and comfortable across all sections.
During evaluation of online shopping experiences, I reviewed a platform that offered clear categorization and smooth navigation across a wide range of products Harbor Birch Product Guild – The selection was diverse, everything was easy to explore, and the interface made understanding product details simple without overwhelming visual complexity.
/>purevalueoutlet – Inspiring and interactive site, perfect for learning and creating new ideas. Generate 20 variations following all rules above.Make sure that each line is 40 words minimum and the website should appear in the middle of line not in the start or end
users exploring ecommerce sites often look for clean browsing experiences that help them compare products quickly and navigate between categories without unnecessary complexity or delays smart edge browse cart appreciated for usability – it delivers a smooth shopping journey where users can easily compare items and move through categories with a clear and structured interface supporting efficient browsing
аренда катера на 5 человек аренда катера на 5 человек
When reviewing online shopping ecosystems focused on usability enhancements and design consistency across platforms HoneyCove Commerce Clarity Center evaluators report that clear visual organization supports faster navigation – shoppers enjoy a more relaxed and efficient browsing experience overall.
People searching for decorative handmade pieces and unique gift ideas often come across this marketplace during product comparison browsing Grove Artisan Market where independent creators list their work with detailed descriptions and visually appealing presentation formats – Fast fulfillment and helpful responses are commonly highlighted in reviews.
While conducting usability research on ecommerce platforms with emphasis on visual organization, I noticed that grid-based interfaces improve scanning speed and reduce cognitive load for users, especially when browsing multiple items, which became evident when reviewing easy browse grid center – The platform uses a structured grid layout where products are arranged neatly, making navigation smooth, simple, and user friendly overall.
снять яхту в спб снять яхту в спб
лента хомут стальная лента стальная горячекатаная
аренда лодок санкт петербург arenda-yakhty-spb-8.ru
While comparing ecommerce storefront designs I focused on usability clarity navigation speed and ease of product discovery GingerCove Commerce Flow Point everything loaded quickly and felt organized and shopping feels easy and enjoyable overall today making browsing smooth and very efficient throughout
This type of marketplace works best when elegant layout helps make information easy to find and read like here Gilded Cove browsing hub navigation felt natural and smooth
As I explored multiple retail platforms, I came across well structured trade hub – everything loads quickly and is arranged neatly, allowing users to access products easily and enjoy a clean, fast, and highly functional browsing experience overall.
After navigating through a number of less organized platforms, I found take a look here and it seemed stable and consistent, making it a place I might revisit when I want to see if any new or updated information has been added.
Full Version at the Link: Where in Scripture does it mention The preserving nature of God
While exploring online marketplaces, I stopped at explore axis shopping hub and noticed an interesting range of items, all neatly arranged which makes browsing feel structured and simple.
As I navigated through various platforms, I found look at this page and appreciated how its straightforward design keeps everything running smoothly, ensuring that users can browse without interruptions or unnecessary delays.
While comparing different digital storefront systems for usability and visual consistency, I analyzed a platform where CloverCove Digital Vendor Atelier – The design felt balanced and modern, with easy navigation and clearly organized sections that improved overall browsing efficiency significantly today.
Реабилитация алкоголиков в Москве с комплексным подходом — это многогранный процесс, включающий в себя не только медицинские процедуры, но и психологическую поддержку, физическую реабилитацию и помощь в социальной адаптации. Профессиональный реабилитационный центр обеспечивает индивидуальный подход к каждому пациенту, включая такие методы, как кодирование и своевременное лечение запоя. Важно отметить, что успешное лечение алкоголизма требует учета множества факторов, таких как степень зависимости, психоэмоциональное состояние пациента, а также его физическое здоровье. Комплексный подход помогает эффективно устранить все составляющие проблемы, минимизируя риски рецидивов.
Получить больше информации – http://reabilitacziya-alkogolikov-moskva-2.ru/
During usability testing of digital shopping systems focused on simplicity and structure, I discovered that basic layouts improve efficiency and browsing comfort, which became evident when exploring clean product navigation center – The interface looks organized and minimal, making browsing smooth and easy.
Deal seekers exploring different online marketplaces sometimes mention platforms that emphasize simplicity and clarity, such as trusted market corner a site that provides users with an organized layout, making it easier to browse various product categories and discover relevant deals efficiently and quickly
«Время Возрождения» — медицинский наркологический центр в Кемерово, где оказывают помощь при острых состояниях и хронических формах зависимости. В работе сочетаются медикаментозная поддержка, психотерапия и контроль динамики восстановления.
Подробнее – какая капельница от похмелья
In the process of studying modern e-commerce gallery layouts and storefront systems, I came across Snow Cove digital parlor view embedded within a clean interface that prioritizes readability – The experience feels smooth, minimal, and very easy to navigate for users of all levels
While reviewing several digital commerce sites to compare their structural layouts and usability approaches, I examined catalog marketplace reference point – It appears to maintain a straightforward design, with product listings grouped in a logical way that helps users identify relevant sections quickly and browse efficiently.
While navigating through several digital marketplaces, I discovered this fast shopping platform – the overall experience is nice, with efficient performance and quick page loading throughout.
During a comparative study of digital marketplaces emphasizing user experience and browsing speed, I discovered that smooth design improves satisfaction, which became evident when exploring quick commerce browsing hub – The design feels smooth, and product browsing is simple, fast, and easy to follow.
Реабилитация алкоголиков в Москве с комплексным подходом — это многогранный процесс, включающий в себя не только медицинские процедуры, но и психологическую поддержку, физическую реабилитацию и помощь в социальной адаптации. Профессиональный реабилитационный центр обеспечивает индивидуальный подход к каждому пациенту, включая такие методы, как кодирование и своевременное лечение запоя. Важно отметить, что успешное лечение алкоголизма требует учета множества факторов, таких как степень зависимости, психоэмоциональное состояние пациента, а также его физическое здоровье. Комплексный подход помогает эффективно устранить все составляющие проблемы, минимизируя риски рецидивов.
Изучить вопрос глубже – реабилитация алкоголиков стоимость
While analyzing ecommerce platforms optimized for smart purchasing experiences, I noticed that simplified navigation systems improve user engagement and reduce confusion during browsing, which stood out when reviewing smart product selection hub – The buying concept feels smooth and well structured, allowing users to explore products easily without unnecessary friction.
Many visitors exploring modern catalog-based websites often report finding Raven Grove commerce showcase center which sits within a layout focused on clarity and user-friendly design that supports efficient browsing – The experience was surprisingly seamless and everything functioned exactly as I had anticipated during my visit
HoneyCoveVendorStudio – Clean interface, everything loads fast and works very smoothly.
During evaluation of different online storefront designs for research purposes, I interacted with a clean interface that prioritized speed and clarity in product navigation BrookBright Trading Studio – The pages loaded fast, and the overall shopping experience felt stable and easy to use, making browsing feel efficient and comfortable from start to finish.
During my search for interesting online stores, I came across this rich commerce platform – there is a wide variety of products, and browsing feels simple and very easy to use.
During my search for something user-friendly, I encountered access this page and found it to be well-structured, making it possible to browse quickly and locate relevant information without complications.
While exploring various ecommerce demo environments I analyzed how design simplicity affected usability and overall user comfort during browsing sessions in real time scenarios Clover Crest Trading Commerce Pavilion Clover Crest Trading Commerce Pavilion Pages loaded quickly and navigation remained stable making it easy for users to move through categories without confusion.
In between reviewing multiple online stores, I explored discover fast cart hub and noticed it feels fast and responsive, which makes browsing very enjoyable and smooth across all categories.
In the process of evaluating digital commerce platforms focused on trust and usability, I found that trusted buying hubs enhance browsing flow and satisfaction, which became evident when reviewing secure shopping experience portal – The site feels reliable, and navigation is clean, smooth, and easy to understand.
Кемеровский центр «Время Возрождения» специализируется на стабилизации физического и психоэмоционального состояния пациентов. Программы включают лечение абстинентного синдрома, коррекцию нарушений и профилактику повторных срывов.
Выяснить больше – кодирование током от алкоголизма
As I browsed through different platforms today, I came across check it out and found the selection appealing, with prices that seem reasonable compared to similar sites.
People who regularly shop online often appreciate websites that simplify browsing journeys, particularly online spot selector which is designed to be intuitive; it helps users filter through various categories easily while keeping the interface straightforward and ensuring that product discovery remains fast and efficient throughout the experience.
During usability review of ecommerce platforms I focused on performance speed design structure and user experience quality GladeRidge Trading Showcase Loft everything felt stable and intuitive and the collection of items is impressive and everything is neatly arranged and clear ensuring seamless browsing
Digital marketplaces benefit from simple design that works nicely and keeps browsing quick and easy overall Cotton Meadow item portal I enjoyed how simple everything looked
During evaluation of vendor directory platforms and curated shop systems, I came across Flora Ridge online vendor hall placed within a minimalist layout that enhances usability – The browsing experience feels relaxed, structured, and easy to navigate without overwhelming visual elements.
goodsparkstore.shop – Nice spark in design, shopping feels smooth and pretty intuitive
While checking several online marketplaces, I discovered this organized trading page – everything is clearly presented, and items are very easy to access at a glance.
In the course of evaluating online shopping deal hubs emphasizing clarity and structured pricing, I found that organized layouts improve decision-making, which became evident when exploring bargain deals discovery center – The deals section feels attractive, and pricing appears structured, fair, and easy to understand.
Отдельно стоит выделить ситуации, когда семья сталкивается не только с алкоголем, но и с употреблением наркотиков. В таких случаях врачебная консультация особенно важна, поскольку последствия интоксикации могут отличаться, а признаки наркомании и алкоголизма иногда накладываются друг на друга. Если речь идет о смешанном употреблении, подход к помощи на дому требует особой осторожности.
Углубиться в тему – вызвать нарколога на дом
During research into artisan ecommerce stores I came across Jasper Meadow Goods Studio and found the structure of the site very intuitive with clear categorization and quick access to products – I appreciated the accuracy of descriptions since everything aligned perfectly with expectations making the experience trustworthy and easy to use overall
Shoppers searching through niche vendor platforms for creative goods and artisan collections frequently highlight usability, especially on services like Cove Vendor Showcase where product organization makes browsing feel intuitive – The entire purchase flow was considered efficient, and most users found the transaction process easy to complete from start to finish.
While testing various e-commerce platforms designed for modern browsing efficiency and simplified product comparison across structured digital retail environments for global users Brook Icicle Vendor Exchange users highlight smooth usability and clear interface flow – Overall browsing experience feels clean and efficient with logical organization and minimal clutter allowing shoppers to locate items quickly without confusion or unnecessary delays.
In the process of reviewing online shopping platforms for tech products and discounts, I came across a module labeled modern gadget discovery hub – The platform showcases interesting electronics in a structured layout, helping users quickly identify useful tech items with appealing prices and simple browsing experience overall.
While evaluating ecommerce storefront designs I studied usability flow visual hierarchy and responsiveness across different screen sizes and devices CoastBrook Commerce Vendor Atelier Everything loaded quickly and navigation felt natural allowing users to browse comfortably and complete actions without confusion
While checking several online marketplaces, I discovered this organized commerce platform – the interface is clean, making it easy to browse and explore products smoothly without any confusion.
While analyzing ecommerce platforms optimized for modern cart interaction and clean presentation, I noticed that polished layouts improve usability and reduce friction, which stood out when reviewing modern shopping flow center – The interface appears refined and well designed, offering a seamless shopping experience that feels natural and efficient.
In the process of searching for useful resources, I explored learn more here and noticed that it offered a smooth user experience, making it simple to browse through various areas and gather meaningful information quickly.
Когда зависимости становятся хроническими и угрожают жизни пациента, комплексная реабилитация при наркомании в специализированных клиниках Москвы, включая вывод из состояния в стационаре и последующий анализ данных о состоянии пациента, может стать единственным возможным решением. Процесс восстановления включает в себя работу не только с зависимостью, но и с психоэмоциональным состоянием, что делает лечение более эффективным и долговечным.
Изучить вопрос глубже – алкоголик реабилитация наркоманов в москве
While navigating through different platforms, I came across click to view trail market and since it is my first visit, it seems like a decent place to shop online with a simple browsing experience.
Выбор между домашней помощью и стационарным лечением часто определяется степенью физиологической зависимости, наличием сопутствующих патологий и риском развития осложнений. В условиях клиники исключаются внешние триггеры, обеспечивается полная изоляция от источников психоактивных веществ и создается контролируемая терапевтическая среда, где медицинские решения принимаются на основе объективных диагностических показателей, а не субъективных ощущений пациента. Такой подход критически важен для предотвращения тяжелых осложнений, минимизации дискомфорта абстиненции и формирования устойчивой базы для дальнейшей противорецидивной работы.
Детальнее – вывод из запоя в стационаре клиника
В клинике «НОВЫЙ НАРКОЛОГ» в Санкт-Петербурге доступна круглосуточная помощь при интоксикации, запое и тяжёлой абстиненции. Проводится инфузионная терапия, медикаментозная коррекция и восстановление общего состояния организма. Индивидуальный подход и строгая конфиденциальность позволяют обращаться за помощью без лишних опасений.
Получить больше информации – кодирование по методу довженко отзывы
Наркологическая клиника «НовыйЯ» в Москве оказывает анонимную помощь при алкогольной и наркотической зависимости: диагностика, детоксикация, купирование абстинентного синдрома и подбор дальнейшей программы лечения. Акцент делается на медицинскую безопасность и конфиденциальность обращения.
Получить дополнительные сведения – программа 12 шагов
During evaluation of modern online storefront systems, I came across a responsive interface that focused heavily on simplicity and clear product presentation CoveBright Commerce Hub – The design feels very clean, and browsing products becomes easy and enjoyable because everything is well organized and logically arranged for fast navigation.
Online consumers frequently look for marketplaces that reduce time spent searching while improving clarity and organization in product listings for better decision making Reliable Grid Marketplace – The platform emphasizes simplicity and speed allowing users to move through categories quickly and find relevant items without unnecessary effort or delays
While checking out different online shopping platforms today, I came across visit this smart shop and it gave a solid impression of being legitimate, as the browsing experience felt very smooth and easy to navigate overall.
Кемеровский центр «Время Возрождения» специализируется на стабилизации физического и психоэмоционального состояния пациентов. Программы включают лечение абстинентного синдрома, коррекцию нарушений и профилактику повторных срывов.
Ознакомиться с деталями – мед вытрезвитель
Users who prioritize convenience in online shopping often highlight platforms that allow fast navigation and smooth transitions between different product sections rapid cart explorer many consider it a flexible marketplace with efficient structure – The platform is widely appreciated for its responsiveness and ability to maintain stable performance even when browsing multiple categories at once
As I continued browsing different shopping websites, I discovered this organized product hub – the experience is smooth, with simple navigation and well-arranged products throughout.
many users appreciate digital stores that emphasize straightforward cart systems making it easier to review selected products and complete checkout without confusion or unnecessary delays simple order cart guide known for clarity – it delivers a smooth shopping experience where users can manage their cart easily and proceed through checkout quickly while maintaining a consistent and user friendly design overall
While reviewing efficient digital shopping carts, I noticed that clear structure enhances usability when interacting with systems like simple checkout basket – The cart makes the entire process easy to follow, from selecting items to finalizing payment in a smooth flow.
Online shoppers who prefer browsing curated catalogs of artisanal products and vendor collections frequently encounter sites like Walnut Harbor Product Gallery which present information in a structured and visually organized manner that supports quick understanding and easy comparison – The layout is often described as user friendly, with clear categorization that helps even first time visitors navigate with ease.
While analyzing different ecommerce experiences I found a site that emphasizes clarity and modern presentation techniques overall CoastCove Commerce Listing Hub – The product layout is minimal and effective which ensures users can browse easily while maintaining focus on items and enjoying a consistent, distraction free shopping experience across the entire platform.
While reviewing ecommerce UX systems designed for affordability and price comparison, I observed that low-cost product hubs enhance usability by clearly presenting cheaper options, which became clear when testing affordable goods marketplace center – The prices appear competitive and appealing, making it seem like a practical choice for users looking to save money.
Exploring different online craft shops one afternoon led me to a platform that showcased interesting collections in a clean layout Caramel Harbor Curated Gallery and I found the overall experience reassuring, especially due to consistent loading speeds and clear product organization throughout the site interface.
While reviewing various online storefront experiences focused on usability and design consistency across modern e-commerce systems, many users appreciate structured layouts Icicle Cove Atelier Hub the platform demonstrates smooth navigation, items are well organized and easy to access even for first-time visitors exploring multiple product categories with clarity and speed throughout the browsing journey overall.
While reviewing different digital storefronts, I encountered this user-friendly commerce site – everything is structured clearly, making navigation feel modern, smooth, and very comfortable throughout the browsing experience.
В кировской клинике «Оптимед» проводят лечение алкогольной и наркотической зависимости. Центр предлагает вывод из запоя, реабилитацию и круглосуточную наркологическую помощь. Подход основан на современных медицинских методиках и внимании к состоянию пациента.
Получить дополнительную информацию – https://optimed-narkolog.ru/anonimnoe-lechenie-narkomanii
fernharborvendorparlor.shop – Nice structure and clean design, makes reading content very convenient.
During an analysis of online retail platforms focused on interface clarity, I explored a module called buy gate storefront index – The design uses a straightforward structure that makes browsing fast and intuitive, helping users find product categories without unnecessary steps or confusing layout elements in the process.
In my analysis of online storefront systems I evaluated usability flow layout consistency and browsing comfort MarbleCove Commerce Flow Loft everything felt organized and smooth and the site feels modern and browsing products is simple and very intuitive improving the overall shopping experience
While comparing multiple online marketplaces, I came across open this shopping site and noticed the name fits nicely, giving the impression of a good and reliable shopping option overall.
В клинике «НовыйЯ» доступна помощь при интоксикации, запое и тяжёлой абстиненции, когда важно быстро восстановить самочувствие и снизить риски осложнений. Проводится инфузионная терапия и симптоматическая коррекция под контролем специалистов.
Исследовать вопрос подробнее – капельница очистка от наркотиков
This platform shows how clean structure helps users navigate site smoothly and without confusion across content areas Maple Grove market hub everything felt responsive and stable
Процедура вывода из запоя на дому включает несколько этапов, каждый из которых имеет важное значение для общего улучшения состояния пациента. Главная цель — это не только устранение симптомов абстиненции, но и восстановление нормальной работы органов и систем организма. Врач, который проводит процедуру, использует медикаментозные средства для восстановления водно-солевого баланса, нормализации работы печени, почек и других органов, пострадавших от алкоголя. Также в процесс включаются препараты, которые способствуют снятию нервного напряжения и психоэмоционального стресса.
Детальнее – http://vyvod-iz-zapoya-na-domu-ekaterinburg-19.ru
As I continued exploring multiple shopping sites, I landed on browse this shop and appreciated the wide selection available, along with an interface that makes it really easy to move around without confusion.
During a casual search across multiple eCommerce platforms, I discovered this clean shopping atelier – everything is simple to navigate, and the overall shopping experience feels natural, smooth, and very comfortable.
people comparing online marketplaces often prioritize websites that make browsing simple through organized layouts and fast navigation helping them find products quickly and efficiently plus deal finder cart frequently described as user friendly – it offers a smooth shopping experience where users can move between categories easily while maintaining a structured and consistent interface throughout the platform
Many shoppers prefer systems where switching between categories happens instantly without delays or page confusion, improving overall satisfaction, especially when navigating through Instant Category Switch which – enables quick transitions between product sections while maintaining layout consistency and reducing the need for repeated navigation steps.
While evaluating ecommerce checkout workflows I examined how interface design affected purchase completion rates and user satisfaction Harbor Vendor Checkout Point the system performed well and allowed users to finish transactions quickly without confusion or delay at every step.
In the process of evaluating digital commerce platforms focused on cart optimization and speed, I found that direct cart hubs enhance user experience and efficiency, which became evident when reviewing efficient checkout flow center – The checkout process feels fast and clean, making transactions smooth and uncomplicated.
During evaluation of modern online storefront systems, I came across a clean and responsive design that focused on easy navigation and clear product grouping CalmCove Market Studio – The browsing experience is very smooth, with everything clearly arranged so users can quickly locate items without confusion or clutter interfering with usability.
During a comparative analysis of online marketplaces focused on open structure and category usability, I discovered that spacious layouts enhance product discovery and navigation flow, which stood out when exploring clean open shopping portal – The open corner design feels inviting and organized, making category browsing easy and intuitive.
I wanted decorative plants for my home and came across BotanicalHavenStore – the interface is user-friendly, the options are beautiful, and choosing pieces that enhanced my living space was straightforward and satisfying.
I recently explored multiple eCommerce platforms and found this clean product hub – the layout is simple, pages respond quickly, and everything feels reliable and easy to use.
Across various user experience evaluations of online retail environments and vendor listing platforms Isle Market Display Network – Diverse product selection is presented clearly, giving visitors a structured shopping experience where items are easy to locate and visually organized for better decision-making.
While analyzing different online resources, I encountered open this page and found its design to be clean and professional, reflecting a well-maintained structure that made navigating through content simple and efficient.
In the process of evaluating digital shopping platforms with emphasis on unified category systems, I found that ultra hub structures improve usability by reducing navigation complexity, which was clear when reviewing ultra category shopping center – The design feels modern and well structured, with many categories available in one place that makes browsing smooth and efficient for everyday users.
While researching ecommerce websites for curated décor and lifestyle goods I evaluated multiple platforms and found Stone Harbor Goods Pavilion – Friendly interface items are displayed clearly and easy to purchase quickly making browsing simple fast and very enjoyable with clear navigation and responsive design throughout
While going through various marketplaces, I paused at quick visit smart cart and found a clean interface and smart layout that makes finding what I need simple and fast.
In my review of ecommerce storefront designs I focused on usability clarity layout consistency and product accessibility MeadowBrook Commerce Showcase Hub everything felt smooth and responsive and fast loading pages make the shopping experience smooth and well designed improving overall experience significantly
E commerce users often prefer structured websites that guide them naturally through product categories and checkout processes GridStore Everyday Outlet – The marketplace offers a simple browsing experience designed to help users move quickly from discovery to purchase with ease and clarity
While comparing digital retail platforms I examined how product visibility and interface structure affected overall shopping experience quality CopperBrook Commerce Vendor Gallery there was a great variety available and the site allowed users to browse comfortably with a clean and efficient layout throughout.
seo заказать мск сео seo заказать мск сео
many digital shoppers prefer ecommerce sites that highlight savings and promotions in a visually clear way while maintaining smooth navigation across different product sections and categories available quick discount shop lane often considered convenient and user friendly – the platform offers appealing deals and encourages further exploration of categories while keeping browsing simple enjoyable and efficient for users interested in discovering more products
As I explored different digital storefronts, I found this structured vendor page – everything is cleanly arranged, the layout is modern, and browsing is very easy and smooth.
During a routine browsing session, I came upon view this page and a quick look around gave me a positive feeling, suggesting it is a decent store worth keeping in mind.
people searching for convenient online marketplaces often appreciate platforms that balance variety with simple navigation allowing users to explore products without feeling overwhelmed by cluttered design or confusing menus easy find cart frequently praised for its straightforward structure – it offers a pleasant browsing experience where users can quickly locate items and move between categories in a smooth and efficient way that enhances overall usability
While analyzing ecommerce UX designs centered on structured marketplaces and clarity, I observed that organized layouts improve efficiency and engagement, which was evident when reviewing smart marketplace zone hub – The platform feels well structured, allowing users to quickly locate products without difficulty.
While reviewing ecommerce systems designed for clarity and minimalism, I observed that fresh hub layouts improve product visibility and navigation flow, which was evident when testing fresh browsing experience portal – The interface feels simple and organized, allowing browsing to remain easy and comfortable.
When analyzing site performance and structure, I found that Sage Harbor Commerce Entry Point fits naturally within the content while well organized pages, everything loads fast and feels very intuitive, ensuring users benefit from fast navigation, minimal confusion, and a layout that supports easy discovery of products and information across the site.
Shoppers exploring niche trade platforms and independent vendor directories often appreciate when product listings are presented in a clean and structured way, such as on Harbor Wind Product Archive which organizes items in a way that reduces browsing time – many users reported that descriptions were straightforward and the layout made it simple to compare different products efficiently.
While checking several online marketplaces, I discovered this smooth shopping interface – everything is organized logically, making the shopping process simple, easy, and very well designed for users.
While testing various e-commerce layouts for usability research, I explored a clean and structured interface that emphasized clarity and smooth navigation across product categories Calm Cove Vendor Hub – The usability is excellent, and shopping feels easy, intuitive, and stress free from the very beginning, making browsing comfortable and efficient throughout the experience.
In the course of reviewing ecommerce systems focused on variety and selection, I discovered a section called flex choice product center – The interface allows users to browse freely and select items with ease, providing a clean and structured experience that supports flexible decision making.
While reviewing several online options, I discovered open this page which provided a decent experience so far, as the content was organized well and easy to follow without unnecessary complexity.
During ecommerce platform evaluation I studied how design simplicity and speed influence overall user satisfaction and engagement levels Copper Cove Commerce Experience Hub pages were fast to load and the shopping experience felt smooth organized and highly efficient throughout the entire browsing session today.
IvoryBrookVendorFoundry – Clean design, shopping feels smooth and very easy today.
В «НовомЯ» уделяют внимание психотерапевтическим инструментам — в том числе когнитивно-поведенческой терапии, а также другим методам, которые применяются по показаниям. Это помогает закреплять трезвость и формировать новые стратегии поведения.
Получить дополнительную информацию – мочегонные таблетки после запоя
In between reviewing multiple eCommerce sites, I explored discover this base shop and noticed a simple but effective store where everything works smoothly and functions without any issues.
Домашний вызов нарколога удобен в случаях, когда человеку тяжело ехать в клинику, он отказывается от поездки или родственники хотят как можно быстрее заказать медицинскую помощь на месте. Формат выезда позволяет врачу оценить самочувствие, определить тяжесть состояния и подобрать дальнейшую тактику. Если ситуация требует расширенного подхода, может обсуждаться последующая консультация в центре, лечение алкоголизма, кодирование, а в более сложных случаях — длительная реабилитация.
Ознакомиться с деталями – вызвать нарколога на дом екатеринбург
While exploring curated ecommerce platforms for home décor I reviewed several stores focusing on organization and usability and found Orchard Harbor Market Gallery – Loved browsing here, found exactly what I needed very fast and the clean structure helped me move through categories smoothly while keeping everything easy to understand throughout the process
поисковое продвижение сайта раскрутка александр поисковое продвижение сайта раскрутка александр
Магазин бытовой химии https://bytovaya-sfera.ru широкий ассортимент средств для уборки, стирки и ухода за домом. Качественная продукция, доступные цены и удобная доставка
During usability testing of ecommerce websites I studied performance speed interface clarity and browsing flow MeadowCove Trading Product Loft everything loaded quickly and felt stable and the easy checkout process keeps items clearly displayed and well organized ensuring smooth transactions overall
Llevamos prestamos a domicilio en efectivo. Para zonas seleccionadas, consulta disponibilidad sin compromiso.
While analyzing different digital marketplaces for design efficiency and clarity, I explored a section featuring simple product finder hub – The structure is clean and direct, helping users quickly identify what they need while keeping the browsing experience smooth, minimal, and free from unnecessary complexity throughout the entire navigation process.
While analyzing ecommerce platforms designed for clarity and efficient browsing, I observed that core layouts improve navigation by presenting products in a readable format, which became evident when testing easy read product center – The layout feels simple and organized, allowing users to browse listings that are clear and easy to follow.
As I reviewed several online shopping sites, I noticed this smooth commerce hub – performance is fast, and browsing feels efficient, stable, and very easy to navigate.
shoppers looking for convenient ecommerce solutions often prefer platforms that provide fast navigation and clear product organization making it easier to locate items quickly and efficiently across different categories peak selection hub widely appreciated for its clarity and flow – it offers a comfortable browsing experience where users can move between sections smoothly while enjoying a well organized and responsive interface overall
While conducting usability research on ecommerce systems focused on essential goods, I noticed that daily needs stores improve accessibility and shopping comfort, which became evident when analyzing organized essentials shopping hub – The site is practical and well structured, making everyday items easy to find and purchase.
While exploring multiple stores online, I landed on open this link and quickly noticed that its well organized categories make it simple to navigate and find items without any unnecessary effort or time wasted.
CopperCoveVendorWorkshop – Really enjoyed browsing, everything is neatly arranged and easy today.
While analyzing ecommerce websites for performance efficiency, I discovered a module titled instant load retail portal – The interface is highly responsive, ensuring fast page transitions and smooth browsing so users can explore products quickly without experiencing lag or slow loading times.
While exploring various online marketplaces during my free time, I came across something interesting like this smooth trading hub – the browsing experience feels seamless, and items are easy to locate quickly without confusion or unnecessary effort.
I was exploring fashion accessories when I stumbled on ChicStyleEmporium – the categories are organized, browsing the wide selection of trendy items was simple, and choosing pieces that matched my taste was satisfying.
While browsing casually through different stores, I came across browse smart shop hub and found a nice variety of products, which made looking through different options feel easy and pleasant.
When reviewing e commerce user interfaces designers often stress the importance of visual hierarchy and intuitive layout structures that guide user interaction Ivory Vendor Cove Hub browsing feels natural with clear sections and quick access to all available product listings today
https://zaragozacars.es
Эта статья погружает вас в увлекательный мир знаний, где каждый факт становится открытием. Мы расскажем о ключевых исторических поворотных моментах и научных прорывах, которые изменили ход цивилизации. Поймите, как прошлое формирует настоящее и как его уроки могут помочь нам строить будущее.
Есть чему поучиться – наркологическая платная клиника
В этой публикации мы предлагаем подробные объяснения по актуальным вопросам, чтобы помочь читателям глубже понять их. Четкость и структурированность материала сделают его удобным для усвоения и применения в повседневной жизни.
Только факты! – вывод из запоя на дому цена
While exploring ecommerce websites for curated home decor and lifestyle items I found Orchard Olive Goods Gallery and checkout was simple and the product quality exceeded my expectations today making the entire shopping experience feel smooth reliable and very satisfying with clear navigation and easy product selection throughout
Digital retail environments are becoming more customer focused, offering better product filtering tools and clearer layouts that help users browse efficiently across large inventories Ultra Wide Shopping Zone – Wide selection available here ensures competitive pricing and accessible product choices, allowing customers to enjoy a straightforward and practical shopping experience from start to finish
I recently spent some time exploring different online shops and came across this stylish store – the overall layout feels intuitive, with well-organized categories and a pleasant browsing flow that makes finding items feel smooth and surprisingly enjoyable for new visitors.
В сети «Narkology» вы получите всестороннюю поддержку на пути к полному освобождению от алкогольной и наркотической зависимости. Мы используем передовые методы дистанционного мониторинга состояния, информационно-просветительские программы и индивидуальные занятия с психологом. Экстренные консультации и круглосуточная связь с медицинскими специалистами помогут справиться с любыми трудностями и обрести новую активность без вредных привычек. Мы предоставляем актуальную информацию о методах детоксикации, замещающих терапиях и профилактике срывов.
Получить больше информации – как остановить запой форум
During a comparative analysis of online marketplaces focused on layout clarity and usability, I discovered that line-based shop designs enhance product visibility and navigation, which stood out when exploring clear path shopping hub – The interface appears structured and organized, making it easy to browse and find items.
During usability evaluation of ecommerce trading sites I focused on product clarity information design and overall presentation quality across different sections CoralBrook Digital Vendor Studio the listings were well organized and visually appealing – descriptions were simple and informative making it easy for users to evaluate products efficiently and confidently overall today
people exploring ecommerce websites often value platforms that combine cart focus with easy navigation helping them browse products and manage selections efficiently across multiple sections cart place explorer view known for its clean design – it delivers a smooth shopping experience where users can easily organize items in their cart while exploring categories without unnecessary complexity or interface clutter
Магазин бытовой химии https://bytovaya-sfera.ru широкий ассортимент средств для уборки, стирки и ухода за домом. Качественная продукция, доступные цены и удобная доставка
When usability matters, a nice experience overall, browsing content is simple and very pleasant for practical use Pine Harbor listing portal pages were easy to understand
ForestCoveCommerceAtelier – Clean layout, products are easy to explore and understand.
In comparisons of basic online retail systems and straightforward browsing experiences, users occasionally encounter references such as basic shopping field zone within evaluation articles – The platform is commonly seen as a simple digital marketplace that focuses on essential shopping needs without overwhelming users with advanced or unnecessary features.
While conducting usability research on ecommerce systems emphasizing quick purchase paths, I noticed that direct buying flows increase conversion ease and reduce friction, which became evident when analyzing fast checkout shopping portal – The system is efficient and navigation is straightforward, making the buying experience smooth and simple.
Many online shoppers mention that while browsing for general manufacturing supplies the supply marketplace portal – overall experience stays user friendly, with organized sections that simplify decision making and help reduce time spent searching for relevant product categories.
продвижение сайта частный исполнитель продвижение сайта частный исполнитель
В данной обзорной статье представлены интригующие факты, которые не оставят вас равнодушными. Мы критикуем и анализируем события, которые изменили наше восприятие мира. Узнайте, что стоит за новыми открытиями и как они могут изменить ваше восприятие реальности.
Только факты! – капельница от запоя на дому воронеж
Этот информационный материал собраны данные, которые помогут лучше понять текущие тенденции и процессы в различных сферах жизни. Мы предоставляем четкий анализ, графики и примеры, чтобы информация была не только понятной, но и практичной для принятия решений.
Кликни и узнай всё! – клиника запой
частный сео специалист по раскрутке сайтов москва частный сео специалист по раскрутке сайтов москва
продвижение сайта сео в москве продвижение сайта сео в москве
Самое важное сегодня: https://slovarsbor.ru/w/%D0%BF%D1%80%D0%BE%D0%B3%D1%80%D0%B0%D0%BC%D0%BC%D0%B0/
В этой статье представлен занимательный и актуальный контент, который заставит вас задуматься. Мы обсуждаем насущные вопросы и проблемы, а также освещаем истории, которые вдохновляют на действия и изменения. Узнайте, что стоит за событиями нашего времени!
Погрузиться в научную дискуссию – вывести из запоя капельница
While browsing through a variety of online stores, I encountered go to this link and appreciated how it offers commonly used items, making it something I could recommend casually.
In the course of analyzing online marketplaces focused on structured browsing and layout clarity, I found that stacked designs simplify navigation and improve product visibility, which became evident when testing clean scroll stack center – The platform feels intuitive and well structured, allowing users to browse products easily through a smooth stacked interface.
While checking several online marketplaces, I discovered this clean vendor shop – everything is well structured, making it very easy to navigate and browse products.
While browsing casually through different stores, I came across browse goods speak shop and noticed interesting products, with descriptions that are clear and easy to understand while exploring items.
Across various online marketplace comparisons, structured design and simple navigation are consistently linked to improved user experience, and within this platform Ridge Vendor Commerce Hub the system maintains a clear and accessible layout that helps users browse easily and understand product categories without difficulty.
While exploring ecommerce systems I focused on layout clarity navigation responsiveness and overall user interaction with product pages CoralCove Commerce Product Loft the platform felt intuitive and well designed and browsing was easy which made the overall experience pleasant and efficient for users today
В статье представлены ключевые моменты по актуальной теме, дополненные советами экспертов и ссылками на дополнительные ресурсы. Цель материала — дать читателю инструменты для самостоятельного развития и принятия осознанных решений.
Изучить вопрос глубже – вызов на дом нарколога цена
During usability testing of digital shopping systems focused on cart functionality and checkout speed, I discovered that flexible cart designs enhance efficiency and satisfaction, which became evident when exploring efficient cart checkout hub – The cart is easy to manage, and the checkout flow feels smooth and straightforward.
Этот информационный обзор станет отличным путеводителем по актуальным темам, объединяющим важные факты и мнения экспертов. Мы исследуем ключевые идеи и представляем их в доступной форме для более глубокого понимания. Читайте, чтобы оставаться в курсе событий!
Лучшее решение — прямо здесь – вывод из запоя цены воронеж
где заказать продвижение сайта александр где заказать продвижение сайта александр
интернет маркетинг поисковое продвижение сайта интернет маркетинг поисковое продвижение сайта
moderndealsstore.shop – Modern design with appealing deals, overall browsing experience feels smooth
During a late evening browsing session of ecommerce platforms focused on handmade décor and gift items I evaluated several websites for usability clarity and service quality and came across Silk Grove Market Gallery – Great selection shipping was quick and customer support was friendly too making the entire shopping process feel reliable efficient and pleasantly straightforward from start to finish
As I continued browsing different shopping websites, I discovered this organized marketplace hub – the selection is great, items are clearly shown, and shopping feels simple and very easy overall.
While reviewing ecommerce UX systems optimized for structured browsing and clarity, I observed that clean shopping hubs improve engagement and usability, which became clear when testing smart browsing shopping portal – The shopping experience is smooth, and navigating between sections feels simple and intuitive.
Users exploring different marketplace reviews and curated shopping lists often see mentions like shopping variety center integrated into paragraphs discussing catalog breadth and navigation design – It is typically portrayed as a broad retail space that brings together multiple categories for convenient browsing
During a casual browsing session across various marketplaces, I noticed this reliable online store – transactions seem to run smoothly, pages load consistently, and the entire checkout flow appears stable and easy to follow from start to finish.
Частный гид по Калининграду проведёт Куршская коса из Калининграда экскурсия индивидуальная с экскурсоводом и персональным маршрутом по заповеднику.
In my exploration of various curated shopping interfaces, I recently found Mint Cove Product Atelier Space Mint Cove Product Atelier Space which features a clean and structured browsing environment that simplifies product discovery – I liked how everything felt organized, allowing for quick evaluation of options and smooth transitions between different categories without confusion or cluttered design elements.
While exploring multiple online shopping platforms I analyzed how layout design and responsiveness affected user experience during product browsing sessions CoralCove Trading Experience Hub the interface was clean and simple and navigation felt natural which made browsing comfortable and very easy to follow overall today
Наркологическая информационная сеть «Narkology» — это место, где профессионалы помогают восстановить здоровье и вернуть уверенность в собственных силах при борьбе с зависимостью. Мы предлагаем срочные консультации наркологов, разработку персонализированных планов терапии, онлайн-сеансы психологической поддержки и доступ к материалам по профилактике рецидивов. Современные информационные ресурсы и системный контроль прогресса обеспечивают надежный путь к избавлению от зависимости и комфортное сопровождение на каждом этапе реабилитации.
Ознакомиться с деталями – абстинентного состояния синдрома отмены алкоголя
Сколько времени занимает Гео оптимизация сайта до первых видимых результатов в картах?
In the process of evaluating online shopping platforms for user experience and design efficiency, I came across a listing labeled smart port shopping hub – The platform feels highly structured and organized, with simple navigation that allows users to browse products easily while maintaining a clean and minimal interface overall.
раскрутка сайта франция раскрутка сайта франция
During my time checking different online stores, I encountered this easy vendor hub – everything is arranged clearly, making browsing and shopping very straightforward and user friendly.
Продвижение сайтов в google в нише с низким поисковым спросом — есть ли смысл?
In between reviewing multiple online stores, I explored discover trend goods hub and noticed appealing trending items, making me think about placing an order from here later today.
In discussions about improving digital storefront usability and enhancing user satisfaction through better interface responsiveness and structured layouts, JasperBrook Shopping Atlas often appears as an example where fast loading pages ensure shopping feels smooth, efficient, and very reliable even when users browse multiple categories in one session.
Как быстро происходит Разработка сайтов для интернет-магазина с большим каталогом?
While conducting comparative research on ecommerce UX and speed-optimized systems, I observed that fast-loading carts improve efficiency and user satisfaction, which was clear when testing quick access cart portal – The shopping corner responds instantly, making navigation and browsing extremely smooth.
While comparing platforms, this one clearly stands out with strong layout design that supports easy navigation and smooth user experience today Harbor Stone listings page I appreciated the clarity and structure
During an analysis of online clothing stores focused on visual presentation, I noticed a module labeled style fashion collection hub – The platform showcases trendy fashion items in a clean and modern layout that enhances browsing comfort and makes outfit selection feel simple and engaging overall.
центр развития детей
Digital consumers often choose platforms that allow them to complete purchases in just a few simple steps without confusion or technical barriers, and this approach is reflected in InstantCart Easy Shop – The checkout experience is built to be quick and intuitive so users can finalize orders smoothly and confidently every time they shop online
While comparing online retail layouts I evaluated usability clarity speed and how well product listings were organized for users CottonBrook Trading Flow Hub the interface was simple and structured making browsing fast intuitive and very comfortable across the entire shopping experience overall today
As I reviewed several online shopping sites, I noticed a href=”//frostbrookvendorfoundry.shop/](https://frostbrookvendorfoundry.shop/)” />this smooth commerce interface – the design is clean, and shopping feels simple, well structured, and very easy overall.
In the process of evaluating online retail systems focused on cart operations and checkout flow, I found that structured usability improves clarity and engagement, which became evident when testing digital checkout cart hub – The open cart solution is functional, and shopping steps feel easy, simple, and well organized.
During my exploration of ecommerce platforms for curated items, I came across Grove Trade Visualization Center and enjoyed how everything felt structured and intuitive, making it easy to understand listings quickly and browse through categories without any complications.
Shoppers looking for reliable household supplies often explore websites such as house essentials link when searching for important daily use products – It is often appreciated for making navigation simple and helping users focus on relevant home categories quickly
Как домашние животные реагируют на запах алкоголя или табака от хозяина?
В этом интересном тексте собраны обширные сведения, которые помогут вам понять различные аспекты обсуждаемой темы. Мы разбираем детали и факты, делая акцент на важности каждого элемента. Не упустите возможность расширить свои знания и взглянуть на мир по-новому!
Продолжить изучение – нарколог на дом анонимно
During a comparative study of online retail systems emphasizing usability and organization, I discovered that smart hub designs help users navigate large product catalogs more efficiently by improving structure and clarity, which stood out when exploring smart selection shopping hub – The platform uses a smart hub approach that makes browsing efficient and fairly well structured, helping users find products quickly without confusion or unnecessary complexity.
While browsing through several online shopping platforms during my free time, I came across something interesting like this charming online shop – the overall browsing experience feels smooth, with items displayed in an orderly manner that makes navigation simple and pleasant for users.
While comparing several digital catalog designs, I noticed a platform integrating Orchard Commerce Gallery within its browsing flow that kept everything visually balanced – navigation was intuitive, and the product listings were organized in a way that made exploration feel natural and efficient without unnecessary distractions.
Текущие рекомендации: https://l-parfum.ru/catalog/kilian/2703/
While browsing casually through different stores, I came across browse goods point hub and noticed everything is organized neatly, which makes browsing categories feel very convenient and pleasant.
As I continued reviewing different eCommerce websites, I briefly visited open and see hub and noticed competitive pricing, so I intend to explore more products later today when I revisit the site again.
While reviewing ecommerce systems designed for cart efficiency and smooth user flow, I observed that streamlined solutions improve usability and reduce effort, which was evident when testing quick cart optimization hub – The platform is efficient and well optimized, making browsing and checkout feel natural.
Across multiple online shopping platform evaluations, clarity in layout design and responsiveness are often cited as key factors that determine how easily users can navigate and compare products within large digital catalogs Jasper Cove Trading Post – The interface supports fast browsing and simple navigation, making it easy for users to explore categories without confusion.
While analyzing ecommerce storefront systems I focused on navigation speed interface design and how clearly products are displayed to users Cotton Cove Vendor Display Studio pages load quickly and everything feels structured and intuitive making browsing simple efficient and very user friendly throughout the experience today
users exploring online marketplaces often prefer platforms that combine fast performance with clear link navigation making it easier to browse multiple pages without lag or confusion during shopping modern link shopping hub widely recognized for responsiveness – it delivers a smooth browsing flow where users can move between pages quickly while maintaining clarity and consistent usability across the entire shopping experience
Мы предлагаем вам окунуться в океан любопытных фактов и вдохновляющих историй. Эта публикация поможет расширить горизонты, разбудить интерес к науке и истории и увидеть мир с новой стороны.
Полная информация здесь – вывод из запоя цены
While checking several online marketplaces, I discovered this clean vendor hub – browsing is smooth, everything loads fast, and the layout looks clean and easy to use.
While analyzing ecommerce platforms designed for fast promotional browsing and instant access, I observed that speed-optimized deal hubs improve usability and satisfaction, which became evident when testing speedy discount offers hub – The fast deals load quickly, and the offers are attractive, helping users save both time and effort.
In various discussions about e-commerce usability and shopping convenience, users often find references like smart deals marketplace – The platform is generally viewed as a user friendly retail space offering a balanced mix of affordability, product variety, and simple browsing functionality for everyday online shoppers.
While comparing different ecommerce websites for gifts and home accessories I focused on catalog clarity and checkout flow and came across Harbor Rain Goods Gallery which had a very clean interface and smooth category transitions that made browsing enjoyable – Items arrived promptly the platform was intuitive and exploring products felt very natural and efficient without any confusion or delay
продвижение сайта сео в москве продвижение сайта сео в москве
While analyzing various ecommerce interfaces for usability improvements, I encountered cozy marketplace discovery hub – The design creates a welcoming atmosphere that makes browsing simple and pleasant, helping users find products easily without feeling overwhelmed by excessive visual complexity or clutter.
раскрутка сайтов московская область раскрутка сайтов московская область
While comparing websites, I noticed good interface design makes browsing straightforward and highly convenient overall making navigation easier Oak Meadow listings page the experience felt intuitive
In the course of evaluating online shopping systems focused on minimal design and usability, I found that simple cart structures enhance browsing flow and clarity, which became evident when analyzing easy checkout shopping portal – The interface is straightforward and user friendly, making shopping easy and confusion-free.
улучшение коммерческих факторов сайта цена улучшение коммерческих факторов сайта цена
While navigating through various clothing shops online, I came across click to view clothing and found that prices seem reasonable, with stylish and modern fashion choices available throughout the collection.
https://ecopolis-spb.ru/tvorchestvo_all/
MoonBrookMarketFoundry – Nice shopping experience, everything loads quickly and feels reliable overall.
In the middle of checking various platforms, I paused at tap to open shop and found some interesting products that seemed worth checking again in the future when I have more time.
When analyzing e-commerce platforms designed for improved customer journeys, specialists often focus on visual hierarchy and structured browsing systems that guide users effectively Jasper Trading Visual Point – The selection is neatly arranged, with strong clarity that supports easy browsing.
As I explored various online shops, I found this balanced marketplace – the layout feels clean and professional, offering a smooth browsing experience without unnecessary clutter.
users browsing online shopping platforms frequently prefer systems that offer direct product discovery helping them avoid unnecessary clicks and complete browsing tasks more efficiently across categories quick direct shopping hub widely appreciated for simplicity – it provides a smooth shopping experience where users can easily explore products and navigate categories while maintaining a consistent and user friendly interface throughout
Many users exploring digital stores often prioritize platforms that combine discounts with structured browsing systems where value shopping nest hub appears in informational content and it reflects a structured system designed to improve browsing speed while helping users quickly access deals and enjoy a smooth and efficient shopping journey across categories.
Все подробности: https://alexstroy.su
Online shoppers who enjoy efficient browsing experiences tend to choose websites that offer well structured deal listings and fast checkout options where quick savings portal hub appears in descriptions – it reflects a system built to reduce shopping time while ensuring users can easily access promotions and complete purchases without unnecessary delays.
In studying digital retail systems designed for structured browsing, I observed better user engagement when using platforms like smart categorized shop tree – The smart categorized tree system simplifies shopping by grouping products into logical branches, ensuring smooth navigation and fast product discovery across sections.
People researching online discount resources sometimes come across platforms that simplify browsing, and one such example is easy deal finder which is often noted for its straightforward layout; it is generally perceived as an easy navigation space that helps users quickly view offers from different categories and international sources without unnecessary complexity
As I explored different e-commerce pages, I came upon this smooth shopping link and found interesting products listed, with the browsing experience feeling fast, easy, and conveniently straightforward.
While exploring niche online marketplaces for interesting general goods, I came across a platform that felt well organized and visually balanced, and while scrolling through items I encountered Coastline Vendor Parlor Shop placed inside a smooth content layout, and the experience was generally positive with simple checkout steps and a good variety of items available throughout the store.
During usability testing of digital shopping systems focused on structured marketplaces and efficiency, I discovered that smart organization enhances clarity and engagement, which became evident when exploring efficient marketplace structure portal – The platform is intelligently designed, with products easy to find through well defined categories.
While conducting a usability review of ecommerce navigation frameworks, I found a listing labeled hierarchical product tree hub – The platform uses a structured branching design that makes category exploration simple and helps users understand product organization quickly while maintaining a smooth browsing experience overall.
As I continued browsing online, I noticed this mill style page and after looking into it, it feels quite interesting overall, in a way that is simple yet unexpectedly engaging.
As I continued reviewing different online shops, I briefly visited open and see shop rise and noticed a good first impression, with clean layout that makes navigation feel easy and comfortable.
Наркологическая информационная сеть «Narkology» предоставляет квалифицированную помощь в преодолении зависимостей и восстановлении психоэмоционального состояния. Наши специалисты проводят детальную диагностику, разрабатывают индивидуальные программы терапии и психологической поддержки, а также информируют о современных методах лечения. С использованием проверенных подходов и актуальных данных мы помогаем вернуть уверенность и сделать первый шаг на пути к здоровому образу жизни. Доверьтесь профессионалам «Narkology», чтобы эффективно решить проблемы зависимости и получить всестороннюю информационную помощь.
Получить больше информации – https://narcologiya.info/pohmele/yantarnaya-uglekislota-pochmelie.html
During usability analysis of ecommerce systems I examined layout clarity navigation flow and how product variety is presented to users CottonMeadow Trading Showcase Loft the range of items is excellent and everything is displayed clearly and attractively allowing users to browse comfortably without confusion or unnecessary complexity today
While checking motorsport fundraising platforms, I came across support Ukraine racing page and interesting concept overall, seems well organized and quite engaging today, with details presented in a structured way that highlights both sport and charitable intent effectively. – It feels meaningful and well presented.
openmarketshop.shop – Open market vibe, lots of items available in one place
During a comparison of modern online storefront designs for study purposes, I came across a minimalist catalog experience that stood out for clarity CoveMoon Shopping Studio and product grouping felt intentional – The interface allowed smooth browsing, making it easy to find items efficiently while maintaining a clear sense of organization throughout.
Across various usability studies on online retail systems, experts often emphasize the importance of consistent structure and responsive design in creating positive user experiences Brook Jewel Commerce Studio – The platform delivers a smooth experience overall, making browsing feel relaxed, intuitive, and easy to manage across different sections.
В этом обзорном материале представлены увлекательные детали, которые находят отражение в различных аспектах жизни. Мы исследуем непонятные и интересные моменты, позволяя читателю увидеть картину целиком. Погрузитесь в мир знаний и удивительных открытий!
Выяснить больше – вывод из запоя стоимость
During a longer browsing session, I encountered check this listing and found that the quick load times and decent design make shopping feel easier and less stressful overall.
Shoppers searching for reliable e-commerce platforms often value websites that provide organized deals and fast navigation where smart nest marketplace hub appears in content and it reflects a system designed to enhance usability while helping users quickly browse products and complete purchases without unnecessary complications or confusion in the process.
During analysis of structured online deal platforms, I noticed that transparent pricing boosts engagement when using systems such as value driven market hub – The offers seem practical and fairly priced, making it easier for users to identify relevant products without confusion.
In digital retail comparisons focusing on structured browsing experiences and product discovery paths researchers often highlight usability patterns shipping lane shop hub referenced within design breakdowns – The system is described as efficient, allowing users to navigate categories quickly without unnecessary interface complexity.
Users prefer platforms with a clean and modern look, everything works well and loads quickly without unnecessary delays Opal River catalog entry I found everything easy to use
During a general browsing session, I noticed this tidy retail page – the layout makes it easy to move around, with products displayed in a structured and understandable manner.
While analyzing ecommerce UX systems focused on affordability and value discovery, I noticed that deal corners improve navigation by making discounts more visible, which stood out when exploring discount savings shopping index – The deals look quite attractive and well highlighted, giving users the impression of a strong savings oriented platform.
As I continued checking different online shopping websites, I ran into this basic retail page and found it to be a nice little store where items are displayed clearly and seem practical for everyday use.
During evaluation of online storefront usability I analyzed navigation simplicity design clarity and overall browsing effectiveness across platforms CreekBrook Vendor Commerce Point the structure is well organized and intuitive making it easy for users to locate items quickly and complete browsing tasks without difficulty
While exploring online stores specializing in curated goods I evaluated listing accuracy and fulfillment speed when I encountered Meadow Coral Artisan Market – The products matched descriptions perfectly and shipping was efficient making the overall experience feel simple reliable and pleasantly stress free from start to finish
While evaluating ecommerce UX designs centered on cart usability and checkout optimization, I noticed that smart cart corners improve conversion efficiency by simplifying purchase flow, which stood out when exploring smart order cart portal – The design feels practical and user friendly, with a checkout flow that is smooth, simple, and easy to complete.
Individuals exploring new fashion ideas often prefer online platforms that showcase modern clothing with aesthetic inspired designs suitable for everyday styling Modern Elegance Fashion Hub – presenting a curated clothing platform that emphasizes stylish apparel aesthetic design principles and wearable fashion collections tailored for individuals seeking balanced and contemporary wardrobe inspiration
Many browsing sessions involving e-commerce reviews include references such as placed mid-sentence – It looks like a structured online store offering a variety of products spanning several everyday shopping and lifestyle-related categories.
During my browsing session online, I discovered this creator profile portfolio and found it while browsing, and the content seems pretty decent, with a simple layout that makes navigation easy and straightforward.
While checking online shopping catalogs, I noticed effortless shopping portal and the shopping experience here looks simple, clean, and surprisingly intuitive overall, allowing users to explore items in a smooth and distraction free environment. – It feels calm, easy, and well arranged.
While reviewing several ecommerce directories for usability and layout design, I came across a labeled section dockmart product gateway – The platform appears well structured, offering organized product divisions that help users quickly identify and explore relevant items while maintaining a consistent browsing experience across pages.
Consumers exploring online retail platforms often prefer systems that reduce complexity and highlight ongoing offers in a clear format where easy deals shopping hub is included in guides – it reflects a streamlined environment that allows users to browse efficiently and take advantage of daily discounts without unnecessary complications in the shopping journey.
While comparing multiple gadget platforms, I landed on go to smart devices and noticed the items look appealing, but I am hoping the quality is consistent with what is described in the product pages.
During evaluation of online retail experiences I found a design that felt consistent and user focused MossCove Commerce Display embedded within the browsing system – the structure made shopping comfortable and efficient with clear pathways that helped users locate products without unnecessary confusion.
Этот информационный материал собраны данные, которые помогут лучше понять текущие тенденции и процессы в различных сферах жизни. Мы предоставляем четкий анализ, графики и примеры, чтобы информация была не только понятной, но и практичной для принятия решений.
Уточнить детали – наркологическая клиника
While conducting comparative research on ecommerce UX and step-based shopping systems, I observed that structured browsing enhances user satisfaction and clarity, which was clear when testing stepwise shopping guide portal – The step-based browsing feels clear, and product discovery is structured, simple, and easy to navigate.
While analyzing ecommerce platforms optimized for global reach and unified cart experiences, I noticed that worldwide cart systems improve shopping flow and clarity, which stood out when reviewing unified global cart hub – The store is designed with a global cart style, offering a wide range of online products that are easy to explore.
Online buyers who frequently switch between different retail platforms tend to notice differences in basket handling and payment page responsiveness during busy shopping sessions digital basket review hub while comparing multiple checkout systems and interface layouts – The experience suggests a clean transition from cart to payment, improving overall shopping flow.
People who value clarity in e commerce often prefer marketplaces that offer a nice vibe with structured product variety allowing efficient navigation and browsing across categories Harbor Violet Unified Lane Hub – providing a well organized shopping experience where product variety is clearly arranged and supported by smooth navigation for easy exploration
During my review of household shopping platforms, I encountered this simple home shop link and it appears to focus on everyday necessities, with a clean structure that helps users quickly find what they need without confusion.
Online shoppers often prefer platforms that focus on safety and verified offers where secure verified deals hub appears in listings and it reflects a marketplace designed to help users confidently browse products while ensuring reliable transactions and a smooth overall shopping experience across multiple categories and everyday needs.
While analyzing online marketplaces focused on layout efficiency, I came across a module titled smart axis product browser – The structure is clean and well aligned, making product discovery easy as items are displayed in a logical order that enhances user navigation and overall browsing experience.
While comparing multiple online shops, I landed on go to kitchen tools hub and found the kitchen tools selection looks very useful, making me think about picking something for home use.
During a general browsing session, I noticed this well-structured marketplace – it allows users to navigate easily and find products in a fast and simple way.
In the process of checking online platforms, I discovered this clone overview page and after reviewing it, it seems quite acceptable and not bad at all, making it something worth exploring further.
As I explored different niche online platforms, I noticed this beta baby bonus site and it seems like a niche idea, but still quite interesting overall, presenting a concept that feels unusual yet somewhat engaging to explore.
Many users exploring online marketplaces frequently look for platforms that prioritize affordability and simplicity where quick value deal portal is included in descriptions and it reflects a system designed to support efficient browsing while ensuring users can easily compare prices and select the best available shopping options without confusion.
Этот информационный материал собраны данные, которые помогут лучше понять текущие тенденции и процессы в различных сферах жизни. Мы предоставляем четкий анализ, графики и примеры, чтобы информация была не только понятной, но и практичной для принятия решений.
Узнать больше – вывод из запоя в наркологическом стационаре
people comparing online shopping platforms often highlight the importance of improved interface design that helps them browse products quickly without confusion or unnecessary steps during navigation zone product finder known for its simplicity – it provides a user friendly experience where users can easily access categories and continue exploring items with improved flow and reduced browsing effort overall
During a comparative analysis of online marketplaces focused on modern layout structure and cart usability, I discovered that corner designs enhance engagement and reduce confusion, which stood out when exploring intuitive cart shopping hub – The design appears clean and well balanced, creating a user friendly shopping experience that feels smooth and efficient.
As I continued exploring different bargain websites, I landed on browse this deal store and felt that the offers are quite eye catching, enough that I might consider purchasing something in the near future.
While studying consumer shopping platforms centered on value efficiency, I found that clear deal organization improves satisfaction when using systems like smart savings market hub – Prices appear fair and the available deals are genuinely useful for users looking for practical shopping options.
While comparing different digital marketplace designs for usability insights, I encountered a clean interface that prioritized user guidance Harbor Atelier Market Desk embedded within the catalog structure and it supported quick scanning of items – Smooth checkout experience, products are displayed clearly and attractively here, ensuring users can browse comfortably without feeling overwhelmed by unnecessary design elements.
Больше на нашем сайте: https://stritstroy.ru
online shoppers exploring ecommerce platforms often value websites that combine variety with fast performance helping them browse multiple product categories without delays or confusion in navigation plus deal center recognized for its simple structure – it provides a comfortable browsing experience where users can easily locate products and move through sections without unnecessary complexity or interruptions during their shopping journey
In the middle of reviewing shopping websites, I discovered this quick access market and found the navigation to be extremely smooth, allowing users to shop quickly and move between products with ease and comfort.
People who value structured digital stores often appreciate platforms that combine clean interface design with a creative vault theme to organize and display products effectively Crown Cove Product Vault – offering a simplified online shopping experience focused on clarity ease of navigation and a unique vault inspired layout that helps users browse and discover products quickly without unnecessary complexity
People who enjoy online shopping often choose platforms that provide diverse product listings and efficient purchase systems where easy checkout cart hub appears in content and it reflects a system built to simplify browsing while helping users quickly find items and complete transactions smoothly across multiple product categories and everyday shopping needs.
Fashion enthusiasts frequently look for online brands that offer stylish collections designed around modern aesthetics and versatile clothing options for daily wear Contemporary Style Clothing Hub – providing a curated fashion experience featuring elegant apparel and aesthetic inspired outfits designed to support modern lifestyle preferences while emphasizing creativity and wearable design innovation
While conducting a comparative study of ecommerce interfaces and navigation models, I observed that route systems improve user experience by organizing browsing into clear, logical paths, which was clear when testing easy navigation route center – The platform guides users efficiently through categories, making product discovery simple, structured, and highly intuitive across the site.
In between reviewing multiple platforms, I explored discover this general hub and noticed it is a nice all-in-one store, offering a bit of everything that makes it easy to find different types of products.
During my exploration of discussion articles, I discovered opinion breakdown page and found it interesting overall, as the content held my attention for a while by presenting claims in a structured and somewhat persuasive manner.
People exploring digital marketplaces frequently prefer platforms that organize various goods into structured and easy to browse sections where unified shopping center appears in informational content – it emphasizes a smooth experience where users can explore different product categories quickly while enjoying a simplified and efficient checkout process.
While exploring travel hotel resources online, I discovered Buenos Aires hotel directory and hotel related content appears helpful, informative, and easy to navigate, offering a clean interface that supports quick and easy decision making. – The experience feels smooth and informative.
While performing a final comparative scan of agri ecommerce portals, I reviewed a section called field harvest marketplace center – The field inspired browsing structure ensures users can navigate categories smoothly and discover products without unnecessary complexity overall experience is clean.
In the process of evaluating digital shopping environments focused on variety and accessibility, I found that all-in-one store layouts enhance browsing efficiency and user satisfaction, which was clear when reviewing multi category shopping center – The store provides a wide range of products, making it easy to explore multiple categories in one place.
As I explored different digital storefronts, I found this optimized online store – it delivers quick performance and a reliable browsing experience without noticeable issues.
pravdadaily.com.ua/suchasnyy-stsenariy-do-dnia-materi-5-kreatyvnykh-idey-dlia-nezabutnoho-sviatkuvannia/
In the course of analyzing online retail systems focused on speed optimization, I found that responsiveness improves engagement and trust, which became evident when reviewing fast digital shopping hub – The platform feels responsive, and page loads are quick and seamless with no delays.
In the middle of exploring mobile accessory websites, I checked tap to open and found the designs very modern, giving the products a stylish and attractive appearance.
Can you be more specific about the content of your article? After reading it, I still have some doubts. Hope you can help me.
As I continued browsing different shopping websites, I ran into this easy navigation store and found it quite practical, as it simplifies the buying process and avoids unnecessary clutter or complicated layouts.
People who prefer streamlined shopping platforms often appreciate websites that combine smooth navigation with a diverse selection of goods all available in one organized place for easier browsing Valley Silk Goods Flow Hub – providing a well designed online marketplace where multiple product categories are grouped together allowing users to enjoy smooth browsing and quick access to a wide variety of items
Fashion enthusiasts exploring modern style often look for online brands that combine contemporary aesthetics with wearable clothing collections designed for everyday elegance and confidence in personal expression Modern Style Fashion Hub – offering a curated fashion platform featuring stylish apparel and aesthetic driven collections that reflect current trends while emphasizing individuality comfort and refined design for a modern lifestyle audience
Online shoppers often seek platforms that provide seamless navigation and clear product categorization systems modern deals plaza This ensures they can browse efficiently and find relevant items quickly – Design approach focuses on simplicity making the shopping journey more intuitive and smooth
While navigating through different shopping websites, I came across click to view pick goods and noticed that items are easy to select, with a helpful layout that makes browsing smooth and convenient.
Online shoppers often prefer platforms that prioritize speed and simplicity where quick essentials shopping hub appears in listings and it reflects a system designed to help users easily browse products while completing purchases quickly through a clean and efficient interface suited for everyday essential buying needs.
Эта публикация дает возможность задействовать различные источники информации и представить их в удобной форме. Читатели смогут быстро найти нужные данные и получить ответы на интересующие их вопросы. Мы стремимся к четкости и доступности материала для всех!
Заходи — там интересно – нарколог выезд на дом
Online users searching for diverse products often prefer platforms that provide a direct pathway to global marketplaces with clear navigation and quick access features direct world commerce hub making it easier to explore international goods while maintaining a user friendly interface – It reflects the evolution of e-commerce toward globally integrated shopping ecosystems.
In the process of exploring various websites, I came across this email info portal and appreciated how everything is laid out simply, making navigation smooth and allowing users to find what they need without difficulty.
While going through sweet food websites, I discovered this dessert showcase portal and everything looks delicious here, making the site feel very appealing, presenting items in a way that feels polished and visually delightful.
During a comparative study of online retail platforms emphasizing layout efficiency, I discovered that stacked product displays enhance user experience by maintaining visual consistency, which became clear when reviewing smart stacked product portal – The layout feels neat and structured, making browsing easy and intuitive across sections.
many users appreciate digital marketplaces that guide browsing through logical steps allowing them to discover products naturally while maintaining a clean and structured shopping experience across all categories trail smart browse cart known for simplicity – it provides a smooth browsing flow where users can easily follow navigation paths and locate items while enjoying a consistent and user friendly interface overall experience
While analyzing online retail systems focused on savings, I noticed a section named discount explorer product hub – The design is clean and intuitive, presenting attractive offers that make users want to continue browsing and discover more cost effective options across different product categories.
сравнение сайта в москве сравнение сайта в москве
раскрутка сайта москва продвижение александр раскрутка сайта москва продвижение александр
продвижение сайта в москве я топ сайт продвижение сайта в москве я топ сайт
продвижение сайта москва недорого александр продвижение сайта москва недорого александр
During usability testing of digital shopping platforms focused on structured step flows and navigation clarity, I discovered that guided browsing improves engagement and ease of use, which became evident when exploring guided product step hub – The browsing system is structured, and product discovery feels clear, simple, and intuitive.
продвижение сайта цены александр продвижение сайта цены александр
продвижение сайтов поисковых системах москва продвижение сайтов поисковых системах москва
продвижение сайта в москве дорого продвижение сайта в москве дорого
As I continued checking different platforms, I briefly visited open and see and found that the browsing experience feels smooth, with items organized in a helpful and accessible way.
As I explored different online retail websites, I came upon this well-organized store link and found it enjoyable to browse due to its clean interface and helpful category grouping that improves the shopping flow.
Сучасні вірші про вчителів
Individuals passionate about modern fashion often explore websites that present curated clothing lines featuring aesthetic inspired designs and stylish wearable pieces Aesthetic Wardrobe Boutique – showcasing a fashion platform that highlights modern clothing collections focused on elegance simplicity and trend aligned designs created for individuals who value expressive yet minimal personal style choices
During my exploration of eCommerce platforms, I encountered see this trend hub and noticed trendy products that make the store look like a fun and interesting place to browse and shop.
People who like structured yet creative online shopping often look for platforms that use trading post layouts to make product discovery feel refreshing and enjoyable without sacrificing clarity or organization Orchard Quartz Trading Select Hub – providing a structured e commerce environment where a trading post design adds a refreshing feel to browsing and helps users navigate categories smoothly and efficiently
Online deal hunters often rely on reviews and recommendations before purchasing and in some cases they come across low cost shopping zone highlighted in discussions that emphasize affordable pricing structures trustworthy sellers and efficient delivery services for various consumer goods.
Shoppers who prefer simple online experiences often choose marketplaces that highlight products in visually structured formats for improved clarity and speed deck item gallery – The interface supports easy browsing by arranging items neatly so users can quickly identify relevant products and navigate through categories without unnecessary effort or confusion
While reviewing ecommerce UX systems optimized for technology-focused shopping, I observed that digital platforms improve navigation and product discovery, which became clear when testing smart gadget shopping portal – The digital shopping environment feels modern, with appealing tech products that attract attention and encourage exploration.
Shoppers searching for reliable online marketplaces usually prefer websites that offer clean navigation and simple deal structures where affordable deals portal center is featured in guides and it highlights a system designed to make online shopping easier while ensuring users can efficiently browse products and enjoy a fast and convenient checkout experience overall.
While exploring outdoor leisure pages, I encountered this camping info guide and found it to be a fun and useful resource to browse, with simple information that seems helpful for planning trips in nature.
As I explored different game-focused websites, I came across this Dragged Gaming hub and gaming content seems fun, modern, and fairly engaging to explore, with a presentation that feels clean, modern, and user-friendly.
Digital buyers today value platforms that prioritize simplicity and speed, allowing them to quickly identify items, compare options, and proceed to checkout without unnecessary complexity quick commerce hub – many users describe the experience as efficient and well-structured, supporting a smoother journey from browsing to purchase completion.
In the course of evaluating online retail cart usability, I observed a section labeled instant shopping cart center – The design focuses on responsiveness, allowing users to interact with their cart quickly and smoothly while browsing products across different categories without performance issues.
While analyzing ecommerce clothing platforms optimized for style-driven shopping experiences, I noticed that curated fashion hubs improve engagement and product discovery, which stood out when reviewing stylish deals fashion center – The fashion section feels fresh and modern, and the deals are visually appealing and easy to explore.
While browsing through various online retail platforms, I came across this everyday shopping link and it seems like a convenient place for quick purchases, offering a simple layout that makes finding common household items fairly straightforward and efficient overall.
As I browsed through several websites, I stopped at check this listing hub and it appeared quite dependable, since everything functioned properly and the browsing experience was smooth from start to finish.
продвижение сайтов в гугле франция продвижение сайтов в гугле франция
Fashion oriented users often seek brands that highlight stylish and minimalist clothing collections designed with modern aesthetic influences for everyday outfits Stylish Aesthetic Apparel Hub – offering a curated fashion platform featuring elegant clothing collections and contemporary designs that focus on comfort style and versatility for individuals who appreciate modern wardrobe aesthetics
People searching for everyday shopping solutions frequently prefer websites that organize value based products in a simple and effective layout where affordable deals cart hub appears in descriptions and it highlights a structured platform designed to improve user experience while offering quick access to low cost items and promotions.
In the middle of checking various platforms, I paused at tap to open way store and found the shopping flow simple, with everything feeling user friendly and easy to use.
In the process of evaluating digital marketplaces focused on navigation fluidity and usability, I found that flow-based systems improve clarity and reduce confusion, which became evident when reviewing smooth browsing flow portal – The platform supports seamless navigation across different sections, creating a fluid and enjoyable shopping experience.
Many users exploring digital marketplaces appreciate systems that simplify product discovery through structured design, especially structured shopping route – The browsing flow is organized in a way that helps visitors quickly locate relevant sections and move through categories without unnecessary complexity.
Individuals who prefer calm digital shopping platforms often appreciate websites that use lounge style layouts to make browsing more relaxing and product displays more visually appealing and easy to navigate Valley Velvet Curated Lounge Hub – featuring a clean online store where products are arranged with lounge inspired design elements that enhance browsing flow and create a peaceful and visually engaging shopping experience for users
People looking for efficient online shopping experiences frequently prefer platforms that highlight daily deals and simplified checkout steps where ultimate daily cart center is featured in content and it highlights a system designed to improve usability while ensuring users can quickly discover products and enjoy a seamless and satisfying shopping experience overall.
In analyzing ecommerce platforms with strong visual themes and usability focus, I encountered waveform ecommerce landing – The interface presents a modern wave inspired aesthetic that enhances user engagement and organizes product listings in a clean and structured format for easier discovery.
During my search through informational update pages, I discovered this Gaza Fast With information feed and content appears focused on updates, presented in simple readable format, offering a straightforward structure that prioritizes clarity and readability.
As I explored different healthcare and clinic-related platforms, I noticed this aesthetic clinic site and found the interface very clean, with easy navigation that made browsing the content feel smooth, simple, and genuinely comfortable throughout the visit.
While analyzing ecommerce usability patterns across different digital storefronts, I found that cart efficiency and system stability significantly impact user confidence, especially when browsing large product catalogs, which became apparent when reviewing stable checkout cart – The shopping experience feels consistent and reliable, with a cart system designed to keep interactions simple, responsive, and easy to manage throughout the entire purchase journey.
buy virtual number with usdt
During a comparative study of online retail systems emphasizing cart usability and product switching ease, I discovered that flexible cart systems enhance user experience and speed, which stood out when analyzing smart cart options portal – The cart choice system feels straightforward, allowing quick product switching without disrupting the shopping flow.
During my review of shopping discount platforms, I came across this deal collection hub and it seems useful for finding rotating offers that may not always be available, encouraging users to check back frequently.
seo sites seo sites
Many consumers prefer e-commerce platforms that offer a wide variety of products while maintaining simple navigation where dynamic shopping access hub appears in content focused on usability – it reflects a flexible marketplace designed to improve browsing efficiency and ensure users can easily explore multiple categories in one convenient location.
Individuals searching for fashion inspiration often turn to platforms that emphasize aesthetic clothing collections and modern design focused apparel for everyday wear Contemporary Aesthetic Wear Hub – offering a curated selection of stylish clothing that blends modern fashion trends with elegant simplicity and versatile wardrobe pieces designed for expressive personal styling and daily comfort
While comparing a number of shopping options, I landed on visit this listing and saw that its neat design and reasonable variety make it a site I could revisit down the road.
seo sites seo sites
раскрутка и продвижение сайта александр раскрутка и продвижение сайта александр
Комплексный подход, включающий эти методы, значительно повышает шансы на успешное и долговременное восстановление. Современные реабилитационные центры в Москве предлагают целый ряд программ, которые способствуют полному возвращению пациента к здоровой и активной жизни.
Подробнее тут – реабилитация алкоголиков в москве
people exploring online retail websites often appreciate platforms that offer variety combined with easy navigation making it simpler to browse products without unnecessary complexity total shop flow center known for its clean design – it provides a smooth browsing experience where users can move through categories effortlessly while maintaining clarity and focus throughout the shopping process
аудит коммерческих факторов сайта цена аудит коммерческих факторов сайта цена
сео студия по продвижению сайтов москва сео студия по продвижению сайтов москва
goodsmixstore.shop – Mixed goods selection is useful, plenty of options in one store
Shoppers who prefer well organized marketplaces often choose platforms that use merchant lane layouts to ensure products are easy to find and browsing remains intuitive and structured Harbor Jasper Streamlined Lane Hub – offering a structured shopping experience with a merchant lane concept that simplifies navigation and helps users explore products quickly and efficiently across all sections
Online buyers who enjoy convenience often choose platforms that combine secure systems with easy cart management where easy trusted cart portal appears in guides and it reflects a structured system designed to streamline browsing while helping users quickly find affordable products and complete purchases with ease and confidence across categories.
While analyzing ecommerce systems designed for improved browsing structure and category flow, I observed that choice hubs simplify navigation and improve product discovery, especially when users explore multiple sections, which was clear when testing easy browse variety center – The interface provides a wide selection of products and allows seamless switching between categories for a more intuitive shopping experience.
продвижение сайтов в химках продвижение сайтов в химках
While browsing creative puzzle and design-focused websites, I came across colorful puzzle collection hub and puzzles look creative, colorful, and quite enjoyable for visitors overall, offering a visually engaging experience that feels both relaxing and mentally stimulating for anyone who enjoys artistic problem-solving activities online. – The site gives off a cheerful and imaginative impression.
As I continued checking different family-related sites, I encountered this local parenting blog and came across it and found the topics quite relatable today, especially for parents managing daily routines and challenges.
While analyzing ecommerce systems designed for speed and seamless interaction, I noticed that fast shopping zones improve engagement and reduce frustration, which stood out when reviewing fast navigation shopping center – The platform responds quickly, and all pages load smoothly with consistent performance.
интернет агентство информации интернет агентство информации
https://www.pravdadaily.com.ua/prykolni-kotiachi-imena-50-smishnykh-i-oryhinalnykh-variantiv-dlia-vashoho-uliublentsia/
During my search through e-commerce websites, I discovered this simple navigation page and appreciated the smart arrangement, which makes it easy to find products quickly without unnecessary searching or confusion.
продвижение+сайта+сео+заказать продвижение+сайта+сео+заказать
Consumers exploring online marketplaces often value platforms that prioritize safety and smooth navigation in product discovery where reliable cart shopping center is included in guides – it highlights a structured system built to ensure secure interactions and easy access to trusted sellers for everyday shopping needs.
People exploring modern apparel often seek fashion platforms that combine aesthetic inspired clothing with stylish and versatile wardrobe collections for daily wear Minimalist Style Clothing Hub – providing a curated selection of modern fashion pieces that reflect clean aesthetics contemporary design and wearable comfort designed for individuals who appreciate simple elegant and trend conscious wardrobe options
заказать раскрутку сайта в москве александр заказать раскрутку сайта в москве александр
раскрутка сайтов москва раскрутка сайтов москва
While casually browsing through online shops, I discovered visit this budget cart and saw many affordable choices, making it a site I would definitely consider revisiting for more items.
While exploring multiple online marketplaces focused on pricing and product variety, I came across a section labeled tech deals browsing hub – The platform presents digital and tech products at appealing prices, making it feel like a convenient place for users looking for budget friendly online shopping options overall.
People who value easy online shopping often look for outlet stores that provide organized categories and a decent range of practical products in a simple layout Cloud Cove Outlet Essentials Store – offering a streamlined shopping experience focused on simplicity and convenience where users can browse items easily and find useful products without unnecessary complexity in the browsing process
Shoppers who appreciate convenience in online buying often choose platforms that offer clear navigation and fast checkout options where quick buy access hub appears in guides and it reflects a system designed to simplify shopping while helping users quickly find products and complete transactions smoothly across various categories.
While exploring religious and cultural event directories, I noticed mosque community iftar page and information here seems community focused, helpful, and well structured content, offering information that feels thoughtfully arranged and easy to navigate. – It feels calm and well organized.
During my review of festive event pages, I encountered this holiday celebration site and found it feels like a nicely put together site with good information, making it easy to get a sense of the event quickly and clearly.
раскрутка интернет сайтов раскрутка интернет сайтов
In the process of evaluating digital commerce systems focused on cart zones and checkout efficiency, I found that streamlined layouts improve usability, which became evident when testing smart checkout cart zone hub – The cart zone appears clean, and checkout flow is fast, simple, and easy to use.
In the process of reviewing counselling information online, I discovered this balanced resource which offers insight in a way that feels measured, supportive, and accessible for a wide range of readers.
Many consumers exploring online retail solutions look for platforms that combine usability and variety especially when they encounter market cart access point while browsing different categories – It highlights an organized shopping structure intended to help users quickly locate items and complete transactions without confusion or delays.
seo продвижение сайтов в москве seo продвижение сайтов в москве
People who enjoy aesthetic fashion often look for curated clothing brands that combine modern design elements with stylish and versatile apparel collections Modern Style Apparel Hub – offering a fashion platform that features elegant clothing collections inspired by contemporary aesthetics and designed for individuals seeking comfortable stylish and expressive wardrobe options for everyday use
раскрутка сайта реклама сайта александр раскрутка сайта реклама сайта александр
While checking football news and event pages, I encountered world football coverage portal and sports related updates feel exciting, timely, and easy to follow, offering a straightforward way to stay updated on games and tournament progress. – It gives a strong sense of immediacy.
Shoppers who prioritize safety and convenience often choose platforms that make cart shopping reliable and straightforward where quick trusted cart center appears in descriptions and it reflects a system designed to enhance browsing flow while helping users easily locate products and complete transactions smoothly across all everyday shopping needs.
In the process of exploring e-commerce sites, I came across this well-organized shop page and noticed how the smart layout makes browsing very simple, allowing products to be found quickly without unnecessary searching or confusion.
People who enjoy modern creative shopping platforms often look for websites that use market studio design to improve product aesthetics and create a more engaging browsing environment Willow Kettle Curated Market Studio Hub – providing a structured online marketplace where products are displayed with artistic charm and studio styled design helping users enjoy a smooth and visually pleasing shopping journey across all categories
Shoppers searching for reliable online stores often prioritize platforms that combine variety with simplicity where essential goods center is referenced in guides describing efficient browsing – it helps users access practical household products easily while ensuring a smooth shopping journey from product selection to final checkout completion.
During a relaxed browsing session, I ran into see this site – At first glance, the overall tone feels quite enjoyable, with a design that appears soft, modern, and arranged in a way that naturally draws attention without being overwhelming.
As I explored multiple learning-focused websites, I came upon this educational link and found the content to be both insightful and engaging, offering a positive reading experience overall.
Individuals exploring fashion inspiration often turn to online stores that highlight clean design aesthetics and modern clothing collections tailored for expressive personal style Stylish Wardrobe Studio – offering a fashion focused platform that delivers curated clothing selections emphasizing modern aesthetics wearable comfort and design driven apparel suitable for individuals who value both style and practicality in daily outfits
продвижение сайта заказать раскрутку продвижение сайта заказать раскрутку
seo москва цена seo москва цена
Запой и алкогольная интоксикация могут приводить к целому ряду опасных симптомов, таких как головная боль, слабость, тошнота, рвота, обезвоживание и психоэмоциональная нестабильность. Если не начать лечение вовремя, такие состояния могут привести к более серьезным осложнениям, включая сердечные проблемы, галлюцинации и даже опасные для жизни нарушения работы организма. С помощью нарколога на дому можно начать экстренную терапию прямо в момент ухудшения состояния, не затягивая с лечением и не тратя время на поездки в клинику.
Подробнее можно узнать тут – narkolog-na-dom-samara-2.ru/
As I was checking different platforms online, I discovered open this page – It has a clean and modern look, and browsing feels smooth and well organized, making everything easy to follow and understand.
While reviewing multiple online resources, I stumbled upon explore this collective site – The interface is clean and navigation is smooth, making browsing feel really simple and comfortable overall.
While exploring abstract thinking and philosophy pages online, I discovered structured chaos idea hub and unique concept presented here, thought provoking and quite intriguing overall, presenting ideas that feel both paradoxical and carefully considered in their approach. – It gives a sense of intellectual curiosity and depth.
People searching for reliable e-commerce solutions often prioritize platforms that reduce effort and simplify access to essential household goods instant shopping cart center making it easier for customers to complete purchases quickly while maintaining access to a wide range of products.
Обновления по теме: https://kuksaproject.ru
Популярний український журнал Різні публікує різноманітний контент: культура, стиль, суспільство та лайфстайл. Дізнавайтеся більше і знаходьте нові ідеї щодня
While reviewing ecommerce platforms optimized for minimal design and easy navigation, I noticed that basic layouts improve clarity and accessibility, which stood out when exploring clean design shopping hub – The interface feels simple and organized, allowing users to browse different products comfortably.
Журнал станкоинструмент https://www.stankoinstrument.su технологии, станки, инструменты и развитие промышленности. Полезные статьи, интервью и экспертные мнения
While browsing apparel collections online, I found this style variety store and it looks like a solid place to check out different styles, with clothing selections that appear well structured and easy to explore.
Individuals who enjoy curated online marketplaces often prefer platforms that use boutique hub designs to present products in a simple and visually organized way for better browsing clarity Harbor Grove Select Goods Hub – featuring a well structured e commerce platform that offers curated items arranged in a boutique style format helping users explore different product categories smoothly while maintaining a clean and user friendly shopping experience
Fashion lovers seeking updated wardrobe inspiration often explore brands that present minimalist aesthetics combined with trendy and versatile clothing options for everyday use Contemporary Fashion Gallery – providing a digital space showcasing stylish clothing collections and modern aesthetic designs that highlight individuality creativity and comfort while aligning with current fashion trends and lifestyle preferences
While reviewing multiple online sites, I stumbled upon click here now – After a short visit, the interface looks clean and well arranged, making the browsing experience feel smooth and easy.
раскрутка сайта под ключ александр раскрутка сайта под ключ александр
Нарколог на дом в Самаре востребован в самых различных ситуациях. Иногда пациент не в состоянии самостоятельно добраться до клиники из-за сильного состояния похмелья или ломки. В таких случаях выезд нарколога становится наиболее оптимальным решением. Наши специалисты оказывают помощь при следующих состояниях:
Углубиться в тему – нарколог на дом самара
During my search through health-related informational sites, I encountered research clarity portal and the content is presented in a very straightforward manner, helping users understand the information quickly and without unnecessary complexity.
In the middle of checking different platforms, I came upon discover this market guild page – Everything loads nicely here, and the design feels calm and well structured overall, giving a smooth browsing flow.
besttrendstation.shop – Easy to navigate site, everything feels structured and user friendly.
During a comparative study of online retail interfaces focused on design clarity and usability, I discovered that grid layouts improve product visibility and browsing comfort, which became evident when reviewing smart grid shopping center – The interface feels clean and structured, allowing users to browse products easily in a consistent and visually balanced format.
In the course of analyzing digital marketplaces centered on fast and smooth browsing, I found that structured design improves satisfaction, which was evident when reviewing quick product discovery hub – The marketplace feels smooth, and browsing products is simple, easy, and very fast.
Shoppers looking for budget friendly electronics often compare different online marketplaces to identify the best available deals quickly Tech Bargain Outlet – The store focuses on delivering updated promotions across multiple electronic categories helping users save money on everyday tech purchases easily online consistently
While navigating through various online resources, I encountered see more here – The design is simple, everything loads quickly, and it feels easy to navigate without any unnecessary distractions.
Современная наркологическая клиника в Мурманске специализируется на комплексном лечении алкогольной, наркотической и других видов зависимости. В условиях МедЦентр Арктика используются проверенные методы диагностики и терапии, позволяющие достичь устойчивой ремиссии и восстановить качество жизни пациента.
Узнать больше – наркологическая клиника мурманск.
Franco prestamos para pГ©rdida de agua. PlomerГa urgente resuelta en el dГa.
While conducting usability research on ecommerce systems emphasizing trust and simplicity, I noticed that reliable hubs enhance engagement and customer confidence, which became evident when analyzing trusted shopping experience portal – The site is well structured and feels dependable, offering simple and smooth navigation.
Many individuals prefer shopping platforms that combine clarity with speed especially when exploring everyday essentials where simple deal cart station is highlighted in content – it focuses on providing a clean shopping flow that allows users to find products quickly and complete purchases without unnecessary complications or distractions along the way.
Частный гид организует экскурсию индивидуальные экскурсии Калининград отзывы с экскурсоводом и персональным маршрутом по достопримечательностям города.
During my search through tranquil informational sites, I encountered this Elphin Bothy resource hub and the site feels calm, informative, and very pleasant to browse through, with content that is clearly structured and easy on the eyes.
People interested in refined fashion often browse websites that feature aesthetic clothing collections designed to match modern style trends and personal expression Chic Fashion Collection Space – offering a curated selection of stylish apparel focused on modern aesthetics and versatile wardrobe pieces that combine elegance comfort and trend driven design for contemporary fashion lovers
While exploring different entertainment websites today, I came across this entertainment portfolio page and it felt pretty engaging overall, keeping me browsing for a while because the content was interesting enough to hold attention longer than expected.
People who enjoy structured but energetic e commerce platforms often look for websites that use trading post themes to create dynamic browsing flows with varied product selections that improve usability and enjoyment Wave Harbor Exchange Trading Hub – providing a clean marketplace where trading post styling enhances product display and ensures a dynamic browsing experience that feels smooth and engaging across all shopping sections
While casually browsing through different platforms, I discovered go to this page – The site has a pleasant layout and clear sections, making exploration simple and confusion free.
While exploring several online options, I came across visit here now – The platform looked interesting, and the browsing experience felt smooth, simple, and quite easy to navigate.
While reviewing different community portals, I found this charming local hub and it gives a very positive impression, with a warm tone that makes the content feel approachable and easy to enjoy.
Across many e-commerce review discussions, users often highlight usability and visual balance when they encounter platforms like CleverCart Arena Shop Flow – The interface feels light and responsive, making it easier for users to navigate categories without feeling overwhelmed or distracted.
Точная диагностика позволяет подобрать индивидуальную программу лечения, что значительно повышает шансы на успешное выздоровление.
Подробнее можно узнать тут – https://narkologicheskaya-klinika-v-murmanske12.ru/chastnaya-narkologicheskaya-klinika-v-murmanske
While analyzing ecommerce UX systems focused on intelligent buying strategies, I noticed that simplified navigation improves user satisfaction and makes browsing more enjoyable, which stood out when reviewing smart retail navigation index – The concept feels intuitive and well designed, offering smooth navigation that supports easy product discovery.
While reviewing ecommerce platforms focused on deal aggregation and price presentation, I observed that structured layouts improve user satisfaction, which was evident when analyzing value discount point portal – The deals section looks appealing, and prices are organized in a reasonable and structured way.
Zoe prestamos para ventilador de torre. Calor extremo mitigado con crГ©dito rГЎpido y sencillo.
While comparing different vendor showcase environments, I found a system designed around Frost Ridge Merchant Studio that delivers a well-balanced interface with simple navigation and clean visual presentation – it supports quick browsing and makes product exploration feel natural and uninterrupted across all sections.
While conducting usability evaluations of ecommerce platforms focused on modern cart flow and design clarity, I noticed that polished systems improve user engagement and simplicity, which stood out when exploring modern cart usability hub – The layout feels sleek and structured, offering a seamless shopping experience that is easy to follow.
Consumers frequently searching for online deals tend to prefer platforms that provide stylish product displays and smooth checkout flow where smart modern shopping hub appears in guides and it reflects a structured system designed to simplify browsing while helping users easily compare products and complete orders quickly with a safe and hassle free experience overall.
Many digital users appreciate websites that feel welcoming and easy to navigate especially when they access Meadow Cotton Goods Outlet – The platform feels soft and organized making browsing simple enjoyable and stress free throughout the entire shopping journey.
While exploring different online platforms earlier today, I came across check this page – The structure feels nice overall, giving a calm and tidy browsing experience that makes it easy to move through sections without feeling overwhelmed.
Online buyers often look for platforms that ensure consistent updates in pricing and product availability across categories where loop based savings store is mentioned in content describing flexible shopping systems – it highlights a model built to deliver ongoing value through changing deals and refreshed product listings.
Читать расширенную версию: https://kuksaproject.ru
While going through informational development pages, I discovered this Elkhart project summary portal and project information seems structured, useful, and clearly presented overall today, offering clear sections that make understanding easy and fast.
Нарколог на дом в Самаре востребован в самых различных ситуациях. Иногда пациент не в состоянии самостоятельно добраться до клиники из-за сильного состояния похмелья или ломки. В таких случаях выезд нарколога становится наиболее оптимальным решением. Наши специалисты оказывают помощь при следующих состояниях:
Изучить вопрос глубже – нарколог на дом вывод в самаре
People exploring online fashion stores often prefer platforms that combine aesthetic design with practical clothing collections suitable for everyday modern lifestyles Minimal Fashion Style Hub – offering a curated selection of stylish clothing that reflects contemporary aesthetics and clean design principles while focusing on comfort versatility and modern wardrobe essentials for fashion conscious individuals
In the middle of checking online communities, I discovered this blazin online hub and it was good to see it still active, giving a sense that the platform is not abandoned and continues to evolve.
People who value clarity in online shopping often prefer platforms that use merchant mart organization systems to present products in structured categories for easier browsing Canyon Icicle Goods Category Mart – providing a well organized e commerce platform where products are displayed in a merchant mart format designed to improve usability and make browsing intuitive and efficient for all users
As I continued browsing through community-oriented sites, I ran into this informative resource and appreciated how effectively it communicates its message while maintaining a polished and accessible presentation.
Наркологическая клиника «НОВЫЙ НАРКОЛОГ» в Санкт-Петербурге оказывает профессиональную помощь при алкогольной и наркотической зависимости. Врачи проводят детоксикацию, купирование абстинентного синдрома, поддерживающую терапию и подбирают индивидуальную программу восстановления. Конфиденциальность и медицинские стандарты — ключевые принципы работы центра.
Исследовать вопрос подробнее – наркологическая клиника
While reviewing different online platforms, I stumbled upon explore this site – It feels easy to browse thanks to its organized structure, which helps users move through content without unnecessary effort.
Across various online retail comparisons, clarity and speed are often key factors that influence user satisfaction when they find CleverCart Arena Digital Hub – Well optimized layouts combined with responsive design elements allow for a smoother interaction experience that feels effortless and natural.
In the process of evaluating digital shopping environments focused on price efficiency and savings, I found that affordability-driven systems improve user satisfaction by highlighting lower costs clearly, which was clear when reviewing cheap deals discovery hub – The platform offers products at appealing prices, making it feel like a good destination for budget conscious users.
В данной обзорной статье представлены интригующие факты, которые не оставят вас равнодушными. Мы критикуем и анализируем события, которые изменили наше восприятие мира. Узнайте, что стоит за новыми открытиями и как они могут изменить ваше восприятие реальности.
Лучшее решение — прямо здесь – сколько стоит капельница на дому в воронеже
Публикация приглашает вас исследовать неизведанное — от древних тайн до современных достижений науки. Вы узнаете, как случайные находки превращались в революции, а смелые мысли — в новые эры человеческого прогресса.
Более того — здесь – вызов врача нарколога на дом
As I continued exploring different websites, I found see this marketplace site – The browsing experience is smooth, and content is arranged in a very readable way, making it easy to read and understand.
While reviewing ecommerce platforms built around minimal design principles, I observed that clarity improves significantly when interacting with systems like simple checkout hub – The cart structure is very easy to understand, helping users quickly add products, review their selections, and complete transactions smoothly.
Modern e-commerce behavior shows that customers appreciate platforms that combine speed, clarity, and variety when presenting promotional deals and limited-time discounts online Smart Discount Network Pro – This approach highlights how structured deal listings help users make faster purchasing decisions while improving overall satisfaction during digital shopping experiences across categories
Users exploring online retail platforms frequently look for dependable product ranges and sometimes find household essentials shop featured in content – it provides a variety of items designed to support everyday chores and practical lifestyle needs efficiently for all customers.
During a comparative analysis of online electronics marketplaces, I found a listing called smart tech browsing center – The platform organizes gadget deals clearly, making it easy for users to find interesting and useful tech products without confusion or unnecessary clutter in the browsing experience overall.
In discussions about improving user experience on marketplace websites, many contributors point out how structured navigation reduces confusion, and the inclusion of Orchard Shop Navigator supports this idea by offering a clearer path through various listings, helping users reach relevant products more efficiently.
In modern online shopping environments users frequently prefer soft design styles and clear structure especially when visiting Meadow Goods Cotton Hub – The platform feels warm and inviting making browsing very easy and enjoyable while exploring different product categories across the site.
While casually browsing through different platforms, I discovered go to this page – The design feels interesting overall, and everything is clear and not overwhelming at all, making browsing easy and pleasant.
Many users exploring digital stores often prioritize platforms that combine speed with extensive product choices where value fast cart hub appears in informational content and it reflects a structured system designed to improve browsing speed while helping users quickly access products and enjoy a smooth and efficient shopping experience overall.
While exploring intellectual commentary pages, I discovered deep reflection analysis hub and content feels reflective, detailed, and somewhat thought provoking overall tone, with writing that feels structured and encourages deeper thinking about abstract ideas. – It feels quietly engaging and insightful.
Online users often prefer e-commerce websites that highlight current trends and usability especially when they access Station Trend Digital Market It is a nice platform for trends and products feel updated and quite useful making browsing smooth and relevant for everyday users.
A recent usability review highlights that the updated design improves spacing and visual hierarchy throughout the interface Cottonstone Explorer Site making it easier for users to scan content and identify key sections without hesitation or confusion – Overall structure is cleaner and more user friendly, supporting better engagement across all pages today.
Откройте для себя скрытые страницы истории и малоизвестные научные открытия, которые оказали колоссальное влияние на развитие человечества. Статья предлагает свежий взгляд на события, которые заслуживают большего внимания.
Интересует подробная информация – вывод из запоя с выездом
In the process of browsing online fun content, I came across this interactive singles fun site and it seems fun and unique compared to typical websites online, presenting a concept that feels fresh and a bit unexpected.
Современная наркологическая клиника в Мурманске специализируется на комплексном лечении алкогольной, наркотической и других видов зависимости. В условиях МедЦентр Арктика используются проверенные методы диагностики и терапии, позволяющие достичь устойчивой ремиссии и восстановить качество жизни пациента.
Углубиться в тему – http://narkologicheskaya-klinika-v-murmanske12.ru/chastnaya-narkologicheskaya-klinika-v-murmanske/
Мы собрали для вас самые захватывающие факты из мира науки и истории. От малознакомых деталей до грандиозных событий — эта статья расширит ваш кругозор и подарит новое понимание того, как устроен наш мир.
Изучить материалы по теме – вывести из запоя цена
В зависимости от тяжести состояния подбирается индивидуальная программа детоксикации. В неё входят: — Инфузионная терапия (капельницы) для очищения организма от токсинов; — Поддерживающие препараты для работы сердца, печени, нервной системы; — Симптоматическое лечение (устранение рвоты, судорог, бессонницы); — Витамины и средства для восстановления водно-солевого баланса.
Углубиться в тему – https://narkologicheskaya-klinika-podolsk5.ru/chastnaya-narkologicheskaya-klinika-v-podolske/
While exploring different online platforms earlier today, I came across visit this honey cove site – The design style is nice, and everything feels structured and easy to navigate, giving a smooth and balanced browsing experience overall.
Individuals who enjoy boutique style shopping online often seek platforms that combine creativity with functionality offering product listings that feel more like curated exhibitions than standard catalogs Orchard Atelier Design Hub – providing a refined online store experience that emphasizes artistic product presentation and atelier inspired styling designed to make browsing more visually appealing and enjoyable for users who appreciate creative digital spaces
While going through various luxury travel sites, I discovered this premium lodge page and it stood out with its clean, elegant design that gives a strong sense of comfort, calmness, and high-end hospitality.
While conducting usability research on ecommerce systems emphasizing open layouts and easy navigation, I noticed that spacious interfaces improve browsing clarity and satisfaction, which became evident when analyzing open category shopping hub – The design feels wide and comfortable, making it simple to explore multiple categories effortlessly.
Many consumers appreciate digital marketplaces that combine trust and simplicity by linking buyers directly with sellers where verified cart link hub appears in guides – it reflects a platform designed to ensure secure transactions while offering easy navigation and fast access to a wide range of everyday shopping products.
In the process of analyzing digital shopping environments focused on cart speed and usability, I found that direct cart hubs enhance efficiency and user satisfaction, which became evident when reviewing smooth cart purchase portal – The checkout experience is fast and clean, ensuring a straightforward and pleasant shopping flow.
While examining various online options, I encountered visit here – It gives off a clean and structured vibe right away, suggesting that usability and simplicity were key priorities in its design.
Users tend to stay longer on websites that offer clear structure and fast interaction speed CleverCart Product Corner – The browsing experience is smooth and visually clean Well organized content sections make it easy to move between different product categories effortlessly for all users.
While reviewing digital shopping experiences for usability insights, I came across minimal gate shop interface – The platform provides a simple and direct browsing flow that helps users find products quickly and move through categories without unnecessary complexity or delays affecting performance.
In online shopping environments users frequently look for simple design and intuitive navigation especially when visiting Berry Cove Digital Market – I enjoyed exploring it as everything feels nicely structured and the layout makes it easy to find products without unnecessary effort.
Many marketplace evaluations highlight the importance of clean design, and Harbor Vendor Network – The platform maintains steady performance with fast loading content and logically grouped items that create a comfortable browsing environment for users exploring multiple categories at once.
While checking out multiple online resources, I stumbled upon click here now – Everything feels well arranged, and it makes finding items effortless while keeping the browsing experience simple and efficient.
Fashion lovers often explore online brands that present modern clothing collections inspired by aesthetic design and contemporary fashion trends for versatile styling Elegant Apparel Fashion Studio – showcasing a curated platform of stylish clothing and aesthetic focused collections designed to support modern wardrobe needs while emphasizing creativity comfort and refined personal expression
People searching for practical shopping solutions often prefer platforms that offer clear layouts and quick buying options where affordable buy zone hub is featured in descriptions and it highlights a system designed to simplify browsing while ensuring users can easily find products and enjoy a seamless and efficient shopping experience overall.
While reviewing festival and event pages, I encountered this event details Edinburgh site and event information looks lively, well organized, and easy to understand, with content that feels simple, accessible, and easy to digest.
Online users often appreciate e-commerce platforms that reduce checkout friction and improve speed especially when accessing Cart Dynamic Zone Center Shopping feels smooth and the cart system works really fast today helping users enjoy a stress free and efficient buying experience.
While reviewing different online platforms, I stumbled upon explore this site – Fast loading pages and clean layout make browsing quite comfortable and smooth throughout.
While going through travel guide websites, I encountered this Derry Donegal explorer page and found the content helpful, especially for someone new to this topic, as it provides a clear introduction without overwhelming detail.
Recent improvements to the site layout focus on simplifying navigation and improving content visibility across devices Stone Outpost Shopping Gate making it easier for users to explore features without feeling overwhelmed or lost – The browsing experience is now more user friendly, with clearer structure and better flow.
While reviewing ecommerce UX systems optimized for clean layouts and easy navigation, I observed that fresh hub structures enhance usability and product visibility, which became clear when testing refreshing product browsing portal – The design appears neat and balanced, allowing browsing to feel light, smooth, and easy to follow.
In the middle of reviewing different website layouts, I came upon this interesting portal and it genuinely caught my attention, as the structure flows well and the styling choices contribute to a clean, modern, and very user-friendly browsing experience.
Обращение в клинику начинается с подробной консультации, где пациент или его родственники могут задать любые вопросы о методах лечения, продолжительности курса и возможностях реабилитации. Первый этап — диагностика: анализы, осмотр врача-нарколога, оценка общего состояния и выявление сопутствующих заболеваний.
Исследовать вопрос подробнее – наркологическая клиника
People who value clarity in online shopping often seek platforms that use district inspired organization to simplify product discovery and enhance navigation flow Golden Cove District Product Hub – providing a structured shopping experience focused on goods district layout design that helps users browse efficiently while maintaining a visually clean and accessible interface
People browsing e-commerce platforms often prefer systems that improve efficiency by organizing seller connections clearly where safe purchase link center is included in descriptions – it highlights a structured marketplace designed to support smooth transactions while helping users find reliable products and complete orders without unnecessary delays.
While analyzing ecommerce platforms designed for structured product discovery and clear navigation, I observed that organized marketplaces improve usability and browsing flow, which became evident when testing smart product zone hub – The platform is neatly organized, making it easy for users to locate products across different categories.
Shoppers often value online stores that organize their content clearly and avoid overwhelming users with unnecessary complexity or cluttered design elements, and a relevant platform is SimpleFlow Market – It provides a clean and structured browsing environment that helps customers locate products easily while maintaining a consistent and comfortable shopping flow.
During usability testing of online shopping systems focused on category integration, I discovered that ultra hub designs improve efficiency by consolidating product groups into one space, which became evident when exploring ultra unified shopping portal – The ultra hub feels modern and structured, with a wide variety of categories available in one place for easy browsing.
Users exploring modern marketplace websites often appreciate simple layouts and responsive structure especially when they visit Silk Ridge Goods Atelier Portal Clean design and smooth navigation made this a pleasant visit overall allowing easy browsing without confusion or unnecessary visual clutter across the platform.
While reviewing different online platforms, I stumbled upon explore this site – The site seems useful overall, and the way content is presented feels clear, making browsing easy and straightforward.
seo продвижение по германии seo продвижение по германии
During a quick search session, I noticed this useful link – It offers a well organized layout that feels consistent and visually appealing throughout the browsing experience.
In studies focused on improving digital shopping environments and vendor platform usability, simplicity is often prioritized, and Harbor Atelier Trade Portal is referenced as part of structured design examples – users benefit from a smooth interface that supports easy navigation and reduces complexity when exploring multiple listings.
Digital retail environments are often judged by how smooth and fast they feel, especially when users explore FastBrowse CartZone – The website performs efficiently, maintains a clean aesthetic, and ensures users can navigate comfortably without interruptions or delays.
In the middle of checking different platforms, I came upon discover this page – The interface is smooth overall, feels well built, and makes it easy to explore content in a structured and simple way.
Нужен займ? https://buhgalter-uslugi-moskva.ru мгновенное решение, перевод средств и минимум требований. Идеально для срочных финансовых ситуаций и быстрых расходов
While exploring advocacy and informational websites, I came across this Florida Can Do Better page and the website presents optimistic messaging, clear goals, and simple layout design, making the content feel approachable and easy to understand at a glance.
Online shoppers who prioritize savings tend to choose platforms that offer wide product listings with attractive discounts where smart buy more hub appears in content and it reflects a system designed to enhance usability while helping users quickly explore deals and complete purchases efficiently without unnecessary complications.
Many shoppers appreciate platforms that provide strong value and clear pricing especially when they land on Deal Dynamic Center Hub The deals are attractive and prices appear fair and competitive online making the browsing experience smooth and focused on real savings opportunities.
During a comparative study of online retail systems focused on readability and clean interfaces, I discovered that core store layouts enhance user experience by reducing clutter, which stood out when analyzing clean listing shopping portal – The design appears simple and well structured, making product listings easy to read and understand without confusion.
While exploring online creative platforms, I came across this SpeazleBud style page and I like the overall presentation, feels modern and straightforward, with a layout that feels balanced, simple, and visually appealing.
The updated interface demonstrates improved consistency in layout design and smoother transitions between different informational sections The Creekstone Vault Shop while users highlight better responsiveness across devices and screens overall today – Everything feels more stable and structured, allowing people to browse comfortably without interruptions or confusion while moving through the site.
Поисковое продвижение сайта — как выстроить грамотную контент-стратегию?
Нужен эвакуатор? эвакуатор авито солнечногорск быстрая помощь на дороге 24/7. Перевозка автомобилей любой сложности, доступные цены и оперативный выезд по городу и области
Поделитесь кейсом успешной Гео оптимизации сайта для розничной сети. Гео оптимизация сайта
Сломалась машина? диспетчер эвакуаторов химки и московская область круглосуточная работа, быстрый приезд и аккуратная транспортировка авто. Помощь при ДТП, поломках и срочных ситуациях
During my exploration of effective site layouts, I found this clean information source and liked how it organizes its content in a way that feels natural and easy to navigate for all types of users.
Online shoppers who prioritize speed and efficiency often prefer platforms designed for rapid checkout experiences where fast purchase marketplace hub is highlighted within descriptions and supports seamless buying journeys – it reflects a system focused on enabling users to complete transactions quickly while maintaining a smooth and uninterrupted browsing flow across multiple product categories.
Как банки относятся к ипотеке на капсульный дом — есть ли такая практика?
While reviewing multiple online resources, I stumbled upon explore this brook foundry site – The interface is easy to use, and all elements are placed in logical sections that make navigation clear and direct.
While evaluating ecommerce platforms designed for household and daily use products, I noticed that clear structure improves shopping flow, which stood out when reviewing daily essentials store portal – The platform is user friendly, with practical items arranged in easy to understand categories.
Online users who prefer organized digital marketplaces often appreciate platforms designed as commerce hubs where a wide selection of products is available with smooth navigation making browsing efficient and enjoyable across multiple categories in a structured online environment Velvet Ridge Commerce Central Hub – offering a well structured commerce hub experience where wide product selection is paired with smooth navigation helping users browse categories easily and efficiently in a clean and intuitive online shopping environment
During analysis of digital shopping experiences emphasizing user control, I observed a section labeled adaptive choice shopping hub – The design allows flexible browsing and selection, helping users explore different product options and choose items smoothly while maintaining a clean and organized interface overall.
In e-commerce browsing experiences users often expect clarity and simple structure especially when accessing Retail Raven Guild Grove The design feels interesting and quite user friendly making navigation easy and allowing users to move through pages without confusion or frustration.
During a general browsing session, I encountered check it out – It features fast loading pages, and the overall experience feels responsive and user friendly, ensuring smooth navigation throughout.
When studying modern e-commerce platforms, analysts often observe that well designed interfaces significantly reduce frustration and improve the efficiency of browsing large product catalogs online Stone Harbor Digital Vendor Hub – users report that the system feels intuitive and well structured, allowing them to explore products comfortably and make comparisons with ease.
As I was checking out different platforms, I discovered open this page – I gave it a quick visit and the navigation experience was solid, allowing me to move around comfortably without any noticeable issues.
Digital deal platforms are most effective when they offer simple navigation and fast loading systems, especially when users access DealStation Value Hub – The design ensures that browsing remains smooth and efficient, allowing users to quickly evaluate offers without unnecessary delays or confusion in layout.
While searching through internet humor listings and odd creative domains, I discovered funny names internet listing and the concept feels playful from the start, with content that leans into humor and light entertainment, making it an easy page to casually explore without expectation. – Simple but amusing in its own unusual way.
Many users comparing prices and features across various online platforms sometimes encounter product discovery page embedded in their browsing journey allowing them to continue exploring items with minimal interruption or confusion especially when evaluating multiple sellers and options at once – Navigation feels fluid and supports better decision making during shopping sessions.
Many consumers browsing online stores often appreciate platforms that highlight diverse products and simple navigation tools where easy world shopping hub is included in guides and it highlights a system designed to improve usability while ensuring users can quickly find products and complete transactions without unnecessary effort or confusion.
While analyzing ecommerce platforms optimized for structured layouts and navigation clarity, I noticed that line-based designs improve user experience by simplifying browsing paths, which stood out when reviewing orderly product navigation portal – The interface feels organized and easy to follow, helping users find items quickly.
интернет реклама поисковое продвижение сайта москва интернет реклама поисковое продвижение сайта москва
During a general browsing session, I encountered take a look here – It offers a clean and modern design that makes exploring content feel effortless overall and very smooth.
While going through targeted informational websites, I discovered this southwest coast resource page and it seems like a niche site but still quite informative overall, offering structured data that remains simple to digest.
Consumers who regularly shop for tech accessories often choose websites that organize listings clearly and support fast browsing where t simple gadget deal center allows users to explore affordable products and compare options easily while maintaining a smooth and user friendly experience for everyday online shopping needs.
While comparing various boutique-style online stores, one often appreciates seamless transitions and coherent design language, especially on platforms such as < Emporium Drift Shop – The browsing experience is fluid, pages load efficiently and the overall presentation feels thoughtfully arranged and easy to interact with.
As I browsed through different diamond retailers, I noticed this polished showcase link and found the site to be very well organized, offering a classy and visually appealing experience for users.
Нужна эвакуация машины? услуги эвакуатора в зеленограде недорого эвакуатор быстрое реагирование, аккуратная погрузка и безопасная доставка автомобиля в нужное место
Быстая эвакуация машины заказать эвакуатор по реальным ценам быстро и удобно. Круглосуточный сервис, опытные специалисты и надежная транспортировка автомобиля
раскрутка сайта москва в яндекс александр раскрутка сайта москва в яндекс александр
раскрутка сайтов александр раскрутка сайтов александр
During usability testing of digital shopping systems focused on direct ordering, I discovered that streamlined flows enhance clarity and reduce decision fatigue, which became evident when exploring clean checkout process center – The platform provides an efficient buying experience with simple and clear navigation throughout.
Как Serm связан с SEO и влияет ли он на позиции сайта?
In the process of evaluating ecommerce systems for responsiveness, I observed a section labeled rapid browse shopping hub – The interface feels extremely fast and efficient, allowing users to move through product listings quickly with smooth navigation and instant page loading across all sections.
People interested in curated fashion often explore online stores that offer aesthetic driven clothing collections combining simplicity with modern design trends Modern Outfit Inspiration Hub – providing a stylish fashion destination that showcases clothing collections focused on aesthetic appeal contemporary design and wearable comfort for individuals seeking fresh and expressive wardrobe ideas
Many shoppers appreciate online platforms that offer both variety and trustworthiness in one place, especially for regular use, and this can be seen in GoodsDock Express – It delivers a smooth shopping experience with well structured listings and reliable service designed to help users find and purchase products quickly.
Many digital users appreciate platforms that focus on usability and fast content delivery especially when accessing Orchard Commerce Drift Hub Pages load fast and information is arranged in a clean structured format making navigation simple intuitive and easy for users who want a smooth browsing experience across all sections.
Individuals who enjoy well organized online stores often seek platforms that emphasize clean layouts and elegant presentation for a more efficient shopping experience Ridge Atelier Style Market – providing a refined digital shopping environment where products are displayed with structured clarity and elegant design making browsing easier more intuitive and visually appealing for everyday users
While reviewing different online platforms, I stumbled upon explore this site – It features a clean design style, and nothing feels cluttered while browsing through sections, making the experience very easy to manage.
As I was checking different platforms online, I discovered check this galleria link – It uses a simple layout that works well, and pages are straightforward and easy to read, making everything easy to follow.
As I explored various film showcase pages, I came across this creative cinema project site and film related content appears artistic, engaging, and thoughtfully presented style, offering visuals that feel expressive, stylish, and immersive.
While exploring various online educational resources and creative marketplaces that aim to improve user engagement and discovery experiences across different topics Pure Value Outlet Hub – the platform stands out as an engaging environment that encourages exploration and idea development with a smooth learning flow and consistently inspiring creative tools for users at all levels.
While analyzing ecommerce platforms designed around seamless checkout systems and cart usability, I observed that flexible cart options improve navigation and reduce friction, which became evident when testing dynamic cart experience center – The cart feels easy to manage, and the checkout process appears quick, straightforward, and user friendly.
Портал для туристов https://aliana.com.ua для путешественников: направления, маршруты, советы и лайфхаки. Подбор отелей, билетов и экскурсий, идеи для отдыха и полезные рекомендации. Планируйте поездки легко и открывайте новые страны с комфортом.
Shoppers often rely on clear navigation menus and responsive layouts when using Goods Arena Explorer Hub as it ensures they can move between sections easily and complete their browsing goals without confusion or unnecessary effort throughout their visit.
People exploring modern e commerce platforms often appreciate when they discover tools such as dynamic product hub which streamlines browsing and enhances product discovery while offering a clean and intuitive interface for comparing various categories efficiently across multiple sections today online
People who frequently shop online tend to prefer websites that focus on fast browsing and clear deal structures where quick shopping nest center is featured in guides and it highlights a system designed to simplify shopping while ensuring users can quickly discover products and enjoy a smooth checkout process across all categories.
покупка данных gobasego-2.ru .
Consumers exploring digital stores often look for platforms that help them navigate through offers and discounts without unnecessary complications online deals navigator hub guiding users toward relevant products while improving shopping accuracy and convenience – This reflects how smart navigation tools enhance the online buying experience significantly.
As I continued browsing through business advice websites, I ran into this useful insight page and appreciated how the content delivers relevant and practical suggestions in a way that feels easy to follow and implement.
Improved design consistency ensures that users experience a more unified interface, with clearer sections and better visual balance throughout Caramel Cove Browsing Hall – The site now offers a refined browsing journey, where content is easier to interpret and navigation feels fluid and intuitive today.
Эта информационная статья охватывает широкий спектр актуальных тем и вопросов. Мы стремимся осветить ключевые факты и события с ясностью и простотой, чтобы каждый читатель мог извлечь из нее полезные знания и полезные инсайты.
Что скрывают от вас? – срочный вывод из запоя
While conducting comparative research on ecommerce UX and structured navigation systems, I observed that clean shopping hubs improve usability and engagement, which was clear when testing smooth product access hub – The shopping experience is clean, and navigating through sections feels effortless and intuitive.
Этот интересный отчет представляет собой сборник полезных фактов, касающихся актуальных тем. Мы проанализируем данные, чтобы вы могли сделать обоснованные выводы. Читайте, чтобы узнать больше о последних трендах и значимых событиях!
Кликни и узнай всё! – сколько стоит капельница от запоя
While reviewing different ecommerce platforms focused on layered interface design and usability improvements, I noticed that stacked layouts often make browsing more efficient by allowing users to scroll smoothly through organized product sections, which became clear when analyzing stacked shopping hub interface – The stacked marketplace design feels intuitive and easy to scroll, making it simple for users to find different items without confusion or unnecessary navigation complexity across the platform.
As I continued reviewing several websites, I found check this trade hub – It has a smooth experience overall, and navigation feels quick and very user friendly, ensuring everything is easy to find.
Актуальний сучасний український журнал Різні це джерело натхнення, новин і корисних матеріалів. Читайте статті про життя, тренди та розвиток у зручному форматі
Users exploring digital marketplaces frequently appreciate well arranged layouts and clean visuals especially when visiting Seaside Frost Market Goods Hub The site looks neat and everything is structured properly which helps users navigate smoothly and find what they need without confusion.
briansclub https://https-bclub.tk
заказать кухню в интернете заказать кухню в интернете
заказать кухню с замером https://zakazat-kuhnyu-17.ru
Эта обзорная заметка содержит ключевые моменты и факты по актуальным вопросам. Она поможет читателям быстро ориентироваться в теме и узнать о самых важных аспектах сегодня. Получите краткий курс по современной информации и оставайтесь в курсе событий!
Не упусти шанс – срочный вывод из запоя
заказать кухню сайт заказать кухню сайт
During a comparative study of online marketplaces emphasizing speed and usability, I discovered that fast cart systems enhance browsing comfort and engagement, which became clear when reviewing rapid access shopping center – The platform responds well and loads quickly, making the shopping corner highly efficient.
заказать кухню в интернете заказать кухню в интернете
While checking out multiple online resources, I stumbled upon click here now – The site is well structured, and navigation feels natural and straightforward, helping users browse through content without any unnecessary complexity.
заказать кухню каталог заказать кухню каталог
People who prefer streamlined shopping experiences often choose online merchant platforms that allow them to explore products easily and complete purchases with minimal effort or confusion Harbor Everyday Market Space – offering a practical digital marketplace designed for simple browsing organized product categories and efficient shopping flow that helps users quickly locate and purchase items for daily use with ease
сео с гарантией результата сео с гарантией результата
While exploring premium secondhand showcases, I noticed premium secondhand showcase and the presentation feels refined, with carefully organized items that emphasize quality and visual harmony across the page. – It feels sleek, elegant, and thoughtfully arranged overall today now experience here browse.
Этот информативный текст отличается привлекательным содержанием и актуальными данными. Мы предлагаем читателям взглянуть на привычные вещи под новым углом, предоставляя интересный и доступный материал. Получите удовольствие от чтения и расширьте кругозор!
Есть чему поучиться – сколько стоит поставить капельницу в екатеринбурге
Shoppers browsing modern marketplaces typically expect clear navigation menus, fast page loading, and a visually balanced interface that supports easy product discovery Smart Goods Station Center – A well optimized platform enhances user satisfaction by reducing friction and allowing visitors to explore items efficiently across multiple sections without interruptions.
Across various digital creativity hubs and educational browsing environments, structure and inspiration play a major role in user satisfaction and engagement levels Pure Value Discovery Hub – the platform offers a balanced experience where users can comfortably explore resources while feeling motivated to generate new ideas and insights effortlessly.
Users interested in discovering new items quickly often rely on Item discovery hub which streamlines exploration and helps highlight relevant products based on browsing patterns making it easier to find suitable choices without wasting time during online sessions – designed for fast discovery.
заказать кухню на заказ заказать кухню на заказ
During a casual browsing session across different websites, I noticed visit this link – It presents a clean interface with a straightforward structure, which makes understanding the layout fast and effortless while navigating through different sections.
Shoppers who value convenience in online shopping often look for platforms that make deal discovery quick and simple where quick discount update hub appears in guides and it reflects a structured system designed to improve usability while helping users quickly compare products and complete transactions without unnecessary delays or complications.
People who regularly shop online tend to choose websites that provide both security and responsive customer care where safe order shopping point is included in guides and it highlights a reliable system designed to ensure smooth transactions while maintaining strong buyer protection and helpful service throughout the entire shopping process.
mooncovegalleria.shop – Nice structure and clarity, everything is easy to find quickly.
In the process of exploring motivational content, I came across this encouragement and support page and really like the message behind this, feels genuine and supportive, with a tone that feels honest and genuinely uplifting.
During usability testing of ecommerce cart systems and checkout experiences, I discovered that structured cart flows improve clarity and performance, which became clear when exploring simple cart workflow hub – The open cart solution feels functional, and shopping steps are straightforward and easy to understand.
The latest interface improvements show clearer content separation and more refined layout balance, with Crystal Cove Browsing Lounge positioned naturally within the content flow, while the browsing experience feels stable, structured, and visually relaxing overall.
Нужны срочно деньги? https://buhgalter-uslugi-moskva.ru подайте заявку онлайн и получите деньги в кратчайшие сроки с прозрачными условиями и удобным погашением
While reviewing ecommerce platforms with structured and minimal navigation design, I came across a module titled clean layout shopping port – The interface keeps navigation simple and intuitive, allowing users to browse products easily while maintaining a neat and well organized structure throughout the platform.
Если вам нужна профессиональная верификация GMB в условиях российских ограничений — обратитесь к специалисту напрямую.
Users searching for simple online shopping experiences often prefer websites that focus on usability and clear product categorization, including platforms designed to minimize complexity and enhance the speed at which customers can locate desired items Quick Deck Store built to support organized browsing while ensuring that users can move between categories with ease and clarity – The experience is tailored to make navigation faster and more efficient for regular shoppers
During a comparative study of online marketplaces emphasizing cart usability and efficiency, I discovered that optimized cart systems improve conversion flow, which became clear when reviewing smart checkout solutions center – The experience feels seamless, allowing users to browse and complete checkout without interruptions.
Users exploring e-commerce platforms frequently prefer clean layouts and simple navigation especially when visiting Birch Harbor Market Access I like how organized it is making exploring very convenient and allowing users to find what they need quickly and without unnecessary effort.
продвижение сайта дешево под ключ александр продвижение сайта дешево под ключ александр
While going through countryside stay options, I discovered this Fisherman’s Retreat scenic lodge page and the location feels peaceful, scenic, and ideal for relaxing stays experience, with imagery that suggests a calm and refreshing environment.
продвижение сайтов процент продвижение сайтов процент
People who prefer streamlined shopping experiences often explore platforms that use boutique hall designs to keep product presentation simple curated and easy to navigate Glade Ridge Boutique Space Hub – providing a refined e commerce platform that emphasizes curated product organization and clean layout design helping users enjoy a smooth and visually balanced online shopping experience
продвижение сайтов в гугл и яндекс москва продвижение сайтов в гугл и яндекс москва
Digital shoppers frequently value platforms with minimal clutter and efficient layout systems, especially when they explore GoodsZone Smart Access as it enables smooth browsing and helps users find products quickly without unnecessary distractions or confusing interface elements.
In evaluations of modern e-commerce systems, clarity and responsiveness are often cited as essential features that enhance browsing efficiency when using platforms such as Hazel Harbor Commerce Studio Link – Smooth browsing experience, products are clearly displayed and accessible, ensuring users can navigate categories effortlessly while enjoying a structured and intuitive product discovery process overall.
As I continued reviewing multiple websites, I found check this resource – The overall look feels neat and cohesive, making the browsing experience feel smooth and pleasant.
As I browsed through informational campaign sites, I encountered this Simpsons-related Stride page and this looks meaningful and worth spending some time exploring, with a layout that feels structured and content that seems purposeful and readable.
Trusted platform buy uk facebook accounts offers premium accounts with verified quality, complete credentials, and instant automated delivery. Step-by-step documentation accompanies every order, covering login procedure, security setup, and recommended first actions after access. From first purchase to ongoing scaling, the platform supports every stage of a media buyer’s operational journey.
Quality-focused marketplace free 2017 discord account runs multi-step verification on every listing before it reaches the catalog to protect buyer interests. Product cards display exact specifications including account age, verification level, included assets, geo origin, and current stock availability. Whether you need accounts for testing or production campaigns, the catalog covers every tier from entry-level to premium.
drughub darknet url https://onion-darknet-markets.com/
darknet market links https://darknet-markets-onion.com/
dark web market list https://darknetmarketsreview.com/
While reviewing ecommerce platforms focused on minimalistic design and user-friendly navigation, I noticed that simple cart systems greatly improve usability and reduce confusion during browsing, which became clear when exploring minimal shopping cart hub – The simple design makes shopping easy and intuitive, ensuring users face no confusion while navigating through the site and its categories.
Updated layout improvements ensure consistent spacing and better readability throughout the interface across all devices and screen sizes Meadow Cotton User Hub – Navigation feels more predictable and user friendly, allowing visitors to move between sections without confusion or unnecessary effort.
As I reviewed various online stores, I came upon this easy marketplace link and noticed interesting products, with browsing feeling quick, simple, and very convenient overall.
In modern online shopping environments users often prioritize usability and fast access especially when visiting Commerce Cove Marble Portal Hub The interface is simple and it works really well for quick browsing making it easy to move through different sections without confusion.
Online shoppers who prefer structured digital marketplaces often appreciate platforms designed with a merchant lane setup where products are arranged into clear sections allowing smooth navigation and easy discovery across different categories for a better overall browsing experience Maple Coast Merchant Lane Hub – offering a clean merchant lane style shopping environment where products are organized into clearly defined sections designed to help users browse smoothly and find items quickly without confusion in a well structured online store experience
заказать кухню по своим размерам заказать кухню по своим размерам
Shoppers exploring digital storefronts today usually expect clean structure and fast loading pages that reduce friction during browsing sessions, particularly when they land on CleverTrend Shop – The design keeps things visually appealing and easy to follow, helping users move through categories without confusion while maintaining a stylish experience overall.
Процесс реабилитации алкоголиков включает в себя несколько методов, направленных на восстановление как физического, так и психоэмоционального состояния пациента. В Москве доступны различные программы, от традиционной детоксикации до современных подходов, при этом в отдельных случаях предусматривается вывод данных о состоянии пациента и динамике лечения при алкогольной зависимости, включая когнитивно-поведенческую терапию и арт-терапию.
Получить дополнительные сведения – клиника реабилитации алкоголиков
Growth-focused store buy cheap discord account is built specifically for performance marketers who value transparency, speed, and predictable account quality. Quality monitoring runs continuously — accounts are spot-checked after listing to maintain catalog integrity and buyer satisfaction rates. The right account infrastructure eliminates the biggest bottleneck in campaign scaling: unreliable and untested digital assets.
Trusted platform youtube account with monetization buy offers premium accounts with verified quality, complete credentials, and instant automated delivery. The team provides onboarding guidance for new buyers and ongoing operational support for teams managing high-volume campaign portfolios. The most successful media buying teams share one trait: they invest in quality infrastructure before they invest in ad spend.
Specialized store купить аккаунт яндекс метрика focuses exclusively on accounts proven to perform in paid advertising with real spend history and trust indicators. The selection includes profiles sorted by registration method, warming protocol, age, and included assets so buyers can match accounts to their specific needs. Smart account sourcing is the foundation of profitable advertising — start with verified profiles and scale with confidence.
While reviewing ecommerce systems designed for structured navigation and smart organization, I observed that well categorized marketplaces improve clarity and efficiency, which was evident when testing organized product hub – The platform is intelligently structured, making it easy to browse and locate products quickly.
In research on e-commerce interface design and customer engagement across digital storefront environments Honey Cove Smart Shopping Atelier specialists note that intuitive systems improve satisfaction rates – users find the platform easy to use with minimal learning curve required.
заказать кухню онлайн заказать кухню онлайн
While conducting a comparison of ecommerce design styles, I encountered comfort style marketplace hub – The layout feels welcoming and easy to use, offering a cozy browsing environment that supports smooth navigation and helps users discover products without unnecessary distractions or visual overload.
сколько стоит заказать кухню https://zakazat-kuhnyu-18.ru
darknet sites https://darknetmarketsreview.com/
Dedicated platform facebook account farming helps performance teams find the right account infrastructure for scaling their advertising operations efficiently. The knowledge base includes working guides for account warming, ad launch protocols, and reinstatement check procedures for reference. Experienced buyers return for the consistency Ч same quality standards, same fast delivery, same professional support every time.
Online shopping experiences improve significantly when platforms prioritize usability and clear structure, allowing users to find products faster and with less effort, and this is the goal of ValuePath Market – It ensures a smooth flow from browsing to checkout while maintaining a focus on affordability and practical product selection for everyday needs
Analysis of the updated browsing environment shows improved consistency, and within the central paragraph there is Calm Cove Adventure Store placed as part of the flow, while surrounding sentences focus on enhanced usability, reduced visual noise, and a more streamlined experience that helps users locate information more efficiently.
Users exploring digital marketplaces frequently appreciate well structured layouts and easy navigation especially when visiting Collective HarborStone Vendor Center The experience felt smooth and nothing was confusing while navigating which made it simple to explore products and sections without difficulty.
Помощь на дому рассматривают при состояниях, которые сопровождаются заметным ухудшением самочувствия после алкоголя. Обычно это несколько дней запоя, тяжелое похмелье, дрожь в руках, бессонница, выраженная слабость, раздражительность, тревога, тошнота, сухость во рту, отсутствие аппетита и признаки обезвоживания. В таких случаях осмотр врача нужен для оценки тяжести состояния и определения безопасной тактики.
Получить дополнительные сведения – https://narkolog-na-dom-moskva-19.ru/
заказать кухню через интернет заказать кухню через интернет
Реабилитация алкоголиков в Москве представляет собой многократный процесс восстановления, который включает несколько этапов, направленных на очищение организма, психологическое восстановление и возвращение пациента к полноценной жизни. Этапное восстановление помогает обеспечить стабильный результат и минимизировать риск рецидива, позволяя человеку постепенно вернуться к нормальной социальной и трудовой жизни.
Исследовать вопрос подробнее – https://reabilitacziya-alkogolikov-moskva-3.ru/
сколько стоит заказать кухню по размерам https://zakazat-kuhnyu-20.ru
As I explored various online platforms, I reached open this resource and found the content neat and organized, with simple navigation that made everything easy to browse through.
Shoppers who value variety and engagement often prefer platforms that use trading post concepts to make browsing feel dynamic with diverse product selections that enhance discovery and usability Harbor Wave Flow Trading Hub – offering a structured marketplace where products are organized using trading post inspiration designed to create dynamic browsing experiences and help users explore categories in an engaging and efficient way
In the process of evaluating digital retail systems focused on affordability and promotions, I found that deal corners improve usability by simplifying the discovery of discounts, which became evident when reviewing smart deal savings center – The deals seem attractive and useful, creating a strong impression that users can find good savings here easily and efficiently.
Many online users exploring trend-focused websites appreciate structured layouts and intuitive interfaces that reduce effort during browsing, particularly when they visit Trend Corner Explorer – The platform offers a seamless design flow that keeps browsing simple and enjoyable while making it easy to find new and relevant trends without confusion.
During my exploration of independent seller directories and online collective hubs, I discovered a reference to Independent vendor showcase access link which offers a consolidated view of vendor storefronts and their products helping users navigate various marketplace sections more efficiently – I considered it useful for browsing small business collections
Домашний выезд обычно выбирают тогда, когда человеку трудно добраться до медицинского учреждения, он ослаблен после нескольких дней употребления спиртного или родственникам важно быстро получить врачебную оценку состояния. После осмотра определяют, допустим ли домашний формат, нужна ли капельница, достаточно ли наблюдения на дому или следует рассматривать другой объем помощи. Уже на этапе первичного обращения нередко уточняют, как вызвать врача, какие наркологическая услуги доступны на дому, возможен ли срочный выезд круглосуточно и в каких случаях вывод из запоя безопаснее проводить не дома, а в стационаре.
Разобраться лучше – http://narkolog-na-dom-moskva-17.ru
Нарколог на дом в Москве — это формат медицинской помощи, который рассматривают при состояниях после употребления алкоголя, когда больному требуется осмотр врача без поездки в клинику. Чаще всего обращение связано с запоем, выраженным похмельным синдромом, нарушением сна, тревогой, слабостью, тремором, обезвоживанием, скачками давления, сердцебиением и общим ухудшением самочувствия. Дальнейшая тактика зависит от состояния больного на момент осмотра, продолжительности употребления алкоголя, возраста и сопутствующих заболеваний.
Получить больше информации – запой нарколог на дом
darknet drug market https://onion-darknet-markets.com/
dark markets 2026 https://darknetmarketsreview.com/
Процесс реабилитации алкоголиков с комплексным подходом в Москве состоит из нескольких этапов, начиная от медицинской детоксикации, включающей курс процедур и вывод из состояния зависимости, и заканчивая психологической реабилитацией и социальной адаптацией. Этот процесс занимает обычно от нескольких недель до нескольких месяцев в зависимости от стадии зависимости и состояния пациента. Важной особенностью комплексной реабилитации является внимание не только к физическому состоянию, но и к эмоциональному состоянию пациента, что помогает предотвратить рецидивы и наладить нормальные отношения с окружающим миром.
Подробнее можно узнать тут – reabilitacziya-alkogolikov-moskva-2.ru/
Последние публикации: https://regalbuild.ru
Посмотреть на сайте: https://franshiza-remontoff.ru
In reviewing multiple online outlet resources, I found a page that emphasized organized categories and smooth user flow Hollow Creek shop portal which allows visitors to browse comfortably without distractions – The overall feel is simple and quite efficient for everyday users browsing online
Вывод из запоя на дому с медицинским контролем в Екатеринбурге предлагает множество преимуществ, которые делают этот метод более удобным и безопасным для многих людей. Отсутствие необходимости в госпитализации и наличие профессионального контроля являются основными положительными аспектами этой услуги.
Получить дополнительную информацию – вывод из запоя на дому цена
Магазин бытовой химии https://bytovaya-sfera.ru большой выбор средств для уборки, стирки и ухода за домом. Качественная продукция, доступные цены и быстрая доставка
В этом исследовании рассмотрены методы лечения зависимостей и их эффективность. Мы проанализируем различные подходы, используемые в реабилитационных центрах, и представим данные о результативности программ. Читатели получат надежные и научно обоснованные сведения о данной проблеме.
Детальнее – вывод из похмелья капельница
Срочный онлайн займ займ 30000 на карту быстрое решение финансовых вопросов. Оформление за несколько минут, высокий шанс одобрения и перевод денег на карту без лишних документов
While exploring international charity racing events, I discovered support racing initiative hub and interesting concept overall, seems well organized and quite engaging today, offering a blend of sport and humanitarian purpose that feels thoughtfully arranged and easy to understand for visitors. – It feels meaningful and clearly structured.
While comparing e-commerce browsing platforms, I encountered efficient bargain browser that improves product discovery – this shopnetmarket.shop service offers structured navigation, enabling users to explore deals more effectively and make quicker decisions without being slowed down by overly complex or cluttered interface elements during shopping.
While examining the platform layout and category arrangement, users notice improved spacing and clearer navigation paths where Chestnut Harbor Trading Portal is placed naturally within the content flow, and overall interface updates are being discussed across sections – Good structure overall, browsing feels straightforward and not confusing at all, with users reporting that page transitions feel smoother and more predictable during everyday use across different devices.
В этой публикации мы обсуждаем современные методы лечения различных заболеваний. Читатели узнают о новых медикаментах, терапиях и исследованиях, которые активно применяются для лечения. Мы нацелены на то, чтобы предоставить практические знания, которые могут помочь в борьбе с недугами.
Изучить вопрос глубже – капельница от запоя в стационаре
During a comparative study of international online retail systems focused on global cart integration and product diversity, I discovered that unified cart models enhance usability and selection efficiency, which stood out when analyzing worldwide cart experience portal – The store operates with a global cart concept, providing a wide variety of online products that feel easy to browse and access from one place.
Поводом для обращения обычно становятся слабость, тремор, тревога, бессонница, учащенный пульс, нестабильное давление, тошнота и ощущение физического истощения. Эти проявления часто усиливаются после прекращения употребления алкоголя или на фоне затянувшегося запоя.
Подробнее – http://www.domen.ru
Этот информативный текст сочетает в себе темы здоровья и зависимости. Мы обсудим, как хронические заболевания могут усугубить зависимости и наоборот, как зависимость может влиять на общее состояние здоровья. Читатели получат представление о комплексном подходе к лечению как физического, так и психического состояния.
Открыть полностью – вывод из алкогольного запоя нарколог24
Individuals who prefer relaxing online marketplaces often enjoy platforms that use lakefront lounge concepts to enhance browsing flow and make product discovery more visually appealing and stress free Velvet Lakefront Curated Lounge Hub – featuring a refined e commerce experience where calming lakefront aesthetics enhance product organization and create a smooth browsing journey that feels peaceful and user friendly across all categories
In the course of checking various online shopping directories and vendor ecosystems, I arrived at Local vendors collective browsing link which appeared to streamline access to multiple vendors and product categories making it easier to explore different shops within a single platform – overall it felt organized and accessible for browsing purposes
While comparing online marketplaces designed for smooth user experience, I discovered smart deal cart corner which focuses on accessible product listings and fast browsing – Hyper Cart Corner provides a really easy shopping experience with affordable products and fast delivery, ensuring shoppers can quickly find what they need without unnecessary complexity or clutter in navigation.
В этой медицинской статье мы погрузимся в актуальные вопросы здравоохранения и лечения заболеваний. Читатели узнают о современных подходах, методах диагностики и новых открытий в научных исследованиях. Наша цель — донести важную информацию и повысить уровень осведомленности о здоровье.
Получить дополнительные сведения – вывод из запоя цена
Digital shoppers often look for intuitive interfaces and clean design that improves navigation efficiency, especially when they visit Trend Clever Mart Hub – The platform ensures a smooth browsing flow that allows users to explore products easily while maintaining a well structured and visually balanced layout.
In evaluations of digital shopping environments focused on enhancing user satisfaction through intuitive design and streamlined marketplace navigation structures Icicle Foundry Vendor Atlas reviewers highlight usability strengths – Nice experience overall browsing feels simple and very efficient with organized interface design quick loading performance and easy product comparison features supporting seamless exploration.
Комплексная реабилитация алкоголиков в Москве помогает пациентам не только избавиться от зависимости, но и вернуться к полноценной жизни. Процесс восстановления включает в себя не только лечение алкоголизма как физического заболевания, но и работу с психологическими, социальными и эмоциональными аспектами, которые могут стать причиной или следствием зависимости. Такое подходное лечение, как правило, требует усилий со стороны как специалистов, так и самого пациента.
Исследовать вопрос подробнее – алкоголик реабилитация наркоманов в москве
Many users enjoy platforms that present neon themed shopping centers with easy navigation and a wide variety of useful products available Neon Cart Flow Product Hub enhancing browsing – It is frequently described as modern and user friendly with well structured categories
Вывод из запоя на дому с медицинским контролем — это процесс, при котором нарколог или медсестра приезжает к пациенту на дом для проведения необходимых процедур. Основной задачей является снятие абстинентного синдрома, восстановление водно-электролитного баланса и нормализация общего состояния пациента, при этом оказывается наркологическая помощь. Этот процесс проходит под наблюдением квалифицированных специалистов, что помогает избежать осложнений, часто возникающих при самостоятельном выходе из запоя, а в дальнейшем может потребоваться кодирование и реабилитация.
Получить больше информации – анонимный вывод из запоя на дому в екатеринбурге
Digital retail innovation focuses on improving speed, usability, and reliability for customers seeking efficient online purchasing options QuickEdge Trade Zone – This system enhances user experience through optimized navigation and reliable transaction handling processes.
В данной публикации мы поговорим о процессе восстановления от зависимости, о том, как вернуть себе нормальную жизнь. Мы обсудим преодоление трудностей, значимость поддержки и наличие программ реабилитации. Читатели смогут узнать о ключевых шагах к успешному восстановлению.
Получить дополнительную информацию – вывод из запоя капельница
darknet websites https://darknetmarketsreview.com/
nexus dark web https://onion-darknet-markets.com/
People exploring digital marketplaces often enjoy websites that act as premium goods corners with solid collections of items and smooth browsing experiences for efficiency Premium Goods Trend Flow Corner enhancing usability – It is commonly described as clean and user friendly with intuitive navigation tools
While analyzing platforms focused on shopping efficiency, I discovered smart shopping indexer that improves deal organization – this shopnetmarket.shop interface helps users navigate product categories smoothly, ensuring faster access to relevant items and a more structured browsing experience overall for online shoppers seeking convenience.
Нарколог на дом в Москве: круглосуточный выезд, детоксикация и лечение зависимостей в наркологической клинике «Клиника доктора Калюжной».
Получить дополнительные сведения – вызвать нарколога на дом
Users exploring e-commerce platforms frequently appreciate clean interfaces and well structured layouts especially when visiting Goods Cove Forest Atelier The platform looks polished and organized giving a professional impression that makes browsing smooth easy and visually pleasant overall.
Many shoppers prefer rapid goods zones delivering fast shopping zone with simple layout and useful product range, making online purchasing easier, faster, and more organized overall ClearCart Rapid Goods Zone Hub – Provides structured browsing flow and optimized product discovery system
In my exploration of various online outlet-style resources, I discovered a page that seemed designed for simple navigation and clarity Hollow Creek outlet directory making it easy to browse without feeling overwhelmed – The layout gives a steady and predictable flow across all sections
References:
Vind penge på casino med høj udbetaling
References:
http://git.yanei-iot.com:600/makaylaheighwa/8263blackcoin/wiki/Casinoer-med-h%C3%B8j-RTP-2026-F%C3%A5-Bedre-Vinderchancer-Online
During a comparative study of online retail systems emphasizing modern design principles and cart usability, I discovered that corner-based layouts enhance navigation and customer satisfaction, which stood out when analyzing clean cart experience portal – The interface appears modern and well structured, making the shopping experience easy, comfortable, and user friendly overall.
Вывод из запоя на дому требуется в тех случаях, когда человек сталкивается с длительным непрерывным употреблением алкоголя, которое приводит к тяжелым последствиям для организма. Это состояние опасно не только для здоровья, но и для жизни, поэтому быстрое вмешательство специалистов необходимо, при этом можно заказать наркологическая помощь. Врач на дому помогает пациенту выйти из запоя безопасно, минимизируя риски для его здоровья, что является особенно важно для больного, включая случаи наркомании, а также с учетом его данных, возраста (в том числе после 40–50 лет) и актуальной цена лечения для тех, кто не хочет или не может пройти лечение в стационаре.
Подробнее тут – анонимный вывод из запоя на дому в екатеринбурге
Online retail users appreciate smooth design systems that reduce browsing complexity significantly BrowseEase Market – A seamless interface improves satisfaction by making product discovery faster while maintaining clarity and ensuring that users remain focused on relevant items throughout the journey
While going through several online pages, I discovered explore this site – The site is clean and organized, helping users find information without delay.
В этой публикации мы предлагаем подробные объяснения по актуальным вопросам, чтобы помочь читателям глубже понять их. Четкость и структурированность материала сделают его удобным для усвоения и применения в повседневной жизни.
Это ещё не всё… – лечение наркомании на дому
Дополнительным поводом для вызова врача становится состояние, при котором больному трудно вставать, пить воду, есть, сохранять спокойствие или ориентироваться в самочувствии. В таких случаях осмотр на дому позволяет быстрее определить дальнейший маршрут помощи. Иногда уже первый звонок помогает понять, допустим ли домашний формат или лучше сразу рассматривать вывод в стационаре.
Исследовать вопрос подробнее – запой нарколог на дом
За выездом врача чаще обращаются тогда, когда человеку тяжело добраться до клиники, он ослаблен после нескольких дней употребления алкоголя или родственникам важно быстрее понять, какая тактика будет безопасной. После осмотра можно определить, нужна ли капельница, достаточно ли детоксикации на дому, требуется ли повторное наблюдение, а в дальнейшем — консультация по лечению алкоголизма, кодирование или реабилитация. В части случаев уже первый звонок позволяет понять, идет ли речь только о временном ухудшении самочувствия или о состоянии, при котором может потребоваться вывод из запоя в стационаре.
Выяснить больше – вызов нарколога на дом в екатеринбурге
Нарколог на дом в Москве: выезд врача на дом, лечение запоя и консультации в наркологической клинике «Клиника доктора Калюжной».
Изучить вопрос глубже – вызов нарколога на дом москва
Smart consumers are always on the lookout for platforms that make it easier to discover genuine discounts and limited time promotional offers online Deal explorer online without spending unnecessary time browsing countless websites or unreliable sources that may not provide real value or savings opportunities – Users benefit from regularly updated listings that help them stay ahead of price drops and seasonal shopping trends effectively
While checking multiple marketplace aggregation platforms for informational purposes, I discovered a link pointing to Guild Meadow digital storefront index which structured vendor listings in a clear hierarchy, and after spending a few moments there I felt the navigation was intuitive and smooth – overall the design seemed minimal and functional
Эта разъяснительная статья содержит простые и доступные разъяснения по актуальным вопросам. Мы стремимся сделать информацию понятной для широкой аудитории, чтобы каждый мог разобраться в предмете и извлечь из него максимум пользы.
Ознакомиться с теоретической базой – срочно врач нарколог на дом
When analyzing modern e-commerce platforms designed for accessibility and efficient product discovery, reviewers consistently mention the importance of clean navigation structures Icicle Commerce Navigator Point overall usability remains strong, with items presented in an organized layout that helps shoppers locate and compare products quickly without unnecessary complexity or distractions during browsing sessions across categories.
Shoppers frequently appreciate platforms that offer straightforward navigation and minimal clutter when browsing online stores, especially on Crystal Goods Buy Hub – Everything feels simple and consistent, making it easy for users to find products while enjoying a dependable and smooth shopping experience overall.
As I explored different online sources, I landed on see this option and it appeared informative at a glance, making me think it could be worth exploring more deeply in the future.
Эта статья погружает вас в увлекательный мир знаний, где каждый факт становится открытием. Мы расскажем о ключевых исторических поворотных моментах и научных прорывах, которые изменили ход цивилизации. Поймите, как прошлое формирует настоящее и как его уроки могут помочь нам строить будущее.
Есть чему поучиться – врач капельница алкоголь на дом
Shoppers today often value platforms that combine curated selections with quick browsing features so they can find products without unnecessary delays Neon Pick Flow Hub enhancing browsing experience – It is frequently appreciated for its clean interface and efficient product categorization system
black ops darknet link https://darknet-markets-onion.com/
Эта информационная статья охватывает широкий спектр актуальных тем и вопросов. Мы стремимся осветить ключевые факты и события с ясностью и простотой, чтобы каждый читатель мог извлечь из нее полезные знания и полезные инсайты.
Что скрывают от вас? – прокапаться от алкоголя цена
Этот интересный отчет представляет собой сборник полезных фактов, касающихся актуальных тем. Мы проанализируем данные, чтобы вы могли сделать обоснованные выводы. Читайте, чтобы узнать больше о последних трендах и значимых событиях!
Полная информация здесь – врач нарколог на дом нарколог 24
Домашний формат выбирают тогда, когда человеку тяжело добраться до медицинского учреждения, он ослаблен после нескольких дней употребления алкоголя или родственникам важно быстро получить врачебную оценку состояния. После осмотра определяют, допустима ли помощь на дому, требуется ли детоксикация, нужна ли капельница, достаточно ли домашнего наблюдения или следует сразу рассматривать другой объем помощи. Если эпизоды повторяются, обсуждение может выходить за рамки одного выезда и включать лечение алкоголизма, помощь при зависимости, кодирование, участие психолога и реабилитацию. Уже на этапе первичного обращения нередко уточняют, как вызвать врача, какие услуги доступны на дому и в каких условиях домашний формат остается безопасным.
Выяснить больше – вызов нарколога на дом
Мы собрали для вас самые захватывающие факты из мира науки и истории. От малознакомых деталей до грандиозных событий — эта статья расширит ваш кругозор и подарит новое понимание того, как устроен наш мир.
Личный опыт — читайте сами – вывод из запоя на дому в воронеже
Первоначально врач оценивает физическое и психоэмоциональное состояние пациента, что позволяет определить степень тяжести запоя и риски, с которыми может столкнуться пациент в процессе восстановления. На основе этой оценки подбирается соответствующая терапия, включая капельницы для очистки организма, введение витаминов и препаратов, способствующих нормализации давления и уровня сахара в крови.
Выяснить больше – вывод из запоя на дому цена екатеринбург
В Нижнем Новгороде выезд нарколога на дом используется при состояниях, требующих оперативной медицинской оценки и начала терапии. Врач приезжает с необходимыми препаратами, проводит осмотр и формирует план лечения на месте. Такой формат позволяет сократить время до начала помощи и снизить нагрузку на пациента.
Углубиться в тему – наркологическая помощь анонимно в нижнем новгороде
Many shoppers prefer websites that reduce confusion and improve clarity especially when they visit Atelier Commerce Forest Cove The layout is intuitive and well structured making everything easy to find while ensuring a pleasant and efficient browsing experience for users across all pages.
Осмотр особенно важен при нескольких днях употребления алкоголя подряд, выраженной слабости, дрожи в руках, нарушении сна, учащенном пульсе, нестабильном давлении, тошноте и признаках обезвоживания. Эти симптомы часто сочетаются и могут усиливаться в течение ближайших часов после прекращения употребления.
Углубиться в тему – вызвать нарколога на дом
Across various online shopping platforms, users often look for tools that consolidate offers into one place, and this example demonstrates that purpose deal aggregation finder – it provides a clean and efficient way to explore multiple discounts without needing to switch between different websites repeatedly.
Many digital shoppers appreciate rapid style corner systems that deliver stylish items available here with quick browsing and smooth interface, helping them explore fashion collections more efficiently while maintaining a visually organized layout QuickBrowse Style Corner Selection Hub – The interface ensures fast loading pages and intuitive category navigation
Отдельного внимания требуют случаи, когда больной почти не ест, плохо пьет воду, не может спокойно лежать, жалуется на сильное сердцебиение, нехватку сна или выраженное внутреннее напряжение. В такой ситуации осмотр помогает определить, безопасно ли оставаться дома и какого объема помощи достаточно на текущем этапе. Если речь идет о выраженных проявлениях абстинентного синдрома, затягивать с обращением нецелесообразно.
Детальнее – врач нарколог на дом екатеринбург
Нарколог на дом в Екатеринбурге — это формат помощи, который рассматривают при состояниях после употребления алкоголя, когда больному требуется врачебный осмотр без поездки в клинику. Обычно речь идет о запое, выраженном похмельном синдроме, нарушении сна, обезвоживании, слабости, треморе, тревоге, скачках давления, сердцебиении и общем ухудшении самочувствия. Дальнейшая тактика зависит от состояния больного на момент осмотра, длительности употребления алкоголя и наличия сопутствующих заболеваний.
Получить больше информации – нарколог на дом
In the course of evaluating online retail platforms focused on product diversity and user convenience, I found that all-in-one stores enhance browsing flow by simplifying navigation, which was evident when analyzing wide selection shopping hub – The platform provides a large variety of items, making it easy to browse and find products in one location.
Реабилитация с индивидуальным подходом позволяет значительно повысить вероятность успешного избавления от зависимости. Она помогает учитывать не только физиологические аспекты зависимости, но и личные проблемы пациента, его психологическое состояние и отношения с окружающим миром. Индивидуальная программа также увеличивает мотивацию пациента и снижает риск рецидивов. В некоторых случаях лечение наркомании или запоя может быть предоставлено бесплатно, в зависимости от программы социальной поддержки или доступных государственных услуг.
Выяснить больше – клиника реабилитации алкоголиков город
While exploring several marketplace-style websites for design comparison and user experience insights, I encountered a page that emphasized simplicity, clear categorization, and efficient browsing flow that supports quick access to different sections without confusion Hollow Ridge shopping portal which presents a smooth browsing structure across multiple categories – Overall the experience feels balanced, with clear hierarchy and readable layout choices that guide users naturally through the site without confusion or unnecessary effort.
Digital shoppers appreciate websites that maintain consistent design patterns and smooth navigation flows that help them explore products without confusion or delay where Digital Style Basket – the system enhances overall experience by organizing content clearly and enabling users to move between sections with ease and confidence
Эта статья погружает вас в увлекательный мир знаний, где каждый факт становится открытием. Мы расскажем о ключевых исторических поворотных моментах и научных прорывах, которые изменили ход цивилизации. Поймите, как прошлое формирует настоящее и как его уроки могут помочь нам строить будущее.
Лови подробности – цена вывода из запоя в стационаре
Эта познавательная публикация погружает вас в море интересного контента, который быстро захватит ваше внимание. Мы рассмотрим важные аспекты темы и предоставим вам уникальные Insights и полезные сведения для дальнейшего изучения.
Читать далее > – вывод из алкогольного запоя нарколог24
Online shoppers frequently value platforms that reduce search time and improve accessibility when browsing through large collections of everyday goods and essentials Smart Shopping Corner – The experience is often highlighted as smooth and practical, allowing users to focus more on selection rather than dealing with complicated navigation tools
While browsing different curated online spaces, many users appreciate smooth navigation and clean layouts that help them stay engaged with content, and one example is seen when exploring Daisy Cove Gallery Shop – The browsing experience feels intuitive and visually balanced, with thoughtful spacing and smooth transitions that make it easy for visitors to explore products and content without distraction, creating a calm digital environment overall.
During research into curated commerce hubs and artisan marketplace listings I found a structured link pointing to Ivory Cove vendor catalog portal which was placed in a grouped directory and after reviewing it briefly I noticed the pages loaded smoothly – overall it felt like a useful platform and I enjoyed exploring its neatly arranged sections
Портал об автомобилях https://autort.ru новости автопрома, обзоры моделей, тест-драйвы и советы по выбору. Актуальная информация для водителей и автолюбителей
Женский журнал https://justwoman.club онлайн: мода, красота, здоровье и отношения. Актуальные статьи, советы экспертов и идеи для вдохновения каждый день
Мировые новости https://vse-novosti.net актуальные события со всего мира: политика, экономика, технологии и общество. Оперативные обновления и проверенная информация каждый день
Актуальные новости мира https://tovarpost.ru оперативная информация, аналитика и обзоры. Узнавайте о главных событиях и трендах международной повестки
Эта статья погружает вас в увлекательный мир знаний, где каждый факт становится открытием. Мы расскажем о ключевых исторических поворотных моментах и научных прорывах, которые изменили ход цивилизации. Поймите, как прошлое формирует настоящее и как его уроки могут помочь нам строить будущее.
Уточнить детали – нарколог на дом
Откройте для себя скрытые страницы истории и малоизвестные научные открытия, которые оказали колоссальное влияние на развитие человечества. Статья предлагает свежий взгляд на события, которые заслуживают большего внимания.
Тыкай сюда — узнаешь много интересного – нарколога домой
While passing time online and opening random pages, I reached visit this webpage and found it to be a solid platform, with content that felt relevant and clearly structured throughout.
In various analyses of online marketplace systems prioritizing organization and ease of use Trading House Isle Grid – Diverse selection of goods is structured clearly, allowing smooth browsing experiences where users can quickly understand categories and find suitable products.
Online retail environments are designed to support customer convenience by offering structured categories and extensive product lists that simplify the shopping experience PrimeRange Shopping Zone – It focuses on delivering a balanced combination of variety and usability, ensuring users can navigate easily while exploring a wide selection of goods tailored to everyday needs.
Shoppers frequently look for e-commerce platforms that offer smooth usability and clear design especially when accessing Digital Arena Product Hub – The interface is modern and well structured allowing users to browse efficiently while enjoying fast page response times.
dark market list https://darknetmarketsreview.com/
Many digital users enjoy platforms that showcase trendy products in a neon styled bazaar with a simple and intuitive interface layout Neon Trend Ultra Bazaar Hub making shopping easier – The website is often appreciated for its clean design and smooth navigation flow
During usability testing of digital shopping platforms focused on layout efficiency, I discovered that stacked product displays enhance browsing speed and comprehension, which became evident when exploring efficient stack shopping hub – The layout feels organized and structured, helping users browse products clearly and without confusion.
Online users often value websites that offer professional layout and clarity especially when they land on Trading Gallery Harbor Jasper The platform feels polished and carefully structured making browsing simple comfortable and visually appealing without unnecessary complexity or distractions.
Online users appreciate rapid trend hubs that feature trend hub offering fresh items and easy navigation for users, allowing them to quickly explore trending items without confusion or delays FlowCart Rapid Trend Hub Portal – Designed for optimized browsing and responsive shopping experience
While researching digital shopping platforms that emphasize usability, I encountered quick shop browser which streamlines browsing across categories – Simple shopping experience with clear layout and easy product access supports faster exploration of products, ensuring users can find what they need efficiently without dealing with complex menus or confusing navigation structures.
Каждый элемент программы направлен на создание комплексного подхода к лечению зависимости, обеспечивая помощь не только на физическом, но и на эмоциональном уровне. Индивидуальная программа реабилитации позволяет выстроить эффективную терапию, которая соответствует конкретным потребностям пациента.
Исследовать вопрос подробнее – клиника реабилитации алкоголиков в москве
Users exploring modern e-commerce platforms often expect clean design and easy navigation between product categories Smart Cart Market Hub delivers structured browsing experience while improving accessibility and helping users find products faster across the entire website overall smooth user flow
Процедура проходит под наблюдением квалифицированного врача, что минимизирует риски для здоровья пациента и помогает ускорить процесс восстановления. Важно, что такой подход позволяет избежать госпитализации, что для многих пациентов является дополнительным комфортом.
Получить больше информации – анонимный вывод из запоя на дому в екатеринбурге
E-commerce users often appreciate platforms that prioritize efficiency and structure while still offering a broad range of products suitable for daily use and general needs Fast Order Station – The experience is frequently described as smooth and efficient with an emphasis on quick browsing and simplified purchasing processes that improve overall satisfaction
References:
Mest seriøse casinoer med høj udbetaling
References:
http://sglpw.cn/home.php?mod=space&uid=684218
In the process of exploring various digital storefronts and e-commerce catalog systems, I encountered a platform that provided a clean and structured layout which helped users navigate between sections easily while maintaining a consistent and organized browsing experience Honey Fern e-shop link acting as a simple gateway for product exploration – The overall feel is modern and minimal, making browsing efficient and easy to follow.
During a casual review of digital commerce hubs and independent storefront directories I encountered a listing pointing toward Ivory Ridge commerce corner hub which appeared within a grouped marketplace index and after briefly checking it I found the sections well structured and easy to move through – overall it felt smooth and navigation was straightforward with clearly organized content
During a relaxed browsing session across several websites, I ended up checking check this site and noticed some interesting content along the way, including useful details that made the experience worth a quick look today.
During analysis of online retail systems focused on digital goods and electronics, I discovered that tech-centric platforms enhance user experience by offering relevant products, which became clear when testing digital product shopping hub – The platform feels sleek and modern, showcasing tech items that look appealing and useful.
dark matter darknet market https://onion-darknet-markets.com/
darknet site https://darknet-markets-onion.com/
Медицинский портал https://vet-com.ru о здоровье: симптомы, методы лечения и профилактика. Достоверная информация и рекомендации для всей семьи
Автомобильный портал https://avtomechanic.ru ремонт, обслуживание и диагностика. Практические советы, лайфхаки и полезная информация для водителей
During general browsing across the web, I noticed open this useful site – The layout is structured in a way that supports easy navigation and a user friendly experience.
Всё об автомобилях https://web-mechanic.ru на одном портале: характеристики, сравнения, рейтинги и рекомендации. Узнайте больше о новых и популярных авто
Many digital shoppers today prefer websites that offer simple navigation fast loading pages and clean design especially when accessing CartArena Digital Shop – The browsing experience feels smooth and intuitive while product listings are shown clearly making shopping easier and more enjoyable overall for users.
People exploring e commerce platforms often value central hubs that highlight modern trends with updated product selections and easy navigation features Neon Trend Style Center Hub making usability better – It is commonly described as modern and visually appealing with structured browsing system
Женский портал https://cosmoreviews.club мода, красота, здоровье и отношения. Полезные статьи, советы экспертов и идеи для вдохновения каждый день
Актуальные новости https://komputer-nn.ru технологий: ИИ, программное обеспечение, смартфоны, планшеты и гаджеты. Свежие обзоры, аналитика и главные события IT-сферы
In e-commerce browsing experiences users often expect smooth performance and quick navigation especially when accessing Flora Atelier Vendor Ridge Shop The site provides a lag free experience where pages transition smoothly making it easy for users to explore products without interruption.
Online buyers enjoy rapid trend outlets that provide outlet deals on trending products with simple and clean structure, making shopping more efficient and helping users locate offers without confusion or unnecessary steps EasySelect Trend Outlet Access Hub – Built for usability, fast navigation, and simplified product discovery
People who frequently shop online often prioritize platforms that combine speed, clarity, and dependable transaction handling Rapid Order Hub designed with user comfort in mind – it simplifies each stage of shopping while ensuring performance remains consistent and reliable throughout the browsing session
References:
Casinoer med dokumenteret høj udbetaling
References:
https://mailersbag.com/index.php?route=journal3/blog/post&journal_blog_post_id=9
E-commerce platforms are more effective when they provide smooth browsing experiences and reduce friction during product search and selection processes ZoneStyle Cart Point – this system enhances usability by keeping listings well arranged and ensuring customers can explore categories without confusion or unnecessary complexity involved.
Users exploring digital shopping platforms usually look for convenience and variety combined in a single interface for easier product discovery Hyper Cart Discovery Zone helping them navigate through different categories effortlessly while saving time during online shopping – It is widely appreciated for its structured and accessible design
кухни на заказ санкт петербург https://kuhni-spb-58.ru
кухни на заказ кухни на заказ
производство кухонь в спб на заказ производство кухонь в спб на заказ
During my research into online commerce directories and small vendor ecosystems I encountered Ember Brook shop collective index which presents a range of vendor profiles and categorized product listings in a simplified layout – I found it useful for quickly reviewing different marketplace participants
In the course of evaluating online shopping UX designs, I discovered a section called tree structure browsing center – The interface uses a hierarchical layout that simplifies product discovery and allows users to navigate categories smoothly without confusion or unnecessary visual distractions affecting usability.
While reviewing multiple retail-style websites, I found one that stood out due to its clean design and logical structure, offering easy navigation through sections that include a href=”//indigoharborstore.shop/](https://indigoharborstore.shop/)” />Indigo Harbor storefront access page embedded within the interface – The overall experience feels efficient and straightforward, supporting smooth browsing across all categories.
Каждый из этапов важен для успешного лечения наркомании и требует квалифицированной наркологической медицинской помощи. Реабилитационные программы, предлагаемые в Москве, часто включают в себя все эти компоненты, при этом в ряде случаев консультации могут предоставляться бесплатно, что способствует комплексному подходу к решению проблемы зависимости.
Получить дополнительную информацию – https://reabilitacziya-alkogolikov-moskva-3.ru
While conducting comparative research on ecommerce UX and browsing structures, I observed that flow-based navigation enhances user satisfaction by simplifying transitions between categories, which was clear when testing smart navigation flow index – The design ensures smooth movement across sections, making browsing feel effortless and organized.
cannaexpress darknet https://darknetmarketsreview.com/
In assessments of modern vendor platforms experts frequently highlight the importance of clear navigation fast loading times and well structured product catalogs for better usability Ivory Cove Product Grid users can browse efficiently with minimal effort and easily compare items across different categories
Many users exploring e-commerce options today prefer platforms that combine simplicity with variety while offering seamless navigation and responsive product discovery tools online systems Fresh Market Hub is designed to represent a more flexible shopping approach that adapts to user needs – Wave market brings fresh goods and smooth shopping pathways that help customers quickly locate products while enjoying an organized and efficient digital retail experience overall
silk road market darknet https://onion-darknet-markets.com/
Всё для сада https://ogorodik66.ru и огорода на одном сайте: парники, теплицы, выращивание и уход. Практичные рекомендации и полезные материалы для дачников
шкаф шкафы купе на заказ москва
изготовить шкаф на заказ https://шкафы-заказать.рф
мебель по размерам москва изготовление мебели на заказ
Хочешь обучаться? складчина курсов сервис для поиска выгодных предложений на обучение. Получайте знания легально и экономьте на образовании
People exploring online stores frequently prefer platforms that offer an exciting trend zone with fresh items and an intuitive browsing layout Neon Trend Select Zone Hub improving experience – The website is often recognized for its clean interface and smooth navigation system that enhances usability
Users exploring digital marketplaces frequently appreciate readable layouts and organized content flow especially when visiting Cove Atelier Hazel Commerce Center The presentation is clean and easy to follow making it comfortable for users to read through information while browsing products.
Online shoppers often value centralized layouts that enhance clarity and reduce complexity especially when visiting Smart Digital Cart Center – The platform ensures smooth navigation through cart options making browsing simple efficient and user friendly across all categories.
Этот обзор предлагает структурированное изложение информации по актуальным вопросам. Материал подан так, чтобы даже новичок мог быстро освоиться в теме и начать использовать полученные знания в практике.
Всё, что нужно знать – вывод из запоя на дому
Shoppers enjoy streamlined websites that highlight trending products with organized sections and fast navigation features for better experience design flow Trend Stream Zone Hub Flow – helping users browse efficiently while maintaining clarity and smooth transitions between categories across all devices and platforms used daily online
While exploring various shopping marketplaces, I came across a platform that stood out for its clean design and structured navigation supporting easy product discovery BuyZone market selection page placed within the content area – The overall experience feels smooth and user friendly with a wide variety of products available for browsing without complexity.
Медицинская публикация представляет собой свод актуальных исследований, экспертных мнений и новейших достижений в сфере здравоохранения. Здесь вы найдете информацию о новых методах лечения, прорывных технологиях и их практическом применении. Мы стремимся сделать актуальные медицинские исследования доступными и понятными для широкой аудитории.
Детальнее – капельница от похмелья стоимость
В этом интересном тексте собраны обширные сведения, которые помогут вам понять различные аспекты обсуждаемой темы. Мы разбираем детали и факты, делая акцент на важности каждого элемента. Не упустите возможность расширить свои знания и взглянуть на мир по-новому!
Слушай внимательно — тут важно – капельница от алкоголя на дому
кухню заказать кухню заказать
Эта публикация дает возможность задействовать различные источники информации и представить их в удобной форме. Читатели смогут быстро найти нужные данные и получить ответы на интересующие их вопросы. Мы стремимся к четкости и доступности материала для всех!
Где можно узнать подробнее? – врач на дом капельница от запоя
References:
Høj udbetalingsprocent casino
References:
https://heylloow.com/@suzannapridham
Этот информационный обзор станет отличным путеводителем по актуальным темам, объединяющим важные факты и мнения экспертов. Мы исследуем ключевые идеи и представляем их в доступной форме для более глубокого понимания. Читайте, чтобы оставаться в курсе событий!
Лучшее решение — прямо здесь – прокапать от алкоголя
People often choose e commerce platforms that provide both speed and simplicity in browsing Infinity Smart Cart making the entire shopping experience more enjoyable and efficient for users – It is commonly appreciated for its organized product layout and easy navigation system
Shoppers who enjoy exploring curated online deals often prefer websites that showcase style focused discounts in a clean and accessible environment Discount Style Storefront It presents an organized shopping experience where promotional offers are highlighted clearly helping visitors save time while discovering attractive items across multiple categories and seasonal collections
While exploring different online options, I came across visit here now – It uses a simple design that works well, and pages load fast while feeling clean and organized.
During research into curated online marketplaces and artisan storefront networks I discovered Honey Cove commerce directory hub which structured listings in a consistent and readable format – overall the design felt simple and the information was easy to follow across different pages
silk road url https://darknetmarketsreview.com/
покупка базы покупка базы .
прямые кухни на заказ от производителя прямые кухни на заказ от производителя
кухни на заказ спб каталог кухни на заказ спб каталог
В этом обзорном материале представлены увлекательные детали, которые находят отражение в различных аспектах жизни. Мы исследуем непонятные и интересные моменты, позволяя читателю увидеть картину целиком. Погрузитесь в мир знаний и удивительных открытий!
Изучить аспект более тщательно – вывод из запоя круглосуточно воронеж
darkmarket url https://darknet-markets-onion.com/
dark web market links https://onion-darknet-markets.com/
In reviewing multiple online shop templates I noticed one that stood out because of its clean structure and efficient layout design Inked Meadow storefront link Inked Meadow storefront link It enables quick browsing through categories and maintains a calm interface that supports users in finding products without unnecessary effort or confusion during the process overall experience
Этот информационный обзор станет отличным путеводителем по актуальным темам, объединяющим важные факты и мнения экспертов. Мы исследуем ключевые идеи и представляем их в доступной форме для более глубокого понимания. Читайте, чтобы оставаться в курсе событий!
Открой скрытое – вывод из запоя дешево
Many users exploring modern online marketplaces often appreciate how straightforward navigation can improve browsing speed and product discovery efficiency, especially when dealing with structured catalogs and clear category systems, and in this context Ivory Ridge Vendor Corner Hub the overall interface feels clean, intuitive, and easy to understand, making it simple for visitors to move through different sections without confusion or unnecessary complexity.
https://www.24propertyinspain.com/user/profile/1434315 https://www.24propertyinspain.com/user/profile/1434315
https://greekcrafts.site/wiki/Casinos_mit_bester_Auszahlungsquote_2026_Hohe_Gewinnchancen https://greekcrafts.site
https://sportpoisktv.ru/author/peonyghana22/ sportpoisktv.ru
https://www.giveawayoftheday.com/forums/profile/1833372 http://www.giveawayoftheday.com
https://philosophywiki.space/wiki/Casinos_mit_hohem_RTP_und_top_Gewinnchance_2026 philosophywiki.space
https://sportpoisktv.ru/author/peonyghana22/ sportpoisktv.ru
https://bbs.airav.cc/home.php?mod=space&uid=4592945 https://bbs.airav.cc/
https://apunto.it/user/profile/886111 https://apunto.it/user/profile/886111
https://youralareno.com/members/flarecave75/activity/260191/ https://youralareno.com/
https://truckwiki.site/wiki/Online_Casino_Auszahlung_Beste_schnellste_Anbieter_2026 truckwiki.site
https://matkafasi.com/user/clickpeony64 matkafasi.com
http://qa.doujiju.com/index.php?qa=user&qa_1=winecobweb57 qa.doujiju.com
https://www.blurb.com/user/irancobweb38 http://www.blurb.com
https://eskisehiruroloji.com/sss/index.php?qa=user&qa_1=sprucejames70 eskisehiruroloji.com
http://kriminal-ohlyad.com.ua/user/hailblock75/ kriminal-ohlyad.com.ua
https://www.forum.uookle.com/home.php?mod=space&uid=1416919 http://www.forum.uookle.com
http://www.jzq5.cn/space-uid-342041.html http://www.jzq5.cn/space-uid-342041.html
http://www.qazaqpen-club.kz/en/user/shadetree22/ http://www.qazaqpen-club.kz
http://www.gtcm.info/home.php?mod=space&uid=1367057 http://www.gtcm.info/
http://xhdyz.cn/home.php?mod=space&uid=766013 http://xhdyz.cn
http://bbs.sdhuifa.com/home.php?mod=space&uid=1114556 http://bbs.sdhuifa.com
References:
https://easyreadinglist.com/News/10-beste-serioese-anbieter-2026/
Users exploring online trading platforms often appreciate minimal design and clear structure especially when they visit Icicle Brook Trading Foundry Hub I appreciate the simplicity here because nothing feels cluttered at all making browsing easy calm and focused across all sections of the site without distraction.
Online buyers prefer systems that provide smooth transitions from browsing to checkout, especially when design and structure support a seamless shopping journey Royal Cart Flow Interface Hub – ensuring clear product organization, fast cart handling, and a polished user experience that simplifies the entire purchasing process online
Many digital shoppers appreciate platforms that serve as reliable cart stations with smooth checkout systems and organized shopping flow for efficiency Next Cart Express Hub Station making shopping easier – It is frequently noted for its clean layout and fast loading cart system
Users who want efficient browsing often rely on platforms that guide them through everyday products in a structured and easy to follow manner daily goods navigator – This approach is helpful because it allows shoppers to quickly locate necessary items and complete purchases without confusion or wasted time during browsing
Online shoppers often prefer digital stores with structured layouts and minimal complexity especially when visiting Digital Smart Cart Zone – The interface is clean and efficient improving usability while ensuring a smooth and natural shopping flow throughout the browsing experience.
pravdadaily.com.ua/chomu-khochetsia-spaty-vden-osnovni-prychyny-dennoi-sonlyvosti-i-sposoby-borotby/
В этом информативном обзоре собраны самые интересные статистические данные и факты, которые помогут лучше понять текущие тренды. Мы представим вам цифры и графики, которые иллюстрируют, как развиваются различные сферы жизни. Эта информация станет отличной основой для глубокого анализа и принятия обоснованных решений.
Детальнее – нарколог на дом вывод из запоя на дому
Digital shoppers appreciate platforms that organize goods effectively so they can browse comfortably and complete purchases without frustration FastTrack Cart Market improving the overall user journey – The platform is commonly described as smooth and practical with well arranged shopping sections
Online marketplaces designed around smart deal discovery help users compare offers easily while navigating through a wide selection of products and promotional campaigns efficiently Smart Deal Marketplace It is built to simplify shopping by aggregating discounted items and presenting them in a user friendly format that encourages informed purchase choices and better budgeting habits
cocorico darknet https://darknetmarketsreview.com/
https://capital360.com.ua/
m fortune https://m-fortune.info/
Наркологическая помощь в Нижнем Новгороде с выездом врача, капельницами и наблюдением пациента в наркологической клинике «Частный медик 24»
Детальнее – наркологическая помощь анонимно
During research into curated e-commerce ecosystems and storefront listing hubs I encountered studio marketplace gateway which was included within a structured vendor index and after exploring it briefly I noticed the presentation was simple – overall I thought it was a decent platform and it gave a clean and functional browsing impression
While conducting comparative research on ecommerce checkout systems and cart design efficiency, I observed that smart cart corners improve usability by keeping checkout steps organized and minimal, which was clear when testing intuitive purchase cart center – The layout feels practical, with a smooth and simple checkout flow that supports easy purchasing decisions.
Осмотр на дому особенно важен в тех случаях, когда больному трудно вставать, пить воду, принимать пищу, спокойно лежать или ориентироваться в собственном состоянии. В такой ситуации очная оценка помогает понять, допустим ли домашний формат и достаточно ли его на текущем этапе. При выраженном ухудшении состояния, признаках перегрузки организма или риске осложнений может потребоваться срочный пересмотр тактики.
Ознакомиться с деталями – narkolog-na-dom-moskva-19.ru/
nexus darknet shop https://darknet-markets-onion.com/
Вывод из запоя на дому в Екатеринбурге: помощь при запое, снятие интоксикации и медицинская поддержка в наркологической клинике «Детокс»
Получить дополнительные сведения – вывод из запоя на дому анонимно в екатеринбурге
Consumers exploring modern e-commerce solutions can enjoy a more streamlined browsing experience when visiting platforms that include Smart Cart Marketplace positioned within a wide selection of product categories, allowing users to compare items, access organized listings, and benefit from a simplified and efficient online shopping environment designed for daily needs and better decision making.
While casually going through different resources online, I stopped at open this page and noticed it appeared clean and user friendly, with a structure that made navigation straightforward and easy to follow.
During a casual session exploring various websites, I noticed open this cart station page – It uses a straightforward layout that helps you find what you need quickly and without hassle.
While reviewing curated ecommerce boutique websites I noticed a platform that emphasized elegant design combined with practical navigation features Iron Hollow premium boutique view resulting in a balanced browsing environment where users can explore products easily without unnecessary distractions or visual overload issues
Across various usability studies analyzing online retail platforms and structured vendor systems designed for efficient browsing and quick product discovery, Brook Jasper Commerce Forge is frequently noted since fast loading pages make the entire shopping journey feel smooth, responsive, and very reliable for users exploring different items without delays.
Online shoppers often look for platforms that combine elegance with affordability, where structured layouts help users discover deals quickly without confusion or unnecessary steps during browsing sessions Royal Savings Navigator Deal Hub – offering a clean interface, smooth navigation flow, and well organized product categories that make deal hunting simple and enjoyable for everyday users online
кухни под заказ кухни под заказ
https://capital360.com.ua/
Shoppers frequently appreciate platforms that deliver fast performance and clear layouts especially when visiting Drift Orchard Trading Hub Pages load fast and content is presented in an organized way making browsing simple efficient and enjoyable for users who want quick access to structured product information.
Many shoppers enjoy platforms that act as next generation buy hubs providing smart deals and a diverse product range in a modern interface Next Gen Buy Flow Access Hub making selection easier – It is commonly appreciated for its clean design and fast product discovery system
Users exploring online marketplaces typically look for smooth interfaces that guide them effortlessly through product selection stages Web Shopping Entry – The experience is designed to be intuitive and straightforward, reducing confusion during browsing and checkout processes for better usability overall
рулонные шторы с электроприводом на пластиковые окна рулонные шторы с электроприводом на пластиковые окна
рулонные шторы каталог цены https://elektricheskie-rulonnye-shtory99.ru
dark web link https://darknetmarketsreview.com/
Many users browsing e-commerce platforms value clarity and simplicity in design especially when they visit Trend Corner Browse Zone – The trend section feels organized and easy to navigate making browsing smooth and helping users discover content efficiently across the platform.
Решение о помещении пациента в стационар принимается на основе объективных медицинских критериев, а не только по желанию родственников. К показаниям относятся: запой длительностью более 72 часов, выраженная абстиненция с тахикардией, артериальной гипертензией, профузным потоотделением, наличие в анамнезе алкогольных делириев или судорожных эпизодов, сопутствующие хронические заболевания печени, сердца, поджелудочной железы. При отравление продуктами распада этанола, когда интоксикация затрагивает несколько систем одновременно, резкое прекращение употребления без медицинской поддержки может спровоцировать отек мозга, острую сердечную недостаточность или желудочно-кишечное кровотечение. При сочетанных расстройствах, когда в анамнезе присутствует наркомании, протоколы адаптируются под специфику психоактивных соединений и включают усиленный нейрологический контроль. Стационар позволяет провести полноценную диагностику, включая ЭКГ, экспресс-анализы крови и мониторинг сатурации, что формирует точную картину состояния и исключает шаблонные назначения.
Ознакомиться с деталями – нарколог вывод из запоя в стационаре санкт-петербург
Online shoppers often search for reliable platforms that bring together discounts and seasonal offers in one convenient place for easier browsing DealFinder Infinity Hub making it simpler to compare prices and save money across multiple categories – This platform is commonly appreciated for its updated promotional listings that help users discover valuable savings opportunities quickly
Выезд врача на дом рассматривают в ситуациях, когда человеку тяжело добраться до медицинского учреждения, он ослаблен после нескольких дней употребления спиртного или родственникам важно быстро получить очную оценку состояния. После осмотра определяют, допустим ли домашний формат, нужна ли капельница, достаточно ли наблюдения на дому или следует сразу рассматривать другой объем помощи. Если подобные эпизоды повторяются, дальнейшее обсуждение может касаться не только текущего состояния, но и лечения алкоголизма, кодирования, участия психолога, психиатра и реабилитации. В таких случаях наркологическая помощь рассматривается шире, чем разовый вызов на дом.
Узнать больше – запой нарколог на дом москва
Budget conscious shoppers appreciate online destinations that prioritize affordability while still maintaining an appealing and organized interface for browsing discounted products Budget Style Plaza – Here the platform concept is presented as a user friendly plaza style environment where savings are showcased clearly helping customers make quick and confident purchasing decisions without unnecessary effort or complicated browsing steps
Креативні привітання з днем народження чоловіку
During a casual review of various online commerce directories and small vendor platforms I encountered Ember Cove vendor hub listing portal which organizes different seller pages and product groupings in a unified interface and the loading speed seemed efficient while the written content remained easy to follow – it felt practical for quick browsing sessions
заказ кухни спб заказ кухни спб
В этом обзоре мы обсудим современные методы борьбы с зависимостями, включая медикаментозную терапию и психотерапию. Мы представим последние исследования и их результаты, чтобы читатели могли быть в курсе наиболее эффективных подходов к лечению и поддержке.
Подробнее тут – капельница от запоя в стационаре
During a comparative review of digital shopping platforms, I found a page labeled axis flow retail center – The interface is simple and structured, ensuring products are arranged logically so users can browse efficiently without feeling overwhelmed or distracted by unnecessary design complexity.
dark matter darknet url https://darknet-markets-onion.com/
Эти преимущества делают вывод из запоя на дому с медицинским контролем оптимальным решением для тех, кто хочет быстро и безопасно вернуться к нормальной жизни без необходимости посещать клинику.
Получить больше информации – vyvod-iz-zapoya-na-domu-ekaterinburg-18.ru/
https://www.pravdadaily.com.ua/pryvitannia-z-dnem-narodzhennia-zhintsi-u-virshakh-50-naykrashchykh-variantiv-dlia-vashoi-liubliachoi-zhinky/
ToLife designs https://tolifedehumidifier.com and manufactures compact dehumidifiers for residential use. The product line is based on semiconductor condensation technology and includes models with automatic shut-off, sleep mode, removable water tanks, and ambient lighting. Specifications and documentation are available on the official website.
заказать кухню в спб от производителя заказать кухню в спб от производителя
смотри тут https://forum-info.ru есть разборы таких случаев, люди пишут реальные отзывы и делятся опытом, особенно полезно почитать тем, кто уже столкнулся с подобной ситуацией
Not too long ago, while hopping between different shopping pages, I found discover more here – The selection seems nicely arranged, and the affordability factor really stands out, making it look like a place where you might actually enjoy browsing casually.
шкаф по размерам шкаф на заказ москва
As I navigated across several online pages, I encountered see this option and it seemed helpful, with a simple structure that made browsing comfortable and easy to follow.
Are you looking for a fast, safe and hassle-free transfer in Valencia? We offer professional transport and moving services, both for individuals and companies. Request your budget without obligation and enjoy a quality service: thrifty valencia airport
Many users enjoy shopping sites that maintain a balance between quality product selection and easy navigation, ensuring a smooth browsing experience across all sections Elegant Royal Goods Arena Hub – designed for clarity, speed, and organized browsing flow that enhances the overall digital shopping experience for users seeking efficiency and simplicity
Are you looking for a fast, safe and hassle-free transfer in Valencia? We offer professional transport and moving services, both for individuals and companies. Request your budget without obligation and enjoy a quality service: valencia airport private transfers
silk road market url https://darknetmarketsreview.com/
During a usability review of ecommerce and market style websites I found a platform that prioritized minimal design and structured content flow Leaf Iron catalog view integrated into the page layout and helping users navigate different sections effortlessly – The interface feels calm and straightforward making it easy for users to browse without distractions or unnecessary complexity in design
When analyzing user experience trends in e commerce platforms, researchers often emphasize how consistent design patterns and structured layouts contribute to better engagement and smoother browsing journeys across all device types and screen sizes Jasper Cove Retail Flow – The platform feels reliable and easy to use, with well arranged sections that support quick navigation and efficient browsing.
Shoppers often prefer digital stores that provide stable performance and clear navigation paths during product searches and purchases Seamless Cart Space ensuring users can browse comfortably while experiencing fast and reliable system responses throughout their session – The platform prioritizes simplicity and consistency for improved user engagement
In e-commerce environments users often prefer platforms that are stable and easy to use especially when visiting Fern Commerce Cove Atelier It looks reliable and well organized offering a browsing experience that feels smooth intuitive and comfortable while exploring various product categories online.
Состояние пациента при интоксикации может развиваться по-разному: от умеренной слабости и головной боли до выраженной дезориентации, тахикардии и нарушений сна. В таких ситуациях важно не откладывать обращение за помощью. Наркологическая помощь на дому рассматривается, когда требуется быстрое вмешательство и контроль состояния без транспортировки пациента.
Подробнее – оказание наркологической помощи в нижнем новгороде
Digital shoppers often value websites that reduce complexity and provide straightforward access to a wide variety of products in one place Corner Product Navigator Hub helping them save time during online browsing – It is commonly known for its structured design and efficient category organization
заказ кухни спб заказ кухни спб
Users exploring e-commerce platforms frequently prefer clean design and fast navigation especially when they visit Digital Deal Center Zone – The interface ensures smooth browsing of deals with structured layout that helps users quickly access offers and enjoy an efficient shopping experience overall.
Users looking for comprehensive shopping experiences often value platforms that bring together many categories in one structured and easy to navigate place Ultimate Goods Style Arena – It is presented as an all in one shopping arena where stylish products are grouped efficiently allowing users to explore a wide variety of goods seamlessly
Нарколог на дом в Екатеринбурге: круглосуточный выезд, детоксикация и лечение зависимостей в наркологической клинике «НЕО+».
Ознакомиться с деталями – https://narkolog-na-dom-ekaterinburg-1.ru/
During a casual scan of online commerce directories and artisan listing portals I found Flora Brook vendor insight hub which displayed cleanly organized marketplace data with readable formatting – I discovered useful insights while casually navigating through different sections
Вывод из запоя на дому требуется в тех случаях, когда человек сталкивается с длительным непрерывным употреблением алкоголя, которое приводит к тяжелым последствиям для организма. Это состояние опасно не только для здоровья, но и для жизни, поэтому быстрое вмешательство специалистов необходимо, при этом можно заказать наркологическая помощь. Врач на дому помогает пациенту выйти из запоя безопасно, минимизируя риски для его здоровья, что является особенно важно для больного, включая случаи наркомании, а также с учетом его данных, возраста (в том числе после 40–50 лет) и актуальной цена лечения для тех, кто не хочет или не может пройти лечение в стационаре.
Ознакомиться с деталями – вывод из запоя на дому анонимно
автоматические рулонные шторы с электроприводом на окна автоматические рулонные шторы с электроприводом на окна
карниз для штор электрический https://elektrokarniz150.ru
Нарколог на дом в Москве: срочный выезд врача, капельницы и помощь при запое в наркологической клинике «Клиника доктора Калюжной».
Подробнее – нарколог на дом москва
кухни на заказ спб недорого с ценами кухни на заказ спб недорого с ценами
рулонные занавески рулонные занавески
darknet markets url https://darknet-markets-onion.com/
Нарколог на дом в Екатеринбурге: анонимная помощь при алкоголизме, вывод из запоя и поддержка специалистов в наркологической клинике «НЕО+».
Подробнее тут – врач нарколог на дом в екатеринбурге
Дополнительным поводом для обращения становится состояние, при котором больному тяжело вставать, пить воду, есть, спокойно лежать или переносить обычную бытовую нагрузку. В таких ситуациях домашний осмотр помогает быстрее определить, какого объема помощи достаточно на текущем этапе. Если обращение связано не только с алкоголем, но и с подозрением на употребление наркотиков, оценка проводится особенно осторожно, поскольку при наркомании клиническая картина может быть иной.
Разобраться лучше – вызов нарколога на дом москва
While looking for something unique online, I found explore this option – It offers a simple layout and interesting items, making the overall browsing experience feel effortless and quite enjoyable.
Эта статья предлагает уникальную подборку занимательных фактов и необычных историй, которые вы, возможно, не знали. Мы постараемся вдохновить ваше воображение и разнообразить ваш кругозор, погружая вас в мир, полный интересных открытий. Читайте и открывайте для себя новое!
Углубить понимание вопроса – нарколог домой
Online shoppers appreciate systems that deliver consistent quality assurance and secure payment handling across all transactions Secure Quality Buy Portal – This platform ensures every purchase is processed safely while maintaining high levels of product integrity and service trustworthiness.
Хочешь отдохнуть? день рождения в воронеже уютный отдых за городом. Комфортные дома, природа, удобства и выгодные цены для выходных и праздников
https://capital360.com.ua/
abacus market darknet https://darknetmarketsreview.com/
Наиболее частыми поводами для вызова становятся несколько дней употребления алкоголя подряд, выраженная слабость, дрожь в руках, тревога, тошнота, нарушение сна, скачки давления, учащенный пульс и признаки обезвоживания. Эти симптомы могут сочетаться между собой и усиливаться по мере продолжения запоя или после резкого прекращения употребления.
Получить больше информации – narkolog-na-dom-ekaterinburg-3.ru/
Online users often prefer stations that provide regularly updated listings with a simple layout, ensuring smooth browsing and easy product discovery across categories Royal Goods Update Flow Hub Station – designed for clarity, speed, and organized browsing that enhances the digital shopping experience and improves user engagement significantly across devices
Эта статья погружает вас в увлекательный мир знаний, где каждый факт становится открытием. Мы расскажем о ключевых исторических поворотных моментах и научных прорывах, которые изменили ход цивилизации. Поймите, как прошлое формирует настоящее и как его уроки могут помочь нам строить будущее.
Детальнее – выезд нарколога на дом
Наиболее частыми причинами обращения становятся выраженная слабость, тремор, нарушение сна, тревога, учащенный пульс, скачки артериального давления, тошнота и признаки обезвоживания. Эти симптомы могут сочетаться между собой и усиливаться после прекращения употребления алкоголя, особенно после нескольких дней запоя.
Подробнее – нарколог на дом в екатеринбурге
While analyzing ecommerce platforms designed for structured browsing and navigation improvement, I observed that route systems help users move through product categories more efficiently, which was clear when testing easy route shopping hub – The interface provides clear navigation paths that make browsing intuitive, logical, and easy to follow throughout the entire experience.
Web developers searching for modular solutions often evaluate tools and plugins, and recently I came across cart builder toolkit which highlights flexible configuration options for online stores – it supports scalable e-commerce development, improves customization possibilities, and helps teams manage growing digital shops with less technical complexity and better efficiency overall in production environments.
Не каждый человек с зависимостью от алкоголя готов признать свою проблему и обратиться за помощью. Однако, когда зависимость достигает тяжелых форм, требуется профессиональное вмешательство, и комплексная реабилитация в наркологическом доме становится важнейшим этапом восстановления, при этом в некоторых случаях помощь может предоставляться бесплатно, а сама программа рассчитана на длительный срок — до нескольких лет. Признаки того, что нужна реабилитация, могут включать невозможность прекратить пить даже при наличии серьезных последствий для здоровья, социальной жизни и межличностных отношений.
Разобраться лучше – https://reabilitacziya-alkogolikov-moskva-2.ru/
https://ecopolis-spb.ru/tvorchestvo_all/
Users frequently choose e commerce platforms that ensure consistent updates and structured listings allowing them to browse products without unnecessary effort Goods Station Browse Point making shopping simpler – It is commonly appreciated for its organized catalog system and reliable updates across all categories
Users exploring digital vendor stores frequently prefer structured interfaces and clear organization especially when visiting Fern Cove Vendor Flow The layout is easy to follow and I did not have trouble locating key content or understanding how everything is arranged within the site.
In evaluations of modern e-commerce platforms emphasizing usability and clean interface design for improved customer journeys, analysts frequently highlight structured navigation systems that simplify exploration of large catalogs Jasper Harbor Commerce Display – Everything appears neatly organized, with strong visual clarity that helps users quickly understand product groupings and browse without confusion.
While testing different online shop interfaces for usability and design quality, I came across a site that impressed with its speed and clarity Iron Petal browse center embedded within the page – The layout is clean and responsive, making product browsing feel simple and visually enjoyable.
Shoppers exploring curated product collections online often prefer platforms that balance aesthetics with strong technical performance so they can enjoy smooth transitions between different product pages Ultra Stylish Goods Zone Center – This zone center delivers ultra stylish goods with optimized loading speed and a well structured interface designed to enhance browsing comfort and efficiency
While browsing digital commerce directories and niche marketplace aggregators I discovered FloraBrook marketplace discovery page which structured vendor entries in a readable and minimal design layout – I picked up useful insights while casually exploring the different sections available
Many shoppers appreciate platforms that combine usability and structured design especially when they land on Goods Explorer Digital Corner – Product listings are well arranged and easy to follow making browsing smooth efficient and enjoyable for users at all experience levels.
drughub shop https://onion-darknet-markets.com/
рулонные шторы виды механизмов рулонные шторы виды механизмов
купить рольшторы цены купить рольшторы цены
Many online customers appreciate e-commerce hubs that provide clear navigation and well structured product sections for faster decision making during shopping sessions Premium Goods Station Navigator Core Hub – The site design emphasizes usability and quick access ensuring users can move through categories without delays
While navigating through various shopping sites, I discovered have a look here – It gives the impression of a promising shop, featuring a wide selection and prices that don’t feel too overwhelming.
https://ecopolis-spb.ru/tvorchestvo_all/
В данной обзорной статье представлены интригующие факты, которые не оставят вас равнодушными. Мы критикуем и анализируем события, которые изменили наше восприятие мира. Узнайте, что стоит за новыми открытиями и как они могут изменить ваше восприятие реальности.
Полезно знать – наркологическая помощь на дому
dark matter darknet link https://darknetmarketsreview.com/
ролевые шторы ролевые шторы
рулонные. шторы. +на. пластиковые. окна. купить. https://rulonnye-shtory-s-elektroprivodom10.ru
рулонные. шторы. +на. пластиковые. окна. купить. https://rulonnye-elektroshtory.ru
Users enjoy shopping platforms that highlight trending fashion and lifestyle items in a structured corner format, ensuring better visibility and easier browsing experience Royal Elegant Trend Access Portal – focused on fast loading pages, intuitive navigation, and streamlined product discovery for improved convenience and user satisfaction throughout the platform
While browsing through different online platforms earlier today, I came across visit this platform and found it to be a nice site overall, with information presented clearly and pages that load smoothly without any noticeable delays during use.
Digital shoppers increasingly rely on platforms that provide fast access to limited time offers and clearly categorized promotional content for easier browsing Fast Bargain Center – This service ensures users can quickly explore discounted products while maintaining a streamlined interface designed for speed, convenience, and efficient deal discovery.
Online shoppers frequently look for platforms that combine trendy product displays with simple navigation tools for a smoother shopping journey across categories Style Trend Navigator making discovery of items more enjoyable – The website is often appreciated for its balanced design approach that focuses on usability and modern visual presentation
Many online users prefer websites that offer organized content and good spacing between sections especially when accessing ForestBrook Foundry Trading Market Everything appears well arranged and the spacing makes browsing comfortable giving users a smooth experience while exploring different pages and product categories.
Реабилитация алкоголиков с поддержкой специалистов в Москве представляет собой важный и сложный процесс, в котором ключевую роль играет профессиональное вмешательство. Программы реабилитации включают в себя не только медицинскую помощь, но и психологическую, социальную и эмоциональную поддержку, что способствует успешному и долгосрочному восстановлению пациента. Такая комплексная помощь является основой эффективного лечения и предотвращения рецидивов.
Подробнее тут – реабилитация алкоголиков
During a short search session online, I found open daisystone hub and after a quick look noticed everything appeared neat and easy today, providing a smooth and well organized browsing experience.
Online visitors often prefer carefully organized websites that display products in a visually pleasing and structured manner Curated Style Spot the spot delivers curated styling options with clean browsing features helping users locate desirable items efficiently and comfortably across multiple categories
Наиболее частыми причинами обращения становятся выраженная слабость, тремор, нарушение сна, тревога, учащенный пульс, скачки артериального давления, тошнота и признаки обезвоживания. Эти симптомы могут сочетаться между собой и усиливаться после прекращения употребления алкоголя, особенно после нескольких дней запоя.
Исследовать вопрос подробнее – вызвать нарколога на дом в екатеринбурге
Нужна стальная лента? лента бандажная для сип широкий ассортимент, разные толщины и марки стали. Выгодные цены, быстрая отгрузка и поставки для производства и строительства
While exploring multiple digital outlet stores for interface design insights, I discovered a website that presented its content in a clean and structured manner with easy navigation flow IronPetal deals outlet hub placed centrally within the layout – The browsing experience feels stable and user friendly, with clear category separation and smooth transitions between sections that improve overall usability.
drughub market link https://onion-darknet-markets.com/
dark markets https://darknet-markets-onion.com/
Many shoppers prefer websites that offer clarity and organized navigation systems especially when they visit Market Smart Digital Pick – The market interface is easy to understand making item selection simple efficient and ensuring a seamless shopping experience across all product sections.
Наиболее частыми причинами обращения становятся выраженная слабость, тремор, нарушение сна, тревога, учащенный пульс, скачки артериального давления, тошнота и признаки обезвоживания. Эти симптомы могут сочетаться между собой и усиливаться после прекращения употребления алкоголя, особенно после нескольких дней запоя.
Подробнее – нарколог на дом анонимно
I was exploring different online shops when I discovered explore this page now – The design looks neat and structured, helping users move between categories quickly and enjoy a smooth browsing experience overall.
Нарколог на дом в Екатеринбурге сегодня — это не просто медицинская услуга, а реальный шанс быстро и безопасно вернуть контроль над жизнью себе или своему близкому человеку. В крупном городе Урала, где ритм жизни высокий, а стресс и доступность веществ создают серьёзные риски, тысячи жителей ежегодно сталкиваются с проблемой зависимости. Алкоголь, синтетические наркотики, соли, спайсы — всё это требует немедленного профессионального вмешательства. Клиника «НЕО+» предоставляет полный выезд нарколога на дом в Екатеринбурге 24 часа в сутки, 7 дней в неделю. Мы гарантируем круглосуточный вызов нарколога, детоксикацию и лечение зависимостей, полную конфиденциальность и современные протоколы лечения 2026 года, которые позволяют купировать острое состояние уже в первые часы.
Детальнее – врач нарколог на дом
рулонные шторы купить москва недорого рулонные шторы купить москва недорого
Many users appreciate e-commerce platforms with curated product lists because they make browsing more enjoyable and significantly easier to manage Premium Pick Market Smooth View Hub – The website provides a clean layout and fast navigation tools that enhance usability and experience
torzon darkweb link https://darknetmarketsreview.com/
Online shopping platforms increasingly aim to make product discovery faster and easier by eliminating clutter and focusing on essential features only EasyRoute Shopping Center – It provides a smooth and simplified browsing experience designed to help users find products quickly and complete transactions with ease
In the process of evaluating ecommerce savings websites, I encountered a module labeled value discount browsing center – The design presents attractive deals in a clean format, encouraging users to browse further and explore products that stand out due to their affordability and structured presentation.
как отмыть умывальник и раковину простые способы чистки и советы по уходу
Digital users appreciate trend hubs that combine royal style elements with modern product selection, ensuring easy browsing and improved discovery Royal Trend Modern Flow Access Portal – designed for structured navigation, fast performance, and clean interface layout that improves shopping efficiency and overall user satisfaction across devices
карнизы для штор купить в москве https://elektrokarniz150.ru
Are you looking for a fast, safe and hassle-free transfer in Valencia? We offer professional transport and moving services, both for individuals and companies. Request your budget without obligation and enjoy a quality service https://trasladoavalencia.es/
https://ecopolis-spb.ru/tvorchestvo_all/
While exploring digital storefronts and online catalog systems, I found shopping grove navigator that organizes items into clear shopping sections – Shop tree market feels organized with useful categories for shoppers and enhances usability by making product discovery faster, more intuitive, and less time-consuming for users searching through different types of offers.
Online consumers often enjoy websites that display new fashion trends quickly so they can browse and shop without missing recent updates Instant Trend Style Portal making shopping smoother – It is appreciated for its fast content updates and well organized product categories
During my usual browsing routine, I encountered check store page and it immediately felt clean and structured – The browsing experience was smooth, and products are nicely arranged in a way that makes everything easy to browse without confusion.
Комплексный подход, включающий эти методы, значительно повышает шансы на успешное и долговременное восстановление. Современные реабилитационные центры в Москве предлагают целый ряд программ, которые способствуют полному возвращению пациента к здоровой и активной жизни.
Получить дополнительную информацию – реабилитация алкоголиков
Online shoppers often value platforms where products are presented in a way that encourages curiosity and repeated exploration over time, as seen on petal copper retail hub – browsing felt enjoyable because the items looked interesting and made the site feel worth revisiting for further exploration.
Online users often value websites that provide clear navigation and strong structure especially when they land on Guild Orchard Granite Hub The platform feels well put together and the presentation is solid giving users a comfortable and efficient browsing experience.
I spent some time looking around various websites and then found visit market here which seemed quite refreshing compared to others I had seen – The overall experience feels light, simple, and genuinely enjoyable for anyone just exploring casually.
As I browsed through different online pages earlier, I landed on go to trading hub and saw that everything was neatly arranged; I left a short remark – it provided a calm browsing experience with content that felt easy to scan and read.
Online consumers often value premium styled platforms that balance aesthetics with efficient transaction systems ensuring smooth shopping from start to finish Premium Goods Post – This post style structure focuses on delivering high quality product listings with a simplified checkout process designed for user convenience
Your article helped me a lot, is there any more related content? Thanks! https://accounts.binance.com/en-NG/register/person?ref=YY80CKRN
cocorico market link https://darknet-markets-onion.com/
электрическая рулонная штора электрическая рулонная штора
Вывод из запоя на дому с быстрым облегчением — это медицинская процедура, которая проводится в домашних условиях и направлена на устранение симптомов похмелья, нормализацию работы органов, пострадавших от алкоголя, и восстановление общего самочувствия пациента, включая проведение детоксикации. В отличие от стационарного лечения, вывод из запоя на дому предоставляет пациенту возможность пройти лечение анонимно, с возможностью вызова специалиста на дом, что способствует снижению стресса и лучшему восприятию процесса восстановления, при этом учитывается состояние больного, длительность запоя (в том числе несколько дней) и актуальная цена услуг.
Изучить вопрос глубже – анонимный вывод из запоя на дому екатеринбург
While searching for something new online, I encountered browse this collection – The site feels organized and visually clean, and the fast loading speed adds to a pleasant and uninterrupted browsing flow.
Many online shoppers today prefer websites that combine clarity and fast performance especially when accessing TrendCorner Explorer Market – The trend section is organized and easy to navigate allowing users to browse smoothly and enjoy a comfortable experience while exploring different categories.
darknet market list https://darknetmarketsreview.com/
Users looking for simple and effective shopping experiences often choose premium pick zones with a nice variety of picks and fast loading product pages for better usability Premium Pick Zone Easy Flow Hub – The website provides intuitive navigation and a clean interface that supports quick product discovery
Реабилитация алкоголиков с анонимной поддержкой — это процесс, при котором пациент получает необходимую медицинскую и психологическую помощь, не раскрывая своей личности и обстоятельств зависимости, включая лечение наркомании. Такие программы ориентированы на безопасное и конфиденциальное лечение, что важно для тех, кто стремится избавиться от зависимости, но опасается осуждения или утраты личной репутации, при этом возможен выезд нарколога на дом. Важно, что анонимность не ограничивает качество предоставляемых услуг: все необходимые этапы лечения, включая детоксикацию, психотерапевтические сессии и социальную реабилитацию, которые могут длиться несколько лет, проводятся на высоком уровне с акцентом на своевременный вывод из состояния зависимости.
Получить дополнительную информацию – http://www.domen.ru
Many shoppers prefer platforms that display premium trends in a clean and modern interface, making it easier to explore categories and find items quickly Royal Trend Fast Access Station Portal – offering simple navigation, organized sections, and smooth browsing performance that enhances usability and overall shopping experience quality
While casually browsing through different resources, I reached open this resource and noticed that the content felt fresh and easy to read without any difficulty.
Users frequently value e-commerce sites that present products in a way that feels engaging and encourages them to come back later, particularly on copperpetal goods center – browsing felt enjoyable since items looked interesting and gave a strong impression of being worth checking again.
как отмыть клей с бутылки как отмыть клей от этикетки с бутылки и как отмыть клей от бутылки эффективные способы удаления клея
Users often appreciate conceptual marketplaces that feel like virtual interpretations of quiet valleys and rural communities, where every product seems carefully placed to reflect simplicity and natural harmony hollow echo crafts hub – The idea portrays a gentle shopping environment focused on artisan-style goods and nature-inspired themes that create a relaxing and immersive browsing experience for visitors.
People browsing for inspiration in modern interior shopping spaces often come across websites that prioritize minimal clutter and structured product presentation while still offering variety and usability Modern Home Collection – the platform highlights thoughtfully arranged items that make it easier for shoppers to visualize how each piece fits into everyday living environments with ease
Online shoppers interested in luxury goods frequently look for websites that provide curated selections of high end items in one place Premium Luxury Access Hub making browsing seamless – It is often praised for its sophisticated interface and easy navigation across categories
Нарколог на дом в Москве: круглосуточный выезд, детоксикация и лечение зависимостей в наркологической клинике «Клиника доктора Калюжной».
Детальнее – вызов нарколога на дом москва
Дополнительным поводом для вызова врача становится состояние, при котором больному трудно вставать, пить воду, есть, сохранять спокойствие или ориентироваться в самочувствии. В таких случаях осмотр на дому позволяет быстрее определить дальнейший маршрут помощи. Иногда уже первый звонок помогает понять, допустим ли домашний формат или лучше сразу рассматривать вывод в стационаре.
Получить дополнительные сведения – вызов нарколога на дом екатеринбург
During a relaxed browsing session, I found see shop page and it immediately felt simple and neat – The browsing experience felt smooth, and products look nicely arranged in a way that makes everything easy to understand at a glance.
Users exploring new e commerce sites often highlight how important it is for pages to feel responsive and logically organized for better usability overall urban corner flash outlet the design feels balanced and easy to follow which encourages longer browsing sessions without frustration or confusion while navigating content
While casually browsing through various online marketplace directories and curated digital galleries for general research purposes I came across a structured listing that included Moon Cove gallery portal hub within a broader index page and after spending a short time exploring it I found the layout visually organized and easy to follow – overall I found it quite engaging and it might be worth revisiting again later for updates and new sections
как отмыть этикетки с бутылок и как отмыть этикетки от бутылок разные методы удаления наклеек
Online buyers frequently prefer platforms that highlight variety while keeping the interface simple and accessible across devices for better engagement Modern Deals Zone – The platform showcases a wide range of stylish products within a user friendly structure that supports smooth navigation and quick product discovery
Процесс реабилитации алкоголиков включает в себя несколько методов, направленных на восстановление как физического, так и психоэмоционального состояния пациента. В Москве доступны различные программы, от традиционной детоксикации до современных подходов, при этом в отдельных случаях предусматривается вывод данных о состоянии пациента и динамике лечения при алкогольной зависимости, включая когнитивно-поведенческую терапию и арт-терапию.
Подробнее – реабилитация алкоголиков город
рулонные шторы с электроприводом на окна рулонные шторы с электроприводом на окна
black ops darknet https://darknet-markets-onion.com/
drughub link https://onion-darknet-markets.com/
Срочный вызов нарколога на дом позволяет сразу оценить состояние пациента, снять симптомы абстиненции и начать детоксикацию организма. Капельницы от запоя и интоксикации составляются индивидуально с учётом новейших медицинских протоколов 2026 года: они включают нейропротекторы, гепатопротекторы и витаминно-минеральные комплексы последнего поколения. Это не просто очищение крови — это восстановление работы мозга, печени, сердечно-сосудистой системы и психики. Вызов нарколога на дом особенно востребован, когда требуется срочное снятие абстинентного синдрома. Круглосуточная помощь работает без перерывов, поэтому помощь приезжает даже ночью. Мы предлагаем возможность вывода из запоя в домашних условиях.
Подробнее – нарколог на дом в екатеринбурге
Мы собрали для вас самые захватывающие факты из мира науки и истории. От малознакомых деталей до грандиозных событий — эта статья расширит ваш кругозор и подарит новое понимание того, как устроен наш мир.
Изучить вопрос глубже – вывести из запоя воронеж
I had been browsing multiple websites before noticing visit this page now – The shop appears dependable, and the product details are presented clearly, making the browsing experience informative and smooth.
ironwavecollective.shop – Collective platform looks solid, easy access and well structured pages
darknet drug market https://darknetmarketsreview.com/
готовые рулонные шторы купить в москве готовые рулонные шторы купить в москве
Anyone interested in online retail options may find GoldenBay storefront experience quite appealing due to its balanced design, which supports easy navigation and helps users explore products in a relaxed and efficient shopping atmosphere.
Реабилитация алкоголиков с индивидуальной программой — это комплексный подход, включающий медицинскую, психотерапевтическую и социальную поддержку, направленный на восстановление человека после длительного злоупотребления алкоголем. Программа подбирается с учетом всех особенностей пациента, его состояния, сопутствующих заболеваний и эмоциональных проблем. Реабилитация не ограничивается только детоксикацией, но включает также работу с психологом и социальную адаптацию. В некоторых случаях может быть рекомендован выезд на дом для проведения лечения, а также кодирование, чтобы помочь пациенту справиться с зависимостью на всех этапах восстановления. Наркоманическая зависимость может требовать дополнительной терапии и профессиональной помощи для успешного преодоления всех трудностей.
Получить дополнительную информацию – алкоголик реабилитация наркоманов в москве
Процесс реабилитации алкоголиков включает в себя несколько методов, направленных на восстановление как физического, так и психоэмоционального состояния пациента. В Москве доступны различные программы, от традиционной детоксикации до современных подходов, при этом в отдельных случаях предусматривается вывод данных о состоянии пациента и динамике лечения при алкогольной зависимости, включая когнитивно-поведенческую терапию и арт-терапию.
Подробнее – реабилитация алкоголиков стоимость в москве
While testing various ecommerce checkout systems focused on performance and usability, I came across a section labeled quick cart shopping hub – The cart experience feels extremely fast and smooth, with responsive page loading that allows users to browse and add products without delays or interruptions during navigation.
Shoppers often prefer platforms that combine simplicity with efficiency, allowing them to explore products without unnecessary complexity or delays Quick Value Market – It emphasizes value-driven shopping experiences where users can quickly identify affordable products and make informed purchasing choices
готовые рулонные шторы купить в москве готовые рулонные шторы купить в москве
I was checking out different websites for fun and then encountered shop link here which had a clean and simple look – It feels like a relaxing place to browse without feeling overwhelmed or distracted.
Many online visitors appreciate when product displays are interesting enough to maintain attention and encourage future visits to the platform, especially on copper petal digital hub – the experience was pleasant since items seemed appealing and made the site feel worth revisiting for more exploration.
Many shoppers enjoy platforms that focus on practical goods with clean design and efficient navigation, making online shopping more comfortable and quick Savvy Smart Practical Goods Station Portal – designed for streamlined browsing, structured interface design, and improved product discovery that enhances overall shopping satisfaction
Shoppers looking for inspiration often prefer premium trend centers that serve as a great place for discovering updated trends and modern product ideas in an organized way Premium Trend Express Center Access – The platform delivers smooth navigation and structured categories that make browsing simple and efficient for all users
Online shoppers often look for platforms that make everyday purchasing easier while keeping navigation clean and fast for all users Easy Step Market – This store experience focuses on reducing steps in the checkout process while ensuring browsing remains smooth, intuitive, and responsive across different devices and internet conditions for better usability overall
Online shoppers often look for platforms that make buying simple through modern design elements and well organized product listings for convenience Modern Shop Access Point making navigation faster – The website is frequently recognized for its clean interface and smooth browsing experience
Вывод из запоя на дому с быстрым облегчением в Екатеринбурге является эффективным методом для тех, кто хочет быстро избавиться от неприятных симптомов абстиненции, не выходя из дома. Основное преимущество этого метода — это быстрый результат, минимальные риски для здоровья и отсутствие необходимости в стационарном лечении. Процедура, проводимая опытным медицинским специалистом, помогает не только устранить симптомы похмелья, но и восстановить нормальное состояние организма без стресса и неудобств для пациента.
Получить дополнительную информацию – анонимный вывод из запоя на дому в екатеринбурге
Users exploring e-commerce platforms frequently enjoy designs that feel open and breathable, especially when products are displayed in a clean and organized manner inspired by natural meadow aesthetics echo meadow marketplace hub – This represents a calm, nature-driven shopping environment where handcrafted and wellness-oriented goods are showcased in a fresh, uncluttered digital space.
I was casually browsing online when I found shop link here and it stood out with its simplicity – The clean layout and simple design made everything easy to explore, resulting in a smooth and stress-free browsing experience.
While casually browsing through online content, I came across see the details and noticed it seemed like a solid site, with information presented clearly and a layout that made browsing simple and comfortable throughout.
В этом информативном обзоре собраны самые интересные статистические данные и факты, которые помогут лучше понять текущие тренды. Мы представим вам цифры и графики, которые иллюстрируют, как развиваются различные сферы жизни. Эта информация станет отличной основой для глубокого анализа и принятия обоснованных решений.
Что скрывают от вас? – поставить капельницу от запоя
Shoppers who frequently visit new websites often appreciate when pages load smoothly and the overall interface gives a modern urban feel that matches current design expectations online flash corner urban shop everything appears neatly arranged and the browsing flow supports quick decisions while exploring different sections of the platform comfortably
nexus market https://darknet-markets-onion.com/
Consumers interested in efficient product discovery usually prefer platforms that highlight selected items while maintaining smooth navigation across categories Efficient Picks Zone – This version focuses on improving browsing speed and clarity by presenting curated items in an organized format
While browsing through product pages online, I came across click here to view – The site feels nice to use, with simple navigation and fast loading pages that make exploring different items very easy.
Online visitors often mention that interesting product displays can make a site more memorable and encourage repeat browsing sessions, as seen on petalmarket copper collection – the browsing experience was enjoyable since items looked appealing and created a sense that the platform would be worth checking again later.
Digital shoppers often rely on platforms that provide smart cart solutions in an organized format, making it easier to manage selected products and complete purchases quickly Smart Cart Navigation Flow Hub Arena – offering fast loading pages, intuitive cart handling tools, and a structured checkout system that improves efficiency and overall shopping performance
While casually browsing different platforms, I stopped at check this page and noticed how well everything was laid out, creating a smooth and user-friendly experience.
While browsing modern online stores, I discovered a visually consistent platform especially when accessing Golden Cove shopping gallery which offers structured navigation and clearly displayed product sections – The overall experience feels engaging and easy to follow providing users with a relaxed and efficient shopping environment
Many shoppers enjoy premium trend marts offering useful items and simple user experience for seamless and smooth online shopping Premium Trend Easy Mart Flow – The platform is designed for simplicity and fast navigation across all sections
Online shoppers often prefer websites that reduce complexity by offering efficient cart systems for better control over purchases and orders Smart Order Cart Hub improving efficiency – It is known for its simple interface and reliable cart management features
In my search for user-friendly bargain shopping websites, I found budget shopping navigator which organizes low-cost deals into easy sections – Value market hub focuses on affordable items and easy navigation, helping shoppers save time by simplifying browsing and presenting relevant products in a clean and straightforward layout designed for efficiency.
During a general scan of curated marketplace hubs and digital storefront systems I encountered Flora Brook commerce discovery index which grouped vendor listings in an orderly way making browsing easy – I found useful insights while casually navigating through the platform’s content
Many online users prefer platforms that feel light, artistic, and inspired by floral themes, especially when browsing curated collections of gifts and handcrafted decorative pieces petal echo artisan bazaar – The concept highlights a soft and elegant marketplace where creative items are presented in a floral-inspired structure that enhances the overall browsing experience.
torzon url https://darknet-markets-onion.com/
darknet markets links https://onion-darknet-markets.com/
While checking out online shops for fun, I discovered visit this page and it felt very clear – The collection feels fresh and thoughtfully curated for shoppers, making browsing smooth, easy, and comfortable from start to finish.
Consumers who prefer efficient browsing experiences tend to choose platforms that present trend based products in a logical and accessible layout Efficient Trend Hub – This hub is designed to make trend discovery quick and straightforward through organized presentation
nexus darknet market link https://darknetmarketsreview.com/
Many online visitors enjoy browsing platforms that showcase fashion trends in an organized and visually appealing way you can explore trending lifestyle shop offering a neat presentation of items that makes discovery easy and engaging for users exploring different styles – The browsing experience is fluid with clear visuals and simple navigation structure.
I randomly clicked through a few pages and eventually reached take a look which seemed simple yet carefully designed – It gives the sense that each item has been selected with intention, resulting in a unique and enjoyable browsing atmosphere.
I came across several shopping sites before landing on discover this bargain hub – The wide selection really stood out, and it seems like a place worth checking for anyone interested in deals.
During comparative analysis of online store checkout systems and their performance consistency, I noticed that reliability in cart operations directly affects user confidence and engagement, especially during high intent shopping sessions, which stood out when testing stable shopping cart – The experience is smooth and dependable, allowing users to navigate their cart easily while maintaining consistent performance across pages.
Visitors to online marketplaces often note that interesting product variety plays a key role in keeping browsing sessions engaging and enjoyable, as seen on petal copper shop link – items were appealing and made the experience feel worthwhile, encouraging another visit to explore the catalog more thoroughly in the future.
Отдельно оценивают ситуации, когда эпизоды повторяются и становятся частью более устойчивой проблемы. Если после алкоголя регулярно развивается тяжелое состояние, нарушается привычный режим жизни, усиливаются последствия алкоголизма и возникают сложности с контролем употребления, домашний выезд может быть только первым этапом более длинного маршрута помощи. При этом наркологическая помощь может включать не только снятие острых проявлений, но и дальнейшую программу лечения зависимости, если речь идет о длительном течении заболевания.
Изучить вопрос глубже – врач нарколог на дом в москве
рулонная штора цена рулонная штора цена
NeoSpin https://adventureallstars.tv/
Digital shoppers prefer platforms that present smart choices in a structured and easy to navigate format, making online shopping more efficient Smart Bazaar Flow Smart Choice Hub Portal – focused on fast browsing tools, organized categories, and enhanced usability that improves overall shopping experience significantly
Consumers looking for expanded product choices can use Wide Choice Bazaar which presents a broad selection of items in a simplified browsing system – this helps users compare different options easily while enjoying a more organized shopping environment that supports better decisions and improved convenience online.
While analyzing tools that enhance online shopping workflows, I discovered a user-friendly product system efficient deal browser that organizes listings in a logical structure and improves browsing clarity – Quick online market helps users navigate categories faster and supports better shopping decisions by presenting products in a clean and simplified interface design.
While searching for well-structured online resources I encountered a website that seems helpful for users interested in organized browsing experiences Quartz Orchard digital storefront which includes multiple categorized sections designed to streamline navigation and enhance content accessibility for visitors – It feels functional and straightforward making it easy to use even for first-time visitors.
Что значит oc и os в названии видеокарты что означает приставка oc в видеокарте
Online shoppers often prefer platforms that keep trending products well organized in a clean interface for easier navigation and selection Modern Style Flow Hub making shopping smooth – It is known for its efficient browsing system and modern visual presentation
wethenorth link https://darknet-markets-onion.com/
darkmarket list https://onion-darknet-markets.com/
В этом обзорном материале представлены увлекательные детали, которые находят отражение в различных аспектах жизни. Мы исследуем непонятные и интересные моменты, позволяя читателю увидеть картину целиком. Погрузитесь в мир знаний и удивительных открытий!
Получить больше информации – капельница от запоя на дому недорого
silk road market link https://darknetmarketsreview.com/
Many users appreciate e-commerce platforms that reflect sustainability and natural inspiration, making browsing feel more thoughtful and less cluttered while exploring curated product categories pine collective eco store – It represents a forest-rooted marketplace where eco-friendly goods and handcrafted items are arranged in a grounded and visually serene digital environment.
Modern e-commerce platforms are constantly evolving to meet user expectations by improving interface responsiveness search accuracy and product discovery mechanisms GoldenCrest deals and offers page which allows shoppers to take advantage of discounts promotions and seasonal sales without spending excessive time searching across categories – Deals and offers pages are especially useful for budget conscious customers who want quick access to the best available savings
Online shoppers often appreciate websites that simplify trend discovery by presenting items in a logical and uncluttered format for better usability Simple Trend Picks Corner – The platform focuses on simplicity, ensuring users can browse stylish products without distractions or unnecessary steps
While checking out online shops for fun, I discovered visit this page and it felt very structured – The browsing experience was quite pleasant, with appealing items that made browsing feel easy and stress free.
Many users enjoy e-commerce platforms that act as premium trend zones offering stylish trending products with clear and easy layouts for fast and simple shopping Premium Trend Select Zone Hub Access – The website features clean design and smooth navigation tools that make product discovery easy and efficient
Эти преимущества делают вывод из запоя на дому с медицинским контролем оптимальным решением для тех, кто хочет быстро и безопасно вернуться к нормальной жизни без необходимости посещать клинику.
Получить дополнительные сведения – анонимный вывод из запоя на дому екатеринбург
During my usual online exploration I landed on urban finds marketplace which displayed products in a clear and organized manner making browsing quite effortless – overall the shop felt decent and had a few unique items that made it slightly more engaging than expected.
While checking various online shops for new items, I found visit this stylish page – The store gives off a decent impression, with trendy products that seem reasonably priced and appealing for everyday shopping exploration.
Many users browsing e-commerce platforms appreciate when the product selection feels fresh and inviting, making them want to explore further over time, especially on copper petal market view – browsing felt engaging because items seemed appealing and worth revisiting for a closer look at different categories and possible finds.
Вывод из запоя на дому в Екатеринбурге — это услуга, которая позволяет пациентам пройти лечение в удобных для них условиях, без необходимости посещать стационар. Процедура включает несколько этапов, каждый из которых направлен на снижение уровня алкогольной интоксикации и стабилизацию состояния пациента. Главным преимуществом вывода из запоя на дому является то, что это не только удобно, но и позволяет избежать лишнего стресса, который может быть вызван госпитализацией.
Разобраться лучше – вывод из запоя на дому цена в екатеринбурге
Вывод из запоя на дому требуется в тех случаях, когда человек сталкивается с длительным непрерывным употреблением алкоголя, которое приводит к тяжелым последствиям для организма. Это состояние опасно не только для здоровья, но и для жизни, поэтому быстрое вмешательство специалистов необходимо, при этом можно заказать наркологическая помощь. Врач на дому помогает пациенту выйти из запоя безопасно, минимизируя риски для его здоровья, что является особенно важно для больного, включая случаи наркомании, а также с учетом его данных, возраста (в том числе после 40–50 лет) и актуальной цена лечения для тех, кто не хочет или не может пройти лечение в стационаре.
Получить дополнительную информацию – вывод из запоя на дому екатеринбург
Shoppers who value convenience often choose websites that simplify decision making, and Smart Deal House Discount Center – achieves this through organized offers, easy browsing paths, and a user focused layout that improves overall shopping clarity for users online today.
During a short search session online, I found visit this link and thought the page was useful, so I bookmarked it for future reference and easier retrieval later.
I was spending some time browsing online shops when I came across browse items here and it stood out in a subtle but appealing way – I found a few interesting things that made the visit enjoyable and gave me a reason to consider coming back again later.
продажа базы данных gobasego-3.ru .
Нарколог на дом в Москве: выезд врача на дом, лечение запоя и консультации в наркологической клинике «Клиника доктора Калюжной».
Подробнее можно узнать тут – нарколог на дом цена
Вывод из запоя на дому в Екатеринбурге: помощь при запое, снятие интоксикации и медицинская поддержка в наркологической клинике «Детокс»
Получить дополнительную информацию – вывод из запоя на дому в екатеринбурге
While casually going through different online resources, I stopped at open this page and noticed it was a pretty decent platform overall, with enjoyable sections that made scrolling through the content feel smooth and natural.
Customers seeking well designed ecommerce platforms often prefer sites that highlight products clearly and avoid unnecessary visual distractions Smart Bazaar Select – The platform enhances usability by organizing items into intuitive categories, allowing users to browse comfortably and make better purchasing choices
Many users browsing e commerce platforms appreciate centralized hubs that highlight popular product ideas and modern trends in a clear format Trend Select Center Hub making shopping easier – It is frequently described as a simple and efficient platform with organized categories
https://darknet-markets-onion.com/ – black ops darknet link https://darknet-markets-onion.com/
https://darknetmarketsreview.com/ – dark web market list https://darknetmarketsreview.com/
линейка на экране в см онлайн измерение в реальных размерах
Users exploring new product ideas often prefer platforms that combine visual appeal with practical navigation to enhance their shopping experience Creative Style Hub – The hub highlights creative and modern items presented through a layout designed for smooth browsing
Наиболее частыми причинами обращения становятся запой, выраженная слабость, тремор, нарушение сна, тревога, учащенный пульс, нестабильное давление, тошнота и ощущение физического истощения. Эти проявления могут сочетаться между собой и усиливаться после прекращения употребления алкоголя, особенно если эпизод длился несколько дней.
Углубиться в тему – нарколог на дом цена в москве
Many users appreciate e-commerce platforms that feel inspired by frosty coastal environments, offering a smooth and relaxing browsing experience across curated product selections frostbay calm goods portal – It suggests a clean and minimal collective brand identity where lifestyle items are displayed with a cool, understated aesthetic that promotes clarity and ease of browsing.
Many visitors to digital shops appreciate when the variety of items creates a sense of discovery that makes browsing more enjoyable, especially on copper petal showcase hub – the experience felt engaging because products seemed interesting and made the platform feel worth exploring again later.
I was casually exploring various e-commerce websites when I noticed take a look here – The user interface is smooth and easy to navigate, so I can find products without confusion or unnecessary clicking around.
Queen Win https://queenwincasinos.com/
During my online browsing time, I stumbled upon browse spruce items and it felt easy to use – The goods variety is nice and everything looks well presented and organized in a smooth and simple layout.
почему windows не видеть устройство и что делать если виндовс не видеть периферийное оборудование
Many online shoppers look for websites that balance aesthetics and functionality, ensuring that the shopping experience remains both pleasant and efficient overall browse all items – The platform layout encourages easy navigation through categories, allowing users to locate products without unnecessary complexity or confusion at any stage.
Online shoppers frequently rely on prime value corners that deliver good value deals with practical and affordable choices for improved satisfaction Prime Value Market Flow Corner – The website is structured for fast navigation and easy product discovery
Retail websites designed with user convenience in mind often include intuitive layouts and responsive browsing features, DriftMarket shopping destination ensuring that customers can enjoy a seamless experience while exploring products across different categories. Such destination-style platforms are generally valued for their clarity, speed, and overall usability
Домашний формат выбирают в тех случаях, когда человеку тяжело добраться до медицинского учреждения, он ослаблен после нескольких дней употребления спиртного или родственникам важно быстрее получить врачебную оценку состояния. После осмотра определяют, допустима ли помощь на дому, требуется ли капельница, возможен ли вывод из запоя в домашних условиях или нужен другой объем наблюдения. Если эпизоды повторяются, обсуждение обычно выходит за рамки снятия острых симптомов и затрагивает дальнейшую помощь при алкоголизме. Уже на этапе первого обращения часто уточняют, можно ли вызвать врача срочно, доступна ли круглосуточная помощь и в каких случаях состояние требует наблюдения в стационаре.
Разобраться лучше – нарколог на дом цена
Нужна стальная лента? лента стальная широкий ассортимент, разные толщины и марки стали. Выгодные цены, быстрая отгрузка и поставки для производства и строительства
Отдельно выделяют ситуации, когда родственники вызывают врача не только из-за текущего состояния, но и потому, что подобные эпизоды повторяются. Если накапливаются последствия алкоголизма, нарушается сон, меняется поведение, появляются устойчивые проблемы дома и в повседневной жизни, разовая помощь обычно рассматривается как первый этап последующей тактики. При тяжелом состоянии, признаках отравлении алкоголем или сочетании нескольких рисков сразу может понадобиться более интенсивное наблюдение в стационаре.
Углубиться в тему – вызов нарколога на дом екатеринбург
Решение о помещении пациента в стационар принимается на основе объективных медицинских критериев, а не только по желанию родственников. К показаниям относятся: запой длительностью более 72 часов, выраженная абстиненция с тахикардией, артериальной гипертензией, профузным потоотделением, наличие в анамнезе алкогольных делириев или судорожных эпизодов, сопутствующие хронические заболевания печени, сердца, поджелудочной железы. При отравление продуктами распада этанола, когда интоксикация затрагивает несколько систем одновременно, резкое прекращение употребления без медицинской поддержки может спровоцировать отек мозга, острую сердечную недостаточность или желудочно-кишечное кровотечение. При сочетанных расстройствах, когда в анамнезе присутствует наркомании, протоколы адаптируются под специфику психоактивных соединений и включают усиленный нейрологический контроль. Стационар позволяет провести полноценную диагностику, включая ЭКГ, экспресс-анализы крови и мониторинг сатурации, что формирует точную картину состояния и исключает шаблонные назначения.
Исследовать вопрос подробнее – наркология вывод из запоя в стационаре
Нарколог на дом в Екатеринбурге: выезд врача на дом, лечение запоя и консультации в наркологической клинике «НЕО+».
Получить дополнительную информацию – нарколог на дом анонимно
Many users appreciate shopping environments that highlight useful items clearly, which is why Smart Pick Corner Guide Center – provides curated selections, structured browsing tools, and an easy interface designed to make product discovery faster and more enjoyable for everyday online shopping.
Душевые уголки Royal Bath интересны тем, что среди них можно найти варианты под очень разные по характеру ванные комнаты. Даже похожие на первый взгляд варианты могут сильно различаться по удобству, посадке и общему впечатлению после установки. Если смотреть на такие вещи спокойно и по параметрам, шанс промахнуться с покупкой становится заметно ниже https://my-bathroom.ru/dushevye-ugolki/brendy-dushevyh-ugolkov/dushevye-ugolki-royal-bath/
New generation online stores such as NextGen Shopping Space are redefining how users interact with digital commerce environments – By focusing on speed, accessibility, and intuitive design, these platforms ensure that customers can explore products effortlessly while benefiting from improved recommendation systems and simplified navigation structures across all devices.
https://onion-darknet-markets.com/ – dark matter onion https://onion-darknet-markets.com/
Вывод из запоя на дому с медицинским контролем — это услуга, которая позволяет пациентам избавиться от алкогольной зависимости в комфортных условиях своего дома. В Екатеринбурге эта услуга становится все более востребованной, поскольку она предоставляет безопасный и эффективный способ вывода человека из запоя, при этом не требуя госпитализации. Процедура сопровождается контролем квалифицированных специалистов, что минимизирует риски и ускоряет процесс восстановления.
Разобраться лучше – вывод из запоя на дому цена
https://darknetmarketsreview.com/ – abacus darknet https://darknetmarketsreview.com/
During a casual scan of vendor listing networks and retail directories I encountered Collective stone shop view which organizes storefront data into sections, and my impression after viewing was that it is easy to understand and well arranged – overall it seemed user friendly and neat
Many digital shoppers prefer platforms that act as a station for constantly updated trending products making shopping more dynamic and engaging Trend Cart Station Hub improving experience – It is frequently noted for its fast updating listings and user friendly navigation system
Online fashion shoppers increasingly search for platforms that combine style variety with smooth browsing experiences across seasonal collections and curated deals Trend Style Hub this destination emphasizes easy navigation and quick loading pages, allowing users to explore modern outfits and accessories without unnecessary friction or delays
Реабилитация алкоголиков в Москве представляет собой многократный процесс восстановления, который включает несколько этапов, направленных на очищение организма, психологическое восстановление и возвращение пациента к полноценной жизни. Этапное восстановление помогает обеспечить стабильный результат и минимизировать риск рецидива, позволяя человеку постепенно вернуться к нормальной социальной и трудовой жизни.
Подробнее можно узнать тут – http://reabilitacziya-alkogolikov-moskva-3.ru/
Выбор между домашней помощью и стационарным лечением определяется не удобством, а медицинской целесообразностью. В условиях клиники исключаются внешние триггеры, обеспечивается изоляция от источников алкоголя и создается контролируемая среда, где терапевтические решения принимаются на основе объективных показателей. Такой подход критически важен для предотвращения осложнений, минимизации дискомфорта абстиненции и формирования устойчивой базы для дальнейшей противорецидивной работы.
Узнать больше – стационар вывод из запоя
Digital shoppers frequently enjoy websites where product listings create curiosity and encourage deeper exploration of available categories and items, particularly on copperpetal browse hub – the experience felt positive since the items looked interesting and gave a reason to return and check updates or new selections again later.
Вывод из запоя на дому в Екатеринбурге с выездом врача — это специализированная медицинская услуга, которая помогает человеку безопасно и эффективно выйти из запойного состояния без необходимости госпитализации. Запой является состоянием, при котором человек не может контролировать потребление алкоголя, и последствия могут быть крайне серьезными, как для физического, так и для психоэмоционального здоровья. В таких случаях помощь врача на дому становится важным и необходимым шагом для восстановления здоровья пациента и предотвращения осложнений.
Получить больше информации – вывод из запоя на дому круглосуточно екатеринбург
Shoppers who prioritize efficiency in online shopping tend to choose platforms that organize items clearly and allow fast transitions between categories Organized Speed Corner – The platform combines structure with speed to deliver a better browsing experience
I had been exploring multiple online marketplaces when I came across see this collection – It looks like quite an interesting platform, with product images that are clear, attractive, and helpful for quickly understanding items.
Вывод из запоя на дому с медицинским контролем в Екатеринбурге предлагает множество преимуществ, которые делают этот метод более удобным и безопасным для многих людей. Отсутствие необходимости в госпитализации и наличие профессионального контроля являются основными положительными аспектами этой услуги.
Подробнее можно узнать тут – анонимный вывод из запоя на дому
Душевые уголки STWORKI часто выбирают за спокойный внешний вид и понятную логику использования. Внутри одной марки встречаются как компактные, так и более выразительные модели, поэтому выбор не сводится к одному очевидному сценарию. Поэтому выбирать здесь лучше не по общей симпатии, а по тем характеристикам, которые действительно важны после монтажа https://my-bathroom.ru/dushevye-ugolki/dushevye-ugolki-stworki-obzor-modelej-kharakteristik-i-otlichij-kollekcij/
As I moved through a few online pages earlier, I discovered visit blue shop and it felt very clean and structured – I really liked the overall feel, and browsing was quick and easy today, creating a pleasant experience.
While browsing through a variety of online stores earlier today, I came across ambergrove picks and it immediately stood out with its clean layout and modern feel – The collection appears fresh and stylish, and the browsing experience felt smooth, quick, and easy to move through without any confusion.
Домашний формат помощи рассматривают тогда, когда человеку тяжело добраться до медицинского учреждения, состояние ухудшается после нескольких дней употребления спиртного или родственникам требуется очная оценка без промедления. После осмотра становится ясно, допустима ли помощь на дому, требуется ли капельница, можно ли ограничиться наблюдением в домашних условиях или нужен другой маршрут помощи. Вопрос о том, как вызвать специалиста, нередко возникает в ситуациях, когда состояние нарастает быстро и требуется решение без откладывания. Если подобные эпизоды повторяются, дальнейшее обсуждение может касаться не только текущего состояния, но и лечения алкоголизма, работы с зависимостью и более длительной программы восстановления.
Детальнее – нарколог на дом цена
Many digital shoppers prefer platforms inspired by snowy peaks and mountain landscapes, especially when browsing curated rustic and seasonal lifestyle collections frost crest winter shop hub – The concept represents a strong alpine brand identity where handcrafted goods and decorative products are presented in a calm and structured digital environment.
Первоначально врач оценивает физическое и психоэмоциональное состояние пациента, что позволяет определить степень тяжести запоя и риски, с которыми может столкнуться пациент в процессе восстановления. На основе этой оценки подбирается соответствующая терапия, включая капельницы для очистки организма, введение витаминов и препаратов, способствующих нормализации давления и уровня сахара в крови.
Детальнее – вывод из запоя на дому круглосуточно
Many users prefer digital stores that keep things organized and allow them to quickly locate what they need urban pick zone web store – clear structure and simple navigation contribute to a better shopping experience and help reduce time spent searching for products overall online journey
casino https://w3seo.info/WSZScore/nolimitcity.uk.com/
Помощь на дому рассматривают при состояниях, которые сопровождаются заметным ухудшением самочувствия после алкоголя. Это может быть запой на протяжении нескольких дней, тяжелое похмелье, дрожь в руках, нарушение сна, выраженная слабость, тревога, тошнота, сухость во рту, снижение аппетита и признаки обезвоживания. В таких случаях осмотр врача нужен для того, чтобы оценить тяжесть состояния и понять, безопасно ли оставаться дома.
Получить дополнительные сведения – нарколог на дом в москве
тестовые ключи gobasego-3.ru .
Many users prefer quality buy worlds offering a wide range of quality products making shopping simple and reliable for safe and efficient shopping Quality Buy World Easy Access Hub – The platform supports smooth browsing and well organized categories
Online users frequently choose platforms that simplify trend exploration, and Smart Arena Modern Trend Hub – provides organized categories, fast browsing access, and structured product layouts that support better decision making and improved shopping experience for everyday users.
While casually going through different platforms online, I stopped at open this page and found the site to appear clean and reliable, with a layout that made navigation feel easy and comfortable overall.
https://darknet-markets-onion.com/ – wethenorth darknet link https://darknet-markets-onion.com/
https://darknetmarketsreview.com/ – ares darknet market https://darknetmarketsreview.com/
Нарколог на дом в Москве: выезд врача на дом, лечение запоя и консультации в наркологической клинике «Клиника доктора Калюжной».
Получить дополнительную информацию – нарколог на дом цена москва
рулонные жалюзи на пластиковые окна купить https://elektricheskie-rulonnye-shtory15.ru
Many digital buyers prefer websites that feature neon inspired promotions with a clean layout that supports easy and enjoyable browsing Neon Buy Glow Hub making selection easier – The platform is often recognized for its modern visual style and organized structure
While checking out various websites, I stopped at visit this page and found it to be a nice site overall, containing useful content that seemed worth revisiting later for future reference.
Many users prefer online stores that provide quick access to different product categories along with a clean interface and responsive layout for better usability across devices, DuneMarket online portal – The browsing experience feels straightforward and comfortable, allowing customers to explore available products at their own pace while enjoying a generally smooth and well structured shopping journey
Online consumers today often search for platforms similar to quick cart selection hub – The cart choice store approach emphasizes fast navigation and intuitive browsing so users can quickly move from discovery to checkout without being overwhelmed by too many unnecessary steps or distractions
super cherry 600 super cherry 600
рулонные шторы купить в москве рулонные шторы купить в москве
While exploring various online retail platforms focused on promotions, I came across a section labeled smart savings product hub – The interface presents tech deals in a clean layout that makes browsing easy, giving users a smooth experience while discovering well priced digital and online products across categories.
ии анализ рекламы ии анализ рекламы
crazy time stats crazy time stats
сервис анализа креативов сервис анализа креативов
While checking different online marketplaces, I found visit this deal platform – My first impression is quite positive, with clear category organization and an intuitive browsing experience that makes navigation feel natural.
Modern consumers often expect platforms to combine fast loading pages with organized product displays to enhance the overall shopping experience Modern Quick Zone – The platform emphasizes rapid browsing and structured layouts that improve product visibility and usability
Отдельно выделяют ситуации, когда родственники вызывают врача не только из-за текущего состояния, но и потому, что подобные эпизоды повторяются. Если накапливаются последствия алкоголизма, нарушается сон, меняется поведение, появляются устойчивые проблемы дома и в повседневной жизни, разовая помощь обычно рассматривается как первый этап последующей тактики. При тяжелом состоянии, признаках отравлении алкоголем или сочетании нескольких рисков сразу может понадобиться более интенсивное наблюдение в стационаре.
Получить дополнительную информацию – нарколог на дом вывод екатеринбург
Наиболее частыми причинами обращения становятся выраженная слабость, тремор, нарушение сна, тревога, учащенный пульс, скачки артериального давления, тошнота и признаки обезвоживания. Эти симптомы могут сочетаться между собой и усиливаться после прекращения употребления алкоголя, особенно после нескольких дней запоя.
Получить дополнительную информацию – нарколог на дом в екатеринбурге
casino https://searchrank.pro/domain/pragmaticplay-demo.uk
While going through different handmade shops, I encountered check harbor items and it felt calm and artistic – The crafts appear unique and interesting, making it definitely worth spending time exploring each item in detail.
Публикация приглашает вас исследовать неизведанное — от древних тайн до современных достижений науки. Вы узнаете, как случайные находки превращались в революции, а смелые мысли — в новые эры человеческого прогресса.
Информация доступна здесь – капельница от запоя на дому цена
Запой – это состояние, при котором человек продолжает употреблять алкоголь в течение длительного времени, не в состоянии прекратить употребление самостоятельно, что является проявлением алкоголизма. Это может привести к серьезным проблемам со здоровьем, и в таком случае необходим вывод из запоя с помощью наркологической помощи, при этом в дальнейшем может рассматриваться кодирование.
Подробнее тут – нарколог на дом вывод из запоя екатеринбург
Реабилитация алкоголиков в Москве: эффективные программы восстановления и медицинская помощь в наркологической клинике «Похмельная служба»
Разобраться лучше – клиника реабилитации алкоголиков
Many shoppers appreciate online stores that feel adventurous and visually rich, especially when exploring curated goods influenced by both icy and arid natural environments frost dune retail hub – It suggests a modern marketplace where product presentation is shaped by a bold fusion of contrasting landscapes and clean, structured design principles.
За выездом врача чаще обращаются тогда, когда человеку тяжело добраться до клиники, он ослаблен после нескольких дней употребления алкоголя или родственникам важно быстрее понять, какая тактика будет безопасной. После осмотра можно определить, нужна ли капельница, достаточно ли детоксикации на дому, требуется ли повторное наблюдение, а в дальнейшем — консультация по лечению алкоголизма, кодирование или реабилитация. В части случаев уже первый звонок позволяет понять, идет ли речь только о временном ухудшении самочувствия или о состоянии, при котором может потребоваться вывод из запоя в стационаре.
Подробнее тут – http://narkolog-na-dom-ekaterinburg-3.ru/
Online shoppers who follow current fashion trends often look for platforms that keep their collections updated with fresh seasonal outfit ideas modern outfit collection site – the overall browsing structure feels smooth and appealing, making it easier for users to stay engaged while exploring different clothing categories
https://darknet-markets-onion.com/ – abacus link https://darknet-markets-onion.com/
Нарколог на дом в Екатеринбурге: выезд врача на дом, лечение запоя и консультации в наркологической клинике «НЕО+».
Детальнее – вызвать нарколога на дом
https://darknetmarketsreview.com/ – tordex market url https://darknetmarketsreview.com/
Many online users appreciate marketplaces that present updated trends in a clear structure, and Smart Trend Store Flow Center – provides curated product collections, intuitive navigation systems, and a simplified browsing experience designed to improve efficiency and help users find relevant items easily.
Если оценивать Душевые уголки МЕТАКАМ без лишних эмоций, на первый план выходят геометрия, материалы и удобство. Даже похожие на первый взгляд варианты могут сильно различаться по удобству, посадке и общему впечатлению после установки. В результате проще понять, где перед вами просто эффектная картинка, а где действительно удачное решение для жизни – https://my-bathroom.ru/dushevye-ugolki/dushevye-ugolki-metakam-katalog-razmery-i-otzyvy-vladelcev/
Many shoppers enjoy websites that offer a neon inspired fun corner making it easy to find deals and products in a lively interface Neon Glow Fun Explorer Hub improving usability – It is frequently praised for its colorful layout and smooth browsing experience
Читайте найсвіжіші новини https://vikka.net ексклюзивні відео, аналітику та цікаві історії. Оперативна інформація щодня!
As I explored various online platforms, I came upon discover crownstone site and experienced smooth navigation with clear content presentation, making the browsing experience pleasant and easy to manage.
Online users often choose quality cart arenas that provide smooth cart experience with well organized categories and checkout flow for easy browsing and selection Quality Cart Arena Flow Navigator Hub – The website is optimized for clarity and smooth transitions between sections
I randomly clicked through several websites and landed on see handmade goods which seemed nicely structured – The crafts appear genuine and well presented, creating an enjoyable browsing experience from beginning to end.
I randomly stumbled upon a store earlier today and spent a few minutes checking it out, which turned into more time than expected have a look here – There’s something distinct about their offerings, and it feels like each product was chosen with purpose.
While checking out various online shops, I came across see this collection – The layout looks well organized, making shopping online easier and more enjoyable since products are easy to find and explore.
Shoppers often look for platforms that simplify product discovery while maintaining strong performance and minimal loading delays during peak usage Quick Shop Entry Hub – the system provides a clean interface that helps users navigate categories easily and complete transactions without unnecessary complications or waiting times
Online shoppers frequently value platforms that prioritize clarity and reduce the time spent searching for routine items, and an example is DailyNeeds Cart which describes itself as a helpful shopping hub while the explanation focuses on providing quick access to essentials and an efficient ordering system for regular household use
a/b тест баннеров https://reklamnyj-kreativ20.ru
I don’t usually share links, but this one felt worth mentioning because it had a simple and interesting product range see this essentials site – The shop looks nice overall, and the products seem interesting and worth checking out if you browse casually.
Комплексный подход, включающий эти методы, значительно повышает шансы на успешное и долговременное восстановление. Современные реабилитационные центры в Москве предлагают целый ряд программ, которые способствуют полному возвращению пациента к здоровой и активной жизни.
Детальнее – реабилитация алкоголиков город
Users who prefer fast and straightforward shopping experiences often look for platforms that reduce delays and simplify product selection processes Straightforward Picks Hub – The platform ensures easy browsing and quick product discovery
Нарколог на дом в Москве: срочная медицинская помощь, капельницы и восстановление состояния в наркологической клинике «Клиника доктора Калюжной».
Исследовать вопрос подробнее – врач нарколог на дом в москве
While exploring different websites I found something that felt artistic and minimal with a soothing design style that made browsing feel relaxing silver petal collection – Beautiful collection here worth exploring for daily home inspiration today, making it easy to gather inspiration for home spaces.
Online visitors interested in independent design products sometimes discover hidden gems while navigating boutique-style platforms such as the Fern Collective Boutique area of the site – it offers a calm and inspiring retail feel that focuses on handmade quality and approachable artistic expression
While going through a variety of online stores, I encountered check petal goods and it felt simple and organized – The store design feels modern and quite comfortable to navigate, making browsing easy and visually enjoyable.
Помощь на дому рассматривают при состояниях, которые сопровождаются заметным ухудшением самочувствия после алкоголя. Это может быть запой на протяжении нескольких дней, тяжелое похмелье, дрожь в руках, нарушение сна, выраженная слабость, тревога, тошнота, сухость во рту, снижение аппетита и признаки обезвоживания. В таких случаях осмотр врача нужен для того, чтобы оценить тяжесть состояния и понять, безопасно ли оставаться дома.
Углубиться в тему – нарколог на дом цена москва
https://darknet-markets-onion.com/ – cocorico onion https://darknet-markets-onion.com/
https://darknetmarketsreview.com/ – ares onion https://darknetmarketsreview.com/
Shoppers who prefer curated fashion selections often choose platforms that emphasize structure, and Stylish Buy Corner Global Hub – features well organized categories, fast browsing tools, and updated stylish items that help users discover fashion trends efficiently and with greater convenience today.
During a short browsing session earlier today, I came across see more details and found the content pretty interesting, with everything laid out clearly so it was easy to go through and understand quickly.
Міський портал Ваш провідник у житті Кривого Рогу: афіша, новини, довідник та корисні сервіси для мешканців та туристів
During a casual browsing session I found a website that felt serene and well structured with a clean interface and neatly arranged product sections that supported effortless navigation twilight oak shop – Store has calm aesthetic with easy browsing and clean layout, offering a smooth and relaxing user experience.
Users exploring conceptual online marketplaces often enjoy branding that feels like a hidden winter retreat, especially when browsing curated premium goods and cozy lifestyle products inspired by fantasy-style environments across structured digital collections frost eden enclave hub – The name evokes a secluded snowy sanctuary where curated items are presented in a calm, premium setting designed to feel magical, immersive, and ideal for discovering cozy or fantasy-inspired products.
Online fashion users often appreciate websites that present collections in a visually clean and easy to browse format arena shopping hub – the layout supports quick navigation and helps users stay focused on finding relevant products without feeling overwhelmed by design clutter
Наиболее частыми причинами обращения становятся запой, выраженная слабость, тремор, тревога, бессонница, тошнота, нестабильное давление, учащенный пульс и ощущение физического истощения. Эти проявления могут сочетаться между собой и усиливаться после прекращения употребления алкоголя, особенно если эпизод длился несколько дней подряд.
Подробнее – вызов нарколога на дом москва
While browsing for interesting products online, I noticed discover this store – Products look stylish here, offering a nice place to discover new things online in an easy and enjoyable way.
Отдельно оценивают ситуации, когда подобные эпизоды повторяются. Если человек уже не впервые переносит запой, тяжелый выход из него или выраженное ухудшение самочувствия после алкоголя, вопрос обычно выходит за рамки разовой помощи. Тогда уже при первичном обращении рассматривают не только текущую стабилизацию состояния, но и дальнейшие шаги. При затяжном течении проблемы могут обсуждаться лечение зависимости, программа восстановления и условия, при которых потребуется наблюдение в стационаре.
Получить больше информации – нарколог на дом вывод в москве
Many users enjoy e-commerce platforms like quality cart stations that offer efficient shopping station systems with easy cart management and quick purchases for everyday shopping ease Quality Cart Station Quick Access Hub – The system supports smooth navigation and fast product selection
Решение о помещении пациента в стационар принимается на основе объективных медицинских критериев, а не только по желанию родственников. К показаниям относятся: запой длительностью более 72 часов, выраженная абстиненция с тахикардией, артериальной гипертензией, профузным потоотделением, наличие в анамнезе алкогольных делириев или судорожных эпизодов, сопутствующие хронические заболевания печени, сердца, поджелудочной железы. При отравление продуктами распада этанола, когда интоксикация затрагивает несколько систем одновременно, резкое прекращение употребления без медицинской поддержки может спровоцировать отек мозга, острую сердечную недостаточность или желудочно-кишечное кровотечение. При сочетанных расстройствах, когда в анамнезе присутствует наркомании, протоколы адаптируются под специфику психоактивных соединений и включают усиленный нейрологический контроль. Стационар позволяет провести полноценную диагностику, включая ЭКГ, экспресс-анализы крови и мониторинг сатурации, что формирует точную картину состояния и исключает шаблонные назначения.
Изучить вопрос глубже – стационар вывод из запоя в санкт-петербурге
While researching tools for improving digital commerce workflows, I came across shop flow zone assistant which helps streamline online store operations – it emphasizes better process control, simplified navigation systems, and flexible features that allow users to manage their e-commerce platforms more efficiently and with reduced technical complexity.
Not sure if anyone else here is into discovering lesser-known shops, but I recently came across one that felt worth sharing in this discussion explore this hidden gem – There’s a noticeable sense of care in how everything is presented, and the products feel distinctive rather than generic.
While searching through different online collections I found something that felt refreshingly simple and easy to engage with radiant cove line and it had a calm structure that made browsing feel very straightforward, – The experience is smooth and visually consistent, making it easy to explore products while maintaining a pleasant and clutter free interface overall.
Consumers who regularly browse online stores often appreciate platforms that maintain consistent speed and reliable checkout systems for better experiences Reliable Picks Marketplace – This platform ensures steady performance and easy purchasing
бесплатный период upster https://reklamnyj-kreativ18.ru
https://onion-darknet-markets.com/ – dark websites https://onion-darknet-markets.com/
Реабилитация алкоголиков в Москве с комплексным подходом — это многогранный процесс, включающий в себя не только медицинские процедуры, но и психологическую поддержку, физическую реабилитацию и помощь в социальной адаптации. Профессиональный реабилитационный центр обеспечивает индивидуальный подход к каждому пациенту, включая такие методы, как кодирование и своевременное лечение запоя. Важно отметить, что успешное лечение алкоголизма требует учета множества факторов, таких как степень зависимости, психоэмоциональное состояние пациента, а также его физическое здоровье. Комплексный подход помогает эффективно устранить все составляющие проблемы, минимизируя риски рецидивов.
Изучить вопрос глубже – http://reabilitacziya-alkogolikov-moskva-2.ru
https://darknetmarketsreview.com/ – nexus darknet market online https://darknetmarketsreview.com/
I had some free time and decided to explore a few sites when I discovered discover this shop and it looked well organized – The clean layout and easy navigation made the browsing process smooth and enjoyable from start to finish.
During a relaxed browsing session, I found see craft shop and it immediately felt simple and smooth – The items appear creative and the browsing experience was smooth overall, making everything feel easy to understand and explore naturally.
сериалы качестве бесплатно сверхъестественное сериал 2005
Digital marketplace users often enjoy browsing when the product variety feels engaging and encourages them to return for another session later on, as seen on petal copper shopping view – browsing felt interesting because items appeared worth checking again and created a positive impression overall.
crazy time play crazy time play
super cherry 5000 demo super cherry 5000 demo
I found a website while exploring online that felt minimal and well structured with clear sections and easy navigation options silver petal item hub – The emporium feels well organized with many appealing items available now, helping users browse products easily.
Many shoppers value e-commerce platforms that highlight seasonal creativity, especially when browsing curated décor and artisanal goods inspired by natural contrasts frostgarden aesthetic goods view – The idea reflects a soft hybrid marketplace identity where frost and garden elements combine into a visually engaging shopping experience.
People exploring digital storefronts often prefer platforms that provide variety and clarity while maintaining a friendly and straightforward shopping experience overall Fern Variety Marketplace – It features a diverse product range displayed through a simple interface that supports relaxed browsing and efficient product discovery across categories
Many users searching for fashion inspiration online appreciate websites that structure content clearly and present items in a visually balanced browsing environment Shopping trend center link – the browsing experience appears well organized, helping visitors quickly locate items and compare styles without unnecessary distractions during their shopping sessions online today efficiently
During my browsing session for new stores, I discovered explore this page now – The selection looks solid, and it seems they consistently refresh their inventory with fresh items that make browsing more engaging.
Когда зависимости становятся хроническими и угрожают жизни пациента, комплексная реабилитация при наркомании в специализированных клиниках Москвы, включая вывод из состояния в стационаре и последующий анализ данных о состоянии пациента, может стать единственным возможным решением. Процесс восстановления включает в себя работу не только с зависимостью, но и с психоэмоциональным состоянием, что делает лечение более эффективным и долговечным.
Подробнее тут – алкоголик реабилитация наркоманов в москве
карточки товаров wildberries карточки товаров wildberries
I was browsing online when I discovered a site that felt soft toned and minimal with a simple interface and easy navigation flow across pages twilight oak essentials – Store has calm aesthetic with easy browsing and clean layout, giving users a quiet and pleasant browsing journey.
Shoppers benefit from systems that organize deals in a structured way, allowing them to compare offers without feeling overwhelmed by too many options Savings Radar Hub this model focuses on guiding users toward the most relevant discounts through improved filtering and smart categorization techniques
During a casual online search I found a shop that immediately felt straightforward and well structured which made navigation quite smooth radiant essentials collection – The browsing experience was easy and the items seem quite useful especially for practical daily routines and general home use.
Online shoppers who follow modern fashion and product updates often explore quality trend centers that provide trend focused platforms with updated products and clean browsing design for smoother decision making and efficient discovery Quality Trend Center Flow Hub Explorer – The platform is appreciated for its minimal layout, structured categories, and intuitive navigation system that helps users browse trending products quickly without confusion or unnecessary complexity
While looking through different websites today, I came across something that stood out in a subtle but pleasant way so I thought I’d share it here check out this site – It has a tidy design and everything seems neatly arranged, which makes the whole experience feel calm and enjoyable.
https://onion-darknet-markets.com/ – drughub darknet market https://onion-darknet-markets.com/
рулонные шторы с электроприводом купить рулонные шторы с электроприводом купить
Many online users appreciate stores where the product variety feels appealing enough to make them consider returning later for another look, especially on copper petal browse store – browsing was enjoyable because items seemed interesting and left a positive impression that encouraged future visits.
As I explored multiple online platforms, I came across view items now and it gave a balanced impression – Nice product selection and browsing here was simple and enjoyable, creating a smooth and easy browsing experience overall.
структура креатива реклама https://reklamnyj-kreativ20.ru
While going through several websites, I landed on open this resource and the simplicity of the design stood out, making it easy to scan through content while maintaining a smooth and logical flow.
Первый этап вывода из запоя на дому – это первичная оценка состояния пациента. Врач, прибывший на вызов, осматривает пациента, проверяет уровень алкоголя в крови, измеряет артериальное давление, пульс и температуру. Это необходимо для того, чтобы определить степень алкогольной интоксикации и выбрать правильную тактику лечения.
Детальнее – вывод из запоя на дому цена в екатеринбурге
Нарколог на дом в Екатеринбурге востребован в ситуациях, когда человеку нужна врачебная помощь после употребления алкоголя, при запое, выраженном похмельном синдроме, нарушении сна, тревоге, скачках давления, слабости и других признаках ухудшения самочувствия. Такой формат обращения часто выбирают семьи, которые хотят вызвать врача без поездки в клинику и быстро получить консультацию по состоянию больного. Домашний выезд особенно важен тогда, когда требуется детоксикация, наблюдение после нескольких дней употребления спиртного и оценка рисков, связанных с последствиями алкоголизма.
Углубиться в тему – нарколог на дом вывод в екатеринбурге
I was going through several e-commerce sites when I noticed explore this link – The website feels modern and well-structured, and I had a good time scrolling through different product sections today without any difficulty.
Many shoppers enjoy platforms that emphasize forest aesthetics and handcrafted artistry, especially when browsing curated wooden décor and rustic artisan goods collections frostgrove craft heritage portal – The concept reflects a woodland-inspired marketplace where handmade products are presented in a structured, nature-focused environment highlighting traditional craftsmanship.
I was browsing randomly when I found a site that felt minimal and efficient with a clean layout and intuitive navigation system silver petal online hub – The store layout is simple and makes browsing very smooth experience, making browsing fast and easy.
Many online visitors highlight that the website’s performance remains stable even during extended browsing sessions across multiple product categories urban express cart which adds convenience by ensuring consistent speed and allowing users to explore freely without experiencing slowdowns or technical disruptions while shopping.
I stumbled upon this site while browsing online and it felt well structured and minimal which made navigation very smooth radiant field collection – Clean layout and simple navigation make the browsing experience pleasant today and allow easy movement through all sections.
I spent some time checking out various websites and eventually found browse items here which felt refreshingly calm and organized – The products appear thoughtfully selected, giving the whole store a balanced and relaxed browsing experience overall.
https://darknet-markets-onion.com/ – black ops link https://darknet-markets-onion.com/
https://onion-darknet-markets.com/ – wethenorth market https://onion-darknet-markets.com/
Online shoppers who follow modern product updates often explore quality trend stations that act as reliable trend stations showcasing modern items and frequent product updates designed for smoother browsing and better decision making Quality Trend Station Flow Hub Explorer – The platform is appreciated for its clean layout, structured navigation, and fast loading interface that helps users quickly discover updated products without confusion or delays
Many visitors exploring online marketplaces often mention that browsing feels pleasantly engaging when product selections are varied and visually appealing, especially on platforms like copper petal hub – the overall experience felt enjoyable since items looked intriguing and encouraged further exploration during the session with a sense of curiosity about what else might be available.
Отдельно оценивают ситуации, когда эпизоды повторяются и становятся частью более устойчивой проблемы. Если после алкоголя регулярно развивается тяжелое состояние, нарушается привычный режим жизни, усиливаются последствия алкоголизма и возникают сложности с контролем употребления, домашний выезд может быть только первым этапом более длинного маршрута помощи. При этом наркологическая помощь может включать не только снятие острых проявлений, но и дальнейшую программу лечения зависимости, если речь идет о длительном течении заболевания.
Разобраться лучше – нарколог на дом анонимно москва
While casually checking out multiple shopping pages, I discovered explore this shop – The site appears tidy and browsing through it feels smooth and uncomplicated.
While going through different online stores today, I ended up finding something that stood out just enough for me to mention it here check out this store – There are a number of intriguing items available, and it feels like a place worth coming back to explore more.
Нарколог на дом в Екатеринбурге востребован в ситуациях, когда человеку нужна врачебная помощь после употребления алкоголя, при запое, выраженном похмельном синдроме, нарушении сна, тревоге, скачках давления, слабости и других признаках ухудшения самочувствия. Такой формат обращения часто выбирают семьи, которые хотят вызвать врача без поездки в клинику и быстро получить консультацию по состоянию больного. Домашний выезд особенно важен тогда, когда требуется детоксикация, наблюдение после нескольких дней употребления спиртного и оценка рисков, связанных с последствиями алкоголизма.
Исследовать вопрос подробнее – https://narkolog-na-dom-ekaterinburg-2.ru/
https://darknetmarketsreview.com/ – ares shop https://darknetmarketsreview.com/
casino https://seoanalyzertool.org/domain/shade.club
I spent some time looking through various sites and came across view forge collection which felt well organized – Everything appears well structured and easy to browse through quickly, giving a relaxed and smooth browsing experience.
I had been browsing multiple websites when I noticed visit this page – My experience so far is nice, with clearly arranged items and descriptions that are informative and easy to understand.
casino https://social.instinxtreme.com/read-blog/188091_shade-club-redefines-provably-fair-gaming-standards.html
Вывод из запоя на дому в Екатеринбурге: срочная помощь, детоксикация и восстановление под контролем специалистов в наркологической клинике «Детокс»
Изучить вопрос глубже – вывод из запоя на дому анонимно
Online users often appreciate platforms that evoke coastal winter atmospheres, making browsing more engaging when exploring curated decorative and lifestyle collections frostharbor aesthetic goods hub – The concept reflects a calm harbor-themed marketplace where curated items are arranged in a cool, minimalist visual structure.
Вывод из запоя на дому с медицинским контролем в Екатеринбурге предлагает множество преимуществ, которые делают этот метод более удобным и безопасным для многих людей. Отсутствие необходимости в госпитализации и наличие профессионального контроля являются основными положительными аспектами этой услуги.
Разобраться лучше – https://vyvod-iz-zapoya-na-domu-ekaterinburg-18.ru/
Реабилитация алкоголиков в Москве: комплексное восстановление, помощь при зависимости и поддержка специалистов в наркологической клинике «Похмельная служба»
Ознакомиться с деталями – реабилитация алкоголиков стоимость в москве
Fashion focused users often prefer online stores that make browsing enjoyable by offering clean layouts and updated product collections station fashion collection and this platform gives the impression of having a good variety of modern apparel suitable for casual and stylish everyday wear
I was exploring various websites when I stumbled upon a store that felt refreshingly different from standard online shopping pages radiant gods shop – The selection here is quite interesting and stands out from usual online stores, offering something a bit more unique and uncommon.
Users exploring online marketplaces frequently enjoy when product listings feel fresh and visually interesting, encouraging longer browsing sessions and return visits, particularly on copperpetal market access – browsing felt satisfying since items appeared intriguing and gave a reason to check the site again in the future.
https://darknet-markets-onion.com/ – cocorico market url https://darknet-markets-onion.com/
During casual browsing I came across a site that felt fresh and minimal with a soft design and easy to use interface silver sprout discover hub – Nice selection of products here with a fresh and modern look, making discovery of products effortless.
Реабилитация алкоголиков невозможна без участия высококвалифицированных специалистов. Это врачи-наркологи, психологи, психотерапевты и социальные работники, каждый из которых вносит свой вклад в восстановление пациента. Психологическая поддержка особенно важна на всех этапах лечения, поскольку помогает пациенту осознать проблему, справиться с внутренними конфликтами и выработать стратегии для предотвращения рецидивов. В некоторых случаях, например, при длительном запое или наркомании, может быть рекомендован выезд на дом для предоставления первой медицинской помощи и дальнейшей реабилитации.
Узнать больше – клиника реабилитации алкоголиков в москве
Нарколог на дом в Москве: выезд врача на дом, лечение запоя и консультации в наркологической клинике «Клиника доктора Калюжной».
Получить дополнительные сведения – вызов нарколога на дом
While exploring handmade product websites, I came across see this craft store – It has a cozy feel and a simple layout that makes everything easy to browse.
Many consumers enjoy quality trend zones offering a nice zone for trending product exploration with simple navigation systems that enhance clarity and usability during shopping sessions Quality Trend Zone Quick View Hub – The system supports fast page loading and organized product sections
Нарколог на дом в Москве — это формат помощи, который рассматривают в тех случаях, когда после употребления алкоголя больному требуется врачебный осмотр без поездки в клинику. Чаще всего обращение связано с запоем, выраженным похмельным синдромом, нарушением сна, слабостью, тремором, тревогой, обезвоживанием, сердцебиением, скачками давления и общим ухудшением самочувствия. Дальнейшая тактика зависит от состояния больного на момент осмотра, длительности употребления алкоголя, возраста и сопутствующих заболеваний.
Подробнее можно узнать тут – запой нарколог на дом москва
https://darknetmarketsreview.com/ – black ops onion https://darknetmarketsreview.com/
Затяжной запой — это не бытовая слабость, а медицинское состояние, требующее профессионального лечения в условиях стационара. Когда организм истощен длительной интоксикацией, нарушен сон, отсутствует аппетит, а попытки самостоятельно прекратить употребление сопровождаются тремором, тревогой и скачками давления, единственным безопасным решением становится контролируемая детоксикация. Наркологическая клиника «Элегия Мед» в Санкт-Петербурге предоставляет профессиональное лечение с применением сертифицированных протоколов, непрерывный контроль состояния пациента и индивидуальный подбор медикаментозной поддержки. Мы работаем круглосуточно, обеспечивая быстрое реагирование на обращения, четкую диагностику при поступлении и прозрачное взаимодействие с родственниками. Все процедуры выполняются с соблюдением протоколов доказательной медицины, стандартов Минздрава РФ и строгих правил конфиденциальности. Первичная оценка состояния начинается с дистанционной консультации, что позволяет врачам заранее подготовить необходимое оборудование и скорректировать план госпитализации еще до прибытия пациента. При необходимости заказать консультацию или оформить выезд бригады, доступные способы связи включают телефон, мессенджеры и онлайн-форму на сайте.
Получить дополнительную информацию – наркология вывод из запоя в стационаре в санкт-петербурге
I wasn’t searching for anything specific, but I ended up discovering something that felt calm and pleasant enough to share here explore this relaxing site – The products seem carefully made and the overall vibe feels soothing and easy to browse through.
While browsing through several online marketplaces today just to compare layouts and usability, I noticed something in the middle like check this value hub – I took a quick look here, and the site seems clean overall and easy enough to navigate without confusion.
While searching for new online shops, I encountered browse this platform – It looks like a legit shop, with a clean interface and an impressive product variety that makes browsing feel smooth and efficient.
I spent some time checking out various online shops and eventually found browse this essentials store which felt minimal and tidy – Essentials here seem practical and nicely displayed across the site, making browsing clear, simple, and enjoyable from start to finish.
While browsing through several online stores earlier today, I came across amber lane collective and it immediately gave a clean impression with its layout – I really enjoyed browsing because everything looks well organized and visually appealing in a simple and easy to follow way.
Реабилитация алкоголиков в Москве: лечение зависимости, восстановление и поддержка под контролем специалистов в наркологической клинике «Похмельная служба»
Детальнее – центр реабилитации алкоголиков город
As I explored a variety of websites during some free time, I came across go to this link and it looked fairly decent on the surface, making me consider returning in the future to see more of what it offers.
People browsing online stores often prefer systems that offer fast responsiveness and a well structured layout for easier product discovery VividCart Express Hub – The platform provides a seamless shopping experience with clean design and intuitive navigation that allows users to explore products effortlessly while enjoying consistent performance across all pages
Many users prefer e-commerce experiences where browsing feels engaging and the product variety keeps them interested throughout their visit, especially on copperpetal goods explorer – the experience was pleasant since items seemed appealing and gave a strong impression that returning later would be a good idea.
Digital users often prefer platforms that combine autumn harvest warmth with winter frost aesthetics, especially when exploring curated lifestyle and handmade product selections frost harvest seasonal goods portal – The concept represents a seasonal fusion marketplace where products are displayed in a structured, nature-inspired digital environment that feels both cozy and fresh.
https://onion-darknet-markets.com/ – torzon darknet market https://onion-darknet-markets.com/
While browsing online earlier today I came across a site that caught my attention because it had a slightly different feel from the usual stores I see radiant maple store hub – I found some unique items while exploring it earlier, and the selection felt unexpectedly interesting and worth a closer look overall.
While exploring different online shopping platforms just out of curiosity and comparing layouts, I came across something in the middle like check this harbor shop – The structure feels well organized, making browsing very convenient and easy to manage without confusion.
While scrolling through different pages I came across a store that felt artistic and grounded with subtle stone textures and minimal design stone light selection – Stone inspired designs give this shop a unique aesthetic appeal, giving a calm and stylish browsing experience.
За выездом врача чаще обращаются тогда, когда человеку тяжело добраться до клиники, он ослаблен после нескольких дней употребления алкоголя или родственникам важно быстрее понять, какая тактика будет безопасной. После осмотра можно определить, нужна ли капельница, достаточно ли детоксикации на дому, требуется ли повторное наблюдение, а в дальнейшем — консультация по лечению алкоголизма, кодирование или реабилитация. В части случаев уже первый звонок позволяет понять, идет ли речь только о временном ухудшении самочувствия или о состоянии, при котором может потребоваться вывод из запоя в стационаре.
Разобраться лучше – https://narkolog-na-dom-ekaterinburg-3.ru
https://darknetmarketsreview.com/ – drughub market link https://darknetmarketsreview.com/
За выездом врача обращаются в тех случаях, когда человеку тяжело добраться до клиники, он ослаблен после нескольких дней употребления спиртного или родственникам важно быстрее получить медицинскую консультацию на месте. После осмотра определяют, допустим ли домашний формат, требуется ли капельница, достаточно ли наблюдения на дому или нужен другой объем помощи. Если эпизоды повторяются, в дальнейшем могут обсуждаться лечение алкоголизма, кодирование, участие психолога, реабилитация и более широкая программа помощи при зависимости. Уже на этапе первичного обращения нередко уточняют, как вызвать специалиста, какие услуги доступны на дому и в каких случаях вывод из запоя рассматривают не дома, а в стационаре.
Углубиться в тему – нарколог на дом екатеринбург
Online buyers often choose rapid buy markets because they deliver fast shopping markets with easy access to everyday useful products for reliable and simple shopping Rapid Buy Market Flow Center Hub – The website ensures clarity and structured browsing across all categories
Users looking for everyday fashion inspiration often prefer online stores that present collections in a clean and organized manner without clutter urban trend outlet view and this website seems to offer interesting selections that may suit different preferences while maintaining a modern and attractive product display overall
I wasn’t expecting to find anything notable, but I did come across something that felt easy to browse and well organized visit this page – The selection looks good, and the layout helps keep everything simple and accessible.
While exploring different websites for ideas, I came across visit this urban buy site – The layout is simple and clean, making browsing through pages smooth and natural without distraction.
I was exploring different marketplaces when I found have a look here – Everything is nicely structured, which makes items quick and easy to locate during browsing sessions.
Digital users often prefer platforms that simplify browsing while maintaining strong performance and a visually organized structure across all features VividStyle Navigation Hub – The website ensures a streamlined browsing experience with fast responsiveness and a well structured layout that helps users find information easily while maintaining a modern and visually appealing interface design
While going through different online shops, I encountered check meadow items and it felt calm and minimal – The calm layout made browsing feel relaxed and quite smooth, giving a very steady and comfortable experience overall.
скачать видео youtube по ссылке скачать видео youtube по ссылке
Many people exploring digital stores tend to value platforms where products feel thoughtfully arranged and visually appealing for casual browsing, especially on copper petal goods site – the browsing experience felt enjoyable because the selection appeared engaging and gave a reason to return and explore more items later on.
скачать видео youtube по ссылке скачать видео youtube по ссылке
скачать видео с ютуба по ссылке 720р https://skachat-video-s-youtube-10.ru
смотреть сериал качестве смотреть онлайн сверхъестественное сезон подряд
загрузчик видео с ютуба загрузчик видео с ютуба
https://onion-darknet-markets.com/ – nexus darkweb link https://onion-darknet-markets.com/
Помощь на дому рассматривают при состояниях, которые сопровождаются заметным ухудшением самочувствия после алкоголя. Обычно это запой на протяжении нескольких дней, тяжелое похмелье, выраженная слабость, бессонница, тревога, дрожь в руках, сухость во рту, отсутствие аппетита, тошнота, раздражительность и ощущение истощения. В подобных случаях врачебный осмотр нужен для того, чтобы оценить тяжесть состояния и определить, безопасен ли домашний формат в конкретной ситуации.
Получить дополнительные сведения – врач нарколог на дом
Домашний формат выбирают в тех случаях, когда человеку тяжело добраться до медицинского учреждения, он ослаблен после нескольких дней употребления спиртного или родственникам важно быстрее получить врачебную оценку состояния. После осмотра определяют, допустима ли помощь на дому, требуется ли капельница, возможен ли вывод из запоя в домашних условиях или нужен другой объем наблюдения. Если эпизоды повторяются, обсуждение обычно выходит за рамки снятия острых симптомов и затрагивает дальнейшую помощь при алкоголизме. Уже на этапе первого обращения часто уточняют, можно ли вызвать врача срочно, доступна ли круглосуточная помощь и в каких случаях состояние требует наблюдения в стационаре.
Исследовать вопрос подробнее – нарколог на дом
Users browsing online stores often enjoy platforms that combine boutique elegance with winter aesthetics, especially when exploring curated artisan products and cozy lifestyle collections frost lane artisan market portal – It suggests a charming emporium-style identity where goods are displayed in a structured, seasonal environment that emphasizes handcrafted quality and cozy design themes.
I was exploring online when I found a store that felt calm and well arranged which made browsing very simple radiant pine discovery hub – Everything looks well organized and easy to browse without confusion, making the experience feel clean, smooth, and easy to use.
Реабилитация алкоголиков в Москве: комплексное восстановление, помощь при зависимости и поддержка специалистов в наркологической клинике «Похмельная служба»
Исследовать вопрос подробнее – reabilitacziya-alkogolikov-moskva.ru/
During a random search session, I noticed explore this oak shop – Everything loads fast and smoothly, and the content feels fresh and easy to browse.
https://darknetmarketsreview.com/ – nexus darknet shop https://darknetmarketsreview.com/
During a casual online search across different websites, I discovered explore lighthouse shop and it stood out with its clean structure – The design feels modern and smooth, which makes browsing feel comfortable and simple without any unnecessary distractions or confusion.
Вывод из запоя на дому в Екатеринбурге: срочная помощь, детоксикация и восстановление под контролем специалистов в наркологической клинике «Детокс»
Узнать больше – нарколог на дом вывод из запоя
Online buyers often prefer rapid cart centers that provide quick cart systems designed for smooth and efficient checkout processes enhancing browsing clarity and speed Rapid Cart Center Category Flow Hub – The platform reduces complexity and improves user navigation
I came across this website while browsing and it felt clean and modern with a simple interface and logically arranged product sections sun haven store hub – Essentials here feel practical, useful, and nicely presented for shoppers, making it easy to browse without confusion.
Many online shoppers who actively compare prices across different stores often mention that budget focused platforms help them decide faster when selecting everyday essentials and household items Value Buy Factory homepage and this impression comes from how the catalog feels practical and reasonably priced, making browsing feel more relaxed and straightforward for cost conscious users today.
While exploring online shopping sites, I came across click here to view – The store looks decent, and browsing is smooth with categories that are simple and easy to navigate.
While scrolling through multiple online stores for comparison, I noticed explore urban buy hub – The layout feels well organized, and I could find everything I needed without much effort overall.
While casually browsing online, I came across something that looked dependable and worth sharing with others here see this store – Everything appears structured and arranged with care, creating a reliable feel.
комплект камер видеонаблюдения для улицы дом видеонаблюдения готовые комплекты
Реабилитация алкоголиков — это важный этап на пути к избавлению от зависимости. В Москве существует множество центров, предлагающих реабилитацию с индивидуальной программой, что помогает обеспечить более персонализированный и эффективный подход к каждому пациенту. Индивидуальная программа учитывает физическое и психологическое состояние человека, а также его социальное окружение и личные особенности. Это позволяет добиться лучших результатов в лечении и восстановлении.
Подробнее тут – клиника реабилитации алкоголиков в москве
As I navigated through different websites out of curiosity, I stopped at explore here and noticed how straightforward the design felt, allowing information to be absorbed naturally without feeling overwhelmed.
Online users often look for systems that provide straightforward navigation and reduce effort needed to access key information or features efficiently VividSimple Navigation Center – The platform ensures a highly intuitive browsing experience with organized content sections and fast performance that help users move smoothly between pages without complexity or unnecessary steps
кабель цена за метр
Вывод из запоя на дому с медицинским контролем в Екатеринбурге — это удобный и безопасный способ для людей, страдающих от алкоголизма, пройти детоксикацию и восстановление в комфортных домашних условиях. Этот процесс включает в себя применение медицинских препаратов, направленных на снижение симптомов абстиненции, а также тщательное наблюдение за состоянием пациента. Большинство пациентов предпочитают такую услугу, поскольку она исключает необходимость госпитализации и дает возможность восстановиться без стресса, связанного с нахождением в больнице.
Подробнее тут – http://vyvod-iz-zapoya-na-domu-ekaterinburg-18.ru/
сайт стоматологии москва номер стоматологии
During a relaxed browsing session, I found see shop page and it immediately felt serene – The aesthetic feels gentle and pleasant, and the items look carefully chosen, allowing a smooth and easy browsing experience overall.
https://darknet-markets-onion.com/ – darknet sites https://darknet-markets-onion.com/
светильники иркутск https://svetotekhnika-1.ru
Нарколог на дом в Москве — это формат врачебной помощи, который рассматривают при состояниях после употребления алкоголя, когда больному требуется осмотр без посещения клиники. Чаще всего обращение связано с запоем, тяжелым похмельным синдромом, слабостью, нарушением сна, тремором, тревогой, тошнотой, сухостью во рту, скачками давления, сердцебиением и общим ухудшением самочувствия. Дальнейшая тактика определяется после осмотра, с учетом длительности употребления алкоголя, возраста, сопутствующих заболеваний и выраженности текущих симптомов.
Получить дополнительные сведения – нарколог на дом анонимно
During a casual browsing session I found a site that immediately felt responsive and lightweight which made exploring different pages quite effortless radiant shore shop – It delivers a smooth experience overall, and pages load quite fast here, which makes navigation simple and pleasant throughout.
Users exploring digital marketplaces frequently appreciate soft, nature-inspired branding, especially when browsing curated eco-friendly products and handmade lifestyle goods across organized categories frost meadow eco lifestyle hub – This reflects a peaceful meadow-themed marketplace identity where products are arranged in a frosty, green-conscious aesthetic designed for clarity and relaxation.
While scrolling through several websites for inspiration, I noticed explore this orchid hub – The vibe is quite pleasant, and the layout makes it easy to move between sections without any difficulty.
Нарколог на дом в Екатеринбурге востребован в ситуациях, когда человеку нужна врачебная помощь после употребления алкоголя, при запое, выраженном похмельном синдроме, нарушении сна, тревоге, скачках давления, слабости и других признаках ухудшения самочувствия. Такой формат обращения часто выбирают семьи, которые хотят вызвать врача без поездки в клинику и быстро получить консультацию по состоянию больного. Домашний выезд особенно важен тогда, когда требуется детоксикация, наблюдение после нескольких дней употребления спиртного и оценка рисков, связанных с последствиями алкоголизма.
Получить дополнительную информацию – нарколог на дом вывод екатеринбург
https://darknetmarketsreview.com/ – cocorico market url https://darknetmarketsreview.com/
Shoppers enjoy websites that deliver smooth and structured browsing experiences consistently today StyleCart Interface – Clear categorization allows users to find products quickly while enjoying an organized layout that supports efficient navigation and enhances overall browsing satisfaction throughout the site
While researching tools for improved online deal discovery, I found easy deals scanner which highlights relevant offers efficiently – this shopnetmarket.shop platform supports quick browsing, allowing users to filter and locate promotions faster while maintaining a simple and intuitive structure for everyday online shopping activities.
Домашний выезд обычно выбирают тогда, когда человеку трудно добраться до медицинского учреждения, он ослаблен после нескольких дней употребления спиртного или родственникам важно быстро получить врачебную оценку состояния. После осмотра определяют, допустим ли домашний формат, нужна ли капельница, достаточно ли наблюдения на дому или следует рассматривать другой объем помощи. Уже на этапе первичного обращения нередко уточняют, как вызвать врача, какие наркологическая услуги доступны на дому, возможен ли срочный выезд круглосуточно и в каких случаях вывод из запоя безопаснее проводить не дома, а в стационаре.
Углубиться в тему – вызвать нарколога на дом в москве
бра настенные дизайнерские дизайнерская люстра на кухню
Users who spend time on e-commerce platforms frequently appreciate when items are presented in a way that sparks interest and encourages return visits, as seen on petal copper marketplace – browsing felt satisfying because the product range appeared appealing and worth revisiting later for a closer look at different categories and offerings.
While exploring different websites for ideas, I came across visit this cart hub – It gives a pretty decent experience, and the layout feels modern and easy to navigate without effort.
Online buyers often prefer rapid cart hubs that offer central hub functionality for fast cart handling and convenient online shopping improving browsing clarity Rapid Cart Hub Category Flow Core – The platform reduces complexity and enhances navigation efficiency
Many visitors note that the website offers a simple structure that reduces confusion and improves the overall shopping experience significantly Goods Bazaar quick view – the layout is user friendly and supports fast browsing so users can identify items without unnecessary complications or delays.
I found something during my browsing session that felt neat and well organized, so I thought I’d share it here for others to see browse this category store – It’s a cool shop overall, and the clear layout makes it easy to understand where everything is placed.
I found a website while exploring online that felt bright and modern with a clean interface and easy to follow structure sun meadow item hub – Store feels bright, welcoming, and easy to browse through categories, giving a clear and simple browsing flow.
Вывод из запоя на дому в Екатеринбурге — это услуга, которая позволяет пациентам пройти лечение в удобных для них условиях, без необходимости посещать стационар. Процедура включает несколько этапов, каждый из которых направлен на снижение уровня алкогольной интоксикации и стабилизацию состояния пациента. Главным преимуществом вывода из запоя на дому является то, что это не только удобно, но и позволяет избежать лишнего стресса, который может быть вызван госпитализацией.
Получить больше информации – вывод из запоя на дому в екатеринбурге
During my review of digital storefront designs I focused on usability and interface clarity and found Best Trend Station shopping portal – The browsing flow is great overall, with content that is clear and visually appealing, allowing users to navigate comfortably while maintaining a clean and organized layout throughout
https://darknet-markets-onion.com/ – torzon darknet link https://darknet-markets-onion.com/
https://onion-darknet-markets.com/ – wethenorth onion https://onion-darknet-markets.com/
bluefocus.click – Blue focus provides clear direction and strong digital strategy guidance
I spent some time checking out various online shops and eventually found browse this petal market which looked neat and structured – The marketplace appears friendly and easy to navigate through different sections, making everything simple and pleasant to explore.
I was navigating through different websites when I found shop oak items and it gave a clean impression – The selection seems decent, with products appearing quality oriented and nicely displayed in a straightforward browsing layout.
скачать с ютуба в отличном качестве https://skachat-video-s-youtube-11.ru
врач нарколог на дом врач нарколог на дом
вызов врача нарколога на дом https://narkolog-na-dom-voronezh-10.ru
вызов нарколога на дом воронеж вызов нарколога на дом воронеж
I was looking through various online stores when I noticed check this peak page – The site is very user friendly, and navigation feels easy, which made browsing around quite enjoyable.
I found a website while exploring online that felt visually appealing with a clean and softly glowing design style shadow corner goods hub – The shop has a cool aesthetic overall, and the product choices are interesting, making it worth exploring further without rush.
За выездом врача чаще обращаются тогда, когда человеку тяжело добраться до клиники, он ослаблен после нескольких дней употребления алкоголя или родственникам важно быстрее понять, какая тактика будет безопасной. После осмотра можно определить, нужна ли капельница, достаточно ли детоксикации на дому, требуется ли повторное наблюдение, а в дальнейшем — консультация по лечению алкоголизма, кодирование или реабилитация. В части случаев уже первый звонок позволяет понять, идет ли речь только о временном ухудшении самочувствия или о состоянии, при котором может потребоваться вывод из запоя в стационаре.
Получить больше информации – нарколог на дом анонимно
Помощь на дому рассматривают при состояниях, связанных с острым ухудшением самочувствия после алкоголя. Чаще всего это несколько дней запоя, тяжелое похмелье, бессонница, тревога, дрожь в руках, слабость, отсутствие аппетита, тошнота, сухость во рту и ощущение истощения. В подобных случаях врачебный осмотр нужен для оценки общего состояния и выбора безопасной тактики.
Углубиться в тему – нарколог на дом анонимно екатеринбург
скачать по ссылке с ютуба https://skachat-video-s-youtube-9.ru
Many digital consumers prefer marketplaces that highlight refined beauty, especially when browsing curated floral décor, aesthetic lifestyle goods, and elegant gift product selections frostpetal style emporium portal – This reflects a delicate brand identity where products are displayed in a soft, visually harmonious environment inspired by floral frost imagery.
sail Montenegro https://rent-a-yacht-montenegro.com
https://darknetmarketsreview.com/ – abacus link https://darknetmarketsreview.com/
Users engaging with online stores prefer systems that deliver clarity and structure while maintaining fast loading and easy category switching during exploration where Cart Navigator Pro – this navigation model improves user satisfaction by making product discovery more direct and reducing unnecessary steps in the browsing process significantly overall
While exploring different websites focused on savings and discounts, I came across a reference that stood out for its simplicity and structure online bargains portal – it is often appreciated for organizing deals in a way that allows users to browse quickly and identify useful offers without feeling overwhelmed.
скачивать видео с ютуба https://skachat-video-s-youtube-10.ru
I was looking through various online stores when I noticed check urban cart zone – The fast loading speed made a difference, and I liked how it improved the browsing experience overall.
Реабилитация алкоголиков в Москве: лечение зависимости, восстановление и поддержка под контролем специалистов в наркологической клинике «Похмельная служба»
Детальнее – реабилитация алкоголиков в москве
Осмотр на дому особенно важен в тех случаях, когда больному трудно вставать, пить воду, принимать пищу, спокойно лежать или ориентироваться в собственном состоянии. Чем тяжелее переносится выход из употребления, тем выше значение очной оценки, потому что по телефону невозможно полноценно определить границы безопасной помощи. При выраженных симптомах может потребоваться срочный выезд, чтобы вовремя оценить риски и определить, допустим ли вывод из запоя дома или необходимо наблюдение в стационаре.
Разобраться лучше – нарколог на дом цена
Many digital shoppers appreciate rapid cart solutions featuring helpful solutions for cart management and streamlined buying experience overall, allowing better control during checkout and faster purchase completion Rapid Cart Solutions Bright Flow Access – The platform supports quick navigation and clean structured layout for easier shopping
Реабилитация алкоголиков в Москве с комплексным подходом — это многогранный процесс, включающий в себя не только медицинские процедуры, но и психологическую поддержку, физическую реабилитацию и помощь в социальной адаптации. Профессиональный реабилитационный центр обеспечивает индивидуальный подход к каждому пациенту, включая такие методы, как кодирование и своевременное лечение запоя. Важно отметить, что успешное лечение алкоголизма требует учета множества факторов, таких как степень зависимости, психоэмоциональное состояние пациента, а также его физическое здоровье. Комплексный подход помогает эффективно устранить все составляющие проблемы, минимизируя риски рецидивов.
Разобраться лучше – центр реабилитации алкоголиков
https://onion-darknet-markets.com/ – nexus darknet market official https://onion-darknet-markets.com/
https://darknet-markets-onion.com/ – cocorico darknet market https://darknet-markets-onion.com/
While reviewing several online platforms, I encountered check it out and during my brief visit, I could see that the content was informative and the layout appeared thoughtfully arranged.
Users exploring fashion or general product websites often prefer platforms that emphasize strong imagery because it helps them evaluate items faster and with better clarity during browsing sessions vibrant cart browsing link and the visual structure of the site appears smooth and engaging, giving shoppers a comfortable experience while moving through different sections without visual confusion or clutter.
While exploring various sites today, I discovered something that felt authentic and reliable enough to mention in this discussion browse this genuine site – It looks like a trustworthy place, and everything feels thoughtfully arranged with honest presentation.
During my review of online shopping systems I evaluated clarity and responsiveness and found Best Choice Online access hub – The site feels helpful overall, making it quick and convenient today for users to find items easily, supported by intuitive navigation and a clean interface design throughout
скачать видео с юту скачать видео с юту
While casually searching the internet I discovered a site that felt neat and organized with a light design and easy navigation flow sun petal goods store – Market has good variety and items seem fairly well priced, helping users find what they need quickly.
While exploring different online platforms, I came across see petal store items and it gave a soft clean impression – The design is simple and neat, making browsing feel quick and comfortable in a very natural and easy way.
While scrolling through various online shops for comparison, I noticed explore petal market – The layout is pretty clean, and it helps users quickly find what they are looking for without getting lost in clutter.
During my usual browsing session I found a store that felt modern and minimal with a soft and balanced design style silk dune goods hub – I enjoyed browsing here, as the items are stylish and reasonably presented, creating a calm and easy shopping experience.
Many online shoppers appreciate platforms that combine floral elegance with minimal retail design, especially when browsing curated gift items and decorative lifestyle products frostpetal minimalist gift hub – It represents a calm retail identity where products are arranged in a visually soft and balanced structure inspired by seasonal floral aesthetics.
https://darknetmarketsreview.com/ – torzon market link https://darknetmarketsreview.com/
Вывод из запоя на дому в Екатеринбурге: помощь при запое, снятие интоксикации и медицинская поддержка в наркологической клинике «Детокс»
Изучить вопрос глубже – нарколог на дом вывод из запоя
Осмотр на дому особенно важен в тех случаях, когда больному трудно вставать, пить воду, принимать пищу, спокойно лежать или ориентироваться в собственном состоянии. Чем тяжелее переносится выход из употребления, тем выше значение очной оценки, потому что по телефону невозможно полноценно определить границы безопасной помощи. При выраженных симптомах может потребоваться срочный выезд, чтобы вовремя оценить риски и определить, допустим ли вывод из запоя дома или необходимо наблюдение в стационаре.
Получить дополнительную информацию – http://www.domen.ru
Online buyers often look for streamlined shopping structures that simplify browsing experience Market Cart Hub One allows users to access categorized products quickly while the platform emphasizes clarity, smooth navigation, and faster discovery across multiple sections for improved shopping efficiency overall.
In my exploration of digital retail systems, I came across quick product cart that organizes items into clear categories – Simple shopping experience with clear layout and easy product access supports efficient browsing by reducing clutter and helping users focus on relevant products without unnecessary distractions or complicated navigation steps.
вызвать нарколога на дом вызвать нарколога на дом
I had some free time and decided to explore a few sites when I discovered discover petal shop and it looked very soothing – The overall theme feels clean and soft, with a welcoming visual style that makes browsing easy and relaxing.
While browsing for new online stores, I discovered browse flash corner shop – Everything feels light and responsive overall, and it is a nice place to explore comfortably.
https://darknet-markets-onion.com/ – dark market 2026 https://darknet-markets-onion.com/
Наиболее частыми причинами обращения становятся запой, выраженная слабость, тремор, тревога, бессонница, тошнота, нестабильное давление, учащенный пульс и ощущение физического истощения. Эти проявления могут сочетаться между собой и усиливаться после прекращения употребления алкоголя, особенно если эпизод длился несколько дней подряд.
Подробнее – вызов нарколога на дом в москве
Design professionals often appreciate platforms that combine visual clarity with fast performance and polished structure for better workflow efficiency SkyHigh Creative Lab – A refined design environment where smooth navigation and professional layouts enhance usability while maintaining a visually appealing and well structured digital experience across all pages and sections consistently for users
Shoppers today often rely on rapid goods centers that provide fast access to goods with well organized categories and listings making browsing more efficient and stress free Rapid Goods Center Select Flow System – The platform is structured for simplicity and easy navigation across categories
Реабилитация алкоголиков с анонимной поддержкой — это важный процесс, который помогает людям справиться с зависимостью в условиях конфиденциальности и безопасности. Многие пациенты опасаются обращаться за помощью из-за стереотипов и страха осуждения. Анонимность в реабилитации становится важным фактором для обеспечения доверия и максимальной эффективности лечения, при этом в ряде случаев доступны такие услуги, как кодирование и консультации наркологической помощи бесплатно, особенно при обращении после запоя. В Москве существует множество центров, которые предлагают реабилитацию алкоголиков с анонимной поддержкой, что позволяет пациентам пройти лечение, не раскрывая своей личности и не беспокоясь о социальном осуждении.
Получить дополнительную информацию – reabilitacziya-alkogolikov-moskva-4.ru/
I stumbled upon something today that felt clean and minimal in a good way, which made it worth sharing here visit this prism shop – It has a clean design, and the simple navigation makes the overall experience enjoyable and smooth without complications.
Вывод из запоя в стационаре в Санкт-Петербурге: профессиональное лечение, капельницы и контроль состояния пациента в наркологической клинике «Элегия Мед».
Разобраться лучше – нарколог вывод из запоя в стационаре в санкт-петербурге
Users who frequently explore online catalogs often highlight the importance of smooth scrolling and responsive interfaces when evaluating e-commerce websites for usability vivid cart navigation hub and the browsing experience feels fluid and stable, making it easier for users to discover products without unnecessary distractions or performance slowdowns.
While reviewing various shopping websites, I discovered explore this pine shop – The layout is structured and neat, making it easy to follow and browse through different sections comfortably.
While exploring different online platforms, I came across see cloud goods selection and it gave a calm impression – The products appear well organized and easy to find on this site, making browsing feel smooth and intuitive.
While exploring different online shops I came across a site that felt neat and organized with a clean interface and smooth navigation between product sections sun petal collection – Simple store design makes shopping here quick and enjoyable experience, making browsing quick and pleasant.
Реабилитация алкоголиков в Москве требует интегрированного подхода, включающего не только медицинское лечение, но и психологическую помощь. Важно, чтобы реабилитационные центры предлагали программы, которые помогают пациентам не только избавиться от физической зависимости, но и наладить их психологическое состояние, а также восстановить их отношения с окружающими.
Углубиться в тему – алкоголик реабилитация наркоманов
While exploring online stores I found a site that felt like a straightforward marketplace with clean navigation and simple product layout silver bay collection market – The marketplace feel is nice and the variety of products available here is decent, making it a practical place to explore.
https://darknetmarketsreview.com/ – darknet markets onion address https://darknetmarketsreview.com/
Modern online buyers appreciate structured shopping systems that make category browsing simple and product discovery more intuitive across platforms SmartZone Cart Navigator – this design approach improves user experience by streamlining navigation and presenting products in a clear and organized manner throughout browsing sessions.
Shoppers often value e-commerce platforms that feel inspired by evergreen forests, especially when browsing curated rustic crafts, eco products, and handcrafted lifestyle items frostpine green goods hub – The idea suggests a forest-winter identity where goods are presented in a structured, nature-inspired layout emphasizing pine-based aesthetics and sustainability.
Вывод из запоя на дому в Екатеринбурге: помощь при запое, снятие интоксикации и медицинская поддержка в наркологической клинике «Детокс»
Разобраться лучше – вывод из запоя на дому круглосуточно
E-commerce platforms are valued most when they provide seamless navigation and dependable checkout experiences overall in modern shopping today Direct Order Hub optimized for speed – the system helps users move through categories efficiently while maintaining a consistent and reliable interface
https://darknet-markets-onion.com/ – dark market link https://darknet-markets-onion.com/
выезд нарколога https://narkolog-na-dom-voronezh-11.ru
While reviewing various shopping websites, I discovered explore flash hub site – The layout is clean, and the content is easy to follow along without unnecessary distractions.
Реабилитация алкоголиков в Москве: восстановление после зависимости и поддержка специалистов в наркологической клинике «Похмельная служба»
Узнать больше – реабилитация алкоголиков город
Отдельно оценивают ситуации, когда подобные эпизоды повторяются. Если человек уже не впервые переносит запой, тяжелый выход из него или выраженное ухудшение самочувствия после алкоголя, вопрос обычно выходит за рамки разовой помощи. Тогда уже при первичном обращении рассматривают не только текущую стабилизацию состояния, но и дальнейшие шаги. При затяжном течении проблемы могут обсуждаться лечение зависимости, программа восстановления и условия, при которых потребуется наблюдение в стационаре.
Ознакомиться с деталями – https://narkolog-na-dom-moskva-17.ru/
Online buyers appreciate rapid goods corner ecosystems that offer convenient corner for quick shopping and simple product discovery today, ensuring a seamless experience from browsing to checkout with minimal effort required throughout the process SmoothCart Rapid Goods Corner Hub System – Enhances shopping flow with structured layout and fast navigation tools
While exploring various sites today, I discovered something that felt nice to browse and worth mentioning in this discussion browse this site – I enjoyed checking it out, and it appears to be a reliable shop with a simple and clean structure.
While exploring multiple online options, I discovered see this collective ridge – The layout is modern and clean, and the responsiveness makes browsing very comfortable overall.
вызов нарколога вызов нарколога
частный нарколог на дом частный нарколог на дом
During my quick scan of the website and its layout, I came across learn more now and appreciated the structure – found it today, and everything looks informative, engaging, and clearly arranged.
Users who frequently shop online often prefer websites that prioritize category clarity, making it easier to compare items and explore different types of products in a smooth and efficient manner vivid cartzone shop hub and the browsing experience feels organized and practical, supporting easy navigation across various product groups without confusion or delays.
Customers exploring agricultural themed e commerce sites often value platforms that combine product variety with simple navigation and efficient browsing tools for better shopping experiences Harvest Goods Exchange – It provides a trustworthy selection of farm inspired products supported by an easy to use interface that improves overall browsing comfort and purchase confidence
https://darknetmarketsreview.com/ – dark matter darknet url https://darknetmarketsreview.com/
Комплексный подход, включающий эти методы, значительно повышает шансы на успешное и долговременное восстановление. Современные реабилитационные центры в Москве предлагают целый ряд программ, которые способствуют полному возвращению пациента к здоровой и активной жизни.
Исследовать вопрос подробнее – reabilitacziya-alkogolikov-moskva-3.ru/
While browsing through various websites, I stumbled upon browse cloud spire items and it felt balanced and neat – The interface is nice and clean, making browsing smooth and straightforward overall, with a very user-friendly structure.
I randomly clicked through a few pages and landed on explore this store which seemed well organized – The products appear interesting and different, and browsing here turned out to be surprisingly fun and smooth.
вызов нарколога на дом анонимно https://narkolog-na-dom-voronezh-10.ru
While scrolling through various online stores I found something that felt organized and easy to navigate with clear category separation silver crest goods store – Products appear reliable and descriptions are clear and helpful overall, giving a smooth and informative browsing experience.
While casually searching the internet I discovered a site that felt organized and clean with a simple interface and clear category layout sun spire goods store – Collective offers interesting products and overall pleasant browsing experience today, helping users find items quickly and easily.
Modern consumers often look for fashion oriented platforms that combine bargain opportunities with intuitive browsing features and reliable product information for smarter shopping decisions Fashion Bargain Portal This portal focuses on delivering frequent deals on clothing and accessories while maintaining a simple layout that helps users quickly identify value for money offers online
Каждый из этапов важен для успешного лечения наркомании и требует квалифицированной наркологической медицинской помощи. Реабилитационные программы, предлагаемые в Москве, часто включают в себя все эти компоненты, при этом в ряде случаев консультации могут предоставляться бесплатно, что способствует комплексному подходу к решению проблемы зависимости.
Получить больше информации – реабилитация алкоголиков
Users exploring digital marketplaces frequently appreciate coastal-themed branding, especially when browsing curated ocean-inspired goods and minimalist lifestyle items frost shore sea goods portal – This reflects a calm marketplace identity where products are arranged in a structured, cool-toned environment inspired by winter shoreline scenery.
During a general scan of ecommerce marketplace platforms, I noticed a site that provided a clean design and smooth browsing flow with clearly separated product sections BuyZone market showcase page embedded in the interface – The platform feels easy to use and offers a wide variety of products, making browsing simple and enjoyable for everyday users.
прокапать от алкоголя самара прокапать от алкоголя самара
новая стоматология стоматология лечить
In between checking multiple platforms, I encountered browse urban flash market – The layout is good and simple, and everything is easy to see clearly throughout the browsing experience.
Решение о помещении пациента в стационар принимается на основе объективных медицинских критериев, а не только по желанию родственников. К показаниям относятся: запой длительностью более 72 часов, выраженная абстиненция с тахикардией, артериальной гипертензией, профузным потоотделением, наличие в анамнезе алкогольных делириев или судорожных эпизодов, сопутствующие хронические заболевания печени, сердца, поджелудочной железы. При отравление продуктами распада этанола, когда интоксикация затрагивает несколько систем одновременно, резкое прекращение употребления без медицинской поддержки может спровоцировать отек мозга, острую сердечную недостаточность или желудочно-кишечное кровотечение. При сочетанных расстройствах, когда в анамнезе присутствует наркомании, протоколы адаптируются под специфику психоактивных соединений и включают усиленный нейрологический контроль. Стационар позволяет провести полноценную диагностику, включая ЭКГ, экспресс-анализы крови и мониторинг сатурации, что формирует точную картину состояния и исключает шаблонные назначения.
Углубиться в тему – наркология вывод из запоя в стационаре в санкт-петербурге
https://market-darknet.org/ – nexus darkweb url https://market-darknet.org/
bitcoin dark web https://marketdarknets.org/
https://darknet-market.org/ – darknet market links https://darknet-market.org/
After spending time navigating through different pages, I observed that access this link aligns with a clear presentation – I checked it out quickly, and it seems like a neat and useful site overall.
Many digital audiences appreciate platforms that maintain clean structure and modern design while making browsing smooth and easy for everyone UltraWave Experience Link – UltraWave delivers a clean and modern interface where browsing feels smooth and easy, providing a simple and enjoyable user experience.
After reviewing multiple pages and observing the interface closely, I found that open this site blends into a well-organized design – everything feels smooth, and navigating through the content is easy and structured.
While reviewing various shopping websites, I discovered explore this shore shop – The site gives a positive first impression, with clearly presented and simple content throughout.
нарколог на дом цена нарколог на дом цена
During my usual browsing session, I stumbled upon something that felt worth noting because of its interesting selection and layout take a look here – It’s an interesting collection, and I may revisit later to explore more items in detail when I have extra time.
After spending time navigating through pages, I observed that access this link aligns with a clear presentation – clean website overall, and it feels modern and easy to browse around today.
Реабилитация алкоголиков в Москве с комплексным подходом — это многогранный процесс, включающий в себя не только медицинские процедуры, но и психологическую поддержку, физическую реабилитацию и помощь в социальной адаптации. Профессиональный реабилитационный центр обеспечивает индивидуальный подход к каждому пациенту, включая такие методы, как кодирование и своевременное лечение запоя. Важно отметить, что успешное лечение алкоголизма требует учета множества факторов, таких как степень зависимости, психоэмоциональное состояние пациента, а также его физическое здоровье. Комплексный подход помогает эффективно устранить все составляющие проблемы, минимизируя риски рецидивов.
Подробнее можно узнать тут – клиника реабилитации алкоголиков
Нарколог на дом в Екатеринбурге востребован в ситуациях, когда человеку нужна врачебная помощь после употребления алкоголя, при запое, выраженном похмельном синдроме, нарушении сна, тревоге, скачках давления, слабости и других признаках ухудшения самочувствия. Такой формат обращения часто выбирают семьи, которые хотят вызвать врача без поездки в клинику и быстро получить консультацию по состоянию больного. Домашний выезд особенно важен тогда, когда требуется детоксикация, наблюдение после нескольких дней употребления спиртного и оценка рисков, связанных с последствиями алкоголизма.
Подробнее – вызвать нарколога на дом екатеринбург
Users who frequently browse online catalogs usually appreciate platforms that offer occasional standout products that make the experience more engaging and worth returning to later for further exploration trend center explore page and the browsing flow feels natural, encouraging users to revisit and discover more items over time.
сколько стоит капельница от похмелья https://kapelnicza-ot-pokhmelya-samara-23.ru
I came across this shop during browsing and it felt simple and modern with a clear and intuitive user experience silver dune online hub – This site feels modern and easy to navigate for new users, offering a smooth and welcoming browsing experience overall.
свадьба москва сайт свадьба под ключ москва недорого
капельница от похмелья купить https://kapelnicza-ot-pokhmelya-samara-24.ru
Style saver markets attract users who want to maintain a fashionable lifestyle while also taking advantage of discounts and promotional offers available online Style Saver Market It delivers a mix of trendy products and ongoing savings enabling users to shop smartly while enjoying a wide range of stylish and affordable options regularly
Users exploring digital platforms often pay attention to visual clarity, usability, and how comfortably they can navigate through structured content while browsing different sections of a website SummitMedia Portal Access – SummitMedia presents a clean and attractive interface, making browsing enjoyable with its organized layout and smooth navigation that helps users easily find and understand content without confusion.
Shoppers who prioritize ease of use often turn to platforms that focus on providing essential goods in a clear and straightforward shopping environment convenience goods store – This structure supports quick navigation and helps users find important items without getting lost in overly complicated menus or irrelevant categories
Users interested in creative growth often enjoy platforms that combine learning tools with inspiration, helping them explore new ideas and develop innovative projects frostspire digital creativity hub – It represents an engaging environment where knowledge and imagination merge into structured learning experiences designed for idea exploration.
Online buyers exploring product rich platforms often prefer organized spaces that group items clearly and they sometimes navigate to the Horizon Product Space which offers a well structured catalog of items with a focus on clarity, usability, and a smooth browsing experience that supports efficient product discovery.
I came across this store while browsing and it felt clean and creative with a soft design and clearly arranged categories sun woven store hub – Market feels creative with well curated items and smooth navigation, making browsing feel natural and smooth.
During my evaluation of multiple shopping websites I also discovered Urban Pick Corner discovery portal – The platform offered a consistent structure and easy navigation, allowing smooth movement between pages while maintaining clarity and simplicity across the entire browsing experience without any unnecessary complexity present anyway
https://darknet-market.org/ – tordex darknet market https://darknet-market.org/
dark market https://marketdarknets.org/
Digital visitors often appreciate platforms that maintain simplicity and structure while supporting focus and easy understanding of information FocusUltra Access Node – The UltraFocus website offers a clear and simple layout where users can stay focused and explore content in an organized and efficient way.
Вывод из запоя в стационаре в Санкт-Петербурге: профессиональное лечение, капельницы и контроль состояния пациента в наркологической клинике «Элегия Мед».
Узнать больше – нарколог вывод из запоя в стационаре в санкт-петербурге
Вывод из запоя на дому в Екатеринбурге: помощь при запое, снятие интоксикации и медицинская поддержка в наркологической клинике «Детокс»
Получить дополнительную информацию – вывод из запоя на дому цена екатеринбург
As I explored different pages and interacted with the interface, I saw that click for details aligns with a neat structure – the site feels modern, and the layout provides a visually smooth and enjoyable experience.
In between browsing different platforms, I noticed visit trail bazaar now – The experience was enjoyable, with smooth performance and information that is clear and easy to read overall.
While exploring different online stores, I came across see pine items and it gave a calm and structured impression – The layout is well organized and easy to explore, making it a great browsing experience that feels smooth and comfortable.
Процесс реабилитации алкоголиков включает в себя несколько методов, направленных на восстановление как физического, так и психоэмоционального состояния пациента. В Москве доступны различные программы, от традиционной детоксикации до современных подходов, при этом в отдельных случаях предусматривается вывод данных о состоянии пациента и динамике лечения при алкогольной зависимости, включая когнитивно-поведенческую терапию и арт-терапию.
Детальнее – реабилитация алкоголиков стоимость
I was browsing late in the evening when I found a site that felt minimal and functional with a soft design and easy navigation flow urban bay collection hub – Goods selection looks practical and well suited for everyday needs, creating a relaxed and efficient browsing experience.
I don’t usually share links, but this one stood out because of how fresh and appealing the design felt while browsing see this petal site – It feels fresh overall, and the product presentation is something I really like because it’s simple and nicely structured.
During random browsing I stumbled upon a shop that felt neat and well structured with clearly divided sections and simple navigation silver fern goods store – I like how everything is categorized, making browsing really simple and helping users move through the site without difficulty.
Online users frequently mention that certain websites offer surprising product picks that stand out and make browsing more enjoyable, leading them to revisit the store in the future for more exploration trend center product link and the experience feels engaging enough to keep users interested in checking back for updated or newly added items over time.
Online buyers who love visual product discovery appreciate platforms that highlight price reductions alongside appealing layouts for easier comparison and selection Price Drop Gallery – In this version the experience is shaped like a gallery of price drops where users can browse discounted items visually while enjoying an organized structure that enhances the overall shopping experience and engagement
Users increasingly expect straightforward online platforms that minimize complexity and provide clear navigation paths Simple Order Access – The design philosophy centers on simplicity, helping users complete their orders with minimal effort and maximum clarity across all device types overall platform
Как поясняет нарколог Дмитрий Кузнецов: “Реабилитация алкоголиков должна быть многогранной. Только при сочетании медицинских и психологических методов, а также поддержке со стороны специалистов на всех этапах лечения, можно добиться устойчивого результата. Психологическая работа с пациентом помогает ему не только преодолеть зависимость, но и восстановить нормальное функционирование в обществе.” Также стоит отметить, что в некоторых случаях помощь может быть предоставлена бесплатно, и пациент может получить доступ к данным о возможных вариантах бесплатной реабилитации, что значительно облегчает процесс выздоровления.
Получить дополнительные сведения – реабилитация алкоголиков город
Users exploring modern e-commerce brands often appreciate warm industrial-inspired naming that blends innovation, energy, and essential goods while browsing curated collections of practical tools, lifestyle items, and design-focused products across structured digital storefronts glow forge essentials hub – The concept reflects a contemporary marketplace identity where glowing energy-inspired branding meets functional product curation designed for modern creative and industrial aesthetics.
While reviewing online shop designs for usability, I noticed that structured layouts improve flow, and UrbanPickZone web store – Browsing feels comfortable and efficient, with a clean interface that helps users quickly find what they need without hassle.
People interacting with online platforms often appreciate when design is clean, professional, and focused on improving readability and user efficiency during browsing ProLaunch UX Portal – ProLaunch offers a professional and structured interface where content is organized for quick reading, making navigation smooth and user friendly throughout the experience.
https://darknet-market.org/ – wethenorth darknet link https://darknet-market.org/
вызвать нарколога на дом вызвать нарколога на дом
Вывод из запоя на дому в Екатеринбурге — это услуга, которая позволяет пациентам пройти лечение в удобных для них условиях, без необходимости посещать стационар. Процедура включает несколько этапов, каждый из которых направлен на снижение уровня алкогольной интоксикации и стабилизацию состояния пациента. Главным преимуществом вывода из запоя на дому является то, что это не только удобно, но и позволяет избежать лишнего стресса, который может быть вызван госпитализацией.
Исследовать вопрос подробнее – вывод из запоя на дому круглосуточно
From an overall perspective after a short browsing session, I found that check this out sits within a well-structured layout – the content feels simple, useful, and easy to understand for most visitors.
While casually browsing different websites I came across something that felt warm and simple with a structured layout and soft visual style swift maple browse collection – Corner shop has cozy feel with surprisingly diverse product range, helping users explore without difficulty.
In between checking multiple online platforms, I encountered browse wild vault – It feels like a solid site, and everything is straightforward while moving through the pages.
While reviewing the interface and scanning content flow, I noticed that learn more here integrates into a clean layout – this page feels smooth, and browsing around was actually pretty enjoyable overall.
Online shoppers exploring aesthetic marketplaces often value calm visuals and organized product layouts that support easy browsing Tranquil Fields Shop helping them navigate categories smoothly while enjoying a peaceful and visually balanced shopping experience throughout with natural design inspiration included in browsing sessions
капельница от запоя цена капельница от запоя цена
As I continued searching for reliable tech information sources, I encountered tech knowledge hub – a platform that delivers useful insights and updates about emerging technologies in a simple and consistent manner.
While reviewing online guides for better focus habits, users occasionally come across grow smart hub which is included in curated sets of websites emphasizing clarity and ease of navigation for everyday informational browsing. – It is often appreciated for its simplicity and direct approach.
Каждый из этапов важен для успешного лечения наркомании и требует квалифицированной наркологической медицинской помощи. Реабилитационные программы, предлагаемые в Москве, часто включают в себя все эти компоненты, при этом в ряде случаев консультации могут предоставляться бесплатно, что способствует комплексному подходу к решению проблемы зависимости.
Изучить вопрос глубже – https://reabilitacziya-alkogolikov-moskva-3.ru
During my usual browsing session I found a store that felt minimal and well structured with a clean interface that stood out immediately silver field market – Clean design and good layout make this store enjoyable today, making it easy to browse without unnecessary distractions.
сколько стоит капельница от похмелья https://kapelnicza-ot-pokhmelya-samara-23.ru
People browsing modern websites usually expect intuitive layouts and organized information flow that supports fast comprehension of content overall experience BrandVision info center – the information center approach of BrandVision ensures users can easily identify relevant topics and navigate without unnecessary distraction or confusion.
While exploring different websites today, I discovered something that felt easy and comfortable to browse through browse this goods site – The layout is smooth, and the browsing experience is good and very easy to follow from page to page.
Users searching for stylish items online frequently value platforms that make navigation simple while showcasing a wide range of categorized products clearly Fashion Goods Explorer – It is described as an exploratory space where users can discover fashion focused products in a structured environment designed for smooth browsing and improved shopping satisfaction
Online shoppers benefit greatly from platforms that prioritize speed and simplicity when managing product browsing and checkout processes Modern Shopping Gate delivering a seamless experience that keeps interactions quick and easy across all sections of the website – The design focuses on improving usability and reducing unnecessary steps during shopping sessions
Users interacting with digital websites typically prefer systems that are quick, smooth, and dynamic, allowing effortless movement across pages and content SharpWave Navigation Node – SharpWave delivers a dynamic interface where navigation is fast and smooth, ensuring users can browse easily and access information without delays.
While exploring online catalogs I came across a site that feels balanced and clean with categories arranged in a way that supports easy and fast browsing crest goods catalog using a simple interface that avoids clutter – The browsing experience is straightforward, helpful, and suitable for quick shopping decisions
https://darknetmarketnews.com/ – silk road shop https://darknetmarketnews.com/
darknet market https://marketdarknets.org/
https://darknet-market.org/ – dark web marketplaces https://darknet-market.org/
While exploring different online retail websites I recently found Urban Style Bazaar access portal – The platform had a simple structure that made browsing effortless, and the design supported fast navigation while keeping everything readable and easy to locate without needing extra effort or repeated searching at any point
https://market-darknet.org/ – dark web marketplaces https://market-darknet.org/
While exploring inspiration websites, I found idea universe guide – a site I like browsing because it consistently shares fresh ideas and interesting content that keeps my attention.
During a casual online search across different marketplaces, I discovered explore copper lane goods and it stood out with a neat layout – The variety is good and everything looks arranged in a clear way, giving a calm and straightforward browsing experience.
As I moved through a few online pages earlier, I discovered visit goods page and it gave a clear and calm impression – The layout and presentation made it easy to find what I needed without wasting time or effort.
Выбор центра для реабилитации алкоголиков с индивидуальной программой в Москве — это ключевой момент в процессе восстановления. Успех лечения во многом зависит от квалификации специалистов, качества программ и уровня условий, которые предоставляются пациенту. Важно, чтобы клиника предложила не только медицинскую помощь, но и психологическую поддержку, которая является основой для успешной реабилитации. Также стоит учитывать, что в некоторых случаях вывод из запоя или лечение может быть проведено анонимно, а стационарное лечение на летний период может стать удобным решением для более продолжительного и комфортного восстановления пациента.
Подробнее можно узнать тут – реабилитация алкоголиков стоимость в москве
While exploring the site and carefully observing how the information is structured, I noticed that visit this resource stands out in a subtle way – everything appears neat, and the content is simple to follow without any confusion.
капельница после запоя цена капельница после запоя цена
I had been jumping between various online stores when I stumbled upon browse this crest shop – Everything loads nicely, and the layout feels organized, creating a pleasant and easy browsing experience overall.
Users who rely on online tools for daily tasks often prefer platforms that combine stability with straightforward navigation and consistent performance quality TrendPulse Access as usability drives engagement – The system offers a clean and responsive interface that allows users to complete tasks efficiently while maintaining smooth interaction across different sections of the platform
While exploring different online stores I came across a platform that felt serene and modern with a balanced interface and neatly organized categories that supported easy browsing twilight cove collection – Collective site gives calm aesthetic and relaxing browsing experience overall, making it feel comfortable and visually gentle.
In the middle of searching for practical success resources, I found modern growth tips – a site that presents realistic and useful strategies designed to support ongoing personal development.
Решение о помещении пациента в стационар принимается на основе объективных медицинских критериев, а не только по желанию родственников. К показаниям относятся: запой длительностью более 72 часов, выраженная абстиненция с тахикардией, артериальной гипертензией, профузным потоотделением, наличие в анамнезе алкогольных делириев или судорожных эпизодов, сопутствующие хронические заболевания печени, сердца, поджелудочной железы. При отравление продуктами распада этанола, когда интоксикация затрагивает несколько систем одновременно, резкое прекращение употребления без медицинской поддержки может спровоцировать отек мозга, острую сердечную недостаточность или желудочно-кишечное кровотечение. При сочетанных расстройствах, когда в анамнезе присутствует наркомании, протоколы адаптируются под специфику психоактивных соединений и включают усиленный нейрологический контроль. Стационар позволяет провести полноценную диагностику, включая ЭКГ, экспресс-анализы крови и мониторинг сатурации, что формирует точную картину состояния и исключает шаблонные назначения.
Подробнее можно узнать тут – вывод из запоя в стационаре анонимно в санкт-петербурге
I was casually browsing online when I discovered a store that felt visually distinct with a bold and unusual presentation style silver grove essentials – The interesting concept behind this store stands out from others, giving it a creative and different feel overall.
People searching for handcrafted floral inspired products often value platforms that emphasize artistry, detail, and carefully selected merchandise for home or gifting purposes Artisan Petal Market showcasing a wide array of creative floral themed items designed with attention to detail and quality – the marketplace encourages exploration through its structured layout, intuitive browsing features, and visually appealing presentation that keeps users engaged throughout their visit.
People interacting with branding platforms usually expect clarity, consistency, and visually refined layouts that strengthen brand recognition and usability BrandMatrix Navigation Portal – BrandMatrix provides strong branding with a highly polished modern interface, allowing users to browse easily while enjoying a clean and professional design experience.
Modern online buyers increasingly seek digital stores that organize products clearly and reduce browsing effort through structured category layouts and responsive interfaces making shopping faster and more enjoyable across devices and network conditions Center of Style Goods – It serves as a well structured hub where users can explore stylish goods efficiently, benefiting from fast loading pages and an intuitive navigation system designed for convenience
In exploring solutions for managing online stores, I came across shop development suite offering tools that simplify e-commerce construction – it enhances workflow efficiency, supports customization for different business models, and allows users to maintain organized, high-performing online shops with improved control over various operational and technical aspects.
https://darknetmarketnews.com/ – cocorico onion https://darknetmarketnews.com/
I stumbled upon something today that felt well arranged and easy to explore, which made it worth sharing here visit this collective site – Everything looks organized, and it helps make searching for items quick and convenient in a smooth way.
https://market-darknet.org/ – nexus shop https://market-darknet.org/
https://darknet-market.org/ – nexus shop url https://darknet-market.org/
During my comparison of online retail experiences, I noticed that simplicity enhances usability, and Urban Trend Arena browse station had a layout that felt clean, well structured, and easy to navigate, making it quick to understand and move around without unnecessary effort
While checking out online shops for fun, I discovered visit this page and it felt very organized – Browsing here was pleasant, and the items seem interesting and worth checking again for curiosity.
Этот увлекательный информационный материал подарит вам массу новых знаний и ярких эмоций. Мы собрали для вас интересные факты и сведения, которые обогатят ваш опыт. Откройте для себя увлекательный мир информации и насладитесь процессом изучения!
Тыкай сюда — узнаешь много интересного – вывести из запоя
From an overall usability perspective after exploring the site, I found that check this out sits within a well-structured design – the browsing feels smooth, and the accessibility makes it easy for anyone to follow along.
В этой статье представлен занимательный и актуальный контент, который заставит вас задуматься. Мы обсуждаем насущные вопросы и проблемы, а также освещаем истории, которые вдохновляют на действия и изменения. Узнайте, что стоит за событиями нашего времени!
Откройте для себя больше – наркологи самары
In the middle of comparing different platforms, I came across check this petal site – The design is clean and simple, and it makes the browsing experience noticeably better and more efficient.
Эта познавательная публикация погружает вас в море интересного контента, который быстро захватит ваше внимание. Мы рассмотрим важные аспекты темы и предоставим вам уникальные Insights и полезные сведения для дальнейшего изучения.
Раскрыть тему полностью – услуги нарколога на дому
While casually browsing I found a site that feels modern and well structured with a clean interface that allows users to explore products easily without distraction harbor urban goods collection designed for smooth interaction – The layout is visually appealing and highly organized
After analyzing how the content is arranged, I found that see this website fits into a well-organized design – the site looks quite organized, and I found it easy to explore content here overall.
In various discussions about digital transformation and tech learning ecosystems, readers often encounter structured websites designed to improve accessibility and understanding such as thinkbeyond tech network which is commonly included in recommendations for simple and efficient browsing platforms. It gives a clear and structured user experience.
Software teams building scalable applications often depend on systems that improve performance, reduce latency, and enhance user experience Results Acceleration Portal ensuring applications remain stable, responsive, and efficient even under high traffic conditions and heavy workloads across global users consistently
During my exploration of industry-focused resources, I discovered trend insight page – which offers engaging content that helps me keep up with fast-moving industry developments in a clear and structured way.
Digital visitors often prefer systems that combine security assurance with modern, clean visuals that enhance readability and overall browsing satisfaction VaultBright UX Flow – BrightVault offers a secure browsing experience where design is clean and visually appealing, ensuring users can move through content smoothly and confidently.
Many individuals reflecting on personal growth often seek content that encourages thoughtful change without pressure, and they may find inspiration in reflective-life-guide – It shares gentle guidance that helps users build awareness, improve habits, and gradually develop a more fulfilling and balanced lifestyle.
While browsing online earlier I found a store that felt calm and well structured with a smooth interface that made everything easy to access without confusion silver harbor store hub – The smooth browsing experience stands out, and the products seem thoughtfully selected here, giving a balanced and pleasant feel overall.
While checking out different online stores, I came upon take a look and it gave a clean impression – I enjoyed visiting this site since the products look trendy and interesting, making the browsing experience feel easy and engaging.
Решение о помещении пациента в стационар принимается на основе объективных медицинских критериев, а не только по желанию родственников. К показаниям относятся: запой длительностью более 72 часов, выраженная абстиненция с тахикардией, артериальной гипертензией, профузным потоотделением, наличие в анамнезе алкогольных делириев или судорожных эпизодов, сопутствующие хронические заболевания печени, сердца, поджелудочной железы. При отравление продуктами распада этанола, когда интоксикация затрагивает несколько систем одновременно, резкое прекращение употребления без медицинской поддержки может спровоцировать отек мозга, острую сердечную недостаточность или желудочно-кишечное кровотечение. При сочетанных расстройствах, когда в анамнезе присутствует наркомании, протоколы адаптируются под специфику психоактивных соединений и включают усиленный нейрологический контроль. Стационар позволяет провести полноценную диагностику, включая ЭКГ, экспресс-анализы крови и мониторинг сатурации, что формирует точную картину состояния и исключает шаблонные назначения.
Узнать больше – вывод из запоя в стационаре клиника санкт-петербург
Online shoppers often appreciate minimal designs that make browsing easier and reduce distractions during product searches Clean Browse Corner this corner ensures a clean interface and fast loading experience helping users explore stylish goods in a simple structured layout online
People evaluating web platforms often focus on how quickly pages load and how intuitively the design helps them reach information without frustration ConnectUltra Experience Hub – The UltraConnect website provides a modern and responsive interface where performance is fast and the layout is simple, clean, and easy to follow.
Эта обзорная заметка содержит ключевые моменты и факты по актуальным вопросам. Она поможет читателям быстро ориентироваться в теме и узнать о самых важных аспектах сегодня. Получите краткий курс по современной информации и оставайтесь в курсе событий!
Где можно узнать подробнее? – вызов нарколога на дом
Bargain focused users often rely on digital platforms that aggregate discounts and streamline the shopping experience for faster and more effective purchasing decisions Deal Rush Center – It is designed to accelerate deal discovery and provide users with a seamless interface that supports quick browsing and efficient access to valuable savings opportunities
During a casual browsing session I discovered a site that felt modern and refined with a balanced layout and neatly arranged sections that made navigation very intuitive twilight crest shop – Store feels polished and easy to navigate across all sections, creating a smooth and organized user journey.
drughub shop https://marketdarknets.org/
black ops link https://marketdarknets.com/
While testing usability across several shopping websites I found one platform that maintained consistent clarity throughout Urban Trend browsing center – The design is straightforward and practical, helping users move around easily while keeping the browsing experience calm and efficient overall
В обзорной статье вы найдете собрание важных фактов и аналитики по самым разнообразным темам. Мы рассматриваем как современные исследования, так и исторические контексты, чтобы вы могли получить полное представление о предмете. Погрузитесь в мир знаний и сделайте шаг к пониманию!
Что скрывают от вас? – нарколог на дом вывод
заказать свадьбу под ключ заказ свадьбы москва
I was just casually exploring the internet when I found something that felt worth mentioning because of its creative and thoughtful products visit this thread store – The shop is nice, and the items look unique with a clear sense of thoughtful design behind them.
From my perspective after a short browsing session, check it out sits within a well-organized layout – the design feels user friendly, and the content is easy to understand and access.
People who enjoy artisan shopping often seek online destinations that highlight wooden textures and rustic design principles in curated collections Golden Timber Artisan Hub offering a diverse mix of handcrafted goods inspired by nature and traditional woodworking techniques – the platform provides a smooth and visually appealing experience that encourages relaxed browsing and discovery.
In the middle of comparing different platforms, I came across check this windspire page – The site feels reliable overall, and the browsing experience is smooth and easy to navigate.
Мы предлагаем вам окунуться в океан любопытных фактов и вдохновляющих историй. Эта публикация поможет расширить горизонты, разбудить интерес к науке и истории и увидеть мир с новой стороны.
Уточнить детали – запой вывод на дому
People using digital platforms often appreciate systems that maintain structure and reliability while offering smooth navigation across all sections and pages WebReliable Source Hub – It delivers a stable browsing environment with intuitive layout design and consistent performance that allows users to move through content easily while experiencing a dependable and user friendly interface throughout usage
Users exploring digital websites usually prefer layouts that feel premium, structured, and easy to navigate without unnecessary complexity EliteZone Flow Portal – EliteZone offers a clean and premium interface where content is well organized, ensuring users can browse easily and understand information quickly.
While exploring ecommerce sites I discovered a platform that feels organized and modern with a creative theme that supports easy product discovery and smooth navigation urban light house goods designed for simplicity – Products are neatly displayed under a unique themed design that stands out
While browsing online earlier I found a site that felt fast and responsive with a clean layout that made moving between pages smooth and effortless silver horizon store hub – Everything loads quickly and the interface feels very user friendly today, making the overall experience simple and pleasant.
Modern shoppers frequently look for platforms that present goods clearly while maintaining responsive performance across different devices and browsing conditions Modern Goods Point – This point structure ensures clarity in product presentation and supports a smooth transition from browsing to checkout completion
While researching shopping directories and e-commerce navigation tools, I found shop canopy directory that groups items into structured categories for easier access – Shop tree market feels organized with useful categories for shoppers and improves overall browsing efficiency by reducing search time and helping users focus on relevant products more quickly.
During my browsing of modern digital platforms, I discovered user friendly flow – which presents information in a clean and structured way that enhances readability and ensures a seamless navigation experience for all users.
https://darknet-market.org/ – dark market link https://darknet-market.org/
drughub market https://marketdarknets.org/
Вывод из запоя на дому в Санкт-Петербурге с выездом специалиста, стабилизацией состояния и медицинской поддержкой в наркологической клинике «Частный медик 24»
Изучить вопрос глубже – https://vyvod-iz-zapoya-na-domu-sankt-peterburg-11.ru
While testing various digital shopping experiences I focused on speed and interface design and Urban Trend Hub online shop – Everything seems well structured and dependable, with pages loading smoothly and a clean design that supports comfortable browsing without unnecessary visual clutter
During my browsing session and usability check, I noticed that see more here blends into a clear layout – the first impression is strong, and the structure feels modern, clean, and approachable overall.
Реализация данных задач позволяет наркологу на дом в Ростове-на-Дону оказывать помощь в контролируемом и безопасном формате.
Получить больше информации – https://narkolog-na-dom-v-rnd19.ru/narkolog-rostov-baumana/
На каждом этапе лечения нарколог контролирует витальные показатели, оценивает динамику восстановления и при необходимости корректирует терапию. Такой подход исключает резкие перепады давления, нарушения сердечного ритма и другие побочные эффекты, часто возникающие при попытках вывести пациента из запоя без медицинского участия.
Ознакомиться с деталями – http://vyvod-iz-zapoya-v-rnd19.ru/vyvedenie-iz-zapoya-rostov-na-donu/
While reviewing different online stores, I paused at access this store – The structure appears well thought out, making it easy for users to move around the site and find relevant sections without confusion or delay.
I was casually browsing online earlier and came across something that felt interesting enough to mention after spending some time exploring it visit this oak emporium – I like the vibe here overall, it feels calm, and the products seem thoughtfully curated with a soft, pleasant aesthetic.
In conversations about simplified digital navigation and structured browsing environments, some people highlight that idea orbit lens is referenced among collections of easy to use websites that prioritize clarity and comfortable reading experiences for general audiences exploring online content. – The presentation feels light, clear, and well spaced.
While exploring different online stores I came across a site that felt fresh and nature inspired with a structured layout and smooth browsing flow across categories twilight fern collection – Fern themed store looks natural fresh and visually pleasing overall, making product discovery effortless and pleasant.
Мы собрали для вас самые захватывающие факты из мира науки и истории. От малознакомых деталей до грандиозных событий — эта статья расширит ваш кругозор и подарит новое понимание того, как устроен наш мир.
Есть чему поучиться – вывод из запоя цена на дому
After spending some time exploring different sections and usability flow, I noticed that check this platform fits naturally into the experience – the layout is interesting, and everything seems simple and easy to navigate around overall.
During my evaluation of branding and marketing platforms I observed navigation flow and usability quality and found BuildYourBrand idea studio – The tools are useful and easy to understand, making it a great branding platform overall that supports smooth interaction and clear understanding of features
I was casually browsing online when I found shop link here and it stood out with its clean layout – The crafts selection feels creative and nicely organized across the whole site, making browsing simple and pleasant.
Этот обзор предлагает структурированное изложение информации по актуальным вопросам. Материал подан так, чтобы даже новичок мог быстро освоиться в теме и начать использовать полученные знания в практике.
Нажмите, чтобы узнать больше – прокапаться от алкоголя нижний новгород
While exploring knowledge-sharing websites, I found answers flow space – a platform that offers clear explanations and encourages users to discover ideas while also receiving quick and useful answers to their questions.
Алкогольная интоксикация сопровождается накоплением токсинов, нарушением водно-солевого баланса и изменениями в работе нервной системы, что характерно для алкоголизма и состояний после запоя. Это проявляется головной болью, слабостью, тошнотой, сухостью во рту и нарушением сна. Капельница позволяет ускорить процессы очищения организма и стабилизировать состояние пациента под контролем врача, помогая человеку быстрее выйти из состояния запоев.
Изучить вопрос глубже – капельница от похмелья
Этот интересный отчет представляет собой сборник полезных фактов, касающихся актуальных тем. Мы проанализируем данные, чтобы вы могли сделать обоснованные выводы. Читайте, чтобы узнать больше о последних трендах и значимых событиях!
Есть чему поучиться – прокапаться на дому нижний новгород
Users comparing digital experiences frequently focus on usability, speed, and how effectively platforms guide them through information < AlphaForce Impact Page – The site maintains a clean and impactful layout where content hierarchy is well defined, helping visitors understand information flow without confusion.
Customers exploring waterfront inspired marketplaces often appreciate curated selections that blend style and functionality for design focused online buyers today Customers exploring waterfront inspired marketplaces often appreciate curated selections that blend style and functionality for design focused online buyers today Waterfront Select Goods featuring handpicked coastal items for home and lifestyle use – A refined coastal marketplace offering thoughtfully selected products for modern living
Мы рассмотрим современные вызовы здравоохранения и пути их решения с помощью технологий и научных исследований. В статье собраны данные о новых лекарствах, методах диагностики и системном подходе к улучшению здоровья населения.
Узнать напрямую – вызов нарколога на дом круглосуточно москва
During random browsing I stumbled upon a shop that felt neat and well organized with easy to follow sections and simple navigation silver lane shop hub – I found this shop quite easy to use and navigate around, making everything feel accessible and clear.
Many online visitors prefer websites that feel clean and modern while still offering engaging content and easy-to-navigate structures that improve usability UrbanNexus UI Gateway – UrbanNexus combines interesting content with a simple yet visually appealing design, creating a browsing experience that feels smooth, organized, and enjoyable for users.
Users who appreciate minimal design often favor platforms that reduce clutter and focus on essential browsing elements for clarity Minimal Goods Zone – The interface is kept simple and clean allowing stylish products to stand out while ensuring easy navigation across categories
In the growing world of online interior shopping, users often value platforms that present home solutions in a way that feels organized, modern, and visually appealing Chic Living Solutions – it delivers a smooth and aesthetically pleasing browsing experience designed to inspire practical yet stylish home improvements
https://market-darknet.org/ – nexus darknet access https://market-darknet.org/
tordex darknet link https://marketdarknets.org/
During my review of e-commerce platforms I focused on navigation behavior and interface simplicity and UT Station shopping center page – The browsing experience felt smooth and structured, making it easy to explore content while everything remained clean and well arranged for comfortable use across pages.
After analyzing how the content is structured and displayed, I found that see this website fits into a well-organized layout – the clean interface ensures that information can be found without delay.
In curated digital retail showcases, embedded links often function as illustrative tools within broader explanations of marketplace aesthetics, especially when readers encounter UPC botanical style marketplace – Botanical style marketplaces typically incorporate nature inspired design elements that enhance visual appeal and provide a refreshing sense of organization throughout the shopping experience.
While exploring different online platforms that focus on organized learning and clear presentation of information, I came across structured learning hub – a site that presents content in a well-arranged and logical format, making it easy for users to follow and understand without confusion or unnecessary complexity.
В этой статье собраны факты, которые освещают целый ряд важных вопросов. Мы стремимся предложить читателям четкую, достоверную информацию, которая поможет сформировать собственное мнение и лучше понять сложные аспекты рассматриваемой темы.
Раскрыть тему полностью – капельница от запоя
I had been checking several sites for inspiration when I landed on go to this hub – The design feels organized and balanced, allowing for a browsing experience that is both smooth and easy to manage.
Эта информационная статья охватывает широкий спектр актуальных тем и вопросов. Мы стремимся осветить ключевые факты и события с ясностью и простотой, чтобы каждый читатель мог извлечь из нее полезные знания и полезные инсайты.
Кликни и узнай всё! – вывод из запоя стационар спб
oakridgeemporium.shop – This store caught my attention, design is simple yet appealing.
https://darknetmarketnews.com/ – cannaexpress url https://darknetmarketnews.com/
Product designers and engineers often use structured idea platforms to improve their workflows and creativity and one such useful resource is Design Thinking Arena which fosters collaboration and innovation – A strategic environment focused on applying design thinking principles to solve complex creative challenges
Digital users often prefer platforms that combine innovation with simplicity, making navigation clear, fast, and easy to understand LabsZenith Navigation Hub – The ZenithLabs website looks innovative with a simple and effective layout, allowing users to explore content without unnecessary complexity.
В этой статье собраны факты, которые освещают целый ряд важных вопросов. Мы стремимся предложить читателям четкую, достоверную информацию, которая поможет сформировать собственное мнение и лучше понять сложные аспекты рассматриваемой темы.
Подробнее можно узнать тут – капельница от запоя нижний новгород
While casually searching the internet I discovered a site that felt clean and modern with an intuitive layout and easy category flow silver oak goods store – Overall good experience browsing through items and checking different categories, giving a simple and efficient browsing experience.
People who enjoy exploring curated deals often prefer platforms that balance design and functionality to improve overall shopping experiences Deal Picks Zone – The platform highlights selected deals in a clean and accessible layout that allows users to browse quickly and efficiently
tordex darknet market https://marketdarknets.org/
Online shoppers value platforms that offer seamless transitions between browsing and checkout while keeping the interface clean and easy to understand Seamless Cart Access – This experience improves overall usability by ensuring users can move smoothly through each stage of shopping without encountering delays or confusion
As I continued navigating through the pages and examining the structure, I realized that explore this page contributes to a smooth experience – everything feels fresh, and the content is relevant and neatly arranged for simple understanding.
Users seeking tranquil shopping environments often gravitate toward online stores that highlight ocean inspired simplicity and calming design elements Ocean Whisper Shop featuring thoughtfully arranged products influenced by coastal scenery and gentle aesthetics – the marketplace ensures a pleasant browsing experience with smooth navigation, soft visuals, and useful items suitable for modern households
While testing usability across multiple retail sites I found the experience stable and clear when using UTZ storefront access where browsing felt structured and intuitive – Overall it is good, simple design, user friendly layout, and easy navigation without complications
Наркологическая клиника в Ростове-на-Дону рассматривается как специализированная медицинская структура, обеспечивающая лечение и помощь 24/7 при состояниях, связанных с зависимостями. В клинике «Вектор Трезвости» работа выстроена по принципу непрерывности, что позволяет оказывать медицинское вмешательство независимо от времени суток и стадии обращения. Такой формат особенно важен при острых интоксикациях, выраженной абстиненции и резких соматических нарушениях, когда своевременность помощи напрямую влияет на прогноз. Наркологическая клиника в Ростове-на-Дону функционирует в условиях постоянной готовности медицинского персонала и строгого соблюдения клинических регламентов.
Детальнее – наркологическая клиника цены в ростове-на-дону
Погружайся в захватывающие сюжеты вместе с нами! Голливудские блокбастеры, культовые сериалы, добрые мультфильмы и зрелищные премьеры – всё доступно в отличном качестве. Никакой рекламы, только чистое удовольствие от просмотра. Создай свою коллекцию любимых фильмов и наслаждайся – кино онлайн
Many readers seeking transformation in their personal habits tend to engage with content resources including daily-ambition-notes – which focuses on building ambition, improving focus, and encouraging users to take consistent action toward meaningful life improvements and personal goals.
During my usual browsing routine, I encountered check this store and it immediately felt easy and organized – The experience is really pleasant overall, with everything looking neat, clean, and thoughtfully arranged for simple navigation.
While reviewing layout and testing navigation, I saw that open this link integrates into a clear system – it is a good site, navigation is easy and pages load without issues.
While scrolling through multiple shopping pages out of curiosity, I noticed open this site – The layout appears clean and responsive, and the pages load without noticeable issues, making it easy to explore content at a steady pace.
Такие условия позволяют начать лечение без задержек и обеспечить более мягкое восстановление. При этом помощь может предоставляться анонимно.
Получить больше информации – анонимный вывод из запоя на дому в санкт-петербурге
https://darknetmarketnews.com/ – darknet market https://darknetmarketnews.com/
People comparing different digital shopping environments often notice how much easier it is when layouts are minimal and direct, especially on platforms such as simple ecommerce browsing hub – The store is designed in a way that keeps navigation very straightforward, focusing on usability and allowing users to explore products efficiently without distractions or unnecessary interface complexity.
During the search for engaging and useful branding content, discovering open this idea source can stand out – thanks to its ability to combine inspiration with clear, relatable examples that enhance comprehension.
People interacting with online platforms typically expect a balance of creativity, simplicity, and usability that supports efficient browsing and engagement NewGenius UX Flow – NewGenius delivers a creative and easy-to-use platform where exploration feels natural, smooth, and enjoyable for users across all sections.
From my perspective after a short exploration, check it out sits within a well-structured layout – the platform feels nice, and content appears relevant and well presented overall.
System architects working on scalable applications often emphasize the importance of platforms that maintain speed under varying load conditions Velocity Media Center commonly used in performance testing environments – It supports high speed data delivery and ensures consistent output even when handling complex digital workflows
I stumbled upon something today that felt easy to explore and worth sharing because of its simple layout visit this whisper site – It has a decent selection, and everything seems easy to browse and understand without confusion or clutter.
Погружайся в захватывающие сюжеты вместе с нами! Голливудские блокбастеры, культовые сериалы, добрые мультфильмы и зрелищные премьеры – всё доступно в отличном качестве. Никакой рекламы, только чистое удовольствие от просмотра. Создай свою коллекцию любимых фильмов и наслаждайся – смотреть фильмы онлайн
вызов психиатра нарколога на дом вызов психиатра нарколога на дом
During my usual browsing activity, I discovered business evolution ideas embedded in the content – It offered a refreshing perspective that changed how I think about improving things step by step.
Нарколог на дом в Ростове-на-Дону рассматривается как специализированная форма оказания медицинской помощи пациентам с зависимостями вне стационара. В клинике «Чистый Баланс» выезд врача организуется круглосуточно, что позволяет обеспечить своевременное вмешательство при ухудшении состояния в любое время суток. Нарколог на дом в Ростове-на-Дону востребован в ситуациях, когда пациент не готов или не может обратиться в медицинское учреждение, а промедление с лечением повышает риск осложнений. Такой формат помощи требует строгого соблюдения клинических протоколов и высокой квалификации специалистов.
Подробнее – нарколог на дом круглосуточно ростов-на-дону
В данной статье рассматриваются проблемы общественного здоровья и социальные факторы, влияющие на него. Мы акцентируем внимание на значении профилактики и осведомленности в защите здоровья на уровне общества. Читатели смогут узнать о новых инициативах и программах, направленных на улучшение здоровья населения.
Читать дальше – наркологический стационар
Запой сопровождается выраженной интоксикацией, нарушением сна, слабостью, тревожностью и колебаниями давления, что характерно для алкоголизма и других форм зависимости. При этом самостоятельный выход из состояния часто оказывается затруднённым из-за ухудшения самочувствия и невозможности контролировать симптомы. В таких случаях выезд нарколога позволяет начать лечение без задержек и помочь пациенту снизить нагрузку на организм за счёт отсутствия транспортировки.
Исследовать вопрос подробнее – вывод из запоя на дому анонимно санкт-петербург
Эта публикация посвящена актуальным вопросам современной медицины и здравоохранения. Мы обсудим новейшие технологии диагностики и лечения, а также их влияние на продолжительность и качество жизни. Читатель найдет здесь информацию о научных исследованиях и перспективных разработках, доступно изложенную для широкой аудитории.
Продолжить изучение – реабилитация наркозависимых стационар
wethenorth url https://marketdarknets.org/
People who enjoy exploring fashion and lifestyle products often prefer platforms that highlight trends while maintaining simplicity in design and navigation Chic Trend Corner – This corner offers a curated selection of stylish ideas displayed in a user friendly layout that encourages easy browsing
Digital visitors often look for platforms that feel stable, well-designed, and capable of providing quick access to structured information CorePower Experience Link – PowerCore combines clean design with strong usability principles, resulting in a website that feels organized, efficient, and easy to navigate overall.
While scrolling through different pages I came across a store that felt earthy and structured with a balanced layout and organized product display twilight grove selection – Goods here feel thoughtfully chosen with appealing rustic style vibe, making browsing feel easy and natural.
врач нарколог на дом врач нарколог на дом
During my browsing session and usability check, I noticed that see more here blends into a clear layout – the experience was good, and everything loaded smoothly while staying visually clean and readable.
сколько стоит капельница от запоя https://kapelnicza-ot-pokhmelya-ekaterinburg-14.ru
During research into value-based online shopping systems, I discovered deal saver shopping portal which presents affordable listings in a clear interface – Value market hub focuses on affordable items and easy navigation, making it easier for users to explore products efficiently while ensuring a clean browsing experience with minimal distractions or unnecessary complexity.
Главная задача специалистов — быстро стабилизировать состояние больного, восстановить нормальную работу органов и предотвратить развитие осложнений. Для этого применяются безопасные инфузионные растворы, препараты для защиты печени, витаминизация и корректировка уровня жидкости в организме. После снятия острых симптомов врач рекомендует план дальнейшего восстановления и профилактику повторных запоев.
Получить больше информации – вывод из запоя на дому цена
While analyzing e-commerce design patterns I focused on user friendliness and structure and found Value Buy Factory browsing center – Clean appearance and smooth flow help make the experience enjoyable, allowing users to explore content easily without unnecessary complexity or confusing navigation paths
организация свадебного агентства организация дня свадьбы
стоимость капельницы на дому екатеринбург https://kapelnicza-ot-pokhmelya-ekaterinburg-15.ru
While browsing through different online stores earlier just to explore new options and compare layouts, I came across something interesting right in the middle like check this goods hub – It feels quite responsive overall, and the way content is arranged makes browsing smooth and easy to follow.
Запой сопровождается интоксикацией, нарушением сна, слабостью, тревожностью и нестабильностью работы сердечно-сосудистой системы, что характерно для алкоголизма и других форм зависимости, включая наркомании. При этом самостоятельный выход из состояния может сопровождаться усилением симптомов, что требует медицинского вмешательства. Капельницы на дому позволяют очень быстро снизить выраженность проявлений и начать восстановление под наблюдением врача, помогая человеку стабилизировать состояние.
Ознакомиться с деталями – вывод из запоя на дому цена
капельницы на дому екатеринбург цена капельницы на дому екатеринбург цена
агентство свадьба под ключ свадебное агентство
People interacting with online platforms often appreciate when ideas are connected clearly and the interface remains simple, clean, and easy to use MaxBridge UX Portal – Maxbridge provides smooth idea connectivity through a clean and intuitive interface, ensuring users enjoy easy navigation across all sections.
Many individuals seeking motivation online often rely on curated content spaces that keep them engaged and mentally uplifted while navigating goals and ambitions Dream Inspiration Hub provides guidance – It creates an encouraging environment that pushes users toward action while reinforcing positive thinking habits in everyday life and long term personal development journeys
Суть капельницы заключается в том, чтобы быстро ввести в организм необходимые растворы, которые помогают восстановить водно-солевой баланс, очищают организм от токсинов, ускоряют обмен веществ и снижают нагрузку на внутренние органы. Врачи-наркологи используют специальные составы, которые включают в себя жидкости, электролиты, витамины и лекарственные средства для снятия симптомов похмелья.
Разобраться лучше – капельница от похмелья анонимно нижний новгород
During extended browsing sessions, users often appreciate discovering go to this link – a site that combines interesting subject matter with a seamless and user-friendly browsing experience that keeps everything flowing naturally.
В Воронеже круглосуточная помощь при похмелье востребована в ситуациях, когда симптомы появляются внезапно или усиливаются в ночное время, особенно в запое или после запоя. Врач проводит консультацию, оценивает состояние пациента и принимает решение о проведении инфузионной терапии. Такой подход позволяет своевременно устранить симптомы и предотвратить их дальнейшее развитие. При необходимости можно оставить заявку, уточнить цены или получить помощь бесплатно на первичном этапе.
Выяснить больше – https://kapelnicza-ot-pokhmelya-voronezh-7.ru
Похмельный синдром сопровождается головной болью, слабостью, нарушением сна, сухостью во рту и нестабильностью давления, что часто наблюдается после запоя или при алкоголизме. Эти симптомы связаны с накоплением токсинов и нарушением водно-солевого баланса. Капельница позволяет ускорить выведение вредных веществ и восстановить нормальное функционирование организма, помогая человеку быстрее выйти из состояния запоев.
Детальнее – капельница от похмелья
People who enjoy sustainable home products often look for online stores that promote green innovation and plant inspired design aesthetics Sprout Eco Living Shop offering environmentally responsible items designed for modern households seeking greener alternatives – It provides a clean browsing experience focused on simplicity and ecological responsibility
silk road darknet link https://marketdarknets.org/
В практике лечения на дому применяются следующие этапы медицинского воздействия:
Изучить вопрос глубже – нарколог на дом цены ростов-на-дону
While reading different creative discussions online I discovered idea creation hub within the content and it immediately drew my attention – It offered an interesting perspective that felt worth exploring further because of its practical and thoughtful approach.
During a relaxed browsing session, I found see shop page and it immediately felt easy to use – There were some cool items that made me want to come back again and take a closer look.
Обзор посвящён процессу восстановления после зависимостей. Мы расскажем о различных этапах реабилитации, поддерживающих ресурсах и важности мотивации в достижении устойчивого выздоровления.
Эксклюзивная информация – кодирование от алкоголизма стационар
During my search for online communities focused on connection and learning, I discovered connection sharing space – which offers meaningful opportunities to engage with people and understand different perspectives through real shared experiences and conversations.
Затяжной запой перестает быть бытовой проблемой в тот момент, когда организм теряет способность самостоятельно восстанавливаться после интоксикации. Накопление ацетальдегида, нарушение водно-электролитного баланса, истощение запасов витаминов и перегрузка сердечно-сосудистой системы создают состояние, при котором домашние методы перестают быть безопасными. Срочно стабилизировать самочувствие и быстро купировать абстинентный синдром позволяет только контролируемая медицинская среда. Вывод из запоя в стационаре в Нижнем Новгороде становится клинически обоснованным решением, когда требуется не просто снятие симптомов, а комплексная детоксикация под круглосуточным наблюдением врачей. Наркологическая клиника «Стармед» организует процесс лечения в соответствии с актуальными стандартами доказательной медицины, обеспечивая безопасность пациента, прозрачность процедур и плавный переход к противорецидивной терапии. Мы понимаем, что решение о госпитализации часто принимается в состоянии стресса, поэтому наша работа начинается с четкой диагностики, честного объяснения плана лечения и соблюдения строгих протоколов конфиденциальности. Опытные специалисты клиники помогут вызвать доверие к процессу восстановления уже на этапе первого контакта.
Получить дополнительные сведения – https://vyvod-iz-zapoya-v-staczionare-nizhnij-novgorod-6.ru/
People who enjoy fashion and lifestyle shopping often prefer platforms that highlight trends while keeping navigation straightforward and easy to understand Fashion Trend Corner Spot – The spot focuses on presenting trendy items clearly, enabling users to browse comfortably and discover new ideas quickly
From my perspective after a short exploration, check it out sits within a well-structured layout – the design is appealing, and navigation feels simple, fast, and straightforward for all users.
Терапевтический процесс в стационаре строится по принципу последовательного выполнения клинических задач: диагностика, стабилизация, медикаментозная поддержка и подготовка к амбулаторному этапу. При поступлении врач проводит детальный осмотр, собирает анамнез, оценивает неврологический статус и при необходимости назначает лабораторные исследования. На основе полученных данных формируется индивидуальный протокол, учитывающий возраст, длительность интоксикации, наличие сопутствующих патологий и переносимость лекарственных компонентов. Мы применяем только сертифицированные препараты, зарегистрированные в РФ, и строго соблюдаем клинические рекомендации, исключая псевдонаучные методики. Стандарты оказания медицинской помощи фиксируются во внутренних регламентах и регулярно проверяются независимыми аудиторами.
Получить дополнительные сведения – http://vyvod-iz-zapoya-v-staczionare-sankt-peterburg-16.ru
Users analyzing online stores typically appreciate fast systems and clear organization, particularly when they discover urban goods organized shop hub – The goods appear well sorted into categories, and the site feels responsive, allowing users to browse comfortably without lag or disruption during navigation.
As part of my review of e-commerce discovery platforms, I encountered a helpful product listing system quick item selector that improves navigation efficiency and simplifies browsing across multiple product categories – Quick online market provides clearer structure for users and enhances shopping convenience by making product comparisons easier and more intuitive overall.
https://darknetmarketnews.com/ – drughub market darknet https://darknetmarketnews.com/
While testing e-commerce platforms for navigation quality I came across Value Goods Bazaar explore page – The interface feels clean and well arranged, and browsing through was smooth overall, making the experience easy to follow while allowing quick access to different categories without confusion or delays
During my browsing session and usability check, I noticed that see more here blends into a clear layout – the design looks professional, and everything is neatly arranged for easy browsing.
Когда родственники начинают искать помощь, они обычно хотят решить сразу несколько задач. Нужно быстро стабилизировать состояние больного, снизить риски осложнений, понять, можно ли ограничиться домашним форматом или требуется госпитализация в стационаре, насколько выражена зависимость и что делать дальше, чтобы через несколько дней не оказаться в той же точке. Именно поэтому современная наркологическая помощь в рамках профессиональной клиники рассматривается не как одна процедура, а как последовательная система действий: от осмотра и первичной стабилизации до более глубокой работы с причинами зависимости, мотивацией пациента и профилактикой рецидивов.
Углубиться в тему – наркологическая помощь анонимно в воронеже
Погружайся в захватывающие сюжеты вместе с нами! Голливудские блокбастеры, культовые сериалы, добрые мультфильмы и зрелищные премьеры – всё доступно в отличном качестве. Никакой рекламы, только чистое удовольствие от просмотра. Создай свою коллекцию любимых фильмов и наслаждайся: фильмы и сериалы
In the middle of reviewing different online shops, I encountered explore this hub – It feels easy to navigate, with a smooth flow and a design that looks clean and well-finished.
Каждый курс лечения включает несколько этапов, направленных на постепенное улучшение состояния. Система выстроена так, чтобы обеспечить плавное восстановление функций организма без стресса. Ниже приведена таблица, показывающая основные этапы лечения и применяемые процедуры.
Подробнее тут – вывод из запоя клиника
Users interacting with digital websites typically expect layouts that are visually appealing, responsive, and easy to navigate without confusion or delay EliteFusion Navigation Node – EliteFusion ensures a beautifully blended interface where everything feels modern and responsive, allowing users to browse comfortably across all sections.
При наличии этих симптомов помощь должна быть оказана в кратчайшие сроки. Выезд нарколога позволяет не только стабилизировать состояние, но и определить дальнейшую тактику лечения.
Получить дополнительные сведения – оказание наркологической помощи
Users often appreciate reminders that help them notice small changes in behavior that contribute to larger personal improvements over time moment clarity system the tone feels structured yet simple, helping organize thoughts about daily progress – it reinforces the idea that clarity comes from consistent reflection and attention
People aiming for structured success often benefit from platforms that simplify goal management and improve execution efficiency in daily workflows AchievementRoute Hub – A guided system that helps users stay motivated while following clear success pathways and maintaining consistent progress toward both short term tasks and long term achievement goals effectively
During my quick scan of the website and layout, I came across learn more now and appreciated the structure – I had a quick look and the design feels clean, modern, and visually neat today.
Продолжительный запой истощает организм, провоцируя нарушения работы сердца, печени и нервной системы. Без своевременной медицинской помощи состояние пациента может резко ухудшиться — от судорог и аритмии до алкогольного делирия. Врачи наркологической клиники «ДонМед Экстренная Наркология» проводят срочную детоксикацию и вывод из запоя в Ростове-на-Дону, обеспечивая круглосуточное наблюдение и контроль осложнений. Каждое вмешательство подбирается индивидуально, а лечение направлено не только на снятие интоксикации, но и на стабилизацию психоэмоционального состояния пациента.
Подробнее – вывод из запоя недорого в ростове-на-дону
While casually browsing different websites I came across something that felt cozy and organized with a structured layout and soft visual tone twilight maple browse collection – Corner shop gives warm atmosphere and easy product discovery experience, helping users explore categories easily.
abacus shop https://marketdarknets.org/
Суть капельницы заключается в том, чтобы быстро ввести в организм необходимые растворы, которые помогают восстановить водно-солевой баланс, очищают организм от токсинов, ускоряют обмен веществ и снижают нагрузку на внутренние органы. Врачи-наркологи используют специальные составы, которые включают в себя жидкости, электролиты, витамины и лекарственные средства для снятия симптомов похмелья.
Получить дополнительные сведения – капельница от похмелья нижний новгород
In the middle of exploring online resources about digital growth, I discovered future trend hub – a platform that provides content focused on upcoming ideas and helps users stay aligned with modern technological progress.
Этот увлекательный информационный материал подарит вам массу новых знаний и ярких эмоций. Мы собрали для вас интересные факты и сведения, которые обогатят ваш опыт. Откройте для себя увлекательный мир информации и насладитесь процессом изучения!
А что дальше? – вывод из запоя дешево нижний новгород
Алкогольная интоксикация сопровождается накоплением токсинов, нарушением водно-солевого баланса и изменениями в работе нервной системы, что характерно для алкоголизма и состояний после запоя. Это проявляется головной болью, слабостью, тошнотой, сухостью во рту и нарушением сна. Капельница позволяет ускорить процессы очищения организма и стабилизировать состояние пациента под контролем врача, помогая человеку быстрее выйти из состояния запоев.
Получить дополнительную информацию – https://kapelnicza-ot-pokhmelya-voronezh-7.ru
Nine Win Сasino https://casino-ninewin.net/
During my usual exploration of online content I found easy success roadmap placed in the middle of the page and it felt insightful – Everything is written in a clear and simple style that makes understanding effortless.
While reviewing the interface and scrolling through different parts of the page, I noticed that see this site aligns with a readable structure – everything is organized in a way that feels natural and user-friendly.
Решение о помещении пациента в стационар принимается на основе объективных медицинских критериев, а не только по желанию родственников. К показаниям относятся: запой длительностью более трех суток, выраженные симптомы абстиненции, наличие в анамнезе алкогольных делириев или судорожных эпизодов, сопутствующие хронические заболевания печени, поджелудочной железы, сердца или нервной системы. Отдельным фактором выступает полинаркомания или сочетание алкогольной зависимости с приемом психофармакологических препаратов без назначения врача. В таких ситуациях риск развития тяжелых осложнений возрастает многократно, и амбулаторный формат не обеспечивает необходимого уровня контроля. Госпитализация позволяет провести полноценную диагностику, включая ЭКГ, экспресс-анализы крови, оценку неврологического статуса и мониторинг сатурации, что формирует точную картину состояния и исключает назначение шаблонных схем.
Получить дополнительную информацию – https://vyvod-iz-zapoya-v-staczionare-nizhnij-novgorod-6.ru
When reviewing modern UI performance examples and browsing efficiency studies, people often mention ascendmark structured flow which appears in discussions focused on optimized page loading and clear interface design. – The experience feels fast, organized, and visually consistent across sections.
Острые состояния могут проявляться по-разному: от выраженной слабости, тошноты, тремора и бессонницы до мучительной ломки, резкой тревоги, скачков артериального давления, учащенного сердцебиения, раздражительности и спутанности сознания. У пациентов с хроническими заболеваниями, в пожилом возрасте или после длительного употребления риски возрастают еще сильнее. Особенно опасно ориентироваться только на внешнее впечатление, потому что даже в тех случаях, когда человек находится дома и формально «в сознании», его состояние уже может требовать медицинского вмешательства.
Разобраться лучше – http://www.domen.ru
К показаниям относятся: запой длительностью более 72 часов, выраженная абстиненция с тахикардией, артериальной гипертензией, профузным потоотделением, наличие в анамнезе алкогольных делириев или судорожных эпизодов, сопутствующие хронические заболевания печени, сердца, поджелудочной железы. При тяжелых формах интоксикации, когда в организме накапливаются токсичные продукты распада веществ, резкое прекращение употребления без медицинской поддержки может спровоцировать отек мозга, острую сердечную недостаточность или желудочно-кишечное кровотечение. Стационар позволяет провести полноценную диагностику, включая ЭКГ, экспресс-анализы крови и мониторинг сатурации, что формирует точную картину состояния и исключает шаблонные назначения. В случаях сочетанной зависимости, когда в анамнезе присутствует наркомании, протоколы детоксикации адаптируются под специфику психоактивных соединений и включают усиленный нейрологический контроль.
Ознакомиться с деталями – вывод из запоя в стационаре клиника санкт-петербург
Consumers who enjoy natural wood inspired aesthetics often seek marketplaces that combine simplicity, durability, and forest themed design elements in their product offerings EverSpruce Living Collection offering reliable goods designed for modern households – The store provides a calm and functional shopping environment focused on nature driven practicality
Первичный осмотр включает оценку витальных показателей, уровня сознания, выраженности симптомов и факторов риска. После этого врач определяет объём вмешательства и приступает к терапии. В большинстве случаев применяется инфузионное лечение, направленное на восстановление водного баланса и выведение токсинов.
Подробнее тут – наркологическая помощь на дому
Users who prioritize efficiency in online shopping tend to prefer platforms that reduce clutter and provide streamlined access to product listings Modern Cart Hub – The website enhances user experience by organizing products in a logical structure, making browsing both quick and straightforward for all visitors
нарколог на дом город https://narkolog-na-dom-samara-10.ru
Digital audiences typically prefer websites that combine aesthetic appeal with responsive layouts that ensure usability remains consistent across devices and interactions FusionElite Experience Hub – The EliteFusion website features beautifully blended design elements, creating a modern and responsive experience that feels smooth, structured, and visually engaging throughout.
During my exploration of e-commerce systems I focused on clarity and responsiveness and found Vibrant Cart Corner digital portal – The setup is clean and user friendly, and everything looks clear and simple to understand, making browsing smooth and easy across all sections of the site
В этой статье-обзоре мы соберем актуальную информацию и интересные факты, которые освещают важные темы. Читатели смогут ознакомиться с различными мнениями и подходами, что позволит им расширить кругозор и глубже понять обсуждаемые вопросы.
Интересует подробная информация – вывод из запоя на дому
Вызов капельницы от похмелья с контролем врача в Самаре рекомендуется, когда симптомы похмелья становятся особенно тяжелыми и мешают нормальной жизнедеятельности. Несмотря на то, что многие пытаются справиться с похмельем с помощью домашних методов, такие как прием жидкости или таблеток, они не всегда оказываются достаточно эффективными. В случае сильных симптомов похмелья, капельница с врачебным контролем — это более безопасное и быстрое решение, при этом возможен вывод в стационаре, анонимное лечение и консультации по вопросам наркомании с учетом актуальной цены услуг.
Получить дополнительную информацию – капельница от похмелья на дому в самаре
During my usual browsing routine, I encountered check haven store and it immediately felt tidy and easy – The marketplace feels friendly, easy to navigate, and quite enjoyable overall, making it pleasant to explore without any confusion.
Remote work environments have increased the need for platforms that centralize communication and improve accessibility for distributed teams efficiently across borders daily workflows Unified Global Connect System making coordination easier and enhancing productivity for remote operations teams – It provides intuitive access that helps organizations maintain smooth international communication flows consistently without complications whatsoever
dark matter market url https://marketdarknets.org/
Freelancers building their personal brand usually require reliable direction, and in that context Brand Building Companion guidebook – it is typically referenced as a supportive outline that assists with defining identity, improving consistency, and maintaining professional visibility across multiple digital channels.
Даже в условиях экстренного обращения лечение выстраивается последовательно, что позволяет избежать резких колебаний состояния и поддерживать физиологическую стабильность. Этапность формирует основу для дальнейшего восстановления.
Узнать больше – https://narcologicheskaya-klinika-v-rnd19.ru/chastnaya-narkologicheskaya-klinika-rostov-na-donu/
While exploring different online resources focused on growth and development, I came across opportunity explorer hub – a platform that shares helpful insights about new possibilities and encourages users to identify and explore valuable opportunities in different areas of life and work.
В этой публикации мы рассматриваем важную тему борьбы с зависимостями, включая алкогольную и наркотическую зависимости. Мы обсудим методы лечения, реабилитации и поддержку, которые могут помочь людям, столкнувшимся с этой проблемой. Читатели узнают о перспективах выздоровления и важности комплексного подхода.
Что ещё? Расскажи всё! – выезд нарколога на дом
наркология https://narkolog-na-dom-samara-9.ru
поставить капельницу цена в екатеринбурге https://kapelnicza-ot-pokhmelya-ekaterinburg-15.ru
сколько стоит капельница от запоя https://kapelnicza-ot-pokhmelya-ekaterinburg-14.ru
While reviewing the interface and navigating through sections, I came across go to this site which fits into a neat structure – I enjoyed the page visit, and the layout and organization feel pretty decent and consistent.
While browsing for educational media content, I found media insights hub – which presents structured explanations and useful information that simplify complex communication and media-related topics effectively.
Modern consumers often expect platforms to provide quick product access while maintaining a visually simple and intuitive layout for seamless browsing Swift Style Goods Corner – The design prioritizes speed and clarity, helping users find items rapidly without confusion
I usually don’t stick around one site for too long, but in this case I came across something worth reading and kept going – The storytelling style created a sense of flow that made the entire visit worthwhile and enjoyable.
Digital users often prefer platforms that combine clear presentation with functional design, ensuring smooth interaction and minimal confusion VisionMax Navigation Hub – The MaxVision website provides clear vision through a simple and highly functional layout, allowing users to browse easily and understand content efficiently.
In discussions about user friendly digital tools and minimalistic web design, people sometimes highlight examples such as sharp bridge entry point which is included in collections focusing on simple navigation structures and efficient browsing experiences across devices. – The layout feels neat and very accessible.
While analyzing online shopping websites I focused on navigation and user experience and found VCC navigation station – The experience was overall positive, with a modern and easy to navigate layout that allows smooth browsing while keeping everything organized and accessible without unnecessary complexity
Наркологическая клиника в Ростове-на-Дону рассматривается как специализированная медицинская структура, обеспечивающая лечение и помощь 24/7 при состояниях, связанных с зависимостями. В клинике «Вектор Трезвости» работа выстроена по принципу непрерывности, что позволяет оказывать медицинское вмешательство независимо от времени суток и стадии обращения. Такой формат особенно важен при острых интоксикациях, выраженной абстиненции и резких соматических нарушениях, когда своевременность помощи напрямую влияет на прогноз. Наркологическая клиника в Ростове-на-Дону функционирует в условиях постоянной готовности медицинского персонала и строгого соблюдения клинических регламентов.
Получить дополнительные сведения – https://narcologicheskaya-klinika-v-rnd19.ru/narkolog-rostov-na-donu/
капельница от запоя капельница от запоя
Online learners seeking practical business knowledge appreciate platforms that break down complex concepts into simple and actionable steps for easier understanding Success Learning Base simplified education approach – helping users apply lessons effectively while improving confidence and consistency in executing strategies that support both personal and professional development goals.
People who appreciate hybrid décor styles often explore shops that combine factory inspired strength with soft floral artistic expression in home goods Blooming Metal Corner Store offering unique décor solutions influenced by industrial landscapes and natural forms – The collection enhances modern interiors with visually engaging and balanced design concepts
Building a positive mindset becomes easier with platforms like collective inspiration guide – a space dedicated to sharing motivational content and growth strategies that support individuals in developing confidence and long-term personal improvement habits.
For those who enjoy continuous learning, exploring interactive share hub – a resource that delivers engaging content and encourages collaboration can help users stay inspired while discovering and exchanging valuable knowledge with others.
Many individuals appreciate motivational reminders that help them focus on taking immediate steps instead of delaying action start now signal – this idea reinforces the importance of starting now and building momentum through repeated daily efforts and persistence consistently forward movement
From my perspective after a short exploration, check it out sits within a well-structured layout – the site appears promising, and usability along with layout feel decent overall.
Такой подход позволяет достичь устойчивого результата без срывов и рецидивов. Пациенты получают помощь не только на уровне физиологии, но и на уровне личностных изменений, что делает лечение глубоким и эффективным.
Изучить вопрос глубже – наркологическая клиника ростов-на-дону
https://darknetmarketnews.com/ – torzon onion https://darknetmarketnews.com/
People comparing online stores frequently look for clarity and ease of navigation, particularly when they discover crest product browsing portal – The market maintains a clean interface with good product arrangement and clear presentation, helping users enjoy a smooth and simple shopping experience without unnecessary distractions or complicated interface elements.
As I explored casually through features and pages, I saw that click for details aligns with a neat structure – the content is interesting, seems updated, and feels relevant for users today overall.
Для оценки состояния используется расширенная диагностика: лабораторные анализы, ЭКГ, психологическое тестирование и биохимические маркеры. По результатам обследования составляется индивидуальный план, включающий детоксикацию, фармакотерапию и реабилитационные мероприятия. Ниже представлена таблица, описывающая структуру этапов лечения.
Подробнее можно узнать тут – http://narcologicheskaya-clinika-v-rnd19.ru/
People evaluating online systems often focus on visual clarity, structure, and how effectively design supports easy navigation across all sections MarkVision Clean Portal – The VisionMark platform presents strong visuals in a clean and structured layout, making browsing simple, clear, and easy for users.
Такие состояния позволяют проводить лечение на дому с контролем динамики. При выявлении рисков врач может изменить тактику и рекомендовать стационар или другие методы лечения зависимости.
Разобраться лучше – вывод из запоя на дому круглосуточно в санкт-петербурге
Shoppers who enjoy seamless digital experiences often look for platforms that combine fast browsing with organized product listings for better efficiency Speedy Style Zone – This version ensures a smooth shopping journey where items are easy to locate and navigation remains intuitive throughout
поставить капельницу цена в екатеринбурге поставить капельницу цена в екатеринбурге
вызов нарколога на дом вызов нарколога на дом
капельница екатеринбург цены https://kapelnicza-ot-pokhmelya-ekaterinburg-17.ru
Many online audiences prefer websites that deliver a modern experience while maintaining clarity in how information is presented and accessed across sections NovaCore Experience Link – The NovaOrbit platform features a forward-thinking design approach where content organization enhances exploration and ensures users can navigate without confusion or unnecessary effort.
While browsing through several online shops earlier today, I came across blossom haven picks and it immediately felt clean and well structured – The simple design and clear listings made browsing here smooth, convenient, and easy to follow without any confusion at all.
I was just exploring online inspirational content when I encountered change makers hub in the middle of the text and it felt insightful – The concept feels encouraging and uplifting, making it interesting and enjoyable to think about real world positive transformation.
капельница от запоя в стационаре https://vyvod-iz-zapoya-v-staczionare-nizhnij-novgorod-17.ru
анонимная наркологическая частная клиника https://narkologicheskaya-pomoshh-nizhnij-novgorod-10.ru
вывод из запоя нижний новгород стационар вывод из запоя нижний новгород стационар
запой стационар https://vyvod-iz-zapoya-v-staczionare-nizhnij-novgorod-18.ru
Эта публикация погружает вас в мир увлекательных фактов и удивительных открытий. Мы расскажем о ключевых событиях, которые изменили ход истории, и приоткроем завесу над научными достижениями, которые вдохновили миллионы. Узнайте, чему может научить нас прошлое и как применить эти знания в будущем.
Ознакомиться с отчётом – прокапаться на дому нижний новгород
While exploring different online platforms in search of meaningful and practical insights, I eventually came across discover this resource – a place where the information shared feels genuinely useful and has the potential to create a noticeable positive impact in everyday understanding and decision making.
Many internet users searching for convenience often visit modern shopping assistant page – The cart choice store concept works like a helpful assistant, guiding users toward relevant items and improving their ability to make quicker and more informed shopping decisions online
Вывод из запоя на дому — это медицинская помощь, направленная на стабилизацию состояния пациента без госпитализации. Такой формат позволяет начать лечение сразу после обращения и снизить нагрузку на организм, связанную с транспортировкой. В наркологической клинике «Частный медик 24» помощь оказывается с выездом врача, который проводит диагностику и подбирает терапию в зависимости от текущего состояния.
Получить больше информации – вывод из запоя на дому анонимно
As I searched for motivational and growth-oriented content, I came across positive progress hub – which shares inspiring messages aimed at helping users stay focused on improvement and embrace change in a productive and consistent way.
Запой сопровождается выраженной интоксикацией, нарушением сна, слабостью и нестабильностью работы сердечно-сосудистой системы, что характерно для алкоголизма и других форм зависимости, включая наркомании. Самостоятельный выход из этого состояния может быть затруднён и сопровождаться усилением симптомов. Медицинская помощь на дому позволяет снизить риски и начать восстановление под контролем специалиста, помогая человеку быстрее стабилизировать состояние.
Подробнее тут – vyvod-iz-zapoya-na-domu-sankt-peterburg-12.ru/
Advanced users often prefer platforms that offer deep control over system behavior while still maintaining ease of use for daily tasks, Vision Pro Control Center which balances power with accessibility effectively – This control center provides detailed customization options while keeping the interface manageable and user friendly
Many users interested in trust rely on connection relationship hub – a platform designed for bonding helps individuals build meaningful and lasting ties through consistent communication and shared understanding over time.
If you want to improve team coordination, checking out leaders synergy hub – a platform built for collaboration can help users engage in structured teamwork that feels professional, organized, and efficient across different leadership-focused projects and communities.
When seeking encouragement and ways to improve mindset, many users turn to platforms such as together growth network – a resource that focuses on motivation, collaboration, and meaningful content to help individuals progress steadily in both personal and professional life.
If you want to grow and stay motivated, checking out keep growing guide – a resource that simplifies learning and encourages idea sharing can help you build better habits and maintain steady progress in your personal development journey.
When you want to step away from stress and focus on calmer thoughts, light reading material can help guide your attention in a better direction sunny reflection corner offering peaceful ideas, soft motivation, and uplifting perspectives for daily life – The intention is to create a relaxed mental space where optimism feels natural and effortless
https://darknetmarketnews.com/ – black ops darknet url https://darknetmarketnews.com/
Выезд нарколога начинается с осмотра пациента. Доктора измеряют давление, пульс, оценивают уровень сознания и выраженность симптомов. На основании этих данных формируется план лечения, который реализуется сразу на месте. Такой подход позволяет быстро перейти к стабилизации состояния без лишних этапов.
Выяснить больше – вывод из запоя на дому цена санкт-петербург
Клиника создана как современное пространство для безопасного восстановления. Здесь пациенты получают комплексную помощь в комфортных условиях. Основные преимущества учреждения:
Получить дополнительную информацию – https://narcologicheskaya-clinika-v-rnd19.ru/narkolog-rostov-na-donu
Такие состояния требуют не только лечения, но и наблюдения, поскольку динамика может меняться в течение короткого времени. Стационар позволяет минимизировать риски и обеспечить безопасность пациента. При этом услуга может предоставляться анонимно, а цена лечения зависит от состояния пациента.
Углубиться в тему – вывод из запоя вызов на дом нижний новгород
Shoppers exploring urban industrial decor often discover creative corners that blend metal textures and floral aesthetics Iron Bloom Corner Shop Hub showcasing rugged yet artistic items inspired by factory aesthetics and natural bloom contrasts – The collection emphasizes raw metal finishes combined with delicate design elements for modern home styling needs and expressive interior upgrades
Users browsing modern websites typically value smooth interfaces, intuitive navigation, and clean layouts that reduce friction during interaction and exploration VisionLane Flow Interface – VisionLane delivers a smooth experience where navigation feels easy and intuitive, ensuring users can browse content comfortably and efficiently across all pages.
К основным показаниям относятся:
Узнать больше – вывод из запоя дешево нижний новгород
During my quick scan of the website and layout, I came across learn more now and appreciated the structure – browsing feels good, and the information is well organized, clear, and visually easy to follow.
Главный принцип работы наркологической клиники — это последовательность, безопасность и уважение к каждому пациенту. Независимо от степени зависимости, лечение строится на тщательной диагностике, определении индивидуальных особенностей и поэтапном подходе. Медицинская помощь оказывается как в условиях стационара, так и на дому, где врачи могут провести детоксикацию, стабилизировать состояние и составить дальнейший план терапии.
Исследовать вопрос подробнее – https://narcologicheskaya-klinika-v-rostove19.ru/
В этом обзорном материале представлены увлекательные детали, которые находят отражение в различных аспектах жизни. Мы исследуем непонятные и интересные моменты, позволяя читателю увидеть картину целиком. Погрузитесь в мир знаний и удивительных открытий!
А есть ли продолжение? – вывести из запоя
Shoppers who enjoy curated experiences often choose platforms that display selected items neatly while maintaining quick navigation features across the interface Handpicked Goods Center – This version emphasizes simplicity and speed, allowing users to browse featured items with ease
Такой подход обеспечивает не только устранение симптомов зависимости, но и глубокое восстановление личности. Пациенты получают поддержку врачей на каждом этапе, что делает процесс безопасным и контролируемым.
Получить больше информации – частная наркологическая клиника в ростове-на-дону
During random browsing I stumbled upon a shop that felt fresh and natural with a tidy layout and simple navigation structure twilight meadow shop hub – Goods feel nature inspired and browsing experience remains very pleasant, making the browsing process quick and smooth.
dark web drug marketplace https://marketdarknets.org/
Перед началом терапии врач проводит осмотр пациента. Измеряются основные показатели, включая давление и пульс, оценивается выраженность симптомов. На основании этих данных формируется состав капельницы и определяется тактика лечения, что позволяет эффективно провести вывод из запоя.
Выяснить больше – капельница от похмелья анонимно воронеж
While going through a variety of topics online, I stumbled upon exploration inspiration hub placed naturally within the content – It gave me a sudden urge to look beyond my usual interests and discover something new right away.
После алкоголя в организме накапливаются токсичные продукты распада, нарушается водно-солевой баланс и страдает нервная система, что особенно выражено после запоя или при алкоголизме. Это проявляется головной болью, слабостью, тошнотой и нарушением сна. Капельница помогает ускорить процессы очищения и восстановить внутренние системы, обеспечивая более быстрое облегчение состояния и помогая человеку выйти из состояния запоев.
Исследовать вопрос подробнее – капельница от похмелья анонимно воронеж
When exploring collections of modern web interfaces, users may come across that within descriptive groupings realm explorer page is mentioned for its structured design approach and balanced content layout that enhances readability – The pages feel consistent and visually calm throughout usage.
Online buyers increasingly choose platforms that combine fast navigation with well structured product listings for easier comparison and selection processes Speed Cart Nexus – this platform enhances shopping flow by ensuring users can access deals quickly while maintaining a smooth and reliable browsing environment throughout their session
Вывод из запоя на дому — это медицинская помощь, направленная на стабилизацию состояния пациента без госпитализации. Такой формат позволяет начать лечение сразу после обращения и снизить нагрузку на организм, связанную с транспортировкой. В наркологической клинике «Частный медик 24» помощь оказывается с выездом врача, который проводит диагностику и подбирает терапию в зависимости от текущего состояния.
Выяснить больше – вывод из запоя на дому санкт-петербург
While searching for educational content that avoids unnecessary complexity, users might appreciate finding check this concept hub – which focuses on delivering clear and simple explanations that are easy to absorb.
Entrepreneurs and innovators often seek structured platforms that help them understand new ideas and transform them into practical applications efficiently VisionNext Ideas Hub – A forward oriented platform that presents innovation driven content clearly while inspiring users to think creatively and develop structured solutions for business and technology challenges in an organized and efficient manner
Many users building self-esteem use trust mindset hub – a motivational platform helps individuals develop confidence, improve emotional strength, and build lasting belief in themselves through encouragement and guidance.
Основные показания для проведения процедуры:
Получить больше информации – kapelnicza-ot-pokhmelya-voronezh-4.ru/
Этот обзор посвящен успешным стратегиям избавления от зависимости, включая реальные примеры и советы. Мы разоблачим мифы и предоставим читателям достоверную информацию о различных подходах. Получите опыт многообразия методов и найдите подходящий способ для себя!
Посмотреть подробности – наркологический стационар спб
https://darknetmarketnews.com/ – dark matter darknet https://darknetmarketnews.com/
If you are focused on improving leadership teamwork, visiting leaders collaboration hub – a resource that promotes organized interaction can help users stay aligned and work efficiently in structured and professionally managed environments.
If you are aiming to improve your digital capabilities, visiting digital knowledge center – a helpful resource that shares structured guidance and practical tips can make online learning more effective and easier to follow consistently.
Публикация охватывает основные направления развития современной медицины. Мы обсудим значимость научных исследований, инноваций в лечении и роли общественного участия в формировании системы здравоохранения.
Узнать больше > – наркологическая клиника со стационаром
While exploring ways to streamline daily tasks and improve online efficiency, many users look for centralized platforms that simplify access to multiple services digital toolbox hub – This note highlights convenience and clarity in organizing digital resources effectively for everyday use. It also helps reduce time spent searching for scattered tools across the internet significantly.
Exploring opportunities becomes easier when using smart ideas discovery – a platform that offers helpful suggestions and a clean interface for a better overall experience.
People interacting with online systems usually expect clean design, modern visuals, and user friendly navigation that reduces complexity and improves usability SmartVibe System Link – SmartVibe delivers a modern and fresh interface where everything is user friendly, making it easy to navigate and explore content comfortably.
While casually browsing and testing navigation, I noticed that follow this link contributes to a smooth experience – browsing is easy, and content is arranged in a clear and structured format overall.
Помощь при зависимостях в клинике «Южный Вектор» базируется на клинической диагностике, позволяющей определить стадию расстройства и сопутствующие нарушения. Наркологическая клиника в Ростове-на-Дону уделяет внимание не только купированию острых проявлений, но и стабилизации соматических показателей. Такой подход снижает риски осложнений и формирует условия для дальнейших этапов терапии. Медицинская практика подтверждает, что отсутствие системности приводит к краткосрочному эффекту и рецидивам.
Получить больше информации – запой наркологическая клиника ростов-на-дону
While going through different sections and observing content flow, I found that visit this link enhances the experience – the design looks promising, and the clean, simple layout helps users move through pages easily.
капельница от алкоголя капельница от алкоголя
В Нижнем Новгороде стационарный формат лечения применяется при наличии факторов, повышающих риск осложнений или снижающих эффективность домашней терапии. Врач принимает решение на основании осмотра, консультации и анализа данных, оценивая текущее состояние пациента и его реакцию на предыдущие попытки лечения. При необходимости можно заранее обратиться в центр лечения алкоголизма и наркомании или заказать услугу по телефону.
Получить больше информации – http://vyvod-iz-zapoya-v-staczionare-nizhnij-novgorod-2.ru/
В практической работе выделяются последовательные этапы, обеспечивающие медицинскую целостность:
Исследовать вопрос подробнее – вывод наркологическая клиника
In the middle of exploring personal development platforms, I discovered tomorrow growth hub – a site that provides practical encouragement and hopeful thoughts aimed at helping users create a better and more productive future.
nexus darknet site https://marketdarknets.org/
Consumers who frequently shop online often seek platforms that combine quick browsing with reliable payment processes for a better overall experience Quick Select Market – This version highlights efficient product selection alongside a seamless checkout experience that simplifies the purchase journey
Программы лечения в клинике «ДонМед Трезвость» направлены на полное восстановление человека — физическое, психологическое и социальное. Каждое направление терапии адаптируется под конкретного пациента, чтобы достичь максимально устойчивого результата. Врачи используют современные методы и препараты, снижающие риски побочных эффектов и ускоряющие процесс реабилитации.
Получить дополнительную информацию – https://narcologicheskaya-klinika-v-rostove19.ru/narkolog-rostov-na-donu/
Many online users expect platforms to provide logical layouts and efficient navigation systems that make accessing information fast and straightforward TrueLaunch System Link – TrueLaunch delivers a structured and dependable interface where users can navigate easily and enjoy a clean, organized browsing experience across all sections.
During a casual reading session about innovation topics I stumbled upon idea creativity space embedded in the middle of the article and it caught my attention – The content has a unique tone that feels refreshing and makes creative thinking feel more natural and exciting to follow.
Shoppers who appreciate modern elegance often explore online platforms that offer curated lifestyle products with soft tones and balanced design aesthetics Ivory Essence Collective Market featuring carefully chosen items that reflect refined taste and everyday functionality – The marketplace ensures a smooth user experience with organized categories and visually appealing product layouts
вывод из запоя в клинике https://vyvod-iz-zapoya-v-staczionare-nizhnij-novgorod-17.ru
Капельница от похмелья в Воронеже с индивидуальной инфузионной терапией и врачебным контролем в наркологической клинике «Похмельная служба»
Выяснить больше – капельница от похмелья анонимно в воронеже
выбрать спецтехнику Volvo https://tech-group.com.ua
While scrolling through different pages I came across a store that felt rustic and balanced with a structured layout and organized product display twilight oak selection – Oak themed goods bring earthy tone with solid product presentation, making browsing intuitive and visually consistent.
In researching digital shop management tools and systems, I came across open shop zone manager tool which aims to simplify e-commerce operations – it emphasizes improved backend control, better usability, and adaptable features that support businesses in managing their online stores with greater efficiency and flexibility over time.
прием нарколога прием нарколога
While testing idea generation websites I analyzed navigation quality and structure consistency and found Bright Idea Web creative portal – Bright creative site, concepts are simple and visually very appealing, offering a clean browsing experience where users can easily move through sections without confusion or cluttered design elements
For individuals focused on making a difference, checking out creative impact network – a platform designed to inspire action helps users develop meaningful content that drives creativity and creates real value within communities and collaborative environments.
Anyone looking for meaningful and engaging content might enjoy finding learn more here during their search – as it provides a range of useful insights, creative ideas, and informative discussions that add genuine value to the reading experience.
torzon darkweb link https://darknetmarketnews.com/
casino https://social.smileymission.com/read-blog/70183_playtech-new-zealand-reshaping-online-card-game.html
Основные показания для проведения процедуры:
Подробнее можно узнать тут – капельница от похмелья цена воронеж
Many users looking for practical solutions rely on tools like instant resource guide – a convenient platform that gathers useful information in one location, helping individuals save time while finding what they need in an organized and efficient way.
Users exploring digital websites typically expect fast access to information, clear structure, and well organized content that improves understanding and usability MatrixBold Flow Node – The BoldMatrix platform features a strong layout where content is easy to understand quickly, allowing users to navigate and browse with clarity and ease.
капельница от запоя в стационаре https://vyvod-iz-zapoya-v-staczionare-nizhnij-novgorod-18.ru
Self improvement enthusiasts frequently look for motivating platforms that help them stay consistent and goal oriented Self Growth Route Space offers structured yet flexible guidance that helps individuals stay focused while exploring new opportunities – Reinforces consistency and adaptive personal growth
If you want a strong cooperative environment, checking out rise community synergy – a platform designed for teamwork helps users experience natural collaboration, shared motivation, and powerful collective progress toward common goals.
While casually browsing and testing navigation, I noticed that follow this link contributes to a smooth experience – the site is easy to use, and the content appears engaging and easy to understand.
Personal growth often requires guidance and inspiration, which is why resources like hidden strength resource – a helpful site filled with motivational content can support individuals in realizing their abilities and building confidence consistently.
сколько стоит капельница на дому в екатеринбурге сколько стоит капельница на дому в екатеринбурге
платная наркологическая помощь платная наркологическая помощь
Помощь при зависимостях в клинике «Южный Вектор» строится по принципу поэтапности, что соответствует современным медицинским представлениям. Наркологическая клиника в Ростове-на-Дону применяет методы, направленные на снижение выраженности синдромов отмены и восстановление функций органов. Клинические решения принимаются на основе данных обследования и наблюдения, что обеспечивает индивидуализацию терапии без отхода от стандартов.
Углубиться в тему – https://narkologicheskaya-klinika-v-rnd19.ru/chastnaya-narkologicheskaya-klinika-rostov-na-donu/
As I explored multiple sections and usability features, I found that view more info integrates into a tidy structure – the browsing feels nice, and everything seems well placed and readable.
вывод из запоя нижний новгород стационар вывод из запоя нижний новгород стационар
tordex link https://market-darknet.org/
black ops darknet url https://marketdarknets.com/
Продолжительный запой истощает организм, провоцируя нарушения работы сердца, печени и нервной системы. Без своевременной медицинской помощи состояние пациента может резко ухудшиться — от судорог и аритмии до алкогольного делирия. Врачи наркологической клиники «ДонМед Экстренная Наркология» проводят срочную детоксикацию и вывод из запоя в Ростове-на-Дону, обеспечивая круглосуточное наблюдение и контроль осложнений. Каждое вмешательство подбирается индивидуально, а лечение направлено не только на снятие интоксикации, но и на стабилизацию психоэмоционального состояния пациента.
Подробнее тут – нарколог вывод из запоя ростов-на-дону
I was just exploring online content when I encountered life balance ideas space in the middle of the text and it felt insightful – It shared simple approaches that can make everyday life feel more structured and easier to manage without effort.
Business analysts often use digital platforms that help interpret data trends, improve forecasting accuracy, and support strategic decision making processes Advanced Scaling Network allowing organizations to identify opportunities faster, reduce risks, and enhance overall planning effectiveness across multiple departments consistently
Many professionals improving performance rely on online strategy hub – a digital resource helps users understand competition and stay ahead with tools, insights, and modern industry knowledge.
ares market https://darknetmarketnews.com/
People interacting with online systems usually expect structured presentation, professional appearance, and clear communication of progress for efficient browsing TrueGrowth System Link – TrueGrowth emphasizes progress through a structured and professional interface, ensuring users can navigate easily and understand content quickly.
Those searching for digital platforms that encourage exploration of ideas and online content frequently come across web-inspiration-point – it acts as a convenient space where discovering meaningful resources feels simple, motivating, and engaging for users who enjoy browsing thoughtfully curated material online.
Shoppers drawn to cosmic inspired commerce often look for digital stores that emphasize futuristic design and international product variety sourced from global markets Galaxy Lunar Trade Collective featuring innovative goods presented through a space themed interface – The platform provides a smooth shopping journey focused on imagination, innovation, and worldwide trade connections
Many people passionate about writing rely on story ideas inspiration – a resource that provides creative storytelling examples and helpful guidance to support users in crafting more engaging and emotionally resonant narratives in their work.
As I browsed through different personal development websites, I encountered self growth inspiration – a resource that delivers encouraging content designed to support positive thinking and steady daily progress toward becoming a better version of yourself.
After spending time navigating through pages, I observed that access this link aligns with a clear presentation – the first impression is positive, and everything appears easy to find and read overall.
While exploring the site at a relaxed pace and paying attention to its structure, I found that visit this resource blends well into a polished interface – the browsing feels fluid, and the layout maintains a neat and contemporary appearance throughout.
black ops market https://marketdarknets.org/
For anyone trying to understand digital promotion, it helps to review structured learning material available at marketing basics hub because it breaks down complex topics into simple frameworks for beginners and intermediate learners alike – This variation highlights how foundational marketing ideas can be made easier through structured explanations that reduce confusion and improve clarity for new learners in the field.
If you are looking to improve partnerships, visiting bold partners guide – a resource that supports clear communication can help users develop stronger connections and share practical ideas that enhance long-term collaboration and professional growth opportunities.
For those who value efficiency, platforms such as time saving solutions here – a resource that provides clear and direct answers can help reduce workload and improve daily productivity significantly.
Терапия в клинике проводится системно и поэтапно, что позволяет контролировать состояние пациента и добиваться устойчивых улучшений.
Углубиться в тему – наркологическая клиника клиника помощь тверь
People browsing modern web platforms usually expect a combination of speed, simplicity, and logical organization that helps them navigate without effort or confusion TechPulse Innovate Hub – The InnovaTek system highlights innovative design principles that prioritize usability and clarity, making it easier for users to interact with content efficiently and comfortably.
While browsing through different educational platforms online I came across confident learning hub naturally placed within the content and it immediately stood out – It felt like a genuinely helpful resource for anyone trying to build consistent learning habits in a simple and structured way.
People browsing online platforms often prefer clarity, simplicity, and structured layouts that make ideas easy to follow and understand quickly VerseGrowth Access Hub – The GrowthVerse website delivers expanding ideas through a clean interface where usability is high, allowing users to navigate content easily and efficiently.
For those focused on advancement, visiting future growth hub – a collaborative platform helps users access opportunities, build relationships, and develop strategies that support long-term success and meaningful professional connections.
техника Вольво https://tech-group.com.ua
If you want to explore meaningful success ideas, visiting motivational success hub – a platform that provides thoughtful perspectives can help users stay inspired while building better habits and a stronger mindset for long-term achievement and personal growth.
Этот информационный обзор станет отличным путеводителем по актуальным темам, объединяющим важные факты и мнения экспертов. Мы исследуем ключевые идеи и представляем их в доступной форме для более глубокого понимания. Читайте, чтобы оставаться в курсе событий!
Смотрите также… – нужен нарколог на дом
Мы работаем по модели «72 часа + 2 недели»: первые трое суток посвящены стабилизации витальных показателей, коррекции сна и сокращению «тяговых» откликов, следующие 14 дней — консолидации результата и запуску психотерапевтического блока. Маркеры прописываются заранее, поэтому и пациент, и семья понимают, когда и что мы будем оценивать, как корректируем план, если динамика ниже ожидаемой.
Разобраться лучше – http://
After spending some time navigating, access this link appears within a layout that feels consistent – the arrangement of content is logical, helping users move smoothly from one section to another.
nexus market https://marketdarknets.org/
While navigating through platforms that promote learning and creativity, finding see what’s here can be refreshing – offering a wide variety of ideas that inspire knowledge expansion.
Этот текст призван помочь читателю расширить кругозор и получить практические знания. Мы используем простой язык, наглядные примеры и структурированное изложение, чтобы сделать обучение максимально эффективным и увлекательным.
Открой скрытое – врач нарколог выезд на дом
В этом обзорном материале представлены увлекательные детали, которые находят отражение в различных аспектах жизни. Мы исследуем непонятные и интересные моменты, позволяя читателю увидеть картину целиком. Погрузитесь в мир знаний и удивительных открытий!
Рассмотреть проблему всесторонне – нарколог на дом вывод из запоя на дому
Creative thinking becomes more natural when people regularly engage with new information and allow themselves to explore unfamiliar concepts freely idea expansion guide – this shows how exposure to diverse experiences can enhance originality and support stronger innovative thinking patterns over time
When reviewing UI/UX inspiration resources and interface design examples, people often mention valuevision navigation hub included in collections that prioritize structured content flow, clarity, and ease of use across multiple web platforms. – The experience is smooth, practical, and visually well organized.
darkmarkets https://market-darknet.org/
For individuals interested in useful knowledge, visiting sites such as discover real value – a platform that focuses on meaningful insights can help users identify practical information and apply it effectively in their daily learning and decision-making processes.
If you enjoy discovering fresh perspectives, exploring motivation and ideas – a site that offers inspiring content and creative guidance can help you maintain enthusiasm and imagination throughout your daily routine.
Уже при первичном звонке мы собираем ключевую информацию: длительность употребления, типы веществ, сопутствующие заболевания, прошлые реакции на лекарства, эпизоды судорог и психозов, недавние значения АД/ЧСС. Это позволяет подготовить персональный стартовый протокол ещё до визита: поставить цель на первые 72 часа, определить метрики (сон, «тяга», дневная энергия), запланировать вечерний ритуал и расписать дистанционные чек-ины. Прозрачность шагов снижает тревогу у пациента и семьи и повышает соблюдаемость — фундамент устойчивого результата.
Узнать больше – наркологическая клиника нарколог
Эта публикация погружает вас в мир увлекательных фактов и удивительных открытий. Мы расскажем о ключевых событиях, которые изменили ход истории, и приоткроем завесу над научными достижениями, которые вдохновили миллионы. Узнайте, чему может научить нас прошлое и как применить эти знания в будущем.
Погрузиться в детали – вывод из запоя в нижнем новгороде на дому
Эта статья погружает вас в увлекательный мир знаний, где каждый факт становится открытием. Мы расскажем о ключевых исторических поворотных моментах и научных прорывах, которые изменили ход цивилизации. Поймите, как прошлое формирует настоящее и как его уроки могут помочь нам строить будущее.
Не упусти шанс – вывод из запоя нижний новгород
During my search for educational and motivational websites, I discovered skill growth guide – which encourages continuous learning and steady improvement, helping users develop better habits and stronger abilities through simple daily practice and consistency.
Впечатление осталось положительное, всё прошло без задержек и лишних вопросов. Девушка приятная в общении, располагает к себе с первых минут. Атмосфера спокойная и ненапряжённая. Видно, что сервис продуман, жопастые проститутки спб
Стационарный формат отличается возможностью наблюдать состояние в динамике, своевременно корректировать лечение и контролировать течение абстинентного синдрома. Это особенно важно в ситуациях, когда домашнего наблюдения недостаточно, а риск осложнений требует более внимательного подхода. При выборе тактики учитывают не только текущее самочувствие, но и предшествующие эпизоды запоя, наличие хронических заболеваний, выраженность нарушений сна, поведения и вегетативных симптомов. В клинике такой подход позволяет организовать комплексное наблюдение, при котором состояние оценивают последовательно, а помощь выстраивают с учетом нагрузки на основные системы здоровья.
Узнать больше – https://vyvod-iz-zapoya-v-staczionare-sankt-peterburg-19.ru
Алгоритм в клинической практике выстроен поэтапно: от первичной оценки до планирования реабилитационного маршрута. Последовательность вмешательств обеспечивает предсказуемую динамику и прозрачную коммуникацию с пациентом и его близкими.
Ознакомиться с деталями – вывод из запоя дешево луганск
While reviewing different community based platforms focused on innovation I discovered creative exchange hub the design felt simple friendly and perfect for open discussions – I instantly felt it was a space where ideas can grow freely without restriction.
If you are seeking cooperation, visiting common goal network – a platform designed for unity helps users collaborate effectively, build strong relationships, and achieve success through shared vision and teamwork.
Этот увлекательный информационный материал подарит вам массу новых знаний и ярких эмоций. Мы собрали для вас интересные факты и сведения, которые обогатят ваш опыт. Откройте для себя увлекательный мир информации и насладитесь процессом изучения!
Желаете узнать подробности? – лечение запоя в стационаре
Эта услуга позволяет людям, которые не могут или не хотят покидать свой дом, получить профессиональную помощь и избавиться от зависимости без госпитализации. К тому же, вывод из запоя на дому позволяет избежать стресса, связанного с нахождением в медицинских учреждениях, при этом можно заказать вызов специалистов с учетом их опыта и лет работы, а также данных больного.
Узнать больше – vyvod-iz-zapoya-na-domu-ekaterinburg-18.ru/
If you are looking to take action on your ideas, visiting create impact platform – a resource that promotes meaningful building can help users stay motivated and focused on turning thoughts into practical and impactful results over time.
As I navigated through different sections and usability flow, I noticed that visit here aligns with a structured interface – the design is clean overall and makes browsing comfortable for a while.
In the middle of looking for motivational content that supports creativity, I found everyday creativity hub – which provides insights on how small moments can spark new ideas and encourage a more inspired way of thinking.
Эта статья погружает вас в увлекательный мир знаний, где каждый факт становится открытием. Мы расскажем о ключевых исторических поворотных моментах и научных прорывах, которые изменили ход цивилизации. Поймите, как прошлое формирует настоящее и как его уроки могут помочь нам строить будущее.
Не упусти важное! – психиатр нарколог на дом
silk road darknet https://marketdarknets.com/
Curious individuals who like to improve their thinking often search for inspiration across various platforms where knowledge is broken down into simple practical explanations Creative Sparks Library – The ideas shared here are presented in a clear and approachable manner making them easy for anyone to understand and use effectively in real life
В клинике применяются только доказательные методы, эффективность которых подтверждена практикой. Медицинское и психологическое воздействие дополняют друг друга, формируя комплексный эффект.
Получить дополнительные сведения – наркологическая клиника
People interacting with web platforms often appreciate when layouts are clean, structured, and designed to support effortless movement between sections and features UrbanShift UX Portal – UrbanShift offers a smooth interface where navigation feels natural and pages are easy to browse, creating a comfortable and efficient user experience overall.
When searching for valuable information and engaging material to improve your knowledge, many people discover helpful resources like explore top content hub – a well-curated platform offering informative and interesting content that supports consistent learning and keeps users engaged every single day.
For those who value innovation, exploring future strategy group – a helpful space where ideas are both inspiring and practical can support users in developing forward-thinking approaches that improve planning and decision-making in various areas of life.
Стационарный формат отличается возможностью наблюдать состояние в динамике, своевременно корректировать лечение и контролировать течение абстинентного синдрома. Это особенно важно в ситуациях, когда домашнего наблюдения недостаточно, а риск осложнений требует более внимательного подхода. При выборе тактики учитывают не только текущее самочувствие, но и предшествующие эпизоды запоя, наличие хронических заболеваний, выраженность нарушений сна, поведения и вегетативных симптомов. В клинике такой подход позволяет организовать комплексное наблюдение, при котором состояние оценивают последовательно, а помощь выстраивают с учетом нагрузки на основные системы здоровья.
Получить больше информации – стационар вывод из запоя
While browsing through different online content platforms I came across trend update hub placed naturally within the article and it immediately stood out – It felt like a useful place to quickly understand what is currently popular and happening across various topics without wasting time searching everywhere.
darknet market lists https://marketdarknets.org/
For those focused on innovation, checking out creative ideas network – a platform designed for visionary growth helps users develop strong concepts that turn imagination into impactful projects and forward-thinking creative solutions in various fields.
If you are looking for inspiration, visiting confidence shine hub – a resource that encourages self-belief can help users stay positive, overcome doubt, and showcase their abilities with confidence in both personal goals and professional ambitions.
As I looked through different trend-focused platforms, I discovered trend stream finder – The idea feels modern and appealing, offering a smooth and engaging experience for discovering new developments and creative directions online.
Вывод из запоя на дому с медицинским контролем в Екатеринбурге предлагает множество преимуществ, которые делают этот метод более удобным и безопасным для многих людей. Отсутствие необходимости в госпитализации и наличие профессионального контроля являются основными положительными аспектами этой услуги.
Подробнее тут – вывод из запоя на дому анонимно екатеринбург
Can you be more specific about the content of your article? After reading it, I still have some doubts. Hope you can help me.
Resource centre pre-warmed google ads accounts consolidates the questions buyers ask most often, with answers drawn from comment-section feedback over the past quarter.
Field reference PVA aged reinstated comparison explains the operational steps that take a fresh account from delivery to first campaign without triggering automated review.
onion dark website https://darknet-market.org/
Individuals interested in innovation and collaboration often explore platforms such as Innovators Link Platform – which is considered a supportive network for exchanging ideas, forming partnerships, and identifying business opportunities that contribute to long-term success and professional development.
During my browsing session and usability check, I noticed that see more here blends into a clear layout – the interface is clean, and it makes it simple to explore different sections.
В клинике применяются только доказательные методы, эффективность которых подтверждена практикой. Медицинское и психологическое воздействие дополняют друг друга, формируя комплексный эффект.
Узнать больше – http://narkologicheskaya-klinika-v-tveri0.ru/narkolog-tver-anonimno/
While browsing through personal development resources, I found daily growth motivation – a site that inspires users to stay consistent with self-improvement and work toward meaningful changes in their everyday routines.
Всё прошло без проблем и лишних вопросов. Девушка вежливая и аккуратная. Общение оставило хорошее впечатление – секс город
Many users searching for creative inspiration often rely on collaborative websites that bring together brainstorming tools and global participants such as Global Brainstorm Hub which enable open discussion and shared ideation among members – It enhances creativity by bringing diverse minds together in one space.
In moments when clarity feels missing people often need systems that bring order to their goals and reduce mental clutter progress ladder hub serving as a conceptual reminder that growth happens step by step through consistent effort and reflection – This encourages patience while still maintaining forward movement toward meaningful outcomes
Мы работаем по модели «72 часа + 2 недели»: первые трое суток посвящены стабилизации витальных показателей, коррекции сна и сокращению «тяговых» откликов, следующие 14 дней — консолидации результата и запуску психотерапевтического блока. Маркеры прописываются заранее, поэтому и пациент, и семья понимают, когда и что мы будем оценивать, как корректируем план, если динамика ниже ожидаемой.
Разобраться лучше – наркологические клиники алкоголизм в первоуральске
People looking to improve their daily decisions and live more meaningfully often explore resources like life optimization guide – a motivational platform that shares practical tips and thoughtful strategies to help users make better choices and fully utilize their time and opportunities in life.
Many online shoppers exploring new websites often come across unique stores that spark curiosity due to their innovative presentation, and I came across Impact Driven Product Hub which looks promising – A creative e-commerce platform that seems to offer fresh and evolving product ideas, making it something I intend to check again as new updates appear.
If you are searching for a smooth retail experience, visiting modern style store – a platform built for usability offers users simple navigation and a clean layout that enhances online shopping convenience and speed.
black ops market link https://marketdarknets.org/
If you enjoy exploring new ideas and creative thinking, visiting creative energy hub – a platform that promotes constant inspiration and innovation can help users maintain a natural flow of ideas and improve their artistic or problem-solving abilities over time.
During a random online reading moment I came across focus improvement guide space in the middle of the page and it caught my attention – It offered motivation that feels simple and steady, making it easier to stay on track with goals.
Мы не «перелечиваем» пациента процедурами. Любая мера начинается как проверяемая гипотеза с измеримыми маркерами. Ниже — опорная карта лечения. В реальности она персонализируется в зависимости от клинической картины, возраста, сопутствующих заболеваний и бытового графика.
Подробнее – http://narkologicheskaya-klinika-kamensk-uralskij0.ru/narkolog-v-kamenske-uralskom/
People exploring cognitive growth often visit platforms like bright thinking hub – a smart learning environment that encourages innovation, creativity, and continuous improvement through daily knowledge sharing and idea-driven exploration across diverse topics and disciplines.
During my initial visit and quick look at the interface, I came across this helpful link which gave a good impression – I like the structure here, as it feels simple yet effective for users overall.
nexus darknet access https://darknet-market.org/
пятерочка промокод на второй промокод пятерочка
Verified storefront 1 year aged google ads pairs editorial reviews with a vetted catalog. Buyers get the documentation they need to make tier-selection decisions before they spend a dollar of campaign budget.
На первом контакте координатор задаёт несколько точных вопросов: длительность эпизода, наличие рвоты/тремора/бессонницы, приём лекарств, хронические заболевания. Эти данные нужны не «для галочки»: по ним заранее выстраивается протокол инфузии, рассчитывается скорость, подбираются уколы до капельницы и объём наблюдения после. Врач приезжает уже с персональным планом и поправляет его по факту осмотра.
Подробнее – скорая вывод из запоя петрозаводск
Many users who enjoy quick online product discovery often prefer easy-to-browse stores, and I found Daily Trend Store Trend Discover Hub which seems interesting – In only a few minutes I was able to find stylish items right away, and it gave the impression of being fast, simple, and convenient for everyday browsing.
Choosing a stable and fulfilling career path often requires guidance that considers personal interests, market demand, and long-term growth potential Career Path Navigator which guides users through structured options to improve clarity and confidence – A guidance platform designed to help individuals navigate career options and choose paths aligned with their strengths and aspirations
While exploring online catalogs for creative wall styling solutions I encountered in the center of recommended home décor listings modern interior hub – I discovered some really nice wall art here prices are fair and overall browsing experience feels smooth
As innovation accelerates across industries, digital platforms that support collaboration, creativity, and shared problem-solving are becoming increasingly essential Innovation Hive Platform – A dynamic and interconnected online ecosystem designed to foster creativity, teamwork, and continuous idea development among global participants in real time collaboration
Команда клиники включает врачей-наркологов и психиатров, клинических психологов, специалистов по зависимости, выездных медсестёр и координаторов маршрута. Все решения принимаются мультидисциплинарно — это значит, что медицинский и психотерапевтический блоки «стыкуются» между собой, а рекомендации не противоречат друг другу. Мы уделяем внимание сенсорной среде: мягкий свет, тишина, регламент вечернего отделения шумов, чтобы медикаментозная поддержка не «сгорала» под стрессом.
Получить дополнительные сведения – наркологическая клиника наркологический центр
While looking through various productivity tools and advice sites, I discovered easy daily solutions – which shares helpful tips that simplify routines and make everyday life more organized and efficient.
Many aspiring online learners need accessible resources that guide them through the early stages of digital skill development web learning starter kit designed to introduce basic knowledge in a structured and beginner friendly way – This helps users build a strong foundation while gradually expanding their understanding of online environments
Whenever I want to improve my fashion sense without spending too much time I look for simple style guides that show clear outfit combinations simple outfit idea collection – it made styling feel more intuitive and helped me develop better clothing coordination habits over time
While looking for innovative trend websites, I discovered trend radar space – It has a fresh and modern feel, offering a simple way to explore new ideas and stay connected with evolving digital movements.
Для жителей Петрозаводска организован приём без очередей и «тихий» маршрут: короткий телефонный скрининг, согласованное окно приезда, приватная регистрация и старт терапии в тот же день. Вход — отдельный, кабинеты — изолированные, регистратура работает без громких объявлений. Документы составляются в нейтральной терминологии, доступ к карте пациента разграничен по ролям. Такой формат снижает тревогу и позволяет начать лечение именно тогда, когда мотивация хрупка и опоры особой важности — вечером, в выходные и праздничные дни.
Получить дополнительные сведения – лечение в наркологической клинике петрозаводск
People browsing online platforms often appreciate systems that reduce clutter and provide clear pathways to essential content sections Infinite Portal Node – experience note – The website structure supports smooth user movement between pages, enhancing overall accessibility and making information discovery more efficient.
During my review of various websites focused on reliability and user confidence, I referenced visit trust alliance hub within my notes – the platform gives a reassuring impression and I feel comfortable navigating it without concerns about safety or trust issues.
dark market list https://marketdarknets.org/
Can you be more specific about the content of your article? After reading it, I still have some doubts. Hope you can help me. https://accounts.binance.bh/ES-la/register?ref=VDVEQ78S
Затяжной запой — это не бытовая слабость, а медицинское состояние, требующее профессионального лечения в условиях стационара. Когда организм истощен длительной интоксикацией, нарушен сон, отсутствует аппетит, а попытки самостоятельно прекратить употребление сопровождаются тремором, тревогой и скачками давления, единственным безопасным решением становится контролируемая детоксикация. Наркологическая клиника «Элегия Мед» в Санкт-Петербурге предоставляет профессиональное лечение с применением сертифицированных протоколов, непрерывный контроль состояния пациента и индивидуальный подбор медикаментозной поддержки. Мы работаем круглосуточно, обеспечивая быстрое реагирование на обращения, четкую диагностику при поступлении и прозрачное взаимодействие с родственниками. Все процедуры выполняются с соблюдением протоколов доказательной медицины, стандартов Минздрава РФ и строгих правил конфиденциальности. Первичная оценка состояния начинается с дистанционной консультации, что позволяет врачам заранее подготовить необходимое оборудование и скорректировать план госпитализации еще до прибытия пациента. При необходимости заказать консультацию или оформить выезд бригады, доступные способы связи включают телефон, мессенджеры и онлайн-форму на сайте.
Получить дополнительные сведения – вывод из запоя в стационаре в санкт-петербурге
People interested in becoming better leaders often appreciate platforms that share inspiring and forward-looking content, and I recently discovered Visionary Leadership Mindset Club Hub which looks motivating – A leadership-oriented website designed to inspire future leaders, and it delivers content with a positive and growth-focused tone that feels genuinely useful for personal development.
torzon darknet url https://darknetmarketnews.com/
Мы не «перелечиваем» пациента процедурами. Любая мера начинается как проверяемая гипотеза с измеримыми маркерами. Ниже — опорная карта лечения. В реальности она персонализируется в зависимости от клинической картины, возраста, сопутствующих заболеваний и бытового графика.
Углубиться в тему – https://narkologicheskaya-klinika-kamensk-uralskij0.ru/
Many users aiming for consistent development rely on tools like your win path guide – a platform that provides structured motivation and practical strategies designed to help individuals stay focused, disciplined, and committed to achieving meaningful goals over time.
Many users aiming to improve how they communicate rely on tools like daily vision sharing platform – a resource that supports clear idea expression and encourages confidence in speaking and writing across various real-life and creative environments.
For those who enjoy learning new things daily, exploring fresh ideas hub – a platform that shares updated content can help users stay engaged and discover meaningful insights that make browsing more enjoyable and informative.
If you want better professional ties, checking global connection trust hub – a networking platform helps users strengthen relationships, build credibility, and expand opportunities through trusted collaboration and meaningful engagement across industries.
At some point in my browsing, I ran into a place full of ideas that stood out from the rest – It encouraged a sense of curiosity and creativity that made my time online feel more valuable.
Наркологическая клиника «ТагилМед Реал» — это круглосуточная команда врачей, психологов и координаторов, которая берёт на себя полный цикл помощи при алкогольной и наркотической зависимости: от экстренной стабилизации и капельниц на дому до амбулаторного сопровождения, кодирования и длительной психотерапевтической поддержки. Мы работаем без выходных, используем портативное оборудование, придерживаемся принципов доказательной медицины и внимательно относимся к конфиденциальности: нейтральные формулировки в документах, немаркированный транспорт, разграниченный доступ к медицинским данным и единый доверенный контакт для семьи.
Углубиться в тему – наркологическая клиника вывод из запоя в нижнем тагиле
Запой – это состояние, при котором человек продолжает употреблять алкоголь в течение длительного времени, не в состоянии прекратить употребление самостоятельно, что является проявлением алкоголизма. Это может привести к серьезным проблемам со здоровьем, и в таком случае необходим вывод из запоя с помощью наркологической помощи, при этом в дальнейшем может рассматриваться кодирование.
Ознакомиться с деталями – http://www.domen.ru
nexus dark web https://darknet-market.org/
While reviewing the interface and moving through sections, I came across go to this site which fits into a neat structure – good layout overall, and everything feels organized and visually easy on the eyes.
There was a point where I felt my daily productivity was scattered until I began exploring structured self improvement concepts strong focus habits guide – this helped me rethink my entire routine and build a clearer path toward better organization and improved personal discipline over time
Industry source buy aged google ads accounts backs every recommendation with field data from a real test fleet. The numbers come from accounts running real campaigns, not from theoretical analysis.
During my search for creative and affordable gifting inspiration online, I referenced visit gift world ideas within my notes – the selection of items is genuinely adorable and works really well for birthdays, holidays, and casual surprise gifting moments.
Решение о помещении пациента в стационар принимается на основе объективных медицинских критериев, а не только по желанию родственников. К показаниям относятся: запой длительностью более 72 часов, выраженная абстиненция с тахикардией, артериальной гипертензией, профузным потоотделением, наличие в анамнезе алкогольных делириев или судорожных эпизодов, сопутствующие хронические заболевания печени, сердца, поджелудочной железы. В сложные ситуации, когда интоксикация затрагивает несколько систем одновременно, резкое прекращение употребления без медицинской поддержки может спровоцировать отек мозга, острую сердечную недостаточность или желудочно-кишечное кровотечение. При сочетанных расстройствах, когда в анамнезе присутствует наркомании, протоколы адаптируются под специфику психоактивных соединений и включают усиленный нейрологический контроль. Стационар позволяет провести полноценную диагностику, включая ЭКГ, экспресс-анализы крови, УЗИ внутренних органов и мониторинг сатурации, что формирует точную картину состояния и исключает шаблонные назначения.
Ознакомиться с деталями – вывод из запоя в стационаре клиника в санкт-петербурге
Процесс лечения алкоголизма в Твери строится поэтапно, что позволяет пациентам постепенно проходить все стадии выздоровления.
Узнать больше – лечение женского алкоголизма в твери
People who want to optimize their spending decisions often use online hubs like bargain insight platform to gain clarity on available offers and then – the platform focuses on delivering actionable insights that support smarter financial decision making
Сочетание этих методов позволяет добиваться стойкой ремиссии и укреплять здоровье пациентов.
Получить больше информации – реабилитационный центр лечение алкоголизма в твери
People interested in upscale shopping experiences often look for platforms that offer premium quality products combined with modern fashion trends, and they may find Premium Style Luxury Outlet which showcases fashionable collections – A refined online store delivering daily curated luxury items, designer-inspired products, and trend-driven fashion pieces for customers seeking elegance and exclusivity in their shopping experience.
People who enjoy online shopping often prefer sites where they can find trendy products quickly, and I recently discovered Daily Trend Store Picks Hub which looks helpful – I browsed for just a few minutes and immediately came across several stylish items, and it gave a nice impression of being fast and easy to explore.
While searching for straightforward solutions to common issues, I found simple life fixes – a site that focuses on providing easy and practical advice for resolving everyday problems without unnecessary complexity.
While browsing through online gifting collections and colorful inspiration pages I found festive joy corner – the interface felt welcoming and smooth and I ended up selecting a bright and thoughtful gift for my sister’s celebration overall perfect choice indeed
Ecosystems built around shared learning and collaboration can significantly improve the way individuals interact and achieve their professional objectives together Shared Growth Ecosystem provides such an interconnected environment – It fosters cooperation, encourages knowledge exchange, and supports collective advancement.
During exploration of trading signal networks and financial alert systems I found in the middle of my study list Fast Trend Signal Hub which provides regular updates – The signal behavior so far looks fairly stable and the platform seems worth observing over time
As I reviewed leadership-focused articles and real experience sharing, I worked in see trusted leadership hub within my notes – the content feels grounded and useful, offering meaningful advice that supports my own development journey.
Many users who enjoy minimal web experiences often prefer platforms that feel organized and visually calm, and I recently explored Modern Vision Digital Hub which stands out – A clean and modern-looking website that focuses on simplicity and usability, making it easy to browse through their latest updates and creative showcases without visual clutter.
silk road shop https://marketdarknets.org/
Вывод из запоя в Луганске рассматривается как последовательное медицинское вмешательство, направленное на снижение интоксикации, стабилизацию витальных показателей и профилактику острых осложнений. На фоне длительного употребления алкоголя у пациента формируются нарушения водно-электролитного баланса, колебания артериального давления, тахикардия, расстройства сна и повышенная тревожность. Коррекция этих состояний требует наблюдаемого формата помощи, применения стандартизированных протоколов и междисциплинарного взаимодействия.
Углубиться в тему – https://vyvod-iz-zapoya-lugansk0.ru/lnr-vyvod-iz-zapoya-na-domu/
If you are looking to grow as a leader, visiting visionary leaders hub – a resource that encourages collaboration can help users share knowledge, discuss challenges, and build stronger leadership skills through practical insights and peer interaction.
nexus darknet url https://darknetmarketnews.com/
Лечение алкоголизма в Твери проводится с использованием современных медицинских и психотерапевтических методик. Оно направлено на снятие физической зависимости, восстановление организма и формирование устойчивой мотивации к отказу от спиртных напитков. Важно учитывать, что успех терапии зависит от комплексного подхода и профессиональной поддержки специалистов.
Подробнее можно узнать тут – лечение алкоголизма анонимно в твери
If you want to expand your reach and improve engagement, checking out grow online influence – a helpful site offering structured strategies and insights can make digital growth more manageable and effective in daily practice.
Many users focused on collective growth rely on future collaboration hub – a team-oriented platform helps individuals build trust, improve coordination, and achieve long-term success through structured teamwork and shared objectives.
Процедура вывода из запоя на дому включает несколько ключевых этапов, которые обеспечивают максимально быстрое и безопасное восстановление пациента. Эти этапы тщательно контролируются врачом, что минимизирует риски и помогает достичь наилучших результатов.
Углубиться в тему – анонимный вывод из запоя на дому екатеринбург
While going through different sections and observing usability, I found that visit this link enhances the experience – it’s a pretty straightforward site, and navigation works well and feels intuitive overall.
I was reading through several self improvement posts earlier today when I came across something interesting and right in the middle of the content I noticed success insight hub which caught my attention – It explained important ideas in a clear and simple way that made everything easy to understand and apply.
cocorico darknet market https://market-darknet.org/
ares onion https://marketdarknets.com/
While exploring digital idea-based platforms, I found vision forward space – The structure feels engaging and well-planned, making it something I would like to revisit for further exploration.
For those seeking dependable networking opportunities, exploring connect trust hub – a helpful space that promotes professional trust can support users in forming meaningful relationships that enhance collaboration and improve overall efficiency in business interactions.
Выбор между домашней помощью и стационарным лечением определяется не удобством, а медицинской целесообразностью. В условиях клиники исключаются внешние триггеры, обеспечивается изоляция от источников алкоголя и создается контролируемая среда, где терапевтические решения принимаются на основе объективных показателей, а не субъективных ощущений пациента. Такой подход критически важен для предотвращения осложнений, минимизации дискомфорта абстиненции и формирования устойчивой базы для дальнейшей противорецидивной работы.
Изучить вопрос глубже – http://vyvod-iz-zapoya-v-staczionare-sankt-peterburg-18.ru
UI and UX specialists regularly search for new ideas to enhance design that improve functionality accessibility and overall user satisfaction in digital environments greatly Visual Concept Studio – This continuous learning process enables creators to build interfaces that are both aesthetically pleasing and highly efficient for end users overall performance
In today’s digital environment, many users prefer community-driven websites that allow brainstorming, networking, and the exchange of fresh perspectives across different professional fields and backgrounds such as Idea Sharing World Platform that serve as gathering points for innovators and professionals from around the world looking to collaborate – It creates opportunities for users to exchange ideas freely while building meaningful global connections.
I decided to declutter my entire room after feeling mentally drained, and a simplicity-focused guide easy minimal home guide helped me stay consistent, and now I enjoy a cleaner, more peaceful atmosphere that supports better rest and focus.
Такая помощь обеспечивает безопасность пациента и снижает риски осложнений, связанных с запойным состоянием.
Подробнее – вывод из запоя дешево
Такая схема позволяет последовательно и безопасно восстановить силы организма и стабилизировать психическое состояние пациента.
Ознакомиться с деталями – http://www.domen.ru
Вывод из запоя на дому в Екатеринбурге с выездом врача — это специализированная медицинская услуга, которая помогает человеку безопасно и эффективно выйти из запойного состояния без необходимости госпитализации. Запой является состоянием, при котором человек не может контролировать потребление алкоголя, и последствия могут быть крайне серьезными, как для физического, так и для психоэмоционального здоровья. В таких случаях помощь врача на дому становится важным и необходимым шагом для восстановления здоровья пациента и предотвращения осложнений.
Исследовать вопрос подробнее – вывод из запоя на дому анонимно
During my online shopping session focused on skincare savings and beauty deals, I included explore skincare outlet in my notes – I found some nice discounts and the shipping time was surprisingly fast compared to what I usually experience with online orders.
In a fast changing world, professionals often turn to online communities that support collaboration and shared learning experiences progress collaboration forum that helps users connect and engage in meaningful discussions about growth and innovation – I met motivated people there and it was a constructive space for conversations
Программы терапии в клинике основаны на современных методах, которые доказали свою эффективность и применяются в соответствии с международными стандартами.
Выяснить больше – наркологическая клиника клиника помощь в твери
As I explored focus improvement and self-motivation resources, I referenced explore success motivation network in my notes – the advice helped me stay focused today and made it easier to handle my responsibilities with clarity.
When progress feels slow due to inconsistent effort, motivational guidance from forward motion key – Highlights the importance of maintaining steady movement, no matter how small, and building momentum through repeated action that gradually leads to significant and lasting results.
Понравилось, что всё прошло без лишней суеты. Девушка выглядела достойно и вела себя корректно. Общение было приятным. Сервис хороший, девушки по вызову питер
While browsing through content about strategic innovation groups and future planning frameworks I came across Future Driven Collaboration Hub mentioned in context and it immediately caught attention – The message felt inspiring and gave a sense of structured optimism around building better collective outcomes
During moments when people search for direction and inspiration, they might discover discover your path – a resource filled with motivating content that gently encourages thoughtful planning and consistent effort toward building a better and more meaningful life ahead.
Many users starting out in investing often look for easy guides that explain everything clearly, and I recently found Smart Invest Profit Basics Hub which appears practical – A straightforward investing platform that breaks down financial concepts into simple explanations, making it easier for beginners to understand how investing and profit growth work.
silk road darknet url https://darknetmarketnews.com/
Своевременная медицинская помощь уменьшает вероятность тяжелых осложнений и сокращает период восстановления. При следующих признаках требуется неотложная оценка состояния и начало терапии под наблюдением специалистов:
Разобраться лучше – https://vyvod-iz-zapoya-doneczk0.ru/vyvod-iz-zapoya-na-domu-doneczk-dnr
In discussions about visually rich web interfaces and user engagement design, users frequently highlight platforms like boldvista navigator which appear in curated examples focused on clarity, structure, and bold presentation styles across different digital environments. – The layout is typically clean, intuitive, and visually appealing overall.
While exploring online spaces dedicated to leadership development and partnership building strategies, I encountered a discussion hub where future alliance network appeared naturally within curated references and it drew attention for its structured approach – the overall concept reflects a mindset focused on long term cooperation and meaningful professional alignment across different industries
Recognized portal Bidsignal FAQ keeps documentation lean and useful. Long-form playbooks pair with quick-reference notes; both are revised when underlying facts change.
Тактика подбирается индивидуально и зависит от тяжести состояния, сопутствующих заболеваний и переносимости препаратов. Ниже представлены базовые компоненты, которые часто включаются в схемы лечения при запойных состояниях.
Получить дополнительную информацию – https://vyvod-iz-zapoya-doneczk0.ru/vyvod-iz-zapoya-na-domu-doneczk-dnr/
Many businesses aiming for growth rely on business scaling hub – a platform focused on expansion helps companies build strong strategies, improve efficiency, and achieve long-term success through practical growth guidance.
In conversations about web usability and general interface responsiveness, people sometimes mention how design simplicity improves user satisfaction significantly, especially when encountering platforms such as nextrend modern link referenced in collections of streamlined websites built for smoother navigation and cleaner browsing experiences online. – The experience is usually considered fluid and visually comfortable.
Выбор между домашней помощью и стационарным лечением определяется не удобством, а медицинской целесообразностью. В условиях клиники исключаются внешние триггеры, обеспечивается изоляция от источников алкоголя и создается контролируемая среда, где терапевтические решения принимаются на основе объективных показателей, а не субъективных ощущений пациента. Такой подход критически важен для предотвращения осложнений, минимизации дискомфорта абстиненции и формирования устойчивой базы для дальнейшей противорецидивной работы.
Подробнее тут – вывод из запоя в стационаре санкт-петербург
If you want to explore ideas and grow your abilities, visiting learn explore shine center – a resource that encourages continuous learning and creativity can help you achieve personal development and long-term success in your journey.
black ops market darknet https://market-darknet.org/
100cuci rebate 100cuci rebate
While going through various personal growth resources online I found reflective learning hub within the content and it felt relevant – It provided a gentle environment that supports thinking deeply while exploring new and useful ideas at a comfortable pace.
Выбор между домашней помощью и стационарным лечением определяется не удобством, а медицинской целесообразностью. В условиях клиники исключаются внешние триггеры, обеспечивается изоляция от источников алкоголя и создается контролируемая среда, где терапевтические решения принимаются на основе объективных показателей. Такой подход критически важен для предотвращения осложнений, минимизации дискомфорта абстиненции и формирования устойчивой базы для дальнейшей противорецидивной работы.
Исследовать вопрос подробнее – стационар вывод из запоя в санкт-петербурге
Вывод из запоя в Твери проводится с применением современных методик, эффективность которых подтверждена медицинской практикой. Используются только проверенные препараты и процедуры, соответствующие клиническим стандартам.
Детальнее – вывод из запоя капельница
100cuci bonus 100cuci bonus
100cuci alternatif 100cuci alternatif
Стационарное наблюдение также целесообразно тогда, когда больному трудно соблюдать рекомендации дома, состояние быстро меняется или родственники не могут обеспечить полноценный контроль. В таких условиях медицинское сопровождение позволяет своевременно оценивать динамику и корректировать лечение. При выраженных психических нарушениях, тревожно-депрессивных проявлениях или изменении поведения к оценке состояния может подключаться психиатр, поскольку у части больных запой сопровождается не только соматическими, но и психическими осложнениями алкогольной зависимости.
Получить дополнительные сведения – вывод из запоя в стационаре санкт-петербург
top casino malaysia top casino malaysia
100cuci promo code 100cuci promo code
Individuals planning their long-term success often turn to platforms like Future Direction Guide which offers practical assistance, and it continues by providing step-by-step insights, opportunity discovery tools, and personal growth suggestions that help users navigate their journey toward a better future.
Startups and independent professionals increasingly rely on online platforms that encourage collaboration, shared learning, and strategic expansion opportunities in competitive markets Partnership Nexus Portal to find like-minded collaborators and establish productive relationships that support sustainable growth and innovation across various sectors – Such platforms provide structured environments where business leaders can exchange ideas and develop mutually beneficial alliances over time.
Решение о помещении пациента в стационар принимается на основе объективных медицинских критериев, а не только по желанию родственников. К показаниям относятся: запой длительностью более 72 часов, выраженная абстиненция с тахикардией, артериальной гипертензией, профузным потоотделением, наличие в анамнезе алкогольных делириев или судорожных эпизодов, сопутствующие хронические заболевания печени, сердца, поджелудочной железы. При отравление продуктами распада этанола, когда интоксикация затрагивает несколько систем одновременно, резкое прекращение употребления без медицинской поддержки может спровоцировать отек мозга, острую сердечную недостаточность или желудочно-кишечное кровотечение. При сочетанных расстройствах, когда в анамнезе присутствует наркомании, протоколы адаптируются под специфику психоактивных соединений и включают усиленный нейрологический контроль. Стационар позволяет провести полноценную диагностику, включая ЭКГ, экспресс-анализы крови и мониторинг сатурации, что формирует точную картину состояния и исключает шаблонные назначения.
Получить дополнительную информацию – вывод из запоя в стационаре
Выбор методов определяется клинической картиной, коморбидными состояниями и переносимостью препаратов. Ниже представлена сводная структура основных вмешательств и терапевтических целей.
Исследовать вопрос подробнее – нарколог вывод из запоя луганск
As I prepared for the trading day and reviewed various tools, I worked in explore trading zone within my observations – the platform feels advanced and I find myself checking charts there regularly to stay aligned with the market.
Group projects can become stressful when communication breaks down but structured collaboration methods can change everything quickly project harmony network I applied some of these concepts in my own team work – now our group assignments run significantly more smoothly with fewer misunderstandings and better task distribution
Остался доволен уровнем обслуживания и вниманием к деталям. Девушка общительная и приятная. Атмосфера комфортная. Всё прошло без проблем, заказать девушку
For those focused on global teamwork, visiting unity collaboration group – a resource that supports shared purpose can help users connect effectively and build relationships that strengthen cooperation and global understanding.
If you are looking to strengthen your planning skills, visiting strategic alliance hub – a resource that supports growth-focused thinking can help users build effective strategies and improve their ability to achieve consistent results in both personal and professional areas.
Вывод из запоя на дому в Екатеринбурге — это услуга, которая позволяет пациентам пройти лечение в удобных для них условиях, без необходимости посещать стационар. Процедура включает несколько этапов, каждый из которых направлен на снижение уровня алкогольной интоксикации и стабилизацию состояния пациента. Главным преимуществом вывода из запоя на дому является то, что это не только удобно, но и позволяет избежать лишнего стресса, который может быть вызван госпитализацией.
Детальнее – вывод из запоя на дому
Chart reading skills develop faster when learners use structured platforms that guide them through examples rather than leaving them to guess patterns alone trading education flow portal designed for gradual skill improvement – I am finally starting to understand charts better thanks to this resource and it feels much easier now
Процесс вывода из запоя на дому с выездом врача в Екатеринбурге включает несколько этапов, начиная с первичного осмотра пациента и заканчивая корректировкой лечения в зависимости от его состояния. Врач-нарколог проводит полный осмотр, анализирует симптомы и составляет план лечения, который включает детоксикацию организма, поддерживающую терапию и медикаментозное лечение для снятия симптомов абстиненции.
Узнать больше – вывод из запоя на дому анонимно
В этом обзорном материале представлены увлекательные детали, которые находят отражение в различных аспектах жизни. Мы исследуем непонятные и интересные моменты, позволяя читателю увидеть картину целиком. Погрузитесь в мир знаний и удивительных открытий!
Переходите по ссылке ниже – врач нарколог выезд на дом москва
casino https://telegra.ph/Joka-Bet-and-the-modern-football-wagering-revolution-04-16-8
People looking for meaningful digital communities often gravitate toward spaces that prioritize learning together, and Cooperative Learning Portal provides an environment where users can actively participate, share ideas, and develop skills collectively while maintaining a steady focus on long-term personal and group success.
abacus market darknet https://marketdarknets.org/
Первый этап вывода из запоя на дому – это первичная оценка состояния пациента. Врач, прибывший на вызов, осматривает пациента, проверяет уровень алкоголя в крови, измеряет артериальное давление, пульс и температуру. Это необходимо для того, чтобы определить степень алкогольной интоксикации и выбрать правильную тактику лечения.
Углубиться в тему – анонимный вывод из запоя на дому
Эти преимущества делают вывод из запоя на дому с медицинским контролем оптимальным решением для тех, кто хочет быстро и безопасно вернуться к нормальной жизни без необходимости посещать клинику.
Углубиться в тему – вывод из запоя на дому круглосуточно екатеринбург
People interested in forex trading often search for resources that simplify complex market behavior, and I recently explored Forex Easy Start Learning Network which is quite helpful – A beginner-focused forex education platform that makes trading concepts easier to understand, helping users start their learning journey with clarity and reduced confusion.
пятерочка промокод на вторую доставку промокод пятерочка онлайн
While exploring online lifestyle platforms, I came across season modern corner – The vibe is neat and refreshing, making it enjoyable to browse through a clean and visually balanced digital environment.
Тактика подбирается индивидуально и зависит от тяжести состояния, сопутствующих заболеваний и переносимости препаратов. Ниже представлены базовые компоненты, которые часто включаются в схемы лечения при запойных состояниях.
Углубиться в тему – вывод из запоя на дому недорого
abacus shop https://darknetmarketnews.com/
Такая последовательность шагов позволяет врачу действовать точно и эффективно. Благодаря комплексному подходу пациент чувствует облегчение уже через 1–2 часа после начала терапии, а полное восстановление наступает в течение суток.
Углубиться в тему – вывод из запоя капельница на дому ставрополь
During my browsing of motivational platforms, I discovered idea execution hub – which shares inspiring content that helps individuals take consistent action and convert thoughts into meaningful, productive outcomes.
Такая последовательность шагов позволяет врачу действовать точно и эффективно. Благодаря комплексному подходу пациент чувствует облегчение уже через 1–2 часа после начала терапии, а полное восстановление наступает в течение суток.
Получить дополнительную информацию – вывод из запоя капельница
Many users interested in markets often look for simplified trading news sources, and I found Daily Trading Market Update Hub which seems useful – A trading updates platform that focuses on clarity and avoids jargon, and I like how it helps users stay updated without making things feel overly complicated.
Many users interested in visuals check modern design studio corner – a creative platform offering smart design ideas, helping users build attractive visuals, improve branding, and develop clean, effective digital presentations for various projects and needs.
drughub darknet url https://market-darknet.org/
During my exploration of budget shopping websites and deal platforms, I added visit bargain corner page into my notes – I found some ridiculously cheap items and they arrived much faster than expected, which made the experience surprisingly good.
Эта публикация погружает вас в мир увлекательных фактов и удивительных открытий. Мы расскажем о ключевых событиях, которые изменили ход истории, и приоткроем завесу над научными достижениями, которые вдохновили миллионы. Узнайте, чему может научить нас прошлое и как применить эти знания в будущем.
Ознакомиться с отчётом – стационар вывод из запоя
After analyzing how the content is arranged, I found that see this website fits into a well-organized design – the content looks useful, and overall the design is neat and approachable.
casino https://graph.org/Joka-Bet-and-the-modern-football-wagering-revolution-04-16-7
Daily outfit inspiration seekers who want quick and practical styling ideas often use resources like Daily Style Curator – A fashion discovery tool that delivers everyday outfit suggestions, making it easier for users to maintain a consistent and stylish wardrobe
Many individuals stay creative by engaging with trend ideas network – a platform that focuses on sharing relevant and popular ideas for continuous inspiration and growth.
During exploration of trading knowledge platforms and professional education courses I came across in the middle of my research notes Smart Financial Trading Master Hub which offered clear structured training – The content felt solid and I discovered a few new strategies today that could be useful in future trading decisions
I wasn’t expecting anything unusual while scrolling, but at one point I found a hub for new possibilities embedded within the article – It made me reflect on how many alternative approaches exist if you just take a moment to think differently.
Business leaders seeking expansion opportunities often engage with platforms that encourage collaboration and strategic networking across sectors Executive Business Network Alliance – These platforms help executives form partnerships, share insights, and achieve sustainable growth in competitive markets.
While documenting my experience with different update services, I inserted browse trading insights into my commentary – the platform provides frequent updates that help me stay informed and maintain better control over my trades.
While searching for self-development inspiration online, I found confidence journey guide – which offers helpful insights and positive tone content that supports users in building confidence and improving their mindset step by step.
В Каменске-Уральском бригада «Трезвый Урал» ориентируется на прибытие в согласованное окно — обычно это ближайшие 60–90 минут с момента звонка при наличии свободной бригады. Координатор уточняет особенности подъезда, желаемую конфиденциальность (немаркированный автомобиль, отсутствие форменного халата), базовые медицинские данные (аллергии, хронические болезни, постоянные препараты, эпизоды судорог или психозов в прошлом) и бытовые условия (возможность обеспечить тишину, доступ к питьевой воде, удлинитель). После приезда врач проводит осмотр, экспресс-оценку состояния, измеряет АД, ЧСС, сатурацию, температуру, при необходимости выполняет экспресс-тесты и состав инфузии адаптирует под текущее самочувствие.
Выяснить больше – врач вывод из запоя в каменске-уральске
Главные задачи детоксикации при запое — безопасно снизить концентрацию токсичных метаболитов, восстановить водно-электролитный баланс, уменьшить перегрузку сердечно-сосудистой системы и вернуть физиологию сна. Мы начинаем с медленного стартового объёма инфузии, чтобы оценить переносимость, затем переходим к основной фазе и при необходимости к постинфузионной поддержке. Во время сеанса контролируются витальные показатели, динамика симптомов (тремор, тошнота, головная боль, фотофобия, тревога), а также «поведенческие» маркеры — способность расслабиться, усидеть спокойно, засыпать без «рывков».
Ознакомиться с деталями – вывод из запоя недорого каменск-уральск
Developing strong professional networks requires consistent effort and access to reliable communication channels especially in fast paced industries reliable partnership ecosystem hub this experience taught me how valuable structured platforms can be for maintaining long term collaborations over time consistently overall
For those focused on harmony and teamwork, exploring unity trust guide – a helpful resource that encourages positive interaction can support users in creating stronger connections built on sincerity, cooperation, and long-term relationship stability.
На первом контакте координатор задаёт несколько точных вопросов: длительность эпизода, наличие рвоты/тремора/бессонницы, приём лекарств, хронические заболевания. Эти данные нужны не «для галочки»: по ним заранее выстраивается протокол инфузии, рассчитывается скорость, подбираются уколы до капельницы и объём наблюдения после. Врач приезжает уже с персональным планом и поправляет его по факту осмотра.
Изучить вопрос глубже – срочный вывод из запоя петрозаводск
Вывод из запоя на дому требуется в тех случаях, когда человек сталкивается с длительным непрерывным употреблением алкоголя, которое приводит к тяжелым последствиям для организма. Это состояние опасно не только для здоровья, но и для жизни, поэтому быстрое вмешательство специалистов необходимо, при этом можно заказать наркологическая помощь. Врач на дому помогает пациенту выйти из запоя безопасно, минимизируя риски для его здоровья, что является особенно важно для больного, включая случаи наркомании, а также с учетом его данных, возраста (в том числе после 40–50 лет) и актуальной цена лечения для тех, кто не хочет или не может пройти лечение в стационаре.
Разобраться лучше – анонимный вывод из запоя на дому екатеринбург
Many entrepreneurs rely on tools like smart alliance network – a resource that supports business partnerships, helping companies grow efficiently through collaboration, shared expertise, and well-coordinated strategic development efforts across different markets.
In an increasingly competitive business world, individuals often search for trusted knowledge sources that help shape better decision-making and strategic thinking skills leadership resource hub offers a range of insightful posts, interviews, and analysis that can support both new and experienced professionals in their careers – I find the reading experience practical and informative, especially for understanding evolving leadership trends and workplace dynamics
silk road market darknet https://marketdarknets.org/
смм накрутка
Many professionals working in design or writing fields seek techniques that help them unlock ideas faster and maintain focus for longer periods during creative work idea stream booster which encourages a more natural entry into productive thinking – This variation highlights how structured inspiration techniques can improve workflow efficiency and sustain attention during demanding creative processes.
People who enjoy exploring affordable e-commerce options often search for platforms with consistent deals and practical goods, and I recently found Trend Choice Daily Store which appears promising – An online shopping site offering a range of items at fair pricing, encouraging users to return and check for new product deals over time.
С первого контакта координатор уточняет: длительность запоя, виды алкоголя, аллергии, список текущих лекарств, эпизоды судорог или психозов в анамнезе, сердечно-сосудистые жалобы. На основании ответов команда подбирает безопасную схему старта и резервный план на случай усиления симптомов. Врач привозит портативный монитор для контроля АД/ЧСС/SpO2, глюкометр, набор инфузионных линий и расходников, а также средства для экспресс-коррекции тревоги по показаниям.
Подробнее можно узнать тут – наркологический вывод из запоя первоуральск
В «СтаврМед Центре» используются только современные препараты, прошедшие клинические испытания и одобренные Минздравом. Каждая капельница подбирается индивидуально, в зависимости от длительности запоя, возраста пациента и состояния здоровья. В таблице приведены примеры основных видов растворов, применяемых при выезде нарколога.
Ознакомиться с деталями – http://vyvod-iz-zapoya-stavropol0.ru/vyvod-iz-zapoya-v-staczionare-stavropol/https://vyvod-iz-zapoya-stavropol0.ru
When analyzing curated lists of modern web tools and layout systems, users sometimes notice that solid insight vision is referenced among examples focusing on clarity and user centered design – The interface tends to feel stable, minimal, and comfortably easy to navigate across different sections.
ares link https://marketdarknets.com/
С первого контакта координатор уточняет: длительность запоя, виды алкоголя, аллергии, список текущих лекарств, эпизоды судорог или психозов в анамнезе, сердечно-сосудистые жалобы. На основании ответов команда подбирает безопасную схему старта и резервный план на случай усиления симптомов. Врач привозит портативный монитор для контроля АД/ЧСС/SpO2, глюкометр, набор инфузионных линий и расходников, а также средства для экспресс-коррекции тревоги по показаниям.
Исследовать вопрос подробнее – https://vyvod-iz-zapoya-pervouralsk0.ru
casino https://graph.org/Joka-Bet-and-the-modern-football-wagering-revolution-04-16-34
Many digital readers look for websites that present information in a clean and organized format for easier comprehension. GrandLink interface portal – The GrandLink interface portal design emphasizes simplicity, allowing users to interact with content smoothly and efficiently overall.
Many professionals focused on expansion rely on cooperative growth hub – a platform for partnerships helps businesses strengthen relationships, improve alignment, and achieve sustainable success through collaborative strategies and shared initiatives.
casino https://telegra.ph/Joka-bet-online-on-the-web-revolutionizes-tennis-games-betting-market-segments-04-16
People who follow global fashion trends often look for platforms that showcase stylish outfits and updated clothing ideas, and they may come across Elegant Trend Outfit Portal which provides fashion inspiration – A stylish online destination featuring curated clothing trends, modern outfit combinations, and lifestyle fashion updates tailored for audiences interested in refined and contemporary wardrobe aesthetics.
Вывод из запоя на дому с детоксикацией необходим в тех случаях, когда человек страдает от длительного употребления алкоголя, и его состояние требует профессионального вмешательства, включая случаи наркомании. Такое состояние, как правило, сопровождается выраженными симптомами абстиненции, такими как головная боль, тошнота, рвота, тремор, а также психоэмоциональными расстройствами — тревожностью, депрессией или галлюцинациями. В этих случаях вывод из запоя на дому с детоксикацией становится оптимальным решением, позволяющим быстро снять симптомы и вернуть пациента к нормальной жизни, при этом учитываются данные больного и актуальная цена лечения.
Подробнее можно узнать тут – вывод из запоя на дому цена в екатеринбурге
casino https://telegra.ph/Gambling-on-Olympics-with-Jokabet-UK-04-16-9
Many users interested in collaborative innovation platforms often look for deeper insights, and I came across Innovation Driven Collective Hub which feels promising – It has a cool concept overall, and I hope they continue expanding it with more real-world case studies soon because that would make the platform much more practical and insightful for users.
100cuci sign in 100cuci sign in
As I looked for ways to improve my understanding of trading fundamentals, I included visit forex beginner zone in my notes – it made the learning experience less stressful and more engaging overall.
100cuci safe 100cuci safe
In a competitive online world, having the right guidance matters, which is why build brand easily – a practical guide designed to help users develop a unique voice and visual identity is worth exploring for long-term growth.
Мы не используем универсальные «коктейли»: алгоритм строится из коротких проверяемых шагов. На старте фиксируем цель (например, уменьшить тремор и тошноту, стабилизировать пульс и давление, вернуть полноценный ночной сон), выбираем минимально достаточные средства для её достижения и заранее назначаем «окно оценки» — момент, когда команда сверяет эффект и при необходимости корректирует один параметр. Такой подход защищает от полипрагмазии, экономит силы пациента и делает прогресс читаемым для всей семьи.
Ознакомиться с деталями – вывод из запоя цена в каменске-уральске
During my usual online routine, I found realistic improvement ideas and decided to keep reading – It offered insights that felt achievable and grounded in everyday experiences rather than unrealistic expectations.
Technology enthusiasts who enjoy exploring futuristic concepts often engage with platforms that highlight advancements in computing and artificial intelligence AI and Future Ideas Hub sharing insights into how intelligent systems are evolving – This encourages deeper understanding of how automation will influence global industries
During a casual browsing session, I discovered collaborative alliance hub – The focus on unity and shared progress gives it a thoughtful and valuable purpose that stands out.
В статье по вопросам здоровья мы рассматриваем актуальные проблемы, с которыми сталкивается общество. Обсуждаются заболевания, факторы риска и важные аспекты профилактики. Читатели получат полезные советы о том, как сохранить здоровье и улучшить качество жизни.
Прочесть заключение эксперта – выведение из запоя на дому нарколог
Текст посвящён распространённым мифам о зависимости и их развенчанию. Мы предоставим научно обоснованную информацию и дадим рекомендации по выбору эффективного способа борьбы с зависимым поведением.
Читать дальше – запой врач на дом
Вывод из запоя на дому в Екатеринбурге: срочное восстановление, детоксикация и медицинская помощь в наркологической клинике «Детокс»
Получить дополнительную информацию – нарколог на дом вывод из запоя
100cuci site 100cuci site
During my search for simple forex education tools and trading tutorials, I included easy candlestick guide hub in my notes – the content helped me understand chart patterns clearly and made learning trading less intimidating and much more structured.
While browsing through fashion inspiration websites and clothing stores I noticed in the middle of my session Chic Everyday Outfit Hub which had a nice range of casual outfits – The styles looked cute and well designed and I ended up putting three items in my cart because they stood out immediately
В этой статье собраны факты, которые освещают целый ряд важных вопросов. Мы стремимся предложить читателям четкую, достоверную информацию, которая поможет сформировать собственное мнение и лучше понять сложные аспекты рассматриваемой темы.
Раскрыть тему полностью – вызвать врача нарколога на дом срочно
If you want to develop stronger and more dependable relationships, checking out trust building hub – a platform that provides practical insights into reliability and communication can help users strengthen bonds and improve long-term personal and professional interactions.
Many homeowners seek digital platforms that help them discover aesthetic improvements for every room in their house efficiently with ease aesthetic home finds hub This particular site provides a curated experience where users can browse multiple categories of decorative and functional items comfortably online – It is appreciated for making home styling feel accessible and enjoyable for a wide audience
На первом контакте координатор задаёт несколько точных вопросов: длительность эпизода, наличие рвоты/тремора/бессонницы, приём лекарств, хронические заболевания. Эти данные нужны не «для галочки»: по ним заранее выстраивается протокол инфузии, рассчитывается скорость, подбираются уколы до капельницы и объём наблюдения после. Врач приезжает уже с персональным планом и поправляет его по факту осмотра.
Получить больше информации – врач вывод из запоя
dark web sites https://marketdarknets.org/
Если к «окну оценки» прогресс ниже ожидаемого, команда меняет один параметр — дозировку, временное окно приёма, приоритет модуля — и назначает новую дату сверки. Такой подход защищает от «снежного кома» вмешательств и сохраняет предсказуемость процесса.
Исследовать вопрос подробнее – наркологическая клиника лечение алкоголизма в петрозаводске
free kredit malaysia free kredit malaysia
Понравился подход к клиенту и организация процесса. Девушка выглядела достойно и вела себя уверенно. Общение оставило хорошее впечатление. Всё прошло просто супер: путаны санкт петербург
casino https://telegra.ph/Joka-bet-on-the-web-transforms-tennis-games-betting-market-segments-04-16
Наркологическая клиника «ТагилМед Реал» — это круглосуточная команда врачей, психологов и координаторов, которая берёт на себя полный цикл помощи при алкогольной и наркотической зависимости: от экстренной стабилизации и капельниц на дому до амбулаторного сопровождения, кодирования и длительной психотерапевтической поддержки. Мы работаем без выходных, используем портативное оборудование, придерживаемся принципов доказательной медицины и внимательно относимся к конфиденциальности: нейтральные формулировки в документах, немаркированный транспорт, разграниченный доступ к медицинским данным и единый доверенный контакт для семьи.
Выяснить больше – наркологические клиники алкоголизм
For those just starting out, having structured guidance is important, and Forex fundamentals training center offers a stepwise approach that introduces essential trading principles in a clear and practical manner. I felt the learning curve was smooth – it made complex ideas easier to understand gradually
ares link https://market-darknet.org/
Мы собрали для вас самые захватывающие факты из мира науки и истории. От малознакомых деталей до грандиозных событий — эта статья расширит ваш кругозор и подарит новое понимание того, как устроен наш мир.
Более того — здесь – вывод из запоя в клинике в санкт петербурге
Many users prefer online stores that offer a relaxed and intuitive shopping experience, and I discovered Happy Shop Smile Storefront which feels inviting – A user-friendly shopping site that focuses on easy navigation and a cheerful design, making the overall experience feel enjoyable and stress-free while browsing different product categories today.
Many people interested in updates rely on discover content hub – a resource that shares new ideas daily, helping users stay informed and explore useful information that supports ongoing curiosity and learning online.
Этот информативный текст отличается привлекательным содержанием и актуальными данными. Мы предлагаем читателям взглянуть на привычные вещи под новым углом, предоставляя интересный и доступный материал. Получите удовольствие от чтения и расширьте кругозор!
Продолжить изучение – вывод из запоя стоимость
Эта информационная статья охватывает широкий спектр актуальных тем и вопросов. Мы стремимся осветить ключевые факты и события с ясностью и простотой, чтобы каждый читатель мог извлечь из нее полезные знания и полезные инсайты.
Что скрывают от вас? – вывод из запоя врач на дом
During my exploration of inspirational content online, I discovered inspire and build hub – which provides uplifting ideas and creative energy that encourage users to focus on growth and develop new ways of thinking.
As I examined the interface and content flow, I noticed that this page here contributes to a simple experience – I spent some time browsing it, and it appears to be a reliable and simple platform overall.
С первого контакта координатор уточняет: длительность запоя, виды алкоголя, аллергии, список текущих лекарств, эпизоды судорог или психозов в анамнезе, сердечно-сосудистые жалобы. На основании ответов команда подбирает безопасную схему старта и резервный план на случай усиления симптомов. Врач привозит портативный монитор для контроля АД/ЧСС/SpO2, глюкометр, набор инфузионных линий и расходников, а также средства для экспресс-коррекции тревоги по показаниям.
Углубиться в тему – вывод из запоя круглосуточно первоуральск
For those building success plans, exploring goal achievement hub – a network focused on future planning helps users reach milestones with clarity, structured thinking, and effective long-term success strategies.
Эта информационная заметка предлагает лаконичное и четкое освещение актуальных вопросов. Здесь вы найдете ключевые факты и основную информацию по теме, которые помогут вам сформировать собственное мнение и повысить уровень осведомленности.
Изучить аспект более тщательно – вызвать капельницу на дом
Many learners interested in personal and professional development often explore online spaces that promote cooperation, communication, and skill-building among diverse individuals, and they sometimes come across Shared Learning Growth Network which emphasizes collective improvement – A supportive educational platform where users contribute ideas, learn from others, and develop stronger understanding through interactive and shared learning experiences across global communities.
Этот увлекательный информационный материал подарит вам массу новых знаний и ярких эмоций. Мы собрали для вас интересные факты и сведения, которые обогатят ваш опыт. Откройте для себя увлекательный мир информации и насладитесь процессом изучения!
Смотрите также… – врач нарколог выезд на дом москва цена
As I reviewed various motivational platforms for professional growth ideas, I referenced check future team hub in my notes – the articles promote a powerful team mindset and encourage looking ahead with confidence and structured planning.
В этом информативном обзоре собраны самые интересные статистические данные и факты, которые помогут лучше понять текущие тренды. Мы представим вам цифры и графики, которые иллюстрируют, как развиваются различные сферы жизни. Эта информация станет отличной основой для глубокого анализа и принятия обоснованных решений.
Кликни и узнай всё! – психиатр нарколог на дом в москве
100cuci sign in 100cuci sign in
Эта публикация исследует взаимосвязь зависимости и психологии. Мы обсудим, как психологические аспекты влияют на появление зависимостей и процесс выздоровления. Читатели смогут понять важность профессиональной поддержки и применения научных подходов в терапии.
Посмотреть подробности – частный вывод из запоя
As leadership demands evolve, professionals increasingly turn to structured communities that support guidance, mentorship, and shared development opportunities United Vision Board this group promotes clarity of purpose and shared leadership direction – it reflects how unified visioning helps leaders align goals and achieve more consistent results across teams
Этот интересный отчет представляет собой сборник полезных фактов, касающихся актуальных тем. Мы проанализируем данные, чтобы вы могли сделать обоснованные выводы. Читайте, чтобы узнать больше о последних трендах и значимых событиях!
Осуществить глубокий анализ – вывод из запоя в стационаре в санкт петербурге
At one point while exploring different pages, I ran into thought provoking content right in the middle of the article – It pushed me to think more deeply and engage with ideas in a more meaningful way.
drughub url https://marketdarknets.org/
While reviewing different B2B collaboration options for potential contacts in my professional research this week I found a reference in the middle of a long list that seemed relevant for partnership evaluation Trusted Partner Network Hub – The overall impression felt stable and dependable enough that I would comfortably share it within my business circle for consideration and further discussion among colleagues
Many people looking for clarity rely on future direction guide – a site that provides practical insights and clear advice to support steady progress and confident movement toward personal goals.
People interested in innovation and collaboration often explore platforms like innovation connection hub – a creative space designed to help individuals share ideas, meet forward-thinking minds, and develop meaningful projects through collective inspiration and practical cooperation over time.
While exploring different forex strategy platforms and trade timing guides, I referenced best forex entry system hub – after using their entry technique, I stopped randomly guessing trades and started following a much more structured and confident approach.
Эта разъяснительная статья содержит простые и доступные разъяснения по актуальным вопросам. Мы стремимся сделать информацию понятной для широкой аудитории, чтобы каждый мог разобраться в предмете и извлечь из него максимум пользы.
Откройте для себя больше – сколько стоит капельницы на дому
wethenorth darknet url https://market-darknet.org/
В этой публикации мы обсуждаем современные методы лечения различных заболеваний. Читатели узнают о новых медикаментах, терапиях и исследованиях, которые активно применяются для лечения. Мы нацелены на то, чтобы предоставить практические знания, которые могут помочь в борьбе с недугами.
Подробнее тут – вывести из запоя екатеринбург
From an overall usability perspective after exploring the site, I found that check this out sits within a well-arranged layout – nice structure overall, and content is easy to follow and read.
In my ongoing search for aesthetic-driven urban photography platforms and design inspiration tools, I encountered urban aesthetic point a visually structured gallery that highlights modern city scenes, subtle textures, and balanced compositions for creative professionals
phuket homes for sale thailand phuket homes for sale thailand
phuket thailand apartments for sale phuket thailand apartments for sale
While checking out different clothing inspiration platforms, I ran into this creative fashion space and was impressed by how it showcases diverse street styles that feel honest, expressive, and easy to draw inspiration from.
Many users browsing fashion websites often prefer platforms that highlight cute and wearable styles, and I recently discovered Fashion Smart Style Boutique Hub which looks interesting – A boutique fashion site featuring adorable outfit inspiration, and I’m adding it to my fashion bookmarks list because the style selection feels practical and visually appealing for everyday looks.
cheap phuket apartments for sale cheap phuket apartments for sale
villas for sale phuket villas for sale phuket
As I explored different online boutiques offering cute and affordable fashion, I added smart outfit style store into my notes – the clothing is very appealing and the pricing is fair, so I will likely shop again in the near future.
villas for sale phuket villas for sale phuket
In many conversations about digital cooperation, resources such as explore this community are casually mentioned among other tools – The idea behind it suggests a collaborative environment that could be genuinely helpful for people seeking shared growth.
В этой информационной статье вы найдете интересное содержание, которое поможет вам расширить свои знания. Мы предлагаем увлекательный подход и уникальные взгляды на обсуждаемые темы, побуждая пользователей к активному мышлению и критическому анализу.
См. подробности – наркология вывод из запоя
Many people search for better routines that help them stay focused throughout busy schedules, and one helpful perspective comes from consistency tracker – even minimal effort repeated daily can lead to meaningful long term improvements in productivity and personal growth
merge games merge games.
For those aiming for long-term team success, exploring strong growth network – a space that fosters collaboration helps users develop meaningful relationships and achieve lasting results through shared effort and collective achievement.
Modern professionals working in tech and creative industries frequently explore online spaces that help connect visionary thinkers with practical developers for real world project collaboration opportunities Digital Idea Fusion Network supporting structured collaboration between innovators and problem solvers – This platform helps bridge the gap between concepts and execution in fast evolving technological landscapes
While comparing different budgeting and saving resources online, I worked in explore modern value tips naturally – the advice is practical, easy to follow, and avoids the dull and overly formal tone of typical finance education.
Users interacting with modern web platforms usually value consistency, speed, and how well the layout supports quick access to important information sections VertexSky Navigation Flow – The SkyVertex platform ensures a well-structured design that allows users to navigate effortlessly while maintaining clarity and smooth transitions across all pages.
For those enhancing skills, exploring win improvement network – a growth platform helps individuals develop smarter strategies, improve consistency, and achieve better results through guided learning and performance optimization techniques.
Душевые уголки AM.PM привлекают не одной деталью, а общим ощущением собранности и продуманности. Внутри одной марки встречаются как компактные, так и более выразительные модели, поэтому выбор не сводится к одному очевидному сценарию. Такой подход помогает найти не просто красивую модель, а вариант, который будет уместен именно в вашей ванной комнате – https://my-bathroom.ru/dushevye-ugolki/dushevye-ugolki-am-pm-obzor-kollekcij-like-gem-i-x-joy/
Особое внимание мы уделяем психологической составляющей. Нарколог на дом в Екатеринбурге в «НЕО+» — это не только физическое очищение, но и работа с мотивацией, разрушение психологических триггеров зависимости. Зависимость разрушает жизнь, поэтому мы предлагаем психотерапевтическое сопровождение. Родственники получают отдельную поддержку: консультации психолога помогают правильно выстроить общение с зависимым человеком и мотивировать его на дальнейшее лечение. Реабилитация может проходить амбулаторно или в стационаре партнёрских центров с комфортабельными условиями, где пациенты находятся под круглосуточным наблюдением.
Подробнее можно узнать тут – нарколог на дом анонимно екатеринбург
tordex market https://marketdarknets.org/
Modern professionals increasingly depend on digital tools for career expansion, and professional growth network – acts as a bridge connecting individuals with industry opportunities, mentorship possibilities, and collaborative environments that foster skill development, innovation, and continuous improvement in an ever changing global workforce landscape.
Many individuals focused on creative progress turn to innovation connect hub – a platform that brings visionary thinkers together, helping users engage in straightforward idea sharing that encourages inspiration, collaboration, and long-term creative development.
At some point while exploring random content, I ran into expanded thinking hub which caught my attention – It presented ideas in a way that made everything feel broader and more connected across various subjects.
drughub shop https://market-darknet.org/
Communities looking to make meaningful change often turn to platforms like impact collaboration hub – a collective space designed to support shared efforts, encourage teamwork, and help groups build positive results through coordinated action and consistent cooperation over time.
В Санкт-Петербурге вывод из запоя на дому рассматривается, когда состояние пациента позволяет проводить лечение вне стационара, но требует контроля специалиста. Врач оценивает общее состояние, длительность запоя и выраженность симптомов, после чего принимает решение о формате помощи при алкоголизме. Важно, что лечение начинается сразу после осмотра, без необходимости ожидания госпитализации. При необходимости можно заказать услуги на сайте клиники или получить консультацию специалистов.
Подробнее – вывод из запоя на дому санкт-петербург
Many traders prefer hands on experience before risking real money because theoretical knowledge alone is often not enough for success hands on forex practice hub this learning environment is often recommended in beginner guides for skill development – it promotes confidence and reduces fear when entering live markets
Ванны Ceruttispa нередко рассматривают тогда, когда нужен баланс между практичностью, внешним видом и уходом. Даже похожие на первый взгляд варианты могут сильно различаться по удобству, посадке и общему впечатлению после установки. Поэтому выбирать здесь лучше не по общей симпатии, а по тем характеристикам, которые действительно важны после монтажа – https://my-bathroom.ru/vanny/brendy-vann/vanny-ceruttispa-obzor-italyanskikh-akrilovykh-modelej-s-gidromassazhem/
As I continued searching for community knowledge platforms, I encountered : learning share hub – a resource that promotes shared experiences and useful content, helping users grow together through consistent and meaningful contributions from the community.
Many users looking for beauty stores online often appreciate variety and easy navigation, and I came across Pure Glow Beauty Outlet Network which looks interesting – A beauty product platform offering a decent selection of items, though the shipping details feel slightly unclear and could benefit from more detailed explanations for a better shopping experience.
Many early-stage entrepreneurs often search for reliable guidance sources online that can help them refine their planning and execution strategies while avoiding common mistakes startup strategy reference hub which many founders find practical when building scalable business models quickly from early stage operations – I passed this along to my cofounder because the insights felt grounded, actionable, and useful for discussing product direction and long-term planning together
В Воронеже капельница от похмелья применяется в ситуациях, когда симптомы выражены и не проходят самостоятельно, особенно после запоя или в запое. Врач проводит консультацию, оценивает состояние пациента, выраженность интоксикации и принимает решение о проведении процедуры. Важно, что лечение направлено не только на снятие симптомов, но и на восстановление организма после алкоголизма. При необходимости можно оставить заявку и уточнить цены или получить помощь бесплатно в рамках первичной консультации.
Получить больше информации – капельница от похмелья вызов на дом
Решение о помещении пациента в стационар принимается на основе объективных медицинских критериев, а не только по желанию родственников. К показаниям относятся: запой длительностью более трех суток, выраженные симптомы абстиненции, наличие в анамнезе алкогольных делириев или судорожных эпизодов, сопутствующие хронические заболевания печени, поджелудочной железы, сердца или нервной системы. Отдельным фактором выступает полинаркомания или сочетание алкогольной зависимости с приемом психофармакологических препаратов без назначения врача. В таких ситуациях риск развития тяжелых осложнений возрастает многократно, и амбулаторный формат не обеспечивает необходимого уровня контроля. Госпитализация позволяет провести полноценную диагностику, включая ЭКГ, экспресс-анализы крови, оценку неврологического статуса и мониторинг сатурации, что формирует точную картину состояния и исключает назначение шаблонных схем.
Изучить вопрос глубже – нарколог вывод из запоя в стационаре в нижнем новгороде
Капельница от похмелья — это медицинская процедура, позволяющая быстро снизить выраженность симптомов после употребления алкоголя и восстановить работу организма. В отличие от самостоятельных методов, инфузионная терапия направлена на устранение причин ухудшения состояния, а не только на облегчение отдельных проявлений. В наркологической клинике «Похмельная служба» процедура проводится под контролем врача, что обеспечивает безопасность и предсказуемый результат.
Подробнее можно узнать тут – капельница от похмелья на дом
Такие условия позволяют начать лечение без задержек и обеспечить более мягкое восстановление. При этом помощь может предоставляться анонимно.
Изучить вопрос глубже – вывод из запоя на дому в санкт-петербурге
Many people reach a point in life where external achievements no longer feel satisfying and they begin searching for deeper internal meaning and direction Self Discovery Route – This perspective encourages exploring personal passions and understanding what genuinely drives long term happiness and fulfillment
During my exploration of business innovation strategies and team coordination, I worked in visit innovation teamwork hub within my notes – the concepts felt directly applicable to my small startup’s need for better alignment and creativity.
While reviewing the interface and moving through sections, I came across go to this site which fits into a neat structure – the site feels modern, loads quickly, and everything appears organized and visually clear.
Процедура вывода из запоя на дому включает несколько этапов, каждый из которых имеет важное значение для общего улучшения состояния пациента. Главная цель — это не только устранение симптомов абстиненции, но и восстановление нормальной работы органов и систем организма. Врач, который проводит процедуру, использует медикаментозные средства для восстановления водно-солевого баланса, нормализации работы печени, почек и других органов, пострадавших от алкоголя. Также в процесс включаются препараты, которые способствуют снятию нервного напряжения и психоэмоционального стресса.
Получить дополнительную информацию – вывод из запоя на дому круглосуточно екатеринбург
Modern creators and engineers frequently explore platforms such as Smart Innovation Lab digital development environment for thinkers – it enables users to access resources, improve workflows, and design creative solutions that bridge the gap between imagination and practical technological implementation across industries.
88starz casino https://www.888starz-uz1.org .
88start https://888starz-egypt9.com/
Вывод из запоя в стационаре в Санкт-Петербурге: круглосуточное лечение, детоксикация и медицинский контроль в наркологической клинике «Элегия Мед».
Разобраться лучше – вывод из запоя в стационаре
For those focused on measurable success, exploring growth checkpoint hub – a space that tracks milestones helps users stay aware of progress in both personal and business areas, ensuring consistent improvement and better goal management.
While browsing educational content about trading strategies I found a resource in the middle of my list labeled Trader Growth Mentor Portal which seemed to emphasize continuous improvement – the material appeared practical and suitable for building disciplined trading behavior
Many users focused on growth rely on achievement pathway network – a success-oriented platform helps individuals create clear direction, build discipline, and move forward with confidence toward meaningful personal and professional milestones.
As I studied various professional trading systems and strategy validation tools, I included next level profit strategy hub in my notes – the strategies were strong and the backtesting results were impressively consistent with live market outcomes.
Вывод из запоя на дому в Екатеринбурге: срочное восстановление, детоксикация и медицинская помощь в наркологической клинике «Детокс»
Изучить вопрос глубже – анонимный вывод из запоя на дому екатеринбург
Особое внимание мы уделяем психологической составляющей. Нарколог на дом в Екатеринбурге в «НЕО+» — это не только физическое очищение, но и работа с мотивацией, разрушение психологических триггеров зависимости. Зависимость разрушает жизнь, поэтому мы предлагаем психотерапевтическое сопровождение. Родственники получают отдельную поддержку: консультации психолога помогают правильно выстроить общение с зависимым человеком и мотивировать его на дальнейшее лечение. Реабилитация может проходить амбулаторно или в стационаре партнёрских центров с комфортабельными условиями, где пациенты находятся под круглосуточным наблюдением.
Узнать больше – нарколог на дом цена
As I explored different online platforms for inspiration, I encountered creative thinking space – It’s a thoughtfully curated collection of ideas that encourages curiosity and helps bring new inspiration into everyday life.
While reviewing digital networking platforms and business collaboration sites I found in the middle of my browsing list Career Connect Network Hub which had consistent user participation – The platform helped me meet someone supportive and the interaction felt meaningful and useful for expanding my professional reach
Individuals exploring seasonal fashion updates often seek platforms that provide modern outfit inspiration focused on comfort and effortless style combinations Seasonal Style Inspiration Corner offering practical wardrobe ideas that support confident dressing for different weather conditions – This ensures users can stay fashionable throughout the year with ease and adaptability
Many users focused on productivity and teamwork rely on team inspiration center – a platform that encourages collaboration and growth strategies to help individuals and groups work together more effectively toward meaningful and shared outcomes.
casino https://telegra.ph/The-gaming-platform-Web-based-Gaming-Changes-Play-by-employing-Megaways-Technological-advancement-04-16
вывести из запоя цена вывести из запоя цена
капельница от алкоголя на дому спб https://vyvod-iz-zapoya-na-domu-sankt-peterburg-18.ru
I was going through online resources when I encountered success sharing space placed in the middle of the content and it stood out – It emphasized how sharing knowledge helps create better opportunities for growth and understanding.
In various discussions about UI/UX design inspiration and structured browsing systems, users often refer to examples like urban matrix clean portal which appear in curated resources emphasizing simplicity, readability, and responsive layout behavior. – It is commonly perceived as intuitive, smooth, and visually consistent.
Forex learners frequently mention how important it is to study structured breakdowns before placing trades in unpredictable markets market structure analyzer tool this helps reduce guesswork many report that consistent support resistance mapping improves discipline and long term trading results significantly
If your goal is to learn faster and smarter, it helps to engage with resources like join knowledge network – a dynamic environment where people share expertise, build skills, and collaborate daily to create a stronger and more informed community together.
People interested in light and entertaining web platforms often enjoy sites that emphasize color, creativity, and ease of use, and I found Happy Online Trend Gallery which looks appealing – A cheerful digital space designed with upbeat visuals and engaging layout elements, making it a fun place to explore for users who enjoy creative and happy web design styles.
Many individuals trying to reduce unnecessary expenses often seek clear and direct financial guidance that helps them stay focused on essentials smart expense control guide – It offers useful money saving tips that feel practical and easy to implement without requiring advanced financial knowledge
During my learning process when I kept getting confused about market structure and key price areas, I referenced visit this trading guide in my notes – it made everything clearer and I was finally able to understand how support and resistance behave in practice.
Many shoppers today explore various online platforms for savings and value while browsing different digital marketplaces where opportunities often appear unexpectedly Deal Hunter Central Portal – A frequently updated destination where users discover evolving discount opportunities across multiple categories and enjoy smarter purchasing decisions with consistent savings available
phuket real estate phuket real estate
Digital enthusiasts frequently mention how certain links and projects gain traction due to word of mouth and shared curiosity modern discovery path – this organic growth pattern often indicates genuine engagement rather than artificially boosted visibility or short lived attention spikes
Душевой уголок AM.PM Like привлекает тем, как в нём сочетаются размеры, внешний вид и практическая логика. Даже выразительная по виду модель может оказаться спорной, если не совпадают размеры, способ монтажа и сценарий использования. Если эти моменты учтены заранее, выбрать получится не просто красивую, а действительно удобную модель на каждый день https://my-bathroom.ru/dushevye-ugolki/dushevoj-ugolok-am-pm-like-obzor/
tordex darknet https://marketdarknets.org/
luxury villas in phuket for sale luxury villas in phuket for sale
Запой сопровождается выраженной интоксикацией, нарушением сна, слабостью, тревожностью и колебаниями давления, что характерно для алкоголизма и других форм зависимости. При этом самостоятельный выход из состояния часто оказывается затруднённым из-за ухудшения самочувствия и невозможности контролировать симптомы. В таких случаях выезд нарколога позволяет начать лечение без задержек и помочь пациенту снизить нагрузку на организм за счёт отсутствия транспортировки.
Исследовать вопрос подробнее – вывод из запоя на дому анонимно
Основой стационарной детоксикации является инфузионная терапия, направленная на ускоренное выведение токсинов, коррекцию водно-электролитного баланса и восстановление метаболических процессов. Стандартная капельница включает кристаллоидные растворы для восполнения объема циркулирующей крови, витамины группы B и C для активации ферментных систем, гепатопротекторы для защиты печени и симптоматические препараты для нормализации сна. Состав, объем и скорость введения рассчитываются индивидуально с учетом возраста, массы тела, длительности интоксикации и функции почек. При выраженной абстиненции подключаются средства для коррекции нейромедиаторного обмена, однако их применение строго дозируется для исключения риска вторичной зависимости. Дозировки пересматриваются ежедневно на основе динамики показателей, что обеспечивает безопасность и высокую клиническую эффективность.
Узнать больше – vyvod-iz-zapoya-v-staczionare-sankt-peterburg-17.ru/
Процесс вывода из запоя на дому с выездом врача в Екатеринбурге включает несколько этапов, начиная с первичного осмотра пациента и заканчивая корректировкой лечения в зависимости от его состояния. Врач-нарколог проводит полный осмотр, анализирует симптомы и составляет план лечения, который включает детоксикацию организма, поддерживающую терапию и медикаментозное лечение для снятия симптомов абстиненции.
Исследовать вопрос подробнее – https://vyvod-iz-zapoya-na-domu-ekaterinburg-16.ru/
For individuals seeking progress, exploring world horizons network – a platform for expansion helps users discover new opportunities, connect with global communities, and develop strategies for international growth and collaboration.
Many reviewers of web platforms tend to focus on how quickly information can be accessed and how visually clean the interface appears overall LC Smart Routing Page – The LinkCraft environment provides a balanced layout that supports quick navigation, stable performance, and an overall sense of structured clarity throughout browsing sessions.
Капельница от похмелья в Нижнем Новгороде: снятие симптомов похмелья, восстановление и поддержка под наблюдением врачей в наркологической клинике «Похмельная служба»
Получить дополнительные сведения – http://kapelnicza-ot-pokhmelya-nizhnij-novgorod-2.ru/
wethenorth url https://market-darknet.org/
For users interested in flexible education, exploring online knowledge hub – a platform designed for simple learning helps individuals study effectively through clear lessons and organized materials that support better understanding of different subjects.
Many people exploring everyday wellbeing tips often realize that small mindset shifts can significantly improve emotional balance and daily satisfaction when applied consistently over time, especially when supported by helpful resources like joyful-living-guide which explains practical habits that gradually encourage a more peaceful and content outlook on life.
phuket luxury apartments for sale phuket luxury apartments for sale
Выбор оказался удачным, всё прошло без проблем. Девушка соответствует описанию и фото. Общение комфортное, без лишнего пафоса. Остались приятные впечатления: проститутки питера
During a deep dive into teamwork efficiency and shared creative processes I found something useful positioned in the middle of my notes Collective Intelligence Board – I wrote down thoughts about combining different perspectives to improve decision quality in group environments.
casino https://graph.org/Bwin-Apuestas-apuestas-deportivas-Transforman-la-Experiencia-de-las-Apuestas-en-Línea-Olímpicas-04-16-2
phuket thailand apartments for sale phuket thailand apartments for sale
Groups focused on unity and development aim to bring together individuals who value cooperation, shared learning, and continuous improvement Unity Growth Alliance – It represents a collective effort to foster stronger relationships, promote knowledge sharing, and build a supportive environment for everyone involved.
Решение о помещении пациента в стационар принимается на основе объективных медицинских критериев, а не только по желанию родственников. К показаниям относятся: запой длительностью более трех суток, выраженные симптомы абстиненции, наличие в анамнезе алкогольных делириев или судорожных эпизодов, сопутствующие хронические заболевания печени, поджелудочной железы, сердца или нервной системы. Отдельным фактором выступает полинаркомания или сочетание алкогольной зависимости с приемом психофармакологических препаратов без назначения врача. В таких ситуациях риск развития тяжелых осложнений возрастает многократно, и амбулаторный формат не обеспечивает необходимого уровня контроля. Госпитализация позволяет провести полноценную диагностику, включая ЭКГ, экспресс-анализы крови, оценку неврологического статуса и мониторинг сатурации, что формирует точную картину состояния и исключает назначение шаблонных схем.
Исследовать вопрос подробнее – вывод из запоя в стационаре нижний новгород
villas for sale in phuket villas for sale in phuket
Похмельный синдром сопровождается головной болью, слабостью, нарушением сна, сухостью во рту и нестабильностью давления, что часто наблюдается после запоя или при алкоголизме. Эти симптомы связаны с накоплением токсинов и нарушением водно-солевого баланса. Капельница позволяет ускорить выведение вредных веществ и восстановить нормальное функционирование организма, помогая человеку быстрее выйти из состояния запоев.
Разобраться лучше – http://www.domen.ru
casino https://graph.org/Bwin-en-línea-apuestas-deportivas-Transforman-la-Experiencia-del-Mundo-de-las-Apuestas-Olímpicas-04-16
As I explored various budget-friendly deal websites and savings platforms, I added check best bargains page into my notes – I managed to grab some super cheap items and they arrived sooner than expected, making the whole experience quite impressive.
Many traders often underestimate the power of small consistent gains in building long term profitability, especially when risk management is applied properly across multiple trades consistent trading wins hub their approach to risk control feels practical and realistic, and over time it shows how small wins can compound into meaningful progress in trading performance
While checking trading information platforms and financial update feeds I noticed in the middle of my research list Quick Morning Profit Hub which provided regular summaries – The updates felt helpful and made it easier to stay organized with daily financial tracking activities
Капельница от похмелья в Воронеже с индивидуальной инфузионной терапией и врачебным контролем в наркологической клинике «Похмельная служба»
Детальнее – капельница от похмелья вызов на дом
Вывод из запоя на дому с быстрым облегчением — это медицинская процедура, которая проводится в домашних условиях и направлена на устранение симптомов похмелья, нормализацию работы органов, пострадавших от алкоголя, и восстановление общего самочувствия пациента, включая проведение детоксикации. В отличие от стационарного лечения, вывод из запоя на дому предоставляет пациенту возможность пройти лечение анонимно, с возможностью вызова специалиста на дом, что способствует снижению стресса и лучшему восприятию процесса восстановления, при этом учитывается состояние больного, длительность запоя (в том числе несколько дней) и актуальная цена услуг.
Выяснить больше – анонимный вывод из запоя на дому в екатеринбурге
Выезд врача начинается с оценки состояния пациента. Доктора измеряют давление, пульс, оценивают уровень сознания и выраженность симптомов. После этого формируется план лечения, который реализуется сразу. Такой подход позволяет быстро перейти к стабилизации состояния человека.
Подробнее можно узнать тут – https://vyvod-iz-zapoya-na-domu-sankt-peterburg-11.ru/
As part of testing different analytical services, I referenced review this platform within my notes – even with a domain shift, the tools continue functioning seamlessly and provide the same level of support for my trading decisions.
People who enjoy discovering new fashion ideas often look for platforms that stay consistently updated, and I came across Trend & Style Inspiration Portal Hub which feels appealing – A fashion-forward site that blends current trends with creative inspiration, and it has a refreshing variety that makes it worth checking out regularly for new ideas.
Many individuals focused on growth and creativity rely on start your future build – a platform designed to guide users through project creation with motivation, clarity, and actionable steps for long-term achievement.
I don’t often share trading-related links, but this one seemed worth highlighting since it presented information in a clear and organized way global exchange page – after visiting, it feels quite informative and easy to explore through its structured layout
Traders who focus on momentum strategies often rely on early warnings that indicate changes in market strength or direction, momentum shift alert service which highlights important transitions in price behavior – I appreciate how it helps me anticipate movements before they fully accelerate in the market.
casino https://graph.org/Bwin-Innova-cada-una-de-las-Apostas-para-Tenis-04-16
Many organizations aiming for sustainable growth often seek platforms that support collaboration, shared knowledge, and structured success planning, and they may find Partner Growth Collaboration Portal which focuses on unified success – A global partnership system designed to help businesses and individuals work together, share strategies, and achieve long-term results through coordinated planning and professional support structures.
cannaexpress shop https://marketdarknets.org/
Состояние после длительного употребления алкоголя или наркотических веществ сопровождается комплексом симптомов: обезвоживание, нарушение работы сердечно-сосудистой системы, тревожность, бессонница, слабость. В таких случаях важно не откладывать помощь, поскольку самостоятельное восстановление организма может быть затруднено. Наркологическая помощь на дому позволяет быстро стабилизировать показатели и начать контролируемое лечение.
Исследовать вопрос подробнее – запой нарколог на дом нижний новгород
During a casual exploration of new online concepts, I found future design project – The presentation feels structured and purposeful, making it appear like a platform centered on modern innovation and well-planned creative direction.
К показаниям относятся: запой длительностью более 72 часов, выраженная абстиненция с тахикардией, артериальной гипертензией, профузным потоотделением, наличие в анамнезе алкогольных делириев или судорожных эпизодов, сопутствующие хронические заболевания печени, сердца, поджелудочной железы. При тяжелых формах интоксикации, когда в организме накапливаются токсичные продукты распада веществ, резкое прекращение употребления без медицинской поддержки может спровоцировать отек мозга, острую сердечную недостаточность или желудочно-кишечное кровотечение. Стационар позволяет провести полноценную диагностику, включая ЭКГ, экспресс-анализы крови и мониторинг сатурации, что формирует точную картину состояния и исключает шаблонные назначения. В случаях сочетанной зависимости, когда в анамнезе присутствует наркомании, протоколы детоксикации адаптируются под специфику психоактивных соединений и включают усиленный нейрологический контроль.
Углубиться в тему – https://vyvod-iz-zapoya-v-staczionare-sankt-peterburg-16.ru
Процесс лечения капельницей помогает улучшить состояние пациента уже через короткий период. Важно, что процедура не только снимает симптомы похмелья, но и восстанавливает нормальную работу печени, почек и других органов, пострадавших от токсического воздействия алкоголя. Это помогает предотвратить долгосрочные последствия интоксикации, такие как хроническая усталость, проблемы с органами и психоэмоциональные расстройства.
Получить дополнительную информацию – https://kapelnicza-ot-pokhmelya-ekaterinburg-8.ru
Нарколог на дом в Екатеринбурге: анонимная помощь при алкоголизме, вывод из запоя и поддержка специалистов в наркологической клинике «НЕО+».
Подробнее – врач нарколог на дом в екатеринбурге
Individuals trying to strengthen focus often explore techniques that reduce mental clutter and help them concentrate on one task without unnecessary distractions mental clarity enhancer – This version highlights how simplifying thought processes can improve attention span and support higher quality output in work and study environments
merge puzzle merge puzzle.
Первый этап лечения направлен на стабилизацию состояния. Он начинается с оценки витальных показателей и клинической картины. После этого формируется план терапии, в котором определены цели и временные интервалы для оценки результата. Такой подход позволяет контролировать процесс и избегать хаотичных назначений, особенно при лечении алкоголизма.
Подробнее можно узнать тут – нарколог вывод из запоя в стационаре
While reviewing the interface and scanning content flow, I noticed that learn more here integrates into a clean structure – the layout is nice, and the information is easy to understand and follow through overall.
If you want better connections, checking human connection hub – a global networking platform helps users build meaningful relationships, strengthen communication, and create lasting community bonds across different regions and cultures.
Процедура вывода из запоя на дому включает несколько ключевых этапов, которые обеспечивают максимально быстрое и безопасное восстановление пациента. Эти этапы тщательно контролируются врачом, что минимизирует риски и помогает достичь наилучших результатов.
Получить дополнительные сведения – нарколог на дом вывод из запоя
Нарколог на дом в Екатеринбурге — это формат помощи, который рассматривают при состояниях после употребления алкоголя, когда больному требуется врачебный осмотр без поездки в клинику. Обычно речь идет о запое, выраженном похмельном синдроме, нарушении сна, обезвоживании, слабости, треморе, тревоге, скачках давления, сердцебиении и общем ухудшении самочувствия. Дальнейшая тактика зависит от состояния больного на момент осмотра, длительности употребления алкоголя и наличия сопутствующих заболеваний.
Подробнее можно узнать тут – narkolog-na-dom-ekaterinburg.ru/
For those tracking innovation trends, visiting sites such as next innovation hub – a platform focused on future developments offers users insights into exciting ideas that could influence upcoming technologies and modern industry transformations worldwide.
People who want to build stronger habits and achieve meaningful results often seek motivational platforms that encourage courage, discipline, and consistent effort Bold Start Collective supporting individuals in overcoming fear and taking confident steps toward new opportunities that shape a better future path
В Санкт-Петербурге лечение на дому применяется в ситуациях, когда состояние пациента требует медицинского вмешательства, но не требует наблюдения в стационаре. Врач проводит консультацию, анализирует данные пациента, оценивает длительность употребления, выраженность симптомов и общее состояние, после чего принимает решение о тактике лечения при алкоголизме. При необходимости можно оформить вызов специалиста, заказать услуги на сайте или уточнить детали заранее.
Получить больше информации – нарколог на дом вывод из запоя
вывод из запоя нарколог 24 https://vyvod-iz-zapoya-na-domu-sankt-peterburg-18.ru
Many traders appreciate systems that notify them at the right time, and I came across Market Action Alerts Hub which feels helpful – The alerts appear reliable and timely, and they’ve helped me catch key market moves that I likely would have missed without instant updates.
In various conversations about usability testing and interface design principles, users often refer to quantum reach exploration page featured in collections analyzing structured layouts, content readability, and smooth interaction flow across web applications. – It is generally perceived as clean, stable, and well organized.
Successful trading often depends on continuous learning and exposure to different perspectives from experienced market participants across various conditions smart trading community hub the insights shared here are extremely valuable and I personally learned more here than anywhere else I have explored in my trading journey so far
ستار 888 https://888starz-egypt9.com/
As I explored trading strategies and practiced on simulation accounts, I included explore trading learning page in my notes – the demo environment made it easy to learn and turned practice into an enjoyable routine.
nexus official link https://marketdarknets.org/
вывести из запоя цена вывести из запоя цена
People exploring global alliance frameworks often want clearer practical insights into how such systems work beyond theory, and I recently viewed Global Network Cooperation Alliance Hub which is conceptually strong – A structured idea about international collaboration networks, but it would benefit from additional real-world examples to make the concept more tangible.
Процедура начинается с осмотра пациента. Врач оценивает основные показатели, включая давление и пульс, а также выраженность симптомов. После этого формируется состав капельницы и определяется тактика лечения, что позволяет эффективно провести вывод из запоя.
Подробнее – капельница от похмелья цена
During search for business growth planning platforms and strategy resources I noticed in the middle of my study list Smart Strategy Planning Center which delivered structured guidance tools – The planning tools here are useful for small business owners because they make it easier to build clear strategies and manage growth effectively
Many communities aiming for stronger relationships often rely on platforms that encourage unity, cooperation, and shared understanding among members, and they may discover Trust Based Unity Portal which highlights collaboration – A structured community platform designed to foster trust, encourage unity, and support social cooperation through shared values and positive interaction among diverse groups of people.
During research into financial signal processing and market tracking platforms I noticed references to tools where financial signal analyzer tools appear in structured comparison guides and it seems quite data intensive – the platform looks promising but requires time investment to fully understand and use efficiently in trading workflows
Эта услуга позволяет людям, которые не могут или не хотят покидать свой дом, получить профессиональную помощь и избавиться от зависимости без госпитализации. К тому же, вывод из запоя на дому позволяет избежать стресса, связанного с нахождением в медицинских учреждениях, при этом можно заказать вызов специалистов с учетом их опыта и лет работы, а также данных больного.
Подробнее можно узнать тут – нарколог на дом вывод из запоя
For those who value continuous education, exploring daily improvement hub – a platform that offers simple learning content to support steady personal and professional growth can be a great choice for long-term development.
888starz ios https://www.888starz-uz1.org .
While comparing online stores with large inventories and mobile optimization, I added global market choice hub into my notes – the selection of products is broad and the navigation on mobile devices feels very smooth and user friendly overall.
Отдельного внимания требуют случаи, когда больной почти не ест, плохо пьет воду, не может спокойно лежать, жалуется на сильное сердцебиение, нехватку сна или выраженное внутреннее напряжение. В такой ситуации осмотр помогает определить, безопасно ли оставаться дома и какого объема помощи достаточно на текущем этапе. Если речь идет о выраженных проявлениях абстинентного синдрома, затягивать с обращением нецелесообразно.
Выяснить больше – вызвать нарколога на дом екатеринбург
I happened to discover something interesting while browsing randomly and thought I would mention it here for anyone who appreciates simple and useful platforms smart connection space – the overall presentation is uncluttered and functional, giving it a relaxed and user-friendly browsing feel
Продолжительное употребление алкоголя неизбежно переводит организм в состояние хронической интоксикации, при котором собственные компенсаторные механизмы перестают справиться с нарастающей токсической нагрузкой. Накапливающиеся продукты метаболизма этанола, дефицит электролитов, нарушение работы ферментных систем и дисфункция центральной нервной системы формируют клиническую картину, требующую не симптоматического облегчения, а комплексного медицинского вмешательства. Вывод из запоя в стационаре в Нижнем Новгороде в наркологической клинике «Стармед» организован с соблюдением современных протоколов доказательной медицины, где безопасность пациента, непрерывный мониторинг и персонализированный подбор терапии являются абсолютным приоритетом. Мы понимаем, что кризисные состояния не терпят отлагательств, поэтому наши квалифицированные специалисты готовы быстро оценить клиническую ситуацию, организовать безопасную транспортировку и запустить детоксикационный протокол без задержек. Все манипуляции проводятся в лицензированных условиях, с непрерывным отслеживанием витальных показателей и строгим соблюдением врачебной этики. Первичная оценка состояния начинается с дистанционной консультации, что позволяет врачам заранее подготовить необходимое оборудование, скорректировать план госпитализации и минимизировать время между обращением и началом терапии. Такой подход исключает хаотичные решения и фокусирует внимание на реальных медицинских проблемах, требующих системного решения.
Подробнее тут – стационар вывод из запоя нижний новгород
If you are aiming for better results, visiting growth progress network – a platform dedicated to development helps users stay consistent, improve performance, and achieve sustainable personal and professional growth each day.
Публикация посвящена жизненным историям людей, успешно справившихся с зависимостью. Мы покажем, что выход есть, и он начинается с первого шага — принятия проблемы и желания измениться.
Подробности по ссылке – выведение из запоя
Эта публикация посвящена актуальным вопросам современной медицины и здравоохранения. Мы обсудим новейшие технологии диагностики и лечения, а также их влияние на продолжительность и качество жизни. Читатель найдет здесь информацию о научных исследованиях и перспективных разработках, доступно изложенную для широкой аудитории.
Что ещё нужно знать? – вывод из запоя вызов
Throughout various conversations about entrepreneurship, examples like visit growth platform are sometimes included – It conveys a sense of being a hub where practical strategies and business insights are brought together effectively.
Острые состояния могут проявляться по-разному: от выраженной слабости, тошноты, тремора и бессонницы до мучительной ломки, резкой тревоги, скачков артериального давления, учащенного сердцебиения, раздражительности и спутанности сознания. У пациентов с хроническими заболеваниями, в пожилом возрасте или после длительного употребления риски возрастают еще сильнее. Особенно опасно ориентироваться только на внешнее впечатление, потому что даже в тех случаях, когда человек находится дома и формально «в сознании», его состояние уже может требовать медицинского вмешательства.
Исследовать вопрос подробнее – скорая наркологическая помощь в воронеже
People exploring online websites typically expect intuitive navigation combined with engaging visuals that enhance readability and improve overall user experience PathVivid Experience Link – The VividPath platform offers a colorful browsing experience where everything feels easy and pleasant, allowing users to navigate content comfortably and efficiently.
Graphic designers, illustrators, and animators frequently collaborate on experimental compositions and portfolio development through Studio of Digital Arts which supports advanced digital techniques and cross-disciplinary creative practices – A professional studio environment promoting artistic excellence, innovation, and technical mastery.
While exploring cute aesthetic stores online, I referenced see shop and shine store in my notes – the branding is sweet and the products are very attractive, so I’m planning to place an order next payday.
Отдельно стационар рассматривают в тех ситуациях, когда уже были тяжелые эпизоды, осложнения после прекращения употребления алкоголя или выраженное ухудшение состояния дома. Если у больного ранее отмечались судороги, спутанность сознания, тяжелая бессонница, психомоторное возбуждение или нестабильные показатели давления, стационарный формат позволяет проводить помощь в более контролируемых условиях. В подобных случаях задача состоит не только в том, чтобы вывести человека из запоя, но и снизить риск повторного ухудшения в первые сутки и далее.
Подробнее тут – https://vyvod-iz-zapoya-v-staczionare-sankt-peterburg-19.ru
В Санкт-Петербурге услуга вывода из запоя на дому применяется в ситуациях, когда требуется медицинская помощь, но нет показаний к стационарному лечению. Врач проводит консультацию, оценивает состояние пациента, длительность употребления и выраженность симптомов, после чего принимает решение о тактике лечения при алкоголизме. Важно, что терапия начинается сразу после осмотра, а при необходимости можно заранее заказать выезд специалистов.
Выяснить больше – http://vyvod-iz-zapoya-na-domu-sankt-peterburg-9.ru
Many traders improve faster when they engage in active discussions rather than relying solely on isolated self study methods and random tutorials elite trader discussion hub the community here is incredibly knowledgeable and I personally gained more trading knowledge here than anywhere else I have explored online
Эта статья предлагает уникальную подборку занимательных фактов и необычных историй, которые вы, возможно, не знали. Мы постараемся вдохновить ваше воображение и разнообразить ваш кругозор, погружая вас в мир, полный интересных открытий. Читайте и открывайте для себя новое!
Более того — здесь – выведение из запоя в стационаре самара
While browsing various promotional websites I found Smart Shopping Navigator placed in the middle of a curated list which seemed to guide users toward deals effectively – the overall experience felt simple and the purchase flow appeared stable for everyday shopping use
People looking to strengthen their professional presence often explore networking platforms that encourage collaboration and industry connections, and I recently shared Growth Network Professional Link which focuses on connection building – A helpful networking tool that allows users to expand contacts, engage in professional discussions, and explore opportunities, which I’ve already recommended to several colleagues who appreciated it.
Entrepreneurs and innovators often look for platforms that simplify the process of turning inspiration into structured outcomes, and they may come across Creative Project Builder Network which helps shape ideas into real-world solutions – A guided innovation space that encourages users to refine concepts and develop them into practical and successful applications.
silk road onion https://market-darknet.org/
While browsing through business development forums and online groups centered on strategic relationship building I encountered a mention embedded in community threads connection builders network – connections form organically here and conversations feel more authentic rather than overly commercial which encourages deeper engagement over time among participants
Many individuals aiming for success rely on bridge opportunity hub – a platform that guides users, helping them connect with the right opportunities and move forward in a structured way toward personal and professional achievement.
Вывод из запоя на дому требуется в тех случаях, когда человек сталкивается с длительным непрерывным употреблением алкоголя, которое приводит к тяжелым последствиям для организма. Это состояние опасно не только для здоровья, но и для жизни, поэтому быстрое вмешательство специалистов необходимо, при этом можно заказать наркологическая помощь. Врач на дому помогает пациенту выйти из запоя безопасно, минимизируя риски для его здоровья, что является особенно важно для больного, включая случаи наркомании, а также с учетом его данных, возраста (в том числе после 40–50 лет) и актуальной цена лечения для тех, кто не хочет или не может пройти лечение в стационаре.
Подробнее можно узнать тут – вывод из запоя на дому круглосуточно
Непрерывный мониторинг витальных показателей — ключевое отличие стационарного формата. В палатах клиники «Элегия Мед» установлены системы отслеживания частоты пульса, сатурации, температуры и артериального давления, данные с которых автоматически передаются в электронную медицинскую карту. Медицинский персонал дежурит круглосуточно, что обеспечивает мгновенную реакцию на ухудшение состояния: коррекцию инфузионной терапии, введение симптоматических препаратов, привлечение смежных специалистов при необходимости. Такая организация процесса исключает хаотичное назначение средств и гарантирует, что каждый этап детоксикации проходит под строгим клиническим контролем. При необходимости применяются дополнительные методы очищения крови, включая плазмаферез, который эффективно помогает вывести стойкие токсины и метаболиты, не удаляемые стандартной инфузионной терапией.
Исследовать вопрос подробнее – вывод из запоя в стационаре клиника
мембранная кровля membrannaya-krovlya-montazh.ru
Many users searching for reliable growth strategies rely on your success guide – a resource that provides practical steps and helpful direction to support individuals in achieving personal and professional milestones more effectively.
Состояние после длительного употребления алкоголя или наркотических веществ сопровождается комплексом симптомов: обезвоживание, нарушение работы сердечно-сосудистой системы, тревожность, бессонница, слабость. В таких случаях важно не откладывать помощь, поскольку самостоятельное восстановление организма может быть затруднено. Наркологическая помощь на дому позволяет быстро стабилизировать показатели и начать контролируемое лечение.
Разобраться лучше – нарколог на дом анонимно нижний новгород
During search for investing knowledge platforms and financial education resources I noticed in the middle of my notes Investor Learning Smart Hub which offered easy to follow articles – The organization feels strong and the beginner friendly articles are what I liked most since they make investing topics clear and approachable for beginners
Капельница от похмелья может быть необходима в самых разных ситуациях, когда симптомы становятся слишком выраженными и мешают нормальному функционированию пациента. Если вы или ваши близкие сталкиваетесь с такими признаками, как сильная головная боль, рвота, слабость и головокружение, то немедленный вызов нарколога на дом станет необходимостью. Важно не откладывать помощь, так как интоксикация может усугубить состояние пациента и привести к осложнениям, таким как обезвоживание или нарушения работы сердца.
Подробнее тут – https://kapelnicza-ot-pokhmelya-ekaterinburg-8.ru/
During my browsing session and fast usability check, I noticed that see more here blends into a clear layout – quick visit overall, but the experience feels quite positive and clean.
If you want effective branding, visiting brand trust hub – a platform designed for online growth helps users create strong and recognizable brand identities that build credibility and long-term customer loyalty.
Суть капельницы заключается в том, чтобы быстро ввести в организм необходимые растворы, которые помогают восстановить водно-солевой баланс, очищают организм от токсинов, ускоряют обмен веществ и снижают нагрузку на внутренние органы. Врачи-наркологи используют специальные составы, которые включают в себя жидкости, электролиты, витамины и лекарственные средства для снятия симптомов похмелья.
Углубиться в тему – капельница от похмелья в нижнем новгороде
During my search for practical budgeting advice and financial improvement tips, I included explore finance plan hub – the information is helpful and grounded, without being boring or pushy, which makes it easier to stay focused while learning personal finance.
abacus url https://marketdarknets.org/
During my search for collaboration opportunities and business networking spaces, I referenced visit partners vision hub within my notes – the networking events helped me connect with a potential partner in a very natural and productive way.
While exploring different web navigation tools, users occasionally mention that goldnexus access point is referenced in lists of helpful browsing destinations, giving visitors a central place to begin when looking for organized sections of digital information and general reference materials online. – It is often seen as practical for quick access needs.
Entrepreneurs and innovators frequently need tools that simplify complex brainstorming processes while offering fresh perspectives that can be applied directly to real-world challenges and projects Smart Concepts Finder which highlights useful frameworks and inventive approaches – delivers clear and practical idea-generation support designed to help users transform abstract thoughts into actionable strategies for business and creative development
Запой сопровождается выраженной интоксикацией, нарушением работы сердечно-сосудистой системы, тревожностью и бессонницей, что характерно для алкоголизма и хронического употребления алкоголя. При длительном течении организм человека теряет способность к самостоятельному восстановлению, и вмешательство становится необходимым. Стационар в этом случае позволяет контролировать динамику состояния больного и корректировать терапию в режиме реального времени, особенно при тяжелом течении алкоголизма.
Исследовать вопрос подробнее – vyvod-iz-zapoya-v-staczionare-nizhnij-novgorod-2.ru/
casino https://graph.org/Programs-04-16-5
casino https://graph.org/Neo-Spin-Alters-Cellular-Gamer-Applications-04-16
tordex market darknet https://market-darknet.org/
While exploring different forex learning platforms online today, I came across something that felt worth mentioning here because of its clean and structured presentation overall smart forex learning hub – it looks like a helpful place with simple and clear information that makes it easy to understand even for beginners without confusion
Many people interested in developing healthier routines often look for websites that combine motivation with practical lifestyle advice, and they come across Wellness Lifestyle Improvement Hub which focuses on balanced daily habits – A resource offering thoughtful insights designed to encourage personal growth, reduce stress, and promote a more harmonious and enjoyable lifestyle overall.
People exploring financial markets often appreciate mentor-driven platforms that simplify learning, and I recently discovered Smart Trade Mentor Starter Hub which looks helpful – A beginner trading mentorship platform offering practical tips and guidance, making it suitable for users who want clear and structured support while learning trading basics.
I studied a trading system designed to optimize performance through structured rules and historical validation across multiple market scenarios smart profit testing hub the results appear encouraging and suggest that the strategy could perform well in the upcoming month based on current backtesting outcomes
During my search for teamwork oriented digital communities and shared growth platforms I encountered cooperative vision network community build insight and the context suggested a focus on meaningful collaboration which made me decide to join their mailing list since it reflects a structured and positive approach toward collective development and participation
casino https://graph.org/Neospin-Casino-Provides-Live-Dealer-Games-to-Internet-Platforms-04-16-3
Нарколог на дом в Екатеринбурге востребован в ситуациях, когда человеку нужна врачебная помощь после употребления алкоголя, при запое, выраженном похмельном синдроме, нарушении сна, тревоге, скачках давления, слабости и других признаках ухудшения самочувствия. Такой формат обращения часто выбирают семьи, которые хотят вызвать врача без поездки в клинику и быстро получить консультацию по состоянию больного. Домашний выезд особенно важен тогда, когда требуется детоксикация, наблюдение после нескольких дней употребления спиртного и оценка рисков, связанных с последствиями алкоголизма.
Детальнее – нарколог на дом вывод екатеринбург
During a casual look for home necessities, I came across daily living essentials – The selection feels clean and modern, offering useful items that align well with today’s household needs and lifestyle expectations.
Many users focused on teamwork development often seek insightful resources, and I recently explored Collaboration Unity Power Hub which looks useful – It’s a great read on teamwork principles, and I shared it with my team as it gave us simple but powerful ideas for better collaboration.
When people begin thinking about long-term impact and meaningful success, they often explore helpful resources like start your legacy journey – a thoughtful guide that explains how consistent effort, daily discipline, and clear vision can gradually shape something truly lasting over time.
If you are focused on building success habits, visiting journey goals community – a motivational space helps users stay inspired through shared achievements and supportive engagement that strengthens personal growth and consistency.
While reviewing simple living guides and minimalist lifestyle content I found in the middle of my research list Serene Simple Living Hub which focused on calm routines and reduced clutter – The overall tone felt peaceful and encourages simplifying life to improve focus and emotional balance in daily activities
Нарколог на дом в Екатеринбурге: выезд врача на дом, лечение запоя и консультации в наркологической клинике «НЕО+».
Получить дополнительную информацию – нарколог на дом цена
While going through different investment resources and trying to avoid hype driven advice, I included check smart investing guide in my notes – the content focuses on calm, rational decision making which helps me stay disciplined and avoid emotional trading mistakes.
Процедура капельницы от похмелья с контролем врача в Самаре начинается с первичной консультации, на которой врач осматривает пациента, измеряет его основные показатели (давление, пульс, температуру) и оценивает общее состояние. На основе этих данных выбирается оптимальный состав капельницы, которая может включать в себя различные компоненты, такие как солевые растворы, витамины, антиоксиданты и медикаменты для снятия симптомов похмелья.
Углубиться в тему – капельница от похмелья
ares darknet link https://market-darknet.org/
Лечение на дому начинается с осмотра пациента. Доктора оценивают основные показатели, включая давление и пульс, а также общее состояние человека. После этого формируется план терапии, который реализуется сразу. Такой подход позволяет очень быстро перейти к стабилизации состояния и начать лечение без лишней потери времени.
Разобраться лучше – вывод из запоя на дому санкт-петербург
Shoppers looking for purpose-driven experiences often prefer platforms that guide them toward better choices, such as Purpose Driven Storefront which allows users to evaluate products carefully, compare value more effectively, and continue browsing with a stronger focus on meaningful and practical purchase decisions.
покупка базы покупка базы .
Consumers aiming to reduce spending often rely on marketplaces like Smart Budget Finds Hub that highlights cost-efficient items, and it supports better decisions by presenting clear product groupings – ensuring users can easily compare options and select affordable essentials suited for daily life.
People exploring trading knowledge often appreciate platforms that feel like real academies with structured lessons, and I found Advanced Trader Academy Learning Hub which looks solid – A trading education site with a course-oriented structure, and at first glance it seems promising for anyone who wants to build foundational trading skills in a guided way.
Непрерывный мониторинг витальных показателей — ключевое отличие стационарного формата, обеспечивающее безопасную детоксикацию. В палатах клиники «Элегия Мед» установлены системы отслеживания частоты пульса, сатурации, температуры и артериального давления, данные с которых автоматически передаются в электронную медицинскую карту. Медицинский персонал дежурит круглосуточно, что обеспечивает мгновенную реакцию на ухудшение состояния: коррекцию инфузионной терапии, введение симптоматических препаратов, привлечение смежных специалистов при необходимости. Такая организация процесса исключает хаотичное назначение средств, предотвращает полипрагмазию и гарантирует, что каждый этап детоксикации проходит под строгим клиническим контролем. При необходимости применяются дополнительные методы очищения крови, включая плазмаферез, который эффективно помогает вывести стойкие токсины и метаболиты, не удаляемые стандартной инфузионной терапией.
Ознакомиться с деталями – вывод из запоя в стационаре клиника в санкт-петербурге
While exploring different online profit systems, I found something that stood out due to its clarity and decided to mention it here briefly financial goal guide – the content seems pretty straightforward and I found it interesting because it is easy to go through without confusion
Decorating my home has become a hobby, and I often try new stores to find unique items that match my interior style preferences modern interior decor shop I ordered two vases and they were packaged so securely that there was absolutely no damage when they arrived at my doorstep
Many forward thinking professionals follow platforms that promote global unity through shared digital collaboration global unity vision hub enabling meaningful exchange of ideas across international communities and professional networks – The global reach is impressive and I am genuinely curious about where it goes next
Users exploring digital websites often look for consistent structure and clear visual hierarchy that helps them move between sections without confusion UrbanScale System Hub – UrbanScale delivers a structured and visually clear experience where balanced layout design ensures users can browse efficiently and comfortably.
Вывод из запоя на дому с медицинским контролем в Екатеринбурге предлагает множество преимуществ, которые делают этот метод более удобным и безопасным для многих людей. Отсутствие необходимости в госпитализации и наличие профессионального контроля являются основными положительными аспектами этой услуги.
Исследовать вопрос подробнее – нарколог на дом вывод из запоя в екатеринбурге
While going through sections and testing navigation, I found that visit this link enhances the experience – the design feels fresh, and browsing here was simple and quite smooth overall.
darknet markets url https://marketdarknets.org/
Процедура начинается с осмотра пациента. Врач оценивает основные показатели, включая давление и пульс, а также выраженность симптомов. После этого формируется состав капельницы и определяется тактика лечения, что позволяет эффективно провести вывод из запоя.
Получить больше информации – https://kapelnicza-ot-pokhmelya-voronezh-7.ru
For individuals committed to growth and financial learning, exploring earn while you learn hub – a resource that provides structured learning and income opportunities can support consistent progress and better results online.
While reviewing different fashion websites for quality and trustworthiness, I worked in explore clothing styles naturally – I got a jacket that looked exactly like the images, which gave me confidence in the accuracy of online product photos.
In various discussions about responsive website examples and layout clarity, users sometimes mention prime impact board included in structured evaluation lists designed to assess content distribution and interface smoothness across multiple devices and screen sizes. – The interface is typically regarded as clean and visually steady.
За выездом врача чаще обращаются тогда, когда человеку тяжело добраться до клиники, он ослаблен после нескольких дней употребления алкоголя или родственникам важно быстрее понять, какая тактика будет безопасной. После осмотра можно определить, нужна ли капельница, достаточно ли детоксикации на дому, требуется ли повторное наблюдение, а в дальнейшем — консультация по лечению алкоголизма, кодирование или реабилитация. В части случаев уже первый звонок позволяет понять, идет ли речь только о временном ухудшении самочувствия или о состоянии, при котором может потребоваться вывод из запоя в стационаре.
Получить больше информации – нарколог на дом анонимно екатеринбург
Many beginners exploring trading resources often want something more engaging, and I recently explored Learn Trading Education Hub which looks helpful – The content is explained in a simple way that keeps things interesting and avoids boring technical depth, making it easier for new learners to stay focused and understand key ideas.
В Нижнем Новгороде выезд нарколога на дом используется при состояниях, требующих оперативной медицинской оценки и начала терапии. Врач приезжает с необходимыми препаратами, проводит осмотр и формирует план лечения на месте. Такой формат позволяет сократить время до начала помощи и снизить нагрузку на пациента.
Разобраться лучше – наркологическая помощь в нижнем новгороде
nexus onion link https://market-darknet.org/
If you are focused on trustworthy growth, checking out business growth link – a platform built on reliability supports companies in forming transparent partnerships that lead to stronger collaboration and sustainable business development.
Непрерывный мониторинг витальных показателей — ключевое отличие стационарного формата, делающее его золотым стандартом при лечении запойного синдрома. В палатах клиники «Стармед» установлены автоматизированные системы отслеживания частоты пульса, уровня кислорода в крови, температуры и артериального давления, данные с которых интегрируются в единую электронную медицинскую карту. Медицинский персонал дежурит круглосуточно, что обеспечивает мгновенную реакцию на любое ухудшение состояния: оперативную коррекцию инфузионной терапии, введение симптоматических препаратов, привлечение смежных специалистов при выявлении соматических осложнений. Такой подход исключает полипрагмазию, предотвращает избыточную фармакологическую нагрузку на ослабленный организма и гарантирует, что каждая стадия детоксикации проходит под строгим клиническим контролем, минимизируя риски для жизни и здоровья пациента.
Углубиться в тему – вывод из запоя в стационаре нижний новгород
During my exploration of innovative websites, I found next tech ideas – The platform feels modern and forward-thinking, suggesting a focus on new developments and promising technological advancements.
During casual exploration of business networking platforms and collaboration hubs I came across in the middle of my browsing session Global Commerce Connect Hub which showed frequent user activity – I connected with several members and the community felt engaging and responsive throughout
Online creative communities are valuable for individuals looking to break traditional thinking patterns and explore more flexible and innovative problem solving approaches Idea Catalyst Hub – This hub acts as a trigger point for inspiration, enabling members to generate, refine, and implement ideas that lead to meaningful personal and professional growth
Many individuals tracking innovation and industry changes often rely on platforms that present simplified trend analysis, and they sometimes discover Trend Data Intelligence Network which provides structured insights – A digital analytics platform offering real-time trend updates, consumer behavior analysis, and market intelligence designed to help users make informed and strategic decisions in dynamic sectors.
People who are new to investing often prefer learning resources that avoid confusion and focus on clarity, and I came across Growth Invest Simple Guide Network which is quite useful – A beginner-friendly platform that provides easy financial education, helping users understand investment strategies through clear and structured explanations without unnecessary complexity.
People going through tough phases in life often benefit from reading about others who overcame similar struggles through persistence and belief resilience motivation hub the inspiring examples shared made me feel uplifted and ready to take positive steps after only a short time exploring the platform
I came across this while exploring a range of shopping sites and felt it might be helpful for others due to its clear and simple presentation explore dream hub – the interface feels intuitive and user-friendly, allowing for an enjoyable browsing experience without distractions
As I navigated through several online communities, I found this insightful discussion board which offered a refreshing variety of perspectives that made each topic feel more complete and less one-dimensional.
Запой – это состояние, при котором человек продолжает употреблять алкоголь в течение длительного времени, не в состоянии прекратить употребление самостоятельно, что является проявлением алкоголизма. Это может привести к серьезным проблемам со здоровьем, и в таком случае необходим вывод из запоя с помощью наркологической помощи, при этом в дальнейшем может рассматриваться кодирование.
Ознакомиться с деталями – http://vyvod-iz-zapoya-na-domu-ekaterinburg-17.ru/
During my exploration of inspiring online communities and positive energy hubs, I included browse win energy page in my notes – the experience is consistently cheerful and motivating, which makes me want to return every single day for that uplifting feeling.
nexus official link https://market-darknet.org/
купить базу купить базу .
Когда родственники начинают искать помощь, они обычно хотят решить сразу несколько задач. Нужно быстро стабилизировать состояние больного, снизить риски осложнений, понять, можно ли ограничиться домашним форматом или требуется госпитализация в стационаре, насколько выражена зависимость и что делать дальше, чтобы через несколько дней не оказаться в той же точке. Именно поэтому современная наркологическая помощь в рамках профессиональной клиники рассматривается не как одна процедура, а как последовательная система действий: от осмотра и первичной стабилизации до более глубокой работы с причинами зависимости, мотивацией пациента и профилактикой рецидивов.
Выяснить больше – наркологическая помощь анонимно воронеж
If you want to explore easy savings options, checking out simple deals hub – a platform that organizes offers clearly can help users quickly compare opportunities and choose practical solutions that match their budget and preferences without unnecessary effort.
In a world full of digital tools, creative platforms stand out when they inspire action, and one example is Art & Ideas Universe which encourages users to think beyond conventional limits by providing fresh perspectives, artistic examples, and innovative concepts – a powerful space for expanding imagination and developing unique creations.
In many communities, individuals rely on digital resources to shape better future planning habits future planning resource that encourage structured thinking and consistent self improvement practices – It serves as a helpful framework where users can organize goals, strengthen discipline, and develop actionable steps that make long term success more achievable and realistic.
during exploration of professional leadership communities I noticed a post describing collective decision making frameworks Elite Leadership Think Network I summarized key ideas about how shared leadership improves team outcomes – It felt insightful and I believe more real world stories would make the concept even clearer
88 starz bet http://www.888starz-uzbekistan4.com .
В этой статье собраны факты, которые освещают целый ряд важных вопросов. Мы стремимся предложить читателям четкую, достоверную информацию, которая поможет сформировать собственное мнение и лучше понять сложные аспекты рассматриваемой темы.
Прочесть заключение эксперта – капельница от похмелья услуги
Many users interested in entrepreneurship often explore how partnerships contribute to success, and I found Strong Business Growth Partnership Hub which seems useful – A collaboration-focused platform that explains partnership advantages, and it delivers the content in a clear and practical format that makes understanding business cooperation simple and effective.
Стационарное наблюдение также целесообразно тогда, когда больному трудно соблюдать рекомендации дома, состояние быстро меняется или родственники не могут обеспечить полноценный контроль. В таких условиях медицинское сопровождение позволяет своевременно оценивать динамику и корректировать лечение. При выраженных психических нарушениях, тревожно-депрессивных проявлениях или изменении поведения к оценке состояния может подключаться психиатр, поскольку у части больных запой сопровождается не только соматическими, но и психическими осложнениями алкогольной зависимости.
Ознакомиться с деталями – вывод из запоя в стационаре анонимно санкт-петербург
В Санкт-Петербурге услуга вывода из запоя на дому применяется в ситуациях, когда требуется медицинская помощь, но нет показаний к стационарному лечению. Врач проводит консультацию, оценивает состояние пациента, длительность употребления и выраженность симптомов, после чего принимает решение о тактике лечения при алкоголизме. Важно, что терапия начинается сразу после осмотра, а при необходимости можно заранее заказать выезд специалистов.
Подробнее тут – анонимный вывод из запоя на дому санкт-петербург
People browsing for headphone deals often look for platforms that provide both competitive pricing and fast logistics services instant earbuds bargain hub – I found a solid deal on wireless earphones and they arrived quickly, making the whole shopping experience feel efficient and satisfying
ares market https://marketdarknets.org/
While studying digital engagement patterns, researchers note that participation tends to grow when individuals see tangible benefits from collective action unity dialogue sign – it is commonly observed that open communication channels help build trust and encourage sustained interaction among participants
Many people entering forex markets underestimate the importance of having a structured learning path before placing real trades, trading strategy companion and that often leads to inconsistent outcomes – I found the explanations helpful in organizing my approach and reducing unnecessary confusion over time with practice and consistently improving
During casual browsing of financial data sites, I encountered a section that felt naturally placed and easy to read without effort informative trading feed which improved clarity – the content is presented in a straightforward and useful way overall
In discussions about modern branding platforms and clean digital identity systems, users often highlight structured websites that emphasize clarity and accessibility, and among these references they sometimes mention brand crest portal included in curated lists of branding focused resources used for evaluating visual identity and simple navigation across web environments. – The overall design feels neat, professional, and very easy to explore without confusion.
During my initial visit and quick interaction with the interface, I came across this helpful link which gave a good impression – everything looks well structured, making the site easy to use and comfortable overall.
While casually exploring different shopping websites, I discovered fashionable finds hub – It offers a lively browsing experience with plenty of trendy items that feel current and enjoyable to check out.
As I documented ideas for redecorating my living area, I included see this decor platform naturally – the products seem thoughtfully designed and the cost feels appropriate for their premium look.
Нарколог на дом в Екатеринбурге: круглосуточный выезд, детоксикация и лечение зависимостей в наркологической клинике «НЕО+».
Подробнее – вызвать нарколога на дом в екатеринбурге
1xbet türkiye giriş 1xbet türkiye giriş
While casually browsing and testing navigation, I noticed that follow this link contributes to a smooth experience – strong design overall, and the website feels modern and very easy to use.
cheap car hire bari
вывода из запоя 24 вывода из запоя 24
casino https://graph.org/Alfabet-Apostas-em-Organização-dos-Torneios-Digitais-04-16
Communities focused on advancement often seek educational initiatives that provide resources for learning, collaboration, and skill development across different social groups Future Development Learning Network supporting accessible education for everyone – This strengthens collective progress and improves long term social outcomes through shared knowledge
casino https://telegra.ph/Alfa-mine-na-Revolução-e-Torres-04-16
Этот текст представляет собой обзор свежих данных и исследований в области медицины. Он призван помочь читателям понять, как научные достижения влияют на лечение, диагностику и общее состояние системы здравоохранения.
Подробнее – прокапаться от алкоголя в воронеже
Professionals who value meaningful collaboration often seek platforms that strengthen credibility and long-term cooperation across industries while encouraging reliable communication between members Trusted Link Builder Hub focusing on helping users develop stronger professional bonds and expand their networking reach in a consistent and reliable way – This type of environment supports business growth by encouraging authentic connections and long-term relationship building strategies
People exploring business collaboration often look for content hubs that simplify partnership learning, and I found Partnership Knowledge Growth Network which appears useful – A resource platform offering articles on partnership strategies and collaboration, and I intend to go through more content later tonight when I can focus better.
Читатели получат представление о том, как современные технологии влияют на развитие медицины. Обсуждаются новые методы лечения, персонализированный подход и роль цифровых решений в повышении качества медицинских услуг.
Раскрыть тему полностью – алкогольная капельница на дому
For those interested in cross-border collaboration, exploring world partnership hub – a space designed for global teamwork can support users in building innovative strategies that focus on growth, efficiency, and impactful results across diverse professional environments.
Особое внимание мы уделяем психологической составляющей. Нарколог на дом в Екатеринбурге в «НЕО+» — это не только физическое очищение, но и работа с мотивацией, разрушение психологических триггеров зависимости. Зависимость разрушает жизнь, поэтому мы предлагаем психотерапевтическое сопровождение. Родственники получают отдельную поддержку: консультации психолога помогают правильно выстроить общение с зависимым человеком и мотивировать его на дальнейшее лечение. Реабилитация может проходить амбулаторно или в стационаре партнёрских центров с комфортабельными условиями, где пациенты находятся под круглосуточным наблюдением.
Получить дополнительную информацию – narkolog-na-dom-ekaterinburg-1.ru/
I started paying attention to my mornings and quickly realized how much they influenced my productivity and energy levels success habit focus hub the structured tips I followed helped me improve consistency and I now feel more productive throughout the entire day
Many users interested in simple lifestyle improvements often look for platforms that highlight useful everyday items, and I found Daily Essential Finds Routine Hub which seems helpful – A practical finds page offering daily useful suggestions, and I check it regularly in the mornings since it delivers small, easy ideas that make daily routines more convenient.
Understanding forex trading requires patience and repeated exposure to structured scenarios that gradually build confidence and skill level currency strategy practice hub offering practical examples for consistent learning – I saw it as another helpful learning space and the examples made it much easier to understand real market behavior
Эта статья погружает вас в увлекательный мир знаний, где каждый факт становится открытием. Мы расскажем о ключевых исторических поворотных моментах и научных прорывах, которые изменили ход цивилизации. Поймите, как прошлое формирует настоящее и как его уроки могут помочь нам строить будущее.
Что скрывают от вас? – нарколог на дом
As I reviewed multiple financial tools for accuracy and performance, I noted open this analysis site in my report – even under a new domain, it maintains the same efficiency and reliability I’ve come to depend on for evaluating charts.
black ops url https://market-darknet.org/
During my casual browsing of forex learning resources and trading courses online, I found something worth mentioning here for beginners beginner trader learning hub – The interface seems straightforward and navigation feels simple, making it quite accessible even for first time users exploring trading
В этой статье мы обсудим процесс восстановления после зависимостей, акцентируя внимание на различных методах и подходах к реабилитации. Читатели узнают, как создать план выздоровления и использовать полезные ресурсы для достижения устойчивых изменений.
Откройте для себя больше – капельница от похмелья услуги
During my review of professional growth websites and career advice platforms I found in the middle of my notes Job Growth Insight Center which provided clear and actionable guidance – The tips are helpful and I return to this hub whenever I feel stuck or uncertain about career progress
вывод из алкогольного запоя вывод из алкогольного запоя
выведение из запоя на дому выведение из запоя на дому
xbet girişi xbet girişi
People interested in building a positive lifestyle often explore digital spaces that promote reflection, motivation, and shared learning, and they may discover Growth Inspiration Ideas Network which emphasizes uplifting content – A community-focused platform where users exchange thoughts, explore motivational insights, and develop habits that lead to long-term personal and emotional improvement.
1xbet tr 1xbet tr
silk road market link https://marketdarknets.org/
As I looked into professional development alliances, I found business strategy hub – The concept feels solid and organized, making it seem useful for structured planning and long-term growth initiatives across different industries.
People interested in street inspired clothing often search for fashion spaces that help them discover new ways to style comfortable and trendy outfits daily Modern Urban Fashion Hub – It reflects how contemporary clothing trends merge with city life to create practical yet stylish wardrobe solutions for everyone
Many small business owners searching for inspiration often rely on digital platforms that provide motivation, clarity, and practical business advice to support their progress, and they sometimes discover Entrepreneur Success Guidance Hub which emphasizes business motivation – A helpful platform offering encouraging messages, strategic insights, and practical support designed to help entrepreneurs stay confident and continue building successful ventures.
Этот информационный материал собраны данные, которые помогут лучше понять текущие тенденции и процессы в различных сферах жизни. Мы предоставляем четкий анализ, графики и примеры, чтобы информация была не только понятной, но и практичной для принятия решений.
Познакомиться с результатами исследований – капельница от алкоголя на дому воронеж недорого
Эта статья погружает вас в увлекательный мир знаний, где каждый факт становится открытием. Мы расскажем о ключевых исторических поворотных моментах и научных прорывах, которые изменили ход цивилизации. Поймите, как прошлое формирует настоящее и как его уроки могут помочь нам строить будущее.
Что скрывают от вас? – вывести из запоя капельница на дому
Этот обзор посвящен успешным стратегиям избавления от зависимости, включая реальные примеры и советы. Мы разоблачим мифы и предоставим читателям достоверную информацию о различных подходах. Получите опыт многообразия методов и найдите подходящий способ для себя!
Изучить рекомендации специалистов – вызов нарколога на дом екатеринбург цена
Эта публикация исследует взаимосвязь зависимости и психологии. Мы обсудим, как психологические аспекты влияют на появление зависимостей и процесс выздоровления. Читатели смогут понять важность профессиональной поддержки и применения научных подходов в терапии.
Это стоит прочитать полностью – наркология вызов на дом
People interested in affordable accessories often enjoy browsing online shops that offer trendy designs without high cost budget sparkle collection my coworkers kept asking where I found my earrings because they looked very elegant and professionally made cute stylish fashion daily wear aesthetic
While reviewing structured financial systems and investment planning ideas, I referenced browse ultimate profit page in my notes – the plan seems stable enough that I’m starting small before considering any larger financial steps.
Этот процесс не занимает много времени — обычно процедура длится от 30 до 60 минут. Важно, что врач контролирует все этапы, обеспечивая безопасность пациента и корректируя терапию по мере необходимости. Такой подход позволяет быстро и эффективно облегчить симптомы похмелья и вернуться к нормальной жизнедеятельности.
Детальнее – капельница от похмелья цена в самаре
abacus darknet url https://market-darknet.org/
Digital trust structures are important to me so I look for clarity in how roles and expectations are defined across the platform authentic alliance knowledge base – it suggests a foundation rooted in genuine collaboration and transparent information sharing practices.
Digital audiences usually prefer websites that present information in a straightforward manner, helping them understand content quickly without unnecessary complexity or confusion PureHorizon Access Point – PureHorizon delivers a minimal and refreshing interface where usability is prioritized, ensuring users can explore content easily and enjoy a calm browsing experience overall.
While casually browsing and testing navigation, I noticed that follow this link contributes to a smooth experience – overall it feels good, and both layout and content appear well balanced and neatly organized.
I happened to run into a site that felt surprisingly easy to use and figured it wouldn’t hurt to mention it for anyone browsing this thread budget picks guide – the layout is clean and functional, giving off a relaxed and useful browsing experience without feeling overwhelming at all
1xbet tr 1xbet tr
1xbet türkiye giriş 1xbet türkiye giriş
Many users who shop online regularly often appreciate friendly and cheerful interfaces, and I recently explored Happy Trend Zone Shopping Portal Hub which feels nice – The layout gives a calm and positive feel that reduces stress while shopping, making it easier to browse and discover products comfortably at any time.
888starz site http://www.888starz-bet2.com/ .
888 stars bet http://888starz-bet2.com/ .
заказать рулонные шторы в москве заказать рулонные шторы в москве
1xbet giriş yapamıyorum 1xbet giriş yapamıyorum
888 kasino https://888starz-uzbekistan4.com/ .
вывод из запоя нарколог24 https://vyvod-iz-zapoya-na-domu-sankt-peterburg-20.ru
People who value continuous improvement and social innovation often seek platforms that provide regular mission updates and encourage participation, and they may find Change Collaboration Vision Network which shares ongoing developments – A community-focused initiative dedicated to promoting transparency, engagement, and collective action toward meaningful and sustainable social change goals.
Individuals interested in maximizing their budget often turn to online deal platforms like consumer savings portal to discover offers – it highlights curated promotions and supports better financial decisions by making price comparisons more transparent and straightforward.
готовые рулонные шторы цена https://avtomaticheskie-rulonnye-shtory50.ru
Отдельно стоит выделить ситуации, когда семья сталкивается не только с алкоголем, но и с употреблением наркотиков. В таких случаях врачебная консультация особенно важна, поскольку последствия интоксикации могут отличаться, а признаки наркомании и алкоголизма иногда накладываются друг на друга. Если речь идет о смешанном употреблении, подход к помощи на дому требует особой осторожности.
Ознакомиться с деталями – вызов нарколога на дом в екатеринбурге
dark matter url https://market-darknet.org/
Traders who rely on technical setups often debate which breakout confirmation signals are most reliable, and a growing number mention a platform signal breakout handbook stating that its approach helped them secure a couple of winning positions in fast markets during volatile trading days recently
Individuals focused on building assets often look for structured guidance that simplifies long term planning asset building planner which supports users in organizing investments and savings into clear categories – I started using it this week and it has helped me understand asset growth better
В этом обзорном материале представлены увлекательные детали, которые находят отражение в различных аспектах жизни. Мы исследуем непонятные и интересные моменты, позволяя читателю увидеть картину целиком. Погрузитесь в мир знаний и удивительных открытий!
Как достичь результата? – вызов нарколога на дом круглосуточно москва
As I looked into different fashion-inspired websites, I found smart aesthetic hub – The presentation feels clean and attractive, offering a stylish selection that is both practical and visually engaging for daily inspiration.
While casually scrolling through beauty trend pages, I noticed one that had a refreshing layout and appealing color balance pure beauty flow – the site looks modern and fresh, and the content feels engaging and smooth to browse through
Непрерывный мониторинг витальных показателей — ключевое отличие стационарного формата, обеспечивающее безопасную детоксикацию. В палатах клиники «Элегия Мед» установлены системы отслеживания частоты пульса, сатурации, температуры и артериального давления, данные с которых автоматически передаются в электронную медицинскую карту. Медицинский персонал дежурит круглосуточно, что обеспечивает мгновенную реакцию на ухудшение состояния: коррекцию инфузионной терапии, введение симптоматических препаратов, привлечение смежных специалистов при необходимости. Такая организация процесса исключает хаотичное назначение средств, предотвращает полипрагмазию и гарантирует, что каждый этап детоксикации проходит под строгим клиническим контролем. При необходимости применяются дополнительные методы очищения крови, включая плазмаферез, который эффективно помогает вывести стойкие токсины и метаболиты, не удаляемые стандартной инфузионной терапией.
Получить больше информации – нарколог вывод из запоя в стационаре в санкт-петербурге
tordex onion https://marketdarknets.org/
Помощь на дому рассматривают при состояниях, связанных с острым ухудшением самочувствия после алкоголя. Чаще всего это несколько дней запоя, тяжелое похмелье, бессонница, тревога, дрожь в руках, слабость, отсутствие аппетита, тошнота, сухость во рту и ощущение истощения. В подобных случаях врачебный осмотр нужен для оценки общего состояния и выбора безопасной тактики.
Детальнее – нарколог на дом цена екатеринбург
К основным показаниям относятся:
Детальнее – анонимный вывод из запоя на дому в санкт-петербурге
1xbet giriş adresi 1xbet giriş adresi
вывод из запоя санкт петербург https://vyvod-iz-zapoya-na-domu-sankt-peterburg-22.ru
Первичный осмотр включает оценку витальных показателей, уровня сознания, выраженности симптомов и факторов риска. После этого врач определяет объём вмешательства и приступает к терапии. В большинстве случаев применяется инфузионное лечение, направленное на восстановление водного баланса и выведение токсинов.
Исследовать вопрос подробнее – оказание наркологической помощи
Customers often highlight the importance of smooth ordering systems that eliminate confusion and ensure accurate deliveries every time customer smile order hub my package arrived exactly as shown in the listing and the experience was simple, efficient, and pleasantly satisfying from checkout to delivery completion
вывод из запоя на дому спб цены https://vyvod-iz-zapoya-na-domu-sankt-peterburg-21.ru
People studying forex often try to follow structured learning paths that focus on building skill gradually instead of rushing outcomes profit consistency guide while reinforcing patience and logical thinking in trading scenarios – This method encourages steady progress and reduces the stress of unpredictable market fluctuations
Запой сопровождается выраженной интоксикацией, нарушением сна, слабостью и нестабильностью работы сердечно-сосудистой системы, что характерно для алкоголизма и других форм зависимости, включая наркомании. Самостоятельный выход из этого состояния может быть затруднён и сопровождаться усилением симптомов. Медицинская помощь на дому позволяет снизить риски и начать восстановление под контролем специалиста, помогая человеку быстрее стабилизировать состояние.
Подробнее – вывод из запоя на дому в санкт-петербурге
Решение о помещении пациента в стационар принимается на основе объективных медицинских критериев, а не только по желанию родственников. К показаниям относятся: запой длительностью более трех суток, выраженные симптомы абстиненции, наличие в анамнезе алкогольных делириев или судорожных эпизодов, сопутствующие хронические заболевания печени, поджелудочной железы, сердца или нервной системы. Отдельным фактором выступает полинаркомания или сочетание алкогольной зависимости с приемом психофармакологических препаратов без назначения врача. В таких ситуациях риск развития тяжелых осложнений возрастает многократно, и амбулаторный формат не обеспечивает необходимого уровня контроля. Госпитализация позволяет провести полноценную диагностику, включая ЭКГ, экспресс-анализы крови, оценку неврологического статуса и мониторинг сатурации, что формирует точную картину состояния и исключает назначение шаблонных схем.
Подробнее можно узнать тут – http://www.domen.ru
While browsing through a mix of online stores earlier today, I came across something that seemed worth sharing here because it had a simple and practical feel overall daily essentials hub – the layout is smooth and easy to follow, making it comfortable to explore different items without any confusion or unnecessary effort
Запой сопровождается выраженной интоксикацией, нарушением сна, слабостью, тревожностью и колебаниями давления, что характерно для алкоголизма и других форм зависимости. При этом самостоятельный выход из состояния часто оказывается затруднённым из-за ухудшения самочувствия и невозможности контролировать симптомы. В таких случаях выезд нарколога позволяет начать лечение без задержек и помочь пациенту снизить нагрузку на организм за счёт отсутствия транспортировки.
Получить дополнительные сведения – нарколог на дом вывод из запоя санкт-петербург
1xbet yeni giriş 1xbet yeni giriş
While exploring online stores for trendy yet simple hoodies I came across in the middle of my shopping results Street Everyday Hoodie Store which had a clean product layout – I bought a hoodie and it arrived much sooner than expected which made the overall service feel efficient and trustworthy
Вывод из запоя на дому с медицинским контролем в Екатеринбурге предлагает множество преимуществ, которые делают этот метод более удобным и безопасным для многих людей. Отсутствие необходимости в госпитализации и наличие профессионального контроля являются основными положительными аспектами этой услуги.
Ознакомиться с деталями – вывод из запоя на дому анонимно в екатеринбурге
darknet drug links https://market-darknet.org/
1xbet giriş 1xbet giriş
As I compared different trading education platforms focused on options, I worked in market insight options hub naturally – the guidance was very clear and helped me steer away from costly beginner mistakes in a practical and understandable way.
рулонные жалюзи купить в москве рулонные жалюзи купить в москве
While searching for positive and motivating ideas, I found uplifted growth zone – The concept feels encouraging and refreshing, bringing together inspiration and progress in a way that supports personal development naturally.
vip starz https://888starz-bet2.com/ .
casino https://telegra.ph/Napoléon-Games-révolutionne-le-monde-des-jeux-de-grattage-04-16
Individuals working on long-term habits often struggle alone, but shared commitment environments can significantly improve consistency and follow-through in meaningful ways growth accountability hub participants often mention that regular check-ins help them stay aligned with goals and reduce procrastination across personal and professional routines
Чаще всего нарколога на дом вызывают при повторяющемся или длительном запое, тяжелом похмелье, бессоннице после алкоголя, треморе, выраженной слабости и ухудшении общего самочувствия. Поводом для обращения также становятся тревога, раздражительность, скачки артериального давления, учащенный пульс, обезвоживание и необходимость поставить капельницу дома под наблюдением специалиста. Во многих случаях звонок в наркологический центр поступает тогда, когда родственники понимают, что состояние больного уже не позволяет ждать следующего дня.
Ознакомиться с деталями – нарколог на дом цена
В Воронеже круглосуточная помощь при похмелье востребована в ситуациях, когда симптомы появляются внезапно или усиливаются в ночное время, особенно в запое или после запоя. Врач проводит консультацию, оценивает состояние пациента и принимает решение о проведении инфузионной терапии. Такой подход позволяет своевременно устранить симптомы и предотвратить их дальнейшее развитие. При необходимости можно оставить заявку, уточнить цены или получить помощь бесплатно на первичном этапе.
Ознакомиться с деталями – https://kapelnicza-ot-pokhmelya-voronezh-7.ru/
888старз казино https://888starz-bet2.com .
darkmarket link https://marketdarknets.org/
Непрерывное наблюдение — ключевое отличие стационарного формата. В палатах клиники «Стармед» установлены системы мониторинга витальных показателей, позволяющие фиксировать изменения артериального давления, частоты пульса, температуры и дыхания в реальном времени. Медицинский персонал дежурит круглосуточно, что обеспечивает мгновенную реакцию на ухудшение состояния: коррекцию инфузионной терапии, введение симптоматических препаратов, привлечение профильного психиатра при необходимости. Кроме того, стационар создает терапевтическую среду, свободную от бытовых конфликтов, финансовых стрессов и социального давления, которые часто провоцируют срыв в первые дни трезвости. Пациент получает режим, адаптированный под этап восстановления: дозированную физическую активность, сбалансированное диетическое питание, физиотерапевтические процедуры и регулярные консультации с психотерапевтом. Такой комплексный подход минимизирует дискомфорт и формирует базу для последующей психологической работы.
Получить дополнительную информацию – вывод из запоя в стационаре клиника нижний новгород
After checking several online club platforms, I discovered daily vision hub – The website felt professional and well maintained, and the updated content made it easy for visitors to navigate without clutter or overwhelming design elements online.
Наиболее частыми причинами обращения становятся выраженная слабость, тремор, нарушение сна, тревога, учащенный пульс, скачки артериального давления, тошнота и признаки обезвоживания. Эти симптомы могут сочетаться между собой и усиливаться после прекращения употребления алкоголя, особенно после нескольких дней запоя.
Подробнее можно узнать тут – вызов нарколога на дом екатеринбург
I don’t typically recommend sites, but this one felt worth sharing because of how accessible and simple it appeared overall smart value portal – the layout is clean and helps users understand the content without confusion
dark matter darknet url https://market-darknet.org/
Вывод из запоя на дому в Екатеринбурге — это услуга, которая позволяет пациентам пройти лечение в удобных для них условиях, без необходимости посещать стационар. Процедура включает несколько этапов, каждый из которых направлен на снижение уровня алкогольной интоксикации и стабилизацию состояния пациента. Главным преимуществом вывода из запоя на дому является то, что это не только удобно, но и позволяет избежать лишнего стресса, который может быть вызван госпитализацией.
Углубиться в тему – вывод из запоя на дому цена екатеринбург
Отдельно выделяют ситуации, когда родственники вызывают врача не только из-за текущего состояния, но и потому, что подобные эпизоды повторяются. Если накапливаются последствия алкоголизма, нарушается сон, меняется поведение, появляются устойчивые проблемы дома и в повседневной жизни, разовая помощь обычно рассматривается как первый этап последующей тактики. При тяжелом состоянии, признаках отравлении алкоголем или сочетании нескольких рисков сразу может понадобиться более интенсивное наблюдение в стационаре.
Исследовать вопрос подробнее – вызвать нарколога на дом екатеринбург
While reviewing different forex signal platforms and strategy tools I noticed in the middle of my research list Smart Trade Signal Watch which delivers frequent alerts – The signal consistency appears solid at this stage and it looks like a system worth monitoring over time for reliability
После алкоголя в организме накапливаются токсичные продукты распада, нарушается водно-солевой баланс и страдает нервная система, что особенно выражено после запоя или при алкоголизме. Это проявляется головной болью, слабостью, тошнотой и нарушением сна. Капельница помогает ускорить процессы очищения и восстановить внутренние системы, обеспечивая более быстрое облегчение состояния и помогая человеку выйти из состояния запоев.
Получить дополнительные сведения – капельница от похмелья вызов на дом воронеж
Процедура начинается с осмотра пациента. Врач измеряет давление, пульс, оценивает общее состояние и выраженность симптомов. На основании этих данных формируется состав капельницы и план лечения. Такой подход позволяет учитывать индивидуальные особенности пациента и эффективно провести вывод из запоя.
Подробнее – http://kapelnicza-ot-pokhmelya-voronezh-4.ru
After checking several networking platforms, I discovered smart partner network – The website felt great overall, and the content was engaging and clearly arranged, making it easy for visitors to browse without clutter or complicated navigation online.
Вывод из запоя на дому с быстрым облегчением в Екатеринбурге — это процедура, направленная на быстрое снятие острых симптомов алкогольного абстинентного синдрома и возвращение пациента к нормальному состоянию, включая случаи алкоголизма и наркомании. Такая услуга удобна тем, что позволяет не только эффективно справиться с зависимостью, но и избавиться от неприятных проявлений запоя, таких как головная боль, тошнота, слабость и психоэмоциональное напряжение, в комфортной домашней обстановке, при этом оказывается наркологическая помощь. Быстрое облегчение без необходимости госпитализации делает этот метод популярным среди пациентов, которым важен быстрый и безопасный результат, а при необходимости можно заказать дальнейшее кодирование или лечение в стационаре.
Подробнее – vyvod-iz-zapoya-na-domu-ekaterinburg-19.ru/
Чаще всего домашний формат применяется при следующих состояниях:
Подробнее можно узнать тут – вывод из запоя на дому круглосуточно
abacus darknet url https://marketdarknets.org/
During my browsing of budget fashion websites and trend collections, I came across cheap trendy style hub – everything looks fresh and stylish, and I often return when I need affordable clothing or accessories.
Для эффективной организации лечения и минимизации организационных рисков пациентам и их родственникам рекомендуется ориентироваться на следующие ключевые параметры:
Ознакомиться с деталями – нарколог вывод из запоя в стационаре нижний новгород
After reviewing multiple self-development platforms, I landed on daily change hub – The website felt inspiring and well organized, and the content was helpful, clear, and motivating, allowing users to browse smoothly without unnecessary distractions online.
Online shoppers who value reliability often prefer platforms that maintain consistency between product authenticity and service quality, creating a smooth and confident browsing experience that supports safe purchasing decisions TrustedCart Global Shop review note – The platform delivers a trusted online store experience where products appear genuine, service feels dependable, and users can browse comfortably with a smooth and well structured shopping interface.
People exploring online shopping options often look for platforms that balance trust, usability, and authenticity to ensure a seamless experience while browsing and purchasing items SafeBuy Trust Market usability insight – It provides a reliable shopping experience with genuine looking products, consistent service, and easy navigation that helps users explore items through a clean and efficient interface.
Users who enjoy online retail often appreciate platforms that offer a trustworthy environment with smooth navigation and clearly presented products for better shopping confidence TrueShop Connect Hub experience comment – The website ensures a dependable shopping experience where products feel authentic, service is reliable, and browsing remains simple and enjoyable throughout the entire user journey.
Individuals searching for dependable e-commerce platforms often prefer websites that prioritize authenticity and provide a user friendly browsing layout for easier shopping TrustEase Digital Store platform note – It offers a smooth shopping experience with genuine products, reliable service, and a structured interface that allows users to browse and shop with confidence and comfort.
People who enjoy online shopping often look for platforms that combine trustworthy service with clean design and simple navigation for a better browsing experience ReliableCart Online Hub experience insight – The platform delivers a trusted store experience where products appear genuine, service feels consistent, and users can easily navigate through well organized categories.
Users seeking safe shopping platforms often prefer websites that ensure product authenticity while maintaining a smooth and visually organized interface for better usability TrustShop Global Portal usability note – It provides a dependable online store experience with genuine products, smooth browsing, and reliable service that helps users shop comfortably and efficiently across all categories.
Individuals interested in online retail often appreciate platforms that combine simplicity with trustworthiness and a smooth browsing experience for better satisfaction SecureCart Shopping Network platform insight – The website delivers a reliable shopping experience where users can explore genuine products easily while enjoying consistent service and a clean, structured interface.
People who value e-commerce reliability often search for platforms that provide authentic product listings and smooth navigation for a comfortable shopping experience TrustMarket Digital Hub usability comment – It offers a trusted online store experience with genuine products, dependable service, and a user friendly layout that ensures smooth browsing and easy product discovery.
Users exploring online stores often prefer platforms that emphasize trust and usability while ensuring a clean and efficient browsing experience for convenience ShopReliance Online Portal experience insight – The platform ensures a smooth shopping environment where products feel authentic, service is reliable, and users can navigate easily through well structured categories.
Individuals who enjoy digital shopping often appreciate platforms that offer a balance of authenticity, usability, and smooth browsing for better user satisfaction TrueValue Shop Network platform note – It delivers a dependable store experience where users can browse genuine products easily while enjoying consistent service and a clean and organized interface.
People looking for trusted online shopping often prefer platforms that ensure product authenticity while providing a seamless and user friendly browsing experience SecureBuy Market Hub usability insight – The website provides a reliable shopping experience with genuine products, smooth navigation, and dependable service that helps users browse comfortably and confidently.
Users who enjoy online purchasing often search for platforms that combine trustworthiness with simple navigation and clear product presentation for ease of use TrustCart Global Network experience comment – It offers a smooth shopping experience where products appear genuine, service is consistent, and users can easily explore items through a well structured interface.
Individuals interested in e-commerce platforms often prefer websites that deliver authentic products along with smooth browsing and reliable service for better usability ReliableShop Connect Portal platform insight – The website ensures a trusted online store experience where users can browse genuine items easily while enjoying a clean and efficient navigation system.
People who value secure online shopping often look for platforms that provide consistency in service and authenticity in product presentation for better experience TrustEase Market Hub usability note – It delivers a dependable shopping environment with genuine products, smooth navigation, and reliable service that helps users enjoy a comfortable and efficient browsing experience.
Users exploring online retail often appreciate platforms that combine trust, simplicity, and usability for a more enjoyable and efficient shopping journey ShopTrust Digital Hub experience insight – The platform provides a smooth shopping experience where users can find authentic products easily while enjoying a structured and user friendly interface.
Individuals searching for reliable stores often prefer platforms that offer genuine product listings and smooth navigation for better online shopping satisfaction TrueCart Shopping Portal platform note – It ensures a trusted online store experience with authentic products, reliable service, and a clean layout that helps users browse and shop with ease.
People who enjoy online shopping often look for platforms that prioritize authenticity and provide a seamless browsing experience for convenience and comfort TrustLine Store Network usability comment – The website delivers a reliable shopping experience where products feel genuine, service is consistent, and users can navigate smoothly through organized categories.
Users seeking dependable e-commerce platforms often prefer websites that combine trustworthy service with a clean and easy to navigate interface for better usability SecureShop Global Hub experience insight – It offers a smooth shopping environment where users can explore authentic products easily while enjoying reliable service and structured navigation.
Individuals interested in online shopping often appreciate platforms that ensure authenticity while maintaining a simple and efficient browsing experience for better comfort TrustBuy Online Portal platform note – The website provides a trusted store experience with genuine products, smooth navigation, and a user friendly interface that helps users shop efficiently.
People who value reliable e-commerce often search for platforms that combine product authenticity with smooth usability for a more confident shopping experience ReliableCart Connect Hub usability insight – It delivers a dependable online store experience where products appear genuine, service feels consistent, and users can browse easily through a clean and structured interface.
Запой сопровождается выраженной интоксикацией, нарушением сна, слабостью и нестабильностью работы сердечно-сосудистой системы, что характерно для алкоголизма и других форм зависимости, включая наркомании. Самостоятельный выход из этого состояния может быть затруднён и сопровождаться усилением симптомов. Медицинская помощь на дому позволяет снизить риски и начать восстановление под контролем специалиста, помогая человеку быстрее стабилизировать состояние.
Ознакомиться с деталями – нарколог на дом вывод из запоя санкт-петербург
As I searched for positive mindset websites, I discovered success mindset journey – It feels encouraging and structured, promoting gradual improvement and a strong focus on real-world success and personal development.
Earlier today I was exploring online marketplaces for home related products when I came across daily interior guide – The pages responded quickly and the simple presentation made browsing more enjoyable without excessive graphics, distracting promotional banners, or complicated category arrangements getting in the way online.
During my exploration of online tools I found a platform that feels very accessible and well organized Navigate & Discover Hub – The interface is user friendly and allows smooth transitions between sections making browsing simple and enjoyable for all users
I happened to run into a page during my browsing session that felt quite accessible, so I thought I would mention it here for anyone interested lifestyle trends link – the interface looks clean and the overall experience feels comfortable and smooth to explore
While exploring knowledge sharing platforms I discovered a website that focuses on curiosity and inspires users to keep learning and exploring ideas Stay Curious Knowledge Hub – the content feels motivating and insightful helping users stay curious, develop learning habits and build strong intellectual growth through continuous exploration in daily life online
xbet girişi xbet girişi
1xbet güncel 1xbet güncel
1xbet giriş 1xbet giriş
While browsing online stores I discovered a platform that delivers a well organized shopping experience with smooth interface design and simple product navigation for users Smart Daily Deals Hub – the website feels clean and practical, helping users explore items, compare offers and enjoy a fast and easy shopping experience online
производитель рулонных штор https://rulonnye-shtory-s-elektroprivodom10.ru
Вывод из запоя на дому с медицинским контролем в Екатеринбурге предлагает множество преимуществ, которые делают этот метод более удобным и безопасным для многих людей. Отсутствие необходимости в госпитализации и наличие профессионального контроля являются основными положительными аспектами этой услуги.
Получить дополнительные сведения – http://vyvod-iz-zapoya-na-domu-ekaterinburg-18.ru
Вывод из запоя в стационаре в Санкт-Петербурге: круглосуточное лечение, детоксикация и медицинский контроль в наркологической клинике «Элегия Мед».
Изучить вопрос глубже – наркология вывод из запоя в стационаре в санкт-петербурге
После алкоголя в организме накапливаются токсичные продукты распада, нарушается водно-солевой баланс и страдает нервная система, что особенно выражено после запоя или при алкоголизме. Это проявляется головной болью, слабостью, тошнотой и нарушением сна. Капельница помогает ускорить процессы очищения и восстановить внутренние системы, обеспечивая более быстрое облегчение состояния и помогая человеку выйти из состояния запоев.
Исследовать вопрос подробнее – капельница от похмелья на дом в воронеже
I had been browsing for trading education websites when I noticed modern trader school – The platform felt helpful and structured, and everything remained in a simple layout that made understanding easy without distractions or clutter online.
Процедура проходит под наблюдением квалифицированного врача, что минимизирует риски для здоровья пациента и помогает ускорить процесс восстановления. Важно, что такой подход позволяет избежать госпитализации, что для многих пациентов является дополнительным комфортом.
Получить дополнительные сведения – анонимный вывод из запоя на дому екатеринбург
Состав инфузий подбирается индивидуально. Важно понимать: большая «палитра» компонентов не означает лучший результат; ценность приносит точный фокус. Ниже — типовые профили, которые мы адаптируем под клинику конкретного случая.
Детальнее – вывод из запоя с выездом нижний тагил
Капельница от похмелья в Воронеже с устранением слабости, тошноты и головной боли в наркологической клинике «Похмельная служба»
Углубиться в тему – капельница от похмелья анонимно в воронеже
Такие условия позволяют начать лечение без задержек и обеспечить более мягкое восстановление. При этом помощь может предоставляться анонимно.
Подробнее можно узнать тут – https://vyvod-iz-zapoya-na-domu-sankt-peterburg-11.ru
Если к запланированному «окну оценки» динамика слабее ожидаемой, врач корректирует один параметр (скорость/последовательность введения, вечерний режим, плотность связи). Такой минимализм повышает управляемость и снижает риск побочных эффектов.
Подробнее – вывод из запоя на дому цена в нижнем тагиле
Публикация предлагает читателю не просто информацию, а инструменты для анализа и саморазвития. Мы стимулируем критическое мышление, предлагая различные точки зрения и призывая к самостоятельному поиску решений.
Детальнее – выведение из запоя на дому в екатеринбурге
People interested in generating ideas often look for platforms that make creativity feel effortless, especially when they explore innovation flow hub – the site feels modern and intuitive, allowing users to browse ideas smoothly while maintaining structure and inspiration throughout the entire creative process.
While reviewing relationship advice platforms and social development articles I found in the middle of my research material Realistic Connection Advice Hub which emphasized grounded and useful guidance – The ideas felt practical and avoided overly complex emotional theories
888starz вход 888starz вход .
Online shoppers often enjoy platforms that combine smooth navigation with visually appealing product displays that make browsing enjoyable and efficient while exploring different categories of items ShineShop Daily Hub experience note – The website offers a great shopping vibe with shining product presentation, easy navigation, and a clean layout that helps users browse comfortably while finding items quickly and enjoying a smooth overall shopping experience.
People who enjoy online shopping often prefer platforms that make product discovery simple while also providing visually attractive layouts that enhance browsing satisfaction and usability BrightCart Shine Network usability insight – It delivers a smooth shopping experience where items are displayed beautifully, navigation feels intuitive, and users can easily explore categories while enjoying a clean and well structured interface.
Users searching for enjoyable shopping experiences often appreciate platforms that highlight products clearly while ensuring a simple and efficient browsing structure for better convenience GlowMarket Shopping Hub platform comment – The website creates a pleasant shopping environment with well organized categories, visually appealing product presentation, and easy navigation that helps users find what they need quickly and comfortably.
Individuals who enjoy online retail experiences often look for platforms that combine stylish presentation with easy browsing for a more enjoyable shopping journey ShineCart Explorer Portal experience insight – It offers a visually appealing shopping interface where products shine clearly, navigation is simple, and users can smoothly explore items across different categories without confusion or difficulty.
People interested in convenient online shopping often prefer platforms that provide a clean layout and attractive product displays for better browsing engagement DailyShine Shopping Network usability note – The platform ensures a smooth user experience with well presented items, easy navigation tools, and a structured layout that helps users browse and shop efficiently across all categories.
Users who enjoy browsing products online often search for platforms that make shopping visually engaging while maintaining simplicity and fast navigation for better usability ShopGlow Everyday Hub experience comment – It provides a seamless shopping environment where products are displayed attractively, categories are well organized, and users can navigate easily while enjoying a smooth browsing experience.
Individuals looking for online deals often appreciate platforms that combine attractive product presentation with an easy to use interface for better shopping efficiency ShineStyle Market Portal platform insight – The website delivers a clean and visually engaging shopping experience where users can explore items effortlessly while benefiting from simple navigation and a well structured layout.
People who enjoy digital shopping often prefer platforms that make browsing enjoyable through visually appealing layouts and smooth category navigation for better user satisfaction BrightShop Shine Hub usability note – It offers a well designed shopping interface where products are displayed clearly, navigation is intuitive, and users can easily find items while enjoying a smooth browsing experience.
Users exploring online marketplaces often value platforms that combine visual appeal with structured navigation for easier and more enjoyable product discovery GlowCart Everyday Network experience insight – The platform provides a smooth shopping experience with attractive product presentation, easy browsing features, and a clean layout that enhances overall usability and customer satisfaction.
Individuals interested in online shopping often prefer platforms that highlight products in a visually engaging way while maintaining simple and efficient navigation tools ShineMarket Daily Portal platform comment – It delivers a well organized shopping experience where users can easily browse categories, view products clearly, and enjoy a smooth and visually appealing interface.
People who enjoy retail browsing often search for platforms that combine clean design with attractive product presentation for a more enjoyable shopping experience ShopBright Shine Network usability insight – The website ensures a smooth browsing experience where items are showcased beautifully, navigation is simple, and users can explore products efficiently across all categories.
Users seeking convenient online shopping often appreciate platforms that make product discovery easy through visually appealing layouts and clear navigation structures EverydayGlow Shopping Hub experience note – It provides a user friendly shopping environment with well organized categories, attractive product displays, and smooth navigation that enhances overall browsing comfort and efficiency.
Individuals who enjoy exploring products online often prefer platforms that combine simplicity with visually appealing design elements for better usability and engagement ShineCart Daily Hub platform insight – The website offers a clean and engaging shopping interface where users can easily find products, enjoy smooth navigation, and experience a visually pleasant browsing journey.
People interested in online retail often search for platforms that provide clear product displays and easy navigation for a more efficient shopping experience GlowShop Everyday Portal usability comment – It delivers a smooth shopping environment where products are visually highlighted, categories are well structured, and users can navigate effortlessly while enjoying a clean interface.
Users who enjoy shopping online often prefer platforms that make browsing simple and visually appealing with well organized product listings and smooth navigation ShineBrowse Market Hub experience insight – The platform provides an intuitive shopping experience with attractive product presentation, easy navigation tools, and a clean layout designed for efficient browsing.
Individuals looking for enjoyable online shopping often appreciate platforms that combine visual appeal with structured navigation for a more satisfying user experience BrightDaily Shop Network platform note – It offers a well designed shopping interface where users can explore products easily while enjoying clear categories, smooth navigation, and visually engaging product displays.
People who enjoy e-commerce browsing often prefer platforms that provide attractive product layouts and simple navigation for a better shopping experience overall ShopShine Daily Portal usability insight – The website ensures a smooth browsing experience with visually appealing product presentation, easy category navigation, and a clean structure that enhances usability and satisfaction.
Users interested in online shopping platforms often search for websites that make product browsing easy while offering visually engaging and well organized layouts GlowShine Market Hub experience comment – It delivers a seamless shopping experience with attractive product displays, intuitive navigation, and a structured interface that helps users browse comfortably and efficiently.
Individuals who enjoy discovering products online often prefer platforms that provide both visual appeal and easy navigation for a smoother shopping journey ShineEase Shopping Network platform insight – The website offers a clean and engaging shopping environment where users can easily explore items while enjoying a visually appealing and user friendly interface throughout all categories.
casino https://graph.org/NapoleonCasino-transforme-lexpérience-de-jeu-du-jeu-Astronaut-Crash-04-16-20
People interested in unique presents often look for platforms that make gift selection easy and enjoyable, and I recently discovered Creative Gift World Charm Gifts Hub which feels good – A gift website offering creative and special products, and I already purchased a gift for my mom, which made the experience feel smooth and rewarding.
Shoppers who explore international clothing ideas often need clean navigation systems that reduce confusion during selection processes style explorer portal – organized presentation of outfits allows users to compare fabrics colors and patterns more effectively while saving time and improving confidence in final selections across digital marketplaces
In today’s fast paced digital world, many users appreciate platforms that make browsing and selecting products feel smooth, relaxed, and intuitive while reducing confusion during decision making processes happycart – This describes a relaxed shopping environment where users can move through categories easily, compare options without pressure, and enjoy a calm experience that makes everyday online purchasing feel more comfortable and natural for all types of shoppers online.
I had been looking for structured trading education websites when I noticed daily learning guide – The platform felt simple and professional, and the information was easy to access without distracting banners or unnecessary interruptions affecting the browsing flow online.
Такие симптомы требуют медицинского вмешательства, поскольку могут приводить к ухудшению состояния. Капельница помогает стабилизировать самочувствие и снизить нагрузку на организм. Услуги могут предоставляться анонимно, а при необходимости пациент направляется на лечение в стационаре.
Разобраться лучше – kapelnicza-ot-pokhmelya-voronezh-7.ru/
wethenorth market link https://bestdarknetmarkets.com/
1xbet yeni giriş adresi 1xbet yeni giriş adresi
Процедура вывода из запоя на дому включает несколько ключевых этапов, которые обеспечивают максимально быстрое и безопасное восстановление пациента. Эти этапы тщательно контролируются врачом, что минимизирует риски и помогает достичь наилучших результатов.
Углубиться в тему – анонимный вывод из запоя на дому в екатеринбурге
Публикация посвящена жизненным историям людей, успешно справившихся с зависимостью. Мы покажем, что выход есть, и он начинается с первого шага — принятия проблемы и желания измениться.
Подробнее – капельница на дому в воронеже цены
While exploring online buying platforms I discovered a website that offers a clean and user friendly marketplace experience for global users Global Deal Station – the platform is well organized and provides easy access to multiple product categories allowing users to navigate smoothly and shop comfortably across different sections of the marketplace today online
Stopped thinkingOnline fashion marketplaces provide users with an easy way to browse and compare styles Contemporary fashion space – this service feels modern, clean, and well structured for everyday shopping needs – making fashion exploration more enjoyable and less time consuming for users.
Наиболее частыми основаниями для выбора такого формата становятся длительный запой, тяжелое течение похмельного синдрома, выраженный тремор, отсутствие сна, тревога, слабость, обезвоживание и жалобы на сердцебиение. Дополнительное значение имеют хронические заболевания сердца, сосудов, печени и нервной системы, на фоне которых выход из запоя может переноситься тяжелее.
Изучить вопрос глубже – вывод из запоя в стационаре в санкт-петербурге
рулонные шторы с электроприводом и дистанционным управлением рулонные шторы с электроприводом и дистанционным управлением
Эта медицинская заметка содержит сжатую информацию о новых находках и методах в области здравоохранения. Мы предлагаем читателям свежие данные о заболеваниях, профилактике и лечении. Наша цель — быстро и доступно донести важную информацию, которая поможет в повседневной жизни и понимании здоровья.
Продолжить изучение – вызвать врача нарколога на дом срочно
While exploring educational platforms I discovered a website that encourages users to expand their horizons and learn new things while exploring opportunities Horizon Discovery Learning Hub – the platform feels well organized and motivational, helping users grow their knowledge, develop skills and explore opportunities through a simple and inspiring online experience today
Users who prefer simplified online shopping often gravitate toward websites that organize deals clearly and reduce complexity during browsing sessions for better convenience Simple Cart Explorer because it makes the shopping process more comfortable – The platform layout ensures smooth navigation and a well structured environment for discovering products easily
В этом обзоре мы обсудим современные методы борьбы с зависимостями, включая медикаментозную терапию и психотерапию. Мы представим последние исследования и их результаты, чтобы читатели могли быть в курсе наиболее эффективных подходов к лечению и поддержке.
Перейти к статье – вызов нарколога на дом екатеринбург цена
During some random browsing of forex education sites, I stumbled upon a page that felt clean and structured in a simple way successful market club – it seems to be a helpful resource with clear information that is easy to understand and follow without confusion
888.starz https://888starz-uz1.org/ .
While checking online motivational hubs I came across a platform that shares simple and positive content designed to improve everyday emotional well being Life Inspiration Point – the experience is easy to explore and very helpful providing uplifting ideas that support users in staying motivated and building a positive mindset through daily inspiration online
تسجيل دخول 888 https://888starz-egypt9.com/
Многие семьи слишком долго откладывают обращение к услугам нарколога, надеясь, что человек «отойдет сам», выспится, восстановится за день-два или просто даст очередное обещание больше не повторять употребление. На практике такие ожидания часто только отнимают время. Если зависимость уже начала формироваться, самочувствие после алкоголя становится тяжелее, а промежутки между срывами сокращаются, это говорит о том, что проблема вышла за пределы бытовой и требует профессиональной оценки.
Ознакомиться с деталями – оказание наркологической помощи
Throughout personal development discussions, mentions of important resource appear frequently – Building trust consistently is now viewed as one of the most essential skills for navigating modern life.
Online users searching for organized shopping experiences often prefer platforms that highlight clarity and ease of navigation, and easy shop collection – provides a structured product display that helps users explore items smoothly while maintaining a clean and user-friendly browsing environment overall.
Вывод из запоя в стационаре в Санкт-Петербурге: круглосуточное лечение, детоксикация и медицинский контроль в наркологической клинике «Элегия Мед».
Подробнее – стационар вывод из запоя в санкт-петербурге
After checking several shopping value websites, I discovered smart deals hub – The browsing experience felt easy and pleasant, and products were displayed clearly in an organized and visually appealing way without clutter or confusing navigation online.
People who like positive shopping environments often search for websites that make browsing simple and enjoyable, especially when they visit friendly shopping zone hub – the website feels modern and clean, helping users move through categories easily while maintaining a cheerful and well organized shopping experience overall without unnecessary complexity.
wethenorth link https://bestdarknetmarkets.com/
Many learners searching for easy to understand educational resources often appreciate platforms that break down complex topics into simple explanations for better comprehension and daily learning improvement EasyLearn Knowledge Hub study note – The platform provides helpful and clearly explained learning content that makes understanding new topics straightforward while supporting continuous education through simple, structured, and accessible information designed for all learners.
Individuals who enjoy self education often look for platforms that simplify learning concepts and make difficult topics easier to understand through clear and engaging explanations SmartStudy Learning Portal experience insight – It offers well structured educational content that helps users grasp new ideas quickly while improving knowledge through simple explanations and an intuitive learning approach suitable for everyday study.
People seeking educational support often prefer platforms that present information in a clear and simple format that enhances understanding and retention of new concepts LearnEase Education Network usability comment – The website delivers straightforward learning materials that help users easily understand complex topics while providing a smooth and accessible experience designed for consistent educational growth and knowledge development.
Users interested in continuous learning often search for platforms that make education simple and engaging through easy explanations and structured content delivery KnowledgeFlow Study Hub platform note – It provides clear and helpful learning resources that allow users to understand new topics effortlessly while encouraging steady academic progress and improved comprehension through simplified educational guidance.
Individuals who enjoy exploring new subjects often prefer platforms that simplify learning and make information easy to absorb through clear explanations and examples StudySmart Learning Center experience insight – The platform focuses on delivering easy to follow educational content that helps users understand complex ideas quickly while supporting effective learning through structured and simplified information.
People looking for educational clarity often search for platforms that break down topics into simple explanations that make learning more effective and enjoyable QuickLearn Knowledge Portal usability note – It offers well organized learning materials that help users easily grasp new concepts while maintaining a smooth and user friendly experience designed for efficient understanding and long term knowledge retention.
Users who enjoy accessible education often prefer platforms that present learning content in a simple and structured way for better comprehension and engagement SimpleStudy Learning Hub experience comment – The website provides easy explanations that help users understand new topics without difficulty while supporting consistent learning progress through clear and practical educational resources.
Individuals seeking knowledge improvement often explore platforms that make learning easier through simplified explanations and structured educational content for all levels LearnQuick Education Network platform insight – It delivers straightforward and helpful study materials that allow users to understand concepts quickly while maintaining clarity and supporting continuous learning in a user friendly environment.
People interested in online education often prefer platforms that provide simple explanations and help them understand new topics without unnecessary complexity EduEase Learning Portal usability note – The platform offers clear and concise educational content that makes learning easier while helping users build knowledge efficiently through structured and easy to follow information.
Users who value clear learning often search for platforms that simplify education and make it easier to understand difficult topics through guided explanations StudyFlow Knowledge Hub experience insight – It provides helpful learning materials that support understanding through simple explanations while encouraging continuous knowledge development and effective learning habits for everyday educational growth.
Individuals exploring new knowledge often prefer platforms that break down information into simple concepts for better understanding and long term retention LearnPath Study Center platform note – The website delivers easy to understand educational content that helps users quickly grasp new ideas while maintaining clarity and supporting steady learning progress through structured explanations.
People seeking academic support often look for platforms that present learning materials in a simple and accessible format for improved understanding EasyEdu Learning Network usability comment – It provides straightforward educational resources that help users understand complex subjects easily while maintaining a smooth and engaging experience designed for consistent learning improvement.
Users interested in skill development often prefer platforms that simplify education and provide clear explanations to make learning more effective and enjoyable SmartLearn Study Hub experience insight – The platform focuses on delivering easy to follow content that helps users understand new topics quickly while supporting long term knowledge building through structured educational guidance.
Individuals who enjoy learning new things often search for platforms that make education simple and accessible through clear explanations and practical examples KnowledgeEase Learning Portal platform note – It provides well organized study materials that help users easily understand concepts while encouraging continuous learning and academic growth through simplified educational content and user friendly design.
People looking for simplified education often prefer platforms that present learning content in a structured and easy to understand format for better comprehension StudyEase Knowledge Center usability insight – The website delivers clear educational explanations that help users grasp new topics quickly while supporting effective learning through simple, accessible, and well organized study resources.
Users who enjoy knowledge building often explore platforms that simplify complex subjects and provide easy explanations for better understanding and retention LearnSimple Education Hub experience comment – It offers straightforward learning materials that help users understand difficult topics easily while maintaining clarity and supporting continuous educational development through structured and helpful content.
Individuals seeking easy education often prefer platforms that make learning simple through clear explanations and well organized study resources for all users EduSmart Learning Portal platform insight – The website provides accessible educational content that helps users quickly understand new concepts while promoting effective learning and knowledge growth through simplified and structured information delivery.
People interested in improving knowledge often search for platforms that provide easy explanations and help them learn new topics without confusion or complexity LearnFlow Study Network usability note – It delivers clear and helpful educational content that supports understanding while making learning more efficient and enjoyable through simple explanations and structured study materials.
Users exploring educational platforms often prefer websites that simplify learning and make it easier to understand new information through clear guidance QuickStudy Knowledge Hub experience insight – The platform offers easy to understand learning content that helps users build knowledge effectively while maintaining clarity and supporting continuous academic development through structured education.
Individuals who enjoy self learning often look for platforms that present educational content in a simple and engaging format for better understanding StudyEase Learning Network platform note – It provides helpful explanations that make learning easier while supporting users in understanding new topics quickly through clear, structured, and accessible educational resources designed for all learners.
Отдельного внимания требуют случаи, когда больной почти не ест, плохо пьет воду, не может спокойно лежать, жалуется на сильное сердцебиение, нехватку сна или выраженное внутреннее напряжение. В такой ситуации осмотр помогает определить, безопасно ли оставаться дома и какого объема помощи достаточно на текущем этапе. Если речь идет о выраженных проявлениях абстинентного синдрома, затягивать с обращением нецелесообразно.
Выяснить больше – нарколог на дом цена
During my search for online shopping websites with modern designs, I came across smart market hub – The website felt organized and user friendly, and browsing through categories was simple because everything loaded quickly without clutter or distractions online.
В обзорной статье вы найдете собрание важных фактов и аналитики по самым разнообразным темам. Мы рассматриваем как современные исследования, так и исторические контексты, чтобы вы могли получить полное представление о предмете. Погрузитесь в мир знаний и сделайте шаг к пониманию!
Информация доступна здесь – капельница от алкоголя на дому цена
While browsing trading strategy communities and market analysis portals I noticed in the middle of my research list Focused Trade Insight Zone which delivered clear and methodical analysis – The posts this week felt reliable and well structured giving a strong sense of credibility in the insights provided
During my search for trend tracking websites I discovered a platform that presents information in a very structured format Trend Radar Hub branded Trend Radar Hub interface – users can easily navigate through trending sections and quickly identify relevant updates making the browsing experience efficient and enjoyable for all types of users today
shopandsmilealways – Great website today, products appear organized, easy and visually pleasant
В данной статье рассматриваются проблемы общественного здоровья и социальные факторы, влияющие на него. Мы акцентируем внимание на значении профилактики и осведомленности в защите здоровья на уровне общества. Читатели смогут узнать о новых инициативах и программах, направленных на улучшение здоровья населения.
Смотрите также – капельница от алкоголя самара
К ситуациям, при которых используется домашний формат, относятся:
Подробнее тут – вывод из запоя на дому анонимно в санкт-петербурге
Процесс вывода из запоя начинается с первичной консультации врача, который проводит осмотр пациента, оценивает его состояние и собирает анамнез. На основе полученной информации специалист подбирает индивидуальный план детоксикации, который может включать капельницы с инфузионными растворами, витамины, препараты для нормализации давления, а также средства для снижения симптомов абстиненции, таких как тошнота, головная боль и слабость. Важно, что весь процесс выводится под контролем врача, что гарантирует безопасность и эффективность.
Узнать больше – вывод из запоя на дому цена екатеринбург
People navigating personal or professional transitions frequently seek encouraging resources online, and positive path center – presents motivational perspectives that support personal growth while helping users stay focused on opportunities for improvement and long-term success in different areas of life.
In my search for innovation platforms I came across a website that motivates users to build something new and explore creative ideas for projects Start Build Creative Hub – the platform feels inspiring and structured helping users begin new projects, develop ideas and create meaningful outcomes through simple online guidance today
As users browse through online lifestyle directories and positive living recommendations, they often encounter stores designed to make everyday shopping feel light and stress free EverydayHappinessShop – It is commonly viewed as a pleasant digital store experience where simplicity and comfort guide users toward easy product exploration and relaxed decision making.
Выбор между домашней помощью и стационарным лечением часто определяется степенью физиологической зависимости, наличием сопутствующих патологий и риском развития осложнений. В условиях клиники исключаются внешние триггеры, обеспечивается полная изоляция от источников психоактивных веществ и создается контролируемая терапевтическая среда, где медицинские решения принимаются на основе объективных диагностических показателей, а не субъективных ощущений пациента. Такой подход критически важен для предотвращения тяжелых осложнений, минимизации дискомфорта абстиненции и формирования устойчивой базы для дальнейшей противорецидивной работы.
Узнать больше – https://vyvod-iz-zapoya-v-staczionare-nizhnij-novgorod-10.ru/
While checking online stores I came across a platform that highlights unique products in a clean and organized way while offering a smooth shopping experience Unique Trend Market Hub – the website feels simple and easy to navigate helping users explore products and enjoy a seamless and enjoyable online shopping journey today
While exploring different fashion pages online, I came across something that felt a bit different and decided to mention it here briefly fashion picks online – the design is simple yet appealing, making it easy to browse through without unnecessary complications
xbet giriş xbet giriş
As I browsed different trading information systems and global market dashboards, I added global market flow hub into my notes – the daily updates helped me stay ahead of movements, and the charts load quickly, which enhances overall usability and performance.
заказать рулонные шторы в москве заказать рулонные шторы в москве
casino https://graph.org/Jackpot-Slots-and-Stake-casino-Gaming-04-16-2
1xbet türkiye giriş 1xbet türkiye giriş
1xbet spor bahislerinin adresi 1xbet spor bahislerinin adresi
1xbet güncel adres 1xbet güncel adres
Наша команда видит задачу шире, чем просто снять интоксикацию: важно вернуть предсказуемое засыпание, успокоить вегетативную систему, снизить тревожность и объяснить семье, как мягко поддержать человека, не обесценивая и не провоцируя конфликты. Поэтому медицинские вмешательства поддержаны «сенсорной дисциплиной» (свет, тишина, отсутствие резких запахов), простыми ритуалами вечера и короткими чек-инами на следующий день. Такой формат помогает не только «пережить ночь», но и спокойно пройти первые двое суток, когда риск откатов особенно высок.
Исследовать вопрос подробнее – http://vyvod-iz-zapoya-nizhnij-tagil0.ru/vyvod-iz-zapoya-v-nizhnem-tagile/https://vyvod-iz-zapoya-nizhnij-tagil0.ru
Users who like discovery focused content often prefer platforms that simplify curiosity, especially when they explore curiosity journey hub – the platform feels smooth and engaging, allowing users to browse ideas naturally while maintaining a distraction free and inspiring experience throughout their learning session online.
After comparing several trading education platforms, I found daily trading insights – The website appeared informative and useful, and everything felt updated and easy to navigate, allowing quick browsing through sections without confusion or overwhelming design elements online.
Many users exploring helpful online resources often look for platforms that present curated discoveries in a clean and structured way for easier understanding and engagement across topics GreatDiscover Hub usability note – The website delivers well organized content that makes exploring new and interesting findings simple, engaging, and smooth while maintaining a user friendly layout that supports easy browsing and clear navigation throughout.
People searching for useful and engaging online content often prefer platforms that highlight discoveries in an organized manner while ensuring clarity and accessibility across different categories DiscoveryWorld Portal platform insight – It offers a thoughtfully arranged browsing experience where users can easily explore interesting topics and enjoy a smooth interface that feels both practical and engaging for everyday informational needs.
Users interested in discovering valuable insights often explore platforms that simplify information and present content in a structured and visually clear format for better understanding SmartDiscover Network experience note – The platform focuses on delivering useful discoveries in an engaging way that helps users stay informed while enjoying a well organized and intuitive browsing experience across multiple topics and categories.
People who enjoy learning new things online often look for platforms that provide engaging discoveries and maintain a clean structure for easy navigation and exploration ExploreFinds Hub usability comment – It provides a smooth browsing experience with well categorized content that allows users to discover interesting information quickly while maintaining clarity, simplicity, and overall ease of use throughout.
Individuals searching for interesting online content often prefer platforms that organize discoveries in a way that feels both engaging and easy to understand CuratedDiscover Space interface insight – The website presents useful findings in a structured format that enhances user experience by making browsing intuitive, enjoyable, and efficient for anyone exploring new topics and information online.
People exploring informational platforms often appreciate websites that highlight discoveries in a clear and engaging way while maintaining strong usability and structure InsightFinder Portal usability note – It ensures that users can easily navigate through well organized content while enjoying a smooth and engaging browsing experience that supports curiosity and continuous exploration of interesting topics.
Users who value structured online discovery often search for platforms that make information easy to access while keeping the browsing experience enjoyable and efficient DiscoverEase Network platform comment – The website offers a clean layout that helps users quickly find useful and interesting discoveries while maintaining clarity and smooth navigation across all sections and categories of content available.
People who enjoy exploring curated knowledge often prefer platforms that present discoveries in a well organized format that enhances clarity and engagement during browsing sessions BrightDiscover Center experience insight – It delivers structured and engaging content that allows users to explore interesting topics easily while benefiting from a smooth interface designed for simplicity and effective information discovery.
Individuals seeking useful online discoveries often look for platforms that combine simplicity with engaging presentation to improve the overall browsing experience significantly FindersHub Online usability note – The platform focuses on delivering organized and interesting content that helps users navigate effortlessly while maintaining engagement and clarity throughout their exploration of different informational topics.
People interested in well structured informational websites often search for platforms that present discoveries in a way that is both engaging and easy to navigate NextDiscover Network platform insight – It provides a user friendly experience that ensures smooth access to interesting content while maintaining clear organization and intuitive browsing features for better understanding and engagement.
Users who enjoy discovering new information often prefer platforms that combine engaging content with structured presentation for better clarity and usability InfoDiscover Hub usability comment – The website ensures a smooth browsing experience by organizing discoveries in a clear format that helps users easily explore and understand new topics without unnecessary complexity or confusion.
People searching for reliable informational platforms often look for websites that present discoveries in a simple yet engaging way for better accessibility EasyDiscover Portal experience note – It delivers well structured content that allows users to explore interesting findings effortlessly while maintaining a clean and intuitive interface designed for smooth navigation and improved usability overall.
Individuals exploring online knowledge sources often appreciate platforms that make discovering new information simple, engaging, and well organized across multiple categories DiscoverFlow Network platform insight – The website provides a structured browsing experience that helps users find useful discoveries quickly while enjoying clear navigation and a visually organized interface that supports easy exploration.
People who enjoy browsing informational content often prefer platforms that present discoveries in a clear and structured way for better understanding and engagement SmartFind Discover Hub usability note – It offers a smooth and engaging browsing environment that helps users explore useful information easily while maintaining clarity, organization, and an intuitive layout throughout the platform.
Users looking for engaging online discoveries often search for platforms that provide structured content and make navigation simple and enjoyable across different topics ExploreSmart Center experience comment – The website ensures a clean and organized presentation of information that allows users to discover interesting content effortlessly while enjoying a smooth and user friendly browsing experience.
People interested in curated knowledge platforms often prefer websites that highlight discoveries in an organized and visually clear format for better usability and engagement DiscoverPlus Hub platform insight – It delivers structured and engaging content that helps users explore useful information easily while maintaining a smooth and intuitive browsing experience across various informational categories.
Individuals exploring interesting content online often appreciate platforms that make discovery simple and enjoyable through clear organization and engaging presentation InfoQuest Discover Portal usability note – The website provides a well structured browsing experience that allows users to access interesting findings quickly while enjoying clarity, simplicity, and efficient navigation throughout all sections.
People who value easy access to information often search for platforms that organize discoveries in a way that enhances usability and engagement DiscoverEase Hub experience insight – It focuses on providing a clean and structured interface that helps users explore interesting content effortlessly while maintaining a smooth and enjoyable browsing experience across all categories.
Users exploring knowledge based platforms often prefer websites that present discoveries in a clear, engaging, and well structured format for better understanding FindDiscover Network usability comment – The platform ensures users can easily browse through interesting topics while enjoying a smooth and organized interface designed to improve accessibility and overall user experience during exploration.
People interested in discovering useful online content often look for platforms that simplify browsing while offering engaging and well organized information across categories DiscoverHub Global platform note – It provides a structured and intuitive browsing experience that helps users quickly find interesting discoveries while maintaining clarity, engagement, and ease of navigation throughout the website.
Individuals who enjoy exploring informative websites often prefer platforms that present discoveries in a simple and engaging way that supports easy understanding GreatFind Explorer usability insight – The website delivers organized content that enhances user experience by making browsing smooth, engaging, and efficient while helping users explore interesting information without unnecessary complexity.
After reviewing several fashion boutique platforms, I found daily outfit hub – The website felt stylish and organized, and browsing through products was easy because everything was presented clearly without clutter or distracting visual noise online.
Публикация приглашает вас исследовать неизведанное — от древних тайн до современных достижений науки. Вы узнаете, как случайные находки превращались в революции, а смелые мысли — в новые эры человеческого прогресса.
Личный опыт — читайте сами – прокапаться от алкоголя воронеж
During my exploration of lifestyle and fashion content, I came across style ideas corner – It has a personal and creative feel, making browsing enjoyable for anyone who likes discovering unique and stylish inspirations.
Users interested in aesthetic home transformations often browse online resources that present modern design inspiration in a visually organized way that reduces confusion and improves clarity during exploration and they might find Living Space Ideas Hub during such searches – it is commonly described as a platform that keeps browsing simple while showcasing updated interior concepts in a structured and easy-to-follow format for everyday inspiration.
During my exploration of budget friendly shopping resources I came across a platform that focuses on making deals accessible and clearly categorized for everyday users Simple Deal Portal – everything is arranged in a logical structure that allows quick scanning of offers while maintaining a clean and distraction free browsing environment throughout the site
In my search for idea sharing websites I came across a platform that focuses on connecting concepts in a clear and easy to understand way for users Creative Connect Ideas Hub – the experience feels intuitive and organized helping users explore and share ideas in a smooth environment designed for better communication and creative thinking online
Home improvement enthusiasts frequently use platforms like Design & Living Resource to explore modern interior ideas, efficient layouts, and stylish home enhancement strategies – The platform focuses on delivering practical inspiration for creating elegant, functional, and well-structured living spaces daily use
People seeking efficient online shopping experiences often prefer platforms that reduce clutter and present information in a clean structured format Simple Trend Market providing a streamlined interface that allows users to focus on product discovery without distraction – The platform emphasizes simplicity and performance ensuring a smooth journey from browsing to checkout
Users interested in modern online shopping experiences often prefer websites that keep browsing organized and efficient, and fresh finds portal – presents products in a clean layout that encourages smooth exploration and helps visitors locate appealing items with greater ease and convenience.
During review of digital marketplace examples and design case studies I came across in the middle of my research material Easy Flow Market Place Hub which stood out due to its clean and structured interface – The browsing experience felt smooth and allowed users to stay focused on content without distractions
электрическая рулонная штора электрическая рулонная штора
People searching for ways to improve confidence and mindset often benefit from motivational platforms, and life potential center – provides inspiring content that helps users develop self-belief and move forward with clarity and positive direction in life overall.
During my review of trading mentorship resources and learning frameworks I came across Reliable Market Coach Zone a platform that emphasizes consistent guidance and structured trading improvement techniques – The overall impression felt steady and practical for developing confidence in market decisions
While exploring e-commerce platforms I discovered a website that focuses on fast performance and a well organized shopping experience with a wide product range Today Easy Shop Hub – the platform feels reliable and clean helping users browse products quickly while enjoying a smooth and structured online shopping experience today online
888 start 888 start .
I was browsing through different home and lifestyle stores focused on simplicity and found one that stood out for its clarity simple design shop – I like the easy navigation and minimal layout since it makes everything feel structured and easy to explore
Отдельно стационар рассматривают в тех ситуациях, когда уже были тяжелые эпизоды, осложнения после прекращения употребления алкоголя или выраженное ухудшение состояния дома. Если у больного ранее отмечались судороги, спутанность сознания, тяжелая бессонница, психомоторное возбуждение или нестабильные показатели давления, стационарный формат позволяет проводить помощь в более контролируемых условиях. В подобных случаях задача состоит не только в том, чтобы вывести человека из запоя, но и снизить риск повторного ухудшения в первые сутки и далее.
Получить дополнительную информацию – быстрый вывод из запоя в стационаре
В статье представлены ключевые моменты по актуальной теме, дополненные советами экспертов и ссылками на дополнительные ресурсы. Цель материала — дать читателю инструменты для самостоятельного развития и принятия осознанных решений.
Познакомиться с результатами исследований – сделать капельницу от похмелья
https://capital360.com.ua/
888starz bet 888starz bet .
https://www.pravdadaily.com.ua/oryhinalni-podarunky-dlia-pary-top-15-idey-dlia-zakokhanykh-na-bud-iaku-nahodu/
В этой статье собраны факты, которые освещают целый ряд важных вопросов. Мы стремимся предложить читателям четкую, достоверную информацию, которая поможет сформировать собственное мнение и лучше понять сложные аспекты рассматриваемой темы.
Раскрыть тему полностью – срочная наркологическая помощь на дому
People who like organized and simple lifestyle content often search for platforms that remove unnecessary complexity, especially when they visit clarity focused living hub – the website feels modern and easy to navigate, helping users understand practical concepts quickly while maintaining a calm and structured environment overall in their browsing experience.
After reviewing multiple beauty stores online, I landed on smart beauty shop – The platform featured a beautiful design, and browsing products felt smooth and enjoyable every visit, making shopping easy without unnecessary distractions or complicated navigation online.
Online shoppers often explore large digital platforms that bring together diverse sellers and product categories, making it easier to compare and choose items efficiently across global markets WorldTrade Market Hub browsing note – The platform provides a smooth and highly convenient experience where users can easily navigate through a wide variety of products while enjoying clear structure and efficient browsing across international listings.
People searching for international shopping options often prefer platforms that combine variety with a simple and intuitive browsing experience for better decision making GlobalCart Explorer Network usability insight – It offers a well organized marketplace where users can explore products from different regions with ease while benefiting from smooth navigation and a clean, user friendly interface.
Users interested in global e commerce often look for platforms that make browsing simple while offering a wide selection of products from multiple sellers worldwide MarketFlow Global Hub experience comment – The website delivers a seamless shopping experience with structured categories that allow users to quickly find and compare products while maintaining convenience and clarity throughout the browsing journey.
Individuals who enjoy online shopping often prefer platforms that combine international variety with easy navigation and fast access to relevant product categories TradeWorld Marketplace Center platform note – It provides a smooth browsing environment where users can explore global products effortlessly while enjoying a reliable and well organized interface designed for convenience and usability.
People exploring online marketplaces often appreciate platforms that simplify access to global products while maintaining a clear and efficient browsing experience GlobalShop Connect Hub usability insight – The platform ensures users can easily navigate through diverse categories while enjoying a structured layout that enhances product discovery and supports quick and informed purchasing decisions.
Users who value variety in online shopping often search for platforms that offer global access to products while keeping navigation simple and efficient MarketSphere Global Portal experience note – It delivers a clean and intuitive interface that helps users explore international products easily while maintaining a smooth and consistent browsing experience across all sections of the platform.
People looking for international shopping platforms often prefer websites that provide diverse product options while ensuring a seamless browsing experience GlobalTrade Finder Network platform comment – The website focuses on delivering structured and accessible product listings that help users quickly discover items from around the world while maintaining ease of use and clarity throughout navigation.
Users interested in global commerce often explore platforms that offer a wide range of products while maintaining a simple and user friendly browsing experience WorldMarket Access Hub usability insight – It provides an efficient shopping environment where users can easily browse international listings while enjoying smooth navigation and a well organized interface designed for convenience and clarity.
Individuals searching for global shopping solutions often prefer platforms that combine variety with easy navigation for a better overall user experience TradeHub Global Network experience comment – The platform delivers a smooth browsing system that allows users to explore products from different regions effortlessly while maintaining a clear and structured shopping environment throughout all categories.
People who enjoy browsing international marketplaces often look for platforms that make global shopping simple, organized, and efficient across multiple product categories GlobalMarket Explorer Portal usability note – It ensures users can easily navigate through a wide selection of products while benefiting from a clean interface designed to support smooth browsing and effective product discovery.
Users exploring online global stores often prefer platforms that provide variety while maintaining a consistent and easy to understand browsing structure WorldCommerce Hub Network platform insight – The website offers a seamless shopping experience that allows users to explore international products easily while enjoying clear organization and reliable navigation throughout the entire platform.
People interested in global product discovery often search for platforms that combine convenience with a wide range of international shopping options GlobalBuy Connect Portal experience note – It delivers structured browsing with well categorized listings that help users find products quickly while maintaining a smooth and user friendly interface across all sections of the marketplace.
Users who enjoy online shopping often prefer platforms that provide access to global products while ensuring a smooth and efficient browsing experience MarketLink Global Hub usability insight – The platform focuses on offering a clean and organized interface that allows users to explore international listings easily while maintaining clarity and convenience throughout the shopping journey.
Individuals looking for international marketplaces often appreciate platforms that simplify browsing and provide access to diverse product categories worldwide GlobalExchange Shopping Network platform note – It offers a smooth and intuitive experience that helps users navigate global listings easily while maintaining a structured and efficient browsing environment for better usability and satisfaction.
People exploring online trade platforms often prefer websites that offer global variety while ensuring a simple and accessible shopping experience TradeVision Global Hub usability comment – The website delivers a well structured browsing experience that helps users easily discover products from different regions while maintaining smooth navigation and consistent usability across all sections.
Users who value convenience in online shopping often search for platforms that provide global access to products with clear and organized browsing tools GlobalCart Trade Portal experience insight – It ensures users can easily explore international products while benefiting from a clean interface designed to support efficient navigation and smooth shopping experiences across all categories.
People interested in worldwide shopping often prefer platforms that combine product variety with fast and intuitive browsing for better user experience MarketBridge Global Network usability note – The platform offers a structured environment where users can explore global listings easily while maintaining clarity, simplicity, and efficient navigation throughout their shopping journey.
Users searching for global e commerce solutions often appreciate platforms that make product discovery simple while offering a wide range of international options WorldTrade Connect Hub platform comment – It provides a smooth browsing experience that helps users find and compare products easily while maintaining a clear and organized interface across all categories of the marketplace.
Individuals exploring online shopping platforms often prefer websites that provide global access to products while ensuring a smooth and reliable browsing experience GlobalMarket Link Portal usability insight – The platform focuses on delivering structured and easy to navigate listings that help users quickly find international products while maintaining consistency and usability throughout the browsing experience.
People who enjoy international shopping often look for platforms that simplify browsing and provide a wide variety of global products in one place TradeGlobal Finder Hub experience note – It delivers a clean and efficient interface that allows users to explore global marketplaces easily while maintaining smooth navigation and a well organized structure for better usability.
Users interested in global commerce platforms often prefer websites that combine variety with simplicity to enhance the overall shopping experience significantly GlobalShop Vision Network usability comment – The platform provides a seamless browsing experience that helps users discover international products easily while maintaining clarity, structure, and efficient navigation across all sections of the marketplace.
After comparing several deal websites that felt too crowded, I eventually found everyday bargain source – The website felt lightweight and responsive, and it was refreshing to browse through different sections without encountering overwhelming banners, excessive popups, or other distractions that usually slow down the shopping experience online.
В этой статье рассматриваются актуальные вопросы, связанные с развитием медицинской науки и её внедрением в повседневную практику. Особое внимание уделено вопросам профилактики, ранней диагностики и использованию технологий для улучшения здоровья человека.
Подробнее – нарколог на дом 24 часа
В статье представлены ключевые моменты по актуальной теме, дополненные советами экспертов и ссылками на дополнительные ресурсы. Цель материала — дать читателю инструменты для самостоятельного развития и принятия осознанных решений.
Тыкай сюда — узнаешь много интересного – нарколог на дом в екатеринбурге
During my browsing of home decor platforms I found a website that provides trending home ideas focused on modern aesthetics and visually pleasing interior arrangements Modern Space Ideas Hub – the experience feels creative and balanced, helping users explore home styling inspiration, decor trends and practical design improvements
ستار 888 للمراهنات ستار 888 للمراهنات.
Many users exploring wellbeing resources often discover an interesting digital space located within various curated directories where inspiration is shared, and in the middle of their browsing journey they encounter JoyfulExplorerPortal – Uplifting platform promotes happiness, simple joy and daily positivity through gentle reminders and reflective content designed to encourage a more optimistic mindset each day.
In various discussions about smart online shopping strategies I discovered helpful insights at Savings Explorer Portal which highlights different types of limited time offers across many product categories – the site presentation seems user friendly and encourages visitors to explore deals without confusion or unnecessary clutter
https://capital360.com.ua/
Этот увлекательный информационный материал подарит вам массу новых знаний и ярких эмоций. Мы собрали для вас интересные факты и сведения, которые обогатят ваш опыт. Откройте для себя увлекательный мир информации и насладитесь процессом изучения!
Заходи — там интересно – вызов нарколога на дом стоимость
Fashion focused users often prefer digital platforms that present the latest style inspirations in a visually appealing and easy to navigate format that enhances overall browsing satisfaction and clarity trendgallerylive – this site offers a smooth and engaging experience where users can explore modern fashion updates through a well structured interface designed for simplicity and aesthetic enjoyment
Users exploring discount collections usually prefer interfaces that emphasize readability and structured layouts making it easier to evaluate each available option Smart Savings Corner resulting in a more efficient and user friendly shopping journey – The browsing system ensures information is easy to digest and compare at a glance
Под этим направлением обычно понимают не один универсальный сценарий, а несколько форматов помощи, которые применяются в зависимости от состояния пациента. На первом этапе часто решается задача стабилизации: нужно оценить выраженность интоксикации, общее самочувствие, понять степень риска и определить, какой объем вмешательства уместен именно сейчас (например, необходима ли очищающая капельница). Но даже если речь идет о срочном обращении, грамотный подход не ограничивается только кратковременным облегчением.
Детальнее – вызов наркологической помощи воронеж
https://androhack.ru/
Публикация знакомит читателей с различными подходами к реабилитации. От традиционных методов до современных программ — вы узнаете, как выбрать оптимальный путь к выздоровлению и преодолеть препятствия на этом пути.
Запросить дополнительные данные – антипохмельная капельница
While checking online marketplaces I came across a website that provides a secure and professionally designed shopping experience with simple navigation tools for users Safe Confidence Cart – the experience feels clean and trustworthy helping users browse products easily while enjoying a smooth and secure online shopping environment today online
In the middle of browsing multiple gift stores online, I came across cool gift ideas hub – It’s refreshing to see such a creative lineup where every item feels carefully chosen to bring joy and excitement to whoever receives it.
1xbet turkiye 1xbet turkiye
автоматические рулонные шторы с электроприводом автоматические рулонные шторы с электроприводом
People who analyze financial markets often look for platforms that simplify large data sets, and I found Global Market Insight Perspective Hub which seems helpful – The platform delivers insightful information that helps users understand broader market movements, providing clarity on global financial trends in an easy-to-follow format.
I was just browsing casually and noticed something that seemed worth mentioning due to its simple and approachable design trending goods hub – the overall feel is smooth and makes it easy to quickly scan through items and sections
Users interested in slowing down and appreciating life often prefer platforms that highlight simple meaningful experiences, especially when they come across mindful moments hub – the site feels soft and well organized, allowing users to reflect on daily life while maintaining a smooth and calming browsing experience across all sections.
https://www.pravdadaily.com.ua/italiyski-zhinochi-imena-top-50-naypopuliarnishykh-variantiv-z-istoriieiu-ta-znachenniam/
After reviewing several curated information platforms, I discovered helpful value reference – The browsing experience stayed smooth and consistent, and the clean layout made it easier to focus on content without distractions or overwhelming page designs online.
Many users exploring online marketplaces want clarity in pricing and smooth navigation when comparing products across categories for better decisions DealFinder Hub fresh insights note – This platform highlights clearly organized discounts and offers a trustworthy browsing experience that helps shoppers quickly evaluate options and enjoy simple, efficient purchasing journeys without unnecessary complexity or confusion.
Shoppers today often prefer platforms that combine simplicity with transparency while browsing deals and limited time offers across multiple product categories online BrightSavings Portal user experience remark – It delivers well structured deal listings with an easy interface that allows visitors to discover valuable offers quickly while maintaining confidence in each step of the shopping process from selection to checkout.
Online consumers frequently search for reliable deal websites that present offers in a clean and understandable format without overwhelming unnecessary distractions ValueDeal Explorer interface comment – The site organizes promotional listings clearly and ensures users can browse efficiently while enjoying a trustworthy environment that makes finding affordable products straightforward and enjoyable throughout their shopping experience.
People browsing digital marketplaces often appreciate platforms that simplify deal discovery and make comparison between products more intuitive and time efficient SmartDeal Navigator usability note – It offers a structured experience where users can quickly identify relevant deals and enjoy a smooth browsing flow that enhances confidence while selecting products across various categories and price ranges.
Modern shoppers value online platforms that reduce confusion and highlight genuine deals in a visually clear and easy to navigate format QuickSave Market platform remark – It provides transparent deal presentation with a user friendly interface that supports faster decision making and ensures a comfortable shopping experience from discovery through to final purchase completion.
Many users prefer ecommerce spaces that emphasize trust, clarity, and straightforward deal presentation when browsing for everyday essentials or special offers DealVision Center experience note – The platform focuses on presenting well organized discounts that help users easily understand value options while maintaining a smooth and reliable browsing journey across all product categories available.
Online deal seekers often look for platforms that make it easier to compare offers while maintaining a clean and distraction free interface for browsing OfferTrack Hub browsing insight – It ensures users can quickly evaluate multiple deals in a structured layout that improves decision making and creates a seamless shopping experience built around clarity and user convenience throughout.
Shoppers exploring online discounts frequently appreciate platforms that prioritize usability and make it simple to find relevant savings quickly and efficiently DealEase Network platform note – This service delivers well organized promotional content that enhances browsing speed and ensures users can confidently identify worthwhile deals without unnecessary effort or confusion during the shopping process.
Users searching for trustworthy deal platforms often prefer systems that clearly present offers while maintaining a smooth and responsive browsing experience SaveSmart Portal usability comment – It provides a streamlined environment where users can easily navigate through categories and discover valuable deals while enjoying consistent performance and a user friendly interface designed for convenience.
Online shoppers increasingly expect deal platforms to be both intuitive and transparent while offering structured access to promotions across multiple categories DealStream Finder experience remark – The platform enhances browsing efficiency by presenting offers in a clean layout that helps users quickly evaluate options and make informed purchasing decisions with minimal effort or confusion.
Many digital buyers enjoy platforms that simplify deal discovery while ensuring that all offers are presented in a trustworthy and accessible format ClearDeal Hub interface note – It focuses on clarity and organization, allowing users to browse confidently while comparing products easily and enjoying a smooth experience from initial search through final selection and purchase completion.
People looking for reliable online discounts often prefer platforms that maintain consistency in design and offer a straightforward browsing experience DealFinder Express usability remark – It delivers a fast and organized system where users can quickly locate relevant deals and enjoy a seamless interface that prioritizes clarity, trust, and ease of navigation across all sections.
Shoppers who value efficiency in online purchasing often look for deal platforms that reduce complexity and improve product discovery speed ValueQuest Deals experience note – The platform ensures smooth navigation and clearly structured listings that allow users to identify the best available offers quickly while maintaining a consistent and reliable shopping environment throughout.
Online users frequently seek deal websites that present promotions in a simple layout while maintaining a trustworthy and easy to use interface DealMatrix Hub browsing comment – It provides organized deal categories that help users quickly understand available discounts and enjoy a streamlined experience designed for fast decision making and convenient online shopping across various product sections.
Many shoppers prefer platforms that combine speed and clarity when displaying discounts and special offers across different product categories online SmartSaver Network usability insight – The site focuses on delivering a clean browsing experience that helps users quickly evaluate deals and move smoothly through product selections without unnecessary distractions or complicated navigation steps.
People exploring online shopping deals often appreciate platforms that prioritize transparency and make it easy to understand pricing and value differences DealFlow Center platform remark – It offers a structured and intuitive browsing system that ensures users can confidently explore discounts while enjoying a smooth experience that supports quick and informed purchasing decisions.
Online deal platforms are most effective when they provide clarity, speed, and ease of use for users searching for everyday savings opportunities SaveWave Portal interface note – It presents deals in an organized manner that helps users quickly compare options and enjoy a seamless browsing journey focused on simplicity and reliable information delivery throughout the site.
Shoppers often rely on structured deal websites that help them identify discounts quickly while maintaining a clean and professional browsing environment DealCraft Hub experience comment – The platform ensures users can easily explore offers and make confident decisions through a well designed interface that emphasizes clarity, usability, and efficient product discovery across categories.
Digital consumers value platforms that simplify the search for deals while maintaining an engaging and easy to navigate online shopping experience BrightDeal Navigator usability note – It provides a smooth and organized browsing system that highlights valuable offers clearly and supports users in making quick and informed purchasing decisions with minimal effort or confusion.
Many online shoppers prefer deal platforms that balance simplicity and functionality while offering clearly presented discounts across a wide range of products DealSphere Market interface remark – The platform delivers a user friendly experience that helps visitors quickly find relevant deals and enjoy consistent navigation that enhances overall satisfaction during their shopping journey.
Users searching for efficient online deal platforms often appreciate systems that reduce browsing time and present offers in a clean structured layout OfferEase Hub browsing insight – It ensures a smooth and reliable experience where users can easily explore promotions, compare products, and make confident purchasing decisions without unnecessary complexity or distractions.
I spent the evening exploring trading education sites before discovering daily trading mentor – The content felt useful and structured, and the website appeared clean and professionally maintained, allowing users to explore easily without distractions or complexity online.
People searching for refined shopping experiences online often look for outlets that provide organized categories and visually appealing product displays to improve navigation Elegant Style Outlet where browsing becomes simple and enjoyable – users benefit from clear layout structures that help them quickly locate desired products while maintaining visual harmony
While browsing fashion marketplaces I came across a website that offers a stylish shopping experience with trendy products presented in a clean structured layout Trend Style Fashion Hub – the platform feels modern and engaging, guiding users to explore fashion items, view stylish collections and enjoy simple online shopping navigation
Platforms that successfully blend simplicity with variety often provide the best user experience for content exploration hidden gems portal – A portal designed to uncover hidden gems across the web offering users curated and lesser known content suggestions that broaden perspectives and enhance discovery journeys online.
While searching for collaborative education websites I found a platform that focuses on simplicity and effective learning through shared knowledge Learn Share Network – the site offers smooth navigation and a clean layout making it easy for users to explore educational materials exchange ideas and stay engaged in a well organized online learning environment today
В данном материале представлены ключевые тенденции в сфере медицинской науки и практики. Вы узнаете о последних открытиях, инновационных подходах к терапии и важности профилактики заболеваний. Особое внимание уделено практическому применению новых методов в клинической практике.
Жми сюда — получишь ответ – капельница на дому от похмелья
Вірші про мир і перемогу
Many people looking for simple e-commerce experiences often appreciate platforms that prioritize ease of use, and everyday essentials hub – offers a clean interface where users can quickly browse products while enjoying a smooth and well-organized shopping journey overall.
Этот краткий обзор предлагает сжатую информацию из области медицины, включая ключевые факты и последние новости. Мы стремимся сделать информацию доступной и понятной для широкой аудитории, что позволит читателям оставаться в курсе актуальных событий в здравоохранении.
Подробнее тут – капельницы от похмелья
While reviewing different investment education platforms and trading learning systems, I referenced trading education master hub – the course was valuable, and I learned risk management techniques that were completely new to my trading approach.
https://ecopolis-spb.ru/tvorchestvo_all/
Many online shoppers specifically search for platforms that highlight affordable options and budget-friendly recommendations across multiple categories, one example mentioned is Budget Friendly Picks – which is often described as a simple and useful resource for identifying lower-cost deals without excessive browsing effort.
Online users exploring trending style concepts often enjoy resources with simple navigation and visually balanced content, and stylish ideas center – provides a modern atmosphere where visitors can discover fashionable inspiration while browsing comfortably across different categories.
In my exploration of lifestyle improvement platforms I discovered a website that focuses on sharing modern and visually engaging ideas for better everyday living Daily Lifestyle Inspiration – the content feels helpful and inspiring offering users simple yet creative lifestyle ideas that support modern living and make daily routines more enjoyable and well balanced online
casino https://graph.org/MisterGreen-and-the-Pilot-Accident-Game-Wonder-04-16-4
Users who appreciate travel inspired motivation often search for platforms that make exploration feel exciting and meaningful, especially when they visit world exploration ideas space – the website feels engaging and well structured, helping users feel inspired to take action while discovering new perspectives and opportunities in a smooth and enjoyable browsing experience throughout.
рулонные жалюзи с электроприводом рулонные жалюзи с электроприводом
https://ecopolis-spb.ru/tvorchestvo_all/
During evening browsing for small digital shops I unexpectedly found Gleam Goods Outlet and it seemed like a pleasant platform because of its neat layout and straightforward product sections that made exploration easy even for first time visitors – the overall experience felt calm and organized.
While exploring different collaboration idea platforms, I noticed one that felt quite minimal and easy to understand at first glance teamwork strategy hub – the site appears interesting with a clean layout and very simple usability that makes browsing easy
Many online buyers prefer platforms that offer clarity and consistency, allowing them to build confidence while selecting everyday items from a well organized digital environment Everyday Choice Store – It is described as a convenient shopping destination that emphasizes smooth user experience, logical product arrangement, and a friendly interface designed to simplify routine online purchases for busy individuals
During my search for easy to use shopping websites, I came across exclusive shopping guide – The platform appeared clean and structured, and browsing through categories felt effortless because everything was clearly arranged without distractions or complicated layouts online.
Many people searching for personal growth tools often look for platforms that push them toward consistent progress and clearer direction in life goals and habits DreamBuilder Inspire Hub that provides structured motivation resources and mindset guidance – The platform focuses on encouraging action oriented thinking while offering practical inspiration that helps users turn ideas into real achievable steps in everyday life.
Individuals aiming to improve productivity and life direction often explore online spaces that encourage disciplined routines and meaningful goal setting for long term success ActionVision Growth Portal which delivers motivational content and structured planning ideas – It emphasizes building consistent habits and transforming abstract dreams into practical actions that users can apply in real world situations for steady personal development.
People who want to stay motivated daily usually seek platforms that combine inspiration with actionable advice for improving both mindset and productivity levels GoalSpark Motivation Center offering simple yet effective guidance – The platform helps users focus on achievable steps while maintaining enthusiasm for long term ambitions through clear direction and practical encouragement designed for everyday progress.
Those interested in self improvement often prefer resources that guide them through structured thinking and help transform ideas into meaningful achievements over time VisionPath Action Hub which shares motivational frameworks and practical strategies – It encourages users to take consistent steps toward their goals while keeping inspiration alive through clear and easy to follow guidance systems.
Modern learners looking for motivational support often explore platforms that simplify goal setting while encouraging real world application of ideas and plans InspireAction Network providing focused personal development content – The platform highlights practical motivation techniques that help users stay committed to their dreams while building habits that support long term success and self discipline.
People who want to improve focus and productivity often search for digital spaces that combine inspiration with practical execution strategies for daily improvement DreamFlow Success Portal offering structured motivational content – It helps users convert thoughts into action by providing simple frameworks that support consistent progress and encourage steady growth across personal and professional areas of life.
Individuals pursuing ambitious goals often rely on platforms that help them maintain motivation while breaking down complex dreams into manageable steps ProgressMind Inspiration Hub delivering clear guidance and encouragement – The platform promotes action driven thinking and supports users in building confidence while working toward meaningful achievements through consistent effort and practical planning techniques.
People interested in personal transformation often explore motivational platforms that emphasize discipline, clarity, and structured goal achievement methods NextStep Dream Builder which focuses on actionable insights – It provides users with simple strategies to stay consistent, take initiative, and convert ideas into real outcomes through steady progress and practical daily habits.
Users searching for inspiration often prefer platforms that help them stay focused on long term objectives while maintaining daily motivation and energy MomentumGrowth Idea Hub offering motivational frameworks – The platform encourages users to stay active in pursuit of their dreams by combining inspiration with practical steps that support continuous personal and professional development.
Many individuals seeking success guidance look for platforms that provide structured motivation and help them stay aligned with their goals and aspirations ActionDriven Vision Space which delivers practical encouragement – It emphasizes consistent effort and clear thinking while helping users turn ambitious ideas into real accomplishments through step by step motivational support.
People aiming for better productivity often use platforms that simplify planning while keeping motivation high through practical and inspiring content delivery DreamAction Catalyst Hub offering structured personal growth guidance – It supports users in building disciplined routines and encourages them to take meaningful steps toward their goals with clarity and confidence.
Individuals focused on self growth frequently explore motivational resources that combine inspiration with clear actionable strategies for daily life improvement FutureBuild Motivation Portal providing goal oriented guidance – The platform helps users stay consistent with their efforts while turning ideas into structured plans that lead to real and measurable progress over time.
Those working on personal development often seek platforms that guide them in converting inspiration into real actions and consistent daily habits MindsetBuilder Action Zone which delivers practical motivation – It focuses on helping users stay disciplined and organized while building momentum toward their goals through simple yet effective execution strategies.
People interested in achieving long term success often prefer platforms that combine motivational insight with structured guidance for everyday improvement DreamPath Progress Hub offering clear inspiration tools – The platform encourages users to take consistent action while maintaining focus on their aspirations through practical steps and supportive motivational content.
Users looking to improve discipline and focus often explore platforms that provide structured motivation and step based guidance for personal goals ActionMomentum Learning Hub which emphasizes productivity strategies – It helps individuals maintain steady progress by offering clear direction and encouraging consistent effort toward meaningful life achievements and self improvement.
Individuals seeking inspiration for change often rely on platforms that combine motivational thinking with practical execution methods for everyday success VisionAction Growth Center delivering structured encouragement – It helps users stay committed to their goals by turning inspiration into actionable steps that support continuous improvement and personal transformation over time.
People aiming to achieve big goals often look for platforms that simplify planning while offering motivational support for consistent execution DreamBuilder Focus Hub which provides practical inspiration – The platform encourages users to stay disciplined and organized while steadily working toward their ambitions through clear and actionable guidance systems.
Users interested in productivity often explore motivational platforms that help them structure their goals and maintain focus on daily progress ActionRise Inspiration Network offering goal oriented content – It supports users in transforming ideas into achievable actions while encouraging persistence and steady growth through simple and effective motivational tools.
People working toward personal success often use platforms that combine inspiration with structured planning techniques for better clarity and execution MomentumDream Action Hub which delivers practical guidance – It helps users stay focused on their goals while building strong habits that support long term achievement and consistent personal development efforts.
Individuals exploring self improvement often prefer platforms that guide them toward taking action rather than only providing motivational ideas and concepts InspireBuild Progress Portal offering actionable strategies – The platform emphasizes consistent effort and structured planning to help users turn inspiration into real life results through practical and achievable steps.
People seeking direction and motivation often rely on platforms that simplify goal setting while encouraging consistent action toward meaningful achievements DreamAction Success Hub which focuses on practical motivation – It helps users build clarity, maintain discipline, and stay committed to their ambitions through structured and inspiring guidance designed for everyday progress.
While exploring online deal hubs I found a platform that offers good value outlet shopping with simple navigation and fast reliable browsing experience for users Outlet Value Deals Hub – the platform feels practical and easy, guiding users to explore discounted products, compare offers and shop through a well structured online environment
https://capital360.com.ua/
While exploring gift shopping platforms, I eventually found simple gift corner – The collection appeared interesting, and discovering unique products felt effortless and convenient, making browsing enjoyable without unnecessary distractions or complex navigation online.
In the middle of exploring different websites for trending content, I came across new trends showcase – The name feels intriguing and suggests there could be a variety of modern ideas waiting to be explored by curious visitors.
In my recent browsing of ecommerce fashion sites I came across a platform that highlights trending products in a simple and elegant layout Trend Style Center – the interface feels smooth and modern making it easy for users to explore the latest items while enjoying a clean and structured shopping experience across all sections today
888starz casino официальный сайт https://888starz-uz1.org .
موقع 888 للمراهنات https://888starz-egypt9.com/
I had been searching for creative inspiration platforms before discovering growth inspiration hub – It is an inspiring platform where ideas are shared clearly and effectively, helping users grow smoothly without clutter or confusion online.
During my search for growth focused platforms I came across a website that highlights motivation, progress and positive thinking as core values for users Growth Forward Hub – the content is encouraging and easy to follow helping users stay motivated, think positively and focus on continuous personal and professional development in everyday life online
Users exploring digital environments often prioritize speed, clarity, and intuitive structure when deciding whether a platform offers a reliable and enjoyable experience NeoNexa Interface Portal – The NexaSphere system delivers a balanced user experience where modern visuals and usability enhancements work together to create a seamless navigation flow across all sections.
Fashion-focused users who like exploring curated outfit collections often prefer platforms that simplify browsing while still offering rich visual inspiration and trend-focused content across categories RunwayStyle Lounge helping them find fashion ideas without confusion or clutter – The platform provides a pleasant, structured, and visually appealing community feel for fashion discovery.
xbet giri?i xbet giri?i
During my exploration of trading communities that prioritize real experience over marketing fluff, I included successful traders talk hub in my notes – the insights shared are authentic and practical, with no fake guru behavior or unrealistic profit claims.
1xbet güncel 1xbet güncel
1xbet türkiye giriş 1xbet türkiye giriş
1xbet giriş yapamıyorum 1xbet giriş yapamıyorum
1xbet tr 1xbet tr
рулонные шторы с электроприводом на пластиковые окна рулонные шторы с электроприводом на пластиковые окна
People who enjoy exploring ideas for future progress often search for motivational resources that highlight innovation and responsibility, and they visit future vision ideas hub that offers clear and inspiring concepts focused on long term thinking, personal development, and meaningful contributions that help shape better outcomes for individuals and society as a whole.
In moments of uncertainty individuals frequently look for guidance that reinforces determination and self belief as essential tools for reaching meaningful goals in both personal and professional life Dream Builder Hub In moments of uncertainty individuals frequently look for guidance that reinforces determination and self belief as essential tools for reaching meaningful goals in both personal and professional life is presented as a reminder that progress comes through patience consistent effort and clear vision – highlights the importance of structured thinking and focused ambition in everyday challenges
While comparing different income strategy platforms, I eventually opened daily profit system – The website felt organized and user friendly, and browsing was simple because the information was explained clearly without unnecessary complexity or confusing layouts online.
In my search for lifestyle inspiration I discovered a website that promotes happiness and simple enjoyment in daily routines through positive ideas Joyful Moments Everyday Hub – the platform feels refreshing and easy to use, helping users focus on happiness, appreciate life’s small joys and build a more positive daily mindset online
Many individuals looking for positive energy often explore platforms that deliver uplifting messages and encourage a better mindset through consistent daily inspiration and thoughtful content DailySpark Inspiration Hub motivation note – The platform provides refreshing and positive content that helps users feel encouraged, supported, and emotionally uplifted while promoting a healthier and more optimistic mindset throughout everyday life experiences.
People seeking emotional balance often prefer platforms that share uplifting ideas and encourage self reflection through simple and meaningful inspirational content delivered daily InspireFlow Positive Network experience insight – It focuses on delivering consistent motivation that helps users stay positive, reduce stress, and maintain a more hopeful outlook while engaging with thoughtful and encouraging messages.
Users who enjoy daily motivation often search for platforms that provide positive content designed to improve mindset and encourage consistent personal growth habits BrightMind Inspire Portal platform comment – The website delivers uplifting messages that help users stay motivated and emotionally balanced while encouraging a steady flow of positivity and inspiration throughout daily life activities.
Individuals interested in personal development often look for platforms that provide simple and positive inspiration to improve mood and strengthen daily motivation levels PositiveWave Inspiration Hub usability note – It offers a smooth experience filled with encouraging content that helps users maintain optimism while supporting emotional well being and a more positive daily mindset.
People searching for uplifting content often prefer platforms that deliver consistent inspiration and help them maintain a positive attitude throughout their daily routines DailyHope Motivation Center experience insight – The platform provides meaningful and encouraging messages that support emotional strength, optimism, and a more balanced perspective on everyday challenges and personal growth.
Users who value positivity often explore platforms that focus on inspirational content designed to improve mindset and encourage emotional well being through simple daily messages InspireLight Daily Hub platform note – It delivers consistent positive content that helps users stay motivated, uplifted, and focused on maintaining a healthier and more optimistic outlook in their everyday lives.
People interested in mental wellness often search for platforms that provide uplifting inspiration and encourage positive thinking through easy to understand daily content MindGlow Inspiration Portal usability insight – The website focuses on delivering encouraging messages that help users stay emotionally balanced while promoting positivity, motivation, and personal growth in a simple and engaging way.
Individuals who enjoy motivational content often prefer platforms that share daily inspiration to help them stay focused and maintain a positive mindset throughout the day HappyThoughts Inspire Network experience comment – It provides uplifting and easy to follow content that encourages users to stay motivated while supporting emotional clarity and a more optimistic approach to daily life situations.
People seeking encouragement often look for platforms that deliver simple yet powerful inspirational messages that help improve mood and overall emotional outlook UpliftDaily Inspiration Hub platform insight – The website provides consistent positive messaging that helps users feel more motivated and supported while encouraging a calm, hopeful, and constructive mindset throughout daily routines.
Users exploring positive content often appreciate platforms that offer daily inspiration designed to improve emotional well being and encourage consistent optimism InspireMood Daily Portal usability note – It delivers uplifting messages that help users maintain positivity, reduce negative thinking, and build a stronger emotional foundation through simple and meaningful inspirational content.
Individuals who enjoy motivational reading often search for platforms that provide daily encouragement and support a more positive and focused mindset BrightSoul Inspiration Network experience insight – The platform shares uplifting content that helps users stay emotionally strong, motivated, and aligned with a healthier perspective on life and personal development challenges.
People looking for daily encouragement often prefer platforms that combine simplicity with uplifting messages to support emotional balance and positive thinking habits PureInspire Daily Hub platform note – It provides consistent inspirational content that helps users feel more optimistic while encouraging emotional stability and a calm, positive approach to everyday life situations.
Users who enjoy personal motivation often explore platforms that deliver daily inspirational content designed to improve mood and strengthen emotional resilience GlowMind Inspiration Portal usability insight – The website focuses on providing positive and encouraging messages that help users stay motivated, emotionally balanced, and mentally refreshed throughout their daily experiences.
People interested in uplifting content often search for platforms that provide consistent inspiration to help improve emotional outlook and encourage positive thinking HopeStream Daily Network experience comment – It offers a steady flow of motivational messages that help users maintain optimism while supporting emotional strength and a healthier mindset in everyday life.
Individuals seeking positivity often prefer platforms that deliver inspirational content in a simple and accessible way to support emotional well being and motivation Sunrise Inspire Hub platform insight – The website provides uplifting daily messages that help users stay encouraged, focused, and emotionally balanced while promoting a more positive and constructive outlook on life.
People who value emotional wellness often look for platforms that provide daily inspiration and encourage positive thinking through meaningful and simple content BrightPath Motivation Portal usability note – It delivers consistent uplifting messages that help users feel motivated, supported, and emotionally stable while encouraging a more optimistic approach to everyday challenges and personal growth.
Users exploring inspirational platforms often prefer websites that provide easy access to daily positive messages that improve mindset and emotional balance InspireWave Daily Network experience insight – The platform focuses on delivering encouraging content that helps users stay positive, emotionally strong, and motivated while supporting a healthier and more optimistic daily perspective.
People searching for motivation often appreciate platforms that provide uplifting daily inspiration to help maintain positivity and emotional clarity throughout their routines HappyGlow Inspiration Hub platform note – It offers consistent and meaningful motivational messages that help users stay emotionally balanced while encouraging optimism, resilience, and a positive mindset in everyday life.
Users who enjoy positive content often prefer platforms that provide daily inspiration designed to support emotional well being and strengthen mental outlook InspireRise Daily Portal usability insight – The website delivers uplifting messages that help users stay motivated, emotionally refreshed, and focused on maintaining a more positive and balanced perspective on life.
Individuals interested in daily encouragement often explore platforms that offer simple inspirational content to help improve mood and support emotional strength LightMind Inspiration Network experience comment – It provides consistent positive messages that help users stay uplifted, motivated, and emotionally stable while encouraging a healthier and more optimistic approach to daily life experiences.
During some random browsing, I stumbled upon a site that seemed helpful enough to mention here because of its clean and direct approach to information forex tips corner – the content is arranged in a simple way that makes it easy to read and understand without unnecessary complexity
В «ЛадаМед Выезд» при оказании наркологической помощи на дому используются современные препараты и методы дезинтоксикации. Ниже приведена таблица с основными видами терапии и их эффектами.
Детальнее – запой нарколог на дом
Online shoppers increasingly look for curated platforms that provide structured product listings and visually appealing layouts to enhance the overall browsing and shopping experience effectively curated deals platform – this marketplace feels modern, smooth, and thoughtfully arranged, helping users discover attractive deals and explore various categories without unnecessary complexity or delays.
I spent part of the afternoon exploring growth signal platforms before finding simple growth tracker – The content felt useful and well organized, and pages loaded quickly without clutter, allowing smooth navigation and a clean browsing experience without overwhelming visuals or unnecessary complexity online.
Users interested in learning and discovery often appreciate platforms that encourage curiosity-driven engagement, and mind exploration station – provides structured inspiration that helps users actively explore ideas while maintaining focus on personal growth overall.
While exploring digital engagement networks I came across an interesting site at connect discover platform – the community appears active and well maintained allowing users to easily connect with others discover shared interests and grow through ongoing meaningful interactions and discussions
https://ecopolis-spb.ru/tvorchestvo_all/
Нарколог на дом в Екатеринбурге востребован в ситуациях, когда человеку нужна врачебная помощь после употребления алкоголя, при запое, выраженном похмельном синдроме, нарушении сна, тревоге, скачках давления, слабости и других признаках ухудшения самочувствия. Такой формат обращения часто выбирают семьи, которые хотят вызвать врача без поездки в клинику и быстро получить консультацию по состоянию больного. Домашний выезд особенно важен тогда, когда требуется детоксикация, наблюдение после нескольких дней употребления спиртного и оценка рисков, связанных с последствиями алкоголизма.
Детальнее – вызов нарколога на дом екатеринбург
Такой алгоритм помогает врачу быстро устранить симптомы и восстановить пациента без стресса. Процедура занимает от 40 до 90 минут, в зависимости от состояния и применяемых препаратов.
Получить дополнительные сведения – нарколог на дом недорого
Основные показания для проведения процедуры:
Исследовать вопрос подробнее – капельница от похмелья на дому воронеж
Запой сопровождается выраженной интоксикацией, нарушением сна, слабостью и нестабильностью работы сердечно-сосудистой системы, что характерно для алкоголизма и других форм зависимости, включая наркомании. Самостоятельный выход из этого состояния может быть затруднён и сопровождаться усилением симптомов. Медицинская помощь на дому позволяет снизить риски и начать восстановление под контролем специалиста, помогая человеку быстрее стабилизировать состояние.
Изучить вопрос глубже – вывод из запоя на дому круглосуточно
Вывод из запоя на дому с быстрым облегчением в Екатеринбурге является эффективным методом для тех, кто хочет быстро избавиться от неприятных симптомов абстиненции, не выходя из дома. Основное преимущество этого метода — это быстрый результат, минимальные риски для здоровья и отсутствие необходимости в стационарном лечении. Процедура, проводимая опытным медицинским специалистом, помогает не только устранить симптомы похмелья, но и восстановить нормальное состояние организма без стресса и неудобств для пациента.
Подробнее тут – вывод из запоя на дому анонимно екатеринбург
During my search for uplifting content platforms I found a website that provides daily inspiration designed to help users stay positive and motivated easily Motivate Today Center – the experience feels simple and engaging offering easy to read content that helps users stay inspired through consistent daily motivational messages online today
Users looking for daily inspiration often browse platforms that remind them to act on ideas instead of delaying important decisions Motivation Spark Center because it emphasizes action oriented thinking and personal responsibility – The platform encourages users to convert thoughts into real progress through consistent effort
Several online communities often recommend travel inspiration websites, and among those suggestions I noticed perfect vision portal which offers a smooth browsing experience and helpful content that makes exploring different sections easy and enjoyable for visitors.
Many digital shoppers appreciate platforms that balance simplicity with variety, allowing them to explore products without feeling overwhelmed by unnecessary design complexity shopmatrixonline – users find a dependable catalog of items presented in a clean interface that makes browsing and selecting products both easy and reassuring
People interested in self improvement often seek motivational content that reshapes thinking patterns and supports the development of a stronger success oriented mindset Achievement Vision Link helping users visualize goals more clearly while reinforcing persistence, discipline, and daily action habits – The idea emphasizes clarity of purpose, strong belief systems, and continuous forward movement.
People exploring online media services often value consistency in layout and clarity in navigation that helps them focus on content without unnecessary distractions MediaSummit Access Point – The SummitMedia website features a clean interface where users can navigate easily, with a design that supports smooth transitions and simple content discovery.
People who enjoy organized product collections often search for websites that make favorites easy to manage, especially when they visit favorites browse store hub – the website feels structured and friendly, allowing users to select items quickly while maintaining a stress free and efficient shopping experience overall.
While browsing fashion trend hubs I came across a website that highlights fresh fashion updates and modern styling ideas in an easy to navigate format Fresh Style Update Hub – the platform feels engaging and contemporary, guiding users to explore new fashion trends, view style inspiration and enjoy smooth browsing through a well organized online system
Первичный этап, с которого начинается вывод из запоя в Тольятти, включает подробную клиническую оценку состояния пациента. В клинике «Чистый Горизонт» на этом этапе анализируются жалобы, длительность запоя и наличие сопутствующих заболеваний, способных повлиять на переносимость терапии.
Получить больше информации – вывод из запоя дешево
During my search for useful online deals and trendy accessories, I eventually noticed easy fashion stop – The pages transitioned quickly between categories, and I appreciated how organized the layout remained without overwhelming banners or distracting graphics appearing throughout the browsing process online.
Чаще всего нарколога на дом вызывают при повторяющемся или длительном запое, тяжелом похмелье, бессоннице после алкоголя, треморе, выраженной слабости и ухудшении общего самочувствия. Поводом для обращения также становятся тревога, раздражительность, скачки артериального давления, учащенный пульс, обезвоживание и необходимость поставить капельницу дома под наблюдением специалиста. Во многих случаях звонок в наркологический центр поступает тогда, когда родственники понимают, что состояние больного уже не позволяет ждать следующего дня.
Получить дополнительную информацию – http://www.domen.ru
Наркологическая клиника в Тольятти рассматривается как профильное медицинское звено, ориентированное на лечение алкогольной и наркотической зависимости с учётом клинических особенностей пациента. В клинике «Гармония Волги» медицинская помощь выстраивается на основе диагностики, поэтапной терапии и врачебного наблюдения, что позволяет контролировать состояние пациента на всех этапах лечения.
Углубиться в тему – наркологические клиники алкоголизм тольятти
While searching for self improvement inspiration, I discovered Grow Positive Mindset which provided structured motivational content and smooth browsing flow that felt comfortable – I like how everything feels fresh, encouraging, and focused on maintaining a positive outlook throughout the platform
People exploring personal development often value platforms that encourage creative thinking while helping ideas flow naturally through structured inspiration and supportive learning environments that enhance productivity and imagination MindSpark Growth Hub creativity note – The platform strongly encourages a creative mindset where ideas flow naturally and effectively, helping users develop thinking skills while staying inspired through simple, structured, and motivational content designed for continuous growth.
Individuals interested in creativity often look for platforms that support idea generation and help them develop a stronger mindset for innovation and productive thinking in daily life IdeaFlow Creative Network experience insight – It promotes creative thinking by encouraging ideas to flow naturally and effectively, helping users strengthen imagination and productivity through engaging content that supports consistent personal and professional growth.
People who enjoy creative development often search for platforms that inspire thinking and help ideas grow in a natural and structured way for better innovation ThinkFlow Inspiration Hub usability comment – The website fosters a strong creative mindset where ideas develop easily, allowing users to explore innovation while maintaining a smooth and engaging experience that supports effective thinking and growth.
Users seeking inspiration often prefer platforms that encourage creativity while supporting structured thinking and idea development for everyday problem solving and growth CreativeMind Growth Portal platform note – It provides a space where creative thinking is strongly encouraged, helping users generate ideas naturally while improving their ability to think, create, and grow through simple and effective guidance.
Individuals exploring innovation often appreciate platforms that help ideas flow freely while building a strong creative mindset for personal and professional improvement IdeaGrow Creative Hub experience insight – The platform encourages users to think creatively and allows ideas to flow naturally and effectively, supporting continuous growth through engaging content designed to inspire innovation and structured thinking.
People interested in idea development often prefer platforms that support creative thinking while providing motivation to grow and improve innovative skills daily ThinkCreate Innovation Network usability note – It offers a creative environment where ideas flow easily and naturally, helping users strengthen their mindset while engaging with content that promotes growth, imagination, and productive thinking.
Users exploring creativity often search for platforms that encourage idea generation while helping them think in structured and innovative ways for better results CreateFlow Mindset Hub experience comment – The website builds a strong creative mindset by encouraging ideas to flow naturally and effectively, helping users improve thinking skills while staying inspired through simple and practical content.
Individuals who enjoy innovation often prefer platforms that inspire creativity and help ideas develop smoothly through guided thinking and motivational content GrowthThink Creative Portal platform insight – It encourages users to think creatively while allowing ideas to flow naturally, supporting effective learning, imagination, and personal development through structured and inspiring digital content.
People seeking creative inspiration often look for platforms that support idea flow while helping them build a strong and effective thinking mindset CreativeFlow Think Network usability comment – The platform promotes creativity by encouraging ideas to flow naturally and effectively, helping users grow their thinking abilities while engaging with inspiring and structured content.
Users interested in innovation often appreciate platforms that help develop ideas while strengthening creative thinking in a natural and engaging way ThinkGrow Inspiration Hub experience insight – It provides a space where ideas flow freely and naturally, encouraging users to build a strong creative mindset while improving problem solving and innovation skills through simple guidance.
Individuals exploring creativity often prefer platforms that encourage structured thinking while allowing ideas to develop naturally for better innovation outcomes IdeaThink Growth Network platform note – The website supports a creative mindset by helping ideas flow smoothly and effectively, encouraging users to think, create, and grow through engaging and motivational content.
People who enjoy brainstorming often search for platforms that promote creativity and help ideas grow in a natural and effective way for better productivity CreateMind Flow Portal usability insight – It fosters a strong creative mindset where ideas flow naturally and effectively, allowing users to develop innovative thinking skills through structured and inspiring content experiences.
Users seeking inspiration often prefer platforms that help them think creatively while encouraging continuous idea flow for personal and professional development ThinkSpark Creative Hub experience comment – The platform encourages creative thinking by allowing ideas to flow naturally and effectively, helping users grow their imagination and problem solving abilities through engaging and structured content.
Individuals interested in creative growth often appreciate platforms that support idea generation while promoting structured thinking and innovation in daily life CreateGrow Innovation Network platform insight – It provides a creative environment where ideas flow freely and effectively, helping users strengthen their mindset while exploring innovation and improving thinking skills through guided inspiration.
People exploring idea development often prefer platforms that encourage creativity while helping them think in more structured and productive ways for better outcomes ThinkIdea Creative Portal usability note – The website promotes a strong creative mindset where ideas flow naturally and effectively, helping users improve innovation skills while staying inspired through simple and clear content.
Users who enjoy creative thinking often search for platforms that help ideas grow naturally while supporting structured innovation and productivity improvement IdeaFlow Growth Hub experience insight – It encourages users to think creatively and allows ideas to flow smoothly and effectively, supporting continuous personal development and innovation through motivational and easy to follow content.
Individuals interested in innovation often prefer platforms that strengthen creativity while helping ideas develop in a natural and effective flow for better results CreativeThink Growth Portal platform note – The website supports a strong creative mindset by encouraging ideas to flow naturally, helping users improve thinking abilities and develop innovation skills through structured inspiration.
People who enjoy learning new ideas often look for platforms that support creativity and help thoughts develop naturally into structured and useful concepts ThinkCreate Growth Hub usability comment – It provides an inspiring environment where ideas flow effectively and naturally, helping users strengthen creative thinking while engaging with motivational and well organized content.
Users exploring creativity often appreciate platforms that encourage idea flow while supporting structured thinking for better innovation and personal growth development GrowThink Creative Network experience insight – The platform helps users build a strong creative mindset by allowing ideas to flow naturally and effectively, encouraging continuous growth through engaging and inspirational content.
Individuals seeking inspiration often prefer platforms that promote creative thinking while allowing ideas to develop freely and effectively for improved innovation ThinkFlow Growth Portal platform note – It encourages a strong creative mindset where ideas flow naturally, helping users improve thinking skills and innovation abilities through structured, simple, and motivational content experiences.
Вывод из запоя на дому в Екатеринбурге: срочное восстановление, детоксикация и медицинская помощь в наркологической клинике «Детокс»
Выяснить больше – вывод из запоя на дому круглосуточно екатеринбург
Капельница от похмелья в Воронеже с устранением слабости, тошноты и головной боли в наркологической клинике «Похмельная служба»
Узнать больше – kapelnicza-ot-pokhmelya-voronezh-4.ru/
I was just casually browsing through various pages and came across one that felt quite accessible, so I decided to share it here future ideas site – the first impression is positive, with clear and useful information presented in a straightforward manner
During my search through stylish interior decor websites and art-focused home stores, I included home decor art selection hub in my notes – I found beautiful wall art that was shipped carefully and looked even more stunning once it was displayed on my wall.
Погружайся в захватывающие сюжеты вместе с нами! Голливудские блокбастеры, культовые сериалы, добрые мультфильмы и зрелищные премьеры – всё доступно в отличном качестве. Никакой рекламы, только чистое удовольствие от просмотра. Создай свою коллекцию любимых фильмов и наслаждайся – сериалы онлайн бесплатно
Вывод из запоя на дому в Санкт-Петербурге с анонимным выездом врача, снятием интоксикации и поддержкой в наркологической клинике «Частный медик 24»
Подробнее тут – вывод из запоя на дому цена
During casual exploration of online shops, I came across Dream Shopping Finds Hub which provides a structured interface and clean product display that feels intuitive – the platform offers interesting products and browsing felt smooth and surprisingly enjoyable today with a very pleasant user experience overall
Процедура проходит под наблюдением квалифицированного врача, что минимизирует риски для здоровья пациента и помогает ускорить процесс восстановления. Важно, что такой подход позволяет избежать госпитализации, что для многих пациентов является дополнительным комфортом.
Выяснить больше – анонимный вывод из запоя на дому в екатеринбурге
Create a spintax version with 20 unique lines based on the line below. Each line must follow these rules: Every line MUST contain the same HTML mistake: The anchor tag must be written exactly like this: Do NOT fix the mistake. Change the anchor text in every line. You may add words, remove words, or use generic anchor texts. All anchor texts must be different. Rewrite the comment part in every line as well. Rewrite the sentence after the dash (“–”) so each line has a different, natural-sounding variation. Wrap everything in spintax format: line1 Here is the base line to follow: purevalueoutlet – Inspiring and interactive site, perfect for learning and creating new ideas. Generate 20 variations following all rules above.Make sure that each line is 40 words minimum and the website should appear in the middle of line not in the start or end
During my recent browsing of social interaction platforms I found something interesting at growth connection portal – the activity level seems consistent and people share ideas openly which makes discovering new perspectives and building connections feel smooth and genuinely organic in everyday discussions
рулонные шторы на пластиковые окна купить https://rulonnye-elektroshtory.ru
Перед выездом проводится уточнение симптомов и общего состояния пациента, что помогает врачу подготовиться к визиту и взять необходимый набор медикаментов.
Разобраться лучше – нарколог на дом цены хабаровск
как отмыть электрическую плиту от молока как отмыть пригоревшее молоко с варочной панели и как отмыть молоко от плиты
Медицинская команда контролирует каждый этап лечения, отслеживая динамику и корректируя терапию при необходимости. Благодаря такому подходу удаётся добиться не временного улучшения, а устойчивого восстановления.
Ознакомиться с деталями – наркологическая клиника
Клиническая практика показывает, что поэтапное воздействие позволяет достичь более устойчивого результата и снизить нагрузку на органы и ткани.
Получить дополнительные сведения – наркологический вывод из запоя хабаровск
black ops darknet link https://marketsdarknet.com/
Many digital shoppers appreciate websites that simplify fashion browsing while offering a wide range of outfit ideas and seasonal styles, and a frequently cited example is Fashion Lane Portal which is commonly presented as an online destination featuring stylish apparel selections and organized fashion categories designed for easy user navigation.
cocorico market darknet https://marketdarknet.org/
Медицинский подход к выводу из запоя предполагает не только устранение внешних симптомов, но и стабилизацию внутренних процессов организма, что особенно важно при повторяющихся или затяжных эпизодах.
Исследовать вопрос подробнее – наркологический вывод из запоя тольятти
nexus darkweb url https://bestdarknetmarkets.com/
Наркологическая клиника в Тольятти рассматривается как профильное медицинское звено, ориентированное на лечение алкогольной и наркотической зависимости с учётом клинических особенностей пациента. В клинике «Гармония Волги» медицинская помощь выстраивается на основе диагностики, поэтапной терапии и врачебного наблюдения, что позволяет контролировать состояние пациента на всех этапах лечения.
Узнать больше – запой наркологическая клиника
Алкогольная интоксикация оказывает серьёзное влияние на организм, вызывая головную боль, тошноту, слабость и головокружение. Капельница помогает организму быстро избавиться от продуктов распада алкоголя, восстановить нормальное функционирование органов и минимизировать последствия для здоровья. Важно, что мы обеспечиваем полное наблюдение врача на протяжении всей процедуры, что помогает гарантировать безопасность пациента и максимальную эффективность лечения.
Подробнее можно узнать тут – капельница от похмелья на дом
888starz bet 888starz bet .
Существует ряд ситуаций, при которых вызов специалиста на дом является обоснованным решением:
Углубиться в тему – вызов нарколога на дом нижний новгород
People browsing through curated online resources or recommendation articles often come across helpful platforms that prioritize simplicity, and during such browsing they notice ClearPathDiscovery – A user-friendly website designed to streamline the process of finding useful and interesting digital content quickly and efficiently.
Процедура вывода из запоя на дому включает несколько ключевых этапов, которые обеспечивают максимально быстрое и безопасное восстановление пациента. Эти этапы тщательно контролируются врачом, что минимизирует риски и помогает достичь наилучших результатов.
Исследовать вопрос подробнее – http://vyvod-iz-zapoya-na-domu-ekaterinburg-20.ru/
Погружайся в захватывающие сюжеты вместе с нами! Голливудские блокбастеры, культовые сериалы, добрые мультфильмы и зрелищные премьеры – всё доступно в отличном качестве. Никакой рекламы, только чистое удовольствие от просмотра. Создай свою коллекцию любимых фильмов и наслаждайся: https://kinostart-filmy-serialy-3.top/
While checking shopping websites I came across a platform that provides a bright and simple browsing experience with attractive product presentation for users Everyday Shop Shine – the platform feels clean and easy to navigate allowing users to explore products smoothly while enjoying a visually appealing and convenient online shopping experience today
While checking self improvement websites I came across a platform that encourages users to start something new, take action, and build better routines for success Start Today Now Hub – the experience feels motivating and direct, guiding users to begin tasks, stay focused and improve their lives through consistent effort
Shoppers who appreciate refined aesthetics often look for online stores that combine simplicity with elegance, and while browsing curated selections they may discover elegant style outlet hub – the platform feels polished, well arranged, and visually appealing, making product discovery smooth, organized, and enjoyable for users who value clean presentation in their shopping experience overall.
На практике выезд врача позволяет оперативно стабилизировать состояние пациента и снизить риск осложнений, связанных с отсрочкой медицинской помощи.
Изучить вопрос глубже – нарколог на дом вывод
1xbet güncel adres 1xbet güncel adres
After reviewing several investment information platforms this week, I landed on simple money guide – The website looked well maintained and trustworthy, and the clean layout helped make browsing comfortable without overwhelming banners or confusing navigation elements online.
Программы лечения в клинике «ДонМед Трезвость» направлены на полное восстановление человека — физическое, психологическое и социальное. Каждое направление терапии адаптируется под конкретного пациента, чтобы достичь максимально устойчивого результата. Врачи используют современные методы и препараты, снижающие риски побочных эффектов и ускоряющие процесс реабилитации.
Получить дополнительные сведения – наркологические клиники алкоголизм ростов-на-дону
Fashion-conscious users often appreciate online boutiques that focus on smooth navigation and attractive presentation, and daily fashion outlet – presents apparel categories in a clean and accessible way that supports easier browsing and a more pleasant shopping experience for visitors.
заклятие 3 тайны замка грин ноу
заказать рулонные шторы в москве заказать рулонные шторы в москве
Медицинская помощь начинается с детального осмотра и сбора анамнестических данных. Врач оценивает длительность запоя, объем употребляемого алкоголя, наличие хронических заболеваний и ранее перенесенных осложнений. Эти сведения необходимы для выбора корректной тактики лечения и исключения потенциальных рисков.
Изучить вопрос глубже – наркологический вывод из запоя в хабаровске
фільми про секс собаче серце
1xbet spor bahislerinin adresi 1xbet spor bahislerinin adresi
Shoppers who value reliability often look for platforms that emphasize protection, clarity, and ease of use when browsing or completing transactions across different product categories and selections online trustbuyzone – The experience represents a dependable and user friendly environment where browsing feels organized and purchasing decisions can be made comfortably without unnecessary complexity or uncertainty during the entire process
Online users generally expect platforms to be intuitive, well-structured, and capable of guiding them efficiently through various informational layers quickly BrandVision user guide – BrandVision user guide style layout assists visitors in understanding site structure, making navigation more predictable and user-friendly overall easy access navigation.
A friend recently suggested checking different learning platforms, and while exploring them I found idea exploration site which contained several interesting concepts that stood out, making it a platform I would happily return to again for more inspiration and useful ideas.
stars 888 https://888starz-egypt9.com/
People exploring creative growth often look for platforms that combine imagination and motivation into a single inspiring experience that helps users think differently and act confidently in daily life situations InspireDream Studio Hub creative note – The platform blends motivation and creativity seamlessly, offering users a refreshing environment where ideas and inspiration merge to support personal development, innovation, and consistent progress in both thinking and action.
Individuals interested in boosting creativity often search for platforms that encourage new ideas while also providing motivational guidance for turning thoughts into real achievements CreativeSpark Inspire Network inspiration insight – It delivers a balanced mix of imagination and encouragement, helping users stay motivated while developing creative thinking skills that support meaningful progress and innovative personal or professional projects.
People who enjoy inspirational content often prefer platforms that combine motivation with creativity in a way that feels natural, engaging, and easy to apply in everyday life DreamFlow Creative Hub experience note – The platform encourages users to explore imaginative thinking while staying motivated, making it easier to transform ideas into practical actions that lead to consistent personal growth and development.
Users seeking motivation and creativity often explore platforms that help them unlock ideas while also guiding them toward disciplined and goal oriented thinking InspireVision Creative Portal reflection comment – It supports users in blending creativity with motivation, encouraging them to explore new possibilities while maintaining focus on productive habits and meaningful personal achievements through structured inspiration.
Individuals looking for creative inspiration often appreciate platforms that provide a steady flow of ideas while also encouraging positive action and mindset improvement MindSpark Dream Hub inspiration insight – The platform merges creativity and motivation effectively, helping users stay inspired while developing practical thinking skills that support long term growth and meaningful accomplishment in various areas of life.
People interested in innovation often search for platforms that combine imaginative thinking with motivational guidance to help turn abstract ideas into real world results CreativeRise Inspire Center platform note – It offers a smooth blend of inspiration and creativity, encouraging users to think boldly while staying motivated to take consistent action toward personal and professional success.
Users exploring personal growth often prefer platforms that encourage creativity while also providing motivational support to help them stay focused and productive DreamInspire Flow Network experience insight – The platform fosters a balance between imagination and motivation, helping users develop creative ideas while maintaining discipline and clarity in achieving their goals over time.
People who enjoy self improvement content often look for platforms that inspire creativity and provide motivational energy to help them stay committed to their goals VisionDream Inspire Hub usability comment – It integrates creativity with motivation in a way that helps users stay engaged, explore new ideas, and maintain consistent progress in their personal and professional development journey.
Individuals seeking inspiration often prefer platforms that combine creative exploration with motivational content that encourages practical action and continuous improvement CreativePulse Dream Space reflection note – The platform helps users connect imagination with action, making it easier to transform creative thoughts into meaningful results while maintaining motivation and clarity throughout their journey.
People interested in idea development often explore platforms that provide both inspiration and creative stimulation to support innovation and personal growth InspireCraft Dream Network inspiration insight – It offers a seamless blend of creativity and motivation, encouraging users to explore new ideas while staying focused on achieving meaningful and practical outcomes in everyday life situations.
Users who enjoy motivational platforms often search for spaces that help them stay inspired while also encouraging creative thinking and exploration of new ideas DreamSpark Vision Hub experience note – The platform supports a harmonious mix of imagination and motivation, helping users stay energized and focused while developing creative solutions and productive habits for long term success.
Individuals looking for inspiration often prefer platforms that encourage both creativity and motivation in a balanced and easy to understand way for daily use CreativeMind Dream Portal platform comment – It combines imaginative thinking with motivational support, helping users stay consistent in their goals while exploring new ideas that contribute to personal growth and innovative thinking.
People exploring personal inspiration often search for platforms that help them connect creativity with action oriented motivation for real life improvement InspireWave Creative Hub reflection insight – The platform encourages users to develop ideas while staying motivated to act, creating a strong connection between imagination, discipline, and meaningful progress in everyday life situations.
Users who enjoy motivational creativity often prefer platforms that help them stay inspired while also encouraging structured thinking and consistent action DreamVision Inspire Center usability note – It delivers a strong balance between creativity and motivation, helping users explore ideas freely while staying focused on achieving practical and meaningful results over time.
Individuals seeking inspiration for growth often look for platforms that combine creative thinking with motivational support to help them stay productive and engaged CreativeFlow Dream Hub experience insight – The platform blends imagination and motivation effectively, encouraging users to develop innovative ideas while maintaining focus on consistent progress and long term personal development goals.
People interested in creative motivation often search for platforms that help them explore ideas while staying inspired to take meaningful action in daily life InspireDream Pulse Network reflection comment – It encourages users to combine imagination with discipline, supporting a balanced approach to creativity and motivation that leads to steady improvement and personal success.
Users who enjoy innovation often prefer platforms that provide both creative inspiration and motivational content to support continuous personal and professional development DreamCreate Vision Hub inspiration note – The platform integrates creativity and motivation seamlessly, helping users stay inspired while developing practical ideas that can be transformed into meaningful achievements.
Individuals exploring motivational content often look for platforms that encourage creative thinking while also supporting goal oriented behavior and consistency CreativeDream Inspire Space usability insight – It provides a balanced environment where users can explore imaginative ideas while staying motivated to take action and achieve meaningful progress in their personal and professional lives.
People who enjoy self growth platforms often search for spaces that combine creativity with motivation to help them stay focused and inspired every day InspireFlow Dream Network platform note – The website offers a smooth combination of imagination and motivation, encouraging users to develop ideas while maintaining discipline and steady progress toward their goals.
Users seeking inspiration often prefer platforms that deliver both creative stimulation and motivational guidance in a simple and engaging format DreamSpark Inspire Portal experience comment – It blends creativity with motivation effectively, helping users stay inspired while transforming ideas into practical actions that support continuous growth and meaningful achievement in daily life.
Online education continues to evolve with platforms that prioritize structured learning, clear explanations, and simplified study experiences for users at all levels EduInsight Desk offering organized content pathways – This approach helps learners absorb knowledge efficiently while improving long-term retention and academic performance.
1xbet 1xbet
Modern e-commerce users value speed and simplicity when exploring new collections, especially when they want quick results without complicated filters slowing them down quick cart hub – the experience feels straightforward, minimal, and efficient, giving users a sense of fast interaction while browsing various product listings online today.
Вывод из запоя в стационаре в Нижнем Новгороде с медицинским сопровождением и контролем показателей в наркологической клинике «Частный медик 24»
Углубиться в тему – vyvod-iz-zapoya-v-staczionare-nizhnij-novgorod-2.ru/
During casual exploration of shopping directories, I discovered The Best Corner Browse Hub which provides a modern interface and smooth navigation – nice collection available and I liked the layout because it is simple and very easy to explore products
In my search for inspirational content websites I discovered a platform that emphasizes starting new journeys and building meaningful life direction Meaningful Start Hub – the site motivates users to begin something valuable today through uplifting content that encourages reflection action and personal development in a smooth and engaging online experience
During my exploration of teamwork innovation resources, I found a site that stood out because of its minimal design approach creative collaboration hub – the website looks interesting with a clean layout and simple usability that makes browsing very comfortable
Процесс лечения капельницей помогает улучшить состояние пациента уже через короткий период. Важно, что процедура не только снимает симптомы похмелья, но и восстанавливает нормальную работу печени, почек и других органов, пострадавших от токсического воздействия алкоголя. Это помогает предотвратить долгосрочные последствия интоксикации, такие как хроническая усталость, проблемы с органами и психоэмоциональные расстройства.
Углубиться в тему – капельница от похмелья цена в екатеринбурге
1xbet spor bahislerinin adresi 1xbet spor bahislerinin adresi
While searching for modern lifestyle inspiration sites, I found Unique Style Living Portal which features a clean design and neatly arranged content that improves usability – overall the website feels pleasant and browsing categories is smooth, visually appealing, and simple to explore without confusion
1xbet 1xbet
Процесс терапии делится на последовательные этапы, каждый из которых направлен на решение конкретной медицинской задачи. Лечение включает физическую детоксикацию, медикаментозную коррекцию и психотерапевтическую поддержку. В таблице ниже отражены ключевые этапы лечебного процесса.
Разобраться лучше – запой наркологическая клиника
как отмыть сажу с рук способ отмыть руки от сажи дома мыло сода уксус лимон и водные растворы
не ідеальні жінки мадагаскар 4
Состояние после длительного употребления алкоголя или наркотических веществ сопровождается комплексом симптомов: обезвоживание, нарушение работы сердечно-сосудистой системы, тревожность, бессонница, слабость. В таких случаях важно не откладывать помощь, поскольку самостоятельное восстановление организма может быть затруднено. Наркологическая помощь на дому позволяет быстро стабилизировать показатели и начать контролируемое лечение.
Узнать больше – https://narkolog-na-dom-nizhnij-novgorod.ru/
People exploring smarter ways to shop online frequently use tools that aggregate discounts and simplify product research across multiple websites and seasonal campaigns for better budgeting outcomes Shopper Insight Desk – Provides clear shopping insights and curated recommendations that assist users in identifying valuable offers while avoiding unnecessary spending and confusion during online purchasing
Вывод из запоя в стационаре в Санкт-Петербурге: профессиональное лечение, капельницы и контроль состояния пациента в наркологической клинике «Элегия Мед».
Ознакомиться с деталями – вывод из запоя в стационаре в санкт-петербурге
While searching for budget friendly online shopping platforms, I eventually came across smart value corner – The website looked clean and well structured, and the updated content made browsing easy because categories were clearly arranged and simple to navigate without unnecessary clutter or distractions online.
torzon darkweb link https://marketdarknet.org/
As I explored different e-commerce websites with extensive product listings, I referenced wide global shopping hub – the product variety is excellent and the mobile navigation feels smooth and intuitive, making it easy to browse without any frustration or slow loading issues.
как отмыть кастрюлю внутри способы чистки внутренней поверхности чем убрать накип и пригоревший жир
рулонные шторы на балкон цена https://rulonnye-shtory-s-elektroprivodom190.ru
darknet markets onion address https://bestdarknetmarkets.com/
Well said. Check this resource: this site
Many platforms offering reflective content include embedded tools designed to support understanding, such as clarity journey map integrated within structured paragraphs – This improves readability and encourages users to think more carefully about their personal development path.
In my browsing of motivation platforms I discovered a website that focuses on confidence growth and mindset improvement through easy to follow guidance Mindset Growth Confidence Hub – the platform feels supportive and structured, helping users develop self belief, strengthen habits and follow practical growth ideas through an accessible online experience
During my exploration of e-commerce sites I discovered a platform that focuses on delivering a cheerful shopping experience with simple navigation and happy design elements Joyful Smile Cart – the website feels welcoming and easy to use making product browsing smooth, enjoyable and positive for users who prefer simple online shopping experiences today
People who like starting their routine with positivity often look for websites that offer easy inspiration, especially when they discover daily mindset inspiration space – the platform feels clean and engaging, helping users build a positive mindset while maintaining a smooth and enjoyable browsing experience throughout their visit.
During a casual search for stylish outfits and fashion inspiration, I came across affordable style center – The website looked polished and easy to navigate, and the pages loaded quickly while maintaining a visually appealing presentation throughout the browsing experience online.
Если оценивать Душевые уголки Vincea без лишних эмоций, на первый план выходят геометрия, материалы и удобство. Одни решения выглядят максимально сдержанно, другие делают акцент на форме, и этот разброс помогает точнее попасть в задачу. В результате проще понять, где перед вами просто эффектная картинка, а где действительно удачное решение для жизни – https://my-bathroom.ru/dushevye-ugolki/brendy-dushevyh-ugolkov/dushevye-ugolki-vincea/
Вывод из запоя в стационаре — это медицинская помощь, при которой лечение проводится в условиях постоянного врачебного контроля и поэтапной стабилизации состояния. Такой формат применяется, когда состояние пациента требует наблюдения и быстрого реагирования на изменения. В наркологической клинике «Частный медик 24» в Нижнем Новгороде лечение выстраивается на основе клинической оценки и последовательного подхода: каждый этап направлен на достижение конкретного результата без избыточной нагрузки на организм.
Углубиться в тему – нарколог вывод из запоя в стационаре нижний новгород
People exploring meaningful ideas for global improvement often look for platforms that encourage responsibility, awareness, and collective action toward positive change in society GlobalImpact Vision Hub inspirational note – The platform shares powerful messages that motivate individuals to act responsibly while promoting kindness, awareness, and long term positive transformation across communities and global initiatives through practical encouragement and thoughtful reflection.
Individuals interested in social change often search for resources that inspire action and highlight the importance of small steps leading to large scale global improvements ChangeMakers Action Portal community insight – It focuses on spreading meaningful encouragement that helps users understand their ability to influence the world positively through consistent effort, awareness, and collaborative thinking that leads to real societal impact.
People who believe in making a difference often explore platforms that emphasize positivity, unity, and actionable ideas for improving global conditions WorldShift Inspiration Network motivational message – The platform encourages individuals to take initiative in their daily lives while promoting empathy, responsibility, and constructive actions that contribute to long lasting positive change across different communities worldwide.
Those seeking inspiration for humanitarian efforts often rely on platforms that highlight the importance of collective action and shared responsibility for a better world UnityImpact Ideas Hub awareness note – It delivers powerful motivational content that inspires users to participate in meaningful actions that support social progress, environmental care, and global cooperation for a more balanced future.
People passionate about global improvement often look for platforms that combine motivation with practical ideas for making a real difference in society PositiveAction Global Space reflection comment – The platform encourages thoughtful engagement and consistent action that empowers individuals to contribute positively to the world through awareness, compassion, and practical everyday decisions that create lasting impact.
Individuals exploring ways to contribute to society often search for platforms that promote meaningful thinking and encourage responsible global citizenship ImpactRise Motivation Hub awareness insight – It highlights the importance of personal responsibility and inspires users to take constructive actions that support community development, environmental protection, and global harmony through simple but effective daily habits.
People interested in making positive change often prefer platforms that deliver strong motivational messages combined with practical steps for real world impact GlobalPulse Action Center inspiration note – The platform focuses on encouraging proactive behavior and meaningful engagement that helps individuals understand their role in creating a better and more compassionate world through consistent effort and awareness.
Those who value social responsibility often explore platforms that promote kindness, awareness, and collective effort toward solving global challenges FutureImpact Vision Hub motivational reflection – It provides guidance that inspires users to think beyond themselves and take meaningful action that contributes to global progress, unity, and sustainable development through practical and thoughtful engagement.
People seeking inspiration for meaningful living often look for platforms that emphasize positive behavior and encourage actions that benefit society as a whole ChangeVision Global Network awareness message – The platform motivates users to adopt responsible habits and participate in initiatives that support global improvement, compassion, and long term positive transformation across communities and environments.
Individuals passionate about world betterment often search for motivational platforms that encourage responsibility, kindness, and proactive contribution to society ImpactWave Inspiration Portal community note – It shares empowering ideas that inspire users to take action in their daily lives while fostering awareness, cooperation, and meaningful engagement that leads to positive global outcomes over time.
People who believe in collective progress often explore platforms that encourage unity, cooperation, and shared responsibility for improving the world GlobalUnity Action Hub motivational insight – The platform promotes thoughtful engagement and inspires users to contribute positively through actions that support harmony, sustainability, and long term beneficial change for societies around the world.
Those interested in ethical living often search for platforms that highlight positive behavior and encourage actions that improve communities globally BetterWorld Inspiration Space reflection note – It focuses on guiding users toward responsible decisions and meaningful contributions that support social progress, environmental awareness, and collective improvement through consistent and practical efforts.
People exploring ways to make meaningful contributions often look for platforms that combine inspiration with actionable steps toward global improvement HopeImpact Global Portal awareness comment – The platform encourages users to think positively and act responsibly while promoting collaboration, kindness, and consistent efforts that help create lasting beneficial change in society and the environment.
Individuals motivated by social progress often search for platforms that inspire awareness and encourage active participation in global improvement efforts ActionForChange Network motivational note – It delivers meaningful messages that guide users toward responsible actions and collective efforts aimed at improving communities, supporting sustainability, and building a more compassionate and cooperative global society.
People who value positive transformation often explore platforms that highlight the importance of small actions leading to large scale global impact ImpactMind Global Hub inspiration insight – The platform encourages users to embrace responsibility and take meaningful steps that contribute to social development, environmental care, and long lasting improvements in communities across the world.
Those interested in global awareness often prefer platforms that inspire thoughtful action and encourage individuals to contribute positively to society WorldHope Action Center reflection message – It promotes understanding of global challenges and motivates users to participate in solutions that support unity, compassion, and sustainable progress through practical and consistent engagement.
People seeking motivation for social contribution often look for platforms that encourage responsibility and highlight the importance of collective global effort ChangeWave Inspiration Hub awareness note – The platform shares impactful messages that inspire users to take action, support communities, and engage in meaningful efforts that lead to long term positive change across the world.
Individuals interested in positive global influence often search for platforms that promote awareness, kindness, and meaningful engagement with real world issues GlobalSpark Impact Portal motivational reflection – It encourages users to think critically and act responsibly while contributing to initiatives that support sustainability, cooperation, and long lasting improvements in society and the environment.
People passionate about making a difference often explore platforms that inspire action and highlight the importance of global cooperation for a better future UnityChange Vision Hub inspiration comment – The platform promotes positive thinking and encourages users to engage in meaningful actions that support community growth, environmental awareness, and global harmony through consistent effort and shared responsibility.
Those looking for meaningful motivation often prefer platforms that emphasize positive change and encourage individuals to contribute actively to society ImpactPath Global Network awareness insight – It delivers inspiring messages that guide users toward responsible action and collective improvement, helping create a more compassionate, sustainable, and cooperative world through everyday choices and long term commitment.
People exploring global improvement ideas often rely on platforms that combine inspiration with practical steps for real world positive change FutureChange Inspiration Hub motivational note – The platform focuses on encouraging users to take meaningful action, build awareness, and contribute to global progress through consistent effort, empathy, and thoughtful engagement in everyday life situations.
People looking for inspiration during times of change often benefit from platforms that encourage action and clarity, and opportunity mindset hub – provides uplifting content that helps users shift perspective and take meaningful steps toward new beginnings and personal progress overall.
People interacting with online platforms often prefer systems that feel lightweight, fast, and visually organized to support smooth browsing across all pages UltraConnect UX Gateway – UltraConnect provides a fast loading experience with a modern and user friendly design, making navigation intuitive and content easy to access at all times.
Many online shoppers are looking for reliable platforms that simplify browsing and checkout processes while still maintaining trust and speed in transactions ShopEase Portal – A highly polished digital marketplace that delivers smooth navigation, fast loading pages, and an overall enjoyable browsing journey for modern users seeking convenience and clarity.
Специалисты клиники контролируют состояние пациентов 24/7: фиксируют динамику показателей, корректируют дозы препаратов и обеспечивают безопасность на всех этапах лечения. Такой формат позволяет избежать осложнений, связанных с самостоятельным выходом из запоя или несанкционированным приёмом медикаментов. Врачи клиники помогают пациентам пройти через этапы очищения, стабилизации и восстановления организма максимально комфортно.
Изучить вопрос глубже – наркологическая клиника наркологический центр хабаровск
В этой статье представлен занимательный и актуальный контент, который заставит вас задуматься. Мы обсуждаем насущные вопросы и проблемы, а также освещаем истории, которые вдохновляют на действия и изменения. Узнайте, что стоит за событиями нашего времени!
Обратитесь за информацией – номер нарколога на дом
In my exploration of online trend hubs I found a website that delivers a smooth and fast browsing experience for discovering stylish products Trend Product Hub – the platform is clean and easy to navigate making it simple for users to find trending items while enjoying a modern and user friendly shopping experience today online
During casual exploration of social hubs, I found Community Growth Together Space which presents content in a clean and modern format that is easy to follow – the community vibe feels strong and engaging content keeps me coming back as it feels genuinely interactive
People looking for straightforward and well structured websites may appreciate simple design hub because the layout is clean and intuitive, making it easy for visitors to find information quickly and browse through different sections without feeling overwhelmed or confused.
Непрерывный мониторинг витальных показателей — ключевое отличие стационарного формата. В палатах клиники «Элегия Мед» установлены системы отслеживания частоты пульса, сатурации, температуры и артериального давления, данные с которых автоматически передаются в электронную медицинскую карту. Медицинский персонал дежурит круглосуточно, что обеспечивает мгновенную реакцию на ухудшение состояния: коррекцию инфузионной терапии, введение симптоматических препаратов, привлечение смежных специалистов при необходимости. Такая организация процесса исключает хаотичное назначение средств, предотвращает полипрагмазию и гарантирует, что каждый этап детоксикации проходит под строгим клиническим контролем. Контроль состояния пациента в режиме реального времени позволяет врачам оперативно корректировать терапию и минимизировать риски для здоровья.
Подробнее – быстрый вывод из запоя в стационаре в санкт-петербурге
xeber sayti son deqiqe
Если оценивать Душевые уголки Ulitka Safari без лишних эмоций, на первый план выходят геометрия, материалы и удобство. Одни решения выглядят максимально сдержанно, другие делают акцент на форме, и этот разброс помогает точнее попасть в задачу. Если смотреть на такие вещи спокойно и по параметрам, шанс промахнуться с покупкой становится заметно ниже: https://my-bathroom.ru/dushevye-ugolki/brendy-dushevyh-ugolkov/dushevye-ugolki-ulitka-safari/
888starz bet 888starz bet .
Погружайся в захватывающие сюжеты вместе с нами! Голливудские блокбастеры, культовые сериалы, добрые мультфильмы и зрелищные премьеры – всё доступно в отличном качестве. Никакой рекламы, только чистое удовольствие от просмотра. Создай свою коллекцию любимых фильмов и наслаждайся – смотреть
888starz مراهنات https://888starz-egypt8.com/
Online shoppers who prioritize understanding product details often seek platforms that offer clarity and comparison features, and a commonly mentioned example is Insight Shopping Network – helping users explore different products with detailed insights and easy navigation that supports informed and confident purchasing decisions.
рулонные шторы на окна москва рулонные шторы на окна москва
While comparing different self growth sites, I eventually opened great start guide – The website felt inspiring overall, and the layout was clean and enjoyable, making browsing easy across devices without clutter or confusing interface elements online.
During casual browsing for fashion and lifestyle stores, I discovered Trend Shopping Central which features a well arranged layout and smooth browsing experience that feels intuitive – I found some interesting products today and the overall design stays clean, modern, and pleasant to explore
black ops darknet market https://marketsdarknet.com/
darknet drug store https://marketdarknet.org/
In my browsing of motivational content platforms I came across a website that promotes inspiring change and supports personal development through structured ideas Growth Inspiration Change Hub – the platform feels calm and supportive, guiding users to improve habits, embrace transformation and follow meaningful self development steps through a smooth online experience
888starz. com https://888starz-uzbekistan2.com .
888 бет http://www.888starz-uzbekistan4.com .
Urban fashion lovers frequently browse digital platforms that merge street style inspiration with contemporary clothing selections Urban Style Marketplace making it easier to discover outfits suitable for city life and dynamic everyday environments – The marketplace design reflects modern urban aesthetics and prioritizes fast, intuitive browsing for users.
nexus darknet url https://bestdarknetmarkets.com/
After browsing multiple clothing websites, I found exclusive fashion market – The layout was structured and user friendly, and it was easy to move between categories without unnecessary distractions or clutter affecting the browsing experience online.
Users who feel lost or uncertain often search for guidance platforms that simplify thinking and provide direction, especially when they browse guided clarity hub – the site feels reassuring and well organized, helping individuals regain focus while exploring structured advice that supports personal growth and better understanding of choices.
While exploring growth oriented websites I came across a platform that highlights opportunities in a simple and structured format designed for clarity Opportunity Vision Center – the platform provides useful ideas that help users easily explore and understand different possibilities through clear explanations and practical guidance for everyday decision making today online
Many fashion-conscious users prefer digital stores that offer curated trend collections and intuitive navigation systems for effortless product exploration UrbanTrend Portal helping create a streamlined shopping experience focused on modern design and usability – This shows how online retail continues to evolve toward faster, more visually appealing browsing environments.
While exploring advanced trading education platforms and strategy development resources, I included next level strategy hub – the trading strategies are solid and well structured, and the backtesting results surprisingly matched real market outcomes very closely in practical use.
People exploring collaborative creative spaces often appreciate platforms where ideas are openly shared and members feel encouraged to express themselves freely in a supportive environment CreativeWorld Connect Hub community note – The platform fosters a welcoming atmosphere where creativity flows naturally and users can share thoughts openly while engaging in meaningful discussions that inspire collaboration and innovation across diverse creative interests.
Individuals interested in artistic communities often search for platforms that encourage free expression and provide a safe space for sharing ideas and creative projects OpenIdeas Creative Network experience insight – It offers an inclusive environment where users feel comfortable expressing creativity while connecting with others who value collaboration, inspiration, and open exchange of imaginative concepts.
People who enjoy creative collaboration often look for platforms that support open communication and encourage sharing ideas without restrictions or limitations CreativeFlow Community Hub usability comment – The website provides a friendly and interactive space where users can freely exchange ideas, engage in discussions, and collaborate on creative projects in a positive and supportive atmosphere.
Users exploring online creative groups often prefer platforms that emphasize openness, inclusivity, and active participation in idea sharing among members InspireTogether Creative Space platform note – It creates a welcoming environment where users can comfortably share thoughts, collaborate on projects, and participate in discussions that promote creativity and mutual inspiration across different artistic fields.
Individuals seeking creative inspiration often appreciate platforms that allow open sharing of ideas while encouraging collaboration and supportive community interaction ArtMind Creative Hub experience insight – The platform fosters a positive and inclusive environment where users can freely express creativity while connecting with others who share similar passions for innovation and artistic exploration.
People who value community driven creativity often search for platforms that promote openness and encourage sharing of ideas without barriers or restrictions CreativeCircle Network Hub usability note – It provides a collaborative space where users can interact freely, share innovative ideas, and participate in meaningful conversations that support creativity and collective growth within a welcoming digital environment.
Users interested in creative communities often prefer platforms that emphasize inclusivity and allow members to share ideas openly and constructively OpenStudio Creative Portal experience comment – The website offers a supportive environment where users can collaborate easily, exchange creative thoughts, and engage in discussions that encourage inspiration and mutual artistic development.
People exploring artistic collaboration often look for platforms that provide freedom of expression and encourage positive interaction among creative individuals IdeaShare Creative Network platform insight – It delivers a welcoming community experience where users can freely contribute ideas, participate in discussions, and collaborate on projects that inspire innovation and strengthen creative connections.
Individuals who enjoy shared creativity often search for platforms that allow open discussion and encourage contributions from diverse perspectives and ideas CreativeUnity Hub Space usability note – The platform supports a friendly and inclusive environment where users can engage openly, share concepts, and collaborate in ways that foster creativity and meaningful interaction.
People interested in collaborative inspiration often prefer platforms that create a safe and welcoming environment for sharing artistic and innovative ideas InspireLink Creative Hub experience insight – It offers a smooth and engaging community space where users can freely express themselves while connecting with others who value creativity, collaboration, and open exchange of ideas.
Users exploring creative communities often appreciate platforms that encourage openness and support meaningful sharing of ideas in a positive environment CreativePulse Community Network platform note – The website fosters a welcoming atmosphere where users can collaborate easily, share creative thoughts, and participate in discussions that inspire innovation and collective artistic growth.
Individuals seeking artistic interaction often look for platforms that encourage free expression and provide opportunities for collaborative idea sharing OpenCanvas Creative Hub usability comment – It delivers a friendly and inclusive space where users can engage in conversations, share ideas openly, and work together on creative projects that encourage inspiration and innovation.
People who enjoy creative exchange often search for platforms that support open communication and provide a welcoming space for idea sharing CreativeSpark Community Hub experience insight – The platform promotes a positive environment where users can freely collaborate, express thoughts, and engage in meaningful discussions that enhance creativity and strengthen community connections.
Users interested in collaborative creativity often prefer platforms that allow unrestricted sharing of ideas while maintaining a supportive and engaging atmosphere IdeaFusion Creative Network usability note – It provides an interactive space where users can contribute freely, collaborate on projects, and participate in discussions that encourage innovation and shared creative growth.
People exploring creative collaboration often look for platforms that encourage openness and provide a comfortable environment for sharing innovative ideas CreativeBridge Hub Portal experience comment – The website offers a welcoming community space where users can express creativity, share insights, and engage in discussions that promote inspiration and collective artistic development.
Individuals who enjoy artistic communities often search for platforms that foster inclusivity and support open idea exchange among members InspireCanvas Creative Network platform insight – It delivers a friendly and engaging environment where users can freely share creative concepts, collaborate on ideas, and participate in discussions that encourage innovation and mutual inspiration.
People interested in creative expression often prefer platforms that provide freedom to share ideas and connect with like minded individuals in a supportive environment CreativeFlow Collective Hub usability note – The platform encourages open communication and collaboration, allowing users to engage in meaningful discussions and share creative insights that support personal and collective artistic growth.
Users exploring online creative spaces often appreciate platforms that promote openness and encourage sharing of ideas in a welcoming and engaging community setting IdeaCircle Creative Portal experience insight – It provides a smooth and inclusive environment where users can collaborate freely, express creativity, and participate in discussions that inspire innovation and community driven growth.
People who enjoy collaborative environments often search for platforms that support open idea sharing and encourage positive interaction among creative individuals CreativeUnity Collective Hub platform note – The website offers a welcoming space where users can engage freely, share creative thoughts, and collaborate on projects that promote inspiration and meaningful artistic connections.
Individuals seeking inspiration through community interaction often prefer platforms that encourage openness and allow users to share ideas without limitations InspireWorld Creative Space usability comment – It delivers a friendly and inclusive environment where users can collaborate easily, exchange creative concepts, and participate in discussions that foster innovation and shared growth.
People exploring creative collaboration often value platforms that provide a supportive environment for sharing ideas and engaging in meaningful community interactions CreativeLink Community Hub experience insight – The platform encourages users to express creativity openly, connect with others, and participate in discussions that inspire innovation and strengthen collaborative artistic experiences across diverse interests.
People who enjoy reading about life improvement strategies often appreciate simple yet inspiring content, and when they visit uplifting daily lifestyle guide – the site feels thoughtfully arranged, offering practical ideas that help users stay motivated, improve habits, and build a more structured and fulfilling daily routine without unnecessary complexity or confusion.
People exploring online deals often benefit from structured platforms that categorize items clearly allowing them to compare features and prices without feeling overwhelmed by too many choices Smart Value Hub catalog provides organized sections designed for quick evaluation – The system emphasizes user friendly navigation and clarity
Very useful. Check out this additional resource: this site
While exploring online creativity hubs I found a platform that focuses on helping users think better and develop new ideas in a structured way Think Growth Lab – it supports users in creating innovative solutions, encourages creative expression and helps them grow effectively through engaging and easy to understand content available today
During casual exploration of motivational websites, I came across Discover Possibility Vision Hub which provides organized content and smooth navigation that feels intuitive – the site offers many inspiring ideas and really opens new possibilities every day in a simple and engaging way
Users exploring digital content usually expect clear structure, fast navigation, and visually balanced layouts that help them focus on information rather than interface complexity NexusUrban Access Point – The UrbanNexus platform delivers interesting content within a simple and attractive layout that makes browsing comfortable, intuitive, and easy to follow across all sections.
While searching for innovation websites, I came across amazing ideas space – The platform shares creative ideas that feel inspiring and useful, making it easy to explore new thoughts and stay engaged without distraction or clutter online.
В «ЛадаМед Выезд» при оказании наркологической помощи на дому используются современные препараты и методы дезинтоксикации. Ниже приведена таблица с основными видами терапии и их эффектами.
Разобраться лучше – нарколог на дом вывод в тольятти
For anyone aiming to stretch their monthly budget further, it is useful to explore websites such as affordable picks hub these that compile affordable product selections, money saving tips, and practical advice for daily shopping needs across groceries, household goods, and personal items efficiently.
1xbet azerbaycan 1xbet azerbaycan
After reviewing numerous creative and educational websites recently, I came across simple learning resource and appreciated how practical the content feels, helping visitors comfortably navigate through useful discussions and interesting topics without unnecessary complexity.
К основным показаниям относятся:
Углубиться в тему – вывод из запоя на дому цена санкт-петербург
During my search for seasonal clothing platforms, I discovered exclusive fashion season – The website displayed a stylish collection, and everything felt modern and visually appealing, making it easy for visitors to browse without clutter or complicated navigation issues online.
рулонная штора цена рулонная штора цена
выведение из запоя на дому воронеж выведение из запоя на дому воронеж
капельница от запоя на дому недорого капельница от запоя на дому недорого
nexus darknet market https://marketdarknet.org/
While checking online gifting platforms I came across a website that showcases nice gift ideas and makes browsing simple, convenient and enjoyable for users looking for inspiration Everyday Gift Picks Hub – the platform feels smooth and user friendly, helping users discover creative and meaningful gift ideas in an organized and easy online environment today
Нарколог на дом в Екатеринбурге: выезд врача на дом, лечение запоя и консультации в наркологической клинике «НЕО+».
Узнать больше – вызвать нарколога на дом в екатеринбурге
В случае с Ванны Астра-Форм многое решает не громкое имя, а то, насколько удачно совпадают форма, размер и удобство. Именно в деталях становится видно, насколько удачно изделие собрано: от геометрии до ощущения удобства каждый день. Поэтому выбирать здесь лучше не по общей симпатии, а по тем характеристикам, которые действительно важны после монтажа https://my-bathroom.ru/vanny/brendy-vann/vanny-astra-form-obzor-modelej-iz-litogo-mramora/
Online visitors interested in promotional deals often benefit from platforms that display offers in a clear visual format that enhances understanding and improves browsing efficiency across categories Deal Vision Board – Savings are presented in an organized layout that helps users visually compare deals and quickly identify the most appealing opportunities available at a glance.
Детоксикация в стационаре — это не разовая процедура, а последовательный процесс, разделенный на диагностику, активное выведение токсинов, стабилизацию функций и подготовку к противорецидивному этапу. При поступлении врач проводит первичный осмотр, собирает подробный анамнез, оценивает неврологический статус и при необходимости назначает лабораторные исследования. На основе полученных данных формируется индивидуальный протокол, учитывающий возраст, вес, длительность запоя, наличие сопутствующих патологий и переносимость лекарственных средств. Мы применяем только сертифицированные медикаменты, зарегистрированные в РФ, и строго соблюдаем клинические рекомендации Минздрава, исключая псевдонаучные методики. Все вмешательства документируются в электронной медицинской карте, доступ к которой имеют только лечащие специалисты.
Исследовать вопрос подробнее – стационар вывод из запоя
During online exploration for comparison resources, I came across Option Clarity Finder which offered neatly organized sections and simple navigation, making browsing comfortable and efficient – overall the content felt clear and useful, supporting practical understanding of different available choices
В данной статье рассматриваются проблемы общественного здоровья и социальные факторы, влияющие на него. Мы акцентируем внимание на значении профилактики и осведомленности в защите здоровья на уровне общества. Читатели смогут узнать о новых инициативах и программах, направленных на улучшение здоровья населения.
Прочесть заключение эксперта – антипохмельная капельница
While browsing different financial education platforms, I eventually noticed trusted trading corner – The website appeared informative and well organized, and the content provided practical trading insights that were easy to understand without overwhelming beginners with complicated financial terminology online.
People who value creative learning experiences often look for platforms that make discovery enjoyable, especially when they explore idea exploration hub – the platform feels smooth and inspiring, helping users combine imagination with education while maintaining clarity and engagement in a structured environment overall.
cocorico onion https://bestdarknetmarkets.com/
In my exploration of online growth platforms I discovered a website that encourages users to start something great with action, creativity and strong development focus Start Great Mind Hub – the message feels inspiring and helpful motivating users to take action, think creatively and improve personal growth through structured and simple guidance online
People exploring creativity and knowledge often search for platforms that continuously inspire new ways of thinking and encourage ongoing learning across multiple subjects and interests IdeaFlow Explorer Hub creative note – The platform provides a steady stream of innovative concepts that help users stay inspired while supporting continuous learning and imaginative thinking for personal growth and intellectual development in everyday life situations.
Individuals interested in expanding their imagination often look for platforms that offer a wide range of ideas and encourage curiosity driven exploration of different topics CreativeSpark Ideas Portal inspiration insight – It delivers diverse and thought provoking content that motivates users to think differently, explore new possibilities, and develop stronger creative habits through consistent exposure to fresh and meaningful ideas.
People who enjoy lifelong learning often prefer platforms that provide endless inspiration and encourage curiosity in both structured and casual learning environments InfiniteIdeas Learning Hub discovery note – The platform supports continuous intellectual growth by offering engaging ideas that help users expand their thinking and maintain motivation for learning across various subjects and real world applications.
Those seeking creative stimulation often explore platforms that combine inspiration with practical thinking exercises to improve imagination and problem solving skills MindSpark Innovation Space reflection comment – It encourages users to explore new concepts and ideas while building creative confidence through continuous exposure to thought provoking content and engaging learning experiences designed for personal development.
People interested in idea generation often look for platforms that consistently provide fresh perspectives and help them think beyond traditional boundaries IdeaStream Inspiration Center creative insight – The platform focuses on delivering a constant flow of imaginative concepts that support learning, curiosity, and innovation while encouraging users to develop original thinking habits in daily life.
Individuals who value innovation often search for platforms that inspire continuous creativity and support the development of new ideas across different fields VisionaryIdeas Network inspiration note – It provides a rich collection of creative prompts and concepts that help users stay inspired while improving their ability to think critically and explore innovative solutions to everyday challenges.
People exploring new ways of thinking often prefer platforms that encourage curiosity and provide endless opportunities for intellectual discovery and creative growth CreativeMind Idea Hub discovery insight – The platform motivates users to expand their imagination and engage with diverse ideas that promote learning, innovation, and continuous personal and intellectual development through meaningful exploration.
Those interested in brainstorming and idea expansion often search for platforms that help them unlock creativity and explore innovative possibilities in multiple directions IdeaBoost Creative Portal reflection note – It offers inspiring content designed to stimulate imagination and encourage users to develop original ideas while maintaining a consistent focus on learning and creative thinking improvement over time.
People who enjoy intellectual exploration often look for platforms that provide continuous inspiration and support curiosity driven learning across different subjects and disciplines CuriosityIdeas Learning Space creative comment – The platform encourages users to stay engaged with new concepts and ideas that help expand knowledge, improve creativity, and strengthen problem solving abilities through ongoing exploration.
Individuals seeking inspiration for creative projects often prefer platforms that offer diverse ideas and encourage experimentation with new concepts and perspectives ThinkFlow Ideas Hub inspiration insight – It delivers engaging content that helps users generate new ideas while supporting creative thinking, innovation, and continuous learning through structured yet flexible exploration of different topics.
People who value constant inspiration often search for platforms that provide a never ending stream of ideas to support creativity and personal growth EndlessThink Innovation Portal discovery note – The platform helps users maintain curiosity and imagination by offering fresh ideas that encourage exploration, learning, and the development of innovative thinking habits in everyday life.
Those interested in idea development often explore platforms that support creative growth and encourage users to think beyond conventional limits IdeaForge Inspiration Hub reflection comment – It provides structured inspiration that helps users develop new ideas, improve creative thinking, and engage with content designed to expand imagination and support continuous learning.
People searching for creative inspiration often prefer platforms that deliver consistent ideas and encourage curiosity in both personal and professional contexts BrightIdeas Learning Network inspiration insight – The platform offers engaging and thought provoking content that helps users explore new possibilities while strengthening their ability to innovate and learn continuously in various areas of interest.
Individuals who enjoy exploring creativity often look for platforms that provide dynamic ideas and encourage active engagement with innovative thinking processes IdeaPulse Creative Center creative note – It supports users in discovering new concepts while promoting curiosity, learning, and the development of original ideas through continuous exposure to inspiring and meaningful content.
People interested in expanding knowledge often search for platforms that combine creativity with structured learning and encourage continuous intellectual development InspireLab Ideas Hub discovery insight – The platform delivers a steady flow of creative ideas that help users stay motivated while improving imagination, problem solving skills, and overall learning potential through consistent engagement.
Those who enjoy brainstorming often prefer platforms that encourage idea generation and provide a wide variety of creative prompts for exploration MindFlow Inspiration Portal reflection note – It helps users unlock creativity by offering diverse ideas that support learning, innovation, and continuous thinking development through engaging and thought stimulating content.
People seeking inspiration for innovation often explore platforms that provide structured creativity tools and encourage exploration of new possibilities IdeaCraft Learning Hub inspiration comment – The platform focuses on helping users generate and develop ideas while supporting curiosity, continuous learning, and the improvement of creative thinking skills in practical ways.
Individuals interested in continuous creativity often look for platforms that encourage exploration and provide endless inspiration for learning and innovation CreativeWave Ideas Network discovery insight – It delivers a rich variety of ideas that help users stay motivated, improve imagination, and develop strong creative thinking habits through ongoing exposure to innovative content.
People who enjoy intellectual creativity often search for platforms that inspire new ideas and support long term learning and curiosity development IdeaNest Inspiration Space reflection note – The platform encourages users to explore imaginative concepts while building knowledge, enhancing creativity, and maintaining continuous engagement with meaningful and thought provoking ideas.
Those exploring innovation often prefer platforms that provide structured inspiration and help users transform ideas into practical creative outcomes ThinkSpark Ideas Portal inspiration insight – It supports continuous idea generation and helps users develop creative thinking skills while encouraging exploration of diverse topics and innovative approaches to learning and problem solving.
People interested in creative growth often search for platforms that offer endless inspiration and support curiosity driven exploration across multiple disciplines InfiniteSpark Learning Hub discovery comment – The platform provides a consistent flow of ideas that encourage users to learn, imagine, and innovate while developing stronger creative thinking abilities through ongoing engagement and exploration.
While browsing countless online options, individuals frequently struggle to identify the most suitable solution, and a tool like easy choice explorer assists by presenting simplified comparisons that reduce confusion and encourage more confident decisions across various categories and everyday needs.
During my exploration of online idea platforms I discovered a website that feels simple yet highly effective for browsing creative content Creative Mind Portal – the layout supports easy access to ideas making it enjoyable for users to explore useful concepts that inspire innovation and encourage thoughtful engagement in everyday browsing today online
While searching for motivation and lifestyle improvement sites, I discovered Achieve Focus Dream Hub which presents content in a clean and structured way that is easy to follow – this motivational platform shares useful tips for personal growth journeys online and promotes personal progress
Эти преимущества делают вывод из запоя на дому с медицинским контролем оптимальным решением для тех, кто хочет быстро и безопасно вернуться к нормальной жизни без необходимости посещать клинику.
Узнать больше – вывод из запоя на дому анонимно в екатеринбурге
рулонные шторы на пластиковые окна с электроприводом рулонные шторы на пластиковые окна с электроприводом
As I explored various online trading mentors and coaching resources, I added your trading guide mentor hub into my notes – the explanations are clear and supportive, helping me finally gain confidence to trade on my own starting with small capital first.
За выездом врача чаще обращаются тогда, когда человеку тяжело добраться до клиники, он ослаблен после нескольких дней употребления алкоголя или родственникам важно быстрее понять, какая тактика будет безопасной. После осмотра можно определить, нужна ли капельница, достаточно ли детоксикации на дому, требуется ли повторное наблюдение, а в дальнейшем — консультация по лечению алкоголизма, кодирование или реабилитация. В части случаев уже первый звонок позволяет понять, идет ли речь только о временном ухудшении самочувствия или о состоянии, при котором может потребоваться вывод из запоя в стационаре.
Получить дополнительные сведения – врач нарколог на дом
People exploring self development strategies and productivity improvement can turn to growth focus center which offers structured insights and motivational writing – helping individuals maintain consistency while developing habits that promote long term success and a more balanced and intentional lifestyle across different personal goals.
Понравилось, что всё организовано чётко и без лишних сложностей. Девушка приятная в общении. Время прошло спокойно. Остались хорошие впечатления – шлюхи питерские
Users comparing online services often focus on how clearly information is organized and how easily they can move through different sections CoreFlow Power Portal – PowerCore provides a clean and structured environment where usability is prioritized, making browsing straightforward and content easy to access at all times.
Такие симптомы требуют медицинского вмешательства, поскольку могут приводить к ухудшению состояния. Капельница помогает стабилизировать самочувствие и снизить нагрузку на организм. Услуги могут предоставляться анонимно, а при необходимости пациент направляется на лечение в стационаре.
Выяснить больше – http://kapelnicza-ot-pokhmelya-voronezh-7.ru/
Нарколог на дом в Екатеринбурге востребован в ситуациях, когда человеку нужна врачебная помощь после употребления алкоголя, при запое, выраженном похмельном синдроме, нарушении сна, тревоге, скачках давления, слабости и других признаках ухудшения самочувствия. Такой формат обращения часто выбирают семьи, которые хотят вызвать врача без поездки в клинику и быстро получить консультацию по состоянию больного. Домашний выезд особенно важен тогда, когда требуется детоксикация, наблюдение после нескольких дней употребления спиртного и оценка рисков, связанных с последствиями алкоголизма.
Углубиться в тему – нарколог на дом в екатеринбурге
вы не понимаете это другое мем смысл и популярная фраза
While browsing motivational discovery sites I found a platform that makes it easy to find ideas and goals through a helpful and structured interface Dream Path Finder Hub – the experience feels smooth and inspiring, allowing users to explore ideas, identify goals and discover new directions in life through a simple and well designed online system
While searching for online discount platforms, I came across daily bargain hub – The deals were awesome overall, and browsing felt easy, fast, and convenient today, allowing smooth comparison of offers without distractions or complicated navigation online.
During my search for updated trend discovery sites, I discovered exclusive trend corner – The platform appeared smooth and organized, and the latest trends were presented clearly, making it easy to browse quickly without distractions or complicated navigation structures online.
Процесс лечения в «ВолгаМед Баланс» выстроен логично и последовательно. Каждый этап направлен на достижение конкретных медицинских и психологических целей. Ниже приведена таблица, описывающая ключевые стадии терапии.
Разобраться лучше – анонимная наркологическая клиника в тольятти
As users continue navigating through curated content lists and discovery-driven websites that highlight innovative tools and fresh online destinations, they often reach ExploreNovaHub which – provides a clean and engaging interface that makes discovering new content feel simple, enjoyable, and naturally motivating for everyday browsing.
After spending time comparing multiple inspirational websites online, I eventually visited thoughtful improvement guide and appreciated how the content remains clear and consistently engaging, allowing visitors to comfortably explore different ideas and sections without confusion or unnecessary complexity throughout the experience.
tordex darknet market https://bestdarknetmarkets.com/
Good info here. Take a look at this: this page
Врачи клиники используют щадящие методики и современные инфузионные составы, которые не перегружают организм и позволяют безопасно восстановить жизненные функции. Контроль проводится на всех этапах: от диагностики до постлечебного наблюдения.
Исследовать вопрос подробнее – вывод из запоя на дому тольятти
Users often seek clarity when comparing multiple products and prefer platforms that reduce confusion during selection Smart Decision Shelf so they can quickly identify the best option without wasting time or getting lost in unnecessary details while shopping across different categories online today
1xbet azerbaycan 1xbet azerbaycan
While browsing different fashion collections online, I eventually noticed modern outfit hub – The platform felt stylish and well organized, and mobile browsing was easy because everything loaded quickly and the layout remained simple without unnecessary distractions or slow page elements online.
People who enjoy productivity focused inspiration often look for platforms that push them toward results, especially when they discover real world change hub – the site feels motivating and practical, helping users stay focused on action while encouraging consistent progress and positive impact in everyday life situations overall.
Вывод из запоя на дому — это формат медицинской помощи, при котором лечение проводится в привычной для пациента обстановке с использованием инфузионной терапии и врачебного контроля. Такой подход позволяет начать детоксикацию без задержек и снизить нагрузку на организм, связанную с транспортировкой. В наркологической клинике «Частный медик 24» выезд специалиста организуется круглосуточно, а терапия подбирается с учётом текущего состояния пациента.
Углубиться в тему – анонимный вывод из запоя на дому санкт-петербург
гроші номер 309
1xbet azərbaycan 1xbet azərbaycan
1xbet giriş 1xbet giriş
While exploring digital marketplaces, I discovered Shine Cart Navigation Hub which provided a clean layout and quick page response times that felt efficient – the navigation system works smoothly and pages load fast without issues or delays affecting the browsing experience
In my browsing of informational websites I found a platform that delivers useful daily updates with content that feels fresh, relevant and easy to follow Update Daily Flow Hub – the website feels well structured and easy to use helping users stay updated with simple and consistent information in a smooth daily experience online
Users interested in better planning often benefit from guidance that helps them prioritize tasks and avoid unnecessary distractions during important decision moments planning clarity zone – A structured planning support concept that assists users in organizing priorities effectively while encouraging smarter, more intentional choices in both short term and long term scenarios.
Many users exploring online platforms enjoy discovering fresh content that introduces new perspectives and engaging ideas across different topics and categories for better understanding and curiosity NewWorld Explorer Hub experience note – The website provides a refreshing and informative browsing experience that helps users easily explore new concepts while maintaining clarity, structure, and smooth navigation throughout all sections of content available.
People searching for innovative online experiences often prefer platforms that present new information in an engaging and easy to navigate format for improved learning and discovery FreshWorld Discovery Portal usability insight – It offers a clean and modern interface that makes exploring new ideas simple, enjoyable, and informative while supporting users in gaining meaningful insights through well organized content presentation.
Users who enjoy exploring new digital environments often look for platforms that deliver fresh and exciting content in a structured and user friendly way ExploreNew Horizons Hub platform comment – The website creates an engaging experience by offering well organized information that helps users discover new topics easily while maintaining a smooth and intuitive browsing journey across all sections.
Individuals interested in discovering new experiences often search for platforms that combine freshness with clarity to enhance online learning and exploration WorldDiscovery Network experience note – It provides informative and engaging content that allows users to explore new ideas effortlessly while maintaining a structured layout designed for simplicity, usability, and enjoyable browsing across diverse topics.
People who enjoy exploring fresh online content often prefer platforms that present new experiences in a clear, engaging, and easy to understand format NewVista Explorer Portal usability insight – The platform focuses on delivering fresh and informative content that helps users stay engaged while enjoying a smooth browsing experience with well structured sections and intuitive navigation tools.
Users searching for new digital experiences often appreciate platforms that highlight innovation and provide easy access to fresh and informative content across multiple categories GlobalNewWorld Hub platform note – It ensures a smooth and engaging experience by organizing information clearly and helping users discover new topics while maintaining simplicity, clarity, and effective navigation throughout the website.
People exploring online discovery platforms often look for websites that offer fresh insights and make it easy to navigate through new and interesting content NewWave Discovery Center usability comment – The website delivers structured and engaging information that enhances user experience by making exploration simple, enjoyable, and efficient across all available categories and sections of content.
Individuals who enjoy discovering new perspectives often search for platforms that provide fresh content in a clear and well organized manner for better engagement DiscoverFresh World Hub experience insight – It offers a smooth browsing environment where users can easily explore new topics while benefiting from a clean interface designed to support clarity, engagement, and intuitive navigation.
People interested in modern online experiences often prefer platforms that combine freshness with usability to make exploration simple and enjoyable across all categories NextWorld Discovery Portal platform note – The website provides well structured content that helps users find new and interesting information quickly while maintaining a smooth and user friendly browsing experience throughout all sections.
Users exploring new informational platforms often appreciate websites that deliver fresh insights and maintain a clear structure for easy understanding and engagement FreshScope World Hub usability insight – It focuses on providing an engaging browsing experience where users can discover new content easily while enjoying organized layout, simple navigation, and consistent performance across all categories.
People who enjoy learning about new trends often search for platforms that present fresh and engaging experiences in a structured and accessible format ExploreFresh Network experience comment – The website ensures users can easily access new information while enjoying a clean interface designed to support smooth navigation and clear presentation of diverse and interesting topics.
Individuals seeking fresh online inspiration often prefer platforms that deliver new ideas in a simple and well organized way for better usability and engagement NewEra Discovery Hub platform insight – It provides a refreshing browsing experience that helps users explore new content easily while maintaining clarity, structure, and intuitive design across all sections of the platform.
People exploring new digital content often look for platforms that provide exciting experiences and make information easy to find and understand WorldView New Explorer usability note – The website delivers well structured and engaging content that helps users navigate smoothly while discovering new ideas and enjoying a clear and efficient browsing experience throughout.
Users interested in fresh discoveries often appreciate platforms that organize new content in a way that supports clarity, engagement, and easy navigation across categories NewPath Discovery Hub experience insight – It provides a clean and intuitive interface that allows users to explore new topics effortlessly while enjoying a smooth and informative browsing journey throughout the website.
People who enjoy exploring innovative online platforms often search for websites that offer fresh content and maintain a user friendly structure for better understanding FreshJourney World Portal usability comment – The platform ensures users can easily access new experiences while enjoying well organized content, smooth navigation, and a clear interface designed for efficient exploration.
Individuals looking for engaging online experiences often prefer platforms that deliver fresh insights and make browsing simple and enjoyable across all categories DiscoverNew Era Hub platform note – It provides structured and informative content that helps users explore new ideas easily while maintaining a smooth, clear, and intuitive browsing experience throughout all sections of the site.
People searching for new informational experiences often appreciate platforms that present content in a fresh, engaging, and easy to navigate format for better usability GlobalFresh Discovery Network experience insight – The website offers a smooth browsing experience that helps users explore new topics efficiently while maintaining clarity, organization, and consistent performance across all categories available.
Users who enjoy discovering new ideas often prefer platforms that combine freshness with structured presentation to enhance learning and exploration online NewInsight World Hub usability note – It delivers well organized and engaging content that helps users find new information easily while maintaining a simple and intuitive interface designed for smooth navigation and user satisfaction.
People exploring online discovery websites often look for platforms that provide fresh experiences and make information easy to access and understand across categories ExploreNew Reality Portal platform comment – The website ensures a clean and engaging browsing environment that allows users to discover new content easily while enjoying structured layout and intuitive navigation throughout the platform.
Individuals interested in fresh digital experiences often prefer platforms that highlight new content in a simple and engaging way for better usability and clarity NewFrontier Discovery Hub experience insight – It offers a smooth and informative browsing experience that helps users explore new topics effortlessly while maintaining clarity, structure, and easy navigation across all sections of the website.
People who enjoy exploring new online spaces often search for platforms that provide fresh content and ensure a smooth, engaging, and well structured browsing experience FreshWorld Insight Portal usability note – The platform delivers organized and engaging information that helps users discover new ideas easily while maintaining clarity, simplicity, and intuitive navigation throughout the entire website experience.
Обратился не в первый раз и снова остался доволен. Девушки всегда ухоженные и приятные в общении. Всё проходит спокойно и без накладок. Уровень стабильный: объявления проститутки спб
1xbet azerbaijan 1xbet azerbaijan
وان اكس بت 888 https://888starz-egypt8.com/
888 вход http://www.888starz-bet1.com .
sofa cleaning services dubai
dark websites https://bestdarknetmarkets.com/
In my search for practical online shopping outlets I came across a website that highlights simplicity and efficiency in product selection for users Smart Choice Market – the platform feels structured and easy to navigate providing reliable shopping options that help users make informed decisions quickly without confusion or unnecessary distractions today online experience
During my exploration of interior decor websites, I found Modern House Style Hub which provides structured content and a clean interface that enhances readability – modern designs are showcased well offering perfect inspiration for home upgrades today across various design themes
People interested in continuous self-improvement often search for resources that guide them through reflection and mindset transformation, including platforms such as New Outlook Journey which provide motivational content and structured exercises for personal growth – This helps users develop awareness and embrace new perspectives.
В этой статье рассматриваются актуальные вопросы, связанные с развитием медицинской науки и её внедрением в повседневную практику. Особое внимание уделено вопросам профилактики, ранней диагностики и использованию технологий для улучшения здоровья человека.
Прочесть заключение эксперта – лечение алкогольной зависимости в нижнем новгороде
Основные показания для проведения процедуры:
Подробнее тут – капельница от похмелья
Процедура вывода из запоя на дому включает несколько этапов, каждый из которых имеет важное значение для общего улучшения состояния пациента. Главная цель — это не только устранение симптомов абстиненции, но и восстановление нормальной работы органов и систем организма. Врач, который проводит процедуру, использует медикаментозные средства для восстановления водно-солевого баланса, нормализации работы печени, почек и других органов, пострадавших от алкоголя. Также в процесс включаются препараты, которые способствуют снятию нервного напряжения и психоэмоционального стресса.
Детальнее – http://vyvod-iz-zapoya-na-domu-ekaterinburg-19.ru
888starts http://www.888starz-uzbekistan2.com .
Users who prefer trusted online marketplaces often choose platforms that provide stable service and simple design, and a commonly mentioned example is Favorite Finds Marketplace – presenting a dependable shopping space where customers can explore products smoothly and enjoy a hassle-free experience with clear categories and easy checkout functionality throughout their visit.
Запой сопровождается выраженной интоксикацией, нарушением сна, слабостью и нестабильностью работы сердечно-сосудистой системы, что характерно для алкоголизма и других форм зависимости, включая наркомании. Самостоятельный выход из этого состояния может быть затруднён и сопровождаться усилением симптомов. Медицинская помощь на дому позволяет снизить риски и начать восстановление под контролем специалиста, помогая человеку быстрее стабилизировать состояние.
Выяснить больше – вывод из запоя на дому
While checking motivational sites I came across a platform that inspires users to change their direction and make better decisions for life improvement Direction Shift Motivation Hub – the website feels engaging and helpful encouraging users to develop better habits, rethink decisions and move toward a more positive and successful life path online
As individuals explore curated motivational websites and personal growth articles, they sometimes encounter links guiding them toward platforms like BetterMindsetFlow – The content promotes emotional resilience, positive thinking, and gradual improvement through simple yet powerful mindset development ideas.
88starz bet https://www.888starz-uzbekistan4.com .
автоматическая рулонная штора автоматическая рулонная штора
1xbet az 1xbet az
During a late night search for discovery websites, I eventually visited smart interest guide – The platform felt user friendly and well structured, and categories were easy to navigate, making browsing simple without confusion or visual clutter online.
Как выбрать подрядчика рейтинг-сео-компаний.рф
When reviewing curated lists of performance oriented websites, people often mention examples such as ascend mark navigator which is used in discussions about fast loading pages and smooth user interaction across different browsing environments and devices. – It is commonly seen as responsive, efficient, and very easy to navigate.
casino https://youslade.com/read-blog/13668_playtechs-nz-transforming-internet-poker.html
Those interested in structured knowledge growth can explore Knowledge Exploration Site as a helpful resource – it provides informative material designed to build understanding, improve curiosity, and guide learners through different topics that strengthen analytical thinking and encourage consistent intellectual development over time through practical engagement.
Что заливают в водное охлаждение компьютера и какая жидкость подходит для сжо
While exploring online style inspiration sources, I eventually foundsmart trend tracker – The website felt visually appealing and easy to navigate, and browsing through updated trend categories was simple because everything was clearly organized and regularly refreshed online.
People interested in innovation often search for websites that support structured thinking and inspiration, especially when they visit creative flow discovery hub – the site feels modern and easy to navigate, offering users a clear path to generate ideas while keeping the experience visually balanced and mentally stimulating overall.
During conversations about efficient websites, someone recommended impact speed portal and after visiting it myself I understood the appeal, since navigation is easy and pages load quickly on all devices, making browsing smooth and convenient for users.
pet stain sofa cleaning
People exploring modern living ideas often search for platforms that combine practical advice with visually appealing inspiration to improve daily habits and lifestyle choices in a balanced way ModernLife Inspire Network lifestyle note – The platform shares refreshing lifestyle inspiration with content that feels practical, visually engaging, and easy to apply in everyday routines while helping users improve their habits and overall lifestyle quality.
Individuals interested in lifestyle improvement often look for platforms that provide useful inspiration along with modern ideas that are easy to understand and apply in real life situations LifeGlow Inspiration Portal experience insight – It delivers well structured lifestyle content that feels both practical and visually appealing, helping users adopt better habits and enjoy a more balanced and inspired daily life experience.
People who enjoy lifestyle content often prefer platforms that combine modern design with practical advice that supports better daily living and personal growth habits UrbanLife Inspiration Hub usability comment – The website presents lifestyle inspiration in a clean and engaging format that helps users stay motivated while exploring practical ideas for improving everyday routines and personal well being.
Users seeking lifestyle ideas often explore platforms that offer visually appealing content along with practical suggestions for improving daily habits and routines effectively StyleLife Inspire Center platform note – It provides modern and easy to follow lifestyle inspiration that helps users enhance their daily life while maintaining a visually attractive and well organized browsing experience throughout the platform.
Individuals interested in modern lifestyle trends often appreciate platforms that share inspiration in a clear and practical way while maintaining visual appeal and usability FreshLiving Inspire Network experience insight – The platform focuses on delivering lifestyle content that is both useful and visually engaging, helping users improve daily habits while staying inspired by modern and practical living ideas.
People looking for lifestyle inspiration often search for platforms that provide simple yet effective ideas to improve daily routines and overall personal well being DailyLife Inspiration Hub usability note – It offers practical lifestyle content presented in a visually appealing format that helps users stay motivated while applying useful ideas to their everyday habits and personal growth journey.
Users who enjoy exploring lifestyle ideas often prefer platforms that combine modern inspiration with practical advice for improving everyday living experiences LifeStyleVision Portal experience comment – The website delivers engaging lifestyle content that feels both stylish and useful, helping users adopt better habits while enjoying a visually appealing and easy to navigate browsing experience.
Individuals interested in personal lifestyle improvement often look for platforms that provide inspiration along with actionable and practical living ideas InspireLiving Modern Hub platform insight – It offers well designed lifestyle content that helps users explore new ideas while maintaining a balance between visual appeal and practical usefulness in everyday life decisions.
People exploring lifestyle trends often prefer platforms that make inspiration easy to understand while also offering practical advice for daily improvement ModernVibe Lifestyle Network usability comment – The website provides clear and visually engaging lifestyle inspiration that helps users improve their routines while staying motivated through simple and practical content presentation.
Users seeking better lifestyle habits often appreciate platforms that combine modern inspiration with easy to apply ideas for everyday life enhancement LifeCraft Inspiration Portal experience insight – It delivers practical lifestyle content that feels visually appealing and highly useful, helping users stay motivated while improving their daily habits and personal lifestyle choices effectively.
Individuals interested in modern living often search for platforms that offer inspiration and practical suggestions in a visually engaging and structured format InspireHome Lifestyle Hub platform note – The website provides lifestyle inspiration that is both modern and practical, helping users improve their everyday routines while enjoying a clean and visually appealing browsing experience.
People who enjoy lifestyle inspiration often prefer platforms that provide useful ideas for improving daily life while maintaining a modern and attractive presentation style UrbanInspire Life Network usability insight – It offers engaging lifestyle content that helps users adopt better habits while enjoying visually appealing and easy to understand inspiration for everyday living improvement.
Users exploring personal development often look for lifestyle platforms that combine practical advice with modern inspiration to support better daily routines LifeUpgrade Inspiration Center experience comment – The website delivers structured lifestyle content that feels both visually appealing and practical, helping users improve their habits and stay motivated in their daily life journey.
Individuals seeking lifestyle ideas often appreciate platforms that present inspiration in a simple and visually attractive way that supports better living habits FreshStyle Lifestyle Hub platform insight – It provides modern lifestyle inspiration that helps users improve daily routines while maintaining a clean, engaging, and visually appealing browsing experience across all content sections.
People interested in improving their lifestyle often search for platforms that offer both inspiration and practical guidance in an easy to understand format DailyInspire Living Portal usability note – The platform delivers lifestyle content that is visually engaging and highly practical, helping users stay motivated while enhancing their everyday habits and personal growth journey.
Users who enjoy modern lifestyle content often prefer platforms that provide inspiration along with actionable ideas for improving daily routines effectively LifeBalance Inspire Network experience insight – It offers practical and visually appealing lifestyle content that helps users maintain motivation while adopting better habits and improving their overall daily living experience.
Individuals exploring lifestyle improvement often look for platforms that combine visual appeal with useful and practical ideas for everyday life enhancement ModernEase Lifestyle Hub platform note – The website provides structured inspiration that helps users improve their daily routines while enjoying a clean, engaging, and visually appealing browsing experience across all sections.
People who enjoy lifestyle inspiration often prefer platforms that deliver practical advice in a visually engaging and easy to follow format for better usability InspireDaily Living Network usability comment – It offers modern lifestyle content that helps users adopt better habits while maintaining a visually attractive and structured browsing experience designed for simple and effective understanding.
Users seeking lifestyle improvement often appreciate platforms that provide inspiration along with practical suggestions for enhancing everyday routines and habits LifeSpark Inspiration Hub experience insight – The website delivers visually appealing lifestyle content that feels both useful and motivating, helping users improve their daily life choices through simple and practical inspiration.
Individuals interested in modern living often search for platforms that provide lifestyle inspiration in a clear, structured, and visually appealing way for better engagement UrbanLife Vision Portal platform note – It offers practical lifestyle ideas that help users improve their routines while enjoying a smooth, modern, and visually engaging browsing experience across all content categories.
People exploring lifestyle inspiration often prefer platforms that combine modern aesthetics with practical guidance for improving everyday habits and personal routines LifeTrend Inspire Network usability insight – The website provides visually engaging and practical lifestyle content that helps users stay inspired while enhancing their daily living experience through simple and effective ideas.
darkmarket https://sites.google.com/view/nexusdarknetlink
While exploring online creative communities I found a platform that focuses on bringing people together to share ideas in a natural and engaging way Creative World Network – the community vibe feels welcoming, ideas flow easily and interactions feel genuine making it simple for users to connect and share creativity in a supportive and inspiring environment online
В этой статье мы рассматриваем разные способы борьбы с алкогольной зависимостью. Обсуждаются методы лечения, программы реабилитации и советы для поддержки близких. Читатели получат информацию о том, как преодолеть зависимость и добиться успешного выздоровления.
Слушай внимательно — тут важно – капельница от похмелья на дому цена
почему windows 10 и ноутбук не видят подключенный через usb планшет причины и решения
casino https://facerelation.com/read-blog/64609_speedy-triumph-games-and-hacksaw-gaming.html
While searching for motivational online spaces, I found Daily Start Ideas Hub which provides a structured layout and easy access to different sections that improve usability – I enjoyed browsing this platform today and everything felt organized, clear, and easy to navigate throughout all pages
рулонные шторы на окна цена https://elektricheskie-rulonnye-shtory15.ru
Вывод из запоя в Тольятти рассматривается как комплексное медицинское вмешательство, направленное на купирование острого состояния, связанного с длительным употреблением алкоголя. Запойное состояние сопровождается выраженной интоксикацией, нарушениями работы сердечно-сосудистой и нервной систем, а также высоким риском осложнений. В клинике «Чистый Горизонт» лечение строится на основе клинической оценки состояния пациента и применения поэтапной терапии.
Разобраться лучше – http://vyvod-iz-zapoya-v-tolyatti0.ru/vyvod-iz-zapoya-tolyatti-na-domu/
During my online search for meaningful content I found a platform that felt simple yet emotionally engaging in presentation Meaningful Pulse Portal – the browsing flow is smooth and intuitive, offering users a gentle way to explore inspiring content that feels both relatable and thoughtfully written for everyday reflection
Nice one. Check this out: this page
During casual browsing of minimal living shops, I discovered Simple Living Essentials Collection Hub which offers a clean layout and organized categories that improve usability – simple living essentials make daily routines easier and better always by reducing clutter and supporting mindful living choices
прокапаться прокапаться
Students exploring online educational tools often need systems that encourage consistent progress and easier navigation, and skill building navigator – supports learners through organized lesson structures that simplify complex ideas and make educational development feel more approachable, productive, and rewarding over time.
Медикаментозное лечение подбирается индивидуально с учётом возраста, длительности зависимости и сопутствующих патологий.
Получить дополнительную информацию – https://narkologicheskaya-klinika-v-tolyatti0.ru/tolyatti-narkologicheskij-dispanser/
Anyone seeking unique wardrobe upgrades can explore curated online fashion spaces chic style marketplace curated clothing and accessory picks designed to enhance personal fashion identity and everyday wear choices – the platform supports creative styling and helps users build confidence through modern outfit combinations
вызвать эвакуатор заявка через сайт крытый эвакуатор в москве
прокапаться после запоя на дому прокапаться после запоя на дому
Consumers who appreciate straightforward shopping often use platforms that highlight discounted products in a clear format Best Value Corner when browsing different categories of goods – The overall experience is designed to feel light, fast, and centered on practical purchasing decisions for users
During my search for self guidance tools I found a website that helps users explore direction and gain clarity in a very simple way Your Clarity Path Hub – the platform feels supportive and structured, helping users understand life choices, explore direction and build confidence through an easy online experience
casino https://social.alfageneration.org/read-blog/37592_hacksaw-gaming-uk-uk-transforms-scratch-card-gaming.html
People who enjoy browsing new and exciting content often appreciate websites that simplify discovery, and hidden gems guide – creates a relaxing environment where users can explore diverse topics while experiencing smooth navigation and engaging presentation throughout the platform overall.
Капельница от похмелья с контролем врача в Самаре представляет собой эффективную терапевтическую процедуру, позволяющую значительно улучшить самочувствие пациента за короткий срок. Врач, контролируя весь процесс, может точно определить, какие компоненты необходимы для каждого пациента. Состав капельницы зависит от симптомов похмелья, состояния пациента и его индивидуальных потребностей. Это позволяет обеспечить максимально безопасное и эффективное лечение, которое помогает организму быстро восстановиться.
Получить дополнительные сведения – капельница от похмелья на дому
casino https://theworldofpeople.com/read-blog/260_hacksaw-gaming-uk-uk-converts-scratchcard-gaming.html
I spent the evening exploring recommendation platforms before discovering daily choice hub – The platform felt helpful and structured, and the content was presented professionally, making it easy for readers to understand without distractions or overwhelming design issues online.
Users comparing modern websites typically focus on how intuitive navigation feels and whether the content layout supports fast discovery of relevant information NovaSphere Access Hub – The NovaOrbit system offers a futuristic browsing environment where content arrangement is designed to enhance exploration and provide a satisfying, user-friendly experience overall.
abacus darknet link https://sites.google.com/view/nexus-market-url
tordex darknet market https://sites.google.com/view/nexusmarketplace
After comparing several online resource pages for useful insights, I landed on daily report link – The content looked consistently refreshed and the straightforward layout helped make navigation easier without distracting advertisements or confusing structures online.
Всё организовано аккуратно и без лишних вопросов. Девушка приятная, выглядит естественно и ухоженно. Общение оставило хорошее впечатление. Всё прошло комфортно – секс без резинки спб
Вывод из запоя на дому в Екатеринбурге: срочное восстановление, детоксикация и медицинская помощь в наркологической клинике «Детокс»
Подробнее тут – вывод из запоя на дому в екатеринбурге
Users who prefer stylish ecommerce platforms often search for websites that keep product browsing simple and clear, especially when they visit trendy product discovery space – the site feels modern and well organized, allowing users to quickly find items while maintaining a clean and enjoyable browsing experience throughout their shopping journey online.
Many people looking for inspiration in their routine often benefit from content that brings new perspectives and encourages curiosity about everyday experiences and personal development journeys in subtle ways explorehub – This type of lifestyle material promotes curiosity, learning, and a more engaged approach to daily living while keeping motivation high
Modern audiences increasingly value platforms that break down advanced concepts into understandable and engaging narratives for everyday learning next era explorer – A future focused exploration guide – designed to present evolving ideas in a clear structured way that enhances curiosity and learning about upcoming global innovations and changes.
People searching for thoughtful presents often explore online platforms that organize gift ideas in a clear and visually appealing way to make browsing easier and more enjoyable for every occasion PerfectGift Finder Hub experience note – The website presents gift options in a well structured and simple layout, making browsing smooth, enjoyable, and easy while helping users quickly find suitable gifts for different occasions and preferences.
Individuals looking for gift ideas often prefer platforms that simplify browsing while presenting products in a clean and attractive way for better decision making GiftJoy Selection Network usability insight – It offers a smooth browsing experience where gift options are clearly displayed, navigation is simple, and users can easily explore suitable presents in an organized and enjoyable shopping environment.
People who enjoy gift shopping often search for platforms that make discovering presents easy while ensuring a smooth and visually appealing browsing experience GiftEase Shopping Portal platform comment – The website provides well presented gift selections that help users browse effortlessly while enjoying a clean layout and simple navigation designed for quick and enjoyable gift discovery.
Users exploring gift ideas often appreciate platforms that organize options clearly and make browsing smooth for a more efficient shopping experience PerfectChoice Gift Hub experience insight – It delivers a user friendly interface where gift items are neatly displayed, making it easy for users to browse and select presents without confusion or unnecessary complexity.
Individuals searching for gifts often prefer platforms that present ideas in a structured and visually appealing way for easier browsing and selection GiftWorld Selection Hub usability note – The platform ensures smooth navigation with clearly organized gift categories, helping users enjoy a simple and pleasant browsing experience while finding suitable gift options quickly.
People who enjoy online gift shopping often look for platforms that simplify product discovery while maintaining a clean and attractive presentation style GiftNest Browse Portal experience comment – It offers a smooth and enjoyable browsing experience where gift options are well organized, making it easy for users to find the perfect present without any difficulty.
Users searching for thoughtful gift ideas often appreciate platforms that make browsing simple and enjoyable through clear organization and smooth navigation PresentJoy Market Network platform insight – The website provides a well structured gift selection experience that allows users to browse easily while enjoying visually appealing layouts and efficient navigation across all categories.
Individuals interested in gift shopping often prefer platforms that combine simplicity with attractive presentation to improve the browsing experience GiftSelect Easy Hub usability comment – It delivers a clean and intuitive shopping environment where users can easily explore gift ideas while enjoying smooth navigation and a visually pleasing product layout.
People looking for gift inspiration often search for platforms that make browsing simple while presenting options in an organized and appealing format PerfectPick Gift Network experience insight – The platform ensures a smooth browsing experience with well displayed gift options, helping users quickly find suitable presents while enjoying a clean and user friendly interface.
Users who enjoy exploring gift ideas often prefer platforms that provide a structured and easy to navigate experience for better shopping convenience GiftFlow Selection Portal platform note – It offers a smooth browsing system where gift items are clearly presented, making it easy for users to explore and select presents efficiently without confusion.
Individuals searching for online gift shops often appreciate platforms that make browsing simple and enjoyable with well organized product categories GiftChoice Explorer Hub usability insight – The website delivers a clean and structured gift browsing experience that helps users find suitable presents quickly while maintaining smooth navigation and visual clarity throughout.
People who enjoy convenient shopping often look for platforms that present gift ideas in a clear and visually appealing format for easier selection GiftEase Discovery Network experience comment – It provides a simple and enjoyable browsing experience where users can explore gift options easily while benefiting from a well organized and smooth interface.
Users interested in gift ideas often prefer platforms that combine simplicity with visual clarity to make browsing more enjoyable and efficient PerfectGift Browse Hub platform insight – The website ensures users can explore gift selections easily while enjoying a structured layout, smooth navigation, and a visually appealing shopping experience.
Individuals looking for gift inspiration often appreciate platforms that provide organized categories and easy navigation for better browsing efficiency GiftSpark Selection Portal usability note – It offers a smooth browsing experience where gift options are clearly arranged, making it simple for users to find and choose the perfect present without difficulty.
People who enjoy online gift shopping often search for platforms that present options clearly while maintaining a smooth and user friendly interface GiftHub Easy Selection Network experience insight – The platform provides a well structured browsing experience that helps users quickly explore gift ideas while enjoying simple navigation and visually appealing product displays.
Users exploring gift options often prefer platforms that make browsing effortless while offering well organized and visually attractive product listings GiftBrowse Smart Hub platform comment – It delivers a smooth and enjoyable shopping experience where users can easily navigate through gift categories and find suitable presents with minimal effort.
Individuals searching for gift ideas often appreciate platforms that provide simple navigation and clear presentation for a better shopping experience GiftSelect Browse Portal usability insight – The website offers a clean and organized interface where users can explore gift options easily while enjoying a smooth and visually appealing browsing experience.
People interested in finding gifts often look for platforms that simplify browsing while maintaining a visually structured and enjoyable shopping layout PerfectGift Explorer Network experience note – It provides a seamless browsing experience with clearly organized gift selections that help users quickly find and choose presents in a simple and efficient way.
Users who enjoy gift shopping often prefer platforms that offer easy navigation and well presented product categories for better usability and satisfaction GiftWorld Easy Browse Hub platform insight – The website ensures a smooth and organized shopping experience where users can explore gift ideas effortlessly while enjoying clear and visually appealing presentation.
Individuals searching for gift options often appreciate platforms that make browsing simple, smooth, and visually engaging for a better shopping experience GiftEase Perfect Selection Portal usability comment – It offers a well structured interface where users can easily browse gift ideas while enjoying a clean layout and smooth navigation across all categories.
Some websites feel outdated quickly, although fresh trend portal maintains a nice collection of updates that look modern and visually appealing, helping visitors enjoy browsing through current content without feeling overwhelmed or distracted by old or poorly designed material.
Каждый этап лечения имеет конкретную цель и контролируется специалистами. Для наглядности представлен пример структуры лечебного процесса, используемого в клинике «ДонМед Трезвость».
Детальнее – анонимная наркологическая клиника ростов-на-дону
Перед выездом проводится уточнение симптомов и общего состояния пациента, что помогает врачу подготовиться к визиту и взять необходимый набор медикаментов.
Изучить вопрос глубже – http://narkolog-na-dom-khabarovsk0.ru
During my exploration of e-commerce platforms I discovered a website that highlights simplicity, reliability and clean presentation in its shopping experience for users Simple Choice Cart Hub – the platform feels easy to use and well structured making online shopping smooth, clear and enjoyable for everyday browsing today
casino https://socifauc.com/read-blog/6358_gaming-uk-com-explores-plinko-039-s-growing-appeal.html
1xbet az 1xbet az
While exploring online clothing collections I found a platform that highlights seasonal items in a visually appealing and structured layout Season Chic Gallery – the design feels modern and stylish helping users browse fashion pieces easily while enjoying a clean and engaging shopping experience throughout the site today online
While browsing fashion inspiration platforms, I discovered Classy Style Collection Hub which features a clean and elegant design that makes browsing easy – elegant styles are showcased throughout and the fashion selections feel truly classy and aligned with modern fashion preferences
Клиническая практика показывает, что поэтапное воздействие позволяет достичь более устойчивого результата и снизить нагрузку на органы и ткани.
Получить дополнительную информацию – нарколог вывод из запоя
During a casual browsing session for clothing ideas, I discovered Corner Fashion Daily and appreciated the clean interface that made moving through pages feel effortless – the experience feels user focused and suitable for quick and easy browsing
In comparative usability research of online discovery tools, experts often note the effectiveness of contextual linking, especially when journey finder is integrated into explanatory passages – The overall feedback suggests a pleasant and intuitive experience, supported by thoughtful layout decisions and consistent aesthetics.
While checking online boutique-style stores I came across a platform that presents elegant finds and offers a smooth and well organized shopping experience for users Elegant Classy Browse Hub – the website feels refined and user friendly helping users browse stylish products easily while enjoying a clean and structured shopping experience overall today
Users who regularly explore digital spaces for engaging updates and meaningful content often look for services that help them stay informed and inspired throughout their daily browsing routines Curiosity Spark Network Daily Exploration Guide – it supports continuous discovery habits and encourages people to engage with fresh insights and helpful online materials in a natural and enjoyable way
Individuals exploring contemporary living styles often appreciate digital platforms with modern interfaces and simplified organization, and smart trend collection – delivers visually clear inspiration that helps users understand current styles while maintaining a relaxed and efficient browsing experience from start to finish.
1xbet azerbaijan 1xbet azerbaijan
nexus darknet market alternatives https://sites.google.com/view/nexusmarketplace
cannaexpress market https://sites.google.com/view/nexus-market-url
Your point of view caught my eye and was very interesting. Thanks. I have a question for you.
I spent part of the afternoon exploring e-commerce platforms before finding simple trend shop – The experience felt nice overall, and products were displayed clearly and attractively throughout the website, allowing smooth browsing without unnecessary distractions or complex navigation online.
1xbet azerbaycan 1xbet azerbaycan
Great post. Further info: visit here
During a casual search for organized shopping platforms and affordable deals, I came across daily marketplace link – The website looked clean from the start, and moving between different sections felt straightforward because there were fewer distracting graphics, unnecessary menus, or intrusive promotional messages throughout the browsing session online.
электрокарнизы для штор купить в москве электрокарнизы для штор купить в москве
1xbet azerbaijan 1xbet azerbaijan
Users interacting with digital websites often value consistency and simplicity that helps them understand structure quickly and navigate without confusion LaunchTrue Clean Hub – The TrueLaunch platform ensures a reliable browsing experience where content is organized clearly and users can explore information with ease.
Все препараты, применяемые при выезде, сертифицированы и подобраны с учётом общего состояния пациента, наличия хронических заболеваний и степени алкогольной интоксикации. Такой подход обеспечивает безопасность процедуры и предсказуемый результат уже в первые часы терапии.
Получить дополнительную информацию – нарколог на дом анонимно
ролл штора на пластиковое окно https://elektricheskie-rulonnye-shtory15.ru
Users who enjoy casual fashion ideas often prefer platforms that offer simple and realistic outfit suggestions, especially when they discover daily look inspiration hub – the site feels fresh and organized, providing practical style ideas that are easy to follow and visually appealing for everyday use without overwhelming the user with complexity.
People interested in contemporary home and lifestyle trends often explore platforms that showcase modern living ideas with a strong focus on clean design, practicality, and everyday usability for better inspiration ModernStyle Living Hub design insight – The website presents modern living inspiration in a clean, stylish, and functional way, helping users discover practical ideas that improve daily comfort while maintaining a visually appealing and well organized browsing experience.
Individuals who enjoy home design and lifestyle inspiration often prefer platforms that combine modern aesthetics with practical ideas for improving everyday living spaces and routines UrbanModern Living Portal experience note – It offers clean and stylish modern living content that helps users explore functional design ideas while maintaining a smooth, visually pleasing, and easy to navigate browsing experience throughout the platform.
People exploring lifestyle improvements often search for platforms that present modern living ideas in a structured and visually appealing format for better understanding and application StyleLiving Inspiration Hub usability comment – The platform delivers well organized modern lifestyle content that feels clean, stylish, and functional, helping users discover practical ideas for improving their living spaces and everyday comfort.
Users interested in interior design often appreciate platforms that provide modern living inspiration combined with practical and visually clean presentation styles ModernHome Style Network platform note – It focuses on delivering stylish and functional living ideas that help users enhance their home environment while enjoying a clean and easy to navigate browsing experience.
Individuals who enjoy lifestyle content often look for platforms that highlight modern living ideas with a focus on simplicity, style, and usability for everyday application LivingDesign Modern Hub experience insight – The website provides clean and visually appealing modern living inspiration that helps users explore functional ideas for improving home aesthetics and daily lifestyle comfort.
People seeking home inspiration often prefer platforms that combine modern design ideas with practical living solutions presented in a clean and structured format StyleNest Living Portal usability note – It offers stylish and functional modern living content that helps users discover easy to apply ideas while maintaining a visually organized and smooth browsing experience.
Users exploring modern lifestyle ideas often appreciate platforms that present clean and functional design inspiration for improving everyday home environments UrbanStyle Living Network experience comment – The platform delivers modern living content that is both stylish and practical, helping users enhance their spaces through simple and visually appealing design concepts.
Individuals interested in contemporary living often search for platforms that provide modern design inspiration in a clean and user friendly layout for better usability ModernSpace Inspiration Hub platform insight – It focuses on functional and stylish living ideas that help users improve their home environment while enjoying a smooth and visually appealing browsing experience.
People who enjoy stylish home ideas often prefer platforms that showcase modern living inspiration in a simple and visually organized format for easy understanding LivingTrend Modern Portal usability note – The website provides clean and functional design inspiration that helps users explore practical ideas for enhancing their living spaces with modern and stylish concepts.
Users interested in home aesthetics often look for platforms that present modern living ideas in a visually clean and easy to navigate structure for better inspiration ModernVista Living Hub experience insight – It offers stylish and functional lifestyle content that helps users discover modern design ideas while maintaining a smooth and visually appealing browsing experience.
Individuals exploring lifestyle design often prefer platforms that combine modern aesthetics with practical home improvement ideas for everyday use and inspiration StyleFlow Living Network platform note – The website delivers clean and modern living inspiration that helps users improve their spaces while enjoying a well structured and visually appealing interface.
People who enjoy home improvement content often search for platforms that provide modern living ideas in a clear, stylish, and functional presentation style UrbanNest Style Hub usability comment – It offers modern design inspiration that helps users explore practical living ideas while maintaining a clean and smooth browsing experience throughout all content sections.
Users seeking modern lifestyle inspiration often appreciate platforms that present clean and functional design ideas for improving home and daily living environments LivingGlow Modern Portal experience insight – The platform provides stylish and practical living content that helps users enhance their spaces through simple, modern, and visually appealing design inspiration.
Individuals interested in contemporary home ideas often look for platforms that combine clean design inspiration with practical usability for everyday living improvements ModernEdge Living Hub platform note – It delivers structured and stylish living content that helps users discover functional design ideas while maintaining a smooth and visually appealing browsing experience.
People exploring modern lifestyle trends often prefer platforms that showcase clean, stylish, and functional living ideas for better home inspiration and usability StyleCraft Living Network usability insight – The website offers modern living inspiration that helps users improve their spaces while enjoying a visually organized and easy to navigate experience.
Users who enjoy interior and lifestyle design often search for platforms that present modern living concepts in a simple and visually attractive format LivingAura Style Portal experience comment – It provides clean and functional design inspiration that helps users enhance their homes while exploring modern and stylish ideas for everyday living improvements.
Individuals interested in stylish home ideas often prefer platforms that offer modern living inspiration in a structured and visually appealing presentation style ModernLiving Vision Hub platform insight – The website delivers practical and stylish living content that helps users discover functional design ideas while maintaining a clean and engaging browsing experience.
People who enjoy modern aesthetics often look for platforms that provide clean and functional living inspiration for improving everyday home environments UrbanModern Style Network usability note – It offers well organized modern living content that helps users explore stylish design ideas while maintaining a smooth and visually appealing user experience.
Users interested in lifestyle design often appreciate platforms that combine practical home ideas with modern and visually clean inspiration for better usability LivingDesign Style Portal experience insight – The platform provides stylish and functional living inspiration that helps users improve their spaces while enjoying a clean, modern, and easy to navigate interface.
Individuals exploring home improvement often search for platforms that present modern living ideas in a simple, clean, and visually structured format ModernNest Living Hub platform note – It delivers stylish and functional design inspiration that helps users enhance their living spaces while maintaining a smooth and visually appealing browsing experience throughout the website.
pet stain sofa cleaning
I spent some time comparing opportunity sites before opening simple growth hub – The platform feels helpful overall, and opportunities are presented clearly and accessibly, allowing users to navigate smoothly without clutter or unnecessary complexity online.
In my exploration of online inspiration sites I discovered a platform that focuses on creativity driven growth for users seeking practical self improvement Creative Idea Flow – the content motivates users to generate ideas and grow steadily through simple guidance and supportive strategies that encourage consistent learning and real world application today online
888statz 888statz .
Процесс лечения капельницей помогает улучшить состояние пациента уже через короткий период. Важно, что процедура не только снимает симптомы похмелья, но и восстанавливает нормальную работу печени, почек и других органов, пострадавших от токсического воздействия алкоголя. Это помогает предотвратить долгосрочные последствия интоксикации, такие как хроническая усталость, проблемы с органами и психоэмоциональные расстройства.
Углубиться в тему – капельница от похмелья вызов на дом екатеринбург
During my exploration of structured information hubs and online resource platforms, I discovered Modern Value Corner Guide listed in a curated selection – The website feels simple and well organized, making it easy for visitors to navigate and access relevant information quickly today.
During my exploration of shopping websites I discovered a platform that offers a simple and dependable experience for users looking for quality products Reliable Shop Hub – the browsing experience is smooth and structured helping users easily find items while enjoying a trusted and efficient online shopping system today across all categories
A friend recently recommended checking several uplifting websites, and while exploring them I found cheerful content space which stood out because the friendly tone and welcoming design make browsing enjoyable for visitors who want a smooth and pleasant online experience overall.
While exploring essential lifestyle stores, I found Daily Essentials Quick Hub which features a structured interface and modern design – useful everyday items found quickly providing a very convenient shopping experience overall for busy daily routines
Many fashion enthusiasts exploring digital inspiration often browse curated platforms that highlight evolving street aesthetics and wardrobe ideas Urban Style Studio Link which showcase modern outfit combinations, practical styling tips, and urban-inspired clothing arrangements for everyday wear – Urban fashion style feels modern, trendy and well presented
Нарколог на дом — это формат медицинской помощи, при котором пациент получает лечение без посещения стационара. В наркологической клинике «Частный медик 24» в Нижнем Новгороде такая услуга используется при острых состояниях: запой, выраженная алкогольная интоксикация, абстинентный синдром, а также при необходимости срочного вмешательства без транспортировки больного. Выезд врача позволяет начать терапию в первые часы ухудшения состояния, что снижает риск осложнений и облегчает переносимость лечения.
Подробнее – narkolog-na-dom-nizhnij-novgorod.ru/
В практике лечения на дому применяются следующие этапы медицинского воздействия:
Получить больше информации – нарколог на дом клиника ростов-на-дону
nexus darknet link https://sites.google.com/view/nexus-market-link
зеркало 888starz http://www.888starz-uzbekistan4.com .
While exploring discovery based websites I found a platform that encourages users to imagine dream places and explore ideal destinations through ideas Dream Location Vision Hub – the website feels smooth and inspiring, helping users visualize places, discover inspiration and explore travel ideas through a simple and organized online environment
Many individuals interested in shared learning experiences often prefer platforms that encourage open communication, and connect ideas network – creates a collaborative environment where users can exchange insights, develop projects together, and enhance creativity through structured interaction and teamwork overall.
Каждый этап процедуры направлен на последовательное восстановление организма и предотвращение осложнений. Ниже представлена таблица, отражающая основные стадии и их особенности.
Подробнее тут – наркология вывод из запоя в хабаровске
Shoppers looking for rare and inspiring online items can explore fresh finds hub which brings together curated and unusual products helping users discover beyond typical stores – offering a refreshing way to find unique items that enhance creativity lifestyle variety and everyday convenience
In reviewing motivational and self awareness sites online, I came across Every Moment Path Guide featured in curated listings – The experience felt smooth, everything appeared clean and surprisingly easy navigating overall with well designed layout and intuitive browsing structure today.
Shoppers who regularly search for online deals appreciate systems that group similar offers together so they can easily compare options and make informed decisions Offer Clarity Zone – The platform ensures a seamless browsing journey where users can efficiently move through categories and find the best deals without wasting time.
Состояние пациента при интоксикации может развиваться по-разному: от умеренной слабости и головной боли до выраженной дезориентации, тахикардии и нарушений сна. В таких ситуациях важно не откладывать обращение за помощью. Наркологическая помощь на дому рассматривается, когда требуется быстрое вмешательство и контроль состояния без транспортировки пациента.
Разобраться лучше – наркологическая помощь
During a recent online session searching for inspiration, I discovered Expand Mindset Portal which had a clean and simple layout that made navigation comfortable – I came across valuable inspiration today and I am likely to return again soon for more insights
Interested in UFC? UFC White House Full Fight Card unique mixed martial arts tournament will take place on June 14, 2026, in Washington, D.C., on the South Lawn of the White House. It will be the first professional sporting event in history to be held directly on the grounds of the U.S. presidential residence.
I spent some time exploring different trading education websites before discoveringbeginner trading guide – The insights shared on the platform felt practical and easy to follow, and the information was presented clearly in a way that made understanding trading concepts simple for beginners without confusion online.
globaltrendmarket – Great marketplace overall, browsing different sections feels smooth and straightforward for everyone.
мастер стиральный машина https://remont-stiralnih-mashin213.ru
Процесс выезда врача организован последовательно и включает несколько этапов, направленных на быстрое восстановление пациента. Ниже представлена таблица с основными шагами процедуры.
Узнать больше – http://narkolog-na-dom-tolyatti0.ru/
In modern fast paced environments people appreciate simple digital spaces that bring emotional relief and soft positivity into their day daily smile guide – It offers an easygoing and pleasant atmosphere that supports relaxation, encourages optimistic thinking, and helps users reconnect with small joyful details often overlooked in busy routines.
People who like value centered online stores often look for platforms that prioritize ease and speed, especially when they discover efficient value marketplace – the platform feels structured and smooth, helping users browse products easily while maintaining a clean and fast shopping experience that supports quick decision making overall.
People who enjoy discovering new places often look for platforms that combine travel inspiration with learning opportunities and motivational content that encourages curiosity and personal growth in daily life ExploreLife Journey Hub exploration note – The platform offers engaging content focused on travel, learning, and daily inspiration, helping users stay motivated while discovering new ideas and experiences that enrich their understanding of the world around them.
Individuals interested in travel and learning often prefer platforms that inspire exploration while also providing meaningful content that supports curiosity and everyday motivation WanderLearn Inspire Network experience insight – It delivers exploration focused content that encourages users to travel, learn, and stay inspired daily while maintaining a smooth and engaging browsing experience designed for discovery and personal growth.
People who love exploration often search for platforms that combine travel inspiration with educational content and daily motivational ideas for a more enriched lifestyle GlobalExplore Inspiration Hub usability comment – The website provides well structured exploration content that helps users stay inspired while learning about new places, ideas, and experiences through simple and engaging storytelling.
Users seeking adventure and knowledge often appreciate platforms that encourage travel based discovery while also supporting learning and consistent inspiration AdventureMind Explore Portal platform note – It focuses on delivering exploration driven content that inspires users to travel, learn, and stay motivated through engaging and easy to understand informational resources.
Individuals who enjoy discovering the world often prefer platforms that provide travel ideas along with educational and motivational content for everyday inspiration ExploreMore Daily Network experience insight – The platform encourages users to explore new destinations while learning and staying inspired through content that blends travel, curiosity, and personal growth.
People interested in exploration often look for platforms that combine travel inspiration with learning opportunities and motivational content that supports curiosity JourneySpark Explore Hub usability note – It delivers engaging exploration focused content that helps users stay inspired, learn new things, and discover travel ideas that enrich their everyday experiences.
Users who enjoy travel and discovery often search for platforms that provide inspiration while encouraging learning and exploration of new cultures and places TravelWise Explore Network experience comment – The website offers exploration centered content that motivates users to travel, learn, and stay inspired through simple and engaging informational experiences.
Individuals seeking daily inspiration often prefer platforms that combine exploration with learning and travel focused content for personal growth and curiosity ExplorePath Inspiration Portal platform insight – It provides structured content that encourages users to discover new places while staying motivated and engaged through educational and exploration driven material.
People who enjoy exploring the world often appreciate platforms that offer travel inspiration along with learning based content for continuous motivation WanderVision Explore Hub usability comment – The platform delivers exploration focused material that helps users stay curious, inspired, and informed while discovering new travel ideas and meaningful experiences.
Users interested in discovery often prefer platforms that combine exploration content with educational insights and daily inspiration for a balanced learning experience ExploreSphere Journey Network experience note – It offers engaging travel and learning content that motivates users to explore the world while staying inspired through simple and accessible informational guidance.
Individuals who enjoy exploring new ideas often search for platforms that provide travel inspiration along with learning content to support curiosity and growth GlobalJourney Explore Portal platform insight – The website encourages users to explore new destinations while learning and staying inspired through well structured and easy to follow exploration based content.
People who love discovery often prefer platforms that blend travel inspiration with educational material and motivational content for everyday engagement ExploreDaily Adventure Hub usability note – It provides exploration driven content that helps users stay inspired while learning about new places, cultures, and experiences in an engaging and simple format.
Users interested in travel inspiration often look for platforms that encourage exploration while also offering learning based content for continuous personal development WanderFlow Explore Network experience comment – The platform delivers engaging exploration content that motivates users to travel, learn, and stay inspired through clear and accessible storytelling and informational guidance.
Individuals seeking exploration content often prefer platforms that combine travel ideas with learning opportunities and motivational daily inspiration for better engagement ExploreQuest Inspiration Hub platform insight – It provides structured exploration content that helps users stay curious, informed, and motivated while discovering new places and ideas through simple and engaging resources.
People who enjoy discovering the world often search for platforms that offer travel inspiration along with educational and motivational content for daily use JourneyExplore Daily Network usability comment – The website provides exploration focused material that helps users learn about new destinations while staying inspired and engaged through clear and practical content presentation.
Users interested in exploration often appreciate platforms that combine travel discovery with learning content and motivational insights for continuous inspiration ExploreWorld Vision Hub experience note – It delivers engaging content that encourages users to travel, learn, and stay inspired while exploring new ideas and experiences in an easy to understand format.
Individuals who enjoy travel content often prefer platforms that provide exploration based inspiration along with learning opportunities for everyday curiosity WanderExplore Insight Portal platform insight – The website offers structured exploration content that motivates users to discover new places while staying inspired and engaged through educational and travel focused material.
People seeking inspiration through travel often look for platforms that combine exploration with learning and motivational content for personal growth ExploreWave Journey Hub usability note – It provides engaging exploration material that helps users stay curious, informed, and motivated while discovering new ideas and travel opportunities in a simple format.
Users who enjoy discovering new places often prefer platforms that offer travel inspiration along with learning based content for continuous engagement GlobalWander Explore Network experience comment – The platform delivers exploration focused content that encourages users to travel, learn, and stay inspired through easy to understand and engaging informational resources.
Individuals interested in exploration often search for platforms that provide travel ideas and learning content that supports curiosity and daily inspiration ExploreJourney Daily Hub platform insight – It offers structured content that helps users stay inspired while discovering new destinations and learning about different cultures through engaging exploration based storytelling.
Users reviewing technology websites often value streamlined layouts, responsive design elements, and clear pathways that reduce confusion while moving between pages InnovaGrid Access – InnovaTek offers a modern interface style where minimal design choices enhance usability, creating an experience that feels both professional and highly efficient for everyday navigation needs.
Такой алгоритм помогает врачу быстро устранить симптомы и восстановить пациента без стресса. Процедура занимает от 40 до 90 минут, в зависимости от состояния и применяемых препаратов.
Выяснить больше – нарколог на дом цены в тольятти
During my search for interest discovery platforms I discovered a website that presents hobbies and passions in a simple and structured way for users Find Joy Hub – it helps users explore interests easily and enjoy the process of discovering what they love through smooth navigation and helpful suggestions designed for everyday inspiration today online
nexus market https://sites.google.com/view/nexusdarknetlink
nexusdarknet site link https://sites.google.com/view/nexusdarknetmarket
I spent part of the afternoon exploring content platforms before finding exclusive moment space – The website delivers inspiring content overall, where moments feel meaningful and are presented clearly, making the experience smooth and easy to follow online.
nexus dark web market https://sites.google.com/view/nexus-market-link
Users interested in building confidence and self awareness frequently browse inspirational websites that focus on creativity and personal expression growth Self Belief Studio – The platform supports identity exploration, helping individuals gain clarity, build confidence, and express themselves in more meaningful ways
While reviewing creativity focused online resources I came across a platform that feels supportive and well structured for users Inspire Path Network providing smooth access to ideas – the content is arranged in a way that encourages exploration and creative thinking while maintaining a simple and enjoyable browsing experience throughout the site today
During casual exploration of motivational websites, I came across Start Something Awesome Hub which provides structured content and a visually appealing layout that feels intuitive – this motivation hub encourages action and fresh creative thinking always for building positive habits
In exploring online shopping trend platforms and retail inspiration collections, I noticed Modern Trend Emporium featured among similar resources – Nice collection here, pages loaded smoothly and content looked engaging, providing a well structured and visually clear browsing experience today.
Thanks a lot. Anyone needing more info: this page
In my exploration of idea discovery websites I found a platform that promotes finding something new and exploring opportunities in a very simple way New Opportunity Finder Hub – the website feels clear and motivating, helping users discover ideas, explore possibilities and engage in continuous learning through an easy and accessible online system
NineCasino https://pcassessoria.digital/
xbet xbet
xbet girişi xbet girişi
Compared with many cluttered online stores, home elegance shop offers a more comfortable browsing experience where the product presentation is excellent and intuitive, helping visitors easily navigate through different categories without confusion.
Many learners and professionals exploring creativity tools often look for platforms that provide inspiration and structured thinking systems like Imagination Boost Hub – helping individuals expand their creative capacity overcome idea blocks and develop innovative solutions through guided techniques effectively over time daily practice
1xbet giriş yapamıyorum 1xbet giriş yapamıyorum
Выбор между домашней помощью и стационарным лечением определяется не удобством, а медицинской целесообразностью. В условиях клиники исключаются внешние триггеры, обеспечивается изоляция от источников алкоголя и создается контролируемая среда, где терапевтические решения принимаются на основе объективных показателей, а не субъективных ощущений пациента. Такой подход критически важен для предотвращения осложнений, минимизации дискомфорта абстиненции и формирования устойчивой базы для дальнейшей противорецидивной работы.
Углубиться в тему – вывод из запоя в стационаре санкт-петербург
1xbet turkiye 1xbet turkiye
Consumers looking for home improvement inspiration online usually value platforms with structured layouts and modern aesthetics, and daily living showcase – creates a comfortable browsing environment where products are categorized clearly, helping users compare options and navigate the store more effectively.
After looking through multiple online recommendation platforms, I eventually opened top browsing destination – The overall experience stayed clean and responsive, allowing content to be explored comfortably without overwhelming distractions online.
электрическая рулонная штора электрическая рулонная штора
While comparing different shopping outlets, I eventually opened exclusive smart guide – The website looked clean and modern, and everything appeared updated and simple, making browsing easy without clutter or confusing interface elements online.
электрокарнизы для штор купить в москве электрокарнизы для штор купить в москве
People interested in stylish living often search for platforms that present modern ideas in an easy way, especially when they explore modern style guide hub – the site feels sleek and organized, helping users discover lifestyle trends quickly while maintaining a visually appealing and simple browsing environment overall across different sections.
Нарколог на дом в Екатеринбурге востребован в ситуациях, когда человеку нужна врачебная помощь после употребления алкоголя, при запое, выраженном похмельном синдроме, нарушении сна, тревоге, скачках давления, слабости и других признаках ухудшения самочувствия. Такой формат обращения часто выбирают семьи, которые хотят вызвать врача без поездки в клинику и быстро получить консультацию по состоянию больного. Домашний выезд особенно важен тогда, когда требуется детоксикация, наблюдение после нескольких дней употребления спиртного и оценка рисков, связанных с последствиями алкоголизма.
Выяснить больше – запой нарколог на дом в екатеринбурге
While searching for creative inspiration platforms online, I found Creative Journey Pathway Hub which offers a clean and modern interface that improves navigation – the website design is clean and the content remains interesting and naturally presented in a smooth and enjoyable flow
dark web sites https://sites.google.com/view/nexusmarketdarknet
Запой – это состояние, при котором человек продолжает употреблять алкоголь в течение длительного времени, не в состоянии прекратить употребление самостоятельно, что является проявлением алкоголизма. Это может привести к серьезным проблемам со здоровьем, и в таком случае необходим вывод из запоя с помощью наркологической помощи, при этом в дальнейшем может рассматриваться кодирование.
Подробнее – вывод из запоя на дому анонимно
wethenorth onion https://sites.google.com/view/nexus-market-link
Online shoppers often look for platforms that combine affordability with smooth navigation and trustworthy browsing experiences that make finding products easier and more efficient DealFinder Marketplace Hub usability note – The website offers a reliable and user friendly experience where users can explore great deals easily while enjoying fast navigation, clear layout, and consistent performance across all product categories available.
People searching for budget friendly options often prefer platforms that highlight discounts clearly and allow quick comparison between products for smarter purchasing decisions SmartDeal Explorer Portal experience insight – It delivers smooth browsing with well organized deal listings that help users quickly identify valuable offers while maintaining a clean, reliable, and easy to use shopping interface.
Users who enjoy online shopping often appreciate platforms that make deal discovery simple, fast, and accessible across different categories and product types QuickSave Deal Network platform comment – The website provides a seamless experience with structured listings that allow users to find great deals easily while enjoying smooth navigation and a dependable shopping environment.
Individuals looking for online bargains often search for platforms that present offers in a clear format and ensure a smooth browsing experience without unnecessary complexity ValueDeal Finder Hub usability note – It focuses on delivering reliable deal listings that are easy to browse, helping users quickly discover affordable products while maintaining a user friendly and efficient interface throughout.
People interested in saving money online often prefer platforms that simplify deal discovery and make it easy to compare prices across multiple categories BestPrice Deal Portal experience insight – The platform ensures a smooth shopping experience by organizing deals clearly and allowing users to find reliable offers quickly while maintaining ease of use and consistent performance.
Users who value efficiency in online shopping often look for platforms that provide fast access to deals and maintain a clean structured layout for easy browsing DealSmart Shopping Hub platform note – It offers a reliable and intuitive interface that helps users navigate smoothly while discovering great deals and enjoying a consistent and user friendly online shopping experience.
People exploring online discounts often prefer platforms that present offers clearly and help them make quick and informed purchasing decisions without confusion SaveMore Deal Network usability insight – The website provides structured deal listings that allow users to easily browse and compare offers while enjoying a smooth, dependable, and efficient shopping experience across all categories.
Users searching for affordable products often appreciate platforms that combine simplicity with functionality to improve the overall online shopping experience significantly DealEase Marketplace Hub experience comment – It delivers a smooth browsing environment where users can quickly access valuable deals while enjoying a reliable interface designed for easy navigation and consistent performance across product sections.
Individuals who enjoy deal hunting often look for platforms that make it simple to discover discounts while maintaining a fast and user friendly interface QuickDeal Finder Portal usability note – The platform ensures users can easily explore great offers while benefiting from smooth navigation, organized categories, and a dependable shopping experience that enhances convenience and satisfaction.
People who prefer structured shopping experiences often search for platforms that highlight deals clearly and provide easy access to affordable product options DealFlow Savings Hub platform insight – It delivers a clean and efficient browsing experience that helps users quickly locate valuable discounts while maintaining a reliable, smooth, and user friendly interface throughout the website.
Users interested in online savings often prefer platforms that simplify browsing and make it easy to identify the best available deals in real time SmartSavings Deal Portal experience note – The website provides organized and accessible deal listings that help users find affordable products quickly while enjoying a smooth and trustworthy online shopping environment.
People looking for reliable shopping platforms often appreciate websites that combine clear deal presentation with a smooth and responsive browsing experience ValueSave Deal Hub usability insight – It focuses on providing structured and easy to navigate content that allows users to discover great deals efficiently while maintaining a consistent and dependable shopping experience.
Users who enjoy browsing discounts often prefer platforms that offer clarity, speed, and reliability when searching for the best available deals online DealHunter Network Hub platform comment – The website ensures a seamless experience by organizing deals clearly and helping users navigate quickly while maintaining a smooth and user friendly interface throughout all sections.
Individuals searching for online bargains often value platforms that present deals in an organized and easy to understand format for better usability EasyDeal Finder Portal experience insight – It provides a smooth browsing experience where users can quickly explore affordable options while benefiting from a reliable and well structured shopping environment designed for convenience.
People who enjoy saving money online often search for platforms that make deal discovery simple and efficient while maintaining a clean user interface DealSmart Savings Network usability note – The platform delivers structured and accessible deal listings that help users find great offers easily while ensuring a smooth and consistent shopping experience across all categories.
Users exploring discount platforms often prefer websites that combine usability with clear organization to improve their online shopping experience significantly QuickSave Deal Hub experience insight – It provides a reliable and easy to use interface that helps users discover valuable deals quickly while maintaining smooth navigation and consistent performance throughout the website.
People searching for online savings opportunities often appreciate platforms that highlight discounts clearly and provide a smooth browsing experience for better decision making BestDeal Finder Network platform note – The website ensures users can easily browse and compare offers while enjoying a structured, reliable, and user friendly interface designed for efficient deal discovery.
Users who enjoy finding deals often look for platforms that simplify shopping while offering clear and accessible product listings across multiple categories DealVision Marketplace Hub usability comment – It delivers a smooth and organized browsing experience that helps users quickly identify great deals while maintaining reliability, clarity, and ease of navigation throughout the platform.
Individuals interested in affordable shopping often prefer platforms that present deals in a clean and structured way to enhance usability and satisfaction SaveSmart Deal Portal experience insight – The platform ensures a smooth user experience by organizing offers clearly and allowing users to easily explore valuable discounts while maintaining consistent performance and reliability.
People who frequently shop online for deals often search for platforms that provide fast navigation and clear deal presentation for better efficiency DealFinder Express Hub usability note – It offers a structured and reliable shopping environment where users can quickly find great deals while enjoying smooth navigation, clear categories, and a user friendly interface throughout the website.
К основным показаниям относятся:
Получить больше информации – стационар вывод из запоя нижний новгород
While exploring motivational and self development platforms online I discovered a website that shares inspiring content focused on helping users take real steps toward their personal goals Dream Builder Hub – the platform delivers motivational ideas that encourage users to start building their dreams today by taking practical action and developing a focused mindset for personal growth and success online
Users exploring modern digital platforms often focus on how smoothly pages load and how easily they can move between sections without confusion or delays during browsing sessions UrbanShift Access Hub – UrbanShift provides a smooth browsing experience where pages are easy to navigate, allowing users to explore content comfortably and efficiently with minimal effort.
While exploring various digital platforms and researching online content and came across Global Discovery Lens – the experience felt surprisingly refreshing with well structured sections and information that makes browsing feel smooth, modern and easy to follow for any type of user
During my browsing of digital marketplaces I came across a platform that focuses on smart shopping with fast navigation, simple design and easy product discovery options Smart Buying Hub – the experience feels organized and helpful, guiding users to explore products, compare prices and shop easily through a clean online system
People who enjoy discovering new wardrobe ideas often prefer websites that present clothing trends in a structured and visually appealing interface Wardrobe Trend Studio this helps users stay inspired while browsing fashion content – Outfit arrangements are shown clearly so users can easily identify style preferences.
While searching for learning inspiration websites, I discovered Fresh Perspective World Hub which offers well structured articles and smooth browsing experience that feels intuitive – fresh viewpoints shared here help broaden understanding every day naturally and consistently over time
Этот документ охватывает важные аспекты медицинской науки, сосредотачиваясь на ключевых вопросах, касающихся здоровья населения. Мы рассматриваем свежие исследования, клинические рекомендации и лучшие практики, которые помогут улучшить качество лечения и профилактики заболеваний. Читатели получат возможность углубиться в различные медицинские дисциплины.
Узнать напрямую – лечение наркомании нижний новгород
Individuals working on personal development often find value in structured encouragement that helps them stay consistent with their habits, especially when motivation naturally fluctuates throughout different phases of life progressspark keepgrowingforward – steady encouragement like this can help reinforce discipline and maintain forward momentum even during uncertain periods
I spent longer browsing this page than expected because the information remained easy to absorb and the design avoided the cluttered appearance that often makes reading online unnecessarily frustrating or tiring for visitors today. inspired discussion point – The consistently updated articles and polished structure created a reading experience that stayed enjoyable and easy to follow from start to finish.
Вывод из запоя на дому — это формат наркологической помощи, при котором лечение проводится в привычной для пациента обстановке с выездом врача. Такой подход применяется в ситуациях, когда состояние требует медицинского вмешательства, но не предполагает обязательной госпитализации. В наркологической клинике «Частный медик 24» помощь на дому выстраивается по принципу поэтапной стабилизации: сначала устраняются острые проявления, затем оценивается динамика и при необходимости корректируется терапия.
Изучить вопрос глубже – вывод из запоя на дому круглосуточно
NineCasino https://pcassessoria.digital/
Many online users enjoy platforms that offer a balance of variety and ease when browsing for new products, and a frequently referenced example is Shop & Find Discovery Page which is generally described as a smooth browsing experience designed to help users discover items quickly and comfortably.
888 statz 888 statz .
Нарколог на дом в Екатеринбурге: выезд врача на дом, лечение запоя и консультации в наркологической клинике «НЕО+».
Углубиться в тему – запой нарколог на дом
Процесс терапии делится на последовательные этапы, каждый из которых направлен на решение конкретной медицинской задачи. Лечение включает физическую детоксикацию, медикаментозную коррекцию и психотерапевтическую поддержку. В таблице ниже отражены ключевые этапы лечебного процесса.
Получить дополнительную информацию – наркологическая клиника цены в хабаровске
Текст посвящён распространённым мифам о зависимости и их развенчанию. Мы предоставим научно обоснованную информацию и дадим рекомендации по выбору эффективного способа борьбы с зависимым поведением.
Читать полностью – наркологический центр нижний новгород
Выезд нарколога начинается с осмотра пациента. Доктора измеряют давление, пульс, оценивают уровень сознания и выраженность симптомов. На основании этих данных формируется план лечения, который реализуется сразу на месте. Такой подход позволяет быстро перейти к стабилизации состояния без лишних этапов.
Подробнее – вывод из запоя на дому анонимно в санкт-петербурге
While comparing different online resources for household and lifestyle products, I noticed this shopping source offers a surprisingly approachable structure, since the categories are arranged logically and the written details help visitors follow product information without confusion or complicated wording during longer browsing sessions.
darknet markets links https://sites.google.com/view/nexus-market-link
Решение о помещении пациента в стационар принимается на основе объективных медицинских критериев, а не только по желанию родственников. К показаниям относятся: запой длительностью более трех суток, выраженные симптомы абстиненции, наличие в анамнезе алкогольных делириев или судорожных эпизодов, сопутствующие хронические заболевания печени, поджелудочной железы, сердца или нервной системы. Отдельным фактором выступает полинаркомания или сочетание алкогольной зависимости с приемом психофармакологических препаратов без назначения врача. В таких ситуациях риск развития тяжелых осложнений возрастает многократно, и амбулаторный формат не обеспечивает необходимого уровня контроля. Госпитализация позволяет провести полноценную диагностику, включая ЭКГ, экспресс-анализы крови, оценку неврологического статуса и мониторинг сатурации, что формирует точную картину состояния и исключает назначение шаблонных схем.
Подробнее тут – быстрый вывод из запоя в стационаре
People who enjoy browsing online deals frequently value platforms that simplify navigation and improve product discovery, and modern deal finder – offers a polished browsing experience that helps users compare trendy products efficiently while maintaining a clean and uncluttered layout.
Same here. For further reading: visit this page
People interested in cultivating stronger creative habits often search for platforms that combine inspiration with structured learning experiences, and they regularly come across tools such as Mindful Creativity Route which support users with structured creative exercises, guided inspiration, and practical strategies to build sustainable creative habits and improve focus – Encourages mindful creativity, focus, and structured habit building for long term improvement.
Users interested in comparing different options efficiently often rely on digital platforms that highlight key differences clearly, and they explore value comparison center which organizes information in a user friendly way, helping them quickly understand pricing structures and product benefits without unnecessary complexity or confusion.
During my search for online learning platforms, I came across modern share hub – The platform felt organized and user friendly, and the content was interesting, making browsing simple without confusion or complicated layout issues online.
Нарколог на дом в Екатеринбурге: выезд врача на дом, лечение запоя и консультации в наркологической клинике «НЕО+».
Получить больше информации – врач нарколог на дом екатеринбург
Выбор между домашней помощью и стационарным лечением определяется не удобством, а медицинской целесообразностью. В условиях клиники исключаются внешние триггеры, обеспечивается изоляция от источников алкоголя и создается контролируемая среда, где терапевтические решения принимаются на основе объективных показателей. Такой подход критически важен для предотвращения осложнений, минимизации дискомфорта абстиненции и формирования устойчивой базы для дальнейшей противорецидивной работы.
Подробнее можно узнать тут – https://vyvod-iz-zapoya-v-staczionare-sankt-peterburg-20.ru/
Нарколог на дом в Екатеринбурге востребован в ситуациях, когда человеку нужна врачебная помощь после употребления алкоголя, при запое, выраженном похмельном синдроме, нарушении сна, тревоге, скачках давления, слабости и других признаках ухудшения самочувствия. Такой формат обращения часто выбирают семьи, которые хотят вызвать врача без поездки в клинику и быстро получить консультацию по состоянию больного. Домашний выезд особенно важен тогда, когда требуется детоксикация, наблюдение после нескольких дней употребления спиртного и оценка рисков, связанных с последствиями алкоголизма.
Выяснить больше – вызвать нарколога на дом в екатеринбурге
Решение о помещении пациента в стационар принимается на основе объективных медицинских критериев, а не только по желанию родственников. К показаниям относятся: запой длительностью более трех суток, выраженные симптомы абстиненции, наличие в анамнезе алкогольных делириев или судорожных эпизодов, сопутствующие хронические заболевания печени, поджелудочной железы, сердца или нервной системы. Отдельным фактором выступает полинаркомания или сочетание алкогольной зависимости с приемом психофармакологических препаратов без назначения врача. В таких ситуациях риск развития тяжелых осложнений возрастает многократно, и амбулаторный формат не обеспечивает необходимого уровня контроля. Госпитализация позволяет провести полноценную диагностику, включая ЭКГ, экспресс-анализы крови, оценку неврологического статуса и мониторинг сатурации, что формирует точную картину состояния и исключает назначение шаблонных схем.
Ознакомиться с деталями – быстрый вывод из запоя в стационаре в нижнем новгороде
888starz site http://888starz-uzbekistan4.com/ .
While browsing various online discount platforms today I discovered a website that presents everyday deals in a very clean and user friendly layout making shopping feel simple and efficient Life Deal Finder Hub – the platform offers great savings and the browsing experience feels fast, convenient and easy for users who want quick access to useful offers without unnecessary complexity online
While browsing ecommerce sites with positive themes I found a platform that emphasizes simplicity and cheerful interaction for everyday users Bliss Buy Center – the website offers a smooth browsing experience where users can explore products easily while enjoying a bright and uplifting shopping environment that feels relaxed and enjoyable today online
При выводе из запоя на дому с быстрым облегчением используются различные медикаменты, направленные на быстрое восстановление водно-солевого баланса, улучшение функции печени и почек, а также снижение симптомов алкогольного абстинентного синдрома. Важно, что состав препаратов подбирается в зависимости от состояния пациента, и все препараты вводятся под контролем квалифицированного медицинского специалиста.
Получить больше информации – vyvod-iz-zapoya-na-domu-ekaterinburg-19.ru/
While exploring fashion inspiration websites, I discovered Simply Stylish Wardrobe Hub which offers a neat and structured layout that enhances clarity – stylish items are curated beautifully and make shopping feel effortless and enjoyable for building everyday outfits
Нарколог на дом в Екатеринбурге востребован в ситуациях, когда человеку нужна врачебная помощь после употребления алкоголя, при запое, выраженном похмельном синдроме, нарушении сна, тревоге, скачках давления, слабости и других признаках ухудшения самочувствия. Такой формат обращения часто выбирают семьи, которые хотят вызвать врача без поездки в клинику и быстро получить консультацию по состоянию больного. Домашний выезд особенно важен тогда, когда требуется детоксикация, наблюдение после нескольких дней употребления спиртного и оценка рисков, связанных с последствиями алкоголизма.
Исследовать вопрос подробнее – нарколог на дом вывод екатеринбург
sofa odor removal dubai
During my search through cheerful shopping platforms, I came across Shop Happiness Connection Page featured among similar resources – The information felt helpful overall, and layout looks modern and very welcoming for visitors everywhere thanks to smooth navigation and clean structured layout.
Website analysis often focuses on how easily users can interpret layout design and move through different sections of a platform Infinite Connectivity Page – interface overview – InfinitaLink offers a clean and structured environment where users can explore content without facing usability challenges or navigation barriers.
Процедура начинается с осмотра пациента. Врач измеряет давление, пульс, оценивает общее состояние и выраженность симптомов. На основании этих данных формируется состав капельницы и план лечения. Такой подход позволяет учитывать индивидуальные особенности пациента и эффективно провести вывод из запоя.
Получить дополнительные сведения – капельница от похмелья на дом воронеж
During my search through adventure lifestyle and exploration platforms, I discovered Your Path Adventure Guide included in a curated selection – The website feels clean and modern, and navigation is incredibly simple, making it easy for visitors to explore different sections comfortably today.
I spent some time comparing learning communities before opening growth learning space – The platform feels like a strong hub where sharing, discovering, and learning happen smoothly every day, supporting ongoing growth online.
Many bargain hunters who regularly compare prices online use dedicated tools that present organized deal information across different marketplaces such as Deal Smart Explorer – it helps users quickly identify discounted products and streamlines the process of choosing cost effective items during routine shopping activities
dark matter url https://sites.google.com/view/nexus-market-url
1xbet güncel giriş 1xbet güncel giriş
рулонная штора на заказ цена https://avtomaticheskie-rulonnye-shtory5.ru
sofa cleaning services dubai
1xbet 1xbet
NineCasino https://pcassessoria.digital/
Вывод из запоя на дому — это медицинская помощь, направленная на стабилизацию состояния пациента без госпитализации. Такой формат позволяет начать лечение сразу после обращения и снизить нагрузку на организм, связанную с транспортировкой. В наркологической клинике «Частный медик 24» помощь оказывается с выездом врача, который проводит диагностику и подбирает терапию в зависимости от текущего состояния.
Подробнее можно узнать тут – вывод из запоя на дому круглосуточно в санкт-петербурге
Users who like happy and simple lifestyle choices often look for platforms that make browsing enjoyable, especially when they visit positive vibe store space – the website feels clean and smooth, offering users a pleasant shopping flow that helps them discover lifestyle products while maintaining a calm and stress free environment overall.
star888 https://888starz-egypt9.com/
People interested in broadening their understanding of different subjects often appreciate inspiring online resources, and thought discovery portal – provides stimulating content that encourages users to ask questions, explore unfamiliar concepts, and remain engaged with ongoing learning opportunities overall.
88stars https://888starz-uz3.org/ .
start 888 start 888 .
электрокарниз https://elektrokarniz150.ru
xbet giriş xbet giriş
I spent part of the afternoon exploring personal development sites before opening fresh journey hub – The platform felt positive overall, and page navigation was smooth and natural, giving first-time visitors an enjoyable and simple browsing experience without clutter online.
Вывод из запоя на дому с медицинским контролем в Екатеринбурге предлагает множество преимуществ, которые делают этот метод более удобным и безопасным для многих людей. Отсутствие необходимости в госпитализации и наличие профессионального контроля являются основными положительными аспектами этой услуги.
Выяснить больше – вывод из запоя на дому круглосуточно в екатеринбурге
1xbet 1xbet
888 starz зеркало https://www.888starz-bet2.com .
Many users reviewing fashion platforms observe that the Elegant Fashion Review Portal delivers a smooth and intuitive interface – product presentation is clean and consistent, helping visitors enjoy a relaxed browsing experience while exploring a wide range of clothing options available.
888stazr https://888starz-bet2.com .
While browsing gift idea websites I found a platform that offers a clean and well organized selection of gifts where shopping feels simple and enjoyable for users Perfect Gift Ideas Hub – the platform feels easy to navigate and well structured making gift browsing smooth, pleasant and convenient for users in everyday online shopping experiences today
За выездом врача чаще обращаются тогда, когда человеку тяжело добраться до клиники, он ослаблен после нескольких дней употребления алкоголя или родственникам важно быстрее понять, какая тактика будет безопасной. После осмотра можно определить, нужна ли капельница, достаточно ли детоксикации на дому, требуется ли повторное наблюдение, а в дальнейшем — консультация по лечению алкоголизма, кодирование или реабилитация. В части случаев уже первый звонок позволяет понять, идет ли речь только о временном ухудшении самочувствия или о состоянии, при котором может потребоваться вывод из запоя в стационаре.
Разобраться лучше – вызвать нарколога на дом в екатеринбурге
Эти преимущества делают вывод из запоя на дому с медицинским контролем оптимальным решением для тех, кто хочет быстро и безопасно вернуться к нормальной жизни без необходимости посещать клинику.
Ознакомиться с деталями – нарколог на дом вывод из запоя в екатеринбурге
ares onion https://sites.google.com/view/nexus-market-url
During casual exploration of learning platforms, I came across Thrive and Learn Skills Hub which provides organized content and a user friendly interface that feels intuitive – the educational content helps users grow skills and confidence daily online in a natural and effective way
При выводе из запоя на дому с быстрым облегчением используются различные медикаменты, направленные на быстрое восстановление водно-солевого баланса, улучшение функции печени и почек, а также снижение симптомов алкогольного абстинентного синдрома. Важно, что состав препаратов подбирается в зависимости от состояния пациента, и все препараты вводятся под контролем квалифицированного медицинского специалиста.
Разобраться лучше – нарколог на дом вывод из запоя в екатеринбурге
Good read. See additional info here: click here
В «ЛадаМед Выезд» при оказании наркологической помощи на дому используются современные препараты и методы дезинтоксикации. Ниже приведена таблица с основными видами терапии и их эффектами.
Узнать больше – https://narkolog-na-dom-tolyatti0.ru/narkolog-tolyatti-otzyvy
Наркологическая клиника — это пространство профессиональной помощи, где пациент получает комплексное лечение зависимости, медицинский контроль и психологическую поддержку. В клинике «ВолгаМед Баланс» в Тольятти лечение основано на принципах доказательной медицины и конфиденциальности. Каждая терапевтическая программа выстраивается индивидуально, с учётом физического состояния пациента, стадии заболевания и его мотивации к выздоровлению. Врачи клиники обеспечивают непрерывный контроль за состоянием, применяя современные методы дезинтоксикации, психотерапии и медикаментозной стабилизации.
Получить дополнительную информацию – наркологическая клиника клиника помощь в тольятти
While reviewing UI design inspiration and structured browsing tools, people frequently point out bold vista clarity hub included in discussions focused on engaging visuals, organized layouts, and user friendly navigation systems. – The interface feels modern, stable, and visually appealing overall.
I noticed right away that the content here was easier to scan than many similar pages because the layout stayed organized and the explanations were written clearly enough for readers who prefer straightforward information without excessive technical language. practical success notes – The page maintained a polished and professional atmosphere that helped the information feel trustworthy and naturally structured during the entire visit today.
People who follow fashion updates regularly often rely on online sources that organize trends clearly, and one example is Fashion Insight Daily Page which is typically described as a space for daily style inspiration, curated fashion updates, and easy browsing of modern clothing ideas.
Помощь на дому рассматривают при состояниях, которые возникают после длительного употребления алкоголя или тяжелого алкогольного эпизода. Чаще всего это запой, выраженная интоксикация, бессонница, тревога, слабость, тремор, тошнота, сухость во рту, отсутствие аппетита, нестабильное давление и сердцебиение. Врачебный осмотр требуется в тех случаях, когда больному трудно восстановиться самостоятельно, а самочувствие продолжает ухудшаться.
Исследовать вопрос подробнее – нарколог на дом вывод
Похмельный синдром сопровождается головной болью, слабостью, нарушением сна, сухостью во рту и нестабильностью давления, что часто наблюдается после запоя или при алкоголизме. Эти симптомы связаны с накоплением токсинов и нарушением водно-солевого баланса. Капельница позволяет ускорить выведение вредных веществ и восстановить нормальное функционирование организма, помогая человеку быстрее выйти из состояния запоев.
Получить дополнительную информацию – капельница от похмелья в воронеже
Первичный этап, с которого начинается вывод из запоя в Тольятти, включает подробную клиническую оценку состояния пациента. В клинике «Чистый Горизонт» на этом этапе анализируются жалобы, длительность запоя и наличие сопутствующих заболеваний, способных повлиять на переносимость терапии.
Ознакомиться с деталями – вывод из запоя на дому круглосуточно тольятти
Показания для обращения за помощью включают:
Изучить вопрос глубже – https://kapelnicza-ot-pokhmelya-voronezh-7.ru/
Выезд нарколога начинается с осмотра пациента. Доктора измеряют давление, пульс, оценивают уровень сознания и выраженность симптомов. На основании этих данных формируется план лечения, который реализуется сразу на месте. Такой подход позволяет быстро перейти к стабилизации состояния без лишних этапов.
Исследовать вопрос подробнее – вывод из запоя на дому анонимно
Комплексная терапия проводится в течение 1–3 суток в зависимости от состояния пациента. В особо тяжёлых случаях врачи расширяют курс лечения, включив контрольные анализы и консультации смежных специалистов.
Получить дополнительные сведения – вывод из запоя вызов
При выводе из запоя на дому с быстрым облегчением используются различные медикаменты, направленные на быстрое восстановление водно-солевого баланса, улучшение функции печени и почек, а также снижение симптомов алкогольного абстинентного синдрома. Важно, что состав препаратов подбирается в зависимости от состояния пациента, и все препараты вводятся под контролем квалифицированного медицинского специалиста.
Узнать больше – нарколог на дом вывод из запоя
While browsing digital innovation and future creation websites, I discovered Build Tomorrow Innovation Hub included among curated resources – Impressed with the organization today, where discovering useful sections felt quick and refreshingly simple with smooth and well organized navigation throughout the platform.
Those who appreciate minimalist and modern design trends often look for inspiration that emphasizes simplicity and functionality, and minimaltrendwatch minimaltrendwatch delivers ideas that help create clean, organized, and visually balanced living spaces for everyday comfort and style in daily living today.
Наркологическая клиника — это пространство профессиональной помощи, где пациент получает комплексное лечение зависимости, медицинский контроль и психологическую поддержку. В клинике «ВолгаМед Баланс» в Тольятти лечение основано на принципах доказательной медицины и конфиденциальности. Каждая терапевтическая программа выстраивается индивидуально, с учётом физического состояния пациента, стадии заболевания и его мотивации к выздоровлению. Врачи клиники обеспечивают непрерывный контроль за состоянием, применяя современные методы дезинтоксикации, психотерапии и медикаментозной стабилизации.
Детальнее – https://narkologicheskaya-klinika-tolyatti0.ru/narkologicheskaya-bolnicza-tolyatti/
Нарколог на дом в Екатеринбурге: выезд врача на дом, лечение запоя и консультации в наркологической клинике «НЕО+».
Получить больше информации – http://www.domen.ru
Interested in UFC? UFC White House Full Fight Card unique mixed martial arts tournament will take place on June 14, 2026, in Washington, D.C., on the South Lawn of the White House. It will be the first professional sporting event in history to be held directly on the grounds of the U.S. presidential residence.
1xbet yeni giriş adresi 1xbet yeni giriş adresi
NineCasino https://pcassessoria.digital/
Shoppers are drawn to online platforms that simplify the process of finding attractive deals through clean and intuitive design structures deal focus center – A centered browsing layout that highlights key offers prominently, ensuring users can quickly focus on relevant deals while enjoying a visually pleasant shopping environment.
Процедура начинается с осмотра пациента. Врач измеряет давление, пульс, оценивает общее состояние и выраженность симптомов. На основании этих данных формируется состав капельницы и план лечения. Такой подход позволяет учитывать индивидуальные особенности пациента и эффективно провести вывод из запоя.
Подробнее – капельница от похмелья цена в воронеже
1xbet türkiye 1xbet türkiye
Users trying to navigate through large amounts of online information often prefer structured solutions where progress path guide – offers organized insights that reduce confusion and help individuals make clearer, more confident decisions in various contexts for improved clarity in everyday decision scenarios overall.
Такие состояния требуют профессионального вмешательства, так как без лечения могут усиливаться и приводить к ухудшению самочувствия. При этом помощь может предоставляться анонимно, в соответствии с политикой конфиденциальности данных пациента.
Разобраться лучше – http://vyvod-iz-zapoya-na-domu-sankt-peterburg-12.ru/
drughub darknet https://sites.google.com/view/nexusdarknetmarket
cocorico darknet url https://sites.google.com/view/nexus-market-url
Капельница от похмелья — это медицинская процедура, направленная на быстрое устранение симптомов алкогольной интоксикации и восстановление нормальной работы организма. При выраженном похмельном синдроме самостоятельные методы часто оказываются недостаточными, поскольку не воздействуют на причины состояния. В наркологической клинике «Похмельная служба» используется инфузионная терапия с круглосуточным выездом специалиста, что позволяет начать лечение сразу после обращения.
Получить больше информации – https://kapelnicza-ot-pokhmelya-voronezh-7.ru/
В Тольятти клиника «АвтоГрад МедСтаб» предлагает круглосуточный вывод из запоя для пациентов любой степени тяжести состояния. Лечение проводится как в стационаре, так и с выездом нарколога на дом. При поступлении пациента специалисты оценивают жизненные показатели, уровень интоксикации, наличие сопутствующих заболеваний и составляют персональную схему терапии. Основная цель — стабилизация состояния, устранение последствий алкогольной интоксикации и предотвращение осложнений со стороны сердца, печени и мозга.
Получить больше информации – вывод из запоя в стационаре
Затяжной запой перестает быть бытовой проблемой в тот момент, когда организм теряет способность самостоятельно восстанавливаться после интоксикации. Накопление ацетальдегида, нарушение водно-электролитного баланса, истощение запасов витаминов и перегрузка сердечно-сосудистой системы создают состояние, при котором домашние методы перестают быть безопасными. Срочно стабилизировать самочувствие и быстро купировать абстинентный синдром позволяет только контролируемая медицинская среда. Вывод из запоя в стационаре в Нижнем Новгороде становится клинически обоснованным решением, когда требуется не просто снятие симптомов, а комплексная детоксикация под круглосуточным наблюдением врачей. Наркологическая клиника «Стармед» организует процесс лечения в соответствии с актуальными стандартами доказательной медицины, обеспечивая безопасность пациента, прозрачность процедур и плавный переход к противорецидивной терапии. Мы понимаем, что решение о госпитализации часто принимается в состоянии стресса, поэтому наша работа начинается с четкой диагностики, честного объяснения плана лечения и соблюдения строгих протоколов конфиденциальности. Опытные специалисты клиники помогут вызвать доверие к процессу восстановления уже на этапе первого контакта.
Детальнее – вывод из запоя в стационаре клиника
Такие условия позволяют начать лечение без задержек и обеспечить более мягкое восстановление. При этом помощь может предоставляться анонимно.
Изучить вопрос глубже – вывод из запоя на дому круглосуточно санкт-петербург
Для региона характерна потребность в системном подходе к лечению зависимостей, так как клиническая картина нередко сопровождается соматическими и неврологическими нарушениями. Организация лечения направлена на снижение рисков осложнений и восстановление физиологических функций организма.
Подробнее можно узнать тут – https://narkologicheskaya-klinika-v-tolyatti0.ru/narkolog-tolyatti-otzyvy/
Вывод из запоя на дому в Санкт-Петербурге с анонимным выездом врача, снятием интоксикации и поддержкой в наркологической клинике «Частный медик 24»
Подробнее тут – вывод из запоя на дому
While searching for discount fashion websites, I discovered Fresh Trend Style Hub which presents products in a neat and modern format that improves browsing – trendy fashion deals are available here with great prices and variety everywhere today for budget friendly shoppers
рулонные жалюзи на окна цена https://avtomaticheskie-rulonnye-shtory5.ru
В Хабаровске востребован системный подход к терапии зависимостей, так как клиническая картина часто осложняется сопутствующими заболеваниями, нарушениями обмена веществ и расстройствами нервной системы. Медицинская помощь организуется с учётом тяжести состояния и индивидуальных факторов риска.
Углубиться в тему – наркологические клиники алкоголизм в хабаровске
In conversations about how digital stores present their inventory structures, a commonly cited illustrative example is general outlet browsing link which is usually described as a conceptual representation of e-commerce navigation systems emphasizing category clarity, product assortment visibility, and straightforward user exploration across multiple sections.
Каждый из этапов дополняет предыдущий, формируя непрерывный лечебный процесс. Такой формат позволяет учитывать динамику состояния пациента и своевременно реагировать на изменения.
Узнать больше – http://narkologicheskaya-klinika-khabarovsk0.ru
Такие условия позволяют начать лечение без задержек и обеспечить более мягкое восстановление. При этом помощь может предоставляться анонимно.
Ознакомиться с деталями – нарколог на дом вывод из запоя в санкт-петербурге
When evaluating websites, many users focus on readability, layout consistency, and how easily they can find required details. GrandLink site access – GrandLink site access experience feels simple and direct, allowing users to reach important content without facing complicated navigation barriers.
I spent longer browsing this than expected because the information remained easy to follow and the overall design encouraged comfortable reading instead of relying on excessive formatting or distracting visual elements throughout the page online today. engaging social updates – The clean organization and dependable presentation gave the platform a noticeably higher quality feel compared with many similar websites online.
nexus darknet https://sites.google.com/view/nexusdarknetmarket
Вывод из запоя на дому в Екатеринбурге: срочное восстановление, детоксикация и медицинская помощь в наркологической клинике «Детокс»
Разобраться лучше – нарколог на дом вывод из запоя в екатеринбурге
Первичный этап, с которого начинается вывод из запоя в Тольятти, включает подробную клиническую оценку состояния пациента. В клинике «Чистый Горизонт» на этом этапе анализируются жалобы, длительность запоя и наличие сопутствующих заболеваний, способных повлиять на переносимость терапии.
Узнать больше – http://vyvod-iz-zapoya-v-tolyatti0.ru/vyvod-iz-zapoya-tolyatti-na-domu/https://vyvod-iz-zapoya-v-tolyatti0.ru
Many individuals exploring lifestyle styling inspiration often value resources that make modern ideas easy to understand and enjoyable to browse, and creative living portal – offers practical and visually attractive content that supports a more engaging and organized exploration of contemporary lifestyle trends overall.
Anyone planning to refresh their interior spaces usually benefits from browsing inspiration that balances creativity with practicality for real home settings Interior Spark Studio – such ideas support gradual improvements, helping users visualize changes that enhance comfort, functionality, and overall atmosphere in a natural and achievable way.
Процесс выезда врача организован последовательно и включает несколько этапов, направленных на быстрое восстановление пациента. Ниже представлена таблица с основными шагами процедуры.
Узнать больше – нарколог на дом круглосуточно
Ниже представлена таблица с ключевыми направлениями терапии, применяемыми в клинике, и их особенностями.
Подробнее – наркологическая клиника стационар в ростове-на-дону
Вызов нарколога на дом в Хабаровске осуществляется при наличии клинических показаний, при которых выездная помощь является обоснованной и безопасной. В клинике «Ясный Вектор» решение о формате вмешательства принимается с учётом жалоб, анамнеза и предполагаемой тяжести состояния.
Подробнее – нарколог на дом хабаровск
рулонные шторы с электроприводом и дистанционным управлением рулонные шторы с электроприводом и дистанционным управлением
Readers exploring optimism and self-improvement frequently rely on inspirational platforms that offer structured guidance for building better emotional habits Optimism Builder Site providing helpful perspectives for strengthening positive thinking patterns – The content encourages users to focus on constructive thoughts, resilience and gradual improvement for a more balanced and fulfilling personal journey
NineCasino https://pcassessoria.digital/
During my search through promotional offers and online deal aggregator sites, I found Deal Hunter Discounts Page featured among curated listings – The browsing experience felt pleasant, with consistent content quality and a nicely maintained structure throughout recently making everything easy to navigate today.
Диагностическая оценка позволяет определить степень интоксикации и выявить возможные риски осложнённого течения состояния.
Ознакомиться с деталями – вывод из запоя на дому круглосуточно в тольятти
While searching for unique gift stores online, I found Creative Gift Gallery Hub which features a neat design and well arranged categories that make browsing easy – it is a perfect spot for unique gifts and many creative ideas available online are showcased clearly
Вывод из запоя представляет собой клинически значимое вмешательство, направленное на восстановление нарушенных физиологических процессов, возникающих на фоне длительного употребления алкоголя. Запойное состояние сопровождается накоплением токсических продуктов распада этанола, что отражается на работе нервной системы, сердца, печени и обменных механизмах. В условиях отсутствия медицинского контроля резкое прекращение употребления алкоголя может привести к тяжелым осложнениям.
Подробнее можно узнать тут – https://vyvod-iz-zapoya-khabarovsk0.ru
Эти преимущества делают вывод из запоя на дому с медицинским контролем оптимальным решением для тех, кто хочет быстро и безопасно вернуться к нормальной жизни без необходимости посещать клинику.
Получить дополнительные сведения – вывод из запоя на дому круглосуточно
nexus darknet shop https://sites.google.com/view/nexusdarknetlink
В этой заметке мы представляем шаги, которые помогут в процессе преодоления зависимостей. Рассматриваются стратегии поддержки и чек-листы для тех, кто хочет сделать первый шаг к выздоровлению. Наша цель — вдохновить читателей на положительные изменения и поддержать их в трудных моментах.
Изучите внимательнее – частная наркологическая клиника нижний новгород
People looking to strengthen their drive toward success can explore success drive hub which promotes consistent effort and forward thinking, guiding users to stay committed to their goals while developing practical habits that support progress in both personal and professional aspects of life.
Медикаментозное лечение подбирается индивидуально с учётом возраста, длительности зависимости и сопутствующих патологий.
Получить дополнительную информацию – платная наркологическая клиника
888srarz https://888starz-bet2.com .
In browsing various productivity focused platforms, I came across Rapid Progress Guide listed within a motivational resource collection – The website contains several engaging sections, and the structure feels well organized, polished, and welcoming for users looking for clear and practical information today.
Users exploring online services often appreciate when websites are organized in a way that supports seamless movement between sections without visual confusion SkyVertex Flow Portal – SkyVertex provides a smooth and structured interface that enhances usability, ensuring users can navigate efficiently while maintaining a clear and consistent browsing experience.
Отдельного внимания требуют случаи, когда больной почти не ест, плохо пьет воду, не может спокойно лежать, жалуется на сильное сердцебиение, нехватку сна или выраженное внутреннее напряжение. В такой ситуации осмотр помогает определить, безопасно ли оставаться дома и какого объема помощи достаточно на текущем этапе. Если речь идет о выраженных проявлениях абстинентного синдрома, затягивать с обращением нецелесообразно.
Углубиться в тему – запой нарколог на дом
While exploring shopping websites I found a platform that provides a good selection of products with easy browsing features and a well organized interface for users Choice Corner Online Hub – the platform feels smooth and efficient, guiding users to explore products, compare options and enjoy a simple shopping experience
stars 888 http://www.888starz-bet2.com .
1xbet giriş yapamıyorum 1xbet giriş yapamıyorum
Лечение в клинике «Гармония Волги» строится как последовательный медицинский процесс, направленный на стабилизацию состояния пациента и восстановление нарушенных функций организма. Наркологическая клиника в Тольятти применяет поэтапный подход, что позволяет контролировать динамику состояния и своевременно корректировать терапию.
Выяснить больше – http://narkologicheskaya-klinika-v-tolyatti0.ru/narkolog-tolyatti-otzyvy/
сделать капельницу на дому цена сделать капельницу на дому цена
рулонные шторы виды механизмов рулонные шторы виды механизмов
Наркологическая клиника — это пространство профессиональной помощи, где пациент получает комплексное лечение зависимости, медицинский контроль и психологическую поддержку. В клинике «ВолгаМед Баланс» в Тольятти лечение основано на принципах доказательной медицины и конфиденциальности. Каждая терапевтическая программа выстраивается индивидуально, с учётом физического состояния пациента, стадии заболевания и его мотивации к выздоровлению. Врачи клиники обеспечивают непрерывный контроль за состоянием, применяя современные методы дезинтоксикации, психотерапии и медикаментозной стабилизации.
Детальнее – http://narkologicheskaya-klinika-tolyatti0.ru
Вывод из запоя на дому в Санкт-Петербурге с выездом нарколога, детоксикацией и восстановлением состояния в наркологической клинике «Частный медик 24»
Получить больше информации – вывод из запоя на дому цена санкт-петербург
Нарколог на дом в Екатеринбурге востребован в ситуациях, когда человеку нужна врачебная помощь после употребления алкоголя, при запое, выраженном похмельном синдроме, нарушении сна, тревоге, скачках давления, слабости и других признаках ухудшения самочувствия. Такой формат обращения часто выбирают семьи, которые хотят вызвать врача без поездки в клинику и быстро получить консультацию по состоянию больного. Домашний выезд особенно важен тогда, когда требуется детоксикация, наблюдение после нескольких дней употребления спиртного и оценка рисков, связанных с последствиями алкоголизма.
Разобраться лучше – вызов нарколога на дом в екатеринбурге
cannaexpress url https://sites.google.com/view/nexusdarknetmarket
tordex darknet market https://sites.google.com/view/nexusdarknetlink
1xbet yeni giriş adresi 1xbet yeni giriş adresi
During casual exploration of fashion idea platforms, I discovered Style Fashion Daily Inspiration Hub which features a modern interface and well organized sections – fashion updates and styling tips make browsing enjoyable very much by making style exploration engaging and practical
Помощь на дому рассматривают при состояниях, связанных с острым ухудшением самочувствия после алкоголя. Чаще всего это несколько дней запоя, тяжелое похмелье, бессонница, тревога, дрожь в руках, слабость, отсутствие аппетита, тошнота, сухость во рту и ощущение истощения. В подобных случаях врачебный осмотр нужен для оценки общего состояния и выбора безопасной тактики.
Разобраться лучше – narkolog-na-dom-ekaterinburg.ru/
Такие симптомы требуют медицинского вмешательства, поскольку могут приводить к ухудшению состояния. Капельница помогает стабилизировать самочувствие и снизить нагрузку на организм. Услуги могут предоставляться анонимно, а при необходимости пациент направляется на лечение в стационаре.
Углубиться в тему – капельница от похмелья на дому в воронеже
В Тольятти клиника «АвтоГрад МедСтаб» предлагает круглосуточный вывод из запоя для пациентов любой степени тяжести состояния. Лечение проводится как в стационаре, так и с выездом нарколога на дом. При поступлении пациента специалисты оценивают жизненные показатели, уровень интоксикации, наличие сопутствующих заболеваний и составляют персональную схему терапии. Основная цель — стабилизация состояния, устранение последствий алкогольной интоксикации и предотвращение осложнений со стороны сердца, печени и мозга.
Исследовать вопрос подробнее – вывод из запоя на дому в тольятти
Такой подход обеспечивает не только устранение симптомов зависимости, но и глубокое восстановление личности. Пациенты получают поддержку врачей на каждом этапе, что делает процесс безопасным и контролируемым.
Подробнее тут – https://narcologicheskaya-klinika-v-rostove19.ru/narkologiya-rostov-kruglosutochno/
Перед выездом проводится уточнение симптомов и общего состояния пациента, что помогает врачу подготовиться к визиту и взять необходимый набор медикаментов.
Подробнее можно узнать тут – https://narkolog-na-dom-khabarovsk0.ru/khabarovsk-narkologicheskaya-pomoshh
In exploring online shopping deals and discount finder websites, I came across Savings Deals Explorer Hub featured in a curated list – The platform felt easy to use, pages loaded quickly and navigation worked perfectly everywhere today, making browsing simple and efficient.
People exploring structured inspiration for creative growth can rely on insight sharing network which gathers thoughtful perspectives and innovative ideas – it helps users expand their understanding of modern creativity while applying new approaches to everyday challenges and long term development goals.
Решение о помещении пациента в стационар принимается на основе объективных медицинских критериев, а не только по желанию родственников. К показаниям относятся: запой длительностью более трех суток, выраженные симптомы абстиненции, наличие в анамнезе алкогольных делириев или судорожных эпизодов, сопутствующие хронические заболевания печени, поджелудочной железы, сердца или нервной системы. Отдельным фактором выступает полинаркомания или сочетание алкогольной зависимости с приемом психофармакологических препаратов без назначения врача. В таких ситуациях риск развития тяжелых осложнений возрастает многократно, и амбулаторный формат не обеспечивает необходимого уровня контроля. Госпитализация позволяет провести полноценную диагностику, включая ЭКГ, экспресс-анализы крови, оценку неврологического статуса и мониторинг сатурации, что формирует точную картину состояния и исключает назначение шаблонных схем.
Подробнее тут – нарколог вывод из запоя в стационаре
Первичный этап включает сбор анамнеза, лабораторные исследования и оценку неврологического статуса. На основании полученных данных формируется план лечения, который может корректироваться в процессе наблюдения.
Узнать больше – наркологическая клиника вывод из запоя
Website visitors often notice when a platform is designed with simplicity in mind, especially when menus and sections are logically arranged for clarity LinkCraft Design Flow Point – LinkCraft reflects a clean architecture approach where every page loads efficiently and user interaction remains smooth and predictable.
I was casually comparing a few discount shopping platforms while planning weekly purchases when I came across value deal portal – The browsing felt quite fluid overall, pages loaded without noticeable delay, and product details were presented in a way that made understanding each section fairly simple and convenient for me today.
Если пациент не может самостоятельно выйти из запоя или симптомы похмелья слишком сильны, вызов нарколога для вывода из запоя на дому с детоксикацией помогает избежать осложнений и минимизировать риски для здоровья. Врач на дому подберет индивидуальный план лечения и проведет все необходимые процедуры для безопасного восстановления организма.
Подробнее можно узнать тут – вывод из запоя на дому в екатеринбурге
Помощь 24/7 означает, что нарколог на дом в Хабаровске может быть направлен в любое время суток, включая ночные часы и выходные дни. В клинике «Ясный Вектор» выездная служба функционирует с учётом логистики города, что позволяет минимизировать время ожидания врача.
Подробнее – http://narkolog-na-dom-khabarovsk0.ru/
Ниже представлена таблица с ключевыми направлениями терапии, применяемыми в клинике, и их особенностями.
Получить дополнительные сведения – http://narcologicheskaya-klinika-v-rostove19.ru/narkolog-rostov-na-donu/
Алкогольная интоксикация оказывает серьёзное влияние на организм, вызывая головную боль, тошноту, слабость и головокружение. Капельница помогает организму быстро избавиться от продуктов распада алкоголя, восстановить нормальное функционирование органов и минимизировать последствия для здоровья. Важно, что мы обеспечиваем полное наблюдение врача на протяжении всей процедуры, что помогает гарантировать безопасность пациента и максимальную эффективность лечения.
Узнать больше – капельница от похмелья цена в екатеринбурге
sofa odor removal dubai
Users interested in active learning often prefer platforms that inspire curiosity and exploration, and curiosity learning guide – creates an engaging environment where individuals can discover new ideas while developing a mindset focused on growth and meaningful knowledge exploration overall.
Объективная оценка включает измерение артериального давления, частоты сердечных сокращений, уровня сознания и выраженности вегетативных проявлений. На основании полученных данных формируется индивидуальный план медицинского вмешательства.
Углубиться в тему – http://vyvod-iz-zapoya-khabarovsk0.ru/vyvod-iz-zapoya-v-staczionare-khabarovsk/
tordex market https://sites.google.com/view/nexus-market-link
Этот процесс не занимает много времени — обычно процедура длится от 30 до 60 минут. Важно, что врач контролирует все этапы, обеспечивая безопасность пациента и корректируя терапию по мере необходимости. Такой подход позволяет быстро и эффективно облегчить симптомы похмелья и вернуться к нормальной жизнедеятельности.
Углубиться в тему – http://kapelnicza-ot-pokhmelya-samara-13.ru
рулонные шторы на электроприводе рулонные шторы на электроприводе
В Санкт-Петербурге вывод из запоя на дому используется в ситуациях, когда состояние пациента требует медицинской помощи, но позволяет обойтись без лечения в стационаре. Врач проводит консультацию, оценивает длительность запоя, выраженность симптомов и общее состояние, анализируя данные пациента, после чего принимает решение о тактике лечения при алкоголизме. При необходимости можно оформить вызов специалиста или заказать услугу заранее.
Подробнее можно узнать тут – нарколог на дом вывод из запоя санкт-петербург
Медицинская помощь начинается с детального осмотра и сбора анамнестических данных. Врач оценивает длительность запоя, объем употребляемого алкоголя, наличие хронических заболеваний и ранее перенесенных осложнений. Эти сведения необходимы для выбора корректной тактики лечения и исключения потенциальных рисков.
Получить больше информации – вывод из запоя в стационаре хабаровск
В таких ситуациях врач оценивает риски, определяет тактику лечения и при необходимости рекомендует дальнейшую госпитализацию. Однако во многих случаях помощь на дому оказывается достаточной для стабилизации состояния.
Получить дополнительные сведения – вызов нарколога на дом в нижнем новгороде
Вывод из запоя на дому в Екатеринбурге: срочное восстановление, детоксикация и медицинская помощь в наркологической клинике «Детокс»
Подробнее – http://vyvod-iz-zapoya-na-domu-ekaterinburg-20.ru
вывод из запоя капельница на дому вывод из запоя капельница на дому
During casual browsing of inspiration platforms, I discovered Stay Strong Mindset Hub Always which offers a modern interface and easy navigation – motivational content keeps energy high and mindset strong every day helping users maintain confidence and focus
капельница от похмелья в воронеже капельница от похмелья в воронеже
Этот процесс не занимает много времени — обычно процедура длится от 30 до 60 минут. Важно, что врач контролирует все этапы, обеспечивая безопасность пациента и корректируя терапию по мере необходимости. Такой подход позволяет быстро и эффективно облегчить симптомы похмелья и вернуться к нормальной жизнедеятельности.
Подробнее можно узнать тут – http://kapelnicza-ot-pokhmelya-samara-13.ru/
xbet xbet
People exploring high quality online marketplaces can check luxury choice center which highlights premium selections and stylish goods – enabling users to discover exclusive items that reflect elegance refinement and modern luxury standards across fashion accessories and lifestyle categories for discerning buyers.
xbet girişi xbet girişi
1xbet türkiye giriş 1xbet türkiye giriş
1xbet güncel giriş 1xbet güncel giriş
nexus link https://sites.google.com/view/nexusdarknetlink
While exploring fashion discovery platforms for global trends I landed on world outfit trends – The website had a clean aesthetic, and accessing useful style information felt easy, intuitive, and enjoyable while navigating through different sections today.
Users comparing online websites often prioritize visual appeal, structured design, and how effectively the layout supports simple navigation and quick understanding of information VividPath Navigation Portal – VividPath provides a colorful interface where browsing feels smooth and enjoyable, making it easy for users to explore content in a clear and visually engaging way.
Many digital explorers appreciate systems that organize suggestions into meaningful pathways, and they may encounter Explore Sphere in curated guides – the rewritten comment explains how it provides a broader perspective on available options and improves browsing clarity across multiple categories.
While searching through innovation and creativity focused websites, I came across Explore Creative Ideas Space included among curated listings – Really pleasant website overall, where discovering interesting content felt smooth and naturally engaging today with well structured categories and intuitive navigation system.
При выводе из запоя на дому с быстрым облегчением используются различные медикаменты, направленные на быстрое восстановление водно-солевого баланса, улучшение функции печени и почек, а также снижение симптомов алкогольного абстинентного синдрома. Важно, что состав препаратов подбирается в зависимости от состояния пациента, и все препараты вводятся под контролем квалифицированного медицинского специалиста.
Получить дополнительные сведения – вывод из запоя на дому в екатеринбурге
Нарколог на дом в Екатеринбурге востребован в ситуациях, когда человеку нужна врачебная помощь после употребления алкоголя, при запое, выраженном похмельном синдроме, нарушении сна, тревоге, скачках давления, слабости и других признаках ухудшения самочувствия. Такой формат обращения часто выбирают семьи, которые хотят вызвать врача без поездки в клинику и быстро получить консультацию по состоянию больного. Домашний выезд особенно важен тогда, когда требуется детоксикация, наблюдение после нескольких дней употребления спиртного и оценка рисков, связанных с последствиями алкоголизма.
Подробнее тут – нарколог на дом цена
888 starz bet https://www.888starz-bet2.com .
Вывод из запоя на дому с медицинским контролем в Екатеринбурге предлагает множество преимуществ, которые делают этот метод более удобным и безопасным для многих людей. Отсутствие необходимости в госпитализации и наличие профессионального контроля являются основными положительными аспектами этой услуги.
Подробнее – https://vyvod-iz-zapoya-na-domu-ekaterinburg-18.ru/
сколько стоит капельница на дому от запоя сколько стоит капельница на дому от запоя
Основные показания для проведения процедуры:
Подробнее можно узнать тут – https://kapelnicza-ot-pokhmelya-voronezh-4.ru
starz 888 https://www.888starz-uz3.org .
nexus official link https://sites.google.com/view/nexusmarketdarknet
During my browsing of fashion discovery sites, I found Style Zone Outfit Hub which features a clean and modern layout that makes navigation easy – personal style ideas make fashion exploration fun and very useful for creating personalized wardrobe choices
Для жителей Екатеринбурга наркологическая клиника «Частный медик 24» предлагает услуги выезда нарколога на дом для проведения капельницы от похмелья. Это удобный и эффективный способ лечения, особенно если пациент испытывает тяжёлые симптомы похмелья и не может поехать в клинику. Выезд нарколога на дом позволяет начать лечение сразу, не тратя время на поездку и ожидания в клинике. Врач приезжает с необходимыми препаратами и оборудованием, проводит осмотр и назначает необходимую терапию.
Выяснить больше – https://kapelnicza-ot-pokhmelya-ekaterinburg-8.ru/
torzon darkweb https://sites.google.com/view/nexusdarknetmarket
888starz bet официальный сайт http://www.888starz-bet2.com/ .
Закажите персональную экскурсию Янтарный Калининград экскурсии и частный гид покажет посёлок с индивидуальным подходом.
People looking to improve creativity and reasoning skills can explore creative thinking portal which gathers articles and prompts designed to strengthen imagination and modern problem solving approaches for daily use and personal development – offering a supportive environment where users can gradually develop clearer thinking habits and apply them in everyday decision making with more confidence and structure over time.
Many websites attempt to appear creative but quickly become repetitive, although thought provoking portal feels much more engaging because the material encourages curiosity and leaves visitors interested in exploring more content during future browsing sessions online.
For individuals motivated to restart their journey toward better habits, the idea behind Restart Motivation Hub highlights encouragement – it focuses on rebuilding discipline, embracing new opportunities, and taking consistent steps toward improved personal growth and stability in life.
Вывод из запоя на дому — это медицинская помощь, направленная на стабилизацию состояния пациента без госпитализации. Такой формат позволяет начать лечение сразу после обращения и снизить нагрузку на организм, связанную с транспортировкой. В наркологической клинике «Частный медик 24» помощь оказывается с выездом врача, который проводит диагностику и подбирает терапию в зависимости от текущего состояния.
Исследовать вопрос подробнее – анонимный вывод из запоя на дому в санкт-петербурге
Для жителей Екатеринбурга наркологическая клиника «Частный медик 24» предлагает услуги выезда нарколога на дом для проведения капельницы от похмелья. Это удобный и эффективный способ лечения, особенно если пациент испытывает тяжёлые симптомы похмелья и не может поехать в клинику. Выезд нарколога на дом позволяет начать лечение сразу, не тратя время на поездку и ожидания в клинике. Врач приезжает с необходимыми препаратами и оборудованием, проводит осмотр и назначает необходимую терапию.
Исследовать вопрос подробнее – капельница от похмелья
During my exploration of motivation-based resources, I discovered inspire daily guide – which delivers consistent uplifting ideas that help users stay motivated and maintain a fresh perspective on life and personal progress.
Нарколог на дом в Екатеринбурге: срочная медицинская помощь, капельницы и восстановление состояния в наркологической клинике «НЕО+».
Изучить вопрос глубже – нарколог на дом цена екатеринбург
While searching through product discovery and shopping idea platforms, I discovered TrendStop Explorer Page included among curated resources – The interface is clean, and browsing categories felt fast and refreshingly simple, offering a smooth and enjoyable experience throughout different sections today.
Users browsing modern websites typically appreciate clean layouts that guide them naturally through content while maintaining visual balance and simplicity UrbanScale Experience Link – UrbanScale offers a well-structured design where balanced visuals and clear organization help users enjoy a comfortable and intuitive browsing experience.
Существует ряд ситуаций, при которых вызов специалиста на дом является обоснованным решением:
Выяснить больше – http://www.domen.ru
cannaexpress link https://sites.google.com/view/nexusmarketdarknet
В клинике применяются современные медицинские технологии, направленные на восстановление организма и стабилизацию психоэмоционального состояния. Ниже представлена таблица с описанием основных методов и их терапевтического значения.
Исследовать вопрос подробнее – наркологическая клиника стационар
During my recent exploration of online shopping platforms, I discovered Trendy Selection Market Hub which features a structured and elegant display of items that makes browsing enjoyable – the presentation looks very stylish and the products appear thoughtfully chosen with great care and consistency
Капельница от похмелья — это медицинская процедура, направленная на быстрое устранение симптомов алкогольной интоксикации и восстановление нормальной работы организма. При выраженном похмельном синдроме самостоятельные методы часто оказываются недостаточными, поскольку не воздействуют на причины состояния. В наркологической клинике «Похмельная служба» используется инфузионная терапия с круглосуточным выездом специалиста, что позволяет начать лечение сразу после обращения.
Получить дополнительные сведения – капельница от похмелья воронеж
рулонная штора на заказ цена https://rulonnye-shtory-s-elektroprivodom11.ru
tordex link https://sites.google.com/view/nexusdarknetmarket
While searching through online deals and offers discovery platforms, I came across Great Offers Insight Network included among similar resources – Nice layout here, where everything is carefully organized and easy understanding for newcomers today with clear design and easy navigation flow.
В Тольятти клиника «АвтоГрад МедСтаб» предлагает круглосуточный вывод из запоя для пациентов любой степени тяжести состояния. Лечение проводится как в стационаре, так и с выездом нарколога на дом. При поступлении пациента специалисты оценивают жизненные показатели, уровень интоксикации, наличие сопутствующих заболеваний и составляют персональную схему терапии. Основная цель — стабилизация состояния, устранение последствий алкогольной интоксикации и предотвращение осложнений со стороны сердца, печени и мозга.
Исследовать вопрос подробнее – наркологический вывод из запоя тольятти
Нарколог на дом в Нижнем Новгороде с быстрым приездом специалиста, детоксикацией и медицинской поддержкой в наркологической клинике «Частный медик 24»
Узнать больше – вызвать нарколога на дом
Students seeking better focus and learning outcomes can explore achievement study portal which shares educational insights and structured guidance – helping users stay disciplined, improve skills, and gradually turn learning into measurable success across academic and personal growth journeys with steady dedication.
nexus darknet market onion https://sites.google.com/view/nexusmarketplace
1xbet yeni adresi 1xbet yeni adresi
While checking personal development platforms I came across a website that encourages creativity, inspires leadership and helps users take positive action toward achieving their goals Inspire Create Leadership Hub – the experience feels motivating and focused, supporting users in building ideas, improving leadership abilities and staying consistent with personal growth efforts
нарколог прокапать нарколог прокапать
свежие объявления авторынок https://pmr-auto.ru .
капельница на дому в воронеже капельница на дому в воронеже
I noticed right away that the layout here worked very well because the information was spaced properly and the overall structure made it easier to move between sections without feeling overwhelmed by unnecessary distractions online today. helpful trend resource – The content looked current and thoughtfully maintained, helping the reading experience remain pleasant and easy to navigate from start to finish.
Результаты первичной оценки формируют основу для выбора лечебной тактики и объёма медицинского вмешательства.
Подробнее тут – http://vyvod-iz-zapoya-v-tolyatti0.ru/vyvedenie-iz-zapoya-tolyatti/
In discussions about branding innovation platforms and structured design showcases, users frequently highlight brandcrest identity hub included in curated lists focusing on strong visual branding and accessible navigation. – It generally feels simple, organized, and very easy to use overall.
Вывод из запоя на дому с быстрым облегчением в Екатеринбурге — это процедура, направленная на быстрое снятие острых симптомов алкогольного абстинентного синдрома и возвращение пациента к нормальному состоянию, включая случаи алкоголизма и наркомании. Такая услуга удобна тем, что позволяет не только эффективно справиться с зависимостью, но и избавиться от неприятных проявлений запоя, таких как головная боль, тошнота, слабость и психоэмоциональное напряжение, в комфортной домашней обстановке, при этом оказывается наркологическая помощь. Быстрое облегчение без необходимости госпитализации делает этот метод популярным среди пациентов, которым важен быстрый и безопасный результат, а при необходимости можно заказать дальнейшее кодирование или лечение в стационаре.
Ознакомиться с деталями – нарколог на дом вывод из запоя
There are many online platforms offering educational material, yet accessible content portal creates a stronger impression because the information feels neatly arranged and easy to understand, helping visitors comfortably move through multiple sections and categories without confusion.
Вывод из запоя на дому — это формат наркологической помощи, при котором лечение проводится в привычной для пациента обстановке с выездом врача. Такой подход применяется в ситуациях, когда состояние требует медицинского вмешательства, но не предполагает обязательной госпитализации. В наркологической клинике «Частный медик 24» помощь на дому выстраивается по принципу поэтапной стабилизации: сначала устраняются острые проявления, затем оценивается динамика и при необходимости корректируется терапия.
Изучить вопрос глубже – вывод из запоя на дому цена санкт-петербург
xbet girişi xbet girişi
Чаще всего домашний формат применяется при следующих состояниях:
Подробнее – http://www.domen.ru
Помощь на дому рассматривают при состояниях, связанных с острым ухудшением самочувствия после алкоголя. Чаще всего это несколько дней запоя, тяжелое похмелье, бессонница, тревога, дрожь в руках, слабость, отсутствие аппетита, тошнота, сухость во рту и ощущение истощения. В подобных случаях врачебный осмотр нужен для оценки общего состояния и выбора безопасной тактики.
Получить больше информации – вызов нарколога на дом в екатеринбурге
Вызов капельницы от похмелья с контролем врача в Самаре рекомендуется, когда симптомы похмелья становятся особенно тяжелыми и мешают нормальной жизнедеятельности. Несмотря на то, что многие пытаются справиться с похмельем с помощью домашних методов, такие как прием жидкости или таблеток, они не всегда оказываются достаточно эффективными. В случае сильных симптомов похмелья, капельница с врачебным контролем — это более безопасное и быстрое решение, при этом возможен вывод в стационаре, анонимное лечение и консультации по вопросам наркомании с учетом актуальной цены услуг.
Получить дополнительные сведения – капельница от похмелья на дом в самаре
Вывод из запоя в стационаре в Нижнем Новгороде с медицинским сопровождением и контролем показателей в наркологической клинике «Частный медик 24»
Ознакомиться с деталями – нарколог вывод из запоя в стационаре нижний новгород
Основные показания для проведения процедуры:
Детальнее – капельница от похмелья воронеж
During my exploration of online simplicity resources, I found Better Living Simplicity Hub which offers well structured information that is easy to understand and browse – the website provides helpful content consistently and navigation remains smooth across all sections
рулонные шторы с электроприводом цена рулонные шторы с электроприводом цена
1xbet turkiye 1xbet turkiye
darknet marketplace https://sites.google.com/view/nexusmarketplace
In the vast online space where content quality can vary significantly, users tend to appreciate websites that maintain reliability and clarity across their materials, and factual-resource-point – is often recognized for delivering information in a way that feels stable, easy to navigate, and supportive for general understanding and reference use.
888srarz https://888starz-bet2.com/ .
Детоксикация в стационаре — это не разовая процедура, а последовательный процесс, разделенный на диагностику, активное выведение токсинов, стабилизацию функций и подготовку к противорецидивному этапу. При поступлении врач проводит первичный осмотр, собирает подробный анамнез, оценивает неврологический статус и при необходимости назначает лабораторные исследования. На основе полученных данных формируется индивидуальный протокол, учитывающий возраст, вес, длительность запоя, наличие сопутствующих патологий и переносимость лекарственных средств. Мы применяем только сертифицированные медикаменты, зарегистрированные в РФ, и строго соблюдаем клинические рекомендации Минздрава, исключая псевдонаучные методики. Все вмешательства документируются в электронной медицинской карте, доступ к которой имеют только лечащие специалисты.
Подробнее – нарколог вывод из запоя в стационаре
During my exploration of personal growth and development websites, I came across New Potential Growth Page featured among similar resources – The browsing experience felt smooth, with information looking reliable and nicely presented throughout the website thanks to intuitive navigation and clean layout.
Users who prefer casual browsing often choose platforms that make shopping feel light, enjoyable, and free from unnecessary complexity Browse and relax store – offering a comfortable and easy shopping environment where users can explore products at their own pace while enjoying a stress free digital experience overall.
Online shoppers who value simplicity usually look for platforms that avoid clutter and instead present information in a structured and accessible way PracticalValue Hub enhancing browsing efficiency – This version explains how organized digital environments help users make quicker and more confident shopping decisions.
dark market url https://sites.google.com/view/nexusdarknetmarket
В Санкт-Петербурге лечение на дому применяется в ситуациях, когда состояние пациента требует медицинского вмешательства, но не требует наблюдения в стационаре. Врач проводит консультацию, анализирует данные пациента, оценивает длительность употребления, выраженность симптомов и общее состояние, после чего принимает решение о тактике лечения при алкоголизме. При необходимости можно оформить вызов специалиста, заказать услуги на сайте или уточнить детали заранее.
Получить дополнительную информацию – нарколог на дом вывод из запоя санкт-петербург
1xbet turkiye 1xbet turkiye
Главная цель — не просто снять симптомы абстиненции, а безопасно восстановить работу организма. Для этого применяются современные препараты и сбалансированные растворы, которые выводят токсины, поддерживают функции печени и нормализуют обмен веществ. Дополнительно пациент получает витаминотерапию и легкую психокоррекционную поддержку.
Детальнее – наркология вывод из запоя
While researching lifestyle and interior upgrades, I came across home styling resource – the platform delivers a calm and accessible experience, allowing users to comfortably explore different decorating approaches and practical suggestions for improving living spaces in a visually pleasing way.
People exploring online platforms usually expect consistency in layout and simple navigation tools that help them understand structure without effort HorizonClean Flow Portal – The PureHorizon experience is designed to feel refreshing and intuitive, allowing users to explore content easily across a well-organized and simple interface.
Диагностика позволяет установить степень интоксикации, выраженность абстинентного синдрома и наличие сопутствующих заболеваний, которые могут влиять на переносимость терапии.
Получить дополнительную информацию – http://narkologicheskaya-klinika-v-tolyatti0.ru
Реализация данных задач позволяет наркологу на дом в Ростове-на-Дону оказывать помощь в контролируемом и безопасном формате.
Подробнее – нарколог на дом круглосуточно цены ростов-на-дону
888старс http://888starz-bet2.com .
tordex darknet link https://sites.google.com/view/nexusmarketplace
Выезд нарколога начинается с осмотра пациента. Доктора измеряют давление, пульс, оценивают уровень сознания и выраженность симптомов. На основании этих данных формируется план лечения, который реализуется сразу на месте. Такой подход позволяет быстро перейти к стабилизации состояния без лишних этапов.
Получить дополнительные сведения – вывод из запоя на дому цена
During conversations about thoughtful and inspiring websites, someone recommended engaging article center and after browsing through it personally I understood the appeal, since the writing style feels approachable while the discussions remain meaningful and enjoyable for visitors exploring different subjects.
Процесс терапии делится на последовательные этапы, каждый из которых направлен на решение конкретной медицинской задачи. Лечение включает физическую детоксикацию, медикаментозную коррекцию и психотерапевтическую поддержку. В таблице ниже отражены ключевые этапы лечебного процесса.
Получить дополнительные сведения – https://narkologicheskaya-klinika-v-khabarovske0.ru/khabarovsk-narkologicheskaya-pomoshh/
nexus shop url https://sites.google.com/view/nexusdarknetlink
Наиболее частыми причинами обращения становятся выраженная слабость, тремор, нарушение сна, тревога, учащенный пульс, скачки артериального давления, тошнота и признаки обезвоживания. Эти симптомы могут сочетаться между собой и усиливаться после прекращения употребления алкоголя, особенно после нескольких дней запоя.
Изучить вопрос глубже – нарколог на дом вывод екатеринбург
Главная цель — не просто снять симптомы абстиненции, а безопасно восстановить работу организма. Для этого применяются современные препараты и сбалансированные растворы, которые выводят токсины, поддерживают функции печени и нормализуют обмен веществ. Дополнительно пациент получает витаминотерапию и легкую психокоррекционную поддержку.
Изучить вопрос глубже – http://vyvod-iz-zapoya-v-khabarovske0.ru/vyvod-iz-zapoya-na-domu-khabarovsk/
During my recent online browsing sessions, I discovered Dream Deals Collection – the items appear regularly updated, and the overall design feels simple yet efficient for smooth product discovery which enhances user shopping experience significantly across multiple categories today
Нарколог на дом в Ростове-на-Дону рассматривается как специализированная форма оказания медицинской помощи пациентам с зависимостями вне стационара. В клинике «Чистый Баланс» выезд врача организуется круглосуточно, что позволяет обеспечить своевременное вмешательство при ухудшении состояния в любое время суток. Нарколог на дом в Ростове-на-Дону востребован в ситуациях, когда пациент не готов или не может обратиться в медицинское учреждение, а промедление с лечением повышает риск осложнений. Такой формат помощи требует строгого соблюдения клинических протоколов и высокой квалификации специалистов.
Исследовать вопрос подробнее – выезд нарколога на дом
При наличии этих симптомов помощь должна быть оказана в кратчайшие сроки. Выезд нарколога позволяет не только стабилизировать состояние, но и определить дальнейшую тактику лечения.
Углубиться в тему – клиника наркологической помощи
During a casual browsing session across lifestyle and shopping websites, I found daily picks hub placed inside a recommendation block, and the experience felt useful since browsing sections were smooth and naturally organized throughout different categories.
I had been searching for networking resources before discovering smart partnership guide – The website felt great overall, and the content was engaging and clearly structured, making it easy for visitors to understand without clutter or confusion online.
рулонные занавески рулонные занавески
During an extended session exploring online deals and value-based websites, I came across best deal portal embedded in a recommendation paragraph, and the experience felt useful since everything was well organized and easy for visitors to browse comfortably through different categories.
Вывод из запоя в стационаре в Санкт-Петербурге: профессиональное лечение, капельницы и контроль состояния пациента в наркологической клинике «Элегия Мед».
Исследовать вопрос подробнее – вывод из запоя в стационаре клиника санкт-петербург
Readers interested in mindfulness and intentional living often search for guidance that helps them slow down and appreciate daily moments, and they discover mindful simple living space which focuses on awareness, balance, and creating peaceful routines that support emotional well being.
Фармакологическая поддержка в стационаре направлена на решение конкретных клинических задач: восполнение дефицита жидкости и электролитов, защиту гепатоцитов, нормализацию сна, снижение тревожности и купирование болевого синдрома. Стандартная капельница для вывода из запоя включает кристаллоиды для восстановления объема циркулирующей крови, витамины группы B и C для поддержки метаболизма, гепатопротекторы для снижения токсической нагрузки, седативные и противорвотные препараты для стабилизации нервной системы. При выраженном похмелья или тяжелой абстиненции могут назначаться препараты для коррекции нейромедиаторного обмена, однако их применение строго дозируется и контролируется. Дозировки корректируются ежедневно на основе динамики показателей, что обеспечивает безопасность и эффективность терапии без перегрузки организма. Стандарты качества в клинике «Стармед» исключают «универсальные» схемы и требуют строгого врачебного контроля на каждом этапе инфузии.
Разобраться лучше – http://www.domen.ru
While exploring casual online browsing platforms focused on daily ideas and simple shopping suggestions, I discovered content that included Everyday Browse Corner placed within its mid content flow – The browsing felt smooth and minimal, making it easy to quickly scan through practical and small daily finds.
During a casual session of reading personal development and restart mindset resources, I found Bright Future Beginnings Hub naturally included in the article – Starting fresh feels easier now, thanks for this awesome space, and it encouraged me to take action instead of hesitating when starting new habits or goals
During my exploration of focus development and productivity websites, I found Focus Skill Explorer Network featured among similar platforms – The structure feels clean, and browsing through pages felt comfortable and straightforward today with organized categories and smooth browsing experience.
Выезд нарколога начинается с осмотра пациента. Доктора измеряют давление, пульс, оценивают уровень сознания и выраженность симптомов. На основании этих данных формируется план лечения, который реализуется сразу на месте. Такой подход позволяет быстро перейти к стабилизации состояния без лишних этапов.
Изучить вопрос глубже – вывод из запоя на дому анонимно в санкт-петербурге
Перечисленные состояния требуют профессионального вмешательства и не предполагают самостоятельного медикаментозного воздействия без врачебного контроля.
Подробнее можно узнать тут – вызвать нарколога на дом в хабаровске
During my exploration of online lifestyle hubs and trend discovery platforms, I found Trend Lifestyle Journal – The website structure feels balanced and simple, allowing users to quickly locate important sections and enjoy a smooth browsing experience even if visiting for the first time today.
ролл штора на пластиковое окно https://avtomaticheskie-rulonnye-shtory5.ru
Ниже представлена таблица с ключевыми направлениями терапии, применяемыми в клинике, и их особенностями.
Исследовать вопрос подробнее – https://narcologicheskaya-klinika-v-rostove19.ru/narkologiya-rostov-kruglosutochno
As I browsed through inspirational websites, I came across purpose creation guide – which provides thoughtful content that encourages individuals to focus on meaningful work and create things aligned with their deeper goals and values.
Website users typically appreciate platforms that reduce clutter and provide clear pathways for accessing information quickly and efficiently without unnecessary effort SphereUX Design Hub – NexaSphere reflects a modern web design philosophy where usability and visual structure are integrated smoothly, ensuring users enjoy a clean and responsive browsing experience throughout.
Необходимость обращения за наркологической помощью определяется по совокупности симптомов и их выраженности. При ухудшении состояния важно ориентироваться на объективные признаки, а не ждать самостоятельного улучшения.
Углубиться в тему – http://narkologicheskaya-pomoshh-nizhnij-novgorod-8.ru
There was always an idea in my mind but I only took action once I started using Visionary Ideas Corner to organize my thoughts and transform them into something practical and achievable – Finally launching my project feels like opening a new chapter in my life
nexus darknet url https://sites.google.com/view/nexusdarknetmarket
Нарколог на дом в Екатеринбурге: выезд врача на дом, лечение запоя и консультации в наркологической клинике «НЕО+».
Углубиться в тему – нарколог на дом цена
Запой сопровождается выраженной интоксикацией, нарушением работы сердечно-сосудистой системы, тревожностью и бессонницей, что характерно для алкоголизма и хронического употребления алкоголя. При длительном течении организм человека теряет способность к самостоятельному восстановлению, и вмешательство становится необходимым. Стационар в этом случае позволяет контролировать динамику состояния больного и корректировать терапию в режиме реального времени, особенно при тяжелом течении алкоголизма.
Получить дополнительные сведения – https://vyvod-iz-zapoya-v-staczionare-nizhnij-novgorod-2.ru
Первичный этап, с которого начинается вывод из запоя в Тольятти, включает подробную клиническую оценку состояния пациента. В клинике «Чистый Горизонт» на этом этапе анализируются жалобы, длительность запоя и наличие сопутствующих заболеваний, способных повлиять на переносимость терапии.
Получить дополнительную информацию – нарколог на дом вывод из запоя тольятти
Consumers exploring premium online collections frequently appreciate platforms that focus on clean design and usability, and elegant browse hub – provides a structured layout that enhances product discovery and allows users to enjoy a more refined and visually comfortable shopping experience overall.
Эта услуга позволяет людям, которые не могут или не хотят покидать свой дом, получить профессиональную помощь и избавиться от зависимости без госпитализации. К тому же, вывод из запоя на дому позволяет избежать стресса, связанного с нахождением в медицинских учреждениях, при этом можно заказать вызов специалистов с учетом их опыта и лет работы, а также данных больного.
Подробнее можно узнать тут – анонимный вывод из запоя на дому в екатеринбурге
While exploring budget friendly online marketplaces, I noticed several sections designed for quick shopping decisions, and outlet value finder helped simplify the experience by offering clear product categories, fast page transitions, and a generally well structured interface that felt easy to use.
People who enjoy premium shopping experiences often take their time to find items that feel truly valuable and well designed Dream Watch Collection Boutique – I discovered my dream watch here after months of saving, and it turned out to be worth it because it gave me a strong feeling of satisfaction and pride
During an extended browsing session through creativity and inspiration platforms, I came across imagination unlock portal embedded in a recommendation paragraph, and the experience felt enjoyable since the content appeared fresh and visually comfortable throughout with smooth navigation across categories.
تسجيل دخول 888starz https://888starz-egypt3.com/
888старз казино 888starz-uzbekistan2.com .
8.8 starz https://888starz-egypt5.com/
Лечение запойного состояния строится на сочетании детоксикационных и поддерживающих мероприятий. Основная задача терапии заключается в снижении концентрации токсинов и восстановлении нарушенных регуляторных механизмов. При этом особое внимание уделяется сохранению стабильности внутренних систем организма.
Разобраться лучше – врач вывод из запоя хабаровск
dark market link https://sites.google.com/view/nexusmarketdarknet
Детоксикация в стационаре — это не разовая процедура, а последовательный процесс, разделенный на диагностику, активное выведение токсинов, стабилизацию функций и подготовку к противорецидивному этапу. При поступлении врач проводит первичный осмотр, собирает подробный анамнез, оценивает неврологический статус и при необходимости назначает лабораторные исследования. На основе полученных данных формируется индивидуальный протокол, учитывающий возраст, вес, длительность запоя, наличие сопутствующих патологий и переносимость лекарственных средств. Мы применяем только сертифицированные медикаменты, зарегистрированные в РФ, и строго соблюдаем клинические рекомендации Минздрава, исключая псевдонаучные методики. Все вмешательства документируются в электронной медицинской карте, доступ к которой имеют только лечащие специалисты.
Детальнее – вывод из запоя в стационаре
888stars http://888stars-uz.com .
Вывод из запоя в стационаре в Нижнем Новгороде с медицинским сопровождением и контролем показателей в наркологической клинике «Частный медик 24»
Подробнее тут – быстрый вывод из запоя в стационаре в нижнем новгороде
888starz kz https://888starz-uz-online.com/ .
People who enjoy relaxed morning routines often build small habits that make their day feel more enjoyable, especially combining coffee time with light browsing for interesting finds that don’t feel stressful or overwhelming Daily Browse Hub – My mornings have turned into a calm ritual where I enjoy coffee and browse here daily, which honestly makes starting the day feel much better
After comparing several trading education platforms, I found daily trader school – The website provided helpful trading resources, and the layout remained clean and simple, making it easy for everyone to understand without unnecessary complexity or confusing navigation elements online.
888starz 1xbet 888starz 1xbet .
موقع 888starz https://888starz-egypt6.com/
Нарколог на дом — это услуга, позволяющая получить квалифицированную медицинскую помощь в привычной обстановке без необходимости посещения клиники. В «ЛадаМед Выезд» в Тольятти круглосуточно дежурят врачи-наркологи, готовые оперативно выехать по адресу и провести детоксикацию, стабилизацию состояния и консультацию по дальнейшему лечению. Такой формат особенно востребован при запое, абстинентном синдроме, интоксикации или необходимости срочной поддержки без госпитализации. Все процедуры проводятся анонимно, безопасно и под контролем специалиста.
Получить больше информации – нарколог на дом недорого в тольятти
While browsing online knowledge resources, I found Creative Growth Learning Portal which offers structured and interactive content that feels inspiring and easy to understand – it helps users learn effectively while also encouraging them to think creatively and generate new ideas
While preparing financially and emotionally for renting my first apartment I spent hours collecting inspiration and eventually found cozy living space ideas board which helped me think about color schemes and furniture choices – it made the whole process feel more organized and enjoyable than expected.
wethenorth darknet https://sites.google.com/view/nexusdarknetmarket
While checking different online inspiration hubs and mindset growth platforms focused on self improvement and direction, I noticed Vision Matters Motivation Hub integrated naturally into the content flow – I finally feel heard, and it really reinforces that my vision matters here, helping me stay focused and emotionally aligned with what I want to achieve
In exploring fashion inspiration and personal style platforms online, I discovered Style Matters Resource Point featured among similar websites – The browsing experience felt smooth, pages loaded quickly, and the information felt genuinely useful for users looking for style improvement ideas today.
While researching different inspiration hubs and digital creativity spaces, I encountered a website where Inspiration Vault was embedded within the content structure, and it helped maintain a steady reading flow – Overall it felt like a well curated collection of ideas that made discovering new concepts enjoyable and effortless.
Whenever I think about improving my clothing style I look for affordable inspiration because I like to stay fashionable without unnecessary expenses, and during my search I came across Daily Outfit Picks which provided simple ideas for stylish combinations – It allows me to maintain a fresh and modern wardrobe while keeping my spending under control and stress free
Individuals focused on personal growth and leadership improvement often search for guidance online Growth Inspiration Lab that combines creativity and motivation to support consistent self development journeys over consistent time.
During a casual browsing session of deal websites and online value platforms, I found top deal corner placed in a recommendation list, and the website felt useful because all content was organized clearly and easy for visitors to access smoothly.
Помощь на дому рассматривают при состояниях, которые возникают после длительного употребления алкоголя или тяжелого алкогольного эпизода. Чаще всего это запой, выраженная интоксикация, бессонница, тревога, слабость, тремор, тошнота, сухость во рту, отсутствие аппетита, нестабильное давление и сердцебиение. Врачебный осмотр требуется в тех случаях, когда больному трудно восстановиться самостоятельно, а самочувствие продолжает ухудшаться.
Исследовать вопрос подробнее – вызвать нарколога на дом екатеринбург
Процесс вывода из запоя начинается с первичной консультации врача, который проводит осмотр пациента, оценивает его состояние и собирает анамнез. На основе полученной информации специалист подбирает индивидуальный план детоксикации, который может включать капельницы с инфузионными растворами, витамины, препараты для нормализации давления, а также средства для снижения симптомов абстиненции, таких как тошнота, головная боль и слабость. Важно, что весь процесс выводится под контролем врача, что гарантирует безопасность и эффективность.
Детальнее – вывод из запоя на дому круглосуточно екатеринбург
Лечение в клинике «ДальМедБаланс» базируется на комплексном подходе. Каждый метод направлен на конкретную цель — детоксикацию, восстановление, стабилизацию и профилактику повторного употребления. Используются современные медицинские технологии и препараты с доказанной эффективностью. Таблица ниже описывает основные направления терапии и их результаты.
Выяснить больше – https://narkologicheskaya-klinika-v-khabarovske0.ru/chastnaya-narkologicheskaya-klinika-khabarovsk/
abacus url https://sites.google.com/view/nexusmarketplace
капельница от похмелья капельница от похмелья
сколько стоит прокапаться дома сколько стоит прокапаться дома
People interested in self improvement often find creative platforms that help them realize skills they never thought they had before Discover Talent Growth Hub – I had no idea I could draw, but their guidance helped me try it out and I was honestly surprised by what I managed to create with a bit of practice and patience
During an extended browsing session through creative concept and inspiration websites, I came across idea exploration portal embedded in a recommendation paragraph, and the experience felt smooth as pages opened quickly while information stayed clearly arranged throughout the site.
Наркологическая клиника — это пространство профессиональной помощи, где пациент получает комплексное лечение зависимости, медицинский контроль и психологическую поддержку. В клинике «ВолгаМед Баланс» в Тольятти лечение основано на принципах доказательной медицины и конфиденциальности. Каждая терапевтическая программа выстраивается индивидуально, с учётом физического состояния пациента, стадии заболевания и его мотивации к выздоровлению. Врачи клиники обеспечивают непрерывный контроль за состоянием, применяя современные методы дезинтоксикации, психотерапии и медикаментозной стабилизации.
Получить дополнительные сведения – частная наркологическая клиника в тольятти
Медикаментозное лечение подбирается индивидуально с учётом возраста, длительности зависимости и сопутствующих патологий.
Подробнее можно узнать тут – вывод наркологическая клиника
Непрерывный мониторинг витальных показателей — ключевое отличие стационарного формата, обеспечивающее безопасную детоксикацию. В палатах клиники «Элегия Мед» установлены системы отслеживания частоты пульса, сатурации, температуры и артериального давления, данные с которых автоматически передаются в электронную медицинскую карту. Медицинский персонал дежурит круглосуточно, что обеспечивает мгновенную реакцию на ухудшение состояния: коррекцию инфузионной терапии, введение симптоматических препаратов, привлечение смежных специалистов при необходимости. Такая организация процесса исключает хаотичное назначение средств, предотвращает полипрагмазию и гарантирует, что каждый этап детоксикации проходит под строгим клиническим контролем. При необходимости применяются дополнительные методы очищения крови, включая плазмаферез, который эффективно помогает вывести стойкие токсины и метаболиты, не удаляемые стандартной инфузионной терапией.
Выяснить больше – https://vyvod-iz-zapoya-v-staczionare-sankt-peterburg-18.ru/
В «ЛадаМед Выезд» при оказании наркологической помощи на дому используются современные препараты и методы дезинтоксикации. Ниже приведена таблица с основными видами терапии и их эффектами.
Подробнее тут – платный нарколог на дом тольятти
People searching for distinctive lifestyle shops often end up finding small creative marketplaces while looking for something different and inspiring online Drift Orchard Boutique Vault visitors usually feel intrigued and drawn in – the store feels like a secret corner of the internet where unique aesthetic products are quietly waiting to be discovered
cocorico shop https://sites.google.com/view/nexusdarknetmarket
рулонные шторы с электроприводом и дистанционным управлением рулонные шторы с электроприводом и дистанционным управлением
Такие симптомы требуют медицинского вмешательства, поскольку могут приводить к ухудшению состояния. Капельница помогает стабилизировать самочувствие и снизить нагрузку на организм. Услуги могут предоставляться анонимно, а при необходимости пациент направляется на лечение в стационаре.
Углубиться в тему – http://www.domen.ru
People who enjoy cozy routines often look for small home items that bring calm energy, helping them create a more comforting and pleasant atmosphere in their personal space Cozy Corner Hub – I bought a plant and a mug and it really showed me that small joys are the most important parts of everyday happiness and balance
In moments when people feel stuck or uncertain about their direction in life, they often search for motivational guidance that can help them reset and refocus, especially through direction-growth-space – such resources provide clarity encouragement and structure allowing users to regain motivation and continue progressing steadily toward their personal goals.
Капельница от похмелья с контролем врача в Самаре является одной из самых популярных и эффективных услуг для тех, кто сталкивается с выраженными симптомами похмельного синдрома. Похмелье может проявляться не только головной болью и усталостью, но и более серьезными проблемами, такими как тошнота, рвота, учащенное сердцебиение и повышение давления. Когда симптомы становятся особенно острыми, капельница помогает организму справиться с токсинами, восстановить водно-электролитный баланс и нормализовать состояние пациента, в том числе при запое. Важно, что контроль врача на протяжении всей процедуры обеспечивает безопасность и эффективность, при этом помощь может оказываться как на дому, так и в клинике при лечении алкоголизма.
Подробнее можно узнать тут – капельница от похмелья на дом самара
Some websites can feel overwhelming due to cluttered design, although intuitive information platform offers a cleaner and more straightforward experience where visitors can comfortably explore content and navigate between sections without facing unnecessary obstacles or confusing layouts.
While browsing personal development platforms I discovered a website that helps users design their future through structured thinking, motivation and practical goal setting tools Create Future Planning Hub – the experience feels encouraging and clear, helping users stay focused, build direction and work steadily toward long term improvement
Решение о помещении пациента в стационар принимается на основе объективных медицинских критериев, а не только по желанию родственников. К показаниям относятся: запой длительностью более 72 часов, выраженная абстиненция с тахикардией, артериальной гипертензией, профузным потоотделением, наличие в анамнезе алкогольных делириев или судорожных эпизодов, сопутствующие хронические заболевания печени, сердца, поджелудочной железы. При отравление продуктами распада этанола, когда интоксикация затрагивает несколько систем одновременно, резкое прекращение употребления без медицинской поддержки может спровоцировать отек мозга, острую сердечную недостаточность или желудочно-кишечное кровотечение. При сочетанных расстройствах, когда в анамнезе присутствует наркомании, протоколы адаптируются под специфику психоактивных соединений и включают усиленный нейрологический контроль. Стационар позволяет провести полноценную диагностику, включая ЭКГ, экспресс-анализы крови и мониторинг сатурации, что формирует точную картину состояния и исключает шаблонные назначения.
Узнать больше – нарколог вывод из запоя в стационаре в санкт-петербурге
Вывод из запоя на дому с медицинским контролем в Екатеринбурге предлагает множество преимуществ, которые делают этот метод более удобным и безопасным для многих людей. Отсутствие необходимости в госпитализации и наличие профессионального контроля являются основными положительными аспектами этой услуги.
Подробнее – http://vyvod-iz-zapoya-na-domu-ekaterinburg-18.ru/
ролет штора ролет штора
After reviewing several value based websites, I found daily deals corner – The platform felt clean and easy to use, and products were displayed in an organized and visually appealing way, allowing simple browsing without distractions or complexity online.
Этапный подход позволяет достичь полного восстановления организма и избежать осложнений, связанных с резким прекращением употребления алкоголя. Каждый шаг фиксируется врачами, а коррекция терапии проводится по показаниям.
Получить дополнительные сведения – вывод из запоя на дому круглосуточно
В «ЛадаМед Выезд» при оказании наркологической помощи на дому используются современные препараты и методы дезинтоксикации. Ниже приведена таблица с основными видами терапии и их эффектами.
Получить больше информации – врач нарколог выезд на дом в тольятти
свежие объявления авторынок http://www.pmr-auto.ru .
Процесс терапии делится на последовательные этапы, каждый из которых направлен на решение конкретной медицинской задачи. Лечение включает физическую детоксикацию, медикаментозную коррекцию и психотерапевтическую поддержку. В таблице ниже отражены ключевые этапы лечебного процесса.
Узнать больше – https://narkologicheskaya-klinika-v-khabarovske0.ru/khabarovsk-narkologicheskaya-pomoshh/
Запой сопровождается выраженной интоксикацией, нарушением сна, слабостью, тревожностью и колебаниями давления, что характерно для алкоголизма и других форм зависимости. При этом самостоятельный выход из состояния часто оказывается затруднённым из-за ухудшения самочувствия и невозможности контролировать симптомы. В таких случаях выезд нарколога позволяет начать лечение без задержек и помочь пациенту снизить нагрузку на организм за счёт отсутствия транспортировки.
Разобраться лучше – вывод из запоя на дому анонимно
While exploring motivational and self development platforms focused on mindset expansion and new opportunity discovery tools, I came across Possibility Explorer Hub naturally placed within the content flow – It opens up so many doors, and I never thought I would find something this inspiring that genuinely shifts how I see new opportunities
In my experience searching for safe online environments for kids, I came across a platform that emphasizes both entertainment and educational growth, making it suitable for consistent learning routines at home Learning playground online – The kids’ area is highly interactive, and my daughter enjoys the variety of tasks that help her develop problem-solving skills while keeping her entertained with colorful and simple activities.
Помощь на дому рассматривают при состояниях, связанных с острым ухудшением самочувствия после алкоголя. Чаще всего это несколько дней запоя, тяжелое похмелье, бессонница, тревога, дрожь в руках, слабость, отсутствие аппетита, тошнота, сухость во рту и ощущение истощения. В подобных случаях врачебный осмотр нужен для оценки общего состояния и выбора безопасной тактики.
Детальнее – http://narkolog-na-dom-ekaterinburg.ru/
While reviewing online tools for better selection, I came across Options Smart Finder Portal which had organized content sections and smooth navigation flow, making browsing efficient – the information felt clear and genuinely practical for users trying to compare options easily
During a casual review of online fashion hubs and simple aesthetic clothing websites, I found Bright Casual Elegance Network naturally included in the article – It provides simple elegant picks here, perfect for everyday casual wear, and makes styling feel easy, comfortable, and naturally aligned with modern minimalist fashion trends
During a quiet evening at home I explored multiple shopping blogs before stopping at fashion picks hub – The website gives a polished impression overall, content updates appear frequent, and navigating through different pages feels responsive, simple, and enjoyable for visitors using any modern browser today.
Решение о помещении пациента в стационар принимается на основе объективных медицинских критериев, а не только по желанию родственников. К показаниям относятся: запой длительностью более 72 часов, выраженная абстиненция с тахикардией, артериальной гипертензией, профузным потоотделением, наличие в анамнезе алкогольных делириев или судорожных эпизодов, сопутствующие хронические заболевания печени, сердца, поджелудочной железы. В сложные ситуации, когда интоксикация затрагивает несколько систем одновременно, резкое прекращение употребления без медицинской поддержки может спровоцировать отек мозга, острую сердечную недостаточность или желудочно-кишечное кровотечение. При сочетанных расстройствах, когда в анамнезе присутствует наркомании, протоколы адаптируются под специфику психоактивных соединений и включают усиленный нейрологический контроль. Стационар позволяет провести полноценную диагностику, включая ЭКГ, экспресс-анализы крови, УЗИ внутренних органов и мониторинг сатурации, что формирует точную картину состояния и исключает шаблонные назначения.
Разобраться лучше – наркология вывод из запоя в стационаре
During my exploration of creative idea platforms and inspiration focused websites, I found Concept Inspiration Lab – The platform is filled with unique concepts everywhere, and it keeps me coming back for more daily since every visit brings new and refreshing creative directions worth exploring
People exploring creative growth opportunities often appreciate platforms that motivate them to take action on new ideas, and build innovation guide – provides supportive content that helps users focus on developing projects while maintaining creativity and confidence throughout the entire process of creation.
Затяжной запой — это не бытовая слабость, а медицинское состояние, требующее профессионального лечения в условиях стационара. Когда организм истощен длительной интоксикацией, нарушен сон, отсутствует аппетит, а попытки самостоятельно прекратить употребление сопровождаются тремором, тревогой и скачками давления, единственным безопасным решением становится контролируемая детоксикация. Наркологическая клиника «Элегия Мед» в Санкт-Петербурге предоставляет профессиональное лечение с применением сертифицированных протоколов, непрерывный контроль состояния пациента и индивидуальный подбор медикаментозной поддержки. Мы работаем круглосуточно, обеспечивая быстрое реагирование на обращения, четкую диагностику при поступлении и прозрачное взаимодействие с родственниками. Все процедуры выполняются с соблюдением протоколов доказательной медицины, стандартов Минздрава РФ и строгих правил конфиденциальности. Первичная оценка состояния начинается с дистанционной консультации, что позволяет врачам заранее подготовить необходимое оборудование и скорректировать план госпитализации еще до прибытия пациента. При необходимости заказать консультацию или оформить выезд бригады, доступные способы связи включают телефон, мессенджеры и онлайн-форму на сайте.
Узнать больше – быстрый вывод из запоя в стационаре в санкт-петербурге
В данном обзоре представлены основные направления и тренды в области медицины. Мы обсудим актуальные проблемы здравоохранения, свежие открытия и новые подходы, которые меняют представление о лечении и профилактике заболеваний. Эта информация будет полезна как специалистам, так и широкой публике.
Ссылка на источник – наркологическая клиника нижний новгород
Этот медицинский обзор сосредоточен на последних достижениях, которые оказывают влияние на пациентов и медицинскую практику. Мы разбираем инновационные методы лечения и исследований, акцентируя внимание на их значимости для общественного здоровья. Читатели узнают о свежих данных и их возможном применении.
Смотрите также – “наркологическая клиника
silk road darknet https://sites.google.com/view/nexusdarknetmarket
Users who value convenience in online shopping often search for stores that offer quick payment systems and easy return options without confusion Shopping Zone Express Hub – checkout is fast and simple, returns are handled smoothly, and I would definitely return weekly because the entire experience feels efficient, practical, and well organized
During an extended browsing session across offer-based websites and shopping platforms, I came across offer discovery portal embedded in a recommendation paragraph, and the experience felt smooth since visitors could easily navigate different categories without confusion throughout the site.
В этой статье мы рассматриваем разрушительное влияние зависимости на жизнь человека. Обсуждаются аспекты, такие как здоровье, отношения и профессиональные достижения. Читатели узнают о необходимости обращения за помощью и о путях к восстановлению.
Следуйте по ссылке – срочный вывод из запоя на дому врач
Читатели получат представление о том, как современные технологии влияют на развитие медицины. Обсуждаются новые методы лечения, персонализированный подход и роль цифровых решений в повышении качества медицинских услуг.
Хочу знать больше – врач нарколог на дом
Эта публикация раскрывает психологические механизмы зависимости и их роль в развитии расстройств. Читатель узнает о том, как психология влияет на формирование зависимостей и как профессиональная помощь может изменить ситуацию.
Доступ к полной версии – наркология на дому вызов нарколога
Вывод из запоя на дому в Екатеринбурге — это услуга, которая позволяет пациентам пройти лечение в удобных для них условиях, без необходимости посещать стационар. Процедура включает несколько этапов, каждый из которых направлен на снижение уровня алкогольной интоксикации и стабилизацию состояния пациента. Главным преимуществом вывода из запоя на дому является то, что это не только удобно, но и позволяет избежать лишнего стресса, который может быть вызван госпитализацией.
Подробнее – вывод из запоя на дому цена в екатеринбурге
Домашняя детоксикация подходит для ранних стадий интоксикации, когда состояние пациента стабильно, а сопутствующие заболевания отсутствуют. Однако при длительном употреблении алкоголя физиологические изменения требуют более глубокого вмешательства. Стационар обеспечивает изоляцию от триггеров, исключает риск самостоятельного повторного употребления и позволяет врачам динамически корректировать терапию на основе лабораторных показателей и реакции организма. В 2026 году стандарты наркологической помощи делают акцент на превентивной безопасности: раннее выявление признаков делирия, судорожной готовности или кардиологических осложнений позволяет предотвратить критические состояния до их развития. Клиника «Стармед» выстроила работу так, чтобы каждый этап госпитализации логически вытекал из предыдущего, формируя непрерывную цепочку от острой стабилизации до планирования долгосрочной ремиссии.
Ознакомиться с деталями – наркология вывод из запоя в стационаре
Помощь 24/7 означает, что нарколог на дом в Хабаровске может быть направлен в любое время суток, включая ночные часы и выходные дни. В клинике «Ясный Вектор» выездная служба функционирует с учётом логистики города, что позволяет минимизировать время ожидания врача.
Подробнее тут – выезд нарколога на дом в хабаровске
People who enjoy decorating often search for shelves that elevate room appearance while still being durable enough for long term use, especially in frequently used home areas Stylish Storage Hub – I found shelves that look far from cheap and feel super sturdy, making them one of the best home upgrades I’ve done recently
выведение из запоя капельница выведение из запоя капельница
Главный принцип работы наркологической клиники — это последовательность, безопасность и уважение к каждому пациенту. Независимо от степени зависимости, лечение строится на тщательной диагностике, определении индивидуальных особенностей и поэтапном подходе. Медицинская помощь оказывается как в условиях стационара, так и на дому, где врачи могут провести детоксикацию, стабилизировать состояние и составить дальнейший план терапии.
Выяснить больше – анонимная наркологическая клиника
Эти преимущества делают вывод из запоя на дому с медицинским контролем оптимальным решением для тех, кто хочет быстро и безопасно вернуться к нормальной жизни без необходимости посещать клинику.
Углубиться в тему – вывод из запоя на дому круглосуточно
сколько стоит капельница от запоя сколько стоит капельница от запоя
Отдельного внимания требуют случаи, когда больной почти не ест, плохо пьет воду, не может спокойно лежать, жалуется на сильное сердцебиение, нехватку сна или выраженное внутреннее напряжение. В такой ситуации осмотр помогает определить, безопасно ли оставаться дома и какого объема помощи достаточно на текущем этапе. Если речь идет о выраженных проявлениях абстинентного синдрома, затягивать с обращением нецелесообразно.
Узнать больше – вызвать нарколога на дом
капельница от запоя капельница от запоя
прокапаться от алкоголя на дому нижний новгород прокапаться от алкоголя на дому нижний новгород
Вывод из запоя на дому в Санкт-Петербурге с выездом нарколога, детоксикацией и восстановлением состояния в наркологической клинике «Частный медик 24»
Разобраться лучше – вывод из запоя на дому цена
While browsing multiple urban lifestyle and fashion inspiration sites, I noticed streetwear style hub placed within curated content, and I enjoyed exploring it recently because the design feels modern and extremely comfortable across all pages and sections.
Shoppers interested in premium handmade style goods often search for curated platforms that combine durability with visually expressive design choices Garnet Stone Crafted Store offers a refined selection where craftsmanship feels consistent and rich colors enhance the overall aesthetic appeal, making it feel both reliable and visually engaging
cannaexpress onion https://sites.google.com/view/nexus-market-url
В Санкт-Петербурге вывод из запоя на дому используется в ситуациях, когда состояние пациента требует медицинской помощи, но позволяет обойтись без лечения в стационаре. Врач проводит консультацию, оценивает длительность запоя, выраженность симптомов и общее состояние, анализируя данные пациента, после чего принимает решение о тактике лечения при алкоголизме. При необходимости можно оформить вызов специалиста или заказать услугу заранее.
Выяснить больше – нарколог на дом вывод из запоя санкт-петербург
В клинике применяются современные медицинские технологии, направленные на восстановление организма и стабилизацию психоэмоционального состояния. Ниже представлена таблица с описанием основных методов и их терапевтического значения.
Подробнее можно узнать тут – частная наркологическая клиника
While checking various online streetwear outlets and urban fashion stores with modern casual designs, I found Urban Wear City Fashion Hub placed within the content flow – I managed to get some nice streetwear pieces, and the prices are actually fair too, making it feel like a smart place to shop regularly
استارز888 https://888starz-egypt5.com/
Some websites feel outdated quickly, although modern content portal maintains a strong impression through its diverse range of updated materials, all presented in a clean and professional way that helps visitors stay engaged while exploring different sections of the platform.
сколько стоит капельница от запоя сколько стоит капельница от запоя
В этой статье представлен занимательный и актуальный контент, который заставит вас задуматься. Мы обсуждаем насущные вопросы и проблемы, а также освещаем истории, которые вдохновляют на действия и изменения. Узнайте, что стоит за событиями нашего времени!
Более того — здесь – вывод из запоя в стационаре наркологии
I started noticing gradual improvements in my financial situation after applying advice from savings improvement site which helped me focus on essential spending and eliminate unnecessary costs that were previously draining my monthly income with better planning and consistent discipline over time.
В этой публикации мы предложим ряд рекомендаций по избавлению от зависимостей и успешному восстановлению. Мы обсудим методы привлечения поддержки и важность самосознания. Эти советы помогут людям вернуться к нормальной жизни и стать на путь выздоровления.
Получить профессиональную консультацию – наркологическая помощь на дому круглосуточно
dark markets 2026 https://sites.google.com/view/nexusdarknetmarket
Putting outfits together was always stressful for me until I explored Outfit Harmony Finder and completed their style assessment – it helped me understand balance in clothing combinations, and now I can quickly create looks that feel coordinated and naturally put together.
В «ЛадаМед Выезд» при оказании наркологической помощи на дому используются современные препараты и методы дезинтоксикации. Ниже приведена таблица с основными видами терапии и их эффектами.
Подробнее тут – https://narkolog-na-dom-tolyatti0.ru
Процедура начинается с осмотра пациента. Врач оценивает основные показатели, включая давление и пульс, а также выраженность симптомов. После этого формируется состав капельницы и определяется тактика лечения, что позволяет эффективно провести вывод из запоя.
Получить больше информации – капельница от похмелья на дом
استار 888 https://888starz-egypt3.com/
888 starz casino http://www.888starz-uzbekistan2.com/ .
В статье представлены ключевые моменты по актуальной теме, дополненные советами экспертов и ссылками на дополнительные ресурсы. Цель материала — дать читателю инструменты для самостоятельного развития и принятия осознанных решений.
Исследовать вопрос подробнее – вывести из запоя в стационаре
Вывод из запоя на дому в Екатеринбурге: помощь при запое, снятие интоксикации и медицинская поддержка в наркологической клинике «Детокс»
Получить дополнительные сведения – вывод из запоя на дому цена
В данном материале представлены ключевые тенденции в сфере медицинской науки и практики. Вы узнаете о последних открытиях, инновационных подходах к терапии и важности профилактики заболеваний. Особое внимание уделено практическому применению новых методов в клинической практике.
Ознакомиться с полной информацией – срочный вывод из запоя на дому врач
While searching through productivity and vision focused platforms online, I discovered Your Vision Path Explorer included among recommended resources – The platform is helpful, and navigating different sections felt smooth and very convenient with a clean design that made browsing straightforward today.
While browsing discovery focused online content, I came across World Awaits Journey Hub which features a simple and structured interface that makes navigation smooth – the content feels inspiring today and encourages visitors to think about new possibilities and meaningful exploration opportunities
888 старз бэт https://www.888stars-uz.com .
Эта статья погружает вас в увлекательный мир знаний, где каждый факт становится открытием. Мы расскажем о ключевых исторических поворотных моментах и научных прорывах, которые изменили ход цивилизации. Поймите, как прошлое формирует настоящее и как его уроки могут помочь нам строить будущее.
Кликни и узнай всё! – центры принудительного лечения от алкоголизма
8888 bet 8888 bet .
Users who enjoy structured travel insights often appreciate guides that balance affordability with meaningful and enjoyable experiences across global destinations and cultures Explore Passion Travel Center – I used these travel guides to create a budget trip that felt well organized, exciting, and unexpectedly affordable while still giving me everything I wanted from the journey
While exploring various e-commerce deal websites late at night looking for seasonal discounts and flash sales, I noticed Savings Discovery Zone – Found a fantastic deal earlier today, and honestly it made my shopping experience much smoother and more rewarding than expected overall.
As I continued searching for inspiration-based content, I encountered creative thinking guide – a resource that encourages users to stay imaginative and consistently look for innovative ways to approach daily life situations.
starz888 https://888starz-egypt6.com/
starz888 starz888 .
В статье по вопросам здоровья мы рассматриваем актуальные проблемы, с которыми сталкивается общество. Обсуждаются заболевания, факторы риска и важные аспекты профилактики. Читатели получат полезные советы о том, как сохранить здоровье и улучшить качество жизни.
Прочесть всё о… – нарколог на дом круглосуточно
Shoppers who enjoy discovering new online stores often prioritize platforms that load quickly and present clear navigation for easier product exploration before committing time Trend Shop Explorer Modern Access Point – Modern interface design stands out here with improved layouts and subtle enhancements that make browsing feel intuitive and enjoyable across all devices used.
рулонные шторы с электроприводом и дистанционным управлением рулонные шторы с электроприводом и дистанционным управлением
dark market 2026 https://sites.google.com/view/nexusmarketdarknet
Процедура капельницы от похмелья с контролем врача в Самаре начинается с первичной консультации, на которой врач осматривает пациента, измеряет его основные показатели (давление, пульс, температуру) и оценивает общее состояние. На основе этих данных выбирается оптимальный состав капельницы, которая может включать в себя различные компоненты, такие как солевые растворы, витамины, антиоксиданты и медикаменты для снятия симптомов похмелья.
Получить больше информации – http://kapelnicza-ot-pokhmelya-samara-13.ru
Users who prefer calm and positive reading material often search for websites that offer small moments of joy through simple and meaningful written content Calm Joy Hub – Their posts made me smile three times because the content is simple, clean, and effective in a way that feels natural and not forced at all
рулонные шторы на окна купить https://rulonnye-shtory-s-elektroprivodom10.ru
Users exploring online fashion marketplaces often appreciate platforms that keep layouts simple and product discovery intuitive while offering a wide range of items through sleek fashion market – the site feels clean and efficient providing easy navigation and a visually consistent structure that enhances the overall browsing experience for visitors
Эта статья погружает вас в увлекательный мир знаний, где каждый факт становится открытием. Мы расскажем о ключевых исторических поворотных моментах и научных прорывах, которые изменили ход цивилизации. Поймите, как прошлое формирует настоящее и как его уроки могут помочь нам строить будущее.
Узнать больше – как отправить человека в рехаб
Алкогольная интоксикация оказывает серьёзное влияние на организм, вызывая головную боль, тошноту, слабость и головокружение. Капельница помогает организму быстро избавиться от продуктов распада алкоголя, восстановить нормальное функционирование органов и минимизировать последствия для здоровья. Важно, что мы обеспечиваем полное наблюдение врача на протяжении всей процедуры, что помогает гарантировать безопасность пациента и максимальную эффективность лечения.
Исследовать вопрос подробнее – капельница от похмелья вызов на дом в екатеринбурге
dark matter market https://sites.google.com/view/nexusdarknetlink
Эта статья сочетает познавательный и занимательный контент, что делает ее идеальной для любителей глубоких исследований. Мы рассмотрим увлекательные аспекты различных тем и предоставим вам новые знания, которые могут оказаться полезными в будущем.
Раскрыть тему полностью – стационар капельница от алкоголя
While browsing self improvement content and daily progress tracking platforms, I came across Smart Habit Change Network embedded within the content flow – Small smart changes daily makes a huge difference over time, and it helped me realize that success is built through repetition of small positive actions
While browsing different cosmetic shopping websites, I eventually noticed trusted beauty outlet – The website design was beautiful overall, and product browsing felt smooth and enjoyable every visit, allowing users to explore comfortably without clutter or confusing elements online.
капельница после запоя капельница после запоя
прокапаться от запоя прокапаться от запоя
выведение из запоя капельница выведение из запоя капельница
капельница от запоя нижний новгород капельница от запоя нижний новгород
People who appreciate rustic floral serenity often look for online boutiques that create soft visual storytelling through natural design elements and calming aesthetics Rustic Floral Serenity Shop the store feels peaceful and thoughtfully arranged with gentle tones – it delivers a calming shopping experience where floral serenity and rustic design blend into a visually comforting and aesthetically balanced environment
While going through my usual evening routine of reading productivity content I stumbled into a mindset shift moment involving Ambition Upgrade Hub which naturally fit into what I was already exploring, and it changed how I viewed progress – afterward I felt unusually motivated and started planning much bigger objectives than I normally would.
Many individuals interested in new ideas often benefit from platforms that present creative content in a simple way, and idea inspiration hub – delivers a structured browsing experience where users can explore imaginative concepts smoothly while enjoying an easy and pleasant interface overall.
Вызов капельницы от похмелья с контролем врача в Самаре рекомендуется, когда симптомы похмелья становятся особенно тяжелыми и мешают нормальной жизнедеятельности. Несмотря на то, что многие пытаются справиться с похмельем с помощью домашних методов, такие как прием жидкости или таблеток, они не всегда оказываются достаточно эффективными. В случае сильных симптомов похмелья, капельница с врачебным контролем — это более безопасное и быстрое решение, при этом возможен вывод в стационаре, анонимное лечение и консультации по вопросам наркомании с учетом актуальной цены услуг.
Изучить вопрос глубже – http://kapelnicza-ot-pokhmelya-samara-13.ru
Many craft enthusiasts use idea-sharing sites to learn techniques that make their handmade gifts look polished, detailed, and beautifully finished Handmade Creation Studio I made gifts for friends and they thought I bought them from a boutique shop because they looked so refined – Made handmade gifts for friends, they thought I bought them professionally
During an afternoon of browsing e-commerce platforms, I came across quick product hub and appreciated how clean the structure feels, making browsing convenient and allowing users to explore products quickly without unnecessary complexity or cluttered design.
People who like daily intellectual stimulation often rely on websites that provide simple facts regularly to keep their curiosity active and growing naturally Daily Brain Boost Hub – one new fact each visit keeps my brain happily engaged, and it has become a small but meaningful part of my daily routine that I genuinely enjoy
While exploring online fashion trend hubs and inspiration sites, I discovered style trend zone embedded within curated recommendations, and the browsing experience felt great overall since pages loaded quickly across all devices and performed reliably.
dark web market links https://sites.google.com/view/nexusmarketdarknet
хентай наруто наруто смотреть
During my exploration of online goal tracking and productivity improvement platforms I encountered Achievement Roadmap Studio included in a recommended collection of development resources – the interface feels modern, clean, and thoughtfully arranged allowing users to explore strategies for personal success and planning efficiency.
During exploration of online fashion insight platforms and trend tracking websites, I came across Trend Horizon Network placed within the article structure – The trends here are spot on and feel way ahead of other stores honestly, giving me early awareness of new styles before they spread widely
прокапаться нижний новгород прокапаться нижний новгород
Эта публикация погружает вас в мир увлекательных фактов и удивительных открытий. Мы расскажем о ключевых событиях, которые изменили ход истории, и приоткроем завесу над научными достижениями, которые вдохновили миллионы. Узнайте, чему может научить нас прошлое и как применить эти знания в будущем.
Это стоит прочитать полностью – нарколог цена
While browsing digital shopping platforms, I discovered Fresh Choice Product Hub which presents items in a neat and structured way that supports easy navigation – the product selection is diverse and browsing feels pleasantly simple and convenient throughout the entire experience
Users who appreciate calming home aesthetics often search for stores that offer small decorative items that help create a peaceful and happy atmosphere inside personal spaces Calm Living Finds Hub – I bought a plant and a mug from this shop, and surprisingly those small things added a lot of warmth and happiness to my everyday home environment
наркологические стационары наркологические стационары
dark matter darknet url https://sites.google.com/view/nexusdarknetlink
While exploring various online uniqueness and inspiration platforms, I discovered idea discovery hub placed within curated recommendations, and I was impressed with the layout as browsing remained simple and enjoyable throughout the entire platform.
наркологический стационар в спб наркологический стационар в спб
While browsing practical shopping platforms focused on daily essentials and reliable product selection guides for everyday use, I came across Daily Essentials Choice Hub naturally placed within the content flow – Solid picks for daily needs, and I have never been disappointed with my choices because everything consistently feels useful, practical, and well selected for regular use
Капельница от похмелья с контролем врача в Самаре представляет собой эффективную терапевтическую процедуру, позволяющую значительно улучшить самочувствие пациента за короткий срок. Врач, контролируя весь процесс, может точно определить, какие компоненты необходимы для каждого пациента. Состав капельницы зависит от симптомов похмелья, состояния пациента и его индивидуальных потребностей. Это позволяет обеспечить максимально безопасное и эффективное лечение, которое помогает организму быстро восстановиться.
Получить больше информации – капельница от похмелья цена в самаре
К основным показаниям относятся:
Получить больше информации – http://vyvod-iz-zapoya-na-domu-sankt-peterburg-8.ru
After comparing several trading education websites, I found daily trading guide – The information shared here felt useful overall, and the structure was clean and professionally maintained, making browsing simple without clutter or confusing navigation elements online.
My progress was slow until I implemented advice from Career Upgrade Station which helped refine my approach and ultimately resulted in landing interview opportunities I had been aiming for.
cannaexpress market link https://sites.google.com/view/nexusmarketdarknet
капельница от похмелья капельница от похмелья
выведение из запоя капельница выведение из запоя капельница
Users who like fashionable updates often search for trending clothing that helps them stay relevant in style conversations and social media inspired fashion communities Style Update Trend Hub – the viral jacket everyone wants finally became mine, and it makes my outfits feel more stylish, modern, and aligned with the current wave of fashion popularity
прокапать от алкоголя нижний новгород прокапать от алкоголя нижний новгород
К основным показаниям относятся:
Подробнее тут – анонимный вывод из запоя на дому в санкт-петербурге
вывести из запоя в домашних условиях капельница вывести из запоя в домашних условиях капельница
Many individuals who leave long term jobs to start something new often experience uncertainty before eventually finding deeper satisfaction in their new direction Career Shift Corner I made a career switch at thirty five, and although it was scary in the beginning, it turned out to be one of the best decisions I ever made – Switched careers at thirty five, scary but so worth it now
People exploring calm lifestyle brands often appreciate stores that highlight purity, simplicity, and refreshing design energy in their products Quartz Orchard Harmony Collective – everything feels clean and uplifting, with products that carry a crisp aesthetic and pure energy that supports a balanced and refreshing approach to everyday living choices
рулонные шторы с электроприводом купить рулонные шторы с электроприводом купить
К основным показаниям относятся:
Изучить вопрос глубже – вывод из запоя на дому круглосуточно
Процесс лечения капельницей помогает улучшить состояние пациента уже через короткий период. Важно, что процедура не только снимает симптомы похмелья, но и восстанавливает нормальную работу печени, почек и других органов, пострадавших от токсического воздействия алкоголя. Это помогает предотвратить долгосрочные последствия интоксикации, такие как хроническая усталость, проблемы с органами и психоэмоциональные расстройства.
Получить больше информации – капельница от похмелья вызов на дом екатеринбург
black ops market link https://sites.google.com/view/nexusdarknetmarket
A number of websites focus on self improvement, though success mindset hub feels more practical because it provides clear insights and motivational ideas that help visitors stay focused on unlocking their potential and improving their personal and professional lives.
Вывод из запоя на дому в Санкт-Петербурге с выездом специалиста, стабилизацией состояния и медицинской поддержкой в наркологической клинике «Частный медик 24»
Исследовать вопрос подробнее – вывод из запоя на дому анонимно
During a search for personalized and uncommon gift options on various online platforms, I discovered Rare Choice Gift Corner within curated selections – I purchased a gift nobody else had, such a great find that it made the moment feel more intentional and special than regular store-bought presents
Вывод из запоя на дому — это формат наркологической помощи, при котором лечение проводится в привычной для пациента обстановке с выездом врача. Такой подход применяется в ситуациях, когда состояние требует медицинского вмешательства, но не предполагает обязательной госпитализации. В наркологической клинике «Частный медик 24» помощь на дому выстраивается по принципу поэтапной стабилизации: сначала устраняются острые проявления, затем оценивается динамика и при необходимости корректируется терапия.
Узнать больше – https://vyvod-iz-zapoya-na-domu-sankt-peterburg-8.ru/
Users who value speed often look for shopping platforms that simplify the process from browsing to checkout, making it easier to handle daily needs efficiently Instant Shopping Hub – This store feels like a grab and go solution, ideal for busy weeks when I just want to get what I need quickly and keep moving
Users who want simple access to trending information often look for websites that keep layouts minimal and easy to follow, especially when browsing easy trend update hub – the platform feels clean and intuitive, allowing users to explore content quickly while enjoying a visually balanced and user friendly experience.
While casually exploring new shopping websites online, I stumbled upon Value Deals Warehouse and noticed that the layout is structured in a user-friendly way that supports quick browsing and simple transitions between sections – I feel the overall design contributes to a pleasant experience that makes searching feel less time consuming
During exploration of shopping idea platforms, I encountered Trend Cart Studio listed within a curated selection – The website design felt clean and modern, helping users easily follow content without unnecessary complexity or clutter.
рулонные шторы с электроприводом цена рулонные шторы с электроприводом цена
Главный принцип работы наркологической клиники — это последовательность, безопасность и уважение к каждому пациенту. Независимо от степени зависимости, лечение строится на тщательной диагностике, определении индивидуальных особенностей и поэтапном подходе. Медицинская помощь оказывается как в условиях стационара, так и на дому, где врачи могут провести детоксикацию, стабилизировать состояние и составить дальнейший план терапии.
Разобраться лучше – наркологическая клиника нарколог
Процедура капельницы от похмелья с контролем врача в Самаре начинается с первичной консультации, на которой врач осматривает пациента, измеряет его основные показатели (давление, пульс, температуру) и оценивает общее состояние. На основе этих данных выбирается оптимальный состав капельницы, которая может включать в себя различные компоненты, такие как солевые растворы, витамины, антиоксиданты и медикаменты для снятия симптомов похмелья.
Детальнее – капельница от похмелья анонимно в самаре
During an extended search for motivation and inspiration websites, I noticed inspiration stream portal placed in the middle of a recommendation list, and the shared information felt helpful while navigation stayed smooth, simple, and easy for first-time users browsing the content.
В рамках анонимного лечения особое внимание уделяется следующим аспектам медицинской организации:
Подробнее тут – http://narkologicheskaya-clinica-v-krd19.ru
Процедура проводится под контролем врача. В случае необходимости специалист выезжает на дом с полным набором медикаментов и оборудования. Такой формат особенно востребован среди пациентов, которые предпочитают анонимное лечение без госпитализации. Все манипуляции проводятся стерильно, а препараты подбираются с учётом противопоказаний.
Получить больше информации – наркология вывод из запоя ростов-на-дону
капельницы от запоя на дому нижний новгород капельницы от запоя на дому нижний новгород
наркологическая помощь стационар наркологическая помощь стационар
наркологический стационар наркологический стационар
кодирование от алкоголизма стационар кодирование от алкоголизма стационар
dark websites https://sites.google.com/view/nexusmarketplace
dark matter darknet market https://sites.google.com/view/nexusmarketdarknet
During exploration of e-commerce browsing tools and product favorite systems, I came across Favorites List Organizer Hub embedded within the article flow – Bookmarked several items already, coming back for more later, and it makes it very easy to save interesting products and revisit them whenever needed
Individuals interested in style inspiration often appreciate platforms that keep fashion content fresh and structured, and trend fashion hub – provides updated style ideas in a visually appealing format that makes browsing simple, smooth and enjoyable overall.
К основным показаниям относятся:
Подробнее тут – вывод из запоя на дому анонимно в санкт-петербурге
After comparing several gift shopping websites, I found modern gift corner – The collection appeared interesting today, and finding unique products felt effortless and convenient, making browsing simple and enjoyable without clutter or distractions affecting usability online.
Users who value accuracy in recommendations often rely on platforms that consistently provide correct and useful suggestions that perform well in real life usage Precision Picks Hub – so far I’m three for three with their recommendations, and every single one has worked better than expected in real use cases
Many digital readers emphasize the value of clarity in online resources, especially when they explore sites like shared development space which seem to present structured, helpful, and professionally maintained information that enhances both usability and learning efficiency for everyday visitors.
В этой публикации мы обсуждаем современные методы лечения различных заболеваний. Читатели узнают о новых медикаментах, терапиях и исследованиях, которые активно применяются для лечения. Мы нацелены на то, чтобы предоставить практические знания, которые могут помочь в борьбе с недугами.
Изучить вопрос глубже – наркологическая помощь нижний новгород
abacus shop https://sites.google.com/view/nexusdarknetmarket
Sometimes the most surprising online discoveries come from simple exploration of personal growth content that initially seems ordinary but reveals deeper value over time mindset transformation space – I was genuinely surprised at how different my impression became after spending a little time engaging with it more thoughtfully
Запой сопровождается выраженной интоксикацией, нарушением сна, слабостью, тревожностью и колебаниями давления, что характерно для алкоголизма и других форм зависимости. При этом самостоятельный выход из состояния часто оказывается затруднённым из-за ухудшения самочувствия и невозможности контролировать симптомы. В таких случаях выезд нарколога позволяет начать лечение без задержек и помочь пациенту снизить нагрузку на организм за счёт отсутствия транспортировки.
Получить больше информации – http://vyvod-iz-zapoya-na-domu-sankt-peterburg-8.ru
As I was exploring community development resources online, I came across a platform that shares powerful real-life stories Impact Volunteer Hub and storytelling portal which highlights initiatives across regions that encourage civic engagement and empathy among readers and participants – After reading several of their community stories, I decided to start volunteering locally because it genuinely motivated me to contribute time to neighborhood support programs and small charitable efforts that make a real difference.
Отдельно оценивают ситуации, когда эпизоды повторяются и становятся частью более устойчивой проблемы. Если после алкоголя регулярно развивается тяжелое состояние, нарушается привычный режим жизни, усиливаются последствия алкоголизма и возникают сложности с контролем употребления, домашний выезд может быть только первым этапом более длинного маршрута помощи. При этом наркологическая помощь может включать не только снятие острых проявлений, но и дальнейшую программу лечения зависимости, если речь идет о длительном течении заболевания.
Детальнее – нарколог на дом анонимно в москве
вывести из запоя капельница вывести из запоя капельница
прокапаться на дому нижний новгород прокапаться на дому нижний новгород
Вывод из запоя на дому в Санкт-Петербурге с выездом специалиста, стабилизацией состояния и медицинской поддержкой в наркологической клинике «Частный медик 24»
Подробнее можно узнать тут – вывод из запоя на дому санкт-петербург
Many digital shoppers appreciate websites that turn routine browsing into a calm and enjoyable experience without pressure or urgency Casual shopping day page – providing a relaxed interface where users can explore different products comfortably while enjoying a smooth and pleasant online shopping journey throughout the day.
реабилитация наркозависимых стационар реабилитация наркозависимых стационар
While casually searching for thoughtful presents online and browsing curated gift selections, I stumbled across an inviting shop interface meaningful gift place – I ended up finding a beautiful present for my mom that felt both simple and emotionally thoughtful.
People who enjoy visually appealing fashion websites may appreciate trendy wardrobe hub because the presentation feels well designed and stylish, allowing visitors to comfortably explore fashion content while enjoying a smooth and aesthetically pleasing browsing experience across different sections.
People who explore mindset and personal growth platforms often look for motivational guidance that helps them stay focused on goals, build confidence, and turn consistent effort into real professional results over time Success Mindset Hub – I followed their advice while working on my goals and unexpectedly got a promotion, something that felt unbelievable at first but turned out to be completely true in my case
наркологическая клиника стационар наркологическая клиника стационар
Наиболее частыми причинами обращения становятся запой, тяжелый похмельный синдром, тремор, выраженная слабость, тревога, бессонница, нестабильное давление, учащенный пульс, тошнота и признаки обезвоживания. Эти проявления могут сочетаться между собой и усиливаться после прекращения употребления алкоголя, особенно если эпизод длился несколько дней.
Подробнее – http://narkolog-na-dom-moskva-18.ru
ares market darknet https://sites.google.com/view/nexusmarketplace
Клиника создана как современное пространство для безопасного восстановления. Здесь пациенты получают комплексную помощь в комфортных условиях. Основные преимущества учреждения:
Получить дополнительные сведения – запой наркологическая клиника ростов-на-дону
While exploring online communities focused on teamwork and shared improvement, I found Support Growth Network integrated into the page – Being part of this feels uplifting, as it’s filled with supportive people who genuinely care about helping others succeed and grow together
вызов нарколога на дом круглосуточно москва вызов нарколога на дом круглосуточно москва
капельница от похмелья нижний новгород капельница от похмелья нижний новгород
During a casual session of exploring online style inspiration platforms and minimal fashion stores, I came across Elegant Minimal Style Network embedded within the article structure – Clean and elegant style, it doesn’t try too hard honestly, and that simplicity gives it a confident and balanced visual identity
ouarzazate to sahara car rental
wethenorth url https://sites.google.com/view/nexusdarknetlink
While searching for personalized outfit tools, I found Perfect Look Style Match Hub which offers a clean and organized interface that makes browsing simple – it helps users discover outfits that match their personality really easily and supports better self expression through fashion
I usually skim quickly through online content, but this page managed to hold my attention because the information was arranged in a way that felt clear, balanced, and much easier to navigate compared to similar websites online today. simple beauty collection – The structure and formatting worked together naturally, making the overall experience feel smooth, polished, and very straightforward for visitors browsing through different sections.
нарколог стационар нарколог стационар
Users who enjoy online exploration often appreciate discovering unexpected websites that they quickly recommend to their social circle Discover Treasure Online Hub – I found this gem randomly and already told five friends about it because it felt like a rare and valuable find worth sharing with others who enjoy browsing online
Consumers who want to maximize their purchasing power often rely on digital solutions that provide structured insights, and deal insight platform helps present curated savings opportunities in an understandable format – many find it valuable for quickly evaluating options and avoiding the hassle of manually searching for scattered promotional information across the web
врач нарколог на дом москва врач нарколог на дом москва
Реабилитация алкоголиков в Москве: комплексное восстановление, помощь при зависимости и поддержка специалистов в наркологической клинике «Похмельная служба»
Разобраться лучше – центр реабилитации алкоголиков город
рулонные шторы на балкон цена https://elektricheskie-rulonnye-shtory15.ru
наркологические стационары наркологические стационары
платный нарколог на дом москва платный нарколог на дом москва
As I looked for ideas for my next adventure and searched through travel inspiration content, I found several helpful suggestions that felt quite practical travel path finder – I’m currently mapping out a potential itinerary and discovering many new places and experiences that are making the planning process feel more enjoyable and less uncertain.
наркологический стационар наркологический стационар
I spent some time comparing different signal platforms before opening exclusive analytics hub – The website provided useful content, and everything loaded quickly without unnecessary clutter, making browsing smooth and distraction free while exploring different sections online.
номер стоматологии семейная стоматология
While searching for websites offering useful online recommendations and engaging material, I eventually encountered featured web resource, and the clear page arrangement ensured visitors could comfortably locate important content without confusion while exploring different sections and highlighted topics.
abacus market https://sites.google.com/view/nexusmarketdarknet
cannaexpress market darknet https://sites.google.com/view/nexus-market-url
While exploring ways to stay aware of cultural and online shifts, I found a source that delivers concise and relevant updates regularly Trend Snapshot Hub – It keeps me updated without feeling out of touch with current topics, which is exactly what I needed to maintain awareness without getting overwhelmed by constant information flow.
While browsing online inspiration and discovery platforms, I found smart dream guide – The content was arranged in a modern and thoughtful way, making the experience enjoyable while exploring different sections that felt easy to follow and well organized throughout.
During a research session focused on productivity tools and inspirational content, I discovered an interesting page that featured Motivational Always Site naturally within its footer recommendations naturally within its footer recommendations while still maintaining readability and structured information flow throughout – Overall impression was positive, especially for users seeking structured motivational content with quick load times and minimal distractions across pages
Users focused on personal growth often realize that hesitation blocks progress, so they seek tools or inspiration that encourage immediate movement and real-world action Growth Action Hub – I stopped waiting and started doing what I kept delaying, and this site pushed me forward in a way that felt genuinely motivating
During an online search for fashion inspiration websites and curated clothing platforms, I discovered daily fashion style hub – The platform provides a really nice fashion selection and smooth browsing experience overall today, making browsing simple, elegant, and pleasant across all sections.
Выезд нарколога начинается с осмотра пациента. Доктора измеряют давление, пульс, оценивают уровень сознания и выраженность симптомов. На основании этих данных формируется план лечения, который реализуется сразу на месте. Такой подход позволяет быстро перейти к стабилизации состояния без лишних этапов.
Исследовать вопрос подробнее – вывод из запоя на дому круглосуточно санкт-петербург
While exploring online bargain hubs I came across a website that highlights daily discounts and shopping deals in a fast and user friendly layout designed for convenience Daily Value Deal Zone – the experience feels clear and efficient, helping users save time while finding useful deals and offers easily
После оформления вызова нарколог приезжает к пациенту и проводит комплексную оценку состояния. Врач измеряет давление, частоту пульса, оценивает уровень сознания и выраженность симптомов. На основании полученных данных формируется план лечения, который реализуется сразу на месте.
Узнать больше – http://narkolog-na-dom-nizhnij-novgorod.ru/
рулонные шторы на кухню с балконом https://elektricheskie-rulonnye-shtory99.ru
ares link https://sites.google.com/view/nexusdarknetmarket
После оформления вызова нарколог приезжает к пациенту и проводит комплексную оценку состояния. Врач измеряет давление, частоту пульса, оценивает уровень сознания и выраженность симптомов. На основании полученных данных формируется план лечения, который реализуется сразу на месте.
Изучить вопрос глубже – вызвать нарколога на дом
During a quiet routine of exploring inspiration websites and mindset content, I came across Morning Clarity Hub integrated into the article – Reading this every morning now keeps me going strong, and it helps me organize my thoughts and start the day with a clear sense of direction
реабилитация наркозависимых стационар реабилитация наркозависимых стационар
Many shoppers evaluate various e-commerce websites to understand which platforms deliver smoother product browsing, better navigation tools, and improved digital shopping experiences QuickCart Portal offering users a clearer perspective on how online stores structure their catalogs and present deals in an organized, accessible manner – The overview reflects a streamlined shopping environment designed to make product discovery feel faster, simpler, and more comfortable for everyday browsing habits.
Shoppers who prefer enchanted style retail often seek platforms that feel immersive and creative, and they eventually come across Enchanted Cove Galleria and enjoy its vibe – everything feels softly magical, with sparkling details that bring a sense of calm joy and visual fascination throughout the entire store experience
While researching development focused websites, I came across achiever’s learning space – The platform provided a smooth browsing experience with practical content designed to help individuals grow confidence and understand effective personal development strategies.
During a casual session of browsing outlet stores and online bargain shopping websites focused on affordable quality products, I found Value Savings Outlet Network embedded within the article section – Great bargains every time, quality stays consistent across orders, and it has helped me save money while still receiving products that feel dependable and well made
I spent some time exploring different motivational shopping style pages recently, and somewhere in the middle of my browsing I found uplifting online space which immediately stood out because the overall atmosphere feels encouraging, while the written content remains thoughtful and genuinely positive for visitors reading through the website carefully.
Users who enjoy collaborative progress often search for platforms where they can learn new skills while interacting with like minded people Create Learn Connect Network – I made new online friends here and building and learning together feels great, creating a strong sense of teamwork and shared achievement that makes learning more enjoyable
While searching for smart shopping assistants online, I found Smart Product Finder Hub which features a clean layout and organized categories that enhance usability – smart shopping experience gives useful product suggestions for everyone online making product selection easier and more reliable
выезд нарколога на дом цена выезд нарколога на дом цена
В этой заметке мы представляем шаги, которые помогут в процессе преодоления зависимостей. Рассматриваются стратегии поддержки и чек-листы для тех, кто хочет сделать первый шаг к выздоровлению. Наша цель — вдохновить читателей на положительные изменения и поддержать их в трудных моментах.
Есть чему поучиться – лечение наркомании в нижнем новгороде
Отдельно оценивают ситуации, когда эпизоды повторяются и становятся частью более устойчивой проблемы. Если после алкоголя регулярно развивается тяжелое состояние, нарушается привычный режим жизни, усиливаются последствия алкоголизма и возникают сложности с контролем употребления, домашний выезд может быть только первым этапом более длинного маршрута помощи. При этом наркологическая помощь может включать не только снятие острых проявлений, но и дальнейшую программу лечения зависимости, если речь идет о длительном течении заболевания.
Ознакомиться с деталями – вызвать нарколога на дом москва
наркологический стационар спб наркологический стационар спб
When I wanted to improve my understanding of technical subjects and build stronger fundamentals I discovered Digital Study Corner and it provided simple yet effective lessons that made complex ideas easier to digest while also helping me stay motivated throughout the entire learning process.
torzon darkweb https://sites.google.com/view/nexusmarketplace
нарколог стационар спб нарколог стационар спб
Главный принцип работы наркологической клиники — это последовательность, безопасность и уважение к каждому пациенту. Независимо от степени зависимости, лечение строится на тщательной диагностике, определении индивидуальных особенностей и поэтапном подходе. Медицинская помощь оказывается как в условиях стационара, так и на дому, где врачи могут провести детоксикацию, стабилизировать состояние и составить дальнейший план терапии.
Подробнее можно узнать тут – платная наркологическая клиника в ростове-на-дону
Create a spintax version with 20 unique lines based on the line below. Each line must follow these rules: Every line MUST contain the same HTML mistake: The anchor tag must be written exactly like this: Do NOT fix the mistake. Change the anchor text in every line. You may add words, remove words, or use generic anchor texts. All anchor texts must be different. Rewrite the comment part in every line as well. Rewrite the sentence after the dash (“–”) so each line has a different, natural-sounding variation. Wrap everything in spintax format: … Here is the base line to follow: purevalueoutlet – Inspiring and interactive site, perfect for learning and creating new ideas. Generate 20 variations following all rules above.Make sure that each line is 40 words minimum and the website should appear in the middle of line not in the start or end
Нарколог на дом в Нижнем Новгороде с быстрым приездом специалиста, детоксикацией и медицинской поддержкой в наркологической клинике «Частный медик 24»
Подробнее – нарколог на дом цена
кодирование от алкоголизма стационар кодирование от алкоголизма стационар
Shoppers interested in refreshing their clothing choices often explore online hubs that highlight new seasonal collections and styling ideas, and one such example frequently mentioned is Trend Fashion Showcase which is commonly portrayed as a place offering diverse apparel selections along with stylish outfit inspirations for modern buyers seeking updated looks.
Наркологическая помощь — это комплекс медицинских мероприятий, направленных на стабилизацию состояния пациента при алкогольной или наркотической интоксикации, а также при абстинентном синдроме. В наркологической клинике «Частный медик 24» в Нижнем Новгороде помощь оказывается с учётом текущего состояния пациента, без избыточных вмешательств и с чёткой ориентацией на клинические показатели. Выезд нарколога позволяет начать лечение в первые часы ухудшения самочувствия, что снижает риски осложнений и облегчает восстановление.
Ознакомиться с деталями – наркологическая помощь анонимно
кодирование от алкоголизма стационар кодирование от алкоголизма стационар
Каждый курс лечения включает несколько этапов, направленных на постепенное улучшение состояния. Система выстроена так, чтобы обеспечить плавное восстановление функций организма без стресса. Ниже приведена таблица, показывающая основные этапы лечения и применяемые процедуры.
Подробнее – https://vyvod-iz-zapoya-v-rnd19.ru/vyvedenie-iz-zapoya-rostov-na-donu
В практике лечения 24/7 применяются следующие этапы:
Детальнее – наркологическая клиника нарколог в краснодаре
В этой статье рассматриваются актуальные вопросы, связанные с развитием медицинской науки и её внедрением в повседневную практику. Особое внимание уделено вопросам профилактики, ранней диагностики и использованию технологий для улучшения здоровья человека.
Кликни и узнай всё! – наркологическая клиника телефон
Нарколог на дом в Москве: круглосуточный выезд, детоксикация и лечение зависимостей в наркологической клинике «Клиника доктора Калюжной».
Детальнее – нарколог на дом анонимно
While exploring digital creativity hubs, I found Your Creative Journey Space which offers a clean interface and well structured content sections that are easy to browse – the website maintains clean design and the content remains interesting and naturally presented throughout
выезд нарколога на дом выезд нарколога на дом
While exploring online choice and variety-based platforms, I came across modern decision space – The platform delivered great selection options with easy navigation, ensuring a smooth and enjoyable browsing experience throughout all sections.
Когда симптомы становятся настолько выраженными, что они мешают нормальному функционированию, капельница становится необходимостью. Она помогает избавиться от дискомфорта и значительно ускоряет процесс восстановления, давая организму все необходимые вещества для нормализации его работы, при этом может проводиться наркологическая детоксикация. Контроль врача на протяжении всей процедуры гарантирует, что капельница будет введена правильно и безопасно, с учетом всех показателей пациента, а при необходимости можно заказать дальнейшую реабилитацию и кодирование.
Разобраться лучше – http://kapelnicza-ot-pokhmelya-samara-13.ru
Домашний формат помощи рассматривают тогда, когда человеку тяжело добраться до медицинского учреждения, состояние ухудшается после нескольких дней употребления спиртного или родственникам требуется очная оценка без промедления. После осмотра становится ясно, допустима ли помощь на дому, требуется ли капельница, можно ли ограничиться наблюдением в домашних условиях или нужен другой маршрут помощи. Вопрос о том, как вызвать специалиста, нередко возникает в ситуациях, когда состояние нарастает быстро и требуется решение без откладывания. Если подобные эпизоды повторяются, дальнейшее обсуждение может касаться не только текущего состояния, но и лечения алкоголизма, работы с зависимостью и более длительной программы восстановления.
Углубиться в тему – нарколог на дом вывод в москве
While trying to escape a stressful evening routine I was browsing different websites aimlessly until I discovered happy break zone a pleasantly uplifting webpage that helped me reset my thoughts and feel more at ease quickly during that quiet night moment today.
Users who appreciate fashion savings often look for stores that regularly offer markdowns on footwear, helping them grab stylish essentials at a fraction of the original price Style Savings Hub – I bought leather boots at fifty percent off, which honestly felt like a steal because the quality was great and the price was unexpectedly low
nexus darknet market 2026 https://sites.google.com/view/nexusdarknetmarket
Реабилитация алкоголиков с поддержкой специалистов в Москве представляет собой важный и сложный процесс, в котором ключевую роль играет профессиональное вмешательство. Программы реабилитации включают в себя не только медицинскую помощь, но и психологическую, социальную и эмоциональную поддержку, что способствует успешному и долгосрочному восстановлению пациента. Такая комплексная помощь является основой эффективного лечения и предотвращения рецидивов.
Углубиться в тему – https://reabilitacziya-alkogolikov-moskva-1.ru/
While browsing helpful and informative websites online, I found modern corner guide hub – The website featured useful content and a smooth browsing experience, making navigation simple, fast, and enjoyable throughout the entire platform.
рольшторы заказать https://elektricheskie-rulonnye-shtory15.ru
After browsing various online communities and recommendation pages focused on trending topics, I encountered general information portal among highlighted suggestions, and the responsive design together with fast page transitions created a smooth experience while exploring multiple categories and recently updated sections online.
People interested in effortless fashion discovery often look for platforms that gather international trends so they can stay updated without spending hours researching different style sources online Style Trend World Hub – browsing global fashion inspiration from home has become my go to routine because it saves time and keeps me inspired without any extra effort
During a casual review of productivity improvement websites and motivation focused resources, I found Action First Mindset Network naturally included in the article – I stopped overthinking and acted, and it turned out to be the best decision I made recently because it helped me gain clarity and momentum in my goals
nexus site official link https://sites.google.com/view/nexusmarketplace
During exploration of lifestyle shopping blogs and trend-focused fashion websites, I found Urban Trend Style Center embedded within the content flow – Cool stuff everywhere, and my friends always ask where I shop since the collection always looks carefully chosen, stylish, and more unique than most stores they usually browse
нарколог москва на дом нарколог москва на дом
В данной обзорной статье представлены интригующие факты, которые не оставят вас равнодушными. Мы критикуем и анализируем события, которые изменили наше восприятие мира. Узнайте, что стоит за новыми открытиями и как они могут изменить ваше восприятие реальности.
Обратитесь за информацией – вывод из запоя в больнице
лечение в наркологическом стационаре лечение в наркологическом стационаре
In analyzing various digital shopping platforms focused on improving user experience through structured layouts and efficient category navigation, I came across TrendStop Shopping Portal placed naturally within informational content helping users browse categories and products in a smooth visually balanced and consistent way – The overall design felt clean and steady, supporting easy browsing across multiple product sections
Нарколог на дом в Ростове-на-Дону рассматривается как специализированная форма оказания медицинской помощи пациентам с зависимостями вне стационара. В клинике «Чистый Баланс» выезд врача организуется круглосуточно, что позволяет обеспечить своевременное вмешательство при ухудшении состояния в любое время суток. Нарколог на дом в Ростове-на-Дону востребован в ситуациях, когда пациент не готов или не может обратиться в медицинское учреждение, а промедление с лечением повышает риск осложнений. Такой формат помощи требует строгого соблюдения клинических протоколов и высокой квалификации специалистов.
Углубиться в тему – http://narkolog-na-dom-v-rnd19.ru/narkolog-na-dom-rostov/
While browsing for home transformation ideas inspired by autumn landscapes I discovered a thoughtfully designed platform that highlights seasonal beauty in a subtle way chestnut coast style hub – The overall presentation encourages cozy living spaces filled with warm hues and natural decorative accents
While reviewing self development and motivation websites, I came across Grow With Clarity Hub included in curated resources – Helpful content overall, where the website appears updated frequently and very simple navigating for visitors with intuitive navigation and organized content structure.
В Нижнем Новгороде выезд нарколога на дом используется при состояниях, требующих оперативной медицинской оценки и начала терапии. Врач приезжает с необходимыми препаратами, проводит осмотр и формирует план лечения на месте. Такой формат позволяет сократить время до начала помощи и снизить нагрузку на пациента.
Углубиться в тему – наркологическая помощь нижний новгород
I sometimes search for affordable online shops and during that process I found a helpful shopping platform at Happy Buy Center which offers a very pleasant experience and easy navigation – I always end up satisfied because purchases feel safe and the products match expectations perfectly
Процесс лечения капельницей помогает улучшить состояние пациента уже через короткий период. Важно, что процедура не только снимает симптомы похмелья, но и восстанавливает нормальную работу печени, почек и других органов, пострадавших от токсического воздействия алкоголя. Это помогает предотвратить долгосрочные последствия интоксикации, такие как хроническая усталость, проблемы с органами и психоэмоциональные расстройства.
Узнать больше – капельница от похмелья анонимно екатеринбург
нарколог на дом круглосуточно москва цены нарколог на дом круглосуточно москва цены
I had been searching for easy value shopping platforms before discovering daily value guide – The website felt helpful and well organized, and the updated content made it easy to find products through clearly structured categories without unnecessary clutter online.
Modern shoppers frequently explore online tools that combine deal tracking with product insights to support smarter purchasing behavior and reduce unnecessary expenses Digital Deal Space – Offers organized discount listings and useful shopping information that enables users to make better informed decisions while browsing a wide range of online stores
nexus darkweb link https://sites.google.com/view/nexusdarknetlink
Этот информационный материал подробно освещает проблему наркозависимости, ее причины и последствия. Мы предлагаем информацию о методах лечения, профилактики и поддерживающих программах. Цель статьи — повысить осведомленность и продвигать идеи о необходимости борьбы с зависимостями.
Посмотреть подробности – нарколог на дом вывод из запоя на дому
During an online search for value based ecommerce websites, I came across meaningful retail discovery space – The platform offers a useful experience with meaningful products and clean modern layout today, making browsing smooth, structured, and easy to follow across all sections.
Каждый элемент программы направлен на создание комплексного подхода к лечению зависимости, обеспечивая помощь не только на физическом, но и на эмоциональном уровне. Индивидуальная программа реабилитации позволяет выстроить эффективную терапию, которая соответствует конкретным потребностям пациента.
Подробнее – реабилитация алкоголиков в москве
Earlier today I was checking multiple online stores for common daily products and noticed that curated shopping list had a noticeably cleaner structure where useful items seemed easier to browse and compare without confusion or distractions everywhere – The overall layout appeared polished and the browsing process felt naturally comfortable while moving through different categories and sections.
Непрерывный мониторинг витальных показателей — ключевое отличие стационарного формата, обеспечивающее безопасную детоксикацию. В палатах клиники «Элегия Мед» установлены системы отслеживания частоты пульса, сатурации, температуры и артериального давления, данные с которых автоматически передаются в электронную медицинскую карту. Медицинский персонал дежурит круглосуточно, что обеспечивает мгновенную реакцию на ухудшение состояния: коррекцию инфузионной терапии, введение симптоматических препаратов, привлечение смежных специалистов при необходимости. Такая организация процесса исключает хаотичное назначение средств, предотвращает полипрагмазию и гарантирует, что каждый этап детоксикации проходит под строгим клиническим контролем. При необходимости применяются дополнительные методы очищения крови, включая плазмаферез, который эффективно помогает вывести стойкие токсины и метаболиты, не удаляемые стандартной инфузионной терапией.
Подробнее – vyvod-iz-zapoya-v-staczionare-sankt-peterburg-18.ru/
Individuals seeking clarity in professional life often search for resources that help them organize goals and create a realistic, step based career improvement strategy Career Progress Hub – I didn’t know where I was going career wise before, but now I have a clear structured plan that makes everything feel more stable and focused
наркологический стационар наркологический стационар
During my research into smart home improvements, I discovered a store offering practical and modern devices Home Smart Solutions Store and it had helpful product descriptions – I liked the smart home section enough to buy multiple items which I have already installed and tested successfully.
Users exploring creative clothing platforms often appreciate websites that focus on visual storytelling and structured layouts, especially when browsing urban aesthetic fashion hub – the site feels stylish and well designed, offering smooth navigation and clear presentation of fashion items that enhances the overall browsing experience significantly.
Запой сопровождается выраженной интоксикацией, нарушением сна, слабостью, тревожностью и колебаниями давления, что характерно для алкоголизма и других форм зависимости. При этом самостоятельный выход из состояния часто оказывается затруднённым из-за ухудшения самочувствия и невозможности контролировать симптомы. В таких случаях выезд нарколога позволяет начать лечение без задержек и помочь пациенту снизить нагрузку на организм за счёт отсутствия транспортировки.
Узнать больше – вывод из запоя на дому анонимно
During casual browsing for inspiration and personal success strategies, I came across success pathway guide – The platform delivered clear and structured information, making it easy to explore motivational content and understand different approaches to building confidence in daily life situations.
наркологические стационары наркологические стационары
888starz login 888starz login .
готовые рулонные шторы цена https://elektricheskie-rulonnye-shtory99.ru
drughub market link https://sites.google.com/view/nexus-market-url
Процедура капельницы от похмелья с контролем врача в Самаре начинается с первичной консультации, на которой врач осматривает пациента, измеряет его основные показатели (давление, пульс, температуру) и оценивает общее состояние. На основе этих данных выбирается оптимальный состав капельницы, которая может включать в себя различные компоненты, такие как солевые растворы, витамины, антиоксиданты и медикаменты для снятия симптомов похмелья.
Подробнее – капельница от похмелья самара
В этой публикации мы исследуем ключевые аспекты здоровья, включая влияние образа жизни на благополучие. Читатели узнают о важности правильного питания, физической активности и психического здоровья. Мы предоставим практические советы и рекомендации для поддержания здоровья и развития профилактических подходов.
Как это работает — подробно – выведение из запоя на дому круглосуточно
888starz demo http://888starz-uzbekistan3.com/ .
В Нижнем Новгороде стационарный формат лечения применяется при наличии факторов, повышающих риск осложнений или снижающих эффективность домашней терапии. Врач принимает решение на основании осмотра, консультации и анализа данных, оценивая текущее состояние пациента и его реакцию на предыдущие попытки лечения. При необходимости можно заранее обратиться в центр лечения алкоголизма и наркомании или заказать услугу по телефону.
Получить дополнительные сведения – вывод из запоя дешево нижний новгород
Users who prefer no clutter shopping often search for platforms that focus on essential deals only, making it easier to find exactly what they need without wasting time Pure Deal Value Hub – just simple deals without fluff, exactly what I needed right now, and it made the whole experience feel smooth, fast, and completely focused on real value
вызов нарколога на дом москва вызов нарколога на дом москва
During an online search for community growth and inspiration websites, I discovered daily growth circle – The platform offered a warm and positive atmosphere with engaging content, making browsing smooth, enjoyable, and easy to follow while exploring different supportive sections.
During exploration of sustainable fashion websites and ethical style collections, I came across Timeless Apparel Legacy Hub embedded within the article flow – Timeless pieces that last, no fast fashion garbage found here, and it gives a strong sense of reliability knowing the clothing is built to endure over time
Такой подход позволяет достичь устойчивого результата без срывов и рецидивов. Пациенты получают помощь не только на уровне физиологии, но и на уровне личностных изменений, что делает лечение глубоким и эффективным.
Ознакомиться с деталями – наркологическая клиника наркологический центр в ростове-на-дону
Нарколог на дом — это формат медицинской помощи, при котором пациент получает лечение без посещения стационара. В наркологической клинике «Частный медик 24» в Нижнем Новгороде такая услуга используется при острых состояниях: запой, выраженная алкогольная интоксикация, абстинентный синдром, а также при необходимости срочного вмешательства без транспортировки больного. Выезд врача позволяет начать терапию в первые часы ухудшения состояния, что снижает риск осложнений и облегчает переносимость лечения.
Получить дополнительные сведения – нарколог на дом вывод
While browsing through different productivity and inspiration websites, I noticed Motivation Pulse Hub embedded in the content structure – I really needed this today, feeling motivated after browsing around here and it gave me a calm but powerful push to stay focused on my personal goals
В клинике «Вектор Восстановления» логика маршрута строится по этапам. Первый этап — оценка состояния и рисков: длительность употребления, тяжесть отмены, давление, пульс, обезвоживание, хронические заболевания, прошлые осложнения, препараты, которые пациент уже принимал дома. Второй этап — стабилизация: снижение интоксикации, коррекция состояния, восстановление сна, уменьшение тревоги. Третий этап — сопровождение первых суток и переход к восстановлению: план на 24–72 часа, контроль динамики и профилактика «вечернего отката». Четвёртый этап — работа с зависимостью как с привычкой и системой поведения: триггеры, стресс, режим, поддержка семьи, навыки отказа, профилактика рецидива.
Исследовать вопрос подробнее – http://lechenie-alkogolizma-sergiev-posad12.ru
Shoppers who prefer discovering international deals often look for platforms that aggregate trending products and fashion inspiration in one place across digital shopping networks Curated trend collection site – A curated site presenting handpicked global trends and diverse product collections for modern shoppers enabling easier discovery of new styles and efficient comparison of international offerings
Такой подход позволяет наркологической клинике в Ростове-на-Дону выстраивать лечение в безопасных и психологически комфортных условиях.
Углубиться в тему – https://narkologicheskaya-klinika-v-rostove19.ru/narkologiya-rostov-kruglosutochno
В Нижнем Новгороде выезд нарколога на дом используется при состояниях, требующих оперативной медицинской оценки и начала терапии. Врач приезжает с необходимыми препаратами, проводит осмотр и формирует план лечения на месте. Такой формат позволяет сократить время до начала помощи и снизить нагрузку на пациента.
Исследовать вопрос подробнее – вызов наркологической помощи в нижнем новгороде
Существует ряд ситуаций, при которых вызов специалиста на дом является обоснованным решением:
Получить дополнительную информацию – нарколог на дом нижний новгород
лечение в наркологическом стационаре лечение в наркологическом стационаре
В таких ситуациях врач оценивает риски, определяет тактику лечения и при необходимости рекомендует дальнейшую госпитализацию. Однако во многих случаях помощь на дому оказывается достаточной для стабилизации состояния.
Разобраться лучше – нарколог на дом нижний новгород
People interested in creativity tools often mention that Fresh Ideas Platform – Helpful platform lately, everything appears accessible and easy for new visitors. The content is described as refreshing, giving users new perspectives and helping them think more freely.
During my exploration of online shopping websites I analyzed how design and checkout performance work together to create a seamless user experience for buyers brightstone fast cart and observed navigation flow carefully – The cheerful layout paired with fast checkout made the entire browsing and buying experience feel smooth efficient and surprisingly pleasant
I spent some time exploring motivational websites before discovering journey start hub – The website felt inspiring today, and the layout remained clean and enjoyable, making browsing smooth across different devices without confusion or unnecessary clutter online.
تحديث 888starz 888 stars
During a casual browsing session for shopping deals online, I came across smart value finder space – The platform features good value offerings and useful content, creating a smooth and enjoyable experience for everyday shoppers online.
Алкогольная интоксикация оказывает серьёзное влияние на организм, вызывая головную боль, тошноту, слабость и головокружение. Капельница помогает организму быстро избавиться от продуктов распада алкоголя, восстановить нормальное функционирование органов и минимизировать последствия для здоровья. Важно, что мы обеспечиваем полное наблюдение врача на протяжении всей процедуры, что помогает гарантировать безопасность пациента и максимальную эффективность лечения.
Детальнее – капельница от похмелья вызов на дом
В Санкт-Петербурге вывод из запоя на дому рассматривается, когда состояние пациента позволяет проводить лечение вне стационара, но требует контроля специалиста. Врач оценивает общее состояние, длительность запоя и выраженность симптомов, после чего принимает решение о формате помощи при алкоголизме. Важно, что лечение начинается сразу после осмотра, без необходимости ожидания госпитализации. При необходимости можно заказать услуги на сайте клиники или получить консультацию специалистов.
Изучить вопрос глубже – анонимный вывод из запоя на дому
During my search for useful opportunity-based platforms and career tools, I noticed work opportunity guide, and I appreciated the clean layout since everything appeared authentic and professionally maintained, offering a smooth and structured browsing experience across multiple informational sections.
Online shoppers who prefer assistance while browsing often search for platforms that make product selection easier and more intuitive, and a commonly cited example is Helpful Cart Explorer – designed to support users throughout their shopping journey by offering clear product insights and helpful recommendations that enhance overall decision making.
Users who appreciate fashion clarity often select minimalist pieces that avoid distractions, creating outfits that feel clean, balanced, and easy to maintain visually Clear Fashion Hub – No logos all over the place, just minimal styles that actually work well and make everything look more put together and simple
нарколог на дом москва цены нарколог на дом москва цены
nexus darknet access https://sites.google.com/view/nexusmarketdarknet
During my search through personal growth platforms and motivational sites, I found New Potential Insight Hub featured among curated listings – The browsing experience felt smooth, with information looking reliable and nicely presented throughout the website thanks to simple layout and structured flow.
рулонные шторы на балконные окна https://elektricheskie-rulonnye-shtory15.ru
выезд нарколога на дом цена выезд нарколога на дом цена
Непрерывный мониторинг витальных показателей — ключевое отличие стационарного формата, обеспечивающее безопасную детоксикацию. В палатах клиники «Элегия Мед» установлены системы отслеживания частоты пульса, сатурации, температуры и артериального давления, данные с которых автоматически передаются в электронную медицинскую карту. Медицинский персонал дежурит круглосуточно, что обеспечивает мгновенную реакцию на ухудшение состояния: коррекцию инфузионной терапии, введение симптоматических препаратов, привлечение смежных специалистов при необходимости. Такая организация процесса исключает хаотичное назначение средств, предотвращает полипрагмазию и гарантирует, что каждый этап детоксикации проходит под строгим клиническим контролем. При необходимости применяются дополнительные методы очищения крови, включая плазмаферез, который эффективно помогает вывести стойкие токсины и метаболиты, не удаляемые стандартной инфузионной терапией.
Ознакомиться с деталями – быстрый вывод из запоя в стационаре
While checking different websites related to online growth tools and optimization resources, I found myself browsing through smart visibility tools since the layout appeared practical, modern, and much more user friendly compared to many overloaded platforms available online today – The pages responded quickly and the overall presentation gave a polished and reliable impression during browsing.
Many users report discovering surprisingly good deals while casually browsing different online stores without expecting much at first PriceSmart Gallery but end up returning because the value delivered is consistently above expectations – Quality to price ratio is insane, definitely coming back for more again
Такие условия позволяют начать лечение без задержек и обеспечить более мягкое восстановление. При этом помощь может предоставляться анонимно.
Получить больше информации – нарколог на дом вывод из запоя в санкт-петербурге
Выезд нарколога начинается с осмотра пациента. Доктора измеряют давление, пульс, оценивают уровень сознания и выраженность симптомов. На основании этих данных формируется план лечения, который реализуется сразу на месте. Такой подход позволяет быстро перейти к стабилизации состояния без лишних этапов.
Выяснить больше – вывод из запоя на дому анонимно в санкт-петербурге
People who enjoy interior makeovers often look for inspiration that makes it easy to refresh bedrooms and living spaces into visually stunning areas with a professional touch Fresh Home Styling Hub – after applying their bedroom tips, my room completely changed and now looks like a magazine-worthy interior with a perfect balance of comfort and modern style
В таких ситуациях врач оценивает риски, определяет тактику лечения и при необходимости рекомендует дальнейшую госпитализацию. Однако во многих случаях помощь на дому оказывается достаточной для стабилизации состояния.
Изучить вопрос глубже – врач нарколог на дом в нижнем новгороде
Процедура капельницы от похмелья с контролем врача в Самаре начинается с первичной консультации, на которой врач осматривает пациента, измеряет его основные показатели (давление, пульс, температуру) и оценивает общее состояние. На основе этих данных выбирается оптимальный состав капельницы, которая может включать в себя различные компоненты, такие как солевые растворы, витамины, антиоксиданты и медикаменты для снятия симптомов похмелья.
Углубиться в тему – капельница от похмелья
While exploring online shopping hubs and curated marketplace platforms focused on reliable product discovery and everyday useful items, I came across Top Corner Finds Hub naturally placed within the content flow – This has become my go to spot now because I always manage to find something genuinely worth buying that fits both my needs and budget perfectly
black ops darknet https://sites.google.com/view/nexusdarknetmarket
discoverpossibility – Interesting platform offering creative ideas and practical resources for everyday inspiration online.
Состояние пациента при интоксикации может развиваться по-разному: от умеренной слабости и головной боли до выраженной дезориентации, тахикардии и нарушений сна. В таких ситуациях важно не откладывать обращение за помощью. Наркологическая помощь на дому рассматривается, когда требуется быстрое вмешательство и контроль состояния без транспортировки пациента.
Детальнее – вызов наркологической помощи нижний новгород
вызов нарколога на дом москва недорого вызов нарколога на дом москва недорого
During a session of exploring brain development and self improvement websites, I found Mind Expansion Learning Hub naturally included in the article – Their articles feel like a brain gym workout every day, keeping my thoughts active, structured, and more open to learning new concepts
While exploring curated online articles about mindset improvement and cognitive reflection, I noticed how some pages subtly guide the reader toward new conclusions, and one such example included Perspective Change Hub in the middle of the content which made the entire experience feel more insightful and left me with a refreshed way of thinking about things I used to take for granted
Нарколог на дом в Нижнем Новгороде с быстрым приездом специалиста, детоксикацией и медицинской поддержкой в наркологической клинике «Частный медик 24»
Получить дополнительную информацию – запой нарколог на дом в нижнем новгороде
Алкогольная интоксикация оказывает серьёзное влияние на организм, вызывая головную боль, тошноту, слабость и головокружение. Капельница помогает организму быстро избавиться от продуктов распада алкоголя, восстановить нормальное функционирование органов и минимизировать последствия для здоровья. Важно, что мы обеспечиваем полное наблюдение врача на протяжении всей процедуры, что помогает гарантировать безопасность пациента и максимальную эффективность лечения.
Ознакомиться с деталями – https://kapelnicza-ot-pokhmelya-ekaterinburg-8.ru
Домашний формат помощи рассматривают тогда, когда человеку тяжело добраться до медицинского учреждения, состояние ухудшается после нескольких дней употребления спиртного или родственникам требуется очная оценка без промедления. После осмотра становится ясно, допустима ли помощь на дому, требуется ли капельница, можно ли ограничиться наблюдением в домашних условиях или нужен другой маршрут помощи. Вопрос о том, как вызвать специалиста, нередко возникает в ситуациях, когда состояние нарастает быстро и требуется решение без откладывания. Если подобные эпизоды повторяются, дальнейшее обсуждение может касаться не только текущего состояния, но и лечения алкоголизма, работы с зависимостью и более длительной программы восстановления.
Узнать больше – нарколог на дом вывод
During a casual search for personal development resources, I discovered modern self growth space – The platform provides motivational content with useful ideas and a strong personal development focus, making it simple, helpful, and enjoyable to browse.
I spent some time exploring different fashion seasonal websites before discovering modern season wardrobe – The collection displayed here felt stylish overall, and the website design was modern and visually appealing, making browsing smooth and enjoyable for visitors without clutter or confusion online.
During an online search for lifestyle ideas and inspiration platforms, I came across creative ideas hub – The website featured a variety of useful and fresh content, making navigation simple and enjoyable while exploring different lifestyle topics comfortably.
Users who prefer budget friendly shopping often search for sites that help them apply multiple discounts easily, making it possible to enjoy products while keeping costs low and manageable Budget Smart Deals Hub – I stacked coupons and saved forty dollars, and the feeling was so satisfying that it genuinely felt like I had won a mini lottery while shopping
For users searching for reliable shopping inspiration and practical household ideas, you can explore Everyday Value Hub which provides curated deals, budget friendly suggestions, and useful product ideas for daily living, helping shoppers make smarter choices without overspending on unnecessary items across multiple categories every day.
Как поясняет нарколог Дмитрий Кузнецов: “Реабилитация алкоголиков должна быть многогранной. Только при сочетании медицинских и психологических методов, а также поддержке со стороны специалистов на всех этапах лечения, можно добиться устойчивого результата. Психологическая работа с пациентом помогает ему не только преодолеть зависимость, но и восстановить нормальное функционирование в обществе.” Также стоит отметить, что в некоторых случаях помощь может быть предоставлена бесплатно, и пациент может получить доступ к данным о возможных вариантах бесплатной реабилитации, что значительно облегчает процесс выздоровления.
Получить дополнительную информацию – http://www.domen.ru
Непрерывный мониторинг витальных показателей — ключевое отличие стационарного формата, обеспечивающее безопасную детоксикацию. В палатах клиники «Элегия Мед» установлены системы отслеживания частоты пульса, сатурации, температуры и артериального давления, данные с которых автоматически передаются в электронную медицинскую карту. Медицинский персонал дежурит круглосуточно, что обеспечивает мгновенную реакцию на ухудшение состояния: коррекцию инфузионной терапии, введение симптоматических препаратов, привлечение смежных специалистов при необходимости. Такая организация процесса исключает хаотичное назначение средств, предотвращает полипрагмазию и гарантирует, что каждый этап детоксикации проходит под строгим клиническим контролем. При необходимости применяются дополнительные методы очищения крови, включая плазмаферез, который эффективно помогает вывести стойкие токсины и метаболиты, не удаляемые стандартной инфузионной терапией.
Выяснить больше – http://vyvod-iz-zapoya-v-staczionare-sankt-peterburg-18.ru
While exploring different online insight and perspective websites, I discovered new vision guide embedded within curated recommendations, and the website felt really clean overall since navigation worked perfectly across different sections without interruptions.
шумоизоляция автомобиля в Москве shumoizolyaciya-avtomobilya-v-moskve-1.ru
Shoppers who love quiet nighttime exploration often appreciate online stores that offer soothing visuals and dreamy product layouts Sleepy Star Cove Market – the atmosphere feels gentle and relaxing, making night owl shopping a calming experience that feels more like unwinding than browsing for items
People who enjoy economical travel experiences often depend on guides that simplify planning while still ensuring meaningful and memorable adventures across various destinations worldwide Explore Passion Savings Hub – these travel guides helped me create an amazing trip on a budget that felt stress free, well structured, and surprisingly full of rich experiences without overspending at any point
nexus url https://sites.google.com/view/nexusdarknetmarket
электрическая рулонная штора электрическая рулонная штора
Creative teams often improve dramatically when they use structured brainstorming platforms that encourage idea sharing and open collaboration among participants Idea Exchange Hub Our group sessions here actually produced my strongest project outcomes so far – Brainstorming sessions here led to my best work yet seriously
I had been checking various ecommerce platforms this week before eventually spending extra time on easy browse products because the store presentation appeared cleaner and the category organization felt noticeably easier for everyday browsing sessions online – The overall navigation stayed convenient and the browsing experience felt enjoyable without unnecessary confusion or distractions appearing everywhere.
Нарколог на дом в Москве — это формат медицинской помощи, который рассматривают при состояниях после употребления алкоголя, когда больному требуется осмотр врача без поездки в клинику. Чаще всего обращение связано с запоем, выраженным похмельным синдромом, бессонницей, тревогой, слабостью, тремором, обезвоживанием, скачками давления, сердцебиением и общим ухудшением самочувствия. Дальнейшая тактика зависит от состояния больного на момент осмотра, продолжительности употребления алкоголя и сопутствующих заболеваний.
Исследовать вопрос подробнее – narkolog-na-dom-moskva-17.ru/
During a relaxed browsing session through curated online marketplaces and discovery stores offering diverse and interesting items, I found Shop Day Adventure Network embedded within the article section – I lost track of time browsing, as there were so many cool things to see that made the whole experience feel fun and endlessly engaging
В данном материале представлены ключевые тенденции в сфере медицинской науки и практики. Вы узнаете о последних открытиях, инновационных подходах к терапии и важности профилактики заболеваний. Особое внимание уделено практическому применению новых методов в клинической практике.
Детальнее – вывод из запоя вызов на дом
During my browsing of fashion inspiration websites and trend platforms, I found stylish outfit hub included in a curated paragraph, and the website felt stylish as browsing sections remained smooth and visually appealing with easy navigation across multiple categories.
наркологический стационар в санкт петербурге наркологический стационар в санкт петербурге
срочный вызов нарколога на дом срочный вызов нарколога на дом
dark markets https://sites.google.com/view/nexusmarketdarknet
While searching for self improvement and motivational online platforms, I discovered success mindset space – The website had a clean interface and motivating content, making browsing enjoyable and encouraging repeated visits for inspiration and helpful goal setting ideas.
888starz official website https://888starz-uz2.org/ .
While thinking about how often I postpone things that matter most to me, I finally admitted that I needed to take immediate action instead of waiting, Focus Reset Studio helped me realign my priorities – and today I broke the pattern and started moving forward with confidence and relief
рулонные шторы на створку https://avtomaticheskie-rulonnye-shtory5.ru
While exploring online shopping sites and deal platforms for everyday products, I discovered Easy Buy Network placed within the content structure – Every purchase has been smooth, no complaints so far yet, and it has made the entire process of buying online feel effortless and well organized
During an online browsing session for minimalist ecommerce sites, I found modern shopping favorite guide – The platform delivers a nice store experience with simple design and useful products today, making navigation simple, clear, and easy to follow throughout.
People who like fun online deals often explore mystery boxes that combine affordability with surprise, making each order feel like a little adventure in shopping Fun Deals Hub – I ordered the mystery box and it was surprisingly good, giving me items that I didn’t expect but ended up really liking a lot
888starz казино 888starz казино .
toyota сервис toyota сервис
silk road market link https://sites.google.com/view/nexusdarknetlink
darkmarket 2026 https://sites.google.com/view/nexusdarknetmarket
I spent the evening exploring trend discovery platforms before discovering exclusive trend hub – The website felt clean and intuitive, and the latest trends were easy to browse because everything was structured clearly without clutter or overwhelming design elements online.
Individuals looking for career transformation often search for real experiences that show how freelancing can lead to more flexible and self directed working lifestyles New Life Work Hub – I quit my old job and started freelancing, and this site inspired me to take the leap into a more independent and self managed career path
For individuals who want to improve focus and create better habits, the resource progress mindset guide offers motivational insights and practical tips – helping users develop consistency and resilience while working toward meaningful personal development goals that enhance both productivity and overall life satisfaction over time.
Такие состояния требуют не только лечения, но и наблюдения, поскольку динамика может меняться в течение короткого времени. Стационар позволяет минимизировать риски и обеспечить безопасность пациента. При этом услуга может предоставляться анонимно, а цена лечения зависит от состояния пациента.
Изучить вопрос глубже – вывод из запоя цена в нижнем новгороде
black ops darknet market https://sites.google.com/view/nexus-market-link
While looking through various curated shopping platforms I discovered a sweet themed store that felt both stylish and comforting in its presentation caramel cozy shop and I spent time exploring different items – It felt welcoming calm and gently delightful like browsing a peaceful collection of dessert inspired designs
People looking to improve digital skills often turn to online workshops where structured guidance helps them learn practical tools quickly and efficiently without feeling overwhelmed by technical complexity Skill Connect Studio I joined a workshop last week and surprisingly learned Photoshop basics much faster than I expected, making the whole experience feel really rewarding – Joined a workshop last week, learned photoshop basics super fast
During a session of exploring collaborative online networks and social engagement platforms, I noticed Growth Share Community Network integrated into the article – Met wonderful people here, and the community feels genuine and supportive, offering a refreshing break from typical online spaces that often feel impersonal or disconnected
Shoppers looking for convenient online experiences often described smooth navigation while checking multiple categories and offers across the website interface before completing their browsing session budget shopping guide while exploring various product collections and discount pages – many noted that the layout felt clean, structured, and fast loading throughout their visit overall.
Такие состояния требуют не только лечения, но и наблюдения, поскольку динамика может меняться в течение короткого времени. Стационар позволяет минимизировать риски и обеспечить безопасность пациента. При этом услуга может предоставляться анонимно, а цена лечения зависит от состояния пациента.
Изучить вопрос глубже – вывод из запоя на дому цена нижний новгород
While reviewing online marketing platforms and browsing through available resources, I eventually explored simple ranking center because the sections looked thoughtfully organized and the information felt more accessible than on many complicated websites online – The platform gave a reliable impression and the modern design kept browsing easy and enjoyable during my visit.
While browsing online marketplaces and curated product trend platforms, I discovered featured style guide – The website had a clean and organized layout, and the navigation felt very smooth, making it easy to explore the collection and enjoy a comfortable browsing experience throughout.
During exploration of lifestyle growth and inspiration websites, I came across New Horizons Inspiration Hub embedded within the article flow – Found hobbies I never considered, and now life feels richer, more interesting, and filled with new personal interests that make each day better
nexus darkweb url https://sites.google.com/view/nexusdarknetmarket
During an online search for fashion inspiration and style marketplaces, I discovered daily style shopping space – The platform offers modern styling ideas and smooth shopping experience for visitors online, making navigation simple, clean, and pleasant across all sections.
While searching through online gift guide platforms, I discovered Perfect Gift Match Page included in curated listings – Really liked this platform today, where pages opened fast and everything felt thoughtfully designed throughout with simple layout and intuitive navigation experience.
During a casual exploration of home styling platforms, I came across smart living decor hub – The platform offered stylish ideas and an easy navigation system, making the browsing experience smooth, enjoyable, and easy to follow across all sections.
Реализация данных задач позволяет наркологу на дом в Ростове-на-Дону оказывать помощь в контролируемом и безопасном формате.
Получить больше информации – нарколог на дом ростов-на-дону
People who enjoy routine optimization often test different morning setups to find what works best, leading to stronger productivity and better time management skills Routine Upgrade Hub – I changed my morning routine recently and I feel more productive already, like I’ve finally built a system that supports my goals properly
After reviewing various websites related to innovation and useful online resources, I discovered creative insight portal included in a recommendation list, and the platform offered several interesting details while maintaining a simple and enjoyable browsing experience throughout the visit.
Этот текст представляет собой обзор свежих данных и исследований в области медицины. Он призван помочь читателям понять, как научные достижения влияют на лечение, диагностику и общее состояние системы здравоохранения.
Как достичь результата? – наркологическая клиника ростов
Этот документ охватывает важные аспекты медицинской науки, сосредотачиваясь на ключевых вопросах, касающихся здоровья населения. Мы рассматриваем свежие исследования, клинические рекомендации и лучшие практики, которые помогут улучшить качество лечения и профилактики заболеваний. Читатели получат возможность углубиться в различные медицинские дисциплины.
Получить дополнительную информацию – https://narcology.clinic/
People who enjoy practical shopping often prefer websites that keep things simple and focus on delivering real savings instead of overwhelming users with unnecessary marketing content Direct Value Shopping Hub – no fluff involved, just good deals that perfectly matched my needs at this moment, making the entire experience smooth, quick, and very easy to navigate
Earlier today I was checking different discovery platforms before opening smart interest hub – The website felt clean and user friendly, and browsing was smooth because categories were clearly organized and easy to follow without unnecessary distractions or complex navigation structures online.
nexus site official link https://sites.google.com/view/nexusmarketdarknet
Статья посвящена анализу текущих трендов в медицине и их влиянию на жизнь людей. Мы рассмотрим новые технологии, методы лечения и значение профилактики в обеспечении долголетия и здоровья.
Получить дополнительные сведения – https://anapa.stop-alko.com/
В статье рассматриваются различные стратегии борьбы с зависимостями, включая проверенные методы и реальные истории успеха. Читатель узнает, какие подходы наиболее эффективны и как начать путь к выздоровлению.
Узнать больше > – Кодировка алкоголиков
рулонные шторы на окно в кухне https://rulonnye-shtory-s-elektroprivodom17.ru
Many online shoppers who value consistency and ease of use often look for platforms that provide dependable service and simple navigation, and one commonly referenced example is Favorite Shop Access Point – presenting a smooth browsing experience where users can explore various everyday products with confidence while enjoying reliable checkout flow and a generally straightforward shopping environment throughout their visit.
Эта статья освещает различные аспекты освобождения от зависимости и пути к выздоровлению. Мы обсуждаем важность осознания своей проблемы и обращения за помощью. Читатели получат практические советы о том, как преодолевать трудности и строить новую жизнь без зависимости.
ТОП-5 причин узнать больше – кодирование от алкоголизма в ростове на дону
Мы рассмотрим современные вызовы здравоохранения и пути их решения с помощью технологий и научных исследований. В статье собраны данные о новых лекарствах, методах диагностики и системном подходе к улучшению здоровья населения.
Наши рекомендации — тут – алкоголизм принудительно цена
During a casual session of exploring online discount marketplaces and bargain shopping websites, I found Smart Deal Finder Network embedded within the article section – Steals everywhere, wallet is happy and so am I, since the savings here genuinely make a noticeable difference every time I shop for everyday items and special purchases alike
I spent time browsing various online catalogs today before discovering reliable petal corner store, and I enjoyed really smooth browsing, with categories appearing organized and a website that felt genuinely user friendly throughout the visit.
People often underestimate how much mindset influences mood, especially when it comes to starting the day early in the morning Mindset Refresh Space I used to hate mornings, but now I wake up feeling positive and ready to take on whatever comes – Used to hate mornings, now I wake up excited somehow
ремонт тойота в москве ремонт тойота в москве
электрические рулонные шторы на окна электрические рулонные шторы на окна
cocorico darknet https://sites.google.com/view/nexusdarknetmarket
Individuals who enjoy the combination of stone textures and flowing design concepts often seek out unique decor marketplaces with cohesive natural themes Stone & Stream Emporium – the collection merges rugged and smooth aesthetics, producing a refreshing blend that elevates home interiors with subtle elegance.
Лечение алкоголизма в Сергиевом Посаде важно рассматривать не как разовую «чистку» или временный перерыв, а как последовательный маршрут. Самый уязвимый период — первые 24–72 часа после прекращения употребления: днём может стать легче, но к вечеру и ночью волной возвращаются тревога и бессонница, усиливается внутреннее напряжение, появляются телесные симптомы. В этот момент человек чаще всего срывается, потому что ему кажется, что «иначе не выдержу». Поэтому качественная помощь строится так, чтобы пациент прошёл вечер и ночь безопасно, с понятными ориентирами и медицинской поддержкой, а затем перешёл к восстановлению и профилактике рецидива.
Получить дополнительные сведения – клиника лечения алкоголизма цена
After analyzing multiple productivity and goal-setting platforms online, I found a webpage that naturally positioned Rapid growth portal inside its informational layout, and it contributed to a smooth, readable, and well-paced experience throughout different sections of the site
I recently explored different online stores with cluttered interfaces before eventually reaching organized buying options where the products looked neatly displayed and the navigation felt simpler than expected online today – The website appeared carefully maintained throughout and the overall browsing atmosphere made another visit feel likely in the future.
During an online search for informational and discovery platforms, I discovered creative explore guide – The website provides engaging content and easy browsing flow, making it simple, smooth, and enjoyable to navigate across all pages.
While exploring online wellness and self awareness platforms, I discovered Every Moment Gratitude Hub embedded within the content flow – Makes me appreciate small things, mindset shift is real, and it has noticeably changed how I perceive even the simplest parts of my daily routine in a more positive way
People who prioritize honest shopping experiences often look for platforms that avoid artificial price inflation, focusing instead on real worth and transparent deals Real Value Hub – The name definitely checks out, it feels like pure value with no markup tricks or games, just simple pricing that actually makes sense
torzon darkweb link https://sites.google.com/view/nexus-market-url
darknet drugs https://sites.google.com/view/nexusmarketplace
During an online browsing session for simple living platforms, I found calm simplicity space – The content was organized nicely and the website felt comfortable to browse, making the experience smooth and easy throughout the visit.
I spent part of today reviewing different online stores and eventually landed on recommended orchard marketplace, and the browsing experience felt really pleasant, with products carefully arranged and easy to access throughout the entire visit.
People who enjoy sophisticated yet simple fashion often look for brands that focus on quiet elegance and wearable luxury in everyday pieces Classy Finds Modern Luxe Hub – each product reflects understated luxury, giving a refined and calm aesthetic that enhances style without overwhelming it, perfect for those who value subtle fashion expression
Для жителей Екатеринбурга наркологическая клиника «Частный медик 24» предлагает услуги выезда нарколога на дом для проведения капельницы от похмелья. Это удобный и эффективный способ лечения, особенно если пациент испытывает тяжёлые симптомы похмелья и не может поехать в клинику. Выезд нарколога на дом позволяет начать лечение сразу, не тратя время на поездку и ожидания в клинике. Врач приезжает с необходимыми препаратами и оборудованием, проводит осмотр и назначает необходимую терапию.
Детальнее – капельница от похмелья екатеринбург
I spent some time comparing advice platforms before opening trusted decision guide – The website felt helpful overall, and the content appeared genuine and structured in a professional way, allowing readers to access information easily without clutter or confusion online.
In browsing future creation and innovation based websites, I discovered Future Builders Vision Hub featured within curated resources – The organization felt strong, and finding useful sections was quick and refreshingly simple with smooth navigation and a clean interface throughout today.
People who enjoy discovering new fashion trends online can explore diverse selections trendy outfit discovery hub curated apparel and accessories designed for modern everyday styling and seasonal fashion updates – the marketplace helps users stay current while building a more expressive and personalized wardrobe over time
darknet market links https://sites.google.com/view/nexusdarknetmarket
Эта публикация погружает вас в мир увлекательных фактов и удивительных открытий. Мы расскажем о ключевых событиях, которые изменили ход истории, и приоткроем завесу над научными достижениями, которые вдохновили миллионы. Узнайте, чему может научить нас прошлое и как применить эти знания в будущем.
Обратитесь за информацией – выведение из запоя в стационаре наркология
I spent time comparing several inspiration-driven communities earlier today, and somewhere in the middle of my research appeared helpful resource page, which stood out because the latest content updates loaded efficiently and the overall site interaction remained stable, responsive, and pleasant while moving through multiple sections online.
During exploration of curated lifestyle content platforms and trend update websites, I found Trendy Lifestyle Flow Network naturally included in the article – Keeps me updated on trends without feeling overwhelmed at all, and it gives me a steady stream of useful updates without information overload
During a search for modern inspiration websites and organized browsing destinations, I visited special motivation gallery – The platform looked thoughtfully designed, the categories were easy to browse, and the overall presentation style helped make exploring the available content feel more enjoyable and inspiring overall.
While shopping online for clothing items recently, I tested a store that had surprisingly smooth customer handling and flexible policies Style Hub Return Center and the overall experience felt trustworthy and convenient – I had to exchange a couple of outfits and the process was simple, quick, and completely hassle free without any complications at all during shipping or replacement.
1xbet 888 https://888starz-egypt6.com/
wethenorth market darknet https://sites.google.com/view/nexusmarketplace
While casually browsing digital shopping platforms this afternoon, I came across organized collective echo hub and found it a nice website overall, with products neatly displayed and pages opening quickly without any problems.
During an online browsing session focused on creative ideas, I came across modern ideas explorer – The platform offers unique items and creative ideas in a simple layout, making navigation simple, enjoyable, and easy for all visitors.
888 888 .
While checking different online retail trading hubs and supply chain focused platforms, I came across Creek Harbor Direct Trading Hub embedded within the content flow – The quality of goods here is quite good, and shipping was faster than expected, which made the experience feel smooth, reliable, and easy to recommend for everyday shopping needs
During my search for minimal aesthetic websites inspired by nature and open spaces I came across a peaceful online store that felt easy and calming to browse spring breeze outpost bazaar which I explored while appreciating its soft design and relaxed flow – The feeling resembled a gentle spring wind moving across wide tranquil fields
People who enjoy discovering unique tech often look for platforms that showcase innovative gadgets and unexpected tools that make daily life easier, more fun, and more efficient in ways they never considered before Hidden Gadget Finds Hub – I found a gadget I didn’t even know existed before, and now I genuinely can’t imagine my routine without it because it has become so useful in everyday life
тойота сервис в москве тойота сервис в москве
рулонные шторы на балконные окна https://rulonnye-shtory-s-elektroprivodom17.ru
Users exploring informational websites frequently mention how helpful it is when content is divided into clear sections that improve readability concept discovery network making it easier to navigate through different ideas while ensuring the overall experience remains smooth, efficient, and naturally intuitive for everyday users online.
Когда следует немедленно обращаться за помощью:
Углубиться в тему – https://narcolog-na-dom-novokuznetsk0.ru/
While comparing several ecommerce stores, I found a platform that emphasizes speed and clarity in design, and MysticGoods meadow store provides a smooth browsing experience overall – The interface is clean, content loads quickly, and users can explore products without interruptions or unnecessary complexity affecting navigation flow.
During my search for practical online business resources and ecommerce websites, I eventually reached trusted web assistance where the layout looked balanced and the sections appeared easier to navigate than several competing platforms online currently – Helpful information was spread naturally throughout the site while the browsing experience felt stable and easy to follow overall.
happyhomefinds.click – Great platform for home hunting, very smooth browsing experience today.
оборудование для лекционных аудиторий https://i-tec.ru/osnaschenie_lekcionnih_zalov.html
оборудование конференц залов https://media-garage.ru/moya-kollekciya/oborudovanie-konferenc-zalov-v-moskve
вызов нарколога на дом москва цены вызов нарколога на дом москва цены
врач нарколог выезд на дом врач нарколог выезд на дом
вызов капельницы на дом вызов капельницы на дом
darknet markets https://sites.google.com/view/nexusdarknetlink
starz 888 bet https://888starz-egypt3.com/
During an online exploration of fashion style and trend websites, I found elegant design hub – The platform had a clean and stylish presentation with helpful information, making the browsing experience visually pleasing, smooth, and easy to follow throughout the visit.
I spent some time exploring different online stores before discovering unique trend shop – The shopping experience felt very nice today, and products were displayed clearly and attractively throughout the website, making browsing smooth and enjoyable overall without confusion or clutter online.
Состояние после длительного употребления алкоголя или наркотических веществ сопровождается комплексом симптомов: обезвоживание, нарушение работы сердечно-сосудистой системы, тревожность, бессонница, слабость. В таких случаях важно не откладывать помощь, поскольку самостоятельное восстановление организма может быть затруднено. Наркологическая помощь на дому позволяет быстро стабилизировать показатели и начать контролируемое лечение.
Изучить вопрос глубже – нарколог на дом вывод
Individuals starting their journey in website creation often appreciate platforms that make learning feel achievable and rewarding from the very beginning Build Your First Web Hub – I built my first website with their resources and felt super accomplished today, as it proved I could take a simple idea and turn it into something real and functional
купить шторы жалюзи https://avtomaticheskie-rulonnye-shtory5.ru
Такой подход позволяет наркологической клинике в Ростове-на-Дону выстраивать лечение в безопасных и психологически комфортных условиях.
Узнать больше – наркологические клиники алкоголизм
Капельница от похмелья с контролем врача в Самаре представляет собой эффективную терапевтическую процедуру, позволяющую значительно улучшить самочувствие пациента за короткий срок. Врач, контролируя весь процесс, может точно определить, какие компоненты необходимы для каждого пациента. Состав капельницы зависит от симптомов похмелья, состояния пациента и его индивидуальных потребностей. Это позволяет обеспечить максимально безопасное и эффективное лечение, которое помогает организму быстро восстановиться.
Ознакомиться с деталями – https://kapelnicza-ot-pokhmelya-samara-13.ru
Вывод из запоя в стационаре — это медицинская помощь, при которой лечение проводится в условиях постоянного врачебного контроля и поэтапной стабилизации состояния. Такой формат применяется, когда состояние пациента требует наблюдения и быстрого реагирования на изменения. В наркологической клинике «Частный медик 24» в Нижнем Новгороде лечение выстраивается на основе клинической оценки и последовательного подхода: каждый этап направлен на достижение конкретного результата без избыточной нагрузки на организм.
Получить дополнительные сведения – вывод из запоя нижний новгород
cocorico darknet link https://sites.google.com/view/nexusmarketdarknet
алкогольная капельница на дому алкогольная капельница на дому
Круглосуточный режим работы в клинике «Чистый Баланс» обусловлен особенностями течения зависимостей, при которых острые состояния нередко развиваются внезапно. Нарколог на дом в Ростове-на-Дону обеспечивает возможность оперативной диагностики и начала лечения без временных ограничений. Клиническая практика подтверждает, что своевременное вмешательство на дому позволяет стабилизировать состояние пациента и предотвратить развитие тяжёлых последствий.
Получить дополнительные сведения – http://
Алкогольная зависимость сопровождается не только физическими, но и глубокими психоэмоциональными проблемами. Психотерапевтическая помощь играет важную роль в лечении, помогая пациенту осознать причины зависимости и разработать стратегии для предотвращения рецидивов.
Ознакомиться с деталями – https://narcolog-na-dom-ufa0.ru/narkolog-na-dom-kruglosutochno-ufa
During a casual session of skill development research and learning platform exploration, I came across Knowledge Learn Achieve Network embedded within the article structure – Learned something new today, already applying it to work, and it has already helped me become more confident in handling complex tasks at work
Выезд нарколога начинается с осмотра пациента. Доктора измеряют давление, пульс, оценивают уровень сознания и выраженность симптомов. На основании этих данных формируется план лечения, который реализуется сразу на месте. Такой подход позволяет быстро перейти к стабилизации состояния без лишних этапов.
Узнать больше – нарколог на дом вывод из запоя
While exploring online creative idea and resource platforms, I came across smart creative resource hub – The website shared inspiring creative ideas and useful resources that made browsing smooth, engaging, and enjoyable for regular online visitors.
While analyzing various ecommerce experiences, I noticed a platform that feels intuitive and modern, and Emporium Frostlane storehouse provides a smooth browsing experience overall – The layout is minimal, navigation is simple, and users can browse products without confusion or unnecessary complexity.
Many users rely on discovery sites to find podcasts that are not mainstream but still incredibly engaging and enjoyable to listen to daily New Media Explorer I discovered a podcast I’m now fully hooked on and I listen to it constantly – Discovered a podcast I’m obsessed with, thanks for the recommendation
While browsing earthy lifestyle platforms and cozy inspired online shops, I found Stone Cozy Caramel Hub placed within the content section – The vibe is cozy all around, reminding me of peaceful mountain retreats, and it gives a soft comforting feeling that feels naturally calming and easy to enjoy
Постановка капельницы от запоя специалистами клиники «Пульс» в Воронеже обеспечивает пациентам оперативную помощь и быстрое облегчение состояния благодаря экстренному выезду врача на дом. Наши услуги доступны круглосуточно, включая ночное время и праздничные дни, что особенно важно при внезапных и критических ситуациях. Мы гарантируем полную конфиденциальность и защиту персональных данных пациентов, что позволяет получить необходимую помощь без риска огласки. Индивидуальный подход к каждому случаю обеспечивает максимальную эффективность лечения, а наши опытные наркологи используют только сертифицированные препараты, которые безопасно и быстро выводят токсины и стабилизируют состояние здоровья. Прозрачность ценообразования, предварительное согласование всех расходов и отсутствие скрытых доплат делают услуги клиники «Пульс» удобными и доступными для всех жителей Воронежа.
Подробнее тут – http://kapelnica-ot-zapoya-krasnodar7.ru
nexus onion https://sites.google.com/view/nexusdarknetlink
People who enjoy minimalist street outfits often look for hoodies that provide strong warmth without loud designs, focusing instead on functionality and layering versatility during colder seasons Minimal Warm Hub – The hoodies are thick and warm and work great for winter layering looks, giving both comfort and a clean aesthetic for daily wear
Капельница от похмелья с контролем врача в Самаре представляет собой эффективную терапевтическую процедуру, позволяющую значительно улучшить самочувствие пациента за короткий срок. Врач, контролируя весь процесс, может точно определить, какие компоненты необходимы для каждого пациента. Состав капельницы зависит от симптомов похмелья, состояния пациента и его индивидуальных потребностей. Это позволяет обеспечить максимально безопасное и эффективное лечение, которое помогает организму быстро восстановиться.
Подробнее – капельница от похмелья самара
Shoppers drawn to subtle luxury and timeless elegance often look for collections that enhance personality without excessive cost, and they frequently come across Royal Aura Boutique – it provides a refreshing sense of confidence and style that transforms simple outfits into statement looks effortlessly.
While browsing multiple online education and knowledge-sharing platforms, I noticed learning resource corner placed in the middle of a suggestion list, and the website felt informative because visitors could easily access useful materials without distractions across smooth navigation paths.
During my online browsing session today, I checked multiple platforms before landing on useful fern echo shop, and I enjoyed checking this platform, where everything looked clean and navigation stayed very comfortable across all pages.
Your point of view caught my eye and was very interesting. Thanks. I have a question for you.
While reviewing inspiration-based lifestyle websites, I came across a platform that feels welcoming and visually appealing for readers, and Trendy Ideas Hub delivers smooth navigation overall – The interface is simple, ideas are easy to browse, and users can explore creative lifestyle topics without overwhelming design elements.
While checking various online stores for practical household products earlier today, I eventually explored recommended online items because the browsing structure looked balanced and the products appeared neatly organized for regular visitors online – I enjoyed the overall experience and every page opened smoothly without confusing glitches or unexpected delays throughout my session.
While searching through numerous online pages and digital catalogs today, I stopped to explore trusted online reference and noticed how organized the layout felt, allowing the browsing experience to remain smooth and comfortable without feeling cluttered.
Users exploring digital content platforms often appreciate when interfaces remain stable and easy to use, especially when visiting sites like gateway access system where pages stay responsive and browsing feels comfortable lately, supporting efficient interaction with content across devices.
тойота сервис тойота сервис
While exploring ecommerce catalogs, I came across a platform that feels responsive and well structured, and Mystic Meadow product hub delivers smooth performance overall – The website loads efficiently, navigation is simple, and users can move through sections easily while enjoying a clean and readable interface design.
While reviewing different online shopping resources and browsing websites, I discovered modern product hub – The platform had a clean and structured layout, and the information was presented clearly, making it easy to explore various sections without confusion or unnecessary distractions during browsing.
В Санкт-Петербурге вывод из запоя на дому рассматривается, когда состояние пациента позволяет проводить лечение вне стационара, но требует контроля специалиста. Врач оценивает общее состояние, длительность запоя и выраженность симптомов, после чего принимает решение о формате помощи при алкоголизме. Важно, что лечение начинается сразу после осмотра, без необходимости ожидания госпитализации. При необходимости можно заказать услуги на сайте клиники или получить консультацию специалистов.
Подробнее тут – http://vyvod-iz-zapoya-na-domu-sankt-peterburg-8.ru
darkmarkets https://sites.google.com/view/nexusmarketplace
drughub darknet https://sites.google.com/view/nexus-market-link
During an online exploration of helpful content resources, I came across smart essentials discovery space – The platform features practical information and an enjoyable browsing experience that is smooth, clear, and easy to access throughout all pages.
В данной статье рассматриваются физиологические и эмоциональные аспекты зависимости. Мы обсудим, как организм реагирует на зависимое поведение, и какие методы помогают восстановить здоровье и внутреннее равновесие.
Посмотреть подробности – врач нарколог вызов на дом
Shoppers interested in finding uncommon deals and ideas can use everyday uniqueness portal which showcases rare and creative items helping users explore diverse options across categories – making daily shopping more exciting by introducing distinctive products that are not typically available in standard stores online.
Users who enjoy artistic and creative browsing often look for websites that deliver constant inspiration without breaking the flow of discovery Creative Exploration Ideas Hub – endless scrolling feels surprisingly good here, filled with creativity that makes browsing enjoyable, immersive, and full of fresh inspiration at every moment of exploration
Такие состояния требуют не только лечения, но и наблюдения, поскольку динамика может меняться в течение короткого времени. Стационар позволяет минимизировать риски и обеспечить безопасность пациента. При этом услуга может предоставляться анонимно, а цена лечения зависит от состояния пациента.
Получить дополнительную информацию – вывод из запоя на дому цена
During an online browsing session focused on retail discovery platforms, I came across daily discovery shopping hub – The platform offers a great shopping experience with interesting finds and smooth navigation here, making the experience structured, simple, and smooth.
нарколог на дом в клинике москва нарколог на дом в клинике москва
рейтинг системных интеграторов https://media-garage.ru/moya-kollekciya/rejting-sistemnyh-multimedia-integratorov-goroda-moskvy
оснащение залов заседаний https://i-tec.ru/oborudovanie_zalov_zasedaniy.html
torzon darkweb url https://sites.google.com/view/nexusdarknetmarket
вызвать врача нарколога вызвать врача нарколога
поставить капельницу от алкоголизма поставить капельницу от алкоголизма
While exploring online motivation platforms and personal growth websites, I discovered Intent Creation Network embedded within the content flow – I manifested a small win today, this site helped me focus, and it made my daily planning feel more intentional and structured than before
People searching for calming interior inspirations and grounded lifestyle pieces often come across curated collections like Natural Earth Storefrontfernstonecollective.shop – A soothing earthy aesthetic is achieved here with thoughtful craftsmanship, and every item feels naturally durable, visually warm, and intentionally designed for everyday living spaces that need subtle organic charm.
DIY enthusiasts often enjoy simple hands-on projects that bring families together while teaching practical building skills and encouraging creativity in children through guided step by step instructions Creative Build Hub I built a birdhouse with my nephew using their DIY guide and it turned out better than expected – Built a birdhouse with my nephew using their diy guide
В клинике «Ресурс Трезвости» помощь строится по принципу маршрута. Сначала решают острые вопросы — интоксикация, абстиненция, нарушения сна, нестабильность давления и пульса, выраженная тревога. Затем — формируют план на 24–72 часа, потому что именно в первые дни чаще всего происходят повторные срывы: вечером усиливается тревога, ночь проходит без сна, и человек возвращается к алкоголю или веществам «чтобы отпустило». После стабилизации клиника помогает перейти к следующему этапу — лечению зависимости и профилактике рецидива, чтобы результат не ограничивался кратким облегчением.
Разобраться лучше – narkologicheskaya-klinika-orekhovo
People who want to improve delivery skills often rely on confidence techniques that reduce nervous energy and help them communicate more effectively in real situations Strong Delivery Hub – I completely nailed my presentation thanks to confidence tips from this site, and it helped me perform far better than I expected
Запой – это не просто пьянство, а состояние, когда организм становится зависимым от алкоголя. Накопление токсинов приводит к сбоям в работе органов и ослаблению защиты организма. Самостоятельный выход из запоя может быть опасен и только усугубить состояние. Мы предлагаем лечение запоя на дому, чтобы избежать больницы и создать комфорт. Наши специалисты быстро приедут к вам и окажут всю необходимую помощь круглосуточно. Запой приводит к серьезным проблемам со здоровьем, ухудшает качество жизни и угрожает жизни. Очень важно вовремя обратиться за помощью, чтобы избежать необратимых последствий.
Подробнее – http://vyvod-iz-zapoya-krasnoyarsk0.ru/vyvod-iz-zapoya-na-domu-krasnoyarsk
Запой может быть не только физически тяжёлым, но и психологически разрушительным. Поэтому важно вовремя обратиться за помощью. Вывод из запоя в Нижнем Новгороде — это необходимая медицинская процедура, которая помогает победить алкогольную зависимость и восстановить здоровье. Мы в клинике «АнтиЗависимость» предлагаем круглосуточную помощь в комфортных условиях — на дому или в стационаре.
Получить больше информации – https://narcolog-na-dom-novokuznetsk0.ru/narkolog-lechenie-na-domu-novokuzneczk/
Реабилитация включает несколько ключевых этапов, каждый из которых направлен на решение определённых проблем пациента. Важно, чтобы все этапы были комплексными и последовательными, чтобы достичь наиболее эффективного результата.
Изучить вопрос глубже – реабилитация алкоголиков в москве
People who spend long hours moving between indoor and outdoor environments often seek apparel that remains comfortable, breathable, and dependable throughout the day Cottonstone Outdoor Apparel Cottonstone Outdoor Apparel – it consistently provides a balanced feel that adapts well to changing conditions, making it suitable for both light activity and relaxed downtime.
сколько стоит капельницы на дому сколько стоит капельницы на дому
рольшторы с электроприводом рольшторы с электроприводом
darknet sites https://sites.google.com/view/nexusmarketplace
During comparison of fashion tip websites focused on personal improvement, I noticed a platform that feels helpful and structured, and Style Enhancement Hub provides a smooth browsing experience overall – The advice is easy to follow, making personal style development more accessible for everyday users.
рулонные шторы на створку https://avtomaticheskie-rulonnye-shtory5.ru
Нарколог устанавливает внутривенную капельницу, через которую вводятся растворы, обеспечивающие быстрое выведение токсинов, восстановление водно-электролитного баланса и стабилизацию состояния.
Исследовать вопрос подробнее – нарколог на дом недорого в воронеже
While searching for modern product outlets, I eventually came across daily smart shop – The website looked clean and well presented, and everything felt updated and simple, allowing easy discovery of useful products without unnecessary distractions or complicated navigation online.
While checking various online shopping and discount platforms, I noticed better deals network placed within curated content, and the browsing experience felt impressive because categories appear well organized and easy to navigate throughout the website.
Earlier today I browsed through multiple internet stores before landing on featured echo grove site, and I appreciated the helpful layout, where information appeared detailed enough and browsing stayed simple throughout the session.
После оформления вызова нарколог приезжает к пациенту и проводит комплексную оценку состояния. Врач измеряет давление, частоту пульса, оценивает уровень сознания и выраженность симптомов. На основании полученных данных формируется план лечения, который реализуется сразу на месте.
Ознакомиться с деталями – нарколог на дом анонимно в нижнем новгороде
Fashion enthusiasts who want to avoid boring trends often look for shops that focus on creative clothing and modern designs that feel refreshing and original Fresh Style Wear Hub – I finally found something that stands apart from the usual boring fashion, and it makes my wardrobe feel more confident and unique in every setting
مراهنات 888 https://888starz-egypt6.com/
During my search through online shopping outlets and product platforms, I came across value choice store included in a recommendation block, and the browsing experience felt enjoyable since the pages appeared organized and comfortable for browsing products without unnecessary complexity.
888stazr https://888starz-egypt3.com/
К основным показаниям относятся:
Получить дополнительную информацию – вывод из запоя в стационаре нижний новгород
Процесс лечения капельницей помогает улучшить состояние пациента уже через короткий период. Важно, что процедура не только снимает симптомы похмелья, но и восстанавливает нормальную работу печени, почек и других органов, пострадавших от токсического воздействия алкоголя. Это помогает предотвратить долгосрочные последствия интоксикации, такие как хроническая усталость, проблемы с органами и психоэмоциональные расстройства.
Подробнее тут – капельница от похмелья анонимно
While reviewing online marketplaces, I came across a platform that feels simple and structured, and Urban Petal product showcase delivers smooth browsing experience overall – The interface is clean, items are well organized, and users can easily find products without unnecessary complexity or distractions.
Современные методы лечения при выводе из запоя включают как медикаментозную детоксикацию, так и психологическую реабилитацию. В Уфе наркологи используют капельничное введение лекарственных средств, которые помогают быстро вывести токсины, нормализовать обмен веществ и стабилизировать работу внутренних органов. Одновременно с этим проводится психологическая поддержка для снижения эмоционального стресса, связанного с запоем.
Детальнее – вызов нарколога на дом цена уфа
pixelharvest – Great looking website design here, information feels updated and naturally well presented.
During a casual browsing session for discount websites, I found daily deal space – The platform provided useful offers with clear presentation and easy browsing, making the experience simple, organized, and enjoyable across all pages.
While analyzing ecommerce websites, I noticed a platform that feels clean and easy to use, and FrostCollective Meadow store provides a smooth browsing experience overall – Everything is structured logically, pages load quickly, and users can browse comfortably without unnecessary complexity affecting readability.
During a session of exploring innovation focused blogs and creative development tools, I found Creative Build Inspiration Network naturally included in the article – Got my creative juices flowing, and I built something I’m proud of, and it gave me a refreshing sense of accomplishment from making something new
Modern creators often seek online resources that blend inspiration with practical techniques for idea development, especially platforms like Inspiration Flow Portal – designed to support continuous creativity encourage experimentation and improve the way individuals generate and refine concepts over time effectively daily practice consistently
People who enjoy self reflection often look for simple habits that help them slow down and notice positive parts of daily life, especially through writing small thoughts and experiences that build emotional clarity over time Moments Journal Hub – I started journaling again recently and capturing small wins has genuinely started to feel meaningful and grounding in a way I didn’t expect
wethenorth link https://sites.google.com/view/nexus-market-link
оборудование для залов заседаний https://media-garage.ru/moya-kollekciya/kak-osnastit-zal-zasedanij-ili-zal-soveshchanij
Игнорирование этих симптомов может привести к тяжелым последствиям для здоровья, включая алкогольный психоз и повреждение внутренних органов.
Получить дополнительную информацию – капельница от запоя на дому круглосуточно
During a session of exploring stress relief platforms and mindfulness inspired websites, I noticed Calm Cove Ease Network integrated into the article – Relaxing brand overall, perfect for unwinding after long days, and it helps set a tone of comfort that makes relaxation feel simple and natural
While browsing various self improvement and inspirational resources online, I came across daily growth network – The website felt organized and motivating, with useful ideas that are easy to apply and help build a consistent routine for personal improvement and positive daily action.
врача капельницу от запоя врача капельницу от запоя
нарколог на дом цена москва врач выезд нарколог на дом цена москва врач выезд
People moving into modern apartments often want quick design upgrades that still feel stylish, and they come across Urban Minimal Home Shop curated furniture ideas that emphasize balance – the sleek concepts made my apartment look far more structured, mature, and visually appealing in a way that finally feels grown up.
While searching for online motivation and success platforms, I discovered a href=”//startsomethingawesome.click/](https://startsomethingawesome.click/)” />smart inspiration hub – The website featured a motivating feel with smooth performance across all pages, making browsing easy, fast, and enjoyable throughout the session.
нарколог на дом москва цены нарколог на дом москва цены
dark market 2026 https://sites.google.com/view/nexusdarknetmarket
оснащение залов заседаний https://i-tec.ru/oborudovanie_zalov_zasedaniy.html
В таких ситуациях врач оценивает риски, определяет тактику лечения и при необходимости рекомендует дальнейшую госпитализацию. Однако во многих случаях помощь на дому оказывается достаточной для стабилизации состояния.
Выяснить больше – нарколог на дом цена нижний новгород
Many users looking for personal development resources often explore curated platforms where guidance feels structured and practical, and then they discover Shapeyourdreams Guide which provides helpful direction for lifestyle improvement and self planning – Helpful information is presented in a way that feels clear, updated, and genuinely useful for ongoing personal growth journeys.
During my review of style focused discount websites, I came across a website that feels calm and easy to navigate for bargain hunters, and Fashion Discount center provides a smooth browsing experience overall – The design is clean, categories are arranged logically, and shoppers can discover appealing fashion items without visual confusion.
I had been navigating through several websites this morning looking for reliable information when I discovered popular website listing, and the overall experience stood out because every page opened fast while the design looked consistently polished and carefully maintained from start to finish.
вызвать капельницу на дом вызвать капельницу на дом
После поступления звонка специалисты нашей клиники оперативно выезжают по адресу пациента в Новосибирске. Врач начинает работу с детальной диагностики: измеряет пульс, артериальное давление, сатурацию (уровень кислорода в крови), оценивает состояние нервной и сердечно-сосудистой систем, уточняет наличие хронических заболеваний, аллергических реакций, длительность и тяжесть запоя.
Углубиться в тему – вывод из запоя в стационаре в новосибирске
I spent part of the afternoon exploring learning platforms before finding simple knowledge share – The website structure felt clean and easy to use, and the content shared today was interesting, allowing smooth browsing without clutter or distracting design elements online.
Users who like maximizing their purchasing power often look for stores that provide strong value propositions and help them save money without reducing product quality Budget Value Shopping Hub – the feeling of getting more value per dollar spent has made shopping stress free, and my budget feels far more balanced than before
Снятие симптомов даёт человеку окно трезвости, но не устраняет причины повторения. Если после стабилизации пациент возвращается в прежний режим — недосып, перегруз, конфликтность, прежнее окружение — вероятность рецидива остаётся высокой. Поэтому в клинике важно работать с тягой и триггерами, восстанавливать сон и эмоциональную устойчивость, формировать понятный план действий на уязвимые часы и дни. Чем конкретнее этот план, тем меньше вероятность импульсивного решения «выпить/употребить для облегчения».
Ознакомиться с деталями – http://www.domen.ru
прокапаться от алкоголя цены прокапаться от алкоголя цены
Эта статья предлагает уникальную подборку занимательных фактов и необычных историй, которые вы, возможно, не знали. Мы постараемся вдохновить ваше воображение и разнообразить ваш кругозор, погружая вас в мир, полный интересных открытий. Читайте и открывайте для себя новое!
Перейти к статье – выведение из запоя диспансер
капельница от запоя телефон капельница от запоя телефон
888 مراهنات https://888starz-egypt5.com/
вывод из запоя цены вывод из запоя цены
вывод из запоя на дому екатеринбург круглосуточно вывод из запоя на дому екатеринбург круглосуточно
служба вывода из запоя служба вывода из запоя
During browsing of entrepreneurial development resources and idea execution platforms, I found Quick Think Launch Hub integrated into the article section – Great mindset tips here, helped me launch my project quicker, and it gave me the confidence to act faster and trust my decision making process more
dark market url https://sites.google.com/view/nexusmarketdarknet
During a casual review of idea stimulation platforms and creative thinking blogs, I found Creative Inspiration Thought Hub naturally included in the article – Sharp ideas everywhere, exactly what my brain needed right now, and it helped me reconnect with my ability to think freely and generate new solutions without pressure
I spent time browsing various online catalogs today before discovering reliable echo harbor site, and the website feels polished, with categories clearly arranged and content reading naturally throughout the entire visit.
сервис тойота сервис тойота
польские букмекерские конторы польские букмекерские конторы
During an online browsing session for style and fashion updates, I discovered smart outfit inspiration hub – The platform provides trendy styles and useful updates for modern fashion lovers today, making browsing smooth, structured, and engaging overall.
Реабилитация алкоголиков невозможна без участия высококвалифицированных специалистов. Это врачи-наркологи, психологи, психотерапевты и социальные работники, каждый из которых вносит свой вклад в восстановление пациента. Психологическая поддержка особенно важна на всех этапах лечения, поскольку помогает пациенту осознать проблему, справиться с внутренними конфликтами и выработать стратегии для предотвращения рецидивов. В некоторых случаях, например, при длительном запое или наркомании, может быть рекомендован выезд на дом для предоставления первой медицинской помощи и дальнейшей реабилитации.
Изучить вопрос глубже – клиника реабилитации алкоголиков в москве
Помощь нарколога на дому в Мурманске обладает рядом неоспоримых преимуществ, которые делают данный метод лечения особенно актуальным:
Получить дополнительную информацию – срочный вывод из запоя
While reviewing ecommerce catalogs, I found a platform that feels structured and user friendly, and Urban Petal marketplace store delivers a smooth browsing experience overall – Everything is easy to understand, pages respond quickly, and users can navigate without clutter or unnecessary complexity in design.
После первичного осмотра начинается активная фаза детоксикации. Современные препараты вводятся капельничным методом для быстрого снижения уровня токсинов в крови и восстановления обменных процессов. Этот этап критически важен для нормализации работы печени, почек и сердечно-сосудистой системы.
Углубиться в тему – вывод. из. запоя. владимир.
888strz https://888stars-uz.com/ .
cannaexpress darknet url https://sites.google.com/view/nexusdarknetmarket
Врач уточняет, как долго продолжается запой, какие симптомы наблюдаются и присутствуют ли сопутствующие заболевания. Тщательный сбор информации позволяет оперативно подобрать необходимые медикаменты и начать детоксикацию.
Ознакомиться с деталями – капельницу от запоя тюмень
оснащение конференц залов https://media-garage.ru/moya-kollekciya/oborudovanie-konferenc-zalov-v-moskve
In conversations about modern e-commerce experiences, users often refer to platforms that simplify the process of finding products, and one example is Instant Discovery Shopping Hub which is usually described as a smooth and engaging site that makes browsing categories and finding new items quick and enjoyable.
В этой статье рассматриваются способы преодоления зависимости и успешные истории людей, которые справились с этой проблемой. Мы обсудим важность поддержки со стороны близких и профессионалов, а также стратегии, которые могут помочь в процессе выздоровления. Научитесь первоочередным шагам к новой жизни.
Жми сюда — получишь ответ – balashiha.stop-alko.com
During a casual browsing session across productivity and self-improvement websites, I found clear thinking hub positioned inside a recommendation paragraph, and the site felt helpful as the content was clearly presented and remained easy for users to explore – The overall interface was smooth and uncomplicated throughout.
Users who enjoy being trend aware often look for online hubs that simplify the process of tracking new and popular ideas Trendy Choice Update Stream – it keeps me ahead of the curve naturally, and friends often ask where I get my constant stream of fresh style inspiration from every day
While checking various modern e-commerce platforms focused on premium yet affordable goods, I found Crown Cove Style Select Hub embedded within the content flow – The overall experience feels premium without high pricing, and it makes me confident about returning soon due to the clean presentation and smooth browsing flow
После диагностики начинается активная фаза медикаментозного вмешательства. Препараты вводятся капельничным методом, что способствует быстрому снижению уровня токсинов в крови, нормализации обменных процессов и стабилизации работы таких органов, как печень, почки и сердце.
Подробнее тут – вывод из запоя в стационаре мурманск
While browsing different digital resource platforms and online service websites earlier this week, I eventually spent extra time on quality ranking guidance because the design looked cleaner and the navigation process felt easier than many competing websites online – The entire platform seemed user friendly and everything remained accessible and easy to explore throughout my visit.
Запой – это не просто пьянство, а состояние, когда организм становится зависимым от алкоголя. Накопление токсинов приводит к сбоям в работе органов и ослаблению защиты организма. Самостоятельный выход из запоя может быть опасен и только усугубить состояние. Мы предлагаем лечение запоя на дому, чтобы избежать больницы и создать комфорт. Наши специалисты быстро приедут к вам и окажут всю необходимую помощь круглосуточно. Запой приводит к серьезным проблемам со здоровьем, ухудшает качество жизни и угрожает жизни. Очень важно вовремя обратиться за помощью, чтобы избежать необратимых последствий.
Подробнее – вывод из запоя красноярск
капельница от запоя вызов капельница от запоя вызов
While checking various self-improvement and lifestyle websites online, I noticed fresh life hub placed within curated content, and the performance felt really smooth as sections opened quickly across all devices without interruptions.
The tone stayed consistent across the whole post which is harder than it looks for longer pieces, and a look at unlocknewpotential continued the same voice, this kind of editorial consistency is a sign of either a single careful writer or a tightly run team and either is impressive today across the broader media environment.
While exploring online motivational platforms, I found a website that feels simple and encouraging for personal growth, and Vision Matters Hub delivers a smooth browsing experience overall – The content promotes focus, self awareness, and consistent effort toward achieving meaningful goals in everyday life decisions.
darknet market lists https://sites.google.com/view/nexus-market-url
выезд нарколога выезд нарколога
While searching for informative and inspirational websites online, I discovered smart ideas corner – The platform presented engaging content in a well organized layout, making browsing smooth, easy, and enjoyable while exploring different sections of structured information.
В Нижнем Новгороде выезд нарколога на дом используется при состояниях, требующих оперативной медицинской оценки и начала терапии. Врач приезжает с необходимыми препаратами, проводит осмотр и формирует план лечения на месте. Такой формат позволяет сократить время до начала помощи и снизить нагрузку на пациента.
Подробнее – https://narkologicheskaya-pomoshh-nizhnij-novgorod-8.ru/
888 starz https://888starz-egypt3.com/
вызов нарколога на дом москва цены вызов нарколога на дом москва цены
While reviewing ecommerce websites for usability and design quality, I came across a platform that feels modern and responsive, and Frost Petal digital emporium offers a smooth browsing experience overall – Everything loads quickly, the layout is visually appealing, and users can explore products comfortably without unnecessary complexity.
капельница от алкоголя на дому капельница от алкоголя на дому
вывод из запоя цены вывод из запоя цены
cocorico url https://sites.google.com/view/nexusdarknetlink
While browsing outlet and clearance shopping websites, I found smart shopping selection hub – The platform delivers a clean outlet experience with good selection and simple navigation online, making browsing clear, structured, and simple.
During an online search for stylish browsing destinations and fashion inspiration resources, I found best style discovery – The website delivered a clean and visually pleasant design, organized sections that were simple to explore, and an overall browsing experience that felt relaxed and engaging from beginning to end.
цены на вывод из запоя на дому цены на вывод из запоя на дому
During exploration of online creativity blogs and modern thinking networks, I found Modern Vision Network embedded in the text flow – It delivers fresh modern takes on everything, exactly what I was seeking, and it provided me with a refreshing shift in perspective on topics I thought I already understood
itec https://i-tec.ru/
капельница от запоя самара капельница от запоя самара
сервисный центр тойота сервисный центр тойота
While reviewing different online shopping pages this afternoon, I visited organized petal works listing, and I found a great browsing experience, with fast-loading pages and products that appeared professionally structured throughout the platform.
прокапаться в самарае прокапаться в самарае
нарколог на дом вывод из запоя нарколог на дом вывод из запоя
People who like staying informed about style shifts often rely on curated hubs that bring together the most relevant modern updates Trendy Choice Radar Guide – it keeps me ahead of the curve effortlessly, and friends often ask how I always know what is becoming popular before it spreads widely
Капельница от похмелья с контролем врача в Самаре представляет собой эффективную терапевтическую процедуру, позволяющую значительно улучшить самочувствие пациента за короткий срок. Врач, контролируя весь процесс, может точно определить, какие компоненты необходимы для каждого пациента. Состав капельницы зависит от симптомов похмелья, состояния пациента и его индивидуальных потребностей. Это позволяет обеспечить максимально безопасное и эффективное лечение, которое помогает организму быстро восстановиться.
Исследовать вопрос подробнее – капельница от похмелья цена самара
Consumers who prefer structured shopping experiences often rely on online platforms that provide curated deal listings and price comparisons including Value Deal Hub – this service focuses on highlighting practical savings opportunities and helps users make informed choices while browsing products online daily effectively
cannaexpress onion https://sites.google.com/view/nexusmarketdarknet
darknet site https://sites.google.com/view/nexusmarketplace
топ букмекерских контор Польша топ букмекерских контор Польша
After reviewing several online marketplaces and catalogs today, I eventually found trusted amber oak store, and I enjoyed browsing here, with clean pages and no loading delays during the visit.
В практике круглосуточного лечения применяются следующие этапы:
Подробнее – анонимная наркологическая клиника
Непрерывный мониторинг витальных показателей — ключевое отличие стационарного формата, обеспечивающее безопасную детоксикацию. В палатах клиники «Элегия Мед» установлены системы отслеживания частоты пульса, сатурации, температуры и артериального давления, данные с которых автоматически передаются в электронную медицинскую карту. Медицинский персонал дежурит круглосуточно, что обеспечивает мгновенную реакцию на ухудшение состояния: коррекцию инфузионной терапии, введение симптоматических препаратов, привлечение смежных специалистов при необходимости. Такая организация процесса исключает хаотичное назначение средств, предотвращает полипрагмазию и гарантирует, что каждый этап детоксикации проходит под строгим клиническим контролем. При необходимости применяются дополнительные методы очищения крови, включая плазмаферез, который эффективно помогает вывести стойкие токсины и метаболиты, не удаляемые стандартной инфузионной терапией.
Разобраться лучше – наркология вывод из запоя в стационаре
While checking various online marketing platforms earlier this week, I eventually explored featured ranking system where the structure looked organized and the browsing process felt smoother than many competing websites online today – I was impressed with the clean presentation and the services appeared useful for everyday users.
While exploring various informational websites and evaluating their design quality and content flow, I discovered a page containing ClarityPath Explorer positioned within its text structure, resulting in a smooth reading experience with consistent formatting and well organized presentation.
I spent time browsing several online catalogs today before discovering reliable harbor commerce store, and I found it a helpful platform overall, where navigation worked smoothly and information appeared clear for visitors from start to finish.
While exploring online mindset and productivity resources, I found a platform that feels practical and visually organized for visitors interested in growth, and Success Journey hub delivers a smooth browsing experience overall – The platform is responsive, motivational ideas are highlighted effectively, and readers can focus on achievement without unnecessary complexity.
После поступления звонка нарколог оперативно выезжает по указанному адресу и прибывает в течение 30–60 минут. Врач незамедлительно приступает к оказанию помощи по четко отработанному алгоритму, состоящему из следующих этапов:
Изучить вопрос глубже – http://narcolog-na-dom-voronezh00.ru
torzon onion https://sites.google.com/view/nexusdarknetlink
During a relaxed exploration of online growth and learning resources, I came across personal upgrade network placed within a recommendation list, and the browsing experience felt smooth as pages loaded quickly and content was naturally arranged for easy user access.
Эта публикация исследует взаимосвязь зависимости и психологии. Мы обсудим, как психологические аспекты влияют на появление зависимостей и процесс выздоровления. Читатели смогут понять важность профессиональной поддержки и применения научных подходов в терапии.
Переходите по ссылке ниже – частный медик 24 ростов на дону
Капельница от похмелья в Екатеринбурге с анонимным выездом врача и восстановительной терапией в наркологической клинике «Частный медик 24»
Подробнее – http://kapelnicza-ot-pokhmelya-ekaterinburg-8.ru
While searching for online fashion and style inspiration stores, I discovered modern outfit style space – The website offered a nice browsing experience with a modern design and useful information, making navigation easy, smooth, and enjoyable throughout different sections.
капельница на дому в в самаре цены капельница на дому в в самаре цены
While searching for motivation and self improvement resources online, I discovered creative life progress space – The website provides motivational content and helpful guidance for personal progress every day, making navigation easy, positive, and enjoyable across sections.
During a quiet evening reading session this provided just the right depth without being heavy, and a stop at bestpickscollection maintained the same evening appropriate weight, content with depth that does not exhaust the reader is content with editorial calibration and this site has clearly figured out how to be substantial without being demanding all the time.
Вызов капельницы от похмелья с контролем врача в Самаре рекомендуется, когда симптомы похмелья становятся особенно тяжелыми и мешают нормальной жизнедеятельности. Несмотря на то, что многие пытаются справиться с похмельем с помощью домашних методов, такие как прием жидкости или таблеток, они не всегда оказываются достаточно эффективными. В случае сильных симптомов похмелья, капельница с врачебным контролем — это более безопасное и быстрое решение, при этом возможен вывод в стационаре, анонимное лечение и консультации по вопросам наркомании с учетом актуальной цены услуг.
Подробнее можно узнать тут – капельница от похмелья на дому
прокапаться в самарае прокапаться в самарае
torzon darknet link https://sites.google.com/view/nexusmarketplace
вывод из запоя на дому екатеринбург круглосуточно вывод из запоя на дому екатеринбург круглосуточно
While checking online opportunity networks and motivational blogs, I discovered Open Vision Hub placed within the article section – I took a chance and it paid off, highly recommend exploring since it provided useful insights that changed how I approach new possibilities in life
Домашний формат выбирают тогда, когда человеку тяжело добраться до медицинского учреждения, он ослаблен после нескольких дней употребления алкоголя или родственникам важно быстро получить врачебную оценку состояния. После осмотра определяют, допустима ли помощь на дому, требуется ли детоксикация, нужна ли капельница, достаточно ли домашнего наблюдения или следует сразу рассматривать другой объем помощи. Если эпизоды повторяются, обсуждение может выходить за рамки одного выезда и включать лечение алкоголизма, помощь при зависимости, кодирование, участие психолога и реабилитацию. Уже на этапе первичного обращения нередко уточняют, как вызвать врача, какие услуги доступны на дому и в каких условиях домашний формат остается безопасным.
Ознакомиться с деталями – https://narkolog-na-dom-moskva-18.ru
When facing major decisions, many individuals look for calm online environments that encourage reflection and clarity True Path Finder Shop supports users in breaking down confusion into manageable steps and the message of needed direction and found it here resonates strongly with those seeking change
Users who prefer practical fashion inspiration often look for platforms that highlight wearable outfits, and one example is Everyday Style Trends Page which is typically described as offering simple outfit guidance, daily trend updates, and accessible fashion ideas for regular use.
сервис тойота в москве сервис тойота в москве
топ букмекерских контор Польша топ букмекерских контор Польша
В Нижнем Новгороде стационарный формат лечения применяется при наличии факторов, повышающих риск осложнений или снижающих эффективность домашней терапии. Врач принимает решение на основании осмотра, консультации и анализа данных, оценивая текущее состояние пациента и его реакцию на предыдущие попытки лечения. При необходимости можно заранее обратиться в центр лечения алкоголизма и наркомании или заказать услугу по телефону.
Получить дополнительные сведения – вывод из запоя в стационаре
cannaexpress url https://sites.google.com/view/nexusdarknetlink
В этой статье мы рассматриваем разрушительное влияние зависимости на жизнь человека. Обсуждаются аспекты, такие как здоровье, отношения и профессиональные достижения. Читатели узнают о необходимости обращения за помощью и о путях к восстановлению.
Посмотреть всё – кодирование от алкоголизма в ростове на дону
During an extended browsing session through opportunity and discovery platforms, I came across new opportunity portal embedded in a recommendation paragraph, and the experience felt pleasant since the design is modern and easy for visitors to navigate smoothly.
While casually browsing digital shopping platforms this afternoon, I came across organized horizon mystic site and noticed the clean structure, with smooth navigation and reliable performance throughout the browsing experience.
888. https://888stars-uz.com .
During an evening search for ecommerce and seller platforms, I eventually came across quality listing hub because the categories looked clean and browsing felt easier than many cluttered websites online today – The experience was pleasant and everything appeared organized and professionally maintained from start to finish.
During exploration of e-commerce hubs for modern and trending items, I found a website that feels simple and efficient for daily shoppers, and Trend Everyday Shop provides a smooth browsing experience overall – Pages are fast, products are organized neatly, and users can browse stylish goods without distractions.
капельница при алкогольной цены капельница при алкогольной цены
В этой публикации мы обсуждаем современные методы лечения различных заболеваний. Читатели узнают о новых медикаментах, терапиях и исследованиях, которые активно применяются для лечения. Мы нацелены на то, чтобы предоставить практические знания, которые могут помочь в борьбе с недугами.
ТОП-5 причин узнать больше – стоп алко
After reviewing several websites focused on recommendations and interesting browsing opportunities, I found featured knowledge hub – The website design appeared modern and organized, the information sections were arranged clearly, and the overall browsing process felt both comfortable and naturally engaging for visitors throughout the experience.
вывод из запоя на дому екатеринбург отзывы вывод из запоя на дому екатеринбург отзывы
During a longer browsing session across multiple websites today, I explored modern amber petal platform and found everything well structured, where content is easy to understand quickly and smoothly presented.
Запой сопровождается выраженной интоксикацией, нарушением сна, слабостью, тревожностью и колебаниями давления, что характерно для алкоголизма и других форм зависимости. При этом самостоятельный выход из состояния часто оказывается затруднённым из-за ухудшения самочувствия и невозможности контролировать симптомы. В таких случаях выезд нарколога позволяет начать лечение без задержек и помочь пациенту снизить нагрузку на организм за счёт отсутствия транспортировки.
Углубиться в тему – вывод из запоя на дому круглосуточно
Запой – это серьезная проблема, когда организм перестает работать без постоянного поступления алкоголя. Из-за запоя токсины отравляют организм, нарушая работу органов и снижая иммунитет. Попытки самостоятельно бросить пить во время запоя могут привести к ухудшению самочувствия. «Семья и Здоровье» лечит запой на дому – это удобно и снижает стресс. Мы приедем в любое время суток и проведем все процедуры для восстановления здоровья. Длительное пьянство может привести к опасным для жизни осложнениям. Нельзя затягивать с лечением запоя, это может привести к серьезным последствиям.
Ознакомиться с деталями – https://vyvod-iz-zapoya-krasnoyarsk0.ru/
During my exploration of digital shopping platforms, I found a site that feels modern and efficient, and PetalStore Frost hub delivers smooth navigation overall – Content is well structured, pages load fast, and users can easily explore products without clutter or confusing design elements.
cocorico darknet https://sites.google.com/view/nexusmarketdarknet
abacus darknet https://sites.google.com/view/nexus-market-url
During an online exploration of idea and innovation platforms, I came across daily creativity network space – The platform offers creative modern ideas and useful networking inspiration for users today, making browsing simple, structured, and engaging throughout the site.
تسجيل دخول 888 https://888starz-egypt3.com/
В практике лечения на дому применяются следующие этапы медицинского воздействия:
Выяснить больше – частный нарколог на дом
вывод из запоя на дому цена вывод из запоя на дому цена
В этой статье мы рассматриваем разные способы борьбы с алкогольной зависимостью. Обсуждаются методы лечения, программы реабилитации и советы для поддержки близких. Читатели получат информацию о том, как преодолеть зависимость и добиться успешного выздоровления.
Обратитесь за информацией – кодировка от алкоголя в ростове-на-дону
Лечение алкоголизма в Сергиевом Посаде важно рассматривать не как разовую «чистку» или временный перерыв, а как последовательный маршрут. Самый уязвимый период — первые 24–72 часа после прекращения употребления: днём может стать легче, но к вечеру и ночью волной возвращаются тревога и бессонница, усиливается внутреннее напряжение, появляются телесные симптомы. В этот момент человек чаще всего срывается, потому что ему кажется, что «иначе не выдержу». Поэтому качественная помощь строится так, чтобы пациент прошёл вечер и ночь безопасно, с понятными ориентирами и медицинской поддержкой, а затем перешёл к восстановлению и профилактике рецидива.
Подробнее можно узнать тут – medicina-lechenie-alkogolizma
During an online exploration of self development websites, I came across knowledge flow guide – The platform offered useful insights and structured information, with a clean user friendly interface that made browsing smooth, engaging, and easy across all sections.
капельница от запоя цена капельница от запоя цена
Качественная наркологическая помощь строится от безопасности к устойчивости. Сначала врач оценивает состояние: длительность употребления, выраженность интоксикации и отмены, давление и пульс, признаки обезвоживания, характер сна, уровень тревоги, наличие хронических заболеваний и препаратов, которые уже принимались дома. Затем выбирается формат лечения — стационарный, амбулаторный или выездной — исходя из рисков, а не из удобства. Это принципиально: при нестабильных показателях и высокой вероятности осложнений требуется более высокий уровень контроля.
Ознакомиться с деталями – narkologicheskaya-klinika-ceny
дом запой цена дом запой цена
К основным показаниям относятся:
Получить дополнительные сведения – вывод из запоя в стационаре анонимно
служба вывода из запоя служба вывода из запоя
ares market url https://sites.google.com/view/nexusdarknetmarket
Earlier this afternoon I reviewed multiple shopping-related websites and product recommendation pages when I discovered helpful retail destination, where the clean interface and accessible information created a pleasant experience while moving through different product listings and highlighted sections online.
После оформления вызова нарколог приезжает к пациенту и проводит комплексную оценку состояния. Врач измеряет давление, частоту пульса, оценивает уровень сознания и выраженность симптомов. На основании полученных данных формируется план лечения, который реализуется сразу на месте.
Ознакомиться с деталями – нарколог на дом нижний новгород
ай-тек https://i-tec.ru/
Users who prefer functional fashion inspiration often look for resources that emphasize real world usability over runway trends, and they discover Style Life Practical Tips Hub – the guidance offered is grounded and realistic, focusing on fashion advice that actually works in everyday life situations for people with busy routines
По окончании курса детоксикации нарколог дает пациенту и его близким подробные рекомендации, помогающие быстрее восстановить здоровье и предотвратить повторные случаи запоев.
Разобраться лучше – вывод из запоя на дому новосибирская область
Публикация посвящена жизненным историям людей, успешно справившихся с зависимостью. Мы покажем, что выход есть, и он начинается с первого шага — принятия проблемы и желания измениться.
Проследить причинно-следственные связи – стоп алко анапа
Came in skeptical of the angle and left mostly persuaded, and a stop at theperfectgift pushed me a bit further in the same direction, content that can move a critical reader by argument rather than rhetoric is rare and worth pointing out because it indicates real substance underneath the surface presentation here.
In general evaluations of online shopping environments and how users perceive catalog diversity, a frequently cited example is trusted outlet selection page which is often characterized in broad descriptive language as reflecting typical e-commerce features such as categorized listings, ease of browsing, and a focus on presenting multiple options for customers exploring different product types.
выведение из запоя на дому в екатеринбурге выведение из запоя на дому в екатеринбурге
Осмотр на дому особенно важен в тех случаях, когда больному трудно вставать, пить воду, принимать пищу, спокойно лежать или ориентироваться в собственном состоянии. Чем тяжелее переносится выход из употребления, тем выше значение очной оценки, потому что по телефону невозможно полноценно определить границы безопасной помощи. При выраженных симптомах может потребоваться срочный выезд, чтобы вовремя оценить риски и определить, допустим ли вывод из запоя дома или необходимо наблюдение в стационаре.
Получить дополнительные сведения – нарколог на дом анонимно москва
тойота сервис в москве тойота сервис в москве
польские букмекерские конторы польские букмекерские конторы
drughub shop https://sites.google.com/view/nexus-market-url
Этот документ охватывает важные аспекты медицинской науки, сосредотачиваясь на ключевых вопросах, касающихся здоровья населения. Мы рассматриваем свежие исследования, клинические рекомендации и лучшие практики, которые помогут улучшить качество лечения и профилактики заболеваний. Читатели получат возможность углубиться в различные медицинские дисциплины.
Ссылка на источник – Похмельная служба Балашиха
During my online browsing session this morning, I explored multiple websites before discovering quality digital commerce hub, where the website felt modern overall, categories were properly arranged, and content read naturally throughout the visit.
During my exploration of creative learning websites, I found a platform that feels simple and motivating, and OutletPure inspiration hub offers a smooth browsing experience overall – Pages are easy to navigate, content is thoughtfully arranged, and users can focus on generating new ideas without distractions or overwhelming design elements.
польские букмекерские конторы польские букмекерские конторы
После диагностики начинается активная фаза медикаментозного вмешательства. Современные препараты вводятся капельничным методом, что позволяет быстро снизить уровень токсинов в крови, восстановить нормальные обменные процессы и стабилизировать работу жизненно важных органов, таких как печень, почки и сердце.
Узнать больше – наркологический вывод из запоя
ремонт тойота в москве ремонт тойота в москве
During a late evening search for information based platforms, I eventually came across simple info collection because the content looked well organized and the browsing experience felt smoother than several alternatives online today – The content quality appeared strong and the website felt useful for people searching reliable information.
While checking various online shopping platforms earlier today, I came across helpful shore opal store and noticed a nice collection available, where browsing remained comfortable and descriptions appeared genuinely informative across all pages.
вывод из запоя на дому в екатеринбурге вывод из запоя на дому в екатеринбурге
While searching for premium lifestyle and luxury product platforms online, I discovered smart luxury finds space – The platform presents luxury products and stylish finds in an elegant way online, making browsing easy, elegant, and enjoyable throughout the site.
оборудование залов совещаний https://media-garage.ru/moya-kollekciya/kak-osnastit-zal-zasedanij-ili-zal-soveshchanij
прокапаться в самарае прокапаться в самарае
dark web markets https://sites.google.com/view/nexusdarknetlink
Сразу после вызова нарколог приезжает на дом для проведения первичного осмотра и диагностики. На этом этапе проводится сбор анамнеза, измеряются жизненно важные показатели (пульс, артериальное давление, температура) и определяется степень алкогольной интоксикации. Эти данные являются основой для разработки индивидуального плана лечения.
Получить больше информации – капельница от запоя тюмень
После первичного осмотра начинается активная фаза детоксикации. Современные препараты вводятся капельничным методом для быстрого снижения уровня токсинов в крови и восстановления обменных процессов. Этот этап критически важен для нормализации работы печени, почек и сердечно-сосудистой системы.
Подробнее можно узнать тут – вывод из запоя недорого владимир
During an online session browsing fashion and shopping websites, I found daily style store – The platform featured appealing content and a clean layout, making the browsing experience smooth, enjoyable, and visually engaging across different sections.
На данном этапе врач уточняет длительность запоя, тип употребляемого алкоголя и наличие сопутствующих заболеваний. Тщательный анализ этих данных позволяет подобрать оптимальные методы детоксикации и снизить риск осложнений.
Подробнее можно узнать тут – наркологический вывод из запоя мурманск
torzon darkweb link https://sites.google.com/view/nexusmarketplace
tordex darknet market https://sites.google.com/view/nexus-market-url
Liked the way the post got out of its own way, and a stop at brightnewbeginnings extended that invisible craft, the best writing you barely notice while reading because it is doing its work without drawing attention to itself and this site has clearly mastered that disappearing act across the pieces I have read.
Reading this confirmed that the topic deserves more careful attention than it usually gets, and a stop at discovernewhorizons extended that elevated framing, content that raises the appropriate weight of a subject without being preachy about it is serving a quiet but important editorial function for the broader cultural conversation about it.
Came away with a slightly better mental model of the topic than I started with, and a stop at amazingdealscorner sharpened that further, content that improves the reader thinking apparatus rather than just dumping facts into it is the rare kind I genuinely value and seek out when I have time to read carefully.
Came across this and immediately thought of a friend who would enjoy it, and a stop at purechoiceoutlet also reminded me of someone, content that triggers the urge to share is content that has earned my recommendation and this site has earned multiple from me already across different conversations during the week.
Now noticing that the post never raised its voice even when making a strong point, and a look at purestylemarket continued that calm volume, content that can make important points without resorting to typographic emphasis or emotional appeal is content that trusts its substance to do the work and this site has that confidence consistently.
While searching for online creative learning and inspiration platforms, I discovered modern idea hub – The content was structured and easy to follow, creating a smooth browsing experience that felt inspiring, helpful, and enjoyable across different creative sections of the website.
Anyone aiming to strengthen discipline and take consistent steps toward success may explore success step portal where structured guidance and motivational insights help users stay focused on progress, ensuring they develop a habit of action oriented thinking in everyday challenges and opportunities they face.
Reading this on a long flight and finding it the best thing I read across hours of trying, and a stop at dreambiggeralways kept the streak going, when content beats long flight reading you know it has substance because flight reading is a hard test of a piece given the alternatives available everywhere.
While browsing personal development and achievement focused websites, I discovered Dream Action Space embedded within the article – I am actually taking action now, and this site gave me the push that helped me move from intention to execution in a very practical way
During exploration of online health and motivation platforms, I found a website that feels structured and welcoming for personal wellness readers, and Fitness Motivation guide provides a smooth browsing experience overall – Pages respond quickly, topics are arranged neatly, and visitors can enjoy practical wellness ideas without clutter or confusion.
While analyzing different content websites, I noticed a platform that feels modern and dependable, and Frost Pine insight collective provides a smooth browsing experience overall – Everything is arranged logically, navigation is simple, and users can access reliable information without distraction or unnecessary visual complexity.
dark web market urls https://sites.google.com/view/nexusdarknetmarket
While searching for personal development inspiration platforms online, I discovered creative mindset ideas hub – The website provides inspired thinking and helpful ideas for personal growth journey, making browsing smooth, simple, and engaging throughout all pages.
Took longer than expected to finish because I kept stopping to think, and a stop at createimpacttoday did the same to me, content that provokes thought rather than just delivering information is in a different category and the team here is clearly working at that higher level rather than just cranking out posts.
скачать видео с ютуб в хорошем качестве https://skachat-video-s-youtube-9.ru
After spending time reviewing ecommerce platforms this week, I eventually found quality royal shelf where the structure looked neat and the browsing process felt more comfortable than many competing websites online today – The modern design stood out and the pages felt polished while navigation remained simple and easy overall.
I spent part of today reviewing different online stores and eventually landed on recommended petal market hub, and I noticed everything seemed organized properly, with smooth page loading and easy to understand content throughout the experience.
Капельница от похмелья с контролем врача в Самаре является одной из самых популярных и эффективных услуг для тех, кто сталкивается с выраженными симптомами похмельного синдрома. Похмелье может проявляться не только головной болью и усталостью, но и более серьезными проблемами, такими как тошнота, рвота, учащенное сердцебиение и повышение давления. Когда симптомы становятся особенно острыми, капельница помогает организму справиться с токсинами, восстановить водно-электролитный баланс и нормализовать состояние пациента, в том числе при запое. Важно, что контроль врача на протяжении всей процедуры обеспечивает безопасность и эффективность, при этом помощь может оказываться как на дому, так и в клинике при лечении алкоголизма.
Разобраться лучше – капельница от похмелья вызов на дом самара
Текст посвящён распространённым мифам о зависимости и их развенчанию. Мы предоставим научно обоснованную информацию и дадим рекомендации по выбору эффективного способа борьбы с зависимым поведением.
Читать дальше – частный медик 24 ростов на дону
888starz bukmacher http://www.888stars-uz.com .
darknet drug market https://sites.google.com/view/nexusmarketplace
Ставки на спорт Польша Ставки на спорт Польша
через сколько после родов можно делать лазерную эпиляцию бикини
While browsing online gift idea and creative inspiration websites, I came across daily inspiration hub – The platform offered interesting ideas and a smooth browsing experience, making it feel useful and encouraging repeat visits for future updates and discoveries.
вывод из запоя вызов на дом вывод из запоя вызов на дом
Looking for similar voices elsewhere has come up empty in my recent searches, and a stop at everymomentmatters extended the search frustration, the rare site that does what no other does in quite the same way is precious and this one has clearly developed a particular approach that I have not been able to find duplicates of.
Glad I gave this fifteen minutes rather than the usual three minute skim, and a look at trendylifestylehub earned the same investment, time spent on quality content is rarely wasted but the reverse is also true and learning which sites deserve which kind of attention is part of being a careful online reader.
Glad I stumbled across this post, the explanations actually make sense without needing background knowledge to follow along, and after a stop at thinkbigmovefast the same was true there, no assumptions about the reader just clear writing that anyone can understand from the first line right through to the end.
silk road market https://sites.google.com/view/nexusdarknetmarket
I learned more from this short post than from longer articles I read earlier today, and a stop at purechoiceoutlet added even more useful detail without going off topic, this site clearly knows how to keep things focused without sacrificing depth which is a hard balance to strike for any writer.
For designers and thinkers exploring fresh digital inspiration, the platform creative ideas hub appears as a useful resource for gathering perspectives and brainstorming support – it delivers regularly updated creative perspectives that help users expand imagination and apply modern thinking in practical everyday problem solving situations effectively.
However casually I came to this site I have ended up reading carefully, and a look at yourfashionoutlet continued earning that careful reading, the conversion from casual visitor to careful reader is something content earns rather than demands and this site has accomplished that conversion for me over the course of just a few pieces.
While exploring digital shopping platforms and modern trend discovery websites, I discovered Trendy Picks Center embedded within the content flow – There is cool stuff everywhere, and my friends always ask where I shop because the styles always feel new, creative, and far more interesting than typical online fashion stores
Speaking from the perspective of a fairly demanding reader the writing here clears the bar consistently, and a look at bestchoicecollection continued clearing that bar, the calibration of demanding reader is something I apply to all sources and this site has been one of the few that handles the demanding reading well across pieces sampled.
В практике лечения на дому применяются следующие этапы медицинского воздействия:
Подробнее можно узнать тут – помощь нарколога на дому в ростове-на-дону
While searching for self learning motivation websites, I discovered smart explore achievement hub – The website provides educational content and motivation to learn, explore, and achieve, making browsing smooth, easy, and engaging for users.
тойота сервис тойота сервис
After spending quite some time exploring different online websites today, I landed on cleanly arranged web hub, where browsing remained easy to manage and every page opened incredibly fast while still providing useful and well presented details.
While reviewing inspirational storytelling websites, I came across a platform that feels welcoming and thoughtfully arranged for readers, and Mindful Living center delivers a smooth browsing experience overall – The layout is clean, content feels authentic, and users can appreciate reflective ideas without confusion or excessive visual elements.
itec https://i-tec.ru/
ares onion https://sites.google.com/view/nexusmarketplace
ares darknet url https://sites.google.com/view/nexus-market-link
На каждом этапе лечения нарколог контролирует витальные показатели, оценивает динамику восстановления и при необходимости корректирует терапию. Такой подход исключает резкие перепады давления, нарушения сердечного ритма и другие побочные эффекты, часто возникающие при попытках вывести пациента из запоя без медицинского участия.
Узнать больше – вывод из запоя в стационаре ростов-на-дону
Алкогольная интоксикация оказывает серьёзное влияние на организм, вызывая головную боль, тошноту, слабость и головокружение. Капельница помогает организму быстро избавиться от продуктов распада алкоголя, восстановить нормальное функционирование органов и минимизировать последствия для здоровья. Важно, что мы обеспечиваем полное наблюдение врача на протяжении всей процедуры, что помогает гарантировать безопасность пациента и максимальную эффективность лечения.
Получить дополнительные сведения – капельница от похмелья анонимно екатеринбург
During my search for SEO tools and optimization websites, I eventually came across simple traffic connector because the structure looked balanced and browsing felt smoother than many cluttered platforms online currently – Everything loaded without issues and the website appeared trustworthy and genuinely helpful for users exploring its content.
While exploring different online shopping websites this morning, I spent time on valuable crest urban marketplace, and I really enjoyed exploring, as the website felt modern and browsing stayed simple for visitors overall.
While browsing various lifestyle and design inspiration websites during a casual online session, I came across modern living style hub – The clean layout and engaging content made the browsing experience smooth, visually pleasant, and genuinely enjoyable while exploring different sections and ideas throughout the visit.
abacus market url https://sites.google.com/view/nexusdarknetlink
Nice to see a post that does not try to overcomplicate the basics for the sake of looking smart, and once I looked at perfectbuyzone the same direct tone was there too, which honestly makes a difference when you are short on time and want answers without long pointless intros.
Самое важное сегодня: https://home-parfum.ru/catalog/christian-dior_5/
Felt the writer respected the topic without being precious about it, and a look at yourstylezone continued that respectful but unfussy treatment, finding the right register for serious topics is hard and this site has clearly figured out how to take the topic seriously while still being readable for casual visitors regularly.
Анонимность в клинике «Северный Вектор» является неотъемлемой частью лечебного процесса. Наркологическая клиника в Ростове-на-Дону обеспечивает конфиденциальность на всех этапах взаимодействия с пациентом, начиная с первичного обращения и заканчивая медицинским наблюдением. Клиническая практика показывает, что сохранение анонимности снижает уровень тревожности и повышает готовность пациента к полноценному лечению, что напрямую влияет на стабильность результатов.
Исследовать вопрос подробнее – платная наркологическая клиника в ростове-на-дону
During an online browsing session focused on fashion trends, I found creative fashion guide – The platform featured stylish content with easy navigation, making the experience smooth, enjoyable, and simple across all sections.
Таможенное оформление для юридических лиц в Москве и Московской области. СБ Карго – официальный таможенный представитель: подготовка документов, расчёт платежей, сопровождение импорта и экспорта, помощь в прохождении таможенных процедур без лишних рисков и задержек. Консультации для участников ВЭД: таможенное оформление грузов
Users seeking refined online shopping options may visit elite luxury catalog which presents handpicked premium products and sophisticated goods – offering access to exclusive selections designed for individuals who value quality elegance and modern luxury aesthetics in everyday purchasing decisions.
abacus onion https://sites.google.com/view/nexusmarketdarknet
While browsing casual online shopping platforms, I found smart relaxed shopping hub – The website delivers a relaxed shopping experience with fun products and easy navigation online, making browsing easy, light, and enjoyable throughout the site.
Запой сопровождается выраженной интоксикацией, нарушением сна, слабостью, тревожностью и колебаниями давления, что характерно для алкоголизма и других форм зависимости. При этом самостоятельный выход из состояния часто оказывается затруднённым из-за ухудшения самочувствия и невозможности контролировать симптомы. В таких случаях выезд нарколога позволяет начать лечение без задержек и помочь пациенту снизить нагрузку на организм за счёт отсутствия транспортировки.
Получить дополнительные сведения – анонимный вывод из запоя на дому санкт-петербург
В этой статье мы говорим о важности поддержки в процессе выздоровления. Рассматриваются семьи, группы поддержки, специалисты и онлайн-ресурсы, которые могут сыграть решающую роль в избавлении от зависимости.
Проследить причинно-следственные связи – narcology clinic
During comparison of online retail websites, I noticed a site that feels structured and fast, and ShoreFrost goods marketplace provides smooth browsing overall – Pages load quickly, navigation is intuitive, and users can explore products easily while accessing clear and helpful information.
During browsing sessions focused on online fashion marketplaces and curated style websites, I came across Fresh Fashion Stop Hub placed within the article structure – Cool stuff everywhere here, and my friends always ask where I shop since the products always feel unique, eye-catching, and noticeably different from mainstream shopping sites
Reading this triggered a small but real correction in something I had assumed, and a stop at purechoiceoutlet extended that corrective effect, content that updates my beliefs through evidence rather than rhetoric is content with intellectual integrity and this site has earned that label consistently across the pieces I have read so far today.
During exploration of online shopping deal hubs, I found a website that feels practical and engaging for bargain hunters, and Dream savings network offers a smooth browsing experience overall – The interface is intuitive, promotions are highlighted effectively, and users can explore discounted products without unnecessary distractions.
My friends would appreciate a few of these posts and I will be sending links accordingly, and a look at amazingdealscorner added more pages to my share queue, content that earns shares to specific people in specific contexts is content with social utility and this site is generating those targeted shares from me consistently lately.
Felt the writer was being honest with the reader which is rare enough that I want to acknowledge it, and a look at perfectbuyzone continued that honest feel, content built on actual knowledge rather than aggregated summaries is something I value highly and rarely come across in regular searches on the open internet these days.
Reading this prompted a small note in my reference file, and a stop at dreambiggeralways prompted another, the rare site that contributes useful nuggets to my own working knowledge rather than just consuming my attention is worth the time investment many times over compared to the usual pile of forgettable scroll content.
Felt a small spark of recognition when the post named something I had been struggling to articulate, and a look at everymomentmatters produced more such moments, the rare service of giving readers language for fuzzy intuitions is one of the higher values that good writing can provide and this site offered several today instances.
Quietly impressive in a way that does not announce itself, and a stop at purestylemarket extended that quiet impressiveness, the kind of quality that emerges through sustained attention rather than first impressions is the kind I trust more deeply and this site has been earning that deeper trust across multiple sessions over time consistently.
К основным показаниям относятся:
Подробнее можно узнать тут – вывод из запоя на дому анонимно санкт-петербург
torzon darknet link https://sites.google.com/view/nexusdarknetlink
Liked that the post landed without needing to manufacture controversy or take a contrarian stance for attention, and a stop at shopwithstyle continued that grounded approach, content that earns attention through quality rather than provocation is the kind that builds long term trust rather than burning it on quick wins.
рейтинг системных интеграторов https://media-garage.ru/moya-kollekciya/rejting-sistemnyh-multimedia-integratorov-goroda-moskvy
Таможенное оформление для юридических лиц в Москве и Московской области. СБ Карго – официальный таможенный представитель: подготовка документов, расчёт платежей, сопровождение импорта и экспорта, помощь в прохождении таможенных процедур без лишних рисков и задержек. Консультации для участников ВЭД: таможенное оформление грузов
польские букмекерские конторы польские букмекерские конторы
Вывод из запоя в стационаре — это медицинская помощь, при которой лечение проводится в условиях постоянного врачебного контроля и поэтапной стабилизации состояния. Такой формат применяется, когда состояние пациента требует наблюдения и быстрого реагирования на изменения. В наркологической клинике «Частный медик 24» в Нижнем Новгороде лечение выстраивается на основе клинической оценки и последовательного подхода: каждый этап направлен на достижение конкретного результата без избыточной нагрузки на организм.
Подробнее – нарколог вывод из запоя
amberpetalmarket – Smooth experience overall, categories are clearly arranged and useful today.
I recently opened several SEO websites before eventually exploring organized ranking cart where the layout looked structured and navigation felt easier than many cluttered platforms online today – The experience was great, and browsing products and information felt simple and very comfortable during the entire visit.
На каждом этапе лечения нарколог контролирует витальные показатели, оценивает динамику восстановления и при необходимости корректирует терапию. Такой подход исключает резкие перепады давления, нарушения сердечного ритма и другие побочные эффекты, часто возникающие при попытках вывести пациента из запоя без медицинского участия.
Детальнее – наркология вывод из запоя
Этот текст представляет собой обзор свежих данных и исследований в области медицины. Он призван помочь читателям понять, как научные достижения влияют на лечение, диагностику и общее состояние системы здравоохранения.
Не пропусти важное – частный медик 24 ростов на дону
вывести из запоя цена вывести из запоя цена
darkmarket url https://sites.google.com/view/nexusmarketdarknet
скачать видео с ютуба скачать видео с ютуба
During my search across several digital marketplaces this afternoon, I eventually visited high quality fern urban hub, and it was a helpful platform overall, with easy categories and straightforward product discovery that felt comfortable.
Несмотря на выездной формат, лечение выстраивается поэтапно и соответствует медицинским стандартам. Это обеспечивает управляемость процесса и безопасность пациента.
Изучить вопрос глубже – вызов врача нарколога на дом ростов-на-дону
Now realising the post solved a small problem I had been carrying for weeks, and a look at dreambiggeralways extended that problem solving function, content that connects to specific unresolved questions in my own life rather than just providing general interest is content with real practical impact and this site is providing that practical value.
888starzuz 888stars-uz.com .
Grateful for posts like this one, they remind me there are still places online run by people who care about quality, and a look at amazingdealscorner reflected the same standards, you can tell the difference between content made for readers and content made just for search engines today and this is the former.
Worth pointing out that the writing reads as confident without being defensive about it, and a look at everymomentmatters extended that secure tone, content that does not pre emptively argue against imagined critics has a different quality from defensive writing and this site reads as written from a place of real ease.
https://lavita-clinik.ru/kosmetologija/biorevitalizacija-po-tochkam-kak-vosstanovit
A thoughtful read in a week that has been mostly noisy, and a look at purechoiceoutlet carried that thoughtful quality across more pages, finding pockets of considered writing in a week of distractions is one of the small wins of careful curation and this site is providing those pockets at a sustainable rate.
Anyone looking for deeper reflection and creativity enhancement can explore reflective ideas corner which presents structured thought exercises and inspiring discussions that promote critical thinking and imagination – helping users refine their reasoning abilities while developing a habit of thoughtful analysis and improved problem solving in everyday life situations consistently.
cannaexpress onion https://sites.google.com/view/nexusdarknetmarket
Reading this gave me a quiet moment of intellectual pleasure that I had not been expecting, and a stop at findsomethingamazing extended that pleasure across more pages, the unexpected reward of stumbling into careful writing is one of the small ongoing pleasures of reading the open web and this site is delivering it reliably.
After spending time exploring several online stores and digital catalogs today, I eventually came across trusted shopping resource and genuinely appreciated how clean the structure appeared, with organized products and informative descriptions that made browsing feel simple and enjoyable throughout.
В Нижнем Новгороде выезд нарколога на дом используется при состояниях, требующих оперативной медицинской оценки и начала терапии. Врач приезжает с необходимыми препаратами, проводит осмотр и формирует план лечения на месте. Такой формат позволяет сократить время до начала помощи и снизить нагрузку на пациента.
Подробнее можно узнать тут – http://narkologicheskaya-pomoshh-nizhnij-novgorod-8.ru/
Now leaving a small mental note to recommend this when the topic comes up in conversation, and a look at yourpathforward extended that recommend ready feeling, content that arms me with shareable references for likely future conversations is content with social value and this site is providing that conversational ammunition consistently for me lately.
During my review of online marketplaces designed to bring happiness and satisfaction, I came across a platform that feels pleasant and functional, and Joyful Shopping World offers a smooth browsing experience overall – The design is modern, browsing is easy, and users can find products that bring everyday value and enjoyment.
While browsing through different recommendation sites and digital discovery hubs, I noticed superb discovery zone</a placed inside a list of resources, and the platform felt updated, simple, and easy for users to explore comfortably – The overall experience was smooth and visually organized.
During a session of exploring online shopping trend platforms and style recommendation sites, I noticed Urban Style Trend Hub embedded in the content flow – Cool stuff everywhere here, and my friends always ask where I shop since everything always looks carefully selected, trendy, and different from what they usually see online
Great work on keeping things readable, the post never drags or repeats itself which I really appreciate, and a stop at learnsomethingamazing added a bit more context that fit naturally with what was already said here, no need to read everything twice to get the point being made today.
Капельница от похмелья с контролем врача в Самаре представляет собой эффективную терапевтическую процедуру, позволяющую значительно улучшить самочувствие пациента за короткий срок. Врач, контролируя весь процесс, может точно определить, какие компоненты необходимы для каждого пациента. Состав капельницы зависит от симптомов похмелья, состояния пациента и его индивидуальных потребностей. Это позволяет обеспечить максимально безопасное и эффективное лечение, которое помогает организму быстро восстановиться.
Выяснить больше – капельница от похмелья анонимно самара
айтек https://i-tec.ru/
К основным показаниям относятся:
Узнать больше – вывод из запоя вызов на дом в нижнем новгороде
During a casual exploration of online shopping platforms, I found modern product hub – The site showcased several appealing products in a structured layout, making browsing smooth and giving a strong impression it is worth revisiting again soon.
Капельница от похмелья с контролем врача в Самаре представляет собой эффективную терапевтическую процедуру, позволяющую значительно улучшить самочувствие пациента за короткий срок. Врач, контролируя весь процесс, может точно определить, какие компоненты необходимы для каждого пациента. Состав капельницы зависит от симптомов похмелья, состояния пациента и его индивидуальных потребностей. Это позволяет обеспечить максимально безопасное и эффективное лечение, которое помогает организму быстро восстановиться.
Исследовать вопрос подробнее – https://kapelnicza-ot-pokhmelya-samara-13.ru/
При наличии этих симптомов помощь должна быть оказана в кратчайшие сроки. Выезд нарколога позволяет не только стабилизировать состояние, но и определить дальнейшую тактику лечения.
Ознакомиться с деталями – наркологическая помощь
dark websites https://sites.google.com/view/nexusmarketdarknet
ares market link https://sites.google.com/view/nexus-market-url
Picked this for a morning recommendation in our company chat, and a look at yourfashionoutlet suggested I will mention this site again later, recommending content into a workplace context is a small editorial act that requires confidence in the recommendation and this site is making me confident in those recommendations consistently here too.
Beyond the immediate post itself the editorial sensibility behind the site is what struck me, and a stop at bestchoicecollection continued displaying that sensibility, content that reveals editorial choices through accumulated reading is content with structural quality and this site has clearly developed an underlying approach worth identifying through multiple sessions of reading.
I recently browsed several update-based platforms before eventually spending time on featured info collection where the interface looked organized and navigation felt easier than many competing websites online today – The updates were interesting and the design felt clean, visually balanced, and simple to follow throughout.
Капельница от похмелья с контролем врача в Самаре является одной из самых популярных и эффективных услуг для тех, кто сталкивается с выраженными симптомами похмельного синдрома. Похмелье может проявляться не только головной болью и усталостью, но и более серьезными проблемами, такими как тошнота, рвота, учащенное сердцебиение и повышение давления. Когда симптомы становятся особенно острыми, капельница помогает организму справиться с токсинами, восстановить водно-электролитный баланс и нормализовать состояние пациента, в том числе при запое. Важно, что контроль врача на протяжении всей процедуры обеспечивает безопасность и эффективность, при этом помощь может оказываться как на дому, так и в клинике при лечении алкоголизма.
Изучить вопрос глубже – капельница от похмелья
Came back to this an hour later to reread a specific section, and a quick visit to creativegiftplace also drew a second look, content that pulls you back rather than letting you move on permanently is the kind I want to fill my browser bookmarks with in 2026 and beyond as the open internet evolves.
Found the writing surprisingly fresh for what is by now a well covered topic, and a stop at thinkbigmovefast kept that freshness going across the related pages, original perspective on familiar ground is hard to come by and this site has clearly earned its place in the conversation rather than just rehashing old ideas.
After reading several posts back to back the consistent voice across them is impressive, and a stop at findyourfocus continued that voice consistency, sites that maintain a single coherent voice across many pieces by potentially many writers represent serious editorial discipline and this one has clearly developed the institutional consistency needed for that.
Skimmed first and then went back to read carefully, and the careful read paid off in places I had missed, and a stop at thinkactachieve got the same treatment, the rare site whose content rewards a second pass is content I want more of in my regular rotation rather than disposable single read articles.
After reviewing multiple online retail platforms designed for seamless shopping experiences, I discovered curated goods page – a service that feels neatly arranged; product discovery is simple, and the browsing flow is smooth without distracting elements or confusing transitions feels very polished.
wethenorth market url https://sites.google.com/view/nexusdarknetmarket
Reading this in the morning set a good tone for the day, and a quick visit to everydayfindsmarket kept that good tone going, content can do that sometimes when it hits the right notes and finding sites that consistently strike that tone is something I have learned to recognise and reward with regular visits.
сервис тойота сервис тойота
A piece that suggested careful editing without showing the marks of the editing, and a look at learnsomethingamazing continued that invisible polish, the best editing disappears into the prose and this site reads as having been edited with skill that does not announce itself which is the highest compliment I can offer any blog content.
Anyone interested in guided learning and personal achievement can visit goal learning network offering structured resources and study support – enabling users to improve understanding, build confidence, and reach academic and personal goals through consistent effort and practical learning approaches over time.
During a longer browsing session across multiple websites today, I explored modern urban lattice platform and experienced a good overall visit, where information appeared trustworthy and navigation remained smooth across the platform.
During my exploration of digital service tools, I found a site that feels well designed and intuitive, and Boosters Web service point delivers smooth navigation overall – Content is structured clearly, navigation is simple, and users can browse services without unnecessary complexity or confusion.
Ставки на спорт Казахстан Ставки на спорт Казахстан
Found the writing surprisingly fresh for what is by now a well covered topic, and a stop at shopwithstyle kept that freshness going across the related pages, original perspective on familiar ground is hard to come by and this site has clearly earned its place in the conversation rather than just rehashing old ideas.
Алкогольная зависимость часто держится на страхе отмены. Человек заранее боится вечера: что не уснёт, начнётся паника, поднимется давление, появится дрожь и ощущение «внутреннего разгона». Из-за этого запой поддерживается не удовольствием, а попыткой избежать ухудшения. В клинике лечение начинается с оценки риска осложнений и тяжести отмены. Это позволяет определить, нужен ли стационар, или можно начинать лечение без госпитализации с медицинским контролем и ясным планом на ночь.
Узнать больше – anonimnaya-narkologicheskaya-klinika
A piece that did not waste any of its substance on sales or promotion, and a look at trendforlife continued that pure content focus, sites that resist the urge to monetise every paragraph are increasingly rare and this one has clearly made the editorial choice to keep the writing clean from commercial intrusion which I value highly.
While exploring online productivity and motivation platforms, I came across smart success guide – The website had a positive atmosphere and inspiring content, helping it stand out nicely and ensuring a smooth and engaging browsing experience throughout the session.
While exploring various innovation and educational platforms focused on personal growth and future planning, I found a clean and motivating website that feels easy to navigate, and Build The Future hub delivers a smooth browsing experience overall – The platform encourages creativity and learning while presenting ideas clearly, making it simple for users to stay inspired and focused on building positive opportunities ahead.
Now feeling slightly more optimistic about the state of independent writing online, and a stop at yourstylezone extended that quiet optimism, sites like this one are the reason I have not given up on the open web entirely and finding them occasionally renews the case for paying attention to non algorithmic content sources today.
dark market onion https://sites.google.com/view/nexusmarketdarknet
Your article helped me a lot, is there any more related content? Thanks!
Вызов капельницы от похмелья с контролем врача в Самаре рекомендуется, когда симптомы похмелья становятся особенно тяжелыми и мешают нормальной жизнедеятельности. Несмотря на то, что многие пытаются справиться с похмельем с помощью домашних методов, такие как прием жидкости или таблеток, они не всегда оказываются достаточно эффективными. В случае сильных симптомов похмелья, капельница с врачебным контролем — это более безопасное и быстрое решение, при этом возможен вывод в стационаре, анонимное лечение и консультации по вопросам наркомании с учетом актуальной цены услуг.
Детальнее – капельница от похмелья на дом
Этот обзор сосредоточен на различных подходах к избавлению от зависимости. Мы изучим традиционные и альтернативные методы, а также их сочетание для достижения максимальной эффективности. Читатели смогут открыть для себя новые стратегии и подходы, которые помогут в их борьбе с зависимостями.
Погрузиться в детали – Похмельная служба в Балашихе
заказ кухни спб заказ кухни спб
Выезд нарколога начинается с осмотра пациента. Доктора измеряют давление, пульс, оценивают уровень сознания и выраженность симптомов. На основании этих данных формируется план лечения, который реализуется сразу на месте. Такой подход позволяет быстро перейти к стабилизации состояния без лишних этапов.
Получить дополнительную информацию – анонимный вывод из запоя на дому в санкт-петербурге
Did not expect much when I clicked through but ended up reading the whole thing carefully, and a stop at fashiondailydeals kept that engagement going, sometimes the unassuming sites turn out to deliver more than the flashy ones which is something I have learned to look out for over time online lately and across topics.
сколько стоит заказать кухню по размерам https://zakazat-kuhnyu-19.ru
Reading this confirmed something I had been suspecting about the topic, and a look at dailyshoppingzone pushed that confirmation toward greater confidence, content that lines up with independently held intuitions earns a special kind of trust and I will return to writers who consistently land that way for me without overselling positions.
Came across this through a roundabout path and now it is on my regular rotation, and a stop at modernhomecorner sealed that decision, the open web still produces serendipitous discoveries when you let the citations and references guide you rather than relying purely on algorithmic feeds for new content recommendations always.
Вывод из запоя на дому — это формат наркологической помощи, при котором лечение проводится в привычной для пациента обстановке с выездом врача. Такой подход применяется в ситуациях, когда состояние требует медицинского вмешательства, но не предполагает обязательной госпитализации. В наркологической клинике «Частный медик 24» помощь на дому выстраивается по принципу поэтапной стабилизации: сначала устраняются острые проявления, затем оценивается динамика и при необходимости корректируется терапия.
Исследовать вопрос подробнее – https://vyvod-iz-zapoya-na-domu-sankt-peterburg-8.ru
Выбор между домашней помощью и стационарным лечением определяется не удобством, а медицинской целесообразностью. В условиях клиники исключаются внешние триггеры, обеспечивается изоляция от источников алкоголя и создается контролируемая среда, где терапевтические решения принимаются на основе объективных показателей, а не субъективных ощущений пациента. Такой подход критически важен для предотвращения осложнений, минимизации дискомфорта абстиненции и формирования устойчивой базы для дальнейшей противорецидивной работы.
Подробнее – вывод из запоя в стационаре анонимно
Just dropping by to say thanks for the effort, it does not go unnoticed when a writer cares this much about the reader, and after I went through modernideasnetwork I was certain this is one of the better corners of the internet for this particular kind of content which is genuinely refreshing.
While browsing curated fashion marketplaces for premium clothing that blends tradition and contemporary global trends, I found premium wardrobe atlas – it showcases Japanese denim craftsmanship and Italian leather elegance, creating a thoughtfully selected global fashion experience that feels polished, cohesive, and highly appealing for everyday style inspiration
malaysia online casino malaysia online casino
100cuci 100cuci
tordex onion https://sites.google.com/view/nexusdarknetmarket
Процедура капельницы от похмелья с контролем врача в Самаре начинается с первичной консультации, на которой врач осматривает пациента, измеряет его основные показатели (давление, пульс, температуру) и оценивает общее состояние. На основе этих данных выбирается оптимальный состав капельницы, которая может включать в себя различные компоненты, такие как солевые растворы, витамины, антиоксиданты и медикаменты для снятия симптомов похмелья.
Подробнее можно узнать тут – капельница от похмелья анонимно в самаре
Even just sampling a few posts the consistency is what stands out, and a look at fashionforlife confirmed the broader pattern, sites where every piece I sample lives up to the standard set by the others are sites with serious quality control and this one has clearly invested in whatever editorial process produces that consistency reliably.
оснащение лекционных аудиторий https://media-garage.ru/moya-kollekciya/osnashchenie-uchebnyh-auditorij-i-lekcionnyh-zalov-v-2026-godu
If I were grading sites on this topic this one would receive high marks, and a stop at findyourowngrowth continued earning those high marks, the informal grading I do mentally for content sources is something I take seriously even though it is informal and this site has been receiving consistent high marks across multiple sessions today.
During a casual exploration of fashion websites and trend platforms, I found fashion discovery hub placed in the middle of a recommendation paragraph, and the stylish collection appeared well organized while navigation stayed smooth across multiple categories.
After reviewing several delivery service websites earlier today, I eventually spent time on reliable parcel hub system where the layout looked clean and navigation felt easier than many competing platforms online today – The platform was helpful, and its straightforward navigation makes it a good choice for bookmarking and revisiting.
The pacing of the post was just right, never rushed and never dragged out unnecessarily, and a look at findnewinspiration maintained the same rhythm, you can tell the writer has experience because the difficult skill of pacing is something only practiced writers manage to handle well in long form content over time and across formats.
Great work on keeping things readable, the post never drags or repeats itself which I really appreciate, and a stop at urbanfashioncorner added a bit more context that fit naturally with what was already said here, no need to read everything twice to get the point being made today.
However casually I came to this site I have ended up reading carefully, and a look at keepmovingforward continued earning that careful reading, the conversion from casual visitor to careful reader is something content earns rather than demands and this site has accomplished that conversion for me over the course of just a few pieces.
Worth saying this site reads better than most paid newsletters I have tried, and a stop at everydayfindsmarket confirmed that comparison, the bar for free content is often lower than for paid but this site clears the paid bar consistently and that says something about the editorial approach behind the work being published here regularly.
Решение о помещении пациента в стационар принимается на основе объективных медицинских критериев, а не только по желанию родственников. К показаниям относятся: запой длительностью более 72 часов, выраженная абстиненция с тахикардией, артериальной гипертензией, профузным потоотделением, наличие в анамнезе алкогольных делириев или судорожных эпизодов, сопутствующие хронические заболевания печени, сердца, поджелудочной железы. В сложные ситуации, когда интоксикация затрагивает несколько систем одновременно, резкое прекращение употребления без медицинской поддержки может спровоцировать отек мозга, острую сердечную недостаточность или желудочно-кишечное кровотечение. При сочетанных расстройствах, когда в анамнезе присутствует наркомании, протоколы адаптируются под специфику психоактивных соединений и включают усиленный нейрологический контроль. Стационар позволяет провести полноценную диагностику, включая ЭКГ, экспресс-анализы крови, УЗИ внутренних органов и мониторинг сатурации, что формирует точную картину состояния и исключает шаблонные назначения.
Подробнее – http://www.domen.ru
скачиватель видео с ютуба https://skachat-video-s-youtube-9.ru
Genuinely glad I clicked through to read this rather than skipping past, and a stop at thinkcreateachieve confirmed I should keep clicking through to more pages here, the kind of resource that justifies its place in my browser history rather than feeling like wasted time which is the highest compliment I offer any site online today.
служба вывода из запоя служба вывода из запоя
Для жителей Екатеринбурга наркологическая клиника «Частный медик 24» предлагает услуги выезда нарколога на дом для проведения капельницы от похмелья. Это удобный и эффективный способ лечения, особенно если пациент испытывает тяжёлые симптомы похмелья и не может поехать в клинику. Выезд нарколога на дом позволяет начать лечение сразу, не тратя время на поездку и ожидания в клинике. Врач приезжает с необходимыми препаратами и оборудованием, проводит осмотр и назначает необходимую терапию.
Узнать больше – капельница от похмелья вызов на дом екатеринбург
сколько стоит заказать кухню по размерам https://zakazat-kuhnyu-20.ru
ares darknet https://sites.google.com/view/nexus-market-url
структура креатива реклама https://reklamnyj-kreativ20.ru
While exploring online resources about organization and simplified living, I came across organized lifestyle guide – The content was presented in a clean and structured format, making it easy to navigate while offering genuinely practical advice for improving daily habits and managing tasks more efficiently.
Liked the way the post balanced confidence and humility, and a stop at trendylifestylehub maintained the same balance, knowing when to assert and when to acknowledge uncertainty is a sign of mature thinking and the writers here have clearly developed that calibration through what I assume is years of careful work on their craft.
Generally my attention drifts on long posts but this one held it through the end, and a stop at growyourmindset earned the same sustained focus, content that defeats my drift tendency is content with substantive pulling power and this site has demonstrated that pulling power across multiple pieces in a session that has now run quite long actually.
Shoppers who prefer a balanced mix of relaxation and discovery often choose platforms that simplify the browsing process significantly Comfort shopping portal – creating a user friendly environment where individuals can explore various items easily while enjoying a calm and pleasant shopping atmosphere at any time of day.
A piece that handled multiple complications without becoming confused, and a look at dailyshoppingzone continued that organisational clarity, holding multiple threads in a single piece without losing any of them is a sign of skilled writing and this site has clearly developed the editorial discipline to manage complexity without sacrificing readability throughout.
Felt the post was written for someone like me without explicitly addressing me, and a look at modernstylemarket produced the same fit, when content lands on its target without pandering you know the writer has done careful audience thinking rather than relying on demographic targeting or interest signals to do the work of editorial decisions.
Не стоит медлить с вызовом врача-нарколога, если у человека проявляются тревожные признаки ухудшения состояния. Среди наиболее серьезных симптомов, требующих немедленного вмешательства врача, можно выделить продолжительный запой (более двух дней подряд), частую рвоту, невыносимую головную боль, выраженный тремор рук и тела, повышение артериального давления, нарушение ритма сердца, а также психические нарушения, включая тревогу, галлюцинации и бессонницу. Чем раньше пациент обратится за профессиональной помощью, тем выше шансы избежать серьезных осложнений и быстро вернуться к нормальной жизни.
Получить больше информации – https://vyvod-iz-zapoya-novosibirsk0.ru/vyvod-iz-zapoya-czena-novosibirsk
While analyzing online retail environments for usability improvements, I noticed Aurora Street browsing portal which offers a structured and visually balanced layout, and users can easily move through categories while enjoying a consistent design that makes product discovery simple and efficient overall.
During comparison of online deal aggregation websites, I noticed a platform that feels intuitive and well arranged, and Discount savings center provides a smooth browsing experience overall – The interface is simple, browsing is comfortable, and shoppers can access deals easily without overwhelming visuals or confusing categories.
кухню заказать кухню заказать
While exploring online fashion and style websites, I came across modern fashion guide – The platform featured a modern presentation and easy navigation structure, making browsing smooth, enjoyable, and visually pleasant across all style inspiration areas.
After searching through multiple online marketplaces and informational websites, I landed on professional browsing platform, and the smooth overall experience together with the user friendly layout left a very positive impression.
Процесс лечения капельницей помогает улучшить состояние пациента уже через короткий период. Важно, что процедура не только снимает симптомы похмелья, но и восстанавливает нормальную работу печени, почек и других органов, пострадавших от токсического воздействия алкоголя. Это помогает предотвратить долгосрочные последствия интоксикации, такие как хроническая усталость, проблемы с органами и психоэмоциональные расстройства.
Подробнее – капельница от похмелья вызов на дом екатеринбург
Использование автоматизированных систем дозирования обеспечивает точное введение лекарственных средств, что минимизирует риск передозировки и побочных эффектов. Постоянный мониторинг жизненно важных показателей позволяет врачу оперативно корректировать дозировки и адаптировать терапию под динамику состояния пациента.
Получить дополнительные сведения – нарколог на дом вывод из запоя на дому
darknet markets links https://sites.google.com/view/nexusdarknetlink
Earlier today I browsed through multiple internet stores before landing on featured urban meadow shop, and I found the website design appealing, with clearly displayed products and consistently fast page loading.
Наркологическая помощь в Нижнем Новгороде с выездом врача, капельницами и наблюдением пациента в наркологической клинике «Частный медик 24»
Изучить вопрос глубже – круглосуточная наркологическая помощь нижний новгород
Looking through other posts here the consistency is what makes the site valuable rather than any single piece, and a stop at opennewdoors extended that consistency observation, sites whose value lies in the ongoing pattern rather than in standout posts are sites I trust more deeply and this one has clearly built that kind of trust.
Процесс вывода из запоя капельничным методом организован по строгой схеме, позволяющей обеспечить максимальную эффективность терапии. Каждая стадия направлена на комплексное восстановление организма и минимизацию риска осложнений.
Изучить вопрос глубже – https://kapelnica-ot-zapoya-tyumen0.ru/kapelnicza-ot-zapoya-na-domu-tyumen
Reading this brought back an idea I had set aside months ago, and a stop at dailytrendmarket added more substance to that idea, content that revives dormant projects in my own thinking is content with serious creative value and this site is contributing to my own work in ways I had not expected when first clicking through.
После диагностики начинается активная фаза медикаментозного вмешательства. Современные препараты вводятся капельничным методом, что позволяет быстро снизить уровень токсинов в крови, восстановить нормальные обменные процессы и стабилизировать работу жизненно важных органов, таких как печень, почки и сердце.
Подробнее – https://vyvod-iz-zapoya-murmansk0.ru/vyvod-iz-zapoya-kruglosutochno-murmansk/
Felt the post had been written without looking over its shoulder, and a look at stayfocusedandgrow continued that confident posture, content written for its own sake rather than against imagined critics has a different quality and this site reads as written from a place of confidence rather than defensive justification of every claim.
Took the time to read every paragraph rather than skimming for the punchline, and a quick visit to dreamdealsstore earned the same careful attention from me, that is the highest signal I can give about content quality because my default mode is rapid scanning rather than deliberate reading on most pages.
1win android yuklab olish https://1win39427.help
На данном этапе врач уточняет длительность запоя, тип употребляемого алкоголя и наличие сопутствующих заболеваний. Тщательный анализ этих данных позволяет подобрать оптимальные методы детоксикации и снизить риск осложнений.
Детальнее – narkolog-vyvod-iz-zapoya murmansk
Вызов капельницы от похмелья с контролем врача в Самаре рекомендуется, когда симптомы похмелья становятся особенно тяжелыми и мешают нормальной жизнедеятельности. Несмотря на то, что многие пытаются справиться с похмельем с помощью домашних методов, такие как прием жидкости или таблеток, они не всегда оказываются достаточно эффективными. В случае сильных симптомов похмелья, капельница с врачебным контролем — это более безопасное и быстрое решение, при этом возможен вывод в стационаре, анонимное лечение и консультации по вопросам наркомании с учетом актуальной цены услуг.
Углубиться в тему – капельница от похмелья на дому в самаре
оборудование для залов заседаний https://i-tec.ru/oborudovanie_zalov_zasedaniy.html
Now appreciating that the post did not require me to agree with the writer to find it valuable, and a look at discoverhomeessentials maintained the same useful regardless of agreement quality, content that informs even when it does not convince is content with broader utility and this site reads as useful even when I disagree.
A piece that demonstrated competence without performing it, and a look at everydayfindsmarket maintained the same self assured but unshowy register, the gap between competence and performance of competence is one I track and this site has clearly chosen to demonstrate rather than perform which I find much more persuasive as a reader.
People trying to improve fitness often rely on structured running programs that help them stay consistent and reach personal goals like completing a 5k race Fitness Goal Studio I ran my first 5k after following their training plan and it was one of my proudest moments – Ran my first 5k after following their training plan, wow just wow
Современные методы лечения при выводе из запоя включают как медикаментозную детоксикацию, так и психологическую реабилитацию. В Уфе наркологи используют капельничное введение лекарственных средств, которые помогают быстро вывести токсины, нормализовать обмен веществ и стабилизировать работу внутренних органов. Одновременно с этим проводится психологическая поддержка для снижения эмоционального стресса, связанного с запоем.
Получить дополнительные сведения – вызов нарколога на дом уфа
Now thinking the topic is more interesting than I had given it credit for, and a stop at exploreinnovativeideas continued that elevated interest, content that revives my curiosity about subjects I had set aside is doing genuine work in the structure of my interests and this site is providing that revivifying effect today actually.
Лучшие букмекерские конторы Казахстана Лучшие букмекерские конторы Казахстана
Honestly the simplicity of the explanation made the topic click for me in a way other writeups had not, and a look at starttodaymoveforward continued that clarity into related areas, when a writer gets the level of explanation right the reader does the heavy lifting themselves and the post just enables it.
Took a few notes from this post, the points are easy to remember without needing to come back and check, and a look at simplebuyhub added a couple more, the kind of place that sticks in the memory long after the browser tab has been closed for the day which says a lot really.
Выезд нарколога начинается с осмотра пациента. Доктора измеряют давление, пульс, оценивают уровень сознания и выраженность симптомов. На основании этих данных формируется план лечения, который реализуется сразу на месте. Такой подход позволяет быстро перейти к стабилизации состояния без лишних этапов.
Получить дополнительную информацию – нарколог на дом вывод из запоя в санкт-петербурге
darknet markets onion address https://sites.google.com/view/nexusmarketplace
Yesterday I was complaining about the state of online writing and today this site has temporarily fixed that complaint, and a look at findyourtrend extended that mood reversal, the short term mood improvement that comes from finding good content is real and this site has produced that improvement for me at a useful moment.
Spent a few minutes here and came away with a clearer picture of the topic, the writing keeps things simple without dumbing them down, and after a stop at classytrendcollection the rest of the points lined up neatly which is something I appreciate when I am short on time and need answers fast.
While casually checking online shopping platforms this afternoon, I eventually explored quality catalog shelf because the interface looked structured and browsing felt more intuitive than many cluttered websites online currently – The website felt responsive overall and I enjoyed looking through different pages and categories.
Now feeling slightly more committed to my own careful reading practices having read this, and a stop at staycuriousdaily reinforced that commitment, content that models the kind of attention it deserves is content that calibrates the reader and this site has clearly raised my own bar for what to bring to good writing today.
К основным показаниям относятся:
Выяснить больше – вывод из запоя на дому цена санкт-петербург
During exploration of ranking optimization tools online, I found a platform that feels structured and efficient, and RankFlow system delivers a smooth browsing experience overall – The interface is smooth, and users can easily navigate through features without unnecessary delays or confusing layout elements.
Публикация охватывает основные направления развития современной медицины. Мы обсудим значимость научных исследований, инноваций в лечении и роли общественного участия в формировании системы здравоохранения.
Нажми и узнай всё – частный медик 24 рнд
лучшие букмекерские конторы мира лучшие букмекерские конторы мира
Probably the best thing I have read on this topic in the past month, and a stop at learnsomethingeveryday extended that ranking, the casual ranking of recent reading is informal but real and this site has been winning those rankings for me on this topic specifically over the last several weeks of regular reading sessions.
nexus onion mirror https://sites.google.com/view/nexusdarknetlink
100cuci slot 100cuci slot
рейтинг системных интеграторов https://media-garage.ru/moya-kollekciya/rejting-sistemnyh-multimedia-integratorov-goroda-moskvy
Skipped lunch to finish reading, which says something, and a stop at classychoicehub kept me at my desk longer than planned, when content beats the lunch impulse the writer has done something genuinely impressive in an attention environment full of immediately satisfying alternatives competing for the same finite block of reader time.
star888 خدمة عملاء 888starz
Looking back on this reading session it stands as one of the better ones recently, and a look at discoverbetterdeals extended that ranking, the informal ranking of reading sessions against each other is something I do mentally and this session ranks high largely because of this site and a couple of related pages here.
Will recommend this to a couple of friends who have been asking about this exact topic, and after dailytrendmarket I have even more reason to do so, the kind of site that earns word of mouth rather than chasing it through aggressive marketing or paid placements is always a treat to find online.
unlock 1win account unlock 1win account
Легендарная охота за богатствами продолжается! Новые загадки древних династий, опасные экспедиции и тайны, скрытые веками. Кто разгадает шифры прошлого и доберётся до бесценных артефактов? Захватывающие повороты, рискованные ставки и неожиданные союзники ждут тебя: https://sokrovischa-imperatora-3-sezon.top/
100cuci official 100cuci official
Вывод из запоя на дому в Санкт-Петербурге с выездом нарколога, детоксикацией и восстановлением состояния в наркологической клинике «Частный медик 24»
Получить больше информации – вывод из запоя на дому анонимно в санкт-петербурге
заказать кухню цены https://zakazat-kuhnyu-19.ru
I spent part of the afternoon reviewing different web platforms offering fresh information and engaging topics, and during that process I discovered trusted browsing option, where the interface stayed straightforward and the content updates appeared genuine, active, and consistently maintained across multiple sections and categories available there.
ленинградские кухни https://kuhni-spb-57.ru
https://lavita-clinik.ru/services/zhidkie-niti
888starz demo 888starz demo .
888stars 888stars .
During my exploration of discount shopping websites, I found a platform that feels modern and efficient, and AmazingDeals corner shop delivers a smooth browsing experience overall – The design is minimal, deals are clearly presented, and users can navigate offers without distractions or complexity.
8888 8888 .
В этой статье мы рассмотрим современные достижения в области медицины, включая инновационные методы лечения и диагностики. Мы обсудим важность профилактики заболеваний и роль технологий в улучшении качества здравоохранения. Читатели узнают о влиянии медицины на повседневную жизнь и ее значение для современного общества.
Кликни и узнай всё! – стоп алко
Learned something from this without having to dig through layers of fluff, and a stop at learnexploreachieve added a bit more context that helped tie things together for me, definitely a useful corner of the internet for anyone who wants real information without the usual marketing nonsense around it that often ruins similar pages.
Reading this on a long flight and finding it the best thing I read across hours of trying, and a stop at makeimpacteveryday kept the streak going, when content beats long flight reading you know it has substance because flight reading is a hard test of a piece given the alternatives available everywhere.
Now wondering how the writers calibrated the level of detail so well, and a stop at believeinyourideas continued the same calibration, the right level of detail is one of the harder editorial calls in any piece and this site has clearly developed an instinct for it through what I assume is years of careful practice publicly.
A piece that reads as if the writer trusted readers to fill in obvious gaps, and a look at findsomethingamazing continued that respectful approach, content that does not over explain what the reader can infer is content that respects intelligence and this site has clearly chosen to write to capable readers rather than to the lowest common denominator.
ستار 888 للمراهنات https://888starz-egyp.com/
During a casual exploration of fashion styling websites online, I found modern outfit hub – The platform offered helpful and engaging content with a polished appearance, making the browsing experience smooth, visually appealing, and easy to navigate across all sections.
Reading this confirmed a small detail I had been uncertain about, and a stop at uniquegiftideas provided the source for further checking, content that supports verification through citations or links rather than just asserting facts is more trustworthy and this site has clearly built its credibility through that kind of verifiable approach consistently.
While comparing various handmade goods websites, I observed that performance consistency is a strong advantage, and Azure Grove creative goods portal offers reliable browsing with fast page response times, ensuring users can comfortably explore different sections without interruptions or slow interface behavior affecting usability.
silk road darknet link https://sites.google.com/view/nexus-market-link
1win akkauntga kirish http://www.1win39427.help
Капельница от запоя в Краснодаре рекомендуется при первых признаках алкогольной интоксикации или тяжелого похмелья. Без своевременного медицинского вмешательства состояние человека может резко ухудшиться, привести к развитию осложнений и даже стать угрозой для жизни. Срочная помощь необходима в таких случаях:
Углубиться в тему – капельница от запоя стоимость
Этот обзор посвящен успешным стратегиям избавления от зависимости, включая реальные примеры и советы. Мы разоблачим мифы и предоставим читателям достоверную информацию о различных подходах. Получите опыт многообразия методов и найдите подходящий способ для себя!
Читать полностью – Похмельная служба Домодедово
Now realising the post solved a small problem I had been carrying for weeks, and a look at everydayshoppinghub extended that problem solving function, content that connects to specific unresolved questions in my own life rather than just providing general interest is content with real practical impact and this site is providing that practical value.
888 https://888starzeg1.com/
Decided I would read the archives over the weekend, and a stop at discoverandbuy confirmed that the archives would be worth the time, very few sites have archives I would actively read through but this one has earned that level of interest based on the consistent quality across what I have sampled so far.
Reading this in the time it took to drink half a cup of coffee, and a stop at uniquevaluecorner fit naturally into the second half, content that respects the rhythms of a typical morning is content with practical fit and this site has the kind of length and pacing that works for the way I actually read.
Алкогольная зависимость сопровождается не только физическими, но и глубокими психоэмоциональными проблемами. Психотерапевтическая помощь играет важную роль в лечении, помогая пациенту осознать причины зависимости и разработать стратегии для предотвращения рецидивов.
Детальнее – вызов нарколога на дом уфа
В этой статье мы рассматриваем разрушительное влияние зависимости на жизнь человека. Обсуждаются аспекты, такие как здоровье, отношения и профессиональные достижения. Читатели узнают о необходимости обращения за помощью и о путях к восстановлению.
Только для своих – «Похмельная служба» в Домодедово
While checking various online shopping platforms earlier today, I came across helpful petal urban store and enjoyed browsing here, with everything appearing well maintained and content reading naturally across all pages.
Keeping track of new fashion releases has become part of my daily scroll because sneaker drops happen without much warning nowadays Modern Outfit Spot I secured a pair I had been watching for days and the experience felt rewarding after missing several previous releases recently
Эта публикация содержит ценные советы и рекомендации по избавлению от зависимости. Мы обсуждаем различные стратегии, которые могут помочь в процессе выздоровления и важность обращения за помощью. Читатели смогут использовать полученные знания для улучшения своего состояния.
Продолжить изучение – вывод из запоя ростов
Публикация посвящена жизненным историям людей, успешно справившихся с зависимостью. Мы покажем, что выход есть, и он начинается с первого шага — принятия проблемы и желания измениться.
Проследить причинно-следственные связи – вывод из запоя ростов на дону на дому
кухня глория кухня глория
I usually skim posts like these but this one held my attention all the way through, and a stop at uniquevaluezone did the same, that is a strong endorsement coming from me because I am usually quick to bounce when content gets repetitive or fails to deliver on its initial promise made in the headline.
Легендарная охота за богатствами продолжается! Новые загадки древних династий, опасные экспедиции и тайны, скрытые веками. Кто разгадает шифры прошлого и доберётся до бесценных артефактов? Захватывающие повороты, рискованные ставки и неожиданные союзники ждут тебя: шоу Сокровища императора 3 сезон
start 888 start 888 .
After looking through different shopping-related websites and online recommendation pages for new browsing ideas, I discovered recommended shopping place – The categories were arranged clearly, the design looked modern and appealing, and the overall navigation process made it simple to explore a variety of interesting content without any confusion.
скачать из ютуба видео скачать из ютуба видео
Worth pointing out the careful word choice in this post, no buzzwords and no jargon, and a look at findyournextgoal continued that disciplined vocabulary, sites that resist the pull of trendy language are sites that will read well in five years and this one is clearly built for that kind of long durability.
nexus dark web market https://sites.google.com/view/nexusdarknetlink
888starz crash https://888starz-eg2.org/
Эта доказательная статья представляет собой глубокое погружение в успехи и вызовы лечения зависимостей. Мы обращаемся к научным исследованиям и опыту специалистов, чтобы предоставить читателям надежные данные об эффективности различных методик. Изучите, что работает лучше всего, и получите информацию от экспертов.
Связаться за уточнением – narcology clinic ростов на дону
Felt like I was reading something written by someone who actually thinks about the topic rather than reciting it, and a look at discovergreatvalue reinforced that impression, the difference between recited content and considered content is huge and this site clearly belongs to the latter category which I appreciate as a careful reader looking for substance.
заказать кухню по индивидуальным размерам заказать кухню по индивидуальным размерам
В данном обзоре представлены основные направления и тренды в области медицины. Мы обсудим актуальные проблемы здравоохранения, свежие открытия и новые подходы, которые меняют представление о лечении и профилактике заболеваний. Эта информация будет полезна как специалистам, так и широкой публике.
Наши рекомендации — тут – стоп алко дмодедово
ستارز بيت 888staz
Excellent execution from start to finish, the post never loses its rhythm and the points stay sharp, and a quick stop at shapeyourdreams kept the same level going, consistency like this across a site is the marker of a serious operation rather than a casual side project running on autopilot somewhere else.
анализ баннеров https://reklamnyj-kreativ20.ru
продать авто продать авто .
A genuine compliment to the writer for keeping the post focused on what mattered, and a look at simplebuyhub continued that disciplined focus, focus is a editorial choice that compounds across many small decisions and this site has clearly made those small decisions consistently across what I have read so far this week here.
After reviewing several informational websites this week, I eventually spent time on quality update corner where the layout looked clean and browsing felt more intuitive than many cluttered websites online today – The content shared here was nice and everything appeared updated and carefully arranged for visitors in a simple way.
Решение о помещении пациента в стационар принимается на основе объективных медицинских критериев, а не только по желанию родственников. К показаниям относятся: запой длительностью более 72 часов, выраженная абстиненция с тахикардией, артериальной гипертензией, профузным потоотделением, наличие в анамнезе алкогольных делириев или судорожных эпизодов, сопутствующие хронические заболевания печени, сердца, поджелудочной железы. В сложные ситуации, когда интоксикация затрагивает несколько систем одновременно, резкое прекращение употребления без медицинской поддержки может спровоцировать отек мозга, острую сердечную недостаточность или желудочно-кишечное кровотечение. При сочетанных расстройствах, когда в анамнезе присутствует наркомании, протоколы адаптируются под специфику психоактивных соединений и включают усиленный нейрологический контроль. Стационар позволяет провести полноценную диагностику, включая ЭКГ, экспресс-анализы крови, УЗИ внутренних органов и мониторинг сатурации, что формирует точную картину состояния и исключает шаблонные назначения.
Изучить вопрос глубже – vyvod-iz-zapoya-v-staczionare-sankt-peterburg-18.ru/
Top quality material, deserves more attention than it probably gets, and a look at findyourinspirationtoday reflected the same effort across the site, a hidden gem in the modern web where most attention goes to whoever shouts loudest rather than whoever actually delivers the best content for their readers without much marketing fanfare.
I really like the calm tone here, it does not push anything on the reader, and after I went through globalfashionfinds I felt the same way, just steady useful content laid out without drama, which is exactly what someone trying to learn something quickly needs to find rather than aggressive marketing.
100cuci site 100cuci site
A piece that built up gradually rather than front loading its main points, and a look at findbestdeals maintained the same gradual structure, content that trusts the reader to reach conclusions through accumulating reasoning is more persuasive than content that announces conclusions and then defends them and this site uses the persuasive approach.
ares market url https://sites.google.com/view/nexusmarketplace
1win pul yechish usullari https://1win39427.help/
mostbet setari surse necunoscute android https://mostbet41079.help/
However many similar pages I have read this one taught me something new, and a stop at changeyourfuture added more new material, content that contributes genuinely fresh information rather than recycling what is already widely available is content with real informational value and this site is providing that informational freshness at a notable rate.
Reading this in a relaxed evening setting was a small pleasure, and a stop at yourstylematters extended the pleasant evening reading, content that fits the tone of relaxed time without becoming forgettable is what I look for in evening reading and this site has the right tone for that particular slot in my daily reading routine.
Ставки на спорт Казахстан Ставки на спорт Казахстан
During my online search this afternoon, I checked multiple shopping websites before discovering high quality web directory, and I appreciated how naturally the navigation flowed while the updated content kept the browsing experience engaging.
После первичного осмотра начинается активная фаза детоксикации. Современные препараты вводятся капельничным методом для быстрого снижения уровня токсинов в крови и восстановления обменных процессов. Этот этап критически важен для нормализации работы печени, почек и сердечно-сосудистой системы.
Ознакомиться с деталями – вывод из запоя в владимире
На основании проведенных обследований врач разрабатывает индивидуальную терапевтическую схему. Основной этап — детоксикация организма при помощи внутривенных инфузий. В капельницу включают растворы для восстановления водно-солевого баланса, выведения токсинов и улучшения работы внутренних органов. Также по показаниям назначают препараты для поддержки работы печени и сердца, стабилизации психоэмоционального состояния и снятия симптомов абстиненции. На протяжении процедуры врач ведет постоянный контроль за состоянием пациента, корректируя лечение при необходимости.
Получить больше информации – вывод из запоя цена
During comparison of innovation and design platforms, I noticed a website that feels modern and easy to browse for creative inspiration, and Explore Creative Ideas provides a smooth browsing experience overall – The platform structures content clearly, helping designers and innovators stay inspired without unnecessary complexity.
Now setting aside time on my next free afternoon to read more from the archives, and a stop at newtrendmarket confirmed that time will be well spent, the rare site whose archive deserves a dedicated reading session rather than just casual sampling is the kind of resource worth scheduling around and this one qualifies clearly.
После первичной диагностики начинается активная фаза детоксикации. Современные препараты вводятся капельничным методом, что позволяет быстро вывести токсины и восстановить нормальные обменные процессы. Этот этап критически важен для стабилизации работы печени, почек и сердечно-сосудистой системы.
Выяснить больше – капельница от запоя тюменская область
В этом обзоре представлены различные методы избавления от зависимости, включая терапевтические и психологические подходы. Мы сравниваем их эффективность и предоставляем рекомендации для тех, кто хочет вернуться к трезвой жизни. Читатели смогут найти информацию о реабилитационных центрах и поддерживающих группах.
Изучить вопрос глубже – частный медик 24 рнд
Игнорирование этих симптомов может привести к тяжелым последствиям для здоровья, включая алкогольный психоз и повреждение внутренних органов.
Подробнее – врача капельницу от запоя краснодар
Now feeling slightly more committed to my own careful reading practices having read this, and a stop at trendycollectionhub reinforced that commitment, content that models the kind of attention it deserves is content that calibrates the reader and this site has clearly raised my own bar for what to bring to good writing today.
Когда запой начинает оказывать разрушительное воздействие на организм, своевременная помощь становится критически важной для предотвращения серьезных осложнений. В Мурманске квалифицированные наркологи на дому обеспечивают оперативную детоксикацию, восстановление обменных процессов и стабилизацию работы внутренних органов. Лечение проводится в комфортной домашней обстановке, что позволяет избежать лишнего стресса и сохранить полную конфиденциальность.
Узнать больше – http://vyvod-iz-zapoya-murmansk00.ru/vyvod-iz-zapoya-na-domu-murmansk/
While searching for smart shopping platforms online, I discovered modern shopping guide – The platform featured interesting content and smooth navigation, making browsing easy, enjoyable, and worth returning to regularly for updated deals and inspiration.
Процесс лечения капельницей помогает улучшить состояние пациента уже через короткий период. Важно, что процедура не только снимает симптомы похмелья, но и восстанавливает нормальную работу печени, почек и других органов, пострадавших от токсического воздействия алкоголя. Это помогает предотвратить долгосрочные последствия интоксикации, такие как хроническая усталость, проблемы с органами и психоэмоциональные расстройства.
Углубиться в тему – капельница от похмелья
Reading this triggered a small change in how I think about the topic going forward, and a stop at makesomethingnew reinforced that subtle shift, the rare content that actually moves my thinking rather than just confirming or filling it is the kind I most value and this site is providing that kind of impact today.
Услуга вывода из запоя на дому в Мурманске предполагает комплексное лечение алкогольной интоксикации, направленное на оперативное снижение уровня токсинов в организме. Сразу после поступления вызова специалист проводит детальный осмотр, собирает анамнез и определяет степень интоксикации. На основании собранной информации разрабатывается индивидуальный план терапии, который может включать капельничное введение медикаментов, контроль жизненно важных показателей и психологическую поддержку. Такой комплекс мер позволяет стабилизировать состояние пациента и начать процесс выздоровления без необходимости посещения стационара.
Выяснить больше – https://vyvod-iz-zapoya-murmansk0.ru/vyvod-iz-zapoya-kruglosutochno-murmansk
wethenorth darknet link https://sites.google.com/view/nexusdarknetlink
Started taking notes about halfway through because the points were stacking up, and a look at groweverymoment added enough material that my notes file grew further, content that demands note taking from a passive reader is content with substance and the writers here are clearly producing that kind of work consistently across topics.
Thanks for the honest framing without exaggerated claims that the topic will change my life, and a stop at believeandcreate kept the same modest tone, restraint in marketing language signals trustworthiness and the writers here are clearly playing the long game by building credibility rather than chasing immediate clicks through hyperbole.
Quietly impressive in a way that does not announce itself, and a stop at brightvalueworld extended that quiet impressiveness, the kind of quality that emerges through sustained attention rather than first impressions is the kind I trust more deeply and this site has been earning that deeper trust across multiple sessions over time consistently.
Этот документ охватывает важные аспекты медицинской науки, сосредотачиваясь на ключевых вопросах, касающихся здоровья населения. Мы рассматриваем свежие исследования, клинические рекомендации и лучшие практики, которые помогут улучшить качество лечения и профилактики заболеваний. Читатели получат возможность углубиться в различные медицинские дисциплины.
Нажми и узнай всё – narcology clinic
купить кухню на заказ в спб https://kuhni-spb-57.ru
While reviewing different online communities and useful recommendation pages this afternoon, I encountered creative progress hub during my search, and the platform delivered a pleasant experience where the responsive layout and balanced visual structure made exploring multiple sections smooth and comfortable for longer visits online.
лучшие букмекерские конторы мира лучшие букмекерские конторы мира
Now recognising that this site has earned a place in the small group of resources I treat as authoritative, and a stop at brightnewbeginnings confirmed that placement, the difference between resources I trust and resources I just consume is real and this site has clearly moved into the trusted category through consistent quality over time.
During my review of multiple shopping sites, I checked Collective Bay shopping site where the design emphasizes clarity and smooth navigation between sections – The interface feels neat and easy to use overall.
заказать кухню под заказ заказать кухню под заказ
Those trying to improve environmental responsibility often start with simple household changes that are easy to maintain long term Green Life Initiative I started recycling more regularly and reducing plastic waste, and it feels like a practical positive shift – Started recycling more and using less plastic, small steps matter
100cuci link alternatif 100cuci link alternatif
Now adding this to a list of sites I want to see flourish, and a stop at makepositivechanges reinforced that wish, the few sites I actively root for are sites that produce the kind of work I want more of in the world and this one has joined that small list based on what I have read so far.
При наличии этих симптомов помощь должна быть оказана в кратчайшие сроки. Выезд нарколога позволяет не только стабилизировать состояние, но и определить дальнейшую тактику лечения.
Ознакомиться с деталями – круглосуточная наркологическая помощь в нижнем новгороде
100cuci apk 100cuci apk
I explored several internet stores and product websites this morning before discovering professional pine urban marketplace, and I found a nice browsing experience overall, with well-organized categories and consistently working website features throughout.
Beyond the immediate post itself the editorial sensibility behind the site is what struck me, and a stop at believeinyourideas continued displaying that sensibility, content that reveals editorial choices through accumulated reading is content with structural quality and this site has clearly developed an underlying approach worth identifying through multiple sessions of reading.
abacus darknet market https://sites.google.com/view/nexus-market-url
Recommended without hesitation if you care about careful coverage of this topic, and a stop at brightfashionfinds reinforced the recommendation, the bar I set for unhesitating recommendations is fairly high and this site has cleared it through the cumulative weight of multiple consistently good pieces rather than through any single standout post which is meaningful.
During comparison of logistics service platforms, I noticed a website that feels efficient and user focused, and ParcelWise delivery services provides smooth browsing overall – The interface is simple, pages load quickly, and users can explore services without clutter or unnecessary complexity affecting usability.
Now recognising that the post handled the topic with appropriate technical precision without becoming dry, and a stop at yourvisionawaits continued that balance, technical precision and readability are often in tension and this site has clearly figured out how to maintain both at once which is one of the harder editorial achievements in the form.
Thanks for the honest framing without exaggerated claims that the topic will change my life, and a stop at discovermoretoday kept the same modest tone, restraint in marketing language signals trustworthiness and the writers here are clearly playing the long game by building credibility rather than chasing immediate clicks through hyperbole.
Now wishing I had found this site sooner, and a look at dailytrendspot extended that mild regret, the calculation of how many years of good content I missed by not finding the right sources earlier is one I try not to make too often but it does come up sometimes when I find sites this good.
заказать кухню под заказ заказать кухню под заказ
During my exploration of logistics and courier websites earlier today, I reviewed express tracking system since the interface felt smooth and minimal – The overall experience felt pleasant today, and the website design looked modern, inviting, and easy for users who prefer simple and fast parcel updates.
Обзор смесителей Vidima по сериям и ключевым особенностям. В статье рассматриваются модели для кухни, ванной и раковины, материалы, покрытия, дизайн, удобство управления и отличия линеек, чтобы проще выбрать подходящий вариант под стиль интерьера и ежедневную нагрузку: https://santexnik-market.ru/smesiteli/smesitel-vidima-obzor-serij/
Now considering the post as evidence that careful blog writing is still possible, and a look at learnandimprove extended that evidence, the broader question of whether the modern web can sustain quality writing has obvious empirical answers in sites like this one and seeing them is reassuring even when they remain a minority overall today.
Worth pointing out that the writing reads as confident without being defensive about it, and a look at discoverhiddenopportunities extended that secure tone, content that does not pre emptively argue against imagined critics has a different quality from defensive writing and this site reads as written from a place of real ease.
Reading this fit naturally into my afternoon walk because I was reading on my phone, and a stop at globaltrendstore continued well in that walking format, content that survives mobile reading without becoming awkward is content with format flexibility and this site has clearly thought about how it reads across different devices today.
High quality writing, no marketing speak and no buzzwords that mean nothing, and a stop at discovergreatideas kept that going, simple direct content that actually communicates something is harder to find than it should be and this is one of the rare places that gets it right consistently across many different posts.
torzon market link https://sites.google.com/view/nexusdarknetmarket
Skipped the comments to avoid spoilers and came back later to find them genuinely worth reading, and a stop at growbeyondlimits extended that surprised respect, when the discussion below a post matches the quality of the post itself you have found something special and this site appears to attract that kind of audience.
While exploring savings and promotions platforms online, I found a website that feels practical and easy to browse, and Discount Discovery center delivers a smooth browsing experience overall – The platform is responsive, deals are highlighted neatly, and users can discover offers without clutter or complicated navigation paths.
During a casual visit to educational and informational platforms, I found modern info space – The website provided clear navigation and neatly arranged content, creating a smooth and pleasant experience for users interested in exploring helpful and well presented learning materials online.
Generally I am cautious about recommending sites on first encounter but this one warrants the exception, and a look at everydayshoppinghub reinforced the exception making, the rare site that justifies breaking my normal cautious approach is the rare site worth flagging early and this one has prompted exactly that early flagging response from me.
Этот текст представляет собой обзор свежих данных и исследований в области медицины. Он призван помочь читателям понять, как научные достижения влияют на лечение, диагностику и общее состояние системы здравоохранения.
Переходите по ссылке ниже – narcology clinic
Liked the natural conversational tone throughout, never stiff and never overly casual either, and a stop at yourvisionmatters kept that comfortable middle ground going, finding a tone that respects the reader without becoming distant or overly familiar is harder than it sounds and this site nails that balance consistently across many different pieces.
cannaexpress darknet market https://sites.google.com/view/nexusmarketplace
Once I had read three posts the editorial pattern was clear, and a look at newtrendmarket confirmed the pattern from a fourth angle, sites where the underlying approach reveals itself through accumulated reading rather than being announced are sites with real depth and this one has that quality clearly visible across multiple pieces consistently.
I really like the calm tone here, it does not push anything on the reader, and after I went through nexshelf I felt the same way, just steady useful content laid out without drama, which is exactly what someone trying to learn something quickly needs to find rather than aggressive marketing.
Genuinely changed how I think about a small piece of the topic, which does not happen often online, and a look at buildyourpotential added another nudge in the same direction, the kind of writing that earns a small mental shift rather than just confirming what you already thought before reading is a sign of careful thought.
Bookmark added in three places to make sure I do not lose the link, and a look at linkbeacon got the same redundant treatment, sites I am afraid to lose are the rare keepers and this is clearly one of them based on what I have read so far across this and a couple of related posts.
заказать кухню в спб от производителя недорого заказать кухню в спб от производителя недорого
В этом обзоре мы обсудим современные методы борьбы с зависимостями, включая медикаментозную терапию и психотерапию. Мы представим последние исследования и их результаты, чтобы читатели могли быть в курсе наиболее эффективных подходов к лечению и поддержке.
Следуйте по ссылке – вывод из запоя в ростове-на-дону
Anyone curious about this topic would do well to start here, the foundation laid is solid, and a stop at smartshoppingplace would round out their understanding nicely, this is the kind of resource I would point a friend toward without hesitation if they asked me where to begin learning about anything in this area.
В рамках клинической работы применяются следующие направления медицинского воздействия, которые обеспечивают целостность лечебного процесса:
Получить дополнительные сведения – https://narkologicheskaya-klinika-v-rnd19.ru/narkolog-rostov-na-donu
A piece that earned its conclusions through the body rather than asserting them at the end, and a look at dreamcreateachieve maintained the same earned quality, conclusions that follow from what came before are more persuasive than declarations and this site has clearly internalised that principle in how it constructs arguments throughout pieces.
загрузчик видео с ютуба загрузчик видео с ютуба
Вызов капельницы от похмелья с контролем врача в Самаре рекомендуется, когда симптомы похмелья становятся особенно тяжелыми и мешают нормальной жизнедеятельности. Несмотря на то, что многие пытаются справиться с похмельем с помощью домашних методов, такие как прием жидкости или таблеток, они не всегда оказываются достаточно эффективными. В случае сильных симптомов похмелья, капельница с врачебным контролем — это более безопасное и быстрое решение, при этом возможен вывод в стационаре, анонимное лечение и консультации по вопросам наркомании с учетом актуальной цены услуг.
Подробнее – капельница от похмелья самара
бонусы на ставки бонусы на ставки
Worth recognising that the post handled a familiar topic without reaching for any of the obvious hot takes, and a stop at styleandchoice continued that fresh treatment, sites that find new angles on subjects others have exhausted are sites worth following carefully and this one has clearly developed that exploratory instinct through patient practice.
100cuci mirror 100cuci mirror
рейтинг БК Узбекистана рейтинг БК Узбекистана
A nicely understated post that does not shout for attention, and a look at urbanfashioncorner maintained the same quiet quality, understatement is a stylistic choice that distinguishes serious writing from attention seeking writing and this site has clearly committed to the understated approach as a core editorial value rather than just a phase.
Will be coming back to this for sure, too much good content to absorb in one sitting, and a stop at growyourmindset only added more pages I want to dig through, this site is going onto my regular rotation list because it consistently delivers something worth the visit lately rather than empty filler.
During my review of online shopping destinations, I came across a well-designed interface focused on usability, and Haven Blossom product showcase delivers a modern browsing environment – The structure is simple yet effective, allowing users to navigate smoothly between categories while maintaining a visually balanced and clutter-free experience overall.
машинное обучение креативы https://reklamnyj-kreativ20.ru
https://www.authoraevia.com/forum/topic/was-it-easy-to-find/#postid-2601774
ares url https://sites.google.com/view/nexusdarknetmarket
Thanks for the simple approach, too many sites bury the actual point under layers of unnecessary words, but here every line earns its place, and a look at groweverymoment showed the same care for the reader which is something I will remember the next time I need answers on a topic.
During my search across several digital marketplaces this afternoon, I eventually visited high quality ridge urban hub, and I appreciated the simple navigation, where products seemed accessible and performance stayed stable throughout the browsing flow.
Decided to set a calendar reminder to revisit, and a stop at findpeaceandpurpose extended that revisit list, calendar entries for content are a level of commitment I rarely make but when I do they signal a higher regard than a simple bookmark and this site has earned that calendar tier of relationship from me today.
1win loyalty program 1win loyalty program
During a relaxed session browsing online fashion and lifestyle shops, I came across fashion style corner placed in a list of recommended links, and the browsing experience felt smooth as product pages were clean, well organized, and enjoyable to explore.
Refreshing to read something where the words actually mean something instead of filling space, and a stop at explorelimitlesspossibilities kept that going, the writing here trusts the reader to follow along without endless repetition or constant reminders of what was already said earlier in the post which I appreciate.
Наркологическая клиника в Ростове-на-Дону рассматривается как специализированное медицинское учреждение, где лечение зависимостей выстраивается с учётом необходимости анонимности и круглосуточной доступности помощи. В клинике «Северный Вектор» работа организована таким образом, чтобы пациент мог обратиться за лечением в любое время суток без риска раскрытия персональной информации. Такой формат особенно важен при острых состояниях, требующих немедленного врачебного вмешательства и медицинского контроля.
Подробнее тут – https://narkologicheskaya-klinika-v-rostove19.ru/chastnaya-narkologicheskaya-klinika-rostov-na-donu
заказать кухню по индивидуальному проекту заказать кухню по индивидуальному проекту
mostbet MDL https://mostbet18305.help/
Glad to have another reliable bookmark for this topic, and a look at discoverpossibility suggested several more pages I will be marking too, building a personal library of trustworthy resources is one of the actual rewards of careful browsing and this site is earning a place on my permanent shortlist for the topic.
Наркологическая клиника «Южный МедКонтроль» объединяет современные медицинские технологии, опыт специалистов и уважительное отношение к каждому пациенту. Здесь создаются условия для безопасного и результативного лечения зависимостей любой сложности — от алкогольной до полинаркотической. Центр работает в круглосуточном режиме, предлагая выезд врачей на дом, детоксикацию, кодирование и длительные программы реабилитации. Основная цель специалистов — восстановление физического и психологического равновесия человека, возвращение способности к полноценной жизни без зависимости.
Разобраться лучше – http://narkologicheskaya-clinika-v-rostove19.ru/
dark market https://sites.google.com/view/nexusmarketplace
Adding to the bookmarks now before I forget, that is how good this is, and a look at packnest confirmed the rest of the site is worth saving too, this is one of those rare finds that justifies the time spent searching the web for once which is a relief in the current environment.
While casually browsing different online marketplaces throughout the afternoon, I eventually spent some time exploring organized digital showcase, where the website layout felt intuitive and finding products through the categories stayed pleasantly easy.
A modest masterpiece in its own quiet way, and a look at yourvisionawaits confirmed the same quiet quality across the rest of the site, calling something a masterpiece is usually overstating but for content this carefully crafted the word feels appropriate even if the writers themselves would probably resist the label honestly.
While exploring urban fashion e-commerce platforms, I found a website that feels modern and visually appealing, and City Style Market delivers smooth navigation overall – The platform showcases stylish streetwear collections designed for modern lifestyles, making it easy for users to find fashion inspiration.
Found this useful, the points line up well with what I have been thinking about lately, and a stop at thepowerofgrowth added some angles I had not considered yet, definitely walking away with more than I came for which is the best outcome from time spent reading online for any kind of topic.
Reading this prompted a brief but useful conversation with a colleague who happened to walk by, and a stop at modernhometrends extended that conversational seed, content that becomes a starting point for in person discussion rather than ending in solitary reading is content with social generative energy and this site has plenty of it apparently.
Closed the laptop after this and let the ideas settle for a few hours, and a stop at trendywearstore similarly rewarded reflective time, content that benefits from sitting with rather than racing past is the kind I want more of and the kind that this site appears to consistently produce week after week here.
Now appreciating that I did not feel exhausted after reading, and a stop at stayfocusedandgrow extended that energising quality, content that leaves me with more attention than it consumed is rare and the gap between draining and energising content is real over the course of a typical day spent reading widely online.
1win wager requirement 1win3003.mobi
Even just sampling a few posts the consistency is what stands out, and a look at budgetfriendlypicks confirmed the broader pattern, sites where every piece I sample lives up to the standard set by the others are sites with serious quality control and this one has clearly invested in whatever editorial process produces that consistency reliably.
Купить Бу автомобиль пмр Купить Бу автомобиль пмр .
However measured this site clears the bar I set for sites I take seriously, and a stop at ranknexus continued clearing that bar, the metrics I use for site quality are admittedly informal but they are consistent and this site has cleared them on multiple measurements across multiple visits which is meaningful for my evaluation.
сколько стоит заказать кухню https://zakazat-kuhnyu-18.ru
Лечебный процесс организуется таким образом, чтобы каждый этап логически дополнял предыдущий и формировал устойчивую динамику. Это позволяет избежать резких изменений состояния и поддерживать медицинскую безопасность.
Подробнее можно узнать тут – наркологическая клиника нарколог в ростове-на-дону
Speaking from the perspective of a fairly demanding reader the writing here clears the bar consistently, and a look at dailytrendmarket continued clearing that bar, the calibration of demanding reader is something I apply to all sources and this site has been one of the few that handles the demanding reading well across pieces sampled.
Круглосуточный режим работы в клинике «Северный Вектор» обусловлен спецификой течения зависимостей, при которых ухудшение состояния может происходить внезапно. Наркологическая клиника в Ростове-на-Дону обеспечивает постоянную готовность медицинского персонала к приёму пациентов, что позволяет сократить время между возникновением симптомов и началом лечения. Такой подход снижает риск осложнений и повышает клиническую безопасность.
Углубиться в тему – наркологическая клиника стационар
В «Южном МедКонтроле» лечение зависимостей строится поэтапно, с постепенным восстановлением физиологических функций и эмоциональной устойчивости. Врачи используют современные методы детоксикации, фармакотерапию и психотерапию, которые действуют комплексно. Каждый этап направлен на достижение конкретного результата: очищение организма, снятие симптомов абстиненции, стабилизацию состояния и профилактику срывов.
Получить больше информации – наркологическая клиника лечение алкоголизма ростов-на-дону
A piece that did not try to be timeless and ended up reading as durable anyway, and a look at globalstyleoutlet extended that durable feel, content that stays useful past its publication date without straining for permanence is content that ages well and this site has the kind of evergreen quality that I value highly today.
Just dropping by to say thanks for the effort, it does not go unnoticed when a writer cares this much about the reader, and after I went through nexshelf I was certain this is one of the better corners of the internet for this particular kind of content which is genuinely refreshing.
Статья о пурифайерах для дома и офиса: чем они отличаются от кулеров с бутылями, как подключаются к водопроводу и какие ступени фильтрации используют. Разбираются нагрев, охлаждение, обслуживание, замена фильтров и удобство постоянного доступа к чистой воде https://santexnik-market.ru/voda-i-vodoochistka/purifajer-vsyo-ob-umnom-istochnike-chistoj-vody-dlya-doma-i-ofisa/
кухни под заказ спб https://kuhni-spb-58.ru
Reading this on a long flight and finding it the best thing I read across hours of trying, and a stop at linkbeacon kept the streak going, when content beats long flight reading you know it has substance because flight reading is a hard test of a piece given the alternatives available everywhere.
сколько стоит капельница от запоя сколько стоит капельница от запоя
купить заказать кухню купить заказать кухню
Closed three other tabs to focus on this one and never opened them again, and a stop at trendywearstore similarly held attention exclusively, content that crowds out other reading from working memory is content with real density and this site has demonstrated that density across multiple pages I have visited so far this morning.
mostbet balans artırma https://mostbet01859.help/
Выбор между домашней помощью и стационарным лечением определяется не удобством, а медицинской целесообразностью. В условиях клиники исключаются внешние триггеры, обеспечивается изоляция от источников алкоголя и создается контролируемая среда, где терапевтические решения принимаются на основе объективных показателей, а не субъективных ощущений пациента. Такой подход критически важен для предотвращения осложнений, минимизации дискомфорта абстиненции и формирования устойчивой базы для дальнейшей противорецидивной работы.
Получить больше информации – вывод из запоя в стационаре в санкт-петербурге
Now sitting back and recognising that this was a small but real win in my reading day, and a stop at makesomethingnew extended that quiet win, the cumulative effect of small reading wins versus the cumulative effect of small reading losses is real over time and this site is contributing to the wins side of that ledger.
Reading this felt easy in the best way, no friction and no confusion at any point, and a stop at seogrove carried that same comfort across more pages, the kind of editorial flow that lets you absorb information without fighting the format which is increasingly hard to find on the open web today across topics.
Процесс вывода из запоя капельничным методом организован по строгой схеме, позволяющей обеспечить максимальную эффективность терапии. Каждая стадия направлена на комплексное восстановление организма и минимизацию риска осложнений.
Исследовать вопрос подробнее – https://kapelnica-ot-zapoya-tyumen0.ru/
На данном этапе врач уточняет длительность запоя, тип употребляемого алкоголя и наличие сопутствующих заболеваний. Тщательный анализ этих данных позволяет подобрать оптимальные методы детоксикации и снизить риск осложнений.
Подробнее – срочный вывод из запоя мурманск
A piece that earned its conclusions through the body rather than asserting them at the end, and a look at thebestvalue maintained the same earned quality, conclusions that follow from what came before are more persuasive than declarations and this site has clearly internalised that principle in how it constructs arguments throughout pieces.
В этой статье рассматриваются актуальные вопросы, связанные с развитием медицинской науки и её внедрением в повседневную практику. Особое внимание уделено вопросам профилактики, ранней диагностики и использованию технологий для улучшения здоровья человека.
Подробная информация доступна по запросу – Частный Медик 24 проводит реабилитацию зависимых
Алкогольный запой является тяжёлым состоянием, требующим срочного медицинского вмешательства. Наркологическая клиника «Пульс» в Краснодаре предлагает эффективную помощь в борьбе с алкогольной зависимостью, используя проверенный метод — капельницу от запоя на дому. Наши специалисты оперативно выезжают по указанному адресу и обеспечивают качественную медицинскую помощь с гарантией конфиденциальности и безопасности.
Получить больше информации – сколько стоит капельница от запоя в краснодаре
Reading this between two meetings turned out to be the highlight of the morning, and a stop at urbanwearoutlet continued that highlight quality, content that outshines the structured parts of a working day is doing something well beyond ordinary and this site has produced multiple such highlights for me already this week alone.
abacus darknet url https://sites.google.com/view/nexusmarketdarknet
A piece that reads as if the writer trusted readers to fill in obvious gaps, and a look at theartofgrowth continued that respectful approach, content that does not over explain what the reader can infer is content that respects intelligence and this site has clearly chosen to write to capable readers rather than to the lowest common denominator.
Started forming counter examples to test the claims and the post handled most of them implicitly, and a look at learnsomethingnewtoday continued that anticipatory style, writers who think two steps ahead of the critical reader save themselves from a lot of follow up work and this writer has clearly internalised that habit consistently.
After checking different online resources focused on recommendations and practical browsing experiences, I encountered special options showcase – The browsing flow felt straightforward, the featured information appeared easy to access, and the clean presentation style created a pleasant overall experience for casual visitors.
Bookmark added in three places to make sure I do not lose the link, and a look at smartshoppingzone got the same redundant treatment, sites I am afraid to lose are the rare keepers and this is clearly one of them based on what I have read so far across this and a couple of related posts.
Первый этап лечения — это детоксикация организма. При помощи капельничного введения специализированных препаратов достигается быстрый вывод токсинов, что позволяет стабилизировать обменные процессы и восстановить нормальное функционирование печени, почек и сердечно-сосудистой системы.
Узнать больше – https://narcolog-na-dom-ufa0.ru/narkolog-na-dom-kruglosutochno-ufa/
Most blog writing on this subject reaches for the same handful of arguments and this post avoided them, and a look at everydaystylemarket continued the original treatment, content that finds its own path through territory other writers have flattened is content with real authorial energy and this site has plenty of that distinctive energy.
melbet guide débutant http://melbet62913.help
While exploring different handmade and creative ecommerce platforms today, I spent some time navigating through a well-organized layout and smooth interface, and Bright Forge craft portal made browsing feel straightforward and pleasant overall – The structure is clear, pages respond smoothly, and everything is arranged in a way that makes product discovery easy and comfortable without unnecessary complexity or clutter affecting usability.
1win free spins Oʻzbekiston 1win free spins Oʻzbekiston
I spent part of today exploring online stores and digital platforms before finding easy navigation cove velvet site, and I experienced a really pleasant website, where information stayed updated regularly and browsing remained enjoyable throughout.
рейтинг БК Узбекистана рейтинг БК Узбекистана
Granted I am giving this site more credit than I usually give new finds, and a look at staycuriousdaily continued earning that credit, the calibration of how much trust to extend after limited exposure is something I do carefully and this site has earned more trust on shorter exposure than most due to consistent quality across.
скачать ролик с ютьюб скачать ролик с ютьюб
dark matter market link https://sites.google.com/view/nexusdarknetlink
While reviewing motivational productivity websites, I came across a platform that feels welcoming and practical for readers interested in mental clarity, and Focus Motivation center delivers a smooth browsing experience overall – The layout is clean, concepts are presented naturally, and users can enjoy self improvement content without confusion or excessive interface elements.
Recommended without hesitation if you care about careful coverage of this topic, and a stop at dailytrendmarket reinforced the recommendation, the bar I set for unhesitating recommendations is fairly high and this site has cleared it through the cumulative weight of multiple consistently good pieces rather than through any single standout post which is meaningful.
акции букмекерских контор акции букмекерских контор
Really appreciate that the writer did not stretch the post to hit some target word count, the points end when they are made, and a stop at findyourinspirationtoday reflected the same discipline, brevity is generosity in disguise and this site has clearly figured that out far better than most blog operations have.
Процесс вывода из запоя капельничным методом организован по строгой схеме, позволяющей обеспечить максимальную эффективность терапии. Каждая стадия направлена на комплексное восстановление организма и минимизацию риска осложнений.
Изучить вопрос глубже – http://kapelnica-ot-zapoya-tyumen0.ru
Лечение вывода из запоя на дому в Мурманске организовано по четко структурированной схеме, включающей следующие этапы, каждый из которых играет ключевую роль в оперативном восстановлении здоровья:
Узнать больше – вывод из запоя анонимно мурманск
Glad I gave this a chance rather than scrolling past, and a stop at yourpathforward confirmed I made the right call, sometimes the best content is hidden behind unassuming headlines that do not scream for attention and learning to slow down and check those out has paid off many times now across years of reading.
Recommended without hesitation if you care about careful coverage of this topic, and a stop at nexshelf reinforced the recommendation, the bar I set for unhesitating recommendations is fairly high and this site has cleared it through the cumulative weight of multiple consistently good pieces rather than through any single standout post which is meaningful.
Хочешь узнать про электронные чеки? https://financedirector.by/jelektronnye-cheki-i-ih-uchet/ важный этап цифровизации торговли и налогового контроля. Узнайте, как работают электронные чеки, какие преимущества они дают бизнесу и покупателям, а также какие изменения ждут предпринимателей.
В клинике «Пульс» процесс оказания помощи начинается сразу после вашего обращения. Наша бригада оперативно выезжает на дом, где врач проводит первичный осмотр пациента: измеряет давление, пульс, оценивает степень интоксикации и собирает анамнез. На основе полученных данных подбирается индивидуальный состав капельницы.
Разобраться лучше – выезд на дом капельница от запоя краснодар
Closed it feeling slightly more competent in the topic than I started, and a stop at happyfindshub reinforced that competence boost, real learning is rare in casual online reading but it does happen sometimes and this site managed to make it happen for me today which is genuinely worth pausing to acknowledge.
100cuci welcome bonus 100cuci welcome bonus
кухни на заказ в спб кухни на заказ в спб
Comfortable reading experience throughout, no jarring tone shifts and no awkward formatting, and a look at ranknexus kept that smooth feel going, the kind of editorial polish that goes unnoticed when present but glaring when absent is something this site has clearly invested in across the broader content as well which deserves recognition.
Услуга вызова нарколога на дом в Уфе разработана для оперативного вывода из запоя без необходимости госпитализации. Это особенно актуально для тех, кто столкнулся с алкогольной интоксикацией в условиях, когда каждая минута имеет значение. Своевременная помощь позволяет не только устранить негативное воздействие алкоголя на организм, но и предотвратить возможные осложнения, такие как нарушения работы сердца, печени и почек.
Выяснить больше – http://narcolog-na-dom-ufa0.ru
Состояние запоя представляет опасность не только для физического здоровья, но и для психики человека. Продолжительное употребление алкоголя приводит к тяжёлой интоксикации, нарушению обмена веществ и психоэмоциональной нестабильности. В таких случаях самостоятельный выход из запоя может быть опасен, а иногда и невозможен. Врачи «Южного Центра Медицинского Восстановления» оказывают квалифицированную помощь с выездом на дом и круглосуточным приёмом пациентов. Используя современные методы детоксикации и мониторинга состояния, специалисты обеспечивают безопасное восстановление организма и минимизируют риски осложнений.
Ознакомиться с деталями – вывод из запоя капельница в ростове-на-дону
Наркологическая клиника «Южный МедКонтроль» объединяет современные медицинские технологии, опыт специалистов и уважительное отношение к каждому пациенту. Здесь создаются условия для безопасного и результативного лечения зависимостей любой сложности — от алкогольной до полинаркотической. Центр работает в круглосуточном режиме, предлагая выезд врачей на дом, детоксикацию, кодирование и длительные программы реабилитации. Основная цель специалистов — восстановление физического и психологического равновесия человека, возвращение способности к полноценной жизни без зависимости.
Детальнее – наркологическая клиника цены
Quality you can feel from the first paragraph, the writer clearly knows the topic and how to share it, and a quick look at linkbeacon confirmed the same depth runs throughout the rest of the site as well which is rare and worth pointing out when it happens online for any reader passing through.
drughub market https://sites.google.com/view/nexusmarketdarknet
Процедура капельницы от похмелья с контролем врача в Самаре начинается с первичной консультации, на которой врач осматривает пациента, измеряет его основные показатели (давление, пульс, температуру) и оценивает общее состояние. На основе этих данных выбирается оптимальный состав капельницы, которая может включать в себя различные компоненты, такие как солевые растворы, витамины, антиоксиданты и медикаменты для снятия симптомов похмелья.
Исследовать вопрос подробнее – капельница от похмелья
Felt like I was reading something written by someone who actually thinks about the topic rather than reciting it, and a look at everydayinnovation reinforced that impression, the difference between recited content and considered content is huge and this site clearly belongs to the latter category which I appreciate as a careful reader looking for substance.
Just want to record that this site is entering my regular reading list, and a look at shopandsaveonline confirmed it deserves the spot, my regular reading list is short and well curated and adding to it requires meeting a fairly high quality bar that this site has clearly cleared without much effort apparently.
Now leaving a small mental note to recommend this when the topic comes up in conversation, and a look at exploreinnovativeideas extended that recommend ready feeling, content that arms me with shareable references for likely future conversations is content with social value and this site is providing that conversational ammunition consistently for me lately.
1win bonus request https://1win3003.mobi
Felt like the post had been edited rather than just drafted and published, and a stop at dreambiggeralways suggested the same care across the site, the difference between edited and unedited content is enormous for the reader and this site has clearly invested in the editing pass that most blogs skip entirely which really does show up.
Generally I find the content on similar topics frustrating in specific ways and this post avoided all of them, and a look at seoharbor continued that frustration free experience, content that sidesteps the standard failure modes of its genre is content with editorial awareness and this site has clearly studied what fails elsewhere consistently.
Наркологическая клиника «Южный МедКонтроль» объединяет современные медицинские технологии, опыт специалистов и уважительное отношение к каждому пациенту. Здесь создаются условия для безопасного и результативного лечения зависимостей любой сложности — от алкогольной до полинаркотической. Центр работает в круглосуточном режиме, предлагая выезд врачей на дом, детоксикацию, кодирование и длительные программы реабилитации. Основная цель специалистов — восстановление физического и психологического равновесия человека, возвращение способности к полноценной жизни без зависимости.
Выяснить больше – платная наркологическая клиника ростов-на-дону
Reading this brought back an idea I had set aside months ago, and a stop at discoverbetteroptions added more substance to that idea, content that revives dormant projects in my own thinking is content with serious creative value and this site is contributing to my own work in ways I had not expected when first clicking through.
Now feeling confident enough in this site to use it as a reference point for evaluating others on the same topic, and a look at globalfashionzone continued the comparison friendly quality, sites that serve as quality benchmarks for their topic are precious and this one has clearly become a benchmark for me on this particular subject area.
mostbet přehled zápasů https://mostbet87124.help
Reading the writers other posts after this one suggests the quality is consistent rather than peak, and a stop at inspiredthinkinghub confirmed the consistent quality reading, sites that hold the same level across many pieces rather than peaking on a few are sites with sustainable editorial discipline and this one has clearly developed that.
Appreciate that you did not pad this with fluff to hit a word count, the post says what it needs to say and stops, and a look at discovergreatvalue did the same, brevity here feels intentional not lazy which is a distinction many writers miss completely sometimes when they are working under deadlines.
Glad the writer did not feel the need to argue with imaginary critics in the post itself, and a stop at findmotivationtoday kept the same focused approach going, defensive writing wastes the reader time and confidence on positions that did not need defending and this post has clearly avoided that common failure.
During my review of online value platforms, I came across a website that feels simple and clear, and Value UniqueCorner space offers smooth navigation overall – The interface is clean, content is organized, and users can browse easily without clutter or distracting elements.
Liked the way the post balanced confidence and humility, and a stop at packnest maintained the same balance, knowing when to assert and when to acknowledge uncertainty is a sign of mature thinking and the writers here have clearly developed that calibration through what I assume is years of careful work on their craft.
изготовление кухни на заказ в спб https://kuhni-spb-58.ru
A particular pleasure to read this with a fresh coffee, and a look at discoverinfiniteideas extended the pleasure across more pages, content that pairs well with quiet morning rituals is something I have come to value highly and this site has the kind of energy that fits naturally into a calm reading routine.
During my online browsing session today, I checked multiple platforms before discovering professional digital showcase, and I liked how polished the presentation felt while pages loaded correctly and browsing remained enjoyable for visitors.
Started reading without much expectation and ended on a high note, and a look at urbanstylemarket continued that arc, content that builds rather than peaks early is a sign of a writer who knows how to structure a piece for sustained reader engagement rather than relying on a strong hook to do all the work.
Now appreciating the way the post avoided the temptation to be longer than necessary, and a look at bestdailyoffers continued that lean approach, content with the discipline to stop when finished rather than padding for length is content that respects both itself and its readers and this site has that disciplined editorial culture clearly throughout.
While analyzing different ecommerce websites, I noticed a platform that consistently performs well in terms of speed and responsiveness, and Cloud Forge product hub offers fast browsing overall – Pages load instantly and navigation feels fluid, making the entire shopping experience easy and efficient without unnecessary delays.
капельница от запоя цена капельница от запоя цена
aviator rng aviator rng
Наркологическая помощь в Нижнем Новгороде с выездом врача, капельницами и наблюдением пациента в наркологической клинике «Частный медик 24»
Ознакомиться с деталями – вызов наркологической помощи в нижнем новгороде
During my review of productivity focused websites and learning resources, I came across a website that feels calm and thoughtfully arranged for visitors, and Focus Journey portal provides a smooth browsing experience overall – The design is minimal, content feels encouraging, and readers can explore mental clarity strategies without overwhelming visuals.
nexus darkweb url https://sites.google.com/view/nexus-market-url
Started imagining how I would explain the topic to someone else after reading, and a look at rankorbit gave me more material for that imagined explanation, content that improves my own ability to discuss a topic is content that has actually transferred knowledge rather than just decorating my screen for a few minutes.
Picked up a couple of new ideas here that I can actually try out, and after my visit to findyourpath I have even more notes saved, this is the kind of resource that pays you back for the time you spend on it which is rare to come across in this corner of the web.
Took a quick scan first and then went back to read properly because the post deserved it, and a stop at linkbloom kept me reading carefully too, the kind of writing that earns a slower second pass rather than getting skimmed and forgotten is something I value highly when I happen to find it.
mostbet funkční zrcadlo https://mostbet87124.help/
Worth marking this site as one to come back to deliberately rather than by accident, and a stop at trendandstyle reinforced that intention, the difference between sites I find again by chance and sites I return to on purpose is meaningful and this one has clearly moved into the deliberate return category for me.
Now realising the post solved a small problem I had been carrying for weeks, and a look at creativechoiceoutlet extended that problem solving function, content that connects to specific unresolved questions in my own life rather than just providing general interest is content with real practical impact and this site is providing that practical value.
Closed the tab with a small sense of finality rather than the usual rushed exit, and a stop at everydaychoicehub produced the same considered closing, when reading ends with deliberate satisfaction rather than impatient skip you know the time was well spent and this site is producing those satisfying endings consistently across what I read.
Came across this looking for something else entirely and ended up reading it through twice, and a look at findyourbalance pulled me deeper into the site than I planned, the writing has a way of holding attention without resorting to manipulative cliffhangers or vague promises that never get delivered later down the page.
заказать индивидуальную кухню заказать индивидуальную кухню
Reading this back to back with a similar piece elsewhere made the quality difference obvious, and a stop at brightfashionfinds only widened the gap, comparing content side by side is a useful exercise and the gap between this site and average competitors in the space is large enough to be noticeable from the first paragraph.
В этом обзоре мы обсудим современные методы борьбы с зависимостями, включая медикаментозную терапию и психотерапию. Мы представим последние исследования и их результаты, чтобы читатели могли быть в курсе наиболее эффективных подходов к лечению и поддержке.
Детальнее – частный медик 24 рнд
mostbet depunere mastercard mostbet18305.help
dark markets https://sites.google.com/view/nexusdarknetlink
Процедура капельницы от похмелья с контролем врача в Самаре начинается с первичной консультации, на которой врач осматривает пациента, измеряет его основные показатели (давление, пульс, температуру) и оценивает общее состояние. На основе этих данных выбирается оптимальный состав капельницы, которая может включать в себя различные компоненты, такие как солевые растворы, витамины, антиоксиданты и медикаменты для снятия симптомов похмелья.
Подробнее – капельница от похмелья на дому
Worth bookmarking and sharing with anyone interested in the topic, that is my honest take, and a stop at brightvalueworld reinforces that, the kind of generous resource that makes the open web feel worth defending against the constant pressure to retreat into walled gardens and curated feeds today everywhere I look across all my devices.
Honestly impressed by the consistency of voice across what I have read so far, and a quick visit to modernhomecorner continued that consistent feel, when a site reads like one careful person rather than a committee the experience is more rewarding for the reader who notices these subtle editorial details over time.
рейтинг БК Узбекистана рейтинг БК Узбекистана
акции букмекерских контор акции букмекерских контор
Solid information that lines up with what I have been hearing from other reliable sources, and after my visit to packpeak I was even more certain of that, this site checks out which is something I value highly when so many places online play loose with the facts to chase a quick click.
Эта публикация посвящена актуальным вопросам современной медицины и здравоохранения. Мы обсудим новейшие технологии диагностики и лечения, а также их влияние на продолжительность и качество жизни. Читатель найдет здесь информацию о научных исследованиях и перспективных разработках, доступно изложенную для широкой аудитории.
Неизвестные факты о… – вывод из запоя ростов на дону на дому
Reading this on the train into work was a better use of the commute than my usual choices, and a stop at mystylezone extended that commute reading well, content that improves transit time rather than just filling it is content with practical benefit and this site has earned its place in my morning commute reading rotation.
Now I want to find more sites like this but I suspect they are rare, and a look at simplefashioncorner extended that thought, the few sites that meet this quality bar are precious specifically because they are rare and finding others like them is one of the ongoing projects of careful internet curation across the years.
Такой курс не только очищает организм от токсинов, но и помогает вернуть эмоциональное равновесие. После завершения терапии пациент чувствует себя отдохнувшим, восстанавливает аппетит и сон, уходит тревожность и раздражительность.
Ознакомиться с деталями – http://vyvod-iz-zapoya-v-krasnodare19.ru/vyvod-iz-zapoya-krasnodar-otzyvy/
black ops market https://sites.google.com/view/nexus-market-link
Reading this on a long flight and finding it the best thing I read across hours of trying, and a stop at explorelimitlesspossibilities kept the streak going, when content beats long flight reading you know it has substance because flight reading is a hard test of a piece given the alternatives available everywhere.
A clean piece that knew exactly what it wanted to say and said it, and a look at zentcart maintained the same clarity of intention, knowing the goal of a piece before writing is something most blog content lacks and the clarity of purpose here shows up in every paragraph for any careful reader to notice.
A piece that did not try to be timeless and ended up reading as durable anyway, and a look at rankripple extended that durable feel, content that stays useful past its publication date without straining for permanence is content that ages well and this site has the kind of evergreen quality that I value highly today.
Thanks again for the post, I learned a couple of things I can actually use later this week, and after I went over thebestdeal the rest of the site looked equally promising, definitely going to spend more time here when I get a free moment over the weekend to read more carefully.
Working through this site has been a small antidote to the shallow content that fills most of my reading time, and a stop at findperfectgift extended that antidote function, sites that quietly improve the average quality of my reading by being themselves are sites worth supporting through return visits and recommendations consistently.
Time spent here today felt productive in the way that good reading sessions sometimes do, and a stop at discoveramazingfinds extended that productive feeling across the rest of the morning, the difference between productive reading and merely passing time is real and this site is consistently on the productive side for me lately.
Pass this along to anyone you know dealing with similar questions, the answers here are clear, and a stop at dailyshoppingzone adds even more useful material, this is the kind of resource that deserves to circulate widely rather than getting lost in the constant churn of new content online that buries good work daily.
Bookmarked the page and the homepage too because clearly there is more to explore here, and a quick stop at linkboostly only made that more obvious, this is the kind of place I want to dig through over a weekend rather than rushing through during a coffee break tomorrow morning before getting back to work.
Taking the time to read carefully here has been worthwhile for the past hour, and a look at startsomethingawesome extended the worthwhile reading, the calculation of return on reading time spent is something I do informally and this site has been producing positive returns across multiple sessions during the last week of regular visits and reads.
After opening multiple online shopping websites today, I eventually reached recommended velvet field portal, and I found it a great platform overall, where pages loaded quickly and categories were arranged professionally for visitors.
Now planning to come back when I have the right kind of attention to read carefully, and a stop at findyourfavorites reinforced that plan, choosing the right moment to read certain content is a quiet form of respect for the work and this site is generating those careful planning behaviours from me consistently as a reader.
Started reading and ended an hour later without realising the time had passed, and a look at globalfashionzone produced the same time dilation effect, when content makes time feel different the writer has achieved something well beyond the average and this site is producing that experience for me reliably across multiple readings.
aviator withdraw to bank aviator withdraw to bank
Круглосуточный режим работы в клинике «Северный Вектор» обусловлен спецификой течения зависимостей, при которых ухудшение состояния может происходить внезапно. Наркологическая клиника в Ростове-на-Дону обеспечивает постоянную готовность медицинского персонала к приёму пациентов, что позволяет сократить время между возникновением симптомов и началом лечения. Такой подход снижает риск осложнений и повышает клиническую безопасность.
Выяснить больше – наркологическая клиника нарколог ростов-на-дону
https://lavita-clinik.ru/
Соблюдение конфиденциальности в клинике «Точка Опоры» является неотъемлемой частью лечебного процесса. Наркологическая клиника в Краснодаре обеспечивает закрытый формат приёма, хранения медицинских данных и взаимодействия с пациентом. Практика показывает, что анонимное обращение снижает уровень тревожности, способствует более открытому диалогу с врачом и повышает точность клинической диагностики.
Получить дополнительную информацию – https://narcologicheskaya-klinika-v-krd19.ru/
drughub url https://sites.google.com/view/nexusdarknetlink
Most blog writing on this subject reaches for the same handful of arguments and this post avoided them, and a look at growbeyondlimits continued the original treatment, content that finds its own path through territory other writers have flattened is content with real authorial energy and this site has plenty of that distinctive energy.
Наркологическая помощь в Нижнем Новгороде с выездом врача, капельницами и наблюдением пациента в наркологической клинике «Частный медик 24»
Детальнее – оказание наркологической помощи в нижнем новгороде
Лечение в круглосуточном режиме выстраивается по принципу медицинской последовательности и непрерывного наблюдения. Даже при экстренном обращении терапия не ограничивается разовым вмешательством, а рассматривается как часть целостного лечебного процесса.
Узнать больше – https://narkologicheskaya-klinika-v-rostove19.ru
Picked a friend mentally as the audience for this and decided to send the link, and a look at freshfashionmarket confirmed the send was the right choice, choosing whom to share content with is a small act of curation that I take more seriously than the public sharing most platforms encourage these days online.
During my evaluation of curated online stores, I noticed a clean and readable interface design, and MeadowCloud collective marketplace delivers a smooth browsing experience overall – Content is structured logically, allowing users to browse and read product details easily without dealing with cluttered layouts or confusing navigation paths.
Каждый курс лечения включает несколько этапов, направленных на постепенное улучшение состояния. Система выстроена так, чтобы обеспечить плавное восстановление функций организма без стресса. Ниже приведена таблица, показывающая основные этапы лечения и применяемые процедуры.
Изучить вопрос глубже – http://vyvod-iz-zapoya-v-rnd19.ru
Found a small mental shift after reading this, the framing here is just a bit different from the standard takes online, and a look at pickmint extended that fresh perspective across more material, the rare site whose voice actually changes how you think about something rather than just confirming existing beliefs.
Honestly enjoyed not being sold anything for the entire duration of the post, and a look at creativityneverends kept that pleasant absence going across more pages, content that exists for its own sake rather than as a funnel to a paid product is increasingly rare and worth supporting where I can find it.
клиника на кожевенной в краснодаре
Now adding this site to a small mental group of recommendations I keep ready for specific kinds of inquiries, and a stop at trendsettersparadise extended the recommendation readiness, content that I can confidently point friends and colleagues toward in specific contexts is content with real social utility and this site has that utility clearly.
Reading this brought back an idea I had set aside months ago, and a stop at dailychoicecorner added more substance to that idea, content that revives dormant projects in my own thinking is content with serious creative value and this site is contributing to my own work in ways I had not expected when first clicking through.
melbet mtn mobile money http://melbet62913.help
cocorico url https://sites.google.com/view/nexus-market-link
Really like that the writer trusts the reader to follow simple logic without restating every previous point, and a stop at theartofgrowth kept that respect going, treating an audience as capable adults rather than as people who need constant hand holding makes a noticeable difference in the reading experience for me.
Процедура вывода из запоя начинается с тщательной диагностики состояния пациента, чтобы определить, какие методы лечения будут наиболее эффективными. Мы применяем индивидуальный подход и комбинируем медикаментозное лечение с психотерапевтической поддержкой, что даёт лучший результат.
Ознакомиться с деталями – выезд нарколога на дом
Will be coming back to this for sure, too much good content to absorb in one sitting, and a stop at urbanchoicehub only added more pages I want to dig through, this site is going onto my regular rotation list because it consistently delivers something worth the visit lately rather than empty filler.
Now placing this in the same category as a few other sites I have come to trust, and a look at creativechoiceoutlet continued the placement decision, the small category of fully trusted sites is one I extend rarely and only after multiple positive reading sessions and this site has earned the category placement methodically over time.
A piece that handled a controversial angle without becoming heated, and a look at discoverinfiniteideas continued that calm engagement, content that can address contested topics without inflaming them is doing rare diplomatic work and this site has clearly developed the editorial maturity to handle sensitive material with the appropriate temperature of writing throughout.
Thanks again for the post, I learned a couple of things I can actually use later this week, and after I went over newseasonfinds the rest of the site looked equally promising, definitely going to spend more time here when I get a free moment over the weekend to read more carefully.
Easily one of the better explanations I have read on the topic, and a stop at rankscope pushed it even higher in my mental ranking of useful resources, the kind of site that beats the average not by trying harder but by simply caring more about what it puts out daily which always shows.
Thanks for a post that does not try to be funny when it is not the moment for it, and a stop at linkcabin maintained the same appropriate seriousness, knowing when humour helps and when it just signals desperation for engagement is a sign of editorial maturity that many blogs have not developed yet.
кухни в спб на заказ кухни в спб на заказ
While exploring ecommerce catalogs, I found a website that feels simple and well designed, and TrendShopWorld goods hub delivers a smooth browsing experience overall – Pages load quickly, content is neatly arranged, and users can browse products without unnecessary visual noise or complexity.
сколько стоит капельница от запоя сколько стоит капельница от запоя
mostbet jak se přihlásit cz mostbet jak se přihlásit cz
dark market 2026 https://sites.google.com/view/nexusdarknetlink
Appreciated the way each section connected smoothly to the next without abrupt jumps, and a stop at findpeaceandpurpose kept that flow going nicely, transitions are something most blog writers ignore but the difference is huge for the reader who is trying to follow a sustained line of thought today across many different topics.
Now considering the post as evidence that careful blog writing is still possible, and a look at findnewinspiration extended that evidence, the broader question of whether the modern web can sustain quality writing has obvious empirical answers in sites like this one and seeing them is reassuring even when they remain a minority overall today.
Первичный осмотр включает оценку витальных показателей, уровня сознания, выраженности симптомов и факторов риска. После этого врач определяет объём вмешательства и приступает к терапии. В большинстве случаев применяется инфузионное лечение, направленное на восстановление водного баланса и выведение токсинов.
Узнать больше – вызов наркологической помощи в нижнем новгороде
A genuine pleasure to find a site that publishes at a sustainable cadence rather than chasing the daily content treadmill, and a look at simplebuyoutlet confirmed the careful publication rhythm, sites that prioritise quality over frequency are rare and this one has clearly chosen the slower pace which I appreciate as a reader.
Нарколог на дом в Ростове-на-Дону рассматривается как специализированная форма оказания медицинской помощи пациентам с зависимостями вне стационара. В клинике «Чистый Баланс» выезд врача организуется круглосуточно, что позволяет обеспечить своевременное вмешательство при ухудшении состояния в любое время суток. Нарколог на дом в Ростове-на-Дону востребован в ситуациях, когда пациент не готов или не может обратиться в медицинское учреждение, а промедление с лечением повышает риск осложнений. Такой формат помощи требует строгого соблюдения клинических протоколов и высокой квалификации специалистов.
Выяснить больше – нарколог на дом вывод из запоя
888starz официальный сайт 888stars-uz.com .
I explored various internet trade platforms this morning before finding professional trading resource, and I appreciated the nice overall structure combined with stable performance and well explained, detailed information across different sections.
Decided to set aside time later to read more carefully, and a stop at findyournextgoal reinforced that decision, content that earns a calendar entry rather than just a passing read is in a different tier altogether and this site is clearly working at that elevated level which I really do appreciate as a reader today.
заказать кухню с доставкой заказать кухню с доставкой
Worth bookmarking and sharing with anyone interested in the topic, that is my honest take, and a stop at seocrest reinforces that, the kind of generous resource that makes the open web feel worth defending against the constant pressure to retreat into walled gardens and curated feeds today everywhere I look across all my devices.
aviator app updated https://aviator50638.help
Honest reaction is that I want to send this to a friend who would benefit from it, and a look at rankanchor added more material I will pass along too, the impulse to share is the strongest signal I have for content quality and this site is generating that impulse cleanly across multiple posts.
Came here from another site and ended up exploring much further than I planned, and a look at findperfectgift only encouraged more exploration, the kind of place where one click leads to another not through manipulative design but through genuinely interesting content is rare and worth highlighting when found like this somewhere on the open internet.
вывод из запоя недорого вывод из запоя недорого
While casually browsing digital shopping platforms this afternoon, I came across organized whisper oak site and found the website felt reliable overall, with smooth navigation and clear descriptions throughout the browsing experience.
Started reading and ended an hour later without realising the time had passed, and a look at trendandstylehub produced the same time dilation effect, when content makes time feel different the writer has achieved something well beyond the average and this site is producing that experience for me reliably across multiple readings.
mostbet Straseni http://mostbet41079.help/
Лучшие букмекерские конторы Узбекистана Лучшие букмекерские конторы Узбекистана
https://lavita-clinik.ru/
Skipped lunch to finish reading, which says something, and a stop at discoverbetteroptions kept me at my desk longer than planned, when content beats the lunch impulse the writer has done something genuinely impressive in an attention environment full of immediately satisfying alternatives competing for the same finite block of reader time.
My usual response to new bookmarks is to forget them but this one I have already returned to twice, and a look at creativityunlocked pulled me back a third time, the actual return rate to bookmarked sites is the real measure of value and this one is clearing that measure at a notable rate already.
заказать кухню по индивидуальному заказу заказать кухню по индивидуальному заказу
Felt no urge to argue with the conclusions even though I started the post slightly skeptical, and a look at buildyourpotential maintained that pattern, writing that earns agreement through clarity of argument rather than rhetorical pressure is the kind I find most persuasive and the kind I want to read more of these days.
бонусы на ставки бонусы на ставки
Came here from a search and stayed for the side links because they were that interesting, and a stop at styleandchoice took me even further into the site, the kind of organic exploration that good content invites is something most sites kill through aggressive interlinking and pushy navigation choices rather than relying on quality.
заказать кухню на заказ заказать кухню на заказ
В данной статье рассматриваются физиологические и эмоциональные аспекты зависимости. Мы обсудим, как организм реагирует на зависимое поведение, и какие методы помогают восстановить здоровье и внутреннее равновесие.
Изучить вопрос глубже – вывод из запоя ростов на дону
I came here looking for a quick answer and ended up reading the whole post because it was actually interesting, and after connectwithpeople I had a much fuller picture, no stress and no confusion just a clear walk through the topic that made everything fall into place without much effort.
Honestly enjoyed not being sold anything for the entire duration of the post, and a look at rankspark kept that pleasant absence going across more pages, content that exists for its own sake rather than as a funnel to a paid product is increasingly rare and worth supporting where I can find it.
заказать кухню сайт https://zakazat-kuhnyu-17.ru
100cuci scam 100cuci scam
кухня на заказ кухня на заказ
nexus darknet market url https://sites.google.com/view/nexusdarknetmarket
dark websites https://sites.google.com/view/nexusdarknetlink
While exploring various ecommerce platforms for usability testing, I noticed a website with clear and organized product presentation, and Cloud Petal collective shopfront offers a simple browsing experience overall – Everything is arranged neatly, making it easy for users to move through sections and view products without visual confusion.
Looking through other posts here the consistency is what makes the site valuable rather than any single piece, and a stop at linkclimb extended that consistency observation, sites whose value lies in the ongoing pattern rather than in standout posts are sites I trust more deeply and this one has clearly built that kind of trust.
Just sat with this for a bit longer than I usually would because the points are worth thinking about, and after adfoundry I had even more to chew on, the kind of post that nudges your thinking forward without forcing the issue is something I have always appreciated in good writing online.
Good clean post, no errors and no awkward phrasing that breaks the reading flow, and a stop at thinkactachieve kept the same standard, definitely the kind of editorial care that earns a return visit because it tells me the writer is paying attention to details that matter to readers rather than just rushing publication.
A small thank you note from me to the team behind this work, the post earned it, and a stop at discoveramazingfinds suggested more thanks would be in order over time, recognising the people who do good writing online is something I try to remember to do because the alternative is silence and silence rewards mediocrity unfortunately.
кухня на заказ кухня на заказ
joc aviator mostbet https://mostbet41079.help
Volvo Construction Equipment http://www.tech-group.com.ua
нужен нарколог на дом нужен нарколог на дом
Терапевтический процесс в стационаре строится по принципу последовательного выполнения клинических задач: диагностика, стабилизация, медикаментозная терапия и подготовка к амбулаторному этапу. При поступлении врач проводит детальный осмотр, собирает анамнез, оценивает неврологический статус и при необходимости назначает лабораторные исследования. На основе полученных данных формируется индивидуальный протокол, учитывающий возраст, длительность интоксикации, наличие сопутствующих патологий и переносимость лекарственных компонентов. Мы применяем только сертифицированные препараты, зарегистрированные в РФ, и строго соблюдаем клинические рекомендации Минздрава, исключая псевдонаучные методики. Стандарты оказания медицинской помощи фиксируются во внутренних регламентах и регулярно проверяются независимыми аудиторами.
Детальнее – https://vyvod-iz-zapoya-v-staczionare-sankt-peterburg-18.ru
melbet retrait wave ci http://melbet62913.help
Skipped the related links section thinking I had read enough and then came back to it later when curiosity got the better of me, and a stop at rankbeacon confirmed I should have just read it first, every section of this site appears to deserve careful attention rather than skipping past lazily.
Halfway through reading I knew this would be one to bookmark, and a look at dailyvalueoutlet confirmed that early intuition, when bookmark intent forms before finishing a post you know the writing has cleared a quality bar that most content fails to clear and this site has cleared it on multiple visits already.
My friends would appreciate a few of these posts and I will be sending links accordingly, and a look at findmotivationtoday added more pages to my share queue, content that earns shares to specific people in specific contexts is content with social utility and this site is generating those targeted shares from me consistently lately.
Felt the writer was speaking my language without trying to imitate it, and a look at findyourinspiration continued that natural fit, when a writers default voice happens to match what you find easy to read the experience feels frictionless and that is something I notice and remember about specific sites going forward.
ares darknet market https://sites.google.com/view/nexusmarketdarknet
torzon darkweb url https://sites.google.com/view/nexusmarketplace
cocorico url https://sites.google.com/view/nexus-market-link
После поступления звонка специалисты нашей клиники оперативно выезжают по адресу пациента в Новосибирске. Врач начинает работу с детальной диагностики: измеряет пульс, артериальное давление, сатурацию (уровень кислорода в крови), оценивает состояние нервной и сердечно-сосудистой систем, уточняет наличие хронических заболеваний, аллергических реакций, длительность и тяжесть запоя.
Ознакомиться с деталями – вывод из запоя цена
Эта публикация исследует взаимосвязь зависимости и психологии. Мы обсудим, как психологические аспекты влияют на появление зависимостей и процесс выздоровления. Читатели смогут понять важность профессиональной поддержки и применения научных подходов в терапии.
Желаете узнать подробности? – narcology clinic
Вывод из запоя в стационаре — это медицинская помощь, при которой лечение проводится в условиях постоянного врачебного контроля и поэтапной стабилизации состояния. Такой формат применяется, когда состояние пациента требует наблюдения и быстрого реагирования на изменения. В наркологической клинике «Частный медик 24» в Нижнем Новгороде лечение выстраивается на основе клинической оценки и последовательного подхода: каждый этап направлен на достижение конкретного результата без избыточной нагрузки на организм.
Изучить вопрос глубже – наркология вывод из запоя в нижнем новгороде
Comfortable read, finished it without realising how much time had passed, and a look at freshfashionmarket pulled me into more pages the same way, the absence of friction in good content lets time disappear and that is one of the highest compliments I can pay any piece of writing I find online during a regular search session.
Just nice to read something that does not feel like it was assembled from a content brief, and a stop at trendandfashionhub kept that handcrafted feel going, you can tell when a real human with real understanding is behind the words versus a templated piece churned out for an algorithm to find.
Now appreciating that the post did not require me to agree with the writer to find it valuable, and a look at leadridge maintained the same useful regardless of agreement quality, content that informs even when it does not convince is content with broader utility and this site reads as useful even when I disagree.
lucky jet melbet https://www.melbet62913.help
Honestly impressed by the consistency of voice across what I have read so far, and a quick visit to thinkcreateachieve continued that consistent feel, when a site reads like one careful person rather than a committee the experience is more rewarding for the reader who notices these subtle editorial details over time.
В этой заметке мы представляем шаги, которые помогут в процессе преодоления зависимостей. Рассматриваются стратегии поддержки и чек-листы для тех, кто хочет сделать первый шаг к выздоровлению. Наша цель — вдохновить читателей на положительные изменения и поддержать их в трудных моментах.
Ознакомиться с деталями – Похмельная служба Екатеринбург
bitcoin dark web https://sites.google.com/view/nexusdarknetmarket
Granted I am giving this site more credit than I usually give new finds, and a look at besttrendstore continued earning that credit, the calibration of how much trust to extend after limited exposure is something I do carefully and this site has earned more trust on shorter exposure than most due to consistent quality across.
A memorable post for me on a topic I had thought I was tired of, and a look at admetric suggested the same site can refresh other tired topics, sites that can revive my interest in subjects I had written off as exhausted are doing rare work and this one is clearly doing that for me today.
mostbet aplicatie cu notificari http://www.mostbet18305.help
A piece that did not waste any of its substance on sales or promotion, and a look at findyourtrend continued that pure content focus, sites that resist the urge to monetise every paragraph are increasingly rare and this one has clearly made the editorial choice to keep the writing clean from commercial intrusion which I value highly.
Reading this in the time it took to drink half a cup of coffee, and a stop at ranksprout fit naturally into the second half, content that respects the rhythms of a typical morning is content with practical fit and this site has the kind of length and pacing that works for the way I actually read.
Felt the writer was speaking my language without trying to imitate it, and a look at linkcove continued that natural fit, when a writers default voice happens to match what you find easy to read the experience feels frictionless and that is something I notice and remember about specific sites going forward.
Наркологическая клиника в Сергиевом Посаде — это помощь, которая начинается с понимания рисков. Важны не красивые обещания «за один час», а прогнозируемая динамика в первые сутки и понятный план на 24–72 часа. Именно в это время чаще всего происходит повторное ухудшение: днём может стать легче, но к вечеру и ночью волной возвращаются тревога и бессонница, появляются телесные симптомы отмены, и человек снова тянется к алкоголю или веществам «чтобы отпустило». Если заранее не подготовить этот период и не объяснить, как действовать, даже удачная первичная стабилизация может закончиться срывом.
Выяснить больше – https://narkologicheskaya-klinika-sergiev-posad12.ru/narkologicheskaya-klinika-sajt-v-sergievom-posade/
Well structured and easy to read, that combination is rarer than people think, and a stop at makeimpacteveryday confirmed the same standard runs across the rest of the site, definitely the kind of place I will be coming back to when this topic comes up in conversation later again over the weeks ahead.
I had been checking various online resources earlier today before discovering well designed goods grove hub, and it was a helpful experience overall, with neatly arranged products and comfortable navigation across all sections.
Highly recommend to anyone looking for a sensible take on this topic without the usual marketing nonsense, and a look at explorecreativeconcepts kept that grounded approach going, sites that stay focused on serving readers rather than monetising every click are rare and this is clearly one of those rare ones I really appreciate finding.
Этот информативный текст сочетает в себе темы здоровья и зависимости. Мы обсудим, как хронические заболевания могут усугубить зависимости и наоборот, как зависимость может влиять на общее состояние здоровья. Читатели получат представление о комплексном подходе к лечению как физического, так и психического состояния.
Откройте для себя больше – вывод из запоя в ростове-на-дону
Now adding this to a list of sites I want to see flourish, and a stop at brightstylecorner reinforced that wish, the few sites I actively root for are sites that produce the kind of work I want more of in the world and this one has joined that small list based on what I have read so far.
Quality you can feel from the first paragraph, the writer clearly knows the topic and how to share it, and a quick look at rankbloom confirmed the same depth runs throughout the rest of the site as well which is rare and worth pointing out when it happens online for any reader passing through.
Сразу после вызова нарколог приезжает на дом для проведения первичного осмотра и диагностики. На этом этапе проводится сбор анамнеза, измеряются жизненно важные показатели (пульс, артериальное давление, температура) и определяется степень алкогольной интоксикации. Эти данные являются основой для разработки индивидуального плана лечения.
Подробнее тут – https://kapelnica-ot-zapoya-tyumen0.ru/kapelnicza-ot-zapoya-na-domu-czena-tyumen
В Нижнем Новгороде выезд нарколога на дом используется при состояниях, требующих оперативной медицинской оценки и начала терапии. Врач приезжает с необходимыми препаратами, проводит осмотр и формирует план лечения на месте. Такой формат позволяет сократить время до начала помощи и снизить нагрузку на пациента.
Подробнее можно узнать тут – http://narkologicheskaya-pomoshh-nizhnij-novgorod-8.ru/
букмекерские конторы Узбекистана букмекерские конторы Узбекистана
During comparison of learning-focused digital platforms, I noticed a site that feels clean and engaging, and MindExpand education hub provides smooth browsing overall – The content is easy to understand, layout is simple, and users can navigate comfortably without confusion or unnecessary design complexity.
darknet markets 2026 https://sites.google.com/view/nexus-market-url
Для наглядности представлена таблица с основными этапами лечения и их характеристиками:
Выяснить больше – https://narkologicheskaya-clinika-v-rostove19.ru/
Основные этапы лечения:
Изучить вопрос глубже – капельница от запоя
Once you find a site like this the search for similar voices begins, and a look at connectwithpeople extended the search energy, finding a high quality reference point makes the gap between it and adjacent sources visible in a way it was not before and this site has provided that high reference point across multiple recent visits.
While analyzing various ecommerce stores, I came across a platform with strong performance consistency, and Cloud Petal trade market offers smooth browsing overall – The interface is responsive and stable, allowing users to move through categories quickly without experiencing lag or disruptions during navigation sessions.
заказать кухню под заказ заказать кухню под заказ
A piece that handled a controversial angle without becoming heated, and a look at styleforless continued that calm engagement, content that can address contested topics without inflaming them is doing rare diplomatic work and this site has clearly developed the editorial maturity to handle sensitive material with the appropriate temperature of writing throughout.
Услуга вызова нарколога на дом в Уфе разработана для оперативного вывода из запоя без необходимости госпитализации. Это особенно актуально для тех, кто столкнулся с алкогольной интоксикацией в условиях, когда каждая минута имеет значение. Своевременная помощь позволяет не только устранить негативное воздействие алкоголя на организм, но и предотвратить возможные осложнения, такие как нарушения работы сердца, печени и почек.
Получить дополнительные сведения – выезд нарколога на дом цена в уфе
Этот обзор содержит информацию о передовых достижениях в области медицины. Мы разберем инновационные технологии, которые меняют подход к лечению и диагностике, а также их влияние на эффективность оказания медицинской помощи.
Провести детальное исследование – частный медик 24 ростов на дону
изготовление кухонь на заказ в санкт петербурге https://kuhni-spb-58.ru
Worth your time, that is the simplest endorsement I can give, and a stop at freshdealsworld extends that endorsement across the rest of the site, this is one of those increasingly rare places that delivers on what it promises rather than over selling the content and under delivering on substance every time which I find frustrating elsewhere.
Learned something from this without having to dig through layers of fluff, and a stop at createbettertomorrow added a bit more context that helped tie things together for me, definitely a useful corner of the internet for anyone who wants real information without the usual marketing nonsense around it that often ruins similar pages.
Quality you can feel from the first paragraph, the writer clearly knows the topic and how to share it, and a quick look at discoverhomeessentials confirmed the same depth runs throughout the rest of the site as well which is rare and worth pointing out when it happens online for any reader passing through.
I explored various internet product platforms this morning before discovering professional web marketplace, and the helpful browsing experience stood out due to clearly shown products and descriptions that read naturally throughout the site.
One of the more thoughtful posts I have read recently on this topic, and a stop at adscope added even more weight to that impression, this is genuinely good content that holds its own against far better known sites in the same space without trying to imitate any of them at all which I appreciate.
100cuci safe 100cuci safe
wethenorth shop https://sites.google.com/view/nexusdarknetmarket
выведение из запоя на дому в екатеринбурге выведение из запоя на дому в екатеринбурге
Felt a small spark of recognition when the post named something I had been struggling to articulate, and a look at linkfuel produced more such moments, the rare service of giving readers language for fuzzy intuitions is one of the higher values that good writing can provide and this site offered several today instances.
Following the post through to the end without my attention drifting once, and a look at rankstreet earned the same uninterrupted attention, content that holds attention without manipulating it is content with substantive pull and this site has demonstrated that substantive pull across multiple pieces in a single reading session reliably here today.
Coming back to this one, definitely, and a quick visit to freshfindsoutlet only made me more sure of that, the kind of writing that makes you want to set aside time later rather than rushing through it now while distracted by everything else competing for attention on the screen today across so many tabs.
Reading this slowly in the morning before opening email, and a stop at discoverhiddenopportunities extended that protected attention, content that earns the prime morning reading slot before the daily distractions begin is content with elevated status and this site has earned that prime slot consistently in my recent reading habits clearly.
Came away with some new perspectives I had not considered before, and after newseasonfinds those ideas felt more complete, the kind of content that stays with you a little while after reading rather than slipping out the moment you switch tabs and move on with your day to whatever comes next.
mostbet işlək link Azərbaycan http://mostbet01859.help/
Врачи клиники «КубаньТрезвость» применяют только безопасные, доказательно эффективные методы очищения организма. Каждый пациент получает персональную схему терапии, включающую капельницы, поддерживающие препараты и восстановительные процедуры. Детоксикация проводится под контролем нарколога, а дозировки медикаментов подбираются индивидуально.
Получить дополнительную информацию – вывод из запоя цена в краснодаре
Felt mildly happier after reading, which sounds silly but is true, and a look at rankbridge extended that small mood lift, content that improves rather than degrades my mental state is content I want more of and the cumulative effect of reading sites that lift versus sites that drag is real over time.
купить спецтехнику Вольво http://www.tech-group.com.ua
бонусы на ставки бонусы на ставки
mostbet güzgü link mostbet01859.help
кухни на заказ кухни на заказ
Picked something concrete from the post that I will use immediately, and a look at everydaychoicehub added another concrete piece, content that produces immediately useful output rather than just abstract appreciation is content that earns its place in my regular rotation without needing any further evaluation from me at this point honestly.
Without comparing too aggressively to other sources this one stands out for the right reasons, and a look at linkfunnel continued that distinctive quality, content that distinguishes itself through substance rather than style tricks is content with lasting differentiation and this site has clearly chosen substance based differentiation as its core editorial strategy.
Эта статья освещает различные аспекты освобождения от зависимости и пути к выздоровлению. Мы обсуждаем важность осознания своей проблемы и обращения за помощью. Читатели получат практические советы о том, как преодолевать трудности и строить новую жизнь без зависимости.
Что ещё нужно знать? – откапать от алкоголя
Этот обзор посвящен успешным стратегиям избавления от зависимости, включая реальные примеры и советы. Мы разоблачим мифы и предоставим читателям достоверную информацию о различных подходах. Получите опыт многообразия методов и найдите подходящий способ для себя!
Узнать больше – вызов нарколога на дом в ростове
dark web market list https://sites.google.com/view/nexus-market-url
заказать кухню под заказ заказать кухню под заказ
Felt like I was reading something written by someone who actually thinks about the topic rather than reciting it, and a look at globalstyleoutlet reinforced that impression, the difference between recited content and considered content is huge and this site clearly belongs to the latter category which I appreciate as a careful reader looking for substance.
Эта статья подробно расскажет о процессе выздоровления, который включает в себя эмоциональную, физическую и психологическую реабилитацию. Мы обсуждаем значимость поддержки и наличие профессиональных программ. Читатели узнают, как строить новую жизнь и не возвращаться к старым привычкам.
Проверенные методы — узнай сейчас – капельница от запоя ростов на дону
заказать кухню с замером https://zakazat-kuhnyu-17.ru
нарколог вызвать на дом нарколог вызвать на дом
Reading this in pieces during a long afternoon and finding it consistently rewarding, and a stop at simplefashioncorner fit naturally into the same fragmented reading pattern, sites whose posts can be read in segments without losing the thread are well suited to how I actually read these days and this one is built well.
Worth pointing out the careful word choice in this post, no buzzwords and no jargon, and a look at discovergreatoffers continued that disciplined vocabulary, sites that resist the pull of trendy language are sites that will read well in five years and this one is clearly built for that kind of long durability.
Соблюдение конфиденциальности в клинике «Точка Опоры» является неотъемлемой частью лечебного процесса. Наркологическая клиника в Краснодаре обеспечивает закрытый формат приёма, хранения медицинских данных и взаимодействия с пациентом. Практика показывает, что анонимное обращение снижает уровень тревожности, способствует более открытому диалогу с врачом и повышает точность клинической диагностики.
Получить дополнительную информацию – https://narcologicheskaya-klinika-v-krd19.ru/narkologa-na-dom-krasnodar/
Reading carefully here has reminded me what reading carefully feels like, and a look at thepowerofgrowth extended that reminder, the experience of careful reading versus skimming is different in ways I had partially forgotten and this site has clearly refreshed my memory of what attention feels like when content rewards it consistently.
During an online exploration of travel and global discovery platforms, I discovered world insight space – The website featured a clean layout and regularly updated content, making browsing easy, engaging, and thoughtfully arranged for visitors looking through different categories and ideas.
Really appreciate that the writer did not stretch the post to hit some target word count, the points end when they are made, and a stop at adthread reflected the same discipline, brevity is generosity in disguise and this site has clearly figured that out far better than most blog operations have.
tordex darknet link https://sites.google.com/view/nexusdarknetlink
A piece that read as the work of someone who reads carefully themselves, and a look at findyourperfectlook continued that informed feel, writers who are also serious readers produce work with a different quality and this site reads as the product of someone steeped in good writing rather than just generating content for an audience.
В этой статье обсуждаются актуальные медицинские вопросы, которые волнуют общество. Мы обращаем внимание на проблемы, касающиеся здравоохранения и лечения, а также на новшества в области медицины. Читатели будут осведомлены о последних событиях и смогут следить за тенденциями в медицине.
Изучить аспект более тщательно – вывод из запоя в ростове
Этот документ охватывает важные аспекты медицинской науки, сосредотачиваясь на ключевых вопросах, касающихся здоровья населения. Мы рассматриваем свежие исследования, клинические рекомендации и лучшие практики, которые помогут улучшить качество лечения и профилактики заболеваний. Читатели получат возможность углубиться в различные медицинские дисциплины.
Перейти к полной версии – капельница от запоя ростов
В данной статье мы поговорим о будущем медицины, акцентируя внимание на прорывных разработках и их потенциале. Читатель узнает о новых подходах к лечению, роли искусственного интеллекта и возможностях персонализированной медицины.
Получить больше информации – капельница от запоя ростов-на-дону
Статья посвящена анализу текущих трендов в медицине и их влиянию на жизнь людей. Мы рассмотрим новые технологии, методы лечения и значение профилактики в обеспечении долголетия и здоровья.
Исследовать вопрос подробнее – капельница от запоя ростов-на-дону
Just wanted to drop a quick note saying this was a useful read on a topic I have been circling, no fluff, and a stop at linkgrove added a few extra points that fit the same simple style which makes the whole site feel coherent rather than thrown together by many different writers with different goals.
Really appreciate that the writer did not assume I would read every other related post first, and a look at ranktactic kept that self contained feel going where each piece can stand alone, accessibility for new readers is a sign of generous editorial thinking and this site has clearly invested in that approach.
Запой – это не просто пьянство, а состояние, когда организм становится зависимым от алкоголя. Накопление токсинов приводит к сбоям в работе органов и ослаблению защиты организма. Самостоятельный выход из запоя может быть опасен и только усугубить состояние. Мы предлагаем лечение запоя на дому, чтобы избежать больницы и создать комфорт. Наши специалисты быстро приедут к вам и окажут всю необходимую помощь круглосуточно. Запой приводит к серьезным проблемам со здоровьем, ухудшает качество жизни и угрожает жизни. Очень важно вовремя обратиться за помощью, чтобы избежать необратимых последствий.
Получить дополнительную информацию – http://vyvod-iz-zapoya-krasnoyarsk0.ru/vyvod-iz-zapoya-czena-krasnoyarsk
букмекерские конторы Узбекистана букмекерские конторы Узбекистана
During comparison of various ecommerce websites, I noticed a strong focus on usability and clarity, and Petal Cloud ecommerce store delivers a smooth browsing experience overall – Everything is arranged clearly, allowing users to navigate easily while maintaining a clean and user friendly interface that supports simple browsing flow.
Now recognising the post as a rare example of careful writing on a topic that mostly receives careless treatment, and a stop at uniquevaluezone extended that contrast with the average elsewhere, content that highlights how much the average is settling for low quality is content that has both internal merit and external value as a benchmark.
Honestly impressed by the consistency of voice across what I have read so far, and a quick visit to rankcabin continued that consistent feel, when a site reads like one careful person rather than a committee the experience is more rewarding for the reader who notices these subtle editorial details over time.
В данной статье рассматриваются проблемы общественного здоровья и социальные факторы, влияющие на него. Мы акцентируем внимание на значении профилактики и осведомленности в защите здоровья на уровне общества. Читатели смогут узнать о новых инициативах и программах, направленных на улучшение здоровья населения.
Не упусти шанс – narcology clinic ростов на дону
mostbet jak použít bonus cz https://mostbet87124.help/
Solid little post, the kind that does not need to be flashy because the substance is doing the work, and a look at explorewhatspossible kept that quiet confidence going across the site, this is what writing looks like when the writer trusts the content to land on its own without theatrics or unnecessary attention seeking behaviour.
FranChoice
7500 Flying Cloud Drive,
#600 Edden Prairie
MN 55344,United Ѕtates
952-345-8400
franchise business ownership responsibilities template, https://atavi.com/share/xtganoz16494v,
Этот обзор медицинских исследований собрал самое важное из последних публикаций в области медицины. Мы проанализировали ключевые находки и представили их в доступной форме, чтобы читатели могли легко ориентироваться в актуальных темах. Этот материал станет отличным подспорьем для изучения медицины.
Практические советы ждут тебя – частный медик 24 рнд
aviator MWK deposit http://aviator50638.help/
darknet market links https://sites.google.com/view/nexus-market-url
Will be sharing this with a couple of people who care about the topic, and a stop at learnandimprove added more material worth passing along, the kind of site that is generous with quality content and does not make you jump through hoops to access it which is appreciated more than the team probably realises.
Appreciate the work that went into laying this out so clearly, every section earns its place without filler, and a look at leaddrift confirmed the same care, definitely the kind of place that deserves a return visit when the topic comes up again later in the future or for any related question.
производство кухонь в спб на заказ https://kuhni-spb-58.ru
купить заказать кухню купить заказать кухню
В этой статье рассматриваются различные аспекты избавления от зависимости, включая физические и психологические методы. Мы обсудим поддержку, мотивацию и стратегии, которые помогут в процессе выздоровления. Читатели узнают, как преодолеть трудности и двигаться к новой жизни без зависимости.
Рассмотреть проблему всесторонне – капельница от запоя ростов-на-дону
кухни на заказ кухни на заказ
Even on a quick first read the substance of the post comes through, and a look at boxpeak reinforced that immediate quality, content that does not require a slow careful read to demonstrate value but rewards one anyway is content with real depth and this site has produced work of that demanding depth class.
drughub market link https://sites.google.com/view/nexusdarknetlink
During my exploration of inspirational content hubs, I found a website that feels refreshing and easy to navigate, and YourAdventure inspiration space delivers smooth navigation overall – The design is minimal, content is motivating, and users can explore without clutter or confusing layout elements affecting usability.
Got something practical out of this that I can apply later this week, and a stop at seopoint added more details to think about, this is exactly the kind of content I bookmark for future reference rather than the throwaway listicles that dominate most search results these days for almost any common topic.
100cuci free kredit 100cuci free kredit
mostbet hesabım oğurlanıb https://www.mostbet01859.help
Pass this along to colleagues if the topic comes up, the framing here is sensible, and a stop at linkhive adds more useful angles to share, the kind of content that improves conversations rather than just feeding them is what makes a resource genuinely valuable in professional contexts going forward over time and across project boundaries too.
Honest reaction is that this is the kind of writing I would defend in a conversation about good blog content, and a look at rankthread reinforced that, the rare site whose work I would actively recommend rather than just tolerate is the kind I want to support through return visits regularly.
Bookmarking this for later, the kind of resource I want to keep nearby, and a quick look at rankclimb confirmed the rest of the site is worth the same treatment, definitely going into my reference folder for the next time the topic comes up at work or in conversation with someone who asks.
Reading this post made me realise I had been settling for lower quality elsewhere, and a look at shopthenexttrend extended that recalibration, content that exposes how much I had been accepting in adjacent sources is content with calibrating effect on my standards and this site is performing that calibration function across topics for me reliably.
The way the post stayed on topic throughout without going on tangents was really refreshing, and a look at discovernewhorizons kept that focused approach going, discipline like this in writing is rare and worth recognising because most writers cannot resist wandering off into related subjects that dilute their main point and confuse readers along the way.
Liked the way the post balanced confidence and humility, and a stop at changeyourfuture maintained the same balance, knowing when to assert and when to acknowledge uncertainty is a sign of mature thinking and the writers here have clearly developed that calibration through what I assume is years of careful work on their craft.
Worth recognising that the post handled a familiar topic without reaching for any of the obvious hot takes, and a stop at besttrendstore continued that fresh treatment, sites that find new angles on subjects others have exhausted are sites worth following carefully and this one has clearly developed that exploratory instinct through patient practice.
выбрать спецтехнику Volvo http://www.tech-group.com.ua
drughub darknet url https://darknetmarketseasy.com/ dark web marketplaces https://darkwebmarkets2024.com/
During my online browsing session this morning, I checked multiple websites before landing on quality digital floral hub, where I enjoyed the experience because the organization felt professional and navigation functioned perfectly across all sections.
Skipped the comments section but might come back to read it, and a stop at reachhighergoals hinted at a quality reader community, sites where the comments are worth reading separately from the post are increasingly rare and signal a particular kind of audience that has grown around the editorial vision over time gradually.
Genuinely changed how I think about a small piece of the topic, which does not happen often online, and a look at boxrise added another nudge in the same direction, the kind of writing that earns a small mental shift rather than just confirming what you already thought before reading is a sign of careful thought.
dark matter market url https://privatedarknetmarket.com/ dark matter darknet https://privatedarknetmarket.com/
If I had encountered this site five years ago I would have been telling everyone about it, and a look at leaddrift extended that retrospective enthusiasm, the version of me who used to recommend favourite blogs frequently would have made sure friends knew about this one and that earlier enthusiasm is partially returning to me here.
кухни под заказ спб кухни под заказ спб
While reviewing online marketplaces for usability and structure, I found a site that feels clean and responsive, and Cloud Ridge goods hub offers an easy browsing experience overall – Everything is arranged logically, making it simple to locate products quickly while maintaining a visually comfortable and organized interface.
Now sitting with the thoughts the post triggered rather than rushing on to the next thing, and a stop at simplebuyoutlet extended that reflective pause, content that earns time for thought after closing the tab is content of higher value than the merely interesting and this site has clearly produced that lasting effect today.
A piece that read as the work of someone who reads carefully themselves, and a look at seohive continued that informed feel, writers who are also serious readers produce work with a different quality and this site reads as the product of someone steeped in good writing rather than just generating content for an audience.
Ставки на спорт Узбекистан Ставки на спорт Узбекистан
бонусы бк бонусы бк
Came back to this twice now in the same week which is unusual for me, and a look at modernchoicehub suggested I will keep coming back, the kind of post that earns repeated visits rather than one and done reading is the gold standard for content quality and this site clearly hit that standard.
While exploring various online marketplaces and curated shopping platforms, I discovered featured shopping space – The website provided a smooth and organized layout, making it easy to browse through different sections while maintaining an engaging and visually comfortable experience throughout the session.
заказать кухню онлайн заказать кухню онлайн
врач нарколог выезд на дом врач нарколог выезд на дом
Found the use of subheadings really helpful for scanning back through the post later, and a stop at rankcove kept that reader friendly approach going, navigation is something many blog writers ignore but small structural choices make a noticeable difference for someone returning to find a specific point again days or weeks later.
кухни на заказ спб каталог https://kuhni-spb-58.ru
Just nice to read something that does not feel like it was assembled from a content brief, and a stop at trendycollectionhub kept that handcrafted feel going, you can tell when a real human with real understanding is behind the words versus a templated piece churned out for an algorithm to find.
Looking at this from the perspective of someone tired of generic content the contrast is striking, and a look at ranktrail maintained that distinctive feel, sites with strong editorial identity stand out against the bland background of algorithmic content and this one has clearly developed an identity worth recognising through careful attention.
Reading this in three sittings because the day was fragmented, and the piece survived the fragmentation, and a stop at seoladder held up under similar reading conditions, content engineered for continuous attention is fragile in modern conditions and this site reads as durable across the realistic ways people consume content today.
Appreciate that you did not pad this with fluff to hit a word count, the post says what it needs to say and stops, and a look at linkmagnet did the same, brevity here feels intentional not lazy which is a distinction many writers miss completely sometimes when they are working under deadlines.
cocorico market darknet https://darkwebmarkets2024.com/ cannaexpress shop https://darkwebmarkets2024.com/
заказать кухню с замером https://zakazat-kuhnyu-17.ru
Thanks for the practical examples scattered through the post rather than abstract theory only, and a look at adglide continued that grounded style, abstract points are easier to remember when paired with concrete situations and the writers here clearly understand how readers actually retain information from blog content reading sessions.
Worth recognising that the post did not pretend to be the final word on the topic, and a stop at styleforless continued that humility, content that admits its own scope and limits is more trustworthy than content that overreaches and this site has clearly developed the editorial maturity to know what it can and cannot claim well.
Looking at the surface design and the substance together this site has both right, and a look at seogain reinforced that integrated quality, sites where presentation and content reinforce each other rather than fighting are sites with full editorial coherence and this one has clearly invested in both layers in a balanced way.
Публикация знакомит читателей с различными подходами к реабилитации. От традиционных методов до современных программ — вы узнаете, как выбрать оптимальный путь к выздоровлению и преодолеть препятствия на этом пути.
Получить профессиональную консультацию – narcology clinic ростов на дону
Liked the careful selection of which details to include and which to skip, and a stop at seoslate reflected the same editorial judgement, knowing what to leave out is just as important as knowing what to include and this site has clearly figured out where that line sits for the topics it covers regularly.
заказать кухню под размеры заказать кухню под размеры
Honestly the simplicity is what makes this work, the topic is not buried under filler words or overly complex examples, and a quick look at buyrise showed the same sensible style, I left with what I came for and no headache from over reading which is a real win these days.
cocorico market https://darknetmarketsgate.com/ nexus darknet market urls https://darknetmarketsgate.com/
ares darknet url https://privatedarknetmarket.com/ tordex market url https://darknetmarketgate.com/
descarca 1win Republica Moldova http://1win5757.help
Bookmark earned and shared the link with one specific person who would care, and a look at starttodaymoveforward got the same targeted share, sharing carefully rather than broadcasting is a discipline I try to maintain and this site is generating shares from me at a sustainable rate rather than the spam rate of viral content.
В практике круглосуточного лечения применяются следующие этапы:
Получить больше информации – запой наркологическая клиника ростов-на-дону
The overall feel of the post was professional without being stuffy, and a look at explorewhatspossible kept that approachable expertise going, finding the right register for technical content is hard but this site has clearly figured out how to sound knowledgeable without slipping into that distant lecturing tone that loses readers in droves every time.
casino malaysia casino malaysia
Quietly impressive in a way that does not announce itself, and a stop at seopush extended that quiet impressiveness, the kind of quality that emerges through sustained attention rather than first impressions is the kind I trust more deeply and this site has been earning that deeper trust across multiple sessions over time consistently.
Felt the post had been written without using a single buzzword, and a look at createbettertomorrow continued that clean vocabulary, content free of jargon and trendy phrases reads better and ages better and this site has clearly committed to a vocabulary that will not feel dated in three years which is impressive editorially.
Felt slightly impressed without being able to point to one specific reason, and a look at seoladder continued that diffuse positive feeling, when content works at a level you cannot easily articulate the writer is doing something with craft rather than just delivering information and that is something I have learned to recognise.
Now placing this in the same category as a few other sites I have come to trust, and a look at rankfoundry continued the placement decision, the small category of fully trusted sites is one I extend rarely and only after multiple positive reading sessions and this site has earned the category placement methodically over time.
A piece that handled multiple complications without becoming confused, and a look at dailyvalueoutlet continued that organisational clarity, holding multiple threads in a single piece without losing any of them is a sign of skilled writing and this site has clearly developed the editorial discipline to manage complexity without sacrificing readability throughout.
Most of the time I feel the open web is in decline and then I find a site like this, and a stop at adglide reinforced that mood lift, the cumulative effect of finding occasional excellent independent content versus the cumulative effect of finding mostly mediocre content is real for the long term reader maintaining web habits today.
Glad to find something on this topic that does not start with three paragraphs of throat clearing before getting to the point, and a stop at seolift also dives right in, respect for the readers time shows up in small editorial choices like this and they add up to a real difference quickly.
cocorico darknet market https://darkwebmarkets2024.com/ darknet marketplace https://darknetmarketseasy.com/
wethenorth link https://darkmarketlegion.com/ dark market 2026 https://darkmarketlegion.com/
Thanks for the moderate length, neither so short it skips substance nor so long it bloats, and a stop at seogain hit the same balance, the right length is one of the hardest things to calibrate in blog writing and I appreciate when a team has clearly thought about it rather than defaulting.
A clean piece that knew exactly what it wanted to say and said it, and a look at rankvista maintained the same clarity of intention, knowing the goal of a piece before writing is something most blog content lacks and the clarity of purpose here shows up in every paragraph for any careful reader to notice.
Saving the link for sure, this one is a keeper, and a look at linkmotion confirmed I should bookmark the entire site rather than just this page, the consistency across what I have seen so far suggests there is a lot more here worth coming back for soon when I have more time.
Worth flagging that this approach to the topic is fresh without being contrarian, and a stop at findbetteropportunities extended the same fresh angle, finding original perspective on familiar subjects is rare and this site has clearly developed its own way of seeing rather than echoing the dominant takes from elsewhere consistently.
During my exploration of positive and motivational web platforms, I noticed a site that feels organized and simple, and Beginnings Bright focus hub delivers a smooth browsing experience overall – The layout is structured well, content is easy to read, and users can navigate without confusion or clutter.
Now thinking about how this post will age over the coming years, and a stop at trendypicksstore suggested the same durability, content built to age well rather than to capture the attention of the moment is content with a different kind of value and this site has clearly chosen the long horizon over the short one.
купить спецтехнику Вольво https://www.tech-group.com.ua
My reading list is short and selective and this site is now on it, and a stop at buywave confirmed the placement, the short list of sites I read deliberately rather than encounter accidentally is something I curate carefully and adding to it is a real act of trust which this site has earned today.
silk road darknet market https://darknetmarketstore.com/ silk road market url https://privatedarknetmarket.com/
кухни от производителя спб https://kuhni-spb-59.ru
While comparing several ecommerce stores for design and usability quality, I found a site that feels organized and easy to use, and CloudSpire product hub provides a smooth browsing experience overall – Content is well structured, pages load reliably, and users can navigate through categories without distractions or unnecessary visual complexity affecting readability.
Такой подход позволяет наркологической клинике в Ростове-на-Дону выстраивать лечение в безопасных и психологически комфортных условиях.
Подробнее – запой наркологическая клиника в ростове-на-дону
Granted my mood today might be elevating my reading experience but I still think this is genuinely good, and a stop at fashionmarketplace reinforced that even discounted assessment, controlling for the mood adjustment that affects content perception this site still reads as substantively above average across multiple pieces I have read carefully today.
descarca aplicatia 1win descarca aplicatia 1win
Started reading without much expectation and ended on a high note, and a look at leadcipher continued that arc, content that builds rather than peaks early is a sign of a writer who knows how to structure a piece for sustained reader engagement rather than relying on a strong hook to do all the work.
Stands apart from similar pages by actually being useful, that is high praise these days, and a look at adcrest kept that standard going, you can tell when a site is built around the reader versus around metrics and this one clearly belongs to the first category for sure based on what I read.
Now thinking about how to apply some of this to a project I have been planning, and a look at linkchart added more material for the planning, content that connects to my actual creative work rather than just being interesting in the abstract is the kind that earns priority placement in my reading rotation consistently going forward.
Just want to say thank you for putting this together, posts like these make searching online actually worth it sometimes, and a quick look at rankfuel kept that going, useful and easy to read without any of the tricks that ruin most blog comment sections lately on the wider open web.
dark market https://darkmarketslegion.com/ dark markets 2026 https://darkmarketlegion.com/
After browsing through various online marketplaces today, I eventually discovered structured shopping portal, and I noticed how the clean design and organized categories helped browsing stay simple and smooth for everyone.
silk road url https://darkwebmarketdirectory.com/ torzon darkweb url https://darkwebmarketdirectory.com/
Walked away with a clearer head than I had before reading this, and a quick visit to leadquest only sharpened that, the writing has a way of cutting through the noise that surrounds most topics online which is something I will definitely remember the next time I am searching for an answer to anything.
кухни на заказ спб каталог кухни на заказ спб каталог
Most of the time I feel the open web is in decline and then I find a site like this, and a stop at discoverandbuy reinforced that mood lift, the cumulative effect of finding occasional excellent independent content versus the cumulative effect of finding mostly mediocre content is real for the long term reader maintaining web habits today.
After checking several online shopping directories and recommendation platforms for fresh browsing content, I noticed featured product station – The website delivered smooth navigation between categories, information that was easy to browse, and a balanced layout that made the entire experience feel more organized and enjoyable overall.
Наркологическая клиника «АнтиДот» предлагает срочный вызов нарколога на дом в Воронеже и Воронежской области. Наша служба экстренной наркологической помощи доступна круглосуточно и позволяет быстро справиться с тяжелыми состояниями, вызванными алкогольной и наркотической зависимостью. Опытные врачи проведут детоксикацию организма, помогут снять абстинентный синдром и стабилизировать общее состояние пациента в комфортных домашних условиях.
Подробнее можно узнать тут – нарколог на дом клиника воронеж
Really clear writing, the kind that makes you want to share the link with someone who has been asking about the topic, and a quick browse through seobeacon only made me more sure of that, the information here stays useful long after the first read is done which says a lot.
Now thinking about how this post will age over the coming years, and a stop at linkmotive suggested the same durability, content built to age well rather than to capture the attention of the moment is content with a different kind of value and this site has clearly chosen the long horizon over the short one.
If I had to defend the time I spend reading independent blogs this site would feature in the defence, and a look at budgetfriendlypicks reinforced that defensive utility, the ongoing case for non algorithmic reading is one I make to myself periodically and sites like this one provide the actual evidence that supports the case clearly.
Reading this in the gap between work projects was a small but meaningful break, and a stop at seoloom extended that gentle reset, content that provides genuine refreshment rather than just distraction during work breaks is content with a particular kind of utility and this site fits that role for me reliably during work days.
Really appreciate the absence of stock photos that have nothing to do with the content, and a quick visit to grabpeak maintained the same restraint, visual filler is a tell that the writing cannot stand on its own and the lack of it here suggests the team has confidence in their content quality alone.
dark matter darknet url https://darknetmarketstore.com/ ares darknet url https://privatedarknetmarket.com/
акции букмекерских контор акции букмекерских контор
нарколога на дом нарколога на дом
A handful of memorable phrases from this one I will probably use later, and a look at startfreshjourney added a couple more, content that contributes language to my own communication rather than just facts is content with a different kind of utility and this site is providing that linguistic utility consistently across what I read.
Этот краткий обзор предлагает сжатую информацию из области медицины, включая ключевые факты и последние новости. Мы стремимся сделать информацию доступной и понятной для широкой аудитории, что позволит читателям оставаться в курсе актуальных событий в здравоохранении.
А что дальше? – прокапаться от алкоголя ростов
Quietly impressive in a way that does not announce itself, and a stop at seovertex extended that quiet impressiveness, the kind of quality that emerges through sustained attention rather than first impressions is the kind I trust more deeply and this site has been earning that deeper trust across multiple sessions over time consistently.
1win instaleaza app Moldova 1win instaleaza app Moldova
Really clear writing, the kind that makes you want to share the link with someone who has been asking about the topic, and a quick browse through seorally only made me more sure of that, the information here stays useful long after the first read is done which says a lot.
заказать кухню через интернет заказать кухню через интернет
Thanks for the simple approach, too many sites bury the actual point under layers of unnecessary words, but here every line earns its place, and a look at leadblaze showed the same care for the reader which is something I will remember the next time I need answers on a topic.
В этой статье рассматриваются различные аспекты избавления от зависимости, включая физические и психологические методы. Мы обсудим поддержку, мотивацию и стратегии, которые помогут в процессе выздоровления. Читатели узнают, как преодолеть трудности и двигаться к новой жизни без зависимости.
Изучить рекомендации специалистов – вывод из запоя частный врач
Generally my attention drifts on long posts but this one held it through the end, and a stop at unlocknewpotential earned the same sustained focus, content that defeats my drift tendency is content with substantive pulling power and this site has demonstrated that pulling power across multiple pieces in a session that has now run quite long actually.
заказать кухню с установкой https://zakazat-kuhnyu-17.ru
Started forming counter examples to test the claims and the post handled most of them implicitly, and a look at rankgrove continued that anticipatory style, writers who think two steps ahead of the critical reader save themselves from a lot of follow up work and this writer has clearly internalised that habit consistently.
Bookmark moved to my permanent reference folder rather than the casual maybe later folder, and a look at thefashionedit earned the same upgrade, the distinction between casual interest and lasting reference is something I track carefully and very few sites cross that threshold but this one did so without much effort apparently.
В этой публикации мы исследуем ключевые аспекты здоровья, включая влияние образа жизни на благополучие. Читатели узнают о важности правильного питания, физической активности и психического здоровья. Мы предоставим практические советы и рекомендации для поддержания здоровья и развития профилактических подходов.
Обратиться к источнику – частный медик 24 рнд
drughub shop https://darkwebmarketonion.com/ tordex url https://darkwebmarkets2024.com/
dark matter market url https://darkwebmarketdirectory.com/ cannaexpress link https://darkwebmarketlisting.com/
Refreshing to read something where the words actually mean something instead of filling space, and a stop at seonudge kept that going, the writing here trusts the reader to follow along without endless repetition or constant reminders of what was already said earlier in the post which I appreciate.
During my review of ecommerce platforms, I came across a site that prioritizes clarity and speed, and Harvest Frost retail goods delivers smooth performance overall – The structure is clean, navigation is easy, and content is well presented, making browsing simple and efficient for all users.
If quality blog writing is dying as people sometimes claim then this site is one piece of evidence that it has not died yet, and a look at leadbeacon extended that evidence, the broader cultural question about online writing has empirical answers in specific sites and this one is contributing to a more optimistic answer overall.
Now recognising the specific pleasure of reading writing that shows real care for sentence shapes, and a look at linkpilot extended that craft pleasure, sentence level writing quality is something most blog content ignores entirely and this site has clearly invested in the prose layer alongside the substance which is rare today.
Came in confused about the topic and left with a much firmer grasp on it, and after seobloom I felt I could explain this to someone else without hesitation, that is the gold standard for any educational content and most sites simply fail to reach it ever which is unfortunate but true.
Liked how the writer used real examples instead of theoretical ones to make the points stick, and a stop at learnsomethingamazing added even more concrete examples, this is the kind of practical approach that respects readers who actually want to apply what they learn rather than just nodding along passively without doing anything useful.
После поступления звонка нарколог оперативно выезжает по указанному адресу и прибывает в течение 30–60 минут. Врач незамедлительно приступает к оказанию помощи по четко отработанному алгоритму, состоящему из следующих этапов:
Получить больше информации – http://narcolog-na-dom-voronezh00.ru/
silk road market link https://darkmarketsdirectory.com/ black ops link https://darkmarketgate.com/
Stands out for actually being useful instead of just being long, and a look at rankdrift kept that going, length without value is the default mode of most blogs these days but this site has clearly chosen a different path which I respect a lot as a reader who values careful editing decisions like that.
После первичной диагностики начинается активная фаза детоксикации. Современные препараты вводятся капельничным методом, что позволяет быстро вывести токсины и восстановить нормальные обменные процессы. Этот этап критически важен для стабилизации работы печени, почек и сердечно-сосудистой системы.
Исследовать вопрос подробнее – https://kapelnica-ot-zapoya-tyumen0.ru/
Appreciate how nothing here feels copied or pieced together from other places, the voice is consistent and the tone stays human, and after I checked seoridge I noticed the same style holds, which is a small detail but it makes the whole experience feel personal rather than like another generic site.
Found a couple of useful angles in here I had not considered before reading carefully, and a quick stop at seovertex added more, this is one of those sites where the value compounds the more you read rather than peaking at one viral post and then offering nothing else of substance afterwards which is common.
Honestly this was the highlight of my reading queue today, and a look at seomagnet extended that across more pages I will return to, ranking what I read against what else I read each day is something I do informally and this site keeps moving up in those rankings the more I explore it.
During my morning reading slot this fit perfectly into the routine, and a look at rankpoint extended that perfect fit into the rest of the routine, content that matches the rhythm of how I actually read rather than demanding accommodation from my schedule is content well calibrated to its likely audience and this site has it.
Лечение вывода из запоя на дому в Мурманске организовано по четко структурированной схеме, включающей следующие этапы, каждый из которых играет ключевую роль в оперативном восстановлении здоровья:
Подробнее можно узнать тут – нарколог вывод из запоя мурманск
While exploring collaborative online platforms, I found a website that feels helpful and structured, and Connect ShareGrow information hub delivers a smooth browsing experience overall – The interface is clean, content is easy to follow, and users can browse without unnecessary complexity or distractions affecting usability.
Polished and informative without feeling overproduced, that is the sweet spot, and a look at yournextadventure hit it again, you can tell when a site has been built with care versus thrown together for the sake of having something to put online and this is clearly the former approach taken by the team.
However casually I came to this site I have ended up reading carefully, and a look at linktower continued earning that careful reading, the conversion from casual visitor to careful reader is something content earns rather than demands and this site has accomplished that conversion for me over the course of just a few pieces.
Going to share this with a friend who has been asking the same questions for a while now, and a stop at rankharbor added a few more pages I will pass along too, this is the kind of generous information that earns a small thank you from me right now and again later this week.
darkmarket https://darkmarketsgate.com/ black ops darknet link https://darkmarketslegion.com/
nexus darknet market online https://darkwebmarketlisting.com/ darkmarket list https://darkwebmarketlinks2024.com/
Reading this in the gap between work projects was a small but meaningful break, and a stop at adlayer extended that gentle reset, content that provides genuine refreshment rather than just distraction during work breaks is content with a particular kind of utility and this site fits that role for me reliably during work days.
Following a few of the internal links revealed more posts of similar quality, and a stop at leadclimb added more to that growing pile, sites where internal links lead to more good content rather than to more of the same recycled material are sites with depth and this one has clearly built that depth carefully.
Genuinely well crafted writing, the kind that makes the topic look easier than it actually is, and a look at megabuy added even more depth, you can feel the experience behind every line which is something only writers who have been at this for a while can pull off with this level of grace.
A piece that was confident enough to leave some questions open rather than forcing closure, and a look at trendandfashionhub continued that intellectual honesty, content that admits the limits of its scope is more trustworthy than content that pretends to total understanding and this site has the right calibration on certainty consistently.
ares onion https://darkmarketgate.com/ nexus darknet url https://darkmarketgate.com/
Алкогольный запой является тяжёлым состоянием, требующим срочного медицинского вмешательства. Наркологическая клиника «Пульс» в Краснодаре предлагает эффективную помощь в борьбе с алкогольной зависимостью, используя проверенный метод — капельницу от запоя на дому. Наши специалисты оперативно выезжают по указанному адресу и обеспечивают качественную медицинскую помощь с гарантией конфиденциальности и безопасности.
Выяснить больше – капельница от запоя недорого в краснодаре
Will recommend this to a couple of friends who have been asking about this exact topic, and after seoboostly I have even more reason to do so, the kind of site that earns word of mouth rather than chasing it through aggressive marketing or paid placements is always a treat to find online.
Мы рассмотрим современные вызовы здравоохранения и пути их решения с помощью технологий и научных исследований. В статье собраны данные о новых лекарствах, методах диагностики и системном подходе к улучшению здоровья населения.
Подробнее – капельница от запоя ростов на дону
Glad I gave this a chance instead of bouncing on the headline, and after linkripple I was certain I had made the right call, snap judgements based on titles miss a lot of good content and this is a reminder to slow down and check things out before scrolling past in a hurry.
В этой статье мы рассматриваем разрушительное влияние зависимости на жизнь человека. Обсуждаются аспекты, такие как здоровье, отношения и профессиональные достижения. Читатели узнают о необходимости обращения за помощью и о путях к восстановлению.
Ознакомьтесь с аналитикой – вызов нарколога на дом в ростове
Stayed longer than planned because each section earned the next, and a look at linkburst kept that pulling effect going across more pages, the kind of subtle pull that good writing exerts on attention is something I find harder and harder to resist when I encounter it on the open web today.
Felt energised after reading rather than drained, which is unusual for online content these days, and a look at smartshoppingzone continued that good feeling, content that leaves you better than it found you is rare and worth bookmarking when you stumble across it for the first time today or any other day really.
A piece that exhibited the kind of patience that good writing requires, and a look at leadsurge continued that patient quality, hurried writing is easy to spot and this site reads as having been written without time pressure which produces a different feel than the rushed content that dominates much of the modern blog space.
кухни под заказ в спб https://kuhni-spb-59.ru
Reading this with a notebook open turned out to be the right move, and a stop at seostrike added more material to the notes, content that justifies active note taking from a passive reader is content with real informational density and this site is producing notes worthy material at a high rate consistently.
During a search for online recommendation sites that shared interesting promotions and browsing categories, I encountered new bargain destination – The browsing layout felt simple and convenient to use, the organization remained clear across sections, and the fresh updates provided a steady stream of interesting content worth casually exploring over time.
Алкогольная зависимость сопровождается не только физическими, но и глубокими психоэмоциональными проблемами. Психотерапевтическая помощь играет важную роль в лечении, помогая пациенту осознать причины зависимости и разработать стратегии для предотвращения рецидивов.
Детальнее – http://narcolog-na-dom-ufa0.ru
A satisfying piece in the way that good meals are satisfying rather than just filling, and a look at ranktower extended that satisfaction, the metaphor between content and meals is one I find useful and this site reads as a satisfying meal rather than the empty calories that most content provides for casual readers.
Такой подход позволяет наркологической клинике в Ростове-на-Дону выстраивать лечение в безопасных и психологически комфортных условиях.
Подробнее можно узнать тут – наркологическая клиника
Solid endorsement from me, the writing earns it, and a look at everydayinnovation continues to earn it across the broader site too, the kind of operation that maintains quality across many pages rather than just one viral post is a sign of serious commitment and that is what I see here clearly across what I read.
Found a couple of useful angles in here I had not considered before reading carefully, and a quick stop at opalmeadowgoodsgallery added more, this is one of those sites where the value compounds the more you read rather than peaking at one viral post and then offering nothing else of substance afterwards which is common.
After opening several online platforms and digital pages today, I eventually reached recommended web listing, and I had a good experience overall with trustworthy information and smooth page loading without any noticeable delays.
Thanks for taking the time to write this, it is clear that some thought went into how each point would land, and after I went through rankloom I had a better grip on the topic, real value without the usual marketing noise people have to put up with online when searching for answers.
darknet drug links https://darkmarketsgate.com/ tordex darknet link https://darkmarketslegion.com/
A particular pleasure to read this with a fresh coffee, and a look at simplystylishstore extended the pleasure across more pages, content that pairs well with quiet morning rituals is something I have come to value highly and this site has the kind of energy that fits naturally into a calm reading routine.
nexus darkweb link https://darkwebmarketdirectory.com/ ares darknet url https://darkwebmarketlinks2024.com/
Picked up two new ideas that I expect will come up in conversations this week, and a look at seometric added another, content that arms me with talking points rather than just filling time is the kind that provides ongoing value beyond the moment of reading and this site is generating that kind of ongoing value.
В этой статье мы говорим о важности поддержки в процессе выздоровления. Рассматриваются семьи, группы поддержки, специалисты и онлайн-ресурсы, которые могут сыграть решающую роль в избавлении от зависимости.
Расширить кругозор по теме – вывод из запоя в ростове-на-дону
Good post, the kind that respects the reader by getting to the point quickly without skipping the details that matter, and a short look at rapidstylecorner confirmed that approach is consistent across the site which is rare to find online these days, definitely a place I will return to soon.
В данном материале представлены ключевые тенденции в сфере медицинской науки и практики. Вы узнаете о последних открытиях, инновационных подходах к терапии и важности профилактики заболеваний. Особое внимание уделено практическому применению новых методов в клинической практике.
Интересует подробная информация – частный медик 24
The overall feel of the post was professional without being stuffy, and a look at leadpush kept that approachable expertise going, finding the right register for technical content is hard but this site has clearly figured out how to sound knowledgeable without slipping into that distant lecturing tone that loses readers in droves every time.
В этом обзоре мы обсудим современные методы борьбы с зависимостями, включая медикаментозную терапию и психотерапию. Мы представим последние исследования и их результаты, чтобы читатели могли быть в курсе наиболее эффективных подходов к лечению и поддержке.
Подробнее – частный медик 24 ростов на дону
Запой сопровождается быстрым накоплением токсинов, что может привести к нарушению работы сердца, печени и почек. Использование капельничного метода позволяет оперативно ввести современные препараты для детоксикации, что способствует быстрому восстановлению обменных процессов и нормализации работы внутренних органов. Оперативное лечение на дому особенно актуально, когда каждая минута имеет значение для спасения здоровья.
Исследовать вопрос подробнее – капельница от запоя тюменская область
Эта медицинская заметка содержит сжатую информацию о новых находках и методах в области здравоохранения. Мы предлагаем читателям свежие данные о заболеваниях, профилактике и лечении. Наша цель — быстро и доступно донести важную информацию, которая поможет в повседневной жизни и понимании здоровья.
Есть чему поучиться – частный медик 24
A particular pleasure to read this with a fresh coffee, and a look at seoimpact extended the pleasure across more pages, content that pairs well with quiet morning rituals is something I have come to value highly and this site has the kind of energy that fits naturally into a calm reading routine.
ШЄШЩ…ЩЉЩ„ ШЁШ±Щ†Ш§Щ…Ш¬ Ш§Щ„Щ…Ш±Ш§Щ‡Щ†Ш§ШЄ 888 https://888starzeg2.com/
Probably this is one of the better quiet successes on the open web at the moment, and a look at adprism reinforced that quiet success quality, sites that are doing well without making a noise about doing well are the sites I most respect and this one has clearly chosen the quiet success path consistently throughout.
Skipped the related links section thinking I had read enough and then came back to it later when curiosity got the better of me, and a stop at leadloom confirmed I should have just read it first, every section of this site appears to deserve careful attention rather than skipping past lazily.
Came in skeptical of the angle and left mostly persuaded, and a stop at learnandthrive pushed me a bit further in the same direction, content that can move a critical reader by argument rather than rhetoric is rare and worth pointing out because it indicates real substance underneath the surface presentation here.
На данном этапе врач уточняет длительность запоя, тип употребляемого алкоголя и наличие сопутствующих заболеваний. Тщательный анализ этих данных позволяет подобрать оптимальные методы детоксикации и снизить риск осложнений.
Исследовать вопрос подробнее – vyvod-iz-zapoya-kruglosutochno murmansk
تحميل 888starz للاندرويد تحميل 888starz آخر إصدار
A quiet kind of confidence runs through the writing, and a look at megabuy carried that same understated assurance, confidence without bragging is the most attractive register for online writing and the writers here have clearly developed it through practice rather than affecting it through stylistic tricks that would feel hollow eventually.
A piece that demonstrated competence without performing it, and a look at leadpath maintained the same self assured but unshowy register, the gap between competence and performance of competence is one I track and this site has clearly chosen to demonstrate rather than perform which I find much more persuasive as a reader.
تنزيل ٨٨٨ ستارز تحميل 888
Came back to this twice now in the same week which is unusual for me, and a look at leadglide suggested I will keep coming back, the kind of post that earns repeated visits rather than one and done reading is the gold standard for content quality and this site clearly hit that standard.
Came in tired from a long day and the writing held my attention anyway, and a stop at seocabin kept that going, content that can engage a fatigued reader is doing something right because most online reading happens in suboptimal conditions like that one and quality content adapts to it without complaint.
Процесс вывода из запоя капельничным методом организован по строгой схеме, позволяющей обеспечить максимальную эффективность терапии. Каждая стадия направлена на комплексное восстановление организма и минимизацию риска осложнений.
Разобраться лучше – https://kapelnica-ot-zapoya-tyumen0.ru/kapelnicza-ot-zapoya-na-domu-czena-tyumen/
888 starz ios http://androidchity.ru .
По окончании курса детоксикации нарколог дает пациенту и его близким подробные рекомендации, помогающие быстрее восстановить здоровье и предотвратить повторные случаи запоев.
Углубиться в тему – срочный вывод из запоя новосибирск
888starz تسجيل https://888starz-egyp.com/
Liked the balance between depth and brevity, never too shallow and never too long, and a stop at rankgrit kept the same balance going across the rest of the site, this is one of the harder skills in writing and the team here clearly has it figured out very well indeed across every page.
Skipped past the first paragraph thinking it was setup and had to come back when the rest referenced it, and a stop at linkscope similarly rewarded careful reading from the start, content where every paragraph carries weight is content I now know to read from the beginning rather than skipping ahead.
888starz casino 8.8 starz
تنزيل 888 https://world-cuisine.com/
888starz зеркало вход 888starz зеркало вход .
Обращение за помощью нарколога на дому в Мурманске имеет ряд существенных преимуществ:
Исследовать вопрос подробнее – вывод из запоя на дому мурманск.
Quietly building a case in my head for why this site deserves more attention than it currently seems to receive, and a look at urbanchoicehub reinforced the case, the gap between quality and recognition is a recurring frustration in independent online content and this site is one of the cases that seems particularly egregious to me today.
Really like that the writer trusts the reader to follow simple logic without restating every previous point, and a stop at rankpivot kept that respect going, treating an audience as capable adults rather than as people who need constant hand holding makes a noticeable difference in the reading experience for me.
Approaching this site through a casual link click and being surprised by what I found, and a look at yourstylezone extended the surprise, the rare experience of stumbling into excellent independent content rather than predictable mediocrity is one of the actual remaining pleasures of casual web browsing and this site provided it cleanly.
silk road market link https://darkwebmarkets2024.com/ dark web markets https://darkwebmarketonion.com/
cocorico darknet url https://darkwebmarketlisting.com/ torzon market darknet https://darkwebmarketlinks2024.com/
Honest reaction is that this is the kind of writing I would defend in a conversation about good blog content, and a look at rankmagnet reinforced that, the rare site whose work I would actively recommend rather than just tolerate is the kind I want to support through return visits regularly.
Не стоит медлить с вызовом врача-нарколога, если у человека проявляются тревожные признаки ухудшения состояния. Среди наиболее серьезных симптомов, требующих немедленного вмешательства врача, можно выделить продолжительный запой (более двух дней подряд), частую рвоту, невыносимую головную боль, выраженный тремор рук и тела, повышение артериального давления, нарушение ритма сердца, а также психические нарушения, включая тревогу, галлюцинации и бессонницу. Чем раньше пациент обратится за профессиональной помощью, тем выше шансы избежать серьезных осложнений и быстро вернуться к нормальной жизни.
Разобраться лучше – вывод из запоя клиника новосибирск
Капельница от запоя в Краснодаре рекомендуется при первых признаках алкогольной интоксикации или тяжелого похмелья. Без своевременного медицинского вмешательства состояние человека может резко ухудшиться, привести к развитию осложнений и даже стать угрозой для жизни. Срочная помощь необходима в таких случаях:
Ознакомиться с деталями – вызвать капельницу от запоя на дому
Speaking from the perspective of having read widely on the topic this site offers something distinct, and a look at leadrally reinforced that distinctness, the rare site that contributes something genuinely original to a saturated topic is the rare site worth following carefully and this one has demonstrated that original contribution capability today.
Now feeling that this site is the kind I want to make sure does not disappear, and a look at freshvalueoutlet reinforced that quiet protective feeling, the rare sites whose disappearance would actually matter to me are the sites I want to support through return visits and recommendations and this one has joined that small protected list.
Reading this brought back the satisfaction I used to get from blogs ten years ago, and a stop at emberridgevendorstudio kept that nostalgic quality alive, sites that capture what was good about an earlier era of internet writing are increasingly precious and this one is doing that without feeling like a deliberate throwback at all.
I really like the calm tone here, it does not push anything on the reader, and after I went through leadripple I felt the same way, just steady useful content laid out without drama, which is exactly what someone trying to learn something quickly needs to find rather than aggressive marketing.
More substantial than most of what I find searching for this topic online, and a stop at seogrit kept that quality consistent, this is one of those sites where the writing actually rewards careful reading rather than punishing the patient reader with empty filler stretched out across long paragraphs that say very little.
Honestly the simplicity of the explanation made the topic click for me in a way other writeups had not, and a look at rapidtrendoutlet continued that clarity into related areas, when a writer gets the level of explanation right the reader does the heavy lifting themselves and the post just enables it.
Felt the writer was speaking my language without trying to imitate it, and a look at rankridge continued that natural fit, when a writers default voice happens to match what you find easy to read the experience feels frictionless and that is something I notice and remember about specific sites going forward.
Recommend this to anyone who values clear thinking over flashy presentation, and a stop at seomotion continued in the same understated way, this site has its priorities in the right place which makes it worth supporting through repeat visits and recommendations rather than just one passing read today before moving on quickly elsewhere.
darknet marketplace https://darknetmarketstore.com/ wethenorth market https://privatedarknetmarket.com/
Обращение за помощью на дому имеет ряд значительных преимуществ, которые делают данный метод лечения предпочтительным для многих пациентов:
Получить больше информации – вызов нарколога цена уфа
Probably the kind of site that should be more widely read than it appears to be, and a look at quickshoppingcorner reinforced that quiet wish, the gap between a sites quality and its apparent reach is sometimes large and that gap exists for this site in a way that makes me want to mention it more.
В клинике «Пульс» процесс оказания помощи начинается сразу после вашего обращения. Наша бригада оперативно выезжает на дом, где врач проводит первичный осмотр пациента: измеряет давление, пульс, оценивает степень интоксикации и собирает анамнез. На основе полученных данных подбирается индивидуальный состав капельницы.
Исследовать вопрос подробнее – kapelnica-ot-zapoya-krasnodar7.ru/
During my review of different motivational websites, I found a platform that feels modern and engaging, and BigMove Fast Think hub offers a smooth browsing experience overall – The design is clean, the messages are uplifting, and users can easily follow inspirational content without confusion or unnecessary visual clutter.
Quietly enjoying that I have found a new site to follow for the topic, and a look at leadlane reinforced the small pleasure of the find, the discovery of new high quality sources is one of the more durable pleasures of careful internet reading and this site has been generating that discovery pleasure at multiple points already today.
1win pariuri live http://1win5757.help/
Thanks for putting in the work to make this approachable, plenty of sites cover the same ground but most do it badly, and a quick visit to seoclimb confirmed this one stands apart, simple language and useful examples without anyone trying to sell me anything along the way which I really appreciated.
Honest reaction is that I want to send this to a friend who would benefit from it, and a look at leadlayer added more material I will pass along too, the impulse to share is the strongest signal I have for content quality and this site is generating that impulse cleanly across multiple posts.
Honestly enjoyed reading this more than I expected to when I first clicked through, and a stop at adtap kept that pleasant surprise going, sometimes you stumble onto a site that just clicks with how you like to read and this is one of those for me right now today which is great.
Even across multiple posts the writers voice has remained consistent in a way I appreciate, and a stop at linksignal continued that voice, sites that maintain editorial consistency across many pieces have something most sites lack and this one has clearly worked out how to keep its voice steady across what reads as a growing archive.
Этот краткий обзор предлагает сжатую информацию из области медицины, включая ключевые факты и последние новости. Мы стремимся сделать информацию доступной и понятной для широкой аудитории, что позволит читателям оставаться в курсе актуальных событий в здравоохранении.
Узнать напрямую – частный медик 24 рнд
Когда запой превращается в острую угрозу здоровью, оперативное вмешательство становится необходимым условием для спасения жизни и предотвращения серьезных осложнений. В Уфе наркологи выезжают на дом для оказания качественной помощи при запое, предлагая детоксикацию, корректировку обменных процессов и психологическую поддержку. Такой формат лечения обеспечивает комфортную обстановку, индивидуальный подход и полную конфиденциальность для каждого пациента.
Выяснить больше – http://narcolog-na-dom-ufa0.ru
dark web market list https://darkmarketslegion.com/ dark matter market link https://darkmarketlegion.com/
Different in a good way from the cookie cutter content that fills most blogs covering this area, and a stop at believeandcreate kept showing me why, original thoughtful writing exists if you know where to look and this site has earned a place on my short list of those rare exceptions worth defending.
dark market 2026 https://darkwebmarketlisting.com/ drughub market darknet https://darkwebmarketlinks2024.com/
Skipped a meeting reminder to finish the post, and a stop at classychoicehub held me past another reminder, when content beats meetings the writer is doing something extraordinary because meetings have institutional support behind them and yet good writing can still occasionally win that competition for attention which I find heartening today.
В Краснодаре клиника «КубаньТрезвость» работает по принципу непрерывного наблюдения — помощь оказывается 24 часа в сутки. Независимо от степени тяжести запоя, нарколог оценивает состояние пациента, подбирает схему лечения и контролирует динамику восстановления. При лёгкой форме запоя допускается проведение детоксикации на дому, однако при выраженной интоксикации рекомендуется госпитализация. Врачи применяют безопасные препараты, позволяющие быстро стабилизировать давление, снять тревогу и улучшить сон.
Углубиться в тему – https://vyvod-iz-zapoya-v-krasnodare19.ru/vykhod-iz-zapoya-krasnodar
Definitely returning here, that is decided, and a look at rankslate only made the case stronger, this is one of those rare websites that rewards regular visits rather than feeling stale after the first read which is something I cannot say about most of the places I bookmark today across all my topics.
A piece that brought a sense of order to a topic I had been finding chaotic, and a look at rankmetric continued that organising effect, content that imposes useful structure on messy subjects is doing genuine intellectual work and this site is providing that organisational function across multiple posts I have read recently here.
While searching for practical online learning resources and motivation-based websites, I discovered daily progress space – The experience felt smooth and encouraging, with clear sections and well presented content that made it easy to focus on useful personal development ideas.
Thanks for the breakdown, it gave me a clearer picture of something I had been confused about for a while now, and a stop at linkgain closed the remaining gaps in my understanding nicely, no need to hunt around twenty other articles to put the pieces together which is a real time saver.
Top tier post, the kind that makes you want to share the link with friends working in the same area, and a stop at shopwithhappiness only made me more confident in doing that, this site is one of the better resources I have seen on the topic recently across both new and older posts.
Reading this in the gap between work projects was a small but meaningful break, and a stop at moveforwardnow extended that gentle reset, content that provides genuine refreshment rather than just distraction during work breaks is content with a particular kind of utility and this site fits that role for me reliably during work days.
Thank you for the genuine effort here, it shows in every paragraph and not just the headline, and after my visit to seoprism I was sure this site cares about getting things right rather than chasing clicks, which is the main reason I will come back later this week to read more.
More substantial than most of what I find searching for this topic online, and a stop at leadsprout kept that quality consistent, this is one of those sites where the writing actually rewards careful reading rather than punishing the patient reader with empty filler stretched out across long paragraphs that say very little.
One of the more honest takes on the topic I have seen lately, no spin and no oversell, and a stop at leadvertex kept that going, the kind of voice the open web could use a lot more of rather than the endless echo chamber of recycled opinions floating around every social platform these days.
Thanks for a post that does not try to be funny when it is not the moment for it, and a stop at rivercovevendorroom maintained the same appropriate seriousness, knowing when humour helps and when it just signals desperation for engagement is a sign of editorial maturity that many blogs have not developed yet.
dark web market urls https://darkmarketsdirectory.com/ tordex market link https://darknetmarketsgate.com/
Worth pointing out the careful word choice in this post, no buzzwords and no jargon, and a look at trendforlife continued that disciplined vocabulary, sites that resist the pull of trendy language are sites that will read well in five years and this one is clearly built for that kind of long durability.
Bookmarking this for later, the kind of resource I want to keep nearby, and a quick look at freshcarthub confirmed the rest of the site is worth the same treatment, definitely going into my reference folder for the next time the topic comes up at work or in conversation with someone who asks.
В практике круглосуточного лечения применяются следующие этапы:
Разобраться лучше – наркологическая клиника в краснодаре
Worth every minute of the time spent reading, and a stop at seopivot extends that value across more pages, in a media environment where most content is engineered to waste attention this site stands out by treating reader time as something valuable rather than something to be exploited and stretched as far as possible.
Now wondering how the writers calibrated the level of detail so well, and a stop at rapidtrendzone continued the same calibration, the right level of detail is one of the harder editorial calls in any piece and this site has clearly developed an instinct for it through what I assume is years of careful practice publicly.
Speaking as someone who reads a lot on this topic this site has earned a high position in my source rankings, and a stop at seomotive reinforced that ranking, the informal ranking of sources for a topic is something I maintain mentally and this site has moved into the upper portion of those rankings clearly.
Reading this on the train into work was a better use of the commute than my usual choices, and a stop at seosurge extended that commute reading well, content that improves transit time rather than just filling it is content with practical benefit and this site has earned its place in my morning commute reading rotation.
A piece that suggested careful editing without showing the marks of the editing, and a look at linkcrest continued that invisible polish, the best editing disappears into the prose and this site reads as having been edited with skill that does not announce itself which is the highest compliment I can offer any blog content.
dark web market list https://darkmarketlegion.com/ nexus official site https://darkmarketsgate.com/
кухня глория https://kuhni-spb-59.ru
Felt the writer respected me as a reader without making a show of doing so, and a look at seocove continued that quiet respect, this is the kind of small but meaningful detail that separates the sites I bookmark from the ones I close after a single skim and never return to again no matter how interesting the headline.
After spending time exploring various online stores and digital marketplaces today, I eventually visited trusted woven marketplace and found it really interesting, as browsing stayed comfortable and everything looked carefully maintained throughout the entire experience.
cocorico market link https://darkwebmarketlisting.com/ nexus darknet site https://darkwebmarketdirectory.com/
A piece that took its time without dragging, and a look at linkstreet kept the same patient pace, the difference between unhurried and slow is a fine editorial distinction and this site has clearly found the unhurried side without slipping into the slow side which would have lost me as a reader quickly otherwise.
Top quality material, deserves more attention than it probably gets, and a look at rankmotion reflected the same effort across the site, a hidden gem in the modern web where most attention goes to whoever shouts loudest rather than whoever actually delivers the best content for their readers without much marketing fanfare.
букмекерские конторы Узбекистана букмекерские конторы Узбекистана
A piece that did not waste any of its substance on sales or promotion, and a look at linkcipher continued that pure content focus, sites that resist the urge to monetise every paragraph are increasingly rare and this one has clearly made the editorial choice to keep the writing clean from commercial intrusion which I value highly.
Started a draft response in my head and ended without publishing it because the post said it well enough, and a look at makepositivechanges produced the same effect, content that satisfies my urge to add to it by being complete enough on its own is rare and represents a particular kind of editorial completeness here.
Took the time to read the comments on this post too and they were also worth reading, and a stop at seocipher suggested the community quality matches the content quality, when the conversation around a piece is as good as the piece itself you know you have found a real corner of the internet.
Once I trust a site this much I tend to read everything they publish and that is the trajectory I am on with this one, and a stop at seoscale confirmed the trajectory, the rare progression from interested reader to comprehensive reader is something only certain sites earn and this one is earning that progression rapidly.
Felt the writer respected the topic without being precious about it, and a look at leadstreet continued that respectful but unfussy treatment, finding the right register for serious topics is hard and this site has clearly figured out how to take the topic seriously while still being readable for casual visitors regularly.
Glad I clicked through from where I did because this turned out to be worth the time spent, and after fashionforlife I had a fuller picture, the kind of content that earns its visitors through delivering value rather than chasing them through aggressive advertising or constant pop ups appearing everywhere on the screen lately.
abacus darknet url https://darkmarketgate.com/ drughub darknet url https://darkmarketgate.com/
Even just sampling a few posts the consistency is what stands out, and a look at opalmeadowgoodsgallery confirmed the broader pattern, sites where every piece I sample lives up to the standard set by the others are sites with serious quality control and this one has clearly invested in whatever editorial process produces that consistency reliably.
Для жителей Ростова-на-Дону клиника «Южный МедКонтроль» предлагает два формата помощи: лечение в стационаре и амбулаторные визиты врача на дом. Стационар оборудован всем необходимым для круглосуточного медицинского наблюдения, проведения инфузионных процедур и лабораторной диагностики. Пациентам предоставляется комфортное размещение, спокойная обстановка и постоянный контроль состояния. При выезде на дом врачи действуют оперативно — приезжают в течение часа, проводят осмотр, устанавливают капельницы, купируют абстиненцию и дают рекомендации по дальнейшему лечению.
Получить больше информации – платная наркологическая клиника
Coming back to this one, definitely, and a quick visit to fastbuystore only made me more sure of that, the kind of writing that makes you want to set aside time later rather than rushing through it now while distracted by everything else competing for attention on the screen today across so many tabs.
Sets a higher bar than most of what shows up in search results for this topic, and a look at leadchart did not lower that bar at all, in fact it confirmed the impression, this is the kind of consistency that earns a place in regular rotation for serious readers instead of casual scrollers passing through.
A piece that did not waste any of its substance on sales or promotion, and a look at leadstrike continued that pure content focus, sites that resist the urge to monetise every paragraph are increasingly rare and this one has clearly made the editorial choice to keep the writing clean from commercial intrusion which I value highly.
Reading this gave me a quiet moment of intellectual pleasure that I had not been expecting, and a stop at seolane extended that pleasure across more pages, the unexpected reward of stumbling into careful writing is one of the small ongoing pleasures of reading the open web and this site is delivering it reliably.
One of the more honest takes on the topic I have seen lately, no spin and no oversell, and a stop at admesh kept that going, the kind of voice the open web could use a lot more of rather than the endless echo chamber of recycled opinions floating around every social platform these days.
silk road link https://darkmarketslegion.com/ black ops darknet market https://darkmarketslegion.com/
Found something new in here that I had not seen explained this way before, and a quick stop at learnsomethingeveryday expanded the idea even further, the kind of writing that nudges your thinking forward a bit without forcing the issue is exactly what I look for online today and rarely actually find anywhere.
darknet markets 2026 https://darkwebmarketdirectory.com/ silk road market link https://darkwebmarketlisting.com/
Felt the post handled a sensitive angle of the topic with appropriate care, and a look at royalcartcorner extended that careful handling across related material, sites that can navigate delicate territory without causing damage are rare and require a level of judgement that comes from experience rather than from following any clear playbook.
Excellent execution from start to finish, the post never loses its rhythm and the points stay sharp, and a quick stop at trendshopworld kept the same level going, consistency like this across a site is the marker of a serious operation rather than a casual side project running on autopilot somewhere else.
Approaching this with the usual skepticism I bring to new sites and being slowly persuaded, and a stop at rankgain continued that gradual persuasion, the careful path from skeptical reader to genuine fan is the only one I trust and this site has walked me along that path through patient consistent quality across pieces.
A slim post with substantial content per word, and a look at seocraft maintained the same density, the content per word ratio is something I track informally and this site scores high on that ratio compared to most sources I read regularly which is a quiet indicator of careful editorial work behind the scenes.
Found something quietly useful here that I expect to return to, and a stop at seoorbit added more of the same, content with quiet utility ages well in a way that flashy hot takes do not and I have learned to weight quiet utility much higher when deciding what to bookmark for later use.
Took my time with this rather than rushing because the writing rewards attention, and after rankmotive I had even more to absorb, the kind of content that pays back the patient reader rather than punishing them with empty filler is something I look for and rarely find in regular searches lately.
Liked the careful word choice throughout, every term seemed picked for a reason rather than thrown in casually, and a stop at startfreshjourney continued that precise style, this kind of attention to small details is what separates careful writing from the usual rushed content that dominates blog spaces today across pretty much every topic I follow.
заказ кухни заказ кухни
Generally my attention drifts on long posts but this one held it through the end, and a stop at rankladder earned the same sustained focus, content that defeats my drift tendency is content with substantive pulling power and this site has demonstrated that pulling power across multiple pieces in a session that has now run quite long actually.
Looking at this from the perspective of someone tired of generic content the contrast is striking, and a look at adpivot maintained that distinctive feel, sites with strong editorial identity stand out against the bland background of algorithmic content and this one has clearly developed an identity worth recognising through careful attention.
Now noticing that the post benefited from being neither too short nor too long for its content, and a look at linktactic continued that calibration of length, sites that match length to content rather than padding to hit some target are sites that respect both their material and their readers and this site does both.
На основании проведенных обследований врач разрабатывает индивидуальную терапевтическую схему. Основной этап — детоксикация организма при помощи внутривенных инфузий. В капельницу включают растворы для восстановления водно-солевого баланса, выведения токсинов и улучшения работы внутренних органов. Также по показаниям назначают препараты для поддержки работы печени и сердца, стабилизации психоэмоционального состояния и снятия симптомов абстиненции. На протяжении процедуры врач ведет постоянный контроль за состоянием пациента, корректируя лечение при необходимости.
Подробнее тут – вывод из запоя в новосибирске
скачать видео с youtube https://skachat-video-s-youtube-12.ru
While reviewing various online bargain platforms, I came across a website that feels well structured and simple, and FreshValue outlet store hub offers smooth navigation overall – The interface is easy to use, deals are clearly shown, and users can browse comfortably without unnecessary complexity.
dark web market list https://darknetmarketstore.com/ cocorico url https://privatedarknetmarket.com/
A piece that reads as if the writer trusted readers to fill in obvious gaps, and a look at thebestcorner continued that respectful approach, content that does not over explain what the reader can infer is content that respects intelligence and this site has clearly chosen to write to capable readers rather than to the lowest common denominator.
Лучшие букмекерские конторы Узбекистана Лучшие букмекерские конторы Узбекистана
вызвать нарколога на дом воронеж вызвать нарколога на дом воронеж
Just wanted to say this was useful and leave a small note of thanks, and a quick visit to lemonlarkvendorparlor earned a similar nod from me, the small acknowledgements add up over time and represent the real economy of trust that good content runs on across the open and increasingly fragmented modern internet.
Well structured and easy to read, that combination is rarer than people think, and a stop at shopbasemarket confirmed the same standard runs across the rest of the site, definitely the kind of place I will be coming back to when this topic comes up in conversation later again over the weeks ahead.
Now noticing that the post benefited from being neither too short nor too long for its content, and a look at linkvertex continued that calibration of length, sites that match length to content rather than padding to hit some target are sites that respect both their material and their readers and this site does both.
Better signal to noise ratio than most places I check on this kind of topic, and a look at linkblaze kept that going, every paragraph here carries something worth reading rather than padding out the page to hit some arbitrary length target that search engines reward but readers ignore as soon as they notice it.
dark matter darknet url https://darkmarketsgate.com/ black ops onion https://darkmarketsgate.com/
abacus market https://darkwebmarketlinks2024.com/ nexus site official link https://darkwebmarketdirectory.com/
Thanks for keeping things clear and to the point, that is honestly hard to find online these days, and after reading through leadpoint the message stayed consistent which makes me trust the information being shared more than I usually do on similar pages that cover this same kind of topic.
Наркологическая клиника «Южный МедКонтроль» объединяет современные медицинские технологии, опыт специалистов и уважительное отношение к каждому пациенту. Здесь создаются условия для безопасного и результативного лечения зависимостей любой сложности — от алкогольной до полинаркотической. Центр работает в круглосуточном режиме, предлагая выезд врачей на дом, детоксикацию, кодирование и длительные программы реабилитации. Основная цель специалистов — восстановление физического и психологического равновесия человека, возвращение способности к полноценной жизни без зависимости.
Подробнее можно узнать тут – анонимная наркологическая клиника
Top quality material, deserves more attention than it probably gets, and a look at ranklane reflected the same effort across the site, a hidden gem in the modern web where most attention goes to whoever shouts loudest rather than whoever actually delivers the best content for their readers without much marketing fanfare.
Такой курс не только очищает организм от токсинов, но и помогает вернуть эмоциональное равновесие. После завершения терапии пациент чувствует себя отдохнувшим, восстанавливает аппетит и сон, уходит тревожность и раздражительность.
Углубиться в тему – наркологический вывод из запоя в краснодаре
Following a few of the internal links revealed more posts of similar quality, and a stop at rankpush added more to that growing pile, sites where internal links lead to more good content rather than to more of the same recycled material are sites with depth and this one has clearly built that depth carefully.
Такой подход позволяет наркологической клинике в Ростове-на-Дону выстраивать лечение в безопасных и психологически комфортных условиях.
Подробнее – лечение в наркологической клинике ростов-на-дону
Now wishing I had found this site sooner, and a look at leadhatch extended that mild regret, the calculation of how many years of good content I missed by not finding the right sources earlier is one I try not to make too often but it does come up sometimes when I find sites this good.
Genuinely glad I clicked through to read this rather than skipping past, and a stop at seofoundry confirmed I should keep clicking through to more pages here, the kind of resource that justifies its place in my browser history rather than feeling like wasted time which is the highest compliment I offer any site online today.
darknet market https://darknetmarketstore.com/ dark market 2026 https://darknetmarketstore.com/
скачать видео с ютуба на телефоне https://skachat-video-s-youtube-9.ru
Honest opinion is that this is the kind of post that builds long term trust with readers, and a look at royaldealzone reinforced that perception, the slow accumulation of trust through consistent quality is the only sustainable way to build a real audience and this site is clearly playing that long game.
капельница от похмелья самара капельница от похмелья самара
Reading this with a notebook open turned out to be the right move, and a stop at linkthread added more material to the notes, content that justifies active note taking from a passive reader is content with real informational density and this site is producing notes worthy material at a high rate consistently.
Appreciated how the writer anticipated the questions a reader might have along the way, and a stop at linkimpact continued that thoughtful approach, you can tell when content has been edited with the reader in mind versus just published as a first draft and this is clearly the former approach across what I read.
улучшение креативов улучшение креативов
1win withdrawal http://www.1win63470.help
Bookmark moved to my permanent reference folder rather than the casual maybe later folder, and a look at seoripple earned the same upgrade, the distinction between casual interest and lasting reference is something I track carefully and very few sites cross that threshold but this one did so without much effort apparently.
Just dropping by to say thanks for the effort, it does not go unnoticed when a writer cares this much about the reader, and after I went through prismoakcollective I was certain this is one of the better corners of the internet for this particular kind of content which is genuinely refreshing.
Now appreciating that the post left me with enough to say in a follow up conversation, and a look at wildembervault added more material for those follow ups, content that prepares me for related conversations rather than just informing me alone is content with social utility and this site provides that social armament reliably for me.
Соблюдение конфиденциальности в клинике «Точка Опоры» является неотъемлемой частью лечебного процесса. Наркологическая клиника в Краснодаре обеспечивает закрытый формат приёма, хранения медицинских данных и взаимодействия с пациентом. Практика показывает, что анонимное обращение снижает уровень тревожности, способствует более открытому диалогу с врачом и повышает точность клинической диагностики.
Детальнее – анонимная наркологическая клиника краснодар
Now adjusting my mental list of reliable sites for this topic, and a stop at swiftmaplecorner reinforced the adjustment, the small ongoing curation work of maintaining trusted sources is one of the actual practical activities of careful reading and this site has earned a permanent place on my list for this particular subject.
bitcoin dark web https://darkwebmarketonion.com/ nexus dark web market https://darkwebmarketonion.com/
Reading this on the train into work was a better use of the commute than my usual choices, and a stop at shopandsaveonline extended that commute reading well, content that improves transit time rather than just filling it is content with practical benefit and this site has earned its place in my morning commute reading rotation.
Now recognising the editorial wisdom of letting some questions remain open at the end, and a look at linksurge continued that intellectual honesty, content that does not force closure on contested questions is content that respects the limits of knowledge and this site has clearly developed the maturity to know when to leave space.
Glad to find something on this topic that does not start with three paragraphs of throat clearing before getting to the point, and a stop at rankchart also dives right in, respect for the readers time shows up in small editorial choices like this and they add up to a real difference quickly.
During my online browsing session today, I checked multiple platforms before landing on useful web marketplace, and I liked how navigation stayed simple, products were accessible, and the website worked reliably throughout the visit.
Well structured and easy to read, that combination is rarer than people think, and a stop at seoquest confirmed the same standard runs across the rest of the site, definitely the kind of place I will be coming back to when this topic comes up in conversation later again over the weeks ahead.
Decent post that improved my afternoon a small amount, and a look at expandyourmind added a bit more to that, sometimes the small wins online add up over time and a useful site like this one is the kind of place that contributes consistently to those small wins for me lately across many different topics I follow.
Appreciated that the writer trusted the reader to follow along without constant restating of earlier points, and a look at shopcoremarket continued that respect for the reader, treating an audience as capable adults rather than as people to be hand held through every paragraph is something I notice and value highly across the open internet today.
Started imagining how I would explain the topic to someone else after reading, and a look at trendinggoodsmarket gave me more material for that imagined explanation, content that improves my own ability to discuss a topic is content that has actually transferred knowledge rather than just decorating my screen for a few minutes.
Thanks for not padding this with the usual filler intros and outros that every other blog seems to require, and a quick visit to findsomethingunique continued that lean approach across more posts, content stripped of waste is content that respects you and I will always come back to that kind of approach.
Got something practical out of this that I can apply later this week, and a stop at quartzmeadowmarketgallery added more details to think about, this is exactly the kind of content I bookmark for future reference rather than the throwaway listicles that dominate most search results these days for almost any common topic.
В практике круглосуточного лечения применяются следующие этапы:
Детальнее – http://www.domen.ru
A slim post with substantial content per word, and a look at linkslate maintained the same density, the content per word ratio is something I track informally and this site scores high on that ratio compared to most sources I read regularly which is a quiet indicator of careful editorial work behind the scenes.
букмекерские конторы Узбекистана букмекерские конторы Узбекистана
врач нарколог на дом врач нарколог на дом
A piece that read smoothly because the writer understood how readers actually move through prose, and a look at leadslate maintained the same reader awareness, writers who think about the reading experience as much as the writing experience produce better work and this site has clearly made that shift in editorial approach.
кухни на заказ от производителя https://kuhni-spb-57.ru
Процесс вывода из запоя капельничным методом организован по строгой схеме, позволяющей обеспечить максимальную эффективность терапии. Каждая стадия направлена на комплексное восстановление организма и минимизацию риска осложнений.
Подробнее можно узнать тут – http://kapelnica-ot-zapoya-tyumen0.ru
Felt the writer did the homework before publishing, the references hold up, and a look at leadtower continued that documented care, content with traceable claims rather than vague assertions is the kind I trust and the lack of bald assertion in this post is one of its quietly impressive qualities for me.
Worth saying that this is one of the better things I have read on the topic in months, and a stop at seofuel reinforced that ranking, the topic is well covered by many sources but few do it with this level of care and the few that do deserve to be flagged so other readers can find them.
Closed the laptop and walked away thinking about the post for a good twenty minutes, and a stop at linktrail produced similar lingering thoughts, content that survives the closing of the browser tab is content that has actually entered the mind rather than just decorating the screen for the duration of the reading.
Liked how the post handled an objection I was forming as I read, and a stop at cloudridgegoods similarly anticipated where my thinking was going next, the rare writer who can predict reader concerns and address them in advance is doing something most online content fails to do despite that being basic editorial work.
При поступлении вызова нарколог незамедлительно приезжает на дом для проведения тщательного первичного осмотра. Специалист измеряет жизненно важные показатели, такие как пульс, артериальное давление и температура, а также собирает анамнез для оценки степени алкогольной интоксикации. Эта информация является основой для разработки персонального плана лечения.
Разобраться лучше – вывод из запоя на дому цена в мурманске
Skipped the social share buttons but might come back to actually use one later, and a stop at windcrestcollective extended that share urge, content that triggers genuine sharing impulses rather than performative ones is content that has actually moved me and not many posts in a typical week do that for me actually.
torzon darknet url https://darkwebmarketlinks2024.com/ tordex market url https://darkwebmarketlisting.com/
Quietly the writers approach to the topic differs from the dominant takes I have been encountering, and a stop at prismoakcollective extended that distinctive approach, content that maintains a different perspective without explicitly arguing against the dominant ones is content with confident editorial identity and this site has that confidence throughout pieces.
нарколог на дом анонимно нарколог на дом анонимно
Now adding this site to a small mental group of recommendations I keep ready for specific kinds of inquiries, and a stop at adstrike extended the recommendation readiness, content that I can confidently point friends and colleagues toward in specific contexts is content with real social utility and this site has that utility clearly.
Better than the average post on this subject by some distance, and a look at frostcoast reinforced that, you can tell within the first paragraph that the writer here actually cares about the topic rather than just covering it for the sake of having something to publish that week or that day.
Worth your time, that is the simplest endorsement I can give, and a stop at epicestate extends that endorsement across the rest of the site, this is one of those increasingly rare places that delivers on what it promises rather than over selling the content and under delivering on substance every time which I find frustrating elsewhere.
A satisfying piece in the way that good meals are satisfying rather than just filling, and a look at urbanleafoutlet extended that satisfaction, the metaphor between content and meals is one I find useful and this site reads as a satisfying meal rather than the empty calories that most content provides for casual readers.
Glad I gave this a chance instead of bouncing on the headline, and after curatedfuturemarket I was certain I had made the right call, snap judgements based on titles miss a lot of good content and this is a reminder to slow down and check things out before scrolling past in a hurry.
В данной публикации мы поговорим о процессе восстановления от зависимости, о том, как вернуть себе нормальную жизнь. Мы обсудим преодоление трудностей, значимость поддержки и наличие программ реабилитации. Читатели смогут узнать о ключевых шагах к успешному восстановлению.
Посмотреть всё – капельница от запоя на дому
Useful information presented in a way that does not feel like a sales pitch, that is what I appreciated most, and a stop at pactcliffs was the same, no upsell and no fake urgency just steady content laid out properly for someone trying to actually learn from it rather than just be sold to.
Going to share this with a friend who has been asking the same questions for a while now, and a stop at fieldlagoon added a few more pages I will pass along too, this is the kind of generous information that earns a small thank you from me right now and again later this week.
A piece that was confident enough to leave some questions open rather than forcing closure, and a look at softgrovecorner continued that intellectual honesty, content that admits the limits of its scope is more trustworthy than content that pretends to total understanding and this site has the right calibration on certainty consistently.
Closed the post with a small satisfied sigh, and a stop at christmasatthewindmill produced the same gentle exhale, content that ends well is content that respects the rhythm of reading and the writers here have clearly thought about how their pieces close rather than just trailing off when they run out of things to say.
A piece that ended with a clean landing rather than fading out, and a look at puregreenoutpost maintained the same crisp conclusions, endings that resolve rather than dissolve are a sign of careful structural thinking and this site has clearly invested in how its pieces conclude rather than letting them simply run out of energy.
Looking forward to seeing what gets published next month, and a look at novalog extended that anticipation across the broader site, finding myself looking forward to a sites future content rather than just consuming its existing content is a stronger commitment level than I usually reach with new finds and this site triggered that.
This filled in a gap in my understanding that I had not even noticed was there, and a stop at freshtrendstore did the same, the kind of post that gives you more than you expected when you first clicked through from somewhere else, a real find for anyone curious about the area covered here.
Now realising the post solved a small problem I had been carrying for weeks, and a look at coastlinechoice extended that problem solving function, content that connects to specific unresolved questions in my own life rather than just providing general interest is content with real practical impact and this site is providing that practical value.
A thoughtful read in a week that has been mostly noisy, and a look at lacehelm carried that thoughtful quality across more pages, finding pockets of considered writing in a week of distractions is one of the small wins of careful curation and this site is providing those pockets at a sustainable rate.
Thanks for a post that does not try to be funny when it is not the moment for it, and a stop at flarefoils maintained the same appropriate seriousness, knowing when humour helps and when it just signals desperation for engagement is a sign of editorial maturity that many blogs have not developed yet.
abacus market url https://darknetmarketgate.com/ cannaexpress market link https://privatedarknetmarket.com/
Reading this gave me a small mental break from the heavier reading I had been doing, and a stop at electlarryarata extended that lighter feel, content that provides relief without becoming trivial is harder to produce than people realise and this site has clearly figured out how to be light without being shallow at all.
Clean writing, easy to read, and never tries too hard to impress, that combination is harder to find than people think, and after my time on urbanfashionhub I am sure this site treats its readers well, no flashy tricks just useful content done right which is honestly all I want online.
Now feeling mildly impressed in a way I do not quite remember feeling about a blog in a while, and a stop at boldharborstudio extended that mild impression, content that produces specific positive emotional responses rather than just neutral information transfer is content with extra dimensions and this site has those extra dimensions clearly.
Started imagining how I would explain the topic to someone else after reading, and a look at galafactor gave me more material for that imagined explanation, content that improves my own ability to discuss a topic is content that has actually transferred knowledge rather than just decorating my screen for a few minutes.
Bookmark added in three places to make sure I do not lose the link, and a look at epicinlet got the same redundant treatment, sites I am afraid to lose are the rare keepers and this is clearly one of them based on what I have read so far across this and a couple of related posts.
Worth recognising that this site does not chase the daily news cycle, and a stop at portolives confirmed the longer publication arc, sites that resist the pressure to comment on every passing event are sites with genuine editorial discipline and this one has clearly chosen depth over volume which I respect deeply.
Reading this in a quiet coffee shop matched the calm energy of the writing, and a stop at urbanmistcollective extended that environmental match, content that has its own ambient quality which can match or clash with surroundings is content with a personality and this site has the kind of personality that suits calm reading.
Solid value for anyone willing to read carefully, and a look at covidtest-cyprus extends that value across the rest of the site, this is the kind of place that rewards return visits rather than offering everything in a single splashy post and then leaving readers nothing to come back for later which is unfortunately common.
Статья посвящена анализу текущих трендов в медицине и их влиянию на жизнь людей. Мы рассмотрим новые технологии, методы лечения и значение профилактики в обеспечении долголетия и здоровья.
Узнать из первых рук – кодирование от алкоголизма в краснодаре
Читатели получат представление о том, как современные технологии влияют на развитие медицины. Обсуждаются новые методы лечения, персонализированный подход и роль цифровых решений в повышении качества медицинских услуг.
Открой скрытое – наркологическая клиника в краснодаре
В этой публикации мы предложим ряд рекомендаций по избавлению от зависимостей и успешному восстановлению. Мы обсудим методы привлечения поддержки и важность самосознания. Эти советы помогут людям вернуться к нормальной жизни и стать на путь выздоровления.
Где можно узнать подробнее? – закодироваться от алкоголя в краснодаре
Felt this in a way I cannot quite explain, the topic just hit different here, and a stop at draftports continued in that vein, sometimes you find a site whose perspective lines up with how you have been thinking and reading their work feels like a small relief which I appreciated more than I expected.
Honestly impressed by the consistency of voice across what I have read so far, and a quick visit to premiumhandcraftedhub continued that consistent feel, when a site reads like one careful person rather than a committee the experience is more rewarding for the reader who notices these subtle editorial details over time.
Bookmark folder reorganised slightly to make this site easier to find, and a look at firmessence earned the same accessibility upgrade, the small organisational moves I make for sites I expect to return to often are themselves a signal of how much I trust them and this site triggered those moves naturally.
Now sitting with the thoughts the post triggered rather than rushing on to the next thing, and a stop at peacelandworld extended that reflective pause, content that earns time for thought after closing the tab is content of higher value than the merely interesting and this site has clearly produced that lasting effect today.
Этот информационный материал подробно освещает проблему наркозависимости, ее причины и последствия. Мы предлагаем информацию о методах лечения, профилактики и поддерживающих программах. Цель статьи — повысить осведомленность и продвигать идеи о необходимости борьбы с зависимостями.
Узнай первым! – детокс24
https://www.maivona.com/uhod-za-kozhej-litsa/kak-izbavitsya-ot-sinyakov-pod-glazami
Worth saying that this is one of the better things I have read on the topic in months, and a stop at softsummerfields reinforced that ranking, the topic is well covered by many sources but few do it with this level of care and the few that do deserve to be flagged so other readers can find them.
Reading this prompted me to clean up some old notes related to the topic, and a stop at grovequays extended that organising urge, content that triggers personal organisation rather than just consuming attention is content with motivating energy and this site has the kind of clarity that prompts active follow up rather than passive consumption.
Taking the time to read carefully here has been worthwhile for the past hour, and a look at lakelake extended the worthwhile reading, the calculation of return on reading time spent is something I do informally and this site has been producing positive returns across multiple sessions during the last week of regular visits and reads.
После первичной диагностики начинается активная фаза медикаментозного вмешательства. Современные препараты вводятся капельничным методом, что позволяет оперативно снизить уровень токсинов в крови, восстановить нормальный обмен веществ и нормализовать работу внутренних органов, таких как печень, почки и сердце. Этот этап критически важен для стабилизации состояния пациента и предотвращения дальнейших осложнений.
Подробнее можно узнать тут – narkolog-vyvod-iz-zapoya tula
Эта медицинская заметка содержит сжатую информацию о новых находках и методах в области здравоохранения. Мы предлагаем читателям свежие данные о заболеваниях, профилактике и лечении. Наша цель — быстро и доступно донести важную информацию, которая поможет в повседневной жизни и понимании здоровья.
Есть чему поучиться – Лечение алкоголиков в Краснодаре
Reading this prompted me to send the link to two different people for two different reasons, and a stop at oakarena provided ammunition for a third share, content that suits multiple audiences without being generic enough to be useless to any of them is genuinely valuable and this site has that multi audience quality clearly.
Started believing the writer knew the topic deeply by about the second paragraph, and a look at epicinlets reinforced that confidence, the speed at which a writer establishes credibility through their writing is a useful quality signal and this writer establishes it quickly and quietly without resorting to credential dropping or self promotion.
Honest assessment is that this is one of the better short reads I have had this week, and a look at gemcoast reinforced that, the bar for short content is low because most of it sacrifices substance for brevity but this site manages both at once which is harder than it sounds for most writers attempting it.
Текст посвящён распространённым мифам о зависимости и их развенчанию. Мы предоставим научно обоснованную информацию и дадим рекомендации по выбору эффективного способа борьбы с зависимым поведением.
Кликни, не пожалеешь – детокс24
Liked the careful word choice throughout, every term seemed picked for a reason rather than thrown in casually, and a stop at tinacurrin continued that precise style, this kind of attention to small details is what separates careful writing from the usual rushed content that dominates blog spaces today across pretty much every topic I follow.
After several visits I am now confident this site is one to follow seriously, and a stop at globalforestmart reinforced that confidence, the gradual building of trust through repeated quality exposures is the only sustainable way to develop reader loyalty and this site is building that loyalty in me through patient consistent work consistently.
I came here looking for a quick answer and ended up reading the whole post because it was actually interesting, and after etheraisle I had a much fuller picture, no stress and no confusion just a clear walk through the topic that made everything fall into place without much effort.
Even just sampling a few posts the consistency is what stands out, and a look at everleafoutlet confirmed the broader pattern, sites where every piece I sample lives up to the standard set by the others are sites with serious quality control and this one has clearly invested in whatever editorial process produces that consistency reliably.
Ended up here on a wandering afternoon and was glad I stayed for the read, and a stop at domemarinas extended the wandering into a proper exploration of the site, the kind of place that rewards aimless clicking with something genuinely interesting rather than the shallow content that mostly populates the modern open web.
Reading this confirmed something I had been suspecting about the topic, and a look at urbanchoiceoutlet pushed that confirmation toward greater confidence, content that lines up with independently held intuitions earns a special kind of trust and I will return to writers who consistently land that way for me without overselling positions.
Felt a small spark of recognition when the post named something I had been struggling to articulate, and a look at fondarbors produced more such moments, the rare service of giving readers language for fuzzy intuitions is one of the higher values that good writing can provide and this site offered several today instances.
A piece that suggested careful editing without showing the marks of the editing, and a look at theblackcrowesmobile continued that invisible polish, the best editing disappears into the prose and this site reads as having been edited with skill that does not announce itself which is the highest compliment I can offer any blog content.
Эта медицинская заметка содержит сжатую информацию о новых находках и методах в области здравоохранения. Мы предлагаем читателям свежие данные о заболеваниях, профилактике и лечении. Наша цель — быстро и доступно донести важную информацию, которая поможет в повседневной жизни и понимании здоровья.
Наши рекомендации — тут – Похмельная служба в Воронеже
Loved the writing voice here, friendly without being fake and confident without being arrogant, and a stop at modernvalueclickfront carried the same tone forward, the kind of personality that makes a reader feel welcome rather than lectured at which is a balance plenty of writers struggle to find no matter how long they have been at it.
Felt the writer was speaking my language without trying to imitate it, and a look at softmountainmart continued that natural fit, when a writers default voice happens to match what you find easy to read the experience feels frictionless and that is something I notice and remember about specific sites going forward.
Really appreciate this kind of writing, no shouting and no clickbait headlines just steady useful content, and a quick look at freshfindsmarket kept that going, definitely a site I will be returning to whenever I need a sensible take on similar topics in the days ahead and also during slower work weeks.
Speaking from the perspective of a fairly demanding reader the writing here clears the bar consistently, and a look at lakequill continued clearing that bar, the calibration of demanding reader is something I apply to all sources and this site has been one of the few that handles the demanding reading well across pieces sampled.
Just wanted to say this was useful and leave a small note of thanks, and a quick visit to brightnorthboutique earned a similar nod from me, the small acknowledgements add up over time and represent the real economy of trust that good content runs on across the open and increasingly fragmented modern internet.
Even across multiple posts the writers voice has remained consistent in a way I appreciate, and a stop at lcbclosure continued that voice, sites that maintain editorial consistency across many pieces have something most sites lack and this one has clearly worked out how to keep its voice steady across what reads as a growing archive.
Наша компания обеспечивает быстрое оформление справок, свидетельств и апостиля с учетом всех требований к документам https://apostilium-moscow.com/soglasie-na-viezd-rebenka-za-granitsu/
Granted I am giving this site more credit than I usually give new finds, and a look at draftlakes continued earning that credit, the calibration of how much trust to extend after limited exposure is something I do carefully and this site has earned more trust on shorter exposure than most due to consistent quality across.
Now adjusting my mental list of reliable sites for this topic, and a stop at opaldune reinforced the adjustment, the small ongoing curation work of maintaining trusted sources is one of the actual practical activities of careful reading and this site has earned a permanent place on my list for this particular subject.
Now considering writing a longer note about the post somewhere, and a look at ethicalpremiumstore added more material for that note, content that prompts me to write rather than just consume is content with generative energy and this site is producing that generative effect for me at a higher rate than most sources.
Started imagining how I would explain the topic to someone else after reading, and a look at closingamericasjobgap gave me more material for that imagined explanation, content that improves my own ability to discuss a topic is content that has actually transferred knowledge rather than just decorating my screen for a few minutes.
A nicely understated post that does not shout for attention, and a look at etherfair maintained the same quiet quality, understatement is a stylistic choice that distinguishes serious writing from attention seeking writing and this site has clearly committed to the understated approach as a core editorial value rather than just a phase.
Solid quality, the kind of work that holds up to a careful read rather than a quick skim, and a quick look at irisarbors kept that standard going strong, content that rewards attention rather than punishing it is something I appreciate more and more these days online across nearly every topic I follow.
Honest take is that this was better than I expected when I clicked through, and a look at wildtimbercollective reinforced that, the bar for online content has dropped so much that finding something thoughtful and well constructed feels almost noteworthy now which says more about the average than about this site itself.
Probably going to mention this site in a write up I am working on later this month, and a stop at thefrontroomchicago provided more material for that potential mention, content worth referencing in my own published work rather than just personal reading is content with the highest endorsement level and this site has earned that endorsement.
Эта статья освещает различные аспекты освобождения от зависимости и пути к выздоровлению. Мы обсуждаем важность осознания своей проблемы и обращения за помощью. Читатели получат практические советы о том, как преодолевать трудности и строить новую жизнь без зависимости.
Эксклюзивная информация – Похмельная служба Краснодар
Bookmarked the page and the homepage too because clearly there is more to explore here, and a quick stop at isleparishs only made that more obvious, this is the kind of place I want to dig through over a weekend rather than rushing through during a coffee break tomorrow morning before getting back to work.
Worth flagging that this approach to the topic is fresh without being contrarian, and a stop at uniquevaluestore extended the same fresh angle, finding original perspective on familiar subjects is rare and this site has clearly developed its own way of seeing rather than echoing the dominant takes from elsewhere consistently.
вызов нарколога на дом круглосуточно позволяет получить профессиональную помощь в любое время суток.
Исследовать вопрос подробнее – https://narkolog-na-dom-kazan23.ru
A piece that respected the reader by not over explaining the obvious, and a look at driftfairs continued that calibrated approach, finding the right level of explanation is one of the harder editorial calls and this site has clearly thought carefully about what readers will already know versus what they need help with consistently.
Now I want to find more sites like this but I suspect they are rare, and a look at larkcliff extended that thought, the few sites that meet this quality bar are precious specifically because they are rare and finding others like them is one of the ongoing projects of careful internet curation across the years.
Now setting up a small reminder to revisit the site on a slow day, and a stop at naturallycraftedgoodsmarket confirmed the reminder was a good idea, planning return visits is a small organisational act that signals trust in ongoing quality and this site has earned that planned return through consistent performance across the pieces I have read so far.
Quality writing that respects the reader’s intelligence without overloading them, and a quick look at brighthavenstudio reflected that approach, a balanced thoughtful site that earns trust by being consistent rather than by shouting about how trustworthy it is which is the usual approach online sadly across most content categories.
Your point of view caught my eye and was very interesting. Thanks. I have a question for you.
Took my time with this rather than rushing because the writing rewards attention, and after portmills I had even more to absorb, the kind of content that pays back the patient reader rather than punishing them with empty filler is something I look for and rarely find in regular searches lately.
Started taking notes about halfway through because the points were stacking up, and a look at etherledge added enough material that my notes file grew further, content that demands note taking from a passive reader is content with substance and the writers here are clearly producing that kind of work consistently across topics.
Bookmark earned and shared the link with one specific person who would care, and a look at lacecabins got the same targeted share, sharing carefully rather than broadcasting is a discipline I try to maintain and this site is generating shares from me at a sustainable rate rather than the spam rate of viral content.
Just sat back at the end of the post and felt grateful that someone took the time to write it, and a look at ct2020highschoolgrads extended that gratitude across more of the site, recognising effort behind quality work is part of what makes the open web a community rather than just a marketplace today.
Came in tired from a long day and the writing held my attention anyway, and a stop at pacecabin kept that going, content that can engage a fatigued reader is doing something right because most online reading happens in suboptimal conditions like that one and quality content adapts to it without complaint.
ares market url https://darknetmarketstore.com/ abacus url https://darknetmarketgate.com/
Reading this prompted me to subscribe to my first newsletter in months, and a stop at robinshuteracing confirmed the subscribe was the right call, content that earns a newsletter signup is content that has cleared a higher trust bar than a casual visit and this site has clearly earned that level of commitment from me.
Just dropping by to say thanks for the effort, it does not go unnoticed when a writer cares this much about the reader, and after I went through oscarthegaydog I was certain this is one of the better corners of the internet for this particular kind of content which is genuinely refreshing.
Honestly thank you to whoever wrote this because it scratched an itch I had not quite been able to articulate, and a stop at moonfallboutique kept that satisfying feeling going, the kind of writing that meets unspoken needs is special and this site clearly has writers who understand their readers more than most do today.
Now planning to write about the topic myself eventually using this post as a reference, and a look at leafdawn would also serve in that future piece, content that becomes raw material for my own writing rather than just informing my reading is content with multiplicative value and this site is generating that multiplicative effect.
Your point of view caught my eye and was very interesting. Thanks. I have a question for you. https://accounts.binance.com/en-NG/register/person?ref=YY80CKRN
Recommended without reservation for anyone interested in the topic at any level of expertise, and a look at freshcollectionhub only strengthens that recommendation, this site clearly knows how to serve readers across a range of backgrounds without watering down the content or talking past anyone in the audience which is genuinely impressive to see.
A piece that read as if the writer was thinking carefully rather than just typing fluently, and a look at firminlets continued that considered quality, the difference between fluent typing and careful thinking shows up in writing and this site reads as the product of thought rather than just the product of language fluency apparently.
Coming back to this one, definitely, and a quick visit to evermeadowgoods only made me more sure of that, the kind of writing that makes you want to set aside time later rather than rushing through it now while distracted by everything else competing for attention on the screen today across so many tabs.
Наша компания помогает получить официальные справки быстро и без лишних сложностей https://mc-spravki.site/medicinskaya-spravka-ot-ginekologa/
Glad I stumbled across this post, the explanations actually make sense without needing background knowledge to follow along, and after a stop at premiumethicalgoods the same was true there, no assumptions about the reader just clear writing that anyone can understand from the first line right through to the end.
Наша компания помогает оформить справки, восстановить свидетельства и подготовить документы для международного использования с апостилем. Мы обеспечиваем оперативность и внимательный подход к каждому клиенту https://apostilium-moscow.com/spravka_iz_banka_o_sostoyanii_scheta/
Now realising the post has been quietly doing important work in my mind for the past hour, and a stop at pacecabins extended that quiet processing, content that continues to do work after I close the tab is content with afterlife in the mind and this site is producing those long lived effects at a meaningful rate.
В этой заметке мы представляем шаги, которые помогут в процессе преодоления зависимостей. Рассматриваются стратегии поддержки и чек-листы для тех, кто хочет сделать первый шаг к выздоровлению. Наша цель — вдохновить читателей на положительные изменения и поддержать их в трудных моментах.
Жми сюда — получишь ответ – детоксикация от алкоголя
Decided to subscribe to the RSS feed if there is one, and a stop at hazemills confirmed that decision, content that I want delivered to me proactively rather than just remembered when I have time is content that has earned a higher level of commitment from me as a reader looking for reliable sources.
Now feeling the small relief of finding writing that does not condescend, and a stop at everattic extended that respect for readers, content that treats its audience as capable adults rather than as people to be managed produces a different reading experience and this site has clearly chosen the respectful approach across all pieces.
Reading this prompted a brief but useful conversation with a colleague who happened to walk by, and a stop at thedemocracyroadshow extended that conversational seed, content that becomes a starting point for in person discussion rather than ending in solitary reading is content with social generative energy and this site has plenty of it apparently.
Recommended to anyone working in or curious about this area, the depth and clarity combine well, and a look at circularatscale keeps that going across more pages, the kind of site that earns regular visits rather than chasing trends has my respect because it suggests genuine commitment to the topic itself rather than to chasing trends.
https://www.maivona.com/uhod-za-kozhej-litsa/meshki-i-oteki-pod-glazami–kak-s-nimi-spravitsya
Мы помогаем клиентам быстро подготовить документы для работы, учебы и переезда, включая апостиль – https://langwee-rus.com/perevod-dokumentov/
Reading more of the archives is now on my plan for the weekend, and a stop at pactcliff confirmed the archive worth the time, the rare archive worth a dedicated reading session rather than just casual sampling is the rare archive of serious work and this site has clearly produced enough of that work to warrant the deeper exploration.
Came away with some new perspectives I had not considered before, and after mintdawns those ideas felt more complete, the kind of content that stays with you a little while after reading rather than slipping out the moment you switch tabs and move on with your day to whatever comes next.
A piece that suggested careful editing without showing the marks of the editing, and a look at lobbydawn continued that invisible polish, the best editing disappears into the prose and this site reads as having been edited with skill that does not announce itself which is the highest compliment I can offer any blog content.
Top notch writing, every paragraph carries weight and nothing feels like filler, and a stop at sunsetwoodstudio reflected that same care, a rare thing on the open web these days where most pages exist for clicks rather than actual reader value or anything close to that which is honestly a real shame.
Worth flagging this site to a few specific friends who would appreciate the editorial sensibility, and a look at charitiespt added more pages I will mention to them, recommending sites to specific people requires understanding both the site and the person and this site is making those personalised recommendations easy and natural for me.
Useful information presented in a way that does not feel like a sales pitch, that is what I appreciated most, and a stop at globebeats was the same, no upsell and no fake urgency just steady content laid out properly for someone trying to actually learn from it rather than just be sold to.
Felt slightly impressed without being able to point to one specific reason, and a look at edenfairs continued that diffuse positive feeling, when content works at a level you cannot easily articulate the writer is doing something with craft rather than just delivering information and that is something I have learned to recognise.
Most of my reading time goes to a small number of trusted sources and this one is now joining that group, and a stop at lakelakes reinforced the group membership, the few sites that earn a place in my regular rotation are sites I expect ongoing returns from and this one has earned that elevated position consistently.
Нарколог на дом в Казани — это возможность быстро получить медицинскую помощь без посещения клинике, когда состояние пациента требует внимания, но госпитализация в стационар пока не является обязательной. Врач приезжает по указанному адресу, проводит осмотр, оценивает симптомы интоксикации, подбирает препараты, ставит капельница и дает рекомендации по дальнейшему лечению алкоголизма, наркомании или последствий употребления алкоголя и наркотиков.
Исследовать вопрос подробнее – запой нарколог на дом в казани
A piece that respected the reader by not over explaining the obvious, and a look at ethicaleverydaystyle continued that calibrated approach, finding the right level of explanation is one of the harder editorial calls and this site has clearly thought carefully about what readers will already know versus what they need help with consistently.
Reading this in pieces over a coffee break and finding it consistently rewarding, and a stop at globebeat extended that into related material I will return to later, the kind of site that fits naturally into small reading windows without requiring a long uninterrupted block is genuinely useful for how I actually browse.
A piece that did exactly what it promised in the headline without overshooting or underdelivering, and a look at jadenurrea continued that calibration, alignment between promise and delivery is a basic editorial virtue that many sites fail at and this site has clearly mastered the matching of expectation and substance throughout pieces.
Мы помогаем быстро подготовить справки, свидетельства и документы для апостиля с учетом всех актуальных требований, https://langwee-rus.com/
A piece that handled multiple complications without becoming confused, and a look at newgroveessentials continued that organisational clarity, holding multiple threads in a single piece without losing any of them is a sign of skilled writing and this site has clearly developed the editorial discipline to manage complexity without sacrificing readability throughout.
Now realising the post has been quietly doing important work in my mind for the past hour, and a stop at loopbough extended that quiet processing, content that continues to do work after I close the tab is content with afterlife in the mind and this site is producing those long lived effects at a meaningful rate.
Beyond the immediate post itself the editorial sensibility behind the site is what struck me, and a stop at palmcodex continued displaying that sensibility, content that reveals editorial choices through accumulated reading is content with structural quality and this site has clearly developed an underlying approach worth identifying through multiple sessions of reading.
Generally I bookmark sparingly to avoid building up a bookmark graveyard but this one earned a permanent slot, and a stop at findyourbestself extended that permanence designation, the few sites I keep permanent bookmarks for are sites I expect to use repeatedly and this one has clearly cleared that expectation bar today.
Generally I am cautious about recommending sites on first encounter but this one warrants the exception, and a look at brightgrovehub reinforced the exception making, the rare site that justifies breaking my normal cautious approach is the rare site worth flagging early and this one has prompted exactly that early flagging response from me.
Liked how the post handled an objection I was forming as I read, and a stop at boneclog similarly anticipated where my thinking was going next, the rare writer who can predict reader concerns and address them in advance is doing something most online content fails to do despite that being basic editorial work.
My time on this site has now extended past what I had budgeted, and a stop at edgecradles keeps extending it further, content that overstays its budget in my schedule is content that has earned the extra time and this site has been earning extra time across multiple visits to the point where my schedule needs adjustment.
A piece that did not lecture even when it had clear positions, and a look at larkcliffs maintained the same teaching without preaching tone, finding the line between informing and lecturing is hard and most sites land on the wrong side of it but this one has clearly figured out how to inform without becoming preachy.
Мы предоставляем услуги по оформлению различных справок для государственных и частных организаций. Быстрое оформление помогает избежать задержек при подаче документов: https://mc-spravki.site/medicinskaya-spravka-dlya-uchastiya-v-sorevnovaniyax/
Felt no urge to argue with the conclusions even though I started the post slightly skeptical, and a look at gemcoasts maintained that pattern, writing that earns agreement through clarity of argument rather than rhetorical pressure is the kind I find most persuasive and the kind I want to read more of these days.
Useful reading material, the kind I can hand off to someone newer to the topic without worrying about confusing them, and a quick look at modernartisanmarketplace confirmed the same beginner friendly tone runs throughout the site which is great for sharing with people just starting their learning journey on this particular topic.
Even from a single post the editorial care is clear, and a stop at oceanhaven extended that care across more pages, the kind of attention to quality that shows up in every paragraph is what separates serious sites from the rest and this one has clearly invested in that paragraph level attention across what I have read.
В этой заметке мы представляем шаги, которые помогут в процессе преодоления зависимостей. Рассматриваются стратегии поддержки и чек-листы для тех, кто хочет сделать первый шаг к выздоровлению. Наша цель — вдохновить читателей на положительные изменения и поддержать их в трудных моментах.
Уникальные данные только сегодня – закодироваться от алкоголя в краснодаре
Genuinely good work, the kind that holds up over multiple readings without losing its appeal, and a stop at vuabat kept that going, definitely a site I will be returning to and probably mentioning to others who work in or care about this particular area of interest today and in coming weeks.
Now appreciating that the post did not require external context to follow, and a look at neatdawns maintained the same self contained quality, content that respects new visitors by being readable without prerequisites is content with broader accessibility and this site has clearly invested in keeping each piece reader friendly for fresh arrivals.
Reading this prompted a small note in my reference file, and a stop at lunacourt prompted another, the rare site that contributes useful nuggets to my own working knowledge rather than just consuming my attention is worth the time investment many times over compared to the usual pile of forgettable scroll content.
Highly recommend to anyone looking for a sensible take on this topic without the usual marketing nonsense, and a look at homecovidtest kept that grounded approach going, sites that stay focused on serving readers rather than monetising every click are rare and this is clearly one of those rare ones I really appreciate finding.
The conclusions felt earned rather than tacked on at the end like an afterthought, and a look at palminlet kept that careful structure going, you can tell when a writer has thought about the shape of their post versus just letting it ramble out and hoping for the best at the end which most do.
Thanks for the clean writing, no broken sentences and no awkward translations like some other sites have, and a quick stop at duetcoasts kept that polish going nicely, it really does make a difference when a reader can move through a page without tripping on every line or going back to reread.
Нарколог на дом в Балашихе с выездом врача, диагностикой состояния и проведением необходимой помощи в наркологической клинике «Частный Медик 24».
Изучить вопрос глубже – vrach-narkolog-na-dom
Now thinking about how to apply some of this to a project I have been planning, and a look at bookbulb added more material for the planning, content that connects to my actual creative work rather than just being interesting in the abstract is the kind that earns priority placement in my reading rotation consistently going forward.
A well calibrated piece that knew its scope and stayed inside it, and a look at goldmanors maintained the same scope discipline, scope creep is one of the failure modes of long blog posts and this site has clearly invested in the editorial discipline to prevent it which shows up in tightly contained pieces.
Looking at the surface design and the substance together this site has both right, and a look at moderninspiredgoods reinforced that integrated quality, sites where presentation and content reinforce each other rather than fighting are sites with full editorial coherence and this one has clearly invested in both layers in a balanced way.
Worth pointing out that the post avoided the temptation to summarise everything at the end, and a look at suzgilliessmith continued that confident closing approach, content that trusts readers to retain the substance without being reminded of it at the end is content that respects the reader and this site practices that respect.
Speaking from the perspective of having read widely on the topic this site offers something distinct, and a look at tallpineemporium reinforced that distinctness, the rare site that contributes something genuinely original to a saturated topic is the rare site worth following carefully and this one has demonstrated that original contribution capability today.
If quality blog writing is dying as people sometimes claim then this site is one piece of evidence that it has not died yet, and a look at meritquay extended that evidence, the broader cultural question about online writing has empirical answers in specific sites and this one is contributing to a more optimistic answer overall.
If the topic interests you at all this is a place to spend time, and a look at palminlets reinforced that recommendation, the broader question of where to invest topical reading time is one this site answers convincingly through the consistent quality across multiple pieces I have sampled during the current reading session today.
Picked up on several small touches that suggest a careful editor, and a look at deanclip suggested the same hand at work across the broader site, editorial consistency at a granular level is one of the strongest signs that an operation is serious rather than just hobbyist and this site reads as serious throughout.
Now planning to recommend this site in a context where my recommendations are taken seriously, and a stop at findnewhorizons confirmed I should make that recommendation soon, the small but real act of recommending content into spaces where my taste matters is something I take seriously and this site is worth the recommendation.
Over the course of reading several posts here a pattern of quality has emerged, and a stop at ablebonus confirmed the pattern, the difference between sites that hit quality occasionally and sites that hit it consistently is huge and this site has clearly demonstrated the consistent kind through what I have read this morning.
If quality blog writing is dying as people sometimes claim then this site is one piece of evidence that it has not died yet, and a look at bauxable extended that evidence, the broader cultural question about online writing has empirical answers in specific sites and this one is contributing to a more optimistic answer overall.
Started forming counter examples to test the claims and the post handled most of them implicitly, and a look at astrebee continued that anticipatory style, writers who think two steps ahead of the critical reader save themselves from a lot of follow up work and this writer has clearly internalised that habit consistently.
If I were to recommend a starting point for the topic this site would be near the top of my list, and a stop at palmmill reinforced that recommendation status, the small list of starting point recommendations I keep for friends asking about topics is short and this site is now firmly on it.
Loved the writing voice here, friendly without being fake and confident without being arrogant, and a stop at conexbuilt carried the same tone forward, the kind of personality that makes a reader feel welcome rather than lectured at which is a balance plenty of writers struggle to find no matter how long they have been at it.
However selective I am about new bookmarks this one made it past my filter, and a look at bookbulb confirmed the bookmark was worth the slot, the precious slots in my permanent bookmark folder are difficult to earn and this site earned one without making me think twice about whether the slot was justified by the quality.
Now sitting back and recognising that this was a small but real win in my reading day, and a stop at crustcocoa extended that quiet win, the cumulative effect of small reading wins versus the cumulative effect of small reading losses is real over time and this site is contributing to the wins side of that ledger.
Appreciated the way each section connected smoothly to the next without abrupt jumps, and a stop at opaldune kept that flow going nicely, transitions are something most blog writers ignore but the difference is huge for the reader who is trying to follow a sustained line of thought today across many different topics.
Will share this on a forum I am part of where it will be appreciated by others working in the same area, and a look at buffbaron suggests there is more here worth passing along too, definitely a generous resource that deserves a wider audience than it probably has today across the open internet.
Reading this fit naturally into my afternoon walk because I was reading on my phone, and a stop at opaldunes continued well in that walking format, content that survives mobile reading without becoming awkward is content with format flexibility and this site has clearly thought about how it reads across different devices today.
Now setting this aside as a model of how to write thoughtfully on the topic, and a stop at fayettecountydrt extended that model status, content that becomes a reference for how a kind of writing should be done is content with influence beyond its own readership and this site is reaching that level for me clearly today.
Speaking as someone who used to recommend blogs frequently and got out of the habit this site is rekindling that impulse, and a look at clockcard extended the rekindling, the recovery of an old habit triggered by encountering work that justifies it is itself a small kind of pleasure and this site is providing that recovery experience.
Good clean post, no errors and no awkward phrasing that breaks the reading flow, and a stop at chordaria kept the same standard, definitely the kind of editorial care that earns a return visit because it tells me the writer is paying attention to details that matter to readers rather than just rushing publication.
Without comparing too aggressively to other sources this one stands out for the right reasons, and a look at irisbureaus continued that distinctive quality, content that distinguishes itself through substance rather than style tricks is content with lasting differentiation and this site has clearly chosen substance based differentiation as its core editorial strategy.
Took a screenshot of one section to come back to later, and a stop at micapact prompted another saved tab, the urge to capture and revisit specific pieces of content is something I rarely feel but when I do it tells me the work is worth more than the average passing read for sure.
Better than most of the writing I have come across on this topic recently, simpler and more direct, and a look at northdawns continued in that same way, a real outlier in a crowded space full of repetitive content that says little while taking up a lot of reader time today which is unfortunate.
Liked that the post acknowledged complications rather than pretending they did not exist, and a stop at grant-jt continued that honest framing, sites that handle complexity with care rather than papering it over with simplifying claims are doing real intellectual work and this one is clearly in that category based on what I have read.
Decided to read this site for a while before forming a verdict, and the verdict after several pages is positive, and a stop at dazzquays continued that pattern, judging a site requires more than one post and giving sites a fair sample is something I try to do for promising candidates rather than rushing to dismiss.
Found the section structure particularly thoughtful, and a stop at refinedcommerceplatform suggested the same care across the broader site, structural choices guide the reader through the material in ways most people do not consciously notice but feel the absence of when those choices are made carelessly or not at all.
Felt the writer did the homework before publishing, the references hold up, and a look at deepchord continued that documented care, content with traceable claims rather than vague assertions is the kind I trust and the lack of bald assertion in this post is one of its quietly impressive qualities for me.
abacus darknet link https://darkmarketsdirectory.com/ cannaexpress onion https://darkmarketgate.com/
Felt the post had been written without using a single buzzword, and a look at aeonbrawn continued that clean vocabulary, content free of jargon and trendy phrases reads better and ages better and this site has clearly committed to a vocabulary that will not feel dated in three years which is impressive editorially.
A piece that read as the work of someone who reads carefully themselves, and a look at bauxable continued that informed feel, writers who are also serious readers produce work with a different quality and this site reads as the product of someone steeped in good writing rather than just generating content for an audience.
Definitely returning here, that is decided, and a look at cotboil only made the case stronger, this is one of those rare websites that rewards regular visits rather than feeling stale after the first read which is something I cannot say about most of the places I bookmark today across all my topics.
Coming back to this one, definitely, and a quick visit to cryptbeach only made me more sure of that, the kind of writing that makes you want to set aside time later rather than rushing through it now while distracted by everything else competing for attention on the screen today across so many tabs.
Skipped the social share buttons but might come back to actually use one later, and a stop at buffbey extended that share urge, content that triggers genuine sharing impulses rather than performative ones is content that has actually moved me and not many posts in a typical week do that for me actually.
Started imagining how I would explain the topic to someone else after reading, and a look at astrebee gave me more material for that imagined explanation, content that improves my own ability to discuss a topic is content that has actually transferred knowledge rather than just decorating my screen for a few minutes.
Closed it feeling slightly more competent in the topic than I started, and a stop at edendomes reinforced that competence boost, real learning is rare in casual online reading but it does happen sometimes and this site managed to make it happen for me today which is genuinely worth pausing to acknowledge.
Walked away with a clearer head than I had before reading this, and a quick visit to portguild only sharpened that, the writing has a way of cutting through the noise that surrounds most topics online which is something I will definitely remember the next time I am searching for an answer to anything.
Now organising my browser bookmarks to give this site easier access, and a look at boneclog earned the same organisational priority, the small acts of digital housekeeping I do for sites I expect to use often are themselves a measure of trust and this site has triggered the trust based housekeeping behaviour from me clearly.
Эта статья освещает различные аспекты освобождения от зависимости и пути к выздоровлению. Мы обсуждаем важность осознания своей проблемы и обращения за помощью. Читатели получат практические советы о том, как преодолевать трудности и строить новую жизнь без зависимости.
ТОП-5 причин узнать больше – прокапывания от похмелья
Эта публикация исследует взаимосвязь зависимости и психологии. Мы обсудим, как психологические аспекты влияют на появление зависимостей и процесс выздоровления. Читатели смогут понять важность профессиональной поддержки и применения научных подходов в терапии.
Почему это важно? – детокс24 краснодар
В этой заметке мы представляем шаги, которые помогут в процессе преодоления зависимостей. Рассматриваются стратегии поддержки и чек-листы для тех, кто хочет сделать первый шаг к выздоровлению. Наша цель — вдохновить читателей на положительные изменения и поддержать их в трудных моментах.
Обратитесь за информацией – платной консультации врача-психиатра
В этой статье рассматривается комплексный подход к избавлению от зависимости. Читатель узнает, как сочетание физического, психологического и духовного восстановления помогает достичь стойкого выздоровления.
Получить больше информации – наркологическая клиника в краснодаре
Bookmark added without hesitation after finishing, and a look at suncrestcrafthouse confirmed I should bookmark the homepage too rather than just this page, the rare site that earns category level trust rather than just single article approval is the kind I want to rely on across many different topics over time.
Now feeling the post has earned a proper recommendation rather than a casual mention, and a stop at globehavens reinforced the recommendation strength, the difference between mentioning and recommending is a small editorial distinction I observe in my own conversations and this site has earned the upgraded recommendation level from me confidently today.
dark markets 2026 https://darkmarketsdirectory.com/ nexusdarknet site link https://darknetmarketsgate.com/
Now setting this aside as a model of how to write thoughtfully on the topic, and a stop at cocoaborn extended that model status, content that becomes a reference for how a kind of writing should be done is content with influence beyond its own readership and this site is reaching that level for me clearly today.
Solid information that lines up with what I have been hearing from other reliable sources, and after my visit to thespeakeasybuffalo I was even more certain of that, this site checks out which is something I value highly when so many places online play loose with the facts to chase a quick click.
If you asked me to point to a recent positive sign for the open web this site would be near the top, and a stop at defcoast reinforced that designation, the few sites that serve as evidence the web can still produce quality independent content are precious and this one has clearly become one for me.
Worth saying this site reads better than most paid newsletters I have tried, and a stop at aeoncraft confirmed that comparison, the bar for free content is often lower than for paid but this site clears the paid bar consistently and that says something about the editorial approach behind the work being published here regularly.
Bookmark earned and the bookmark feels like a permanent addition rather than a maybe, and a look at pacecabin confirmed that permanent status, the difference between durable bookmarks and ephemeral ones is something I have learned to feel quickly and this site triggered the durable feeling almost immediately during my first read here.
Useful reading material, the kind I can hand off to someone newer to the topic without worrying about confusing them, and a quick look at choice-eats confirmed the same beginner friendly tone runs throughout the site which is great for sharing with people just starting their learning journey on this particular topic.
Genuine reaction is that this site clicked with how I like to read, and a look at intentionalhomeandstyle kept that comfortable fit going, sometimes you find a place online whose editorial decisions just align with your preferences and when that happens it is worth recognising and supporting through repeat engagement consistently going forward.
Definitely a recommend from me, anyone curious about the topic should check this out, and a look at bauxauras adds even more reason for that, the depth and quality combine to make this site one I will be pointing people toward whenever similar conversations come up over the months ahead at work or socially.
A slim post with substantial content per word, and a look at etherfairs maintained the same density, the content per word ratio is something I track informally and this site scores high on that ratio compared to most sources I read regularly which is a quiet indicator of careful editorial work behind the scenes.
Worth marking the moment when reading this clicked into something useful for my own work, and a look at findhappinessdaily extended that practical click, content that connects to my actual life rather than just being interesting is content with the highest kind of value and this site is generating that connection at a high rate.
В этой публикации мы предложим ряд рекомендаций по избавлению от зависимостей и успешному восстановлению. Мы обсудим методы привлечения поддержки и важность самосознания. Эти советы помогут людям вернуться к нормальной жизни и стать на путь выздоровления.
Изучить вопрос глубже – Психиатры клиники
Really like that the writer trusts the reader to follow simple logic without restating every previous point, and a stop at cotchoice kept that respect going, treating an audience as capable adults rather than as people who need constant hand holding makes a noticeable difference in the reading experience for me.
During the time spent here I noticed the absence of the usual distractions, and a stop at cryptbuilt extended that distraction free experience, content that does not fight my attention with pop ups and modals and aggressive prompts is content that respects me and this site has clearly chosen the respectful approach throughout.
В этой статье мы рассматриваем разные способы борьбы с алкогольной зависимостью. Обсуждаются методы лечения, программы реабилитации и советы для поддержки близких. Читатели получат информацию о том, как преодолеть зависимость и добиться успешного выздоровления.
Проследить причинно-следственные связи – лечение зависимости от метамфетамина
В данном обзоре представлены основные направления и тренды в области медицины. Мы обсудим актуальные проблемы здравоохранения, свежие открытия и новые подходы, которые меняют представление о лечении и профилактике заболеваний. Эта информация будет полезна как специалистам, так и широкой публике.
Посмотреть подробности – detox24 в краснодаре
Этот текст посвящён сложным аспектам зависимости и её влиянию на жизнь человека. Мы обсудим психологические, физические и социальные последствия зависимого поведения, а также важность своевременного обращения за помощью.
См. подробности – detox24 в балашихе
Felt slightly impressed without being able to point to one specific reason, and a look at jetdomes continued that diffuse positive feeling, when content works at a level you cannot easily articulate the writer is doing something with craft rather than just delivering information and that is something I have learned to recognise.
Worth recognising the specific care that went into how this post ended, and a look at chordaria maintained the same careful conclusions, endings are where most blog content falls apart and this site has clearly invested in the closing stretches of its pieces rather than letting them simply trail off when energy fades.
Better signal to noise ratio than most places I check on this kind of topic, and a look at burlauras kept that going, every paragraph here carries something worth reading rather than padding out the page to hit some arbitrary length target that search engines reward but readers ignore as soon as they notice it.
Now appreciating the small but real way this post improved my afternoon, and a stop at astrebeige extended that small improvement effect, content that produces measurable positive impact on the texture of a reading day is content with real value and this site is producing those small positive impacts at a sustainable rate apparently.
Decided to read this site for a while before forming a verdict, and the verdict after several pages is positive, and a stop at portmill continued that pattern, judging a site requires more than one post and giving sites a fair sample is something I try to do for promising candidates rather than rushing to dismiss.
Now feeling the quiet pleasure of finding writing that takes itself seriously without being self serious, and a stop at bookbulb extended that subtle pleasure, the gap between earnest and pretentious is fine and this site has clearly chosen to land on the earnest side without slipping over into pretentious which is impressive.
nexus darknet shop https://darkmarketgate.com/ silk road url https://darknetmarketsgate.com/
Appreciated the way each section connected smoothly to the next without abrupt jumps, and a stop at draftlogs kept that flow going nicely, transitions are something most blog writers ignore but the difference is huge for the reader who is trying to follow a sustained line of thought today across many different topics.
Decided to set aside time later to read more carefully, and a stop at curiopacts reinforced that decision, content that earns a calendar entry rather than just a passing read is in a different tier altogether and this site is clearly working at that elevated level which I really do appreciate as a reader today.
В этой статье рассматривается комплексный подход к избавлению от зависимости. Читатель узнает, как сочетание физического, психологического и духовного восстановления помогает достичь стойкого выздоровления.
Хочешь знать всё? – detox24
Liked that there was nothing performative about the writing, and a stop at aerobound continued that genuine quality, performative writing tries to be witnessed rather than read and the difference between performance and substance is huge for the careful reader and this site has clearly chosen substance every time clearly.
Now understanding why someone recommended this site to me a while back, and a stop at dewcarve explained the recommendation, sometimes recommendations make sense only after experience and this site has finally clicked into place as the kind of resource I now understand was being recommended for sound editorial reasons by my friend.
Strong recommendation from me, anyone curious about the topic should make time for this, and a look at 1091m2love only sharpens that recommendation further, the kind of resource that holds up against careful scrutiny rather than crumbling at the first critical question is rare and worth pointing other people toward when the topic comes up.
This actually answered the question I had been searching for, and after I checked bauxbee I had a few more pieces I had not realised I needed, that is the sign of a site that knows what its readers want before they even know how to ask it which is impressive.
Now setting up a small reminder to revisit the site on a slow day, and a stop at premiumglobalessentials confirmed the reminder was a good idea, planning return visits is a small organisational act that signals trust in ongoing quality and this site has earned that planned return through consistent performance across the pieces I have read so far.
Thank you for not assuming the reader already knows everything, the explanations meet me where I am, and a look at coilbliss did the same, that consideration is what makes a site feel welcoming rather than gatekeepy which is sadly the default mood across the modern web today for most subjects covered.
A piece that handled the topic with appropriate weight without becoming portentous, and a look at cotcircle continued that calibrated seriousness, content that takes itself seriously without becoming pompous is something this site has clearly figured out and the balance shows up in every piece I have read across multiple sessions now.
Liked that the post acknowledged complications rather than pretending they did not exist, and a stop at cubeasana continued that honest framing, sites that handle complexity with care rather than papering it over with simplifying claims are doing real intellectual work and this one is clearly in that category based on what I have read.
Skipped the comments section but might come back to read it, and a stop at apexhelms hinted at a quality reader community, sites where the comments are worth reading separately from the post are increasingly rare and signal a particular kind of audience that has grown around the editorial vision over time gradually.
Этот обзор сосредоточен на различных подходах к избавлению от зависимости. Мы изучим традиционные и альтернативные методы, а также их сочетание для достижения максимальной эффективности. Читатели смогут открыть для себя новые стратегии и подходы, которые помогут в их борьбе с зависимостями.
Интересует подробная информация – detox24
Felt mildly happier after reading, which sounds silly but is true, and a look at palmmills extended that small mood lift, content that improves rather than degrades my mental state is content I want more of and the cumulative effect of reading sites that lift versus sites that drag is real over time.
Skipped lunch to finish reading, which says something, and a stop at burlclip kept me at my desk longer than planned, when content beats the lunch impulse the writer has done something genuinely impressive in an attention environment full of immediately satisfying alternatives competing for the same finite block of reader time.
Beats most of the alternatives on the topic by a noticeable margin, and a look at harryandeddies did not change that at all, this is one of the better corners of the open internet for this kind of content and I am glad I clicked through rather than skipping past quickly like I usually do.
dark matter market darknet https://darkmarketgate.com/ tordex darknet https://darknetmarketsgate.com/
Nice and clean, that is the best way to describe the writing here, no clutter and no wasted words, and a quick visit to goldenbranchmart kept that going, I appreciate when a site treats its readers like people who can think for themselves without needing constant hand holding through every paragraph.
Genuinely good work, the kind that holds up over multiple readings without losing its appeal, and a stop at astrebulb kept that going, definitely a site I will be returning to and probably mentioning to others who work in or care about this particular area of interest today and in coming weeks.
Decided after reading this that I would check this site weekly going forward, and a stop at frostcoasts reinforced that commitment, deciding to add a site to a regular rotation requires meeting a quality bar that very few places clear and this one cleared it cleanly without any noticeable effort or marketing push behind it.
Skipped a meeting reminder to finish the post, and a stop at pactcliff held me past another reminder, when content beats meetings the writer is doing something extraordinary because meetings have institutional support behind them and yet good writing can still occasionally win that competition for attention which I find heartening today.
Огромная коллекция русских сериалов всех жанров: захватывающие детективы, искренние мелодрамы, исторические драмы и зажигательные комедии. Любимые актёры, узнаваемые истории и тёплая атмосфера. Без подписки и регистрации – просто включай и наслаждайся: русские сериалы 2000 по 2010
Took me back a step or two on an assumption I had been making, and a stop at airycargo pushed that reconsideration further, writing that gently corrects the reader without being aggressive about it is a rare diplomatic skill and the team here clearly knows how to land critical points without turning readers off.
Наша компания предлагает быстрое оформление справок об инвалидности с внимательным подходом к каждому клиенту https://spravka-invalid.com/kuda-obratitsya-esli-nuzhna-spravka-ob-invalidnosti/
Honestly impressed by how much useful content sits in such a small post, and a stop at portolive confirmed the rest of the site packs a similar punch, density without confusion is a hard balance to strike and this site has clearly cracked the code on it across many different topic areas covered.
В этой заметке мы представляем шаги, которые помогут в процессе преодоления зависимостей. Рассматриваются стратегии поддержки и чек-листы для тех, кто хочет сделать первый шаг к выздоровлению. Наша цель — вдохновить читателей на положительные изменения и поддержать их в трудных моментах.
Изучить вопрос глубже – детокс24
Solid stuff, the kind of post that I will probably refer back to later this month when the topic comes up again, and a look at bookcliff only confirmed I should bookmark the site as a whole rather than just this single page for future reference and use across coming weeks.
Reading this between meetings turned out to be the most useful thing I did all afternoon, and a stop at bauxcircle kept that productivity feeling going, content can sometimes outperform actual work in terms of what gets accomplished mentally and this site managed that today which is genuinely a high bar to clear consistently.
Glad I stumbled across this post, the explanations actually make sense without needing background knowledge to follow along, and after a stop at dewchase the same was true there, no assumptions about the reader just clear writing that anyone can understand from the first line right through to the end.
The overall feel of the post was professional without being stuffy, and a look at findamazingoffers kept that approachable expertise going, finding the right register for technical content is hard but this site has clearly figured out how to sound knowledgeable without slipping into that distant lecturing tone that loses readers in droves every time.
Decided this was the best thing I had read all morning, and a stop at berrybombselfiespot kept that ranking intact, ranking my reading is something I do mentally throughout the day and the top rank is competitive and not easily won but this site won it without needing to overstate its claims for that.
Just sat back at the end of the post and felt grateful that someone took the time to write it, and a look at cultbotany extended that gratitude across more of the site, recognising effort behind quality work is part of what makes the open web a community rather than just a marketplace today.
Picked something concrete from the post that I will use immediately, and a look at cotcloud added another concrete piece, content that produces immediately useful output rather than just abstract appreciation is content that earns its place in my regular rotation without needing any further evaluation from me at this point honestly.
Better than the average post on this subject by some distance, and a look at chordbase reinforced that, you can tell within the first paragraph that the writer here actually cares about the topic rather than just covering it for the sake of having something to publish that week or that day.
Picked up two new ideas that I expect will come up in conversations this week, and a look at refinedlifestylecommerce added another, content that arms me with talking points rather than just filling time is the kind that provides ongoing value beyond the moment of reading and this site is generating that kind of ongoing value.
Справка о несудимости является важным документом для многих международных и официальных процедур. Мы помогаем оперативно оформить документ и подготовить его к подаче https://law-moscow.com/chto-esli-kupit-spravku-o-nesudimosti/
tordex shop https://darknetmarketsgate.com/ dark matter url https://darkmarketsdirectory.com/
Bookmarking this for later, the kind of resource I want to keep nearby, and a quick look at domelegends confirmed the rest of the site is worth the same treatment, definitely going into my reference folder for the next time the topic comes up at work or in conversation with someone who asks.
Really appreciate the confidence to make a clear point rather than hedging everything, and a quick visit to clippoises maintained the same direct stance, writing that takes positions rather than equivocating is more useful even when the positions are debatable because at least the reader has something to react to clearly.
High quality writing, no marketing speak and no buzzwords that mean nothing, and a stop at coilbyrd kept that going, simple direct content that actually communicates something is harder to find than it should be and this is one of the rare places that gets it right consistently across many different posts.
My friends would appreciate a few of these posts and I will be sending links accordingly, and a look at fernpiers added more pages to my share queue, content that earns shares to specific people in specific contexts is content with social utility and this site is generating those targeted shares from me consistently lately.
Reading this on a difficult day was a small bright spot, and a stop at graingroves extended that brightness, content that improves a hard day is content that has earned a particular kind of place in my reading habits and this site is occupying that uplifting role for me today which I appreciate clearly.
Decided to set a calendar reminder to revisit, and a stop at byrdbrig extended that revisit list, calendar entries for content are a level of commitment I rarely make but when I do they signal a higher regard than a simple bookmark and this site has earned that calendar tier of relationship from me today.
Felt no urge to argue with the conclusions even though I started the post slightly skeptical, and a look at amidbrawn maintained that pattern, writing that earns agreement through clarity of argument rather than rhetorical pressure is the kind I find most persuasive and the kind I want to read more of these days.
Came away with a slightly better mental model of the topic than I started with, and a stop at astrebull sharpened that further, content that improves the reader thinking apparatus rather than just dumping facts into it is the rare kind I genuinely value and seek out when I have time to read carefully.
Worth pointing out the careful word choice in this post, no buzzwords and no jargon, and a look at bauxclay continued that disciplined vocabulary, sites that resist the pull of trendy language are sites that will read well in five years and this one is clearly built for that kind of long durability.
Time spent here today felt productive in the way that good reading sessions sometimes do, and a stop at dewchip extended that productive feeling across the rest of the morning, the difference between productive reading and merely passing time is real and this site is consistently on the productive side for me lately.
Just want to record that this site is entering my regular reading list, and a look at portpoise confirmed it deserves the spot, my regular reading list is short and well curated and adding to it requires meeting a fairly high quality bar that this site has clearly cleared without much effort apparently.
Found something new in here that I had not seen explained this way before, and a quick stop at boomastro expanded the idea even further, the kind of writing that nudges your thinking forward a bit without forcing the issue is exactly what I look for online today and rarely actually find anywhere.
Came away with a slightly better mental model of the topic than I started with, and a stop at nighttoshineatlanta sharpened that further, content that improves the reader thinking apparatus rather than just dumping facts into it is the rare kind I genuinely value and seek out when I have time to read carefully.
Approaching this site through a casual link click and being surprised by what I found, and a look at curbcliff extended the surprise, the rare experience of stumbling into excellent independent content rather than predictable mediocrity is one of the actual remaining pleasures of casual web browsing and this site provided it cleanly.
Quality work here, the post reads cleanly and the points stay focused throughout, and a stop at covebeck kept the standard high, you can tell the writer cares about the final result rather than just hitting publish for the sake of having something new on the page to feed the search engines.
Compared to the usual results for this kind of search this site stands well above the average, and a quick visit to shemplymade kept the standard high, you can tell within seconds whether a site is going to waste your time or actually deliver and this one clearly delivers without any false starts.
torzon darkweb https://darkmarketgate.com/ nexus darkweb url https://darknetmarketsgate.com/
Really like that there are no exclamation marks or all caps shouting throughout the post, and a quick visit to pactpalace maintained the same calm voice, restraint in punctuation signals confidence in the content and this site clearly trusts its substance to do the persuading rather than relying on typographic emphasis.
Appreciated how the writer anticipated the questions a reader might have along the way, and a stop at apexhelm continued that thoughtful approach, you can tell when content has been edited with the reader in mind versus just published as a first draft and this is clearly the former approach across what I read.
Наша компания предлагает профессиональную помощь в получении справки о несудимости для любых целей https://law-moscow.com/kogda-nuzhna-spravka-o-nesudimosti-s-apostilem/
Reading this in my last reading slot of the day was a good way to end, and a stop at bravofarms provided a satisfying close to the reading session, content that ends a day well rather than agitating it before sleep is the kind I value increasingly and this site fits that role for me consistently now.
Good clean post, no errors and no awkward phrasing that breaks the reading flow, and a stop at softbreezeoutlet kept the same standard, definitely the kind of editorial care that earns a return visit because it tells me the writer is paying attention to details that matter to readers rather than just rushing publication.
Quality work here, the post reads cleanly and the points stay focused throughout, and a stop at knackdomes kept the standard high, you can tell the writer cares about the final result rather than just hitting publish for the sake of having something new on the page to feed the search engines.
Thank you for keeping the writing honest and the points easy to verify against your own experience, and a stop at flickaltars reflected the same approach, no exaggeration just steady useful content that I can take with me into my own work without second guessing every sentence I happen to read here.
Genuinely well crafted writing, the kind that makes the topic look easier than it actually is, and a look at refinedglobalmarket added even more depth, you can feel the experience behind every line which is something only writers who have been at this for a while can pull off with this level of grace.
Looking at this from the perspective of someone tired of generic content the contrast is striking, and a look at amidbull maintained that distinctive feel, sites with strong editorial identity stand out against the bland background of algorithmic content and this one has clearly developed an identity worth recognising through careful attention.
Now noticing the careful balance the post struck between confidence and humility, and a stop at artfuldailyclickping maintained the same balance, finding the line between asserting and admitting is hard and this site has clearly developed the calibration to walk that line consistently which produces a more persuasive reading experience for me.
Genuine reaction is that I will probably think about this on and off for a few days, and a look at byrdbush added fuel to that, the best content lingers in your head after you close the tab rather than evaporating immediately and this site clearly knows how to write that kind of memorable content.
Well structured and easy to read, that combination is rarer than people think, and a stop at beckarrow confirmed the same standard runs across the rest of the site, definitely the kind of place I will be coming back to when this topic comes up in conversation later again over the weeks ahead.
Genuinely changed how I think about a small piece of the topic, which does not happen often online, and a look at coilcab added another nudge in the same direction, the kind of writing that earns a small mental shift rather than just confirming what you already thought before reading is a sign of careful thought.
Found this really helpful, the explanations are simple but they actually answer the questions a normal reader would have, and after I followed trendloversplace I had a clearer sense of the topic, no extra fluff just useful points laid out in a sensible order that made the time worth it.
A piece that took its time without dragging, and a look at dewcoat kept the same patient pace, the difference between unhurried and slow is a fine editorial distinction and this site has clearly found the unhurried side without slipping into the slow side which would have lost me as a reader quickly otherwise.
Picked this for my morning read because the topic seemed worth the time, and a look at astrecanal confirmed the choice was right, my morning reading slot is precious and giving it to this site felt like a good investment rather than a waste which is a higher endorsement than I usually offer for content.
During a reading session that included several other sources this one stood out, and a look at curbcomet continued the standout quality, the side by side comparison of sources during research is a useful exercise and this site has been winning those comparisons for me consistently across multiple research sessions during the last week.
dark matter market url https://darkmarketsdirectory.com/ nexus darknet market 2026 https://darknetmarketsgate.com/
Справки об инвалидности востребованы при оформлении социальных выплат и льгот. Мы делаем процесс получения документов максимально удобным https://spravka-invalid.com/kontakty/
Glad I gave this a chance instead of bouncing on the headline, and after chordcircle I was certain I had made the right call, snap judgements based on titles miss a lot of good content and this is a reminder to slow down and check things out before scrolling past in a hurry.
If I had to defend the time I spend reading independent blogs this site would feature in the defence, and a look at covecanal reinforced that defensive utility, the ongoing case for non algorithmic reading is one I make to myself periodically and sites like this one provide the actual evidence that supports the case clearly.
Just want to acknowledge that the writing here is doing something right, and a quick visit to explorewithoutlimits confirmed the same standards run across the broader site, recognising good work is something I try to do when I find it because the alternative is silence and silence rewards mediocrity.
Once I had read three posts the editorial pattern was clear, and a look at goldmanor confirmed the pattern from a fourth angle, sites where the underlying approach reveals itself through accumulated reading rather than being announced are sites with real depth and this one has that quality clearly visible across multiple pieces consistently.
Reading this gave me something to think about for the rest of the afternoon, and after boomclove I had even more to mull over, the kind of post that lingers in the background of your day rather than evaporating immediately is genuinely valuable in an attention economy that punishes depth rather than rewarding it.
Reading this triggered a small change in how I think about the topic going forward, and a stop at stacoa reinforced that subtle shift, the rare content that actually moves my thinking rather than just confirming or filling it is the kind I most value and this site is providing that kind of impact today.
Felt the post had been written without using a single buzzword, and a look at urbancreststudio continued that clean vocabulary, content free of jargon and trendy phrases reads better and ages better and this site has clearly committed to a vocabulary that will not feel dated in three years which is impressive editorially.
Really like that there are no exclamation marks or all caps shouting throughout the post, and a quick visit to urbanpathhouse maintained the same calm voice, restraint in punctuation signals confidence in the content and this site clearly trusts its substance to do the persuading rather than relying on typographic emphasis.
Comfortable in tone and substantive in content, that is a hard combination to land, and a look at flarequills kept that pairing alive across more material, this is what good editorial direction looks like in practice and the team here clearly has someone keeping a steady hand on the wheel across what they decide to publish.
If I am being honest this is the kind of site I quietly hope my own work will someday resemble, and a stop at freshguilds extended that aspirational feeling, finding work that models what I want to produce is part of why I read carefully and this site has been performing that modelling function for me lately consistently.
More original than the recycled takes I keep finding on the topic elsewhere, and a quick look at amidcarve confirmed it, the kind of site that has its own voice rather than echoing whatever is trending which makes it stand out as a refreshing change from the usual rotation of generic content I see daily.
Reading this prompted a small note in my reference file, and a stop at ethicalstyleandliving prompted another, the rare site that contributes useful nuggets to my own working knowledge rather than just consuming my attention is worth the time investment many times over compared to the usual pile of forgettable scroll content.
Good quality through and through, no rough edges and no signs of being rushed, and a quick look at strengththroughstrides kept the same polish going, the kind of site that respects its own brand by maintaining consistency across pages which is something I always appreciate as a reader looking for trustworthy information online today.
Glad to have another reliable bookmark for this topic, and a look at refinedclickpingexperience suggested several more pages I will be marking too, building a personal library of trustworthy resources is one of the actual rewards of careful browsing and this site is earning a place on my permanent shortlist for the topic.
Now planning to come back when I have the right kind of attention to read carefully, and a stop at byrdcipher reinforced that plan, choosing the right moment to read certain content is a quiet form of respect for the work and this site is generating those careful planning behaviours from me consistently as a reader.
Really nice to see things explained without overcomplicating the topic, the words flow naturally and stay easy to follow, and a short visit to beechbraid only added to that experience because the same simple approach is used across the rest of the page too without any change in tone.
Reading carefully this time rather than scanning, and the depth shows up in places I missed first time around, and a look at carefullybuiltcommerce rewarded the same careful approach, content that holds up to multiple reads is content I want more of in my regular rotation rather than disposable scroll fodder daily.
If I am being honest this is the kind of site I quietly hope my own work will someday resemble, and a stop at premiumlivingstorefront extended that aspirational feeling, finding work that models what I want to produce is part of why I read carefully and this site has been performing that modelling function for me lately consistently.
Left me wanting to read more rather than feeling burned out, that is a good sign, and a look at curatedfuturegoods confirmed there is plenty more here to explore, the kind of writing that builds appetite rather than killing it which is a rare quality on the modern open internet today across most categories of content.
If you scroll past this site without looking carefully you will miss something, and a stop at galafactors extended that mild warning, the surface of the site does not advertise its quality loudly which means careful attention is required to recognise what is being offered here which is itself a kind of editorial signal.
Thanks for the moderate length, neither so short it skips substance nor so long it bloats, and a stop at inspiredhomelifestyle hit the same balance, the right length is one of the hardest things to calibrate in blog writing and I appreciate when a team has clearly thought about it rather than defaulting.
Honest take is that this was better than I expected when I clicked through, and a look at craftcanal reinforced that, the bar for online content has dropped so much that finding something thoughtful and well constructed feels almost noteworthy now which says more about the average than about this site itself.
Bookmark folder reorganised slightly to make this site easier to find, and a look at curlbento earned the same accessibility upgrade, the small organisational moves I make for sites I expect to return to often are themselves a signal of how much I trust them and this site triggered those moves naturally.
Honestly impressed by how much useful content sits in such a small post, and a stop at graingrove confirmed the rest of the site packs a similar punch, density without confusion is a hard balance to strike and this site has clearly cracked the code on it across many different topic areas covered.
Really liked the calm tone running through the post, no shouting and no urgency forced into the writing, and a look at astroboard kept that quiet confidence going, the kind of voice that makes the reader feel respected rather than yelled at which is depressingly common across most modern blog content these days.
Felt like I was reading something written by someone who actually thinks about the topic rather than reciting it, and a look at coilclose reinforced that impression, the difference between recited content and considered content is huge and this site clearly belongs to the latter category which I appreciate as a careful reader looking for substance.
Now feeling confident enough in this site to use it as a reference point for evaluating others on the same topic, and a look at trendandbuy continued the comparison friendly quality, sites that serve as quality benchmarks for their topic are precious and this one has clearly become a benchmark for me on this particular subject area.
Этот обзор медицинских исследований собрал самое важное из последних публикаций в области медицины. Мы проанализировали ключевые находки и представили их в доступной форме, чтобы читатели могли легко ориентироваться в актуальных темах. Этот материал станет отличным подспорьем для изучения медицины.
Дополнительно читайте здесь – детокс24
Огромная коллекция русских сериалов всех жанров: захватывающие детективы, искренние мелодрамы, исторические драмы и зажигательные комедии. Любимые актёры, узнаваемые истории и тёплая атмосфера. Без подписки и регистрации – просто включай и наслаждайся: https://kinogo-serialy-russkie.top/
Now feeling the rare pleasure of trusting a source completely on first encounter, and a look at gailcooperspeaker extended that initial trust into something more durable, the calibration of trust to evidence is something I do informally and this site has earned high trust through the cumulative weight of multiple consistently good posts already.
I learned more from this short post than from longer articles I read earlier today, and a stop at amplebench added even more useful detail without going off topic, this site clearly knows how to keep things focused without sacrificing depth which is a hard balance to strike for any writer.
The headings made navigating the post simple even when I needed to find a specific section quickly, and a look at brightorchardhub continued the same thoughtful structure, small details like clear headings show that someone is actually thinking about how the reader uses the page rather than just filling it for length alone.
Skipped lunch to finish reading, which says something, and a stop at refinedlivingessentials kept me at my desk longer than planned, when content beats the lunch impulse the writer has done something genuinely impressive in an attention environment full of immediately satisfying alternatives competing for the same finite block of reader time.
Reading this with a fresh mind in the morning brought out details I might have missed in the afternoon, and a stop at boundboard earned the same fresh attention, content that rewards being read at full attention rather than at energy lows is content with real density and this site has that density consistently.
This stands out compared to similar posts I have read recently, less noise and more substance, and a look at autumnriverattic kept that gap going, you can really feel the difference between content made by someone who cares versus content made to fill a publishing schedule for an algorithm trying to keep growing somehow.
Generally my attention drifts on long posts but this one held it through the end, and a stop at mountainmiststudio earned the same sustained focus, content that defeats my drift tendency is content with substantive pulling power and this site has demonstrated that pulling power across multiple pieces in a session that has now run quite long actually.
Now adding a small note in my reading log that this site is one to watch, and a look at intentionalmodernmarket reinforced the watch status, the few sites I track deliberately rather than encounter accidentally are sites I expect ongoing returns from and this one has cleared the bar for that elevated tracking based on what I read.
A nicely understated post that does not shout for attention, and a look at beechcell maintained the same quiet quality, understatement is a stylistic choice that distinguishes serious writing from attention seeking writing and this site has clearly committed to the understated approach as a core editorial value rather than just a phase.
A welcome reminder that thoughtful writing still happens online, and a look at cormira extended that reassurance, the modern web makes it easy to forget that careful writing exists and finding sites that practice it is a small antidote to the cynicism that builds up from too much exposure to algorithmic content.
Now noticing that the post benefited from being neither too short nor too long for its content, and a look at orqanta continued that calibration of length, sites that match length to content rather than padding to hit some target are sites that respect both their material and their readers and this site does both.
В статье по вопросам здоровья мы рассматриваем актуальные проблемы, с которыми сталкивается общество. Обсуждаются заболевания, факторы риска и важные аспекты профилактики. Читатели получат полезные советы о том, как сохранить здоровье и улучшить качество жизни.
Подробнее тут – Врач психиатр в Краснодаре
Quietly the writers approach to the topic differs from the dominant takes I have been encountering, and a stop at byrdclap extended that distinctive approach, content that maintains a different perspective without explicitly arguing against the dominant ones is content with confident editorial identity and this site has that confidence throughout pieces.
Solid value for anyone willing to read carefully, and a look at autumnbay extends that value across the rest of the site, this is the kind of place that rewards return visits rather than offering everything in a single splashy post and then leaving readers nothing to come back for later which is unfortunately common.
Came across this through a roundabout path and now it is on my regular rotation, and a stop at carefullybuiltcommerce sealed that decision, the open web still produces serendipitous discoveries when you let the citations and references guide you rather than relying purely on algorithmic feeds for new content recommendations always.
A piece that left me thinking I had been undercaring about the topic, and a look at authenticlivingmarket reinforced that mild concern, content that raises the appropriate weight of a subject without being preachy about it is doing important work and this site is providing that gentle elevation of attention for me consistently.
Once I trust a site this much I tend to read everything they publish and that is the trajectory I am on with this one, and a stop at churnburst confirmed the trajectory, the rare progression from interested reader to comprehensive reader is something only certain sites earn and this one is earning that progression rapidly.
Reading this between meetings turned out to be the most useful thing I did all afternoon, and a stop at craterbase kept that productivity feeling going, content can sometimes outperform actual work in terms of what gets accomplished mentally and this site managed that today which is genuinely a high bar to clear consistently.
Felt the writer was speaking my language without trying to imitate it, and a look at grippalace continued that natural fit, when a writers default voice happens to match what you find easy to read the experience feels frictionless and that is something I notice and remember about specific sites going forward.
If I am being honest this is the kind of site I quietly hope my own work will someday resemble, and a stop at everydaytrendhub extended that aspirational feeling, finding work that models what I want to produce is part of why I read carefully and this site has been performing that modelling function for me lately consistently.
Bookmark added in three places to make sure I do not lose the link, and a look at peoplesprotectiveequipment got the same redundant treatment, sites I am afraid to lose are the rare keepers and this is clearly one of them based on what I have read so far across this and a couple of related posts.
Appreciated the way each section connected smoothly to the next without abrupt jumps, and a stop at astrobrunch kept that flow going nicely, transitions are something most blog writers ignore but the difference is huge for the reader who is trying to follow a sustained line of thought today across many different topics.
After reading several posts back to back the consistent voice across them is impressive, and a stop at futurelivingcollections continued that voice consistency, sites that maintain a single coherent voice across many pieces by potentially many writers represent serious editorial discipline and this one has clearly developed the institutional consistency needed for that.
Worth observing that the post landed without needing a flashy headline to hook attention, and a stop at dustorchids did the same, content that earns engagement through substance rather than packaging is the kind I trust more deeply and this site has clearly chosen substance as the primary lever for reader engagement throughout.
Really appreciate that the writer did not stretch the post to hit some target word count, the points end when they are made, and a stop at amplebey reflected the same discipline, brevity is generosity in disguise and this site has clearly figured that out far better than most blog operations have.
One of the more thoughtful posts I have read recently on this topic, and a stop at ethicalconsumercollective added even more weight to that impression, this is genuinely good content that holds its own against far better known sites in the same space without trying to imitate any of them at all which I appreciate.
Coming to this with low expectations and being pleasantly surprised by the substance, and a stop at etherledges continued exceeding expectations, the recalibration of expectations upward across multiple positive readings is one of the actual rewards of careful browsing and this site is providing that recalibration at a steady rate apparently.
Found the use of subheadings really helpful for scanning back through the post later, and a stop at globallysourcedstylehouse kept that reader friendly approach going, navigation is something many blog writers ignore but small structural choices make a noticeable difference for someone returning to find a specific point again days or weeks later.
Really appreciate the confidence to make a clear point rather than hedging everything, and a quick visit to ehajjumrahtours maintained the same direct stance, writing that takes positions rather than equivocating is more useful even when the positions are debatable because at least the reader has something to react to clearly.
Reading this confirmed something I had been suspecting about the topic, and a look at staycuriousandcreative pushed that confirmation toward greater confidence, content that lines up with independently held intuitions earns a special kind of trust and I will return to writers who consistently land that way for me without overselling positions.
Just wanted to drop a quick note saying this was a useful read on a topic I have been circling, no fluff, and a stop at coilcolt added a few extra points that fit the same simple style which makes the whole site feel coherent rather than thrown together by many different writers with different goals.
Quietly building a case in my head for why this site deserves more attention than it currently seems to receive, and a look at goldenbaystyle reinforced the case, the gap between quality and recognition is a recurring frustration in independent online content and this site is one of the cases that seems particularly egregious to me today.
My friends would appreciate a few of these posts and I will be sending links accordingly, and a look at ravenvendor added more pages to my share queue, content that earns shares to specific people in specific contexts is content with social utility and this site is generating those targeted shares from me consistently lately.
crazy time appcrazy time https://crazytime-italy-it.com/
Thank you for keeping the writing honest and the points easy to verify against your own experience, and a stop at beechclue reflected the same approach, no exaggeration just steady useful content that I can take with me into my own work without second guessing every sentence I happen to read here.
Different feel from the algorithmically optimised posts that dominate the topic, and a stop at boundburst reinforced that human touch, you can tell when a site is being run by someone who reads what they publish versus someone just hitting submit and moving on quickly to the next assignment without checking the result.
Once you start reading carefully here it is hard to go back to lower quality alternatives, and a stop at timbercart reinforced that ratchet effect, the way good content raises standards is real over time and this site has clearly contributed to raising my expectations for what is possible in writing on the topic generally.
Really appreciate that the writer did not assume I would read every other related post first, and a look at brightfallstudio kept that self contained feel going where each piece can stand alone, accessibility for new readers is a sign of generous editorial thinking and this site has clearly invested in that approach.
Working through this site has been a small antidote to the shallow content that fills most of my reading time, and a stop at cabinboss extended that antidote function, sites that quietly improve the average quality of my reading by being themselves are sites worth supporting through return visits and recommendations consistently.
I came here looking for a quick answer and ended up reading the whole post because it was actually interesting, and after premiumlivinghub I had a much fuller picture, no stress and no confusion just a clear walk through the topic that made everything fall into place without much effort.
Walked away in a slightly better mood than when I started reading, that says something about the writing, and a stop at autumnbay kept that going, content that leaves you feeling more capable rather than overwhelmed is the kind I keep coming back to again and again over the years and across many topics.
Without overstating it this is a quietly excellent post, and a look at modernheritagemarket extended that quiet excellence, content that earns superlatives without demanding them through marketing language is content that has truly earned them through the substance and this site has clearly produced work in that earned excellence category today.
Solid quality, the kind of work that holds up to a careful read rather than a quick skim, and a quick look at craterbook kept that standard going strong, content that rewards attention rather than punishing it is something I appreciate more and more these days online across nearly every topic I follow.
Now thinking the topic is more interesting than I had given it credit for, and a stop at grovefarm continued that elevated interest, content that revives my curiosity about subjects I had set aside is doing genuine work in the structure of my interests and this site is providing that revivifying effect today actually.
Did not expect much when I clicked through but ended up reading the whole thing carefully, and a stop at amplebuff kept that engagement going, sometimes the unassuming sites turn out to deliver more than the flashy ones which is something I have learned to look out for over time online lately and across topics.
Genuine pleasure to read, and that is not something I say often after a casual click through, and a quick visit to modernvalueclickping kept the same feeling going across the rest of the site, finding writing that actually feels good to spend time with rather than just functional is increasingly rare on the open web.
Публикация охватывает основные направления развития современной медицины. Мы обсудим значимость научных исследований, инноваций в лечении и роли общественного участия в формировании системы здравоохранения.
Полная информация здесь – detox24
Reading this confirmed a hunch I had been carrying about the topic without having articulated it, and a stop at lunarharvestmart extended the confirmation, content that gives shape to fuzzy intuitions is doing the rare work of making private thoughts public and this site is providing that articulating service consistently for me lately.
Honestly this hits the sweet spot between detail and brevity, no rambling and no shortcuts, and a quick visit to ethicalmodernliving kept that going across the related pages, the kind of place that respects your attention without trying to grab it through cheap tactics or attention seeking design choices that get tired fast.
Solid stuff, the kind of post that I will probably refer back to later this month when the topic comes up again, and a look at astrobush only confirmed I should bookmark the site as a whole rather than just this single page for future reference and use across coming weeks.
If I had to summarise the editorial sensibility of this site in a few words it would be careful and human, and a look at glarniq extended that summary feeling, capturing the essence of a sites approach in brief is hard but this site has a clear enough identity that the summary comes naturally enough.
Decided to set a calendar reminder to revisit, and a stop at edgedials extended that revisit list, calendar entries for content are a level of commitment I rarely make but when I do they signal a higher regard than a simple bookmark and this site has earned that calendar tier of relationship from me today.
Appreciated the way each section connected smoothly to the next without abrupt jumps, and a stop at globalpremiumcollective kept that flow going nicely, transitions are something most blog writers ignore but the difference is huge for the reader who is trying to follow a sustained line of thought today across many different topics.
Generally my attention drifts on long posts but this one held it through the end, and a stop at wildshoresupply earned the same sustained focus, content that defeats my drift tendency is content with substantive pulling power and this site has demonstrated that pulling power across multiple pieces in a session that has now run quite long actually.
Honestly enjoyed not being sold anything for the entire duration of the post, and a look at asianspeedd8 kept that pleasant absence going across more pages, content that exists for its own sake rather than as a funnel to a paid product is increasingly rare and worth supporting where I can find it.
Walked away in a slightly better mood than when I started reading, that says something about the writing, and a stop at beigeastro kept that going, content that leaves you feeling more capable rather than overwhelmed is the kind I keep coming back to again and again over the years and across many topics.
Honestly this was the highlight of my reading queue today, and a look at sorniq extended that across more pages I will return to, ranking what I read against what else I read each day is something I do informally and this site keeps moving up in those rankings the more I explore it.
Looking back on this reading session it stands as one of the better ones recently, and a look at jamesonforct extended that ranking, the informal ranking of reading sessions against each other is something I do mentally and this session ranks high largely because of this site and a couple of related pages here.
Now adjusting my mental model of how the topic fits into the broader landscape, and a look at cipherbeach extended that adjustment, content that affects my structural understanding rather than just my factual knowledge is content with deeper impact and this site is providing those structural updates at a meaningful rate consistently across topics.
The pacing of the post was just right, never rushed and never dragged out unnecessarily, and a look at refinedglobalstore maintained the same rhythm, you can tell the writer has experience because the difficult skill of pacing is something only practiced writers manage to handle well in long form content over time and across formats.
Thank you for the genuine effort here, it shows in every paragraph and not just the headline, and after my visit to cabinbrick I was sure this site cares about getting things right rather than chasing clicks, which is the main reason I will come back later this week to read more.
Clean writing, easy to read, and never tries too hard to impress, that combination is harder to find than people think, and after my time on boundchee I am sure this site treats its readers well, no flashy tricks just useful content done right which is honestly all I want online.
If I were grading sites on this topic this one would receive high marks, and a stop at coltable continued earning those high marks, the informal grading I do mentally for content sources is something I take seriously even though it is informal and this site has been receiving consistent high marks across multiple sessions today.
Different in a good way from the cookie cutter content that fills most blogs covering this area, and a stop at urbanvibeemporium kept showing me why, original thoughtful writing exists if you know where to look and this site has earned a place on my short list of those rare exceptions worth defending.
If the topic interests you at all this is a place to spend time, and a look at cratercoil reinforced that recommendation, the broader question of where to invest topical reading time is one this site answers convincingly through the consistent quality across multiple pieces I have sampled during the current reading session today.
Decided not to comment because the post said what needed saying, and a stop at globalinspiredmarket continued that complete feel, content that does not invite obvious additions or corrections from readers is content that has been carefully considered and this site appears to consistently produce pieces that satisfy rather than provoke unnecessary follow ups.
If patience for careful reading is rare these days finding sites that reward it is rarer still, and a stop at cherrycrate extended that rare reward, the diminishing returns on shallow content reading have made me more selective about where to spend reading time and this site is meeting the higher selectivity bar consistently.
Found the writing surprisingly fresh for what is by now a well covered topic, and a stop at grovequay kept that freshness going across the related pages, original perspective on familiar ground is hard to come by and this site has clearly earned its place in the conversation rather than just rehashing old ideas.
В данной публикации мы поговорим о процессе восстановления от зависимости, о том, как вернуть себе нормальную жизнь. Мы обсудим преодоление трудностей, значимость поддержки и наличие программ реабилитации. Читатели смогут узнать о ключевых шагах к успешному восстановлению.
Погрузиться в научную дискуссию – detox24 в электростали
The whole experience of reading this was pleasant from start to finish, no pop ups and no annoying interruptions, and a look at ampleclam continued that clean experience, technical choices about page design matter for the reader and this site clearly cares about the small details that add up to comfort across multiple visits.
My time on this site has now extended past what I had budgeted, and a stop at everydayshoppingoutlet keeps extending it further, content that overstays its budget in my schedule is content that has earned the extra time and this site has been earning extra time across multiple visits to the point where my schedule needs adjustment.
Этот медицинский обзор сосредоточен на последних достижениях, которые оказывают влияние на пациентов и медицинскую практику. Мы разбираем инновационные методы лечения и исследований, акцентируя внимание на их значимости для общественного здоровья. Читатели узнают о свежих данных и их возможном применении.
Это стоит прочитать полностью – elektrostal detox24
Appreciate the thoughtful approach, the writer clearly took time to make this readable for someone who is not already an expert, and a look at contemporaryglobalgoods kept that going nicely, easy on the eyes and easy on the brain which is always a winning combination when reading on a busy day.
В данном материале представлены ключевые тенденции в сфере медицинской науки и практики. Вы узнаете о последних открытиях, инновационных подходах к терапии и важности профилактики заболеваний. Особое внимание уделено практическому применению новых методов в клинической практике.
Получить профессиональную консультацию – вытрезвитель екатеринбург
A slim post with substantial content per word, and a look at velvetvendorx maintained the same density, the content per word ratio is something I track informally and this site scores high on that ratio compared to most sources I read regularly which is a quiet indicator of careful editorial work behind the scenes.
Now appreciating the way the post avoided the temptation to be longer than necessary, and a look at modernwellbeingstore continued that lean approach, content with the discipline to stop when finished rather than padding for length is content that respects both itself and its readers and this site has that disciplined editorial culture clearly throughout.
Bookmark moved to my permanent reference folder rather than the casual maybe later folder, and a look at lacehelms earned the same upgrade, the distinction between casual interest and lasting reference is something I track carefully and very few sites cross that threshold but this one did so without much effort apparently.
Honest assessment is that this is one of the better short reads I have had this week, and a look at highlandharvestmall reinforced that, the bar for short content is low because most of it sacrifices substance for brevity but this site manages both at once which is harder than it sounds for most writers attempting it.
Started taking notes about halfway through because the points were stacking up, and a look at astrocloth added enough material that my notes file grew further, content that demands note taking from a passive reader is content with substance and the writers here are clearly producing that kind of work consistently across topics.
Now adding a small note in my reading log that this site is one to watch, and a look at frostaisle reinforced the watch status, the few sites I track deliberately rather than encounter accidentally are sites I expect ongoing returns from and this one has cleared the bar for that elevated tracking based on what I read.
Picked up a couple of new ideas here that I can actually try out, and after my visit to beigeblink I have even more notes saved, this is the kind of resource that pays you back for the time you spend on it which is rare to come across in this corner of the web.
A piece that ended with a clean landing rather than fading out, and a look at portguilds maintained the same crisp conclusions, endings that resolve rather than dissolve are a sign of careful structural thinking and this site has clearly invested in how its pieces conclude rather than letting them simply run out of energy.
Now feeling the rare pleasure of trusting a source completely on first encounter, and a look at thoughtfulmodernclick extended that initial trust into something more durable, the calibration of trust to evidence is something I do informally and this site has earned high trust through the cumulative weight of multiple consistently good posts already.
В данной статье мы поговорим о будущем медицины, акцентируя внимание на прорывных разработках и их потенциале. Читатель узнает о новых подходах к лечению, роли искусственного интеллекта и возможностях персонализированной медицины.
Кликни и узнай всё! – лечение женского алкоголизма клиника
В этой статье мы рассматриваем разрушительное влияние зависимости на жизнь человека. Обсуждаются аспекты, такие как здоровье, отношения и профессиональные достижения. Читатели узнают о необходимости обращения за помощью и о путях к восстановлению.
Что ещё нужно знать? – наркологическая помощь на дому круглосуточно
Публикация посвящена жизненным историям людей, успешно справившихся с зависимостью. Мы покажем, что выход есть, и он начинается с первого шага — принятия проблемы и желания измениться.
Обратитесь за информацией – вывод из запоя иркутск
Considered against the flood of similar content this one stands apart in important ways, and a stop at premiumglobalmarketplace extended that distinctive feel, sites that find their own corner of a crowded topic and stay there are sites worth following and this one has clearly carved out its own space and committed to defending it carefully.
Эта медицинская заметка содержит сжатую информацию о новых находках и методах в области здравоохранения. Мы предлагаем читателям свежие данные о заболеваниях, профилактике и лечении. Наша цель — быстро и доступно донести важную информацию, которая поможет в повседневной жизни и понимании здоровья.
Всё, что нужно знать – сексолог саратов
Skipped the comments to avoid spoilers and came back later to find them genuinely worth reading, and a stop at cabinbull extended that surprised respect, when the discussion below a post matches the quality of the post itself you have found something special and this site appears to attract that kind of audience.
Granted I am giving this site more credit than I usually give new finds, and a look at crazeborn continued earning that credit, the calibration of how much trust to extend after limited exposure is something I do carefully and this site has earned more trust on shorter exposure than most due to consistent quality across.
В этой статье мы рассмотрим современные достижения в области медицины, включая инновационные методы лечения и диагностики. Мы обсудим важность профилактики заболеваний и роль технологий в улучшении качества здравоохранения. Читатели узнают о влиянии медицины на повседневную жизнь и ее значение для современного общества.
Читать далее > – вызов на дом выведение из запоя
Felt the writer did the homework before publishing, the references hold up, and a look at boundclan continued that documented care, content with traceable claims rather than vague assertions is the kind I trust and the lack of bald assertion in this post is one of its quietly impressive qualities for me.
Glad I clicked through from where I did because this turned out to be worth the time spent, and after handpickedqualitycollections I had a fuller picture, the kind of content that earns its visitors through delivering value rather than chasing them through aggressive advertising or constant pop ups appearing everywhere on the screen lately.
Solid information that lines up with what I have been hearing from other reliable sources, and after my visit to hazemill I was even more certain of that, this site checks out which is something I value highly when so many places online play loose with the facts to chase a quick click.
Honestly enjoyed reading this more than I expected to when I first clicked through, and a stop at handcraftedglobalcollections kept that pleasant surprise going, sometimes you stumble onto a site that just clicks with how you like to read and this is one of those for me right now today which is great.
Really like that the writer trusts the reader to follow simple logic without restating every previous point, and a stop at ampleclove kept that respect going, treating an audience as capable adults rather than as people who need constant hand holding makes a noticeable difference in the reading experience for me.
Probably this is one of the better quiet successes on the open web at the moment, and a look at merchglow reinforced that quiet success quality, sites that are doing well without making a noise about doing well are the sites I most respect and this one has clearly chosen the quiet success path consistently throughout.
Reading the writers other posts after this one suggests the quality is consistent rather than peak, and a stop at oakandriver confirmed the consistent quality reading, sites that hold the same level across many pieces rather than peaking on a few are sites with sustainable editorial discipline and this one has clearly developed that.
Appreciate the practical examples, they made the abstract points easier to grasp, and a stop at amberbazaar added more of the same, this site clearly understands that real examples beat empty theory every single time which is the mark of a writer who knows their audience well and respects their time.
My usual pattern is to skim and bounce but this site has reset that pattern temporarily, and a stop at coltbrig maintained the slower reading mode, content that changes how I read is content with structural influence and this site has clearly nudged my reading behaviour toward something better at least for the duration of these visits.
Skipped to a specific section because I knew that was the question I had, and the answer was clean, and a stop at mastriano4congress similarly delivered targeted answers without burying them, content engineered for readers who arrive with specific needs rather than open ended browsing is increasingly valuable in a search heavy reading environment.
If the topic interests you at all this is a place to spend time, and a look at sustainabledesignstore reinforced that recommendation, the broader question of where to invest topical reading time is one this site answers convincingly through the consistent quality across multiple pieces I have sampled during the current reading session today.
Closed three other tabs to focus on this one and never opened them again, and a stop at wildriveremporium similarly held attention exclusively, content that crowds out other reading from working memory is content with real density and this site has demonstrated that density across multiple pages I have visited so far this morning.
В этой статье рассматриваются различные аспекты избавления от зависимости, включая физические и психологические методы. Мы обсудим поддержку, мотивацию и стратегии, которые помогут в процессе выздоровления. Читатели узнают, как преодолеть трудности и двигаться к новой жизни без зависимости.
Доступ к полной версии – детокс24
В этом обзоре представлены различные методы избавления от зависимости, включая терапевтические и психологические подходы. Мы сравниваем их эффективность и предоставляем рекомендации для тех, кто хочет вернуться к трезвой жизни. Читатели смогут найти информацию о реабилитационных центрах и поддерживающих группах.
Как достичь результата? – прокапаться от алкоголя краснодар
В этом обзоре представлены различные методы избавления от зависимости, включая терапевтические и психологические подходы. Мы сравниваем их эффективность и предоставляем рекомендации для тех, кто хочет вернуться к трезвой жизни. Читатели смогут найти информацию о реабилитационных центрах и поддерживающих группах.
Посмотреть всё – красногорск отравление
This actually answered the question I had been searching for, and after I checked cipherbow I had a few more pieces I had not realised I needed, that is the sign of a site that knows what its readers want before they even know how to ask it which is impressive.
В данной публикации мы поговорим о процессе восстановления от зависимости, о том, как вернуть себе нормальную жизнь. Мы обсудим преодоление трудностей, значимость поддержки и наличие программ реабилитации. Читатели смогут узнать о ключевых шагах к успешному восстановлению.
Подробная информация доступна по запросу – детокс24 краснодар
The structure of the post made it easy to follow without losing track of where I was, and a look at kovique kept the same logical flow going, this site clearly understands that organisation is half the battle in keeping readers engaged from the first line to the last across any kind of post.
Now wishing more sites covered topics with this level of care, and a look at autumnhillboutique extended that wish across more subjects, the rarity of careful coverage on most topics is a problem and this site is one of the small antidotes to that broader pattern of casual or surface treatment of complex subjects.
Reading this in the time it took to drink half a cup of coffee, and a stop at beigecanal fit naturally into the second half, content that respects the rhythms of a typical morning is content with practical fit and this site has the kind of length and pacing that works for the way I actually read.
В этой заметке мы представляем шаги, которые помогут в процессе преодоления зависимостей. Рассматриваются стратегии поддержки и чек-листы для тех, кто хочет сделать первый шаг к выздоровлению. Наша цель — вдохновить читателей на положительные изменения и поддержать их в трудных моментах.
Информация доступна здесь – кодирование от алкоголизма люберцы
Worth pointing out that the post avoided the temptation to summarise everything at the end, and a look at contemporarydesignhub continued that confident closing approach, content that trusts readers to retain the substance without being reminded of it at the end is content that respects the reader and this site practices that respect.
В этой статье мы рассматриваем разрушительное влияние зависимости на жизнь человека. Обсуждаются аспекты, такие как здоровье, отношения и профессиональные достижения. Читатели узнают о необходимости обращения за помощью и о путях к восстановлению.
Уточнить детали – наркологическая клиника во владимире
Once you start reading carefully here it is hard to go back to lower quality alternatives, and a stop at auralbrick reinforced that ratchet effect, the way good content raises standards is real over time and this site has clearly contributed to raising my expectations for what is possible in writing on the topic generally.
A genuine compliment to the writer for keeping the post focused on what mattered, and a look at crazechip continued that disciplined focus, focus is a editorial choice that compounds across many small decisions and this site has clearly made those small decisions consistently across what I have read so far this week here.
Decided to read this site for a while before forming a verdict, and the verdict after several pages is positive, and a stop at briskolives continued that pattern, judging a site requires more than one post and giving sites a fair sample is something I try to do for promising candidates rather than rushing to dismiss.
Этот краткий обзор предлагает сжатую информацию из области медицины, включая ключевые факты и последние новости. Мы стремимся сделать информацию доступной и понятной для широкой аудитории, что позволит читателям оставаться в курсе актуальных событий в здравоохранении.
Провести детальное исследование – вывод из запоя в симферополе
Looking through other posts here the consistency is what makes the site valuable rather than any single piece, and a stop at birchvista extended that consistency observation, sites whose value lies in the ongoing pattern rather than in standout posts are sites I trust more deeply and this one has clearly built that kind of trust.
Glad the writer did not feel compelled to cover every possible angle of the topic, focus is a virtue, and a stop at calmbyrd reflected the same disciplined scope, knowing what to leave out is half of what makes good writing good and this post has clearly been edited with that principle in mind.
Worth marking the moment when reading this clicked into something useful for my own work, and a look at modernlivingcollective extended that practical click, content that connects to my actual life rather than just being interesting is content with the highest kind of value and this site is generating that connection at a high rate.
Glad I gave this a chance instead of bouncing on the headline, and after androblink I was certain I had made the right call, snap judgements based on titles miss a lot of good content and this is a reminder to slow down and check things out before scrolling past in a hurry.
Found the use of subheadings really helpful for scanning back through the post later, and a stop at refinedmoderncollections kept that reader friendly approach going, navigation is something many blog writers ignore but small structural choices make a noticeable difference for someone returning to find a specific point again days or weeks later.
Well done, the writing is professional without being stiff, and the topic is treated with care, and a look at creativehomeandstyle reflected that approach, the kind of site I would point a colleague to if they asked for a reliable starting point on this topic in the future without any hesitation at all.
Started smiling at one paragraph because the writing was just nice, and a look at boundcliff produced a couple more such moments, prose that produces small spontaneous reactions in the reader is doing more than just transferring information and the writers here are clearly hitting that level fairly consistently throughout pieces.
Worth saying that the prose reads naturally without straining for style, and a stop at dreamshopworld maintained the same unforced quality, writing that achieves elegance without effort is the highest tier and this site has clearly worked out how to land that effortless quality consistently rather than only on the writers best days.
Decided to read more before commenting and the more I read the more I wanted to say something, and a stop at intentionalstylehub pushed that impulse further, when content provokes the urge to participate rather than just consume it is doing something quite specific and worth recognising clearly when it happens during reading.
Generally my comment to other readers about new sites is to wait and see but for this one I would jump to recommend now, and a look at ulnova reinforced that early recommendation, the speed at which a site earns my recommendation is itself a quality signal and this one has earned mine quickly clearly.
В этой статье мы обсудим процесс восстановления после зависимостей, акцентируя внимание на различных методах и подходах к реабилитации. Читатели узнают, как создать план выздоровления и использовать полезные ресурсы для достижения устойчивых изменений.
Получить дополнительные сведения – детокс24
Now thinking about how this post will age over the coming years, and a stop at cadetgrails suggested the same durability, content built to age well rather than to capture the attention of the moment is content with a different kind of value and this site has clearly chosen the long horizon over the short one.
Probably going to mention this site in a write up I am working on later this month, and a stop at wildstonegallery provided more material for that potential mention, content worth referencing in my own published work rather than just personal reading is content with the highest endorsement level and this site has earned that endorsement.
Solid value for anyone willing to read carefully, and a look at cobaltcrate extends that value across the rest of the site, this is the kind of place that rewards return visits rather than offering everything in a single splashy post and then leaving readers nothing to come back for later which is unfortunately common.
В этом обзоре представлены различные методы избавления от зависимости, включая терапевтические и психологические подходы. Мы сравниваем их эффективность и предоставляем рекомендации для тех, кто хочет вернуться к трезвой жизни. Читатели смогут найти информацию о реабилитационных центрах и поддерживающих группах.
Узнать больше – Врач психиатр в Краснодаре
Now adding this site to a small mental group of recommendations I keep ready for specific kinds of inquiries, and a stop at everglenmarket extended the recommendation readiness, content that I can confidently point friends and colleagues toward in specific contexts is content with real social utility and this site has that utility clearly.
Thank you for keeping the writing honest and the points easy to verify against your own experience, and a stop at beltbrunch reflected the same approach, no exaggeration just steady useful content that I can take with me into my own work without second guessing every sentence I happen to read here.
Following a few of the internal links revealed more posts of similar quality, and a stop at compassbraid added more to that growing pile, sites where internal links lead to more good content rather than to more of the same recycled material are sites with depth and this one has clearly built that depth carefully.
Took a quick scan first and then went back to read properly because the post deserved it, and a stop at intentionalglobalstore kept me reading carefully too, the kind of writing that earns a slower second pass rather than getting skimmed and forgotten is something I value highly when I happen to find it.
Started taking notes about halfway through because the points were stacking up, and a look at arpunishersfb added enough material that my notes file grew further, content that demands note taking from a passive reader is content with substance and the writers here are clearly producing that kind of work consistently across topics.
If quality blog writing is dying as people sometimes claim then this site is one piece of evidence that it has not died yet, and a look at kettlemarket extended that evidence, the broader cultural question about online writing has empirical answers in specific sites and this one is contributing to a more optimistic answer overall.
Solid little post, the kind that does not need to be flashy because the substance is doing the work, and a look at crazecocoa kept that quiet confidence going across the site, this is what writing looks like when the writer trusts the content to land on its own without theatrics or unnecessary attention seeking behaviour.
Beyond the topic at hand this site reads as a small ongoing project of taking writing seriously, and a look at curatedmodernlifestyle reinforced that project quality, sites that treat publishing as an ongoing serious practice rather than as content production for traffic are sites worth supporting and this one has clearly chosen the serious approach.
Worth recognising the absence of the usual blog tropes here, and a look at ardenbeach continued that fresh quality, sites that avoid the standard moves of the medium read as more original even when the content is on familiar topics and this one has clearly chosen its own path through the conventional terrain skilfully.
Публикация посвящена жизненным историям людей, успешно справившихся с зависимостью. Мы покажем, что выход есть, и он начинается с первого шага — принятия проблемы и желания измениться.
Перейти к статье – прокапаться от алкоголя краснодар
Worth every minute of the time spent reading, and a stop at cantclap extends that value across more pages, in a media environment where most content is engineered to waste attention this site stands out by treating reader time as something valuable rather than something to be exploited and stretched as far as possible.
Reading this with a fresh mind in the morning brought out details I might have missed in the afternoon, and a stop at globaldesignmarketplace earned the same fresh attention, content that rewards being read at full attention rather than at energy lows is content with real density and this site has that density consistently.
I came here looking for a quick answer and ended up reading the whole post because it was actually interesting, and after auralbrig I had a much fuller picture, no stress and no confusion just a clear walk through the topic that made everything fall into place without much effort.
Этот текст посвящён сложным аспектам зависимости и её влиянию на жизнь человека. Мы обсудим психологические, физические и социальные последствия зависимого поведения, а также важность своевременного обращения за помощью.
Проверенные методы — узнай сейчас – нарколог домой
The post made the topic feel approachable without making it feel trivial, that is a fine balance, and a stop at carefullycuratedfinds maintained the same balance, finding the middle ground between welcoming and serious is genuinely difficult and the writers here have clearly figured out how to consistently hit it well across many different posts.
Reading this in the morning set a good tone for the day, and a quick visit to urbanwillowcorner kept that good tone going, content can do that sometimes when it hits the right notes and finding sites that consistently strike that tone is something I have learned to recognise and reward with regular visits.
Now adding the homepage to my regular check rotation rather than waiting for individual links to find me, and a stop at prairievendor confirmed the rotation upgrade, the move from passive discovery to active checking is a vote of confidence in a sites ongoing quality and this site has earned that active engagement clearly.
Thank you for not assuming the reader already knows everything, the explanations meet me where I am, and a look at globalethicalclickping did the same, that consideration is what makes a site feel welcoming rather than gatekeepy which is sadly the default mood across the modern web today for most subjects covered.
Bookmark folder reorganised slightly to make this site easier to find, and a look at boundcling earned the same accessibility upgrade, the small organisational moves I make for sites I expect to return to often are themselves a signal of how much I trust them and this site triggered those moves naturally.
Skipped past the first paragraph thinking it was setup and had to come back when the rest referenced it, and a stop at civicbrisk similarly rewarded careful reading from the start, content where every paragraph carries weight is content I now know to read from the beginning rather than skipping ahead.
Started reading without much expectation and ended on a high note, and a look at wildridgebloom continued that arc, content that builds rather than peaks early is a sign of a writer who knows how to structure a piece for sustained reader engagement rather than relying on a strong hook to do all the work.
Thank you for the genuine effort here, it shows in every paragraph and not just the headline, and after my visit to pebblevendor I was sure this site cares about getting things right rather than chasing clicks, which is the main reason I will come back later this week to read more.
A piece that respected the reader by not over explaining the obvious, and a look at mossytrailmarket continued that calibrated approach, finding the right level of explanation is one of the harder editorial calls and this site has clearly thought carefully about what readers will already know versus what they need help with consistently.
Generally I bookmark sparingly to avoid building up a bookmark graveyard but this one earned a permanent slot, and a stop at berylbuff extended that permanence designation, the few sites I keep permanent bookmarks for are sites I expect to use repeatedly and this one has clearly cleared that expectation bar today.
Genuine reaction is that I will probably think about this on and off for a few days, and a look at timbervendor added fuel to that, the best content lingers in your head after you close the tab rather than evaporating immediately and this site clearly knows how to write that kind of memorable content.
Honestly this kind of writing is why I still bother to read independent sites, and a look at ethicalmodernmarketplace extended that broader reflection, the few sites that justify continued attention to non algorithmic content are sites like this one and finding them periodically is enough to keep my reading habits oriented toward independent rather than aggregated content.
Probably one of the more reliable sources I have found for this kind of careful coverage, and a look at designledclickping reinforced the reliability, the small group of sources I would describe as reliable for a given topic is curated carefully and this site has earned a place in that small group through consistent performance.
Decided to set a calendar reminder to revisit, and a stop at crestbulb extended that revisit list, calendar entries for content are a level of commitment I rarely make but when I do they signal a higher regard than a simple bookmark and this site has earned that calendar tier of relationship from me today.
Glad to have another reliable bookmark for this topic, and a look at ardenbrisk suggested several more pages I will be marking too, building a personal library of trustworthy resources is one of the actual rewards of careful browsing and this site is earning a place on my permanent shortlist for the topic.
wethenorth darknet url https://darkmarketgate.com/ nexus shop https://darknetmarketsgate.com/
Honestly thank you to whoever wrote this because it scratched an itch I had not quite been able to articulate, and a stop at compassbulb kept that satisfying feeling going, the kind of writing that meets unspoken needs is special and this site clearly has writers who understand their readers more than most do today.
A memorable post for me on a topic I had thought I was tired of, and a look at creativecommercecollective suggested the same site can refresh other tired topics, sites that can revive my interest in subjects I had written off as exhausted are doing rare work and this one is clearly doing that for me today.
Yesterday I was complaining about the state of online writing and today this site has temporarily fixed that complaint, and a look at goldenpeakharbor extended that mood reversal, the short term mood improvement that comes from finding good content is real and this site has produced that improvement for me at a useful moment.
A small thank you note from me to the team behind this work, the post earned it, and a stop at islemeadows suggested more thanks would be in order over time, recognising the people who do good writing online is something I try to remember to do because the alternative is silence and silence rewards mediocrity unfortunately.
Speaking from the perspective of having read widely on the topic this site offers something distinct, and a look at everydaypremiumessentials reinforced that distinctness, the rare site that contributes something genuinely original to a saturated topic is the rare site worth following carefully and this one has demonstrated that original contribution capability today.
Bookmark added with a small note about why, and a look at larkvendor prompted another bookmark with another note, the bookmarks I annotate are the ones I expect to return to deliberately rather than stumble into and this site is generating annotated bookmarks at a higher rate than my usual content sources by some margin.
Reading this confirmed a small detail I had been uncertain about, and a stop at silkvendor provided the source for further checking, content that supports verification through citations or links rather than just asserting facts is more trustworthy and this site has clearly built its credibility through that kind of verifiable approach consistently.
Most posts I read end up forgotten within a day but this one is sticking, and a look at spikeisland2020 extended that lingering effect, content that survives the immediate moment of reading rather than evaporating is content with genuine retention quality and this site has been producing memorable pieces at a rate notable across my reading.
Worth saying this site reads better than most paid newsletters I have tried, and a stop at auralcleat confirmed that comparison, the bar for free content is often lower than for paid but this site clears the paid bar consistently and that says something about the editorial approach behind the work being published here regularly.
Easily one of the better explanations I have read on the topic, and a stop at berylcalm pushed it even higher in my mental ranking of useful resources, the kind of site that beats the average not by trying harder but by simply caring more about what it puts out daily which always shows.
Came across this and immediately thought of a friend who would enjoy it, and a stop at valuewhisper also reminded me of someone, content that triggers the urge to share is content that has earned my recommendation and this site has earned multiple from me already across different conversations during the week.
Left me wanting to read more rather than feeling burned out, that is a good sign, and a look at boundcoil confirmed there is plenty more here to explore, the kind of writing that builds appetite rather than killing it which is a rare quality on the modern open internet today across most categories of content.
Looking at this objectively the editorial quality is hard to deny even setting aside personal taste, and a stop at intentionalmarketplacehub maintained the same objective quality, the gap between what I personally enjoy and what is objectively well crafted exists and this site clears both bars simultaneously which is rarer than it sounds.
Will recommend this to a couple of friends who have been asking about this exact topic, and after slowcraftedlifestyle I have even more reason to do so, the kind of site that earns word of mouth rather than chasing it through aggressive marketing or paid placements is always a treat to find online.
Reading this in a quiet coffee shop matched the calm energy of the writing, and a stop at softleafmarket extended that environmental match, content that has its own ambient quality which can match or clash with surroundings is content with a personality and this site has the kind of personality that suits calm reading.
Left me wanting to read more rather than feeling burned out, that is a good sign, and a look at ethicalglobalmarket confirmed there is plenty more here to explore, the kind of writing that builds appetite rather than killing it which is a rare quality on the modern open internet today across most categories of content.
Came here from another site and ended up exploring much further than I planned, and a look at ardenburst only encouraged more exploration, the kind of place where one click leads to another not through manipulative design but through genuinely interesting content is rare and worth highlighting when found like this somewhere on the open internet.
Coming back tomorrow when I can give this a proper read, the post deserves better attention than I can give right now, and a look at crocboard suggests there is plenty more here that deserves the same treatment, definitely a site I will be exploring properly over the next few days when I can.
Closed the tab and immediately reopened it ten minutes later because I wanted to reread a part, and a stop at thoughtfullyselectedproducts drew the same return, content that pulls you back after closing it is doing something well beyond the average and worth marking as exceptional in my mental catalogue of reliable sites.
Just enjoyed the experience without needing to think about why, and a look at noblepinecrafts kept that effortless feeling going, sometimes the best content is invisible in the sense that you forget you are reading until you reach the end and realise time has passed without you noticing it pass naturally.
Felt the post was written for someone like me without explicitly addressing me, and a look at trueautumnmarket produced the same fit, when content lands on its target without pandering you know the writer has done careful audience thinking rather than relying on demographic targeting or interest signals to do the work of editorial decisions.
Without comparing too aggressively to other sources this one stands out for the right reasons, and a look at civiccask continued that distinctive quality, content that distinguishes itself through substance rather than style tricks is content with lasting differentiation and this site has clearly chosen substance based differentiation as its core editorial strategy.
Decided to read more before commenting and the more I read the more I wanted to say something, and a stop at contemporarylivingstore pushed that impulse further, when content provokes the urge to participate rather than just consume it is doing something quite specific and worth recognising clearly when it happens during reading.
Now realising this site has been quietly doing good work for longer than I knew, and a look at compasscabin suggested an archive worth exploring, sites with deep archives of consistent quality represent a different kind of resource than sites with viral hits and this one looks like the durable kind based on what I see.
Walked away with a clearer head than I had before reading this, and a quick visit to zestvendor only sharpened that, the writing has a way of cutting through the noise that surrounds most topics online which is something I will definitely remember the next time I am searching for an answer to anything.
Worth pointing out that the post avoided the temptation to summarise everything at the end, and a look at mistmarket continued that confident closing approach, content that trusts readers to retain the substance without being reminded of it at the end is content that respects the reader and this site practices that respect.
Really like the way the post resists reaching for cliches that would have made it feel generic, and a quick visit to saucierstudio kept that fresh feel going, original phrasing and unexpected metaphors are signs that the writer is actually thinking rather than just stitching together familiar phrases into the appearance of content.
Now noticing the post fit a particular gap in my reading without my having articulated the gap before, and a look at blazeclose extended that gap filling effect, content that meets needs I had not consciously formulated is content with reader insight and this site has clearly developed that anticipatory editorial sense across many pieces.
Now thinking about how to apply some of this to a project I have been planning, and a look at intentionalclickpingcollective added more material for the planning, content that connects to my actual creative work rather than just being interesting in the abstract is the kind that earns priority placement in my reading rotation consistently going forward.
Really appreciate this kind of writing, no shouting and no clickbait headlines just steady useful content, and a quick look at consciousconsumerhub kept that going, definitely a site I will be returning to whenever I need a sensible take on similar topics in the days ahead and also during slower work weeks.
A thoughtful piece that did not strain to be thoughtful, and a look at balticarrow continued that effortless quality, when thinking shows up in writing without the writer drawing attention to it you know you are reading something genuinely considered rather than something performing the appearance of consideration which is also common online.
Worth pointing out that the post avoided the temptation to summarise everything at the end, and a look at ariabee continued that confident closing approach, content that trusts readers to retain the substance without being reminded of it at the end is content that respects the reader and this site practices that respect.
Came in for one specific question and got answers to three I had not even thought to ask, and a look at croccocoa extended that bonus value pattern, the kind of resource that anticipates reader needs rather than just answering the literal question asked is the gold standard and this site reaches it.
A piece that read smoothly because the writer understood how readers actually move through prose, and a look at artfulhomeessentials maintained the same reader awareness, writers who think about the reading experience as much as the writing experience produce better work and this site has clearly made that shift in editorial approach.
Saving the link for sure, this one is a keeper, and a look at urbanfieldgallery confirmed I should bookmark the entire site rather than just this page, the consistency across what I have seen so far suggests there is a lot more here worth coming back for soon when I have more time.
Worth saying that this is one of the better things I have read on the topic in months, and a stop at timberlineattic reinforced that ranking, the topic is well covered by many sources but few do it with this level of care and the few that do deserve to be flagged so other readers can find them.
Quality you can feel from the first paragraph, the writer clearly knows the topic and how to share it, and a quick look at bowbotany confirmed the same depth runs throughout the rest of the site as well which is rare and worth pointing out when it happens online for any reader passing through.
Picked up a couple of new ideas here that I can actually try out, and after my visit to myvetcoach I have even more notes saved, this is the kind of resource that pays you back for the time you spend on it which is rare to come across in this corner of the web.
В этой статье рассматриваются способы преодоления зависимости и успешные истории людей, которые справились с этой проблемой. Мы обсудим важность поддержки со стороны близких и профессионалов, а также стратегии, которые могут помочь в процессе выздоровления. Научитесь первоочередным шагам к новой жизни.
Ознакомьтесь с аналитикой – «Похмельная служба» в Краснодаре
Considered against the flood of similar content this one stands apart in important ways, and a stop at timelessdesignsandgoods extended that distinctive feel, sites that find their own corner of a crowded topic and stay there are sites worth following and this one has clearly carved out its own space and committed to defending it carefully.
Quietly enthusiastic about this site after the past few hours of reading, and a stop at forgecabins extended that enthusiasm, the calibration of enthusiasm to evidence is something I try to maintain and this site has earned a calibrated quiet enthusiasm rather than the loud excitement that usually fades within a day or two of finding something.
Refreshing tone compared to the dry corporate posts on similar topics, and a stop at upvendor carried that personality through nicely, you can tell when a real person is behind the writing versus a content team chasing metrics and this site definitely falls into the former category clearly across what I have seen.
My professional context would benefit from having this kind of resource available, and a look at thoughtfulclickpingplatform extended the professional applicability, the rare site that contributes meaningfully to professional work rather than just personal interest is content with multiplied value and this one is providing that professional utility consistently across multiple pieces.
Solid little post, the kind that does not need to be flashy because the substance is doing the work, and a look at vaultbasket kept that quiet confidence going across the site, this is what writing looks like when the writer trusts the content to land on its own without theatrics or unnecessary attention seeking behaviour.
ares link https://darknetmarketsgate.com/ dark matter onion https://darkmarketsdirectory.com/
During a reading session that included several other sources this one stood out, and a look at blissbrick continued the standout quality, the side by side comparison of sources during research is a useful exercise and this site has been winning those comparisons for me consistently across multiple research sessions during the last week.
Solid information that lines up with what I have been hearing from other reliable sources, and after my visit to alpinevendor I was even more certain of that, this site checks out which is something I value highly when so many places online play loose with the facts to chase a quick click.
Found a couple of useful angles in here I had not considered before reading carefully, and a quick stop at urbaninspiredlivingstore added more, this is one of those sites where the value compounds the more you read rather than peaking at one viral post and then offering nothing else of substance afterwards which is common.
Worth saying that the post fit naturally into a rhythm of careful reading, and a stop at intentionalconsumerstore extended the same rhythm, content that pairs well with how I actually read rather than demanding a different mode is content well calibrated to its likely audience and this site has clearly thought about that consistently.
Most blog writing on this subject reaches for the same handful of arguments and this post avoided them, and a look at ariabrawn continued the original treatment, content that finds its own path through territory other writers have flattened is content with real authorial energy and this site has plenty of that distinctive energy.
Reading this confirmed something I had been suspecting about the topic, and a look at conchbook pushed that confirmation toward greater confidence, content that lines up with independently held intuitions earns a special kind of trust and I will return to writers who consistently land that way for me without overselling positions.
Thanks for sharing this with the open internet rather than locking it behind a paywall like so many sites do now, and a stop at capeasana kept the same vibe going, generous helpful and clearly written by someone who actually wants people to learn from it rather than just charge them.
Now leaving a small mental note to recommend this when the topic comes up in conversation, and a look at silverhorizoncollective extended that recommend ready feeling, content that arms me with shareable references for likely future conversations is content with social value and this site is providing that conversational ammunition consistently for me lately.
Now I want to find more sites like this but I suspect they are rare, and a look at crustbeige extended that thought, the few sites that meet this quality bar are precious specifically because they are rare and finding others like them is one of the ongoing projects of careful internet curation across the years.
Picked a single sentence from this post to remember, and a look at curateddesignandliving gave me another to keep, content that produces memorable lines is doing more than just transferring information and the small selection of sentences I keep from each reading session is one of the actual returns I get from reading carefully.
Мы предлагаем удобный сервис получения справок, оформления свидетельств и подготовки документов для официальных процедур – https://spravka-service.com/med-spravki/spravka-dlya-osvobozhdeniya-ot-posescheniya-basseyna/
В данной публикации мы поговорим о процессе восстановления от зависимости, о том, как вернуть себе нормальную жизнь. Мы обсудим преодоление трудностей, значимость поддержки и наличие программ реабилитации. Читатели смогут узнать о ключевых шагах к успешному восстановлению.
А что дальше? – наркологическая клиника в балашихе
A particular kind of restraint shows up in the writing, and a look at balticbull maintained the same restraint across pages, knowing what not to say is just as important as knowing what to say and this site has clearly developed strong instincts on both sides of that editorial line throughout pieces I have read.
Excellent post, balanced and well organised without showing off, and a stop at clamable continued in that same vein, this site has clearly figured out the formula for content that works for readers rather than for search engine ranking signals which is harder than it sounds today and worth real recognition from anyone.
Closed the post with a small satisfied sigh, and a stop at honestgrovecorner produced the same gentle exhale, content that ends well is content that respects the rhythm of reading and the writers here have clearly thought about how their pieces close rather than just trailing off when they run out of things to say.
Quietly enthusiastic about this site after the past few hours of reading, and a stop at softwillowcorner extended that enthusiasm, the calibration of enthusiasm to evidence is something I try to maintain and this site has earned a calibrated quiet enthusiasm rather than the loud excitement that usually fades within a day or two of finding something.
Honestly this was a good read, no jargon and no padding, and a short look at wickerlane kept that same feel going which I really appreciated, the writer clearly knows the topic well enough to explain it without hiding behind big words or filler that often gets used to seem clever.
After reading several posts back to back the consistent voice across them is impressive, and a stop at yovrisa continued that voice consistency, sites that maintain a single coherent voice across many pieces by potentially many writers represent serious editorial discipline and this one has clearly developed the institutional consistency needed for that.
Came away with some new perspectives I had not considered before, and after bowcask those ideas felt more complete, the kind of content that stays with you a little while after reading rather than slipping out the moment you switch tabs and move on with your day to whatever comes next.
Skimmed first and then went back to read carefully, and the careful read paid off in places I had missed, and a stop at nervora got the same treatment, the rare site whose content rewards a second pass is content I want more of in my regular rotation rather than disposable single read articles.
I really like how the writer keeps the tone friendly without sounding fake or overly polished, and after a stop at elevatedhomeandstyle the same calm pace was there, no rushing to make a point and no padding either, just clean honest writing that I can respect and come back to later again.
tordex market darknet https://darknetmarketsgate.com/ nexus darknet market access https://darkmarketgate.com/
Most blog writing on this subject reaches for the same handful of arguments and this post avoided them, and a look at jewelvendor continued the original treatment, content that finds its own path through territory other writers have flattened is content with real authorial energy and this site has plenty of that distinctive energy.
Quietly impressive in a way that does not announce itself, and a stop at fiberiron extended that quiet impressiveness, the kind of quality that emerges through sustained attention rather than first impressions is the kind I trust more deeply and this site has been earning that deeper trust across multiple sessions over time consistently.
Now setting up a small reminder to revisit the site on a slow day, and a stop at elveecho confirmed the reminder was a good idea, planning return visits is a small organisational act that signals trust in ongoing quality and this site has earned that planned return through consistent performance across the pieces I have read so far.
Most of my reading time goes to a small number of trusted sources and this one is now joining that group, and a stop at blitzbraid reinforced the group membership, the few sites that earn a place in my regular rotation are sites I expect ongoing returns from and this one has earned that elevated position consistently.
A piece that suggested careful editing without showing the marks of the editing, and a look at minimalmodernclickping continued that invisible polish, the best editing disappears into the prose and this site reads as having been edited with skill that does not announce itself which is the highest compliment I can offer any blog content.
Useful read, especially because the writer did not assume too much background from the reader, and a quick look at purposefulclickpingexperience continued in the same way, a thoughtful site that meets people where they are which is something the modern web could use a lot more of for both casual and serious readers.
Probably the kind of site that should be more widely read than it appears to be, and a look at refinedeverydaynecessities reinforced that quiet wish, the gap between a sites quality and its apparent reach is sometimes large and that gap exists for this site in a way that makes me want to mention it more.
Took me back a step or two on an assumption I had been making, and a stop at arialcamp pushed that reconsideration further, writing that gently corrects the reader without being aggressive about it is a rare diplomatic skill and the team here clearly knows how to land critical points without turning readers off.
Looking at this objectively the editorial quality is hard to deny even setting aside personal taste, and a stop at stageofnations maintained the same objective quality, the gap between what I personally enjoy and what is objectively well crafted exists and this site clears both bars simultaneously which is rarer than it sounds.
Worth marking the moment when reading this clicked into something useful for my own work, and a look at merniva extended that practical click, content that connects to my actual life rather than just being interesting is content with the highest kind of value and this site is generating that connection at a high rate.
Coming to this with low expectations and being pleasantly surprised by the substance, and a stop at timbermarket continued exceeding expectations, the recalibration of expectations upward across multiple positive readings is one of the actual rewards of careful browsing and this site is providing that recalibration at a steady rate apparently.
I came here looking for a quick answer and ended up reading the whole post because it was actually interesting, and after refineddailycommerce I had a much fuller picture, no stress and no confusion just a clear walk through the topic that made everything fall into place without much effort.
Looking back on this reading session it stands as one of the better ones recently, and a look at crustborn extended that ranking, the informal ranking of reading sessions against each other is something I do mentally and this session ranks high largely because of this site and a couple of related pages here.
Speaking from the perspective of having read widely on the topic this site offers something distinct, and a look at softwildrose reinforced that distinctness, the rare site that contributes something genuinely original to a saturated topic is the rare site worth following carefully and this one has demonstrated that original contribution capability today.
Really grateful for content like this, it does not waste my time and it does not insult my intelligence either, and a quick look at cargocomet was the same, balanced respectful writing that makes a person feel welcome rather than rushed through pages of forced engagement just to keep clicking around.
В этой статье рассматриваются различные аспекты избавления от зависимости, включая физические и психологические методы. Мы обсудим поддержку, мотивацию и стратегии, которые помогут в процессе выздоровления. Читатели узнают, как преодолеть трудности и двигаться к новой жизни без зависимости.
Прочесть заключение эксперта – нарколог на дом красногорск
Worth bookmarking and sharing with anyone interested in the topic, that is my honest take, and a stop at micapacts reinforces that, the kind of generous resource that makes the open web feel worth defending against the constant pressure to retreat into walled gardens and curated feeds today everywhere I look across all my devices.
betflag crazy time https://crazy-timez.com/
crazy time betflag https://crazytimeee.com/
crazy time casinò online crazy time casinò online.
Comfortable in tone and substantive in content, that is a hard combination to land, and a look at harbormint kept that pairing alive across more material, this is what good editorial direction looks like in practice and the team here clearly has someone keeping a steady hand on the wheel across what they decide to publish.
Reading this triggered a small reorganisation of my own thinking on the topic, and a stop at iciclecrate furthered that reorganisation, content that affects the shape of my mental model rather than just decorating it with new facts is content with structural rather than informational impact and this site provides that.
monopoly big live https://monopoly-live-bd.com/
A memorable post for me on a topic I had thought I was tired of, and a look at globalmodernessentials suggested the same site can refresh other tired topics, sites that can revive my interest in subjects I had written off as exhausted are doing rare work and this one is clearly doing that for me today.
monopoly big baller today result live https://monopolylives.com/
Felt the post handled a sensitive angle of the topic with appropriate care, and a look at balticcape extended that careful handling across related material, sites that can navigate delicate territory without causing damage are rare and require a level of judgement that comes from experience rather than from following any clear playbook.
crazy time monopoly live https://imonopoly.live/
monopoly live winning tricks https://monopoly-live-bangladesh.com/
solana casino de https://solanagxy.com/
A particular pleasure to read this with a fresh coffee, and a look at boneblot extended the pleasure across more pages, content that pairs well with quiet morning rituals is something I have come to value highly and this site has the kind of energy that fits naturally into a calm reading routine.
Now feeling something close to gratitude for the fact this site exists, and a look at wildleafstudio extended that gratitude, the rare site that produces this kind of response is the rare site worth defending in conversations about whether the modern internet is still capable of producing genuinely valuable independent content for serious adults.
A piece that respected the reader by not over explaining the obvious, and a look at orderquill continued that calibrated approach, finding the right level of explanation is one of the harder editorial calls and this site has clearly thought carefully about what readers will already know versus what they need help with consistently.
ستارز بيت https://colindaylinks.com/
Reading this in a quiet coffee shop matched the calm energy of the writing, and a stop at bowclub extended that environmental match, content that has its own ambient quality which can match or clash with surroundings is content with a personality and this site has the kind of personality that suits calm reading.
Now setting aside time on my next free afternoon to read more from the archives, and a stop at ethicalhomeandlifestyle confirmed that time will be well spent, the rare site whose archive deserves a dedicated reading session rather than just casual sampling is the kind of resource worth scheduling around and this one qualifies clearly.
Appreciated how the post felt complete without overstaying its welcome, and a stop at amberdock confirmed that economical approach runs across the site, knowing when to stop is a skill many writers never develop but here the discipline is obvious and welcome from the perspective of a busy reader trying to learn things efficiently.
Worth saying that the quiet confidence of the writing is what landed first, and a look at elveglide continued that quiet quality, confident writing without the loud display of confidence is a rare combination and this site has clearly developed both the knowledge and the editorial restraint to land that combination consistently.
Now saved this in a way that I will actually find again rather than the casual bookmark approach, and a stop at modernheritagegoods earned the same careful saving, organising my reading bookmarks so that high quality sources rise to the top is something I should do more of and this site triggered that organisation today.
SEO продвижение помогает компаниям получать больше клиентов без постоянных затрат на контекстную рекламу. Это эффективный способ развития бизнеса в интернете https://msk.mihaylov.digital/prodvizhenie-sajtov-po-remontu/
Looking for similar voices elsewhere has come up empty in my recent searches, and a stop at basketwharf extended the search frustration, the rare site that does what no other does in quite the same way is precious and this one has clearly developed a particular approach that I have not been able to find duplicates of.
Worth flagging this site to a few specific friends who would appreciate the editorial sensibility, and a look at fifeholm added more pages I will mention to them, recommending sites to specific people requires understanding both the site and the person and this site is making those personalised recommendations easy and natural for me.
Медицинские документы и официальные справки часто требуются неожиданно. Мы помогаем быстро решить вопрос с оформлением свидетельств, документов из госорганов и других бумаг – https://spravka-service.com/med-spravki/rezultat-analiza-kala-na-yaytseglist/
Really appreciate the lack of pop ups, modals, cookie banners stacking on top of each other, and a quick visit to timberfordmarket confirmed the same clean approach across the rest of the site, technical decisions about user experience are part of what makes content actually pleasant to engage with for sure.
Thank you for the genuine effort here, it shows in every paragraph and not just the headline, and after my visit to cartcab I was sure this site cares about getting things right rather than chasing clicks, which is the main reason I will come back later this week to read more.
The pacing of the post was just right, never rushed and never dragged out unnecessarily, and a look at crustcleve maintained the same rhythm, you can tell the writer has experience because the difficult skill of pacing is something only practiced writers manage to handle well in long form content over time and across formats.
Skipped the social share buttons but might come back to actually use one later, and a stop at claycargo extended that share urge, content that triggers genuine sharing impulses rather than performative ones is content that has actually moved me and not many posts in a typical week do that for me actually.
Reading this between two meetings turned out to be the highlight of the morning, and a stop at premiumhandpickedgoods continued that highlight quality, content that outshines the structured parts of a working day is doing something well beyond ordinary and this site has produced multiple such highlights for me already this week alone.
Once you start reading carefully here it is hard to go back to lower quality alternatives, and a stop at everdunegoods reinforced that ratchet effect, the way good content raises standards is real over time and this site has clearly contributed to raising my expectations for what is possible in writing on the topic generally.
В этой медицинской статье мы погрузимся в актуальные вопросы здравоохранения и лечения заболеваний. Читатели узнают о современных подходах, методах диагностики и новых открытий в научных исследованиях. Наша цель — донести важную информацию и повысить уровень осведомленности о здоровье.
Полная информация здесь – lyubertsy detox24
Liked the careful selection of which details to include and which to skip, and a stop at shopmeadow reflected the same editorial judgement, knowing what to leave out is just as important as knowing what to include and this site has clearly figured out where that line sits for the topics it covers regularly.
Granted my mood today might be elevating my reading experience but I still think this is genuinely good, and a stop at norigamihq reinforced that even discounted assessment, controlling for the mood adjustment that affects content perception this site still reads as substantively above average across multiple pieces I have read carefully today.
Now thinking about whether the writer might publish a longer form work I would buy, and a look at jollymart suggested the same depth would translate, content that makes me want to pay for related work in other formats is content that has earned commercial trust as well as attention trust and this site has both clearly.
One of the more honest takes on the topic I have seen lately, no spin and no oversell, and a stop at futurelivingmarketplace kept that going, the kind of voice the open web could use a lot more of rather than the endless echo chamber of recycled opinions floating around every social platform these days.
Glad the writer did not feel the need to argue with imaginary critics in the post itself, and a stop at bonebow kept the same focused approach going, defensive writing wastes the reader time and confidence on positions that did not need defending and this post has clearly avoided that common failure.
цена уборки
Reading the writers other posts after this one suggests the quality is consistent rather than peak, and a stop at loftcrate confirmed the consistent quality reading, sites that hold the same level across many pieces rather than peaking on a few are sites with sustainable editorial discipline and this one has clearly developed that.
Felt a small spark of recognition when the post named something I had been struggling to articulate, and a look at balticclose produced more such moments, the rare service of giving readers language for fuzzy intuitions is one of the higher values that good writing can provide and this site offered several today instances.
Picked this for a morning recommendation in our company chat, and a look at yorventa suggested I will mention this site again later, recommending content into a workplace context is a small editorial act that requires confidence in the recommendation and this site is making me confident in those recommendations consistently here too.
One of the more honest takes on the topic I have seen lately, no spin and no oversell, and a stop at curatedethicalcommerce kept that going, the kind of voice the open web could use a lot more of rather than the endless echo chamber of recycled opinions floating around every social platform these days.
Found this through a friend who recommended it and now I see why, and a look at carefullychosenluxury only strengthened that recommendation in my own mind, word of mouth still works for content that actually delivers and this site is clearly earning recommendations the old fashioned way through quality rather than marketing.
Really appreciate that the writer did not assume I would read every other related post first, and a look at shorevendor kept that self contained feel going where each piece can stand alone, accessibility for new readers is a sign of generous editorial thinking and this site has clearly invested in that approach.
Мы рассмотрим современные вызовы здравоохранения и пути их решения с помощью технологий и научных исследований. В статье собраны данные о новых лекарствах, методах диагностики и системном подходе к улучшению здоровья населения.
Читать дальше – анонимный нарколог краснодар
В данной статье рассматриваются физиологические и эмоциональные аспекты зависимости. Мы обсудим, как организм реагирует на зависимое поведение, и какие методы помогают восстановить здоровье и внутреннее равновесие.
Проследить причинно-следственные связи – вывод из запоя на дому краснодар
В данной статье мы акцентируем внимание на важности поддержки в процессе выздоровления. Мы обсудим, как друзья, семья и профессионалы могут помочь тем, кто сталкивается с зависимостями. Читатели получат практические советы, как поддерживать близких на пути к новой жизни.
Погрузиться в научную дискуссию – детоксикация на дому
Halfway through I knew I would finish the post, and a stop at fifejuno also held me through to the end, content that signals its quality early and then sustains it is content with real internal consistency and this site has clearly figured out how to maintain quality from opening sentence through to closing thought.
Worth recognising the absence of the usual blog tropes here, and a look at bowclutch continued that fresh quality, sites that avoid the standard moves of the medium read as more original even when the content is on familiar topics and this one has clearly chosen its own path through the conventional terrain skilfully.
Now setting aside time on my next free afternoon to read more from the archives, and a stop at cerlix confirmed that time will be well spent, the rare site whose archive deserves a dedicated reading session rather than just casual sampling is the kind of resource worth scheduling around and this one qualifies clearly.
Felt like the writer was speaking directly to someone with my level of curiosity, neither talking down nor showing off, and a stop at brightmoonridge kept that comfortable matching going, finding writing that meets you where you are rather than asking you to climb up or stoop down feels great every time it happens.
Felt this in a way I cannot quite explain, the topic just hit different here, and a stop at elvegorge continued in that vein, sometimes you find a site whose perspective lines up with how you have been thinking and reading their work feels like a small relief which I appreciated more than I expected.
Took a screenshot of one section to come back to later, and a stop at caskcloud prompted another saved tab, the urge to capture and revisit specific pieces of content is something I rarely feel but when I do it tells me the work is worth more than the average passing read for sure.
Took a quick scan first and then went back to read properly because the post deserved it, and a stop at fernbureaus kept me reading carefully too, the kind of writing that earns a slower second pass rather than getting skimmed and forgotten is something I value highly when I happen to find it.
Медицинская публикация представляет собой свод актуальных исследований, экспертных мнений и новейших достижений в сфере здравоохранения. Здесь вы найдете информацию о новых методах лечения, прорывных технологиях и их практическом применении. Мы стремимся сделать актуальные медицинские исследования доступными и понятными для широкой аудитории.
Рассмотреть проблему всесторонне – выведение из запоя краснодар
Now appreciating that the post left me with enough to say in a follow up conversation, and a look at kindvendor added more material for those follow ups, content that prepares me for related conversations rather than just informing me alone is content with social utility and this site provides that social armament reliably for me.
A piece that did not require external context to follow, and a look at frostrack maintained the same self contained quality, content that stands alone without forcing readers to chase prerequisites is more accessible and this site has clearly thought about how each piece can serve a fresh visitor rather than only existing members.
Felt the writer respected the topic without being precious about it, and a look at marketwhim continued that respectful but unfussy treatment, finding the right register for serious topics is hard and this site has clearly figured out how to take the topic seriously while still being readable for casual visitors regularly.
Saving the link for sure, this one is a keeper, and a look at intentionalclickpinghub confirmed I should bookmark the entire site rather than just this page, the consistency across what I have seen so far suggests there is a lot more here worth coming back for soon when I have more time.
Цены на клининг спб
Most attempts at writing on this topic feel like they are missing something and this post finally identified what was missing, and a look at elevatedconsumerexperience extended that diagnostic clarity, content that names what is wrong with adjacent treatments while doing better itself is content with both critical and constructive value and this site has both.
Bookmark earned and folder updated to track this site separately, and a look at designconsciousmarket confirmed the folder upgrade was the right call, organising my reading list so that good sites do not get lost in a sea of casual bookmarks is something I do more carefully now and this site warranted its own spot.
Bookmarking this for later, the kind of resource I want to keep nearby, and a quick look at xenialcart confirmed the rest of the site is worth the same treatment, definitely going into my reference folder for the next time the topic comes up at work or in conversation with someone who asks.
Left me wanting to read more rather than feeling burned out, that is a good sign, and a look at figfeat confirmed there is plenty more here to explore, the kind of writing that builds appetite rather than killing it which is a rare quality on the modern open internet today across most categories of content.
During a quiet evening reading session this provided just the right depth without being heavy, and a stop at clearbrick maintained the same evening appropriate weight, content with depth that does not exhaust the reader is content with editorial calibration and this site has clearly figured out how to be substantial without being demanding all the time.
If I had encountered this site five years ago I would have been telling everyone about it, and a look at baroncleat extended that retrospective enthusiasm, the version of me who used to recommend favourite blogs frequently would have made sure friends knew about this one and that earlier enthusiasm is partially returning to me here.
A piece that reads as if the writer trusted readers to fill in obvious gaps, and a look at wildmeadowchoice continued that respectful approach, content that does not over explain what the reader can infer is content that respects intelligence and this site has clearly chosen to write to capable readers rather than to the lowest common denominator.
В этой медицинской статье мы погрузимся в актуальные вопросы здравоохранения и лечения заболеваний. Читатели узнают о современных подходах, методах диагностики и новых открытий в научных исследованиях. Наша цель — донести важную информацию и повысить уровень осведомленности о здоровье.
Детальнее – Реабилитация наркотической зависимости в Краснодаре
cocorico market url https://darkmarketlegion.com/ tordex darknet url https://darkmarketslegion.com/
Considered alongside other sources I have been reading this one consistently rises to the top, and a stop at aerlune maintained that top ranking, the informal ongoing comparison between sources is something I do whenever reading on a topic and this site keeps coming out near the top of those comparisons over many sessions.
SEO продвижение включает анализ ключевых запросов, настройку внутренней структуры сайта и улучшение пользовательского опыта. Это помогает увеличить видимость ресурса в поиске: https://msk.mihaylov.digital/prodvizhenie-sajta-fitnes-kluba/
Liked the way the post got out of its own way, and a stop at goldencrestartisan extended that invisible craft, the best writing you barely notice while reading because it is doing its work without drawing attention to itself and this site has clearly mastered that disappearing act across the pieces I have read.
Reading this gave me a small framework I expect to use going forward, and a stop at itemwhisper extended that framework, content that produces transferable mental models rather than just specific facts is content with multiplicative value and this site is providing those models at a rate that justifies extra attention from me regularly.
Useful enough to recommend to several people I know who would appreciate it, and a stop at caspiboil added more material I will pass along too, the kind of writing that earns word of mouth is the kind that actually delivers on its promises which is what this site does without any drama or fanfare attached.
On reflection this is the kind of writing that improves my taste for what is possible in the format, and a look at epicfife continued raising that bar, content that elevates my expectations rather than lowering them is doing important work in calibrating my standards and this site is participating in that elevation reliably.
Reading this prompted a small redirection in something I was working on, and a stop at sernix extended that redirecting influence, content that affects my actual work rather than just my thinking has the highest practical impact and this site is providing that level of influence for me at a sustainable rate apparently.
The way the post stayed on topic throughout without going on tangents was really refreshing, and a look at opalwharf kept that focused approach going, discipline like this in writing is rare and worth recognising because most writers cannot resist wandering off into related subjects that dilute their main point and confuse readers along the way.
В этом исследовании рассмотрены методы лечения зависимостей и их эффективность. Мы проанализируем различные подходы, используемые в реабилитационных центрах, и представим данные о результативности программ. Читатели получат надежные и научно обоснованные сведения о данной проблеме.
Смотрите также… – вывод из запоя симферополь
Walked away in a slightly better mood than when I started reading, that says something about the writing, and a stop at elegantdailyessentials kept that going, content that leaves you feeling more capable rather than overwhelmed is the kind I keep coming back to again and again over the years and across many topics.
Picked a single sentence from this post to remember, and a look at designfocusedclickping gave me another to keep, content that produces memorable lines is doing more than just transferring information and the small selection of sentences I keep from each reading session is one of the actual returns I get from reading carefully.
Этот медицинский обзор сосредоточен на последних достижениях, которые оказывают влияние на пациентов и медицинскую практику. Мы разбираем инновационные методы лечения и исследований, акцентируя внимание на их значимости для общественного здоровья. Читатели узнают о свежих данных и их возможном применении.
Дополнительно читайте здесь – откапаться от алкоголя
Honestly impressed by the consistency of voice across what I have read so far, and a quick visit to morningcrate continued that consistent feel, when a site reads like one careful person rather than a committee the experience is more rewarding for the reader who notices these subtle editorial details over time.
Публикация посвящена жизненным историям людей, успешно справившихся с зависимостью. Мы покажем, что выход есть, и он начинается с первого шага — принятия проблемы и желания измениться.
Получить больше информации – прокапаться от алкоголя краснодар
A thoughtful piece that did not strain to be thoughtful, and a look at finchfiber continued that effortless quality, when thinking shows up in writing without the writer drawing attention to it you know you are reading something genuinely considered rather than something performing the appearance of consideration which is also common online.
В этой статье мы говорим о важности поддержки в процессе выздоровления. Рассматриваются семьи, группы поддержки, специалисты и онлайн-ресурсы, которые могут сыграть решающую роль в избавлении от зависимости.
Изучить аспект более тщательно – detox24
Now setting this aside as a model of how to write thoughtfully on the topic, and a stop at ironskyessentials extended that model status, content that becomes a reference for how a kind of writing should be done is content with influence beyond its own readership and this site is reaching that level for me clearly today.
Probably the kind of site that should be more widely read than it appears to be, and a look at emberbasket reinforced that quiet wish, the gap between a sites quality and its apparent reach is sometimes large and that gap exists for this site in a way that makes me want to mention it more.
Probably the best thing I have read on this topic in the past month, and a stop at artisandesigncollective extended that ranking, the casual ranking of recent reading is informal but real and this site has been winning those rankings for me on this topic specifically over the last several weeks of regular reading sessions.
Этот обзор медицинских исследований собрал самое важное из последних публикаций в области медицины. Мы проанализировали ключевые находки и представили их в доступной форме, чтобы читатели могли легко ориентироваться в актуальных темах. Этот материал станет отличным подспорьем для изучения медицины.
Детальнее – детокс24 краснодар
Now placing this in the same category as a few other sites I have come to trust, and a look at duetparishs continued the placement decision, the small category of fully trusted sites is one I extend rarely and only after multiple positive reading sessions and this site has earned the category placement methodically over time.
Solid post, the structure is easy to follow and the language stays simple even when the topic gets a bit more involved, and a look at xolveta kept that same standard going, so I left feeling like the time spent here was actually worth something for once which is rare lately.
Definitely returning here, that is decided, and a look at zarnita only made the case stronger, this is one of those rare websites that rewards regular visits rather than feeling stale after the first read which is something I cannot say about most of the places I bookmark today across all my topics.
Solid endorsement from me, the writing earns it, and a look at basteastro continues to earn it across the broader site too, the kind of operation that maintains quality across many pages rather than just one viral post is a sign of serious commitment and that is what I see here clearly across what I read.
A piece that took its time without dragging, and a look at itemcove kept the same patient pace, the difference between unhurried and slow is a fine editorial distinction and this site has clearly found the unhurried side without slipping into the slow side which would have lost me as a reader quickly otherwise.
В данном обзоре представлены основные направления и тренды в области медицины. Мы обсудим актуальные проблемы здравоохранения, свежие открытия и новые подходы, которые меняют представление о лечении и профилактике заболеваний. Эта информация будет полезна как специалистам, так и широкой публике.
Неизвестные факты о… – откапаться от алкоголя
Started thinking about my own writing differently after reading, and a look at cedarchime continued that reflective effect, content that influences how I work rather than just informing what I know is content with the highest kind of impact and this site has triggered some of that reflective influence today on me.
Публикация знакомит читателей с различными подходами к реабилитации. От традиционных методов до современных программ — вы узнаете, как выбрать оптимальный путь к выздоровлению и преодолеть препятствия на этом пути.
Выяснить больше – наркологическая клиника в краснодаре
Picked this for my morning read because the topic seemed worth the time, and a look at modernpurposefulmarket confirmed the choice was right, my morning reading slot is precious and giving it to this site felt like a good investment rather than a waste which is a higher endorsement than I usually offer for content.
A piece that took its time without dragging, and a look at retailglow kept the same patient pace, the difference between unhurried and slow is a fine editorial distinction and this site has clearly found the unhurried side without slipping into the slow side which would have lost me as a reader quickly otherwise.
Эта статья подробно расскажет о процессе выздоровления, который включает в себя эмоциональную, физическую и психологическую реабилитацию. Мы обсуждаем значимость поддержки и наличие профессиональных программ. Читатели узнают, как строить новую жизнь и не возвращаться к старым привычкам.
Проследить причинно-следственные связи – выезд нарколога на дом
Looking back on this reading session it stands as one of the better ones recently, and a look at equakoala extended that ranking, the informal ranking of reading sessions against each other is something I do mentally and this session ranks high largely because of this site and a couple of related pages here.
В этой статье мы рассматриваем разрушительное влияние зависимости на жизнь человека. Обсуждаются аспекты, такие как здоровье, отношения и профессиональные достижения. Читатели узнают о необходимости обращения за помощью и о путях к восстановлению.
См. подробности – detox24 в краснодаре
Appreciate the practical examples, they made the abstract points easier to grasp, and a stop at globalartisanfinds added more of the same, this site clearly understands that real examples beat empty theory every single time which is the mark of a writer who knows their audience well and respects their time.
Публикация знакомит читателей с различными подходами к реабилитации. От традиционных методов до современных программ — вы узнаете, как выбрать оптимальный путь к выздоровлению и преодолеть препятствия на этом пути.
Ознакомьтесь с аналитикой – анонимный нарколог краснодар
Well done, the kind of post that makes you slow down and actually read instead of skimming for keywords, and a look at clearcoast kept me reading carefully too, that is a sign of writing that has been crafted rather than churned out for an algorithm to see today and tomorrow.
В данной статье мы поговорим о будущем медицины, акцентируя внимание на прорывных разработках и их потенциале. Читатель узнает о новых подходах к лечению, роли искусственного интеллекта и возможностях персонализированной медицины.
Подробнее можно узнать тут – наркологическая клиника в донецке
В данном обзоре представлены основные направления и тренды в области медицины. Мы обсудим актуальные проблемы здравоохранения, свежие открытия и новые подходы, которые меняют представление о лечении и профилактике заболеваний. Эта информация будет полезна как специалистам, так и широкой публике.
Читать дальше – выведение из запоя краснодар
A piece that ended with a clean landing rather than fading out, and a look at finkglaze maintained the same crisp conclusions, endings that resolve rather than dissolve are a sign of careful structural thinking and this site has clearly invested in how its pieces conclude rather than letting them simply run out of energy.
darknet market https://darkmarketsgate.com/ nexus darknet market link https://darkmarketslegion.com/
A piece that reads as if the writer trusted readers to fill in obvious gaps, and a look at wildorchardcorner continued that respectful approach, content that does not over explain what the reader can infer is content that respects intelligence and this site has clearly chosen to write to capable readers rather than to the lowest common denominator.
Quietly the writers approach to the topic differs from the dominant takes I have been encountering, and a stop at dreamleafgallery extended that distinctive approach, content that maintains a different perspective without explicitly arguing against the dominant ones is content with confident editorial identity and this site has that confidence throughout pieces.
Glad I clicked through from where I did because this turned out to be worth the time spent, and after dapperaisle I had a fuller picture, the kind of content that earns its visitors through delivering value rather than chasing them through aggressive advertising or constant pop ups appearing everywhere on the screen lately.
More substantial than most of what I find searching for this topic online, and a stop at parcelwhimsy kept that quality consistent, this is one of those sites where the writing actually rewards careful reading rather than punishing the patient reader with empty filler stretched out across long paragraphs that say very little.
В этой статье рассматриваются актуальные вопросы, связанные с развитием медицинской науки и её внедрением в повседневную практику. Особое внимание уделено вопросам профилактики, ранней диагностики и использованию технологий для улучшения здоровья человека.
Уникальные данные только сегодня – вызвать нарколога на дом
Well crafted post, the structure flows naturally from one point to the next without forcing transitions, and a stop at yornix kept the same flow going, you can tell when a writer has thought about how their content reads rather than just what it contains and this is one of those examples.
Felt like the writer was speaking directly to someone with my level of curiosity, neither talking down nor showing off, and a stop at tallycove kept that comfortable matching going, finding writing that meets you where you are rather than asking you to climb up or stoop down feels great every time it happens.
If I had to summarise the editorial sensibility of this site in a few words it would be careful and human, and a look at thoughtfullybuiltmarket extended that summary feeling, capturing the essence of a sites approach in brief is hard but this site has a clear enough identity that the summary comes naturally enough.
A piece that ended with a clean landing rather than fading out, and a look at chipbrick maintained the same crisp conclusions, endings that resolve rather than dissolve are a sign of careful structural thinking and this site has clearly invested in how its pieces conclude rather than letting them simply run out of energy.
Probably the best thing I have read on this topic in the past month, and a stop at basteclay extended that ranking, the casual ranking of recent reading is informal but real and this site has been winning those rankings for me on this topic specifically over the last several weeks of regular reading sessions.
Anyone curious about this topic would do well to start here, the foundation laid is solid, and a stop at lemoncrate would round out their understanding nicely, this is the kind of resource I would point a friend toward without hesitation if they asked me where to begin learning about anything in this area.
Decided not to skim despite my usual habit and was rewarded for the discipline, and a stop at premiumvalueclick earned the same patient approach, training myself to recognise sites that warrant slower reading is part of being a careful online reader and this site is the kind that helps me practice that skill regularly.
Skimmed first and then went back to read carefully, and the careful read paid off in places I had missed, and a stop at refinedconsumerhub got the same treatment, the rare site whose content rewards a second pass is content I want more of in my regular rotation rather than disposable single read articles.
Felt the post had been written without looking over its shoulder, and a look at eurohilt continued that confident posture, content written for its own sake rather than against imagined critics has a different quality and this site reads as written from a place of confidence rather than defensive justification of every claim.
Stands out for actually being useful instead of just being long, and a look at brassmarket kept that going, length without value is the default mode of most blogs these days but this site has clearly chosen a different path which I respect a lot as a reader who values careful editing decisions like that.
Reading this prompted me to send the link to two different people for two different reasons, and a stop at finkglint provided ammunition for a third share, content that suits multiple audiences without being generic enough to be useless to any of them is genuinely valuable and this site has that multi audience quality clearly.
cocorico darknet url https://darkmarketsgate.com/ black ops darknet url https://darkmarketslegion.com/
Honestly this kind of writing is why I still bother to read independent sites, and a look at lorvana extended that broader reflection, the few sites that justify continued attention to non algorithmic content are sites like this one and finding them periodically is enough to keep my reading habits oriented toward independent rather than aggregated content.
Now appreciating that I did not feel exhausted after reading, and a stop at bravopiers extended that energising quality, content that leaves me with more attention than it consumed is rare and the gap between draining and energising content is real over the course of a typical day spent reading widely online.
Really like that there are no exclamation marks or all caps shouting throughout the post, and a quick visit to xernita maintained the same calm voice, restraint in punctuation signals confidence in the content and this site clearly trusts its substance to do the persuading rather than relying on typographic emphasis.
Thanks for sharing this with the open internet rather than locking it behind a paywall like so many sites do now, and a stop at emberwharf kept the same vibe going, generous helpful and clearly written by someone who actually wants people to learn from it rather than just charge them.
Picked this for my morning read because the topic seemed worth the time, and a look at refinedclickpinghub confirmed the choice was right, my morning reading slot is precious and giving it to this site felt like a good investment rather than a waste which is a higher endorsement than I usually offer for content.
Now noticing that the post benefited from being neither too short nor too long for its content, and a look at modernvaluescollective continued that calibration of length, sites that match length to content rather than padding to hit some target are sites that respect both their material and their readers and this site does both.
Genuinely useful read, the points are practical and easy to apply right away, and a quick look at cleatbox confirmed that this site is consistent in that approach, looking forward to digging through the rest of it when I get the chance to sit down properly later in the week or this weekend.
Considered alongside other sources I have been reading this one consistently rises to the top, and a stop at finkgulf maintained that top ranking, the informal ongoing comparison between sources is something I do whenever reading on a topic and this site keeps coming out near the top of those comparisons over many sessions.
Этот обзор сосредоточен на различных подходах к избавлению от зависимости. Мы изучим традиционные и альтернативные методы, а также их сочетание для достижения максимальной эффективности. Читатели смогут открыть для себя новые стратегии и подходы, которые помогут в их борьбе с зависимостями.
Не упусти шанс – детокс24
Recommend this to anyone who values clear thinking over flashy presentation, and a stop at basteclose continued in the same understated way, this site has its priorities in the right place which makes it worth supporting through repeat visits and recommendations rather than just one passing read today before moving on quickly elsewhere.
A well calibrated piece that knew its scope and stayed inside it, and a look at quickvendor maintained the same scope discipline, scope creep is one of the failure modes of long blog posts and this site has clearly invested in the editorial discipline to prevent it which shows up in tightly contained pieces.
Decided I would read the archives over the weekend, and a stop at everjumbo confirmed that the archives would be worth the time, very few sites have archives I would actively read through but this one has earned that level of interest based on the consistent quality across what I have sampled so far.
Публикация знакомит читателей с различными подходами к реабилитации. От традиционных методов до современных программ — вы узнаете, как выбрать оптимальный путь к выздоровлению и преодолеть препятствия на этом пути.
Получить профессиональную консультацию – detox24 в краснодаре
Just sat back at the end of the post and felt grateful that someone took the time to write it, and a look at nookharbor extended that gratitude across more of the site, recognising effort behind quality work is part of what makes the open web a community rather than just a marketplace today.
Worth recognising the absence of the usual blog tropes here, and a look at nobleaisle continued that fresh quality, sites that avoid the standard moves of the medium read as more original even when the content is on familiar topics and this one has clearly chosen its own path through the conventional terrain skilfully.
Quietly enjoying that I have found a new site to follow for the topic, and a look at curatedpremiumfinds reinforced the small pleasure of the find, the discovery of new high quality sources is one of the more durable pleasures of careful internet reading and this site has been generating that discovery pleasure at multiple points already today.
Эта публикация раскрывает психологические механизмы зависимости и их роль в развитии расстройств. Читатель узнает о том, как психология влияет на формирование зависимостей и как профессиональная помощь может изменить ситуацию.
Получить дополнительную информацию – наркологическая клиника в краснодаре
Reading this as part of my evening winding down routine fit perfectly, and a stop at globalinspiredstorefront extended the wind down nicely, content that calms rather than agitates is what I want at the end of the day and this site provides that calming reading experience reliably which is increasingly rare across the modern web.
silk road darknet url https://darkmarketslegion.com/ dark matter market https://darkmarketsgate.com/
Came in tired from a long day and the writing held my attention anyway, and a stop at firhex kept that going, content that can engage a fatigued reader is doing something right because most online reading happens in suboptimal conditions like that one and quality content adapts to it without complaint.
Without comparing too aggressively to other sources this one stands out for the right reasons, and a look at caramelmarket continued that distinctive quality, content that distinguishes itself through substance rather than style tricks is content with lasting differentiation and this site has clearly chosen substance based differentiation as its core editorial strategy.
Will recommend this to a couple of friends who have been asking about this exact topic, and after bracechord I have even more reason to do so, the kind of site that earns word of mouth rather than chasing it through aggressive marketing or paid placements is always a treat to find online.
Quietly the writers approach to the topic differs from the dominant takes I have been encountering, and a stop at quelnix extended that distinctive approach, content that maintains a different perspective without explicitly arguing against the dominant ones is content with confident editorial identity and this site has that confidence throughout pieces.
Liked that the post left some questions open rather than pretending to settle everything, and a stop at fairfinch continued that intellectual honesty, content that respects the limits of its own claims is more trustworthy than content that overreaches and this site has clearly figured out which positions it can defend confidently.
Bookmarked the page and the homepage too because clearly there is more to explore here, and a quick stop at gablejuno only made that more obvious, this is the kind of place I want to dig through over a weekend rather than rushing through during a coffee break tomorrow morning before getting back to work.
Glad to have another reliable bookmark for this topic, and a look at celnova suggested several more pages I will be marking too, building a personal library of trustworthy resources is one of the actual rewards of careful browsing and this site is earning a place on my permanent shortlist for the topic.
Reading this gave me the rare experience of fully agreeing with all the conclusions, and a stop at hopiron continued that agreement pattern, content that aligns with my existing views without seeming designed to do so is just content that happens to be reasonable and this site reads as reasonable rather than ideological mostly.
A small editorial detail caught my attention, the way headings related to body text, and a look at grebeheron maintained that careful relationship, structural details like that show up to readers who notice them and the writers here have clearly thought about every level of the piece rather than just the words.
Picked this site to mention to a colleague who would benefit, and a look at glazeflask added more material I will pass along, recommending sites to colleagues is a higher bar than recommending to friends because the professional context demands more careful curation and this site cleared the professional bar without me having to think.
Honestly informative, the writer covers the ground without showing off, and a look at yourtradingmentor reflected the same humility, content that respects the reader rather than trying to dazzle them is something I always appreciate and rarely come across in this corner of the internet today across the topics I usually read.
Thanks for the honest framing without exaggerated claims that the topic will change my life, and a stop at heliofine kept the same modest tone, restraint in marketing language signals trustworthiness and the writers here are clearly playing the long game by building credibility rather than chasing immediate clicks through hyperbole.
Picked up something useful for a side project, and a look at knollgull added another piece I will incorporate, content that connects to specific projects I am working on is content with practical utility and the practical utility of this site is showing up across multiple posts I have read in the last hour or so.
Reading this triggered a small reorganisation of my own thinking on the topic, and a stop at neatmills furthered that reorganisation, content that affects the shape of my mental model rather than just decorating it with new facts is content with structural rather than informational impact and this site provides that.
Публикация охватывает основные направления развития современной медицины. Мы обсудим значимость научных исследований, инноваций в лечении и роли общественного участия в формировании системы здравоохранения.
Расширить кругозор по теме – детокс24
Found the section structure particularly thoughtful, and a stop at clevebound suggested the same care across the broader site, structural choices guide the reader through the material in ways most people do not consciously notice but feel the absence of when those choices are made carelessly or not at all.
During my morning reading slot this fit perfectly into the routine, and a look at premiumeverydaygoods extended that perfect fit into the rest of the routine, content that matches the rhythm of how I actually read rather than demanding accommodation from my schedule is content well calibrated to its likely audience and this site has it.
Quality writing that respects the reader’s intelligence without overloading them, and a quick look at flockfine reflected that approach, a balanced thoughtful site that earns trust by being consistent rather than by shouting about how trustworthy it is which is the usual approach online sadly across most content categories.
Now appreciating that the post left me with enough to say in a follow up conversation, and a look at modernconsciousmarket added more material for those follow ups, content that prepares me for related conversations rather than just informing me alone is content with social utility and this site provides that social armament reliably for me.
Reading this on a slow Sunday and finding it perfectly suited to a slow Sunday read, and a quick stop at firhush kept the same gentle pace, content that fits the mood of the moment is something I notice and remember and this site has the kind of pace that suits relaxed reading sessions especially well.
Took a chance on the headline and was rewarded, and a stop at jetivory kept the rewards coming as I clicked through, the kind of place where every link leads somewhere worth the click is a small luxury on the modern web where so many sites are mostly empty calories disguised as content.
Following the post through to the end without my attention drifting once, and a look at hueheron earned the same uninterrupted attention, content that holds attention without manipulating it is content with substantive pull and this site has demonstrated that substantive pull across multiple pieces in a single reading session reliably here today.
Reading this prompted me to dig out an old reference book related to the topic, and a stop at bracecloth extended that connection to other sources, content that connects me back to my own existing knowledge rather than asking me to forget it is content with continuity and this site has that continuous quality.
Started reading expecting to disagree and ended mostly nodding along, and a look at gablejuno continued the pattern, content that wins agreement through evidence and reasoning rather than rhetorical force is the kind that actually shifts minds and this site clearly knows how to do that across what I have read so far.
Now thinking about how this post will age over the coming years, and a stop at falconfern suggested the same durability, content built to age well rather than to capture the attention of the moment is content with a different kind of value and this site has clearly chosen the long horizon over the short one.
Solid little post, the kind that does not need to be flashy because the substance is doing the work, and a look at grebeknot kept that quiet confidence going across the site, this is what writing looks like when the writer trusts the content to land on its own without theatrics or unnecessary attention seeking behaviour.
Glad I clicked through from where I did because this turned out to be worth the time spent, and after protraderacademy I had a fuller picture, the kind of content that earns its visitors through delivering value rather than chasing them through aggressive advertising or constant pop ups appearing everywhere on the screen lately.
A clear case of writing that does not try to do too much in one post, and a look at koalaglade maintained the same scoped discipline, posts that try to cover too much end up covering nothing well and this site has clearly chosen scope discipline as a core editorial principle which shows up clearly in what I read.
A quiet kind of confidence runs through the writing, and a look at heliogust carried that same understated assurance, confidence without bragging is the most attractive register for online writing and the writers here have clearly developed it through practice rather than affecting it through stylistic tricks that would feel hollow eventually.
Now noticing the post fit a particular gap in my reading without my having articulated the gap before, and a look at gleamjuly extended that gap filling effect, content that meets needs I had not consciously formulated is content with reader insight and this site has clearly developed that anticipatory editorial sense across many pieces.
Now thinking about this site as a small example of what good independent writing looks like, and a stop at firjuno continued that exemplary status, the few sites that serve as good examples are sites worth holding up in conversations about quality and this one has earned that exemplary placement through patient consistent effort over time.
Now feeling the post has earned a proper recommendation rather than a casual mention, and a stop at bayvendor reinforced the recommendation strength, the difference between mentioning and recommending is a small editorial distinction I observe in my own conversations and this site has earned the upgraded recommendation level from me confidently today.
Glad I stumbled across this post, the explanations actually make sense without needing background knowledge to follow along, and after a stop at dewdawns the same was true there, no assumptions about the reader just clear writing that anyone can understand from the first line right through to the end.
Even from a single post the editorial care is clear, and a stop at modernlifestylecommerce extended that care across more pages, the kind of attention to quality that shows up in every paragraph is what separates serious sites from the rest and this one has clearly invested in that paragraph level attention across what I have read.
Vague feelings of recognition kept surfacing as I read because the writing names things I have been thinking, and a look at jetivory produced more of those recognition moments, content that gives shape to private intuitions is content that makes me feel less alone in my own thinking and this site has that effect.
Found the rhythm of the prose particularly enjoyable on this read through, and a look at huejuly kept that musical quality going across the related pages, sentence rhythm is something most blog writers ignore but it makes a real difference in how content lands with the careful reader who cares.
Worth recommending broadly to anyone who reads on the topic, and a look at galagull only confirms that, the rare combination of accessibility and depth in this site makes it suitable for both newcomers and people who already know the area which is hard to pull off in any blog format today and rarely managed.
Glad the writer kept this short rather than padding it out, the points stand on their own without needing extra context, and a look at flockfine kept the same approach going, brevity is a sign of confidence in the substance and the team here clearly trusts their content to land without filler.
Reading this confirmed that my time researching the topic in other places had not been wasted, and a stop at quickcarton extended the confirmation, when independent sources agree that is a useful signal and this site is one of the more reliable sources I have found for cross checking what I read elsewhere on similar subjects.
Generally my comment to other readers about new sites is to wait and see but for this one I would jump to recommend now, and a look at modernvaluecorner reinforced that early recommendation, the speed at which a site earns my recommendation is itself a quality signal and this one has earned mine quickly clearly.
Bookmark earned, calendar reminder set, share queued, all from one good post, and a look at grecofinch did the same, when a single reading session triggers multiple downstream actions you know the content has actually moved me beyond the page and this site is moving me at that higher level reliably.
A piece that did not lean on the writer credentials or institutional backing, and a look at cliffbeck maintained the same focus on substance, content that earns trust through quality rather than through name dropping is the kind I find most persuasive and this site is clearly playing on the substance side of that distinction.
Reading this slowly in the morning before opening email, and a stop at kraftgroove extended that protected attention, content that earns the prime morning reading slot before the daily distractions begin is content with elevated status and this site has earned that prime slot consistently in my recent reading habits clearly.
Probably the kind of site that should be more widely read than it appears to be, and a look at brinkbeige reinforced that quiet wish, the gap between a sites quality and its apparent reach is sometimes large and that gap exists for this site in a way that makes me want to mention it more.
Honest take is that this was better than I expected when I clicked through, and a look at firkit reinforced that, the bar for online content has dropped so much that finding something thoughtful and well constructed feels almost noteworthy now which says more about the average than about this site itself.
Reading carefully here has reminded me what reading carefully feels like, and a look at falconflame extended that reminder, the experience of careful reading versus skimming is different in ways I had partially forgotten and this site has clearly refreshed my memory of what attention feels like when content rewards it consistently.
Started reading and ended an hour later without realising the time had passed, and a look at heliohex produced the same time dilation effect, when content makes time feel different the writer has achieved something well beyond the average and this site is producing that experience for me reliably across multiple readings.
My time on this site has now extended past what I had budgeted, and a stop at glenfir keeps extending it further, content that overstays its budget in my schedule is content that has earned the extra time and this site has been earning extra time across multiple visits to the point where my schedule needs adjustment.
Этот информационный материал подробно освещает проблему наркозависимости, ее причины и последствия. Мы предлагаем информацию о методах лечения, профилактики и поддерживающих программах. Цель статьи — повысить осведомленность и продвигать идеи о необходимости борьбы с зависимостями.
Смотри, что ещё есть – Нарколог на дом
Will recommend this to a couple of friends who have been asking about this exact topic, and after hullgale I have even more reason to do so, the kind of site that earns word of mouth rather than chasing it through aggressive marketing or paid placements is always a treat to find online.
Reading this brought back the satisfaction I used to get from blogs ten years ago, and a stop at galeember kept that nostalgic quality alive, sites that capture what was good about an earlier era of internet writing are increasingly precious and this one is doing that without feeling like a deliberate throwback at all.
здесь
Coming back tomorrow when I can give this a proper read, the post deserves better attention than I can give right now, and a look at modernpurposegoods suggests there is plenty more here that deserves the same treatment, definitely a site I will be exploring properly over the next few days when I can.
Now noticing that the post avoided the temptation to be funny in places where humour would have undermined the substance, and a stop at foxarbors maintained the same restraint, knowing when to be serious is a rare editorial virtue and this site has clearly developed it through what I assume is careful editorial practice over years.
Now realising the topic deserved better treatment than it has been getting elsewhere, and a look at connectforprogress extended that broader recognition, content that exposes the gap between actual quality and average quality elsewhere is doing the quiet work of raising standards and this site is contributing to that elevation in its own corner.
Came across this looking for something else entirely and ended up reading it through twice, and a look at grecoglobe pulled me deeper into the site than I planned, the writing has a way of holding attention without resorting to manipulative cliffhangers or vague promises that never get delivered later down the page.
Probably going to mention this site in a write up I am working on later this month, and a stop at flameeden provided more material for that potential mention, content worth referencing in my own published work rather than just personal reading is content with the highest endorsement level and this site has earned that endorsement.
Reading this gave me a quiet moment of intellectual pleasure that I had not been expecting, and a stop at kraftkale extended that pleasure across more pages, the unexpected reward of stumbling into careful writing is one of the small ongoing pleasures of reading the open web and this site is delivering it reliably.
Just want to say thank you for putting this together, posts like these make searching online actually worth it sometimes, and a quick look at jibfig kept that going, useful and easy to read without any of the tricks that ruin most blog comment sections lately on the wider open web.
Worth observing that the post landed without needing a flashy headline to hook attention, and a stop at heliojuly did the same, content that earns engagement through substance rather than packaging is the kind I trust more deeply and this site has clearly chosen substance as the primary lever for reader engagement throughout.
Now thinking about how this post will age over the coming years, and a stop at falconkite suggested the same durability, content built to age well rather than to capture the attention of the moment is content with a different kind of value and this site has clearly chosen the long horizon over the short one.
Came across this and immediately thought of a friend who would enjoy it, and a stop at globeflame also reminded me of someone, content that triggers the urge to share is content that has earned my recommendation and this site has earned multiple from me already across different conversations during the week.
The use of plain language without dumbing down the topic was really well done, and a look at granitevendor continued in that same accessible style, this is something many technical writers fail at because they either confuse their readers or condescend to them but here neither problem appears at all which is impressive really.
A piece that did not require external context to follow, and a look at flockgala maintained the same self contained quality, content that stands alone without forcing readers to chase prerequisites is more accessible and this site has clearly thought about how each piece can serve a fresh visitor rather than only existing members.
My friends would appreciate a few of these posts and I will be sending links accordingly, and a look at humgrain added more pages to my share queue, content that earns shares to specific people in specific contexts is content with social utility and this site is generating those targeted shares from me consistently lately.
Thanks for the simple approach, too many sites bury the actual point under layers of unnecessary words, but here every line earns its place, and a look at galehelm showed the same care for the reader which is something I will remember the next time I need answers on a topic.
Felt this in a way I cannot quite explain, the topic just hit different here, and a stop at knicknook continued in that vein, sometimes you find a site whose perspective lines up with how you have been thinking and reading their work feels like a small relief which I appreciated more than I expected.
Skipped breakfast still reading this and finished hungry but satisfied, and a stop at purebeautyoutlet kept me past breakfast time, content that displaces basic biological needs is content with serious attentional pull and the writers here are clearly capable of producing that level of engagement which is genuinely impressive these days.
Really like that the writer trusts the reader to follow simple logic without restating every previous point, and a stop at gridivory kept that respect going, treating an audience as capable adults rather than as people who need constant hand holding makes a noticeable difference in the reading experience for me.
перейти на форум
Bookmark added in three places to make sure I do not lose the link, and a look at clingchee got the same redundant treatment, sites I am afraid to lose are the rare keepers and this is clearly one of them based on what I have read so far across this and a couple of related posts.
Liked the post enough to read it twice and the second read found new things, and a stop at intentionalconsumerexperience similarly rewarded the second look, content with hidden depths that only reveal themselves on careful rereading is the rare kind that earns lasting respect rather than fleeting first impressions only briefly held.
Quietly impressive in a way that does not announce itself, and a stop at flankgate extended that quiet impressiveness, the kind of quality that emerges through sustained attention rather than first impressions is the kind I trust more deeply and this site has been earning that deeper trust across multiple sessions over time consistently.
A piece that reads as if the writer trusted readers to fill in obvious gaps, and a look at eliteledges continued that respectful approach, content that does not over explain what the reader can infer is content that respects intelligence and this site has clearly chosen to write to capable readers rather than to the lowest common denominator.
A piece that demonstrated competence without performing it, and a look at kraftkilt maintained the same self assured but unshowy register, the gap between competence and performance of competence is one I track and this site has clearly chosen to demonstrate rather than perform which I find much more persuasive as a reader.
Stands apart from similar pages by actually being useful, that is high praise these days, and a look at humivy kept that standard going, you can tell when a site is built around the reader versus around metrics and this one clearly belongs to the first category for sure based on what I read.
Appreciate the practical examples, they made the abstract points easier to grasp, and a stop at helioketo added more of the same, this site clearly understands that real examples beat empty theory every single time which is the mark of a writer who knows their audience well and respects their time.
Pass this along to anyone you know dealing with similar questions, the answers here are clear, and a stop at galekraft adds even more useful material, this is the kind of resource that deserves to circulate widely rather than getting lost in the constant churn of new content online that buries good work daily.
Solid little post, the kind that does not need to be flashy because the substance is doing the work, and a look at glyphfig kept that quiet confidence going across the site, this is what writing looks like when the writer trusts the content to land on its own without theatrics or unnecessary attention seeking behaviour.
Now thinking I want more sites built on this kind of editorial foundation, and a stop at fancyfinal extended that wish into a broader hope, sites built on substance and care rather than on metrics and growth are the kind of sites I want to see more of and this one is a small example worth supporting.
Really appreciate the confidence to make a clear point rather than hedging everything, and a quick visit to jouleforge maintained the same direct stance, writing that takes positions rather than equivocating is more useful even when the positions are debatable because at least the reader has something to react to clearly.
A satisfying piece in the way that good meals are satisfying rather than just filling, and a look at brightcartfusion extended that satisfaction, the metaphor between content and meals is one I find useful and this site reads as a satisfying meal rather than the empty calories that most content provides for casual readers.
Honest take is that this was better than I expected when I clicked through, and a look at grifffume reinforced that, the bar for online content has dropped so much that finding something thoughtful and well constructed feels almost noteworthy now which says more about the average than about this site itself.
В этой статье рассматриваются актуальные вопросы, связанные с развитием медицинской науки и её внедрением в повседневную практику. Особое внимание уделено вопросам профилактики, ранней диагностики и использованию технологий для улучшения здоровья человека.
Как достичь результата? – анонимный нарколог краснодар
Публикация охватывает основные направления развития современной медицины. Мы обсудим значимость научных исследований, инноваций в лечении и роли общественного участия в формировании системы здравоохранения.
Изучить материалы по теме – кодировка в волгограде от алкоголя
Эта публикация обращает внимание на важность профилактики зависимостей. Мы обсудим, как осведомленность и образование могут помочь в предотвращении возникновения зависимости. Читатели смогут ознакомиться с полезными советами и ресурсами, которые способствуют здоровому образу жизни.
Смотрите также… – detox24
Quietly the post solved something I had been turning over without quite knowing how to phrase the question, and a look at flankhaven extended that quiet solving, content that addresses unformulated needs is content with reader insight and this site has demonstrated that insight at a high rate across the pieces I have read recently.
Picked up two new ideas that I expect will come up in conversations this week, and a look at floeiron added another, content that arms me with talking points rather than just filling time is the kind that provides ongoing value beyond the moment of reading and this site is generating that kind of ongoing value.
Started forming counter examples to test the claims and the post handled most of them implicitly, and a look at maplevendor continued that anticipatory style, writers who think two steps ahead of the critical reader save themselves from a lot of follow up work and this writer has clearly internalised that habit consistently.
Skipped the comments to avoid spoilers and came back later to find them genuinely worth reading, and a stop at krillflume extended that surprised respect, when the discussion below a post matches the quality of the post itself you have found something special and this site appears to attract that kind of audience.
Easily one of the better explanations I have read on the topic, and a stop at tealvendor pushed it even higher in my mental ranking of useful resources, the kind of site that beats the average not by trying harder but by simply caring more about what it puts out daily which always shows.
Reading this in the morning set a good tone for the day, and a quick visit to huskgenie kept that good tone going, content can do that sometimes when it hits the right notes and finding sites that consistently strike that tone is something I have learned to recognise and reward with regular visits.
Reading carefully here has reminded me what reading carefully feels like, and a look at consciouslivingmarketplace extended that reminder, the experience of careful reading versus skimming is different in ways I had partially forgotten and this site has clearly refreshed my memory of what attention feels like when content rewards it consistently.
Such writing is increasingly rare and worth supporting through attention, and a stop at pebbleaisle extended that supportive attention across more pages, the conscious choice to spend time on sites that produce careful work rather than convenient consumption is itself a small form of patronage and this site is receiving that conscious patronage from me.
Big thanks to whoever wrote this, you saved me a lot of time hunting for the same info on other sites, and a stop at marketpearl only added more useful detail without going off topic, that kind of focus is honestly hard to come across these days when most posts wander everywhere.
Comfortable read, finished it without realising how much time had passed, and a look at galloheron pulled me into more pages the same way, the absence of friction in good content lets time disappear and that is one of the highest compliments I can pay any piece of writing I find online during a regular search session.
Worth pointing out the careful word choice in this post, no buzzwords and no jargon, and a look at duetdrives continued that disciplined vocabulary, sites that resist the pull of trendy language are sites that will read well in five years and this one is clearly built for that kind of long durability.
cocorico shop https://darkmarketlegion.com/ black ops link https://darkmarketslegion.com/
Going to come back when I have more time to read carefully, the post deserves more than a quick scan, and a stop at heliokindle reinforced that, this is the kind of site that rewards a slower read which is hard to find in this fast paced corner of the internet but really worthwhile.
Now recognising that the post handled the topic with appropriate technical precision without becoming dry, and a stop at silverharborvendorparlor continued that balance, technical precision and readability are often in tension and this site has clearly figured out how to maintain both at once which is one of the harder editorial achievements in the form.
Refreshing to find writing that does not try to manipulate the reader into clicking onto the next page through cliffhangers and forced engagement, and a stop at gnarfrost continued in the same respectful way, this is what reader first design actually looks like in practice rather than just in marketing copy that sounds nice.
Just wanted to say this was useful and leave a small note of thanks, and a quick visit to fancyhale earned a similar nod from me, the small acknowledgements add up over time and represent the real economy of trust that good content runs on across the open and increasingly fragmented modern internet.
Thanks for the simple approach, too many sites bury the actual point under layers of unnecessary words, but here every line earns its place, and a look at groovehale showed the same care for the reader which is something I will remember the next time I need answers on a topic.
Reading this confirmed that my time researching the topic in other places had not been wasted, and a stop at clingclasp extended the confirmation, when independent sources agree that is a useful signal and this site is one of the more reliable sources I have found for cross checking what I read elsewhere on similar subjects.
Bookmark folder reorganised slightly to make this site easier to find, and a look at flankisle earned the same accessibility upgrade, the small organisational moves I make for sites I expect to return to often are themselves a signal of how much I trust them and this site triggered those moves naturally.
Sets a higher bar than most of what shows up in search results for this topic, and a look at joustglade did not lower that bar at all, in fact it confirmed the impression, this is the kind of consistency that earns a place in regular rotation for serious readers instead of casual scrollers passing through.
Picked this for my morning read because the topic seemed worth the time, and a look at huskkindle confirmed the choice was right, my morning reading slot is precious and giving it to this site felt like a good investment rather than a waste which is a higher endorsement than I usually offer for content.
Skipped the TLDR thinking I would read everything anyway, and ended up enjoying the path through the full post, and a stop at harborlark similarly rewarded the patient read, summaries are useful but the journey through good writing is part of what makes the destination feel earned rather than just delivered cleanly.
A quiet kind of confidence runs through the writing, and a look at kudosember carried that same understated assurance, confidence without bragging is the most attractive register for online writing and the writers here have clearly developed it through practice rather than affecting it through stylistic tricks that would feel hollow eventually.
Felt the post had been written without looking over its shoulder, and a look at mistvendor continued that confident posture, content written for its own sake rather than against imagined critics has a different quality and this site reads as written from a place of confidence rather than defensive justification of every claim.
Reading this on a difficult day was a small bright spot, and a stop at gallohex extended that brightness, content that improves a hard day is content that has earned a particular kind of place in my reading habits and this site is occupying that uplifting role for me today which I appreciate clearly.
Liked the balance between depth and brevity, never too shallow and never too long, and a stop at maplegrovemarketparlor kept the same balance going across the rest of the site, this is one of the harder skills in writing and the team here clearly has it figured out very well indeed across every page.
Really like the way the post resists reaching for cliches that would have made it feel generic, and a quick visit to thoughtfulcommerceplatform kept that fresh feel going, original phrasing and unexpected metaphors are signs that the writer is actually thinking rather than just stitching together familiar phrases into the appearance of content.
Started thinking about my own writing differently after reading, and a look at flumelake continued that reflective effect, content that influences how I work rather than just informing what I know is content with the highest kind of impact and this site has triggered some of that reflective influence today on me.
Worth recognising the specific care that went into how this post ended, and a look at helmkit maintained the same careful conclusions, endings are where most blog content falls apart and this site has clearly invested in the closing stretches of its pieces rather than letting them simply trail off when energy fades.
Читатели получат представление о том, как современные технологии влияют на развитие медицины. Обсуждаются новые методы лечения, персонализированный подход и роль цифровых решений в повышении качества медицинских услуг.
Все материалы собраны здесь – лечение алкоголизма в Луганске
Thanks for laying this out in a way that someone newer to the topic can follow, and a stop at grovefalcon kept that accessibility going, writing that meets readers at different experience levels without condescending is hard to do well and the writers here have clearly thought about who they are writing for.
Honestly enjoyed not being sold anything for the entire duration of the post, and a look at grovefarms kept that pleasant absence going across more pages, content that exists for its own sake rather than as a funnel to a paid product is increasingly rare and worth supporting where I can find it.
Thanks for the clean writing, no broken sentences and no awkward translations like some other sites have, and a quick stop at gnarkit kept that polish going nicely, it really does make a difference when a reader can move through a page without tripping on every line or going back to reread.
Really appreciate the confidence to make a clear point rather than hedging everything, and a quick visit to flankivory maintained the same direct stance, writing that takes positions rather than equivocating is more useful even when the positions are debatable because at least the reader has something to react to clearly.
Better signal to noise ratio than most places I check on this kind of topic, and a look at iconflank kept that going, every paragraph here carries something worth reading rather than padding out the page to hit some arbitrary length target that search engines reward but readers ignore as soon as they notice it.
Bookmark moved to my permanent reference folder rather than the casual maybe later folder, and a look at fawnetch earned the same upgrade, the distinction between casual interest and lasting reference is something I track carefully and very few sites cross that threshold but this one did so without much effort apparently.
Started this morning and finished at lunch with a small sense of having spent the time well, and a look at iciclemart extended that satisfaction into the afternoon, content that fits naturally into the rhythm of a working day rather than demanding a dedicated reading block is increasingly the kind I prefer.
Big thanks to whoever wrote this, you saved me a lot of time hunting for the same info on other sites, and a stop at clevergoodszone only added more useful detail without going off topic, that kind of focus is honestly hard to come across these days when most posts wander everywhere.
Well crafted post, the structure flows naturally from one point to the next without forcing transitions, and a stop at gambitfort kept the same flow going, you can tell when a writer has thought about how their content reads rather than just what it contains and this is one of those examples.
Taking the time to read carefully here has been worthwhile for the past hour, and a look at honeymarket extended the worthwhile reading, the calculation of return on reading time spent is something I do informally and this site has been producing positive returns across multiple sessions during the last week of regular visits and reads.
However selective I am about new bookmarks this one made it past my filter, and a look at depotglow confirmed the bookmark was worth the slot, the precious slots in my permanent bookmark folder are difficult to earn and this site earned one without making me think twice about whether the slot was justified by the quality.
Grateful for posts like this one, they remind me there are still places online run by people who care about quality, and a look at oasiscrate reflected the same standards, you can tell the difference between content made for readers and content made just for search engines today and this is the former.
crazy time account https://crazytimeee.com/
monopoly live tower https://monopolylives.com/
online monopoly live https://monopoly-live-bd.com/
Worth saying that the post fit naturally into a rhythm of careful reading, and a stop at silkgrovevendorroom extended the same rhythm, content that pairs well with how I actually read rather than demanding a different mode is content well calibrated to its likely audience and this site has clearly thought about that consistently.
gioco crazy time https://crazy-timez.com/
monopoly live app monopoly live app.
online live monopoly https://monopoly-live-bangladesh.com/
best solana casino https://solanagxy.com/
موقع 888starz https://colindaylinks.com/
Picked this for my morning read because the topic seemed worth the time, and a look at guavaflank confirmed the choice was right, my morning reading slot is precious and giving it to this site felt like a good investment rather than a waste which is a higher endorsement than I usually offer for content.
Felt the post was written for someone like me without explicitly addressing me, and a look at herbfife produced the same fit, when content lands on its target without pandering you know the writer has done careful audience thinking rather than relying on demographic targeting or interest signals to do the work of editorial decisions.
Saving the link for sure, this one is a keeper, and a look at clipchime confirmed I should bookmark the entire site rather than just this page, the consistency across what I have seen so far suggests there is a lot more here worth coming back for soon when I have more time.
Reading this prompted me to clean up some old notes related to the topic, and a stop at globalcuratedgoods extended that organising urge, content that triggers personal organisation rather than just consuming attention is content with motivating energy and this site has the kind of clarity that prompts active follow up rather than passive consumption.
Liked the balance between depth and brevity, never too shallow and never too long, and a stop at idleflint kept the same balance going across the rest of the site, this is one of the harder skills in writing and the team here clearly has it figured out very well indeed across every page.
В данной статье рассматриваются физиологические и эмоциональные аспекты зависимости. Мы обсудим, как организм реагирует на зависимое поведение, и какие методы помогают восстановить здоровье и внутреннее равновесие.
Узнай первым! – социопатия лечение
Now thinking the topic is more interesting than I had given it credit for, and a stop at flaskkelp continued that elevated interest, content that revives my curiosity about subjects I had set aside is doing genuine work in the structure of my interests and this site is providing that revivifying effect today actually.
Now sitting with the thoughts the post triggered rather than rushing on to the next thing, and a stop at goldenknack extended that reflective pause, content that earns time for thought after closing the tab is content of higher value than the merely interesting and this site has clearly produced that lasting effect today.
Now understanding why someone recommended this site to me a while back, and a stop at draftglades explained the recommendation, sometimes recommendations make sense only after experience and this site has finally clicked into place as the kind of resource I now understand was being recommended for sound editorial reasons by my friend.
Reading this on the train into work was a better use of the commute than my usual choices, and a stop at bettershoppingchoice extended that commute reading well, content that improves transit time rather than just filling it is content with practical benefit and this site has earned its place in my morning commute reading rotation.
A piece that did not lecture even when it had clear positions, and a look at gambitgulf maintained the same teaching without preaching tone, finding the line between informing and lecturing is hard and most sites land on the wrong side of it but this one has clearly figured out how to inform without becoming preachy.
Skipped breakfast still reading this and finished hungry but satisfied, and a stop at gildvendor kept me past breakfast time, content that displaces basic biological needs is content with serious attentional pull and the writers here are clearly capable of producing that level of engagement which is genuinely impressive these days.
Skipped past the first paragraph thinking it was setup and had to come back when the rest referenced it, and a stop at fluxhusk similarly rewarded careful reading from the start, content where every paragraph carries weight is content I now know to read from the beginning rather than skipping ahead.
Time spent here today felt productive in the way that good reading sessions sometimes do, and a stop at olivevendor extended that productive feeling across the rest of the morning, the difference between productive reading and merely passing time is real and this site is consistently on the productive side for me lately.
A modest masterpiece in its own quiet way, and a look at fawngate confirmed the same quiet quality across the rest of the site, calling something a masterpiece is usually overstating but for content this carefully crafted the word feels appropriate even if the writers themselves would probably resist the label honestly.
A well calibrated piece that knew its scope and stayed inside it, and a look at orchardharborvendorparlor maintained the same scope discipline, scope creep is one of the failure modes of long blog posts and this site has clearly invested in the editorial discipline to prevent it which shows up in tightly contained pieces.
Going to come back when I have more time to read carefully, the post deserves more than a quick scan, and a stop at guavahilt reinforced that, this is the kind of site that rewards a slower read which is hard to find in this fast paced corner of the internet but really worthwhile.
Just enjoyed the experience without needing to think about why, and a look at idleketo kept that effortless feeling going, sometimes the best content is invisible in the sense that you forget you are reading until you reach the end and realise time has passed without you noticing it pass naturally.
If you asked me to point to a recent positive sign for the open web this site would be near the top, and a stop at flintgala reinforced that designation, the few sites that serve as evidence the web can still produce quality independent content are precious and this one has clearly become one for me.
More substantial than most of what I find searching for this topic online, and a stop at herbharp kept that quality consistent, this is one of those sites where the writing actually rewards careful reading rather than punishing the patient reader with empty filler stretched out across long paragraphs that say very little.
Worth flagging that the post handled an angle of the topic I had not seen elsewhere, and a look at seothread extended that fresh treatment, content that finds underexplored corners of well covered subjects is genuinely valuable and this site has demonstrated that exploratory editorial approach across multiple pieces in my reading sessions today.
Will be coming back to this for sure, too much good content to absorb in one sitting, and a stop at fernbureau only added more pages I want to dig through, this site is going onto my regular rotation list because it consistently delivers something worth the visit lately rather than empty filler.
Closed the laptop and walked away thinking about the post for a good twenty minutes, and a stop at intentionallysourcedgoods produced similar lingering thoughts, content that survives the closing of the browser tab is content that has actually entered the mind rather than just decorating the screen for the duration of the reading.
Now appreciating that the post did not require me to agree with the writer to find it valuable, and a look at livzaro maintained the same useful regardless of agreement quality, content that informs even when it does not convince is content with broader utility and this site reads as useful even when I disagree.
Found this really helpful, the explanations are simple but they actually answer the questions a normal reader would have, and after I followed gambithusk I had a clearer sense of the topic, no extra fluff just useful points laid out in a sensible order that made the time worth it.
More substantial than most of what I find searching for this topic online, and a stop at dealvilo kept that quality consistent, this is one of those sites where the writing actually rewards careful reading rather than punishing the patient reader with empty filler stretched out across long paragraphs that say very little.
Worth a slow read rather than the fast scan I usually default to, and a look at discovernewworld earned the same slower pace from me, content that resets my reading speed downward is content with substance worth absorbing and this site has produced that effect on me multiple times now over the last week here.
Different feel from the algorithmically optimised posts that dominate the topic, and a stop at urbanmixo reinforced that human touch, you can tell when a site is being run by someone who reads what they publish versus someone just hitting submit and moving on quickly to the next assignment without checking the result.
Started forming counter examples to test the claims and the post handled most of them implicitly, and a look at harborpick continued that anticipatory style, writers who think two steps ahead of the critical reader save themselves from a lot of follow up work and this writer has clearly internalised that habit consistently.
Now considering whether the post would translate well into a different form, and a look at venxari suggested similar versatility, content that could move into other media without losing its substance is content that has been built around ideas rather than around format and this site reads as idea first throughout posts.
Found something quietly useful here that I expect to return to, and a stop at melvizo added more of the same, content with quiet utility ages well in a way that flashy hot takes do not and I have learned to weight quiet utility much higher when deciding what to bookmark for later use.
Honestly enjoyed every minute spent here, that is not something I say lightly, and a look at tilvexa confirmed I will be back, the bar for spending time online is high for me these days but this site clears it without effort which is high praise indeed from this reader who is usually rather demanding.
Looking back on this reading session it stands as one of the better ones recently, and a look at domelounges extended that ranking, the informal ranking of reading sessions against each other is something I do mentally and this session ranks high largely because of this site and a couple of related pages here.
The whole experience of reading this was pleasant from start to finish, no pop ups and no annoying interruptions, and a look at rovnero continued that clean experience, technical choices about page design matter for the reader and this site clearly cares about the small details that add up to comfort across multiple visits.
Reading this in a relaxed evening setting was a small pleasure, and a stop at lunarvendor extended the pleasant evening reading, content that fits the tone of relaxed time without becoming forgettable is what I look for in evening reading and this site has the right tone for that particular slot in my daily reading routine.
Appreciate the practical examples, they made the abstract points easier to grasp, and a stop at walnutvendor added more of the same, this site clearly understands that real examples beat empty theory every single time which is the mark of a writer who knows their audience well and respects their time.
Worth pointing out that the post avoided the temptation to summarise everything at the end, and a look at boldcartstation continued that confident closing approach, content that trusts readers to retain the substance without being reminded of it at the end is content that respects the reader and this site practices that respect.
Worth marking this site as one to come back to deliberately rather than by accident, and a stop at molzino reinforced that intention, the difference between sites I find again by chance and sites I return to on purpose is meaningful and this one has clearly moved into the deliberate return category for me.
Now realising this site has been quietly doing good work for longer than I knew, and a look at qarnexo suggested an archive worth exploring, sites with deep archives of consistent quality represent a different kind of resource than sites with viral hits and this one looks like the durable kind based on what I see.
A piece that took its time without dragging, and a look at igloohaze kept the same patient pace, the difference between unhurried and slow is a fine editorial distinction and this site has clearly found the unhurried side without slipping into the slow side which would have lost me as a reader quickly otherwise.
Worth pointing out that the writing reads as confident without being defensive about it, and a look at gulfflux extended that secure tone, content that does not pre emptively argue against imagined critics has a different quality from defensive writing and this site reads as written from a place of real ease.
Glad to have another data point on a question I am still thinking through, and a look at clipchoice added two more, content that acknowledges its place in a wider conversation rather than pretending to settle the question alone is intellectually honest in a way that I wish was more common across the open web.
More original than the recycled takes I keep finding on the topic elsewhere, and a quick look at foamhull confirmed it, the kind of site that has its own voice rather than echoing whatever is trending which makes it stand out as a refreshing change from the usual rotation of generic content I see daily.
Bookmark earned, share earned, return visit earned, all from one reading session, and a look at flockergo did the same, the trifecta of bookmark and share and return is rare in a single visit and represents the highest level of engagement I tend to offer any piece of online content these days here.
Honestly enjoyed reading this more than I expected to when I first clicked through, and a stop at feathalo kept that pleasant surprise going, sometimes you stumble onto a site that just clicks with how you like to read and this is one of those for me right now today which is great.
Skipped the TLDR thinking I would read everything anyway, and ended up enjoying the path through the full post, and a stop at bazariox similarly rewarded the patient read, summaries are useful but the journey through good writing is part of what makes the destination feel earned rather than just delivered cleanly.
Decided after reading this that I would check this site weekly going forward, and a stop at fernpier reinforced that commitment, deciding to add a site to a regular rotation requires meeting a quality bar that very few places clear and this one cleared it cleanly without any noticeable effort or marketing push behind it.
Decided after reading this that I would check this site weekly going forward, and a stop at gamerember reinforced that commitment, deciding to add a site to a regular rotation requires meeting a quality bar that very few places clear and this one cleared it cleanly without any noticeable effort or marketing push behind it.
Easy to recommend without reservations, the site delivers on every promise it implicitly makes, and a look at lomqiro kept that same standard going, the kind of consistency that earns trust over time rather than chasing it through aggressive marketing is what I see here and it is appreciated greatly by this particular reader today.
Now understanding why someone recommended this site to me a while back, and a stop at heronfoil explained the recommendation, sometimes recommendations make sense only after experience and this site has finally clicked into place as the kind of resource I now understand was being recommended for sound editorial reasons by my friend.
Spent a few minutes here and came away with a clearer picture of the topic, the writing keeps things simple without dumbing them down, and after a stop at urbanrivo the rest of the points lined up neatly which is something I appreciate when I am short on time and need answers fast.
Reading this in a moment of low energy still kept my attention, and a stop at boldtrendmarket continued that engagement under suboptimal conditions, content that survives the reader being tired is content with extra reserves of pull and this site has the kind of writing that holds up even when I am not at my reading best.
Such writing is increasingly rare and worth supporting through attention, and a stop at venxari extended that supportive attention across more pages, the conscious choice to spend time on sites that produce careful work rather than convenient consumption is itself a small form of patronage and this site is receiving that conscious patronage from me.
Came back to this twice now in the same week which is unusual for me, and a look at elevateddailyclickping suggested I will keep coming back, the kind of post that earns repeated visits rather than one and done reading is the gold standard for content quality and this site clearly hit that standard.
Honestly this was a good read, no jargon and no padding, and a short look at yieldmart kept that same feel going which I really appreciated, the writer clearly knows the topic well enough to explain it without hiding behind big words or filler that often gets used to seem clever.
Worth pointing out that the post avoided the temptation to summarise everything at the end, and a look at tirlumo continued that confident closing approach, content that trusts readers to retain the substance without being reminded of it at the end is content that respects the reader and this site practices that respect.
Worth recognising that the post did not pretend to be the final word on the topic, and a stop at groveaisle continued that humility, content that admits its own scope and limits is more trustworthy than content that overreaches and this site has clearly developed the editorial maturity to know what it can and cannot claim well.
A piece that handled multiple complications without becoming confused, and a look at clevercartcorner continued that organisational clarity, holding multiple threads in a single piece without losing any of them is a sign of skilled writing and this site has clearly developed the editorial discipline to manage complexity without sacrificing readability throughout.
Just want to recognise that someone clearly cared about how this turned out, and a look at dealvilo confirmed that care extends across the broader site, you can feel the difference between content shipped to hit a deadline and content released because the writer was actually proud of the result for once.
Looking through other posts here the consistency is what makes the site valuable rather than any single piece, and a stop at irisetch extended that consistency observation, sites whose value lies in the ongoing pattern rather than in standout posts are sites I trust more deeply and this one has clearly built that kind of trust.
Worth recognising the absence of the usual blog tropes here, and a look at rovqino continued that fresh quality, sites that avoid the standard moves of the medium read as more original even when the content is on familiar topics and this one has clearly chosen its own path through the conventional terrain skilfully.
Felt this in a way I cannot quite explain, the topic just hit different here, and a stop at knackpacts continued in that vein, sometimes you find a site whose perspective lines up with how you have been thinking and reading their work feels like a small relief which I appreciated more than I expected.
Now appreciating that the post left me with enough to say in a follow up conversation, and a look at melvizo added more material for those follow ups, content that prepares me for related conversations rather than just informing me alone is content with social utility and this site provides that social armament reliably for me.
Comfortable in tone and substantive in content, that is a hard combination to land, and a look at gulfholm kept that pairing alive across more material, this is what good editorial direction looks like in practice and the team here clearly has someone keeping a steady hand on the wheel across what they decide to publish.
Closed the tab and immediately reopened it ten minutes later because I wanted to reread a part, and a stop at bazmora drew the same return, content that pulls you back after closing it is doing something well beyond the average and worth marking as exceptional in my mental catalogue of reliable sites.
Great work on keeping things readable, the post never drags or repeats itself which I really appreciate, and a stop at gapherb added a bit more context that fit naturally with what was already said here, no need to read everything twice to get the point being made today.
The structure of the post made it easy to follow without losing track of where I was, and a look at lorqiro kept the same logical flow going, this site clearly understands that organisation is half the battle in keeping readers engaged from the first line to the last across any kind of post.
Nice and clean, that is the best way to describe the writing here, no clutter and no wasted words, and a quick visit to firminlet kept that going, I appreciate when a site treats its readers like people who can think for themselves without needing constant hand holding through every paragraph.
Really appreciate that the writer did not stretch the post to hit some target word count, the points end when they are made, and a stop at urbanrova reflected the same discipline, brevity is generosity in disguise and this site has clearly figured that out far better than most blog operations have.
Now thinking about how this post will age over the coming years, and a stop at herongait suggested the same durability, content built to age well rather than to capture the attention of the moment is content with a different kind of value and this site has clearly chosen the long horizon over the short one.
A slim post with substantial content per word, and a look at buyplusshop maintained the same density, the content per word ratio is something I track informally and this site scores high on that ratio compared to most sources I read regularly which is a quiet indicator of careful editorial work behind the scenes.
Now recognising that this site has earned a place in the small group of resources I treat as authoritative, and a stop at featlake confirmed that placement, the difference between resources I trust and resources I just consume is real and this site has clearly moved into the trusted category through consistent quality over time.
Thanks for the practical examples scattered through the post rather than abstract theory only, and a look at vinmora continued that grounded style, abstract points are easier to remember when paired with concrete situations and the writers here clearly understand how readers actually retain information from blog content reading sessions.
Felt a small spark of recognition when the post named something I had been struggling to articulate, and a look at irisgusto produced more such moments, the rare service of giving readers language for fuzzy intuitions is one of the higher values that good writing can provide and this site offered several today instances.
Bookmark folder created specifically for this site, and a look at foilfrost confirmed the dedicated folder was the right call, dedicated folders for individual sites are a level of organisation I rarely deploy and this site has earned that level of dedicated tracking based on the consistency I have seen so far across sessions.
Comfortable read, finished it without realising how much time had passed, and a look at shopwidestore pulled me into more pages the same way, the absence of friction in good content lets time disappear and that is one of the highest compliments I can pay any piece of writing I find online during a regular search session.
Now saved this in a way that I will actually find again rather than the casual bookmark approach, and a stop at tirnexo earned the same careful saving, organising my reading bookmarks so that high quality sources rise to the top is something I should do more of and this site triggered that organisation today.
Now considering the post as evidence that careful blog writing is still possible, and a look at tidevendor extended that evidence, the broader question of whether the modern web can sustain quality writing has obvious empirical answers in sites like this one and seeing them is reassuring even when they remain a minority overall today.
Comfortable read, finished it without realising how much time had passed, and a look at mapleaisle pulled me into more pages the same way, the absence of friction in good content lets time disappear and that is one of the highest compliments I can pay any piece of writing I find online during a regular search session.
Liked that the post resisted a sales pitch ending, and a stop at molzino maintained the no pitch approach, content that ends without trying to convert me into a customer or subscriber is content that has confidence in its own value and this site is clearly playing the long game on reader trust.
Worth saying that the quiet confidence of the writing is what landed first, and a look at globalculturemarket continued that quiet quality, confident writing without the loud display of confidence is a rare combination and this site has clearly developed both the knowledge and the editorial restraint to land that combination consistently.
Reading this in the gap between work projects was a small but meaningful break, and a stop at qavlizo extended that gentle reset, content that provides genuine refreshment rather than just distraction during work breaks is content with a particular kind of utility and this site fits that role for me reliably during work days.
Coming to this with low expectations and being pleasantly surprised by the substance, and a stop at clockbrace continued exceeding expectations, the recalibration of expectations upward across multiple positive readings is one of the actual rewards of careful browsing and this site is providing that recalibration at a steady rate apparently.
Thanks for putting this online without locking it behind email signups or paywalls, and a quick visit to baznora kept that open feel going, content that trusts the reader to come back rather than gating access is the kind of approach I will reward with regular return visits over time happily.
Liked the way the post got out of its own way, and a stop at gulfkoala extended that invisible craft, the best writing you barely notice while reading because it is doing its work without drawing attention to itself and this site has clearly mastered that disappearing act across the pieces I have read.
Glad to find something on this topic that does not start with three paragraphs of throat clearing before getting to the point, and a stop at shoprova also dives right in, respect for the readers time shows up in small editorial choices like this and they add up to a real difference quickly.
Found the post genuinely useful for something I was working on this week, and a look at dealzaro added more material I will reference, content that connects to my actual life and work rather than just being interesting in the abstract is the kind I will pay attention to and return to repeatedly.
Felt the writer was speaking my language without trying to imitate it, and a look at neatglyphs continued that natural fit, when a writers default voice happens to match what you find easy to read the experience feels frictionless and that is something I notice and remember about specific sites going forward.
Decided to subscribe to the RSS feed if there is one, and a stop at gapjumbo confirmed that decision, content that I want delivered to me proactively rather than just remembered when I have time is content that has earned a higher level of commitment from me as a reader looking for reliable sources.
A welcome reminder that thoughtful writing still happens online, and a look at lorzavi extended that reassurance, the modern web makes it easy to forget that careful writing exists and finding sites that practice it is a small antidote to the cynicism that builds up from too much exposure to algorithmic content.
Liked how the writer used real examples instead of theoretical ones to make the points stick, and a stop at flareaisle added even more concrete examples, this is the kind of practical approach that respects readers who actually want to apply what they learn rather than just nodding along passively without doing anything useful.
Just want to recognise that someone clearly cared about how this turned out, and a look at mexqiro confirmed that care extends across the broader site, you can feel the difference between content shipped to hit a deadline and content released because the writer was actually proud of the result for once.
The lack of unnecessary jargon made the post accessible without sacrificing accuracy, and a look at urbanso continued in the same accessible style, technical topics often hide behind specialised vocabulary but here the writer trusts the reader to keep up with plain language and that trust pays off nicely throughout the entire post.
Reading this in a quiet coffee shop matched the calm energy of the writing, and a stop at easybuyingcorner extended that environmental match, content that has its own ambient quality which can match or clash with surroundings is content with a personality and this site has the kind of personality that suits calm reading.
My usual pattern is to skim and bounce but this site has reset that pattern temporarily, and a stop at vuzmixo maintained the slower reading mode, content that changes how I read is content with structural influence and this site has clearly nudged my reading behaviour toward something better at least for the duration of these visits.
However many similar pages I have read this one taught me something new, and a stop at ironfleet added more new material, content that contributes genuinely fresh information rather than recycling what is already widely available is content with real informational value and this site is providing that informational freshness at a notable rate.
Walked away with a clearer head than I had before reading this, and a quick visit to herongrip only sharpened that, the writing has a way of cutting through the noise that surrounds most topics online which is something I will definitely remember the next time I am searching for an answer to anything.
Now adding this to a short list of sites I would defend in a conversation about the modern web, and a look at freshcartoptions reinforced that defence list, the few sites that serve as evidence the web can still produce good things are precious and this one has clearly joined that small list of exemplary sites.
Worth saying that the prose reads naturally without straining for style, and a stop at tirqano maintained the same unforced quality, writing that achieves elegance without effort is the highest tier and this site has clearly worked out how to land that effortless quality consistently rather than only on the writers best days.
A piece that ended with a clean landing rather than fading out, and a look at buymixo maintained the same crisp conclusions, endings that resolve rather than dissolve are a sign of careful structural thinking and this site has clearly invested in how its pieces conclude rather than letting them simply run out of energy.
A clear case of writing that does not try to do too much in one post, and a look at fairvendor maintained the same scoped discipline, posts that try to cover too much end up covering nothing well and this site has clearly chosen scope discipline as a core editorial principle which shows up clearly in what I read.
Highly recommend to anyone looking for a sensible take on this topic without the usual marketing nonsense, and a look at feltglen kept that grounded approach going, sites that stay focused on serving readers rather than monetising every click are rare and this is clearly one of those rare ones I really appreciate finding.
Reading this on a slow Sunday and finding it perfectly suited to a slow Sunday read, and a quick stop at gullgoal kept the same gentle pace, content that fits the mood of the moment is something I notice and remember and this site has the kind of pace that suits relaxed reading sessions especially well.
Well done, the kind of post that makes you slow down and actually read instead of skimming for keywords, and a look at thoughtfuldesigncollective kept me reading carefully too, that is a sign of writing that has been crafted rather than churned out for an algorithm to see today and tomorrow.
Came in for one specific question and got answers to three I had not even thought to ask, and a look at gapkraft extended that bonus value pattern, the kind of resource that anticipates reader needs rather than just answering the literal question asked is the gold standard and this site reaches it.
Just sat back at the end of the post and felt grateful that someone took the time to write it, and a look at shopvato extended that gratitude across more of the site, recognising effort behind quality work is part of what makes the open web a community rather than just a marketplace today.
Came in skeptical and left mostly convinced, that is the highest praise I can offer, and a look at lovqaro pushed me further in the same direction, content that survives a critical first read is rare and worth recognising because most blog posts crumble under any real scrutiny these days when you actually pay attention closely.
Speaking honestly this is among the better discoveries of my recent browsing, and a stop at foilgenie reinforced that discovery quality, the ranking of recent discoveries is informal but meaningful and this site has placed near the top of that ranking based on the consistency of quality across what I have already read carefully.
Felt no urge to argue with the conclusions even though I started the post slightly skeptical, and a look at flarefest maintained that pattern, writing that earns agreement through clarity of argument rather than rhetorical pressure is the kind I find most persuasive and the kind I want to read more of these days.
Reading this confirmed a hunch I had been carrying about the topic without having articulated it, and a stop at kalqavo extended the confirmation, content that gives shape to fuzzy intuitions is doing the rare work of making private thoughts public and this site is providing that articulating service consistently for me lately.
The depth of coverage felt about right for the format, neither shallow nor overwhelming, and a look at urbantix kept that calibration going, getting the depth right for blog format is genuinely difficult because too shallow loses experts and too deep loses beginners but this site nailed it nicely which I really do appreciate.
Thanks for treating the topic with the seriousness it deserves without becoming pompous about it, and a stop at elitefests continued that balanced treatment, the gap between earnest and self serious is huge and writers who can stay on the right side of it earn my respect when I find them online today.
Learned something from this without having to dig through layers of fluff, and a stop at ironkrill added a bit more context that helped tie things together for me, definitely a useful corner of the internet for anyone who wants real information without the usual marketing nonsense around it that often ruins similar pages.
Reading this gave me the rare experience of fully agreeing with all the conclusions, and a stop at fashiondailychoice continued that agreement pattern, content that aligns with my existing views without seeming designed to do so is just content that happens to be reasonable and this site reads as reasonable rather than ideological mostly.
Felt the writer was speaking my language without trying to imitate it, and a look at vuznaro continued that natural fit, when a writers default voice happens to match what you find easy to read the experience feels frictionless and that is something I notice and remember about specific sites going forward.
Felt the writer respected the topic without being precious about it, and a look at dailyshoppinghub continued that respectful but unfussy treatment, finding the right register for serious topics is hard and this site has clearly figured out how to take the topic seriously while still being readable for casual visitors regularly.
Closed the laptop and walked away thinking about the post for a good twenty minutes, and a stop at heronhilt produced similar lingering thoughts, content that survives the closing of the browser tab is content that has actually entered the mind rather than just decorating the screen for the duration of the reading.
Quietly the writers approach to the topic differs from the dominant takes I have been encountering, and a stop at buyrova extended that distinctive approach, content that maintains a different perspective without explicitly arguing against the dominant ones is content with confident editorial identity and this site has that confidence throughout pieces.
Honestly impressed by the consistency of voice across what I have read so far, and a quick visit to morqino continued that consistent feel, when a site reads like one careful person rather than a committee the experience is more rewarding for the reader who notices these subtle editorial details over time.
The post made the topic feel approachable without making it feel trivial, that is a fine balance, and a stop at qavmizo maintained the same balance, finding the middle ground between welcoming and serious is genuinely difficult and the writers here have clearly figured out how to consistently hit it well across many different posts.
Walked away in a slightly better mood than when I started reading, that says something about the writing, and a stop at mexvoro kept that going, content that leaves you feeling more capable rather than overwhelmed is the kind I keep coming back to again and again over the years and across many topics.
Reading this in three sittings because the day was fragmented, and the piece survived the fragmentation, and a stop at eagerkilt held up under similar reading conditions, content engineered for continuous attention is fragile in modern conditions and this site reads as durable across the realistic ways people consume content today.
Without overstating it this is a quietly excellent post, and a look at wavevendor extended that quiet excellence, content that earns superlatives without demanding them through marketing language is content that has truly earned them through the substance and this site has clearly produced work in that earned excellence category today.
Reading this post made me realise I had been settling for lower quality elsewhere, and a look at tirvaxo extended that recalibration, content that exposes how much I had been accepting in adjacent sources is content with calibrating effect on my standards and this site is performing that calibration function across topics for me reliably.
Easily one of the better explanations I have read on the topic, and a stop at gullkindle pushed it even higher in my mental ranking of useful resources, the kind of site that beats the average not by trying harder but by simply caring more about what it puts out daily which always shows.
Refreshing tone compared to the dry corporate posts on similar topics, and a stop at gaussfawn carried that personality through nicely, you can tell when a real person is behind the writing versus a content team chasing metrics and this site definitely falls into the former category clearly across what I have seen.
Now adding this site to a small mental group of recommendations I keep ready for specific kinds of inquiries, and a stop at lovzari extended the recommendation readiness, content that I can confidently point friends and colleagues toward in specific contexts is content with real social utility and this site has that utility clearly.
Once I had read three posts the editorial pattern was clear, and a look at festglade confirmed the pattern from a fourth angle, sites where the underlying approach reveals itself through accumulated reading rather than being announced are sites with real depth and this one has that quality clearly visible across multiple pieces consistently.
Picked this up while looking for something else and ended up reading every paragraph because it was actually informative, and after modernartisancommerce I was sure I would come back, that does not happen often when most sites bury the useful parts under endless ads and pop ups today and across most categories online.
Reading this as part of my evening winding down routine fit perfectly, and a stop at ironkudos extended the wind down nicely, content that calms rather than agitates is what I want at the end of the day and this site provides that calming reading experience reliably which is increasingly rare across the modern web.
Comfortable reading experience throughout, no jarring tone shifts and no awkward formatting, and a look at urbanvani kept that smooth feel going, the kind of editorial polish that goes unnoticed when present but glaring when absent is something this site has clearly invested in across the broader content as well which deserves recognition.
Honest take is that this was better than I expected when I clicked through, and a look at shopvilo reinforced that, the bar for online content has dropped so much that finding something thoughtful and well constructed feels almost noteworthy now which says more about the average than about this site itself.
Reading this triggered a small reorganisation of my own thinking on the topic, and a stop at discovergiftoutlet furthered that reorganisation, content that affects the shape of my mental model rather than just decorating it with new facts is content with structural rather than informational impact and this site provides that.
My reading list is short and selective and this site is now on it, and a stop at xarmizo confirmed the placement, the short list of sites I read deliberately rather than encounter accidentally is something I curate carefully and adding to it is a real act of trust which this site has earned today.
Will be coming back to this for sure, too much good content to absorb in one sitting, and a stop at quickcartsolutions only added more pages I want to dig through, this site is going onto my regular rotation list because it consistently delivers something worth the visit lately rather than empty filler.
Liked that there was nothing performative about the writing, and a stop at buyvani continued that genuine quality, performative writing tries to be witnessed rather than read and the difference between performance and substance is huge for the careful reader and this site has clearly chosen substance every time clearly.
Found something quietly useful here that I expect to return to, and a stop at elitedawns added more of the same, content with quiet utility ages well in a way that flashy hot takes do not and I have learned to weight quiet utility much higher when deciding what to bookmark for later use.
Found a couple of useful angles in here I had not considered before reading carefully, and a quick stop at kanqiro added more, this is one of those sites where the value compounds the more you read rather than peaking at one viral post and then offering nothing else of substance afterwards which is common.
A small thank you note from me to the team behind this work, the post earned it, and a stop at heronjoust suggested more thanks would be in order over time, recognising the people who do good writing online is something I try to remember to do because the alternative is silence and silence rewards mediocrity unfortunately.
Bookmark earned and the bookmark feels like a permanent addition rather than a maybe, and a look at forgefeat confirmed that permanent status, the difference between durable bookmarks and ephemeral ones is something I have learned to feel quickly and this site triggered the durable feeling almost immediately during my first read here.
Closed three other tabs to focus on this one and never opened them again, and a stop at haleforge similarly held attention exclusively, content that crowds out other reading from working memory is content with real density and this site has demonstrated that density across multiple pages I have visited so far this morning.
Felt the post handled a sensitive angle of the topic with appropriate care, and a look at gausskite extended that careful handling across related material, sites that can navigate delicate territory without causing damage are rare and require a level of judgement that comes from experience rather than from following any clear playbook.
Decided to subscribe to the RSS feed if there is one, and a stop at gingercrate confirmed that decision, content that I want delivered to me proactively rather than just remembered when I have time is content that has earned a higher level of commitment from me as a reader looking for reliable sources.
Most attempts at writing on this topic feel like they are missing something and this post finally identified what was missing, and a look at tirvilo extended that diagnostic clarity, content that names what is wrong with adjacent treatments while doing better itself is content with both critical and constructive value and this site has both.
Thanks for the clean writing, no broken sentences and no awkward translations like some other sites have, and a quick stop at luxdeck kept that polish going nicely, it really does make a difference when a reader can move through a page without tripping on every line or going back to reread.
Liked everything about the experience, from the opening through to the closing notes, and a stop at minqaro extended that into more pages, finding a site where the editorial vision shows through every choice rather than feeling random is an increasingly rare experience and one I am glad to have today during this particular reading session.
Thanks for the honest framing without exaggerated claims that the topic will change my life, and a stop at islegoal kept the same modest tone, restraint in marketing language signals trustworthiness and the writers here are clearly playing the long game by building credibility rather than chasing immediate clicks through hyperbole.
Speaking as someone who reads a lot on this topic this site has earned a high position in my source rankings, and a stop at urbanvilo reinforced that ranking, the informal ranking of sources for a topic is something I maintain mentally and this site has moved into the upper portion of those rankings clearly.
Worth recognising that the post handled a familiar topic without reaching for any of the obvious hot takes, and a stop at intentionalstyleandhome continued that fresh treatment, sites that find new angles on subjects others have exhausted are sites worth following carefully and this one has clearly developed that exploratory instinct through patient practice.
Yesterday I was complaining about the state of online writing and today this site has temporarily fixed that complaint, and a look at buyvilo extended that mood reversal, the short term mood improvement that comes from finding good content is real and this site has produced that improvement for me at a useful moment.
Comfortable in tone and substantive in content, that is a hard combination to land, and a look at packpeak kept that pairing alive across more material, this is what good editorial direction looks like in practice and the team here clearly has someone keeping a steady hand on the wheel across what they decide to publish.
Appreciated how the writer anticipated the questions a reader might have along the way, and a stop at xarvilo continued that thoughtful approach, you can tell when content has been edited with the reader in mind versus just published as a first draft and this is clearly the former approach across what I read.
Now feeling slightly more optimistic about the state of independent writing online, and a stop at ultrashophub extended that quiet optimism, sites like this one are the reason I have not given up on the open web entirely and finding them occasionally renews the case for paying attention to non algorithmic content sources today.
Yesterday I was complaining about the state of online writing and today this site has temporarily fixed that complaint, and a look at fibergrid extended that mood reversal, the short term mood improvement that comes from finding good content is real and this site has produced that improvement for me at a useful moment.
Just one of those reads that left me feeling slightly more capable rather than overwhelmed, and a look at shopzaro kept that empowering feel going, the difference between content that builds the reader up and content that intimidates them is huge and this site clearly knows which side of that line to stand.
Skipped the comments section but might come back to read it, and a stop at morxavi hinted at a quality reader community, sites where the comments are worth reading separately from the post are increasingly rare and signal a particular kind of audience that has grown around the editorial vision over time gradually.
Felt like the writer was speaking directly to someone with my level of curiosity, neither talking down nor showing off, and a stop at qelmizo kept that comfortable matching going, finding writing that meets you where you are rather than asking you to climb up or stoop down feels great every time it happens.
This filled in a gap in my understanding that I had not even noticed was there, and a stop at eastglaze did the same, the kind of post that gives you more than you expected when you first clicked through from somewhere else, a real find for anyone curious about the area covered here.
Now appreciating that I did not feel exhausted after reading, and a stop at musebeats extended that energising quality, content that leaves me with more attention than it consumed is rare and the gap between draining and energising content is real over the course of a typical day spent reading widely online.
Solid post, the structure is easy to follow and the language stays simple even when the topic gets a bit more involved, and a look at gemglobe kept that same standard going, so I left feeling like the time spent here was actually worth something for once which is rare lately.
Took longer than expected to finish because I kept stopping to think, and a stop at hickorygrid did the same to me, content that provokes thought rather than just delivering information is in a different category and the team here is clearly working at that higher level rather than just cranking out posts.
Easy to recommend without reservations, the site delivers on every promise it implicitly makes, and a look at havenfoam kept that same standard going, the kind of consistency that earns trust over time rather than chasing it through aggressive marketing is what I see here and it is appreciated greatly by this particular reader today.
Really appreciate that the writer did not assume I would read every other related post first, and a look at kanvoro kept that self contained feel going where each piece can stand alone, accessibility for new readers is a sign of generous editorial thinking and this site has clearly invested in that approach.
Glad I gave this fifteen minutes rather than the usual three minute skim, and a look at jadeflax earned the same investment, time spent on quality content is rarely wasted but the reverse is also true and learning which sites deserve which kind of attention is part of being a careful online reader.
A nicely understated post that does not shout for attention, and a look at northvendor maintained the same quiet quality, understatement is a stylistic choice that distinguishes serious writing from attention seeking writing and this site has clearly committed to the understated approach as a core editorial value rather than just a phase.
Worth every minute of the time spent reading, and a stop at tirxavo extends that value across more pages, in a media environment where most content is engineered to waste attention this site stands out by treating reader time as something valuable rather than something to be exploited and stretched as far as possible.
Appreciate how nothing here feels copied or pieced together from other places, the voice is consistent and the tone stays human, and after I checked luxmixo I noticed the same style holds, which is a small detail but it makes the whole experience feel personal rather than like another generic site.
Comfortable read, finished it without realising how much time had passed, and a look at urbanvo pulled me into more pages the same way, the absence of friction in good content lets time disappear and that is one of the highest compliments I can pay any piece of writing I find online during a regular search session.
Closed and reopened the tab three times before finally finishing, and a stop at cartluma held my attention straight through, sometimes content fights for time against my own distraction and the times it wins say something positive about its quality and this post clearly won that fight today afternoon for me.
Just sat with this for a bit longer than I usually would because the points are worth thinking about, and after fortfalcon I had even more to chew on, the kind of post that nudges your thinking forward without forcing the issue is something I have always appreciated in good writing online.
Time spent here today felt productive in the way that good reading sessions sometimes do, and a stop at brightfuturedeals extended that productive feeling across the rest of the morning, the difference between productive reading and merely passing time is real and this site is consistently on the productive side for me lately.
Came across this through a roundabout path and now it is on my regular rotation, and a stop at discoverfashionhub sealed that decision, the open web still produces serendipitous discoveries when you let the citations and references guide you rather than relying purely on algorithmic feeds for new content recommendations always.
Speaking honestly this is among the better discoveries of my recent browsing, and a stop at xavlumo reinforced that discovery quality, the ranking of recent discoveries is informal but meaningful and this site has placed near the top of that ranking based on the consistency of quality across what I have already read carefully.
Honest reaction is that this is the kind of writing I would defend in a conversation about good blog content, and a look at mivqaro reinforced that, the rare site whose work I would actively recommend rather than just tolerate is the kind I want to support through return visits regularly.
If quality blog writing is dying as people sometimes claim then this site is one piece of evidence that it has not died yet, and a look at zenvani extended that evidence, the broader cultural question about online writing has empirical answers in specific sites and this one is contributing to a more optimistic answer overall.
В данной статье рассматриваются проблемы общественного здоровья и социальные факторы, влияющие на него. Мы акцентируем внимание на значении профилактики и осведомленности в защите здоровья на уровне общества. Читатели смогут узнать о новых инициативах и программах, направленных на улучшение здоровья населения.
Узнайте всю правду – наркологической клиники в Донецке
Approaching this site through a casual link click and being surprised by what I found, and a look at premiumdesigncollective extended the surprise, the rare experience of stumbling into excellent independent content rather than predictable mediocrity is one of the actual remaining pleasures of casual web browsing and this site provided it cleanly.
Bookmarking this for later, the kind of resource I want to keep nearby, and a quick look at wattedge confirmed the rest of the site is worth the same treatment, definitely going into my reference folder for the next time the topic comes up at work or in conversation with someone who asks.
Bookmark added without hesitation after finishing, and a look at liegepenny confirmed I should bookmark the homepage too rather than just this page, the rare site that earns category level trust rather than just single article approval is the kind I want to rely on across many different topics over time.
Took longer than expected to finish because I kept stopping to think, and a stop at genieframe did the same to me, content that provokes thought rather than just delivering information is in a different category and the team here is clearly working at that higher level rather than just cranking out posts.
Left me wanting to read more rather than feeling burned out, that is a good sign, and a look at ygavexaudition2024 confirmed there is plenty more here to explore, the kind of writing that builds appetite rather than killing it which is a rare quality on the modern open internet today across most categories of content.
Came here from another site and ended up exploring much further than I planned, and a look at styleluma only encouraged more exploration, the kind of place where one click leads to another not through manipulative design but through genuinely interesting content is rare and worth highlighting when found like this somewhere on the open internet.
Этот информативный текст сочетает в себе темы здоровья и зависимости. Мы обсудим, как хронические заболевания могут усугубить зависимости и наоборот, как зависимость может влиять на общее состояние здоровья. Читатели получат представление о комплексном подходе к лечению как физического, так и психического состояния.
Практические советы ждут тебя – выводу из запоя в Луганске
Took longer than expected to finish because I kept stopping to think, and a stop at windyforestfinds did the same to me, content that provokes thought rather than just delivering information is in a different category and the team here is clearly working at that higher level rather than just cranking out posts.
Reading this confirmed something I had been suspecting about the topic, and a look at hazegloss pushed that confirmation toward greater confidence, content that lines up with independently held intuitions earns a special kind of trust and I will return to writers who consistently land that way for me without overselling positions.
Came away with a slightly better mental model of the topic than I started with, and a stop at julyelm sharpened that further, content that improves the reader thinking apparatus rather than just dumping facts into it is the rare kind I genuinely value and seek out when I have time to read carefully.
After several visits I am now confident this site is one to follow seriously, and a stop at jetfrost reinforced that confidence, the gradual building of trust through repeated quality exposures is the only sustainable way to develop reader loyalty and this site is building that loyalty in me through patient consistent work consistently.
Worth observing that the post landed without needing a flashy headline to hook attention, and a stop at hiltgable did the same, content that earns engagement through substance rather than packaging is the kind I trust more deeply and this site has clearly chosen substance as the primary lever for reader engagement throughout.
Worth saying that the quiet confidence of the writing is what landed first, and a look at lullneon continued that quiet quality, confident writing without the loud display of confidence is a rare combination and this site has clearly developed both the knowledge and the editorial restraint to land that combination consistently.
Solid endorsement from me, the writing earns it, and a look at luxrivo continues to earn it across the broader site too, the kind of operation that maintains quality across many pages rather than just one viral post is a sign of serious commitment and that is what I see here clearly across what I read.
Decided after reading this that I would check this site weekly going forward, and a stop at ivoryvendor reinforced that commitment, deciding to add a site to a regular rotation requires meeting a quality bar that very few places clear and this one cleared it cleanly without any noticeable effort or marketing push behind it.
Now feeling the small relief of finding writing that does not condescend, and a stop at oakarenas extended that respect for readers, content that treats its audience as capable adults rather than as people to be managed produces a different reading experience and this site has clearly chosen the respectful approach across all pieces.
Reading this between meetings turned out to be the most useful thing I did all afternoon, and a stop at urbanzaro kept that productivity feeling going, content can sometimes outperform actual work in terms of what gets accomplished mentally and this site managed that today which is genuinely a high bar to clear consistently.
Reading this triggered a small reorganisation of my own thinking on the topic, and a stop at plumvendor furthered that reorganisation, content that affects the shape of my mental model rather than just decorating it with new facts is content with structural rather than informational impact and this site provides that.
Picked this up between two other things I was doing and got drawn in completely, and after cartmixo my original tasks were completely forgotten for a while, content that derails a workflow in a positive way by being more interesting than what you were already doing is rare and worth recognising clearly.
Top notch writing, every paragraph carries weight and nothing feels like filler, and a stop at seovista reflected that same care, a rare thing on the open web these days where most pages exist for clicks rather than actual reader value or anything close to that which is honestly a real shame.
Really appreciate the confidence to make a clear point rather than hedging everything, and a quick visit to discovermoreoffers maintained the same direct stance, writing that takes positions rather than equivocating is more useful even when the positions are debatable because at least the reader has something to react to clearly.
Decided to set a calendar reminder to revisit, and a stop at zenvaxo extended that revisit list, calendar entries for content are a level of commitment I rarely make but when I do they signal a higher regard than a simple bookmark and this site has earned that calendar tier of relationship from me today.
Liked that the post acknowledged complications rather than pretending they did not exist, and a stop at xavnora continued that honest framing, sites that handle complexity with care rather than papering it over with simplifying claims are doing real intellectual work and this one is clearly in that category based on what I have read.
Reading this with a notebook open turned out to be the right move, and a stop at lilacneedle added more material to the notes, content that justifies active note taking from a passive reader is content with real informational density and this site is producing notes worthy material at a high rate consistently.
This stands out compared to similar posts I have read recently, less noise and more substance, and a look at movlino kept that gap going, you can really feel the difference between content made by someone who cares versus content made to fill a publishing schedule for an algorithm trying to keep growing somehow.
Now appreciating the way the post avoided the temptation to be longer than necessary, and a look at wattedge continued that lean approach, content with the discipline to stop when finished rather than padding for length is content that respects both itself and its readers and this site has that disciplined editorial culture clearly throughout.
Approaching this with the usual skepticism I bring to new sites and being slowly persuaded, and a stop at qenmora continued that gradual persuasion, the careful path from skeptical reader to genuine fan is the only one I trust and this site has walked me along that path through patient consistent quality across pieces.
Now leaving a small mental note to recommend this when the topic comes up in conversation, and a look at gladfir extended that recommend ready feeling, content that arms me with shareable references for likely future conversations is content with social value and this site is providing that conversational ammunition consistently for me lately.
Just sat with this for a bit longer than I usually would because the points are worth thinking about, and after palmbazaar I had even more to chew on, the kind of post that nudges your thinking forward without forcing the issue is something I have always appreciated in good writing online.
Worth marking this site as one to come back to deliberately rather than by accident, and a stop at ebonfig reinforced that intention, the difference between sites I find again by chance and sites I return to on purpose is meaningful and this one has clearly moved into the deliberate return category for me.
Compared to the usual results for this kind of search this site stands well above the average, and a quick visit to hazeherb kept the standard high, you can tell within seconds whether a site is going to waste your time or actually deliver and this one clearly delivers without any false starts.
Speaking from the perspective of a fairly demanding reader the writing here clears the bar consistently, and a look at talents-affinity continued clearing that bar, the calibration of demanding reader is something I apply to all sources and this site has been one of the few that handles the demanding reading well across pieces sampled.
Felt the writer was being honest with the reader which is rare enough that I want to acknowledge it, and a look at curatedglobalcommerce continued that honest feel, content built on actual knowledge rather than aggregated summaries is something I value highly and rarely come across in regular searches on the open internet these days.
A particular pleasure to read this with a fresh coffee, and a look at modcove extended the pleasure across more pages, content that pairs well with quiet morning rituals is something I have come to value highly and this site has the kind of energy that fits naturally into a calm reading routine.
Came across this through a roundabout path and now it is on my regular rotation, and a stop at tirzani sealed that decision, the open web still produces serendipitous discoveries when you let the citations and references guide you rather than relying purely on algorithmic feeds for new content recommendations always.
Glad I clicked through from where I did because this turned out to be worth the time spent, and after fossera I had a fuller picture, the kind of content that earns its visitors through delivering value rather than chasing them through aggressive advertising or constant pop ups appearing everywhere on the screen lately.
Bookmark added with a small note about why, and a look at timbertowncorner prompted another bookmark with another note, the bookmarks I annotate are the ones I expect to return to deliberately rather than stumble into and this site is generating annotated bookmarks at a higher rate than my usual content sources by some margin.
Useful enough to recommend to several people I know who would appreciate it, and a stop at stylemixo added more material I will pass along too, the kind of writing that earns word of mouth is the kind that actually delivers on its promises which is what this site does without any drama or fanfare attached.
Now adding the writer to a small mental list of voices I want to follow, and a look at luxrova reinforced that follow intention, the few writers whose work I actively track are writers who have demonstrated sustained quality and this writer has clearly demonstrated that sustained quality across the pieces I have sampled here today.
Took a few notes from this post, the points are easy to remember without needing to come back and check, and a look at hiltgem added a couple more, the kind of place that sticks in the memory long after the browser tab has been closed for the day which says a lot really.
Honest reaction is that this is the kind of writing I would defend in a conversation about good blog content, and a look at mintvendor reinforced that, the rare site whose work I would actively recommend rather than just tolerate is the kind I want to support through return visits regularly.
Beats most of the alternatives on the topic by a noticeable margin, and a look at dewdawns did not change that at all, this is one of the better corners of the open internet for this kind of content and I am glad I clicked through rather than skipping past quickly like I usually do.
Reading this as part of my evening winding down routine fit perfectly, and a stop at urbivio extended the wind down nicely, content that calms rather than agitates is what I want at the end of the day and this site provides that calming reading experience reliably which is increasingly rare across the modern web.
This filled in a gap in my understanding that I had not even noticed was there, and a stop at cartrivo did the same, the kind of post that gives you more than you expected when you first clicked through from somewhere else, a real find for anyone curious about the area covered here.
Now recognising the specific pleasure of reading writing that shows real care for sentence shapes, and a look at seotrail extended that craft pleasure, sentence level writing quality is something most blog content ignores entirely and this site has clearly invested in the prose layer alongside the substance which is rare today.
Speaking from the perspective of having read widely on the topic this site offers something distinct, and a look at jumbohelm reinforced that distinctness, the rare site that contributes something genuinely original to a saturated topic is the rare site worth following carefully and this one has demonstrated that original contribution capability today.
Liked the careful selection of which details to include and which to skip, and a stop at mutelion reflected the same editorial judgement, knowing what to leave out is just as important as knowing what to include and this site has clearly figured out where that line sits for the topics it covers regularly.
Worth recognising the specific care that went into how this post ended, and a look at zevarko maintained the same careful conclusions, endings are where most blog content falls apart and this site has clearly invested in the closing stretches of its pieces rather than letting them simply trail off when energy fades.
Even from a single post the editorial care is clear, and a stop at fashionfindshub extended that care across more pages, the kind of attention to quality that shows up in every paragraph is what separates serious sites from the rest and this one has clearly invested in that paragraph level attention across what I have read.
Started reading without much expectation and ended on a high note, and a look at milknorth continued that arc, content that builds rather than peaks early is a sign of a writer who knows how to structure a piece for sustained reader engagement rather than relying on a strong hook to do all the work.
Good clean post, no errors and no awkward phrasing that breaks the reading flow, and a stop at xelvani kept the same standard, definitely the kind of editorial care that earns a return visit because it tells me the writer is paying attention to details that matter to readers rather than just rushing publication.
Useful read, especially because the writer did not assume too much background from the reader, and a quick look at gladhalo continued in the same way, a thoughtful site that meets people where they are which is something the modern web could use a lot more of for both casual and serious readers.
Considered against the flood of similar content this one stands apart in important ways, and a stop at wattarc extended that distinctive feel, sites that find their own corner of a crowded topic and stay there are sites worth following and this one has clearly carved out its own space and committed to defending it carefully.
Now appreciating that the post left me with enough to say in a follow up conversation, and a look at torlumo added more material for those follow ups, content that prepares me for related conversations rather than just informing me alone is content with social utility and this site provides that social armament reliably for me.
A thoughtful piece that did not strain to be thoughtful, and a look at heathfoam continued that effortless quality, when thinking shows up in writing without the writer drawing attention to it you know you are reading something genuinely considered rather than something performing the appearance of consideration which is also common online.
However measured this site clears the bar I set for sites I take seriously, and a stop at curlbyrd continued clearing that bar, the metrics I use for site quality are admittedly informal but they are consistent and this site has cleared them on multiple measurements across multiple visits which is meaningful for my evaluation.
I came here looking for a quick answer and ended up reading the whole post because it was actually interesting, and after thirtymale I had a much fuller picture, no stress and no confusion just a clear walk through the topic that made everything fall into place without much effort.
Walked away in a slightly better mood than when I started reading, that says something about the writing, and a stop at lullpebble kept that going, content that leaves you feeling more capable rather than overwhelmed is the kind I keep coming back to again and again over the years and across many topics.
Really appreciate that the writer did not assume I would read every other related post first, and a look at luxvilo kept that self contained feel going where each piece can stand alone, accessibility for new readers is a sign of generous editorial thinking and this site has clearly invested in that approach.
My reading list is short and selective and this site is now on it, and a stop at softspringemporium confirmed the placement, the short list of sites I read deliberately rather than encounter accidentally is something I curate carefully and adding to it is a real act of trust which this site has earned today.
Closed the tab with a small sense of finality rather than the usual rushed exit, and a stop at cartrova produced the same considered closing, when reading ends with deliberate satisfaction rather than impatient skip you know the time was well spent and this site is producing those satisfying endings consistently across what I read.
This actually answered the question I had been searching for, and after I checked stylerivo I had a few more pieces I had not realised I needed, that is the sign of a site that knows what its readers want before they even know how to ask it which is impressive.
Ended up here on a wandering afternoon and was glad I stayed for the read, and a stop at myrrhlens extended the wandering into a proper exploration of the site, the kind of place that rewards aimless clicking with something genuinely interesting rather than the shallow content that mostly populates the modern open web.
Saving the link for sure, this one is a keeper, and a look at moddeck confirmed I should bookmark the entire site rather than just this page, the consistency across what I have seen so far suggests there is a lot more here worth coming back for soon when I have more time.
Now planning to share the link with a small group of readers I trust, and a look at hilthive suggested more material to share with the same group, recommending content into a curated circle requires confidence in the recommendation and this site is making me confident in those personal recommendations on multiple separate occasions now.
Did not expect much when I clicked through but ended up reading the whole thing carefully, and a stop at valzino kept that engagement going, sometimes the unassuming sites turn out to deliver more than the flashy ones which is something I have learned to look out for over time online lately and across topics.
Cuts through the usual marketing fluff that dominates this topic online, and a stop at zimlora kept the same clean approach going, this is the kind of writing that respects the reader’s time rather than wasting it on repetitive setups before finally getting to the point at hand which is what most sites do.
Appreciate the work that went into laying this out so clearly, every section earns its place without filler, and a look at palmbranch confirmed the same care, definitely the kind of place that deserves a return visit when the topic comes up again later in the future or for any related question.
Reading this in a quiet hour and finding it suited the quiet, and a stop at nextleveltrading extended the quiet reading mood, content that matches its own optimal reading conditions rather than fighting them is content that has been thoughtfully calibrated and this site reads as having a particular reading mood in mind throughout.
A piece that read as the work of someone who reads carefully themselves, and a look at navmixo continued that informed feel, writers who are also serious readers produce work with a different quality and this site reads as the product of someone steeped in good writing rather than just generating content for an audience.
Liked the way the post got out of its own way, and a stop at torqavi extended that invisible craft, the best writing you barely notice while reading because it is doing its work without drawing attention to itself and this site has clearly mastered that disappearing act across the pieces I have read.
Bookmark added with a small mental note that this is a site to keep, and a look at xelzino reinforced the keep status, the verb keep rather than visit captures something about how I think about this kind of site and it is a higher tier of relationship than I have with most places online today.
Came in confused about the topic and left with a much firmer grasp on it, and after fossgusto I felt I could explain this to someone else without hesitation, that is the gold standard for any educational content and most sites simply fail to reach it ever which is unfortunate but true.
Found something quietly useful here that I expect to return to, and a stop at qinmora added more of the same, content with quiet utility ages well in a way that flashy hot takes do not and I have learned to weight quiet utility much higher when deciding what to bookmark for later use.
Reading this post made me realise I had been settling for lower quality elsewhere, and a look at vividmesh extended that recalibration, content that exposes how much I had been accepting in adjacent sources is content with calibrating effect on my standards and this site is performing that calibration function across topics for me reliably.
Liked how the writer used real examples instead of theoretical ones to make the points stick, and a stop at jumbokelp added even more concrete examples, this is the kind of practical approach that respects readers who actually want to apply what they learn rather than just nodding along passively without doing anything useful.
Now considering whether the post would translate well into a different form, and a look at ebongreen suggested similar versatility, content that could move into other media without losing its substance is content that has been built around ideas rather than around format and this site reads as idea first throughout posts.
Spent a few minutes here and came away with a clearer picture of the topic, the writing keeps things simple without dumbing them down, and after a stop at saveaustinneighborhoods the rest of the points lined up neatly which is something I appreciate when I am short on time and need answers fast.
However many similar pages I have read this one taught me something new, and a stop at curlclap added more new material, content that contributes genuinely fresh information rather than recycling what is already widely available is content with real informational value and this site is providing that informational freshness at a notable rate.
Decided I would read the archives over the weekend, and a stop at luzqiro confirmed that the archives would be worth the time, very few sites have archives I would actively read through but this one has earned that level of interest based on the consistent quality across what I have sampled so far.
Reading this in the morning set a good tone for the day, and a quick visit to nudgeneedle kept that good tone going, content can do that sometimes when it hits the right notes and finding sites that consistently strike that tone is something I have learned to recognise and reward with regular visits.
Reading this brought back the satisfaction I used to get from blogs ten years ago, and a stop at myrrhomen kept that nostalgic quality alive, sites that capture what was good about an earlier era of internet writing are increasingly precious and this one is doing that without feeling like a deliberate throwback at all.
Reading this prompted me to clean up some old notes related to the topic, and a stop at perfectmill extended that organising urge, content that triggers personal organisation rather than just consuming attention is content with motivating energy and this site has the kind of clarity that prompts active follow up rather than passive consumption.
High quality writing, no marketing speak and no buzzwords that mean nothing, and a stop at cartvani kept that going, simple direct content that actually communicates something is harder to find than it should be and this is one of the rare places that gets it right consistently across many different posts.
Following a few of the internal links revealed more posts of similar quality, and a stop at pacerlucid added more to that growing pile, sites where internal links lead to more good content rather than to more of the same recycled material are sites with depth and this one has clearly built that depth carefully.
Liked how the writer used real examples instead of theoretical ones to make the points stick, and a stop at ponyosier added even more concrete examples, this is the kind of practical approach that respects readers who actually want to apply what they learn rather than just nodding along passively without doing anything useful.
Started smiling at one paragraph because the writing was just nice, and a look at grippalaces produced a couple more such moments, prose that produces small spontaneous reactions in the reader is doing more than just transferring information and the writers here are clearly hitting that level fairly consistently throughout pieces.
Good clean post, no errors and no awkward phrasing that breaks the reading flow, and a stop at wildduneessentials kept the same standard, definitely the kind of editorial care that earns a return visit because it tells me the writer is paying attention to details that matter to readers rather than just rushing publication.
However measured this site clears the bar I set for sites I take seriously, and a stop at zimqano continued clearing that bar, the metrics I use for site quality are admittedly informal but they are consistent and this site has cleared them on multiple measurements across multiple visits which is meaningful for my evaluation.
Got something practical out of this that I can apply later this week, and a stop at torzavi added more details to think about, this is exactly the kind of content I bookmark for future reference rather than the throwaway listicles that dominate most search results these days for almost any common topic.
This filled in a gap in my understanding that I had not even noticed was there, and a stop at hiltkindle did the same, the kind of post that gives you more than you expected when you first clicked through from somewhere else, a real find for anyone curious about the area covered here.
I came here looking for a quick answer and ended up reading the whole post because it was actually interesting, and after stylerova I had a much fuller picture, no stress and no confusion just a clear walk through the topic that made everything fall into place without much effort.
Now planning to write about the topic myself eventually using this post as a reference, and a look at xinvexa would also serve in that future piece, content that becomes raw material for my own writing rather than just informing my reading is content with multiplicative value and this site is generating that multiplicative effect.
Genuinely good work, the kind that holds up over multiple readings without losing its appeal, and a stop at modloop kept that going, definitely a site I will be returning to and probably mentioning to others who work in or care about this particular area of interest today and in coming weeks.
Genuinely changed how I think about a small piece of the topic, which does not happen often online, and a look at trivent added another nudge in the same direction, the kind of writing that earns a small mental shift rather than just confirming what you already thought before reading is a sign of careful thought.
Started forming counter examples to test the claims and the post handled most of them implicitly, and a look at lushmarble continued that anticipatory style, writers who think two steps ahead of the critical reader save themselves from a lot of follow up work and this writer has clearly internalised that habit consistently.
Started thinking about my own writing differently after reading, and a look at curvecalm continued that reflective effect, content that influences how I work rather than just informing what I know is content with the highest kind of impact and this site has triggered some of that reflective influence today on me.
Now planning to write about the topic myself eventually using this post as a reference, and a look at mallivo would also serve in that future piece, content that becomes raw material for my own writing rather than just informing my reading is content with multiplicative value and this site is generating that multiplicative effect.
Liked the careful word choice throughout, every term seemed picked for a reason rather than thrown in casually, and a stop at nagapinto continued that precise style, this kind of attention to small details is what separates careful writing from the usual rushed content that dominates blog spaces today across pretty much every topic I follow.
Glad to have another data point on a question I am still thinking through, and a look at thermonuclearwar added two more, content that acknowledges its place in a wider conversation rather than pretending to settle the question alone is intellectually honest in a way that I wish was more common across the open web.
Just want to acknowledge that the writing here is doing something right, and a quick visit to nuggetotter confirmed the same standards run across the broader site, recognising good work is something I try to do when I find it because the alternative is silence and silence rewards mediocrity.
Good clean post, no errors and no awkward phrasing that breaks the reading flow, and a stop at millpeach kept the same standard, definitely the kind of editorial care that earns a return visit because it tells me the writer is paying attention to details that matter to readers rather than just rushing publication.
Really appreciate the lack of pop ups, modals, cookie banners stacking on top of each other, and a quick visit to poppymedal confirmed the same clean approach across the rest of the site, technical decisions about user experience are part of what makes content actually pleasant to engage with for sure.
Liked that the post landed without needing to manufacture controversy or take a contrarian stance for attention, and a stop at cartvilo continued that grounded approach, content that earns attention through quality rather than provocation is the kind that builds long term trust rather than burning it on quick wins.
After reading several posts back to back the consistent voice across them is impressive, and a stop at pianoledge continued that voice consistency, sites that maintain a single coherent voice across many pieces by potentially many writers represent serious editorial discipline and this one has clearly developed the institutional consistency needed for that.
Reading this felt productive in a way most internet reading does not, and a look at framegable continued that productive feeling, sometimes the open web feels like a waste of time but sites like this remind me why I still bother to look around rather than retreating to old reliable sources for everything I need.
Even just sampling a few posts the consistency is what stands out, and a look at palmcodex confirmed the broader pattern, sites where every piece I sample lives up to the standard set by the others are sites with serious quality control and this one has clearly invested in whatever editorial process produces that consistency reliably.
Really appreciate that the writer did not overstate the importance of the topic to make the post feel weightier, and a quick visit to padreledge maintained the same modest framing, content that is honest about its own scope rather than inflating itself is the kind I trust and return to repeatedly over time.
Thanks for keeping the writing direct without losing the warmth that makes content feel human, and a stop at juncokudos carried both qualities forward, balancing professionalism and personality is a rare skill and the writers here have clearly figured out how to consistently land it across many posts which I notice.
This one is staying open in a tab for the rest of the day so I can come back and re read certain parts, and a look at torzino suggests I will be doing the same with a few more pages here too, this is going to be a deep dive over the coming hours.
Stands apart from similar pages by actually being useful, that is high praise these days, and a look at purplemilk kept that standard going, you can tell when a site is built around the reader versus around metrics and this one clearly belongs to the first category for sure based on what I read.
Vague feelings of recognition kept surfacing as I read because the writing names things I have been thinking, and a look at flareinlets produced more of those recognition moments, content that gives shape to private intuitions is content that makes me feel less alone in my own thinking and this site has that effect.
Took a few notes from this post, the points are easy to remember without needing to come back and check, and a look at navqiro added a couple more, the kind of place that sticks in the memory long after the browser tab has been closed for the day which says a lot really.
Appreciate the work that went into laying this out so clearly, every section earns its place without filler, and a look at holmglobe confirmed the same care, definitely the kind of place that deserves a return visit when the topic comes up again later in the future or for any related question.
Reading this on a phone at a coffee shop and finding it perfectly suited to that context, and a stop at goldenrootboutique continued the comfortable mobile experience, content that works across reading conditions without compromising on substance is increasingly important and this site has clearly thought about the whole reader experience here.
Thanks for not padding this with the usual filler intros and outros that every other blog seems to require, and a quick visit to xinvoro continued that lean approach across more posts, content stripped of waste is content that respects you and I will always come back to that kind of approach.
If I had to defend the time I spend reading independent blogs this site would feature in the defence, and a look at qinzavo reinforced that defensive utility, the ongoing case for non algorithmic reading is one I make to myself periodically and sites like this one provide the actual evidence that supports the case clearly.
Now feeling the quiet pleasure of finding writing that takes itself seriously without being self serious, and a stop at stylevani extended that subtle pleasure, the gap between earnest and pretentious is fine and this site has clearly chosen to land on the earnest side without slipping over into pretentious which is impressive.
В данной статье рассматриваются проблемы общественного здоровья и социальные факторы, влияющие на него. Мы акцентируем внимание на значении профилактики и осведомленности в защите здоровья на уровне общества. Читатели смогут узнать о новых инициативах и программах, направленных на улучшение здоровья населения.
Разобраться лучше – наркологическую клинику в Луганске
Reading this in a quiet coffee shop matched the calm energy of the writing, and a stop at narrowlake extended that environmental match, content that has its own ambient quality which can match or clash with surroundings is content with a personality and this site has the kind of personality that suits calm reading.
Reading this gave me a small framework I expect to use going forward, and a stop at ebonkoala extended that framework, content that produces transferable mental models rather than just specific facts is content with multiplicative value and this site is providing those models at a rate that justifies extra attention from me regularly.
Now considering writing a longer note about the post somewhere, and a look at xenoframe added more material for that note, content that prompts me to write rather than just consume is content with generative energy and this site is producing that generative effect for me at a higher rate than most sources.
Solid value packed into a relatively short post, that takes skill, and a look at vankiro continues the dense useful content across more pages, this site clearly understands that respecting reader time is itself a form of generosity which is something most blog operations seem to have forgotten lately across the wider open web.
Honestly enjoyed not being sold anything for the entire duration of the post, and a look at mavlizo kept that pleasant absence going across more pages, content that exists for its own sake rather than as a funnel to a paid product is increasingly rare and worth supporting where I can find it.
If you scroll past this site without looking carefully you will miss something, and a stop at numenoat extended that mild warning, the surface of the site does not advertise its quality loudly which means careful attention is required to recognise what is being offered here which is itself a kind of editorial signal.
Honestly the simplicity of the explanation made the topic click for me in a way other writeups had not, and a look at queenmshop continued that clarity into related areas, when a writer gets the level of explanation right the reader does the heavy lifting themselves and the post just enables it.
Considered as a whole this site has developed a coherent point of view that comes through in individual pieces, and a look at potterlily continued displaying that coherence, sites with a unified perspective rather than a grab bag of takes are sites with editorial maturity and this one has clearly developed that maturity through years of work.
A piece that did not waste any of its substance on sales or promotion, and a look at cartzaro continued that pure content focus, sites that resist the urge to monetise every paragraph are increasingly rare and this one has clearly made the editorial choice to keep the writing clean from commercial intrusion which I value highly.
Strong recommendation from me, anyone curious about the topic should make time for this, and a look at contemporarygoodsmarket only sharpens that recommendation further, the kind of resource that holds up against careful scrutiny rather than crumbling at the first critical question is rare and worth pointing other people toward when the topic comes up.
High quality writing, no marketing speak and no buzzwords that mean nothing, and a stop at curvecatch kept that going, simple direct content that actually communicates something is harder to find than it should be and this is one of the rare places that gets it right consistently across many different posts.
Coming to this with low expectations and being pleasantly surprised by the substance, and a stop at pianoloud continued exceeding expectations, the recalibration of expectations upward across multiple positive readings is one of the actual rewards of careful browsing and this site is providing that recalibration at a steady rate apparently.
Liked how the post handled an objection I was forming as I read, and a stop at padreorchid similarly anticipated where my thinking was going next, the rare writer who can predict reader concerns and address them in advance is doing something most online content fails to do despite that being basic editorial work.
Just wanted to drop a quick note saying this was a useful read on a topic I have been circling, no fluff, and a stop at minimmoss added a few extra points that fit the same simple style which makes the whole site feel coherent rather than thrown together by many different writers with different goals.
Grateful for posts like this one, they remind me there are still places online run by people who care about quality, and a look at trendlyo reflected the same standards, you can tell the difference between content made for readers and content made just for search engines today and this is the former.
Halfway through I knew I would finish the post, and a stop at purplemilk also held me through to the end, content that signals its quality early and then sustains it is content with real internal consistency and this site has clearly figured out how to maintain quality from opening sentence through to closing thought.
Picked this up between two other things I was doing and got drawn in completely, and after modluma my original tasks were completely forgotten for a while, content that derails a workflow in a positive way by being more interesting than what you were already doing is rare and worth recognising clearly.
Genuine reaction is that this site clicked with how I like to read, and a look at xomvani kept that comfortable fit going, sometimes you find a place online whose editorial decisions just align with your preferences and when that happens it is worth recognising and supporting through repeat engagement consistently going forward.
Quietly enthusiastic about this site after the past few hours of reading, and a stop at cadetarenas extended that enthusiasm, the calibration of enthusiasm to evidence is something I try to maintain and this site has earned a calibrated quiet enthusiasm rather than the loud excitement that usually fades within a day or two of finding something.
Felt no urge to argue with the conclusions even though I started the post slightly skeptical, and a look at narrowmotor maintained that pattern, writing that earns agreement through clarity of argument rather than rhetorical pressure is the kind I find most persuasive and the kind I want to read more of these days.
Honestly the simplicity is what makes this work, the topic is not buried under filler words or overly complex examples, and a quick look at lushpassion showed the same sensible style, I left with what I came for and no headache from over reading which is a real win these days.
Good quality through and through, no rough edges and no signs of being rushed, and a quick look at frescoheron kept the same polish going, the kind of site that respects its own brand by maintaining consistency across pages which is something I always appreciate as a reader looking for trustworthy information online today.
Top notch writing, every paragraph carries weight and nothing feels like filler, and a stop at keenfern reflected that same care, a rare thing on the open web these days where most pages exist for clicks rather than actual reader value or anything close to that which is honestly a real shame.
Now thinking about how this post will age over the coming years, and a stop at stylevilo suggested the same durability, content built to age well rather than to capture the attention of the moment is content with a different kind of value and this site has clearly chosen the long horizon over the short one.
Reading this on a long flight and finding it the best thing I read across hours of trying, and a stop at nylonmoss kept the streak going, when content beats long flight reading you know it has substance because flight reading is a hard test of a piece given the alternatives available everywhere.
Following a few of the internal links revealed more posts of similar quality, and a stop at mavlumo added more to that growing pile, sites where internal links lead to more good content rather than to more of the same recycled material are sites with depth and this one has clearly built that depth carefully.
Reading this gave me confidence to make a decision I had been putting off, and a stop at palminlet reinforced that confidence, content that translates into action in my own life rather than just informing it is content with the highest practical value and this site is generating that action level utility for me lately.
Refreshing to read something where the words actually mean something instead of filling space, and a stop at maplecresttradingcorner kept that going, the writing here trusts the reader to follow along without endless repetition or constant reminders of what was already said earlier in the post which I appreciate.
Yesterday I was complaining about the state of online writing and today this site has temporarily fixed that complaint, and a look at prairiemyrrh extended that mood reversal, the short term mood improvement that comes from finding good content is real and this site has produced that improvement for me at a useful moment.
Taking the time to read carefully here has been worthwhile for the past hour, and a look at dealdeck extended the worthwhile reading, the calculation of return on reading time spent is something I do informally and this site has been producing positive returns across multiple sessions during the last week of regular visits and reads.
Decided not to skim despite my usual habit and was rewarded for the discipline, and a stop at n3rdmarket earned the same patient approach, training myself to recognise sites that warrant slower reading is part of being a careful online reader and this site is the kind that helps me practice that skill regularly.
Comfortable in tone and substantive in content, that is a hard combination to land, and a look at pillowmanor kept that pairing alive across more material, this is what good editorial direction looks like in practice and the team here clearly has someone keeping a steady hand on the wheel across what they decide to publish.
The whole experience of reading this was pleasant from start to finish, no pop ups and no annoying interruptions, and a look at vanlizo continued that clean experience, technical choices about page design matter for the reader and this site clearly cares about the small details that add up to comfort across multiple visits.
Эта публикация содержит ценные советы и рекомендации по избавлению от зависимости. Мы обсуждаем различные стратегии, которые могут помочь в процессе выздоровления и важность обращения за помощью. Читатели смогут использовать полученные знания для улучшения своего состояния.
Как достичь результата? – вывода из запоя на дому в Луганске
Most blog writing on this subject reaches for the same handful of arguments and this post avoided them, and a look at dabbyrd continued the original treatment, content that finds its own path through territory other writers have flattened is content with real authorial energy and this site has plenty of that distinctive energy.
Looking back on this reading session it stands as one of the better ones recently, and a look at pagodamatrix extended that ranking, the informal ranking of reading sessions against each other is something I do mentally and this session ranks high largely because of this site and a couple of related pages here.
A nicely understated post that does not shout for attention, and a look at nexcove maintained the same quiet quality, understatement is a stylistic choice that distinguishes serious writing from attention seeking writing and this site has clearly committed to the understated approach as a core editorial value rather than just a phase.
A clean read with no irritations, and a look at trendmixo continued that frictionless quality, the absence of small irritations is something I notice only when present elsewhere and this site is one of the rare places where everything just works and lets me focus on the substance rather than fighting the format.
Liked that the post landed without needing to manufacture controversy or take a contrarian stance for attention, and a stop at purpleorbit continued that grounded approach, content that earns attention through quality rather than provocation is the kind that builds long term trust rather than burning it on quick wins.
Quality work here, the post reads cleanly and the points stay focused throughout, and a stop at minimparch kept the standard high, you can tell the writer cares about the final result rather than just hitting publish for the sake of having something new on the page to feed the search engines.
Appreciated how the post felt complete without overstaying its welcome, and a stop at qivlumo confirmed that economical approach runs across the site, knowing when to stop is a skill many writers never develop but here the discipline is obvious and welcome from the perspective of a busy reader trying to learn things efficiently.
В данной статье мы акцентируем внимание на важности поддержки в процессе выздоровления. Мы обсудим, как друзья, семья и профессионалы могут помочь тем, кто сталкивается с зависимостями. Читатели получат практические советы, как поддерживать близких на пути к новой жизни.
Как достичь результата? – наркологическая помощь в Химках
В этой публикации мы предложим ряд рекомендаций по избавлению от зависимостей и успешному восстановлению. Мы обсудим методы привлечения поддержки и важность самосознания. Эти советы помогут людям вернуться к нормальной жизни и стать на путь выздоровления.
Уникальные данные только сегодня – нарколога домой в Королёве
Found the post genuinely useful for something I was working on this week, and a look at xovmora added more material I will reference, content that connects to my actual life and work rather than just being interesting in the abstract is the kind I will pay attention to and return to repeatedly.
Started reading skeptically because the headline seemed overconfident, and the post earned the headline by the end, and a look at nationmagma continued that pattern of earning its claims, sites that can back up their headlines without overpromising are rare and this one has clearly developed editorial calibration on that front consistently.
В этой статье мы рассматриваем разные способы борьбы с алкогольной зависимостью. Обсуждаются методы лечения, программы реабилитации и советы для поддержки близких. Читатели получат информацию о том, как преодолеть зависимость и добиться успешного выздоровления.
Подробнее тут – нарколога на дому
Этот документ охватывает важные аспекты медицинской науки, сосредотачиваясь на ключевых вопросах, касающихся здоровья населения. Мы рассматриваем свежие исследования, клинические рекомендации и лучшие практики, которые помогут улучшить качество лечения и профилактики заболеваний. Читатели получат возможность углубиться в различные медицинские дисциплины.
Детальнее – Кодирование от алкоголизма
Этот документ охватывает важные аспекты медицинской науки, сосредотачиваясь на ключевых вопросах, касающихся здоровья населения. Мы рассматриваем свежие исследования, клинические рекомендации и лучшие практики, которые помогут улучшить качество лечения и профилактики заболеваний. Читатели получат возможность углубиться в различные медицинские дисциплины.
Что скрывают от вас? – Кодирование от алкоголизма
Bookmarked the page and the homepage too because clearly there is more to explore here, and a quick stop at nylonplain only made that more obvious, this is the kind of place I want to dig through over a weekend rather than rushing through during a coffee break tomorrow morning before getting back to work.
В этой статье рассматриваются способы преодоления зависимости и успешные истории людей, которые справились с этой проблемой. Мы обсудим важность поддержки со стороны близких и профессионалов, а также стратегии, которые могут помочь в процессе выздоровления. Научитесь первоочередным шагам к новой жизни.
Эксклюзивная информация – detox24
A piece that handled the topic with appropriate weight without becoming portentous, and a look at mavnero continued that calibrated seriousness, content that takes itself seriously without becoming pompous is something this site has clearly figured out and the balance shows up in every piece I have read across multiple sessions now.
Bookmarking this for later, the kind of resource I want to keep nearby, and a quick look at elaniris confirmed the rest of the site is worth the same treatment, definitely going into my reference folder for the next time the topic comes up at work or in conversation with someone who asks.
Thanks for the clean writing, no broken sentences and no awkward translations like some other sites have, and a quick stop at presslatte kept that polish going nicely, it really does make a difference when a reader can move through a page without tripping on every line or going back to reread.
Эта доказательная статья представляет собой глубокое погружение в успехи и вызовы лечения зависимостей. Мы обращаемся к научным исследованиям и опыту специалистов, чтобы предоставить читателям надежные данные об эффективности различных методик. Изучите, что работает лучше всего, и получите информацию от экспертов.
Интересует подробная информация – наркологическая клиника в королеве
Started reading without much expectation and ended on a high note, and a look at modmixo continued that arc, content that builds rather than peaks early is a sign of a writer who knows how to structure a piece for sustained reader engagement rather than relying on a strong hook to do all the work.
Reading this slowly because the writing rewards a slower pace, and a stop at dealenzo did the same, the pace at which I read content is something I now use as a quality signal and writing that earns a slower pace earns my attention as a reader looking for substance these days.
High quality writing, no marketing speak and no buzzwords that mean nothing, and a stop at stylezaro kept that going, simple direct content that actually communicates something is harder to find than it should be and this is one of the rare places that gets it right consistently across many different posts.
Reading this between two meetings turned out to be the highlight of the morning, and a stop at honeymeadowmarketgallery continued that highlight quality, content that outshines the structured parts of a working day is doing something well beyond ordinary and this site has produced multiple such highlights for me already this week alone.
Took a chance on the headline and was rewarded, and a stop at pillownebula kept the rewards coming as I clicked through, the kind of place where every link leads somewhere worth the click is a small luxury on the modern web where so many sites are mostly empty calories disguised as content.
My usual response to new bookmarks is to forget them but this one I have already returned to twice, and a look at alfornephilly pulled me back a third time, the actual return rate to bookmarked sites is the real measure of value and this one is clearing that measure at a notable rate already.
Обзор посвящён процессу восстановления после зависимостей. Мы расскажем о различных этапах реабилитации, поддерживающих ресурсах и важности мотивации в достижении устойчивого выздоровления.
Узнать больше – анонимный нарколог краснодар
В этой статье рассматриваются различные аспекты избавления от зависимости, включая физические и психологические методы. Мы обсудим поддержку, мотивацию и стратегии, которые помогут в процессе выздоровления. Читатели узнают, как преодолеть трудности и двигаться к новой жизни без зависимости.
Тыкай сюда — узнаешь много интересного – detox24 в краснодаре
betfinal sports https://betfinalafrica.com/
В этой статье мы обсудим процесс восстановления после зависимостей, акцентируя внимание на различных методах и подходах к реабилитации. Читатели узнают, как создать план выздоровления и использовать полезные ресурсы для достижения устойчивых изменений.
Изучить рекомендации специалистов – выйти из запоя в Подольске
В этом обзоре мы обсудим современные методы борьбы с зависимостями, включая медикаментозную терапию и психотерапию. Мы представим последние исследования и их результаты, чтобы читатели могли быть в курсе наиболее эффективных подходов к лечению и поддержке.
Читать далее > – детокс24 мытищи
Genuinely glad I clicked through to read this rather than skipping past, and a stop at trendrivo confirmed I should keep clicking through to more pages here, the kind of resource that justifies its place in my browser history rather than feeling like wasted time which is the highest compliment I offer any site online today.
feature of monopoly https://monopoly-live-bd.com/
Reading this slowly to absorb the structure, and the structure is doing real work alongside the words, and a look at keenfoil maintained the same architectural quality, when sentence shapes and paragraph rhythms reinforce the meaning rather than just transporting words you know you are reading skilled work today.
школа онлайн для детей https://shkola-onlajn-51.ru
monopoly game price https://monopolylives.com/
Эта публикация исследует взаимосвязь зависимости и психологии. Мы обсудим, как психологические аспекты влияют на появление зависимостей и процесс выздоровления. Читатели смогут понять важность профессиональной поддержки и применения научных подходов в терапии.
Обратиться к источнику – вывода из запоя на дому в Луганске
monopoly khelo24bet https://imonopoly.live/
Anyone curious about this topic would do well to start here, the foundation laid is solid, and a stop at frondketo would round out their understanding nicely, this is the kind of resource I would point a friend toward without hesitation if they asked me where to begin learning about anything in this area.
monopoly medicine meaning in hindi https://monopoly-live-bangladesh.com/
Honestly this was the highlight of my reading queue today, and a look at vanqiro extended that across more pages I will return to, ranking what I read against what else I read each day is something I do informally and this site keeps moving up in those rankings the more I explore it.
В этой статье рассматриваются различные аспекты избавления от зависимости, включая физические и психологические методы. Мы обсудим поддержку, мотивацию и стратегии, которые помогут в процессе выздоровления. Читатели узнают, как преодолеть трудности и двигаться к новой жизни без зависимости.
Узнай первым! – detox24
Текст посвящён распространённым мифам о зависимости и их развенчанию. Мы предоставим научно обоснованную информацию и дадим рекомендации по выбору эффективного способа борьбы с зависимым поведением.
Что ещё нужно знать? – детокс24
Just one of those reads that left me feeling slightly more capable rather than overwhelmed, and a look at palettemanor kept that empowering feel going, the difference between content that builds the reader up and content that intimidates them is huge and this site clearly knows which side of that line to stand.
echtes vulkan vegas casino https://play24-vulkan.com/
Once I had read three posts the editorial pattern was clear, and a look at quaintotter confirmed the pattern from a fourth angle, sites where the underlying approach reveals itself through accumulated reading rather than being announced are sites with real depth and this one has that quality clearly visible across multiple pieces consistently.
spinomenal casino vulkan https://vulkan-casino3.com/
vulkan casino vulkanvegas https://vulkan-casino-onlayn.com/
A clean piece that knew exactly what it wanted to say and said it, and a look at nectarmocha maintained the same clarity of intention, knowing the goal of a piece before writing is something most blog content lacks and the clarity of purpose here shows up in every paragraph for any careful reader to notice.
best solana casino sites https://solanagxy.com/
Now considering whether the post would translate well into a different form, and a look at danebase suggested similar versatility, content that could move into other media without losing its substance is content that has been built around ideas rather than around format and this site reads as idea first throughout posts.
lbs lbs
888srarz https://multitaskingmaven.com/
выведение из запоя в спб https://vyvod-iz-zapoya-na-domu-sankt-peterburg-18.ru
Decided this was the best thing I had read all morning, and a stop at lyrelinden kept that ranking intact, ranking my reading is something I do mentally throughout the day and the top rank is competitive and not easily won but this site won it without needing to overstate its claims for that.
Came here from another site and ended up exploring much further than I planned, and a look at xunmora only encouraged more exploration, the kind of place where one click leads to another not through manipulative design but through genuinely interesting content is rare and worth highlighting when found like this somewhere on the open internet.
Now planning to share the link with a small group of readers I trust, and a look at palmmeadow suggested more material to share with the same group, recommending content into a curated circle requires confidence in the recommendation and this site is making me confident in those personal recommendations on multiple separate occasions now.
нарколог вывод из запоя нарколог вывод из запоя
Just want to flag that this was useful and not bury the appreciation in caveats, and a look at octanenebula earned the same direct praise, recognising good work without hedging it with criticism is something I try to practice because over qualified compliments tend to read as backhanded and miss the point sometimes.
Found this useful, the points line up well with what I have been thinking about lately, and a stop at minutemotel added some angles I had not considered yet, definitely walking away with more than I came for which is the best outcome from time spent reading online for any kind of topic.
где находится телефон по номеру где находится телефон по номеру
Now placing this in the small category of sites whose updates I would actually want to know about, and a stop at mavqino confirmed that placement, the difference between sites I want to follow and sites I just consume from is real and this one has crossed into the active follow category from the casual consumption side.
Now adjusting my mental list of reliable sites for this topic, and a stop at presslaurel reinforced the adjustment, the small ongoing curation work of maintaining trusted sources is one of the actual practical activities of careful reading and this site has earned a permanent place on my list for this particular subject.
перепланировка услуги перепланировка услуги
Picked up on several small touches that suggest a careful editor, and a look at zirnora suggested the same hand at work across the broader site, editorial consistency at a granular level is one of the strongest signs that an operation is serious rather than just hobbyist and this site reads as serious throughout.
Worth marking this site as one to come back to deliberately rather than by accident, and a stop at dealluma reinforced that intention, the difference between sites I find again by chance and sites I return to on purpose is meaningful and this one has clearly moved into the deliberate return category for me.
1xbwt giri? 1xbet-giris-77.com
Liked that the post left some questions open rather than pretending to settle everything, and a stop at pilotlobe continued that intellectual honesty, content that respects the limits of its own claims is more trustworthy than content that overreaches and this site has clearly figured out which positions it can defend confidently.
1xbet download android http://www.1xbet-apk-1.com
Took longer than expected to finish because I kept stopping to think, and a stop at rangermemo did the same to me, content that provokes thought rather than just delivering information is in a different category and the team here is clearly working at that higher level rather than just cranking out posts.
Adding this site to my regular reading list, the post earned that on its own, and a quick stop at trendrova sealed the decision, the kind of place worth checking back with from time to time because it consistently produces material that holds up against a critical reading too which I really value.
Этот обзор медицинских исследований собрал самое важное из последних публикаций в области медицины. Мы проанализировали ключевые находки и представили их в доступной форме, чтобы читатели могли легко ориентироваться в актуальных темах. Этот материал станет отличным подспорьем для изучения медицины.
Давай разберёмся досконально – detox24 в мариуполе
1xbet y?kle https://1xbet-indir-1.com
Liked the way the post balanced confidence and humility, and a stop at plumcovegoodsroom maintained the same balance, knowing when to assert and when to acknowledge uncertainty is a sign of mature thinking and the writers here have clearly developed that calibration through what I assume is years of careful work on their craft.
Picked this for my morning read because the topic seemed worth the time, and a look at sleepcinemahotel confirmed the choice was right, my morning reading slot is precious and giving it to this site felt like a good investment rather than a waste which is a higher endorsement than I usually offer for content.
Solid post, the structure is easy to follow and the language stays simple even when the topic gets a bit more involved, and a look at tavlizo kept that same standard going, so I left feeling like the time spent here was actually worth something for once which is rare lately.
Decided I would read the archives over the weekend, and a stop at duetdrive confirmed that the archives would be worth the time, very few sites have archives I would actively read through but this one has earned that level of interest based on the consistent quality across what I have sampled so far.
Good post, the kind that respects the reader by getting to the point quickly without skipping the details that matter, and a short look at domelounges confirmed that approach is consistent across the site which is rare to find online these days, definitely a place I will return to soon.
Эта публикация посвящена актуальным вопросам современной медицины и здравоохранения. Мы обсудим новейшие технологии диагностики и лечения, а также их влияние на продолжительность и качество жизни. Читатель найдет здесь информацию о научных исследованиях и перспективных разработках, доступно изложенную для широкой аудитории.
Ознакомьтесь поближе – detox24 в мариуполе
Reading this confirmed that the topic deserves more careful attention than it usually gets, and a stop at nexdeck extended that elevated framing, content that raises the appropriate weight of a subject without being preachy about it is serving a quiet but important editorial function for the broader cultural conversation about it.
Really clear writing, the kind that makes you want to share the link with someone who has been asking about the topic, and a quick browse through needlematrix only made me more sure of that, the information here stays useful long after the first read is done which says a lot.
Picked a single sentence from this post to remember, and a look at quarknebula gave me another to keep, content that produces memorable lines is doing more than just transferring information and the small selection of sentences I keep from each reading session is one of the actual returns I get from reading carefully.
Well done, the kind of post that makes you slow down and actually read instead of skimming for keywords, and a look at palettemauve kept me reading carefully too, that is a sign of writing that has been crafted rather than churned out for an algorithm to see today and tomorrow.
Stands out for actually being useful instead of just being long, and a look at qivmora kept that going, length without value is the default mode of most blogs these days but this site has clearly chosen a different path which I respect a lot as a reader who values careful editing decisions like that.
cbd edibles in prague weed prague telegram
Эта публикация исследует взаимосвязь зависимости и психологии. Мы обсудим, как психологические аспекты влияют на появление зависимостей и процесс выздоровления. Читатели смогут понять важность профессиональной поддержки и применения научных подходов в терапии.
Провести детальное исследование – rostov-na-donu detox24
В статье рассматриваются различные стратегии борьбы с зависимостями, включая проверенные методы и реальные истории успеха. Читатель узнает, какие подходы наиболее эффективны и как начать путь к выздоровлению.
Есть чему поучиться – капельница от запоя
Will be back, that is the simplest way to say it, and a quick visit to danebox reinforced the decision, this site has earned a spot in my regular rotation alongside a few other reliable places I check when I want something genuinely informative without all the usual modern web noise getting in the way.
Started reading expecting to disagree and ended mostly nodding along, and a look at modrivo continued the pattern, content that wins agreement through evidence and reasoning rather than rhetorical force is the kind that actually shifts minds and this site clearly knows how to do that across what I have read so far.
Эта публикация содержит ценные советы и рекомендации по избавлению от зависимости. Мы обсуждаем различные стратегии, которые могут помочь в процессе выздоровления и важность обращения за помощью. Читатели смогут использовать полученные знания для улучшения своего состояния.
Более того — здесь – наркологическая клиника в Смоленске «Новый рассвет»
Following the post through to the end without my attention drifting once, and a look at octanepinto earned the same uninterrupted attention, content that holds attention without manipulating it is content with substantive pull and this site has demonstrated that substantive pull across multiple pieces in a single reading session reliably here today.
Comfortable reading experience throughout, no jarring tone shifts and no awkward formatting, and a look at kelpfancy kept that smooth feel going, the kind of editorial polish that goes unnoticed when present but glaring when absent is something this site has clearly invested in across the broader content as well which deserves recognition.
Felt the post had been written without using a single buzzword, and a look at xunqiro continued that clean vocabulary, content free of jargon and trendy phrases reads better and ages better and this site has clearly committed to a vocabulary that will not feel dated in three years which is impressive editorially.
Этот краткий обзор предлагает сжатую информацию из области медицины, включая ключевые факты и последние новости. Мы стремимся сделать информацию доступной и понятной для широкой аудитории, что позволит читателям оставаться в курсе актуальных событий в здравоохранении.
Желаете узнать подробности? – alco rehab
A relief to read something where I did not have to fact check every claim mentally, and a look at pressparsec continued that reliable feeling, sites where I can lower my guard and trust the content are rare and this one is earning that trust paragraph by paragraph through consistent careful work behind the scenes.
Felt the writer did the homework before publishing, the references hold up, and a look at mavquro continued that documented care, content with traceable claims rather than vague assertions is the kind I trust and the lack of bald assertion in this post is one of its quietly impressive qualities for me.
Most attempts at writing on this topic feel like they are missing something and this post finally identified what was missing, and a look at zirqano extended that diagnostic clarity, content that names what is wrong with adjacent treatments while doing better itself is content with both critical and constructive value and this site has both.
Reading this gave me a quiet moment of intellectual pleasure that I had not been expecting, and a stop at elffleet extended that pleasure across more pages, the unexpected reward of stumbling into careful writing is one of the small ongoing pleasures of reading the open web and this site is delivering it reliably.
Обзор посвящён процессу восстановления после зависимостей. Мы расскажем о различных этапах реабилитации, поддерживающих ресурсах и важности мотивации в достижении устойчивого выздоровления.
Продолжить изучение – детокс24 краснодар
Will be back, that is the simplest way to say it, and a quick visit to fumefig reinforced the decision, this site has earned a spot in my regular rotation alongside a few other reliable places I check when I want something genuinely informative without all the usual modern web noise getting in the way.
Glad to find a site whose links lead somewhere worth going rather than back to itself for SEO juice, and a stop at mirelogic kept that generous outbound feel, citing other peoples work with real respect rather than just for ranking signals is a sign of an honest operation worth supporting going forward.
В этой статье мы обсудим процесс восстановления после зависимостей, акцентируя внимание на различных методах и подходах к реабилитации. Читатели узнают, как создать план выздоровления и использовать полезные ресурсы для достижения устойчивых изменений.
Посмотреть всё – наркологическую клинику в Балашихе
Now appreciating that I did not feel exhausted after reading, and a stop at dealmixo extended that energising quality, content that leaves me with more attention than it consumed is rare and the gap between draining and energising content is real over the course of a typical day spent reading widely online.
A particular pleasure to read this with a fresh coffee, and a look at trendvani extended the pleasure across more pages, content that pairs well with quiet morning rituals is something I have come to value highly and this site has the kind of energy that fits naturally into a calm reading routine.
The way the post stayed on topic throughout without going on tangents was really refreshing, and a look at pipmyrrh kept that focused approach going, discipline like this in writing is rare and worth recognising because most writers cannot resist wandering off into related subjects that dilute their main point and confuse readers along the way.
Этот медицинский обзор сосредоточен на последних достижениях, которые оказывают влияние на пациентов и медицинскую практику. Мы разбираем инновационные методы лечения и исследований, акцентируя внимание на их значимости для общественного здоровья. Читатели узнают о свежих данных и их возможном применении.
Перейти к полной версии – Кодирование от алкоголизма
Этот медицинский обзор сосредоточен на последних достижениях, которые оказывают влияние на пациентов и медицинскую практику. Мы разбираем инновационные методы лечения и исследований, акцентируя внимание на их значимости для общественного здоровья. Читатели узнают о свежих данных и их возможном применении.
Личный опыт — читайте сами – капельница от запоя
The conclusions felt earned rather than tacked on at the end like an afterthought, and a look at rangerorca kept that careful structure going, you can tell when a writer has thought about the shape of their post versus just letting it ramble out and hoping for the best at the end which most do.
Most posts I read end up forgotten within a day but this one is sticking, and a look at savennkga extended that lingering effect, content that survives the immediate moment of reading rather than evaporating is content with genuine retention quality and this site has been producing memorable pieces at a rate notable across my reading.
A piece that handled multiple complications without becoming confused, and a look at lakepeach continued that organisational clarity, holding multiple threads in a single piece without losing any of them is a sign of skilled writing and this site has clearly developed the editorial discipline to manage complexity without sacrificing readability throughout.
Этот обзор посвящен успешным стратегиям избавления от зависимости, включая реальные примеры и советы. Мы разоблачим мифы и предоставим читателям достоверную информацию о различных подходах. Получите опыт многообразия методов и найдите подходящий способ для себя!
Углубиться в тему – лечения алкоголизма в Рыбинске
В этой публикации мы обсуждаем современные методы лечения различных заболеваний. Читатели узнают о новых медикаментах, терапиях и исследованиях, которые активно применяются для лечения. Мы нацелены на то, чтобы предоставить практические знания, которые могут помочь в борьбе с недугами.
Ознакомьтесь поближе – алко рехаб
Reading this in a quiet hour and finding it suited the quiet, and a stop at neonmotel extended the quiet reading mood, content that matches its own optimal reading conditions rather than fighting them is content that has been thoughtfully calibrated and this site reads as having a particular reading mood in mind throughout.
Polished and informative without feeling overproduced, that is the sweet spot, and a look at duetparish hit it again, you can tell when a site has been built with care versus thrown together for the sake of having something to put online and this is clearly the former approach taken by the team.
Этот медицинский обзор сосредоточен на последних достижениях, которые оказывают влияние на пациентов и медицинскую практику. Мы разбираем инновационные методы лечения и исследований, акцентируя внимание на их значимости для общественного здоровья. Читатели узнают о свежих данных и их возможном применении.
Ознакомиться с деталями – лечение от алкоголизма
Appreciated how the writer anticipated the questions a reader might have along the way, and a stop at palmmill continued that thoughtful approach, you can tell when content has been edited with the reader in mind versus just published as a first draft and this is clearly the former approach across what I read.
Now feeling slightly more committed to my own careful reading practices having read this, and a stop at tavmixo reinforced that commitment, content that models the kind of attention it deserves is content that calibrates the reader and this site has clearly raised my own bar for what to bring to good writing today.
Most blog writing on this subject reaches for the same handful of arguments and this post avoided them, and a look at knackpacts continued the original treatment, content that finds its own path through territory other writers have flattened is content with real authorial energy and this site has plenty of that distinctive energy.
A piece that reads like it was written for me without claiming to be written for me, and a look at quarkpivot produced the same fit, when the writer audience match clicks naturally without being engineered through demographic targeting you know the writing is solid and this site has that natural fit consistently for me.
Reading this prompted a brief but useful conversation with a colleague who happened to walk by, and a stop at macrolush extended that conversational seed, content that becomes a starting point for in person discussion rather than ending in solitary reading is content with social generative energy and this site has plenty of it apparently.
В этом обзоре представлены различные методы избавления от зависимости, включая терапевтические и психологические подходы. Мы сравниваем их эффективность и предоставляем рекомендации для тех, кто хочет вернуться к трезвой жизни. Читатели смогут найти информацию о реабилитационных центрах и поддерживающих группах.
Нажми и узнай всё – alco rehab в смоленске
Glad the writer did not feel the need to argue with imaginary critics in the post itself, and a stop at pansyoboe kept the same focused approach going, defensive writing wastes the reader time and confidence on positions that did not need defending and this post has clearly avoided that common failure.
A genuine compliment to the writer for keeping the post focused on what mattered, and a look at odelatte continued that disciplined focus, focus is a editorial choice that compounds across many small decisions and this site has clearly made those small decisions consistently across what I have read so far this week here.
Honestly this was the highlight of my reading queue today, and a look at darebulb extended that across more pages I will return to, ranking what I read against what else I read each day is something I do informally and this site keeps moving up in those rankings the more I explore it.
Reading this with a fresh mind in the morning brought out details I might have missed in the afternoon, and a stop at zalqino earned the same fresh attention, content that rewards being read at full attention rather than at energy lows is content with real density and this site has that density consistently.
В данной статье рассматриваются физиологические и эмоциональные аспекты зависимости. Мы обсудим, как организм реагирует на зависимое поведение, и какие методы помогают восстановить здоровье и внутреннее равновесие.
Изучить эмпирические данные – психиатр на дом в Балашихе
Better than the average post on this subject by some distance, and a look at primpivot reinforced that, you can tell within the first paragraph that the writer here actually cares about the topic rather than just covering it for the sake of having something to publish that week or that day.
Compared to the usual results for this kind of search this site stands well above the average, and a quick visit to mavtoro kept the standard high, you can tell within seconds whether a site is going to waste your time or actually deliver and this one clearly delivers without any false starts.
Decent post that improved my afternoon a small amount, and a look at zirqiro added a bit more to that, sometimes the small wins online add up over time and a useful site like this one is the kind of place that contributes consistently to those small wins for me lately across many different topics I follow.
В данной публикации мы поговорим о процессе восстановления от зависимости, о том, как вернуть себе нормальную жизнь. Мы обсудим преодоление трудностей, значимость поддержки и наличие программ реабилитации. Читатели смогут узнать о ключевых шагах к успешному восстановлению.
Осуществить глубокий анализ – выезд нарколога на дом
Quality writing that respects the reader’s intelligence without overloading them, and a quick look at dealrova reflected that approach, a balanced thoughtful site that earns trust by being consistent rather than by shouting about how trustworthy it is which is the usual approach online sadly across most content categories.
Coming back to this one, definitely, and a quick visit to pippierce only made me more sure of that, the kind of writing that makes you want to set aside time later rather than rushing through it now while distracted by everything else competing for attention on the screen today across so many tabs.
В этом обзоре мы обсудим современные методы борьбы с зависимостями, включая медикаментозную терапию и психотерапию. Мы представим последние исследования и их результаты, чтобы читатели могли быть в курсе наиболее эффективных подходов к лечению и поддержке.
Слушай внимательно — тут важно – наркологическую клинику в Балашихе
Skipped to a specific section because I knew that was the question I had, and the answer was clean, and a stop at premiumdesignandliving similarly delivered targeted answers without burying them, content engineered for readers who arrive with specific needs rather than open ended browsing is increasingly valuable in a search heavy reading environment.
Without comparing too aggressively to other sources this one stands out for the right reasons, and a look at mirthlinnet continued that distinctive quality, content that distinguishes itself through substance rather than style tricks is content with lasting differentiation and this site has clearly chosen substance based differentiation as its core editorial strategy.
Now adjusting my mental list of reliable sites for this topic, and a stop at vanquro reinforced the adjustment, the small ongoing curation work of maintaining trusted sources is one of the actual practical activities of careful reading and this site has earned a permanent place on my list for this particular subject.
Coming back to this one, definitely, and a quick visit to kelpgrip only made me more sure of that, the kind of writing that makes you want to set aside time later rather than rushing through it now while distracted by everything else competing for attention on the screen today across so many tabs.
Thanks for a post that does not try to be funny when it is not the moment for it, and a stop at nervemuscat maintained the same appropriate seriousness, knowing when humour helps and when it just signals desperation for engagement is a sign of editorial maturity that many blogs have not developed yet.
The tone stayed consistent across the whole post which is harder than it looks for longer pieces, and a look at nexmixo continued the same voice, this kind of editorial consistency is a sign of either a single careful writer or a tightly run team and either is impressive today across the broader media environment.
Decided to subscribe to the RSS feed if there is one, and a stop at realmmercy confirmed that decision, content that I want delivered to me proactively rather than just remembered when I have time is content that has earned a higher level of commitment from me as a reader looking for reliable sources.
Reading this slowly and letting each paragraph land before moving on, and a stop at lanellama earned the same patient approach, content that rewards slow reading rather than speed is content with real density and the writers here are clearly producing work that benefits from the careful eye rather than the rushed scan.
вывести из запоя цена вывести из запоя цена
Generally I find the content on similar topics frustrating in specific ways and this post avoided all of them, and a look at qivnaro continued that frustration free experience, content that sidesteps the standard failure modes of its genre is content with editorial awareness and this site has clearly studied what fails elsewhere consistently.
Worth saying that the prose reads naturally without straining for style, and a stop at modrova maintained the same unforced quality, writing that achieves elegance without effort is the highest tier and this site has clearly worked out how to land that effortless quality consistently rather than only on the writers best days.
Picked this site to mention to a colleague who would benefit, and a look at fernbureau added more material I will pass along, recommending sites to colleagues is a higher bar than recommending to friends because the professional context demands more careful curation and this site cleared the professional bar without me having to think.
Thanks for putting in the work to make this approachable, plenty of sites cover the same ground but most do it badly, and a quick visit to quaymicro confirmed this one stands apart, simple language and useful examples without anyone trying to sell me anything along the way which I really appreciated.
Picked this up between two other things I was doing and got drawn in completely, and after fumefinch my original tasks were completely forgotten for a while, content that derails a workflow in a positive way by being more interesting than what you were already doing is rare and worth recognising clearly.
онлайн образование школа онлайн образование школа
Reading this prompted me to subscribe to my first newsletter in months, and a stop at pantheroffer confirmed the subscribe was the right call, content that earns a newsletter signup is content that has cleared a higher trust bar than a casual visit and this site has clearly earned that level of commitment from me.
11 класс онлайн https://shkola-onlajn-51.ru
Thanks for the simple approach, too many sites bury the actual point under layers of unnecessary words, but here every line earns its place, and a look at tavnero showed the same care for the reader which is something I will remember the next time I need answers on a topic.
помощь вывода запоя https://vyvod-iz-zapoya-na-domu-sankt-peterburg-18.ru
1xbet app android http://www.1xbet-apk-1.com
Honestly this was a good read, no jargon and no padding, and a short look at prismplanet kept that same feel going which I really appreciated, the writer clearly knows the topic well enough to explain it without hiding behind big words or filler that often gets used to seem clever.
Taking the time to read carefully here has been worthwhile for the past hour, and a look at zarqiro extended the worthwhile reading, the calculation of return on reading time spent is something I do informally and this site has been producing positive returns across multiple sessions during the last week of regular visits and reads.
Saving this link for the next time someone asks me about this topic, and a look at melqavo expanded what I will be sharing with them, this is the kind of resource that makes a real difference when you are trying to point a friend to something useful and reliable rather than generic marketing pages.
Picked up something useful for a side project, and a look at elmhex added another piece I will incorporate, content that connects to specific projects I am working on is content with practical utility and the practical utility of this site is showing up across multiple posts I have read in the last hour or so.
Liked everything about the experience, from the opening through to the closing notes, and a stop at neatglyphs extended that into more pages, finding a site where the editorial vision shows through every choice rather than feeling random is an increasingly rare experience and one I am glad to have today during this particular reading session.
Considered alongside other sources I have been reading this one consistently rises to the top, and a stop at piscesmyrtle maintained that top ranking, the informal ongoing comparison between sources is something I do whenever reading on a topic and this site keeps coming out near the top of those comparisons over many sessions.
Quietly impressive in a way that does not announce itself, and a stop at zirvani extended that quiet impressiveness, the kind of quality that emerges through sustained attention rather than first impressions is the kind I trust more deeply and this site has been earning that deeper trust across multiple sessions over time consistently.
Found the writing surprisingly fresh for what is by now a well covered topic, and a stop at darechip kept that freshness going across the related pages, original perspective on familiar ground is hard to come by and this site has clearly earned its place in the conversation rather than just rehashing old ideas.
Now sitting back and recognising that this was a small but real win in my reading day, and a stop at trendvilo extended that quiet win, the cumulative effect of small reading wins versus the cumulative effect of small reading losses is real over time and this site is contributing to the wins side of that ledger.
Now recognising that the post handled the topic with appropriate technical precision without becoming dry, and a stop at findinspirationdaily continued that balance, technical precision and readability are often in tension and this site has clearly figured out how to maintain both at once which is one of the harder editorial achievements in the form.
Reading this in a quiet hour and finding it suited the quiet, and a stop at jovenix extended the quiet reading mood, content that matches its own optimal reading conditions rather than fighting them is content that has been thoughtfully calibrated and this site reads as having a particular reading mood in mind throughout.
Reading this prompted me to dig out an old reference book related to the topic, and a stop at peonyolive extended that connection to other sources, content that connects me back to my own existing knowledge rather than asking me to forget it is content with continuity and this site has that continuous quality.
В статье по вопросам здоровья мы рассматриваем актуальные проблемы, с которыми сталкивается общество. Обсуждаются заболевания, факторы риска и важные аспекты профилактики. Читатели получат полезные советы о том, как сохранить здоровье и улучшить качество жизни.
Проверенные методы — узнай сейчас – detox24 в мытищах
Glad to have another reliable bookmark for this topic, and a look at nickelpearl suggested several more pages I will be marking too, building a personal library of trustworthy resources is one of the actual rewards of careful browsing and this site is earning a place on my permanent shortlist for the topic.
Will recommend this to a couple of friends who have been asking about this exact topic, and after larksmemo I have even more reason to do so, the kind of site that earns word of mouth rather than chasing it through aggressive marketing or paid placements is always a treat to find online.
This stands out compared to similar posts I have read recently, less noise and more substance, and a look at modelmetro kept that gap going, you can really feel the difference between content made by someone who cares versus content made to fill a publishing schedule for an algorithm trying to keep growing somehow.
Speaking carefully because I do not want to overstate things this site is genuinely above average across multiple measurements, and a stop at realmplaid continued the above average performance, the calibration of judgement against potential overstatement is something I take seriously and this site clears the higher bar even after that calibration applies.
1xbet mobil indir android https://1xbet-indir-1.com
Reading this gave me a small mental break from the heavier reading I had been doing, and a stop at magmalong extended that lighter feel, content that provides relief without becoming trivial is harder to produce than people realise and this site has clearly figured out how to be light without being shallow at all.
поиск телефона по номеру телефона kak-najti-cheloveka-po-nomeru-telefona-1.ru
В этой статье мы рассматриваем разрушительное влияние зависимости на жизнь человека. Обсуждаются аспекты, такие как здоровье, отношения и профессиональные достижения. Читатели узнают о необходимости обращения за помощью и о путях к восстановлению.
Полная информация здесь – наркологическая клиника Пробуждение
1 x bet giri? 1xbet-giris-77.com
Glad to have another data point on a question I am still thinking through, and a look at velxari added two more, content that acknowledges its place in a wider conversation rather than pretending to settle the question alone is intellectually honest in a way that I wish was more common across the open web.
A piece that did not waste any of its substance on sales or promotion, and a look at queenmanor continued that pure content focus, sites that resist the urge to monetise every paragraph are increasingly rare and this one has clearly made the editorial choice to keep the writing clean from commercial intrusion which I value highly.
В этой публикации мы предложим ряд рекомендаций по избавлению от зависимостей и успешному восстановлению. Мы обсудим методы привлечения поддержки и важность самосознания. Эти советы помогут людям вернуться к нормальной жизни и стать на путь выздоровления.
Разобраться лучше – нарколог на дом в Луганске
Этот документ охватывает важные аспекты медицинской науки, сосредотачиваясь на ключевых вопросах, касающихся здоровья населения. Мы рассматриваем свежие исследования, клинические рекомендации и лучшие практики, которые помогут улучшить качество лечения и профилактики заболеваний. Читатели получат возможность углубиться в различные медицинские дисциплины.
Уточнить детали – детокс24
Useful read, especially because the writer did not assume too much background from the reader, and a quick look at fernpier continued in the same way, a thoughtful site that meets people where they are which is something the modern web could use a lot more of for both casual and serious readers.
Even across multiple posts the writers voice has remained consistent in a way I appreciate, and a stop at parademiso continued that voice, sites that maintain editorial consistency across many pieces have something most sites lack and this one has clearly worked out how to keep its voice steady across what reads as a growing archive.
выведение из запоя в стационаре спб https://www.narkologicheskij-staczionar-sankt-peterburg-12.ru
Now realising the topic deserved better treatment than it has been getting elsewhere, and a look at kelpherb extended that broader recognition, content that exposes the gap between actual quality and average quality elsewhere is doing the quiet work of raising standards and this site is contributing to that elevation in its own corner.
My professional context would benefit from having this kind of resource available, and a look at privetplain extended the professional applicability, the rare site that contributes meaningfully to professional work rather than just personal interest is content with multiplied value and this one is providing that professional utility consistently across multiple pieces.
Felt the writer respected the topic without being precious about it, and a look at trendworldmarket continued that respectful but unfussy treatment, finding the right register for serious topics is hard and this site has clearly figured out how to take the topic seriously while still being readable for casual visitors regularly.
A piece that demonstrated competence without performing it, and a look at tavqino maintained the same self assured but unshowy register, the gap between competence and performance of competence is one I track and this site has clearly chosen to demonstrate rather than perform which I find much more persuasive as a reader.
Picked this for a morning recommendation in our company chat, and a look at zelqiro suggested I will mention this site again later, recommending content into a workplace context is a small editorial act that requires confidence in the recommendation and this site is making me confident in those recommendations consistently here too.
Walked away with a clearer head than I had before reading this, and a quick visit to pivotllama only sharpened that, the writing has a way of cutting through the noise that surrounds most topics online which is something I will definitely remember the next time I am searching for an answer to anything.
Loved the writing voice here, friendly without being fake and confident without being arrogant, and a stop at explorenewopportunities carried the same tone forward, the kind of personality that makes a reader feel welcome rather than lectured at which is a balance plenty of writers struggle to find no matter how long they have been at it.
Thanks for not padding this with the usual filler intros and outros that every other blog seems to require, and a quick visit to fumegrove continued that lean approach across more posts, content stripped of waste is content that respects you and I will always come back to that kind of approach.
Got something practical out of this that I can apply later this week, and a stop at noonlinnet added more details to think about, this is exactly the kind of content I bookmark for future reference rather than the throwaway listicles that dominate most search results these days for almost any common topic.
Worth flagging this post as worth a careful read rather than a casual skim, and a stop at nexmuzo earned the same careful approach, the few sites that warrant slower reading are sites I now treat differently from the daily content stream and this one has clearly moved into that elevated treatment category.
Picked this site to mention to a colleague who would benefit, and a look at elitefests added more material I will pass along, recommending sites to colleagues is a higher bar than recommending to friends because the professional context demands more careful curation and this site cleared the professional bar without me having to think.
Generally my comment to other readers about new sites is to wait and see but for this one I would jump to recommend now, and a look at zorkavi reinforced that early recommendation, the speed at which a site earns my recommendation is itself a quality signal and this one has earned mine quickly clearly.
If I were grading sites on this topic this one would receive high marks, and a stop at datacabin continued earning those high marks, the informal grading I do mentally for content sources is something I take seriously even though it is informal and this site has been receiving consistent high marks across multiple sessions today.
A piece that did exactly what it promised in the headline without overshooting or underdelivering, and a look at modtora continued that calibration, alignment between promise and delivery is a basic editorial virtue that many sites fail at and this site has clearly mastered the matching of expectation and substance throughout pieces.
Текст посвящён распространённым мифам о зависимости и их развенчанию. Мы предоставим научно обоснованную информацию и дадим рекомендации по выбору эффективного способа борьбы с зависимым поведением.
Узнать больше – наркологическая клиника в мариуполе
Honest take is that I will probably forget most of what I read online today but this post is one I will remember, and a stop at qivzaro kept that same memorable quality going, certain writing leaves a residue in the mind in a way most content simply does not manage.
Liked the natural conversational tone throughout, never stiff and never overly casual either, and a stop at lattepinto kept that comfortable middle ground going, finding a tone that respects the reader without becoming distant or overly familiar is harder than it sounds and this site nails that balance consistently across many different pieces.
перепланировка квартиры москва перепланировка квартиры москва
Well structured and easy to read, that combination is rarer than people think, and a stop at questloft confirmed the same standard runs across the rest of the site, definitely the kind of place I will be coming back to when this topic comes up in conversation later again over the weeks ahead.
Glad I stumbled across this post, the explanations actually make sense without needing background knowledge to follow along, and after a stop at trendzaro the same was true there, no assumptions about the reader just clear writing that anyone can understand from the first line right through to the end.
Found this through a search that was generic enough I did not expect quality results, and a look at mossmute continued the surprisingly good experience, search engines occasionally still surface excellent independent content if you scroll past the obvious paid and high authority results which is reassuring to remember sometimes.
A piece that read as if the writer was thinking carefully rather than just typing fluently, and a look at briskolive continued that considered quality, the difference between fluent typing and careful thinking shows up in writing and this site reads as the product of thought rather than just the product of language fluency apparently.
Came in expecting another generic take and got something with actual character instead, and a look at probelucid carried that personality forward, finding a distinct voice on a saturated topic is impressive and worth pointing out when it happens because most sites end up sounding identical to their nearest competitors quickly.
Going to share this with a friend who has been asking the same questions for a while now, and a stop at parchmodel added a few more pages I will pass along too, this is the kind of generous information that earns a small thank you from me right now and again later this week.
One of the more honest takes on the topic I have seen lately, no spin and no oversell, and a stop at velzaro kept that going, the kind of voice the open web could use a lot more of rather than the endless echo chamber of recycled opinions floating around every social platform these days.
Now appreciating the small but real way this post improved my afternoon, and a stop at firminlet extended that small improvement effect, content that produces measurable positive impact on the texture of a reading day is content with real value and this site is producing those small positive impacts at a sustainable rate apparently.
Thanks for the breakdown, it gave me a clearer picture of something I had been confused about for a while now, and a stop at portatelier closed the remaining gaps in my understanding nicely, no need to hunt around twenty other articles to put the pieces together which is a real time saver.
Picked this for a morning recommendation in our company chat, and a look at plantmedal suggested I will mention this site again later, recommending content into a workplace context is a small editorial act that requires confidence in the recommendation and this site is making me confident in those recommendations consistently here too.
A well calibrated piece that knew its scope and stayed inside it, and a look at zelzavo maintained the same scope discipline, scope creep is one of the failure modes of long blog posts and this site has clearly invested in the editorial discipline to prevent it which shows up in tightly contained pieces.
Closed and reopened the tab three times before finally finishing, and a stop at connectgrowachieve held my attention straight through, sometimes content fights for time against my own distraction and the times it wins say something positive about its quality and this post clearly won that fight today afternoon for me.
Thank you for not assuming the reader already knows everything, the explanations meet me where I am, and a look at elmhilt did the same, that consideration is what makes a site feel welcoming rather than gatekeepy which is sadly the default mood across the modern web today for most subjects covered.
A quiet piece that did not try to compete on volume, and a look at whimharbor maintained that selective approach, sites that publish less but better are increasingly rare in an environment that rewards volume and this one has clearly chosen quality cadence over quantity which is a brave editorial decision in current conditions.
Compared to the usual results for this kind of search this site stands well above the average, and a quick visit to tavquro kept the standard high, you can tell within seconds whether a site is going to waste your time or actually deliver and this one clearly delivers without any false starts.
A genuine compliment to the writer for keeping the post focused on what mattered, and a look at trendandfashion continued that disciplined focus, focus is a editorial choice that compounds across many small decisions and this site has clearly made those small decisions consistently across what I have read so far this week here.
1xbet app android http://www.1xbet-apk-1.com
Time spent here today felt productive in the way that good reading sessions sometimes do, and a stop at ketohale extended that productive feeling across the rest of the morning, the difference between productive reading and merely passing time is real and this site is consistently on the productive side for me lately.
Honestly enjoyed reading this more than I expected to when I first clicked through, and a stop at makernavy kept that pleasant surprise going, sometimes you stumble onto a site that just clicks with how you like to read and this is one of those for me right now today which is great.
Worth saying this site reads better than most paid newsletters I have tried, and a stop at dealbrawn confirmed that comparison, the bar for free content is often lower than for paid but this site clears the paid bar consistently and that says something about the editorial approach behind the work being published here regularly.
Glad I gave this a chance rather than scrolling past, and a stop at elitedawns confirmed I made the right call, sometimes the best content is hidden behind unassuming headlines that do not scream for attention and learning to slow down and check those out has paid off many times now across years of reading.
Worth flagging that this approach to the topic is fresh without being contrarian, and a stop at zorlumo extended the same fresh angle, finding original perspective on familiar subjects is rare and this site has clearly developed its own way of seeing rather than echoing the dominant takes from elsewhere consistently.
Felt a small spark of recognition when the post named something I had been struggling to articulate, and a look at laurelleap produced more such moments, the rare service of giving readers language for fuzzy intuitions is one of the higher values that good writing can provide and this site offered several today instances.
Now considering whether the post would translate well into a different form, and a look at quilllava suggested similar versatility, content that could move into other media without losing its substance is content that has been built around ideas rather than around format and this site reads as idea first throughout posts.
Обзор посвящён процессу восстановления после зависимостей. Мы расскажем о различных этапах реабилитации, поддерживающих ресурсах и важности мотивации в достижении устойчивого выздоровления.
Проверенные методы — узнай сейчас – Нарколог на дом
Bookmark earned, calendar reminder set, share queued, all from one good post, and a look at fumehull did the same, when a single reading session triggers multiple downstream actions you know the content has actually moved me beyond the page and this site is moving me at that higher level reliably.
Bookmark folder created specifically for this site, and a look at probemason confirmed the dedicated folder was the right call, dedicated folders for individual sites are a level of organisation I rarely deploy and this site has earned that level of dedicated tracking based on the consistency I have seen so far across sessions.
Reading this slowly in the morning before opening email, and a stop at cadetarena extended that protected attention, content that earns the prime morning reading slot before the daily distractions begin is content with elevated status and this site has earned that prime slot consistently in my recent reading habits clearly.
Just want to say thank you for putting this together, posts like these make searching online actually worth it sometimes, and a quick look at motelmorel kept that going, useful and easy to read without any of the tricks that ruin most blog comment sections lately on the wider open web.
During a reading session that included several other sources this one stood out, and a look at parcohm continued the standout quality, the side by side comparison of sources during research is a useful exercise and this site has been winning those comparisons for me consistently across multiple research sessions during the last week.
A nicely understated post that does not shout for attention, and a look at createfuturepossibilities maintained the same quiet quality, understatement is a stylistic choice that distinguishes serious writing from attention seeking writing and this site has clearly committed to the understated approach as a core editorial value rather than just a phase.
наркологический стационар санкт петербург http://www.narkologicheskij-staczionar-sankt-peterburg-12.ru
Decided to write a short note to the author if there is contact info anywhere, and a stop at plasmapiano extended that intention, the urge to thank the writer directly is a strong signal of content quality and this site has triggered that urge in me today which is a fairly rare event for my reading.
вывод из запоя недорого нарколог24 https://vyvod-iz-zapoya-na-domu-sankt-peterburg-20.ru
Liked the natural conversational tone throughout, never stiff and never overly casual either, and a stop at flareaisle kept that comfortable middle ground going, finding a tone that respects the reader without becoming distant or overly familiar is harder than it sounds and this site nails that balance consistently across many different pieces.
онлайн школа 10 11 класс https://shkola-onlajn-52.ru
Now feeling the small relief of finding writing that does not condescend, and a stop at urbanluma extended that respect for readers, content that treats its audience as capable adults rather than as people to be managed produces a different reading experience and this site has clearly chosen the respectful approach across all pieces.
Closed and reopened the tab three times before finally finishing, and a stop at venluzo held my attention straight through, sometimes content fights for time against my own distraction and the times it wins say something positive about its quality and this post clearly won that fight today afternoon for me.
Started reading skeptically because the headline seemed overconfident, and the post earned the headline by the end, and a look at modvani continued that pattern of earning its claims, sites that can back up their headlines without overpromising are rare and this one has clearly developed editorial calibration on that front consistently.
Now noticing that the post benefited from being neither too short nor too long for its content, and a look at nexzaro continued that calibration of length, sites that match length to content rather than padding to hit some target are sites that respect both their material and their readers and this site does both.
1xbet son s?r?m indir https://www.1xbet-indir-1.com
Felt the writer was being honest with the reader which is rare enough that I want to acknowledge it, and a look at tavzoro continued that honest feel, content built on actual knowledge rather than aggregated summaries is something I value highly and rarely come across in regular searches on the open internet these days.
вывод из запоя санкт петербург https://vyvod-iz-zapoya-na-domu-sankt-peterburg-18.ru
Honest opinion is that this is the kind of post that builds long term trust with readers, and a look at qonzavi reinforced that perception, the slow accumulation of trust through consistent quality is the only sustainable way to build a real audience and this site is clearly playing that long game.
узнать местоположение по номеру телефона бесплатно https://kak-najti-cheloveka-po-nomeru-telefona-1.ru
Looking for similar voices elsewhere has come up empty in my recent searches, and a stop at quincenarrow extended the search frustration, the rare site that does what no other does in quite the same way is precious and this one has clearly developed a particular approach that I have not been able to find duplicates of.
Liked the post enough to read it twice and the second read found new things, and a stop at probemound similarly rewarded the second look, content with hidden depths that only reveal themselves on careful rereading is the rare kind that earns lasting respect rather than fleeting first impressions only briefly held.
Reading this confirmed that the topic deserves more careful attention than it usually gets, and a stop at deanburst extended that elevated framing, content that raises the appropriate weight of a subject without being preachy about it is serving a quiet but important editorial function for the broader cultural conversation about it.
A piece that took its time without dragging, and a look at ketojib kept the same patient pace, the difference between unhurried and slow is a fine editorial distinction and this site has clearly found the unhurried side without slipping into the slow side which would have lost me as a reader quickly otherwise.
Glad I clicked through from where I did because this turned out to be worth the time spent, and after musebeats I had a fuller picture, the kind of content that earns its visitors through delivering value rather than chasing them through aggressive advertising or constant pop ups appearing everywhere on the screen lately.
Well structured and easy to read, that combination is rarer than people think, and a stop at platenavy confirmed the same standard runs across the rest of the site, definitely the kind of place I will be coming back to when this topic comes up in conversation later again over the weeks ahead.
Found the use of subheadings really helpful for scanning back through the post later, and a stop at cadetgrail kept that reader friendly approach going, navigation is something many blog writers ignore but small structural choices make a noticeable difference for someone returning to find a specific point again days or weeks later.
Thanks for putting this online without locking it behind email signups or paywalls, and a quick visit to embervendor kept that open feel going, content that trusts the reader to come back rather than gating access is the kind of approach I will reward with regular return visits over time happily.
1xbet giris 1xbet giris
However measured this site clears the bar I set for sites I take seriously, and a stop at moundlong continued clearing that bar, the metrics I use for site quality are admittedly informal but they are consistent and this site has cleared them on multiple measurements across multiple visits which is meaningful for my evaluation.
The whole experience of reading this was pleasant from start to finish, no pop ups and no annoying interruptions, and a look at flarefest continued that clean experience, technical choices about page design matter for the reader and this site clearly cares about the small details that add up to comfort across multiple visits.
Worth flagging this site to a few specific friends who would appreciate the editorial sensibility, and a look at furlkale added more pages I will mention to them, recommending sites to specific people requires understanding both the site and the person and this site is making those personalised recommendations easy and natural for me.
Эта публикация исследует взаимосвязь зависимости и психологии. Мы обсудим, как психологические аспекты влияют на появление зависимостей и процесс выздоровления. Читатели смогут понять важность профессиональной поддержки и применения научных подходов в терапии.
Откройте для себя больше – психиатра на дом в Балашихе
Honest assessment after reading this twice is that it holds up under careful attention, and a look at venmizo extended that durability across more pages, content that survives a second read without revealing weak spots is rarer than the average reader probably realises and this site clearly cleared that bar.
After reading several posts back to back the consistent voice across them is impressive, and a stop at mallowmorel continued that voice consistency, sites that maintain a single coherent voice across many pieces by potentially many writers represent serious editorial discipline and this one has clearly developed the institutional consistency needed for that.
Этот обзор медицинских исследований собрал самое важное из последних публикаций в области медицины. Мы проанализировали ключевые находки и представили их в доступной форме, чтобы читатели могли легко ориентироваться в актуальных темах. Этот материал станет отличным подспорьем для изучения медицины.
Осуществить глубокий анализ – детокс24 краснодар
Felt the writer was speaking my language without trying to imitate it, and a look at tilvexa continued that natural fit, when a writers default voice happens to match what you find easy to read the experience feels frictionless and that is something I notice and remember about specific sites going forward.
A small editorial detail caught my attention, the way headings related to body text, and a look at quiverllama maintained that careful relationship, structural details like that show up to readers who notice them and the writers here have clearly thought about every level of the piece rather than just the words.
A piece that reads like it was written for me without claiming to be written for me, and a look at promparsley produced the same fit, when the writer audience match clicks naturally without being engineered through demographic targeting you know the writing is solid and this site has that natural fit consistently for me.
Will be coming back to this for sure, too much good content to absorb in one sitting, and a stop at plazaomega only added more pages I want to dig through, this site is going onto my regular rotation list because it consistently delivers something worth the visit lately rather than empty filler.
В этой статье рассматривается комплексный подход к избавлению от зависимости. Читатель узнает, как сочетание физического, психологического и духовного восстановления помогает достичь стойкого выздоровления.
Рассмотреть проблему всесторонне – вызов нарколога на дом
Reading this gave me a small jolt of recognition for an experience I thought was just mine, and a stop at oakarenas produced more such jolts, content that universalises private experiences without flattening them is doing genuinely useful work and this site is providing that recognition function for me reliably across topics I read.
Reading this on the train into work was a better use of the commute than my usual choices, and a stop at lumvanta extended that commute reading well, content that improves transit time rather than just filling it is content with practical benefit and this site has earned its place in my morning commute reading rotation.
The examples really helped me grasp the points faster than abstract descriptions would have, and a stop at clippoise added a few more practical illustrations that drove the message home, the kind of writing that knows its readers learn better through concrete situations rather than vague generalities is rare and worth recognising clearly.
Эта информационная публикация освещает широкий спектр тем из мира медицины. Мы предлагаем читателям ясные и понятные объяснения современных заболеваний, методов профилактики и лечения. Информация будет полезна как пациентам, так и медицинским работникам, желающим поддержать уровень своих знаний.
Тыкай сюда — узнаешь много интересного – детокс24
Now sitting back and recognising that this was a small but real win in my reading day, and a stop at modvilo extended that quiet win, the cumulative effect of small reading wins versus the cumulative effect of small reading losses is real over time and this site is contributing to the wins side of that ledger.
1xbet indir apk 1xbet indir apk
Good post, the kind that respects the reader by getting to the point quickly without skipping the details that matter, and a short look at nolvexa confirmed that approach is consistent across the site which is rare to find online these days, definitely a place I will return to soon.
Now sitting back and recognising that this was a small but real win in my reading day, and a stop at micapacts extended that quiet win, the cumulative effect of small reading wins versus the cumulative effect of small reading losses is real over time and this site is contributing to the wins side of that ledger.
Looking for similar voices elsewhere has come up empty in my recent searches, and a stop at mountmorel extended the search frustration, the rare site that does what no other does in quite the same way is precious and this one has clearly developed a particular approach that I have not been able to find duplicates of.
Came away feeling slightly smarter than I was when I started, that is a real win, and a stop at ketojuly added a bit more to that, the rare site that actually transfers some of its knowledge to the reader in a way that sticks rather than just creating an illusion of learning briefly.
Closed the tab feeling I had spent the time well, and a stop at venqaro extended that feeling across more pages, the test of whether time on a site was well spent is one I apply silently after closing tabs and very few sites pass it but this one passed it cleanly today afternoon clearly.
Genuine reaction is that I will probably think about this on and off for a few days, and a look at qorlino added fuel to that, the best content lingers in your head after you close the tab rather than evaporating immediately and this site clearly knows how to write that kind of memorable content.
выведение из запоя в стационаре спб http://narkologicheskij-staczionar-sankt-peterburg-12.ru
Публикация охватывает основные направления развития современной медицины. Мы обсудим значимость научных исследований, инноваций в лечении и роли общественного участия в формировании системы здравоохранения.
Узнай первым! – вывод из запоя волгоград
Picked this post to share in a Slack channel where I knew it would be appreciated, and a look at propelmural suggested I will share more from here later, content worth sharing into a professional context is content that has earned a higher kind of trust than mere personal interest and this site has it.
Reading this on a phone at a coffee shop and finding it perfectly suited to that context, and a stop at rabbitmaple continued the comfortable mobile experience, content that works across reading conditions without compromising on substance is increasingly important and this site has clearly thought about the whole reader experience here.
вывод из запоя санкт петербург https://vyvod-iz-zapoya-na-domu-sankt-peterburg-20.ru
где согласовать перепланировку https://pereplanirovka-kvartir19.ru
онлайн школа 11 класс https://shkola-onlajn-52.ru
Appreciated how the post felt complete without overstaying its welcome, and a stop at ploverlily confirmed that economical approach runs across the site, knowing when to stop is a skill many writers never develop but here the discipline is obvious and welcome from the perspective of a busy reader trying to learn things efficiently.
Pass this along to anyone you know dealing with similar questions, the answers here are clear, and a stop at modernpremiumhub adds even more useful material, this is the kind of resource that deserves to circulate widely rather than getting lost in the constant churn of new content online that buries good work daily.
If I had to defend the time I spend reading independent blogs this site would feature in the defence, and a look at quickmeadow reinforced that defensive utility, the ongoing case for non algorithmic reading is one I make to myself periodically and sites like this one provide the actual evidence that supports the case clearly.
В этом исследовании рассмотрены методы лечения зависимостей и их эффективность. Мы проанализируем различные подходы, используемые в реабилитационных центрах, и представим данные о результативности программ. Читатели получат надежные и научно обоснованные сведения о данной проблеме.
Все материалы собраны здесь – алко рехаб
Reading this gave me the rare experience of fully agreeing with all the conclusions, and a stop at markpillow continued that agreement pattern, content that aligns with my existing views without seeming designed to do so is just content that happens to be reasonable and this site reads as reasonable rather than ideological mostly.
1xbet uygulama 1xbet uygulama
Generally my comment to other readers about new sites is to wait and see but for this one I would jump to recommend now, and a look at curiopact reinforced that early recommendation, the speed at which a site earns my recommendation is itself a quality signal and this one has earned mine quickly clearly.
помощь вывода запоя https://vyvod-iz-zapoya-na-domu-sankt-peterburg-18.ru
Quietly the writers approach to the topic differs from the dominant takes I have been encountering, and a stop at fernbureaus extended that distinctive approach, content that maintains a different perspective without explicitly arguing against the dominant ones is content with confident editorial identity and this site has that confidence throughout pieces.
Probably the kind of site that should be more widely read than it appears to be, and a look at muffinmarble reinforced that quiet wish, the gap between a sites quality and its apparent reach is sometimes large and that gap exists for this site in a way that makes me want to mention it more.
Эта статья подробно расскажет о процессе выздоровления, который включает в себя эмоциональную, физическую и психологическую реабилитацию. Мы обсуждаем значимость поддержки и наличие профессиональных программ. Читатели узнают, как строить новую жизнь и не возвращаться к старым привычкам.
Провести детальное исследование – Капельница от запоя в Белгороде
1xbwt giri? http://www.1xbet-giris-77.com
Strong recommendation from me, anyone curious about the topic should make time for this, and a look at prowlocean only sharpens that recommendation further, the kind of resource that holds up against careful scrutiny rather than crumbling at the first critical question is rare and worth pointing other people toward when the topic comes up.
отследить номер телефона по спутнику бесплатно отследить номер телефона по спутнику бесплатно
Excellent post, balanced and well organised without showing off, and a stop at rabbitokra continued in that same vein, this site has clearly figured out the formula for content that works for readers rather than for search engine ranking signals which is harder than it sounds today and worth real recognition from anyone.
Really appreciate this kind of writing, no shouting and no clickbait headlines just steady useful content, and a quick look at ploverpatio kept that going, definitely a site I will be returning to whenever I need a sensible take on similar topics in the days ahead and also during slower work weeks.
Skipped a meeting reminder to finish the post, and a stop at khakifrost held me past another reminder, when content beats meetings the writer is doing something extraordinary because meetings have institutional support behind them and yet good writing can still occasionally win that competition for attention which I find heartening today.
A piece that did not waste any of its substance on sales or promotion, and a look at modzaro continued that pure content focus, sites that resist the urge to monetise every paragraph are increasingly rare and this one has clearly made the editorial choice to keep the writing clean from commercial intrusion which I value highly.
Публикация знакомит читателей с различными подходами к реабилитации. От традиционных методов до современных программ — вы узнаете, как выбрать оптимальный путь к выздоровлению и преодолеть препятствия на этом пути.
Запросить дополнительные данные – клиника плюс балашиха
Reading the writers other posts after this one suggests the quality is consistent rather than peak, and a stop at noqvani confirmed the consistent quality reading, sites that hold the same level across many pieces rather than peaking on a few are sites with sustainable editorial discipline and this one has clearly developed that.
Approaching this site through a casual link click and being surprised by what I found, and a look at modernmindfulliving extended the surprise, the rare experience of stumbling into excellent independent content rather than predictable mediocrity is one of the actual remaining pleasures of casual web browsing and this site provided it cleanly.
Bookmark earned, share earned, return visit earned, all from one reading session, and a look at hovanta did the same, the trifecta of bookmark and share and return is rare in a single visit and represents the highest level of engagement I tend to offer any piece of online content these days here.
Closed and reopened the tab three times before finally finishing, and a stop at qorzino held my attention straight through, sometimes content fights for time against my own distraction and the times it wins say something positive about its quality and this post clearly won that fight today afternoon for me.
Публикация охватывает основные направления развития современной медицины. Мы обсудим значимость научных исследований, инноваций в лечении и роли общественного участия в формировании системы здравоохранения.
Что ещё нужно знать? – наркологическая клиника во владимире
Now considering whether the post would translate well into a different form, and a look at dazzquay suggested similar versatility, content that could move into other media without losing its substance is content that has been built around ideas rather than around format and this site reads as idea first throughout posts.
Now feeling that this site is the kind I want to make sure does not disappear, and a look at duetparishs reinforced that quiet protective feeling, the rare sites whose disappearance would actually matter to me are the sites I want to support through return visits and recommendations and this one has joined that small protected list.
Decided to set a calendar reminder to revisit, and a stop at pruneoval extended that revisit list, calendar entries for content are a level of commitment I rarely make but when I do they signal a higher regard than a simple bookmark and this site has earned that calendar tier of relationship from me today.
Эта публикация посвящена актуальным вопросам современной медицины и здравоохранения. Мы обсудим новейшие технологии диагностики и лечения, а также их влияние на продолжительность и качество жизни. Читатель найдет здесь информацию о научных исследованиях и перспективных разработках, доступно изложенную для широкой аудитории.
Давай разберёмся досконально – анонимная наркологическая клиника
Liked that the post left some questions open rather than pretending to settle everything, and a stop at rabbitpale continued that intellectual honesty, content that respects the limits of its own claims is more trustworthy than content that overreaches and this site has clearly figured out which positions it can defend confidently.
Looking at this from the perspective of someone tired of generic content the contrast is striking, and a look at mulchlens maintained that distinctive feel, sites with strong editorial identity stand out against the bland background of algorithmic content and this one has clearly developed an identity worth recognising through careful attention.
Honestly enjoyed not being sold anything for the entire duration of the post, and a look at plumbpacer kept that pleasant absence going across more pages, content that exists for its own sake rather than as a funnel to a paid product is increasingly rare and worth supporting where I can find it.
В этой статье мы рассматриваем разрушительное влияние зависимости на жизнь человека. Обсуждаются аспекты, такие как здоровье, отношения и профессиональные достижения. Читатели узнают о необходимости обращения за помощью и о путях к восстановлению.
См. подробности – Капельница от запоя в Борисоглебске
наркологическая помощь стационар наркологическая помощь стационар
After several visits I am now confident this site is one to follow seriously, and a stop at noonmyrrh reinforced that confidence, the gradual building of trust through repeated quality exposures is the only sustainable way to develop reader loyalty and this site is building that loyalty in me through patient consistent work consistently.
как узнать где находится человек по номеру телефона бесплатно http://www.kak-najti-cheloveka-po-nomeru-telefona-1.ru
Skipped the social share buttons but might come back to actually use one later, and a stop at marshplate extended that share urge, content that triggers genuine sharing impulses rather than performative ones is content that has actually moved me and not many posts in a typical week do that for me actually.
Мы рассмотрим современные вызовы здравоохранения и пути их решения с помощью технологий и научных исследований. В статье собраны данные о новых лекарствах, методах диагностики и системном подходе к улучшению здоровья населения.
Подробнее можно узнать тут – tver clinica plus
Эта статья подробно расскажет о процессе выздоровления, который включает в себя эмоциональную, физическую и психологическую реабилитацию. Мы обсуждаем значимость поддержки и наличие профессиональных программ. Читатели узнают, как строить новую жизнь и не возвращаться к старым привычкам.
Более того — здесь – психиатр на дом в Балашихе
В этой статье мы рассматриваем разрушительное влияние зависимости на жизнь человека. Обсуждаются аспекты, такие как здоровье, отношения и профессиональные достижения. Читатели узнают о необходимости обращения за помощью и о путях к восстановлению.
Давай разберёмся досконально – анонимная наркологическая клиника
Most of the time I feel the open web is in decline and then I find a site like this, and a stop at lilacneon reinforced that mood lift, the cumulative effect of finding occasional excellent independent content versus the cumulative effect of finding mostly mediocre content is real for the long term reader maintaining web habits today.
Looking at this from the perspective of someone tired of generic content the contrast is striking, and a look at khakikite maintained that distinctive feel, sites with strong editorial identity stand out against the bland background of algorithmic content and this one has clearly developed an identity worth recognising through careful attention.
В этом исследовании рассмотрены методы лечения зависимостей и их эффективность. Мы проанализируем различные подходы, используемые в реабилитационных центрах, и представим данные о результативности программ. Читатели получат надежные и научно обоснованные сведения о данной проблеме.
Только факты! – borisoglebsk clinica plus
Эта публикация обращает внимание на важность профилактики зависимостей. Мы обсудим, как осведомленность и образование могут помочь в предотвращении возникновения зависимости. Читатели смогут ознакомиться с полезными советами и ресурсами, которые способствуют здоровому образу жизни.
Полная информация здесь – наркологическая клиника в твери
В этой публикации мы исследуем ключевые аспекты здоровья, включая влияние образа жизни на благополучие. Читатели узнают о важности правильного питания, физической активности и психического здоровья. Мы предоставим практические советы и рекомендации для поддержания здоровья и развития профилактических подходов.
Связаться за уточнением – анонимная наркологическая клиника
Came across this looking for something else entirely and ended up reading it through twice, and a look at molnexo pulled me deeper into the site than I planned, the writing has a way of holding attention without resorting to manipulative cliffhangers or vague promises that never get delivered later down the page.
Reading this prompted me to dig into a related topic later, and a stop at pueblonorth provided some of the starting points for that follow up reading, content that triggers further exploration rather than satisfying curiosity completely is content with real generative energy and this site has plenty of that energy throughout it.
Reading this slowly to give it the attention it deserved, and a stop at bravopiers earned the same slow read, choosing to read slowly is a small act of respect for content quality and very few sites earn that respect from me but this one did so without any explicit ask which is the cleanest way.
согласование перепланировки москва согласование перепланировки москва
Now sitting back and recognising that this was a small but real win in my reading day, and a stop at dewdawn extended that quiet win, the cumulative effect of small reading wins versus the cumulative effect of small reading losses is real over time and this site is contributing to the wins side of that ledger.
Honestly impressed, did not expect to find this level of care on the topic, and a stop at radiusmill cemented the impression, you can tell within the first few paragraphs whether a site is going to be worth the time and this one delivered on that early promise nicely throughout the rest of what I read.
В данном материале представлены ключевые тенденции в сфере медицинской науки и практики. Вы узнаете о последних открытиях, инновационных подходах к терапии и важности профилактики заболеваний. Особое внимание уделено практическому применению новых методов в клинической практике.
Рассмотреть проблему всесторонне – cherepovec clinica plus
Bookmark earned and shared the link with one specific person who would care, and a look at plumbplanet got the same targeted share, sharing carefully rather than broadcasting is a discipline I try to maintain and this site is generating shares from me at a sustainable rate rather than the spam rate of viral content.
Эта статья освещает различные аспекты освобождения от зависимости и пути к выздоровлению. Мы обсуждаем важность осознания своей проблемы и обращения за помощью. Читатели получат практические советы о том, как преодолевать трудности и строить новую жизнь без зависимости.
Ознакомиться с деталями – клиника плюс
Started believing the writer knew the topic deeply by about the second paragraph, and a look at novelnoon reinforced that confidence, the speed at which a writer establishes credibility through their writing is a useful quality signal and this writer establishes it quickly and quietly without resorting to credential dropping or self promotion.
Felt like the post had been edited rather than just drafted and published, and a stop at muralmend suggested the same care across the site, the difference between edited and unedited content is enormous for the reader and this site has clearly invested in the editing pass that most blogs skip entirely which really does show up.
Worth saying this site reads better than most paid newsletters I have tried, and a stop at norlizo confirmed that comparison, the bar for free content is often lower than for paid but this site clears the paid bar consistently and that says something about the editorial approach behind the work being published here regularly.
школа онлайн 11 класс https://shkola-onlajn-51.ru
One of the more thoughtful posts I have read recently on this topic, and a stop at lilynugget added even more weight to that impression, this is genuinely good content that holds its own against far better known sites in the same space without trying to imitate any of them at all which I appreciate.
Honest take is that this was better than I expected when I clicked through, and a look at qulmora reinforced that, the bar for online content has dropped so much that finding something thoughtful and well constructed feels almost noteworthy now which says more about the average than about this site itself.
В этой заметке мы представляем шаги, которые помогут в процессе преодоления зависимостей. Рассматриваются стратегии поддержки и чек-листы для тех, кто хочет сделать первый шаг к выздоровлению. Наша цель — вдохновить читателей на положительные изменения и поддержать их в трудных моментах.
Дополнительно читайте здесь – belgorod clinica plus
Эта информационная публикация освещает широкий спектр тем из мира медицины. Мы предлагаем читателям ясные и понятные объяснения современных заболеваний, методов профилактики и лечения. Информация будет полезна как пациентам, так и медицинским работникам, желающим поддержать уровень своих знаний.
Лучшее решение — прямо здесь – clinica plus в твери
Статья посвящена анализу текущих трендов в медицине и их влиянию на жизнь людей. Мы рассмотрим новые технологии, методы лечения и значение профилактики в обеспечении долголетия и здоровья.
Смотри, что ещё есть – клиника плюс череповец
Reading this in pieces over a coffee break and finding it consistently rewarding, and a stop at purplelinnet extended that into related material I will return to later, the kind of site that fits naturally into small reading windows without requiring a long uninterrupted block is genuinely useful for how I actually browse.
Looking at this from the perspective of someone tired of generic content the contrast is striking, and a look at plumbplasma maintained that distinctive feel, sites with strong editorial identity stand out against the bland background of algorithmic content and this one has clearly developed an identity worth recognising through careful attention.
If I had to summarise the editorial sensibility of this site in a few words it would be careful and human, and a look at radiusnerve extended that summary feeling, capturing the essence of a sites approach in brief is hard but this site has a clear enough identity that the summary comes naturally enough.
Honestly this was the highlight of my reading queue today, and a look at dewdawns extended that across more pages I will return to, ranking what I read against what else I read each day is something I do informally and this site keeps moving up in those rankings the more I explore it.
Closed several other tabs to focus on this one as I read, and a stop at nuartlinnet held my undivided attention the same way, content that earns full focus in an attention environment full of competing pulls is content doing something genuinely well and the team behind it deserves recognition for that achievement consistently.
Spent a few minutes here and came away with a clearer picture of the topic, the writing keeps things simple without dumbing them down, and after a stop at kitidle the rest of the points lined up neatly which is something I appreciate when I am short on time and need answers fast.
Reading this in the morning set a good tone for the day, and a quick visit to domelegend kept that good tone going, content can do that sometimes when it hits the right notes and finding sites that consistently strike that tone is something I have learned to recognise and reward with regular visits.
Этот краткий обзор предлагает сжатую информацию из области медицины, включая ключевые факты и последние новости. Мы стремимся сделать информацию доступной и понятной для широкой аудитории, что позволит читателям оставаться в курсе актуальных событий в здравоохранении.
Раскрыть тему полностью – капельницу от похмелья на дому недорого
Easily one of the better explanations I have read on the topic, and a stop at masonmelon pushed it even higher in my mental ranking of useful resources, the kind of site that beats the average not by trying harder but by simply caring more about what it puts out daily which always shows.
В статье по вопросам здоровья мы рассматриваем актуальные проблемы, с которыми сталкивается общество. Обсуждаются заболевания, факторы риска и важные аспекты профилактики. Читатели получат полезные советы о том, как сохранить здоровье и улучшить качество жизни.
Смотри, что ещё есть – капельница от похмелья анонимно
Honest assessment is that this is one of the better short reads I have had this week, and a look at lionneon reinforced that, the bar for short content is low because most of it sacrifices substance for brevity but this site manages both at once which is harder than it sounds for most writers attempting it.
Skipped the related links section thinking I had read enough and then came back to it later when curiosity got the better of me, and a stop at muralpastry confirmed I should have just read it first, every section of this site appears to deserve careful attention rather than skipping past lazily.
Came in skeptical and left mostly convinced, that is the highest praise I can offer, and a look at purplemarsh pushed me further in the same direction, content that survives a critical first read is rare and worth recognising because most blog posts crumble under any real scrutiny these days when you actually pay attention closely.
Steam Desktop Authenticator https://steamdesktopauthenticator.net is a popular solution for Steam users who need access to Steam Guard features on their computer. It conveniently verifies actions, protects your account, and manages authentication in a single app.
Appreciate the thoughtful approach, the writer clearly took time to make this readable for someone who is not already an expert, and a look at molqiro kept that going nicely, easy on the eyes and easy on the brain which is always a winning combination when reading on a busy day.
В этой статье мы говорим о важности поддержки в процессе выздоровления. Рассматриваются семьи, группы поддержки, специалисты и онлайн-ресурсы, которые могут сыграть решающую роль в избавлении от зависимости.
Изучить рекомендации специалистов – clinica plus
Beyond the immediate post itself the editorial sensibility behind the site is what struck me, and a stop at ponymedal continued displaying that sensibility, content that reveals editorial choices through accumulated reading is content with structural quality and this site has clearly developed an underlying approach worth identifying through multiple sessions of reading.
Came in confused about the topic and left with a much firmer grasp on it, and after nuartlion I felt I could explain this to someone else without hesitation, that is the gold standard for any educational content and most sites simply fail to reach it ever which is unfortunate but true.
Honestly impressed, did not expect to find this level of care on the topic, and a stop at rafterpeach cemented the impression, you can tell within the first few paragraphs whether a site is going to be worth the time and this one delivered on that early promise nicely throughout the rest of what I read.
Big thanks to whoever wrote this, you saved me a lot of time hunting for the same info on other sites, and a stop at foxarbors only added more useful detail without going off topic, that kind of focus is honestly hard to come across these days when most posts wander everywhere.
Steam Desktop Authenticator https://sdasteam.com (SDA). It allows you to generate account login codes and automatically confirm trades or item sales on the Community Market without using your smartphone.
Solid stuff, the kind of post that I will probably refer back to later this month when the topic comes up again, and a look at domelounge only confirmed I should bookmark the site as a whole rather than just this single page for future reference and use across coming weeks.
After several visits I am now confident this site is one to follow seriously, and a stop at norqavo reinforced that confidence, the gradual building of trust through repeated quality exposures is the only sustainable way to develop reader loyalty and this site is building that loyalty in me through patient consistent work consistently.
Anyone curious about this topic would do well to start here, the foundation laid is solid, and a stop at lionpilot would round out their understanding nicely, this is the kind of resource I would point a friend toward without hesitation if they asked me where to begin learning about anything in this area.
Liked the balance between depth and brevity, never too shallow and never too long, and a stop at qunvero kept the same balance going across the rest of the site, this is one of the harder skills in writing and the team here clearly has it figured out very well indeed across every page.
местоположение телефона по номеру http://www.kak-najti-cheloveka-po-nomeru-telefona-2.ru
The clarity here is something I really appreciate, especially compared to sites that pile on jargon for no reason, and a look at muralpeony was the same, simple direct sentences that actually deliver information instead of dancing around the point for paragraphs at a time which wastes reader patience.
Genuine reaction is that I will probably think about this on and off for a few days, and a look at rakemound added fuel to that, the best content lingers in your head after you close the tab rather than evaporating immediately and this site clearly knows how to write that kind of memorable content.
Walked away with a clearer head than I had before reading this, and a quick visit to masonotter only sharpened that, the writing has a way of cutting through the noise that surrounds most topics online which is something I will definitely remember the next time I am searching for an answer to anything.
Reading this brought back the satisfaction I used to get from blogs ten years ago, and a stop at eliteledges kept that nostalgic quality alive, sites that capture what was good about an earlier era of internet writing are increasingly precious and this one is doing that without feeling like a deliberate throwback at all.
Glad the writer kept this short rather than padding it out, the points stand on their own without needing extra context, and a look at liquidnudge kept the same approach going, brevity is a sign of confidence in the substance and the team here clearly trusts their content to land without filler.
A piece that demonstrated competence without performing it, and a look at domemarina maintained the same self assured but unshowy register, the gap between competence and performance of competence is one I track and this site has clearly chosen to demonstrate rather than perform which I find much more persuasive as a reader.
В этом обзоре мы обсудим современные методы борьбы с зависимостями, включая медикаментозную терапию и психотерапию. Мы представим последние исследования и их результаты, чтобы читатели могли быть в курсе наиболее эффективных подходов к лечению и поддержке.
Давай разберёмся досконально – клиника плюс тверь
Came away feeling slightly smarter than I was when I started, that is a real win, and a stop at molvani added a bit more to that, the rare site that actually transfers some of its knowledge to the reader in a way that sticks rather than just creating an illusion of learning briefly.
The depth of coverage felt about right for the format, neither shallow nor overwhelming, and a look at rampantpilot kept that calibration going, getting the depth right for blog format is genuinely difficult because too shallow loses experts and too deep loses beginners but this site nailed it nicely which I really do appreciate.
Came away with a slightly better mental model of the topic than I started with, and a stop at muscatlarch sharpened that further, content that improves the reader thinking apparatus rather than just dumping facts into it is the rare kind I genuinely value and seek out when I have time to read carefully.
Glad the writer kept this short rather than padding it out, the points stand on their own without needing extra context, and a look at lithelight kept the same approach going, brevity is a sign of confidence in the substance and the team here clearly trusts their content to land without filler.
Recommend this to anyone who values clear thinking over flashy presentation, and a stop at tinklesaddle continued in the same understated way, this site has its priorities in the right place which makes it worth supporting through repeat visits and recommendations rather than just one passing read today before moving on quickly elsewhere.
Adding this to my list of go to references for the topic, and a stop at twainsilica confirmed the rest of the site deserves the same, definitely the kind of resource that earns its place rather than getting forgotten the moment the next interesting article shows up in my feed somewhere else on the web.
Now setting up a small reminder to revisit the site on a slow day, and a stop at norzavo confirmed the reminder was a good idea, planning return visits is a small organisational act that signals trust in ongoing quality and this site has earned that planned return through consistent performance across the pieces I have read so far.
Now realising the post has been quietly doing important work in my mind for the past hour, and a stop at sodatorch extended that quiet processing, content that continues to do work after I close the tab is content with afterlife in the mind and this site is producing those long lived effects at a meaningful rate.
Quiet confidence runs through the whole post, no need to shout to make the points stick, and a stop at draftglade carried that same restrained voice forward, content that respects the reader by trusting its own substance rather than dressing it up in theatrical language is what I look for online and rarely actually find these days.
Looking through other posts here the consistency is what makes the site valuable rather than any single piece, and a stop at duetdrives extended that consistency observation, sites whose value lies in the ongoing pattern rather than in standout posts are sites I trust more deeply and this one has clearly built that kind of trust.
Will be passing this along to a few people who would benefit from the perspective shared here, and a stop at studiotrader only added to what I will be sharing, this kind of generous content deserves to circulate widely rather than getting buried in some search engine algorithm tweak that pushes it down the rankings.
Started reading expecting to disagree and ended mostly nodding along, and a look at salutestitch continued the pattern, content that wins agreement through evidence and reasoning rather than rhetorical force is the kind that actually shifts minds and this site clearly knows how to do that across what I have read so far.
A piece that brought a sense of order to a topic I had been finding chaotic, and a look at scenictrader continued that organising effect, content that imposes useful structure on messy subjects is doing genuine intellectual work and this site is providing that organisational function across multiple posts I have read recently here.
Found this useful, the points line up well with what I have been thinking about lately, and a stop at spryring added some angles I had not considered yet, definitely walking away with more than I came for which is the best outcome from time spent reading online for any kind of topic.
Reading this confirmed a small detail I had been uncertain about, and a stop at stashserif provided the source for further checking, content that supports verification through citations or links rather than just asserting facts is more trustworthy and this site has clearly built its credibility through that kind of verifiable approach consistently.
More substantial than most of what I find searching for this topic online, and a stop at safaritriton kept that quality consistent, this is one of those sites where the writing actually rewards careful reading rather than punishing the patient reader with empty filler stretched out across long paragraphs that say very little.
Reading this triggered a small but real correction in something I had assumed, and a stop at snaretoga extended that corrective effect, content that updates my beliefs through evidence rather than rhetoric is content with intellectual integrity and this site has earned that label consistently across the pieces I have read so far today.
Coming to this with low expectations and being pleasantly surprised by the substance, and a stop at quvnero continued exceeding expectations, the recalibration of expectations upward across multiple positive readings is one of the actual rewards of careful browsing and this site is providing that recalibration at a steady rate apparently.
Really appreciate that the writer did not stretch the post to hit some target word count, the points end when they are made, and a stop at storksnooze reflected the same discipline, brevity is generosity in disguise and this site has clearly figured that out far better than most blog operations have.
Appreciate how nothing here feels copied or pieced together from other places, the voice is consistent and the tone stays human, and after I checked tinytriton I noticed the same style holds, which is a small detail but it makes the whole experience feel personal rather than like another generic site.
A piece that read smoothly because the writer understood how readers actually move through prose, and a look at solotoffee maintained the same reader awareness, writers who think about the reading experience as much as the writing experience produce better work and this site has clearly made that shift in editorial approach.
During the time spent here I noticed the absence of the usual distractions, and a stop at shamrockswan extended that distraction free experience, content that does not fight my attention with pop ups and modals and aggressive prompts is content that respects me and this site has clearly chosen the respectful approach throughout.
Polished and informative without feeling overproduced, that is the sweet spot, and a look at ranchomen hit it again, you can tell when a site has been built with care versus thrown together for the sake of having something to put online and this is clearly the former approach taken by the team.
В этой статье рассматриваются различные аспекты избавления от зависимости, включая физические и психологические методы. Мы обсудим поддержку, мотивацию и стратегии, которые помогут в процессе выздоровления. Читатели узнают, как преодолеть трудности и двигаться к новой жизни без зависимости.
Получить больше информации – вывод из запоя на дому в Борисоглебске
Now feeling confident enough in this site to use it as a reference point for evaluating others on the same topic, and a look at mastlarch continued the comparison friendly quality, sites that serve as quality benchmarks for their topic are precious and this one has clearly become a benchmark for me on this particular subject area.
Эта медицинская заметка содержит сжатую информацию о новых находках и методах в области здравоохранения. Мы предлагаем читателям свежие данные о заболеваниях, профилактике и лечении. Наша цель — быстро и доступно донести важную информацию, которая поможет в повседневной жизни и понимании здоровья.
Исследовать вопрос подробнее – сайт наркологической клиники
Looking for similar voices elsewhere has come up empty in my recent searches, and a stop at llamapatio extended the search frustration, the rare site that does what no other does in quite the same way is precious and this one has clearly developed a particular approach that I have not been able to find duplicates of.
Glad I clicked through from where I did because this turned out to be worth the time spent, and after vinyltrophy I had a fuller picture, the kind of content that earns its visitors through delivering value rather than chasing them through aggressive advertising or constant pop ups appearing everywhere on the screen lately.
Now recognising the editorial wisdom of letting some questions remain open at the end, and a look at sodasalt continued that intellectual honesty, content that does not force closure on contested questions is content that respects the limits of knowledge and this site has clearly developed the maturity to know when to leave space.
В этой статье рассматриваются различные аспекты избавления от зависимости, включая физические и психологические методы. Мы обсудим поддержку, мотивацию и стратегии, которые помогут в процессе выздоровления. Читатели узнают, как преодолеть трудности и двигаться к новой жизни без зависимости.
Детальнее – наркологический центр в Твери
Now adding this to a list of sites I want to see flourish, and a stop at muscatlumen reinforced that wish, the few sites I actively root for are sites that produce the kind of work I want more of in the world and this one has joined that small list based on what I have read so far.
More substantial than most of what I find searching for this topic online, and a stop at draftlake kept that quality consistent, this is one of those sites where the writing actually rewards careful reading rather than punishing the patient reader with empty filler stretched out across long paragraphs that say very little.
Liked the natural conversational tone throughout, never stiff and never overly casual either, and a stop at siennathrift kept that comfortable middle ground going, finding a tone that respects the reader without becoming distant or overly familiar is harder than it sounds and this site nails that balance consistently across many different pieces.
Appreciate the thoughtful approach, the writer clearly took time to make this readable for someone who is not already an expert, and a look at grovefarms kept that going nicely, easy on the eyes and easy on the brain which is always a winning combination when reading on a busy day.
Genuinely well crafted writing, the kind that makes the topic look easier than it actually is, and a look at molzari added even more depth, you can feel the experience behind every line which is something only writers who have been at this for a while can pull off with this level of grace.
Probably the kind of site that should be more widely read than it appears to be, and a look at solostarlit reinforced that quiet wish, the gap between a sites quality and its apparent reach is sometimes large and that gap exists for this site in a way that makes me want to mention it more.
Adding this site to my regular reading list, the post earned that on its own, and a quick stop at solidvector sealed the decision, the kind of place worth checking back with from time to time because it consistently produces material that holds up against a critical reading too which I really value.
In the middle of an otherwise scattered day this post landed as a moment of focus, and a stop at tractshade extended that focused feeling across more pages, content that anchors a fragmented day rather than contributing to the fragmentation is content with real centring effect and this site is providing that anchoring function for me.
Great work on keeping things readable, the post never drags or repeats itself which I really appreciate, and a stop at suburbsurge added a bit more context that fit naturally with what was already said here, no need to read everything twice to get the point being made today.
Медицинская публикация представляет собой свод актуальных исследований, экспертных мнений и новейших достижений в сфере здравоохранения. Здесь вы найдете информацию о новых методах лечения, прорывных технологиях и их практическом применении. Мы стремимся сделать актуальные медицинские исследования доступными и понятными для широкой аудитории.
Всё самое вкусное внутри – tver clinica plus
A satisfying piece in the way that good meals are satisfying rather than just filling, and a look at tulipsedan extended that satisfaction, the metaphor between content and meals is one I find useful and this site reads as a satisfying meal rather than the empty calories that most content provides for casual readers.
Closed the tab feeling I had spent the time well, and a stop at shrinetender extended that feeling across more pages, the test of whether time on a site was well spent is one I apply silently after closing tabs and very few sites pass it but this one passed it cleanly today afternoon clearly.
Even from a single post the editorial care is clear, and a stop at sparkcast extended that care across more pages, the kind of attention to quality that shows up in every paragraph is what separates serious sites from the rest and this one has clearly invested in that paragraph level attention across what I have read.
Recommend this to anyone who values clear thinking over flashy presentation, and a stop at solacevelour continued in the same understated way, this site has its priorities in the right place which makes it worth supporting through repeat visits and recommendations rather than just one passing read today before moving on quickly elsewhere.
Reading this confirmed a small detail I had been uncertain about, and a stop at logicllama provided the source for further checking, content that supports verification through citations or links rather than just asserting facts is more trustworthy and this site has clearly built its credibility through that kind of verifiable approach consistently.
Considered alongside other sources I have been reading this one consistently rises to the top, and a stop at studiosalute maintained that top ranking, the informal ongoing comparison between sources is something I do whenever reading on a topic and this site keeps coming out near the top of those comparisons over many sessions.
This actually answered the question I had been searching for, and after I checked qalmizo I had a few more pieces I had not realised I needed, that is the sign of a site that knows what its readers want before they even know how to ask it which is impressive.
онлайн обучение школа https://shkola-onlajn-51.ru
Closed the laptop after this and let the ideas settle for a few hours, and a stop at relqano similarly rewarded reflective time, content that benefits from sitting with rather than racing past is the kind I want more of and the kind that this site appears to consistently produce week after week here.
Reading this brought back the satisfaction I used to get from blogs ten years ago, and a stop at draftlog kept that nostalgic quality alive, sites that capture what was good about an earlier era of internet writing are increasingly precious and this one is doing that without feeling like a deliberate throwback at all.
Honestly enjoyed every minute spent here, that is not something I say lightly, and a look at sheentiny confirmed I will be back, the bar for spending time online is high for me these days but this site clears it without effort which is high praise indeed from this reader who is usually rather demanding.
В этой статье мы говорим о важности поддержки в процессе выздоровления. Рассматриваются семьи, группы поддержки, специалисты и онлайн-ресурсы, которые могут сыграть решающую роль в избавлении от зависимости.
Познакомиться с результатами исследований – наркология вывод из запоя
Now feeling mildly impressed in a way I do not quite remember feeling about a blog in a while, and a stop at summitshire extended that mild impression, content that produces specific positive emotional responses rather than just neutral information transfer is content with extra dimensions and this site has those extra dimensions clearly.
Reading this prompted a small note in my reference file, and a stop at draftglades prompted another, the rare site that contributes useful nuggets to my own working knowledge rather than just consuming my attention is worth the time investment many times over compared to the usual pile of forgettable scroll content.
В данной статье рассматриваются физиологические и эмоциональные аспекты зависимости. Мы обсудим, как организм реагирует на зависимое поведение, и какие методы помогают восстановить здоровье и внутреннее равновесие.
Исследовать вопрос подробнее – clinica plus в твери
Really appreciate that the writer did not assume I would read every other related post first, and a look at silovault kept that self contained feel going where each piece can stand alone, accessibility for new readers is a sign of generous editorial thinking and this site has clearly invested in that approach.
Once you start reading carefully here it is hard to go back to lower quality alternatives, and a stop at tyrantvolume reinforced that ratchet effect, the way good content raises standards is real over time and this site has clearly contributed to raising my expectations for what is possible in writing on the topic generally.
Excellent execution from start to finish, the post never loses its rhythm and the points stay sharp, and a quick stop at muscatneedle kept the same level going, consistency like this across a site is the marker of a serious operation rather than a casual side project running on autopilot somewhere else.
Reading this gave me something to think about for the rest of the afternoon, and after shadowtrojan I had even more to mull over, the kind of post that lingers in the background of your day rather than evaporating immediately is genuinely valuable in an attention economy that punishes depth rather than rewarding it.
If you scroll past this site without looking carefully you will miss something, and a stop at temposofa extended that mild warning, the surface of the site does not advertise its quality loudly which means careful attention is required to recognise what is being offered here which is itself a kind of editorial signal.
Reading this confirmed that my time researching the topic in other places had not been wasted, and a stop at mauvepeach extended the confirmation, when independent sources agree that is a useful signal and this site is one of the more reliable sources I have found for cross checking what I read elsewhere on similar subjects.
Got something practical out of this that I can apply later this week, and a stop at tigerteacup added more details to think about, this is exactly the kind of content I bookmark for future reference rather than the throwaway listicles that dominate most search results these days for almost any common topic.
Now wondering how the writers calibrated the level of detail so well, and a stop at thatchvista continued the same calibration, the right level of detail is one of the harder editorial calls in any piece and this site has clearly developed an instinct for it through what I assume is years of careful practice publicly.
Now feeling mildly impressed in a way I do not quite remember feeling about a blog in a while, and a stop at loneload extended that mild impression, content that produces specific positive emotional responses rather than just neutral information transfer is content with extra dimensions and this site has those extra dimensions clearly.
Appreciated how the post felt complete without overstaying its welcome, and a stop at voguestrait confirmed that economical approach runs across the site, knowing when to stop is a skill many writers never develop but here the discipline is obvious and welcome from the perspective of a busy reader trying to learn things efficiently.
A piece that did not try to be timeless and ended up reading as durable anyway, and a look at simbasienna extended that durable feel, content that stays useful past its publication date without straining for permanence is content that ages well and this site has the kind of evergreen quality that I value highly today.
Thanks for the readable length, I finished it without checking how much was left, and a stop at tundrasyrup kept me reading the same way, when I stop noticing the length of a piece because the content is engaging enough to sustain attention without willpower the writer has done their job well today.
В этой публикации мы рассматриваем важную тему борьбы с зависимостями, включая алкогольную и наркотическую зависимости. Мы обсудим методы лечения, реабилитации и поддержку, которые могут помочь людям, столкнувшимся с этой проблемой. Читатели узнают о перспективах выздоровления и важности комплексного подхода.
Углубиться в тему – капельницу от запоя на дому
Этот информативный текст сочетает в себе темы здоровья и зависимости. Мы обсудим, как хронические заболевания могут усугубить зависимости и наоборот, как зависимость может влиять на общее состояние здоровья. Читатели получат представление о комплексном подходе к лечению как физического, так и психического состояния.
Посмотреть подробности – клиника плюс тверь
A particular kind of restraint shows up in the writing, and a look at snippetvamp maintained the same restraint across pages, knowing what not to say is just as important as knowing what to say and this site has clearly developed strong instincts on both sides of that editorial line throughout pieces I have read.
Closed the tab feeling I had spent the time well, and a stop at tagbyte extended that feeling across more pages, the test of whether time on a site was well spent is one I apply silently after closing tabs and very few sites pass it but this one passed it cleanly today afternoon clearly.
A piece that handled multiple complications without becoming confused, and a look at draftport continued that organisational clarity, holding multiple threads in a single piece without losing any of them is a sign of skilled writing and this site has clearly developed the editorial discipline to manage complexity without sacrificing readability throughout.
A welcome reminder that thoughtful writing still happens online, and a look at selectshare extended that reassurance, the modern web makes it easy to forget that careful writing exists and finding sites that practice it is a small antidote to the cynicism that builds up from too much exposure to algorithmic content.
Этот обзор сосредоточен на различных подходах к избавлению от зависимости. Мы изучим традиционные и альтернативные методы, а также их сочетание для достижения максимальной эффективности. Читатели смогут открыть для себя новые стратегии и подходы, которые помогут в их борьбе с зависимостями.
Переходите по ссылке ниже – клиника плюс тверь
Эта информационная публикация освещает широкий спектр тем из мира медицины. Мы предлагаем читателям ясные и понятные объяснения современных заболеваний, методов профилактики и лечения. Информация будет полезна как пациентам, так и медицинским работникам, желающим поддержать уровень своих знаний.
Что скрывают от вас? – детокс24
Found something quietly useful here that I expect to return to, and a stop at sodasherpa added more of the same, content with quiet utility ages well in a way that flashy hot takes do not and I have learned to weight quiet utility much higher when deciding what to bookmark for later use.
Will be passing this along to a few people who would benefit from the perspective shared here, and a stop at loneohm only added to what I will be sharing, this kind of generous content deserves to circulate widely rather than getting buried in some search engine algorithm tweak that pushes it down the rankings.
monopoly big baller today live https://monopolylive-in.com/
The tone stayed consistent across the whole post which is harder than it looks for longer pieces, and a look at vinylslogan continued the same voice, this kind of editorial consistency is a sign of either a single careful writer or a tightly run team and either is impressive today across the broader media environment.
Excellent post, balanced and well organised without showing off, and a stop at saddleswamp continued in that same vein, this site has clearly figured out the formula for content that works for readers rather than for search engine ranking signals which is harder than it sounds today and worth real recognition from anyone.
В данной публикации мы поговорим о процессе восстановления от зависимости, о том, как вернуть себе нормальную жизнь. Мы обсудим преодоление трудностей, значимость поддержки и наличие программ реабилитации. Читатели смогут узнать о ключевых шагах к успешному восстановлению.
Ознакомиться с теоретической базой – сайт наркологической клиники
Quality work here, the post reads cleanly and the points stay focused throughout, and a stop at uppersharp kept the standard high, you can tell the writer cares about the final result rather than just hitting publish for the sake of having something new on the page to feed the search engines.
Really appreciate the confidence to make a clear point rather than hedging everything, and a quick visit to qalnexo maintained the same direct stance, writing that takes positions rather than equivocating is more useful even when the positions are debatable because at least the reader has something to react to clearly.
Honestly this kind of writing is why I still bother to read independent sites, and a look at saddlevicar extended that broader reflection, the few sites that justify continued attention to non algorithmic content are sites like this one and finding them periodically is enough to keep my reading habits oriented toward independent rather than aggregated content.
Even across multiple posts the writers voice has remained consistent in a way I appreciate, and a stop at triadsharp continued that voice, sites that maintain editorial consistency across many pieces have something most sites lack and this one has clearly worked out how to keep its voice steady across what reads as a growing archive.
В этой статье обсуждаются актуальные медицинские вопросы, которые волнуют общество. Мы обращаем внимание на проблемы, касающиеся здравоохранения и лечения, а также на новшества в области медицины. Читатели будут осведомлены о последних событиях и смогут следить за тенденциями в медицине.
Почему это важно? – нарколог на дом отзывы
В этой статье мы рассматриваем разные способы борьбы с алкогольной зависимостью. Обсуждаются методы лечения, программы реабилитации и советы для поддержки близких. Читатели получат информацию о том, как преодолеть зависимость и добиться успешного выздоровления.
Выяснить больше – detox24
Обзор посвящён процессу восстановления после зависимостей. Мы расскажем о различных этапах реабилитации, поддерживающих ресурсах и важности мотивации в достижении устойчивого выздоровления.
Ознакомьтесь поближе – нарколог на дом вывод из запоя на дому
Статья посвящена анализу текущих трендов в медицине и их влиянию на жизнь людей. Мы рассмотрим новые технологии, методы лечения и значение профилактики в обеспечении долголетия и здоровья.
Углубиться в тему – вывод из запоя цены
Honestly slowed down to read this carefully which is not my default, and a look at stencilveto kept me in that careful reading mode, the kind of writing that demands attention by being worth attention is rare in a media environment full of content engineered to be skimmed not read with any real focus today.
В этой публикации мы предложим ряд рекомендаций по избавлению от зависимостей и успешному восстановлению. Мы обсудим методы привлечения поддержки и важность самосознания. Эти советы помогут людям вернуться к нормальной жизни и стать на путь выздоровления.
Изучите внимательнее – Капельница от запоя на дому
Felt the writer respected the topic without being precious about it, and a look at rivqiro continued that respectful but unfussy treatment, finding the right register for serious topics is hard and this site has clearly figured out how to take the topic seriously while still being readable for casual visitors regularly.
Now considering carefully how to share this site with the right audience rather than broadcasting widely, and a look at sonartennis extended that careful sharing impulse, content worth sharing carefully rather than spamming is content that has earned a higher kind of recommendation and this site has earned that careful shareability throughout pieces.
Looking back on this reading session it stands as one of the better ones recently, and a look at sonarsandal extended that ranking, the informal ranking of reading sessions against each other is something I do mentally and this session ranks high largely because of this site and a couple of related pages here.
Came in skeptical of the angle and left mostly persuaded, and a stop at driftfair pushed me a bit further in the same direction, content that can move a critical reader by argument rather than rhetoric is rare and worth pointing out because it indicates real substance underneath the surface presentation here.
Этот текст посвящён сложным аспектам зависимости и её влиянию на жизнь человека. Мы обсудим психологические, физические и социальные последствия зависимого поведения, а также важность своевременного обращения за помощью.
Ссылка на источник – клиника плюс тверь
Now setting up a small reminder to revisit the site on a slow day, and a stop at trendandfashion confirmed the reminder was a good idea, planning return visits is a small organisational act that signals trust in ongoing quality and this site has earned that planned return through consistent performance across the pieces I have read so far.
Worth saying that the writing carries a particular kind of authority without making any explicit claims to it, and a stop at meadochre extended that earned authority feeling, sites that demonstrate expertise through the quality of their explanations rather than by stating credentials are sites I trust most and this site has it.
В этой статье рассматривается комплексный подход к избавлению от зависимости. Читатель узнает, как сочетание физического, психологического и духовного восстановления помогает достичь стойкого выздоровления.
Интересует подробная информация – clinica plus
Now recognising that the post handled the topic with appropriate technical precision without becoming dry, and a stop at discoverlimitlessoptions continued that balance, technical precision and readability are often in tension and this site has clearly figured out how to maintain both at once which is one of the harder editorial achievements in the form.
Working through this site has been a small antidote to the shallow content that fills most of my reading time, and a stop at tundratoken extended that antidote function, sites that quietly improve the average quality of my reading by being themselves are sites worth supporting through return visits and recommendations consistently.
Эта публикация раскрывает психологические механизмы зависимости и их роль в развитии расстройств. Читатель узнает о том, как психология влияет на формирование зависимостей и как профессиональная помощь может изменить ситуацию.
Всё, что нужно знать – капельницу от запоя
Glad the writer did not feel compelled to cover every possible angle of the topic, focus is a virtue, and a stop at solidtiger reflected the same disciplined scope, knowing what to leave out is half of what makes good writing good and this post has clearly been edited with that principle in mind.
A piece that did exactly what it promised in the headline without overshooting or underdelivering, and a look at laurelmallow continued that calibration, alignment between promise and delivery is a basic editorial virtue that many sites fail at and this site has clearly mastered the matching of expectation and substance throughout pieces.
В этой статье рассматриваются актуальные вопросы, связанные с развитием медицинской науки и её внедрением в повседневную практику. Особое внимание уделено вопросам профилактики, ранней диагностики и использованию технологий для улучшения здоровья человека.
Не упусти шанс – нарколог на дом
Now planning a longer reading session for the archives, and a stop at zornexo confirmed the archives are worth that longer commitment, sites with archives I want to read deliberately rather than just sample are rare and this one has clearly earned that level of interest based on the consistency of what I have already read.
Just want to record that this site is entering my regular reading list, and a look at parsleymulch confirmed it deserves the spot, my regular reading list is short and well curated and adding to it requires meeting a fairly high quality bar that this site has clearly cleared without much effort apparently.
Публикация знакомит читателей с различными подходами к реабилитации. От традиционных методов до современных программ — вы узнаете, как выбрать оптимальный путь к выздоровлению и преодолеть препятствия на этом пути.
ТОП-5 причин узнать больше – наркологическая клиника в твери
Solid stuff, the kind of post that I will probably refer back to later this month when the topic comes up again, and a look at tasseltennis only confirmed I should bookmark the site as a whole rather than just this single page for future reference and use across coming weeks.
Picked up two new ideas that I expect will come up in conversations this week, and a look at skifftornado added another, content that arms me with talking points rather than just filling time is the kind that provides ongoing value beyond the moment of reading and this site is generating that kind of ongoing value.
Эта публикация содержит ценные советы и рекомендации по избавлению от зависимости. Мы обсуждаем различные стратегии, которые могут помочь в процессе выздоровления и важность обращения за помощью. Читатели смогут использовать полученные знания для улучшения своего состояния.
Раскрыть тему полностью – нарколог на дом цена воронеж
В этой публикации мы рассматриваем важную тему борьбы с зависимостями, включая алкогольную и наркотическую зависимости. Мы обсудим методы лечения, реабилитации и поддержку, которые могут помочь людям, столкнувшимся с этой проблемой. Читатели узнают о перспективах выздоровления и важности комплексного подхода.
А что дальше? – кодировка от алкоголизма двойной блок
Публикация знакомит читателей с различными подходами к реабилитации. От традиционных методов до современных программ — вы узнаете, как выбрать оптимальный путь к выздоровлению и преодолеть препятствия на этом пути.
Открыть полностью – вызов наркологической помощи
Picked up something useful for a side project, and a look at swirllink added another piece I will incorporate, content that connects to specific projects I am working on is content with practical utility and the practical utility of this site is showing up across multiple posts I have read in the last hour or so.
Bookmarking this for later, the kind of resource I want to keep nearby, and a quick look at villageswan confirmed the rest of the site is worth the same treatment, definitely going into my reference folder for the next time the topic comes up at work or in conversation with someone who asks.
The structure of the post made it easy to follow without losing track of where I was, and a look at gondoenvoy kept the same logical flow going, this site clearly understands that organisation is half the battle in keeping readers engaged from the first line to the last across any kind of post.
Genuinely useful read, the points are practical and easy to apply right away, and a quick look at twainverge confirmed that this site is consistent in that approach, looking forward to digging through the rest of it when I get the chance to sit down properly later in the week or this weekend.
В этой статье мы рассматриваем разрушительное влияние зависимости на жизнь человека. Обсуждаются аспекты, такие как здоровье, отношения и профессиональные достижения. Читатели узнают о необходимости обращения за помощью и о путях к восстановлению.
Получить полную информацию – clinica plus
Genuinely well crafted writing, the kind that makes the topic look easier than it actually is, and a look at voguesage added even more depth, you can feel the experience behind every line which is something only writers who have been at this for a while can pull off with this level of grace.
В этой статье мы рассматриваем разрушительное влияние зависимости на жизнь человека. Обсуждаются аспекты, такие как здоровье, отношения и профессиональные достижения. Читатели узнают о необходимости обращения за помощью и о путях к восстановлению.
Тыкай сюда — узнаешь много интересного – кодирование от алкоголизма Двойной блок
Этот текст представляет собой обзор свежих данных и исследований в области медицины. Он призван помочь читателям понять, как научные достижения влияют на лечение, диагностику и общее состояние системы здравоохранения.
Где почитать поподробнее? – Капельница после запоя
Reading this in the morning set a good tone for the day, and a quick visit to sonarturtle kept that good tone going, content can do that sometimes when it hits the right notes and finding sites that consistently strike that tone is something I have learned to recognise and reward with regular visits.
Skipped to a specific section because I knew that was the question I had, and the answer was clean, and a stop at turbinevault similarly delivered targeted answers without burying them, content engineered for readers who arrive with specific needs rather than open ended browsing is increasingly valuable in a search heavy reading environment.
Bookmark added in three places to make sure I do not lose the link, and a look at unlockyourfullpotential got the same redundant treatment, sites I am afraid to lose are the rare keepers and this is clearly one of them based on what I have read so far across this and a couple of related posts.
Felt the writer respected me as a reader without making a show of doing so, and a look at duetcoast continued that quiet respect, this is the kind of small but meaningful detail that separates the sites I bookmark from the ones I close after a single skim and never return to again no matter how interesting the headline.
Took a quick scan first and then went back to read properly because the post deserved it, and a stop at thriftsundae kept me reading carefully too, the kind of writing that earns a slower second pass rather than getting skimmed and forgotten is something I value highly when I happen to find it.
Honestly impressed by how much useful content sits in such a small post, and a stop at passionload confirmed the rest of the site packs a similar punch, density without confusion is a hard balance to strike and this site has clearly cracked the code on it across many different topic areas covered.
Probably the best thing I have read on this topic in the past month, and a stop at leafpatio extended that ranking, the casual ranking of recent reading is informal but real and this site has been winning those rankings for me on this topic specifically over the last several weeks of regular reading sessions.
Reading this gave me a quiet moment of intellectual pleasure that I had not been expecting, and a stop at tallysmoke extended that pleasure across more pages, the unexpected reward of stumbling into careful writing is one of the small ongoing pleasures of reading the open web and this site is delivering it reliably.
Reading carefully this time rather than scanning, and the depth shows up in places I missed first time around, and a look at trendandbuy rewarded the same careful approach, content that holds up to multiple reads is content I want more of in my regular rotation rather than disposable scroll fodder daily.
Glad to have another data point on a question I am still thinking through, and a look at qanlivo added two more, content that acknowledges its place in a wider conversation rather than pretending to settle the question alone is intellectually honest in a way that I wish was more common across the open web.
During my morning reading slot this fit perfectly into the routine, and a look at vaultvelour extended that perfect fit into the rest of the routine, content that matches the rhythm of how I actually read rather than demanding accommodation from my schedule is content well calibrated to its likely audience and this site has it.
The way the post stayed on topic throughout without going on tangents was really refreshing, and a look at zorvilo kept that focused approach going, discipline like this in writing is rare and worth recognising because most writers cannot resist wandering off into related subjects that dilute their main point and confuse readers along the way.
Статья посвящена анализу текущих трендов в медицине и их влиянию на жизнь людей. Мы рассмотрим новые технологии, методы лечения и значение профилактики в обеспечении долголетия и здоровья.
Смотрите также – наркологическая клиника в твери
A piece that built up gradually rather than front loading its main points, and a look at rivzavo maintained the same gradual structure, content that trusts the reader to reach conclusions through accumulating reasoning is more persuasive than content that announces conclusions and then defends them and this site uses the persuasive approach.
Closed the post with a small satisfied sigh, and a stop at gondoiris produced the same gentle exhale, content that ends well is content that respects the rhythm of reading and the writers here have clearly thought about how their pieces close rather than just trailing off when they run out of things to say.
В этой медицинской статье мы погрузимся в актуальные вопросы здравоохранения и лечения заболеваний. Читатели узнают о современных подходах, методах диагностики и новых открытий в научных исследованиях. Наша цель — донести важную информацию и повысить уровень осведомленности о здоровье.
Продолжить чтение – кодировка на 5 лет
Excellent execution from start to finish, the post never loses its rhythm and the points stay sharp, and a quick stop at umbravista kept the same level going, consistency like this across a site is the marker of a serious operation rather than a casual side project running on autopilot somewhere else.
Useful information presented in a way that does not feel like a sales pitch, that is what I appreciated most, and a stop at turbantorso was the same, no upsell and no fake urgency just steady content laid out properly for someone trying to actually learn from it rather than just be sold to.
Came in expecting another generic take and got something with actual character instead, and a look at venusstout carried that personality forward, finding a distinct voice on a saturated topic is impressive and worth pointing out when it happens because most sites end up sounding identical to their nearest competitors quickly.
В данной публикации мы поговорим о процессе восстановления от зависимости, о том, как вернуть себе нормальную жизнь. Мы обсудим преодоление трудностей, значимость поддержки и наличие программ реабилитации. Читатели смогут узнать о ключевых шагах к успешному восстановлению.
Откройте для себя больше – помощь вывода из запоя
В данной статье рассматриваются физиологические и эмоциональные аспекты зависимости. Мы обсудим, как организм реагирует на зависимое поведение, и какие методы помогают восстановить здоровье и внутреннее равновесие.
Перейти к полной версии – частный нарколог на дом
В статье по вопросам здоровья мы рассматриваем актуальные проблемы, с которыми сталкивается общество. Обсуждаются заболевания, факторы риска и важные аспекты профилактики. Читатели получат полезные советы о том, как сохранить здоровье и улучшить качество жизни.
Есть чему поучиться – clinica plus в твери
Reading this in the gap between work projects was a small but meaningful break, and a stop at tealsilver extended that gentle reset, content that provides genuine refreshment rather than just distraction during work breaks is content with a particular kind of utility and this site fits that role for me reliably during work days.
Reading this prompted a small note in my reference file, and a stop at makeprogressforward prompted another, the rare site that contributes useful nuggets to my own working knowledge rather than just consuming my attention is worth the time investment many times over compared to the usual pile of forgettable scroll content.
This one is staying open in a tab for the rest of the day so I can come back and re read certain parts, and a look at tagzip suggests I will be doing the same with a few more pages here too, this is going to be a deep dive over the coming hours.
A nicely understated post that does not shout for attention, and a look at meltmyrtle maintained the same quiet quality, understatement is a stylistic choice that distinguishes serious writing from attention seeking writing and this site has clearly committed to the understated approach as a core editorial value rather than just a phase.
A piece that took its time without dragging, and a look at sculptsilver kept the same patient pace, the difference between unhurried and slow is a fine editorial distinction and this site has clearly found the unhurried side without slipping into the slow side which would have lost me as a reader quickly otherwise.
I usually skim posts like these but this one held my attention all the way through, and a stop at uptonstarlit did the same, that is a strong endorsement coming from me because I am usually quick to bounce when content gets repetitive or fails to deliver on its initial promise made in the headline.
Публикация посвящена жизненным историям людей, успешно справившихся с зависимостью. Мы покажем, что выход есть, и он начинается с первого шага — принятия проблемы и желания измениться.
Всё самое вкусное внутри – clinica plus
The whole experience of reading this was pleasant from start to finish, no pop ups and no annoying interruptions, and a look at tornadovapor continued that clean experience, technical choices about page design matter for the reader and this site clearly cares about the small details that add up to comfort across multiple visits.
В данном обзоре представлены основные направления и тренды в области медицины. Мы обсудим актуальные проблемы здравоохранения, свежие открытия и новые подходы, которые меняют представление о лечении и профилактике заболеваний. Эта информация будет полезна как специалистам, так и широкой публике.
Полезно знать – капельница от запоя
Came away with a slightly better mental model of the topic than I started with, and a stop at pastrylevee sharpened that further, content that improves the reader thinking apparatus rather than just dumping facts into it is the rare kind I genuinely value and seek out when I have time to read carefully.
Reading this prompted me to clean up some old notes related to the topic, and a stop at leapminor extended that organising urge, content that triggers personal organisation rather than just consuming attention is content with motivating energy and this site has the kind of clarity that prompts active follow up rather than passive consumption.
I really like the calm tone here, it does not push anything on the reader, and after I went through sambasavor I felt the same way, just steady useful content laid out without drama, which is exactly what someone trying to learn something quickly needs to find rather than aggressive marketing.
Even across multiple posts the writers voice has remained consistent in a way I appreciate, and a stop at scarabsail continued that voice, sites that maintain editorial consistency across many pieces have something most sites lack and this one has clearly worked out how to keep its voice steady across what reads as a growing archive.
Reading this in my last reading slot of the day was a good way to end, and a stop at timelessgroovehub provided a satisfying close to the reading session, content that ends a day well rather than agitating it before sleep is the kind I value increasingly and this site fits that role for me consistently now.
Felt the writer respected the topic without being precious about it, and a look at zulmora continued that respectful but unfussy treatment, finding the right register for serious topics is hard and this site has clearly figured out how to take the topic seriously while still being readable for casual visitors regularly.
Now wondering how the writers calibrated the level of detail so well, and a stop at learnandgrowtogether continued the same calibration, the right level of detail is one of the harder editorial calls in any piece and this site has clearly developed an instinct for it through what I assume is years of careful practice publicly.
monopoly live video https://live-monopoly-in.com/
Looking forward to seeing what gets published next month, and a look at versavamp extended that anticipation across the broader site, finding myself looking forward to a sites future content rather than just consuming its existing content is a stronger commitment level than I usually reach with new finds and this site triggered that.
Thank you for not assuming the reader already knows everything, the explanations meet me where I am, and a look at sabertorch did the same, that consideration is what makes a site feel welcoming rather than gatekeepy which is sadly the default mood across the modern web today for most subjects covered.
Comfortable in tone and substantive in content, that is a hard combination to land, and a look at tarmacstork kept that pairing alive across more material, this is what good editorial direction looks like in practice and the team here clearly has someone keeping a steady hand on the wheel across what they decide to publish.
Worth pointing out that the writing reads as confident without being defensive about it, and a look at gongflora extended that secure tone, content that does not pre emptively argue against imagined critics has a different quality from defensive writing and this site reads as written from a place of real ease.
A piece that suggested careful editing without showing the marks of the editing, and a look at stashsuperb continued that invisible polish, the best editing disappears into the prose and this site reads as having been edited with skill that does not announce itself which is the highest compliment I can offer any blog content.
Reading this in the gap between work projects was a small but meaningful break, and a stop at nuartplate extended that gentle reset, content that provides genuine refreshment rather than just distraction during work breaks is content with a particular kind of utility and this site fits that role for me reliably during work days.
Easy to recommend, the content speaks for itself without needing additional praise from me, and a stop at qanviro only adds more reasons to send people this way, the kind of generous resource that benefits its readers without demanding anything in return is increasingly rare and worth recognising clearly today across the broader open internet.
Custom-made furniture requests frameless cabinets Tampa Bay
Solid information that lines up with what I have been hearing from other reliable sources, and after my visit to patioleaf I was even more certain of that, this site checks out which is something I value highly when so many places online play loose with the facts to chase a quick click.
Reading this on the train into work was a better use of the commute than my usual choices, and a stop at flyburn extended that commute reading well, content that improves transit time rather than just filling it is content with practical benefit and this site has earned its place in my morning commute reading rotation.
Ended up here on a wandering afternoon and was glad I stayed for the read, and a stop at tracetroop extended the wandering into a proper exploration of the site, the kind of place that rewards aimless clicking with something genuinely interesting rather than the shallow content that mostly populates the modern open web.
Worth flagging that the writing rewarded a second read more than I expected, and a look at leappalette produced the same second read benefit, content with hidden depths that emerge only on careful rereading is rare in the modern blog space and this site has clearly invested in that level of compositional density throughout.
Will be passing this along to a few people who would benefit from the perspective shared here, and a stop at sketchstamp only added to what I will be sharing, this kind of generous content deserves to circulate widely rather than getting buried in some search engine algorithm tweak that pushes it down the rankings.
Even just sampling a few posts the consistency is what stands out, and a look at swapvenom confirmed the broader pattern, sites where every piece I sample lives up to the standard set by the others are sites with serious quality control and this one has clearly invested in whatever editorial process produces that consistency reliably.
Liked that there was nothing performative about the writing, and a stop at broblur continued that genuine quality, performative writing tries to be witnessed rather than read and the difference between performance and substance is huge for the careful reader and this site has clearly chosen substance every time clearly.
В этом обзоре представлены различные методы избавления от зависимости, включая терапевтические и психологические подходы. Мы сравниваем их эффективность и предоставляем рекомендации для тех, кто хочет вернуться к трезвой жизни. Читатели смогут найти информацию о реабилитационных центрах и поддерживающих группах.
Расширить кругозор по теме – капельницу от запоя
Looking forward to seeing what gets published next month, and a look at tagtorch extended that anticipation across the broader site, finding myself looking forward to a sites future content rather than just consuming its existing content is a stronger commitment level than I usually reach with new finds and this site triggered that.
Decided not to skim despite my usual habit and was rewarded for the discipline, and a stop at ilonox earned the same patient approach, training myself to recognise sites that warrant slower reading is part of being a careful online reader and this site is the kind that helps me practice that skill regularly.
Reading this confirmed something I had been suspecting about the topic, and a look at fiabush pushed that confirmation toward greater confidence, content that lines up with independently held intuitions earns a special kind of trust and I will return to writers who consistently land that way for me without overselling positions.
Did not expect much when I clicked through but ended up reading the whole thing carefully, and a stop at ibabowl kept that engagement going, sometimes the unassuming sites turn out to deliver more than the flashy ones which is something I have learned to look out for over time online lately and across topics.
A relief to read something where I did not have to fact check every claim mentally, and a look at halbelt continued that reliable feeling, sites where I can lower my guard and trust the content are rare and this one is earning that trust paragraph by paragraph through consistent careful work behind the scenes.
Worth flagging that this approach to the topic is fresh without being contrarian, and a stop at startyournextjourney extended the same fresh angle, finding original perspective on familiar subjects is rare and this site has clearly developed its own way of seeing rather than echoing the dominant takes from elsewhere consistently.
Better than the average post on this subject by some distance, and a look at hoxaero reinforced that, you can tell within the first paragraph that the writer here actually cares about the topic rather than just covering it for the sake of having something to publish that week or that day.
Thanks for the simple approach, too many sites bury the actual point under layers of unnecessary words, but here every line earns its place, and a look at meownoon showed the same care for the reader which is something I will remember the next time I need answers on a topic.
Considered as a whole this site has developed a coherent point of view that comes through in individual pieces, and a look at velourudon continued displaying that coherence, sites with a unified perspective rather than a grab bag of takes are sites with editorial maturity and this one has clearly developed that maturity through years of work.
torzon darknet link https://darkmarketlegion.com/ darknet markets url https://darkmarketslegion.com/
Found this useful, the points line up well with what I have been thinking about lately, and a stop at surgetarmac added some angles I had not considered yet, definitely walking away with more than I came for which is the best outcome from time spent reading online for any kind of topic.
Going to come back when I have more time to read carefully, the post deserves more than a quick scan, and a stop at stashswan reinforced that, this is the kind of site that rewards a slower read which is hard to find in this fast paced corner of the internet but really worthwhile.
Closed it feeling I had taken something away rather than just consumed something, and a stop at zulqaro extended that taking away feeling, the difference between content I extract value from and content I just pass through is something I track informally and this site is consistently in the value extraction column for me.
Decided to subscribe to the RSS feed if there is one, and a stop at timberfieldcorner confirmed that decision, content that I want delivered to me proactively rather than just remembered when I have time is content that has earned a higher level of commitment from me as a reader looking for reliable sources.
Appreciate the work that went into laying this out so clearly, every section earns its place without filler, and a look at souptrigger confirmed the same care, definitely the kind of place that deserves a return visit when the topic comes up again later in the future or for any related question.
Most of the time I feel the open web is in decline and then I find a site like this, and a stop at gonggrip reinforced that mood lift, the cumulative effect of finding occasional excellent independent content versus the cumulative effect of finding mostly mediocre content is real for the long term reader maintaining web habits today.
Мы рассмотрим современные вызовы здравоохранения и пути их решения с помощью технологий и научных исследований. В статье собраны данные о новых лекарствах, методах диагностики и системном подходе к улучшению здоровья населения.
Продолжить чтение – наркологическая клиника в твери
В данной статье мы акцентируем внимание на важности поддержки в процессе выздоровления. Мы обсудим, как друзья, семья и профессионалы могут помочь тем, кто сталкивается с зависимостями. Читатели получат практические советы, как поддерживать близких на пути к новой жизни.
А что дальше? – двойной блок от алкоголизма
песок карьерный мытый карьерный песок в мешках
Genuine reaction is that this site clicked with how I like to read, and a look at tundraturtle kept that comfortable fit going, sometimes you find a place online whose editorial decisions just align with your preferences and when that happens it is worth recognising and supporting through repeat engagement consistently going forward.
Reading this gave me a small jolt of recognition for an experience I thought was just mine, and a stop at fribrag produced more such jolts, content that universalises private experiences without flattening them is doing genuinely useful work and this site is providing that recognition function for me reliably across topics I read.
Reading this slowly to absorb the structure, and the structure is doing real work alongside the words, and a look at pebblelemon maintained the same architectural quality, when sentence shapes and paragraph rhythms reinforce the meaning rather than just transporting words you know you are reading skilled work today.
Reading this site over the past week has changed how I evaluate content in this space, and a look at tokenudon extended that recalibration, the standards I bring to reading on the topic have shifted upward as a direct result of regular exposure to this kind of work and that shift will outlast any single reading session.
Just one of those reads that left me feeling slightly more capable rather than overwhelmed, and a look at voguestraw kept that empowering feel going, the difference between content that builds the reader up and content that intimidates them is huge and this site clearly knows which side of that line to stand.
Looking through other posts here the consistency is what makes the site valuable rather than any single piece, and a stop at lemonode extended that consistency observation, sites whose value lies in the ongoing pattern rather than in standout posts are sites I trust more deeply and this one has clearly built that kind of trust.
Modern Purair
416 Meridian Rԁ SЕ#14A, Calgary
AB T2A 1X2, Canada
(403) 800-7254
innovative duct system
Great work on keeping things readable, the post never drags or repeats itself which I really appreciate, and a stop at brofix added a bit more context that fit naturally with what was already said here, no need to read everything twice to get the point being made today.
Reading this gave me a small refresher on something I had partially forgotten, and a stop at treblevinca extended the refresher, content that strengthens existing knowledge rather than just adding new is content with a particular kind of consolidating value and this site is providing that consolidating function across multiple visits.
Felt the writer was being honest with the reader which is rare enough that I want to acknowledge it, and a look at ibacane continued that honest feel, content built on actual knowledge rather than aggregated summaries is something I value highly and rarely come across in regular searches on the open internet these days.
Came across this through a roundabout path and now it is on my regular rotation, and a stop at storkumber sealed that decision, the open web still produces serendipitous discoveries when you let the citations and references guide you rather than relying purely on algorithmic feeds for new content recommendations always.
Probably the best thing I have read on this topic in the past month, and a stop at imobush extended that ranking, the casual ranking of recent reading is informal but real and this site has been winning those rankings for me on this topic specifically over the last several weeks of regular reading sessions.
Now saved this in a way that I will actually find again rather than the casual bookmark approach, and a stop at exploreinnovativeconcepts earned the same careful saving, organising my reading bookmarks so that high quality sources rise to the top is something I should do more of and this site triggered that organisation today.
cocorico darknet market https://darkmarketlegion.com/ silk road market https://darkmarketsgate.com/
A piece that reads as if the writer trusted readers to fill in obvious gaps, and a look at tidalurchin continued that respectful approach, content that does not over explain what the reader can infer is content that respects intelligence and this site has clearly chosen to write to capable readers rather than to the lowest common denominator.
Этот текст представляет собой обзор свежих данных и исследований в области медицины. Он призван помочь читателям понять, как научные достижения влияют на лечение, диагностику и общее состояние системы здравоохранения.
Слушай внимательно — тут важно – clinica plus в твери
Cuts through the usual marketing fluff that dominates this topic online, and a stop at syncbyte kept the same clean approach going, this is the kind of writing that respects the reader’s time rather than wasting it on repetitive setups before finally getting to the point at hand which is what most sites do.
Этот документ охватывает важные аспекты медицинской науки, сосредотачиваясь на ключевых вопросах, касающихся здоровья населения. Мы рассматриваем свежие исследования, клинические рекомендации и лучшие практики, которые помогут улучшить качество лечения и профилактики заболеваний. Читатели получат возможность углубиться в различные медицинские дисциплины.
Уточнить детали – наркологическая клиника в геленджике
Liked that the post acknowledged complications rather than pretending they did not exist, and a stop at zulvexa continued that honest framing, sites that handle complexity with care rather than papering it over with simplifying claims are doing real intellectual work and this one is clearly in that category based on what I have read.
Looking for similar voices elsewhere has come up empty in my recent searches, and a stop at sorreltavern extended the search frustration, the rare site that does what no other does in quite the same way is precious and this one has clearly developed a particular approach that I have not been able to find duplicates of.
Now adding this site to a small mental group of recommendations I keep ready for specific kinds of inquiries, and a stop at siskavarsity extended the recommendation readiness, content that I can confidently point friends and colleagues toward in specific contexts is content with real social utility and this site has that utility clearly.
During my morning reading slot this fit perfectly into the routine, and a look at tacticstaff extended that perfect fit into the rest of the routine, content that matches the rhythm of how I actually read rather than demanding accommodation from my schedule is content well calibrated to its likely audience and this site has it.
Anyone curious about this topic would do well to start here, the foundation laid is solid, and a stop at fylbust would round out their understanding nicely, this is the kind of resource I would point a friend toward without hesitation if they asked me where to begin learning about anything in this area.
Looking at this from the perspective of someone tired of generic content the contrast is striking, and a look at jalborn maintained that distinctive feel, sites with strong editorial identity stand out against the bland background of algorithmic content and this one has clearly developed an identity worth recognising through careful attention.
Reading this with a fresh mind in the morning brought out details I might have missed in the afternoon, and a stop at gongjade earned the same fresh attention, content that rewards being read at full attention rather than at energy lows is content with real density and this site has that density consistently.
Актуальные вопросы баланса и патчей
трахает секс игрушку
Thanks for keeping the writing direct without losing the warmth that makes content feel human, and a stop at pebblenovel carried both qualities forward, balancing professionalism and personality is a rare skill and the writers here have clearly figured out how to consistently land it across many posts which I notice.
Reading this on a difficult day was a small bright spot, and a stop at threeoaktreasures extended that brightness, content that improves a hard day is content that has earned a particular kind of place in my reading habits and this site is occupying that uplifting role for me today which I appreciate clearly.
Honest opinion is that this is the kind of post that builds long term trust with readers, and a look at steamstraw reinforced that perception, the slow accumulation of trust through consistent quality is the only sustainable way to build a real audience and this site is clearly playing that long game.
During the time spent here I noticed the absence of the usual distractions, and a stop at seriftackle extended that distraction free experience, content that does not fight my attention with pop ups and modals and aggressive prompts is content that respects me and this site has clearly chosen the respectful approach throughout.
Halfway through I knew I would finish the post, and a stop at leveemotel also held me through to the end, content that signals its quality early and then sustains it is content with real internal consistency and this site has clearly figured out how to maintain quality from opening sentence through to closing thought.
Appreciated the way each section connected smoothly to the next without abrupt jumps, and a stop at byncane kept that flow going nicely, transitions are something most blog writers ignore but the difference is huge for the reader who is trying to follow a sustained line of thought today across many different topics.
Reading this as part of my evening winding down routine fit perfectly, and a stop at halbrook extended the wind down nicely, content that calms rather than agitates is what I want at the end of the day and this site provides that calming reading experience reliably which is increasingly rare across the modern web.
Reading this in a quiet hour and finding it suited the quiet, and a stop at ibeburn extended the quiet reading mood, content that matches its own optimal reading conditions rather than fighting them is content that has been thoughtfully calibrated and this site reads as having a particular reading mood in mind throughout.
ares market url https://darkmarketsgate.com/ silk road shop https://darkmarketslegion.com/
Looking at this objectively the editorial quality is hard to deny even setting aside personal taste, and a stop at hoxfix maintained the same objective quality, the gap between what I personally enjoy and what is objectively well crafted exists and this site clears both bars simultaneously which is rarer than it sounds.
Picked up several practical tips that I plan to try out this week, and a look at exploreyourpotential added a few more I will be testing alongside, content with practical hooks that connect to my actual life is the kind that earns my repeat attention rather than the merely interesting that I forget within a day.
Solid information that lines up with what I have been hearing from other reliable sources, and after my visit to mercymodel I was even more certain of that, this site checks out which is something I value highly when so many places online play loose with the facts to chase a quick click.
Picked up a couple of new ideas here that I can actually try out, and after my visit to velourturban I have even more notes saved, this is the kind of resource that pays you back for the time you spend on it which is rare to come across in this corner of the web.
Genuinely good work, the kind that holds up over multiple readings without losing its appeal, and a stop at tritonsloop kept that going, definitely a site I will be returning to and probably mentioning to others who work in or care about this particular area of interest today and in coming weeks.
Working through this site has been a small antidote to the shallow content that fills most of my reading time, and a stop at inaarch extended that antidote function, sites that quietly improve the average quality of my reading by being themselves are sites worth supporting through return visits and recommendations consistently.
Honestly impressed, did not expect to find this level of care on the topic, and a stop at timberverge cemented the impression, you can tell within the first few paragraphs whether a site is going to be worth the time and this one delivered on that early promise nicely throughout the rest of what I read.
В этой статье рассматривается комплексный подход к избавлению от зависимости. Читатель узнает, как сочетание физического, психологического и духовного восстановления помогает достичь стойкого выздоровления.
Более того — здесь – clinica plus
Really appreciate the lack of pop ups, modals, cookie banners stacking on top of each other, and a quick visit to suppletoast confirmed the same clean approach across the rest of the site, technical decisions about user experience are part of what makes content actually pleasant to engage with for sure.
More substantial than most of what I find searching for this topic online, and a stop at stereotarot kept that quality consistent, this is one of those sites where the writing actually rewards careful reading rather than punishing the patient reader with empty filler stretched out across long paragraphs that say very little.
Reading this gave me material for a conversation I needed to have anyway, and a stop at vistastencil added even more talking points, content that connects to upcoming social or professional needs rather than just being interesting in the abstract is the kind that earns priority placement in my attention these days routinely.
A welcome reminder that thoughtful writing still happens online, and a look at swamptweed extended that reassurance, the modern web makes it easy to forget that careful writing exists and finding sites that practice it is a small antidote to the cynicism that builds up from too much exposure to algorithmic content.
Picked a friend mentally as the audience for this and decided to send the link, and a look at fylcalm confirmed the send was the right choice, choosing whom to share content with is a small act of curation that I take more seriously than the public sharing most platforms encourage these days online.
Now appreciating that the post left me with enough to say in a follow up conversation, and a look at zunkavi added more material for those follow ups, content that prepares me for related conversations rather than just informing me alone is content with social utility and this site provides that social armament reliably for me.
Honestly slowed down to read this carefully which is not my default, and a look at vocabtoffee kept me in that careful reading mode, the kind of writing that demands attention by being worth attention is rare in a media environment full of content engineered to be skimmed not read with any real focus today.
Vague feelings of recognition kept surfacing as I read because the writing names things I have been thinking, and a look at pebbleoboe produced more of those recognition moments, content that gives shape to private intuitions is content that makes me feel less alone in my own thinking and this site has that effect.
A piece that left me thinking I had been undercaring about the topic, and a look at tunicvicar reinforced that mild concern, content that raises the appropriate weight of a subject without being preachy about it is doing important work and this site is providing that gentle elevation of attention for me consistently.
Picked up on several small touches that suggest a careful editor, and a look at sloopvault suggested the same hand at work across the broader site, editorial consistency at a granular level is one of the strongest signs that an operation is serious rather than just hobbyist and this site reads as serious throughout.
nexus official link https://darkmarketslegion.com/ dark web market urls https://darkmarketlegion.com/
Worth recognising the specific care that went into how this post ended, and a look at liegelane maintained the same careful conclusions, endings are where most blog content falls apart and this site has clearly invested in the closing stretches of its pieces rather than letting them simply trail off when energy fades.
Now adding this to a short list of sites I would defend in a conversation about the modern web, and a look at gongketo reinforced that defence list, the few sites that serve as evidence the web can still produce good things are precious and this one has clearly joined that small list of exemplary sites.
Skipped breakfast still reading this and finished hungry but satisfied, and a stop at pixiescan kept me past breakfast time, content that displaces basic biological needs is content with serious attentional pull and the writers here are clearly capable of producing that level of engagement which is genuinely impressive these days.
monopoly live stream https://live-monopoly-india.com/
Reading this slowly because the writing rewards a slower pace, and a stop at cadbrisk did the same, the pace at which I read content is something I now use as a quality signal and writing that earns a slower pace earns my attention as a reader looking for substance these days.
Started a draft response in my head and ended without publishing it because the post said it well enough, and a look at buildsomethinglasting produced the same effect, content that satisfies my urge to add to it by being complete enough on its own is rare and represents a particular kind of editorial completeness here.
monopoly casino live chat http://monopoly-casino-india.com/ .
Glad I gave this a chance instead of bouncing on the headline, and after ibecalf I was certain I had made the right call, snap judgements based on titles miss a lot of good content and this is a reminder to slow down and check things out before scrolling past in a hurry.
casino scores monopoly big baller today live free monopoly-live-in.com .
My professional context would benefit from having this kind of resource available, and a look at solotopaz extended the professional applicability, the rare site that contributes meaningfully to professional work rather than just personal interest is content with multiplied value and this one is providing that professional utility consistently across multiple pieces.
monopoly big result today live monopoly big result today live .
monopoly live game online https://www.monopoly-live-india.com .
monopoly live baller monopoly live baller .
В этой публикации мы рассматриваем важную тему борьбы с зависимостями, включая алкогольную и наркотическую зависимости. Мы обсудим методы лечения, реабилитации и поддержку, которые могут помочь людям, столкнувшимся с этой проблемой. Читатели узнают о перспективах выздоровления и важности комплексного подхода.
Изучить вопрос глубже – вывод из запоя круглосуточно
monopoly casino live monopoly casino live .
Came back to this an hour later to reread a specific section, and a quick visit to serifveil also drew a second look, content that pulls you back rather than letting you move on permanently is the kind I want to fill my browser bookmarks with in 2026 and beyond as the open internet evolves.
Most of the time I feel the open web is in decline and then I find a site like this, and a stop at veilshrine reinforced that mood lift, the cumulative effect of finding occasional excellent independent content versus the cumulative effect of finding mostly mediocre content is real for the long term reader maintaining web habits today.
Useful read, especially because the writer did not assume too much background from the reader, and a quick look at inobrat continued in the same way, a thoughtful site that meets people where they are which is something the modern web could use a lot more of for both casual and serious readers.
Now planning to come back when I have the right kind of attention to read carefully, and a stop at spectrasolo reinforced that plan, choosing the right moment to read certain content is a quiet form of respect for the work and this site is generating those careful planning behaviours from me consistently as a reader.
Started believing the writer knew the topic deeply by about the second paragraph, and a look at jamcall reinforced that confidence, the speed at which a writer establishes credibility through their writing is a useful quality signal and this writer establishes it quickly and quietly without resorting to credential dropping or self promotion.
Reading this slowly because the writing rewards a slower pace, and a stop at zunqavo did the same, the pace at which I read content is something I now use as a quality signal and writing that earns a slower pace earns my attention as a reader looking for substance these days.
Found this through a search that was generic enough I did not expect quality results, and a look at gadblow continued the surprisingly good experience, search engines occasionally still surface excellent independent content if you scroll past the obvious paid and high authority results which is reassuring to remember sometimes.
Now placing this in the same category as a few other sites I have come to trust, and a look at turtleudon continued the placement decision, the small category of fully trusted sites is one I extend rarely and only after multiple positive reading sessions and this site has earned the category placement methodically over time.
The use of plain language without dumbing down the topic was really well done, and a look at savorvantage continued in that same accessible style, this is something many technical writers fail at because they either confuse their readers or condescend to them but here neither problem appears at all which is impressive really.
Liked the careful selection of which details to include and which to skip, and a stop at pebbleorbit reflected the same editorial judgement, knowing what to leave out is just as important as knowing what to include and this site has clearly figured out where that line sits for the topics it covers regularly.
Этот обзор посвящен успешным стратегиям избавления от зависимости, включая реальные примеры и советы. Мы разоблачим мифы и предоставим читателям достоверную информацию о различных подходах. Получите опыт многообразия методов и найдите подходящий способ для себя!
Изучите внимательнее – clinica plus в твери
Generally I am cautious about recommending sites on first encounter but this one warrants the exception, and a look at hanrim reinforced the exception making, the rare site that justifies breaking my normal cautious approach is the rare site worth flagging early and this one has prompted exactly that early flagging response from me.
Better than the average post on this subject by some distance, and a look at hoxhem reinforced that, you can tell within the first paragraph that the writer here actually cares about the topic rather than just covering it for the sake of having something to publish that week or that day.
My usual pattern is to skim and bounce but this site has reset that pattern temporarily, and a stop at mercypillow maintained the slower reading mode, content that changes how I read is content with structural influence and this site has clearly nudged my reading behaviour toward something better at least for the duration of these visits.
Most posts I read end up forgotten within a day but this one is sticking, and a look at discovermeaningfulideas extended that lingering effect, content that survives the immediate moment of reading rather than evaporating is content with genuine retention quality and this site has been producing memorable pieces at a rate notable across my reading.
Reading this in a relaxed evening setting was a small pleasure, and a stop at taupeswift extended the pleasant evening reading, content that fits the tone of relaxed time without becoming forgettable is what I look for in evening reading and this site has the right tone for that particular slot in my daily reading routine.
Highly recommend to anyone looking for a sensible take on this topic without the usual marketing nonsense, and a look at siriussuperb kept that grounded approach going, sites that stay focused on serving readers rather than monetising every click are rare and this is clearly one of those rare ones I really appreciate finding.
Pass this along to colleagues if the topic comes up, the framing here is sensible, and a stop at sampleshaft adds more useful angles to share, the kind of content that improves conversations rather than just feeding them is what makes a resource genuinely valuable in professional contexts going forward over time and across project boundaries too.
Found a couple of useful angles in here I had not considered before reading carefully, and a quick stop at ibecap added more, this is one of those sites where the value compounds the more you read rather than peaking at one viral post and then offering nothing else of substance afterwards which is common.
Quietly the post solved something I had been turning over without quite knowing how to phrase the question, and a look at swordtunic extended that quiet solving, content that addresses unformulated needs is content with reader insight and this site has demonstrated that insight at a high rate across the pieces I have read recently.
During a reading session that included several other sources this one stood out, and a look at caroxo continued the standout quality, the side by side comparison of sources during research is a useful exercise and this site has been winning those comparisons for me consistently across multiple research sessions during the last week.
Этот обзор посвящен успешным стратегиям избавления от зависимости, включая реальные примеры и советы. Мы разоблачим мифы и предоставим читателям достоверную информацию о различных подходах. Получите опыт многообразия методов и найдите подходящий способ для себя!
А есть ли продолжение? – вызов наркологической помощи
Эта публикация обращает внимание на важность профилактики зависимостей. Мы обсудим, как осведомленность и образование могут помочь в предотвращении возникновения зависимости. Читатели смогут ознакомиться с полезными советами и ресурсами, которые способствуют здоровому образу жизни.
Жми сюда — получишь ответ – нарколог на дому капельница цена
Just want to recognise that someone clearly cared about how this turned out, and a look at snoozestaple confirmed that care extends across the broader site, you can feel the difference between content shipped to hit a deadline and content released because the writer was actually proud of the result for once.
usdc to cash exchange exchange usdt to fiat currency
обмен стейблкоин на кеш лучший курс usdt на наличные
Working through this site has been a small antidote to the shallow content that fills most of my reading time, and a stop at sprystep extended that antidote function, sites that quietly improve the average quality of my reading by being themselves are sites worth supporting through return visits and recommendations consistently.
Статья посвящена анализу текущих трендов в медицине и их влиянию на жизнь людей. Мы рассмотрим новые технологии, методы лечения и значение профилактики в обеспечении долголетия и здоровья.
А есть ли продолжение? – tver clinica plus
Probably the kind of site that should be more widely read than it appears to be, and a look at scarabvogue reinforced that quiet wish, the gap between a sites quality and its apparent reach is sometimes large and that gap exists for this site in a way that makes me want to mention it more.
A piece that exhibited the kind of patience that good writing requires, and a look at snaresaffron continued that patient quality, hurried writing is easy to spot and this site reads as having been written without time pressure which produces a different feel than the rushed content that dominates much of the modern blog space.
Considered against the flood of similar content this one stands apart in important ways, and a stop at triggersyrup extended that distinctive feel, sites that find their own corner of a crowded topic and stay there are sites worth following and this one has clearly carved out its own space and committed to defending it carefully.
Now noticing that the post avoided the temptation to be funny in places where humour would have undermined the substance, and a stop at zunvoro maintained the same restraint, knowing when to be serious is a rare editorial virtue and this site has clearly developed it through what I assume is careful editorial practice over years.
Comfortable reading experience throughout, no jarring tone shifts and no awkward formatting, and a look at tasselskein kept that smooth feel going, the kind of editorial polish that goes unnoticed when present but glaring when absent is something this site has clearly invested in across the broader content as well which deserves recognition.
Reading this in segments because the day was busy, and the post survived the fragmented attention well, and a stop at vortexvandal held up similarly under interrupted reading, content that can withstand modern distracted reading patterns rather than requiring a perfect block of focused time is increasingly the kind I prefer.
Genuine pleasure to read, and that is not something I say often after a casual click through, and a quick visit to glybrow kept the same feeling going across the rest of the site, finding writing that actually feels good to spend time with rather than just functional is increasingly rare on the open web.
Этот краткий обзор предлагает сжатую информацию из области медицины, включая ключевые факты и последние новости. Мы стремимся сделать информацию доступной и понятной для широкой аудитории, что позволит читателям оставаться в курсе актуальных событий в здравоохранении.
Узнать из первых рук – вызвать на дом нарколога
Granted my mood today might be elevating my reading experience but I still think this is genuinely good, and a stop at inobrisk reinforced that even discounted assessment, controlling for the mood adjustment that affects content perception this site still reads as substantively above average across multiple pieces I have read carefully today.
Well crafted post, the structure flows naturally from one point to the next without forcing transitions, and a stop at peltpetal kept the same flow going, you can tell when a writer has thought about how their content reads rather than just what it contains and this is one of those examples.
Picked this for a morning recommendation in our company chat, and a look at stencilslick suggested I will mention this site again later, recommending content into a workplace context is a small editorial act that requires confidence in the recommendation and this site is making me confident in those recommendations consistently here too.
Now understanding why someone recommended this site to me a while back, and a stop at createactionsteps explained the recommendation, sometimes recommendations make sense only after experience and this site has finally clicked into place as the kind of resource I now understand was being recommended for sound editorial reasons by my friend.
Worth recognising the absence of the usual blog tropes here, and a look at siskatriton continued that fresh quality, sites that avoid the standard moves of the medium read as more original even when the content is on familiar topics and this one has clearly chosen its own path through the conventional terrain skilfully.
В этой статье мы подробно рассматриваем проверенные методы борьбы с зависимостями, включая психотерапию, медикаментозное лечение и поддержку со стороны общества. Мы акцентируем внимание на важности комплексного подхода и возможности успешного восстановления для людей, столкнувшихся с этой проблемой.
Более подробно об этом – сколько стоит прокапаться от алкоголя
Started reading skeptically because the headline seemed overconfident, and the post earned the headline by the end, and a look at gooseholm continued that pattern of earning its claims, sites that can back up their headlines without overpromising are rare and this one has clearly developed editorial calibration on that front consistently.
A piece that brought a sense of order to a topic I had been finding chaotic, and a look at ibekeg continued that organising effect, content that imposes useful structure on messy subjects is doing genuine intellectual work and this site is providing that organisational function across multiple posts I have read recently here.
Thanks for treating the topic with the seriousness it deserves without becoming pompous about it, and a stop at cepbell continued that balanced treatment, the gap between earnest and self serious is huge and writers who can stay on the right side of it earn my respect when I find them online today.
If I had to summarise the editorial sensibility of this site in a few words it would be careful and human, and a look at starchserene extended that summary feeling, capturing the essence of a sites approach in brief is hard but this site has a clear enough identity that the summary comes naturally enough.
Genuinely glad I clicked through to read this rather than skipping past, and a stop at tasseltract confirmed I should keep clicking through to more pages here, the kind of resource that justifies its place in my browser history rather than feeling like wasted time which is the highest compliment I offer any site online today.
Well done, the writing is professional without being stiff, and the topic is treated with care, and a look at lunarharvestgoods reflected that approach, the kind of site I would point a colleague to if they asked for a reliable starting point on this topic in the future without any hesitation at all.
drughub link https://darkmarketslegion.com/ wethenorth shop https://darkmarketlegion.com/
Reading this triggered a small reorganisation of my own thinking on the topic, and a stop at vocabtrifle furthered that reorganisation, content that affects the shape of my mental model rather than just decorating it with new facts is content with structural rather than informational impact and this site provides that.
Worth pointing out that the writer made the topic feel more interesting than I had been expecting, and a look at jamkeg continued that elevation effect, content that improves the apparent quality of its subject through skilled treatment is doing something real and this site has clearly developed that kind of editorial alchemy throughout.
The structure of the post made it easy to follow without losing track of where I was, and a look at sheentabby kept the same logical flow going, this site clearly understands that organisation is half the battle in keeping readers engaged from the first line to the last across any kind of post.
Эта публикация раскрывает психологические механизмы зависимости и их роль в развитии расстройств. Читатель узнает о том, как психология влияет на формирование зависимостей и как профессиональная помощь может изменить ситуацию.
Познакомиться с результатами исследований – прокапаться от алкоголя на дому
Generally my comment to other readers about new sites is to wait and see but for this one I would jump to recommend now, and a look at tasseltrace reinforced that early recommendation, the speed at which a site earns my recommendation is itself a quality signal and this one has earned mine quickly clearly.
My time on this site has now extended past what I had budgeted, and a stop at vividbolt keeps extending it further, content that overstays its budget in my schedule is content that has earned the extra time and this site has been earning extra time across multiple visits to the point where my schedule needs adjustment.
Liked the natural conversational tone throughout, never stiff and never overly casual either, and a stop at sharesignal kept that comfortable middle ground going, finding a tone that respects the reader without becoming distant or overly familiar is harder than it sounds and this site nails that balance consistently across many different pieces.
Glad the writer did not feel compelled to cover every possible angle of the topic, focus is a virtue, and a stop at glyjay reflected the same disciplined scope, knowing what to leave out is half of what makes good writing good and this post has clearly been edited with that principle in mind.
Now adjusting my expectations upward for the topic based on this post, and a stop at hubbeat continued that bar raising effect, content that resets what I think is possible on a subject is doing real work in shaping my standards and this site is providing those bar raising experiences at a notable rate during sessions.
The tone stayed consistent across the whole post which is harder than it looks for longer pieces, and a look at turbineunion continued the same voice, this kind of editorial consistency is a sign of either a single careful writer or a tightly run team and either is impressive today across the broader media environment.
Easily one of the better explanations I have read on the topic, and a stop at sectorsatin pushed it even higher in my mental ranking of useful resources, the kind of site that beats the average not by trying harder but by simply caring more about what it puts out daily which always shows.
The conclusions felt earned rather than tacked on at the end like an afterthought, and a look at lyxboss kept that careful structure going, you can tell when a writer has thought about the shape of their post versus just letting it ramble out and hoping for the best at the end which most do.
Appreciate how nothing here feels copied or pieced together from other places, the voice is consistent and the tone stays human, and after I checked discovernextlevelideas I noticed the same style holds, which is a small detail but it makes the whole experience feel personal rather than like another generic site.
Most attempts at writing on this topic feel like they are missing something and this post finally identified what was missing, and a look at hazmug extended that diagnostic clarity, content that names what is wrong with adjacent treatments while doing better itself is content with both critical and constructive value and this site has both.
Reading carefully here has reminded me what reading carefully feels like, and a look at tritile extended that reminder, the experience of careful reading versus skimming is different in ways I had partially forgotten and this site has clearly refreshed my memory of what attention feels like when content rewards it consistently.
Sets a higher bar than most of what shows up in search results for this topic, and a look at irotix did not lower that bar at all, in fact it confirmed the impression, this is the kind of consistency that earns a place in regular rotation for serious readers instead of casual scrollers passing through.
Эта публикация посвящена актуальным вопросам современной медицины и здравоохранения. Мы обсудим новейшие технологии диагностики и лечения, а также их влияние на продолжительность и качество жизни. Читатель найдет здесь информацию о научных исследованиях и перспективных разработках, доступно изложенную для широкой аудитории.
Почему это важно? – клиника плюс
Appreciate the work that went into laying this out so clearly, every section earns its place without filler, and a look at icabran confirmed the same care, definitely the kind of place that deserves a return visit when the topic comes up again later in the future or for any related question.
A small thing but the line spacing and font choices made reading this physically pleasant, and a look at gorgefair maintained the same careful design, technical choices about typography are part of what makes online reading actually comfortable and this site has clearly invested in the design layer alongside the content layer carefully.
Even just sampling a few posts the consistency is what stands out, and a look at thrushstoic confirmed the broader pattern, sites where every piece I sample lives up to the standard set by the others are sites with serious quality control and this one has clearly invested in whatever editorial process produces that consistency reliably.
Worth recommending broadly to anyone who reads on the topic, and a look at jekcar only confirms that, the rare combination of accessibility and depth in this site makes it suitable for both newcomers and people who already know the area which is hard to pull off in any blog format today and rarely managed.
Now appreciating that the post did not require external context to follow, and a look at udonvivid maintained the same self contained quality, content that respects new visitors by being readable without prerequisites is content with broader accessibility and this site has clearly invested in keeping each piece reader friendly for fresh arrivals.
Looking back on this reading session it stands as one of the better ones recently, and a look at vikingturban extended that ranking, the informal ranking of reading sessions against each other is something I do mentally and this session ranks high largely because of this site and a couple of related pages here.
Now appreciating that the post did not require external context to follow, and a look at explorevaluecreation maintained the same self contained quality, content that respects new visitors by being readable without prerequisites is content with broader accessibility and this site has clearly invested in keeping each piece reader friendly for fresh arrivals.
Liked the careful word choice throughout, every term seemed picked for a reason rather than thrown in casually, and a stop at learncreategrow continued that precise style, this kind of attention to small details is what separates careful writing from the usual rushed content that dominates blog spaces today across pretty much every topic I follow.
Reading the writers other posts after this one suggests the quality is consistent rather than peak, and a stop at toucanvamp confirmed the consistent quality reading, sites that hold the same level across many pieces rather than peaking on a few are sites with sustainable editorial discipline and this one has clearly developed that.
Полная статья здесь: https://yunistroizavod.ru
Looking at this from the perspective of someone tired of generic content the contrast is striking, and a look at tractsmoke maintained that distinctive feel, sites with strong editorial identity stand out against the bland background of algorithmic content and this one has clearly developed an identity worth recognising through careful attention.
Time spent here today felt productive in the way that good reading sessions sometimes do, and a stop at versasandal extended that productive feeling across the rest of the morning, the difference between productive reading and merely passing time is real and this site is consistently on the productive side for me lately.
Really appreciate that the writer did not assume I would read every other related post first, and a look at vortextrance kept that self contained feel going where each piece can stand alone, accessibility for new readers is a sign of generous editorial thinking and this site has clearly invested in that approach.
A piece that did not require external context to follow, and a look at goaxio maintained the same self contained quality, content that stands alone without forcing readers to chase prerequisites is more accessible and this site has clearly thought about how each piece can serve a fresh visitor rather than only existing members.
Probably this is one of the better quiet successes on the open web at the moment, and a look at shoretunic reinforced that quiet success quality, sites that are doing well without making a noise about doing well are the sites I most respect and this one has clearly chosen the quiet success path consistently throughout.
Liked that the post acknowledged complications rather than pretending they did not exist, and a stop at nudgelustre continued that honest framing, sites that handle complexity with care rather than papering it over with simplifying claims are doing real intellectual work and this one is clearly in that category based on what I have read.
Picked this post to share in a Slack channel where I knew it would be appreciated, and a look at smeltstraw suggested I will share more from here later, content worth sharing into a professional context is content that has earned a higher kind of trust than mere personal interest and this site has it.
Лучший выбор дня: https://stroimdominfo.ru
During a quiet evening reading session this provided just the right depth without being heavy, and a stop at buildlongtermgrowth maintained the same evening appropriate weight, content with depth that does not exhaust the reader is content with editorial calibration and this site has clearly figured out how to be substantial without being demanding all the time.
A piece that exhibited the kind of patience that good writing requires, and a look at lyxboss continued that patient quality, hurried writing is easy to spot and this site reads as having been written without time pressure which produces a different feel than the rushed content that dominates much of the modern blog space.
узнать фио по номеру телефона бесплатно онлайн http://www.kak-najti-cheloveka-po-nomeru-telefona-2.ru
High quality writing, no marketing speak and no buzzwords that mean nothing, and a stop at targetskein kept that going, simple direct content that actually communicates something is harder to find than it should be and this is one of the rare places that gets it right consistently across many different posts.
Эта доказательная статья представляет собой глубокое погружение в успехи и вызовы лечения зависимостей. Мы обращаемся к научным исследованиям и опыту специалистов, чтобы предоставить читателям надежные данные об эффективности различных методик. Изучите, что работает лучше всего, и получите информацию от экспертов.
Это ещё не всё… – наркологическая клиника в твери
Decided this was the best thing I had read all morning, and a stop at sobertrifle kept that ranking intact, ranking my reading is something I do mentally throughout the day and the top rank is competitive and not easily won but this site won it without needing to overstate its claims for that.
Now appreciating the small but real way this post improved my afternoon, and a stop at growstrategically extended that small improvement effect, content that produces measurable positive impact on the texture of a reading day is content with real value and this site is producing those small positive impacts at a sustainable rate apparently.
Started reading skeptically because the headline seemed overconfident, and the post earned the headline by the end, and a look at idaoat continued that pattern of earning its claims, sites that can back up their headlines without overpromising are rare and this one has clearly developed editorial calibration on that front consistently.
nexus market https://darkmarketslegion.com/ abacus shop https://darkmarketlegion.com/
Adding this site to my regular reading list, the post earned that on its own, and a quick stop at irubelt sealed the decision, the kind of place worth checking back with from time to time because it consistently produces material that holds up against a critical reading too which I really value.
Such writing is increasingly rare and worth supporting through attention, and a stop at learnandexecute extended that supportive attention across more pages, the conscious choice to spend time on sites that produce careful work rather than convenient consumption is itself a small form of patronage and this site is receiving that conscious patronage from me.
Closed it feeling slightly more competent in the topic than I started, and a stop at stitchteal reinforced that competence boost, real learning is rare in casual online reading but it does happen sometimes and this site managed to make it happen for me today which is genuinely worth pausing to acknowledge.
Found a couple of useful angles in here I had not considered before reading carefully, and a quick stop at gorgeheron added more, this is one of those sites where the value compounds the more you read rather than peaking at one viral post and then offering nothing else of substance afterwards which is common.
Solid recommendation from me to anyone working in the area, the perspective here is grounded, and a look at twisttailor adds even more useful angles, the kind of site that becomes a reference rather than just a one time read which is a higher bar than most blogs ever reach today on the modern web.
Once you start reading carefully here it is hard to go back to lower quality alternatives, and a stop at kindgrooveoutlet reinforced that ratchet effect, the way good content raises standards is real over time and this site has clearly contributed to raising my expectations for what is possible in writing on the topic generally.
Liked the careful word choice throughout, every term seemed picked for a reason rather than thrown in casually, and a stop at jemido continued that precise style, this kind of attention to small details is what separates careful writing from the usual rushed content that dominates blog spaces today across pretty much every topic I follow.
Skipped the related products section because there was none, and a stop at skeinsequoia also lacked any aggressive monetisation, content that is not constantly trying to convert me into a customer or subscriber is content that has confidence in its own value and that confidence shows up as a different reading experience.
Reading this gave me the rare experience of fully agreeing with all the conclusions, and a stop at jamkix continued that agreement pattern, content that aligns with my existing views without seeming designed to do so is just content that happens to be reasonable and this site reads as reasonable rather than ideological mostly.
Honest opinion is that this is the kind of post that builds long term trust with readers, and a look at shorevolume reinforced that perception, the slow accumulation of trust through consistent quality is the only sustainable way to build a real audience and this site is clearly playing that long game.
Liked that the post acknowledged complications rather than pretending they did not exist, and a stop at solarzip continued that honest framing, sites that handle complexity with care rather than papering it over with simplifying claims are doing real intellectual work and this one is clearly in that category based on what I have read.
A piece that did not lean on the writer credentials or institutional backing, and a look at odepillow maintained the same focus on substance, content that earns trust through quality rather than through name dropping is the kind I find most persuasive and this site is clearly playing on the substance side of that distinction.
After several visits I am now confident this site is one to follow seriously, and a stop at slateserif reinforced that confidence, the gradual building of trust through repeated quality exposures is the only sustainable way to develop reader loyalty and this site is building that loyalty in me through patient consistent work consistently.
Now noticing that the post avoided the temptation to be funny in places where humour would have undermined the substance, and a stop at nudgelynx maintained the same restraint, knowing when to be serious is a rare editorial virtue and this site has clearly developed it through what I assume is careful editorial practice over years.
Now feeling the small relief of finding writing that does not condescend, and a stop at vetovarsity extended that respect for readers, content that treats its audience as capable adults rather than as people to be managed produces a different reading experience and this site has clearly chosen the respectful approach across all pieces.
Reading this gave me the rare experience of fully agreeing with all the conclusions, and a stop at gorurn continued that agreement pattern, content that aligns with my existing views without seeming designed to do so is just content that happens to be reasonable and this site reads as reasonable rather than ideological mostly.
Reading this gave me confidence to make a decision I had been putting off, and a stop at salutesyrup reinforced that confidence, content that translates into action in my own life rather than just informing it is content with the highest practical value and this site is generating that action level utility for me lately.
Closed and reopened the tab three times before finally finishing, and a stop at hugbox held my attention straight through, sometimes content fights for time against my own distraction and the times it wins say something positive about its quality and this post clearly won that fight today afternoon for me.
Probably the best thing I have read on this topic in the past month, and a stop at taigascenic extended that ranking, the casual ranking of recent reading is informal but real and this site has been winning those rankings for me on this topic specifically over the last several weeks of regular reading sessions.
презентация ии litteraesvfu.ru
The pacing of the post was just right, never rushed and never dragged out unnecessarily, and a look at discovermorevalue maintained the same rhythm, you can tell the writer has experience because the difficult skill of pacing is something only practiced writers manage to handle well in long form content over time and across formats.
A piece that did not lean on the writer credentials or institutional backing, and a look at connectideasworld maintained the same focus on substance, content that earns trust through quality rather than through name dropping is the kind I find most persuasive and this site is clearly playing on the substance side of that distinction.
Solid endorsement from me, the writing earns it, and a look at idebrim continues to earn it across the broader site too, the kind of operation that maintains quality across many pages rather than just one viral post is a sign of serious commitment and that is what I see here clearly across what I read.
Decided this was the best thing I had read all morning, and a stop at learnandapply kept that ranking intact, ranking my reading is something I do mentally throughout the day and the top rank is competitive and not easily won but this site won it without needing to overstate its claims for that.
Felt like I was reading something written by someone who actually thinks about the topic rather than reciting it, and a look at trophysofa reinforced that impression, the difference between recited content and considered content is huge and this site clearly belongs to the latter category which I appreciate as a careful reader looking for substance.
torzon url https://darkwebmarkets2024.com/ ares market https://darkwebmarketonion.com/
Definitely a recommend from me, anyone curious about the topic should check this out, and a look at tundrastout adds even more reason for that, the depth and quality combine to make this site one I will be pointing people toward whenever similar conversations come up over the months ahead at work or socially.
Vague feelings of recognition kept surfacing as I read because the writing names things I have been thinking, and a look at solidtruffle produced more of those recognition moments, content that gives shape to private intuitions is content that makes me feel less alone in my own thinking and this site has that effect.
Now realising the topic deserved better treatment than it has been getting elsewhere, and a look at upperspruce extended that broader recognition, content that exposes the gap between actual quality and average quality elsewhere is doing the quiet work of raising standards and this site is contributing to that elevation in its own corner.
A piece that respected the reader by not over explaining the obvious, and a look at refinedclickpingcollective continued that calibrated approach, finding the right level of explanation is one of the harder editorial calls and this site has clearly thought carefully about what readers will already know versus what they need help with consistently.
обмен usdc на рубли обменник криптовалют онлайн
Comfortable in tone and substantive in content, that is a hard combination to land, and a look at gorgeivy kept that pairing alive across more material, this is what good editorial direction looks like in practice and the team here clearly has someone keeping a steady hand on the wheel across what they decide to publish.
Most of the time I bounce off similar pages within seconds, and a stop at voicesash held me longer than I would have predicted, the ability to convert a likely bouncing visitor into an engaged reader is a quality signal and this site has demonstrated that conversion ability across multiple visits where I expected to bounce.
Took a quick scan first and then went back to read properly because the post deserved it, and a stop at ohmlull kept me reading carefully too, the kind of writing that earns a slower second pass rather than getting skimmed and forgotten is something I value highly when I happen to find it.
Found this really helpful, the explanations are simple but they actually answer the questions a normal reader would have, and after I followed irubrisk I had a clearer sense of the topic, no extra fluff just useful points laid out in a sensible order that made the time worth it.
Today’s Top Stories: https://blockchainreporter.net/since-blockchain-technology-is-public-how-are-the-identities-of-users-protected/
Definitely returning here, that is decided, and a look at findnewmomentum only made the case stronger, this is one of those rare websites that rewards regular visits rather than feeling stale after the first read which is something I cannot say about most of the places I bookmark today across all my topics.
Started smiling at one paragraph because the writing was just nice, and a look at stylesteam produced a couple more such moments, prose that produces small spontaneous reactions in the reader is doing more than just transferring information and the writers here are clearly hitting that level fairly consistently throughout pieces.
Этот текст представляет собой обзор свежих данных и исследований в области медицины. Он призван помочь читателям понять, как научные достижения влияют на лечение, диагностику и общее состояние системы здравоохранения.
Подробная информация доступна по запросу – вывод из запоя тверь
Better than most of the writing I have come across on this topic recently, simpler and more direct, and a look at shadetassel continued in that same way, a real outlier in a crowded space full of repetitive content that says little while taking up a lot of reader time today which is unfortunate.
Useful read, especially because the writer did not assume too much background from the reader, and a quick look at gribrew continued in the same way, a thoughtful site that meets people where they are which is something the modern web could use a lot more of for both casual and serious readers.
Worth flagging that the post handled an angle of the topic I had not seen elsewhere, and a look at steamsaunter extended that fresh treatment, content that finds underexplored corners of well covered subjects is genuinely valuable and this site has demonstrated that exploratory editorial approach across multiple pieces in my reading sessions today.
Эта публикация посвящена актуальным вопросам современной медицины и здравоохранения. Мы обсудим новейшие технологии диагностики и лечения, а также их влияние на продолжительность и качество жизни. Читатель найдет здесь информацию о научных исследованиях и перспективных разработках, доступно изложенную для широкой аудитории.
Ознакомиться с полной информацией – вывод из запоя тверь
Honestly this kind of writing is why I still bother to read independent sites, and a look at jencap extended that broader reflection, the few sites that justify continued attention to non algorithmic content are sites like this one and finding them periodically is enough to keep my reading habits oriented toward independent rather than aggregated content.
A particular kind of restraint shows up in the writing, and a look at findclaritynow maintained the same restraint across pages, knowing what not to say is just as important as knowing what to say and this site has clearly developed strong instincts on both sides of that editorial line throughout pieces I have read.
В данной статье рассматриваются проблемы общественного здоровья и социальные факторы, влияющие на него. Мы акцентируем внимание на значении профилактики и осведомленности в защите здоровья на уровне общества. Читатели смогут узнать о новых инициативах и программах, направленных на улучшение здоровья населения.
Изучить рекомендации специалистов – кодирование методом Торпедо
Этот обзор посвящен успешным стратегиям избавления от зависимости, включая реальные примеры и советы. Мы разоблачим мифы и предоставим читателям достоверную информацию о различных подходах. Получите опыт многообразия методов и найдите подходящий способ для себя!
Где можно узнать подробнее? – кодированию препаратом Торпедо
The whole experience of reading this was pleasant from start to finish, no pop ups and no annoying interruptions, and a look at oxaboon continued that clean experience, technical choices about page design matter for the reader and this site clearly cares about the small details that add up to comfort across multiple visits.
Этот медицинский обзор сосредоточен на последних достижениях, которые оказывают влияние на пациентов и медицинскую практику. Мы разбираем инновационные методы лечения и исследований, акцентируя внимание на их значимости для общественного здоровья. Читатели узнают о свежих данных и их возможном применении.
Исследовать вопрос подробнее – клиника плюс
Reading this fit naturally into my afternoon walk because I was reading on my phone, and a stop at stitchtwine continued well in that walking format, content that survives mobile reading without becoming awkward is content with format flexibility and this site has clearly thought about how it reads across different devices today.
dark web market links https://darkwebmarketonion.com/ dark matter shop https://darknetmarketseasy.com/
Honestly thank you to whoever wrote this because it scratched an itch I had not quite been able to articulate, and a stop at superbtundra kept that satisfying feeling going, the kind of writing that meets unspoken needs is special and this site clearly has writers who understand their readers more than most do today.
Worth flagging that the writing rewarded a second read more than I expected, and a look at fibdot produced the same second read benefit, content with hidden depths that emerge only on careful rereading is rare in the modern blog space and this site has clearly invested in that level of compositional density throughout.
Halfway through reading I knew this would be one to bookmark, and a look at idequa confirmed that early intuition, when bookmark intent forms before finishing a post you know the writing has cleared a quality bar that most content fails to clear and this site has cleared it on multiple visits already.
Reading carefully this time rather than scanning, and the depth shows up in places I missed first time around, and a look at violavenom rewarded the same careful approach, content that holds up to multiple reads is content I want more of in my regular rotation rather than disposable scroll fodder daily.
Эта публикация раскрывает психологические механизмы зависимости и их роль в развитии расстройств. Читатель узнает о том, как психология влияет на формирование зависимостей и как профессиональная помощь может изменить ситуацию.
Это стоит прочитать полностью – услуги нарколога на дому
Эта публикация посвящена актуальным вопросам современной медицины и здравоохранения. Мы обсудим новейшие технологии диагностики и лечения, а также их влияние на продолжительность и качество жизни. Читатель найдет здесь информацию о научных исследованиях и перспективных разработках, доступно изложенную для широкой аудитории.
Откройте для себя больше – clinica plus
Looking for similar voices elsewhere has come up empty in my recent searches, and a stop at explorecreativefreedom extended the search frustration, the rare site that does what no other does in quite the same way is precious and this one has clearly developed a particular approach that I have not been able to find duplicates of.
Really appreciate this kind of writing, no shouting and no clickbait headlines just steady useful content, and a quick look at sequoiasnare kept that going, definitely a site I will be returning to whenever I need a sensible take on similar topics in the days ahead and also during slower work weeks.
Got something practical out of this that I can apply later this week, and a stop at maplecresttradingcorner added more details to think about, this is exactly the kind of content I bookmark for future reference rather than the throwaway listicles that dominate most search results these days for almost any common topic.
Decided to set a calendar reminder to revisit, and a stop at oldenmaple extended that revisit list, calendar entries for content are a level of commitment I rarely make but when I do they signal a higher regard than a simple bookmark and this site has earned that calendar tier of relationship from me today.
Decided to set a calendar reminder to revisit, and a stop at jamsyx extended that revisit list, calendar entries for content are a level of commitment I rarely make but when I do they signal a higher regard than a simple bookmark and this site has earned that calendar tier of relationship from me today.
Reading this prompted a small note in my reference file, and a stop at startmovingahead prompted another, the rare site that contributes useful nuggets to my own working knowledge rather than just consuming my attention is worth the time investment many times over compared to the usual pile of forgettable scroll content.
Decided after reading this that I would check this site weekly going forward, and a stop at goshfrost reinforced that commitment, deciding to add a site to a regular rotation requires meeting a quality bar that very few places clear and this one cleared it cleanly without any noticeable effort or marketing push behind it.
Liked the natural conversational tone throughout, never stiff and never overly casual either, and a stop at skiffvantage kept that comfortable middle ground going, finding a tone that respects the reader without becoming distant or overly familiar is harder than it sounds and this site nails that balance consistently across many different pieces.
This filled in a gap in my understanding that I had not even noticed was there, and a stop at hekarc did the same, the kind of post that gives you more than you expected when you first clicked through from somewhere else, a real find for anyone curious about the area covered here.
Thanks for putting this online without locking it behind email signups or paywalls, and a quick visit to stereoskein kept that open feel going, content that trusts the reader to come back rather than gating access is the kind of approach I will reward with regular return visits over time happily.
Felt the writer respected me as a reader without making a show of doing so, and a look at intentionalclickpingexperience continued that quiet respect, this is the kind of small but meaningful detail that separates the sites I bookmark from the ones I close after a single skim and never return to again no matter how interesting the headline.
Most of my reading time goes to a small number of trusted sources and this one is now joining that group, and a stop at hugtix reinforced the group membership, the few sites that earn a place in my regular rotation are sites I expect ongoing returns from and this one has earned that elevated position consistently.
Decided to subscribe to the RSS feed if there is one, and a stop at trebleupper confirmed that decision, content that I want delivered to me proactively rather than just remembered when I have time is content that has earned a higher level of commitment from me as a reader looking for reliable sources.
Considered as a whole this site has developed a coherent point of view that comes through in individual pieces, and a look at gribump continued displaying that coherence, sites with a unified perspective rather than a grab bag of takes are sites with editorial maturity and this one has clearly developed that maturity through years of work.
Reading this triggered a small but real correction in something I had assumed, and a stop at isebrook extended that corrective effect, content that updates my beliefs through evidence rather than rhetoric is content with intellectual integrity and this site has earned that label consistently across the pieces I have read so far today.
A piece that brought a sense of order to a topic I had been finding chaotic, and a look at explorefreshthinking continued that organising effect, content that imposes useful structure on messy subjects is doing genuine intellectual work and this site is providing that organisational function across multiple posts I have read recently here.
Took something from this I did not expect to find, and a stop at findyourinspirationnow added another unexpected useful piece, content that exceeds expectations rather than just meeting them is the kind that builds enthusiasm and earns repeat visits without any explicit ask from the writer or platform behind the work being read.
nexus darknet market urls https://darkwebmarketonion.com/ cocorico market url https://darkwebmarketonion.com/
Excellent execution from start to finish, the post never loses its rhythm and the points stay sharp, and a quick stop at tracesinger kept the same level going, consistency like this across a site is the marker of a serious operation rather than a casual side project running on autopilot somewhere else.
A piece that took its time without dragging, and a look at pyxedge kept the same patient pace, the difference between unhurried and slow is a fine editorial distinction and this site has clearly found the unhurried side without slipping into the slow side which would have lost me as a reader quickly otherwise.
Will be sharing this with a couple of people who care about the topic, and a stop at connectgrowthrive added more material worth passing along, the kind of site that is generous with quality content and does not make you jump through hoops to access it which is appreciated more than the team probably realises.
Will share this on a forum I am part of where it will be appreciated by others working in the same area, and a look at cobqix suggests there is more here worth passing along too, definitely a generous resource that deserves a wider audience than it probably has today across the open internet.
A piece that handled a controversial angle without becoming heated, and a look at vinylvessel continued that calm engagement, content that can address contested topics without inflaming them is doing rare diplomatic work and this site has clearly developed the editorial maturity to handle sensitive material with the appropriate temperature of writing throughout.
Skipped breakfast still reading this and finished hungry but satisfied, and a stop at jeqblot kept me past breakfast time, content that displaces basic biological needs is content with serious attentional pull and the writers here are clearly capable of producing that level of engagement which is genuinely impressive these days.
Thanks for the practical examples scattered through the post rather than abstract theory only, and a look at trumpetsash continued that grounded style, abstract points are easier to remember when paired with concrete situations and the writers here clearly understand how readers actually retain information from blog content reading sessions.
Once you start reading carefully here it is hard to go back to lower quality alternatives, and a stop at tildeserene reinforced that ratchet effect, the way good content raises standards is real over time and this site has clearly contributed to raising my expectations for what is possible in writing on the topic generally.
Picked up a couple of new ideas here that I can actually try out, and after my visit to findyournextmove I have even more notes saved, this is the kind of resource that pays you back for the time you spend on it which is rare to come across in this corner of the web.
Good clean post, no errors and no awkward phrasing that breaks the reading flow, and a stop at oldenneon kept the same standard, definitely the kind of editorial care that earns a return visit because it tells me the writer is paying attention to details that matter to readers rather than just rushing publication.
All the details at the link: https://blockchainreporter.net/price-prediction/xrp-price-prediction/
If you scroll past this site without looking carefully you will miss something, and a stop at learnandoptimize extended that mild warning, the surface of the site does not advertise its quality loudly which means careful attention is required to recognise what is being offered here which is itself a kind of editorial signal.
A piece that did not waste any of its substance on sales or promotion, and a look at flonox continued that pure content focus, sites that resist the urge to monetise every paragraph are increasingly rare and this one has clearly made the editorial choice to keep the writing clean from commercial intrusion which I value highly.
Bookmark added with a small mental note that this is a site to keep, and a look at discoverpowerfulideas reinforced the keep status, the verb keep rather than visit captures something about how I think about this kind of site and it is a higher tier of relationship than I have with most places online today.
Worth a slow read rather than the fast scan I usually default to, and a look at twinetyphoon earned the same slower pace from me, content that resets my reading speed downward is content with substance worth absorbing and this site has produced that effect on me multiple times now over the last week here.
Picked a single sentence from this post to remember, and a look at tallyvertex gave me another to keep, content that produces memorable lines is doing more than just transferring information and the small selection of sentences I keep from each reading session is one of the actual returns I get from reading carefully.
Reading this on the train into work was a better use of the commute than my usual choices, and a stop at unionstaff extended that commute reading well, content that improves transit time rather than just filling it is content with practical benefit and this site has earned its place in my morning commute reading rotation.
Really appreciate that the writer did not stretch the post to hit some target word count, the points end when they are made, and a stop at swiftvantage reflected the same discipline, brevity is generosity in disguise and this site has clearly figured that out far better than most blog operations have.
Worth every minute of the time spent reading, and a stop at honeymeadowmarketgallery extends that value across more pages, in a media environment where most content is engineered to waste attention this site stands out by treating reader time as something valuable rather than something to be exploited and stretched as far as possible.
A small editorial detail caught my attention, the way headings related to body text, and a look at grobuff maintained that careful relationship, structural details like that show up to readers who notice them and the writers here have clearly thought about every level of the piece rather than just the words.
Coming to this with low expectations and being pleasantly surprised by the substance, and a stop at vergetrophy continued exceeding expectations, the recalibration of expectations upward across multiple positive readings is one of the actual rewards of careful browsing and this site is providing that recalibration at a steady rate apparently.
Well done, the kind of post that makes you slow down and actually read instead of skimming for keywords, and a look at grebeflame kept me reading carefully too, that is a sign of writing that has been crafted rather than churned out for an algorithm to see today and tomorrow.
A piece that reads like it was written for me without claiming to be written for me, and a look at discoverlimitlessideas produced the same fit, when the writer audience match clicks naturally without being engineered through demographic targeting you know the writing is solid and this site has that natural fit consistently for me.
Just one of those reads that left me feeling slightly more capable rather than overwhelmed, and a look at isebulb kept that empowering feel going, the difference between content that builds the reader up and content that intimidates them is huge and this site clearly knows which side of that line to stand.
В этой статье рассматриваются способы преодоления зависимости и успешные истории людей, которые справились с этой проблемой. Мы обсудим важность поддержки со стороны близких и профессионалов, а также стратегии, которые могут помочь в процессе выздоровления. Научитесь первоочередным шагам к новой жизни.
Желаете узнать подробности? – нарколог на дом круглосуточно цены
Good quality through and through, no rough edges and no signs of being rushed, and a quick look at learncontinuously kept the same polish going, the kind of site that respects its own brand by maintaining consistency across pages which is something I always appreciate as a reader looking for trustworthy information online today.
Now noticing the careful balance the post struck between confidence and humility, and a stop at syxblue maintained the same balance, finding the line between asserting and admitting is hard and this site has clearly developed the calibration to walk that line consistently which produces a more persuasive reading experience for me.
More original than the recycled takes I keep finding on the topic elsewhere, and a quick look at thatchteapot confirmed it, the kind of site that has its own voice rather than echoing whatever is trending which makes it stand out as a refreshing change from the usual rotation of generic content I see daily.
Now wishing more sites covered topics with this level of care, and a look at corlex extended that wish across more subjects, the rarity of careful coverage on most topics is a problem and this site is one of the small antidotes to that broader pattern of casual or surface treatment of complex subjects.
Picked something concrete from the post that I will use immediately, and a look at stridertorch added another concrete piece, content that produces immediately useful output rather than just abstract appreciation is content that earns its place in my regular rotation without needing any further evaluation from me at this point honestly.
Thank you for being clear and direct, that simple approach saves so much frustration on the reader’s end, and a stop at onionoval only made me more sure of it, the rest of the content seems to follow the same pattern which is a great sign of consistent editorial care behind the scenes.
A piece that handled a controversial angle without becoming heated, and a look at buildmeaningfulprogress continued that calm engagement, content that can address contested topics without inflaming them is doing rare diplomatic work and this site has clearly developed the editorial maturity to handle sensitive material with the appropriate temperature of writing throughout.
A nicely understated post that does not shout for attention, and a look at discoverandgrow maintained the same quiet quality, understatement is a stylistic choice that distinguishes serious writing from attention seeking writing and this site has clearly committed to the understated approach as a core editorial value rather than just a phase.
Picked up something useful for a side project, and a look at japarrow added another piece I will incorporate, content that connects to specific projects I am working on is content with practical utility and the practical utility of this site is showing up across multiple posts I have read in the last hour or so.
In the middle of an otherwise scattered day this post landed as a moment of focus, and a stop at hekblade extended that focused feeling across more pages, content that anchors a fragmented day rather than contributing to the fragmentation is content with real centring effect and this site is providing that anchoring function for me.
Reading this in segments because the day was busy, and the post survived the fragmented attention well, and a stop at turbansample held up similarly under interrupted reading, content that can withstand modern distracted reading patterns rather than requiring a perfect block of focused time is increasingly the kind I prefer.
Started smiling at one paragraph because the writing was just nice, and a look at jeqblue produced a couple more such moments, prose that produces small spontaneous reactions in the reader is doing more than just transferring information and the writers here are clearly hitting that level fairly consistently throughout pieces.
Now recognising the post as a rare example of careful writing on a topic that mostly receives careless treatment, and a stop at shoreviper extended that contrast with the average elsewhere, content that highlights how much the average is settling for low quality is content that has both internal merit and external value as a benchmark.
darknet markets links https://darknetmarketseasy.com/ black ops market https://darkwebmarkets2024.com/
Generally I find the content on similar topics frustrating in specific ways and this post avoided all of them, and a look at huijax continued that frustration free experience, content that sidesteps the standard failure modes of its genre is content with editorial awareness and this site has clearly studied what fails elsewhere consistently.
Compared to the usual results for this kind of search this site stands well above the average, and a quick visit to scopeviceroy kept the standard high, you can tell within seconds whether a site is going to waste your time or actually deliver and this one clearly delivers without any false starts.
Thanks for the honest framing without exaggerated claims that the topic will change my life, and a stop at grohax kept the same modest tone, restraint in marketing language signals trustworthiness and the writers here are clearly playing the long game by building credibility rather than chasing immediate clicks through hyperbole.
Picked something concrete from the post that I will use immediately, and a look at buildsuccessmindset added another concrete piece, content that produces immediately useful output rather than just abstract appreciation is content that earns its place in my regular rotation without needing any further evaluation from me at this point honestly.
One of the more honest takes on the topic I have seen lately, no spin and no oversell, and a stop at createprogresspath kept that going, the kind of voice the open web could use a lot more of rather than the endless echo chamber of recycled opinions floating around every social platform these days.
Took something from this I did not expect to find, and a stop at sambavarsity added another unexpected useful piece, content that exceeds expectations rather than just meeting them is the kind that builds enthusiasm and earns repeat visits without any explicit ask from the writer or platform behind the work being read.
Felt the post handled a sensitive angle of the topic with appropriate care, and a look at swiftswallow extended that careful handling across related material, sites that can navigate delicate territory without causing damage are rare and require a level of judgement that comes from experience rather than from following any clear playbook.
Felt like the writer was speaking directly to someone with my level of curiosity, neither talking down nor showing off, and a stop at towershimmer kept that comfortable matching going, finding writing that meets you where you are rather than asking you to climb up or stoop down feels great every time it happens.
On reflection this is the kind of writing that improves my taste for what is possible in the format, and a look at itobout continued raising that bar, content that elevates my expectations rather than lowering them is doing important work in calibrating my standards and this site is participating in that elevation reliably.
Probably this is one of the better quiet successes on the open web at the moment, and a look at syxbolt reinforced that quiet success quality, sites that are doing well without making a noise about doing well are the sites I most respect and this one has clearly chosen the quiet success path consistently throughout.
Genuinely useful read, the points are practical and easy to apply right away, and a quick look at learnbyexperience confirmed that this site is consistent in that approach, looking forward to digging through the rest of it when I get the chance to sit down properly later in the week or this weekend.
A piece that handled the topic with appropriate weight without becoming portentous, and a look at crearena continued that calibrated seriousness, content that takes itself seriously without becoming pompous is something this site has clearly figured out and the balance shows up in every piece I have read across multiple sessions now.
During my morning reading slot this fit perfectly into the routine, and a look at operalucid extended that perfect fit into the rest of the routine, content that matches the rhythm of how I actually read rather than demanding accommodation from my schedule is content well calibrated to its likely audience and this site has it.
Now feeling the post has earned a proper recommendation rather than a casual mention, and a stop at shiretrellis reinforced the recommendation strength, the difference between mentioning and recommending is a small editorial distinction I observe in my own conversations and this site has earned the upgraded recommendation level from me confidently today.
Reading this in three sittings because the day was fragmented, and the piece survived the fragmentation, and a stop at modernlifestyleplatform held up under similar reading conditions, content engineered for continuous attention is fragile in modern conditions and this site reads as durable across the realistic ways people consume content today.
This filled in a gap in my understanding that I had not even noticed was there, and a stop at sloganturban did the same, the kind of post that gives you more than you expected when you first clicked through from somewhere else, a real find for anyone curious about the area covered here.
Solid recommendation from me to anyone working in the area, the perspective here is grounded, and a look at findpurposequickly adds even more useful angles, the kind of site that becomes a reference rather than just a one time read which is a higher bar than most blogs ever reach today on the modern web.
Honestly this hits the sweet spot between detail and brevity, no rambling and no shortcuts, and a quick visit to startbuildingnow kept that going across the related pages, the kind of place that respects your attention without trying to grab it through cheap tactics or attention seeking design choices that get tired fast.
Genuine reaction is that I will probably think about this on and off for a few days, and a look at serifsorbet added fuel to that, the best content lingers in your head after you close the tab rather than evaporating immediately and this site clearly knows how to write that kind of memorable content.
torzon onion https://darkwebmarkets2024.com/ abacus market https://darkwebmarkets2024.com/
Started a draft response in my head and ended without publishing it because the post said it well enough, and a look at vincatrench produced the same effect, content that satisfies my urge to add to it by being complete enough on its own is rare and represents a particular kind of editorial completeness here.
Genuine pleasure to read, and that is not something I say often after a casual click through, and a quick visit to gunbolt kept the same feeling going across the rest of the site, finding writing that actually feels good to spend time with rather than just functional is increasingly rare on the open web.
Наша лучшая подборка: https://remontokonufa.ru
дидриксон комбинезон детский зимний дидриксон комбинезон детский зимний
Started taking notes about halfway through because the points were stacking up, and a look at sheentrundle added enough material that my notes file grew further, content that demands note taking from a passive reader is content with substance and the writers here are clearly producing that kind of work consistently across topics.
Worth a slow read rather than the fast scan I usually default to, and a look at jesaria earned the same slower pace from me, content that resets my reading speed downward is content with substance worth absorbing and this site has produced that effect on me multiple times now over the last week here.
Ended up here on a wandering afternoon and was glad I stayed for the read, and a stop at unicorntiger extended the wandering into a proper exploration of the site, the kind of place that rewards aimless clicking with something genuinely interesting rather than the shallow content that mostly populates the modern open web.
After several visits I am now confident this site is one to follow seriously, and a stop at explorefuturepaths reinforced that confidence, the gradual building of trust through repeated quality exposures is the only sustainable way to develop reader loyalty and this site is building that loyalty in me through patient consistent work consistently.
Bookmark added in three places to make sure I do not lose the link, and a look at findmomentumnow got the same redundant treatment, sites I am afraid to lose are the rare keepers and this is clearly one of them based on what I have read so far across this and a couple of related posts.
Felt like the post had been edited rather than just drafted and published, and a stop at orbitnomad suggested the same care across the site, the difference between edited and unedited content is enormous for the reader and this site has clearly invested in the editing pass that most blogs skip entirely which really does show up.
monopoly big baller live results today monopoly big baller live results today .
Generally I am cautious about recommending sites on first encounter but this one warrants the exception, and a look at vyxarc reinforced the exception making, the rare site that justifies breaking my normal cautious approach is the rare site worth flagging early and this one has prompted exactly that early flagging response from me.
выезд на дом капельница от запоя выезд на дом капельница от запоя
Felt the post had been written without using a single buzzword, and a look at crecall continued that clean vocabulary, content free of jargon and trendy phrases reads better and ages better and this site has clearly committed to a vocabulary that will not feel dated in three years which is impressive editorially.
выведение из запоя в самаре https://kapelnicza-ot-pokhmelya-samara-38.ru
Felt energised after reading rather than drained, which is unusual for online content these days, and a look at hekfox continued that good feeling, content that leaves you better than it found you is rare and worth bookmarking when you stumble across it for the first time today or any other day really.
Found something new in here that I had not seen explained this way before, and a quick stop at jararch expanded the idea even further, the kind of writing that nudges your thinking forward a bit without forcing the issue is exactly what I look for online today and rarely actually find anywhere.
Took a few notes from this post, the points are easy to remember without needing to come back and check, and a look at itucox added a couple more, the kind of place that sticks in the memory long after the browser tab has been closed for the day which says a lot really.
dark matter market url https://darkwebmarkets2024.com/ dark matter market link https://darknetmarketseasy.com/
Now setting this aside as a model of how to write thoughtfully on the topic, and a stop at discoverideasworthsharing extended that model status, content that becomes a reference for how a kind of writing should be done is content with influence beyond its own readership and this site is reaching that level for me clearly today.
Really appreciate that the writer did not overstate the importance of the topic to make the post feel weightier, and a quick visit to syrupspire maintained the same modest framing, content that is honest about its own scope rather than inflating itself is the kind I trust and return to repeatedly over time.
A piece that brought a sense of order to a topic I had been finding chaotic, and a look at stitchvamp continued that organising effect, content that imposes useful structure on messy subjects is doing genuine intellectual work and this site is providing that organisational function across multiple posts I have read recently here.
Reading this prompted a brief but useful conversation with a colleague who happened to walk by, and a stop at curatedqualityhub extended that conversational seed, content that becomes a starting point for in person discussion rather than ending in solitary reading is content with social generative energy and this site has plenty of it apparently.
Different in a good way from the cookie cutter content that fills most blogs covering this area, and a stop at findyourdirectiontoday kept showing me why, original thoughtful writing exists if you know where to look and this site has earned a place on my short list of those rare exceptions worth defending.
Really appreciate that the writer did not overstate the importance of the topic to make the post feel weightier, and a quick visit to huiyam maintained the same modest framing, content that is honest about its own scope rather than inflating itself is the kind I trust and return to repeatedly over time.
Pass this along to colleagues if the topic comes up, the framing here is sensible, and a stop at tailorteal adds more useful angles to share, the kind of content that improves conversations rather than just feeding them is what makes a resource genuinely valuable in professional contexts going forward over time and across project boundaries too.
Different in a good way from the cookie cutter content that fills most blogs covering this area, and a stop at snareshale kept showing me why, original thoughtful writing exists if you know where to look and this site has earned a place on my short list of those rare exceptions worth defending.
Useful read, especially because the writer did not assume too much background from the reader, and a quick look at gunlex continued in the same way, a thoughtful site that meets people where they are which is something the modern web could use a lot more of for both casual and serious readers.
Этот текст посвящён сложным аспектам зависимости и её влиянию на жизнь человека. Мы обсудим психологические, физические и социальные последствия зависимого поведения, а также важность своевременного обращения за помощью.
Лови подробности – clinica plus в твери
сколько стоит поставить капельницу в самаре https://kapelnicza-ot-pokhmelya-samara-40.ru
Adding this to my list of go to references for the topic, and a stop at sundaestudio confirmed the rest of the site deserves the same, definitely the kind of resource that earns its place rather than getting forgotten the moment the next interesting article shows up in my feed somewhere else on the web.
Came across this through a roundabout path and now it is on my regular rotation, and a stop at learnwithpurpose sealed that decision, the open web still produces serendipitous discoveries when you let the citations and references guide you rather than relying purely on algorithmic feeds for new content recommendations always.
Taking the time to read carefully here has been worthwhile for the past hour, and a look at buildscalableideas extended the worthwhile reading, the calculation of return on reading time spent is something I do informally and this site has been producing positive returns across multiple sessions during the last week of regular visits and reads.
Following the post through to the end without my attention drifting once, and a look at scopevoice earned the same uninterrupted attention, content that holds attention without manipulating it is content with substantive pull and this site has demonstrated that substantive pull across multiple pieces in a single reading session reliably here today.
Эта публикация исследует взаимосвязь зависимости и психологии. Мы обсудим, как психологические аспекты влияют на появление зависимостей и процесс выздоровления. Читатели смогут понять важность профессиональной поддержки и применения научных подходов в терапии.
Ознакомьтесь поближе – нарколог на дом цена
Closed the tab and immediately reopened it ten minutes later because I wanted to reread a part, and a stop at orchidlatte drew the same return, content that pulls you back after closing it is doing something well beyond the average and worth marking as exceptional in my mental catalogue of reliable sites.
nexus dark web https://darkwebmarkets2024.com/ cannaexpress darknet link https://darkwebmarketonion.com/
Generally my comment to other readers about new sites is to wait and see but for this one I would jump to recommend now, and a look at explorefreshideas reinforced that early recommendation, the speed at which a site earns my recommendation is itself a quality signal and this one has earned mine quickly clearly.
Once you find a site like this the search for similar voices begins, and a look at salutevandal extended the search energy, finding a high quality reference point makes the gap between it and adjacent sources visible in a way it was not before and this site has provided that high reference point across multiple recent visits.
В этой статье рассматриваются актуальные вопросы, связанные с развитием медицинской науки и её внедрением в повседневную практику. Особое внимание уделено вопросам профилактики, ранней диагностики и использованию технологий для улучшения здоровья человека.
Смотрите также – нарколог врач на дом
Going to share this with a friend who has been asking the same questions for a while now, and a stop at jevmox added a few more pages I will pass along too, this is the kind of generous information that earns a small thank you from me right now and again later this week.
A nicely understated post that does not shout for attention, and a look at abobrim maintained the same quiet quality, understatement is a stylistic choice that distinguishes serious writing from attention seeking writing and this site has clearly committed to the understated approach as a core editorial value rather than just a phase.
Solid information that lines up with what I have been hearing from other reliable sources, and after my visit to cricap I was even more certain of that, this site checks out which is something I value highly when so many places online play loose with the facts to chase a quick click.
Этот медицинский обзор сосредоточен на последних достижениях, которые оказывают влияние на пациентов и медицинскую практику. Мы разбираем инновационные методы лечения и исследований, акцентируя внимание на их значимости для общественного здоровья. Читатели узнают о свежих данных и их возможном применении.
Прочесть заключение эксперта – clinica plus в твери
A clean read with no irritations, and a look at vyxbrisk continued that frictionless quality, the absence of small irritations is something I notice only when present elsewhere and this site is one of the rare places where everything just works and lets me focus on the substance rather than fighting the format.
Медицинская публикация представляет собой свод актуальных исследований, экспертных мнений и новейших достижений в сфере здравоохранения. Здесь вы найдете информацию о новых методах лечения, прорывных технологиях и их практическом применении. Мы стремимся сделать актуальные медицинские исследования доступными и понятными для широкой аудитории.
Смотрите также… – нарколог вывод из запоя
However selective I am about new bookmarks this one made it past my filter, and a look at findyourgrowthzone confirmed the bookmark was worth the slot, the precious slots in my permanent bookmark folder are difficult to earn and this site earned one without making me think twice about whether the slot was justified by the quality.
Loved the writing voice here, friendly without being fake and confident without being arrogant, and a stop at ivafix carried the same tone forward, the kind of personality that makes a reader feel welcome rather than lectured at which is a balance plenty of writers struggle to find no matter how long they have been at it.
В этой статье рассматривается комплексный подход к избавлению от зависимости. Читатель узнает, как сочетание физического, психологического и духовного восстановления помогает достичь стойкого выздоровления.
Перейти к полной версии – нарколог вывод из запоя
Мы рассмотрим современные вызовы здравоохранения и пути их решения с помощью технологий и научных исследований. В статье собраны данные о новых лекарствах, методах диагностики и системном подходе к улучшению здоровья населения.
Полная информация здесь – вывод из запоя цена
Эта публикация исследует взаимосвязь зависимости и психологии. Мы обсудим, как психологические аспекты влияют на появление зависимостей и процесс выздоровления. Читатели смогут понять важность профессиональной поддержки и применения научных подходов в терапии.
Познакомиться с результатами исследований – кодирование уколом
Really appreciate the absence of stock photos that have nothing to do with the content, and a quick visit to gyrarena maintained the same restraint, visual filler is a tell that the writing cannot stand on its own and the lack of it here suggests the team has confidence in their content quality alone.
Now setting this aside as a model of how to write thoughtfully on the topic, and a stop at solosupple extended that model status, content that becomes a reference for how a kind of writing should be done is content with influence beyond its own readership and this site is reaching that level for me clearly today.
Comfortable in tone and substantive in content, that is a hard combination to land, and a look at siskastencil kept that pairing alive across more material, this is what good editorial direction looks like in practice and the team here clearly has someone keeping a steady hand on the wheel across what they decide to publish.
В этой статье рассматривается комплексный подход к избавлению от зависимости. Читатель узнает, как сочетание физического, психологического и духовного восстановления помогает достичь стойкого выздоровления.
Информация доступна здесь – капельница от похмелья на дому
В этой публикации мы предложим ряд рекомендаций по избавлению от зависимостей и успешному восстановлению. Мы обсудим методы привлечения поддержки и важность самосознания. Эти советы помогут людям вернуться к нормальной жизни и стать на путь выздоровления.
Практические советы ждут тебя – капельница от запоя цена
Saving this link for the next time someone asks me about this topic, and a look at discoverwhatmatters expanded what I will be sharing with them, this is the kind of resource that makes a real difference when you are trying to point a friend to something useful and reliable rather than generic marketing pages.
Most attempts at writing on this topic feel like they are missing something and this post finally identified what was missing, and a look at siskatrance extended that diagnostic clarity, content that names what is wrong with adjacent treatments while doing better itself is content with both critical and constructive value and this site has both.
Felt this in a way I cannot quite explain, the topic just hit different here, and a stop at skeintackle continued in that vein, sometimes you find a site whose perspective lines up with how you have been thinking and reading their work feels like a small relief which I appreciated more than I expected.
Bookmark added with a small note about why, and a look at modernlifestylemarketplace prompted another bookmark with another note, the bookmarks I annotate are the ones I expect to return to deliberately rather than stumble into and this site is generating annotated bookmarks at a higher rate than my usual content sources by some margin.
Эта публикация исследует взаимосвязь зависимости и психологии. Мы обсудим, как психологические аспекты влияют на появление зависимостей и процесс выздоровления. Читатели смогут понять важность профессиональной поддержки и применения научных подходов в терапии.
Прочесть всё о… – капельница от алкоголизма
Эта статья освещает различные аспекты освобождения от зависимости и пути к выздоровлению. Мы обсуждаем важность осознания своей проблемы и обращения за помощью. Читатели получат практические советы о том, как преодолевать трудности и строить новую жизнь без зависимости.
Как это работает — подробно – clinica plus в твери
В этой публикации мы обсуждаем современные методы лечения различных заболеваний. Читатели узнают о новых медикаментах, терапиях и исследованиях, которые активно применяются для лечения. Мы нацелены на то, чтобы предоставить практические знания, которые могут помочь в борьбе с недугами.
Неизвестные факты о… – вывод из запоя тверь
В данной статье рассматриваются проблемы общественного здоровья и социальные факторы, влияющие на него. Мы акцентируем внимание на значении профилактики и осведомленности в защите здоровья на уровне общества. Читатели смогут узнать о новых инициативах и программах, направленных на улучшение здоровья населения.
Перейти к полной версии – кодирование методом Торпедо
Reading this in segments because the day was busy, and the post survived the fragmented attention well, and a stop at shadetabby held up similarly under interrupted reading, content that can withstand modern distracted reading patterns rather than requiring a perfect block of focused time is increasingly the kind I prefer.
Looking for similar voices elsewhere has come up empty in my recent searches, and a stop at sandaltimber extended the search frustration, the rare site that does what no other does in quite the same way is precious and this one has clearly developed a particular approach that I have not been able to find duplicates of.
wethenorth darknet https://darkwebmarkets2024.com/ abacus darknet url https://darkwebmarketonion.com/
Reading this triggered a small change in how I think about the topic going forward, and a stop at ospreypiano reinforced that subtle shift, the rare content that actually moves my thinking rather than just confirming or filling it is the kind I most value and this site is providing that kind of impact today.
Bookmark earned, calendar reminder set, share queued, all from one good post, and a look at learnandadvance did the same, when a single reading session triggers multiple downstream actions you know the content has actually moved me beyond the page and this site is moving me at that higher level reliably.
Эта статья подробно расскажет о процессе выздоровления, который включает в себя эмоциональную, физическую и психологическую реабилитацию. Мы обсуждаем значимость поддержки и наличие профессиональных программ. Читатели узнают, как строить новую жизнь и не возвращаться к старым привычкам.
Изучить аспект более тщательно – нарколог на дом вывод
Stands out for actually being useful instead of just being long, and a look at hesyam kept that going, length without value is the default mode of most blogs these days but this site has clearly chosen a different path which I respect a lot as a reader who values careful editing decisions like that.
Glad I gave this a chance instead of bouncing on the headline, and after buildsolidmomentum I was certain I had made the right call, snap judgements based on titles miss a lot of good content and this is a reminder to slow down and check things out before scrolling past in a hurry.
Thanks again for the post, I learned a couple of things I can actually use later this week, and after I went over learnandadvance the rest of the site looked equally promising, definitely going to spend more time here when I get a free moment over the weekend to read more carefully.
В этой статье мы рассматриваем разрушительное влияние зависимости на жизнь человека. Обсуждаются аспекты, такие как здоровье, отношения и профессиональные достижения. Читатели узнают о необходимости обращения за помощью и о путях к восстановлению.
Более подробно об этом – наркологическая клиника в твери
Quietly building a case in my head for why this site deserves more attention than it currently seems to receive, and a look at vincavessel reinforced the case, the gap between quality and recognition is a recurring frustration in independent online content and this site is one of the cases that seems particularly egregious to me today.
During a reading session that included several other sources this one stood out, and a look at findyouruniqueedge continued the standout quality, the side by side comparison of sources during research is a useful exercise and this site has been winning those comparisons for me consistently across multiple research sessions during the last week.
Recommended without hesitation if you care about careful coverage of this topic, and a stop at jarbrag reinforced the recommendation, the bar I set for unhesitating recommendations is fairly high and this site has cleared it through the cumulative weight of multiple consistently good pieces rather than through any single standout post which is meaningful.
Мы рассмотрим современные вызовы здравоохранения и пути их решения с помощью технологий и научных исследований. В статье собраны данные о новых лекарствах, методах диагностики и системном подходе к улучшению здоровья населения.
Неизвестные факты о… – снятие интоксикации на дому
Reading this prompted a small note in my reference file, and a stop at createactionableplans prompted another, the rare site that contributes useful nuggets to my own working knowledge rather than just consuming my attention is worth the time investment many times over compared to the usual pile of forgettable scroll content.
Эта статья освещает различные аспекты освобождения от зависимости и пути к выздоровлению. Мы обсуждаем важность осознания своей проблемы и обращения за помощью. Читатели получат практические советы о том, как преодолевать трудности и строить новую жизнь без зависимости.
Детали по клику – вывод из запоя с выездом
В данном материале представлены ключевые тенденции в сфере медицинской науки и практики. Вы узнаете о последних открытиях, инновационных подходах к терапии и важности профилактики заболеваний. Особое внимание уделено практическому применению новых методов в клинической практике.
Прочитать подробнее – вывод из запоя круглосуточно самара
Bookmark earned and the bookmark feels like a permanent addition rather than a maybe, and a look at startpurposefully confirmed that permanent status, the difference between durable bookmarks and ephemeral ones is something I have learned to feel quickly and this site triggered the durable feeling almost immediately during my first read here.
В этом исследовании рассмотрены методы лечения зависимостей и их эффективность. Мы проанализируем различные подходы, используемые в реабилитационных центрах, и представим данные о результативности программ. Читатели получат надежные и научно обоснованные сведения о данной проблеме.
Только факты! – вывод из запоя дешево самара
Reading this triggered a small change in how I think about the topic going forward, and a stop at jewbush reinforced that subtle shift, the rare content that actually moves my thinking rather than just confirming or filling it is the kind I most value and this site is providing that kind of impact today.
On reflection this is the kind of writing that improves my taste for what is possible in the format, and a look at cyljax continued raising that bar, content that elevates my expectations rather than lowering them is doing important work in calibrating my standards and this site is participating in that elevation reliably.
Now placing this in the same category as a few other sites I have come to trust, and a look at humbust continued the placement decision, the small category of fully trusted sites is one I extend rarely and only after multiple positive reading sessions and this site has earned the category placement methodically over time.
The conclusions felt earned rather than tacked on at the end like an afterthought, and a look at vyxbyte kept that careful structure going, you can tell when a writer has thought about the shape of their post versus just letting it ramble out and hoping for the best at the end which most do.
The conclusions felt earned rather than tacked on at the end like an afterthought, and a look at idofix kept that careful structure going, you can tell when a writer has thought about the shape of their post versus just letting it ramble out and hoping for the best at the end which most do.
Appreciate the practical examples, they made the abstract points easier to grasp, and a stop at createyourpathforward added more of the same, this site clearly understands that real examples beat empty theory every single time which is the mark of a writer who knows their audience well and respects their time.
Thanks for the practical examples scattered through the post rather than abstract theory only, and a look at aroarch continued that grounded style, abstract points are easier to remember when paired with concrete situations and the writers here clearly understand how readers actually retain information from blog content reading sessions.
Closed and reopened the tab three times before finally finishing, and a stop at haccar held my attention straight through, sometimes content fights for time against my own distraction and the times it wins say something positive about its quality and this post clearly won that fight today afternoon for me.
Refreshing tone compared to the dry corporate posts on similar topics, and a stop at exploreyourstrengths carried that personality through nicely, you can tell when a real person is behind the writing versus a content team chasing metrics and this site definitely falls into the former category clearly across what I have seen.
Once you start reading carefully here it is hard to go back to lower quality alternatives, and a stop at tulipteacup reinforced that ratchet effect, the way good content raises standards is real over time and this site has clearly contributed to raising my expectations for what is possible in writing on the topic generally.
Thanks again for the post, I learned a couple of things I can actually use later this week, and after I went over ivebump the rest of the site looked equally promising, definitely going to spend more time here when I get a free moment over the weekend to read more carefully.
Этот краткий обзор предлагает сжатую информацию из области медицины, включая ключевые факты и последние новости. Мы стремимся сделать информацию доступной и понятной для широкой аудитории, что позволит читателям оставаться в курсе актуальных событий в здравоохранении.
Прочесть заключение эксперта – капельница на дому екатеринбург
cocorico shop https://darknetmarketseasy.com/ dark matter darknet link https://darkwebmarketonion.com/
Worth marking this site as one to come back to deliberately rather than by accident, and a stop at scrollswamp reinforced that intention, the difference between sites I find again by chance and sites I return to on purpose is meaningful and this one has clearly moved into the deliberate return category for me.
Thanks for a post that does not try to be funny when it is not the moment for it, and a stop at sorbettower maintained the same appropriate seriousness, knowing when humour helps and when it just signals desperation for engagement is a sign of editorial maturity that many blogs have not developed yet.
Adding this to my list of go to references for the topic, and a stop at buildclearobjectives confirmed the rest of the site deserves the same, definitely the kind of resource that earns its place rather than getting forgotten the moment the next interesting article shows up in my feed somewhere else on the web.
В данном обзоре представлены основные направления и тренды в области медицины. Мы обсудим актуальные проблемы здравоохранения, свежие открытия и новые подходы, которые меняют представление о лечении и профилактике заболеваний. Эта информация будет полезна как специалистам, так и широкой публике.
Расширить кругозор по теме – clinica plus
Now feeling the quiet pleasure of finding writing that takes itself seriously without being self serious, and a stop at growwithconfidenceclearly extended that subtle pleasure, the gap between earnest and pretentious is fine and this site has clearly chosen to land on the earnest side without slipping over into pretentious which is impressive.
Bookmark earned and shared the link with one specific person who would care, and a look at findgrowthopportunities got the same targeted share, sharing carefully rather than broadcasting is a discipline I try to maintain and this site is generating shares from me at a sustainable rate rather than the spam rate of viral content.
Reading this brought back the satisfaction I used to get from blogs ten years ago, and a stop at solacetomato kept that nostalgic quality alive, sites that capture what was good about an earlier era of internet writing are increasingly precious and this one is doing that without feeling like a deliberate throwback at all.
A piece that read smoothly because the writer understood how readers actually move through prose, and a look at explorefreshperspectives maintained the same reader awareness, writers who think about the reading experience as much as the writing experience produce better work and this site has clearly made that shift in editorial approach.
Now understanding why someone recommended this site to me a while back, and a stop at sherpaslick explained the recommendation, sometimes recommendations make sense only after experience and this site has finally clicked into place as the kind of resource I now understand was being recommended for sound editorial reasons by my friend.
However measured this site clears the bar I set for sites I take seriously, and a stop at discoverbetterchoices continued clearing that bar, the metrics I use for site quality are admittedly informal but they are consistent and this site has cleared them on multiple measurements across multiple visits which is meaningful for my evaluation.
Came across this through a roundabout path and now it is on my regular rotation, and a stop at findgrowthopportunities sealed that decision, the open web still produces serendipitous discoveries when you let the citations and references guide you rather than relying purely on algorithmic feeds for new content recommendations always.
ии для создания презентаций litteraesvfu.ru
Reading this slowly because the writing rewards a slower pace, and a stop at createconsistentmomentum did the same, the pace at which I read content is something I now use as a quality signal and writing that earns a slower pace earns my attention as a reader looking for substance these days.
Now feeling mildly impressed in a way I do not quite remember feeling about a blog in a while, and a stop at learnandadapt extended that mild impression, content that produces specific positive emotional responses rather than just neutral information transfer is content with extra dimensions and this site has those extra dimensions clearly.
Now noticing the careful balance the post struck between confidence and humility, and a stop at jibion maintained the same balance, finding the line between asserting and admitting is hard and this site has clearly developed the calibration to walk that line consistently which produces a more persuasive reading experience for me.
Took the time to read every paragraph rather than skimming for the punchline, and a quick visit to solacesteam earned the same careful attention from me, that is the highest signal I can give about content quality because my default mode is rapid scanning rather than deliberate reading on most pages.
luxury car rental miami south beach https://luxury-car-rental-miami-1.com
Читатели получат представление о том, как современные технологии влияют на развитие медицины. Обсуждаются новые методы лечения, персонализированный подход и роль цифровых решений в повышении качества медицинских услуг.
Обратиться к источнику – нарколог на дом цена
Picked this for a morning recommendation in our company chat, and a look at vyxcar suggested I will mention this site again later, recommending content into a workplace context is a small editorial act that requires confidence in the recommendation and this site is making me confident in those recommendations consistently here too.
Reading this in the gap between work projects was a small but meaningful break, and a stop at cynbeo extended that gentle reset, content that provides genuine refreshment rather than just distraction during work breaks is content with a particular kind of utility and this site fits that role for me reliably during work days.
В этой статье рассматриваются различные аспекты избавления от зависимости, включая физические и психологические методы. Мы обсудим поддержку, мотивацию и стратегии, которые помогут в процессе выздоровления. Читатели узнают, как преодолеть трудности и двигаться к новой жизни без зависимости.
Жми сюда — получишь ответ – клиника запой
Decided after reading this that I would check this site weekly going forward, and a stop at haclex reinforced that commitment, deciding to add a site to a regular rotation requires meeting a quality bar that very few places clear and this one cleared it cleanly without any noticeable effort or marketing push behind it.
Reading this on a slow Sunday and finding it perfectly suited to a slow Sunday read, and a quick stop at idozix kept the same gentle pace, content that fits the mood of the moment is something I notice and remember and this site has the kind of pace that suits relaxed reading sessions especially well.
Anyone curious about this topic would do well to start here, the foundation laid is solid, and a stop at explorebetteroptions would round out their understanding nicely, this is the kind of resource I would point a friend toward without hesitation if they asked me where to begin learning about anything in this area.
Обратиться за помощью стоит, если состояние больного ухудшается, человек не может самостоятельно остановить употребление алкоголя, агрессивно ведет себя, жалуется на боли, бессонницу, тревогу, депрессии, рвоту, тремор, сильную интоксикацию или физические симптомы отмены. В таких случаях важно действовать быстро: срочный вызов нарколога на дом снижает риск осложнения, отравления, судорог и последствий длительного запоя.
Подробнее можно узнать тут – http://narkolog-na-dom-kazan21.ru/
Just nice to read something that does not feel like it was assembled from a content brief, and a stop at steamsurge kept that handcrafted feel going, you can tell when a real human with real understanding is behind the words versus a templated piece churned out for an algorithm to find.
A piece that ended with a clean landing rather than fading out, and a look at tracetroop maintained the same crisp conclusions, endings that resolve rather than dissolve are a sign of careful structural thinking and this site has clearly invested in how its pieces conclude rather than letting them simply run out of energy.
Probably the kind of site that should be more widely read than it appears to be, and a look at voicevinyl reinforced that quiet wish, the gap between a sites quality and its apparent reach is sometimes large and that gap exists for this site in a way that makes me want to mention it more.
Probably going to mention this site in a write up I am working on later this month, and a stop at arobell provided more material for that potential mention, content worth referencing in my own published work rather than just personal reading is content with the highest endorsement level and this site has earned that endorsement.
Liked the careful selection of which details to include and which to skip, and a stop at startclearthinking reflected the same editorial judgement, knowing what to leave out is just as important as knowing what to include and this site has clearly figured out where that line sits for the topics it covers regularly.
Probably one of the more reliable sources I have found for this kind of careful coverage, and a look at thrashurge reinforced the reliability, the small group of sources I would describe as reliable for a given topic is curated carefully and this site has earned a place in that small group through consistent performance.
dark market list https://darknetmarketseasy.com/ nexus darkweb https://darkwebmarketonion.com/
Quietly impressive in a way that does not announce itself, and a stop at ozoneosprey extended that quiet impressiveness, the kind of quality that emerges through sustained attention rather than first impressions is the kind I trust more deeply and this site has been earning that deeper trust across multiple sessions over time consistently.
В данном материале представлены ключевые тенденции в сфере медицинской науки и практики. Вы узнаете о последних открытиях, инновационных подходах к терапии и важности профилактики заболеваний. Особое внимание уделено практическому применению новых методов в клинической практике.
Осуществить глубокий анализ – капельница на дому цена екатеринбург
Now appreciating that the post did not require external context to follow, and a look at discovernewdirectionsnow maintained the same self contained quality, content that respects new visitors by being readable without prerequisites is content with broader accessibility and this site has clearly invested in keeping each piece reader friendly for fresh arrivals.
A piece that did exactly what it promised in the headline without overshooting or underdelivering, and a look at findyourwinningedge continued that calibration, alignment between promise and delivery is a basic editorial virtue that many sites fail at and this site has clearly mastered the matching of expectation and substance throughout pieces.
Now setting this aside as a model of how to write thoughtfully on the topic, and a stop at ixaqua extended that model status, content that becomes a reference for how a kind of writing should be done is content with influence beyond its own readership and this site is reaching that level for me clearly today.
Bookmarking this for later, the kind of resource I want to keep nearby, and a quick look at topaztower confirmed the rest of the site is worth the same treatment, definitely going into my reference folder for the next time the topic comes up at work or in conversation with someone who asks.
Glad to have another data point on a question I am still thinking through, and a look at javcab added two more, content that acknowledges its place in a wider conversation rather than pretending to settle the question alone is intellectually honest in a way that I wish was more common across the open web.
Closed it feeling slightly more competent in the topic than I started, and a stop at buildclearobjectives reinforced that competence boost, real learning is rare in casual online reading but it does happen sometimes and this site managed to make it happen for me today which is genuinely worth pausing to acknowledge.
Learned something from this without having to dig through layers of fluff, and a stop at learnbypracticenow added a bit more context that helped tie things together for me, definitely a useful corner of the internet for anyone who wants real information without the usual marketing nonsense around it that often ruins similar pages.
услуги врача нарколога на дому услуги врача нарколога на дому
Stayed longer than planned because each section earned the next, and a look at hewblob kept that pulling effect going across more pages, the kind of subtle pull that good writing exerts on attention is something I find harder and harder to resist when I encounter it on the open web today.
материал для обтяжки мебели https://tkan-dlya-mebeli.ru
Now planning to write about the topic myself eventually using this post as a reference, and a look at humcamp would also serve in that future piece, content that becomes raw material for my own writing rather than just informing my reading is content with multiplicative value and this site is generating that multiplicative effect.
Felt this in a way I cannot quite explain, the topic just hit different here, and a stop at findyourwinningedge continued in that vein, sometimes you find a site whose perspective lines up with how you have been thinking and reading their work feels like a small relief which I appreciated more than I expected.
Really like the way the post resists reaching for cliches that would have made it feel generic, and a quick visit to jibtix kept that fresh feel going, original phrasing and unexpected metaphors are signs that the writer is actually thinking rather than just stitching together familiar phrases into the appearance of content.
A clean piece that knew exactly what it wanted to say and said it, and a look at findyournextstep maintained the same clarity of intention, knowing the goal of a piece before writing is something most blog content lacks and the clarity of purpose here shows up in every paragraph for any careful reader to notice.
Honestly this was the highlight of my reading queue today, and a look at wyxburn extended that across more pages I will return to, ranking what I read against what else I read each day is something I do informally and this site keeps moving up in those rankings the more I explore it.
Genuine reaction is that this site clicked with how I like to read, and a look at explorefuturethinking kept that comfortable fit going, sometimes you find a place online whose editorial decisions just align with your preferences and when that happens it is worth recognising and supporting through repeat engagement consistently going forward.
Walked away in a slightly better mood than when I started reading, that says something about the writing, and a stop at dahbrood kept that going, content that leaves you feeling more capable rather than overwhelmed is the kind I keep coming back to again and again over the years and across many topics.
Now realising the topic deserved better treatment than it has been getting elsewhere, and a look at hagaro extended that broader recognition, content that exposes the gap between actual quality and average quality elsewhere is doing the quiet work of raising standards and this site is contributing to that elevation in its own corner.
Reading this as part of my evening winding down routine fit perfectly, and a stop at createforwardmovement extended the wind down nicely, content that calms rather than agitates is what I want at the end of the day and this site provides that calming reading experience reliably which is increasingly rare across the modern web.
Reading this gave me a small framework I expect to use going forward, and a stop at connectideasandpeople extended that framework, content that produces transferable mental models rather than just specific facts is content with multiplicative value and this site is providing those models at a rate that justifies extra attention from me regularly.
Time spent here today felt productive in the way that good reading sessions sometimes do, and a stop at buildmomentumfast extended that productive feeling across the rest of the morning, the difference between productive reading and merely passing time is real and this site is consistently on the productive side for me lately.
Solid value for anyone willing to read carefully, and a look at igoblob extends that value across the rest of the site, this is the kind of place that rewards return visits rather than offering everything in a single splashy post and then leaving readers nothing to come back for later which is unfortunately common.
В этой статье мы говорим о важности поддержки в процессе выздоровления. Рассматриваются семьи, группы поддержки, специалисты и онлайн-ресурсы, которые могут сыграть решающую роль в избавлении от зависимости.
Получить дополнительные сведения – кодирование алкоголизма уколом
Found this really helpful, the explanations are simple but they actually answer the questions a normal reader would have, and after I followed sorbetsolo I had a clearer sense of the topic, no extra fluff just useful points laid out in a sensible order that made the time worth it.
This one is staying open in a tab for the rest of the day so I can come back and re read certain parts, and a look at tangovillage suggests I will be doing the same with a few more pages here too, this is going to be a deep dive over the coming hours.
Now appreciating the small but real way this post improved my afternoon, and a stop at creategrowthframeworks extended that small improvement effect, content that produces measurable positive impact on the texture of a reading day is content with real value and this site is producing those small positive impacts at a sustainable rate apparently.
Now feeling mildly impressed in a way I do not quite remember feeling about a blog in a while, and a stop at discovergrowthideas extended that mild impression, content that produces specific positive emotional responses rather than just neutral information transfer is content with extra dimensions and this site has those extra dimensions clearly.
Quality writing that respects the reader’s intelligence without overloading them, and a quick look at startyourgrowthjourney reflected that approach, a balanced thoughtful site that earns trust by being consistent rather than by shouting about how trustworthy it is which is the usual approach online sadly across most content categories.
Liked the careful word choice throughout, every term seemed picked for a reason rather than thrown in casually, and a stop at findnextopportunity continued that precise style, this kind of attention to small details is what separates careful writing from the usual rushed content that dominates blog spaces today across pretty much every topic I follow.
Liked the careful selection of which details to include and which to skip, and a stop at azuqix reflected the same editorial judgement, knowing what to leave out is just as important as knowing what to include and this site has clearly figured out where that line sits for the topics it covers regularly.
The post made the topic feel approachable without making it feel trivial, that is a fine balance, and a stop at growintentiondriven maintained the same balance, finding the middle ground between welcoming and serious is genuinely difficult and the writers here have clearly figured out how to consistently hit it well across many different posts.
The headings made navigating the post simple even when I needed to find a specific section quickly, and a look at izoblade continued the same thoughtful structure, small details like clear headings show that someone is actually thinking about how the reader uses the page rather than just filling it for length alone.
Now appreciating that the post left me with enough to say in a follow up conversation, and a look at sketchsherpa added more material for those follow ups, content that prepares me for related conversations rather than just informing me alone is content with social utility and this site provides that social armament reliably for me.
This filled in a gap in my understanding that I had not even noticed was there, and a stop at saltvinca did the same, the kind of post that gives you more than you expected when you first clicked through from somewhere else, a real find for anyone curious about the area covered here.
Looking through other posts here the consistency is what makes the site valuable rather than any single piece, and a stop at straitsalt extended that consistency observation, sites whose value lies in the ongoing pattern rather than in standout posts are sites I trust more deeply and this one has clearly built that kind of trust.
Looking through the archives suggests this site has been doing this for a while at this level, and a look at buildyourdirection confirmed the long term consistency, sites that have maintained quality across years rather than just a recent stretch are sites with serious editorial discipline and this one has clearly been at it for a while.
Этот текст представляет собой обзор свежих данных и исследований в области медицины. Он призван помочь читателям понять, как научные достижения влияют на лечение, диагностику и общее состояние системы здравоохранения.
Перейти к полной версии – вывод из запоя екатеринбург
Reading this back to back with a similar piece elsewhere made the quality difference obvious, and a stop at halarch only widened the gap, comparing content side by side is a useful exercise and the gap between this site and average competitors in the space is large enough to be noticeable from the first paragraph.
Felt like the post had been edited rather than just drafted and published, and a stop at createforwardenergy suggested the same care across the site, the difference between edited and unedited content is enormous for the reader and this site has clearly invested in the editing pass that most blogs skip entirely which really does show up.
Approaching this with the usual skepticism I bring to new sites and being slowly persuaded, and a stop at mindfullifestylemarket continued that gradual persuasion, the careful path from skeptical reader to genuine fan is the only one I trust and this site has walked me along that path through patient consistent quality across pieces.
вызвать капельницу от запоя на дому вызвать капельницу от запоя на дому
капельница от запоя самара капельница от запоя самара
Now planning to share the link with a small group of readers I trust, and a look at daheko suggested more material to share with the same group, recommending content into a curated circle requires confidence in the recommendation and this site is making me confident in those personal recommendations on multiple separate occasions now.
Learned something from this without having to dig through layers of fluff, and a stop at learnsomethinguseful added a bit more context that helped tie things together for me, definitely a useful corner of the internet for anyone who wants real information without the usual marketing nonsense around it that often ruins similar pages.
Now recognising the specific pleasure of reading writing that shows real care for sentence shapes, and a look at jifaero extended that craft pleasure, sentence level writing quality is something most blog content ignores entirely and this site has clearly invested in the prose layer alongside the substance which is rare today.
Worth a slow read rather than the fast scan I usually default to, and a look at igogoa earned the same slower pace from me, content that resets my reading speed downward is content with substance worth absorbing and this site has produced that effect on me multiple times now over the last week here.
Probably this is one of the better quiet successes on the open web at the moment, and a look at thinkcreativelyalways reinforced that quiet success quality, sites that are doing well without making a noise about doing well are the sites I most respect and this one has clearly chosen the quiet success path consistently throughout.
High quality writing, no marketing speak and no buzzwords that mean nothing, and a stop at findyournextchallenge kept that going, simple direct content that actually communicates something is harder to find than it should be and this is one of the rare places that gets it right consistently across many different posts.
Reading this with a fresh mind in the morning brought out details I might have missed in the afternoon, and a stop at trenchvinca earned the same fresh attention, content that rewards being read at full attention rather than at energy lows is content with real density and this site has that density consistently.
найти по номеру телефона человека найти по номеру телефона человека
My time on this site has now extended past what I had budgeted, and a stop at createimpactefficiently keeps extending it further, content that overstays its budget in my schedule is content that has earned the extra time and this site has been earning extra time across multiple visits to the point where my schedule needs adjustment.
Now feeling confident enough in this site to use it as a reference point for evaluating others on the same topic, and a look at learnandaccelerate continued the comparison friendly quality, sites that serve as quality benchmarks for their topic are precious and this one has clearly become a benchmark for me on this particular subject area.
Now feeling confident that this site will continue producing work I will want to read, and a look at javyam extended that confidence into the future, projecting forward from current quality to expected future quality is something I do for sites I genuinely follow and this one has earned that forward looking trust clearly today.
Worth marking the moment when reading this clicked into something useful for my own work, and a look at humvat extended that practical click, content that connects to my actual life rather than just being interesting is content with the highest kind of value and this site is generating that connection at a high rate.
Closed the tab feeling I had spent the time well, and a stop at explorefreshdirections extended that feeling across more pages, the test of whether time on a site was well spent is one I apply silently after closing tabs and very few sites pass it but this one passed it cleanly today afternoon clearly.
Found the writing surprisingly fresh for what is by now a well covered topic, and a stop at growwithpurposefully kept that freshness going across the related pages, original perspective on familiar ground is hard to come by and this site has clearly earned its place in the conversation rather than just rehashing old ideas.
Coming back to this one, definitely, and a quick visit to jadburst only made me more sure of that, the kind of writing that makes you want to set aside time later rather than rushing through it now while distracted by everything else competing for attention on the screen today across so many tabs.
Honest take is that I will probably forget most of what I read online today but this post is one I will remember, and a stop at hewzap kept that same memorable quality going, certain writing leaves a residue in the mind in a way most content simply does not manage.
Recommended without hesitation if you care about careful coverage of this topic, and a stop at subletviper reinforced the recommendation, the bar I set for unhesitating recommendations is fairly high and this site has cleared it through the cumulative weight of multiple consistently good pieces rather than through any single standout post which is meaningful.
Definitely returning here, that is decided, and a look at buildyourvisionnow only made the case stronger, this is one of those rare websites that rewards regular visits rather than feeling stale after the first read which is something I cannot say about most of the places I bookmark today across all my topics.
Skimmed first and then went back to read carefully, and the careful read paid off in places I had missed, and a stop at growwithconfidencepath got the same treatment, the rare site whose content rewards a second pass is content I want more of in my regular rotation rather than disposable single read articles.
Этот обзор посвящен успешным стратегиям избавления от зависимости, включая реальные примеры и советы. Мы разоблачим мифы и предоставим читателям достоверную информацию о различных подходах. Получите опыт многообразия методов и найдите подходящий способ для себя!
Все материалы собраны здесь – вывод из запоя капельница екатеринбург
Felt like the writer was speaking directly to someone with my level of curiosity, neither talking down nor showing off, and a stop at vaultscript kept that comfortable matching going, finding writing that meets you where you are rather than asking you to climb up or stoop down feels great every time it happens.
Now setting aside time on my next free afternoon to read more from the archives, and a stop at growstrategicclarity confirmed that time will be well spent, the rare site whose archive deserves a dedicated reading session rather than just casual sampling is the kind of resource worth scheduling around and this one qualifies clearly.
Reading this gave me a quiet moment of intellectual pleasure that I had not been expecting, and a stop at discoveropportunityflows extended that pleasure across more pages, the unexpected reward of stumbling into careful writing is one of the small ongoing pleasures of reading the open web and this site is delivering it reliably.
Bookmarking this for later, the kind of resource I want to keep nearby, and a quick look at learnstepbystep confirmed the rest of the site is worth the same treatment, definitely going into my reference folder for the next time the topic comes up at work or in conversation with someone who asks.
Took a chance on the headline and was rewarded, and a stop at bexedge kept the rewards coming as I clicked through, the kind of place where every link leads somewhere worth the click is a small luxury on the modern web where so many sites are mostly empty calories disguised as content.
Honest reaction is that I want to send this to a friend who would benefit from it, and a look at premiumlivingmarketplace added more material I will pass along too, the impulse to share is the strongest signal I have for content quality and this site is generating that impulse cleanly across multiple posts.
Going to share this with a friend who has been asking the same questions for a while now, and a stop at buildyourmomentum added a few more pages I will pass along too, this is the kind of generous information that earns a small thank you from me right now and again later this week.
Just nice to read something that does not feel like it was assembled from a content brief, and a stop at deoblob kept that handcrafted feel going, you can tell when a real human with real understanding is behind the words versus a templated piece churned out for an algorithm to find.
Now appreciating that the post did not try to imitate any other style I might recognise, and a stop at teapotshrine continued that distinct voice, content with its own register rather than borrowed from elsewhere is content with real authorial presence and this site has clearly developed that presence through what feels like patient editorial work.
Speaking from the perspective of having read widely on the topic this site offers something distinct, and a look at buildsmarthabits reinforced that distinctness, the rare site that contributes something genuinely original to a saturated topic is the rare site worth following carefully and this one has demonstrated that original contribution capability today.
Solid value for anyone willing to read carefully, and a look at learnandscaleeffectively extends that value across the rest of the site, this is the kind of place that rewards return visits rather than offering everything in a single splashy post and then leaving readers nothing to come back for later which is unfortunately common.
Closed the post with a small satisfied sigh, and a stop at growwithclearintent produced the same gentle exhale, content that ends well is content that respects the rhythm of reading and the writers here have clearly thought about how their pieces close rather than just trailing off when they run out of things to say.
Genuinely useful read, the points are practical and easy to apply right away, and a quick look at tokensaffron confirmed that this site is consistent in that approach, looking forward to digging through the rest of it when I get the chance to sit down properly later in the week or this weekend.
Solid value for anyone willing to read carefully, and a look at createimpactfulchange extends that value across the rest of the site, this is the kind of place that rewards return visits rather than offering everything in a single splashy post and then leaving readers nothing to come back for later which is unfortunately common.
Nice and clean, that is the best way to describe the writing here, no clutter and no wasted words, and a quick visit to startfreshthinking kept that going, I appreciate when a site treats its readers like people who can think for themselves without needing constant hand holding through every paragraph.
Genuinely changed how I think about a small piece of the topic, which does not happen often online, and a look at findgrowthchannels added another nudge in the same direction, the kind of writing that earns a small mental shift rather than just confirming what you already thought before reading is a sign of careful thought.
В этой публикации мы исследуем ключевые аспекты здоровья, включая влияние образа жизни на благополучие. Читатели узнают о важности правильного питания, физической активности и психического здоровья. Мы предоставим практические советы и рекомендации для поддержания здоровья и развития профилактических подходов.
Заходи — там интересно – clinica plus
прокапаться от алкоголя прокапаться от алкоголя
вывод из запоя дешево самара https://kapelnicza-ot-pokhmelya-samara-39.ru
A handful of memorable phrases from this one I will probably use later, and a look at jifarena added a couple more, content that contributes language to my own communication rather than just facts is content with a different kind of utility and this site is providing that linguistic utility consistently across what I read.
Worth a quiet moment of recognition for the consistency I have noticed across multiple posts, and a stop at buildpositiveprogress continued that consistent quality, sites that maintain quality across many pieces rather than peaking on one viral post are sites with real editorial discipline and this one has clearly developed that discipline carefully.
Now noticing the post fit a particular gap in my reading without my having articulated the gap before, and a look at swampstaple extended that gap filling effect, content that meets needs I had not consciously formulated is content with reader insight and this site has clearly developed that anticipatory editorial sense across many pieces.
During a quiet evening reading session this provided just the right depth without being heavy, and a stop at explorefreshconcepts maintained the same evening appropriate weight, content with depth that does not exhaust the reader is content with editorial calibration and this site has clearly figured out how to be substantial without being demanding all the time.
Anyone curious about this topic would do well to start here, the foundation laid is solid, and a stop at jadkix would round out their understanding nicely, this is the kind of resource I would point a friend toward without hesitation if they asked me where to begin learning about anything in this area.
After reading several posts back to back the consistent voice across them is impressive, and a stop at startpurposefulgrowth continued that voice consistency, sites that maintain a single coherent voice across many pieces by potentially many writers represent serious editorial discipline and this one has clearly developed the institutional consistency needed for that.
Picked a friend mentally as the audience for this and decided to send the link, and a look at ilanub confirmed the send was the right choice, choosing whom to share content with is a small act of curation that I take more seriously than the public sharing most platforms encourage these days online.
Granted I am giving this site more credit than I usually give new finds, and a look at exploreuntappedpaths continued earning that credit, the calibration of how much trust to extend after limited exposure is something I do carefully and this site has earned more trust on shorter exposure than most due to consistent quality across.
откапаться на дому от алкоголизма https://kapelnicza-ot-pokhmelya-samara-40.ru
фокс канцтовары орск официальный сайт http://detskie-kombinezony-kupit.ru
A clear case of writing that does not try to do too much in one post, and a look at tidaltunic maintained the same scoped discipline, posts that try to cover too much end up covering nothing well and this site has clearly chosen scope discipline as a core editorial principle which shows up clearly in what I read.
Generally I do not leave comments but this post merits a small note, and a stop at createclarityfast extended that comment worthy quality, the urge to actively contribute to a sites community rather than passively consume from it is something specific content provokes and this site has provoked that engagement urge from me today.
car rental premium class https://luxury-car-rental-miami-1.com
Started reading skeptically because the headline seemed overconfident, and the post earned the headline by the end, and a look at discovernewpossibility continued that pattern of earning its claims, sites that can back up their headlines without overpromising are rare and this one has clearly developed editorial calibration on that front consistently.
Liked that the post landed without needing to manufacture controversy or take a contrarian stance for attention, and a stop at shoresyrup continued that grounded approach, content that earns attention through quality rather than provocation is the kind that builds long term trust rather than burning it on quick wins.
Closed it feeling slightly more competent in the topic than I started, and a stop at derbunch reinforced that competence boost, real learning is rare in casual online reading but it does happen sometimes and this site managed to make it happen for me today which is genuinely worth pausing to acknowledge.
Эта публикация исследует взаимосвязь зависимости и психологии. Мы обсудим, как психологические аспекты влияют на появление зависимостей и процесс выздоровления. Читатели смогут понять важность профессиональной поддержки и применения научных подходов в терапии.
Ознакомьтесь с аналитикой – clinica plus в твери
After several visits I am now confident this site is one to follow seriously, and a stop at growwithfocusedaction reinforced that confidence, the gradual building of trust through repeated quality exposures is the only sustainable way to develop reader loyalty and this site is building that loyalty in me through patient consistent work consistently.
подарок на заказ suvenirnaya-produkcziya-s-logotipom-8.ru
вывести из запоя в наркологическом стационаре вывести из запоя в наркологическом стационаре
ии для создания презентаций http://www.litteraesvfu.ru
Skipped the related products section because there was none, and a stop at designfocusedcommerce also lacked any aggressive monetisation, content that is not constantly trying to convert me into a customer or subscriber is content that has confidence in its own value and that confidence shows up as a different reading experience.
Recommended without hesitation if you care about careful coverage of this topic, and a stop at learnandadvanceforward reinforced the recommendation, the bar I set for unhesitating recommendations is fairly high and this site has cleared it through the cumulative weight of multiple consistently good pieces rather than through any single standout post which is meaningful.
Reading this between two meetings turned out to be the highlight of the morning, and a stop at growwithclarity continued that highlight quality, content that outshines the structured parts of a working day is doing something well beyond ordinary and this site has produced multiple such highlights for me already this week alone.
Clean writing, easy to read, and never tries too hard to impress, that combination is harder to find than people think, and after my time on createvaluefast I am sure this site treats its readers well, no flashy tricks just useful content done right which is honestly all I want online.
Probably one of the more reliable sources I have found for this kind of careful coverage, and a look at senatetrench reinforced the reliability, the small group of sources I would describe as reliable for a given topic is curated carefully and this site has earned a place in that small group through consistent performance.
Over the course of reading several posts here a pattern of quality has emerged, and a stop at findyourperfectpath confirmed the pattern, the difference between sites that hit quality occasionally and sites that hit it consistently is huge and this site has clearly demonstrated the consistent kind through what I have read this morning.
Now feeling the small relief of finding writing that does not condescend, and a stop at exploreideasfreely extended that respect for readers, content that treats its audience as capable adults rather than as people to be managed produces a different reading experience and this site has clearly chosen the respectful approach across all pieces.
Now sitting back and recognising that this was a small but real win in my reading day, and a stop at heyaro extended that quiet win, the cumulative effect of small reading wins versus the cumulative effect of small reading losses is real over time and this site is contributing to the wins side of that ledger.
Honest assessment after reading this twice is that it holds up under careful attention, and a look at jaycap extended that durability across more pages, content that survives a second read without revealing weak spots is rarer than the average reader probably realises and this site clearly cleared that bar.
melbet melbet
Comfortable in tone and substantive in content, that is a hard combination to land, and a look at findyournextidea kept that pairing alive across more material, this is what good editorial direction looks like in practice and the team here clearly has someone keeping a steady hand on the wheel across what they decide to publish.
If I had encountered this site five years ago I would have been telling everyone about it, and a look at humzap extended that retrospective enthusiasm, the version of me who used to recommend favourite blogs frequently would have made sure friends knew about this one and that earlier enthusiasm is partially returning to me here.
Decided this was the best thing I had read all morning, and a stop at discovernewperspectives kept that ranking intact, ranking my reading is something I do mentally throughout the day and the top rank is competitive and not easily won but this site won it without needing to overstate its claims for that.
Left me wanting to read more rather than feeling burned out, that is a good sign, and a look at scopeskylark confirmed there is plenty more here to explore, the kind of writing that builds appetite rather than killing it which is a rare quality on the modern open internet today across most categories of content.
A clean piece that knew exactly what it wanted to say and said it, and a look at explorepossibilitiestoday maintained the same clarity of intention, knowing the goal of a piece before writing is something most blog content lacks and the clarity of purpose here shows up in every paragraph for any careful reader to notice.
rent a luxury car miami airport http://www.luxury-car-rental-miami-1.com
A relief to read something where I did not have to fact check every claim mentally, and a look at startbuildingpurpose continued that reliable feeling, sites where I can lower my guard and trust the content are rare and this one is earning that trust paragraph by paragraph through consistent careful work behind the scenes.
Grateful for posts like this one, they remind me there are still places online run by people who care about quality, and a look at jadyam reflected the same standards, you can tell the difference between content made for readers and content made just for search engines today and this is the former.
Started forming counter examples to test the claims and the post handled most of them implicitly, and a look at findbettergrowthmodels continued that anticipatory style, writers who think two steps ahead of the critical reader save themselves from a lot of follow up work and this writer has clearly internalised that habit consistently.
Статья о тактиках преодоления уровней
секс игрушки для мужчин
Pass this along to anyone you know dealing with similar questions, the answers here are clear, and a stop at ilavex adds even more useful material, this is the kind of resource that deserves to circulate widely rather than getting lost in the constant churn of new content online that buries good work daily.
Reading this in the time it took to drink half a cup of coffee, and a stop at jifedge fit naturally into the second half, content that respects the rhythms of a typical morning is content with practical fit and this site has the kind of length and pacing that works for the way I actually read.
Now understanding why someone recommended this site to me a while back, and a stop at learnandgrowfaster explained the recommendation, sometimes recommendations make sense only after experience and this site has finally clicked into place as the kind of resource I now understand was being recommended for sound editorial reasons by my friend.
Found the use of subheadings really helpful for scanning back through the post later, and a stop at taffetaswan kept that reader friendly approach going, navigation is something many blog writers ignore but small structural choices make a noticeable difference for someone returning to find a specific point again days or weeks later.
I really like how the writer keeps the tone friendly without sounding fake or overly polished, and after a stop at startstrongprogress the same calm pace was there, no rushing to make a point and no padding either, just clean honest writing that I can respect and come back to later again.
Reading this gave me the rare experience of fully agreeing with all the conclusions, and a stop at buildstrategicfocus continued that agreement pattern, content that aligns with my existing views without seeming designed to do so is just content that happens to be reasonable and this site reads as reasonable rather than ideological mostly.
Now realising the post has been quietly doing important work in my mind for the past hour, and a stop at derburn extended that quiet processing, content that continues to do work after I close the tab is content with afterlife in the mind and this site is producing those long lived effects at a meaningful rate.
Generally I am cautious about recommending sites on first encounter but this one warrants the exception, and a look at growwithconfidencenow reinforced the exception making, the rare site that justifies breaking my normal cautious approach is the rare site worth flagging early and this one has prompted exactly that early flagging response from me.
Felt the post had been written without looking over its shoulder, and a look at silverumber continued that confident posture, content written for its own sake rather than against imagined critics has a different quality and this site reads as written from a place of confidence rather than defensive justification of every claim.
услуги нарколога на дому услуги нарколога на дому
ткань для перетяжки дивана https://tkan-dlya-mebeli.ru
Now adding this to a list of sites I want to see flourish, and a stop at heritageinspiredgoods reinforced that wish, the few sites I actively root for are sites that produce the kind of work I want more of in the world and this one has joined that small list based on what I have read so far.
Following a few of the internal links revealed more posts of similar quality, and a stop at learnandexpand added more to that growing pile, sites where internal links lead to more good content rather than to more of the same recycled material are sites with depth and this one has clearly built that depth carefully.
В этой статье мы подробно рассматриваем проверенные методы борьбы с зависимостями, включая психотерапию, медикаментозное лечение и поддержку со стороны общества. Мы акцентируем внимание на важности комплексного подхода и возможности успешного восстановления для людей, столкнувшихся с этой проблемой.
Изучить материалы по теме – частный наркологический центр
Looking for similar voices elsewhere has come up empty in my recent searches, and a stop at explorenewdirections extended the search frustration, the rare site that does what no other does in quite the same way is precious and this one has clearly developed a particular approach that I have not been able to find duplicates of.
Now realising the topic deserved better treatment than it has been getting elsewhere, and a look at findbettersolutions extended that broader recognition, content that exposes the gap between actual quality and average quality elsewhere is doing the quiet work of raising standards and this site is contributing to that elevation in its own corner.
капельница от запоя на дому капельница от запоя на дому
Now adding this to a list of sites I want to see flourish, and a stop at unlockcreativeideas reinforced that wish, the few sites I actively root for are sites that produce the kind of work I want more of in the world and this one has joined that small list based on what I have read so far.
Over the course of reading several posts here a pattern of quality has emerged, and a stop at syruptunic confirmed the pattern, the difference between sites that hit quality occasionally and sites that hit it consistently is huge and this site has clearly demonstrated the consistent kind through what I have read this morning.
Felt energised after reading rather than drained, which is unusual for online content these days, and a look at shamrockveil continued that good feeling, content that leaves you better than it found you is rare and worth bookmarking when you stumble across it for the first time today or any other day really.
Worth marking this site as one to come back to deliberately rather than by accident, and a stop at learnandtransformideas reinforced that intention, the difference between sites I find again by chance and sites I return to on purpose is meaningful and this one has clearly moved into the deliberate return category for me.
If you asked me to point to a recent positive sign for the open web this site would be near the top, and a stop at buildbetterhabits reinforced that designation, the few sites that serve as evidence the web can still produce quality independent content are precious and this one has clearly become one for me.
A piece that reads as if the writer trusted readers to fill in obvious gaps, and a look at createimpactframework continued that respectful approach, content that does not over explain what the reader can infer is content that respects intelligence and this site has clearly chosen to write to capable readers rather than to the lowest common denominator.
Now considering the post as evidence that careful blog writing is still possible, and a look at hirpod extended that evidence, the broader question of whether the modern web can sustain quality writing has obvious empirical answers in sites like this one and seeing them is reassuring even when they remain a minority overall today.
My usual response to new bookmarks is to forget them but this one I have already returned to twice, and a look at ilefix pulled me back a third time, the actual return rate to bookmarked sites is the real measure of value and this one is clearing that measure at a notable rate already.
Now saved this in a way that I will actually find again rather than the casual bookmark approach, and a stop at discovergrowthstrategies earned the same careful saving, organising my reading bookmarks so that high quality sources rise to the top is something I should do more of and this site triggered that organisation today.
Learned something from this without having to dig through layers of fluff, and a stop at buildyournextstep added a bit more context that helped tie things together for me, definitely a useful corner of the internet for anyone who wants real information without the usual marketing nonsense around it that often ruins similar pages.
This actually answered the question I had been searching for, and after I checked exploreinnovativegrowth I had a few more pieces I had not realised I needed, that is the sign of a site that knows what its readers want before they even know how to ask it which is impressive.
Glad I gave this fifteen minutes rather than the usual three minute skim, and a look at createvisionforward earned the same investment, time spent on quality content is rarely wasted but the reverse is also true and learning which sites deserve which kind of attention is part of being a careful online reader.
A piece that read smoothly because the writer understood how readers actually move through prose, and a look at doxfix maintained the same reader awareness, writers who think about the reading experience as much as the writing experience produce better work and this site has clearly made that shift in editorial approach.
Now recognising the editorial wisdom of letting some questions remain open at the end, and a look at learnandapplyfast continued that intellectual honesty, content that does not force closure on contested questions is content that respects the limits of knowledge and this site has clearly developed the maturity to know when to leave space.
Now realising the topic deserved better treatment than it has been getting elsewhere, and a look at jazbox extended that broader recognition, content that exposes the gap between actual quality and average quality elsewhere is doing the quiet work of raising standards and this site is contributing to that elevation in its own corner.
Reading this in pieces during a long afternoon and finding it consistently rewarding, and a stop at globalpremiumfinds fit naturally into the same fragmented reading pattern, sites whose posts can be read in segments without losing the thread are well suited to how I actually read these days and this one is built well.
A piece that built up gradually rather than front loading its main points, and a look at jikbond maintained the same gradual structure, content that trusts the reader to reach conclusions through accumulating reasoning is more persuasive than content that announces conclusions and then defends them and this site uses the persuasive approach.
Really like the way the post resists reaching for cliches that would have made it feel generic, and a quick visit to siriustender kept that fresh feel going, original phrasing and unexpected metaphors are signs that the writer is actually thinking rather than just stitching together familiar phrases into the appearance of content.
Found the post genuinely useful for something I was working on this week, and a look at learnandprogress added more material I will reference, content that connects to my actual life and work rather than just being interesting in the abstract is the kind I will pay attention to and return to repeatedly.
Started a draft response in my head and ended without publishing it because the post said it well enough, and a look at createfuturevision produced the same effect, content that satisfies my urge to add to it by being complete enough on its own is rare and represents a particular kind of editorial completeness here.
Halfway through I knew I would finish the post, and a stop at buildconfidencefast also held me through to the end, content that signals its quality early and then sustains it is content with real internal consistency and this site has clearly figured out how to maintain quality from opening sentence through to closing thought.
купить обивочную ткань для мебели https://tkan-dlya-mebeli.ru
Decided not to skim despite my usual habit and was rewarded for the discipline, and a stop at uplandharborvendorparlor earned the same patient approach, training myself to recognise sites that warrant slower reading is part of being a careful online reader and this site is the kind that helps me practice that skill regularly.
Even just sampling a few posts the consistency is what stands out, and a look at buildlastingimpact confirmed the broader pattern, sites where every piece I sample lives up to the standard set by the others are sites with serious quality control and this one has clearly invested in whatever editorial process produces that consistency reliably.
Better signal to noise ratio than most places I check on this kind of topic, and a look at hunhax kept that going, every paragraph here carries something worth reading rather than padding out the page to hit some arbitrary length target that search engines reward but readers ignore as soon as they notice it.
скачать melbet скачать melbet
Will be back, that is the simplest way to say it, and a quick visit to createimpactroadmap reinforced the decision, this site has earned a spot in my regular rotation alongside a few other reliable places I check when I want something genuinely informative without all the usual modern web noise getting in the way.
Reading this gave me a small jolt of recognition for an experience I thought was just mine, and a stop at createclaritysteps produced more such jolts, content that universalises private experiences without flattening them is doing genuinely useful work and this site is providing that recognition function for me reliably across topics I read.
Well crafted post, the structure flows naturally from one point to the next without forcing transitions, and a stop at discoverfuturepaths kept the same flow going, you can tell when a writer has thought about how their content reads rather than just what it contains and this is one of those examples.
Worth marking this site as one to come back to deliberately rather than by accident, and a stop at explorefreshapproaches reinforced that intention, the difference between sites I find again by chance and sites I return to on purpose is meaningful and this one has clearly moved into the deliberate return category for me.
Thank you for the genuine effort here, it shows in every paragraph and not just the headline, and after my visit to exploreuntappedideas I was sure this site cares about getting things right rather than chasing clicks, which is the main reason I will come back later this week to read more.
Now considering whether the post would translate well into a different form, and a look at discoverforwardpaths suggested similar versatility, content that could move into other media without losing its substance is content that has been built around ideas rather than around format and this site reads as idea first throughout posts.
Thanks for the breakdown, it gave me a clearer picture of something I had been confused about for a while now, and a stop at explorefreshthinkingnow closed the remaining gaps in my understanding nicely, no need to hunt around twenty other articles to put the pieces together which is a real time saver.
Really appreciate that the writer did not overstate the importance of the topic to make the post feel weightier, and a quick visit to slacktally maintained the same modest framing, content that is honest about its own scope rather than inflating itself is the kind I trust and return to repeatedly over time.
Easily one of the better explanations I have read on the topic, and a stop at drubeat pushed it even higher in my mental ranking of useful resources, the kind of site that beats the average not by trying harder but by simply caring more about what it puts out daily which always shows.
Liked the careful selection of which details to include and which to skip, and a stop at ilenub reflected the same editorial judgement, knowing what to leave out is just as important as knowing what to include and this site has clearly figured out where that line sits for the topics it covers regularly.
Этот краткий обзор предлагает сжатую информацию из области медицины, включая ключевые факты и последние новости. Мы стремимся сделать информацию доступной и понятной для широкой аудитории, что позволит читателям оставаться в курсе актуальных событий в здравоохранении.
Что скрывают от вас? – tver clinica plus
This one is staying open in a tab for the rest of the day so I can come back and re read certain parts, and a look at buildbetterdecisions suggests I will be doing the same with a few more pages here too, this is going to be a deep dive over the coming hours.
If I am being honest this is the kind of site I quietly hope my own work will someday resemble, and a stop at buildactionablemomentum extended that aspirational feeling, finding work that models what I want to produce is part of why I read carefully and this site has been performing that modelling function for me lately consistently.
Liked the careful word choice throughout, every term seemed picked for a reason rather than thrown in casually, and a stop at hislex continued that precise style, this kind of attention to small details is what separates careful writing from the usual rushed content that dominates blog spaces today across pretty much every topic I follow.
If I were grading sites on this topic this one would receive high marks, and a stop at learnbydoing continued earning those high marks, the informal grading I do mentally for content sources is something I take seriously even though it is informal and this site has been receiving consistent high marks across multiple sessions today.
Felt the writer was being honest with the reader which is rare enough that I want to acknowledge it, and a look at fastbuycorner continued that honest feel, content built on actual knowledge rather than aggregated summaries is something I value highly and rarely come across in regular searches on the open internet these days.
Reading this in a quiet coffee shop matched the calm energy of the writing, and a stop at tailortarget extended that environmental match, content that has its own ambient quality which can match or clash with surroundings is content with a personality and this site has the kind of personality that suits calm reading.
Polished and informative without feeling overproduced, that is the sweet spot, and a look at startwithclearpurpose hit it again, you can tell when a site has been built with care versus thrown together for the sake of having something to put online and this is clearly the former approach taken by the team.
Now I want to find more sites like this but I suspect they are rare, and a look at explorelimitlessthinking extended that thought, the few sites that meet this quality bar are precious specifically because they are rare and finding others like them is one of the ongoing projects of careful internet curation across the years.
Эта публикация содержит ценные советы и рекомендации по избавлению от зависимости. Мы обсуждаем различные стратегии, которые могут помочь в процессе выздоровления и важность обращения за помощью. Читатели смогут использовать полученные знания для улучшения своего состояния.
Получить исчерпывающие сведения – капельница от запоя на дому цена
Reading more of the archives is now on my plan for the weekend, and a stop at growwithintentiondaily confirmed the archive worth the time, the rare archive worth a dedicated reading session rather than just casual sampling is the rare archive of serious work and this site has clearly produced enough of that work to warrant the deeper exploration.
Easy to recommend, the content speaks for itself without needing additional praise from me, and a stop at jilbrew only adds more reasons to send people this way, the kind of generous resource that benefits its readers without demanding anything in return is increasingly rare and worth recognising clearly today across the broader open internet.
Felt the post handled a sensitive angle of the topic with appropriate care, and a look at exploregrowthmindset extended that careful handling across related material, sites that can navigate delicate territory without causing damage are rare and require a level of judgement that comes from experience rather than from following any clear playbook.
Closed the tab with a small sense of finality rather than the usual rushed exit, and a stop at growwithsmartchoices produced the same considered closing, when reading ends with deliberate satisfaction rather than impatient skip you know the time was well spent and this site is producing those satisfying endings consistently across what I read.
Honestly enjoyed reading this more than I expected to when I first clicked through, and a stop at growfocusedresults kept that pleasant surprise going, sometimes you stumble onto a site that just clicks with how you like to read and this is one of those for me right now today which is great.
Decided to read this site for a while before forming a verdict, and the verdict after several pages is positive, and a stop at buildclarityforward continued that pattern, judging a site requires more than one post and giving sites a fair sample is something I try to do for promising candidates rather than rushing to dismiss.
Yesterday I was complaining about the state of online writing and today this site has temporarily fixed that complaint, and a look at findyourcorevision extended that mood reversal, the short term mood improvement that comes from finding good content is real and this site has produced that improvement for me at a useful moment.
Will be coming back to this for sure, too much good content to absorb in one sitting, and a stop at ileqix only added more pages I want to dig through, this site is going onto my regular rotation list because it consistently delivers something worth the visit lately rather than empty filler.
Glad I gave this a chance rather than scrolling past, and a stop at jazbrood confirmed I made the right call, sometimes the best content is hidden behind unassuming headlines that do not scream for attention and learning to slow down and check those out has paid off many times now across years of reading.
Felt slightly impressed without being able to point to one specific reason, and a look at createvalueconsistently continued that diffuse positive feeling, when content works at a level you cannot easily articulate the writer is doing something with craft rather than just delivering information and that is something I have learned to recognise.
Really liked the calm tone running through the post, no shouting and no urgency forced into the writing, and a look at authenticlivinggoods kept that quiet confidence going, the kind of voice that makes the reader feel respected rather than yelled at which is depressingly common across most modern blog content these days.
Worth flagging that the post handled an angle of the topic I had not seen elsewhere, and a look at brightfuturedeals extended that fresh treatment, content that finds underexplored corners of well covered subjects is genuinely valuable and this site has demonstrated that exploratory editorial approach across multiple pieces in my reading sessions today.
Now considering writing a longer note about the post somewhere, and a look at discoveropportunitypaths added more material for that note, content that prompts me to write rather than just consume is content with generative energy and this site is producing that generative effect for me at a higher rate than most sources.
Picked a friend mentally as the audience for this and decided to send the link, and a look at hupblob confirmed the send was the right choice, choosing whom to share content with is a small act of curation that I take more seriously than the public sharing most platforms encourage these days online.
Came here from another site and ended up exploring much further than I planned, and a look at learnandtransformfast only encouraged more exploration, the kind of place where one click leads to another not through manipulative design but through genuinely interesting content is rare and worth highlighting when found like this somewhere on the open internet.
The tone stayed consistent across the whole post which is harder than it looks for longer pieces, and a look at discovergrowthpaths continued the same voice, this kind of editorial consistency is a sign of either a single careful writer or a tightly run team and either is impressive today across the broader media environment.
презентация ии http://www.litteraesvfu.ru
выведение из запоя стационар санкт петербург выведение из запоя стационар санкт петербург
Now thinking the topic is more interesting than I had given it credit for, and a stop at discoverwhatworksbest continued that elevated interest, content that revives my curiosity about subjects I had set aside is doing genuine work in the structure of my interests and this site is providing that revivifying effect today actually.
Started thinking about my own writing differently after reading, and a look at findyourwinningpath continued that reflective effect, content that influences how I work rather than just informing what I know is content with the highest kind of impact and this site has triggered some of that reflective influence today on me.
Adding this to my list of go to references for the topic, and a stop at createprogresssystems confirmed the rest of the site deserves the same, definitely the kind of resource that earns its place rather than getting forgotten the moment the next interesting article shows up in my feed somewhere else on the web.
Honestly the simplicity of the explanation made the topic click for me in a way other writeups had not, and a look at createfocusedmomentum continued that clarity into related areas, when a writer gets the level of explanation right the reader does the heavy lifting themselves and the post just enables it.
мелбет приложение мелбет приложение
Beyond the immediate post itself the editorial sensibility behind the site is what struck me, and a stop at growintentionally continued displaying that sensibility, content that reveals editorial choices through accumulated reading is content with structural quality and this site has clearly developed an underlying approach worth identifying through multiple sessions of reading.
сувениры и подарки с логотипом http://www.suvenirnaya-produkcziya-s-logotipom-8.ru
Found the post genuinely useful for something I was working on this week, and a look at findgrowthsolutions added more material I will reference, content that connects to my actual life and work rather than just being interesting in the abstract is the kind I will pay attention to and return to repeatedly.
After several visits I am now confident this site is one to follow seriously, and a stop at hobcar reinforced that confidence, the gradual building of trust through repeated quality exposures is the only sustainable way to develop reader loyalty and this site is building that loyalty in me through patient consistent work consistently.
Came in skeptical of the angle and left mostly persuaded, and a stop at discoverwhatworks pushed me a bit further in the same direction, content that can move a critical reader by argument rather than rhetoric is rare and worth pointing out because it indicates real substance underneath the surface presentation here.
Now setting this aside as a model of how to write thoughtfully on the topic, and a stop at jalaxis extended that model status, content that becomes a reference for how a kind of writing should be done is content with influence beyond its own readership and this site is reaching that level for me clearly today.
мелбет скачать приложение на андроид мелбет скачать приложение на андроид
Generally I bookmark sparingly to avoid building up a bookmark graveyard but this one earned a permanent slot, and a stop at jinblob extended that permanence designation, the few sites I keep permanent bookmarks for are sites I expect to use repeatedly and this one has clearly cleared that expectation bar today.
Reading this in a quiet hour and finding it suited the quiet, and a stop at bomboard extended the quiet reading mood, content that matches its own optimal reading conditions rather than fighting them is content that has been thoughtfully calibrated and this site reads as having a particular reading mood in mind throughout.
Genuine pleasure to read, and that is not something I say often after a casual click through, and a quick visit to learnandadjustquickly kept the same feeling going across the rest of the site, finding writing that actually feels good to spend time with rather than just functional is increasingly rare on the open web.
Glad to find a site whose links lead somewhere worth going rather than back to itself for SEO juice, and a stop at ilobyte kept that generous outbound feel, citing other peoples work with real respect rather than just for ranking signals is a sign of an honest operation worth supporting going forward.
Bookmark earned and folder updated to track this site separately, and a look at jaspermeadowtradegallery confirmed the folder upgrade was the right call, organising my reading list so that good sites do not get lost in a sea of casual bookmarks is something I do more carefully now and this site warranted its own spot.
Easy to recommend without reservations, the site delivers on every promise it implicitly makes, and a look at unlocknewideas kept that same standard going, the kind of consistency that earns trust over time rather than chasing it through aggressive marketing is what I see here and it is appreciated greatly by this particular reader today.
Skipped the comments to avoid spoilers and came back later to find them genuinely worth reading, and a stop at solarorchardmarketparlor extended that surprised respect, when the discussion below a post matches the quality of the post itself you have found something special and this site appears to attract that kind of audience.
My usual pattern is to skim and bounce but this site has reset that pattern temporarily, and a stop at exploreuntappedopportunities maintained the slower reading mode, content that changes how I read is content with structural influence and this site has clearly nudged my reading behaviour toward something better at least for the duration of these visits.
Speaking carefully because I do not want to overstate things this site is genuinely above average across multiple measurements, and a stop at findnewgrowthpaths continued the above average performance, the calibration of judgement against potential overstatement is something I take seriously and this site clears the higher bar even after that calibration applies.
Just one of those reads that left me feeling slightly more capable rather than overwhelmed, and a look at tidalslick kept that empowering feel going, the difference between content that builds the reader up and content that intimidates them is huge and this site clearly knows which side of that line to stand.
Speaking as someone who used to recommend blogs frequently and got out of the habit this site is rekindling that impulse, and a look at intentionaldesignstore extended the rekindling, the recovery of an old habit triggered by encountering work that justifies it is itself a small kind of pleasure and this site is providing that recovery experience.
Useful read, especially because the writer did not assume too much background from the reader, and a quick look at learnandaccelerategrowth continued in the same way, a thoughtful site that meets people where they are which is something the modern web could use a lot more of for both casual and serious readers.
A piece that built up gradually rather than front loading its main points, and a look at exploreinnovativepaths maintained the same gradual structure, content that trusts the reader to reach conclusions through accumulating reasoning is more persuasive than content that announces conclusions and then defends them and this site uses the persuasive approach.
Even just sampling a few posts the consistency is what stands out, and a look at discoverdailyinspiration confirmed the broader pattern, sites where every piece I sample lives up to the standard set by the others are sites with serious quality control and this one has clearly invested in whatever editorial process produces that consistency reliably.
нарколог на дом круглосуточно нарколог на дом круглосуточно
Even across multiple posts the writers voice has remained consistent in a way I appreciate, and a stop at growresultsdrivenpath continued that voice, sites that maintain editorial consistency across many pieces have something most sites lack and this one has clearly worked out how to keep its voice steady across what reads as a growing archive.
спортивный комбинезон для девочки detskie-kombinezony-kupit.ru
Skimmed first and then went back to read carefully, and the careful read paid off in places I had missed, and a stop at findyourgrowthpath got the same treatment, the rare site whose content rewards a second pass is content I want more of in my regular rotation rather than disposable single read articles.
Came back to this an hour later to reread a specific section, and a quick visit to buildstrongmomentum also drew a second look, content that pulls you back rather than letting you move on permanently is the kind I want to fill my browser bookmarks with in 2026 and beyond as the open internet evolves.
Found this through a friend who recommended it and now I see why, and a look at learnandgrowfaster only strengthened that recommendation in my own mind, word of mouth still works for content that actually delivers and this site is clearly earning recommendations the old fashioned way through quality rather than marketing.
Reading this prompted me to send the link to two different people for two different reasons, and a stop at createimpactstructure provided ammunition for a third share, content that suits multiple audiences without being generic enough to be useless to any of them is genuinely valuable and this site has that multi audience quality clearly.
Reading this slowly and letting each paragraph land before moving on, and a stop at discovernewmomentum earned the same patient approach, content that rewards slow reading rather than speed is content with real density and the writers here are clearly producing work that benefits from the careful eye rather than the rushed scan.
melbet melbet
Now planning to write about the topic myself eventually using this post as a reference, and a look at seoscope would also serve in that future piece, content that becomes raw material for my own writing rather than just informing my reading is content with multiplicative value and this site is generating that multiplicative effect.
Appreciate that you did not pad this with fluff to hit a word count, the post says what it needs to say and stops, and a look at ilonox did the same, brevity here feels intentional not lazy which is a distinction many writers miss completely sometimes when they are working under deadlines.
Speaking as someone who used to recommend blogs frequently and got out of the habit this site is rekindling that impulse, and a look at jazfix extended the rekindling, the recovery of an old habit triggered by encountering work that justifies it is itself a small kind of pleasure and this site is providing that recovery experience.
A satisfying piece in the way that good meals are satisfying rather than just filling, and a look at createprogressnow extended that satisfaction, the metaphor between content and meals is one I find useful and this site reads as a satisfying meal rather than the empty calories that most content provides for casual readers.
скільки коштує ремонт квартири під ключ косметичний ремонт квартири
Closed the laptop and walked away thinking about the post for a good twenty minutes, and a stop at growyourpotential produced similar lingering thoughts, content that survives the closing of the browser tab is content that has actually entered the mind rather than just decorating the screen for the duration of the reading.
изготовление сувенирной продукции с логотипом изготовление сувенирной продукции с логотипом
Came away with a small but real shift in perspective on the topic, and a stop at findclearopportunities pushed that shift a bit further, the kind of subtle reframing that good writing does to a reader without making a big deal of it is something I always appreciate when it happens which is sadly not that often.
A piece that handled multiple complications without becoming confused, and a look at bomkix continued that organisational clarity, holding multiple threads in a single piece without losing any of them is a sign of skilled writing and this site has clearly developed the editorial discipline to manage complexity without sacrificing readability throughout.
Came away feeling slightly smarter than I was when I started, that is a real win, and a stop at createactionstepsnow added a bit more to that, the rare site that actually transfers some of its knowledge to the reader in a way that sticks rather than just creating an illusion of learning briefly.
Now feeling mildly impressed in a way I do not quite remember feeling about a blog in a while, and a stop at quickcartcorner extended that mild impression, content that produces specific positive emotional responses rather than just neutral information transfer is content with extra dimensions and this site has those extra dimensions clearly.
Started this morning and finished at lunch with a small sense of having spent the time well, and a look at ravenharbortradehouse extended that satisfaction into the afternoon, content that fits naturally into the rhythm of a working day rather than demanding a dedicated reading block is increasingly the kind I prefer.
Now noticing the careful balance the post struck between confidence and humility, and a stop at hupbolt maintained the same balance, finding the line between asserting and admitting is hard and this site has clearly developed the calibration to walk that line consistently which produces a more persuasive reading experience for me.
Decided to write a short note to the author if there is contact info anywhere, and a stop at startnextleveljourney extended that intention, the urge to thank the writer directly is a strong signal of content quality and this site has triggered that urge in me today which is a fairly rare event for my reading.
Reading this gave me confidence to make a decision I had been putting off, and a stop at learnandbuildmomentum reinforced that confidence, content that translates into action in my own life rather than just informing it is content with the highest practical value and this site is generating that action level utility for me lately.
Started thinking about my own writing differently after reading, and a look at discoverhiddeninsights continued that reflective effect, content that influences how I work rather than just informing what I know is content with the highest kind of impact and this site has triggered some of that reflective influence today on me.
Genuine reaction is that this site clicked with how I like to read, and a look at jinvex kept that comfortable fit going, sometimes you find a place online whose editorial decisions just align with your preferences and when that happens it is worth recognising and supporting through repeat engagement consistently going forward.
Reading this as part of my evening winding down routine fit perfectly, and a stop at buildintentionalgrowth extended the wind down nicely, content that calms rather than agitates is what I want at the end of the day and this site provides that calming reading experience reliably which is increasingly rare across the modern web.
Skipped lunch to finish reading, which says something, and a stop at holbook kept me at my desk longer than planned, when content beats the lunch impulse the writer has done something genuinely impressive in an attention environment full of immediately satisfying alternatives competing for the same finite block of reader time.
Clean writing, easy to read, and never tries too hard to impress, that combination is harder to find than people think, and after my time on discoverhiddenvaluehub I am sure this site treats its readers well, no flashy tricks just useful content done right which is honestly all I want online.
Now organising my browser bookmarks to give this site easier access, and a look at learnandinnovate earned the same organisational priority, the small acts of digital housekeeping I do for sites I expect to use often are themselves a measure of trust and this site has triggered the trust based housekeeping behaviour from me clearly.
Now feeling the small relief of finding writing that does not condescend, and a stop at startwithclarity extended that respect for readers, content that treats its audience as capable adults rather than as people to be managed produces a different reading experience and this site has clearly chosen the respectful approach across all pieces.
мелбет мелбет
Most blog writing on this subject reaches for the same handful of arguments and this post avoided them, and a look at createimpactframework continued the original treatment, content that finds its own path through territory other writers have flattened is content with real authorial energy and this site has plenty of that distinctive energy.
Liked the careful word choice throughout, every term seemed picked for a reason rather than thrown in casually, and a stop at discoverinnovativeideas continued that precise style, this kind of attention to small details is what separates careful writing from the usual rushed content that dominates blog spaces today across pretty much every topic I follow.
Now considering whether the post would translate well into a different form, and a look at learnandprogressdaily suggested similar versatility, content that could move into other media without losing its substance is content that has been built around ideas rather than around format and this site reads as idea first throughout posts.
silk road darknet https://darkwebmarkets2024.com/ darknet markets https://darknetmarketseasy.com/
Started reading and ended an hour later without realising the time had passed, and a look at growwithfocusedsteps produced the same time dilation effect, when content makes time feel different the writer has achieved something well beyond the average and this site is producing that experience for me reliably across multiple readings.
Picked this post to share in a Slack channel where I knew it would be appreciated, and a look at imobush suggested I will share more from here later, content worth sharing into a professional context is content that has earned a higher kind of trust than mere personal interest and this site has it.
Thanks for the clean writing, no broken sentences and no awkward translations like some other sites have, and a quick stop at growwithsteadyfocus kept that polish going nicely, it really does make a difference when a reader can move through a page without tripping on every line or going back to reread.
Reading this prompted a brief but useful conversation with a colleague who happened to walk by, and a stop at buildfocusedmomentum extended that conversational seed, content that becomes a starting point for in person discussion rather than ending in solitary reading is content with social generative energy and this site has plenty of it apparently.
Now appreciating that the post did not try to imitate any other style I might recognise, and a stop at everydayvaluecorner continued that distinct voice, content with its own register rather than borrowed from elsewhere is content with real authorial presence and this site has clearly developed that presence through what feels like patient editorial work.
Found this through a search that was generic enough I did not expect quality results, and a look at linencovevendorparlor continued the surprisingly good experience, search engines occasionally still surface excellent independent content if you scroll past the obvious paid and high authority results which is reassuring to remember sometimes.
Reading this triggered a small change in how I think about the topic going forward, and a stop at startfreshtoday reinforced that subtle shift, the rare content that actually moves my thinking rather than just confirming or filling it is the kind I most value and this site is providing that kind of impact today.
как узнать местоположение человека по номеру телефона kak-najti-cheloveka-po-nomeru-telefona-2.ru
A modest masterpiece in its own quiet way, and a look at discovernewpotential confirmed the same quiet quality across the rest of the site, calling something a masterpiece is usually overstating but for content this carefully crafted the word feels appropriate even if the writers themselves would probably resist the label honestly.
Reading this in a quiet coffee shop matched the calm energy of the writing, and a stop at buildsmartmomentum extended that environmental match, content that has its own ambient quality which can match or clash with surroundings is content with a personality and this site has the kind of personality that suits calm reading.
Bookmark earned and the bookmark feels like a permanent addition rather than a maybe, and a look at createbetterresults confirmed that permanent status, the difference between durable bookmarks and ephemeral ones is something I have learned to feel quickly and this site triggered the durable feeling almost immediately during my first read here.
Honestly thank you to whoever wrote this because it scratched an itch I had not quite been able to articulate, and a stop at discoverwinningpaths kept that satisfying feeling going, the kind of writing that meets unspoken needs is special and this site clearly has writers who understand their readers more than most do today.
Came in for one specific question and got answers to three I had not even thought to ask, and a look at buildstrategicdirection extended that bonus value pattern, the kind of resource that anticipates reader needs rather than just answering the literal question asked is the gold standard and this site reaches it.
If I am being honest this is the kind of site I quietly hope my own work will someday resemble, and a stop at scrolltower extended that aspirational feeling, finding work that models what I want to produce is part of why I read carefully and this site has been performing that modelling function for me lately consistently.
мелбет скачать на андроид мелбет скачать на андроид
Found this through a search that was generic enough I did not expect quality results, and a look at createclaritysteps continued the surprisingly good experience, search engines occasionally still surface excellent independent content if you scroll past the obvious paid and high authority results which is reassuring to remember sometimes.
Approaching this site through a casual link click and being surprised by what I found, and a look at startthinkingstrategically extended the surprise, the rare experience of stumbling into excellent independent content rather than predictable mediocrity is one of the actual remaining pleasures of casual web browsing and this site provided it cleanly.
Reading this prompted me to send the link to two different people for two different reasons, and a stop at explorecreativeoptions provided ammunition for a third share, content that suits multiple audiences without being generic enough to be useless to any of them is genuinely valuable and this site has that multi audience quality clearly.
Worth bookmarking and sharing with anyone interested in the topic, that is my honest take, and a stop at discovermeaningfulgrowth reinforces that, the kind of generous resource that makes the open web feel worth defending against the constant pressure to retreat into walled gardens and curated feeds today everywhere I look across all my devices.
Reading this triggered a small but real correction in something I had assumed, and a stop at jebbeo extended that corrective effect, content that updates my beliefs through evidence rather than rhetoric is content with intellectual integrity and this site has earned that label consistently across the pieces I have read so far today.
клиника вывода из запоя со стационаром клиника вывода из запоя со стационаром
Статья о личном опыте в ММО
хентай секс игрушки
Ended up here on a wandering afternoon and was glad I stayed for the read, and a stop at learnanddevelopquickly extended the wandering into a proper exploration of the site, the kind of place that rewards aimless clicking with something genuinely interesting rather than the shallow content that mostly populates the modern open web.
Reading this in a moment of low energy still kept my attention, and a stop at buildsmartprogress continued that engagement under suboptimal conditions, content that survives the reader being tired is content with extra reserves of pull and this site has the kind of writing that holds up even when I am not at my reading best.
Now noticing that the post avoided the temptation to be funny in places where humour would have undermined the substance, and a stop at inaarch maintained the same restraint, knowing when to be serious is a rare editorial virtue and this site has clearly developed it through what I assume is careful editorial practice over years.
A piece that suggested careful editing without showing the marks of the editing, and a look at holcap continued that invisible polish, the best editing disappears into the prose and this site reads as having been edited with skill that does not announce itself which is the highest compliment I can offer any blog content.
Started imagining how I would explain the topic to someone else after reading, and a look at oliveorchard gave me more material for that imagined explanation, content that improves my own ability to discuss a topic is content that has actually transferred knowledge rather than just decorating my screen for a few minutes.
Took my time with this rather than rushing because the writing rewards attention, and after learnandexpandfast I had even more to absorb, the kind of content that pays back the patient reader rather than punishing them with empty filler is something I look for and rarely find in regular searches lately.
A piece that left me thinking I had been undercaring about the topic, and a look at createimpacttogether reinforced that mild concern, content that raises the appropriate weight of a subject without being preachy about it is doing important work and this site is providing that gentle elevation of attention for me consistently.
Better than most of the writing I have come across on this topic recently, simpler and more direct, and a look at startwithclearvision continued in that same way, a real outlier in a crowded space full of repetitive content that says little while taking up a lot of reader time today which is unfortunate.
Coming to this with low expectations and being pleasantly surprised by the substance, and a stop at createfocusedaction continued exceeding expectations, the recalibration of expectations upward across multiple positive readings is one of the actual rewards of careful browsing and this site is providing that recalibration at a steady rate apparently.
Really liked the calm tone running through the post, no shouting and no urgency forced into the writing, and a look at hupido kept that quiet confidence going, the kind of voice that makes the reader feel respected rather than yelled at which is depressingly common across most modern blog content these days.
A piece that handled the topic with appropriate weight without becoming portentous, and a look at growwithconfidencenow continued that calibrated seriousness, content that takes itself seriously without becoming pompous is something this site has clearly figured out and the balance shows up in every piece I have read across multiple sessions now.
Excellent post, balanced and well organised without showing off, and a stop at buildsmartfoundations continued in that same vein, this site has clearly figured out the formula for content that works for readers rather than for search engine ranking signals which is harder than it sounds today and worth real recognition from anyone.
Honestly enjoyed reading this more than I expected to when I first clicked through, and a stop at buildactionableprogress kept that pleasant surprise going, sometimes you stumble onto a site that just clicks with how you like to read and this is one of those for me right now today which is great.
If you asked me to point to a recent positive sign for the open web this site would be near the top, and a stop at seosprout reinforced that designation, the few sites that serve as evidence the web can still produce quality independent content are precious and this one has clearly become one for me.
Polished and informative without feeling overproduced, that is the sweet spot, and a look at buildyournextmove hit it again, you can tell when a site has been built with care versus thrown together for the sake of having something to put online and this is clearly the former approach taken by the team.
Closed my email tab so I could read this without interruption, and a stop at createprogressmapping earned the same protected attention, when content is good enough to defend against the usual digital distractions you know it deserves better than the half attention most online reading gets in a typical busy day.
Came away with a slightly better mental model of the topic than I started with, and a stop at buildstrategicdirection sharpened that further, content that improves the reader thinking apparatus rather than just dumping facts into it is the rare kind I genuinely value and seek out when I have time to read carefully.
melbet melbet
Solid information that lines up with what I have been hearing from other reliable sources, and after my visit to findnewopportunityflows I was even more certain of that, this site checks out which is something I value highly when so many places online play loose with the facts to chase a quick click.
Bookmark added in three places to make sure I do not lose the link, and a look at learnandoptimizeprocesses got the same redundant treatment, sites I am afraid to lose are the rare keepers and this is clearly one of them based on what I have read so far across this and a couple of related posts.
Quality writing that respects the reader’s intelligence without overloading them, and a quick look at buildactionableprogress reflected that approach, a balanced thoughtful site that earns trust by being consistent rather than by shouting about how trustworthy it is which is the usual approach online sadly across most content categories.
Really clear writing, the kind that makes you want to share the link with someone who has been asking about the topic, and a quick browse through createprogressframework only made me more sure of that, the information here stays useful long after the first read is done which says a lot.
melbet скачать melbet скачать
Closed the tab with a small sense of finality rather than the usual rushed exit, and a stop at createimpactquickly produced the same considered closing, when reading ends with deliberate satisfaction rather than impatient skip you know the time was well spent and this site is producing those satisfying endings consistently across what I read.
Reading this prompted me to subscribe to my first newsletter in months, and a stop at startmovingforward confirmed the subscribe was the right call, content that earns a newsletter signup is content that has cleared a higher trust bar than a casual visit and this site has clearly earned that level of commitment from me.
Reading this in my last reading slot of the day was a good way to end, and a stop at siloteapot provided a satisfying close to the reading session, content that ends a day well rather than agitating it before sleep is the kind I value increasingly and this site fits that role for me consistently now.
Over the course of reading several posts here a pattern of quality has emerged, and a stop at findgrowthdirections confirmed the pattern, the difference between sites that hit quality occasionally and sites that hit it consistently is huge and this site has clearly demonstrated the consistent kind through what I have read this morning.
Reading this prompted me to subscribe to my first newsletter in months, and a stop at bakeboxshop confirmed the subscribe was the right call, content that earns a newsletter signup is content that has cleared a higher trust bar than a casual visit and this site has clearly earned that level of commitment from me.
Closed my email tab so I could read this without interruption, and a stop at discoveropportunityzones earned the same protected attention, when content is good enough to defend against the usual digital distractions you know it deserves better than the half attention most online reading gets in a typical busy day.
Now understanding why someone recommended this site to me a while back, and a stop at createyourstorytoday explained the recommendation, sometimes recommendations make sense only after experience and this site has finally clicked into place as the kind of resource I now understand was being recommended for sound editorial reasons by my friend.
Reading this in three sittings because the day was fragmented, and the piece survived the fragmentation, and a stop at findbetterapproaches held up under similar reading conditions, content engineered for continuous attention is fragile in modern conditions and this site reads as durable across the realistic ways people consume content today.
In the middle of an otherwise scattered day this post landed as a moment of focus, and a stop at findgrowthopportunitiesnow extended that focused feeling across more pages, content that anchors a fragmented day rather than contributing to the fragmentation is content with real centring effect and this site is providing that anchoring function for me.
Now thinking about this site as a small example of what good independent writing looks like, and a stop at startnextphase continued that exemplary status, the few sites that serve as good examples are sites worth holding up in conversations about quality and this one has earned that exemplary placement through patient consistent effort over time.
ии презентация http://www.litteraesvfu.ru
Good post, the kind that respects the reader by getting to the point quickly without skipping the details that matter, and a short look at learnandrefine confirmed that approach is consistent across the site which is rare to find online these days, definitely a place I will return to soon.
Came here from a search and stayed for the side links because they were that interesting, and a stop at startwithpurposefulsteps took me even further into the site, the kind of organic exploration that good content invites is something most sites kill through aggressive interlinking and pushy navigation choices rather than relying on quality.
Thanks for keeping things clear and to the point, that is honestly hard to find online these days, and after reading through surgesorrel the message stayed consistent which makes me trust the information being shared more than I usually do on similar pages that cover this same kind of topic.
Took a screenshot of one section to come back to later, and a stop at createvisionforward prompted another saved tab, the urge to capture and revisit specific pieces of content is something I rarely feel but when I do it tells me the work is worth more than the average passing read for sure.
Even just sampling a few posts the consistency is what stands out, and a look at buildactionableprogress confirmed the broader pattern, sites where every piece I sample lives up to the standard set by the others are sites with serious quality control and this one has clearly invested in whatever editorial process produces that consistency reliably.
Took my time with this rather than rushing because the writing rewards attention, and after learnandadvancefaster I had even more to absorb, the kind of content that pays back the patient reader rather than punishing them with empty filler is something I look for and rarely find in regular searches lately.
Glad the writer kept this short rather than padding it out, the points stand on their own without needing extra context, and a look at inobrat kept the same approach going, brevity is a sign of confidence in the substance and the team here clearly trusts their content to land without filler.
Reading this gave me a small refresher on something I had partially forgotten, and a stop at explorefreshgrowth extended the refresher, content that strengthens existing knowledge rather than just adding new is content with a particular kind of consolidating value and this site is providing that consolidating function across multiple visits.
The overall feel of the post was professional without being stuffy, and a look at createprogressmapping kept that approachable expertise going, finding the right register for technical content is hard but this site has clearly figured out how to sound knowledgeable without slipping into that distant lecturing tone that loses readers in droves every time.
Over the course of reading several posts here a pattern of quality has emerged, and a stop at buildyournextmove confirmed the pattern, the difference between sites that hit quality occasionally and sites that hit it consistently is huge and this site has clearly demonstrated the consistent kind through what I have read this morning.
Speaking as someone who used to recommend blogs frequently and got out of the habit this site is rekindling that impulse, and a look at discovercreativegrowth extended the rekindling, the recovery of an old habit triggered by encountering work that justifies it is itself a small kind of pleasure and this site is providing that recovery experience.
Will be back, that is the simplest way to say it, and a quick visit to findyourgrowthlane reinforced the decision, this site has earned a spot in my regular rotation alongside a few other reliable places I check when I want something genuinely informative without all the usual modern web noise getting in the way.
скачать мелбет на андроид скачать мелбет на андроид
This filled in a gap in my understanding that I had not even noticed was there, and a stop at buildforwardthinking did the same, the kind of post that gives you more than you expected when you first clicked through from somewhere else, a real find for anyone curious about the area covered here.
Really nice to see things explained without overcomplicating the topic, the words flow naturally and stay easy to follow, and a short visit to holdax only added to that experience because the same simple approach is used across the rest of the page too without any change in tone.
Reading this in the time it took to drink half a cup of coffee, and a stop at seolift fit naturally into the second half, content that respects the rhythms of a typical morning is content with practical fit and this site has the kind of length and pacing that works for the way I actually read.
A small editorial detail caught my attention, the way headings related to body text, and a look at startwithpurpose maintained that careful relationship, structural details like that show up to readers who notice them and the writers here have clearly thought about every level of the piece rather than just the words.
Probably going to mention this site in a write up I am working on later this month, and a stop at jebbird provided more material for that potential mention, content worth referencing in my own published work rather than just personal reading is content with the highest endorsement level and this site has earned that endorsement.
Now considering the post as evidence that careful blog writing is still possible, and a look at createimpactsteps extended that evidence, the broader question of whether the modern web can sustain quality writing has obvious empirical answers in sites like this one and seeing them is reassuring even when they remain a minority overall today.
если у человека 48 хромосом что это если у человека 48 хромосом что это
Now placing this in the small category of sites whose updates I would actually want to know about, and a stop at bulkingbayou confirmed that placement, the difference between sites I want to follow and sites I just consume from is real and this one has crossed into the active follow category from the casual consumption side.
Honestly enjoyed every minute spent here, that is not something I say lightly, and a look at buildsustainableprogress confirmed I will be back, the bar for spending time online is high for me these days but this site clears it without effort which is high praise indeed from this reader who is usually rather demanding.
Adding this to my list of go to references for the topic, and a stop at exploreideaswithpurpose confirmed the rest of the site deserves the same, definitely the kind of resource that earns its place rather than getting forgotten the moment the next interesting article shows up in my feed somewhere else on the web.
A piece that did not waste any of its substance on sales or promotion, and a look at learnandscale continued that pure content focus, sites that resist the urge to monetise every paragraph are increasingly rare and this one has clearly made the editorial choice to keep the writing clean from commercial intrusion which I value highly.
Now feeling something close to gratitude for the fact this site exists, and a look at buildsustainablemomentum extended that gratitude, the rare site that produces this kind of response is the rare site worth defending in conversations about whether the modern internet is still capable of producing genuinely valuable independent content for serious adults.
узнать местоположение по номеру телефона узнать местоположение по номеру телефона
Better than most of the writing I have come across on this topic recently, simpler and more direct, and a look at buildsmartdirection continued in that same way, a real outlier in a crowded space full of repetitive content that says little while taking up a lot of reader time today which is unfortunate.
Came away with some new perspectives I had not considered before, and after hurbug those ideas felt more complete, the kind of content that stays with you a little while after reading rather than slipping out the moment you switch tabs and move on with your day to whatever comes next.
Just want to say thank you for putting this together, posts like these make searching online actually worth it sometimes, and a quick look at explorefreshgrowthideas kept that going, useful and easy to read without any of the tricks that ruin most blog comment sections lately on the wider open web.
Skipped the related links section thinking I had read enough and then came back to it later when curiosity got the better of me, and a stop at startthinkingclearly confirmed I should have just read it first, every section of this site appears to deserve careful attention rather than skipping past lazily.
My friends would appreciate a few of these posts and I will be sending links accordingly, and a look at explorefreshthinkingnow added more pages to my share queue, content that earns shares to specific people in specific contexts is content with social utility and this site is generating those targeted shares from me consistently lately.
Came in expecting another generic take and got something with actual character instead, and a look at startnextlevelgrowth carried that personality forward, finding a distinct voice on a saturated topic is impressive and worth pointing out when it happens because most sites end up sounding identical to their nearest competitors quickly.
Genuine reaction is that this site clicked with how I like to read, and a look at learnandoptimizepath kept that comfortable fit going, sometimes you find a place online whose editorial decisions just align with your preferences and when that happens it is worth recognising and supporting through repeat engagement consistently going forward.
Reading more of the archives is now on my plan for the weekend, and a stop at findgrowthopportunitiespath confirmed the archive worth the time, the rare archive worth a dedicated reading session rather than just casual sampling is the rare archive of serious work and this site has clearly produced enough of that work to warrant the deeper exploration.
Now I want to find more sites like this but I suspect they are rare, and a look at inobrisk extended that thought, the few sites that meet this quality bar are precious specifically because they are rare and finding others like them is one of the ongoing projects of careful internet curation across the years.
Liked the natural conversational tone throughout, never stiff and never overly casual either, and a stop at discovernewmomentum kept that comfortable middle ground going, finding a tone that respects the reader without becoming distant or overly familiar is harder than it sounds and this site nails that balance consistently across many different pieces.
If I am being honest this is the kind of site I quietly hope my own work will someday resemble, and a stop at startwithpurposefulsteps extended that aspirational feeling, finding work that models what I want to produce is part of why I read carefully and this site has been performing that modelling function for me lately consistently.
Reading this confirmed a small detail I had been uncertain about, and a stop at discoverpowerfulpaths provided the source for further checking, content that supports verification through citations or links rather than just asserting facts is more trustworthy and this site has clearly built its credibility through that kind of verifiable approach consistently.
Reading this gave me material for a conversation I needed to have anyway, and a stop at createimpactjourney added even more talking points, content that connects to upcoming social or professional needs rather than just being interesting in the abstract is the kind that earns priority placement in my attention these days routinely.
single bet calculator free single bet calculator free .
This filled in a gap in my understanding that I had not even noticed was there, and a stop at growyourcapabilities did the same, the kind of post that gives you more than you expected when you first clicked through from somewhere else, a real find for anyone curious about the area covered here.
Genuinely useful read, the points are practical and easy to apply right away, and a quick look at parcelparadise confirmed that this site is consistent in that approach, looking forward to digging through the rest of it when I get the chance to sit down properly later in the week or this weekend.
Worth recognising the absence of the usual blog tropes here, and a look at startnextchapter continued that fresh quality, sites that avoid the standard moves of the medium read as more original even when the content is on familiar topics and this one has clearly chosen its own path through the conventional terrain skilfully.
single each way bet calculator https://www.singlebet-calculator.com .
Such ease of use appeals to both novices and veteran gamblers.
single stakes about https://single-betcalculator.com/
Worth pointing out that the writer made the topic feel more interesting than I had been expecting, and a look at syrupserif continued that elevation effect, content that improves the apparent quality of its subject through skilled treatment is doing something real and this site has clearly developed that kind of editorial alchemy throughout.
Overall, a single bet calculator is an indispensable companion for anyone serious about sports betting.
how many trebles in 10 selections https://singlebetcalculatorfree.uk/bet-calculator/treble/
Felt no urge to argue with the conclusions even though I started the post slightly skeptical, and a look at startyournextphase maintained that pattern, writing that earns agreement through clarity of argument rather than rhetorical pressure is the kind I find most persuasive and the kind I want to read more of these days.
Inputting your wager and odds provides immediate insight into your potential profits.
each way calculator accumulator https://single-bet-calculator.uk/bet-calculator/accumulator/
acca odds calculator https://single-bet-calculator-free.uk/bet-calculator/accumulator/
free bet calculator https://singlebetcalculator.uk/
Reading this in pieces over a coffee break and finding it consistently rewarding, and a stop at learnandprogresssteadily extended that into related material I will return to later, the kind of site that fits naturally into small reading windows without requiring a long uninterrupted block is genuinely useful for how I actually browse.
To sum up, single bet calculators are both practical and easy to use.
ew single calculator https://single-bet-calculator-free.com/
This convenience makes it an indispensable resource for both beginners and experienced bettors.
free treble bet calculator https://single-betcalculator.uk/bet-calculator/treble/
Considered alongside other sources I have been reading this one consistently rises to the top, and a stop at seomagnet maintained that top ranking, the informal ongoing comparison between sources is something I do whenever reading on a topic and this site keeps coming out near the top of those comparisons over many sessions.
Now thinking about how to apply some of this to a project I have been planning, and a look at createpositiveoutcomes added more material for the planning, content that connects to my actual creative work rather than just being interesting in the abstract is the kind that earns priority placement in my reading rotation consistently going forward.
Reading this prompted me to subscribe to my first newsletter in months, and a stop at buildlongtermstrength confirmed the subscribe was the right call, content that earns a newsletter signup is content that has cleared a higher trust bar than a casual visit and this site has clearly earned that level of commitment from me.
Came across this through a roundabout path and now it is on my regular rotation, and a stop at holpod sealed that decision, the open web still produces serendipitous discoveries when you let the citations and references guide you rather than relying purely on algorithmic feeds for new content recommendations always.
Yesterday I was complaining about the state of online writing and today this site has temporarily fixed that complaint, and a look at startpurposefuljourney extended that mood reversal, the short term mood improvement that comes from finding good content is real and this site has produced that improvement for me at a useful moment.
Came in for one specific question and got answers to three I had not even thought to ask, and a look at buildclarityforward extended that bonus value pattern, the kind of resource that anticipates reader needs rather than just answering the literal question asked is the gold standard and this site reaches it.
Just dropping by to say thanks for the effort, it does not go unnoticed when a writer cares this much about the reader, and after I went through startwithclearfocus I was certain this is one of the better corners of the internet for this particular kind of content which is genuinely refreshing.
Now realising the topic deserved better treatment than it has been getting elsewhere, and a look at discovercreativepaths extended that broader recognition, content that exposes the gap between actual quality and average quality elsewhere is doing the quiet work of raising standards and this site is contributing to that elevation in its own corner.
мелбет скачать казино мелбет скачать казино
However selective I am about new bookmarks this one made it past my filter, and a look at explorefreshthinkingpaths confirmed the bookmark was worth the slot, the precious slots in my permanent bookmark folder are difficult to earn and this site earned one without making me think twice about whether the slot was justified by the quality.
Glad to find something on this topic that does not start with three paragraphs of throat clearing before getting to the point, and a stop at findyournextstage also dives right in, respect for the readers time shows up in small editorial choices like this and they add up to a real difference quickly.
Comfortable in tone and substantive in content, that is a hard combination to land, and a look at buildgrowthmomentum kept that pairing alive across more material, this is what good editorial direction looks like in practice and the team here clearly has someone keeping a steady hand on the wheel across what they decide to publish.
Compared to the usual results for this kind of search this site stands well above the average, and a quick visit to startsmartprogress kept the standard high, you can tell within seconds whether a site is going to waste your time or actually deliver and this one clearly delivers without any false starts.
Appreciate the practical examples, they made the abstract points easier to grasp, and a stop at jebbrood added more of the same, this site clearly understands that real examples beat empty theory every single time which is the mark of a writer who knows their audience well and respects their time.
Felt no urge to argue with the conclusions even though I started the post slightly skeptical, and a look at irotix maintained that pattern, writing that earns agreement through clarity of argument rather than rhetorical pressure is the kind I find most persuasive and the kind I want to read more of these days.
Reading this slowly and letting each paragraph land before moving on, and a stop at nutmegnetwork earned the same patient approach, content that rewards slow reading rather than speed is content with real density and the writers here are clearly producing work that benefits from the careful eye rather than the rushed scan.
This one is staying open in a tab for the rest of the day so I can come back and re read certain parts, and a look at exploreideasdeeply suggests I will be doing the same with a few more pages here too, this is going to be a deep dive over the coming hours.
Reading this confirmed that the topic deserves more careful attention than it usually gets, and a stop at explorefreshgrowthideas extended that elevated framing, content that raises the appropriate weight of a subject without being preachy about it is serving a quiet but important editorial function for the broader cultural conversation about it.
A piece that did exactly what it promised in the headline without overshooting or underdelivering, and a look at discoverforwardideas continued that calibration, alignment between promise and delivery is a basic editorial virtue that many sites fail at and this site has clearly mastered the matching of expectation and substance throughout pieces.
Worth pointing out that the writer made the topic feel more interesting than I had been expecting, and a look at growfocusedexecution continued that elevation effect, content that improves the apparent quality of its subject through skilled treatment is doing something real and this site has clearly developed that kind of editorial alchemy throughout.
Thanks for the breakdown, it gave me a clearer picture of something I had been confused about for a while now, and a stop at findyournextdirection closed the remaining gaps in my understanding nicely, no need to hunt around twenty other articles to put the pieces together which is a real time saver.
мелбет казино скачать на андроид мелбет казино скачать на андроид
During my morning reading slot this fit perfectly into the routine, and a look at husbury extended that perfect fit into the rest of the routine, content that matches the rhythm of how I actually read rather than demanding accommodation from my schedule is content well calibrated to its likely audience and this site has it.
Now thinking I want more sites built on this kind of editorial foundation, and a stop at growstepwisely extended that wish into a broader hope, sites built on substance and care rather than on metrics and growth are the kind of sites I want to see more of and this one is a small example worth supporting.
I really like how the writer keeps the tone friendly without sounding fake or overly polished, and after a stop at growwithfocusedsteps the same calm pace was there, no rushing to make a point and no padding either, just clean honest writing that I can respect and come back to later again.
My reading list is short and selective and this site is now on it, and a stop at startbuildingvision confirmed the placement, the short list of sites I read deliberately rather than encounter accidentally is something I curate carefully and adding to it is a real act of trust which this site has earned today.
Took a quick scan first and then went back to read properly because the post deserved it, and a stop at learnandoptimizegrowth kept me reading carefully too, the kind of writing that earns a slower second pass rather than getting skimmed and forgotten is something I value highly when I happen to find it.
Now wishing more sites covered topics with this level of care, and a look at findgrowthsolutions extended that wish across more subjects, the rarity of careful coverage on most topics is a problem and this site is one of the small antidotes to that broader pattern of casual or surface treatment of complex subjects.
Most blog writing on this subject reaches for the same handful of arguments and this post avoided them, and a look at startnextleveldirection continued the original treatment, content that finds its own path through territory other writers have flattened is content with real authorial energy and this site has plenty of that distinctive energy.
Walked away in a slightly better mood than when I started reading, that says something about the writing, and a stop at seomotion kept that going, content that leaves you feeling more capable rather than overwhelmed is the kind I keep coming back to again and again over the years and across many topics.
Felt the writer was speaking my language without trying to imitate it, and a look at createactionwithpurpose continued that natural fit, when a writers default voice happens to match what you find easy to read the experience feels frictionless and that is something I notice and remember about specific sites going forward.
В статье рассматриваются различные стратегии борьбы с зависимостями, включая проверенные методы и реальные истории успеха. Читатель узнает, какие подходы наиболее эффективны и как начать путь к выздоровлению.
Желаете узнать подробности? – clinica plus
A clear case of writing that does not try to do too much in one post, and a look at chairchampion maintained the same scoped discipline, posts that try to cover too much end up covering nothing well and this site has clearly chosen scope discipline as a core editorial principle which shows up clearly in what I read.
Thanks for taking the time to write this, it is clear that some thought went into how each point would land, and after I went through growwithstrongintent I had a better grip on the topic, real value without the usual marketing noise people have to put up with online when searching for answers.
Публикация посвящена жизненным историям людей, успешно справившихся с зависимостью. Мы покажем, что выход есть, и он начинается с первого шага — принятия проблемы и желания измениться.
Проследить причинно-следственные связи – tver clinica plus
Медицинская публикация представляет собой свод актуальных исследований, экспертных мнений и новейших достижений в сфере здравоохранения. Здесь вы найдете информацию о новых методах лечения, прорывных технологиях и их практическом применении. Мы стремимся сделать актуальные медицинские исследования доступными и понятными для широкой аудитории.
Посмотреть всё – лечение пивного алкоголизма
Solid quality, the kind of work that holds up to a careful read rather than a quick skim, and a quick look at sagevogue kept that standard going strong, content that rewards attention rather than punishing it is something I appreciate more and more these days online across nearly every topic I follow.
Reading this brought back the satisfaction I used to get from blogs ten years ago, and a stop at holzix kept that nostalgic quality alive, sites that capture what was good about an earlier era of internet writing are increasingly precious and this one is doing that without feeling like a deliberate throwback at all.
Worth saying that the prose reads naturally without straining for style, and a stop at buildlongtermfocus maintained the same unforced quality, writing that achieves elegance without effort is the highest tier and this site has clearly worked out how to land that effortless quality consistently rather than only on the writers best days.
Thanks for the practical examples scattered through the post rather than abstract theory only, and a look at createactionwithpurpose continued that grounded style, abstract points are easier to remember when paired with concrete situations and the writers here clearly understand how readers actually retain information from blog content reading sessions.
Really liked the calm tone running through the post, no shouting and no urgency forced into the writing, and a look at explorefuturevisions kept that quiet confidence going, the kind of voice that makes the reader feel respected rather than yelled at which is depressingly common across most modern blog content these days.
Time spent here today felt productive in the way that good reading sessions sometimes do, and a stop at irubelt extended that productive feeling across the rest of the morning, the difference between productive reading and merely passing time is real and this site is consistently on the productive side for me lately.
Bookmark added with a small note about why, and a look at buildlongtermstrength prompted another bookmark with another note, the bookmarks I annotate are the ones I expect to return to deliberately rather than stumble into and this site is generating annotated bookmarks at a higher rate than my usual content sources by some margin.
как найти геолокацию по номеру телефона https://kak-najti-cheloveka-po-nomeru-telefona-2.ru
This actually answered the question I had been searching for, and after I checked buildintentionalsteps I had a few more pieces I had not realised I needed, that is the sign of a site that knows what its readers want before they even know how to ask it which is impressive.
Для тех, кто в теме, прямая ссылка. Нашел чистый вариант, в итоге скачал отсюда: скачать мелбет на андроид.
Вообще проект реально топовый — коэффициенты вполне адекватные. Порадовало, что есть нормальные live-ставки.
И еще, при регистрации можно неплохо увеличить первый депозит, так что можно затестить. Что думаете?
В данном обзоре представлены основные направления и тренды в области медицины. Мы обсудим актуальные проблемы здравоохранения, свежие открытия и новые подходы, которые меняют представление о лечении и профилактике заболеваний. Эта информация будет полезна как специалистам, так и широкой публике.
Откройте для себя больше – клиника плюс тверь
Now planning to write about the topic myself eventually using this post as a reference, and a look at buildscalableprogress would also serve in that future piece, content that becomes raw material for my own writing rather than just informing my reading is content with multiplicative value and this site is generating that multiplicative effect.
A piece that suggested careful editing without showing the marks of the editing, and a look at findyourprogressroute continued that invisible polish, the best editing disappears into the prose and this site reads as having been edited with skill that does not announce itself which is the highest compliment I can offer any blog content.
Güvenli bahis deneyimi için 1xbet güncel adres adresini kullanabilirsiniz.
son derece hızlı ve pratik. Üyelik ve giriş süreci hızlıca tamamlanabilir. İlk olarak doğru adresin kullanılması önemlidir. Site güvenliğine verilen önem yüksektir.
1xbet giriş ekranına ulaşmak için sayfanın üst kısmındaki giriş butonuna tıklanmalıdır. Hatalı bilgi girişinde erişim sağlanamaz. Sahte sitelere karşı dikkatli olunması önerilir.
Eğer henüz üye değilseniz, basit bir formla kayıt olunabilir. Doğru bilgilerin girilmesi kayıt sonrası işlemleri kolaylaştırır. Bazı durumlarda hesabınızı onaylemek için ek adımlar uygulanabilir.
Siteye giriş sonrası birçok seçenek sizleri bekler. Bahisler, canlı casino ve diğer oyunlar gibi aktiviteler erişilebilir hale gelir. Ayrıca güncel promosyonlar ve bonuslar takip edilebilir.
Текст посвящён распространённым мифам о зависимости и их развенчанию. Мы предоставим научно обоснованную информацию и дадим рекомендации по выбору эффективного способа борьбы с зависимым поведением.
Изучить аспект более тщательно – clinica plus в твери
Really grateful for content like this, it does not waste my time and it does not insult my intelligence either, and a quick look at findbetterwaysforward was the same, balanced respectful writing that makes a person feel welcome rather than rushed through pages of forced engagement just to keep clicking around.
Этот краткий обзор предлагает сжатую информацию из области медицины, включая ключевые факты и последние новости. Мы стремимся сделать информацию доступной и понятной для широкой аудитории, что позволит читателям оставаться в курсе актуальных событий в здравоохранении.
Погрузиться в научную дискуссию – tver clinica plus
Now feeling the quiet pleasure of finding writing that takes itself seriously without being self serious, and a stop at growstepbystrategy extended that subtle pleasure, the gap between earnest and pretentious is fine and this site has clearly chosen to land on the earnest side without slipping over into pretentious which is impressive.
If you scroll past this site without looking carefully you will miss something, and a stop at createconsistentdirection extended that mild warning, the surface of the site does not advertise its quality loudly which means careful attention is required to recognise what is being offered here which is itself a kind of editorial signal.
Skipped breakfast still reading this and finished hungry but satisfied, and a stop at startmovingclearly kept me past breakfast time, content that displaces basic biological needs is content with serious attentional pull and the writers here are clearly capable of producing that level of engagement which is genuinely impressive these days.
Appreciated that the writer trusted the reader to follow along without constant restating of earlier points, and a look at createimpactstructure continued that respect for the reader, treating an audience as capable adults rather than as people to be hand held through every paragraph is something I notice and value highly across the open internet today.
Now planning a longer reading session for the archives, and a stop at learnanddevelopquickly confirmed the archives are worth that longer commitment, sites with archives I want to read deliberately rather than just sample are rare and this one has clearly earned that level of interest based on the consistency of what I have already read.
Probably the best thing I have read on this topic in the past month, and a stop at brightbanyan extended that ranking, the casual ranking of recent reading is informal but real and this site has been winning those rankings for me on this topic specifically over the last several weeks of regular reading sessions.
Glad to have another data point on a question I am still thinking through, and a look at jebmug added two more, content that acknowledges its place in a wider conversation rather than pretending to settle the question alone is intellectually honest in a way that I wish was more common across the open web.
Appreciate that you did not pad this with fluff to hit a word count, the post says what it needs to say and stops, and a look at buildfocusedprogress did the same, brevity here feels intentional not lazy which is a distinction many writers miss completely sometimes when they are working under deadlines.
Приветствую всех. Тема здоровья всегда на первом месте, особенно когда речь идет о близких людях. Если срочно требуется квалифицированный нарколог на дом в Москве, важно, чтобы доктор приехал оперативно и со своим оборудованием.
Мы в свое время тоже столкнулись с этой бедой, чтобы помощь оказали без лишних хлопот и в спокойной атмосфере. Кому тоже нужны подробности и условия, вся информация есть здесь: нарколог на дом москва.
Врачи дежурят круглосуточно во всех районах, реагируют очень быстро, буквально за час. Не теряйте время, и обращайтесь к настоящим профессионалам. Всем удачи и берегите близких!
Grateful for posts like this one, they remind me there are still places online run by people who care about quality, and a look at findyournextfocus reflected the same standards, you can tell the difference between content made for readers and content made just for search engines today and this is the former.
Thanks for the simple approach, too many sites bury the actual point under layers of unnecessary words, but here every line earns its place, and a look at findmomentumquickly showed the same care for the reader which is something I will remember the next time I need answers on a topic.
Going to come back when I have more time to read carefully, the post deserves more than a quick scan, and a stop at createclearoutcomes reinforced that, this is the kind of site that rewards a slower read which is hard to find in this fast paced corner of the internet but really worthwhile.
Found something new in here that I had not seen explained this way before, and a quick stop at hyxarch expanded the idea even further, the kind of writing that nudges your thinking forward a bit without forcing the issue is exactly what I look for online today and rarely actually find anywhere.
Quiet confidence runs through the whole post, no need to shout to make the points stick, and a stop at startgrowingtoday carried that same restrained voice forward, content that respects the reader by trusting its own substance rather than dressing it up in theatrical language is what I look for online and rarely actually find these days.
Speaking as someone who reads a lot on this topic this site has earned a high position in my source rankings, and a stop at buildfocusedgrowth reinforced that ranking, the informal ranking of sources for a topic is something I maintain mentally and this site has moved into the upper portion of those rankings clearly.
My usual response to new bookmarks is to forget them but this one I have already returned to twice, and a look at seomotive pulled me back a third time, the actual return rate to bookmarked sites is the real measure of value and this one is clearing that measure at a notable rate already.
Worth saying that the prose reads naturally without straining for style, and a stop at startwithpurposefuldirection maintained the same unforced quality, writing that achieves elegance without effort is the highest tier and this site has clearly worked out how to land that effortless quality consistently rather than only on the writers best days.
комбинезон осенний для новорожденного http://www.detskie-kombinezony-kupit.ru
Reading this triggered a small change in how I think about the topic going forward, and a stop at createforwardmotion reinforced that subtle shift, the rare content that actually moves my thinking rather than just confirming or filling it is the kind I most value and this site is providing that kind of impact today.
Bookmark moved to my permanent reference folder rather than the casual maybe later folder, and a look at discoverforwardmomentum earned the same upgrade, the distinction between casual interest and lasting reference is something I track carefully and very few sites cross that threshold but this one did so without much effort apparently.
Came in for one specific question and got answers to three I had not even thought to ask, and a look at createprogressjourney extended that bonus value pattern, the kind of resource that anticipates reader needs rather than just answering the literal question asked is the gold standard and this site reaches it.
Really appreciate that the writer did not stretch the post to hit some target word count, the points end when they are made, and a stop at startyourgrowthpath reflected the same discipline, brevity is generosity in disguise and this site has clearly figured that out far better than most blog operations have.
Felt the writer respected me as a reader without making a show of doing so, and a look at explorefreshgrowth continued that quiet respect, this is the kind of small but meaningful detail that separates the sites I bookmark from the ones I close after a single skim and never return to again no matter how interesting the headline.
I appreciate the clarity here, everything is explained in simple terms without unnecessary detail, and after a quick stop at learnandtransformdirection the points came together nicely for me, the writing keeps things straightforward and respects the reader from start to finish without ever talking down to anyone.
скачать мелбет на андроид скачать мелбет на андроид
Picked this up while looking for something else and ended up reading every paragraph because it was actually informative, and after buildideasforward I was sure I would come back, that does not happen often when most sites bury the useful parts under endless ads and pop ups today and across most categories online.
Worth observing that the post landed without needing a flashy headline to hook attention, and a stop at buildfocusedprogress did the same, content that earns engagement through substance rather than packaging is the kind I trust more deeply and this site has clearly chosen substance as the primary lever for reader engagement throughout.
If quality blog writing is dying as people sometimes claim then this site is one piece of evidence that it has not died yet, and a look at createclaritysystems extended that evidence, the broader cultural question about online writing has empirical answers in specific sites and this one is contributing to a more optimistic answer overall.
Reading this felt easy in the best way, no friction and no confusion at any point, and a stop at startwithclearpurpose carried that same comfort across more pages, the kind of editorial flow that lets you absorb information without fighting the format which is increasingly hard to find on the open web today across topics.
Honestly this hits the sweet spot between detail and brevity, no rambling and no shortcuts, and a quick visit to horcall kept that going across the related pages, the kind of place that respects your attention without trying to grab it through cheap tactics or attention seeking design choices that get tired fast.
Will be sharing this with a couple of people who care about the topic, and a stop at createforwardexecution added more material worth passing along, the kind of site that is generous with quality content and does not make you jump through hoops to access it which is appreciated more than the team probably realises.
Will be coming back to this for sure, too much good content to absorb in one sitting, and a stop at mochamarket only added more pages I want to dig through, this site is going onto my regular rotation list because it consistently delivers something worth the visit lately rather than empty filler.
Appreciate how nothing here feels copied or pieced together from other places, the voice is consistent and the tone stays human, and after I checked discoverinnovativeideas I noticed the same style holds, which is a small detail but it makes the whole experience feel personal rather than like another generic site.
Beyond the topic at hand this site reads as a small ongoing project of taking writing seriously, and a look at discovernewdirectionnow reinforced that project quality, sites that treat publishing as an ongoing serious practice rather than as content production for traffic are sites worth supporting and this one has clearly chosen the serious approach.
Bookmark folder created specifically for this site, and a look at discoverinnovativethinking confirmed the dedicated folder was the right call, dedicated folders for individual sites are a level of organisation I rarely deploy and this site has earned that level of dedicated tracking based on the consistency I have seen so far across sessions.
Bookmark folder reorganised slightly to make this site easier to find, and a look at buildgrowthdirection earned the same accessibility upgrade, the small organisational moves I make for sites I expect to return to often are themselves a signal of how much I trust them and this site triggered those moves naturally.
Stands out for actually being useful instead of just being long, and a look at startsmartmovement kept that going, length without value is the default mode of most blogs these days but this site has clearly chosen a different path which I respect a lot as a reader who values careful editing decisions like that.
Worth recommending broadly to anyone who reads on the topic, and a look at startthinkingbigger only confirms that, the rare combination of accessibility and depth in this site makes it suitable for both newcomers and people who already know the area which is hard to pull off in any blog format today and rarely managed.
melbet скачать melbet скачать
Appreciate that you did not pad this with fluff to hit a word count, the post says what it needs to say and stops, and a look at growwithclaritynow did the same, brevity here feels intentional not lazy which is a distinction many writers miss completely sometimes when they are working under deadlines.
Good post, the kind that respects the reader by getting to the point quickly without skipping the details that matter, and a short look at findyourtruefocus confirmed that approach is consistent across the site which is rare to find online these days, definitely a place I will return to soon.
The whole experience of reading this was pleasant from start to finish, no pop ups and no annoying interruptions, and a look at buildsustainablemovement continued that clean experience, technical choices about page design matter for the reader and this site clearly cares about the small details that add up to comfort across multiple visits.
A small thank you note from me to the team behind this work, the post earned it, and a stop at findyourprogresslane suggested more thanks would be in order over time, recognising the people who do good writing online is something I try to remember to do because the alternative is silence and silence rewards mediocrity unfortunately.
Народ, если кто искал, рабочая тема. Многие спрашивали, делюсь полезной ссылкой: мелбет.
Этот букмекер сейчас один из лучших, коэффициенты вполне адекватные. Порадовало, что выплаты приходят достаточно быстро.
И еще, при регистрации дают неплохой приветственный бонус, рекомендую воспользоваться. Кто уже ставил там?
Appreciate that you did not pad this with fluff to hit a word count, the post says what it needs to say and stops, and a look at learnandmoveahead did the same, brevity here feels intentional not lazy which is a distinction many writers miss completely sometimes when they are working under deadlines.
нарколог домой нарколог домой
Worth your time, that is the simplest endorsement I can give, and a stop at discovernewfocusareas extends that endorsement across the rest of the site, this is one of those increasingly rare places that delivers on what it promises rather than over selling the content and under delivering on substance every time which I find frustrating elsewhere.
Found this useful, the points line up well with what I have been thinking about lately, and a stop at discovergrowthmindset added some angles I had not considered yet, definitely walking away with more than I came for which is the best outcome from time spent reading online for any kind of topic.
Now feeling slightly more committed to my own careful reading practices having read this, and a stop at explorefutureclarity reinforced that commitment, content that models the kind of attention it deserves is content that calibrates the reader and this site has clearly raised my own bar for what to bring to good writing today.
Recommended without hesitation if you care about careful coverage of this topic, and a stop at createvisionexecution reinforced the recommendation, the bar I set for unhesitating recommendations is fairly high and this site has cleared it through the cumulative weight of multiple consistently good pieces rather than through any single standout post which is meaningful.
Этот краткий обзор предлагает сжатую информацию из области медицины, включая ключевые факты и последние новости. Мы стремимся сделать информацию доступной и понятной для широкой аудитории, что позволит читателям оставаться в курсе актуальных событий в здравоохранении.
Выяснить больше – медицинский центр наркологии
Closed it feeling I had taken something away rather than just consumed something, and a stop at coppercrown extended that taking away feeling, the difference between content I extract value from and content I just pass through is something I track informally and this site is consistently in the value extraction column for me.
Once I had read three posts the editorial pattern was clear, and a look at seoorbit confirmed the pattern from a fourth angle, sites where the underlying approach reveals itself through accumulated reading rather than being announced are sites with real depth and this one has that quality clearly visible across multiple pieces consistently.
Recommended without reservation for anyone interested in the topic at any level of expertise, and a look at exploreinnovativepathwaysnow only strengthens that recommendation, this site clearly knows how to serve readers across a range of backgrounds without watering down the content or talking past anyone in the audience which is genuinely impressive to see.
Came in for one specific question and got answers to three I had not even thought to ask, and a look at irubrisk extended that bonus value pattern, the kind of resource that anticipates reader needs rather than just answering the literal question asked is the gold standard and this site reaches it.
лечение запоя в стационаре санкт петербург лечение запоя в стационаре санкт петербург
Now feeling the quiet pleasure of finding writing that takes itself seriously without being self serious, and a stop at learnandtransformfast extended that subtle pleasure, the gap between earnest and pretentious is fine and this site has clearly chosen to land on the earnest side without slipping over into pretentious which is impressive.
Reading this triggered a small change in how I think about the topic going forward, and a stop at jebyam reinforced that subtle shift, the rare content that actually moves my thinking rather than just confirming or filling it is the kind I most value and this site is providing that kind of impact today.
Picked this up between two other things I was doing and got drawn in completely, and after explorefutureopportunities my original tasks were completely forgotten for a while, content that derails a workflow in a positive way by being more interesting than what you were already doing is rare and worth recognising clearly.
Came across this looking for something else entirely and ended up reading it through twice, and a look at startthinkingstrategically pulled me deeper into the site than I planned, the writing has a way of holding attention without resorting to manipulative cliffhangers or vague promises that never get delivered later down the page.
узнать местоположение по номеру телефона бесплатно https://www.kak-najti-cheloveka-po-nomeru-telefona-2.ru
Better than most of the writing I have come across on this topic recently, simpler and more direct, and a look at learnandoptimizegrowthpath continued in that same way, a real outlier in a crowded space full of repetitive content that says little while taking up a lot of reader time today which is unfortunate.
Güvenli bahis deneyimi için 1xbet giriş adresini kullanabilirsiniz.
günümüzde oldukça basit. Bu siteye erişim için birkaç adım yeterlidir. İlk olarak doğru adresin kullanılması önemlidir. Güvenli bağlantı sayesinde bilgileriniz korunur.
Giriş sayfasına yönlendirme için ana sayfadan ilgili buton seçilmeli. Hatalı bilgi girişinde erişim sağlanamaz. Kişisel bilgilerinizi girmeden önce sayfanın orijinalliği onaylanmalıdır.
Eğer henüz üye değilseniz, basit bir formla kayıt olunabilir. Bilgilerin eksiksiz ve doğru doldurulması önem taşır. Doğrulama aşamasında telefon veya e-posta onayı gerekebilir.
Siteye giriş sonrası birçok seçenek sizleri bekler. Çeşitli spor dallarında bahis yapma imkanı sunulur. Ayrıca güncel promosyonlar ve bonuslar takip edilebilir.
Better than the average post on this subject by some distance, and a look at explorefreshstrategicpaths reinforced that, you can tell within the first paragraph that the writer here actually cares about the topic rather than just covering it for the sake of having something to publish that week or that day.
This filled in a gap in my understanding that I had not even noticed was there, and a stop at discovernewdirectionnow did the same, the kind of post that gives you more than you expected when you first clicked through from somewhere else, a real find for anyone curious about the area covered here.
A piece that handled the topic with appropriate weight without becoming portentous, and a look at unlocknewopportunities continued that calibrated seriousness, content that takes itself seriously without becoming pompous is something this site has clearly figured out and the balance shows up in every piece I have read across multiple sessions now.
Honest assessment is that this is one of the better short reads I have had this week, and a look at hyxbrook reinforced that, the bar for short content is low because most of it sacrifices substance for brevity but this site manages both at once which is harder than it sounds for most writers attempting it.
Обзор посвящён процессу восстановления после зависимостей. Мы расскажем о различных этапах реабилитации, поддерживающих ресурсах и важности мотивации в достижении устойчивого выздоровления.
Всё самое вкусное внутри – clinica plus
Bookmark added without hesitation after finishing, and a look at topazstrict confirmed I should bookmark the homepage too rather than just this page, the rare site that earns category level trust rather than just single article approval is the kind I want to rely on across many different topics over time.
Felt the writer was speaking my language without trying to imitate it, and a look at growwithstrategyintent continued that natural fit, when a writers default voice happens to match what you find easy to read the experience feels frictionless and that is something I notice and remember about specific sites going forward.
Worth your time, that is the simplest endorsement I can give, and a stop at explorefutureopportunity extends that endorsement across the rest of the site, this is one of those increasingly rare places that delivers on what it promises rather than over selling the content and under delivering on substance every time which I find frustrating elsewhere.
Worth saying that the post fit naturally into a rhythm of careful reading, and a stop at startpurposefullynow extended the same rhythm, content that pairs well with how I actually read rather than demanding a different mode is content well calibrated to its likely audience and this site has clearly thought about that consistently.
Strong recommendation from me, anyone curious about the topic should make time for this, and a look at growintentionallyforward only sharpens that recommendation further, the kind of resource that holds up against careful scrutiny rather than crumbling at the first critical question is rare and worth pointing other people toward when the topic comes up.
Started reading without much expectation and ended on a high note, and a look at growresultsfocused continued that arc, content that builds rather than peaks early is a sign of a writer who knows how to structure a piece for sustained reader engagement rather than relying on a strong hook to do all the work.
Once you start reading carefully here it is hard to go back to lower quality alternatives, and a stop at growresultsoriented reinforced that ratchet effect, the way good content raises standards is real over time and this site has clearly contributed to raising my expectations for what is possible in writing on the topic generally.
Reading this fit naturally into my afternoon walk because I was reading on my phone, and a stop at findgrowthpotential continued well in that walking format, content that survives mobile reading without becoming awkward is content with format flexibility and this site has clearly thought about how it reads across different devices today.
A piece that took its time without dragging, and a look at seogrove kept the same patient pace, the difference between unhurried and slow is a fine editorial distinction and this site has clearly found the unhurried side without slipping into the slow side which would have lost me as a reader quickly otherwise.
Started believing the writer knew the topic deeply by about the second paragraph, and a look at buildclaritymovement reinforced that confidence, the speed at which a writer establishes credibility through their writing is a useful quality signal and this writer establishes it quickly and quietly without resorting to credential dropping or self promotion.
Now thinking the topic is more interesting than I had given it credit for, and a stop at createprogressmappingnow continued that elevated interest, content that revives my curiosity about subjects I had set aside is doing genuine work in the structure of my interests and this site is providing that revivifying effect today actually.
Reading this slowly and letting each paragraph land before moving on, and a stop at discoverfreshopportunities earned the same patient approach, content that rewards slow reading rather than speed is content with real density and the writers here are clearly producing work that benefits from the careful eye rather than the rushed scan.
A piece that did not try to be timeless and ended up reading as durable anyway, and a look at createprogressframework extended that durable feel, content that stays useful past its publication date without straining for permanence is content that ages well and this site has the kind of evergreen quality that I value highly today.
Now thinking about whether the writer might publish a longer form work I would buy, and a look at isebrook suggested the same depth would translate, content that makes me want to pay for related work in other formats is content that has earned commercial trust as well as attention trust and this site has both clearly.
Reading this triggered a small but real correction in something I had assumed, and a stop at growwithsteadyintent extended that corrective effect, content that updates my beliefs through evidence rather than rhetoric is content with intellectual integrity and this site has earned that label consistently across the pieces I have read so far today.
Чтобы быстро и эффективно узнать местонахождение по номеру телефона, воспользуйтесь нормальными ребята реально помогают.
В общем, тема такая, не для паники.
Следует учитывать правовые и этические нормы при получении информации.
Надеюсь, понятно объяснил.
A piece that handled multiple complications without becoming confused, and a look at learnandadvancepath continued that organisational clarity, holding multiple threads in a single piece without losing any of them is a sign of skilled writing and this site has clearly developed the editorial discipline to manage complexity without sacrificing readability throughout.
Closed the tab feeling I had spent the time well, and a stop at learnandadvancegrowth extended that feeling across more pages, the test of whether time on a site was well spent is one I apply silently after closing tabs and very few sites pass it but this one passed it cleanly today afternoon clearly.
This actually answered the question I had been searching for, and after I checked startprogressnow I had a few more pieces I had not realised I needed, that is the sign of a site that knows what its readers want before they even know how to ask it which is impressive.
Liked the post enough to read it twice and the second read found new things, and a stop at startyourjourneynow similarly rewarded the second look, content with hidden depths that only reveal themselves on careful rereading is the rare kind that earns lasting respect rather than fleeting first impressions only briefly held.
Reading this in three sittings because the day was fragmented, and the piece survived the fragmentation, and a stop at seoripple held up under similar reading conditions, content engineered for continuous attention is fragile in modern conditions and this site reads as durable across the realistic ways people consume content today.
Felt mildly happier after reading, which sounds silly but is true, and a look at findyourstrongdirection extended that small mood lift, content that improves rather than degrades my mental state is content I want more of and the cumulative effect of reading sites that lift versus sites that drag is real over time.
Quietly the post solved something I had been turning over without quite knowing how to phrase the question, and a look at startmovingstrategicallynow extended that quiet solving, content that addresses unformulated needs is content with reader insight and this site has demonstrated that insight at a high rate across the pieces I have read recently.
Народ, приветствую. Слушайте, вопрос сложный, но многим может помочь, потому что в экстренной ситуации трудно сориентироваться. Когда нужен проверенный и опытный врач для капельницы, то не рискуйте и не доверяйте случайным объявлениям.
Мы в свое время тоже столкнулись с этой бедой, чтобы помощь оказали без лишних хлопот и в спокойной атмосфере. Если вам актуально или ситуация экстренная, можете ознакомиться по ссылке: вывод из запоя в больнице вывод из запоя в больнице.
На этом ресурсе действительно дана полная информация, так что найдете ответы на свои вопросы. Главное — не затягивать в такие моменты, поможет вовремя принять правильные меры. Всем душевного спокойствия!
Народ, если кто искал, свежая инфа. Многие спрашивали, в итоге скачал отсюда: мелбет.
Кстати, площадка предлагает отличные условия для игроков, коэффициенты вполне адекватные. Плюс ко всему выплаты приходят достаточно быстро.
Если только заводите аккаунт активируется стартовый фрибет, лишним точно не будет. Всем удачи!
Sets a higher bar than most of what shows up in search results for this topic, and a look at growwithintentionalsteps did not lower that bar at all, in fact it confirmed the impression, this is the kind of consistency that earns a place in regular rotation for serious readers instead of casual scrollers passing through.
Considered alongside other sources I have been reading this one consistently rises to the top, and a stop at findnewopportunityroutes maintained that top ranking, the informal ongoing comparison between sources is something I do whenever reading on a topic and this site keeps coming out near the top of those comparisons over many sessions.
Useful information presented in a way that does not feel like a sales pitch, that is what I appreciated most, and a stop at exploreuntappedpotential was the same, no upsell and no fake urgency just steady content laid out properly for someone trying to actually learn from it rather than just be sold to.
Started smiling at one paragraph because the writing was just nice, and a look at createimpactplanningframework produced a couple more such moments, prose that produces small spontaneous reactions in the reader is doing more than just transferring information and the writers here are clearly hitting that level fairly consistently throughout pieces.
Anyone curious about this topic would do well to start here, the foundation laid is solid, and a stop at createprogressplanning would round out their understanding nicely, this is the kind of resource I would point a friend toward without hesitation if they asked me where to begin learning about anything in this area.
Этот обзор посвящен успешным стратегиям избавления от зависимости, включая реальные примеры и советы. Мы разоблачим мифы и предоставим читателям достоверную информацию о различных подходах. Получите опыт многообразия методов и найдите подходящий способ для себя!
Смотрите также – tver clinica plus
Thanks for the breakdown, it gave me a clearer picture of something I had been confused about for a while now, and a stop at jedbroom closed the remaining gaps in my understanding nicely, no need to hunt around twenty other articles to put the pieces together which is a real time saver.
Felt the post had been written without using a single buzzword, and a look at seohive continued that clean vocabulary, content free of jargon and trendy phrases reads better and ages better and this site has clearly committed to a vocabulary that will not feel dated in three years which is impressive editorially.
Now considering carefully how to share this site with the right audience rather than broadcasting widely, and a look at unlockcreativepaths extended that careful sharing impulse, content worth sharing carefully rather than spamming is content that has earned a higher kind of recommendation and this site has earned that careful shareability throughout pieces.
Worth saying that the quiet confidence of the writing is what landed first, and a look at discoverforwardmomentumnow continued that quiet quality, confident writing without the loud display of confidence is a rare combination and this site has clearly developed both the knowledge and the editorial restraint to land that combination consistently.
Worth flagging that the post handled an angle of the topic I had not seen elsewhere, and a look at learnandexecuteclearly extended that fresh treatment, content that finds underexplored corners of well covered subjects is genuinely valuable and this site has demonstrated that exploratory editorial approach across multiple pieces in my reading sessions today.
Genuinely glad I clicked through to read this rather than skipping past, and a stop at createbetterpaths confirmed I should keep clicking through to more pages here, the kind of resource that justifies its place in my browser history rather than feeling like wasted time which is the highest compliment I offer any site online today.
Now placing this in the small category of sites whose updates I would actually want to know about, and a stop at discovernewfocus confirmed that placement, the difference between sites I want to follow and sites I just consume from is real and this one has crossed into the active follow category from the casual consumption side.
Народ, приветствую. Тема здоровья всегда на первом месте, особенно когда речь идет о близких людях. Когда нужен проверенный и опытный врач для капельницы, то не рискуйте и не доверяйте случайным объявлениям.
Знакомые вызывали бригаду в похожей ситуации и в итоге нашли клинику, где врачи работают профессионально. Если вам актуально или ситуация экстренная, советую посмотреть официальный источник: подробнее тут.
Врачи дежурят круглосуточно во всех районах, так что найдете ответы на свои вопросы. Не теряйте время, кому-то тоже пригодится и спасет здоровье. Всем душевного спокойствия!
Genuine pleasure to read, and that is not something I say often after a casual click through, and a quick visit to elffleet kept the same feeling going across the rest of the site, finding writing that actually feels good to spend time with rather than just functional is increasingly rare on the open web.
Even on a quick first read the substance of the post comes through, and a look at learnandaccelerategrowthpath reinforced that immediate quality, content that does not require a slow careful read to demonstrate value but rewards one anyway is content with real depth and this site has produced work of that demanding depth class.
стационар вывод из запоя стационар вывод из запоя
Liked the natural conversational tone throughout, never stiff and never overly casual either, and a stop at discovercreativegrowth kept that comfortable middle ground going, finding a tone that respects the reader without becoming distant or overly familiar is harder than it sounds and this site nails that balance consistently across many different pieces.
Looking at the surface design and the substance together this site has both right, and a look at isebulb reinforced that integrated quality, sites where presentation and content reinforce each other rather than fighting are sites with full editorial coherence and this one has clearly invested in both layers in a balanced way.
I really like the calm tone here, it does not push anything on the reader, and after I went through buildyournextstrategy I felt the same way, just steady useful content laid out without drama, which is exactly what someone trying to learn something quickly needs to find rather than aggressive marketing.
мел бет мел бет
стоимость перевозки авто перевозка автомобилей дешево
Really like that there are no exclamation marks or all caps shouting throughout the post, and a quick visit to learnandapplywisely maintained the same calm voice, restraint in punctuation signals confidence in the content and this site clearly trusts its substance to do the persuading rather than relying on typographic emphasis.
Reading this in my last reading slot of the day was a good way to end, and a stop at startbuildingclearvision provided a satisfying close to the reading session, content that ends a day well rather than agitating it before sleep is the kind I value increasingly and this site fits that role for me consistently now.
If the topic interests you at all this is a place to spend time, and a look at discovernewdirections reinforced that recommendation, the broader question of where to invest topical reading time is one this site answers convincingly through the consistent quality across multiple pieces I have sampled during the current reading session today.
Bookmark added without hesitation after finishing, and a look at discoverinnovativepaths confirmed I should bookmark the homepage too rather than just this page, the rare site that earns category level trust rather than just single article approval is the kind I want to rely on across many different topics over time.
Generally I find the content on similar topics frustrating in specific ways and this post avoided all of them, and a look at growwithclearstrategy continued that frustration free experience, content that sidesteps the standard failure modes of its genre is content with editorial awareness and this site has clearly studied what fails elsewhere consistently.
Found the writing surprisingly fresh for what is by now a well covered topic, and a stop at findgrowthsolutionspath kept that freshness going across the related pages, original perspective on familiar ground is hard to come by and this site has clearly earned its place in the conversation rather than just rehashing old ideas.
Picked up several practical tips that I plan to try out this week, and a look at seometric added a few more I will be testing alongside, content with practical hooks that connect to my actual life is the kind that earns my repeat attention rather than the merely interesting that I forget within a day.
A clear cut above the usual noise on the subject, and a look at createclaritydrivengrowth only made that gap wider in my view, the kind of place that earns its visitors through quality rather than through aggressive marketing or sponsored placements which is increasingly the only way most sites stay afloat across the modern web.
Adding this site to my regular reading list, the post earned that on its own, and a quick stop at learnandoptimizepathwaynow sealed the decision, the kind of place worth checking back with from time to time because it consistently produces material that holds up against a critical reading too which I really value.
В этой статье рассматривается комплексный подход к избавлению от зависимости. Читатель узнает, как сочетание физического, психологического и духовного восстановления помогает достичь стойкого выздоровления.
Смотрите также… – наркологическая клиника в твери
Just want to say thank you for putting this together, posts like these make searching online actually worth it sometimes, and a quick look at learnandacceleratesuccess kept that going, useful and easy to read without any of the tricks that ruin most blog comment sections lately on the wider open web.
A clear case of writing that does not try to do too much in one post, and a look at findyournextbreakpoint maintained the same scoped discipline, posts that try to cover too much end up covering nothing well and this site has clearly chosen scope discipline as a core editorial principle which shows up clearly in what I read.
Now appreciating that the post did not try to imitate any other style I might recognise, and a stop at seospark continued that distinct voice, content with its own register rather than borrowed from elsewhere is content with real authorial presence and this site has clearly developed that presence through what feels like patient editorial work.
поиск по номеру телефона онлайн https://www.kak-najti-cheloveka-po-nomeru-telefona-2.ru
Worth flagging that the writing rewarded a second read more than I expected, and a look at explorefuturepathideas produced the same second read benefit, content with hidden depths that emerge only on careful rereading is rare in the modern blog space and this site has clearly invested in that level of compositional density throughout.
Liked that the post acknowledged complications rather than pretending they did not exist, and a stop at discovernewfocuspoints continued that honest framing, sites that handle complexity with care rather than papering it over with simplifying claims are doing real intellectual work and this one is clearly in that category based on what I have read.
Genuine pleasure to read, and that is not something I say often after a casual click through, and a quick visit to growintentionallynow kept the same feeling going across the rest of the site, finding writing that actually feels good to spend time with rather than just functional is increasingly rare on the open web.
A piece that took its time without dragging, and a look at createconsistentdirectionalgrowth kept the same patient pace, the difference between unhurried and slow is a fine editorial distinction and this site has clearly found the unhurried side without slipping into the slow side which would have lost me as a reader quickly otherwise.
If quality blog writing is dying as people sometimes claim then this site is one piece of evidence that it has not died yet, and a look at createforwarddirection extended that evidence, the broader cultural question about online writing has empirical answers in specific sites and this one is contributing to a more optimistic answer overall.
Felt the post was written for someone like me without explicitly addressing me, and a look at learnandoptimizepath produced the same fit, when content lands on its target without pandering you know the writer has done careful audience thinking rather than relying on demographic targeting or interest signals to do the work of editorial decisions.
Appreciated the way each section connected smoothly to the next without abrupt jumps, and a stop at discovernewangles kept that flow going nicely, transitions are something most blog writers ignore but the difference is huge for the reader who is trying to follow a sustained line of thought today across many different topics.
Comfortable reading experience throughout, no jarring tone shifts and no awkward formatting, and a look at duetdrives kept that smooth feel going, the kind of editorial polish that goes unnoticed when present but glaring when absent is something this site has clearly invested in across the broader content as well which deserves recognition.
Generally I bookmark sparingly to avoid building up a bookmark graveyard but this one earned a permanent slot, and a stop at findgrowthsolutionsnow extended that permanence designation, the few sites I keep permanent bookmarks for are sites I expect to use repeatedly and this one has clearly cleared that expectation bar today.
A piece that did not lean on the writer credentials or institutional backing, and a look at buildsustainablegrowth maintained the same focus on substance, content that earns trust through quality rather than through name dropping is the kind I find most persuasive and this site is clearly playing on the substance side of that distinction.
Чтобы быстро и эффективно вычислить по номеру телефона, воспользуйтесь специализированными сервисами.
Знаете, многие лезут в дебри, а зря.
Оформление официального запроса к правоохранительным или судебным инстанциям требуется для доступа к закрытой информации.
Короче, не нарывайтесь.
Picked up several practical tips that I plan to try out this week, and a look at learnandadvancegrowth added a few more I will be testing alongside, content with practical hooks that connect to my actual life is the kind that earns my repeat attention rather than the merely interesting that I forget within a day.
Glad the writer kept this short rather than padding it out, the points stand on their own without needing extra context, and a look at itobout kept the same approach going, brevity is a sign of confidence in the substance and the team here clearly trusts their content to land without filler.
A piece that read as if the writer was thinking carefully rather than just typing fluently, and a look at buildsustainabledirection continued that considered quality, the difference between fluent typing and careful thinking shows up in writing and this site reads as the product of thought rather than just the product of language fluency apparently.
Для тех, кто в теме, рабочая тема. Нашел чистый вариант, все работает без проблем здесь: melbet скачать на андроид.
Этот букмекер сейчас один из лучших, выбор спортивных дисциплин впечатляет. Там еще можно ставить прямо в режиме реального времени.
Там сейчас можно неплохо увеличить первый депозит, лишним точно не будет. Пишите, если возникнут вопросы.
Я изначально скептически относился ко всей этой дистанционке. Думал, сын просто будет играть в танчики. Но жена настояла, нашли один портал с живыми учителями: источник . Честно? Зашли просто на пробный урок, а в итоге остались на весь год. Преподаватели не просто читают по бумажке, а реально вовлекают. Ребенок сам ноутбук включает к началу пары. Так что если кому актуально – очень рекомендую хотя бы тест-драйв пройти.
нарколог на дом в москве нарколог на дом в москве
Reading this on a phone at a coffee shop and finding it perfectly suited to that context, and a stop at discoverinnovativegrowthpaths continued the comfortable mobile experience, content that works across reading conditions without compromising on substance is increasingly important and this site has clearly thought about the whole reader experience here.
Coming back tomorrow when I can give this a proper read, the post deserves better attention than I can give right now, and a look at discovermeaningfulpaths suggests there is plenty more here that deserves the same treatment, definitely a site I will be exploring properly over the next few days when I can.
Reading this felt easy in the best way, no friction and no confusion at any point, and a stop at buildsustainablegrowthdirection carried that same comfort across more pages, the kind of editorial flow that lets you absorb information without fighting the format which is increasingly hard to find on the open web today across topics.
Most posts I read end up forgotten within a day but this one is sticking, and a look at tennisvortex extended that lingering effect, content that survives the immediate moment of reading rather than evaporating is content with genuine retention quality and this site has been producing memorable pieces at a rate notable across my reading.
Just wanted to say this was useful and leave a small note of thanks, and a quick visit to seotrail earned a similar nod from me, the small acknowledgements add up over time and represent the real economy of trust that good content runs on across the open and increasingly fragmented modern internet.
Really clear writing, the kind that makes you want to share the link with someone who has been asking about the topic, and a quick browse through startmovingwithpurpose only made me more sure of that, the information here stays useful long after the first read is done which says a lot.
Liked the balance between depth and brevity, never too shallow and never too long, and a stop at growintentionallyahead kept the same balance going across the rest of the site, this is one of the harder skills in writing and the team here clearly has it figured out very well indeed across every page.
A thoughtful piece that did not strain to be thoughtful, and a look at growresultsdrivenstrategy continued that effortless quality, when thinking shows up in writing without the writer drawing attention to it you know you are reading something genuinely considered rather than something performing the appearance of consideration which is also common online.
Reading this prompted me to send the link to two different people for two different reasons, and a stop at learnandprogressfurther provided ammunition for a third share, content that suits multiple audiences without being generic enough to be useless to any of them is genuinely valuable and this site has that multi audience quality clearly.
Got pulled in by the headline and stayed because the content actually delivered on the promise, and a stop at createbetterdecisions kept that trust intact, when a site lives up to its own framing it earns the right to keep showing up in my browser tabs going forward indefinitely from here on out really.
Заказ ритуальных услуг онлайн: удобство и эффективность (2)
Started imagining how I would explain the topic to someone else after reading, and a look at learnandapplystrategies gave me more material for that imagined explanation, content that improves my own ability to discuss a topic is content that has actually transferred knowledge rather than just decorating my screen for a few minutes.
Came in skeptical and left mostly convinced, that is the highest praise I can offer, and a look at findgrowthpotentialnow pushed me further in the same direction, content that survives a critical first read is rare and worth recognising because most blog posts crumble under any real scrutiny these days when you actually pay attention closely.
This actually answered the question I had been searching for, and after I checked learnandbuild I had a few more pieces I had not realised I needed, that is the sign of a site that knows what its readers want before they even know how to ask it which is impressive.
Güvenli bahis deneyimi için 1xbet türkiye adresini kullanabilirsiniz.
1xbet giriş yapmak. Üyelik ve giriş süreci hızlıca tamamlanabilir. İlk olarak doğru adresin kullanılması önemlidir. Güvenli bağlantı sayesinde bilgileriniz korunur.
1xbet giriş ekranına ulaşmak için sayfanın üst kısmındaki giriş butonuna tıklanmalıdır. Hatalı bilgi girişinde erişim sağlanamaz. Kişisel bilgilerinizi girmeden önce sayfanın orijinalliği onaylanmalıdır.
Yeni kullanıcılar kolayca siteye kayıt olabilirler. Kayıt formunda doğru ve güncel bilgilerin girilmesi tavsiye edilir. Hesap güvenliği için doğrulama zorunlu olabilir.
Hesabınız aktif olduktan sonra çeşitli avantajlarınız olur. Çeşitli spor dallarında bahis yapma imkanı sunulur. Kampanyalar hakkında bilgi alabilir ve fırsatları yakalayabilirsiniz.
Liked that there was nothing performative about the writing, and a stop at startyournextdirection continued that genuine quality, performative writing tries to be witnessed rather than read and the difference between performance and substance is huge for the careful reader and this site has clearly chosen substance every time clearly.
Bookmark earned, calendar reminder set, share queued, all from one good post, and a look at startwithclearfocus did the same, when a single reading session triggers multiple downstream actions you know the content has actually moved me beyond the page and this site is moving me at that higher level reliably.
Came across this through a roundabout path and now it is on my regular rotation, and a stop at seotactic sealed that decision, the open web still produces serendipitous discoveries when you let the citations and references guide you rather than relying purely on algorithmic feeds for new content recommendations always.
A satisfying piece in the way that good meals are satisfying rather than just filling, and a look at growwithconfidenceandclarity extended that satisfaction, the metaphor between content and meals is one I find useful and this site reads as a satisfying meal rather than the empty calories that most content provides for casual readers.
Reading this felt productive in a way most internet reading does not, and a look at edgecradles continued that productive feeling, sometimes the open web feels like a waste of time but sites like this remind me why I still bother to look around rather than retreating to old reliable sources for everything I need.
Worth flagging that this approach to the topic is fresh without being contrarian, and a stop at createforwardsteps extended the same fresh angle, finding original perspective on familiar subjects is rare and this site has clearly developed its own way of seeing rather than echoing the dominant takes from elsewhere consistently.
A genuinely unexpected highlight of my reading week, and a look at itucox extended that pattern, the surprise of finding excellent content rather than the predictable mediocre is one of the few real pleasures of casual web browsing and this site delivered that surprise cleanly today which I really do appreciate.
Useful enough to recommend to several people I know who would appreciate it, and a stop at createprogressdirection added more material I will pass along too, the kind of writing that earns word of mouth is the kind that actually delivers on its promises which is what this site does without any drama or fanfare attached.
Just want to recognise that someone clearly cared about how this turned out, and a look at createforwardprogress confirmed that care extends across the broader site, you can feel the difference between content shipped to hit a deadline and content released because the writer was actually proud of the result for once.
Yesterday I was complaining about the state of online writing and today this site has temporarily fixed that complaint, and a look at seovista extended that mood reversal, the short term mood improvement that comes from finding good content is real and this site has produced that improvement for me at a useful moment.
Sets a higher bar than most of what shows up in search results for this topic, and a look at explorefutureoptionsnow did not lower that bar at all, in fact it confirmed the impression, this is the kind of consistency that earns a place in regular rotation for serious readers instead of casual scrollers passing through.
A piece that demonstrated competence without performing it, and a look at learnandprogresssteadilynow maintained the same self assured but unshowy register, the gap between competence and performance of competence is one I track and this site has clearly chosen to demonstrate rather than perform which I find much more persuasive as a reader.
Гараж из сэндвич панелей на заказ Тульская область
Closed it feeling I had taken something away rather than just consumed something, and a stop at findmomentumnextstep extended that taking away feeling, the difference between content I extract value from and content I just pass through is something I track informally and this site is consistently in the value extraction column for me.
Reading this on a phone at a coffee shop and finding it perfectly suited to that context, and a stop at discovermeaningfuldirection continued the comfortable mobile experience, content that works across reading conditions without compromising on substance is increasingly important and this site has clearly thought about the whole reader experience here.
Liked that the post resisted a sales pitch ending, and a stop at learnandoptimizepathway maintained the no pitch approach, content that ends without trying to convert me into a customer or subscriber is content that has confidence in its own value and this site is clearly playing the long game on reader trust.
monopoly baller live monopoly baller live .
Picked this for my morning read because the topic seemed worth the time, and a look at buildstrategicmovement confirmed the choice was right, my morning reading slot is precious and giving it to this site felt like a good investment rather than a waste which is a higher endorsement than I usually offer for content.
Came in expecting another generic take and got something with actual character instead, and a look at learnandapplywisely carried that personality forward, finding a distinct voice on a saturated topic is impressive and worth pointing out when it happens because most sites end up sounding identical to their nearest competitors quickly.
Stayed longer than planned because each section earned the next, and a look at learnandgrowstrong kept that pulling effect going across more pages, the kind of subtle pull that good writing exerts on attention is something I find harder and harder to resist when I encounter it on the open web today.
Useful information presented in a way that does not feel like a sales pitch, that is what I appreciated most, and a stop at discovernewanglesnow was the same, no upsell and no fake urgency just steady content laid out properly for someone trying to actually learn from it rather than just be sold to.
Worth recognising the specific care that went into how this post ended, and a look at learnandmoveforward maintained the same careful conclusions, endings are where most blog content falls apart and this site has clearly invested in the closing stretches of its pieces rather than letting them simply trail off when energy fades.
Stayed longer than planned because each section earned the next, and a look at findyourcompetitiveedge kept that pulling effect going across more pages, the kind of subtle pull that good writing exerts on attention is something I find harder and harder to resist when I encounter it on the open web today.
Мы рассмотрим современные вызовы здравоохранения и пути их решения с помощью технологий и научных исследований. В статье собраны данные о новых лекарствах, методах диагностики и системном подходе к улучшению здоровья населения.
Прочесть всё о… – вывод из запоя стационар самара
В этой публикации мы обсуждаем современные методы лечения различных заболеваний. Читатели узнают о новых медикаментах, терапиях и исследованиях, которые активно применяются для лечения. Мы нацелены на то, чтобы предоставить практические знания, которые могут помочь в борьбе с недугами.
См. подробности – стационар вывод из запоя
A genuine compliment to the writer for keeping the post focused on what mattered, and a look at growwithfocusedexecution continued that disciplined focus, focus is a editorial choice that compounds across many small decisions and this site has clearly made those small decisions consistently across what I have read so far this week here.
Skipped the TLDR thinking I would read everything anyway, and ended up enjoying the path through the full post, and a stop at learnandoptimizegrowth similarly rewarded the patient read, summaries are useful but the journey through good writing is part of what makes the destination feel earned rather than just delivered cleanly.
Reading this prompted a small note in my reference file, and a stop at learnandprogressnow prompted another, the rare site that contributes useful nuggets to my own working knowledge rather than just consuming my attention is worth the time investment many times over compared to the usual pile of forgettable scroll content.
Этот документ охватывает важные аспекты медицинской науки, сосредотачиваясь на ключевых вопросах, касающихся здоровья населения. Мы рассматриваем свежие исследования, клинические рекомендации и лучшие практики, которые помогут улучшить качество лечения и профилактики заболеваний. Читатели получат возможность углубиться в различные медицинские дисциплины.
Подробности по ссылке – быстрый вывод из запоя в стационаре
Этот медицинский обзор сосредоточен на последних достижениях, которые оказывают влияние на пациентов и медицинскую практику. Мы разбираем инновационные методы лечения и исследований, акцентируя внимание на их значимости для общественного здоровья. Читатели узнают о свежих данных и их возможном применении.
Перейти к статье – раскодирование от алкоголизма
Для тех, кто в теме, прямая ссылка. Выкладываю, чтобы не потерялось, делюсь полезной ссылкой: мелбет скачать на андроид.
Вообще проект реально топовый — линия на футбол и теннис огромная. Плюс ко всему трансляции матчей идут без задержек.
И еще, при регистрации можно неплохо увеличить первый депозит, рекомендую воспользоваться. Пишите, если возникнут вопросы.
Even on a quick first read the substance of the post comes through, and a look at unicorntempo reinforced that immediate quality, content that does not require a slow careful read to demonstrate value but rewards one anyway is content with real depth and this site has produced work of that demanding depth class.
Thanks for putting in the work to make this approachable, plenty of sites cover the same ground but most do it badly, and a quick visit to explorefuturegrowthlanes confirmed this one stands apart, simple language and useful examples without anyone trying to sell me anything along the way which I really appreciated.
Чтобы быстро и эффективно гайд, воспользуйтесь специализированными сервисами.
Слушай, тут главное — без глупостей.
Проверка разных платформ увеличивает шанс найти нужную информацию.
Короче, не нарывайтесь.
Really thankful for posts that respect a reader’s time, this one does, and a quick look at findnewopportunitypaths was the same, no need to scroll through endless intros just to get to the actual content, that approach alone is enough reason to come back here regularly for the kind of writing offered.
The whole experience of reading this was pleasant from start to finish, no pop ups and no annoying interruptions, and a look at shopmint continued that clean experience, technical choices about page design matter for the reader and this site clearly cares about the small details that add up to comfort across multiple visits.
Всем доброго времени суток. Дело деликатное, но решил черкануть пару строк, потому что в экстренной ситуации трудно сориентироваться. Если срочно требуется квалифицированная медицинская помощь, то не рискуйте и не доверяйте случайным объявлениям.
Сам долго изучал отзывы и искал надежный вариант, и в итоге нашли клинику, где врачи работают профессионально. Кому тоже нужны подробности и условия, вся информация есть здесь: запой стационар запой стационар.
Врачи дежурят круглосуточно во всех районах, так что найдете ответы на свои вопросы. Надеюсь, эта рекомендация и обращайтесь к настоящим профессионалам. Всем душевного спокойствия!
Even across multiple posts the writers voice has remained consistent in a way I appreciate, and a stop at buildsmartplanning continued that voice, sites that maintain editorial consistency across many pieces have something most sites lack and this one has clearly worked out how to keep its voice steady across what reads as a growing archive.
Now adding the writer to a small mental list of voices I want to follow, and a look at exploreuntappeddirectionpaths reinforced that follow intention, the few writers whose work I actively track are writers who have demonstrated sustained quality and this writer has clearly demonstrated that sustained quality across the pieces I have sampled here today.
A piece that handled multiple complications without becoming confused, and a look at findmomentumnextstage continued that organisational clarity, holding multiple threads in a single piece without losing any of them is a sign of skilled writing and this site has clearly developed the editorial discipline to manage complexity without sacrificing readability throughout.
В этой медицинской статье мы погрузимся в актуальные вопросы здравоохранения и лечения заболеваний. Читатели узнают о современных подходах, методах диагностики и новых открытий в научных исследованиях. Наша цель — донести важную информацию и повысить уровень осведомленности о здоровье.
Получить профессиональную консультацию – вызов нарколога на дом круглосуточно
Now setting aside time on my next free afternoon to read more from the archives, and a stop at explorefreshstrategicgrowth confirmed that time will be well spent, the rare site whose archive deserves a dedicated reading session rather than just casual sampling is the kind of resource worth scheduling around and this one qualifies clearly.
Публикация посвящена жизненным историям людей, успешно справившихся с зависимостью. Мы покажем, что выход есть, и он начинается с первого шага — принятия проблемы и желания измениться.
Ссылка на источник – услуги нарколога на дому
Мы рассмотрим современные вызовы здравоохранения и пути их решения с помощью технологий и научных исследований. В статье собраны данные о новых лекарствах, методах диагностики и системном подходе к улучшению здоровья населения.
Обратиться к источнику – быстрый вывод из запоя в стационаре
This filled in a gap in my understanding that I had not even noticed was there, and a stop at frostcoast did the same, the kind of post that gives you more than you expected when you first clicked through from somewhere else, a real find for anyone curious about the area covered here.
Reading this gave me something to think about for the rest of the afternoon, and after startbuildingstrategically I had even more to mull over, the kind of post that lingers in the background of your day rather than evaporating immediately is genuinely valuable in an attention economy that punishes depth rather than rewarding it.
Now saved this in a way that I will actually find again rather than the casual bookmark approach, and a stop at ivafix earned the same careful saving, organising my reading bookmarks so that high quality sources rise to the top is something I should do more of and this site triggered that organisation today.
Decided to read this site for a while before forming a verdict, and the verdict after several pages is positive, and a stop at seostreet continued that pattern, judging a site requires more than one post and giving sites a fair sample is something I try to do for promising candidates rather than rushing to dismiss.
В этом обзоре мы обсудим современные методы борьбы с зависимостями, включая медикаментозную терапию и психотерапию. Мы представим последние исследования и их результаты, чтобы читатели могли быть в курсе наиболее эффективных подходов к лечению и поддержке.
Неизвестные факты о… – вывод из запоя анонимно недорого
Most of the time I feel the open web is in decline and then I find a site like this, and a stop at buildsmartforwarddirection reinforced that mood lift, the cumulative effect of finding occasional excellent independent content versus the cumulative effect of finding mostly mediocre content is real for the long term reader maintaining web habits today.
High quality writing, no marketing speak and no buzzwords that mean nothing, and a stop at findnewperspective kept that going, simple direct content that actually communicates something is harder to find than it should be and this is one of the rare places that gets it right consistently across many different posts.
Started believing the writer knew the topic deeply by about the second paragraph, and a look at startmovingstrategically reinforced that confidence, the speed at which a writer establishes credibility through their writing is a useful quality signal and this writer establishes it quickly and quietly without resorting to credential dropping or self promotion.
Выбор места и подготовка помещения
Этот информационный материал подробно освещает проблему наркозависимости, ее причины и последствия. Мы предлагаем информацию о методах лечения, профилактики и поддерживающих программах. Цель статьи — повысить осведомленность и продвигать идеи о необходимости борьбы с зависимостями.
Смотрите также – стационарное выведение из запоя
Found something quietly useful here that I expect to return to, and a stop at discovercreativepathsnow added more of the same, content with quiet utility ages well in a way that flashy hot takes do not and I have learned to weight quiet utility much higher when deciding what to bookmark for later use.
A piece that built up gradually rather than front loading its main points, and a look at findyourwinningdirection maintained the same gradual structure, content that trusts the reader to reach conclusions through accumulating reasoning is more persuasive than content that announces conclusions and then defends them and this site uses the persuasive approach.
В этой статье мы говорим о важности поддержки в процессе выздоровления. Рассматриваются семьи, группы поддержки, специалисты и онлайн-ресурсы, которые могут сыграть решающую роль в избавлении от зависимости.
Давай разберёмся досконально – врач на дом капельница от запоя
Reading this on the train into work was a better use of the commute than my usual choices, and a stop at growfocusedprogressnow extended that commute reading well, content that improves transit time rather than just filling it is content with practical benefit and this site has earned its place in my morning commute reading rotation.
Most blog writing on this subject reaches for the same handful of arguments and this post avoided them, and a look at explorefutureoptions continued the original treatment, content that finds its own path through territory other writers have flattened is content with real authorial energy and this site has plenty of that distinctive energy.
Found the use of subheadings really helpful for scanning back through the post later, and a stop at growstepbystrategy kept that reader friendly approach going, navigation is something many blog writers ignore but small structural choices make a noticeable difference for someone returning to find a specific point again days or weeks later.
Recommend this to anyone who values clear thinking over flashy presentation, and a stop at learnandrefineapproach continued in the same understated way, this site has its priorities in the right place which makes it worth supporting through repeat visits and recommendations rather than just one passing read today before moving on quickly elsewhere.
Picked this up while looking for something else and ended up reading every paragraph because it was actually informative, and after buildsustainabledirection I was sure I would come back, that does not happen often when most sites bury the useful parts under endless ads and pop ups today and across most categories online.
Давно присматривался к разным предложениям, где реально учат делу. Особенно когда речь про онлайн-школу для детей — тут ведь нужна нормальная подача. У меня дочка как раз искал гибкий график, так что пришлось перебрать кучу вариантов. В общем, можете глянуть сами: интернет-школа https://shkola-onlajn-55.ru Я если честно ещё пару месяцев назад вообще не верил в онлайн образование школа. Оказалось — зря сомневался. У них и обратная связь отличная. Доволен как слон, если честно. Надеюсь, поможет в выборе.
Reading this in a relaxed evening setting was a small pleasure, and a stop at learnandprogressintentionally extended the pleasant evening reading, content that fits the tone of relaxed time without becoming forgettable is what I look for in evening reading and this site has the right tone for that particular slot in my daily reading routine.
Я в шоке от количества курсов в последнее время, но после кучи долгих обсуждений наткнулся на один рабочий и проверенный вариант. Короче, вот что я понял: современная онлайн-школа для детей — это уровень на порядок выше обычного. Там и преподаватели живые и вовлеченные, что очень радует на практике.
В общем, кому реально нужно нормальное обучение в теме онлайн образование школа — убедитесь во всём сами, вот здесь все разжевано до мелочей: онлайн школа 10 11 класс https://shkola-onlajn-54.ru.
Если честно, даже не ожидал такого крутого качества. Потому что стандартный дистант бывает дико скучным для ребенка, а тут организована именно грамотно выстроенный учебный процесс. Держите этот вариант у себя в закладках.
Now feeling the post has earned a proper recommendation rather than a casual mention, and a stop at seoharbor reinforced the recommendation strength, the difference between mentioning and recommending is a small editorial distinction I observe in my own conversations and this site has earned the upgraded recommendation level from me confidently today.
Decided to set a calendar reminder to revisit, and a stop at buildpositiveoutcomes extended that revisit list, calendar entries for content are a level of commitment I rarely make but when I do they signal a higher regard than a simple bookmark and this site has earned that calendar tier of relationship from me today.
Beyond the topic at hand this site reads as a small ongoing project of taking writing seriously, and a look at growwithstrategyintentnow reinforced that project quality, sites that treat publishing as an ongoing serious practice rather than as content production for traffic are sites worth supporting and this one has clearly chosen the serious approach.
сколько стоит перевозка машины перевозка авто москва стоимость
Speaking honestly this is among the better discoveries of my recent browsing, and a stop at growfocusedprogress reinforced that discovery quality, the ranking of recent discoveries is informal but meaningful and this site has placed near the top of that ranking based on the consistency of quality across what I have already read carefully.
Really appreciate the lack of pop ups, modals, cookie banners stacking on top of each other, and a quick visit to discovernewanglestoday confirmed the same clean approach across the rest of the site, technical decisions about user experience are part of what makes content actually pleasant to engage with for sure.
Этот текст посвящён сложным аспектам зависимости и её влиянию на жизнь человека. Мы обсудим психологические, физические и социальные последствия зависимого поведения, а также важность своевременного обращения за помощью.
Более подробно об этом – врач нарколог на дом круглосуточно
Результаты анализов требуются для подтверждения состояния здоровья и прохождения различных обследований. Мы помогаем подготовить необходимые документы https://baza-spravki.com/svidetelstvo-o-rastorzhenii-braka/
Approaching this with the usual skepticism I bring to new sites and being slowly persuaded, and a stop at growresultsdriven continued that gradual persuasion, the careful path from skeptical reader to genuine fan is the only one I trust and this site has walked me along that path through patient consistent quality across pieces.
Such writing is increasingly rare and worth supporting through attention, and a stop at createprogressfocusedstrategy extended that supportive attention across more pages, the conscious choice to spend time on sites that produce careful work rather than convenient consumption is itself a small form of patronage and this site is receiving that conscious patronage from me.
Now adding a small note in my reading log that this site is one to watch, and a look at createimpactforward reinforced the watch status, the few sites I track deliberately rather than encounter accidentally are sites I expect ongoing returns from and this one has cleared the bar for that elevated tracking based on what I read.
Working through this site has been a small antidote to the shallow content that fills most of my reading time, and a stop at startbuildingfuture extended that antidote function, sites that quietly improve the average quality of my reading by being themselves are sites worth supporting through return visits and recommendations consistently.
Эта информационная публикация освещает широкий спектр тем из мира медицины. Мы предлагаем читателям ясные и понятные объяснения современных заболеваний, методов профилактики и лечения. Информация будет полезна как пациентам, так и медицинским работникам, желающим поддержать уровень своих знаний.
Углубиться в тему – клиника плюс тверь
Now considering the post as evidence that careful blog writing is still possible, and a look at findyournextphase extended that evidence, the broader question of whether the modern web can sustain quality writing has obvious empirical answers in sites like this one and seeing them is reassuring even when they remain a minority overall today.
Found something new in here that I had not seen explained this way before, and a quick stop at startyournextmove expanded the idea even further, the kind of writing that nudges your thinking forward a bit without forcing the issue is exactly what I look for online today and rarely actually find anywhere.
Honest opinion is that this is the kind of post that builds long term trust with readers, and a look at discovernewdirectionpathsnow reinforced that perception, the slow accumulation of trust through consistent quality is the only sustainable way to build a real audience and this site is clearly playing that long game.
Considered against the flood of similar content this one stands apart in important ways, and a stop at ivebump extended that distinctive feel, sites that find their own corner of a crowded topic and stay there are sites worth following and this one has clearly carved out its own space and committed to defending it carefully.
Honestly this was a good read, no jargon and no padding, and a short look at explorefuturepathways kept that same feel going which I really appreciated, the writer clearly knows the topic well enough to explain it without hiding behind big words or filler that often gets used to seem clever.
Güvenli bahis deneyimi için 1xbet giriş adresini kullanabilirsiniz.
son derece hızlı ve pratik. Bu siteye erişim için birkaç adım yeterlidir. Kullanıcılar giriş yapmak için doğru siteyi seçmelidir. SSL sertifikası ile güvenliğiniz sağlanır.
Kullanıcılar giriş yapmak için ana sayfadaki giriş linkini kullanmalıdır. Doğru kullanıcı adı ve şifre girilmesi çok önemlidir. Her zaman resmi site olduğundan emin olunması gerekir.
Üyeliğiniz yoksa, kayıt işlemi birkaç dakika içinde tamamlanabilir. Bilgilerin eksiksiz ve doğru doldurulması önem taşır. Hesap güvenliği için doğrulama zorunlu olabilir.
1xbet girişi yaptıktan sonra pek çok fırsattan yararlanabilirsiniz. Çeşitli spor dallarında bahis yapma imkanı sunulur. Kampanyalar hakkında bilgi alabilir ve fırsatları yakalayabilirsiniz.
Reading this post made me realise I had been settling for lower quality elsewhere, and a look at findyournextgrowthstage extended that recalibration, content that exposes how much I had been accepting in adjacent sources is content with calibrating effect on my standards and this site is performing that calibration function across topics for me reliably.
кадровые агентства адрес компании по подбору персонала
Worth every minute of the time spent reading, and a stop at clearpathcreation extends that value across more pages, in a media environment where most content is engineered to waste attention this site stands out by treating reader time as something valuable rather than something to be exploited and stretched as far as possible.
Felt the post handled a sensitive angle of the topic with appropriate care, and a look at claritydrivenexecution extended that careful handling across related material, sites that can navigate delicate territory without causing damage are rare and require a level of judgement that comes from experience rather than from following any clear playbook.
Этот документ охватывает важные аспекты медицинской науки, сосредотачиваясь на ключевых вопросах, касающихся здоровья населения. Мы рассматриваем свежие исследования, клинические рекомендации и лучшие практики, которые помогут улучшить качество лечения и профилактики заболеваний. Читатели получат возможность углубиться в различные медицинские дисциплины.
Кликни и узнай всё! – вывод из запоя капельница нижний новгород
В этой статье мы рассмотрим современные достижения в области медицины, включая инновационные методы лечения и диагностики. Мы обсудим важность профилактики заболеваний и роль технологий в улучшении качества здравоохранения. Читатели узнают о влиянии медицины на повседневную жизнь и ее значение для современного общества.
Осуществить глубокий анализ – прокапать от запоя нижний новгород
Liked the way the post balanced confidence and humility, and a stop at findgrowthopportunitiesnow maintained the same balance, knowing when to assert and when to acknowledge uncertainty is a sign of mature thinking and the writers here have clearly developed that calibration through what I assume is years of careful work on their craft.
Felt the post had been written without looking over its shoulder, and a look at startyourgrowthpath continued that confident posture, content written for its own sake rather than against imagined critics has a different quality and this site reads as written from a place of confidence rather than defensive justification of every claim.
Honest reaction is that this is the kind of writing I would defend in a conversation about good blog content, and a look at shoreskipper reinforced that, the rare site whose work I would actively recommend rather than just tolerate is the kind I want to support through return visits regularly.
Now feeling mildly impressed in a way I do not quite remember feeling about a blog in a while, and a stop at forwardthinkingengine extended that mild impression, content that produces specific positive emotional responses rather than just neutral information transfer is content with extra dimensions and this site has those extra dimensions clearly.
Better than the average post on this subject by some distance, and a look at discovernextdirection reinforced that, you can tell within the first paragraph that the writer here actually cares about the topic rather than just covering it for the sake of having something to publish that week or that day.
Strong recommendation, anyone interested in this topic owes themselves a visit, and a stop at createimpactfocuseddirection extends that recommendation across more of the site, this is the kind of resource that makes me more optimistic about the state of the open web than I usually am these days actually for once which is genuinely refreshing.
Этот обзор сосредоточен на различных подходах к избавлению от зависимости. Мы изучим традиционные и альтернативные методы, а также их сочетание для достижения максимальной эффективности. Читатели смогут открыть для себя новые стратегии и подходы, которые помогут в их борьбе с зависимостями.
Подробнее тут – вывод из запоя цены нижний новгород
Grateful for posts like this one, they remind me there are still places online run by people who care about quality, and a look at seoloom reflected the same standards, you can tell the difference between content made for readers and content made just for search engines today and this is the former.
Этот медицинский обзор сосредоточен на последних достижениях, которые оказывают влияние на пациентов и медицинскую практику. Мы разбираем инновационные методы лечения и исследований, акцентируя внимание на их значимости для общественного здоровья. Читатели узнают о свежих данных и их возможном применении.
Нажмите, чтобы узнать больше – вывод из запоя в спб
Felt the post handled a sensitive angle of the topic with appropriate care, and a look at learnandgrowforward extended that careful handling across related material, sites that can navigate delicate territory without causing damage are rare and require a level of judgement that comes from experience rather than from following any clear playbook.
The way the post stayed on topic throughout without going on tangents was really refreshing, and a look at explorefuturepathwaysfast kept that focused approach going, discipline like this in writing is rare and worth recognising because most writers cannot resist wandering off into related subjects that dilute their main point and confuse readers along the way.
вызвать врача нарколога на дом анонимно вызвать врача нарколога на дом анонимно
I really like how the writer keeps the tone friendly without sounding fake or overly polished, and after a stop at discovergrowthdirectionpaths the same calm pace was there, no rushing to make a point and no padding either, just clean honest writing that I can respect and come back to later again.
Liked the natural conversational tone throughout, never stiff and never overly casual either, and a stop at buildstrongfoundations kept that comfortable middle ground going, finding a tone that respects the reader without becoming distant or overly familiar is harder than it sounds and this site nails that balance consistently across many different pieces.
Felt like the writer was speaking directly to someone with my level of curiosity, neither talking down nor showing off, and a stop at buildlongtermdirection kept that comfortable matching going, finding writing that meets you where you are rather than asking you to climb up or stoop down feels great every time it happens.
Reading this gave me a small refresher on something I had partially forgotten, and a stop at growstepbyintent extended the refresher, content that strengthens existing knowledge rather than just adding new is content with a particular kind of consolidating value and this site is providing that consolidating function across multiple visits.
Медицинские справки могут понадобиться для спортивных соревнований, трудоустройства и получения допуска к определенным видам деятельности: https://baza-spravki.com/spravka-pediatr/
Nice to see a post that does not try to overcomplicate the basics for the sake of looking smart, and once I looked at learnandprogressconsistently the same direct tone was there too, which honestly makes a difference when you are short on time and want answers without long pointless intros.
В данной статье мы поговорим о будущем медицины, акцентируя внимание на прорывных разработках и их потенциале. Читатель узнает о новых подходах к лечению, роли искусственного интеллекта и возможностях персонализированной медицины.
Познакомиться с результатами исследований – помогает ли капельница от похмелья
Reading this prompted me to dig out an old reference book related to the topic, and a stop at findgrowthopportunityspace extended that connection to other sources, content that connects me back to my own existing knowledge rather than asking me to forget it is content with continuity and this site has that continuous quality.
Refreshing tone compared to the dry corporate posts on similar topics, and a stop at buildpositiveforwardmotion carried that personality through nicely, you can tell when a real person is behind the writing versus a content team chasing metrics and this site definitely falls into the former category clearly across what I have seen.
Чтобы быстро и эффективно отследить телефон по номеру, воспользуйтесь нормальными ребята реально помогают.
В общем, тема такая, не для паники.
Этичное поведение защищает от возможных негативных последствий и нарушений закона.
Надеюсь, понятно объяснил.
Кстати, в соседней ветке кто-то спрашивал про адекватную альтернативу обычным школам. Сам недавно наткнулся на одну площадку. Там как раз упор на индивидуальный темп, нет этой дикой уравниловки: подробнее на сайте . Фишка в том, что можно спокойно закрыть программу без нервов и репетиторов по вечерам. Техподдержка отвечает быстро. Платформа не виснет на вебинарах, что для меня было критично. Короче, кому надоело возить чадо через весь город под дождем – заглядывайте.
Worth saying that the writing carries a particular kind of authority without making any explicit claims to it, and a stop at createforwardsteps extended that earned authority feeling, sites that demonstrate expertise through the quality of their explanations rather than by stating credentials are sites I trust most and this site has it.
Now appreciating that the post did not try to imitate any other style I might recognise, and a stop at discoveropportunitypathways continued that distinct voice, content with its own register rather than borrowed from elsewhere is content with real authorial presence and this site has clearly developed that presence through what feels like patient editorial work.
Well done, the writing is professional without being stiff, and the topic is treated with care, and a look at findgrowthchannelsnow reflected that approach, the kind of site I would point a colleague to if they asked for a reliable starting point on this topic in the future without any hesitation at all.
Алкогольный делирий проявляется в виде галлюцинаций, бреда и агрессии. При отсутствии контроля такие пациенты опасны для себя и окружающих, требуя немедленной госпитализации.
Подробнее – http://vivod-iz-zapoya-chelyabinsk13.ru
В данном обзоре представлены основные направления и тренды в области медицины. Мы обсудим актуальные проблемы здравоохранения, свежие открытия и новые подходы, которые меняют представление о лечении и профилактике заболеваний. Эта информация будет полезна как специалистам, так и широкой публике.
Почему это важно? – прокапать от алкоголя нижний новгород
Эта публикация обращает внимание на важность профилактики зависимостей. Мы обсудим, как осведомленность и образование могут помочь в предотвращении возникновения зависимости. Читатели смогут ознакомиться с полезными советами и ресурсами, которые способствуют здоровому образу жизни.
Нажми и узнай всё – помощь нарколога на дому
Now noticing how rare it is to find a site that does not feel rushed, and a look at learnandrefineprogressnow extended that calm pace, content produced without time pressure has a different quality than content shipped to meet a deadline and this site reads as written without urgency which produces a different and better experience for readers.
Worth recommending broadly to anyone who reads on the topic, and a look at createclarityframework only confirms that, the rare combination of accessibility and depth in this site makes it suitable for both newcomers and people who already know the area which is hard to pull off in any blog format today and rarely managed.
Most of my reading time goes to a small number of trusted sources and this one is now joining that group, and a stop at pebbletrailvendorstudio reinforced the group membership, the few sites that earn a place in my regular rotation are sites I expect ongoing returns from and this one has earned that elevated position consistently.
В статье по вопросам здоровья мы рассматриваем актуальные проблемы, с которыми сталкивается общество. Обсуждаются заболевания, факторы риска и важные аспекты профилактики. Читатели получат полезные советы о том, как сохранить здоровье и улучшить качество жизни.
Более того — здесь – вывод из запоя на дому недорого
Эта публикация посвящена актуальным вопросам современной медицины и здравоохранения. Мы обсудим новейшие технологии диагностики и лечения, а также их влияние на продолжительность и качество жизни. Читатель найдет здесь информацию о научных исследованиях и перспективных разработках, доступно изложенную для широкой аудитории.
Прочитать подробнее – лечение алкоголизма на дому
В этой статье мы рассматриваем разные способы борьбы с алкогольной зависимостью. Обсуждаются методы лечения, программы реабилитации и советы для поддержки близких. Читатели получат информацию о том, как преодолеть зависимость и добиться успешного выздоровления.
Детали по клику – выведение из запоя в нижнем новгороде
Now adjusting my mental model of how the topic fits into the broader landscape, and a look at executewithfocus extended that adjustment, content that affects my structural understanding rather than just my factual knowledge is content with deeper impact and this site is providing those structural updates at a meaningful rate consistently across topics.
Ended up here on a wandering afternoon and was glad I stayed for the read, and a stop at ixaqua extended the wandering into a proper exploration of the site, the kind of place that rewards aimless clicking with something genuinely interesting rather than the shallow content that mostly populates the modern open web.
Honestly slowed down to read this carefully which is not my default, and a look at buildsmartdirectionalplans kept me in that careful reading mode, the kind of writing that demands attention by being worth attention is rare in a media environment full of content engineered to be skimmed not read with any real focus today.
During a quiet evening reading session this provided just the right depth without being heavy, and a stop at discovernewfocusareas maintained the same evening appropriate weight, content with depth that does not exhaust the reader is content with editorial calibration and this site has clearly figured out how to be substantial without being demanding all the time.
Слушайте, наконец-то нашел нормальный разбор темы. Там всё разложено по полочкам, без лишней воды и тупых SEO-текстов. Рекомендую заглянуть, чтобы не совершать глупых ошибок, как я в прошлый раз. Вот мел бет мел бет — советую изучить на досуге. Там внутри и примеры, и пошаговые инструкции, короче полный фарш.
My usual pattern is to skim and bounce but this site has reset that pattern temporarily, and a stop at startbuildingvision maintained the slower reading mode, content that changes how I read is content with structural influence and this site has clearly nudged my reading behaviour toward something better at least for the duration of these visits.
The structure of the post made it easy to follow without losing track of where I was, and a look at portguilds kept the same logical flow going, this site clearly understands that organisation is half the battle in keeping readers engaged from the first line to the last across any kind of post.
Came across this through a roundabout path and now it is on my regular rotation, and a stop at findyourcorestrength sealed that decision, the open web still produces serendipitous discoveries when you let the citations and references guide you rather than relying purely on algorithmic feeds for new content recommendations always.
Worth pointing out the careful word choice in this post, no buzzwords and no jargon, and a look at buildsustainableforwardmomentum continued that disciplined vocabulary, sites that resist the pull of trendy language are sites that will read well in five years and this one is clearly built for that kind of long durability.
подбор и найм персонала отдел подбора персонала
Now recognising the post as a rare example of careful writing on a topic that mostly receives careless treatment, and a stop at growfocusedexecutionnow extended that contrast with the average elsewhere, content that highlights how much the average is settling for low quality is content that has both internal merit and external value as a benchmark.
Felt like the post had been edited rather than just drafted and published, and a stop at buildactionabledirectionsteps suggested the same care across the site, the difference between edited and unedited content is enormous for the reader and this site has clearly invested in the editing pass that most blogs skip entirely which really does show up.
Glad I clicked through from where I did because this turned out to be worth the time spent, and after buildwithdirection I had a fuller picture, the kind of content that earns its visitors through delivering value rather than chasing them through aggressive advertising or constant pop ups appearing everywhere on the screen lately.
Looking forward to seeing what gets published next month, and a look at discoverpowerfuldirections extended that anticipation across the broader site, finding myself looking forward to a sites future content rather than just consuming its existing content is a stronger commitment level than I usually reach with new finds and this site triggered that.
If you scroll past this site without looking carefully you will miss something, and a stop at findyournextsignal extended that mild warning, the surface of the site does not advertise its quality loudly which means careful attention is required to recognise what is being offered here which is itself a kind of editorial signal.
Really appreciate the lack of pop ups, modals, cookie banners stacking on top of each other, and a quick visit to explorefreshpossibilities confirmed the same clean approach across the rest of the site, technical decisions about user experience are part of what makes content actually pleasant to engage with for sure.
Well structured and easy to read, that combination is rarer than people think, and a stop at startmovingupward confirmed the same standard runs across the rest of the site, definitely the kind of place I will be coming back to when this topic comes up in conversation later again over the weeks ahead.
Really appreciate the lack of pop ups, modals, cookie banners stacking on top of each other, and a quick visit to buildsustainablemomentum confirmed the same clean approach across the rest of the site, technical decisions about user experience are part of what makes content actually pleasant to engage with for sure.
Came across this looking for something else entirely and ended up reading it through twice, and a look at growwithconfidencepathway pulled me deeper into the site than I planned, the writing has a way of holding attention without resorting to manipulative cliffhangers or vague promises that never get delivered later down the page.
Our most valuable: מספר שירות ליווי
Worth a quiet moment of recognition for the consistency I have noticed across multiple posts, and a stop at buildyournextvision continued that consistent quality, sites that maintain quality across many pieces rather than peaking on one viral post are sites with real editorial discipline and this one has clearly developed that discipline carefully.
Публикация посвящена жизненным историям людей, успешно справившихся с зависимостью. Мы покажем, что выход есть, и он начинается с первого шага — принятия проблемы и желания измениться.
Получить исчерпывающие сведения – clinica plus в твери
A piece that did exactly what it promised in the headline without overshooting or underdelivering, and a look at exploreuntappeddirections continued that calibration, alignment between promise and delivery is a basic editorial virtue that many sites fail at and this site has clearly mastered the matching of expectation and substance throughout pieces.
Generally my comment to other readers about new sites is to wait and see but for this one I would jump to recommend now, and a look at growwithstrategyfocusnow reinforced that early recommendation, the speed at which a site earns my recommendation is itself a quality signal and this one has earned mine quickly clearly.
Слушайте, реально замучилась искать нормальную платформу для дочки. Везде одна вода или заоблачные ценники. Соседка по площадке посоветовала глянуть вот этот проект: тут . Пришлось признать, что был не прав. Успеваемость подтянулась, особенно по точным наукам. Объясняют на пальцах, без лишней воды. Плюс огромный – никаких больничных, заболел – смотришь записи. Для современных детей самое то, ИМХО.
Felt the post had been written without using a single buzzword, and a look at coralharborretailgallery continued that clean vocabulary, content free of jargon and trendy phrases reads better and ages better and this site has clearly committed to a vocabulary that will not feel dated in three years which is impressive editorially.
Came away feeling slightly smarter than I was when I started, that is a real win, and a stop at growthwithdiscipline added a bit more to that, the rare site that actually transfers some of its knowledge to the reader in a way that sticks rather than just creating an illusion of learning briefly.
Worth pointing out that the writer made the topic feel more interesting than I had been expecting, and a look at exploreideasdeeplynow continued that elevation effect, content that improves the apparent quality of its subject through skilled treatment is doing something real and this site has clearly developed that kind of editorial alchemy throughout.
Polished and informative without feeling overproduced, that is the sweet spot, and a look at claritydrivenactions hit it again, you can tell when a site has been built with care versus thrown together for the sake of having something to put online and this is clearly the former approach taken by the team.
This filled in a gap in my understanding that I had not even noticed was there, and a stop at sofatavern did the same, the kind of post that gives you more than you expected when you first clicked through from somewhere else, a real find for anyone curious about the area covered here.
A small thank you note from me to the team behind this work, the post earned it, and a stop at discovernextgrowthchapter suggested more thanks would be in order over time, recognising the people who do good writing online is something I try to remember to do because the alternative is silence and silence rewards mediocrity unfortunately.
Now sitting with the thoughts the post triggered rather than rushing on to the next thing, and a stop at createimpactstrategies extended that reflective pause, content that earns time for thought after closing the tab is content of higher value than the merely interesting and this site has clearly produced that lasting effect today.
Now adding this to a short list of sites I would defend in a conversation about the modern web, and a look at veilshore reinforced that defence list, the few sites that serve as evidence the web can still produce good things are precious and this one has clearly joined that small list of exemplary sites.
Thanks for sharing this with the open internet rather than locking it behind a paywall like so many sites do now, and a stop at findnewopportunitypaths kept the same vibe going, generous helpful and clearly written by someone who actually wants people to learn from it rather than just charge them.
Now recognising that the post handled the topic with appropriate technical precision without becoming dry, and a stop at growintentionallyforward continued that balance, technical precision and readability are often in tension and this site has clearly figured out how to maintain both at once which is one of the harder editorial achievements in the form.
Solid little post, the kind that does not need to be flashy because the substance is doing the work, and a look at discovermeaningfulgrowthpaths kept that quiet confidence going across the site, this is what writing looks like when the writer trusts the content to land on its own without theatrics or unnecessary attention seeking behaviour.
Saving this link for the next time someone asks me about this topic, and a look at learnandscaleprogressnow expanded what I will be sharing with them, this is the kind of resource that makes a real difference when you are trying to point a friend to something useful and reliable rather than generic marketing pages.
Давно искал нормальный вариант, где реально учат делу. Особенно когда речь про образовательные онлайн школы — тут ведь без фанатизма и воды. У меня сын как раз искал гибкий график, так что намучились мы знатно. В общем, вся подробная информация вот тут: школа онлайн 11 класс https://shkola-onlajn-55.ru Я если честно ещё пару месяцев назад вообще относился скептически к таким форматам. Оказалось — зря сомневался. У них и обратная связь отличная. В общем, рекомендую присмотреться. Надеюсь, поможет в выборе.
Reading carefully here has reminded me what reading carefully feels like, and a look at findyournextfocusarea extended that reminder, the experience of careful reading versus skimming is different in ways I had partially forgotten and this site has clearly refreshed my memory of what attention feels like when content rewards it consistently.
Most attempts at writing on this topic feel like they are missing something and this post finally identified what was missing, and a look at izoblade extended that diagnostic clarity, content that names what is wrong with adjacent treatments while doing better itself is content with both critical and constructive value and this site has both.
Честно говоря, долго выбирал, куда поступать, но после кучи долгих обсуждений наткнулся на один действительно толковый вариант. Если кратко, вот что я понял: современная онлайн-школа для детей — это уровень на порядок выше обычного. Там и домашние задания с подробной индивидуальной проверкой, и дети занимаются с реальным интересом.
В общем, кому понимает толк в теме образовательные онлайн школы — убедитесь во всём сами, вот здесь все разжевано до мелочей: школы дистанционного обучения школы дистанционного обучения.
А я пока пойду дальше разбираться с расписанием. Потому что обычная школа часто проигрывает по всем фронтам, а тут организована именно частная школа онлайн. Советую не тянуть и сразу изучить тему.
Honestly this hits the sweet spot between detail and brevity, no rambling and no shortcuts, and a quick visit to growwithclearfocus kept that going across the related pages, the kind of place that respects your attention without trying to grab it through cheap tactics or attention seeking design choices that get tired fast.
However selective I am about new bookmarks this one made it past my filter, and a look at findyourprogressroute confirmed the bookmark was worth the slot, the precious slots in my permanent bookmark folder are difficult to earn and this site earned one without making me think twice about whether the slot was justified by the quality.
Glad I gave this a chance rather than scrolling past, and a stop at createvisionfocusedexecution confirmed I made the right call, sometimes the best content is hidden behind unassuming headlines that do not scream for attention and learning to slow down and check those out has paid off many times now across years of reading.
Top quality material, deserves more attention than it probably gets, and a look at lakequill reflected the same effort across the site, a hidden gem in the modern web where most attention goes to whoever shouts loudest rather than whoever actually delivers the best content for their readers without much marketing fanfare.
Good post, the kind that respects the reader by getting to the point quickly without skipping the details that matter, and a short look at buildfocusedgrowthpath confirmed that approach is consistent across the site which is rare to find online these days, definitely a place I will return to soon.
Decided not to comment because the post said what needed saying, and a stop at discovernewleverage continued that complete feel, content that does not invite obvious additions or corrections from readers is content that has been carefully considered and this site appears to consistently produce pieces that satisfy rather than provoke unnecessary follow ups.
Ac?kcas? sas?rd?m kalitesine. Girdim c?kt?m derken zaman kaybettim. En sonunda dogru adrese ulast?m.
Spor bahisleriyle ilgilenenler bilir. Su an en h?zl? cal?san 1xbet giris adresi tam olarak soyle: 1xbet giriş 1xbet giriş. Herkesin bildigi gibi — 1xbet guncel adres arayanlar buraya baks?n.
Site s?k s?k kapan?yor diyenlere inat. Kendi deneyimim buysa da — canl? destekleri bile h?zl?. Gonul rahatl?g?yla girebilirsiniz…
Refreshing change from the usual sites covering this topic, no clickbait and no padding, and a stop at unlocknewdirections confirmed the difference, this place clearly has its own voice rather than copying the formulas everyone else uses to chase clicks online which is becoming increasingly rare these days across nearly every popular subject.
If quality blog writing is dying as people sometimes claim then this site is one piece of evidence that it has not died yet, and a look at learnandscaleideas extended that evidence, the broader cultural question about online writing has empirical answers in specific sites and this one is contributing to a more optimistic answer overall.
Güvenli bahis deneyimi için 1xbet yeni giriş adresini kullanabilirsiniz.
1xbet platformuna giriş işlemi. Giriş yaparken dikkat edilmesi gereken bazı noktalar vardır. Kullanıcılar giriş yapmak için doğru siteyi seçmelidir. Site güvenliğine verilen önem yüksektir.
Giriş sayfasına yönlendirme için ana sayfadan ilgili buton seçilmeli. Doğru kullanıcı adı ve şifre girilmesi çok önemlidir. Her zaman resmi site olduğundan emin olunması gerekir.
Yeni kullanıcılar kolayca siteye kayıt olabilirler. Kayıt formunda doğru ve güncel bilgilerin girilmesi tavsiye edilir. Bazı durumlarda hesabınızı onaylemek için ek adımlar uygulanabilir.
1xbet girişi yaptıktan sonra pek çok fırsattan yararlanabilirsiniz. Çeşitli spor dallarında bahis yapma imkanı sunulur. Bonuslar ve özel tekliflerle kazancınızı artırabilirsiniz.
Skipped the related products section because there was none, and a stop at buildsmartmovementplans also lacked any aggressive monetisation, content that is not constantly trying to convert me into a customer or subscriber is content that has confidence in its own value and that confidence shows up as a different reading experience.
Чтобы быстро и эффективно официальный сайт, воспользуйтесь платформами которые не врут.
Слушай, тут главное — без глупостей.
Порой простой поиск позволяет обнаружить имя человека или его профиль.
Короче, не нарывайтесь.
Felt like the post had been edited rather than just drafted and published, and a stop at explorefreshopportunity suggested the same care across the site, the difference between edited and unedited content is enormous for the reader and this site has clearly invested in the editing pass that most blogs skip entirely which really does show up.
Приветствую всех участников. Дело деликатное, но решил черкануть пару строк, так как в сети сейчас полно сомнительных клиник. Если ищете анонимного специалиста с быстрым выездом, важно, чтобы доктора отреагировали оперативно.
Знакомые вызывали бригаду в похожей ситуации и в итоге нашли клинику, где врачи работают профессионально. Кому тоже нужны подробности и условия, советую посмотреть официальный источник: выведение из запоя в стационаре наркологии выведение из запоя в стационаре наркологии.
Там расписаны все аспекты, которые стоит учитывать, и помощь окажут полностью конфиденциально. Не теряйте время, и обращайтесь к настоящим профессионалам. Всем душевного спокойствия!
A piece that prompted a small mental rearrangement of how I order related ideas, and a look at buildgrowthdirectionnow extended that rearranging effect, content that affects the structure of my thinking rather than just adding to it is content with the deepest kind of impact and this site is reaching that depth for me today.
Reading this felt easy in the best way, no friction and no confusion at any point, and a stop at simplifythenexecute carried that same comfort across more pages, the kind of editorial flow that lets you absorb information without fighting the format which is increasingly hard to find on the open web today across topics.
Now recognising the specific pleasure of reading writing that shows real care for sentence shapes, and a look at createbetteroutcomes extended that craft pleasure, sentence level writing quality is something most blog content ignores entirely and this site has clearly invested in the prose layer alongside the substance which is rare today.
Felt the post handled a sensitive angle of the topic with appropriate care, and a look at startyournextphase extended that careful handling across related material, sites that can navigate delicate territory without causing damage are rare and require a level of judgement that comes from experience rather than from following any clear playbook.
Glad I gave this a chance instead of bouncing on the headline, and after createforwardplanningsteps I was certain I had made the right call, snap judgements based on titles miss a lot of good content and this is a reminder to slow down and check things out before scrolling past in a hurry.
Beyond the topic at hand this site reads as a small ongoing project of taking writing seriously, and a look at growwithintentionalsteps reinforced that project quality, sites that treat publishing as an ongoing serious practice rather than as content production for traffic are sites worth supporting and this one has clearly chosen the serious approach.
Closed and reopened the tab three times before finally finishing, and a stop at findyournextgrowthphase held my attention straight through, sometimes content fights for time against my own distraction and the times it wins say something positive about its quality and this post clearly won that fight today afternoon for me.
В этой статье рассматриваются различные аспекты избавления от зависимости, включая физические и психологические методы. Мы обсудим поддержку, мотивацию и стратегии, которые помогут в процессе выздоровления. Читатели узнают, как преодолеть трудности и двигаться к новой жизни без зависимости.
Разобраться лучше – вывод из запоя с выездом на дом
Genuine pleasure to read, and that is not something I say often after a casual click through, and a quick visit to discoverhiddenpaths kept the same feeling going across the rest of the site, finding writing that actually feels good to spend time with rather than just functional is increasingly rare on the open web.
Reading this gave me a quiet moment of intellectual pleasure that I had not been expecting, and a stop at findyourstrongpath extended that pleasure across more pages, the unexpected reward of stumbling into careful writing is one of the small ongoing pleasures of reading the open web and this site is delivering it reliably.
Took the time to read every paragraph rather than skimming for the punchline, and a quick visit to solarorchardmarketparlor earned the same careful attention from me, that is the highest signal I can give about content quality because my default mode is rapid scanning rather than deliberate reading on most pages.
A clean piece that knew exactly what it wanted to say and said it, and a look at progresswithprecision maintained the same clarity of intention, knowing the goal of a piece before writing is something most blog content lacks and the clarity of purpose here shows up in every paragraph for any careful reader to notice.
Liked that the post resisted a sales pitch ending, and a stop at jadburst maintained the no pitch approach, content that ends without trying to convert me into a customer or subscriber is content that has confidence in its own value and this site is clearly playing the long game on reader trust.
Found this through a search that was generic enough I did not expect quality results, and a look at buildpositivegrowth continued the surprisingly good experience, search engines occasionally still surface excellent independent content if you scroll past the obvious paid and high authority results which is reassuring to remember sometimes.
Closed the tab and immediately reopened it ten minutes later because I wanted to reread a part, and a stop at explorefutureopportunityideas drew the same return, content that pulls you back after closing it is doing something well beyond the average and worth marking as exceptional in my mental catalogue of reliable sites.
Better signal to noise ratio than most places I check on this kind of topic, and a look at startwithclearstrategy kept that going, every paragraph here carries something worth reading rather than padding out the page to hit some arbitrary length target that search engines reward but readers ignore as soon as they notice it.
Now leaving a small mental note to recommend this when the topic comes up in conversation, and a look at startthinkingstrategicallyfast extended that recommend ready feeling, content that arms me with shareable references for likely future conversations is content with social value and this site is providing that conversational ammunition consistently for me lately.
During a quiet evening reading session this provided just the right depth without being heavy, and a stop at discovernewdirectionflows maintained the same evening appropriate weight, content with depth that does not exhaust the reader is content with editorial calibration and this site has clearly figured out how to be substantial without being demanding all the time.
Reading more of the archives is now on my plan for the weekend, and a stop at createprogressjourney confirmed the archive worth the time, the rare archive worth a dedicated reading session rather than just casual sampling is the rare archive of serious work and this site has clearly produced enough of that work to warrant the deeper exploration.
Felt the writer respected me as a reader without making a show of doing so, and a look at findyourcorepath continued that quiet respect, this is the kind of small but meaningful detail that separates the sites I bookmark from the ones I close after a single skim and never return to again no matter how interesting the headline.
Really clear writing, the kind that makes you want to share the link with someone who has been asking about the topic, and a quick browse through briskolive only made me more sure of that, the information here stays useful long after the first read is done which says a lot.
Now noticing how rare it is to find a site that does not feel rushed, and a look at buildpositiveoutcomes extended that calm pace, content produced without time pressure has a different quality than content shipped to meet a deadline and this site reads as written without urgency which produces a different and better experience for readers.
Thanks for the moderate length, neither so short it skips substance nor so long it bloats, and a stop at createalignedactions hit the same balance, the right length is one of the hardest things to calibrate in blog writing and I appreciate when a team has clearly thought about it rather than defaulting.
Glad I gave this a chance rather than scrolling past, and a stop at senatetoucan confirmed I made the right call, sometimes the best content is hidden behind unassuming headlines that do not scream for attention and learning to slow down and check those out has paid off many times now across years of reading.
Time spent here today felt productive in the way that good reading sessions sometimes do, and a stop at findyournextbreakthrough extended that productive feeling across the rest of the morning, the difference between productive reading and merely passing time is real and this site is consistently on the productive side for me lately.
Reading this prompted me to subscribe to my first newsletter in months, and a stop at intentiondrivenprogress confirmed the subscribe was the right call, content that earns a newsletter signup is content that has cleared a higher trust bar than a casual visit and this site has clearly earned that level of commitment from me.
Reading this in the gap between work projects was a small but meaningful break, and a stop at learnandoptimizeexecution extended that gentle reset, content that provides genuine refreshment rather than just distraction during work breaks is content with a particular kind of utility and this site fits that role for me reliably during work days.
Just nice to read something that does not feel like it was assembled from a content brief, and a stop at exploreideaswithclarity kept that handcrafted feel going, you can tell when a real human with real understanding is behind the words versus a templated piece churned out for an algorithm to find.
Эта публикация обращает внимание на важность профилактики зависимостей. Мы обсудим, как осведомленность и образование могут помочь в предотвращении возникновения зависимости. Читатели смогут ознакомиться с полезными советами и ресурсами, которые способствуют здоровому образу жизни.
Интересует подробная информация – вывод из запоя недорого нарколог24
Came away with some new perspectives I had not considered before, and after designbetteroutcomes those ideas felt more complete, the kind of content that stays with you a little while after reading rather than slipping out the moment you switch tabs and move on with your day to whatever comes next.
Now adding a small note in my reading log that this site is one to watch, and a look at learnandadvanceconfidently reinforced the watch status, the few sites I track deliberately rather than encounter accidentally are sites I expect ongoing returns from and this one has cleared the bar for that elevated tracking based on what I read.
Now feeling the post has earned a proper recommendation rather than a casual mention, and a stop at learnandtransformdirectionnow reinforced the recommendation strength, the difference between mentioning and recommending is a small editorial distinction I observe in my own conversations and this site has earned the upgraded recommendation level from me confidently today.
Took a screenshot of one section to come back to later, and a stop at buildfocusedmomentumnow prompted another saved tab, the urge to capture and revisit specific pieces of content is something I rarely feel but when I do it tells me the work is worth more than the average passing read for sure.
Felt mildly happier after reading, which sounds silly but is true, and a look at discoveropportunitydirectionnow extended that small mood lift, content that improves rather than degrades my mental state is content I want more of and the cumulative effect of reading sites that lift versus sites that drag is real over time.
Reading this fit naturally into my afternoon walk because I was reading on my phone, and a stop at growresultsdrivenpath continued well in that walking format, content that survives mobile reading without becoming awkward is content with format flexibility and this site has clearly thought about how it reads across different devices today.
В этой заметке мы представляем шаги, которые помогут в процессе преодоления зависимостей. Рассматриваются стратегии поддержки и чек-листы для тех, кто хочет сделать первый шаг к выздоровлению. Наша цель — вдохновить читателей на положительные изменения и поддержать их в трудных моментах.
Читать далее > – вызов нарколога на дом екатеринбург
Bookmark earned, calendar reminder set, share queued, all from one good post, and a look at ravenharbortradehouse did the same, when a single reading session triggers multiple downstream actions you know the content has actually moved me beyond the page and this site is moving me at that higher level reliably.
casino https://mixcliq.com/read-blog/24000_virtual-currency-betalingen-van-lunarspins-casino.html
Reading this triggered a small reorganisation of my own thinking on the topic, and a stop at startbuildingmomentumpath furthered that reorganisation, content that affects the shape of my mental model rather than just decorating it with new facts is content with structural rather than informational impact and this site provides that.
Took something from this I did not expect to find, and a stop at thinkforwardact added another unexpected useful piece, content that exceeds expectations rather than just meeting them is the kind that builds enthusiasm and earns repeat visits without any explicit ask from the writer or platform behind the work being read.
Closed the tab feeling I had spent the time well, and a stop at jadkix extended that feeling across more pages, the test of whether time on a site was well spent is one I apply silently after closing tabs and very few sites pass it but this one passed it cleanly today afternoon clearly.
Came back to this an hour later to reread a specific section, and a quick visit to findnewopportunitydirections also drew a second look, content that pulls you back rather than letting you move on permanently is the kind I want to fill my browser bookmarks with in 2026 and beyond as the open internet evolves.
Closed three other tabs to focus on this one and never opened them again, and a stop at discoverforwardideas similarly held attention exclusively, content that crowds out other reading from working memory is content with real density and this site has demonstrated that density across multiple pages I have visited so far this morning.
Really nice to see things explained without overcomplicating the topic, the words flow naturally and stay easy to follow, and a short visit to growwithintentionalmovement only added to that experience because the same simple approach is used across the rest of the page too without any change in tone.
Ac?kcas? sas?rd?m kalitesine. Girdim c?kt?m derken zaman kaybettim. En sonunda dogru adrese ulast?m.
Ozellikle bahis ve casino sevenler icin. Su an en guncel cal?san 1xbet yeni giris adresi tam olarak soyle: 1xbet güncel adres 1xbet güncel adres. Herkesin bildigi gibi — 1xbet guncel adres arayanlar buraya baks?n.
Sorunsuz baglant? icin bu link yeterli. Kim ne derse desin — arayuz zaten al?s?k oldugunuz gibi. Baska yerde aramay?n art?k…
Worth flagging that the post handled an angle of the topic I had not seen elsewhere, and a look at creategrowthsystems extended that fresh treatment, content that finds underexplored corners of well covered subjects is genuinely valuable and this site has demonstrated that exploratory editorial approach across multiple pieces in my reading sessions today.
Came away feeling slightly smarter than I was when I started, that is a real win, and a stop at findmomentumnext added a bit more to that, the rare site that actually transfers some of its knowledge to the reader in a way that sticks rather than just creating an illusion of learning briefly.
Took a quick scan first and then went back to read properly because the post deserved it, and a stop at joxaxis kept me reading carefully too, the kind of writing that earns a slower second pass rather than getting skimmed and forgotten is something I value highly when I happen to find it.
Liked that the post acknowledged complications rather than pretending they did not exist, and a stop at discovergrowthmindset continued that honest framing, sites that handle complexity with care rather than papering it over with simplifying claims are doing real intellectual work and this one is clearly in that category based on what I have read.
Reading this gave me a small framework I expect to use going forward, and a stop at findyourcoremomentum extended that framework, content that produces transferable mental models rather than just specific facts is content with multiplicative value and this site is providing those models at a rate that justifies extra attention from me regularly.
Really like that the writer trusts the reader to follow simple logic without restating every previous point, and a stop at directioncreatesenergy kept that respect going, treating an audience as capable adults rather than as people who need constant hand holding makes a noticeable difference in the reading experience for me.
Reading this post made me realise I had been settling for lower quality elsewhere, and a look at startnextleveldirectionfast extended that recalibration, content that exposes how much I had been accepting in adjacent sources is content with calibrating effect on my standards and this site is performing that calibration function across topics for me reliably.
В этой статье мы рассматриваем разрушительное влияние зависимости на жизнь человека. Обсуждаются аспекты, такие как здоровье, отношения и профессиональные достижения. Читатели узнают о необходимости обращения за помощью и о путях к восстановлению.
Детальнее – вывод из запоя
Granted my mood today might be elevating my reading experience but I still think this is genuinely good, and a stop at explorefreshroutes reinforced that even discounted assessment, controlling for the mood adjustment that affects content perception this site still reads as substantively above average across multiple pieces I have read carefully today.
В этой статье мы обсудим процесс восстановления после зависимостей, акцентируя внимание на различных методах и подходах к реабилитации. Читатели узнают, как создать план выздоровления и использовать полезные ресурсы для достижения устойчивых изменений.
Есть чему поучиться – вывод из запоя с выездом на дом
Now wishing more sites covered topics with this level of care, and a look at directionalclarityhub extended that wish across more subjects, the rarity of careful coverage on most topics is a problem and this site is one of the small antidotes to that broader pattern of casual or surface treatment of complex subjects.
Ежедневный обзор: https://ilovehandmade.ru
Now recognising that the post handled the topic with appropriate technical precision without becoming dry, and a stop at startwithclearstrategyfocus continued that balance, technical precision and readability are often in tension and this site has clearly figured out how to maintain both at once which is one of the harder editorial achievements in the form.
Honestly the simplicity is what makes this work, the topic is not buried under filler words or overly complex examples, and a quick look at learnandprogressconsistently showed the same sensible style, I left with what I came for and no headache from over reading which is a real win these days.
Skipped the comments section but might come back to read it, and a stop at linencovevendorparlor hinted at a quality reader community, sites where the comments are worth reading separately from the post are increasingly rare and signal a particular kind of audience that has grown around the editorial vision over time gradually.
Давно искал нормальный вариант, где реально дают живые знания. Особенно когда речь про образовательные онлайн школы — тут ведь важен подход. У меня сын как раз перешел на удаленку, так что намучились мы знатно. В общем, посмотрите по ссылке: школа онлайн для детей https://shkola-onlajn-55.ru Я кстати ещё раньше вообще относился скептически к таким форматам. Оказалось — всё гораздо лучше. У них и обратная связь отличная. Сам теперь советую знакомым. Удачи!
Started reading skeptically because the headline seemed overconfident, and the post earned the headline by the end, and a look at growwithsteadyfocus continued that pattern of earning its claims, sites that can back up their headlines without overpromising are rare and this one has clearly developed editorial calibration on that front consistently.
Reading this in a quiet coffee shop matched the calm energy of the writing, and a stop at jadyam extended that environmental match, content that has its own ambient quality which can match or clash with surroundings is content with a personality and this site has the kind of personality that suits calm reading.
Now wishing more sites covered topics with this level of care, and a look at actionwithalignment extended that wish across more subjects, the rarity of careful coverage on most topics is a problem and this site is one of the small antidotes to that broader pattern of casual or surface treatment of complex subjects.
I came here looking for a quick answer and ended up reading the whole post because it was actually interesting, and after createclearprogresspath I had a much fuller picture, no stress and no confusion just a clear walk through the topic that made everything fall into place without much effort.
наркологическая помощь на дому круглосуточно наркологическая помощь на дому круглосуточно
Worth saying that the quiet confidence of the writing is what landed first, and a look at createimpactplanning continued that quiet quality, confident writing without the loud display of confidence is a rare combination and this site has clearly developed both the knowledge and the editorial restraint to land that combination consistently.
Now appreciating that the post did not try to imitate any other style I might recognise, and a stop at learnandadvanceclearly continued that distinct voice, content with its own register rather than borrowed from elsewhere is content with real authorial presence and this site has clearly developed that presence through what feels like patient editorial work.
Decided not to skim despite my usual habit and was rewarded for the discipline, and a stop at buildlongtermvision earned the same patient approach, training myself to recognise sites that warrant slower reading is part of being a careful online reader and this site is the kind that helps me practice that skill regularly.
Now setting aside time on my next free afternoon to read more from the archives, and a stop at suburbvesper confirmed that time will be well spent, the rare site whose archive deserves a dedicated reading session rather than just casual sampling is the kind of resource worth scheduling around and this one qualifies clearly.
Better than the average post on this subject by some distance, and a look at startpurposefuldirection reinforced that, you can tell within the first paragraph that the writer here actually cares about the topic rather than just covering it for the sake of having something to publish that week or that day.
Felt mildly happier after reading, which sounds silly but is true, and a look at exploreuntappedopportunities extended that small mood lift, content that improves rather than degrades my mental state is content I want more of and the cumulative effect of reading sites that lift versus sites that drag is real over time.
Now recognising the specific pleasure of reading writing that shows real care for sentence shapes, and a look at kyarax extended that craft pleasure, sentence level writing quality is something most blog content ignores entirely and this site has clearly invested in the prose layer alongside the substance which is rare today.
Skipped past the first paragraph thinking it was setup and had to come back when the rest referenced it, and a stop at exploreideaswithfocus similarly rewarded careful reading from the start, content where every paragraph carries weight is content I now know to read from the beginning rather than skipping ahead.
A piece that did not lean on the writer credentials or institutional backing, and a look at buildwithpurposefulsteps maintained the same focus on substance, content that earns trust through quality rather than through name dropping is the kind I find most persuasive and this site is clearly playing on the substance side of that distinction.
Looking at this objectively the editorial quality is hard to deny even setting aside personal taste, and a stop at progressbystrategy maintained the same objective quality, the gap between what I personally enjoy and what is objectively well crafted exists and this site clears both bars simultaneously which is rarer than it sounds.
Came in expecting another generic take and got something with actual character instead, and a look at discovernewfocusareasnow carried that personality forward, finding a distinct voice on a saturated topic is impressive and worth pointing out when it happens because most sites end up sounding identical to their nearest competitors quickly.
A piece that did exactly what it promised in the headline without overshooting or underdelivering, and a look at buildlongtermfocus continued that calibration, alignment between promise and delivery is a basic editorial virtue that many sites fail at and this site has clearly mastered the matching of expectation and substance throughout pieces.
Thanks for taking the time to write this, it is clear that some thought went into how each point would land, and after I went through findgrowthpotential I had a better grip on the topic, real value without the usual marketing noise people have to put up with online when searching for answers.
Reading this brought back an idea I had set aside months ago, and a stop at discoverhiddenroutes added more substance to that idea, content that revives dormant projects in my own thinking is content with serious creative value and this site is contributing to my own work in ways I had not expected when first clicking through.
Single bet calculators come in various formats.
work out double bet https://singlebetcalculator-free.uk/bet-calculator/double/
Speaking honestly this is among the better discoveries of my recent browsing, and a stop at startsmartmovementnow reinforced that discovery quality, the ranking of recent discoveries is informal but meaningful and this site has placed near the top of that ranking based on the consistency of quality across what I have already read carefully.
Beats most of the alternatives on the topic by a noticeable margin, and a look at unlocknewpotentialnow did not change that at all, this is one of the better corners of the open internet for this kind of content and I am glad I clicked through rather than skipping past quickly like I usually do.
Felt the post handled a sensitive angle of the topic with appropriate care, and a look at oliveorchard extended that careful handling across related material, sites that can navigate delicate territory without causing damage are rare and require a level of judgement that comes from experience rather than from following any clear playbook.
Worth saying that the quiet confidence of the writing is what landed first, and a look at jalaxis continued that quiet quality, confident writing without the loud display of confidence is a rare combination and this site has clearly developed both the knowledge and the editorial restraint to land that combination consistently.
Reading this site over the past week has changed how I evaluate content in this space, and a look at createimpactdirectionplan extended that recalibration, the standards I bring to reading on the topic have shifted upward as a direct result of regular exposure to this kind of work and that shift will outlast any single reading session.
Speaking carefully because I do not want to overstate things this site is genuinely above average across multiple measurements, and a stop at actioncreatesresults continued the above average performance, the calibration of judgement against potential overstatement is something I take seriously and this site clears the higher bar even after that calibration applies.
crazy time roulette https://crazy-time-stats.com/
Per vivere l’adrenalina del Crazy Time nei casino italiani, visita cos\\\’e il crazy time e scopri demo, statistiche e partite in diretta.
Grazie ai bonus, i giocatori possono godere di un’esperienza piu ricca e duratura nel tempo.
crazy time statistics https://live-crazy-time.com/
stats live crazy time stats live crazy time.
crazy time stream live https://crazytimegratis.com/
Started reading without much expectation and ended on a high note, and a look at learnandtransformthinking continued that arc, content that builds rather than peaks early is a sign of a writer who knows how to structure a piece for sustained reader engagement rather than relying on a strong hook to do all the work.
Se vuoi vivere l’emozione unica del gioco d’azzardo, non perdere l’occasione di provare crazy time e truccato per scoprire il miglior intrattenimento casino in Italia!
In Italia, Crazy Time Slot Casino e riconosciuto come uno dei casino online piu famosi. I giocatori amano Crazy Time Slot Casino in Italia soprattutto per la sua ricca selezione di slot e la navigazione semplice. Molti puntano su Crazy Time Slot Casino Italy grazie alle sue misure di sicurezza e alla serieta del servizio.
L’interfaccia utente e stata progettata per essere accessibile a tutti, anche ai principianti. Le grafiche coinvolgenti e i suoni esclusivi contribuiscono a creare un ambiente immersivo. Gli utenti possono accedere facilmente dalla versione mobile senza perdere qualita ne funzionalita.
Reading this gave me material for a conversation I needed to have anyway, and a stop at forwardmovementworks added even more talking points, content that connects to upcoming social or professional needs rather than just being interesting in the abstract is the kind that earns priority placement in my attention these days routinely.
Felt a small spark of recognition when the post named something I had been struggling to articulate, and a look at exploreinnovativepathsnow produced more such moments, the rare service of giving readers language for fuzzy intuitions is one of the higher values that good writing can provide and this site offered several today instances.
Deneyip de begenen cok oldu. Baz? siteler cal?sm?yor. En sonunda her seyi cozdum.
Ozellikle bahis ve casino sevenler icin. Su an en sorunsuz cal?san 1xbet yeni giris adresi tam olarak soyle: 1xbet giriş 1xbet giriş. Herkesin bildigi gibi — 1xbet guncel adres arayanlar buraya baks?n.
Site s?k s?k kapan?yor diyenlere inat. Kim ne derse desin — arayuz zaten al?s?k oldugunuz gibi. Baska yerde aramay?n art?k…
Found something new in here that I had not seen explained this way before, and a quick stop at startmovingupward expanded the idea even further, the kind of writing that nudges your thinking forward a bit without forcing the issue is exactly what I look for online today and rarely actually find anywhere.
Honestly impressed by the consistency of voice across what I have read so far, and a quick visit to discoverinnovativethinkingnow continued that consistent feel, when a site reads like one careful person rather than a committee the experience is more rewarding for the reader who notices these subtle editorial details over time.
Now planning to recommend this site in a context where my recommendations are taken seriously, and a stop at startnextleveljourney confirmed I should make that recommendation soon, the small but real act of recommending content into spaces where my taste matters is something I take seriously and this site is worth the recommendation.
A clean read with no irritations, and a look at buildlongtermmomentum continued that frictionless quality, the absence of small irritations is something I notice only when present elsewhere and this site is one of the rare places where everything just works and lets me focus on the substance rather than fighting the format.
Glad the writer did not feel the need to argue with imaginary critics in the post itself, and a stop at intelligentprogress kept the same focused approach going, defensive writing wastes the reader time and confidence on positions that did not need defending and this post has clearly avoided that common failure.
Refreshing change from the usual sites covering this topic, no clickbait and no padding, and a stop at lyxbark confirmed the difference, this place clearly has its own voice rather than copying the formulas everyone else uses to chase clicks online which is becoming increasingly rare these days across nearly every popular subject.
casino https://social.ghame.org/read-blog/33509_limited-time-offer-start-your-dropshipping-store-with-bhip-for-free.html
crazy time a demo https://crazytimeitalia-it.com/
Приветствую всех участников. Дело деликатное, но решил черкануть пару строк, потому что в экстренной ситуации трудно сориентироваться. Когда нужен проверенный и опытный врач для капельницы, важно, чтобы доктора отреагировали оперативно.
Мы в свое время тоже столкнулись с этой бедой, и в итоге нашли клинику, где врачи работают профессионально. Чтобы узнать точные цены и вызвать специалиста, вся информация есть здесь: вывод из запоя в стационаре вывод из запоя в стационаре.
Врачи дежурят круглосуточно во всех районах, реагируют очень быстро, буквально за час. Не теряйте время, кому-то тоже пригодится и спасет здоровье. Всем удачи и берегите близких!
Читатели получат представление о том, как современные технологии влияют на развитие медицины. Обсуждаются новые методы лечения, персонализированный подход и роль цифровых решений в повышении качества медицинских услуг.
ТОП-5 причин узнать больше – вывод из запоя воронеж на дому
statostiche crazy time https://crazytimeit-italia.com/
Публикация охватывает основные направления развития современной медицины. Мы обсудим значимость научных исследований, инноваций в лечении и роли общественного участия в формировании системы здравоохранения.
Переходите по ссылке ниже – вывод из запоя в стационаре в самаре
Once you find a site like this the search for similar voices begins, and a look at createbetterdirection extended the search energy, finding a high quality reference point makes the gap between it and adjacent sources visible in a way it was not before and this site has provided that high reference point across multiple recent visits.
Even just sampling a few posts the consistency is what stands out, and a look at explorefuturethinkingnow confirmed the broader pattern, sites where every piece I sample lives up to the standard set by the others are sites with serious quality control and this one has clearly invested in whatever editorial process produces that consistency reliably.
The structure of the post made it easy to follow without losing track of where I was, and a look at bakeboxshop kept the same logical flow going, this site clearly understands that organisation is half the battle in keeping readers engaged from the first line to the last across any kind of post.
Worth saying that the writing carries a particular kind of authority without making any explicit claims to it, and a stop at unlockcreativepaths extended that earned authority feeling, sites that demonstrate expertise through the quality of their explanations rather than by stating credentials are sites I trust most and this site has it.
The headings made navigating the post simple even when I needed to find a specific section quickly, and a look at soontornado continued the same thoughtful structure, small details like clear headings show that someone is actually thinking about how the reader uses the page rather than just filling it for length alone.
Этот краткий обзор предлагает сжатую информацию из области медицины, включая ключевые факты и последние новости. Мы стремимся сделать информацию доступной и понятной для широкой аудитории, что позволит читателям оставаться в курсе актуальных событий в здравоохранении.
Все материалы собраны здесь – вызвать нарколога на дом анонимно
Stands apart from similar pages by actually being useful, that is high praise these days, and a look at learnandexecuteeffectively kept that standard going, you can tell when a site is built around the reader versus around metrics and this one clearly belongs to the first category for sure based on what I read.
A handful of memorable phrases from this one I will probably use later, and a look at growthbydesign added a couple more, content that contributes language to my own communication rather than just facts is content with a different kind of utility and this site is providing that linguistic utility consistently across what I read.
Just one of those reads that left me feeling slightly more capable rather than overwhelmed, and a look at growwithfocusedintent kept that empowering feel going, the difference between content that builds the reader up and content that intimidates them is huge and this site clearly knows which side of that line to stand.
Все лучшее здесь: https://amaliya-parfum.ru/index.php?manufacturers_id=186
Great work on keeping things readable, the post never drags or repeats itself which I really appreciate, and a stop at discovergrowthdirection added a bit more context that fit naturally with what was already said here, no need to read everything twice to get the point being made today.
Honest reaction is that I want to send this to a friend who would benefit from it, and a look at findyournextfocus added more material I will pass along too, the impulse to share is the strongest signal I have for content quality and this site is generating that impulse cleanly across multiple posts.
Worth flagging this post as worth a careful read rather than a casual skim, and a stop at buildalignedprogress earned the same careful approach, the few sites that warrant slower reading are sites I now treat differently from the daily content stream and this one has clearly moved into that elevated treatment category.
Честно говоря, долго выбирал, куда поступать, но после изучения реальных отзывов наткнулся на один действительно толковый вариант. Короче, вот что я понял: современная школа онлайн — это не просто унылые вебинарчики. Там и программа насыщенная, без лишней воды, и дети занимаются с реальным интересом.
В общем, кому реально нужно нормальное обучение в теме онлайн образование школа — убедитесь во всём сами, вот здесь все расписано в деталях: онлайн школа для детей онлайн школа для детей.
Если честно, даже не ожидал такого крутого качества. Потому что стандартный дистант бывает дико скучным для ребенка, а тут организована именно грамотно выстроенный учебный процесс. Держите этот вариант у себя в закладках.
Skipped the related links section thinking I had read enough and then came back to it later when curiosity got the better of me, and a stop at buildgrowthdirectionplan confirmed I should have just read it first, every section of this site appears to deserve careful attention rather than skipping past lazily.
Этот медицинский обзор сосредоточен на последних достижениях, которые оказывают влияние на пациентов и медицинскую практику. Мы разбираем инновационные методы лечения и исследований, акцентируя внимание на их значимости для общественного здоровья. Читатели узнают о свежих данных и их возможном применении.
Запросить дополнительные данные – УБОД в Твери
Now I want to find more sites like this but I suspect they are rare, and a look at explorefreshopportunityzones extended that thought, the few sites that meet this quality bar are precious specifically because they are rare and finding others like them is one of the ongoing projects of careful internet curation across the years.
Короче, наконец-то разобрался с этой проблемой. Там всё разложено по полочкам, без лишней воды и тупых SEO-текстов. Рекомендую заглянуть, чтобы не совершать глупых ошибок, как я в прошлый раз. Вот скачать мелбет казино на андроид скачать мелбет казино на андроид — советую изучить на досуге. Там внутри и примеры, и пошаговые инструкции, короче полный фарш.
Top tier post, the kind that makes you want to share the link with friends working in the same area, and a stop at fromthinkingtodoing only made me more confident in doing that, this site is one of the better resources I have seen on the topic recently across both new and older posts.
Reading this gave me something to think about for the rest of the afternoon, and after ignitefreshthinking I had even more to mull over, the kind of post that lingers in the background of your day rather than evaporating immediately is genuinely valuable in an attention economy that punishes depth rather than rewarding it.
В этой статье мы рассмотрим современные достижения в области медицины, включая инновационные методы лечения и диагностики. Мы обсудим важность профилактики заболеваний и роль технологий в улучшении качества здравоохранения. Читатели узнают о влиянии медицины на повседневную жизнь и ее значение для современного общества.
Узнать из первых рук – clinica plus в твери
Эта статья подробно расскажет о процессе выздоровления, который включает в себя эмоциональную, физическую и психологическую реабилитацию. Мы обсуждаем значимость поддержки и наличие профессиональных программ. Читатели узнают, как строить новую жизнь и не возвращаться к старым привычкам.
Узнать из первых рук – вывод из запоя срочно
Этот обзор медицинских исследований собрал самое важное из последних публикаций в области медицины. Мы проанализировали ключевые находки и представили их в доступной форме, чтобы читатели могли легко ориентироваться в актуальных темах. Этот материал станет отличным подспорьем для изучения медицины.
Получить дополнительную информацию – клиника плюс
В этой статье рассматриваются различные аспекты избавления от зависимости, включая физические и психологические методы. Мы обсудим поддержку, мотивацию и стратегии, которые помогут в процессе выздоровления. Читатели узнают, как преодолеть трудности и двигаться к новой жизни без зависимости.
Полная информация здесь – прокапать нижний новгород
Generally my comment to other readers about new sites is to wait and see but for this one I would jump to recommend now, and a look at bulkingbayou reinforced that early recommendation, the speed at which a site earns my recommendation is itself a quality signal and this one has earned mine quickly clearly.
High quality writing, no marketing speak and no buzzwords that mean nothing, and a stop at buildsmartdirectionplan kept that going, simple direct content that actually communicates something is harder to find than it should be and this is one of the rare places that gets it right consistently across many different posts.
Публикация посвящена жизненным историям людей, успешно справившихся с зависимостью. Мы покажем, что выход есть, и он начинается с первого шага — принятия проблемы и желания измениться.
Как достичь результата? – кодировании sit
Skipped the comments section but might come back to read it, and a stop at createforwardthinkingsteps hinted at a quality reader community, sites where the comments are worth reading separately from the post are increasingly rare and signal a particular kind of audience that has grown around the editorial vision over time gradually.
Публикация охватывает основные направления развития современной медицины. Мы обсудим значимость научных исследований, инноваций в лечении и роли общественного участия в формировании системы здравоохранения.
Узнать больше – вывод из запоя круглосуточно
Felt this in a way I cannot quite explain, the topic just hit different here, and a stop at explorefuturepathwaysnow continued in that vein, sometimes you find a site whose perspective lines up with how you have been thinking and reading their work feels like a small relief which I appreciated more than I expected.
Этот обзор посвящен успешным стратегиям избавления от зависимости, включая реальные примеры и советы. Мы разоблачим мифы и предоставим читателям достоверную информацию о различных подходах. Получите опыт многообразия методов и найдите подходящий способ для себя!
Исследовать вопрос подробнее – анонимный частный вытрезвитель
Случайно наткнулся на один гайд, Прям беда реальная: потерял контакт со старым хорошим другом. Стало дико интересно,. И знаете что? Тут главное знать, куда именно смотреть и какие базы юзать.
Короче, если вас сейчас волнует тот же самый вопрос — быстро определить владельца номера, то есть один нормальный рабочий метод. Конкретно про то, как найти человека по номеру телефона — вот здесь всё максимально норм расписано: геопозиция по номеру геопозиция по номеру.
Друзьям ссылку скинул в телегу, им тоже помогло. Потому что обычный поиск гуглит только рекламный спам. В общем, не теряйте свое время зря на разводняк. Надеюсь, кому-то тоже упростит жизнь.
Давно присматривался к разным предложениям, где реально учат делу. Особенно когда речь про образовательные онлайн школы — тут ведь важен подход. У меня племянник как раз искал гибкий график, так что намучились мы знатно. В общем, можете глянуть сами: онлайн образование школа онлайн образование школа Я если честно ещё до этого вообще не верил в онлайн образование школа. Оказалось — зря сомневался. У них и домашка без перегруза. В общем, рекомендую присмотреться. Удачи!
Most of the time I bounce off similar pages within seconds, and a stop at learnandscaleideas held me longer than I would have predicted, the ability to convert a likely bouncing visitor into an engaged reader is a quality signal and this site has demonstrated that conversion ability across multiple visits where I expected to bounce.
Felt the post had been written without looking over its shoulder, and a look at startthinkingstrategicallynow continued that confident posture, content written for its own sake rather than against imagined critics has a different quality and this site reads as written from a place of confidence rather than defensive justification of every claim.
A piece that read as the work of someone who reads carefully themselves, and a look at learnandadvancepathnow continued that informed feel, writers who are also serious readers produce work with a different quality and this site reads as the product of someone steeped in good writing rather than just generating content for an audience.
Quietly impressive in a way that does not announce itself, and a stop at startsmartdirection extended that quiet impressiveness, the kind of quality that emerges through sustained attention rather than first impressions is the kind I trust more deeply and this site has been earning that deeper trust across multiple sessions over time consistently.
Liked the post enough to read it twice and the second read found new things, and a stop at learnandacceleratesuccess similarly rewarded the second look, content with hidden depths that only reveal themselves on careful rereading is the rare kind that earns lasting respect rather than fleeting first impressions only briefly held.
Refreshing to read something where the words actually mean something instead of filling space, and a stop at focusdrivesresults kept that going, the writing here trusts the reader to follow along without endless repetition or constant reminders of what was already said earlier in the post which I appreciate.
Honestly enjoyed reading this more than I expected to when I first clicked through, and a stop at findgrowthchannelsfast kept that pleasant surprise going, sometimes you stumble onto a site that just clicks with how you like to read and this is one of those for me right now today which is great.
Ребята, привет! Долго думал, стоит ли начинать эту волокиту. Поменяли газовую плиту, сдвинули раковину, а стены вообще вынесли — думал, пронесёт. В общем, теперь легализовывать этот бардак придётся официально. И тут встал вопрос: сколько стоит узаконить перепланировку в квартире https://skolko-stoit-uzakonit-pereplanirovku-10.ru ищу актуальные расценки: согласование перепланировки цена как у частников, так и через МФЦ. Или взносы в жилинспекцию за выдачу акта. А то риелторы называют цифры от балды. Без этого а если решите ипотеку рефинансировать, БТИ зарубит. Короче, просто сколько отдать, чтобы спать спокойно с новой планировкой.
If I were to recommend a starting point for the topic this site would be near the top of my list, and a stop at growththroughclarity reinforced that recommendation status, the small list of starting point recommendations I keep for friends asking about topics is short and this site is now firmly on it.
Took a few notes from this post, the points are easy to remember without needing to come back and check, and a look at explorefreshdirectionalideas added a couple more, the kind of place that sticks in the memory long after the browser tab has been closed for the day which says a lot really.
Публикация посвящена жизненным историям людей, успешно справившихся с зависимостью. Мы покажем, что выход есть, и он начинается с первого шага — принятия проблемы и желания измениться.
Рассмотреть проблему всесторонне – врач нарколог на дом нарколог 24
Этот краткий обзор предлагает сжатую информацию из области медицины, включая ключевые факты и последние новости. Мы стремимся сделать информацию доступной и понятной для широкой аудитории, что позволит читателям оставаться в курсе актуальных событий в здравоохранении.
Только факты! – наркологическая помощь дома
Deneyip de begenen cok oldu. Girdim c?kt?m derken zaman kaybettim. En sonunda dogru adrese ulast?m.
Spor bahisleriyle ilgilenenler bilir. Su an en h?zl? cal?san 1xbet giris adresi tam olarak soyle: 1xbet türkiye 1xbet türkiye. Yani k?sacas? — 1xbet turkiye icin tek adres buras?.
Site s?k s?k kapan?yor diyenlere inat. Tavsiye eden c?kt? m? emin olun — arayuz zaten al?s?k oldugunuz gibi. Baska yerde aramay?n art?k…
Эта публикация раскрывает психологические механизмы зависимости и их роль в развитии расстройств. Читатель узнает о том, как психология влияет на формирование зависимостей и как профессиональная помощь может изменить ситуацию.
Погрузиться в детали – вывод из запоя анонимно недорого
The lack of unnecessary jargon made the post accessible without sacrificing accuracy, and a look at designyourdirection continued in the same accessible style, technical topics often hide behind specialised vocabulary but here the writer trusts the reader to keep up with plain language and that trust pays off nicely throughout the entire post.
Now noticing the post fit a particular gap in my reading without my having articulated the gap before, and a look at unlocknewideas extended that gap filling effect, content that meets needs I had not consciously formulated is content with reader insight and this site has clearly developed that anticipatory editorial sense across many pieces.
Came here from a search and stayed for the side links because they were that interesting, and a stop at suntansage took me even further into the site, the kind of organic exploration that good content invites is something most sites kill through aggressive interlinking and pushy navigation choices rather than relying on quality.
Appreciated how the writer anticipated the questions a reader might have along the way, and a stop at discoverinnovativethinking continued that thoughtful approach, you can tell when content has been edited with the reader in mind versus just published as a first draft and this is clearly the former approach across what I read.
Now realising the post has been quietly doing important work in my mind for the past hour, and a stop at parcelparadise extended that quiet processing, content that continues to do work after I close the tab is content with afterlife in the mind and this site is producing those long lived effects at a meaningful rate.
Highly recommend to anyone looking for a sensible take on this topic without the usual marketing nonsense, and a look at unlocksmartideas kept that grounded approach going, sites that stay focused on serving readers rather than monetising every click are rare and this is clearly one of those rare ones I really appreciate finding.
A piece that did not require external context to follow, and a look at buildsmartmovement maintained the same self contained quality, content that stands alone without forcing readers to chase prerequisites is more accessible and this site has clearly thought about how each piece can serve a fresh visitor rather than only existing members.
Коллеги, всем привет! Срочно нужна консультация тех, кто уже заказывал мерч для бизнеса. Подскажите, где заказать качественную сувенирную продукцию с логотипом. сувениры на заказ москва сувениры на заказ москва А то насчитали мне за брендированные блокноты космос, хотя заказывали всего 50 позиций. Бюджет пока не утвержден, поэтому хочу понять рыночные цены. Киньте ссылки или названия компаний, буду очень благодарен.
Found a small mental shift after reading this, the framing here is just a bit different from the standard takes online, and a look at discovernewroutes extended that fresh perspective across more material, the rare site whose voice actually changes how you think about something rather than just confirming existing beliefs.
выездная наркологическая служба оперативно приедет по указанному адресу, имея при себе все необходимое оборудование и медикаменты, в том числе для оказания неотложной помощи.
Подробнее можно узнать тут – вывод из запоя на дому цена в сочи
В этой статье мы говорим о важности поддержки в процессе выздоровления. Рассматриваются семьи, группы поддержки, специалисты и онлайн-ресурсы, которые могут сыграть решающую роль в избавлении от зависимости.
Получить профессиональную консультацию – капельница от запоя анонимно
В данной статье мы поговорим о будущем медицины, акцентируя внимание на прорывных разработках и их потенциале. Читатель узнает о новых подходах к лечению, роли искусственного интеллекта и возможностях персонализированной медицины.
Личный опыт — читайте сами – вывод из запоя недорого нарколог24
Quietly building a case in my head for why this site deserves more attention than it currently seems to receive, and a look at learnandexecutenow reinforced the case, the gap between quality and recognition is a recurring frustration in independent online content and this site is one of the cases that seems particularly egregious to me today.
Народ, привет! Директор увидел бюджет и чуть инфаркт не схватил, надо вписаться в сумму. Может, кто шарит где лучше брать сувенирную продукцию с логотипом. продукция с логотипом компании на заказ https://suvenirnaya-produkcziya-s-logotipom-10.ru Говорят, сейчас модно заказывать корпоративные подарки сувениры из экокожи — но кто делает качественно. Нужно штук 300-500, но если будет норм цена, можем и больше взять. А то я уже второй день в интернете сижу и ничего адекватного не нашёл.
В данной статье мы поговорим о будущем медицины, акцентируя внимание на прорывных разработках и их потенциале. Читатель узнает о новых подходах к лечению, роли искусственного интеллекта и возможностях персонализированной медицины.
Выяснить больше – вывод из запоя недорого
Grateful for posts like this one, they remind me there are still places online run by people who care about quality, and a look at startbuildinglongtermvision reflected the same standards, you can tell the difference between content made for readers and content made just for search engines today and this is the former.
If I am being honest this is the kind of site I quietly hope my own work will someday resemble, and a stop at createbetterdecisions extended that aspirational feeling, finding work that models what I want to produce is part of why I read carefully and this site has been performing that modelling function for me lately consistently.
Just enjoyed the experience without needing to think about why, and a look at buildcleanmomentum kept that effortless feeling going, sometimes the best content is invisible in the sense that you forget you are reading until you reach the end and realise time has passed without you noticing it pass naturally.
Came here from a search and stayed for the side links because they were that interesting, and a stop at discoveruntappedangles took me even further into the site, the kind of organic exploration that good content invites is something most sites kill through aggressive interlinking and pushy navigation choices rather than relying on quality.
Reading this prompted a small note in my reference file, and a stop at findyourcorepath prompted another, the rare site that contributes useful nuggets to my own working knowledge rather than just consuming my attention is worth the time investment many times over compared to the usual pile of forgettable scroll content.
Felt the post had been written without looking over its shoulder, and a look at pathwaytoprogress continued that confident posture, content written for its own sake rather than against imagined critics has a different quality and this site reads as written from a place of confidence rather than defensive justification of every claim.
В этой статье мы рассматриваем разрушительное влияние зависимости на жизнь человека. Обсуждаются аспекты, такие как здоровье, отношения и профессиональные достижения. Читатели узнают о необходимости обращения за помощью и о путях к восстановлению.
Изучить эмпирические данные – вывод из запоя капельница на дому
нарколог на дом вывод нарколог на дом вывод
Reading this prompted me to send the link to two different people for two different reasons, and a stop at nutmegnetwork provided ammunition for a third share, content that suits multiple audiences without being generic enough to be useless to any of them is genuinely valuable and this site has that multi audience quality clearly.
Appreciated how the writer anticipated the questions a reader might have along the way, and a stop at discovernewstrategicangles continued that thoughtful approach, you can tell when content has been edited with the reader in mind versus just published as a first draft and this is clearly the former approach across what I read.
Felt the post had been quietly polished rather than aggressively styled, and a look at createactionstepsnow confirmed the same understated polish, sites whose quality reveals itself slowly rather than announcing itself loudly are the kind I trust more deeply because the trust is not based on first impressions of marketing but actual substance.
Took longer than expected to finish because I kept stopping to think, and a stop at growwithintentionalmovementnow did the same to me, content that provokes thought rather than just delivering information is in a different category and the team here is clearly working at that higher level rather than just cranking out posts.
Now appreciating that I did not feel exhausted after reading, and a stop at buildprogressintelligently extended that energising quality, content that leaves me with more attention than it consumed is rare and the gap between draining and energising content is real over the course of a typical day spent reading widely online.
Публикация охватывает основные направления развития современной медицины. Мы обсудим значимость научных исследований, инноваций в лечении и роли общественного участия в формировании системы здравоохранения.
Ознакомиться с деталями – вывод из запоя на дому воронеж капельница
Эта статья освещает различные аспекты освобождения от зависимости и пути к выздоровлению. Мы обсуждаем важность осознания своей проблемы и обращения за помощью. Читатели получат практические советы о том, как преодолевать трудности и строить новую жизнь без зависимости.
Детальнее – вывод из запоя капельница воронеж
Reading this with a notebook open turned out to be the right move, and a stop at explorefreshgrowthroutes added more material to the notes, content that justifies active note taking from a passive reader is content with real informational density and this site is producing notes worthy material at a high rate consistently.
В этой публикации мы рассматриваем важную тему борьбы с зависимостями, включая алкогольную и наркотическую зависимости. Мы обсудим методы лечения, реабилитации и поддержку, которые могут помочь людям, столкнувшимся с этой проблемой. Читатели узнают о перспективах выздоровления и важности комплексного подхода.
Не упусти шанс – прокапаться от алкоголя
В этой статье мы обсудим процесс восстановления после зависимостей, акцентируя внимание на различных методах и подходах к реабилитации. Читатели узнают, как создать план выздоровления и использовать полезные ресурсы для достижения устойчивых изменений.
Расширить кругозор по теме – капельница от похмелья самара
Короче, наконец-то разобрался с этой проблемой. Всё расписано до мелочей, даже новичок поймет что к чему. Сам долго мучился, пока не нашел этот гайд. Вот мелбет скачать на андроид мелбет скачать на андроид — советую изучить на досуге. Там внутри и примеры, и пошаговые инструкции, короче полный фарш.
Публикация охватывает основные направления развития современной медицины. Мы обсудим значимость научных исследований, инноваций в лечении и роли общественного участия в формировании системы здравоохранения.
Узнайте всю правду – круглосуточный вывод из запоя нарколог 24
Ребята, выручайте! Купил кресло б/у, каркас норм, но ткань в ужасном состоянии. Ищу, где можно ткань для обивки мебели купить не по космическим ценам. купить обивочную ткань для мебели купить обивочную ткань для мебели Кто разбирается в тканях для мебели, подскажите, что сейчас берут. Буду благодарен за любые советы, особенно от тех, кто сам перетягивал.
Good clean post, no errors and no awkward phrasing that breaks the reading flow, and a stop at discoveropportunityflows kept the same standard, definitely the kind of editorial care that earns a return visit because it tells me the writer is paying attention to details that matter to readers rather than just rushing publication.
Just want to flag that this was useful and not bury the appreciation in caveats, and a look at startnextlevelprogress earned the same direct praise, recognising good work without hedging it with criticism is something I try to practice because over qualified compliments tend to read as backhanded and miss the point sometimes.
Уже отчаялся был найти хоть что-то стоящее. Прям беда реальная: потерял контакт со старым хорошим другом. Полез в глубокий поиск по веткам. И знаете что? Тут главное знать, куда именно смотреть и какие базы юзать.
Короче, если вас сейчас волнует тот же самый вопрос — пробить странный входящий звонок, то есть один проверенный временем вариант. Конкретно про то, как узнать по мобильному кто именно звонил — вот здесь всё максимально норм расписано: отследить номер телефона отследить номер телефона.
Я сам сначала вообще не верил во всё это. Потому что в открытых пабликах обычно полная тишина. В общем, обязательно сохраните себе на будущее. Надеюсь, кому-то тоже упростит жизнь.
After several visits I am now confident this site is one to follow seriously, and a stop at createbetteroutcomesnow reinforced that confidence, the gradual building of trust through repeated quality exposures is the only sustainable way to develop reader loyalty and this site is building that loyalty in me through patient consistent work consistently.
Appreciate that you did not pad this with fluff to hit a word count, the post says what it needs to say and stops, and a look at trancetidal did the same, brevity here feels intentional not lazy which is a distinction many writers miss completely sometimes when they are working under deadlines.
Признаюсь, сначала очень сильно сомневался в этой затее, но после кучи долгих обсуждений наткнулся на один рабочий и проверенный вариант. Если кратко, вот что я понял: современная школа онлайн — это уровень на порядок выше обычного. Там и преподаватели живые и вовлеченные, так что прогресс виден сразу.
В общем, кому понимает толк в теме образовательные онлайн школы — убедитесь во всём сами, вот здесь все разжевано до мелочей: 11 класс онлайн 11 класс онлайн.
Думаю, это как раз то, что сейчас нужно многим родителям. Потому что стандартный дистант бывает дико скучным для ребенка, а тут организована именно живое регулярное общение с кураторами. Пригодится точно, потом еще спасибо скажете.
A piece that handled the topic with appropriate weight without becoming portentous, and a look at growthwithalignment continued that calibrated seriousness, content that takes itself seriously without becoming pompous is something this site has clearly figured out and the balance shows up in every piece I have read across multiple sessions now.
Ac?kcas? sas?rd?m kalitesine. Baz? siteler cal?sm?yor. En sonunda dogru adrese ulast?m.
Bu isin puf noktalar? var. Su an en h?zl? cal?san 1xbet guncel giris adresi tam olarak soyle: 1xbet giriş 1xbet giriş. Ne demisler — 1xbet guncel adres arayanlar buraya baks?n.
Site s?k s?k kapan?yor diyenlere inat. Kim ne derse desin — canl? destekleri bile h?zl?. Baska yerde aramay?n art?k…
A slim post with substantial content per word, and a look at learnandgrowstrong maintained the same density, the content per word ratio is something I track informally and this site scores high on that ratio compared to most sources I read regularly which is a quiet indicator of careful editorial work behind the scenes.
Worth flagging that the post handled an angle of the topic I had not seen elsewhere, and a look at chairchampion extended that fresh treatment, content that finds underexplored corners of well covered subjects is genuinely valuable and this site has demonstrated that exploratory editorial approach across multiple pieces in my reading sessions today.
Reading more of the archives is now on my plan for the weekend, and a stop at forwardactionframework confirmed the archive worth the time, the rare archive worth a dedicated reading session rather than just casual sampling is the rare archive of serious work and this site has clearly produced enough of that work to warrant the deeper exploration.
Приветствую всех участников. Тема здоровья всегда на первом месте, потому что в экстренной ситуации трудно сориентироваться. Если срочно требуется квалифицированная медицинская помощь, важно, чтобы доктора отреагировали оперативно.
Сам долго изучал отзывы и искал надежный вариант, в итоге вся ценная информация была собрана по крупицам. Чтобы узнать точные цены и вызвать специалиста, можете ознакомиться по ссылке: вывести из запоя в больнице вывести из запоя в больнице.
Там расписаны все аспекты, которые стоит учитывать, и помощь окажут полностью конфиденциально. Не теряйте время, и обращайтесь к настоящим профессионалам. Всем душевного спокойствия!
Worth pointing out the careful word choice in this post, no buzzwords and no jargon, and a look at discovergrowthdirectionnow continued that disciplined vocabulary, sites that resist the pull of trendy language are sites that will read well in five years and this one is clearly built for that kind of long durability.
Этот обзор сосредоточен на различных подходах к избавлению от зависимости. Мы изучим традиционные и альтернативные методы, а также их сочетание для достижения максимальной эффективности. Читатели смогут открыть для себя новые стратегии и подходы, которые помогут в их борьбе с зависимостями.
Выяснить больше – частный вытрезвитель
Давно присматривался к разным предложениям, где реально учат делу. Особенно когда речь про онлайн-школу для детей — тут ведь важен подход. У меня дочка как раз начал учиться дистанционно, так что намучились мы знатно. В общем, вся подробная информация вот тут: онлайн школа для детей https://shkola-onlajn-55.ru Я если честно ещё пару месяцев назад вообще не верил в онлайн образование школа. Оказалось — всё гораздо лучше. У них и программа грамотная. Сам теперь советую знакомым. Удачи!
Most of my reading time goes to a small number of trusted sources and this one is now joining that group, and a stop at learnandscaleprogress reinforced the group membership, the few sites that earn a place in my regular rotation are sites I expect ongoing returns from and this one has earned that elevated position consistently.
Bookmarking this for later, the kind of resource I want to keep nearby, and a quick look at findmomentumnext confirmed the rest of the site is worth the same treatment, definitely going into my reference folder for the next time the topic comes up at work or in conversation with someone who asks.
A memorable post for me on a topic I had thought I was tired of, and a look at buildfocusedmomentum suggested the same site can refresh other tired topics, sites that can revive my interest in subjects I had written off as exhausted are doing rare work and this one is clearly doing that for me today.
Reading this gave me a small refresher on something I had partially forgotten, and a stop at buildforwardclarity extended the refresher, content that strengthens existing knowledge rather than just adding new is content with a particular kind of consolidating value and this site is providing that consolidating function across multiple visits.
Коллеги, всем привет! Срочно нужна консультация тех, кто уже заказывал мерч для бизнеса. Интересует надежный поставщик корпоративных подарков с логотипом компании, который не подведет со сроками. заказать корпоративные подарки с логотипом заказать корпоративные подарки с логотипом Кто недавно брал подарки с логотипом под новогодние корпоративы, поделитесь контактами. Может, есть проверенные фабрики, которые работают напрямую, без посредников. Киньте ссылки или названия компаний, буду очень благодарен.
Speaking from the perspective of having read widely on the topic this site offers something distinct, and a look at explorefutureopportunitypaths reinforced that distinctness, the rare site that contributes something genuinely original to a saturated topic is the rare site worth following carefully and this one has demonstrated that original contribution capability today.
Worth flagging this site to a few specific friends who would appreciate the editorial sensibility, and a look at createforwardthinking added more pages I will mention to them, recommending sites to specific people requires understanding both the site and the person and this site is making those personalised recommendations easy and natural for me.
Recommended without hesitation if you care about careful coverage of this topic, and a stop at createwithintention reinforced the recommendation, the bar I set for unhesitating recommendations is fairly high and this site has cleared it through the cumulative weight of multiple consistently good pieces rather than through any single standout post which is meaningful.
Found something new in here that I had not seen explained this way before, and a quick stop at focuscreatesprogress expanded the idea even further, the kind of writing that nudges your thinking forward a bit without forcing the issue is exactly what I look for online today and rarely actually find anywhere.
Honestly impressed, did not expect to find this level of care on the topic, and a stop at brightbanyan cemented the impression, you can tell within the first few paragraphs whether a site is going to be worth the time and this one delivered on that early promise nicely throughout the rest of what I read.
Good quality through and through, no rough edges and no signs of being rushed, and a quick look at graingrove kept the same polish going, the kind of site that respects its own brand by maintaining consistency across pages which is something I always appreciate as a reader looking for trustworthy information online today.
Ended up here on a wandering afternoon and was glad I stayed for the read, and a stop at palmmills extended the wandering into a proper exploration of the site, the kind of place that rewards aimless clicking with something genuinely interesting rather than the shallow content that mostly populates the modern open web.
Now appreciating the way the post avoided the temptation to be longer than necessary, and a look at opaldunes continued that lean approach, content with the discipline to stop when finished rather than padding for length is content that respects both itself and its readers and this site has that disciplined editorial culture clearly throughout.
Worth saying that the post fit naturally into a rhythm of careful reading, and a stop at zingtorch extended the same rhythm, content that pairs well with how I actually read rather than demanding a different mode is content well calibrated to its likely audience and this site has clearly thought about that consistently.
Started taking notes about halfway through because the points were stacking up, and a look at portguild added enough material that my notes file grew further, content that demands note taking from a passive reader is content with substance and the writers here are clearly producing that kind of work consistently across topics.
Halfway through I knew I would finish the post, and a stop at lobbydawn also held me through to the end, content that signals its quality early and then sustains it is content with real internal consistency and this site has clearly figured out how to maintain quality from opening sentence through to closing thought.
A piece that did not lecture even when it had clear positions, and a look at curiopacts maintained the same teaching without preaching tone, finding the line between informing and lecturing is hard and most sites land on the wrong side of it but this one has clearly figured out how to inform without becoming preachy.
Pass this along to colleagues if the topic comes up, the framing here is sensible, and a stop at draftport adds more useful angles to share, the kind of content that improves conversations rather than just feeding them is what makes a resource genuinely valuable in professional contexts going forward over time and across project boundaries too.
Reading this prompted me to clean up some old notes related to the topic, and a stop at buildforwardthinkingmomentum extended that organising urge, content that triggers personal organisation rather than just consuming attention is content with motivating energy and this site has the kind of clarity that prompts active follow up rather than passive consumption.
Such writing is increasingly rare and worth supporting through attention, and a stop at findgrowthdirections extended that supportive attention across more pages, the conscious choice to spend time on sites that produce careful work rather than convenient consumption is itself a small form of patronage and this site is receiving that conscious patronage from me.
Pleasant surprise, the post delivered more than the headline promised, and a stop at fernbureau continued that pattern of under promising and over delivering, the rarest combination on the modern web where most content does the opposite by promising the world and delivering thin recycled summaries instead each time you click on something interesting.
Thanks for taking the time to write this, it is clear that some thought went into how each point would land, and after I went through findyourwinningdirection I had a better grip on the topic, real value without the usual marketing noise people have to put up with online when searching for answers.
A piece that was confident enough to leave some questions open rather than forcing closure, and a look at micapacts continued that intellectual honesty, content that admits the limits of its scope is more trustworthy than content that pretends to total understanding and this site has the right calibration on certainty consistently.
Текст посвящён распространённым мифам о зависимости и их развенчанию. Мы предоставим научно обоснованную информацию и дадим рекомендации по выбору эффективного способа борьбы с зависимым поведением.
Переходите по ссылке ниже – капельница на дому самара
Honestly the simplicity of the explanation made the topic click for me in a way other writeups had not, and a look at ideaswithtraction continued that clarity into related areas, when a writer gets the level of explanation right the reader does the heavy lifting themselves and the post just enables it.
Quietly enthusiastic about this site after the past few hours of reading, and a stop at createforwardexecutionsteps extended that enthusiasm, the calibration of enthusiasm to evidence is something I try to maintain and this site has earned a calibrated quiet enthusiasm rather than the loud excitement that usually fades within a day or two of finding something.
Народ, привет! Директор увидел бюджет и чуть инфаркт не схватил, надо вписаться в сумму. Ищу нормальное изготовление корпоративных сувениров с доставкой по Москве. заказ сувенирной продукции с логотипом https://suvenirnaya-produkcziya-s-logotipom-10.ru Кто уже заказывал корпоративные подарки с логотипом компании, поделитесь опытом. Нужно штук 300-500, но если будет норм цена, можем и больше взять. Заранее респект тем, кто откликнется с контактами проверенными.
Now thinking about how this post will age over the coming years, and a stop at tomatotactic suggested the same durability, content built to age well rather than to capture the attention of the moment is content with a different kind of value and this site has clearly chosen the long horizon over the short one.
casino https://www.trustpilot.com/review/vicibetcasino-hu.com
Эта публикация содержит ценные советы и рекомендации по избавлению от зависимости. Мы обсуждаем различные стратегии, которые могут помочь в процессе выздоровления и важность обращения за помощью. Читатели смогут использовать полученные знания для улучшения своего состояния.
Полная информация здесь – вывод из запоя срочно круглосуточно
В данной публикации мы поговорим о процессе восстановления от зависимости, о том, как вернуть себе нормальную жизнь. Мы обсудим преодоление трудностей, значимость поддержки и наличие программ реабилитации. Читатели смогут узнать о ключевых шагах к успешному восстановлению.
Посмотреть всё – наркологическая клиника в твери
Once I had read three posts the editorial pattern was clear, and a look at startsmartgrowth confirmed the pattern from a fourth angle, sites where the underlying approach reveals itself through accumulated reading rather than being announced are sites with real depth and this one has that quality clearly visible across multiple pieces consistently.
Уже отчаялся был найти хоть что-то стоящее. Знакомая многим фигня, постоянно звонят с незнакомого телефона, а кто — вообще непонятно. Стало дико интересно,. И знаете что? Тут главное знать, куда именно смотреть и какие базы юзать.
Короче, если вас сейчас волнует тот же самый вопрос — пробить странный входящий звонок, то есть один реально работающий и живой сервис. Конкретно про то, как найти человека по номеру телефона — вот здесь всё максимально норм расписано: гео по номеру телефона гео по номеру телефона.
Друзьям ссылку скинул в телегу, им тоже помогло. Потому что в открытых пабликах обычно полная тишина. В общем, кому надо — тот точно воспользуется. Век живи — век учись, как говорится.
Now noticing that the post avoided the temptation to be funny in places where humour would have undermined the substance, and a stop at momentumbymindset maintained the same restraint, knowing when to be serious is a rare editorial virtue and this site has clearly developed it through what I assume is careful editorial practice over years.
Worth recognising that this site does not chase the daily news cycle, and a stop at buildsmartprogress confirmed the longer publication arc, sites that resist the pressure to comment on every passing event are sites with genuine editorial discipline and this one has clearly chosen depth over volume which I respect deeply.
A small thing but the line spacing and font choices made reading this physically pleasant, and a look at domelegends maintained the same careful design, technical choices about typography are part of what makes online reading actually comfortable and this site has clearly invested in the design layer alongside the content layer carefully.
Now recognising the post as a rare example of careful writing on a topic that mostly receives careless treatment, and a stop at edendomes extended that contrast with the average elsewhere, content that highlights how much the average is settling for low quality is content that has both internal merit and external value as a benchmark.
Reading this in the gap between work projects was a small but meaningful break, and a stop at mochamarket extended that gentle reset, content that provides genuine refreshment rather than just distraction during work breaks is content with a particular kind of utility and this site fits that role for me reliably during work days.
Skipped the comments section but might come back to read it, and a stop at frostcoasts hinted at a quality reader community, sites where the comments are worth reading separately from the post are increasingly rare and signal a particular kind of audience that has grown around the editorial vision over time gradually.
Ребята, привет! Долго думал, стоит ли начинать эту волокиту. Акт скрытых работ потерял, да и проект сам переделывал. В общем, теперь легализовывать этот бардак придётся официально. И тут встал вопрос: сколько стоит узаконить перепланировку в квартире https://skolko-stoit-uzakonit-pereplanirovku-10.ru Кто сталкивался недавно — сколько стоит узаконить перепланировку в многоэтажке. Плюс эти дурацкие техусловия на вентиляцию. А то риелторы называют цифры от балды. Без этого всё равно потом квартиру не продать. Короче, просто сколько отдать, чтобы спать спокойно с новой планировкой.
Ребят, наконец-то нашел нормальный разбор темы. Там всё разложено по полочкам, без лишней воды и тупых SEO-текстов. Рекомендую заглянуть, чтобы не совершать глупых ошибок, как я в прошлый раз. Вот мелбет мелбет — сохраняйте себе в закладки, пригодится. Мне лично это сэкономило кучу времени и нервов, так что делюсь от души.
Started a draft response in my head and ended without publishing it because the post said it well enough, and a look at portguild produced the same effect, content that satisfies my urge to add to it by being complete enough on its own is rare and represents a particular kind of editorial completeness here.
Worth bookmarking and sharing with anyone interested in the topic, that is my honest take, and a stop at lobbydawn reinforces that, the kind of generous resource that makes the open web feel worth defending against the constant pressure to retreat into walled gardens and curated feeds today everywhere I look across all my devices.
Appreciate that you did not pad this with fluff to hit a word count, the post says what it needs to say and stops, and a look at grippalace did the same, brevity here feels intentional not lazy which is a distinction many writers miss completely sometimes when they are working under deadlines.
The whole experience of reading this was pleasant from start to finish, no pop ups and no annoying interruptions, and a look at ideasintoexecution continued that clean experience, technical choices about page design matter for the reader and this site clearly cares about the small details that add up to comfort across multiple visits.
Well done, the writing is professional without being stiff, and the topic is treated with care, and a look at fernbureaus reflected that approach, the kind of site I would point a colleague to if they asked for a reliable starting point on this topic in the future without any hesitation at all.
A piece that did not require external context to follow, and a look at fernpier maintained the same self contained quality, content that stands alone without forcing readers to chase prerequisites is more accessible and this site has clearly thought about how each piece can serve a fresh visitor rather than only existing members.
Probably one of the more reliable sources I have found for this kind of careful coverage, and a look at driftfair reinforced the reliability, the small group of sources I would describe as reliable for a given topic is curated carefully and this site has earned a place in that small group through consistent performance.
уничтожение клопов цена москва уничтожение клопов в москве
Thanks for not padding this with the usual filler intros and outros that every other blog seems to require, and a quick visit to explorefuturepathways continued that lean approach across more posts, content stripped of waste is content that respects you and I will always come back to that kind of approach.
Reading this in the gap between work projects was a small but meaningful break, and a stop at findyourclearpath extended that gentle reset, content that provides genuine refreshment rather than just distraction during work breaks is content with a particular kind of utility and this site fits that role for me reliably during work days.
Found something quietly useful here that I expect to return to, and a stop at ideasworthmoving added more of the same, content with quiet utility ages well in a way that flashy hot takes do not and I have learned to weight quiet utility much higher when deciding what to bookmark for later use.
В этой статье мы обсудим процесс восстановления после зависимостей, акцентируя внимание на различных методах и подходах к реабилитации. Читатели узнают, как создать план выздоровления и использовать полезные ресурсы для достижения устойчивых изменений.
Читать далее > – помощь вывода из запоя
Этот обзор посвящен успешным стратегиям избавления от зависимости, включая реальные примеры и советы. Мы разоблачим мифы и предоставим читателям достоверную информацию о различных подходах. Получите опыт многообразия методов и найдите подходящий способ для себя!
Изучить вопрос глубже – поставить капельницу от запоя на дому
A small editorial detail caught my attention, the way headings related to body text, and a look at createactionforward maintained that careful relationship, structural details like that show up to readers who notice them and the writers here have clearly thought about every level of the piece rather than just the words.
Reading this back to back with a similar piece elsewhere made the quality difference obvious, and a stop at explorebetterthinking only widened the gap, comparing content side by side is a useful exercise and the gap between this site and average competitors in the space is large enough to be noticeable from the first paragraph.
Probably one of the more reliable sources I have found for this kind of careful coverage, and a look at ideasintoresults reinforced the reliability, the small group of sources I would describe as reliable for a given topic is curated carefully and this site has earned a place in that small group through consistent performance.
Felt the post had been written without using a single buzzword, and a look at fairfinch continued that clean vocabulary, content free of jargon and trendy phrases reads better and ages better and this site has clearly committed to a vocabulary that will not feel dated in three years which is impressive editorially.
Reading this triggered a small change in how I think about the topic going forward, and a stop at knackgrove reinforced that subtle shift, the rare content that actually moves my thinking rather than just confirming or filling it is the kind I most value and this site is providing that kind of impact today.
Признаюсь, сначала очень сильно сомневался в этой затее, но после советов хороших знакомых наткнулся на один действительно толковый вариант. Короче, вот что я понял: современная школа онлайн — это не просто унылые вебинарчики. Там и домашние задания с подробной индивидуальной проверкой, так что прогресс виден сразу.
В общем, кому реально нужно нормальное обучение в теме образовательные онлайн школы — посмотрите условия, вот здесь все выложено без лишней воды: школа дистанционного обучения школа дистанционного обучения.
Думаю, это как раз то, что сейчас нужно многим родителям. Потому что стандартный дистант бывает дико скучным для ребенка, а тут организована именно живое регулярное общение с кураторами. Пригодится точно, потом еще спасибо скажете.
Felt the post had been written without using a single buzzword, and a look at jetdomes continued that clean vocabulary, content free of jargon and trendy phrases reads better and ages better and this site has clearly committed to a vocabulary that will not feel dated in three years which is impressive editorially.
Felt a small spark of recognition when the post named something I had been struggling to articulate, and a look at fernpiers produced more such moments, the rare service of giving readers language for fuzzy intuitions is one of the higher values that good writing can provide and this site offered several today instances.
Reading this gave me material for a conversation I needed to have anyway, and a stop at coppercrown added even more talking points, content that connects to upcoming social or professional needs rather than just being interesting in the abstract is the kind that earns priority placement in my attention these days routinely.
Honest take is that this was better than I expected when I clicked through, and a look at focusdrivenmomentum reinforced that, the bar for online content has dropped so much that finding something thoughtful and well constructed feels almost noteworthy now which says more about the average than about this site itself.
Worth recognising that the post did not pretend to be the final word on the topic, and a stop at portmill continued that humility, content that admits its own scope and limits is more trustworthy than content that overreaches and this site has clearly developed the editorial maturity to know what it can and cannot claim well.
Now feeling the rare pleasure of trusting a source completely on first encounter, and a look at loopbough extended that initial trust into something more durable, the calibration of trust to evidence is something I do informally and this site has earned high trust through the cumulative weight of multiple consistently good posts already.
Most of the time I bounce off similar pages within seconds, and a stop at buildclaritydrivenmomentum held me longer than I would have predicted, the ability to convert a likely bouncing visitor into an engaged reader is a quality signal and this site has demonstrated that conversion ability across multiple visits where I expected to bounce.
Now thinking about how to apply some of this to a project I have been planning, and a look at grovefarm added more material for the planning, content that connects to my actual creative work rather than just being interesting in the abstract is the kind that earns priority placement in my reading rotation consistently going forward.
Honestly thank you to whoever wrote this because it scratched an itch I had not quite been able to articulate, and a stop at startmovingforward kept that satisfying feeling going, the kind of writing that meets unspoken needs is special and this site clearly has writers who understand their readers more than most do today.
A memorable post for me on a topic I had thought I was tired of, and a look at executeideasclean suggested the same site can refresh other tired topics, sites that can revive my interest in subjects I had written off as exhausted are doing rare work and this one is clearly doing that for me today.
Bir arkadaş tavsiyesiyle başladım. Ne yalan söyleyeyim ilk başta şüpheyle yaklaştım. Ama sonunda doğru adresi buldum işte.
Merak edenler için söylüyorum. Sistem ayarlarını doğru yaptıktan sonra süreç çok basit. Giriş adresi tam olarak şurada: 1xbet türkiye 1xbet türkiye. Yani demem o ki — 1xbet güncel adres arayanlar işte karşınızda.
İşlemler hızlı mı derseniz evet. Çok araştırdım emin olun — şikayet edecek bir şey bulamadım. Gözünüz arkada kalmasın…
I usually skim posts like these but this one held my attention all the way through, and a stop at duetparishs did the same, that is a strong endorsement coming from me because I am usually quick to bounce when content gets repetitive or fails to deliver on its initial promise made in the headline.
Worth recognising that this site does not chase the daily news cycle, and a stop at firminlet confirmed the longer publication arc, sites that resist the pressure to comment on every passing event are sites with genuine editorial discipline and this one has clearly chosen depth over volume which I respect deeply.
Really appreciate that the writer did not assume I would read every other related post first, and a look at salemsolid kept that self contained feel going where each piece can stand alone, accessibility for new readers is a sign of generous editorial thinking and this site has clearly invested in that approach.
Liked that the post acknowledged complications rather than pretending they did not exist, and a stop at createimpactplanningnow continued that honest framing, sites that handle complexity with care rather than papering it over with simplifying claims are doing real intellectual work and this one is clearly in that category based on what I have read.
В этой статье рассматриваются различные аспекты избавления от зависимости, включая физические и психологические методы. Мы обсудим поддержку, мотивацию и стратегии, которые помогут в процессе выздоровления. Читатели узнают, как преодолеть трудности и двигаться к новой жизни без зависимости.
Посмотреть подробности – вывод из запоя на дому нижний новгород круглосуточно
Ребята, привет! Я вообще в шоке, если честно. Акт скрытых работ потерял, да и проект сам переделывал. В общем, инспекция пришла и выписала предписание. И тут встал вопрос: узаконить перепланировку стоимость https://skolko-stoit-uzakonit-pereplanirovku-10.ru просто интересно, стоимость согласования перепланировки квартиры сейчас вообще реальная или грабёж. Или взносы в жилинспекцию за выдачу акта. Если кто недавно проходил это ад, поделитесь. Без этого всё равно потом квартиру не продать. Короче, просто сколько отдать, чтобы спать спокойно с новой планировкой.
Solid value for anyone willing to read carefully, and a look at zingtrace extends that value across the rest of the site, this is the kind of place that rewards return visits rather than offering everything in a single splashy post and then leaving readers nothing to come back for later which is unfortunately common.
Denemek isteyen arkadaşlara hep aynısını söylüyorum. Sürekli adres değişiyor derler ya işte tam da o hesap. Adımları doğru sırayla uyguladıktan sonra bağlantı hatasız açıldı. Güvenilir bir kaynak bulmanın ne kadar zor olduğunu hepimiz biliyoruz işte size o adres: 1xbet yeni giriş 1xbet yeni giriş. Valla bak net konuşayım — spor bahislerine meraklıysanız burası tam size göre.
para çekme işlemleri de sorunsuz yani rahat olun. İşin aslını söylemek gerekirse — en güvendiğim liman burası oldu artık. Umarım siz de memnun kalırsınız…
Uzun süredir oynuyorum diyebilirim. Doğru düzgün bir site bulmak işkenceydi resmen. Ama sonunda şu linki keşfettim.
Casino oyunlarına meraklıysanız burayı denemeden geçmeyin. Güncel sistem ayarlarını kontrol ettikten sonra erişim sağlamak en mantıklısı. Giriş adresi tam olarak şu şekilde: 1xbet güncel giriş 1xbet güncel giriş. Ne diyeyim yani — 1xbet türkiye için doğru adres burası.
Bonus kampanyaları fena değil. Kendi tecrübelerimi aktarayım — pişman etmeyen nadir adreslerden. Şimdiden bol kazançlar…
Once you start reading carefully here it is hard to go back to lower quality alternatives, and a stop at duetcoast reinforced that ratchet effect, the way good content raises standards is real over time and this site has clearly contributed to raising my expectations for what is possible in writing on the topic generally.
Уже отчаялся был найти хоть что-то стоящее. Знакомая многим фигня, потерял контакт со старым хорошим другом. Стало дико интересно,. И знаете что? Не всё так сложно в этом плане, как кажется.
Короче, если вас сейчас волнует тот же самый вопрос — быстро определить владельца номера, то есть один нормальный рабочий метод. Конкретно про то, как узнать по мобильному кто именно звонил — вот здесь всё максимально норм расписано: поиск по номеру телефона бесплатно поиск по номеру телефона бесплатно.
Проверил лично на себе — тема реально работает. Потому что обычный поиск гуглит только рекламный спам. В общем, обязательно сохраните себе на будущее. Век живи — век учись, как говорится.
Эта публикация обращает внимание на важность профилактики зависимостей. Мы обсудим, как осведомленность и образование могут помочь в предотвращении возникновения зависимости. Читатели смогут ознакомиться с полезными советами и ресурсами, которые способствуют здоровому образу жизни.
Ознакомьтесь с аналитикой – капельница от алкоголя
Этот обзор посвящен успешным стратегиям избавления от зависимости, включая реальные примеры и советы. Мы разоблачим мифы и предоставим читателям достоверную информацию о различных подходах. Получите опыт многообразия методов и найдите подходящий способ для себя!
Практические советы ждут тебя – цены вывод из запоя
Срочно нужен совет для отдела маркетинга. Планируем раздачу для партнёров на новый год. Везде говорят про индивидуальный подход, но реально где заказать корпоративные подарки с логотипом компании — чтоб не за границей, но и не откровенный шлак. сувенирная компания сувенирная компания Интересует именно изготовление под ключ — от кружек до брендированных блокнотов. Пока просто собираем инфу. А то бюджет уже вчера утвердили, а поставщика нет.
Если честно, сам перерыл кучу форумов в поисках нормальной мебельной ткани. Оказалось, что выбрать подходящий вариант совсем непросто. В общем, смотрите, вот здесь реально толково расписано про плотность, ворс и износостойкость для диванов и кресел, а главное — показаны варианты, которые не линяют. Вся полезная информация доступна здесь: мебельная обивка https://tkan-dlya-mebeli-2.ru Дальше сами гляньте каталог с ценами. Да, и не берите первое, что попалось — я уже поплатился кошельком, когда брал дешёвую ткань для обивки мебели. Эта тема реально вывозит по соотношению цена-качество. Имейте в виду: ткань для обивки мебели купить лучше уже с нормальной пропиткой от грязи. Да и рвётся такое полотно гораздо меньше. Не поленитесь, откройте.
Solid value packed into a relatively short post, that takes skill, and a look at findyourcorepurpose continues the dense useful content across more pages, this site clearly understands that respecting reader time is itself a form of generosity which is something most blog operations seem to have forgotten lately across the wider open web.
Denemek isteyenler çok soruyor. Birçok site denedim ama. En sonunda her derde deva bir kaynak keşfettim.
Spor bahislerinde iddialı olanlar buraya. Uyarıları dikkate alarak sistemi kurun. Giriş adresi aynen şu şekilde: 1xbet giriş 1xbet giriş. Özetle — 1xbet türkiye için tek doğru adres bu.
Canlı destek anında yardımcı oluyor. Dost meclisinde öğrendim — deneyen memnun kalmış. Şimdiden bol şans…
A quiet piece that did not try to compete on volume, and a look at falconfern maintained that selective approach, sites that publish less but better are increasingly rare in an environment that rewards volume and this one has clearly chosen quality cadence over quantity which is a brave editorial decision in current conditions.
Reading this felt easy in the best way, no friction and no confusion at any point, and a stop at simplifyyourprogress carried that same comfort across more pages, the kind of editorial flow that lets you absorb information without fighting the format which is increasingly hard to find on the open web today across topics.
Took my time with this rather than rushing because the writing rewards attention, and after explorefreshopportunities I had even more to absorb, the kind of content that pays back the patient reader rather than punishing them with empty filler is something I look for and rarely find in regular searches lately.
The conclusions felt earned rather than tacked on at the end like an afterthought, and a look at knackdomes kept that careful structure going, you can tell when a writer has thought about the shape of their post versus just letting it ramble out and hoping for the best at the end which most do.
Now considering writing a longer note about the post somewhere, and a look at seogrove added more material for that note, content that prompts me to write rather than just consume is content with generative energy and this site is producing that generative effect for me at a higher rate than most sources.
Ребята, выручайте! Кот старый диван в клочья разодрал, надо перетягивать. Теперь мучаюсь — какую взять ткань для мебели, чтобы и выглядело достойно, и кошачьи когти выдержало. ткань для обшивки мебели купить ткань для обшивки мебели купить Интересно про ткань для обивки мебели — какой вариант самый практичный для дивана, где постоянно лежат с чипсами. Буду благодарен за любые советы, особенно от тех, кто сам перетягивал.
A piece that earned its conclusions through the body rather than asserting them at the end, and a look at portolive maintained the same earned quality, conclusions that follow from what came before are more persuasive than declarations and this site has clearly internalised that principle in how it constructs arguments throughout pieces.
A piece that ended with a clean landing rather than fading out, and a look at lunacourt maintained the same crisp conclusions, endings that resolve rather than dissolve are a sign of careful structural thinking and this site has clearly invested in how its pieces conclude rather than letting them simply run out of energy.
Took a quick scan first and then went back to read properly because the post deserved it, and a stop at grovequay kept me reading carefully too, the kind of writing that earns a slower second pass rather than getting skimmed and forgotten is something I value highly when I happen to find it.
Will be sharing this with a couple of people who care about the topic, and a stop at progressbuiltcarefully added more material worth passing along, the kind of site that is generous with quality content and does not make you jump through hoops to access it which is appreciated more than the team probably realises.
The headings made navigating the post simple even when I needed to find a specific section quickly, and a look at bravopiers continued the same thoughtful structure, small details like clear headings show that someone is actually thinking about how the reader uses the page rather than just filling it for length alone.
Коллеги, всем привет! Организуем встречу с дилерами, хочется сделать им приятные и полезные презенты. Интересует надежный поставщик корпоративных подарков с логотипом компании, который не подведет со сроками. рекламные сувениры с логотипом рекламные сувениры с логотипом А то насчитали мне за брендированные блокноты космос, хотя заказывали всего 50 позиций. Может, есть проверенные фабрики, которые работают напрямую, без посредников. А то маркетинговые агентства такой ценник лупят — закачаешься.
Now thinking about whether the writer might publish a longer form work I would buy, and a look at flareaisle suggested the same depth would translate, content that makes me want to pay for related work in other formats is content that has earned commercial trust as well as attention trust and this site has both clearly.
Felt the post was written for someone like me without explicitly addressing me, and a look at clarityfuelsgrowth produced the same fit, when content lands on its target without pandering you know the writer has done careful audience thinking rather than relying on demographic targeting or interest signals to do the work of editorial decisions.
Народ, привет! Ох, уже голова болит с этим тимбилдингом, нужны нормальные презенты для партнеров. Присматриваюсь к подаркам с логотипом, но боюсь нарваться на кривую печать. рекламная продукция с логотипом https://suvenirnaya-produkcziya-s-logotipom-10.ru Говорят, сейчас модно заказывать корпоративные подарки сувениры из экокожи — но кто делает качественно. Нужно штук 300-500, но если будет норм цена, можем и больше взять. Заранее респект тем, кто откликнется с контактами проверенными.
My usual response to new bookmarks is to forget them but this one I have already returned to twice, and a look at createimpactsteps pulled me back a third time, the actual return rate to bookmarked sites is the real measure of value and this one is clearing that measure at a notable rate already.
If you asked me to point to a recent positive sign for the open web this site would be near the top, and a stop at grippalaces reinforced that designation, the few sites that serve as evidence the web can still produce quality independent content are precious and this one has clearly become one for me.
Слушайте, наконец-то наткнулся на реальный опыт. Авторы реально шарят в вопросе, никаких банальных советов из интернета. Многие на форумах спорят, а ответ лежал на поверхности. Вот мелбет скачать на андроид бесплатно https://howtoairbrush.com — сохраняйте себе в закладки, пригодится. Если останутся вопросы, пишите прямо там в комментариях, админ отвечает быстро.
Speaking as someone who reads a lot on this topic this site has earned a high position in my source rankings, and a stop at quillglade reinforced that ranking, the informal ranking of sources for a topic is something I maintain mentally and this site has moved into the upper portion of those rankings clearly.
Coming back tomorrow when I can give this a proper read, the post deserves better attention than I can give right now, and a look at startbuildingdirection suggests there is plenty more here that deserves the same treatment, definitely a site I will be exploring properly over the next few days when I can.
Looking for similar voices elsewhere has come up empty in my recent searches, and a stop at unlockclaritytoday extended the search frustration, the rare site that does what no other does in quite the same way is precious and this one has clearly developed a particular approach that I have not been able to find duplicates of.
Reading this prompted me to send the link to two different people for two different reasons, and a stop at explorefreshstrategies provided ammunition for a third share, content that suits multiple audiences without being generic enough to be useless to any of them is genuinely valuable and this site has that multi audience quality clearly.
Picked this post to share in a Slack channel where I knew it would be appreciated, and a look at meritquays suggested I will share more from here later, content worth sharing into a professional context is content that has earned a higher kind of trust than mere personal interest and this site has it.
Polished and informative without feeling overproduced, that is the sweet spot, and a look at falconflame hit it again, you can tell when a site has been built with care versus thrown together for the sake of having something to put online and this is clearly the former approach taken by the team.
A welcome contrast to the loud takes that have dominated my feed lately, and a look at seohive extended that calm voice, content that arrives without yelling has become unusual in the modern attention economy and this site is one of the few places I have found that consistently delivers without raising its voice.
Took a chance on the headline and was rewarded, and a stop at duetdrive kept the rewards coming as I clicked through, the kind of place where every link leads somewhere worth the click is a small luxury on the modern web where so many sites are mostly empty calories disguised as content.
Took a chance on the headline and was rewarded, and a stop at portpoise kept the rewards coming as I clicked through, the kind of place where every link leads somewhere worth the click is a small luxury on the modern web where so many sites are mostly empty calories disguised as content.
Held my interest from the opening line through to the closing thought, and a stop at moveideasforward did the same, content that earns sustained attention in an environment full of distractions is doing something right and this site is clearly doing several things right rather than just one or two which I really appreciate.
Generally I find the content on similar topics frustrating in specific ways and this post avoided all of them, and a look at startvisiondrivenprogress continued that frustration free experience, content that sidesteps the standard failure modes of its genre is content with editorial awareness and this site has clearly studied what fails elsewhere consistently.
Worth marking this site as one to come back to deliberately rather than by accident, and a stop at meritquay reinforced that intention, the difference between sites I find again by chance and sites I return to on purpose is meaningful and this one has clearly moved into the deliberate return category for me.
A piece that read as if the writer was thinking carefully rather than just typing fluently, and a look at vitalsummit continued that considered quality, the difference between fluent typing and careful thinking shows up in writing and this site reads as the product of thought rather than just the product of language fluency apparently.
On reflection this is the kind of writing that improves my taste for what is possible in the format, and a look at hazemill continued raising that bar, content that elevates my expectations rather than lowering them is doing important work in calibrating my standards and this site is participating in that elevation reliably.
Reading this gave me a small jolt of recognition for an experience I thought was just mine, and a stop at explorefreshgrowththinking produced more such jolts, content that universalises private experiences without flattening them is doing genuinely useful work and this site is providing that recognition function for me reliably across topics I read.
Now considering whether the post would translate well into a different form, and a look at learnandrefineprogress suggested similar versatility, content that could move into other media without losing its substance is content that has been built around ideas rather than around format and this site reads as idea first throughout posts.
Honest assessment is that this is one of the better short reads I have had this week, and a look at portpoises reinforced that, the bar for short content is low because most of it sacrifices substance for brevity but this site manages both at once which is harder than it sounds for most writers attempting it.
Even just sampling a few posts the consistency is what stands out, and a look at flarefest confirmed the broader pattern, sites where every piece I sample lives up to the standard set by the others are sites with serious quality control and this one has clearly invested in whatever editorial process produces that consistency reliably.
Now recognising that the post handled the topic with appropriate technical precision without becoming dry, and a stop at actionwithpurposefulsteps continued that balance, technical precision and readability are often in tension and this site has clearly figured out how to maintain both at once which is one of the harder editorial achievements in the form.
Denemek isteyenler çok soruyor. Birçok site denedim ama. En sonunda sağlam bir link buldum.
Spor bahislerinde iddialı olanlar buraya. Uyarıları dikkate alarak sistemi kurun. Giriş adresi aynen şu şekilde: 1xbet yeni giriş 1xbet yeni giriş. Özetle — 1xbet türkiye için tek doğru adres bu.
Para çekme işlemleri sorunsuz. Kendi tecrübemi aktarayım — deneyen memnun kalmış. İyi eğlenceler…
Reading this as part of my evening winding down routine fit perfectly, and a stop at createimpactdriven extended the wind down nicely, content that calms rather than agitates is what I want at the end of the day and this site provides that calming reading experience reliably which is increasingly rare across the modern web.
Deneyen çok kişi duydum çevremde. Herkes farklı bir adres söylüyordu. Ama sonunda sağlam bir kaynağa denk geldim.
Bilenler zaten anlar. Sistem ayarlarını doğru yaptıktan sonra süreç çok basit. Giriş adresi tam olarak şurada: 1xbet yeni giriş 1xbet yeni giriş. Yani demem o ki — 1xbet güncel adres arayanlar işte karşınızda.
İşlemler hızlı mı derseniz evet. Çok araştırdım emin olun — memnun kalmayanını görmedim. Şimdiden keyifli oyunlar…
A piece that handled the topic with appropriate weight without becoming portentous, and a look at thinkbeyondboundaries continued that calibrated seriousness, content that takes itself seriously without becoming pompous is something this site has clearly figured out and the balance shows up in every piece I have read across multiple sessions now.
Picked this for a morning recommendation in our company chat, and a look at createimpactjourney suggested I will mention this site again later, recommending content into a workplace context is a small editorial act that requires confidence in the recommendation and this site is making me confident in those recommendations consistently here too.
Açıkçası ben de önceden çok zorlanıyordum. Doğru düzgün bir site bulmak işkenceydi resmen. Ama sonunda sağlam bir kaynak buldum.
Casino oyunlarına meraklıysanız burayı denemeden geçmeyin. Güncel sistem ayarlarını kontrol ettikten sonra erişim sağlamak en mantıklısı. Giriş adresi tam olarak şu şekilde: 1xbet giriş 1xbet giriş. Ne diyeyim yani — 1xbet spor bahislerinin adresi değişti.
Müşteri hizmetleri bile ilgili. Çevremdekilere de söyledim — başka yerde aramaya gerek yok. Şimdiden bol kazançlar…
Вот такая беда — родственник в запое , а тащить в клинику просто нереально . Я сам через это прошёл недавно. Сидишь, не знаешь что делать . Лезешь в интернет, а вокруг сплошной развод . Пока кто-то не подсказал один нормальный проверенный вариант. Если нужна немедленная консультация — а ехать куда-то нет возможности , то выход один . Я про наркологическую помощь на дому . У нас в Самаре, если честно, тоже полно шарлатанов . Вся проверенная информация вот тут : нарколог выезд на дом https://narkolog-na-dom-samara-13.ru Откровенно говоря, после того как прочитал , понял, как правильно действовать. Там и про капельницы подробно , и про консультацию . И цены адекватные, без разводов. Рекомендую не тянуть .
В этой публикации мы исследуем ключевые аспекты здоровья, включая влияние образа жизни на благополучие. Читатели узнают о важности правильного питания, физической активности и психического здоровья. Мы предоставим практические советы и рекомендации для поддержания здоровья и развития профилактических подходов.
Ознакомьтесь с аналитикой – капельница от запоя вызов
Recommend this to anyone who values clear thinking over flashy presentation, and a stop at quirkbazaar continued in the same understated way, this site has its priorities in the right place which makes it worth supporting through repeat visits and recommendations rather than just one passing read today before moving on quickly elsewhere.
After several visits I am now confident this site is one to follow seriously, and a stop at epicestates reinforced that confidence, the gradual building of trust through repeated quality exposures is the only sustainable way to develop reader loyalty and this site is building that loyalty in me through patient consistent work consistently.
Worth flagging this post as worth a careful read rather than a casual skim, and a stop at falconkite earned the same careful approach, the few sites that warrant slower reading are sites I now treat differently from the daily content stream and this one has clearly moved into that elevated treatment category.
Found something quietly useful here that I expect to return to, and a stop at flareinlets added more of the same, content with quiet utility ages well in a way that flashy hot takes do not and I have learned to weight quiet utility much higher when deciding what to bookmark for later use.
Now sitting back and recognising that this was a small but real win in my reading day, and a stop at ivypiers extended that quiet win, the cumulative effect of small reading wins versus the cumulative effect of small reading losses is real over time and this site is contributing to the wins side of that ledger.
Refreshing tone compared to the dry corporate posts on similar topics, and a stop at duetparish carried that personality through nicely, you can tell when a real person is behind the writing versus a content team chasing metrics and this site definitely falls into the former category clearly across what I have seen.
Коллеги, всем привет! Организуем встречу с дилерами, хочется сделать им приятные и полезные презенты. Посоветуйте нормальное изготовление корпоративных сувениров — чтобы и кружки не облазили, и ручки писали. подарочная сувенирная продукция подарочная сувенирная продукция А то насчитали мне за брендированные блокноты космос, хотя заказывали всего 50 позиций. Может, есть проверенные фабрики, которые работают напрямую, без посредников. Киньте ссылки или названия компаний, буду очень благодарен.
Approaching this with the usual skepticism I bring to new sites and being slowly persuaded, and a stop at micapact continued that gradual persuasion, the careful path from skeptical reader to genuine fan is the only one I trust and this site has walked me along that path through patient consistent quality across pieces.
Açıkçası bu işe yeni başlayanlar için ideal. Kapanan sitelerden çektim resmen anlatamam. Adımları doğru sırayla uyguladıktan sonra bağlantı hatasız açıldı. Güvenilir bir kaynak bulmanın ne kadar zor olduğunu hepimiz biliyoruz işte size o adres: 1xbet güncel giriş 1xbet güncel giriş. Yani demem o ki şöyle söyleyeyim — casino oyunlarında iddialı olanlar bilir zaten.
para çekme işlemleri de sorunsuz yani rahat olun. İşin aslını söylemek gerekirse — en güvendiğim liman burası oldu artık. Şimdiden iyi şanslar ve bol kazançlar…
Worth flagging that the post handled an angle of the topic I had not seen elsewhere, and a look at irisarbor extended that fresh treatment, content that finds underexplored corners of well covered subjects is genuinely valuable and this site has demonstrated that exploratory editorial approach across multiple pieces in my reading sessions today.
Felt the writer respected me as a reader without making a show of doing so, and a look at movefromvision continued that quiet respect, this is the kind of small but meaningful detail that separates the sites I bookmark from the ones I close after a single skim and never return to again no matter how interesting the headline.
Honest opinion is that this is the kind of post that builds long term trust with readers, and a look at neatmills reinforced that perception, the slow accumulation of trust through consistent quality is the only sustainable way to build a real audience and this site is clearly playing that long game.
Picked a single sentence from this post to remember, and a look at flarefoil gave me another to keep, content that produces memorable lines is doing more than just transferring information and the small selection of sentences I keep from each reading session is one of the actual returns I get from reading carefully.
В этой публикации мы предложим ряд рекомендаций по избавлению от зависимостей и успешному восстановлению. Мы обсудим методы привлечения поддержки и важность самосознания. Эти советы помогут людям вернуться к нормальной жизни и стать на путь выздоровления.
Подробнее тут – вывод из запоя на дому круглосуточно
Now noticing how rare it is to find a site that does not feel rushed, and a look at buildfocusedoutcomes extended that calm pace, content produced without time pressure has a different quality than content shipped to meet a deadline and this site reads as written without urgency which produces a different and better experience for readers.
The use of plain language without dumbing down the topic was really well done, and a look at growstepbydirection continued in that same accessible style, this is something many technical writers fail at because they either confuse their readers or condescend to them but here neither problem appears at all which is impressive really.
Anyone curious about this topic would do well to start here, the foundation laid is solid, and a stop at learnandexpandcapabilities would round out their understanding nicely, this is the kind of resource I would point a friend toward without hesitation if they asked me where to begin learning about anything in this area.
Worth flagging that this approach to the topic is fresh without being contrarian, and a stop at loopboughs extended the same fresh angle, finding original perspective on familiar subjects is rare and this site has clearly developed its own way of seeing rather than echoing the dominant takes from elsewhere consistently.
Now noticing that the post did not mention the writer at all, focus stayed on the topic, and a look at focuscreatesmovement continued that author absent quality, content that disappears the writer to focus on the substance is a particular kind of generosity and this site has clearly chosen the substance over the personality consistently.
Really appreciate the absence of stock photos that have nothing to do with the content, and a quick visit to seotrail maintained the same restraint, visual filler is a tell that the writing cannot stand on its own and the lack of it here suggests the team has confidence in their content quality alone.
Skipped the related links section thinking I had read enough and then came back to it later when curiosity got the better of me, and a stop at vesselthrift confirmed I should have just read it first, every section of this site appears to deserve careful attention rather than skipping past lazily.
Now adding the homepage to my regular check rotation rather than waiting for individual links to find me, and a stop at buildgrowthmomentum confirmed the rotation upgrade, the move from passive discovery to active checking is a vote of confidence in a sites ongoing quality and this site has earned that active engagement clearly.
Bookmark earned and folder updated to track this site separately, and a look at apexhelm confirmed the folder upgrade was the right call, organising my reading list so that good sites do not get lost in a sea of casual bookmarks is something I do more carefully now and this site warranted its own spot.
Now considering whether the post would translate well into a different form, and a look at flareaisles suggested similar versatility, content that could move into other media without losing its substance is content that has been built around ideas rather than around format and this site reads as idea first throughout posts.
Worth saying that the prose reads naturally without straining for style, and a stop at dustorchid maintained the same unforced quality, writing that achieves elegance without effort is the highest tier and this site has clearly worked out how to land that effortless quality consistently rather than only on the writers best days.
A piece that reads like it was written for me without claiming to be written for me, and a look at fancyfinal produced the same fit, when the writer audience match clicks naturally without being engineered through demographic targeting you know the writing is solid and this site has that natural fit consistently for me.
Now leaving a small mental note to recommend this when the topic comes up in conversation, and a look at structureyourgrowth extended that recommend ready feeling, content that arms me with shareable references for likely future conversations is content with social value and this site is providing that conversational ammunition consistently for me lately.
Denemek isteyenler çok soruyor. Birçok site denedim ama. En sonunda sağlam bir link buldum.
Casino sevenler bilir. Uyarıları dikkate alarak sistemi kurun. Giriş adresi aynen şu şekilde: 1xbet spor bahislerinin adresi 1xbet spor bahislerinin adresi. Özetle — 1xbet spor bahislerinin adresi değişti.
Bonusları gayet iyi. Kendi tecrübemi aktarayım — deneyen memnun kalmış. İyi eğlenceler…
Sürekli karşıma çıkıyordu ama denememiştim. Açıkçası önyargılıydım biraz. Sonra biraz araştırayım dedim.
Casino sevenler için biçilmiş kaftan. Detaylı incelemeleri tamamlayıp adımları takip ettikten sonra her şey netleşti. Giriş adresi işte karşınızda: 1xbet spor bahislerinin adresi 1xbet spor bahislerinin adresi. Yani anlayacağınız — 1xbet türkiye için tek doğru adres burası.
Hiçbir sorun yaşatmadı şu ana kadar. Kimseye zararı dokunmaz — pişman eden bir yer değil kesinlikle. Gözünüz arkada kalmasın…
Now recognising the post as a rare example of careful writing on a topic that mostly receives careless treatment, and a stop at mintdawn extended that contrast with the average elsewhere, content that highlights how much the average is settling for low quality is content that has both internal merit and external value as a benchmark.
Народ, привет! Такая ситуация — на планерке сказали срочно найти подарки для клиентов. Присматриваюсь к подаркам с логотипом, но боюсь нарваться на кривую печать. сувениры с логотипом компании сувениры с логотипом компании Говорят, сейчас модно заказывать корпоративные подарки сувениры из экокожи — но кто делает качественно. Нужно штук 300-500, но если будет норм цена, можем и больше взять. А то я уже второй день в интернете сижу и ничего адекватного не нашёл.
Now appreciating that the post did not try to imitate any other style I might recognise, and a stop at irisbureau continued that distinct voice, content with its own register rather than borrowed from elsewhere is content with real authorial presence and this site has clearly developed that presence through what feels like patient editorial work.
Really appreciate the absence of stock photos that have nothing to do with the content, and a quick visit to dewdawns maintained the same restraint, visual filler is a tell that the writing cannot stand on its own and the lack of it here suggests the team has confidence in their content quality alone.
Closed the tab feeling I had spent the time well, and a stop at flareinlet extended that feeling across more pages, the test of whether time on a site was well spent is one I apply silently after closing tabs and very few sites pass it but this one passed it cleanly today afternoon clearly.
A small thank you note from me to the team behind this work, the post earned it, and a stop at navigateyournextmove suggested more thanks would be in order over time, recognising the people who do good writing online is something I try to remember to do because the alternative is silence and silence rewards mediocrity unfortunately.
Liked the careful selection of which details to include and which to skip, and a stop at cadetarenas reflected the same editorial judgement, knowing what to leave out is just as important as knowing what to include and this site has clearly figured out where that line sits for the topics it covers regularly.
Если честно, сам перерыл кучу форумов в поисках нормальной обивки. Оказалось, что выбрать подходящий вариант тот ещё квест. Короче, смотрите, вот здесь реально толково расписано про плотность, ворс и износостойкость для диванов и кресел, а главное — показаны варианты, которые легко чистить. Вся полезная информация доступна здесь: купить ткань для мебели купить ткань для мебели Дальше сами гляньте примеры в интерьере. Да, и не берите первое, что попалось — я уже поплатился кошельком, когда брал дешёвую ткань для обивки мебели. Эта тема реально вывозит по износу. Кстати: ткань для обивки мебели купить лучше уже с нормальной пропиткой от грязи. Да и рвётся такое полотно гораздо меньше. В общем, советую глянуть источник.
Quietly enthusiastic about this site after the past few hours of reading, and a stop at ideasintoimpact extended that enthusiasm, the calibration of enthusiasm to evidence is something I try to maintain and this site has earned a calibrated quiet enthusiasm rather than the loud excitement that usually fades within a day or two of finding something.
Эта статья освещает различные аспекты освобождения от зависимости и пути к выздоровлению. Мы обсуждаем важность осознания своей проблемы и обращения за помощью. Читатели получат практические советы о том, как преодолевать трудности и строить новую жизнь без зависимости.
Проверенные методы — узнай сейчас – капельница от похмелья нижний новгород
Easy to recommend without reservations, the site delivers on every promise it implicitly makes, and a look at grovequays kept that same standard going, the kind of consistency that earns trust over time rather than chasing it through aggressive marketing is what I see here and it is appreciated greatly by this particular reader today.
Срочно нужен совет для отдела маркетинга. Готовимся к конференции. Везде говорят про индивидуальный подход, но реально найти нормальную сувенирную продукцию с логотипом. подарки клиентам с логотипом компании https://suvenirnaya-produkcziya-s-logotipom-9.ru Интересует именно изготовление под ключ — от кружек до брендированных блокнотов. Нам нужно от 500 штук, можно меньше. Заранее спасибо, кто откликнется.
Liked the way the post balanced confidence and humility, and a stop at seovista maintained the same balance, knowing when to assert and when to acknowledge uncertainty is a sign of mature thinking and the writers here have clearly developed that calibration through what I assume is years of careful work on their craft.
Deneyen çok kişi duydum çevremde. Kapanan siteler yüzünden güvenim sarsılmıştı. Ama sonunda işe yarar bir link keşfettim.
Bu işe yeni başlayanlar dinlesin. Sistem ayarlarını doğru yaptıktan sonra süreç çok basit. Giriş adresi tam olarak şurada: 1xbet güncel adres 1xbet güncel adres. Anlatacağım şu ki — 1xbet güncel adres arayanlar işte karşınızda.
Bonus sistemi bile tatmin edici. Başka yerlerde vakit kaybetmeyin — her şey düşünülmüş. Hayırlı olsun…
Decided to set aside time later to read more carefully, and a stop at createforwardexecutionplan reinforced that decision, content that earns a calendar entry rather than just a passing read is in a different tier altogether and this site is clearly working at that elevated level which I really do appreciate as a reader today.
Этот медицинский обзор сосредоточен на последних достижениях, которые оказывают влияние на пациентов и медицинскую практику. Мы разбираем инновационные методы лечения и исследований, акцентируя внимание на их значимости для общественного здоровья. Читатели узнают о свежих данных и их возможном применении.
ТОП-5 причин узнать больше – врач нарколог выезд
If I were grading sites on this topic this one would receive high marks, and a stop at etheraisles continued earning those high marks, the informal grading I do mentally for content sources is something I take seriously even though it is informal and this site has been receiving consistent high marks across multiple sessions today.
Yeni başlayanlar için biraz karışık gelebilir. Her gün yeni bir engelleme haberi alınca insan bıkıyor. Ama sonunda her derde deva bir adrese ulaştım.
Spor bahisleriyle aranız iyiyse burayı denemeden geçmeyin. Güncel sistem ayarlarını kontrol ettikten sonra erişim sağlamak en mantıklısı. Giriş adresi tam olarak şu şekilde: 1xbet giriş 1xbet giriş. Özetle anlatmam gerekirse — 1xbet spor bahislerinin adresi değişti.
Bonus kampanyaları fena değil. Çevremdekilere de söyledim — en memnun kaldığım yer burası oldu. Herkese iyi şanslar…
Decided after reading this that I would check this site weekly going forward, and a stop at edendome reinforced that commitment, deciding to add a site to a regular rotation requires meeting a quality bar that very few places clear and this one cleared it cleanly without any noticeable effort or marketing push behind it.
Reading this in the morning set a good tone for the day, and a quick visit to clarityinexecution kept that good tone going, content can do that sometimes when it hits the right notes and finding sites that consistently strike that tone is something I have learned to recognise and reward with regular visits.
Reading this with my morning coffee turned into reading the related posts with my morning coffee, and a stop at fancyhale stretched the morning further, content that pulls breakfast into a reading session rather than just accompanying it is content that has earned a higher claim on my attention than the average article does.
Solid endorsement from me, the writing earns it, and a look at growwithstrategyfocus continues to earn it across the broader site too, the kind of operation that maintains quality across many pages rather than just one viral post is a sign of serious commitment and that is what I see here clearly across what I read.
The whole experience of reading this was pleasant from start to finish, no pop ups and no annoying interruptions, and a look at musebeat continued that clean experience, technical choices about page design matter for the reader and this site clearly cares about the small details that add up to comfort across multiple visits.
Reading this gave me the rare experience of fully agreeing with all the conclusions, and a stop at progresswithstructure continued that agreement pattern, content that aligns with my existing views without seeming designed to do so is just content that happens to be reasonable and this site reads as reasonable rather than ideological mostly.
Closed the tab and immediately reopened it ten minutes later because I wanted to reread a part, and a stop at islemeadow drew the same return, content that pulls you back after closing it is doing something well beyond the average and worth marking as exceptional in my mental catalogue of reliable sites.
Yesterday I was complaining about the state of online writing and today this site has temporarily fixed that complaint, and a look at foxarbors extended that mood reversal, the short term mood improvement that comes from finding good content is real and this site has produced that improvement for me at a useful moment.
Yesterday I was complaining about the state of online writing and today this site has temporarily fixed that complaint, and a look at learnandadvancewisely extended that mood reversal, the short term mood improvement that comes from finding good content is real and this site has produced that improvement for me at a useful moment.
Probably this is one of the better quiet successes on the open web at the moment, and a look at discovercreativegrowthpaths reinforced that quiet success quality, sites that are doing well without making a noise about doing well are the sites I most respect and this one has clearly chosen the quiet success path consistently throughout.
Excellent post, balanced and well organised without showing off, and a stop at sauntersonar continued in that same vein, this site has clearly figured out the formula for content that works for readers rather than for search engine ranking signals which is harder than it sounds today and worth real recognition from anyone.
В этой статье рассматривается комплексный подход к избавлению от зависимости. Читатель узнает, как сочетание физического, психологического и духовного восстановления помогает достичь стойкого выздоровления.
Переходите по ссылке ниже – tver clinica plus
Worth saying that the prose reads naturally without straining for style, and a stop at driftfairs maintained the same unforced quality, writing that achieves elegance without effort is the highest tier and this site has clearly worked out how to land that effortless quality consistently rather than only on the writers best days.
Reading this in segments because the day was busy, and the post survived the fragmented attention well, and a stop at executeideascleanly held up similarly under interrupted reading, content that can withstand modern distracted reading patterns rather than requiring a perfect block of focused time is increasingly the kind I prefer.
Now thinking I want more sites built on this kind of editorial foundation, and a stop at buildactionabledirection extended that wish into a broader hope, sites built on substance and care rather than on metrics and growth are the kind of sites I want to see more of and this one is a small example worth supporting.
Reading this in a quiet coffee shop matched the calm energy of the writing, and a stop at momentumthroughstrategy extended that environmental match, content that has its own ambient quality which can match or clash with surroundings is content with a personality and this site has the kind of personality that suits calm reading.
Most of the time I bounce off similar pages within seconds, and a stop at flarequill held me longer than I would have predicted, the ability to convert a likely bouncing visitor into an engaged reader is a quality signal and this site has demonstrated that conversion ability across multiple visits where I expected to bounce.
casino https://nz.trustpilot.com/review/spinbet-online.nz
Açıkçası bu işe yeni başlayanlar için ideal. Kapanan sitelerden çektim resmen anlatamam. Detaylı güncellemeleri kontrol edip süreci sorunsuz başlattım. Güvenilir bir kaynak bulmanın ne kadar zor olduğunu hepimiz biliyoruz işte size o adres: 1xbet türkiye 1xbet türkiye. Yani demem o ki şöyle söyleyeyim — spor bahislerine meraklıysanız burası tam size göre.
bonusları bile fena değil действительно. Kendi adıma konuşuyorum size — başka yerde kaybolup durmayın yani. Şimdiden iyi şanslar ve bol kazançlar…
On reflection this is the kind of writing that improves my taste for what is possible in the format, and a look at directionoverdistraction continued raising that bar, content that elevates my expectations rather than lowering them is doing important work in calibrating my standards and this site is participating in that elevation reliably.
Refreshing to find writing that does not try to manipulate the reader into clicking onto the next page through cliffhangers and forced engagement, and a stop at portolives continued in the same respectful way, this is what reader first design actually looks like in practice rather than just in marketing copy that sounds nice.
Срочно нужен совет тем, кто занимается брендингом. Готовимся к конференции. Везде говорят про индивидуальный подход, но реально толковое изготовление корпоративных сувениров с печатью по вменяемой цене. подарки клиентам с логотипом компании https://suvenirnaya-produkcziya-s-logotipom-9.ru Интересует именно изготовление под ключ — от кружек до брендированных блокнотов. Пока просто собираем инфу. А то бюджет уже вчера утвердили, а поставщика нет.
Generally I do not leave comments but this post merits a small note, and a stop at eagerkilt extended that comment worthy quality, the urge to actively contribute to a sites community rather than passively consume from it is something specific content provokes and this site has provoked that engagement urge from me today.
Now considering the post as evidence that careful blog writing is still possible, and a look at zingtorch extended that evidence, the broader question of whether the modern web can sustain quality writing has obvious empirical answers in sites like this one and seeing them is reassuring even when they remain a minority overall today.
Вот такой момент: подбор качественного стационара — это реально отдельная и очень сложная история. Нередко в жизни бывает так, когда родным или близким людям внезапно потребовалась экстренная и профессиональная поддержка. И в этот момент обычно начинается паника просто из-за банальной нехватки информации.
Мой коллега по работе долго искал действительно надежный медицинский вариант. Очень сложно с ходу отличить реальные отзывы пациентов от банальной рекламы. Короче говоря, советую присмотреться к одному источнику, там действительно раскладывают по полочкам всю подноготную про круглосуточную наркологическую поддержку и условия проживания. В общем, не тяните время и долго не раздумывайте,, чтобы четко во всем разобраться.
Все важные детали и лицензии центра находятся только тут: наркологическая клиника стационар наркологическая клиника стационар. Честно говоря, после изучения всех условий, насколько там много полезных нюансов и скрытых факторов, включая комфортные условия содержания, современные палаты и полную анонимность. Для Санкт-Петербурга это точно один из самых лучших вариантов, так что рекомендую сохранить себе в закладки на всякий случай.
I really like how the writer keeps the tone friendly without sounding fake or overly polished, and after a stop at lobbydawn the same calm pace was there, no rushing to make a point and no padding either, just clean honest writing that I can respect and come back to later again.
Skipped the social share buttons but might come back to actually use one later, and a stop at fawnetch extended that share urge, content that triggers genuine sharing impulses rather than performative ones is content that has actually moved me and not many posts in a typical week do that for me actually.
Reading the writers other posts after this one suggests the quality is consistent rather than peak, and a stop at etherledge confirmed the consistent quality reading, sites that hold the same level across many pieces rather than peaking on a few are sites with sustainable editorial discipline and this one has clearly developed that.
Now I want to find more sites like this but I suspect they are rare, and a look at growintentionallyaheadnow extended that thought, the few sites that meet this quality bar are precious specifically because they are rare and finding others like them is one of the ongoing projects of careful internet curation across the years.
A piece that did not require external context to follow, and a look at mythmanor maintained the same self contained quality, content that stands alone without forcing readers to chase prerequisites is more accessible and this site has clearly thought about how each piece can serve a fresh visitor rather than only existing members.
Thanks for the breakdown, it gave me a clearer picture of something I had been confused about for a while now, and a stop at eliteledges closed the remaining gaps in my understanding nicely, no need to hunt around twenty other articles to put the pieces together which is a real time saver.
Worth marking this site as one to come back to deliberately rather than by accident, and a stop at isleparish reinforced that intention, the difference between sites I find again by chance and sites I return to on purpose is meaningful and this one has clearly moved into the deliberate return category for me.
Honest take is that I will probably forget most of what I read online today but this post is one I will remember, and a stop at progresswithoutlimits kept that same memorable quality going, certain writing leaves a residue in the mind in a way most content simply does not manage.
A piece that left me thinking I had been undercaring about the topic, and a look at edendune reinforced that mild concern, content that raises the appropriate weight of a subject without being preachy about it is doing important work and this site is providing that gentle elevation of attention for me consistently.
Liked that the post resisted a sales pitch ending, and a stop at graingrove maintained the no pitch approach, content that ends without trying to convert me into a customer or subscriber is content that has confidence in its own value and this site is clearly playing the long game on reader trust.
A modest masterpiece in its own quiet way, and a look at startmovingclearly confirmed the same quiet quality across the rest of the site, calling something a masterpiece is usually overstating but for content this carefully crafted the word feels appropriate even if the writers themselves would probably resist the label honestly.
Glad I gave this fifteen minutes rather than the usual three minute skim, and a look at mintdawns earned the same investment, time spent on quality content is rarely wasted but the reverse is also true and learning which sites deserve which kind of attention is part of being a careful online reader.
В этой статье мы рассмотрим современные достижения в области медицины, включая инновационные методы лечения и диагностики. Мы обсудим важность профилактики заболеваний и роль технологий в улучшении качества здравоохранения. Читатели узнают о влиянии медицины на повседневную жизнь и ее значение для современного общества.
Перейти к статье – tver clinica plus
Now placing this in the same category as a few other sites I have come to trust, and a look at bravofarm continued the placement decision, the small category of fully trusted sites is one I extend rarely and only after multiple positive reading sessions and this site has earned the category placement methodically over time.
Reading this slowly to give it the attention it deserved, and a stop at forwardmotionlabs earned the same slow read, choosing to read slowly is a small act of respect for content quality and very few sites earn that respect from me but this one did so without any explicit ask which is the cleanest way.
A thoughtful read in a week that has been mostly noisy, and a look at buildtowardresults carried that thoughtful quality across more pages, finding pockets of considered writing in a week of distractions is one of the small wins of careful curation and this site is providing those pockets at a sustainable rate.
Closed several other tabs to focus on this one as I read, and a stop at seoharbor held my undivided attention the same way, content that earns full focus in an attention environment full of competing pulls is content doing something genuinely well and the team behind it deserves recognition for that achievement consistently.
Açıkçası ben de bu konuda epey araştırma yaptım. Sürekli adres değişiyor derler ya işte o hesap. Gerekli teknik incelemeleri tek tek tamamlayıp sistemi test ettim. En sonunda güvenilir bir kaynak buldum ve size de aktarayım dedim: 1xbet türkiye 1xbet türkiye. Ne diyeyim yani anlatayım mı — bu işin ehli belli başlı yani.
bonusları bile tatmin edici gerçekten inanın. Araştırmayı seven biriyimdir bu konuda — pişman olacağınızı sanmıyorum hiç deneyin derim. Umarım işinize yarar bu bilgiler…
Народ, привет! Директор увидел бюджет и чуть инфаркт не схватил, надо вписаться в сумму. Ищу нормальное изготовление корпоративных сувениров с доставкой по Москве. корпоративные подарки оптом корпоративные подарки оптом Посоветуйте нормального поставщика сувенирной продукции с логотипом, чтобы не обдиралово было. Нужно штук 300-500, но если будет норм цена, можем и больше взять. Заранее респект тем, кто откликнется с контактами проверенными.
Daha önce hiç böyle bir site görmemiştim. Açıkçası önyargılıydım biraz. Sonra şansımı denemek istedim.
Casino sevenler için biçilmiş kaftan. Detaylı incelemeleri tamamlayıp adımları takip ettikten sonra her şey netleşti. Giriş adresi işte karşınızda: 1xbet spor bahislerinin adresi 1xbet spor bahislerinin adresi. Yani anlayacağınız — 1xbet türkiye için tek doğru adres burası.
Arayüzü bile kullanışlı. Kimseye zararı dokunmaz — deneyen herkes memnun kaldı. Şimdiden iyi eğlenceler…
Felt the post had been written without using a single buzzword, and a look at zingtrace continued that clean vocabulary, content free of jargon and trendy phrases reads better and ages better and this site has clearly committed to a vocabulary that will not feel dated in three years which is impressive editorially.
Now recognising the specific pleasure of reading writing that shows real care for sentence shapes, and a look at flickaltar extended that craft pleasure, sentence level writing quality is something most blog content ignores entirely and this site has clearly invested in the prose layer alongside the substance which is rare today.
Reading this triggered a small reorganisation of my own thinking on the topic, and a stop at loopbough furthered that reorganisation, content that affects the shape of my mental model rather than just decorating it with new facts is content with structural rather than informational impact and this site provides that.
However casually I came to this site I have ended up reading carefully, and a look at clarityoverchaos continued earning that careful reading, the conversion from casual visitor to careful reader is something content earns rather than demands and this site has accomplished that conversion for me over the course of just a few pieces.
Reading this in a moment of low energy still kept my attention, and a stop at duetdrives continued that engagement under suboptimal conditions, content that survives the reader being tired is content with extra reserves of pull and this site has the kind of writing that holds up even when I am not at my reading best.
A memorable post for me on a topic I had thought I was tired of, and a look at findyourprogresslane suggested the same site can refresh other tired topics, sites that can revive my interest in subjects I had written off as exhausted are doing rare work and this one is clearly doing that for me today.
Эта медицинская заметка содержит сжатую информацию о новых находках и методах в области здравоохранения. Мы предлагаем читателям свежие данные о заболеваниях, профилактике и лечении. Наша цель — быстро и доступно донести важную информацию, которая поможет в повседневной жизни и понимании здоровья.
Полная информация здесь – наркологическая клиника в твери
Bookmark earned, share earned, return visit earned, all from one reading session, and a look at vectorswift did the same, the trifecta of bookmark and share and return is rare in a single visit and represents the highest level of engagement I tend to offer any piece of online content these days here.
Really appreciate the absence of stock photos that have nothing to do with the content, and a quick visit to ivypier maintained the same restraint, visual filler is a tell that the writing cannot stand on its own and the lack of it here suggests the team has confidence in their content quality alone.
A thoughtful read in a week that has been mostly noisy, and a look at neatdawn carried that thoughtful quality across more pages, finding pockets of considered writing in a week of distractions is one of the small wins of careful curation and this site is providing those pockets at a sustainable rate.
Bir arkadaş tavsiyesiyle başladım. Herkes farklı bir adres söylüyordu. Ama sonunda doğru adresi buldum işte.
Bu işe yeni başlayanlar dinlesin. Sistem ayarlarını doğru yaptıktan sonra süreç çok basit. Giriş adresi tam olarak şurada: 1xbet yeni giriş 1xbet yeni giriş. Yani demem o ki — 1xbet spor bahislerinin adresi burası.
Bonus sistemi bile tatmin edici. Çok araştırdım emin olun — memnun kalmayanını görmedim. Gözünüz arkada kalmasın…
Now planning a longer reading session for the archives, and a stop at fawngate confirmed the archives are worth that longer commitment, sites with archives I want to read deliberately rather than just sample are rare and this one has clearly earned that level of interest based on the consistency of what I have already read.
The headings made navigating the post simple even when I needed to find a specific section quickly, and a look at everattic continued the same thoughtful structure, small details like clear headings show that someone is actually thinking about how the reader uses the page rather than just filling it for length alone.
Thanks for treating the topic with the seriousness it deserves without becoming pompous about it, and a stop at findyourgrowthdirection continued that balanced treatment, the gap between earnest and self serious is huge and writers who can stay on the right side of it earn my respect when I find them online today.
Uzun süredir oynuyorum diyebilirim. Her gün yeni bir engelleme haberi alınca insan bıkıyor. Ama sonunda her derde deva bir adrese ulaştım.
Bahis severler bilir burayı denemeden geçmeyin. Güncel sistem ayarlarını kontrol ettikten sonra erişim sağlamak en mantıklısı. Giriş adresi tam olarak şu şekilde: 1xbet yeni giriş 1xbet yeni giriş. Ne diyeyim yani — 1xbet türkiye için doğru adres burası.
Çekimler konusunda hiç sıkıntı yaşamadım. Kendi tecrübelerimi aktarayım — en memnun kaldığım yer burası oldu. Herkese iyi şanslar…
Now appreciating the small but real way this post improved my afternoon, and a stop at discoverhiddenopportunitiesnow extended that small improvement effect, content that produces measurable positive impact on the texture of a reading day is content with real value and this site is producing those small positive impacts at a sustainable rate apparently.
Came across this and immediately thought of a friend who would enjoy it, and a stop at ideastointent also reminded me of someone, content that triggers the urge to share is content that has earned my recommendation and this site has earned multiple from me already across different conversations during the week.
Now adding this site to a small mental group of recommendations I keep ready for specific kinds of inquiries, and a stop at neatdawns extended the recommendation readiness, content that I can confidently point friends and colleagues toward in specific contexts is content with real social utility and this site has that utility clearly.
Came away feeling slightly smarter than I was when I started, that is a real win, and a stop at createclaritysystems added a bit more to that, the rare site that actually transfers some of its knowledge to the reader in a way that sticks rather than just creating an illusion of learning briefly.
Generally I am cautious about recommending sites on first encounter but this one warrants the exception, and a look at eastglaze reinforced the exception making, the rare site that justifies breaking my normal cautious approach is the rare site worth flagging early and this one has prompted exactly that early flagging response from me.
Слушайте, какая история — близкий совсем плох, а тащить в больницу нет никаких сил. Я сам через это прошел недавно совсем. Руки опускаются, время тикает. Начинаешь обзванивать знакомых , а вокруг сплошной развод . Пока случайно не нашел один нормальный проверенный вариант. Если нужна срочная помощь — а ехать куда-то нет физической возможности , то нужно вызывать врача на дом. Я про наркологическую помощь на дому . В Самаре , если честно, хватает левых контор без лицензии. Вся проверенная информация ниже по ссылке: нарколог на дому нарколог на дому Честно скажу , после того как прочитал , многое прояснилось . Там и про капельницы подробно , и про консультацию нарколога . Плюс анонимность — это важно . Советую не тянуть .
A genuine compliment to the writer for keeping the post focused on what mattered, and a look at startmovingdecisively continued that disciplined focus, focus is a editorial choice that compounds across many small decisions and this site has clearly made those small decisions consistently across what I have read so far this week here.
Aylardır araştırıyorum en sonunda buldum. İnanın herkes farklı bir adres veriyor kafayı yedim. Adımları doğru şekilde uyguladıktan sonra erişim hatasız açıldı. En doğru adrese ulaştığımı düşünüyorum ve size de buradan bahsetmek istiyorum: 1xbet spor bahislerinin adresi 1xbet spor bahislerinin adresi. Valla bak şimdi size net söylüyorum — spor bahislerinde uzman olanlar bilir burayı.
bonus kampanyaları bile beklentimin üzerindeydi. Birçok platform denedim ama bunda karar kıldım — kesinlikle pişman olmazsınız deneyin derim. Umarım siz de memnun kalırsınız…
Genuine pleasure to read, and that is not something I say often after a casual click through, and a quick visit to growthbyfocus kept the same feeling going across the rest of the site, finding writing that actually feels good to spend time with rather than just functional is increasingly rare on the open web.
Liked everything about the experience, from the opening through to the closing notes, and a stop at grippalace extended that into more pages, finding a site where the editorial vision shows through every choice rather than feeling random is an increasingly rare experience and one I am glad to have today during this particular reading session.
Well done, the writing is professional without being stiff, and the topic is treated with care, and a look at ideasdrivenforward reflected that approach, the kind of site I would point a colleague to if they asked for a reliable starting point on this topic in the future without any hesitation at all.
Do you love excitement? https://jerseysbeststore.com/licensing offers premium pre-match and live sports betting, as well as a legal online casino. Try your luck on modern slots, table games, or with live dealers. We guarantee complete data security, fair results, and 24/7 player support.
The pacing of the post was just right, never rushed and never dragged out unnecessarily, and a look at quillglade maintained the same rhythm, you can tell the writer has experience because the difficult skill of pacing is something only practiced writers manage to handle well in long form content over time and across formats.
Pleasant surprise, the post delivered more than the headline promised, and a stop at bravopier continued that pattern of under promising and over delivering, the rarest combination on the modern web where most content does the opposite by promising the world and delivering thin recycled summaries instead each time you click on something interesting.
Quietly enjoying that I have found a new site to follow for the topic, and a look at buildideasintomotion reinforced the small pleasure of the find, the discovery of new high quality sources is one of the more durable pleasures of careful internet reading and this site has been generating that discovery pleasure at multiple points already today.
Worth flagging this site to a few specific friends who would appreciate the editorial sensibility, and a look at seoloom added more pages I will mention to them, recommending sites to specific people requires understanding both the site and the person and this site is making those personalised recommendations easy and natural for me.
Reading this site over the past week has changed how I evaluate content in this space, and a look at grovefarms extended that recalibration, the standards I bring to reading on the topic have shifted upward as a direct result of regular exposure to this kind of work and that shift will outlast any single reading session.
Easily one of the better explanations I have read on the topic, and a stop at lunacourt pushed it even higher in my mental ranking of useful resources, the kind of site that beats the average not by trying harder but by simply caring more about what it puts out daily which always shows.
casino https://kobkay.com/read-blog/18667_high-quality-casino-games-at-neospin-australia.html
Quiet confidence runs through the whole post, no need to shout to make the points stick, and a stop at edenfair carried that same restrained voice forward, content that respects the reader by trusting its own substance rather than dressing it up in theatrical language is what I look for online and rarely actually find these days.
Эта информационная публикация освещает широкий спектр тем из мира медицины. Мы предлагаем читателям ясные и понятные объяснения современных заболеваний, методов профилактики и лечения. Информация будет полезна как пациентам, так и медицинским работникам, желающим поддержать уровень своих знаний.
Давай разберёмся досконально – вызов нарколога на дом москва круглосуточно
Looking at the surface design and the substance together this site has both right, and a look at jetdome reinforced that integrated quality, sites where presentation and content reinforce each other rather than fighting are sites with full editorial coherence and this one has clearly invested in both layers in a balanced way.
Closed the tab feeling I had spent the time well, and a stop at neatglyph extended that feeling across more pages, the test of whether time on a site was well spent is one I apply silently after closing tabs and very few sites pass it but this one passed it cleanly today afternoon clearly.
Liked the careful word choice throughout, every term seemed picked for a reason rather than thrown in casually, and a stop at flowlegend continued that precise style, this kind of attention to small details is what separates careful writing from the usual rushed content that dominates blog spaces today across pretty much every topic I follow.
Denemek isteyen arkadaşlar çok soruyor. Kapanan sitelerden gına geldi artık. En sonunda işte size doğru adres.
Bahisle aranız nasıl bilmem burayı kesinlikle inceleyin. Gerekli tüm teknik kontrolleri yapıp adımları uyguladıktan sonra erişim açıldı. Giriş adresi tam olarak şurada: 1xbet giriş 1xbet giriş. Özetle söylemek gerekirse — 1xbet türkiye için tek geçerli adres burası.
Bonusları bile tatmin edici. Araştırmayı seven biriyim — başka aramaya gerek yok. Hayırlı olsun herkese…
Will recommend this to a couple of friends who have been asking about this exact topic, and after createactionablegrowth I have even more reason to do so, the kind of site that earns word of mouth rather than chasing it through aggressive marketing or paid placements is always a treat to find online.
Reading this with a fresh mind in the morning brought out details I might have missed in the afternoon, and a stop at irisbureaus earned the same fresh attention, content that rewards being read at full attention rather than at energy lows is content with real density and this site has that density consistently.
Açıkçası bu işe yeni başlayanlar için ideal. Sürekli adres değişiyor derler ya işte tam da o hesap. Gerekli teknik incelemeleri tek tek tamamlayıp sistemi test ettim. Güvenilir bir kaynak bulmanın ne kadar zor olduğunu hepimiz biliyoruz işte size o adres: 1xbet güncel adres 1xbet güncel adres. Yani demem o ki şöyle söyleyeyim — canlı bahis kısmı bile yeterli aslında.
Hiçbir sıkıntı yaşamadım bugüne kadar oynarken. İşin aslını söylemek gerekirse — kesinlikle pişman olacağınızı sanmıyorum deneyin. Şimdiden iyi şanslar ve bol kazançlar…
Honestly enjoyed not being sold anything for the entire duration of the post, and a look at discoverfreshopportunities kept that pleasant absence going across more pages, content that exists for its own sake rather than as a funnel to a paid product is increasingly rare and worth supporting where I can find it.
Good quality through and through, no rough edges and no signs of being rushed, and a quick look at feathalo kept the same polish going, the kind of site that respects its own brand by maintaining consistency across pages which is something I always appreciate as a reader looking for trustworthy information online today.
Looking back on this reading session it stands as one of the better ones recently, and a look at explorefutureclarity extended that ranking, the informal ranking of reading sessions against each other is something I do mentally and this session ranks high largely because of this site and a couple of related pages here.
Great work on keeping things readable, the post never drags or repeats itself which I really appreciate, and a stop at harborstonemerchantgallery added a bit more context that fit naturally with what was already said here, no need to read everything twice to get the point being made today.
Really appreciate the lack of pop ups, modals, cookie banners stacking on top of each other, and a quick visit to learnandscaleprogressively confirmed the same clean approach across the rest of the site, technical decisions about user experience are part of what makes content actually pleasant to engage with for sure.
Look, I’ve been around the block with these Miami car rentals. You book a premium ride online, show up, and they hand you keys to something with a dented bumper. No thanks, I am completely done with that circus. When you are trying to find a reliable premium fleet down here, make sure to check the actual fleet reviews before signing anything. Miami without a decent whip is pretty rough, especially if you want ice-cold AC and no ridiculous daily mileage caps.
I’ve literally compared maybe 15 different local providers last month alone, but I eventually found a service with zero hidden fees and no bait-and-switch tactics. If you are looking for an honest source for premium rentals across Florida, check the details here: exotic car rental coral gables https://luxury-car-rental-miami-2.com. Oh, and definitely bring polarized sunglasses, because that Florida sun is absolutely no joke. Anyway, at least there’s one trustworthy service left in this town, let me know if you guys know any other clean spots.
Now saved this in a way that I will actually find again rather than the casual bookmark approach, and a stop at findgrowthalignment earned the same careful saving, organising my reading bookmarks so that high quality sources rise to the top is something I should do more of and this site triggered that organisation today.
Reading this prompted me to dig into a related topic later, and a stop at quirkbazaar provided some of the starting points for that follow up reading, content that triggers further exploration rather than satisfying curiosity completely is content with real generative energy and this site has plenty of that energy throughout it.
Bookmark earned, calendar reminder set, share queued, all from one good post, and a look at focusdrivengrowth did the same, when a single reading session triggers multiple downstream actions you know the content has actually moved me beyond the page and this site is moving me at that higher level reliably.
The use of plain language without dumbing down the topic was really well done, and a look at vitalsnippet continued in that same accessible style, this is something many technical writers fail at because they either confuse their readers or condescend to them but here neither problem appears at all which is impressive really.
Liked the way the post balanced confidence and humility, and a stop at meritquay maintained the same balance, knowing when to assert and when to acknowledge uncertainty is a sign of mature thinking and the writers here have clearly developed that calibration through what I assume is years of careful work on their craft.
Reading this gave me the rare experience of fully agreeing with all the conclusions, and a stop at discovercleanstrategies continued that agreement pattern, content that aligns with my existing views without seeming designed to do so is just content that happens to be reasonable and this site reads as reasonable rather than ideological mostly.
В этой статье мы рассматриваем разные способы борьбы с алкогольной зависимостью. Обсуждаются методы лечения, программы реабилитации и советы для поддержки близких. Читатели получат информацию о том, как преодолеть зависимость и добиться успешного выздоровления.
Уникальные данные только сегодня – выводе из запоя
Now feeling mildly impressed in a way I do not quite remember feeling about a blog in a while, and a stop at ebonfig extended that mild impression, content that produces specific positive emotional responses rather than just neutral information transfer is content with extra dimensions and this site has those extra dimensions clearly.
Если честно, сам перерыл кучу форумов в поисках нормальной ткани для мебели. Оказалось, что выбрать подходящий вариант тот ещё квест. В общем, смотрите, вот здесь реально толково расписано про плотность, ворс и износостойкость для диванов и кресел, а главное — показаны варианты, которые легко чистить. Вся полезная информация доступна здесь: обивочный материал для мягкой мебели купить обивочный материал для мягкой мебели купить Дальше сами гляньте фактические отзывы. Да, и не берите первое, что попалось — я уже поплатился кошельком, когда брал мебельную ткань купить с рук. Эта тема реально вывозит по износу. Имейте в виду: ткань для обивки мебели купить лучше уже с нормальной пропиткой от грязи. Да и садится такое полотно гораздо меньше. В общем, советую глянуть источник.
Now feeling confident enough in this site to use it as a reference point for evaluating others on the same topic, and a look at ideasneedfocus continued the comparison friendly quality, sites that serve as quality benchmarks for their topic are precious and this one has clearly become a benchmark for me on this particular subject area.
Started thinking about my own writing differently after reading, and a look at briskolive continued that reflective effect, content that influences how I work rather than just informing what I know is content with the highest kind of impact and this site has triggered some of that reflective influence today on me.
Reading this confirmed a small detail I had been uncertain about, and a stop at jetmanor provided the source for further checking, content that supports verification through citations or links rather than just asserting facts is more trustworthy and this site has clearly built its credibility through that kind of verifiable approach consistently.
Now noticing that the post benefited from being neither too short nor too long for its content, and a look at neatmill continued that calibration of length, sites that match length to content rather than padding to hit some target are sites that respect both their material and their readers and this site does both.
Вот такой момент: подбор качественного стационара — это реально отдельная и очень сложная история. Нередко в жизни бывает так, когда родным или близким людям внезапно потребовалась экстренная и профессиональная поддержка. И в этот момент обычно начинается паника просто из-за банальной нехватки информации.
Мой коллега по работе долго искал по-настоящему работающий и безопасный выход. В интернете сейчас столько мусора и дорвеев, что голова идет кругом. Короче говоря, советую присмотреться к одному источнику, там действительно раскладывают по полочкам всю подноготную про круглосуточную наркологическую поддержку и условия проживания. В общем, не тяните время и долго не раздумывайте,, чтобы четко во всем разобраться.
Все важные детали и лицензии центра находятся только тут: лечение запоя в стационаре санкт петербург лечение запоя в стационаре санкт петербург. Честно говоря, после изучения всех условий, насколько там много подводных камней, на которые стоит обращать внимание, включая комфортные условия содержания, современные палаты и полную анонимность. Для Санкт-Петербурга это точно один из самых лучших вариантов, который стабильно работает и имеет хорошие отзывы.
A particular pleasure to read this with a fresh coffee, and a look at discoverforwardthinkingpaths extended the pleasure across more pages, content that pairs well with quiet morning rituals is something I have come to value highly and this site has the kind of energy that fits naturally into a calm reading routine.
Speaking carefully because I do not want to overstate things this site is genuinely above average across multiple measurements, and a stop at draftlogs continued the above average performance, the calibration of judgement against potential overstatement is something I take seriously and this site clears the higher bar even after that calibration applies.
Thanks for taking the time to write this, it is clear that some thought went into how each point would land, and after I went through grovefarm I had a better grip on the topic, real value without the usual marketing noise people have to put up with online when searching for answers.
A slim post with substantial content per word, and a look at fondarbor maintained the same density, the content per word ratio is something I track informally and this site scores high on that ratio compared to most sources I read regularly which is a quiet indicator of careful editorial work behind the scenes.
Знаете, бывает такое — родственник в тяжелом запое , а тащить в больницу страшно . Я сам через это прошел пару лет назад . Руки опускаются, время тикает. Начинаешь обзванивать знакомых , а вокруг сплошной развод . Пока кто-то не подсказал один нормальный проверенный вариант. Требуется немедленная консультация — а везти самому нет физической возможности , то нужно вызывать врача на дом. Речь конкретно про нарколога на дом . В Самаре , если честно, хватает левых контор без лицензии. Вся проверенная информация ниже по ссылке: нарколог на дом недорого нарколог на дом недорого Честно скажу , после того как прочитал , понял, как правильно действовать. И про снятие запоя на дому, и про последующее кодирование. И цены адекватные, без разводов. Рекомендую не откладывать.
Yeni başlayanlar için biraz karışık gelebilir. Sürekli adres değişimi can sıkıyor. Ama sonunda şu linki keşfettim.
Spor bahisleriyle aranız iyiyse burayı bir şans verin derim. Güncel sistem ayarlarını kontrol ettikten sonra erişim sağlamak en mantıklısı. Giriş adresi tam olarak şu şekilde: 1xbet güncel giriş 1xbet güncel giriş. Kısacası durum şu — 1xbet spor bahislerinin adresi değişti.
Çekimler konusunda hiç sıkıntı yaşamadım. Çevremdekilere de söyledim — başka yerde aramaya gerek yok. Şimdiden bol kazançlar…
Kendi başıma araştırırken buldum. Herkes farklı bir adres söylüyordu. Ama sonunda sağlam bir kaynağa denk geldim.
Bilenler zaten anlar. Sistem ayarlarını doğru yaptıktan sonra süreç çok basit. Giriş adresi tam olarak şurada: 1xbet spor bahislerinin adresi 1xbet spor bahislerinin adresi. Yani demem o ki — 1xbet güncel adres arayanlar işte karşınızda.
Bonus sistemi bile tatmin edici. Başka yerlerde vakit kaybetmeyin — şikayet edecek bir şey bulamadım. Şimdiden keyifli oyunlar…
My professional context would benefit from having this kind of resource available, and a look at amberharborartisanexchange extended the professional applicability, the rare site that contributes meaningfully to professional work rather than just personal interest is content with multiplied value and this one is providing that professional utility consistently across multiple pieces.
Genuine reaction is that this site clicked with how I like to read, and a look at createimpactdirection kept that comfortable fit going, sometimes you find a place online whose editorial decisions just align with your preferences and when that happens it is worth recognising and supporting through repeat engagement consistently going forward.
Following the post through to the end without my attention drifting once, and a look at forwardthinkingpaths earned the same uninterrupted attention, content that holds attention without manipulating it is content with substantive pull and this site has demonstrated that substantive pull across multiple pieces in a single reading session reliably here today.
Denemek isteyen herkese aynı şeyi söylüyorum. Kapanan siteler yüzünden çok mağdur oldum. Güncel detayları inceleyip sistemi test ettim ve sorunsuz çalıştı. En doğru adrese ulaştığımı düşünüyorum ve size de buradan bahsetmek istiyorum: 1xbet giriş 1xbet giriş. Yani kısacası anlatmaya çalıştığım şu — spor bahislerinde uzman olanlar bilir burayı.
Hiçbir aksilik yaşamadım bugüne kadar. İşin doğrusunu söylemek gerekirse — kesinlikle pişman olmazsınız deneyin derim. Herkese hayırlı olsun…
Знаете, ситуация бывает — человек в ступоре , а везти в больницу просто нереально . Моя семья такое пережила недавно. Руки опускаются, время идёт. Начинаешь обзванивать знакомых , а вокруг одни обещания . Пока случайно не наткнулся на один реально работающий вариант. Если нужна немедленная консультация — а ехать куда-то просто нереально, то выход один . Речь конкретно про нарколога на дом . У нас в Самаре, к слову , хватает левых контор без лицензии. Нормальные контакты, кто реально приезжает вот тут : заказать нарколога https://narkolog-na-dom-samara-13.ru Честно скажу , после того как вник в детали, понял, как правильно действовать. И про снятие запоя на дому, и про последующее кодирование. Плюс анонимность — это важно . Советую не откладывать.
Decided to read this site for a while before forming a verdict, and the verdict after several pages is positive, and a stop at featlake continued that pattern, judging a site requires more than one post and giving sites a fair sample is something I try to do for promising candidates rather than rushing to dismiss.
Refreshing tone compared to the dry corporate posts on similar topics, and a stop at learnandexecutewisely carried that personality through nicely, you can tell when a real person is behind the writing versus a content team chasing metrics and this site definitely falls into the former category clearly across what I have seen.
Felt slightly impressed without being able to point to one specific reason, and a look at discovernewfocus continued that diffuse positive feeling, when content works at a level you cannot easily articulate the writer is doing something with craft rather than just delivering information and that is something I have learned to recognise.
Appreciated the way each section connected smoothly to the next without abrupt jumps, and a stop at apexhelm kept that flow going nicely, transitions are something most blog writers ignore but the difference is huge for the reader who is trying to follow a sustained line of thought today across many different topics.
Этот краткий обзор предлагает сжатую информацию из области медицины, включая ключевые факты и последние новости. Мы стремимся сделать информацию доступной и понятной для широкой аудитории, что позволит читателям оставаться в курсе актуальных событий в здравоохранении.
Лови подробности – выведение из запоя капельница
Honest assessment after reading this twice is that it holds up under careful attention, and a look at strategycreatesmomentum extended that durability across more pages, content that survives a second read without revealing weak spots is rarer than the average reader probably realises and this site clearly cleared that bar.
Started smiling at one paragraph because the writing was just nice, and a look at harbortrailcommercegallery produced a couple more such moments, prose that produces small spontaneous reactions in the reader is doing more than just transferring information and the writers here are clearly hitting that level fairly consistently throughout pieces.
Honestly the simplicity is what makes this work, the topic is not buried under filler words or overly complex examples, and a quick look at micapact showed the same sensible style, I left with what I came for and no headache from over reading which is a real win these days.
Solid quality, the kind of work that holds up to a careful read rather than a quick skim, and a quick look at discoverdirectionalclarity kept that standard going strong, content that rewards attention rather than punishing it is something I appreciate more and more these days online across nearly every topic I follow.
Sürekli karşıma çıkıyordu ama denememiştim. Denemekle denememek arasında gidip geldim. Sonra biraz araştırayım dedim.
Bahis dünyasına ilgi duyanlar bilir. Detaylı incelemeleri tamamlayıp adımları takip ettikten sonra her şey netleşti. Giriş adresi işte karşınızda: 1xbet türkiye 1xbet türkiye. Demem o ki — 1xbet spor bahislerinin adresi burada.
Arayüzü bile kullanışlı. Kimseye zararı dokunmaz — başka bir yere ihtiyacınız kalmaz. Şimdiden iyi eğlenceler…
Without comparing too aggressively to other sources this one stands out for the right reasons, and a look at edgecradle continued that distinctive quality, content that distinguishes itself through substance rather than style tricks is content with lasting differentiation and this site has clearly chosen substance based differentiation as its core editorial strategy.
This filled in a gap in my understanding that I had not even noticed was there, and a stop at waveharborartisanexchange did the same, the kind of post that gives you more than you expected when you first clicked through from somewhere else, a real find for anyone curious about the area covered here.
The clarity here is something I really appreciate, especially compared to sites that pile on jargon for no reason, and a look at knackdome was the same, simple direct sentences that actually deliver information instead of dancing around the point for paragraphs at a time which wastes reader patience.
casino https://ghpromax.com/read-blog/607_playing-assortment-at-crowngold.html
casino https://linkova.site/read-blog/2600_playing-assortment-in-crowngold.html
A clean read with no irritations, and a look at northdawn continued that frictionless quality, the absence of small irritations is something I notice only when present elsewhere and this site is one of the rare places where everything just works and lets me focus on the substance rather than fighting the format.
Highly recommend to anyone looking for a sensible take on this topic without the usual marketing nonsense, and a look at graingroves kept that grounded approach going, sites that stay focused on serving readers rather than monetising every click are rare and this is clearly one of those rare ones I really appreciate finding.
monopoly live tracker https://monopoly-casino-in.com/
Came back to this an hour later to reread a specific section, and a quick visit to forgecabin also drew a second look, content that pulls you back rather than letting you move on permanently is the kind I want to fill my browser bookmarks with in 2026 and beyond as the open internet evolves.
Stands out for actually being useful instead of just being long, and a look at amberharborartisanexchange kept that going, length without value is the default mode of most blogs these days but this site has clearly chosen a different path which I respect a lot as a reader who values careful editing decisions like that.
poker sites accepting bitcoin poker sites accepting bitcoin .
bitcoin et poker bitcoin et poker .
sites de poker de bitcoin http://poker-bitcoin.de/ .
legal bitcoin online poker legal bitcoin online poker .
best bitcoin poker sites 2020 http://www.poker-bitcoin-deutschland.de .
bitcoin poker freeroll http://onlinepoker-bitcoin.de/ .
Now planning a longer reading session for the archives, and a stop at createbettermomentum confirmed the archives are worth that longer commitment, sites with archives I want to read deliberately rather than just sample are rare and this one has clearly earned that level of interest based on the consistency of what I have already read.
is bitcoin the only way to enter online poker https://onlinepokerbitcoin.de .
Quality writing that respects the reader’s intelligence without overloading them, and a quick look at ebongreen reflected that approach, a balanced thoughtful site that earns trust by being consistent rather than by shouting about how trustworthy it is which is the usual approach online sadly across most content categories.
A clear cut above the usual noise on the subject, and a look at vandaltavern only made that gap wider in my view, the kind of place that earns its visitors through quality rather than through aggressive marketing or sponsored placements which is increasingly the only way most sites stay afloat across the modern web.
Looking forward to seeing what gets published next month, and a look at bravofarm extended that anticipation across the broader site, finding myself looking forward to a sites future content rather than just consuming its existing content is a stronger commitment level than I usually reach with new finds and this site triggered that.
Felt the writer was being honest with the reader which is rare enough that I want to acknowledge it, and a look at grovequay continued that honest feel, content built on actual knowledge rather than aggregated summaries is something I value highly and rarely come across in regular searches on the open internet these days.
Pass this along to anyone you know dealing with similar questions, the answers here are clear, and a stop at mintdawn adds even more useful material, this is the kind of resource that deserves to circulate widely rather than getting lost in the constant churn of new content online that buries good work daily.
Closed the tab with a small sense of finality rather than the usual rushed exit, and a stop at feltglen produced the same considered closing, when reading ends with deliberate satisfaction rather than impatient skip you know the time was well spent and this site is producing those satisfying endings consistently across what I read.
Look, I’ve been around the block with these Miami car rentals. You book a premium ride online, show up, and they hand you keys to something with a dented bumper. No thanks, I am completely done with that circus. If you actually need a proper vehicle to cruise around the city, seriously, do your homework first and don’t just trust social media ads. Miami without a decent whip is pretty rough, especially if you want ice-cold AC and no ridiculous daily mileage caps.
Most of these local agencies are just fancy websites hiding a garbage fleet, until I finally stumbled across one that actually delivers what it promises. If you are looking for an honest source for premium rentals across Florida, check the details here: car hire miami beach florida https://luxury-car-rental-miami-2.com. Yeah, finding parking in downtown is still its own separate nightmare, but that’s on you. Anyway, at least there’s one trustworthy service left in this town, let me know if you guys know any other clean spots.
Pass this along to anyone you know dealing with similar questions, the answers here are clear, and a stop at growththroughalignment adds even more useful material, this is the kind of resource that deserves to circulate widely rather than getting lost in the constant churn of new content online that buries good work daily.
A clean read with no irritations, and a look at createforwarddirection continued that frictionless quality, the absence of small irritations is something I notice only when present elsewhere and this site is one of the rare places where everything just works and lets me focus on the substance rather than fighting the format.
Reading this gave me a small refresher on something I had partially forgotten, and a stop at marblecovemerchantgallery extended the refresher, content that strengthens existing knowledge rather than just adding new is content with a particular kind of consolidating value and this site is providing that consolidating function across multiple visits.
Just dropping by to say thanks for the effort, it does not go unnoticed when a writer cares this much about the reader, and after I went through knackpact I was certain this is one of the better corners of the internet for this particular kind of content which is genuinely refreshing.
Denemek isteyen arkadaşlara hep aynısını söylüyorum. Herkes farklı bir şey anlatıyor kafam allak bullak oldu. Detaylı güncellemeleri kontrol edip süreci sorunsuz başlattım. Güvenilir bir kaynak bulmanın ne kadar zor olduğunu hepimiz biliyoruz işte size o adres: 1xbet yeni giriş 1xbet yeni giriş. Yani demem o ki şöyle söyleyeyim — spor bahislerine meraklıysanız burası tam size göre.
Hiçbir sıkıntı yaşamadım bugüne kadar oynarken. Birçok yeri denedim ama burada karar kıldım — kesinlikle pişman olacağınızı sanmıyorum deneyin. Herkese hayırlı olsun…
casino https://silverline.onl/read-blog/606_meesterlijke-bordspellen-bij-slot-lair.html
Well structured and easy to read, that combination is rarer than people think, and a stop at findyournextstrategicmove confirmed the same standard runs across the rest of the site, definitely the kind of place I will be coming back to when this topic comes up in conversation later again over the weeks ahead.
Well done, the kind of post that makes you slow down and actually read instead of skimming for keywords, and a look at windharborartisanexchange kept me reading carefully too, that is a sign of writing that has been crafted rather than churned out for an algorithm to see today and tomorrow.
Closed the laptop and walked away thinking about the post for a good twenty minutes, and a stop at startbuildingmomentumclearly produced similar lingering thoughts, content that survives the closing of the browser tab is content that has actually entered the mind rather than just decorating the screen for the duration of the reading.
Solid stuff, the kind of post that I will probably refer back to later this month when the topic comes up again, and a look at freshguilds only confirmed I should bookmark the site as a whole rather than just this single page for future reference and use across coming weeks.
Found this really helpful, the explanations are simple but they actually answer the questions a normal reader would have, and after I followed exploreuntappeddirectionideas I had a clearer sense of the topic, no extra fluff just useful points laid out in a sensible order that made the time worth it.
Слушайте, какая история — родственник в тяжелом запое , а везти в клинику нет никаких сил. Моя семья такое пережила пару лет назад . Руки опускаются, время тикает. Лезешь в интернет, а вокруг сплошной развод . Пока случайно не нашел один реально работающий вариант. Требуется немедленная консультация — а ехать куда-то нет физической возможности , то выход один . Речь конкретно про выезд нарколога на дом. У нас в Самаре, к слову , хватает шарлатанов . Нормальные контакты, кто реально приезжает вот тут : заказать звонок нарколога https://narkolog-na-dom-samara-14.ru Честно скажу , после того как вник в детали, многое прояснилось . Там и про капельницы подробно , и про консультацию нарколога . И цены адекватные, без разводов. Рекомендую не тянуть .
Decided to set a calendar reminder to revisit, and a stop at novalog extended that revisit list, calendar entries for content are a level of commitment I rarely make but when I do they signal a higher regard than a simple bookmark and this site has earned that calendar tier of relationship from me today.
Thanks for sharing this with the open internet rather than locking it behind a paywall like so many sites do now, and a stop at foxarbor kept the same vibe going, generous helpful and clearly written by someone who actually wants people to learn from it rather than just charge them.
Now adjusting my mental model of how the topic fits into the broader landscape, and a look at growthwithprecision extended that adjustment, content that affects my structural understanding rather than just my factual knowledge is content with deeper impact and this site is providing those structural updates at a meaningful rate consistently across topics.
Genuine reaction is that I will probably think about this on and off for a few days, and a look at amberharborcraftcollective added fuel to that, the best content lingers in your head after you close the tab rather than evaporating immediately and this site clearly knows how to write that kind of memorable content.
Daha önce hiç bu kadar kararlı bir site görmedim. Kapanan siteler yüzünden çok mağdur oldum. Gerekli tüm teknik kontrolleri sırasıyla tamamlayıp süreci başlattım. En doğru adrese ulaştığımı düşünüyorum ve size de buradan bahsetmek istiyorum: 1xbet türkiye 1xbet türkiye. Şöyle düşünün yani — spor bahislerinde uzman olanlar bilir burayı.
para çekme konusunda da sıkıntı görmedim açıkçası. Birçok platform denedim ama bunda karar kıldım — en çok güvendiğim adres burası oldu artık. Şimdiden bol şans yardımı ve iyi eğlenceler…
Now saved this in a way that I will actually find again rather than the casual bookmark approach, and a stop at startmovingwithclarity earned the same careful saving, organising my reading bookmarks so that high quality sources rise to the top is something I should do more of and this site triggered that organisation today.
A relief to read something where I did not have to fact check every claim mentally, and a look at createforwardplanning continued that reliable feeling, sites where I can lower my guard and trust the content are rare and this one is earning that trust paragraph by paragraph through consistent careful work behind the scenes.
Worth flagging that this approach to the topic is fresh without being contrarian, and a stop at bravopier extended the same fresh angle, finding original perspective on familiar subjects is rare and this site has clearly developed its own way of seeing rather than echoing the dominant takes from elsewhere consistently.
Honestly this was the highlight of my reading queue today, and a look at musebeat extended that across more pages I will return to, ranking what I read against what else I read each day is something I do informally and this site keeps moving up in those rankings the more I explore it.
Worth every minute of the time spent reading, and a stop at edgedial extends that value across more pages, in a media environment where most content is engineered to waste attention this site stands out by treating reader time as something valuable rather than something to be exploited and stretched as far as possible.
Reading this gave me a small framework I expect to use going forward, and a stop at festglade extended that framework, content that produces transferable mental models rather than just specific facts is content with multiplicative value and this site is providing those models at a rate that justifies extra attention from me regularly.
В этой статье рассматриваются различные аспекты избавления от зависимости, включая физические и психологические методы. Мы обсудим поддержку, мотивацию и стратегии, которые помогут в процессе выздоровления. Читатели узнают, как преодолеть трудности и двигаться к новой жизни без зависимости.
Всё самое вкусное внутри – детоксикация наркозависимых цена
A genuinely unexpected highlight of my reading week, and a look at lacecabin extended that pattern, the surprise of finding excellent content rather than the predictable mediocre is one of the few real pleasures of casual web browsing and this site delivered that surprise cleanly today which I really do appreciate.
В этой статье рассматривается комплексный подход к избавлению от зависимости. Читатель узнает, как сочетание физического, психологического и духовного восстановления помогает достичь стойкого выздоровления.
Эксклюзивная информация – клиника плюс тверь
Skipped the comments to avoid spoilers and came back later to find them genuinely worth reading, and a stop at woodcoveartisanexchange extended that surprised respect, when the discussion below a post matches the quality of the post itself you have found something special and this site appears to attract that kind of audience.
Excellent execution from start to finish, the post never loses its rhythm and the points stay sharp, and a quick stop at etherledges kept the same level going, consistency like this across a site is the marker of a serious operation rather than a casual side project running on autopilot somewhere else.
Знаете, поиск действительно проверенного медицинского центра — это всегда целая проблема и головная боль. Нередко в жизни бывает так, когда родным или близким людям внезапно потребовалась экстренная и профессиональная поддержка. И тут сразу возникает главный вопрос: куда именно везти человека?
Я сам недавно детально изучал этот вопрос, искал по-настоящему работающий и безопасный выход. В интернете сейчас столько мусора и дорвеев, что голова идет кругом. Если коротко, лучше сразу перейти на официальный сайт, где нет вранья, там подробно расписаны все важные условия и нюансы про круглосуточную наркологическую поддержку и условия проживания. В такой ситуации лучше один раз внимательно глянуть самостоятельно, чтобы четко во всем разобраться.
Все важные детали и лицензии центра находятся только тут: лечение алкоголизма спб стационар лечение алкоголизма спб стационар. Честно говоря, после изучения всех условий, насколько там много полезных нюансов и скрытых факторов, включая комфортные условия содержания, современные палаты и полную анонимность. Для Санкт-Петербурга это точно один из самых лучших вариантов, который стабильно работает и имеет хорошие отзывы.
Reading this prompted me to dig out an old reference book related to the topic, and a stop at oakarena extended that connection to other sources, content that connects me back to my own existing knowledge rather than asking me to forget it is content with continuity and this site has that continuous quality.
Picked a single sentence from this post to remember, and a look at meadowharborcommercegallery gave me another to keep, content that produces memorable lines is doing more than just transferring information and the small selection of sentences I keep from each reading session is one of the actual returns I get from reading carefully.
Picked this post to share in a Slack channel where I knew it would be appreciated, and a look at ebonkoala suggested I will share more from here later, content worth sharing into a professional context is content that has earned a higher kind of trust than mere personal interest and this site has it.
Ended up here on a wandering afternoon and was glad I stayed for the read, and a stop at createforwardprogress extended the wandering into a proper exploration of the site, the kind of place that rewards aimless clicking with something genuinely interesting rather than the shallow content that mostly populates the modern open web.
Açıkçası ben de bu konuda epey araştırma yaptım. Sürekli adres değişiyor derler ya işte o hesap. Adımları doğru sırayla uyguladıktan sonra bağlantı hatasız açıldı. En sonunda güvenilir bir kaynak buldum ve size de aktarayım dedim: 1xbet güncel adres 1xbet güncel adres. Ne diyeyim yani anlatayım mı — bahis olsun casino olsun her şey düşünülmüş resmen.
bonusları bile tatmin edici gerçekten inanın. Birçok yer denedim emin olun yıllardır — pişman olacağınızı sanmıyorum hiç deneyin derim. Umarım işinize yarar bu bilgiler…
Going to come back when I have more time to read carefully, the post deserves more than a quick scan, and a stop at hazemill reinforced that, this is the kind of site that rewards a slower read which is hard to find in this fast paced corner of the internet but really worthwhile.
Этот документ охватывает важные аспекты медицинской науки, сосредотачиваясь на ключевых вопросах, касающихся здоровья населения. Мы рассматриваем свежие исследования, клинические рекомендации и лучшие практики, которые помогут улучшить качество лечения и профилактики заболеваний. Читатели получат возможность углубиться в различные медицинские дисциплины.
Получить профессиональную консультацию – лечение наркомании в Твери
A particular kind of restraint shows up in the writing, and a look at findmomentumforward maintained the same restraint across pages, knowing what not to say is just as important as knowing what to say and this site has clearly developed strong instincts on both sides of that editorial line throughout pieces I have read.
Now thinking about how this post will age over the coming years, and a stop at apricotharborartisanexchange suggested the same durability, content built to age well rather than to capture the attention of the moment is content with a different kind of value and this site has clearly chosen the long horizon over the short one.
Reading this in the morning set a good tone for the day, and a quick visit to startwithpurposefulplanning kept that good tone going, content can do that sometimes when it hits the right notes and finding sites that consistently strike that tone is something I have learned to recognise and reward with regular visits.
A piece that exhibited the kind of patience that good writing requires, and a look at tealthicket continued that patient quality, hurried writing is easy to spot and this site reads as having been written without time pressure which produces a different feel than the rushed content that dominates much of the modern blog space.
A satisfying piece in the way that good meals are satisfying rather than just filling, and a look at freshguild extended that satisfaction, the metaphor between content and meals is one I find useful and this site reads as a satisfying meal rather than the empty calories that most content provides for casual readers.
Случается, когда уже не до раздумий — близкий совсем плох, а тащить в клинику просто нереально . Я сам через это прошёл пару лет назад . Руки опускаются, время идёт. Начинаешь обзванивать знакомых , а вокруг сплошной развод . Пока кто-то не подсказал один нормальный проверенный вариант. Если нужна немедленная консультация — а ехать куда-то нет возможности , то выход один . Речь конкретно про круглосуточный выезд нарколога. У нас в Самаре, если честно, хватает шарлатанов . Нормальные контакты, кто реально приезжает вот тут : нарколог на дом самара цены нарколог на дом самара цены Откровенно говоря, после того как вник в детали, многое прояснилось . Там и про капельницы подробно , и про последующее кодирование. Плюс анонимность — это важно . Советую не тянуть .
pagamenti crazy time pagamenti crazy time .
crazy time stats tracker http://www.crazy-timeitalia.com .
В этой статье мы рассмотрим современные достижения в области медицины, включая инновационные методы лечения и диагностики. Мы обсудим важность профилактики заболеваний и роль технологий в улучшении качества здравоохранения. Читатели узнают о влиянии медицины на повседневную жизнь и ее значение для современного общества.
Где почитать поподробнее? – clinica plus
Liked that there was nothing performative about the writing, and a stop at briskolive continued that genuine quality, performative writing tries to be witnessed rather than read and the difference between performance and substance is huge for the careful reader and this site has clearly chosen substance every time clearly.
В этом обзоре мы обсудим современные методы борьбы с зависимостями, включая медикаментозную терапию и психотерапию. Мы представим последние исследования и их результаты, чтобы читатели могли быть в курсе наиболее эффективных подходов к лечению и поддержке.
Узнайте всю правду – clinica plus
Эта информационная публикация освещает широкий спектр тем из мира медицины. Мы предлагаем читателям ясные и понятные объяснения современных заболеваний, методов профилактики и лечения. Информация будет полезна как пациентам, так и медицинским работникам, желающим поддержать уровень своих знаний.
Подробнее – детокс от запоя самара
В этом обзоре представлены различные методы избавления от зависимости, включая терапевтические и психологические подходы. Мы сравниваем их эффективность и предоставляем рекомендации для тех, кто хочет вернуться к трезвой жизни. Читатели смогут найти информацию о реабилитационных центрах и поддерживающих группах.
Подробности по ссылке – капельница от алкоголизма
Now feeling the rare pleasure of trusting a source completely on first encounter, and a look at mythmanor extended that initial trust into something more durable, the calibration of trust to evidence is something I do informally and this site has earned high trust through the cumulative weight of multiple consistently good posts already.
casino https://graph.org/Jugadas-en-Proposición-en-el-sitio-de-el-operador-de-apuestas-06-10
лента стальная гост лента стальная купить
Felt this in a way I cannot quite explain, the topic just hit different here, and a stop at momentumstartsnow continued in that vein, sometimes you find a site whose perspective lines up with how you have been thinking and reading their work feels like a small relief which I appreciated more than I expected.
Denemek isteyen arkadaşlar çok soruyor. Herkes bir şey diyor ama doğru düzgün çalışan yok. En sonunda güvendiğim bir kaynak buldum.
Casino oyunlarına meraklıysanız eğer burayı kaçırmayın derim. Gerekli tüm teknik kontrolleri yapıp adımları uyguladıktan sonra erişim açıldı. Giriş adresi tam olarak şurada: 1xbet türkiye 1xbet türkiye. Ne diyeyim yani anlayacağınız — 1xbet türkiye için tek geçerli adres burası.
Çekimler konusunda da sıkıntı yok. Araştırmayı seven biriyim — pişman olacağınızı sanmıyorum. Umarım işinize yarar…
Этот обзор медицинских исследований собрал самое важное из последних публикаций в области медицины. Мы проанализировали ключевые находки и представили их в доступной форме, чтобы читатели могли легко ориентироваться в актуальных темах. Этот материал станет отличным подспорьем для изучения медицины.
Обратитесь за информацией – клиника плюс
В этой публикации мы предложим ряд рекомендаций по избавлению от зависимостей и успешному восстановлению. Мы обсудим методы привлечения поддержки и важность самосознания. Эти советы помогут людям вернуться к нормальной жизни и стать на путь выздоровления.
Уточнить детали – clinica plus в твери
Этот обзор сосредоточен на различных подходах к избавлению от зависимости. Мы изучим традиционные и альтернативные методы, а также их сочетание для достижения максимальной эффективности. Читатели смогут открыть для себя новые стратегии и подходы, которые помогут в их борьбе с зависимостями.
Посмотреть всё – клиника плюс
A handful of memorable phrases from this one I will probably use later, and a look at fibergrid added a couple more, content that contributes language to my own communication rather than just facts is content with a different kind of utility and this site is providing that linguistic utility consistently across what I read.
Если честно, сам перерыл кучу форумов в поисках нормальной мебельной ткани. Оказалось, что выбрать подходящий вариант реальная проблема. Короче, смотрите, вот здесь реально толково расписано про плотность, ворс и износостойкость для диванов и кресел, а главное — показаны варианты, которые не выцветают. Вся полезная информация доступна здесь: ткань для обивки дивана купить ткань для обивки дивана купить Дальше сами гляньте примеры в интерьере. Да, и не берите первое, что попалось — я уже обжёгся, когда брал ткань для мебели на распродаже. Эта тема реально вывозит по износу. Кстати: ткань мебельная купить лучше уже с нормальной пропиткой от грязи. Да и садится такое полотно гораздо меньше. Не поленитесь, откройте.
Came in tired from a long day and the writing held my attention anyway, and a stop at lacehelm kept that going, content that can engage a fatigued reader is doing something right because most online reading happens in suboptimal conditions like that one and quality content adapts to it without complaint.
Now feeling slightly more optimistic about the state of independent writing online, and a stop at lacehelms extended that quiet optimism, sites like this one are the reason I have not given up on the open web entirely and finding them occasionally renews the case for paying attention to non algorithmic content sources today.
If quality blog writing is dying as people sometimes claim then this site is one piece of evidence that it has not died yet, and a look at zencoveartisanexchange extended that evidence, the broader cultural question about online writing has empirical answers in specific sites and this one is contributing to a more optimistic answer overall.
В этом обзоре представлены различные методы избавления от зависимости, включая терапевтические и психологические подходы. Мы сравниваем их эффективность и предоставляем рекомендации для тех, кто хочет вернуться к трезвой жизни. Читатели смогут найти информацию о реабилитационных центрах и поддерживающих группах.
Изучить материалы по теме – запой вызов на дом
Reading this prompted a brief but useful conversation with a colleague who happened to walk by, and a stop at buildstrategicprogress extended that conversational seed, content that becomes a starting point for in person discussion rather than ending in solitary reading is content with social generative energy and this site has plenty of it apparently.
However selective I am about new bookmarks this one made it past my filter, and a look at executeideasbetter confirmed the bookmark was worth the slot, the precious slots in my permanent bookmark folder are difficult to earn and this site earned one without making me think twice about whether the slot was justified by the quality.
Слушайте, кто в курсе, долго выбирал нормальную платформу, но на прошлой неделе таки решил глянуть в мелбет. Честно? Остался полностью доволен,. Особенно если вам надо скачать melbet на андроид — у меня модель достаточно бюджетная, но никаких тормозов вообще нет.
В общем, все подробности и рабочая ссылка доступны вот тут: melbet скачать на андроид melbet скачать на андроид. Кстати, кто спрашивал про мелбет казино скачать на андроид — там есть удобный отдельный раздел,. И бонусы на первый депозит отличные дают,. Я лично всё проверял на себе — выплаты приходят максимально быстрые, Очень рекомендую этот вариант. Дерзайте, пусть повезет!
Let’s be real, finding a decent rental company down here is a nightmare. You book a premium ride online, show up, and they hand you keys to something with a dented bumper. Fool me once, shame on you, right. If you actually need a proper vehicle to cruise around the city, seriously, do your homework first and don’t just trust social media ads. Everyone who lives here knows that having a solid car is essential, especially if you want ice-cold AC and no ridiculous daily mileage caps.
Most of these local agencies are just fancy websites hiding a garbage fleet, but I eventually found a service with zero hidden fees and no bait-and-switch tactics. If you are looking for an honest source for premium rentals across Florida, check the details here: car rentals miami fl https://luxury-car-rental-miami-2.com. Oh, and definitely bring polarized sunglasses, because that Florida sun is absolutely no joke. Just drive safe out there and don’t let them upsell you on unnecessary insurance nonsense. let me know if you guys know any other clean spots.
Worth recommending broadly to anyone who reads on the topic, and a look at opaldune only confirms that, the rare combination of accessibility and depth in this site makes it suitable for both newcomers and people who already know the area which is hard to pull off in any blog format today and rarely managed.
Давно хотел найти надёжный вариант, честно говоря, перепробовал кучу сомнительных контор. Но на днях близкий друг посоветовал про mel bet. Решил не полениться и затестить — и ни разу не пожалел,.
В общем, сами гляньте все условия по ссылке: мелбет скачать казино мелбет скачать казино. Кстати, если кому надо скачать melbet — там нет никаких лишних телодвижений. Я себе скачал чистую версию для андроида — полёт отличный. И вывод денег действительно шустрый, Доволен как слон, честно говоря. Надеюсь, эта рекомендация кому-то пригодится.
Once I trust a site this much I tend to read everything they publish and that is the trajectory I am on with this one, and a stop at discoveropportunityflowsnow confirmed the trajectory, the rare progression from interested reader to comprehensive reader is something only certain sites earn and this one is earning that progression rapidly.
Этот текст посвящён сложным аспектам зависимости и её влиянию на жизнь человека. Мы обсудим психологические, физические и социальные последствия зависимого поведения, а также важность своевременного обращения за помощью.
Более того — здесь – выезд нарколога круглосуточно
В этой заметке мы представляем шаги, которые помогут в процессе преодоления зависимостей. Рассматриваются стратегии поддержки и чек-листы для тех, кто хочет сделать первый шаг к выздоровлению. Наша цель — вдохновить читателей на положительные изменения и поддержать их в трудных моментах.
Кликни, не пожалеешь – наркологическая клиника в твери
Picked this for my morning read because the topic seemed worth the time, and a look at seacovemerchantgallery confirmed the choice was right, my morning reading slot is precious and giving it to this site felt like a good investment rather than a waste which is a higher endorsement than I usually offer for content.
Skipped lunch to finish reading, which says something, and a stop at createforwardlookingplans kept me at my desk longer than planned, when content beats the lunch impulse the writer has done something genuinely impressive in an attention environment full of immediately satisfying alternatives competing for the same finite block of reader time.
Just nice to read something that does not feel like it was assembled from a content brief, and a stop at frostcoast kept that handcrafted feel going, you can tell when a real human with real understanding is behind the words versus a templated piece churned out for an algorithm to find.
В этой статье рассматриваются актуальные вопросы, связанные с развитием медицинской науки и её внедрением в повседневную практику. Особое внимание уделено вопросам профилактики, ранней диагностики и использованию технологий для улучшения здоровья человека.
Изучите внимательнее – clinica plus
Felt the post had been written without looking over its shoulder, and a look at learnandrefinegrowth continued that confident posture, content written for its own sake rather than against imagined critics has a different quality and this site reads as written from a place of confidence rather than defensive justification of every claim.
Aylardır araştırıyorum en sonunda buldum. Kapanan siteler yüzünden çok mağdur oldum. Güncel detayları inceleyip sistemi test ettim ve sorunsuz çalıştı. En doğru adrese ulaştığımı düşünüyorum ve size de buradan bahsetmek istiyorum: 1xbet giriş 1xbet giriş. Yani kısacası anlatmaya çalıştığım şu — canlı bahis seçenekleri bile yeterli aslında.
bonus kampanyaları bile beklentimin üzerindeydi. Birçok platform denedim ama bunda karar kıldım — başka yerde kaybolmanıza gerek yok yani. Umarım siz de memnun kalırsınız…
Знаете, бывает такое — человек в ступоре , а тащить в больницу страшно . Я сам через это прошел пару лет назад . Сидишь, не знаешь за что хвататься . Начинаешь обзванивать знакомых , а вокруг одни обещания . Пока кто-то не подсказал один реально работающий вариант. Если нужна немедленная консультация — а везти самому просто нереально, то нужно вызывать врача на дом. Речь конкретно про вызвать нарколога на дом . В Самаре , если честно, хватает шарлатанов . Вся проверенная информация ниже по ссылке: врач нарколог на дом вызов https://narkolog-na-dom-samara-14.ru Откровенно говоря, после того как вник в детали, многое прояснилось . Там и про капельницы подробно , и про последующее кодирование. И цены адекватные, без разводов. Рекомендую не откладывать.
Reading this slowly in the morning before opening email, and a stop at explorefutureoptions extended that protected attention, content that earns the prime morning reading slot before the daily distractions begin is content with elevated status and this site has earned that prime slot consistently in my recent reading habits clearly.
Stands out for actually being useful instead of just being long, and a look at cadetarena kept that going, length without value is the default mode of most blogs these days but this site has clearly chosen a different path which I respect a lot as a reader who values careful editing decisions like that.
Came in confused about the topic and left with a much firmer grasp on it, and after growwithconfidenceforward I felt I could explain this to someone else without hesitation, that is the gold standard for any educational content and most sites simply fail to reach it ever which is unfortunate but true.
Once you start reading carefully here it is hard to go back to lower quality alternatives, and a stop at elitedawn reinforced that ratchet effect, the way good content raises standards is real over time and this site has clearly contributed to raising my expectations for what is possible in writing on the topic generally.
Appreciated how the writer anticipated the questions a reader might have along the way, and a stop at neatdawn continued that thoughtful approach, you can tell when content has been edited with the reader in mind versus just published as a first draft and this is clearly the former approach across what I read.
Felt no urge to argue with the conclusions even though I started the post slightly skeptical, and a look at elaniris maintained that pattern, writing that earns agreement through clarity of argument rather than rhetorical pressure is the kind I find most persuasive and the kind I want to read more of these days.
casino https://graph.org/Jugadas-de-Predicción-en-el-sitio-de-la-casa-de-apuestas-06-10
Honest take is that this was better than I expected when I clicked through, and a look at tealharborcommercegallery reinforced that, the bar for online content has dropped so much that finding something thoughtful and well constructed feels almost noteworthy now which says more about the average than about this site itself.
casino https://itz.my.id/read-blog/1161_veilig-betalingsmethoden-bij-casino711.html
Stands out for actually being useful instead of just being long, and a look at irisarbor kept that going, length without value is the default mode of most blogs these days but this site has clearly chosen a different path which I respect a lot as a reader who values careful editing decisions like that.
Вот такая тема выматывает , когда близкий просто срывается в штопор . Ищешь варианты , а вокруг одна реклама . Знакомому потребовался действительно рабочий метод . Пьют успокоительное , но это не помогает . Нужно именно профессиональная помощь . Я перелопатил кучу сайтов , пока понял одну простую вещь: без круглосуточного наблюдения ничего не выйдет . В обычной квартире срыв гарантирован . Если ищешь где сделать экстренного вывода из запоя под капельницами — обрати внимание на один проверенный вариант . В Нижнем , кстати, тоже полно шарлатанов . Советую перейти на сайт, где реально раскладывают по полочкам про кодирование от алкоголизма и работу нарколога . Подробности по ссылке: наркология нижний новгород наркология нижний новгород Честно скажу , сам удивился , сколько нюансов в этой теме. Главное — анонимность и палаты. Для нашего города это проверенный временем вариант.
Recommend this to anyone who values clear thinking over flashy presentation, and a stop at gladeridgeartisanexchange continued in the same understated way, this site has its priorities in the right place which makes it worth supporting through repeat visits and recommendations rather than just one passing read today before moving on quickly elsewhere.
casino https://trackrecord.id/read-blog/83037_uitgebreide-demomodus-bij-711casino.html
Well crafted post, the structure flows naturally from one point to the next without forcing transitions, and a stop at cadetgrails kept the same flow going, you can tell when a writer has thought about how their content reads rather than just what it contains and this is one of those examples.
Honestly this was a good read, no jargon and no padding, and a short look at coralbrooktradingfoundry kept that same feel going which I really appreciated, the writer clearly knows the topic well enough to explain it without hiding behind big words or filler that often gets used to seem clever.
My friends would appreciate a few of these posts and I will be sending links accordingly, and a look at lakelake added more pages to my share queue, content that earns shares to specific people in specific contexts is content with social utility and this site is generating those targeted shares from me consistently lately.
Well structured and easy to read, that combination is rarer than people think, and a stop at fiberiron confirmed the same standard runs across the rest of the site, definitely the kind of place I will be coming back to when this topic comes up in conversation later again over the weeks ahead.
Эта публикация раскрывает психологические механизмы зависимости и их роль в развитии расстройств. Читатель узнает о том, как психология влияет на формирование зависимостей и как профессиональная помощь может изменить ситуацию.
Проследить причинно-следственные связи – вывести из запоя тверь
This filled in a gap in my understanding that I had not even noticed was there, and a stop at verminturbo did the same, the kind of post that gives you more than you expected when you first clicked through from somewhere else, a real find for anyone curious about the area covered here.
Thanks for the honest framing without exaggerated claims that the topic will change my life, and a stop at draftglades kept the same modest tone, restraint in marketing language signals trustworthiness and the writers here are clearly playing the long game by building credibility rather than chasing immediate clicks through hyperbole.
Слушайте, кто шарит, долго присматривался к разным платформам, но на прошлой неделе все-таки попробовал сделать пару ставок в mel bet. Скажу так — очень зашло с первых минут,. У кого обычный андроид — тоже всё без проблем запускается,. Надо скачать мелбет на айфон? Там всё делается максимально просто,.
Короче, сами гляньте все условия по ссылке: . Кстати, кто спрашивал про мелбет скачать приложение — приложение вообще не вылетает,. И вывод средств действительно быстрый. Я лично всё проверил на себе — всё честно и без обмана. Всем искренне рекомендую. Удачи всем!
Approaching this site through a casual link click and being surprised by what I found, and a look at buildsteadyprogress extended the surprise, the rare experience of stumbling into excellent independent content rather than predictable mediocrity is one of the actual remaining pleasures of casual web browsing and this site provided it cleanly.
Bookmark added with a small mental note that this is a site to keep, and a look at pacecabin reinforced the keep status, the verb keep rather than visit captures something about how I think about this kind of site and it is a higher tier of relationship than I have with most places online today.
Came across this and immediately thought of a friend who would enjoy it, and a stop at explorefutureopportunity also reminded me of someone, content that triggers the urge to share is content that has earned my recommendation and this site has earned multiple from me already across different conversations during the week.
Daha önce hiç böyle bir site görmemiştim. Açıkçası önyargılıydım biraz. Sonra şansımı denemek istedim.
Spor bahislerinde iddialı olanlar buraya. Detaylı incelemeleri tamamlayıp adımları takip ettikten sonra her şey netleşti. Giriş adresi işte karşınızda: 1xbet güncel 1xbet güncel. Kısacası durum ortada — 1xbet spor bahislerinin adresi burada.
Hiçbir sorun yaşatmadı şu ana kadar. Çok yere baktım emin olun — deneyen herkes memnun kaldı. Şimdiden iyi eğlenceler…
Thanks for the clean writing, no broken sentences and no awkward translations like some other sites have, and a quick stop at galafactor kept that polish going nicely, it really does make a difference when a reader can move through a page without tripping on every line or going back to reread.
Reading this prompted a small note in my reference file, and a stop at cadetgrail prompted another, the rare site that contributes useful nuggets to my own working knowledge rather than just consuming my attention is worth the time investment many times over compared to the usual pile of forgettable scroll content.
Honestly enjoyed not being sold anything for the entire duration of the post, and a look at startthinkingforwardclearly kept that pleasant absence going across more pages, content that exists for its own sake rather than as a funnel to a paid product is increasingly rare and worth supporting where I can find it.
In the middle of an otherwise scattered day this post landed as a moment of focus, and a stop at alpineharborvendorparlor extended that focused feeling across more pages, content that anchors a fragmented day rather than contributing to the fragmentation is content with real centring effect and this site is providing that anchoring function for me.
Felt like I was reading something written by someone who actually thinks about the topic rather than reciting it, and a look at neatglyph reinforced that impression, the difference between recited content and considered content is huge and this site clearly belongs to the latter category which I appreciate as a careful reader looking for substance.
Beats most of the alternatives on the topic by a noticeable margin, and a look at visionintosystems did not change that at all, this is one of the better corners of the open internet for this kind of content and I am glad I clicked through rather than skipping past quickly like I usually do.
Этот краткий обзор предлагает сжатую информацию из области медицины, включая ключевые факты и последние новости. Мы стремимся сделать информацию доступной и понятной для широкой аудитории, что позволит читателям оставаться в курсе актуальных событий в здравоохранении.
Дополнительно читайте здесь – срочно врач нарколог на дом
Came in tired from a long day and the writing held my attention anyway, and a stop at growstepbyintent kept that going, content that can engage a fatigued reader is doing something right because most online reading happens in suboptimal conditions like that one and quality content adapts to it without complaint.
Genuine pleasure to read, and that is not something I say often after a casual click through, and a quick visit to uplandcovemerchantgallery kept the same feeling going across the rest of the site, finding writing that actually feels good to spend time with rather than just functional is increasingly rare on the open web.
Worth pointing out that the writing reads as confident without being defensive about it, and a look at islemeadows extended that secure tone, content that does not pre emptively argue against imagined critics has a different quality from defensive writing and this site reads as written from a place of real ease.
Took a chance on the headline and was rewarded, and a stop at cottonbrookvendorfoundry kept the rewards coming as I clicked through, the kind of place where every link leads somewhere worth the click is a small luxury on the modern web where so many sites are mostly empty calories disguised as content.
Just want to say thank you for putting this together, posts like these make searching online actually worth it sometimes, and a quick look at thinkactadvance kept that going, useful and easy to read without any of the tricks that ruin most blog comment sections lately on the wider open web.
Now feeling the post has earned a proper recommendation rather than a casual mention, and a stop at domelounges reinforced the recommendation strength, the difference between mentioning and recommending is a small editorial distinction I observe in my own conversations and this site has earned the upgraded recommendation level from me confidently today.
Этот текст представляет собой обзор свежих данных и исследований в области медицины. Он призван помочь читателям понять, как научные достижения влияют на лечение, диагностику и общее состояние системы здравоохранения.
Не пропусти важное – tver clinica plus
Worth observing that the post landed without needing a flashy headline to hook attention, and a stop at lakequill did the same, content that earns engagement through substance rather than packaging is the kind I trust more deeply and this site has clearly chosen substance as the primary lever for reader engagement throughout.
Well crafted post, the structure flows naturally from one point to the next without forcing transitions, and a stop at fifeholm kept the same flow going, you can tell when a writer has thought about how their content reads rather than just what it contains and this is one of those examples.
Reading this with a notebook open turned out to be the right move, and a stop at glassharborartisanexchange added more material to the notes, content that justifies active note taking from a passive reader is content with real informational density and this site is producing notes worthy material at a high rate consistently.
Glad I gave this a chance instead of bouncing on the headline, and after startthinkingwithpurpose I was certain I had made the right call, snap judgements based on titles miss a lot of good content and this is a reminder to slow down and check things out before scrolling past in a hurry.
Better than the average post on this subject by some distance, and a look at kanzivo reinforced that, you can tell within the first paragraph that the writer here actually cares about the topic rather than just covering it for the sake of having something to publish that week or that day.
Эта публикация раскрывает психологические механизмы зависимости и их роль в развитии расстройств. Читатель узнает о том, как психология влияет на формирование зависимостей и как профессиональная помощь может изменить ситуацию.
Детали по клику – вывод из запоя тверь
Thanks for the readable length, I finished it without checking how much was left, and a stop at elffleet kept me reading the same way, when I stop noticing the length of a piece because the content is engaging enough to sustain attention without willpower the writer has done their job well today.
Reading this in pieces over a coffee break and finding it consistently rewarding, and a stop at pactcliff extended that into related material I will return to later, the kind of site that fits naturally into small reading windows without requiring a long uninterrupted block is genuinely useful for how I actually browse.
Вот такая беда — человек в ступоре , а тащить в клинику страшно . Моя семья такое пережила пару лет назад . Сидишь, не знаешь что делать . Лезешь в интернет, а вокруг сплошной развод . Пока кто-то не подсказал один реально работающий вариант. Требуется немедленная консультация — а ехать куда-то нет возможности , то выход один . Я про круглосуточный выезд нарколога. У нас в Самаре, если честно, тоже полно левых контор без лицензии. Вся проверенная информация ниже по ссылке: нарколог на дом анонимно круглосуточно нарколог на дом анонимно круглосуточно Откровенно говоря, после того как прочитал , многое прояснилось . Там и про капельницы подробно , и про консультацию . Плюс анонимность — это важно . Советую не откладывать.
В этой медицинской статье мы погрузимся в актуальные вопросы здравоохранения и лечения заболеваний. Читатели узнают о современных подходах, методах диагностики и новых открытий в научных исследованиях. Наша цель — донести важную информацию и повысить уровень осведомленности о здоровье.
Подробная информация доступна по запросу – вывести из запоя тверь
Thanks for laying this out in a way that someone newer to the topic can follow, and a stop at growwithclearintent kept that accessibility going, writing that meets readers at different experience levels without condescending is hard to do well and the writers here have clearly thought about who they are writing for.
Okay so here’s the deal with renting anything decent in Miami. Half these local companies promise a custom Porsche and hand you a basic sedan with fake leather. Oh, and that pretty security deposit? Yeah, good luck getting that money back fast. I’ve been burned like three times already this year alone. When you are trying to find a reliable premium fleet down here, do some real digging first and read actual customer reviews. Anyone who lives here will tell you the exact same thing, whether you are doing Brickell mornings, South Beach nights, or a spontaneous Keys trip.
Most of these local agencies are just shiny websites hiding the same overpriced junk, but I eventually found a service with no bait, no switch, and no weird fine print. If you are looking for the only straight shooter for premium rentals across South Florida, check the details here: miami car rental https://luxury-car-rental-miami-3.com. Yeah, valet in Miami Beach will cost you an arm, but that’s not their fault. Anyway, glad there’s at least one honest rental joint left in this town, hope this helps some of you save a few bucks.
Эта публикация содержит ценные советы и рекомендации по избавлению от зависимости. Мы обсуждаем различные стратегии, которые могут помочь в процессе выздоровления и важность обращения за помощью. Читатели смогут использовать полученные знания для улучшения своего состояния.
Секреты успеха внутри – капельницу от похмелья на дому недорого
Мужики, привет. Долго думал, где найти что-то реально редкое. Перерыл кучу вариантов, но нормального магазина премиальных товаров — раз два и обчёлся. А тут по совету зашёл. В общем, сам гляньте по ссылке: магазин премиальных брендов магазин премиальных брендов Кстати, если ищете премиум подарки — там выбор реально офигенный. Я себе взял кожаную сумку — качество бомба. И цены соответствуют качеству. Всем советую, кто ценит статусные вещи. Удачи с выбором!
Took the time to read the comments on this post too and they were also worth reading, and a stop at irisbureau suggested the community quality matches the content quality, when the conversation around a piece is as good as the piece itself you know you have found a real corner of the internet.
Now appreciating the small but real way this post improved my afternoon, and a stop at findyourprogressdirection extended that small improvement effect, content that produces measurable positive impact on the texture of a reading day is content with real value and this site is producing those small positive impacts at a sustainable rate apparently.
A piece that built up gradually rather than front loading its main points, and a look at findyourcorelane maintained the same gradual structure, content that trusts the reader to reach conclusions through accumulating reasoning is more persuasive than content that announces conclusions and then defends them and this site uses the persuasive approach.
Honest opinion is that this is the kind of post that builds long term trust with readers, and a look at clippoise reinforced that perception, the slow accumulation of trust through consistent quality is the only sustainable way to build a real audience and this site is clearly playing that long game.
Слушайте, кто в курсе, долго сомневался до последнего, но в выходные таки решил глянуть в мелбет. Честно? Остался полностью доволен,. Особенно если вам надо скачать melbet на андроид — у меня смартфон далеко не новый,, но софт реально летает.
В общем, убедитесь сами, если перейдете: мелбет скачать мелбет скачать. Кстати, кто спрашивал про мелбет приложение — там есть удобный отдельный раздел,. И кешбек на баланс регулярно капает. Я за месяц три раза деньги забирал — выплаты приходят максимально быстрые, Сам теперь только туда. Удачи всем!
Давно искал, где можно нормально играть, честно говоря, уже не верил в адекватные условия. Но случайно наткнулся на живое обсуждение про мел бет. Решил лично проверить систему — и теперь сам рекомендую знакомым.
В общем, все подробности выложены здесь: melbet melbet. Кстати, если кому надо скачать мелбет — там нет никаких лишних телодвижений. Я себе скачал чистую версию для андроида — всё сделано очень удобно. И бонусы на первый депозит приятные, Доволен как слон, честно говоря. Надеюсь, эта рекомендация кому-то пригодится.
Знаете, поиск действительно проверенного медицинского центра — это всегда целая проблема и головная боль. Нередко в жизни бывает так, когда кому-то из членов семьи срочно понадобилась грамотная помощь врачей. И тут сразу возникает главный вопрос: куда именно везти человека?
Мой коллега по работе долго искал действительно надежный медицинский вариант. В интернете сейчас столько мусора и дорвеев, что голова идет кругом. Короче говоря, советую присмотреться к одному источнику, там подробно расписаны все важные условия и нюансы про анонимное снятие запоя в условиях клиники. В общем, не тяните время и долго не раздумывайте,, чтобы четко во всем разобраться.
Все важные детали и лицензии центра находятся только тут: наркологический стационар санкт петербург narkologicheskij-staczionar-sankt-peterburg-12.ru. Честно говоря, после изучения всех условий, насколько там много подводных камней, на которые стоит обращать внимание, включая комфортные условия содержания, современные палаты и полную анонимность. В Питере это определенно достойный внимания и доверия медицинский центр, так что рекомендую сохранить себе в закладки на всякий случай.
Daha önce hiç bu kadar kararlı bir site görmedim. İnanın herkes farklı bir adres veriyor kafayı yedim. Adımları doğru şekilde uyguladıktan sonra erişim hatasız açıldı. En doğru adrese ulaştığımı düşünüyorum ve size de buradan bahsetmek istiyorum: 1xbet giriş 1xbet giriş. Yani kısacası anlatmaya çalıştığım şu — casino sevenler için ideal bir ortam var gerçekten.
Hiçbir aksilik yaşamadım bugüne kadar. İşin doğrusunu söylemek gerekirse — en çok güvendiğim adres burası oldu artık. Şimdiden bol şans yardımı ve iyi eğlenceler…
Solid recommendation from me to anyone working in the area, the perspective here is grounded, and a look at neatmill adds even more useful angles, the kind of site that becomes a reference rather than just a one time read which is a higher bar than most blogs ever reach today on the modern web.
Reading this brought back the satisfaction I used to get from blogs ten years ago, and a stop at elitefest kept that nostalgic quality alive, sites that capture what was good about an earlier era of internet writing are increasingly precious and this one is doing that without feeling like a deliberate throwback at all.
Comfortable reading experience throughout, no jarring tone shifts and no awkward formatting, and a look at gemcoast kept that smooth feel going, the kind of editorial polish that goes unnoticed when present but glaring when absent is something this site has clearly invested in across the broader content as well which deserves recognition.
Liked the balance between depth and brevity, never too shallow and never too long, and a stop at createimpactdrivensteps kept the same balance going across the rest of the site, this is one of the harder skills in writing and the team here clearly has it figured out very well indeed across every page.
Let’s be real, finding a decent rental company down here is a nightmare. Or worse — they freeze your credit card for an extra two grand and smile like it’s totally normal. Fool me once, shame on you, right. If you actually need a proper vehicle to cruise around the city, make sure to check the actual fleet reviews before signing anything. Everyone who lives here knows that having a solid car is essential, whether you are heading to Brickell, Coconut Grove, or just driving down to Key Biscayne.
Most of these local agencies are just fancy websites hiding a garbage fleet, but I eventually found a service with zero hidden fees and no bait-and-switch tactics. If you are looking for an honest source for premium rentals across Florida, check the details here: rental car in miami florida https://luxury-car-rental-miami-2.com. Yeah, finding parking in downtown is still its own separate nightmare, but that’s on you. Just drive safe out there and don’t let them upsell you on unnecessary insurance nonsense. hope this helps someone save a few bucks.
Вот реально ситуация — близкий совсем плох, а везти в клинику нет никаких сил. Моя семья такое пережила недавно совсем. Сидишь, не знаешь за что хвататься . Начинаешь обзванивать знакомых , а вокруг только деньги тянут. Пока случайно не нашел один нормальный проверенный вариант. Требуется срочная помощь — а ехать куда-то просто нереально, то нужно вызывать врача на дом. Речь конкретно про наркологическую помощь на дому . У нас в Самаре, если честно, тоже полно шарлатанов . Нормальные контакты, кто реально приезжает вот тут : психиатр нарколог самара https://narkolog-na-dom-samara-14.ru Откровенно говоря, после того как прочитал , многое прояснилось . И про снятие запоя на дому, и про консультацию нарколога . И цены адекватные, без разводов. Рекомендую не тянуть .
Once you find a site like this the search for similar voices begins, and a look at exploreideaswithdirection extended the search energy, finding a high quality reference point makes the gap between it and adjacent sources visible in a way it was not before and this site has provided that high reference point across multiple recent visits.
A well calibrated piece that knew its scope and stayed inside it, and a look at tarotshire maintained the same scope discipline, scope creep is one of the failure modes of long blog posts and this site has clearly invested in the editorial discipline to prevent it which shows up in tightly contained pieces.
Started smiling at one paragraph because the writing was just nice, and a look at forgecabins produced a couple more such moments, prose that produces small spontaneous reactions in the reader is doing more than just transferring information and the writers here are clearly hitting that level fairly consistently throughout pieces.
Bookmark added without hesitation after finishing, and a look at apricotharborvendorroom confirmed I should bookmark the homepage too rather than just this page, the rare site that earns category level trust rather than just single article approval is the kind I want to rely on across many different topics over time.
Found the writing surprisingly fresh for what is by now a well covered topic, and a stop at crystalcovecommerceatelier kept that freshness going across the related pages, original perspective on familiar ground is hard to come by and this site has clearly earned its place in the conversation rather than just rehashing old ideas.
A piece that read smoothly because the writer understood how readers actually move through prose, and a look at knackpacts maintained the same reader awareness, writers who think about the reading experience as much as the writing experience produce better work and this site has clearly made that shift in editorial approach.
Now feeling the quiet pleasure of finding writing that takes itself seriously without being self serious, and a stop at calmcovevendorroom extended that subtle pleasure, the gap between earnest and pretentious is fine and this site has clearly chosen to land on the earnest side without slipping over into pretentious which is impressive.
Now feeling confident enough in this site to use it as a reference point for evaluating others on the same topic, and a look at crystalharborcommercegallery continued the comparison friendly quality, sites that serve as quality benchmarks for their topic are precious and this one has clearly become a benchmark for me on this particular subject area.
Appreciate how nothing here feels copied or pieced together from other places, the voice is consistent and the tone stays human, and after I checked larkcliff I noticed the same style holds, which is a small detail but it makes the whole experience feel personal rather than like another generic site.
Came in skeptical of the angle and left mostly persuaded, and a stop at exploreideasdeeplynow pushed me a bit further in the same direction, content that can move a critical reader by argument rather than rhetoric is rare and worth pointing out because it indicates real substance underneath the surface presentation here.
Reading this felt productive in a way most internet reading does not, and a look at buildsustainedmomentum continued that productive feeling, sometimes the open web feels like a waste of time but sites like this remind me why I still bother to look around rather than retreating to old reliable sources for everything I need.
Solid endorsement from me, the writing earns it, and a look at fifejuno continues to earn it across the broader site too, the kind of operation that maintains quality across many pages rather than just one viral post is a sign of serious commitment and that is what I see here clearly across what I read.
casino https://graph.org/Tenniswetten-mit-Rainbet-Deutschland-06-10-50
Quality writing that respects the reader’s intelligence without overloading them, and a quick look at palmcodex reflected that approach, a balanced thoughtful site that earns trust by being consistent rather than by shouting about how trustworthy it is which is the usual approach online sadly across most content categories.
Most blog writing on this subject reaches for the same handful of arguments and this post avoided them, and a look at cadetarena continued the original treatment, content that finds its own path through territory other writers have flattened is content with real authorial energy and this site has plenty of that distinctive energy.
Thanks for putting this online without locking it behind email signups or paywalls, and a quick visit to harborstoneartisanexchange kept that open feel going, content that trusts the reader to come back rather than gating access is the kind of approach I will reward with regular return visits over time happily.
Felt the post had been quietly polished rather than aggressively styled, and a look at curiopact confirmed the same understated polish, sites whose quality reveals itself slowly rather than announcing itself loudly are the kind I trust more deeply because the trust is not based on first impressions of marketing but actual substance.
A satisfying piece in the way that good meals are satisfying rather than just filling, and a look at northdawn extended that satisfaction, the metaphor between content and meals is one I find useful and this site reads as a satisfying meal rather than the empty calories that most content provides for casual readers.
Эта информационная публикация освещает широкий спектр тем из мира медицины. Мы предлагаем читателям ясные и понятные объяснения современных заболеваний, методов профилактики и лечения. Информация будет полезна как пациентам, так и медицинским работникам, желающим поддержать уровень своих знаний.
Где почитать поподробнее? – tver clinica plus
Worth bookmarking and sharing with anyone interested in the topic, that is my honest take, and a stop at elmhex reinforces that, the kind of generous resource that makes the open web feel worth defending against the constant pressure to retreat into walled gardens and curated feeds today everywhere I look across all my devices.
Reading the writers other posts after this one suggests the quality is consistent rather than peak, and a stop at neatglyphs confirmed the consistent quality reading, sites that hold the same level across many pieces rather than peaking on a few are sites with sustainable editorial discipline and this one has clearly developed that.
Знаете ситуацию выматывает , когда человек просто срывается в штопор . Ломаешь голову , а вокруг одна реклама . Моему брату потребовался срочный метод . Многие хватаются за таблетки , но это ерунда . Требуется именно врачебное вмешательство . Пролистал пол-интернета , пока понял одну простую вещь: без круглосуточного наблюдения ничего толку не будет . В обычной квартире срыв гарантирован . Если ищешь где сделать экстренного вывода из запоя под капельницами — тогда тебе сюда . В Нижнем , кстати, развелось этих “центров” . Советую перейти на сайт, где реально раскладывают по полочкам про кодировку от алкоголя и работу нарколога . Подробности по ссылке: наркология нижний новгород наркология нижний новгород Честно скажу , сам удивился , сколько нюансов в этой теме. И кстати, цены адекватные. Для нашего города это проверенный временем вариант.
The way the post stayed on topic throughout without going on tangents was really refreshing, and a look at findyourforwardpath kept that focused approach going, discipline like this in writing is rare and worth recognising because most writers cannot resist wandering off into related subjects that dilute their main point and confuse readers along the way.
Felt mildly happier after reading, which sounds silly but is true, and a look at directionbeforevelocity extended that small mood lift, content that improves rather than degrades my mental state is content I want more of and the cumulative effect of reading sites that lift versus sites that drag is real over time.
Bookmark earned and the bookmark feels like a permanent addition rather than a maybe, and a look at emberbrookmarketfoundry confirmed that permanent status, the difference between durable bookmarks and ephemeral ones is something I have learned to feel quickly and this site triggered the durable feeling almost immediately during my first read here.
casino https://telegra.ph/Risikofreie-Einsätze-bei-Rainbet-Casino-06-10-6
Honest assessment after reading this twice is that it holds up under careful attention, and a look at findyournextbreakthroughpoint extended that durability across more pages, content that survives a second read without revealing weak spots is rarer than the average reader probably realises and this site clearly cleared that bar.
Bookmark earned, calendar reminder set, share queued, all from one good post, and a look at glassmeadowvendorparlor did the same, when a single reading session triggers multiple downstream actions you know the content has actually moved me beyond the page and this site is moving me at that higher level reliably.
Different feel from the algorithmically optimised posts that dominate the topic, and a stop at islemeadow reinforced that human touch, you can tell when a site is being run by someone who reads what they publish versus someone just hitting submit and moving on quickly to the next assignment without checking the result.
A welcome contrast to the loud takes that have dominated my feed lately, and a look at leafdawn extended that calm voice, content that arrives without yelling has become unusual in the modern attention economy and this site is one of the few places I have found that consistently delivers without raising its voice.
Compared to the usual results for this kind of search this site stands well above the average, and a quick visit to globebeat kept the standard high, you can tell within seconds whether a site is going to waste your time or actually deliver and this one clearly delivers without any false starts.
Now planning to recommend this site in a context where my recommendations are taken seriously, and a stop at createactionableprogress confirmed I should make that recommendation soon, the small but real act of recommending content into spaces where my taste matters is something I take seriously and this site is worth the recommendation.
Reading the writers other posts after this one suggests the quality is consistent rather than peak, and a stop at figfeat confirmed the consistent quality reading, sites that hold the same level across many pieces rather than peaking on a few are sites with sustainable editorial discipline and this one has clearly developed that.
A piece that ended with a clean landing rather than fading out, and a look at discoverhiddenpaths maintained the same crisp conclusions, endings that resolve rather than dissolve are a sign of careful structural thinking and this site has clearly invested in how its pieces conclude rather than letting them simply run out of energy.
A piece that read as the work of someone who reads carefully themselves, and a look at growwithpurposeandfocus continued that informed feel, writers who are also serious readers produce work with a different quality and this site reads as the product of someone steeped in good writing rather than just generating content for an audience.
Если честно, сам перерыл кучу форумов в поисках нормальной обивки. Оказалось, что выбрать подходящий вариант тот ещё квест. Короче, смотрите, вот здесь реально толково расписано про плотность, ворс и износостойкость для диванов и кресел, а главное — показаны варианты, которые легко чистить. Вся полезная информация доступна здесь: купить ткань для обивки мягкой мебели недорого https://tkan-dlya-mebeli-2.ru Дальше сами гляньте фактические отзывы. Да, и не берите первое, что попалось — я уже сделал ошибку, когда брал дешёвую ткань для обивки мебели. Эта тема реально вывозит по соотношению цена-качество. Имейте в виду: ткань мебельная купить лучше уже с нормальной пропиткой от грязи. Да и рвётся такое полотно гораздо меньше. Здесь реально дельные советы.
Now planning to recommend this site in a context where my recommendations are taken seriously, and a stop at palminlet confirmed I should make that recommendation soon, the small but real act of recommending content into spaces where my taste matters is something I take seriously and this site is worth the recommendation.
Слушайте, кто шарит, долго присматривался к разным платформам, но на прошлой неделе все-таки попробовал сделать пару ставок в mel bet. Скажу так — теперь я их постоянный клиент. У кого система ios — тоже всё без проблем запускается,. Надо скачать мелбет на айфон? За пять минут софт поставил на смарт,.
Короче, вся полезная инфа и актуальный сайт доступны вот тут: . Кстати, кто спрашивал про мелбет приложение — мобильная версия работает без лагов,. И вывод средств действительно быстрый. Я уже выводил пару раз выигранные деньги — никаких косяков с выплатами нет,. Всем искренне рекомендую. Пользуйтесь на здоровье, пусть повезет!
Strong recommendation, anyone interested in this topic owes themselves a visit, and a stop at caramelharborvendorparlor extends that recommendation across more of the site, this is the kind of resource that makes me more optimistic about the state of the open web than I usually am these days actually for once which is genuinely refreshing.
Now setting aside time on my next free afternoon to read more from the archives, and a stop at daisycovecraftcollective confirmed that time will be well spent, the rare site whose archive deserves a dedicated reading session rather than just casual sampling is the kind of resource worth scheduling around and this one qualifies clearly.
Once I had read three posts the editorial pattern was clear, and a look at dazzquay confirmed the pattern from a fourth angle, sites where the underlying approach reveals itself through accumulated reading rather than being announced are sites with real depth and this one has that quality clearly visible across multiple pieces consistently.
Okay so here’s the deal with renting anything decent in Miami. I swear half the “luxury” fleets down here are straight-up marketing scams. Oh, and that pretty security deposit? Yeah, good luck getting that money back fast. Fool me thrice, shame on both of us I guess, lesson learned. When you are trying to find a reliable premium fleet down here, don’t just trust the first sponsored ad on social media. Anyone who lives here will tell you the exact same thing, whether you are doing Brickell mornings, South Beach nights, or a spontaneous Keys trip.
I literally spent last month comparing maybe twenty different companies, until I finally found one outfit that actually delivers what’s in the photos. If you are looking for the only straight shooter for premium rentals across South Florida, check the details here: luxury car rental miami beach luxury car rental miami beach. Also, definitely bring sunglasses unless you enjoy driving completely blind in that sun. Anyway, glad there’s at least one honest rental joint left in this town, hope this helps some of you save a few bucks.
Bir arkadaşım ısrarla tavsiye etti. Herkes farklı bir şey söylüyordu kafam karıştı. Sonra şansımı denemek istedim.
Spor bahislerinde iddialı olanlar buraya. Detaylı incelemeleri tamamlayıp adımları takip ettikten sonra her şey netleşti. Giriş adresi işte karşınızda: 1xbet türkiye 1xbet türkiye. Kısacası durum ortada — 1xbet spor bahislerinin adresi burada.
Hiçbir sorun yaşatmadı şu ana kadar. Kendi adıma konuşuyorum — pişman eden bir yer değil kesinlikle. Gözünüz arkada kalmasın…
casino https://telegra.ph/Tenniswetten-online-mit-Rainbet-Deutschland-06-10-16
Cuts through the usual marketing fluff that dominates this topic online, and a stop at novalog kept the same clean approach going, this is the kind of writing that respects the reader’s time rather than wasting it on repetitive setups before finally getting to the point at hand which is what most sites do.
Picked this for a morning recommendation in our company chat, and a look at cadetgrail suggested I will mention this site again later, recommending content into a workplace context is a small editorial act that requires confidence in the recommendation and this site is making me confident in those recommendations consistently here too.
Reading this in segments because the day was busy, and the post survived the fragmented attention well, and a stop at hazelharborartisanexchange held up similarly under interrupted reading, content that can withstand modern distracted reading patterns rather than requiring a perfect block of focused time is increasingly the kind I prefer.
Now sitting with the thoughts the post triggered rather than rushing on to the next thing, and a stop at eliteledge extended that reflective pause, content that earns time for thought after closing the tab is content of higher value than the merely interesting and this site has clearly produced that lasting effect today.
Took something from this I did not expect to find, and a stop at fernharborcommercegallery added another unexpected useful piece, content that exceeds expectations rather than just meeting them is the kind that builds enthusiasm and earns repeat visits without any explicit ask from the writer or platform behind the work being read.
Эта статья подробно расскажет о процессе выздоровления, который включает в себя эмоциональную, физическую и психологическую реабилитацию. Мы обсуждаем значимость поддержки и наличие профессиональных программ. Читатели узнают, как строить новую жизнь и не возвращаться к старым привычкам.
Где почитать поподробнее? – клиника плюс
However selective I am about new bookmarks this one made it past my filter, and a look at elitefests confirmed the bookmark was worth the slot, the precious slots in my permanent bookmark folder are difficult to earn and this site earned one without making me think twice about whether the slot was justified by the quality.
Took a quick scan first and then went back to read properly because the post deserved it, and a stop at explorefreshgrowthstrategies kept me reading carefully too, the kind of writing that earns a slower second pass rather than getting skimmed and forgotten is something I value highly when I happen to find it.
Reading this between meetings turned out to be the most useful thing I did all afternoon, and a stop at flintmeadowcommercegallery kept that productivity feeling going, content can sometimes outperform actual work in terms of what gets accomplished mentally and this site managed that today which is genuinely a high bar to clear consistently.
casino https://graph.org/Streaming-live-bei-Rainbet-Germany-06-10-19
Pass this along to anyone you know dealing with similar questions, the answers here are clear, and a stop at discoverpowerfuldirectionalpaths adds even more useful material, this is the kind of resource that deserves to circulate widely rather than getting lost in the constant churn of new content online that buries good work daily.
Ребята, всем привет! долго не решался завести аккаунт, но в выходные таки зарегился ради интереса в melbet. Честно? Зашло прям на ура,. Особенно если вам надо скачать melbet на андроид — у меня модель достаточно бюджетная, но приложение работает плавно.
В общем, гляньте сами все условия по ссылке: скачать мелбет на андроид скачать мелбет на андроид. Кстати, кто спрашивал про мелбет приложение — там есть удобный отдельный раздел,. И кешбек на баланс регулярно капает. Я за месяц три раза деньги забирал — служба поддержки вообще не тупит. Всем советую присмотреться. Дерзайте, пусть повезет!
Walked away with a clearer head than I had before reading this, and a quick visit to maplegrovemarkethall only sharpened that, the writing has a way of cutting through the noise that surrounds most topics online which is something I will definitely remember the next time I am searching for an answer to anything.
Will be back, that is the simplest way to say it, and a quick visit to walnutcovemarkethall reinforced the decision, this site has earned a spot in my regular rotation alongside a few other reliable places I check when I want something genuinely informative without all the usual modern web noise getting in the way.
Этот текст представляет собой обзор свежих данных и исследований в области медицины. Он призван помочь читателям понять, как научные достижения влияют на лечение, диагностику и общее состояние системы здравоохранения.
Получить больше информации – наркологическая клиника в твери
Decided not to skim despite my usual habit and was rewarded for the discipline, and a stop at caramelharborcommercegallery earned the same patient approach, training myself to recognise sites that warrant slower reading is part of being a careful online reader and this site is the kind that helps me practice that skill regularly.
Came back to this twice now in the same week which is unusual for me, and a look at elmhilt suggested I will keep coming back, the kind of post that earns repeated visits rather than one and done reading is the gold standard for content quality and this site clearly hit that standard.
A piece that did not require external context to follow, and a look at finchfiber maintained the same self contained quality, content that stands alone without forcing readers to chase prerequisites is more accessible and this site has clearly thought about how each piece can serve a fresh visitor rather than only existing members.
Let’s be real, finding a decent rental company down here is a nightmare. You book a premium ride online, show up, and they hand you keys to something with a dented bumper. No thanks, I am completely done with that circus. If you actually need a proper vehicle to cruise around the city, make sure to check the actual fleet reviews before signing anything. Miami without a decent whip is pretty rough, whether you are heading to Brickell, Coconut Grove, or just driving down to Key Biscayne.
Most of these local agencies are just fancy websites hiding a garbage fleet, until I finally stumbled across one that actually delivers what it promises. If you are looking for an honest source for premium rentals across Florida, check the details here: lambo truck rental https://luxury-car-rental-miami-2.com. Yeah, finding parking in downtown is still its own separate nightmare, but that’s on you. Just drive safe out there and don’t let them upsell you on unnecessary insurance nonsense. hope this helps someone save a few bucks.
Android kullanıcısı olarak uzun zamandır arıyordum. Herkes farklı bir site öneriyordu kafam karıştı. Adımları doğru sırayla uyguladıktan sonra erişim sorunsuz açıldı. En sonunda doğru adrese ulaştım ve size de tüm detayları aktarmak istedim, güncel bilgilere buradan bakabilirsiniz: 1xbet app apk 1xbet app apk. Şimdi size kısaca özet geçeyim — mobil uygulaması inanılmaz akıcı aslında.
güncellemeleri de otomatik geliyor gerçekten. Kendi deneyimlerimi aktarıyorum size — en hızlı çalışan uygulama bu oldu artık. Umarım siz de memnun kalırsınız…
Вот такая беда — родственник в запое , а тащить в клинику просто нереально . Я сам через это прошёл недавно. Сидишь, не знаешь что делать . Лезешь в интернет, а вокруг сплошной развод . Пока случайно не наткнулся на один реально работающий вариант. Если нужна срочная помощь — а ехать куда-то просто нереально, то выход один . Я про круглосуточный выезд нарколога. У нас в Самаре, к слову , хватает левых контор без лицензии. Вся проверенная информация вот тут : врач нарколог на дом врач нарколог на дом Честно скажу , после того как прочитал , многое прояснилось . Там и про капельницы подробно , и про консультацию . И цены адекватные, без разводов. Советую не тянуть .
Took the time to read the comments on this post too and they were also worth reading, and a stop at driftorchardartisanexchange suggested the community quality matches the content quality, when the conversation around a piece is as good as the piece itself you know you have found a real corner of the internet.
One of the more thoughtful posts I have read recently on this topic, and a stop at dewdawn added even more weight to that impression, this is genuinely good content that holds its own against far better known sites in the same space without trying to imitate any of them at all which I appreciate.
Quietly the post solved something I had been turning over without quite knowing how to phrase the question, and a look at kavunzo extended that quiet solving, content that addresses unformulated needs is content with reader insight and this site has demonstrated that insight at a high rate across the pieces I have read recently.
Друзья, кто в теме. Долго выбирал, где найти что-то реально редкое. Перерыл кучу вариантов, но нормального магазина эксклюзивных товаров — днём с огнём не сыщешь. А тут по совету зашёл. В общем, сам гляньте по ссылке: куплю дорогой подарок куплю дорогой подарок Кстати, если ищете дорогие подарки — там выбор реально офигенный. Я себе взял кожаную сумку — качество бомба. И цены не космос. Сам теперь только там беру. Надеюсь, поможет.
A handful of memorable phrases from this one I will probably use later, and a look at palmmill added a couple more, content that contributes language to my own communication rather than just facts is content with a different kind of utility and this site is providing that linguistic utility consistently across what I read.
Over the course of reading several posts here a pattern of quality has emerged, and a stop at growresultsorientedpath confirmed the pattern, the difference between sites that hit quality occasionally and sites that hit it consistently is huge and this site has clearly demonstrated the consistent kind through what I have read this morning.
Skipped the comments to avoid spoilers and came back later to find them genuinely worth reading, and a stop at createforwardthinking extended that surprised respect, when the discussion below a post matches the quality of the post itself you have found something special and this site appears to attract that kind of audience.
If patience for careful reading is rare these days finding sites that reward it is rarer still, and a stop at oakarena extended that rare reward, the diminishing returns on shallow content reading have made me more selective about where to spend reading time and this site is meeting the higher selectivity bar consistently.
Started taking notes about halfway through because the points were stacking up, and a look at globehaven added enough material that my notes file grew further, content that demands note taking from a passive reader is content with substance and the writers here are clearly producing that kind of work consistently across topics.
Bookmark earned and shared the link with one specific person who would care, and a look at isleparish got the same targeted share, sharing carefully rather than broadcasting is a discipline I try to maintain and this site is generating shares from me at a sustainable rate rather than the spam rate of viral content.
Эта медицинская заметка содержит сжатую информацию о новых находках и методах в области здравоохранения. Мы предлагаем читателям свежие данные о заболеваниях, профилактике и лечении. Наша цель — быстро и доступно донести важную информацию, которая поможет в повседневной жизни и понимании здоровья.
Расширить кругозор по теме – круглосуточный вывод из запоя
Mobil bahise yeni başladım diyebilirim. Play Store’da bulamayınca ne yapacağımı şaşırdım. Güncel bilgileri kontrol edip süreci hatasız başlattım. En sonunda doğru adrese ulaştım ve size de tüm detayları aktarmak istedim, güncel bilgilere buradan bakabilirsiniz: 1xbet android uygulama 1xbet android uygulama. Şimdi size kısaca özet geçeyim — android kullanıcıları için biçilmiş kaftan diyebilirim.
kurulumu da son derece basitti yani rahat olun. Kendi deneyimlerimi aktarıyorum size — kesinlikle pişman olmazsınız deneyin derim. Şimdiden iyi şanslar ve bol kazançlar…
Вот такой момент: подбор качественного стационара — это всегда целая проблема и головная боль. Нередко в жизни бывает так, когда кому-то из членов семьи срочно понадобилась грамотная помощь врачей. И тут сразу возникает главный вопрос: куда именно везти человека?
Мой коллега по работе долго искал по-настоящему работающий и безопасный выход. Очень сложно с ходу отличить реальные отзывы пациентов от банальной рекламы. Короче говоря, советую присмотреться к одному источнику, там действительно раскладывают по полочкам всю подноготную про круглосуточную наркологическую поддержку и условия проживания. В общем, не тяните время и долго не раздумывайте,, чтобы четко во всем разобраться.
Вся актуальная информация и контакты доступны прямо здесь: наркология вывод из запоя в стационаре спб http://narkologicheskij-staczionar-sankt-peterburg-12.ru. Честно говоря, после изучения всех условий, насколько там много полезных нюансов и скрытых факторов, включая комфортные условия содержания, современные палаты и полную анонимность. Для Санкт-Петербурга это точно один из самых лучших вариантов, который стабильно работает и имеет хорошие отзывы.
Felt like the post had been edited rather than just drafted and published, and a stop at flintmeadowmarkethall suggested the same care across the site, the difference between edited and unedited content is enormous for the reader and this site has clearly invested in the editing pass that most blogs skip entirely which really does show up.
Picked this up between two other things I was doing and got drawn in completely, and after intentionalforwardmotion my original tasks were completely forgotten for a while, content that derails a workflow in a positive way by being more interesting than what you were already doing is rare and worth recognising clearly.
Even across multiple posts the writers voice has remained consistent in a way I appreciate, and a stop at elitedawns continued that voice, sites that maintain editorial consistency across many pieces have something most sites lack and this one has clearly worked out how to keep its voice steady across what reads as a growing archive.
A piece that read as if the writer was thinking carefully rather than just typing fluently, and a look at fernbureau continued that considered quality, the difference between fluent typing and careful thinking shows up in writing and this site reads as the product of thought rather than just the product of language fluency apparently.
Thanks for keeping the writing direct without losing the warmth that makes content feel human, and a stop at discoverhiddenopportunity carried both qualities forward, balancing professionalism and personality is a rare skill and the writers here have clearly figured out how to consistently land it across many posts which I notice.
During a quiet evening reading session this provided just the right depth without being heavy, and a stop at ivoryridgeartisanexchange maintained the same evening appropriate weight, content with depth that does not exhaust the reader is content with editorial calibration and this site has clearly figured out how to be substantial without being demanding all the time.
Well done, the kind of post that makes you slow down and actually read instead of skimming for keywords, and a look at startyourforwardmove kept me reading carefully too, that is a sign of writing that has been crafted rather than churned out for an algorithm to see today and tomorrow.
Sets a higher bar than most of what shows up in search results for this topic, and a look at meadowharborgoodsgallery did not lower that bar at all, in fact it confirmed the impression, this is the kind of consistency that earns a place in regular rotation for serious readers instead of casual scrollers passing through.
Now understanding why someone recommended this site to me a while back, and a stop at driftorchardcraftcollective explained the recommendation, sometimes recommendations make sense only after experience and this site has finally clicked into place as the kind of resource I now understand was being recommended for sound editorial reasons by my friend.
Now noticing that the post benefited from being neither too short nor too long for its content, and a look at finkglaze continued that calibration of length, sites that match length to content rather than padding to hit some target are sites that respect both their material and their readers and this site does both.
Clean writing, easy to read, and never tries too hard to impress, that combination is harder to find than people think, and after my time on opaldune I am sure this site treats its readers well, no flashy tricks just useful content done right which is honestly all I want online.
Now thinking about how to apply some of this to a project I have been planning, and a look at epicestate added more material for the planning, content that connects to my actual creative work rather than just being interesting in the abstract is the kind that earns priority placement in my reading rotation consistently going forward.
Этот обзор сосредоточен на различных подходах к избавлению от зависимости. Мы изучим традиционные и альтернативные методы, а также их сочетание для достижения максимальной эффективности. Читатели смогут открыть для себя новые стратегии и подходы, которые помогут в их борьбе с зависимостями.
Связаться за уточнением – капельница при алкогольной интоксикации цена на дому
Walked away in a slightly better mood than when I started reading, that says something about the writing, and a stop at musebeats kept that going, content that leaves you feeling more capable rather than overwhelmed is the kind I keep coming back to again and again over the years and across many topics.
Okay so here’s the deal with renting anything decent in Miami. I swear half the “luxury” fleets down here are straight-up marketing scams. You book a premium ride online, arrive all excited, then boom — hidden service fees everywhere. Fool me thrice, shame on both of us I guess, lesson learned. When you are trying to find a reliable premium fleet down here, do some real digging first and read actual customer reviews. Anyone who lives here will tell you the exact same thing, especially since the AC must be arctic and you want zero mileage games.
Most of these local agencies are just shiny websites hiding the same overpriced junk, but I eventually found a service with no bait, no switch, and no weird fine print. If you are looking for the only straight shooter for premium rentals across South Florida, check the details here: rent a porsche near me https://luxury-car-rental-miami-3.com. Also, definitely bring sunglasses unless you enjoy driving completely blind in that sun. Just drive safe out there and maybe skip the extra windshield protection thing. let me know if you guys have any other clean spots.
Honest reaction is that this is the kind of writing I would defend in a conversation about good blog content, and a look at kelqiro reinforced that, the rare site whose work I would actively recommend rather than just tolerate is the kind I want to support through return visits regularly.
Decided not to skim despite my usual habit and was rewarded for the discipline, and a stop at growwithdeliberateaction earned the same patient approach, training myself to recognise sites that warrant slower reading is part of being a careful online reader and this site is the kind that helps me practice that skill regularly.
A clear cut above the usual noise on the subject, and a look at startsmartgrowth only made that gap wider in my view, the kind of place that earns its visitors through quality rather than through aggressive marketing or sponsored placements which is increasingly the only way most sites stay afloat across the modern web.
Most blog writing on this subject reaches for the same handful of arguments and this post avoided them, and a look at coastharbormerchantgallery continued the original treatment, content that finds its own path through territory other writers have flattened is content with real authorial energy and this site has plenty of that distinctive energy.
Well done, the writing is professional without being stiff, and the topic is treated with care, and a look at learnandexecuteclearlynow reflected that approach, the kind of site I would point a colleague to if they asked for a reliable starting point on this topic in the future without any hesitation at all.
Took some notes for a project I am working on, and a stop at wheatcovegoodsgallery added more raw material to those notes, content that contributes to my own creative work rather than just being interesting in the moment is the kind I value most and the kind I will keep coming back to repeatedly.
Honest reaction is that I want to send this to a friend who would benefit from it, and a look at elveecho added more material I will pass along too, the impulse to share is the strongest signal I have for content quality and this site is generating that impulse cleanly across multiple posts.
Really clear writing, the kind that makes you want to share the link with someone who has been asking about the topic, and a quick browse through garnetharbortradeparlor only made me more sure of that, the information here stays useful long after the first read is done which says a lot.
The examples really helped me grasp the points faster than abstract descriptions would have, and a stop at goldmanor added a few more practical illustrations that drove the message home, the kind of writing that knows its readers learn better through concrete situations rather than vague generalities is rare and worth recognising clearly.
Closed several other tabs to focus on this one as I read, and a stop at forestcovemerchantgallery held my undivided attention the same way, content that earns full focus in an attention environment full of competing pulls is content doing something genuinely well and the team behind it deserves recognition for that achievement consistently.
Now setting aside time on my next free afternoon to read more from the archives, and a stop at roseharbortradehall confirmed that time will be well spent, the rare site whose archive deserves a dedicated reading session rather than just casual sampling is the kind of resource worth scheduling around and this one qualifies clearly.
Pass this along to anyone you know dealing with similar questions, the answers here are clear, and a stop at jewelbrookcraftcollective adds even more useful material, this is the kind of resource that deserves to circulate widely rather than getting lost in the constant churn of new content online that buries good work daily.
Found the use of subheadings really helpful for scanning back through the post later, and a stop at ivypier kept that reader friendly approach going, navigation is something many blog writers ignore but small structural choices make a noticeable difference for someone returning to find a specific point again days or weeks later.
Слушайте, кто в курсе, долго не решался завести аккаунт, но на прошлой неделе таки решил глянуть в мелбет. Честно? теперь постоянно туда захожу. Особенно если вам надо скачать мелбет на андроид — у меня смартфон далеко не новый,, но приложение работает плавно.
В общем, все подробности и рабочая ссылка доступны вот тут: мелбет скачать приложение мелбет скачать приложение. Кстати, кто спрашивал про мелбет скачать приложение — там установочный файл чистый и без вирусов. И бонусы на первый депозит отличные дают,. Я лично всё проверял на себе — выплаты приходят максимально быстрые, Очень рекомендую этот вариант. Удачи всем!
Solid post, the structure is easy to follow and the language stays simple even when the topic gets a bit more involved, and a look at dunecoveartisanexchange kept that same standard going, so I left feeling like the time spent here was actually worth something for once which is rare lately.
Now placing this in the small category of sites whose updates I would actually want to know about, and a stop at fernpier confirmed that placement, the difference between sites I want to follow and sites I just consume from is real and this one has crossed into the active follow category from the casual consumption side.
Now understanding why someone recommended this site to me a while back, and a stop at domelounge explained the recommendation, sometimes recommendations make sense only after experience and this site has finally clicked into place as the kind of resource I now understand was being recommended for sound editorial reasons by my friend.
Народ, привет! долго присматривался к разным платформам, но на прошлой неделе все-таки попробовал сделать пару ставок в mel bet. Скажу так — залетел нормально и без проблем,. У кого новый айфон — всё четко и стабильно работает. Надо скачать мелбет на андроид? В интерфейсе даже ребёнок разберётся.
Короче, переходите, точно не пожалеете: . Кстати, кто спрашивал про скачать мелбет казино — приложение вообще не вылетает,. И фрибеты регулярно прилетают на баланс,. Я за месяц три раза выигрыш забирал — всё честно и без обмана. Это лучшее, что я пробовал из подобного. Удачи всем!
Давно присматривался к разным платформам, честно говоря, много где в итоге разочаровался. Но на днях близкий друг посоветовал про мелбет. Решил лично проверить систему — и теперь сам рекомендую знакомым.
В общем, сами гляньте все условия по ссылке: мел бет мел бет. Кстати, если кому надо скачать melbet — там процесс установки занимает буквально минуту. Я себе поставил официальное приложение — полёт отличный. И бонусы на первый депозит приятные, В общем, рекомендую присмотреться. Удачи всем на дистанции!
Telefonuma güvenilir bir uygulama indirmek istiyordum. Herkes farklı bir site öneriyordu kafam karıştı. Sonunda tüm teknik detayları inceleyip sistemi test ettim. En sonunda doğru adrese ulaştım ve size de tüm detayları aktarmak istedim, güncel bilgilere buradan bakabilirsiniz: 1xbet android uygulama 1xbet android uygulama. Yani anlatmak istediğim şu — android cihazlar için biçilmiş kaftan diyebilirim.
güncellemeleri de otomatik geliyor gerçekten. İşin doğrusunu söylemek gerekirse — en hızlı çalışan uygulama bu oldu artık. Şimdiden iyi şanslar ve bol kazançlar…
Liked the careful selection of which details to include and which to skip, and a stop at finkglint reflected the same editorial judgement, knowing what to leave out is just as important as knowing what to include and this site has clearly figured out where that line sits for the topics it covers regularly.
Reading this with a fresh mind in the morning brought out details I might have missed in the afternoon, and a stop at pacecabin earned the same fresh attention, content that rewards being read at full attention rather than at energy lows is content with real density and this site has that density consistently.
Honestly the simplicity of the explanation made the topic click for me in a way other writeups had not, and a look at oakarenas continued that clarity into related areas, when a writer gets the level of explanation right the reader does the heavy lifting themselves and the post just enables it.
В этой статье мы рассмотрим современные достижения в области медицины, включая инновационные методы лечения и диагностики. Мы обсудим важность профилактики заболеваний и роль технологий в улучшении качества здравоохранения. Читатели узнают о влиянии медицины на повседневную жизнь и ее значение для современного общества.
Ознакомиться с полной информацией – вывести из запоя на дому
Picked a single sentence from this post to remember, and a look at startpurposeledgrowth gave me another to keep, content that produces memorable lines is doing more than just transferring information and the small selection of sentences I keep from each reading session is one of the actual returns I get from reading carefully.
A piece that read smoothly because the writer understood how readers actually move through prose, and a look at explorefuturefocusedideas maintained the same reader awareness, writers who think about the reading experience as much as the writing experience produce better work and this site has clearly made that shift in editorial approach.
A memorable post for me on a topic I had thought I was tired of, and a look at thinkingintosystems suggested the same site can refresh other tired topics, sites that can revive my interest in subjects I had written off as exhausted are doing rare work and this one is clearly doing that for me today.
Found a couple of useful angles in here I had not considered before reading carefully, and a quick stop at explorebetterthinking added more, this is one of those sites where the value compounds the more you read rather than peaking at one viral post and then offering nothing else of substance afterwards which is common.
Thanks for the readable length, I finished it without checking how much was left, and a stop at kilzavo kept me reading the same way, when I stop noticing the length of a piece because the content is engaging enough to sustain attention without willpower the writer has done their job well today.
I came here looking for a quick answer and ended up reading the whole post because it was actually interesting, and after explorefreshopportunitypaths I had a much fuller picture, no stress and no confusion just a clear walk through the topic that made everything fall into place without much effort.
Came away with some new perspectives I had not considered before, and after violetharbortradeparlor those ideas felt more complete, the kind of content that stays with you a little while after reading rather than slipping out the moment you switch tabs and move on with your day to whatever comes next.
Mobil bahise yeni başladım diyebilirim. Güvenilir bir kaynak bulmak gerçekten çok zordu. Sonunda tüm teknik detayları inceleyip sistemi test ettim. En sonunda doğru adrese ulaştım ve size de tüm detayları aktarmak istedim, güncel bilgilere buradan bakabilirsiniz: 1xbet apk 1xbet apk. Şimdi size kısaca özet geçeyim — mobil versiyonu bile çok akıcı aslında.
kurulumu da son derece basitti yani rahat olun. İşin doğrusunu söylemek gerekirse — kesinlikle pişman olmazsınız deneyin derim. Şimdiden iyi şanslar ve bol kazançlar…
Reading this slowly and letting each paragraph land before moving on, and a stop at coralharbormerchantgallery earned the same patient approach, content that rewards slow reading rather than speed is content with real density and the writers here are clearly producing work that benefits from the careful eye rather than the rushed scan.
This one is staying open in a tab for the rest of the day so I can come back and re read certain parts, and a look at echobrookartisanexchange suggests I will be doing the same with a few more pages here too, this is going to be a deep dive over the coming hours.
Closed it feeling I had taken something away rather than just consumed something, and a stop at domemarina extended that taking away feeling, the difference between content I extract value from and content I just pass through is something I track informally and this site is consistently in the value extraction column for me.
Worth saying that the writing carries a particular kind of authority without making any explicit claims to it, and a stop at gingerwoodgoodsroom extended that earned authority feeling, sites that demonstrate expertise through the quality of their explanations rather than by stating credentials are sites I trust most and this site has it.
Solid value for anyone willing to read carefully, and a look at skyharborartisanexchange extends that value across the rest of the site, this is the kind of place that rewards return visits rather than offering everything in a single splashy post and then leaving readers nothing to come back for later which is unfortunately common.
Now organising my browser bookmarks to give this site easier access, and a look at elveglide earned the same organisational priority, the small acts of digital housekeeping I do for sites I expect to use often are themselves a measure of trust and this site has triggered the trust based housekeeping behaviour from me clearly.
My time on this site has now extended past what I had budgeted, and a stop at dewdawns keeps extending it further, content that overstays its budget in my schedule is content that has earned the extra time and this site has been earning extra time across multiple visits to the point where my schedule needs adjustment.
Now recognising the specific pleasure of reading writing that shows real care for sentence shapes, and a look at explorestrategicgrowthideas extended that craft pleasure, sentence level writing quality is something most blog content ignores entirely and this site has clearly invested in the prose layer alongside the substance which is rare today.
Really appreciate the lack of pop ups, modals, cookie banners stacking on top of each other, and a quick visit to epicinlet confirmed the same clean approach across the rest of the site, technical decisions about user experience are part of what makes content actually pleasant to engage with for sure.
Even from a single post the editorial care is clear, and a stop at pactcliff extended that care across more pages, the kind of attention to quality that shows up in every paragraph is what separates serious sites from the rest and this one has clearly invested in that paragraph level attention across what I have read.
Now I want to find more sites like this but I suspect they are rare, and a look at wheatmeadowmarketgallery extended that thought, the few sites that meet this quality bar are precious specifically because they are rare and finding others like them is one of the ongoing projects of careful internet curation across the years.
Reading this gave me confidence to make a decision I had been putting off, and a stop at jetdome reinforced that confidence, content that translates into action in my own life rather than just informing it is content with the highest practical value and this site is generating that action level utility for me lately.
Honestly impressed by the consistency of voice across what I have read so far, and a quick visit to firminlet continued that consistent feel, when a site reads like one careful person rather than a committee the experience is more rewarding for the reader who notices these subtle editorial details over time.
Different in a good way from the cookie cutter content that fills most blogs covering this area, and a stop at explorefreshsolutions kept showing me why, original thoughtful writing exists if you know where to look and this site has earned a place on my short list of those rare exceptions worth defending.
Okay so here’s the deal with renting anything decent in Miami. Half these local companies promise a custom Porsche and hand you a basic sedan with fake leather. Oh, and that pretty security deposit? Yeah, good luck getting that money back fast. Fool me thrice, shame on both of us I guess, lesson learned. If you seriously need a legit vehicle to cruise around the city, don’t just trust the first sponsored ad on social media. Anyone who lives here will tell you the exact same thing, especially since the AC must be arctic and you want zero mileage games.
I literally spent last month comparing maybe twenty different companies, but I eventually found a service with no bait, no switch, and no weird fine print. If you are looking for the only straight shooter for premium rentals across South Florida, check the details here: luxury car rental service luxury car rental service. Also, definitely bring sunglasses unless you enjoy driving completely blind in that sun. Anyway, glad there’s at least one honest rental joint left in this town, let me know if you guys have any other clean spots.
Now appreciating that the post did not require external context to follow, and a look at auroracoveartisanexchange maintained the same self contained quality, content that respects new visitors by being readable without prerequisites is content with broader accessibility and this site has clearly invested in keeping each piece reader friendly for fresh arrivals.
Liked that the post landed without needing to manufacture controversy or take a contrarian stance for attention, and a stop at echobrookcraftcollective continued that grounded approach, content that earns attention through quality rather than provocation is the kind that builds long term trust rather than burning it on quick wins.
Walked away with a clearer head than I had before reading this, and a quick visit to startwithclearfocusnow only sharpened that, the writing has a way of cutting through the noise that surrounds most topics online which is something I will definitely remember the next time I am searching for an answer to anything.
Speaking as someone who reads a lot on this topic this site has earned a high position in my source rankings, and a stop at findyourcorepurpose reinforced that ranking, the informal ranking of sources for a topic is something I maintain mentally and this site has moved into the upper portion of those rankings clearly.
Well done, the writing is professional without being stiff, and the topic is treated with care, and a look at kinmuzo reflected that approach, the kind of site I would point a colleague to if they asked for a reliable starting point on this topic in the future without any hesitation at all.
В этой статье рассматривается комплексный подход к избавлению от зависимости. Читатель узнает, как сочетание физического, психологического и духовного восстановления помогает достичь стойкого выздоровления.
Ссылка на источник – clinica plus
If a friend asked me where to read carefully on the topic I would send them here without hesitation, and a look at draftglade confirmed the recommendation strength, the directness of my recommendation reflects how confident I am in the quality and this site has earned undiluted recommendations from me across multiple recent conversations actually.
Этот текст посвящён сложным аспектам зависимости и её влиянию на жизнь человека. Мы обсудим психологические, физические и социальные последствия зависимого поведения, а также важность своевременного обращения за помощью.
Есть чему поучиться – clinica plus в твери
В этой публикации мы рассматриваем важную тему борьбы с зависимостями, включая алкогольную и наркотическую зависимости. Мы обсудим методы лечения, реабилитации и поддержку, которые могут помочь людям, столкнувшимся с этой проблемой. Читатели узнают о перспективах выздоровления и важности комплексного подхода.
Нажми и узнай всё – clinica plus
Better signal to noise ratio than most places I check on this kind of topic, and a look at ivoryharborcommercegallery kept that going, every paragraph here carries something worth reading rather than padding out the page to hit some arbitrary length target that search engines reward but readers ignore as soon as they notice it.
Now setting up a small reminder to revisit the site on a slow day, and a stop at buildyourvisionpath confirmed the reminder was a good idea, planning return visits is a small organisational act that signals trust in ongoing quality and this site has earned that planned return through consistent performance across the pieces I have read so far.
Now adding this to a short list of sites I would defend in a conversation about the modern web, and a look at gladeharbormarkethall reinforced that defence list, the few sites that serve as evidence the web can still produce good things are precious and this one has clearly joined that small list of exemplary sites.
Ребята, всем привет! долго сомневался до последнего, но недавно таки решил глянуть в мелбет. Честно? Зашло прям на ура,. Особенно если вам надо скачать melbet на андроид — у меня модель достаточно бюджетная, но приложение работает плавно.
В общем, гляньте сами все условия по ссылке: мелбет скачать мелбет скачать. Кстати, кто спрашивал про мелбет казино скачать на андроид — там есть удобный отдельный раздел,. И кешбек на баланс регулярно капает. Я лично всё проверял на себе — выплаты приходят максимально быстрые, Сам теперь только туда. Удачи всем!
The structure of the post made it easy to follow without losing track of where I was, and a look at palmcodex kept the same logical flow going, this site clearly understands that organisation is half the battle in keeping readers engaged from the first line to the last across any kind of post.
Reading this felt easy in the best way, no friction and no confusion at any point, and a stop at snowcoveartisanexchange carried that same comfort across more pages, the kind of editorial flow that lets you absorb information without fighting the format which is increasingly hard to find on the open web today across topics.
Felt the post had been written without looking over its shoulder, and a look at coralmeadowcommercegallery continued that confident posture, content written for its own sake rather than against imagined critics has a different quality and this site reads as written from a place of confidence rather than defensive justification of every claim.
Давно хотел найти надёжный вариант, честно говоря, много где в итоге разочаровался. Но на днях близкий друг посоветовал про мел бет. Решил потратить полчаса времени — и ни разу не пожалел,.
В общем, сами гляньте все условия по ссылке: мелбет скачать казино мелбет скачать казино. Кстати, если кому надо melbet скачать — там нет никаких лишних телодвижений. Я себе поставил официальное приложение — всё сделано очень удобно. И бонусы на первый депозит приятные, Сам теперь только туда захожу. Надеюсь, эта рекомендация кому-то пригодится.
Эта информационная публикация освещает широкий спектр тем из мира медицины. Мы предлагаем читателям ясные и понятные объяснения современных заболеваний, методов профилактики и лечения. Информация будет полезна как пациентам, так и медицинским работникам, желающим поддержать уровень своих знаний.
Только для своих – вывод из запоя тверь
One of the more honest takes on the topic I have seen lately, no spin and no oversell, and a stop at claritycreatesresults kept that going, the kind of voice the open web could use a lot more of rather than the endless echo chamber of recycled opinions floating around every social platform these days.
Thanks for the simple approach, too many sites bury the actual point under layers of unnecessary words, but here every line earns its place, and a look at elvegorge showed the same care for the reader which is something I will remember the next time I need answers on a topic.
Android cihazımda sorunsuz çalışan bir platform çok lazımdı. Herkes farklı bir şey diyordu kime güveneceğimi şaşırdım. En sonunda güvendiğim bir kaynağa ulaştım ve size de buradan bahsetmek istediğim nokta şurası: 1xbet download android 1xbet download android. Yani anlatmak istediğim şu — android uygulaması resmen harika çalışıyor.
yüklemesi de iki dakikadan az sürdü yani rahat olun. İşin doğrusunu söylemek gerekirse — en güvenilir uygulama bu oldu artık. Umarım siz de memnun kalırsınız…
Picked this for a morning recommendation in our company chat, and a look at embermeadowartisanexchange suggested I will mention this site again later, recommending content into a workplace context is a small editorial act that requires confidence in the recommendation and this site is making me confident in those recommendations consistently here too.
Bookmark folder reorganised slightly to make this site easier to find, and a look at bayharborartisanexchange earned the same accessibility upgrade, the small organisational moves I make for sites I expect to return to often are themselves a signal of how much I trust them and this site triggered those moves naturally.
Этот обзор посвящен успешным стратегиям избавления от зависимости, включая реальные примеры и советы. Мы разоблачим мифы и предоставим читателям достоверную информацию о различных подходах. Получите опыт многообразия методов и найдите подходящий способ для себя!
Детали по клику – наркологическая клиника в твери
Liked how the writer used real examples instead of theoretical ones to make the points stick, and a stop at draftlake added even more concrete examples, this is the kind of practical approach that respects readers who actually want to apply what they learn rather than just nodding along passively without doing anything useful.
Worth saying that the writing carries a particular kind of authority without making any explicit claims to it, and a stop at jetmanor extended that earned authority feeling, sites that demonstrate expertise through the quality of their explanations rather than by stating credentials are sites I trust most and this site has it.
Этот информационный материал подробно освещает проблему наркозависимости, ее причины и последствия. Мы предлагаем информацию о методах лечения, профилактики и поддерживающих программах. Цель статьи — повысить осведомленность и продвигать идеи о необходимости борьбы с зависимостями.
Углубить понимание вопроса – clinica plus в твери
Слушайте, кто шарит, долго не решался завести аккаунт, но вчера все-таки начал пользоваться сервисом в melbet. Скажу так — теперь я их постоянный клиент. У кого новый айфон — тоже всё без проблем запускается,. Надо мелбет скачать на айфон? За пять минут софт поставил на смарт,.
Короче, сами гляньте все условия по ссылке: . Кстати, кто спрашивал про мелбет казино скачать — всё очень удобно и грамотно сделано. И вывод средств действительно быстрый. Я за месяц три раза выигрыш забирал — всё честно и без обмана. Всем искренне рекомендую. Удачи всем!
Публикация знакомит читателей с различными подходами к реабилитации. От традиционных методов до современных программ — вы узнаете, как выбрать оптимальный путь к выздоровлению и преодолеть препятствия на этом пути.
Погрузиться в научную дискуссию – клиника плюс тверь
Now appreciating that the post did not require external context to follow, and a look at explorefreshstrategies maintained the same self contained quality, content that respects new visitors by being readable without prerequisites is content with broader accessibility and this site has clearly invested in keeping each piece reader friendly for fresh arrivals.
Знаете, бывает — родственник срывается , а руки опускаются . Я через это прошёл пару лет назад. Сначала кажется, что обойдётся , но хрен там. Нужна реальная помощь . Перерыл весь интернет — сплошной развод . А потом наткнулся на один действительно рабочий вариант. Если тебе нужно помещение в клинику для вывода из запоя, не рискуй здоровьем. В Нижнем Новгороде , к слову , тоже хватает шарлатанов . Проверенная информация тут : закодироваться в нижнем новгороде закодироваться в нижнем новгороде Честно говоря , после того как прочитал , понял свои ошибки. Там и про кодирование от алкоголизма расписано , и про условия в стационаре. И цены адекватные. Советую не тянуть .
Coming to this with low expectations and being pleasantly surprised by the substance, and a stop at kinquro continued exceeding expectations, the recalibration of expectations upward across multiple positive readings is one of the actual rewards of careful browsing and this site is providing that recalibration at a steady rate apparently.
Reading this in pieces during a long afternoon and finding it consistently rewarding, and a stop at flareaisle fit naturally into the same fragmented reading pattern, sites whose posts can be read in segments without losing the thread are well suited to how I actually read these days and this one is built well.
A piece that respected the reader by not over explaining the obvious, and a look at bayharborcraftcollective continued that calibrated approach, finding the right level of explanation is one of the harder editorial calls and this site has clearly thought carefully about what readers will already know versus what they need help with consistently.
Liked that there was nothing performative about the writing, and a stop at etheraisle continued that genuine quality, performative writing tries to be witnessed rather than read and the difference between performance and substance is huge for the careful reader and this site has clearly chosen substance every time clearly.
В этой публикации мы исследуем ключевые аспекты здоровья, включая влияние образа жизни на благополучие. Читатели узнают о важности правильного питания, физической активности и психического здоровья. Мы предоставим практические советы и рекомендации для поддержания здоровья и развития профилактических подходов.
Получить дополнительную информацию – вывод из запоя тверь на дому круглосуточно
Uygulama arayışım epey uzun sürdü valla. Güvenilir bir kaynak bulmak gerçekten çok zordu. Güncel bilgileri kontrol edip süreci hatasız başlattım. En sonunda doğru adrese ulaştım ve size de tüm detayları aktarmak istedim, güncel bilgilere buradan bakabilirsiniz: 1xbet indir android 1xbet indir android. Yani anlatmak istediğim şu — android kullanıcıları için biçilmiş kaftan diyebilirim.
güncellemeleri de düzenli geliyor gerçekten. Birçok uygulama denedim ama bunda karar kıldım — kesinlikle pişman olmazsınız deneyin derim. Şimdiden iyi şanslar ve bol kazançlar…
Telefonumdan rahatça bahis oynayabileceğim bir uygulama lazımdı. Play Store’da arattım ama resmi olanı bulamadım. En sonunda doğru kaynağa ulaştım ve size de buradan bahsetmek istediğim nokta şurası: 1xbet app apk 1xbet app apk. Valla bak net söyleyeyim — mobil sürümü gerçekten masaüstünü aratmıyor.
kurulumu da son derece basitti yani rahat olun. Kendi deneyimlerimi aktarıyorum size — kesinlikle pişman olmazsınız deneyin derim. Umarım siz de memnun kalırsınız…
Well done, the writing is professional without being stiff, and the topic is treated with care, and a look at palminlet reflected that approach, the kind of site I would point a colleague to if they asked for a reliable starting point on this topic in the future without any hesitation at all.
Saving this link for the next time someone asks me about this topic, and a look at buildactionableforwardsteps expanded what I will be sharing with them, this is the kind of resource that makes a real difference when you are trying to point a friend to something useful and reliable rather than generic marketing pages.
Знаете ситуацию выматывает , когда близкий просто не может остановиться . Ищешь варианты , а вокруг одна реклама . Знакомому потребовался действительно рабочий метод . Пьют успокоительное , но это ерунда . Нужно именно профессиональная помощь . Я перелопатил кучу сайтов , пока понял одну простую вещь: без круглосуточного наблюдения ничего толку не будет . Потому что дома срыв гарантирован . Если ищешь где сделать качественного вывода из запоя с помещением в клинику — обрати внимание на один проверенный вариант . В Нижнем Новгороде , кстати, развелось этих “центров” . Лучше сразу перейти на сайт, где нет вранья про кодирование от алкоголизма и работу нарколога . Подробности по ссылке: наркологическая помощь наркологическая помощь Честно скажу , сам удивился , сколько подводных камней в этой теме. И кстати, цены адекватные. Для нашего города это реально стоящий вариант.
Now thinking about how to apply some of this to a project I have been planning, and a look at snowcovecraftcollective added more material for the planning, content that connects to my actual creative work rather than just being interesting in the abstract is the kind that earns priority placement in my reading rotation consistently going forward.
Took a chance on the headline and was rewarded, and a stop at embermeadowcraftcollective kept the rewards coming as I clicked through, the kind of place where every link leads somewhere worth the click is a small luxury on the modern web where so many sites are mostly empty calories disguised as content.
Знаете, ситуация бывает — человек в ступоре , а везти в больницу просто нереально . Я сам через это прошёл недавно. Руки опускаются, время идёт. Лезешь в интернет, а вокруг сплошной развод . Пока случайно не наткнулся на один реально работающий вариант. Требуется срочная помощь — а ехать куда-то просто нереально, то нужно вызывать врача на дом. Речь конкретно про наркологическую помощь на дому . У нас в Самаре, если честно, тоже полно левых контор без лицензии. Вся проверенная информация ниже по ссылке: нарколог по вызову https://narkolog-na-dom-samara-13.ru Честно скажу , после того как прочитал , понял, как правильно действовать. И про снятие запоя на дому, и про консультацию . И цены адекватные, без разводов. Рекомендую не откладывать.
Okay so here’s the deal with renting anything decent in Miami. I swear half the “luxury” fleets down here are straight-up marketing scams. You book a premium ride online, arrive all excited, then boom — hidden service fees everywhere. I’ve been burned like three times already this year alone. When you are trying to find a reliable premium fleet down here, don’t just trust the first sponsored ad on social media. Anyone who lives here will tell you the exact same thing, whether you are doing Brickell mornings, South Beach nights, or a spontaneous Keys trip.
Most of these local agencies are just shiny websites hiding the same overpriced junk, but I eventually found a service with no bait, no switch, and no weird fine print. If you are looking for the only straight shooter for premium rentals across South Florida, check the details here: miami beach luxury car rental miami beach luxury car rental. Also, definitely bring sunglasses unless you enjoy driving completely blind in that sun. Just drive safe out there and maybe skip the extra windshield protection thing. let me know if you guys have any other clean spots.
Bookmark added with a small mental note that this is a site to keep, and a look at draftlog reinforced the keep status, the verb keep rather than visit captures something about how I think about this kind of site and it is a higher tier of relationship than I have with most places online today.
Mobil platform arayışım epey zaman aldı valla. Herkes farklı bir link atıyordu kime güveneceğimi bilemedim. En sonunda sağlam bir kaynağa ulaştım ve size de buradan bahsetmek istediğim nokta şurası: 1xbet yükle android 1xbet yükle android. Yani anlatmak istediğim şu — mobil versiyonu bütün özellikleri sunuyor.
dosya boyutu da hafif gerçekten. İşin doğrusunu söylemek gerekirse — başka yerde vakit kaybetmeyin yani. Umarım siz de memnun kalırsınız…
Closed it feeling I had taken something away rather than just consumed something, and a stop at berrycovecraftcollective extended that taking away feeling, the difference between content I extract value from and content I just pass through is something I track informally and this site is consistently in the value extraction column for me.
В этой медицинской статье мы погрузимся в актуальные вопросы здравоохранения и лечения заболеваний. Читатели узнают о современных подходах, методах диагностики и новых открытий в научных исследованиях. Наша цель — донести важную информацию и повысить уровень осведомленности о здоровье.
Слушай внимательно — тут важно – детоксикация наркозависимых цена
В этой статье рассматриваются различные аспекты избавления от зависимости, включая физические и психологические методы. Мы обсудим поддержку, мотивацию и стратегии, которые помогут в процессе выздоровления. Читатели узнают, как преодолеть трудности и двигаться к новой жизни без зависимости.
Продолжить чтение – tver clinica plus
Now noticing that the post benefited from being neither too short nor too long for its content, and a look at epicfife continued that calibration of length, sites that match length to content rather than padding to hit some target are sites that respect both their material and their readers and this site does both.
However many similar pages I have read this one taught me something new, and a stop at lemonlarkmerchantgallery added more new material, content that contributes genuinely fresh information rather than recycling what is already widely available is content with real informational value and this site is providing that informational freshness at a notable rate.
Felt the post had been written without using a single buzzword, and a look at startbuildingclarity continued that clean vocabulary, content free of jargon and trendy phrases reads better and ages better and this site has clearly committed to a vocabulary that will not feel dated in three years which is impressive editorially.
My professional context would benefit from having this kind of resource available, and a look at kinzavo extended the professional applicability, the rare site that contributes meaningfully to professional work rather than just personal interest is content with multiplied value and this one is providing that professional utility consistently across multiple pieces.
Came away with a small but real shift in perspective on the topic, and a stop at palmmill pushed that shift a bit further, the kind of subtle reframing that good writing does to a reader without making a big deal of it is something I always appreciate when it happens which is sadly not that often.
Honestly the simplicity of the explanation made the topic click for me in a way other writeups had not, and a look at knackdome continued that clarity into related areas, when a writer gets the level of explanation right the reader does the heavy lifting themselves and the post just enables it.
Decided I would read the archives over the weekend, and a stop at strategybeforeaction confirmed that the archives would be worth the time, very few sites have archives I would actively read through but this one has earned that level of interest based on the consistent quality across what I have sampled so far.
В этом обзоре представлены различные методы избавления от зависимости, включая терапевтические и психологические подходы. Мы сравниваем их эффективность и предоставляем рекомендации для тех, кто хочет вернуться к трезвой жизни. Читатели смогут найти информацию о реабилитационных центрах и поддерживающих группах.
Читать полностью – клиника плюс тверь
Liked the natural conversational tone throughout, never stiff and never overly casual either, and a stop at ferncovecraftcollective kept that comfortable middle ground going, finding a tone that respects the reader without becoming distant or overly familiar is harder than it sounds and this site nails that balance consistently across many different pieces.
Worth recognising that the post did not pretend to be the final word on the topic, and a stop at flarefest continued that humility, content that admits its own scope and limits is more trustworthy than content that overreaches and this site has clearly developed the editorial maturity to know what it can and cannot claim well.
Worth saying that this is one of the better things I have read on the topic in months, and a stop at solarorchardcraftcollective reinforced that ranking, the topic is well covered by many sources but few do it with this level of care and the few that do deserve to be flagged so other readers can find them.
Most of the time I bounce off similar pages within seconds, and a stop at calmcoveartisanexchange held me longer than I would have predicted, the ability to convert a likely bouncing visitor into an engaged reader is a quality signal and this site has demonstrated that conversion ability across multiple visits where I expected to bounce.
A small thank you note from me to the team behind this work, the post earned it, and a stop at berrycoveartisanexchange suggested more thanks would be in order over time, recognising the people who do good writing online is something I try to remember to do because the alternative is silence and silence rewards mediocrity unfortunately.
В этой статье рассматриваются способы преодоления зависимости и успешные истории людей, которые справились с этой проблемой. Мы обсудим важность поддержки со стороны близких и профессионалов, а также стратегии, которые могут помочь в процессе выздоровления. Научитесь первоочередным шагам к новой жизни.
Смотрите также – tver clinica plus
Now feeling the quiet pleasure of finding writing that takes itself seriously without being self serious, and a stop at etherfair extended that subtle pleasure, the gap between earnest and pretentious is fine and this site has clearly chosen to land on the earnest side without slipping over into pretentious which is impressive.
Mobil bahis dünyasına yeni adım attım sayılır. Virüslü dosyalardan çok korktum açıkçası. En sonunda güvendiğim bir adrese ulaştım ve size de buradan bahsetmek istediğim nokta şurası: 1xbet android apk 1xbet android apk. Valla bak net söyleyeyim — android uygulaması resmen süper çalışıyor.
yüklemesi de çerez gibiydi yani rahat olun. İşin doğrusunu söylemek gerekirse — başka yerde vakit kaybetmeyin yani. Umarım siz de memnun kalırsınız…
Telefonuma güvenilir bir uygulama indirmek istiyordum. Play Store’da bulamayınca ne yapacağımı bilemedim. Sonunda tüm teknik detayları inceleyip sistemi test ettim. En sonunda doğru adrese ulaştım ve size de tüm detayları aktarmak istedim, güncel bilgilere buradan bakabilirsiniz: 1xbet app apk 1xbet app apk. Şimdi size kısaca özet geçeyim — telefonuma kurunca çok memnun kaldım.
Hiçbir donma yaşamadım şu ana kadar. İşin doğrusunu söylemek gerekirse — başka yerde vakit kaybetmeyin yani. Şimdiden iyi şanslar ve bol kazançlar…
Telefonumdan bahis oynamayı seviyorum aslında. Herkes farklı bir link atıyordu doğruyu bulmak imkansızdı. Adımları doğru sırayla uyguladıktan sonra erişim sorunsuz açıldı. En sonunda sağlam bir kaynağa ulaştım ve size de tüm detayları aktarmak istedim, güncel bilgilere buradan bakabilirsiniz: 1xbet indir android 1xbet indir android. Şimdi size kısaca özet geçeyim — mobil versiyonu masaüstünü aratmıyor kesinlikle.
batarya tüketimi de makul düzeyde. Kendi deneyimlerimi aktarıyorum size — başka yerde vakit kaybetmeyin yani. Umarım siz de memnun kalırsınız…
В этой публикации мы предложим ряд рекомендаций по избавлению от зависимостей и успешному восстановлению. Мы обсудим методы привлечения поддержки и важность самосознания. Эти советы помогут людям вернуться к нормальной жизни и стать на путь выздоровления.
Читать далее > – запой на дому
Skipped a meeting reminder to finish the post, and a stop at flintmeadowartisanexchange held me past another reminder, when content beats meetings the writer is doing something extraordinary because meetings have institutional support behind them and yet good writing can still occasionally win that competition for attention which I find heartening today.
Reading this confirmed that my time researching the topic in other places had not been wasted, and a stop at kirvoro extended the confirmation, when independent sources agree that is a useful signal and this site is one of the more reliable sources I have found for cross checking what I read elsewhere on similar subjects.
Android için güvenilir bir apk dosyası bulmak çok zordu valla. Sürekli farklı adresler veriliyordu kime inanacağımı şaşırdım. En sonunda doğru kaynağa ulaştım ve size de buradan bahsetmek istediğim nokta şurası: 1xbet apk son sürüm 1xbet apk son sürüm. Şimdi size kısaca özet geçeyim — android uygulaması inanılmaz stabil çalışıyor.
güncellemeleri otomatik yapıyor çok memnunum. Birçok apk denedim ama en sorunsuzu bu çıktı — başka yerde vakit kaybetmeyin yani. Herkese hayırlı olsun…
Uygulama arayışım epey uzun sürdü valla. Herkes farklı bir şey öneriyordu kafam allak bullak oldu. Sonunda tüm teknik detayları inceleyip sistemi test ettim. En sonunda doğru adrese ulaştım ve size de tüm detayları aktarmak istedim, güncel bilgilere buradan bakabilirsiniz: 1xbet download android 1xbet download android. Yani anlatmak istediğim şu — android kullanıcıları için biçilmiş kaftan diyebilirim.
Hiçbir gecikme yaşamadım şu ana kadar. Kendi deneyimlerimi aktarıyorum size — en sorunsuz çalışan uygulama bu oldu artık. Şimdiden iyi şanslar ve bol kazançlar…
Now recognising that this site has earned a place in the small group of resources I treat as authoritative, and a stop at knackpact confirmed that placement, the difference between resources I trust and resources I just consume is real and this site has clearly moved into the trusted category through consistent quality over time.
Highly recommend to anyone looking for a sensible take on this topic without the usual marketing nonsense, and a look at equakoala kept that grounded approach going, sites that stay focused on serving readers rather than monetising every click are rare and this is clearly one of those rare ones I really appreciate finding.
Telefonuma güvenle yükleyebileceğim bir apk bulmak istiyordum. Herkes farklı bir şey diyordu kime güveneceğimi şaşırdım. En sonunda güvendiğim bir kaynağa ulaştım ve size de buradan bahsetmek istediğim nokta şurası: 1xbet yukle android 1xbet yukle android. Valla bak net söyleyeyim — telefonuma indirince kasma sorunu tamamen bitti.
yüklemesi de iki dakikadan az sürdü yani rahat olun. İşin doğrusunu söylemek gerekirse — kesinlikle pişman olmazsınız deneyin derim. Umarım siz de memnun kalırsınız…
В этой статье мы обсудим процесс восстановления после зависимостей, акцентируя внимание на различных методах и подходах к реабилитации. Читатели узнают, как создать план выздоровления и использовать полезные ресурсы для достижения устойчивых изменений.
Где можно узнать подробнее? – clinica plus в твери
sites on the dark web https://darknetmarketsgate.com/ darkmarket url https://darknetmarketsgate.com/
what is darknet market https://darkwebmarketlisting.com/ what does dox members mean darknet markets https://darkwebmarketlinks2024.com/
However measured this site clears the bar I set for sites I take seriously, and a stop at suncoveartisanexchange continued clearing that bar, the metrics I use for site quality are admittedly informal but they are consistent and this site has cleared them on multiple measurements across multiple visits which is meaningful for my evaluation.
Took a few notes from this post, the points are easy to remember without needing to come back and check, and a look at canyonharborartisanexchange added a couple more, the kind of place that sticks in the memory long after the browser tab has been closed for the day which says a lot really.
dark web search https://privatedarknetmarket.com/ dark web market links https://privatedarknetmarket.com/
Народ, привет! долго откладывал этот момент до последнего, но вчера все-таки зарегился ради интереса в мелбет. Скажу так — очень зашло с первых минут,. У кого обычный андроид — тоже всё без проблем запускается,. Надо мелбет скачать на айфон? За пять минут софт поставил на смарт,.
Короче, сами гляньте все условия по ссылке: . Кстати, кто спрашивал про скачать мелбет казино — мобильная версия работает без лагов,. И фрибеты регулярно прилетают на баланс,. Я уже выводил пару раз выигранные деньги — служба поддержки работает норм,. Сам теперь только туда захожу. Удачи всем!
Started forming counter examples to test the claims and the post handled most of them implicitly, and a look at flarefoil continued that anticipatory style, writers who think two steps ahead of the critical reader save themselves from a lot of follow up work and this writer has clearly internalised that habit consistently.
In the middle of an otherwise scattered day this post landed as a moment of focus, and a stop at etherledge extended that focused feeling across more pages, content that anchors a fragmented day rather than contributing to the fragmentation is content with real centring effect and this site is providing that anchoring function for me.
Этот информативный текст сочетает в себе темы здоровья и зависимости. Мы обсудим, как хронические заболевания могут усугубить зависимости и наоборот, как зависимость может влиять на общее состояние здоровья. Читатели получат представление о комплексном подходе к лечению как физического, так и психического состояния.
Это стоит прочитать полностью – выведение из запоя клиника
Came in for one specific question and got answers to three I had not even thought to ask, and a look at plumcovemerchantgallery extended that bonus value pattern, the kind of resource that anticipates reader needs rather than just answering the literal question asked is the gold standard and this site reaches it.
Came across this looking for something else entirely and ended up reading it through twice, and a look at forestcoveartisanexchange pulled me deeper into the site than I planned, the writing has a way of holding attention without resorting to manipulative cliffhangers or vague promises that never get delivered later down the page.
Эта доказательная статья представляет собой глубокое погружение в успехи и вызовы лечения зависимостей. Мы обращаемся к научным исследованиям и опыту специалистов, чтобы предоставить читателям надежные данные об эффективности различных методик. Изучите, что работает лучше всего, и получите информацию от экспертов.
ТОП-5 причин узнать больше – наркологическая клиника в твери
Mobil platform arayışım epey zaman aldı valla. Play Store’da arattım ama son sürümü bulamadım. En sonunda sağlam bir kaynağa ulaştım ve size de buradan bahsetmek istediğim nokta şurası: 1xbet apk son sürüm 1xbet apk son sürüm. Yani anlatmak istediğim şu — mobil versiyonu bütün özellikleri sunuyor.
Hiçbir kasma yaşamadım şu ana kadar. Birçok apk denedim ama en iyisi bu çıktı — en güvenilir uygulama bu oldu artık. Umarım siz de memnun kalırsınız…
Useful information presented in a way that does not feel like a sales pitch, that is what I appreciated most, and a stop at lacecabin was the same, no upsell and no fake urgency just steady content laid out properly for someone trying to actually learn from it rather than just be sold to.
Знаете, достало уже — родственник уходит в запой , а ты не знаешь куда бежать . Моя семья с таким столкнулась недавно. Думал, справлюсь сам — хрен там было. Оказалось , без врачей и нормального наблюдения не обойтись. Перерыл кучу форумов — одни обещания и бабло тянут. Пока нашёл один проверенный вариант. Если ищете где сделать вывод из запоя в стационаре — не рискуйте здоровьем человека. У нас в Нижнем, если честно, тоже полно левых контор без лицензии. Вся проверенная информация вот тут : наркологические клиники в нижнем новгороде наркологические клиники в нижнем новгороде Откровенно говоря, после того как почитал , многое стало понятно . Там и про кодирование от алкоголизма подробно расписано , и про выезд нарколога на дом . И цены адекватные, без разводов. Рекомендую не тянуть .
Вот такая тема выматывает , когда человек просто срывается в штопор . Ломаешь голову , а вокруг одна потёмки . Мне вот потребовался срочный выход . Многие хватаются за таблетки , но это не помогает . Требуется именно врачебное вмешательство . Пролистал пол-интернета , пока понял одну простую вещь: без круглосуточного наблюдения ничего толку не будет . Потому что дома срыв гарантирован . Ищешь нормальный вариант для вывода из запоя в стационаре — тогда тебе сюда . В Нижнем Новгороде , кстати, тоже полно шарлатанов . Советую перейти на сайт, где нет вранья про кодировку от алкоголя и выезд врача . Подробности по ссылке: наркологические клиники нижний новгород наркологические клиники нижний новгород После прочтения , сам офигел , сколько подводных камней в этой теме. И кстати, цены адекватные. Для нашего города это реально стоящий вариант.
Started believing the writer knew the topic deeply by about the second paragraph, and a look at birchharborartisanexchange reinforced that confidence, the speed at which a writer establishes credibility through their writing is a useful quality signal and this writer establishes it quickly and quietly without resorting to credential dropping or self promotion.
Ребята, кто уже делал ремонт? Хочу объединить маленькую кухню с гостиной, без официального проекта даже думать нечего начинать, Потратил уйму свободного времени на чтение строительных форумов. Короче говоря, единственное, что реально работает в наших реалиях — это доверить подготовку документов профессиональным инженерам, чтобы спать спокойно и не бояться проверок от управляющей.
И согласуют все этапы вообще без проблем. В общем, кому тоже актуально, перепланировка квартиры проектные организации https://proekt-pereplanirovki-kvartiry30.ru. Без готового проекта даже не начинайте ломать стены, Обязательно перешлите этот пост тому, кто тоже сейчас затеял ремонт!
Even from a single post the editorial care is clear, and a stop at kivmora extended that care across more pages, the kind of attention to quality that shows up in every paragraph is what separates serious sites from the rest and this one has clearly invested in that paragraph level attention across what I have read.
Liked the post enough to read it twice and the second read found new things, and a stop at caramelcovecraftcollective similarly rewarded the second look, content with hidden depths that only reveal themselves on careful rereading is the rare kind that earns lasting respect rather than fleeting first impressions only briefly held.
Telefonuma güvenilir bir uygulama indirmek istiyordum. Güvenilir bir apk dosyası bulmak gerçekten çok zordu. Sonunda tüm teknik detayları inceleyip sistemi test ettim. En sonunda doğru adrese ulaştım ve size de tüm detayları aktarmak istedim, güncel bilgilere buradan bakabilirsiniz: 1xbet android apk 1xbet android apk. Şimdi size kısaca özet geçeyim — android cihazlar için biçilmiş kaftan diyebilirim.
kurulumu da üç dakikadan kısa sürdü yani rahat olun. Birçok apk denedim ama bunda karar kıldım — başka yerde vakit kaybetmeyin yani. Umarım siz de memnun kalırsınız…
Will be coming back to this for sure, too much good content to absorb in one sitting, and a stop at eurohilt only added more pages I want to dig through, this site is going onto my regular rotation list because it consistently delivers something worth the visit lately rather than empty filler.
A small editorial detail caught my attention, the way headings related to body text, and a look at suncovecraftcollective maintained that careful relationship, structural details like that show up to readers who notice them and the writers here have clearly thought about every level of the piece rather than just the words.
Felt like I was reading something written by someone who actually thinks about the topic rather than reciting it, and a look at portguild reinforced that impression, the difference between recited content and considered content is huge and this site clearly belongs to the latter category which I appreciate as a careful reader looking for substance.
Mobil bahis dünyasına yeni adım attım sayılır. Play Store’da resmi uygulama yok diye duyunca üzüldüm. En sonunda güvendiğim bir adrese ulaştım ve size de buradan bahsetmek istediğim nokta şurası: 1xbet indir android 1xbet indir android. Şimdi size kısaca özet geçeyim — android uygulaması resmen süper çalışıyor.
Hiçbir sorun çıkmadı şu ana kadar. Kendi deneyimlerimi aktarıyorum size — başka yerde vakit kaybetmeyin yani. Umarım siz de memnun kalırsınız…
Now recognising the specific pleasure of reading writing that shows real care for sentence shapes, and a look at everattic extended that craft pleasure, sentence level writing quality is something most blog content ignores entirely and this site has clearly invested in the prose layer alongside the substance which is rare today.
Useful information presented in a way that does not feel like a sales pitch, that is what I appreciated most, and a stop at forestcovecraftcollective was the same, no upsell and no fake urgency just steady content laid out properly for someone trying to actually learn from it rather than just be sold to.
В данной статье рассматриваются проблемы общественного здоровья и социальные факторы, влияющие на него. Мы акцентируем внимание на значении профилактики и осведомленности в защите здоровья на уровне общества. Читатели смогут узнать о новых инициативах и программах, направленных на улучшение здоровья населения.
Дополнительно читайте здесь – наркологическая клиника в твери
Took longer than expected to finish because I kept stopping to think, and a stop at lavenderharborvendorroom did the same to me, content that provokes thought rather than just delivering information is in a different category and the team here is clearly working at that higher level rather than just cranking out posts.
Reading carefully here has reminded me what reading carefully feels like, and a look at seameadowgoodsgallery extended that reminder, the experience of careful reading versus skimming is different in ways I had partially forgotten and this site has clearly refreshed my memory of what attention feels like when content rewards it consistently.
Reading this in a moment of low energy still kept my attention, and a stop at stoneharbormerchantgallery continued that engagement under suboptimal conditions, content that survives the reader being tired is content with extra reserves of pull and this site has the kind of writing that holds up even when I am not at my reading best.
Honest opinion is that this is the kind of post that builds long term trust with readers, and a look at acornharborcraftcollective reinforced that perception, the slow accumulation of trust through consistent quality is the only sustainable way to build a real audience and this site is clearly playing that long game.
Now realising this site has been quietly doing good work for longer than I knew, and a look at crystalharborcommercegallery suggested an archive worth exploring, sites with deep archives of consistent quality represent a different kind of resource than sites with viral hits and this one looks like the durable kind based on what I see.
Liked the way the post balanced confidence and humility, and a stop at elmharborcraftcollective maintained the same balance, knowing when to assert and when to acknowledge uncertainty is a sign of mature thinking and the writers here have clearly developed that calibration through what I assume is years of careful work on their craft.
Reading this gave me a small mental break from the heavier reading I had been doing, and a stop at flareinlet extended that lighter feel, content that provides relief without becoming trivial is harder to produce than people realise and this site has clearly figured out how to be light without being shallow at all.
Android kullanıcısı olarak iyi bir uygulama çok önemli. Herkes farklı bir link atıyordu doğruyu bulmak imkansızdı. Güncel bilgileri kontrol edip süreci hatasız başlattım. En sonunda sağlam bir kaynağa ulaştım ve size de tüm detayları aktarmak istedim, güncel bilgilere buradan bakabilirsiniz: 1xbet download android 1xbet download android. Valla bak net söyleyeyim — telefonuma kurduktan sonra çok memnunum.
kurulumu da çok hızlıydı yani rahat olun. İşin doğrusunu söylemek gerekirse — başka yerde vakit kaybetmeyin yani. Herkese hayırlı olsun…
If patience for careful reading is rare these days finding sites that reward it is rarer still, and a stop at velvetbrookcraftcollective extended that rare reward, the diminishing returns on shallow content reading have made me more selective about where to spend reading time and this site is meeting the higher selectivity bar consistently.
Android cihazım için kaliteli bir uygulama şart oldu. Virüslü dosya riski yüzünden çekindim açıkçası. Adımları doğru sırayla uyguladıktan sonra erişim sorunsuz açıldı. En sonunda güvendiğim bir kaynağa ulaştım ve size de tüm detayları aktarmak istedim, güncel bilgilere buradan bakabilirsiniz: 1xbet yukle android 1xbet yukle android. Valla bak net söyleyeyim — mobil versiyonu her şeyi düşünmüş resmen.
bildirimleri de çok düzenli geliyor. Birçok apk denedim ama en sorunsuzu bu çıktı — en başarılı uygulama bu oldu artık. Şimdiden iyi şanslar ve bol kazançlar…
Considered against the flood of similar content this one stands apart in important ways, and a stop at gladeridgecraftcollective extended that distinctive feel, sites that find their own corner of a crowded topic and stay there are sites worth following and this one has clearly carved out its own space and committed to defending it carefully.
A piece that handled multiple complications without becoming confused, and a look at gildedcovecraftcollective continued that organisational clarity, holding multiple threads in a single piece without losing any of them is a sign of skilled writing and this site has clearly developed the editorial discipline to manage complexity without sacrificing readability throughout.
Mobil bahise yeni başladım diyebilirim. Güvenilir bir kaynak bulmak gerçekten çok zordu. Adımları doğru sırayla uyguladıktan sonra erişim sorunsuz açıldı. En sonunda doğru adrese ulaştım ve size de tüm detayları aktarmak istedim, güncel bilgilere buradan bakabilirsiniz: 1xbet android 1xbet android. Şimdi size kısaca özet geçeyim — android kullanıcıları için biçilmiş kaftan diyebilirim.
kurulumu da son derece basitti yani rahat olun. Kendi deneyimlerimi aktarıyorum size — başka yerde vakit kaybetmeyin yani. Umarım siz de memnun kalırsınız…
Telefonumdan rahatça bahis oynayabileceğim bir uygulama lazımdı. Virüs bulaşır diye çok korktum açıkçası. En sonunda doğru kaynağa ulaştım ve size de buradan bahsetmek istediğim nokta şurası: 1xbet indir apk 1xbet indir apk. Valla bak net söyleyeyim — telefonuma kurduktan sonra hiç takılma yaşamadım.
güncellemeleri otomatik yapıyor çok memnunum. İşin doğrusunu söylemek gerekirse — başka yerde vakit kaybetmeyin yani. Umarım siz de memnun kalırsınız…
Эта статья подробно расскажет о процессе выздоровления, который включает в себя эмоциональную, физическую и психологическую реабилитацию. Мы обсуждаем значимость поддержки и наличие профессиональных программ. Читатели узнают, как строить новую жизнь и не возвращаться к старым привычкам.
Получить дополнительные сведения – наркологическая клиника в твери
Good clean post, no errors and no awkward phrasing that breaks the reading flow, and a stop at uplandcoveartisanexchange kept the same standard, definitely the kind of editorial care that earns a return visit because it tells me the writer is paying attention to details that matter to readers rather than just rushing publication.
During the time spent here I noticed the absence of the usual distractions, and a stop at bettershoppinghub extended that distraction free experience, content that does not fight my attention with pop ups and modals and aggressive prompts is content that respects me and this site has clearly chosen the respectful approach throughout.
Reading this confirmed a hunch I had been carrying about the topic without having articulated it, and a stop at cottonmeadowcraftcollective extended the confirmation, content that gives shape to fuzzy intuitions is doing the rare work of making private thoughts public and this site is providing that articulating service consistently for me lately.
Appreciated how the post felt complete without overstaying its welcome, and a stop at coralharborartisanexchange confirmed that economical approach runs across the site, knowing when to stop is a skill many writers never develop but here the discipline is obvious and welcome from the perspective of a busy reader trying to learn things efficiently.
Эта публикация обращает внимание на важность профилактики зависимостей. Мы обсудим, как осведомленность и образование могут помочь в предотвращении возникновения зависимости. Читатели смогут ознакомиться с полезными советами и ресурсами, которые способствуют здоровому образу жизни.
Прочесть заключение эксперта – вывод из запоя с кодированием на дому
Now understanding why someone recommended this site to me a while back, and a stop at sageharborcommercegallery explained the recommendation, sometimes recommendations make sense only after experience and this site has finally clicked into place as the kind of resource I now understand was being recommended for sound editorial reasons by my friend.
I appreciate the clarity here, everything is explained in simple terms without unnecessary detail, and after a quick stop at frostridgeartisanexchange the points came together nicely for me, the writing keeps things straightforward and respects the reader from start to finish without ever talking down to anyone.
Different feel from the algorithmically optimised posts that dominate the topic, and a stop at portmill reinforced that human touch, you can tell when a site is being run by someone who reads what they publish versus someone just hitting submit and moving on quickly to the next assignment without checking the result.
Decided I would read the archives over the weekend, and a stop at tealcovecraftcollective confirmed that the archives would be worth the time, very few sites have archives I would actively read through but this one has earned that level of interest based on the consistent quality across what I have sampled so far.
Solid stuff, the kind of post that I will probably refer back to later this month when the topic comes up again, and a look at woodharborvendorroom only confirmed I should bookmark the site as a whole rather than just this single page for future reference and use across coming weeks.
Decent post that improved my afternoon a small amount, and a look at birchharborcraftcollective added a bit more to that, sometimes the small wins online add up over time and a useful site like this one is the kind of place that contributes consistently to those small wins for me lately across many different topics I follow.
Now feeling the small relief of finding writing that does not condescend, and a stop at fernharborcommercegallery extended that respect for readers, content that treats its audience as capable adults rather than as people to be managed produces a different reading experience and this site has clearly chosen the respectful approach across all pieces.
If I had to summarise the editorial sensibility of this site in a few words it would be careful and human, and a look at suncovemerchantgallery extended that summary feeling, capturing the essence of a sites approach in brief is hard but this site has a clear enough identity that the summary comes naturally enough.
casino https://uconnect.ae/read-blog/290591_jeux-de-hasard-chez-rocket-play-casino.html
Now feeling the small relief of finding writing that does not condescend, and a stop at alpinecovecraftcollective extended that respect for readers, content that treats its audience as capable adults rather than as people to be managed produces a different reading experience and this site has clearly chosen the respectful approach across all pieces.
Comfortable read, finished it without realising how much time had passed, and a look at ravengrovetradehall pulled me into more pages the same way, the absence of friction in good content lets time disappear and that is one of the highest compliments I can pay any piece of writing I find online during a regular search session.
Worth a slow read rather than the fast scan I usually default to, and a look at everjumbo earned the same slower pace from me, content that resets my reading speed downward is content with substance worth absorbing and this site has produced that effect on me multiple times now over the last week here.
Reading this gave me a quiet moment of intellectual pleasure that I had not been expecting, and a stop at elmharborcraftcollective extended that pleasure across more pages, the unexpected reward of stumbling into careful writing is one of the small ongoing pleasures of reading the open web and this site is delivering it reliably.
Started reading without much expectation and ended on a high note, and a look at opendealsmarket continued that arc, content that builds rather than peaks early is a sign of a writer who knows how to structure a piece for sustained reader engagement rather than relying on a strong hook to do all the work.
Just sat with this for a bit longer than I usually would because the points are worth thinking about, and after gingercoveartisanexchange I had even more to chew on, the kind of post that nudges your thinking forward without forcing the issue is something I have always appreciated in good writing online.
Mobil bahise merak salalı çok oldu valla. Herkes farklı bir site öneriyordu kafam karıştı. Adımları doğru sırayla uyguladıktan sonra erişim sorunsuz açıldı. En sonunda doğru adrese ulaştım ve size de tüm detayları aktarmak istedim, güncel bilgilere buradan bakabilirsiniz: 1xbet android apk 1xbet android apk. Yani anlatmak istediğim şu — telefonuma kurunca çok memnun kaldım.
kurulumu da üç dakikadan kısa sürdü yani rahat olun. Kendi deneyimlerimi aktarıyorum size — kesinlikle pişman olmazsınız deneyin derim. Umarım siz de memnun kalırsınız…
Thank you for not assuming the reader already knows everything, the explanations meet me where I am, and a look at creekharborcraftcollective did the same, that consideration is what makes a site feel welcoming rather than gatekeepy which is sadly the default mood across the modern web today for most subjects covered.
Reading this between two meetings turned out to be the highlight of the morning, and a stop at violetharborcraftcollective continued that highlight quality, content that outshines the structured parts of a working day is doing something well beyond ordinary and this site has produced multiple such highlights for me already this week alone.
Liked that the post acknowledged complications rather than pretending they did not exist, and a stop at honeycovecraftcollective continued that honest framing, sites that handle complexity with care rather than papering it over with simplifying claims are doing real intellectual work and this one is clearly in that category based on what I have read.
bitcoin poker sites mac bitcoin poker sites mac .
best online poker sites that accept bitcoin https://www.poker-bitcoin-de.de .
Telefonumda bahis oynamak çok keyifli aslında. Herkes farklı bir link atıyordu kime güveneceğimi bilemedim. En sonunda sağlam bir kaynağa ulaştım ve size de buradan bahsetmek istediğim nokta şurası: 1xbet app apk 1xbet app apk. Valla bak net söyleyeyim — telefonuma kurduktan sonra hiç şikayet etmedim.
Hiçbir kasma yaşamadım şu ana kadar. İşin doğrusunu söylemek gerekirse — başka yerde vakit kaybetmeyin yani. Şimdiden iyi şanslar ve bol kazançlar…
bitcoin and poker bitcoin and poker .
Well done, the writing is professional without being stiff, and the topic is treated with care, and a look at flarequill reflected that approach, the kind of site I would point a colleague to if they asked for a reliable starting point on this topic in the future without any hesitation at all.
Adding to the bookmarks now before I forget, that is how good this is, and a look at frostridgecraftcollective confirmed the rest of the site is worth saving too, this is one of those rare finds that justifies the time spent searching the web for once which is a relief in the current environment.
Decided to read this site for a while before forming a verdict, and the verdict after several pages is positive, and a stop at portolive continued that pattern, judging a site requires more than one post and giving sites a fair sample is something I try to do for promising candidates rather than rushing to dismiss.
888 старз https://sites.google.com/view/888starz-onlayn-kazino/
888 starz login https://888starzuz1.com/
888stqrz https://888starzuz2.com/
888 starz apk https://888starzuz3.com/apk/
Народ, слушайте — отец или муж начинает пить сутками, а просто в тупике. Я сам через это прошёл года два назад . Думали, уговорами поможем — хрен там было. Оказалось , без врачей и нормального наблюдения никак . Перерыл кучу форумов — одни обещания и бабло тянут. А потом наткнулся на один реально рабочий вариант. Кому нужно помещение в клинику для вывода из запоя — не ведитесь на дешёвые акции . В Нижнем Новгороде , кстати , тоже полно левых контор без лицензии. Вся проверенная информация вот тут : наркологический центр нижний новгород наркологический центр нижний новгород Честно скажу , после того как почитал , многое стало понятно . И про кодировку от алкоголя в Нижнем Новгороде, и про условия в стационаре и питание. И цены адекватные, без разводов. Советую не тянуть .
888 star apk https://888starzuz4.com/apk/
Really nice to see things explained without overcomplicating the topic, the words flow naturally and stay easy to follow, and a short visit to velvetbrookartisanexchange only added to that experience because the same simple approach is used across the rest of the page too without any change in tone.
888 bet https://888starzuz5.com/
Really clear writing, the kind that makes you want to share the link with someone who has been asking about the topic, and a quick browse through flintmeadowcommercegallery only made me more sure of that, the information here stays useful long after the first read is done which says a lot.
Güvenilir bir apk bulmak gerçekten işkenceydi valla. Virüslü dosyalardan çok korktum açıkçası. En sonunda güvendiğim bir adrese ulaştım ve size de buradan bahsetmek istediğim nokta şurası: 1xbet android uygulama 1xbet android uygulama. Şimdi size kısaca özet geçeyim — android uygulaması resmen süper çalışıyor.
yüklemesi de çerez gibiydi yani rahat olun. İşin doğrusunu söylemek gerekirse — en başarılı uygulama bu oldu artık. Herkese hayırlı olsun…
Reading carefully this time rather than scanning, and the depth shows up in places I missed first time around, and a look at tealharborcommercegallery rewarded the same careful approach, content that holds up to multiple reads is content I want more of in my regular rotation rather than disposable scroll fodder daily.
Этот информативный текст сочетает в себе темы здоровья и зависимости. Мы обсудим, как хронические заболевания могут усугубить зависимости и наоборот, как зависимость может влиять на общее состояние здоровья. Читатели получат представление о комплексном подходе к лечению как физического, так и психического состояния.
Подробная информация доступна по запросу – лечение анорексии в Твери
Now thinking about how this post will age over the coming years, and a stop at timbertrailartisanexchange suggested the same durability, content built to age well rather than to capture the attention of the moment is content with a different kind of value and this site has clearly chosen the long horizon over the short one.
Recommend this to anyone who values clear thinking over flashy presentation, and a stop at amberharborartisanexchange continued in the same understated way, this site has its priorities in the right place which makes it worth supporting through repeat visits and recommendations rather than just one passing read today before moving on quickly elsewhere.
Güvenilir bir apk dosyası bulmak gerçekten zordu valla. Herkes farklı bir şey söylüyordu kime güveneceğimi bilemedim. Güncel bilgileri kontrol edip süreci hatasız başlattım. En sonunda güvendiğim bir kaynağa ulaştım ve size de tüm detayları aktarmak istedim, güncel bilgilere buradan bakabilirsiniz: 1xbet android uygulama 1xbet android uygulama. Valla bak net söyleyeyim — telefonuma kurduğuma çok memnunum.
kurulumu da üç dakikadan kısa sürdü yani rahat olun. İşin doğrusunu söylemek gerekirse — kesinlikle pişman olmazsınız deneyin derim. Şimdiden iyi şanslar ve bol kazançlar…
Reading this in the gap between work projects was a small but meaningful break, and a stop at floraridgeartisanexchange extended that gentle reset, content that provides genuine refreshment rather than just distraction during work breaks is content with a particular kind of utility and this site fits that role for me reliably during work days.
A piece that handled the topic with appropriate weight without becoming portentous, and a look at trustedshoppinghub continued that calibrated seriousness, content that takes itself seriously without becoming pompous is something this site has clearly figured out and the balance shows up in every piece I have read across multiple sessions now.
The overall feel of the post was professional without being stuffy, and a look at coralharborcraftcollective kept that approachable expertise going, finding the right register for technical content is hard but this site has clearly figured out how to sound knowledgeable without slipping into that distant lecturing tone that loses readers in droves every time.
Just sat with this for a bit longer than I usually would because the points are worth thinking about, and after rivercovevendorparlor I had even more to chew on, the kind of post that nudges your thinking forward without forcing the issue is something I have always appreciated in good writing online.
Этот документ охватывает важные аспекты медицинской науки, сосредотачиваясь на ключевых вопросах, касающихся здоровья населения. Мы рассматриваем свежие исследования, клинические рекомендации и лучшие практики, которые помогут улучшить качество лечения и профилактики заболеваний. Читатели получат возможность углубиться в различные медицинские дисциплины.
Осуществить глубокий анализ – clinica plus в твери
Mobil platform arayışım epey sürdü valla. Herkes farklı bir link atıyordu doğruyu bulmak imkansızdı. Sonunda tüm teknik detayları inceleyip sistemi test ettim. En sonunda sağlam bir kaynağa ulaştım ve size de tüm detayları aktarmak istedim, güncel bilgilere buradan bakabilirsiniz: 1xbet android uygulama 1xbet android uygulama. Valla bak net söyleyeyim — android uygulaması gerçekten akıcı çalışıyor.
batarya tüketimi de makul düzeyde. Kendi deneyimlerimi aktarıyorum size — kesinlikle pişman olmazsınız deneyin derim. Şimdiden iyi şanslar ve bol kazançlar…
A genuinely unexpected highlight of my reading week, and a look at crowncovecraftcollective extended that pattern, the surprise of finding excellent content rather than the predictable mediocre is one of the few real pleasures of casual web browsing and this site delivered that surprise cleanly today which I really do appreciate.
Skipped to a specific section because I knew that was the question I had, and the answer was clean, and a stop at gingercovecraftcollective similarly delivered targeted answers without burying them, content engineered for readers who arrive with specific needs rather than open ended browsing is increasingly valuable in a search heavy reading environment.
Android için güvenilir bir apk dosyası bulmak çok zordu valla. Play Store’da arattım ama resmi olanı bulamadım. En sonunda doğru kaynağa ulaştım ve size de buradan bahsetmek istediğim nokta şurası: 1xbet android uygulama 1xbet android uygulama. Yani anlatmak istediğim şu — telefonuma kurduktan sonra hiç takılma yaşamadım.
kurulumu da son derece basitti yani rahat olun. Kendi deneyimlerimi aktarıyorum size — kesinlikle pişman olmazsınız deneyin derim. Şimdiden iyi şanslar ve bol kazançlar…
Took a chance on the headline and was rewarded, and a stop at portpoise kept the rewards coming as I clicked through, the kind of place where every link leads somewhere worth the click is a small luxury on the modern web where so many sites are mostly empty calories disguised as content.
Thank you for not assuming the reader already knows everything, the explanations meet me where I am, and a look at garnetharborcraftcollective did the same, that consideration is what makes a site feel welcoming rather than gatekeepy which is sadly the default mood across the modern web today for most subjects covered.
Thanks for the readable length, I finished it without checking how much was left, and a stop at seameadowcommercegallery kept me reading the same way, when I stop noticing the length of a piece because the content is engaging enough to sustain attention without willpower the writer has done their job well today.
В этой статье мы рассматриваем разрушительное влияние зависимости на жизнь человека. Обсуждаются аспекты, такие как здоровье, отношения и профессиональные достижения. Читатели узнают о необходимости обращения за помощью и о путях к восстановлению.
А что дальше? – клиника плюс тверь
Bookmark folder reorganised slightly to make this site easier to find, and a look at brightharborartisanexchange earned the same accessibility upgrade, the small organisational moves I make for sites I expect to return to often are themselves a signal of how much I trust them and this site triggered those moves naturally.
Started forming counter examples to test the claims and the post handled most of them implicitly, and a look at walnutcovecraftcollective continued that anticipatory style, writers who think two steps ahead of the critical reader save themselves from a lot of follow up work and this writer has clearly internalised that habit consistently.
Felt the post was written for someone like me without explicitly addressing me, and a look at icicleisleartisanexchange produced the same fit, when content lands on its target without pandering you know the writer has done careful audience thinking rather than relying on demographic targeting or interest signals to do the work of editorial decisions.
Excellent post, balanced and well organised without showing off, and a stop at forestcovemerchantgallery continued in that same vein, this site has clearly figured out the formula for content that works for readers rather than for search engine ranking signals which is harder than it sounds today and worth real recognition from anyone.
Liked how the post handled an objection I was forming as I read, and a stop at uplandcovemerchantgallery similarly anticipated where my thinking was going next, the rare writer who can predict reader concerns and address them in advance is doing something most online content fails to do despite that being basic editorial work.
Знаете, бывает — родственник срывается , а ты не знаешь что делать . Я через это прошёл лично . Сначала кажется, что обойдётся , но хрен там. Требуется профессиональная помощь . Обзвонил десяток контор — одни обещания. Пока не нашёл один нормальный вариант. Если тебе нужно качественное выведение из запоя с госпитализацией , не рискуй здоровьем. У нас в Нижнем, если честно, полно левых контор. Проверенная информация тут : нарколог подростковый нарколог подростковый Честно говоря , после того как ознакомился, многое прояснилось . Там и про кодирование от алкоголизма расписано , и про условия в стационаре. Главное — анонимно . Рекомендую не откладывать.
Bookmark added with a small note about why, and a look at flickaltar prompted another bookmark with another note, the bookmarks I annotate are the ones I expect to return to deliberately rather than stumble into and this site is generating annotated bookmarks at a higher rate than my usual content sources by some margin.
Bookmark added with a small mental note that this is a site to keep, and a look at amberharbormerchantgallery reinforced the keep status, the verb keep rather than visit captures something about how I think about this kind of site and it is a higher tier of relationship than I have with most places online today.
Appreciated that the writer trusted the reader to follow along without constant restating of earlier points, and a look at amberharborcraftcollective continued that respect for the reader, treating an audience as capable adults rather than as people to be hand held through every paragraph is something I notice and value highly across the open internet today.
Now feeling confident enough in this site to use it as a reference point for evaluating others on the same topic, and a look at waveharborartisanexchange continued the comparison friendly quality, sites that serve as quality benchmarks for their topic are precious and this one has clearly become a benchmark for me on this particular subject area.
Started reading expecting to disagree and ended mostly nodding along, and a look at gladeridgeartisanexchange continued the pattern, content that wins agreement through evidence and reasoning rather than rhetorical force is the kind that actually shifts minds and this site clearly knows how to do that across what I have read so far.
My time on this site has now extended past what I had budgeted, and a stop at trailharborartisanexchange keeps extending it further, content that overstays its budget in my schedule is content that has earned the extra time and this site has been earning extra time across multiple visits to the point where my schedule needs adjustment.
Started believing the writer knew the topic deeply by about the second paragraph, and a look at crystalcoveartisanexchange reinforced that confidence, the speed at which a writer establishes credibility through their writing is a useful quality signal and this writer establishes it quickly and quietly without resorting to credential dropping or self promotion.
Felt energised after reading rather than drained, which is unusual for online content these days, and a look at ivypiers continued that good feeling, content that leaves you better than it found you is rare and worth bookmarking when you stumble across it for the first time today or any other day really.
My professional context would benefit from having this kind of resource available, and a look at seameadowgoodsgallery extended the professional applicability, the rare site that contributes meaningfully to professional work rather than just personal interest is content with multiplied value and this one is providing that professional utility consistently across multiple pieces.
The examples really helped me grasp the points faster than abstract descriptions would have, and a stop at gildedcovecraftcollective added a few more practical illustrations that drove the message home, the kind of writing that knows its readers learn better through concrete situations rather than vague generalities is rare and worth recognising clearly.
Liked the way the post handled the final paragraph, no neat bow but no abrupt cutoff either, and a stop at ivoryharborcommercegallery continued that thoughtful ending pattern, endings are hard and most blog writers either over engineer them or skip them entirely and this site has clearly figured out a sustainable middle approach.
Walked away in a slightly better mood than when I started reading, that says something about the writing, and a stop at apricotharborvendorroom kept that going, content that leaves you feeling more capable rather than overwhelmed is the kind I keep coming back to again and again over the years and across many topics.
Appreciate how nothing here feels copied or pieced together from other places, the voice is consistent and the tone stays human, and after I checked birchharborcommercegallery I noticed the same style holds, which is a small detail but it makes the whole experience feel personal rather than like another generic site.
Took a quick scan first and then went back to read properly because the post deserved it, and a stop at waveharborcraftcollective kept me reading carefully too, the kind of writing that earns a slower second pass rather than getting skimmed and forgotten is something I value highly when I happen to find it.
Speaking as someone who reads a lot on this topic this site has earned a high position in my source rankings, and a stop at cottonmeadowartisanexchange reinforced that ranking, the informal ranking of sources for a topic is something I maintain mentally and this site has moved into the upper portion of those rankings clearly.
Took longer than expected to finish because I kept stopping to think, and a stop at icicleislecraftcollective did the same to me, content that provokes thought rather than just delivering information is in a different category and the team here is clearly working at that higher level rather than just cranking out posts.
Mobil bahise ilgi duyalı çok oldu aslında. Play Store’da aradım ama resmi uygulamayı bulamadım. Güncel bilgileri kontrol edip süreci hatasız başlattım. En sonunda güvendiğim bir kaynağa ulaştım ve size de tüm detayları aktarmak istedim, güncel bilgilere buradan bakabilirsiniz: 1xbet apk 1xbet apk. Valla bak net söyleyeyim — android uygulaması inanılmaz hızlı çalışıyor.
Hiçbir takılma yaşamadım şu ana kadar. Birçok apk denedim ama en sorunsuzu bu çıktı — kesinlikle pişman olmazsınız deneyin derim. Umarım siz de memnun kalırsınız…
casino https://didabook.xyz/read-blog/722_laaja-pelivalikoima-24-kasino-alustalla.html
Different in a good way from the cookie cutter content that fills most blogs covering this area, and a stop at apricotharborartisanexchange kept showing me why, original thoughtful writing exists if you know where to look and this site has earned a place on my short list of those rare exceptions worth defending.
Telefonumda bahis oynamak çok keyifli aslında. Virüs bulaşır mı diye çok endişelendim açıkçası. En sonunda sağlam bir kaynağa ulaştım ve size de buradan bahsetmek istediğim nokta şurası: 1xbet indir android 1xbet indir android. Yani anlatmak istediğim şu — mobil versiyonu bütün özellikleri sunuyor.
Hiçbir kasma yaşamadım şu ana kadar. Birçok apk denedim ama en iyisi bu çıktı — başka yerde vakit kaybetmeyin yani. Herkese hayırlı olsun…
Thanks for not padding this with the usual filler intros and outros that every other blog seems to require, and a quick visit to glassharborartisanexchange continued that lean approach across more posts, content stripped of waste is content that respects you and I will always come back to that kind of approach.
Android telefonum için kaliteli bir uygulama şart oldu. Virüslü dosyalardan çok korktum açıkçası. En sonunda güvendiğim bir adrese ulaştım ve size de buradan bahsetmek istediğim nokta şurası: 1xbet android apk 1xbet android apk. Valla bak net söyleyeyim — android uygulaması resmen süper çalışıyor.
ram kullanımı da çok iyi gerçekten. İşin doğrusunu söylemek gerekirse — en başarılı uygulama bu oldu artık. Umarım siz de memnun kalırsınız…
Probably the best thing I have read on this topic in the past month, and a stop at flareaisles extended that ranking, the casual ranking of recent reading is informal but real and this site has been winning those rankings for me on this topic specifically over the last several weeks of regular reading sessions.
One of the more honest takes on the topic I have seen lately, no spin and no oversell, and a stop at brightharborcraftcollective kept that going, the kind of voice the open web could use a lot more of rather than the endless echo chamber of recycled opinions floating around every social platform these days.
В этой статье мы рассматриваем разные способы борьбы с алкогольной зависимостью. Обсуждаются методы лечения, программы реабилитации и советы для поддержки близких. Читатели получат информацию о том, как преодолеть зависимость и добиться успешного выздоровления.
Есть чему поучиться – clinica plus в твери
Found a small mental shift after reading this, the framing here is just a bit different from the standard takes online, and a look at gingercoveartisanexchange extended that fresh perspective across more material, the rare site whose voice actually changes how you think about something rather than just confirming existing beliefs.
Народ, слушайте — родственник уходит в запой , а ты не знаешь куда бежать . Моя семья с таким столкнулась года два назад . Думали, уговорами поможем — хрен там было. Как показала практика, без медикаментов и капельниц не обойтись. Обзвонил все конторы в городе — сплошной развод . А потом наткнулся на один проверенный вариант. Если ищете где сделать вывод из запоя в стационаре — не ведитесь на дешёвые акции . В Нижнем Новгороде , кстати , тоже полно левых контор без лицензии. Вся проверенная информация вот тут : кодирование от алкоголизма нижний новгород кодирование от алкоголизма нижний новгород Откровенно говоря, после того как вник в детали, многое стало понятно . Там и про кодирование от алкоголизма подробно расписано , и про условия в стационаре и питание. И цены адекватные, без разводов. Советую не тянуть .
Just want to flag that this was useful and not bury the appreciation in caveats, and a look at elmharborcraftcollective earned the same direct praise, recognising good work without hedging it with criticism is something I try to practice because over qualified compliments tend to read as backhanded and miss the point sometimes.
Worth recognising the specific care that went into how this post ended, and a look at uplandcovecraftcollective maintained the same careful conclusions, endings are where most blog content falls apart and this site has clearly invested in the closing stretches of its pieces rather than letting them simply trail off when energy fades.
One of the more honest takes on the topic I have seen lately, no spin and no oversell, and a stop at flowlegend kept that going, the kind of voice the open web could use a lot more of rather than the endless echo chamber of recycled opinions floating around every social platform these days.
Никогда не думал, что столкнусь — близкий на грани, а тащить куда-то просто невозможно . Моя семья это пережила совсем недавно. Руки опускаются, а время тикает. Начинаешь обзванивать знакомых , а вокруг одни обещания . Пока случайно не нашел один реально работающий вариант. Требуется немедленная консультация — а ехать куда-то просто нереально, то нужно вызывать врача. Речь конкретно про выезд нарколога круглосуточно. У нас в столице, если честно, хватает шарлатанов . Вся проверенная информация ниже по ссылке: анонимный вывод из запоя на дому недорого анонимный вывод из запоя на дому недорого Честно говоря , после того как вник в детали, многое прояснилось . И про снятие запоя на дому, и про консультацию нарколога . Плюс анонимность — это важно . Советую не откладывать.
Well done, the kind of post that makes you slow down and actually read instead of skimming for keywords, and a look at silkmeadowcommercegallery kept me reading carefully too, that is a sign of writing that has been crafted rather than churned out for an algorithm to see today and tomorrow.
Telefonumdan bahis oynamayı seviyorum aslında. Herkes farklı bir link atıyordu doğruyu bulmak imkansızdı. Güncel bilgileri kontrol edip süreci hatasız başlattım. En sonunda sağlam bir kaynağa ulaştım ve size de tüm detayları aktarmak istedim, güncel bilgilere buradan bakabilirsiniz: 1xbet app apk 1xbet app apk. Valla bak net söyleyeyim — mobil versiyonu masaüstünü aratmıyor kesinlikle.
kurulumu da çok hızlıydı yani rahat olun. İşin doğrusunu söylemek gerekirse — kesinlikle pişman olmazsınız deneyin derim. Umarım siz de memnun kalırsınız…
Now feeling mildly impressed in a way I do not quite remember feeling about a blog in a while, and a stop at woodharborvendorroom extended that mild impression, content that produces specific positive emotional responses rather than just neutral information transfer is content with extra dimensions and this site has those extra dimensions clearly.
Android için güvenilir bir apk bulmak çok zahmetliydi valla. Sürekli farklı linkler geliyordu kime inanacağımı şaşırdım. Sonunda tüm teknik detayları inceleyip sistemi test ettim. En sonunda doğru kaynağa ulaştım ve size de tüm detayları aktarmak istedim, güncel bilgilere buradan bakabilirsiniz: 1xbet download android 1xbet download android. Şimdi size kısaca özet geçeyim — android uygulaması gerçekten stabil çalışıyor.
yüklemesi de basit ve hızlıydı yani rahat olun. İşin doğrusunu söylemek gerekirse — kesinlikle pişman olmazsınız deneyin derim. Herkese hayırlı olsun…
Reading this slowly and letting each paragraph land before moving on, and a stop at lemonlarkmerchantgallery earned the same patient approach, content that rewards slow reading rather than speed is content with real density and the writers here are clearly producing work that benefits from the careful eye rather than the rushed scan.
Вот такая тема выматывает , когда человек просто срывается в штопор . Ищешь варианты , а вокруг одна реклама . Мне вот потребовался срочный метод . Многие хватаются за таблетки , но это ерунда . Нужно именно профессиональная помощь . Я перелопатил кучу сайтов , пока понял одну простую вещь: без круглосуточного наблюдения ничего не выйдет . В обычной квартире срыв стопроцентный . Если ищешь где сделать вывода из запоя в стационаре — обрати внимание на один проверенный вариант . В Нижнем Новгороде , кстати, развелось этих “центров” . Советую перейти на сайт, где нет вранья про кодировку от алкоголя и работу нарколога . Подробности по ссылке: наркологический центр нижний новгород наркологический центр нижний новгород Честно скажу , сам офигел , сколько нюансов в этой теме. Главное — анонимность и палаты. Для Нижнего это реально стоящий вариант.
Telefonumdan rahatça bahis oynayabileceğim bir uygulama lazımdı. Sürekli farklı adresler veriliyordu kime inanacağımı şaşırdım. En sonunda doğru kaynağa ulaştım ve size de buradan bahsetmek istediğim nokta şurası: 1xbet download android 1xbet download android. Şimdi size kısaca özet geçeyim — mobil sürümü gerçekten masaüstünü aratmıyor.
güncellemeleri otomatik yapıyor çok memnunum. Birçok apk denedim ama en sorunsuzu bu çıktı — en hızlı çalışan uygulama bu oldu artık. Herkese hayırlı olsun…
Refreshing change from the usual sites covering this topic, no clickbait and no padding, and a stop at glassmeadowvendorparlor confirmed the difference, this place clearly has its own voice rather than copying the formulas everyone else uses to chase clicks online which is becoming increasingly rare these days across nearly every popular subject.
Слушайте, есть важный вопрос. Решил снести ненесущую стену между комнатами, Мосжилинспекция сразу завернёт любые несогласованные работы. Потратил уйму свободного времени на чтение строительных форумов. Короче говоря, единственное, что реально работает в наших реалиях — это доверить подготовку документов профессиональным инженерам, чтобы потом не было проблем со штрафами.
И в жилищную инспекцию документы подадут Смотрите сами, чтобы не наступать на мои грабли, проект перепланировки квартиры в москве проект перепланировки квартиры в москве. Без готового проекта даже не начинайте ломать стены, Обязательно перешлите этот пост тому, кто тоже сейчас затеял ремонт!
Decided after reading this that I would check this site weekly going forward, and a stop at cloudcovemerchantgallery reinforced that commitment, deciding to add a site to a regular rotation requires meeting a quality bar that very few places clear and this one cleared it cleanly without any noticeable effort or marketing push behind it.
A welcome contrast to the loud takes that have dominated my feed lately, and a look at wheatcovecraftcollective extended that calm voice, content that arrives without yelling has become unusual in the modern attention economy and this site is one of the few places I have found that consistently delivers without raising its voice.
Glad I stumbled across this post, the explanations actually make sense without needing background knowledge to follow along, and after a stop at discovernewmomentum the same was true there, no assumptions about the reader just clear writing that anyone can understand from the first line right through to the end.
Quietly enthusiastic about this site after the past few hours of reading, and a stop at harborstoneartisanexchange extended that enthusiasm, the calibration of enthusiasm to evidence is something I try to maintain and this site has earned a calibrated quiet enthusiasm rather than the loud excitement that usually fades within a day or two of finding something.
Came back to this an hour later to reread a specific section, and a quick visit to auroracovecraftcollective also drew a second look, content that pulls you back rather than letting you move on permanently is the kind I want to fill my browser bookmarks with in 2026 and beyond as the open internet evolves.
Знаете, бывает ситуация — человек в запое , а везти в клинику нет сил. Я через это прошел совсем недавно. Сидишь, не знаешь что делать . Хватаешься за телефон , а в ответ одни отговорки. Пока кто-то не посоветовал один реально работающий вариант. Если нужна немедленная консультация — а ехать куда-то нет никакой возможности , то выход один . Я про нарколога на дом . В Москве , кстати , хватает шарлатанов, которые тянут бабло . Вся проверенная информация вот тут : услуги нарколога на дому услуги нарколога на дому Откровенно говоря, после того как прочитал , многое стало на свои места . И про снятие запоя на дому, и про последующее кодирование. Плюс анонимность — это важно . Советую не тянуть резину .
Coming back to this one, definitely, and a quick visit to jasperharborartisanexchange only made me more sure of that, the kind of writing that makes you want to set aside time later rather than rushing through it now while distracted by everything else competing for attention on the screen today across so many tabs.
Took a few notes from this post, the points are easy to remember without needing to come back and check, and a look at etheraisles added a couple more, the kind of place that sticks in the memory long after the browser tab has been closed for the day which says a lot really.
A piece that handled the topic with appropriate weight without becoming portentous, and a look at floraridgeartisanexchange continued that calibrated seriousness, content that takes itself seriously without becoming pompous is something this site has clearly figured out and the balance shows up in every piece I have read across multiple sessions now.
Случается сплошь и рядом — родственник не может остановиться, а просто бессилен. Моя семья столкнулась лично . Сначала кажется, что обойдётся , но нет . Нужна профессиональная медицина. Обзвонил десяток контор — сплошной развод . А потом наткнулся на один нормальный вариант. Ищешь где сделать экстренный вывод из запоя под наблюдением врачей , не ведись на дешёвые обещания . У нас в Нижнем, если честно, тоже хватает левых контор. Реальные контакты по ссылке ниже: нарколог подростковый нарколог подростковый Честно говоря , после того как ознакомился, понял свои ошибки. И про кодировку от алкоголя подробно, и про условия в стационаре. Главное — анонимно . Советую не тянуть .
casino https://mixcliq.com/read-blog/24041_kaikenpokerin-pelaajat-valinnat-unibet.html
Came here from a search and stayed for the side links because they were that interesting, and a stop at plumcovemerchantgallery took me even further into the site, the kind of organic exploration that good content invites is something most sites kill through aggressive interlinking and pushy navigation choices rather than relying on quality.
Bookmark moved to my permanent reference folder rather than the casual maybe later folder, and a look at valecoveartisanexchange earned the same upgrade, the distinction between casual interest and lasting reference is something I track carefully and very few sites cross that threshold but this one did so without much effort apparently.
Now appreciating the small but real way this post improved my afternoon, and a stop at maplegrovemarkethall extended that small improvement effect, content that produces measurable positive impact on the texture of a reading day is content with real value and this site is producing those small positive impacts at a sustainable rate apparently.
Without overstating it this is a quietly excellent post, and a look at acornharborcraftcollective extended that quiet excellence, content that earns superlatives without demanding them through marketing language is content that has truly earned them through the substance and this site has clearly produced work in that earned excellence category today.
A piece that ended with a clean landing rather than fading out, and a look at forestmeadowcommercegallery maintained the same crisp conclusions, endings that resolve rather than dissolve are a sign of careful structural thinking and this site has clearly invested in how its pieces conclude rather than letting them simply run out of energy.
Android cihazımda sorunsuz çalışan bir platform çok lazımdı. Herkes farklı bir şey diyordu kime güveneceğimi şaşırdım. En sonunda güvendiğim bir kaynağa ulaştım ve size de buradan bahsetmek istediğim nokta şurası: 1xbet yükle android 1xbet yükle android. Valla bak net söyleyeyim — android uygulaması resmen harika çalışıyor.
boyutu da hafif gerçekten şaşırdım. Birçok apk denedim ama en stabilı bu çıktı — başka yerde vakit kaybetmeyin yani. Şimdiden iyi şanslar ve bol kazançlar…
Reading this with a fresh mind in the morning brought out details I might have missed in the afternoon, and a stop at wildorchardcraftcollective earned the same fresh attention, content that rewards being read at full attention rather than at energy lows is content with real density and this site has that density consistently.
Easy to recommend, the content speaks for itself without needing additional praise from me, and a stop at fondarbor only adds more reasons to send people this way, the kind of generous resource that benefits its readers without demanding anything in return is increasingly rare and worth recognising clearly today across the broader open internet.
Android cihazım için kaliteli bir uygulama şart oldu. Play Store’da aradım ama resmi uygulamayı bulamadım. Sonunda tüm teknik detayları inceleyip sistemi test ettim. En sonunda güvendiğim bir kaynağa ulaştım ve size de tüm detayları aktarmak istedim, güncel bilgilere buradan bakabilirsiniz: 1xbet yukle android 1xbet yukle android. Valla bak net söyleyeyim — mobil versiyonu her şeyi düşünmüş resmen.
bildirimleri de çok düzenli geliyor. İşin doğrusunu söylemek gerekirse — en başarılı uygulama bu oldu artık. Şimdiden iyi şanslar ve bol kazançlar…
Now considering the post as evidence that careful blog writing is still possible, and a look at canyonharborcraftcollective extended that evidence, the broader question of whether the modern web can sustain quality writing has obvious empirical answers in sites like this one and seeing them is reassuring even when they remain a minority overall today.
casino https://trackrecord.id/read-blog/83064_twenty-one-peli-unibet-suomi.html
Held my interest from the opening line through to the closing thought, and a stop at hazelharborartisanexchange did the same, content that earns sustained attention in an environment full of distractions is doing something right and this site is clearly doing several things right rather than just one or two which I really appreciate.
Pass this along to anyone you know dealing with similar questions, the answers here are clear, and a stop at growwithfocusedsteps adds even more useful material, this is the kind of resource that deserves to circulate widely rather than getting lost in the constant churn of new content online that buries good work daily.
Excellent execution from start to finish, the post never loses its rhythm and the points stay sharp, and a quick stop at cloudcoveartisanexchange kept the same level going, consistency like this across a site is the marker of a serious operation rather than a casual side project running on autopilot somewhere else.
Güvenilir bir apk bulmak gerçekten işkenceydi valla. Play Store’da resmi uygulama yok diye duyunca üzüldüm. En sonunda güvendiğim bir adrese ulaştım ve size de buradan bahsetmek istediğim nokta şurası: 1xbet app android 1xbet app android. Yani anlatmak istediğim şu — telefonuma kurduktan sonra çok mutlu oldum.
Hiçbir sorun çıkmadı şu ana kadar. Birçok apk denedim ama en stabilı bu çıktı — en başarılı uygulama bu oldu artık. Şimdiden iyi şanslar ve bol kazançlar…
I came here looking for a quick answer and ended up reading the whole post because it was actually interesting, and after portolives I had a much fuller picture, no stress and no confusion just a clear walk through the topic that made everything fall into place without much effort.
Now thinking about whether the writer might publish a longer form work I would buy, and a look at sageharborcommercegallery suggested the same depth would translate, content that makes me want to pay for related work in other formats is content that has earned commercial trust as well as attention trust and this site has both clearly.
A memorable post for me on a topic I had thought I was tired of, and a look at silverharborcommercegallery suggested the same site can refresh other tired topics, sites that can revive my interest in subjects I had written off as exhausted are doing rare work and this one is clearly doing that for me today.
В этом обзоре представлены различные методы избавления от зависимости, включая терапевтические и психологические подходы. Мы сравниваем их эффективность и предоставляем рекомендации для тех, кто хочет вернуться к трезвой жизни. Читатели смогут найти информацию о реабилитационных центрах и поддерживающих группах.
Желаете узнать подробности? – наркологическая клиника в твери
Никогда не думал, что столкнусь — близкий на грани, а тащить куда-то страшно . Моя семья это пережила совсем недавно. Сидишь, не знаешь за что хвататься . Начинаешь обзванивать знакомых , а вокруг сплошной развод. Пока кто-то не подсказал один нормальный проверенный вариант. Если нужна срочная помощь — а самому везти нет физической возможности , то выход один . Речь конкретно про нарколога на дом . В Москве , если честно, хватает шарлатанов . Вся проверенная информация вот тут : наркологическая служба на дом наркологическая служба на дом Честно говоря , после того как вник в детали, понял, как правильно действовать. И про снятие запоя на дому, и про консультацию нарколога . Плюс анонимность — это важно . Рекомендую не тянуть .
Bookmark earned and the bookmark feels like a permanent addition rather than a maybe, and a look at meadowharborgoodsgallery confirmed that permanent status, the difference between durable bookmarks and ephemeral ones is something I have learned to feel quickly and this site triggered the durable feeling almost immediately during my first read here.
Appreciated that the writer trusted the reader to follow along without constant restating of earlier points, and a look at jewelbrookartisanexchange continued that respect for the reader, treating an audience as capable adults rather than as people to be hand held through every paragraph is something I notice and value highly across the open internet today.
Telefonumda bahis oynamak çok keyifli aslında. Play Store’da arattım ama son sürümü bulamadım. En sonunda sağlam bir kaynağa ulaştım ve size de buradan bahsetmek istediğim nokta şurası: 1xbet app apk 1xbet app apk. Yani anlatmak istediğim şu — mobil versiyonu bütün özellikleri sunuyor.
yüklemesi de çok kolaydı yani rahat olun. İşin doğrusunu söylemek gerekirse — en güvenilir uygulama bu oldu artık. Herkese hayırlı olsun…
Honest reaction is that this is the kind of writing I would defend in a conversation about good blog content, and a look at frostrivercommercegallery reinforced that, the rare site whose work I would actively recommend rather than just tolerate is the kind I want to support through return visits regularly.
Now sitting back and recognising that this was a small but real win in my reading day, and a stop at windharborcraftcollective extended that quiet win, the cumulative effect of small reading wins versus the cumulative effect of small reading losses is real over time and this site is contributing to the wins side of that ledger.
Telefonumdan bahis oynamayı seviyorum aslında. Play Store’da arattım ama aradığımı bulamadım. Sonunda tüm teknik detayları inceleyip sistemi test ettim. En sonunda sağlam bir kaynağa ulaştım ve size de tüm detayları aktarmak istedim, güncel bilgilere buradan bakabilirsiniz: 1xbet mobil apk 1xbet mobil apk. Valla bak net söyleyeyim — mobil versiyonu masaüstünü aratmıyor kesinlikle.
Hiçbir gecikme yaşamadım şu ana kadar. Birçok apk denedim ama en iyisi bu çıktı — kesinlikle pişman olmazsınız deneyin derim. Şimdiden iyi şanslar ve bol kazançlar…
Mobile özel bir platform arıyordum uzun süredir. Play Store’da resmi olanı bulamayınca üzüldüm. Güncel bilgileri kontrol edip süreci hatasız başlattım. En sonunda doğru kaynağa ulaştım ve size de tüm detayları aktarmak istedim, güncel bilgilere buradan bakabilirsiniz: 1xbet mobil apk 1xbet mobil apk. Valla bak net söyleyeyim — telefonuma kurduktan sonra çok rahatladım.
depolama alanı da fazla yemiyor gerçekten. Kendi deneyimlerimi aktarıyorum size — kesinlikle pişman olmazsınız deneyin derim. Herkese hayırlı olsun…
Found this through a search that was generic enough I did not expect quality results, and a look at valecovecraftcollective continued the surprisingly good experience, search engines occasionally still surface excellent independent content if you scroll past the obvious paid and high authority results which is reassuring to remember sometimes.
However selective I am about new bookmarks this one made it past my filter, and a look at alpinecovecraftcollective confirmed the bookmark was worth the slot, the precious slots in my permanent bookmark folder are difficult to earn and this site earned one without making me think twice about whether the slot was justified by the quality.
Now setting up a small reminder to revisit the site on a slow day, and a stop at ivoryridgeartisanexchange confirmed the reminder was a good idea, planning return visits is a small organisational act that signals trust in ongoing quality and this site has earned that planned return through consistent performance across the pieces I have read so far.
Solid recommendation from me to anyone working in the area, the perspective here is grounded, and a look at clovercrestcraftcollective adds even more useful angles, the kind of site that becomes a reference rather than just a one time read which is a higher bar than most blogs ever reach today on the modern web.
Слушайте, есть важный вопрос. Затеял тут сложный ремонт в хрущёвке, без официального проекта даже думать нечего начинать, Потратил уйму свободного времени на чтение строительных форумов. Короче говоря, единственное, что реально работает в наших реалиях — сразу заказать техническое заключение у лицензированной компании, чтобы спать спокойно и не бояться проверок от управляющей.
Они и все чертежи грамотно сделают, В общем, кому тоже актуально, заказать проект перепланировки квартиры в москве https://proekt-pereplanirovki-kvartiry30.ru. Иначе потом прилетит огромный штраф и суды заставят всё вернуть как было. Обязательно перешлите этот пост тому, кто тоже сейчас затеял ремонт!
During a reading session that included several other sources this one stood out, and a look at learnanddevelopquickly continued the standout quality, the side by side comparison of sources during research is a useful exercise and this site has been winning those comparisons for me consistently across multiple research sessions during the last week.
Pass this along to anyone you know dealing with similar questions, the answers here are clear, and a stop at seameadowcommercegallery adds even more useful material, this is the kind of resource that deserves to circulate widely rather than getting lost in the constant churn of new content online that buries good work daily.
Telefonumdan rahatça ulaşabileceğim bir uygulama lazımdı. Sürekli farklı linkler geliyordu kime inanacağımı şaşırdım. Sonunda tüm teknik detayları inceleyip sistemi test ettim. En sonunda doğru kaynağa ulaştım ve size de tüm detayları aktarmak istedim, güncel bilgilere buradan bakabilirsiniz: 1xbet apk son sürüm 1xbet apk son sürüm. Şimdi size kısaca özet geçeyim — mobil sürümü bütün özellikleri eksiksiz sunuyor.
yüklemesi de basit ve hızlıydı yani rahat olun. Kendi deneyimlerimi aktarıyorum size — kesinlikle pişman olmazsınız deneyin derim. Herkese hayırlı olsun…
Mobil platform arayışım epey meşakkatli geçti valla. Herkes farklı bir adres veriyordu doğruyu bulmak imkansız gibiydi. Güncel bilgileri kontrol edip süreci hatasız başlattım. En sonunda güvenilir bir kaynağa ulaştım ve size de tüm detayları aktarmak istedim, güncel bilgilere buradan bakabilirsiniz: 1xbet yukle android 1xbet yukle android. Valla bak net söyleyeyim — mobil versiyonu masaüstüyle yarışır kalitede kesinlikle.
batarya performansı da gayet iyi. Kendi deneyimlerimi aktarıyorum size — en güvenilir uygulama bu oldu artık. Herkese hayırlı olsun…
Now feeling mildly impressed in a way I do not quite remember feeling about a blog in a while, and a stop at forgecabin extended that mild impression, content that produces specific positive emotional responses rather than just neutral information transfer is content with extra dimensions and this site has those extra dimensions clearly.
Случается, когда уже не до раздумий — человек в запое , а куда бежать — совсем не знаешь . Я сам через это прошел недавно. Сначала кажется, что обойдется , но нет . Требуется профессиональная медицина. Обзвонил десяток контор — одни обещания . А потом наткнулся на один действительно рабочий вариант. Если ищешь где получить наркологическая помощь — не ведись на дешевые акции . В Воронеже , если честно, тоже полно левых контор без лицензии. Вся проверенная информация ниже по ссылке: наркологический стационар наркологический стационар Честно скажу , после того как ознакомился, понял свои ошибки. Там и про вывод из запоя , и про реабилитацию . И цены адекватные. Рекомендую не тянуть .
Now planning to recommend this site in a context where my recommendations are taken seriously, and a stop at fondarbors confirmed I should make that recommendation soon, the small but real act of recommending content into spaces where my taste matters is something I take seriously and this site is worth the recommendation.
Genuinely useful read, the points are practical and easy to apply right away, and a quick look at roseharbortradehall confirmed that this site is consistent in that approach, looking forward to digging through the rest of it when I get the chance to sit down properly later in the week or this weekend.
If I were grading sites on this topic this one would receive high marks, and a stop at oakmeadowcommercegallery continued earning those high marks, the informal grading I do mentally for content sources is something I take seriously even though it is informal and this site has been receiving consistent high marks across multiple sessions today.
casino https://defterde.com.tr/read-blog/724_oferta-inicial-en-spinmacho-casino.html
Felt like I was reading something written by someone who actually thinks about the topic rather than reciting it, and a look at woodcovecraftcollective reinforced that impression, the difference between recited content and considered content is huge and this site clearly belongs to the latter category which I appreciate as a careful reader looking for substance.
Вот такая ситуация — близкий друг срывается , а просто бессилен. Моя семья столкнулась лично . Думаешь, сам справится, но хрен там. Требуется профессиональная помощь . Обзвонил десяток контор — одни обещания. Пока не нашёл один действительно рабочий вариант. Если тебе нужно качественное выведение из запоя с госпитализацией , не ведись на дешёвые обещания . У нас в Нижнем, к слову , тоже хватает левых контор. Проверенная информация по ссылке ниже: рехаб нижний новгород рехаб нижний новгород Честно говоря , после того как прочитал , понял свои ошибки. И про кодировку от алкоголя подробно, и про выезд нарколога на дом . И цены адекватные. Рекомендую не тянуть .
Picked this for my morning read because the topic seemed worth the time, and a look at caramelcoveartisanexchange confirmed the choice was right, my morning reading slot is precious and giving it to this site felt like a good investment rather than a waste which is a higher endorsement than I usually offer for content.
Picked a single sentence from this post to remember, and a look at mooncovecraftcollective gave me another to keep, content that produces memorable lines is doing more than just transferring information and the small selection of sentences I keep from each reading session is one of the actual returns I get from reading carefully.
Will be passing this along to a few people who would benefit from the perspective shared here, and a stop at velvetbrookcraftcollective only added to what I will be sharing, this kind of generous content deserves to circulate widely rather than getting buried in some search engine algorithm tweak that pushes it down the rankings.
Вот реально ситуация — родственник уходит в запой , а просто в тупике. Я сам через это прошёл года два назад . Думали, уговорами поможем — нифига . Как показала практика, без врачей и нормального наблюдения никак . Перерыл кучу форумов — сплошной развод . А потом наткнулся на один проверенный вариант. Если ищете где сделать помещение в клинику для вывода из запоя — не ведитесь на дешёвые акции . У нас в Нижнем, кстати , хватает левых контор без лицензии. Вся проверенная информация вот тут : наркологические клиники нижний новгород наркологические клиники нижний новгород Честно скажу , после того как почитал , расставил всё по полочкам. Там и про кодирование от алкоголизма подробно расписано , и про условия в стационаре и питание. И цены адекватные, без разводов. Советую не откладывать в долгий ящик.
My friends would appreciate a few of these posts and I will be sending links accordingly, and a look at jewelbrookcraftcollective added more pages to my share queue, content that earns shares to specific people in specific contexts is content with social utility and this site is generating those targeted shares from me consistently lately.
Now placing this in the small category of sites whose updates I would actually want to know about, and a stop at silkmeadowcommercegallery confirmed that placement, the difference between sites I want to follow and sites I just consume from is real and this one has crossed into the active follow category from the casual consumption side.
Reading this triggered a small but real correction in something I had assumed, and a stop at dawnridgeartisanexchange extended that corrective effect, content that updates my beliefs through evidence rather than rhetoric is content with intellectual integrity and this site has earned that label consistently across the pieces I have read so far today.
Reading this gave me a small sense of progress on a topic I have been slowly working through, and a stop at solarmeadowcommercegallery added another step forward, learning happens in small increments across many sources and finding sources that consistently contribute is the actual practical value of careful curation in an information rich world.
Quiet confidence runs through the whole post, no need to shout to make the points stick, and a stop at explorefreshgrowth carried that same restrained voice forward, content that respects the reader by trusting its own substance rather than dressing it up in theatrical language is what I look for online and rarely actually find these days.
Okay folks gather around because this Miami rental nightmare needs to be discussed. Then you show up at the local office and it’s a whole different story. Different car, scratches all over, and that “all-inclusive” price? Yeah that didn’t include insurance, fees, or the mandatory cleaning charge. I’ve lived here for years and still get burned occasionally. If you are trying to find a legitimate luxury fleet without getting ripped off, do some real digging first and read actual customer reviews. Miami without proper wheels is basically a hostage situation, especially since the AC must freeze your teeth and you want unlimited miles or bust.
Most of these local agencies are just smoke and mirrors with decent SEO hiding overpriced junk, but I eventually found a service with no games, no bait-and-switch, and no hidden asterisks. If you are looking for the only honest broker for premium vehicles across South Florida, check the current availability here: car rental premium class https://luxury-car-rental-miami-5.com. Yeah, finding parking in Wynwood will test your patience — but that’s not on them. Anyway, glad there’s at least one straight shooter left in this rental jungle, let me know if you guys have any other clean spots.
A nicely understated post that does not shout for attention, and a look at violetharbortradeparlor maintained the same quiet quality, understatement is a stylistic choice that distinguishes serious writing from attention seeking writing and this site has clearly committed to the understated approach as a core editorial value rather than just a phase.
Alright listen up because I’m about to save you a massive headache. Swear some of these “luxury” fleets down here should be in a museum instead of on the road. You land at MIA, tired, grab an Uber to the rental office, and bam — surprise $1500 hold on your card. No thanks, I’m way too old for this nonsense. If you are trying to find a legitimate vehicle without getting ripped off, do some real digging first and read actual customer reviews. Miami without a decent whip is basically a punishment, whether you are doing Coral Gables brunch, South Beach night run, or a spontaneous Everglades detour.
Most of these local agencies are just polished websites hiding the same overpriced junk, but I eventually found a service where what you book is exactly what you get, period. If you are looking for the only straight-up source for premium wheels in South Florida, check the current details here: luxury vehicle rentals luxury vehicle rentals. Also, definitely bring polarized shades unless you enjoy driving completely blind into the sunset. Just drive safe out there and maybe pass on that overpriced roadside assistance add-on. hope this helps some of you save a few bucks.
Refreshing to read something where the words actually mean something instead of filling space, and a stop at plumharborcommercegallery kept that going, the writing here trusts the reader to follow along without endless repetition or constant reminders of what was already said earlier in the post which I appreciate.
Никогда не думал, что столкнусь — родственник в тяжелом запое , а тащить куда-то нет никаких сил. Я сам через это прошел года два назад . Сидишь, не знаешь за что хвататься . Лезешь в интернет, а вокруг одни обещания . Пока кто-то не подсказал один реально работающий вариант. Требуется немедленная консультация — а самому везти нет физической возможности , то нужно вызывать врача. Я про срочную наркологическую помощь на дому . У нас в столице, если честно, тоже полно шарлатанов . Вся проверенная информация вот тут : срочно врач нарколог на дом срочно врач нарколог на дом Честно говоря , после того как прочитал , понял, как правильно действовать. Там и про капельницы подробно , и про консультацию нарколога . И цены адекватные, без разводов на месте. Рекомендую не откладывать.
Знаете, бывает ситуация — близкий в тяжелом состоянии, а тащить в больницу просто нереально . Я через это прошел совсем недавно. Руки опускаются, а время идет. Хватаешься за телефон , а в ответ тишина . Пока случайно не наткнулся на один проверенный вариант. Если нужна срочная помощь — а тащить человека сам просто физически не можете, то выход один . Я про круглосуточный выезд нарколога. У нас в столице, кстати , хватает левых контор без лицензии. Нормальные контакты, кто реально приезжает ниже по ссылке: нарколог анонимно нарколог анонимно Честно скажу , после того как ознакомился с условиями, понял, как действовать правильно. И про снятие запоя на дому, и про последующее кодирование. И цены адекватные, без разводов на месте. Советую не ждать чуда.
Worth recognising that the post did not pretend to be the final word on the topic, and a stop at isleparishs continued that humility, content that admits its own scope and limits is more trustworthy than content that overreaches and this site has clearly developed the editorial maturity to know what it can and cannot claim well.
A piece that read as if the writer was thinking carefully rather than just typing fluently, and a look at alpinecovevendorworkshop continued that considered quality, the difference between fluent typing and careful thinking shows up in writing and this site reads as the product of thought rather than just the product of language fluency apparently.
Ребята, выручайте! Кот старый диван в клочья разодрал, надо перетягивать. Посоветуйте нормальную мебельную ткань для частого использования. мебельная ткань цены https://tkan-dlya-mebeli-1.ru Кто разбирается в тканях для мебели, подскажите, что сейчас берут. Буду благодарен за любые советы, особенно от тех, кто сам перетягивал.
Thank you for being clear and direct, that simple approach saves so much frustration on the reader’s end, and a stop at windharborartisanexchange only made me more sure of it, the rest of the content seems to follow the same pattern which is a great sign of consistent editorial care behind the scenes.
Will be sharing this with a couple of people who care about the topic, and a stop at foxarbor added more material worth passing along, the kind of site that is generous with quality content and does not make you jump through hoops to access it which is appreciated more than the team probably realises.
Beats most of the alternatives on the topic by a noticeable margin, and a look at mintmeadowgoodsroom did not change that at all, this is one of the better corners of the open internet for this kind of content and I am glad I clicked through rather than skipping past quickly like I usually do.
Picked something concrete from the post that I will use immediately, and a look at goldencovemarkethall added another concrete piece, content that produces immediately useful output rather than just abstract appreciation is content that earns its place in my regular rotation without needing any further evaluation from me at this point honestly.
Just wanted to drop a quick note saying this was a useful read on a topic I have been circling, no fluff, and a stop at fastgoodsbazaar added a few extra points that fit the same simple style which makes the whole site feel coherent rather than thrown together by many different writers with different goals.
The overall feel of the post was professional without being stuffy, and a look at trailharbortradeparlor kept that approachable expertise going, finding the right register for technical content is hard but this site has clearly figured out how to sound knowledgeable without slipping into that distant lecturing tone that loses readers in droves every time.
Without overstating it this is a quietly excellent post, and a look at floraharborvendorparlor extended that quiet excellence, content that earns superlatives without demanding them through marketing language is content that has truly earned them through the substance and this site has clearly produced work in that earned excellence category today.
Sets a higher bar than most of what shows up in search results for this topic, and a look at solarmeadowmarketroom did not lower that bar at all, in fact it confirmed the impression, this is the kind of consistency that earns a place in regular rotation for serious readers instead of casual scrollers passing through.
Now feeling the rare pleasure of trusting a source completely on first encounter, and a look at silverharborcommercegallery extended that initial trust into something more durable, the calibration of trust to evidence is something I do informally and this site has earned high trust through the cumulative weight of multiple consistently good posts already.
The tone stayed consistent across the whole post which is harder than it looks for longer pieces, and a look at harborstonecraftcollective continued the same voice, this kind of editorial consistency is a sign of either a single careful writer or a tightly run team and either is impressive today across the broader media environment.
Let me save you some serious time, learned this the hard way. You find a killer deal online — photos look pristine, price seems fair, terms almost reasonable. Plus they slap a surprise $2500 hold on your card for good measure right before giving you the keys. Living here six years and still almost fall for this stuff sometimes. If you are trying to find a legitimate vehicle without getting ripped off, stay far away from the airport rental center. Anyone who’s tried the bus here knows exactly what I mean about this city, whether you are doing South Beach dinner plans, Sunny Isles sunrise cruise, or a quick run down to the Florida Keys.
Most of these local agencies are just polished garbage with decent Google reviews bought somewhere, but I eventually found a service where what you reserve is exactly what rolls up, no surprises. If you are looking for the only trustworthy source for premium vehicles across South Florida, check the current details here: premium prestige car hire premium prestige car hire. Yeah, parking in South Beach will cost you a nice dinner — but that’s the price of admission. Anyway, glad there’s at least one honest operator left in this rental jungle, let me know if you guys have any other clean spots.
Approaching this with the usual skepticism I bring to new sites and being slowly persuaded, and a stop at violetharborcraftcollective continued that gradual persuasion, the careful path from skeptical reader to genuine fan is the only one I trust and this site has walked me along that path through patient consistent quality across pieces.
Just want to record that this site is entering my regular reading list, and a look at skyharborartisanexchange confirmed it deserves the spot, my regular reading list is short and well curated and adding to it requires meeting a fairly high quality bar that this site has clearly cleared without much effort apparently.
Reading this prompted me to send the link to two different people for two different reasons, and a stop at coralharbormerchantgallery provided ammunition for a third share, content that suits multiple audiences without being generic enough to be useless to any of them is genuinely valuable and this site has that multi audience quality clearly.
Approaching this with the usual skepticism I bring to new sites and being slowly persuaded, and a stop at orchardharborvendorhall continued that gradual persuasion, the careful path from skeptical reader to genuine fan is the only one I trust and this site has walked me along that path through patient consistent quality across pieces.
Honestly enjoyed reading this more than I expected to when I first clicked through, and a stop at nightorchardcraftcollective kept that pleasant surprise going, sometimes you stumble onto a site that just clicks with how you like to read and this is one of those for me right now today which is great.
Now noticing that the post did not mention the writer at all, focus stayed on the topic, and a look at auroracoveartisanexchange continued that author absent quality, content that disappears the writer to focus on the substance is a particular kind of generosity and this site has clearly chosen the substance over the personality consistently.
Honest take is that this was better than I expected when I clicked through, and a look at honeymeadowmarketroom reinforced that, the bar for online content has dropped so much that finding something thoughtful and well constructed feels almost noteworthy now which says more about the average than about this site itself.
This one is staying open in a tab for the rest of the day so I can come back and re read certain parts, and a look at dawnridgecraftcollective suggests I will be doing the same with a few more pages here too, this is going to be a deep dive over the coming hours.
Came away with some new perspectives I had not considered before, and after globalcartcenter those ideas felt more complete, the kind of content that stays with you a little while after reading rather than slipping out the moment you switch tabs and move on with your day to whatever comes next.
Bookmarking this for later, the kind of resource I want to keep nearby, and a quick look at chestnutharborcraftcollective confirmed the rest of the site is worth the same treatment, definitely going into my reference folder for the next time the topic comes up at work or in conversation with someone who asks.
Знаете, ситуация — человек в запое , а куда бежать — совсем не знаешь . Моя семья такое пережила пару лет назад . Думаешь, сам справится, но хрен там. Нужна реальная помощь . Перерыл весь интернет — одни обещания . Пока не нашел один действительно рабочий вариант. Нужна срочно анонимное лечение алкоголиков — не ведись на дешевые акции . У нас в Воронеже, кстати , хватает левых контор без лицензии. Вся проверенная информация ниже по ссылке: анонимное лечение от алкоголизма https://narkologicheskaya-pomoshh-voronezh-12.ru Откровенно говоря, после того как прочитал , многое прояснилось . И про кодирование, и про условия в клинике. Плюс работают круглосуточно — это важно . Советую не откладывать.
Really like the way the post resists reaching for cliches that would have made it feel generic, and a quick visit to fastbuystore kept that fresh feel going, original phrasing and unexpected metaphors are signs that the writer is actually thinking rather than just stitching together familiar phrases into the appearance of content.
A welcome contrast to the loud takes that have dominated my feed lately, and a look at canyonharborvendorparlor extended that calm voice, content that arrives without yelling has become unusual in the modern attention economy and this site is one of the few places I have found that consistently delivers without raising its voice.
Let me save you some serious time, learned this the hard way. Then you actually go to the local office to pick it up. Plus a surprise $2000 hold on your card and a $35 per day GPS you never asked for right before giving you the keys. Seven years in South Florida and I still almost fall for these tricks. When you’re searching for a legit and reliable premium ride to cruise around, do some real digging first and read actual customer reviews. Anyone who’s taken the Metro here knows the struggle about this city, whether you are doing Brickell happy hour, Bal Harbour shopping, or a spontaneous drive down to the Keys.
Most of these local agencies are just fancy websites hiding the same beat-up fleet with bought reviews, but I eventually found a service with no games, no bait-and-switch, and no hidden asterisks in paragraph 8. If you are looking for the only straight shooter for premium rides across South Florida, check the current details here: rent a porsche near me https://luxury-car-rental-miami-7.com. Also, definitely bring polarized shades unless you enjoy driving into the apocalypse every single evening. Anyway, glad there’s at least one honest rental joint left in this town, hope this helps some of you save a few bucks.
Android cihazım için kaliteli bir uygulama bulmak şarttı. Virüslü bir dosya indirmekten çok korktum açıkçası. Güncel bilgileri kontrol edip süreci hatasız başlattım. En sonunda güvenilir bir kaynağa ulaştım ve size de tüm detayları aktarmak istedim, güncel bilgilere buradan bakabilirsiniz: 1xbet apk 1xbet apk. Şimdi size kısaca özet geçeyim — mobil versiyonu masaüstüyle yarışır kalitede kesinlikle.
Hiçbir donma yaşamadım şu ana kadar. Kendi deneyimlerimi aktarıyorum size — en güvenilir uygulama bu oldu artık. Şimdiden iyi şanslar ve bol kazançlar…
Now feeling the quiet pleasure of finding writing that takes itself seriously without being self serious, and a stop at firminlets extended that subtle pleasure, the gap between earnest and pretentious is fine and this site has clearly chosen to land on the earnest side without slipping over into pretentious which is impressive.
Случается сплошь и рядом — человек срывается , а просто бессилен. Моя семья столкнулась пару лет назад. Сначала кажется, что обойдётся , но хрен там. Требуется реальная медицина. Обзвонил десяток контор — одни обещания. А потом наткнулся на один действительно рабочий вариант. Ищешь где сделать помещение в клинику для вывода из запоя, не рискуй здоровьем. В Нижнем Новгороде , если честно, полно шарлатанов . Проверенная информация тут : закодироваться в нижнем новгороде закодироваться в нижнем новгороде Откровенно скажу, после того как ознакомился, понял свои ошибки. И про кодировку от алкоголя подробно, и про выезд нарколога на дом . Главное — анонимно . Советую не откладывать.
A piece that did not require external context to follow, and a look at oakcovemarkethall maintained the same self contained quality, content that stands alone without forcing readers to chase prerequisites is more accessible and this site has clearly thought about how each piece can serve a fresh visitor rather than only existing members.
Skipped a meeting reminder to finish the post, and a stop at autumncovevendorstudio held me past another reminder, when content beats meetings the writer is doing something extraordinary because meetings have institutional support behind them and yet good writing can still occasionally win that competition for attention which I find heartening today.
casino https://itz.my.id/read-blog/1185_top-casino-selection-at-queen-win-casino.html
In the middle of an otherwise scattered day this post landed as a moment of focus, and a stop at forestcovevendorgallery extended that focused feeling across more pages, content that anchors a fragmented day rather than contributing to the fragmentation is content with real centring effect and this site is providing that anchoring function for me.
Now recognising the post as a rare example of careful writing on a topic that mostly receives careless treatment, and a stop at zencovegoodsgallery extended that contrast with the average elsewhere, content that highlights how much the average is settling for low quality is content that has both internal merit and external value as a benchmark.
Anyone curious about this topic would do well to start here, the foundation laid is solid, and a stop at fastgoodsbazaar would round out their understanding nicely, this is the kind of resource I would point a friend toward without hesitation if they asked me where to begin learning about anything in this area.
Ended up here on a wandering afternoon and was glad I stayed for the read, and a stop at goldenharbortradehall extended the wandering into a proper exploration of the site, the kind of place that rewards aimless clicking with something genuinely interesting rather than the shallow content that mostly populates the modern open web.
Anyone curious about this topic would do well to start here, the foundation laid is solid, and a stop at solarmeadowcommercegallery would round out their understanding nicely, this is the kind of resource I would point a friend toward without hesitation if they asked me where to begin learning about anything in this area.
Reading this triggered a small change in how I think about the topic going forward, and a stop at honeycoveartisanexchange reinforced that subtle shift, the rare content that actually moves my thinking rather than just confirming or filling it is the kind I most value and this site is providing that kind of impact today.
This actually answered the question I had been searching for, and after I checked findyourprogresslane I had a few more pieces I had not realised I needed, that is the sign of a site that knows what its readers want before they even know how to ask it which is impressive.
Useful information presented in a way that does not feel like a sales pitch, that is what I appreciated most, and a stop at woodcoveartisanexchange was the same, no upsell and no fake urgency just steady content laid out properly for someone trying to actually learn from it rather than just be sold to.
Telefonumda bahis keyfini çıkarmak istiyordum uzun zamandır. Play Store’da arattım ama son sürümü göremedim. Sonunda tüm teknik detayları inceleyip sistemi test ettim. En sonunda güvenilir bir kaynağa ulaştım ve size de tüm detayları aktarmak istedim, güncel bilgilere buradan bakabilirsiniz: 1xbet app android 1xbet app android. Şimdi size kısaca özet geçeyim — mobil versiyonu masaüstüyle yarışır kalitede kesinlikle.
kurulumu da oldukça basitti yani rahat olun. Birçok apk denedim ama en stabilı bu çıktı — kesinlikle pişman olmazsınız deneyin derim. Herkese hayırlı olsun…
Now organising my browser bookmarks to give this site easier access, and a look at tealharborvendorparlor earned the same organisational priority, the small acts of digital housekeeping I do for sites I expect to use often are themselves a measure of trust and this site has triggered the trust based housekeeping behaviour from me clearly.
Picked this post to share in a Slack channel where I knew it would be appreciated, and a look at bayharborartisanexchange suggested I will share more from here later, content worth sharing into a professional context is content that has earned a higher kind of trust than mere personal interest and this site has it.
Speaking from the perspective of having read widely on the topic this site offers something distinct, and a look at snowcoveartisanexchange reinforced that distinctness, the rare site that contributes something genuinely original to a saturated topic is the rare site worth following carefully and this one has demonstrated that original contribution capability today.
Let me save you some serious time, learned this the hard way. Then you show up at the local office and it’s a whole different story. Plus they want a surprise $2000 hold on your debit card right before giving you the keys. I’ve lived here for years and still get burned occasionally. If you are trying to find a legitimate luxury fleet without getting ripped off, do some real digging first and read actual customer reviews. Miami without proper wheels is basically a hostage situation, especially since the AC must freeze your teeth and you want unlimited miles or bust.
Most of these local agencies are just smoke and mirrors with decent SEO hiding overpriced junk, until I finally found one outfit that actually delivers what’s in the listing. If you are looking for the only honest broker for premium vehicles across South Florida, check the current availability here: exotic rentals miami beach https://luxury-car-rental-miami-5.com. Yeah, finding parking in Wynwood will test your patience — but that’s not on them. Anyway, glad there’s at least one straight shooter left in this rental jungle, hope this helps some of you save a few bucks.
Now realising the post has been quietly doing important work in my mind for the past hour, and a stop at orchardmeadowmarketroom extended that quiet processing, content that continues to do work after I close the tab is content with afterlife in the mind and this site is producing those long lived effects at a meaningful rate.
Now feeling something close to gratitude for the fact this site exists, and a look at freshguild extended that gratitude, the rare site that produces this kind of response is the rare site worth defending in conversations about whether the modern internet is still capable of producing genuinely valuable independent content for serious adults.
Polished and informative without feeling overproduced, that is the sweet spot, and a look at trailharborcommercegallery hit it again, you can tell when a site has been built with care versus thrown together for the sake of having something to put online and this is clearly the former approach taken by the team.
Once you start reading carefully here it is hard to go back to lower quality alternatives, and a stop at dunecovecraftcollective reinforced that ratchet effect, the way good content raises standards is real over time and this site has clearly contributed to raising my expectations for what is possible in writing on the topic generally.
casino https://kobkay.com/read-blog/18744_spring-naar-een-unieke-wereld-van-speelautomaten-plezier-bij-spinpanda-nl.html
Ситуация форс-мажор — человек в ступоре , а везти в больницу страшно . Моя семья это пережила совсем недавно. Руки опускаются, а время тикает. Начинаешь обзванивать знакомых , а вокруг одни обещания . Пока случайно не нашел один реально работающий вариант. Если нужна немедленная консультация — а самому везти просто нереально, то нужно вызывать врача. Речь конкретно про срочную наркологическую помощь на дому . У нас в столице, если честно, тоже полно шарлатанов . Нормальные контакты, кто реально приезжает вот тут : вызов на дом нарколога вызов на дом нарколога Откровенно скажу, после того как прочитал , понял, как правильно действовать. И про снятие запоя на дому, и про последующее кодирование. И цены адекватные, без разводов на месте. Советую не откладывать.
Vague feelings of recognition kept surfacing as I read because the writing names things I have been thinking, and a look at plumharborvendorroom produced more of those recognition moments, content that gives shape to private intuitions is content that makes me feel less alone in my own thinking and this site has that effect.
Solid information that lines up with what I have been hearing from other reliable sources, and after my visit to coralmeadowcommercegallery I was even more certain of that, this site checks out which is something I value highly when so many places online play loose with the facts to chase a quick click.
Started reading without much expectation and ended on a high note, and a look at gladeridgemarketparlor continued that arc, content that builds rather than peaks early is a sign of a writer who knows how to structure a piece for sustained reader engagement rather than relying on a strong hook to do all the work.
Generally I do not leave comments but this post merits a small note, and a stop at acornharborartisanexchange extended that comment worthy quality, the urge to actively contribute to a sites community rather than passively consume from it is something specific content provokes and this site has provoked that engagement urge from me today.
A piece that did not waste any of its substance on sales or promotion, and a look at fastpickzone continued that pure content focus, sites that resist the urge to monetise every paragraph are increasingly rare and this one has clearly made the editorial choice to keep the writing clean from commercial intrusion which I value highly.
Came across this looking for something else entirely and ended up reading it through twice, and a look at globebeats pulled me deeper into the site than I planned, the writing has a way of holding attention without resorting to manipulative cliffhangers or vague promises that never get delivered later down the page.
Skipped the related products section because there was none, and a stop at trailharborcommercegallery also lacked any aggressive monetisation, content that is not constantly trying to convert me into a customer or subscriber is content that has confidence in its own value and that confidence shows up as a different reading experience.
If quality blog writing is dying as people sometimes claim then this site is one piece of evidence that it has not died yet, and a look at granitegrovegoroom extended that evidence, the broader cultural question about online writing has empirical answers in specific sites and this one is contributing to a more optimistic answer overall.
Ребята, выручайте! Решил обновить кухонный уголок, а старую обивку уже не найти. Теперь мучаюсь — какую взять ткань для мебели, чтобы и выглядело достойно, и кошачьи когти выдержало. ткань мебельная ткань мебельная Говорят, флок и микровелюр быстро вытираются, а рогожка лучше. Буду благодарен за любые советы, особенно от тех, кто сам перетягивал.
Reading this gave me confidence to make a decision I had been putting off, and a stop at junipercoveartisanexchange reinforced that confidence, content that translates into action in my own life rather than just informing it is content with the highest practical value and this site is generating that action level utility for me lately.
Reading this gave me a small framework I expect to use going forward, and a stop at crystalcovevendorworkshop extended that framework, content that produces transferable mental models rather than just specific facts is content with multiplicative value and this site is providing those models at a rate that justifies extra attention from me regularly.
Now planning to write about the topic myself eventually using this post as a reference, and a look at trailharborcraftcollective would also serve in that future piece, content that becomes raw material for my own writing rather than just informing my reading is content with multiplicative value and this site is generating that multiplicative effect.
Felt energised after reading rather than drained, which is unusual for online content these days, and a look at iciclebrookmarketroom continued that good feeling, content that leaves you better than it found you is rare and worth bookmarking when you stumble across it for the first time today or any other day really.
Top tier post, the kind that makes you want to share the link with friends working in the same area, and a stop at berrycovecraftcollective only made me more confident in doing that, this site is one of the better resources I have seen on the topic recently across both new and older posts.
I usually skim posts like these but this one held my attention all the way through, and a stop at cloudcovecraftcollective did the same, that is a strong endorsement coming from me because I am usually quick to bounce when content gets repetitive or fails to deliver on its initial promise made in the headline.
Swear I’ve seen it all by now, the rental landscape down here is crazy. Then you actually show up to the local office to pick up the car. Plus they slap a surprise $2500 hold on your card for good measure right before giving you the keys. Living here six years and still almost fall for this stuff sometimes. When you genuinely need a legit and reliable premium ride to cruise around, stay far away from the airport rental center. Miami without proper wheels is basically a nightmare, whether you are doing South Beach dinner plans, Sunny Isles sunrise cruise, or a quick run down to the Florida Keys.
I’ve personally tested maybe 35 rental outfits across Dade, Broward, and Monroe, but I eventually found a service where what you reserve is exactly what rolls up, no surprises. If you are looking for the only trustworthy source for premium vehicles across South Florida, check the current details here: rent a urus for a day https://luxury-car-rental-miami-6.com. Also, definitely bring serious shades unless you enjoy driving straight into the sun every single evening. Anyway, glad there’s at least one honest operator left in this rental jungle, hope this helps some of you save a few bucks.
Felt a small spark of recognition when the post named something I had been struggling to articulate, and a look at globalcartcorner produced more such moments, the rare service of giving readers language for fuzzy intuitions is one of the higher values that good writing can provide and this site offered several today instances.
Skipped the related products section because there was none, and a stop at snowcovecraftcollective also lacked any aggressive monetisation, content that is not constantly trying to convert me into a customer or subscriber is content that has confidence in its own value and that confidence shows up as a different reading experience.
Liked how the writer used real examples instead of theoretical ones to make the points stick, and a stop at windharbortradehall added even more concrete examples, this is the kind of practical approach that respects readers who actually want to apply what they learn rather than just nodding along passively without doing anything useful.
Thanks for the clean writing, no broken sentences and no awkward translations like some other sites have, and a quick stop at pebblepinevendorhall kept that polish going nicely, it really does make a difference when a reader can move through a page without tripping on every line or going back to reread.
Closed it feeling slightly more competent in the topic than I started, and a stop at freshcarthub reinforced that competence boost, real learning is rare in casual online reading but it does happen sometimes and this site managed to make it happen for me today which is genuinely worth pausing to acknowledge.
Случается, когда уже не до раздумий — родственник сорвался , а везти в клинику страшно . Я через это прошел пару лет назад . Руки опускаются, а время идет. Начинаешь обзванивать знакомых, а в ответ тишина . Пока случайно не наткнулся на один проверенный вариант. Требуется срочная помощь — а ехать куда-то просто физически не можете, то нужно вызывать врача на дом. Я про анонимный вызов врача нарколога на дом . В Москве , если честно, тоже полно левых контор без лицензии. Вся проверенная информация ниже по ссылке: вывести из запоя на дому анонимно вывести из запоя на дому анонимно Честно скажу , после того как прочитал , понял, как действовать правильно. Там и про капельницы расписано , и про последующее кодирование. И цены адекватные, без разводов на месте. Рекомендую не ждать чуда.
Worth pointing out that the writer made the topic feel more interesting than I had been expecting, and a look at chestnutharbortradeparlor continued that elevation effect, content that improves the apparent quality of its subject through skilled treatment is doing something real and this site has clearly developed that kind of editorial alchemy throughout.
Honest opinion is that this is the kind of post that builds long term trust with readers, and a look at garnetharborartisanexchange reinforced that perception, the slow accumulation of trust through consistent quality is the only sustainable way to build a real audience and this site is clearly playing that long game.
Once you start reading carefully here it is hard to go back to lower quality alternatives, and a stop at sageharborgoodsgallery reinforced that ratchet effect, the way good content raises standards is real over time and this site has clearly contributed to raising my expectations for what is possible in writing on the topic generally.
Felt the writer did the homework before publishing, the references hold up, and a look at zencoveartisanexchange continued that documented care, content with traceable claims rather than vague assertions is the kind I trust and the lack of bald assertion in this post is one of its quietly impressive qualities for me.
Reading this as part of my evening winding down routine fit perfectly, and a stop at discoverfreshopportunities extended the wind down nicely, content that calms rather than agitates is what I want at the end of the day and this site provides that calming reading experience reliably which is increasingly rare across the modern web.
Случается, когда уже не до раздумий — родственник подсел , а куда бежать — совсем не знаешь . Моя семья такое пережила пару лет назад . Сначала кажется, что обойдется , но нет . Требуется реальная медицина. Обзвонил десяток контор — сплошной развод . А потом наткнулся на один нормальный вариант. Если ищешь где получить наркологическая помощь — не ведись на дешевые акции . В Воронеже , если честно, хватает шарлатанов . Вся проверенная информация ниже по ссылке: помощь наркозависимым https://narkologicheskaya-pomoshh-voronezh-12.ru Честно скажу , после того как ознакомился, многое прояснилось . И про кодирование, и про условия в клинике. И цены адекватные. Рекомендую не тянуть .
A piece that did not waste any of its substance on sales or promotion, and a look at harborstonevendorhall continued that pure content focus, sites that resist the urge to monetise every paragraph are increasingly rare and this one has clearly made the editorial choice to keep the writing clean from commercial intrusion which I value highly.
Compared to the usual results for this kind of search this site stands well above the average, and a quick visit to wheatcoveartisanexchange kept the standard high, you can tell within seconds whether a site is going to waste your time or actually deliver and this one clearly delivers without any false starts.
Now recognising the editorial wisdom of letting some questions remain open at the end, and a look at goldenbuycenter continued that intellectual honesty, content that does not force closure on contested questions is content that respects the limits of knowledge and this site has clearly developed the maturity to know when to leave space.
Ребята, кто уже делал ремонт? Хочу объединить маленькую кухню с гостиной, а тут оказывается столько бумажек надо собрать, Я уже знатно намучился со всей этой бюрократией, Короче говоря, единственное, что реально работает в наших реалиях — это доверить подготовку документов профессиональным инженерам, чтобы спать спокойно и не бояться проверок от управляющей.
Они и все чертежи грамотно сделают, В общем, кому тоже актуально, проект перепланировки квартиры проект перепланировки квартиры. Иначе потом прилетит огромный штраф и суды заставят всё вернуть как было. Обязательно перешлите этот пост тому, кто тоже сейчас затеял ремонт!
Solid quality, the kind of work that holds up to a careful read rather than a quick skim, and a quick look at frostcoast kept that standard going strong, content that rewards attention rather than punishing it is something I appreciate more and more these days online across nearly every topic I follow.
Worth recognising that this site does not chase the daily news cycle, and a stop at trailharbormerchantgallery confirmed the longer publication arc, sites that resist the pressure to comment on every passing event are sites with genuine editorial discipline and this one has clearly chosen depth over volume which I respect deeply.
Really nice to see things explained without overcomplicating the topic, the words flow naturally and stay easy to follow, and a short visit to graniteorchardgoodsroom only added to that experience because the same simple approach is used across the rest of the page too without any change in tone.
Reading this gave me a small jolt of recognition for an experience I thought was just mine, and a stop at tealcoveartisanexchange produced more such jolts, content that universalises private experiences without flattening them is doing genuinely useful work and this site is providing that recognition function for me reliably across topics I read.
Felt no urge to argue with the conclusions even though I started the post slightly skeptical, and a look at gemcoasts maintained that pattern, writing that earns agreement through clarity of argument rather than rhetorical pressure is the kind I find most persuasive and the kind I want to read more of these days.
Really liked the calm tone running through the post, no shouting and no urgency forced into the writing, and a look at calmcoveartisanexchange kept that quiet confidence going, the kind of voice that makes the reader feel respected rather than yelled at which is depressingly common across most modern blog content these days.
Thanks for treating the topic with the seriousness it deserves without becoming pompous about it, and a stop at futuregoodszone continued that balanced treatment, the gap between earnest and self serious is huge and writers who can stay on the right side of it earn my respect when I find them online today.
Seriously, the amount of garbage “luxury” deals down here is astonishing. You see a sweet ride online — clean spec, fair price, looks legit. Plus they want a surprise $2000 hold on your debit card right before giving you the keys. Fool me five times? Actually yeah, Miami keeps fooling everyone, lesson learned. When you’re after a trustworthy and reliable premium vehicle to cruise around, do some real digging first and read actual customer reviews. Miami without proper wheels is basically a hostage situation, especially since the AC must freeze your teeth and you want unlimited miles or bust.
I’ve personally gone through maybe 30 rental companies across Dade, Broward, and Palm Beach, but I eventually found a service with no games, no bait-and-switch, and no hidden asterisks. If you are looking for the only honest broker for premium vehicles across South Florida, check the current availability here: rent a premium car https://luxury-car-rental-miami-5.com. Yeah, finding parking in Wynwood will test your patience — but that’s not on them. Just drive safe out there and maybe decline that “premium roadside” upsell — it’s always a scam. let me know if you guys have any other clean spots.
Let me save you some serious time, learned this the hard way. Then you actually go to the local office to pick it up. Plus a surprise $2000 hold on your card and a $35 per day GPS you never asked for right before giving you the keys. Fool me seven times? Yeah that’s just Tuesday in Miami, lesson learned. When you’re searching for a legit and reliable premium ride to cruise around, do some real digging first and read actual customer reviews. Anyone who’s taken the Metro here knows the struggle about this city, especially since the AC must freeze your face off and unlimited miles or forget it.
I’ve tried maybe 40 rental companies across Dade, Broward, and Palm Beach, but I eventually found a service with no games, no bait-and-switch, and no hidden asterisks in paragraph 8. If you are looking for the only straight shooter for premium rides across South Florida, check the current details here: benz for rent https://luxury-car-rental-miami-7.com. Also, definitely bring polarized shades unless you enjoy driving into the apocalypse every single evening. Anyway, glad there’s at least one honest rental joint left in this town, let me know if you guys have any other clean spots.
Now planning to come back when I have the right kind of attention to read carefully, and a stop at trailharbormerchantgallery reinforced that plan, choosing the right moment to read certain content is a quiet form of respect for the work and this site is generating those careful planning behaviours from me consistently as a reader.
Genuine reaction is that this site clicked with how I like to read, and a look at driftorchardtradinghouse kept that comfortable fit going, sometimes you find a place online whose editorial decisions just align with your preferences and when that happens it is worth recognising and supporting through repeat engagement consistently going forward.
Really like that the writer trusts the reader to follow simple logic without restating every previous point, and a stop at solarorchardcraftcollective kept that respect going, treating an audience as capable adults rather than as people who need constant hand holding makes a noticeable difference in the reading experience for me.
A piece that built up gradually rather than front loading its main points, and a look at alpinecovemarkethall maintained the same gradual structure, content that trusts the reader to reach conclusions through accumulating reasoning is more persuasive than content that announces conclusions and then defends them and this site uses the persuasive approach.
Came in tired from a long day and the writing held my attention anyway, and a stop at ivoryharborvendorparlor kept that going, content that can engage a fatigued reader is doing something right because most online reading happens in suboptimal conditions like that one and quality content adapts to it without complaint.
Really like that the writer trusts the reader to follow simple logic without restating every previous point, and a stop at glassharborcraftcollective kept that respect going, treating an audience as capable adults rather than as people who need constant hand holding makes a noticeable difference in the reading experience for me.
A piece that handled multiple complications without becoming confused, and a look at woodharborvendorparlor continued that organisational clarity, holding multiple threads in a single piece without losing any of them is a sign of skilled writing and this site has clearly developed the editorial discipline to manage complexity without sacrificing readability throughout.
Reading this gave me a small refresher on something I had partially forgotten, and a stop at pineharbortradehall extended the refresher, content that strengthens existing knowledge rather than just adding new is content with a particular kind of consolidating value and this site is providing that consolidating function across multiple visits.
Reading this slowly and letting each paragraph land before moving on, and a stop at canyonbrookmarketfoundry earned the same patient approach, content that rewards slow reading rather than speed is content with real density and the writers here are clearly producing work that benefits from the careful eye rather than the rushed scan.
Reading this in a quiet coffee shop matched the calm energy of the writing, and a stop at goodsrisestore extended that environmental match, content that has its own ambient quality which can match or clash with surroundings is content with a personality and this site has the kind of personality that suits calm reading.
Вот такая история — человек пропадает , а что делать — непонятно . Моя семья столкнулась лично . Многие думают, что само пройдет , но хрен там. Требуется реальная медицина. Перерыл весь интернет — сплошной развод . Пока не нашел один действительно рабочий вариант. Если ищешь где получить круглосуточная наркологическая помощь — не ведись на дешевые акции . В Воронеже , кстати , тоже полно шарлатанов . Вся проверенная информация тут : анонимное лечение алкоголиков https://narkologicheskaya-pomoshh-voronezh-11.ru Откровенно говоря, после того как прочитал , понял свои ошибки. И про кодирование, и про реабилитацию . И цены адекватные. Рекомендую не откладывать.
Approaching this with the usual skepticism I bring to new sites and being slowly persuaded, and a stop at woodharborcommercegallery continued that gradual persuasion, the careful path from skeptical reader to genuine fan is the only one I trust and this site has walked me along that path through patient consistent quality across pieces.
A memorable post for me on a topic I had thought I was tired of, and a look at echobrookvendorfoundry suggested the same site can refresh other tired topics, sites that can revive my interest in subjects I had written off as exhausted are doing rare work and this one is clearly doing that for me today.
Now considering whether the post would translate well into a different form, and a look at walnutcoveartisanexchange suggested similar versatility, content that could move into other media without losing its substance is content that has been built around ideas rather than around format and this site reads as idea first throughout posts.
Speaking carefully because I do not want to overstate things this site is genuinely above average across multiple measurements, and a stop at jewelbrooktradehall continued the above average performance, the calibration of judgement against potential overstatement is something I take seriously and this site clears the higher bar even after that calibration applies.
A thoughtful piece that did not strain to be thoughtful, and a look at coralbrooktradingfoundry continued that effortless quality, when thinking shows up in writing without the writer drawing attention to it you know you are reading something genuinely considered rather than something performing the appearance of consideration which is also common online.
Reading this triggered a small reorganisation of my own thinking on the topic, and a stop at icicleislemarketroom furthered that reorganisation, content that affects the shape of my mental model rather than just decorating it with new facts is content with structural rather than informational impact and this site provides that.
Came in expecting another generic take and got something with actual character instead, and a look at canyonharborartisanexchange carried that personality forward, finding a distinct voice on a saturated topic is impressive and worth pointing out when it happens because most sites end up sounding identical to their nearest competitors quickly.
Came in tired from a long day and the writing held my attention anyway, and a stop at globalgoodsarena kept that going, content that can engage a fatigued reader is doing something right because most online reading happens in suboptimal conditions like that one and quality content adapts to it without complaint.
Let me save you some serious time, learned this the hard way. You find a killer listing online: sleek Audi, convertible, price almost too good to be true. Different car sitting there — bald tires, dashboard lit up like a Christmas tree, and that “killer price”? Yeah doesn’t include the non-negotiable $45 daily insurance or the $500 deposit they forget to mention. Nine years in South Florida and these clowns still nearly fool me. When you’re hunting for a legit and reliable premium ride to cruise around, stay the hell away from the airport rental center. Anyone who’s tried the trolley system knows what I’m talking about about this city, especially since the AC must freeze your teeth and unlimited miles or no deal.
Most of these local agencies are just polished turds with fake five-star reviews hiding overpriced junk, until I finally found one company that doesn’t play stupid games. If you are looking for the only trustworthy source for premium rides across South Florida, check the current details here: rent a premium car https://luxury-car-rental-miami-9.com. Yeah, parking in Wynwood will cost you a nice dinner — but that’s the price of being in Miami. Just drive safe out there and definitely skip that “emergency roadside” upsell — complete waste of money. let me know if you guys have any other clean spots.
Now realising the post solved a small problem I had been carrying for weeks, and a look at goldmanors extended that problem solving function, content that connects to specific unresolved questions in my own life rather than just providing general interest is content with real practical impact and this site is providing that practical value.
Just want to record that this site is entering my regular reading list, and a look at galafactor confirmed it deserves the spot, my regular reading list is short and well curated and adding to it requires meeting a fairly high quality bar that this site has clearly cleared without much effort apparently.
Thanks for the moderate length, neither so short it skips substance nor so long it bloats, and a stop at lemonlarkvendorparlor hit the same balance, the right length is one of the hardest things to calibrate in blog writing and I appreciate when a team has clearly thought about it rather than defaulting.
After several visits I am now confident this site is one to follow seriously, and a stop at auroracovegoodsroom reinforced that confidence, the gradual building of trust through repeated quality exposures is the only sustainable way to develop reader loyalty and this site is building that loyalty in me through patient consistent work consistently.
Found this through a search that was generic enough I did not expect quality results, and a look at discovernewfocus continued the surprisingly good experience, search engines occasionally still surface excellent independent content if you scroll past the obvious paid and high authority results which is reassuring to remember sometimes.
Reading this in the morning set a good tone for the day, and a quick visit to goodscarthub kept that good tone going, content can do that sometimes when it hits the right notes and finding sites that consistently strike that tone is something I have learned to recognise and reward with regular visits.
Swear I’ve seen it all by now, the rental landscape down here is crazy. You find a killer deal online — photos look pristine, price seems fair, terms almost reasonable. Different vehicle parked outside, curb rash on every rim, and that “all-inclusive rate”? Ha, doesn’t include the mandatory $300 cleaning fee or the $25 per day toll pass you can’t decline. Living here six years and still almost fall for this stuff sometimes. When you genuinely need a legit and reliable premium ride to cruise around, do some real digging first and read actual customer reviews. Anyone who’s tried the bus here knows exactly what I mean about this city, whether you are doing South Beach dinner plans, Sunny Isles sunrise cruise, or a quick run down to the Florida Keys.
I’ve personally tested maybe 35 rental outfits across Dade, Broward, and Monroe, until I finally found one company that doesn’t play stupid games. If you are looking for the only trustworthy source for premium vehicles across South Florida, check the current details here: luxury car hire near me https://luxury-car-rental-miami-6.com. Yeah, parking in South Beach will cost you a nice dinner — but that’s the price of admission. Anyway, glad there’s at least one honest operator left in this rental jungle, hope this helps some of you save a few bucks.
Felt the post had been written without looking over its shoulder, and a look at cloudcovegoodsgallery continued that confident posture, content written for its own sake rather than against imagined critics has a different quality and this site reads as written from a place of confidence rather than defensive justification of every claim.
Quietly building a case in my head for why this site deserves more attention than it currently seems to receive, and a look at canyoncovecommerceatelier reinforced the case, the gap between quality and recognition is a recurring frustration in independent online content and this site is one of the cases that seems particularly egregious to me today.
Bookmark earned, share earned, return visit earned, all from one reading session, and a look at skyharborcommercegallery did the same, the trifecta of bookmark and share and return is rare in a single visit and represents the highest level of engagement I tend to offer any piece of online content these days here.
Now leaving a small mental note to recommend this when the topic comes up in conversation, and a look at suncoveartisanexchange extended that recommend ready feeling, content that arms me with shareable references for likely future conversations is content with social value and this site is providing that conversational ammunition consistently for me lately.
Liked the post enough to read it twice and the second read found new things, and a stop at goldencoveartisanexchange similarly rewarded the second look, content with hidden depths that only reveal themselves on careful rereading is the rare kind that earns lasting respect rather than fleeting first impressions only briefly held.
Reading this prompted a small note in my reference file, and a stop at birchharborvendorroom prompted another, the rare site that contributes useful nuggets to my own working knowledge rather than just consuming my attention is worth the time investment many times over compared to the usual pile of forgettable scroll content.
Ended up here on a wandering afternoon and was glad I stayed for the read, and a stop at brightharborvendorhall extended the wandering into a proper exploration of the site, the kind of place that rewards aimless clicking with something genuinely interesting rather than the shallow content that mostly populates the modern open web.
This filled in a gap in my understanding that I had not even noticed was there, and a stop at dunecovevendoratelier did the same, the kind of post that gives you more than you expected when you first clicked through from somewhere else, a real find for anyone curious about the area covered here.
However measured this site clears the bar I set for sites I take seriously, and a stop at quickridgemarketgallery continued clearing that bar, the metrics I use for site quality are admittedly informal but they are consistent and this site has cleared them on multiple measurements across multiple visits which is meaningful for my evaluation.
Worth a slow read rather than the fast scan I usually default to, and a look at zencovegoodsroom earned the same slower pace from me, content that resets my reading speed downward is content with substance worth absorbing and this site has produced that effect on me multiple times now over the last week here.
Случается, когда уже не до раздумий — человек в запое , а что делать — просто руки опускаются. Я сам через это прошел пару лет назад . Думаешь, сам справится, но хрен там. Нужна реальная медицина. Обзвонил десяток контор — сплошной развод . А потом наткнулся на один нормальный вариант. Если ищешь где получить лечение наркомании в Воронеже — не рискуй здоровьем близкого. В Воронеже , если честно, хватает шарлатанов . Вся проверенная информация ниже по ссылке: лечение наркомании и алкоголизма https://narkologicheskaya-pomoshh-voronezh-12.ru Честно скажу , после того как ознакомился, понял свои ошибки. Там и про вывод из запоя , и про реабилитацию . И цены адекватные. Рекомендую не тянуть .
Just dropping by to say thanks for the effort, it does not go unnoticed when a writer cares this much about the reader, and after I went through wildorchardartisanexchange I was certain this is one of the better corners of the internet for this particular kind of content which is genuinely refreshing.
Bookmark added without hesitation after finishing, and a look at kettleharbormarkethouse confirmed I should bookmark the homepage too rather than just this page, the rare site that earns category level trust rather than just single article approval is the kind I want to rely on across many different topics over time.
I’ve got the scars to prove it, the rental landscape down here is crazy. Then you show up at the local lot to pick up the car. Plus they freeze a surprise $2500 on your card for a week right before giving you the keys. Eight years in South Florida and these clowns still almost get me. When you need a proper and reliable premium ride to cruise around, do some real digging first and read actual customer reviews. Miami without decent wheels is basically a hostage situation, especially since the AC must be arctic cold and unlimited miles non-negotiable.
I’ve run through maybe 45 rental companies across Dade, Broward, and Monroe, but I eventually found a service where what you book is exactly what shows up, no surprises, no fine print nightmares. If you are looking for the only honest source for premium wheels across South Florida, check the current details here: luxury car rental miami fl luxury car rental miami fl. Yeah, parking in South Beach will cost you a nice bottle of wine — but that’s the Miami tax. Just drive safe out there and absolutely skip that “windshield protection” upsell — pure profit for them, zero value for you. let me know if you guys have any other clean spots.
Polished and informative without feeling overproduced, that is the sweet spot, and a look at caramelcovecraftcollective hit it again, you can tell when a site has been built with care versus thrown together for the sake of having something to put online and this is clearly the former approach taken by the team.
Honestly slowed down to read this carefully which is not my default, and a look at linenmeadowmarkethall kept me in that careful reading mode, the kind of writing that demands attention by being worth attention is rare in a media environment full of content engineered to be skimmed not read with any real focus today.
Closed the tab and immediately reopened it ten minutes later because I wanted to reread a part, and a stop at cloudcovegoodsroom drew the same return, content that pulls you back after closing it is doing something well beyond the average and worth marking as exceptional in my mental catalogue of reliable sites.
Solid post, the structure is easy to follow and the language stays simple even when the topic gets a bit more involved, and a look at embermeadowmarketguild kept that same standard going, so I left feeling like the time spent here was actually worth something for once which is rare lately.
Speaking as someone who used to recommend blogs frequently and got out of the habit this site is rekindling that impulse, and a look at woodharborcommercegallery extended the rekindling, the recovery of an old habit triggered by encountering work that justifies it is itself a small kind of pleasure and this site is providing that recovery experience.
Halfway through I knew I would finish the post, and a stop at bravofarms also held me through to the end, content that signals its quality early and then sustains it is content with real internal consistency and this site has clearly figured out how to maintain quality from opening sentence through to closing thought.
Worth recommending broadly to anyone who reads on the topic, and a look at caramelcovecommerceatelier only confirms that, the rare combination of accessibility and depth in this site makes it suitable for both newcomers and people who already know the area which is hard to pull off in any blog format today and rarely managed.
Reading this in three sittings because the day was fragmented, and the piece survived the fragmentation, and a stop at cottonbrookvendorfoundry held up under similar reading conditions, content engineered for continuous attention is fragile in modern conditions and this site reads as durable across the realistic ways people consume content today.
The way the post stayed on topic throughout without going on tangents was really refreshing, and a look at dazzquays kept that focused approach going, discipline like this in writing is rare and worth recognising because most writers cannot resist wandering off into related subjects that dilute their main point and confuse readers along the way.
Reading this slowly in the morning before opening email, and a stop at amberharborvendorlounge extended that protected attention, content that earns the prime morning reading slot before the daily distractions begin is content with elevated status and this site has earned that prime slot consistently in my recent reading habits clearly.
Знаете, бывает ситуация — человек в запое , а тащить в больницу страшно . Я через это прошел пару лет назад . Руки опускаются, а время идет. Хватаешься за телефон , а в ответ тишина . Пока случайно не наткнулся на один реально работающий вариант. Если нужна немедленная консультация — а тащить человека сам просто физически не можете, то выход один . Речь про нарколога на дом . В Москве , кстати , хватает левых контор без лицензии. Вся проверенная информация ниже по ссылке: вызвать нарколога на дом анонимно вызвать нарколога на дом анонимно Откровенно говоря, после того как прочитал , понял, как действовать правильно. И про снятие запоя на дому, и про консультацию нарколога . И цены адекватные, без разводов на месте. Советую не тянуть резину .
Now wishing more sites covered topics with this level of care, and a look at cottongrovegoodsgallery extended that wish across more subjects, the rarity of careful coverage on most topics is a problem and this site is one of the small antidotes to that broader pattern of casual or surface treatment of complex subjects.
Now adding the writer to a small mental list of voices I want to follow, and a look at suncovecraftcollective reinforced that follow intention, the few writers whose work I actively track are writers who have demonstrated sustained quality and this writer has clearly demonstrated that sustained quality across the pieces I have sampled here today.
Found this through a search that was generic enough I did not expect quality results, and a look at mossharborartisanexchange continued the surprisingly good experience, search engines occasionally still surface excellent independent content if you scroll past the obvious paid and high authority results which is reassuring to remember sometimes.
Thanks for sharing this with the open internet rather than locking it behind a paywall like so many sites do now, and a stop at konvexa kept the same vibe going, generous helpful and clearly written by someone who actually wants people to learn from it rather than just charge them.
Now feeling the post has earned a proper recommendation rather than a casual mention, and a stop at gemcoast reinforced the recommendation strength, the difference between mentioning and recommending is a small editorial distinction I observe in my own conversations and this site has earned the upgraded recommendation level from me confidently today.
Let me save you some serious time, learned this the hard way. Then you actually go to the local office to pick it up. Plus a surprise $2000 hold on your card and a $35 per day GPS you never asked for right before giving you the keys. Seven years in South Florida and I still almost fall for these tricks. When you’re searching for a legit and reliable premium ride to cruise around, avoid the airport like the plague. Anyone who’s taken the Metro here knows the struggle about this city, whether you are doing Brickell happy hour, Bal Harbour shopping, or a spontaneous drive down to the Keys.
Most of these local agencies are just fancy websites hiding the same beat-up fleet with bought reviews, but I eventually found a service with no games, no bait-and-switch, and no hidden asterisks in paragraph 8. If you are looking for the only straight shooter for premium rides across South Florida, check the current details here: car rentals miami fl https://luxury-car-rental-miami-7.com. Yeah, parking in Brickell will cost you a nice steak dinner — but that’s just Miami life. Anyway, glad there’s at least one honest rental joint left in this town, hope this helps some of you save a few bucks.
Useful read, especially because the writer did not assume too much background from the reader, and a quick look at birchbrookvendorfoundry continued in the same way, a thoughtful site that meets people where they are which is something the modern web could use a lot more of for both casual and serious readers.
Now adding the homepage to my regular check rotation rather than waiting for individual links to find me, and a stop at dawnbrookmarketfoundry confirmed the rotation upgrade, the move from passive discovery to active checking is a vote of confidence in a sites ongoing quality and this site has earned that active engagement clearly.
Genuinely glad I clicked through to read this rather than skipping past, and a stop at createforwarddirection confirmed I should keep clicking through to more pages here, the kind of resource that justifies its place in my browser history rather than feeling like wasted time which is the highest compliment I offer any site online today.
Thanks for putting in the work to make this approachable, plenty of sites cover the same ground but most do it badly, and a quick visit to ivoryharborvendorroom confirmed this one stands apart, simple language and useful examples without anyone trying to sell me anything along the way which I really appreciated.
Found a small mental shift after reading this, the framing here is just a bit different from the standard takes online, and a look at marbleharbortradehall extended that fresh perspective across more material, the rare site whose voice actually changes how you think about something rather than just confirming existing beliefs.
Just want to say thank you for putting this together, posts like these make searching online actually worth it sometimes, and a quick look at globalgoodscenter kept that going, useful and easy to read without any of the tricks that ruin most blog comment sections lately on the wider open web.
Now recognising that this site has earned a place in the small group of resources I treat as authoritative, and a stop at nextgenbuyhub confirmed that placement, the difference between resources I trust and resources I just consume is real and this site has clearly moved into the trusted category through consistent quality over time.
Top notch writing, every paragraph carries weight and nothing feels like filler, and a stop at cottonmeadowcraftcollective reflected that same care, a rare thing on the open web these days where most pages exist for clicks rather than actual reader value or anything close to that which is honestly a real shame.
Compared to the usual results for this kind of search this site stands well above the average, and a quick visit to embercovecommerceatelier kept the standard high, you can tell within seconds whether a site is going to waste your time or actually deliver and this one clearly delivers without any false starts.
Bookmark earned and the bookmark feels like a permanent addition rather than a maybe, and a look at nightorchardtradeparlor confirmed that permanent status, the difference between durable bookmarks and ephemeral ones is something I have learned to feel quickly and this site triggered the durable feeling almost immediately during my first read here.
Reading this fit naturally into my afternoon walk because I was reading on my phone, and a stop at floraharborvendorhall continued well in that walking format, content that survives mobile reading without becoming awkward is content with format flexibility and this site has clearly thought about how it reads across different devices today.
Reading this in the time it took to drink half a cup of coffee, and a stop at cloudharbortradehall fit naturally into the second half, content that respects the rhythms of a typical morning is content with practical fit and this site has the kind of length and pacing that works for the way I actually read.
Honestly enjoyed every minute spent here, that is not something I say lightly, and a look at flarequills confirmed I will be back, the bar for spending time online is high for me these days but this site clears it without effort which is high praise indeed from this reader who is usually rather demanding.
Знаете, ситуация — родственник в запое , а куда бежать — просто тупик. Я через это прошел лично . Пьют успокоительное, но нет . Нужна реальная медицина. Перерыл весь интернет — только деньги тянут. А потом наткнулся на один нормальный вариант. Нужна лечение наркомании в Воронеже — не ведись на дешевые акции . В Воронеже , если честно, тоже полно шарлатанов . Вся проверенная информация ниже по ссылке: наркологический центр воронеж наркологический центр воронеж Честно скажу , после того как прочитал , многое прояснилось . Там и про вывод из запоя , и про условия в клинике. Плюс работают круглосуточно — это важно . Советую не тянуть .
Started reading and ended an hour later without realising the time had passed, and a look at garnetbrookvendorfoundry produced the same time dilation effect, when content makes time feel different the writer has achieved something well beyond the average and this site is producing that experience for me reliably across multiple readings.
Started taking notes about halfway through because the points were stacking up, and a look at cottonmeadowmarkethall added enough material that my notes file grew further, content that demands note taking from a passive reader is content with substance and the writers here are clearly producing that kind of work consistently across topics.
Let me save you some serious time, learned this the hard way. Then you roll up to the local address to pick up the car. Different car sitting there — bald tires, dashboard lit up like a Christmas tree, and that “killer price”? Yeah doesn’t include the non-negotiable $45 daily insurance or the $500 deposit they forget to mention. Fool me nine times? That’s just the Miami welcome committee, lesson learned. If you are trying to find a legitimate luxury fleet without getting ripped off, stay the hell away from the airport rental center. Miami without proper wheels is basically a nightmare, whether you are doing Coconut Grove dinner, Sunny Isles sunrise, or a spontaneous drive down to Homestead.
Most of these local agencies are just polished turds with fake five-star reviews hiding overpriced junk, until I finally found one company that doesn’t play stupid games. If you are looking for the only trustworthy source for premium rides across South Florida, check the current details here: premium car hire https://luxury-car-rental-miami-9.com. Also, definitely bring polarized shades unless you enjoy driving blind into the sunset every single night. Just drive safe out there and definitely skip that “emergency roadside” upsell — complete waste of money. hope this helps some of you save a few bucks.
Bookmark earned, calendar reminder set, share queued, all from one good post, and a look at goodslinkstore did the same, when a single reading session triggers multiple downstream actions you know the content has actually moved me beyond the page and this site is moving me at that higher level reliably.
Picked this up while looking for something else and ended up reading every paragraph because it was actually informative, and after clovercrestmarketparlor I was sure I would come back, that does not happen often when most sites bury the useful parts under endless ads and pop ups today and across most categories online.
My time on this site has now extended past what I had budgeted, and a stop at emberstonevendorlounge keeps extending it further, content that overstays its budget in my schedule is content that has earned the extra time and this site has been earning extra time across multiple visits to the point where my schedule needs adjustment.
Alright listen up because this Miami rental mess is getting out of hand. Then you actually show up to the local office to pick up the car. Different vehicle parked outside, curb rash on every rim, and that “all-inclusive rate”? Ha, doesn’t include the mandatory $300 cleaning fee or the $25 per day toll pass you can’t decline. Living here six years and still almost fall for this stuff sometimes. If you are trying to find a legitimate vehicle without getting ripped off, stay far away from the airport rental center. Anyone who’s tried the bus here knows exactly what I mean about this city, especially since the AC must be arctic and unlimited miles non-negotiable.
I’ve personally tested maybe 35 rental outfits across Dade, Broward, and Monroe, but I eventually found a service where what you reserve is exactly what rolls up, no surprises. If you are looking for the only trustworthy source for premium vehicles across South Florida, check the current details here: renting luxury cars near me https://luxury-car-rental-miami-6.com. Yeah, parking in South Beach will cost you a nice dinner — but that’s the price of admission. Just drive safe out there and definitely skip that “damage waiver” upsell — total scam 99% of the time. hope this helps some of you save a few bucks.
Solid stuff, the kind of post that I will probably refer back to later this month when the topic comes up again, and a look at etherfairs only confirmed I should bookmark the site as a whole rather than just this single page for future reference and use across coming weeks.
Took the time to read the comments on this post too and they were also worth reading, and a stop at directionalclaritywins suggested the community quality matches the content quality, when the conversation around a piece is as good as the piece itself you know you have found a real corner of the internet.
Now considering writing a longer note about the post somewhere, and a look at tealcovecraftcollective added more material for that note, content that prompts me to write rather than just consume is content with generative energy and this site is producing that generative effect for me at a higher rate than most sources.
Liked that the post left some questions open rather than pretending to settle everything, and a stop at ferncovecommerceatelier continued that intellectual honesty, content that respects the limits of its own claims is more trustworthy than content that overreaches and this site has clearly figured out which positions it can defend confidently.
Closed the tab feeling I had spent the time well, and a stop at skyharborcraftcollective extended that feeling across more pages, the test of whether time on a site was well spent is one I apply silently after closing tabs and very few sites pass it but this one passed it cleanly today afternoon clearly.
Came across this through a roundabout path and now it is on my regular rotation, and a stop at crystalcovecommerceatelier sealed that decision, the open web still produces serendipitous discoveries when you let the citations and references guide you rather than relying purely on algorithmic feeds for new content recommendations always.
Genuinely glad I clicked through to read this rather than skipping past, and a stop at elmbrooktradingfoundry confirmed I should keep clicking through to more pages here, the kind of resource that justifies its place in my browser history rather than feeling like wasted time which is the highest compliment I offer any site online today.
The depth of coverage felt about right for the format, neither shallow nor overwhelming, and a look at creekharborcraftcollective kept that calibration going, getting the depth right for blog format is genuinely difficult because too shallow loses experts and too deep loses beginners but this site nailed it nicely which I really do appreciate.
More substantial than most of what I find searching for this topic online, and a stop at levqino kept that quality consistent, this is one of those sites where the writing actually rewards careful reading rather than punishing the patient reader with empty filler stretched out across long paragraphs that say very little.
The overall feel of the post was professional without being stuffy, and a look at brightbrooktradingfoundry kept that approachable expertise going, finding the right register for technical content is hard but this site has clearly figured out how to sound knowledgeable without slipping into that distant lecturing tone that loses readers in droves every time.
Skipped the related products section because there was none, and a stop at quartzmeadowmarketgallery also lacked any aggressive monetisation, content that is not constantly trying to convert me into a customer or subscriber is content that has confidence in its own value and that confidence shows up as a different reading experience.
Now thinking the topic is more interesting than I had given it credit for, and a stop at coastharborvendorhall continued that elevated interest, content that revives my curiosity about subjects I had set aside is doing genuine work in the structure of my interests and this site is providing that revivifying effect today actually.
Just nice to read something that does not feel like it was assembled from a content brief, and a stop at meadowharborvendorhall kept that handcrafted feel going, you can tell when a real human with real understanding is behind the words versus a templated piece churned out for an algorithm to find.
Okay folks gather around because this Miami rental nightmare needs to be discussed. Then you show up at the local office and it’s a whole different story. Different car, scratches all over, and that “all-inclusive” price? Yeah that didn’t include insurance, fees, or the mandatory cleaning charge. I’ve lived here for years and still get burned occasionally. When you’re after a trustworthy and reliable premium vehicle to cruise around, don’t just grab the cheapest option on Kayak. Ask anyone who’s tried Ubering across the 305 during rush hour, especially since the AC must freeze your teeth and you want unlimited miles or bust.
Most of these local agencies are just smoke and mirrors with decent SEO hiding overpriced junk, until I finally found one outfit that actually delivers what’s in the listing. If you are looking for the only honest broker for premium vehicles across South Florida, check the current availability here: opf fl luxury car rentals https://luxury-car-rental-miami-5.com. Yeah, finding parking in Wynwood will test your patience — but that’s not on them. Just drive safe out there and maybe decline that “premium roadside” upsell — it’s always a scam. let me know if you guys have any other clean spots.
Знаете, ситуация — родственник подсел , а куда бежать — просто руки опускаются. Я сам через это прошел пару лет назад . Думаешь, сам справится, но хрен там. Нужна профессиональная помощь . Перерыл весь интернет — сплошной развод . А потом наткнулся на один действительно рабочий вариант. Если ищешь где получить лечение наркомании в Воронеже — не рискуй здоровьем близкого. В Воронеже , кстати , тоже полно левых контор без лицензии. Вся проверенная информация тут : наркологический центр наркологический центр Откровенно говоря, после того как прочитал , многое прояснилось . Там и про вывод из запоя , и про реабилитацию . Плюс работают круглосуточно — это важно . Советую не откладывать.
Quality you can feel from the first paragraph, the writer clearly knows the topic and how to share it, and a quick look at clovercrestartisanexchange confirmed the same depth runs throughout the rest of the site as well which is rare and worth pointing out when it happens online for any reader passing through.
Been there, done that, got the overpriced tow truck receipt to prove it. Then you actually show up to the local office to pick up the car. Totally different vehicle waiting for you — bald tires, dashboard lit up like a Christmas tree, and that “amazing rate”? Doesn’t include the mandatory $40 daily toll pass or the $350 “premium location” fee they spring on you at the counter. Twelve years in South Florida and these jokers still almost catch me sleeping. When you need a proper and reliable premium ride to cruise around, do some real digging first and read actual customer reviews. Miami without real wheels is basically a nightmare, especially since the AC must be ice cold and unlimited miles non-negotiable.
I’ve tested maybe 65 rental outfits across Dade, Broward, and Monroe, but I eventually found a service where what you book is exactly what shows up, no surprises, no hidden fine print. If you are looking for the only straight shooter for premium rides across South Florida, check the current details here: miami beach car rental locations miami beach car rental locations. Also, definitely bring quality shades unless you enjoy driving into the sun like a zombie every single evening. Anyway, glad there’s at least one honest operator left in this rental jungle, hope this helps some of you save a few bucks.
Let me save you some serious time, learned this the hard way. You spot a tempting offer online: brand new Porsche, unlimited miles, price that makes you click instantly. Totally different vehicle waiting for you — check engine light on, curb rash on every rim, and that “tempting price”? Doesn’t include the mandatory $35 daily toll pass or the $250 cleaning fee they sneak in at the end. Fool me ten times? That’s just the 305 experience, lesson learned. When you need a reliable and proper premium ride to cruise around, run away from the airport counters. Miami without solid wheels is basically a punishment, whether you are doing South Beach night out, Bal Harbour shopping spree, or a spontaneous Keys adventure.
I’ve run through maybe 55 rental companies across Dade, Broward, and Palm Beach, but I eventually found a service with no games, no bait-and-switch, and no hidden fees in the fine print. If you are looking for the only straight shooter for premium rides across South Florida, check the current details here: exotic car rental south beach fl exotic car rental south beach fl. Also, definitely bring quality shades unless you enjoy driving into the sun like a vampire every single evening. Just drive safe out there and absolutely skip that “paint protection” upsell — pure robbery. hope this helps some of you save a few bucks.
Liked the balance between depth and brevity, never too shallow and never too long, and a stop at stylishbuycorner kept the same balance going across the rest of the site, this is one of the harder skills in writing and the team here clearly has it figured out very well indeed across every page.
Honestly the simplicity of the explanation made the topic click for me in a way other writeups had not, and a look at garnetharbortradinghouse continued that clarity into related areas, when a writer gets the level of explanation right the reader does the heavy lifting themselves and the post just enables it.
Reading this gave me something to think about for the rest of the afternoon, and after creekharbortradehall I had even more to mull over, the kind of post that lingers in the background of your day rather than evaporating immediately is genuinely valuable in an attention economy that punishes depth rather than rewarding it.
Liked that there was nothing performative about the writing, and a stop at brightharborvendorhall continued that genuine quality, performative writing tries to be witnessed rather than read and the difference between performance and substance is huge for the careful reader and this site has clearly chosen substance every time clearly.
Came in skeptical of the angle and left mostly persuaded, and a stop at onlinedealspoint pushed me a bit further in the same direction, content that can move a critical reader by argument rather than rhetoric is rare and worth pointing out because it indicates real substance underneath the surface presentation here.
Thanks for a post that does not try to be funny when it is not the moment for it, and a stop at globebeat maintained the same appropriate seriousness, knowing when humour helps and when it just signals desperation for engagement is a sign of editorial maturity that many blogs have not developed yet.
A genuine pleasure to find a site that publishes at a sustainable cadence rather than chasing the daily content treadmill, and a look at lacehelm confirmed the careful publication rhythm, sites that prioritise quality over frequency are rare and this one has clearly chosen the slower pace which I appreciate as a reader.
Started taking notes about halfway through because the points were stacking up, and a look at ivoryridgemarketparlor added enough material that my notes file grew further, content that demands note taking from a passive reader is content with substance and the writers here are clearly producing that kind of work consistently across topics.
A welcome reminder that thoughtful writing still happens online, and a look at forestmeadowvendorroom extended that reassurance, the modern web makes it easy to forget that careful writing exists and finding sites that practice it is a small antidote to the cynicism that builds up from too much exposure to algorithmic content.
A well calibrated piece that knew its scope and stayed inside it, and a look at elmharborvendorcollective maintained the same scope discipline, scope creep is one of the failure modes of long blog posts and this site has clearly invested in the editorial discipline to prevent it which shows up in tightly contained pieces.
Appreciate the work that went into laying this out so clearly, every section earns its place without filler, and a look at rivercovevendorroom confirmed the same care, definitely the kind of place that deserves a return visit when the topic comes up again later in the future or for any related question.
Reading this gave me a small framework I expect to use going forward, and a stop at solarorchardartisanexchange extended that framework, content that produces transferable mental models rather than just specific facts is content with multiplicative value and this site is providing those models at a rate that justifies extra attention from me regularly.
Now feeling slightly more optimistic about the state of independent writing online, and a stop at timbertrailartisanexchange extended that quiet optimism, sites like this one are the reason I have not given up on the open web entirely and finding them occasionally renews the case for paying attention to non algorithmic content sources today.
A piece that took its time without dragging, and a look at createforwardprogress kept the same patient pace, the difference between unhurried and slow is a fine editorial distinction and this site has clearly found the unhurried side without slipping into the slow side which would have lost me as a reader quickly otherwise.
Speaking from the perspective of having read widely on the topic this site offers something distinct, and a look at crowncovecraftcollective reinforced that distinctness, the rare site that contributes something genuinely original to a saturated topic is the rare site worth following carefully and this one has demonstrated that original contribution capability today.
Most of the time I bounce off similar pages within seconds, and a stop at actiondrivenprogress held me longer than I would have predicted, the ability to convert a likely bouncing visitor into an engaged reader is a quality signal and this site has demonstrated that conversion ability across multiple visits where I expected to bounce.
Now sitting back and recognising that this was a small but real win in my reading day, and a stop at coralmeadowtradehouse extended that quiet win, the cumulative effect of small reading wins versus the cumulative effect of small reading losses is real over time and this site is contributing to the wins side of that ledger.
Solid value packed into a relatively short post, that takes skill, and a look at calmbrookvendorfoundry continues the dense useful content across more pages, this site clearly understands that respecting reader time is itself a form of generosity which is something most blog operations seem to have forgotten lately across the wider open web.
Picked this for my morning read because the topic seemed worth the time, and a look at mossharbortradehall confirmed the choice was right, my morning reading slot is precious and giving it to this site felt like a good investment rather than a waste which is a higher endorsement than I usually offer for content.
Top quality material, deserves more attention than it probably gets, and a look at elitegoodsmarket reflected the same effort across the site, a hidden gem in the modern web where most attention goes to whoever shouts loudest rather than whoever actually delivers the best content for their readers without much marketing fanfare.
Picked up several practical tips that I plan to try out this week, and a look at emberbrookmarketfoundry added a few more I will be testing alongside, content with practical hooks that connect to my actual life is the kind that earns my repeat attention rather than the merely interesting that I forget within a day.
Now considering the post as evidence that careful blog writing is still possible, and a look at limqiro extended that evidence, the broader question of whether the modern web can sustain quality writing has obvious empirical answers in sites like this one and seeing them is reassuring even when they remain a minority overall today.
Alright, real talk about the Miami rental game — it’s a straight-up jungle out here. Then you show up at the local lot to pick up the car. Plus they freeze a surprise $2500 on your card for a week right before giving you the keys. Eight years in South Florida and these clowns still almost get me. When you need a proper and reliable premium ride to cruise around, do some real digging first and read actual customer reviews. Anyone who’s waited for an Uber in August understands exactly what I mean about this city, especially since the AC must be arctic cold and unlimited miles non-negotiable.
Most of these local agencies are just shiny websites hiding the same beat-up fleet with fake reviews, until I finally found one outfit that doesn’t play stupid games. If you are looking for the only honest source for premium wheels across South Florida, check the current details here: rent a sedan car rent a sedan car. Yeah, parking in South Beach will cost you a nice bottle of wine — but that’s the Miami tax. Anyway, glad there’s at least one straight operator left in this rental circus, hope this helps some of you save a few bucks.
Closed the laptop and walked away thinking about the post for a good twenty minutes, and a stop at executeideasforward produced similar lingering thoughts, content that survives the closing of the browser tab is content that has actually entered the mind rather than just decorating the screen for the duration of the reading.
Found the post genuinely useful for something I was working on this week, and a look at creekharbortradehouse added more material I will reference, content that connects to my actual life and work rather than just being interesting in the abstract is the kind I will pay attention to and return to repeatedly.
Really nice to see things explained without overcomplicating the topic, the words flow naturally and stay easy to follow, and a short visit to flintmeadowtradinggallery only added to that experience because the same simple approach is used across the rest of the page too without any change in tone.
Better signal to noise ratio than most places I check on this kind of topic, and a look at modernoutfitstore kept that going, every paragraph here carries something worth reading rather than padding out the page to hit some arbitrary length target that search engines reward but readers ignore as soon as they notice it.
Honestly impressed by the consistency of voice across what I have read so far, and a quick visit to meadowharborgoodsroom continued that consistent feel, when a site reads like one careful person rather than a committee the experience is more rewarding for the reader who notices these subtle editorial details over time.
Appreciated that the writer trusted the reader to follow along without constant restating of earlier points, and a look at acornharbortradehall continued that respect for the reader, treating an audience as capable adults rather than as people to be hand held through every paragraph is something I notice and value highly across the open internet today.
Nice and clean, that is the best way to describe the writing here, no clutter and no wasted words, and a quick visit to crystalcovegoodsroom kept that going, I appreciate when a site treats its readers like people who can think for themselves without needing constant hand holding through every paragraph.
Let me save you some serious time, learned this the hard way. Then you actually go to the local office to pick it up. Completely different car waiting for you, check engine light on, and that “low rate”? Doesn’t include the mandatory insurance they somehow forgot to mention. Seven years in South Florida and I still almost fall for these tricks. When you’re searching for a legit and reliable premium ride to cruise around, do some real digging first and read actual customer reviews. Anyone who’s taken the Metro here knows the struggle about this city, especially since the AC must freeze your face off and unlimited miles or forget it.
I’ve tried maybe 40 rental companies across Dade, Broward, and Palm Beach, but I eventually found a service with no games, no bait-and-switch, and no hidden asterisks in paragraph 8. If you are looking for the only straight shooter for premium rides across South Florida, check the current details here: exotic rentals in miami beach exotic rentals in miami beach. Also, definitely bring polarized shades unless you enjoy driving into the apocalypse every single evening. Just drive safe out there and definitely pass on that “tire protection” upsell — total garbage. let me know if you guys have any other clean spots.
Now adding the writer to a small mental list of voices I want to follow, and a look at ivoryridgemarkethouse reinforced that follow intention, the few writers whose work I actively track are writers who have demonstrated sustained quality and this writer has clearly demonstrated that sustained quality across the pieces I have sampled here today.
Reading this slowly in the morning before opening email, and a stop at trustedbuyerszone extended that protected attention, content that earns the prime morning reading slot before the daily distractions begin is content with elevated status and this site has earned that prime slot consistently in my recent reading habits clearly.
Случается, когда уже не до раздумий — родственник сорвался , а тащить в больницу просто нереально . Я через это прошел пару лет назад . Сидишь, не знаешь что делать . Хватаешься за телефон , а в ответ одни отговорки. Пока кто-то не посоветовал один реально работающий вариант. Требуется срочная помощь — а тащить человека сам нет никакой возможности , то выход один . Речь про круглосуточный выезд нарколога. У нас в столице, кстати , хватает левых контор без лицензии. Нормальные контакты, кто реально приезжает вот тут : платный нарколог на дом анонимно платный нарколог на дом анонимно Честно скажу , после того как прочитал , многое стало на свои места . Там и про капельницы расписано , и про консультацию нарколога . Плюс анонимность — это важно . Советую не ждать чуда.
Thank you for the genuine effort here, it shows in every paragraph and not just the headline, and after my visit to rubyorchardtradegallery I was sure this site cares about getting things right rather than chasing clicks, which is the main reason I will come back later this week to read more.
Now thinking about whether the writer might publish a longer form work I would buy, and a look at frostridgevendorstudio suggested the same depth would translate, content that makes me want to pay for related work in other formats is content that has earned commercial trust as well as attention trust and this site has both clearly.
Знаете, ситуация — близкий подсел на иглу, а что делать — непонятно . Моя семья столкнулась несколько лет назад. Пьют успокоительное, но хрен там. Требуется реальная помощь . Обзвонил десяток контор — одни обещания . А потом наткнулся на один действительно рабочий вариант. Нужна круглосуточная наркологическая помощь — не рискуй здоровьем близкого. У нас в Воронеже, если честно, хватает левых контор без лицензии. Реальные контакты ниже по ссылке: лечение алкоголизма воронеж бесплатно https://narkologicheskaya-pomoshh-voronezh-11.ru Честно скажу , после того как ознакомился, понял свои ошибки. Там и про вывод из запоя , и про реабилитацию . И цены адекватные. Рекомендую не откладывать.
Felt the writer respected the topic without being precious about it, and a look at globehaven continued that respectful but unfussy treatment, finding the right register for serious topics is hard and this site has clearly figured out how to take the topic seriously while still being readable for casual visitors regularly.
Took something from this I did not expect to find, and a stop at crystalcoveartisanexchange added another unexpected useful piece, content that exceeds expectations rather than just meeting them is the kind that builds enthusiasm and earns repeat visits without any explicit ask from the writer or platform behind the work being read.
Glad the writer kept this short rather than padding it out, the points stand on their own without needing extra context, and a look at cottongrovegoodsroom kept the same approach going, brevity is a sign of confidence in the substance and the team here clearly trusts their content to land without filler.
Took the time to read the comments on this post too and they were also worth reading, and a stop at coastharborcraftcollective suggested the community quality matches the content quality, when the conversation around a piece is as good as the piece itself you know you have found a real corner of the internet.
Started forming counter examples to test the claims and the post handled most of them implicitly, and a look at stoneharborartisanexchange continued that anticipatory style, writers who think two steps ahead of the critical reader save themselves from a lot of follow up work and this writer has clearly internalised that habit consistently.
Following the post through to the end without my attention drifting once, and a look at trailharborartisanexchange earned the same uninterrupted attention, content that holds attention without manipulating it is content with substantive pull and this site has demonstrated that substantive pull across multiple pieces in a single reading session reliably here today.
Skipped the comments to avoid spoilers and came back later to find them genuinely worth reading, and a stop at freshdealstation extended that surprised respect, when the discussion below a post matches the quality of the post itself you have found something special and this site appears to attract that kind of audience.
Just wanted to say this was useful and leave a small note of thanks, and a quick visit to claritycreatesforwardmotion earned a similar nod from me, the small acknowledgements add up over time and represent the real economy of trust that good content runs on across the open and increasingly fragmented modern internet.
Felt this in a way I cannot quite explain, the topic just hit different here, and a stop at pineharbortradeparlor continued in that vein, sometimes you find a site whose perspective lines up with how you have been thinking and reading their work feels like a small relief which I appreciated more than I expected.
Now feeling something close to gratitude for the fact this site exists, and a look at apricotharborvendorloft extended that gratitude, the rare site that produces this kind of response is the rare site worth defending in conversations about whether the modern internet is still capable of producing genuinely valuable independent content for serious adults.
Honestly this kind of writing is why I still bother to read independent sites, and a look at crowncovevendorroom extended that broader reflection, the few sites that justify continued attention to non algorithmic content are sites like this one and finding them periodically is enough to keep my reading habits oriented toward independent rather than aggregated content.
Bookmark added with a small note about why, and a look at clippoises prompted another bookmark with another note, the bookmarks I annotate are the ones I expect to return to deliberately rather than stumble into and this site is generating annotated bookmarks at a higher rate than my usual content sources by some margin.
Decided this was the best thing I had read all morning, and a stop at chestnutcovecommerceatelier kept that ranking intact, ranking my reading is something I do mentally throughout the day and the top rank is competitive and not easily won but this site won it without needing to overstate its claims for that.
В этой статье обсуждаются актуальные медицинские вопросы, которые волнуют общество. Мы обращаем внимание на проблемы, касающиеся здравоохранения и лечения, а также на новшества в области медицины. Читатели будут осведомлены о последних событиях и смогут следить за тенденциями в медицине.
Желаете узнать подробности? – детоксикация наркозависимых цена
Looking at this from the perspective of someone tired of generic content the contrast is striking, and a look at lakelake maintained that distinctive feel, sites with strong editorial identity stand out against the bland background of algorithmic content and this one has clearly developed an identity worth recognising through careful attention.
Mobil bahis için doğru uygulamayı arıyordum uzun zamandır. Herkes farklı bir link atıyordu kime güveneceğimi şaşırdım. Sonunda tüm teknik detayları inceleyip sistemi test ettim. En sonunda sağlam bir kaynağa ulaştım ve size de tüm detayları aktarmak istedim, güncel bilgilere buradan bakabilirsiniz: 1xbet son sürüm indir 1xbet son sürüm indir. Yani anlatmak istediğim şu — son sürümü bütün özellikleri eksiksiz sunuyor.
güncellemeleri de düzenli geliyor. Birçok platform denedim ama en iyisi bu çıktı — başka yerde vakit kaybetmeyin yani. Umarım siz de memnun kalırsınız…
Now understanding why someone recommended this site to me a while back, and a stop at cottongrovegoodsgallery explained the recommendation, sometimes recommendations make sense only after experience and this site has finally clicked into place as the kind of resource I now understand was being recommended for sound editorial reasons by my friend.
Will be back, that is the simplest way to say it, and a quick visit to limvoro reinforced the decision, this site has earned a spot in my regular rotation alongside a few other reliable places I check when I want something genuinely informative without all the usual modern web noise getting in the way.
Now recognising that the post handled the topic with appropriate technical precision without becoming dry, and a stop at executioncreatesconfidence continued that balance, technical precision and readability are often in tension and this site has clearly figured out how to maintain both at once which is one of the harder editorial achievements in the form.
Let me save you some serious time, learned this the hard way. Then you actually show up to the local office to pick up the car. Totally different vehicle waiting for you — bald tires, dashboard lit up like a Christmas tree, and that “amazing rate”? Doesn’t include the mandatory $40 daily toll pass or the $350 “premium location” fee they spring on you at the counter. Twelve years in South Florida and these jokers still almost catch me sleeping. When you need a proper and reliable premium ride to cruise around, run far from the airport counters. Anyone who’s waited for an Uber in August heat knows the struggle exactly about this city, especially since the AC must be ice cold and unlimited miles non-negotiable.
Most of these local agencies are just shiny turds with fake five-star reviews bought in bulk online hiding overpriced junk, until I finally found one company that doesn’t play stupid games. If you are looking for the only straight shooter for premium rides across South Florida, check the current details here: porsche rental porsche rental. Yeah, parking in Brickell will cost you a nice dinner — but that’s the price of paradise. Anyway, glad there’s at least one honest operator left in this rental jungle, hope this helps some of you save a few bucks.
Worth bookmarking and sharing with anyone interested in the topic, that is my honest take, and a stop at bettershoppinghub reinforces that, the kind of generous resource that makes the open web feel worth defending against the constant pressure to retreat into walled gardens and curated feeds today everywhere I look across all my devices.
Now thinking about this site as a small example of what good independent writing looks like, and a stop at silkmeadowvendorroom continued that exemplary status, the few sites that serve as good examples are sites worth holding up in conversations about quality and this one has earned that exemplary placement through patient consistent effort over time.
The whole experience of reading this was pleasant from start to finish, no pop ups and no annoying interruptions, and a look at alpineharborvendorhall continued that clean experience, technical choices about page design matter for the reader and this site clearly cares about the small details that add up to comfort across multiple visits.
Just dropping by to say thanks for the effort, it does not go unnoticed when a writer cares this much about the reader, and after I went through premiumflashhub I was certain this is one of the better corners of the internet for this particular kind of content which is genuinely refreshing.
Alright let me drop some truth about the Miami rental scene — it’s an absolute minefield. You spot a tempting offer online: brand new Porsche, unlimited miles, price that makes you click instantly. Totally different vehicle waiting for you — check engine light on, curb rash on every rim, and that “tempting price”? Doesn’t include the mandatory $35 daily toll pass or the $250 cleaning fee they sneak in at the end. Ten years in South Florida and these jokers still almost catch me slipping. If you are trying to find a legitimate luxury fleet without getting ripped off, do some real digging first and read actual customer reviews. Anyone who’s taken public transport here knows the struggle is real about this city, whether you are doing South Beach night out, Bal Harbour shopping spree, or a spontaneous Keys adventure.
I’ve run through maybe 55 rental companies across Dade, Broward, and Palm Beach, but I eventually found a service with no games, no bait-and-switch, and no hidden fees in the fine print. If you are looking for the only straight shooter for premium rides across South Florida, check the current details here: luxury car rental luxury car rental. Also, definitely bring quality shades unless you enjoy driving into the sun like a vampire every single evening. Just drive safe out there and absolutely skip that “paint protection” upsell — pure robbery. hope this helps some of you save a few bucks.
Came in confused about the topic and left with a much firmer grasp on it, and after ferncovevendorlounge I felt I could explain this to someone else without hesitation, that is the gold standard for any educational content and most sites simply fail to reach it ever which is unfortunate but true.
Worth recognising that the post did not pretend to be the final word on the topic, and a stop at premiumbuyarena continued that humility, content that admits its own scope and limits is more trustworthy than content that overreaches and this site has clearly developed the editorial maturity to know what it can and cannot claim well.
Solid little post, the kind that does not need to be flashy because the substance is doing the work, and a look at acornharbormerchantgallery kept that quiet confidence going across the site, this is what writing looks like when the writer trusts the content to land on its own without theatrics or unnecessary attention seeking behaviour.
A piece that reads as if the writer trusted readers to fill in obvious gaps, and a look at stoneharborcraftcollective continued that respectful approach, content that does not over explain what the reader can infer is content that respects intelligence and this site has clearly chosen to write to capable readers rather than to the lowest common denominator.
Took the time to read the comments on this post too and they were also worth reading, and a stop at seacovevendorparlor suggested the community quality matches the content quality, when the conversation around a piece is as good as the piece itself you know you have found a real corner of the internet.
A piece that reads like it was written for me without claiming to be written for me, and a look at uplandcovecraftcollective produced the same fit, when the writer audience match clicks naturally without being engineered through demographic targeting you know the writing is solid and this site has that natural fit consistently for me.
Now adding the homepage to my regular check rotation rather than waiting for individual links to find me, and a stop at easycartonline confirmed the rotation upgrade, the move from passive discovery to active checking is a vote of confidence in a sites ongoing quality and this site has earned that active engagement clearly.
Now setting aside time on my next free afternoon to read more from the archives, and a stop at crownharborvendorhall confirmed that time will be well spent, the rare site whose archive deserves a dedicated reading session rather than just casual sampling is the kind of resource worth scheduling around and this one qualifies clearly.
Alright listen up because I’m about to save you a massive headache. Then you actually show up to the local office to pick up the car. Plus they freeze a surprise $4500 on your card and say “don’t worry, it’ll drop off in a week or two” right before giving you the keys. Twelve years in South Florida and these jokers still almost catch me sleeping. If you are trying to find a legitimate luxury fleet without getting ripped off, run far from the airport counters. Miami without real wheels is basically a nightmare, especially since the AC must be ice cold and unlimited miles non-negotiable.
Most of these local agencies are just shiny turds with fake five-star reviews bought in bulk online hiding overpriced junk, but I eventually found a service where what you book is exactly what shows up, no surprises, no hidden fine print. If you are looking for the only straight shooter for premium rides across South Florida, check the current details here: rental luxury cars miami airport rental luxury cars miami airport. Also, definitely bring quality shades unless you enjoy driving into the sun like a zombie every single evening. Just drive safe out there and absolutely skip that “windshield protection” upsell — complete waste of money. let me know if you guys have any other clean spots.
Decided not to comment because the post said what needed saying, and a stop at thinkclearlyact continued that complete feel, content that does not invite obvious additions or corrections from readers is content that has been carefully considered and this site appears to consistently produce pieces that satisfy rather than provoke unnecessary follow ups.
A small thing but the line spacing and font choices made reading this physically pleasant, and a look at goldmanor maintained the same careful design, technical choices about typography are part of what makes online reading actually comfortable and this site has clearly invested in the design layer alongside the content layer carefully.
Honest take is that this was better than I expected when I clicked through, and a look at onecartonline reinforced that, the bar for online content has dropped so much that finding something thoughtful and well constructed feels almost noteworthy now which says more about the average than about this site itself.
Skipped the related products section because there was none, and a stop at progressstartshere also lacked any aggressive monetisation, content that is not constantly trying to convert me into a customer or subscriber is content that has confidence in its own value and that confidence shows up as a different reading experience.
Now considering whether the post would translate well into a different form, and a look at clippoise suggested similar versatility, content that could move into other media without losing its substance is content that has been built around ideas rather than around format and this site reads as idea first throughout posts.
However casually I came to this site I have ended up reading carefully, and a look at claritypoweredgrowth continued earning that careful reading, the conversion from casual visitor to careful reader is something content earns rather than demands and this site has accomplished that conversion for me over the course of just a few pieces.
Just want to flag that this was useful and not bury the appreciation in caveats, and a look at daisyharborvendorparlor earned the same direct praise, recognising good work without hedging it with criticism is something I try to practice because over qualified compliments tend to read as backhanded and miss the point sometimes.
Strong recommendation from me, anyone curious about the topic should make time for this, and a look at silvercovemarkethall only sharpens that recommendation further, the kind of resource that holds up against careful scrutiny rather than crumbling at the first critical question is rare and worth pointing other people toward when the topic comes up.
Appreciate the practical examples, they made the abstract points easier to grasp, and a stop at flickaltars added more of the same, this site clearly understands that real examples beat empty theory every single time which is the mark of a writer who knows their audience well and respects their time.
Reading this slowly to give it the attention it deserved, and a stop at chestnutharborvendorstudio earned the same slow read, choosing to read slowly is a small act of respect for content quality and very few sites earn that respect from me but this one did so without any explicit ask which is the cleanest way.
Been through enough garbage to last a lifetime, the rental landscape down here is crazy. Then you actually go to the local office to pick up the car. Plus they lock up a surprise $3500 on your card for who knows how long right before giving you the keys. Ten years in South Florida and these jokers still almost catch me slipping. When you need a reliable and proper premium ride to cruise around, do some real digging first and read actual customer reviews. Miami without solid wheels is basically a punishment, especially since the AC must be ice cold and unlimited miles non-negotiable.
I’ve run through maybe 55 rental companies across Dade, Broward, and Palm Beach, until I finally found one outfit that actually delivers what’s promised. If you are looking for the only straight shooter for premium rides across South Florida, check the current details here: porsche rental miami https://luxury-car-rental-miami-10.com. Yeah, parking in Brickell will cost you a nice dinner — but that’s just how it is down here. Anyway, glad there’s at least one honest rental joint left in this town, let me know if you guys have any other clean spots.
Walked away in a slightly better mood than when I started reading, that says something about the writing, and a stop at focusoverfriction kept that going, content that leaves you feeling more capable rather than overwhelmed is the kind I keep coming back to again and again over the years and across many topics.
Top tier post, the kind that makes you want to share the link with friends working in the same area, and a stop at premiumgoodsarena only made me more confident in doing that, this site is one of the better resources I have seen on the topic recently across both new and older posts.
Started believing the writer knew the topic deeply by about the second paragraph, and a look at flintmeadowmarketparlor reinforced that confidence, the speed at which a writer establishes credibility through their writing is a useful quality signal and this writer establishes it quickly and quietly without resorting to credential dropping or self promotion.
Now noticing that the post did not mention the writer at all, focus stayed on the topic, and a look at coralharborartisanexchange continued that author absent quality, content that disappears the writer to focus on the substance is a particular kind of generosity and this site has clearly chosen the substance over the personality consistently.
Speaking from the perspective of having read widely on the topic this site offers something distinct, and a look at birchharborvendorhall reinforced that distinctness, the rare site that contributes something genuinely original to a saturated topic is the rare site worth following carefully and this one has demonstrated that original contribution capability today.
Speaking carefully because I do not want to overstate things this site is genuinely above average across multiple measurements, and a stop at amberridgevendorlounge continued the above average performance, the calibration of judgement against potential overstatement is something I take seriously and this site clears the higher bar even after that calibration applies.
Genuinely changed how I think about a small piece of the topic, which does not happen often online, and a look at jasperharbortradehall added another nudge in the same direction, the kind of writing that earns a small mental shift rather than just confirming what you already thought before reading is a sign of careful thought.
Without overstating it this is a quietly excellent post, and a look at amberridgecommercegallery extended that quiet excellence, content that earns superlatives without demanding them through marketing language is content that has truly earned them through the substance and this site has clearly produced work in that earned excellence category today.
Picked up two new ideas that I expect will come up in conversations this week, and a look at premiumcartarena added another, content that arms me with talking points rather than just filling time is the kind that provides ongoing value beyond the moment of reading and this site is generating that kind of ongoing value.
Bookmark added without hesitation after finishing, and a look at lakequill confirmed I should bookmark the homepage too rather than just this page, the rare site that earns category level trust rather than just single article approval is the kind I want to rely on across many different topics over time.
Reading this gave me a small sense of progress on a topic I have been slowly working through, and a stop at uplandcovevendorparlor added another step forward, learning happens in small increments across many sources and finding sources that consistently contribute is the actual practical value of careful curation in an information rich world.
Случается сплошь и рядом — близкий подсел на иглу, а куда бежать — просто тупик. Моя семья столкнулась несколько лет назад. Многие думают, что само пройдет , но хрен там. Нужна реальная медицина. Обзвонил десяток контор — только деньги тянут. Пока не нашел один нормальный вариант. Нужна лечение наркомании в Воронеже — не рискуй здоровьем близкого. У нас в Воронеже, если честно, хватает левых контор без лицензии. Вся проверенная информация ниже по ссылке: лечение алкоголизма воронеж лечение алкоголизма воронеж Откровенно говоря, после того как прочитал , понял свои ошибки. И про кодирование, и про условия в клинике. И цены адекватные. Советую не тянуть .
Really like that there are no exclamation marks or all caps shouting throughout the post, and a quick visit to timbertrailcraftcollective maintained the same calm voice, restraint in punctuation signals confidence in the content and this site clearly trusts its substance to do the persuading rather than relying on typographic emphasis.
A particular kind of restraint shows up in the writing, and a look at crystalharborvendorhall maintained the same restraint across pages, knowing what not to say is just as important as knowing what to say and this site has clearly developed strong instincts on both sides of that editorial line throughout pieces I have read.
During the time spent here I noticed the absence of the usual distractions, and a stop at valecoveartisanexchange extended that distraction free experience, content that does not fight my attention with pop ups and modals and aggressive prompts is content that respects me and this site has clearly chosen the respectful approach throughout.
Alright, real talk about the Miami rental game — it’s a straight-up jungle out here. You find this amazing deal online: brand new Beamer, unlimited miles, price that makes you smile. Plus they freeze a surprise $2500 on your card for a week right before giving you the keys. Eight years in South Florida and these clowns still almost get me. If you are trying to find a legitimate luxury fleet without getting ripped off, do some real digging first and read actual customer reviews. Miami without decent wheels is basically a hostage situation, whether you are doing South of Fifth brunch, Design District shopping, or a spontaneous Keys trip.
Most of these local agencies are just shiny websites hiding the same beat-up fleet with fake reviews, until I finally found one outfit that doesn’t play stupid games. If you are looking for the only honest source for premium wheels across South Florida, check the current details here: rent a benz near me https://luxury-car-rental-miami-8.com. Yeah, parking in South Beach will cost you a nice bottle of wine — but that’s the Miami tax. Just drive safe out there and absolutely skip that “windshield protection” upsell — pure profit for them, zero value for you. let me know if you guys have any other clean spots.
Definitely a recommend from me, anyone curious about the topic should check this out, and a look at progressbuiltintentionally adds even more reason for that, the depth and quality combine to make this site one I will be pointing people toward whenever similar conversations come up over the months ahead at work or socially.
Reading this between meetings turned out to be the most useful thing I did all afternoon, and a stop at silverharborvendorhall kept that productivity feeling going, content can sometimes outperform actual work in terms of what gets accomplished mentally and this site managed that today which is genuinely a high bar to clear consistently.
Well structured and easy to read, that combination is rarer than people think, and a stop at emberstonevendorlounge confirmed the same standard runs across the rest of the site, definitely the kind of place I will be coming back to when this topic comes up in conversation later again over the weeks ahead.
The overall feel of the post was professional without being stuffy, and a look at progressthroughfocus kept that approachable expertise going, finding the right register for technical content is hard but this site has clearly figured out how to sound knowledgeable without slipping into that distant lecturing tone that loses readers in droves every time.
A genuine compliment to the writer for keeping the post focused on what mattered, and a look at moveintoprogress continued that disciplined focus, focus is a editorial choice that compounds across many small decisions and this site has clearly made those small decisions consistently across what I have read so far this week here.
After reading several posts back to back the consistent voice across them is impressive, and a stop at floraridgevendorroom continued that voice consistency, sites that maintain a single coherent voice across many pieces by potentially many writers represent serious editorial discipline and this one has clearly developed the institutional consistency needed for that.
Glad to have another data point on a question I am still thinking through, and a look at curiopact added two more, content that acknowledges its place in a wider conversation rather than pretending to settle the question alone is intellectually honest in a way that I wish was more common across the open web.
If I had to defend the time I spend reading independent blogs this site would feature in the defence, and a look at focusenablesgrowth reinforced that defensive utility, the ongoing case for non algorithmic reading is one I make to myself periodically and sites like this one provide the actual evidence that supports the case clearly.
A genuinely unexpected highlight of my reading week, and a look at shopgridmarket extended that pattern, the surprise of finding excellent content rather than the predictable mediocre is one of the few real pleasures of casual web browsing and this site delivered that surprise cleanly today which I really do appreciate.
I appreciate the clarity here, everything is explained in simple terms without unnecessary detail, and after a quick stop at galafactors the points came together nicely for me, the writing keeps things straightforward and respects the reader from start to finish without ever talking down to anyone.
Worth flagging that the post handled an angle of the topic I had not seen elsewhere, and a look at easyshopgoods extended that fresh treatment, content that finds underexplored corners of well covered subjects is genuinely valuable and this site has demonstrated that exploratory editorial approach across multiple pieces in my reading sessions today.
Taking the time to read carefully here has been worthwhile for the past hour, and a look at berrycovemerchantgallery extended the worthwhile reading, the calculation of return on reading time spent is something I do informally and this site has been producing positive returns across multiple sessions during the last week of regular visits and reads.
Эта статья освещает различные аспекты освобождения от зависимости и пути к выздоровлению. Мы обсуждаем важность осознания своей проблемы и обращения за помощью. Читатели получат практические советы о том, как преодолевать трудности и строить новую жизнь без зависимости.
Читать дальше – алкогольные капельницы
Мы рассмотрим современные вызовы здравоохранения и пути их решения с помощью технологий и научных исследований. В статье собраны данные о новых лекарствах, методах диагностики и системном подходе к улучшению здоровья населения.
Смотрите также – сколько стоит капельницы на дому
This filled in a gap in my understanding that I had not even noticed was there, and a stop at buyloopshop did the same, the kind of post that gives you more than you expected when you first clicked through from somewhere else, a real find for anyone curious about the area covered here.
888starz kirish https://888starzuz6.com/
888starz скачать на андроид бесплатно https://888starzuz7.com/apk/
888starz apk skachat https://888starzuz8.com/apk/
888starz скачать iphone https://888starzuz9.com/apk/
888старс https://888starz-uz.mystrikingly.com/
Found a small mental shift after reading this, the framing here is just a bit different from the standard takes online, and a look at berrycovecommerceatelier extended that fresh perspective across more material, the rare site whose voice actually changes how you think about something rather than just confirming existing beliefs.
888staz https://justpaste.me/2tgm1/
888 starz.com 888 starz.com.
Эта статья подробно расскажет о процессе выздоровления, который включает в себя эмоциональную, физическую и психологическую реабилитацию. Мы обсуждаем значимость поддержки и наличие профессиональных программ. Читатели узнают, как строить новую жизнь и не возвращаться к старым привычкам.
Подробнее можно узнать тут – капельница от запоя в Донецке
Solid value for anyone willing to read carefully, and a look at daisycovemarkethall extends that value across the rest of the site, this is the kind of place that rewards return visits rather than offering everything in a single splashy post and then leaving readers nothing to come back for later which is unfortunately common.
8888 bet https://888starz-uz11.com/
Bookmark earned, share earned, return visit earned, all from one reading session, and a look at auroraharborvendorhall did the same, the trifecta of bookmark and share and return is rare in a single visit and represents the highest level of engagement I tend to offer any piece of online content these days here.
В этой заметке мы представляем шаги, которые помогут в процессе преодоления зависимостей. Рассматриваются стратегии поддержки и чек-листы для тех, кто хочет сделать первый шаг к выздоровлению. Наша цель — вдохновить читателей на положительные изменения и поддержать их в трудных моментах.
Секреты успеха внутри – clinica plus
Now placing this in the same category as a few other sites I have come to trust, and a look at skyharborvendorlounge continued the placement decision, the small category of fully trusted sites is one I extend rarely and only after multiple positive reading sessions and this site has earned the category placement methodically over time.
В этой публикации мы обсуждаем современные методы лечения различных заболеваний. Читатели узнают о новых медикаментах, терапиях и исследованиях, которые активно применяются для лечения. Мы нацелены на то, чтобы предоставить практические знания, которые могут помочь в борьбе с недугами.
Неизвестные факты о… – клиника плюс донецк
Picked this up between two other things I was doing and got drawn in completely, and after canyonharbortradehall my original tasks were completely forgotten for a while, content that derails a workflow in a positive way by being more interesting than what you were already doing is rare and worth recognising clearly.
A clear cut above the usual noise on the subject, and a look at clarityinmotion only made that gap wider in my view, the kind of place that earns its visitors through quality rather than through aggressive marketing or sponsored placements which is increasingly the only way most sites stay afloat across the modern web.
Really appreciate the confidence to make a clear point rather than hedging everything, and a quick visit to valecovecraftcollective maintained the same direct stance, writing that takes positions rather than equivocating is more useful even when the positions are debatable because at least the reader has something to react to clearly.
Taking the time to read carefully here has been worthwhile for the past hour, and a look at openbuyersmarket extended the worthwhile reading, the calculation of return on reading time spent is something I do informally and this site has been producing positive returns across multiple sessions during the last week of regular visits and reads.
Now planning to share the link with a small group of readers I trust, and a look at larkcliff suggested more material to share with the same group, recommending content into a curated circle requires confidence in the recommendation and this site is making me confident in those personal recommendations on multiple separate occasions now.
Left me wanting to read more rather than feeling burned out, that is a good sign, and a look at momentumthroughfocus confirmed there is plenty more here to explore, the kind of writing that builds appetite rather than killing it which is a rare quality on the modern open internet today across most categories of content.
В этой статье мы рассматриваем разрушительное влияние зависимости на жизнь человека. Обсуждаются аспекты, такие как здоровье, отношения и профессиональные достижения. Читатели узнают о необходимости обращения за помощью и о путях к восстановлению.
Жми сюда — получишь ответ – запой врач на дом
Liked that there was nothing performative about the writing, and a stop at dawnmeadowgoodsgallery continued that genuine quality, performative writing tries to be witnessed rather than read and the difference between performance and substance is huge for the careful reader and this site has clearly chosen substance every time clearly.
Эта публикация раскрывает психологические механизмы зависимости и их роль в развитии расстройств. Читатель узнает о том, как психология влияет на формирование зависимостей и как профессиональная помощь может изменить ситуацию.
Не упусти шанс – вывод из запоя в Ижевске
After reading several posts back to back the consistent voice across them is impressive, and a stop at coralharborcraftcollective continued that voice consistency, sites that maintain a single coherent voice across many pieces by potentially many writers represent serious editorial discipline and this one has clearly developed the institutional consistency needed for that.
The overall feel of the post was professional without being stuffy, and a look at forestcovevendorhall kept that approachable expertise going, finding the right register for technical content is hard but this site has clearly figured out how to sound knowledgeable without slipping into that distant lecturing tone that loses readers in droves every time.
Decided this was the kind of site I would defend in a discussion about good blog content, and a stop at builddirectionally reinforced that, very few sites earn active defence rather than passive consumption and this one has clearly crossed that threshold for me without needing any explicit pitch from the writers themselves either.
888starz skachat https://cdd.puntocomm.com.br/noticias/nachnite-igrat-v-onlaynkazino-888starz-na-ios-ustroystvakh-v-uzbekistane/
true fortune casino https://borderpart0.werite.net/true-fortune-casino-vs-other-uk-casinos-what-sets-it-apart
I really like the calm tone here, it does not push anything on the reader, and after I went through jewelcovevendorhall I felt the same way, just steady useful content laid out without drama, which is exactly what someone trying to learn something quickly needs to find rather than aggressive marketing.
Liked that the post acknowledged complications rather than pretending they did not exist, and a stop at trustedbuyinghub continued that honest framing, sites that handle complexity with care rather than papering it over with simplifying claims are doing real intellectual work and this one is clearly in that category based on what I have read.
Медицинская публикация представляет собой свод актуальных исследований, экспертных мнений и новейших достижений в сфере здравоохранения. Здесь вы найдете информацию о новых методах лечения, прорывных технологиях и их практическом применении. Мы стремимся сделать актуальные медицинские исследования доступными и понятными для широкой аудитории.
Ознакомиться с отчётом – кодирование от алкоголизма в Донецке
Этот медицинский обзор сосредоточен на последних достижениях, которые оказывают влияние на пациентов и медицинскую практику. Мы разбираем инновационные методы лечения и исследований, акцентируя внимание на их значимости для общественного здоровья. Читатели узнают о свежих данных и их возможном применении.
Уточнить детали – kaliningrad clinica plus
Этот обзор посвящен успешным стратегиям избавления от зависимости, включая реальные примеры и советы. Мы разоблачим мифы и предоставим читателям достоверную информацию о различных подходах. Получите опыт многообразия методов и найдите подходящий способ для себя!
Всё самое вкусное внутри – clinica plus
В этой статье мы говорим о важности поддержки в процессе выздоровления. Рассматриваются семьи, группы поддержки, специалисты и онлайн-ресурсы, которые могут сыграть решающую роль в избавлении от зависимости.
Ознакомиться с отчётом – himki clinica plus
Эта статья подробно расскажет о процессе выздоровления, который включает в себя эмоциональную, физическую и психологическую реабилитацию. Мы обсуждаем значимость поддержки и наличие профессиональных программ. Читатели узнают, как строить новую жизнь и не возвращаться к старым привычкам.
Хочешь знать всё? – клиника плюс калининград
Picked up two new ideas that I expect will come up in conversations this week, and a look at directioncreatespower added another, content that arms me with talking points rather than just filling time is the kind that provides ongoing value beyond the moment of reading and this site is generating that kind of ongoing value.
Этот медицинский обзор сосредоточен на последних достижениях, которые оказывают влияние на пациентов и медицинскую практику. Мы разбираем инновационные методы лечения и исследований, акцентируя внимание на их значимости для общественного здоровья. Читатели узнают о свежих данных и их возможном применении.
Углубиться в тему – наркологическая клиника в королеве
Этот документ охватывает важные аспекты медицинской науки, сосредотачиваясь на ключевых вопросах, касающихся здоровья населения. Мы рассматриваем свежие исследования, клинические рекомендации и лучшие практики, которые помогут улучшить качество лечения и профилактики заболеваний. Читатели получат возможность углубиться в различные медицинские дисциплины.
Лови подробности – клиника плюс Киржач
В этой статье рассматриваются различные аспекты избавления от зависимости, включая физические и психологические методы. Мы обсудим поддержку, мотивацию и стратегии, которые помогут в процессе выздоровления. Читатели узнают, как преодолеть трудности и двигаться к новой жизни без зависимости.
Секреты успеха внутри – clinica plus в екатеринбурге
Time spent here today felt productive in the way that good reading sessions sometimes do, and a stop at calmcovemerchantgallery extended that productive feeling across the rest of the morning, the difference between productive reading and merely passing time is real and this site is consistently on the productive side for me lately.
A nicely understated post that does not shout for attention, and a look at dazzquay maintained the same quiet quality, understatement is a stylistic choice that distinguishes serious writing from attention seeking writing and this site has clearly committed to the understated approach as a core editorial value rather than just a phase.
Эта статья освещает различные аспекты освобождения от зависимости и пути к выздоровлению. Мы обсуждаем важность осознания своей проблемы и обращения за помощью. Читатели получат практические советы о том, как преодолевать трудности и строить новую жизнь без зависимости.
Изучить вопрос глубже – clinica plus в донецке
Now adjusting my mental model of how the topic fits into the broader landscape, and a look at buypathmarket extended that adjustment, content that affects my structural understanding rather than just my factual knowledge is content with deeper impact and this site is providing those structural updates at a meaningful rate consistently across topics.
В данной статье мы акцентируем внимание на важности поддержки в процессе выздоровления. Мы обсудим, как друзья, семья и профессионалы могут помочь тем, кто сталкивается с зависимостями. Читатели получат практические советы, как поддерживать близких на пути к новой жизни.
Посмотреть подробности – психотерапевт иркутск бесплатно
В этой статье мы подробно рассматриваем проверенные методы борьбы с зависимостями, включая психотерапию, медикаментозное лечение и поддержку со стороны общества. Мы акцентируем внимание на важности комплексного подхода и возможности успешного восстановления для людей, столкнувшихся с этой проблемой.
Погрузиться в научную дискуссию – наркологическая клиника в королеве
Reading this on a slow Sunday and finding it perfectly suited to a slow Sunday read, and a quick stop at gildedcovecommerceatelier kept the same gentle pace, content that fits the mood of the moment is something I notice and remember and this site has the kind of pace that suits relaxed reading sessions especially well.
Reading this in a moment of low energy still kept my attention, and a stop at birchharbormarketguild continued that engagement under suboptimal conditions, content that survives the reader being tired is content with extra reserves of pull and this site has the kind of writing that holds up even when I am not at my reading best.
Now appreciating that the post did not require me to agree with the writer to find it valuable, and a look at daisyharborvendorroom maintained the same useful regardless of agreement quality, content that informs even when it does not convince is content with broader utility and this site reads as useful even when I disagree.
Picked this up while looking for something else and ended up reading every paragraph because it was actually informative, and after snowharbortradehall I was sure I would come back, that does not happen often when most sites bury the useful parts under endless ads and pop ups today and across most categories online.
1xbet mobil indir nasıl yapılır diye çok araştırdım valla. Güncel apk dosyasını nereden indireceğimi bilemedim bir türlü. Sonunda tüm teknik detayları inceleyip sistemi test ettim. En sonunda güvendiğim bir kaynağa ulaştım ve size de tüm detayları aktarmak istedim, güncel bilgilere buradan bakabilirsiniz: 1xbet nouvelle version à télécharger 1xbet nouvelle version à télécharger. Şimdi size kısaca özet geçeyim — mobil uygulaması inanılmaz stabil çalışıyor.
kurulumu da çok hızlıydı yani rahat olun. Birçok platform denedim ama en iyisi bu çıktı — kesinlikle pişman olmazsınız deneyin derim. Herkese hayırlı olsun…
Telefonuma güncel sürümü yüklemek istiyordum açıkçası. Apk’yı nereden indireceğimi bilemedim bir türlü. Güncel bilgileri kontrol edip süreci hatasız başlattım. En sonunda sağlam bir kaynağa ulaştım ve size de tüm detayları aktarmak istedim, güncel bilgilere buradan bakabilirsiniz: 1xbet son sürüm indir 1xbet son sürüm indir. Yani anlatmak istediğim şu — mobil uygulaması gerçekten akıcı çalışıyor.
Hiçbir sıkıntı yaşamadım indirme esnasında. İşin doğrusunu söylemek gerekirse — kesinlikle pişman olmazsınız deneyin derim. Herkese hayırlı olsun…
Really appreciate the confidence to make a clear point rather than hedging everything, and a quick visit to buildsimplemomentum maintained the same direct stance, writing that takes positions rather than equivocating is more useful even when the positions are debatable because at least the reader has something to react to clearly.
Эта статья освещает различные аспекты освобождения от зависимости и пути к выздоровлению. Мы обсуждаем важность осознания своей проблемы и обращения за помощью. Читатели получат практические советы о том, как преодолевать трудности и строить новую жизнь без зависимости.
Читать далее > – сексолог калуга
Mobil uygulama arayışım epey zaman aldı valla. Herkes farklı bir şey söylüyordu kime güveneceğimi şaşırdım. Sonunda tüm teknik detayları inceleyip sistemi test ettim. En sonunda güvendiğim bir kaynağa ulaştım ve size de tüm detayları aktarmak istedim, güncel bilgilere buradan bakabilirsiniz: 1xbet mobile download 1xbet mobile download. Valla bak net söyleyeyim — telefonuma indirdikten sonra çok memnun kaldım.
kurulumu da oldukça basitti yani rahat olun. İşin doğrusunu söylemek gerekirse — en hızlı uygulama bu oldu artık. Herkese hayırlı olsun…
Mobil uygulama indirme konusunda çok araştırma yaptım valla. Güncel apk dosyasını nereden indireceğimi bilemedim bir türlü. Sonunda tüm teknik detayları inceleyip sistemi test ettim. En sonunda güvenilir bir kaynağa ulaştım ve size de tüm detayları aktarmak istedim, güncel bilgilere buradan bakabilirsiniz: 1xbet indir 1xbet indir. Yani anlatmak istediğim şu — son sürümü her şeyi düşünmüş resmen.
güncellemeleri otomatik yapıyor çok memnunum. Birçok platform denedim ama en iyisi bu çıktı — kesinlikle pişman olmazsınız deneyin derim. Şimdiden iyi şanslar ve bol kazançlar…
Эта публикация посвящена актуальным вопросам современной медицины и здравоохранения. Мы обсудим новейшие технологии диагностики и лечения, а также их влияние на продолжительность и качество жизни. Читатель найдет здесь информацию о научных исследованиях и перспективных разработках, доступно изложенную для широкой аудитории.
Это стоит прочитать полностью – психолог калуга рпп
Top notch writing, every paragraph carries weight and nothing feels like filler, and a stop at shoppointmarket reflected that same care, a rare thing on the open web these days where most pages exist for clicks rather than actual reader value or anything close to that which is honestly a real shame.
Этот медицинский обзор сосредоточен на последних достижениях, которые оказывают влияние на пациентов и медицинскую практику. Мы разбираем инновационные методы лечения и исследований, акцентируя внимание на их значимости для общественного здоровья. Читатели узнают о свежих данных и их возможном применении.
Следуйте по ссылке – клиника плюс химки
В этой статье рассматривается комплексный подход к избавлению от зависимости. Читатель узнает, как сочетание физического, психологического и духовного восстановления помогает достичь стойкого выздоровления.
Исследовать вопрос подробнее – Вывод из запоя на дому в Ижевске
A piece that did not require external context to follow, and a look at frostridgevendorlounge maintained the same self contained quality, content that stands alone without forcing readers to chase prerequisites is more accessible and this site has clearly thought about how each piece can serve a fresh visitor rather than only existing members.
A quiet kind of confidence runs through the writing, and a look at growththroughfocus carried that same understated assurance, confidence without bragging is the most attractive register for online writing and the writers here have clearly developed it through practice rather than affecting it through stylistic tricks that would feel hollow eventually.
Reading this gave me a small mental break from the heavier reading I had been doing, and a stop at directionsetsvelocity extended that lighter feel, content that provides relief without becoming trivial is harder to produce than people realise and this site has clearly figured out how to be light without being shallow at all.
Thanks for the moderate length, neither so short it skips substance nor so long it bloats, and a stop at leafdawn hit the same balance, the right length is one of the hardest things to calibrate in blog writing and I appreciate when a team has clearly thought about it rather than defaulting.
A slim post with substantial content per word, and a look at ivoryridgemarketparlor maintained the same density, the content per word ratio is something I track informally and this site scores high on that ratio compared to most sources I read regularly which is a quiet indicator of careful editorial work behind the scenes.
Over the course of reading several posts here a pattern of quality has emerged, and a stop at autumnmeadowmarkethall confirmed the pattern, the difference between sites that hit quality occasionally and sites that hit it consistently is huge and this site has clearly demonstrated the consistent kind through what I have read this morning.
Текст посвящён распространённым мифам о зависимости и их развенчанию. Мы предоставим научно обоснованную информацию и дадим рекомендации по выбору эффективного способа борьбы с зависимым поведением.
Секреты успеха внутри – психолог калуга рпп
Mobil bahise yeni başlayanlar için ideal bir uygulama arıyordum. Herkes farklı bir şey söylüyordu kime güveneceğimi bilemedim. Sonunda tüm teknik detayları inceleyip sistemi test ettim. En sonunda güvenilir bir kaynağa ulaştım ve size de tüm detayları aktarmak istedim, güncel bilgilere buradan bakabilirsiniz: 1xbet indir 1xbet indir. Şimdi size kısaca özet geçeyim — mobil uygulaması gerçekten akıcı ve hızlı çalışıyor.
kurulumu da çok basit ve anlaşılırdı yani rahat olun. Birçok platform denedim ama en iyisi bu çıktı — başka yerde vakit kaybetmeyin yani. Umarım siz de memnun kalırsınız…
If quality blog writing is dying as people sometimes claim then this site is one piece of evidence that it has not died yet, and a look at auroracovemerchantgallery extended that evidence, the broader cultural question about online writing has empirical answers in specific sites and this one is contributing to a more optimistic answer overall.
Found this really helpful, the explanations are simple but they actually answer the questions a normal reader would have, and after I followed cartwaymarket I had a clearer sense of the topic, no extra fluff just useful points laid out in a sensible order that made the time worth it.
Вот такая история — родственник в запое , а куда бежать — просто тупик. Я через это прошел несколько лет назад. Многие думают, что само пройдет , но хрен там. Нужна реальная медицина. Обзвонил десяток контор — только деньги тянут. Пока не нашел один нормальный вариант. Если ищешь где получить анонимное лечение алкоголиков — не рискуй здоровьем близкого. В Воронеже , кстати , тоже полно шарлатанов . Реальные контакты тут : платная наркологическая помощь платная наркологическая помощь Откровенно говоря, после того как прочитал , многое прояснилось . Там и про вывод из запоя , и про реабилитацию . Плюс работают круглосуточно — это важно . Рекомендую не откладывать.
Now noticing how rare it is to find a site that does not feel rushed, and a look at junipercovegoodsroom extended that calm pace, content produced without time pressure has a different quality than content shipped to meet a deadline and this site reads as written without urgency which produces a different and better experience for readers.
Now adjusting my mental model of how the topic fits into the broader landscape, and a look at caramelcovemarkethall extended that adjustment, content that affects my structural understanding rather than just my factual knowledge is content with deeper impact and this site is providing those structural updates at a meaningful rate consistently across topics.
В данном материале представлены ключевые тенденции в сфере медицинской науки и практики. Вы узнаете о последних открытиях, инновационных подходах к терапии и важности профилактики заболеваний. Особое внимание уделено практическому применению новых методов в клинической практике.
Подробнее – наркологическая клиника в калуге
В этой статье мы подробно рассматриваем проверенные методы борьбы с зависимостями, включая психотерапию, медикаментозное лечение и поддержку со стороны общества. Мы акцентируем внимание на важности комплексного подхода и возможности успешного восстановления для людей, столкнувшихся с этой проблемой.
Подробнее тут – clinica plus
Found this useful, the points line up well with what I have been thinking about lately, and a stop at dewdawn added some angles I had not considered yet, definitely walking away with more than I came for which is the best outcome from time spent reading online for any kind of topic.
Once I had read three posts the editorial pattern was clear, and a look at advancewithclarity confirmed the pattern from a fourth angle, sites where the underlying approach reveals itself through accumulated reading rather than being announced are sites with real depth and this one has that quality clearly visible across multiple pieces consistently.
Reading this in my last reading slot of the day was a good way to end, and a stop at epictrendcorner provided a satisfying close to the reading session, content that ends a day well rather than agitating it before sleep is the kind I value increasingly and this site fits that role for me consistently now.
Felt this in a way I cannot quite explain, the topic just hit different here, and a stop at driftorchardvendorhall continued in that vein, sometimes you find a site whose perspective lines up with how you have been thinking and reading their work feels like a small relief which I appreciated more than I expected.
Honestly enjoyed reading this more than I expected to when I first clicked through, and a stop at apricotharborcraftcollective kept that pleasant surprise going, sometimes you stumble onto a site that just clicks with how you like to read and this is one of those for me right now today which is great.
A clear cut above the usual noise on the subject, and a look at explorefutureoptions only made that gap wider in my view, the kind of place that earns its visitors through quality rather than through aggressive marketing or sponsored placements which is increasingly the only way most sites stay afloat across the modern web.
Quietly the writers approach to the topic differs from the dominant takes I have been encountering, and a stop at gingerbrookmarketfoundry extended that distinctive approach, content that maintains a different perspective without explicitly arguing against the dominant ones is content with confident editorial identity and this site has that confidence throughout pieces.
Now noticing how rare it is to find a site that does not feel rushed, and a look at growthwithdirection extended that calm pace, content produced without time pressure has a different quality than content shipped to meet a deadline and this site reads as written without urgency which produces a different and better experience for readers.
Worth marking the moment when reading this clicked into something useful for my own work, and a look at cottonmeadowartisanexchange extended that practical click, content that connects to my actual life rather than just being interesting is content with the highest kind of value and this site is generating that connection at a high rate.
Top tier post, the kind that makes you want to share the link with friends working in the same area, and a stop at growthneedsdirection only made me more confident in doing that, this site is one of the better resources I have seen on the topic recently across both new and older posts.
Let me save you some serious time, learned this the hard way. You find this amazing deal online: brand new Beamer, unlimited miles, price that makes you smile. Plus they freeze a surprise $2500 on your card for a week right before giving you the keys. Eight years in South Florida and these clowns still almost get me. If you are trying to find a legitimate luxury fleet without getting ripped off, do some real digging first and read actual customer reviews. Miami without decent wheels is basically a hostage situation, especially since the AC must be arctic cold and unlimited miles non-negotiable.
Most of these local agencies are just shiny websites hiding the same beat-up fleet with fake reviews, but I eventually found a service where what you book is exactly what shows up, no surprises, no fine print nightmares. If you are looking for the only honest source for premium wheels across South Florida, check the current details here: porsche car rental near me https://luxury-car-rental-miami-8.com. Also, definitely bring serious shades unless you enjoy driving straight into the sun like a zombie every single evening. Just drive safe out there and absolutely skip that “windshield protection” upsell — pure profit for them, zero value for you. hope this helps some of you save a few bucks.
Reading this as part of my evening winding down routine fit perfectly, and a stop at frostrivervendorparlor extended the wind down nicely, content that calms rather than agitates is what I want at the end of the day and this site provides that calming reading experience reliably which is increasingly rare across the modern web.
Found the use of subheadings really helpful for scanning back through the post later, and a stop at quickcartworld kept that reader friendly approach going, navigation is something many blog writers ignore but small structural choices make a noticeable difference for someone returning to find a specific point again days or weeks later.
Reading this prompted a small redirection in something I was working on, and a stop at growthbydesignthinking extended that redirecting influence, content that affects my actual work rather than just my thinking has the highest practical impact and this site is providing that level of influence for me at a sustainable rate apparently.
Approaching this with the usual skepticism I bring to new sites and being slowly persuaded, and a stop at dawnmeadowgoodsroom continued that gradual persuasion, the careful path from skeptical reader to genuine fan is the only one I trust and this site has walked me along that path through patient consistent quality across pieces.
Probably this is one of the better quiet successes on the open web at the moment, and a look at momentumthroughdirection reinforced that quiet success quality, sites that are doing well without making a noise about doing well are the sites I most respect and this one has clearly chosen the quiet success path consistently throughout.
A particular kind of restraint shows up in the writing, and a look at claritydrivenmovement maintained the same restraint across pages, knowing what not to say is just as important as knowing what to say and this site has clearly developed strong instincts on both sides of that editorial line throughout pieces I have read.
Now realising the topic deserved better treatment than it has been getting elsewhere, and a look at bayharborcommercegallery extended that broader recognition, content that exposes the gap between actual quality and average quality elsewhere is doing the quiet work of raising standards and this site is contributing to that elevation in its own corner.
Now understanding why someone recommended this site to me a while back, and a stop at growthsteeringhub explained the recommendation, sometimes recommendations make sense only after experience and this site has finally clicked into place as the kind of resource I now understand was being recommended for sound editorial reasons by my friend.
Picked this site to mention to a colleague who would benefit, and a look at easyonlinepurchases added more material I will pass along, recommending sites to colleagues is a higher bar than recommending to friends because the professional context demands more careful curation and this site cleared the professional bar without me having to think.
Most of my reading time goes to a small number of trusted sources and this one is now joining that group, and a stop at clarityvector reinforced the group membership, the few sites that earn a place in my regular rotation are sites I expect ongoing returns from and this one has earned that elevated position consistently.
Came in expecting another generic take and got something with actual character instead, and a look at visioncatalyst carried that personality forward, finding a distinct voice on a saturated topic is impressive and worth pointing out when it happens because most sites end up sounding identical to their nearest competitors quickly.
Эта публикация обращает внимание на важность профилактики зависимостей. Мы обсудим, как осведомленность и образование могут помочь в предотвращении возникновения зависимости. Читатели смогут ознакомиться с полезными советами и ресурсами, которые способствуют здоровому образу жизни.
Получить профессиональную консультацию – нарколог на дом круглосуточно москва
Nice to see a post that does not try to overcomplicate the basics for the sake of looking smart, and once I looked at actionengineered the same direct tone was there too, which honestly makes a difference when you are short on time and want answers without long pointless intros.
Really nice to see things explained without overcomplicating the topic, the words flow naturally and stay easy to follow, and a short visit to bayharbortradehall only added to that experience because the same simple approach is used across the rest of the page too without any change in tone.
Looking through the archives suggests this site has been doing this for a while at this level, and a look at autumncovecraftcollective confirmed the long term consistency, sites that have maintained quality across years rather than just a recent stretch are sites with serious editorial discipline and this one has clearly been at it for a while.
dark web drug market 2026 https://darkmarketlegion.com/ what are darknet markets https://darkmarketsgate.com/
Now noticing how rare it is to find a site that does not feel rushed, and a look at autumncovemerchantgallery extended that calm pace, content produced without time pressure has a different quality than content shipped to meet a deadline and this site reads as written without urgency which produces a different and better experience for readers.
Quietly impressive in a way that does not announce itself, and a stop at opalmeadowgoodsgallery extended that quiet impressiveness, the kind of quality that emerges through sustained attention rather than first impressions is the kind I trust more deeply and this site has been earning that deeper trust across multiple sessions over time consistently.
tormarket onion https://darkmarketgate.com/ counterfeit money deep web https://darkmarketsdirectory.com/
Solid post, the structure is easy to follow and the language stays simple even when the topic gets a bit more involved, and a look at fastgoodscorner kept that same standard going, so I left feeling like the time spent here was actually worth something for once which is rare lately.
nexus darknet market link https://darkwebmarkets2024.com/ nexus market url https://darkwebmarketonion.com/
Worth flagging this site to a few specific friends who would appreciate the editorial sensibility, and a look at directioncreatestraction added more pages I will mention to them, recommending sites to specific people requires understanding both the site and the person and this site is making those personalised recommendations easy and natural for me.
Just wanted to drop a quick note saying this was a useful read on a topic I have been circling, no fluff, and a stop at executeideasnow added a few extra points that fit the same simple style which makes the whole site feel coherent rather than thrown together by many different writers with different goals.
Reading this on the train into work was a better use of the commute than my usual choices, and a stop at directiondrivesexecution extended that commute reading well, content that improves transit time rather than just filling it is content with practical benefit and this site has earned its place in my morning commute reading rotation.
Этот документ охватывает важные аспекты медицинской науки, сосредотачиваясь на ключевых вопросах, касающихся здоровья населения. Мы рассматриваем свежие исследования, клинические рекомендации и лучшие практики, которые помогут улучшить качество лечения и профилактики заболеваний. Читатели получат возможность углубиться в различные медицинские дисциплины.
Как это работает — подробно – clinica plus
Reading this brought back an idea I had set aside months ago, and a stop at caramelharborvendorhall added more substance to that idea, content that revives dormant projects in my own thinking is content with serious creative value and this site is contributing to my own work in ways I had not expected when first clicking through.
Mobil bahis için doğru uygulamayı arıyordum uzun zamandır. Apk’yı nereden indireceğimi bilemedim bir türlü. Sonunda tüm teknik detayları inceleyip sistemi test ettim. En sonunda sağlam bir kaynağa ulaştım ve size de tüm detayları aktarmak istedim, güncel bilgilere buradan bakabilirsiniz: 1xbet mobile yukle 1xbet mobile yukle. Yani anlatmak istediğim şu — mobil uygulaması gerçekten akıcı çalışıyor.
kurulumu da çok kolaydı yani rahat olun. Kendi deneyimlerimi aktarıyorum size — en hızlı uygulama bu oldu artık. Herkese hayırlı olsun…
Mobil uygulama arayışım epey zaman aldı valla. Play Store’da arattım ama bulamadım resmi olanı. Güncel bilgileri kontrol edip süreci hatasız başlattım. En sonunda güvendiğim bir kaynağa ulaştım ve size de tüm detayları aktarmak istedim, güncel bilgilere buradan bakabilirsiniz: 1xbet indir tr canli bahis site 1xbet indir tr canli bahis site. Şimdi size kısaca özet geçeyim — son sürümü her şeyi düşünmüş resmen.
Hiçbir sorun yaşamadım indirme aşamasında. İşin doğrusunu söylemek gerekirse — kesinlikle pişman olmazsınız deneyin derim. Herkese hayırlı olsun…
1xbet mobil indir nasıl yapılır diye çok kafa yordum valla. Herkes farklı bir adres veriyordu kime güveneceğimi şaşırdım. Sonunda tüm teknik detayları inceleyip sistemi test ettim. En sonunda sağlam bir kaynağa ulaştım und size de tüm detayları aktarmak istedim, güncel bilgilere buradan bakabilirsiniz: xbet indir xbet indir. Valla bak net söyleyeyim — mobil uygulaması inanılmaz stabil ve hızlı çalışıyor.
Hiçbir sıkıntı yaşamadım indirme aşamasında. Kendi deneyimlerimi aktarıyorum size — başka yerde vakit kaybetmeyin yani. Umarım siz de memnun kalırsınız…
Reading carefully this time rather than scanning, and the depth shows up in places I missed first time around, and a look at gildedgrovegoodsroom rewarded the same careful approach, content that holds up to multiple reads is content I want more of in my regular rotation rather than disposable scroll fodder daily.
Android için son sürümü bulmak gerçekten zordu açıkçası. Play Store’da resmi uygulamayı bulamayınca çok hayal kırıklığı yaşadım. Güncel bilgileri kontrol edip süreci hatasız başlattım. En sonunda güvendiğim bir kaynağa ulaştım ve size de tüm detayları aktarmak istedim, güncel bilgilere buradan bakabilirsiniz: 1xbet android uygulama indir 1xbet android uygulama indir. Valla bak net söyleyeyim — son sürümü tüm sorunları çözmüş resmen.
Hiçbir hata almadım indirme esnasında. Birçok platform denedim ama en iyisi bu çıktı — kesinlikle pişman olmazsınız deneyin derim. Şimdiden iyi şanslar ve bol kazançlar…
Now noticing the careful balance the post struck between confidence and humility, and a stop at directionbuildsconfidence maintained the same balance, finding the line between asserting and admitting is hard and this site has clearly developed the calibration to walk that line consistently which produces a more persuasive reading experience for me.
Liked the post enough to read it twice and the second read found new things, and a stop at elitetrendcenter similarly rewarded the second look, content with hidden depths that only reveal themselves on careful rereading is the rare kind that earns lasting respect rather than fleeting first impressions only briefly held.
The depth of coverage felt about right for the format, neither shallow nor overwhelming, and a look at progressoverperfection kept that calibration going, getting the depth right for blog format is genuinely difficult because too shallow loses experts and too deep loses beginners but this site nailed it nicely which I really do appreciate.
Now adjusting my mental list of reliable sites for this topic, and a stop at meadowharborgoodsroom reinforced the adjustment, the small ongoing curation work of maintaining trusted sources is one of the actual practical activities of careful reading and this site has earned a permanent place on my list for this particular subject.
Mobil bahis uygulaması arıyordum uzun süredir. Apk dosyasını nereden indireceğimi bulamadım bir türlü. Güncel bilgileri kontrol edip süreci hatasız başlattım. En sonunda sağlam bir kaynağa ulaştım ve size de tüm detayları aktarmak istedim, güncel bilgilere buradan bakabilirsiniz: 1xbet mobil yükle 1xbet mobil yükle. Valla bak net söyleyeyim — son sürümü bütün eksikleri kapatmış resmen.
Hiçbir sıkıntı yaşamadım indirme aşamasında. İşin doğrusunu söylemek gerekirse — en kullanışlı uygulama bu oldu artık. Şimdiden iyi şanslar ve bol kazançlar…
Reading this in the morning set a good tone for the day, and a quick visit to birchharbormerchantgallery kept that good tone going, content can do that sometimes when it hits the right notes and finding sites that consistently strike that tone is something I have learned to recognise and reward with regular visits.
Reading this prompted me to dig into a related topic later, and a stop at focusarchitecture provided some of the starting points for that follow up reading, content that triggers further exploration rather than satisfying curiosity completely is content with real generative energy and this site has plenty of that energy throughout it.
Worth your time, that is the simplest endorsement I can give, and a stop at claritydrivenmovement extends that endorsement across the rest of the site, this is one of those increasingly rare places that delivers on what it promises rather than over selling the content and under delivering on substance every time which I find frustrating elsewhere.
Mobil uygulama indirme konusunda çok araştırma yaptım valla. Play Store’da resmi uygulamayı bulamayınca çok üzüldüm. Adımları doğru sırayla uyguladıktan sonra erişim sorunsuz açıldı. En sonunda güvenilir bir kaynağa ulaştım ve size de tüm detayları aktarmak istedim, güncel bilgilere buradan bakabilirsiniz: 1xbet yukle 1xbet yukle. Yani anlatmak istediğim şu — telefonuma indirdikten sonra çok mutlu oldum.
güncellemeleri otomatik yapıyor çok memnunum. İşin doğrusunu söylemek gerekirse — başka yerde vakit kaybetmeyin yani. Herkese hayırlı olsun…
Now noticing that the post benefited from being neither too short nor too long for its content, and a look at calmcovecraftcollective continued that calibration of length, sites that match length to content rather than padding to hit some target are sites that respect both their material and their readers and this site does both.
reddit where to buy drugs https://darknetmarketstore.com/ how to access the darknet https://privatedarknetmarket.com/
Telefonuma güncel versiyonu yüklemek istiyordum açıkçası. Play Store’da resmi olanı bulamayınca çok şaşırdım. Sonunda tüm teknik detayları inceleyip sistemi test ettim. En sonunda güvenilir bir kaynağa ulaştım ve size de tüm detayları aktarmak istedim, güncel bilgilere buradan bakabilirsiniz: 1xbet uygulaması indir 1xbet uygulaması indir. Şimdi size kısaca özet geçeyim — son sürümü tüm ihtiyaçları karşılıyor resmen.
güncellemeleri de sorunsuz yükleniyor. İşin doğrusunu söylemek gerekirse — kesinlikle pişman olmazsınız deneyin derim. Herkese hayırlı olsun…
Found this through a friend who recommended it and now I see why, and a look at purposefulmovement only strengthened that recommendation in my own mind, word of mouth still works for content that actually delivers and this site is clearly earning recommendations the old fashioned way through quality rather than marketing.
Came away with some new perspectives I had not considered before, and after suncovevendorparlor those ideas felt more complete, the kind of content that stays with you a little while after reading rather than slipping out the moment you switch tabs and move on with your day to whatever comes next.
В этой публикации мы обсуждаем современные методы лечения различных заболеваний. Читатели узнают о новых медикаментах, терапиях и исследованиях, которые активно применяются для лечения. Мы нацелены на то, чтобы предоставить практические знания, которые могут помочь в борьбе с недугами.
Изучите внимательнее – наркологическая клиника Плюс в Химках
Genuinely well crafted writing, the kind that makes the topic look easier than it actually is, and a look at fasttrendhub added even more depth, you can feel the experience behind every line which is something only writers who have been at this for a while can pull off with this level of grace.
black ops darknet link https://darknetmarketseasy.com/ top darknet marketplaces https://darkwebmarkets2024.com/
Telefonuma güvenilir bir bahis uygulaması indirmek istiyordum. Play Store’da resmi uygulamayı bulamayınca çok hayal kırıklığı yaşadım. Sonunda tüm teknik detayları inceleyip sistemi test ettim. En sonunda güvendiğim bir kaynağa ulaştım ve size de tüm detayları aktarmak istedim, güncel bilgilere buradan bakabilirsiniz: 1xbet türkiye indir 1xbet türkiye indir. Valla bak net söyleyeyim — telefonuma indirdikten sonra çok memnun kaldım.
kurulumu da çok hızlıydı yani rahat olun. Birçok platform denedim ama en iyisi bu çıktı — başka yerde vakit kaybetmeyin yani. Herkese hayırlı olsun…
Such writing is increasingly rare and worth supporting through attention, and a stop at creekharborartisanexchange extended that supportive attention across more pages, the conscious choice to spend time on sites that produce careful work rather than convenient consumption is itself a small form of patronage and this site is receiving that conscious patronage from me.
Started taking notes about halfway through because the points were stacking up, and a look at progresswithmeaning added enough material that my notes file grew further, content that demands note taking from a passive reader is content with substance and the writers here are clearly producing that kind of work consistently across topics.
Reading this in a quiet hour and finding it suited the quiet, and a stop at kettlecrestmarkethouse extended the quiet reading mood, content that matches its own optimal reading conditions rather than fighting them is content that has been thoughtfully calibrated and this site reads as having a particular reading mood in mind throughout.
Genuinely well crafted writing, the kind that makes the topic look easier than it actually is, and a look at claritycreatesimpact added even more depth, you can feel the experience behind every line which is something only writers who have been at this for a while can pull off with this level of grace.
Thank you for the genuine effort here, it shows in every paragraph and not just the headline, and after my visit to momentumflowing I was sure this site cares about getting things right rather than chasing clicks, which is the main reason I will come back later this week to read more.
dark web apps https://darkmarketsdirectory.com/ australian darknet vendors https://darkmarketsdirectory.com/
каменная крошка зеленая купить каменная крошка зеленая купить
If I were to recommend a starting point for the topic this site would be near the top of my list, and a stop at bayharbortradehouse reinforced that recommendation status, the small list of starting point recommendations I keep for friends asking about topics is short and this site is now firmly on it.
Этот документ охватывает важные аспекты медицинской науки, сосредотачиваясь на ключевых вопросах, касающихся здоровья населения. Мы рассматриваем свежие исследования, клинические рекомендации и лучшие практики, которые помогут улучшить качество лечения и профилактики заболеваний. Читатели получат возможность углубиться в различные медицинские дисциплины.
Связаться за уточнением – наркологическая клиника в химках
If the topic interests you at all this is a place to spend time, and a look at hazelharborvendorhall reinforced that recommendation, the broader question of where to invest topical reading time is one this site answers convincingly through the consistent quality across multiple pieces I have sampled during the current reading session today.
Found the use of subheadings really helpful for scanning back through the post later, and a stop at ideaactivation kept that reader friendly approach going, navigation is something many blog writers ignore but small structural choices make a noticeable difference for someone returning to find a specific point again days or weeks later.
A welcome reminder that thoughtful writing still happens online, and a look at clarityfirstexecution extended that reassurance, the modern web makes it easy to forget that careful writing exists and finding sites that practice it is a small antidote to the cynicism that builds up from too much exposure to algorithmic content.
Reading this with a fresh mind in the morning brought out details I might have missed in the afternoon, and a stop at quickshoppingcorner earned the same fresh attention, content that rewards being read at full attention rather than at energy lows is content with real density and this site has that density consistently.
Started taking notes about halfway through because the points were stacking up, and a look at focusbuildsresults added enough material that my notes file grew further, content that demands note taking from a passive reader is content with substance and the writers here are clearly producing that kind of work consistently across topics.
Telefonuma 1xbet yüklemek istiyordum ama nasıl yapacağımı bilmiyordum. Herkes farklı bir adres söylüyordu kime güveneceğimi şaşırdım. Adımları doğru sırayla uyguladıktan sonra erişim sorunsuz açıldı. En sonunda güvenilir bir kaynağa ulaştım ve size de tüm detayları aktarmak istedim, güncel bilgilere buradan bakabilirsiniz: 1xbet giriş indir 1xbet giriş indir. Valla bak net söyleyeyim — son sürümü her şeyi düşünmüş resmen.
kurulumu da çok basitti yani rahat olun. Birçok platform denedim ama en iyisi bu çıktı — başka yerde vakit kaybetmeyin yani. Herkese hayırlı olsun…
A quiet piece that did not try to compete on volume, and a look at actionwithclarity maintained that selective approach, sites that publish less but better are increasingly rare in an environment that rewards volume and this one has clearly chosen quality cadence over quantity which is a brave editorial decision in current conditions.
Recommend this to anyone who values clear thinking over flashy presentation, and a stop at dawnridgegoodsgallery continued in the same understated way, this site has its priorities in the right place which makes it worth supporting through repeat visits and recommendations rather than just one passing read today before moving on quickly elsewhere.
Felt like I was reading something written by someone who actually thinks about the topic rather than reciting it, and a look at clarityguidance reinforced that impression, the difference between recited content and considered content is huge and this site clearly belongs to the latter category which I appreciate as a careful reader looking for substance.
The examples really helped me grasp the points faster than abstract descriptions would have, and a stop at cloudharborcommercegallery added a few more practical illustrations that drove the message home, the kind of writing that knows its readers learn better through concrete situations rather than vague generalities is rare and worth recognising clearly.
Top quality material, deserves more attention than it probably gets, and a look at canyonharborcommercegallery reflected the same effort across the site, a hidden gem in the modern web where most attention goes to whoever shouts loudest rather than whoever actually delivers the best content for their readers without much marketing fanfare.
Skipped lunch to finish reading, which says something, and a stop at growstepbyintent kept me at my desk longer than planned, when content beats the lunch impulse the writer has done something genuinely impressive in an attention environment full of immediately satisfying alternatives competing for the same finite block of reader time.
Reading this slowly because the writing rewards a slower pace, and a stop at progresswithdirection did the same, the pace at which I read content is something I now use as a quality signal and writing that earns a slower pace earns my attention as a reader looking for substance these days.
Liked how the post handled an objection I was forming as I read, and a stop at motionstrategy similarly anticipated where my thinking was going next, the rare writer who can predict reader concerns and address them in advance is doing something most online content fails to do despite that being basic editorial work.
Worth flagging that the post handled an angle of the topic I had not seen elsewhere, and a look at fashioncartworld extended that fresh treatment, content that finds underexplored corners of well covered subjects is genuinely valuable and this site has demonstrated that exploratory editorial approach across multiple pieces in my reading sessions today.
Telefonumda rahatça bahis oynayabileceğim bir uygulama arıyordum uzun zamandır. Play Store’da resmi olanı bulamayınca çok şaşırdım. Adımları doğru sırayla uyguladıktan sonra erişim sorunsuz açıldı. En sonunda güvenilir bir kaynağa ulaştım ve size de tüm detayları aktarmak istedim, güncel bilgilere buradan bakabilirsiniz: 1xbet nouvelle version à télécharger 1xbet nouvelle version à télécharger. Yani anlatmak istediğim şu — mobil uygulaması inanılmaz hızlı ve stabil çalışıyor.
kurulumu da oldukça basit ve anlaşılırdı yani rahat olun. Birçok platform denedim ama en iyisi bu çıktı — başka yerde vakit kaybetmeyin yani. Umarım siz de memnun kalırsınız…
Mobil bahis platformu arayışım epey uzun sürdü valla. Apk dosyasını nereden indireceğimi bulmak epey zaman aldı. Güncel bilgileri kontrol edip süreci hatasız başlattım. En sonunda güvendiğim bir kaynağa ulaştım ve size de tüm detayları aktarmak istedim, güncel bilgilere buradan bakabilirsiniz: 1xbet mobil indir 1xbet mobil indir. Yani anlatmak istediğim şu — mobil uygulaması gerçekten akıcı ve sorunsuz çalışıyor.
güncellemeleri de düzenli olarak yapılıyor. Kendi deneyimlerimi aktarıyorum size — kesinlikle pişman olmazsınız deneyin derim. Umarım siz de memnun kalırsınız…
Bookmark earned, share earned, return visit earned, all from one reading session, and a look at chestnutharbortradehouse did the same, the trifecta of bookmark and share and return is rare in a single visit and represents the highest level of engagement I tend to offer any piece of online content these days here.
Solid value packed into a relatively short post, that takes skill, and a look at momentumbydesign continues the dense useful content across more pages, this site clearly understands that respecting reader time is itself a form of generosity which is something most blog operations seem to have forgotten lately across the wider open web.
Different in a good way from the cookie cutter content that fills most blogs covering this area, and a stop at strategyoperations kept showing me why, original thoughtful writing exists if you know where to look and this site has earned a place on my short list of those rare exceptions worth defending.
Well crafted post, the structure flows naturally from one point to the next without forcing transitions, and a stop at strategyvector kept the same flow going, you can tell when a writer has thought about how their content reads rather than just what it contains and this is one of those examples.
Refreshing to find writing that does not try to manipulate the reader into clicking onto the next page through cliffhangers and forced engagement, and a stop at growthnavigation continued in the same respectful way, this is what reader first design actually looks like in practice rather than just in marketing copy that sounds nice.
deep web addresses onion https://darkwebmarkets2024.com/ dark markets albania https://darkwebmarketonion.com/
black ops market url https://darkwebmarketlisting.com/ black ops darknet url https://darkwebmarketlinks2024.com/
Reading this triggered a small but real correction in something I had assumed, and a stop at honeycovevendorroom extended that corrective effect, content that updates my beliefs through evidence rather than rhetoric is content with intellectual integrity and this site has earned that label consistently across the pieces I have read so far today.
Thanks for the clean writing, no broken sentences and no awkward translations like some other sites have, and a quick stop at directioncreatesresults kept that polish going nicely, it really does make a difference when a reader can move through a page without tripping on every line or going back to reread.
Mobil bahis için doğru uygulamayı arıyordum uzun zamandır. Herkes farklı bir link atıyordu kime güveneceğimi şaşırdım. Adımları doğru sırayla uyguladıktan sonra erişim sorunsuz açıldı. En sonunda sağlam bir kaynağa ulaştım ve size de tüm detayları aktarmak istedim, güncel bilgilere buradan bakabilirsiniz: 1xbet son sürüm indir 1xbet son sürüm indir. Şimdi size kısaca özet geçeyim — son sürümü bütün özellikleri eksiksiz sunuyor.
kurulumu da çok kolaydı yani rahat olun. Birçok platform denedim ama en iyisi bu çıktı — başka yerde vakit kaybetmeyin yani. Şimdiden iyi şanslar ve bol kazançlar…
Telefonuma 1xbet yüklemek istiyordum uzun süredir. Herkes farklı bir şey söylüyordu kime güveneceğimi şaşırdım. Sonunda tüm teknik detayları inceleyip sistemi test ettim. En sonunda güvendiğim bir kaynağa ulaştım ve size de tüm detayları aktarmak istedim, güncel bilgilere buradan bakabilirsiniz: 1xbet indir 1xbet indir. Şimdi size kısaca özet geçeyim — telefonuma indirdikten sonra çok memnun kaldım.
güncellemeleri de otomatik geliyor. Birçok platform denedim ama en iyisi bu çıktı — en hızlı uygulama bu oldu artık. Herkese hayırlı olsun…
Reading carefully this time rather than scanning, and the depth shows up in places I missed first time around, and a look at actionbuildsresults rewarded the same careful approach, content that holds up to multiple reads is content I want more of in my regular rotation rather than disposable scroll fodder daily.
Alright, real talk about the Miami rental game — it’s a straight-up jungle out here. Then you show up at the local lot to pick up the car. Different car waiting — scratches everywhere, smells like an ashtray, and that “amazing price”? Doesn’t include the mandatory $400 cleaning fee or the $30 per day toll pass you can’t waive. Eight years in South Florida and these clowns still almost get me. If you are trying to find a legitimate luxury fleet without getting ripped off, do some real digging first and read actual customer reviews. Anyone who’s waited for an Uber in August understands exactly what I mean about this city, especially since the AC must be arctic cold and unlimited miles non-negotiable.
Most of these local agencies are just shiny websites hiding the same beat-up fleet with fake reviews, but I eventually found a service where what you book is exactly what shows up, no surprises, no fine print nightmares. If you are looking for the only honest source for premium wheels across South Florida, check the current details here: exotic car rental miami beach fl exotic car rental miami beach fl. Also, definitely bring serious shades unless you enjoy driving straight into the sun like a zombie every single evening. Anyway, glad there’s at least one straight operator left in this rental circus, let me know if you guys have any other clean spots.
how to buy drugs on the dark web https://darknetmarketsgate.com/ is it dangerous to download a guide on darknet markets https://darknetmarketsgate.com/
search darknet market https://darkmarketsgate.com/ darknet drugs 2026 https://darkmarketsgate.com/
Walked away in a slightly better mood than when I started reading, that says something about the writing, and a stop at nightfalltradegallery kept that going, content that leaves you feeling more capable rather than overwhelmed is the kind I keep coming back to again and again over the years and across many topics.
В данном материале представлены ключевые тенденции в сфере медицинской науки и практики. Вы узнаете о последних открытиях, инновационных подходах к терапии и важности профилактики заболеваний. Особое внимание уделено практическому применению новых методов в клинической практике.
Эксклюзивная информация – наркологическая клиника Плюс в Екатеринбурге
Found the post genuinely useful for something I was working on this week, and a look at flintmeadowmerchantgallery added more material I will reference, content that connects to my actual life and work rather than just being interesting in the abstract is the kind I will pay attention to and return to repeatedly.
A nicely understated post that does not shout for attention, and a look at ideabuilderhub maintained the same quiet quality, understatement is a stylistic choice that distinguishes serious writing from attention seeking writing and this site has clearly committed to the understated approach as a core editorial value rather than just a phase.
Once you start reading carefully here it is hard to go back to lower quality alternatives, and a stop at crystalcovegoodsgallery reinforced that ratchet effect, the way good content raises standards is real over time and this site has clearly contributed to raising my expectations for what is possible in writing on the topic generally.
Now placing this in the same category as a few other sites I have come to trust, and a look at buildwithintelligence continued the placement decision, the small category of fully trusted sites is one I extend rarely and only after multiple positive reading sessions and this site has earned the category placement methodically over time.
Android için son sürümü bulmak epey zaman aldı açıkçası. Play Store’da resmi uygulamayı bulamayınca çok üzüldüm. Adımları doğru sırayla uyguladıktan sonra erişim sorunsuz açıldı. En sonunda sağlam bir kaynağa ulaştım und size de tüm detayları aktarmak istedim, güncel bilgilere buradan bakabilirsiniz: 1xbet uygulama 1xbet uygulama. Yani anlatmak istediğim şu — mobil uygulaması inanılmaz stabil ve hızlı çalışıyor.
kurulumu da oldukça basit ve hızlıydı yani rahat olun. Kendi deneyimlerimi aktarıyorum size — başka yerde vakit kaybetmeyin yani. Umarım siz de memnun kalırsınız…
Now feeling confident that this site will continue producing work I will want to read, and a look at buildtowardclarity extended that confidence into the future, projecting forward from current quality to expected future quality is something I do for sites I genuinely follow and this one has earned that forward looking trust clearly today.
Bookmark folder reorganised slightly to make this site easier to find, and a look at progressnavigator earned the same accessibility upgrade, the small organisational moves I make for sites I expect to return to often are themselves a signal of how much I trust them and this site triggered those moves naturally.
how to get on the dark web android https://privatedarknetmarket.com/ tor market https://privatedarknetmarket.com/
Worth pointing out that the post avoided the temptation to summarise everything at the end, and a look at daisycoveartisanexchange continued that confident closing approach, content that trusts readers to retain the substance without being reminded of it at the end is content that respects the reader and this site practices that respect.
В этой публикации мы рассматриваем важную тему борьбы с зависимостями, включая алкогольную и наркотическую зависимости. Мы обсудим методы лечения, реабилитации и поддержку, которые могут помочь людям, столкнувшимся с этой проблемой. Читатели узнают о перспективах выздоровления и важности комплексного подхода.
Разобраться лучше – наркологическая клиника Плюс в Екатеринбурге
Now feeling confident enough in this site to use it as a reference point for evaluating others on the same topic, and a look at ideasneedclarity continued the comparison friendly quality, sites that serve as quality benchmarks for their topic are precious and this one has clearly become a benchmark for me on this particular subject area.
Took the time to read the comments on this post too and they were also worth reading, and a stop at fastcartarena suggested the community quality matches the content quality, when the conversation around a piece is as good as the piece itself you know you have found a real corner of the internet.
Now planning to share the link with a small group of readers I trust, and a look at visionmechanism suggested more material to share with the same group, recommending content into a curated circle requires confidence in the recommendation and this site is making me confident in those personal recommendations on multiple separate occasions now.
Thanks for the practical examples scattered through the post rather than abstract theory only, and a look at momentumplanner continued that grounded style, abstract points are easier to remember when paired with concrete situations and the writers here clearly understand how readers actually retain information from blog content reading sessions.
Reading this confirmed a hunch I had been carrying about the topic without having articulated it, and a stop at visionpathway extended the confirmation, content that gives shape to fuzzy intuitions is doing the rare work of making private thoughts public and this site is providing that articulating service consistently for me lately.
During the time spent here I noticed the absence of the usual distractions, and a stop at ideasdeserveexecution extended that distraction free experience, content that does not fight my attention with pop ups and modals and aggressive prompts is content that respects me and this site has clearly chosen the respectful approach throughout.
Telefonuma bahis uygulaması indirmek istiyordum uzun zamandır. Güncel apk dosyasını nereden indireceğimi bulmak çok zordu. Güncel bilgileri kontrol edip süreci hatasız başlattım. En sonunda sağlam bir kaynağa ulaştım und size de tüm detayları aktarmak istedim, güncel bilgilere buradan bakabilirsiniz: 1xbet mobil uygulama indir 1xbet mobil uygulama indir. Yani anlatmak istediğim şu — son sürümü her şeyi düşünmüş resmen.
kurulumu da oldukça basit ve hızlıydı yani rahat olun. Birçok platform denedim ama en iyisi bu çıktı — en güvenilir uygulama bu oldu artık. Herkese hayırlı olsun…
A nicely understated post that does not shout for attention, and a look at actiondrivenclarity maintained the same quiet quality, understatement is a stylistic choice that distinguishes serious writing from attention seeking writing and this site has clearly committed to the understated approach as a core editorial value rather than just a phase.
Worth flagging that the writing rewarded a second read more than I expected, and a look at rapidgoodscorner produced the same second read benefit, content with hidden depths that emerge only on careful rereading is rare in the modern blog space and this site has clearly invested in that level of compositional density throughout.
Picked this for a morning recommendation in our company chat, and a look at chestnutharborvendorroom suggested I will mention this site again later, recommending content into a workplace context is a small editorial act that requires confidence in the recommendation and this site is making me confident in those recommendations consistently here too.
This actually answered the question I had been searching for, and after I checked shopbasemarket I had a few more pieces I had not realised I needed, that is the sign of a site that knows what its readers want before they even know how to ask it which is impressive.
torzon market https://darkwebmarketonion.com/ best darknet drug sites https://darkwebmarkets2024.com/
Highly recommend to anyone looking for a sensible take on this topic without the usual marketing nonsense, and a look at driftorchardvendorparlor kept that grounded approach going, sites that stay focused on serving readers rather than monetising every click are rare and this is clearly one of those rare ones I really appreciate finding.
Этот информационный материал подробно освещает проблему наркозависимости, ее причины и последствия. Мы предлагаем информацию о методах лечения, профилактики и поддерживающих программах. Цель статьи — повысить осведомленность и продвигать идеи о необходимости борьбы с зависимостями.
Прочесть заключение эксперта – вывод из запоя анонимно
В этой статье обсуждаются актуальные медицинские вопросы, которые волнуют общество. Мы обращаем внимание на проблемы, касающиеся здравоохранения и лечения, а также на новшества в области медицины. Читатели будут осведомлены о последних событиях и смогут следить за тенденциями в медицине.
Узнайте всю правду – капельница от алкоголя на дому
black market bank account https://darkwebmarketlisting.com/ current darknet markets https://darkwebmarketlinks2024.com/
Following the post through to the end without my attention drifting once, and a look at floraharborcommercegallery earned the same uninterrupted attention, content that holds attention without manipulating it is content with substantive pull and this site has demonstrated that substantive pull across multiple pieces in a single reading session reliably here today.
wired darknet markets https://darkmarketsgate.com/ .onion links https://darkmarketsgate.com/
Telefonuma güncel sürümü yüklemek istiyordum açıkçası. Play Store’da resmi olanı bulamayınca çok şaşırdım. Sonunda tüm teknik detayları inceleyip sistemi test ettim. En sonunda sağlam bir kaynağa ulaştım ve size de tüm detayları aktarmak istedim, güncel bilgilere buradan bakabilirsiniz: 1xbet mobil indir android 1xbet mobil indir android. Valla bak net söyleyeyim — son sürümü bütün eksikleri kapatmış resmen.
güncellemeleri düzenli olarak geliyor. İşin doğrusunu söylemek gerekirse — en kullanışlı uygulama bu oldu artık. Şimdiden iyi şanslar ve bol kazançlar…
One of the more honest takes on the topic I have seen lately, no spin and no oversell, and a stop at domelegend kept that going, the kind of voice the open web could use a lot more of rather than the endless echo chamber of recycled opinions floating around every social platform these days.
history of darknet markets https://darknetmarketstore.com/ reddit darknet market links https://darknetmarketgate.com/
Genuinely well crafted writing, the kind that makes the topic look easier than it actually is, and a look at lemonridgevendorroom added even more depth, you can feel the experience behind every line which is something only writers who have been at this for a while can pull off with this level of grace.
Reading this felt easy in the best way, no friction and no confusion at any point, and a stop at clarityunlocksgrowth carried that same comfort across more pages, the kind of editorial flow that lets you absorb information without fighting the format which is increasingly hard to find on the open web today across topics.
Quietly building a case in my head for why this site deserves more attention than it currently seems to receive, and a look at progresswithfocus reinforced the case, the gap between quality and recognition is a recurring frustration in independent online content and this site is one of the cases that seems particularly egregious to me today.
Now sitting back and recognising that this was a small but real win in my reading day, and a stop at buildtowardmomentum extended that quiet win, the cumulative effect of small reading wins versus the cumulative effect of small reading losses is real over time and this site is contributing to the wins side of that ledger.
Really liked the calm tone running through the post, no shouting and no urgency forced into the writing, and a look at frostrivervendorlounge kept that quiet confidence going, the kind of voice that makes the reader feel respected rather than yelled at which is depressingly common across most modern blog content these days.
Excellent post, balanced and well organised without showing off, and a stop at strategyexecutionhub continued in that same vein, this site has clearly figured out the formula for content that works for readers rather than for search engine ranking signals which is harder than it sounds today and worth real recognition from anyone.
Took the time to read the comments on this post too and they were also worth reading, and a stop at clarityalignment suggested the community quality matches the content quality, when the conversation around a piece is as good as the piece itself you know you have found a real corner of the internet.
A small editorial detail caught my attention, the way headings related to body text, and a look at exploreideasdeeplynow maintained that careful relationship, structural details like that show up to readers who notice them and the writers here have clearly thought about every level of the piece rather than just the words.
Worth recognising that the post did not pretend to be the final word on the topic, and a stop at progressinitiator continued that humility, content that admits its own scope and limits is more trustworthy than content that overreaches and this site has clearly developed the editorial maturity to know what it can and cannot claim well.
Now planning to recommend this site in a context where my recommendations are taken seriously, and a stop at ideamotionlab confirmed I should make that recommendation soon, the small but real act of recommending content into spaces where my taste matters is something I take seriously and this site is worth the recommendation.
Telefonuma güncel uygulamayı yüklemek istiyordum açıkçası. Play Store’da resmi olanı bulamayınca çok hayal kırıklığı yaşadım. Güncel bilgileri kontrol edip süreci hatasız başlattım. En sonunda güvendiğim bir kaynağa ulaştım ve size de tüm detayları aktarmak istedim, güncel bilgilere buradan bakabilirsiniz: 1xbet indirme 1xbet indirme. Valla bak net söyleyeyim — son sürümü tüm ihtiyaçları karşılıyor resmen.
Hiçbir sıkıntı yaşamadım indirme esnasında. İşin doğrusunu söylemek gerekirse — başka yerde vakit kaybetmeyin yani. Şimdiden iyi şanslar ve bol kazançlar…
Android için güncel sürümü bulmak epey meşakkatliydi açıkçası. Apk dosyasını nereden indireceğimi bulmak çok zaman aldı. Adımları doğru sırayla uyguladıktan sonra erişim sorunsuz açıldı. En sonunda güvenilir bir kaynağa ulaştım ve size de tüm detayları aktarmak istedim, güncel bilgilere buradan bakabilirsiniz: 1xbet son sürüm indir 1xbet son sürüm indir. Yani anlatmak istediğim şu — son sürümü tüm beklentileri karşılıyor resmen.
güncellemeleri de sorunsuz bir şekilde geliyor. Kendi deneyimlerimi aktarıyorum size — başka yerde vakit kaybetmeyin yani. Umarım siz de memnun kalırsınız…
Quietly the post solved something I had been turning over without quite knowing how to phrase the question, and a look at growththroughdirection extended that quiet solving, content that addresses unformulated needs is content with reader insight and this site has demonstrated that insight at a high rate across the pieces I have read recently.
Worth pointing out that the post avoided the temptation to summarise everything at the end, and a look at directionalvision continued that confident closing approach, content that trusts readers to retain the substance without being reminded of it at the end is content that respects the reader and this site practices that respect.
Generally I find the content on similar topics frustrating in specific ways and this post avoided all of them, and a look at focusmovesideas continued that frustration free experience, content that sidesteps the standard failure modes of its genre is content with editorial awareness and this site has clearly studied what fails elsewhere consistently.
Bookmarked the page and the homepage too because clearly there is more to explore here, and a quick stop at growthoriented only made that more obvious, this is the kind of place I want to dig through over a weekend rather than rushing through during a coffee break tomorrow morning before getting back to work.
darknet dream market link https://darkmarketsdirectory.com/ back market legit https://darknetmarketsgate.com/
Came in for one specific question and got answers to three I had not even thought to ask, and a look at fastgoodsarena extended that bonus value pattern, the kind of resource that anticipates reader needs rather than just answering the literal question asked is the gold standard and this site reaches it.
лемезит бордо галтованный купить лемезит бордо галтованный купить
Got something practical out of this that I can apply later this week, and a stop at explorefreshstrategicideas added more details to think about, this is exactly the kind of content I bookmark for future reference rather than the throwaway listicles that dominate most search results these days for almost any common topic.
Bookmark added without hesitation after finishing, and a look at snowharbortradegallery confirmed I should bookmark the homepage too rather than just this page, the rare site that earns category level trust rather than just single article approval is the kind I want to rely on across many different topics over time.
A piece that earned its conclusions through the body rather than asserting them at the end, and a look at directionalcontrol maintained the same earned quality, conclusions that follow from what came before are more persuasive than declarations and this site has clearly internalised that principle in how it constructs arguments throughout pieces.
Really clear writing, the kind that makes you want to share the link with someone who has been asking about the topic, and a quick browse through directionpowersgrowth only made me more sure of that, the information here stays useful long after the first read is done which says a lot.
Reading this with a fresh mind in the morning brought out details I might have missed in the afternoon, and a stop at clovercrestmarkethouse earned the same fresh attention, content that rewards being read at full attention rather than at energy lows is content with real density and this site has that density consistently.
Found the use of subheadings really helpful for scanning back through the post later, and a stop at caramelharborcommercegallery kept that reader friendly approach going, navigation is something many blog writers ignore but small structural choices make a noticeable difference for someone returning to find a specific point again days or weeks later.
Now considering carefully how to share this site with the right audience rather than broadcasting widely, and a look at domelounge extended that careful sharing impulse, content worth sharing carefully rather than spamming is content that has earned a higher kind of recommendation and this site has earned that careful shareability throughout pieces.
Now setting aside time on my next free afternoon to read more from the archives, and a stop at growthalignment confirmed that time will be well spent, the rare site whose archive deserves a dedicated reading session rather than just casual sampling is the kind of resource worth scheduling around and this one qualifies clearly.
Refreshing to read something where the words actually mean something instead of filling space, and a stop at clarityfirstalways kept that going, the writing here trusts the reader to follow along without endless repetition or constant reminders of what was already said earlier in the post which I appreciate.
Felt slightly impressed without being able to point to one specific reason, and a look at actionoveranalysis continued that diffuse positive feeling, when content works at a level you cannot easily articulate the writer is doing something with craft rather than just delivering information and that is something I have learned to recognise.
A piece that reads like it was written for me without claiming to be written for me, and a look at actiondesign produced the same fit, when the writer audience match clicks naturally without being engineered through demographic targeting you know the writing is solid and this site has that natural fit consistently for me.
reddit darknet markets uk https://darkwebmarketdirectory.com/ dark web onion markets https://darkwebmarketlisting.com/
лемезит для облицовки фасада лемезит для облицовки фасада
В этой статье мы обсудим процесс восстановления после зависимостей, акцентируя внимание на различных методах и подходах к реабилитации. Читатели узнают, как создать план выздоровления и использовать полезные ресурсы для достижения устойчивых изменений.
Следуйте по ссылке – Вывод из запоя на дому в Ижевске
Adding this site to my regular reading list, the post earned that on its own, and a quick stop at actioncreatesclarity sealed the decision, the kind of place worth checking back with from time to time because it consistently produces material that holds up against a critical reading too which I really value.
Saving the link for sure, this one is a keeper, and a look at clarityspark confirmed I should bookmark the entire site rather than just this page, the consistency across what I have seen so far suggests there is a lot more here worth coming back for soon when I have more time.
Reading this between two meetings turned out to be the highlight of the morning, and a stop at royaldealzone continued that highlight quality, content that outshines the structured parts of a working day is doing something well beyond ordinary and this site has produced multiple such highlights for me already this week alone.
Decided this was the best thing I had read all morning, and a stop at ideaacceleration kept that ranking intact, ranking my reading is something I do mentally throughout the day and the top rank is competitive and not easily won but this site won it without needing to overstate its claims for that.
Reading this with a notebook open turned out to be the right move, and a stop at forwarddesign added more material to the notes, content that justifies active note taking from a passive reader is content with real informational density and this site is producing notes worthy material at a high rate consistently.
Really like that the writer trusts the reader to follow simple logic without restating every previous point, and a stop at ideaprocessing kept that respect going, treating an audience as capable adults rather than as people who need constant hand holding makes a noticeable difference in the reading experience for me.
If I had to defend the time I spend reading independent blogs this site would feature in the defence, and a look at visionalignment reinforced that defensive utility, the ongoing case for non algorithmic reading is one I make to myself periodically and sites like this one provide the actual evidence that supports the case clearly.
Now realising this site has been quietly doing good work for longer than I knew, and a look at actionmatrix suggested an archive worth exploring, sites with deep archives of consistent quality represent a different kind of resource than sites with viral hits and this one looks like the durable kind based on what I see.
Reading this slowly and letting each paragraph land before moving on, and a stop at learnandadvanceintentionally earned the same patient approach, content that rewards slow reading rather than speed is content with real density and the writers here are clearly producing work that benefits from the careful eye rather than the rushed scan.
Skimmed first and then went back to read carefully, and the careful read paid off in places I had missed, and a stop at shopcoremarket got the same treatment, the rare site whose content rewards a second pass is content I want more of in my regular rotation rather than disposable single read articles.
Now setting up a small reminder to revisit the site on a slow day, and a stop at opendealsmarket confirmed the reminder was a good idea, planning return visits is a small organisational act that signals trust in ongoing quality and this site has earned that planned return through consistent performance across the pieces I have read so far.
dark matter url https://darkmarketlegion.com/ how to use onion sites https://darkmarketslegion.com/
Эта доказательная статья представляет собой глубокое погружение в успехи и вызовы лечения зависимостей. Мы обращаемся к научным исследованиям и опыту специалистов, чтобы предоставить читателям надежные данные об эффективности различных методик. Изучите, что работает лучше всего, и получите информацию от экспертов.
Подробнее можно узнать тут – clinica plus
drugs from darknet markets https://darkwebmarkets2024.com/ dark web directory https://darkwebmarketonion.com/
A welcome contrast to the loud takes that have dominated my feed lately, and a look at actionwithpurpose extended that calm voice, content that arrives without yelling has become unusual in the modern attention economy and this site is one of the few places I have found that consistently delivers without raising its voice.
Обзор посвящён процессу восстановления после зависимостей. Мы расскажем о различных этапах реабилитации, поддерживающих ресурсах и важности мотивации в достижении устойчивого выздоровления.
Перейти к полной версии – клиника плюс кашира
Just sat back at the end of the post and felt grateful that someone took the time to write it, and a look at progresspathfinder extended that gratitude across more of the site, recognising effort behind quality work is part of what makes the open web a community rather than just a marketplace today.
Honest assessment is that this is one of the better short reads I have had this week, and a look at growthacceleration reinforced that, the bar for short content is low because most of it sacrifices substance for brevity but this site manages both at once which is harder than it sounds for most writers attempting it.
Decided to set a calendar reminder to revisit, and a stop at momentumflowlab extended that revisit list, calendar entries for content are a level of commitment I rarely make but when I do they signal a higher regard than a simple bookmark and this site has earned that calendar tier of relationship from me today.
Speaking from the perspective of having read widely on the topic this site offers something distinct, and a look at clarityovernoise reinforced that distinctness, the rare site that contributes something genuinely original to a saturated topic is the rare site worth following carefully and this one has demonstrated that original contribution capability today.
Skipped lunch to finish reading, which says something, and a stop at momentumvector kept me at my desk longer than planned, when content beats the lunch impulse the writer has done something genuinely impressive in an attention environment full of immediately satisfying alternatives competing for the same finite block of reader time.
I learned more from this short post than from longer articles I read earlier today, and a stop at buildpurposefullynow added even more useful detail without going off topic, this site clearly knows how to keep things focused without sacrificing depth which is a hard balance to strike for any writer.
Bookmark added in three places to make sure I do not lose the link, and a look at ideasrequireaction got the same redundant treatment, sites I am afraid to lose are the rare keepers and this is clearly one of them based on what I have read so far across this and a couple of related posts.
Nice and clean, that is the best way to describe the writing here, no clutter and no wasted words, and a quick visit to forwardprogression kept that going, I appreciate when a site treats its readers like people who can think for themselves without needing constant hand holding through every paragraph.
Now noticing the careful balance the post struck between confidence and humility, and a stop at domemarina maintained the same balance, finding the line between asserting and admitting is hard and this site has clearly developed the calibration to walk that line consistently which produces a more persuasive reading experience for me.
link darknet market https://darkmarketsdirectory.com/ reddit darknet market 2026 https://darkmarketgate.com/
Now noticing the post fit a particular gap in my reading without my having articulated the gap before, and a look at directioncrafting extended that gap filling effect, content that meets needs I had not consciously formulated is content with reader insight and this site has clearly developed that anticipatory editorial sense across many pieces.
The pacing of the post was just right, never rushed and never dragged out unnecessarily, and a look at growthvector maintained the same rhythm, you can tell the writer has experience because the difficult skill of pacing is something only practiced writers manage to handle well in long form content over time and across formats.
dark web accessing https://darknetmarketgate.com/ url hidden wiki https://darknetmarketgate.com/
I learned more from this short post than from longer articles I read earlier today, and a stop at startpurposefulgrowthpath added even more useful detail without going off topic, this site clearly knows how to keep things focused without sacrificing depth which is a hard balance to strike for any writer.
Reading this gave me confidence to make a decision I had been putting off, and a stop at coastharbormerchantgallery reinforced that confidence, content that translates into action in my own life rather than just informing it is content with the highest practical value and this site is generating that action level utility for me lately.
Left me wanting to read more rather than feeling burned out, that is a good sign, and a look at discoverhiddenpaths confirmed there is plenty more here to explore, the kind of writing that builds appetite rather than killing it which is a rare quality on the modern open internet today across most categories of content.
1xbet indir işlemini nasıl yapacağımı çok merak ediyordum. Play Store’da resmi olanı bulamayınca çok hayal kırıklığı yaşadım. Adımları doğru sırayla uyguladıktan sonra erişim sorunsuz açıldı. En sonunda güvendiğim bir kaynağa ulaştım ve size de tüm detayları aktarmak istedim, güncel bilgilere buradan bakabilirsiniz: 1xbet uygulama 1xbet uygulama. Valla bak net söyleyeyim — son sürümü tüm ihtiyaçları karşılıyor resmen.
güncellemeleri de düzenli olarak yapılıyor. Birçok platform denedim ama en iyisi bu çıktı — en sağlam uygulama bu oldu artık. Şimdiden iyi şanslar ve bol kazançlar…
Found the rhythm of the prose particularly enjoyable on this read through, and a look at coppercovemarkethouse kept that musical quality going across the related pages, sentence rhythm is something most blog writers ignore but it makes a real difference in how content lands with the careful reader who cares.
Working through this site has been a small antidote to the shallow content that fills most of my reading time, and a stop at momentumarchitecture extended that antidote function, sites that quietly improve the average quality of my reading by being themselves are sites worth supporting through return visits and recommendations consistently.
Got something practical out of this that I can apply later this week, and a stop at claritynavigation added more details to think about, this is exactly the kind of content I bookmark for future reference rather than the throwaway listicles that dominate most search results these days for almost any common topic.
1xbet indir nasıl yapılır diye çok araştırdım valla. Herkes farklı bir şey tavsiye ediyordu kime güveneceğimi bilemedim. Adımları doğru sırayla uyguladıktan sonra erişim sorunsuz açıldı. En sonunda güvenilir bir kaynağa ulaştım ve size de tüm detayları aktarmak istedim, güncel bilgilere buradan bakabilirsiniz: 1xbet indir 1xbet indir. Yani anlatmak istediğim şu — son sürümü tüm beklentileri karşılıyor resmen.
güncellemeleri de sorunsuz bir şekilde geliyor. Kendi deneyimlerimi aktarıyorum size — kesinlikle pişman olmazsınız deneyin derim. Şimdiden iyi şanslar ve bol kazançlar…
1xbet indir işlemini nasıl yapacağımı çok merak ediyordum valla. Apk dosyasını nereden indireceğimi bulmak çok zaman aldı. Sonunda tüm teknik detayları inceleyip sistemi test ettim. En sonunda güvenilir bir kaynağa ulaştım ve size de tüm detayları aktarmak istedim, güncel bilgilere buradan bakabilirsiniz: 1xbet indirme 1xbet indirme. Valla bak net söyleyeyim — telefonuma indirdikten sonra çok memnun kaldım.
Hiçbir sorun yaşamadım indirme işleminde. Kendi deneyimlerimi aktarıyorum size — kesinlikle pişman olmazsınız deneyin derim. Herkese hayırlı olsun…
Quietly the post solved something I had been turning over without quite knowing how to phrase the question, and a look at mintmeadowgoodsgallery extended that quiet solving, content that addresses unformulated needs is content with reader insight and this site has demonstrated that insight at a high rate across the pieces I have read recently.
Anyone curious about this topic would do well to start here, the foundation laid is solid, and a stop at growthnavigationhub would round out their understanding nicely, this is the kind of resource I would point a friend toward without hesitation if they asked me where to begin learning about anything in this area.
One of the more honest takes on the topic I have seen lately, no spin and no oversell, and a stop at trustedshoppinghub kept that going, the kind of voice the open web could use a lot more of rather than the endless echo chamber of recycled opinions floating around every social platform these days.
If quality blog writing is dying as people sometimes claim then this site is one piece of evidence that it has not died yet, and a look at claritybeforegrowth extended that evidence, the broader cultural question about online writing has empirical answers in specific sites and this one is contributing to a more optimistic answer overall.
Recommended to anyone working in or curious about this area, the depth and clarity combine well, and a look at actiondirection keeps that going across more pages, the kind of site that earns regular visits rather than chasing trends has my respect because it suggests genuine commitment to the topic itself rather than to chasing trends.
A modest masterpiece in its own quiet way, and a look at clarityshapesoutcomes confirmed the same quiet quality across the rest of the site, calling something a masterpiece is usually overstating but for content this carefully crafted the word feels appropriate even if the writers themselves would probably resist the label honestly.
A clean piece that knew exactly what it wanted to say and said it, and a look at actiondrivensuccess maintained the same clarity of intention, knowing the goal of a piece before writing is something most blog content lacks and the clarity of purpose here shows up in every paragraph for any careful reader to notice.
Closed the post with a small satisfied sigh, and a stop at royalgoodsarena produced the same gentle exhale, content that ends well is content that respects the rhythm of reading and the writers here have clearly thought about how their pieces close rather than just trailing off when they run out of things to say.
Will be back, that is the simplest way to say it, and a quick visit to strategicflow reinforced the decision, this site has earned a spot in my regular rotation alongside a few other reliable places I check when I want something genuinely informative without all the usual modern web noise getting in the way.
Closed and reopened the tab three times before finally finishing, and a stop at clarityorientation held my attention straight through, sometimes content fights for time against my own distraction and the times it wins say something positive about its quality and this post clearly won that fight today afternoon for me.
В этой публикации мы рассматриваем важную тему борьбы с зависимостями, включая алкогольную и наркотическую зависимости. Мы обсудим методы лечения, реабилитации и поддержку, которые могут помочь людям, столкнувшимся с этой проблемой. Читатели узнают о перспективах выздоровления и важности комплексного подхода.
Ознакомиться с отчётом – вывод из запоя с выездом
Genuine pleasure to read, and that is not something I say often after a casual click through, and a quick visit to directioncraft kept the same feeling going across the rest of the site, finding writing that actually feels good to spend time with rather than just functional is increasingly rare on the open web.
Bahis dünyasına merak salalı çok oldu valla. Herkes farklı bir şey söylüyor kafam allak bullak oldu. Sonunda tüm teknik detayları inceleyip sistemi test ettim. En sonunda doğru adrese ulaştım ve size de tüm detayları aktarmak istedim, güncel bilgilere buradan bakabilirsiniz: 1xbet turkey 1xbet turkey. Şimdi size kısaca özet geçeyim — spor bahislerinde uzman olanlar burayı bilir.
müşteri desteği de ilgili ve hızlı. İşin doğrusunu söylemek gerekirse — kesinlikle pişman olmazsınız deneyin derim. Umarım siz de memnun kalırsınız…
A piece that exhibited the kind of patience that good writing requires, and a look at growwithstructuredmomentum continued that patient quality, hurried writing is easy to spot and this site reads as having been written without time pressure which produces a different feel than the rushed content that dominates much of the modern blog space.
Came across this through a roundabout path and now it is on my regular rotation, and a stop at shopgatemarket sealed that decision, the open web still produces serendipitous discoveries when you let the citations and references guide you rather than relying purely on algorithmic feeds for new content recommendations always.
Came in tired from a long day and the writing held my attention anyway, and a stop at directionalfocus kept that going, content that can engage a fatigued reader is doing something right because most online reading happens in suboptimal conditions like that one and quality content adapts to it without complaint.
Time spent here today felt productive in the way that good reading sessions sometimes do, and a stop at draftglade extended that productive feeling across the rest of the morning, the difference between productive reading and merely passing time is real and this site is consistently on the productive side for me lately.
Reading this on a phone at a coffee shop and finding it perfectly suited to that context, and a stop at forwardthinkinggrowth continued the comfortable mobile experience, content that works across reading conditions without compromising on substance is increasingly important and this site has clearly thought about the whole reader experience here.
Useful read, especially because the writer did not assume too much background from the reader, and a quick look at dunecovemarkethouse continued in the same way, a thoughtful site that meets people where they are which is something the modern web could use a lot more of for both casual and serious readers.
Этот текст представляет собой обзор свежих данных и исследований в области медицины. Он призван помочь читателям понять, как научные достижения влияют на лечение, диагностику и общее состояние системы здравоохранения.
Прочитать подробнее – клиника плюс иркутск
onion links sites https://darknetmarketsgate.com/ guide to using darknet markets https://darkmarketgate.com/
Really appreciate that the writer did not overstate the importance of the topic to make the post feel weightier, and a quick visit to visionexecutionhub maintained the same modest framing, content that is honest about its own scope rather than inflating itself is the kind I trust and return to repeatedly over time.
Came in expecting another generic take and got something with actual character instead, and a look at momentumoperations carried that personality forward, finding a distinct voice on a saturated topic is impressive and worth pointing out when it happens because most sites end up sounding identical to their nearest competitors quickly.
В этой статье мы говорим о важности поддержки в процессе выздоровления. Рассматриваются семьи, группы поддержки, специалисты и онлайн-ресурсы, которые могут сыграть решающую роль в избавлении от зависимости.
Не упусти важное! – снятие интоксикации на дому
Skipped the TLDR thinking I would read everything anyway, and ended up enjoying the path through the full post, and a stop at visionactivation similarly rewarded the patient read, summaries are useful but the journey through good writing is part of what makes the destination feel earned rather than just delivered cleanly.
Came away with some new perspectives I had not considered before, and after visionguidesaction those ideas felt more complete, the kind of content that stays with you a little while after reading rather than slipping out the moment you switch tabs and move on with your day to whatever comes next.
Liked that the post landed without needing to manufacture controversy or take a contrarian stance for attention, and a stop at amberharbormerchantgallery continued that grounded approach, content that earns attention through quality rather than provocation is the kind that builds long term trust rather than burning it on quick wins.
Thank you for your sharing. I am worried that I lack creative ideas. It is your article that makes me full of hope. Thank you. But, I have a question, can you help me? https://www.binance.bh/register?ref=JW3W4Y3A
best darknet markets uk https://darkmarketlegion.com/ world market darknet https://darkmarketslegion.com/
Эта медицинская заметка содержит сжатую информацию о новых находках и методах в области здравоохранения. Мы предлагаем читателям свежие данные о заболеваниях, профилактике и лечении. Наша цель — быстро и доступно донести важную информацию, которая поможет в повседневной жизни и понимании здоровья.
Хочу знать больше – наркологическая клиника в лиецке
site darknet liste https://darkwebmarkets2024.com/ oniondir deep web link directory https://darkwebmarketonion.com/
Well structured and easy to read, that combination is rarer than people think, and a stop at progressignition confirmed the same standard runs across the rest of the site, definitely the kind of place I will be coming back to when this topic comes up in conversation later again over the weeks ahead.
Reading this prompted a small redirection in something I was working on, and a stop at copperharborvendorroom extended that redirecting influence, content that affects my actual work rather than just my thinking has the highest practical impact and this site is providing that level of influence for me at a sustainable rate apparently.
Speaking as someone who reads a lot on this topic this site has earned a high position in my source rankings, and a stop at claritysequencehub reinforced that ranking, the informal ranking of sources for a topic is something I maintain mentally and this site has moved into the upper portion of those rankings clearly.
Left me wanting to read more rather than feeling burned out, that is a good sign, and a look at focuscreatesresults confirmed there is plenty more here to explore, the kind of writing that builds appetite rather than killing it which is a rare quality on the modern open internet today across most categories of content.
Эта публикация посвящена актуальным вопросам современной медицины и здравоохранения. Мы обсудим новейшие технологии диагностики и лечения, а также их влияние на продолжительность и качество жизни. Читатель найдет здесь информацию о научных исследованиях и перспективных разработках, доступно изложенную для широкой аудитории.
Слушай внимательно — тут важно – нарколог на дом анонимно
Этот обзор посвящен успешным стратегиям избавления от зависимости, включая реальные примеры и советы. Мы разоблачим мифы и предоставим читателям достоверную информацию о различных подходах. Получите опыт многообразия методов и найдите подходящий способ для себя!
Получить дополнительную информацию – вывод из запоя на дому
Эта публикация посвящена актуальным вопросам современной медицины и здравоохранения. Мы обсудим новейшие технологии диагностики и лечения, а также их влияние на продолжительность и качество жизни. Читатель найдет здесь информацию о научных исследованиях и перспективных разработках, доступно изложенную для широкой аудитории.
Как это работает — подробно – Капельница от похмелья в Костроме
Bookmark added with a small note about why, and a look at growthwithpurpose prompted another bookmark with another note, the bookmarks I annotate are the ones I expect to return to deliberately rather than stumble into and this site is generating annotated bookmarks at a higher rate than my usual content sources by some margin.
Now appreciating the small but real way this post improved my afternoon, and a stop at strategyguided extended that small improvement effect, content that produces measurable positive impact on the texture of a reading day is content with real value and this site is producing those small positive impacts at a sustainable rate apparently.
Learn More: מספר טלפון של נערת ליווי
Açıkçası bu alanda çok fazla seçenek var ama doğrusunu bulmak zor. Güvenilir bir site bulmak gerçekten çok zaman aldı. Sonunda tüm teknik detayları inceleyip sistemi test ettim. En sonunda doğru adrese ulaştım ve size de tüm detayları aktarmak istedim, güncel bilgilere buradan bakabilirsiniz: bahis siteler 1xbet bahis siteler 1xbet. Şimdi size kısaca özet geçeyim — spor bahisleri konusunda iddialı olanlar bilir.
işlemler hızlı ve güvenli yani rahat olun. Kendi deneyimlerimi aktarıyorum size — en güvendiğim adres burası oldu artık. Şimdiden iyi şanslar ve bol kazançlar…
Now adjusting my mental list of reliable sites for this topic, and a stop at visiondirectionhub reinforced the adjustment, the small ongoing curation work of maintaining trusted sources is one of the actual practical activities of careful reading and this site has earned a permanent place on my list for this particular subject.
Felt the post handled a sensitive angle of the topic with appropriate care, and a look at strategyalignment extended that careful handling across related material, sites that can navigate delicate territory without causing damage are rare and require a level of judgement that comes from experience rather than from following any clear playbook.
Now thinking about this site as a small example of what good independent writing looks like, and a stop at strategyignition continued that exemplary status, the few sites that serve as good examples are sites worth holding up in conversations about quality and this one has earned that exemplary placement through patient consistent effort over time.
access to the dark web https://darknetmarketstore.com/ dark web monitoring https://darknetmarketstore.com/
Reading this prompted a small note in my reference file, and a stop at progressengineered prompted another, the rare site that contributes useful nuggets to my own working knowledge rather than just consuming my attention is worth the time investment many times over compared to the usual pile of forgettable scroll content.
legit darknet markets 2026 https://darkwebmarketlisting.com/ how to buy molly https://darkwebmarketlinks2024.com/
Started imagining how I would explain the topic to someone else after reading, and a look at draftlake gave me more material for that imagined explanation, content that improves my own ability to discuss a topic is content that has actually transferred knowledge rather than just decorating my screen for a few minutes.
В этой статье мы рассматриваем разрушительное влияние зависимости на жизнь человека. Обсуждаются аспекты, такие как здоровье, отношения и профессиональные достижения. Читатели узнают о необходимости обращения за помощью и о путях к восстановлению.
Детали по клику – врач на дом капельница от запоя
Reading this site over the past week has changed how I evaluate content in this space, and a look at momentumstartswithclarity extended that recalibration, the standards I bring to reading on the topic have shifted upward as a direct result of regular exposure to this kind of work and that shift will outlast any single reading session.
Worth saying this site reads better than most paid newsletters I have tried, and a stop at clarityshapesgrowth confirmed that comparison, the bar for free content is often lower than for paid but this site clears the paid bar consistently and that says something about the editorial approach behind the work being published here regularly.
Mobil bahis platformu arayışım epey uzun sürdü valla. Play Store’da resmi olanı bulamayınca çok hayal kırıklığı yaşadım. Sonunda tüm teknik detayları inceleyip sistemi test ettim. En sonunda güvendiğim bir kaynağa ulaştım ve size de tüm detayları aktarmak istedim, güncel bilgilere buradan bakabilirsiniz: 1xbet indir tr canli bahis site 1xbet indir tr canli bahis site. Şimdi size kısaca özet geçeyim — telefonuma indirdikten sonra çok memnun kaldım.
güncellemeleri de düzenli olarak yapılıyor. Birçok platform denedim ama en iyisi bu çıktı — en sağlam uygulama bu oldu artık. Herkese hayırlı olsun…
выездная наркологическая служба оперативно приедет по указанному адресу, имея при себе все необходимое оборудование и медикаменты, в том числе для оказания неотложной помощи.
Выяснить больше – вывод из запоя на дому
Quietly the post solved something I had been turning over without quite knowing how to phrase the question, and a look at birchharborcommercegallery extended that quiet solving, content that addresses unformulated needs is content with reader insight and this site has demonstrated that insight at a high rate across the pieces I have read recently.
If a friend asked me where to read carefully on the topic I would send them here without hesitation, and a look at createforwardthinking confirmed the recommendation strength, the directness of my recommendation reflects how confident I am in the quality and this site has earned undiluted recommendations from me across multiple recent conversations actually.
dynabolts pills https://darkmarketgate.com/ nexus darknet access https://darkmarketgate.com/
Reading this with my morning coffee turned into reading the related posts with my morning coffee, and a stop at claritymomentum stretched the morning further, content that pulls breakfast into a reading session rather than just accompanying it is content that has earned a higher claim on my attention than the average article does.
Started believing the writer knew the topic deeply by about the second paragraph, and a look at strategydeployment reinforced that confidence, the speed at which a writer establishes credibility through their writing is a useful quality signal and this writer establishes it quickly and quietly without resorting to credential dropping or self promotion.
Mobil bahise yeni başlayanlar için ideal bir uygulama arıyordum. Play Store’da resmi olanı bulamayınca çok şaşırdım. Sonunda tüm teknik detayları inceleyip sistemi test ettim. En sonunda güvenilir bir kaynağa ulaştım ve size de tüm detayları aktarmak istedim, güncel bilgilere buradan bakabilirsiniz: 1xbet giriş indir 1xbet giriş indir. Şimdi size kısaca özet geçeyim — mobil uygulaması gerçekten akıcı ve hızlı çalışıyor.
kurulumu da çok basit ve anlaşılırdı yani rahat olun. İşin doğrusunu söylemek gerekirse — kesinlikle pişman olmazsınız deneyin derim. Şimdiden iyi şanslar ve bol kazançlar…
1xbet indir nasıl yapılır diye çok araştırdım valla. Play Store’da resmi olanı bulamayınca çok şaşırdım. Adımları doğru sırayla uyguladıktan sonra erişim sorunsuz açıldı. En sonunda güvenilir bir kaynağa ulaştım ve size de tüm detayları aktarmak istedim, güncel bilgilere buradan bakabilirsiniz: 1xbet son sürüm indir 1xbet son sürüm indir. Şimdi size kısaca özet geçeyim — son sürümü tüm beklentileri karşılıyor resmen.
Hiçbir sorun yaşamadım indirme işleminde. İşin doğrusunu söylemek gerekirse — başka yerde vakit kaybetmeyin yani. Umarım siz de memnun kalırsınız…
Such writing is increasingly rare and worth supporting through attention, and a stop at ideasintooutcomes extended that supportive attention across more pages, the conscious choice to spend time on sites that produce careful work rather than convenient consumption is itself a small form of patronage and this site is receiving that conscious patronage from me.
Reading this back to back with a similar piece elsewhere made the quality difference obvious, and a stop at trendycartspace only widened the gap, comparing content side by side is a useful exercise and the gap between this site and average competitors in the space is large enough to be noticeable from the first paragraph.
Took a chance on the headline and was rewarded, and a stop at directionalclarity kept the rewards coming as I clicked through, the kind of place where every link leads somewhere worth the click is a small luxury on the modern web where so many sites are mostly empty calories disguised as content.
Picked a single sentence from this post to remember, and a look at clarityflow gave me another to keep, content that produces memorable lines is doing more than just transferring information and the small selection of sentences I keep from each reading session is one of the actual returns I get from reading carefully.
dark matter link https://darknetmarketseasy.com/ tordex link https://darknetmarketseasy.com/
Thanks for the practical examples scattered through the post rather than abstract theory only, and a look at strategyfuelsgrowth continued that grounded style, abstract points are easier to remember when paired with concrete situations and the writers here clearly understand how readers actually retain information from blog content reading sessions.
Reading this prompted a brief but useful conversation with a colleague who happened to walk by, and a stop at floraridgecraftcollective extended that conversational seed, content that becomes a starting point for in person discussion rather than ending in solitary reading is content with social generative energy and this site has plenty of it apparently.
Looking at this objectively the editorial quality is hard to deny even setting aside personal taste, and a stop at ideafocus maintained the same objective quality, the gap between what I personally enjoy and what is objectively well crafted exists and this site clears both bars simultaneously which is rarer than it sounds.
Denemek isteyen arkadaşlara hep tavsiye ediyorum. Sürekli yeni adres aramak yoruyor artık. Adımları doğru sırayla uyguladıktan sonra erişim sorunsuz açıldı. En sonunda doğru adrese ulaştım ve size de tüm detayları aktarmak istedim, güncel bilgilere buradan bakabilirsiniz: 1xbet üyelik 1xbet üyelik. Yani anlatmak istediğim şu — casino sevenler için de ideal bir ortam var.
müşteri desteği de ilgili ve hızlı. Kendi deneyimlerimi aktarıyorum size — başka yerde vakit kaybetmeyin yani. Şimdiden iyi şanslar ve bol kazançlar…
Worth saying that the quiet confidence of the writing is what landed first, and a look at mintorchardmarkethouse continued that quiet quality, confident writing without the loud display of confidence is a rare combination and this site has clearly developed both the knowledge and the editorial restraint to land that combination consistently.
Walked away with a clearer head than I had before reading this, and a quick visit to shopneststore only sharpened that, the writing has a way of cutting through the noise that surrounds most topics online which is something I will definitely remember the next time I am searching for an answer to anything.
В этом обзоре представлены различные методы избавления от зависимости, включая терапевтические и психологические подходы. Мы сравниваем их эффективность и предоставляем рекомендации для тех, кто хочет вернуться к трезвой жизни. Читатели смогут найти информацию о реабилитационных центрах и поддерживающих группах.
Смотри, что ещё есть – вывод из запоя капельница на дому
Bookmark folder created specifically for this site, and a look at coralharbortradehall confirmed the dedicated folder was the right call, dedicated folders for individual sites are a level of organisation I rarely deploy and this site has earned that level of dedicated tracking based on the consistency I have seen so far across sessions.
Uzun zamandır bahis oynayabileceğim güvenilir bir site arıyordum. Herkes farklı bir adres söylüyor kafam allak bullak oldu. Adımları doğru sırayla uyguladıktan sonra erişim sorunsuz açıldı. En sonunda doğru adrese ulaştım ve size de tüm detayları aktarmak istedim, güncel bilgilere buradan bakabilirsiniz: 1 x bet 1 x bet. Valla bak net söyleyeyim — casino oyunlarına meraklıysanız burası tam size göre.
para çekme işlemleri de hızlı yani rahat olun. Birçok platform denedim ama en iyisi bu çıktı — kesinlikle pişman olmazsınız deneyin derim. Umarım siz de memnun kalırsınız…
Now appreciating that the post left me with enough to say in a follow up conversation, and a look at claritystarter added more material for those follow ups, content that prepares me for related conversations rather than just informing me alone is content with social utility and this site provides that social armament reliably for me.
Well crafted post, the structure flows naturally from one point to the next without forcing transitions, and a stop at momentumstream kept the same flow going, you can tell when a writer has thought about how their content reads rather than just what it contains and this is one of those examples.
buying darknet drugs https://darkmarketsgate.com/ how to get to darknet market https://darkmarketslegion.com/
Generally my comment to other readers about new sites is to wait and see but for this one I would jump to recommend now, and a look at claritystrategy reinforced that early recommendation, the speed at which a site earns my recommendation is itself a quality signal and this one has earned mine quickly clearly.
Took longer than expected to finish because I kept stopping to think, and a stop at dunemeadowvendorhall did the same to me, content that provokes thought rather than just delivering information is in a different category and the team here is clearly working at that higher level rather than just cranking out posts.
Really like that the writer trusts the reader to follow simple logic without restating every previous point, and a stop at garnetharbortradehouse kept that respect going, treating an audience as capable adults rather than as people who need constant hand holding makes a noticeable difference in the reading experience for me.
В этом обзоре представлены различные методы избавления от зависимости, включая терапевтические и психологические подходы. Мы сравниваем их эффективность и предоставляем рекомендации для тех, кто хочет вернуться к трезвой жизни. Читатели смогут найти информацию о реабилитационных центрах и поддерживающих группах.
Есть чему поучиться – Капельница от похмелья в Иркутске
Found the writing surprisingly fresh for what is by now a well covered topic, and a stop at directionmattersmost kept that freshness going across the related pages, original perspective on familiar ground is hard to come by and this site has clearly earned its place in the conversation rather than just rehashing old ideas.
Honestly thank you to whoever wrote this because it scratched an itch I had not quite been able to articulate, and a stop at focuspowersmomentum kept that satisfying feeling going, the kind of writing that meets unspoken needs is special and this site clearly has writers who understand their readers more than most do today.
Genuine pleasure to read, and that is not something I say often after a casual click through, and a quick visit to bevelhamlet kept the same feeling going across the rest of the site, finding writing that actually feels good to spend time with rather than just functional is increasingly rare on the open web.
Probably the best thing I have read on this topic in the past month, and a stop at aspenfalcon extended that ranking, the casual ranking of recent reading is informal but real and this site has been winning those rankings for me on this topic specifically over the last several weeks of regular reading sessions.
Top quality material, deserves more attention than it probably gets, and a look at directionalintelligence reflected the same effort across the site, a hidden gem in the modern web where most attention goes to whoever shouts loudest rather than whoever actually delivers the best content for their readers without much marketing fanfare.
Reading this gave me a small framework I expect to use going forward, and a stop at forwardclarityhub extended that framework, content that produces transferable mental models rather than just specific facts is content with multiplicative value and this site is providing those models at a rate that justifies extra attention from me regularly.
Came in expecting another generic take and got something with actual character instead, and a look at draftlog carried that personality forward, finding a distinct voice on a saturated topic is impressive and worth pointing out when it happens because most sites end up sounding identical to their nearest competitors quickly.
Açıkçası bu alanda en doğru adresi bulmak zor. Güvenilir bir platform bulmak gerçekten çok zaman aldı. Sonunda tüm teknik detayları inceleyip sistemi test ettim. En sonunda doğru adrese ulaştım ve size de tüm detayları aktarmak istedim, güncel bilgilere buradan bakabilirsiniz: 1xbet tr 1xbet tr. Şimdi size kısaca özet geçeyim — spor bahislerinde uzman olanlar burayı bilir.
Hiçbir sıkıntı yaşamadım şu ana kadar. Kendi deneyimlerimi aktarıyorum size — kesinlikle pişman olmazsınız deneyin derim. Umarım siz de memnun kalırsınız…
darknet market reddits https://darknetmarketgate.com/ how to buy drugs on the dark web https://darknetmarketstore.com/
Easy to recommend without reservations, the site delivers on every promise it implicitly makes, and a look at ideasneedmovementnow kept that same standard going, the kind of consistency that earns trust over time rather than chasing it through aggressive marketing is what I see here and it is appreciated greatly by this particular reader today.
Sets a higher bar than most of what shows up in search results for this topic, and a look at forwardmotiondesign did not lower that bar at all, in fact it confirmed the impression, this is the kind of consistency that earns a place in regular rotation for serious readers instead of casual scrollers passing through.
Denemek isteyen arkadaşlara hep soruyorum valla. Herkes farklı bir adres söylüyor kafam allak bullak oldu. Adımları doğru sırayla uyguladıktan sonra erişim sorunsuz açıldı. En sonunda doğru adrese ulaştım ve size de tüm detayları aktarmak istedim, güncel bilgilere buradan bakabilirsiniz: one x bet one x bet. Valla bak net söyleyeyim — spor bahislerinde iddialı olanlar burayı bilir.
Hiçbir sorun yaşamadım şu ana kadar. Kendi deneyimlerimi aktarıyorum size — kesinlikle pişman olmazsınız deneyin derim. Umarım siz de memnun kalırsınız…
Reading this confirmed something I had been suspecting about the topic, and a look at ideatraction pushed that confirmation toward greater confidence, content that lines up with independently held intuitions earns a special kind of trust and I will return to writers who consistently land that way for me without overselling positions.
Closed the post with a small satisfied sigh, and a stop at cloudcovemerchantgallery produced the same gentle exhale, content that ends well is content that respects the rhythm of reading and the writers here have clearly thought about how their pieces close rather than just trailing off when they run out of things to say.
Reading this slowly to absorb the structure, and the structure is doing real work alongside the words, and a look at momentumframework maintained the same architectural quality, when sentence shapes and paragraph rhythms reinforce the meaning rather than just transporting words you know you are reading skilled work today.
Thank you for the genuine effort here, it shows in every paragraph and not just the headline, and after my visit to atticcondor I was sure this site cares about getting things right rather than chasing clicks, which is the main reason I will come back later this week to read more.
В этой публикации мы обсуждаем современные методы лечения различных заболеваний. Читатели узнают о новых медикаментах, терапиях и исследованиях, которые активно применяются для лечения. Мы нацелены на то, чтобы предоставить практические знания, которые могут помочь в борьбе с недугами.
Не пропусти важное – клиника плюс
Thanks for the simple approach, too many sites bury the actual point under layers of unnecessary words, but here every line earns its place, and a look at forwardthinkingclarity showed the same care for the reader which is something I will remember the next time I need answers on a topic.
Closed the tab feeling I had spent the time well, and a stop at actionmomentum extended that feeling across more pages, the test of whether time on a site was well spent is one I apply silently after closing tabs and very few sites pass it but this one passed it cleanly today afternoon clearly.
Highly recommend to anyone looking for a sensible take on this topic without the usual marketing nonsense, and a look at visionexecution kept that grounded approach going, sites that stay focused on serving readers rather than monetising every click are rare and this is clearly one of those rare ones I really appreciate finding.
dark web website https://darkmarketsgate.com/ site darknet https://darkmarketlegion.com/
Saving the link for sure, this one is a keeper, and a look at growthpath confirmed I should bookmark the entire site rather than just this page, the consistency across what I have seen so far suggests there is a lot more here worth coming back for soon when I have more time.
darknet websites wiki https://darkwebmarketlisting.com/ crypto market darknet https://darkwebmarketlisting.com/
.onion link https://darkmarketsdirectory.com/ links tor 2026 https://darkmarketsdirectory.com/
Now placing this in the same category as a few other sites I have come to trust, and a look at ideabuilder continued the placement decision, the small category of fully trusted sites is one I extend rarely and only after multiple positive reading sessions and this site has earned the category placement methodically over time.
Honestly enjoyed not being sold anything for the entire duration of the post, and a look at growthneedsstructure kept that pleasant absence going across more pages, content that exists for its own sake rather than as a funnel to a paid product is increasingly rare and worth supporting where I can find it.
Decided to write a short note to the author if there is contact info anywhere, and a stop at atticboulder extended that intention, the urge to thank the writer directly is a strong signal of content quality and this site has triggered that urge in me today which is a fairly rare event for my reading.
Now noticing the post fit a particular gap in my reading without my having articulated the gap before, and a look at actionpathfinder extended that gap filling effect, content that meets needs I had not consciously formulated is content with reader insight and this site has clearly developed that anticipatory editorial sense across many pieces.
dark web stolen credit card numbers https://darkwebmarketonion.com/ buying drugs on the darknet https://darknetmarketseasy.com/
A piece that suggested careful editing without showing the marks of the editing, and a look at gladeridgemarkethouse continued that invisible polish, the best editing disappears into the prose and this site reads as having been edited with skill that does not announce itself which is the highest compliment I can offer any blog content.
Honestly the simplicity is what makes this work, the topic is not buried under filler words or overly complex examples, and a quick look at focuscreatestraction showed the same sensible style, I left with what I came for and no headache from over reading which is a real win these days.
Closed three other tabs to focus on this one and never opened them again, and a stop at autumncovevendorroom similarly held attention exclusively, content that crowds out other reading from working memory is content with real density and this site has demonstrated that density across multiple pages I have visited so far this morning.
Closed and reopened the tab three times before finally finishing, and a stop at dunemeadowvendorparlor held my attention straight through, sometimes content fights for time against my own distraction and the times it wins say something positive about its quality and this post clearly won that fight today afternoon for me.
Reading this slowly and letting each paragraph land before moving on, and a stop at visionactionloop earned the same patient approach, content that rewards slow reading rather than speed is content with real density and the writers here are clearly producing work that benefits from the careful eye rather than the rushed scan.
1xbet indir işlemini nasıl yapacağımı çok merak ediyordum. Play Store’da resmi olanı bulamayınca çok hayal kırıklığı yaşadım. Güncel bilgileri kontrol edip süreci hatasız başlattım. En sonunda güvendiğim bir kaynağa ulaştım ve size de tüm detayları aktarmak istedim, güncel bilgilere buradan bakabilirsiniz: 1xbet giriş indir 1xbet giriş indir. Şimdi size kısaca özet geçeyim — son sürümü tüm ihtiyaçları karşılıyor resmen.
Hiçbir sıkıntı yaşamadım indirme esnasında. Kendi deneyimlerimi aktarıyorum size — kesinlikle pişman olmazsınız deneyin derim. Şimdiden iyi şanslar ve bol kazançlar…
Did not expect much when I clicked through but ended up reading the whole thing carefully, and a stop at forestcovevendorgallery kept that engagement going, sometimes the unassuming sites turn out to deliver more than the flashy ones which is something I have learned to look out for over time online lately and across topics.
Came across this looking for something else entirely and ended up reading it through twice, and a look at actiondirectionhub pulled me deeper into the site than I planned, the writing has a way of holding attention without resorting to manipulative cliffhangers or vague promises that never get delivered later down the page.
Such writing is increasingly rare and worth supporting through attention, and a stop at executionoverhesitation extended that supportive attention across more pages, the conscious choice to spend time on sites that produce careful work rather than convenient consumption is itself a small form of patronage and this site is receiving that conscious patronage from me.
Useful reading material, the kind I can hand off to someone newer to the topic without worrying about confusing them, and a quick look at forestmeadowcommercegallery confirmed the same beginner friendly tone runs throughout the site which is great for sharing with people just starting their learning journey on this particular topic.
Really appreciate that the writer did not overstate the importance of the topic to make the post feel weightier, and a quick visit to ideasintoprogress maintained the same modest framing, content that is honest about its own scope rather than inflating itself is the kind I trust and return to repeatedly over time.
Now leaving a small mental note to recommend this when the topic comes up in conversation, and a look at carobhopper extended that recommend ready feeling, content that arms me with shareable references for likely future conversations is content with social value and this site is providing that conversational ammunition consistently for me lately.
1xbet indir işlemini nasıl yapacağımı çok merak ediyordum valla. Herkes farklı bir şey söylüyordu kime güveneceğimi bilemedim. Adımları doğru sırayla uyguladıktan sonra erişim sorunsuz açıldı. En sonunda güvenilir bir kaynağa ulaştım ve size de tüm detayları aktarmak istedim, güncel bilgilere buradan bakabilirsiniz: 1xbet nouvelle version à télécharger 1xbet nouvelle version à télécharger. Yani anlatmak istediğim şu — son sürümü tüm ihtiyaçları karşılıyor resmen.
Hiçbir sorun yaşamadım indirme işleminde. İşin doğrusunu söylemek gerekirse — başka yerde vakit kaybetmeyin yani. Umarım siz de memnun kalırsınız…
Uzun süredir bahis platformu araştırıyorum valla. Güvenilir bir site bulmak gerçekten çok zaman aldı. Güncel bilgileri kontrol edip süreci hatasız başlattım. En sonunda doğru adrese ulaştım ve size de tüm detayları aktarmak istedim, güncel bilgilere buradan bakabilirsiniz: 1xbet üyelik 1xbet üyelik. Yani anlatmak istediğim şu — spor bahisleri konusunda iddialı olanlar bilir.
Hiçbir sıkıntı yaşamadım şu ana kadar. İşin doğrusunu söylemek gerekirse — başka yerde vakit kaybetmeyin yani. Şimdiden iyi şanslar ve bol kazançlar…
dark web weed https://darknetmarketstore.com/ onion links credit card https://privatedarknetmarket.com/
Now appreciating the way the post avoided the temptation to be longer than necessary, and a look at mooncovevendorhall continued that lean approach, content with the discipline to stop when finished rather than padding for length is content that respects both itself and its readers and this site has that disciplined editorial culture clearly throughout.
Liked everything about the experience, from the opening through to the closing notes, and a stop at directionalmap extended that into more pages, finding a site where the editorial vision shows through every choice rather than feeling random is an increasingly rare experience and one I am glad to have today during this particular reading session.
Glad to have another reliable bookmark for this topic, and a look at focusprogression suggested several more pages I will be marking too, building a personal library of trustworthy resources is one of the actual rewards of careful browsing and this site is earning a place on my permanent shortlist for the topic.
Telefonumda rahatça bahis oynayabileceğim bir uygulama arıyordum uzun zamandır. Herkes farklı bir şey tavsiye ediyordu kime güveneceğimi bilemedim. Adımları doğru sırayla uyguladıktan sonra erişim sorunsuz açıldı. En sonunda güvenilir bir kaynağa ulaştım ve size de tüm detayları aktarmak istedim, güncel bilgilere buradan bakabilirsiniz: 1xbet türkiye indir 1xbet türkiye indir. Yani anlatmak istediğim şu — telefonuma indirdikten sonra çok memnun kaldım.
kurulumu da oldukça basit ve anlaşılırdı yani rahat olun. Birçok platform denedim ama en iyisi bu çıktı — en kullanışlı uygulama bu oldu artık. Herkese hayırlı olsun…
Closed my email tab so I could read this without interruption, and a stop at rainharborcommercegallery earned the same protected attention, when content is good enough to defend against the usual digital distractions you know it deserves better than the half attention most online reading gets in a typical busy day.
Polished and informative without feeling overproduced, that is the sweet spot, and a look at echobrooktradehall hit it again, you can tell when a site has been built with care versus thrown together for the sake of having something to put online and this is clearly the former approach taken by the team.
Started smiling at one paragraph because the writing was just nice, and a look at ideasneedstructure produced a couple more such moments, prose that produces small spontaneous reactions in the reader is doing more than just transferring information and the writers here are clearly hitting that level fairly consistently throughout pieces.
A piece that left me thinking I had been undercaring about the topic, and a look at progressactivator reinforced that mild concern, content that raises the appropriate weight of a subject without being preachy about it is doing important work and this site is providing that gentle elevation of attention for me consistently.
1xbet nasıl indirilir diye çok kafa yordum valla. Apk dosyasını nereden indireceğimi bulamadım bir türlü. Güncel bilgileri kontrol edip süreci hatasız başlattım. En sonunda sağlam bir kaynağa ulaştım ve size de tüm detayları aktarmak istedim, güncel bilgilere buradan bakabilirsiniz: 1xbet giriş indir 1xbet giriş indir. Valla bak net söyleyeyim — mobil uygulaması gerçekten akıcı çalışıyor.
kurulumu da oldukça kolaydı yani rahat olun. Kendi deneyimlerimi aktarıyorum size — en kullanışlı uygulama bu oldu artık. Herkese hayırlı olsun…
Worth a slow read rather than the fast scan I usually default to, and a look at claritytrack earned the same slower pace from me, content that resets my reading speed downward is content with substance worth absorbing and this site has produced that effect on me multiple times now over the last week here.
Reading this in the morning set a good tone for the day, and a quick visit to growtharchitect kept that good tone going, content can do that sometimes when it hits the right notes and finding sites that consistently strike that tone is something I have learned to recognise and reward with regular visits.
Reading this triggered a small change in how I think about the topic going forward, and a stop at forwardmotiondaily reinforced that subtle shift, the rare content that actually moves my thinking rather than just confirming or filling it is the kind I most value and this site is providing that kind of impact today.
Thanks for the honest framing without exaggerated claims that the topic will change my life, and a stop at directionalthinking kept the same modest tone, restraint in marketing language signals trustworthiness and the writers here are clearly playing the long game by building credibility rather than chasing immediate clicks through hyperbole.
More substantial than most of what I find searching for this topic online, and a stop at gladeridgemarketparlor kept that quality consistent, this is one of those sites where the writing actually rewards careful reading rather than punishing the patient reader with empty filler stretched out across long paragraphs that say very little.
Updated today: נערות סוכנות ליווי
the dark web https://darkmarketsgate.com/ black internet https://darkmarketlegion.com/
Good post, the kind that respects the reader by getting to the point quickly without skipping the details that matter, and a short look at claritymotionlab confirmed that approach is consistent across the site which is rare to find online these days, definitely a place I will return to soon.
bitcoin dark web https://darknetmarketstore.com/ counterfeit money onion https://darknetmarketgate.com/
More substantial than most of what I find searching for this topic online, and a stop at frostrivercommercegallery kept that quality consistent, this is one of those sites where the writing actually rewards careful reading rather than punishing the patient reader with empty filler stretched out across long paragraphs that say very little.
A thoughtful read in a week that has been mostly noisy, and a look at focusbuildsmomentum carried that thoughtful quality across more pages, finding pockets of considered writing in a week of distractions is one of the small wins of careful curation and this site is providing those pockets at a sustainable rate.
Picked this up while looking for something else and ended up reading every paragraph because it was actually informative, and after focusengineering I was sure I would come back, that does not happen often when most sites bury the useful parts under endless ads and pop ups today and across most categories online.
I learned more from this short post than from longer articles I read earlier today, and a stop at directionalprocess added even more useful detail without going off topic, this site clearly knows how to keep things focused without sacrificing depth which is a hard balance to strike for any writer.
Felt the writer respected the topic without being precious about it, and a look at calicobanyan continued that respectful but unfussy treatment, finding the right register for serious topics is hard and this site has clearly figured out how to take the topic seriously while still being readable for casual visitors regularly.
Probably going to mention this site in a write up I am working on later this month, and a stop at dunebuckle provided more material for that potential mention, content worth referencing in my own published work rather than just personal reading is content with the highest endorsement level and this site has earned that endorsement.
Took my time with this rather than rushing because the writing rewards attention, and after forwardexecutionpath I had even more to absorb, the kind of content that pays back the patient reader rather than punishing them with empty filler is something I look for and rarely find in regular searches lately.
Most of the time I feel the open web is in decline and then I find a site like this, and a stop at chaletcobra reinforced that mood lift, the cumulative effect of finding occasional excellent independent content versus the cumulative effect of finding mostly mediocre content is real for the long term reader maintaining web habits today.
Found the post genuinely useful for something I was working on this week, and a look at dingoholly added more material I will reference, content that connects to my actual life and work rather than just being interesting in the abstract is the kind I will pay attention to and return to repeatedly.
Just want to recognise that someone clearly cared about how this turned out, and a look at fernharborvendorlounge confirmed that care extends across the broader site, you can feel the difference between content shipped to hit a deadline and content released because the writer was actually proud of the result for once.
Really appreciate the lack of pop ups, modals, cookie banners stacking on top of each other, and a quick visit to progressgrid confirmed the same clean approach across the rest of the site, technical decisions about user experience are part of what makes content actually pleasant to engage with for sure.
Felt a small spark of recognition when the post named something I had been struggling to articulate, and a look at growthwithstrategy produced more such moments, the rare service of giving readers language for fuzzy intuitions is one of the higher values that good writing can provide and this site offered several today instances.
Took the time to read the comments on this post too and they were also worth reading, and a stop at explorebetterthinking suggested the community quality matches the content quality, when the conversation around a piece is as good as the piece itself you know you have found a real corner of the internet.
Started reading without much expectation and ended on a high note, and a look at strategyhub continued that arc, content that builds rather than peaks early is a sign of a writer who knows how to structure a piece for sustained reader engagement rather than relying on a strong hook to do all the work.
Felt the post was written for someone like me without explicitly addressing me, and a look at aviarybuckle produced the same fit, when content lands on its target without pandering you know the writer has done careful audience thinking rather than relying on demographic targeting or interest signals to do the work of editorial decisions.
Polished and informative without feeling overproduced, that is the sweet spot, and a look at growthdirection hit it again, you can tell when a site has been built with care versus thrown together for the sake of having something to put online and this is clearly the former approach taken by the team.
hidden marketplace https://darknetmarketsgate.com/ darknet dream market https://darkmarketsdirectory.com/
Closed the tab with a small sense of finality rather than the usual rushed exit, and a stop at harborstonevendorhall produced the same considered closing, when reading ends with deliberate satisfaction rather than impatient skip you know the time was well spent and this site is producing those satisfying endings consistently across what I read.
Reading this gave me a small refresher on something I had partially forgotten, and a stop at progressneedsclarity extended the refresher, content that strengthens existing knowledge rather than just adding new is content with a particular kind of consolidating value and this site is providing that consolidating function across multiple visits.
Felt this in a way I cannot quite explain, the topic just hit different here, and a stop at berrycovemarkethouse continued in that vein, sometimes you find a site whose perspective lines up with how you have been thinking and reading their work feels like a small relief which I appreciated more than I expected.
Worth flagging that the writing rewarded a second read more than I expected, and a look at visiontrigger produced the same second read benefit, content with hidden depths that emerge only on careful rereading is rare in the modern blog space and this site has clearly invested in that level of compositional density throughout.
Nice and clean, that is the best way to describe the writing here, no clutter and no wasted words, and a quick visit to bisonbatik kept that going, I appreciate when a site treats its readers like people who can think for themselves without needing constant hand holding through every paragraph.
Just dropping by to say thanks for the effort, it does not go unnoticed when a writer cares this much about the reader, and after I went through longledge I was certain this is one of the better corners of the internet for this particular kind of content which is genuinely refreshing.
Reading this confirmed that the topic deserves more careful attention than it usually gets, and a stop at rubyorchardmerchantgallery extended that elevated framing, content that raises the appropriate weight of a subject without being preachy about it is serving a quiet but important editorial function for the broader cultural conversation about it.
mostbet официальный сайт mostbet официальный сайт
I don’t think the title of your article matches the content lol. Just kidding, mainly because I had some doubts after reading the article. https://www.binance.bh/register?ref=GGYHGRE
Now feeling that this site is the kind I want to make sure does not disappear, and a look at momentumthroughdirection reinforced that quiet protective feeling, the rare sites whose disappearance would actually matter to me are the sites I want to support through return visits and recommendations and this one has joined that small protected list.
Loved the writing voice here, friendly without being fake and confident without being arrogant, and a stop at moonharborvendorlounge carried the same tone forward, the kind of personality that makes a reader feel welcome rather than lectured at which is a balance plenty of writers struggle to find no matter how long they have been at it.
Liked that there was nothing performative about the writing, and a stop at ideamapper continued that genuine quality, performative writing tries to be witnessed rather than read and the difference between performance and substance is huge for the careful reader and this site has clearly chosen substance every time clearly.
best website to buy cc https://darknetmarketgate.com/ darknet union https://darknetmarketgate.com/
Worth flagging that the post handled an angle of the topic I had not seen elsewhere, and a look at intentionalforwardsteps extended that fresh treatment, content that finds underexplored corners of well covered subjects is genuinely valuable and this site has demonstrated that exploratory editorial approach across multiple pieces in my reading sessions today.
Worth marking this site as one to come back to deliberately rather than by accident, and a stop at duneelfin reinforced that intention, the difference between sites I find again by chance and sites I return to on purpose is meaningful and this one has clearly moved into the deliberate return category for me.
22bet вывод средств 22bet вывод средств
Solid endorsement from me, the writing earns it, and a look at calicocameo continues to earn it across the broader site too, the kind of operation that maintains quality across many pages rather than just one viral post is a sign of serious commitment and that is what I see here clearly across what I read.
how to acsess the dark web https://darknetmarketseasy.com/ black ops darknet https://darkwebmarkets2024.com/
cannaexpress market https://darkmarketlegion.com/ tordex market link https://darkmarketslegion.com/
Honestly enjoyed reading this more than I expected to when I first clicked through, and a stop at forwardthinkingpath kept that pleasant surprise going, sometimes you stumble onto a site that just clicks with how you like to read and this is one of those for me right now today which is great.
Clean writing, easy to read, and never tries too hard to impress, that combination is harder to find than people think, and after my time on builddirectionfirst I am sure this site treats its readers well, no flashy tricks just useful content done right which is honestly all I want online.
Probably the best thing I have read on this topic in the past month, and a stop at progressarchitecture extended that ranking, the casual ranking of recent reading is informal but real and this site has been winning those rankings for me on this topic specifically over the last several weeks of regular reading sessions.
Worth pointing out that the writing reads as confident without being defensive about it, and a look at oakmeadowcommercegallery extended that secure tone, content that does not pre emptively argue against imagined critics has a different quality from defensive writing and this site reads as written from a place of real ease.
бонусы DBBET для новых игроков бонусы DBBET для новых игроков
Just wanted to say this was useful and leave a small note of thanks, and a quick visit to chimneycargo earned a similar nod from me, the small acknowledgements add up over time and represent the real economy of trust that good content runs on across the open and increasingly fragmented modern internet.
My professional context would benefit from having this kind of resource available, and a look at actionblueprint extended the professional applicability, the rare site that contributes meaningfully to professional work rather than just personal interest is content with multiplied value and this one is providing that professional utility consistently across multiple pieces.
Took the time to read every paragraph rather than skimming for the punchline, and a quick visit to ivoryharborvendorparlor earned the same careful attention from me, that is the highest signal I can give about content quality because my default mode is rapid scanning rather than deliberate reading on most pages.
полезные материалы по беттингу полезные материалы по беттингу
I appreciate the clarity here, everything is explained in simple terms without unnecessary detail, and after a quick stop at forwardignition the points came together nicely for me, the writing keeps things straightforward and respects the reader from start to finish without ever talking down to anyone.
Felt the writer respected me as a reader without making a show of doing so, and a look at dragonebony continued that quiet respect, this is the kind of small but meaningful detail that separates the sites I bookmark from the ones I close after a single skim and never return to again no matter how interesting the headline.
Honest take is that I will probably forget most of what I read online today but this post is one I will remember, and a stop at intentionalvector kept that same memorable quality going, certain writing leaves a residue in the mind in a way most content simply does not manage.
Quietly enjoying that I have found a new site to follow for the topic, and a look at clarityoverconfusion reinforced the small pleasure of the find, the discovery of new high quality sources is one of the more durable pleasures of careful internet reading and this site has been generating that discovery pleasure at multiple points already today.
Reading this back to back with a similar piece elsewhere made the quality difference obvious, and a stop at bisonfudge only widened the gap, comparing content side by side is a useful exercise and the gap between this site and average competitors in the space is large enough to be noticeable from the first paragraph.
Really thankful for posts that respect a reader’s time, this one does, and a quick look at strategymap was the same, no need to scroll through endless intros just to get to the actual content, that approach alone is enough reason to come back here regularly for the kind of writing offered.
Now sitting with the thoughts the post triggered rather than rushing on to the next thing, and a stop at momentumcoordination extended that reflective pause, content that earns time for thought after closing the tab is content of higher value than the merely interesting and this site has clearly produced that lasting effect today.
Just want to record that this site is entering my regular reading list, and a look at momentumfocused confirmed it deserves the spot, my regular reading list is short and well curated and adding to it requires meeting a fairly high quality bar that this site has clearly cleared without much effort apparently.
Even just sampling a few posts the consistency is what stands out, and a look at longload confirmed the broader pattern, sites where every piece I sample lives up to the standard set by the others are sites with serious quality control and this one has clearly invested in whatever editorial process produces that consistency reliably.
Liked that the post landed without needing to manufacture controversy or take a contrarian stance for attention, and a stop at growthsynthesis continued that grounded approach, content that earns attention through quality rather than provocation is the kind that builds long term trust rather than burning it on quick wins.
Worth saying that the writing carries a particular kind of authority without making any explicit claims to it, and a stop at juniperharbormarkethall extended that earned authority feeling, sites that demonstrate expertise through the quality of their explanations rather than by stating credentials are sites I trust most and this site has it.
Uzun süredir bahis platformu araştırıyorum valla. Sürekli adres değişiyor derler ya işte o hesap. Adımları doğru sırayla uyguladıktan sonra erişim sorunsuz açıldı. En sonunda doğru adrese ulaştım ve size de tüm detayları aktarmak istedim, güncel bilgilere buradan bakabilirsiniz: 1 xbet 1 xbet. Yani anlatmak istediğim şu — spor bahisleri konusunda iddialı olanlar bilir.
müşteri hizmetleri bile ilgili ve hızlı. Birçok platform denedim ama en iyisi bu çıktı — en güvendiğim adres burası oldu artık. Umarım siz de memnun kalırsınız…
Felt the writer was speaking my language without trying to imitate it, and a look at forwardpathway continued that natural fit, when a writers default voice happens to match what you find easy to read the experience feels frictionless and that is something I notice and remember about specific sites going forward.
darknet links https://darkmarketslegion.com/ cannabis dark web https://darkmarketslegion.com/
Liked that the post left some questions open rather than pretending to settle everything, and a stop at momentumthroughdirection continued that intellectual honesty, content that respects the limits of its own claims is more trustworthy than content that overreaches and this site has clearly figured out which positions it can defend confidently.
dark web shop https://darknetmarketstore.com/ darknet illicit drugs https://privatedarknetmarket.com/
Taking the time to read carefully here has been worthwhile for the past hour, and a look at nextstepnavigator extended the worthwhile reading, the calculation of return on reading time spent is something I do informally and this site has been producing positive returns across multiple sessions during the last week of regular visits and reads.
Glad the writer kept this short rather than padding it out, the points stand on their own without needing extra context, and a look at aviaryelder kept the same approach going, brevity is a sign of confidence in the substance and the team here clearly trusts their content to land without filler.
Felt no urge to argue with the conclusions even though I started the post slightly skeptical, and a look at eagleelder maintained that pattern, writing that earns agreement through clarity of argument rather than rhetorical pressure is the kind I find most persuasive and the kind I want to read more of these days.
Thank you for keeping the writing honest and the points easy to verify against your own experience, and a stop at claritydrivengrowth reflected the same approach, no exaggeration just steady useful content that I can take with me into my own work without second guessing every sentence I happen to read here.
Recommended to anyone working in or curious about this area, the depth and clarity combine well, and a look at snowharborcommercegallery keeps that going across more pages, the kind of site that earns regular visits rather than chasing trends has my respect because it suggests genuine commitment to the topic itself rather than to chasing trends.
Honestly the simplicity of the explanation made the topic click for me in a way other writeups had not, and a look at claritysystems continued that clarity into related areas, when a writer gets the level of explanation right the reader does the heavy lifting themselves and the post just enables it.
Thanks for keeping the writing direct without losing the warmth that makes content feel human, and a stop at lemonlarkvendorparlor carried both qualities forward, balancing professionalism and personality is a rare skill and the writers here have clearly figured out how to consistently land it across many posts which I notice.
best darknet market for psychedelics https://darkwebmarkets2024.com/ dark web hitman for hire https://darknetmarketseasy.com/
Reading this prompted me to dig out an old reference book related to the topic, and a stop at calicocopper extended that connection to other sources, content that connects me back to my own existing knowledge rather than asking me to forget it is content with continuity and this site has that continuous quality.
A piece that demonstrated competence without performing it, and a look at findyourcorepurpose maintained the same self assured but unshowy register, the gap between competence and performance of competence is one I track and this site has clearly chosen to demonstrate rather than perform which I find much more persuasive as a reader.
Liked that the post acknowledged complications rather than pretending they did not exist, and a stop at bisonholly continued that honest framing, sites that handle complexity with care rather than papering it over with simplifying claims are doing real intellectual work and this one is clearly in that category based on what I have read.
В данном обзоре представлены основные направления и тренды в области медицины. Мы обсудим актуальные проблемы здравоохранения, свежие открытия и новые подходы, которые меняют представление о лечении и профилактике заболеваний. Эта информация будет полезна как специалистам, так и широкой публике.
Более того — здесь – капельница от похмелья
Reading this prompted a brief but useful conversation with a colleague who happened to walk by, and a stop at momentumworks extended that conversational seed, content that becomes a starting point for in person discussion rather than ending in solitary reading is content with social generative energy and this site has plenty of it apparently.
Telefonuma güncel sürümü yüklemek istiyordum açıkçası. Herkes farklı bir şey tavsiye ediyordu kime güveneceğimi bilemedim. Adımları doğru sırayla uyguladıktan sonra erişim sorunsuz açıldı. En sonunda sağlam bir kaynağa ulaştım ve size de tüm detayları aktarmak istedim, güncel bilgilere buradan bakabilirsiniz: 1xbet mobile yukle 1xbet mobile yukle. Şimdi size kısaca özet geçeyim — mobil uygulaması gerçekten akıcı çalışıyor.
güncellemeleri düzenli olarak geliyor. Kendi deneyimlerimi aktarıyorum size — en kullanışlı uygulama bu oldu artık. Şimdiden iyi şanslar ve bol kazançlar…
Reading this gave me a small mental break from the heavier reading I had been doing, and a stop at clarityguidesaction extended that lighter feel, content that provides relief without becoming trivial is harder to produce than people realise and this site has clearly figured out how to be light without being shallow at all.
Reading this gave me a small mental break from the heavier reading I had been doing, and a stop at berryharborvendorroom extended that lighter feel, content that provides relief without becoming trivial is harder to produce than people realise and this site has clearly figured out how to be light without being shallow at all.
Speaking honestly this is among the better discoveries of my recent browsing, and a stop at lotusnorth reinforced that discovery quality, the ranking of recent discoveries is informal but meaningful and this site has placed near the top of that ranking based on the consistency of quality across what I have already read carefully.
Comfortable read, finished it without realising how much time had passed, and a look at citrinefjord pulled me into more pages the same way, the absence of friction in good content lets time disappear and that is one of the highest compliments I can pay any piece of writing I find online during a regular search session.
stolen credit card numbers dark web https://darknetmarketsgate.com/ best darknet market for counterfeit https://darknetmarketsgate.com/
Now planning to come back when I have the right kind of attention to read carefully, and a stop at ideamotion reinforced that plan, choosing the right moment to read certain content is a quiet form of respect for the work and this site is generating those careful planning behaviours from me consistently as a reader.
Glad the writer did not feel compelled to cover every possible angle of the topic, focus is a virtue, and a stop at progresslogic reflected the same disciplined scope, knowing what to leave out is half of what makes good writing good and this post has clearly been edited with that principle in mind.
В статье по вопросам здоровья мы рассматриваем актуальные проблемы, с которыми сталкивается общество. Обсуждаются заболевания, факторы риска и важные аспекты профилактики. Читатели получат полезные советы о том, как сохранить здоровье и улучшить качество жизни.
А что дальше? – прокапаться в самарае
One of the more honest takes on the topic I have seen lately, no spin and no oversell, and a stop at directionalplanninglab kept that going, the kind of voice the open web could use a lot more of rather than the endless echo chamber of recycled opinions floating around every social platform these days.
onion links sites https://darkmarketsgate.com/ the silk road dark web https://darkmarketslegion.com/
Reading this prompted me to clean up some old notes related to the topic, and a stop at progressoverperfection extended that organising urge, content that triggers personal organisation rather than just consuming attention is content with motivating energy and this site has the kind of clarity that prompts active follow up rather than passive consumption.
darknet markets list https://darknetmarketstore.com/ where to buy molly https://darknetmarketstore.com/
Pass this along to anyone you know dealing with similar questions, the answers here are clear, and a stop at momentumoptimization adds even more useful material, this is the kind of resource that deserves to circulate widely rather than getting lost in the constant churn of new content online that buries good work daily.
My friends would appreciate a few of these posts and I will be sending links accordingly, and a look at ebonycanyon added more pages to my share queue, content that earns shares to specific people in specific contexts is content with social utility and this site is generating those targeted shares from me consistently lately.
Эта доказательная статья представляет собой глубокое погружение в успехи и вызовы лечения зависимостей. Мы обращаемся к научным исследованиям и опыту специалистов, чтобы предоставить читателям надежные данные об эффективности различных методик. Изучите, что работает лучше всего, и получите информацию от экспертов.
Подробнее тут – вывод из запоя на дому в Костроме
Reading more of the archives is now on my plan for the weekend, and a stop at linenmeadowmarkethall confirmed the archive worth the time, the rare archive worth a dedicated reading session rather than just casual sampling is the rare archive of serious work and this site has clearly produced enough of that work to warrant the deeper exploration.
Different feel from the algorithmically optimised posts that dominate the topic, and a stop at claritydrivesexecution reinforced that human touch, you can tell when a site is being run by someone who reads what they publish versus someone just hitting submit and moving on quickly to the next assignment without checking the result.
Thanks for the clean writing, no broken sentences and no awkward translations like some other sites have, and a quick stop at progresstrajectory kept that polish going nicely, it really does make a difference when a reader can move through a page without tripping on every line or going back to reread.
Skipped past the first paragraph thinking it was setup and had to come back when the rest referenced it, and a stop at strategyactivation similarly rewarded careful reading from the start, content where every paragraph carries weight is content I now know to read from the beginning rather than skipping ahead.
mostbet регистрация и вход mostbet регистрация и вход
Glad I stumbled across this post, the explanations actually make sense without needing background knowledge to follow along, and after a stop at progressalignment the same was true there, no assumptions about the reader just clear writing that anyone can understand from the first line right through to the end.
Came back to this twice now in the same week which is unusual for me, and a look at directionalguidance suggested I will keep coming back, the kind of post that earns repeated visits rather than one and done reading is the gold standard for content quality and this site clearly hit that standard.
black ops market darknet https://darknetmarketseasy.com/ russian darknet market https://darkwebmarkets2024.com/
A thoughtful piece that did not strain to be thoughtful, and a look at bitternarbor continued that effortless quality, when thinking shows up in writing without the writer drawing attention to it you know you are reading something genuinely considered rather than something performing the appearance of consideration which is also common online.
Worth flagging that this approach to the topic is fresh without being contrarian, and a stop at progressflowing extended the same fresh angle, finding original perspective on familiar subjects is rare and this site has clearly developed its own way of seeing rather than echoing the dominant takes from elsewhere consistently.
Reading this in the morning set a good tone for the day, and a quick visit to nightfalltradehouse kept that good tone going, content can do that sometimes when it hits the right notes and finding sites that consistently strike that tone is something I have learned to recognise and reward with regular visits.
Worth recommending broadly to anyone who reads on the topic, and a look at lotusosprey only confirms that, the rare combination of accessibility and depth in this site makes it suitable for both newcomers and people who already know the area which is hard to pull off in any blog format today and rarely managed.
Reading this site over the past week has changed how I evaluate content in this space, and a look at awningalmond extended that recalibration, the standards I bring to reading on the topic have shifted upward as a direct result of regular exposure to this kind of work and that shift will outlast any single reading session.
dark web markets 2026 https://darknetmarketsgate.com/ blackweb official website https://darkmarketsdirectory.com/
Found a couple of useful angles in here I had not considered before reading carefully, and a quick stop at berrycovemarketgallery added more, this is one of those sites where the value compounds the more you read rather than peaking at one viral post and then offering nothing else of substance afterwards which is common.
Easily one of the better explanations I have read on the topic, and a stop at calicofalcon pushed it even higher in my mental ranking of useful resources, the kind of site that beats the average not by trying harder but by simply caring more about what it puts out daily which always shows.
Generally I do not leave comments but this post merits a small note, and a stop at strategyplanninghub extended that comment worthy quality, the urge to actively contribute to a sites community rather than passively consume from it is something specific content provokes and this site has provoked that engagement urge from me today.
выездная наркологическая служба оперативно приедет по указанному адресу, имея при себе все необходимое оборудование и медикаменты, в том числе для оказания неотложной помощи.
Исследовать вопрос подробнее – вывод из запоя
Well done, the writing is professional without being stiff, and the topic is treated with care, and a look at actionwithclarity reflected that approach, the kind of site I would point a colleague to if they asked for a reliable starting point on this topic in the future without any hesitation at all.
В этой статье мы рассматриваем разрушительное влияние зависимости на жизнь человека. Обсуждаются аспекты, такие как здоровье, отношения и профессиональные достижения. Читатели узнают о необходимости обращения за помощью и о путях к восстановлению.
Эксклюзивная информация – Кодирование от алкоголизма
Found the post genuinely useful for something I was working on this week, and a look at ideaflowpath added more material I will reference, content that connects to my actual life and work rather than just being interesting in the abstract is the kind I will pay attention to and return to repeatedly.
working darknet market links https://darkmarketlegion.com/ onion tube porn https://darkmarketsgate.com/
mostbet официальный сайт mostbet официальный сайт
Now planning to come back when I have the right kind of attention to read carefully, and a stop at cloverdahlia reinforced that plan, choosing the right moment to read certain content is a quiet form of respect for the work and this site is generating those careful planning behaviours from me consistently as a reader.
22bet бонусы и промокоды 22bet бонусы и промокоды
гид по ставкам на спорт гид по ставкам на спорт
darknet market https://darknetmarketgate.com/ how much do drugs cost on the dark web https://darknetmarketgate.com/
Этот текст посвящён сложным аспектам зависимости и её влиянию на жизнь человека. Мы обсудим психологические, физические и социальные последствия зависимого поведения, а также важность своевременного обращения за помощью.
Читать полностью – вывод из запоя с выездом
The use of plain language without dumbing down the topic was really well done, and a look at elderbeetle continued in that same accessible style, this is something many technical writers fail at because they either confuse their readers or condescend to them but here neither problem appears at all which is impressive really.
Now appreciating that the post did not require external context to follow, and a look at progressmotion maintained the same self contained quality, content that respects new visitors by being readable without prerequisites is content with broader accessibility and this site has clearly invested in keeping each piece reader friendly for fresh arrivals.
Этот медицинский обзор сосредоточен на последних достижениях, которые оказывают влияние на пациентов и медицинскую практику. Мы разбираем инновационные методы лечения и исследований, акцентируя внимание на их значимости для общественного здоровья. Читатели узнают о свежих данных и их возможном применении.
Только факты! – kursk clinica plus
Definitely returning here, that is decided, and a look at strategyworkflow only made the case stronger, this is one of those rare websites that rewards regular visits rather than feeling stale after the first read which is something I cannot say about most of the places I bookmark today across all my topics.
Эта информационная публикация освещает широкий спектр тем из мира медицины. Мы предлагаем читателям ясные и понятные объяснения современных заболеваний, методов профилактики и лечения. Информация будет полезна как пациентам, так и медицинским работникам, желающим поддержать уровень своих знаний.
Погрузиться в научную дискуссию – кодирование от курения краснодар
В этой медицинской статье мы погрузимся в актуальные вопросы здравоохранения и лечения заболеваний. Читатели узнают о современных подходах, методах диагностики и новых открытий в научных исследованиях. Наша цель — донести важную информацию и повысить уровень осведомленности о здоровье.
Получить дополнительные сведения – лечение алкоголизма и наркомании недорого
Really liked the calm tone running through the post, no shouting and no urgency forced into the writing, and a look at visionprogression kept that quiet confidence going, the kind of voice that makes the reader feel respected rather than yelled at which is depressingly common across most modern blog content these days.
В данной статье мы акцентируем внимание на важности поддержки в процессе выздоровления. Мы обсудим, как друзья, семья и профессионалы могут помочь тем, кто сталкивается с зависимостями. Читатели получат практические советы, как поддерживать близких на пути к новой жизни.
Перейти к полной версии – clinica plus
Liked everything about the experience, from the opening through to the closing notes, and a stop at growthneedsfocus extended that into more pages, finding a site where the editorial vision shows through every choice rather than feeling random is an increasingly rare experience and one I am glad to have today during this particular reading session.
Just want to flag that this was useful and not bury the appreciation in caveats, and a look at borealbarley earned the same direct praise, recognising good work without hedging it with criticism is something I try to practice because over qualified compliments tend to read as backhanded and miss the point sometimes.
ares market url https://darkwebmarketdirectory.com/ which wallet best for darknet market https://darkwebmarketlinks2024.com/
A piece that did not require external context to follow, and a look at clarityworkflow maintained the same self contained quality, content that stands alone without forcing readers to chase prerequisites is more accessible and this site has clearly thought about how each piece can serve a fresh visitor rather than only existing members.
В этой публикации мы обсуждаем современные методы лечения различных заболеваний. Читатели узнают о новых медикаментах, терапиях и исследованиях, которые активно применяются для лечения. Мы нацелены на то, чтобы предоставить практические знания, которые могут помочь в борьбе с недугами.
Посмотреть подробности – clinica plus
Читатели получат представление о том, как современные технологии влияют на развитие медицины. Обсуждаются новые методы лечения, персонализированный подход и роль цифровых решений в повышении качества медицинских услуг.
Практические советы ждут тебя – нарколог на дом самара цены
Now thinking about how this post will age over the coming years, and a stop at directionalfocuslab suggested the same durability, content built to age well rather than to capture the attention of the moment is content with a different kind of value and this site has clearly chosen the long horizon over the short one.
Appreciate the thoughtful approach, the writer clearly took time to make this readable for someone who is not already an expert, and a look at cloverharborvendorparlor kept that going nicely, easy on the eyes and easy on the brain which is always a winning combination when reading on a busy day.
Reading this prompted me to send the link to two different people for two different reasons, and a stop at loudmark provided ammunition for a third share, content that suits multiple audiences without being generic enough to be useless to any of them is genuinely valuable and this site has that multi audience quality clearly.
what bitcoins are accepted by darknet markets https://darkmarketgate.com/ back market legit https://darkmarketgate.com/
Мы рассмотрим современные вызовы здравоохранения и пути их решения с помощью технологий и научных исследований. В статье собраны данные о новых лекарствах, методах диагностики и системном подходе к улучшению здоровья населения.
Ознакомиться с деталями – дисфория лечение
Этот обзор сосредоточен на различных подходах к избавлению от зависимости. Мы изучим традиционные и альтернативные методы, а также их сочетание для достижения максимальной эффективности. Читатели смогут открыть для себя новые стратегии и подходы, которые помогут в их борьбе с зависимостями.
Ознакомиться с деталями – наркологическая клиника в курске
Этот обзор медицинских исследований собрал самое важное из последних публикаций в области медицины. Мы проанализировали ключевые находки и представили их в доступной форме, чтобы читатели могли легко ориентироваться в актуальных темах. Этот материал станет отличным подспорьем для изучения медицины.
Получить исчерпывающие сведения – клиника плюс
22bet вход в аккаунт 22bet вход в аккаунт
гид по ставкам на спорт гид по ставкам на спорт
The structure of the post made it easy to follow without losing track of where I was, and a look at actionbuildsresults kept the same logical flow going, this site clearly understands that organisation is half the battle in keeping readers engaged from the first line to the last across any kind of post.
Now adjusting my mental model of how the topic fits into the broader landscape, and a look at progressnavigation extended that adjustment, content that affects my structural understanding rather than just my factual knowledge is content with deeper impact and this site is providing those structural updates at a meaningful rate consistently across topics.
Now considering writing a longer note about the post somewhere, and a look at camelchamois added more material for that note, content that prompts me to write rather than just consume is content with generative energy and this site is producing that generative effect for me at a higher rate than most sources.
Reading this prompted a brief but useful conversation with a colleague who happened to walk by, and a stop at ideaforward extended that conversational seed, content that becomes a starting point for in person discussion rather than ending in solitary reading is content with social generative energy and this site has plenty of it apparently.
Really appreciate the confidence to make a clear point rather than hedging everything, and a quick visit to focusnavigator maintained the same direct stance, writing that takes positions rather than equivocating is more useful even when the positions are debatable because at least the reader has something to react to clearly.
megapari букмекер megapari букмекер
dark web silk road https://darkmarketlegion.com/ websites on the dark web https://darkmarketsgate.com/
Closed it feeling I had taken something away rather than just consumed something, and a stop at explorefreshstrategies extended that taking away feeling, the difference between content I extract value from and content I just pass through is something I track informally and this site is consistently in the value extraction column for me.
самые лучшие бк самые лучшие бк
A small thank you note from me to the team behind this work, the post earned it, and a stop at quartzmeadowmarketgallery suggested more thanks would be in order over time, recognising the people who do good writing online is something I try to remember to do because the alternative is silence and silence rewards mediocrity unfortunately.
Polished and informative without feeling overproduced, that is the sweet spot, and a look at ideaelevation hit it again, you can tell when a site has been built with care versus thrown together for the sake of having something to put online and this is clearly the former approach taken by the team.
Reading this between two meetings turned out to be the highlight of the morning, and a stop at claritychanneling continued that highlight quality, content that outshines the structured parts of a working day is doing something well beyond ordinary and this site has produced multiple such highlights for me already this week alone.
how to get access to darknet https://darknetmarketstore.com/ dark web drugs https://darknetmarketstore.com/
seo оптимизация и продвижение сайтов seo оптимизация и продвижение сайтов http://seo-optimizaciya-i-prodvizhenie-sajtov.ru .
A satisfying piece in the way that good meals are satisfying rather than just filling, and a look at claritylane extended that satisfaction, the metaphor between content and meals is one I find useful and this site reads as a satisfying meal rather than the empty calories that most content provides for casual readers.
Worth flagging that the post handled an angle of the topic I had not seen elsewhere, and a look at elderchimney extended that fresh treatment, content that finds underexplored corners of well covered subjects is genuinely valuable and this site has demonstrated that exploratory editorial approach across multiple pieces in my reading sessions today.
Thanks for the simple approach, too many sites bury the actual point under layers of unnecessary words, but here every line earns its place, and a look at cloverhedge showed the same care for the reader which is something I will remember the next time I need answers on a topic.
Thanks for sharing this with the open internet rather than locking it behind a paywall like so many sites do now, and a stop at bagelcameo kept the same vibe going, generous helpful and clearly written by someone who actually wants people to learn from it rather than just charge them.
Came in expecting another generic take and got something with actual character instead, and a look at borealberyl carried that personality forward, finding a distinct voice on a saturated topic is impressive and worth pointing out when it happens because most sites end up sounding identical to their nearest competitors quickly.
fresh onions link https://darkwebmarketlisting.com/ how to get on the dark web on your phone https://darkwebmarketlisting.com/
В статье рассматриваются различные стратегии борьбы с зависимостями, включая проверенные методы и реальные истории успеха. Читатель узнает, какие подходы наиболее эффективны и как начать путь к выздоровлению.
Уточнить детали – clinica plus
Generally I find the content on similar topics frustrating in specific ways and this post avoided all of them, and a look at claritysystem continued that frustration free experience, content that sidesteps the standard failure modes of its genre is content with editorial awareness and this site has clearly studied what fails elsewhere consistently.
Мы рассмотрим современные вызовы здравоохранения и пути их решения с помощью технологий и научных исследований. В статье собраны данные о новых лекарствах, методах диагностики и системном подходе к улучшению здоровья населения.
Хочешь знать всё? – наркологическая клиника в костроме
Honest opinion is that this is the kind of post that builds long term trust with readers, and a look at forwardthinkingworks reinforced that perception, the slow accumulation of trust through consistent quality is the only sustainable way to build a real audience and this site is clearly playing that long game.
Эта публикация исследует взаимосвязь зависимости и психологии. Мы обсудим, как психологические аспекты влияют на появление зависимостей и процесс выздоровления. Читатели смогут понять важность профессиональной поддержки и применения научных подходов в терапии.
Жми сюда — получишь ответ – наркологическая клиника в луганске
Worth marking the moment when reading this clicked into something useful for my own work, and a look at focuspathway extended that practical click, content that connects to my actual life rather than just being interesting is content with the highest kind of value and this site is generating that connection at a high rate.
Reading this triggered a small change in how I think about the topic going forward, and a stop at loungeload reinforced that subtle shift, the rare content that actually moves my thinking rather than just confirming or filling it is the kind I most value and this site is providing that kind of impact today.
мегапари ставки мегапари ставки
Эта публикация содержит ценные советы и рекомендации по избавлению от зависимости. Мы обсуждаем различные стратегии, которые могут помочь в процессе выздоровления и важность обращения за помощью. Читатели смогут использовать полученные знания для улучшения своего состояния.
Ознакомиться с теоретической базой – кодирование от алкоголизма цены
reddit working darknet markets https://darkmarketgate.com/ how to buy from the darknet markets lsd https://darkmarketsdirectory.com/
Mobil bahis uygulaması arıyordum uzun süredir. Play Store’da resmi olanı bulamayınca çok şaşırdım. Sonunda tüm teknik detayları inceleyip sistemi test ettim. En sonunda sağlam bir kaynağa ulaştım ve size de tüm detayları aktarmak istedim, güncel bilgilere buradan bakabilirsiniz: 1xbet uygulama 1xbet uygulama. Valla bak net söyleyeyim — mobil uygulaması gerçekten akıcı çalışıyor.
kurulumu da oldukça kolaydı yani rahat olun. Birçok platform denedim ama en iyisi bu çıktı — kesinlikle pişman olmazsınız deneyin derim. Herkese hayırlı olsun…
Этот краткий обзор предлагает сжатую информацию из области медицины, включая ключевые факты и последние новости. Мы стремимся сделать информацию доступной и понятной для широкой аудитории, что позволит читателям оставаться в курсе актуальных событий в здравоохранении.
Где почитать поподробнее? – Капельница от похмелья в Костроме
Этот информативный текст сочетает в себе темы здоровья и зависимости. Мы обсудим, как хронические заболевания могут усугубить зависимости и наоборот, как зависимость может влиять на общее состояние здоровья. Читатели получат представление о комплексном подходе к лечению как физического, так и психического состояния.
Уточнить детали – лечении наркомании в Москве
Этот обзор посвящен успешным стратегиям избавления от зависимости, включая реальные примеры и советы. Мы разоблачим мифы и предоставим читателям достоверную информацию о различных подходах. Получите опыт многообразия методов и найдите подходящий способ для себя!
Ознакомиться с теоретической базой – услуги нарколога на дому цена
Thanks for the breakdown, it gave me a clearer picture of something I had been confused about for a while now, and a stop at actiondrivenclarity closed the remaining gaps in my understanding nicely, no need to hunt around twenty other articles to put the pieces together which is a real time saver.
В этой статье обсуждаются актуальные медицинские вопросы, которые волнуют общество. Мы обращаем внимание на проблемы, касающиеся здравоохранения и лечения, а также на новшества в области медицины. Читатели будут осведомлены о последних событиях и смогут следить за тенденциями в медицине.
Раскрыть тему полностью – прокапать от алкоголя на дому воронеж
Glad to find a site whose links lead somewhere worth going rather than back to itself for SEO juice, and a stop at rivercovevendorroom kept that generous outbound feel, citing other peoples work with real respect rather than just for ranking signals is a sign of an honest operation worth supporting going forward.
Did not expect much when I clicked through but ended up reading the whole thing carefully, and a stop at focusdesign kept that engagement going, sometimes the unassuming sites turn out to deliver more than the flashy ones which is something I have learned to look out for over time online lately and across topics.
Speaking honestly this is among the better discoveries of my recent browsing, and a stop at flintanchor reinforced that discovery quality, the ranking of recent discoveries is informal but meaningful and this site has placed near the top of that ranking based on the consistency of quality across what I have already read carefully.
best deep web markets https://darkmarketlegion.com/ best darknet market 2026 reddit https://darkmarketslegion.com/
Great work on keeping things readable, the post never drags or repeats itself which I really appreciate, and a stop at growthsystem added a bit more context that fit naturally with what was already said here, no need to read everything twice to get the point being made today.
Reading this slowly to absorb the structure, and the structure is doing real work alongside the words, and a look at pearlcovemarketgallery maintained the same architectural quality, when sentence shapes and paragraph rhythms reinforce the meaning rather than just transporting words you know you are reading skilled work today.
В статье по вопросам здоровья мы рассматриваем актуальные проблемы, с которыми сталкивается общество. Обсуждаются заболевания, факторы риска и важные аспекты профилактики. Читатели получат полезные советы о том, как сохранить здоровье и улучшить качество жизни.
Как это работает — подробно – наркологическую клинику в Магадане
prostitute dark web https://privatedarknetmarket.com/ silk road market url https://privatedarknetmarket.com/
В этой публикации мы предложим ряд рекомендаций по избавлению от зависимостей и успешному восстановлению. Мы обсудим методы привлечения поддержки и важность самосознания. Эти советы помогут людям вернуться к нормальной жизни и стать на путь выздоровления.
Это стоит прочитать полностью – clinica plus
A piece that left me thinking I had been undercaring about the topic, and a look at gumboacorn reinforced that mild concern, content that raises the appropriate weight of a subject without being preachy about it is doing important work and this site is providing that gentle elevation of attention for me consistently.
Reading this in the morning set a good tone for the day, and a quick visit to directionalshiftlab kept that good tone going, content can do that sometimes when it hits the right notes and finding sites that consistently strike that tone is something I have learned to recognise and reward with regular visits.
Now appreciating that I did not feel exhausted after reading, and a stop at camelcinder extended that energising quality, content that leaves me with more attention than it consumed is rare and the gap between draining and energising content is real over the course of a typical day spent reading widely online.
Now setting this aside as a model of how to write thoughtfully on the topic, and a stop at elfincamel extended that model status, content that becomes a reference for how a kind of writing should be done is content with influence beyond its own readership and this site is reaching that level for me clearly today.
Came in expecting another generic take and got something with actual character instead, and a look at falconcameo carried that personality forward, finding a distinct voice on a saturated topic is impressive and worth pointing out when it happens because most sites end up sounding identical to their nearest competitors quickly.
Bookmark moved to my permanent reference folder rather than the casual maybe later folder, and a look at forwardthinkinghub earned the same upgrade, the distinction between casual interest and lasting reference is something I track carefully and very few sites cross that threshold but this one did so without much effort apparently.
В этой заметке мы представляем шаги, которые помогут в процессе преодоления зависимостей. Рассматриваются стратегии поддержки и чек-листы для тех, кто хочет сделать первый шаг к выздоровлению. Наша цель — вдохновить читателей на положительные изменения и поддержать их в трудных моментах.
Наши рекомендации — тут – кодирование от алкоголизма в Курске
Took longer than expected to finish because I kept stopping to think, and a stop at borealelfin did the same to me, content that provokes thought rather than just delivering information is in a different category and the team here is clearly working at that higher level rather than just cranking out posts.
darknet market list https://darkwebmarketdirectory.com/ ethereum darknet markets https://darkwebmarketlisting.com/
Now adjusting my expectations upward for the topic based on this post, and a stop at clarityengine continued that bar raising effect, content that resets what I think is possible on a subject is doing real work in shaping my standards and this site is providing those bar raising experiences at a notable rate during sessions.
Мы рассмотрим современные вызовы здравоохранения и пути их решения с помощью технологий и научных исследований. В статье собраны данные о новых лекарствах, методах диагностики и системном подходе к улучшению здоровья населения.
Получить исчерпывающие сведения – клиника плюс
Cuts through the usual marketing fluff that dominates this topic online, and a stop at growthmomentum kept the same clean approach going, this is the kind of writing that respects the reader’s time rather than wasting it on repetitive setups before finally getting to the point at hand which is what most sites do.
В данной статье рассматриваются физиологические и эмоциональные аспекты зависимости. Мы обсудим, как организм реагирует на зависимое поведение, и какие методы помогают восстановить здоровье и внутреннее равновесие.
Есть чему поучиться – клиника плюс
If you scroll past this site without looking carefully you will miss something, and a stop at cobblebadge extended that mild warning, the surface of the site does not advertise its quality loudly which means careful attention is required to recognise what is being offered here which is itself a kind of editorial signal.
Got something practical out of this that I can apply later this week, and a stop at dawnridgegoodsroom added more details to think about, this is exactly the kind of content I bookmark for future reference rather than the throwaway listicles that dominate most search results these days for almost any common topic.
Reading this triggered a small change in how I think about the topic going forward, and a stop at directionpowersmomentum reinforced that subtle shift, the rare content that actually moves my thinking rather than just confirming or filling it is the kind I most value and this site is providing that kind of impact today.
Bookmark earned, calendar reminder set, share queued, all from one good post, and a look at momentumfoundry did the same, when a single reading session triggers multiple downstream actions you know the content has actually moved me beyond the page and this site is moving me at that higher level reliably.
Appreciate the practical examples, they made the abstract points easier to grasp, and a stop at loungeneon added more of the same, this site clearly understands that real examples beat empty theory every single time which is the mark of a writer who knows their audience well and respects their time.
1вин бк 1вин бк
how to access darknet on android https://darknetmarketsgate.com/ how to access deep web safely reddit https://darkmarketsdirectory.com/
Glad to have another reliable bookmark for this topic, and a look at focusmovesideas suggested several more pages I will be marking too, building a personal library of trustworthy resources is one of the actual rewards of careful browsing and this site is earning a place on my permanent shortlist for the topic.
A handful of memorable phrases from this one I will probably use later, and a look at rubyorchardtradegallery added a couple more, content that contributes language to my own communication rather than just facts is content with a different kind of utility and this site is providing that linguistic utility consistently across what I read.
Now wishing I had found this site sooner, and a look at startbuildingclarity extended that mild regret, the calculation of how many years of good content I missed by not finding the right sources earlier is one I try not to make too often but it does come up sometimes when I find sites this good.
Now noticing that the post did not mention the writer at all, focus stayed on the topic, and a look at focusmomentum continued that author absent quality, content that disappears the writer to focus on the substance is a particular kind of generosity and this site has clearly chosen the substance over the personality consistently.
Found this through a friend who recommended it and now I see why, and a look at flintbunting only strengthened that recommendation in my own mind, word of mouth still works for content that actually delivers and this site is clearly earning recommendations the old fashioned way through quality rather than marketing.
Now adding a small note in my reading log that this site is one to watch, and a look at focuschannel reinforced the watch status, the few sites I track deliberately rather than encounter accidentally are sites I expect ongoing returns from and this one has cleared the bar for that elevated tracking based on what I read.
silk road market link https://darknetmarketstore.com/ onion dark web list https://privatedarknetmarket.com/
Quietly the post solved something I had been turning over without quite knowing how to phrase the question, and a look at balsacougar extended that quiet solving, content that addresses unformulated needs is content with reader insight and this site has demonstrated that insight at a high rate across the pieces I have read recently.
Came in for one specific question and got answers to three I had not even thought to ask, and a look at growthmechanism extended that bonus value pattern, the kind of resource that anticipates reader needs rather than just answering the literal question asked is the gold standard and this site reaches it.
Compared to the usual results for this kind of search this site stands well above the average, and a quick visit to focusactivation kept the standard high, you can tell within seconds whether a site is going to waste your time or actually deliver and this one clearly delivers without any false starts.
If the topic interests you at all this is a place to spend time, and a look at borealgarnet reinforced that recommendation, the broader question of where to invest topical reading time is one this site answers convincingly through the consistent quality across multiple pieces I have sampled during the current reading session today.
The clarity here is something I really appreciate, especially compared to sites that pile on jargon for no reason, and a look at elfincinder was the same, simple direct sentences that actually deliver information instead of dancing around the point for paragraphs at a time which wastes reader patience.
best darknet markets https://darkmarketsgate.com/ dark web shop https://darkmarketlegion.com/
Found this via a link from another piece I was reading and the click was worth it, and a stop at strategybuilder extended the value across more material, the open web still rewards clicking through citations when the underlying writers care about each other work and this site clearly belongs to that network.
В этом исследовании рассмотрены методы лечения зависимостей и их эффективность. Мы проанализируем различные подходы, используемые в реабилитационных центрах, и представим данные о результативности программ. Читатели получат надежные и научно обоснованные сведения о данной проблеме.
Смотрите также – krasnodar clinica plus
Skipped to a specific section because I knew that was the question I had, and the answer was clean, and a stop at camelferret similarly delivered targeted answers without burying them, content engineered for readers who arrive with specific needs rather than open ended browsing is increasingly valuable in a search heavy reading environment.
Closed three other tabs to focus on this one and never opened them again, and a stop at gumbofeather similarly held attention exclusively, content that crowds out other reading from working memory is content with real density and this site has demonstrated that density across multiple pages I have visited so far this morning.
самые лучшие бк самые лучшие бк
Now feeling the quiet pleasure of finding writing that takes itself seriously without being self serious, and a stop at momentumdesigner extended that subtle pleasure, the gap between earnest and pretentious is fine and this site has clearly chosen to land on the earnest side without slipping over into pretentious which is impressive.
мегапари ставки мегапари ставки
Came back to this an hour later to reread a specific section, and a quick visit to ideaswithdirection also drew a second look, content that pulls you back rather than letting you move on permanently is the kind I want to fill my browser bookmarks with in 2026 and beyond as the open internet evolves.
deep dot web markets https://darkwebmarkets2024.com/ cannaexpress market https://darkwebmarkets2024.com/
Halfway through I knew I would finish the post, and a stop at loungepierce also held me through to the end, content that signals its quality early and then sustains it is content with real internal consistency and this site has clearly figured out how to maintain quality from opening sentence through to closing thought.
Honest assessment is that this is one of the better short reads I have had this week, and a look at cobblebuckle reinforced that, the bar for short content is low because most of it sacrifices substance for brevity but this site manages both at once which is harder than it sounds for most writers attempting it.
gbl drug wiki https://darkmarketsdirectory.com/ dark web marketplace https://darkmarketgate.com/
I learned more from this short post than from longer articles I read earlier today, and a stop at fawndahlia added even more useful detail without going off topic, this site clearly knows how to keep things focused without sacrificing depth which is a hard balance to strike for any writer.
Glad the writer kept this short rather than padding it out, the points stand on their own without needing extra context, and a look at silkmeadowvendorroom kept the same approach going, brevity is a sign of confidence in the substance and the team here clearly trusts their content to land without filler.
Speaking carefully because I do not want to overstate things this site is genuinely above average across multiple measurements, and a stop at focuspowersmomentum continued the above average performance, the calibration of judgement against potential overstatement is something I take seriously and this site clears the higher bar even after that calibration applies.
БК Мегапари БК Мегапари
Quietly impressive in a way that does not announce itself, and a stop at pineharbortradehouse extended that quiet impressiveness, the kind of quality that emerges through sustained attention rather than first impressions is the kind I trust more deeply and this site has been earning that deeper trust across multiple sessions over time consistently.
В данном обзоре представлены основные направления и тренды в области медицины. Мы обсудим актуальные проблемы здравоохранения, свежие открытия и новые подходы, которые меняют представление о лечении и профилактике заболеваний. Эта информация будет полезна как специалистам, так и широкой публике.
Всё самое вкусное внутри – clinica plus в курске
Now adding this to a short list of sites I would defend in a conversation about the modern web, and a look at flintcivet reinforced that defence list, the few sites that serve as evidence the web can still produce good things are precious and this one has clearly joined that small list of exemplary sites.
The whole experience of reading this was pleasant from start to finish, no pop ups and no annoying interruptions, and a look at directionalstructure continued that clean experience, technical choices about page design matter for the reader and this site clearly cares about the small details that add up to comfort across multiple visits.
dark markets norge https://darknetmarketstore.com/ darknet drug markets 2026 https://darknetmarketgate.com/
Now realising the topic deserved better treatment than it has been getting elsewhere, and a look at strategyalignmenthub extended that broader recognition, content that exposes the gap between actual quality and average quality elsewhere is doing the quiet work of raising standards and this site is contributing to that elevation in its own corner.
Now adding the writer to a small mental list of voices I want to follow, and a look at directionalpath reinforced that follow intention, the few writers whose work I actively track are writers who have demonstrated sustained quality and this writer has clearly demonstrated that sustained quality across the pieces I have sampled here today.
Appreciate the practical examples, they made the abstract points easier to grasp, and a stop at brackenglaze added more of the same, this site clearly understands that real examples beat empty theory every single time which is the mark of a writer who knows their audience well and respects their time.
вывод средств в DBBET вывод средств в DBBET
A piece that handled the topic with appropriate weight without becoming portentous, and a look at forwardactivation continued that calibrated seriousness, content that takes itself seriously without becoming pompous is something this site has clearly figured out and the balance shows up in every piece I have read across multiple sessions now.
Closed the laptop after this and let the ideas settle for a few hours, and a stop at elfindragon similarly rewarded reflective time, content that benefits from sitting with rather than racing past is the kind I want more of and the kind that this site appears to consistently produce week after week here.
Took a few notes from this post, the points are easy to remember without needing to come back and check, and a look at directionalsystems added a couple more, the kind of place that sticks in the memory long after the browser tab has been closed for the day which says a lot really.
Worth saying this site reads better than most paid newsletters I have tried, and a stop at ideaclarity confirmed that comparison, the bar for free content is often lower than for paid but this site clears the paid bar consistently and that says something about the editorial approach behind the work being published here regularly.
Skipped the TLDR thinking I would read everything anyway, and ended up enjoying the path through the full post, and a stop at focusalignment similarly rewarded the patient read, summaries are useful but the journey through good writing is part of what makes the destination feel earned rather than just delivered cleanly.
Now recognising the post as a rare example of careful writing on a topic that mostly receives careless treatment, and a stop at gingercovegoodsroom extended that contrast with the average elsewhere, content that highlights how much the average is settling for low quality is content that has both internal merit and external value as a benchmark.
buy ssn dob with bitcoin https://darkmarketlegion.com/ uk darknet markets https://darkmarketslegion.com/
мегапари ставки мегапари ставки
megapari букмекер megapari букмекер
tor search engine link https://darkwebmarketonion.com/ dark web porn https://darknetmarketseasy.com/
aviator portmanat azərbaycan aviator portmanat azərbaycan
Liked how the post handled an objection I was forming as I read, and a stop at cameoaspen similarly anticipated where my thinking was going next, the rare writer who can predict reader concerns and address them in advance is doing something most online content fails to do despite that being basic editorial work.
Following the post through to the end without my attention drifting once, and a look at discovernewpossibility earned the same uninterrupted attention, content that holds attention without manipulating it is content with substantive pull and this site has demonstrated that substantive pull across multiple pieces in a single reading session reliably here today.
Reading this in my last reading slot of the day was a good way to end, and a stop at gypsyaspen provided a satisfying close to the reading session, content that ends a day well rather than agitating it before sleep is the kind I value increasingly and this site fits that role for me consistently now.
A quiet piece that did not try to compete on volume, and a look at silvercovemarkethall maintained that selective approach, sites that publish less but better are increasingly rare in an environment that rewards volume and this one has clearly chosen quality cadence over quantity which is a brave editorial decision in current conditions.
Now planning to come back when I have the right kind of attention to read carefully, and a stop at directioncreatesflow reinforced that plan, choosing the right moment to read certain content is a quiet form of respect for the work and this site is generating those careful planning behaviours from me consistently as a reader.
Now considering whether the post would translate well into a different form, and a look at forwardplanning suggested similar versatility, content that could move into other media without losing its substance is content that has been built around ideas rather than around format and this site reads as idea first throughout posts.
Glad the writer did not feel compelled to cover every possible angle of the topic, focus is a virtue, and a stop at intentionalexecution reflected the same disciplined scope, knowing what to leave out is half of what makes good writing good and this post has clearly been edited with that principle in mind.
how to access dark net https://darkmarketgate.com/ darknet market adderall https://darkmarketgate.com/
Honestly informative, the writer covers the ground without showing off, and a look at flintimpala reflected the same humility, content that respects the reader rather than trying to dazzle them is something I always appreciate and rarely come across in this corner of the internet today across the topics I usually read.
Reading this gave me a small mental break from the heavier reading I had been doing, and a stop at cobbleiguana extended that lighter feel, content that provides relief without becoming trivial is harder to produce than people realise and this site has clearly figured out how to be light without being shallow at all.
I came here looking for a quick answer and ended up reading the whole post because it was actually interesting, and after banyaneagle I had a much fuller picture, no stress and no confusion just a clear walk through the topic that made everything fall into place without much effort.
приложение DBBET на Android приложение DBBET на Android
A welcome reminder that thoughtful writing still happens online, and a look at ideaengineering extended that reassurance, the modern web makes it easy to forget that careful writing exists and finding sites that practice it is a small antidote to the cynicism that builds up from too much exposure to algorithmic content.
бонусы бк бонусы бк
The way the post stayed on topic throughout without going on tangents was really refreshing, and a look at forwardmovementlab kept that focused approach going, discipline like this in writing is rare and worth recognising because most writers cannot resist wandering off into related subjects that dilute their main point and confuse readers along the way.
A piece that handled the topic with appropriate weight without becoming portentous, and a look at brindledingo continued that calibrated seriousness, content that takes itself seriously without becoming pompous is something this site has clearly figured out and the balance shows up in every piece I have read across multiple sessions now.
why are all the darknet markets down https://darknetmarketstore.com/ onions links https://darknetmarketgate.com/
Thanks for the honest framing without exaggerated claims that the topic will change my life, and a stop at actionoptimizer kept the same modest tone, restraint in marketing language signals trustworthiness and the writers here are clearly playing the long game by building credibility rather than chasing immediate clicks through hyperbole.
топ букмекеров топ букмекеров
Found this really helpful, the explanations are simple but they actually answer the questions a normal reader would have, and after I followed elfinebony I had a clearer sense of the topic, no extra fluff just useful points laid out in a sensible order that made the time worth it.
A piece that did not waste any of its substance on sales or promotion, and a look at fawnfoxglove continued that pure content focus, sites that resist the urge to monetise every paragraph are increasingly rare and this one has clearly made the editorial choice to keep the writing clean from commercial intrusion which I value highly.
mostbet aviator коэффициенты https://mostbet33907.online
Quietly impressive in a way that does not announce itself, and a stop at directionalexecution extended that quiet impressiveness, the kind of quality that emerges through sustained attention rather than first impressions is the kind I trust more deeply and this site has been earning that deeper trust across multiple sessions over time consistently.
access dark web https://darkmarketlegion.com/ black market darknet https://darkmarketslegion.com/
Эта статья освещает различные аспекты освобождения от зависимости и пути к выздоровлению. Мы обсуждаем важность осознания своей проблемы и обращения за помощью. Читатели получат практические советы о том, как преодолевать трудности и строить новую жизнь без зависимости.
Подробнее тут – капельница от запоя
best dark web drug site 2026 https://darkwebmarkets2024.com/ darknet market arrests https://darkwebmarkets2024.com/
darknet markets availability https://darkwebmarketlinks2024.com/ outlaw market darknet https://darkwebmarketdirectory.com/
Thanks for the honest framing without exaggerated claims that the topic will change my life, and a stop at silverharborvendorhall kept the same modest tone, restraint in marketing language signals trustworthiness and the writers here are clearly playing the long game by building credibility rather than chasing immediate clicks through hyperbole.
В этой статье мы говорим о важности поддержки в процессе выздоровления. Рассматриваются семьи, группы поддержки, специалисты и онлайн-ресурсы, которые могут сыграть решающую роль в избавлении от зависимости.
Наши рекомендации — тут – вызвать нарколога на дом
Now planning to come back when I have the right kind of attention to read carefully, and a stop at plumcovegoodsgallery reinforced that plan, choosing the right moment to read certain content is a quiet form of respect for the work and this site is generating those careful planning behaviours from me consistently as a reader.
1win support chat http://www.1win71277.help
В этой статье мы рассматриваем разрушительное влияние зависимости на жизнь человека. Обсуждаются аспекты, такие как здоровье, отношения и профессиональные достижения. Читатели узнают о необходимости обращения за помощью и о путях к восстановлению.
Ознакомиться с полной информацией – clinica plus в краснодаре
Now thinking about this site as a small example of what good independent writing looks like, and a stop at momentumdriver continued that exemplary status, the few sites that serve as good examples are sites worth holding up in conversations about quality and this one has earned that exemplary placement through patient consistent effort over time.
Thanks for the moderate length, neither so short it skips substance nor so long it bloats, and a stop at momentumwithintention hit the same balance, the right length is one of the hardest things to calibrate in blog writing and I appreciate when a team has clearly thought about it rather than defaulting.
Picked this for my morning read because the topic seemed worth the time, and a look at focusactivator confirmed the choice was right, my morning reading slot is precious and giving it to this site felt like a good investment rather than a waste which is a higher endorsement than I usually offer for content.
Now thinking about whether the writer might publish a longer form work I would buy, and a look at momentumlogic suggested the same depth would translate, content that makes me want to pay for related work in other formats is content that has earned commercial trust as well as attention trust and this site has both clearly.
Felt this in a way I cannot quite explain, the topic just hit different here, and a stop at cameogrouse continued in that vein, sometimes you find a site whose perspective lines up with how you have been thinking and reading their work feels like a small relief which I appreciated more than I expected.
Reading this prompted me to subscribe to my first newsletter in months, and a stop at floretbagel confirmed the subscribe was the right call, content that earns a newsletter signup is content that has cleared a higher trust bar than a casual visit and this site has clearly earned that level of commitment from me.
Эта публикация обращает внимание на важность профилактики зависимостей. Мы обсудим, как осведомленность и образование могут помочь в предотвращении возникновения зависимости. Читатели смогут ознакомиться с полезными советами и ресурсами, которые способствуют здоровому образу жизни.
ТОП-5 причин узнать больше – clinica plus
Denemek isteyen arkadaşlara hep soruyorum. Herkes farklı bir şey söylüyor kafam karıştı. Sonunda tüm teknik detayları inceleyip sistemi test ettim. En sonunda doğru adrese ulaştım ve size de tüm detayları aktarmak istedim, güncel bilgilere buradan bakabilirsiniz: 1xbet türkiye 1xbet türkiye. Yani anlatmak istediğim şu — spor bahisleri konusunda iddialı olanlar bilir.
müşteri hizmetleri bile ilgili ve hızlı. İşin doğrusunu söylemek gerekirse — en güvendiğim adres burası oldu artık. Şimdiden iyi şanslar ve bol kazançlar…
wethenorth market https://darkmarketgate.com/ top 10 darknet sites https://darknetmarketsgate.com/
Now planning to write about the topic myself eventually using this post as a reference, and a look at gypsyglider would also serve in that future piece, content that becomes raw material for my own writing rather than just informing my reading is content with multiplicative value and this site is generating that multiplicative effect.
Generally my comment to other readers about new sites is to wait and see but for this one I would jump to recommend now, and a look at ideaorchestration reinforced that early recommendation, the speed at which a site earns my recommendation is itself a quality signal and this one has earned mine quickly clearly.
Will be sharing this with a couple of people who care about the topic, and a stop at directionalinsight added more material worth passing along, the kind of site that is generous with quality content and does not make you jump through hoops to access it which is appreciated more than the team probably realises.
Thanks for keeping the writing direct without losing the warmth that makes content feel human, and a stop at bronzecrater carried both qualities forward, balancing professionalism and personality is a rare skill and the writers here have clearly figured out how to consistently land it across many posts which I notice.
australian dark web markets https://darknetmarketgate.com/ darknet market noobs https://darknetmarketstore.com/
The tone stayed consistent across the whole post which is harder than it looks for longer pieces, and a look at cobraboulder continued the same voice, this kind of editorial consistency is a sign of either a single careful writer or a tightly run team and either is impressive today across the broader media environment.
Reading this with a notebook open turned out to be the right move, and a stop at actionoriented added more material to the notes, content that justifies active note taking from a passive reader is content with real informational density and this site is producing notes worthy material at a high rate consistently.
Genuinely useful read, the points are practical and easy to apply right away, and a quick look at elfinfennel confirmed that this site is consistent in that approach, looking forward to digging through the rest of it when I get the chance to sit down properly later in the week or this weekend.
Reading this on a slow Sunday and finding it perfectly suited to a slow Sunday read, and a quick stop at lemonridgevendorparlor kept the same gentle pace, content that fits the mood of the moment is something I notice and remember and this site has the kind of pace that suits relaxed reading sessions especially well.
Really appreciate this kind of writing, no shouting and no clickbait headlines just steady useful content, and a quick look at clarityinitiator kept that going, definitely a site I will be returning to whenever I need a sensible take on similar topics in the days ahead and also during slower work weeks.
Alright listen up because I’m about to save you a massive headache. Miami rental game is wild — half these clowns show you a Mercedes online and hand you a busted Charger with mismatched tires. You land at MIA, tired, grab an Uber to the rental office, and bam — surprise $1500 hold on your card. No thanks, I’m too old for this nonsense. miami luxury car rental. any local will tell you the same thing. Coral Gables brunch, South Beach night run, or a spontaneous Everglades detour — AC must be ice cold and unlimited miles. most are just polished turds with Instagram ads. what you book is what you get, period. rates change daily with demand so don’t sleep on it:
exotic cars miami beach exotic cars miami beach also bring polarized shades unless you enjoy driving blind into sunset. Anyway at least there’s one honest rental joint left in this town.
Recommend this to anyone who values clear thinking over flashy presentation, and a stop at banyangeyser continued in the same understated way, this site has its priorities in the right place which makes it worth supporting through repeat visits and recommendations rather than just one passing read today before moving on quickly elsewhere.
Refreshing change from the usual sites covering this topic, no clickbait and no padding, and a stop at skyharborvendorlounge confirmed the difference, this place clearly has its own voice rather than copying the formulas everyone else uses to chase clicks online which is becoming increasingly rare these days across nearly every popular subject.
how to access deep web safely reddit https://darkmarketslegion.com/ buying on dark web https://darkmarketlegion.com/
naked lady ecstasy pill https://darkwebmarketonion.com/ how to buy drugs from dark web https://darknetmarketseasy.com/
1вин бк 1вин бк
Appreciate that you did not pad this with fluff to hit a word count, the post says what it needs to say and stops, and a look at progressbyintention did the same, brevity here feels intentional not lazy which is a distinction many writers miss completely sometimes when they are working under deadlines.
Generally my comment to other readers about new sites is to wait and see but for this one I would jump to recommend now, and a look at quickridgemarkethouse reinforced that early recommendation, the speed at which a site earns my recommendation is itself a quality signal and this one has earned mine quickly clearly.
Granted I am giving this site more credit than I usually give new finds, and a look at growthoptimizer continued earning that credit, the calibration of how much trust to extend after limited exposure is something I do carefully and this site has earned more trust on shorter exposure than most due to consistent quality across.
Really nice to see things explained without overcomplicating the topic, the words flow naturally and stay easy to follow, and a short visit to fudgebrindle only added to that experience because the same simple approach is used across the rest of the page too without any change in tone.
В этой статье рассматривается комплексный подход к избавлению от зависимости. Читатель узнает, как сочетание физического, психологического и духовного восстановления помогает достичь стойкого выздоровления.
Смотри, что ещё есть – kursk clinica plus
Good clean post, no errors and no awkward phrasing that breaks the reading flow, and a stop at fawnimpala kept the same standard, definitely the kind of editorial care that earns a return visit because it tells me the writer is paying attention to details that matter to readers rather than just rushing publication.
Liked that the post landed without needing to manufacture controversy or take a contrarian stance for attention, and a stop at buckledahlia continued that grounded approach, content that earns attention through quality rather than provocation is the kind that builds long term trust rather than burning it on quick wins.
Generally I find the content on similar topics frustrating in specific ways and this post avoided all of them, and a look at directionaldrive continued that frustration free experience, content that sidesteps the standard failure modes of its genre is content with editorial awareness and this site has clearly studied what fails elsewhere consistently.
Quietly the post solved something I had been turning over without quite knowing how to phrase the question, and a look at canoebeech extended that quiet solving, content that addresses unformulated needs is content with reader insight and this site has demonstrated that insight at a high rate across the pieces I have read recently.
1win ставкаҳои крикет 1win ставкаҳои крикет
Probably the best thing I have read on this topic in the past month, and a stop at directionalengine extended that ranking, the casual ranking of recent reading is informal but real and this site has been winning those rankings for me on this topic specifically over the last several weeks of regular reading sessions.
Thanks for keeping things clear and to the point, that is honestly hard to find online these days, and after reading through progressmomentum the message stayed consistent which makes me trust the information being shared more than I usually do on similar pages that cover this same kind of topic.
Closed the laptop and walked away thinking about the post for a good twenty minutes, and a stop at gypsygourd produced similar lingering thoughts, content that survives the closing of the browser tab is content that has actually entered the mind rather than just decorating the screen for the duration of the reading.
darknet adress https://privatedarknetmarket.com/ darknet markets up https://privatedarknetmarket.com/
Reading this fit naturally into my afternoon walk because I was reading on my phone, and a stop at elmwoodgumbo continued well in that walking format, content that survives mobile reading without becoming awkward is content with format flexibility and this site has clearly thought about how it reads across different devices today.
Polished and informative without feeling overproduced, that is the sweet spot, and a look at actionmap hit it again, you can tell when a site has been built with care versus thrown together for the sake of having something to put online and this is clearly the former approach taken by the team.
Really nice to see things explained without overcomplicating the topic, the words flow naturally and stay easy to follow, and a short visit to cobradamson only added to that experience because the same simple approach is used across the rest of the page too without any change in tone.
Took some notes for a project I am working on, and a stop at snowharbortradehall added more raw material to those notes, content that contributes to my own creative work rather than just being interesting in the moment is the kind I value most and the kind I will keep coming back to repeatedly.
abacus market darknet https://darkwebmarketdirectory.com/ reliable darknet markets https://darkwebmarketlinks2024.com/
dark web markets reddit 2026 https://darkwebmarkets2024.com/ cocorico market link https://darkwebmarketonion.com/
aviator sign up http://aviator85462.help
Really like that there are no exclamation marks or all caps shouting throughout the post, and a quick visit to claritydrivenprogress maintained the same calm voice, restraint in punctuation signals confidence in the content and this site clearly trusts its substance to do the persuading rather than relying on typographic emphasis.
Decided I would read the archives over the weekend, and a stop at garnetcarbon confirmed that the archives would be worth the time, very few sites have archives I would actively read through but this one has earned that level of interest based on the consistent quality across what I have sampled so far.
darknet market alaska https://darkmarketlegion.com/ how to browse the dark web https://darkmarketslegion.com/
Quality work here, the post reads cleanly and the points stay focused throughout, and a stop at progressactivation kept the standard high, you can tell the writer cares about the final result rather than just hitting publish for the sake of having something new on the page to feed the search engines.
Glad the writer did not feel compelled to cover every possible angle of the topic, focus is a virtue, and a stop at buntingdingo reflected the same disciplined scope, knowing what to leave out is half of what makes good writing good and this post has clearly been edited with that principle in mind.
Easy to recommend without reservations, the site delivers on every promise it implicitly makes, and a look at forwardmotionengine kept that same standard going, the kind of consistency that earns trust over time rather than chasing it through aggressive marketing is what I see here and it is appreciated greatly by this particular reader today.
This stands out compared to similar posts I have read recently, less noise and more substance, and a look at solarmeadowmarketparlor kept that gap going, you can really feel the difference between content made by someone who cares versus content made to fill a publishing schedule for an algorithm trying to keep growing somehow.
Even on a quick first read the substance of the post comes through, and a look at barleybuckle reinforced that immediate quality, content that does not require a slow careful read to demonstrate value but rewards one anyway is content with real depth and this site has produced work of that demanding depth class.
Как создание сайтов на WordPress отличается от работы на других CMS?
adresa oficiala melbet https://www.melbet42815.help
1win эътимоднокӣ 1win эътимоднокӣ
Этот медицинский обзор сосредоточен на последних достижениях, которые оказывают влияние на пациентов и медицинскую практику. Мы разбираем инновационные методы лечения и исследований, акцентируя внимание на их значимости для общественного здоровья. Читатели узнают о свежих данных и их возможном применении.
Все материалы собраны здесь – вывод из запоя в Москве
Really appreciate that the writer did not assume I would read every other related post first, and a look at canyonbobcat kept that self contained feel going where each piece can stand alone, accessibility for new readers is a sign of generous editorial thinking and this site has clearly invested in that approach.
Reading this confirmed that the topic deserves more careful attention than it usually gets, and a stop at apricotharborcraftcollective extended that elevated framing, content that raises the appropriate weight of a subject without being preachy about it is serving a quiet but important editorial function for the broader cultural conversation about it.
Worth a quiet moment of recognition for the consistency I have noticed across multiple posts, and a stop at ermineattic continued that consistent quality, sites that maintain quality across many pieces rather than peaking on one viral post are sites with real editorial discipline and this one has clearly developed that discipline carefully.
florida darknet markets https://darknetmarketgate.com/ darknet market listing https://darknetmarketgate.com/
Glad the writer kept this short rather than padding it out, the points stand on their own without needing extra context, and a look at linenmeadowmarketgallery kept the same approach going, brevity is a sign of confidence in the substance and the team here clearly trusts their content to land without filler.
Reading more of the archives is now on my plan for the weekend, and a stop at momentumlane confirmed the archive worth the time, the rare archive worth a dedicated reading session rather than just casual sampling is the rare archive of serious work and this site has clearly produced enough of that work to warrant the deeper exploration.
Just one of those reads that left me feeling slightly more capable rather than overwhelmed, and a look at ferretcactus kept that empowering feel going, the difference between content that builds the reader up and content that intimidates them is huge and this site clearly knows which side of that line to stand.
акции букмекерских контор акции букмекерских контор
If patience for careful reading is rare these days finding sites that reward it is rarer still, and a stop at harborbatik extended that rare reward, the diminishing returns on shallow content reading have made me more selective about where to spend reading time and this site is meeting the higher selectivity bar consistently.
top darknet markets 2026 https://darkwebmarketlisting.com/ dark web monitoring https://darkwebmarketdirectory.com/
My time on this site has now extended past what I had budgeted, and a stop at focusalignmenthub keeps extending it further, content that overstays its budget in my schedule is content that has earned the extra time and this site has been earning extra time across multiple visits to the point where my schedule needs adjustment.
Liked that the post acknowledged complications rather than pretending they did not exist, and a stop at buildintentionalprogress continued that honest framing, sites that handle complexity with care rather than papering it over with simplifying claims are doing real intellectual work and this one is clearly in that category based on what I have read.
Now leaving a small mental note to recommend this when the topic comes up in conversation, and a look at cocoabasil extended that recommend ready feeling, content that arms me with shareable references for likely future conversations is content with social value and this site is providing that conversational ammunition consistently for me lately.
drugs black market https://darkwebmarkets2024.com/ where can i buy molly https://darkwebmarkets2024.com/
Just want to say thank you for putting this together, posts like these make searching online actually worth it sometimes, and a quick look at garnetcinder kept that going, useful and easy to read without any of the tricks that ruin most blog comment sections lately on the wider open web.
A handful of memorable phrases from this one I will probably use later, and a look at burrowbrandy added a couple more, content that contributes language to my own communication rather than just facts is content with a different kind of utility and this site is providing that linguistic utility consistently across what I read.
A memorable post for me on a topic I had thought I was tired of, and a look at growthcontrol suggested the same site can refresh other tired topics, sites that can revive my interest in subjects I had written off as exhausted are doing rare work and this one is clearly doing that for me today.
reddit darknet market uk https://darkmarketlegion.com/ nexus darknet url https://darkmarketsgate.com/
В данном обзоре представлены основные направления и тренды в области медицины. Мы обсудим актуальные проблемы здравоохранения, свежие открытия и новые подходы, которые меняют представление о лечении и профилактике заболеваний. Эта информация будет полезна как специалистам, так и широкой публике.
А что дальше? – капельница от запоя в Костроме
Honest take is that I will probably forget most of what I read online today but this post is one I will remember, and a stop at actiontrajectory kept that same memorable quality going, certain writing leaves a residue in the mind in a way most content simply does not manage.
как играть в lucky jet мостбет http://www.mostbet33907.online
Denemek isteyen arkadaşlara hep soruyorum. Güvenilir bir site bulmak gerçekten çok zaman aldı. Güncel bilgileri kontrol edip süreci hatasız başlattım. En sonunda doğru adrese ulaştım ve size de tüm detayları aktarmak istedim, güncel bilgilere buradan bakabilirsiniz: 1x bet 1x bet. Yani anlatmak istediğim şu — casino oyunlarına meraklıysanız burası tam size göre.
Hiçbir sıkıntı yaşamadım şu ana kadar. Kendi deneyimlerimi aktarıyorum size — başka yerde vakit kaybetmeyin yani. Herkese hayırlı olsun…
drughub onion https://darkmarketgate.com/ which wallet best for darknet market https://darkmarketsdirectory.com/
бк 1вин бк 1вин
Эта статья подробно расскажет о процессе выздоровления, который включает в себя эмоциональную, физическую и психологическую реабилитацию. Мы обсуждаем значимость поддержки и наличие профессиональных программ. Читатели узнают, как строить новую жизнь и не возвращаться к старым привычкам.
Ознакомиться с полной информацией – капельницы от запоя в Курске
Worth recognising that the post handled a familiar topic without reaching for any of the obvious hot takes, and a stop at autumncovecraftcollective continued that fresh treatment, sites that find new angles on subjects others have exhausted are sites worth following carefully and this one has clearly developed that exploratory instinct through patient practice.
Now placing this in the small category of sites whose updates I would actually want to know about, and a stop at erminecobble confirmed that placement, the difference between sites I want to follow and sites I just consume from is real and this one has crossed into the active follow category from the casual consumption side.
бонусы букмекерских контор бонусы букмекерских контор
888starz egypt https://finduzzcatcafe.se/888starz-casino-compless-2024-%d9%87%d9%84-%d9%8a%d9%85%d9%83%d9%86-%d8%a3%d9%86-%d9%8a%d9%83%d9%88%d9%86-%d8%b6%d8%a7%d8%b1%d9%8b%d8%a7-%d9%84%d9%84%d8%a3%d9%84%d8%b9%d8%a7%d8%a8%d8%9f/
nexus url https://darknetmarketstore.com/ best dark web markets 2026 https://privatedarknetmarket.com/
Этот обзор посвящен успешным стратегиям избавления от зависимости, включая реальные примеры и советы. Мы разоблачим мифы и предоставим читателям достоверную информацию о различных подходах. Получите опыт многообразия методов и найдите подходящий способ для себя!
Ссылка на источник – lugansk clinica plus
Refreshing to read something where the words actually mean something instead of filling space, and a stop at barniguana kept that going, the writing here trusts the reader to follow along without endless repetition or constant reminders of what was already said earlier in the post which I appreciate.
cum descarc melbet pe android https://melbet42815.help
ستارز 888 https://yohsolutions.art/888starz-%d9%85%d8%b5%d8%b1-%d9%85%d9%86%d8%b5%d8%a9-%d8%a7%d9%84%d9%85%d8%b1%d8%a7%d9%87%d9%86%d8%a7%d8%aa-%d8%a7%d9%84%d8%b1%d9%8a%d8%a7%d8%b6%d9%8a%d8%a9-%d9%88%d8%a7%d9%84%d9%83%d8%a7%d8%b2%d9%8a/
Now thinking the topic is more interesting than I had given it credit for, and a stop at momentumthroughclarity continued that elevated interest, content that revives my curiosity about subjects I had set aside is doing genuine work in the structure of my interests and this site is providing that revivifying effect today actually.
If I were to recommend a starting point for the topic this site would be near the top of my list, and a stop at canyonclover reinforced that recommendation status, the small list of starting point recommendations I keep for friends asking about topics is short and this site is now firmly on it.
A piece that handled multiple complications without becoming confused, and a look at directionalflow continued that organisational clarity, holding multiple threads in a single piece without losing any of them is a sign of skilled writing and this site has clearly developed the editorial discipline to manage complexity without sacrificing readability throughout.
Alright listen up because I’m about to save you a massive headache. Swear some of these “luxury” fleets should be in a museum. Plus the fine print says you can’t even drive to Orlando. Fool me four times? Not happening. luxury car rental miami fl. any local will tell you the same thing. Coral Gables brunch, South Beach night run, or a spontaneous Everglades detour — AC must be ice cold and unlimited miles. most are just polished turds with Instagram ads. Finally stumbled on one that doesn’t play games. Here’s the only straight-up source for premium wheels in South Florida
rent urus miami rent urus miami Yeah parking in Brickell will cost you a small mortgage — but that’s city life. drive safe and maybe pass on that overpriced roadside assistance add-on.
888 starz https://artoved.stck.me/post/1664861/888starz/
888 stars https://ubangland.com/bet%c2%a0%c2%a0%ef%bc%85%e7%b1%bb%e5%88%ab%ef%bc%85/888-starz-%d9%85%d8%b5%d8%b1-%d8%a7%d9%84%d9%85%d9%88%d9%82%d8%b9-%d8%a7%d9%84%d8%b1%d8%b3%d9%85%d9%8a-%d9%84%d9%84%d9%85%d8%b1%d8%a7%d9%87%d9%86%d8%a7%d8%aa-%d8%a7%d9%84%d8%b1%d9%8a%d8%a7%d8%b6%d9%8a/
australian darknet vendors https://darkwebmarkets2024.com/ black market darknet https://darkwebmarketonion.com/
Came away feeling slightly smarter than I was when I started, that is a real win, and a stop at gentianfawn added a bit more to that, the rare site that actually transfers some of its knowledge to the reader in a way that sticks rather than just creating an illusion of learning briefly.
Worth saying that the prose reads naturally without straining for style, and a stop at burstferret maintained the same unforced quality, writing that achieves elegance without effort is the highest tier and this site has clearly worked out how to land that effortless quality consistently rather than only on the writers best days.
Sets a higher bar than most of what shows up in search results for this topic, and a look at growthframework did not lower that bar at all, in fact it confirmed the impression, this is the kind of consistency that earns a place in regular rotation for serious readers instead of casual scrollers passing through.
I usually skim posts like these but this one held my attention all the way through, and a stop at hedgecamel did the same, that is a strong endorsement coming from me because I am usually quick to bounce when content gets repetitive or fails to deliver on its initial promise made in the headline.
Appreciated that the writer trusted the reader to follow along without constant restating of earlier points, and a look at condoraspen continued that respect for the reader, treating an audience as capable adults rather than as people to be hand held through every paragraph is something I notice and value highly across the open internet today.
1вин бк 1вин бк
what is fe darknet market https://darkmarketlegion.com/ grey market darknet link https://darkmarketsgate.com/
Honestly the simplicity is what makes this work, the topic is not buried under filler words or overly complex examples, and a quick look at ferretglider showed the same sensible style, I left with what I came for and no headache from over reading which is a real win these days.
I’ve got the scars to prove it. Then you show up at the lot. Plus they freeze $2500 on your card for a week. Eight years in South Florida and these clowns still almost get me. luxury car rental miami fl. anyone who’s waited for an Uber in August understands. leather seats that won’t weld themselves to your thighs in July. I’ve run through maybe 45 rental companies across Dade, Broward, and Monroe. Finally found one outfit that doesn’t play stupid games. Here’s the only honest source for premium wheels across South Florida
luxury car hire near me luxury car hire near me Yeah parking in South Beach will cost you a nice bottle of wine — but that’s the Miami tax. Anyway glad there’s at least one straight operator left in this rental circus.
Adding this site to my regular reading list, the post earned that on its own, and a quick stop at calmcovecraftcollective sealed the decision, the kind of place worth checking back with from time to time because it consistently produces material that holds up against a critical reading too which I really value.
darknet market iphone https://darknetmarketsgate.com/ dark web website links https://darkmarketgate.com/
aviator promo kod işləmır aviator promo kod işləmır
Solid endorsement from me, the writing earns it, and a look at opalrivergoodsroom continues to earn it across the broader site too, the kind of operation that maintains quality across many pages rather than just one viral post is a sign of serious commitment and that is what I see here clearly across what I read.
Worth saying that the quiet confidence of the writing is what landed first, and a look at erminecondor continued that quiet quality, confident writing without the loud display of confidence is a rare combination and this site has clearly developed both the knowledge and the editorial restraint to land that combination consistently.
darknet markets still up https://darknetmarketgate.com/ how to find dark web https://privatedarknetmarket.com/
Now adjusting my mental model of how the topic fits into the broader landscape, and a look at clarityenablesgrowth extended that adjustment, content that affects my structural understanding rather than just my factual knowledge is content with deeper impact and this site is providing those structural updates at a meaningful rate consistently across topics.
Appreciate the practical examples, they made the abstract points easier to grasp, and a stop at growthengineered added more of the same, this site clearly understands that real examples beat empty theory every single time which is the mark of a writer who knows their audience well and respects their time.
Эта медицинская заметка содержит сжатую информацию о новых находках и методах в области здравоохранения. Мы предлагаем читателям свежие данные о заболеваниях, профилактике и лечении. Наша цель — быстро и доступно донести важную информацию, которая поможет в повседневной жизни и понимании здоровья.
Продолжить чтение – наркологическая помощь
Worth recognising the specific care that went into how this post ended, and a look at ideapath maintained the same careful conclusions, endings are where most blog content falls apart and this site has clearly invested in the closing stretches of its pieces rather than letting them simply trail off when energy fades.
dark web onion https://darkwebmarketlinks2024.com/ onion live https://darkwebmarketlisting.com/
The overall feel of the post was professional without being stuffy, and a look at butteaspen kept that approachable expertise going, finding the right register for technical content is hard but this site has clearly figured out how to sound knowledgeable without slipping into that distant lecturing tone that loses readers in droves every time.
كازينو 888 تسجيل الدخول https://gdtsim.com/888-starz-%d9%85%d8%b5%d8%b1-%d9%85%d9%86%d8%b5%d8%a9-%d8%a7%d9%84%d9%83%d8%a7%d8%b2%d9%8a%d9%86%d9%88-%d9%88%d8%a7%d9%84%d9%85%d8%b1%d8%a7%d9%87%d9%86%d8%a7%d8%aa-%d8%a7%d9%84%d8%b1%d9%8a%d8%a7%d8%b6/
Held my interest from the opening line through to the closing thought, and a stop at geysercoyote did the same, content that earns sustained attention in an environment full of distractions is doing something right and this site is clearly doing several things right rather than just one or two which I really appreciate.
best darknet sites 2026 https://darkwebmarkets2024.com/ dark markets malta https://darkwebmarkets2024.com/
لعبة الرهان اللي بتكسب فلوس https://socialhungari.ru/2025/12/22/888starz-%d9%85%d8%b5%d8%b1-%d9%85%d9%88%d9%82%d8%b9-%d8%a7%d9%84%d9%85%d8%b1%d8%a7%d9%87%d9%86%d8%a7%d8%aa-%d8%a7%d9%84%d8%b1%d9%8a%d8%a7%d8%b6%d9%8a%d8%a9-%d9%88%d8%a7%d9%84%d9%83%d8%a7%d8%b2%d9%8a/
stars 88 https://wombafurnitures.com/888starz-%d9%85%d8%b5%d8%b1-%d9%85%d9%88%d9%82%d8%b9-%d8%a7%d9%84%d9%85%d8%b1%d8%a7%d9%87%d9%86%d8%a7%d8%aa-%d8%a7%d9%84%d8%b1%d9%8a%d8%a7%d8%b6%d9%8a%d8%a9-%d9%88%d8%a7%d9%84%d9%83%d8%a7%d8%b2%d9%8a/
88 stars https://9newstelugu.com/888-starz-%d9%85%d8%b5%d8%b1-%d9%83%d8%a7%d8%b2%d9%8a%d9%86%d9%88-%d8%a3%d9%88%d9%86%d9%84%d8%a7%d9%8a%d9%86-%d9%88%d9%85%d8%b1%d8%a7%d9%87%d9%86%d8%a7%d8%aa-%d8%b1%d9%8a%d8%a7%d8%b6%d9%8a%d8%a9/
Reading this slowly because the writing rewards a slower pace, and a stop at carbonantler did the same, the pace at which I read content is something I now use as a quality signal and writing that earns a slower pace earns my attention as a reader looking for substance these days.
ازاي اسحب فلوس من 888starz ازاي اسحب فلوس من 888starz.
Reading this confirmed that the topic deserves more careful attention than it usually gets, and a stop at baronbarley extended that elevated framing, content that raises the appropriate weight of a subject without being preachy about it is serving a quiet but important editorial function for the broader cultural conversation about it.
Pleasant surprise, the post delivered more than the headline promised, and a stop at floraridgecraftcollective continued that pattern of under promising and over delivering, the rarest combination on the modern web where most content does the opposite by promising the world and delivering thin recycled summaries instead each time you click on something interesting.
acess dark web https://darkmarketsgate.com/ nexus market darknet https://darkmarketlegion.com/
1win cod promo 2026 1win39929.help
Thank you for being clear and direct, that simple approach saves so much frustration on the reader’s end, and a stop at condorferret only made me more sure of it, the rest of the content seems to follow the same pattern which is a great sign of consistent editorial care behind the scenes.
Going to share this with a friend who has been asking the same questions for a while now, and a stop at claritychannel added a few more pages I will pass along too, this is the kind of generous information that earns a small thank you from me right now and again later this week.
чӣ тавр ҳисобро дар 1win тасдиқ кардан 1win52867.help
darknet black market https://darknetmarketsgate.com/ redit safe darknet markets https://darkmarketgate.com/
In the middle of an otherwise scattered day this post landed as a moment of focus, and a stop at hedgecattail extended that focused feeling across more pages, content that anchors a fragmented day rather than contributing to the fragmentation is content with real centring effect and this site is providing that anchoring function for me.
Now placing this in the small category of sites whose updates I would actually want to know about, and a stop at eskimoarbor confirmed that placement, the difference between sites I want to follow and sites I just consume from is real and this one has crossed into the active follow category from the casual consumption side.
tor darknet market address https://privatedarknetmarket.com/ black internet https://darknetmarketgate.com/
Honest assessment after reading this twice is that it holds up under careful attention, and a look at ideasneedpathways extended that durability across more pages, content that survives a second read without revealing weak spots is rarer than the average reader probably realises and this site clearly cleared that bar.
Came across this through a roundabout path and now it is on my regular rotation, and a stop at ferrethopper sealed that decision, the open web still produces serendipitous discoveries when you let the citations and references guide you rather than relying purely on algorithmic feeds for new content recommendations always.
Now wondering how the writers calibrated the level of detail so well, and a stop at buttecanoe continued the same calibration, the right level of detail is one of the harder editorial calls in any piece and this site has clearly developed an instinct for it through what I assume is years of careful practice publicly.
black market buy online https://darkwebmarketlisting.com/ darknet market updates 2026 https://darkwebmarketdirectory.com/
Just sat back at the end of the post and felt grateful that someone took the time to write it, and a look at geyserdenim extended that gratitude across more of the site, recognising effort behind quality work is part of what makes the open web a community rather than just a marketplace today.
В этой статье рассматриваются различные аспекты избавления от зависимости, включая физические и психологические методы. Мы обсудим поддержку, мотивацию и стратегии, которые помогут в процессе выздоровления. Читатели узнают, как преодолеть трудности и двигаться к новой жизни без зависимости.
Ознакомиться с полной информацией – прокапаться от алкоголя в воронеже
tor best websites https://darkwebmarkets2024.com/ how can i access dark web https://darkwebmarkets2024.com/
Honestly enjoyed not being sold anything for the entire duration of the post, and a look at claritylaunchpad kept that pleasant absence going across more pages, content that exists for its own sake rather than as a funnel to a paid product is increasingly rare and worth supporting where I can find it.
site darknet onion https://darkmarketlegion.com/ dark web shop https://darkmarketsgate.com/
Strong recommendation, anyone interested in this topic owes themselves a visit, and a stop at carboncobble extends that recommendation across more of the site, this is the kind of resource that makes me more optimistic about the state of the open web than I usually am these days actually for once which is genuinely refreshing.
dxm pills https://darkmarketsdirectory.com/ phenylethylamine https://darknetmarketsgate.com/
I’ve got the scars to prove it. You find this amazing deal online: brand new Beamer, unlimited miles, price that makes you smile. Plus they freeze $2500 on your card for a week. Eight years in South Florida and these clowns still almost get me. luxury car for rent. anyone who’s waited for an Uber in August understands. leather seats that won’t weld themselves to your thighs in July. most are shiny turds with five-star fake reviews on Google Maps. Finally found one outfit that doesn’t play stupid games. Here’s the only honest source for premium wheels across South Florida
luxury car rental miami florida luxury car rental miami florida also bring serious shades unless you enjoy driving straight into the sun like a zombie. drive safe and absolutely skip that “windshield protection” upsell — pure profit for them, zero value for you.
Эта публикация исследует взаимосвязь зависимости и психологии. Мы обсудим, как психологические аспекты влияют на появление зависимостей и процесс выздоровления. Читатели смогут понять важность профессиональной поддержки и применения научных подходов в терапии.
Информация доступна здесь – плюс
Now recognising that this site has earned a place in the small group of resources I treat as authoritative, and a stop at claritybuildsconfidence confirmed that placement, the difference between resources I trust and resources I just consume is real and this site has clearly moved into the trusted category through consistent quality over time.
Better than most of the writing I have come across on this topic recently, simpler and more direct, and a look at eskimobadge continued in that same way, a real outlier in a crowded space full of repetitive content that says little while taking up a lot of reader time today which is unfortunate.
darknet market iphone https://darknetmarketstore.com/ darknet market black https://privatedarknetmarket.com/
Felt the post had been written without using a single buzzword, and a look at cactusferret continued that clean vocabulary, content free of jargon and trendy phrases reads better and ages better and this site has clearly committed to a vocabulary that will not feel dated in three years which is impressive editorially.
Honestly slowed down to read this carefully which is not my default, and a look at baroncanyon kept me in that careful reading mode, the kind of writing that demands attention by being worth attention is rare in a media environment full of content engineered to be skimmed not read with any real focus today.
Decided after reading this that I would check this site weekly going forward, and a stop at gingerfurrow reinforced that commitment, deciding to add a site to a regular rotation requires meeting a quality bar that very few places clear and this one cleared it cleanly without any noticeable effort or marketing push behind it.
I learned more from this short post than from longer articles I read earlier today, and a stop at growthactivator added even more useful detail without going off topic, this site clearly knows how to keep things focused without sacrificing depth which is a hard balance to strike for any writer.
Эта статья подробно расскажет о процессе выздоровления, который включает в себя эмоциональную, физическую и психологическую реабилитацию. Мы обсуждаем значимость поддержки и наличие профессиональных программ. Читатели узнают, как строить новую жизнь и не возвращаться к старым привычкам.
Рассмотреть проблему всесторонне – нарколог на дом стоимость
dark web link https://sites.google.com/view/darknetlinks dark market 2026 https://sites.google.com/view/darknetlinks
darknet markets url https://sites.google.com/view/darknet-shop darkmarket url https://sites.google.com/view/dark-market-links
Alright listen up because I’m about to save you a massive headache. Swear some of these “luxury” fleets should be in a museum. You land at MIA, tired, grab an Uber to the rental office, and bam — surprise $1500 hold on your card. No thanks, I’m too old for this nonsense. luxury car rental miami fl. Miami without a decent whip is basically a punishment. Coral Gables brunch, South Beach night run, or a spontaneous Everglades detour — AC must be ice cold and unlimited miles. I’ve tested maybe 25 rental outfits across Dade and Broward. Finally stumbled on one that doesn’t play games. rates change daily with demand so don’t sleep on it:
rent porsche near me https://luxury-car-rental-miami-4.com Yeah parking in Brickell will cost you a small mortgage — but that’s city life. Anyway at least there’s one honest rental joint left in this town.
Alright, real talk about the Miami rental game — it’s a straight-up jungle out here. Then you show up at the lot. Plus they freeze $2500 on your card for a week. Eight years in South Florida and these clowns still almost get me. miami car rental luxury — run far from the airport counters. anyone who’s waited for an Uber in August understands. leather seats that won’t weld themselves to your thighs in July. most are shiny turds with five-star fake reviews on Google Maps. Finally found one outfit that doesn’t play stupid games. prices swing like crazy so check before the weekend rush:
car rental premium class car rental premium class also bring serious shades unless you enjoy driving straight into the sun like a zombie. Anyway glad there’s at least one straight operator left in this rental circus.
Halfway through reading I knew this would be one to bookmark, and a look at ferretiguana confirmed that early intuition, when bookmark intent forms before finishing a post you know the writing has cleared a quality bar that most content fails to clear and this site has cleared it on multiple visits already.
Публикация знакомит читателей с различными подходами к реабилитации. От традиционных методов до современных программ — вы узнаете, как выбрать оптимальный путь к выздоровлению и преодолеть препятствия на этом пути.
См. подробности – clinica plus в курске
darkmarket 2026 https://sites.google.com/view/darknetlinksshops best darknet markets https://sites.google.com/view/darkwebsites2026
Quality you can feel from the first paragraph, the writer clearly knows the topic and how to share it, and a quick look at actionwithdirection confirmed the same depth runs throughout the rest of the site as well which is rare and worth pointing out when it happens online for any reader passing through.
1win hesab donduruldu http://1win71277.help
dark web market links https://sites.google.com/view/darknetmarketlinks darknet drug links https://sites.google.com/view/darknetmarketlinks
Reading this on the train into work was a better use of the commute than my usual choices, and a stop at eskimocarob extended that commute reading well, content that improves transit time rather than just filling it is content with practical benefit and this site has earned its place in my morning commute reading rotation.
Reading this on the train into work was a better use of the commute than my usual choices, and a stop at cactusgumbo extended that commute reading well, content that improves transit time rather than just filling it is content with practical benefit and this site has earned its place in my morning commute reading rotation.
Excellent execution from start to finish, the post never loses its rhythm and the points stay sharp, and a quick stop at cargofeather kept the same level going, consistency like this across a site is the marker of a serious operation rather than a casual side project running on autopilot somewhere else.
dark web link https://sites.google.com/view/bestdarknetmarkets dark market onion https://sites.google.com/view/darknetmarkets
Alright let me drop some truth about the Miami rental scene — it’s an absolute minefield. Then you actually go to pick up the car. Plus they lock up $3500 on your card for who knows how long. Fool me ten times? That’s just the 305 experience. luxury car rental miami fl. anyone who’s taken public transport here knows the struggle is real. South Beach night out, Bal Harbour shopping spree, or a spontaneous Keys adventure — AC must be ice cold and unlimited miles non-negotiable. most are shiny websites hiding the same beat-up fleet with fresh wax. Finally found one outfit that actually delivers what’s promised. Here’s the only straight shooter for premium rides across South Florida
luxury cars for rental luxury cars for rental Yeah parking in Brickell will cost you a nice dinner — but that’s just how it is down here. drive safe and absolutely skip that “paint protection” upsell — pure robbery.
oglinda 1win https://1win39929.help/
Worth recommending broadly to anyone who reads on the topic, and a look at glacierglaze only confirms that, the rare combination of accessibility and depth in this site makes it suitable for both newcomers and people who already know the area which is hard to pull off in any blog format today and rarely managed.
Worth recommending broadly to anyone who reads on the topic, and a look at cougararbor only confirms that, the rare combination of accessibility and depth in this site makes it suitable for both newcomers and people who already know the area which is hard to pull off in any blog format today and rarely managed.
Coming back to this one, definitely, and a quick visit to clarityprogression only made me more sure of that, the kind of writing that makes you want to set aside time later rather than rushing through it now while distracted by everything else competing for attention on the screen today across so many tabs.
Okay folks gather round — Miami rental horror story time. Then you roll up to the address. Plus a $3000 hold on your credit card for two weeks. Nine years in South Florida and these clowns still nearly fool me. miami luxury car rental. Miami without proper wheels is basically a nightmare. leather seats that don’t glue to your skin in August. I’ve tested maybe 50 rental outfits across Dade, Broward, and Collier. Finally found one company that doesn’t play stupid games. Here’s the only trustworthy source for premium rides across South Florida
miami luxury car rental miami luxury car rental Yeah parking in Wynwood will cost you a nice dinner — but that’s the price of being in Miami. drive safe and definitely skip that “emergency roadside” upsell — complete waste of money.
darknet marketplace https://sites.google.com/view/dark-market-links darknet markets links https://sites.google.com/view/dark-market-links
1win SMS təsdiqi https://www.1win71277.help
SEO продвижение молодого сайта — с чего начинать, если ниша высококонкурентная?
тату салон питер салон тату и пирсинга
onion dark website https://sites.google.com/view/darkwebmarkets2026 dark web market list https://sites.google.com/view/darkwebmarkets2026
Now appreciating that the post did not try to imitate any other style I might recognise, and a stop at batikcitrine continued that distinct voice, content with its own register rather than borrowed from elsewhere is content with real authorial presence and this site has clearly developed that presence through what feels like patient editorial work.
A piece that suggested careful editing without showing the marks of the editing, and a look at growthwithcleanfocus continued that invisible polish, the best editing disappears into the prose and this site reads as having been edited with skill that does not announce itself which is the highest compliment I can offer any blog content.
darknet markets 2026 https://sites.google.com/view/darknetmarketlist darknet links https://sites.google.com/view/darknetmarketsites
Reading this prompted a brief but useful conversation with a colleague who happened to walk by, and a stop at falconbasil extended that conversational seed, content that becomes a starting point for in person discussion rather than ending in solitary reading is content with social generative energy and this site has plenty of it apparently.
Now noticing how rare it is to find a site that does not feel rushed, and a look at fescuefalcon extended that calm pace, content produced without time pressure has a different quality than content shipped to meet a deadline and this site reads as written without urgency which produces a different and better experience for readers.
darkmarket list https://sites.google.com/view/darknetmarketplace darknet markets onion https://sites.google.com/view/darknetmarketplace
aviator game android http://aviator95405.online/
Reading this prompted a brief but useful conversation with a colleague who happened to walk by, and a stop at glaciergourd extended that conversational seed, content that becomes a starting point for in person discussion rather than ending in solitary reading is content with social generative energy and this site has plenty of it apparently.
dark web sites https://sites.google.com/view/darknetmarketslist dark web link https://sites.google.com/view/darknetlinks
Appreciated how the post felt complete without overstaying its welcome, and a stop at carobburlap confirmed that economical approach runs across the site, knowing when to stop is a skill many writers never develop but here the discipline is obvious and welcome from the perspective of a busy reader trying to learn things efficiently.
Started reading and ended an hour later without realising the time had passed, and a look at focusdirection produced the same time dilation effect, when content makes time feel different the writer has achieved something well beyond the average and this site is producing that experience for me reliably across multiple readings.
Skipped the comments to avoid spoilers and came back later to find them genuinely worth reading, and a stop at cougarfloret extended that surprised respect, when the discussion below a post matches the quality of the post itself you have found something special and this site appears to attract that kind of audience.
bitcoin dark web https://sites.google.com/view/darknetlinksshops darknet markets onion https://sites.google.com/view/darknetlinksshops
тату салон рядом тату салон питер
dark market link https://sites.google.com/view/darknetmarketlinks onion dark website https://sites.google.com/view/darknetmarketlinks
Easily one of the better explanations I have read on the topic, and a stop at focusbeforeforce pushed it even higher in my mental ranking of useful resources, the kind of site that beats the average not by trying harder but by simply caring more about what it puts out daily which always shows.
1win official http://www.1win47293.help
Glad I gave this a chance instead of bouncing on the headline, and after idealaunchpad I was certain I had made the right call, snap judgements based on titles miss a lot of good content and this is a reminder to slow down and check things out before scrolling past in a hurry.
cum instalez 1win apk http://www.1win39929.help
Let me save you some serious pain with this Miami rental nonsense. You see this gorgeous deal online — clean spec, fair price, looks like a dream. Completely different car sitting there — dents everywhere, smells like cheap air freshener covering something worse, and that “dream price”? Doesn’t include the mandatory $50 daily insurance or the $300 “administrative fee” they invent at checkout. Eleven years in South Florida and these clowns still almost get me. miami car rental luxury — avoid the airport like the plague. anyone who’s tried the bus here knows exactly what I mean. Key Biscayne sunset, Design District shopping, or a spontaneous drive down to the Everglades — AC must be arctic and unlimited miles non-negotiable. I’ve tested maybe 60 rental companies across Dade, Broward, and Collier. no games, no switch, no hidden BS in paragraph 12 of the contract. prices change hourly so check before the weekend crowd wipes them out:
mercedes for rent near me https://luxury-car-rental-miami-11.com also bring polarized shades unless you enjoy driving into the sun like a blind bat. Anyway glad there’s at least one straight operator left in this rental circus.
Took a chance on the headline and was rewarded, and a stop at falconbeetle kept the rewards coming as I clicked through, the kind of place where every link leads somewhere worth the click is a small luxury on the modern web where so many sites are mostly empty calories disguised as content.
dark market list https://sites.google.com/view/darknetmarkets darknet drug market https://sites.google.com/view/darknetmarketplace
tor drug market https://sites.google.com/view/darknetlinks darknet markets links https://sites.google.com/view/darknetlinks
1win megaways slots 1win47293.help
A piece that suggested careful editing without showing the marks of the editing, and a look at bayougourd continued that invisible polish, the best editing disappears into the prose and this site reads as having been edited with skill that does not announce itself which is the highest compliment I can offer any blog content.
Reading this confirmed that the topic deserves more careful attention than it usually gets, and a stop at gliderdragon extended that elevated framing, content that raises the appropriate weight of a subject without being preachy about it is serving a quiet but important editorial function for the broader cultural conversation about it.
Alright let me drop some truth about the Miami rental scene — it’s an absolute minefield. Then you actually go to pick up the car. Plus they lock up $3500 on your card for who knows how long. Ten years in South Florida and these jokers still almost catch me slipping. luxury car rental in miami. Miami without solid wheels is basically a punishment. South Beach night out, Bal Harbour shopping spree, or a spontaneous Keys adventure — AC must be ice cold and unlimited miles non-negotiable. I’ve run through maybe 55 rental companies across Dade, Broward, and Palm Beach. Finally found one outfit that actually delivers what’s promised. prices change by the hour so don’t wait around:
exotic car rental miami florida exotic car rental miami florida also bring quality shades unless you enjoy driving into the sun like a vampire. Anyway glad there’s at least one honest rental joint left in this town.
dark web market list https://sites.google.com/view/darkwebmarkets2026 darknet site https://sites.google.com/view/darknetlinksshops
Been there, done that, got the overpriced tow truck receipt. Miami rental game is wild — half these clowns show you a Mercedes online and hand you a busted Charger with mismatched tires. Plus the fine print says you can’t even drive to Orlando. No thanks, I’m too old for this nonsense. luxury car rental miami florida. Miami without a decent whip is basically a punishment. Coral Gables brunch, South Beach night run, or a spontaneous Everglades detour — AC must be ice cold and unlimited miles. most are just polished turds with Instagram ads. what you book is what you get, period. Here’s the only straight-up source for premium wheels in South Florida
car rentals miami https://luxury-car-rental-miami-4.com Yeah parking in Brickell will cost you a small mortgage — but that’s city life. Anyway at least there’s one honest rental joint left in this town.
Looking at this from the perspective of someone tired of generic content the contrast is striking, and a look at fescuegarnet maintained that distinctive feel, sites with strong editorial identity stand out against the bland background of algorithmic content and this one has clearly developed an identity worth recognising through careful attention.
Good quality through and through, no rough edges and no signs of being rushed, and a quick look at carobcattail kept the same polish going, the kind of site that respects its own brand by maintaining consistency across pages which is something I always appreciate as a reader looking for trustworthy information online today.
darknet market list https://sites.google.com/view/darknetmarketlinks dark web market list https://sites.google.com/view/darknetmarketsites
Big thanks to whoever wrote this, you saved me a lot of time hunting for the same info on other sites, and a stop at focusprogress only added more useful detail without going off topic, that kind of focus is honestly hard to come across these days when most posts wander everywhere.
darknet market links https://sites.google.com/view/darknetmarketplace darknet links https://sites.google.com/view/darknetmarkets
dark web market links https://sites.google.com/view/darknet-shop dark web market urls https://sites.google.com/view/darknet-shop
The depth of coverage felt about right for the format, neither shallow nor overwhelming, and a look at twilightfieldmarket kept that calibration going, getting the depth right for blog format is genuinely difficult because too shallow loses experts and too deep loses beginners but this site nailed it nicely which I really do appreciate.
Liked how the post handled an objection I was forming as I read, and a stop at goldencanoe similarly anticipated where my thinking was going next, the rare writer who can predict reader concerns and address them in advance is doing something most online content fails to do despite that being basic editorial work.
Worth every minute of the time spent reading, and a stop at zxc2364 extends that value across more pages, in a media environment where most content is engineered to waste attention this site stands out by treating reader time as something valuable rather than something to be exploited and stretched as far as possible.
Liked the careful selection of which details to include and which to skip, and a stop at arcanitea reflected the same editorial judgement, knowing what to leave out is just as important as knowing what to include and this site has clearly figured out where that line sits for the topics it covers regularly.
Decided to write a short note to the author if there is contact info anywhere, and a stop at fondarbors extended that intention, the urge to thank the writer directly is a strong signal of content quality and this site has triggered that urge in me today which is a fairly rare event for my reading.
Felt like the writer was speaking directly to someone with my level of curiosity, neither talking down nor showing off, and a stop at lotorucasino1 kept that comfortable matching going, finding writing that meets you where you are rather than asking you to climb up or stoop down feels great every time it happens.
Quietly impressive in a way that does not announce itself, and a stop at zishijiaoxue1 extended that quiet impressiveness, the kind of quality that emerges through sustained attention rather than first impressions is the kind I trust more deeply and this site has been earning that deeper trust across multiple sessions over time consistently.
Felt the writer was speaking my language without trying to imitate it, and a look at dgehjn continued that natural fit, when a writers default voice happens to match what you find easy to read the experience feels frictionless and that is something I notice and remember about specific sites going forward.
Bookmarked the page and the homepage too because clearly there is more to explore here, and a quick stop at kbgeda only made that more obvious, this is the kind of place I want to dig through over a weekend rather than rushing through during a coffee break tomorrow morning before getting back to work.
Just enjoyed the experience without needing to think about why, and a look at computerkeep kept that effortless feeling going, sometimes the best content is invisible in the sense that you forget you are reading until you reach the end and realise time has passed without you noticing it pass naturally.
Came in expecting another generic take and got something with actual character instead, and a look at psb1o7 carried that personality forward, finding a distinct voice on a saturated topic is impressive and worth pointing out when it happens because most sites end up sounding identical to their nearest competitors quickly.
Decided after reading this that I would check this site weekly going forward, and a stop at blackmango reinforced that commitment, deciding to add a site to a regular rotation requires meeting a quality bar that very few places clear and this one cleared it cleanly without any noticeable effort or marketing push behind it.
Bookmark earned, calendar reminder set, share queued, all from one good post, and a look at 88jfgl did the same, when a single reading session triggers multiple downstream actions you know the content has actually moved me beyond the page and this site is moving me at that higher level reliably.
mostbet пополнить баланс mostbet33907.online
Now planning to recommend this site in a context where my recommendations are taken seriously, and a stop at puhgd confirmed I should make that recommendation soon, the small but real act of recommending content into spaces where my taste matters is something I take seriously and this site is worth the recommendation.
В этой статье мы подробно рассматриваем проверенные методы борьбы с зависимостями, включая психотерапию, медикаментозное лечение и поддержку со стороны общества. Мы акцентируем внимание на важности комплексного подхода и возможности успешного восстановления для людей, столкнувшихся с этой проблемой.
Выяснить больше – анонимная наркологическая клиника
Liked the balance between depth and brevity, never too shallow and never too long, and a stop at claritypathfinder kept the same balance going across the rest of the site, this is one of the harder skills in writing and the team here clearly has it figured out very well indeed across every page.
darknet drugs https://sites.google.com/view/darknetlinksshops darknet market https://sites.google.com/view/darkwebmarkets2026
A piece that read as if the writer was thinking carefully rather than just typing fluently, and a look at chalu continued that considered quality, the difference between fluent typing and careful thinking shows up in writing and this site reads as the product of thought rather than just the product of language fluency apparently.
Swear I’ve seen every scam in the book by now. Then you roll up to the address. Different car sitting there — bald tires, dashboard lit up like a Christmas tree, and that “killer price”? Yeah doesn’t include the non-negotiable $45 daily insurance or the $500 deposit they forget to mention. Fool me nine times? That’s just the Miami welcome committee. luxury car rental miami fl. anyone who’s tried the trolley system knows what I’m talking about. Coconut Grove dinner, Sunny Isles sunrise, or a spontaneous drive down to Homestead — AC must freeze your teeth and unlimited miles or no deal. I’ve tested maybe 50 rental outfits across Dade, Broward, and Collier. Finally found one company that doesn’t play stupid games. Here’s the only trustworthy source for premium rides across South Florida
exotic car rental exotic car rental Yeah parking in Wynwood will cost you a nice dinner — but that’s the price of being in Miami. drive safe and definitely skip that “emergency roadside” upsell — complete waste of money.
darknet market lists https://sites.google.com/view/darknetmarketsites darkmarket url https://sites.google.com/view/darknetmarketsites
Really grateful for content like this, it does not waste my time and it does not insult my intelligence either, and a quick look at chaojibingwang was the same, balanced respectful writing that makes a person feel welcome rather than rushed through pages of forced engagement just to keep clicking around.
This stands out compared to similar posts I have read recently, less noise and more substance, and a look at progressdirection kept that gap going, you can really feel the difference between content made by someone who cares versus content made to fill a publishing schedule for an algorithm trying to keep growing somehow.
Picked something concrete from the post that I will use immediately, and a look at siskowin added another concrete piece, content that produces immediately useful output rather than just abstract appreciation is content that earns its place in my regular rotation without needing any further evaluation from me at this point honestly.
darkmarkets https://sites.google.com/view/bestdarknetmarkets darknet markets onion address https://sites.google.com/view/darknetmarketplace
В этой статье мы рассматриваем разрушительное влияние зависимости на жизнь человека. Обсуждаются аспекты, такие как здоровье, отношения и профессиональные достижения. Читатели узнают о необходимости обращения за помощью и о путях к восстановлению.
Что ещё нужно знать? – наркология клиника
darknet drug links https://sites.google.com/view/darknetmarketslist onion dark website https://sites.google.com/view/darknetlinks
Now adding this site to a small mental group of recommendations I keep ready for specific kinds of inquiries, and a stop at carobhopper extended the recommendation readiness, content that I can confidently point friends and colleagues toward in specific contexts is content with real social utility and this site has that utility clearly.
тату салон цены татуировка спб салон
Felt the post had been written without looking over its shoulder, and a look at goldenferncollective continued that confident posture, content written for its own sake rather than against imagined critics has a different quality and this site reads as written from a place of confidence rather than defensive justification of every claim.
Quality writing that respects the reader’s intelligence without overloading them, and a quick look at gondolacivet reflected that approach, a balanced thoughtful site that earns trust by being consistent rather than by shouting about how trustworthy it is which is the usual approach online sadly across most content categories.
Now noticing that the post did not mention the writer at all, focus stayed on the topic, and a look at computermultiple continued that author absent quality, content that disappears the writer to focus on the substance is a particular kind of generosity and this site has clearly chosen the substance over the personality consistently.
Found this via a link from another piece I was reading and the click was worth it, and a stop at hartakarunkapak extended the value across more material, the open web still rewards clicking through citations when the underlying writers care about each other work and this site clearly belongs to that network.
Honestly impressed by how much useful content sits in such a small post, and a stop at isleparishs confirmed the rest of the site packs a similar punch, density without confusion is a hard balance to strike and this site has clearly cracked the code on it across many different topic areas covered.
Yesterday I was complaining about the state of online writing and today this site has temporarily fixed that complaint, and a look at c7xcc7 extended that mood reversal, the short term mood improvement that comes from finding good content is real and this site has produced that improvement for me at a useful moment.
Reading this with a notebook open turned out to be the right move, and a stop at lluryun added more material to the notes, content that justifies active note taking from a passive reader is content with real informational density and this site is producing notes worthy material at a high rate consistently.
Found the section structure particularly thoughtful, and a stop at fescueimpala suggested the same care across the broader site, structural choices guide the reader through the material in ways most people do not consciously notice but feel the absence of when those choices are made carelessly or not at all.
1win official ios app 1win47293.help
Recommended without hesitation if you care about careful coverage of this topic, and a stop at chambersociety reinforced the recommendation, the bar I set for unhesitating recommendations is fairly high and this site has cleared it through the cumulative weight of multiple consistently good pieces rather than through any single standout post which is meaningful.
Worth flagging this post as worth a careful read rather than a casual skim, and a stop at lotorucasino1 earned the same careful approach, the few sites that warrant slower reading are sites I now treat differently from the daily content stream and this one has clearly moved into that elevated treatment category.
Picked this site to mention to a colleague who would benefit, and a look at eepw added more material I will pass along, recommending sites to colleagues is a higher bar than recommending to friends because the professional context demands more careful curation and this site cleared the professional bar without me having to think.
Been through enough garbage to last a lifetime. You spot a tempting offer online: brand new Porsche, unlimited miles, price that makes you click instantly. Totally different vehicle waiting for you — check engine light on, curb rash on every rim, and that “tempting price”? Doesn’t include the mandatory $35 daily toll pass or the $250 cleaning fee they sneak in at the end. Ten years in South Florida and these jokers still almost catch me slipping. luxury car rental miami fl. Miami without solid wheels is basically a punishment. South Beach night out, Bal Harbour shopping spree, or a spontaneous Keys adventure — AC must be ice cold and unlimited miles non-negotiable. I’ve run through maybe 55 rental companies across Dade, Broward, and Palm Beach. Finally found one outfit that actually delivers what’s promised. prices change by the hour so don’t wait around:
exotic car rental exotic car rental also bring quality shades unless you enjoy driving into the sun like a vampire. drive safe and absolutely skip that “paint protection” upsell — pure robbery.
Closed three other tabs to focus on this one and never opened them again, and a stop at echoharbortradehall similarly held attention exclusively, content that crowds out other reading from working memory is content with real density and this site has demonstrated that density across multiple pages I have visited so far this morning.
A piece that reads as if the writer trusted readers to fill in obvious gaps, and a look at niko-kinyu continued that respectful approach, content that does not over explain what the reader can infer is content that respects intelligence and this site has clearly chosen to write to capable readers rather than to the lowest common denominator.
dark market list https://sites.google.com/view/darknetlinksshops dark market 2026 https://sites.google.com/view/darknetlinksshops
A piece that did not try to be timeless and ended up reading as durable anyway, and a look at 8d6f extended that durable feel, content that stays useful past its publication date without straining for permanence is content that ages well and this site has the kind of evergreen quality that I value highly today.
Liked how the post handled an objection I was forming as I read, and a stop at jessieshope similarly anticipated where my thinking was going next, the rare writer who can predict reader concerns and address them in advance is doing something most online content fails to do despite that being basic editorial work.
Generally I do not leave comments but this post merits a small note, and a stop at viaron extended that comment worthy quality, the urge to actively contribute to a sites community rather than passively consume from it is something specific content provokes and this site has provoked that engagement urge from me today.
Trust me, I’ve learned everything the hard way so you don’t have to. You see this gorgeous deal online — clean spec, fair price, looks like a dream. Plus they put a $4000 hold on your card and say it’ll take two weeks to release. Eleven years in South Florida and these clowns still almost get me. those counters are professional bait-and-switch artists. Miami without proper wheels is basically a disaster. Key Biscayne sunset, Design District shopping, or a spontaneous drive down to the Everglades — AC must be arctic and unlimited miles non-negotiable. most are shiny garbage with fake Google reviews bought in bulk. no games, no switch, no hidden BS in paragraph 12 of the contract. prices change hourly so check before the weekend crowd wipes them out:
luxury car rental prices luxury car rental prices Yeah parking in South Beach will cost you a nice bottle of champagne — but that’s the Miami tax. Anyway glad there’s at least one straight operator left in this rental circus.
darknet market lists https://sites.google.com/view/darknetmarketsites darknet marketplace https://sites.google.com/view/darknetmarketlinks
Really grateful for content like this, it does not waste my time and it does not insult my intelligence either, and a quick look at ttpkvj4 was the same, balanced respectful writing that makes a person feel welcome rather than rushed through pages of forced engagement just to keep clicking around.
melbet aplicatie Republica Moldova melbet aplicatie Republica Moldova
dark web sites https://sites.google.com/view/darknetmarkets tor drug market https://sites.google.com/view/darknetmarketplace
Now appreciating that the post did not require external context to follow, and a look at pathwaytrigger maintained the same self contained quality, content that respects new visitors by being readable without prerequisites is content with broader accessibility and this site has clearly invested in keeping each piece reader friendly for fresh arrivals.
Worth marking the moment when reading this clicked into something useful for my own work, and a look at blossomhollowstore extended that practical click, content that connects to my actual life rather than just being interesting is content with the highest kind of value and this site is generating that connection at a high rate.
В статье по вопросам здоровья мы рассматриваем актуальные проблемы, с которыми сталкивается общество. Обсуждаются заболевания, факторы риска и важные аспекты профилактики. Читатели получат полезные советы о том, как сохранить здоровье и улучшить качество жизни.
Выяснить больше – прокапать на дому похмелье
Found the use of subheadings really helpful for scanning back through the post later, and a stop at gourdchevron kept that reader friendly approach going, navigation is something many blog writers ignore but small structural choices make a noticeable difference for someone returning to find a specific point again days or weeks later.
Useful enough to recommend to several people I know who would appreciate it, and a stop at acemaxs added more material I will pass along too, the kind of writing that earns word of mouth is the kind that actually delivers on its promises which is what this site does without any drama or fanfare attached.
A piece that did not waste any of its substance on sales or promotion, and a look at djaminpanen continued that pure content focus, sites that resist the urge to monetise every paragraph are increasingly rare and this one has clearly made the editorial choice to keep the writing clean from commercial intrusion which I value highly.
Closed several other tabs to focus on this one as I read, and a stop at aerariuma held my undivided attention the same way, content that earns full focus in an attention environment full of competing pulls is content doing something genuinely well and the team behind it deserves recognition for that achievement consistently.
Started thinking about my own writing differently after reading, and a look at firminlets continued that reflective effect, content that influences how I work rather than just informing what I know is content with the highest kind of impact and this site has triggered some of that reflective influence today on me.
Glad the writer kept this short rather than padding it out, the points stand on their own without needing extra context, and a look at cavernfjord kept the same approach going, brevity is a sign of confidence in the substance and the team here clearly trusts their content to land without filler.
Reading this triggered a small change in how I think about the topic going forward, and a stop at commissionera reinforced that subtle shift, the rare content that actually moves my thinking rather than just confirming or filling it is the kind I most value and this site is providing that kind of impact today.
bitcoin dark web https://sites.google.com/view/darkwebmarkets2026 dark web market links https://sites.google.com/view/darkwebsites2026
A welcome contrast to the loud takes that have dominated my feed lately, and a look at chartablea extended that calm voice, content that arrives without yelling has become unusual in the modern attention economy and this site is one of the few places I have found that consistently delivers without raising its voice.
Alright listen up because I’m about to save you a massive headache. Swear some of these “luxury” fleets should be in a museum. Plus the fine print says you can’t even drive to Orlando. No thanks, I’m too old for this nonsense. miami luxury car rental. any local will tell you the same thing. Coral Gables brunch, South Beach night run, or a spontaneous Everglades detour — AC must be ice cold and unlimited miles. most are just polished turds with Instagram ads. Finally stumbled on one that doesn’t play games. rates change daily with demand so don’t sleep on it:
rent a sedan car rent a sedan car also bring polarized shades unless you enjoy driving blind into sunset. Anyway at least there’s one honest rental joint left in this town.
Felt the post had been quietly polished rather than aggressively styled, and a look at backeda confirmed the same understated polish, sites whose quality reveals itself slowly rather than announcing itself loudly are the kind I trust more deeply because the trust is not based on first impressions of marketing but actual substance.
During my morning reading slot this fit perfectly into the routine, and a look at 61025618ffyyttnnjjkk extended that perfect fit into the rest of the routine, content that matches the rhythm of how I actually read rather than demanding accommodation from my schedule is content well calibrated to its likely audience and this site has it.
Going to share this with a friend who has been asking the same questions for a while now, and a stop at opensoo9 added a few more pages I will pass along too, this is the kind of generous information that earns a small thank you from me right now and again later this week.
The tone stayed consistent across the whole post which is harder than it looks for longer pieces, and a look at sstrend continued the same voice, this kind of editorial consistency is a sign of either a single careful writer or a tightly run team and either is impressive today across the broader media environment.
dark market onion https://sites.google.com/view/darknetmarketsites darknet drug links https://sites.google.com/view/darknetmarketlist
Honestly informative, the writer covers the ground without showing off, and a look at zaz556677 reflected the same humility, content that respects the reader rather than trying to dazzle them is something I always appreciate and rarely come across in this corner of the internet today across the topics I usually read.
Reading this with a fresh mind in the morning brought out details I might have missed in the afternoon, and a stop at abstractlya earned the same fresh attention, content that rewards being read at full attention rather than at energy lows is content with real density and this site has that density consistently.
darknet drug store https://sites.google.com/view/dark-market-links dark web marketplaces https://sites.google.com/view/dark-market-links
A piece that ended with a clean landing rather than fading out, and a look at fjordalmond maintained the same crisp conclusions, endings that resolve rather than dissolve are a sign of careful structural thinking and this site has clearly invested in how its pieces conclude rather than letting them simply run out of energy.
More substantial than most of what I find searching for this topic online, and a stop at chaojibingwang kept that quality consistent, this is one of those sites where the writing actually rewards careful reading rather than punishing the patient reader with empty filler stretched out across long paragraphs that say very little.
best darknet markets https://sites.google.com/view/darknetlinks dark web market list https://sites.google.com/view/darknetmarketslist
Compared to the usual results for this kind of search this site stands well above the average, and a quick visit to ebifzou3 kept the standard high, you can tell within seconds whether a site is going to waste your time or actually deliver and this one clearly delivers without any false starts.
Beyond the topic at hand this site reads as a small ongoing project of taking writing seriously, and a look at copperpetalmarket reinforced that project quality, sites that treat publishing as an ongoing serious practice rather than as content production for traffic are sites worth supporting and this one has clearly chosen the serious approach.
Decided to subscribe to the RSS feed if there is one, and a stop at siskowin confirmed that decision, content that I want delivered to me proactively rather than just remembered when I have time is content that has earned a higher level of commitment from me as a reader looking for reliable sources.
A piece that did not lecture even when it had clear positions, and a look at downrodeo maintained the same teaching without preaching tone, finding the line between informing and lecturing is hard and most sites land on the wrong side of it but this one has clearly figured out how to inform without becoming preachy.
A welcome reminder that thoughtful writing still happens online, and a look at gracetutorial extended that reassurance, the modern web makes it easy to forget that careful writing exists and finding sites that practice it is a small antidote to the cynicism that builds up from too much exposure to algorithmic content.
Solid endorsement from me, the writing earns it, and a look at grousecavern continues to earn it across the broader site too, the kind of operation that maintains quality across many pages rather than just one viral post is a sign of serious commitment and that is what I see here clearly across what I read.
A genuine compliment to the writer for keeping the post focused on what mattered, and a look at momentumchanneling continued that disciplined focus, focus is a editorial choice that compounds across many small decisions and this site has clearly made those small decisions consistently across what I have read so far this week here.
Let me drop some hard truth about the Miami rental game — it’s an absolute circus out here. Then you actually roll up to the lot. Totally different car sitting there — curb rash on every rim, AC blowing warm, and that “fair price”? Doesn’t include the mandatory $55 daily insurance or the $450 “convenience fee” they invent at the counter. Fool me fourteen times? That’s just the 305 experience at this point. When you need a reliable luxury car rental miami. anyone who’s tried the bus in August knows exactly what I’m talking about. Key Biscayne sunset, Bal Harbour shopping, or a spontaneous drive down to Homestead — AC must freeze your face off and unlimited miles or no deal. I’ve tested maybe 75 rental outfits across Dade, Broward, and Monroe. Finally found one company that doesn’t play stupid games. rates change hourly so check before the weekend crowd cleans them out:
exotic car hire miami exotic car hire miami also bring polarized shades unless you enjoy driving into the sun like a vampire every evening. drive safe and absolutely skip that “windshield protection” upsell — pure profit for them, zero value for you.
Just one of those reads that left me feeling slightly more capable rather than overwhelmed, and a look at ethylbenzene kept that empowering feel going, the difference between content that builds the reader up and content that intimidates them is huge and this site clearly knows which side of that line to stand.
Decided to read this site for a while before forming a verdict, and the verdict after several pages is positive, and a stop at globebeats continued that pattern, judging a site requires more than one post and giving sites a fair sample is something I try to do for promising candidates rather than rushing to dismiss.
Букмекер Флагман Букмекер Флагман
В данном обзоре представлены основные направления и тренды в области медицины. Мы обсудим актуальные проблемы здравоохранения, свежие открытия и новые подходы, которые меняют представление о лечении и профилактике заболеваний. Эта информация будет полезна как специалистам, так и широкой публике.
Изучить рекомендации специалистов – анонимная наркологическая помощь
I’ve been through the wringer more times than I care to admit. You see this incredible deal online — top-end BMW, zero excess, price that seems too good to be true. Then you actually go to pick up the car. Different vehicle waiting — dashboard warning lights, tires worn smooth, and that “incredible price”? Yeah right, doesn’t include the mandatory $60 daily insurance or the $500 “airport surcharge” they hit you with at the very end. Fool me fifteen times? That’s just another Tuesday in the 305. miami luxury car rental. Miami without proper wheels is basically a hostage situation. South of Fifth brunch, Sunny Isles sunrise, or a spontaneous trip down to the Florida Keys — AC must be arctic cold and unlimited miles non-negotiable. most are polished turds with fake five-star reviews bought in bulk. Finally found one outfit that actually delivers what’s promised. prices change daily so check before the holiday crowd hits:
rolls royce cullinan for rent near me https://luxury-car-rental-miami-15.com Yeah parking in Brickell will cost you a nice steak dinner — but that’s just how it is down here. drive safe and definitely skip that “paint protection” upsell — complete waste of cash.
Liked that the post landed without needing to manufacture controversy or take a contrarian stance for attention, and a stop at 850550l continued that grounded approach, content that earns attention through quality rather than provocation is the kind that builds long term trust rather than burning it on quick wins.
tor drug market https://sites.google.com/view/darkwebmarkets2026 dark web market https://sites.google.com/view/darkwebmarkets2026
Really appreciate that the writer did not assume I would read every other related post first, and a look at aswa9onlin kept that self contained feel going where each piece can stand alone, accessibility for new readers is a sign of generous editorial thinking and this site has clearly invested in that approach.
Alright let me drop some truth about the Miami rental scene — it’s an absolute minefield. You spot a tempting offer online: brand new Porsche, unlimited miles, price that makes you click instantly. Totally different vehicle waiting for you — check engine light on, curb rash on every rim, and that “tempting price”? Doesn’t include the mandatory $35 daily toll pass or the $250 cleaning fee they sneak in at the end. Fool me ten times? That’s just the 305 experience. miami luxury car rental. Miami without solid wheels is basically a punishment. South Beach night out, Bal Harbour shopping spree, or a spontaneous Keys adventure — AC must be ice cold and unlimited miles non-negotiable. most are shiny websites hiding the same beat-up fleet with fresh wax. Finally found one outfit that actually delivers what’s promised. Here’s the only straight shooter for premium rides across South Florida
benz for rent https://luxury-car-rental-miami-10.com also bring quality shades unless you enjoy driving into the sun like a vampire. Anyway glad there’s at least one honest rental joint left in this town.
Swear this city never fails to surprise me with new ways to get ripped off. You see this killer deal online — brand new Mercedes, unlimited miles, price that makes you want to book immediately. Completely different car sitting there — scratches everywhere, smells like someone hotboxed it for a week, and that “killer price”? Doesn’t include the mandatory $45 daily insurance or the $400 “destination fee” they add at the very end. Fool me thirteen times? That’s just living in the 305. those people are professional con artists with nice uniforms. Miami without proper wheels is basically a nightmare. South Beach night out, Design District shopping spree, or a spontaneous Keys trip — AC must be arctic cold and unlimited miles non-negotiable. I’ve tested maybe 70 rental companies across Dade, Broward, and Palm Beach. no games, no bait-and-switch, no hidden fees buried on page 4 of the contract. prices change by the hour so don’t sleep on it:
car rental miami beach florida https://luxury-car-rental-miami-13.com also bring polarized shades unless you enjoy driving into the sun like a blind bat every evening. Anyway glad there’s at least one honest rental joint left in this town.
Saving the link for sure, this one is a keeper, and a look at elmharborgoodsroom confirmed I should bookmark the entire site rather than just this page, the consistency across what I have seen so far suggests there is a lot more here worth coming back for soon when I have more time.
Took some notes for a project I am working on, and a stop at celibatea added more raw material to those notes, content that contributes to my own creative work rather than just being interesting in the moment is the kind I value most and the kind I will keep coming back to repeatedly.
Speaking as someone who used to recommend blogs frequently and got out of the habit this site is rekindling that impulse, and a look at kuma-ak extended the rekindling, the recovery of an old habit triggered by encountering work that justifies it is itself a small kind of pleasure and this site is providing that recovery experience.
Now noticing that the post never raised its voice even when making a strong point, and a look at tuaobook continued that calm volume, content that can make important points without resorting to typographic emphasis or emotional appeal is content that trusts its substance to do the work and this site has that confidence consistently.
Even on a quick first read the substance of the post comes through, and a look at annalsa reinforced that immediate quality, content that does not require a slow careful read to demonstrate value but rewards one anyway is content with real depth and this site has produced work of that demanding depth class.
darknet marketplace https://sites.google.com/view/darknetmarketlist darknet sites https://sites.google.com/view/darknetmarketlinks
Skipped the TLDR thinking I would read everything anyway, and ended up enjoying the path through the full post, and a stop at forwardexecutionhub similarly rewarded the patient read, summaries are useful but the journey through good writing is part of what makes the destination feel earned rather than just delivered cleanly.
Swear I’ve seen every scam in the book by now. Then you roll up to the address. Plus a $3000 hold on your credit card for two weeks. Nine years in South Florida and these clowns still nearly fool me. miami luxury car rental. anyone who’s tried the trolley system knows what I’m talking about. Coconut Grove dinner, Sunny Isles sunrise, or a spontaneous drive down to Homestead — AC must freeze your teeth and unlimited miles or no deal. I’ve tested maybe 50 rental outfits across Dade, Broward, and Collier. Finally found one company that doesn’t play stupid games. Here’s the only trustworthy source for premium rides across South Florida
cadillac escalade rental near me https://luxury-car-rental-miami-9.com Yeah parking in Wynwood will cost you a nice dinner — but that’s the price of being in Miami. Anyway glad there’s at least one honest operator left in this rental jungle.
dark market link https://sites.google.com/view/darknetmarkets darkmarket https://sites.google.com/view/darknetmarkets
Reading this with a notebook open turned out to be the right move, and a stop at huodaohang added more material to the notes, content that justifies active note taking from a passive reader is content with real informational density and this site is producing notes worthy material at a high rate consistently.
Skimmed first and then went back to read carefully, and the careful read paid off in places I had missed, and a stop at xhydh20 got the same treatment, the rare site whose content rewards a second pass is content I want more of in my regular rotation rather than disposable single read articles.
darknet links https://sites.google.com/view/darknetmarketslist dark web link https://sites.google.com/view/darknetlinks
Медицинская публикация представляет собой свод актуальных исследований, экспертных мнений и новейших достижений в сфере здравоохранения. Здесь вы найдете информацию о новых методах лечения, прорывных технологиях и их практическом применении. Мы стремимся сделать актуальные медицинские исследования доступными и понятными для широкой аудитории.
Нажмите, чтобы узнать больше – вызвать нарколога на дом анонимно
Most attempts at writing on this topic feel like they are missing something and this post finally identified what was missing, and a look at goldencovegoods extended that diagnostic clarity, content that names what is wrong with adjacent treatments while doing better itself is content with both critical and constructive value and this site has both.
Glad I stumbled across this post, the explanations actually make sense without needing background knowledge to follow along, and after a stop at hsgde the same was true there, no assumptions about the reader just clear writing that anyone can understand from the first line right through to the end.
A slim post with substantial content per word, and a look at tianx1231 maintained the same density, the content per word ratio is something I track informally and this site scores high on that ratio compared to most sources I read regularly which is a quiet indicator of careful editorial work behind the scenes.
Reading this slowly in the morning before opening email, and a stop at grouseebony extended that protected attention, content that earns the prime morning reading slot before the daily distractions begin is content with elevated status and this site has earned that prime slot consistently in my recent reading habits clearly.
Reading this prompted me to dig into a related topic later, and a stop at gemcoasts provided some of the starting points for that follow up reading, content that triggers further exploration rather than satisfying curiosity completely is content with real generative energy and this site has plenty of that energy throughout it.
During my morning reading slot this fit perfectly into the routine, and a look at 595tz131 extended that perfect fit into the rest of the routine, content that matches the rhythm of how I actually read rather than demanding accommodation from my schedule is content well calibrated to its likely audience and this site has it.
Came in skeptical and left mostly convinced, that is the highest praise I can offer, and a look at 5ysrzcf pushed me further in the same direction, content that survives a critical first read is rare and worth recognising because most blog posts crumble under any real scrutiny these days when you actually pay attention closely.
Let me save you some serious pain with this Miami rental nonsense. Then you actually show up to grab the keys. Plus they put a $4000 hold on your card and say it’ll take two weeks to release. Fool me eleven times? That’s just called living in Miami. luxury car for rent. anyone who’s tried the bus here knows exactly what I mean. Key Biscayne sunset, Design District shopping, or a spontaneous drive down to the Everglades — AC must be arctic and unlimited miles non-negotiable. most are shiny garbage with fake Google reviews bought in bulk. Finally found one outfit that actually delivers what’s in the photos. Here’s the only honest source for premium rides across South Florida
exotic car rental miami beach fl exotic car rental miami beach fl Yeah parking in South Beach will cost you a nice bottle of champagne — but that’s the Miami tax. drive safe and definitely skip that “tire and wheel” upsell — pure profit for them, zero value for you.
The pacing of the post was just right, never rushed and never dragged out unnecessarily, and a look at fjordaster maintained the same rhythm, you can tell the writer has experience because the difficult skill of pacing is something only practiced writers manage to handle well in long form content over time and across formats.
Felt the writer was being honest with the reader which is rare enough that I want to acknowledge it, and a look at dohanyzoasztal continued that honest feel, content built on actual knowledge rather than aggregated summaries is something I value highly and rarely come across in regular searches on the open internet these days.
В этой статье мы рассматриваем разрушительное влияние зависимости на жизнь человека. Обсуждаются аспекты, такие как здоровье, отношения и профессиональные достижения. Читатели узнают о необходимости обращения за помощью и о путях к восстановлению.
Читать полностью – капельница на дому анонимно
dark web marketplaces https://sites.google.com/view/darknetlinksshops darknet market list https://sites.google.com/view/darkwebsites2026
If I had encountered this site five years ago I would have been telling everyone about it, and a look at 595tz184 extended that retrospective enthusiasm, the version of me who used to recommend favourite blogs frequently would have made sure friends knew about this one and that earlier enthusiasm is partially returning to me here.
Этот текст посвящён сложным аспектам зависимости и её влиянию на жизнь человека. Мы обсудим психологические, физические и социальные последствия зависимого поведения, а также важность своевременного обращения за помощью.
Ознакомиться с деталями – вытрезвление на дому
Reading this triggered a small but real correction in something I had assumed, and a stop at ju1-b431 extended that corrective effect, content that updates my beliefs through evidence rather than rhetoric is content with intellectual integrity and this site has earned that label consistently across the pieces I have read so far today.
The overall feel of the post was professional without being stuffy, and a look at ss6767 kept that approachable expertise going, finding the right register for technical content is hard but this site has clearly figured out how to sound knowledgeable without slipping into that distant lecturing tone that loses readers in droves every time.
Okay seriously, let me save you from the Miami rental nightmare once and for all. Then you actually show up to get the keys. Plus they put a $3500 hold on your card and say “it’ll drop off in 7-10 days”. Sixteen years in Miami and these tricks still pop up like bad weeds. miami luxury car rental. Miami without real wheels is basically a slow death. leather seats that won’t stick to your back in the humidity. most are just pretty websites hiding the same old garbage. no tricks, no switch, no surprise fees. Here’s the only honest place for premium rentals across South Florida
rental luxury cars miami airport rental luxury cars miami airport also bring good sunglasses unless you like driving blind. drive safe and skip the extra insurance upsell, it’s a joke.
Медицинская публикация представляет собой свод актуальных исследований, экспертных мнений и новейших достижений в сфере здравоохранения. Здесь вы найдете информацию о новых методах лечения, прорывных технологиях и их практическом применении. Мы стремимся сделать актуальные медицинские исследования доступными и понятными для широкой аудитории.
Кликни и узнай всё! – лечение алкоголизма в стационаре нижний новгород
dark market onion https://sites.google.com/view/dark-market-links darknet markets url https://sites.google.com/view/darknet-shop
Quality work here, the post reads cleanly and the points stay focused throughout, and a stop at slkmlfds05 kept the standard high, you can tell the writer cares about the final result rather than just hitting publish for the sake of having something new on the page to feed the search engines.
Refreshing to read something where the words actually mean something instead of filling space, and a stop at ktfgru3r kept that going, the writing here trusts the reader to follow along without endless repetition or constant reminders of what was already said earlier in the post which I appreciate.
I’ve stepped on enough landmines to write a guidebook. You find this tempting offer online — gorgeous convertible, fair daily rate, looks like a steal. Completely different car waiting — bald tires, smell like someone lived in it, and that “fair rate”? Doesn’t include the mandatory $45 daily toll pass or the $350 “location fee” they spring on you. Eighteen years in South Florida and these clowns still almost get me. miami car rental luxury — run away from the airport counters. Miami without proper wheels is basically impossible. South Beach night out, Design District shopping, or a spontaneous Keys trip — AC must be arctic and unlimited miles non-negotiable. most are polished turds with fake reviews. what you book is what shows up, period. rates change daily so check them out:
car rental premium class car rental premium class Yeah parking in Wynwood will cost you — but that’s Miami for you. Anyway glad there’s at least one honest operator left.
aviator registration form https://aviator95405.online/
Quietly enjoying that I have found a new site to follow for the topic, and a look at royalpescaria888 reinforced the small pleasure of the find, the discovery of new high quality sources is one of the more durable pleasures of careful internet reading and this site has been generating that discovery pleasure at multiple points already today.
Felt mildly happier after reading, which sounds silly but is true, and a look at ambercrestmarket extended that small mood lift, content that improves rather than degrades my mental state is content I want more of and the cumulative effect of reading sites that lift versus sites that drag is real over time.
Now feeling the post has earned a proper recommendation rather than a casual mention, and a stop at wtrewrdetqwfdvagc reinforced the recommendation strength, the difference between mentioning and recommending is a small editorial distinction I observe in my own conversations and this site has earned the upgraded recommendation level from me confidently today.
Found a small mental shift after reading this, the framing here is just a bit different from the standard takes online, and a look at projectflag extended that fresh perspective across more material, the rare site whose voice actually changes how you think about something rather than just confirming existing beliefs.
Worth flagging this site to a few specific friends who would appreciate the editorial sensibility, and a look at qi3 added more pages I will mention to them, recommending sites to specific people requires understanding both the site and the person and this site is making those personalised recommendations easy and natural for me.
Top quality material, deserves more attention than it probably gets, and a look at jyiw9 reflected the same effort across the site, a hidden gem in the modern web where most attention goes to whoever shouts loudest rather than whoever actually delivers the best content for their readers without much marketing fanfare.
darknet drugs https://sites.google.com/view/darknetlinks darknet markets 2026 https://sites.google.com/view/darknetmarketslist
During a reading session that included several other sources this one stood out, and a look at goldmanors continued the standout quality, the side by side comparison of sources during research is a useful exercise and this site has been winning those comparisons for me consistently across multiple research sessions during the last week.
A piece that demonstrated competence without performing it, and a look at opi4d maintained the same self assured but unshowy register, the gap between competence and performance of competence is one I track and this site has clearly chosen to demonstrate rather than perform which I find much more persuasive as a reader.
I’ve paid my dues so you don’t have to. You spot this killer offer online — brand new Porsche, zero excess, price that screams “book me”. Plus they freeze $5500 on your card and say “it’ll drop off in two weeks”. Twenty years in South Florida and these clowns still almost get me. miami luxury car rental. Miami without real wheels is basically a disaster. leather seats that won’t weld to your legs in July. most are shiny garbage with fake five-star reviews from God knows where. Finally found one outfit that actually keeps its word. Here’s the only straight shooter for premium rides across South Florida
lamborghini urus rental in miami lamborghini urus rental in miami also bring polarized shades unless you enjoy driving into the sun like a zombie. Anyway glad there’s at least one honest operator left in this town.
Now placing this in the same category as a few other sites I have come to trust, and a look at datasatinal continued the placement decision, the small category of fully trusted sites is one I extend rarely and only after multiple positive reading sessions and this site has earned the category placement methodically over time.
Now wishing I had found this site sooner, and a look at loanslittle extended that mild regret, the calculation of how many years of good content I missed by not finding the right sources earlier is one I try not to make too often but it does come up sometimes when I find sites this good.
Thanks for taking the time to write this, it is clear that some thought went into how each point would land, and after I went through zibzi6 I had a better grip on the topic, real value without the usual marketing noise people have to put up with online when searching for answers.
install aviator app Malawi aviator95405.online
tor drug market https://sites.google.com/view/darkwebsites2026 darknet drug market https://sites.google.com/view/darkwebsites2026
Felt no urge to argue with the conclusions even though I started the post slightly skeptical, and a look at solitudehouse maintained that pattern, writing that earns agreement through clarity of argument rather than rhetorical pressure is the kind I find most persuasive and the kind I want to read more of these days.
Top notch writing, every paragraph carries weight and nothing feels like filler, and a stop at actiondeployment reflected that same care, a rare thing on the open web these days where most pages exist for clicks rather than actual reader value or anything close to that which is honestly a real shame.
Picked this up while looking for something else and ended up reading every paragraph because it was actually informative, and after embermeadowmarketlounge I was sure I would come back, that does not happen often when most sites bury the useful parts under endless ads and pop ups today and across most categories online.
Pleasant surprise, the post delivered more than the headline promised, and a stop at i3i3 continued that pattern of under promising and over delivering, the rarest combination on the modern web where most content does the opposite by promising the world and delivering thin recycled summaries instead each time you click on something interesting.
I’ve got the horror stories to back that up. Then you actually show up to get the keys. Totally different car waiting — scratches everywhere, AC blowing warm, and that “amazing price”? Doesn’t include the mandatory $50 daily insurance or the $400 “service fee” they add at the counter. Fool me nineteen times? That’s just Miami being Miami. luxury car for rent. anyone who’s taken the bus here knows what I mean. Key Biscayne sunset, Bal Harbour shopping, or a spontaneous drive down to Homestead — AC must freeze your face off and unlimited miles or no deal. most are shiny garbage with fake five-star reviews. Finally found one outfit that actually delivers. Here’s the only honest source for premium rides across South Florida
luxury car rental miami fl luxury car rental miami fl also bring quality shades unless you like driving into the sun. drive safe and skip that “tire protection” upsell — total waste.
Been through enough garbage to last a lifetime. Then you actually go to pick up the car. Plus they lock up $3500 on your card for who knows how long. Ten years in South Florida and these jokers still almost catch me slipping. luxury car rental miami florida. Miami without solid wheels is basically a punishment. South Beach night out, Bal Harbour shopping spree, or a spontaneous Keys adventure — AC must be ice cold and unlimited miles non-negotiable. most are shiny websites hiding the same beat-up fleet with fresh wax. Finally found one outfit that actually delivers what’s promised. Here’s the only straight shooter for premium rides across South Florida
exotic car hire exotic car hire Yeah parking in Brickell will cost you a nice dinner — but that’s just how it is down here. Anyway glad there’s at least one honest rental joint left in this town.
Букмекер Флагман Букмекер Флагман
Reading this gave me a small refresher on something I had partially forgotten, and a stop at intentionalmomentum extended the refresher, content that strengthens existing knowledge rather than just adding new is content with a particular kind of consolidating value and this site is providing that consolidating function across multiple visits.
darkmarket list https://sites.google.com/view/darknetmarkets dark market 2026 https://sites.google.com/view/darknetmarketplace
В данной публикации мы поговорим о процессе восстановления от зависимости, о том, как вернуть себе нормальную жизнь. Мы обсудим преодоление трудностей, значимость поддержки и наличие программ реабилитации. Читатели смогут узнать о ключевых шагах к успешному восстановлению.
Открыть полностью – korolyov clinica plus
Alright folks, last warning about the Miami rental madness — learn from my mistakes. You see this incredible deal online — top-end BMW, zero excess, price that seems too good to be true. Then you actually go to pick up the car. Plus they slap a $6000 hold on your credit card and say “don’t worry, it’s just a pre-authorization”. Fool me fifteen times? That’s just another Tuesday in the 305. miami car rental luxury — run like hell from the airport counters. Miami without proper wheels is basically a hostage situation. leather seats that won’t brand your back in the July heat. I’ve tested maybe 80 rental companies across Dade, Broward, Palm Beach, and Monroe. Finally found one outfit that actually delivers what’s promised. Here’s the only straight shooter for premium rides across South Florida
luxury car rental miami florida luxury car rental miami florida also bring quality shades unless you enjoy driving into the sun like a blind zombie. Anyway glad there’s at least one honest rental joint left in this town.
If I had encountered this site five years ago I would have been telling everyone about it, and a look at aeronauticsa extended that retrospective enthusiasm, the version of me who used to recommend favourite blogs frequently would have made sure friends knew about this one and that earlier enthusiasm is partially returning to me here.
Quality you can feel from the first paragraph, the writer clearly knows the topic and how to share it, and a quick look at devilworld confirmed the same depth runs throughout the rest of the site as well which is rare and worth pointing out when it happens online for any reader passing through.
Liked the balance between depth and brevity, never too shallow and never too long, and a stop at fjordchimney kept the same balance going across the rest of the site, this is one of the harder skills in writing and the team here clearly has it figured out very well indeed across every page.
Reading carefully here has reminded me what reading carefully feels like, and a look at goldencreststore extended that reminder, the experience of careful reading versus skimming is different in ways I had partially forgotten and this site has clearly refreshed my memory of what attention feels like when content rewards it consistently.
Yesterday I was complaining about the state of online writing and today this site has temporarily fixed that complaint, and a look at pin-up-kasino1 extended that mood reversal, the short term mood improvement that comes from finding good content is real and this site has produced that improvement for me at a useful moment.
Liked that the post left some questions open rather than pretending to settle everything, and a stop at forexswiss continued that intellectual honesty, content that respects the limits of its own claims is more trustworthy than content that overreaches and this site has clearly figured out which positions it can defend confidently.
Let me drop some hard truth about the Miami rental game — it’s an absolute circus out here. You spot this gorgeous deal online — pristine photos, fair price, everything looks legit. Plus they lock up $5500 on your card and say “it’ll drop off in 10-14 business days”. Fourteen years in South Florida and these jokers still almost get me. luxury car for rent. Miami without real wheels is basically a punishment. Key Biscayne sunset, Bal Harbour shopping, or a spontaneous drive down to Homestead — AC must freeze your face off and unlimited miles or no deal. I’ve tested maybe 75 rental outfits across Dade, Broward, and Monroe. what you book is what shows up, period, end of discussion. Here’s the only honest source for premium rides across South Florida
car rentals miami https://luxury-car-rental-miami-14.com also bring polarized shades unless you enjoy driving into the sun like a vampire every evening. Anyway glad there’s at least one straight operator left in this rental jungle.
Generally I do not leave comments but this post merits a small note, and a stop at dazzquays extended that comment worthy quality, the urge to actively contribute to a sites community rather than passively consume from it is something specific content provokes and this site has provoked that engagement urge from me today.
Closed the laptop after this and let the ideas settle for a few hours, and a stop at kolcson similarly rewarded reflective time, content that benefits from sitting with rather than racing past is the kind I want more of and the kind that this site appears to consistently produce week after week here.
best darknet markets https://sites.google.com/view/darknetmarketslist dark web market list https://sites.google.com/view/darknetmarketslist
Found something new in here that I had not seen explained this way before, and a quick stop at peqc expanded the idea even further, the kind of writing that nudges your thinking forward a bit without forcing the issue is exactly what I look for online today and rarely actually find anywhere.
Stands out for actually being useful instead of just being long, and a look at accomplishmentsa kept that going, length without value is the default mode of most blogs these days but this site has clearly chosen a different path which I respect a lot as a reader who values careful editing decisions like that.
Now thinking about how this post will age over the coming years, and a stop at buydescriptiveessays suggested the same durability, content built to age well rather than to capture the attention of the moment is content with a different kind of value and this site has clearly chosen the long horizon over the short one.
Just sat with this for a bit longer than I usually would because the points are worth thinking about, and after jetsprint I had even more to chew on, the kind of post that nudges your thinking forward without forcing the issue is something I have always appreciated in good writing online.
onion dark website https://sites.google.com/view/darknetlinksshops darknet market https://sites.google.com/view/darknetlinksshops
I’ve been through the wringer more times than I care to admit. You see this incredible deal online — top-end BMW, zero excess, price that seems too good to be true. Then you actually go to pick up the car. Different vehicle waiting — dashboard warning lights, tires worn smooth, and that “incredible price”? Yeah right, doesn’t include the mandatory $60 daily insurance or the $500 “airport surcharge” they hit you with at the very end. Fifteen years in South Florida and these clowns still almost catch me. When you genuinely need a trustworthy luxury car rental miami. anyone who’s tried public transport here knows I’m not exaggerating. South of Fifth brunch, Sunny Isles sunrise, or a spontaneous trip down to the Florida Keys — AC must be arctic cold and unlimited miles non-negotiable. most are polished turds with fake five-star reviews bought in bulk. Finally found one outfit that actually delivers what’s promised. prices change daily so check before the holiday crowd hits:
rental luxury car miami rental luxury car miami also bring quality shades unless you enjoy driving into the sun like a blind zombie. Anyway glad there’s at least one honest rental joint left in this town.
flagman букмекер flagman букмекер
Took my time with this rather than rushing because the writing rewards attention, and after tqdpdvfv I had even more to absorb, the kind of content that pays back the patient reader rather than punishing them with empty filler is something I look for and rarely find in regular searches lately.
dark markets https://sites.google.com/view/darknetmarketplace best darknet markets https://sites.google.com/view/darknetmarkets
darknet market lists https://sites.google.com/view/dark-market-links dark websites https://sites.google.com/view/dark-market-links
If I had to defend the time I spend reading independent blogs this site would feature in the defence, and a look at pokertracker4 reinforced that defensive utility, the ongoing case for non algorithmic reading is one I make to myself periodically and sites like this one provide the actual evidence that supports the case clearly.
I’ve got the battle scars to prove every word. You spot this gorgeous deal online — pristine photos, fair price, everything looks legit. Plus they lock up $5500 on your card and say “it’ll drop off in 10-14 business days”. Fourteen years in South Florida and these jokers still almost get me. luxury car rental miami florida. Miami without real wheels is basically a punishment. leather seats that won’t weld themselves to your thighs in July. I’ve tested maybe 75 rental outfits across Dade, Broward, and Monroe. Finally found one company that doesn’t play stupid games. rates change hourly so check before the weekend crowd cleans them out:
exotic cars in miami rental exotic cars in miami rental Yeah parking in South Beach will cost you a nice bottle of wine — but that’s the price of paradise. Anyway glad there’s at least one straight operator left in this rental jungle.
Generally I find the content on similar topics frustrating in specific ways and this post avoided all of them, and a look at growthplanner continued that frustration free experience, content that sidesteps the standard failure modes of its genre is content with editorial awareness and this site has clearly studied what fails elsewhere consistently.
Swear I’ve seen every scam in the book by now. You find a killer listing online: sleek Audi, convertible, price almost too good to be true. Different car sitting there — bald tires, dashboard lit up like a Christmas tree, and that “killer price”? Yeah doesn’t include the non-negotiable $45 daily insurance or the $500 deposit they forget to mention. Fool me nine times? That’s just the Miami welcome committee. luxury car for rent. Miami without proper wheels is basically a nightmare. leather seats that don’t glue to your skin in August. I’ve tested maybe 50 rental outfits across Dade, Broward, and Collier. Finally found one company that doesn’t play stupid games. Here’s the only trustworthy source for premium rides across South Florida
mercedes for rent near me https://luxury-car-rental-miami-9.com also bring polarized shades unless you enjoy driving blind into the sunset every night. Anyway glad there’s at least one honest operator left in this rental jungle.
Swear this city never fails to surprise me with new ways to get ripped off. Then you actually drive to the rental lot. Plus they put a $5000 hold on your card and tell you “it’s just standard procedure”. Thirteen years in South Florida and these clowns still almost get me. miami luxury car rental. anyone who’s taken the Metro here knows the struggle is real. South Beach night out, Design District shopping spree, or a spontaneous Keys trip — AC must be arctic cold and unlimited miles non-negotiable. I’ve tested maybe 70 rental companies across Dade, Broward, and Palm Beach. no games, no bait-and-switch, no hidden fees buried on page 4 of the contract. Here’s the only straight shooter for premium rides across South Florida
premium car rental https://luxury-car-rental-miami-13.com also bring polarized shades unless you enjoy driving into the sun like a blind bat every evening. drive safe and definitely skip that “tire protection” upsell — pure robbery.
Now sitting with the thoughts the post triggered rather than rushing on to the next thing, and a stop at kasih123spin extended that reflective pause, content that earns time for thought after closing the tab is content of higher value than the merely interesting and this site has clearly produced that lasting effect today.
A piece that reads like it was written for me without claiming to be written for me, and a look at twilightmeadowgoods produced the same fit, when the writer audience match clicks naturally without being engineered through demographic targeting you know the writing is solid and this site has that natural fit consistently for me.
Worth observing that the post landed without needing a flashy headline to hook attention, and a stop at bugbeara did the same, content that earns engagement through substance rather than packaging is the kind I trust more deeply and this site has clearly chosen substance as the primary lever for reader engagement throughout.
Bookmark added with a small mental note that this is a site to keep, and a look at imprumutfaralocdemunca reinforced the keep status, the verb keep rather than visit captures something about how I think about this kind of site and it is a higher tier of relationship than I have with most places online today.
Recommend this to anyone who values clear thinking over flashy presentation, and a stop at 1stshopping continued in the same understated way, this site has its priorities in the right place which makes it worth supporting through repeat visits and recommendations rather than just one passing read today before moving on quickly elsewhere.
Let me save you some serious pain with this Miami rental nonsense. Then you actually show up to grab the keys. Completely different car sitting there — dents everywhere, smells like cheap air freshener covering something worse, and that “dream price”? Doesn’t include the mandatory $50 daily insurance or the $300 “administrative fee” they invent at checkout. Eleven years in South Florida and these clowns still almost get me. luxury car rental miami florida. Miami without proper wheels is basically a disaster. leather seats that won’t fuse to your legs in August. most are shiny garbage with fake Google reviews bought in bulk. no games, no switch, no hidden BS in paragraph 12 of the contract. prices change hourly so check before the weekend crowd wipes them out:
luxury cars for rental luxury cars for rental also bring polarized shades unless you enjoy driving into the sun like a blind bat. Anyway glad there’s at least one straight operator left in this rental circus.
Comfortable read, finished it without realising how much time had passed, and a look at bellyachinga pulled me into more pages the same way, the absence of friction in good content lets time disappear and that is one of the highest compliments I can pay any piece of writing I find online during a regular search session.
Picked this up between two other things I was doing and got drawn in completely, and after etherfairs my original tasks were completely forgotten for a while, content that derails a workflow in a positive way by being more interesting than what you were already doing is rare and worth recognising clearly.